Tyranid Horde wrote: My first introduction to painting and modelling was with Airfix and my dad got me started with enamels before I started playing 40k. Being 10 at the time ultimately made me switch to acrylics because they were easier to use, but I do fancy giving enamels a go again to see which I prefer.
And remember that it's not a "either / or" question. You can use both, even on the same model...
...but you do have to leave more time than usual for painting (water-based) acrylics over (oil-based) enamels. Y'know, so that they stick...
I'll echo the other, I didn't realise how teeny the train depot was. Seeing the firewarrior next to it was quite surprising.
Your approach to the blightbringer was interesting. Having the paints in the picture to provide some basis of what the colour actually looks like (As opposed to just the colour name) helps give a bit more understanding of whats going on in the different stages of painting.
The Inceptors are coming along well. Still can't stand the stupid models themselves, but the dynamic posing and the interesting bases make them much more palatable.
Thanks MT.
Progress has been slow of late as the painting has been the bottleneck this month. NBB is nearly done though.
Lo Snrub. Yeah, when working in different scales it's good to show references from time to time.
I do like to occasionally show a layer-by-layer. And showing the paints is good as I know most of DDakka don't use the same paints as I do (spare a thought for me whenever you are all talking about your silly-named Citadel paints).
It's always tricky trying to get the actual colours across on the internet; there's the different camera settings, different processing of the photos before uploading, and different screen settings... What one sees on one end, someone else sees different.
Posing can help with any model.
Thanks Gits'.
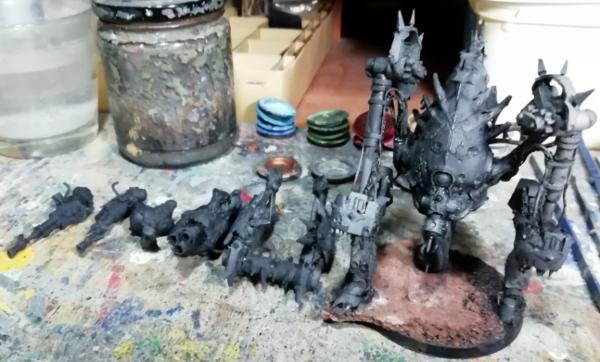
Some more progress on the Noxious Blightbringer.
Horns and flesh etc.
Getting ready to stick him on his base and then there will be goo.
That green tint o the horns really ties it together. Are those black tips on the horns fully done? Becasue I feel they could do with some more integrating into the rest of the horns. Not that I could pull it off, mind you
I didn't add any green to the horns, but I chose them to be bleached enough to work with the green. Trick of the eye and/or camera.
Yes, the black is intentional, can't find the exact picture I used for reference but this is close enough:
Normally, I would blend the black through brown into the bone colour, but went for something different this time.
Thanks T'horde. Ja, I have my Verdigris - brass method down.
And done.
The inceptors are now "blacked" and ready to paint, and I've pulled out the next model from the box and am considering modifications...
Horn makes sense, just seemed a very harsh contrast in the first pics. And no green in the horns? Darn, the light really played a trick on me . Lovely model!
Apologies for silence. Initial paint layers on the Inceptors is not very exciting and I've not started chopping the plaguecaster yet...
But first.
Thanks Lamby.
Theophony wrote:Nice work on the bone horn and the rusted nails in it .
Thanks. Those nails were a rush job when I realised that I'd forgotten to paint them when I did the rest of the rust and quickly threw some brown and orange at them (well, took a bit more care than that implies) and let it run onto the bone a little. Turned out well enough, so I left them alone.
Now that the shed is done I can officially start calling you Dr. “Two sheds” H .
Well, they're not my sheds. But I'll answer to anything really: It was Dr "toilets" H for a bit...
Thanks Joe'.
As mentioned, I've started the painting of the Inceptors, and then realised I'd forgotten the jet flames and filling the gaps in the jetpacks (that I was going to do at the same time).
But I have planned out the paint scheme and can show you how they look, but they are back on the modelling desk for a "quick" addition...
Having looked into their fluff, I see that they drop from orbit and that made me think of a) mostly metal surfaces to resist the heat and b) spacesuits and their white-ness.
So anything you see here that isn't "white", will be metallic.
Nice work on the Blightbringer, Doc. A nice range of... muted, pastel... ( what ever the right adjective for them is) colours. The pale green and the soft reds and blues. And well done on not going over board with the verdigris. So many people go over the top with it.
I actually came across this picture recently. You're not the only one to have the thought!
Thanks Snrub. Faded, muted tones just fit the Nurgle theme, I feel.
Whereas the green went paler (I thought about the colours fading with age and exposure), I took the red darker to give contrast, not only as complimentary colours (less obvious as the colours are desaturated), but in tone.
The red/brown of the rust is also dark to contrast with the light armour and the light horns. Minimal orange to keep it mostly dark.
As to the verdigris, I usually keep that subtle anyway, but it needed to be minimal so as to not lighten the bells up from the dark bronze (again the contrast with the horns and armour).
Plasma for plasmaguns are always blue... as per the previous conversation about some things always being the same colour even if it doesn't match the "theme". And hey, black gun for the bad guys, rather than the heroic red for SMs )
Good to see I'm not alone, if not unique. I probably won't be adding nasa logos though.
Progress...
Flames I said, and flames I have been doing.
It's not as easy as Klaus makes it look.
I did want them more flame-y than muzzle flash-y though.
Still, what do we think?
Not attached yet, room to change.
First chap first (that's the one hopping the fence)
Second chap second (He's the one landing on the box). As he's landing I gave the flames a less jet-like appearance. May add some smoke to these too to show the "turning off" nature.
I let these cure to see how they looked on before sculpting the last ones for the third chap. His are curing at the mo'.
Thoughts
I tend to think of actual flaming jet packs as more of an orky thing than marine, but that's not hard and fast even in my own head I think they could work really well with the kind of old-school feel engendered by the colour choices. As always with effects it will be the paint job that sells it - the sculpts look great as a flame type effect.
Thanks MT. My thinking for these will be clean, blue flames to contrast with what I'd do for Orks as smoky, orange flames (should I ever get around to doing any Orky jet-pack troops).
Thanks Gits'. I just looked up various tutorials and had a go.
Thanks CK. Poking, squeezing, tweaking and pinching with tweezers of a cone of GS. Kept going until it looked about right.
Sculpting is just like any other skill, try it out, look to tutorials, learn the techniques, get better, repeat...
I use milliput for gap filling, better for sanding.
Glad to hear you like the flames, and think they look flame-like enough.
They are now attached and primed.
And the Malignant plaguecaster (keep knocking out those catchy names there GW... ) has been started.
Which has involved me cutting off the blobby cloud and moving the arm.
It took a while for me to get what GW were going for with that cloud, and now I know what they were trying to achieve, I still don't like it... so chop chop...
The arm will get some tentacles, of course. I'm considering changes to his staff; looking at pictures of diseased branches for inspiration, and then I'll see if there's anything else I could change.
Also starting to think about Christmas presents. 4 to do, and the sooner I start them, the less rushed December gets.
So expect some more random projects to start soon...
GW really has gotten sillier over the years with the names, but I guess we have Chapterhouse to really thank for that.
If you are going to change up the staff how about making a cloud of flies that are being attracted to it?
Thanks Theo'. Don't know about flies, they're part of the reason the blob was cut off. We'll have to see if I can make any decent ones and attach them realistically.
Graven': There's not a huge amount that can be done to him without a lot of replacement sculpting. The arm I've moved is easy, but you have to remove the cloud and then that hand is not usable (hence tentacles). I'm considering changes to the backpack as that and the stick are the only accessible parts to change.
Anyway, progress on Inceptors...
...well, I say progress, I've re-blacked the black parts in preparation for metallics, and now to decide where to put which metallic paint.
I took some photos so that I can have a look at where I want the paints and thought I may as well show you. and while I'm at it I can show you the reason I don't tend towards NMM techniques... when you have this many metallic paints, who needs fake ones (and this doesn't include a polish-able aluminium and red, green, blue, and black metallics).
No progress on either the Inceptors or Mr plaguecaster.
But I have made a start on Christmas presents.
One to show.
Bard the bowman.
To be standing on a ruined and burning wooden tower (I have an LED candle to put to use).
But first I had to fix his arm (excess and dried-out glue); re-attached and gap filled.
And then I strung his bow. I have the perfect wire for scale bows, from some motor or other. Fine as hair, but will cut you before snapping, if you're not careful.
Cut notches into the ends of the bow (jewellery saw),
Started at the top, wrapped the wire around and then up over the notch, plus a bit of superglue,
Over the notch at the bottom and wrapped around there, plus superglue.
Straightened the bow (metal model) to pull the wire tight.
I have a dislike of scale bows without strings. I can't help it.
In other news;
The "elements" Intercessor squad are on the way to their new owner. First good, high-value sale.
As is the way when trying something new and learning how to do something while doing it, I've not been keeping you up to date.
So today you get a 2-for-1 deal update.
But first...
Thanks Cam'.
Thanks Graven'. It's a relief that someone will actually pay what I'm asking, so don't you all wait for the prices to drop.
monkeytroll wrote:Bows need strings
Indeed they do MT.
Thanks Gits'. If I didn't have a wire like this I'd probably use some hair. Just find someone with suitable length and thickness and borrow a few strands.
All that wire you see in the baggie in that photo came from one motor... from something... So if something motorised breaks, strip it down. Just another "it'll be useful one day" things.
Thanks T'Horde.
Thanks Cleatus.
Thanks CK. I wouldn't expect it to damage a brush. I'd just run the brush along the length, once each side and it should be done. It's as smooth and fine as human hair (hence my suggestion above).
And now progress.
The plan here is to just be building the top of a tower and integrating it into a display base/plinth.
As Bard the bowman is all about shooting dragons with arrows, the tower needs some fire damage, and I just so happen to have some LED candles.
Step one, build a box.
Step two, build rough shape of tower on top of box.
Step 3, install LED candle into bottom of box.
Step 4, add wool. Initial covering is a cylinder of stuffing-like material (I think for clothing padding). This allows the light to fill the interior of what will become the smoke plume.
Step 5, Start to add layers of wool of various colours to create the interior of the smoke plume...
Step 6, realise that you should probably finish the tower first...
Step 7, Add planking to the tower and work towards filling it out to the thickness of the box.
Step 8, Add a ladder to show how Bard would get to the top of said tower. This will be mostly obscured by more smoke.
Then some actual textures get added in the shape of some strips of thin card (scored for wood texture).
I'll fill around his feet with putty to hide his base and make the planks complete.
Next job is to build some of the top of the tower and finish the structure of the lower tower and merge that with the box.
Then I'll be able to finally attach the top and finish the smoke...
Great looking stuff! The building is coming along nicely and I approve of the bow string! I added them to all my LotR stuff back in the day but never found a wire as fine as that, it works perfectly
Thanks CC. It's nice when you've kept something and have no idea what you can use it for, and then later a problem emerges that it perfectly solves.
Tower progress. I've filled in the gaps and around Bard's feet with putty. The planks should look continuous under him once painted.
It also turns out that sections from my Hut kit (2 still available in my Etsy shop ) when cut in half, make nice low fences, and with the end planks removed from each they are the perfect length for each side of the tower.
And the smoke and fire has been added. Red inside and black/grey around that.
You'll notice that the glue is still wet here and so the smoke will get teased out a bit more once dry. Also, the smoke will be blackened at the extremes during the painting, but only on a surface level.
The glow is not terribly noticeable in well lit conditions, but does the job.
Just need to paper over the bottom and then it can be painted.
Painting has started on the tower. One other project is nearly finished building and will need minimal painting. Present number 3 has been started. One other to do. 24 days to go...
First the tower to show. Primed, blacked and now the first taste of colour (just a dry-brush of sand and I'm going to experiment with an ink wash over this...) Bard is going to be colourful as the focus of this piece, the rest us just a backdrop.
And 1 (count them) 1 internet points to anyone that knows what this is going to be... 1:1 scale Nice change of pace. Used MDF as a base for the handle and trigger bits as it'll need a bit more strength than plasticard would manage. Won't be functional however. That colourful piece is part of an old pen lid. Was just the right thickness. Putty work next.
Thanks Red'. Well you got the size about right, and probably the inspiration for the original. nil points.
MT. You have the genre right (sci-fi), but not the film. nil points.
Dark Apostle' wins the internet... point. Spend it wisely. Yes, the Noisy Cricket. I nearly went for the neuraliser but felt I'd want that to at least pop up, maybe next time.
Thanks.
MT2, that's because it is.
Thanks CC. I hope so.
Thanks Graven'..
Introducing the third project.
Another earring display box. The previous one is full, so a new box is required for more earrings to be presents.
I'll also need to make a new set of earrings as well, have to remember that...
Rather than making 3D designs with my 3D printing pen, I thought I'd draw directly on the clear box.
To get the swirls at least roughly the correct sizes I used circles of paper.
Then it was just freehanded swirls about the place.
As a distraction from or to directly hide the joins in the box, it does the job.
I'd have preferred to have them perfectly symmetrical on each side, but that went out the window on the first swirl, so embracing the asymmetry.
Deliberately didn't attempt to get any lines smooth as that's virtually impossible with one of these pens and with it melting to the clear plastic you only get one go and one mistake would destroy the whole thing (and I don't have any more clear plastic). Embracing the rough look.
And yes, progress on the Noisy Cricket.
Found the perfect piece of plastic for creating the point out of (from a soap dispenser). Gives the steps at the point where the tip extends from.
Then just putty up the sides for that (holes to be drilled).
Grip and bits to sculpt and the tip to add (last as I'd break it off if I added it sooner).
Thanks MT. The grey/silver is the plastic I used; as it was going onto a clear surface I wanted a more neutral colour (the other option I had for the filament was BRIGHT green/yellow, I've used up my purple)
Good to hear Gits'. Thanks.
Gitsplitta wrote:... Nicely done Cam...
CAM!
CAM! I know I'm good, but...
Thanks CK. Yeah, the existence and intention of this blog (as opposed to my "army" blog) has led to a great deal of diversifying in my work. The same methods, but with different directions.
Progress...
Which shall I show first
Cricket now has all the details
Just a matter of making sure everything is smooth and then it'll be painting time.
And the wood is done on Bard's tower.
Windows too (these were nearly boarded up, with shutters, opened, broken, any combination of the above, but finally painted).
Now to airbrush some blackening from the smoke/fire, before painting Bard himself.
I must confess I had no idea what the noisy cricket was until Men in Black was mentioned, and then I still had no idea because I haven't seen the film in years! Great job on it though, maybe I need to re-watch MiB.
Bard's tower is looking brilliant already, the wood detailing is really lovely and the leaded windows are lovely.
Thanks Graven'. Yeah, I was sorely tempted to do the windows 3D, but thought that I'd manage it with paint. Good to see I was right.
Just a layer of gunmetal as 2 sets of parallel lines and then broken (or dashed) black lines to shade them and make them more uniform in thickness.
Thanks T'Horde. Maybe I overestimated the Noisy Cricket's notoriety, I thought everyone and their dog would recognise it from the profile. *shrugs*
You could, and probably have, google'd it but see below for a film still for the cricket in context.
No worries Gits'. We've all done it. I frequently read a blog's progress and then pause and scroll up to see who it is that has actually done the work. Thanks.
Noisy Cricket is now smoothed, primed and blacked.
I used a different shot from the film to guess the scale and then fit it to my hand.
Unless Will Smith has extremely large hands this should be close enough to the "real" thing, and I can hold it comfortably enough.
It's less than 4" long, and that's from the back of the "hammer" to the tip of that extended tip...
The grip doesn't reach back to my thumb and instead rests on the "base" (there's probably an official term for it) of my index finger.
Bard's tower now with finished smoke effects.
Just Bard himself to paint.
19 days to go. Feeling better about getting it all done now.
Noisy cricket always reminds me of the piercing/tag gun we used at Builders Square to price the rugs, almost identical shape. You’ve done a great job making it to match the photo.
Bard is looking desperate at the top of that tower. Maybe he should have played nicer with the locals .
Theophony wrote:Noisy cricket always reminds me of the piercing/tag gun we used at Builders Square to price the rugs, almost identical shape. You’ve done a great job making it to match the photo.
Knowing how many movie props are made, it's likely that one of those things may have at least donated parts to the original. Thanks.
Bard is looking desperate at the top of that tower. Maybe he should have played nicer with the locals .
It's not the locals that are causing Bard's issues, it's an entity called Smaug.
Much like people living in glass houses, throwing stones, if you live in wooden buildings on a lake, try not to anger the nearby dragon.
Hello Brian. *waves*
Thanks Boss Salvage.
Progress on Bard.
Browns and skin.
Blues and reds to do...
Bard is done. Just need to tidy up around the base. But you'll all see that later.
The Cricket has had one layer of paint, more to come.
The earring box is nearing completion and the earrings are made and painted (just need varnish).
And the final present is in the planning stage.
2 weeks to go (although I'm "loosing" next weekend to booze)
Should be fine to get them done in time.
Apologies for the radio-silence. Weekend was lost to booze, and I've been trying to finish off the final present this week, so no time for posting updates.
I also fell behind on keeping up with all your blogs, but have caught up now, will try to comment tomorrow.
I did, however, remember to take wip photos and I can now share them to keep you all entertained until Christmas (final photos afterwards).
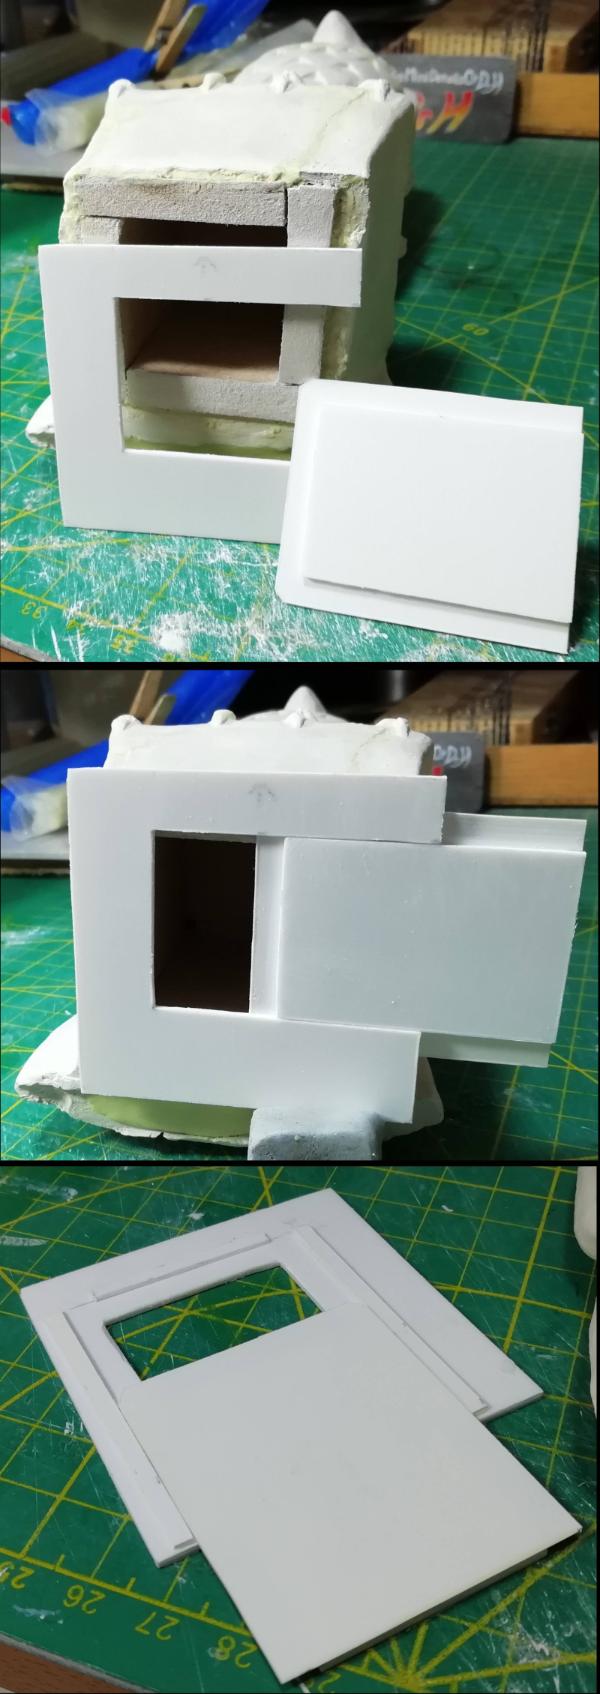
Final present is again something N-gauge (1:160 scale, ~10mm), but not particularly train related.
I dug through the box of buildings to see what grabbed me and found a bungalow and thought that would look nice with a garden and some added details inside.
These photos show the thing as-found, and the plan for the interior (mainly based on the window positions:
It was fairly solid and tidy, so no repairs were needed.
But a few sizeable windows meant an interior of some description was "needed".
Once decided on what room was what, I made a list of what should be in those rooms and set about making shapes from lumps of foamboard and added some card to clean up the open sides of those.
I then spent quite a bit of time seeing what would fit and what could be seen through the windows.
The garage was closed off, so that was to be left empty.
The bathroom's window was small and the curtains covered most of it, so that is also left empty.
The bedroom has some visibility, so minimal furnishing: bed, wardrobe and a "mirror" (painted on a wall).
Kitchen has a fair sized window and as the first build got quite a lot of things added: sink, fridge-freezer, cupboards, cooker, washing-machine and some over-the-head storage....
...but most of it is various rectangular cubes arranged next to each other...
and the living-room / dining room has a large window and many smaller ones. This got a couple of cupboards, sofa and comfy chair, dining table and chairs, and a tv.
First job was to create the interior walls and see what space was available.
I then build the kitchen as practice for how the create tiny cubes and to see what is visible through windows.
Then I build all the other furnishings.
And found some patterned things to use as carpet. Flat colours would be a bit boring so went a bit '70s with the decor.
Then I found out how to arrange the items within the confines of the house.
Stay tuned for installation and painting, next time...
Thanks Theo'. Was a handy piece of cloth I had laying about.
Thanks Graven'.
Painting the interior, I decided to keep to high-contrast to make sure things were visible through the windows.
Bright colours, black details. No need for shading and highlighting. (really, you'll see at the end that many things can barely be seen)
Once the interior was painted it was time to install the items into the house.
The comfy chairs(!) were glued to the base, as was the dining table (now with chairs in the shape of some bent card pieces).
The rest was glued into the house first and will be glued to the base as one item.
The base then got some grass (grass on paper and some flock) and concrete (card).
The exterior was painted,
Garden added (those are pieces of sponge, and some pieces of dried paint on the end of lengths of paintbrush bristle)
Fence built,
And a car pulled out of the collection. I was interested to see that they bothered to base it on a real car and name it on the bottom.
You'll see this finished, along with the other presents, after Christmas.
I'm now going to focus on recording footage for my next Fallout 4 settlement walkthroughl, as that is also finished.
Not long now. If I don't see you all before have a good Christmas, one and all.
Thanks Red'. Yeah, it's good to work at a variety of scales, mediums, materials, and themes. They all help each other too.
Thanks Theo'. It is the busiest I am all year, getting 4 projects done together. But I do start them in November and work on them in tandem (as one dries, cures, etc. I'll work on the next). It is stressful and tiring though. The car didn't need cutting, the top and bottom are just press-fit, but in attempting to remove the windows (a solid lump of clear plastic, glued in) I did snap off the front of the car and had to fix that (plastic glue and some putty for strength).
Thanks Stormwall.
Thanks Cam'.
and yes, a Merry Christmas to you all. Hope it was pleasant, productive/relaxing and fruitful.
I did well this year, Load of music: Bjork - utopia, Chase and Status - Brand New Machine, Foo Fighters - Concrete and Gold, Jamiroquai - Automaton, Pendulum - Immersion, and The Prodigy - No Tourists. Books: The rest of the Sin City graphic novels, Batman - The Killing Joke, and a couple of Stephen King books. Some sweets, biscuits and chocolate. And some new toys...
A box of Dremel accessories (12 unique things). And a tool stand thing for the Dremel:
The main aim I wanted this for was for holding the Dremel still as I use it for sanding things flat, but it will prove useful for many other things together with all the new bits I have for sanding, polishing, cutting... and I can use it to drill holes straight.
I'll be back later to show you all the finished Christmas presents, if someone would be so kind to interrupt the auto-append.
Great stuff DrH and a nice crimbo haul, I've been eyeing up the dremel stand for a while - just need to get a proper dremel first (I have a knock-off version bought from Woolies before they went belly up, but it's not very good...
That house is shouting out for some LED lights though - maybe next time?
Thanks Ruglud. This one states that it's compatible with most rotary tools, and lists;
Dremel,
Black & Decker RTX
WEN
Chicago Electric
DrillMaster
ToolSharp
MasterCraft
Milwaukee
Hitachi
"and more"
So long as you have a screw thread at the head of the tool, above and around the spinning bit (I'm full of technical terms), this stand has 2 rings to attach them (see the red thing in the 2nd photo); one with a thin thread and one with a coarser thread.
Yeah, maybe next time (if I have somewhere to put the battery).
Speaking of the house, here's the finished piece:
and some close-ups
This is the earring display
and matching earrings
Oh, I forgot to include a model for scale (and valid DDakka gallery privilege ) so these may disappear soon.
This is the finished Noisy Cricket
And finally, the finished Bard the Bowman piece.
high angles
Close-ups of Bard himself and the lighting differences
and as a special treat, a video showing the lighting in action.
I'm still working on the video for my next Fallout 4 settlment, but I'll let you know when that's done.
Thanks for sticking around.
Dr H wrote: ...Load of music: Bjork - utopia, Chase and Status - Brand New Machine, Foo Fighters - Concrete and Gold, Jamiroquai - Automaton, Pendulum - Immersion, and The Prodigy - No Tourists...
Red', I didn't notice how political those album titles looked together until you mentioned the "leave" thing (I think Brexit sounds more like a breakfast cereal than something as important as a country shooting themselves in the foot).
"Utopia" - what we hope to achieve (and will get the opposite),
"Brand new machine" (working as well as a well oiled machine...without oil),
"Concrete and gold" - If we can hold on to it all.
"Automoton" - would work better in the gov'nt.
"Immersion" - only one that doesn't immediately fit the theme, insert something about being immersed in water... or sinking...
"No tourists" - all those horrible foreigners that have been ruining the country...not.
No, I'm only interested in music I like (I try to avoid labelling music as "good" or "bad", it's a matter of taste). Any hidden meanings are purely coincidental.
I'm now 4 short of 500 CDs. Will have to make those 4 extra iconic / classic / "good" to celebrate.
Thanks Cam'. All well received indeed.
Fallout 4 settlement video edited and rendered. Will try to upload tomorrow.
Walkthrough video is up, and I got the blueprint done too.
This settlement is first found as a greenhouse inhabited by gardening robots.
Therefore I decided to keep it all robots and build a factory to produce more robots.
Stuff goes in (armour, weapons, raiders...), junk is produced, junk can be used to build more robots...
However, I wanted it to look really busy, so I have conveyor belts running all over the place and there's switches and wires all over the place, and if you leave it running long enough there's junk all over the place.
You can watch me walk about the settlement here:
Or you can download the blueprint and add it to your own game and walk around it yourself (only for PC, via the Nexus and "Transfer Settlements"):
https://www.nexusmods.com/fallout4/mods/36662
Thanks and have a good new year if I don't see you before.
I wasn't trying for the political. I just thought the idea of a band called "Breunion Boys" to be silly. Since I had just read about it, and saw your post about music, I saw an opportunity to make a potentially humorous remark.
As far as foot shooting goes; ahem. A lot of that going around the various Nations o' Earth.
Have had a bit of time off from the usual modelling, so not had anything to show you all. I did post a year round-up in my other blog if you haven't seen that yet and want to see what I've produced this past year, all in one place.
Link for ease: https://www.dakkadakka.com/dakkaforum/posts/list/4230/471119.page#10292941
Normal service here shall be resumed shortly, but in the mean time I did some more woodwork to augment my dremel stand.
The one thing I felt it was missing for my intended use case is a flat surface to rest items on for it's sideways configuration, so I made this:
Using the part of the stand that is used to mount the plunger and tool vertically, I added the rod at the back that means the whole jig is aligned with the Dremel even if I don't position the Dremel perfectly with respect to the base.
That rod can move up and down a slot (that I made a mess of when the piece moved during routing) in the upright to allow height adjustment of the Dremel (to account for different tool diameters).
The rod can also be moved into or out of the stand to allow adjustment of the tool above the support plane (to account for different tool lengths, and for sanding top vs. side, etc...).
And I added the rear shield to "catch" dust and (hopefully) reduce it's spread towards my tv/monitor and PC. The bottom of the tool, as seen here, is moving towards the rear.
I still need to add some runners (to be done in plastic for reduced friction) to allow the sled to be moved forward and backward and remain at 90o to the Dremel.
Incidentally, that tool shown in the first photo is a beast; it cuts through wood like a hot knife through butter, no burning.
With that done I can reclaim my workspace and resume the Nurgle chap, and with the cutting and sanding of wood done I can resume painting of the flying m'reens too.
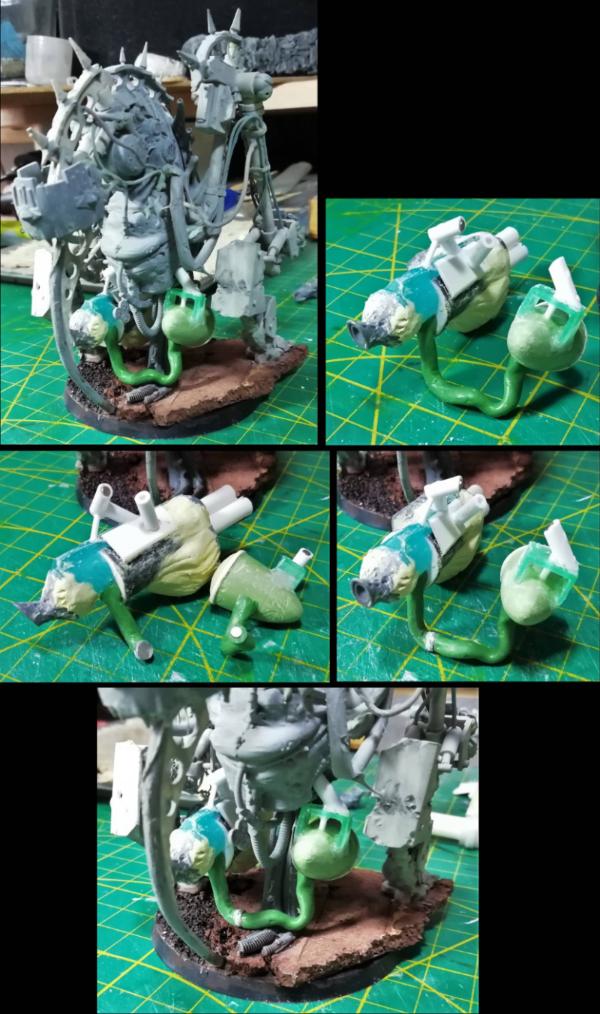
I had an idea of how to progress with the plaguecaster...
What's better than a vague cloud of blobs (vanilla)?
Tentacles! *
What's left of the base around the edge will get broken earth to show them being called fourth from the ground.
*I mean, tentacles are better than practically anything. Except more tentacles, more tentacles are better...
inmygravenimage wrote:Might need to steal this idea for my my second plague caster. Damn you vile woman! Or something...
Ta. I see him as bringing fourth diseased tentacles. Steal away, that's why I share my progress.
Thanks Theo'. I only have the main character model left of the Nurgle chaps. Don't know how much potential three is to have him ride a tentacle, but there will not doubt be tentacles involved somewhere.
Thanks CC. That's good to hear, just what I want to achieve.
I've now changed his spiky stick into a diseased stick (with the help of the 3D pen), finished off his tentacle hand (3 fingers as it's Nurgle), and roughed up the holes in his armour (forgot to do the same for the scraps of cloth on the backpack, will do that shortly), and finished off the base by populating some holes and sprinkling sawdust (had a lot about the place close to hand ). Will get some static grass at the end.
But I have some Inceptors to finish first... remember them? Probably not...
The plan for these was White and Metallic, using most of my metallic paints for all the parts previously left black.
This is after all the areas were basecoated in their particular metallic and a wash of black (therefore still highlights to do).
Also, the 2 areas of black on the jet-pack thrusters are to be done with the polish-able paints, and will be done after highlights for the rest.
There's also the few parts that are not to be white or metallic, still to do.
As for the metallics, there are areas of:
Gunmetal,
Aluminium,
Chrome,
Brass,
Gold,
Metallic black.
(most will be cleaned up or highlighted with silver).
Highlights next, maybe some more black pin-washes in certain parts, clean up some of the white, and the Metalcote paints (applied and polished up).
In other news:
I got a new phone as an upgrade and have spent all day setting it up.
These are the first photos from that phone and, as with all the parts of this phone, they are slightly better than the previous phone (but not that you'd notice if you weren't looking).
monkeytroll wrote: Good work on the dremel stand - I seem to be a bit behind....
Ta. I look forward to actually using it.
No worries about being behind, I'm happy to get comments on things I made years ago, days is nothing. This is why there's links to every completed project in the OP, anyone can browse through, without needing to look at every page. There's something for everyone, but not everything is for everyone.
Obviously I'm a fan of the plaguecaster work
Obviously. Tentacles are for life, not just for "AaarrggGodEmperorKillIt"
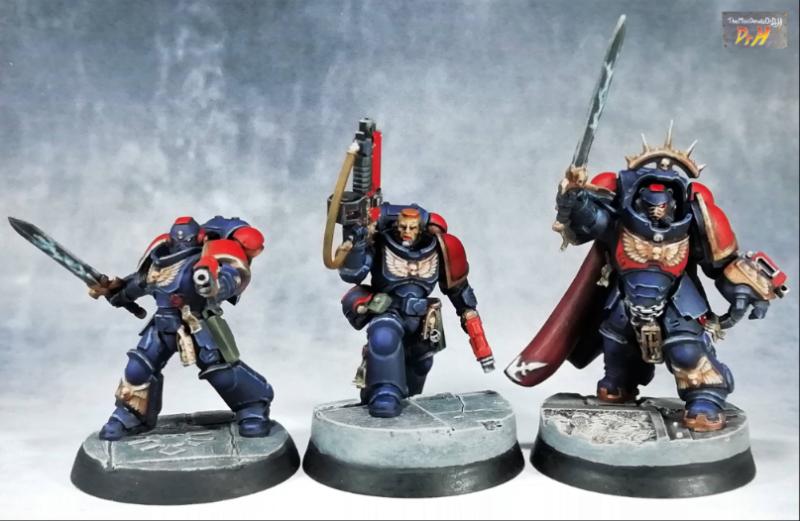
Colour scheme seems to be working as intended on the bouncy marines.
Ta. Metallics finished off now. See below:
Highlighted and further black washes, and the Metalcote paints are on and polished.
Here's an example of what those paints look like before and after a quick rub.
And these are all-round of all three with the metals done.
I might get the bases done before finishing off the last details.
We shall see...
Lo Brian. I usually use a cotton bud.
Good for getting into restricted spaces (if needed) and firm enough to polish without needing a finger behind it.
Those metallic are interesting. Wondering if you have ever messed about with graphite, can do similar type of things but maybe not in different shades.
Bare in mind everyone, re. polishing: These are special paints that are intended to be polished, you can't do this with any paint.
What I'm using is the Humbrol Metalcote range. Other paints do exist.
I have 3 flavours, Gunmetal (the darker of the 2 above), Polished steel (the lighter one above), and Aluminium.
While the first 2 work well, the Aluminium one doesn't really do much, no matter how much you mix it, polish it, threaten it...
So ymmv.
Thanks Cam'. I have used graphite to give a shiny edge to something before, but not on a full surface.
The thing with graphite is that it'll rub off with minor handling and would therefore need sealing in, and that can dull the shine.
These paints shouldn't need sealing (hence only using them sparingly on these models) and should actually get shinier with handling... in theory...
They may wear off eventually... but so will any paint... eventually.
Progress on bases (done, minus grass and base edges):
And here they are mounted on the bases ready for the finishing touches.
Had a bit of a tidy up and now the building desk is ready for the next project (currently holding off as I don't want the painting backlog to get too long). Soon... soon...
Thanks Theo'. You're not trying hard enough if you don't bring your own piece of tactical terrain with you. However, these chaps didn't get the memo and are stood on the terrain, not hiding behind it.
Thanks Gits'.
Thanks Graven'. A fairly easy job to do with my wooden box kit.
Thanks Cam'.
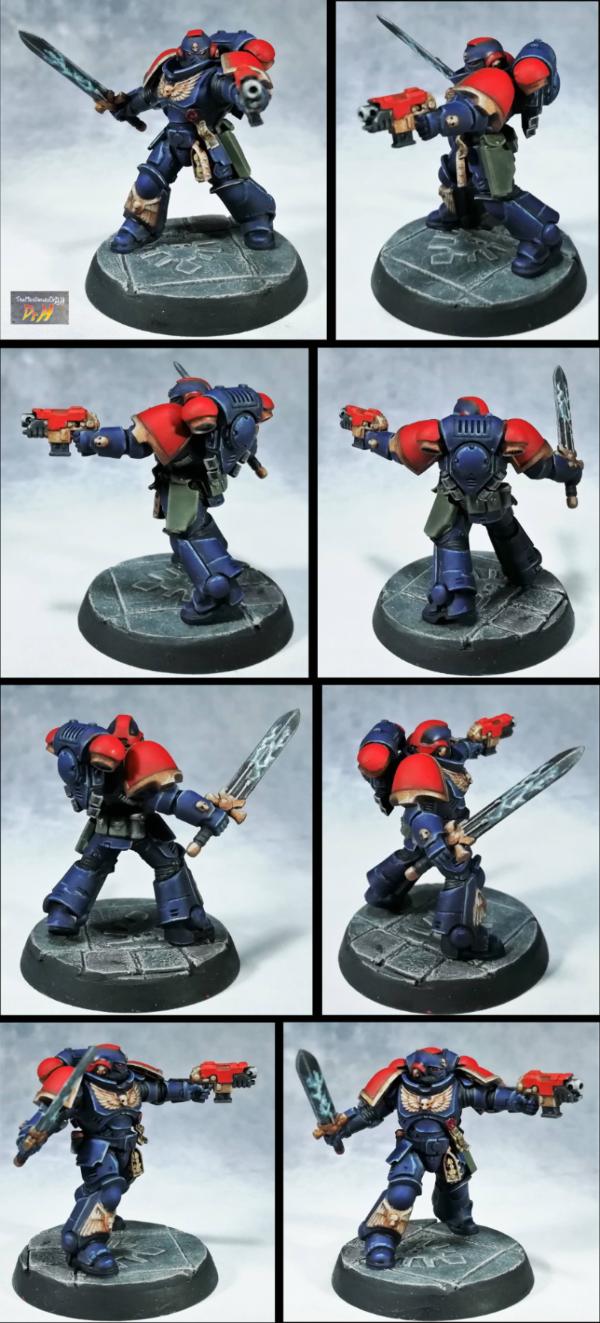
And a final push to finish them off.
Some light weathering on their armour in the shape of some scorch streaks from re-entry: I envisage them dropping head-first and flipping for final landing, so streaks are top to bottom.
I added a simple blue circle to the left shoulder to keep them chapter neutral without leaving it blank or making it impossible to add your own chapter symbol on top.
Everything else is as you might expect.
Note: I've replaced the photos here due to Git's comment below
Together
Number 1 (fence hopping):
Number 2 (crate landing):
Number 3 (Unique approach to obstacles):
Now the plague caster can get started painting (I also have a little side project to paint), and it's time to start on the next model from the box... already cleaned of mould lines, considering modification options...
Well now that you mention it, Gits', no they are neutral grey.
I'm trying out some new backdrops and thought the red one was a great improvement on the yellow one I tried first.
They were a little green in the original photos, so I may have gone too far with the colour correction.
I'll need better photos for Etsy, so I'll try another background and do a better job of colour correction.
I've replaced the photos above with better ones, with a truer colour representation.
Thanks Git's for pointing it out, I was having a blind moment and didn't realise how far off they were from reality.
The Malignant Plaguecaster is now primed and blacked...
I'm thinking bright colours for this one;
Bright, but sickly, green for the armour,
"fresh" orange rust for the trim,
and a bright colour for some magic affects (as if he's summoning the tentacles).
Will get the skin / fleshy / guts bits done first though...
Still needs the final highlighting on that green, but that's the general tone.
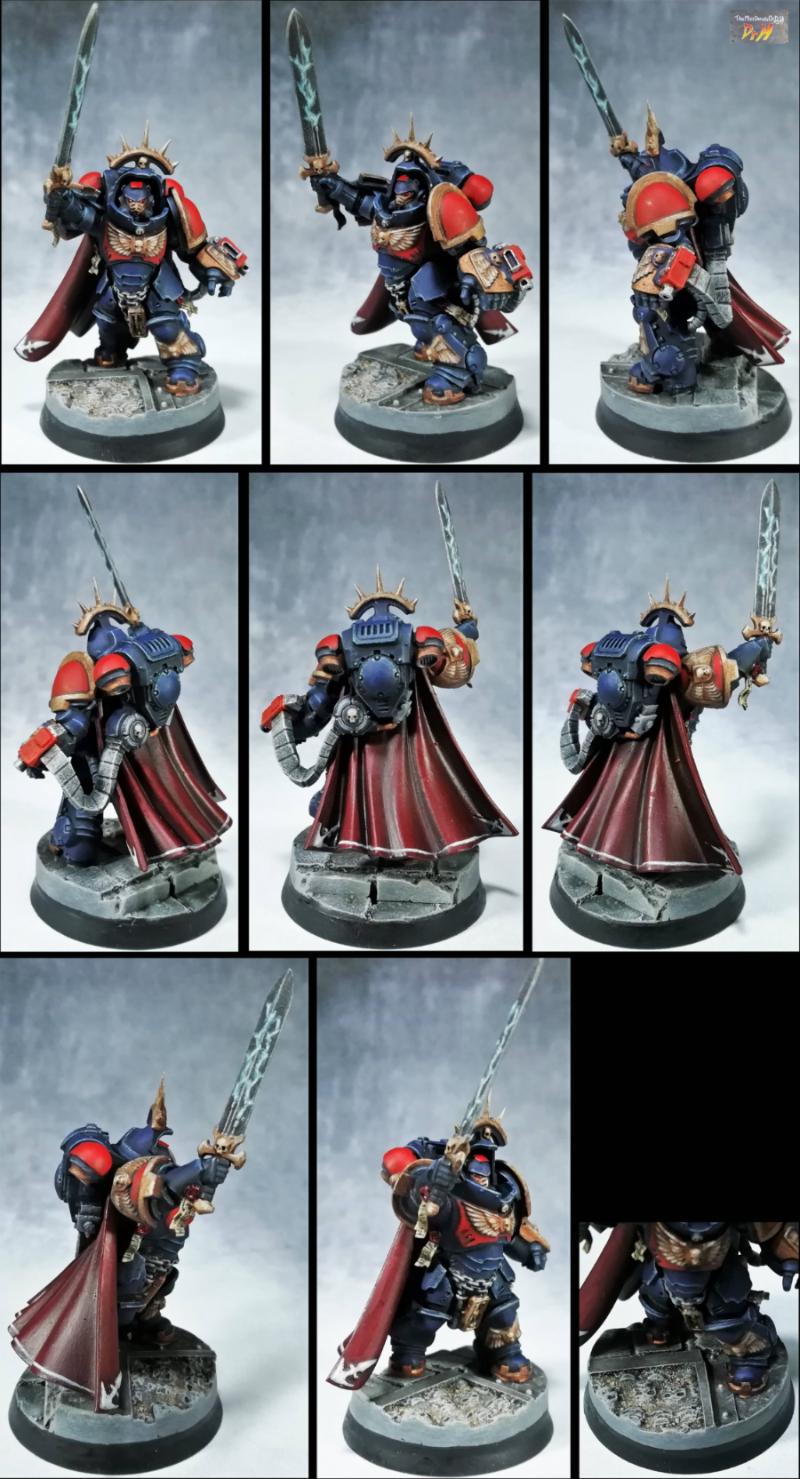
I've also started on the Ancient.
Not a lot that can be changed about the mini' without completely changing the mini', which defeats the purpose of using the mini'.
But have a good basing idea for him... that's in progress.
I did say I was going bright and colourful with the plaguecaster...
Yeah, that can work.
Not sure what colour the hood will end up, will need to have a look at a colour wheel to see what can match the green and orange... and the purple tentacles.
Theophony wrote:Brown goes with everything , it’s the new black “Oh I just smiled my armor...well use your cloak to lean it up, it’s brown anyway”
Looks like the gods of auto-correct really hammered your here, Theo'. I've gone for red though, as looking at him, a brown hood would merge with the horns and this red matches the (slightly more purple) guts hanging out and spreads that colour across the model, making it a good counterpoint to the orange and green.
And it keeps him colourful, which is the aim of this model.
What color is the marine going to be? I’d vote for Crimson Fists
Had not put any thought into his colouration yet. I'm tempted to do a half or quartered scheme to stay with the heraldic theme of a chap with a large flag.
Or a chapter that is particularly against Orks...
Gitsplitta wrote:Nice work on the plaguecaster. Looks great!
Thanks Gits'.
Here is progress on the plaguecaster.
Cloth pieces in the aforementioned red,
Horns in ... horn colour,
Brass bits with plenty of verdigris,
And the staff now done with the diseased wood (normal wood colours, red wash over diseased pieces, black dry-brush over those areas).
Looking at pictures like this:
Sure enough autocorrect flubbed it again. That and my limited time to double check my posts. Should have been soiled not smiled. Oh well, red looks good .
Anyway, I said I was considering half/quartered schemes for the Ancient. I would also like to keep his unique and therefore unaffiliated with any existing chapter (and therefore saleable to anyone), Looking through the existing chapters* I've narrowed it down to 4 possible options.
* "existing" as in what schemes I can find on "official" all-the-chapters posters/pictures.
If there is anyone out there, I'd like opinions on which of these you like the look of and why: Green and Yellow, Orange and Blue, Blue and Black, Orange and White...
In other news; The lord of contagion is a problematic model... There's little you can do to modify it without re-building large portions (and if you're going that far, what's the point of using this model to start from). On top of that, it's basically impossible to paint the miniature in one piece if you want to do a half-decent job of it.
So, the plan is to paint him in 3 parts: body and legs, arms and axe, and the backpack and cloak. The only other thing I can do with it is to add to the basing; therefore I've stuck the body and legs to the base and will add many Nurglings about him as he's already modelled with a pile of Nurglings under one foot (and it makes no sense that the only place there are Nurglings is under that one foot).
On the colors.
1. No, makes me want to drink a sprite and I’m not that interested.
2. yes, because all primary colors are involved even though yellow and red are mixed to make the orange.
3. No, too dark of a base
4. Okay, but only because I worked at Home Depot and those were the main colors.
Thanks Theo'. DDakka seeming quiet all over at the mo.
So, on the whole a fan of orange then... noted.
Anyone else have any thoughts on the colour scheme.
In the mean time, progress on the Lordy:
As I mentioned, the plan is to add Nurglings to the base.
First is the 3 main Nurglings (there will be some more).
A blob of milliput roughly sculpted to body shape > let cure
2 blobs of GS/milliput added to top, small blob first squashed flat and larger blob on top, sculpted to rough head shape. Give the double-chin effect. > let cure.
Small sausages of GS, tapering to one end, crimped at middle and towards thinner end. These are legs; thigh to middle crimp and shin to second crimp, foot on end.
Afix thicker end to side of "hip" and smooth into the posterior,
Then push, with a tool, the second crimp towards the thick end, bending the leg at the first crimp.
Add toes as best you can into the little foot piece.
I also made one of them slug-like (or Jabba-like if you will) for a change.
Next I will add a couple more with these to support them, and then give them all arms at the same time.
More details, to be added later, should make them look better than these rough sculpts do at the moment.
Dr H wrote: The lord of contagion is a problematic model...
There's little you can do to modify it without re-building large portions (and if you're going that far, what's the point of using this model to start from).
It's funny you should say this, as I just ordered a Lord of Contagion to convert into a Slaanesh terminator lord Plan is to strip out a lot of details, fill in bullet holes, swap his gut out for abs, swap his head out for a possessed one, etc, etc. Personally super excited.
All that said, I'm also a fan of the original mini, and moar nurglings are moar better
Lo Boss Salvage. Thanks.
For a personal project, yeah it's possible. It's just a lot of work for little return if you intend to sell it at a respectable price, as I do here.
Can you get Lordy here as a separate (multi-part) model, or are you buying one from the Dark Imperium set, as this one is?
My main issue is with how these "starter" set miniatures are made:
Yes, they are easier to put together than a multi-part kit model, if you just want a gaming piece (not a model).
They do go together well, with little to no gap, but there's so much going on they're not really good for a "starter" modeller. Things like Lordy must be really intimidating for a novice painter.
When you build a multi-part kit (or scratch-build something) you can add just as much detail as you get on this, but because you've added it one at a time, you know what's there.
You easily put together the 7 "parts" of Lordy, but when you look at the finished miniature and start to decide how to paint it, you are assaulted with more and more detail the harder you look. You can be painting one piece and then find something new part-way through and that can change plans, and you don't even know what this new thing is immediately.
And then coupled with that, the exaggerated posing means much of the finished model is difficult to get to. Not something a novice would think of when they are building all the miniatures so they can play now and paint later.
And for converters, it adds work when GW makes many of these impossible poses: A knee will be bent but where 2 pieces of armour clash and would either need to move or will prevent the pose, they just "overlap" the pieces (pushing one inside the other). This means if you cut the joint to change the pose you have to re-build the removed part of at least one of the armour pieces. And GW does this across the whole model. This is what I mean about having to rebuild large portions of a model if you want to change something.
For an experienced modeller, with all the time in the world, it's not a problem.
But for a novice, or someone with limited time (by RL or for what I'm doing), it can be a big restriction.
Good luck with your conversion though, sounds fun.
And stick around for the final miniature from this box (still some marines to do first) where I'll let myself off the leash and go for a major conversion on the largest model in the box.
Here's some work on the next of the Nurglings:
blob of putty with wire inserted before curing,
bend and cut wire to size,
pin to base,
cover with more GS (need to be built up in layers)...
I also have a smaller one on the go for the other side,
once these have heads, I can move on to adding horns, arms, tentacles (of course), guts, and boils...
Thanks Aku', so do I.
and yes, still looking for input on these:
Dr H wrote:If there is anyone out there, I'd like opinions on which of these you like the look of and why:
Green and Yellow,
Orange and Blue,
Blue and Black,
Orange and White...
I love the Nurglings. I've been thinking about how to make some, and how to do an armourium cherub, so things like this are very useful. I agree with you about the frustrations that come from the poses of a lot of the newer stuff.
As for Primaris -
Green and Yellow, I quite like
Orange and Blue, no, looks like a can of irn bru
Blue and Black, maybe. Not thrilled but not bad.
Orange and White... Rebel scum.
Thanks CK. A flat front to the body and something to span the gap to the head, and putty to bring it all together in one piece. 2nd arm "conveniently missing" so that it doesn't get in the way of placing the Ancient.
Thanks Graven'. Nurglings are basically just blobs on blobs with either bits missing or more blobs added. You can get away with being quick and dirty with them and hide the sins with pus etc. For a cherub, I'd probably carve it from something. But that's because I'm more comfortable with carving than sculpting like these. Whenever I've sculpted something I always go in later and carve in more details / improve the shape. This is why I decided to show these from the start; to show that everything goes through an "ugly" stage before improving. We all learn together how to make these (I'm just making it up as I go).
So now we have sprite and Irn bru for the first 2 possible Ancient schemes, anyone got a drinks brand that matches the last 2? Leaning towards the Orange/white currently...
Next steps on the Nurglings: Drilled some wire through their heads and added putty for horns (bit of superglue used to help it stick, hence the white). Probably a better result would have come from carving plastic down and sticking them on, but here we are. Those were carved down a bit, and then arms and tongues were added.
The little chap beneath the axe is going to be covered with blood dripping from the axe and the one next to him is licking it off.
Next stage on the Nurglings was to add the boils and details.
The boils are a variety of beads that are glued into drilled recesses. The excess glue helps in this case by giving an uneven, but natural, edge about the boil (rather than trying to keep it neat and tidy for rivets done with this technique).
However, they are now at the point where there's so many different colours on them it's difficult to see if they all go together and what details are missing... so...
Hey Doc, beaut work on those grubby little nurglings. They've got that old school nurgling vibe of just being disgusting little blobs of gak and filth that the new ones just dont have.
If it's not to late to vote on the primaris colours, I'd go Orange/White. But make it a grey white rather then a white white.
Lo Snrub. Thanks.
On the Nurglings, I can't see anything drastic that I want to change on them (at least nothing that is short of re-doing them entirely), so they and Lordy have moved to the painting desk to await the Ancient being finshed.
For the Ancient. Not too late considering you chose the correct option, but simultaneously late as I've painted the white in antisi.... ....pation of white being one of the colours or any other colour wanting a bright base.
There are a few rough patches (they will be fixed / hidden), but I did try to give the banner a fabric texture with some fine lines on the flat surfaces.
I'll now decide upon the quarters and paint over the relevant parts with orange before tidying up the black edges/lines and doing the non-orange/white parts.
I have now pulled out the last of the Space Marines from the DI box and am considering modifications:
The Captain will, like Lordy before him, likely be stock. So will need a nice base theme.
The Lt's may have options for re-posing.
Then there's only the final Nurgle model left from the box.
Yeah, that works for me. More to do on that and in reality the orange is slightly more yellow than it appears in this photo, but that will be pushed further anyway with the next coats.
In other news:
I've come across a curious thing on Twitter. I follow a lot of artists of various media and I've seen a few comment to the point that unsolicited critique is rude. No matter what you say or how you say it, if it's not asked for it's rude (full-stop).
This is, as I'm sure you all here are aware of, not something I'm familiar with.
I like to receive feedback, good or bad, on any and all of my work. I see it as a good way to learn.
I know many of you out there think along similar lines, so I'm preaching to the converted. But a few things of note:
The problems I'm seeing with these complaints are:
The critic is not informed in the art-form / they are not an expert in the field / don't know what they are talking about. (everyone can have an opinion on anything as subjective as art, as I see it).
The critique comes out of the blue with no prior conversation. Often compared to stopping someone on the street and critiquing their outfit (not a comparison I agree with).
The artist didn't ask for help, and is only practising techniques, or it's only for a bit of fun. (I still think it may help them in the future)
I also get the impression that much of the feedback they have received in this way is not worded politely either. Which can lead to leaving a bad taste in the mouth of the artist about receiving any feedback this way.
If you feel the need to critique someone's work be sure to use the feedback sandwich technique; something good, critique, something good.
Your critique should avoid words like "bad" or "wrong" that make it seem like a fact, and should be phrased as an opinion (as that is what it is).
Your critique should include how you think it could be improved (and not "how it should be fixed").
If you don't know how it could be improved, probably stick to just mentioning what you like about the piece and skip the critique.
Be polite. Rude feedback is always rude.
And be aware, that the artist doesn't have to follow your advice. It's their art and they can do what they want. Their's (and other's) opinions may differ from your's, and they are all valid.
I've left quite a long thread on my thoughts on my Twitter page also.
This PSA has been brought to you by "conversations on Twitter",
Social media . I’m a gaming dork who lives in a cave. Give me a length of string and a Campbell’s soup can (preferably full with pork and beans), cause that’s how I communicate .
Quick question on orange/white ancient. Is his quartering supposed to be opposite of the test sample figure because he’s a veteran? Otherwise his armor is looking great .
Theo', I'm sure your little one's are on the social medias, get them on the case. And I'll let you know when I have an account on the "can phone" lines...
Theophony wrote:...Quick question on orange/white ancient. Is his quartering supposed to be opposite of the test sample figure because he’s a veteran? Otherwise his armor is looking great .
The mock-up was just to illustrate the colour combinations. I gave no thought to which quarters were which.
For the model, there's a few reasons;
1. This way round means I only need to re-do the white on one shoulder pad. The other way round would have meant I'd need to re-do a shoulder pad and a leg. Yeah, both shoulder pads were not as smooth as I wanted.
II. This way the orange arm and hand holding the flag, contrast with the white of the back of the flag.
c. I thought there was a third reason, but it slips my mind for now... Mostly the first reason.
Thanks.
Now tidied up the other elements with black.
The majority of that black will be covered.
That is all, just something to show while I reply.
Thanks Theo'. No plans for any more, he'll be sold as an individual. This is why I wanted a unique paint scheme, rather than catering to collectors of only one chapter. Looking at him IRL he will REALLY stand out on the gaming table. and Orange, Theo', orange.
And now more together than he was, with added metallics.
Started with a brass basecoat for all the to-be-gold bits and decided that I quite liked a few bits in brass, so those remained brass (such as the shoulder pad trim and Primaris knee bits).
For the gold bits I added a little yellow to the gold to give it more colour so that it can compete with the orange and then highlighted with silver.
I've kept the gun black (Shock! Horror!) as the usual red really wouldn't work in this case. The black contrasts nicely with the lighter colours of the armour.
Next to do is the scroll bits and the green leaf-thing on the flag... wreath, that's what it's called.
And the lenses of his helmet and scope.
I've left the centre of the banner empty (as well as the left shoulder pad) for the owner to add their own chapter symbol, if they wish.
"Clara" = "Bright" in latin,
"Vetus" = "Ancient" in latin.
Together they may not be grammatically correct, and I'd likely get a Centurion correcting me at sword-point for it, but to anyone not fluent in latin it's just flavour text... and an "in" joke for me.
The text turned out better than I expected, but the photos don't do it any favours.
He'll be up in my Etsy shop soon.
On to the next...
Thanks chaps. Good to see you "get me" with the Latin.
There's no hope of me getting the grammar right for Latin, I struggle (well, I would if I cared about getting it right) with English.
I just picked the translated words (from Google) that were short enough to fit on the banner comfortably. There was quite a selection for these and other words I tried.
And it needed 2 words due to the skull cutting the scroll in half; I'm sure you've all seen other versions along the lines of "ULTRAmaRINES"
Theophony wrote:...Looking fabulous, your giving Nerdfest a run for his money on beautiful quartered marine colors there, but I think he has you on speed.
I can't say I'd match Nerdy with any painting work. He just gets his blending contrasts so "right", mine are just sooooo "subtle".
And yes, there are glaciers that can evolve into sentient beings and take up painting, that are quicker than me. 12 hours and 18 minutes work on this one... spread over days and days.
In other news;
I'm considering opening a Ko-fi account. It's an online tip-jar thing.
Unlike Patreon, it doesn't work on a reward system. I keep doing what I'm doing and my followers can throw small amounts of money at me, in the form of "buying me a coffee", to help me plod along towards goals or just as a "cheer". No signing up for a monthly payment, just one-off tips.
I can't see it producing mounds of cash, but it may help give me with a slow trickle between the rare sales.
Still unsure if it's worth it as yet, but it doesn't cost me anything (except for login details for yet another website... *sigh*).
In other other news;
Once I'm done with the Dark Imperium models, I'm going to have a serious push to get a "real" job. What I have here has not advanced beyond paying for itself over the last 5 years, so it's time to grow up and "adult" more.
I won't be stopping the modelling, but it may slow down (even more than the slow creep at the moment) during and if the job search is successful.
But in the end, I will gain more freedom to do what I want (read; more crazy modelling).
Stating this out "loud" means I'm more likely to do it and not put it off until "tomorrow" as I have been.
Thanks Graven'.
Some bits of growing up are necessary though; like becoming self-sufficient in the money department.
Where were we...?
Oh yeah, starting new things...
Bases for the Lt's and Captain.
Created with a combination of foamboard (to add lightness to the building up), plaster (to give realistic chips and cracks to the tiles), plasticard (diamond plate texture), and putty (to fill gaps).
The first Lt will be modified to be stepping up onto the higher level. His right leg is not glued on yet at the knee and it should be relatively easy to chop into the hip to lift the leg up.
The second Lt is just on a flat base and won't get any modifications to his legs, but arms are available to be modified. I carved that Imperial symbol into the plaster tile as the "simplest" way to produce that effect.
and the Captain (who is glued together and won't be changed) gets a raised base to give him some height over the others. His base gets some skull tiles in a section at the front (quick Plasticine mould with skulls pressed in and plaster poured in), just to give it an Imperial feel without needing to do another eagle.
The bases are primed just so I can actually see what's going on and what more needs to be done (they were mostly "WHITE").
Painting has started on Lordy, but not worth showing yet.
Turns out I quite like the pose on the middle Lt, so he'll be staying as-is too.
But the first Lt is now stepping up.
Quite a bit of careful cutting required, but not too difficult.
The left leg only needed the foot flattening out. Requires you to cut through the foot, under the ankle bumps and around the toe armour.
The right leg is already separated at the knee, but the foot angle also needs to be changed to bring the toe down. Similar method to the above.
The thigh needs cutting away from the body at the hip, follow along the armour plate and cut up under the helmet and pouch.
Then carefully glue it all back together at the right angles, testing by dry-fitting the parts.
I used a couple of pieces of plastic to solidify the larger gaps,
and then filled with putty.
Due to the stock pose being a lunge forward, the left (rear) foot is raised at the heel. This works nicely for the step up.
Just need to set his head and arm pose to match and these are ready for paint.
Should get on with painting the Lordy then shouldn't I...
Thanks Graven'. Looks like it's time you got the saw out then... *insert maniacal laughter*
And now... with arms:
Just some tidying up of rough edges etc. and these are ready to go for painting.
On that note, painting; Lordy's got his rust on: Just some more black wash in places and some highlights (possibly with a pencil), then paint the rest...
Camkierhi wrote:Well it is a first, you are way more productive than me at the moment, and as usual fantastic work.
...and then I return 5 days later with no progress and you've updated both your blogs in that time... Conspiracy?! Thanks Cam', and you can produce more in one day than I typically manage in a week, I have a lot of catching up to do.
Thanks Graven'. Partly inspired by some of your Nurgles or some talk on your thread at least. The rustiness will be broken up a bit with future additions.
Thanks Joe'. That'll be nice, my Twitter is fast catching up with my other outlets (all between 60 and 80).
No progress to show, but I have cleaned up the Lt on the step, and highlighted / varnished Lordy ready for the next stage.
In other news;
You may (or may not) have noticed a change to my signature below.
I have added a ko-fi link. So if you want, you can support me by buying me the equivalent of a coffee (works through PayPal). I get every penny you give and you get a warm feeling in return. But please only give if you can spare it, I'm no charity, I'm not raising funds for something ultra-cool, it's just a little "thank you" to support my art without needing to fork out for one of my pieces (which most of you don't need as we're all modellers).
Link for the signature-poor: http://ko-fi.com/theminidetailsofdrh
In other other news:
I've finished off my latest Fallout 4 settlement build, recorded, edited and uploaded the walkthrough video, and created and uploaded the blueprint mod.
Tour:
It's much smaller than my previous builds (but still 3 times the vanilla build limit), and is themed as a family farm, rather than a town-settlement (or the cities that were the Castle and Vault 88).
And I noticed today that Lordy belly is hanging out and that area isn't armour.
He (or should we say She?) is effectively wearing an armoured bikini top...
Therefore, I've painted up the skin and guts, and I painted the brass areas and added verdigris.
Cloaks, tentacles, Nurglings, horns, smoke blood and goo to do...
At some point in there Lordy will actually be glued together too.
You could have left it armor colored as the story goes they’ve been in the armor for so long that it has melded with their body and distorted. Also a pregger belly on him since he gives birth to nurglings is kind of suiting.
Thanks Graven'. Well I wouldn't go so far as to call is a mankini, that's more of a Slaanesh thing.
Thanks Theo'. I might have done if I hadn't noticed that the top of the belly is pierced to the chest piece of armour with a ring. It helps make him not all the same colour, even if that is hidden by the axe handle.
Thanks Gits'.
Today's progress is on the horns and the Nurglings (as I was already painting their horns...) All give good contrast to Lordy's armour.
I just need to decide on a suitable colour for the cloak now... Will avoid the brown / beige as that's too close to the horn, I think desaturated will match the corroded theme, but too much and he'll continue to be the same tone all over, The smoke will be a dark grey to green, so should avoid that so those stay distinct, There's going to be quite a bit of bright red blood at the front, so should avoid red... or use red to balance the blood... maybe red inside the cloak, Something to contrast with the orange rust, which is somewhere between green and blue, already avoiding green, and there's turquoise on the brass...
...that leaves blue... Will have to try out some tones in "mspaint"
Still have dirt, stains and goo to add so it won't look so "clean" in the end.
It also doesn't look quite so blue IRL. You'll have to trust me on that for now. I also gave it a dark red interior so that there is some contrast where it's folded back or ripped.
Thanks chaps. Good to hear that occasionally my experiments with colour work out from the start. (and good to know that when it doesn't you also let me know)
And with the final touches, Lordy is done.
Close-ups of the Nurglings:
The last of the marines are now on to the painting desk and I can begin construction of the last model from the box...remember what happened to the last model from the Dark Vengeance box?!
Graven'; The smoke simultaneously looks less green and less flat in real-world lighting. It's a dark green "highlighted" to black, so it was probably always going to look a bit flat. I don't really want to lighten the green any more and I can't blacken the black any more. One of those photo things I suppose.
Thanks Gits'. It needed the cloak like that to make it jump.
Big H, Curious about why you don't like the red? I just wanted a dark side to contrast with the lighter outside, I went for red to harmonise with the blood splatter at the front of the miniature.
I also think of this cloak as being very faded and worn and it used to be Royal blue outside and maybe a deep purple velvet inside.
Big H wrote:...What happen to the last dude from Dark Vengence ?
This:
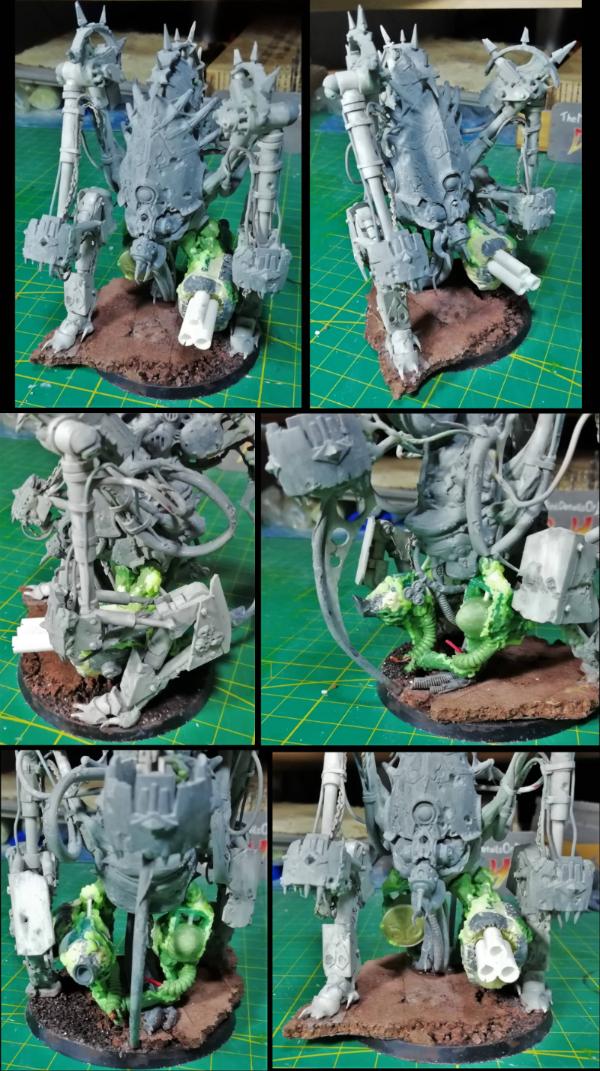
The bloat drone is the last model in this box... plans are afoot...
Thanks Cam'.
I did consider "spraying" the blood further about, but restrained myself so that it was focused on the little nurgling to highlight the licking off. That might be lost if the blood is splattered across that whole area of the model.
Big H, Curious about why you don't like the red? I just wanted a dark side to contrast with the lighter outside, I went for red to harmonise with the blood splatter at the front of the miniature.
I also think of this cloak as being very faded and worn and it used to be Royal blue outside and maybe a deep purple velvet inside.
It’s not in any way the execution of it Doc, it’s just to me it looks like the colour is getting lost with the blood and rust. It might have been better an off white or cream colour and used it as a backdrop for filth and blood spatter I like the blue /grey outside tho, and will probably use a similar shade for my Deathguard cloaks/ rags.
Ah well, it's easily lost: there's not much of the inside of the cloak that can be seen, especially with the additional nurglings.
You can't see between his legs, the left (from the back) side is folded back, but is behind the standing nurgling, and the only open side of the cloak (by his right leg) quickly disappears into shadow.
It's possible that a lighter colour may frame his legs well, but the tears at the back wouldn't contrast so strongly with the pale blue.
The blue, for reference, is Humbrol 89 (Middle blue), that's desaturated with various greys for the shading: black, dark grey, and the grey-est of greys (#64). Then a little white to that for highlights.
The wear is some added "sand" to the blue/grey mix.
Dr H wrote: Ah well, it's easily lost: there's not much of the inside of the cloak that can be seen, especially with the additional nurglings.
You can't see between his legs, the left (from the back) side is folded back, but is behind the standing nurgling, and the only open side of the cloak (by his right leg) quickly disappears into shadow.
It's possible that a lighter colour may frame his legs well, but the tears at the back wouldn't contrast so strongly with the pale blue.
The blue, for reference, is Humbrol 89 (Middle blue), that's desaturated with various greys for the shading: black, dark grey, and the grey-est of greys (#64). Then a little white to that for highlights.
The wear is some added "sand" to the blue/grey mix.
All good reasons Doc, you’re an experienced enough painter for me to completely accept that, please standby for me to make a hash of my version !
And all feedback is appreciated, even if I explain it away to avoid doing more work. A lot of the time though I have thought of these things and it's not all avoiding work.
Big H wrote: ... please standby for me to make a hash of my version !
I added small quantities of the black/grey to the blue to get the tone I wanted, but if you wanted to get really desaturated, add the blue to the grey. Saves on paint.
This cloak took 4 passes;
Dark all over,
Light on peaks,
Mid between those 2 and blend together,
Highlight.
Light and highlights cover the most area combined.
Before I get started on the blight drone and the building desk is clear, I got out the airbrush and gave the Lt's and Cap' a couple of layers of paint.
Primed, blacked, and then AB dark blue and "lightened" dark blue.
...You ever have the thing where you paint a model and take a photo and the vibrant colours just seem so washed out in the photo?
These are the exact opposite of that; these are darker blue IRL and not so "these are totally going to be Ultramarines" blue...
They are not going to be Ultramarines, but a dark blue is going to be the main colour.
Backpacks can now be attached and then highlights on the blue and maybe some black washes in the recesses.
And on the theme of blue, something that is blue just because it's the default colour...
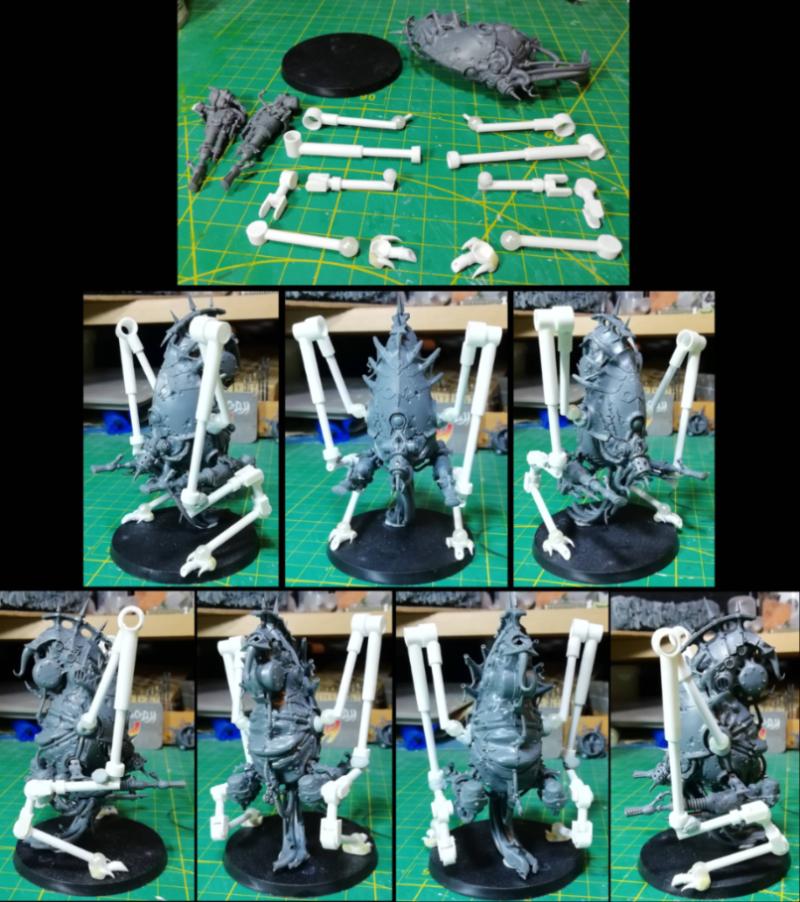
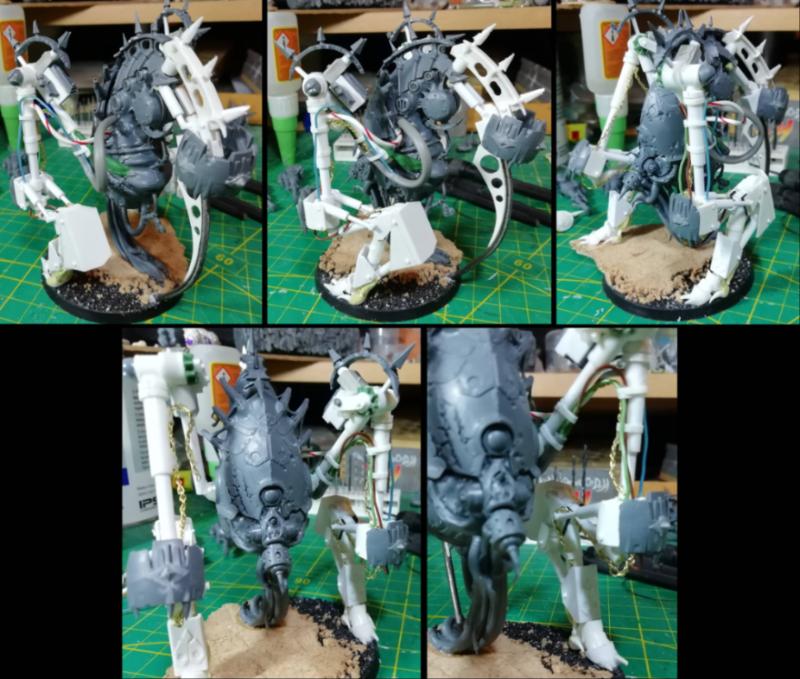
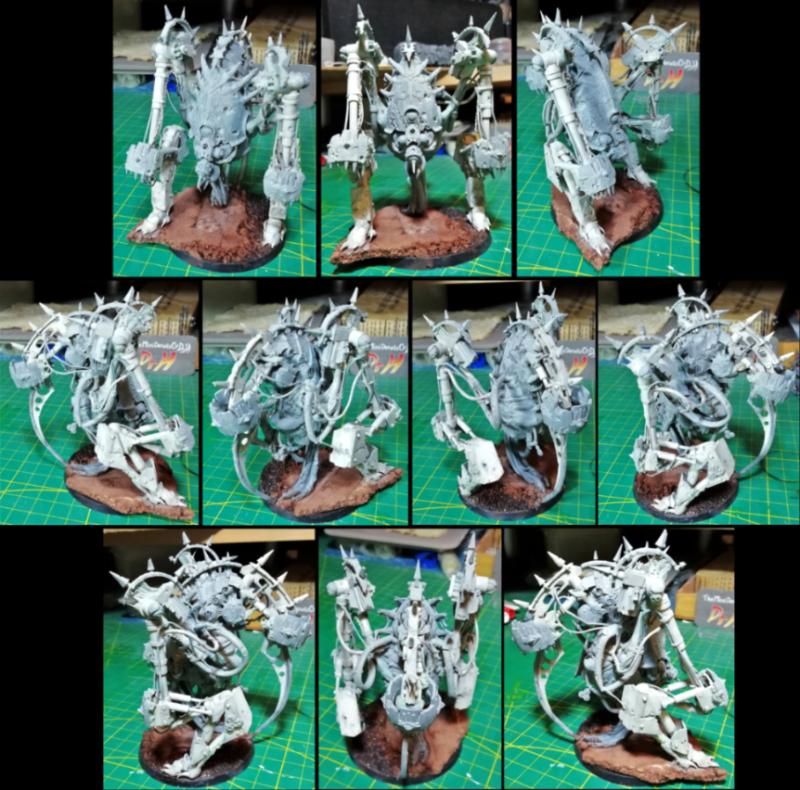
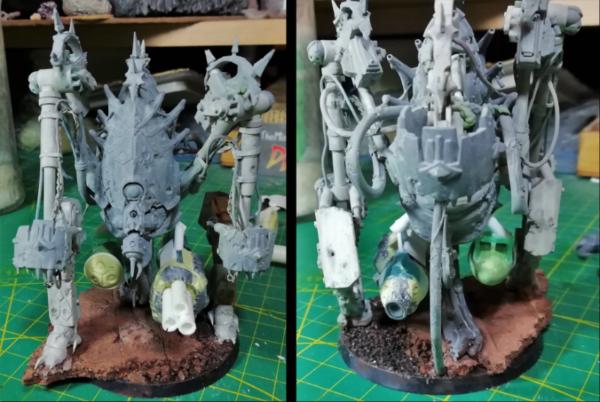
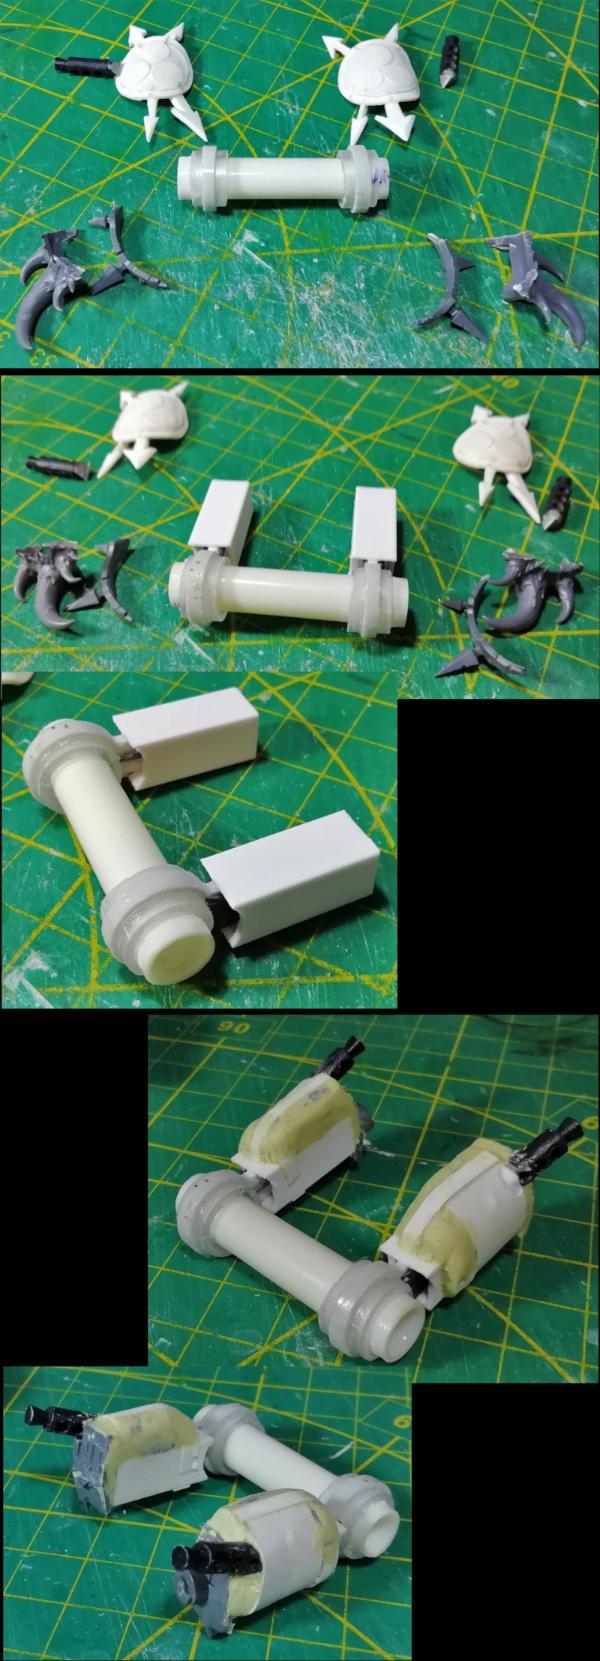
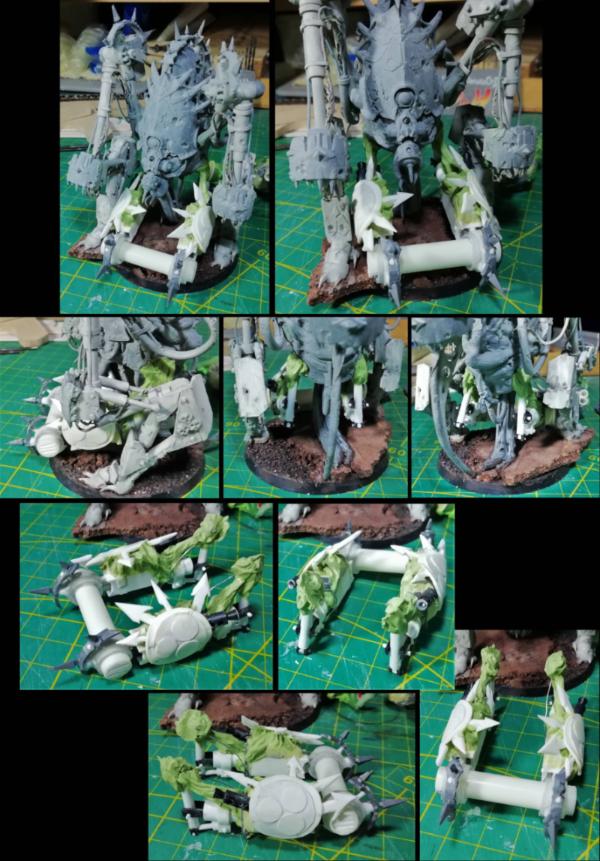
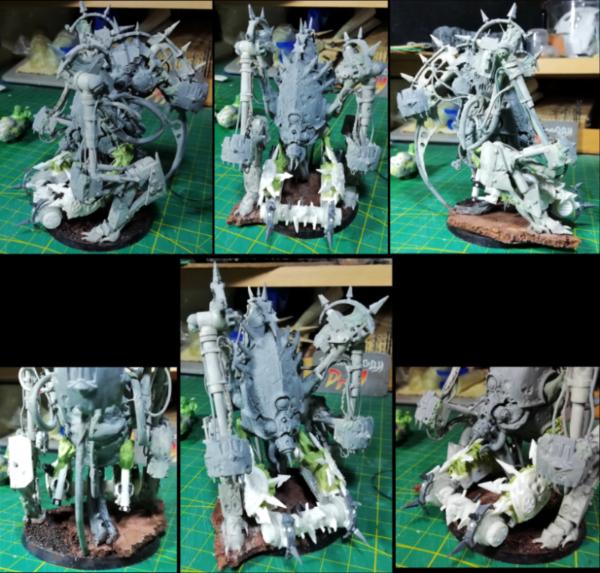
As I mentioned, I started planning for the Blight drone and unlike the Helbrute I'm not adverse to how it looks and so there is no major changes I want to make to it in that sense.
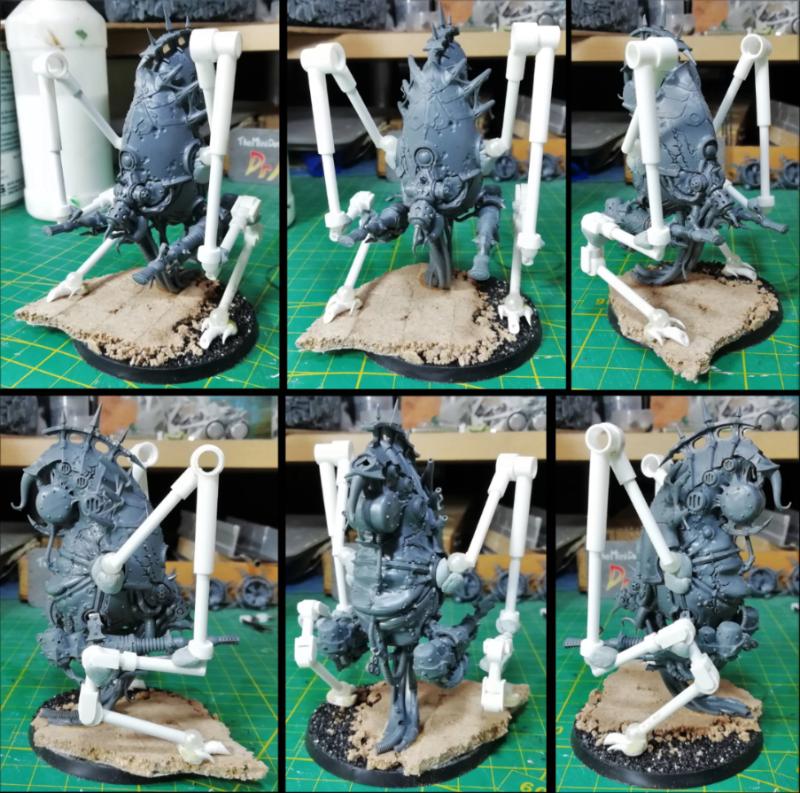
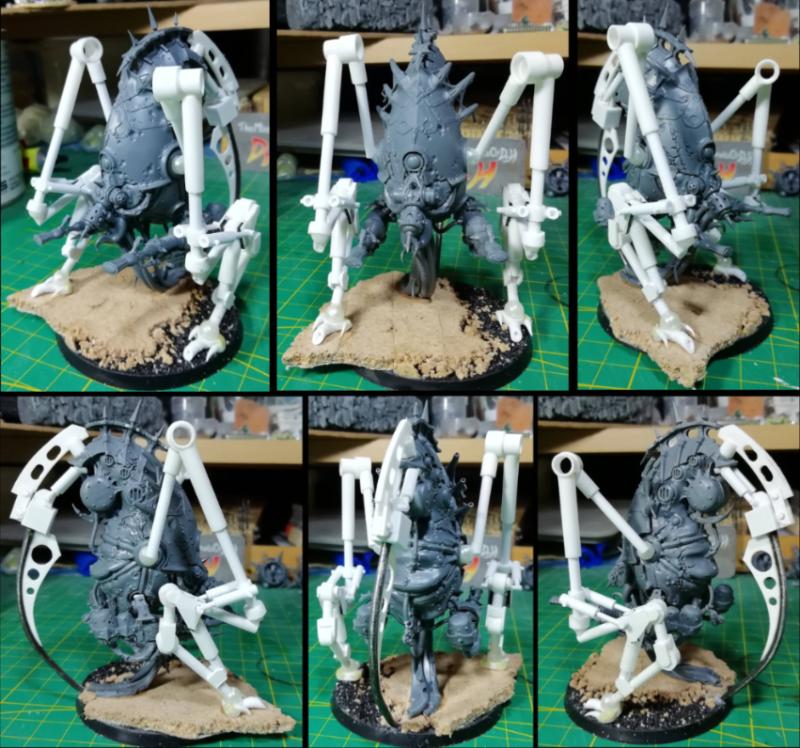
However, there is one small change I've wanted to make, just because; that is to change it from a hovering drone to a walker... and nurgle is all about 3's, and there's 3 attachment points ready for the 3 fans, and I REALLY like tripods...
I started to plan on a piece of paper and felt like I needed a more 3D view to really get a good look at how the legs could work.
Inspiration was taken from the Jeff Wayne style Martian tripods, which would then be modified to fit the aesthetic later.
I also wanted to make the legs more useful for walking at this smaller scale. Long stilts are fine when you're 100ft tall, but the drone is only a third of that at best, it need to be able to step over relatively larger obstacles.
More sections in the legs would allow them to fold up for stepping higher.
I wanted to keep the high "knee" pointing out sideways thing, to give it that insect look.
And that led to what I've labelled Mk1 below:
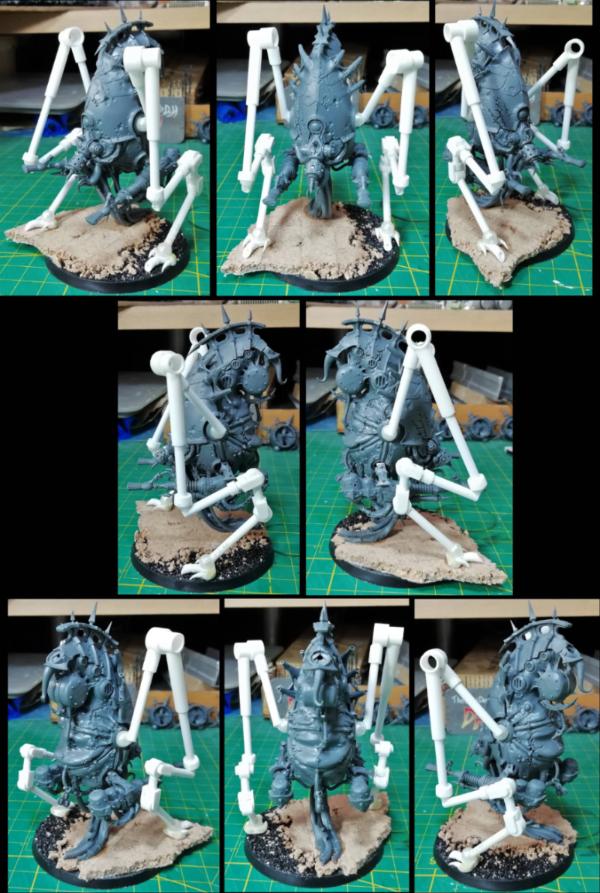
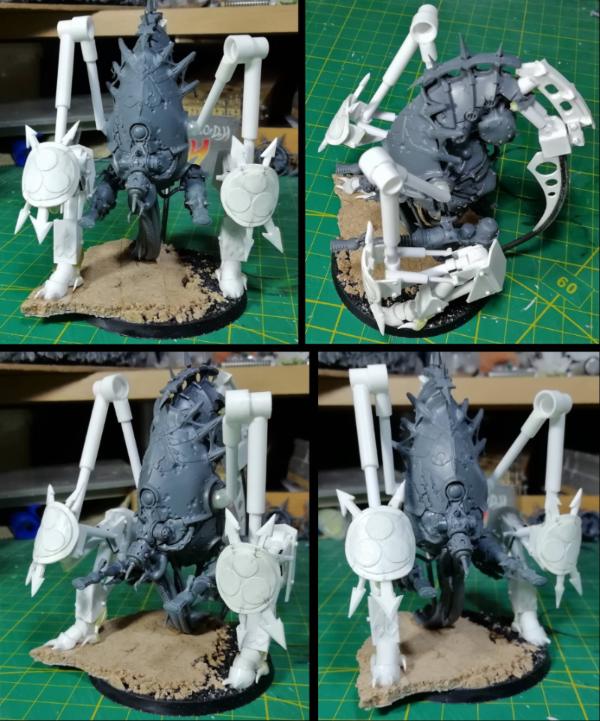
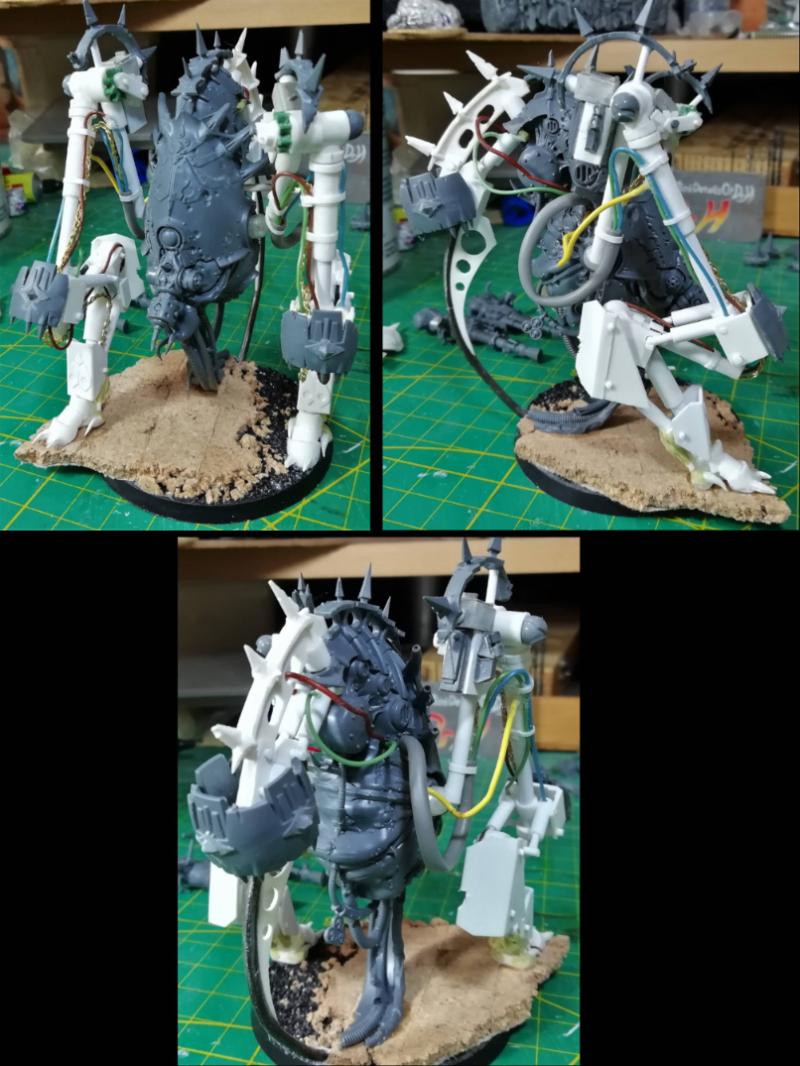
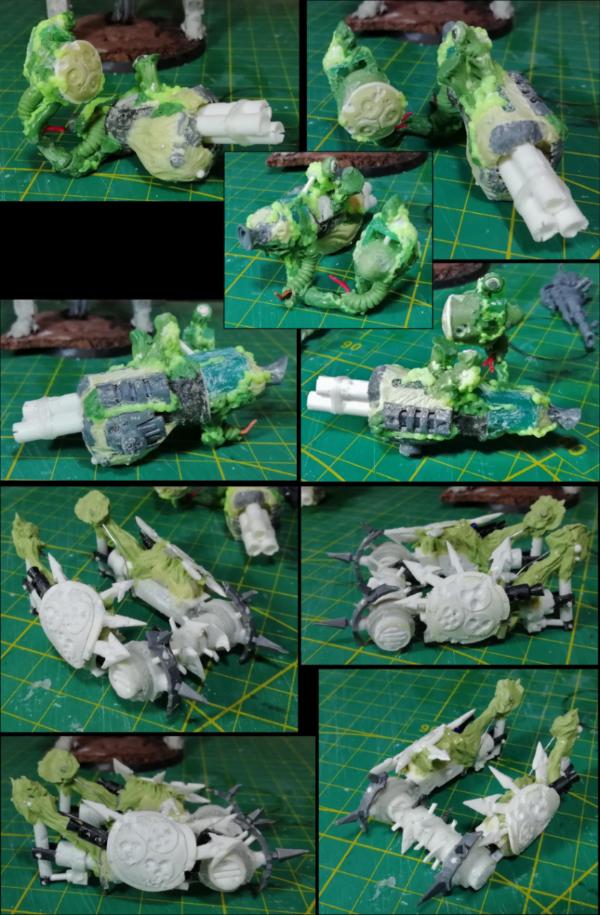
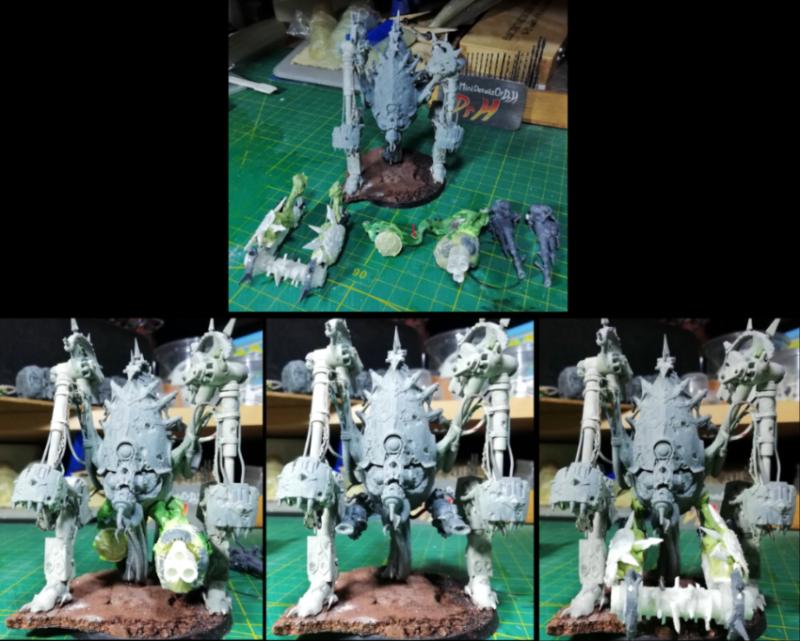
I then wanted to work on the pieces that I'd need to actually build to then construct the legs with for the model.
That led to Mk2:
But I wasn't feeling the pose and couldn't decide if it was the pose or the legs. So I looked for lizard skeletons because I couldn't get my arm into the right pose to see how it would work, and lizards basically have their legs in this position.
From that, I found that the legs are actually positioned forwards of the "hip" joint and swing outwards from that.
E.g. sticking out at 90deg is wrong.
Using the same pieces I rotated a few of them and positioned the legs forwards... much better.
This led to Mk3.
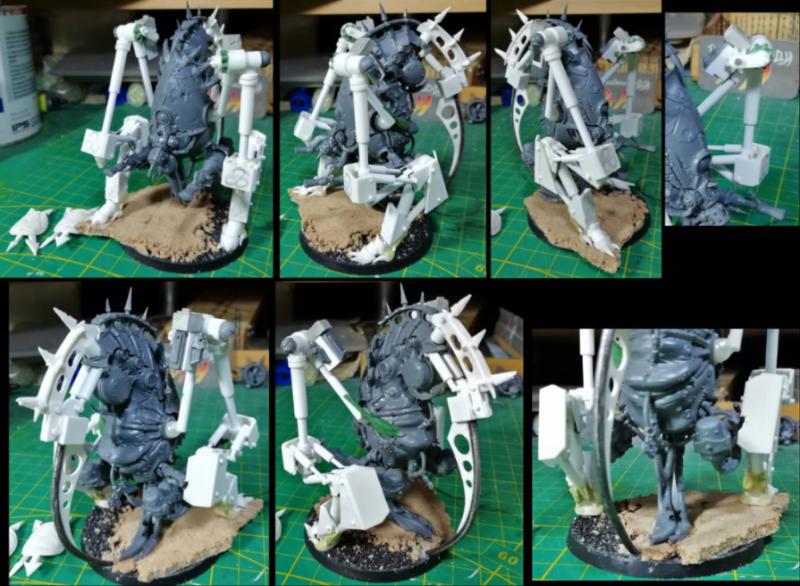
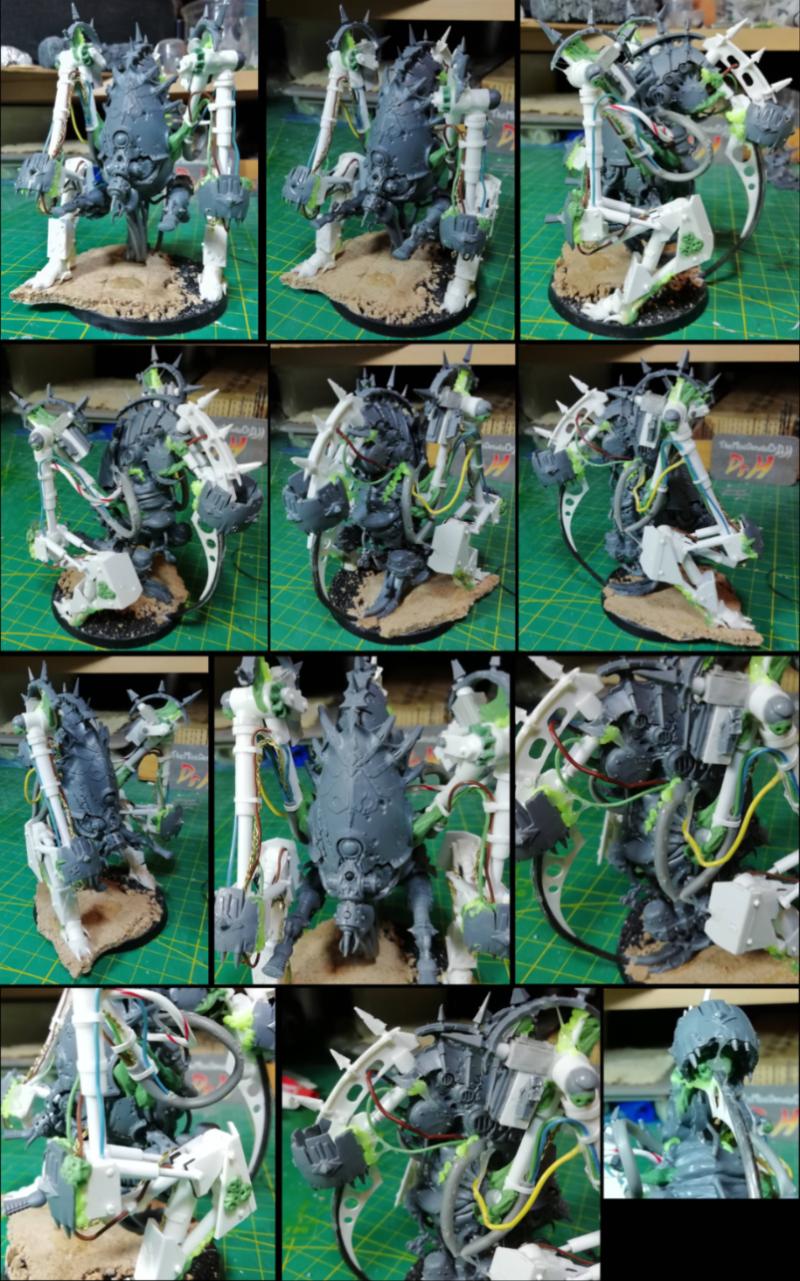
But it was still a little "off", and the lizard legs gave me another hint.
I had thought of the sections at the foot end as a foot / toe piece and was just for stability on rough terrain. This meant I mostly kept the long legs of the Martian tripod.
This also made it look wrong.
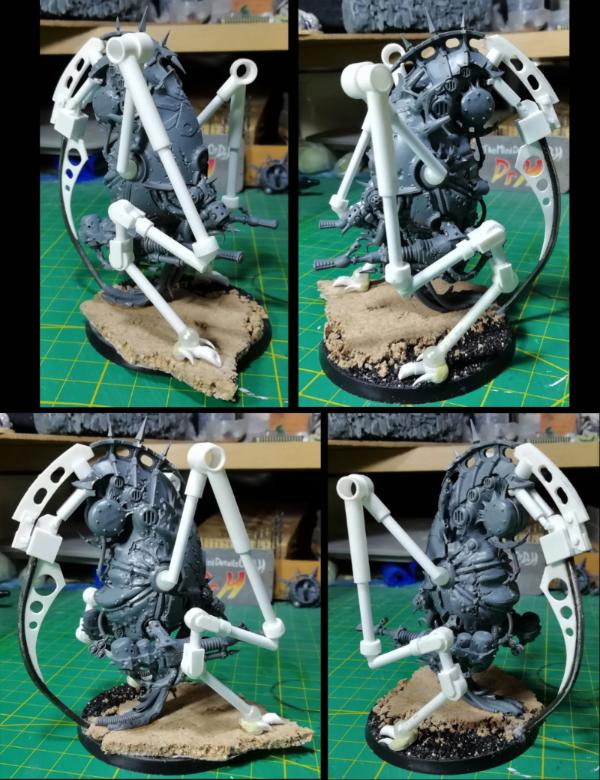
Therefore I swapped the relative sizes of the sections and we have Mk3.1, and I'm pretty happy with that.
The third leg will be slightly different as it attaches higher up and has a different job (as far as legs go). That'll be next for a concept.
But first, I have a small project to knock out ready for Mother's day.
Thanks chaps. We'll see if I can pull it off. Not started yet...
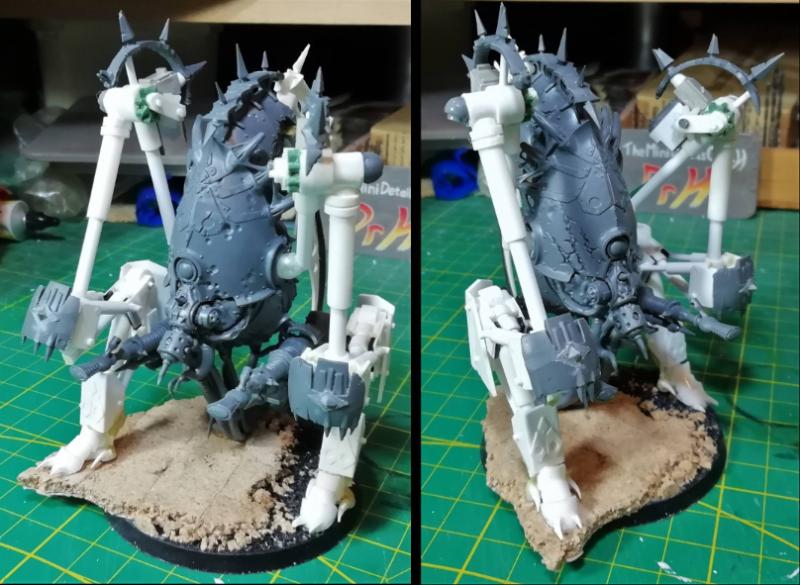
Progress has been made on the Primaris colour scheme. You may get an idea of where it's heading now.
Although the camera is still insisting that the blue is bluer than it really is and I have to do some quite extreme colour correction to bring it down some.
The blue needs more extreme highlights than I've added so far as they don't stand out IRL.
The red needs some shading.
And the "gold" is only basecoated in brass so far.
Just considering how to break up the blue before fully committing to the scheme.
Black areas and an overall black/brown wash to do next.
The side project is done though, you'll see that after Sunday.
Thanks youwashock. I gave the Captain the red chest to distinguish him from the Lt's while keeping the same scheme.
And now I've manged to persuade my phone to get the right colour of the blue in the photo.
This is after black and brown washes and re-highlights of the blue and metals.
Red still needs some work.
Other colours (skin, pouches, cloak, etc.) still to do.
You can now see why I was complaining about the blue colouration of the previous photos (and what you see is after I've fiddled with them to try and correct the colour).
I know; I know. Been really lacking the mojo these past few... Oh, talking about the mini?
Looks fine. I've noted that people tend to overdo colors on GW minis, given all the little bits on the figs. You are showing proper restraint here. (IMHO, of course).
The metals, a bronze or gold? Hard to tell on my screen. Either will work. I'd vote for bronze, were I polled.
Red'; well if that comment can serve a dual purpose then so be it. Well the mini's tend to come with so many details modelled on it's easy to end up with a riot of colour if you try and get everything to stand out.
But for realism, if you think about it, not everything has to stand out. Some things can be muted in their tones.
There is, however, quite a few items not yet coloured-in on these.
I'm still contemplating the colours of many of them, with thoughts towards not breaking the scheme.
The Cap's cloak is a large area and could easily overpower the scheme, it needs to work with the blue and red... no further thoughts yet.
The guns. I initially thought to do them in a cream/gold scheme to give them a "premium" feel. But a light cream or off-white would really draw the eye away from the centre of the models. I could go with my "usual" red colour for them and stay in scheme, but that may be too much red. Black is certainly too dark and they disappear into the armour, so some colour is required there.
Pouches / holsters are likely to get the usual olive drab.
The chap with his helmet off, I'm tempted to go ginger for the reason that it will stand out.
Cap's power fist is likely to get a touch of hazard stripes, but just for the top surround of that gold piece (underside and fingers staying blue). Again the gun there will match the others.
And then there's the power swords. How powered I go (full glow or lightning) and whether plasma blue or "hot" red/orange will change the final balance of the models.
With all that to think about, there's no progress to show today.
I've started on the legs for the blight drone, but still playing with size and shape, so also nowt to show.
But it's Mother's day here in the UK, so here's the hidden project from earlier this week.
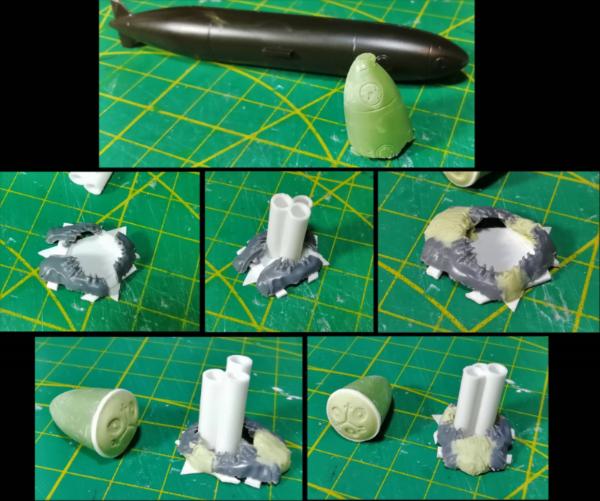
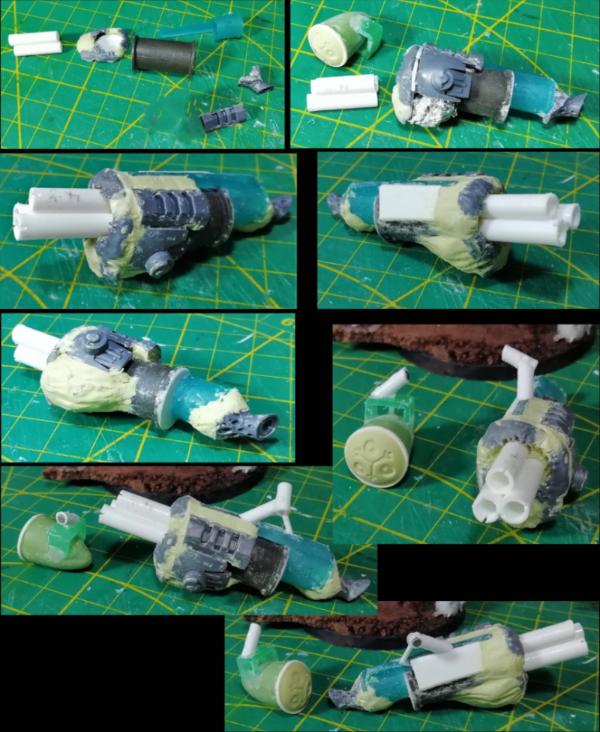
I was told "purple", so here we have a pair of purple planets.
For a change I decided to try out making the backs more interesting by enclosing the rubber piece in the second "half" of the planet.
The backs are made from 2 domes of milliput that are drilled out to allow the rubber back to fit in, and a smaller hole all the way through to allow the peg to pass through.
There is also a piece of plasticard fitted to the large face (also with a hole for the rubber back) of these to lengthen them to give a better grip on the smooth, round shape.
Will have to see what the feedback is like for this experiment as time goes on.
I forgot the scale shot so these photos may disappear if they are removed from the gallery. I'll have to replace them and appease KidK', once I get my hands on the earrings again.
Thanks Red', Gits'. It's ok, the picture has been approved by a moderator, so it's here to stay.
For scale, the fronts are 6mm diameter (the rears are slightly larger by 0.5-1mm, that's just how they worked out, no reason for it)
So if based on Jupiter (69,911km radius) these are at 1:23,303,666,667 scale (23x109 so you were close, Red', maybe you were considering Neptune or Uranus)
Yeah, I have thought about making a Saturn-like style earring. One new thing at a time though.
Actual model progress...
The leg design for the blight drone has been proving tricky to get the size and shape right. I've been trying and thinking about many variations.
These are the pieces I have at the moment:
That's ball and socket joints at the "hip", "ankle" and "toe", with 2 hinges at the "knee" and "heel".
I will have to blu-tack this all together to see if the sizes work (as this all has to stand on the original base) and see if anything else needs changing.
Also, note that this is just the "skeleton" of the legs, there will be pistons and muscles and cables and wires and armour plates, etc...
And for the Primaris Lts and Cap', some more layers of paint:
The red is done,
I have also made the guns red, and the helmet lenses, and the cloak will be a darker red (not done yet, this is just shadow tone),
Metals mostly done,
Bare head and ginger hair done,
Pouches and holsters done,
Thanks Theo'. Still at concept stage for the legs, much um-ing and ah-ing. It'll progress quicker once I find a path.
However, on that note, I've blu-tacked it together to get an idea of the scale of the legs to the body, and a few changes have presented themselves:
Some sections need to be shortened: The upper leg ("hip" to "knee"), and the horizontal piece ("ankle" to "heel").
This will bring the upright "shin" towards the body and position it above the "foot" / "toe". I may also shorten one of the shins to aid in a stepping pose and not standing as it is here.
Also, the "heel" joint needs more flexibility as this is as "compressed" as that joint can get. I'll make it double-jointed so that it could fold flat if necessary.
But I should create the foot ("toe") so that I know where that end of the leg can be placed in respect to the base edge.
And with the leg modifications:
As it's loosely held together with blu-tack the pieces are not in exactly the positions I would have them (they were shifting as I took the photos). But you get the general idea of how it works.
Bulked up, affixed together properly, and painted up, this should look the part.
I'll probably get these "right" with connections and pose, and then make the third leg to match the aesthetic and detail them all together.
And and... progress on the Primaris:
On to the bases for the final round of details.
The red of the cloak is done. It has a satin finish that proves tricky to photograph. It may matt down further by the end... but the satin also helps sell a higher quality cloth than matt.
Very nice. I think going with the darker red on the cape was a solid call. The more vibrant red from the rest of the model would have been too much, I think.
youwashock wrote:Very nice. I think going with the darker red on the cape was a solid call. The more vibrant red from the rest of the model would have been too much, I think.
Yarp, my thoughts exactly. Thanks.
Theo': Yeah, insectoid is the kind of look these Nurgle things have and what I'm aiming for.
inmygravenimage wrote:I'd like to see tri-clawed toes, and fly like hairs up the legs.
We'll have to see on the toes and how limited the space is. Spikes to look like hairs is a possibility.
And a pony.
Now lets not get too carried away.
Thanks Gits'.
And with that the Primaris Lieutenants and Captain are done.
You know... I really love the way those look. I'm kinda thinkin' you should make the gauntlets red as well. That way you'd have an awesome dark blue center with bright red banging out in both directions. Like danger signals or stop signs. "Warning, your death is at hand... beg the Emperor for forgiveness or be destroyed!"
Thanks Gits'. The trouble with red gauntlets is the Crimson Fists, especially with blue armour. I'm already concerned with similarities with just using blue and red, so avoided the hands. But good thoughts.
Progress on the Bloat drone. Basis for the feet done. Note that there will be armour plates over much of this.
I also remembered that this things needs weapons... And that I planned to magnetise them...
A few problems aside, the base weapons are ready. They required their own magnets as I couldn't get the fit close enough for metal to work. We will have to see how I manage on the scratch-built weapons to come.
With that in mind, the feet need to be positioned farther apart to avoid clashes with said weapons. So I need to extend the base to one side at least; time to think of something it can stand on...
In other news; I've started a playthrough of Morrowind. Picked it up recently when Bethesda gave it away free for the 25th anniversary of the Eldar Scrolls. I spent most of the weekend modding it and starting to explore. If I go quiet you know where I am.
That gives me more space to get the weapons in with armour and the like on the legs. I may swap the long "shin" pieces over to get the right leg stepping forward better with the longer of the two.
And here's how the third leg turned out. Mostly like I envisioned, but not exactly. These things build themselves... I'm thinking of this as more of a spike than a "leg", to keep with the insect vibes. The mohawk of spikes will continue along the top of the rear leg, and there'll be some armour around the joint and that cube piece to tie it all together.
Thanks Theo'. I see what you mean. It was not on my mind at the time though.
Thanks Brian. I might have to have a look over some for when I run out of ideas later. Currently, the plans are unfolding.
And that means, pistons...
I think the other joints are going to have a combination of piston and muscle. I need to consider the armour plates first though due to attachment points and hiding sins in the eventual muscle sculpting.
I love the blue on your Primaris guys. Whenever I try to do such an extreme highlight, it just lands up looking out of place, and fake. You might it look just right.
Ta Red'. Thought it time to bring it in line with my social media avatars. I can't actually use the Laughing man logo officially as it's copyrighted (and widely used). The wolf is at least partly my work.
That thing is a mad hovering robo-thing that floats about and dissolves or mangles people...
...quick thought, I may make it purple and then it can be a purple people eater...
...I've made it a tripod. That's the important thing. Creepy is good. I hope to keep that.
Thanks Tom.
For those not aware of where the wolf comes from, it's a crop of a photo of my Princess Mononoke conversion of the SDE wolf rider. The build is covered in my personal army blog here on DDakka (find links in sig' or my profile).
Spoiler:
Fifty wrote:I love the blue on your Primaris guys. Whenever I try to do such an extreme highlight, it just lands up looking out of place, and fake. You might it look just right.
Thanks Fifty. The highlights did take 2 or 3 attempts to get there (too subtle on the first attempt as I was worried about being too light) and are not all the same on all edges; only the "highest" of edges got the lightest of highlights.
Side note:
I do like what they've done to the gallery; making the photos stretch out to fill the window. Much better to see the details on the full photo and not a tiny window.
Does make my long photo-montages quite the scroll-fest.
Progress on the bloat drone.
Working my way up the legs and adding armour plates to protect the joints.
Toes, foot, heel, and working on the ankle (there will be forward-facing armour plates on there soon).
I also did some work on the extension to the mohawk on top of the rear leg. Just need to add spikes.
If I can find somewhere to put them, maybe I will, Theo'.
The armouring continues...
These have been through a few iterations so far, they will get more details added; skulls, weeping colanders, as per Nurgle, battle damage, rust, rivets...
There's a lot of joint they are trying to protect, and yet they still look too large. The curve did help, and the chaos star arrows help break up the shape, but maybe they are not meant for that position.
I still have the upper leg armour to do. What happens there may make these look smaller and more fitting.
These may also be moved up to there and something smaller placed here.
Just trying to fit in some nurgle iconography and a set of 3 circles takes up a surprising amount of space.
There may well be a lot of chopping and changing of things about these. Luckily, with nurgle (as with Orks) rough edges and warped shapes are not a problem.
Thanks Tom. High praise. But then mine would not be unique.
Thanks Aku', I know what you mean. There would need to be many changes in the design (how the legs would work) for it to only have the two. Consider the third leg as a tail / stinger, then it still only has 2 legs.
So yes, I wasn't sold on those armour pieces and they came off again. I replaced them with simple rectangular pieces that will get nurgle-things later. You can see that I've kept the round armour pieces and will find a use for one or both of them.
I've also added the spikes to the third leg to continue the mohawk, And I created the mechanism for the knee joint. Rather than pistons (which just wouldn't work with the position of the pieces and the required range of motion), I found a cog in my junk collection... ... cut that in half and then cast that into 2 more... ... Found a few more bits and boxes to create the power/motor housing.
Still more work to do about there with some gap filling and cabling etc...
You can also see some added muscles, made from left over putty. These will multiply in time.
Wait...wait... I just had a good idea while chopping up the vanilla fans...
inmygravenimage wrote:I love how the back spike is evolving
Thanks Graven'. Still need to work out an armour plate for the middle part of the third leg.
Theophony wrote:Sad to see the drone get knee-capped, but the adjustment was definitely for the better.
Thanks Theo'. More below...
...I was chopping the spiked rings off the fans for use as decoration and hit upon the idea of using the body of the fan as armour plates as the look will match perfectly.
And now some hoses and cables (before I get too carried away with other details).
Trying to make it look more "Chaos" and less "neat and efficient" in the wiring runs.
Most are the usual simple wires, but I did plait the wires that run to the toes. It's ultimately easier than dealing with 4 independent wires over that length.
Still need to wire the knee motor and then the other leg... and the third leg...
Then musculature and fleshy bits...
I just love wiring and cabling on models. It's so 40k... and even though there would never be any kind of exposed wiring or cabling on a real war machine... it just gives the right touch. Nicely done!
Yeah, It's an odd thing about these models, all the interesting bits should be hidden inside, but then they don't look like they'd work. Stick a load of wires and cables all over the place and you can make the leap that, yes that thing can work. Thanks Gits'.
I was going to protect the cables about the upper legs with spaced armour plates, but I think that disturbs the creepy leg thing I have going, so I'm keeping them thin and rangy.
I've now added some damage and I've added fleshy bits, muscles, and stringy gooey bits to give it the Nurgle feel.
I used a combination of my 3D printing pen (bright green), epoxy putty (darker green), and hot glue (hot glue coloured).
Deserves a good close look, but will be easier to see once primed.
Next job is to rough up all the existing Nurgle-damage and add some more about the place.
Then I may prime it to get a good look at where we are,
And I'll start planning the additional weapons...
Graven', I can't really say much about which might be the best to get, I don't even know what's available. This one was a present, so I didn't even look into buying one.
This is the one I have:
I can try and dig out the box if you want a name for it.
It's very simple in operation, you can see the slider on the side for how fast you want it to push the filament through.
The opposite side has forward and reverse buttons (hold to feed, or double click to constant feed).
Power light in red, and "hot enough" light next to it (usually green).
I do have suggestions for what to look for though;
1) Get variable temperature. (you can see the dark shape to the right of the power lights above, under that is a variable resistor to set the temperature)
This lets you use more types of filament (as they melt at different temperatures) and so keep your options open. You can also use it to "set" how flexible the plastic is when it exits the pen, before it cools and solidifies.
2) Think about where you're going to get the filaments from, and what filaments (not just material but thickness) the pen takes. (think of it like a hot glue gun for plastic)
There's 2 main types of filament and they each have ups and downs based on their properties. What I have is fairly brittle, but I can glue it with plastic cement.
c) That might be it. I can't think of more at the moment. Feel free to ask me questions once you have something more specific in mind.
Much fiddling and making it up as I go and... progress...
I needed 2 additional weapons for this beastie, a goo-grenade launcher thing and a people-mower (I'm sure that's the official names )
Goo-grenade launcher requires a separate tank to contain the goo and a 3-barreled gun, connected with a hose of sorts.
The tank I decided to use an aircraft fuel tank as a "template" and used my Oyumaru (love this stuff) to make a cast of the end with a GS/milliput mixture and kept it hollow to save weight.
Then with some shaving and sanding I fitted a plasticard circle, leaving that slightly wider to give a ridge and then a blob of milliput on the end for a dome with a pressed-in Nurgle pattern for flavour.
The gun started with 3 lengths of plastic tube and then I adapted one of the Helbrute big mouth parts to fit around them.
Cut into 3 and then I used lengths of plasticard to position them relative to each other and a sheet (that just happened to be triangular) of plasticard to give a flat rear.
I then filled the gap with putty.
I've decided that this version will be more fleshy than the quite mechanical version on the official model. Just to make use of this Helbrute piece and make it look more Chaos/Nurgle.
I then selected a few pieces of junk to create the rest of the gun and set about sticking them together.
I used foil to fill in most of the shape to save on putty and to keep it lightweight as it's being suspended with magnets.
Filled gaps with putty and gave it a general shape (more Nurgl-iness will be added later).
Then both the gun and tank received the basis of fixture points to place the magnets in about the right place and to hang in about the right angle.
Here's how they hang at the moment:
There will be some more added support pieces for 2 attachment points (for stability) and then I'll build the hose between them which is planned to also help with keeping them pointing in the right direction (that will also get a magnetised split).
Then it'll all get Nugle-ised.
I've also started on the people-mower, but it has not progressed as far:
Planning to use the Nurgle shields on these arms, and I also pulled out a few other pieces to use.
I then made the rotating piece and affixed the start of the arms / engines with the help of pins for strength.
The shape was then built out with plasticard and voids filled with foil before being covered with putty. All to save weight as above.
The rest of the arms (to attach to the body) will extend from the rear of these.
I still need to add the blades and Nurgle-ise it all.
This has all be quite a challenge what with the legs in the way. I keep having to hold them up to the model to make sure it all fits within the legs.
Would have been much easier if it had stayed floating... but not as unique...
To create the hose between the tank and gun I used a length of GS,
With both parts attached to the body,I stuck one end of the GS to the gun and then positioned the hose-to-be across the model's dangling hoses and attached it to the tank.
I made sure I was happy with the position and then left that to cure.
Once cured I removed the whole thing in one piece.
I selected a suitable place to cut and cut the hose into two.
I then found a piece of metal (the perfect piece of metal that needed no modification to be used) and glued that to one end, and drilled a magnet into the other end, I also drilled pins through the hose to attach it to each piece.
Those can now be re-attached at any time and holds the weapon in the correct position.
And to keep things interesting here's some progress on the people-mower.
I had to rearrange the arrows about the Nurgle-shields in order to keep it all fitting between the legs, but this is where you want the sharp pointy bits anyway.
Next job on this will be the arms to attach it to the body (that smooth centre is just too useful as a handle, the blades will be added last).
Progress so far.
The goo gun has had some fleshy detailing added...
...And the basis of the arms have been added to the people-mower:
To get the right angles I first estimated the position of the magnets on the spheres and filed those flat to glue on said magnets,
The hinge joint was kept mobile by drilling the peg through,
The collar about the large, horizontal, cylinder hides a break in those and was also kept unglued,
Once push-fitted together I attached the magnets to the body, positioned the mower AND THEN added thin plastic cement to the various joins.
Now set, it's a perfect fit (almost a bit too good ).
I now need to add some bulking up of those arms, pistons, muscles, etc.
And then it'll all be ready for full detailing and Nurgle-ing.
But first, the tripod project has to stand aside as I start a new project for a Birthday at the end of the month.
Why so early?
I'm going to be using air-drying clay to sculpt a movie prop and that'll need at least a few days to dry eventually and I don't want to get caught out waiting.
Just picked up 2kg of clay today, so come with me as I embark on a new adventure... "proper" sculpting*...
*I no doubt will be doing some carving of things at the end as I always do when sculpting.
Thanks Gits'. Glad to hear you have enjoyed the ride so much.
Thanks Graven'. There will likely be spew.
And now the reveal of the new project that's interrupting things...
Hands up when you know what it is.
Just building out the shape at the moment, details will be sculpted in later.
Things I've noticed while working with clay for the "first" time. (at least first time since adulthood)
Wet the surface to get it to affix firmly. Not strictly something I've learnt from doing, something I remember from watching the Terrain Tutor.
Knead the clay for a little while before adding it to the sculpture. It softens quite significantly; softer than new, fresh, milliput.putty.
This may be a mechanical thing, and/or the heat of your hands as it stiffens up once it's cooled (or slightly dried...)
Adding water is good to stop you sticking to the fresh clay and also good for smoothing the surface.
Have a pot of water nearby the wash off your hands and get them and your tools wet.
Consider using gloves rather than bare hands.
No fingerprints and it keeps your hands clean if you need/want to do something else without properly washing your hands. I'm using blue nitrile gloves.
Don't be tempted to push fresh clay on to a sculpture firmly, be gentle and spread/scrape it about.
Pushing it on one side will mean you pushing the clay in on the opposite side. being gentle with your addition avoids the firmer clay from being disturbed.
Scraping away clay from a surface is easier to redistribute it than trying to push/squeeze it across a surface.
Again, you'll need to press hard to move it. Scraping it off and re-applying is gentle.
Don't worry about getting a perfect surface from the start, you'll foul it as soon as you start adding more clay and it'll be fouled by the wet cloth you drape over it to keep it from drying out while you're not working on it.
...
Specific things to what I've doing;
You'll notice an internal structure, I was concerned with top-heaviness (especially if I go for a secret compartment in the base), so bulked out the upper body with polystyrene.
I created the box for the base to give it a solid base to work on and give me some structure if I do add the secret compartment. If it's still top heavy, I can fill in the box.
The polystyrene is joined to the base with 2 lengths of wire coat-hanger, "epoxied" in.
The pieces of polystyrene are glued together with PVA (and left overnight to fully dry).
Working in air-drying clay does give you a lot of motivation to keep working on it, I constantly got the feeling that I should be working on it as it's all drying and should be all together before anything dries too much.
All the clay work you see above was done today, in 2 long sittings, each with one short break to check on the world (twitter).
Very different from my usual do a bit, check internet, do a bit, check... etc...
Building out the shape should be finished tomorrow and then detailing can be started (and will need to be finished without needing to be left with a damp cloth over it). Quick job with a long wait to dry (3-5 days, and slower is best).
Thanks Cam'. Was I making Poe references? I'm not enough of a literary buff to do that intentionally, I got a D in English lit' GCSE. Good to see the beak shape is working.
Indeed it does, Gits'.
You could say say that, Graven'.
Wings on. I think this is the last of the large shaping required. Nearly a full kilo of clay used, the finished piece will have some heft to it.
Getting quite tricky now with making bits looking right. A lot of concentration required.
Now to start on the details. Starting with the feet and working up.
Yesterday's work was all about finishing off the sculpted details in the wet clay so that I didn't need to cover any of it with a cloth that would require more cleaning up of the fouled surface and I can start the drying process (3-5 days remember). I got everything done except the eyes. But I decided that they were going to involve carving into the clay and some sharpening of edges later with some putty (more on this below). Mostly went well, especially when I found the right technique for adding the details: Metal tool with straight edge, wet, Press in point at deepest point of detail (or start of line), Drag outwards in a straight line releasing pressure, Reverse angle and repeat for other side of indentation.
Do this for every detail (with minor variations for odd shapes etc.) all over the bird.
Pause halfway through due to sore shoulder...
The lines on the back/wings were done with a round point clay shaper (sometimes called a colour shaper). Use mostly like a pencil (for sharpness and depth), but occasionally drag at shallow angle to widen/soften lines.
I roughly "drew" in where the eyes would be and left it all to start drying overnight.
...
During the previous steps I had noticed a couple of cracks forming on the base and I expected these due to being clay (shinks) over wood (swells) and had planned to sort these out at the end as there's not much I can do about it during the sculpting process.
Also, while adding the details to the upper chest of the bird I noticed a couple of areas where I was pressing down to the polystyrene underneath. This meant that the clay here is quite thin. I know what to expect due to this...
So there are quite a few cracks across the bird. I'm going to leave it to fully dry, asses the damage that occurs and then fix it all with milliput. It's going to be painted anyway, I can hide the sins.
Anyway, I set about it today carving in the eyes (these were already planned to be enhanced with the addition of milliput as well to get sharper features, so milliput was already going to be used). And this is how it is now:
It will return next week once it's fully dry and I start on the milliput fixing and detailing.
Bloat drone will return to the building desk for continuation in the mean time...
Thanks Graven'. Good to hear, I nearly thought that was a typo but I get the "noir-ish" now I come to reply.
Thanks Gits'. Too kind. I just poke it until it looks about right. It's not as close as I wanted to make it, but it's as close as I can.
Thanks Aku'.
Now back to the bloat drone: Added some pistons and musculature to the arms of the people-mower.
To add the putty without sticking it to the body I used some cling-film, attached the arms via the magnets and then sculpted about it. Once cured and the cling-film removed the arms now fit the contours of the body perfectly but are still magnetised and removable. The added putty also helps to strengthen the arms for repeated pulling when adding and removing the mower.
Not sure what's next on the jobs list, I'll have to look over the model and remind myself (It's been like, a whole week since I last touched it, like. You can't expect me to remember things for that long...)
inmygravenimage wrote:^I saw this and thought of you
What a coincidence, I also thought of me...
Thanks Argive, Paint will happen soon...ish. I have to finish the Falcon by the end of the month, so that has priority, but painting of that will be quick and easy. The drone will return soon.
Stage... the next... for the Falcon is repairs.
First, lets assess the damage:
Well, that could have been worse...
Could have been better too.
Still, bigger cracks are easier to fill.
I focused on getting the milliput in as deep as possible to all the cracks, to make it as solid as possible. Tidying up can come later.
And while I'm at it, time to add the hidden compartment... well, no, the compartment is already there... the method for which the compartment is to be hidden...
Sliding hatch, with as minimal of gaps as possible (base will also be felted, which will help hide it.
Now I'm just filling in the shape of the base and will then move on the refining the features of the bird and smoothing out the surfaces.
Nice set of repairs. My jewelry instructor once told me that the sign of the true craftsman isn't being perfect, it's making your mistakes look like they were intended all along.
Ta Gits'. Yeah, I'm a believer that being an expert in a subject is not about being perfect all the time, it's about knowing what to do when it goes wrong (which can be making it look intended, as you say, or fixing it, or hiding it).
I do like doing things perfectly though.
But I know when I've reached my limit. This bird is as close to the original as I am able to make it.
Thanks Cam'. Good to hear. Definitely will need to get a good point-of-view / in-situ / "realistic" photo of the finished Nurgle-thing.
I see what you did there, Red.
And it has been. I have until Thursday to get it finished.
But...
...it's just painting to do.
Milliput work is done.
Sanding and smoothing is done.
Unless primer reveals any horrors that I must fix, it is done.
At least the painting is simple; it's black and it's 1:1. No shading, no highlights, just black and shiny.
Hidden compartment (I ran out of black felt):
As the fit is quite tight I decided (as well as time pressure) to not fully paint the insert.
A comparison with the original:
While I got the height about right, mine is not quite as stocky as the original. But it seems to be the thing with these; to make your own interpretation. So this is my Maltese Falcon.
It stands 24cm / 9.5" and weighs about a kilogram.
While I was at it, I also black-ed the Nurgle tripod:
Painting will start on that soon, but I have a second sculpture of another "must have" prop', that I will start soon too...
And now to use up the rest of the clay I bought, by making something else ICONic.
Hands up when you know what it is...
Just bulking out the shape to save weight and keep the centre of mass towards the base, and a frame to keep me honest in the dimensions and angles of the limbs.
At the "oh god, what have I started" stage.
I shall start throwing clay at it this evening.
No idea what this is yet. I was thinking the toy story misfit toy erector walker with head attached until you said the limbs were only there for support.
I didn’t think the Nurgle thing could get creepier I was wrong.
You all have such Fertility imaginations. You are probably seeing all kinds of false clues in everything you are Raiders in what I type. Icon not confirm or deny any guesses.
Theo'. The frame has proven to be causing more problems than it solved, but you live and learn. Good to hear, painting will only help the creepiness more... when I get around to it.
Thanks Gits'. Nice to hear about the Falcon. It's not caught much attention across my many platforms.
inmygravenimage wrote:Reminds me of the statue from raiders of the lost ark
I can't imagine why...
Gitsplitta wrote:I have a guess, but I will refrain from saying it out loud.
Even if you did, we wouldn't hear you.
Lo Fifty. I do like those Easter Island statues though. Might have to make some in a terrain piece... one day.
Thanks Snrub. The Falcon just... is. Made as a present, no further use than that. Although you could slap down something similar on a gaming table. Thanks.
Progress has been slow and painful. Just getting the size and shape right for the body has been really tricky. Coupled with the frame for the legs coming loose under the weight of the clay, so I have to reposition the frame and then smooth over the clay when it pokes out.
Two main things to keep in mind about the Icon: 1:It's bigger than you think. Remember what it looked like as Indy picks it up of the plinth? Picture that in your mind, imagine holding it and how large it appears in your hand. ... Wrong. It's 20cm tall, and 15cm deep and wide. That's 8 x 6 x 6 inches. It's a huge lump of ugly.
2. Which brings me to... It's uglier than you remember too.
So far I've only worked on the body. I keep thinking it's turning out too big, but I have to believe my measurements. and that the head is going to be much larger than the foam I have there to bulk out the space.
Just feeling out the shape and size at the moment. Finer sculpting details will be done later.
And to show the scale to what the head will look like, here's a mock-up: The head will be about the same width as the shoulders, and the hair sticks out quite a way out the back too. The face also looks up at about 45 degrees, so that sticking out bit on my foam is for the chin.
Interesting fact about the actual film prop. It was hollow plastic and the eyes were originally intended to follow Indy about the room, but that was cut from the film. If that thing was actually solid gold, Indy and co would not have been handling it with one hand either. A bag of sand would not have done the job replacing it.
Thanks 'Tom. Recipient was pleased with a pretty statue indeed.
Apologies to you all. I've been neglecting DDakka recently. This Icon has really been kicking me where it hurts and I've either been working on it or thinking about working on it. I've just not had the time or energy to check DDakka or the threads I follow. I will sit down and try to catch up this weekend.
Progress.
Just still poking at it and adding more and more clay.
I think it's now at about 2kg of clay on it, with the chin still to do, but some may be removed here and there for detailing or re-shaping. And that's with quite a lot of PS foam within (see below).
Getting this looking "right" at the right scale is proving really hard.
Eyes, jaw, and mouth still to add. Then I can refine the shape and add the details.


 .
.

 what ever the right adjective for them is) colours. The pale green and the soft reds and blues. And well done on not going over board with the verdigris. So many people go over the top with it.

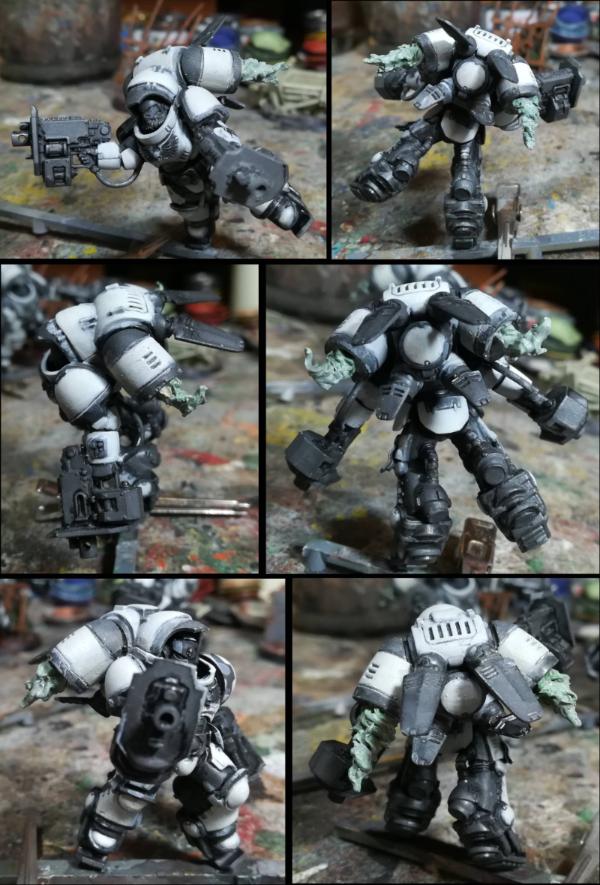
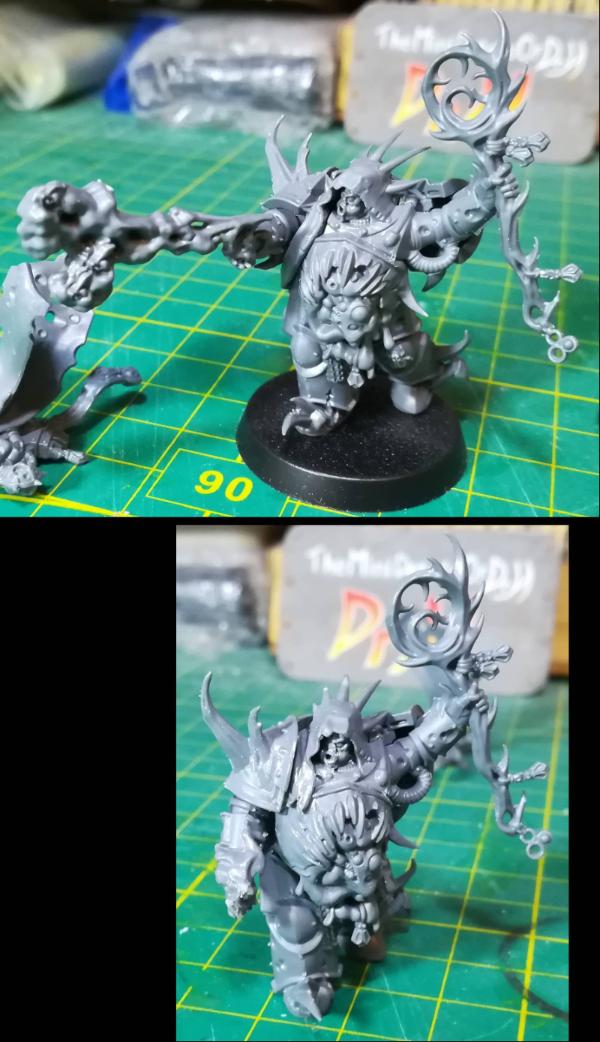
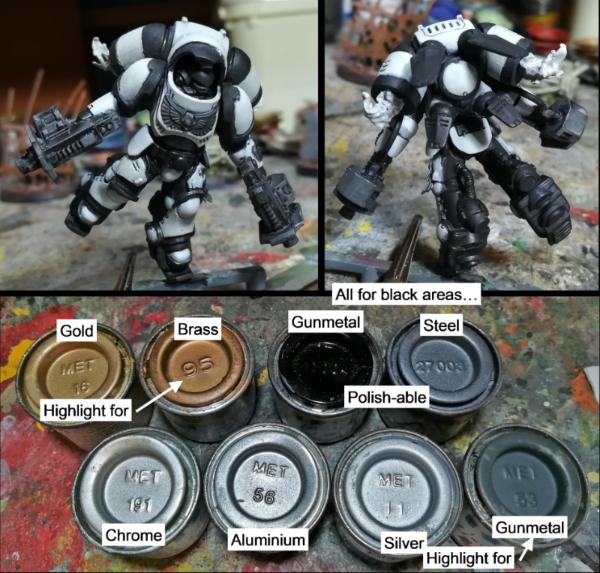

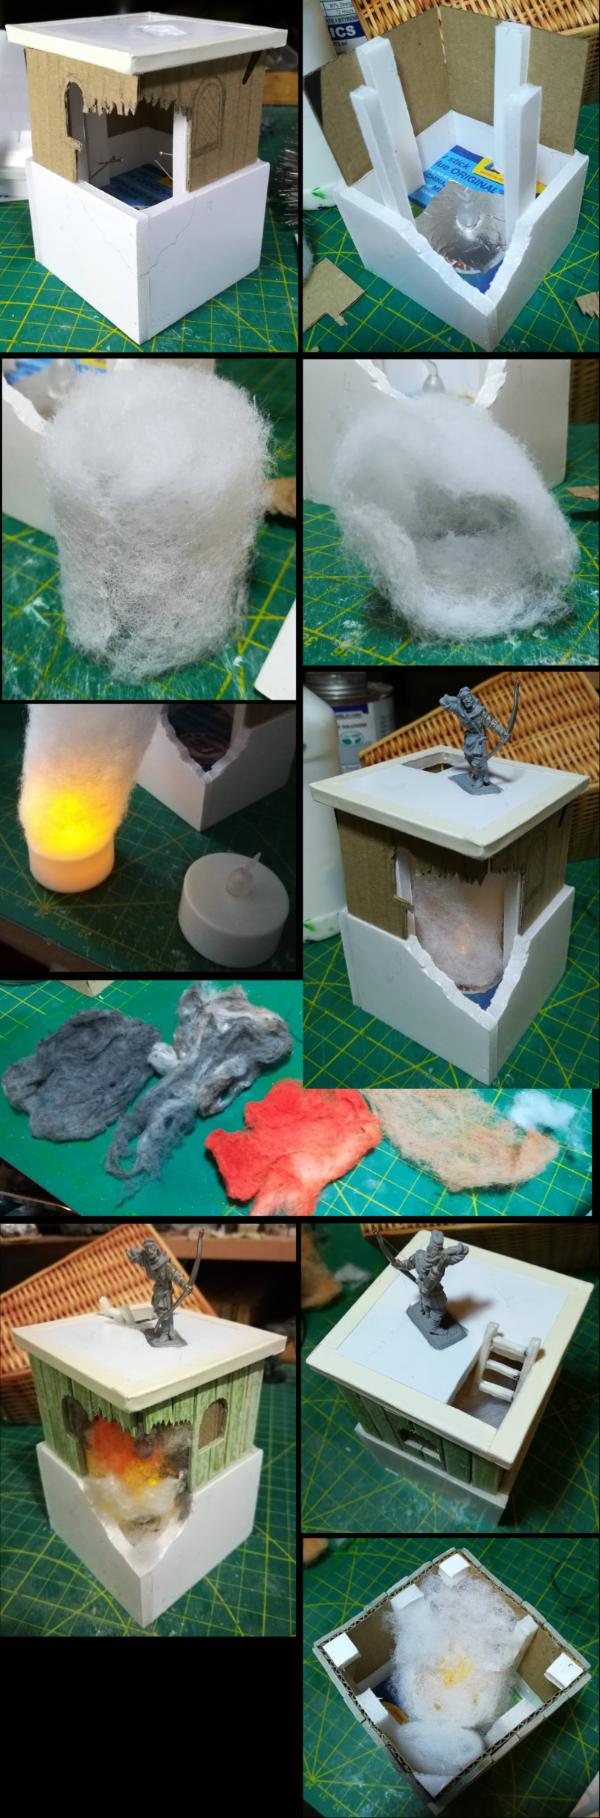
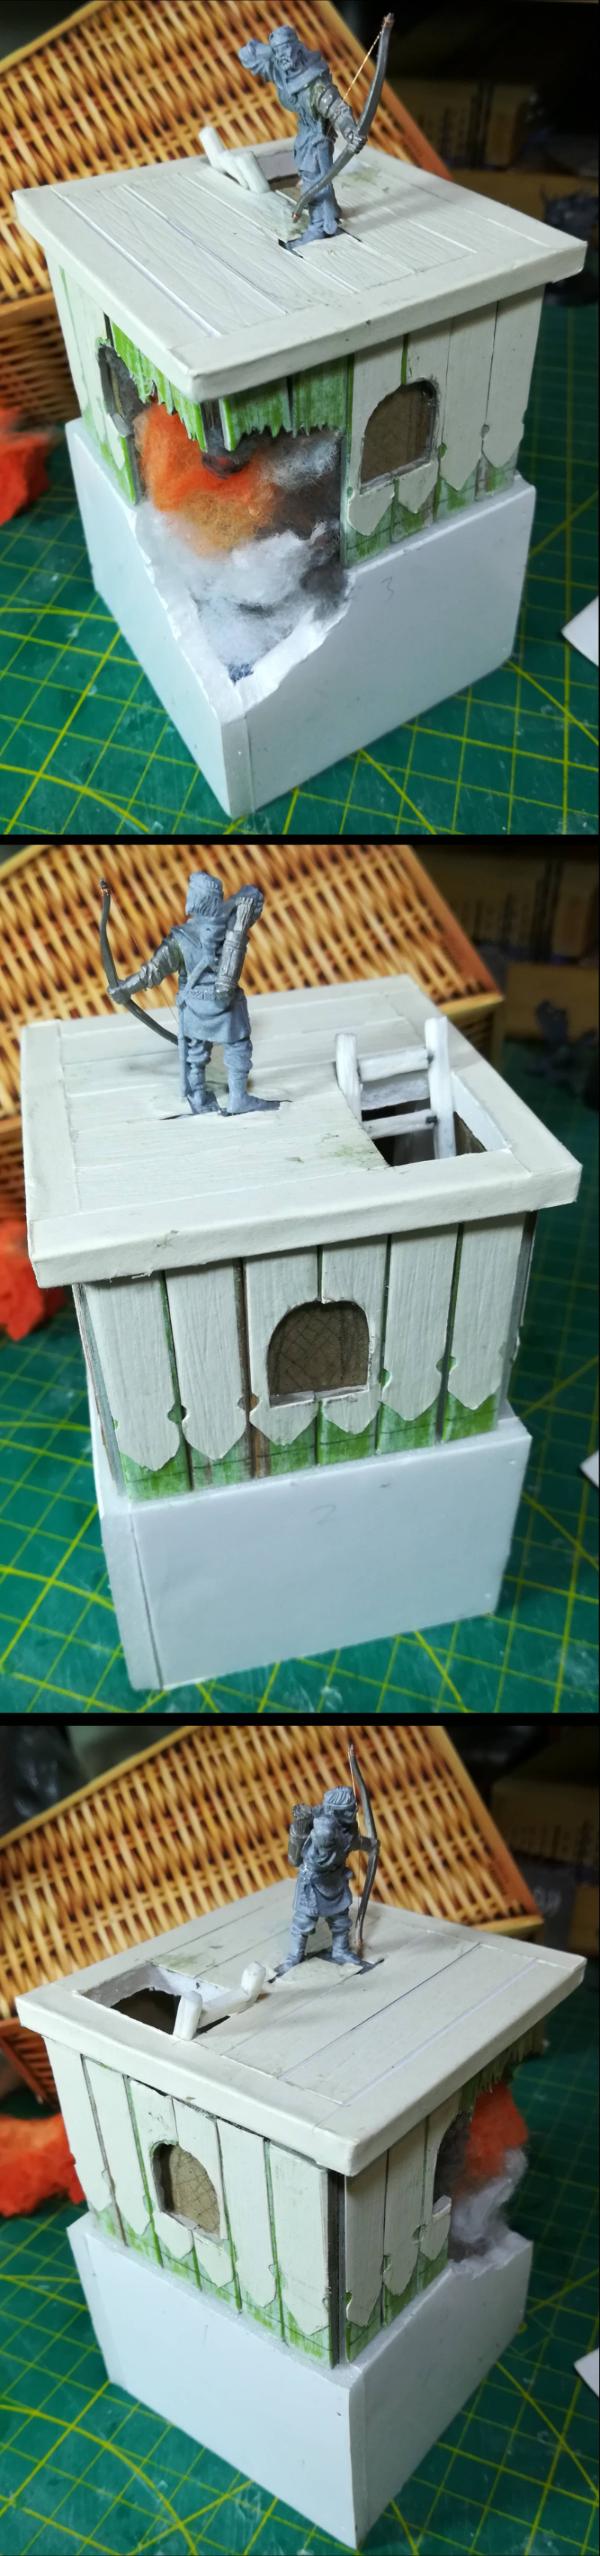
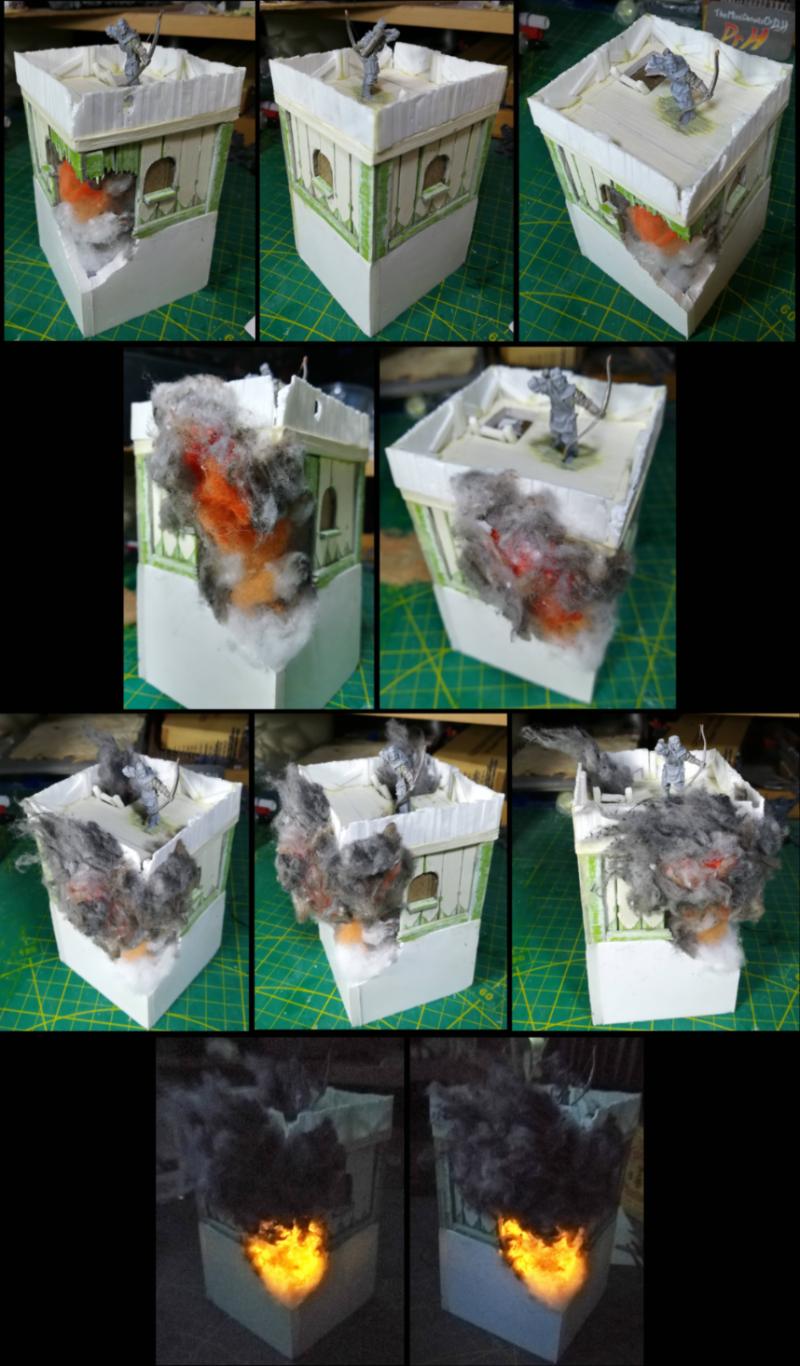
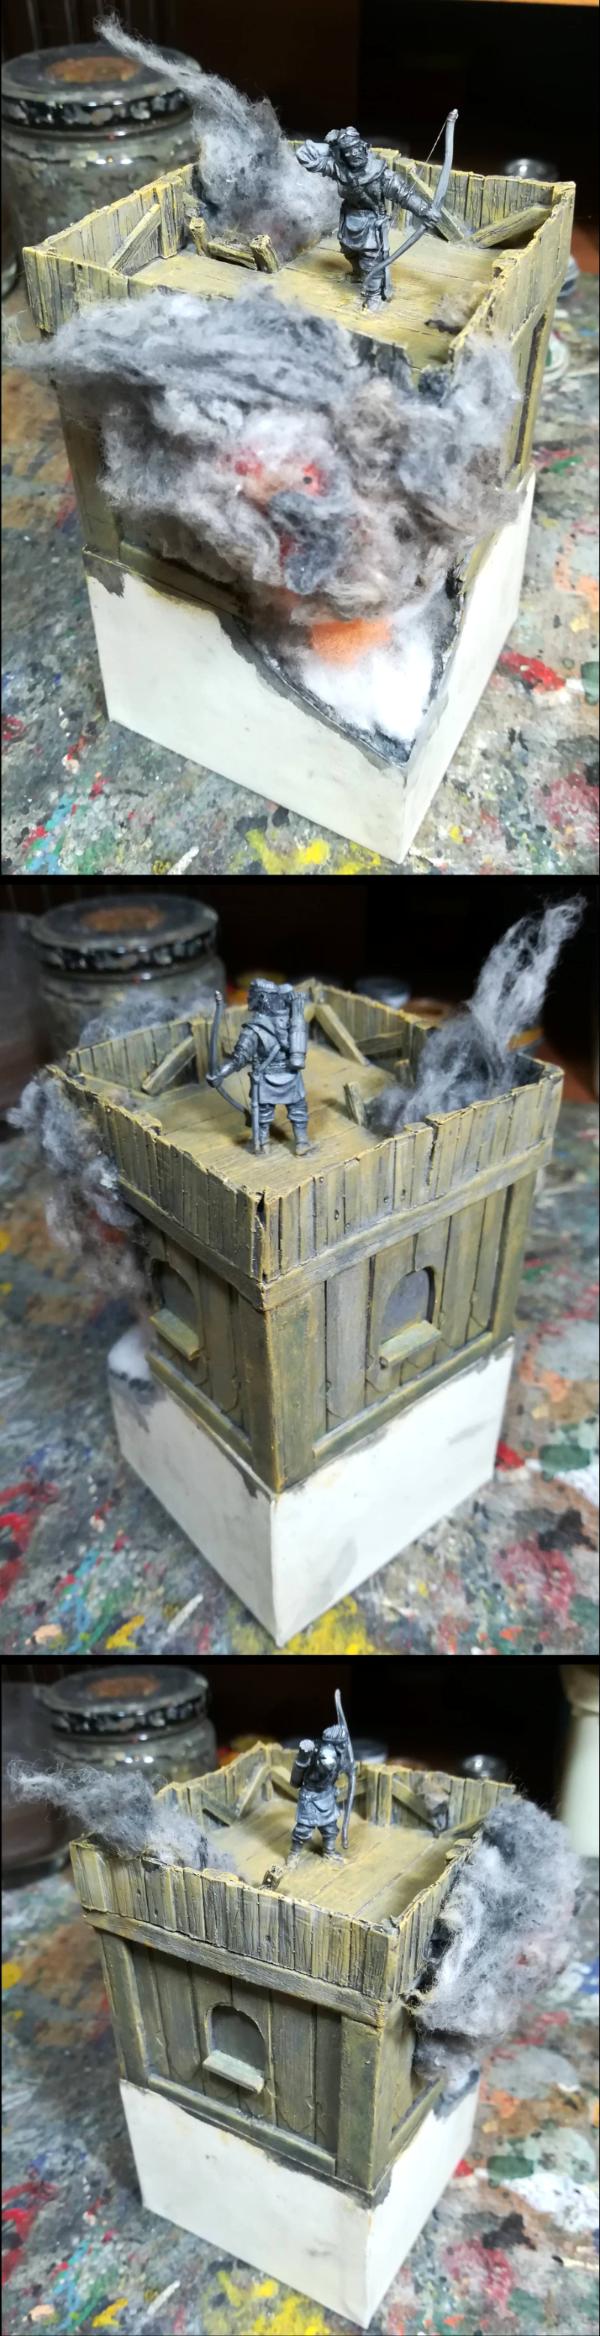
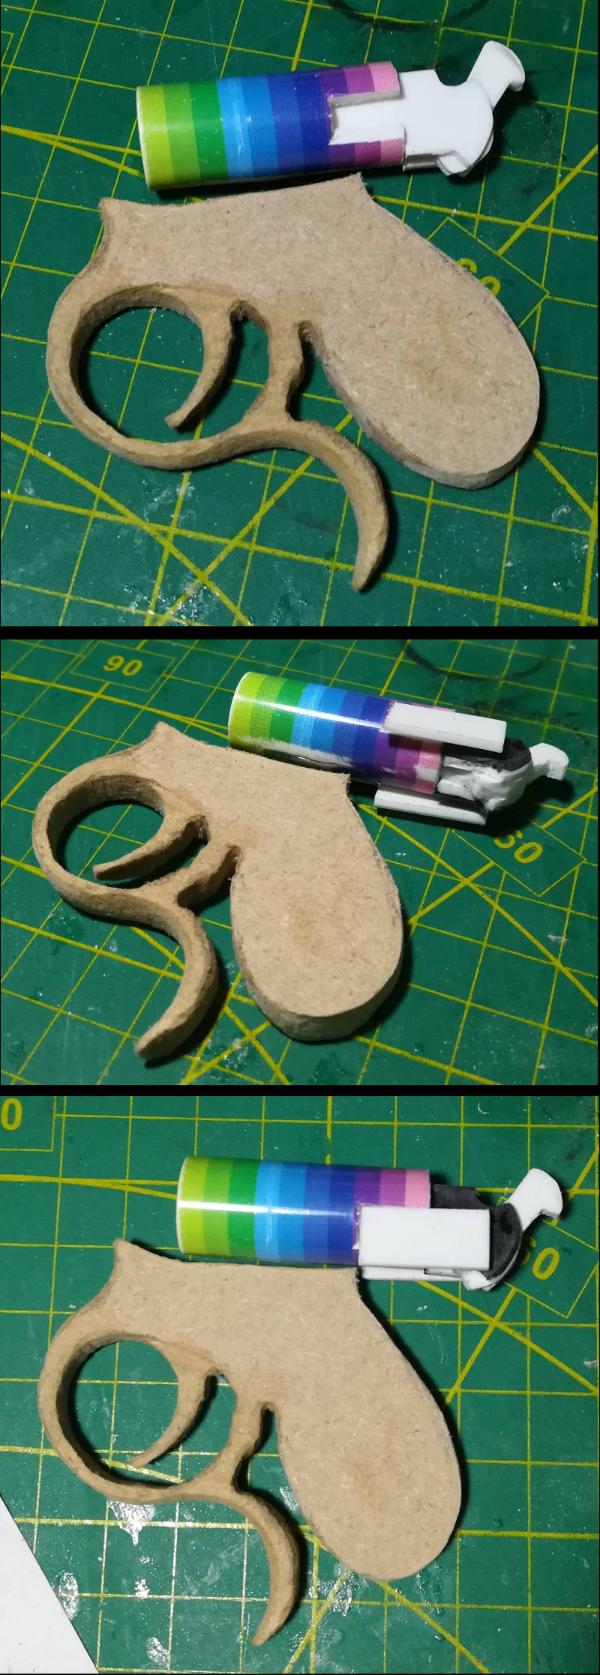
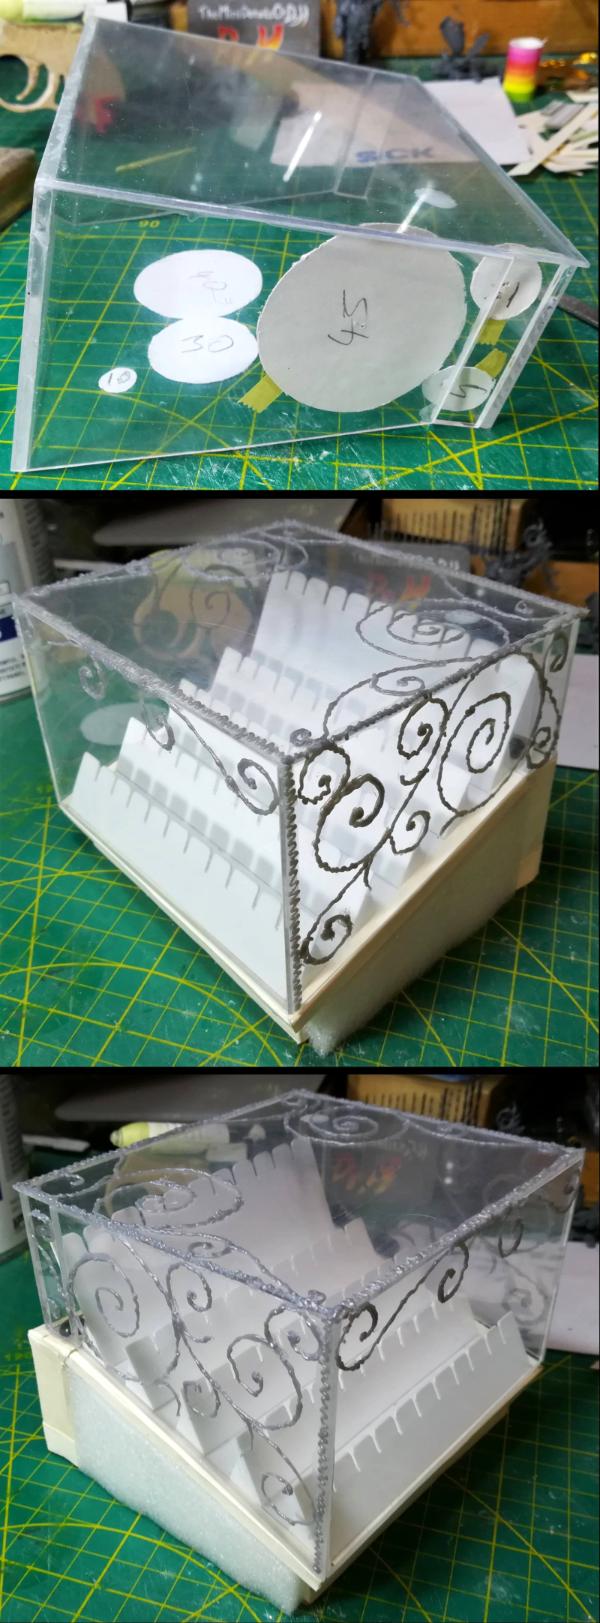
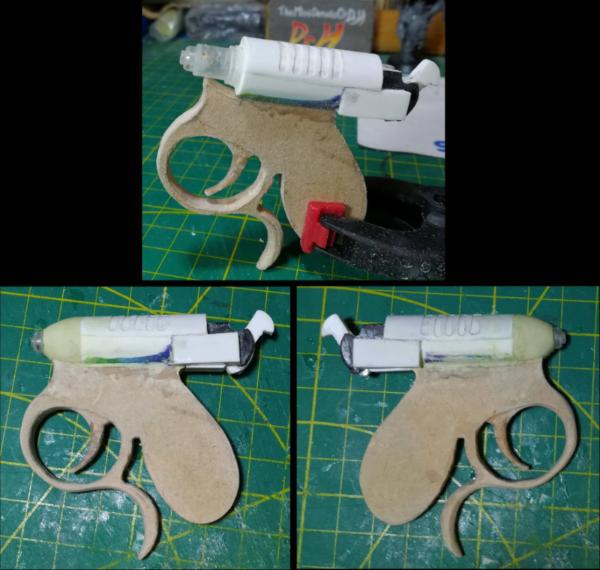

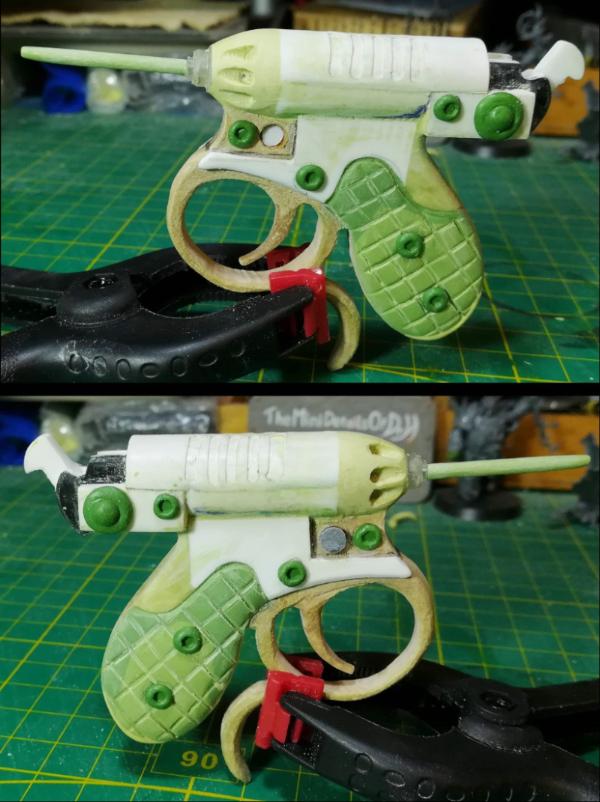
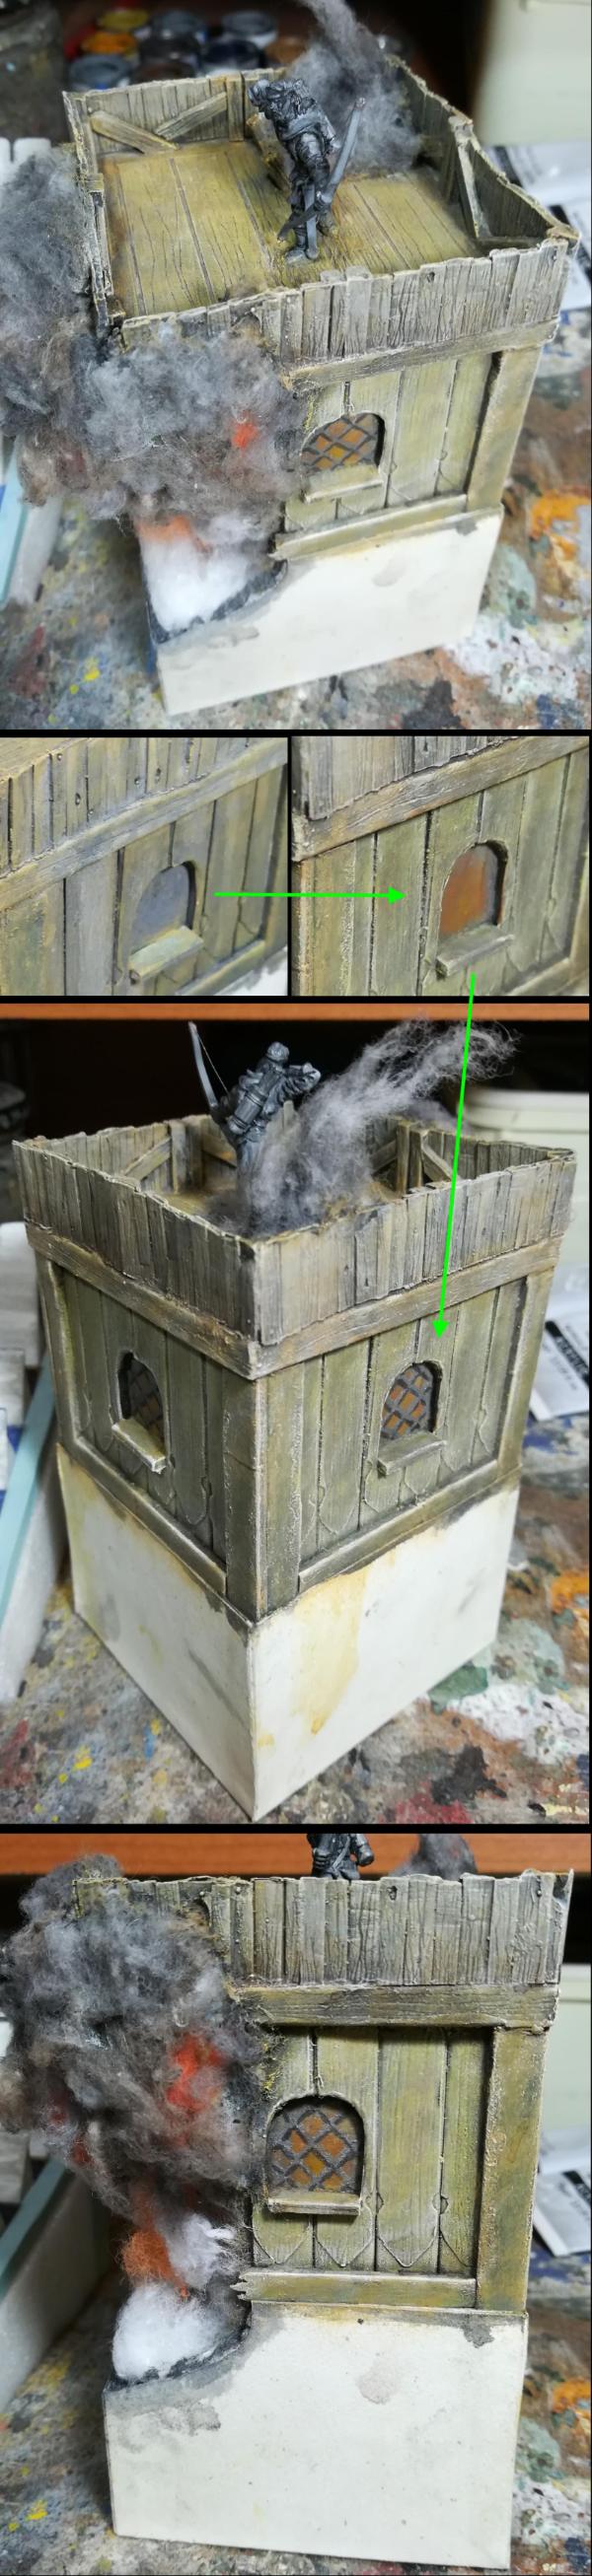
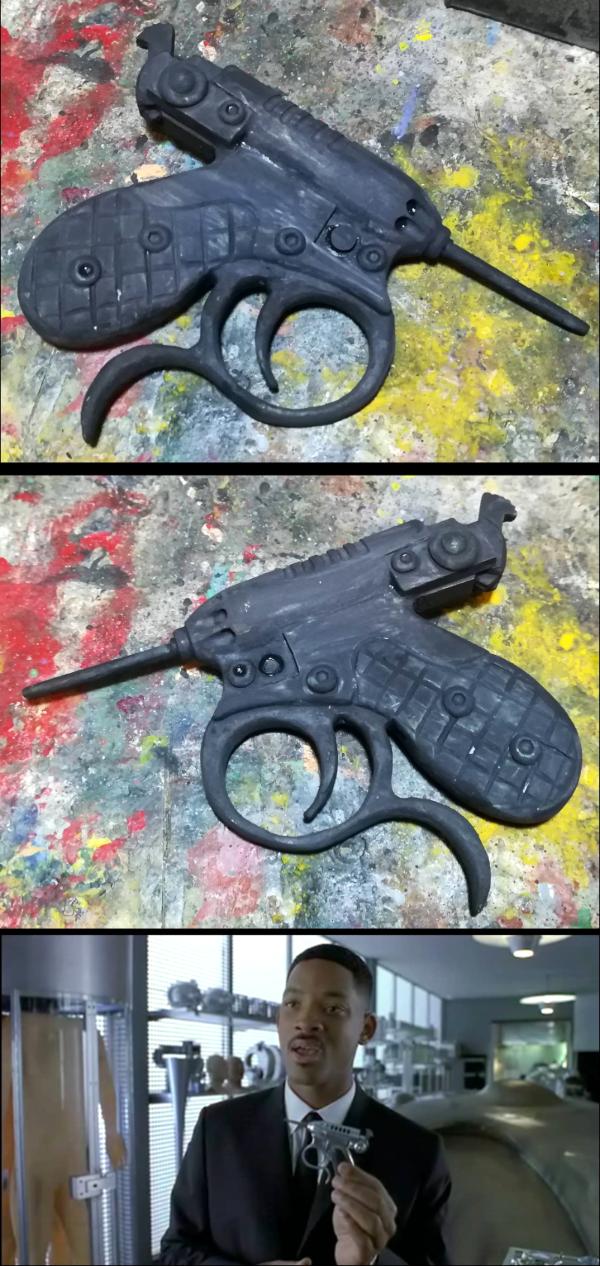
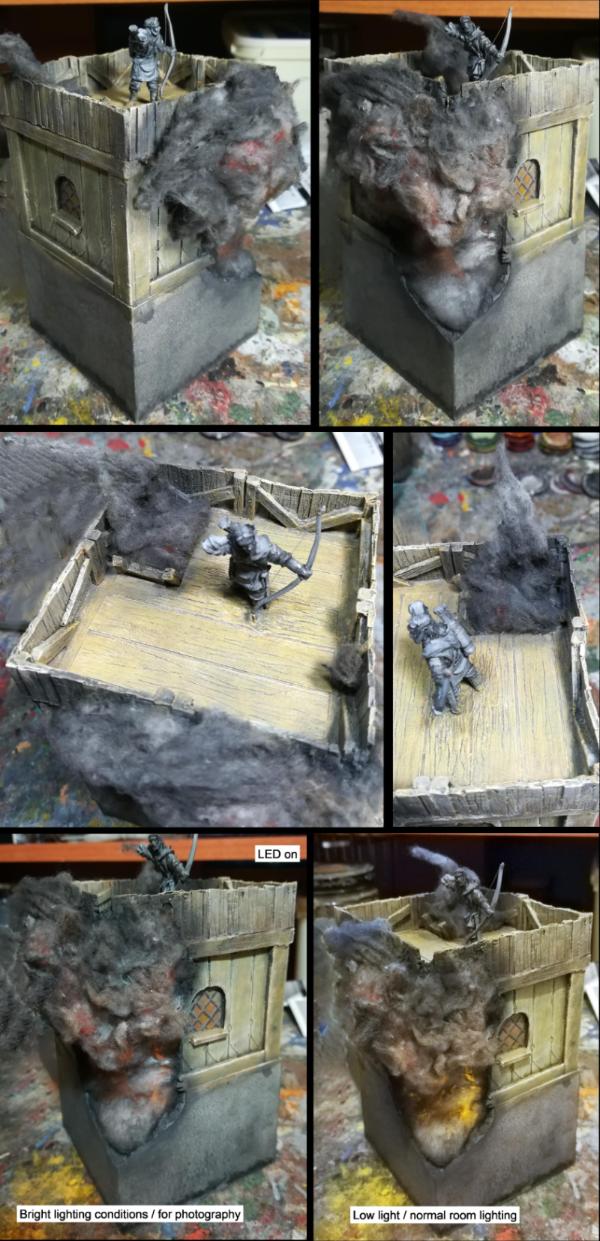
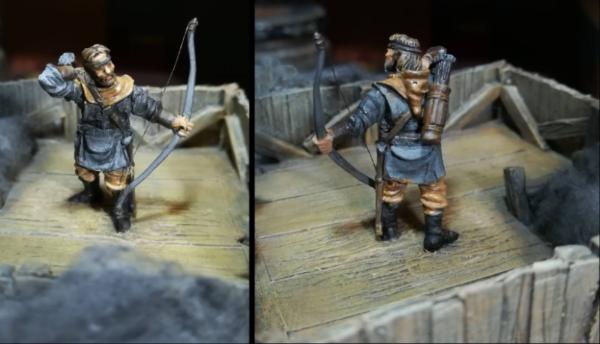
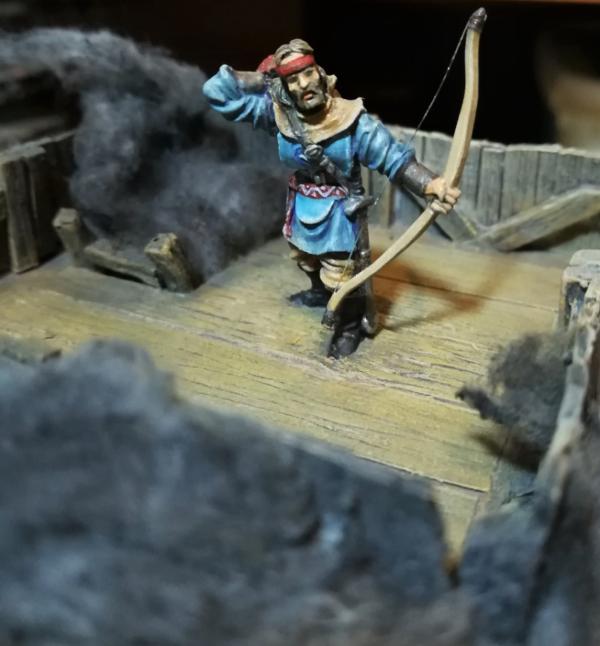
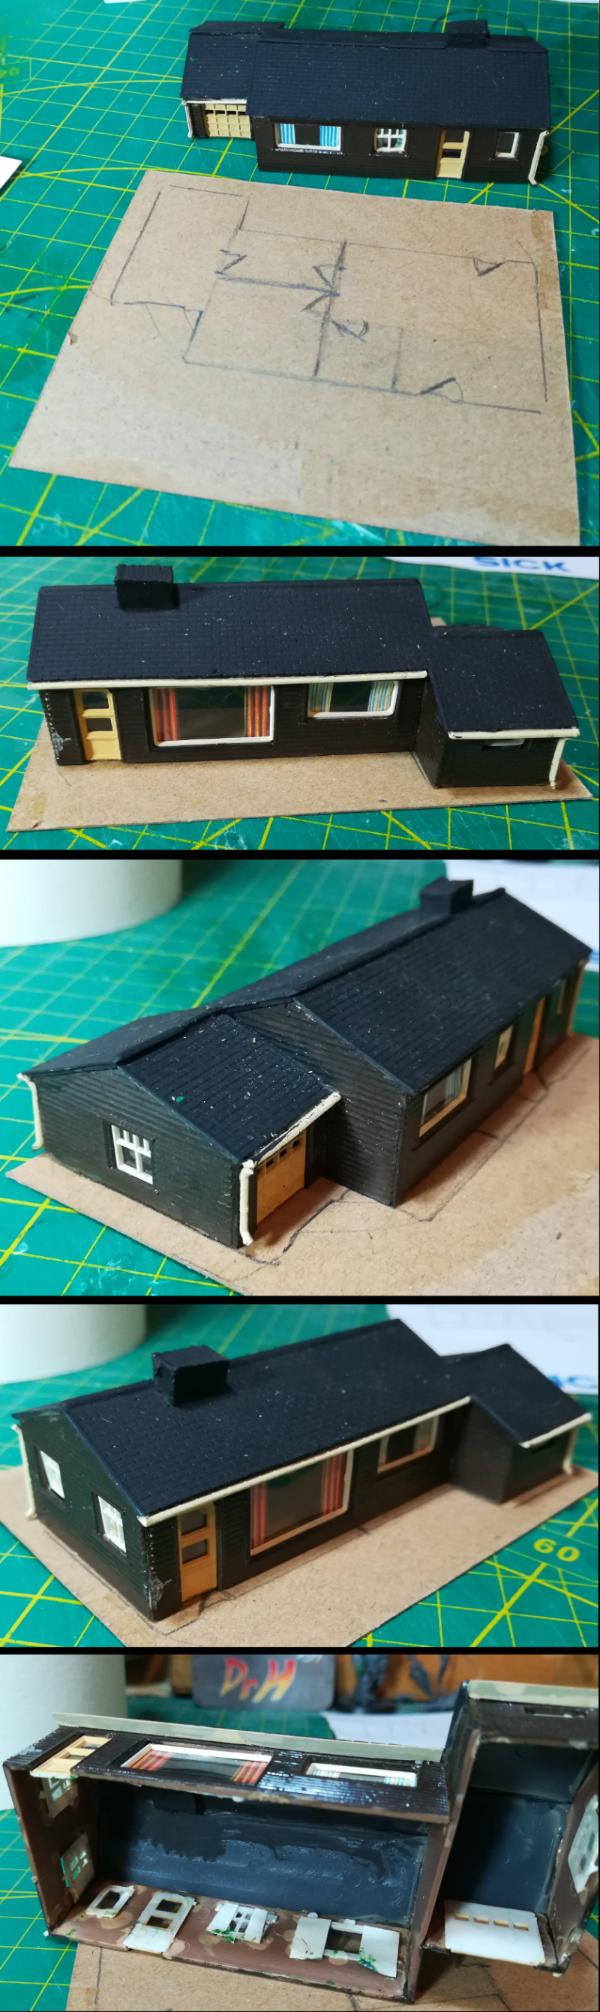
 dining table and chairs, and a tv.
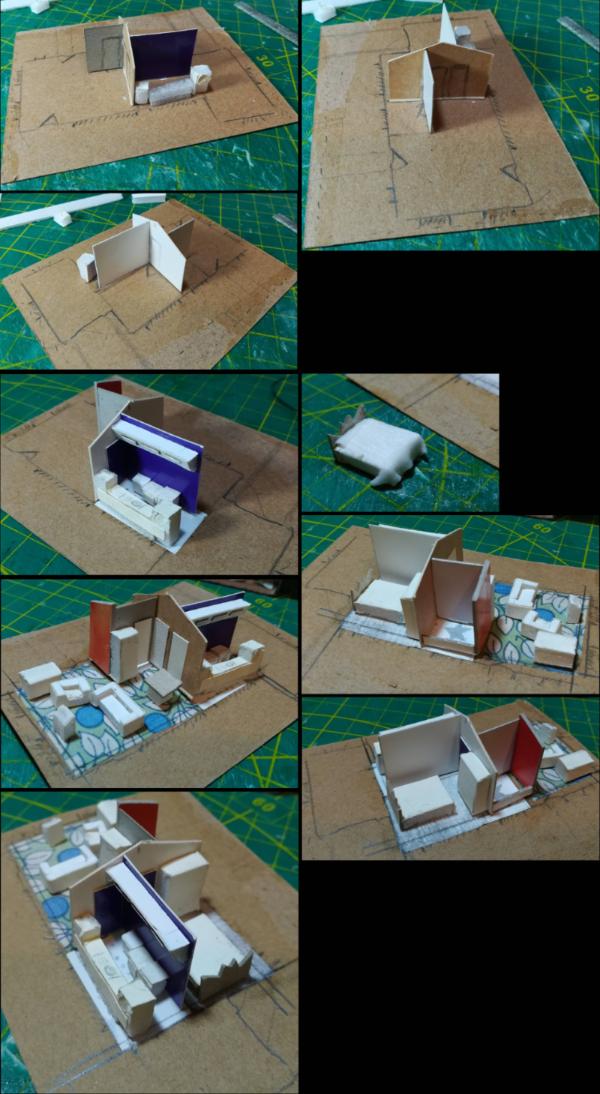
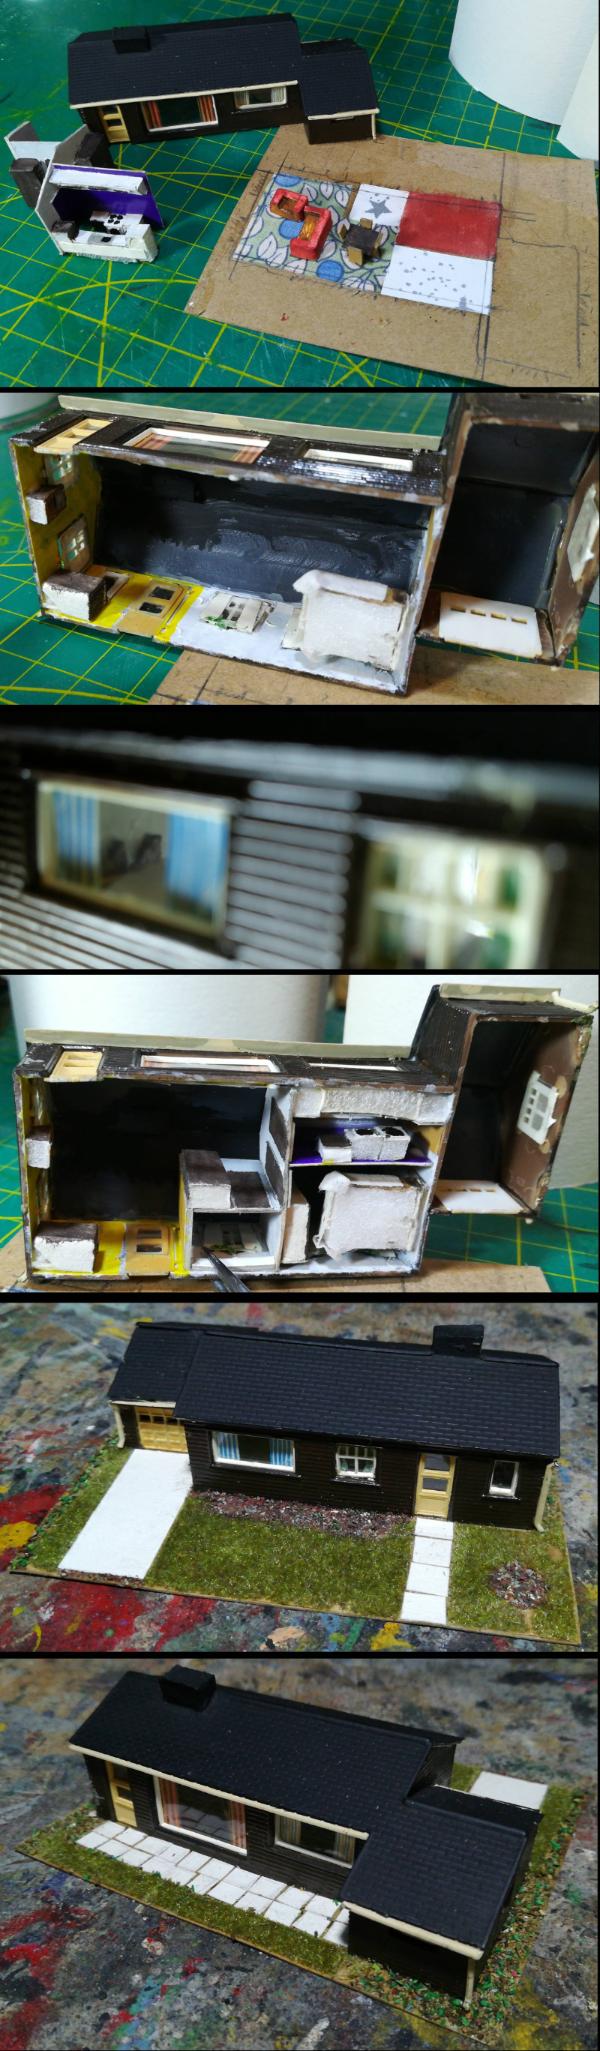
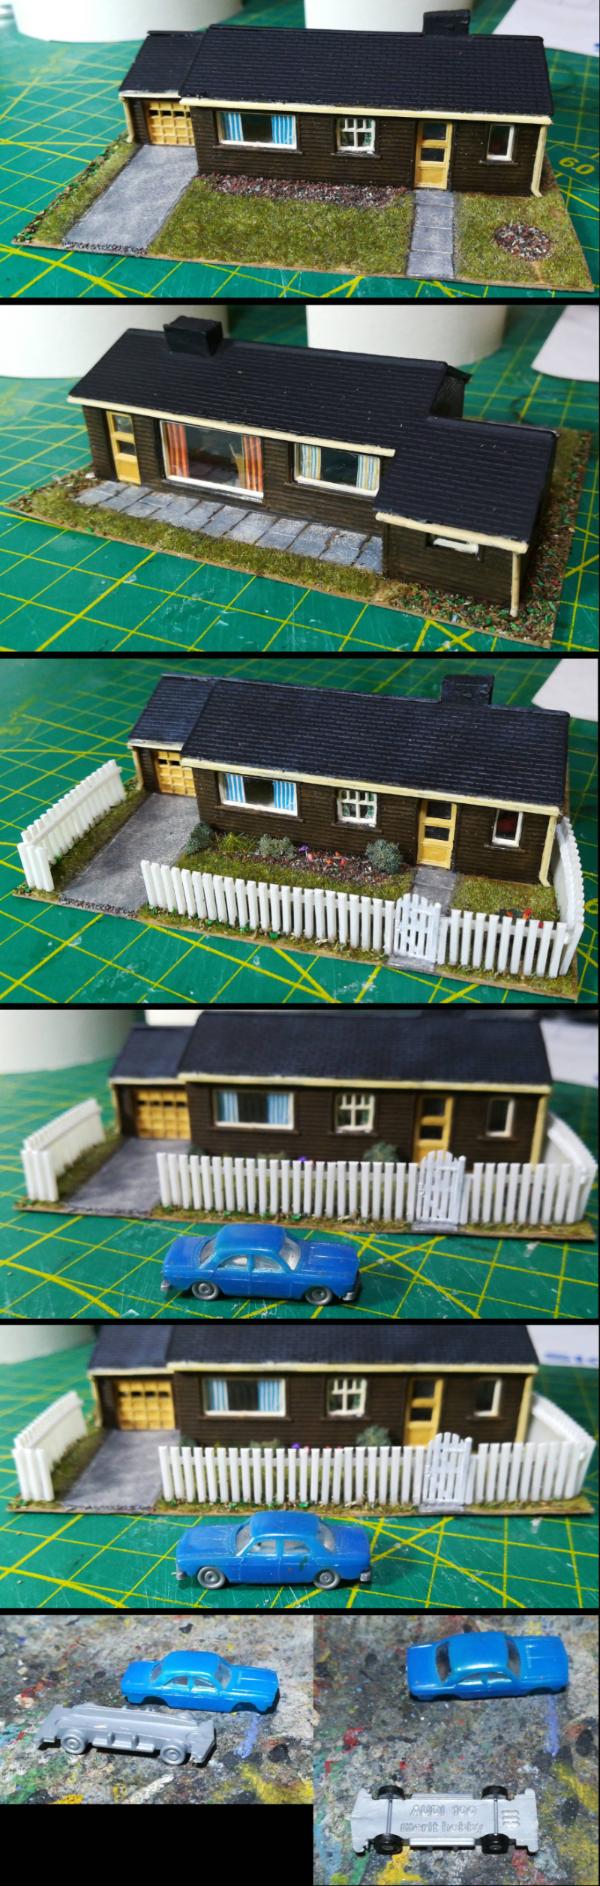
 .
.
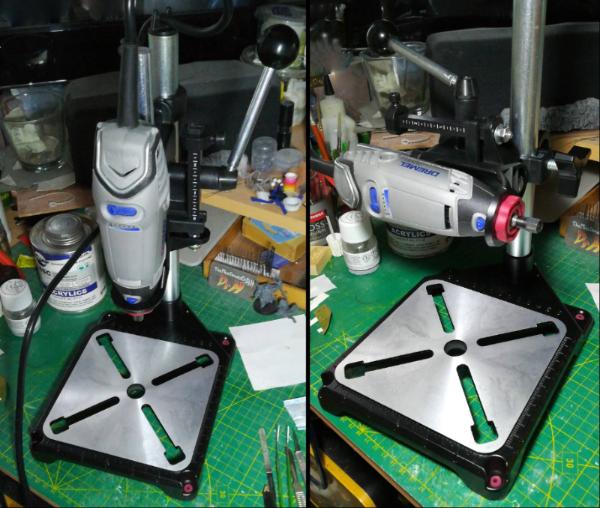


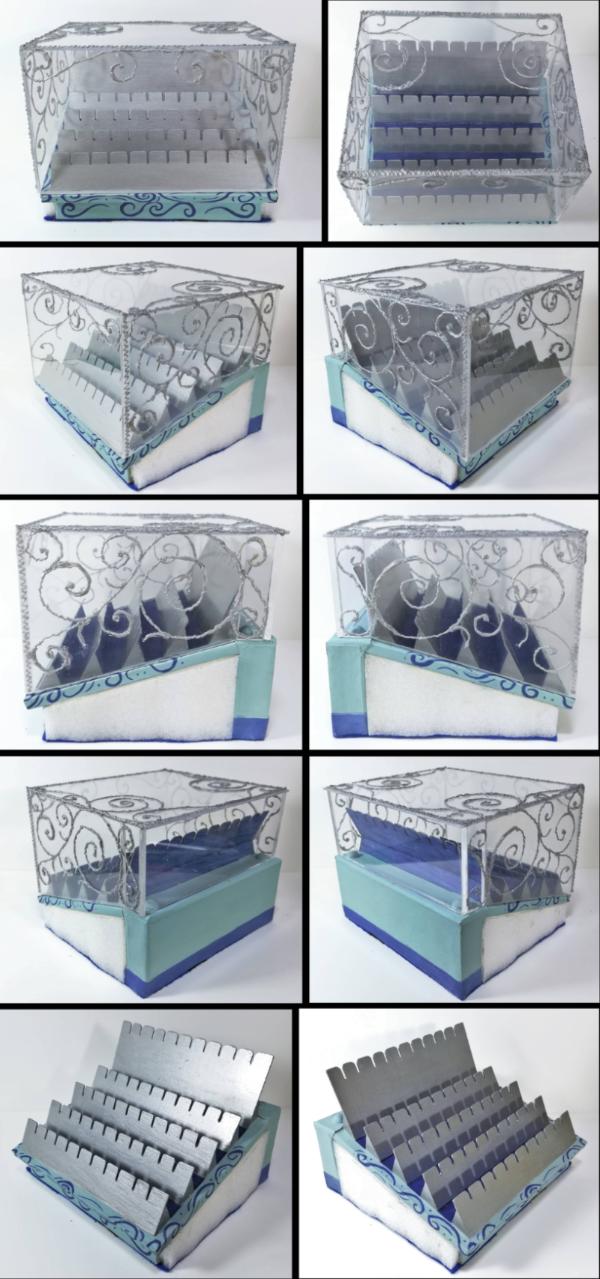
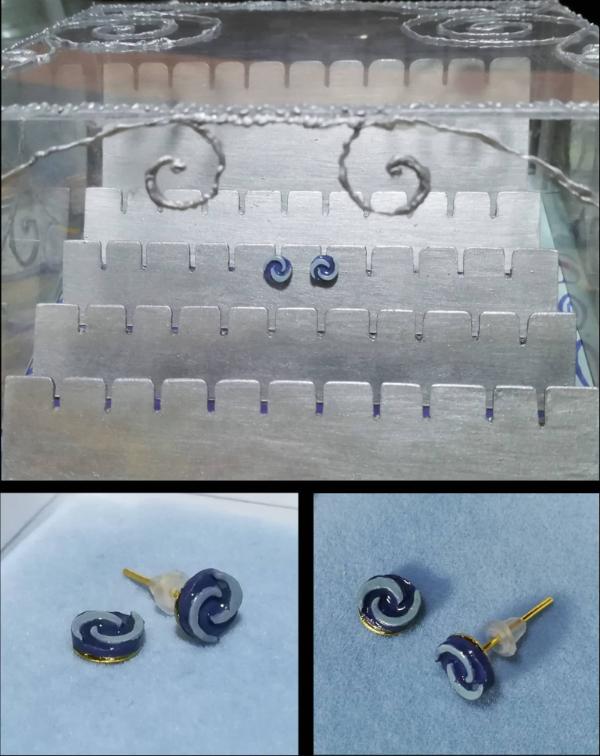
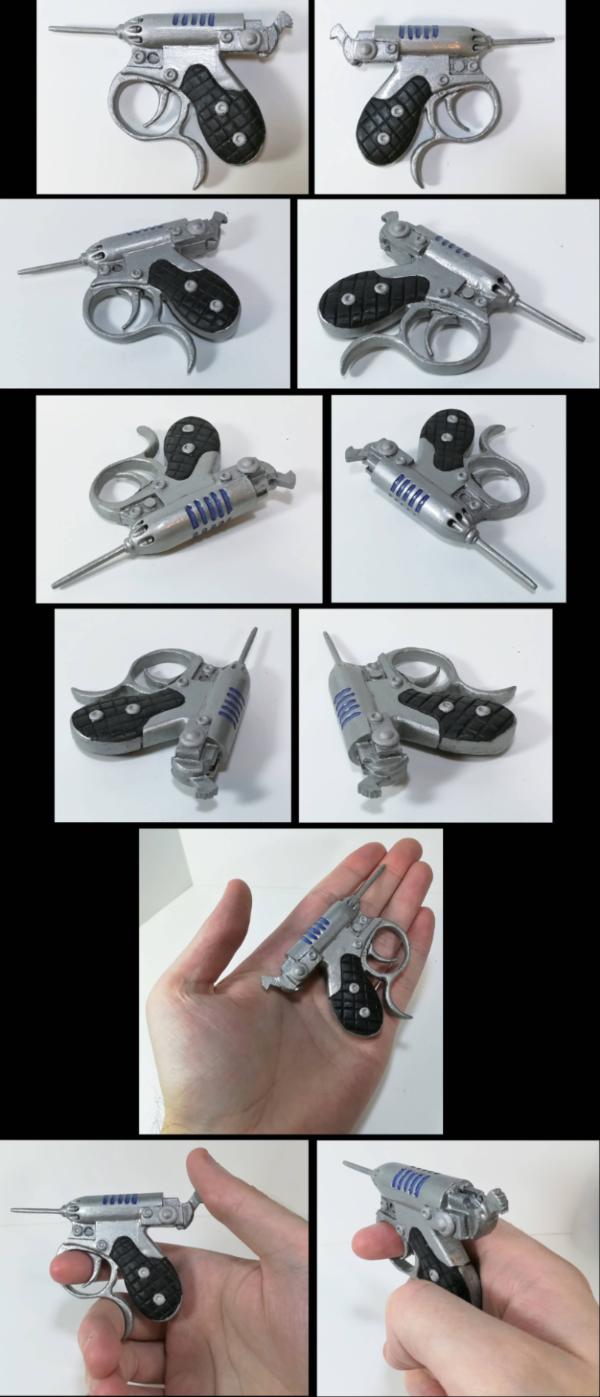
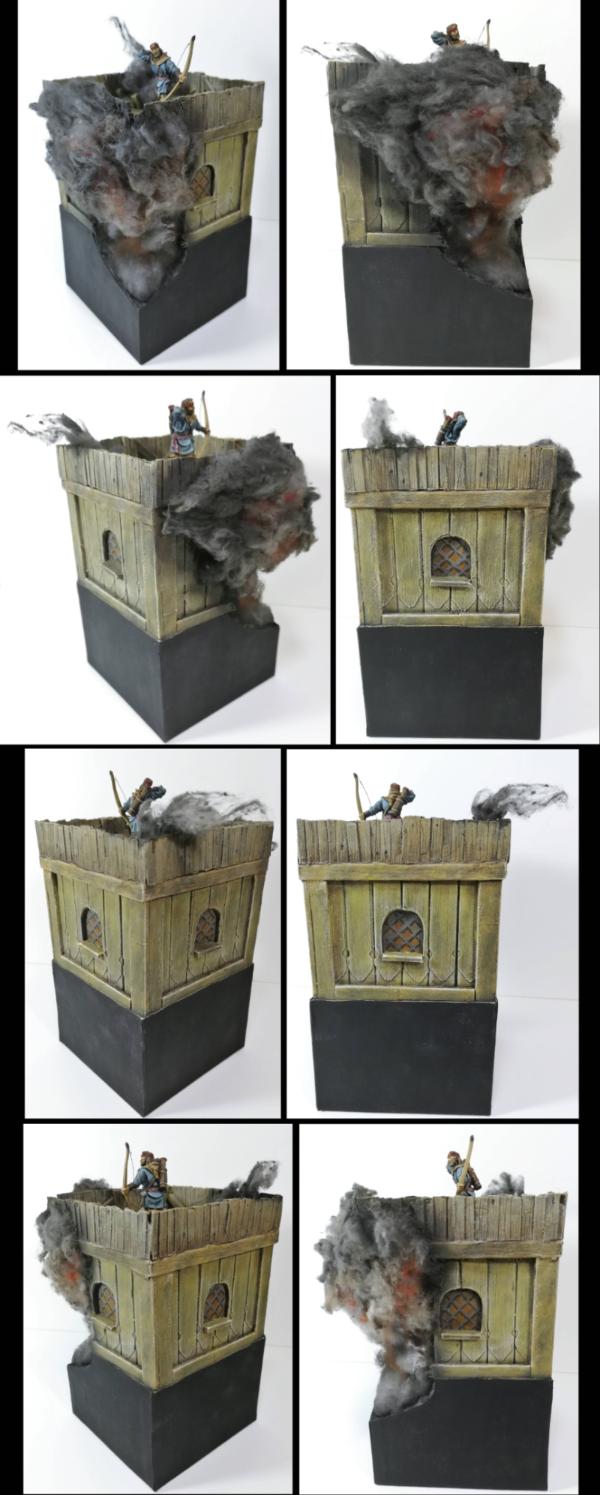

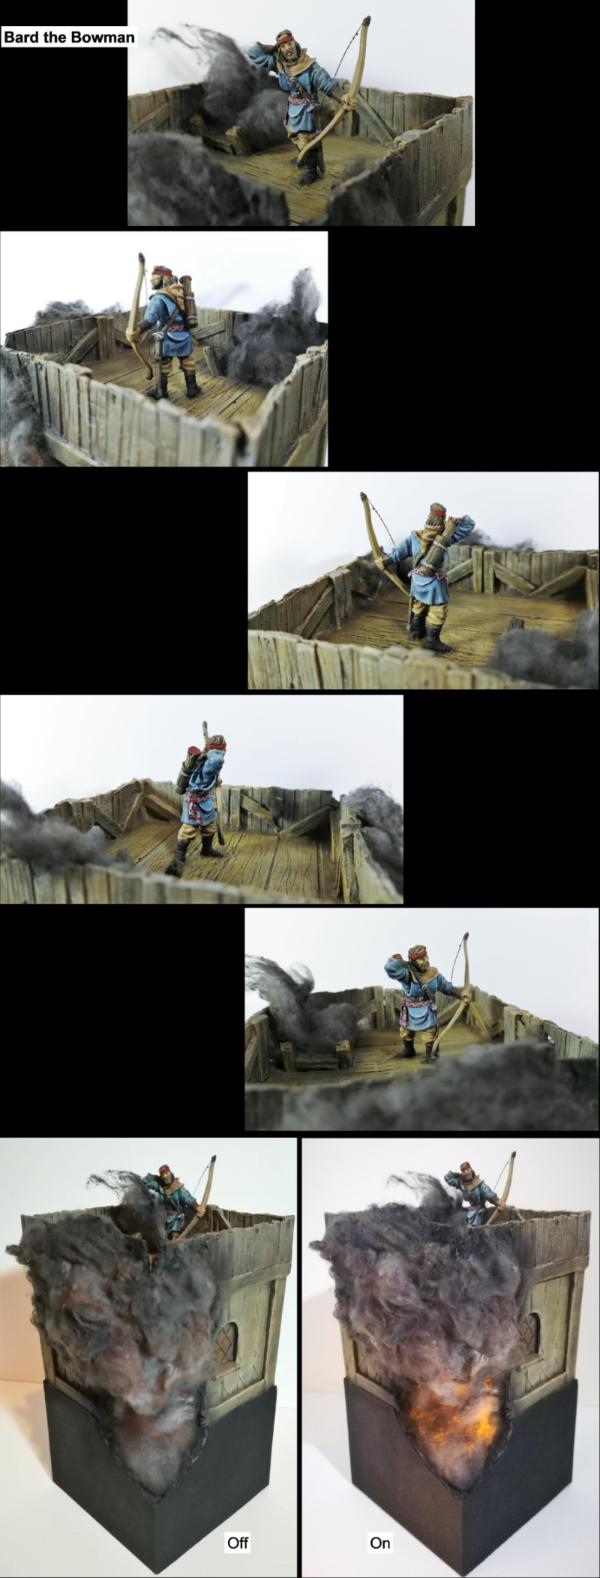

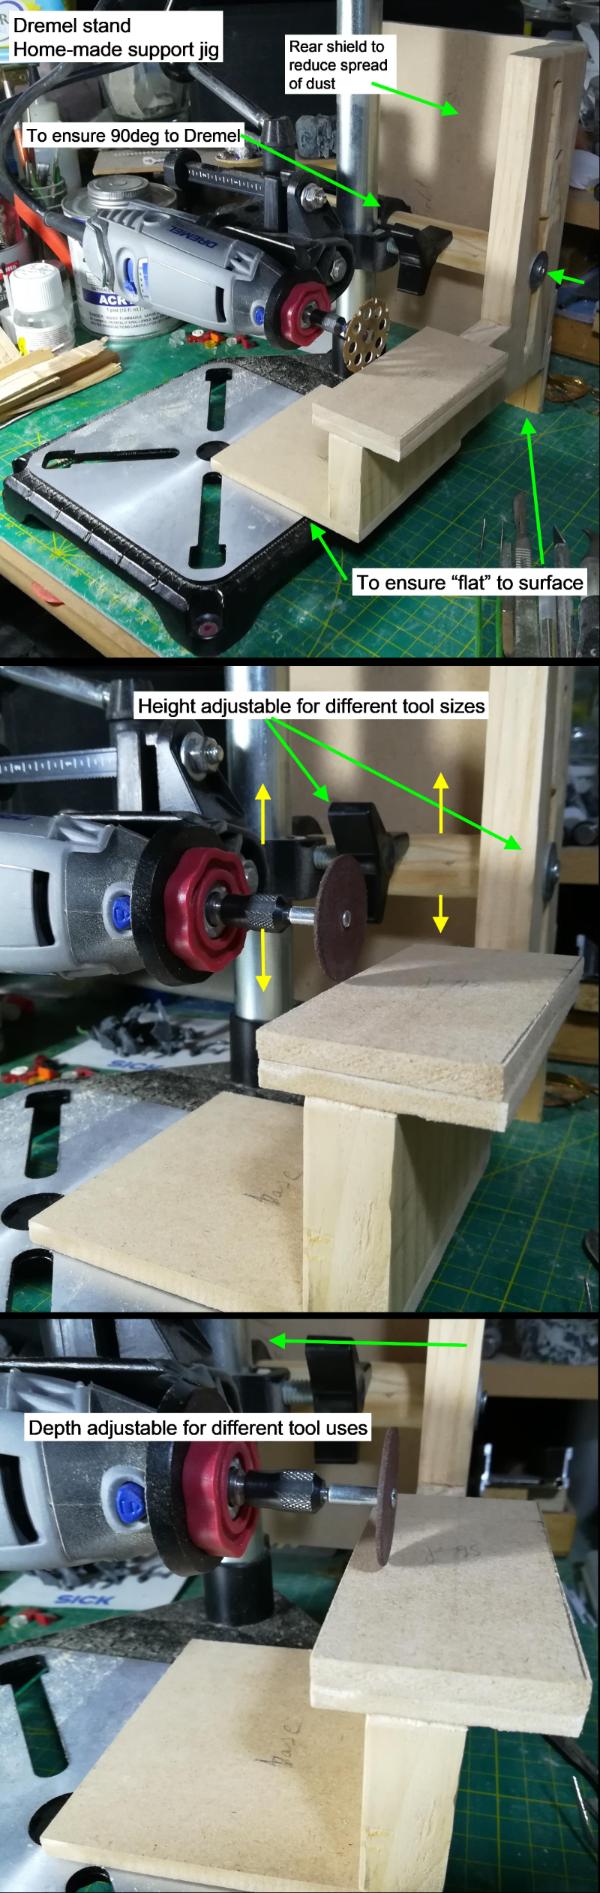
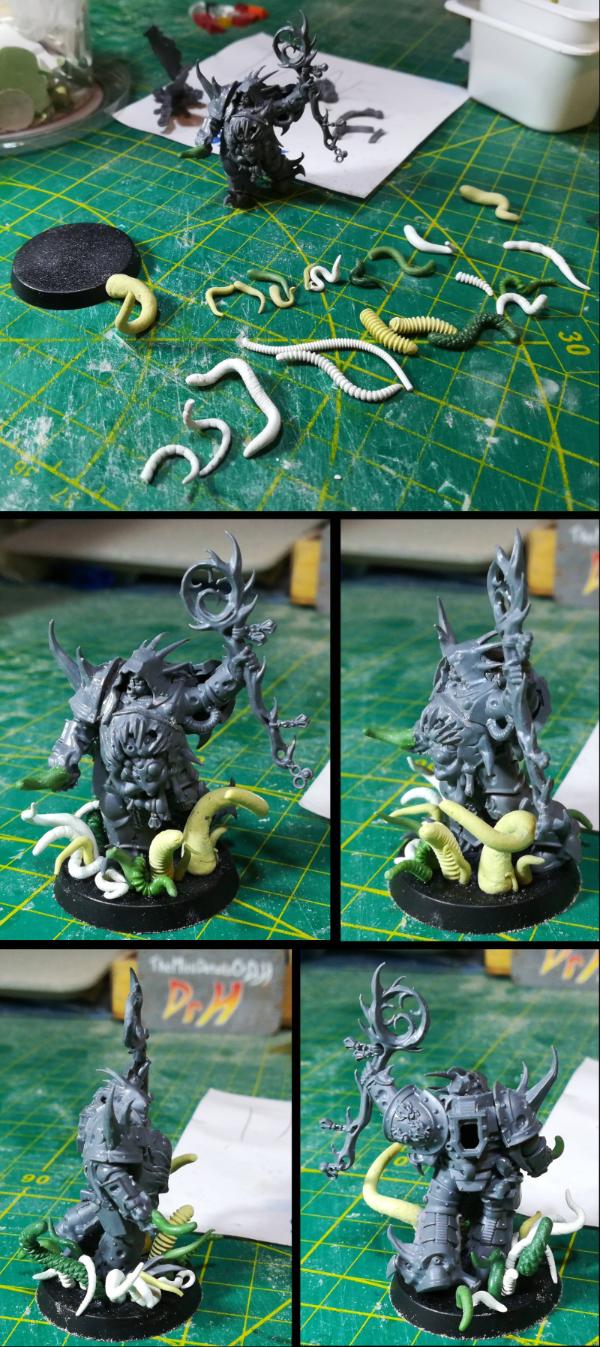
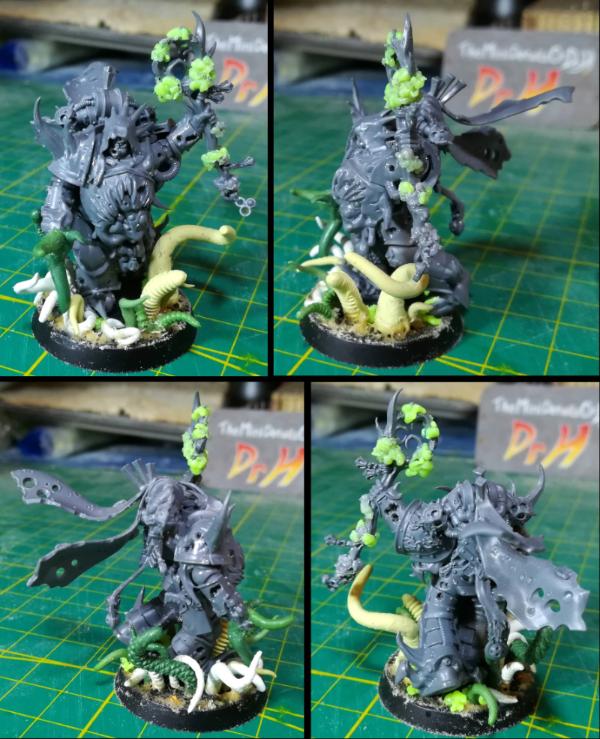
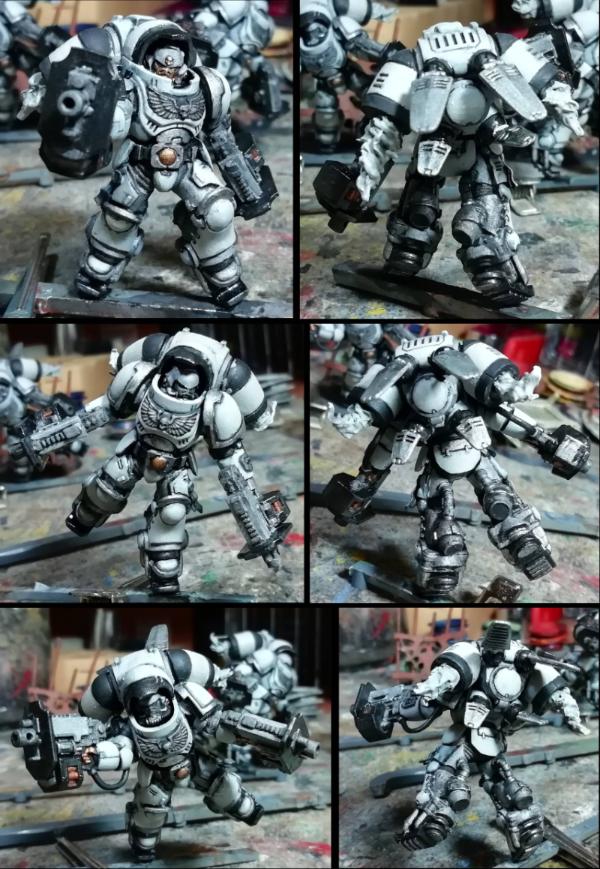
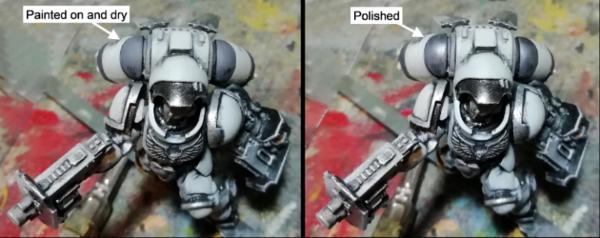
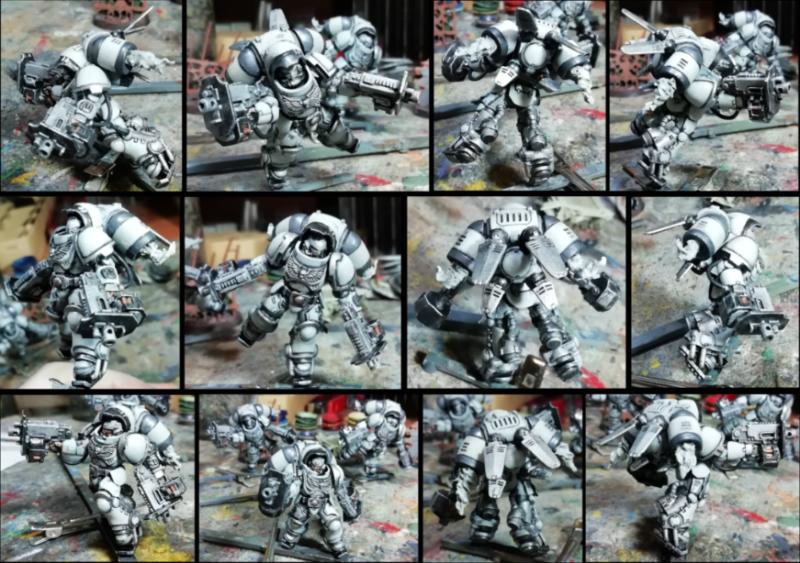
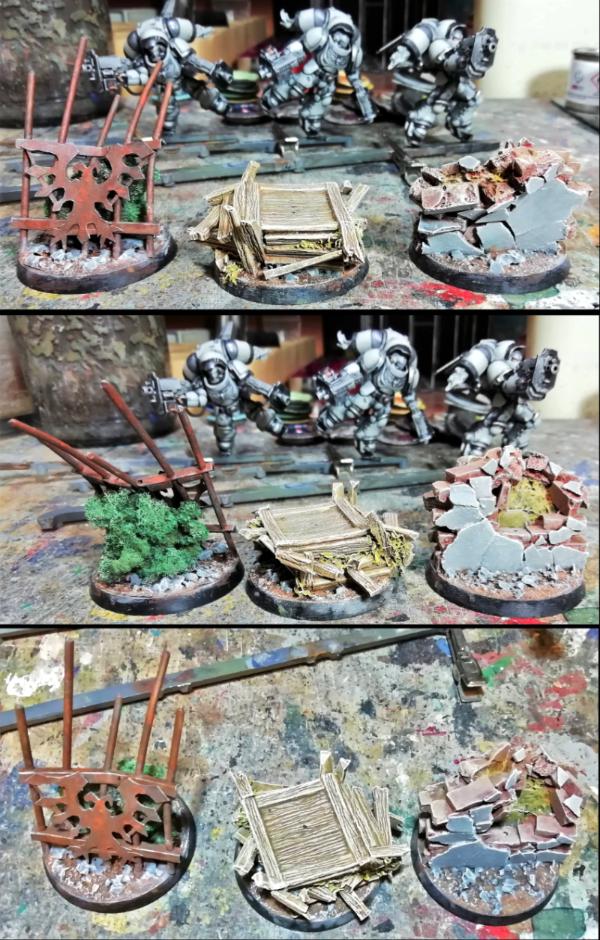
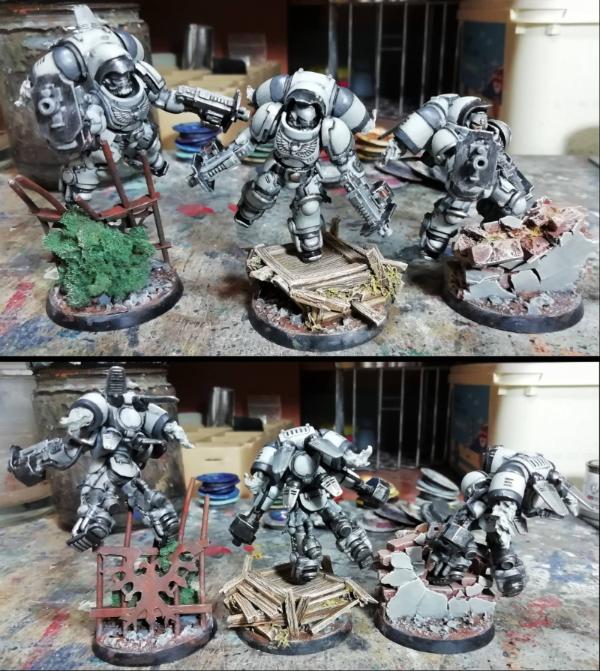
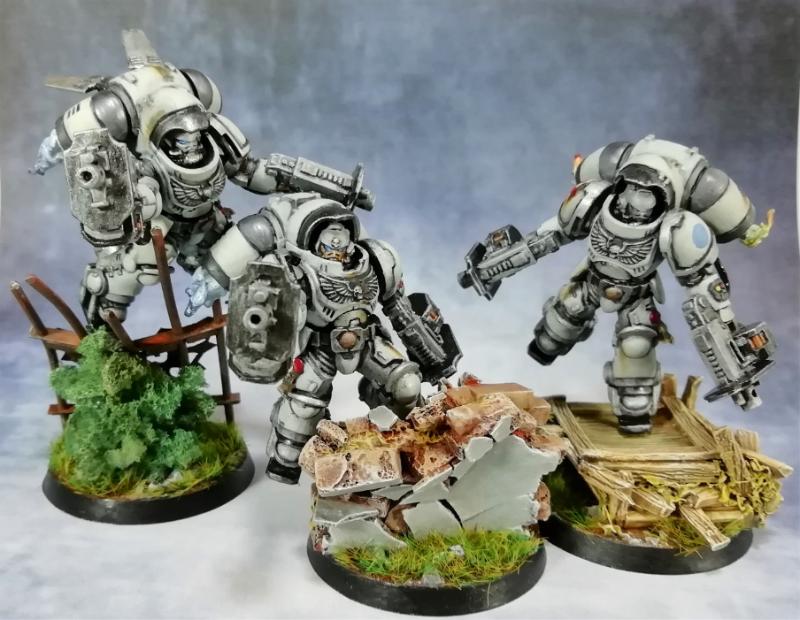

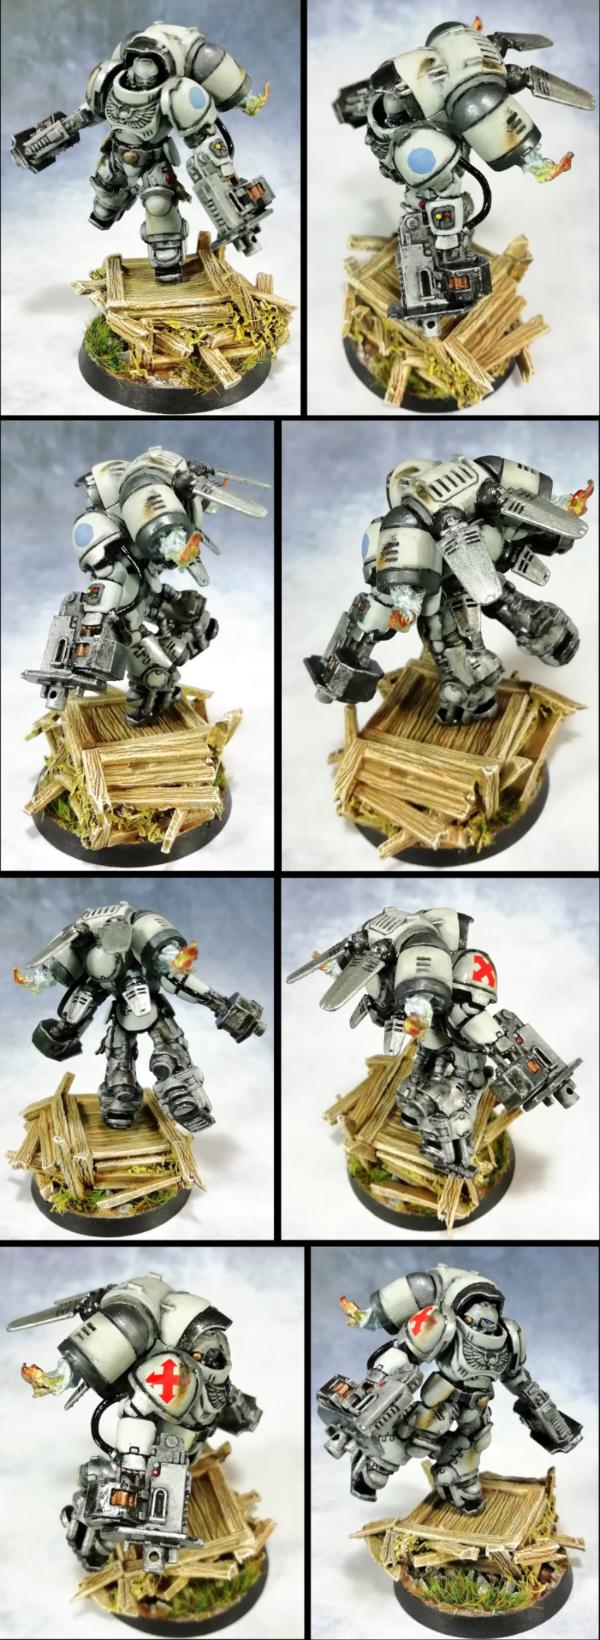
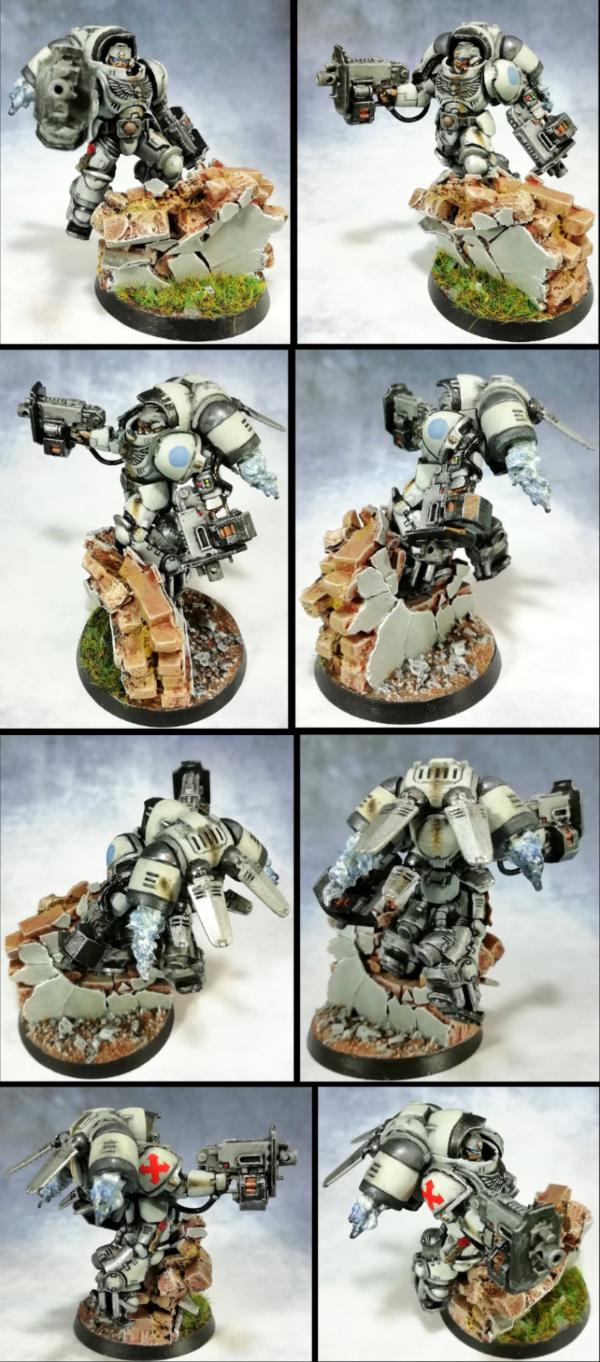

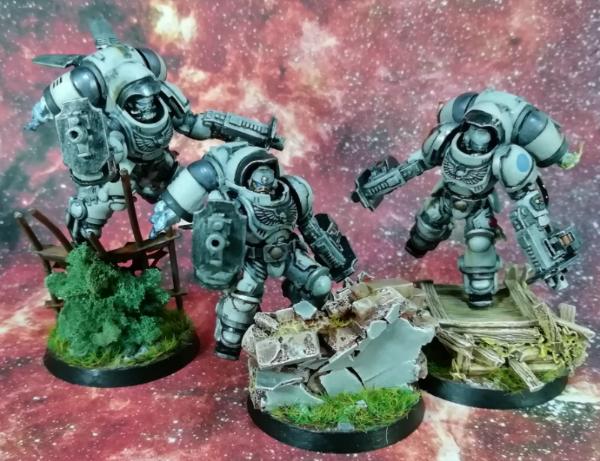
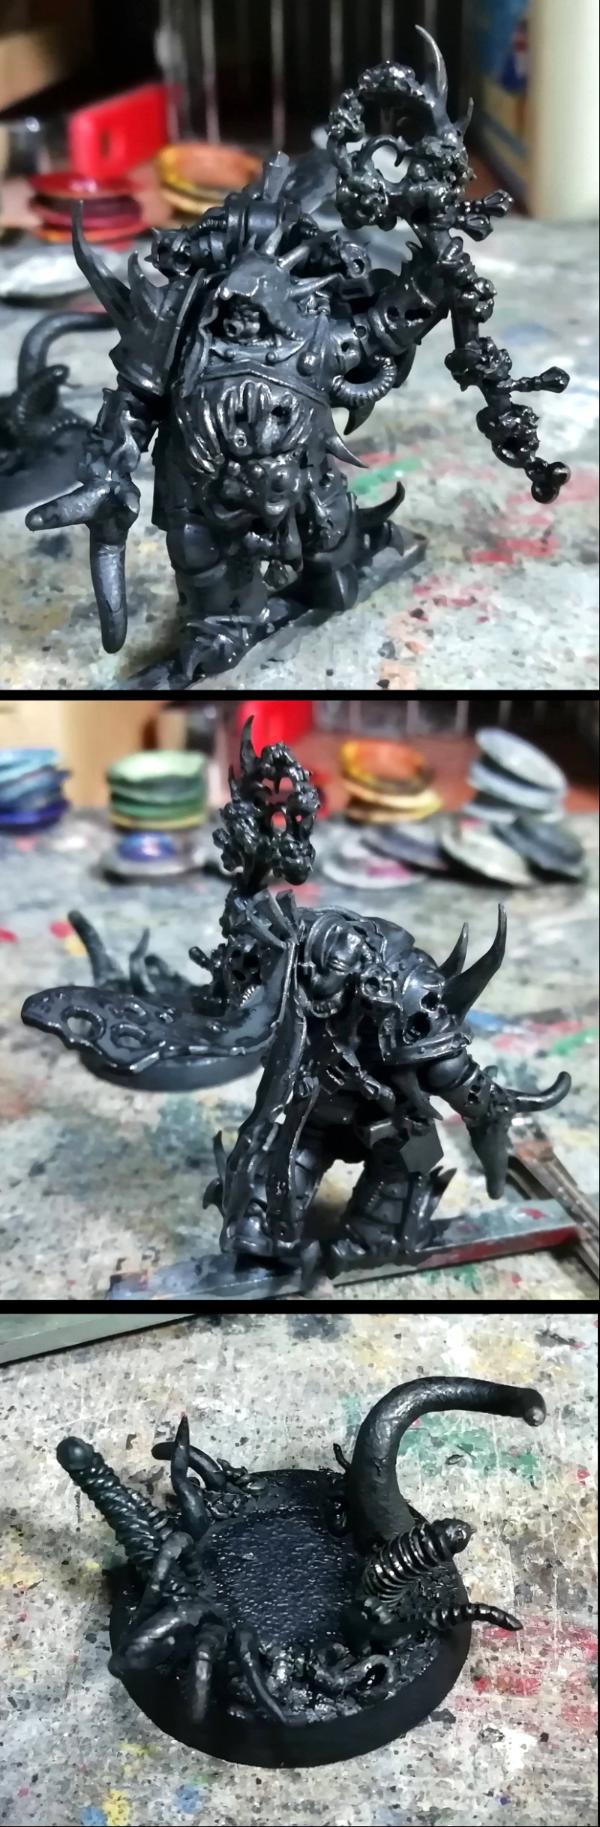
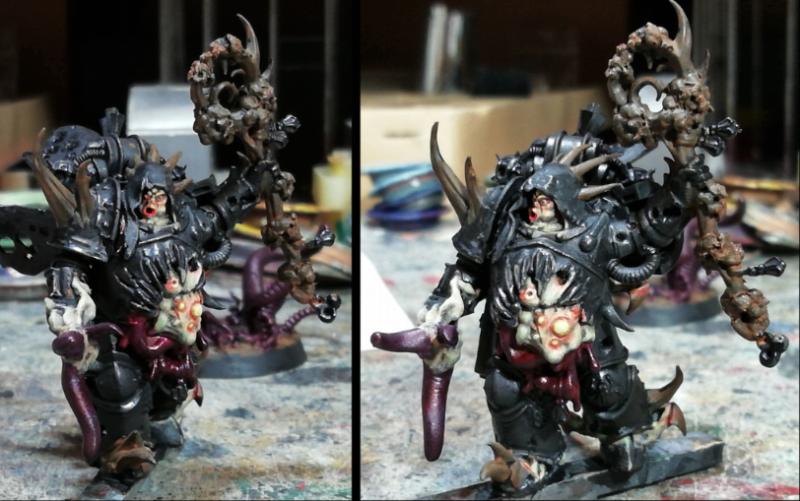
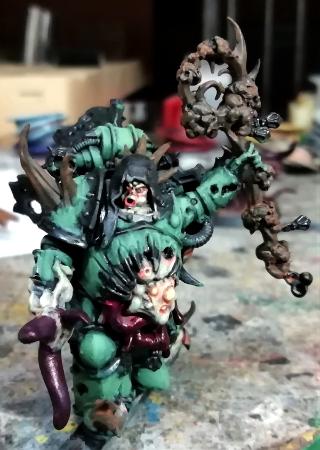
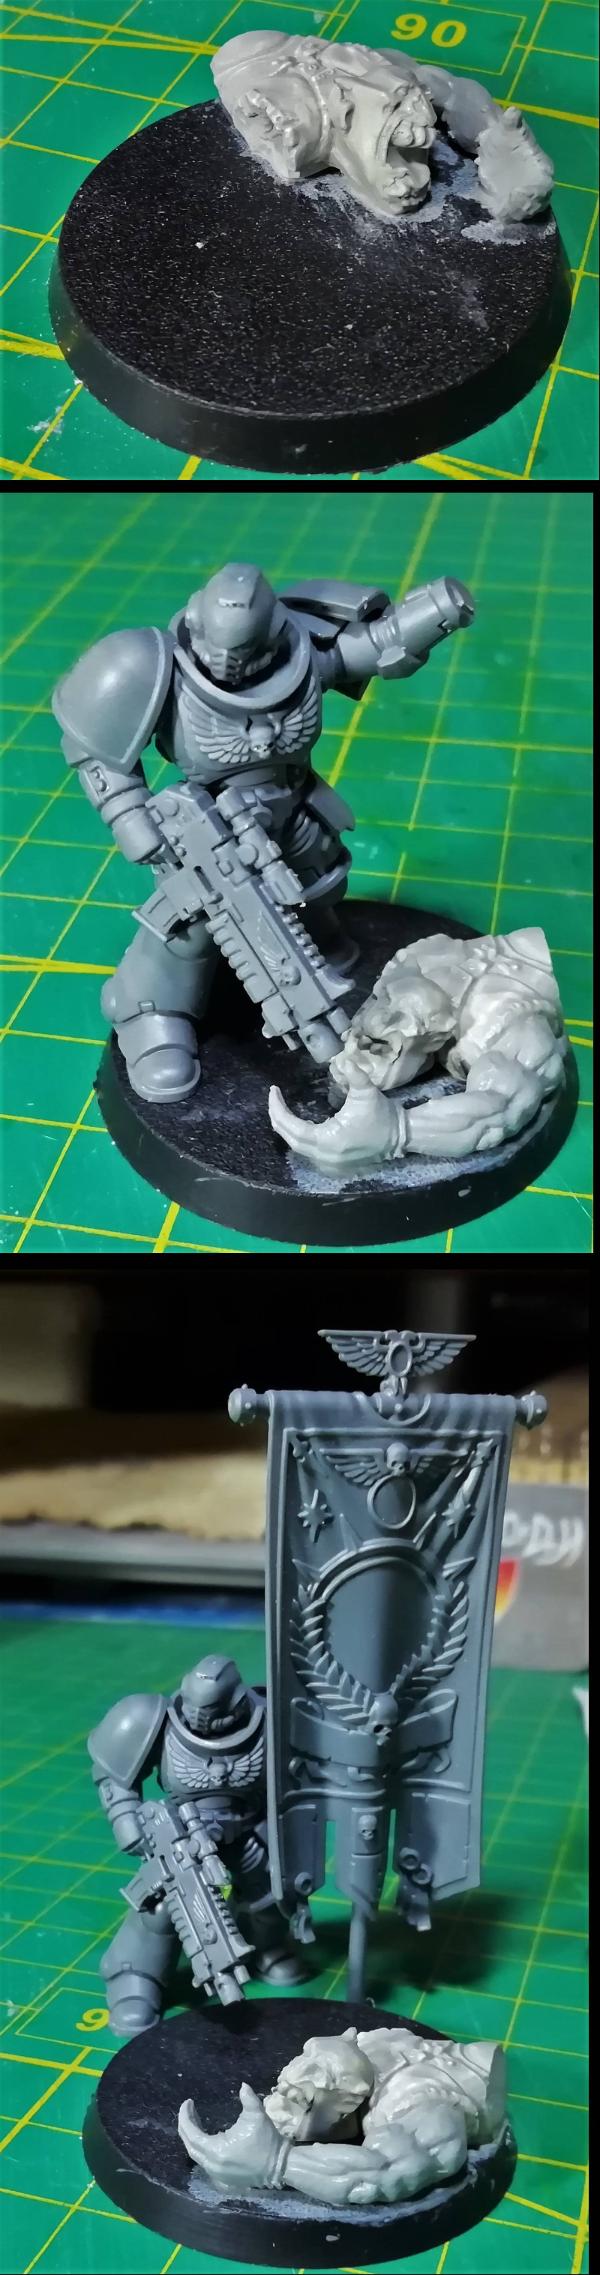

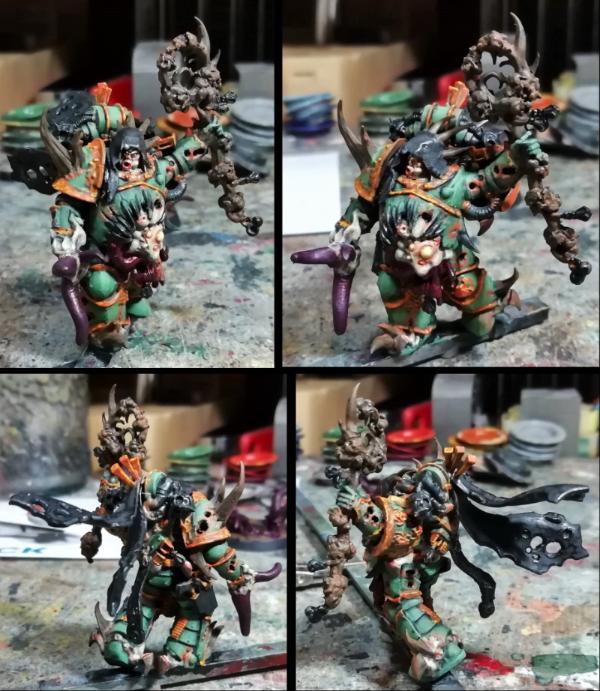
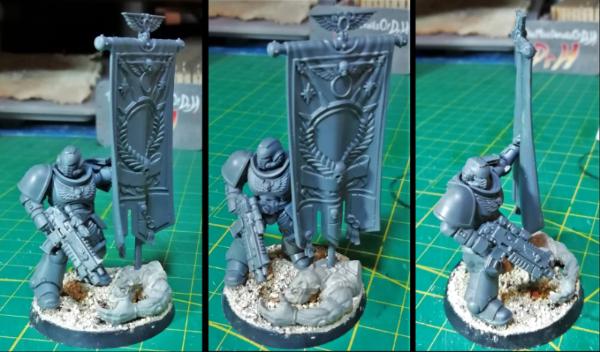

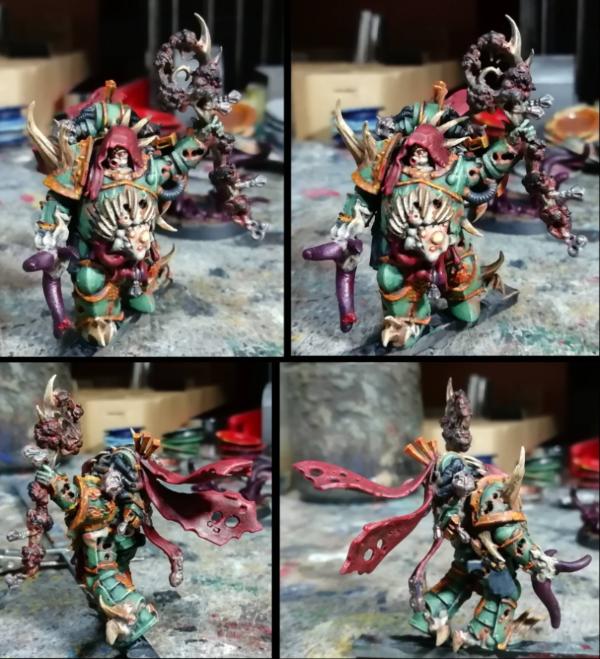
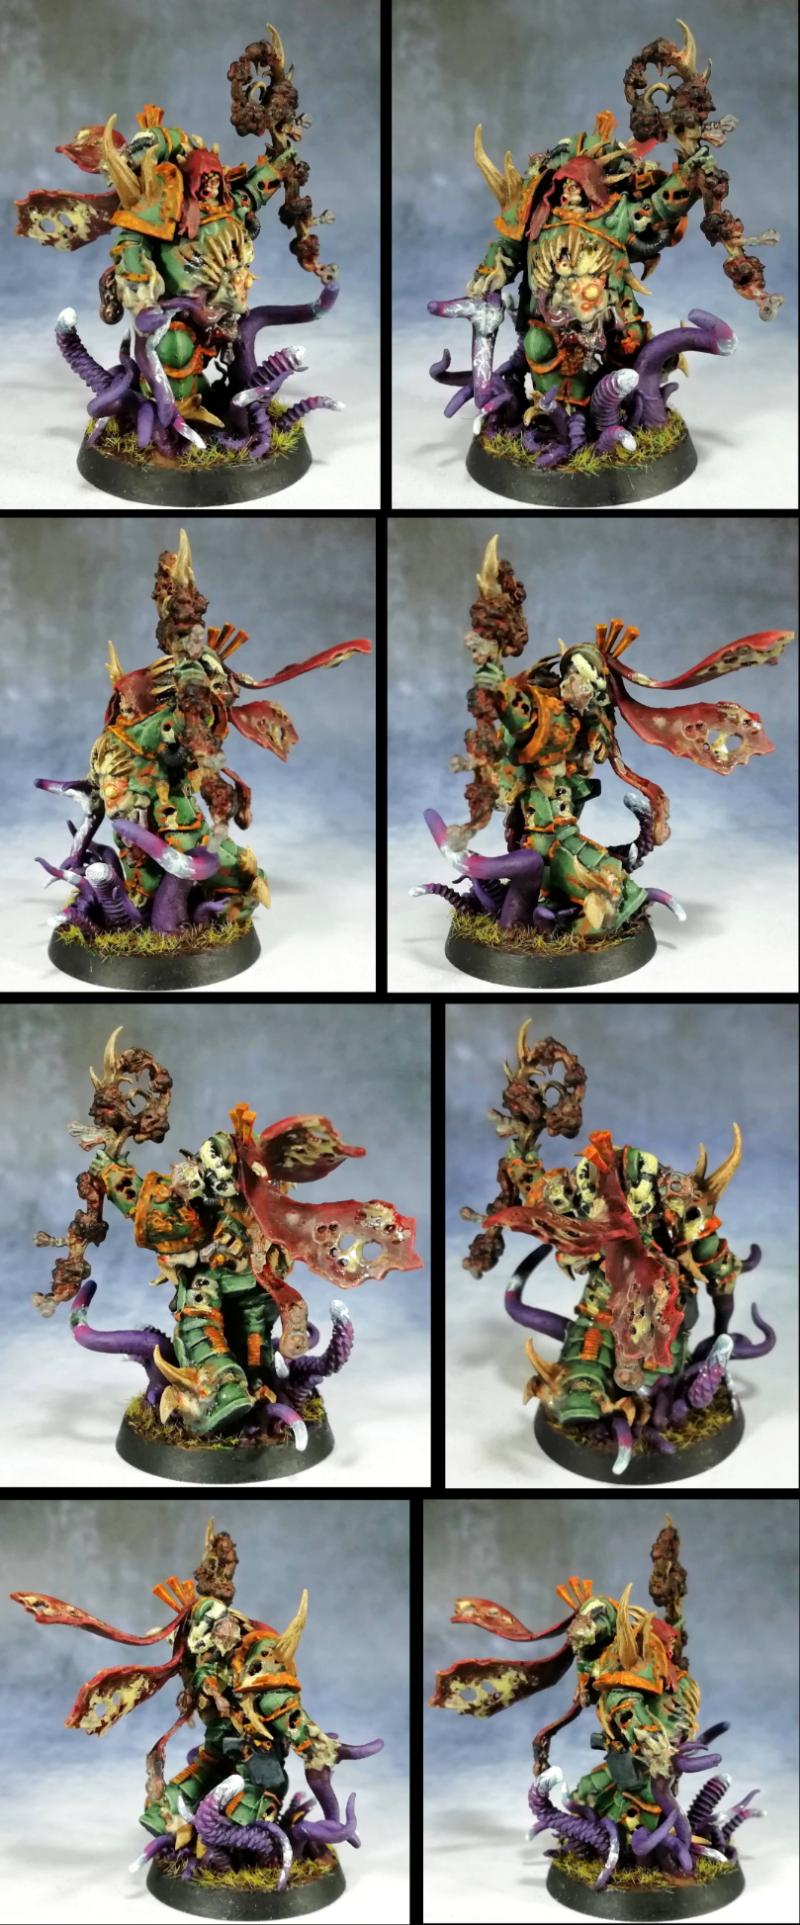

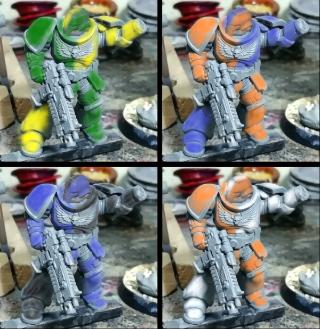
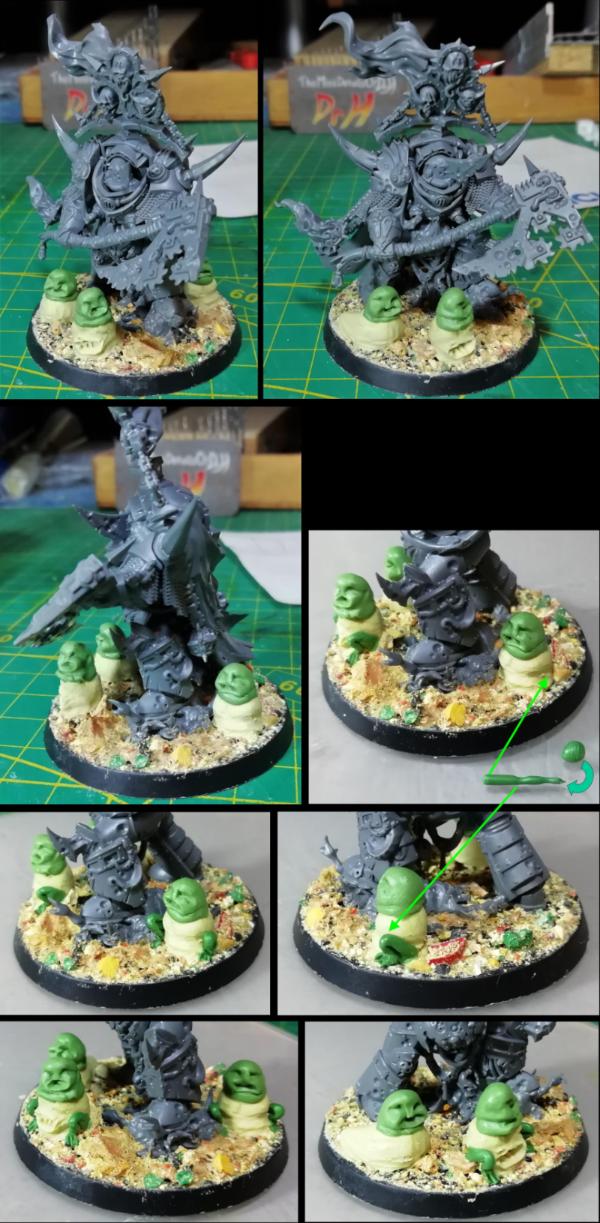
 Plan is to strip out a lot of details, fill in bullet holes, swap his gut out for abs, swap his head out for a possessed one, etc, etc. Personally super excited.

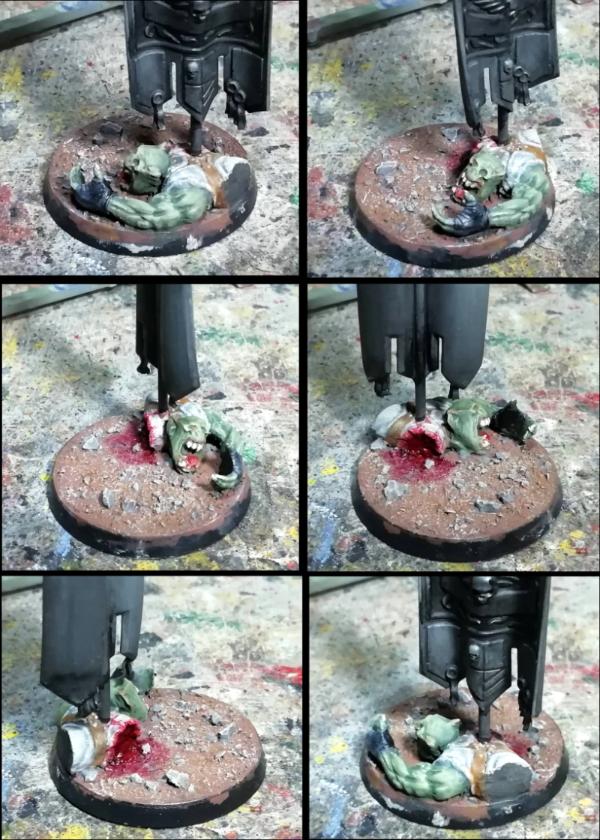
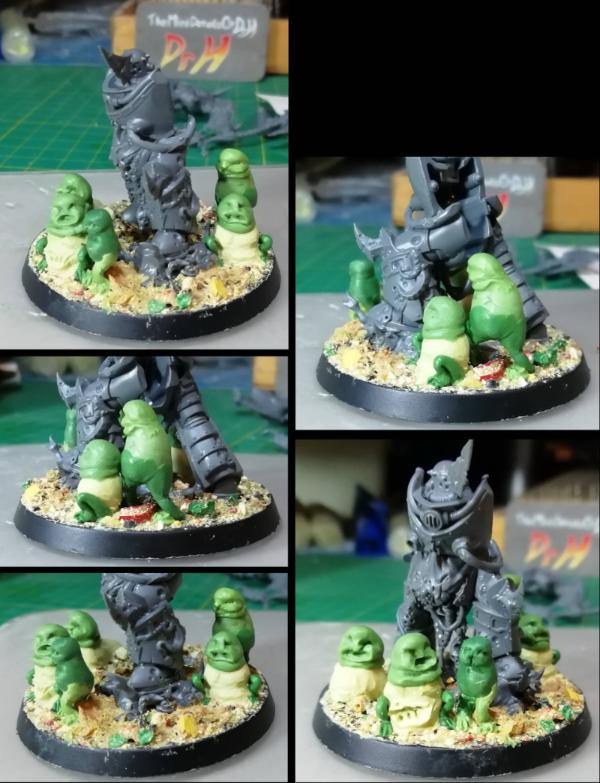
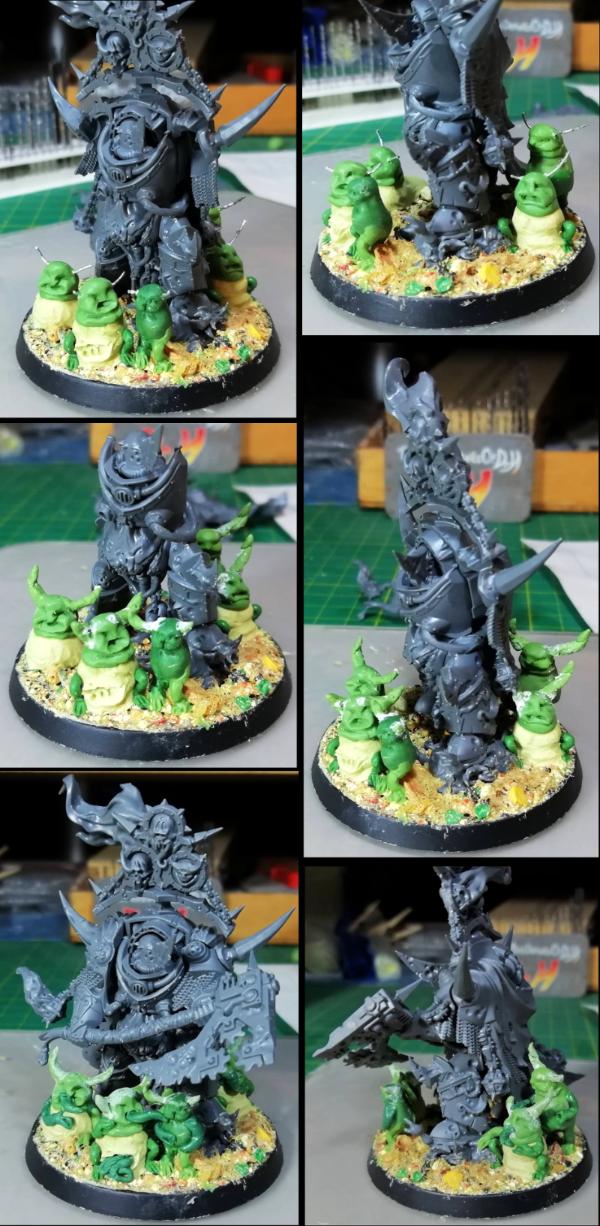
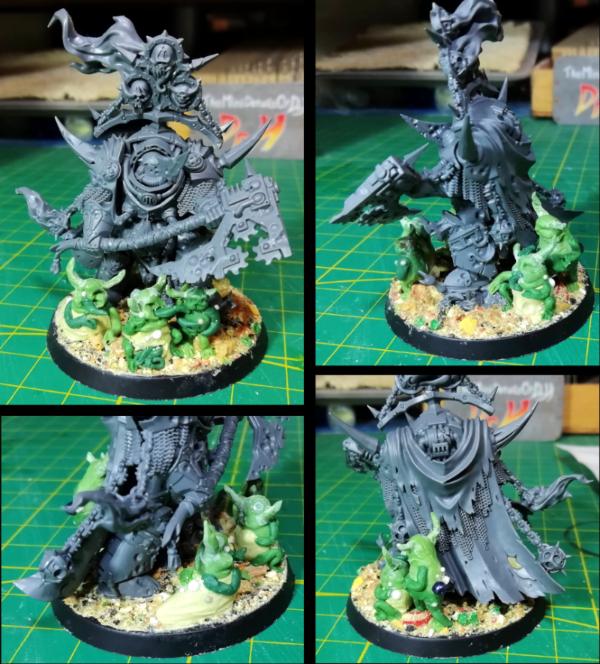
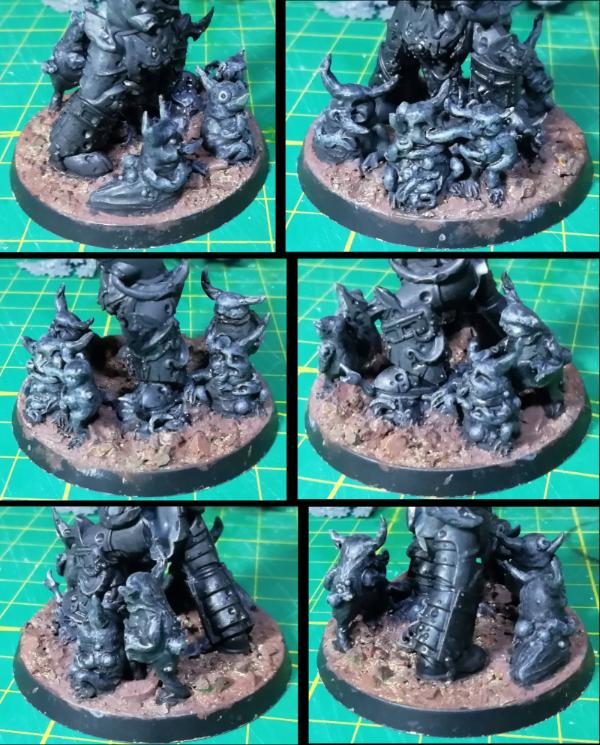
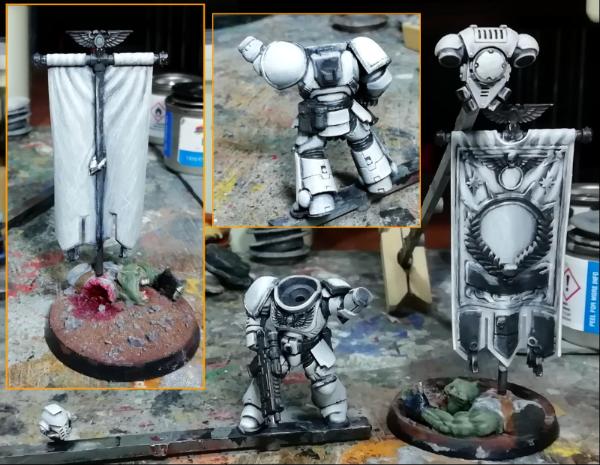
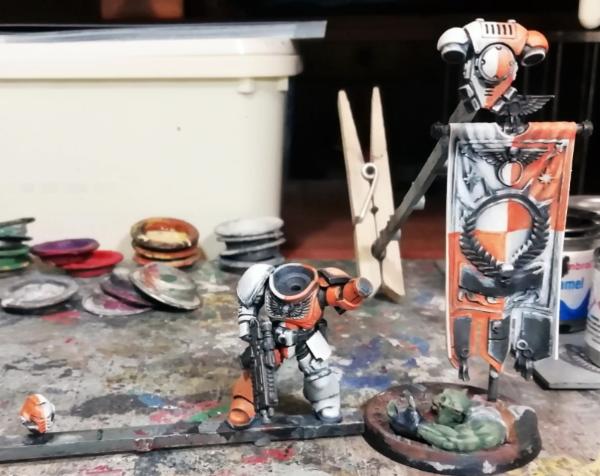
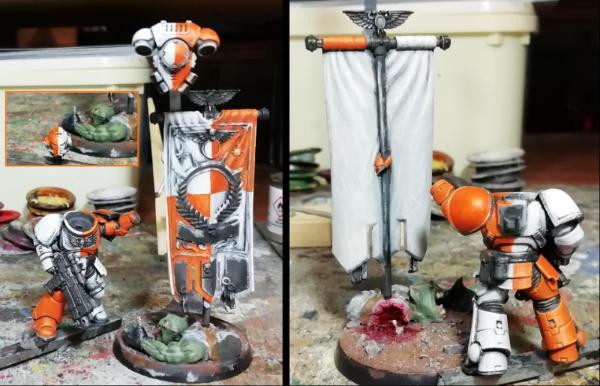
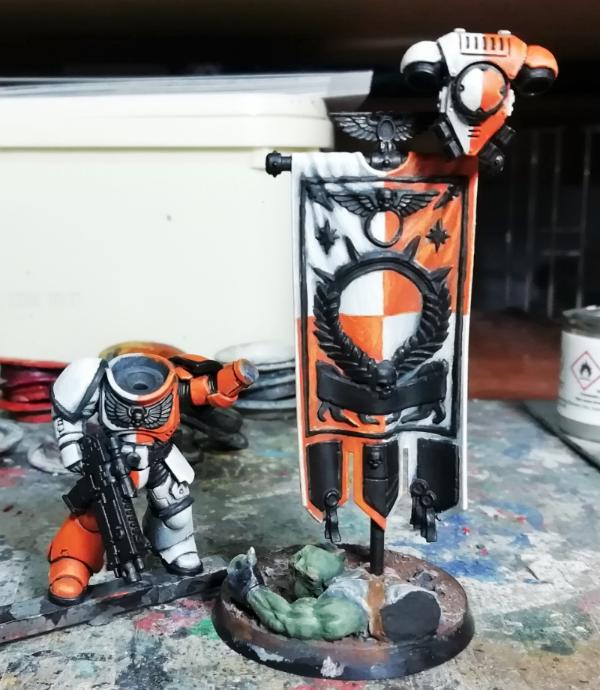
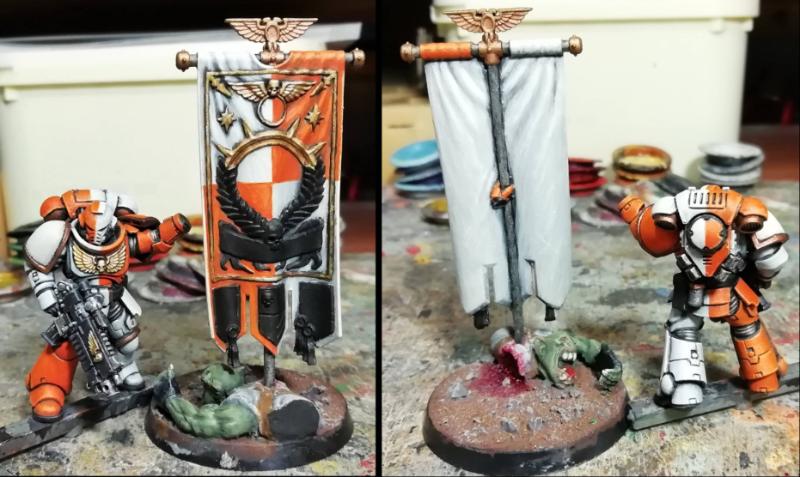
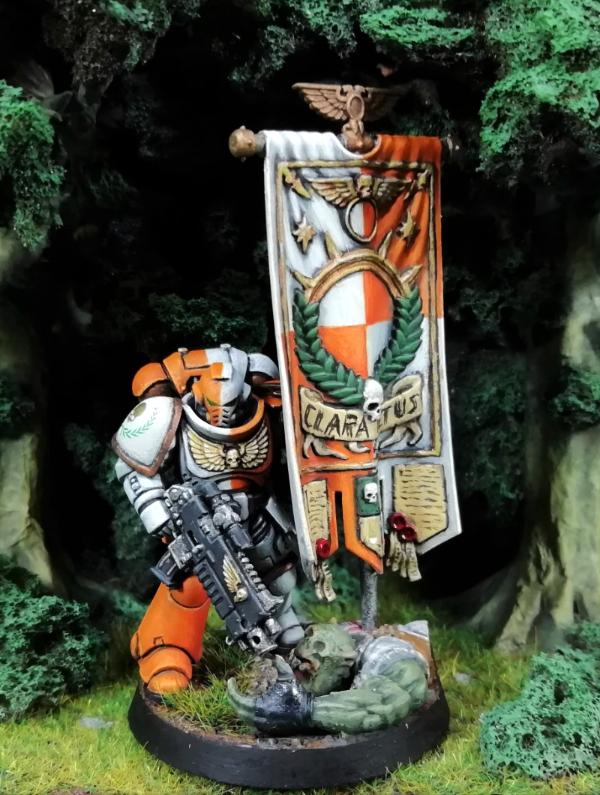
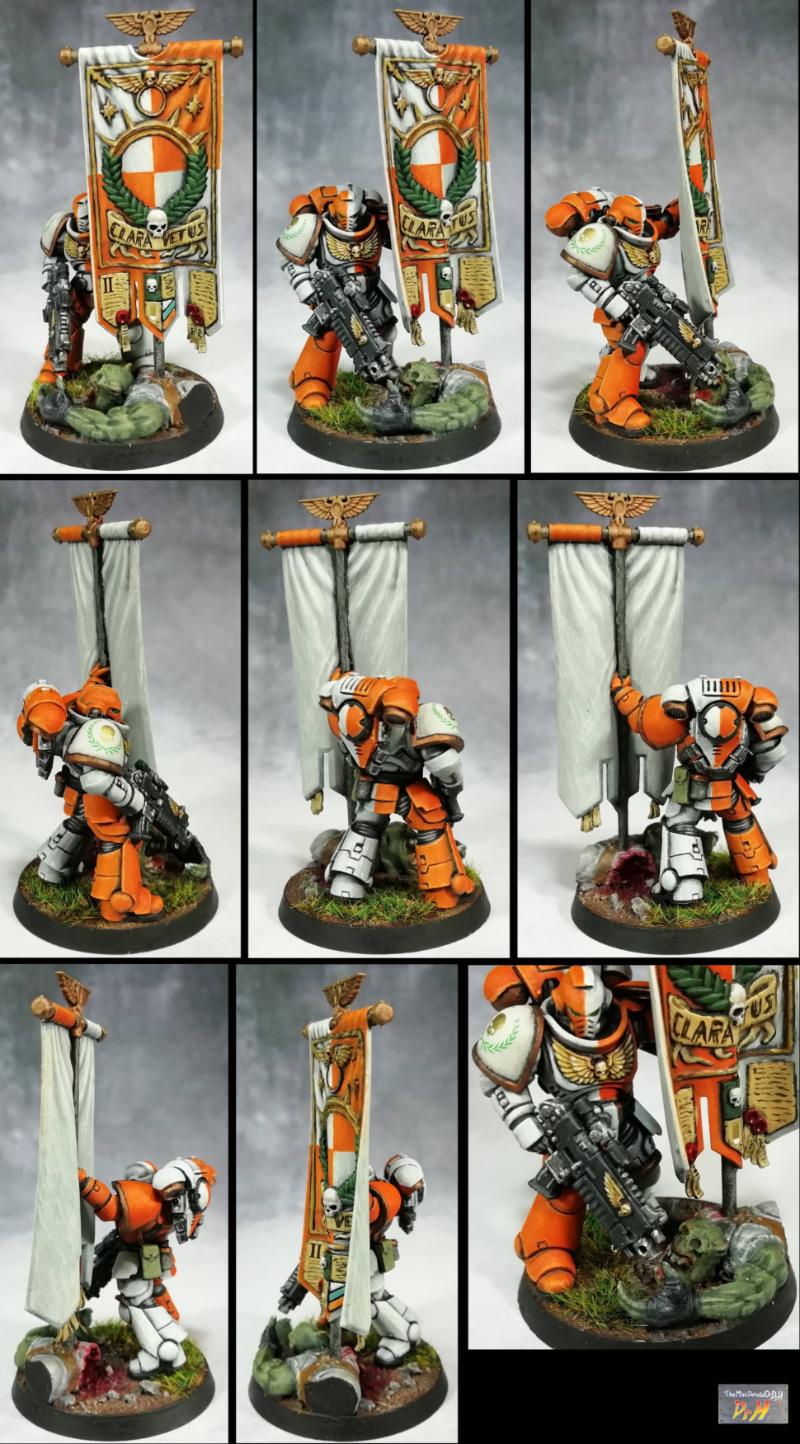
 .
.
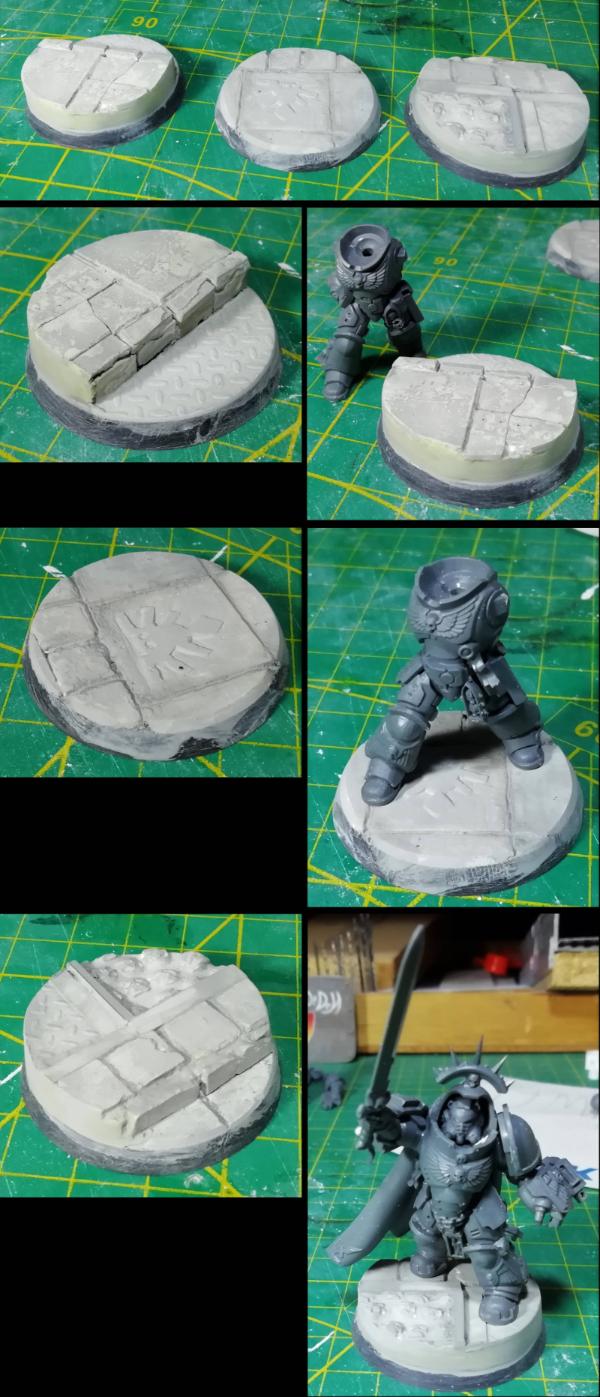
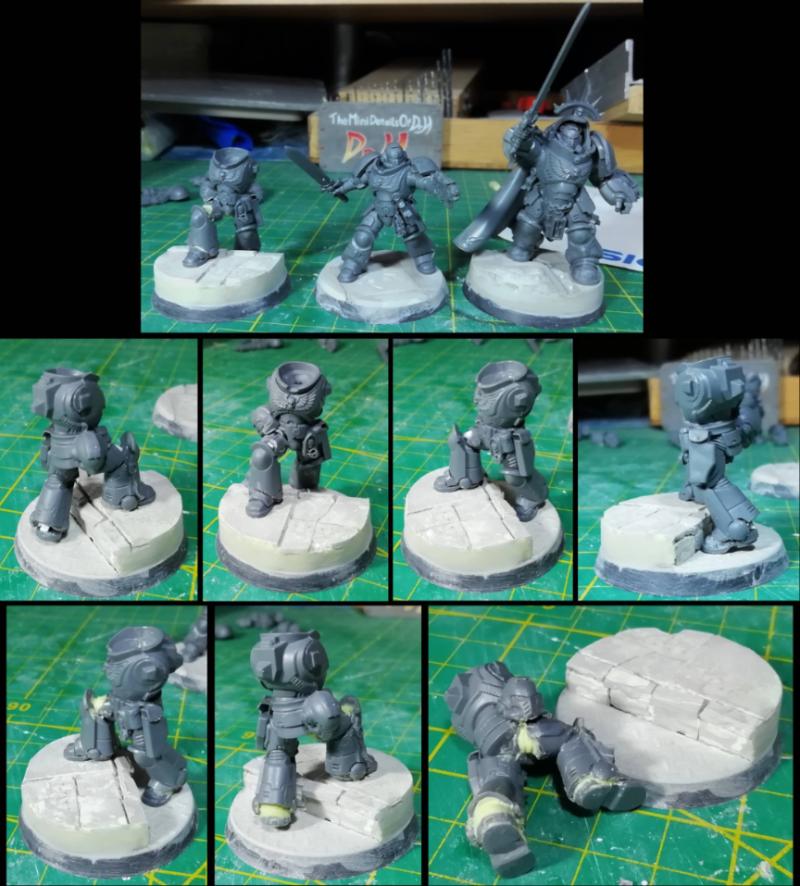

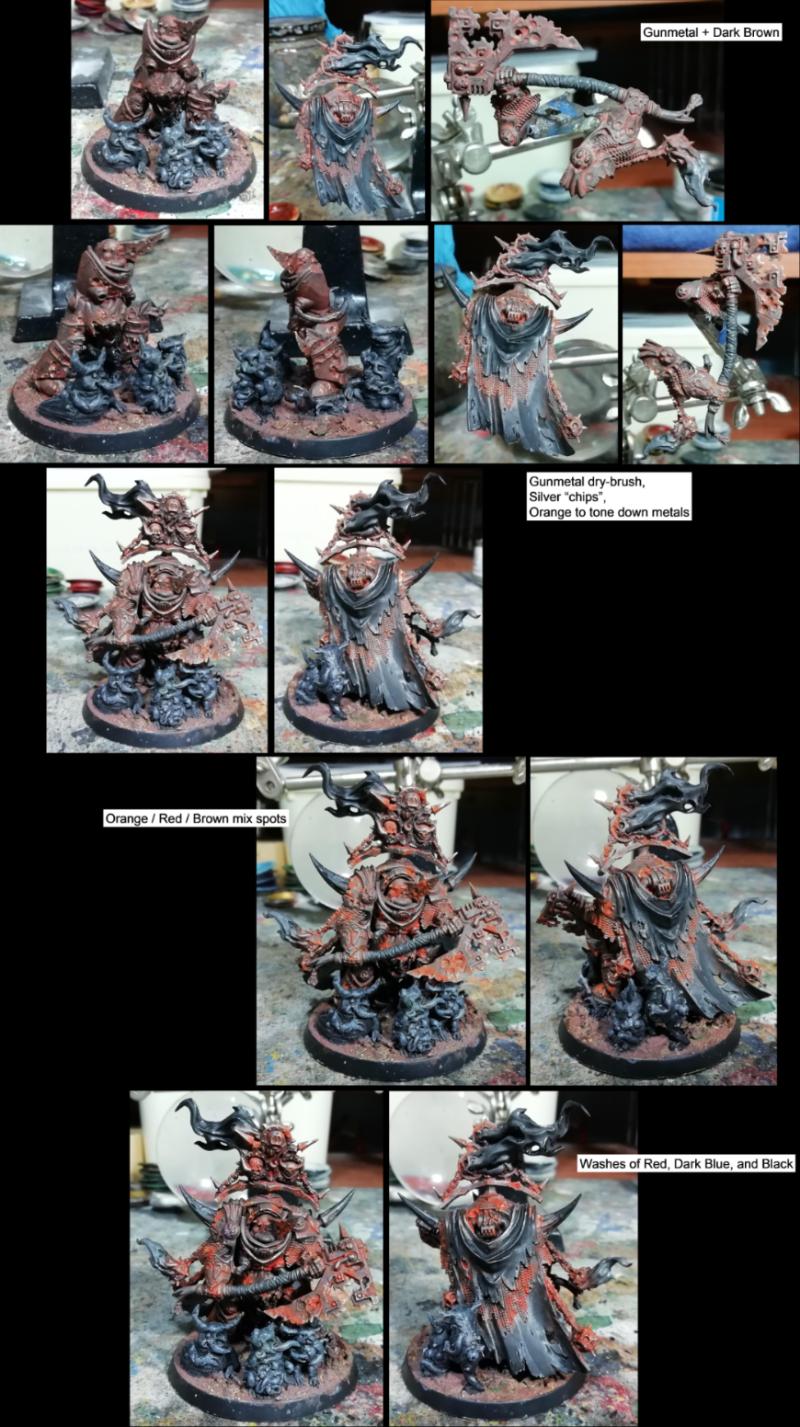
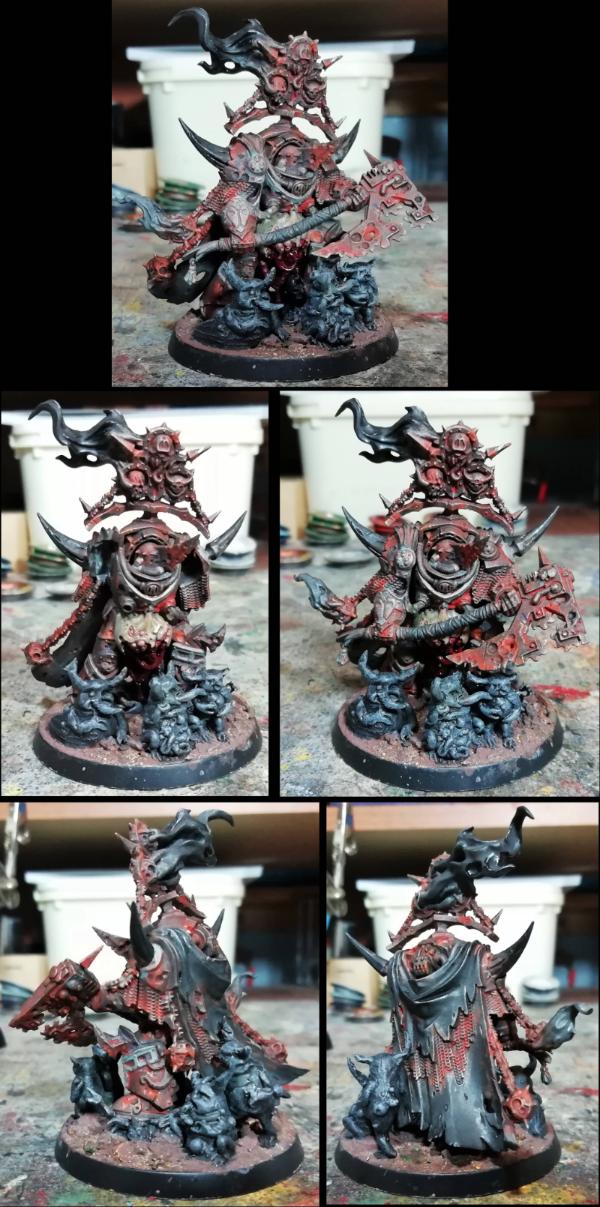
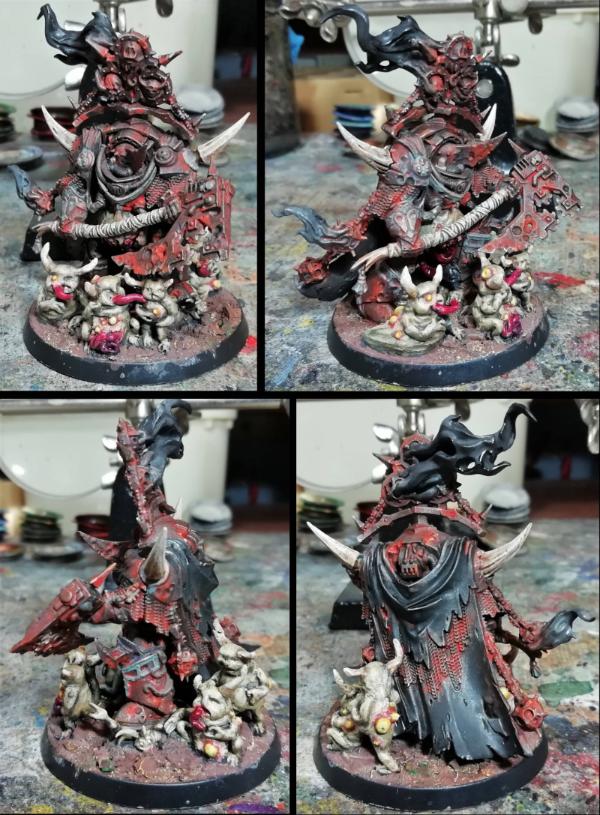
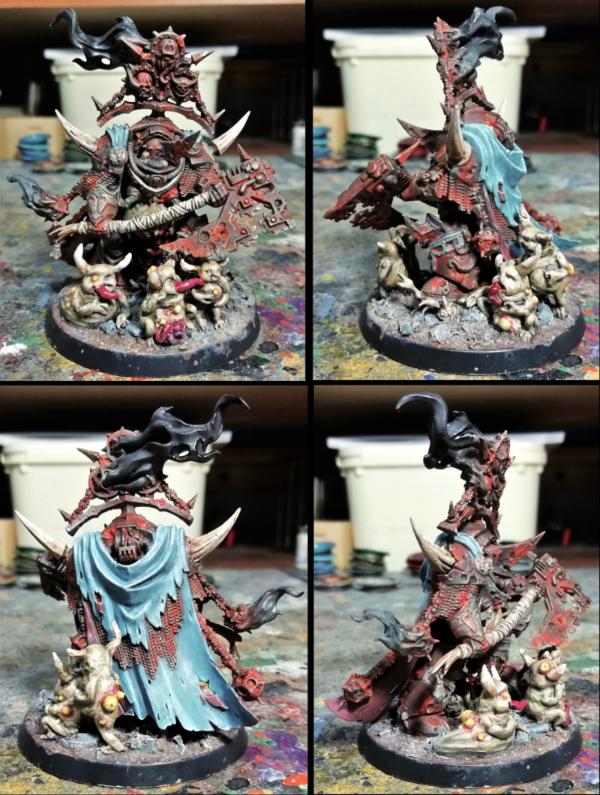


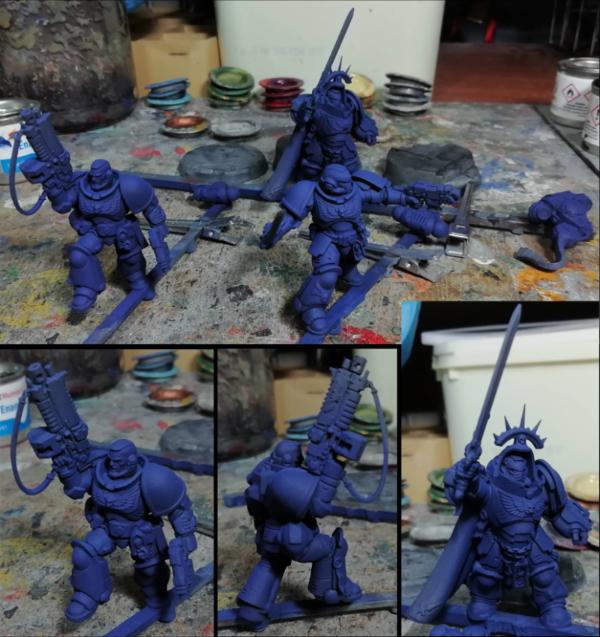
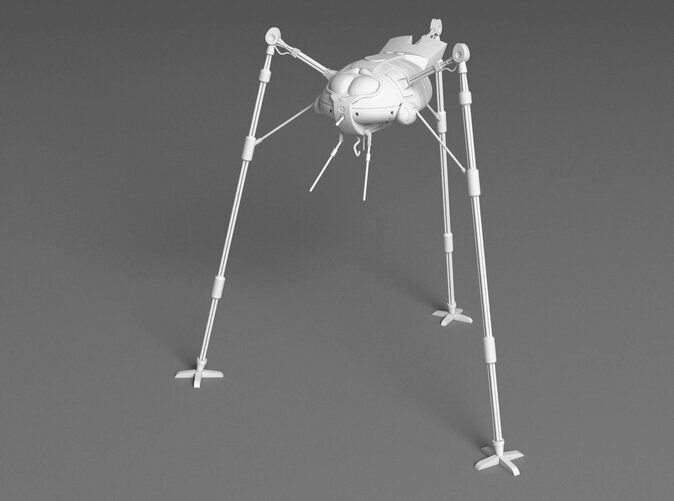
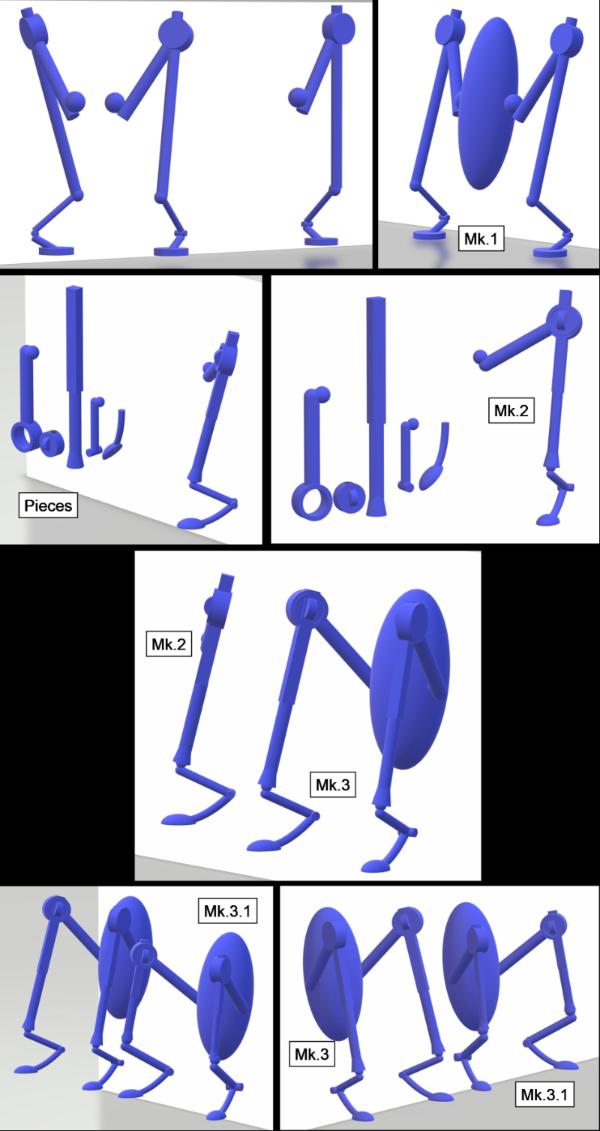
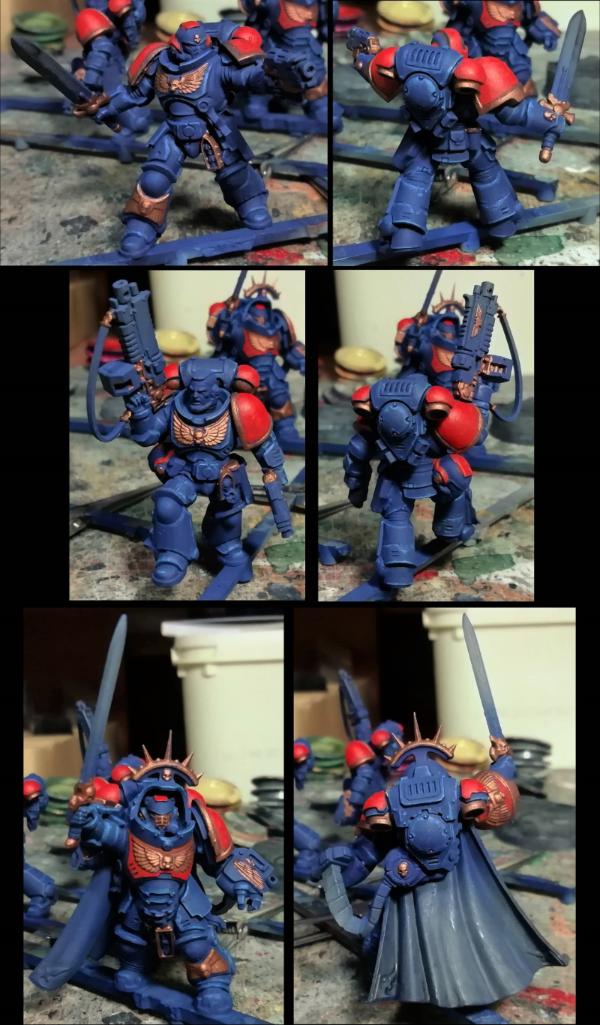
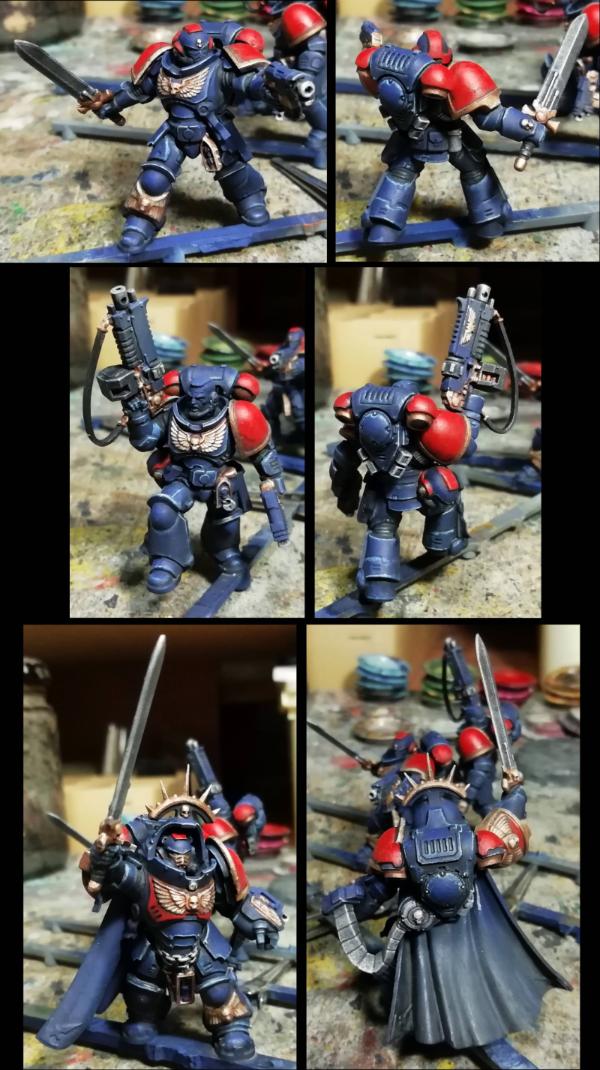
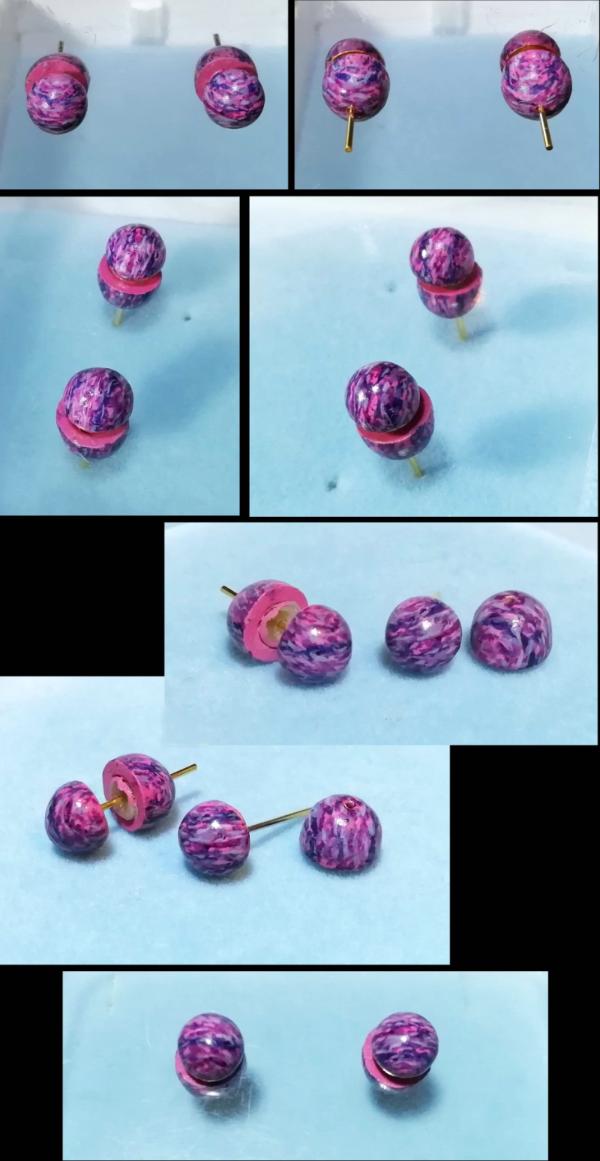
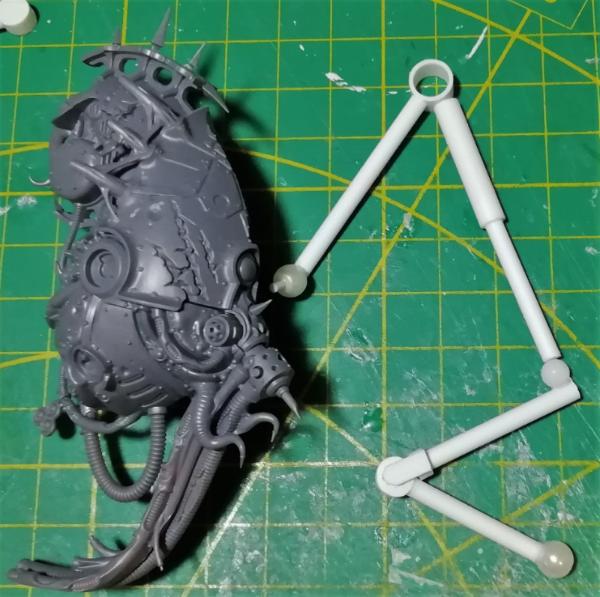
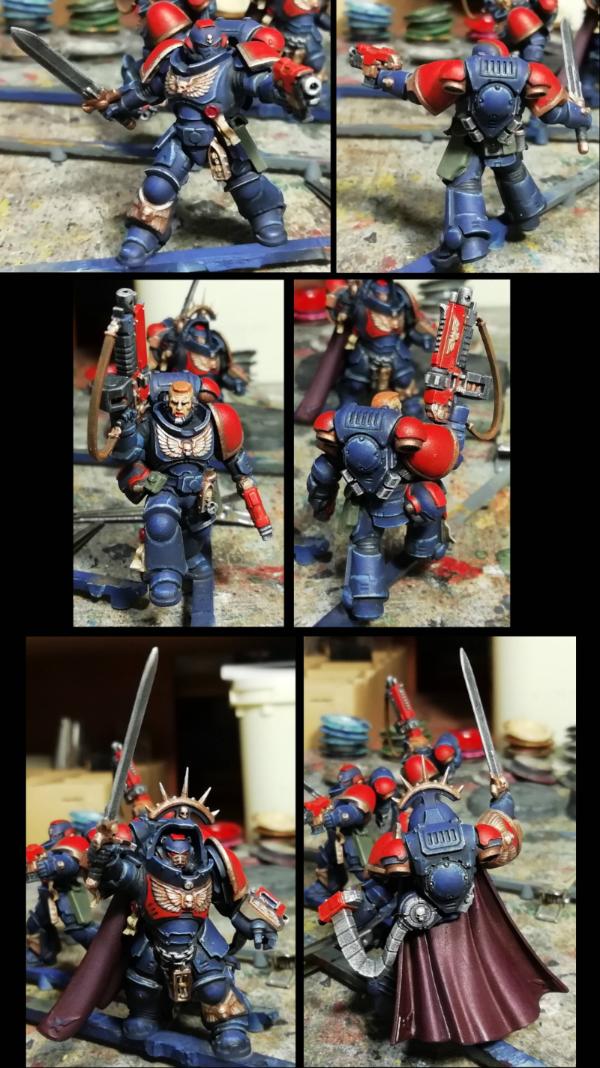
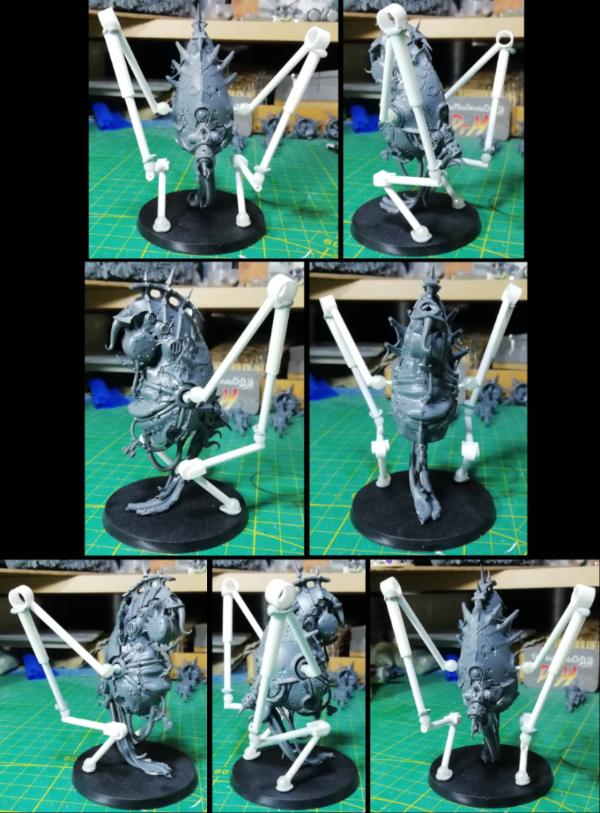
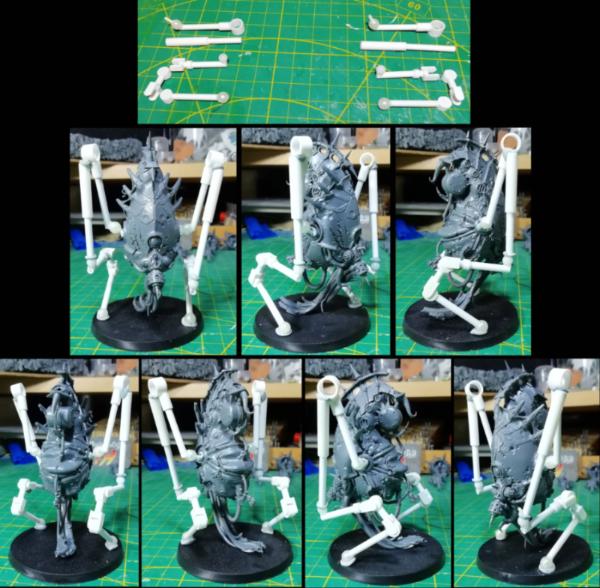
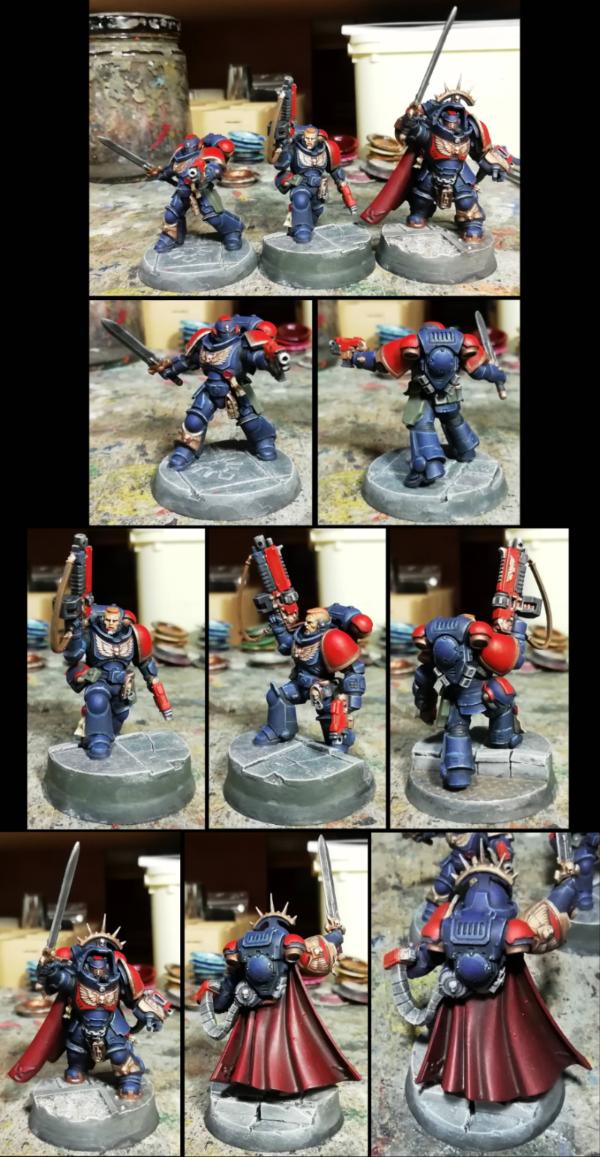

 you know that Right?