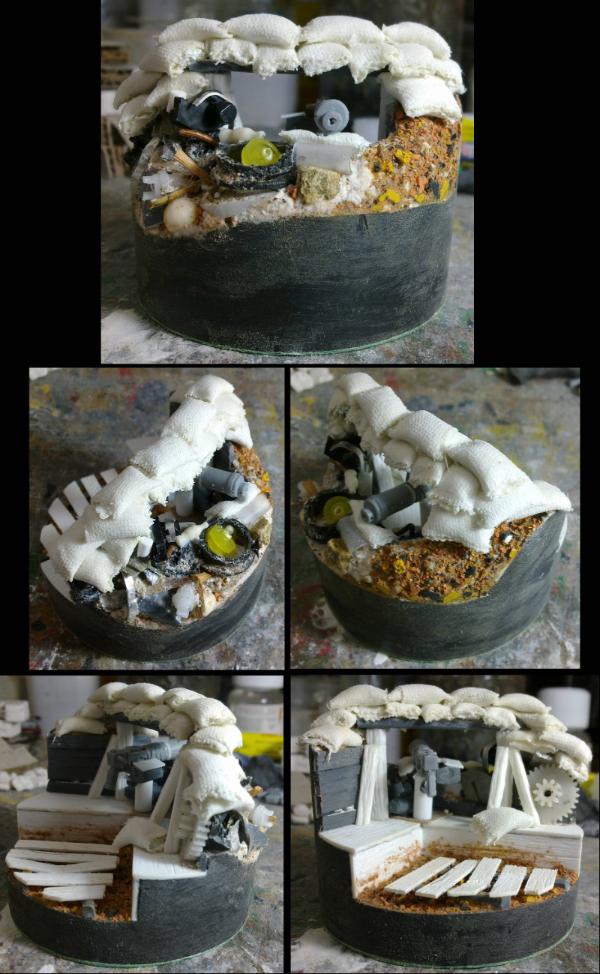
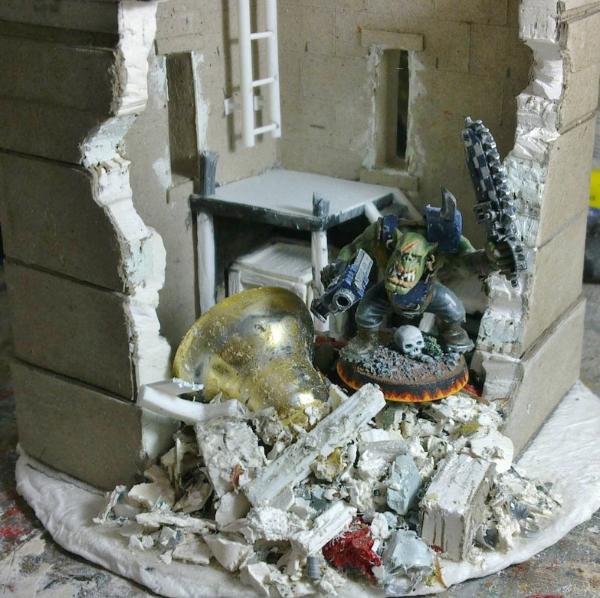
Well I very nearly completely cocked it all up with my bright idea.
The idea was thus; to give the flesh a metallic sheen by dry-brushing metal over it.
The result was; less than impressive. It did give a slight sheen to the skin as intended. But when the light didn't catch the metal, it looked horrible, flat and dirty (not in a good way).
I took photos to check (and will show you all later) and have now gone over the whole model with white spirit to wash off the metal paint. This should have taken the model back to where it was before the metal was added (as all previous layers were dry). There may be some residual metal in crevices, but that will be subtle and can be explained as the intended effect of metal skin, and there might be some bits to touch up before continuing.
Probably should have tried this on one of the weapons first as that would have been easier to fix...
Semi-disaster over, mostly fixed, normal service will be resumed shortly...
Urks... those tubes already look so disgusting real, like cutting open a fresh chicken... even before this baby is ready, I will vomit. Great job! I had painted my own to look like dead fleash, but I consider re-painting it to living tissue like you do. SO much better - ah worse - just - gulp... better not look into this blog when eating, now. Expecially chicken.
I meant glaze in the traditional sense of a thin transparent layer over an opaque coat, not what is labelled 'glaze' by some companies. It is a classic technique, especially with oils -- hence my mention of the Master It also is working very well for you.
As far as joining the acrylics club, meh. I keep dreaming of breaking out my oils and painting with them, but I just dislike dealing with the solvents. Turpentine especially. Linseed Oil is not so bad, but under the right conditions can spontaneously combust :| You're using mineral spirits?
Edit: Just looked it up. Ah, white spirits is UK English for mineral spirits. Never mind. And there is an odorless variety these days. Hmmm. Interest piqued. I'll get some next time I'm out. Blending with oils is so so very much nicer than with acrylics.
Thanks Hruotland. Lol Good to know that it can provoke that response, just what I was going for.
Thanks Shas. I only use metallic paint for metals. I would probably have to almost completely obliterate the flesh colour to make the "metal skin" work. Something to try again in the future.
Fair enough, Red. Yeah, that one.
Strangely enough, when working on paper, I prefer to use watercolours...
Thanks.
Ja, it would be mineral spirits over there. I do use the smelly stuff, doesn't bother me with my chemistry background, I realise this is not the case for others.
Don't know how the odourless variety compares, good luck.
Thanks Jehan. Yep, fully modular for all your psychotic, violent cyborg needs. Nice reference.
and look at how big a power fist is on a basic SM, this one is positively in scale...
So, with the "metal skin" idea binned for now, I have taken the flesh up my usual route for skin.
Looking back at the method I posted on the last page, this it taken to the end with all highlights (2 or 3 passes at each stage).
White background so that you can see the shading in the flesh.
Still have to do the red wash for the sore bits and then finish off the metals and small cables and then on to armour...
Well,, even for metallics, I do the darker metal, then highlight with a much brighter variant, the trick is having the just right contrast between the metals if they are too close the effect does not pull off enough.
I found the easiest is Tin Bitz base, dry brush it with the Dwarf Bronze, and highlight with shining gold for a very brassy/bronzy effect
for more steel like I used Bolt Gun metal base(maybe a dark wash), then do a dry of chainmail with the final highlight with the Mithril Silver.
Thanks Shas. That's roughly what I do with metals.
Brass > copper > dark wash > highlight gold (for copper colours)
Brass > Gold > dark wash > highlight silver (for gold)
Gunmetal > dark wash > highlight silver (for steels etc.)
Vary the relative quantities and what wash to use for various metals. That's just the base coat above, and even the silver didn't save the "metal skin" I tried.
Thanks Casey. Armour soon.
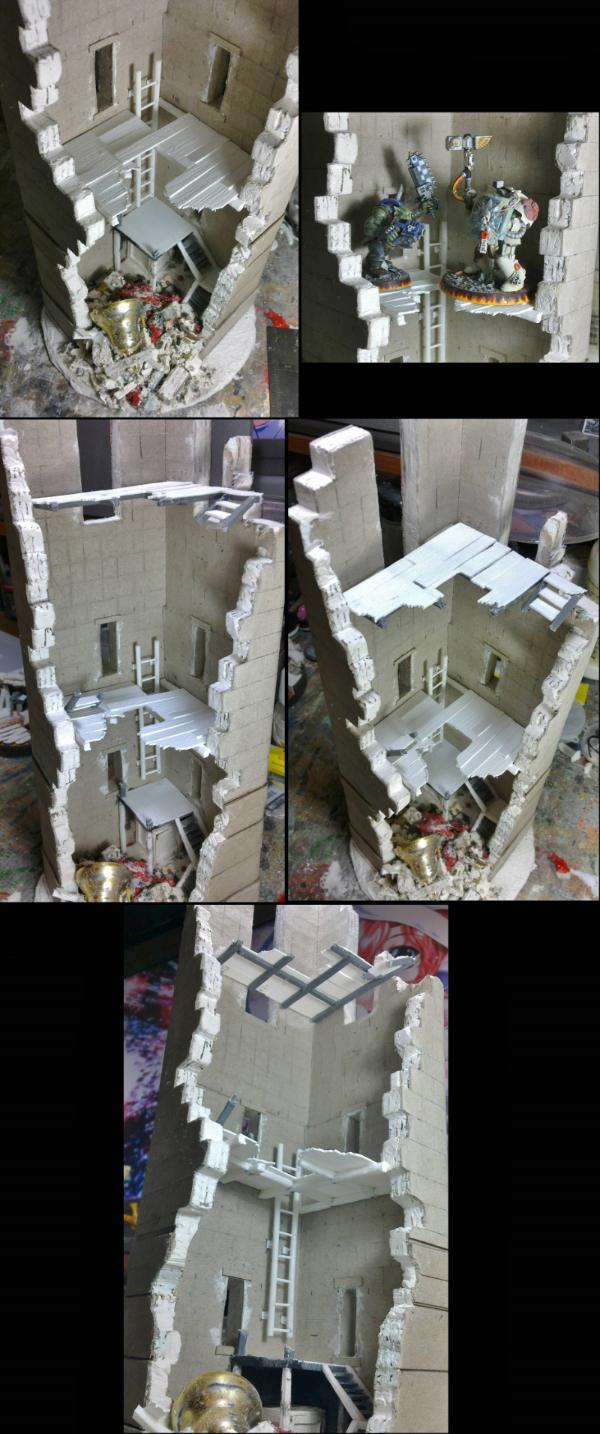
Today's update is on the reddening of the skin and the metals.
I also remembered that during the build, certain details were not visible to you chaps and thought I'd take this moment to show what was what...
(this is before the metals were done)
And this shows the body with the metal washed and highlighted, also the various cables done.
There are a few bits that need touching up (such as around some of the horns/spikes, and what to do with the exhaust, etc...), but they can be seen to as I progress.
I shall be looking at the armour next and bringing the whole thing together...
Okay so the trick just had trouble is all. I know there are some who use the non-metal colors technique to trey and mimic metal. Old 'Eavy Metal paint tricks I felt still looked like just another paint job, but never actually metallic.
Thanks OMN. Creepy is good. Glad to have won you over.
Thanks Shas. Oh, I never actually showed what it looked like did I?
Here you go, metallics dry-brushed over skin:
You can see where the light catches it, it looks good and shiny. Just what I wanted.
But where the light doesn't catch it, it looks flat and dirty. The grey metallic paint just killed all the shading I had put into the flesh.
Dry-brushing is not the way to do this.
Thanks Cam.
And so, I've been working on the armour. This has been though a few iterations to get here, but the colours have stayed constant... so far.
You will have to use your imaginations a little (difficult, I know. But try). The red-ish areas will be red (rich but not too bright), the brassy trim will be gold, and the black areas... will be black
At first, I had the red and black roughly 50:50 over the armour, but it looked too red. So I've reduced it to black with red bits.
shasolenzabi wrote:Most definitely a need for highlight work on the dull parts.
That's what I hoped the metallic paint would do. I shall revisit the metal skin thing at a later date, when I have time to play about.
Casey's Law wrote:Looking strong, pal, good start on the armour.
Thanks Casey. Progress below...
Ruglud wrote:So for the skin, had you considered going with a mottled effect ala the Borg?
I had thought about adding veins under the skin and did try it in a couple of places, but it didn't work.
If anyone has any good ideas of how to do this affect, I'm willing to listen and may add it to certain places.
So, I'm calling the red done...ish. Many, many layers of red over brown and red-brown to get to this stage. It should look darker around the edges... rich, but not too bright?
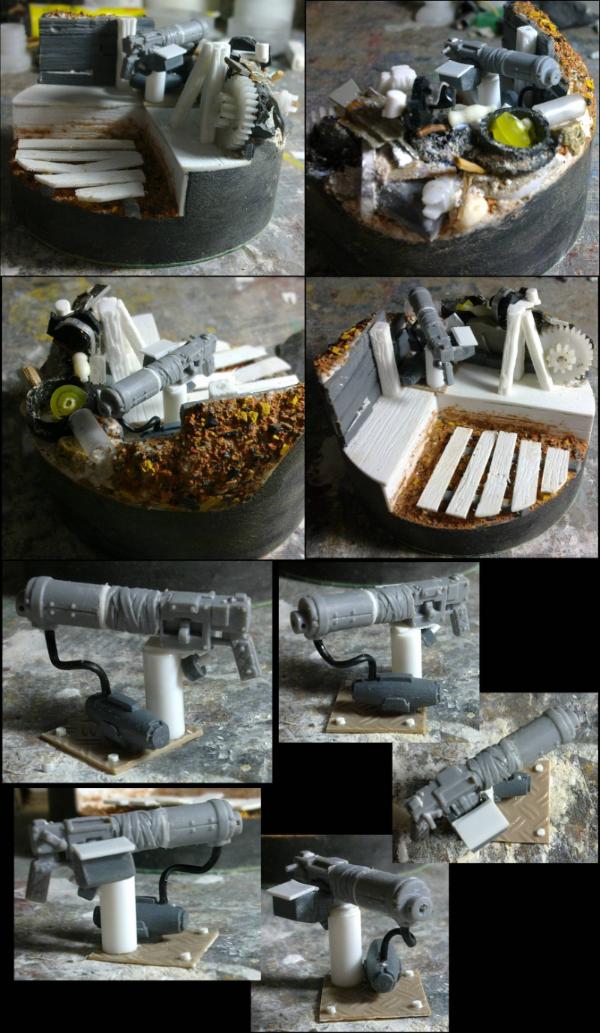
And this shows how all the weapons are being tied in to the Dread'
There are a few areas of not quite perfect red, but this is not going to be "factory fresh" at the end, so any dodgy parts will be hidden with scratches etc...
Now to finish off the black (quickly dry-brushed with grey above, needs smoothing out), and then the gold work.
Sorry for not dropping in on peoples blogs much recently, I've been busy with this and Christmas presents that I'm making (won't be able to show these until after the day).
Sorry, can't add anything constructive - my brain has overloaded with the strain of trying to imagine the reddish areas as red, the black areas as black and the metals to be mettalic
Hmm, how about a metallic wash over the skin, that might shine a bit better in the recesses but leave the highlighting on the skin visible. If you could find a good translucent metallic glaze that might be a plan - but not too sure if you can get a good glaze that keeps it's metallic properties. Maybe a pearlescent glaze could give the skin the sheen you might be after. Not sure on any of that....probably needs some test subjects.
DR H, out of curiousity: When you said you're making money out of these projects -in the case of the Hellbrute are you making moulds out of blue stuff to replicate the parts, or otherwise duplicating it? Or is it a once-off? As superb as it is I can only imagine the time that went into creating it...
monkeytroll wrote:Sorry, can't add anything constructive - my brain has overloaded with the strain of trying to imagine the reddish areas as red, the black areas as black and the metals to be mettalic
You don't need to imagine the red parts any more, MT.
Hmm, how about a metallic wash over the skin, that might shine a bit better in the recesses but leave the highlighting on the skin visible. If you could find a good translucent metallic glaze that might be a plan - but not too sure if you can get a good glaze that keeps it's metallic properties. Maybe a pearlescent glaze could give the skin the sheen you might be after. Not sure on any of that....probably needs some test subjects.
It's an interesting idea. I'll remember that.
I'll try out various metal skin techniques another time as I don't want to experiment and have to re-do the skin again on this one.
thegreatchimp wrote:DR H, out of curiousity: When you said you're making money out of these projects -in the case of the Hellbrute are you making moulds out of blue stuff to replicate the parts, or otherwise duplicating it? Or is it a once-off? As superb as it is I can only imagine the time that went into creating it...
This is a one-off, super, extra-rare, extra-special, one-of-a-kind piece. and will be priced accordingly...
However, no I won't be making back the money for the time taken on this one. But like most of the things in this thread, it's an experiment to see where money can be made, what sells well, what doesn't, where to put the effort in, etc...
So far I've tried things such as:
Basic models with basic paint-jobs, (easy, guaranteed, but lower profits)
Usual, "official" paint schemes Vs. Unusual paint schemes, (unique seems to sell well)
Various techniques to give unique touches, (some good, some not so good)
Casting my own pieces, (jury's out...)
Group Vs single models, (the more specific the model, the longer it takes to sell)
And, the various things on the Helbrute...
I try to keep track of how long things take to give me an idea of what is worthwhile and what wastes time.
Turns out, scratch-building 14 interchangeable pieces for a modified, single-pose model, takes a lot of time... I won't be doing things like this often...
As for moulding these pieces, some of them would be possible as they are, but some would have to have been made differently to allow for casting. Many of them are also custom made to fit this particular model and therefore the casts would not be worth that much to anyone else. It would be better to make casts of unique weapons that fit onto an existing model with easily exchangeable parts (a multi-piece, pose-able model for a start), which won't require the buyer to modify their model to make it fit.
Ruglud wrote:So for the skin, had you considered going with a mottled effect ala the Borg?
I had thought about adding veins under the skin and did try it in a couple of places, but it didn't work. If anyone has any good ideas of how to do this affect, I'm willing to listen and may add it to certain places.
Brothers and sisters, he is not lost to us, he has emerged from the warp unscathed (well, you know, slightly damged, but there was always a trace of hat anyway....) and is once more free to , well, you know....to do....stuff
A little verdigris on the metal? Some evidence of heating/soot on the exhaust pipes? (or is that covered on the burns part?)
It all looks fine to me though.
Camkierhi wrote:Like I say it would be a personal thing, I think of Chaos as Slimey or Glistening, so the "black" panel parts would be a gloss finish for me.
Totally not necessary, though, it looks stunning as is.
I see. I won't on this one as I want the few gloss parts to stand out (the letterbox visor, the eye and lenses on the weapons and the red exposed hoses). Thanks.
Thanks Peter. Thought I'd give it a go and see what all this magnetising was all about.
Red Harvest wrote:A little verdigris on the metal?
I wanted this to say "gold" rather than "brass". Also, that would likely cover up the wash I've already given it.
Some evidence of heating/soot on the exhaust pipes? (or is that covered on the burns part?)
It all looks fine to me though.
That is covered in the "burn" part. Thanks.
Just made a mess of the freehand by varnishing too soon (note to self; get some spray-on varnish). Just have to give it an eye and eyebrow back and then wait before varnishing again.
Looking outstanding bud. Brilliant job on the chipping. Overall this thing is looking amazing. Taken a while,but worth the effort I think. Hope you get a nice penny or two for it.
Camkierhi wrote:Looking outstanding bud. Brilliant job on the chipping. Overall this thing is looking amazing. Taken a while,but worth the effort I think. Hope you get a nice penny or two for it.
Thanks Cam. Good to hear. Yeah, it's taken much longer than I hoped, but then I gave up on finishing it quickly halfway through. Just have to see what someone thinks it's worth.
shasolenzabi wrote:And add rust to the chipping!
I'm ahead of you there, Shas. Although I only added rust to some of the chips to show that some are newer than others.
Briancj wrote:I do like this dread, and all the options are attractive to a potential buyer. Luck!
Thanks Brian. That's the aim.
cormadepanda wrote:I really like the alternate face plate, and your black. It is deep, but still black. And also shaded giving a depth i enjoy in black.
I want to see it having a bad day (weathered) and look forward to it.
Thanks Comrade. Yep, that's what I wanted to achieve with the black. I have dirtied him up a bit, but as I ended up with a rocky base, I couldn't do loads of mud splashes etc. But there is dust and dirt, mostly around the legs, and some rust streaks and soot in places.
Right, so unless anyone can spot anything I've missed, it is DONE.
Have a close look through the pictures, there is loads of detail that you may or may not have missed so far.
He'll be up for sale soon. I need to have a chat with my friend to see what we're going to ask for it first.
I'll be heading back to my army blog soon with something new soon-ish...
Four Hundred Million Billion Dollars of course But that would represent a significant discount over what Games Workshop charges for the basic model, no?
Really a very nice conversion. I do hope it finds a good home.
Certainly can't see anything which needs doing. I'm on my phone so not the best pics...but I'm pretty confident that I won't change my tune tomorrow on the big screen
Nicely done, reckon it should easily fetch one of your Earth Pounds
If someone were to pay that much, I would personally visit any of their games where it is in use and move it about the table for them, making suitable noises as I do so. Just as a bonus.
The Helbrute kit is not as badly priced as some other GW "models" (in quote marks as the worst offenders are usually the single pose, 3 pieces if you are lucky, Character "models"). The helbrute sits in the relatively-reasonably-priced middle, between the single pose characters and the "large" (but not actually that large in the modelling world. I'm always amazed at how small GW models are) super-over-powered uber-models for stupid money.
Anyway, tangent aside...
Thanks Red.
If I tell you that it took roughly 107 hours to build and paint, you can work out for yourself how much it "should" cost (even at minimum wage) and therefore, how much of a good deal it'll be to whoever buys it.
Certainly can't see anything which needs doing. I'm on my phone so not the best pics...but I'm pretty confident that I won't change my tune tomorrow on the big screen
Thanks MT.
Nicely done, reckon it should easily fetch one of your Earth Pounds
Wow great work dr. All the bits/weapon swaps are amazing touches. Only complaint is the weathering is slightly dull, but doesnt draw back by any means.
LOL! Ever since dropping some interesting recreational chems, I have been resistant to adverts and such sales attempts. BUT like I said, IF I had a CSM army, that would be a centerpiece for it!
That someone is gonna be a very happy man real soon ... that's for sure!
Btw the work on the pre-Hellbrute model is really astounding for every bit from start to finish. Really impressive and excellent work can't say this enough! As I said before and to say it again Doc, you're a true genius! Keep it working up!
Thanks Gorgrimm. That's what I wanted to achieve with the options. Hide the join and make each attachment look like it's permanently attached.
Although, I could have spent twice as long as I did to get them as closely fitting as I really wanted. But I had to say "close enough" for the sake of time/money.
Ruglud wrote: So.... how close to the asking price did you get?
We got £175 for him. Which I think is a good middle-ground for us and the buyer. I got roughly the same hourly wage as I have for most of the other things I've painted, so that's ok.
We shall see what the buyer thinks of it when it arrives.
Shas and Ruglud. Yeah, not cheap. But a good deal considering the time put in to create it (it "should" have been closer to £600 if I was to get minimum wage, but no-one would have paid that much).
While I'm working on a couple of personal projects over in my other thread, thoughts are turning to what will appear here next. Stay tuned.
Having won the terrain contest, I'm now running the next round. Click on this to check it out:
And now back to our (semi-) regular programming...
My friend that helps with the buying and selling of the models / projects that I make in this blog, had been looking for the next thing for me to have a look at and found that Terminators seemed to have the largest potential for profit. He told me this at the same time as saying that he had found a cheap squad of Terminators on ebay and they were on their way to me.
They arrived, well packaged and glued together; this much was expected.
What wasn't expected was the build quality and the vast excess of glue used to build them.
You will see them in the pictures below, but I'll expand here:
None of the mould lines were removed. That's ok, some people don't like dealing with them and they can be a lot of work for someone that just wan't to get on with the gaming.
However, they also didn't remove any of the sprue tags from any of the pieces. These have just be clipped off and glued together.
This brings us to the glue. I crossed my fingers and threw them in the freezer. Hoping that it was superglue and that they would fall apart...
No such luck. This was plastic cement... the thick stuff... and there was a lot of it... all over the models...
So they sat to one side (crying to themselves) while I worked on the aforementioned projects. Now with those finished, I've pulled these from the shelf and started work.
Using scalpel and jeweller's saw, I removed them from their bases and removed their arms and the (wonky) add-ons.
Cleaned up all the pieces and assessed the damage.
Some of them needed some repair to the bodies where I'd removed a bit too much with the arms, and some needed the bottoms of their feet repairing.
True, I probably could have got away with doing neither, but I like to start from a good point and not have a problem hanging over me as I do the rest of the work.
Now, I have finished the re-posing (using wedges of sprue to angle the arms out a bit). I shuffled the arms about and selected pairs that went with how each body was sitting on the legs.
There will be much putty work to do and a few additions to make, but the basic builds can be seen below (before, during and after):
I'm referring to these as "Rescue" Terminators as I'm rescuing them from what they were before, and I'm going to run with this as a theme: They will be the most veteran of veterans, wearing old, battle-worn armour. Sent in to extract vital people or things from the most deadly of places. The damage and chips on the models will be used as battle damage and I'll give them a worn and scuffed paint-job.
I will be following this H. I have three rescue grav centurions with sprue still on, god awful mold lines, and basing. I can't wait to see what I learn from your efforts.
At least they were only 40$ and have decent poses.
Thanks for the enthusiasm. I hope to live up to it.
weetyskemian44 wrote:I love rescuing a model. Or even a whole squad. Reduce, reuse, recycle.
and you do a brilliant job of it too.
monkeytroll wrote:International Rescue terminators.... Go on....go on....you know you want to
I don't even know how I'd do that, other than painting them different colours. Not sure on the resale value of it either. Maybe I'll try and fit a reference in somewhere.
Stormwall wrote:I will be following this H. I have three rescue grav centurions with sprue still on, god awful mold lines, and basing. I can't wait to see what I learn from your efforts.
At least they were only 40$ and have decent poses.
Good luck with them. I can't offer any Centurion specific advice (as I've not seen, let alone built, that kit), but I will say; when it comes to rescuing models (especially those that have been badly built), don't worry about trying to dismantle them carefully. Use appropriate tools, obviously, but expect some damage and then either incorporate it into the final model, or fix it afterwards.
I've just added putty to the arm joints and am now turning my thoughts to additions.
One of them has some cables that extend out above his head, where 3 of the other 4 (one being an older, possibly starter set, model) have a light/lens attachment. What these cables are actually for, I don't know (answers on a post...), but I'm thinking of making a larger light/lens thing. He is the one with the assault cannon, so more light is probably a good thing. He also needs an ammo' pack for the assault cannon which appears to be missing it (did I say these were cheap off ebay...).
Other than that, there won't be much more I'll do to them. Maybe some small trinkets etc...
I'm also in two minds about the bases.
Either simple gravel and/or mud and rocks,
Or some kind of space hulk decking...
I can't see anyone voting for the simple bases, so this is me just thinking aloud.
These will also serve as practice for my new airbrush. Stay tuned for my thoughts on this later...
haha... love the thought of international rescue terminators.... Just got a question.... do you use Photoshop or another programme to create your listing images..... almost cartoon style with the text overlapping... its a nice effect!
MagosBiff90 wrote:haha... love the thought of international rescue terminators.... Just got a question.... do you use Photoshop or another programme to create your listing images..... almost cartoon style with the text overlapping... its a nice effect!
Thanks. I just use Powerpoint. One day I decided that I wanted to start cropping my photos and arranging them together, had a look at what I had that would do it...
Not the best program for the job really, but I know how to use it and just haven't got around to trying out better one (it is something I intend to do... one day).
SJM wrote:Ahhh, part of the fun for me, I love a good model rescue.
Ebay 99p specials normally.
With the amount of work I put in to a standard, new, model (see my army blog); it's not a great deal more work to do.
Stormwall wrote:Model rescue is the best part of modeling.
Frustrating though. Odd, I normally hate terminators but, I am following this with glee waiting for an update.
It can be frustrating at first, but once the models are cut up into parts, they are no different from any other model... to me.
Good to see I'm sparking your interest.
I mentioned that the one with the assault cannon was missing the ammo' drum. So I had a look though my parts (that took longer than expected when I received a package from OMN that contained a ton of bits as my prize for the LoER contest) and found the battery pack for a Predator turret...
...While they are intended as a battery pack and not ammo' pack, I thought "what the hell" and chopped one of them off and set about it:
Next is to give him a light/camera thing up top...
Thanks for the info mate... that's a cool idea..... oh... and that detailing on the rotator cannon ammo box is just awesome! Really adds a lot of detail!
False Advertising! I saw 'rescue terminators' and though, "Cool, Fire and Rescue themed or Search and Rescue themed termies." Both of which would be way cool. Instead, rescued terminators. Sigh. You'll do a good job with them though.
MagosBiff90 wrote:Thanks for the info mate... that's a cool idea..... oh... and that detailing on the rotator cannon ammo box is just awesome! Really adds a lot of detail!
Ta. Well the little comment boxes become necessary when you start putting progress pictures all together. People have to be able to follow what you are showing. Usually each montage is just for one stage and shows different angles of the same thing, so I don't usually add any comments.
Thanks. I added the triangular shape to match those on the ammo' boxes of the other Terminator's storm bolters. The visible bullets are necessary so people know what it is and don't ask "why does that have a battery pack?". The whole thing being necessary so that it has some ammo' to use...
Red Harvest wrote:False Advertising! I saw 'rescue terminators' and though, "Cool, Fire and Rescue themed or Search and Rescue themed termies." Both of which would be way cool. Instead, rescued terminators. Sigh. You'll do a good job with them though.
Who says they are not themed, and that they can't be both rescued and rescue Terminators? The theme may be more apparent once painted... there will be hazard stripes at least
They have their last lot of details; some medals and purity seals.
The assault cannon bearer has his lighting / camera addition.
After rummaging in my bits I ended up finding the perfect shape in one of the sculpted pieces I made for the feet of the Chaos Dreadnought (now that is recycling ). Added a couple of bits from the end of some round sprue and a small strip of plasticard under the rear (between the lumps on the top of the body). I thought about adding more detail to it, but the flat and plain look matches that of the Terminator armour.
You can also see here the putty work in their armpits and a couple of them needed the rear of one of their shoulder pads repaired (as the previous owner had used 2 of the right "crux" pads on their right shoulders... as well as the ones on their left. I've shaved off the crux on those pads also).
And spare a thought for the runt of the herd; the starter box Terminator. He's noticeably shorter than the others, and this is part emphasised and part hidden by the lack of anything on top of his shoulders.
Also notice that I've added to the battle damage on their armour. Again, painting will help with this.
The bases have ended up being more work than the models that are to stand on them , but they are now done.
This says it all really;
Yes, that is a Genestealer hand (I had a spare one already chopped off), and yes there are rivets (if you look closely enough. Paint will bring them out).
I did intend to leave the sides open but some of the smaller part-plates were liable to break off in the future and filling all the gaps with putty made it much easier to sand the sides to a neat finish.
I could have done more with these, but they took long enough as it is (because of trial and error. I'll know what I'm doing next time).
There will be painted details though.
And here's the Terminators on the bases (not glued), ready to paint.
Thanks Calibanite', I just had the plate loose to make it different and then remembered that I had a hand that I had chopped off a previous model, and making these I can't help but think of space hulk...
SJM wrote:Absolutely love the basing, I need to up my game!
Thanks.
Where did you get the textured metal floor plates plasti card?
It seems to work pretty well. I didn't fiddle with it much and had no major problems.
There are a few things that will need to be perfected, such as;
The perfect air pressure (Just getting the needle off the pin in the cheap-O regulator seems to work fine),
The best paint viscosity (although I seem to have got that ok),
Maybe reading about what the twiddly bit on the back of the airbrush is for (didn't touch it, worked fine...),
And the technique (distance, variation of the paint-flow, timing of layers, etc.).
As it happened;
Sorted out all the things I'd need and set myself up in the garage (No space in my room for this and no current means of extraction).
Started with my primer and, after checking that the airbrush worked with plain white spirit in, threw some in and tried it out on some card.
I should mention at this stage that I have used a siphon feed airbrush before and so I am used to the action of pushing a button to spray paint, and to getting the paint thin enough for it to spray. This new (proper) airbrush seems to like the same treatment as I gave the old spraygun.
The only new things to me were the gravity feed (stick paint in top, no need to worry about how much paint to mix up so that the tube can suck it up = win), and the dual-action trigger (after a quick play I got the hang of it fine, seems quite natural).
As no problems presented themselves I got straight on with the models.
Primed them grey. Very thin coat so not full coverage. Was tricky to see what I was doing though...
...Unlike a paintbrush you can't always see where you are painting (or I couldn't, more light may be a solution to this). Especially if you are spraying only a little paint, the jet is pretty much invisible, so it's difficult to tell where you are spraying and where you want to move your hand to spray an area of the model. This may come with practice (and more light). Painting a grey thing with grey paint is probably not the best to start with, so I soldiered on...
I then gave them a coating of black. At least easier to see what you are painting.
However, in my eagerness to make the models black I did try to spray them black in one go and this seems a bad way to do things. As you spray the paint can build up and without time to dry you can end up with runs and pooling. I could see this happening and so eased off and it didn't end up so bad in the end. I also wasn't worried as this is going to be covered up anyway.
Then (after letting the paint dry) I sprayed brown on the models from the top, leaving the undersides of things like the arms and legs, black. Part of my cunning plan...
Then (after letting that dry, and trimming a hedge) I sprayed them red. Again focussing from the top, but making sure to cover the black as well.
I took the red really easy, and built up the colour in successive passes, giving each model a light coat before moving on to the next and cycling back around after giving the paint time to dry a little. This worked much better.
This now gives me some nicely shaded red armour in a similar time that I would probably take wet-blending one of them...
And here's photographic evidence:
Now it's back to the "normal" brushes to finish these off...
The next stage was to pick out the various black, "stone" (or whatever those crux's are made of) and metal parts in black and then start on adding the base colours for these parts.
As an example of the power of airbrushing, all that above, being careful with a paintbrush, took longer than all the airbrushing...
Here's an example of how they look now:
Much more work to do on them.
and yeah, they are getting gold helmets. I said they were going to be the most Veteran of veterans.
Did someone mention hazard stripes? Oh yeah that was me...
Also done a few other things you may see; purity seals, lenses, etc.
Now on to final details, highlighting the red areas and edges, BA transfers, squad markings and deciding what is to be written on the two scrolls...
Then battle damage / weathering and bases...
Thanks Shas. That would be because they are Blood Angels.
However, the addition of the transfers didn't go as smoothly as it could have (I used to be happy to just stick on the decals and leave them with that edging that you get, now my higher standards want to completely obliterate it), still learning the best way to use Microsol/set; hit and miss at the moment.
So the Blood angel markings are battle damaged already and the rest of the armour will follow suit.
Here they are after highlights:
Also had some issues with the bases, but may have saved them (well pretty much re-painted them...).
Warboss_Waaazag wrote:Looks great! I really like the hazard striping on the power fists. Very old school.
Thanks 'boss. Can't beat the old school.
ckig wrote:Looking good! By the time your done the rescue termies will be good as new
Thanks. With all the damage I've added, maybe not so "new".
shasolenzabi wrote:I noticed the one with the assault cannon has a peppermint stick power fist.
Just say that to his face and you'll find out what it tastes of...
I'm calling them done.
They are quite beat up, but you will notice that there is no dirt or rust; they do still keep up the maintenance of their armour.
and being on metal plate floor, it doesn't make sense to have any mud etc...
The bases did have quite vibrant lines painted on, but upon trying to weather them I lifted off a patch of "metal" paint and had to fix that. This led to almost completely re-painting them and left the lines quite dulled down. I left them dull so as to not over-power the models standing on them.
Decided to leave the name plates blank so that the new owner can add his/her own names to them (as I did on previous models).
The most veteran of veterans, these marines are sent in when all others have failed and the odds are high.
When a relic needs securing or some brothers need extracting; this squad is sent in and they show no mercy.
Between them, centuries of experience, and many lifetimes of knowledge.
If you're in need of help, and if you can find them... er... the Rescue Terminators.
Whole squad:
"Stumpy", Has he noticed the hand or is he in for a surprise (you don't become veterans by being surprised...)
Assault cannon Terminator. The damage to the shoulder pad was already there when I got him (and is probably the reason the original owner didn't remove any other sprue tags).
Squad leader, looking pretty chilled out (or confident in his squad). Quite happy with how the power sword came out.
Second in command of the squad. Slightly more decorated than the others.
and Mr Hazard fist. Nuff said.
These will be up on ebay soon-ish. I'll let you know.
Calibanite Lion wrote:Rescue terminators look good, nice transformation from what they started out as! Colours and basing look good too.
Thanks. Was an interesting challenge to work with the starting issues and I'm happy with how they turned out.
Red Harvest wrote:Nice job , and on the bases too. I dislike overly decorated bases. Distracts from the mini, IMHO.
Thanks Red'. Yeah, the lines on the bases started off a bit too bright and would have needed more additions for them to make sense. This way they frame the models and don't detract from them.
Supreme Ultramarine wrote:Very impressive work as always Doc!
Red Harvest wrote:It damn well better be for a trebuchet.
Just sayin'.
Because working scale model trebuchets are the epitome and quintessence of cool....
A trebuchet would be cool. Maybe something for the future.
On the subject of pirate ships, a 1/56 scale pirate ship, or any other sailing ship, would be awesome. And would sell in a hurry.
and would be very difficult to cast at this time. Maybe with more practice (which is the aim of this project).
shasolenzabi wrote:Great Miniature rescue/recovery there Doc! Nicely done!
Thanks Shas.
Supreme Ultramarine wrote:
What could these be for, and in this thread?
For building some kind of abandoned shack? That would be nice! :-)
Greetz from the S Take care!
That would also be correct. Give the man a cookie.
Yes, a hut.
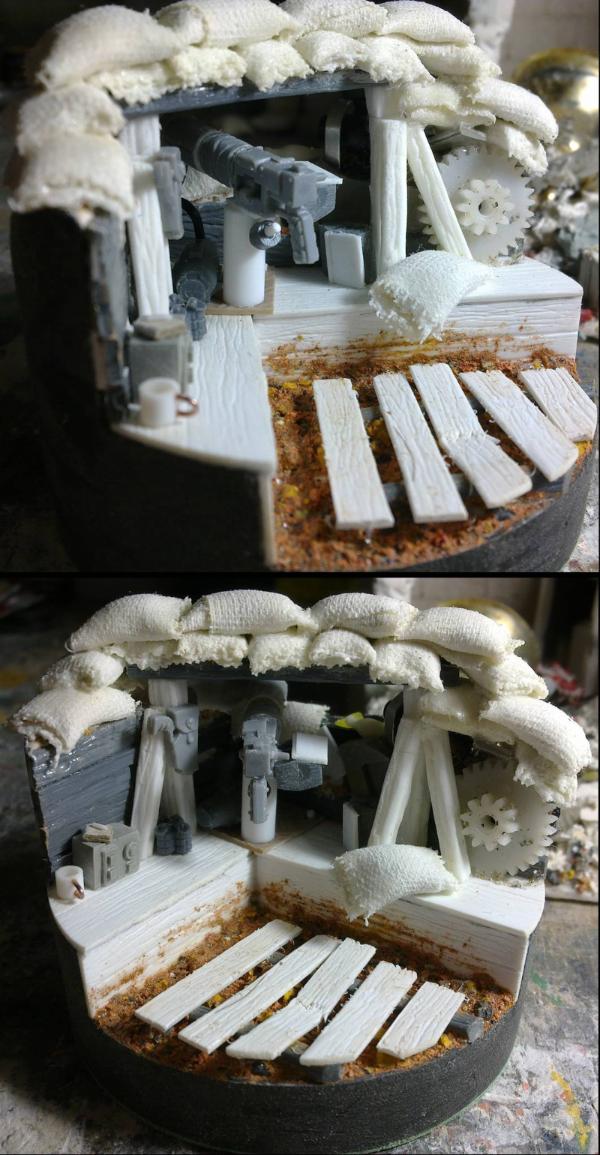
You may have seen my previous attempt at a wooden hut and I was pretty pleased with how that one came out. But it is not without it's problems, mostly in the scale and engineering sides.
This hut will be better constructed, undamaged (as a master copy), and will be moulded and cast as a model kit that will allow the customer to build it how they want (modify parts, alter the shape, etc...).
This is what I have so far.
I'm still working out how the parts go together and many of the edges are rough for the moment (as I don't want to cut something off I may need later).
What you can see is that each wall section (which still need a diagonal beam) will come separate and that the posts will also be separate.
I'm aiming to have the wall sections able to be assembled either way up and therefore only need 3 different sections to make a whole hut from without any obvious repetition. 2 completed walls of the hut will be 3 sections and the other 2 will be 4 sections.
There will also be a window and a door section for each kit, and these will be interchangeable with the wall sections, allowing you to have the door and window anywhere you want.
It should also be possible to build the hut "inside out" to give more variation. Will have to see how that works out though in the corners.
I'm going to try and give this hut a pointy roof (as opposed to the flat roof on my previous hut) which should look nice.
Also, the wall sections, turned on their sides, could make a fence; giving cover and not just blocking line of sight.
And, buying more than 1 kit will allow you to make bigger huts, different shapes (with a bit of modelling), or a hut with a fence and a porch (or whatever you like).
But, as I said, still early days and I'm still planning the layout and how the parts fit together.
I've wanted to make this kit since I started with the casting and selling things, and I hope you will be as excited at the possibilities as I am. If all goes well, I may even make a futuristic version... or other themed versions... and they could all be interchangeable with each other...
That would also be correct. Give the man a cookie.
Yes please, I like cookies!
I'm still working out how the parts go together and many of the edges are rough for the moment (as I don't want to cut something off I may need later).
What you can see is that each wall section (which still need a diagonal beam) will come separate and that the posts will also be separate.
I'm aiming to have the wall sections able to be assembled either way up and therefore only need 3 different sections to make a whole hut from without any obvious repetition. 2 completed walls of the hut will be 3 sections and the other 2 will be 4 sections.
There will also be a window and a door section for each kit, and these will be interchangeable with the wall sections, allowing you to have the door and window anywhere you want.
It should also be possible to build the hut "inside out" to give more variation. Will have to see how that works out though in the corners.
I'm going to try and give this hut a pointy roof (as opposed to the flat roof on my previous hut) which should look nice.
Also, the wall sections, turned on their sides, could make a fence; giving cover and not just blocking line of sight.
And, buying more than 1 kit will allow you to make bigger huts, different shapes (with a bit of modelling), or a hut with a fence and a porch (or whatever you like).
But, as I said, still early days and I'm still planning the layout and how the parts fit together.
I've wanted to make this kit since I started with the casting and selling things, and I hope you will be as excited at the possibilities as I am.
If all goes well, I may even make a futuristic version... or other themed versions... and they could all be interchangeable with each other...
...still, one step at a time...
Ok this sounds and looks all very fantastic! I'll be keeping an eye on this project and be looking forward to see it finished! Give it a go Doc!
It's also going to be relatively difficult to make. But I'm not one to make things easy for myself.
Might be a kit I would buy. I could used it to make another medieval house maybe?
Sounds good. I would love to see one (or two ) painted by you.
Thanks Stormwall. I'm also eager to see how it turns out.
Thanks C'Lion.
After a bit of a tidy up of the edges and fixing the lengths of the wall sections and posts, This is how the walls work:
Now all these pieces fit together pretty much any way up or any way round I can move on to the next step.
Some sides of the posts are tighter fits than others on certain sides of the wall sections, but you only need to rotate the post 90deg (or turn it over) and try again.
As you can see, it should be possible to dry-fit the whole thing together to check these things.
Not too sure about the outside of the corners yet. I may make something to fit in there and make it look more "meant to be".
Now I need 4 more posts, more planks, and then I'll make the window and door sections.
That should also give you an idea of how big this hut kit will be, that's the long wall length to compare with the 3 section short walls.
Obviously, you could build it as a 3x3 hut and have a couple of wall sections spare for a fence.
Painting: is just gunmetal over black, a few washes of black and brown and a dry-brush of silver.
The lines were made using Tamiya tape, but they have been mostly obliterated with more washes and dry-brushing.
There is also a couple of splodges of gloss black to look like oil spills.
Give me a moment to get around the auto-append... Done!
Lets see if the door can arouse more excitement then the window did.
The door frame has hinges (bits of sprue with holes in) on both sides and the door's half of the hinges have pegs on both sides.
This allows you to mount the door either way around and you can cut off the unused pegs and hinges if you want.
The door frame is made of two of the posts that are used for all the wall sections and are spaced at the same distance as they are for each wall section (so this section can be placed anywhere around the hut, just like the window, but comes with it's own posts).
Next, I have to do a little more design work...
Automatically Appended Next Post: This will auto-append, but I'm less bothered about it.
This is a really good idea for a terrain kit, in that it could work for any game system - it'd look just as good on a Fantasy or LOTR board as it would on a 40K one - clever design on the hinges, by the way - moving parts are always good!
Thanks Dark Apostle. Glad you think so. Yes the aim is to have it work with any game of the right scale.
I always like to see moving parts and try to have them in my models. A door is just too obvious a target to have moving (especially as I've gone into texturing the inside of the hut).
Thanks OMN. Yeah, all the grey is sprue (the white being plasticard and plastic rod).
The door kept demanding more detail as it started with just the brackets for the hinge, and then I thought that it should be riveted through the door and get those fancy metalwork bits. Then I thought about how those planks are held together: the walls are all "nailed" to the posts and support beams, but the door just had planks magically floating beside one another, so I added the strips to hold them together. I have to have things in my models that work (or look like they work).
Well draughts are a consequence of pre-fab' construction.
Ta.
And here's a sneak peek at the roof end sections:
Now I need to make 2 more of these and then add planks to 2 of the 3 (one being down the middle of the building not needing planks).
May need to add a cross bar in the middle for the planks to be "nailed" to...
As the hut is being designed to fit any time in history, in any universe, and in any setting (why make life easy and try and stick to one concept, eh?), I needed a roof that would fit as easily as the wooden walls do.
Anything is possible in the future, so I looked to the past and found that it's either thatch or tiles (although there is a choice in material and design of those).
Thatch:
I could have dug out a large piece of rope or a brush and made the thatch like that, and if this was just a one-off build I may have put in the effort. But I have to think of moulding and casting something that is going to work and still look good. There must be a good way to make a thatch look, without the effort of laying down thousands of bristles? And there is...
And I had an old dressing gown that I had set aside for an experiment in making grass patches, that would fit the bill... so I thought...
I wasn't impressed with the result I achieved, but tried painting some of it to see how it would look... and it still didn't look like a thatch.
Hessian sheet, maybe. Thatch, it is not.
It would work better if you used a towel with denser and longer fibers, then the underlying structure of the material wouldn't show though.
So, tiles then:
Due to cutting the card by eye and not measuring anything, I ended up with 3 piles of (roughly) the same width tiles; large, medium and small (l to r).
I then alternated between the sizes as I laid out the tiles to give a slightly less regular appearance.
As it turned out, I cut exactly the right number of tiles. I couldn't have done that if I had measured and calculated how many I'd need...
Now to make a matching piece for the top of the roof and to detail the underside.
MagosBiff90 wrote:I LOVE those bases! Very clever and loo really cool! easily adaptable for a dio or terrain piece too.... hmmmmm interesting....
And who knew those Blood Angel chaps were so helpful! Delightful manners!
In all seriousness.... that hut is really looking good! Got me beady wee eyes on this!
Thanks Magos'. Yeah, that flooring would work well for terrain.
Well all that "For the Emp'ror!" stuff is just for show. Catch them at home and they're as nice as anyone.
Ta.
Here's a bit more on the roof. I was trying to make a flat roof topper by making "bent" tiles from plasticard. But I didn't like how they turned out and so have resorted to cutting a tube up. The curves are not quite half a circle as that makes them stand too high. These are glued together in one line and will be cast like that, but they are easily cut up if you want a missing section, etc. The flat of the roof will be cast as it is and you'll get 2.
You can also see how it will all roughly come together at the end with the wall. I cheated on the inside of the roof; that's just one sheet of plasticard with the planks and the texture scored on. The two beams are just two strips of plasticard stuck on.
The inside of the roof is not going to be looked at by many people on a regular basis, so I'm spending time on what will be seen.
I had to spend a fair amount of time today straightening this roof out as it had dried further overnight and curved. As I bent it back into shape the card tiles broke away from the plastic, so I re-glued it and left it under some heavy weights.
It's straight now, we will have to see if it remains so...
I am very excited by the moving hinges. And the wood texture is spot on. I'm not 100% on the tiles, they need a bit of texture on them maybs? Still, better tiles than I did on my house!
weetyskemian44 wrote: I am very excited by the moving hinges. And the wood texture is spot on. I'm not 100% on the tiles, they need a bit of texture on them maybs? Still, better tiles than I did on my house!
Thanks Weety.
I'm pleased at how the hinges worked out. I expected to have to tweak them after gluing them on, but they worked perfectly first time. The wood texture, I toned down a little from my wooden boxes (which would still make ideal accessories to this hut ) and I think it looks less "cartoon-like" or exaggerated. Glad you like it.
I'm not sure what I can do to texture the tiles. Real world tiles are fairly plain, with only a little roughness up close. I can't think of a way to exaggerate that sort of texture. There is the clamp and sandpaper technique I used on my UFO crash's wall, but that's more of a concrete look than ceramic tile...
Also, these tiles are made of card, but the curved tiles for the top are a hard plastic. Trying to get the same texture on both would be difficult (a clamp would not work for a curved surface for one). There is a fine texture on both from some sanding and scraping and excess glue, here and there. But this will only come out when painted (and painted on texture would probably be more effective anyway).
I may paint all these bits before casting, just to see how they look and solve any problems that present themselves before committing to silicone. We can see how the tiles look then. If anyone has any ideas for the tile texture, let me know.
I don't really want to add much in the way of damage to the tiles (or the wood) as this would mean more obvious repetition across the surfaces. It'll also be easier for the owner to "add" broken tiles to the resin copies than it is for me to do so on the card original.
So, a quick check of what I have:
3 unique wall sections. To be cast to make 12 sections.
1 window section.
1 door section (with 2 posts).
1 reversible door.
4 unique posts. To be cast to make 12 posts.
1 central roof support section.
2 unique roof support end sections.
1 long roof beam.
1 tiled roof section. To be cast to make 2 sections.
1 curved tile roof topper.
I think that is all that is needed to make a hut.
The final cast kits will therefore have 34 parts.
That's not too bad, considering I did once think about making just the frames and supplying the planks to glue on... that would have made 100's of parts.
I think though, that I may make some accessories to add some more uniqueness to the final huts...
Hatch for the window,
Need to look at these corners,
What else could a hut need? Let me know.
I'm not sure how much space I'll have in the moulds at this stage, and I may not even have enough space for all I have at the moment. If I do have to buy more silicone to fit this in then I'll likely have space for larger things (although there's also the possibility of more Fallout stuff).
Yes, yes, I did ask for more things to make even though I may not have the space for it...
A Chimney. I suppose I could do the outer part and a ring fitting for the inside, if I go for metal cylinder type (A brick one would be too much work as that would basically replace a whole wall and/or be a large addition), and not have to make the boiler if I keep it to standard drinking straw thickness.
Water drain and rain barrel would also need guttering. That's quite a fine object to cast and would therefore be quite fragile. If there's no guttering then there can't be a rain barrel... maybe a future addition (and depending on mould space).
I've added some tags on the roof supports to... support the roof; the cross beams on the underside of the roof sit on top of these to give you the correct placing. I still need to add some marks on the underside of the roof so that you get the right spacing of those supports... note to self.
The hatch for the window is done. Just a separate piece. Can be placed either way up and can be added closed or open any way you like. I think adding hinges would make it ugly (as they need to be large enough to be cast and not fragile), so you'll need to do that yourself if you use the hatch.
I've also made some things to fit into the corners and make them less ugly. Again, optional.
Looking good, I have been waiting until you got a bit more done to comment and so far it looks awesome. I think once you have done this you should try a brick building workshop or something. As for adding stuff to this, what about a screen door to go in front of the wooden door or a porch?
Thanks C'Lion. Next... Still got to go though the "fun" that is moulding and casting of this. I usually need a rest after that (and by "rest" I mean making something for my army ).
I'll add workshop to my ever increasing list of things to do.
I think a screen door would be really difficult to cast as it'd be fairly thin and would cause a lot of back pressure / not fill up properly. I'm far from an expert in casting things and still learning how to do things in the best way.
Will have to see about space in the moulds for a porch, but that's a good idea for an expansion to the hut kit.
That makes sense Doc. I can add texture myself. I suppose the only texture tiles might have is lichen and moss which depends on the climate and the age of the tile.
weetyskemian44 wrote:That makes sense Doc. I can add texture myself. I suppose the only texture tiles might have is lichen and moss which depends on the climate and the age of the tile.
See what you think below with just some simple dry-brushing to bring out the natural texture.
hk1x1 wrote:This is all looking very nice so far I look forward to seeing the finished version.
Thanks hk. There's about a third of it below to keep you going until I've cast the rest.
NobodyXY wrote:The hut is looking awesome!! The fact that its modular is probably my favourite part.
Thanks NobodyXY. I'm glad you like the modular nature, I'm hoping this will be the unique selling point. It's how I'd like to be able to buy kits anyway.
I've been splashing some paint about amongst other things (still working on the chimney, it's fighting back at the moment).
Just a quick going over to check it looks right.
Parts:
And Blu-tacked together to give you an idea of how it fits together and looks at the end:
Calibanite Lion wrote:That looks really cool, comes to life so much with paint (and a good paint job it is too)
Thanks. Yeah, it helps with visualising the material for what it's meant to be. If the texture is already there on the model, wood becomes pretty easy to paint: this is brown base coat, dry-brush "bone", "patchy" dry-brush of white and then an uneven wash of black.
OneManNoodles wrote:Wow, that looks fantastic! if only you'd done a wood effect on the roof, it could be wood shingles. Is it molded up now?
But yea very cool, makes me want to play skyrim for some reason...
Thanks OMN. I did think about doing more wood for the roof, but thought that it would have ended up with the hut being a bit too "woody" and lack a bit of visual interest.
Mm, Skyrim. Their houses are a bit more fancy than mine.
weetyskemian44 wrote:You could do a wooden shingle roof as an optional extra...
That is a possibility for the future. The modular nature of this kit should allow me to produce all kinds of variations to swap in and out.
Oh and by the way that looks totally pro now its finished up
Thanks Weety.
FenixPhox wrote:I wish I could paint this good, I'm completely rubbish with shading and highlighting though (even with washes.)
Thanks.
All it takes is practice, practice, practice and patience.
Read/watch tutorials. Ask questions when you see something you like. Try out new techniques, but don't give up on them after only a few failures. Find what works for you.
All the painting techniques I use now, I've learnt from the DDakka community (directly or indirectly) in the ~2 and a half years I've been here. To the extent that I've started re-painting the models I started with, one of which is the helpful BA marine helping with the hut here.
This is a comparison of before and after:
Spoiler:
And I'm still learning, still trying new things with every model I build.
...And seeing the world with the eye of an artist. Something I watched recently was a programme that explained the difference between how a non-artist and an artist looks at the world.
Using eye-tracking technology, they showed pictures to people and found that non-artists would only look at an object to identify what it is and would completely ignore open spaces of colour (sky is blue, kind of thing). An artist would study every shape, area, texture and colour and "see" the subtle shading in things like the blue of the sky.
I thought it was interesting as I hadn't thought about how a non-artist sees the world. I've been looking at the shading of shapes and colours since I was a small child and just thought it was natural to everyone.
Next time someone says that they can't draw/paint/etc. you can tell them that's there's nothing wrong with their hands (unless there is something wrong with their hands), but it's their eyes that are wrong.
The good thing is, this way of looking at the world can be learnt. These people just need to know what to learn.
Anyway, went off on a tangent there... we return you to your usual programming...
I'm not going to lie, that was extremely inspiring to me lol. I had never thought of the difference in how an artist/non-artist views the world but it makes a lot of sense to me. I've been a musician for a long time now and I can say that the same is most likely true for musicians/non-musicians. When I listen to music I'm not just listening to the lyrics or tune. I hear the key of the music, the timing of it, and can seperate all the instruments mentally and almost visualize them working together to create the track. To be completely honest I almost zone out the lyrics entirely. Which is why I prefer instrumental tracks and my girlfriend doesn't let me pick the music anymore lol.
It is an odd truss, TBH. Perhaps a W truss or even the old Kings post truss would work better? The Hut looks very good.
As a sale item, what market are you considering? The Hut looks like it could work for Malifaux-- which has an odd Wild West sensibility to some of its terrain-- but you may need to add something to adjust the height of the doors. Malifaux uses 32mm minis.
Now its painted it looks fantastic, very well done .
I'm assuming because you've designed it to be modular, you could (if you had enough piece's) build bigger,
more intricate multi leveled buildings, or maybe even an entire town.
Sorry got a bit carried away then, but it would be awesome .
Good to hear, FenixPhox. Can't claim to be a musician here (although I did dabble a bit as a hobby), but I pull apart music like that also, probably not to the same extent though. And, yes, the vocals are just another instrument to me too. Although that's partly to do with my dyslexia; even if I concentrate I don't know what most lyrics are on about.
Thanks Magos'. Glad you like.
Yeah Red, you got me, I did zero research into how the truss should look / work. Hopefully they don't destroy the look for anyone. Thanks.
As for the market I'm aiming for; anyone that wants a wooden hut. I tried to not include any elements that would tie it to a specific setting. And the modular nature means I can add more specific things at a later date without having to completely re-design a building.
Well it could be a hut for dwarfs at 32mm scale. They have dwarfs don't they?
Thanks hk. That is indeed the aim. Multiple kits would allow you to build a larger building, or a differently shaped building (I'm thinking L-shaped, but that would require some clever cutting of the roof, or make your own...). You can even use spare wall sections to make a fence (on their sides, for example).
The door and window can go anywhere you want around the hut, and you can even break sections, cut out planks, etc... to make a damaged building.
The aim is to be as flexible as possible. One kit for an entire town of unique, but aesthetically-matching, houses.
There will be a slight delay in the start of moulding as I have something to build for one of my brothers, so I have to do that before I "convert" my work station to moulding/casting mode.
Right, er, sorry about the radio silence there. I've been busy making a birthday present for one of my brothers.
He wanted a phone dock type thing that will:
a) Hold his current (and possibly future) Phablet.
b) Use his QI wireless charger thing to charge said Phablet.
c) Take up less space than his Phablet laying on top of the charger.
d) match the table that he keeps it on.
So I took a few measurements of his phablet, borrowed one of the chargers, and took a quick photo of the table.
I have since been chopping and glueing sprue and plasticard together to make something solid, practical and nice to look at.
The basic prism shape was the easy part. There has been so many false starts and dead-ends in the making of the rest of it.
The actual charger is a flat disk of about 60mm diameter and 8mm thick and has a wire to plug in to a USB port. It needs to be within ~5mm of the rear of the phone and in a certain area on the back of the phone.
I decided to house the charger block within the "dock", hidden out of sight. But I didn't want to fix the thing inside, in case it needed to be removed/changed. I therefore had to invent a way to hold it in place, close to the front of the box that would become the dock, and that had to be reversible to allow removal and not be difficult to do each time.
The bottom of the void that it would sit in is curved up to meet the far side and pushing the charger into the hole makes it ride up to where it should be. There is a ridge at the bottom and near side that the charger slides past on the way in and out, but hold it in place when inserted. Finally, there is a plastic "leaf spring" that holds the charger against the front of the void.
That all took quite a bit of effort to make it solid and positive in holding the charger, but easy to insert and remove it. That void is sealed off from the rest of the structure, which is filled with plaster to make it heavy and solid (so it doesn't fall over when the phone is placed on it).
Then, I couldn't just have a large hole in the side and decided to add a "door" to hide it.
This went thought many designs, some that would hide the wire as well, but eventually I came to what is just a push-fit "plug" with a small hole for the wire.
Aesthetically, the outside had to match (as close as possible) the table. While it may vary a little in tone and some markings (Yet to see it in place, so won't know how close I've got it until then) it has the important things of being the right design and looks like it's made of wood. It just needs a couple more coats of varnish and it's done.
This is what it looks like:
Once this is out of the way, I'll be into moulding and casting this hut...
I now need to go and catch up with all my sub'd blogs...
The Silicone is in. Won't be cured until 1am though.
I found that I had some silicone left over from last time that I had forgotten about, so I have more that I thought I had, but this stuff is a little thicker that it should be (still seems to work though).
MagosBiff90 wrote: Great progress and a great project! watching the design / build / creative process through all of its stages is really enjoyable!
Thanks Magos. Seeing every stage is what I like to see of other people's work, so that's how I post.
Cant wait to see the end product!
Neither can I.
I poured the second half of the first mould last night before bed and woke up to a complete mould. A little tidying and that mould is more or less ready.
First half of the next mould is in. This has the door in it and I'm interested to see how that turns out...
OK, so sorting things out took longer than expected, but I think I've got all the mould supports set up to prevent leaks now. Once they are dry (I test with water), I will give them a test, maybe before bed... more than likely tomorrow.
Then we (I) shall know if all the channels and the layout works. Those will then be corrected... and then production... and writing instructions... and completing the display example hut...
Dr H wrote: That's what I like to hear, Stormwall.
OK, so sorting things out took longer than expected, but I think I've got all the mould supports set up to prevent leaks now. Once they are dry (I test with water), I will give them a test, maybe before bed... more than likely tomorrow.
Then we (I) shall know if all the channels and the layout works. Those will then be corrected... and then production... and writing instructions... and completing the display example hut...
Start saving up those pennies.
Any tips of stopping leaks? I took some credit cards and lined my mold wall. Then using keyholes and rubber bands got it as tight as possible without damaging things, and filled it.
Idk if it got air in the channels due to bubbles rising up to the top of my channels/entrance for the resin (meaning I didn't pour enough,) or if it leaked. It appears to be a smidgen of both.
Hopefully I got it fixed. Please post pictures of your efforts. (Within reason. :p)
Stormwall wrote: Any tips of stopping leaks? I took some credit cards and lined my mold wall. Then using keyholes and rubber bands got it as tight as possible without damaging things, and filled it.
The best way to avoid leaks in your mould is to have a good space in your mould box around the parts you are casting. I think a centimetre or more is recommended. More silicone around the edges means more surface area to seal the mould. If however, you are like me, you'll probably have less than this to save silicone.
In any case it's also important to get the two halves of your mould to meet up as flat and straight as possible. If this isn't flat and straight then you're not going to get an even pressure around the mould and therefore, leaks. I spend a lot of time (over and hour per mould) getting the plasticine as flat as possible before pouring the first half of the mould.
Also, the silicone should be nice and thick around the cavity. I think a centimetre depth above the highest point of your parts is recommended. A nice thick mould will again mean that you get good even pressure all around your mould. If however, you are again like me, you probably won't do this to save silicone. Some of these moulds are very thin in places.
Once you have your mould you want it firmly and evenly held together. I've been using some old flexible chopping mats (other handy pieces of plastic are available in your area) and lots of rubber bands. This time around though I have also chopped some wood up to use. But I found that I still needed the plastic sheets: While the wood pieces are the same dimensions as the moulds, the plastic is slightly larger. I have rubber bands around the plastic and this holds the edges of the moulds together. The wood is then placed around that to hold the whole thing flat.
Avoiding leaks is just a matter of seeing where the leak is from the mould and adjusting the position and number of rubber bands around the mould.
However, I am about to experiment with one of these moulds (that still wanted to leak) and using some Vaseline to seal the edge. I'll report back on that when I try it.
Also, pressure. Something to think about when designing the layout of your moulds is bottlenecks. If, on the way though your mould, the resin comes to an excessively narrow part (where a channel meets a part, or a corner, etc.) then the pressure behind this will increase and might force a leak. Making it easier for the resin to pass though the whole mould will mean that there are no pressure spikes and less leaks.
Idk if it got air in the channels due to bubbles rising up to the top of my channels/entrance for the resin (meaning I didn't pour enough,) or if it leaked. It appears to be a smidgen of both.
If you have a leak that is enough to impact on the final cast, then it'll be obvious from a pool/trail of resin under the mould or along the sides, and there will be areas of flash inside the mould. These will help to pinpoint where your leaks are for adjusting the rubber bands etc.
I didn't have much luck with pouring my resin in. As I tend to be casting relatively thin items there isn't enough force produced by gravity to get the resin all the way though my moulds. I therefore use syringes to inject into the inlet of my moulds.
You should be adding enough resin to a mould to fill it all the way to the outlets and then a little more. Depending on the type of resin used, bubbles should rise to the top of the mould, and therefore the exit of the outlets. If you keep adding resin until it comes out the outlets with no bubbles, then all the air (unless it's trapped somewhere) should be gone.
The first resin I used, cured in 10 minutes, and while that's nice for a quick turnaround, it did mean than there's little time to let the resin settle in the mould and bubbles to rise to the top, etc. I now use one that cures in 30 minutes and this gives me the luxury to take my time injecting the moulds, and any bubbles should rise to any of the exits before the resin is too viscous to allow them to move.
Hopefully I got it fixed. Please post pictures of your efforts. (Within reason. :p)
Good luck. It's a learning experience, casting. I'm still learning myself, this is only the third round of casting I've done (although I do a lot of casting each time).
These are pictures of the first test casts. You can see that for all but one I didn't have enough resin to fill the moulds, but now I can use more in future. There were no major bubble traps that I noticed, but one of the moulds needed some of the channels widening to allow for better flow though the mould. The flash is no worse than I've had on previous moulds, although less would be nice.
Ah yes, I remember you bemoaning their resin choice. I can't really give you much of a comparison, as I've only used this stuff (and I've not poked at the resin bits that OMN sent me).
This resin is more brittle than the "usual" polystyrene used for models. But that's not saying much.
Yeah is all Greek to me. It seems the stuff is maybe similar, rigid, so less flex, but the idea they gave was they used something t first for pick akin to the gray resin like that used by Secret weapon, what is received though is the white or yellowed (maybe they were smoking or mixed it wrong?) kit that was not a friendly to many modelers kind of affair as a vehicle model. The bubble and flash of the test run there reminds me of what I received from Warchimera, Not that I would worry much about the material for a representation of a dwelling, they are handled less once the battles start, vehicles must be moved every so often. I had to rework wheels on the first one as the 'axle" broke, so drill and wire fixed that. Then I did the trick with the styrene tubes
shasolenzabi wrote:Yeah is all Greek to me. It seems the stuff is maybe similar, rigid, so less flex, but the idea they gave was they used something t first for pick akin to the gray resin like that used by Secret weapon,
This stuff is pretty tough once fully cured. I wouldn't be worried about making a model to be handled out of it. But for things like that, design is important; working to the strengths and avoiding the weaknesses of the material...
what is received though is the white or yellowed (maybe they were smoking or mixed it wrong?) kit that was not a friendly to many modelers kind of affair as a vehicle model. The bubble and flash of the test run there reminds me of what I received from Warchimera, Not that I would worry much about the material for a representation of a dwelling, they are handled less once the battles start, vehicles must be moved every so often. I had to rework wheels on the first one as the 'axle" broke, so drill and wire fixed that. Then I did the trick with the styrene tubes
In the notes for this resin it says that exposure to light will make it yellow over time. Paint and varnish should protect it from this. It doesn't say anything about the material properties being affected, but that may not be true for all "white" resins. Maybe you just got some "old" resin parts that had degraded, maybe not. They could be using a cheaper resin than I am (what I have is not the cheapest available).
The axle of a vehicle is going to be the weak point of a model like that. All the weight has to go through that and it's probably better to have an overly thick axle than a "realistically" scaled one.
I have found that particularly thin parts made in this resin can snap easily (such as the cistern pipe on my Tainted Toilets), and that's why I've avoided any particularly thin pieces on this model.
Stormwall wrote:Would you mind taking a gander at my mold later then? If that isn't too rude of me to ask?
I can have a look, but no promises that I'll be able to fix any or all of your problems, I'm still quite new to this whole casting thing myself. Link me up and I'll have a goosey.
Also, not to pry but, how much do you think these huts will be? I am making a certain fort from Skyrim in it, it needs a tavern for the troops!
Exciting.
Not set yet (set, geddit? ), but looking at the likely volume of resin needed per hut and comparing it to my previous casts I have sold...
... somewhere between £15 and £20, depending on how happy I am with the final kit and how it compares to building kits you can already buy... and depending on what people are willing to pay me for them (I could say £100, but no one would buy any then). Does that sound like a good price (I may also do discounts for buying multiple kits like I have with my bathrooms etc...)?
In related news, I've found that the roof mould is a bit too flexible.
As there is no support within the mould across the whole rood cavity it tends to bow inwards a bit, and this leads to the roof coming out very thin in the middle.
So I'm adding more silicone to that mould as the extra bulk will help to hold the cavity straight.
Also, a note on the vaseline sealing a mould. It didn't hurt the casting, I didn't get a leak, but I'm not sure it was the vaseline that helped or it was just that I got the support for the mould right. This was on the roof mould as well, so further experimentation will be delayed until the new silicone has cured (another 4 hours at least). The extra silicone may also solve the problem anyway and so eliminate the need.
Yeah, I do suspect that they did use a cheaper, lower grade resin for the sold kits. the original images of the things were the dark grey stuff like other companies used which is more workable. The things were only 80bucks altogether for 3 of them.
Looks like the casting went well , yeah there's a lot of flashing, but its better than getting a casting full of bubbles.
At least the flashing can be removed.
shasolenzabi wrote:Yeah, I do suspect that they did use a cheaper, lower grade resin for the sold kits. the original images of the things were the dark grey stuff like other companies used which is more workable. The things were only 80bucks altogether for 3 of them.
I suppose it does make a difference if you are casting large solid lumps, but for the number of casts I get per unit volume of resin I won't save much money using a cheaper (and lower quality) resin.
hk1x1 wrote:Looks like the casting went well , yeah there's a lot of flashing, but its better than getting a casting full of bubbles. At least the flashing can be removed.
Thanks hk'. This round of casting seems to be going quite well. The flash is getting better with each cast, and most of what's there is paper thin (and I usually pull off most of it as soon as it comes out the mould).
There has been a few bubbles trapped here and there. Mostly near the exits (not following my own advice about pushing enough resin through the mould ). The others I am slowly removing by adding more vents (or widening / deepening them).
Stormwall wrote:Yep, I have noticed the same HK.
And yeah, depending on how it turns out I would pay 15-20.
Good good. And seeing what you can get for 20 squids from airfix or hornby for terrain (not to mention GW), I think it's a good deal.
The added silicone to the roof mould has indeed solved the warping issue and the leak issue too.
Yeah, I don't often know what's on my own mind, Shas. Never mind anyone else.
Yes, I have been quiet again. I have been casting and it's not the most exciting thing to see (or do).
But I have now finished casting... or more accurately, I've used up all the resin I have and so have stopped.
So how many kits have I produced from a whole pot (well pots as it comes in two parts) of resin?
4. Yes four. Count them. You can count them on the fingers of one hand, 4.
There is also a pile of miscasts about the size of one more hut, but you can't build a hut from that pile.
I was hoping for more than that, but there you go...
I've taken care to pick only the best casts for these kits, but there are still a few little bubbles within some of the parts. Only those that would hold their structural integrity under a firm squeeze from my fingers were allowed in though.
My next job is to complete my example hut (using some casts that will need a little work to fix them), and to write the building instructions for the kit.
Here's some photos to show the full spread of one kit.
Top picture is all one kit,
Then close-ups of the individual parts,
and at the bottom is a scale shot to show just how much resin you get in one kit (compared to a space marine).
So this may become a limited availability kit, as I get so few from a batch of resin. However, if there is a great interest in them I may be forced to increase production somehow...
I shall catch up on everyone's blogs in a bit, expect comments soon.
In other news; I'll be out and about over the weekend, meeting some old friends. I'll be back Sunday (probably with a hangover with any luck...the sign of a good session ). There will therefore be a slight delay in proceedings.
It was difficult at first to get into 2D painting again, and I didn't even know if it would look any good until I started adding the final details, but pretty pleased with it now. Works well in the hand, looks rough when zoomed in.
Hut will be next up (and hopefully won't take all week...).
The latest round of the League of Extraordinary Riveter's terrain contest finished on Monday morning, and as I was running it this time around, I have been judging the finalists. The contest thread can be found here: http://www.dakkadakka.com/dakkaforum/posts/list/643658.page#7734224
The winners of both will be announced on Monday.
Thanks.
And now back to my wooden hut kit.
You know the problem with my style of painting wood?
It's really difficult to match it on a second attempt.
After filling holes in some miscast pieces (as the best casts have gone into the kits I want to sell), I have been throwing various shades of paint at them to get them as close as I can to the original pieces, so it doesn't look odd when I build the example hut.
Here's the results, see if you can spot which are the originals and which are the resin miscasts (note that the door, window and roof support sections are all original).
Now I can find the best way to put it together and write some instructions, hints and tips.
Also, I've realised that I can't make this a permanent construction, as I'll need the original parts to re-make moulds (in particular the wall sections) when they wear out / warp / tear (which the wall section mould pretty much has).
However, once I've "built" a full hut and photographed it, I can re-build it as a broken hut from the rest of the miscasts that are in an even worse state than the ones I used here... and use that as another example hut.
It would yes. Although you could always commission me to paint it for you (in pieces like this or as a whole hut). But that would increase the price quite a bit.
I have been thinking about offering a "cleaning up" service with these. As I realise that my casts are not the tidiest in the world of models and that may be putting some people off.
What these two services would cost (as well as the kit price) I don't know yet. Need to nail this all down soon though.
Thoughts on whether these would be services people would use are welcome.
Well, as you saw, with the Hammer APC's was to do my own cleaning, (man were thy a mess!) and then I paint and wash myself etc as I do like the painting as seen by my own uploaded images, But I know there are folks who would probably commission the cleaning and even the full painting, a deluxe edition as it would be called of the shack.
Indeed, Shas. Although from the amount of work you had to do on that APC, I'm sure you would have been happier if it had arrived all clean and ready to go.
On the plus side, the resin I use is really easy to clean up with some gentle scraping.
On the extras, I would suspect that people would go for a fully complete hut no worries, and pay what you will ask for it. I would say that the cleaning up "cost" will probably not be viable for you, I think your time, will "cost" too much and put people off that option, compared to buying a straight kit. We people that will be purchasing your hut in kit form are used to cleaning up kits and indeed it is all part of our hobby, I know we bitch about it sometimes, but it is good for our modellers souls to clean kits and make thousands of tiny rivets at a time.
Having said that, the price you charge for your kits to date is so cheap you could sell them all as cleaned up kits and not have the standard as an option, That way you could charge a bit more for the kit, covering your cleanup.
I have never had any issue with any of the kits and even the mishapes I have had from you, your kits are fantastic, I am positive this is going to be a great success.
Warboss_Waaazag wrote:Post construction instructions! And also a finished piece! Looks great.
[Churchill]Oh yes[/Churchill]
Will be, and here's the first wall:
Thanks, 'boss.
weetyskemian44 wrote:A nice little painting you've done there. I respect you as an artist more now I see this little beauty.
Damian Hurst cannot paint to save his life. I bet his eyes couldn't even see something on this scale. It would be a blur.
Thanks Weety. Means a lot coming from someone with your qualifications. I have plans to do more paintings at this scale and sell them to the doll house makers for (hopefully) lots of money.
Ha, yeah don't get me started on half-an-animal-in-formaldehyde (or pile-of-bricks, unmade bed, etc...) Vs. real artworks.
I like my art to involve more work and less "interpretation" (excuses for why anyone could have done it but it's really art, honest).
On the extras, I would suspect that people would go for a fully complete hut no worries, and pay what you will ask for it. I would say that the cleaning up "cost" will probably not be viable for you, I think your time, will "cost" too much and put people off that option, compared to buying a straight kit.
Thanks Cam'. Yeah, as easy as the initial clean up of a model is, it's does take a lot of time compared to the later stages of a model.
We people that will be purchasing your hut in kit form are used to cleaning up kits and indeed it is all part of our hobby, I know we bitch about it sometimes, but it is good for our modellers souls to clean kits and make thousands of tiny rivets at a time.
True. It is part of the fun.
Having said that, the price you charge for your kits to date is so cheap you could sell them all as cleaned up kits and not have the standard as an option, That way you could charge a bit more for the kit, covering your cleanup.
I have never had any issue with any of the kits and even the mishapes I have had from you, your kits are fantastic, I am positive this is going to be a great success.
That is a thought. I'll have to experiment and see how the timing goes.
The example hut is built. Here's a few photos to show how it looks.
There's a few things I need to iron out and clarify in the instructions (so you can make the most of the kit) before I'll post them up, you may even see a few of the issues in the above photos.
shasolenzabi wrote:ah yes, how to deal with the gaps between walls and upper section
Yeah, that is the more obvious problem. But easily fixed during the build.
This arises due to the way the walls are built and the slight variation in the post dimensions: while they are all the same length, overall, the slots vary slightly from one to another and around the same post.
In fitting them to the wall sections you can end up with some of the posts peeping above the wall.
I did make them to be slightly longer than the wall sections, but sometimes the gap could be too big for some people.
The offending posts just need a little trimming to get the perfect fit.
Other than a few other little fit / gap variations that I've addressed in the instructions, the only other issue was with my clever roof alignment markings that I moulded into it. The X's on the wood of the roof are not quite far enough apart, so that when you attach the roof support in the position I intended, they end up not quite as wide as the base of the hut. Which is an even worse result than the above mentioned gap. This is addressed in the instructions also.
Warboss_Waaazag wrote:Awesome.
Thanks 'boss.
After much head-scratching and photography and fiddling and correcting my English... These are my hut instructions and tips (some may be obvious but I had to put it in for completeness, and much of it is suggestions rather than hard rules). See what you think (it's quite long) and let me know.
And to have it all together, these are the parts pictures as well.
This is how it is supplied (the name tags are what I refer to during the instructions):
Spoiler:
Instructions:
1 of 4
Spoiler:
2 of 4
Spoiler:
3 of 4
Spoiler:
4 of 4
Spoiler:
and now, after you've waded though all that, how many people actually want one of these and would part with cash for it?
I'm looking for interest levels. As I only have 4 casts available at the moment, I want to know if these will be hanging around for a while or I will have to make more casts in the very near future.
These first 4 will likely be £20 each (my earlier price estimate was a little low as it turns out), and unless I get more casts (and less miscasts) from future batches, the price may go up to about £30. It's difficult to estimate and price these things.
The plan now is to pull this hut apart, clean the glue off the original parts (save them for re-moulding) and then use some of the miscasts to turn this into a damaged hut / variation.
From the pile of miscasts I have enough wall sections to work with (and still have plenty spare) and a have roof parts that I can use.
But no spare posts and no roof support bits...
So I made some quick plaster casts of posts (which all promptly broke at the narrow parts and I've had to glue them back together) and have used some of them for the new walls. I may have to do something similar with the roof support...
I also decided to make this example hut a bit more interesting with not just a broken section (necessary for the use of the miscasts) but an extended section at the front, a kind of porch. Depending on how I attach the two halves of this hut together, it may only require 2 extra wall sections, 2 extra posts and 1 or 2 extra corner pieces (and some more roof that will need to be scratch-built). With the extras I have, I may be able to include these extras in the first 4 kits (although they will be plaster posts, not resin, and you will have to sort out your own roof for the porch), for free.
This is how the new hut is looking now:
I'm now gluing some CDs together to make a base for this one to be mounted on.
Once that is ready I'll glue down and stick together the two halves of the hut and then think about this roof...
If you are interested in buying one of my huts, let me know. I'd like to know interest levels of people willing to part with cash.
Thanks.
Yeah, I don't like to waste material, and miscasts are no different from leftover sprue or plasticard off-cuts.
I designed this kit to be a versatile as possible. Only limited by your imagination (nearly). It doesn't have to be built as a basic hut, in fact I'd love to see other's making something I haven't thought of out of it.
This is the blank slate, the basic structure, the skeleton, for you to build on.
Dr H wrote: ...and now, after you've waded though all that, how many people actually want one of these and would part with cash for it? .
To be honest, while it looks awesome, it also looks like something that could be easily replicated with some balsa and cardstock.
There is a market for terrain like this amongst those who don't know how to build it, or just don't want to... but to make the most of that, you need detailing that is harder to replicate from scratch.
Sorry Theo, Shas and Jehan are correct; it's going to be the police Spinner from Bladerunner.
Thanks insaniak.
Yes, I don't expect the scratch-builders to want it. I see it as somewhere between scratch-building and the kind of kits that come with 4 walls and a roof in two parts. I've done the hard work of the material prep' (as you get in a model kit), but there is potential for the personalisation of a scratch-build.
But true, the only tricky details on this hut is on the door, the rest being mainly wood. Part of the design of this kit is that I can add more interesting sections later (maybe sooner) that can be swapped in without a complete kit redesign.
This was an experiment to see just how hard it is to produce a model kit with the materials/tools/skills I have here. As it turns out, it's quite hard work, but a good learning experience.
OneManNoodles wrote:I knew there was something about it that said 'cyberpunk' looking forward to watching this one.
Great work on the hut, it looks really well cast.
Thanks OMN.
The casting was a bit hit-and-miss this time around; Once I'd solved the various leaks and mould warpage the parts came out quite well. The occasional part has a few bubbles inside, and I did have quite a large pile of miscasts, but the outside of the pieces are as good as possible.
Camkierhi wrote:Good shape, nice and smooth so far.
Very iconic vehicle.
Thanks. Indeed. Although it's not a vehicle that I've ever studied in such great detail before, there's many things about the Spinner that I've never considered in the past.
Being smooth is very important, it's a very smooth and rounded shape (again, more-so than I had expected).
Hut kit looks awesomw bud, have you decided a price?
Thanks, Cam'. I'm looking at £20 for these first 4 kits and then future batches may be more (depending on the number of miscasts etc., but I'll aim to make them worth it somehow).
Good to be back... I'm hopefully going to have a 6x4 table of the tiles in my thread good to use for the con... lotta casting to do... mostly floor tiles though so will speed up alot once I get a couple of molds poured tonight.
If I was going to go for accuracy, I'd have made a much larger version (and may do in the future anyway) and actually measured things rather than do it by eye.
Still adding details to the Spinner (and yet seemingly not getting nearer to finishing...)
I have scribed the lines. Some will need neatening once I've primed (so I can see what I'm doing).
And I've added the lights to the underside; the top half of slices of the smallest sprue I had.
And I've started to make the top lighting cluster...
The lights for the top, however, are oval in shape.
So I thought I'd try an experiment to see if things like lights and gems can be made from clear sprue; this is part one of their making...
You can see that the result is a frosted shape. I'm hoping that a gloss coat will clear this up (clear, geddit? ).
I also have to colour these and inconveniently they need to be yellow and blue and I have green and red clear paints... Will need to be imaginative (possibly adding colour to the gloss to create a glaze...).
You could try painting behind the lenses the vivid colour required. It may "glow" through.
Although you should be fine mixing up a coloured glaze.
Thanks Cam'. I did think about painting the rears, but not sure if that will work with domes like this (as from the side they will be uncoloured). However, I will experiment and report back. I need to mount them first before painting, just to make it easier to hold them for a start.
How quick do you need this bit sorted, I have an idea that might work but want to see first.
Ideally I want this finished this week, but as soon as possible really. What did you have in mind?
The domes from before were glued to a piece of plasicard (as the original lights have a base) and were then cut out and smoothed as best as possible.
The rest of the light fitting was made from a length of plasticard and a couple of plastic rods.
The "square" lights are again carved clear sprue.
The "square" lights were glued on first, angled appropriately due to the angle of the mount on the Spinner. Then the dome lights were glued to lengths of plastic rod and these were glued in-between the other lights. (See pic')
These then fit into drilled holes in the top of the Spinner (not glued yet to make painting easier; there are windows under the lights).
The light on the side of the Spinner, the one that appears to be able to move up and down, involved pinning a strip of plasticard to the Spinner, top and bottom. I then glued another strip of plasticard on this to help hold it's shape in the future.
Then the dome light (with it's plasticard base) was glued to a length of plastic rod and that to a lump of sprue.
This was then pinned and glued to the strip.
That's the Spinner taken care of, now to make it's flying stand... where's my cotton wool... No strings attached.
I used 2 Tau drone flight stands, but instead of relying on their strength I drilled some paperclips a looooooooooooong way into both the stands and the Spinner. I also pinned them to the base with 2 pins, aligned front to back, for strength.
Then started covering them in cotton wool...
Once the glue for that had dried I painted it all black (as I do) and then added more cotton wool to "fluff up" the jets a little...
...as it turns out, a little too much, I prefer how it looked above so I'll be thinning these down a bit once the glue has dried.
I also included a scale shot.
Once I've sorted these "jets" it'll be painting time...
Now that is a splendid effect my friend!! very nice! I notice in the reference pics the "steam" downwash is predominantly wwhite with some deeper greys ... are you going to add some? How does the cotton wool take paint? Or...will you leave it because actually nearly the same effect is created with the flight stands you used...
Really nice though!
You prop know already.... but regular kitchen sponge can work well for these kinds of effects too... although maybe better for smoke etc. and not the steam kind of effect...
MagosBiff90 wrote: Now that is a splendid effect my friend!! very nice! I notice in the reference pics the "steam" downwash is predominantly wwhite with some deeper greys ... are you going to add some? How does the cotton wool take paint? Or...will you leave it because actually nearly the same effect is created with the flight stands you used...
Thanks Magos.
The thing to remember about that reference picture is that the Spinner and the steam/smoke are back-lit; this make the smoke look darker than it would if the lighting is from the front.
But yes, there will be more painting. The contrast between the black (should have used a dark grey) stands and the white cotton is a bit too stark at the moment. The idea of the black flight stands was to give a dark core to the "jets", I just need to blend that into the white outer layers.
Cotton REALLY likes to soak up paint, but as to actually painting it I'll have to report back on that when I come to the greys and whites on it.
Really nice though!
You prop know already.... but regular kitchen sponge can work well for these kinds of effects too... although maybe better for smoke etc. and not the steam kind of effect...
nice
Ta. Yeah I had a look at this cotton next to some spare stuffed toy ...er... stuffing and went for this as it was a finer texture, which would be better for this scale.
I've poked and prodded the cotton now and made it more "jets" and "smoke-covered ground" (rather than the "lots of cloud" you see above), and I'm happier with it now.
Thanks. He said he wanted it on a flight stand and this immediately popped into my head.
So... painting cotton wool.
Not great. It might be ok if you wanted to tint the whole in one or two colours, but building up layers of paint ends up with a matted result as the paint sticks the strands together, leaving it not so fluffy.
However, it has reduced the contrast issue.
I'm going to try and stick a little more cotton wool over this to give it back it's wispiness.
The windows are also in progress and will be a blend from black to red to orange to pink, with white highlights to give the feel of the neon lights of Bladerunner.
And it should contrast nicely with the blue body... I think.
And now with more cotton wool (and the windows in progress)
This may be the way to do cotton wool things; dark core, a layer of intermediate tone cotton, and then a layer of unpainted cotton (or dyed if you want another colour).
not going to apply the same neon reflections to the rest of bodywork are you?
I really don't know what to suggest with the cotton wool, you might be on to some thing... what about instead of paint you use a wash, like diluted ink, then let it dry?
Thanks OMN. I've now smoothed out the transitions a bit more and added the highlights. Once it's all glossed up it should look about right (it is currently slightly glossy due to one of the reds I use being a gloss and the rest being matt).
not going to apply the same neon reflections to the rest of bodywork are you?
As the whole vehicle will be gloss (as cars tend to be) I may add a few of the pink highlights to select places, but I'm not going to go overboard with the red otherwise it may end up half red and half blue, and I want it to remain a blue Spinner.
I really don't know what to suggest with the cotton wool, you might be on to some thing... what about instead of paint you use a wash, like diluted ink, then let it dry?
Yeah, ink would be the way to colour it properly. When I added very dilute paint (wash consistency) it did soak in well, but that's only good for colouring the whole and not creating the layers needed to show depth.
Probably colouring the separate layers of cotton first and then sticking them on would be the best way. I'll have to experiment next time I try this affect.
Looks good so far. Windows are great, and I like the fumes too.
Going a bit back, the hut turned out very good, though I agree with Insaniak, not too sure about it as a "commercial" piece, too close to it's scratch-built origins no to be too easily duplicable...
LT; Indeed. Now I have the "base" model kit, I can add more interesting features for the next casting run. Although I'll probably do more Fallout stuff next time. When that will be, I don't know. I have many other projects that I also want to get off the ground and I can only do so much at once.
And with that, the Spinner is DONE!
I could continue to fiddle with it, and try and get it nearer to perfect, but that would take another week (at least) and it's gone on long enough.
So I present to you, my interpretation of the police Spinner from Bladerunner in Matchbox / Hot wheels scale (which the internet tells me is about 1:64, this may be closer to 1:72 but who's measuring).
This was a surprisingly tricky build, not just because of the smaller scale than I'm used to, but it's a deceptively complex shape with more details than I had imagined.
Thanks for sticking with me on this tangent, I'll return to the example hut in due course, but I have some prizes to be designing and making for the winners of the last round of the LoER terrain contest. I may do these over in my "main" blog as that has lain silent for quite long enough.
This can be found (if you are not already following along) here: http://www.dakkadakka.com/dakkaforum/posts/list/471119.page#4673874
And while I'm throwing links about, I would like to point you to my "new" Facebook page, here:https://www.facebook.com/pages/Dr-H-Painting-and-Modelling/766353710145525?ref=aymt_homepage_panel. The aim of this is to try and spread my visibility a bit wider. I'm still building the portfolio over there and so it is lagging behind my blogs on DDakka, and you won't see anything over there that you don't see here. Feel free to "like" it and maybe it'll become more exciting when I actually get some visitors.
I shall now go and start drawing some things and will be in contact with both Graven and Magos soon...ish.
Slight change of plan in that I will continue to use this blog as these are technically commissions, and so should go in my commission thread. I will get back to my own army one day soon...
As I mentioned before, I hosted the previous round of the LoER terrain contest; and so it was my responsibility to provide prizes (of my choosing) to 1st and 2nd place.
I decided to offer commissioned terrain pieces. The only limits being the base size; CD-sized (120mm) for 1st and ~60mm for 2nd.
After spending time liaising with the winners, we have settled on designs/concepts and I've now started to make them 3D.
Graven, who won 1st place with a lovely asteroid base, has decided to make the most of the base limitations ( ) and asked for a bell tower. Concept (to be made at 35mm scale for the Batman game):
Spoiler:
Magos, who won 2nd place with a nice damaged pump station thing, asked for a trench diorama. Concept (to be made at 28mm scale to match the DKoK aesthetic):
Spoiler:
I'm planning on building and painting these in tandem (even though they are different settings and scales), as I can swap between them as glue / putty / paint dries.
To start with I needed something for both pieces to act as the basic structure. The walls of Graven's tower needed something thick, strong and light, and foamboard would have been ideal... but I don't have any. I could go and buy some, but I thought I'd see if I could make something just as good with what I did have (and if it doesn't work out I can go and get some foamboard anyway), and I have a lot of cardboard:
I thought I'd see what would happen if I stuck a few layers of cardboard together and covered that with card to make my own, all card, foamboard. And, yeah, if I'd used actual foamboard I'd be finished by now... It's surprisingly sturdy already and it's not finished yet.
Magos' trench piece is much easier. I just needed something cylindrical to form the basis of the cut-out (the sides that would be underground). The rest of the model will be built within this once it's cut to shape. Originally, this was part of the cover of an office chair piston. I now need to scratch my head over where this needs cutting to give the "open" side of the diorama.
Gitsplitta wrote:.... waiting to be entertained....
inmygravenimage wrote:Squee, and do forth!
MagosBiff90 wrote:Nice nice nice.... looking forward to the updates! good starts all round!
Glad you are both excited, even if Gits' is not.
Graven, how does the size of bricks look to you?
So that's the inside and out covered. Next is to seal the lot with PVA/water, cut the edges to the correct shape and then attach it to a base.
And the trench base has been cut:
I was quite hesitant to cut this, but then I had the idea to make a template; a wrapped paper around the cylinder and then drew on what the shape was to be. Once I was happy with the shape I sellotaped the paper down and Dremel-ed the out of it.
There's now little bits of plastic all over my room...
This now needs a bottom and then to progressively fill it in.
inmygravenimage wrote:Bricks look excellent, and thanks for the "bases" shot, that's really informative
Good good. Yeah, I don't happen to have a 30mm base so I gave you shots either side (although I could have easily cut a 30mm circle of card, but where's the fun in that). That Terminator also stands 35mm above his base and his hammer is 55mm from the base; He's my go-to height reference.
Good to hear, Gits'.
Today's progress:
I have been sawing chunks out of the tower to show where bricks have fallen away.
This is still subject to change as I progress, add windows, more damage, and check access for hands.
You might just about be able to make out where the floors will be (marks at the rear corner).
I'm a big fan of lightweight spackle for plaster modeling... can be tricky to work with depending on what you're trying to do with it, but it's not bad.
Thanks Theo. Well I hope to match the pencil markings, that's why I drew them.
Thanks Magos'. Your's has not stood still, and is already on to the mud stages.
The planks on the floor will get a bit more beaten up, and the gap on the right (as we look at it) will be built up with junk to the height of the left, then sandbags across the top.
I now need to find the bits that I will use as the "junk".
The holes of the tower have now been cut; they were more difficult than I expected, but not impossible (as I thought once I'd started).
Here's a picture to show how Mr Scale Terminator sizes up to the windows on the 1st floor.
So that's waist to top of head, taking account of standing on the floor inside on his base. Bare in mind that he's also "standing" 20mm from the window due to being in the middle of a 40mm base (and the window is about 8mm deep).
Next is to start layering up the surface details... bricks first.
And today's progress has involved much gluing of card and arranging of small pieces...
Card:
Still more to do; the bricks will be scored in, the windows will get sills, the edges will get broken, etc...
Small pieces:
There will eventually be sandbags across the top (where the cross beam was placed, leaving that hole for the gun), and that will probably get some more support when I add it.
Tower looks good, I like the old-style tall narrow windows. Dry-wall filler could be an option to plaster, too, if you have not tried it yet.
The planks are spot on, but we have already learnt to expect that here!
Thanks LT. As I have most of a 25kg bag of plaster laying about, I'm generally looking for excuses to use it. Most of that plaster will be covered over anyway, it's just to give a solid end to the walls that I can work with.
Be interested in how you pull off the paint job on that tower. The basic structure reminds me of the DUST building pieces which I just got more of. I'm trying to think of a quick and dirty way to paint them. I'm thinking a sandstone bottom with reddish walls, but will look to your tower for inspiration once paint starts to fly.
Wow.... both pieces looking really awesome... very much enjoying the damaged section... and the beam across the top really gives that "trench / foxhole" feel!
Nice tower. Joint Compound-- related to and may actually be spackle-- has some additives to it that make it less brittle and more flexible. I would recommend it over plaster for future projects. But the better solution is to cut strips of cardstock and glue then over the edges.
Next time, really do try using foamcore-- yes, you'd be finished by now , but peel the paper off one side and 'carve' the details into it. I've seen this done to really good, and quick and easy, effect. The pores of the foam make for a good 'stone' texture. Or 'brick' or even 'concrete'.
Theo: Not currently thinking of how I will paint it. But I have had scheme instructions from Graven as to how he wants it to look.
inmygravenimage wrote:That looks immense! And I like the figure towering over it
Thanks Graven. Ha, that was my computer's wallpaper at the time (it changes every 15 mins). This is the picture if you'd like a better look:
Spoiler:
Thanks hk, setting a scene is the aim with the trench. There will be many "lived in" details before the end.
MagosBiff90 wrote:Wow.... both pieces looking really awesome... very much enjoying the damaged section... and the beam across the top really gives that "trench / foxhole" feel!
Good to hear you like it. I've tried to add a range of different materials in this pile (unlike my junk pile that was mostly rusty metal), so it should look visually interesting once painted.
Although, I did specifically add the cog just so I could do this again:
Thanks Gits'. I'm channelling Red Harvest with this card building building.
And speaking of Red... Thanks. I'll keep a look out for it, for when I start building terrain in larger numbers.
The insides of the windows are going to get card inserts to give them clean edges.
I couldn't use card for the wall edges as I had plans to rough them up (see below) so needed something carve-able.
I'll also look at getting foamcore for when I build terrain in the future.
Red Harvest wrote:Love the spinner. Very cool.
Thanks.
This is how I'm planning on having the cross beam (still not attached) and then many sandbags across the top of that. Also see the insert as a test for sandbag texture.
I've also started the gun mount and thinking about the gun...
And the tower now has bricks and damaged edges, and window sills:
and for those of you interested in the wallpaper this time it's a picture of an apparently nameless girl (no clues from the picture), so here's a picture of Louise instead:
Having heard this alot in my old line of work, I must steal a commonly heard phrase and say with that base your attention to detail is outstanding.
Just wonderful, and don't channel Red Harvest too much, he still has a large table of shame himself to finish. (*Cough* I can't speak, I have one too... )
Theophony wrote: Only one table????what is this madness? I have a whole basement of shame....and a one car garage of stuff so shameful it's not allowed in the basement
I have a bookshelf of shame. I'm not sure where this leaves me. I always laughed at people who had too much plastic to paint.
Now, I have that issue and I still have things to buy, wtf!!!
Oh, yeah, table of shame. Y'know shaming people for a table of shame is not nice. Y'all are supposed to encourage the shamed one to work on clearing the table. Sadly, I think I have added more to the table than I have taken off this year-- but there are still 5 full months before Year's End. I can do it.
Then there is the Shelf of Shame. Where the minis sit in judgement. But I have been clearing that, mini by mini. Having a Spreadsheet O' Shame is helping.
Masamune Shirow, eh? As an Infinity player, I am quite familiar with that name. That is a fairly tame image from him though.
I am curious to see what those windows will end up like. Windows always drive me nuts. ( So I use Linux. )
Another useful filler is your basic yellow wood filler, the pre-mixed stuff. Not as messy as the plaster of spackle.
Stormwall wrote:Having heard this alot in my old line of work, I must steal a commonly heard phrase and say with that base your attention to detail is outstanding...
I'm only just getting going on the details. Thanks.
As for areas of shame, I don't go in for that. For one, I don't have space for a collection of part-built models (I barely have space for the finished models as it is). And I don't like to leave a job half finished; if I start something, I'll keep working on that until it's finished.
That said, I do have the example hut (balanced on top of my putty-working things, which are balanced on my paint-stripping tubs - I said I had limited space...) that is part-built. Other than that, the only thing that is "part done" is a bagged space marine waiting to become an objective marker. Everything else is either finished or in potentia.
Red Harvest wrote:Oh, yeah, table of shame. Y'know shaming people for a table of shame is not nice. Y'all are supposed to encourage the shamed one to work on clearing the table. Sadly, I think I have added more to the table than I have taken off this year-- but there are still 5 full months before Year's End. I can do it.
Then there is the Shelf of Shame. Where the minis sit in judgement. But I have been clearing that, mini by mini. Having a Spreadsheet O' Shame is helping.
You go, Red. You can do it.
Masamune Shirow, eh? As an Infinity player, I am quite familiar with that name. That is a fairly tame image from him though.
I'm a fan of Masamune's artwork as evidenced by my chosen avatar. But yes, that is one of his more tame pictures. ... Hopefully you are all forming a healthy image of my taste in art after this and the Giger work previously...
I am curious to see what those windows will end up like. Windows always drive me nuts. ( So I use Linux. )
Another useful filler is your basic yellow wood filler, the pre-mixed stuff. Not as messy as the plaster of spackle.
Ho Ho, windows See below, card inserts and a little putty filler.
I'll look out for that also.
inmygravenimage wrote:Looking good mate... and so's the building
Thanks.
I've now tidied up the inside of the tower; nothing too obvious, but necessary. And the windows have had card inserted and the inside sills done (and gaps filled).
This now concludes the basic structure building and now I can move on to the details. Meaning that it's time to attach it to a base and work up from there.
As I'm not used to building gaming terrain, I will ask is this too much of a lip for a base? Bare in mind it will get basing materials on top of that.
I can take out the roughness of the underside, but that's not going to make it much lower and will just be for neatness sake.
Scale terminator seems quite happy there, and I struggle to see how it could be made much thinner without being prone to damage.
Thoughts (especially from Mr Graven) welcome?
Also, a bell tower is not a bell tower without a bell (old Christmas deco's for the win). That will be part buried in the rubble at the base.
And for the trench piece, what do you think of this for the gun?
In an unusual move for me, I've left it removable to make painting easier. I may however, leave it removable should Magos want to have the trench with and without gun for ease of viewing?
Also, another concept for sandbags:
Need a bit of work. These are bits of plaster wrapped in Zinc oxide tape (not much use to any of you that haven't done any climbing, I know, but...).
I may do the final versions with fresh putty so that I can mould them to the shape of the trench so that they look heavy and not like cushions.
Yay bell! I think that lip is perfectly reasonable. My lampposts are on lipped bases for the game, after all, you have to have stability for stuff. Lovely sandbags, btw.
inmygravenimage wrote: Yay bell! I think that lip is perfectly reasonable. My lampposts are on lipped bases for the game, after all, you have to have stability for stuff. Lovely sandbags, btw.
Good good. I have tidied up how it sits on a surface and will address any other issues once basing has begun.
Before basing (and rubble pile) can happen, I needed to start the lower platform and stairs as the rubble will interact with them.
Scale shot (with a 25mm base) to show that models can pause at that level.
And construction of the stairs up to it. Gone for narrow, rickety stairs as the models will just "jump" past them.
Steps don't go all the way to the ground as they will be covered up to that height with rubble.
I put the box in the corner as models won't be able to get in there, so needed to fill it up with something.
I had to give that corner a splash of black paint as you could just about see into it and I wouldn't be able to paint it once the steps went in. The post that you can still see has had some brown as well.
I'm thinking a ladder up the wall to the first floor from here (about 70mm)?
As for the trench, I was happy enough with the sandbag test that I went ahead with them using milliput so that I could mould them to shape. Hope you like it Magos?
There's the final little details still to do, so any feedback is good at this stage.
inmygravenimage wrote:Excellent indeed! Ladder sounds about right.
Good to hear, Graven.
This is ladder mark II;
Ladder mark I was made of "wood" but turned out far too chunky and made the (intentionally small) stairs look too small a scale.
Mark II will be metal to add another material so it doesn't all look a bit too much like wood interiors-R-us.
Yay or Nay?
Also you can see the rubble pile. I left the top of the pile able for a model to stand on it, but hopefully it doesn't look it.
Love the trenchwork too, btw.
Thanks.
hk1x1 wrote:Those sandbags look really good, so much better than making them from green stuff.
I might have to give those a try myself
Thanks hk. When people say that, you know you're on the right track.
Next, I'm going to start the 1st floor (and probably do the 2nd floor at the same time).
What have I got to show you today, I hear you all cry... no, just me... oh well, I have something to show anyway; Floors!.
In the picture below you can see, from top to bottom (and ironically from the bottom of the tower to the top);
The first floor, with a hole for the ladder, a hole for the bell's rope and a comic-inspired bell-shaped hole (let me know, Graven, if that's a bit too Loony Toons rather than Batman )
Next to that is a photo that shows the space available and that the first floor can support the weight of 2 plastic models (not a lot admittedly), even though it's not glued in or had it's support beams added yet.
Then, I added the remnants of stairs from the first floor to the 2nd floor, as requested.
And at the bottom a photo to show the underside structure.
That looks stunning mate - I'm desperate to get playing on/with this! Ladder fab and excellent arrangement of space on the floors. Not at all obvious that that's a practical rubble pile, which I heartily approve of also :thumbusp:
I love how the floors look like they've been damaged by the bell, as it fell through the tower. You've put thought into how the building would of collapsed, and what damage would of been caused in the process.
A lot of people don't do this when their making ruins, and it really makes a difference, well done. .
inmygravenimage wrote:That looks stunning mate - I'm desperate to get playing on/with this!
Good to hear. Not long now (for relative values of "long"), just the detail at the top of the wall to do and then basing and little details throughout, before paint.
Ladder fab and excellent arrangement of space on the floors. Not at all obvious that that's a practical rubble pile, which I heartily approve of also :thumbusp:
Glad you are liking it all.
The floors now have their support struts and to test their strength I placed 5 metal mini's on them.
That should do you. The floors are not even glued on yet (left off for painting).
and to prove the practical rubble:
And I've done the "vents" (slats, whatever they are) at the top of the tower.
So, as I said, it's just the detail at the top of the tower's wall, the basing (how green do you want it, that is plantlife-wise?), and the scattering of little details, to do.
MagosBiff90 wrote:Wow wow wow! Looks cracking mate! Really cool! Great details! And I think that gun is awesome!! love the bell tower too! The bell is a great addition!
I must learn the secret to your sandbags!
Great to hear you are pleased with it. Your's is nearly done, just the little details and painting to do. Hope you don't mind waiting for Graven's to catch up and then I'll paint both together.
Glad you like the sandbags. I'll throw in some of my tape when I post the trench so that you can have a play.
hk1x1 wrote:I love how the floors look like they've been damaged by the bell, as it fell through the tower. You've put thought into how the building would of collapsed, and what damage would of been caused in the process.
A lot of people don't do this when their making ruins, and it really makes a difference, well done. .
Thanks hk. Yeah, I always have to rationalise every detail in my models; no detail for detail's sake, it all has to have a reason. It's a blessing and a curse.
The vents are excellent, and flooring looks substantial. Going to have to try swamp thing on there (weighs about the same as a metal dreadnought)! As for greenery, dark side of verdant please mate.
Red Harvest wrote:Easiest way to detail a building is to ask yourself, if the building were real...? And construct accordingly
And the same can be said of any model.
inmygravenimage wrote:The vents are excellent, and flooring looks substantial. Going to have to try swamp thing on there (weighs about the same as a metal dreadnought)!
Cool. Glad you like them.
I don't know how much a metal dreadnought weighs either, but I'm pretty sure that anything heavy enough to break the floors away from the tower (baring in mind the supports are glued and pinned to the walls) will bend the plastic of the floors first depositing the offending item "safely" away from the tower. In short, I'm pretty sure they can take a lot more than the 5 figures above.
As for greenery, dark side of verdant please mate.
But how much?
Looking at your wall sections I'm seeing muddy ground and some leafy creepers. So I can do my usual mud 'n' rocks basing, with a few patches of grass, and then a creeper-like plant up one of the walls?
As for today's progress;
Mainly "invisible" work: filling some gaps, tidying some edges, covering the base and levelling the floors.
And to show the relative height of the floors;
10cm as requested, between 1st and 2nd floors.
The first floor is about 8cm above the rubble pile.
However, I did also add some detail to the top of tower to indicate that it once was more interesting towards the top of the original structure. Kept is reasonably simple in the end.
This time being overlooked by Alicia Silverstone.
Next up, in addition to finishing the basing, is the little details.
This will mostly be a scattering of rubbish, bottles and things and just some general debris from the collapse.
I'm also thinking a sleeping bag etc on the 2nd floor and a light on the walls of the ground and 1st floors (one of which will be inoperative, possibly the 1st floor).
Magos, I'm also collecting together little details to finish your trench off too.
MagosBiff90 wrote:Looking really nice, there is a real "Art Deco" Gotham feel coming from the tower...
Thanks. That was the aim. I had to do quite a bit of research into what "Deco" was at first, so I'm glad it comes across in the piece.
EEEkkkk.... looking forward to the finished trench piece!!
Here you go, Magos. Provisionally done (short of some plant-life). Let me know if you think it needs anything else.
You will see an added ammo' box next to the gun, and a spare pistol, some grenades, a little electrical box (maybe a radio), notebook and pencil, and a mug:
weetyskemian44 wrote:Gives me vertigo just looking at it.
Sorry, here's some photo's that'll help with that... Note to self, I'm definitely going to have to do some final shots with lighting though the windows.
And some progress on tower details;
debris, a cardboard box bedding and rolled-up sheet (and some bottles to scatter about once I decide on where the "bed" is going, and the lights (these will get wires soon).
The bottles, lights and the radio in the trench are all from OMN. Give him a shout if you like the look of them.
It's truly magnificent. The scatter just adds to the super awesome. One relatively small section of Creeper will be fine, thanks. (apologies for brevity - on phone) omn 's bits look fab too.
That tower is amazing , so much detail that I would loose every game played on that table as I stare at it and forget to do so many other actions. The vents are a great touch to the upper level windows.
And that has to be the compfiest trench dugout ever , a bedroll AND refreshments


 It also is working very well for you.


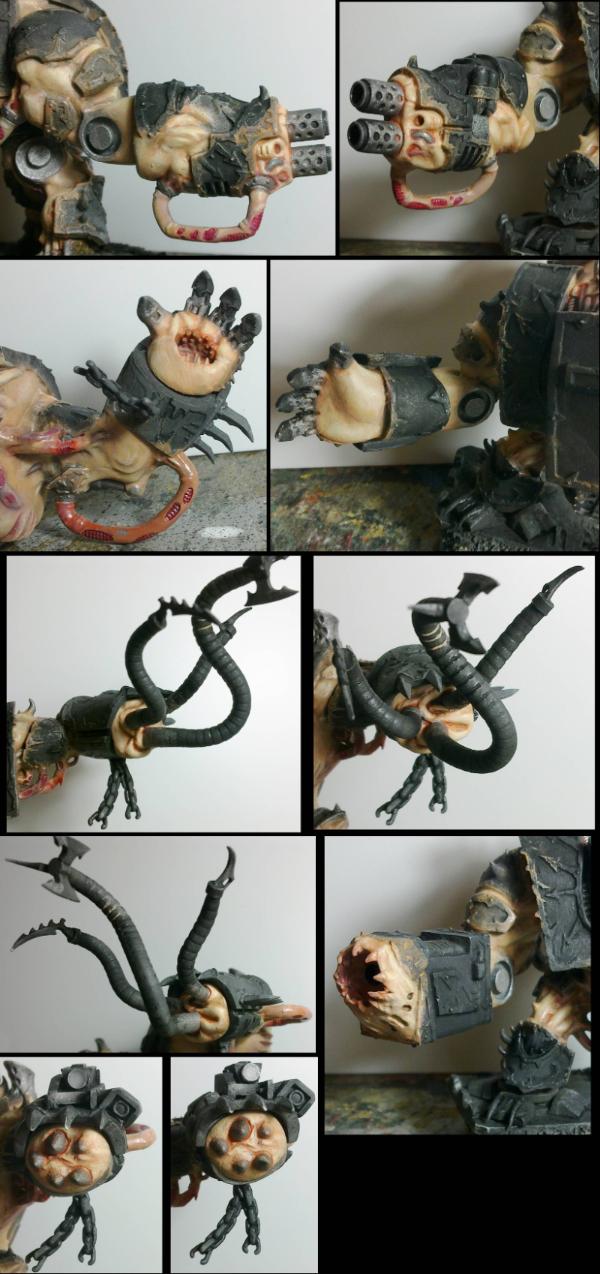
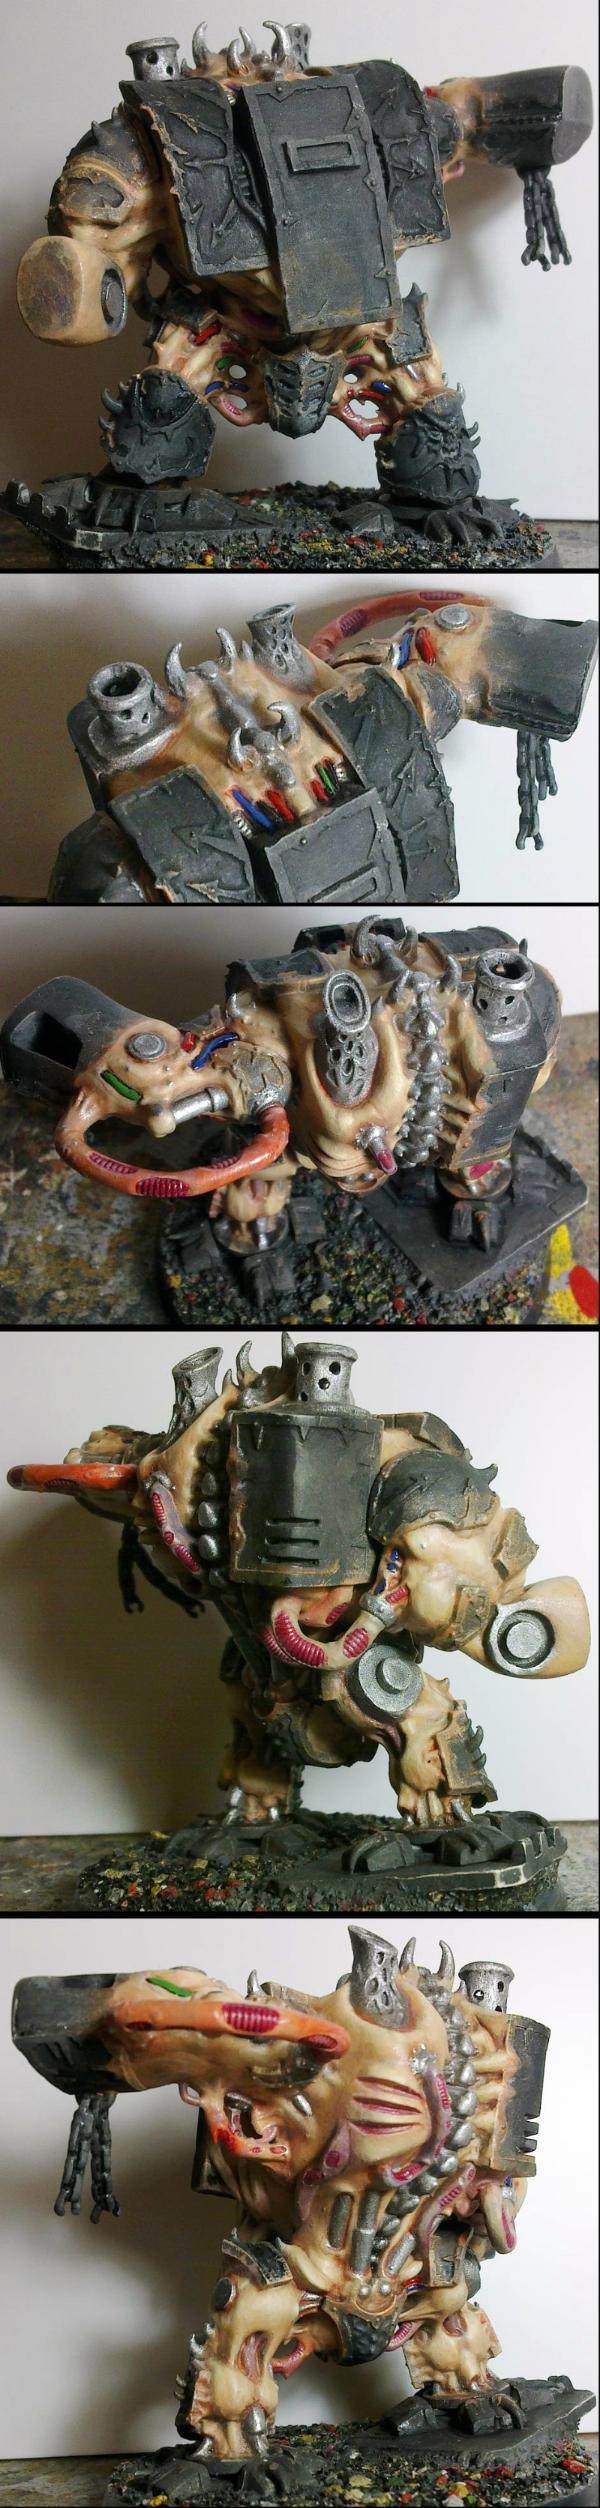

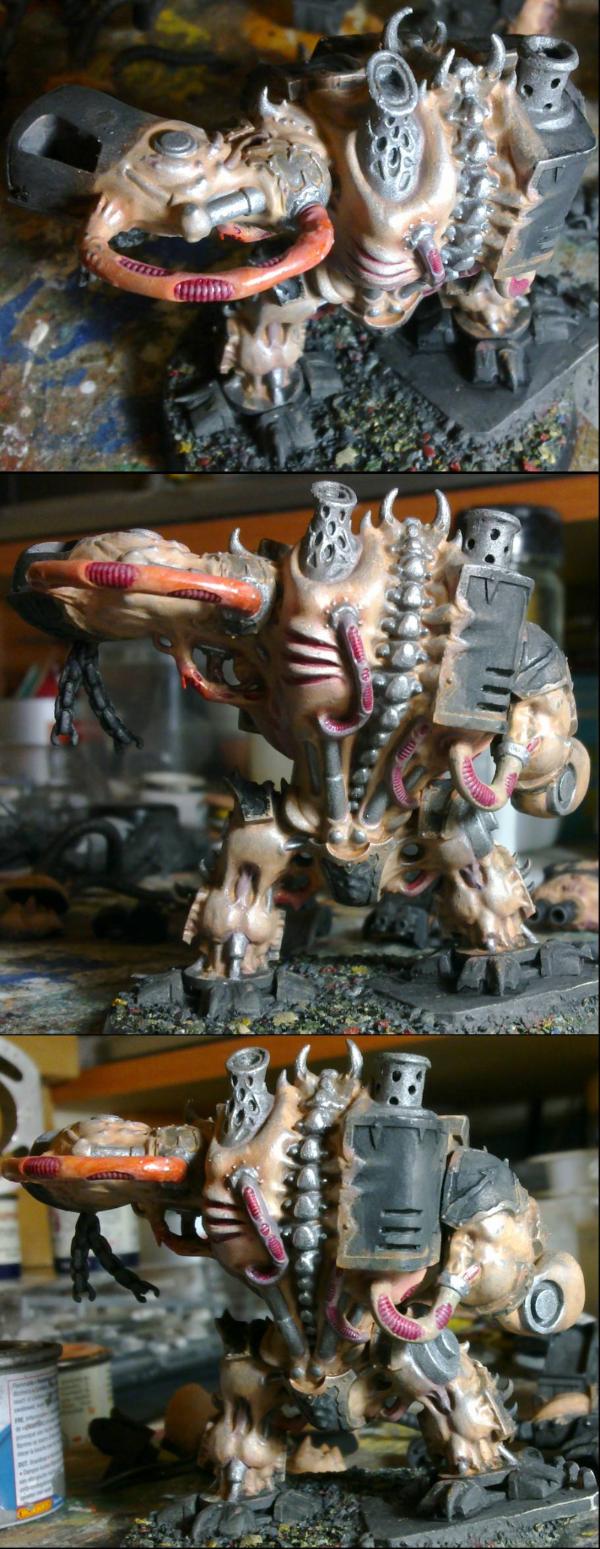

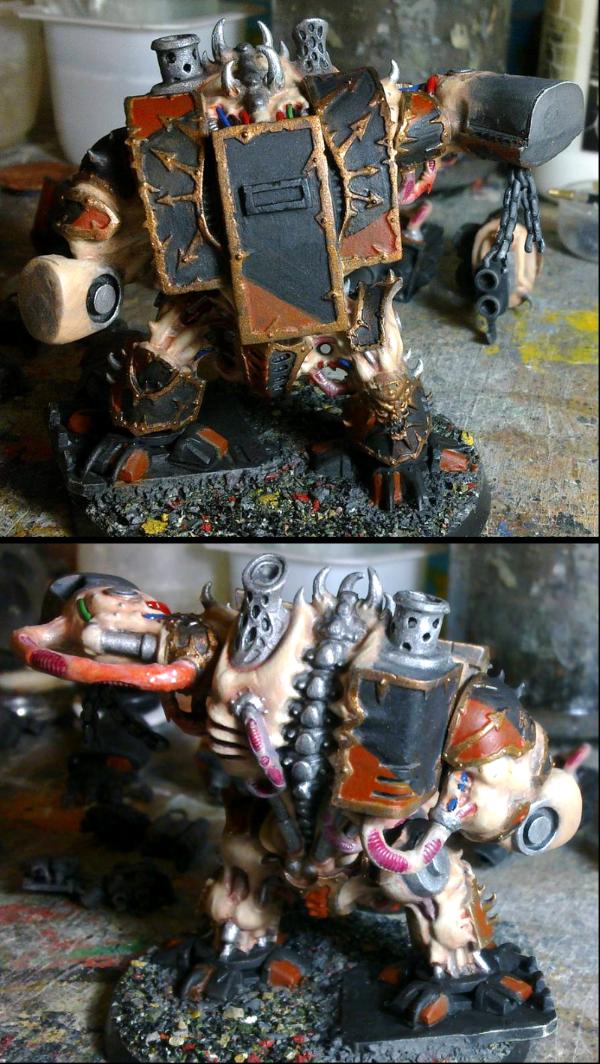


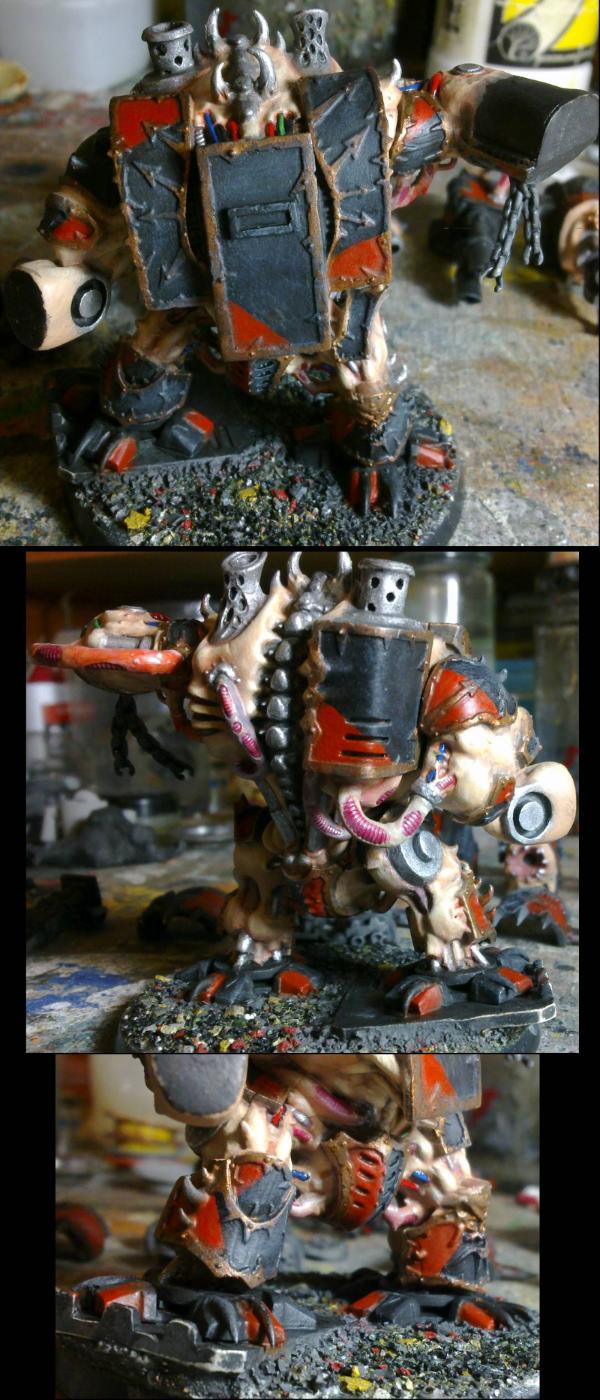
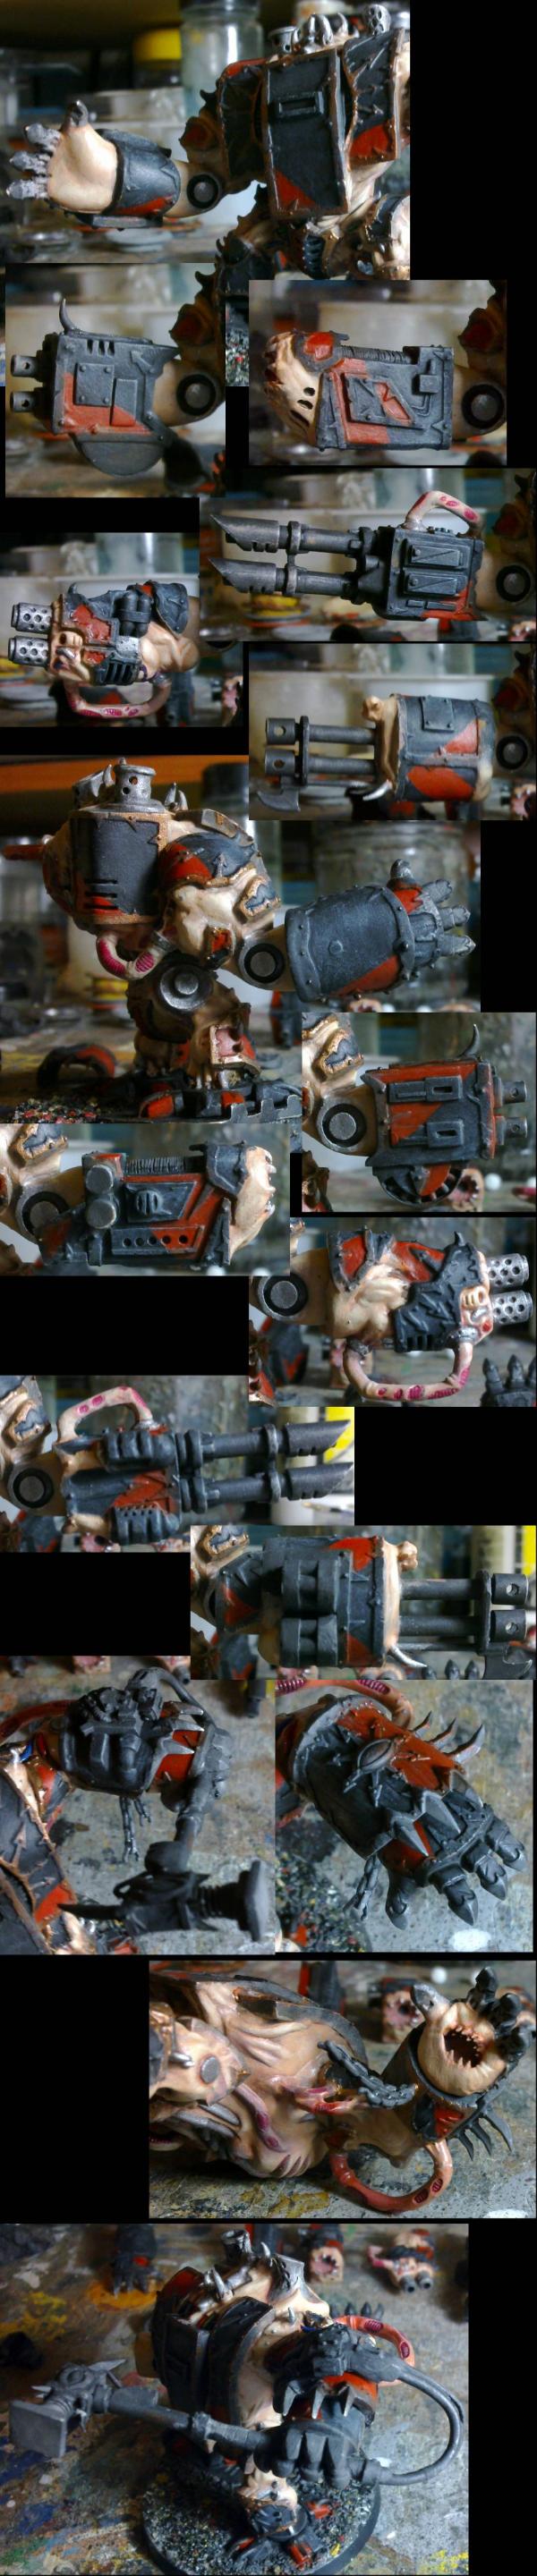


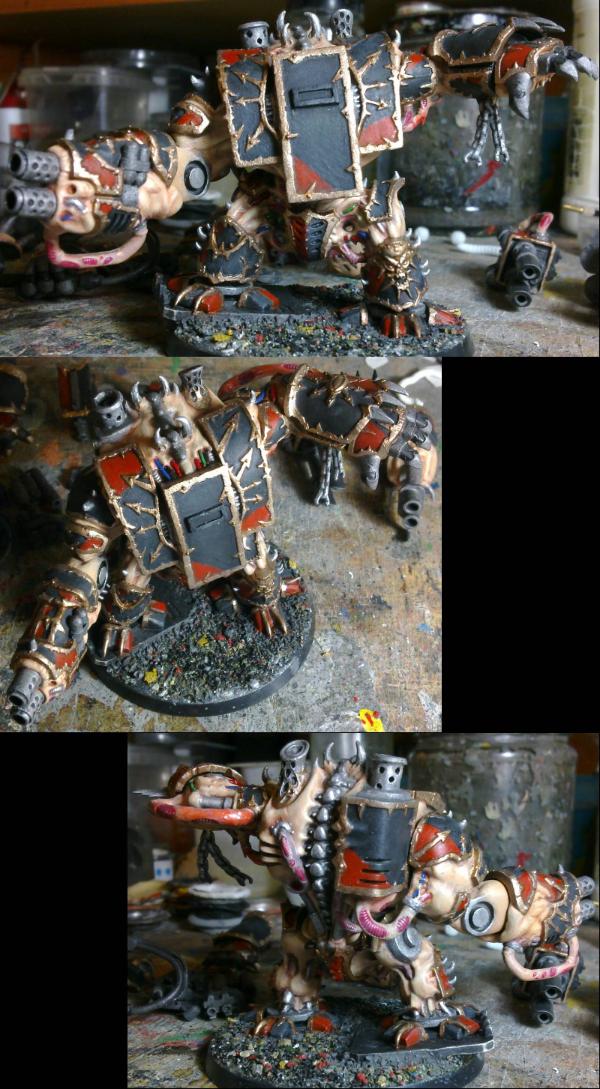
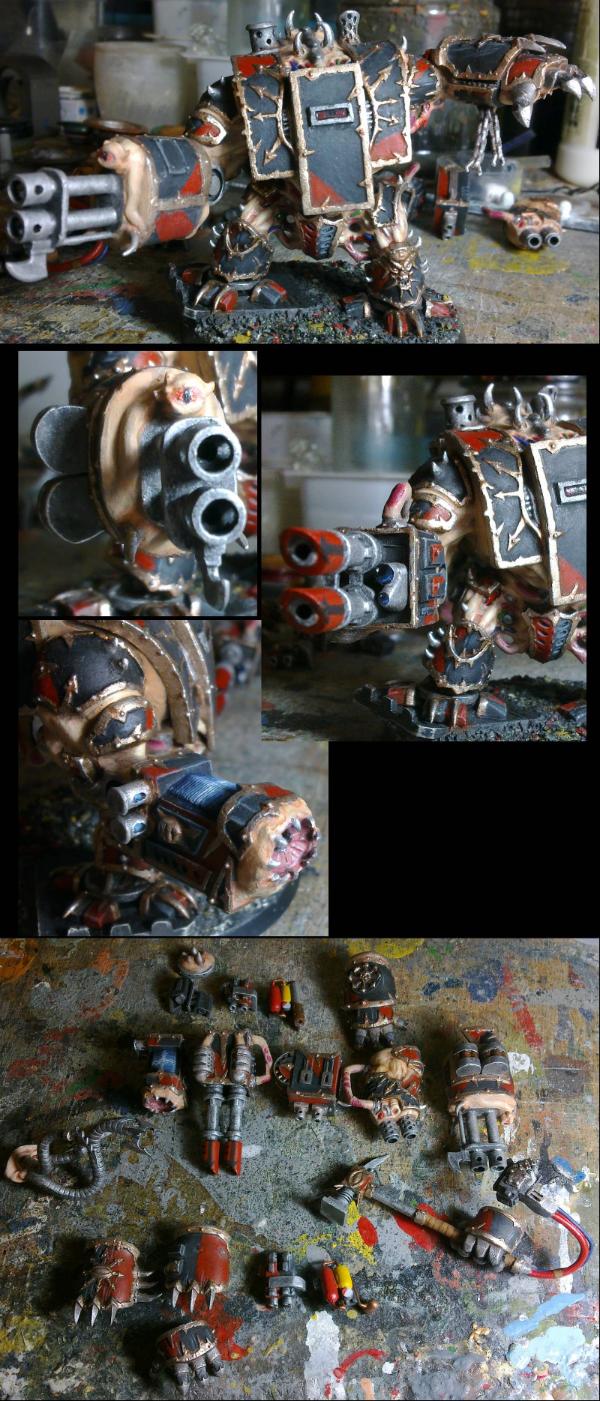

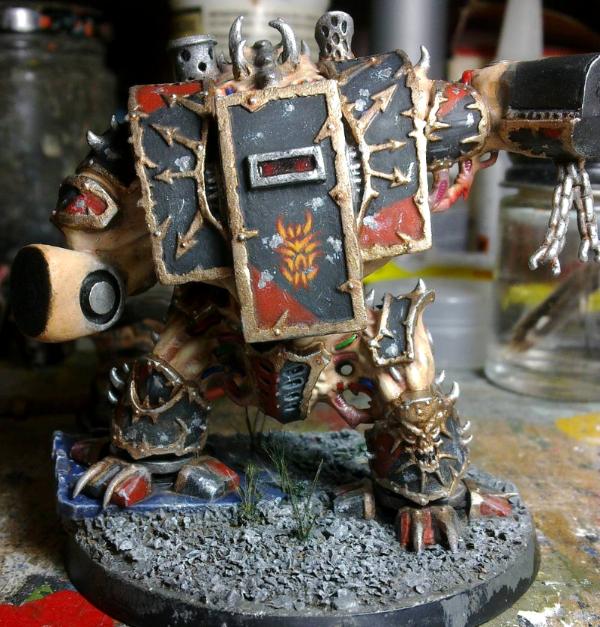
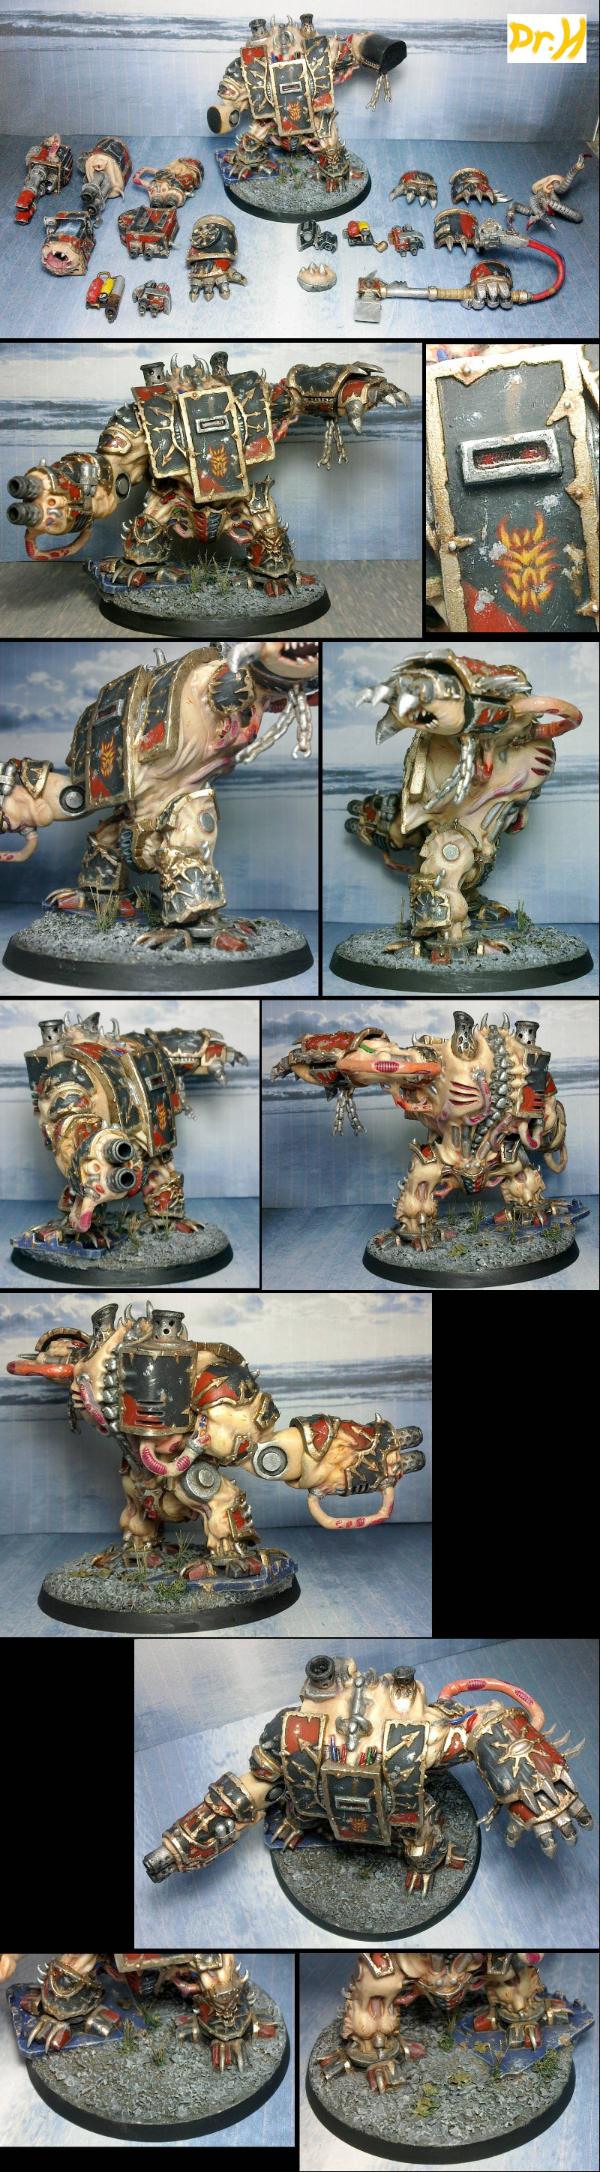
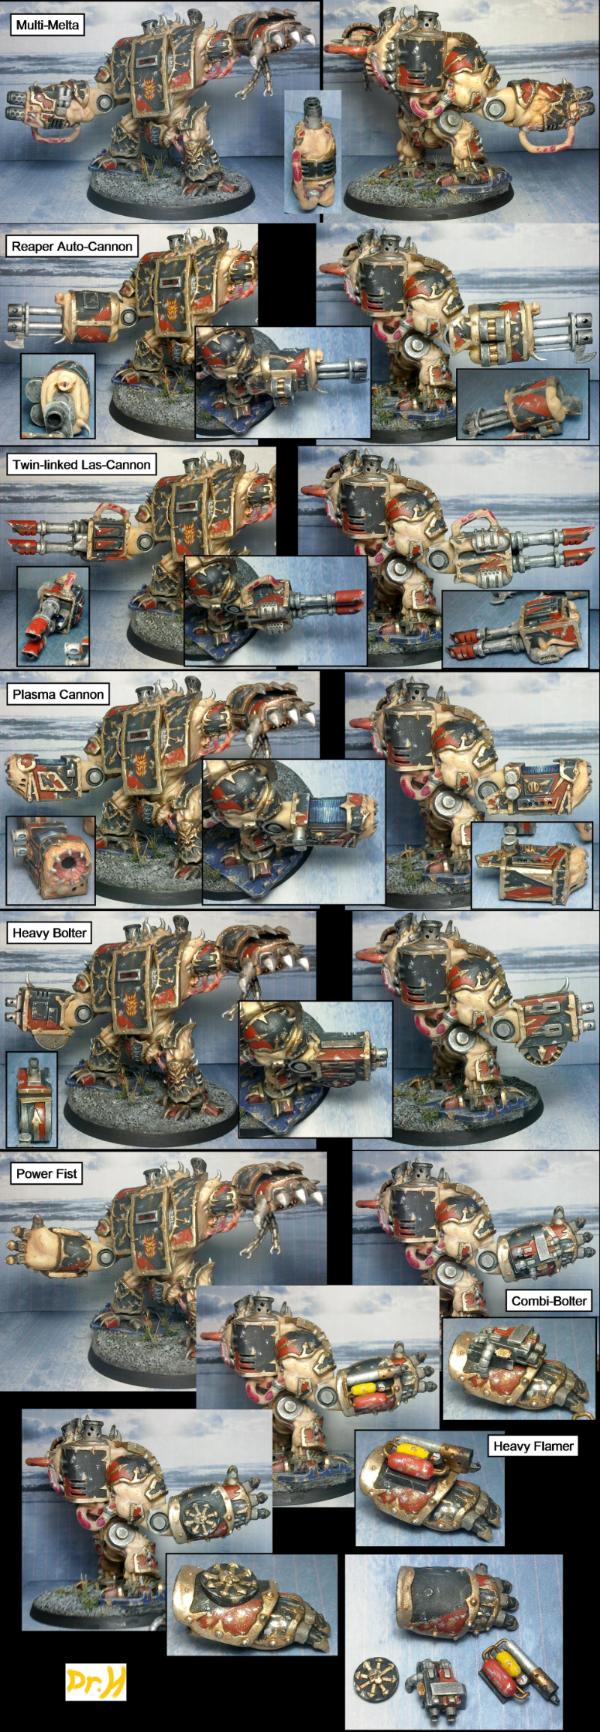
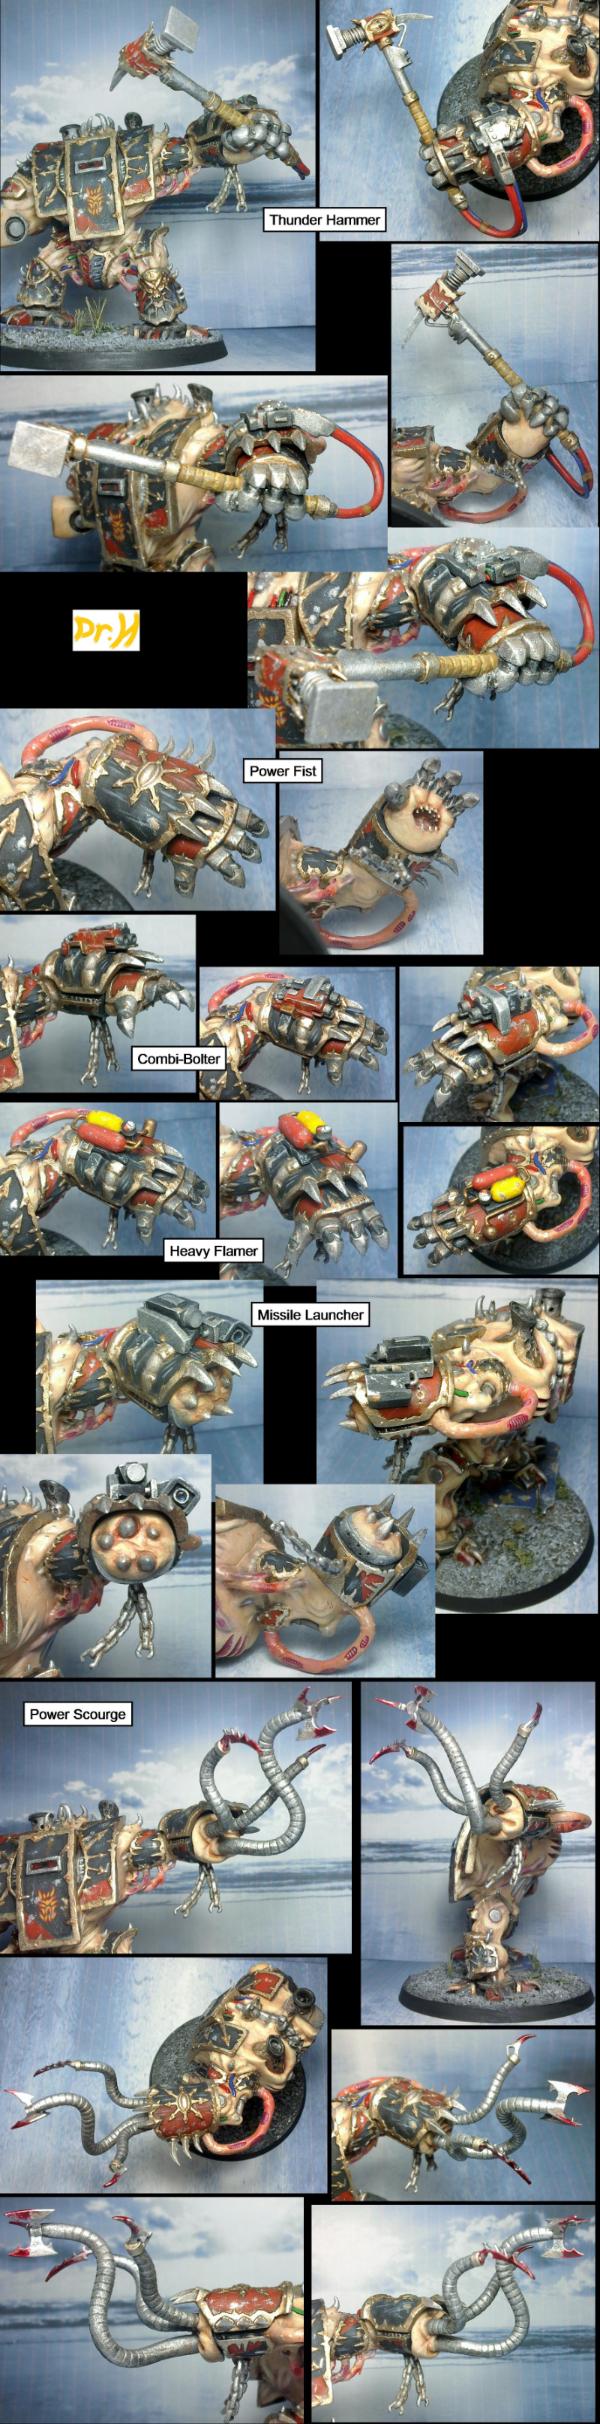


 Keep it going doc!


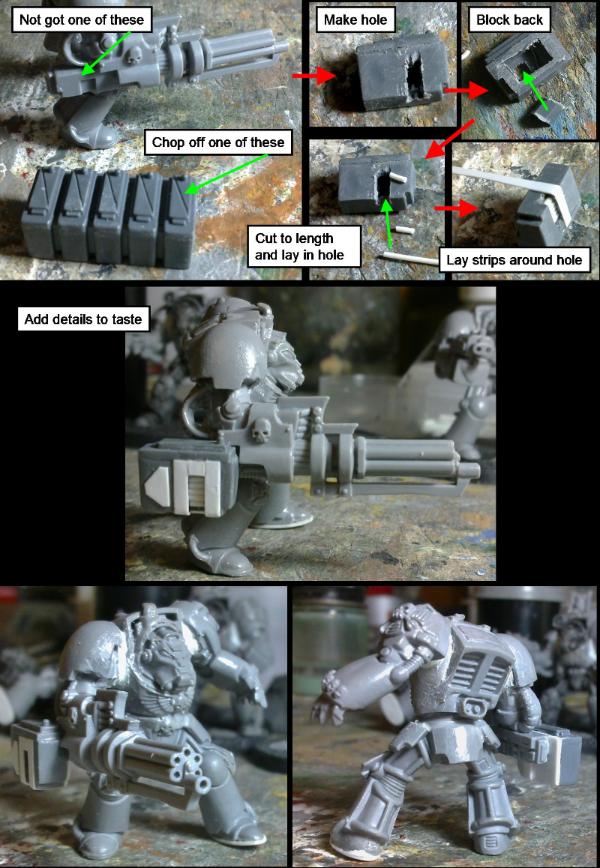
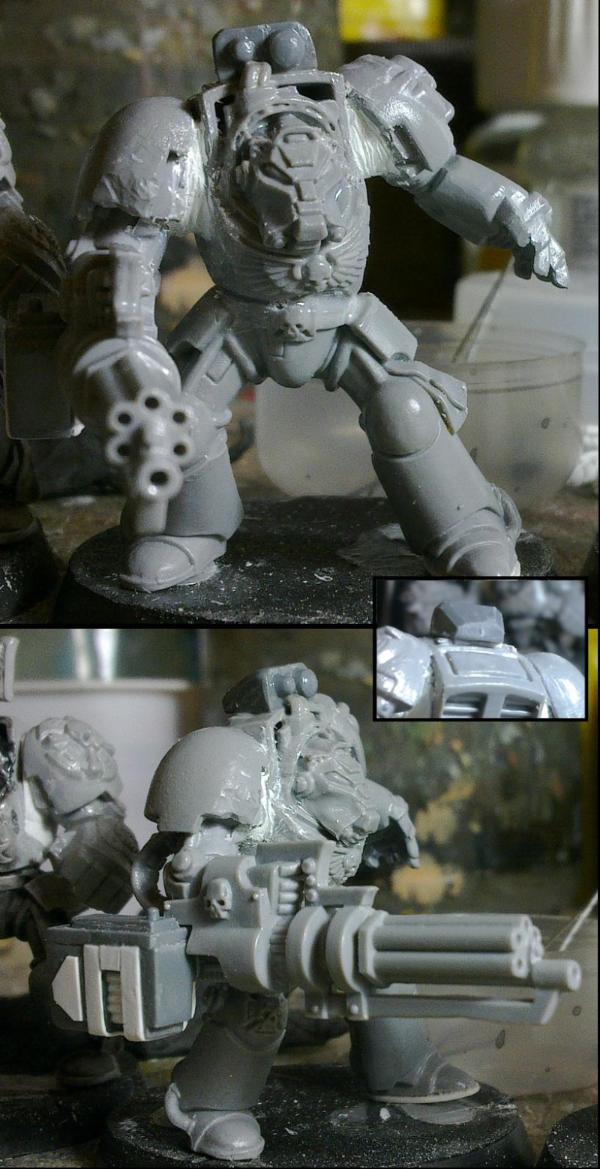
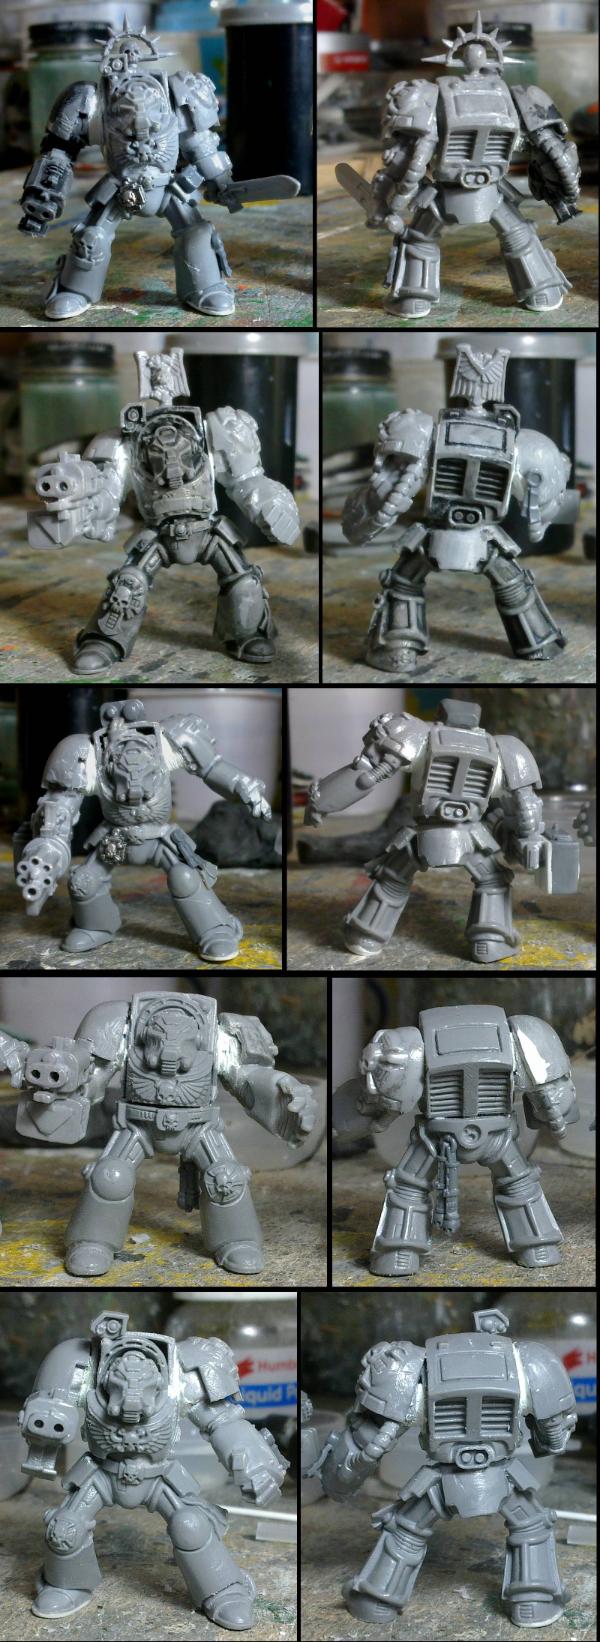
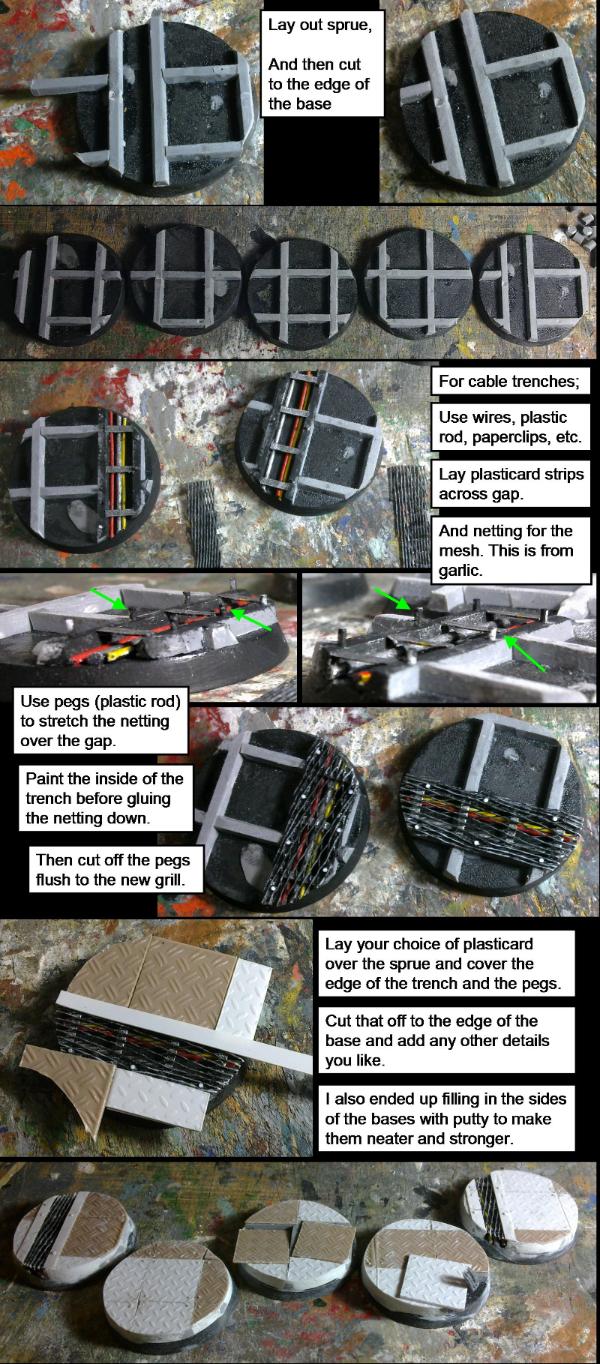
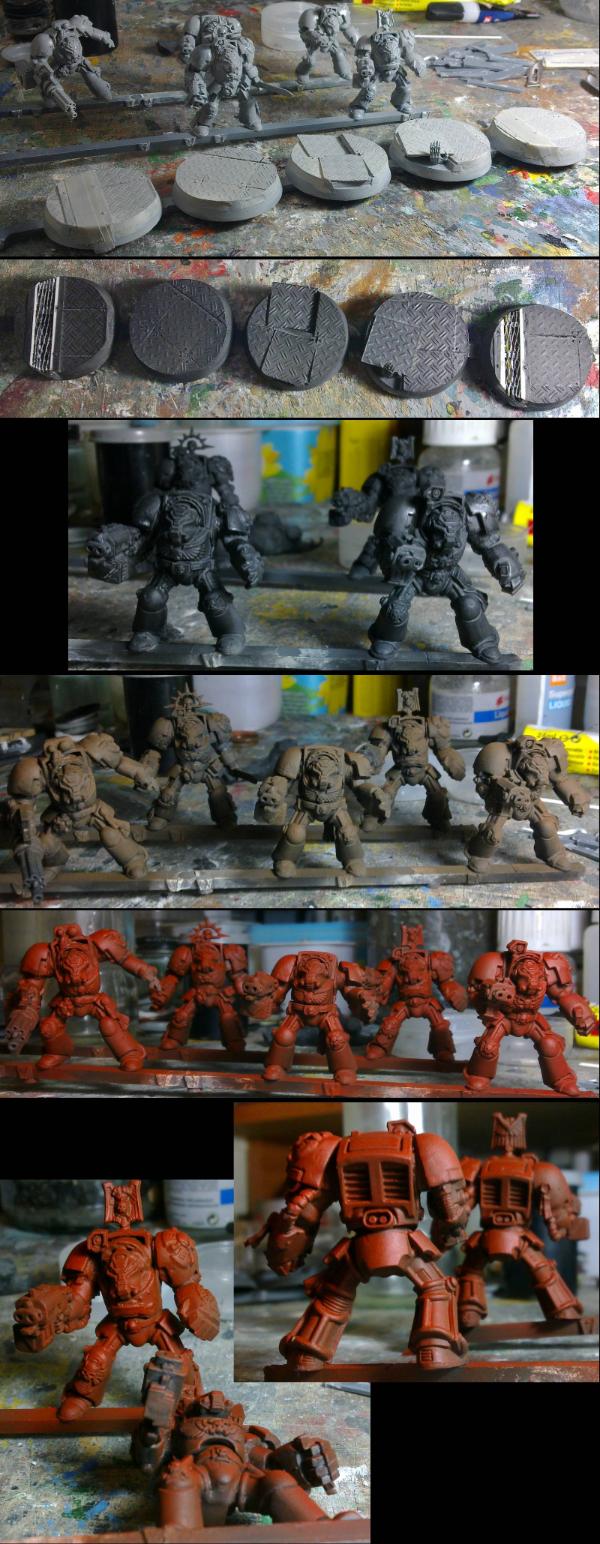
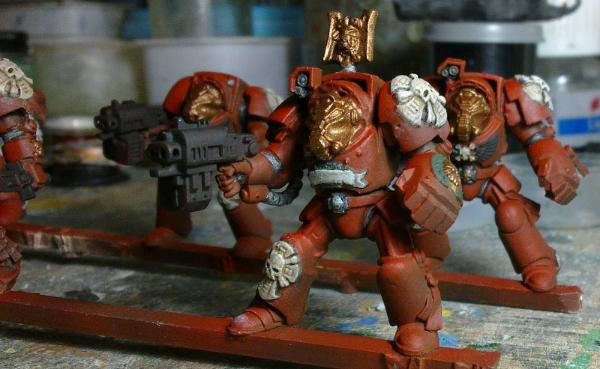
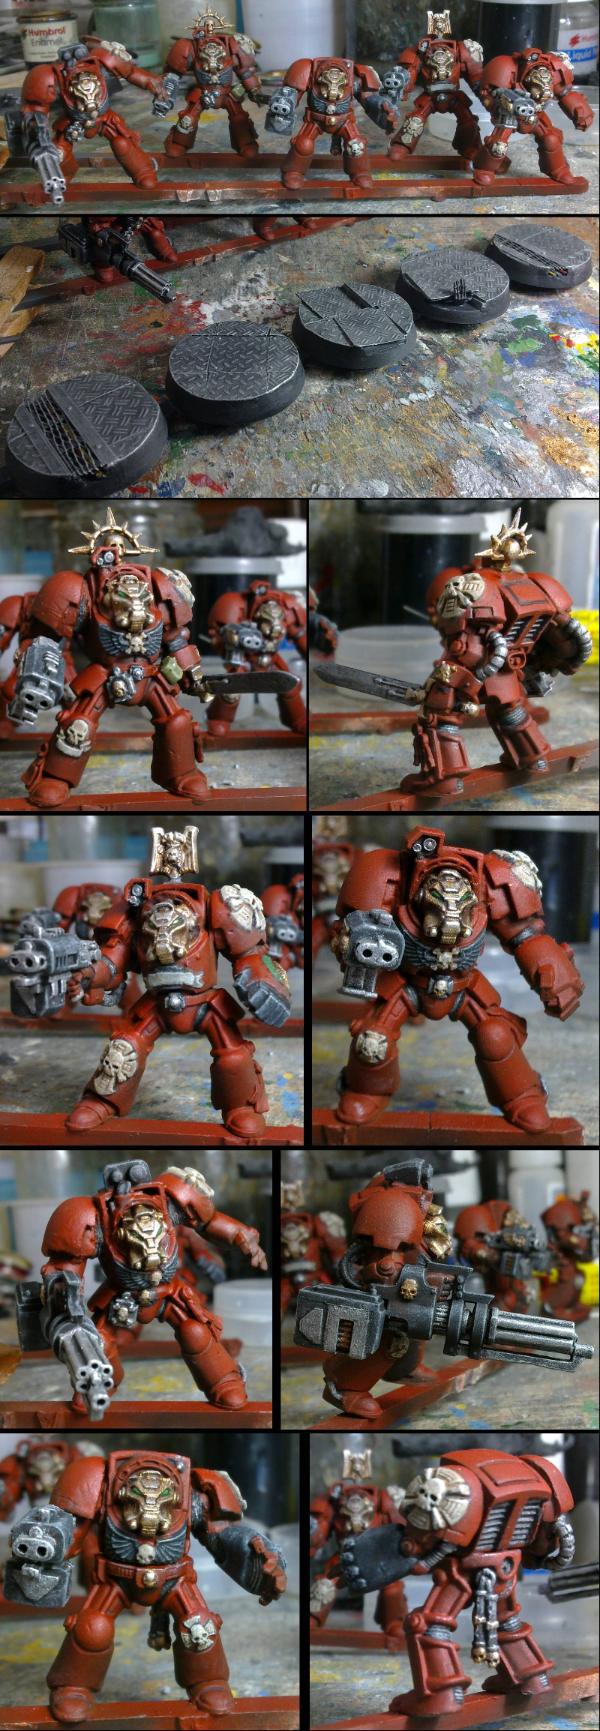
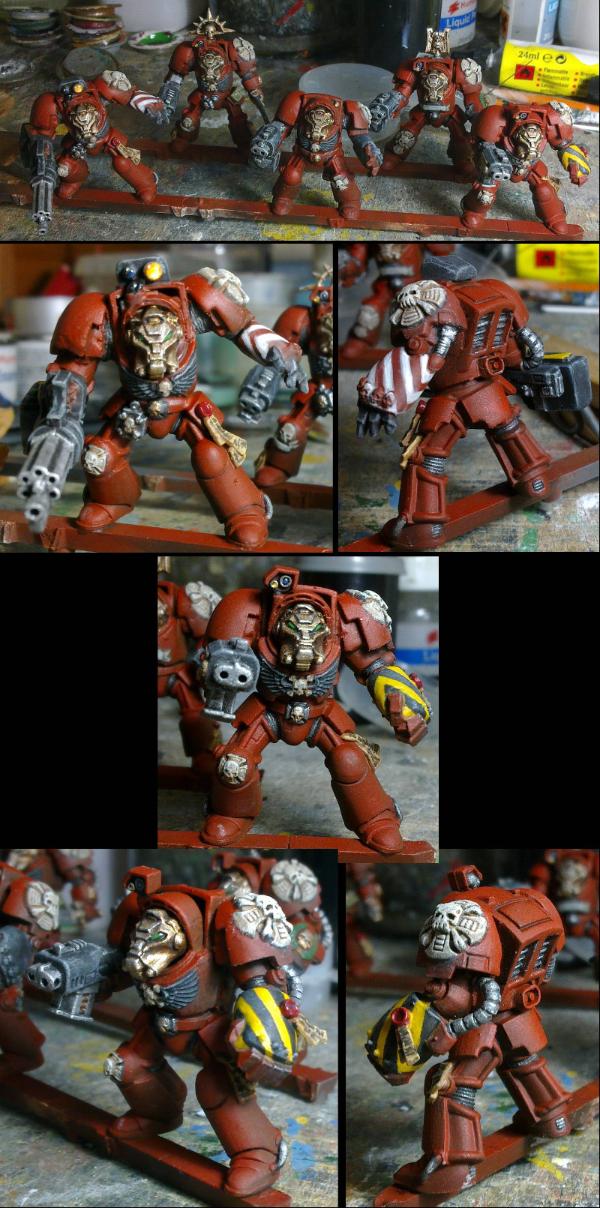
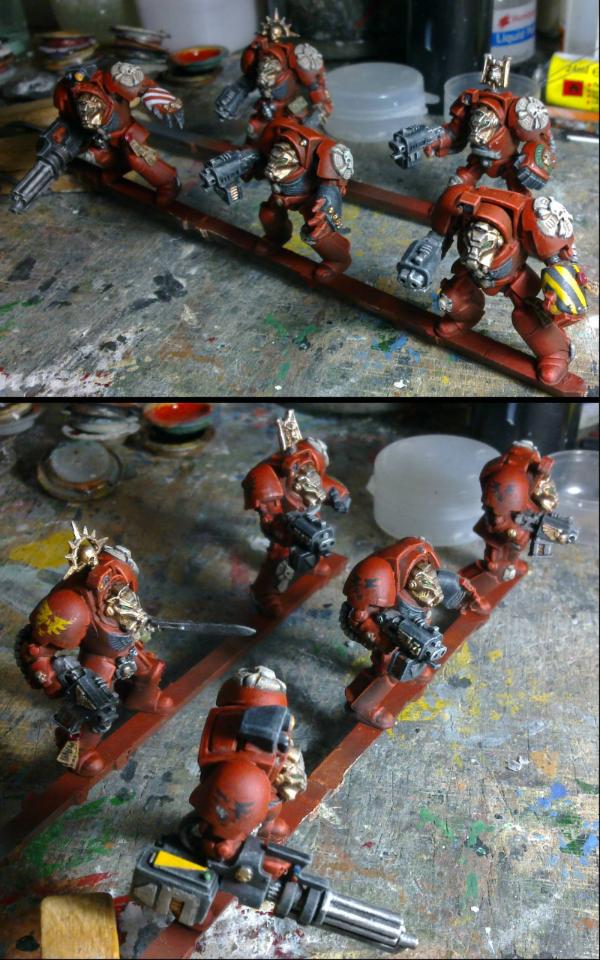
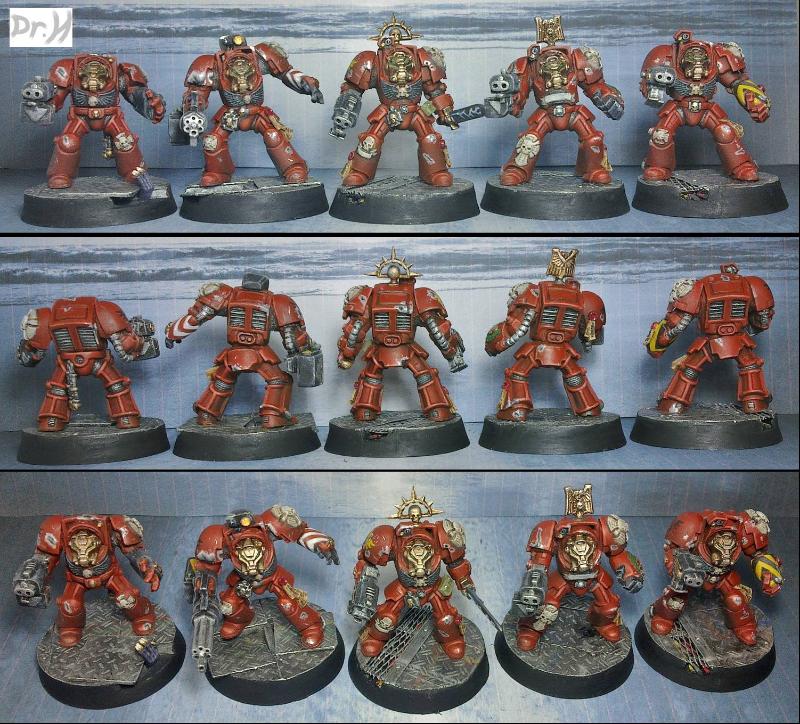
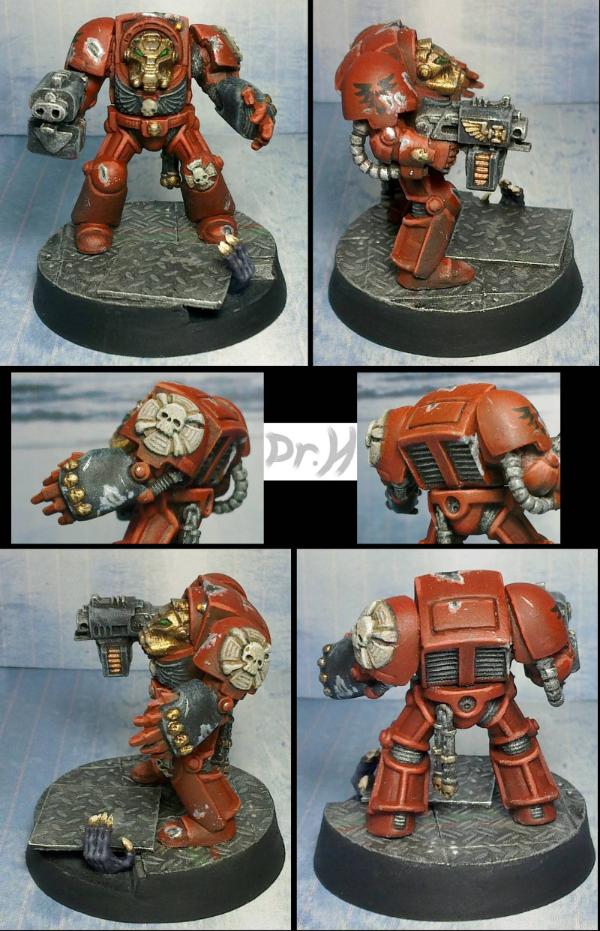

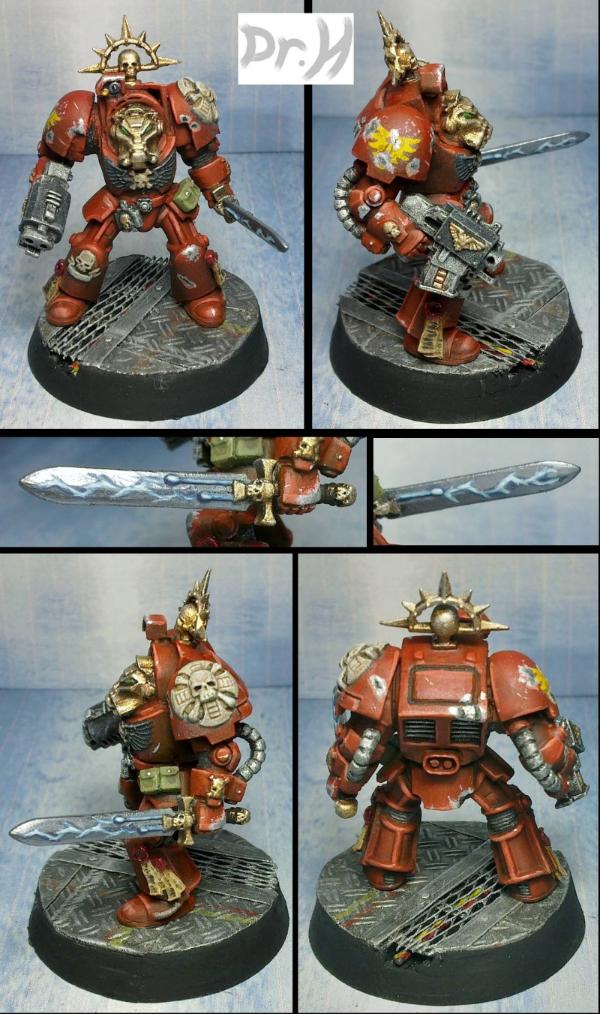
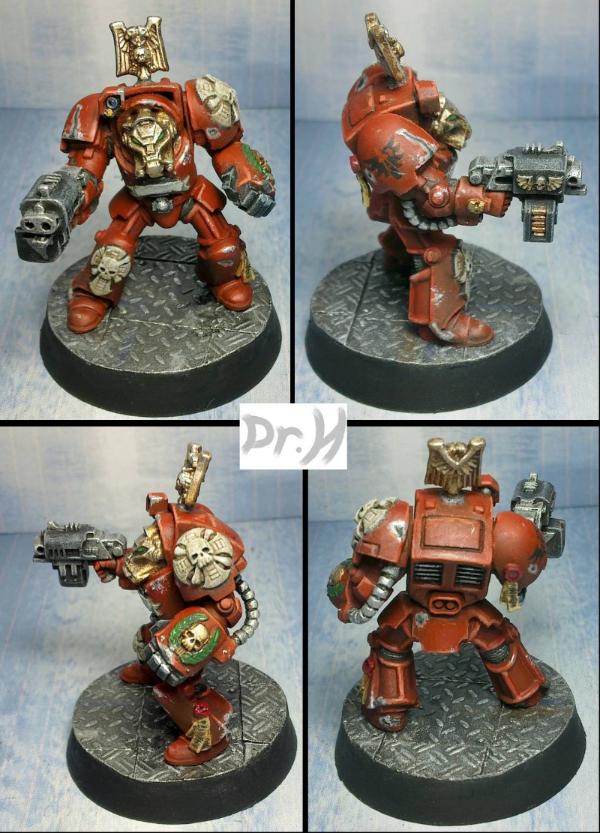
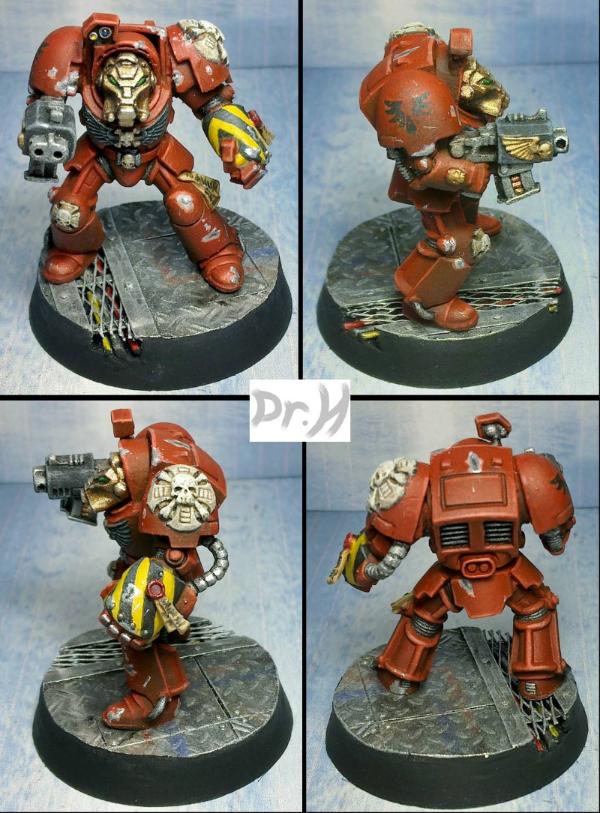
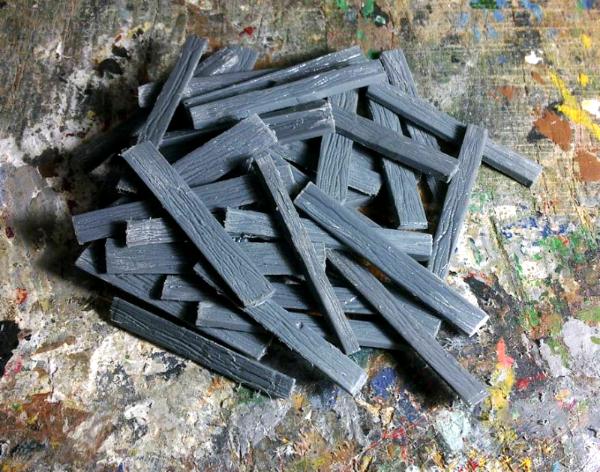
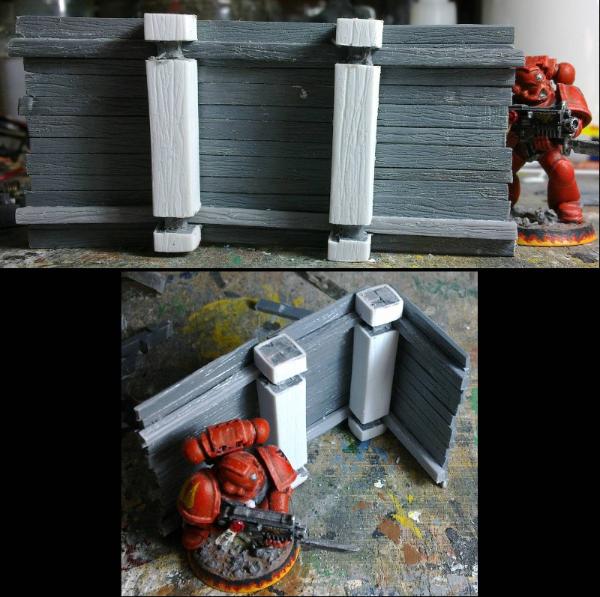
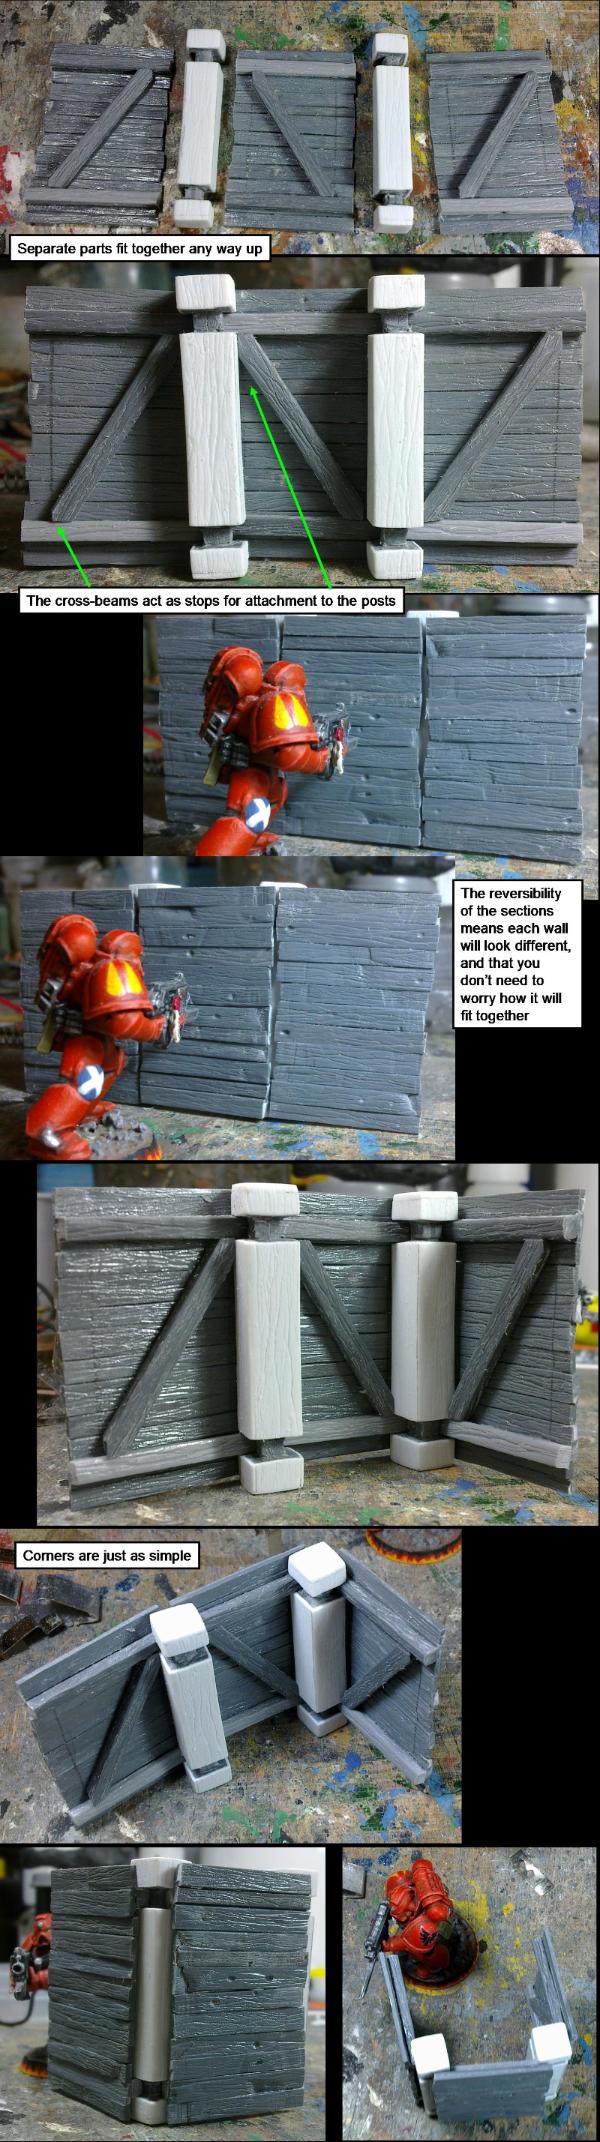

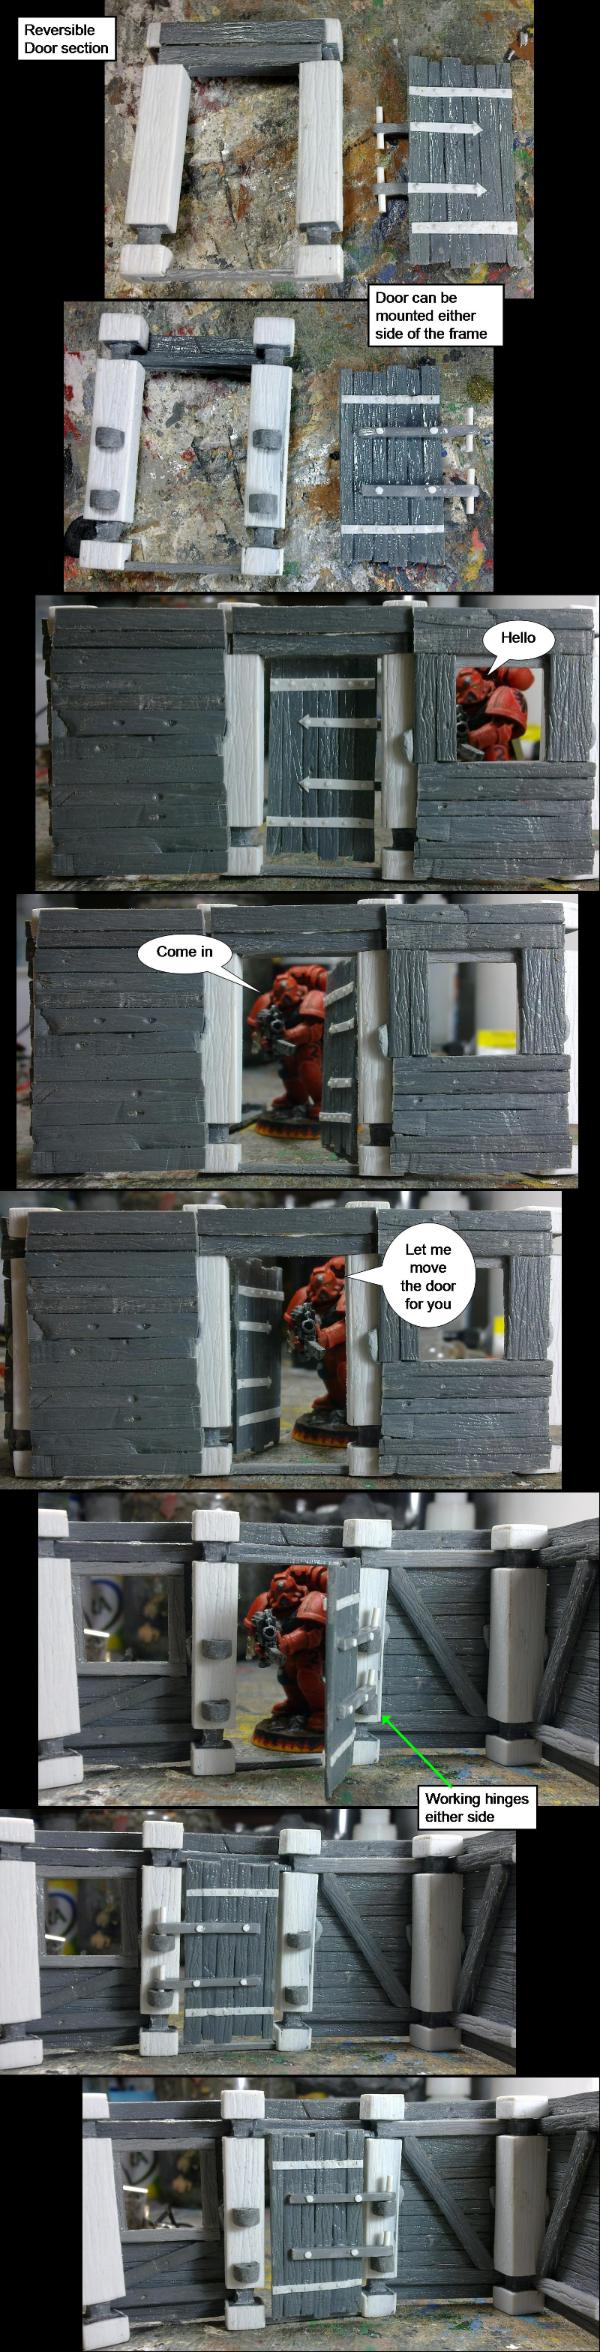

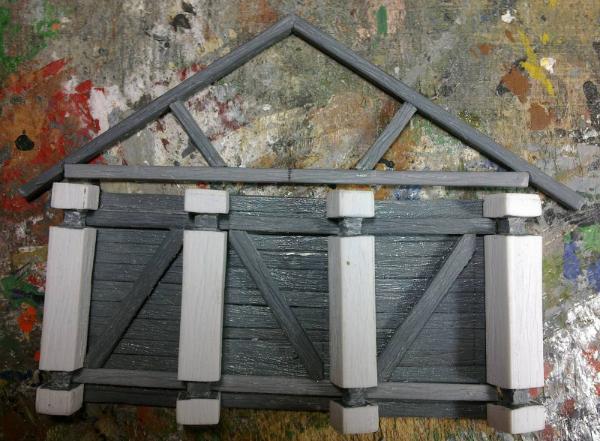
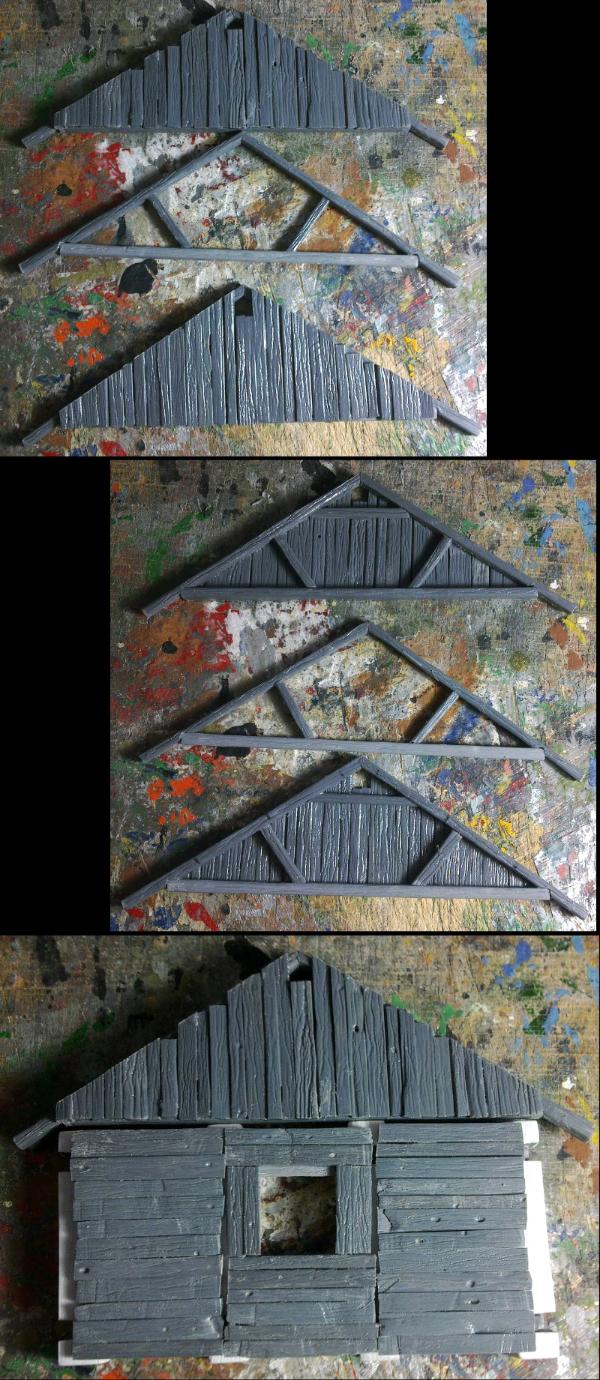
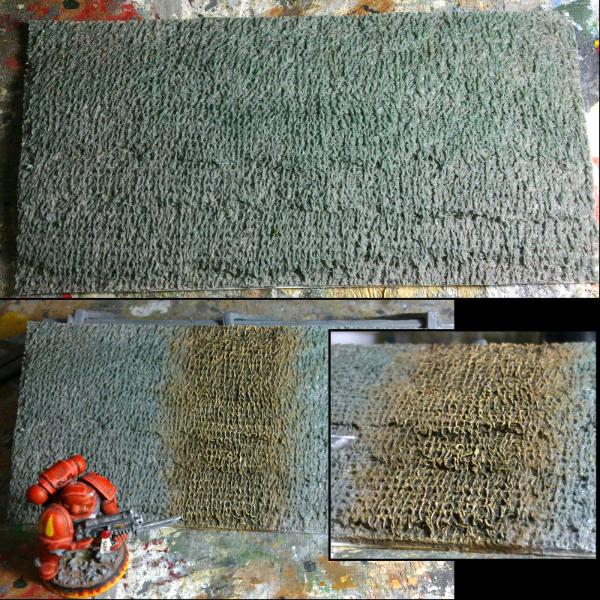
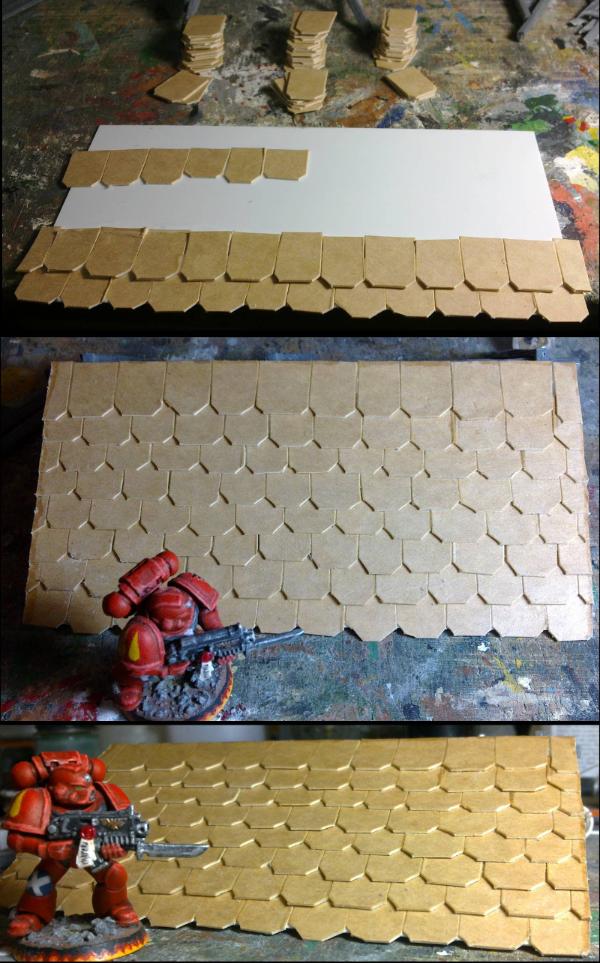
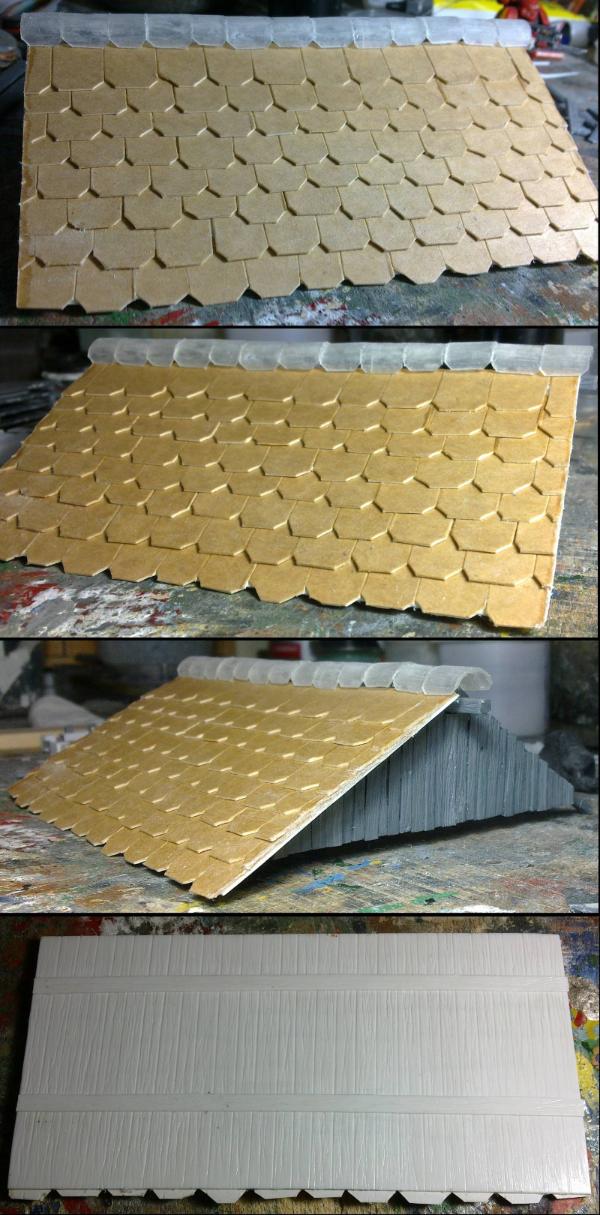
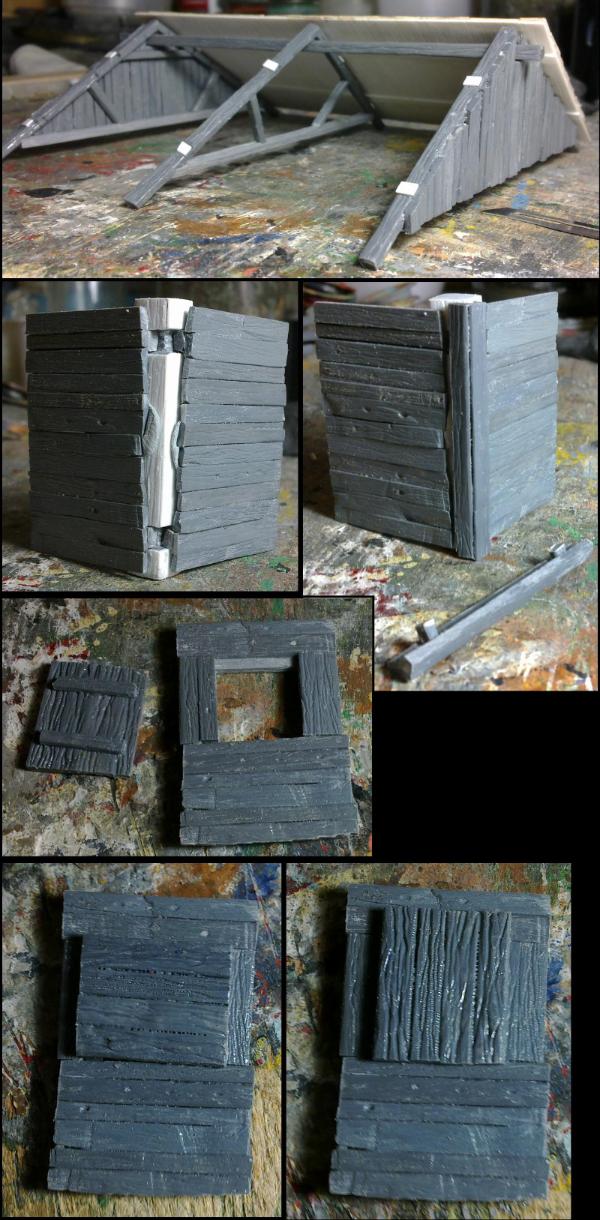
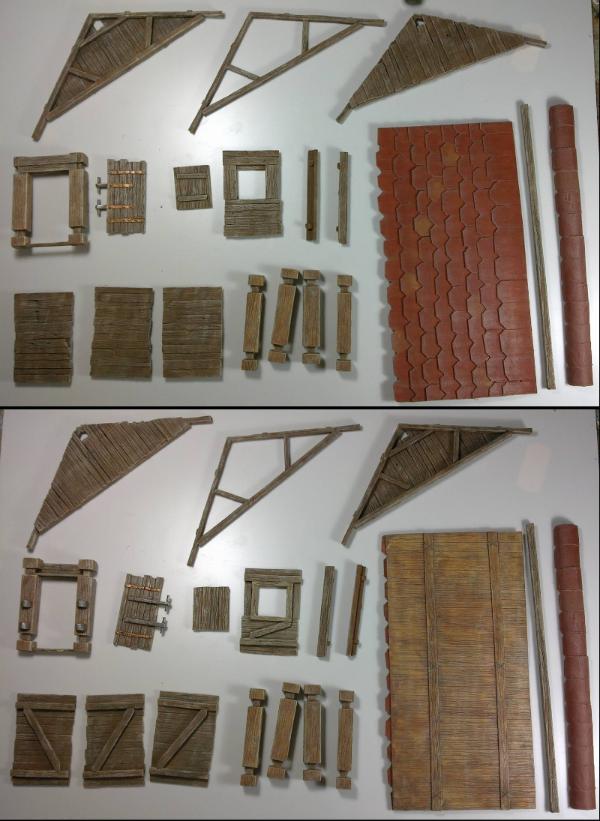

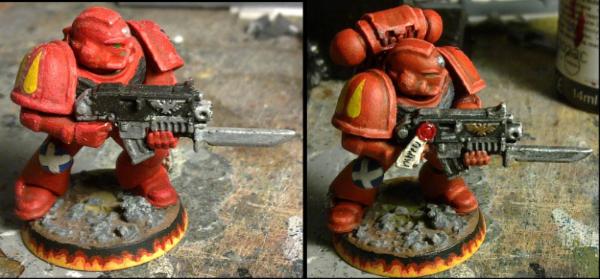
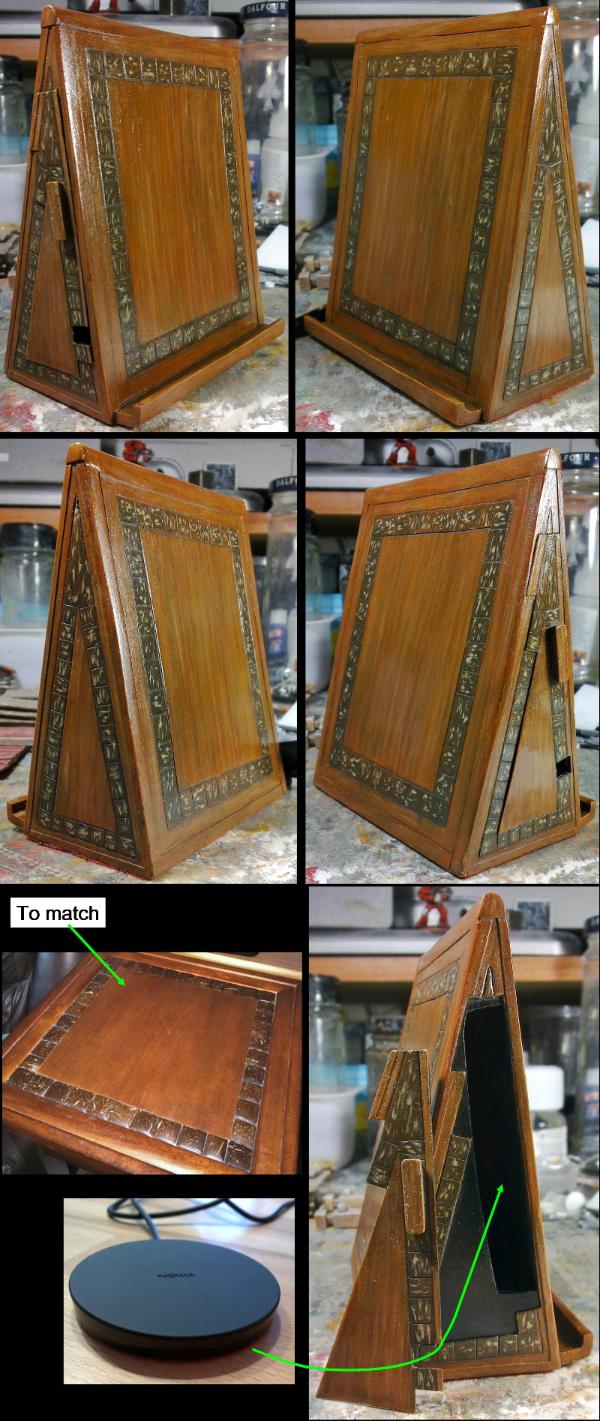
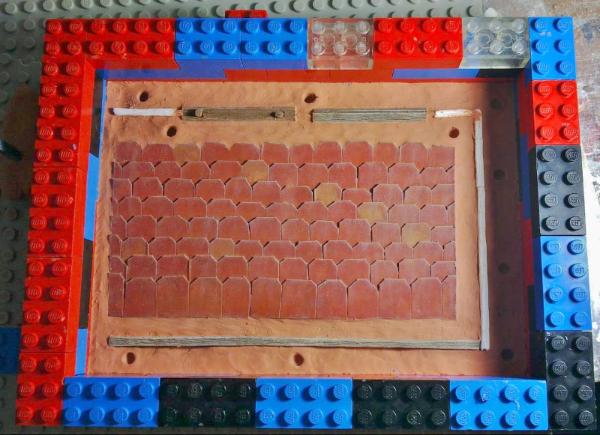
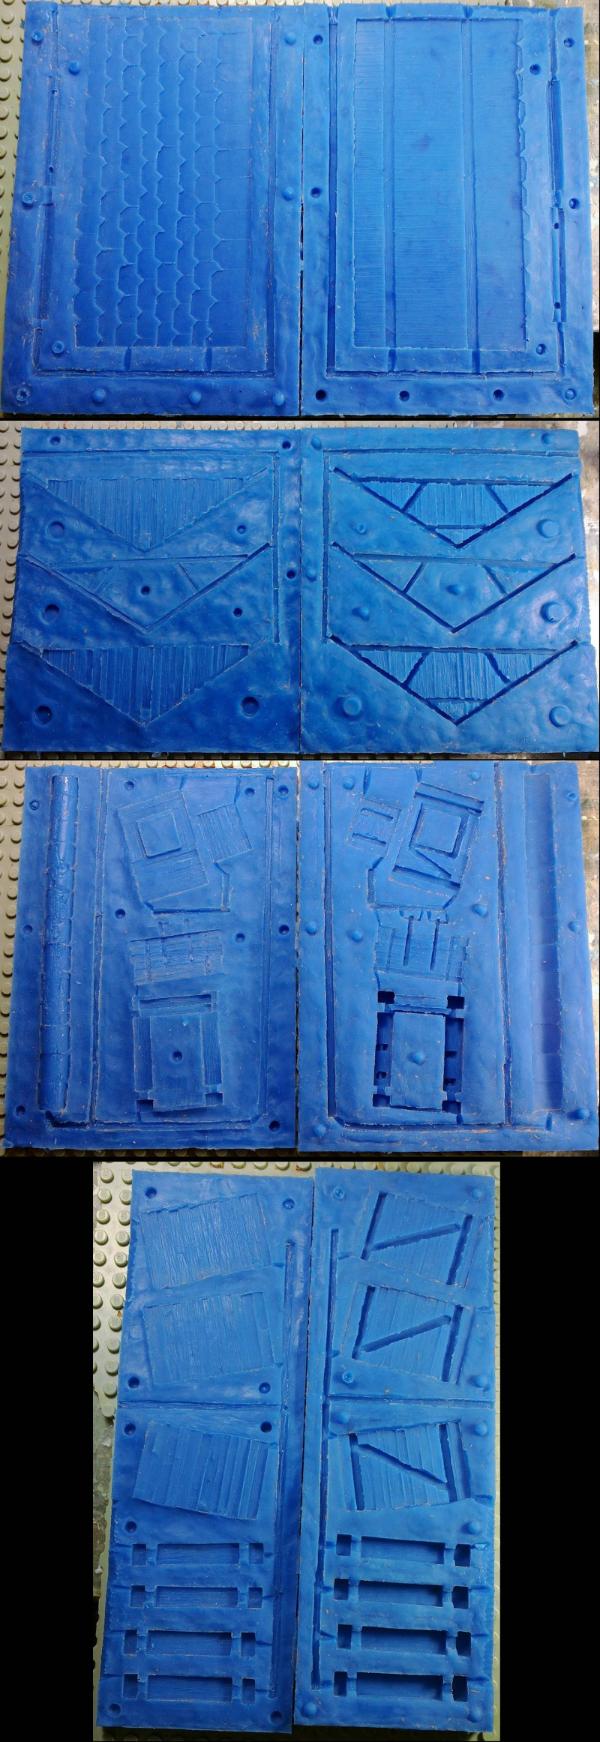
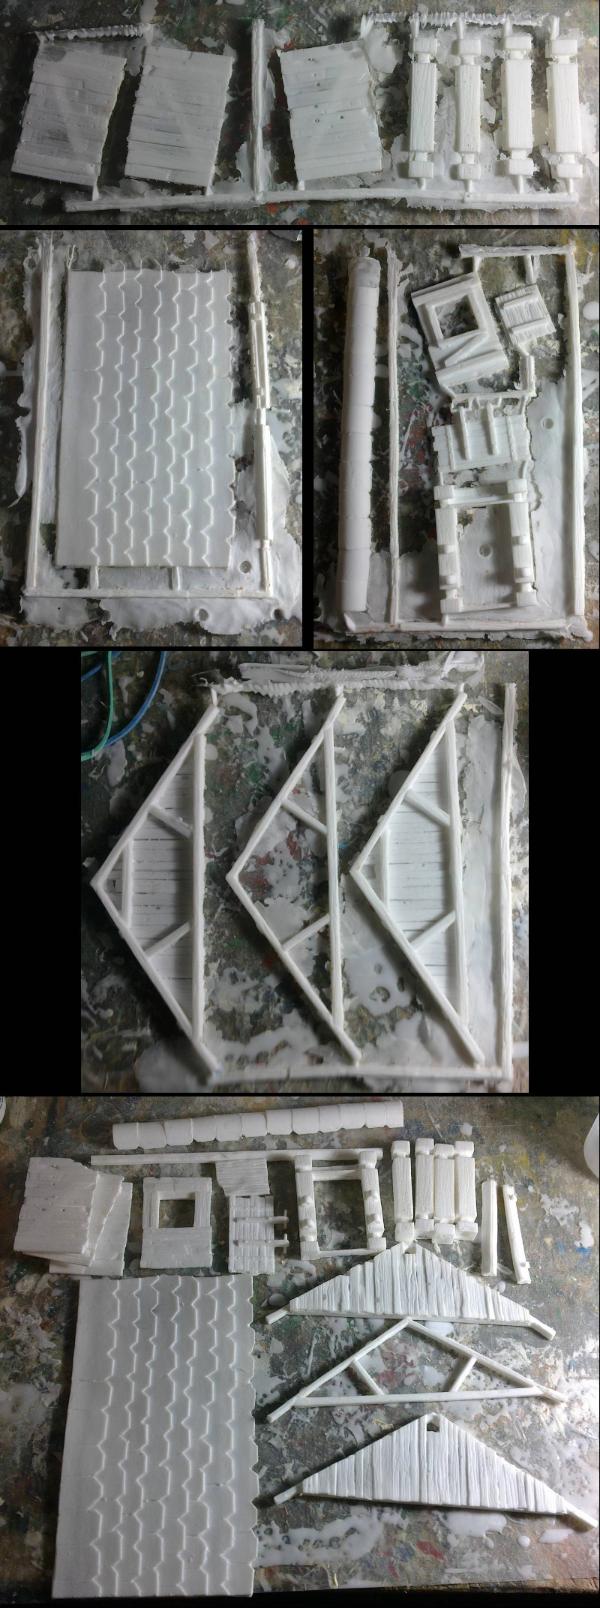
 ). The others I am slowly removing by adding more vents (or widening / deepening them).
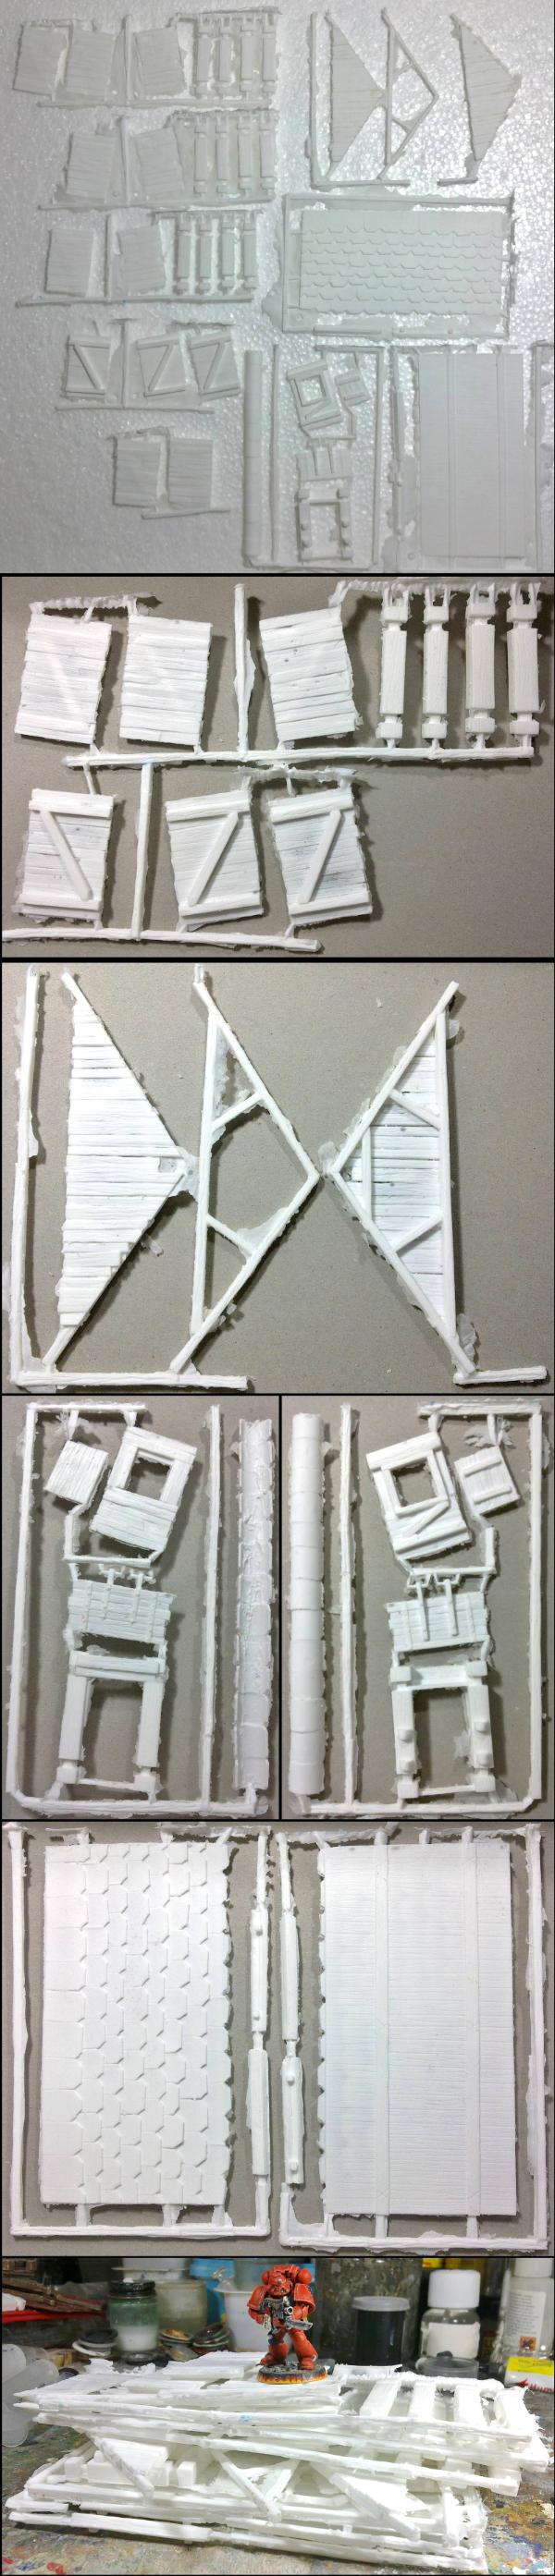

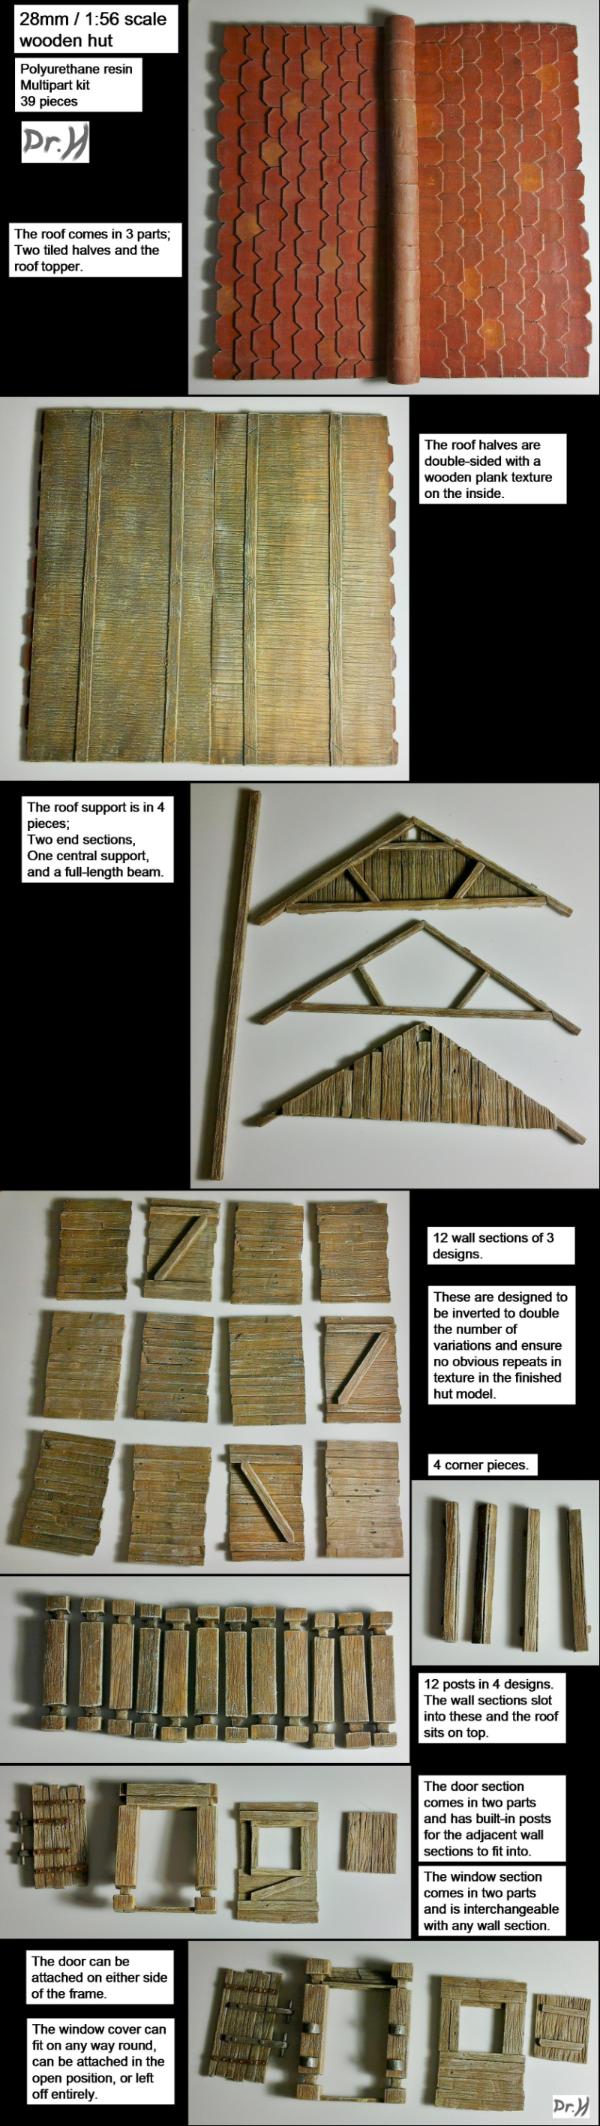
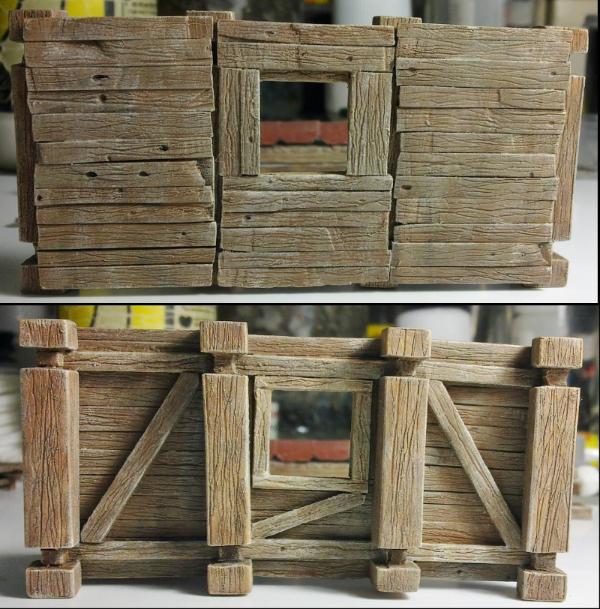

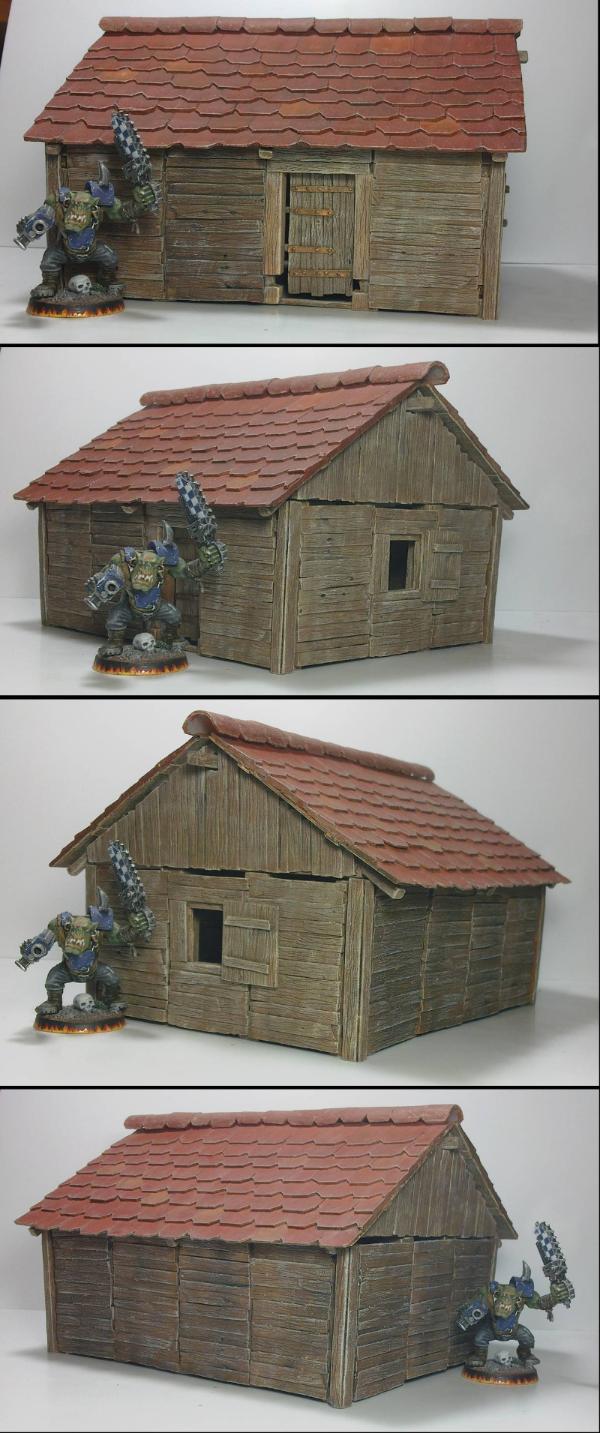

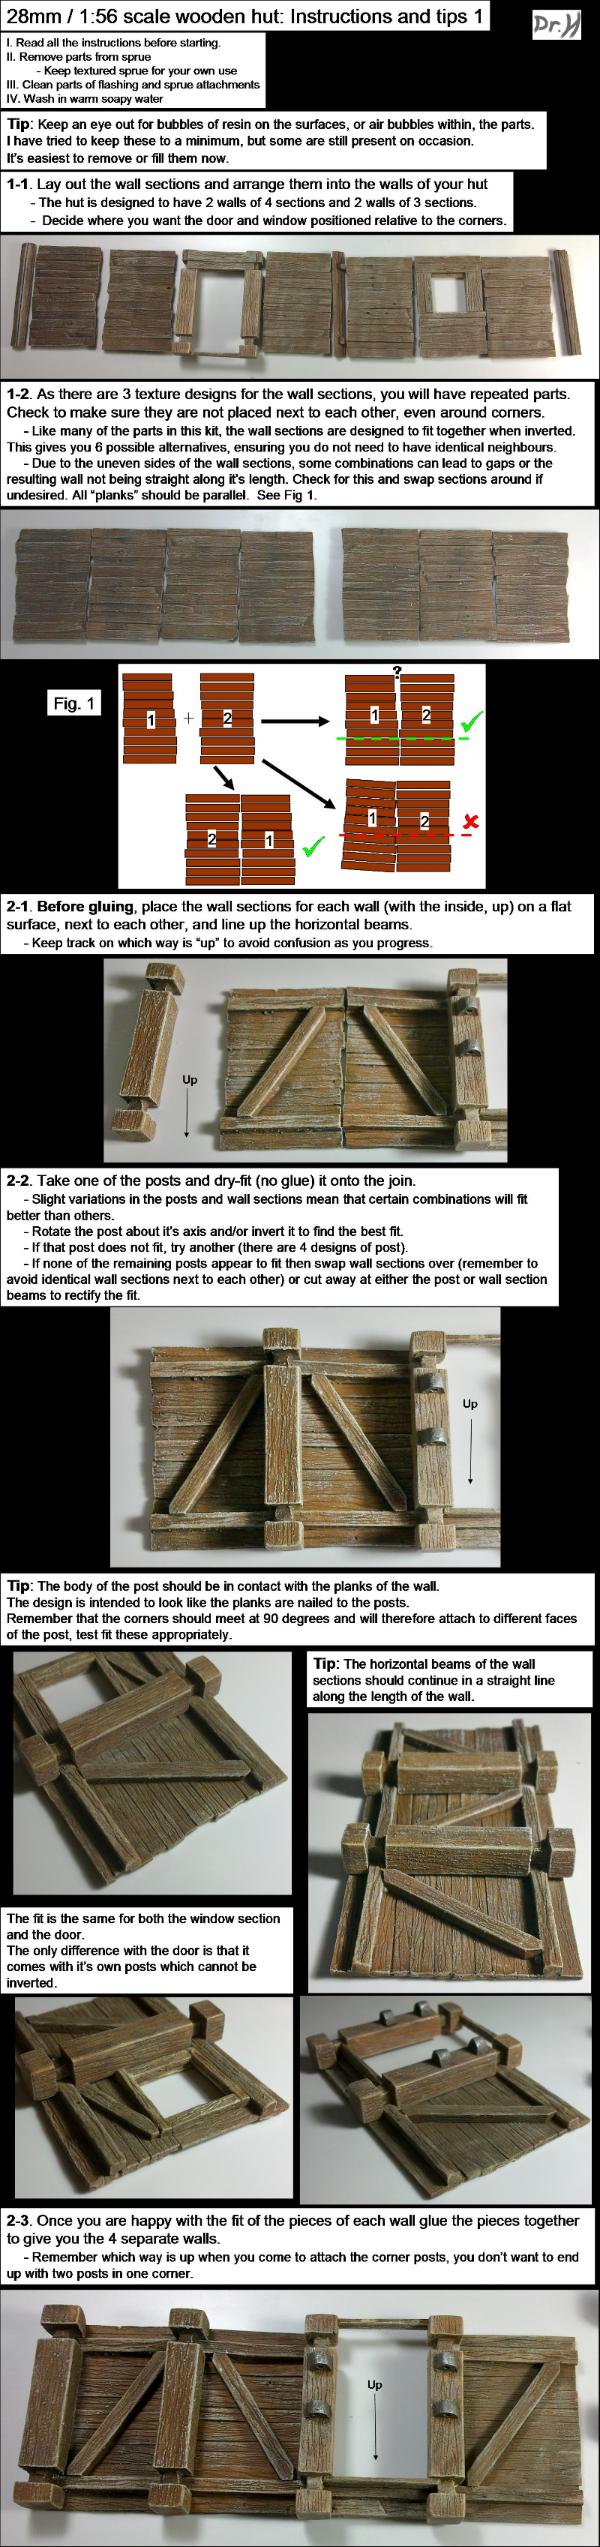
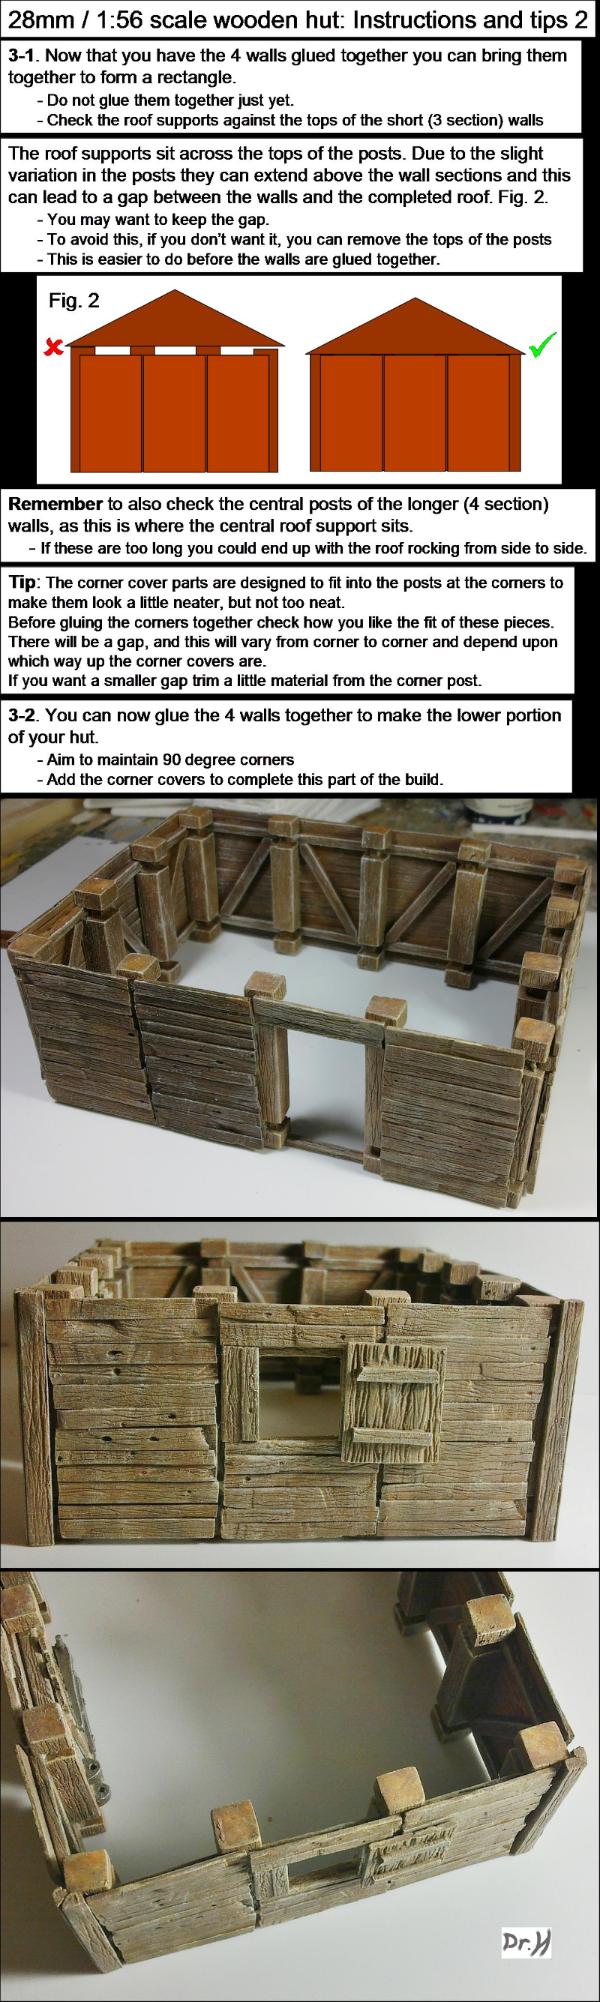
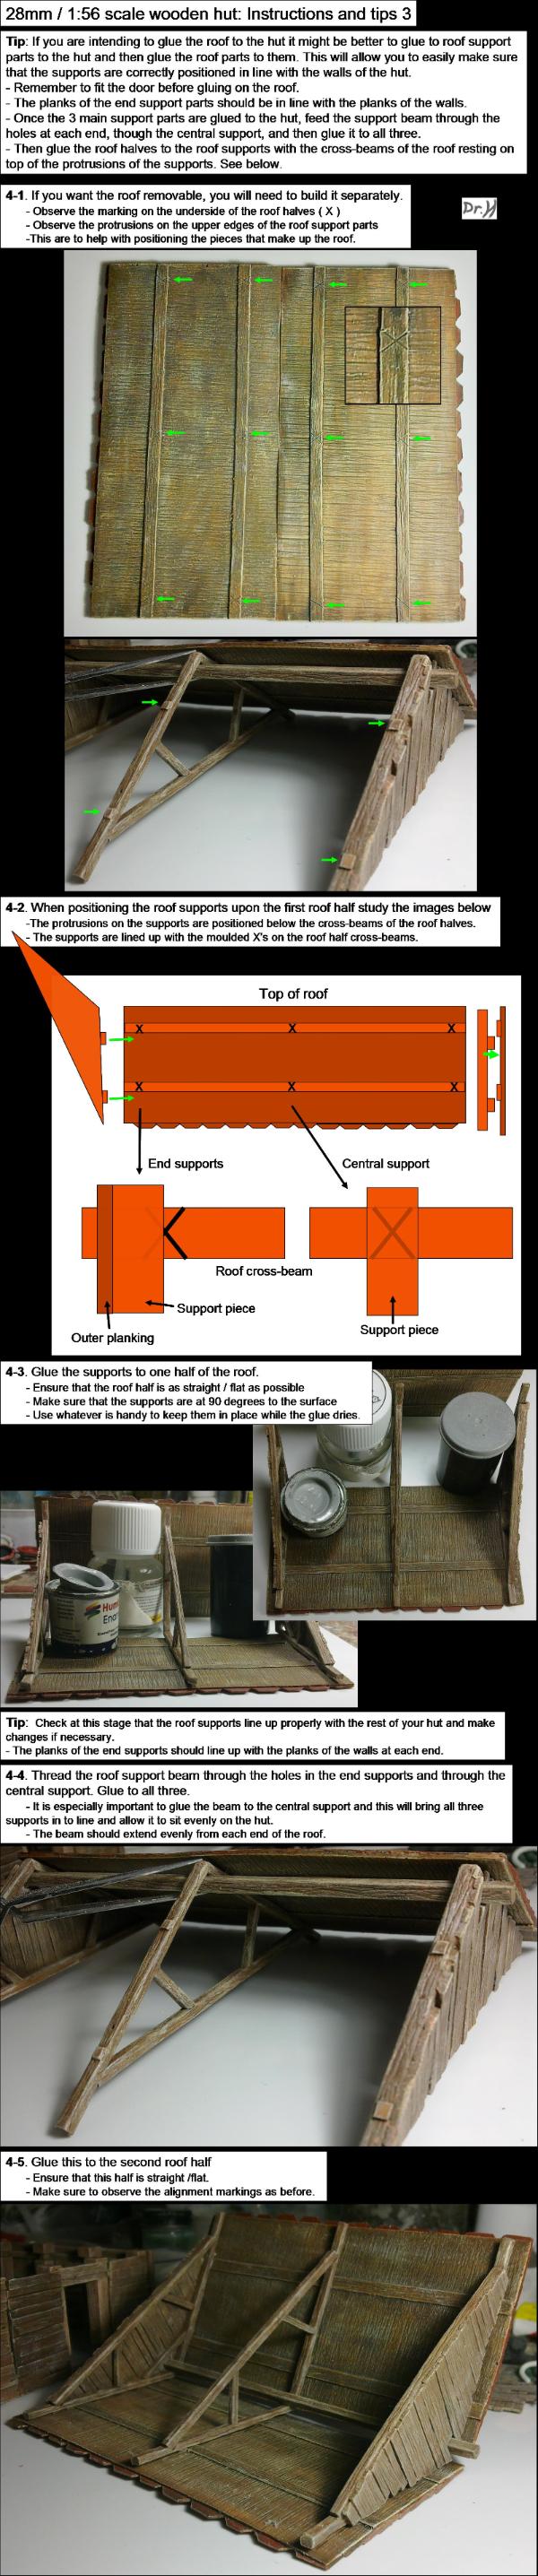
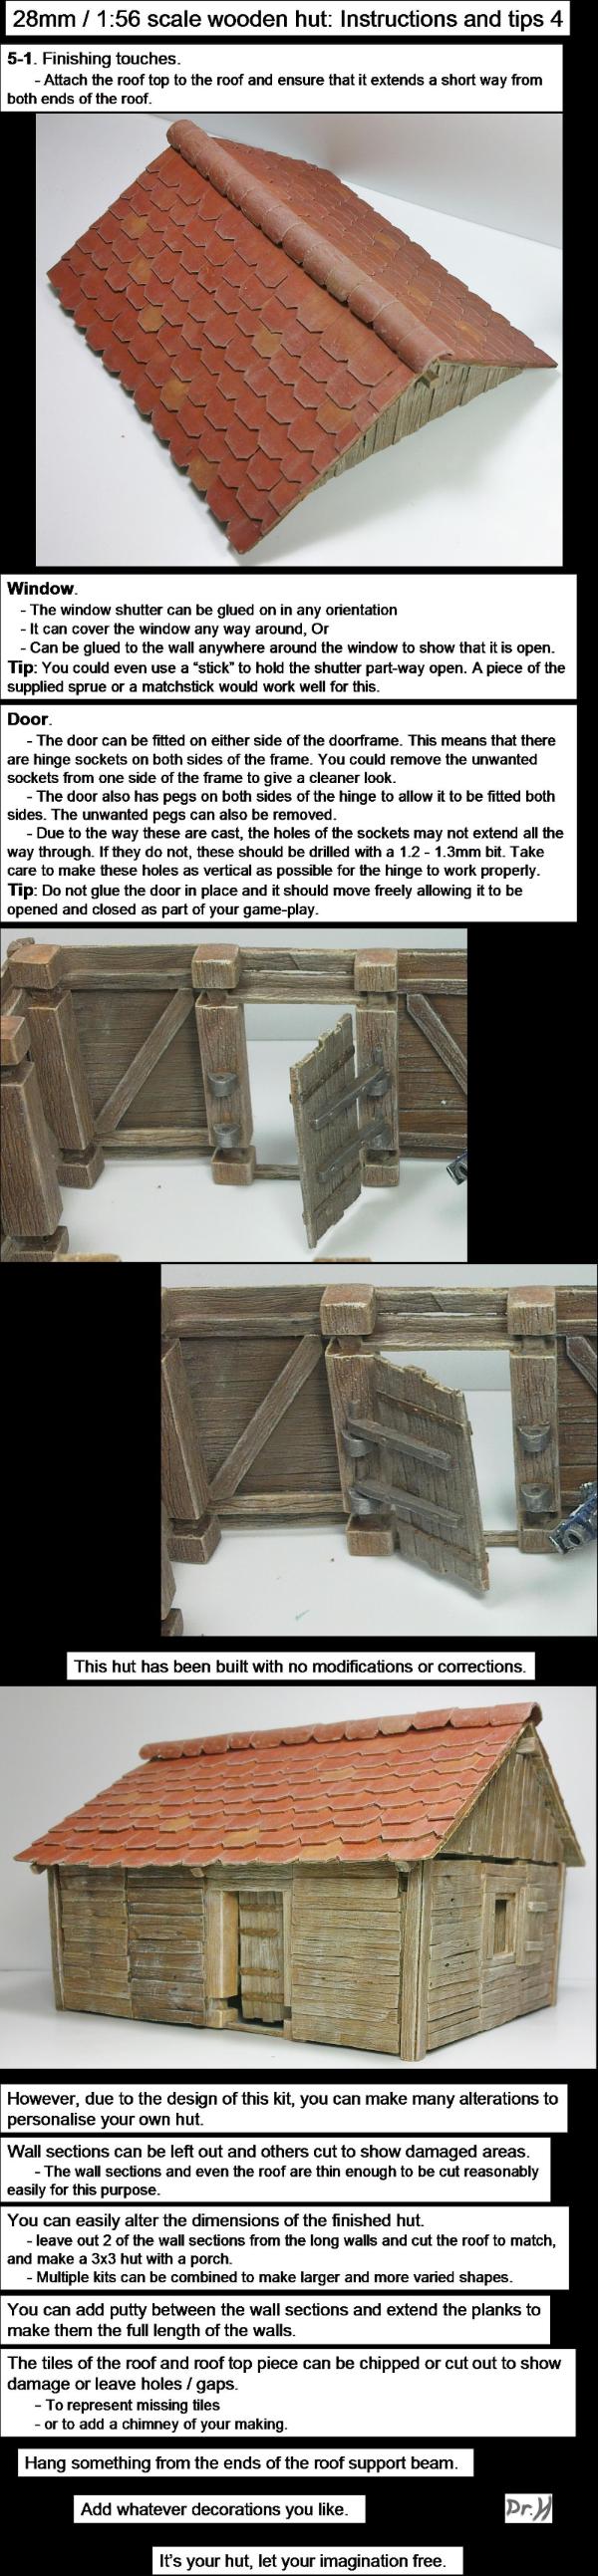
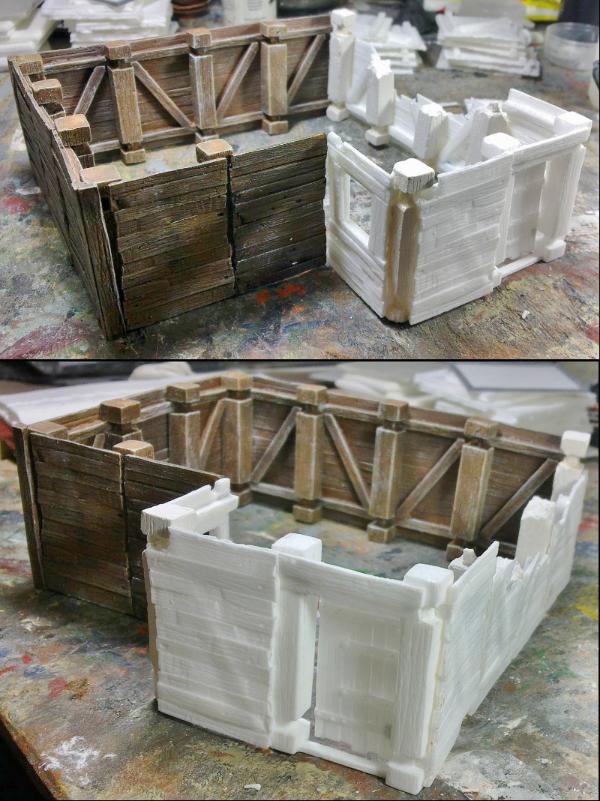
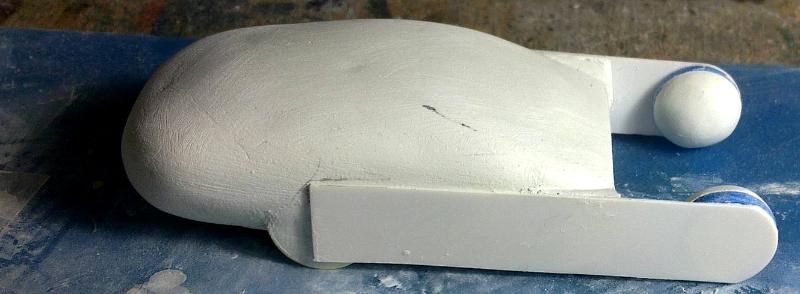
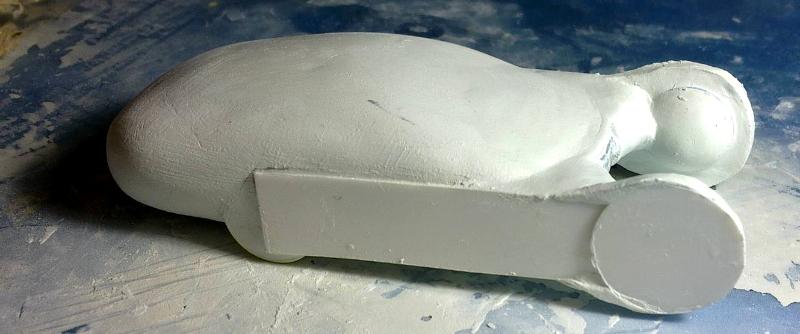
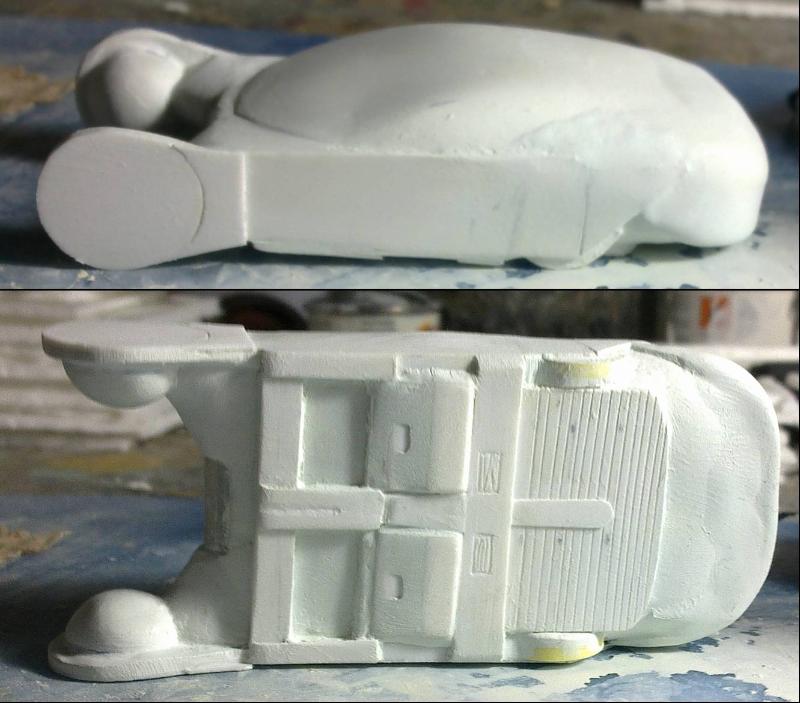
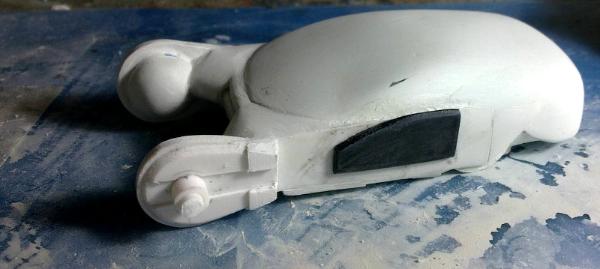
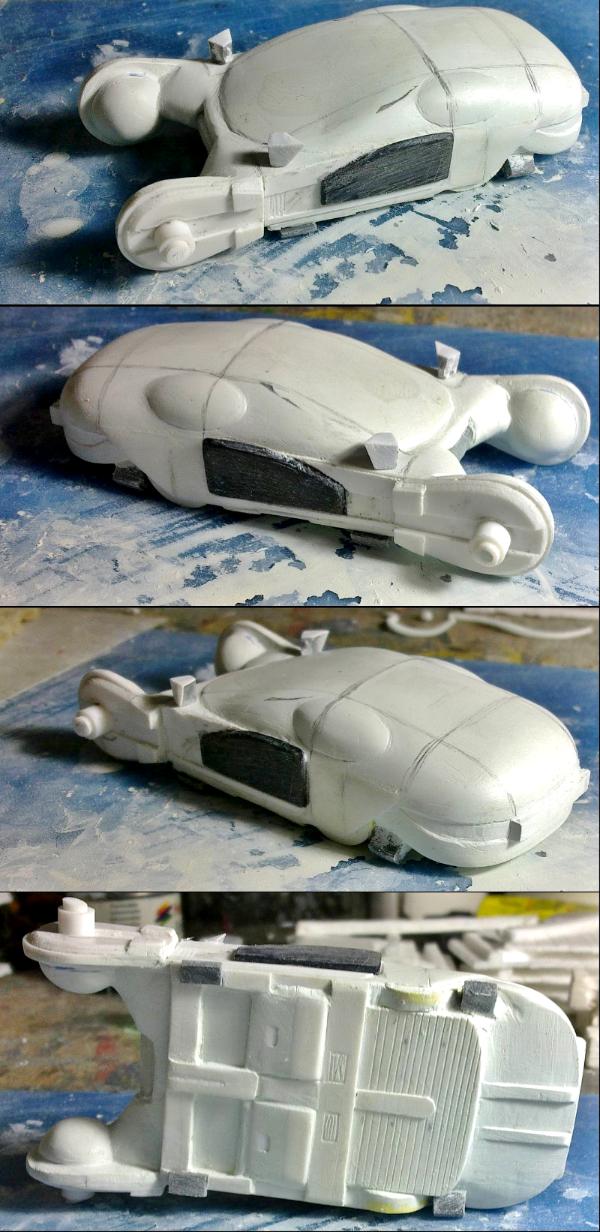

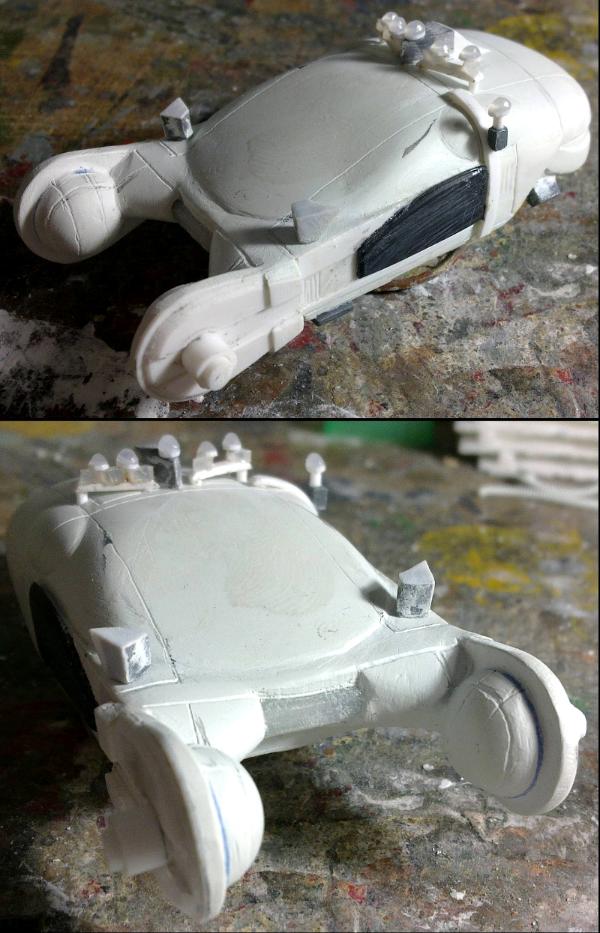

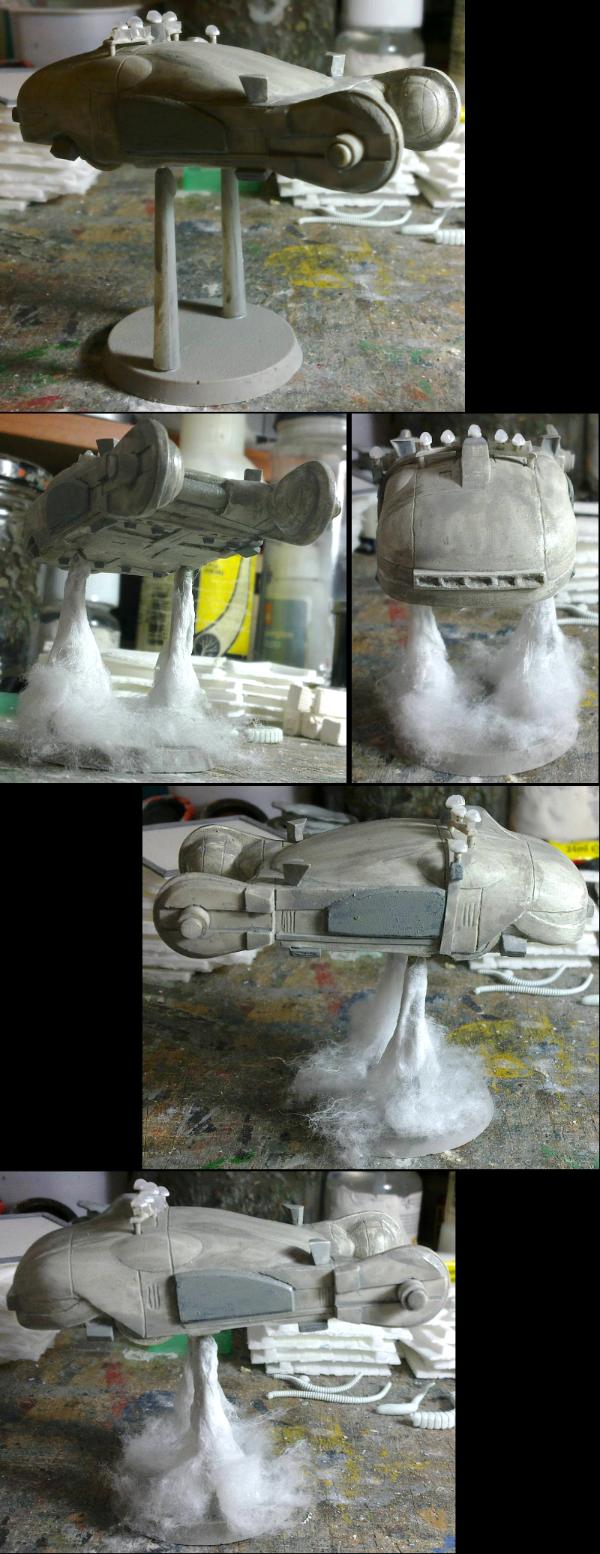
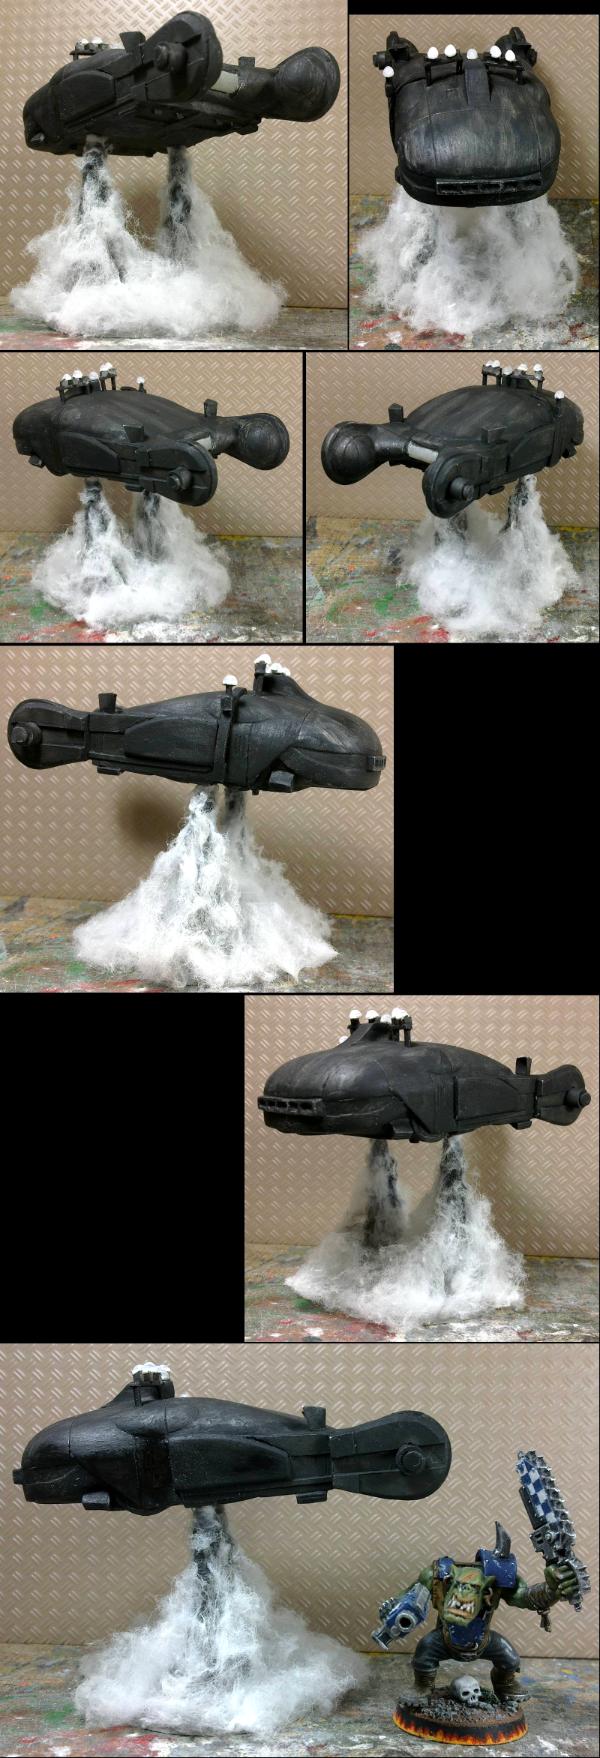


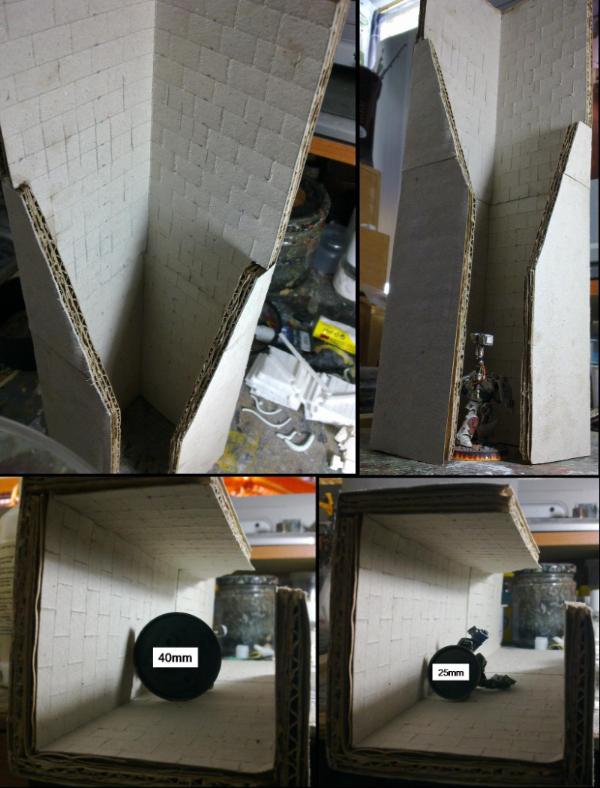
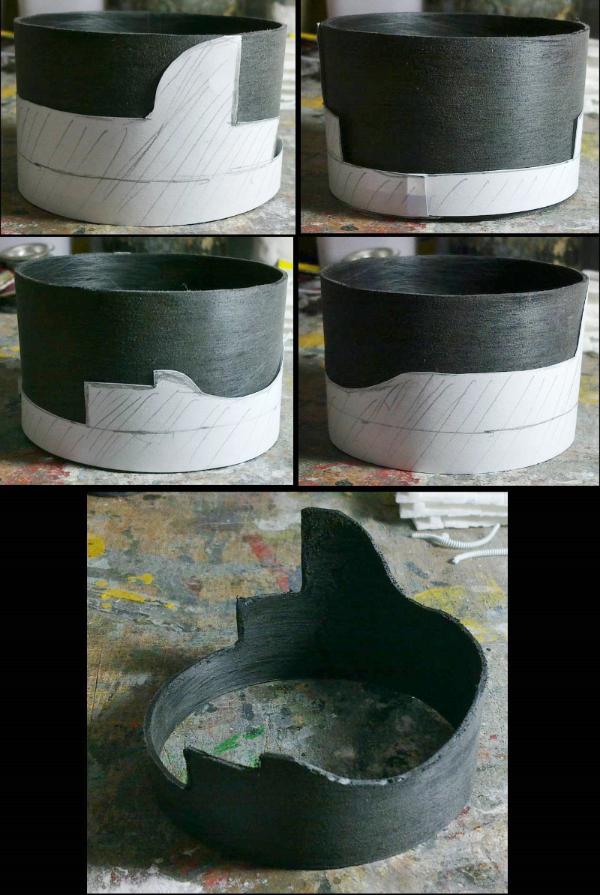
 out of it.
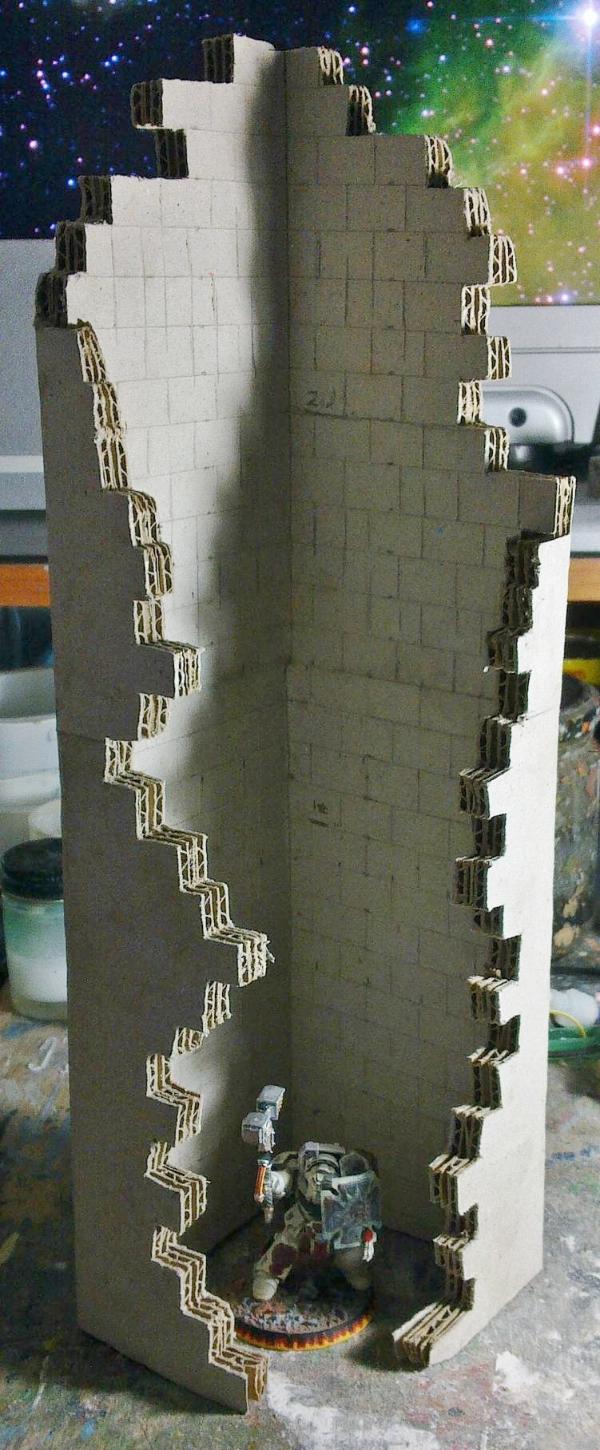
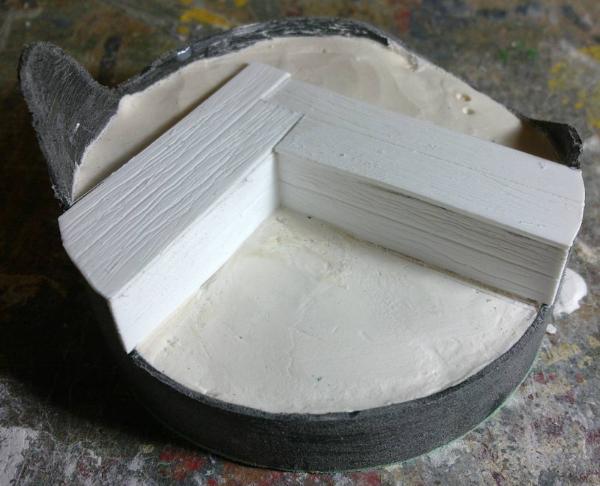
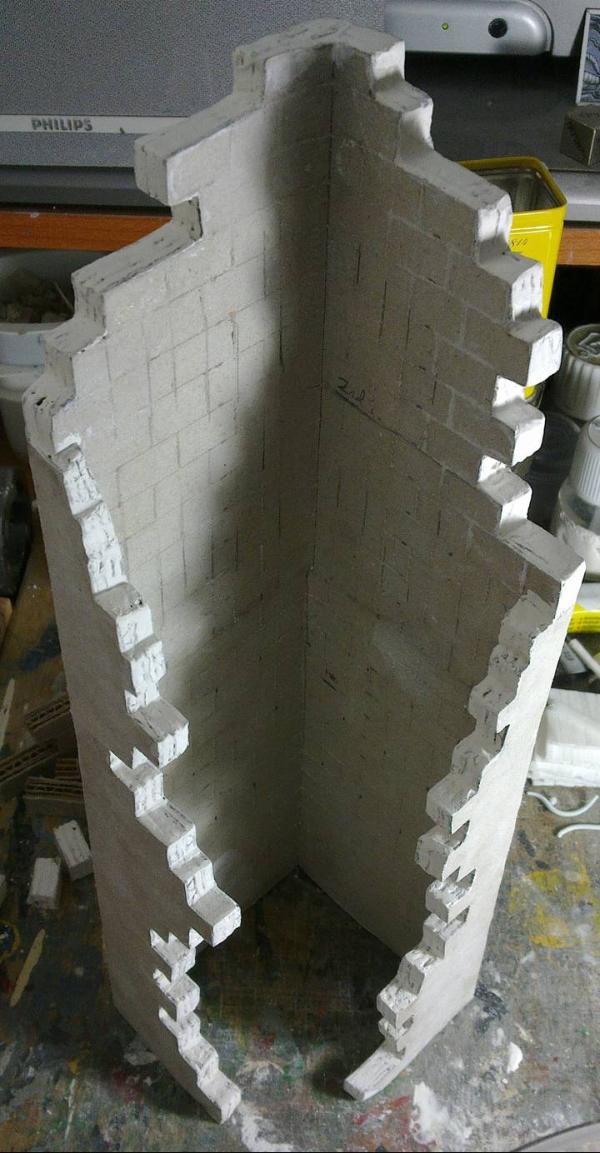
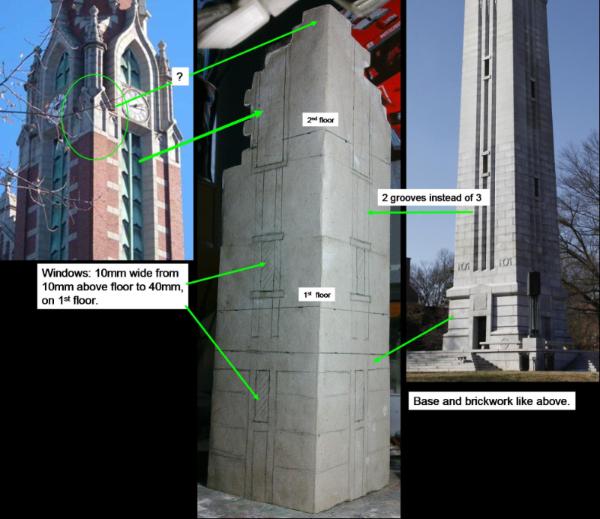
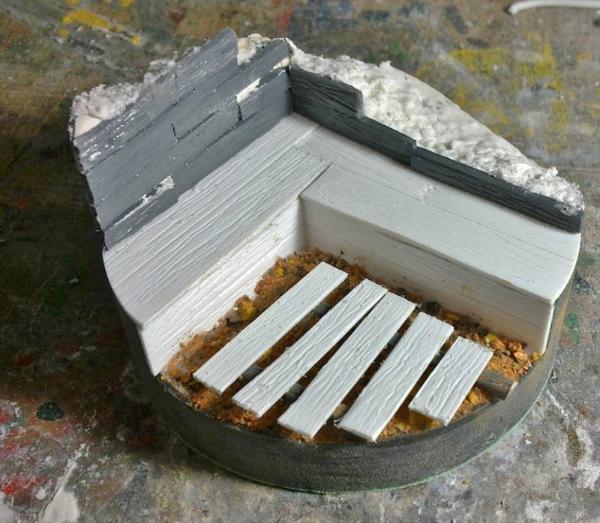
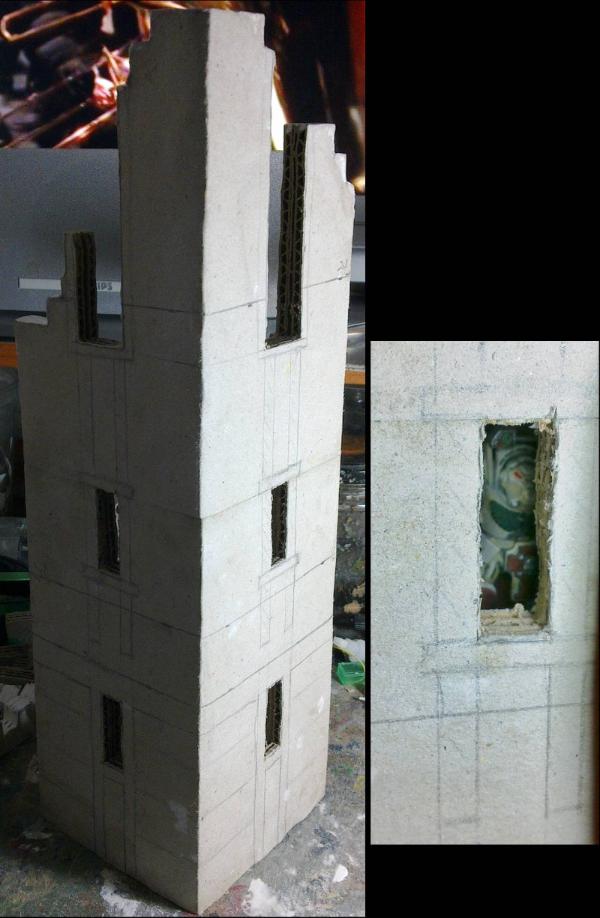
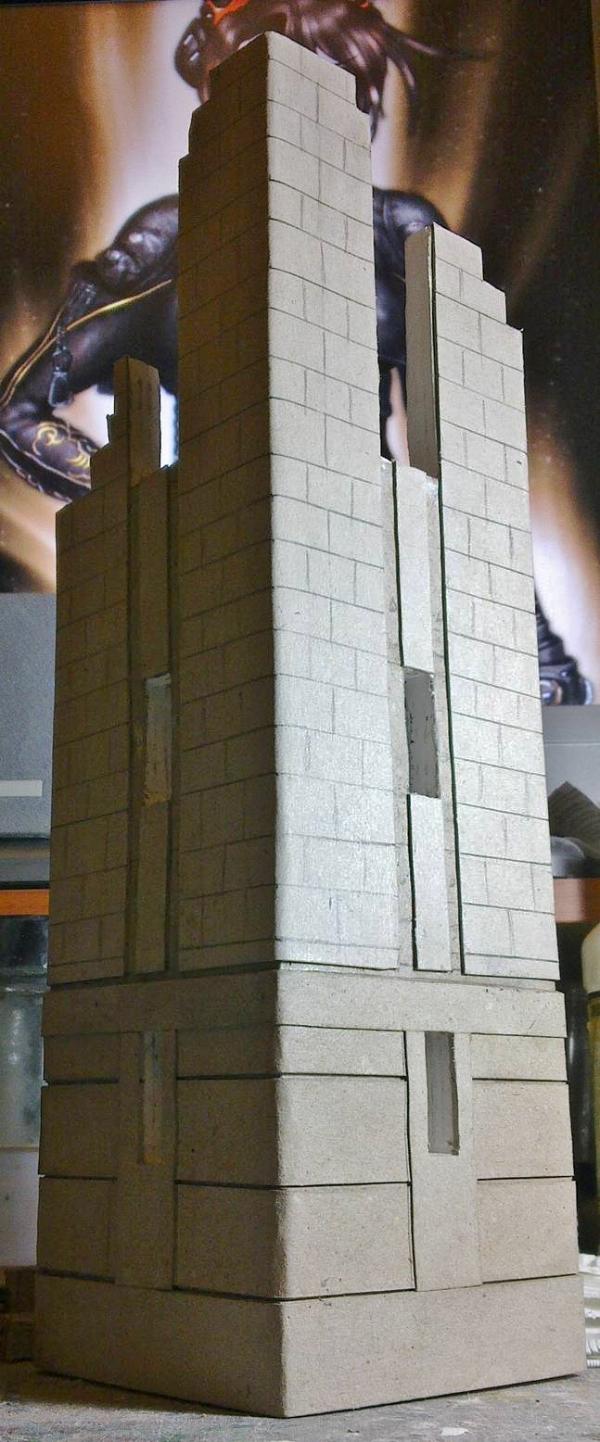
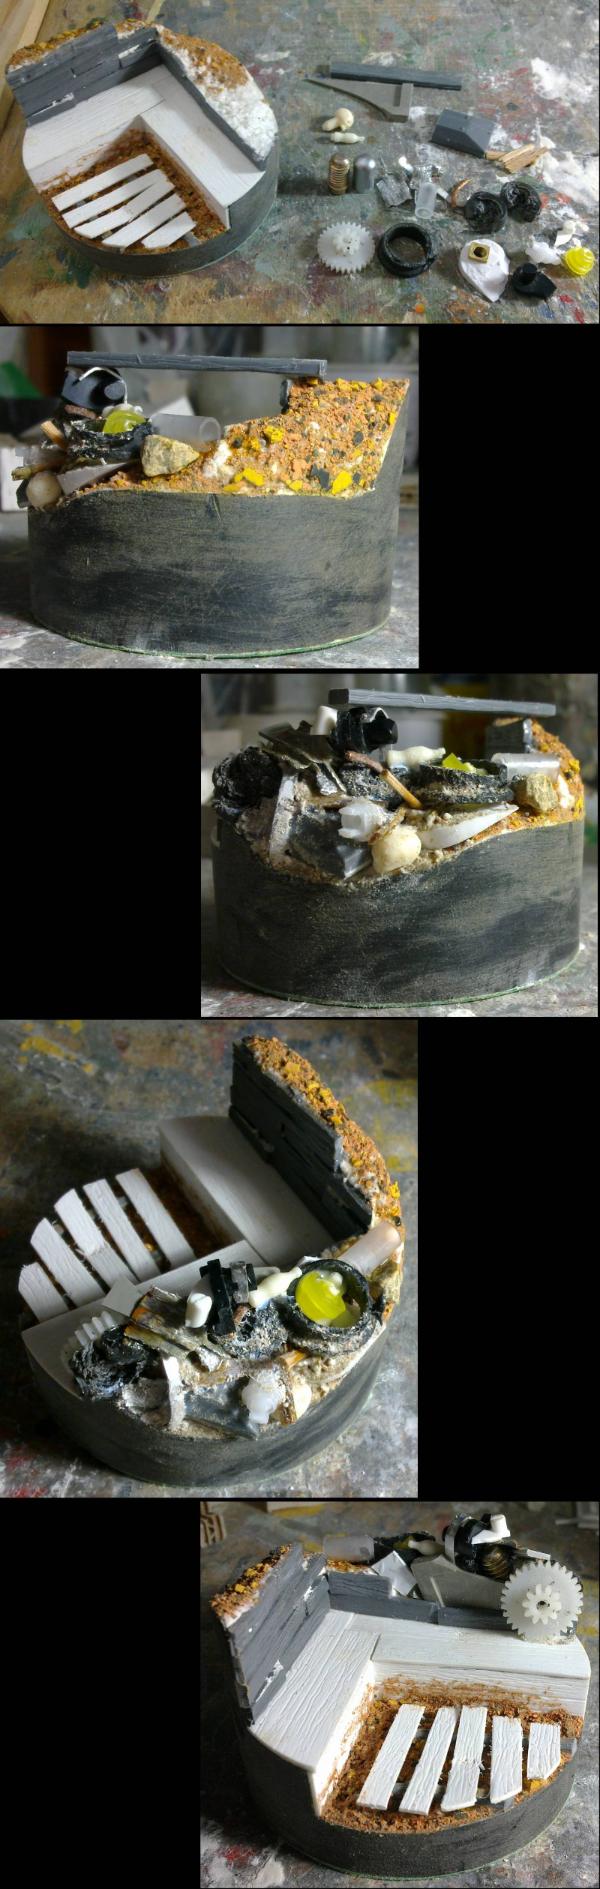

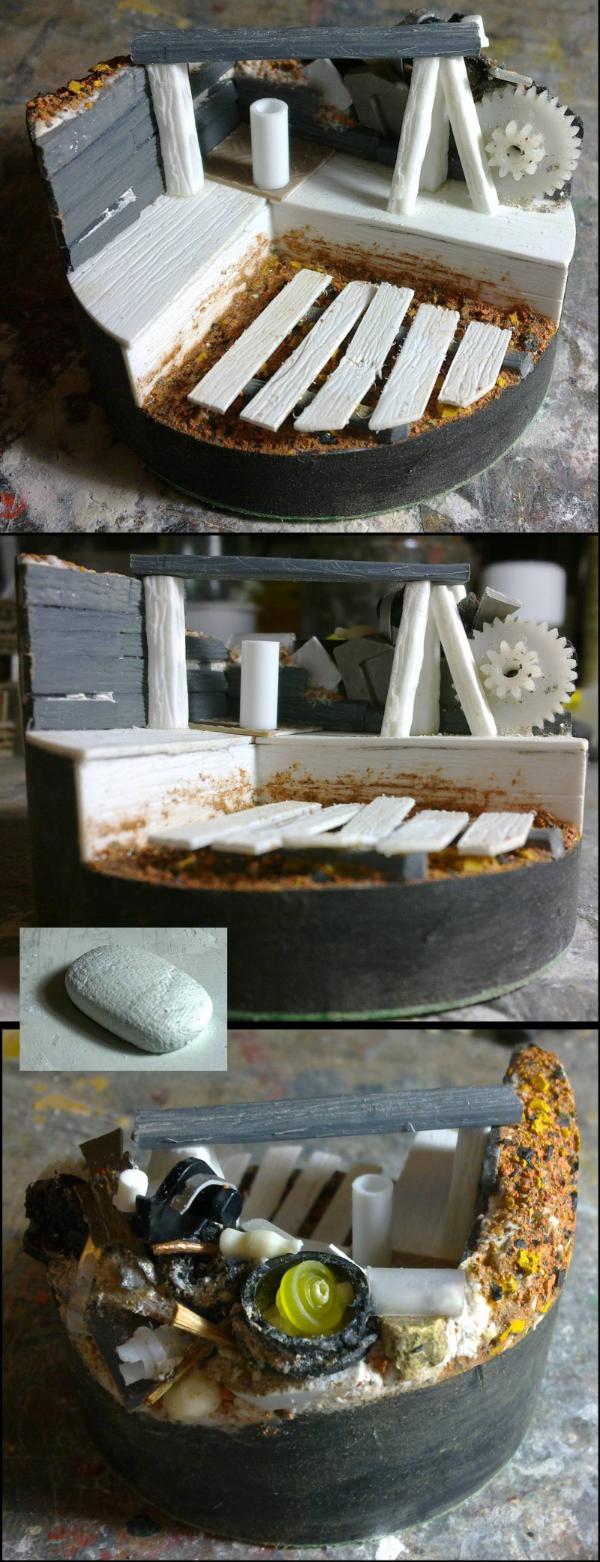


 )
)