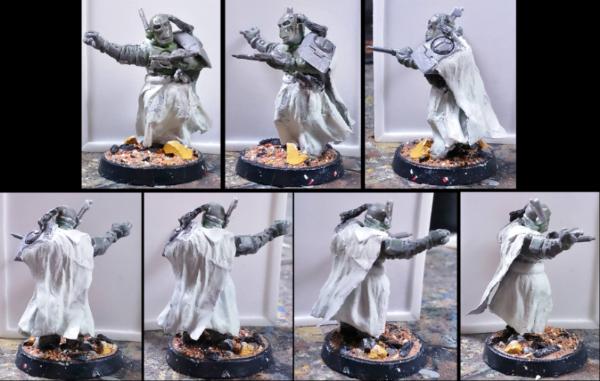
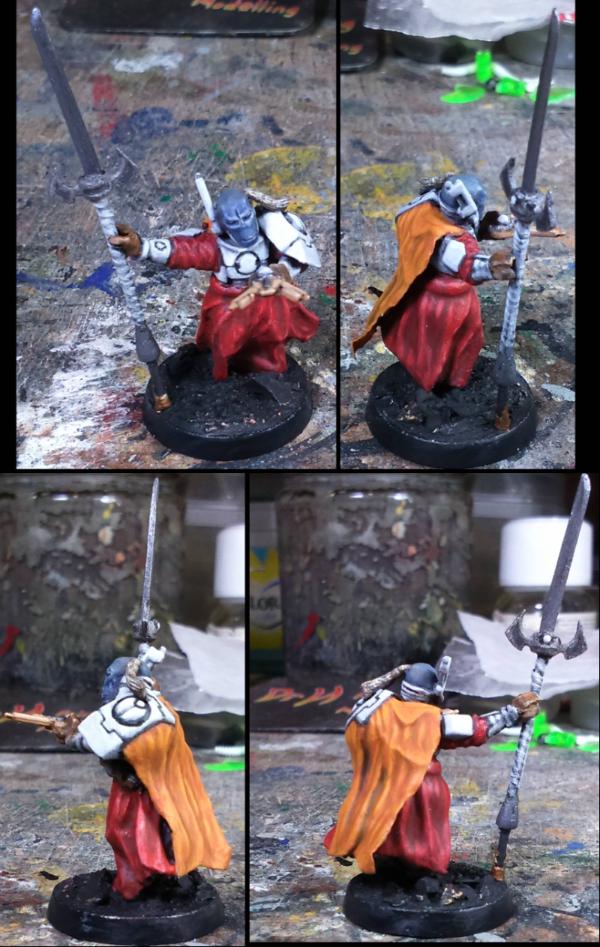
Thanks Graven. Here's the rest in place, the wiring in and the plant-life added. See what you think?
Theophony wrote:That tower is amazing , so much detail that I would loose every game played on that table as I stare at it and forget to do so many other actions. The vents are a great touch to the upper level windows.
Thanks Theo. Ha, maybe that'll be my secret weapon for when I eventually get around to making a full gaming table and playing a game on it; distract the opposition with details.
And that has to be the compfiest trench dugout ever , a bedroll AND refreshments
Well it was intended to be an unused sandbag, rather than a bedroll, but one man's sandbag is another's bedroll .
And all trenches have mugs, although what they contain may not always be tea or coffee...
For example (relevant part starts at 1:45, but it's worth watching the rest anyway):
The trench has also had some plant-life added and I'm in the process of deepening the mud inside the trench (and hopefully giving it a waterlogged look...):
OneManNoodles wrote:Rather brutalistic tower, I like the rounded corners. Might be at home in Gotham.
Trench dug out looks awesome as well
Good you see your finding a use for the bits .
BTW very impressed with how the Blade runner cop car turned out, very nice!
Thank you, Thank you, and Thank you.
Rounded corners came about from the way I was layering on the card, but I liked the way they were going so stuck with it.
I've been trying to find any and all excuses to make use of your bits (oo matron ), and these are the first of many such occasions.
Damn how have I missed this that tower is one piece of creation, love the Art Deco vibe very Gotham.
Love the way you add the little details to bring it to life, the bed roll and bottles really add to the feeling of life.
The Fox hole/ gun placement is brilliant love the sand bags totally stealing that idea the sense of destruction and and battle comes through perfectly I think all will be happy with there winnings I know I would be
Littletower wrote:Onece again superb attention to detail: great job on the tower cabling and the mug in the trench!
Thanks LT.
lone dirty dog wrote:Damn how have I missed this
I don't know, it's not as if I don't have it in my Sig' for all to see. Although this thread is not as prominent as my "main" blog. At some point I may rectify this.
that tower is one piece of creation, love the Art Deco vibe very Gotham.
Love the way you add the little details to bring it to life, the bed roll and bottles really add to the feeling of life.
The Fox hole/ gun placement is brilliant love the sand bags totally stealing that idea the sense of destruction and and battle comes through perfectly I think all will be happy with there winnings I know I would be
Thanks. Steal away, this is why I share these things.
I aim to please, and hope that the recipients are pleased when they receive them.
Which should be one step closer, as I've run out of things to add to them.
I'll be priming them tomorrow to see how they look and to check them for any issues before starting the painting.
There's still time to make changes though, so shout out (especially Graven and Magos) if you see an issue.
And as I mentioned when I started these, they are prizes for the LoER terrain contest round that I ran a while ago. The current round of the contest is still under way and has 3 weeks left to run. Please go and check it out, leave comments, join in, build something (big or small), fabulous prizes to be won. Link also in my Sig'.
Looking great!! No comments from me for any changes etc.... pretty much exactly as I had thought and hoped it might look like! I always get exited when a model gets its first coat of primer.... just really beings the whole design together for me!
MagosBiff90 wrote:Looking great!! No comments from me for any changes etc.... pretty much exactly as I had thought and hoped it might look like! I always get exited when a model gets its first coat of primer.... just really beings the whole design together for me!
Good good. All (nearly) the same colour below.
hk1x1 wrote:The trench really does looked water logged. Did you use a resin water effect for that, or just PVA glue?
It looks a bit less water logged now, but should be fine once I've finished with it. Just PVA and my usual basing material (dried paint).
Red Harvest wrote:All is good. I like the trench better. It could tell an interesting story, moreso than the tower. The trench has a certain unity of design to it.
Thanks Red. That's the difference between a set piece diorama and a piece of gaming terrain; certain concessions need to be made to make space for models. However, more "life" will be given to the tower (and the trench too) when I get to painting it.
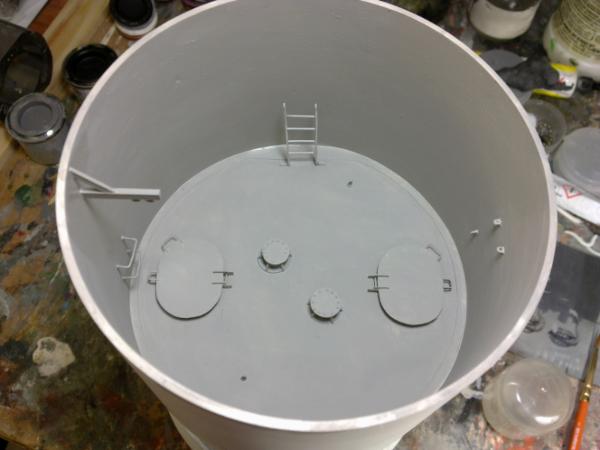
And so, I had the air brush out today and made both pieces grey:
Had a few issues with the airbrush spraying towards the end; Intermittent paint flow seemingly independent of the trigger position.
I think after a while the seals swell due to the white spirit and it affects how the brush works.
I've stripped it and sprayed some water though it, so will see how it behaves tomorrow. Either way it's a sign that I should resume my search for a better quality airbrush.
These will become black tomorrow, and then the painting can start proper...
Blown away by this. It's really forcing me to get a move on with my minis for it - I want them done and ready to go when it comes! The detailing is just superb.
inmygravenimage wrote:Blown away by this. It's really forcing me to get a move on with my minis for it - I want them done and ready to go when it comes! The detailing is just superb.
You seem to be getting through the mini's pretty quick, unless you have a load we haven't seen yet you'll be done before me. I'm just aiming to finish this before your round of the contest finishes... Which people can find via the link in my Sig'; LoER Terrain Contest. Go and check it out.
I'm glad you are pleased with it. Some thoughts below...
Gitsplitta wrote:That's really amazing. Every update just impresses me to no end.
Thanks, Gits'. That's good to hear.
MagosBiff90 wrote:
Thanks Magos. Some thoughts for you below also...
Stormwall wrote:Amazing work. Love the vents/slats up top. That tower is quite impressive.
Thanks Stormwall.
Nice art in the background.
It's not always hot/scantily-clad ladies, but they do form quite a large percentage of the pictures I use.
Today, I have made both pieces black. The airbrush worked fine for 5 minutes and then started playing up again, so the rest of the work will be by hairy brush as I have no control of the airbrushes' flow rate.
Therefore thought have turned to how these two will be painted...
The Trench: Magos asked for muddy, and muddy there will be. The sandbags will be sandbag colour. The wood, I'm thinking, will be of a lighter tone (to give some contrast with the mud), but will be old, dirty and discoloured. The junk will have a selection of colours from clean to rusty metals, I've made sure to include a selection of materials in there to give some variety and that will be picked up with the painting. The gun will be gun coloured. The tin mug can be any colour you like.
The Tower: Graven wants the stonework to look like ...well this (big pic'):
Spoiler:
I think the inside stone should match that also (as it's very likely the same stone). One question though; Should the bottom section match the bricks, or contrast? I'm currently thinking that the lower section should be all "black" like the darker section of the photo (the angled parts), so will match, but will contrast with the multi-coloured brickwork. The gaps in the lower section would then be black in contrast to the sand coloured mortar of the bricks (I'm currently experimenting with the paints to use for the mortar as that seems to be the first thing to do). The broken edges of the walls would be fresher, yellow, sandstone. But this may need toning down a bit so it doesn't jump out on the model. The vents can be verdigris green as the roof in the photo above. The wood inside I'm in two minds for; either old and dirty (to look really decrepit and unloved) or an expensive-looking red mahogany type (to show that money was once spent on this tower), that will still be old and dirty though..Basically, the underside of this table: Or, the top of this bench: It may depend on if that works with the "yellow" sandstone... Will have to see. Bell will be bell coloured. Rubble will match the walls in one way or another. Mud will be mud coloured. Plants, plant coloured. Then a touch of graffiti. The inside will be dark "shadowed", probably lighter about the windows and broken side, except for the ground floor that has the working light and will get some OSL of some description.
I think you're right, the lower section should be darker. I'm pro old greyish wood, personally. Also, I've still got all my streetlights, crates and barricades to do (and then there's the cryo-vault) - the aim is to have a fully playable table, a hero crew and a villain crew!
Littletower wrote:Sorry to hear about AB troubles, hope it's fixable.
It was expected. It's a cheap AB that came with the compressor, and I knew that the seals would be attacked by the solvent. I could buy new seals, or extra seals and swap them over regularly, but as this is the 3rd time using it that's going to get old very quickly. I'm looking at getting a decent AB that is designed for use with my paints (this was the plan all along, I just thought I'd give this one a go and see how it went). It's just a matter of finding a good deal as I'd rather not spend over £100 on an AB if I can help it... I've spent more than I've sold recently.
Always a joy to be walked through your thought process.
Old, untended wood for me, greyish brown with a green under tint. Though the red mahogany could give a nice contrast... Not too helpful...
Thanks. It's always nice to see the hows and whys to the things people do. My thoughts exactly on the wood, hence asking.
inmygravenimage wrote:I think you're right, the lower section should be darker. I'm pro old greyish wood, personally. Also, I've still got all my streetlights, crates and barricades to do (and then there's the cryo-vault) - the aim is to have a fully playable table, a hero crew and a villain crew!
Good good. Will work in that direction then.
And on that note:
Just to show that things are happening... I'm still playing about with the paint, this is not the final effect... or even near it really...
This is the base colours blocked in for the brick section. They now need to be made to look like bricks and get some shading and weathering etc. Some areas will get darker.
I did fill all the grooves between the bricks with a light sand colour (as per the reference for mortar), but you can probably tell that it doesn't show; that's not the photo, I can't see it IRL either. The gaps I have here are a bit too thin for the light colour to show up, so I may have to go with dark mortar. But will try again first.
Also, you will see that I've started on the wood:
I'm attempting shading it for the position of light sources. This is also still in progress.
And because I was painting wood...
Doesn't look much lighter than my usual wood, but it is in person and will look better once I've done the mud to contrast with it. More to do still...
These (the wood and brickwork) should be the hardest, and therefore slowest, parts of the painting. Once I find the effect I'm after these should fly along (relatively).
Actually, it looks pretty real. Wood that has been soaked in water and then dried on scorching Sun, over and over again and again, with lovely little xenos bacteria and algae forming within the recesses of wood planks...
Thanks StarDrop, the trick with wood (like rust) is to build up multiple tones and colours. See below for wood progress.
Thanks Magos. More work on the wood below.
Thanks Shas.
and Thanks Weety. That's the hope.
Not had a lot of time to work on these the past few days, but I now have the wood up to the required standard.
This will get some more staining and splashes of mud and rust as it progresses.
Mud next.
Now I need to bring the bricks up to the same standard...
...that's if I don't suffer heat-stroke or am eaten by horny spiders first...
StarDrop, the way I paint will not save me from the giant love-struck spiders.
Not to worry, Graven, I have a pair of ninja vibrating spider sentries in my room, although the largest of them is nothing compared to the 4 inch horny spider we found yesterday.
And I've made progress on the bricks that I'm happy to show:
I re-did the mortar lines with a pin-wash of light stone, and I've just finished adding the light wear pattern to the bricks.
Next is the dark deposits on the bricks.
Dr H wrote: And I've made progress on the bricks that I'm happy to show:
I re-did the mortar lines with a pin-wash of light stone, and I've just finished adding the light wear pattern to the bricks.
Next is the dark deposits on the bricks.
Looks amazing bud, beautiful stone work.
Was going to suggest a Dave method of "pointing" but looks like you got it sussed.
inmygravenimage wrote:Damn, but that looks amazing. I am a very happy customer indeed!
Good to hear, Graven. Hopefully it looks even more amazing now I've added the dark and a little dry-brushing. Also, I've done the broken edges to show a mixture of sandstone and mortar.
Now I can move on to the lower section before some final weathering over the lot.
Things should move quicker now this is "done".
Camkierhi wrote:Looks amazing bud, beautiful stone work.
Was going to suggest a Dave method of "pointing" but looks like you got it sussed.
Thanks Cam'. Ah yes, I would have had to buy the paint he used first though. The main problem with this was the grooves were only shallow and are relatively narrow; getting them to show up was just a matter of building up the colour... and then not covering it up when I painted the bricks... and I have to remember it when I consider black washes
Magos, I have started the mud, but it's not much to look at at the moment. Soon.
Thanks, hanshot'. That's the kind of reaction anyone likes to receive.
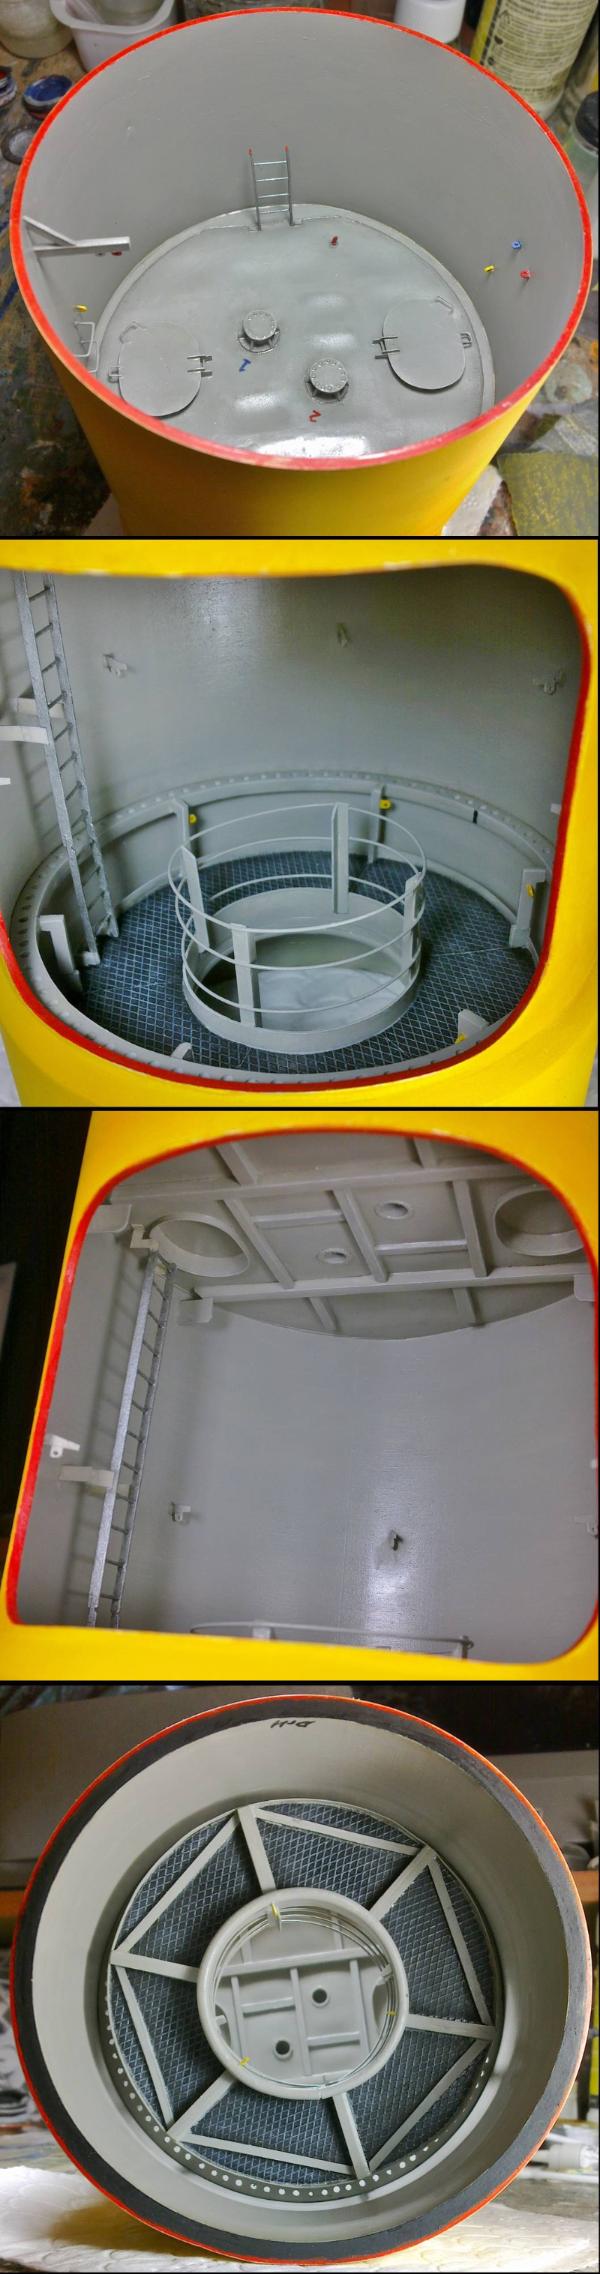
Progress and much to explain this time. We'll start with mud...
The trench has got the bulk of it's mud added (there may be some splashes later).
Outside the trench I've done my "usual" mud recipe, but inside I've used a wash of light brown (instead of a dry-brush) and lots of gloss varnish to make it look waterlogged. Rocks have yet to be done, and they will break up the brown a bit.
You can also see the broken plank is dipping into the wet mud and has become darker and wetter (gloss again).
As for the tower, the dark sections (lower portion and top, fiddly bits) have been made dark.
There is a very slight greenness to these parts. This is to make them not-black but still black. It's only really noticeable if you put something pure black next to it, but to paint it pure black wouldn't look right. More natural if you will. You can also see why I picked this particular card for these parts; texture.
And this is what it now looks like overall:
Mud 'n' rocks, vents, rubble, bell and plants to do... and final details...
Inside, much thinking has happened and resulted in the below:
From top to bottom;
The bulk of the interior has been painted dark with shades of blue, again to make it not-black but also to give it that comic look where night is always blue .
It's not as blue as it seems in the photos, I had to up the brightness on most of them so you can see the details.
Which brings us to the top photo. This is probably closest to reality in terms of colour.
Being the most open, the top floor has most of the colours of the bricks showing. But is still darker than the outside so that the shading on the wooden floor makes sense.
Under this (picture to right) you can see the light creeping in under the stairs.
Next floor down you can see the walls being lighter about the windows and that I've recreated the pattern of the bricks in dark blue, and is darker in the corners to match the wooden floor.
The ground floor has the light about the windows and you can see the light effect from the working light in the shadow of the platform's leg, how dark it is under the platform (I may add some streaks of "light" where it goes though the stairs), and around the corner (where the light is)... which I think is working quite well even though it's not finished yet.
Dr H wrote: The ground floor has the light about the windows and you can see the light effect from the working light in the shadow of the platform's leg, how dark it is under the platform (I may add some streaks of "light" where it goes though the stairs), and around the corner (where the light is)... which I think is working quite well even though it's not finished yet.
Thoughts?
If you don't have a girlfriend, you should find one asap. You have too much spare time to paint this scenery ridiculously good!
Theophony wrote:Wasn't sure of the colors on the stone initially, but since you did the mortar lines it looks stunning.
I wasn't sure about the stone until I'd finished it. I knew what the aim was, but had no idea about how to get there. Just kept plugging away and it came together in the end. Thanks.
inmygravenimage wrote:Stone looks fabulous, I love it. Gloss varnish worked a treat too
And you're the man that counts. Glad you are still liking it. Do let me know if there is something you don't like though.
StarDrop wrote:If you don't have a girlfriend, you should find one asap. You have too much spare time to paint this scenery ridiculously good!
Stormwall wrote:Now that's just a low blow.
"Stop painting miniatures? Frankly my dear, I don't give a damn what you think."
Ha. No, and I have no job either currently. Hence, the existence of this particular blog and trying to make money with modelling and painting...
Thanks Gits'. Good to hear that people like it so much.
MagosBiff90 wrote:The contrast between the weathered façade stone and the exposed internal stone of the wall is lovely!
Thanks. Contrast is what I was going for. It emphasises just how broken it is; if it was all the same colour then it wouldn't look at broken as it does.
LOVE the mud on the trench too..... Really giving it a wonderfully atmospheric feel!!
Good good. Here's a bit more atmosphere for you...
As these get closer to completion the smaller the things that I'm painting become:
The trench has had rusty metals, non-rusty metals, other materials (there's bits of wood that need some touching up, and some bits that I'm calling ceramic), rocks and sandbags painted. The skull is yet to be painted and the gun is in progress:
The tower has had it's ladder (rusty metal), the rocks and rubble about the base and on the floors painted.
And I've started on the few other details; sleeping area etc.
Rusty ladder (I'm sure that's safe to climb up... )
Base:
Floors:
There's some black washing needed to be done and then the vents of the tower (the bell will get a bit of verdigris at the same time), and smaller details on both...
inmygravenimage wrote:Looking amazing. Love the verdigris and the Ivy up the side is excellent!
Wait until you see it painted...
The scattered bric-a-brac is fab, also, and adds a splash of colour too
More splashes of colour added below...
Speaking of which, these are not the final photos but just to check if either of you, Graven or Magos, want any final additions or changes. Let me know if you want any other photos.
Graven, you wanted graffiti. Something to do with the Odessa gang?
I could do with a bit more information about them, if you know anything, I can't find much:
http://dc.wikia.com/wiki/Odessa_Mob Ukrainian gangsters... and that's about it.
Do you know of any symbols or mascots that they have used?
Currently I'm thinking of a piece of graffiti with them claiming responsibility for the tower's demise: Odessa Mob woz 'ere (possibly in Ukrainian; Odessa Mob був тут apparently... maybe not). I do know someone that could give me a better translation though.
I may also add a few other random tags about the base of the tower (possibly a sneaky "Dr H woz 'ere" too, by way of a signature).
So, apart from the graffiti, this is what the tower looks like:
I like the blue coffee mug in the diorama. Always good for a soldier to keep awake while guarding the line.
Also the Cardboard box makeshift bed on the top of Graven's piece is a piece of genius , most people would have just laid out a single piece and not put the detail into it, but you crushed it with all the writing for box weight in metric and parts per pack
the only thing I don't see is a rope to get to the top, but the person hiding out up there probably has that on them......or climbing claws.
All looks really good, really well done on all the little details, I'm very impressed by the way you painted the bottles and the illuminated areas from the lights on the tower.
For the trench, aside from the duckboards and the mud the little notepad and pencil is really cool, great work on the cup IRL not everything is brown & grey
Theophony wrote:I like the blue coffee mug in the diorama. Always good for a soldier to keep awake while guarding the line.
Thanks Theo. The mug was the first thing I thought of when planning the trench. It's just a piece of plastic tube, two drilled holes and a piece of wire bent from one to the other. I did also sand the bottom edge of the tube to give the rounded edge of the bottom of the mug.
You should be able to see that it gets plenty of use with all the coffee rings there.
Also the Cardboard box makeshift bed on the top of Graven's piece is a piece of genius , most people would have just laid out a single piece and not put the detail into it, but you crushed it with all the writing for box weight in metric and parts per pack
It was quite fun to make the cardboard box. Thinking about how a real box is constructed. I folded this up to make a box to check that it worked, was a sensible size and to give it the fold lines. Crushing it had to be done as in this setting it wouldn't be a new box and undamaged it didn't look right in-scale.
Part-way though painting it I didn't think it was going to come out well as it looked like a piece of leather; luckily I managed to lighten it and make it cardboard-like.
The markings were a must, and I wonder if anyone has looked closely enough to see the company that this box came from?
the only thing I don't see is a rope to get to the top, but the person hiding out up there probably has that on them......or climbing claws.
Methods of getting to the top floor were intentionally left off as Graven wanted one of the floors difficult to get to in-game (climbing, ropes and batamarangs are important parts of the game, I'm led to believe).
As to the original occupant and how he/she goes to bed, that's anyone's guess. Maybe they were lucky enough to survive the collapse (or be out when it happened), or really wanted their privacy. That's all open to interpretation.
Thanks muchly Gits'.
Thanks Shas.
inmygravenimage wrote:Looks amazing. Coke bottle especially neat touch! Just Odessa in cyrillic or similar would be fine and dandy mate. Plus your own inimitable touches
I probably had a slight lack of imagination when it came to the bottles (and can) as they all ended up as red and white "coke", but you can't beat the recognisability.
Also witness my first attempt at painting transparent glass on an opaque bottle. There is actually some coke left in the spilled bottle if you can see it from the right angle (same on the trench )
Cool. I've sent an email to my friend with the Ukrainian wife to see if I can get something typically Ukrainian to write, so will see how that goes.
Thanks Weety. Again, the marking just had to be done.
OneManNoodles wrote:All looks really good, really well done on all the little details, I'm very impressed by the way you painted the bottles and the illuminated areas from the lights on the tower.
Thanks OMN. Both the bottles and lighting effects were experiments, so I'm glad they have worked out well.
For the trench, aside from the duckboards and the mud the little notepad and pencil is really cool, great work on the cup IRL not everything is brown & grey
Thanks. As a diorama it needs all those little details to tell the story (which could be written in a notepad ).
Yes it needed some little splashes of colour to bring the whole thing to life, and to contrast with the dirt and rust.
ACME box FTW! Yeah, jumping, leaping and climbing are integral parts of the game. It's good to have variety Also, I realised I haven't really commented on how fab the trench is looking, and that pesudo-Brenn gun (or is it a pseudo-Vickers?) is fab.
Mymearan wrote:Jesus man... Your scenery painting skills are insane! Subscribed!
Thanks very much. Mostly a mixture of washes and dry-brushing for the bulk of the work. Welcome.
inmygravenimage wrote:ACME box FTW! Yeah, jumping, leaping and climbing are integral parts of the game. It's good to have variety
He he, couldn't resist. I thought about LexCorp, or something else Batman-related, but... ACME...
Also, I realised I haven't really commented on how fab the trench is looking, and that pesudo-Brenn gun (or is it a pseudo-Vickers?) is fab.
Thanks. I looked at Vickers for inspiration, so Pseudo-Vickers. And that's mostly Ork Boy gun parts on a base.
I have varnished the important parts.
Had to use my brush-on varnish as my spray cans have clogged up. Not just the nozzle, no, that would be too simple, the valve inside the can is clogged. I have found a (potentially dangerous) method for unclogging them, but need to wait for good weather to try it outside in case using a compressor to force the blockage back into the can results in a mess (of varnish, shrapnel and blood... It shouldn't, in theory, but safety first...).
Yes, make sure to blow yourself up OUTSIDE, your parents will be so greatful that they can just hose you out into the garden instead of having to air out the house .
I think our sleeper awakened from a really bad dream where he blew up inside a tower realize only the tower blew up. That's what happens when you order your ACME alarm clock from a discount online dealer.
Theophony wrote: Yes, make sure to blow yourself up OUTSIDE, your parents will be so greatful that they can just hose you out into the garden instead of having to air out the house .
Let it not be said that I am not considerate of others...
I think our sleeper awakened from a really bad dream where he blew up inside a tower realize only the tower blew up. That's what happens when you order your ACME alarm clock from a discount online dealer.
Or maybe he had some ACME Earthquake pills?
While waiting for my Ukrainian graffiti translation I've done the few other bits of graffiti:
I did think about adding either a Batman yellow-and-black symbol (possibly with a red grin over the top), or a POW (or similar) graffiti. But they both would have dominated the model as they would have been brightly coloured.
Therefore I went for smaller and not so brightly coloured graffiti.
I also kept most of them "in Gotham" (with references to "the man", Poison Ivy and the Joker), except for the broken wall with the "Graven" and "Dr H" tags.
Good O, Graven.
It's not your problem, not awkward at all, It's me trying to do it "right". I could plug it in to google translate and get something that looks right to anyone that can't read it, but I want it to be realistic to those that can read it also...
And this is the reason I wanted to get someone who knows Ukrainian, and not just a direct translation of something English:
Здравствуй моя Мурка и прощай!!!
Which means 'Hello my <Morka> and goodbye for ever!'
Traditional Odessian cold-blooded stuff to say to someone just before you kill them,
This stems from a time when it was said was to a woman who betrayed a gang and they caught up with her.
You would only get that from someone familiar with Ukraine, couldn't have made up anything better.
I will now plan out how this will fit on the tower and what "font" to graffiti it in.
I can also just use прощай!!! (goodbye forever) if I run short of space... Or if Graven prefers one over the other.
I'll probably still do a large "Odessa" above it for all the English Batman fans out there.
And while there is just a few more brush-strokes to do on the tower, Magos has signed off on the trench piece.
Here are the final photos (votable, an' all) of his prize commission:
The next time you see it, it'll be in his hands.
Congratulations again, Magos, and thanks for the interesting challenge.
Thanks both of you. Happy customers are the best customers... or at least a close second to rich customers (but that is irrelevant in this case)
Last painting in progress post; graffiti now in technicolour...
And, while I had them out, a photo of all the paints that were required for the "Odessa", not to mention the mixtures and blending. An enjoyable couple of hours.
I'll be back in a while with final photos of the tower once I've checked it over for issues and edited all the photos... got to find a backdrop large enough for this too...
inmygravenimage wrote:Blending enamels?! You are a mad man! I am happy, happy boy!
I pretty much always use enamels on all my models. These two are 100% enamel. See below for more happiness Have a good look over it and if you are still happy, it is done. I have removed a few more brush bristles since these photos (one of the brushes I was using for dry-brushing decided to moult quicker than a cat with alopecia), so if you spot a bristle let me know, but I may have already removed it.
Red Harvest wrote:The trench. I finally figured out why I like it.
...and would you care to share this insight?
The tower is pretty nifty too. It'll be cool to see some of the Batman minis around it.
Thanks Red'. Graven will supply the Batman mini's when he receives it.
And now the final photos of the broken bell tower:
Full tower shots:
Inside and details:
Fun with lighting shots:
Congratulations again for the win, Graven, and a very interesting learning experience with this build.
Red Harvest wrote:The trench. I finally figured out why I like it.
...and would you care to share this insight?
And ruin it for everyone else? Naw. Although I suppose that I might spoil it. Here goes...
Spoiler:
I wrote before
Red Harvest wrote: All is good. I like the trench better. It could tell an interesting story, moreso than the tower. The trench has a certain unity of design to it.
It needs no miniatures to make it work. It is a stand alone piece -- that unity of design. As a matter of fact, putting a mini on it would absolutely ruin it, IMHO. The story it tells is ambiguous, and is entirely up to the viewer. Basically, where is the occupant and what might have happened to him? Is he off to the latrine? Is he dead? Is the war over and he's on his way home... or what? It is a piece to get the viewer thinking. The best kind of diorama. One that engages the mind as well as the eyes.
And we're back. You've got a few days, how about something with a trap-door?
Red', I see what you mean. Getting a "story" into the model is the important thing for me. Every detail has a reason to be there. I do like to leave things open to interpretation though, while I may have my own reasons for why I added something or put it in a particular place, it's better to leave it up to the viewer to make up their own mind as to what has happened from the evidence supplied.
inmygravenimage wrote:It's incredible. I can't wait to set about it!
They are both winging their ways north and I look forward to the reactions when they arrive (biting finger-nails... commence).
Man, going to need a Joker now
It's a Batman game, when were you ever NOT going to need the Joker...
And we're back. You've got a few days, how about something with a trap-door?
^QFT
A few days... I wouldn't even have finished planning it by then. I started these two at the same time as that round of the contest began and only just finished them...
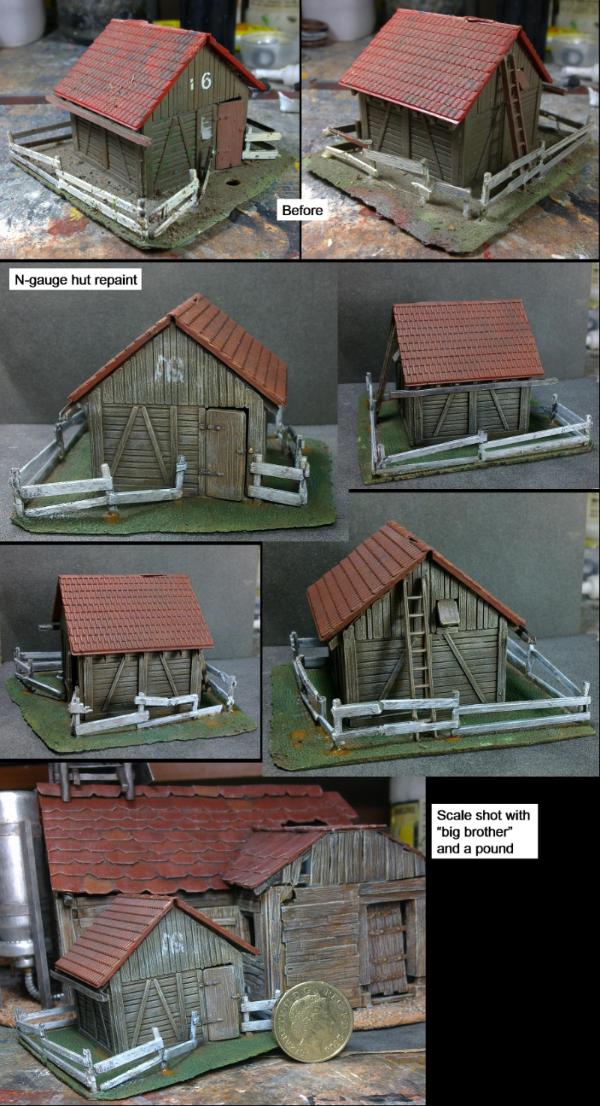
Time for a quick tidy up and then back to this part-built hut.
inmygravenimage wrote:It is even better in real life. You have no idea how awesome it is.
There's only so much a photo can convey. Glad it doesn't disappoint in person.
My desk is now tidy (as tidy as it gets) and the hut is now sitting there ready for work. Considering what to put inside and/or what caused the damage...
...First idea for both is an illegal distillery or drug den... Oh, I have some baths laying about don't I? There's a thought...
Before I can put anything inside the hut it needs a ground.
A note on the use of CDs as bases: If you are going to overlap the CDs to make a larger base, it'll save you time and effort to cut/snap the CDs so that they don't overlap... I didn't mind that they would produce an uneven surface on the model side of the base, but it also didn't give me a flat underside and 2/3rds of the base edge was not properly touching the table. I had to open up the base, remove the offending CDs, snap them to size, and replace them.
As the inside of the hut will have tables and bathtubs, etc... I decided not to fully cover the tissue layers. That should look like mud and bedrock after being cleared by many feet.
The originals, that were made from sprue, have been set aside after being used to make the example hut you have seen earlier (and is the reason half of this is already painted); the originals will be kept (as with all my original pieces) for making future moulds with when necessary.
I will have to make use of sprue when I come to add the roof to this hut as I don't have any miscasts of the roof support structure.
The 4 kits that I made are still available for £20, if anyone is (still) interested.
And, I'm considering selling this hut when I've finished it; price tbc...
StarDrop: Well that's nicer than what most people say when they leave a class.
How's this for a reason to why this hut is damaged? And a possible nice use for all those old razors, after you've stripped them for all other useful parts...
I didn't want to glue the tanks down to the base at this stage, but I needed to know where they would be located so that I can position all the things inside the hut.
Therefore I hit upon the idea of using some tubes: A length of tube is glued to the bottom of the tanks and slots into (without being glued yet) a short piece of wider tube that is glued to the base. I can then add the pipes and hoses to those and use them to locate the tanks for when I come to position the baths around them.
The exit pipes have been made from excess-putty tentacles; cut to length and matched up to make a continuous pipe.
These lead to one wall of the hut and to a large pipe outside into the large storage tank (more pipes, taps, fixtures, etc. to be added).
The external tank is also not fixed in place yet.
Amazing use of an empty inhaler fill from asthma meds! Makes great tanks! I must use that idea for some fuel/chem storage when I empty a inhaler container
Thanks Shas. This is from an air freshener, but similar press-to-squirt action as an asthma inhaler. I did drill a hole in it just to ensure that it is not a pressurised container; it was, it's not any more. The packaging that may have had to phrase "do not pierce or burn" has long been thrown away.
I've now added the final element in the processing chain; a pump. As you look over the photos below, the thought process for how this all works is: The liquid ingredients are mixed in the bathtubs first. Final ingredient/catalyst is added directly to the spherical tanks (via hatches that will become apparent eventually). The pump creates a vacuum in the spherical tanks. The plugs of baths are removed and the solution is sucked into the tanks. Reaction takes place. Product is a gas at usual temp' and pressure, but is formed in a sealed container that keeps it a liquid at high pressure. The pump then pressurises the spherical tanks and the product solution is pushed out into the large tank outside. *You should be able to see where the damaged tank came from now* Whatever the product is, it is sold as a gas and this is tapped off the top of the large tank.
In the photos you can see how the parts fit in; the pump, heaters for the baths and pipes are glued in, the tanks then fit in and the baths are added last. I'll probably paint all these separately before gluing them in. You will also see that I've added some "liquid" to the broken tank, and one of the baths will also get some "liquid".
Next, I need to add the fuel tanks for the bath heaters and then some valves/taps for the various hoses...
zennioptical.com. It'll take two weeks for your specs to arrive, but their prices are amazing, and their quality is solid. I only buy eyeglasses from them.
inmygravenimage wrote:Very cool. The pump is extraordinarily clever.
Thanks Graven. The pump is a random box from an old model kit that I've been looking for a use for (it was nearly a Gatling gun at one point) and a couple of OMN bits.
Gitsplitta wrote:I like it. Needs moar dakka though.
Showing your Orkiness there. Thanks. I may add a firing point of some description when I do the roof; give it some in-game use beyond LOS blocking.
Warboss_Waaazag wrote:It's looking great so far. I approve of all the random gubbins used.
Thanks 'boss. Expect many more random gubbins to be used in future terrain pieces; I have quite a large stockpile and these will help thin it out a little.
weetyskemian44 wrote:Nice secret lab Dr H. I wonder, has there just been an explosion?
What could give you that impression...
I would buy a hut, but need to save money for spectacles. Eyes before toys. £20 is a bargain price for your work so hopefully nearer xmass.
Yes, it's no good buying a model and not being able to see it. So far I have avoided the need to have glasses, but that won't last as I'm the last in my family without them...
I can hold on to one for you, would love to see you paint one.
exactly what I was thinking. Hopefully they don't try to dissolve the bodies in the tub, didn't work out to well the last time.
lol to you all. Did you see the Mythbusters, bust that bit. Both hydrochloric and sulphuric acids didn't touch the bath, and even with Piranha solution the bath was untouched. Although I think Aqua Regia would have damaged the bath, but they didn't try that...
I've added the tank for the bath heaters and splashed some paint about. Just basecoating things at the moment.
I think I may make the surrounding dirt quite light, to contrast with the dark wood. Once the base is painted I can install the tanks and baths (painted also) and then set about building the roof.
That looks interesting, and really bloody cool, the dirt reminds me of something you might encounter in the New Vegas wasteland, all that's missing is a few corrugated iron sheets.
Makes me think you could have expanded the base outwards a bit for a bit of a debris field from the exploded storage tank.
OneManNoodles wrote:That looks interesting, and really bloody cool, the dirt reminds me of something you might encounter in the New Vegas wasteland, all that's missing is a few corrugated iron sheets.
Thanks OMN. Maybe I'll add a sheet or two to the roof when I get there.
Makes me think you could have expanded the base outwards a bit for a bit of a debris field from the exploded storage tank.
Had I decided that the damage was due to an explosion outwards, before I had glued it to the base, I may well have.
lone dirty dog wrote:Splendid indeed you just need some hillbillies to finish of the look of making hooch
Or is it a meth lab I really can't keep up with today's trends .... Either way amazing work and great creativity the Dr is the house or shack at least
I believe meth labs are all the rage these days, even in government buildings. Thanks.
Progress is progressing; painted the base with it's rocks (grey ones and red ones ), base coated the metals, and matched the wood:
Once I've finished the metals, I can glue the bits in...
Make your own fantasy/sci-fi meth lab? That's one to get the kids involved.
Things are now painted and glued in.
The exterior tank is not glued on yet as it might get in the way for the roof.
Now I can move on to making/installing the roof. How this goes will dictate what else might be added.
In other news: I'm in talks for the possibility of making a scale model for a windfarm company. However, I won't be able to share it, so I may go quiet for a while in the near future. But this could be the start of really making money with modelling...
Will I ever finish this hut build?
Will it forever be pushed aside by other projects?
Will I ever get back to making something for my own army?
Time will tell, tune in next time...
That is not how we agreed. You leaving us was not on our bucket list. Who is gonna inspire us to do better terrain and amazing pieces?
Fingers crossed and best of luck! We will hold the gaming ground until you return!
Thanks Shas', and if you have to ask, it's probably not for you.
Worry not, StarDrop. It's only a one-off piece at the moment and first I need to build part of it to see if it's feasible, not too expensive (in time and materials), and that they like it enough to pay me for it.
If they do like it, I'll finish off the rest of the ~70cm/28inch tall model. and that's at 1:35 scale.
and to be honest, it's not the most exciting thing to look at for the average person; it's not built for looks. It's going to be an exercise in accuracy rather than coolness. But being it's their IP, I can't distribute images of it without their permission.
But first I need to find and buy certain things to make it from and then decide on a plan of action. So I'll still be working on this hut for now.
And I'll still be floating about DDakka, and maybe I'll find time to do small things (maybe I'll get around to doing more re-paints...) while I have a break from measuring things to high accuracy.
StarDrop wrote: Fingers crossed and best of luck!
Thanks.
We will hold the gaming ground until you return!
People play games with these things...
In the mean time...
I've made the roof supports for this hut from spare "wooden" sprue
I kept them in the same design as those in my kit (to infuriate Red Harvest ) as this is meant to show what can be done with the kit.
I need to add planks (and first make the planks) to the outer ones, but thankfully the broken on won't need many as they have been removed by the explosion.
The middle one is missing the overlap as that is where it meets the extension of the hut.
In other, other news: I have managed to sell the "Rescue" Terminators, and they are on their way to their new master now.
In other, other, other news: Happy Birthday to me...
Yes, I did see that. Only counts in America for the moment though.
They've been making millions per year from "Happy Birthday"... what a world we live in.
Also, I'm rather difficult to infuriate. That whole Adult thing about good impulse control
Good luck with the wind farm modelling gig.
I didn't actually expect you to be infuriated. Just to show that I do remember comments.
Thanks.
inmygravenimage wrote:Very exciting news, and good tidings also!
Thanks Graven.
One of the minor issues that I found with my kit was that, on occasion, some of the posts may end up too high for the roof supports to sit neatly on the walls.
Here's a picture to show that it is easily solved:
It was only the middle two posts of this wall that were too tall.
Just rest your saw on top of the wall and saw off anything that is too tall.
And now with the planks in place and the supports glued to half the roof you can see the whole coming together:
Other half of the roof went on pretty easily.
Glued and primed.
Now I need to build the roof for the "porch" area, which will also be partially damaged.
Then it'll be painted to match the rest.
Then I may build a platform to sit on top of the roof for people to shoot from...
Still two hut kits unclaimed, y'know, if anyone else is interested...
Warboss_Waaazag wrote:Looks great.
Thanks 'boss.
Progress:
The outer tank is glued on,
The main roof is painted, inside and out, and has been pinned to where it will eventually be glued,
and construction of the front roof has happened...
...there's a few more tweaks to be done to this, mainly with how it interacts with the rest of the hut.
I think I may paint the tiles on this part in a dark, slate-y blue for a change.
Warboss_Waaazag wrote:I was wondering what you were going to do with the rest of the rrof. It looks really good, that extension.
Yeah, while a roof for the extension is not included in the kits (I don't have enough spare roof), I had enough to scratch-build this (and make more planks) for the example.
I wasn't sure how it was going to come out, but I'm reasonably pleased with the result. Thanks.
Now, what do we think of the blue tiles for this section?
Too colorful given the state of the rest of the place. They'd be the same as the other roofing tiles unless there's a reason to believe that it is an older or newer section of the building... in which case they'd either look newer or older.
Red Harvest wrote: The roof needs some orange for highlighting, although it kills me to say so. Get more of a terra cotta look to the tiles. IMHO, of course.
It's currently highlighted with pink (the base red-brown with added white) and then a light grey. I did this so as to not be so RED and give it a dusty/stone-y look.
I have a small section painted that I cut off from under the new section. I'll try some orange on that and see how it looks.
Perhaps break up the roof mass with some greebles, like a pipe vent or two, or something similar.
One idea I had was to add a walkway/platform over the roof for models to climb up on. This would break up the red (does it need breaking up? is probably an important question ), and would allow models to interact with the hut: At the moment the hut is basically a "pretty" LOS blocker.
The door does still open and close, and while you can embark models into the hut and designate firing points/arcs, you can't place models in there (no space and the roof is glued on). Would it be more useful/desirable if it had a platform on the roof? Does it need it? Would it spoil it?
Thanks Red. That's the sort of thing, but maybe not quite so "posh" as the examples in that link.
Still looking for other opinions on this, if anyone else has an opinion?
As to the highlighting with orange:
I dry-brushed orange over the off-cut that you can see there.
While I agree that is does look more terracotta I have a couple of issues with it for the roof:
1) It would match / blend in with the ground a bit too much, I think.
b) It would make all the tiles look like the few scattered lighter tiles I have across the roof.
I'm happy with how the tiles look as they are, but thanks for the idea.
The roof as it is looks good, I agree with you on the orange, whilst yes it does make it look more like terracotta it looks fine as it is for the points you list. But if you change your mind and do go for a more orange look, add black to some of the tiles to represent them being too close to the fire in the kiln or something.
Whilst I do not game, an idea I had would be to be able to sit a mock up of the interior on the roof for model positions ... its a bad idea.
I'm not sure how you'd fit a walkway or platform around it though.
Rather than paint the whole roof orange/Terracotta, maybe you could just do more of the scattered tiles, in lighter and darker tones.
Also I do like the idea of adding a walkway to roof, but I'd keep it as a separate piece that just fitted over the hut, and could be removed or swapped out for something different.
Amazing job. Wooden hut is superb, and the tanks are great.
As for the roof, I'd go for adding something else on it too, agreeing with hk1x1, I'd try to make if removable if possible.
Maybe a scaffolding? Sort of a poor's man widow's walk? Wooden, of course, but a different age - and colours - than the rest of the house.
Tiles look good too, but a bit too "even"? And old roofs can grow moss (dark green or green-grey) or even bigger vegetation if the weather is humid enough...
No update. Been working on (planning) the commission piece. Trying to find/buy/make tubes of a certain size (somewhere between 5 and 6 inches diameter).
So, replies and an alternative.
Thanks Graven. Good to see the word "professional".
OneManNoodles wrote:That does look really good.
The roof as it is looks good, I agree with you on the orange, whilst yes it does make it look more like terracotta it looks fine as it is for the points you list. But if you change your mind and do go for a more orange look, add black to some of the tiles to represent them being too close to the fire in the kiln or something.
Thanks OMN. Good idea with the blackened tiles, might use that.
Whilst I do not game, an idea I had would be to be able to sit a mock up of the interior on the roof for model positions ... its a bad idea.
Yeah, I think it'd be easier just to leave the roof off and build the interior in the interior. The reason I've glued the roof on, was to save time, by only detailing the interior from one side. If I was going to leave the roof removable, I'd have spent twice a long on the interior details.
I'm not sure how you'd fit a walkway or platform around it though.
The idea I have was for it to straddle the roof spine; over the hut rather than around it.
hk1x1 wrote:Rather than paint the whole roof orange/Terracotta, maybe you could just do more of the scattered tiles, in lighter and darker tones.
I'm seeing a trend here...
Also I do like the idea of adding a walkway to roof, but I'd keep it as a separate piece that just fitted over the hut, and could be removed or swapped out for something different.
Yes, I did think that it should be left removable, as you say.
Littletower wrote:Amazing job. Wooden hut is superb, and the tanks are great.
As for the roof, I'd go for adding something else on it too, agreeing with hk1x1, I'd try to make if removable if possible.
Maybe a scaffolding? Sort of a poor's man widow's walk? Wooden, of course, but a different age - and colours - than the rest of the house.
Thanks LT. Ja, I was thinking just a framework / scaffolding type thing.
Wooden eh? I was thinking metal so that it contrasts with the wooden hut. A different wood-tone "wood" be necessary.
Tiles look good too, but a bit too "even"? And old roofs can grow moss (dark green or green-grey) or even bigger vegetation if the weather is humid enough...
Definitely a trend here. More variation in the tiles. Check.
And for an alternative to a walkway (for the purpose of breaking up the colours), how about some graffiti of some kind: I'm thinking a kind of advert for where to get the "product" from. A large "happy acid face" or similar?
If I added a walkway, would it see any use in game?
Infinity, maybe.
40K ?
Others ?
It's not as if it goes anywhere. Just a little higher up; see and be seen...
If it won't be used, then there's little point in making the effort.
Glad to hear about that commission work, even if we won´t get to see much of it.
Plastic tubes OK? If so, plastic (PVC and/or ABS) pipes and fittings might do it.
Pipes usually came in 6 meter stretches, which might be a bit much, but there's an ample catalogue of fittings and accessories that might be of use.
Watch out for inexact or "confusing" measurements: specified pipe sizes do not necessarily relate to an exact measurement of either the internal or external diameter, but refer to the nominal bore of the pipe (emphasis in "nominal", as un-related to "actual" !), sockets add some more width variation too.
(I guess what I mean is that a trip to a hardware or plumbing store and actually handling the options would beat ordering online)
If mechanical strength is required, product specific glue (solvent based fusing) might be worth considering too, and shouldn't add too much to the tab.
Back on the hut, metallic walkway or scaffolding sounds good. Not the most seasoned gamer here, but height differences are very important in Deadzone, less in 40K, and, though I'd guess they would be relevant in Infinity, I haven't tried it yet Modelling wise, it'd add quite some interest to the roof, though, so I'd say go for it anyway1
Adding a ladder and walkway is a great idea, but I would make it go somewhere, maybe a look out, does not have to be much just a lean to with a tin roof big enough for one guy. Bit like a crows nest.
inmygravenimage wrote:I'm all about graffiti. How about something Transmetropolitan?
Had not heard of that before, but a quick google says "cyberpunk" and "gonzo journalism" ... so I need to get hold of these at some time as I'm in to both.
Littletower wrote:Glad to hear about that commission work, even if we won´t get to see much of it.
...
(I guess what I mean is that a trip to a hardware or plumbing store and actually handling the options would beat ordering online)
If mechanical strength is required, product specific glue (solvent based fusing) might be worth considering too, and shouldn't add too much to the tab.
Ta, LT. Yeah, I've been looking at PVC and cardboard tubes.
As it's a scale model, I've been trying to fit very strict measurements. The final model (that I may or may not be commissioned to make) will have an inside and an outside, this means that the wall thickness of the "pipe" is important. The problem with PVC pipes are that the walls are not "in-scale" with the diameters, and they are all standard sizes.
I have found a few companies that make cardboard tubes to order, but a one-off order to exact measurements don't come cheap. But making them myself are not going to happen.
Still I have found a short length of PVC pipe that I will use for the initial test model to see if they like what I can do.
Back on the hut, metallic walkway or scaffolding sounds good. Not the most seasoned gamer here, but height differences are very important in Deadzone, less in 40K, and, though I'd guess they would be relevant in Infinity, I haven't tried it yet Modelling wise, it'd add quite some interest to the roof, though, so I'd say go for it anyway1
Thanks.
Camkierhi wrote:Looking amazing.
Adding a ladder and walkway is a great idea, but I would make it go somewhere, maybe a look out, does not have to be much just a lean to with a tin roof big enough for one guy. Bit like a crows nest.
Thanks Cam'. Yeah, I am thinking of a lookout area for security reasons.
I suppose the usability of a lookout "tower" would allow me to ask for the upper end of what I want to charge for this piece.
I'll see what I can knock up without taking ages. Expect; sprue (for structure), tread-plate (for flooring) and corrugated steel (as I've just bought some corrugated plasticard).
Right, so, a small, removable, watchtower...
I'll let the photos tell the story:
There will be more distressing added,
Probably painted up like the top of the tank there,
I don't think I'll add a roof though, as that would either have to be very high, or would prevent more exuberant (or just taller) miniatures than Ork #1 there.
Will make a ladder to get up there.
And I keep forgetting to mention this:
If you like wood, check out the latest round of the LoER terrain contest: "Got Wood?" Have a look, join in, have fun, fabulous prizes to be won...
Red Harvest wrote:Interesting that it is asymmetrical. I approve.
Thanks. The asymmetry is functional as well as aesthetic; The short legs sit right next to the roof spine when the structure (I don't really feel that "tower" is a label I can give it after the previous tower... ) is level. If it equally spanned the roof it would always end up skew-whiff (without further centralising additions).
That srpue looks like tree branches. Nice.
Also a good use for sprue, and one I have in mind for future tree needs. It uses up the twisty-twirly bits that are now more common in GW kits, that are otherwise useless for straight rods/girders/bars/etc...
I even have a couple of bits of sprue set aside for motorbike frames...
These, however, are to be metal pipes. Hence I've drilled holes into the ends.
You would need to remove the injection/exit ports from the sprue to be used as tree branches, whereas I used them for the attachments points of the corrugated steel.
About those tubes. Can you say what the dimensions are?
The real life "tube" is made of two differently dimensioned tubes of:
5m diameter with 70mm walls; which is 135.7mm OD with 1.9mm walls at the scale I was aiming at,
and 5.3m diameter with 50mm walls; which is 143.8mm OD with 1.3mm walls...
The larger tube, however, may not need any interior and so could be built up on the outside of the smaller tube, meaning I only need to buy one tube...
At that scale (~1:33), the combined length of those tubes would be 630.2mm (~2 foot).
So I've been looking for 5 to 6 inch pipes in 1 to 2 foot lengths, with thin enough walls... Most PVC pipes of that dia' come in 6m lengths (and some outlets will cut it down for you if you don't want that much... to 3m lengths... ) and that's a lot of pipe to buy for 2 foot.
This is why I've changed tact' to: find a tube and scale to match that...
MagosBiff90 wrote:Very nice wee addition! and... another handy trick for using sprue.....
Thanks and yes indeed.
I've now made a ladder, added some bent and damaged areas, and started painting.
These photos also show that a 40mm base can fit (but needs to be slotted in from the top...at least he won't be falling out... )
Soon to be various shades of rusty metal, and there may be a blood stain too...what with all those bullet holes...
Thanks 'boss. I'm always looking out for uses of sprue.
And painted:
I decided to not go too rusty as this hut is meant as an (until recently) occupied building and I don't want the outlook to appear as if it's about to fall apart.
In the same way, the hut is in reasonably good condition (except for the large hole).
For plant-life, there are two small bunches of dead grass; one at the corner of the hut by the foot of the ladder, and one in the damaged corner of the wall by the doorway. Neither of which you can really see in the above photos. I decided to avoid green plants as the mud looks pretty dry and I like to think that whatever it is being made in the hut is so bad for health that nothing will grow nearby.
Also, I've U-turned on the graffiti. I think the understated look to the exterior of the hut is best for an illegal "cooking" operation and drawing attention to themselves would lead to more bullet holes that it already has...
I've started planning the test commission and I have a couple of birthday presents to make for this month, so this hut needs to be finished and moved on without sucking up any more time.
However, should whoever wants to buy this, also wants changes, I'm sure we can come to an arrangement...
This brings me to price.
I'm thinking £80 for it. Which may sound a lot at first, but if I'm selling the kits for £20-30, and that doesn't include the interior or the extra roof used on the front and the lookout/ladder, basing, then painting the whole thing... I should probably ask for more (but doubt anyone would bite).
Thoughts? Final photos will happen soon-ish, unless I'm convinced otherwise.
I think it's superb. It's exceptionally reasonable given what some commission painters charge. I would suggest tarting yourself about a bit more though, need get the exposure up
I think that's very reasonable considering it's a scratch-built, extremely well painted, custom piece of artwork.
My only recommendation is that you make sure your buildings are built as solidly as possible so they will not fall apart easily. Nothing will ruin your rep like someone paying a premium price for a beautiful object that falls apart in 6 months because the glue seems have failed.
inmygravenimage wrote:I think it's superb. It's exceptionally reasonable given what some commission painters charge. I would suggest tarting yourself about a bit more though, need get the exposure up
Thanks Graven. Yeah, due to building this in many separate stages, I've not kept track of how much time I've spent on it. But it's purpose is to show what can be done with my hut kit, which I think it does, And I don't have the shelf space to store it anyway, so sending it off to someone that might actually use it is a good thing.
But feel free to "like" it (if you are on FB) and maybe more people will find it, that will encourage me to post more over there as time goes on...
Gitsplitta wrote:I think that's very reasonable considering it's a scratch-built, extremely well painted, custom piece of artwork.
Thanks Gits'. Maybe I should be charging more for things... Get it while you can...
My only recommendation is that you make sure your buildings are built as solidly as possible so they will not fall apart easily. Nothing will ruin your rep like someone paying a premium price for a beautiful object that falls apart in 6 months because the glue seems have failed.
Yep, know what you mean. I do build things to last though. If the material is polystyrene, then I'm going to use poly cement (the lookout is such a case, another advantage of using sprue), and I make sure to use as much of any glue to make as permanent a join as possible. The roof, in this case, is even pinned to the walls.
The only things that would be "easily" broken are the ladder (which is glued to the base and hut by 3 small points), and the external tank (again attached to the base by 4 small points). I wouldn't attempt to pick up the whole piece by either, but you can move it about a surface using them. The ladder itself should be fairly durable, again being PS it's cemented together, and the rungs are drilled into the uprights. You are only going to pull it off the hut.
I would hope that someone who pays a premium price for a model is not going to be throwing it in a box with a load of other "objects" and throwing the box into the boot of their car before going off to take part in a demolition derby.
I would like to think that what I build will last the distance though, and should be as solid, if not more so, than the owners own models.
I'm sure Graven can testify to my build quality for gaming?
For fully painted, the price sounds fine. I am always bemused by people who complain about paying for a nice paint job. Something along the lines of, "Why am I paying $50 for paint on a $7-$8 dollar mini." Perhaps we should point out how much people pay to have a $15 canvas painted
Edit: for the cardboard tubes, these
are 130mm diameter with ~1mm walls. Easy to thicken the walls too. Mentioned in case you have not considered them. Plus, good for the cholesterol. I have it on good authority that horses eat them in England but people eat them in Scotland
Red Harvest wrote: For fully painted, the price sounds fine. I am always bemused by people who complain about paying for a nice paint job. Something along the lines of, "Why am I paying $50 for paint on a $7-$8 dollar mini." Perhaps we should point out how much people pay to have a $15 canvas painted
Thanks Red'. Yeah, skills cost money; for the customer it always seems high, and for the seller it's often not enough...
Edit: for the cardboard tubes, these...
Ta. Will have to have a look out in the shops when/if I need them.
I have it on good authority that horses eat them in England but people eat them in Scotland
I shall need to acquire a horse to dispose of the contents then.. or a Scot... Sorry Cam', Graven, Magos, and the many of you that seem to be in Scotland. It was Red'... It was Reeeeeeeeeeeeeeeeeedd...
Anyway, final photos of the example hut build.
If we get these on the Dakka gallery home page, together with my tower and trench pictures that are up there, there won't be any space for anyone else's pictures...
I'm willing to sell this to a good home for £80 (plus postage), first come, first served; this is a one-off, unique piece for a good price. If you want it, let me know before someone else does...
Now now, I was making a Samuel Johnson reference it's on the page somewhere. After Jobbernowl. Hmm, an interesting word that.
I do eat oatmeal, and I'm... well, a fair number of my relatives were Scottish, but they left Scotland for America in the 17th and early 18th centuries. I do like it in a stout
Aslong as the porridge / oatmeal is made with "good quality" tap water then all is well! And for a wee treat if its a special occasion.... a sprinkling of sea salt!!! MMMMMmmmmm!!!
Lol.... but as for that hut..... its pretty amazing! You really do have the timber painting technique nailed!
Steel cut oats are the way to go, lad. Take longer to cook, but worth it. Stir in some apple pieces and sprinkle on some cinnamon. Breakfast for a brisk autumnal day. And the big selling point around here, 'gluten free'.
Ha It's a game (usually) played by children, using the seeds of the horse chestnut tree.
Drill a hole in the centre of the nut.
Thread a string though the hole (tie a knot in one end).
Take it in turns to hit your opponents nut...
Keep going until one breaks.
I've not touched a conker since I was a child, and was worried about how well I did ("surely, I couldn't win it with no experience/practice/technique").
As it turns out technique is a big thing, Amy, the one that knocked me out and won the women's crown, was really, really good at it (and had won it before).
Was just a fun day out really, not serious in the least.
Can't believe it the Doc is leaving us nerds to become a jock in the world of professional sport, what's next going to the sand pits and kicking sand in our faces
@gitsplitta how dare you say you have never heard of our great long time sport of "Conkers", where do you think "William the Conker err errr " got his name from
Thanks StarDrop. 9000 what? Am I showing my age, or are you offering me money
LDD: I'm not leaving, top 12 is nothing in the world of conkers, it's all about the king and queen conker. It's an annual event, and anyone can enter. http://www.worldconkerchampionships.com/index.php I saw the Italian champion (knocked out in the first round) and a team from USA (with embroidered jackets) amongst the people there. Many though were, like me, there for the first time and hadn't touched conkers for years.
But of the people that got though to the quarter- / semi-finals, they were pretty much all past champions or team champions.
Red Harvest wrote:Seriously. Next he will regale us with tales of his prowess at Rounders
Actually, I was pretty good at rounders at school...
I think the 'over 9000' comment is a reference to some meme or the other. I've seen it before. Never researched it though. This internet thing is lousy with memes.
I think the 'over 9000' comment is a reference to some meme or the other. I've seen it before. Never researched it though. This internet thing is lousy with memes.
I see. Showing my age then.
Let's see if I can find a thing that's relevant and more from my time (it reminds me of something I've seen before):
Found it... Kings of power 4 billion percent.
It's a lot more blasphemous and bloody than I remember... NSFW or the easily offended, or anyone with photo-sensitive epilepsy.
Link in spoiler for those that want over-the-top 90's computer graphic violence.
hk1x1 wrote:Fantastic to see the hut finished, and that tower really does make a difference.
Thanks hk.
It's still available (as well as the kits and other casts I make).
Birthdays presents are progressing nicely, you'll be able to see them soon-ish, and I'm waiting to hear if I can actually show the "tube" commission test that I'll be starting this week.
In other news: I've been looking at graphics cards. This is baaaaaaad.
The imminent release of Fallout 4 (which will be on my Christmas list) has a minimum requirement of a 2GB graphics card. I have a GeForce 8800 GTS 512, that's 512 MB...
However, This card has seen me though Crysis on near full settings and runs Skyrim perfectly well (with the HD texture pack and many "prettiness" mods); which has a minimum requirement of a 1GB graphics card.
What has helped my old card is the TV/monitor I have is relatively low resolution (1280x768), so the card can focus on doing other things instead of MORE PIXELS.
Hopefully, I'll be able to run Fallout 4, if not I'll be splashing out on a new graphics card... such is life...
Thanks StarDrop. 9000 what? Am I showing my age, or are you offering me money
Red Harvest wrote: Ah, how about baseball then? I think the 'over 9000' comment is a reference to some meme or the other. I've seen it before. Never researched it though. This internet thing is lousy with memes.
It did turn into a meme, but is a reference to Dragon Ball anime, Return of Goku, in which the main character returns more powerful than ever and kicks the bad guys right in the bawls...
And that is how powerful you are, Dr H. Your skills and results of your work.
I can show you the progress I make on the commission piece.
This is for myself and the customer to ascertain how long this kind of model will take, and therefore how much it will cost. and also to see if my quality is up to scratch.
If all goes well then I'll be commissioned to make the whole piece that will be at a larger scale and involve a third internal platform, double the length (and then some for the larger scale), a large outer platform (with crane), and many ladders, railings and other things,
The point of this model is accuracy, not excitement; so no "lasers", battle damage, weathering, bloodstains, OSL, etc..
But everything has to scale correctly to the engineering drawings I have been supplied with.
This means a great deal of calculations, measurements, very careful cutting, and sanding to fit.
Hopefully, it won't be too boring to you, dear reader, and I may be able to pass along any useful tips (as usual) for accurate modelling.
#1, for free, is cut slightly too large and sand down if you want a really close fit.
and so, this is what I have done so far:
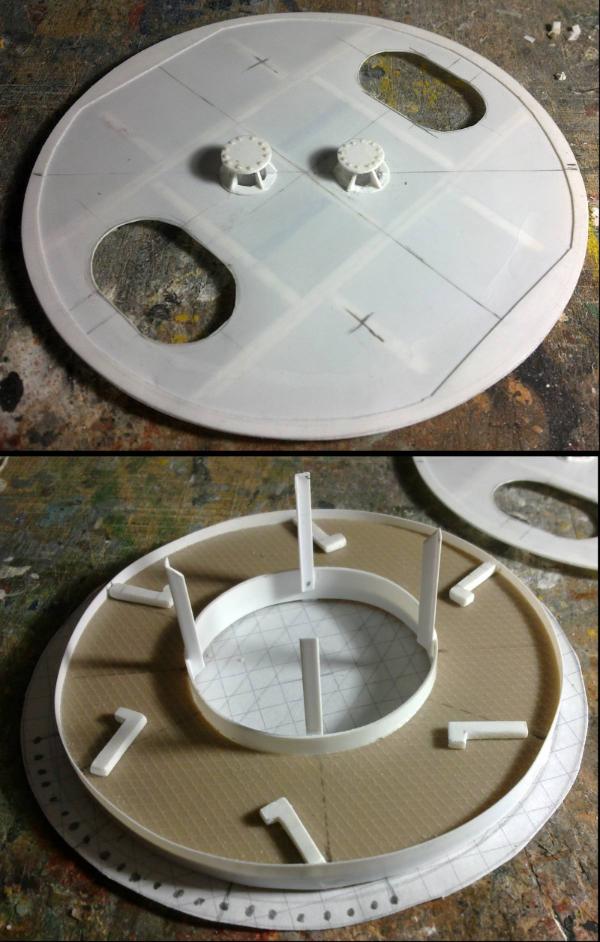
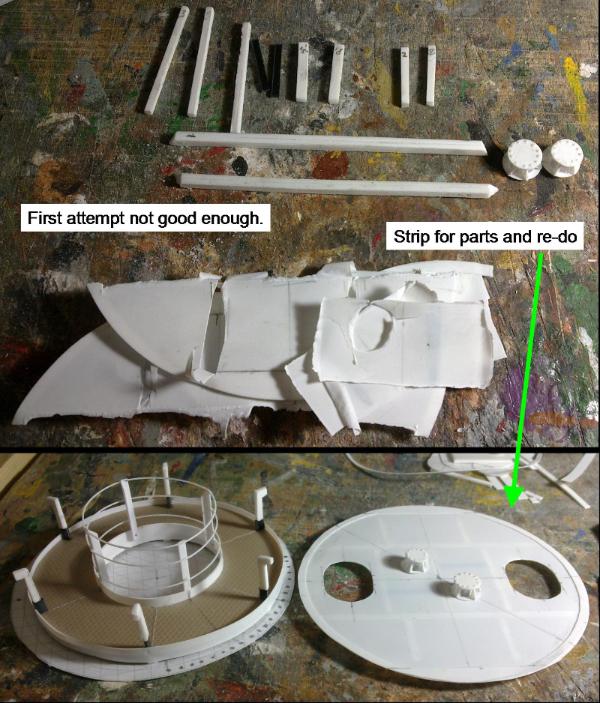
This is an air-tight platform that will have two hatches and two flange-topped tubes.
You can see all the measurements and guidelines I needed to do just this.
Two circles, one had to centre removed and became the raised lip around the edge, This is from 0.25mm plasticard, which is why you can see though it. In scale, this is slightly too thick but (thankfully) won't be noticeable in the finished model. But you get the idea of how little wriggle-room I have to work with; no "close enough, I'll putty the gap" here.
Then I cut the holes for the hatches and tubes,
Then I made the support from lengths of different plasticard, laminated to get the second dimension (e.g. 2x 2.5mm strips of 1.5mm thick plasticard, stuck together to give me 2.5 x 3mm, or 2mm strips of 1.5 and 0.5mm plasticard to give me a 2 x 2mm piece...)
While I could have carved these from sprue, as I would for a gaming model, this is much quicker and easier.
More measuring and guidelines and then these were glued to the bottom of the disk.
This is 1 of 2 platforms that I'll be making for this piece, the other one is slightly more interesting and involves mesh flooring and railings etc...
Stay tuned for more thrills next time.
If you ask me to guess Id say it looks like a simple differential driven 2 wheel robot chassis minus casters. Edit 1: and the size would say a maze solver
Though you really need to get a compass cutter.
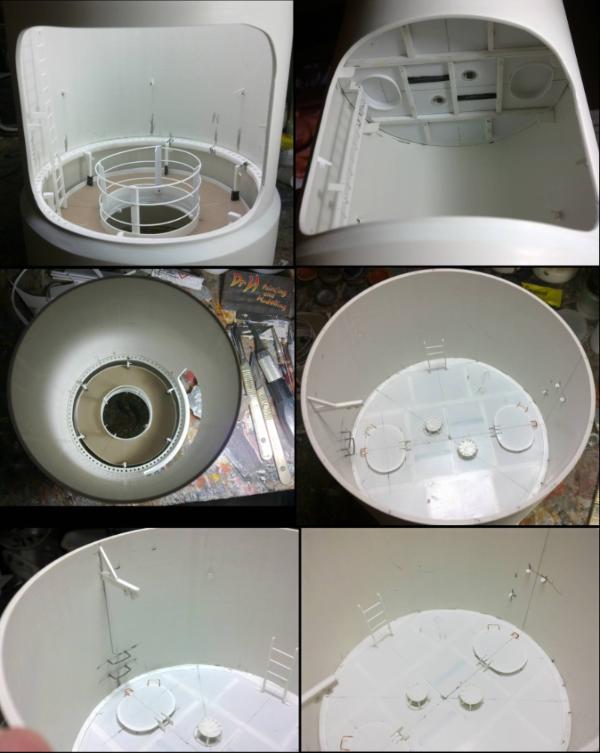
This is part of the tower of an offshore wind turbine.
The whole part that I may be asked to make is known as the transition piece; it is the part that sits half in and half out of the water.
It is the yellow part in this picture (which is about 5m across if you want to know the scale):
But that's only the top half of that piece (what with being under water).
What I'm making at the moment as a test is just the inside of part of the transition piece; a couple of floors for engineers to wander about on.
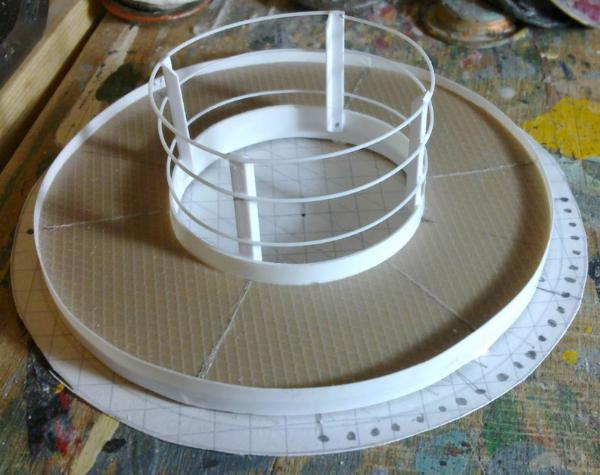
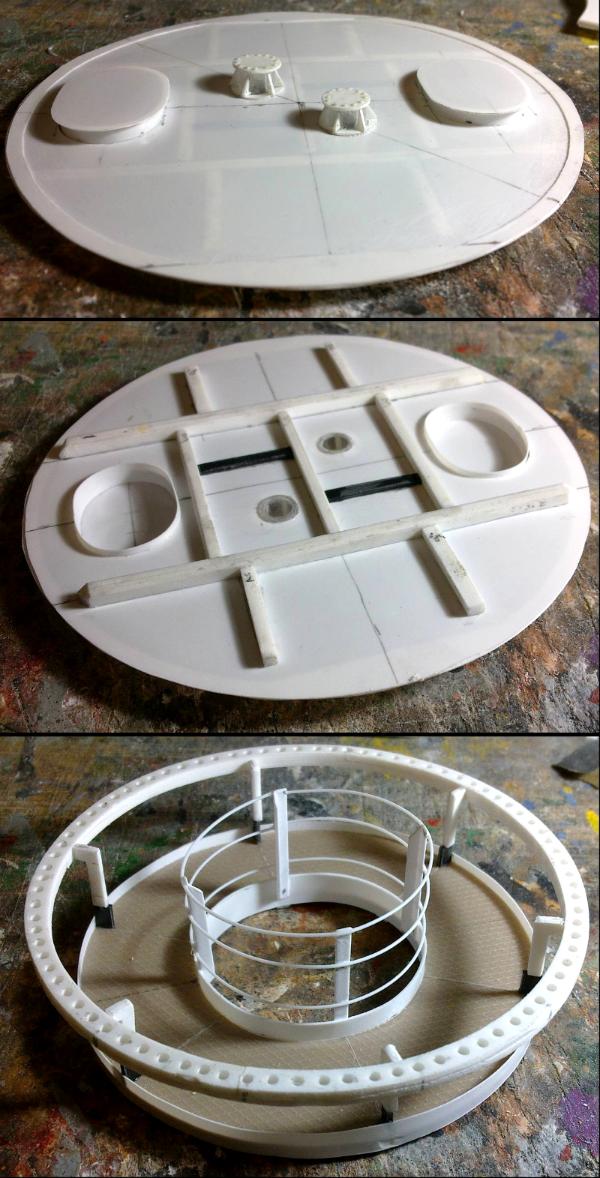
Here's the lower working platform.
This is "hung" from lumps of metal around the outside (inverted L-shapes) and has a railing around the inner ring.
The mesh flooring is some 1:72 scale mesh plasticard to represent the actual mesh (which is a different design).
I've placed the joins of the two rings where the posts should cover them up.
Today's tip: when building something from engineering drawings, don't forget that you don't have to use the same number of parts. The little L-shaped pieces you can see below, in reality are made from straight steel tubes and joined at 90deg; I nearly did this before I realised I could just cut out L-shapes in plastic that would be stronger as they don't need to be glued together.
Progress:
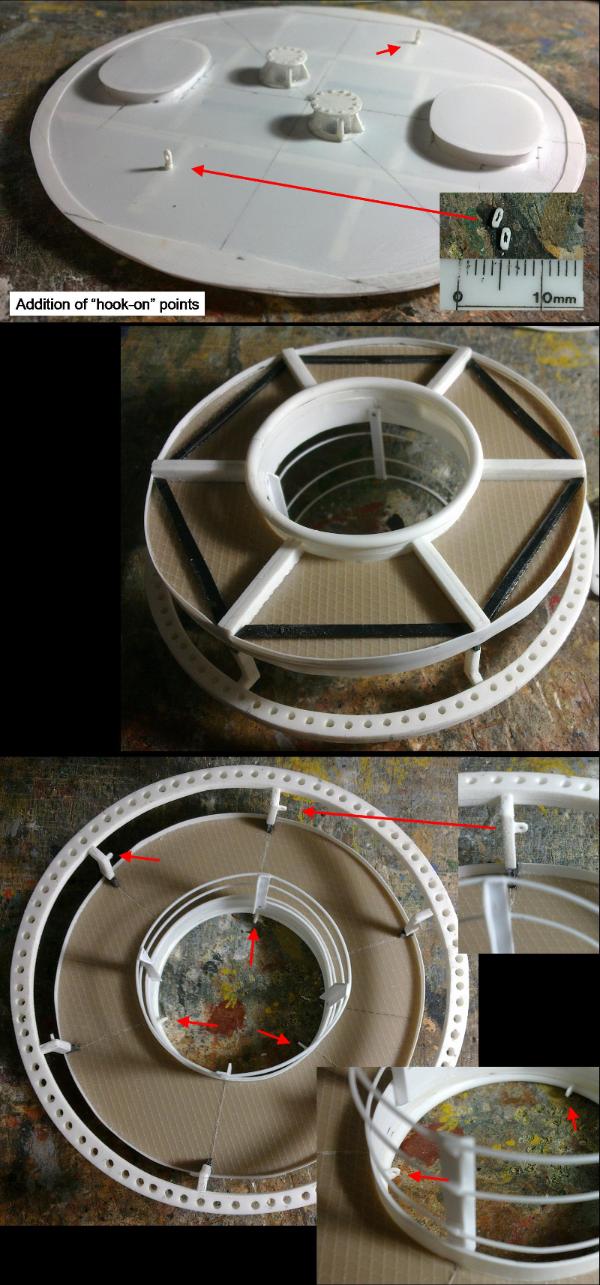
The air-tight platform got it's flanged tubes (I thought it best to start in the middle and work outwards).
and the lower platform got it's railing posts and the aforementioned L-shaped hangy pieces (that's the technical term ), I'm going to finishing the railing before attaching those.
While details like rivets are not necessary for the commission, things like those flanges wouldn't look right without them, even if they are supposed to be hexagonal bolts and not 0.5mm round plastic rod pieces. As far as trip hazards go, I think they do the job for the purposes of the model.
You can also see the template for the main flange under the lower platform. This will be a ring attached to the walls of the tube that the L-shaped pieces attach to. The dots on it are to be holes that I'll drill (84 in total), just 'coz I can.
Ahh, it was going so well and then I came to make the tubes for the hatches, cut a length of plastic to wrap around, check the length and find it too short...
The strip is correct, that means...
...the hole is wrong. too long.
Too far out to be usable, can't patch it or use putty to fill it (the plastic is too thin, and is the thinnest plasticard I have).
But before I start again, I can still try something to fix it...
Use the underlying framework to cut out a section and replace it.
You can see the difference in the holes there and the result after some sanding (a little filling and more sanding will be needed).
On the plus side, I did get the railings done on the lower platform.
Ah, you made a Dutchman, as that sort of repair is called in woodworking
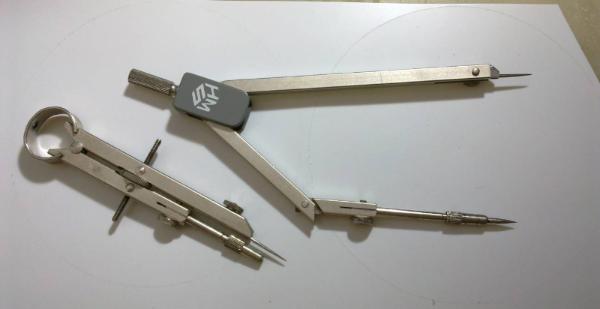
Are you having some difficulty cutting the circles? I think I see some irregularities. Perhaps scribe the lines first, using a compass with some sort of metal point in lieu of a pencil?
Red Harvest wrote: Ah, you made a Dutchman, as that sort of repair is called in woodworking
I'll believe you. I've puttied all the slight gaps in it and will see how it turns out after a sanding tomorrow.
Are you having some difficulty cutting the circles? I think I see some irregularities. Perhaps scribe the lines first, using a compass with some sort of metal point in lieu of a pencil?
Difficulty, not as such. Requires sanding, yes. I have been cutting this all by hand though, most edges are going to be hidden to some extent anyway; such as the edges of the lower platform, under those flanged tubes, and around the hatches.
The flanges, hatches (the actual door bit) and things like that though need to be smooth-edged.
I should get my hands on one of those compass cutters (as OMN suggested), though making a scribe out of the compass I'm using is a good idea (that I should have thought about ) Ta.
It's one of those 'experience is the best teacher' things. At worst, drive a pin from a pushpin (you'll have to remove the plastic head) into a length of dowel rod-- which has a diameter similar to that of a pencil-- with a little CA glue, and then insert into the compass as you would a pencil. Other option is to have a nice Staedtler* compass that comes with optional points.
I think OMN and I exchanged comments on the compass cutter some time ago. It is barely adequate, but it is apparently the only thing out there.
No idea why that sort of patch is called a Dutchman, except perhaps a reference to the whole finger in a dyke story. Hmm, will the language filter alter dyke?
Red Harvest wrote:It's one of those 'experience is the best teacher' things. At worst, drive a pin from a pushpin (you'll have to remove the plastic head) into a length of dowel rod-- which has a diameter similar to that of a pencil-- with a little CA glue, and then insert into the compass as you would a pencil. Other option is to have a nice Staedtler* compass that comes with optional points.
I think OMN and I exchanged comments on the compass cutter some time ago. It is barely adequate, but it is apparently the only thing out there.
The irony of this is that, not only was I using a Staedtler-like compass, but it also had a selection of spiky bits for just this purpose (or for whatever else you may want 2 pointy bits on a compass for; maps etc..)
I even got out the other one there (A-shaped) for doing the smaller circles, as the "typical" compass tended to wander while doing small holes.
No idea why that sort of patch is called a Dutchman, except perhaps a reference to the whole finger in a dyke story. Hmm, will the language filter alter dyke?
Crazy, crazy Dutchmen.
weetyskemian44 wrote:I love anything miniature, so I don't mind if the subject matter is a little dryer than normal!
Or do I mean wetter?
Thanks Weety. I see what you did there.
So, in the cold light of the early...afternoon, the perfectionist side of me decided he didn't like how the repair was going.
While I could put in more effort to hide the joins it was going to approach the effort required to make a new one,
And with that in mind, I noticed that the new patches were sagging a little compared to how it should be, and some of the other sections were also sagging due to handling (and it being 0.25mm plasticard).
Therefore:
You can also see the progress on the lower platform too.
The Ork in me hopes you saved all those stripped off pieces for some other crazy project - like an exploded oil tank or something. Anyway, this project is really awesome and coming along nicely. Looking forward to seeing the progress you make on it.
Warboss_Waaazag wrote: The Ork in me hopes you saved all those stripped off pieces for some other crazy project - like an exploded oil tank or something.
Don't you worry, I don't throw things away that can still be used for models (especially when it's polystyrene); I even keep all the shavings from when I'm carving pieces (many just go into my "basing" tub).
Anyway, this project is really awesome and coming along nicely. Looking forward to seeing the progress you make on it.
Thanks. Here's a bit more from today...
The "new" air-tight platform got it's hatches (they still need handles, hinges and maybe some bolts/rivets).
The tubes for the hatches are made from a strip of plasticard, cut/sanded until the perfect length, and glued in once wedged in against itself.
The lower platform got it's main flange.
This was made from 4 semi-circles of 1.5mm plasticard; a couple of reasons for this, the piece of plastic I had to hand was not large enough (or didn't look it) for two full circles (needed 2 layers to make it 3mm thick), but I could fit 3 halves around the edge and one in the middle.
Also, as it turns out and wasn't planned, the middles are easier to remove from a semi-circle compared to a full circle (snapping them off rather than cutting all the way through).
Anyway, after I had the 4 halves I glued them in pairs, one of top of the other at 90deg to keep the joins strong.
Then followed lots of trimming and sanding to neaten them up and make them fit a) the tube and b) the platform.
Once it all fitted together I set about making it pretty (amazing what a few holes will do) by drilling many holes in my modelling board the flange.
Normally the spiky bits are so that you may use the compass as a set of dividers. Anyway, with plasticard and these things, you scribe the line, then score it deeper using the spike, then use the furrow thus created to guide a hobby knife, or, flip the piece, scribe and score again-- the compass center hole is going to go through the thin plasticar--, then snap the piece out. At least these are the methods I've used. the piece on the right is actually a set of dividers, not a compass-- or not a very useful compass.
V2.0 looks much improved. Now, for sanding, what do you use? I really do not work much with plasticard, so I'm curious. I've used a nail file to decent results, and emery boards too. Also, I'e used a chisel blade in my hobby knife handle as a cabinet scraper on the edges. This works as well.
Red Harvest wrote: Normally the spiky bits are so that you may use the compass as a set of dividers. Anyway, with plasticard and these things, you scribe the line, then score it deeper using the spike, then use the furrow thus created to guide a hobby knife, or, flip the piece, scribe and score again-- the compass center hole is going to go through the thin plasticar--, then snap the piece out. At least these are the methods I've used. the piece on the right is actually a set of dividers, not a compass-- or not a very useful compass.
Ja, I've been scribing all the pieces I've cut since then and it has helped with getting smoother lines. Should have thought about it myself, so ta.
V2.0 looks much improved. Now, for sanding, what do you use? I really do not work much with plasticard, so I'm curious. I've used a nail file to decent results, and emery boards too. Also, I'e used a chisel blade in my hobby knife handle as a cabinet scraper on the edges. This works as well.
Thanks.
I use... sandpaper...
Yeah, just pieces of sandpaper, sometimes folded to make them stiffer, sometimes a tiny piece held in tweezers to get into little gaps (such as with the insides of my toilets and sinks). I currently have a selection of grades from 150 and 240, to some 600 for finishing surfaces.
I usually shave down the plastic with a scalpel (I have a nice one with a hooked blade that really works well for pulling towards my thumb... in the way that you are not supposed to, but I have done for years...), I do also have a chisel ended blade
Sometimes I will scrape with my usual scalpel held sideways (90deg to direction of movement and perpendicular to the surface), though I mostly do this for mould lines.
And then I'll work down the scale of sandpapers until I get a finish I want.
I also have a few files that I will use occasionally.
As the actual items of interest to the customer, these "hook-on" points are necessary details.
They are also some of the smallest scratch-building I've had to do.
Tip for the day: if you are making something small with a hole in. Drill the hole first, then sand the rounded edged, and THEN cut to length.
I didn't do this for the first pair (the long thin ones on the air-tight platform), but had the idea after I'd glued them on.
It's tricky, but not impossible, to hold a 1x3mm piece of plastic with tweezers and drill 0.35mm holes in it, then join them up with the tip of my scalpel.
I also added the ring to the bottom of the lower platform. This got 3 hook-on points (2x2mm) in addition to the 6 around the outer posts.
inmygravenimage wrote:Inspiring work indeed! The little details make it unbelievably real
Thanks Graven. Real is the aim as I'm doing this for the engineers that designed it...
OneManNoodles wrote:You really are going to town on this one.
I'm not going completely mad on it; I'm not doing unnecessary details, I only added the rivets bolts to the little flanges as they wouldn't look right without them, other bolts that are just holding thing together I'm not bothering with as they will just add time without being useful to the customer.
I find I have more control cutting towards me as well, last time I tried cutting away I cut myself...
So long as you don't try to remove too much material in one go and avoid blunt blades that make you apply too much pressure, there's little more risk in cutting towards yourself. Just be sensible.
nice work, I know how much of a pain making little things like those hook points can be.
Thanks OMN. Once I started doing them in the method I mentioned they were pretty easy to knock out quickly.
Warboss_Waaazag wrote:Stunning detail and awesome inspiration, Dr H!
Thanks 'boss.
Red Harvest wrote:Excellent progress. How come you didn't use the heads of sewing needles for the hook-on points? I know they can come in just that shape.
If I had had some laying nearby that were the perfect shape, maybe I would have used them. But I'd like to keep this kind of model as near to 100% polystyrene as possible; then I know once it's glued it's glued for life.
No progress to report on the TP today, I had to wait for a few more drawings to be sent my way for some more details (some more hook-on points and ladders etc..), however, I can show one of the birthday presents I mentioned the other day:
Thanks Graven. Mum was very pleased with them, and has "ordered" turquoise for Christmas (best 99p I've spent, getting those earring backs).
I did also intend to start selling earrings too, but haven't got around to making any to sell. But if anyone does have a person-wot-does-wear-earrings in their life, feel free to make an order.
On that front, the huts (built and kits) are still available too. As are my boxes and bathroom items.
Anyway, plugging aside, progress on the TP.
The tube has been cut to size and I used another section of the same tube to expand the lower part of it (to represent the wider lower section of the whole piece). I'll show this when I've added the putty to it to smooth off some areas, fill some gaps etc...
What I will show is an array of tiny items that I've made to "furnish" the interior with: The ladder on the left is to go from one platform to the other. You may notice a "break" near the bottom (just above the flange), this is because that lower section is removable to allow access behind it for welding etc...
On the air-tight platform (right) you can see I added the hinges and handles for the hatches, and the other bits scattered there are: 1. Attachment points between the air-tight platform and the tube walls
2. Rungs to be attached to the wall above the hatch on the left (which has the ladder underneath). The hatch on the right is for equipment and so doesn't have a ladder.
3. Representative section of the ladder that ascends from the air-tight platform above the top of this model (so in reality would be much longer).
4. Mansafe attachment point. This goes above the hatch / ladder and has a safety cable thing hanging from it (called a "mansafe" see below. I don't know what women are supposed to use... maybe there's a pink one ).
5. Tool support brackets. These are spaced out above the lower platform and, I assume are for attaching tools to so you don't loose them.
Thanks Gits'. It's nice to have found a group of people that are as interested in this kind of thing (modelling) as I am. The marvel of the internet *sniff*
Half the work (designing) has been done for me, I just have to translate it into scale plastic.
It is interesting to see how flimsy real items become at scale after the chunky things I've made recently, and this is 1:48, not ~1:56 of 40K etc...
Last time I mentioned that I'd started on the tube that will form the walls of this model, now I can show you.
Although I didn't take a photo of the first step...
So here's a thousand words in place of a picture:
I needed to thicken the lower part of this pipe by 6mm (3mm all round) to get the correct ratio.
The pipe I am using has 2mm thick walls.
I therefore glued strips of plasticard around it, you can use as many as you like, I had a strip about every 30degs.
Using 1mm thick plasticard meant that when I surrounded this with another section of pipe, I had 3mm thicker walls.
PVC pipe, not being elastic enough to stretch around itself, I had to cut it lengthways; this meant that it was now not long enough to reach all the way around the now 6mm larger diameter circle.
Making sure that this new piece of pipe started and finished on one of the strips (so that the ends were at the correct distance), I added a piece of 1.5mm plasticard to fill the gap. But this was not thick enough to reach the desired radius, nor curved like the rest of the pipe.
Luckily it did meet up with the ends of the pipe, so I just had to fill in the curve.
To aid me with achieving the correct thickness, I added a thin strip of plasticard (1.5mm. Plus the 1.5mm piece = 3mm to match the 3mm walls) to the centre and flanked that with thinner pieces to hold it firm.
The upper edge of the added pipe and that gap have been covered in putty.
After a quick tidy I decided to find something else to do while I wait for the putty to cure enough that is doesn't clog my sandpaper every 5 seconds.
So I cut a great big hole in the side of the pipe:
A cut-away, so that the interior can actually be seen.
Using a combination of my razor-saw, jeweller's saw (breaking 2 blades) and my Dremel (for the vertical cuts and sanding the curved edges).
That's just a test fit of the lower platform, I need to get it all aligned properly for the position of the other pieces to be added (and to hide certain parts that shouldn't be seen by non-modellers )
It is interesting to see how flimsy real items become at scale after the chunky things I've made recently, and this is 1:48, not ~1:56 of 40K etc...
Things look so much better though, in scale. harmonious to the eye and all that.
Progressing well. Interesting solution to the tube problem. Looks very familiar to me too...
Say, what sort of hobby vise do you use? I've been considering a jeweler's vise like this to replace my current vise. The swivel action looks darn useful.
P.S. I hate cutting PVC by hand. I wonder how well a roto-zip (a dremel on steroids) might do. I'll need to try it sometime.
It is interesting to see how flimsy real items become at scale after the chunky things I've made recently, and this is 1:48, not ~1:56 of 40K etc...
Things look so much better though, in scale. harmonious to the eye and all that.
Yeah. I may experiment in future, with the balance between properly scaled and robust enough for gaming... not that I was far off with some of the things I've made in the past.
Progressing well. Interesting solution to the tube problem. Looks very familiar to me too...
Ta. It appears to have worked well, see below.
Say, what sort of hobby vise do you use? I've been considering a jeweler's vise like this to replace my current vise. The swivel action looks darn useful.
Looks like a nice vice. I have a small hobby vice...
...Like this one: Mainly plastic, only stays put with suction... You get the idea,
I don't use it much.
P.S. I hate cutting PVC by hand. I wonder how well a roto-zip (a dremel on steroids) might do. I'll need to try it sometime.
I didn't notice any problems with cutting this pipe. I only broke the jeweller's blades due to cutting those curves while keeping the other end of the blade on the straight part and slowly twisting it... The dremel with a basic cut-off wheel went through it really easily, as did the sanding attachment.
Today's progress sees the air-tight platform being positioned and glued in... ...and all the fiddly bits to the walls.
First, the external view:
And then the internal views:
The lower platform is still removable (along with the attached ladder), to aid painting.
And that is about it, really, painting will happen soon-ish when I get some good colour references.
It is now primed and painting has started, no photos yet and don't expect anything exciting paint-wise; the inside is grey (pretty much everything except the ladders is grey) and the outside yellow.
I've been spending time trying to decide on what paints to use to match the colours I've been given:
Outside: RAL 1023
Inside: RAL 7044
The ladders are just galvanised steel and some of the hook-on points are either yellow or red, and the tool support points are blue.
Sadly, there doesn't appear to be any hazard stripes or anything exciting like that...
However, I can now show you the other birthday present I made recently:
You know how I said that I'd done enough wood recently (on the latest LoER terrain contest thread, that can be found here: http://www.dakkadakka.com/dakkaforum/posts/list/665211.page#8151782)... well this is more wood.
Originally, this hut was my grandfather's and is now my father's, to be included in a railway setup.
Below you can see what it looked like after I'd pulled it from a box in the garage,
after I'd cleaned and painted it,
and in scale with it's "big brother" and a pound coin.
After seeing it with it's red roof and wooden walls, I had to do that one.
The fence needed re-gluing as the old glue had become brittle and some sections fell off (so I took the time to rearrange them a little).
And I added a post to hold open the hatch at the rear (that was defying gravity).
I kept it nondescript, as I don't want it to jump out in the setup or upstage the eventual trains.
That base, is that the old model RR stuff with flock on thick brown paper? I haven't seen that stuff in ages. Model RR has essentially died as a hobby in the US.
I have no idea what size a UK pound coin might be. The wiki tells me 22.5mm diameter.
*pulls out a pound coin and measures it*
Yep about that.
No, that's a plastic moulded base, no flock, it's textured like that. Except for the couple of holes (for screws I believe) that I filled with the round bits off sprue (what else?!) and then textured with dried paint.
Painting at the moment is just layers and layers of grey to give me a smooth finish.
Not that exciting to look at, but I took some photos to check how it was progressing; using the camera's tendency to show errors in the paint-job for a benefit.
So I thought I'd share one picture with you. I think it'll need at least one more coat.
I will do a little shading of grooves and some highlighting of edges, but that's pretty much what it'll look like.
Thanks Gits'. Great to hear that (warm and fuzzy inside).
Progress:
Many layers of grey have coated the inside, then some subtle shading and highlighting.
What little decoration has been added.
And the outside received primer (grey) and many layers of white and then yellow; all via air-brush.
All was going so reasonably well... and then I put a series of black finger prints around it while painting the lower edge...
Most cleaned off, but one persisted and I'm in the process of covering it up and attempting to match the air-brushed tone with hairy brush, as well as touching up a few other areas (I'm definitely using the proceeds from this model to buy a decent air-brush that'll give me a consistent flow, although I didn't help this one by tipping in some old, bit-filled paint at one point).
Anyway, this is what it looks like:
Once I've fixed my yellow, I'll gloss coat the whole thing and it'll be done.
This is for a company that designs windfarms. They wanted a model that they could show to people.
They decided that 3D printed models were too expensive and my friend (who works there) said he knew a man who makes models.
It has to be accurate and to-scale to their drawings.
This particular model (at ~1:48 scale) is a test to see how long it would take me, how much it would cost, and whether they like what I can achieve.
If they are happy with all of it, they might commission me to make a larger scale version of the full piece (with more platforms, ladders, and many other things). This would end up over 70cm (~28 inches) tall... and doesn't even include the windmill bit at the top...
This is why I'm being so precise with the model.
It has given me the idea to approach other companies that might want scale models made, as a way to actually get a decent wage from this stuff.
Could be the start of a "proper" job, or I could be deluding myself again...
This kind of thing does bring out the perfectionist in me though; there are so many things on this that I know should be better (and will be on the final commission... if I get that chance).
Having glossed the inside, I could finally glue in the lower platform. I am very pleased that the ladder does reach the air-tight platform, as it should, and the lower platform is lined up with the flange. I did all the measurements, and cut and glued all the parts carefully, but until you properly install this kind of thing, there's always a doubt.
However, the gloss has highlighted one issue I was not aware of, and this is the subtle sagging of the air-tight platform. It must have been the painting (white spirit does attack polystyrene) as this was flat when I glued it in, and I've only painted it since. Something else to keep in mind about thin (0.25mm) plasticard and painting. Not that anyone else reading this uses the paints I use. *shrugs*
Still, today's tip; gloss varnish will show up any and all imperfections in a surface. Use that to your advantage.
I still need to gloss the outside, but more photos of the inside to keep you going:
You also get a view from below (that I haven't shown before), and no one in reality sees; the lower platform being the lowest anyone goes.
Excellent. Even when following strict guidelines, your attention to detail and preciseness (hope that actually means what I mean ), come through into a great build.
Hope the little mishap with the warping does not hurt the model much.
Good luck with it, I'd love to see your take on the larger scale one!
Thanks Graven. Not getting paid to do it yet... but if they like it... As for yellow, wait until you see the final photos...
...On the note of photos, there will be a slight delay as the air-tight floor is being re-painted; I tried to matt varnish it to take it back to before it was glossed, but my matt varnish appears to be... pretty poor... to put it politely. The only way to make this matt is to go out and find a suitable varnish or re-paint it.
Re-painting is quicker and cheaper. Will find a better matt varnish for future use.
Thanks LT. I believe it means what you intended it to mean. My little perfectionism daemon on my shoulder keeps telling me it could be better here and there.
See above about the warped floor. Once it's matt it shouldn't show, you can only look down upon it.
Larger version will be bigger (well duh...) and better (after this practice). I do hope I get the chance.
Finished (barring any comments from the customer).
Outside:
Yellow.
Inside:
With re-painted air-tight platform that no longer shows the warping.
Scale shots (with a 1:48 scale 6ft cardboard cutout and Ork #1):
And there you have it.
There may be a delay in the full model (if they want it), so I might find something else to do in the mean time... maybe even something for my own army... Or this Lynx that's been staring at me for 9 months...
After seeing it with it's red roof and wooden walls, I had to do that one.
The fence needed re-gluing as the old glue had become brittle and some sections fell off (so I took the time to rearrange them a little).
And I added a post to hold open the hatch at the rear (that was defying gravity).
I kept it nondescript, as I don't want it to jump out in the setup or upstage the eventual trains.
Thanks LT. It's still there and still warped, it just doesn't show up with a matt finish, and no shading/washing.
Won't get away with it on the full model as it's likely to have the cut-away span across it. But I'll use thicker plastic for it (0.5mm) and it should be fine.
The customer has not received the photos with the Ork. That is only there for your benefit; in case anyone didn't realise the size of this model.
Graven. There are so many parts of this model that I wanted to paint in hazard stripes. Sadly, real life engineers don't appear to use them in this case.
As proof of life here's some wip shots of a present I'm making. See if you can tell what it is before the last photos...
After a lot of time wasted trying to make the body from card and plaster I went back to plastic and knocked out a better shape in less time... should stick to what I know...
The engines were made from conveniently sized tubes and then cast in plaster (using the wonder material; Oyumaru) as those particular tubes are not easy to sand smooth... and having made 2, needing 4, I didn't fancy scratch-building another 2.
and yes, each laser is made from 6 pieces; the thickest only being 2mm in diameter (not including the tube used for the semi-circles at the tip).
Have you guessed what it is yet?
That's right, it's an X-shaped, 4-wing, space fighter.
There's still some tidying to do, and final small details (like panel lines) will be added in the painting.
It's not an exact replica as that would have taken beyond Christmas to do, and I have 2 more presents to make before then... and to paint them all...
Why do I leave these things so late, I've had all year...
Littletower wrote: Not an exact replica, he says... Well, I'd call it an excellent tribute!
Ha, thanks LT.
Plaster? Is it going to be a display piece (aka not used for gaming) then?
Nice job.
The plaster was just for the card to hold it's shape, there's no plaster in this plastic version.
but yes, it's just for display. From what I gather this would be too big for the x-wing game, this is over 3 inches long. I get the impression the ones in the game are half that. at least.
Thanks Graven. Necessity is the mother of invention after all: No money + model-maker = crafted presents.
Thanks Gits'.
Next completed... well, "completed" where it is defined as; the bulk of the work is done and all that is left is some minor touch-ups and painting...
A miniature version of the recipient's car.
If you can tell what car it is from these pictures, I've done a good job.
The bulk of the shape was made from plasticard. I wasn't going to mess about with card and plaster after the time wasted on the X-wing's first attempt.
Other pieces of sprue and plasticard were used to add bulk (to save on putty) and define depths in some places.
Once I got on to the putty work I didn't take many photos, but it was added in many stages with the shape slowly coming into view.
After the main body shape was done the final details were added; wheel arches (these were a right pita, and I'm still not entirely happy with them), spoilers, bumpers, etc.
I planned on carving the alloy wheels from plasticard pieces and gluing them on to the bulk of the wheels added earlier. These didn't go well at all, so those details, like the rest, will be added in painting... and can't look worse than the wonky, broken, carved attempts.
And the wing-mirrors are plasticard, drilled and pinned to the sides.
So now it looks like this:
Still need to go over it with fine sandpaper and fix a couple of "dings", but that's the basic shape done.
If you can't tell what it is this is what I was aiming for:
Spoiler:
Landrover Freelander 2 TD4 (more than likely called something different in other countries).
Thanks Gits' and Stormwall. They're not quite at what I would call a professional level, but that is something to aim for.
I've been quiet recently as I was working flat out to get the presents done on time. The last two were finished on Christmas eve, so I only just made it.
All presents were well received, and a good Christmas was had.
Happy Christmas to all of you out there. Hope you got some nice surprises in your stockings.
Here's the final photos of what I have been making for the past 3 weeks:
Earrings and matching necklace pendant (sculpted in milliput):
"Brass" sculpture (milliput again):
She's about 6cm (~2.5") tall.
The Landrover I showed you earlier:
and the X-Wing:
Painting straight lines is hard, yo.
This one is about 9cm (~3.5") long.
Given more time, I would have changed / improved on many parts of all of these, but can't complain about the result really.
Is there a doctor in the house as I think I just passed out
I always look forward to your Christmas present work it's a step away from the norm and you never know what will see, great stuff all round from the sculpting to the brush work.
However the Land Rover is some great paint work as the shading has really given it the 3dimensional look
Also that X-wing is just fantastic yes I feel your pain as to the straight lines but you have achieved a great effect, the panel lines are spot on
Hope you have had a great festive holiday and continues to be a good one
The fact that all that is scratch-built / sculpted is just amazing. The land rover is fantastic with the one exception being the roughness of the surface. Could you have possibly tried wet-sanding in order to smooth it out a bit more?
4. Mansafe attachment point. This goes above the hatch / ladder and has a safety cable thing hanging from it (called a "mansafe" see below. I don't know what women are supposed to use... maybe there's a pink one ).
LDD: Hope you didn't bang your head when you passed out.
These things are a nice way to branch out and practice new (or less well-used) techniques. I am pushing myself and my skills to the limits, that's why some things work and some ... not so much.
The paintwork on both the Landrover and X-wing had to make up for the missing sculpted/modelled details. I'd have preferred to have added all the details during the build but didn't have the time.
Ta.
Gitsplitta: Thanks. Yeah, I don't know where that texture came from. I'm sure the paint was smooth when I did it, and it only showed up after the varnishing. As it's evenly distributed across all surfaces I assume it was something to do with the varnish.
If I'd had at least one more day to work on it I would have sanded and re-varnished. But if the problem was with the varnish it may well have re-appeared...
Theo: For that scale it's probably easier to buy model cars and modify/paint them to match the setting. Ta
StarDrop: Good to see it ticked someone.
hk: Thanks.
I'm off to run about post-apocalyptic Boston again...
Don't worry I have landed on my head several times ....... And that was before I found alcohol.
I liked the use of paint to represent detail it helps with painting techniques, plus I think you did a damn fine job sir
As for the surface issues it probably was the varnish, when we use to lacquer/varnish furniture we had to apply 3 to 4 coats with sanding between on areas to get a complete smooth finish.
LDD: That's... ok then, and explains some things... Thanks. I just didn't have the time to scribe all the lines and often those are not much straighter anyway.
And to layer on sheets of plastic would have taken even longer (as I did for the Jet bike conversion with the Necron rider).
Graven: Thanks. Enjoying it far too much...
Cam: But but but, there's so much junk to collect and hoard and build things out of, and there's places to see, people to meet kill.
Modelling will happen soon...ish. Just one more adventure...
Having now finished a model for my shelf (and I'm weaning myself off Fallout 4), it's time to make some more money models... er, money... models to sell... for money.
To start with it's another rescue job, in a way. This chap started as a bright green (and thick paint) Tau fire warrior, that I earmarked for doing up and selling. I'll show a comparison photo when he's finished. Now, I can't really do him as a lone fire warrior, as who would buy one fire warrior... So, what do Tau armies have one of? Ethereals (I think). A single character model is something that I can sell.
A quick look about at Ethereals leads me to a few essentials; robes, regal looking, with a long pointy device.
I've not changed to pose, this is how he was glued together, so this is the pose I'm going with. The right arm is the "throwing a grenade" arm, and with a removal of the grenade, gives a "holding/leaning on a spear" pose. Once glued on, the pike will sit on the base, it just won't stay put if I rest it in his hand and on the base.
The pike is a sword blade I got from OMN; at least I assume it is a sword blade, it had no hilt and the tip was broken (one of a selection of miscasts, not something I actually paid for), and it wasn't just a random piece of resin that just made it's way into the bag. It has a nice cross-section for a blade and just required a little sanding to give it a tip. That was pinned and glued to a length of plastic rod that had an odd piece of "end of a staff" (don't know where it came from, but it was the right thickness and finishes the end nicely) glued to the other end. The guard is an Eldar piece with the gems removed. I think this is a Wraithguard piece that I got from Comrade Panda. The gap in that piece was filled with the end of a Tau helmet antennae (the rest being glued to his earpiece) and some putty, to make a gem or something.
The wrappings were an experiment. Can you guess what I used...? Dental floss. Glued and wrapped round. Then a ring and some putty at the other end to give it a lance-like appearance. Implying knights and therefore regal... (tenuous links - R - us).
I've only started on the robes. A piece of metal (from a squadron putty tube) around the back and then tissue and PVA/water all around. I'm in the process of adding putty to add in some shape and structure. There will also be more robes down his back once this is done.
Work has been slightly interrupted by some decorating, but he now has a cape:
Once this has set it'll get some sanding to smooth out the surface and hopefully painting will bring out the folds and creases better than it all being white.
And while I'm here I'll remind you, the viewer, that I still have a stock of bathroom items, boxes, and wooden huts; including the built, converted and painted example.
All the relevant details can be found in my Swap shop thread: http://www.dakkadakka.com/dakkaforum/posts/list/582046.page#6580426
Yeah, they were the first thing I thought of when thinking about "robes", and the Ethereals are meant to be monks of a sort if I have the right end of the stick. So it'll be a nice nod to that.
I've been painting... walls... but I have also started on the Ethereal.
Here's how the red and orange is looking:
Next is to paint the armour (white) and head (blue).
Automatically Appended Next Post: With the armour, skin, hair and leather bits done he should look a bit more balanced...
and, as inappropriate as it is to take photos up someone's skirt, you can see that not only does he have legs under his skirt (unlike many moulded models) I have painted them as well.
Automatically Appended Next Post: Damn you automatic appending... *shakes fist*
Skin looks great, like the contrast with the white armour, orange looks fantastic. Red is really clashing for me, not sure what it is, but I think it would be better orange, maybe just give it some orange to bring it a little closer.
Excellent details as always bud, but honest we trust you, no need for upskirt shots
What colour, if any, are you going with for effects?
Camkierhi wrote: Skin looks great, like the contrast with the white armour, orange looks fantastic.
Thanks mate.
Red is really clashing for me, not sure what it is, but I think it would be better orange, maybe just give it some orange to bring it a little closer.
Yeah, the red / orange balance has been a problem. This is the second version as the first had too pink/purple a red and that REALLY clashed; compared to that, this is much better.
However, I think the orange is the problem. If you look up at the monks I showed previously, their cloaks are more yellow than what I have achieved. So I might try to add yellow to the cloak (and I have a nice translucent yellow paint I can use that has usually been a pain as it doesn't cover well. This should work well as a filter over the cloak) and see if that helps the balance more.
Excellent details as always bud, but honest we trust you, no need for upskirt shots
What colour, if any, are you going with for effects?
Ha Not really planning on any effects. There will be some more spot colours to come and some weathering/dirt about the bottom of the skirt etc.
Theophony wrote:Great colors on him so far. I never liked that device in his hand though as it looks like he is dowsing for water.
Thanks Theo. I don't know what it is, whether it is a piece of in-game or just fluff equipment or GW just decided to add a random gizmo for a unique arm... it's what he came with.
Maybe he is looking for water, or is he checking for ghosts... Thinking of that I should have painted it to match the ectometer, however I've chosen it to represent the "original" colours of the Tau. I'll have to remember that when I come to use it in my own army.
Warboss_Waaazag wrote:The highlights on the cape look awesome. You've really captured the look of fabric.
Thanks 'boss.
What I'm glad about is that my putty-work for that cloak looks like a cloak, painting it is far easier in my eyes; dark in the dips and progressively lighter on the high points. Thin paints and many layers is the trick to folded cloth.
Speaking of the cloak, I've added the yellow glaze/filter.
I mixed up some of the poorly-covering yellow paint I have (I have another yellow that covers much better, hence the distinction) with some matt varnish, and then brushed over the whole cloak.
This has brought it much closer to the reference photos and, I think, less clashy with the red.
I also painted the gizmo and started on the metals.
First, here is a comparison to what he looked like when he arrived at my home.
Stripped of paint, modified and added to; but you can still see the same arms, head, legs (if you peek up his skirt ), etc...
Lovely work. If I were being picky I'd maybe like another colour in the Halberd/staff thing, maybe a crystal blade or something, but that's not necessary, just an idea observation.
It is a good point, but having built the naginata it reminded me of a famous cartoon sword (I wonder if anyone can tell which?) and I decided to paint it to match that; turns out it's not as colourful as I remembered.
I didn't want to paint on lightning streaks, which would be a good way to add interest, as it might be confused for a power weapon and I don't know if Ethereals can have such a weapon.
Also, being quite a large weapon, it might dominate the model if it were painted in brighter colours. I'd like it to remain an accessory to the Ethereal, and not the focal point.
shasolenzabi wrote:That Tau with the Pike is looking great!
Thanks Shas.
The Ethereal is not yet up on ebay, real life delays etc... I'll let you know when he is.
I'm now moving into some new projects that will hopefully prove interesting to you (at the very least), and profitable to me.
"You don't know if you don't try" is the mantra that I'm working on for these projects; maybe they will be turn out to be better money making activities than painting models, not that I plan on stopping this, just that I'm hoping to branch out into newer and hopefully uncharted territories. Maybe they will come to nothing...
The first of these projects is a painting.
"You've been painting things all along" I hear you scream.
Ah, but this is not a painted model, this is a painting; a 2D painting... in scale.
1:12th scale, to be exact (although with a 2D rectangle it can work for many scales without issue).
Why that scale? That's the scale often used for doll houses, and the people that make doll houses seem to have money to burn (I once saw a 1:12 scale squirrel on ebay for well north of £50 if memory serves correct. It was nice, but a single scale squirrel for lots of cash... shows promise).
You may remember the painting and easel that I showed a while ago, that was the proof of concept.
Spoiler:
The initial bud of the idea came from when I painting my Predator tank (over in my army blog). For that I wanted a piece of tank-art to commemorate H. R. Giger, and during practice for the piece of art I eventually used I painted a picture on a piece of card.
Having done that and then adding a frame to it from pieces of card, I had a thought of maybe selling similar paintings to people who might want paintings, and hence the doll house scale.
*possibly NSFW due to being a bit suggestive*
Spoiler:
I made two original frame types for paintings, and while I was casting the hut kits I used excess silicone and resin to make copies of the frames. Some of these need some tidying up (lots of bubbles form when you're squeezing and scraping together excess resin), but they are quicker than scratch-building a frame each time.
These have sat to one side for quite a while and now it's time to test the waters and see if they'll sell.
Now, I can't see a great overlap in the doll house and Giger fan groups, so I'll need to choose "safer" subjects...
This left me stuck for a while (and hence the latest gap in contact), but I've finished the first painting; titled "Fiery Sunset" for reasons that will become apparent.
As I wanted these paintings to be "real" artworks, used and collected (fingers crossed) as such, I've gone the extra mile to add a string to hang them by and a certification on the back.
Edit: Ah it appears that picture is not wargaming enough for DDakka, I'll use FB instead.
Edit (again): After a conversation with the gallery Mod, the photos are allowed in the gallery again:
I have another painting to do next, and then something (possibly) even more interesting...
It appears that a scale painting is not wargaming enough for DDakka (it would be nice to be informed if a photo is removed), so I'm using FB to host them instead.
However, they are in enormo-vision. If anyone has an idea of how to scale photos from a link such as from FB, let me know.
I use Imgur for everything, and only upload finished stuff, some of it, to the gallery here. Anyway, please complain about the deletion in the Nuts&Bolts section. You have a valid case here. At the least get the Administration to agree to notify people of deletions from their gallery.
I'm curious, what did you use for a canvas. The frame is wood?
Don't get it, I posted pictures a while ago of paintings I did for one of my models, and they never got deleted! This could easily be hung in a building for just about any game system barring maybe fantasy. I would buy this for maybe infinity scenery setting.
Fantastic work. I get a vaguely 80's vibe off it.
I know how you are going for original art, but don't knock the appeal of a knock off, obviously watch the old copyright bit. But something that looks vaguely like a Picaso or Monet would have great appeal to many. The pics I did where for my self, but I had one or two similar to classics in there, and they come off well in scale.
I think you could well be on to something with the idea, good luck.
Red Harvest wrote:I use Imgur for everything, and only upload finished stuff, some of it, to the gallery here. Anyway, please complain about the deletion in the Nuts&Bolts section. You have a valid case here. At the least get the Administration to agree to notify people of deletions from their gallery.
K. Will do.
I'm curious, what did you use for a canvas. The frame is wood?
Ah Ha, got you there. The frame and canvas are a one piece resin cast; hence on the back saying Enamel paint on polyurethane. The original being made of a piece of plasticard and some sprue (what else?).
I used a little spare silicone to make a one piece, open top mould while I was moulding other things, and then any extra resin from when I was casting I dumped into the mould; free material / save on wastage.
And being a single piece of plastic they are quite sturdy.
Camkierhi wrote:Don't get it, I posted pictures a while ago of paintings I did for one of my models, and they never got deleted! This could easily be hung in a building for just about any game system barring maybe fantasy. I would buy this for maybe infinity scenery setting.
It is also odd that the other painting I have shown there on the easel has been allowed in the gallery. I'll ask for clarification as Red' said.
Fantastic work. I get a vaguely 80's vibe off it.
I know how you are going for original art, but don't knock the appeal of a knock off, obviously watch the old copyright bit. But something that looks vaguely like a Picaso or Monet would have great appeal to many. The pics I did where for my self, but I had one or two similar to classics in there, and they come off well in scale.
I think you could well be on to something with the idea, good luck.
Well, I am from the '80s; maybe it's that coming through.
I may well experiment with differing styles, but no direct copies. If you want a Picaso painting in scale, just print one off. The extra effort to copy something accurately (and I would have to be accurate) would make the time involved too great to make this an earner. But certainly, I'll be doing some Picaso-like, etc. paintings in time.
Painting is excellent. Perfect for Dolls' Playboy mansion
I agree about the insane money there. A friend(Mabrothrax)'s mother builds custom houses for around £3000 a time. They are amazing scale models, but still.
Painting miniatures used to mean just this... And just think how much money you will save on canvas acreage and paint quantities over doing full size ones.
Hope some rich dolls house maniac becomes your patron and starts a dolls gallery!
Littletower wrote:Maybe if you hang it from a tank?
Yeah, using a wargaming miniature "for scale purposes" is the best way to guarantee the photo's acceptance in the gallery. I've used this technique in the past. Just didn't consider it an issue this time around.
However, Good news everybody!
After a conversation with the gallery mod, the painting is allowed back into the gallery for everyone's convenience etc... Thanks to those that fought my corner (although KK was/is very reasonable anyway).
I was just thinking the Giger style was not too fitting for a doll house right bero reading your comment on it, it'd certainly be a unique doll-house!
Paintings look good, and idea sounds good too, hope there's a market for those.
I would love to find someone out there that does love both doll houses and Giger.
What I really need to do is find somewhere that the doll house crowd hang out (as we of the wargaming models have DDakka)... research is needed.
Thanks LT.
Red Harvest:
Solidarity Brother.
Elvis on black velvet? If someone wants a painting of Elvis, I'll give it a go. But likenesses (and faces) are hard. Maybe when I've got my 2D eye in again (I used to be pretty good in 2D, but not done much for a long time).
Thanks 'Graven.
weetyskemian44 wrote:Painting miniatures used to mean just this... And just think how much money you will save on canvas acreage and paint quantities over doing full size ones.
Too true, Weety, too true.
Hope some rich dolls house maniac becomes your patron and starts a dolls gallery!
Fingers crossed.
No update as yet, the next painting has been pushed to one side by a present project that is proving to be quite a challenge. Once I have some progress on that I'll share with you all.
In other news: The Tau Ethereal from earlier is now up on Ebay: Tau Ethereal Should you or someone you know want a unique Ethereal for their army (or shelf), have a look.
And while I'm at it; I still have plenty of my casts available if anyone wants some boxes, bathrooms or huts (including the built and painted example).
Thanks Comrade. Here's one of my art-dealer 'nids to show off another painting for your hive tyrant.
This painting is entitled "Through the Trees". Having done a mostly red painting last time, I decided to do a mostly green painting this time. I had a look about for mostly green pictures and found a photo of sunlight through some trees; so used that for inspiration.
Notice that this painting uses a different frame from the previous one; this being "framed" compared to the earlier "frameless" painting.
I thought some variety would be nice, and some picture lend themselves to one or the other.
also note my cunning plan that will allow this to be allowed in the DDakka gallery with no ambiguity.
Also also... I mentioned that the above painting was pushed aside so that I could work on a different project as a present. Now that you have seen that I finished the painting you would assume that I finished the other project... you would be wrong; while waiting for putty and/or glue to dry on the other project, I worked on the painting.
So, what is this project? Why haven't I shown any wip shots? and why has it needed so much putty work? Will Dr H stop putting questions in his reader's mouths?
The main problem with this project is that I've been making it up as I go along and didn't really know where it was going or if anything was going to work, so rather than string you along with me going backwards and forwards I decided to wait and see what became of it. This would allow me to show you a logical progression and not random musings and dead ends.
Inspired by the recent Easter holiday (or as I call it, happy chocolate day), the recipient expressed a desire for a Faberge-like egg.
Challenge accepted, I had to find a way to produce an egg shape, and then how to decorate the surface of said egg. Not as simple as it may seem at first.
The easiest way to get an egg shape would be just to mould and cast a real egg. But I had visions of breaking the egg or some other issue and wanted to see just how hard it would be to make one from scratch. Probably should have just moulded an egg really...
I took a hollow plastic sphere and installed 6 pegs (paper clips) to give a depth reference for the round and pointy ends.
Then covered the whole thing with foil to bulk out the shape.
Then covered that with tissue / PVA to hold it all together.
Then covered that with milliput.
Sanded smooth and to the desired shape.
I then made a mould of half of that egg with plasticine. As it turns out, even with lubrication it's tricky to remove something from a plasticine mould without affecting the mould. I then cast some half eggs in dental plaster. Then when I poured the second halves, I placed the first half on top of the wet plaster to create a whole egg (did this twice to give me two practice eggs in addition to the original).
These were originally intended for practice of the following steps so that I had at least one perfect egg to produce the final result.
These were cleaned up and sanded smooth.
One of them turned out perfect and, in the end, has become the product (leaving me with the original and a practice egg - now spare material).
Once I had the shape I needed a base or stand so that it would stand up by itself (what with eggs not being known to stay in one place without support).
On the practice egg, I tried a ring-like structure that I tidied up with some putty. However, I didn't like how this turned out as it mostly obliterated the curved shape of the egg at that end, I wanted a more delicate solution.
This led to installing some pieces of paperclip into the egg that would serve to guide and strengthen plastic rods that were to become the basis of the stand.
A bit of fiddling was required, but this is how it transpired:
The flat parts of that were drilled with a variety of bits to create a pattern.
The extensions that were added are made of squares with the holes drilled into them BEFORE being cut in half on the diagonal. The halves were then glued on each side of another piece of plasticard and the results trimmed and tidied.
A triangle of plasticard was then drilled etc. before being glued on to create the final stand.
The egg was then detailed with 3 strips of plasticard, glued on from legs to top.
Around the middle some beads were used for some "gems". The central ones are cut in half (as they had a handy hole though them to help with this), the others are glued into pits drilled into the egg. These were then puttied around.
With that done, I then added some more details with putty. these were very difficult to get tidy and involved trimming, sanding, re-doing some parts, more sanding and then painting over quickly to hide the sins...
This is where it stands at the moment, more to come in the near future.
Thanks.
and no, I will not stop putting words into your mouths.
I've bling-ed up the egg with some beads and painting the raised areas in gold.
The next step is to add many fiddly, twirly bits over all the "blank" space... Freehand Hoooooooooooooooooooo...
In other news;
I came across this short article about making moulds for small parts and I thought that I should share it here for you, dear reader, if you were interested in what is involved in making moulds like those I have used to create some of the things I have shown (and sell ), or if I have inspired you to think about trying it yourself.
http://www.tested.com/art/makers/567094-molding-and-casting-tiny-prop-parts/
cormadepanda wrote:The good old swirls of beauty. That sounds like difficult free hand excited to see how that turns out, but the egg looks pretty and Dr like.
Difficult and time-consuming, in more ways than one. Thanks Comrade.
inmygravenimage wrote:If I ever build a stately Wayne Manor, you're decorating!
Thanks.
Red Harvest wrote:Ooh, Faberge egg. There was a lady in my parent's neighborhood who used to make those.
I'm sure she did a better job than me. It's coming together, but I feel that this kind of thing is outside my expertise at the moment.
Including a model is always a good thing to do. It shows scale. Let's see if it keeps over-worked Mods from making certain sorts of decisions
It has served me well in the past...
Spoiler:
shasolenzabi wrote:Eldar egg thingy!
I suppose it is a little Eldar-like. I've used this kind of curved spike design in much of my past artwork, so it comes naturally. The difficulty comes in not doing it the same every time...
The freehand work has taken quite some time to come together, not least just for the paint to dry between layers (and there are many layers/passes here), but I have been taking photos throughout and can now show how this kind of freehand can be built up.
Each area starts with a basic shape in one colour which is progressively broken up by following colours, adding complexity.
Boundaries are tidied up (again and again in some cases) and the final design emerges from the original "child's drawing".
The close-up photos don't really do it justice, as it (is meant to) looks better in real life, at arms distance... with a squint, in a dark room... You get the idea.
The gold wasn't quite "lively" enough for me on this so I added some yellow to the gold paint for a basecoat, a quick wash of dark brown at the edges, and then went over that with a thin layer of the straight gold (to give it back some of the metallic sparkle), and then highlights with a gold/silver mix.
Now to add some more freehand to the larger gold areas, paint the gems and then some final touches before a gloss finish.
All done. Gems, final touches, some interference purple on the non-metal areas, and glossed.
Here it is together with a scale shot (I don't know if anyone out there realised the size of this egg, or naturally assumed that is was "egg-sized", which it is roughly).
Now I have one more painting to do and then the long-promised excitingly different project can start...

 .
.
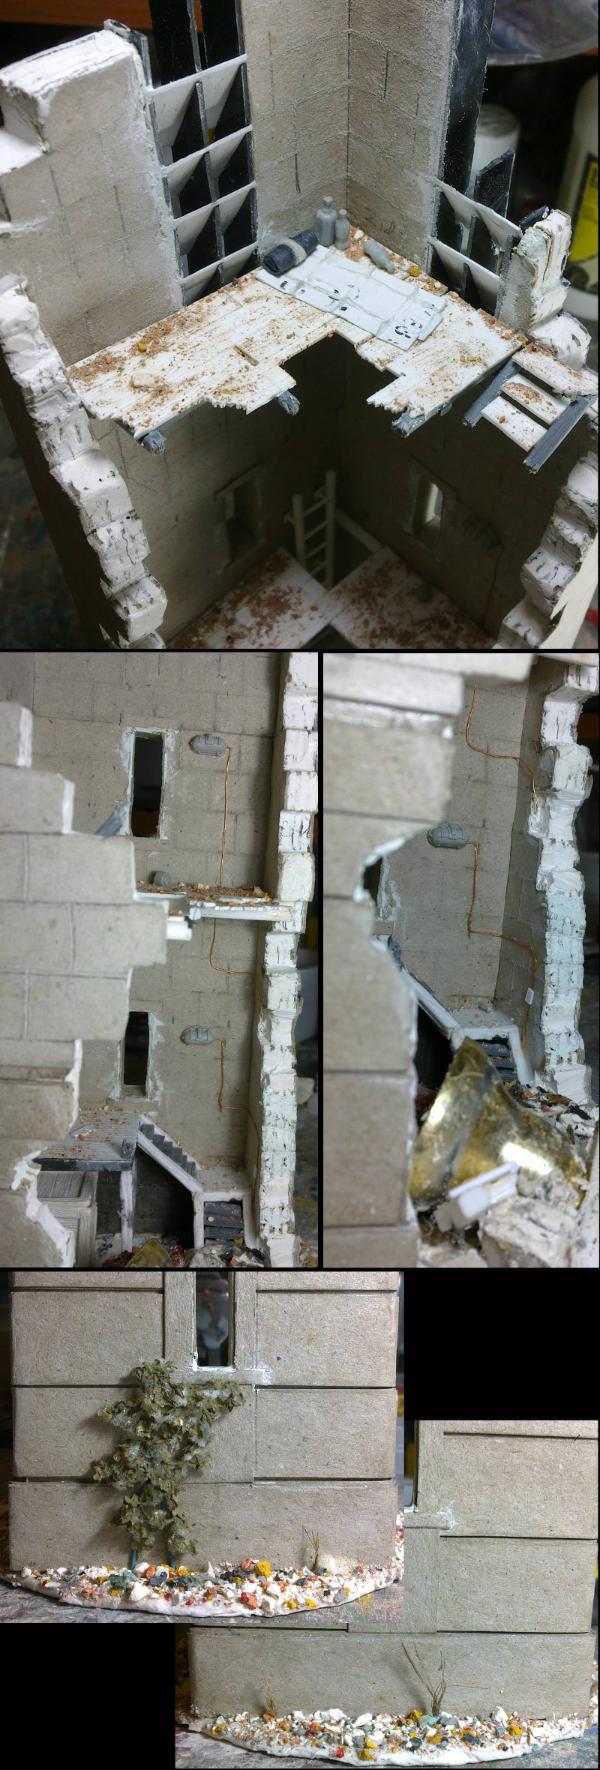
 , so much detail that I would loose every game played on that table as I stare at it and forget to do so many other actions. The vents are a great touch to the upper level windows.
 , a bedroll AND refreshments
  .
.
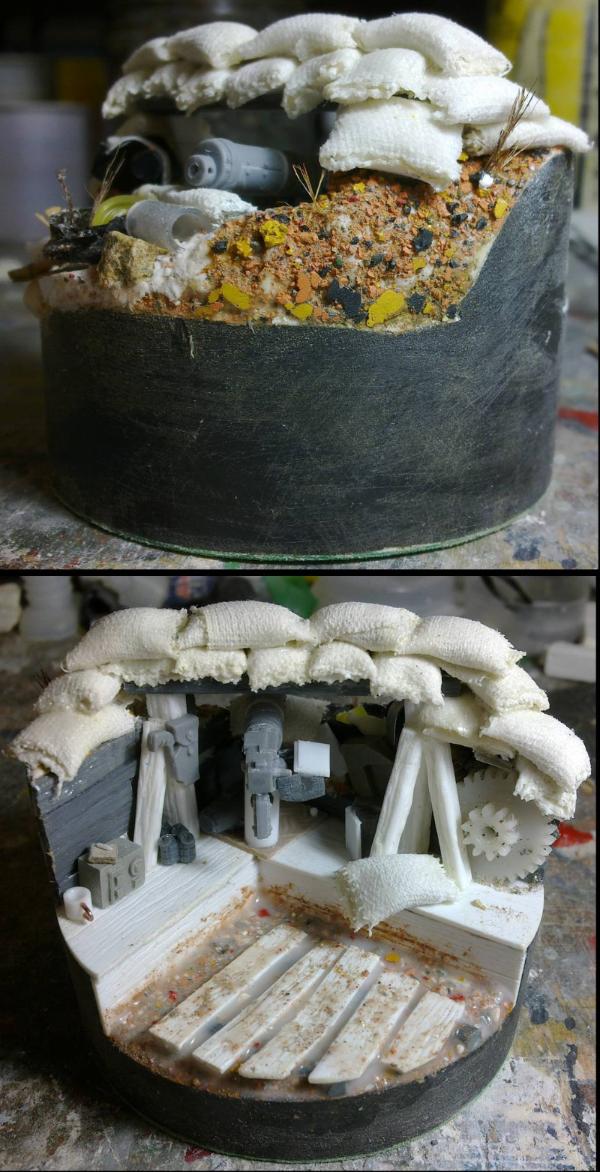


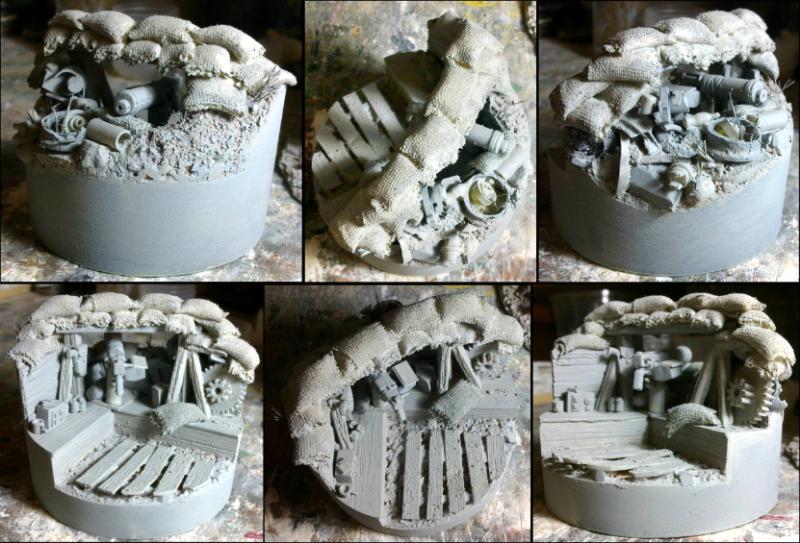
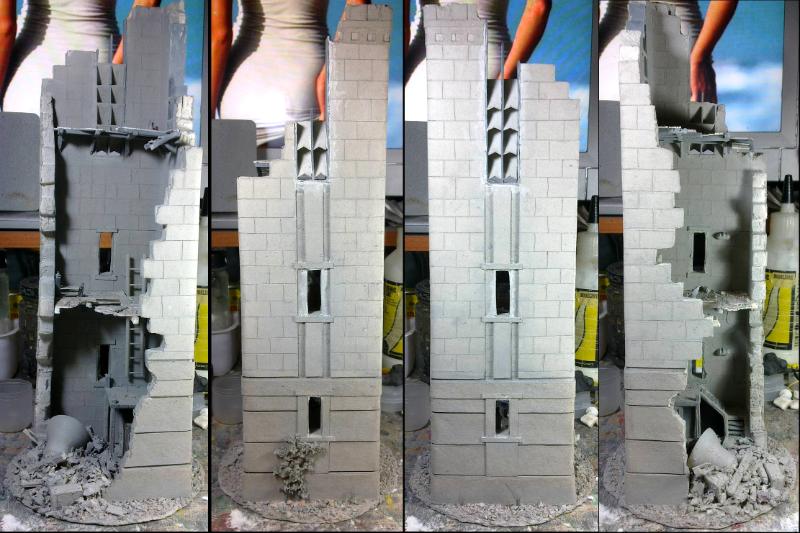
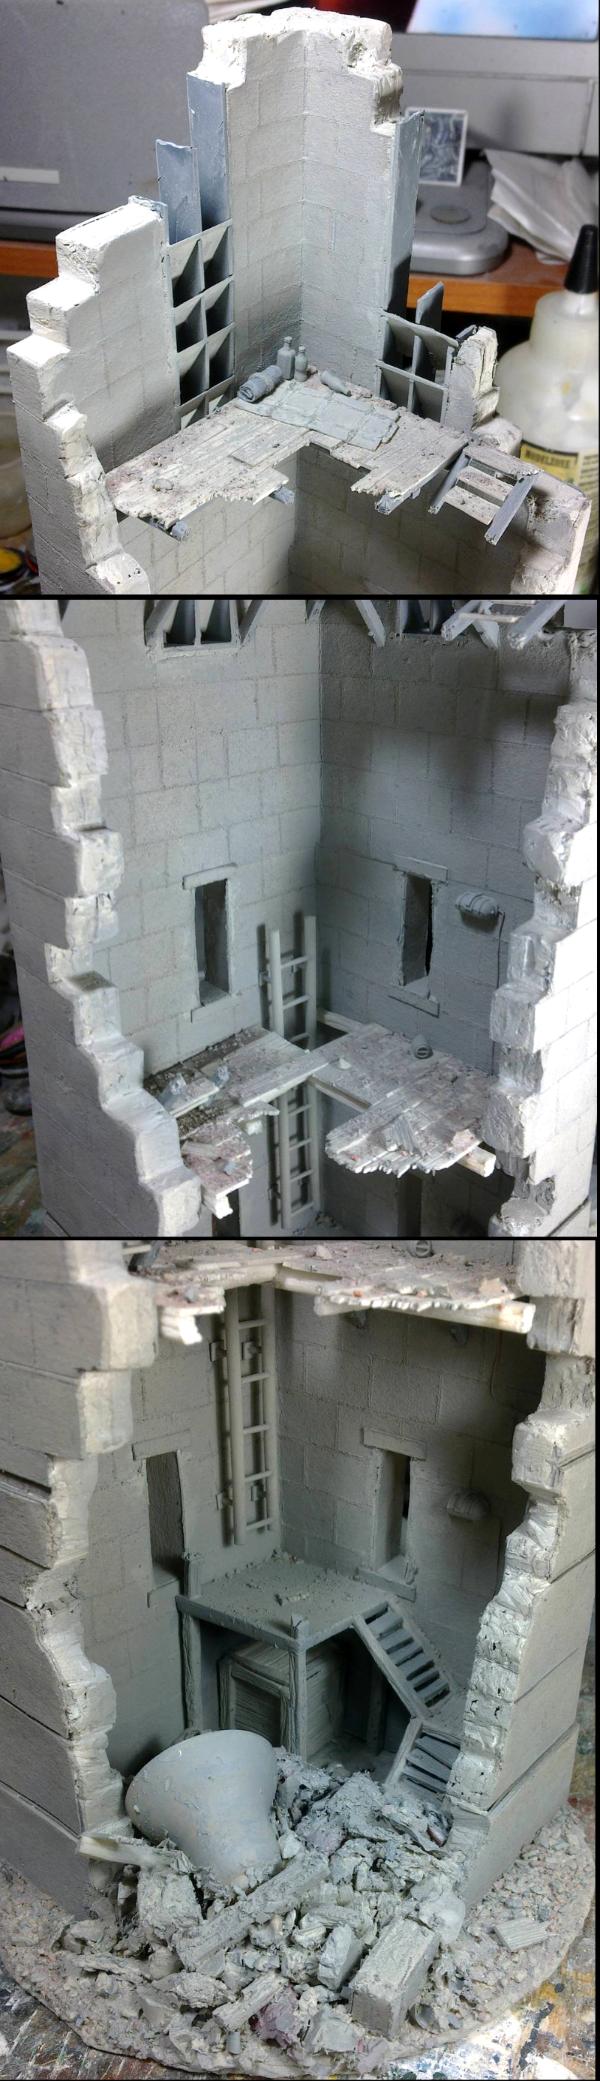


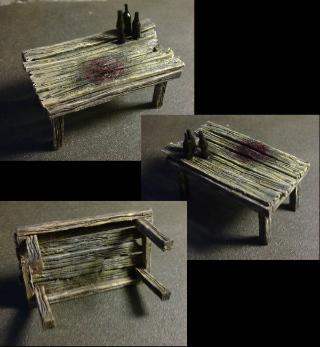
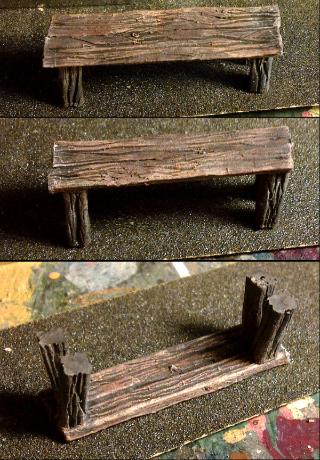
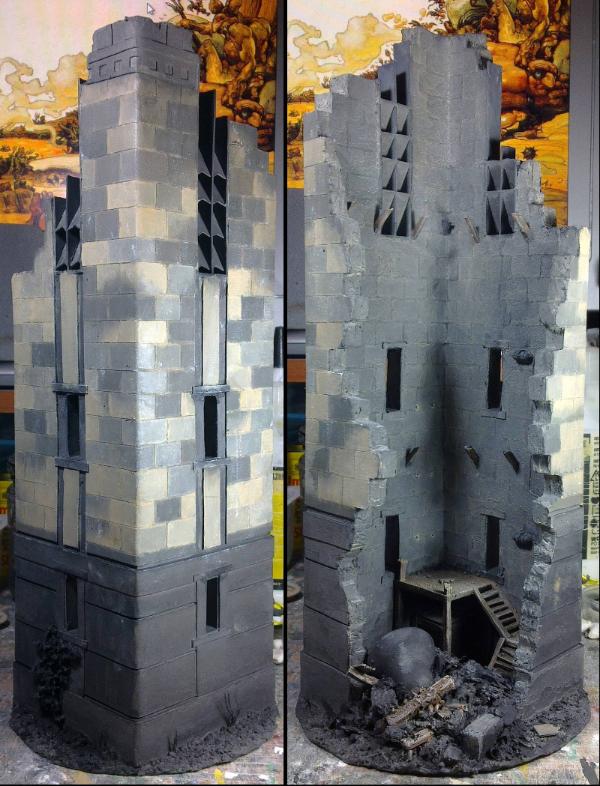
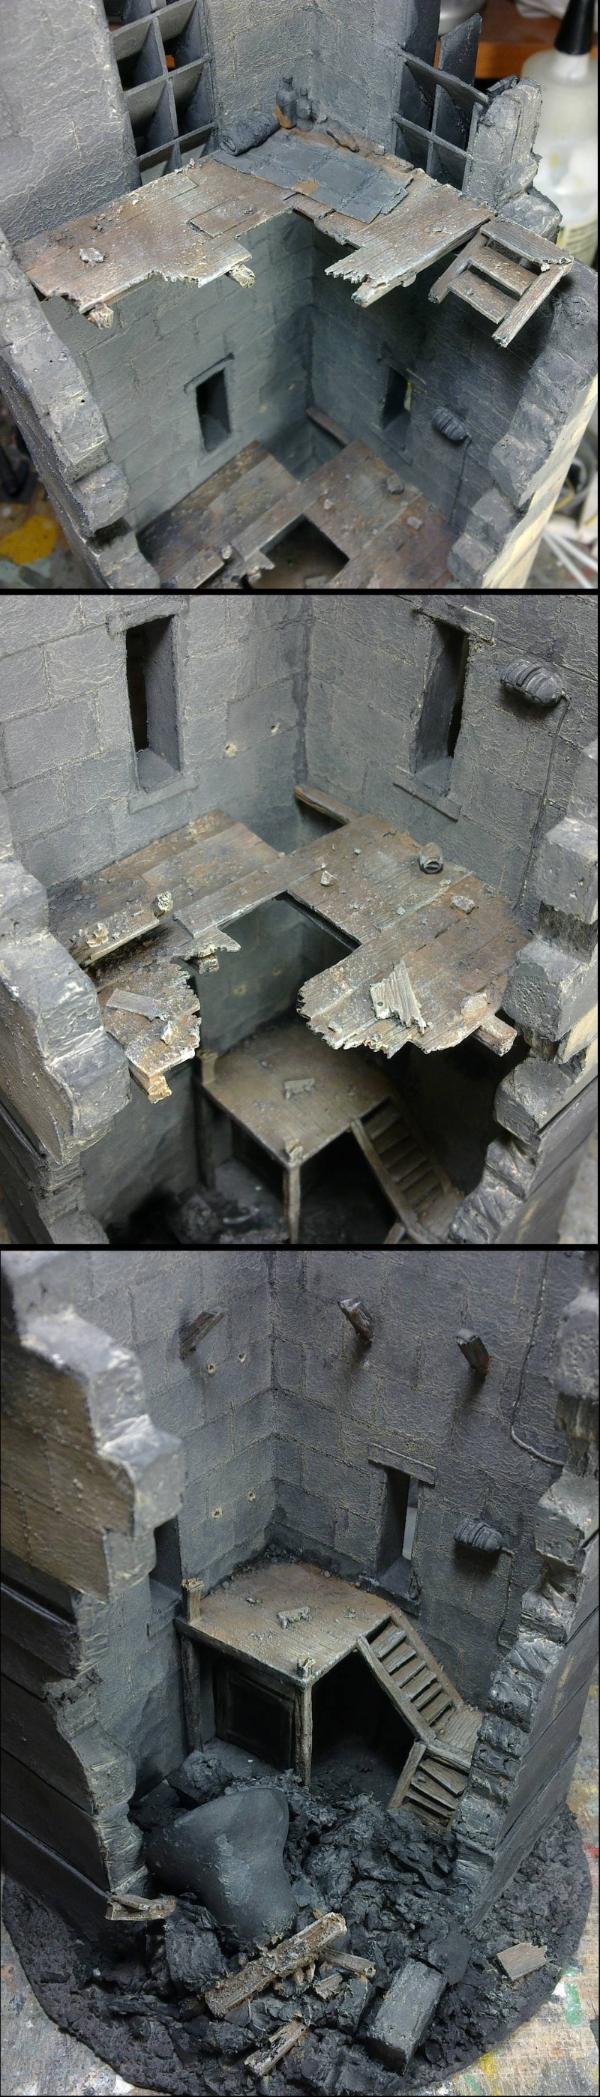
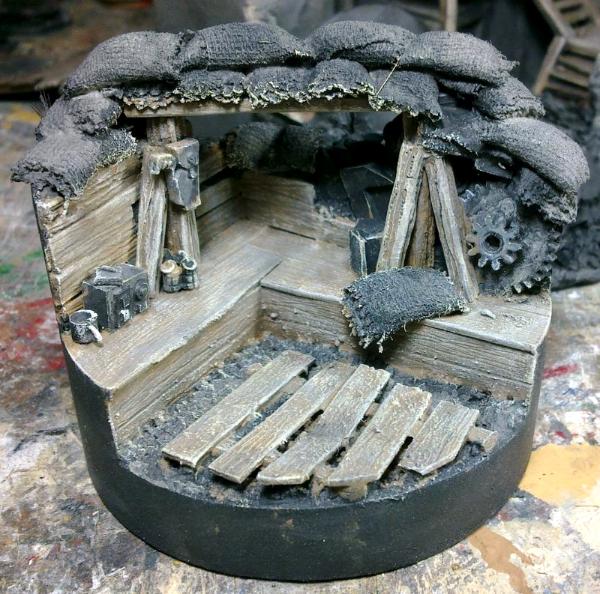
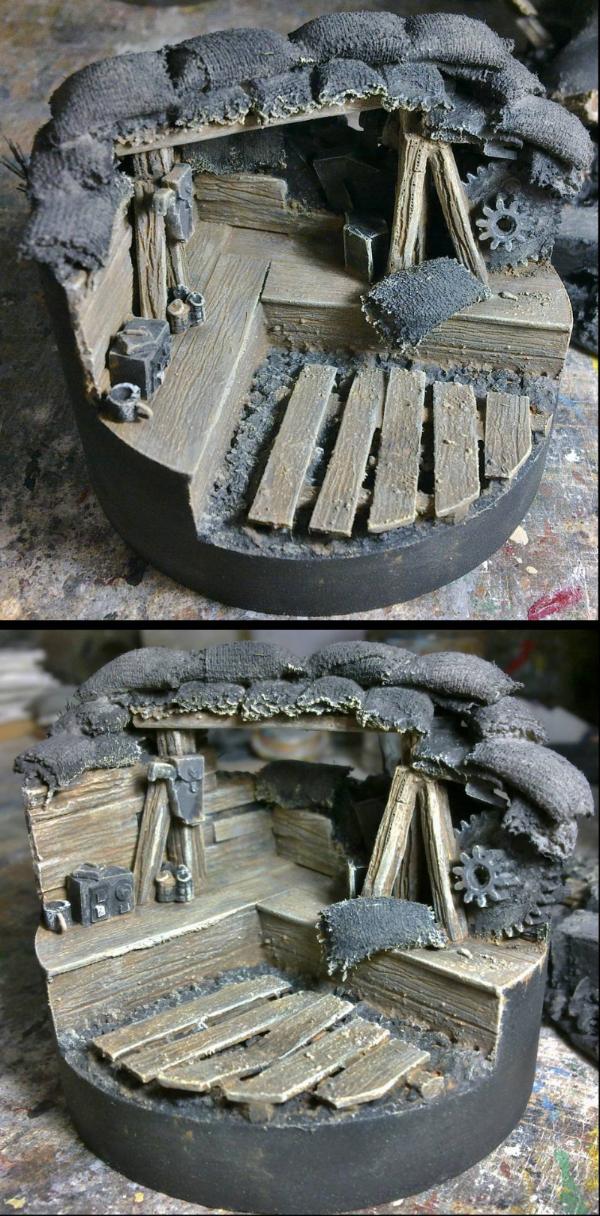
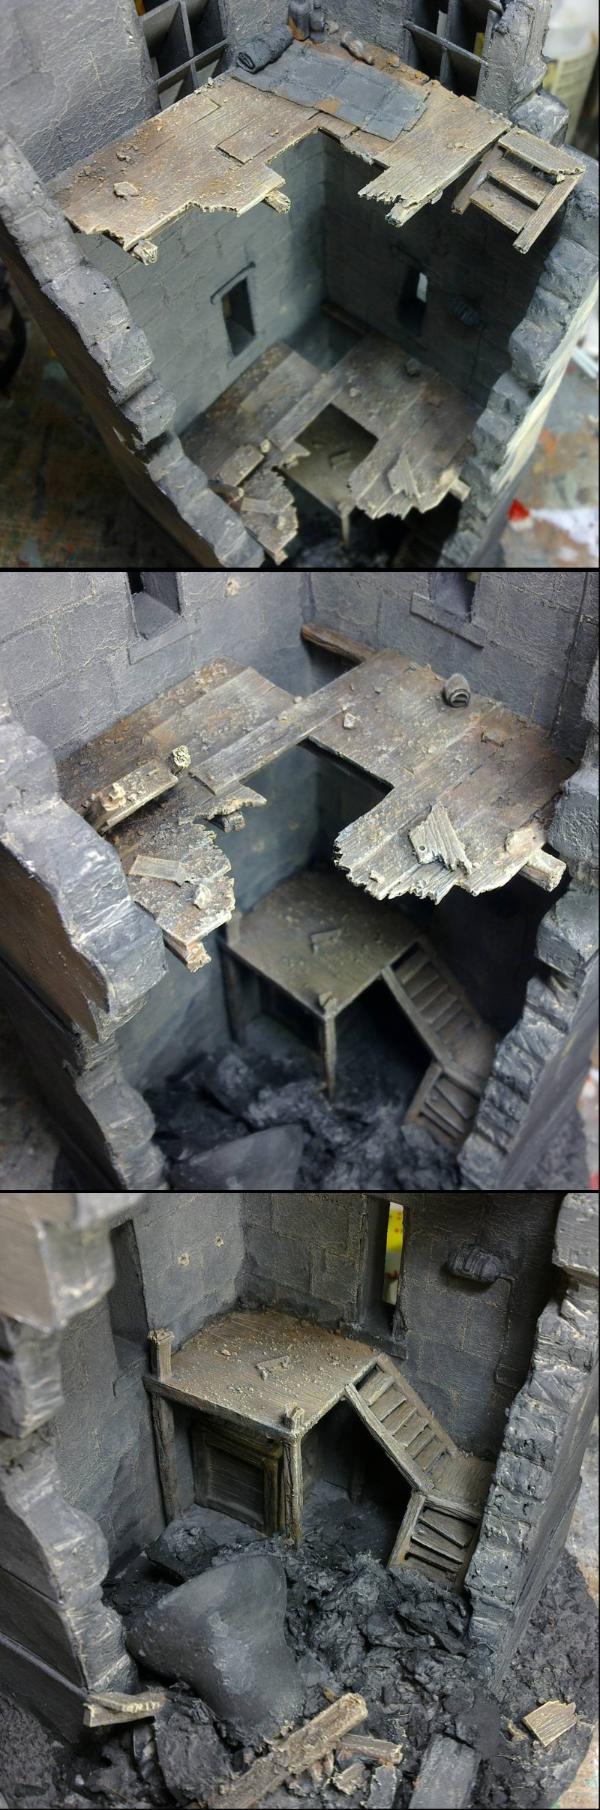
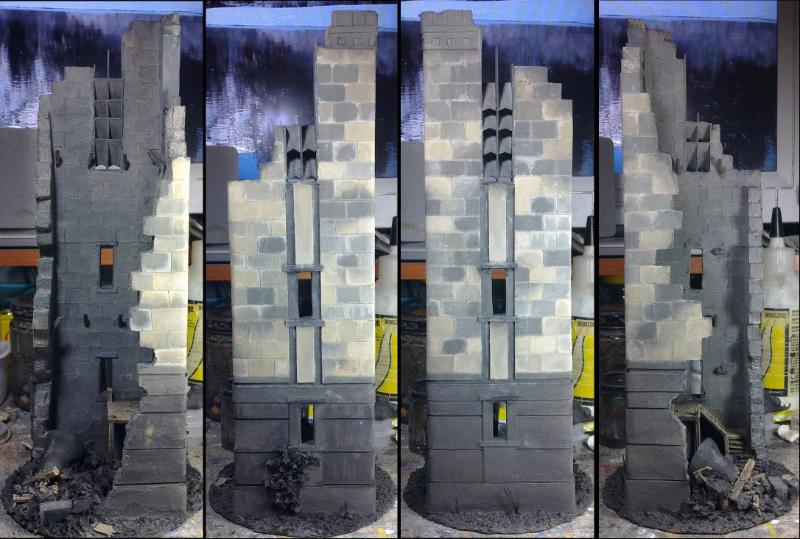
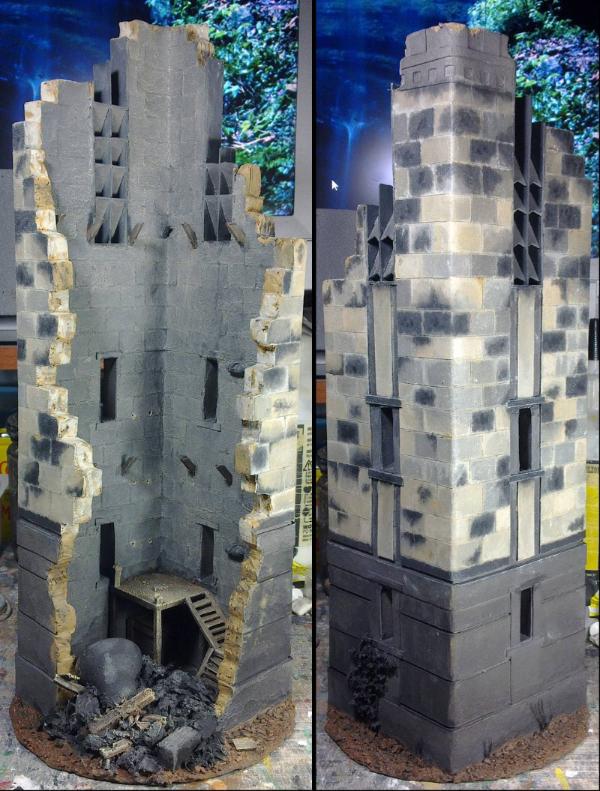

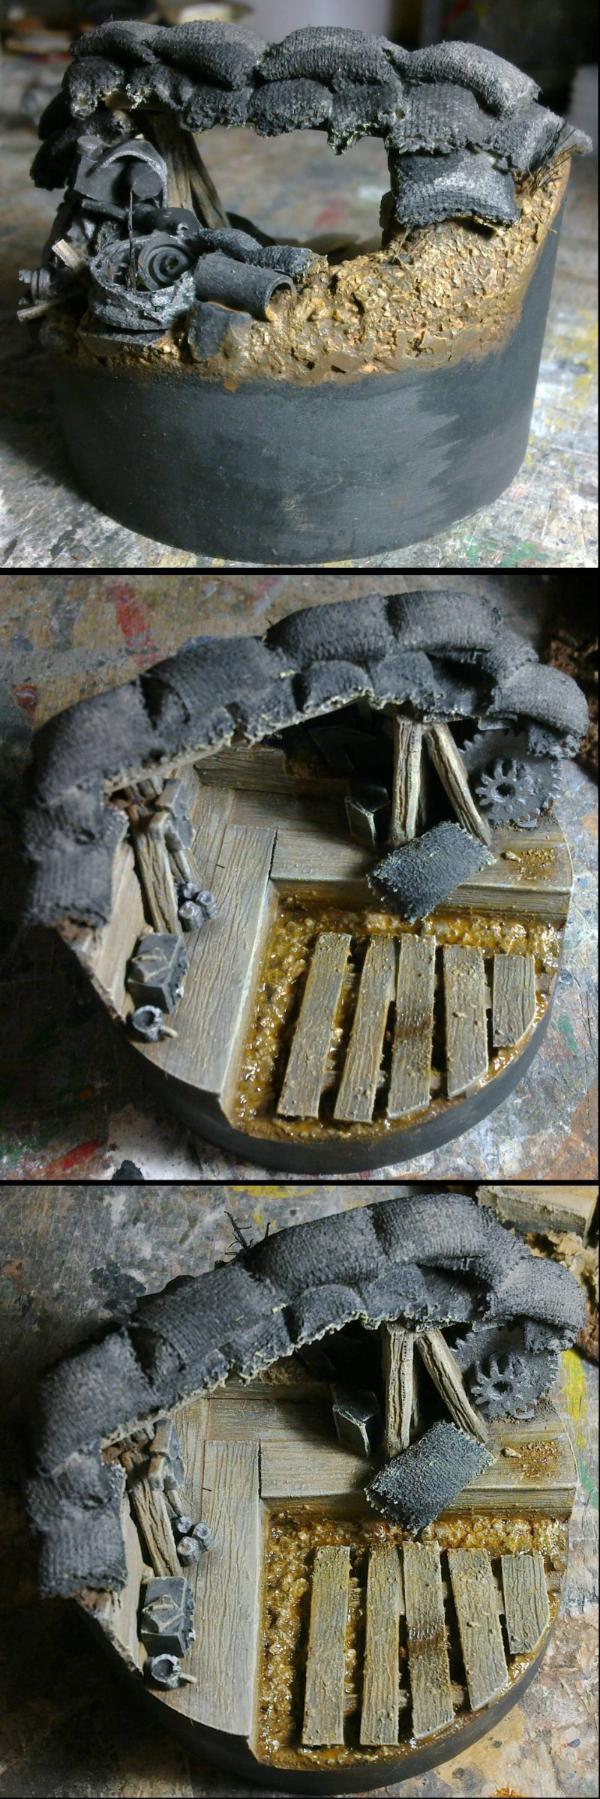
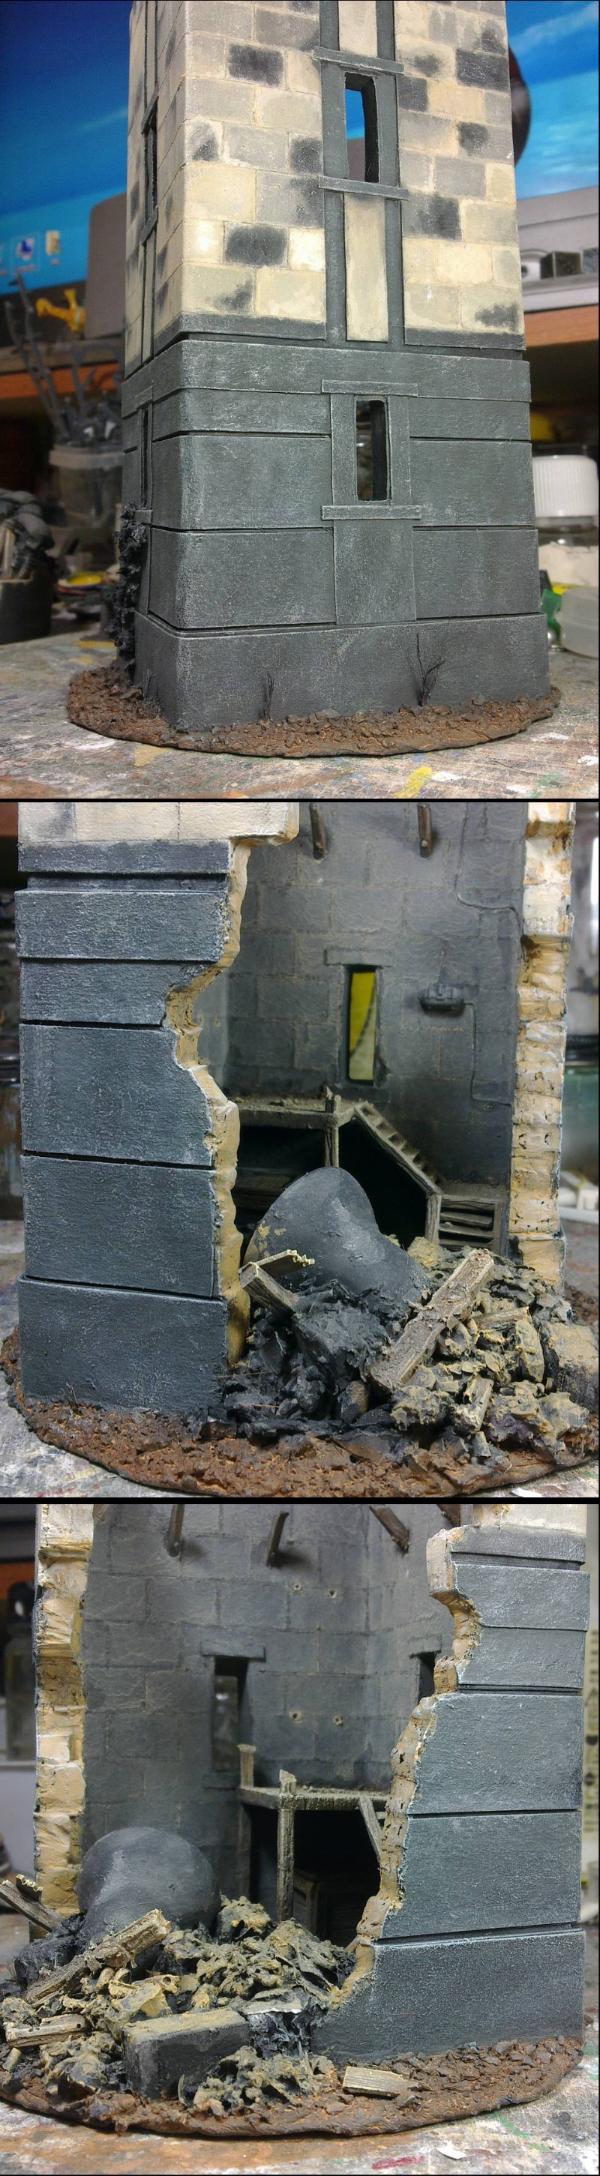
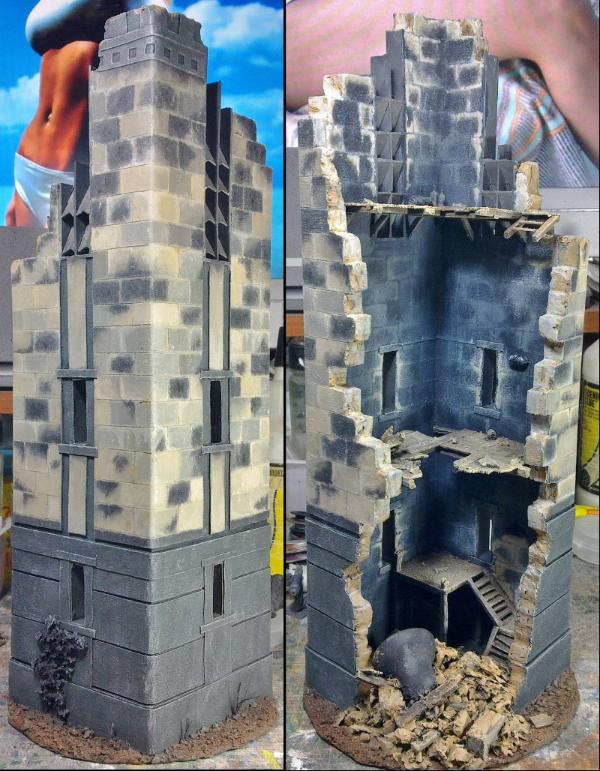
 .
.
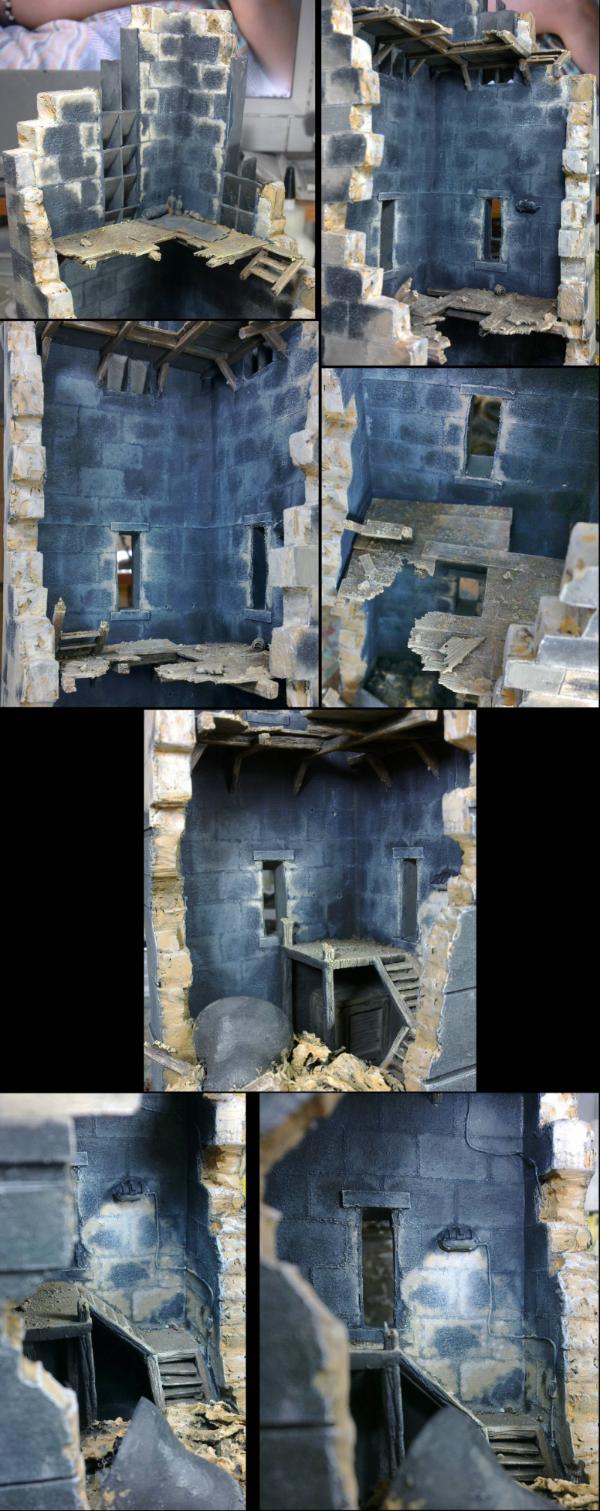
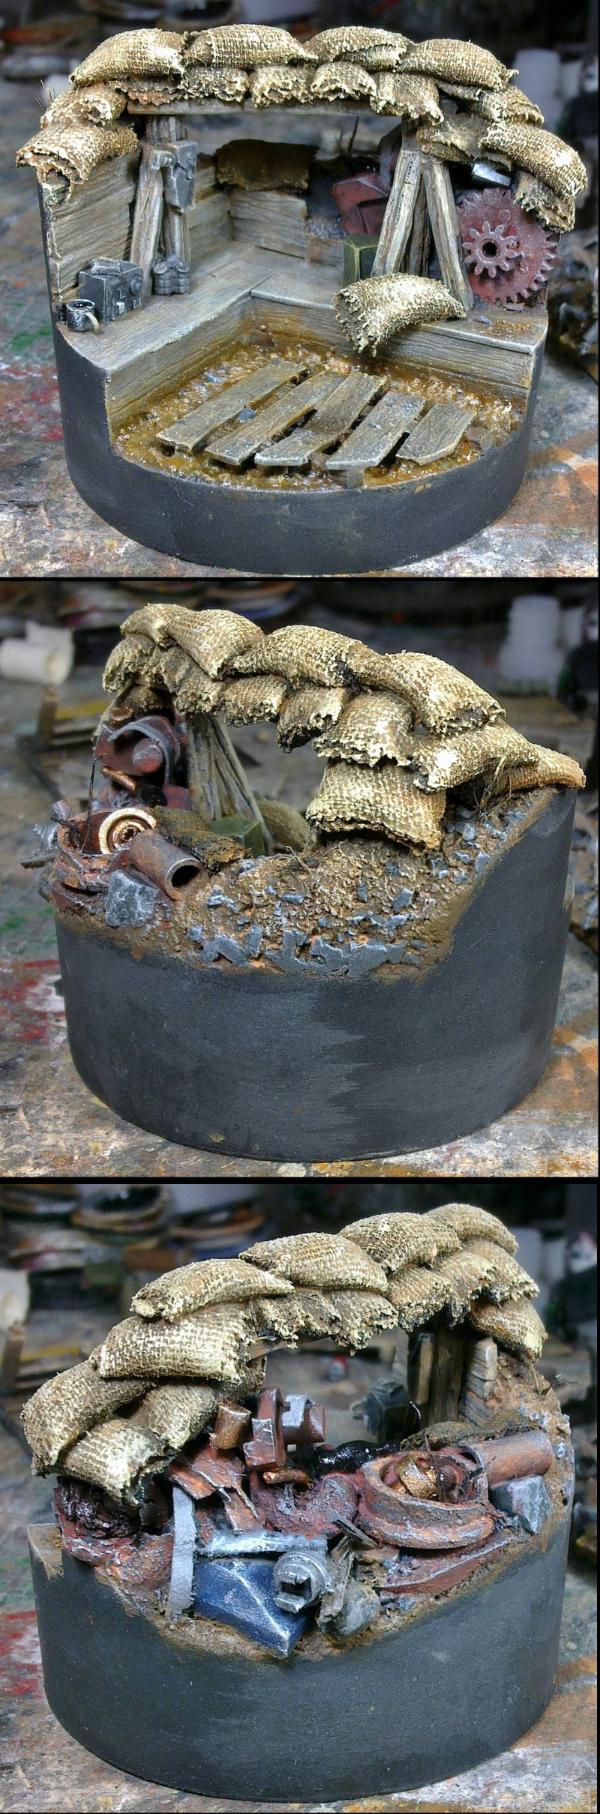
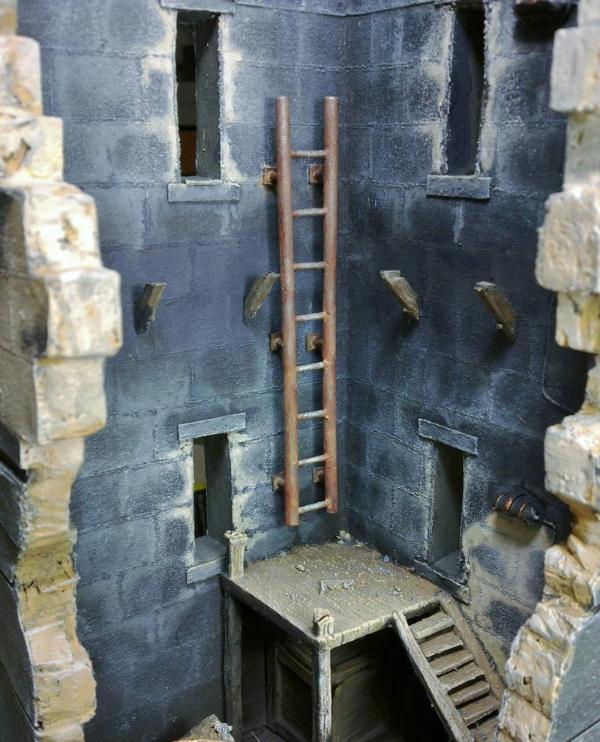
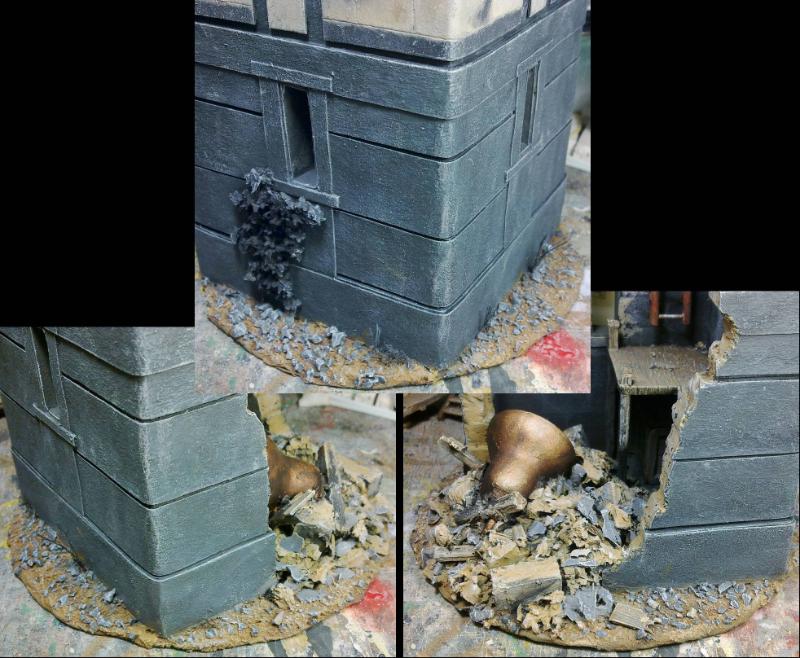
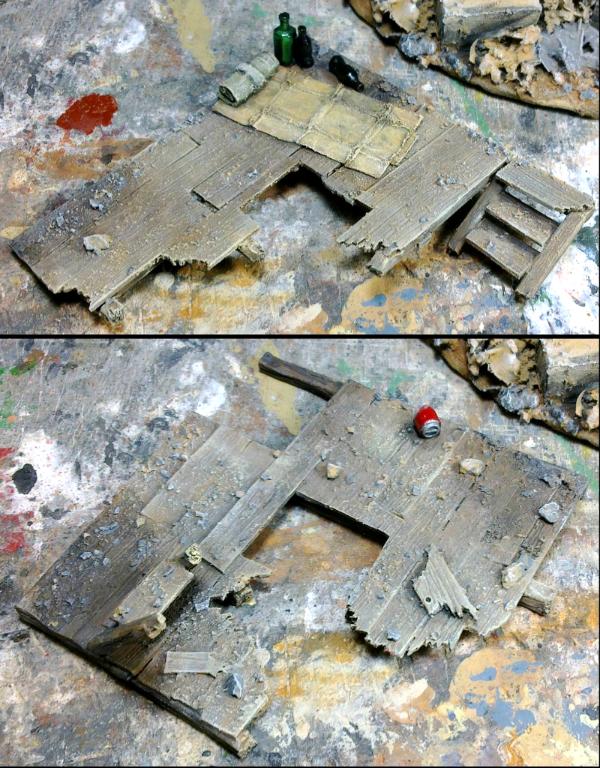
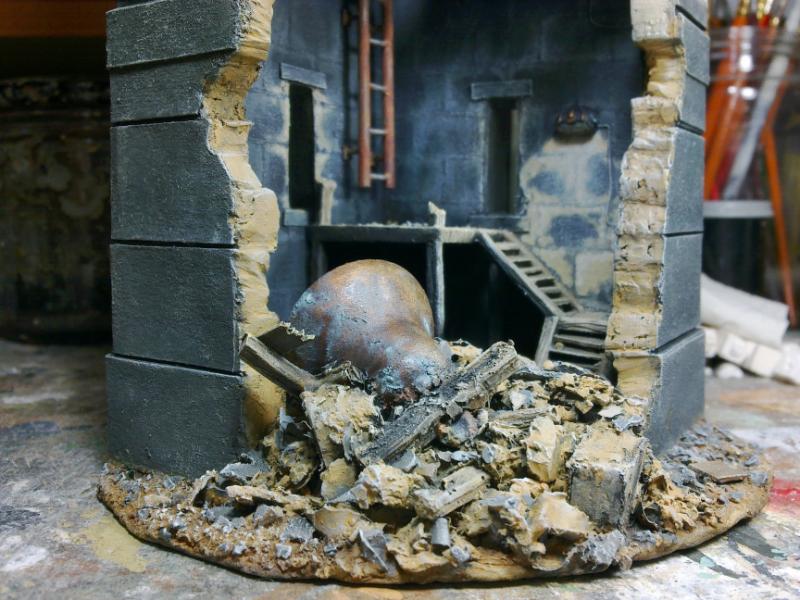

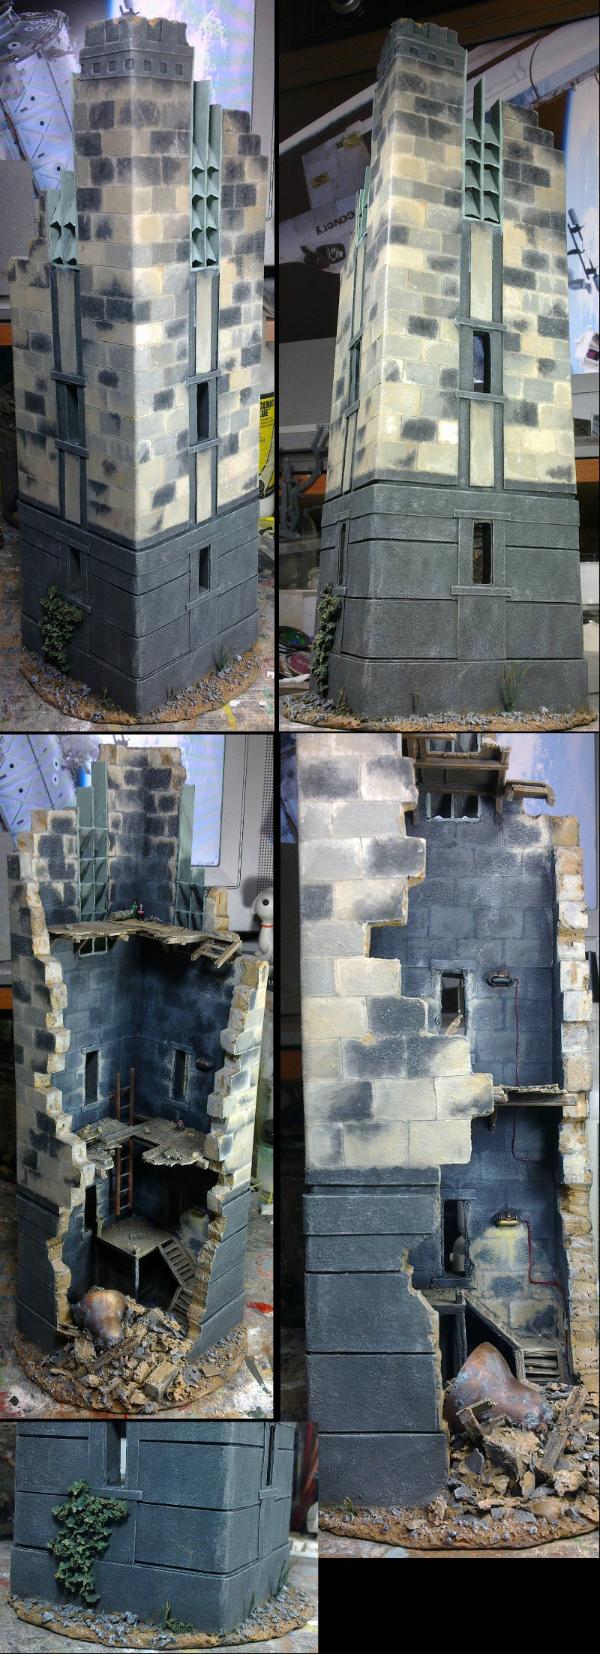
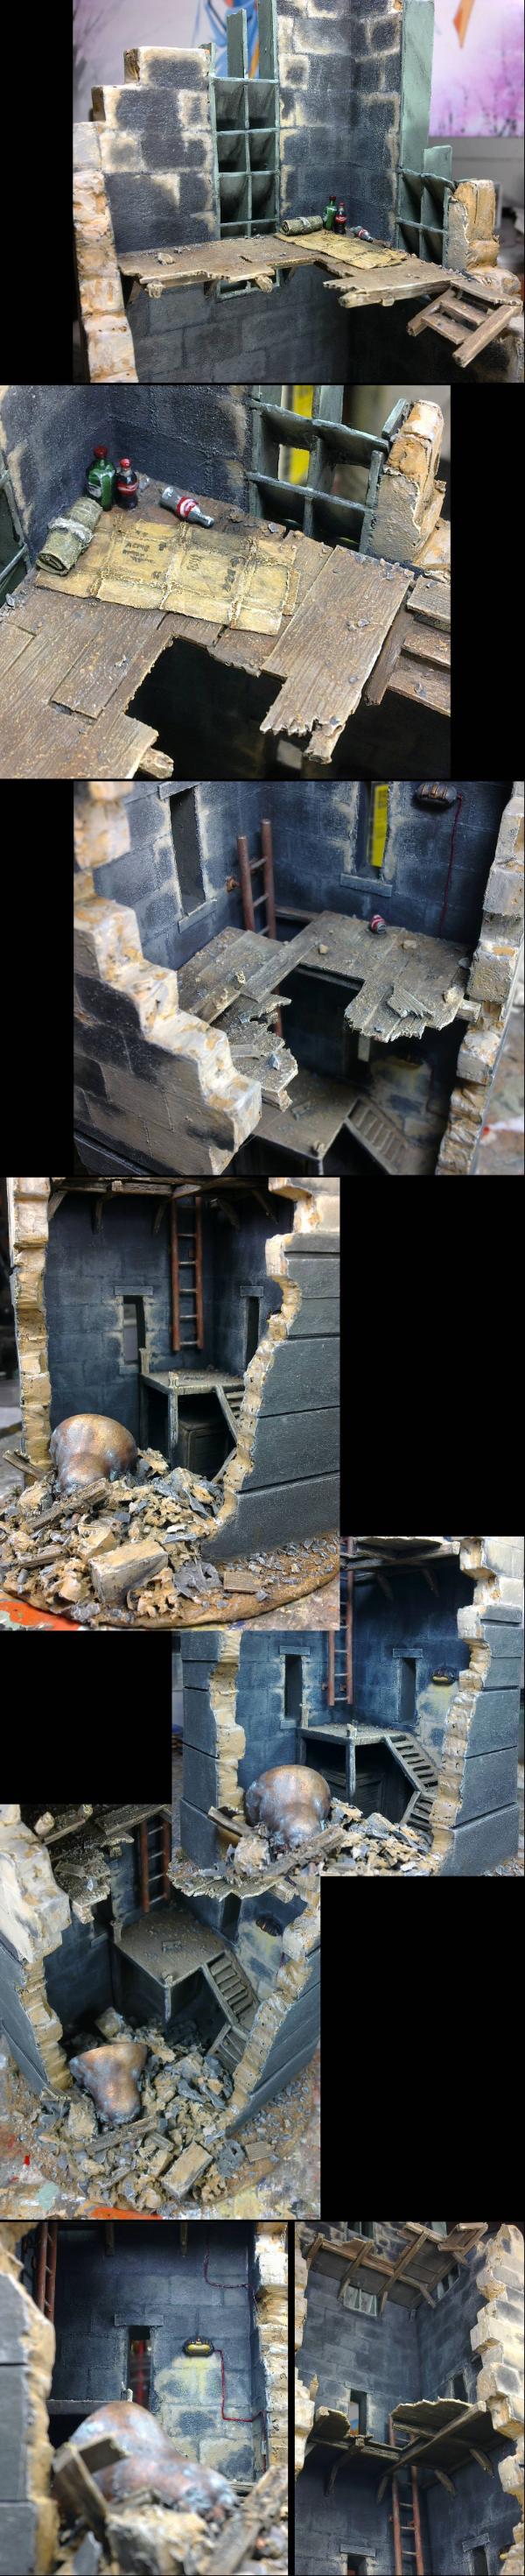
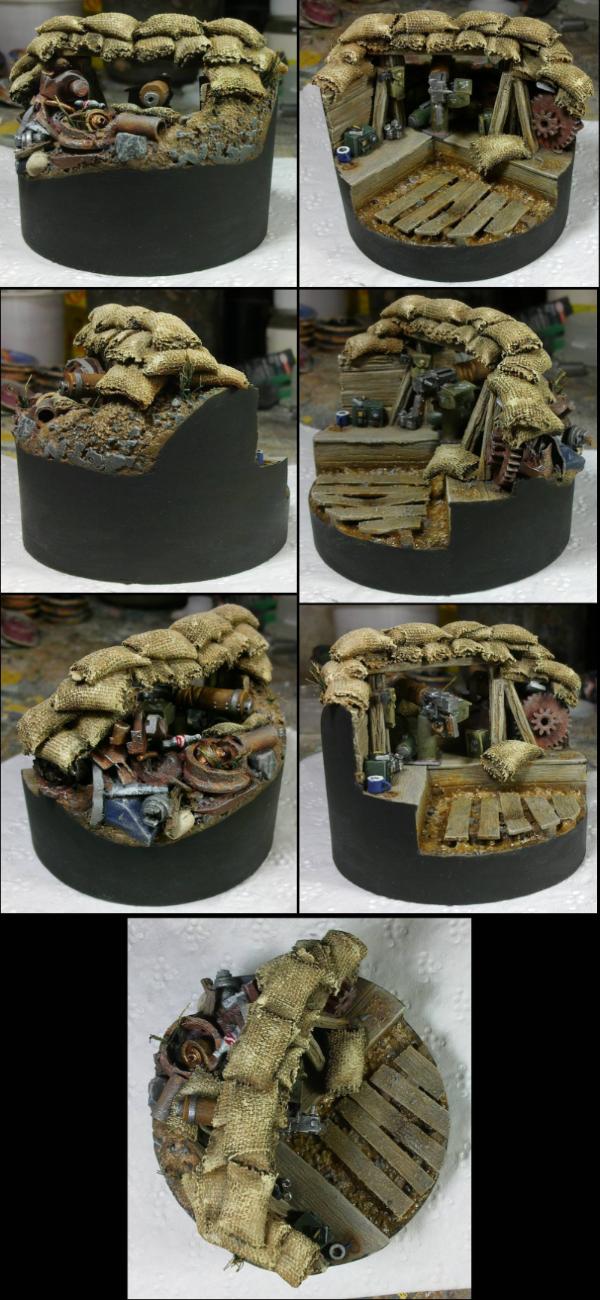
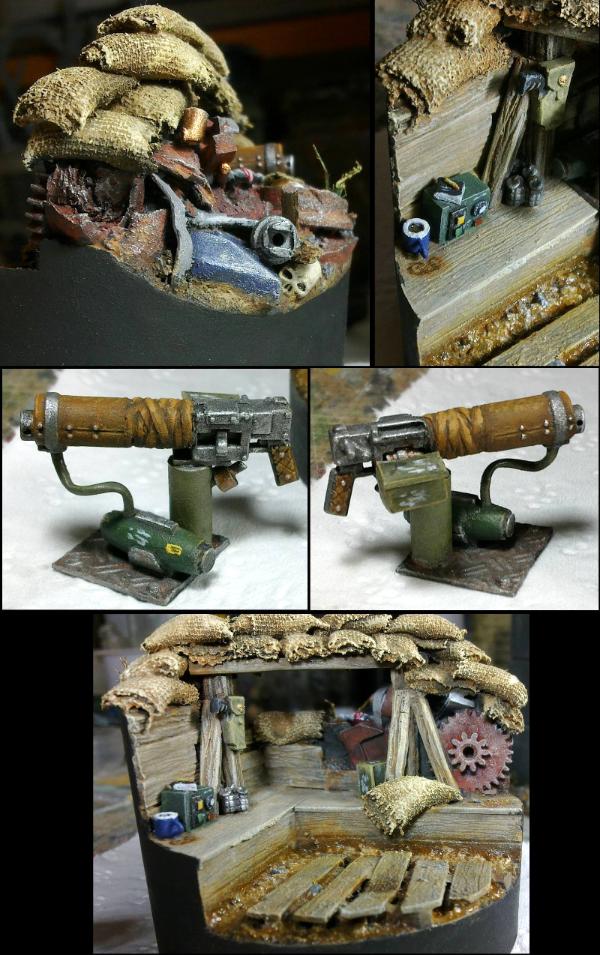


 awesome work!
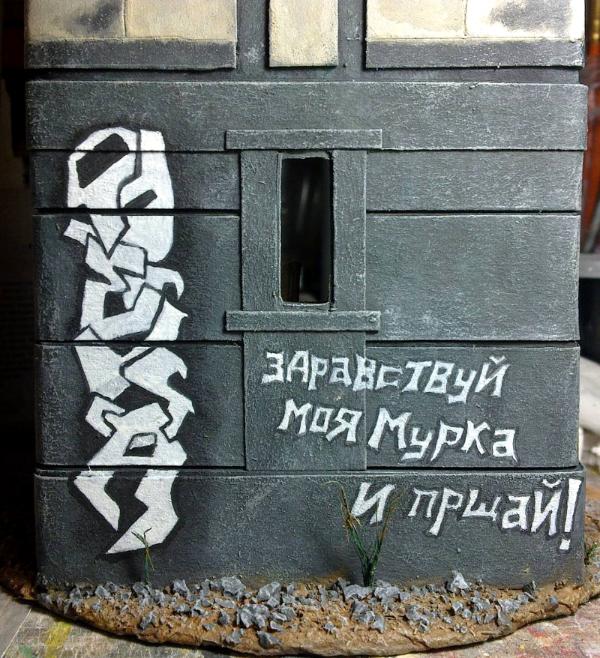
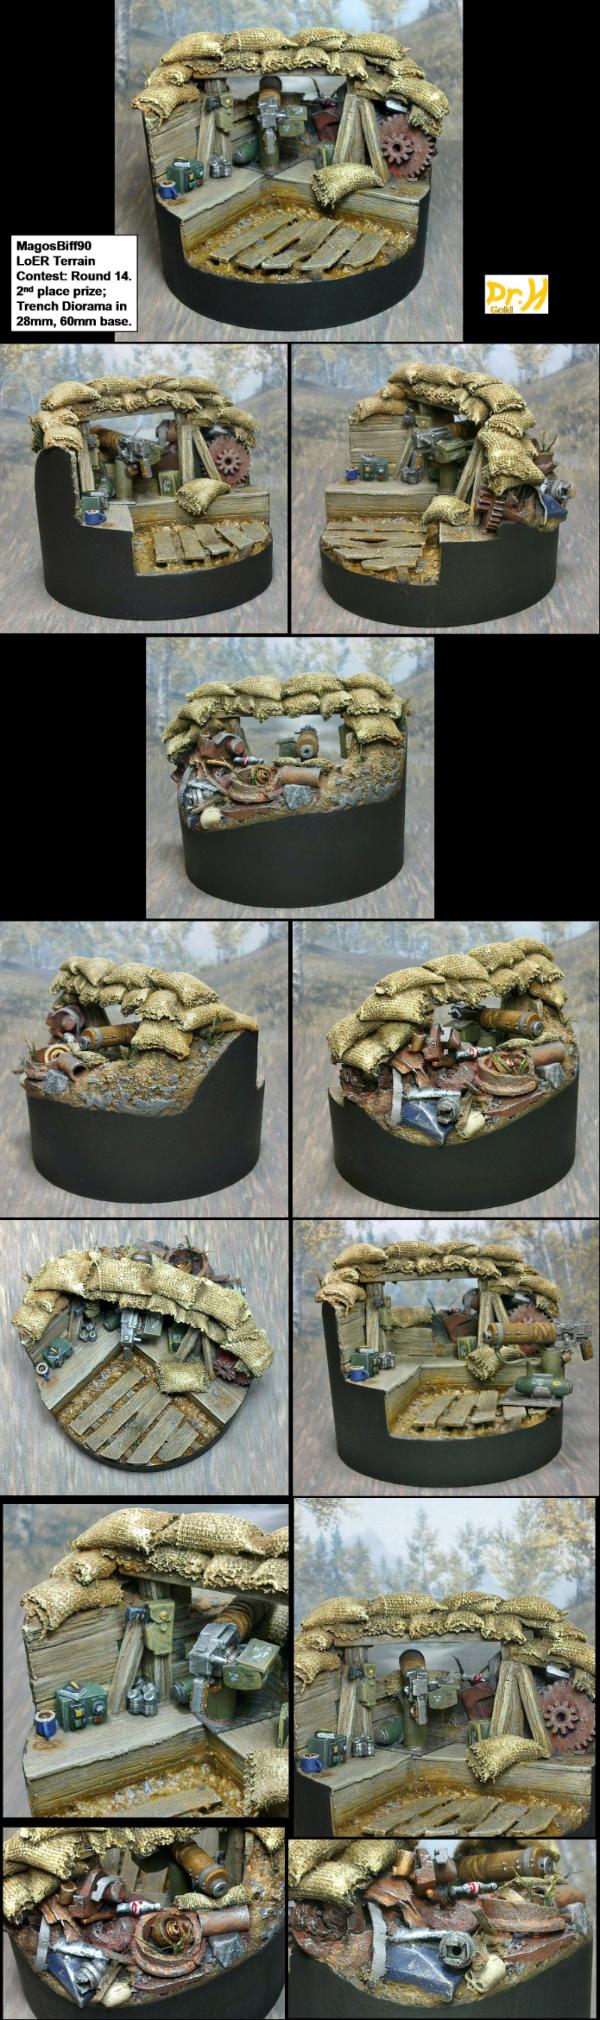
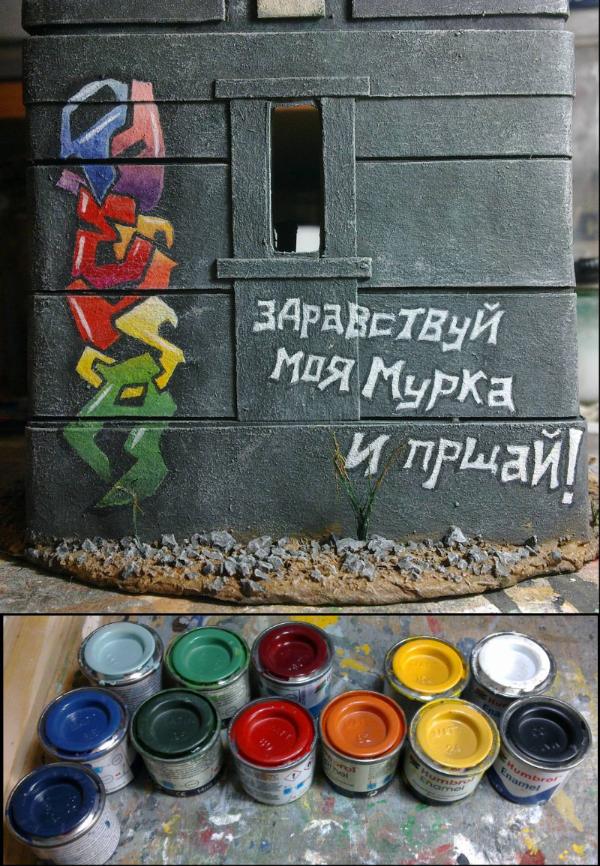
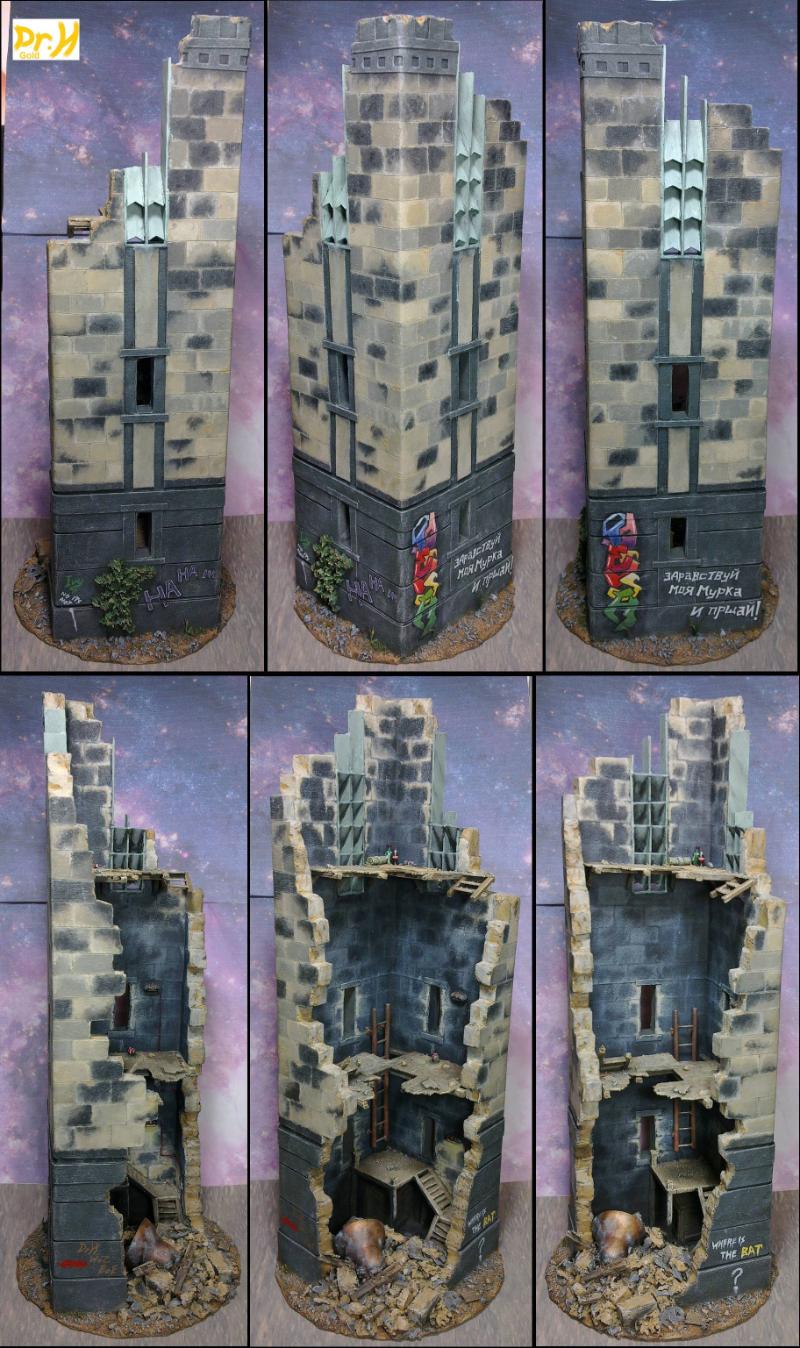

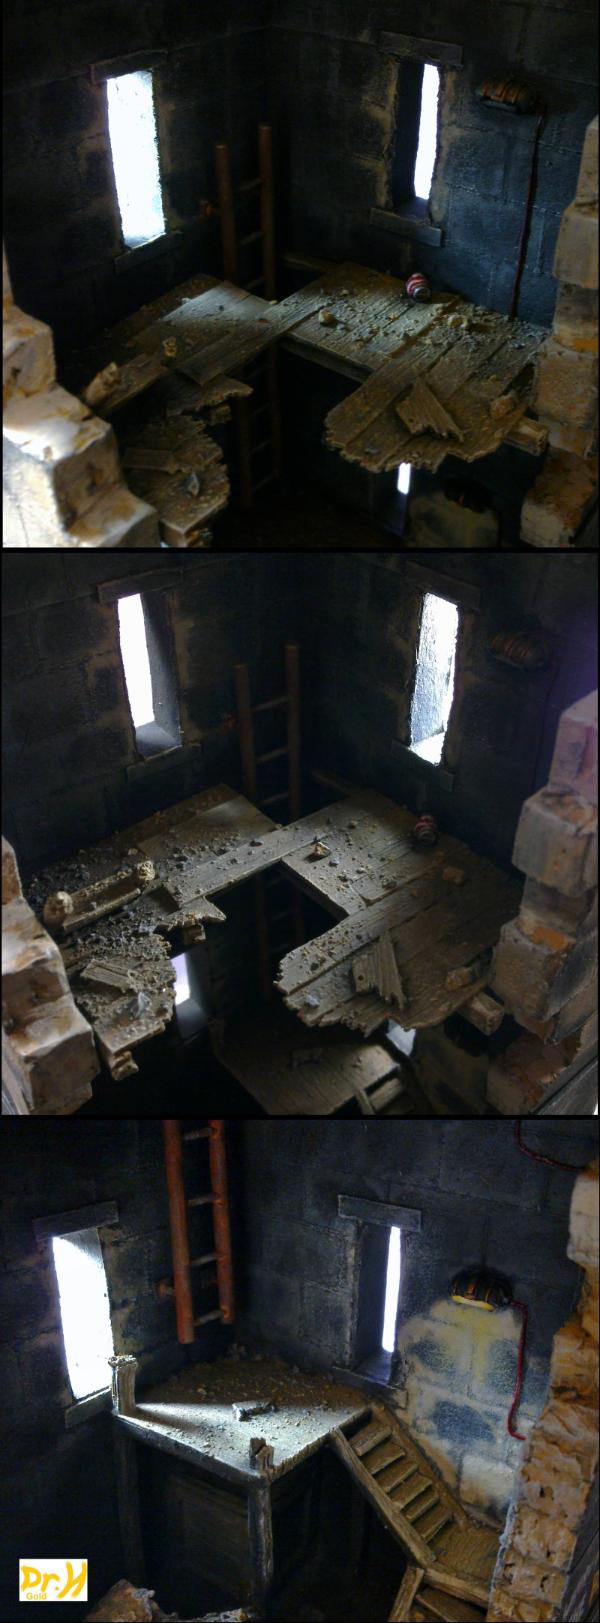


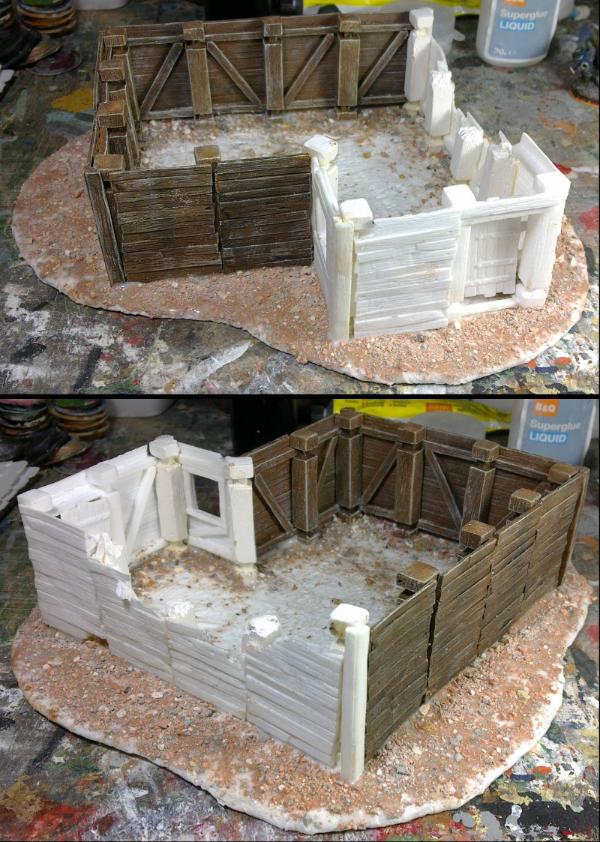
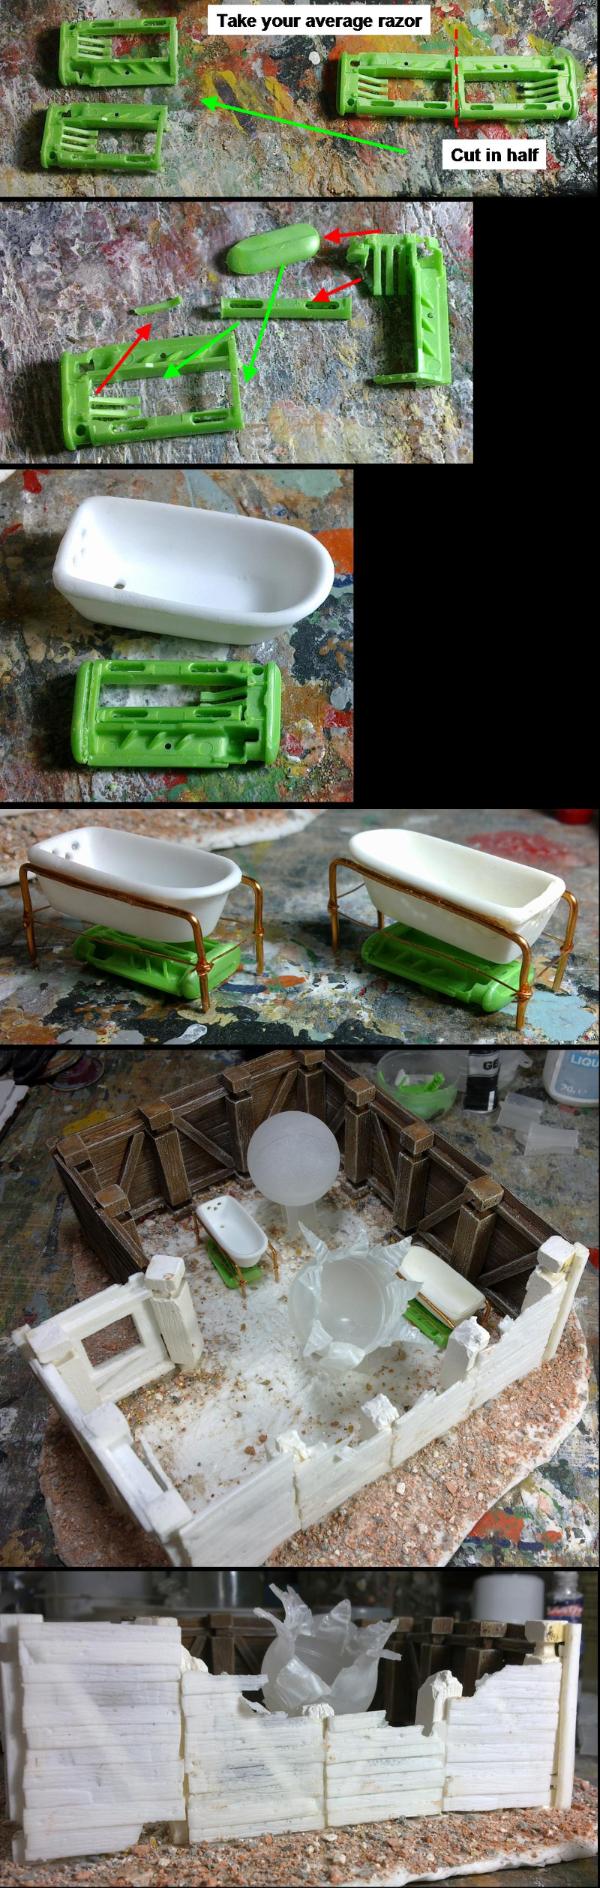
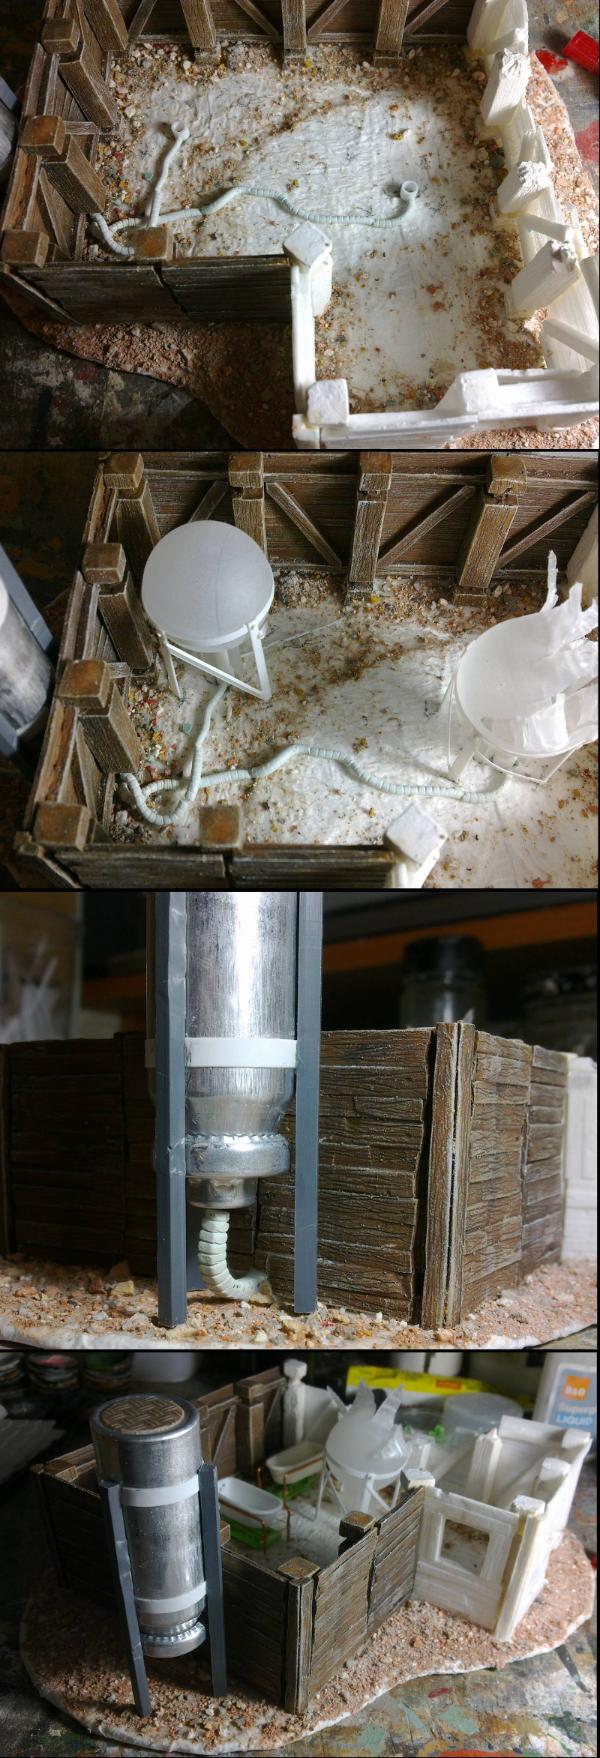
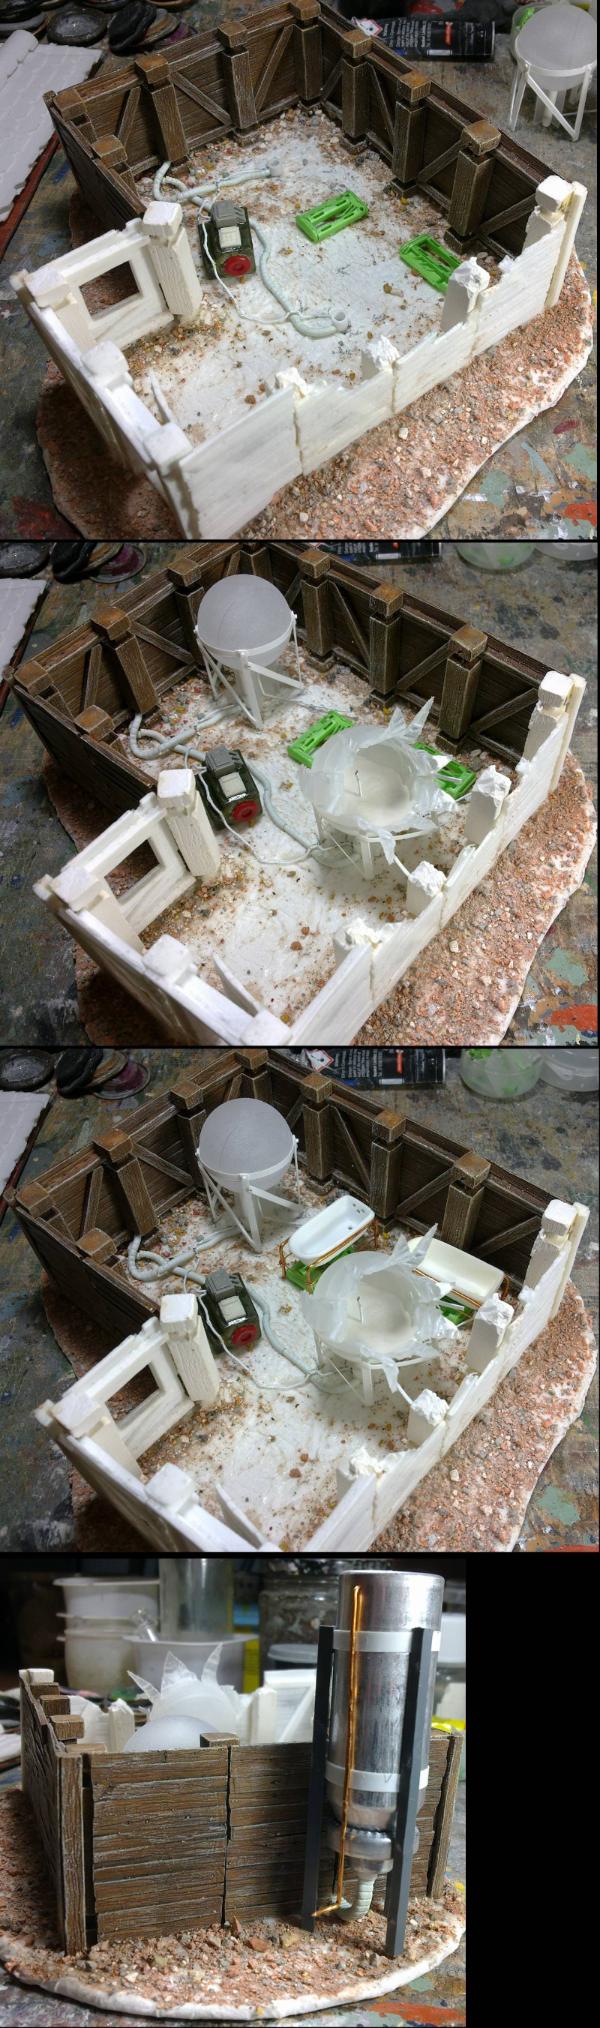

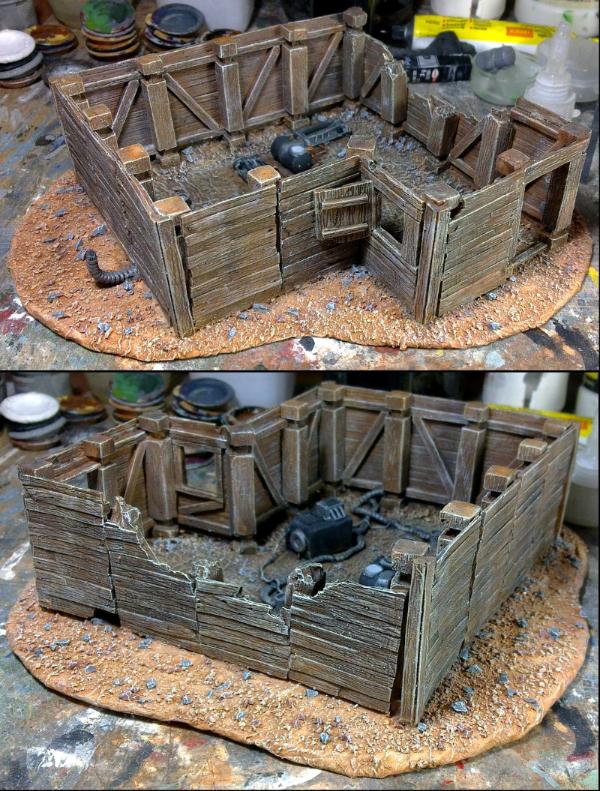
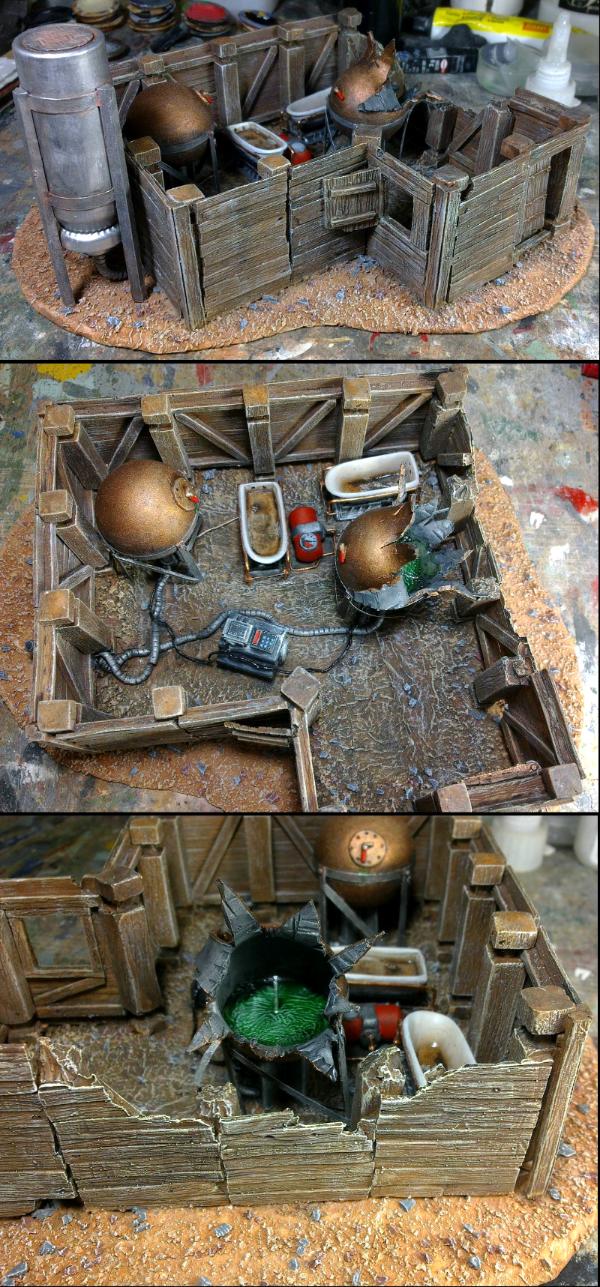


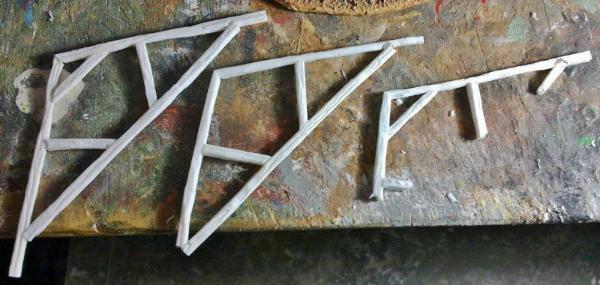
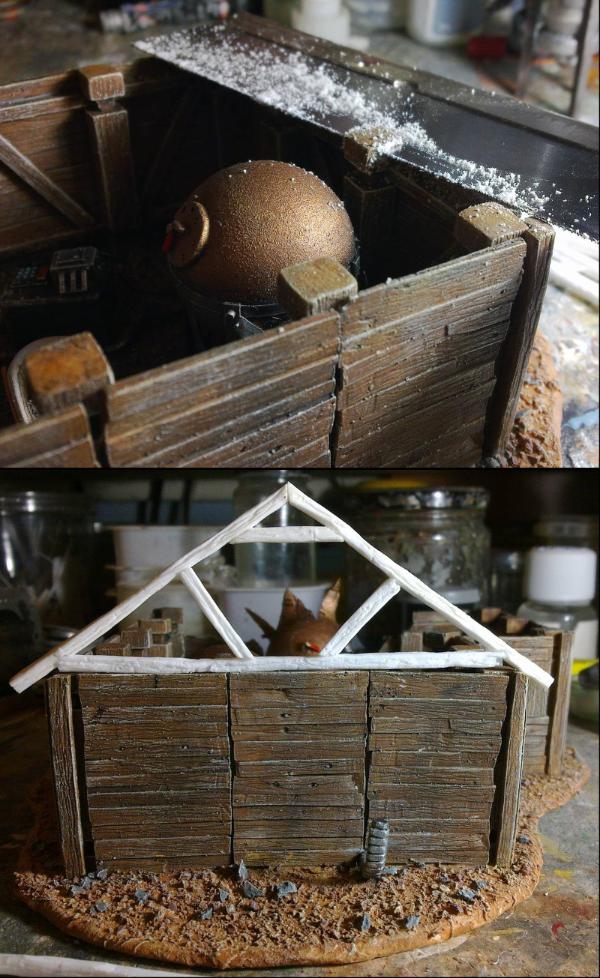
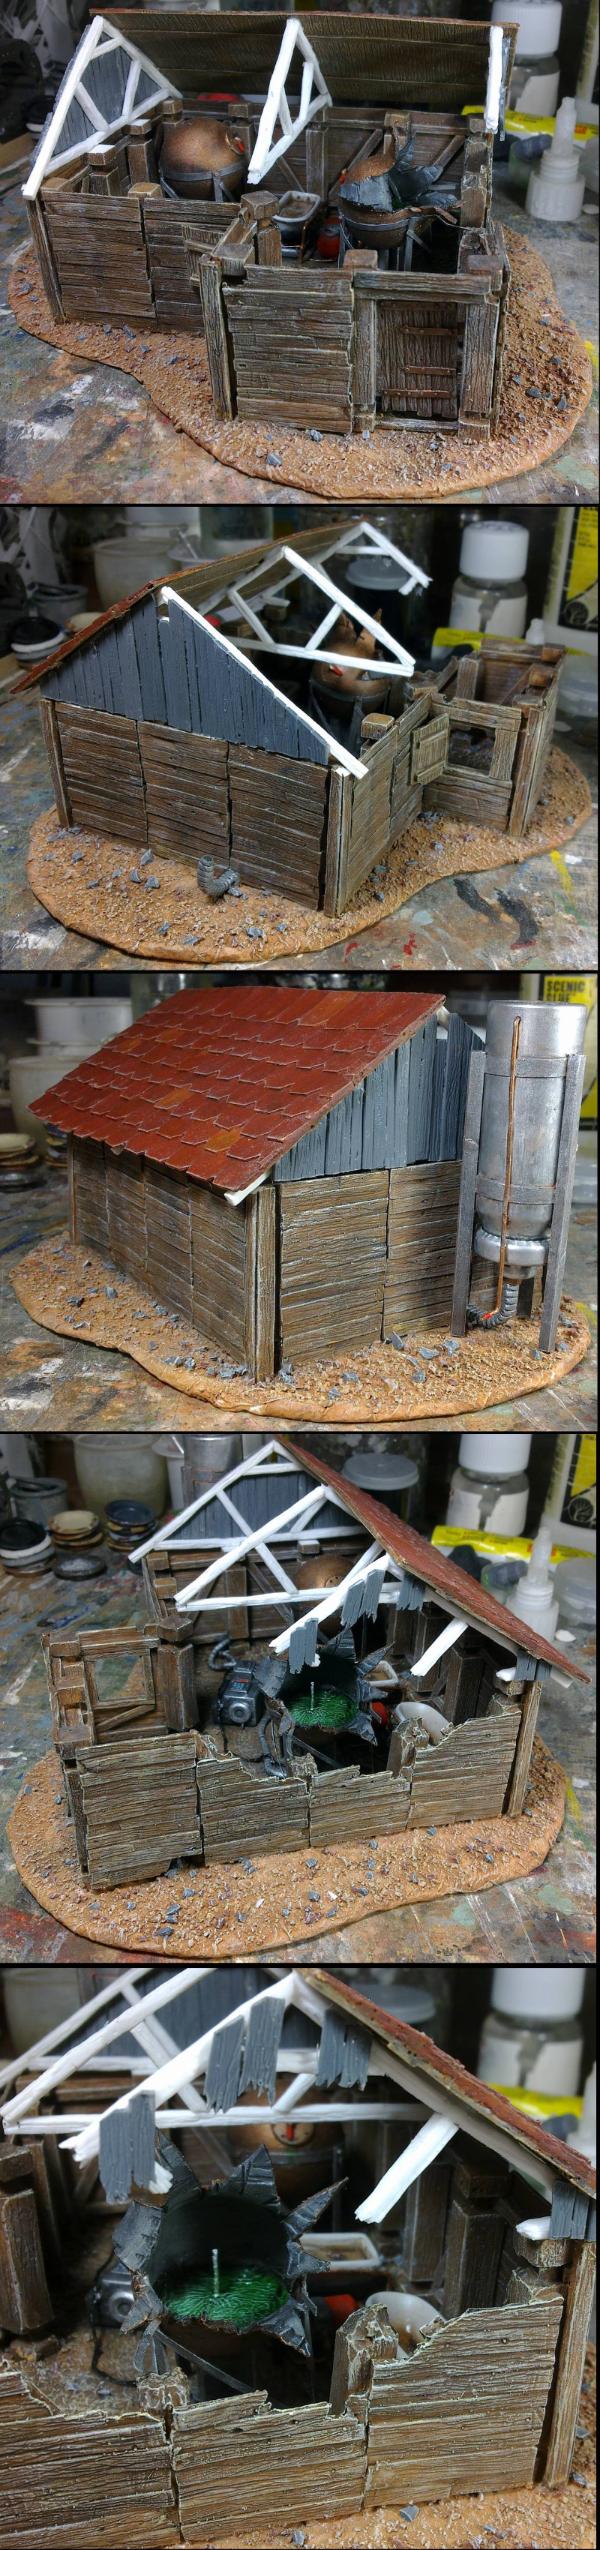
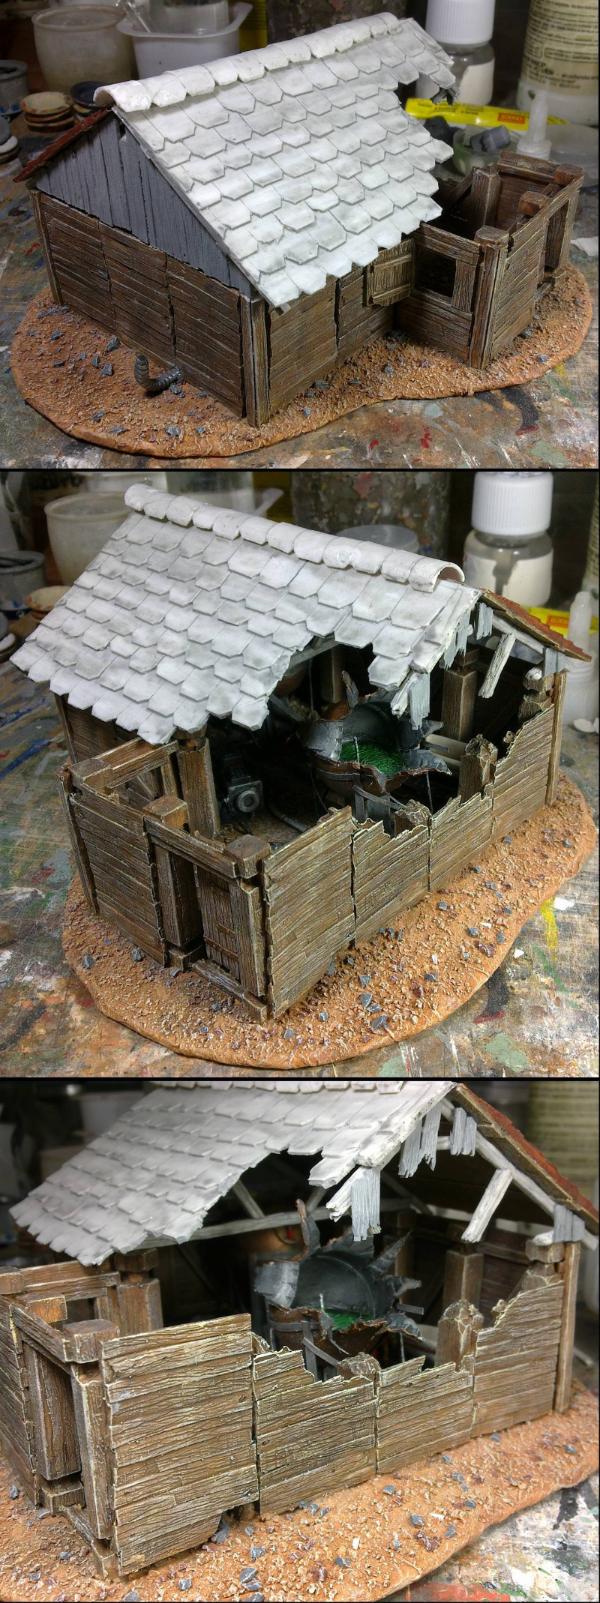
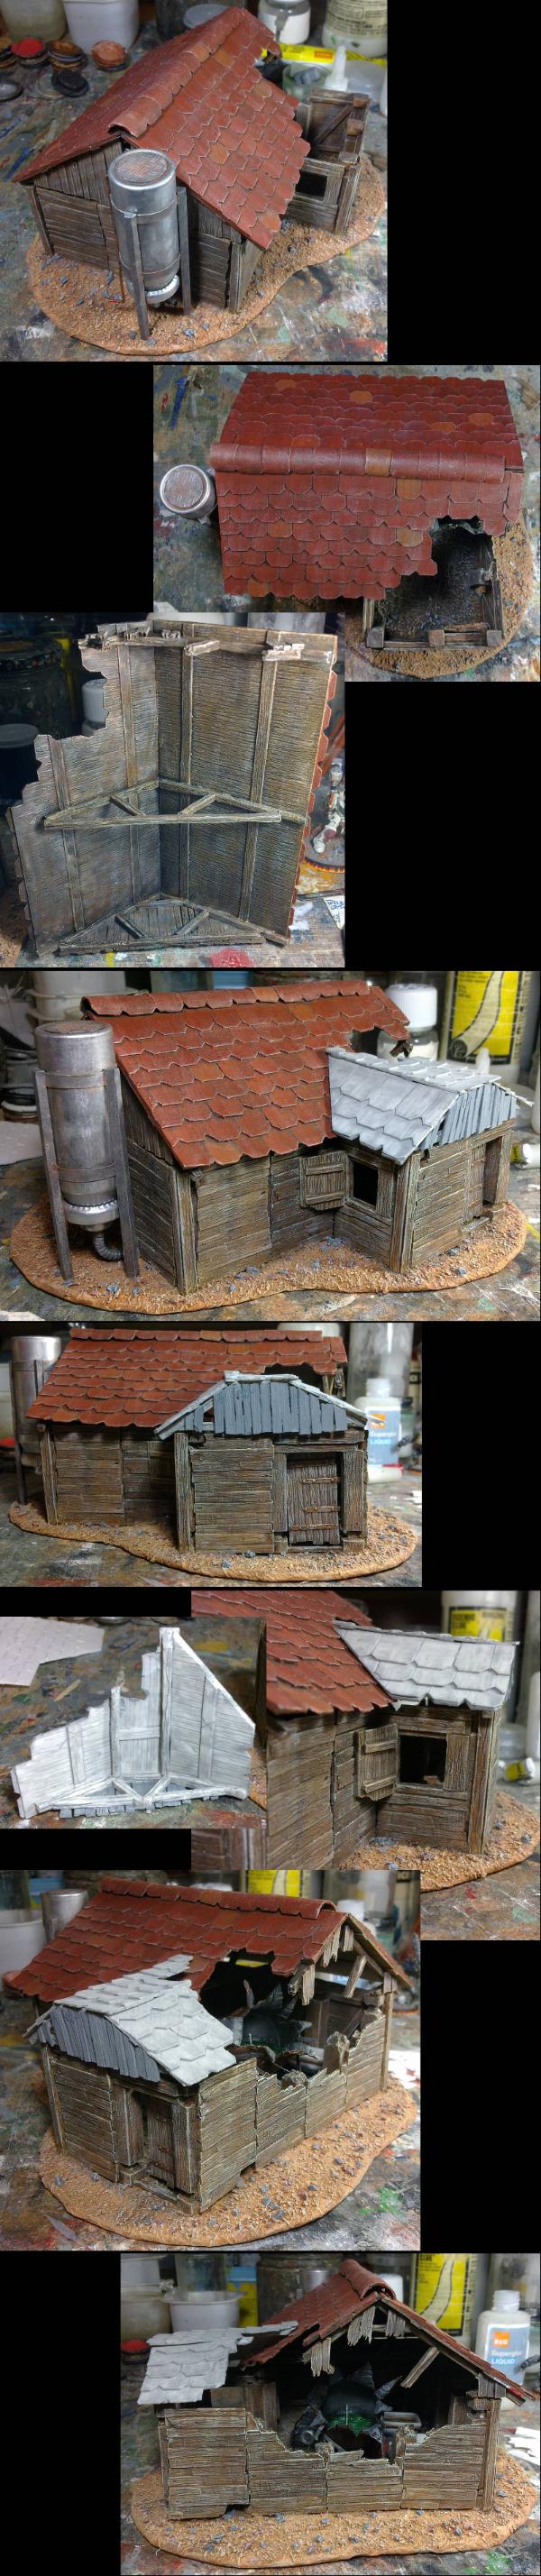
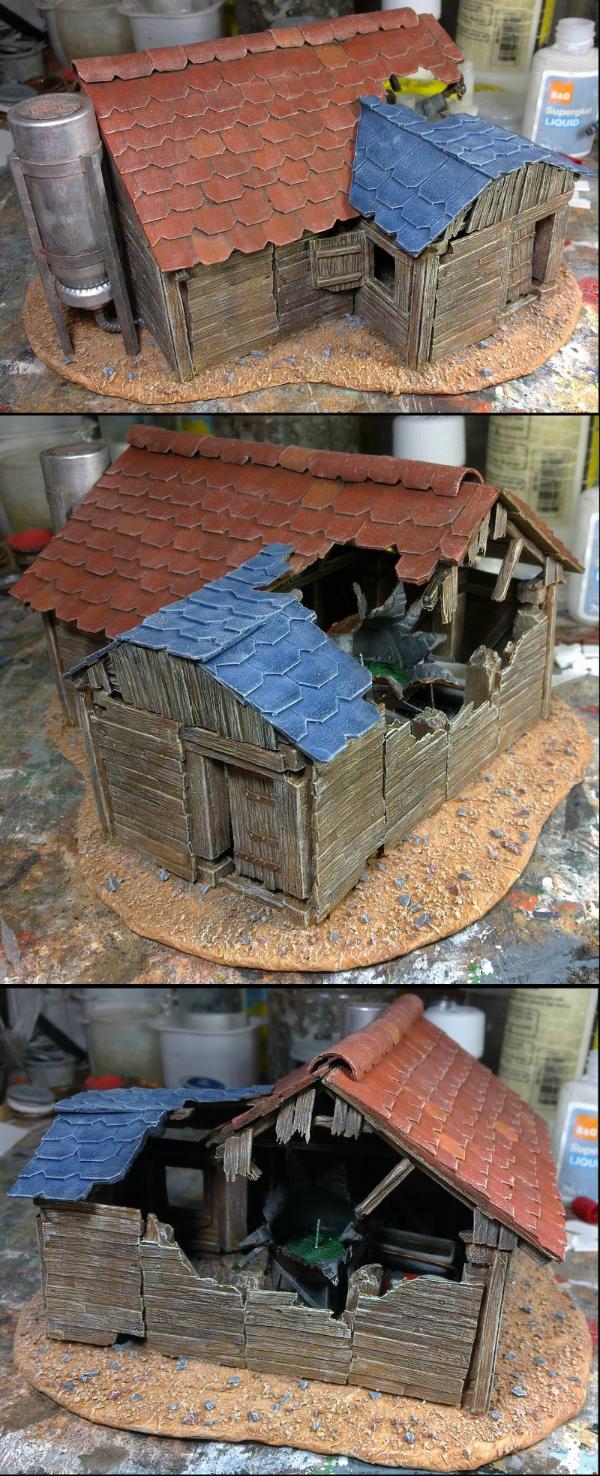
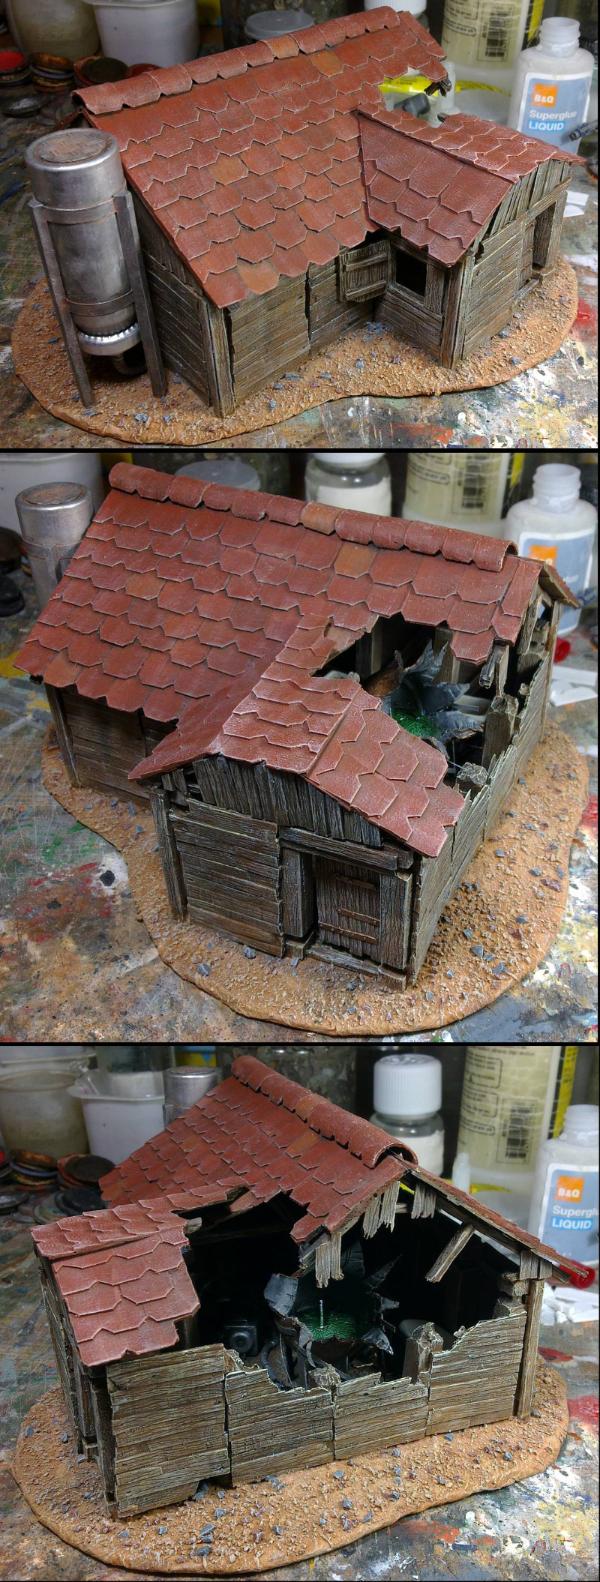
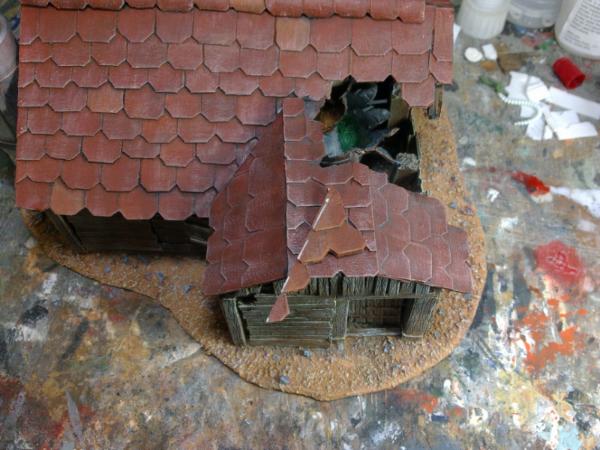
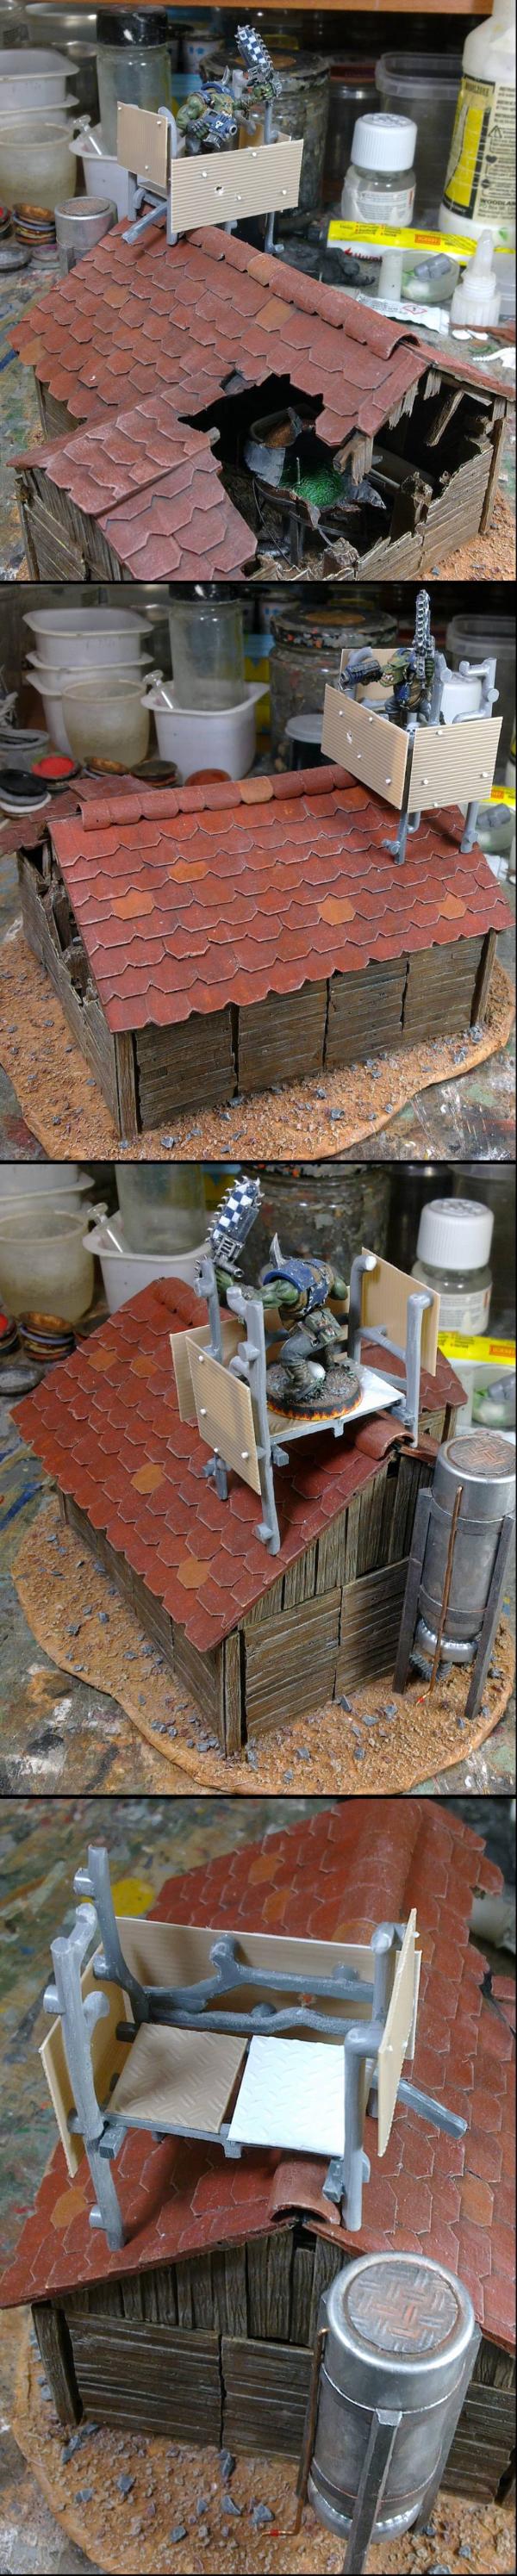
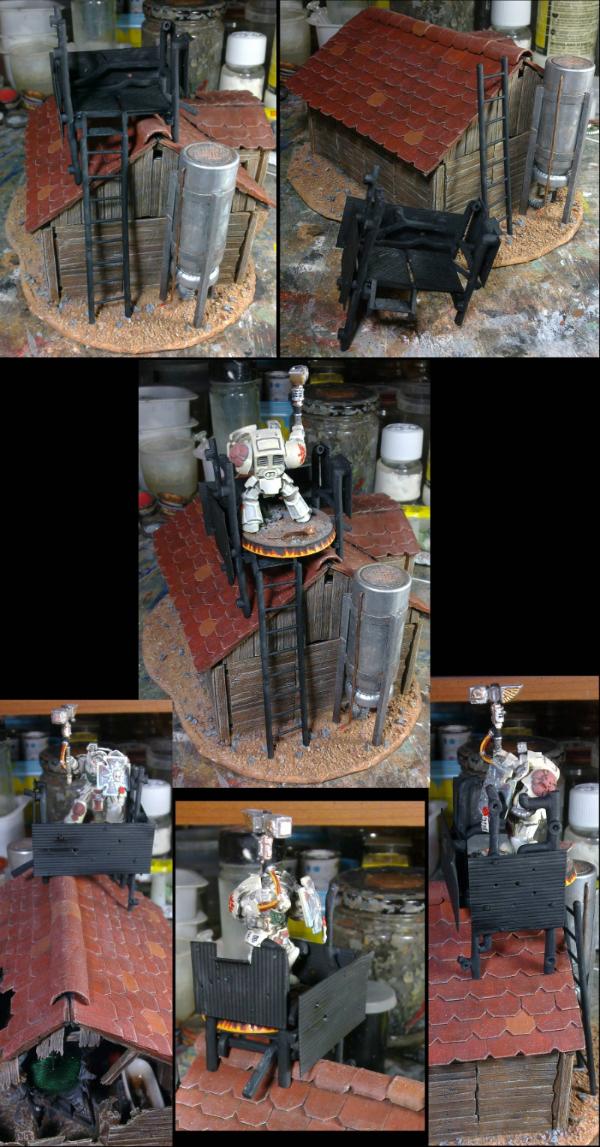
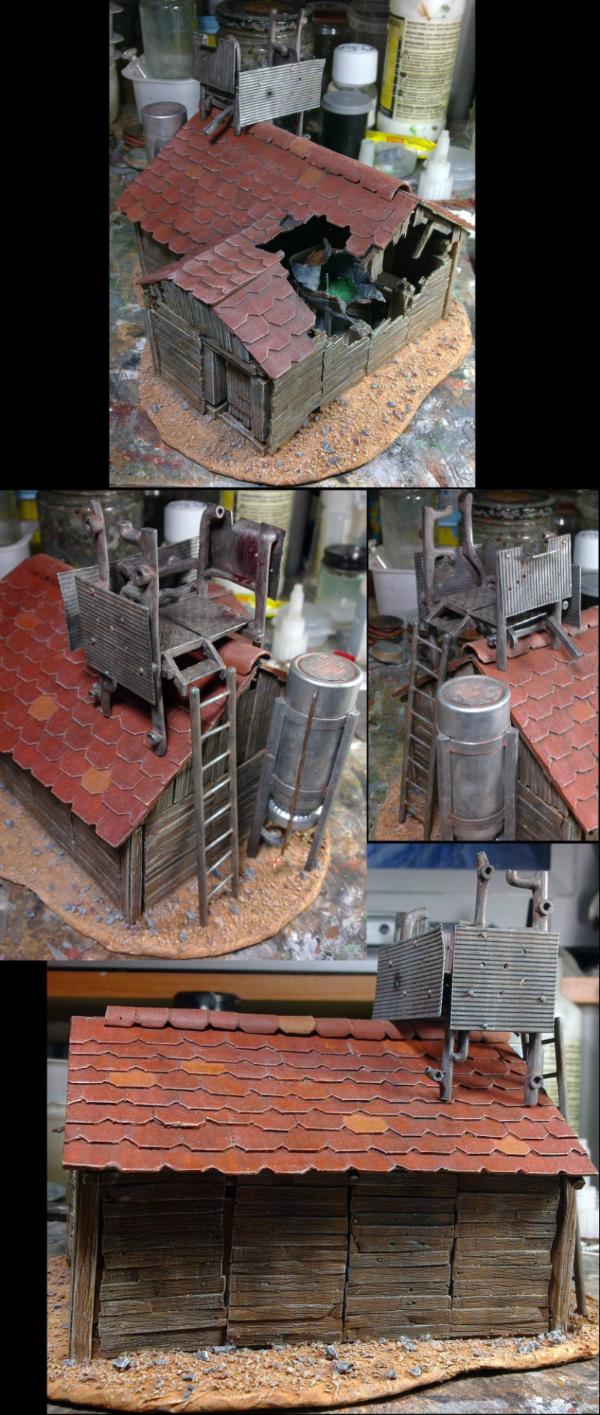

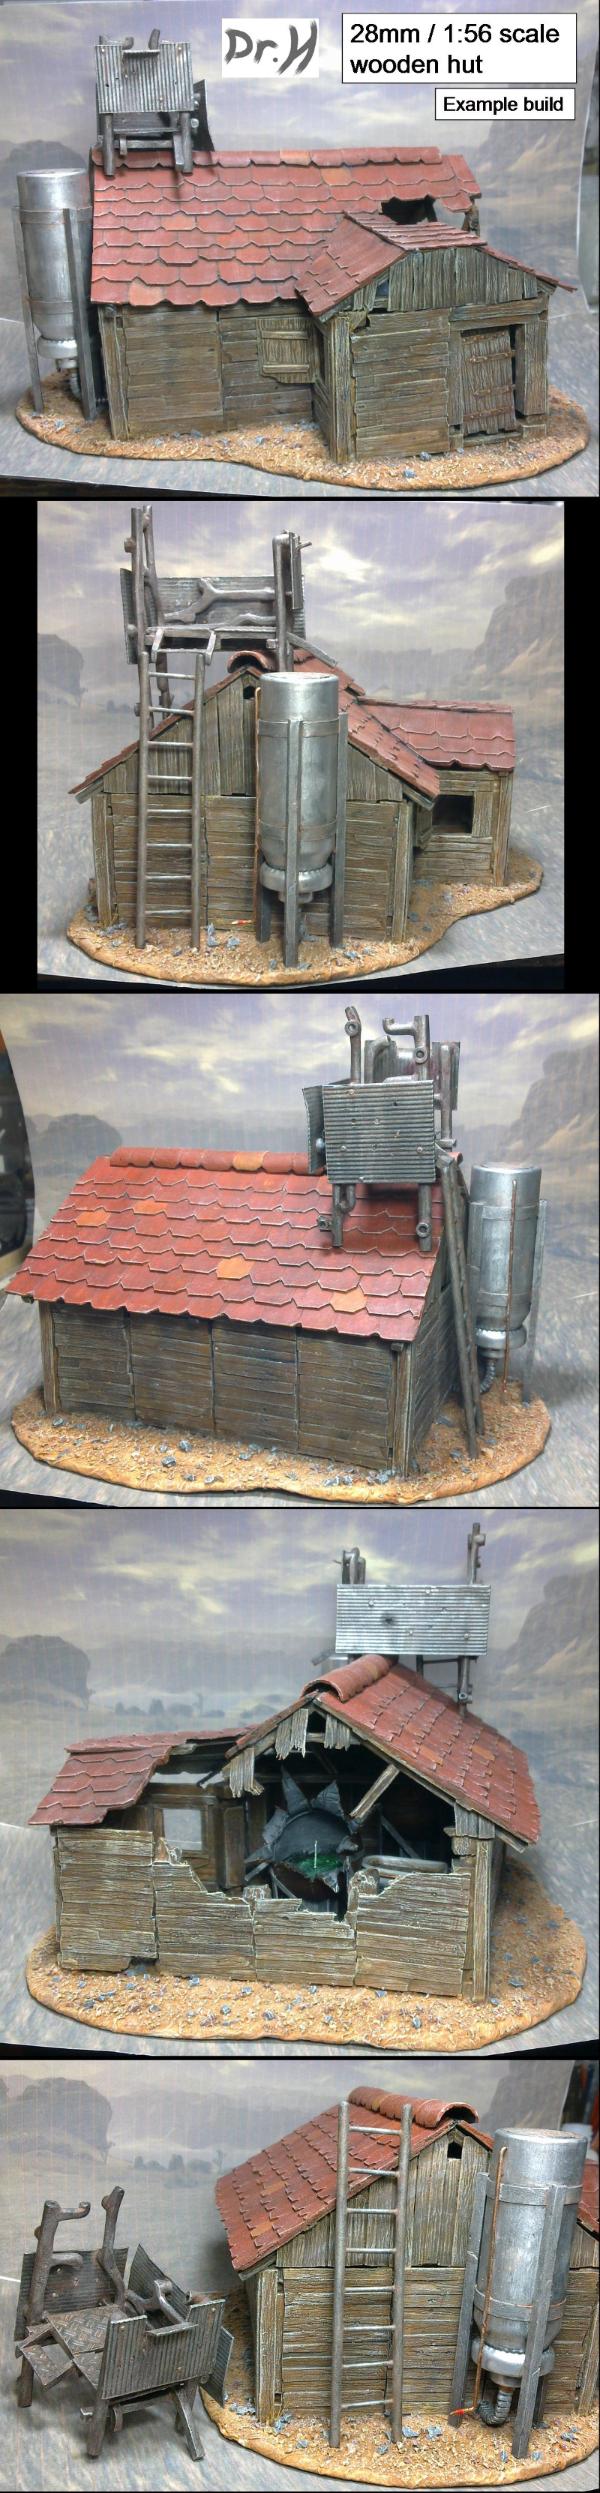
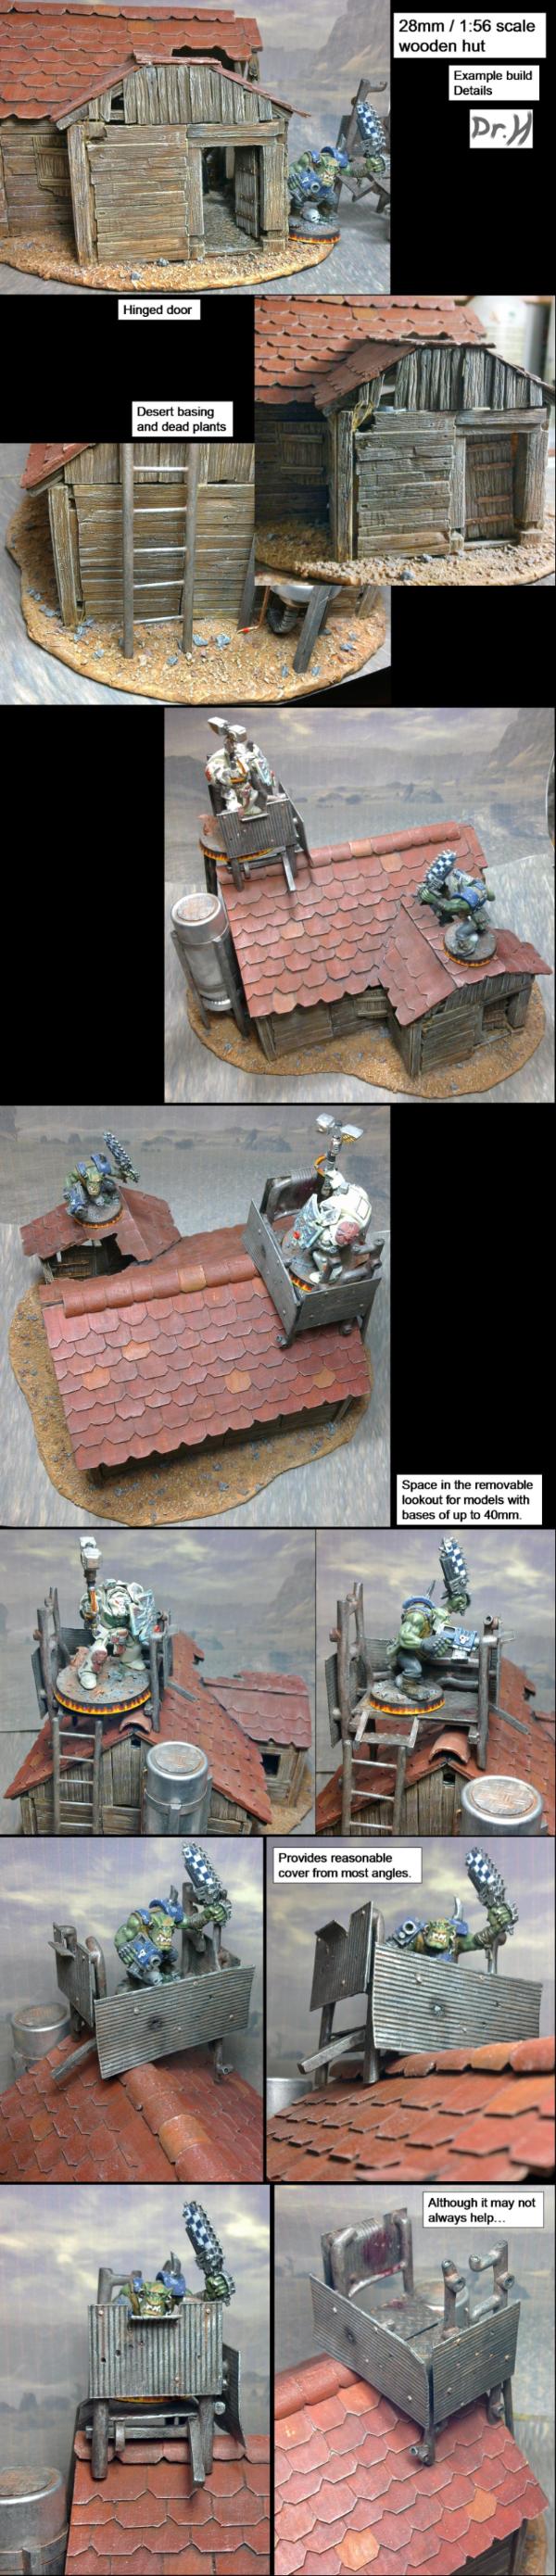


.jpg/300px-Windmills_D1-D4_(Thornton_Bank).jpg)