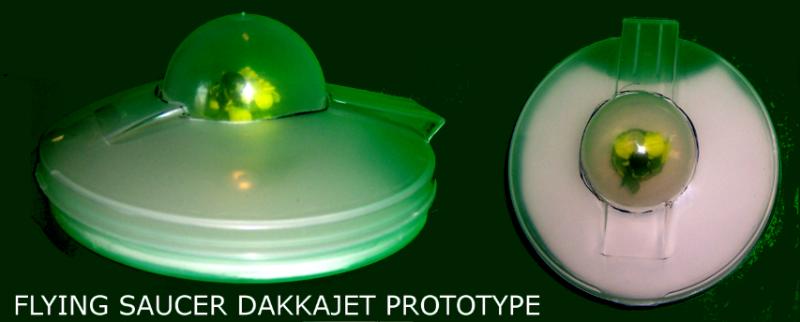
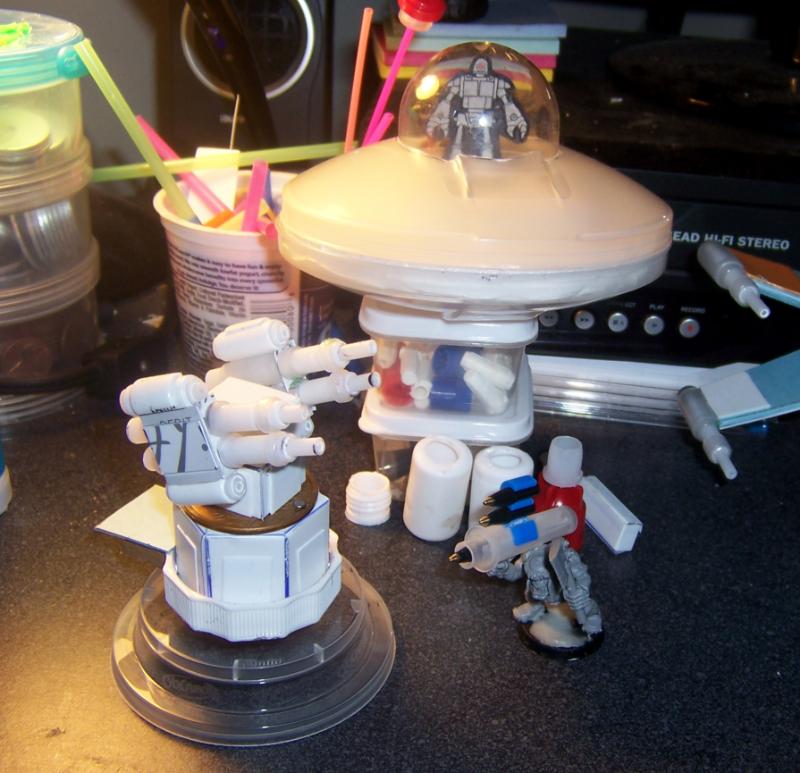
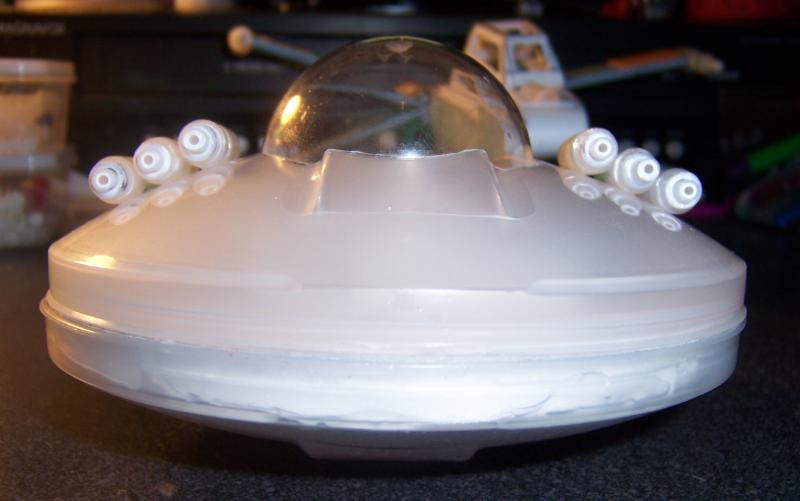
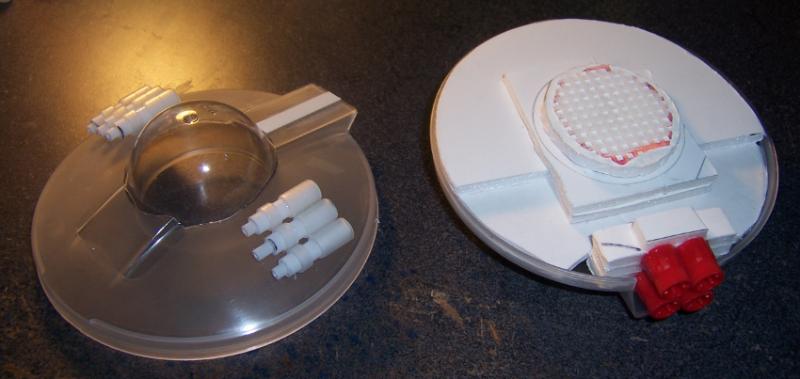
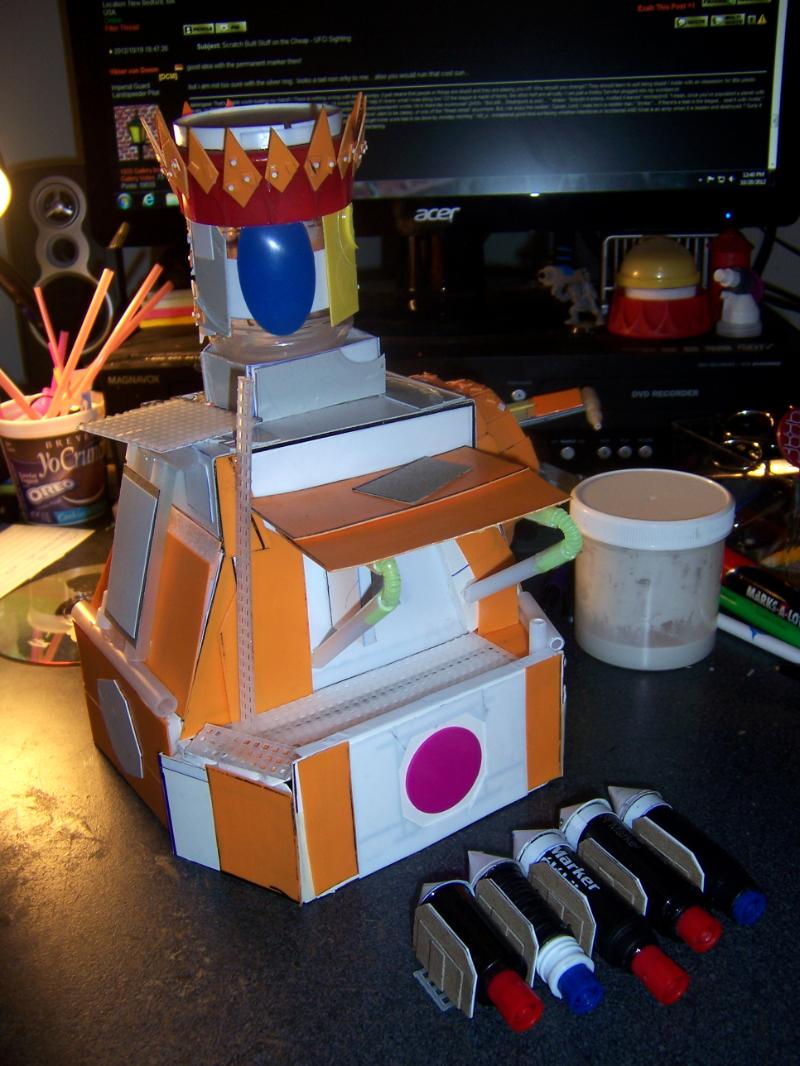
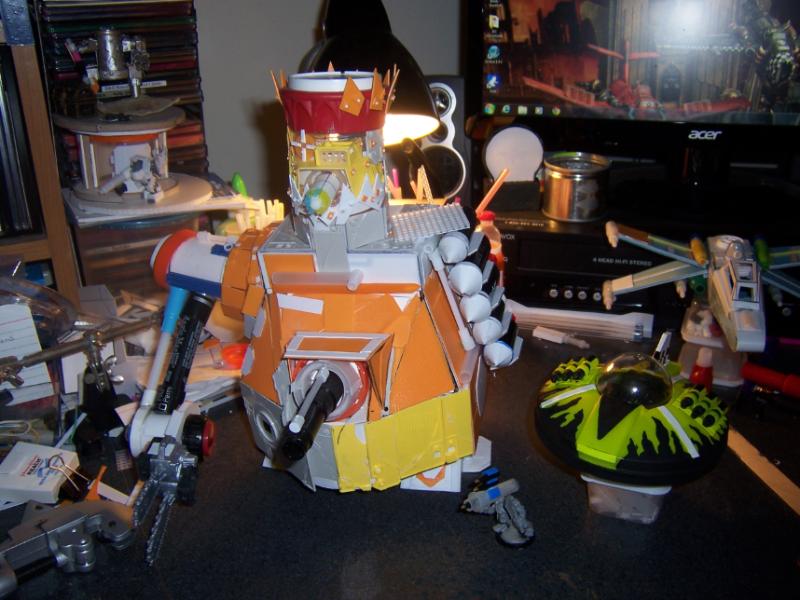
For the saucer, I decided I needed to cut into the top canopy to fit in the pilot. The decision was between UFO bubble top or Necron Scythe open top. I decided since the whole flying saucer concept is tongue in cheek to begin with, that I might as well go all the way and use a transparent bubble top.
that would certainly be a new way to get things done... one of these days i need to make a transparent canopy too... just to get it over with as i always fear my paintjob then would ruin the model... as you cant really redo transparent stuff after you messed it up...
adamsouza wrote: For the saucer, I decided I needed to cut into the top canopy to fit in the pilot. The decision was between UFO bubble top or Necron Scythe open top. I decided since the whole flying saucer concept is tongue in cheek to begin with, that I might as well go all the way and use a transparent bubble top.
I feel like I've seen this somewhere in germany...
Watched the first one and a half seasons of Breaking Bad and whipped up two random pieces of terrain while doing so. I built and took photos of an Ork Guard Tower and a radar dish, but haven't uploaded them because every time I sat at the PC I just ended up watching more Breaking Bad. I hope to have some pics of the new stuff up inthe next 24 hours.
I don't find Breaking Bad particularly violent. In the first season only two deaths, in the second season only one so far. What makes it shocking is that the main characters are good guys pushed to the breaking limit, and they start making all the wrong choices for all the right reasons. To use a Star Wars analogy, it's like watching a Jedi slowly succumb to the Dark Side.
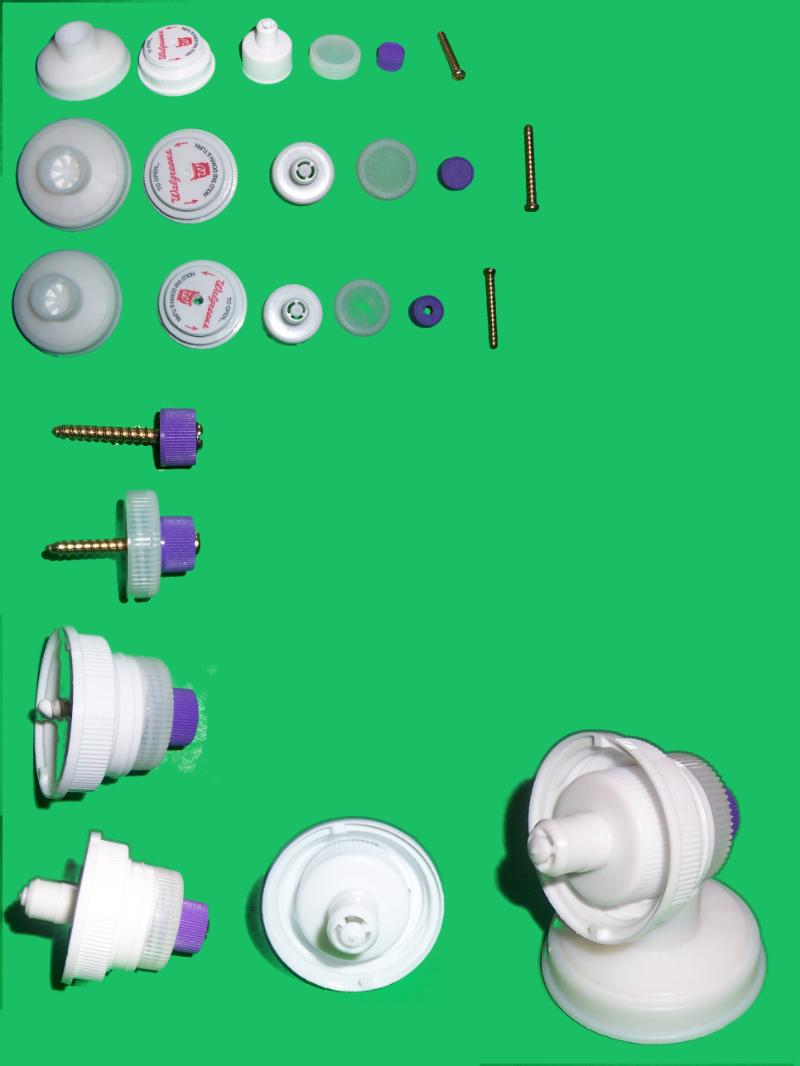
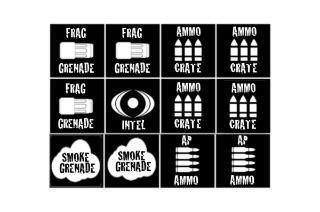
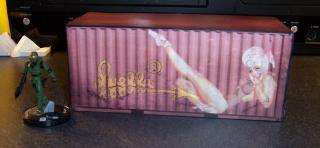
From left to right
Random Air Filter
Prescription Bottle Cap
Water Bottle Cap - Squeeze type with pop up part removed
Bottled Water Cap - screw on
Cap from tiny tube of skin lotion
Wood screw
Water Bottle Cap - Squeeze type with pop up part removed
Bottled Water Cap - screw on
couple... i had that confused with the dishwater soap caps... they get sometimes a similar design... well when you think about it... nearly the same function...
Thanks for that cool necromunda link, and those fans look great!
@ vik yep its Brian Cranston from Malcom In The Middle, he is a great actor and I dont think I would like the show as much without him
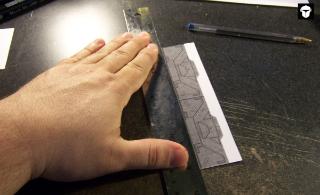
Cleaning paint from canopies can be easily done.
You can even remove scratches from clear canopies. Best of all its not even that hard to do... practice it once or twice, and love it forever:
Sand the excess paint or damage to the canopy down using grain 1200 then work to grain 1600sanding paper, and then use a fine cloth and TOOTHPASTE to afterwards clear up the clear parts again. The toothpaste works as a polisher and the canopy will be clear as ever. After all that just dip it in a clear floor polish like parket cleaner for floors, and it'll be shiney and new, as well as protected
Hope you find this useful friends
MauS
Thanks MauS !
Sounds like the old remedy for scratched CDs, but I would have never thought to try it.
Automatically Appended Next Post:
Viktor von Domm wrote: even tho i read the thread title you updated ... i instantly had a strong SW vibe... good work mister!!! you come up with some cool ideas of latley!
if that orkwing goes well... wich i have no doubt... you should do millions of them... that is a most usefull idea to explore futher...!
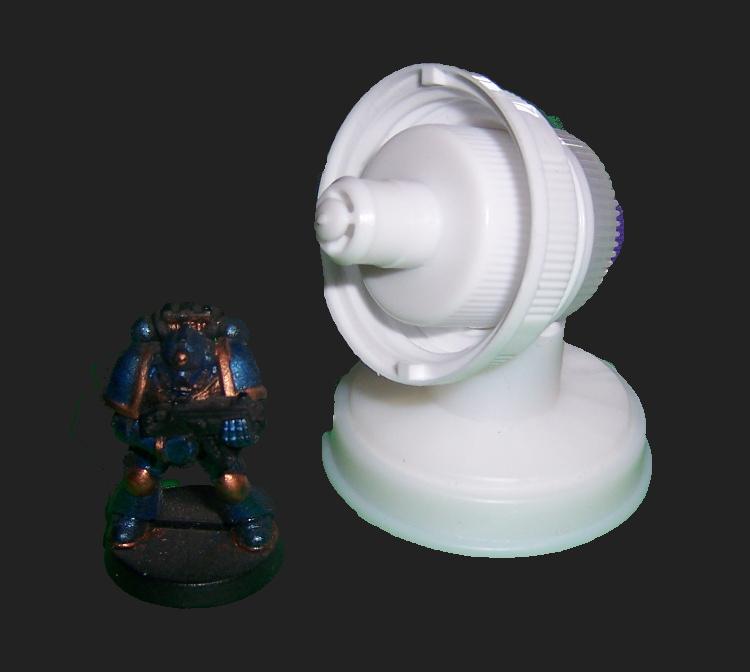
I don't know about mass producing anything, but I was thinking about vacuum forming transparent canopies for my dakkajets.
Also had an idea for a bike sized hover vehicle, designed specifically so I could vaccum form it.
I have all the parts to build a small vacuum forming machine. Haven't gotten around to building it yet.
By the end of the year, I plan to build 2 4ft x 8ft Gaming tables and a vacuum forming machine. The gaming tables will have shelves underneath so I can store my terrain collection under the tables they are used on. The Vacuum forming machine will be small, built to use sheets of 5x5in plastic I get from work.
There will be a two workbenches . One with tools, and the second work bench set up with Foam Cutting and Vaccum Forming equipment.
I also have a nice airbrush setup that I've never used.
This is about 10 years worth of stuff I've been accumulating and just kept putting off since we had the kids. Now that the kids are old enough that they don't need constant supervision I'm back into gaming and I need to start using this stuff to justify the space
The vacuum forming part is pretty simple. The heating the plastic without your wife screaming at you that you've ruined the oven is the tricky part.
It's one of the reasons I'm building it small. When I'm all done the whole thing should take up about 2 square feet of tabletop, with a shop vac under the table.
Automatically Appended Next Post: I almost forgot why I swung by here
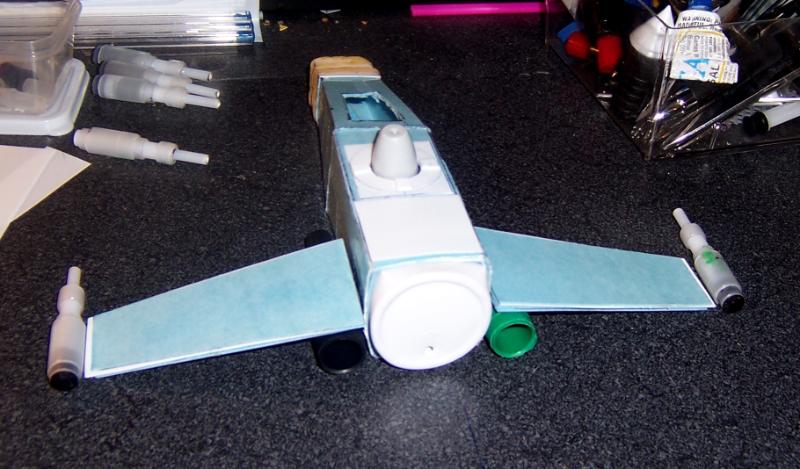
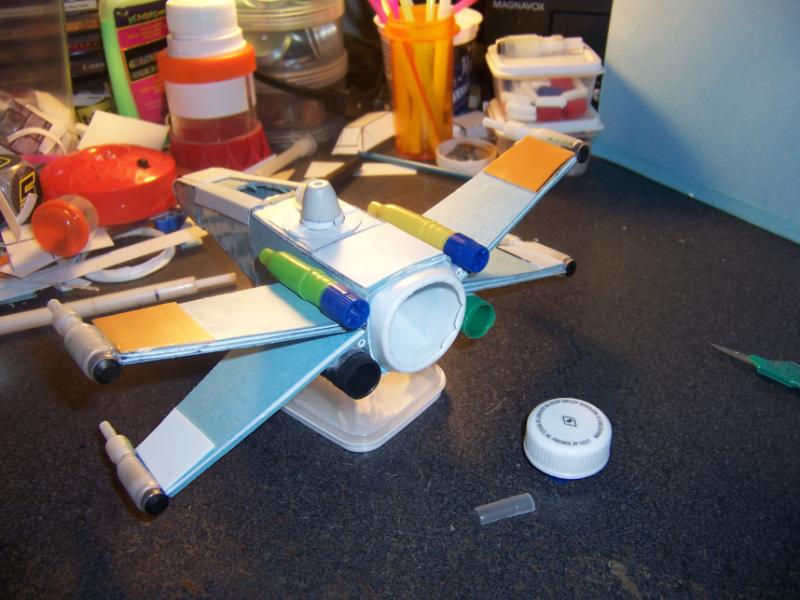
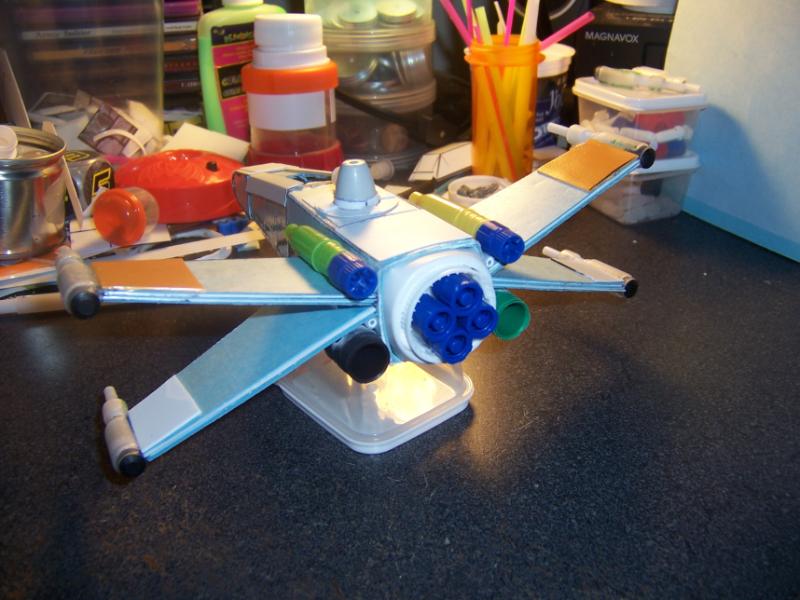
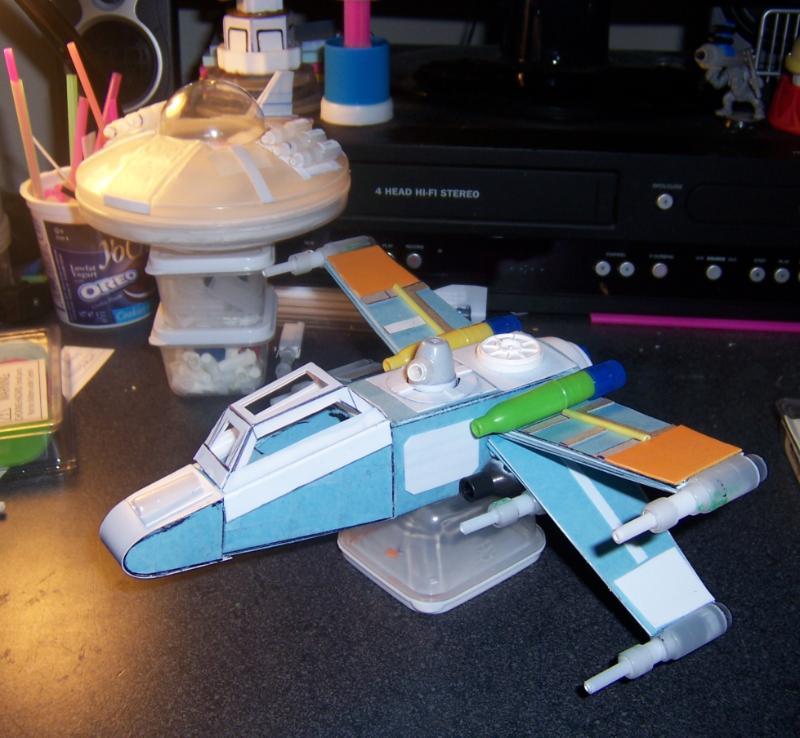
Yup, just a test fit in that pic. Built the other two wings since then, just trying top figure out how I'm going to attach them and keep them in the open attack foil position.
Breaking Bad is awesome, been bigging it up to all my peeps, it didn't get a lot of notice over here either but is picking up interest now. Don't know how you can build anything while you're watching it though, I've not caught the last couple of season 2 yet as I know that once I start I won't be able to tear my eyes of the screen till I'm well into season 3
I'm enjoying the modelling aspect soo much that my current plans for my Ork and Necron Forces are all flyer heavy.
I've been slowly buying up Necrons here and there when I can find them cheap, but I promised myself I wouldn't work on them until I have my Ork forces in order.
Although the prospect of Orkified Necron Allies may allow for some overlap..... just imagine cyborks with Gauss weapons and repair protocols...muahahaha!!!
hasslefree has tons of cool mini for such needs... and do look for reaper chronoscope minis as they have some really cool minis too... for example the sucker punch minis too, for a game of zombies they fit like a glove^^
and you are always carring your katana while drinking a "soda"?
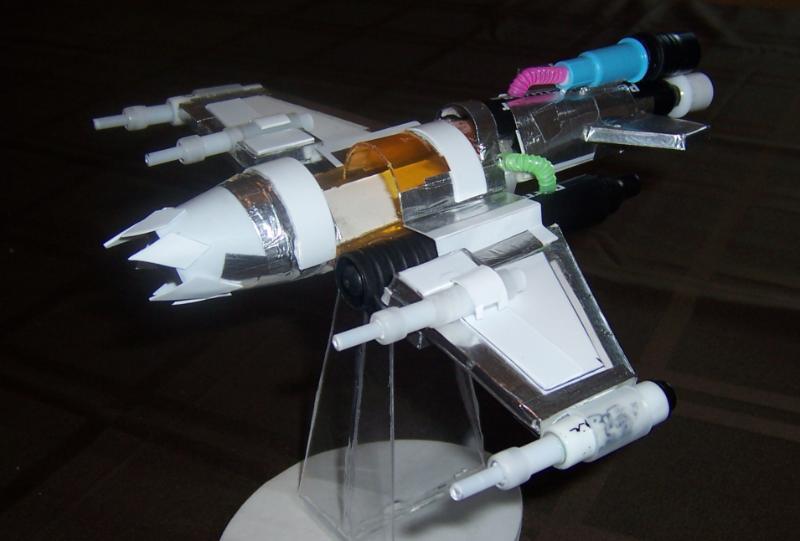
Hey the DAKKAwing is looking really good so far, it put a smile on my face. What are the things you used for the "guns" on each wing? They look familiar, are those the spring mechanisms/pump parts in spray bottles?
and you are always carring your katana while drinking a "soda"?
If it were a Ninjato and a can of coke, there could be pictures of me like that from the 90's.
Hey the DAKKAwing is looking really good so far, it put a smile on my face. What are the things you used for the "guns" on each wing? They look familiar, are those the spring mechanisms/pump parts in spray bottles?
Thanks !.
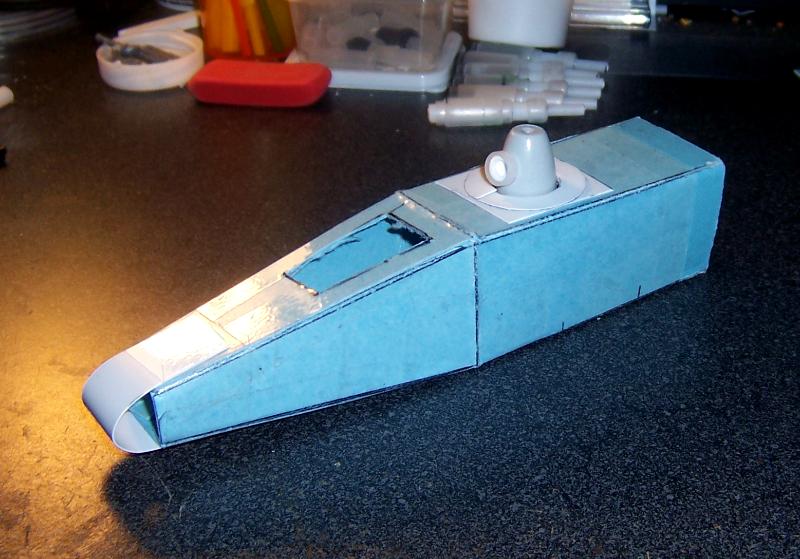
The guns are completely scratch built. Two pieces of plastic tubing crammed inside 3 pieces of a Bic Round stic pen.
adamsouza wrote: The VCR in the background is one of the reasons I Green Screen some of my pics. Other times I'm just in a rush and don't remember to do it.
and you are always carring your katana while drinking a "soda"?
If it were a Ninjato and a can of coke, there could be pictures of me like that from the 90's.
Hey the DAKKAwing is looking really good so far, it put a smile on my face. What are the things you used for the "guns" on each wing? They look familiar, are those the spring mechanisms/pump parts in spray bottles?
Thanks !.
The guns are completely scratch built. Two pieces of plastic tubing crammed inside 3 pieces of a Bic Round stic pen.
feth. Seriously, I cant thank Bic enough for making those cheap ass pens they make. I have built so many things for not only my Orks, but Ive honestly, even fixed some house hold appliances with those tubes
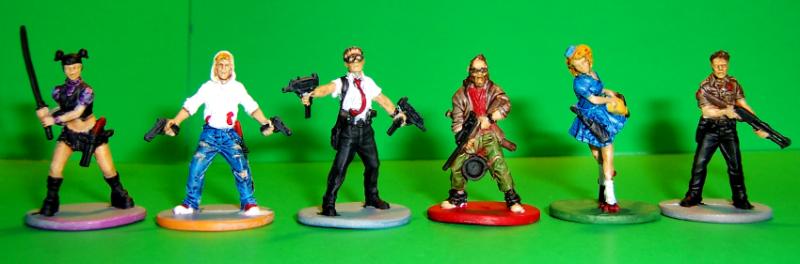
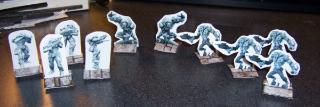
I was thinking about zombie Apocalypse survivors based on my gaming groups members.
At the very least miniature heads that resemble ours to put on other figures. I wouldn't be above putting my ugly mug on a Space Marine Captain. Kit bashing and scuplting bodies I could do, but sculpting faces that resemble non mutants is out of my league. Acutally heads seem to be the way to go. I could just cast them as needed and slap on other models I decapitated.
well i suggest you contact RS Jake... he might have atm some time for such like sculpts...
and i meant more a discription of said characters... then i could lend you a hand for some suitable minis i might think of...after all zombie fighters are almost in every mini range for every company...
I'd have to discuss with my friends what they are looking for, but if you find a fat guy in a trenchcoat let me know.
I'm looking into having a comic book artist make up some concept art, I know a few. Seeing if I can talk him into making paper minatures for us. Once we're happy with the look of those I can use them as something to have sculpts based on.
I like a lot of the stuff from Hasslefree, but it's ironically quite a hassle to get their stuff stateside, for anything less than full retail plus international shipping.
Next weekend I'm going to try to get my gaming group to show in Zombie Hunting attire and take pictures, to have something to give to the artists.
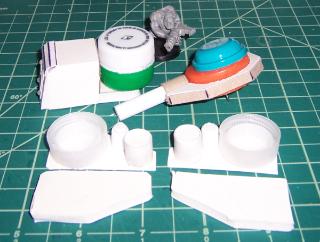
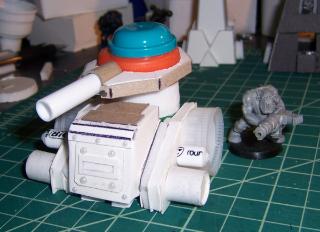
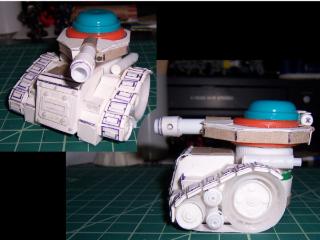
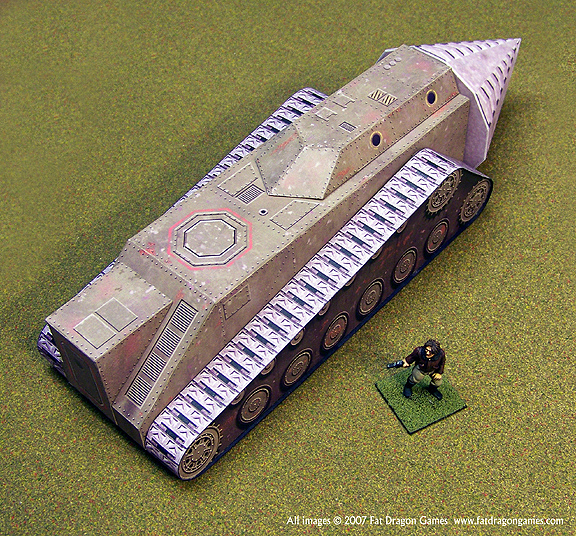
The tank and was a wooden model from a craft store. Added a ton of plating and other detail to it. The picture came out crap but the model is coming out so well that I wouldn't feel bad actually fielding it as a vehicle, if I needed a generic tank.
The statue is a Dollar Store toy sitting on a Kuerig Cop, based on a tin can lid.
the orkwing looks just super! the extra thrusters make it look now as finished as can be in my book!
and the lil tank... too bad you don´t use the dakka gallery... would have loved to zoom in on the pic... as for the statue... cool... this will be a nice terrain piece... will you do it bronze or plaster like?
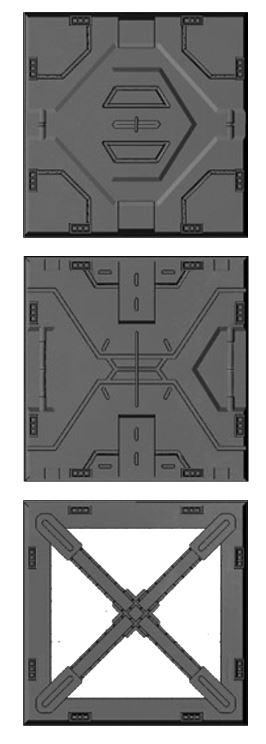
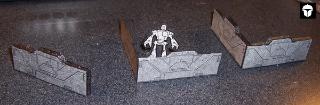
Back when 6E was released, August, I scratch built an Aegis defense line. I ordered on from my LGS at the same time, with them promising me a 2 week delivery, because I didn't have a good idea how to build a quad gun,. without one for reference.
1 week later I asked about, was told it would be another week.
2 weeks later, when it should have arrived, I was on vacation.
3 weeks later, I asked about it, was told when it arrived they would call me, and they seemed annoyed about me asking.
5 weeks later, I asked about it, was told when it arrived they would call me, they said GW was out of stock and it would be here in 2 weeks
7 weeks later, I didn't ask, and I decided I'm never ordering anything from them again ever.
9 weeks later, I built my own Quad Gun, with no reference, still haven't got phone call about it coming in
Ovion wrote: To be honest, I would request a refund at this point.
9 weeks of dicking you about and a craptastic attitude? I wouldn't want them to have my money.
I agree. Luckily they didn't ask for any money down. While I'm annoyed at the situation, it's getting absurd enough that it's starting to be funny.
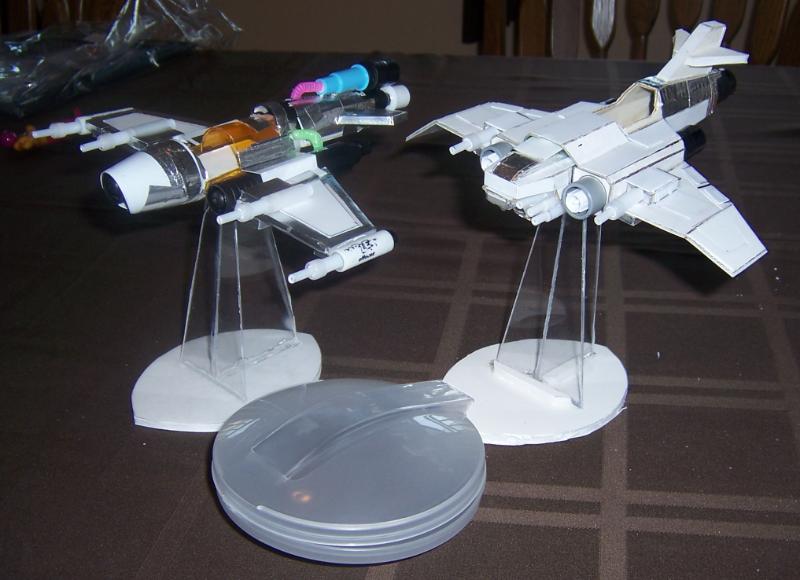
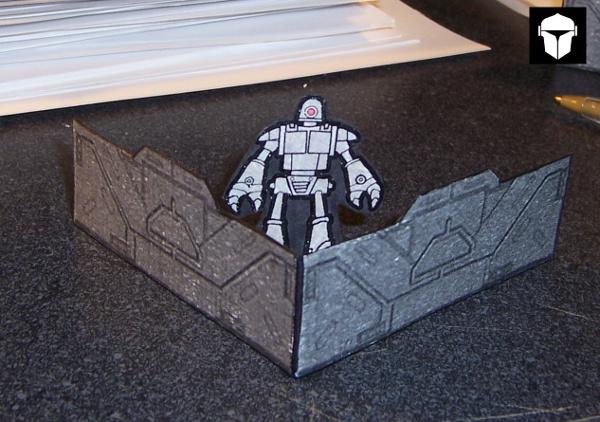
The UFO needs guns and a pilot. The Ork wing, as well as my other two Dakka Jets, need pilots. Just been procrastinating, while watching WEEDS. Ran out of BREAKING BAD episodes a week back, and been toying with ideas for Zombicide and Dreadball. I have drawn a full scale DreadBall arena and was toying with the idea of carving it, with a hot knife, into to some foam sheet.
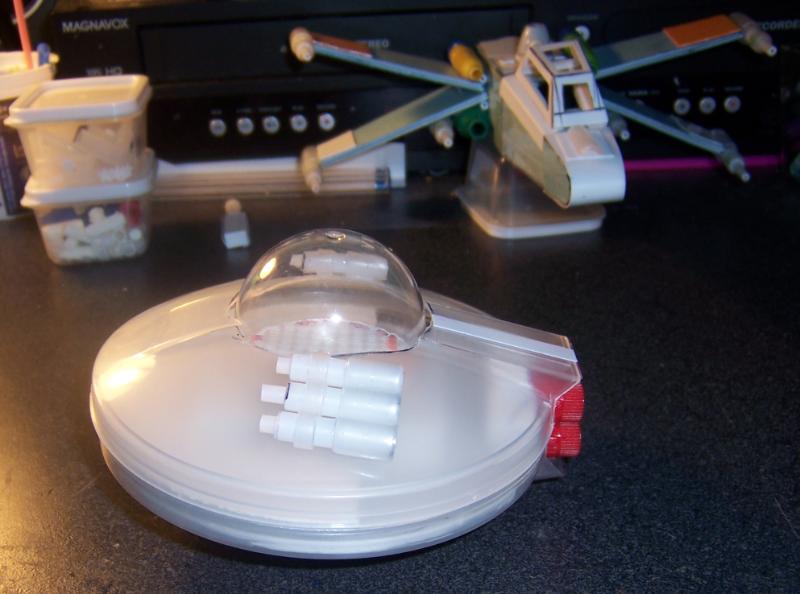
I'm not a 100% cetain with the gun placement. The idea of mouting them on the side seemed more appealing, but it took away from the saucer shape some, and required tme to seal the OFO (Ork Flying Object) , which I'm not ready to do. It does look nicely retro with the guns top mounted, so it may just staty that way.
My new Avatar is of my own design. I wanted my own logo I can add to stuff, and that's what I came up with.
oh... doubly cool then for the selfmade avatar and logo...!
hmm... for the guns i would suggest drilling cooling holes into the muzzles or the barrels... to add to the orky feel... and maybe some amo fed? other then that i think the OFO is shaping up extremly well!!!
i would rather call this a blessing... and i would never dare say a word against either earl grey not chilli... by the way... leftover chilli is the best thing that can hit the taste buds
no, see, you should NEVER EVER allow a store to "get annoyed with you" for expecting them to order you a common $25 product! They probably didn't pay their last Bill and GW won't send anymore until they settle up, one of the local stores here does that crap, I won't shop there anymore.
Exceptional social grace and the desire to run a comic shop seem to be mutually exclusive concepts.
LMAO!!! even funnier as i was a comic addicted creep for almost ten years... all my first hard earned money as a school kid went there... what a shame as the guy in that shop was a total loonie...
and the orkwing looks good with the added detail...
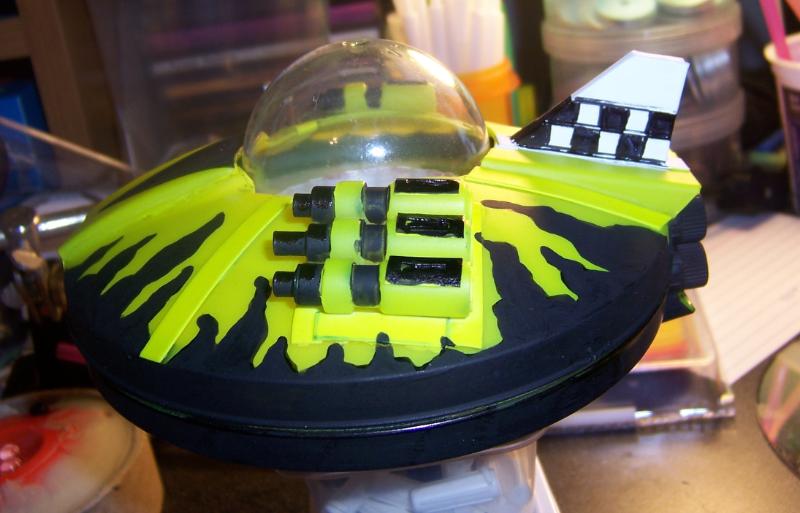
the fins on the OFO look a bit like they made the whole thing is way stubbier now than before... wanted effect?
KingCracker wrote: Thats because BadMoonz are the best klan there is. Not to mention, if there was klan that could afford to erm..."Purchase" a UFO, itd be them
Pretty much.
Dem Boyz better have lots uv teef to afford da 2 Stompas, 2 Dreads, 12+ Kans, 4+ DakkaJetts I plan to eventually field
KingCracker wrote: Thats because BadMoonz are the best klan there is. Not to mention, if there was klan that could afford to erm..."Purchase" a UFO, itd be them
Pretty much.
Dem Boyz better have lots uv teef to afford da 2 Stompas, 2 Dreads, 12+ Kans, 4+ DakkaJetts I plan to eventually field
Thats an assload of Kanz But dont worry, thats why Orks are da bestest. If they cant afford to pay for it, they just kill and steal until they get what they want.
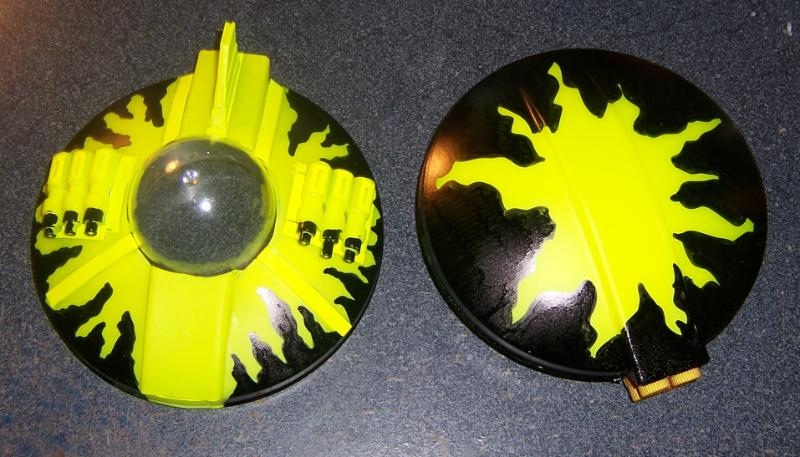
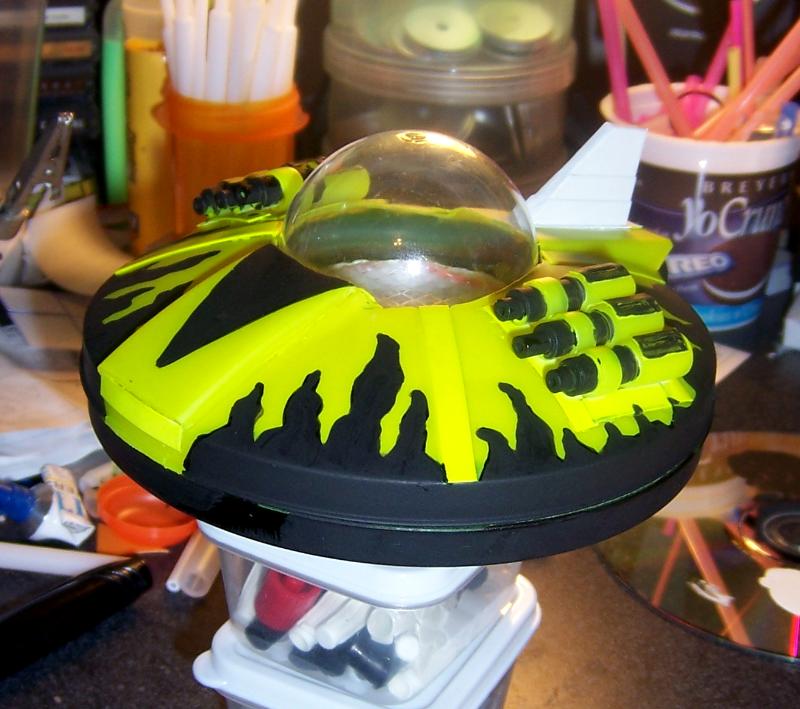
The flames right now are just black pernanent marker. I figured I'd go over it with black acrylic after I go tthe look I wanted. Also saves me from layering multiple coats
Instead of freehanding any critter features onto it I was thinking of a silver ring around the cockpit, a black triangle in front, and a white tail fin.
Instead of the silver ring, make it checkers. I think the triangle and then a band of black and white (or yellow) checkers would look awesome. Be sure to use a pen or a pencil for drawing the checkers first, because they are tricky to do well, and easy to goof on
I like the idea about the checkers/dags. The tail fin looks pretty blah as is, I think I may add some checkers to it..
Two days ago, the backside of my Stompa was a completely flat surface. I assembled the missile rack as well.
And yes ENOZONE, I'm planning on doing more terrain. I'm actually always building something. The Necromunda terrain just got pusehd back when I started playing 40K again.
My next big project is I'm going to build a 4ftx8ft gaming table with shelves underneath, so I have somewhere to stroe all this stuff
Automatically Appended Next Post: Quick checkering of the tail fin with a marker.
The Stompa sat on the backburner while I worked on the rest of the army. Now I just want to finish it so it won't sit there looking sad and incomplete.
I need about 60 shoota boys for my army and I think I am procrastinating doing everything else first
Yea I know how it is letting big builds slide for a bit while you work on more important stuff. I have a Skullhamma/battlefortress deally-o that is sitting in the same spot on the shelf since I finished building it Its mighty cool and pretty impressive, but I need my normal forces to be actually built then a cool giant tank that will only randomly see the light of day
The culprit was the bottom sheet collapsing into the main hull. I've now shoved some additional reinforcements in there, as well as packed it full of shipping peanuts to prevent it from happeneing again. I'm also going to drill and attach the feet with screws this time, instead of just gluing them.
I did lose maybe 20% of the crown. Undecided as to wether to try and recreate them, or go with something different.
Been playing Zombicide, and working on custom Zombicide stuff as well. Just received another Zombicide set int he mail and I plan on painting the figures.
adamsouza wrote: The culprit was the bottom sheet collapsing into the main hull. I've now shoved some additional reinforcements in there, as well as packed it full of shipping peanuts to prevent it from happeneing again. I'm also going to drill and attach the feet with screws this time, instead of just gluing them.
I did lose maybe 20% of the crown. Undecided as to wether to try and recreate them, or go with something different.
Been playing Zombicide, and working on custom Zombicide stuff as well. Just received another Zombicide set int he mail and I plan on painting the figures.
I'm all tapped out of Orky inspiration at the moment.
Between Walking Dead, Stripperland, and a few ZOmbie related books I've read in the past week, I'm in the mood to bash in some Zombie heads.
Since I'm fresh out of Zombies to smoosh, I've begun painitng a set of Zombicide. My Kickstarter set has exclusive figures, so I'm a bit reluctant to paint it, but I happened to have a second normal set of Zombicide.
I'll still be adding Orky bits to my stuff as I go, but for the next couple of weeks it looks like I will revisti my Zombicide and All Things Zombie collections
evildrcheese wrote: Are you gonna show us the Zombicide figs you've painted?
D
I'll post pics once I have some serious progress done.
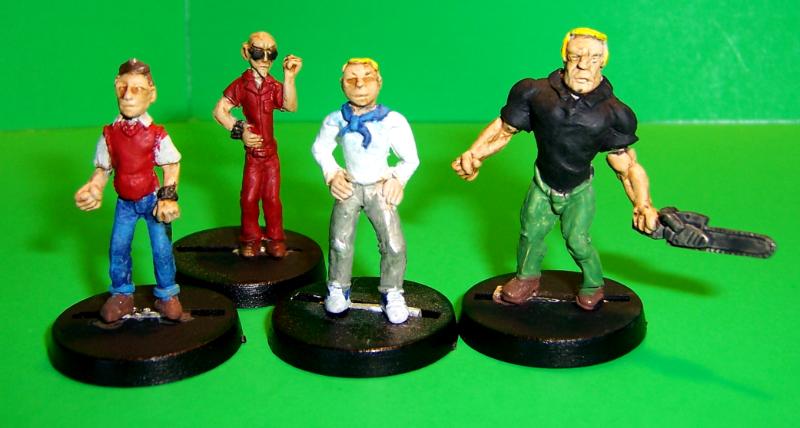
After 15+ years of base coating everything black, I went with gray, and I'm playing with washes over the gray. There are a ton of zombies to paint, and I'm trying to find a method that looks, is fast, easy, and suits me. No finished figures yet, but I've gotten some desent progress on the survivors. I'll get a few pics of them up when I can.
So far so good. I recently shifted from black undercoat to white, I think I prefer it but I can't articulate why...how did you find the shift to grey? And have you got a good method down that suits you for bulk batches (which is what I assume you were referring to above?).
I chose grey over white specifically for this project because you can get ;lazy and wash colors over it, in a way you can't get away with when using white or black base coats.
Give the zombie clothing a quick paint job and then just wash over the entire figure with a sepia wash.
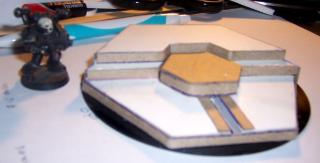
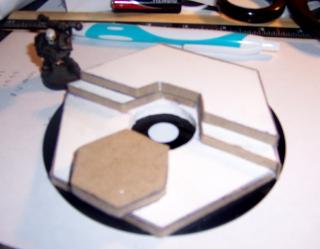
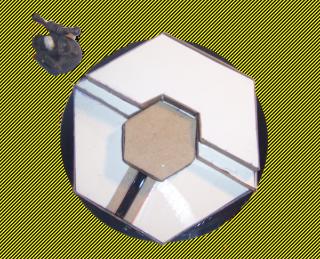
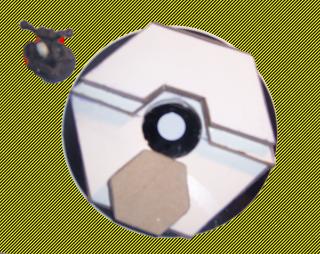
Visited the Confessions of a 40K addict website and got some terrain inspiration.
The site is great and has templates so you can recreate some of his projects.
The piece I made is inspired by has Standard Manifold Coupling project. I liked the way it looked and decided to build one. The project was simple enough that I actually didn't use the templates.
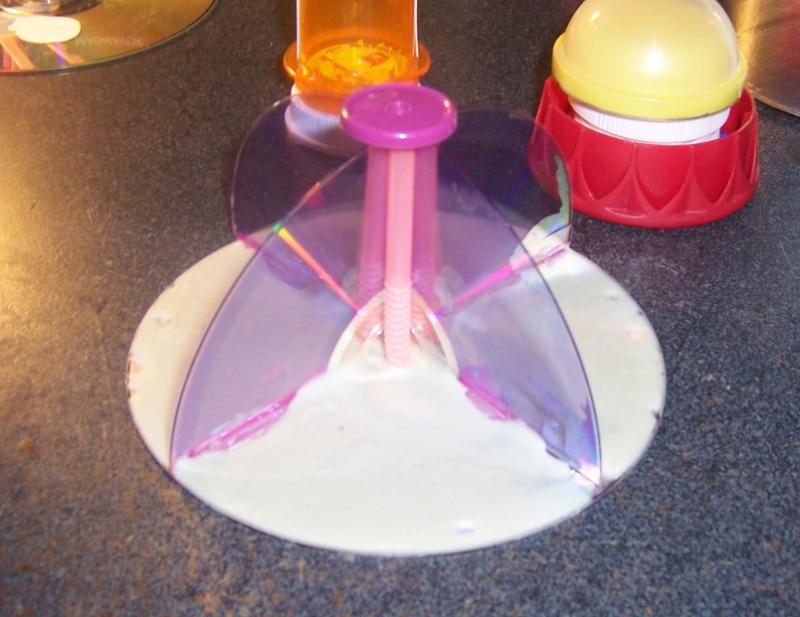
Mine is scaled to use a CD as a base. I like to use CDs. They don't warp. I have a plentiful supply, and the added perk of using recycled materials.
I've already added some rivets, and caution stripes were on my to do list.
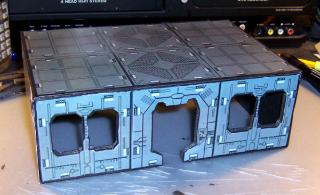
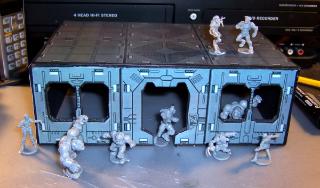
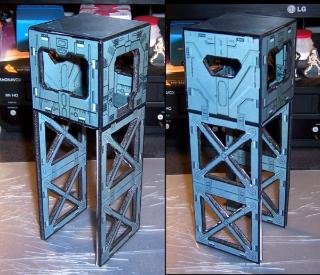
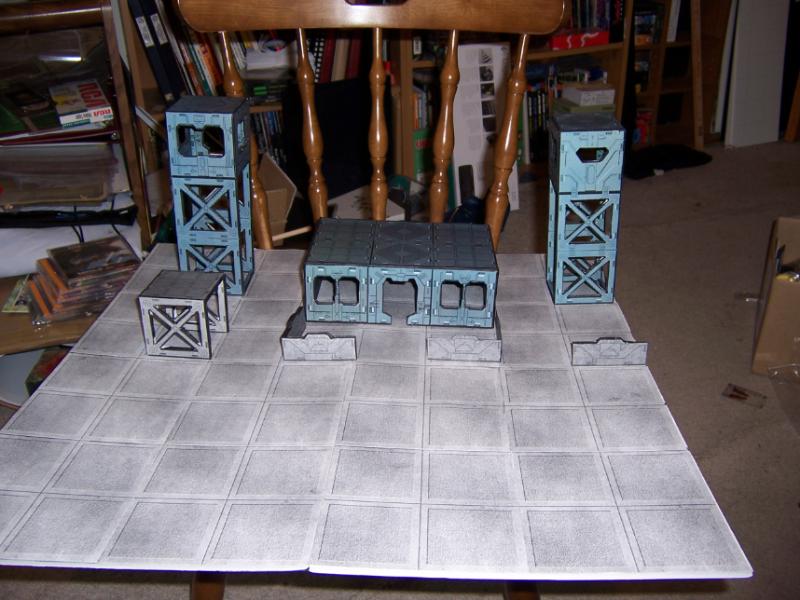
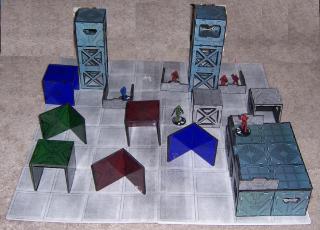
Also got around to base coating most of the Necromunda terrain I had whipped up and shown in this thread.
Playing Pathfinder and Zombicide at the moment, but Dead Zone has gotten me motivated to work on terrain again.
Automatically Appended Next Post: Most of the Necromunda terrain I worked on earlier was based on 3" levels, so the Dead Zone terrain, all 3" based has me fantasizing about hybrid terrain already.
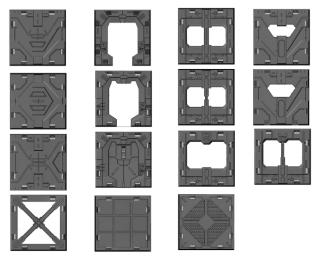
This is a preview pic of their tiles
I intend on building some new terrain with a similar style and appearance.
Every piece will be a 3" square. I'll add detail to foam core, make a mold, and cast them in dental plaster.
I have dental plaster left over from a Hirst Arts project that never got off the ground, and a recipe for home brew mold material I've been waiting to try. That and a few jars of latex mold rubber.
that sounds quite cool... casted dental plaster always gets my attention...
yesterday my son at school had a little workshop going on... they literally shreddered CD´s and then they melted these in an old desktop oven... and it worked... as the teach who oversaw everything explained to me... it smells a bit but the stuff only emits carbondioxid... nothing else... so the melting process is harmless... that could be a cool upgrade for anyones casting material problems... if the casts are sturdy and heat resistant enough you could save up on a fortune here....
Viktor von Domm wrote: that sounds quite cool... casted dental plaster always gets my attention...
yesterday my son at school had a little workshop going on... they literally shreddered CD´s and then they melted these in an old desktop oven... and it worked... as the teach who oversaw everything explained to me... it smells a bit but the stuff only emits carbondioxid... nothing else... so the melting process is harmless... that could be a cool upgrade for anyones casting material problems... if the casts are sturdy and heat resistant enough you could save up on a fortune here....
Do you remember the Temp and time ?
I just googled it and all I can find is people melting CDs and forming them into bowls and jewelry. No one shredding and melting them as you describe.
shredding would sped melt time due to increased surface area.
can´t really say about the temperature... but not that hot...(yeah...lame answer^^) and around five minutes...
they put plastic granulate to the shredded CD´s but it would work without that too provided you have really small pieces of the shredded CD´s... the teach told me it would work on the kitchen oven too...but then you get a bit of nasty smell there...so better something for the outside...but seeing these plans of yours...i think that could very well be a means to an end...
I intend to, but I'm debating buidling these other two buildings first.
I have all the art for each invidual piece already, so it's a matter of combining, printing and assembling them. The really time consuming part is cutting out the windows. There are many small angles to them, that aren't easy to do with foamcore.
I'll try to scan the original art pieces I made myself.
They'll get made eventually, because I want a source of bulkheads I don't have to scratch build over and over.
can´t really say about the temperature... but not that hot...(yeah...lame answer^^) and around five minutes...
they put plastic granulate to the shredded CD´s but it would work without that too provided you have really small pieces of the shredded CD´s... the teach told me it would work on the kitchen oven too...but then you get a bit of nasty smell there...so better something for the outside...but seeing these plans of yours...i think that could very well be a means to an end...
That may work for heat resistant push molds... I'll keep it in mind. I doubt it would be pourable, so it kind of limits it's applications.
Automatically Appended Next Post: I'm kind of going overboard on scenery as of late.
Working on the Necromunda terrain I made last year.
Backing the Deadzone Kickstarter, which comes with terrain.
Making terrain to match the DreadZone stuff.
Ordered some Laser Cut terrain
I saw that laser cut terrain and it looks awesome, but it was too much for my brain to figure out what group I wanted and then which level I had to back it at to get them. I know it sounds lame, but if your trying to get people's money make it easy.
and as for the molten plastic... well it will look rather rough in places but maybe for certain purposes this might work of...
Automatically Appended Next Post:
Theophony wrote: but if your trying to get people's money make it easy.
far from lame... that´s the first rule in marketing!!!!! it´s a bloody shame not many enterprises read the rulebook...(aka our favorite producer of plastic crack...)
I usually stay away from Laser Cut terrain because of the expense, but I got all that for $96 US, with free shipping.
It's still more than I would like to have spent on terrain, but I felt it was a good value. A table's worth of terrain that is durable and has a matching aesthetic. I could have built something similar, but it would have taken me years, the way I get distracted
I created a few new tiles. I have a new door and windows tiles with less complicated openings, making them much wasier to cut out. It's a good thing, because all this razor play has been brutal on my left hand. I've suffered a #11 blade stab to the palm and paper cut I swear felt like it cut to the bone
Taking more photos of it in progress this time. Figured I would post a tutorial along with the PDF's required, so people could build their own.
now that sounds really good... I am always open for free stuff
and well... blood for the blood god?... yesterday I cut my lil finger open by the rim of a...wait for it...cooking pot...can you believe it? there is so many tools out there craving our blood these days... I just made a careless movement when putting stuff away from the dishwashing we did and bang my finger got cut open...
at least you did your cuttings in a sort of related environment... but who expects pots to attack you???...hope it didn´t interfere with your further work...
They are looking good. With mantic taking over the specialist games market by doing similar things, and GW just rolling over, seems like there might be more at work in the shadows. Leads me to believe that mantic is actually going to be the ones buying up GW when they eventually collapse due to stupidity.
The deadzone tiles look great, I would have removed the 'clips' from the design because it does kinda stand out and adds nothing architecturally to the building.
Theophony wrote: They are looking good. With mantic taking over the specialist games market by doing similar things, and GW just rolling over, seems like there might be more at work in the shadows. Leads me to believe that mantic is actually going to be the ones buying up GW when they eventually collapse due to stupidity.
Thanks, and I think that would be a great scenario.
The deadzone tiles look great, I would have removed the 'clips' from the design because it does kinda stand out and adds nothing architecturally to the building.
I was going for a look that was as similar as possible. The original idea I had was to glue "clips" on top to add a bit more texture and keep the look authentic.
It's all still work in progress. lately, I've been creating new tiles and laying them out for a PDF to share with everyone.
hmmm... good looking... are these new tiles and wall segements printable or will you show and share some high end stuff later on and these are some teaser?...copied them to HD anyway^^
Viktor von Domm wrote: hmmm... good looking... are these new tiles and wall segements printable or will you show and share some high end stuff later on and these are some teaser?...copied them to HD anyway^^
That's just a lower resolution preview.
I'm putting together a multiple paged PDF that will allow people to print them out at the proper scale, and at higher resolution.
As for removing all the clip spots, I'm not saying I'll never get around to it, but they don't bother me that much.
It is also time consuming, and boring work, to remove them all, while keeping the tiles looking right. I'll experiment with it, but right now I'm having fun making new tiles.
Automatically Appended Next Post: I don't know if people missed it, but a page back I posted a link to a downloadable PDF of the first building
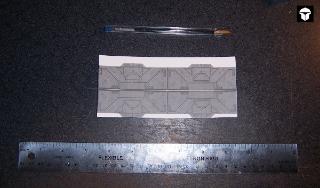
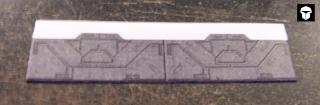
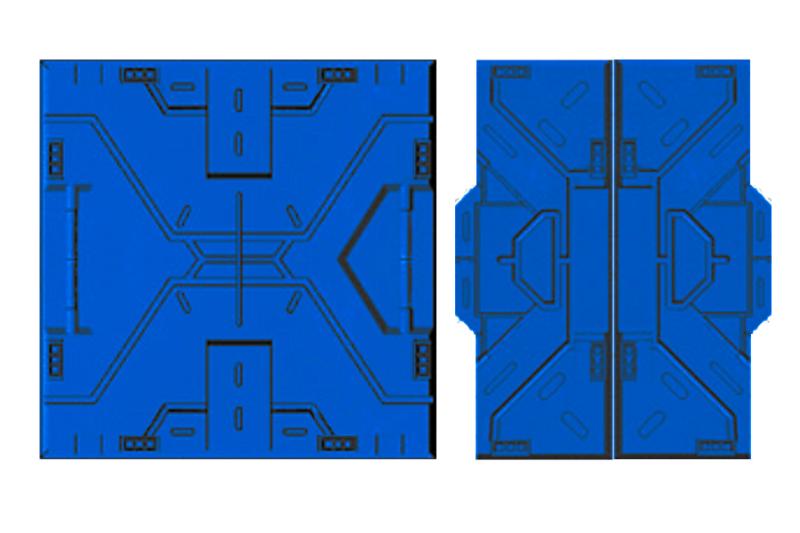
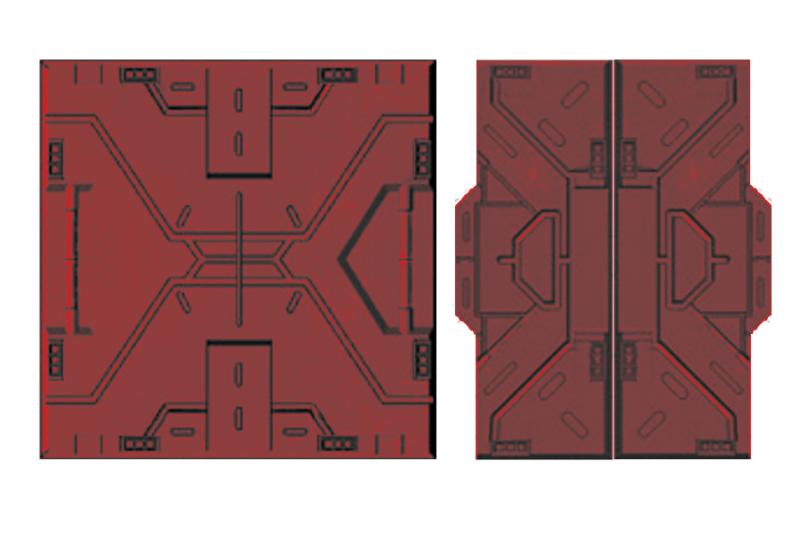
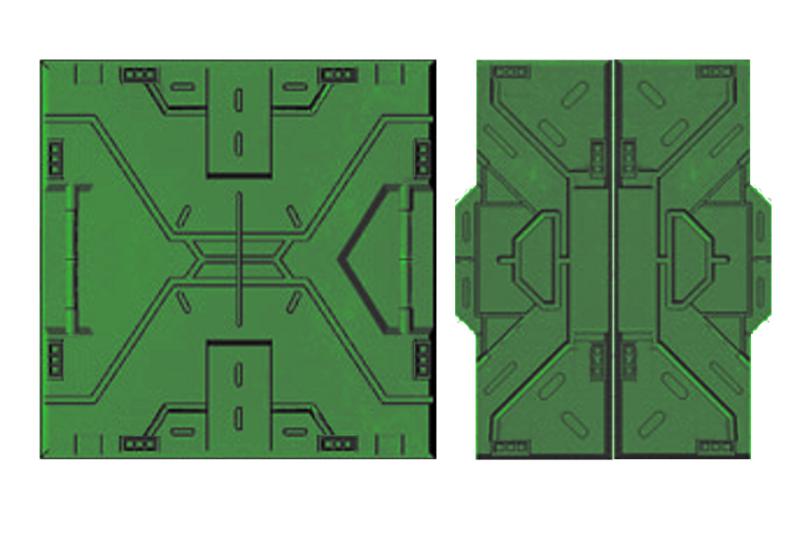
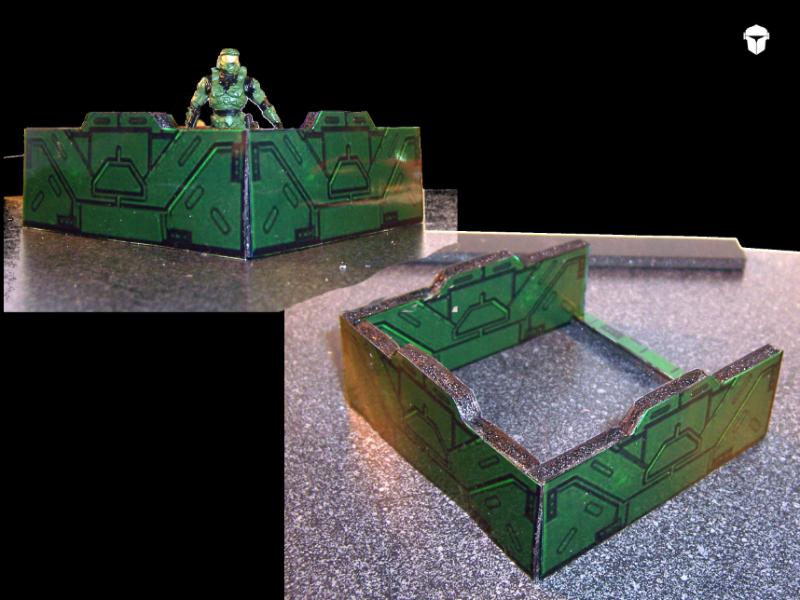
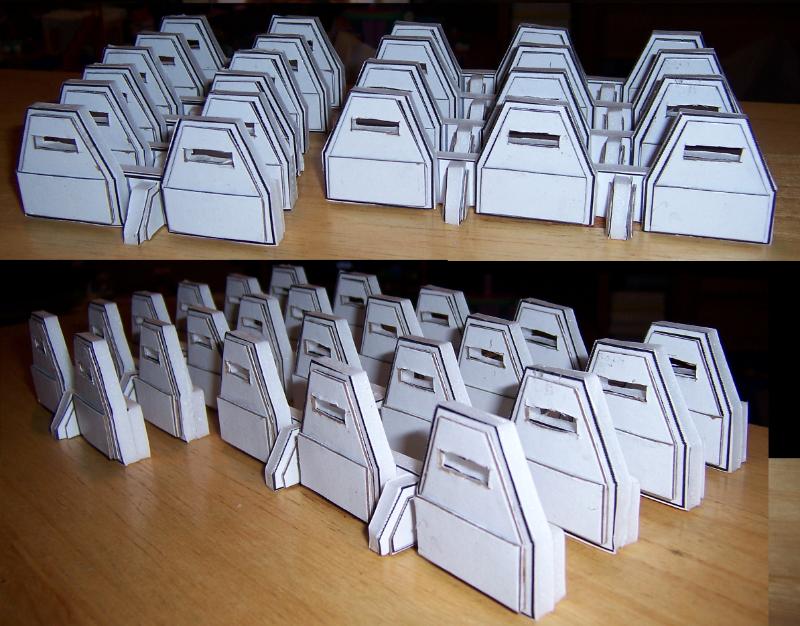
Today, we are going to print and build a Deadzone Barricade
First, we print the attached PDF and cut out one barricade
Then we use a ruler and ball point pen to score the fold line down the middle
Apply a thin line of PVA or Tacky Craft Glue
Use your finger to spread the glue into a thin and even layer
Fold and Flatten
After the glue dries, you cut off the remaining white excess and fold down the middle,
Scoring the center line with the ballpoint pen and ruler will help.
To make the edges look neat, take a black marker and paint the exposed white edges
If you really want to kick it up a notch, cut the barricade halves apart and sandwich a layer of foam core board between them for a sturdier and bulkier barricade
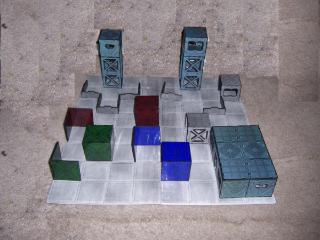
I've come down with a nasty cold, so I'm behind in production where I wanted to be. Did print up some Red, Green, and Blue Walls for my Beta Test. Just wanted to see how it all looks with more color.
After reading your comment and thinking about it for a second, I just had a pretty good laugh to myself as well.
The terrain is all kinds of boxy, which is something I would normally try to avoid, but it works. It's cohesive with a definite man made theme.
This one is less boxy, but since it features Kilroy I had to make it. The idea that "Kilroy was here" spanned time and space from WWII to the distant future was too good to pass up.
My Father was a Navy man and he used to doodle Kilroy as far back as I can remember. I've drawn him since I was child.
A few years back I found out about the origin and was quite amused. There was even a story about misunderstandings about the meaning of it, and legends of a Super Trooper were rumored to have circulated.
James Kilroy and Leroy Jenkins are making it into my next army roster...
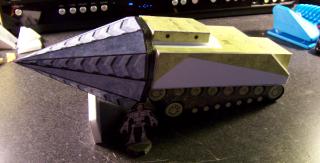
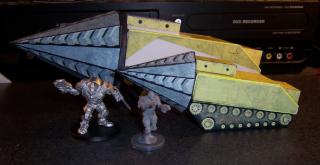
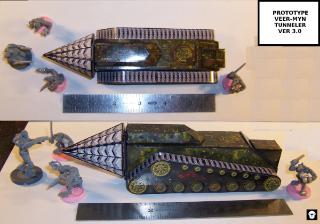
Unfortunately, It too big for a Veer-myn Driller, who are supposed to be nimble land torpedos, and lacks the guns on all sides of a Veer-myn Tunneler. Nice looking model though.
In all seriousness I googled his name and did a quick search on DakkaDakka and the only thing it linked back to was this thread and you and I mentioned him.
Just noticed him while he was commenting on your P&M Blog
This one is a half scale version of the Fat Dragon Games Hollow Earth Expedition Model, that I adjusted the color. The 1 hour photo that I had print the model color corrected it, do it now has a paint scheme that is neither original or the way I planned it.
It's sleek and has the appearance it go fast, but I'm not thrilled about the overall length. The top piece was a bit fiddly to assemble in that scale, and difficult to reinforce. The majority of the model is mounted to foam core, making it about as durable as the average tabletop model. The drill hollow, but is reinforced with strips on both the interior and exterior. I've dropped it from a 3ft height a dozen times to test the durability. You would have to deliberately have to damage it, as it easily survives the hazards of conventional use and falling off a gaming table.
The drill is not that fragile, but I will take your suggestion and give it a layer of PVA. I've used PVA for that purpose before and it's always turned out well. It might take the gloss gloss finish and bring it down to more of a satin as well.
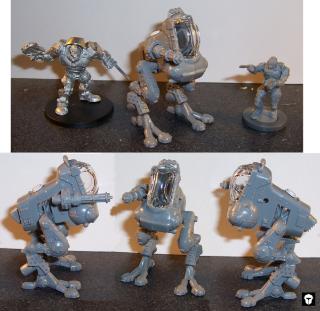
Most people son't seem to like the chickenhawks design, but I always did. I would have preferred the Ape Suit over the chickenhawk, but no Ape Suits are currently on the market.
hmmm.... as money seems no issue here (converting starship trooper models...that sure is quite expensive...) then the exoskeletons of maschinen krieger could be of value for you?
I've gotten to the point where I refuse to pay retail for any Wargaming miniatures. I'll either buy it at a discount or scratch build it.
It's part of what has drawn me to Warpath. They don't have official models for the vehicles yet, and I've been able to buy the army boxes at a significant discount on Ebay.
Fate of the ForgeStar $45 (65 models + 2 vehicles)
Enforcers Army Set $56 (31 models)
Yeah, based on what I saw of the rules for the vehicles in Warpath Beta, they can use 40k vehicles and get them as "stands in" for their models, Or other minis like my Old Crow collection would work as well.
The Coporation has Chimera, Hellhound, Lemun Russ, Manticore, and Sentinel equivalents.
The Enforcers have Rhino, Razorback, Predator, Whirlwind, and Sentinel equivalents.
The Marauders have buggy, Battle wagon, and Killa Kan equivalents.
It's rediculously simple to convert between 40K and Warpath
40K Imperial Guard to Warpath Corporation
40K Space Marines to Warpath Enforcers
40K Orks to Warpath Marauders
40K Squats to Warpath Forgefathers
and if you have WFB Skaven Army and you feel like adding guns, flamethrowers, and drills on them, then you have a Veer-myn army.
Pretty much how it looks, Mantic was snooping around and seeing what folks really liked, and the other races they are making seem also to be such blends
I thought it was a thing of beauty that Mantic made Forgefathers (Squats/DemiUrg) and Veer-myn (Space Skaven/Hrudd) after GW's stance on NOT making them.
Squats always came off as goofy and slow, poor mans IG with some nice toys, while the Forge Farthers are a technologically advanced race, low in number high on firepower.
Space Skaven never made it past fan made lists, while the Veer-myn have a tunneling and short ranged special weapons of destruction theme.
True, I think they outdid the GW Squats quite well, and also seems to have them in the Demiurg role with their high tech always able to mine in spce and such.
Veer-Myn also did the fan idea of the space-Skaven/Hrud concept as was wanted but turned down by GW, the Asterians seem very Necron/Eldar/Tau mixed
The rebs seem a new idea, the Xxor seem Tyranid/other hybrid, and the Plague, I was watching the movie Planet Hulk, and they have elements of the Spikes infection mixed with zombie movies and others in fiction.
Saw you had a blog. Thought I'd check it out. Awesome stuff! I fall into a similar place as you in terms of not being willing to pay full retail for minis these days. Not nearly so accomplished with the scratchbuilding though! I made some paper buildings for D&D once but paper stuff and I just don't get along too well, and the awesome buildings and terrain you people pull out of thin air and random parts are just beyond me!
Much of interest be here, I'll be watching for sure
I'll be back into the swing of things scratch building soon enough. Been side tracked lately with some real life drama, and an addiction to Marvel Avengers: Alliance.
Didn't get any modelling done, other than to put a few layers of PVA on the drill sections of my tunneling vehicles.
Didn't get the promotion, I was the most qualified for, and they didn't even have the decency to call and tell me.
Spent a week on vacation with my wife and kids, which resulted in me needing a vacation more now, when it's over, than when it started.
My wife and daughter got in to a car accident this morning. They are okay, but the car will be out of commission for days/weeks until it gets sorted. They actually got rear ended, by a police officer.
Heading into work today, for the first time in 9 days, feeling under appreciated, dreading the heavy Monday work load, and I think I'm coming down with a sinus infection, because I'm starting to get an ear ache.
It's been one of those days. All I want to do is go back to bed.
Built a pair of working catapults with my daughter. Will post pictures of those, once the paint dries.
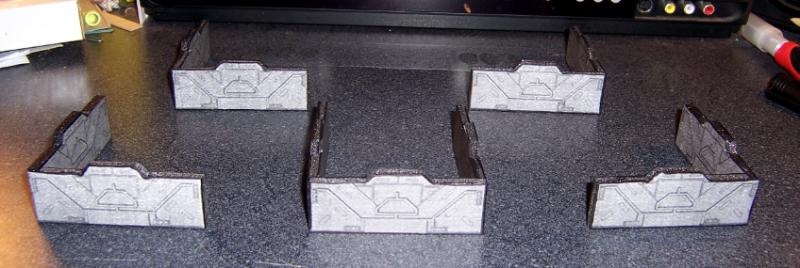
Someone kindly asked me about the defense lines I made a while back. Had completely forgot about them. Will try and get a set of printable plans up for them this weekend.
Got my Reaper Bones package. 29.6 lbs. I got tired just cutting them out of their little individual baggies. I'm not looking forward to inventorying them, but I think a few odds and ends might be missing. Beautiful detail. Reaper always made top quality models.
One of my friends, just this week, opened up a new gaming shop, Cape Cod Collectables. Miniatures Gaming, Comics, MTG, Heroclix, and 3D printing all under one roof. Going by there later tonight to check it out, I'm quite excited about having an awesome new gaming shop a 20 minute drive from my house.
Wow jealous of reaper bones backers.. missed that one.
Wish your friends new game store wasn't half the country away (assuming its cape cod ma) but good to hear you've got another one close, they're in short supply out my way.
Yup, Cape Cod Mass. Technically East Wareham, and a 30 minute drive from my house, but worth the trip.
The Gaming store is going to be awesome. It's in a great location, has lots of parking, handicap accessible, lots of space for gaming and merchandise,two additional rooms, an outdoor fenced in basketball court, and literally 20+ places to eat minutes away, some just across the street.
One of the additional rooms used to be a good sized conference room and is now the Role Playing Game room. 8x8 table, dry erase board on the wall, well lit. The other room they plan on having a permanent painting station set up, for gamers to have some where to relax and assemble/paint their models, and work on terrain.
The building used to be a church, and it's in immaculate condition. They'll have GW product on the shelves by weeks end. Comics, T-shirts, and toys already line the shelves. Home of the worlds largest repository of SHOCKFORCE miniatures and rule books (One of the owners bought out all of DemonBlades Games inventory)
There are also plans to add Mantic products, and Warpath as well. They already have a MTG and Warmachine playerbases already playing in the stores.
They plan on running classes/seminars on 3D printing, and I will jump on those.
I wanted to do a proper release of the defense walls with a more detailed version, a building tutorial, some painted pics, etc... but I always seem to get distracted. Not playing 40K, or having plans to in the near future, crushes some of my motivation, but I will do it, eventually
In the mean time, here is the original version, so you can experiment with it yourselves.
thanks mate... very genrous of you!... downloaded already!!!
i think i will need that sooner than later...i think it will star in a way in my next league of extraordinary riveteer competition...i will of course show credit where it´s due
With the risk of goind off topic, my YLAM Gaming blog has had the pleasure of letting people know about this work, since it's inception a few years now, and I figured it would be welcomed news here on DakkaDakka of the update
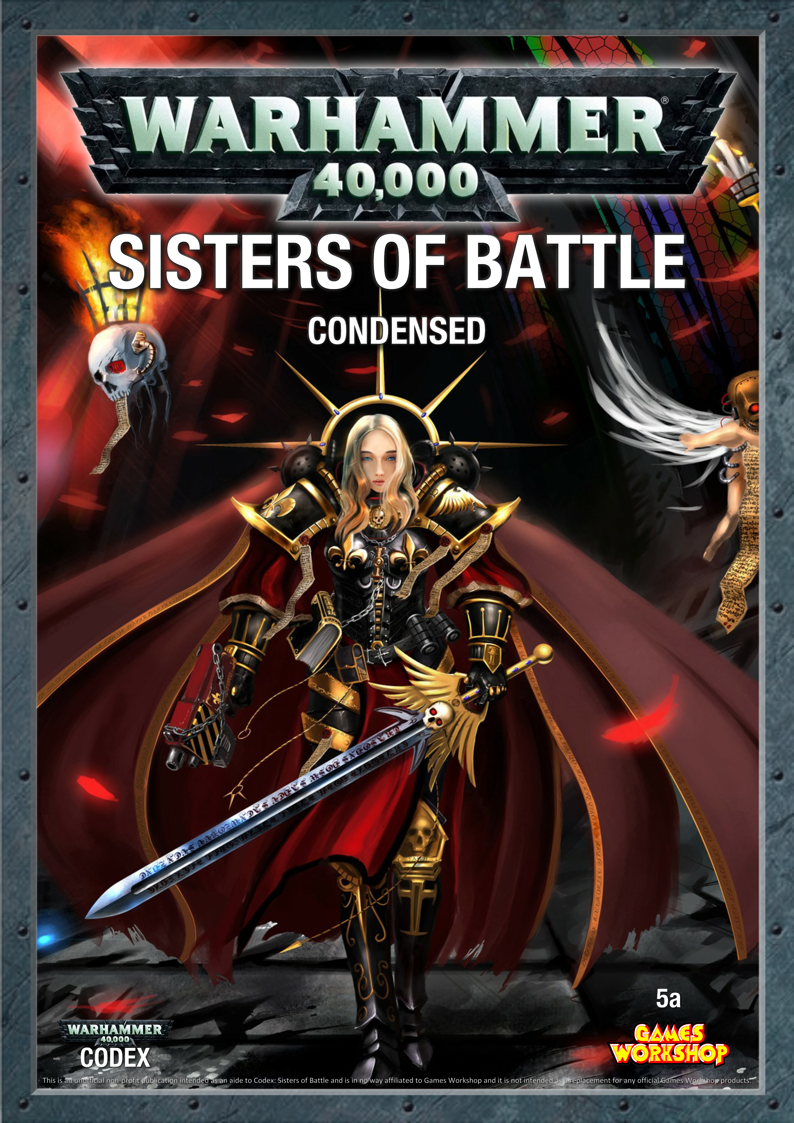
Updated Warhammer 40K 6E Sisters Of Battle Codex July 2013
This is an updated, improved version of the Sisters of Battle Codex as found in White Dwarf Issues 379 and 380, combined with the infomation in Warhammer 40,000 6th Edition Rulebook, Imperial Armour Vol. 2: Space Marines and Forces of the Inquisition, Imperial Armour Aeronautica, Wall of Martyrs – Vengeance Weapons Battery set, Wall of Martyrs – Firestorm Redoubt set and the FAQs and Errata for all of the above, into a print-ready, Condensed Codex, which includes all the rules for running a Sisters of Battle army.
GW has so far neglected the Sisters of Battle in an official capacity for years. Certain enterprising people, who wish to remain anonymous, have lovingly compiled all the official Sisters of Battle material into one handy resource.
Two days ago I was at my local GW, and the manager there told me that GW customer services explicitly told him to tell people wanting to start an SoB army to just download a PDF from the internet.
You may actually be getting more downloads thanks to GW!
With over 7000 downloads in the past months, this may be as unofficialy official as it gets.
Actually the Bastion was done on the fly. I made a box for the bottom, a box for the middle, and just figured out the rest of the pieces as I needed them, nothing was digital, but I'll see if I can put something together
------------------------------------------------------
And now for something completely different...
This week I built some terrain for a Necessary Evil Game I'm running. It's printed cardstock, mounted on Foamcore.
Trigger helped me out with some custom art, and I kitbashed the heck out of it.
The Building is from Fat Dragon GamesCapital City Line, and is building number 4. All the blue trim, window art, and doors are custom work by Trigger.
The original model is basically a box. I mounted it to foam core, recessed the doorways and roof, added the side window and wrap around wood trim, and removed a thrid door from the original model.
I showed one of the owners of Cape Cod Collectables and he was delighted.
Just finished building this new model. It's another kitbash, based on the same basic model as the Cape Cod Collectables building, but Savaged by Trigger and myself into a Pinnacle Building.
The trifold figures are of my Daughter, Miranda, me, with the crowbar, and my late friend, Greg, who passed away unexpectedly yesterday, and never got to lay eyes on his paper doppleganger in action.
And now for something completely different...
V'sori Vehicles from [url=http://www.rpgnow.com/product/18617/Necessary-Evil-Figure-Flats?it=1&filters=0_0_1600_0_0]Necessary Evil Figure Flats [/url]
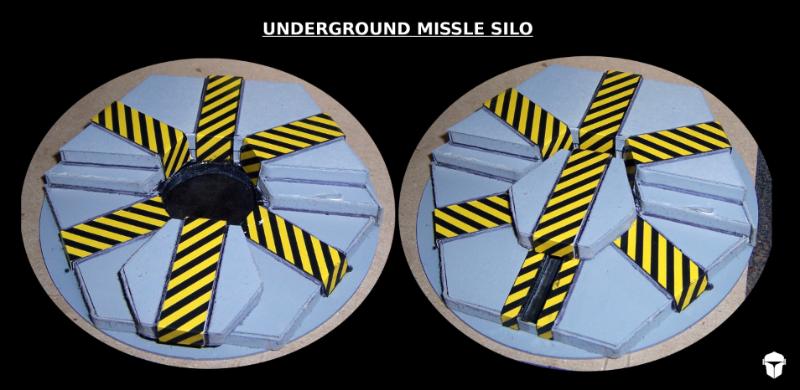
Huh, nice and simple. It would probably make a good objective, or possibly even a hazard if the missile was fired during the game, things may get burnt!
GrimDork wrote: Huh, nice and simple. It would probably make a good objective, or possibly even a hazard if the missile was fired during the game, things may get burnt!
I'm figuring with all the new objectives in 40K 7E it should get some use. At the very least I'm going to use it to pour forth toxic zombies in this weeks Zombicide adventure.
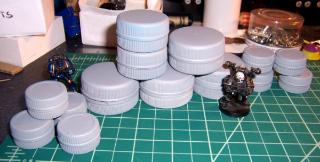
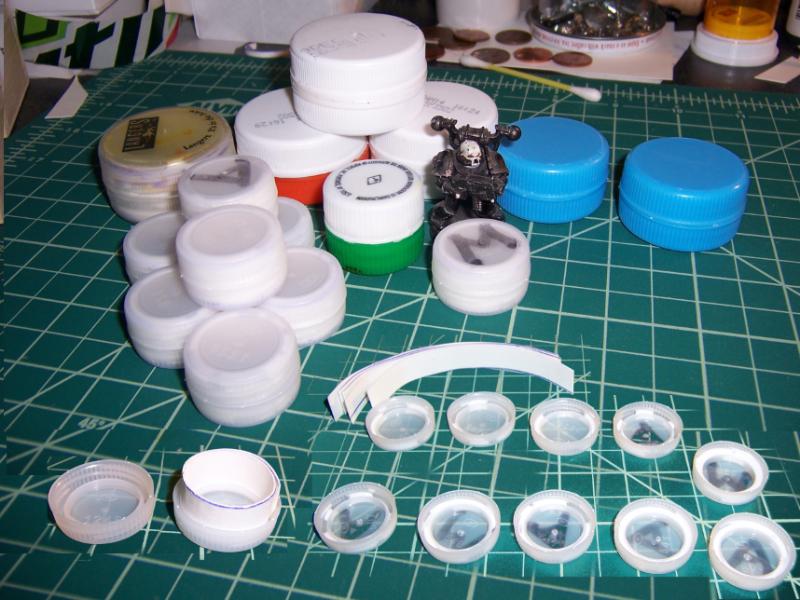
The idea of using bottlecaps for storage containers has been around for years, but I hadn't seen anyone pull it off until GrimDork posted some in his P&M Blog.
I'd been saving some to use as wheels, so I had a supply.
Now just gluing them together is courting disaster, so I measure and cut strips of thn card to act as supports. Also drilled a hole in the center of half of each container so there would be a little airflow for the glue to dry.
I'm going to let them dry overnight, and then spray paint a base coat on them.
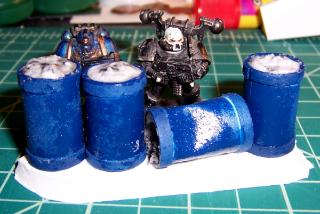
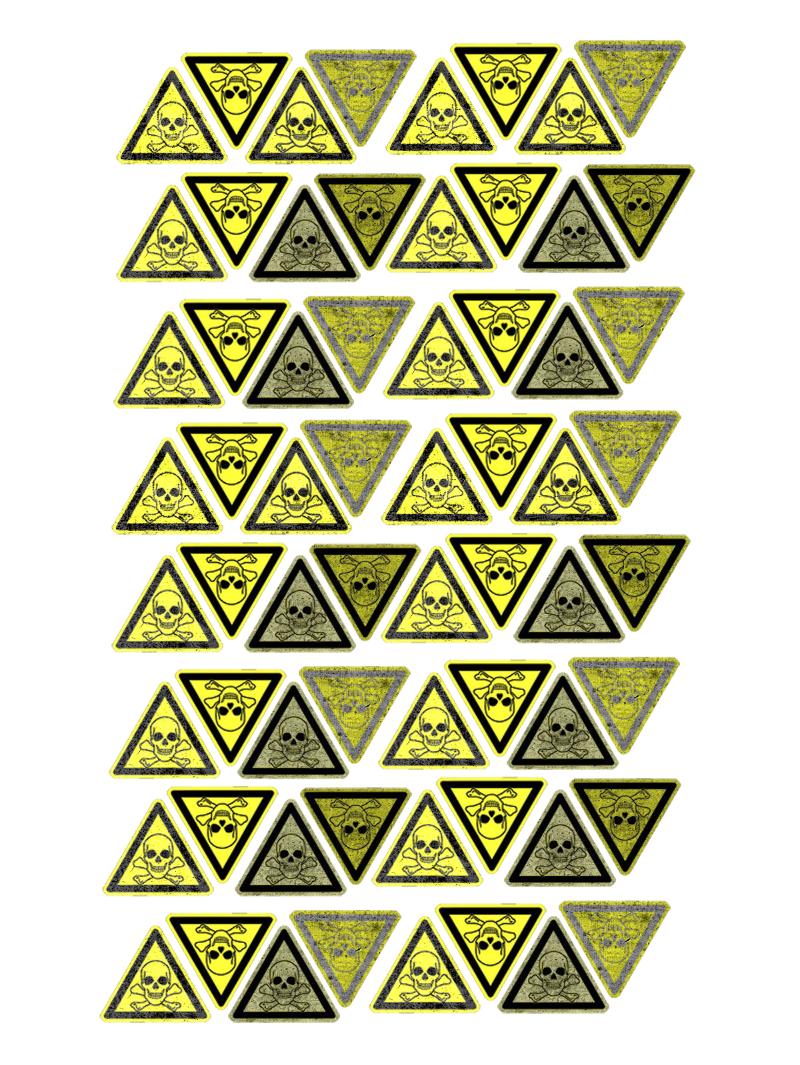
Also found this toxic waste sign and put together a 4x6 print of it to add to the barrels.
now with paint the silos have me change my mind... at first I was hesitant... due to the rather bland and simple shape... but now they look stunning...
I like that you have thought the glueing of bottle caps through... I tried to glue them once too and it didn´t work that good... I think your air vent holes idea is a very good explanation for my errors... I will try that too! also supportive bands is also a good way to provide stability!!!
Ah hah! See you've just got to do something, even if it's not well, and then someone else will come along and do it better. Then you can just steal the idea right back That's a great idea, I'll have to use it when my own 'left to chance' barrels eventually pop apart. I may have to make some more too, as they're soooo easy.
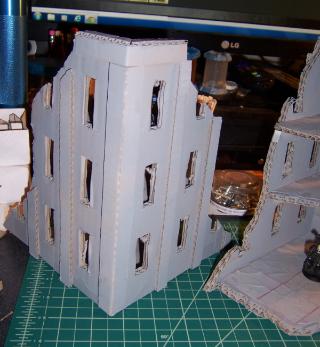
Other than modern terrain, I haven't had a cohesive theme to the terrain I've built, in a long time. With the advent of 7th Edition and the new Ork codex, I forsee some 40K battles in my future, so I figured I'd steer my creative juices into that direction. I'll be digging out my Orks, once I get my hands on the new codex. In the mean time I figured I'd shoot for a tables worth of ruins.
Ooh, looks good in terms of structure, and it's always a good idea to think about the usability. I know I've made some stuff that's effectively pointless when you really get to considering it
When I started building terrain years ago, I spent hours building terrain for Warhammer Fantasy that would never get used. I was focused on making stuff look cool, and not thinking about what would fit on it.
Viktor von Domm wrote: how did you connect the floors to the walls? is it strong enough?
Right now they are held in place with a thick bead of PVA glue. They should support anything plastic. I was thinking of using the off cuts from the rabbet cutter to make a ledge for them to sit on for additional support.
the barrels look very good too...and the sheer mass of it is overwhelming too
I plan on using the barrels 4-9 to a stand, and here and there as details on larger bits of terrain.
Once you pre-cut a supply of barrel components it doesn't take much concentration to assemble them while watching video, so their ranks will probably swell in number as I catch up on shows.
I find it hard to get good WIP shots of making the barrels since both hands are in use.
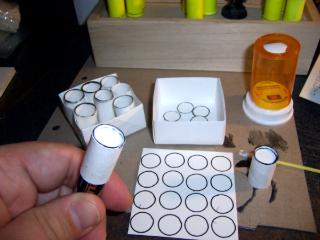
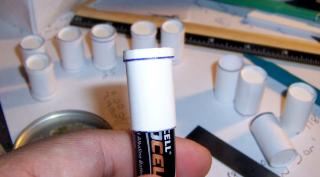
Cut strips of paper 1" x 8.5"
Put a bit of glue on one side.
Roll the paper around a AA Battery.
Cut out a circle of thin card the same diameter as the battery.
Stuff cirlce into one end.
Apply glue to inner lip to stick it in place.
Cut 2 thin strips of card, 1/8" wide, and wrap and glue them around top and bottom lip
If your feeling ambitious, glue circle on other end.
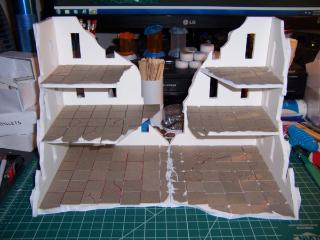
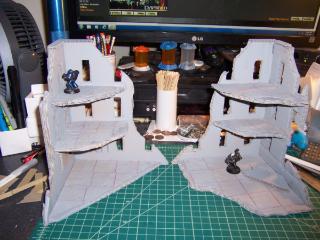
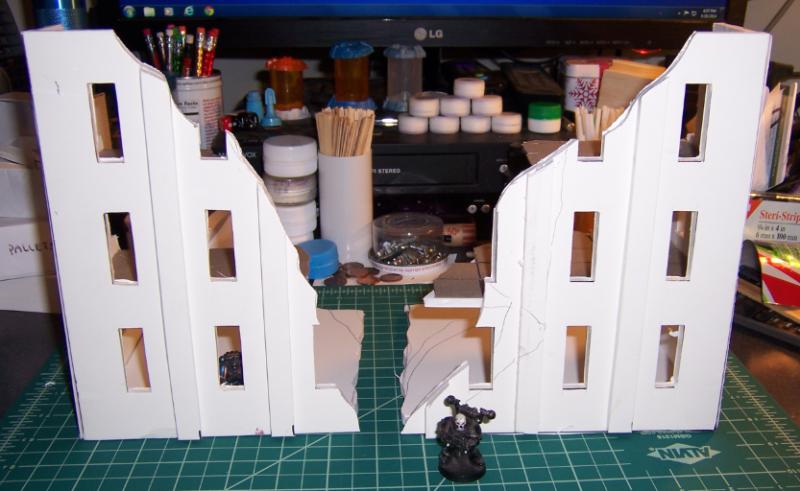
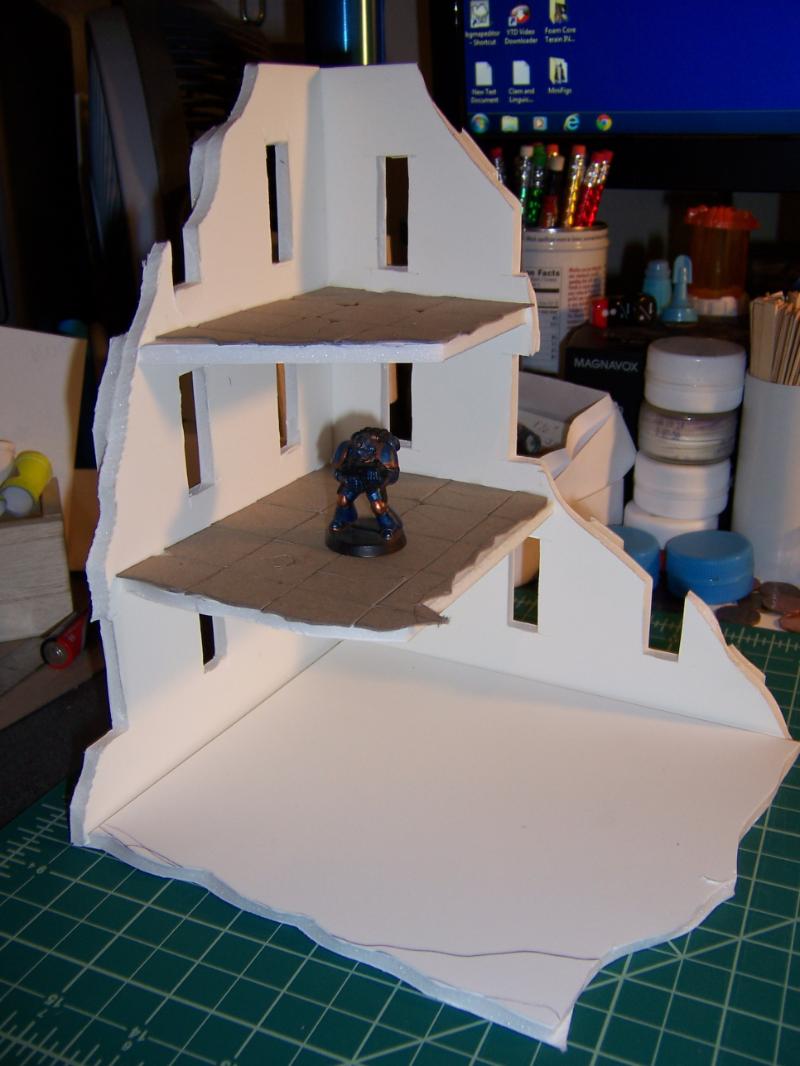
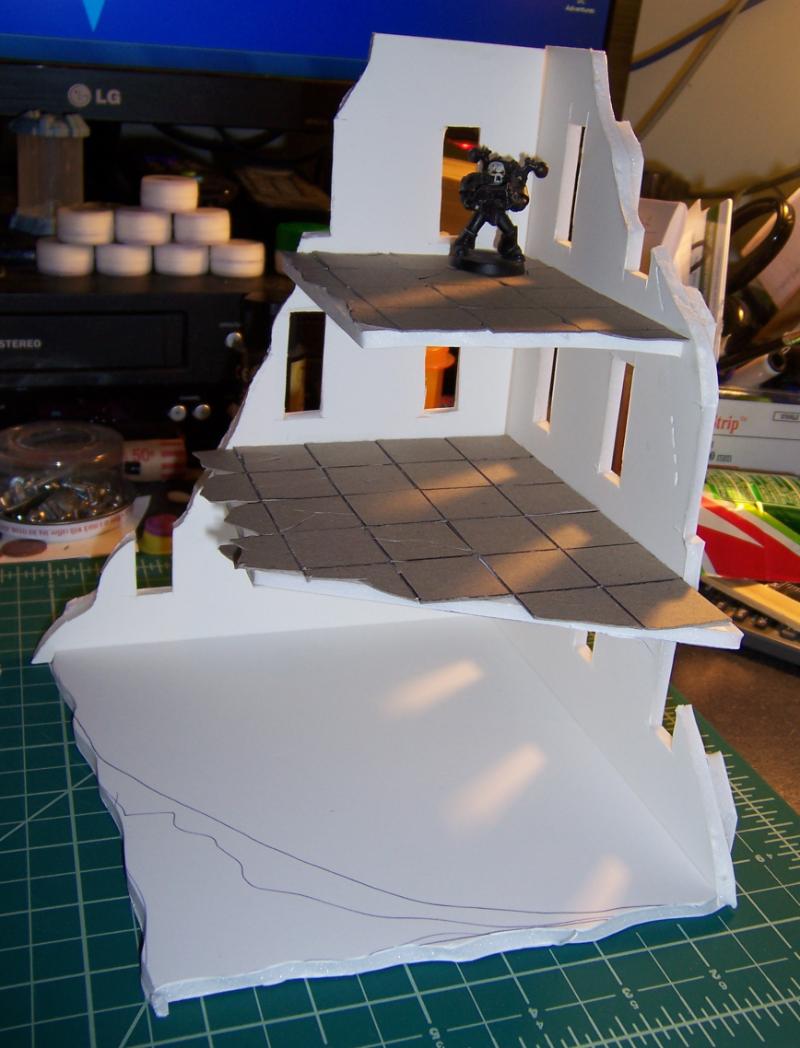
What I did today
added detailed floors for both of the foamcore ruins
Built 3 new ruins out of cardboard (I wanted to try another material)
Detailed the floors on the 3 new ruins
base coated the 3 new ruins, and all my bottlecap containers gray.
That's a nice piece of scatter. I like all aspects of the hobby but its almost a chore to get the time set aside to play. Building and painting are my current focus though getting a game in wouldn't hurt my feelings
^Are you talking about the barrels he's making? He mentions using a AA battery to roll the paper but then pushing it out after the glue sets, which is why batteries were used instead of all of his lame tapered markers
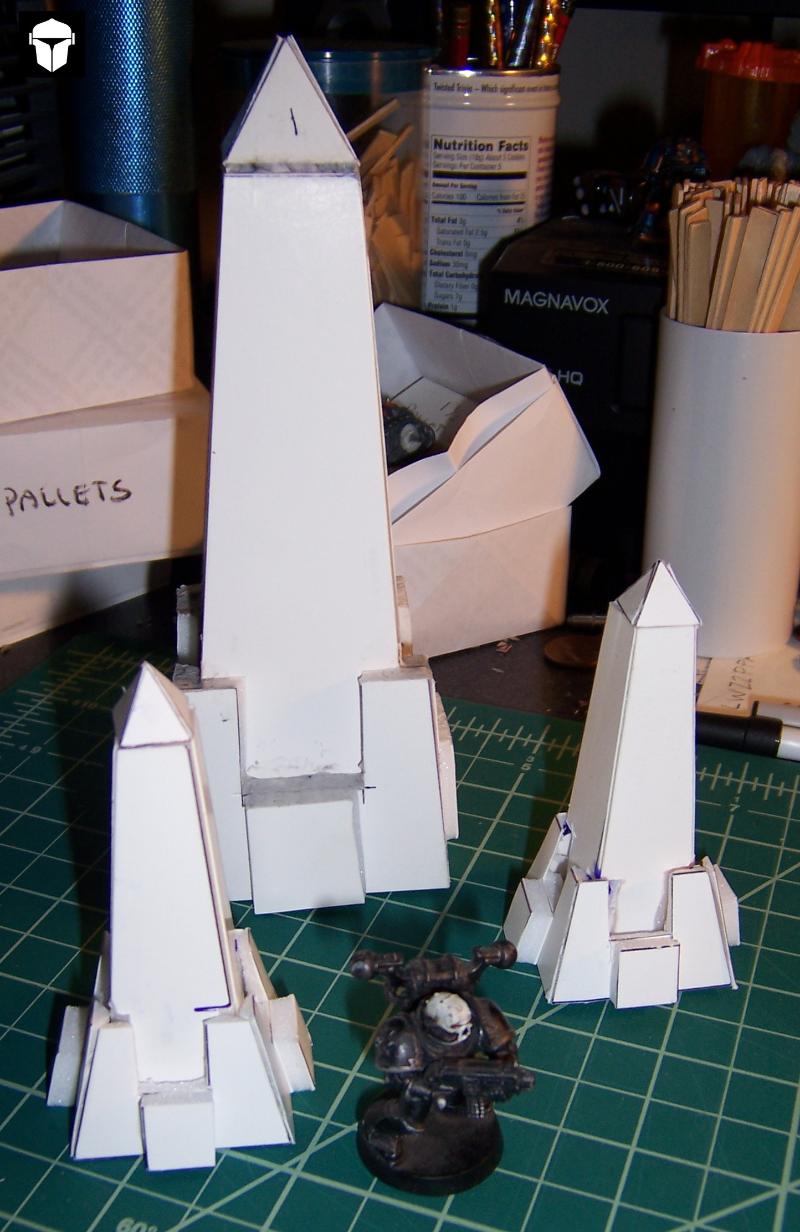
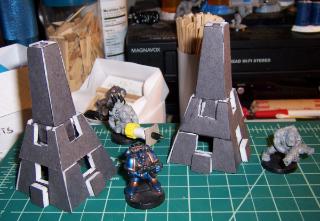
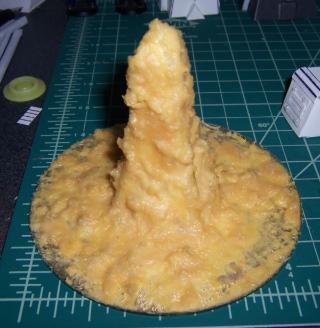
that übermonolith looks amazing.... I would really like to build one of these for my own... maybe a bit larger even as it would make an ideal airship station...I think it looks totally super...
the ruins are actually quite inspiring... I still want to do a whole city table one of these days ... unfortunately the idea of a steampunk / Victorian city structure is needed... I shudder when thinking about all the details needed to add...
50/50 Blend of Baking Soda and PVA glue works wonders.
While rummaging around in the basement I found 3 large bags of empty soda bottles, just wating to be recycled. Raided them all for the bottle caps, then did the same with the recycle bin at work. I'm going to have a crap ton of the bottle cap storage containers.
that übermonolith looks amazing.... I would really like to build one of these for my own...
I did make templates for this project, so that I could make more than one. Eventually, I'll scan them and work up a tutorial.
the ruins are actually quite inspiring... I still want to do a whole city table one of these days ...
I realized after years of gaming that I had a cohesive collection of terrain for Fantasy, Gorkamorka, Necromunda, and modern settings. All my 40K gaming had been at the LGS or on a hodge podge collection of random Scifi terrain elements. This time I am shooting for a table full of cohesive 40K suitable terrain.
However, it's looking like they built a city and it fell to ruins on a Necron World
That's dirty... . Nah, sounds like a good base for more terrain. You would need more of those crystals though. Wonder if I should request models from the wife or just leave it to chance...
There is a slight oversight in the templates that requires the central crystal shape to shaved down, at the bottom, in order for the other pieces to fit properly around it. I'm still trying to work that out.
I modified the templates when I made the smaller monoliths, but that acutally made the problem worse, but ended up with a cooler looiking finished model.
Pretty sure I've figure out how to solve the problem, and I will implement the changes in the next batch
As for the Card Terrain, I didn't see the Eldar vibe until you mentioned it, but now I totally do.
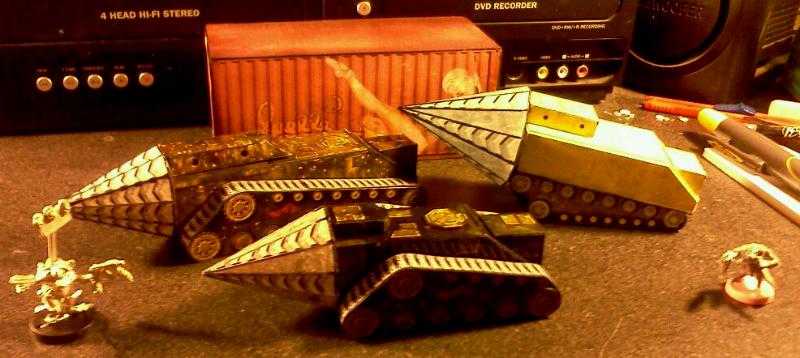
Was reading through some 40K stuff and came across Grot Tanks..
While going through my art supplies I found a tub of Latex Mold Building material. It's starting to dry up so I decided to make some use of it.
Started making a mold of one of the mini monoliths.
Grot Tank I was able to jam 5 bottlecaps into it's construction. While that may not be all that impressive, it was personally satisfying to find uses for the bottle caps, other than storage bins.
Tank treads, barrel muzzle, headlights, and other important details are all on it. Now it's just a matter of adding fun little details and rivets. Instead of usign my normal methods for rivets, I'm experimenting with 2 and 3mm half round beads (hemispeheres). They were under $1.50 for 1,000. If they work out, they may be my new default rivet technology.
Mini Monoliths No paint on any of these yet. I can't decide between a rusty metal or black with green glow paitn scheme.
The latex mold I made for the 1st mini monolith came out well. I had made it in such a rush, that I had forgotten to seal the orignal model before molding. It turned out okay, with only minimal damage to the original. Will try to get a casting of it done on Friday, my next day off.
Ruins Been busy with the other projects, so no real progress with these.
I am pretty happy with the way the foam core ones came out. As for the card board ones, I am happy with the interiors. The textured paint I used on the exterior just isn't doing it for me over the gray base coat. Will try base coating the exterior black, and then re-applying the textured paint.
I had tried microbeads before, they were ok but what you're talking about sounds much handier. Do let us know if it pans out!
I'm also curious to see how your mini monolith casting comes out. I've been eyeing the casting kit at Hobby Lobby for years, need something useful to cast first though.
It kind of does a little bit. I'll have to keep this in mind as I look into making some treads to replace missing rhino treads. Those look fairly serviceable as is.


 Anyone know a sculptor who's willing to work cheap ?


qrBRhk(wKK5!~~48_72.JPG)


 added detailed floors for both of the foamcore ruins