5462
Post by: adamsouza
I love to scratch build and modify models, some times more than I enjoy actually playing a game.
Start of Death Guard
Fun with Dice HERE
Start of Ork Gorkanaut Project HERE
Start of Chaos Daemon Soul Grinder HERE
Start of Ork Trukk Project: HERE
Start of Tyranid Tryannocyte Project: HERE
In this thread you will find scratch built, or at least heavily modded:
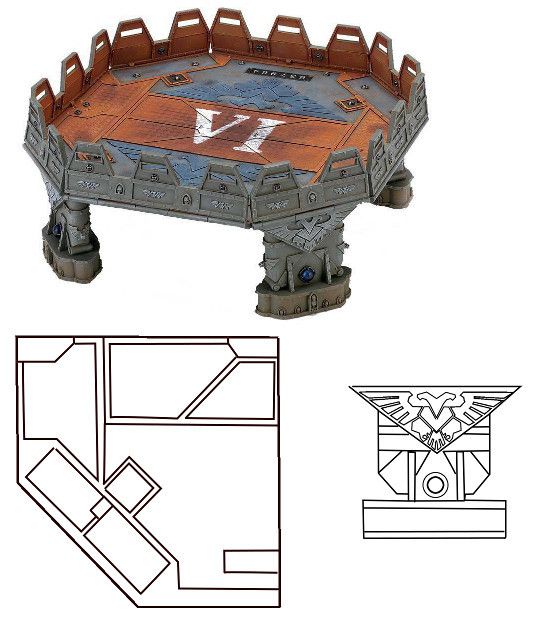
D&D Dungeon Terrain
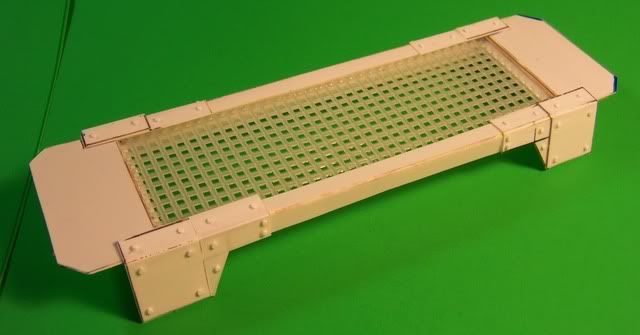
Modular SciFi Walls 4"x2" (templates)
Modular SciFi Walls 3"x2" (templates)
Space Marine Drop Pod (templates)
Space Marine Drop Pod Version 2 (templates)
Modern Printed Buildings
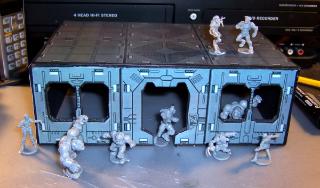
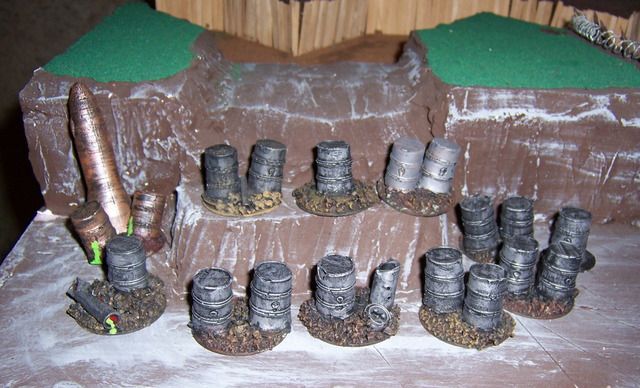
Necromunda Terrain
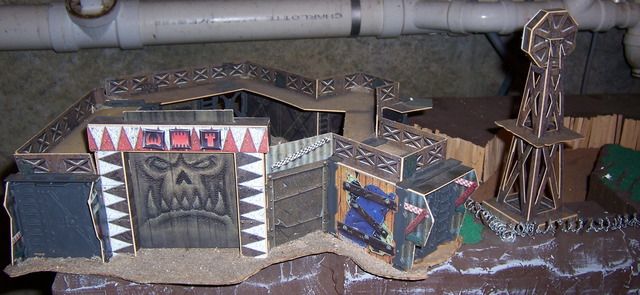
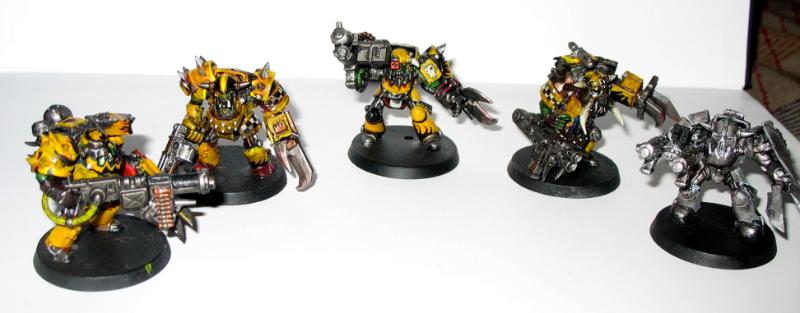
Ork Stompa
Imperial Bastion
Skyshield Landing Pad
Aegis Defense Line
Ork Army ( Mega Armor Warboss, 'Ard Boyz, Killa Kanz)
If you have any consturctive comments, suggestion or questions I'd love to hear them.
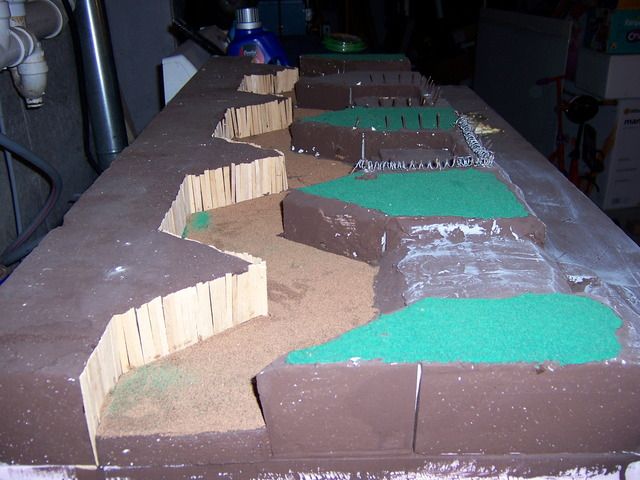
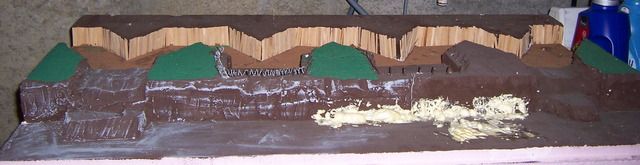
This should give you an idea where this is going
.
54042
Post by: hunter_sk
Like the way when terrain is accomplished from non-hobby related pieces like some bottles, straws, etc. Keep up the good work. What object is base to ladder?
26618
Post by: Two Spartan
Wow dude that looks good! I agree totally with the scratch building of terrain, fun cheap and can look awesome!
If you haven't checked out his blog yet dsteingass made a lot of necro terrain based off the old card cutouts. http://www.dakkadakka.com/dakkaforum/posts/list/399826.page
might find a few useful tips there.
Can't wait till this stuff gets painted, thanks for sharing. Keep us posted : )
5462
Post by: adamsouza
Actually, seeing his blog the other day is what inspired me to start mine.
There are few more pieces I forgot to take pictures of, that I'll add soon.
Right now, I need to focus on detailing the pieces I already have. The little details are what make terrain really pop, but they are also the most tedious.
54592
Post by: AlfonsoTheTraitor
Im loving it ! Thanks for sharing your scratch built structures I only wish more people would do this .
5462
Post by: adamsouza
Upgraded one of the towers to have an additional level.
I had inadvertantly made most of the pieces with levels at 6" and not many at any other height.
52201
Post by: evildrcheese
Wow, these are amazing. Truly inspirational.
D
5462
Post by: adamsouza
Thanks !!
Sometimes I think I enjoy building terrain and miniatures more than I enjoy playing with them.
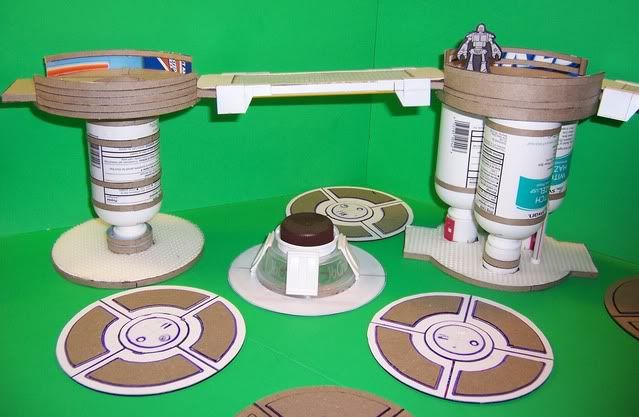
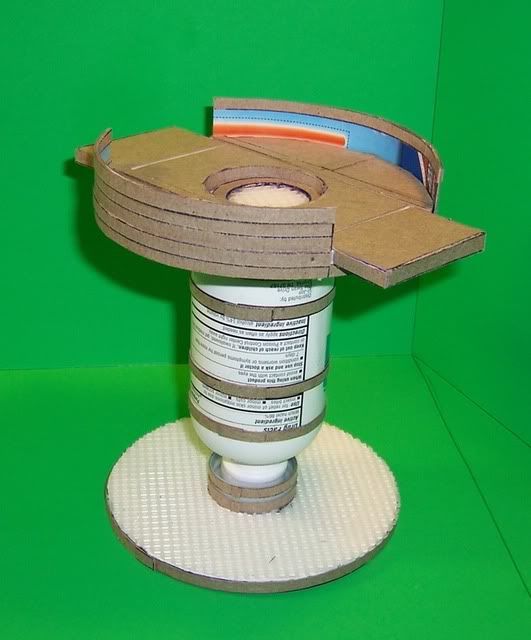
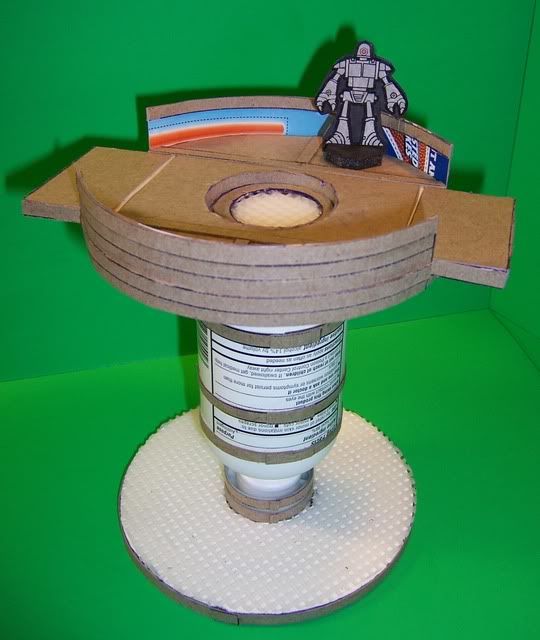
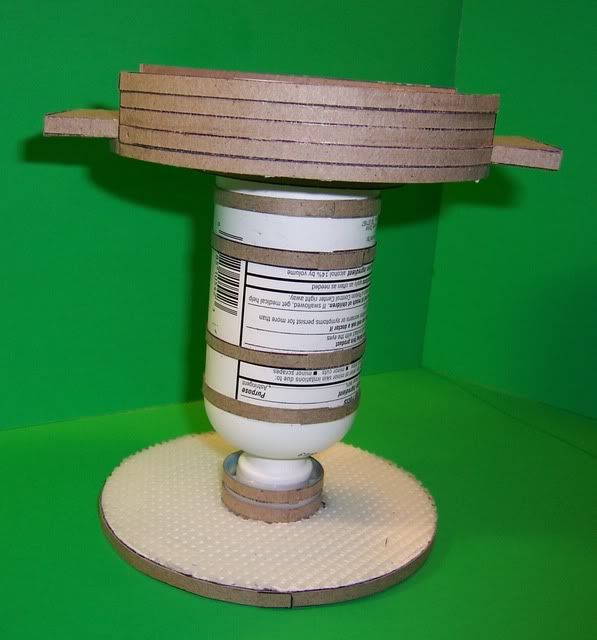
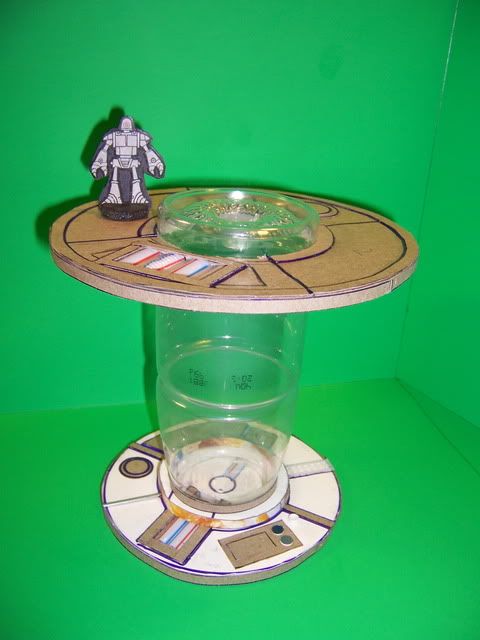
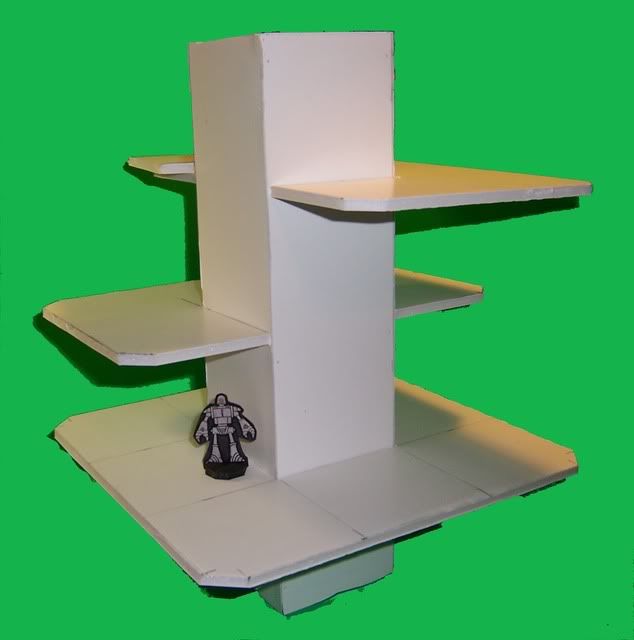
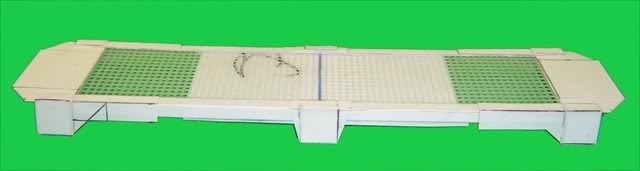
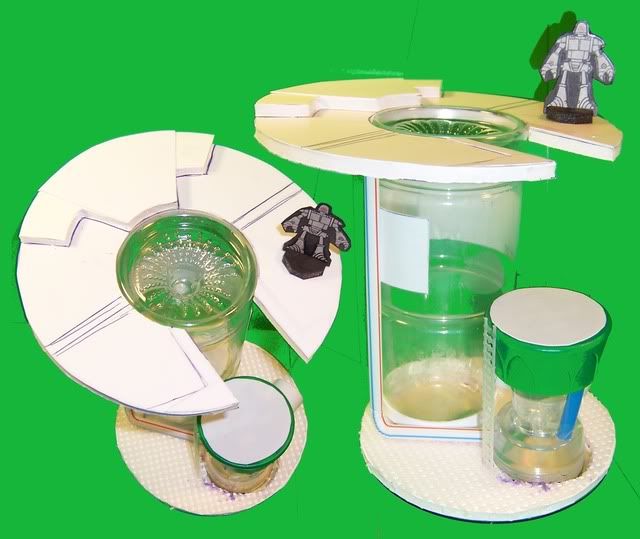
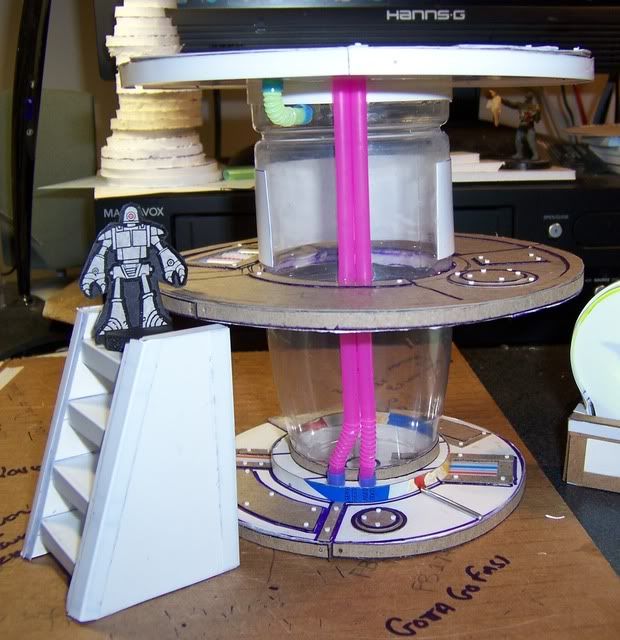
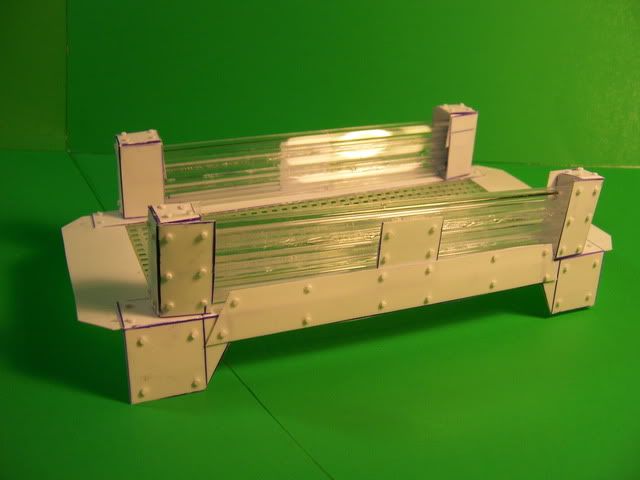
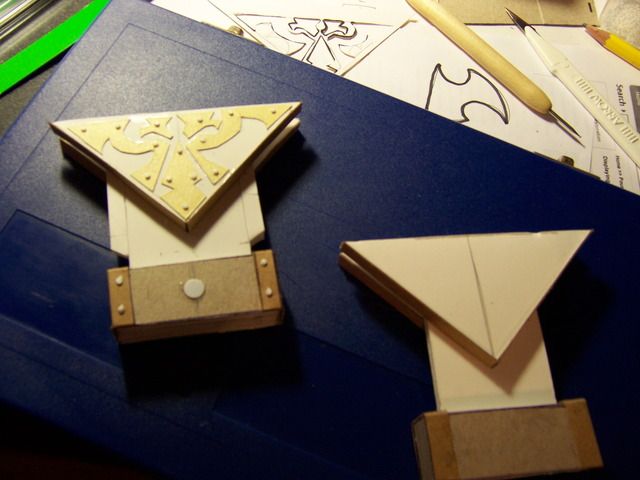
Here's a platform I built. 8" across 3" high. I wanted to do something that wasn't circular.
5462
Post by: adamsouza
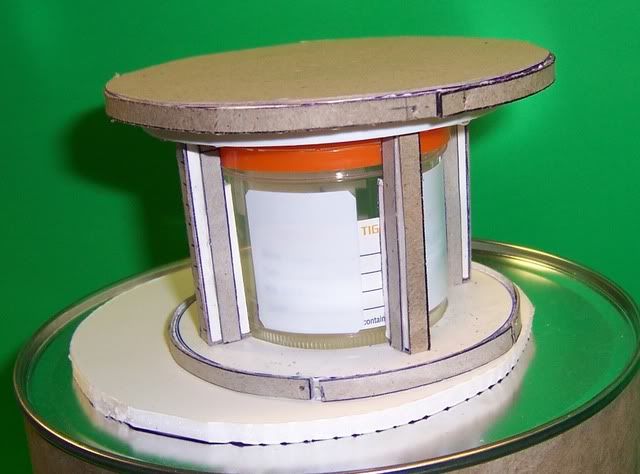
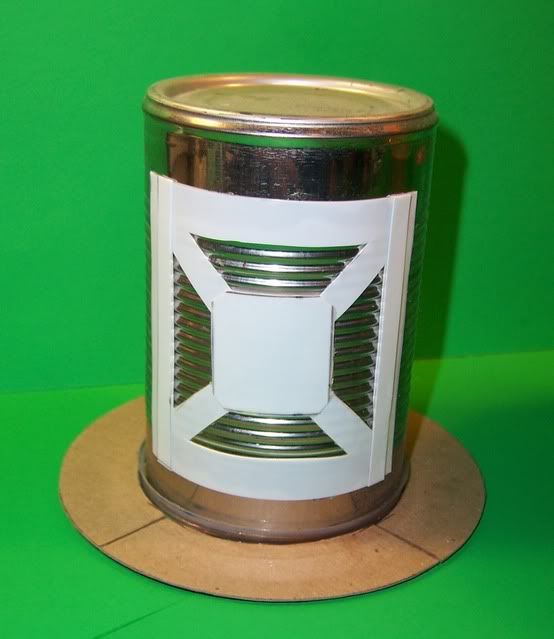
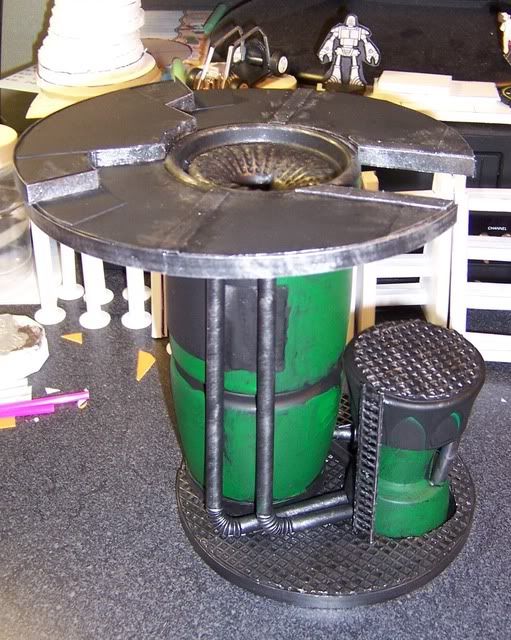
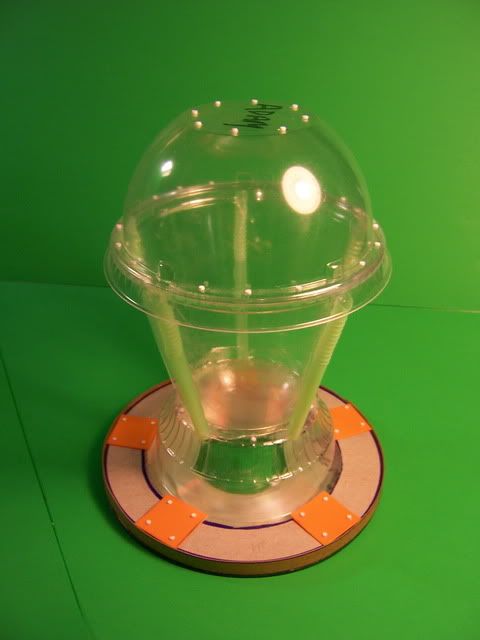
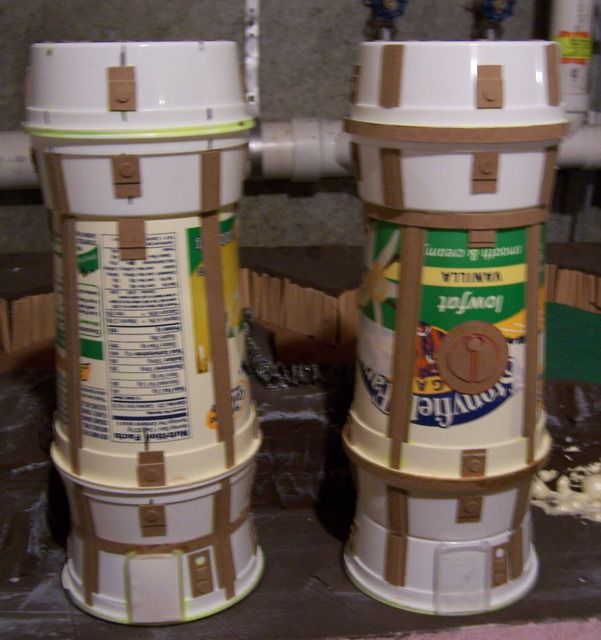
This piece was too plain for my taste and not very functional, other than blocking LOS, I added a platform at the 6" height, and some pipes, as well as a ring at the base.
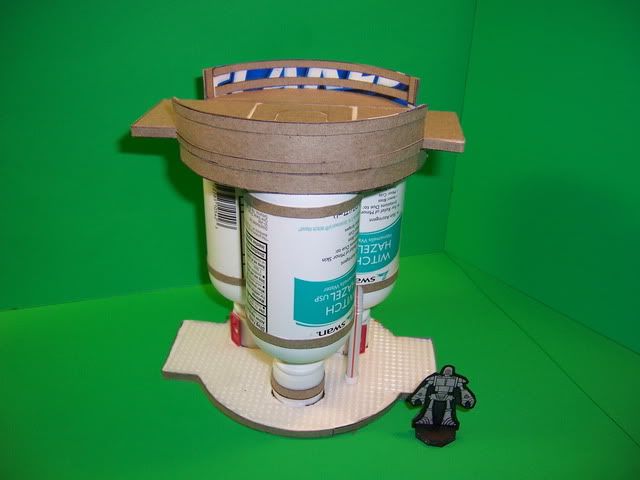
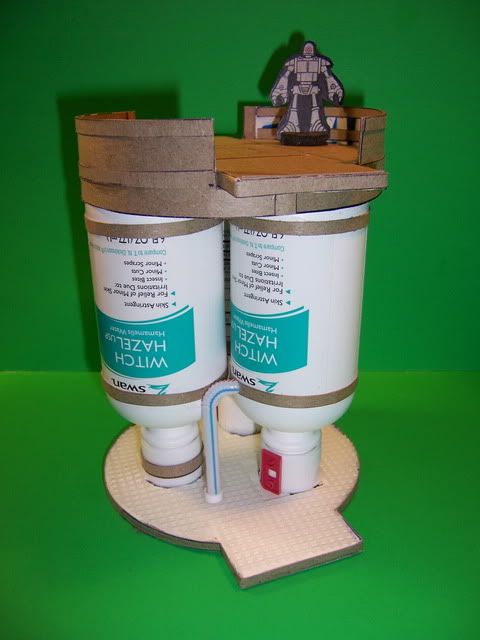
This tower is some sort of moisture collector. It's syphons water molecules out of the rank air of the underhive and creates drinkable water.I want it to look less sleek and high tech, and pipes give it more low tech steam punk vibe and less Tau Tech look.
224
Post by: migsula
This s really great stuff. Reminds me of old times in the best possible way. Thanks for sharing.
52346
Post by: Ghostflame
Awesome stuff, kudos to you dude...looking forward to seeing more!
R
5462
Post by: adamsouza
Thank you for the encouragement.
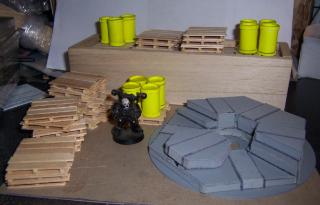
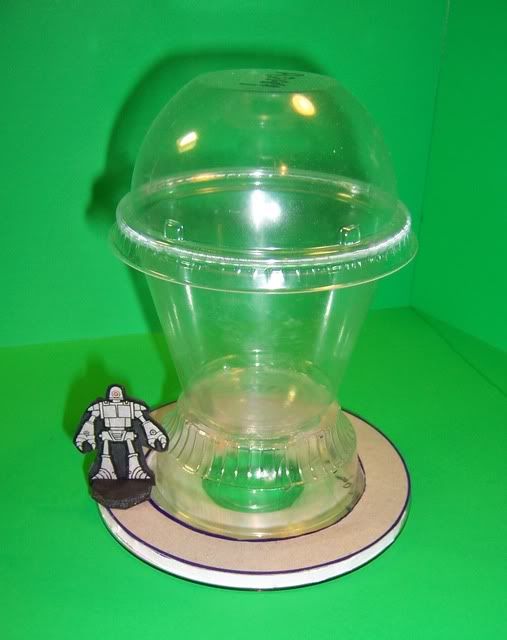
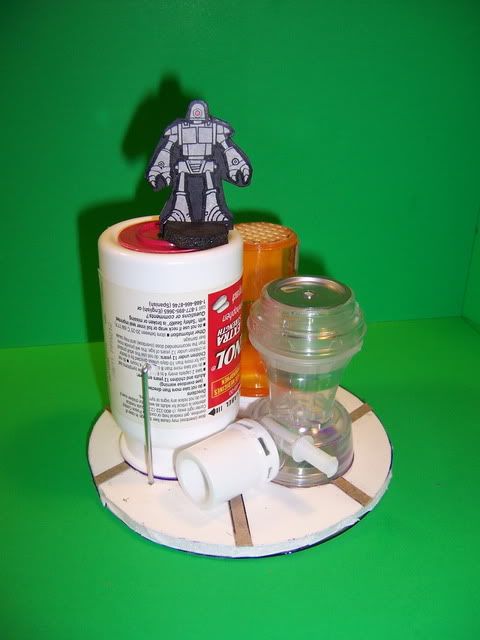
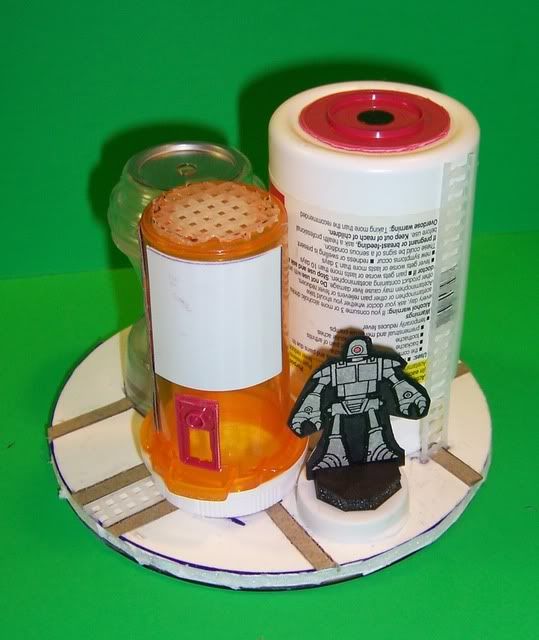
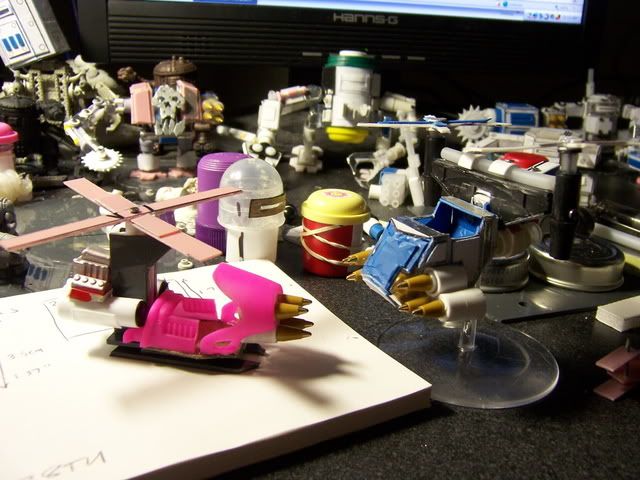
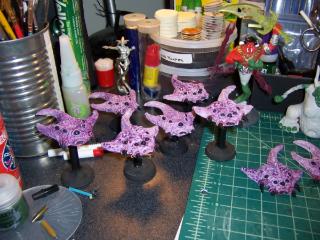
Some random details while the glue is drying
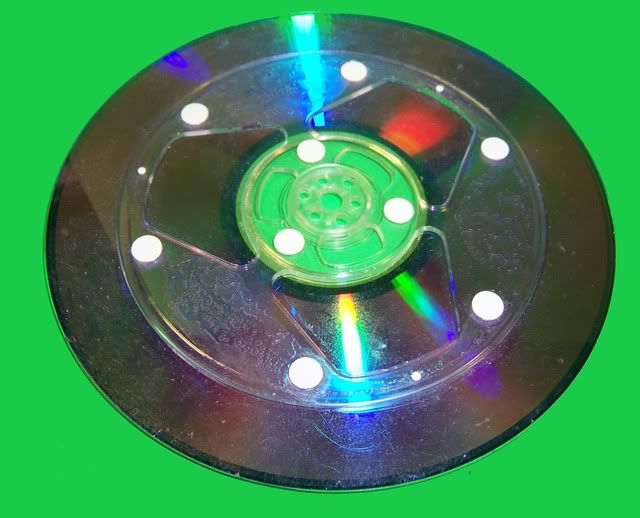
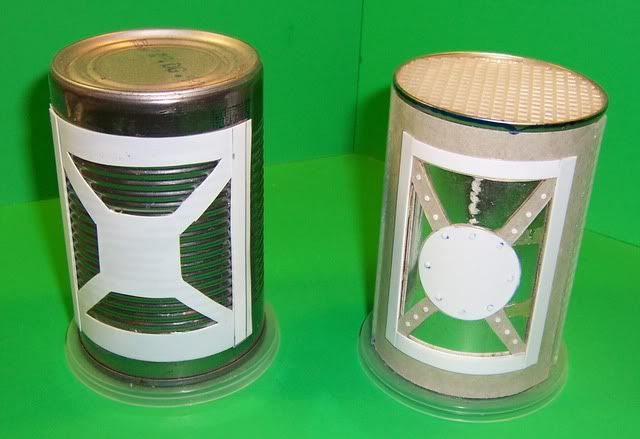
Most of the items are based on CDs. I had a ton of them I was saving, so I figured it was about time to use them. They provide a standard size base that doesn't warp or chip.
A lot of detailing is done with 1/4" strips of cereal box
All the clear containers are left overs from my lunch break at work.
I use tacky glue, almost exclusively, to assemble everything
I just polished of a jar of nutella and I'm determined to find a way to use it for terrain
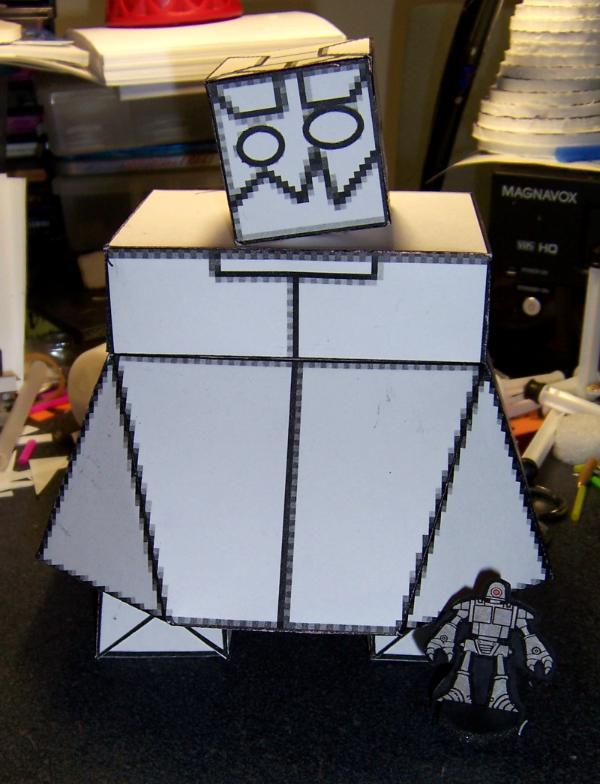
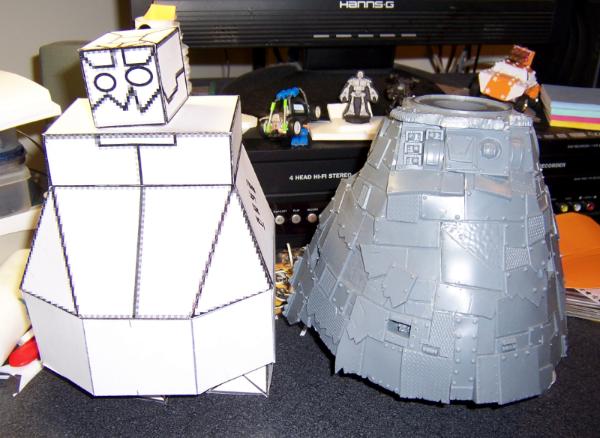
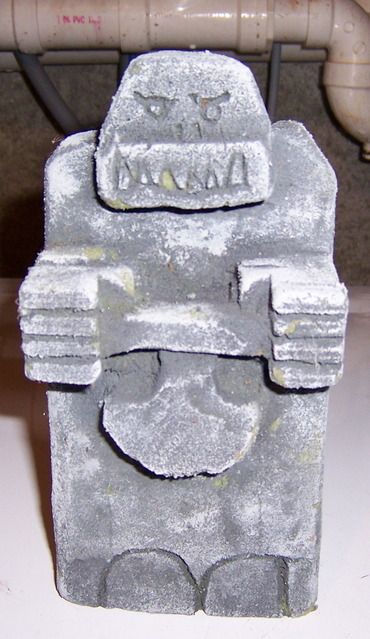
The little robot I'm using for scale reference is a paper model I created myself
Zombicide is up to 108 miniatures (71 figures in the base set + 3 promo figures + 3 promo zombies + 4 Fatties + 1 Abomination + 6 runners + 20 Walkers) , 6 custom black dice, 6 glow in the dark dice, 1 T-shirt, 1 signed lithograph, 1 additional scenario all for $100 Delivered anywhere is the US(downloadable)
5462
Post by: adamsouza
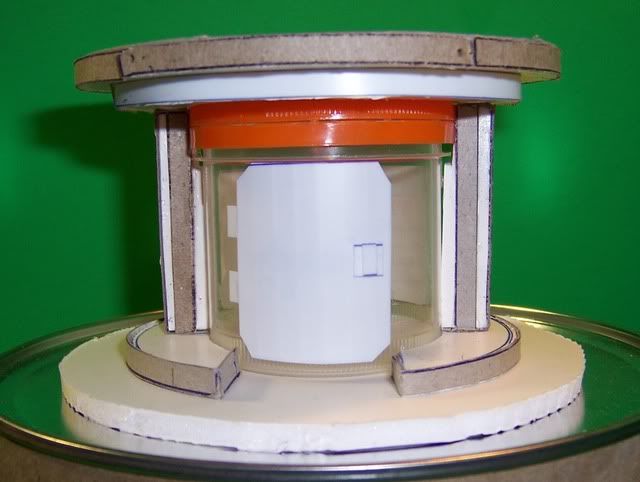
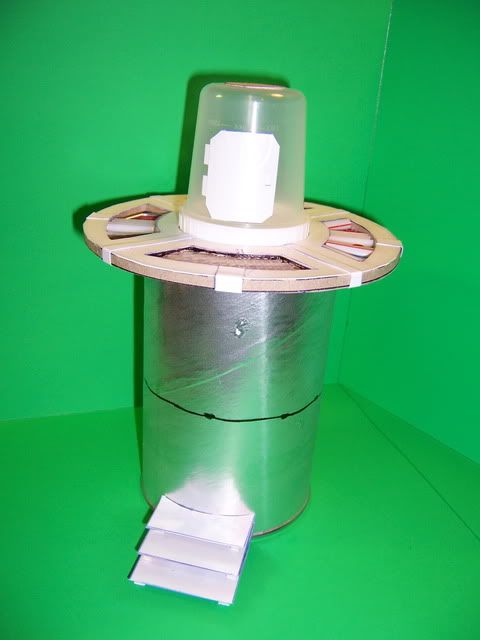
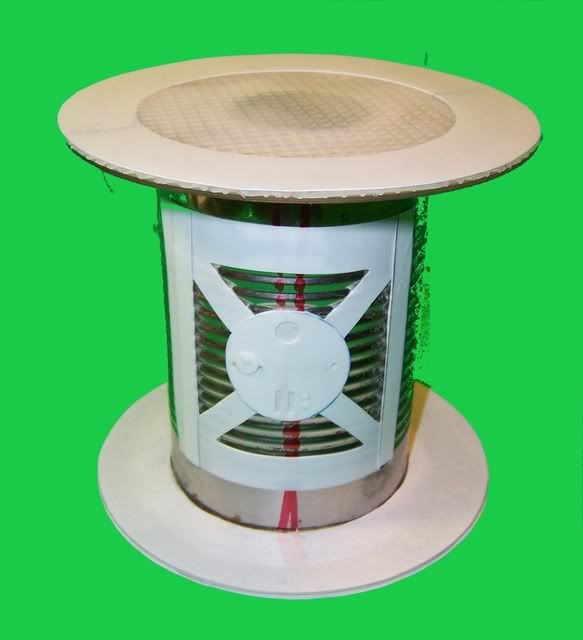
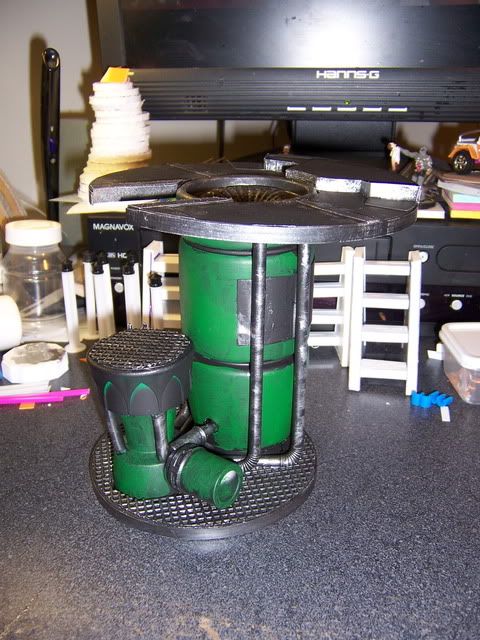
Updated photo of tower. Added more pipes and covered the exposed edges of the foam core.
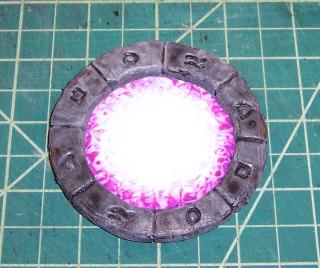
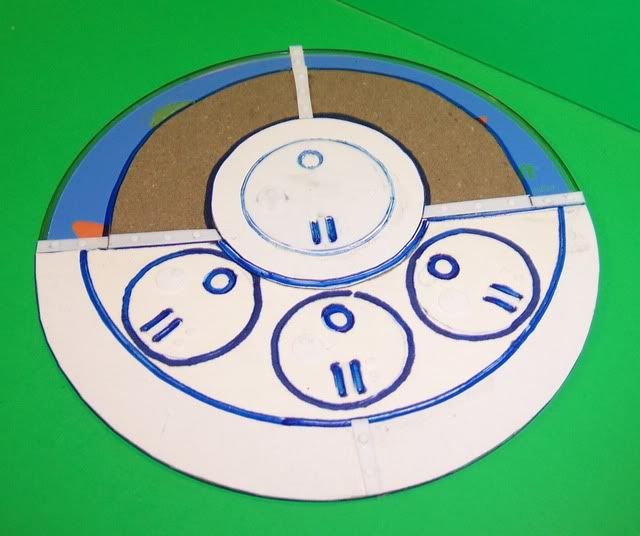
Hows this for an objective marker ?
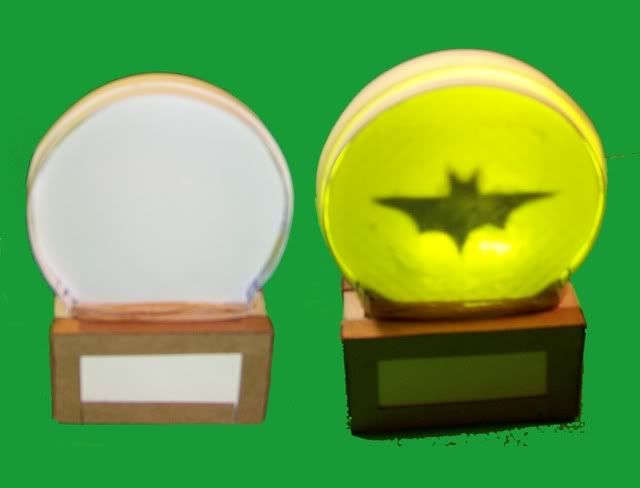
It lights up !!
Automatically Appended Next Post: Made a new piece this morning
26618
Post by: Two Spartan
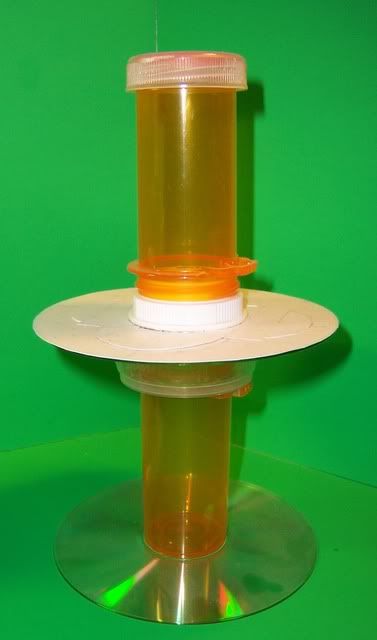
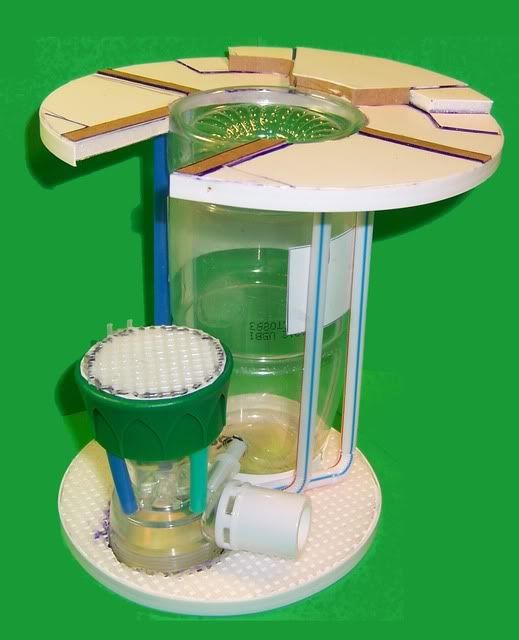
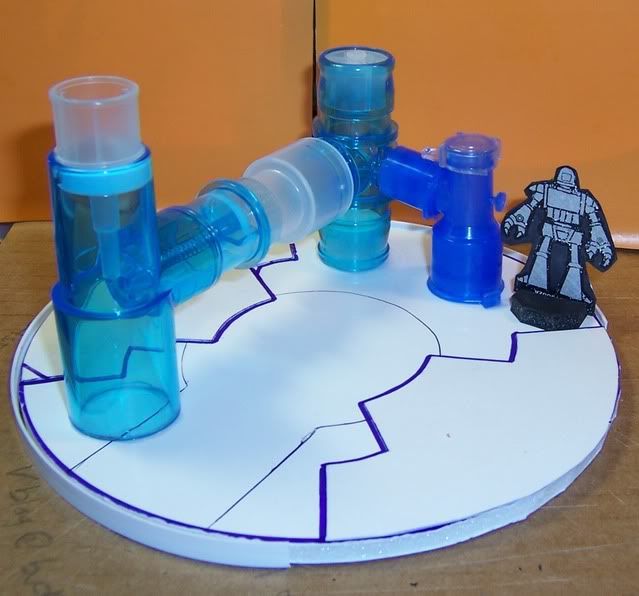
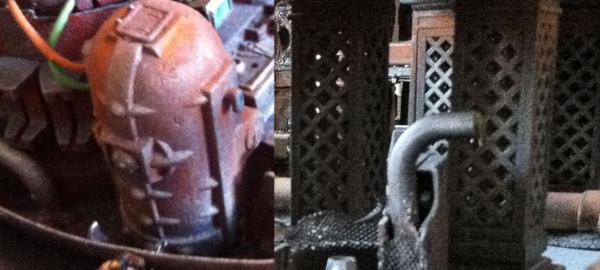
Hey cool tubes, what are they water filter parts?
57468
Post by: Bruticus
Those tube bits are great, I'd also like to know where they are from. Really loving the level of detail you've put into this stuff, it ought to look great when painted. Could maybe use a few rivets to make it look a bit more industrial rather than high-tech.
You say you base stuff on CDs, do you use a few CDs glued together for the extra depth?
Small towers are the way to go for Necromunda scenery, gives so many options compared to big bits. I think you could use some cover on your walkways though, I found that walkways with no cover were just death traps. Also maybe a few more ladders to get up the towers?
5462
Post by: adamsouza
Thanks guys.
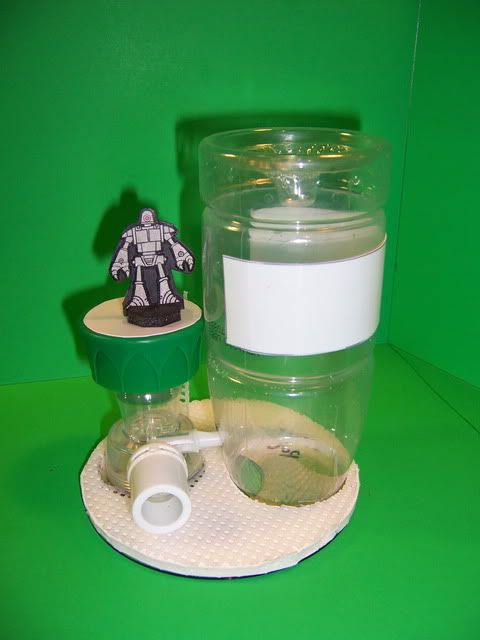
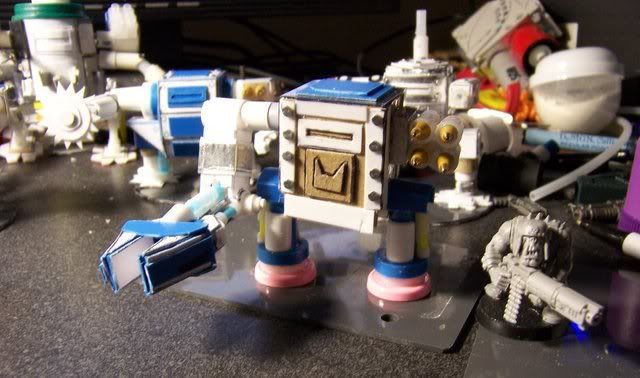
The blue bits are repiratory supplies. I have sleep apnea and sleep with a machine at night, and I work in medical supply, so I have access to all kinds of strange bits, that normaly would get thrown out.
The thicker bases have a layer of foam core to them to bult them up, on top of the CD.
I agree with the rivects suggestion. They were already on my to do list. Just a tad tedious to cut and glue all those tiny rivets.
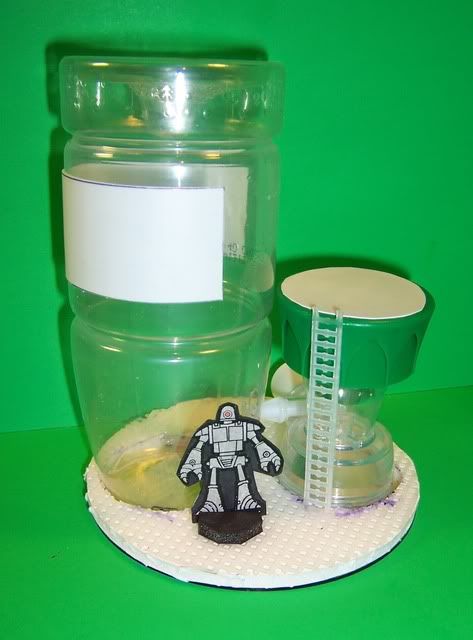
Still trying to find an easy way to add guard rails/low walls to the walkways that looks right, with the supplies I have on hand. I was thinking of making foam core walkways wit low walls attached.
33775
Post by: Fosner1703
I love the retro 1960's Sci Fi feel the terrain has. This is awesome. I might have to steal you grated bridge idea. That is simple and easy, looks amazing.
52346
Post by: Ghostflame
Adam when you gonna slap some paint on these bad boys?
R
5462
Post by: adamsouza
Still adding little texture details to them before painting.
I just punched out a few hundred "bolts" for that purpose.
If the local weather is co-operative I intend to start base coating and painting this weekend.
57468
Post by: Bruticus
Some DIY stores sell great textured spray paint in dark metal shades which give an amazing coarse iron look to things like pipes and boilers, especially when dusted with rust. I think it would be really suitable for some of your pieces.
5462
Post by: adamsouza
That's an interesting idea. I'll look into that. My only would be that the texture obliterates the fine details of the model.
48150
Post by: storag
Nice terrain, love the omnipresent robo-guy 
5462
Post by: adamsouza
Thanks !
I was wondering if anyone was going to mention him
It's available, for FREE, on the One Monk Miniatures Website
 Automatically Appended Next Post: Automatically Appended Next Post: Bruticus wrote: Also maybe a few more ladders to get up the towers?
After you mentioned it, I took a look at my collection here and realised that I didn't have enough ways for figures to get up between levels.
Since most of them are already built and their design doesn't really support slapping on Add-On ladders, I'm opting for stairs.
I got a prototype built before coming to work today. They are functional and they will also provide much needed cover.
I'll post some pics when I get home tonight.
5462
Post by: adamsouza
Took a few pictures, but the new detail work was white on white and it didn't photograph well.
5462
Post by: adamsouza
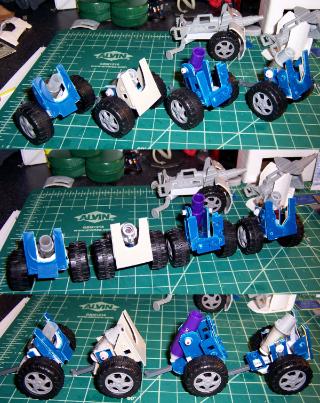
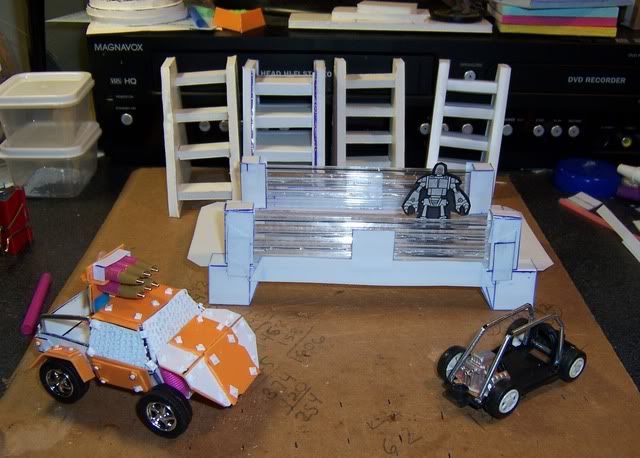
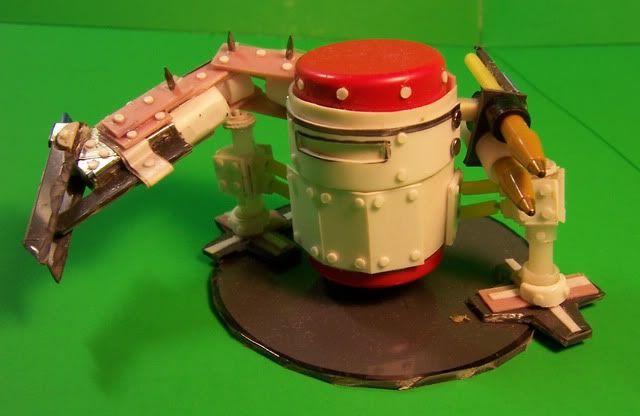
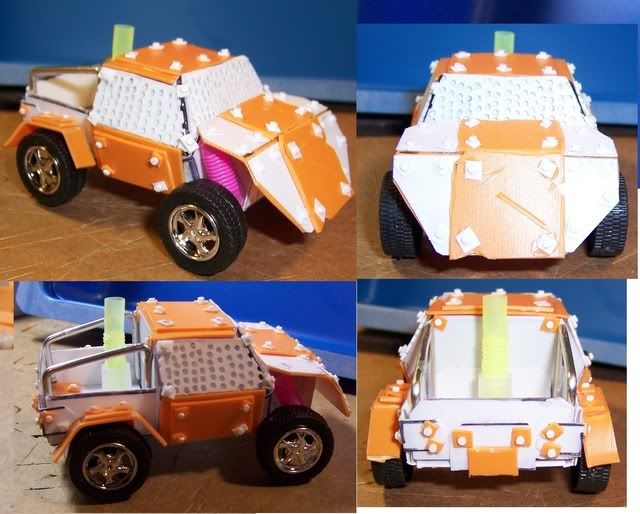
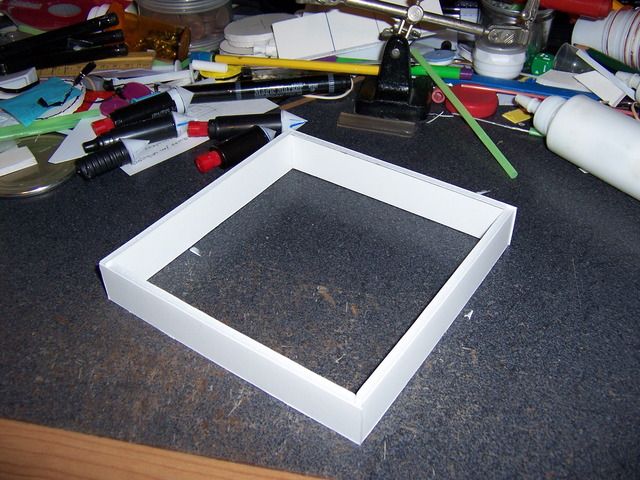
A bit of a diversion.
26618
Post by: Two Spartan
Hahahah cool car dude, I like the suspension =)
Also I looked over your stuff and didn't realise your bat-symbol lit up! gotta show us pics once your terrain is painted.
5462
Post by: adamsouza
I will. I will. I'm procrastinating painting in part because I'm not really sure how I want to paint it and partly because I keep going back to each peice and adding more detail and texture.
I'm a better modeller than painter, so I'm trying to play to my strong suit. Terrain with lots of flat surfaces needs a better paint job to look good than a really textured model.
57468
Post by: Bruticus
Aww, that care is very cute. Reminds me of Carmageddon.
As for painting I got a can of that textured paint - it's called Rust-oleum Aged Iron and I reckon it would be suitable for some of your stuff, it makes things look like old corroded wrought iron if you dust it with pigments, I'll be using mine soon and will post a few pics if you want to see how it looks. Alternatively maybe go for a very modern/clean look like how people do Infinity scenery, that could be interesting, I love rust and grime but that's at least partially because it's easier to do than clean and neat.
5462
Post by: adamsouza
I'd be very interested in seeing how the Aged Iron paint works out for you. Please post a link or pics here when you have them,
54592
Post by: AlfonsoTheTraitor
You have a lot of great Ideas !
5462
Post by: adamsouza
Thanks !! I appreciate the encouragement.
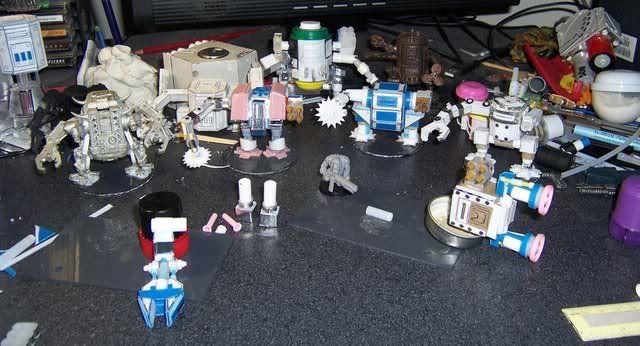
Here's a few pieces together.
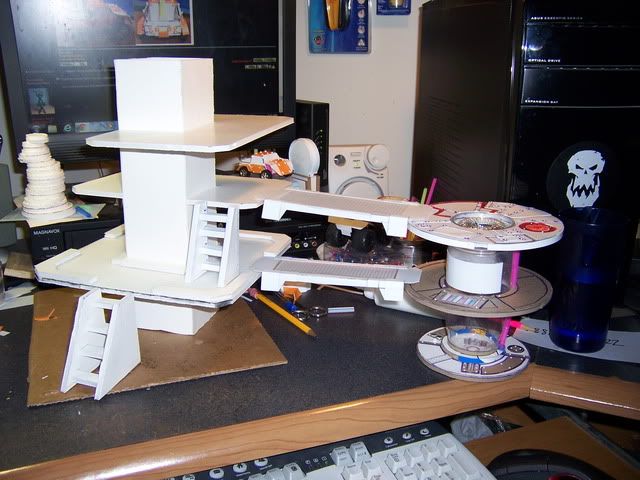
Still working on detailing them out of course, but you can get an idea how they'll go together.
53776
Post by: TheLionOfTheForest
Never played necromunda, but seeing your terrain makes me want to get into it
26618
Post by: Two Spartan
OMG a post in the blog, where you can see earlier posts in the same blog. Blog inception! How deep can the layers get?
Automatically Appended Next Post:
Also good work on the walkways and stairs, more avenues of movement should make the action move all over your terrain. Otherwise some areas would be hard to get to with little reward.
As always keep us posted =)
5462
Post by: adamsouza
Two Spartan wrote:OMG a post in the blog, where you can see earlier posts in the same blog. Blog inception! How deep can the layers get?
Huh ?
I took that photo last night.
48150
Post by: storag
Funny car you need a drive-by grot team for it )
Thanks for the link!
26618
Post by: Two Spartan
Huh ?
I took that photo last night.
I just thought it was funny that you could see your blog in a pic in your blog.
Those ork builds look pretty good dude, have you got pictures of them painted?
I like the heli's the best, most inventive parts used =)
43225
Post by: Nightfall
I like what you have made the terrain out off!
19517
Post by: Brotheralexos
I really like the log, the terrain looks good.
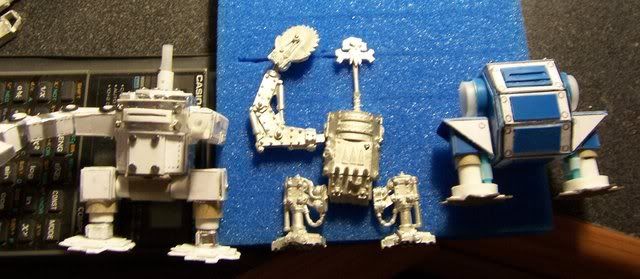
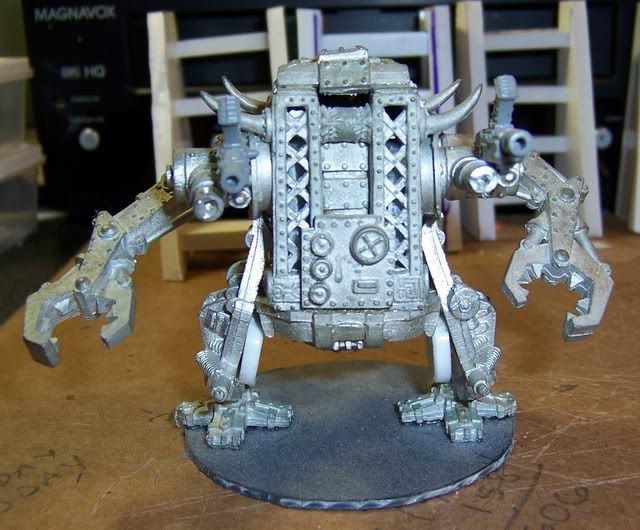
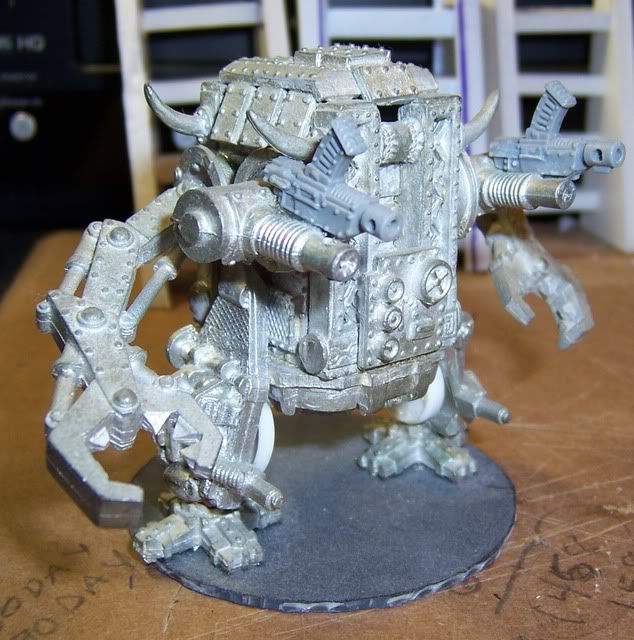
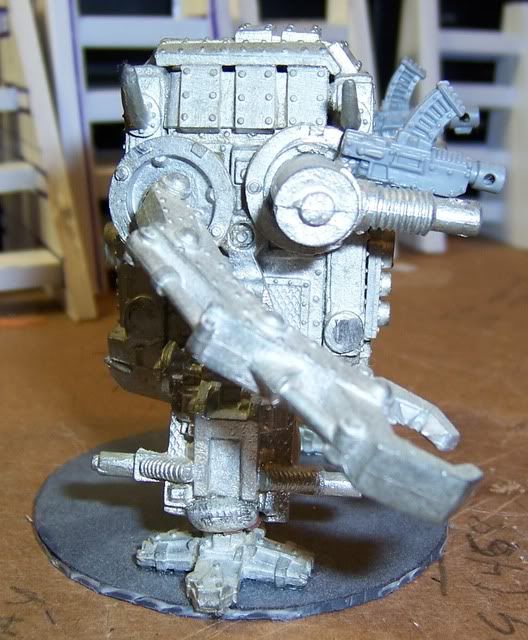
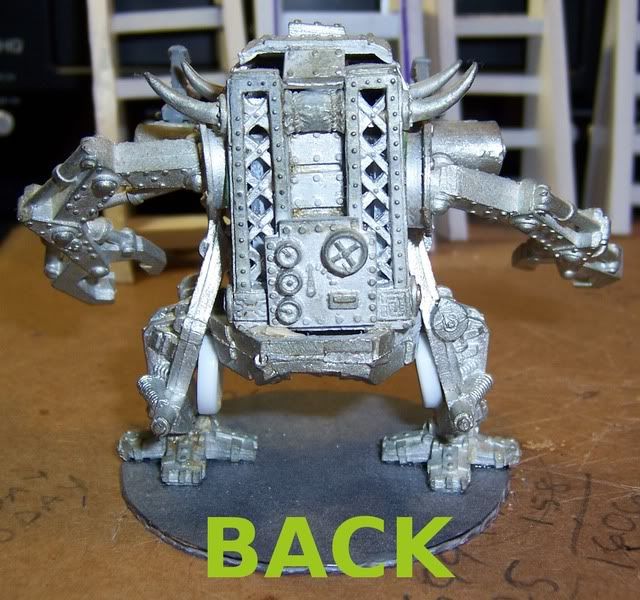
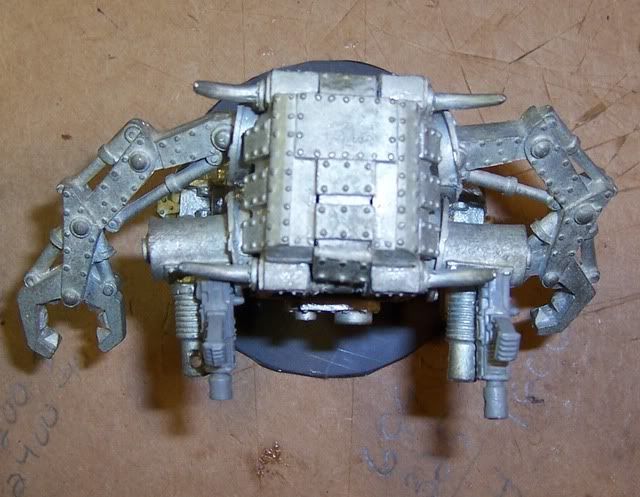
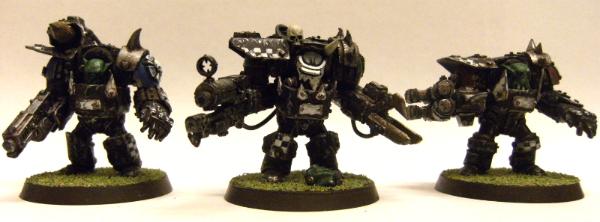
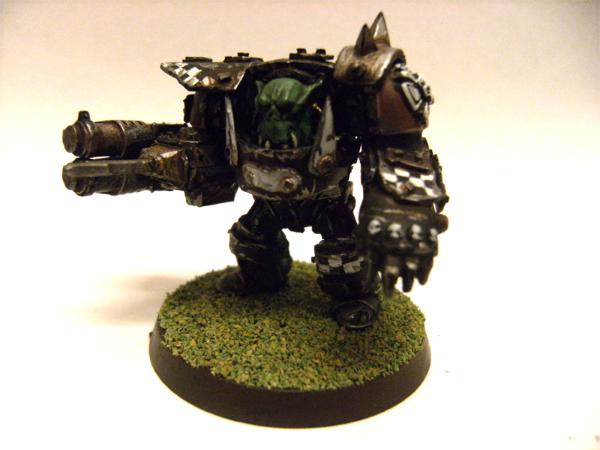
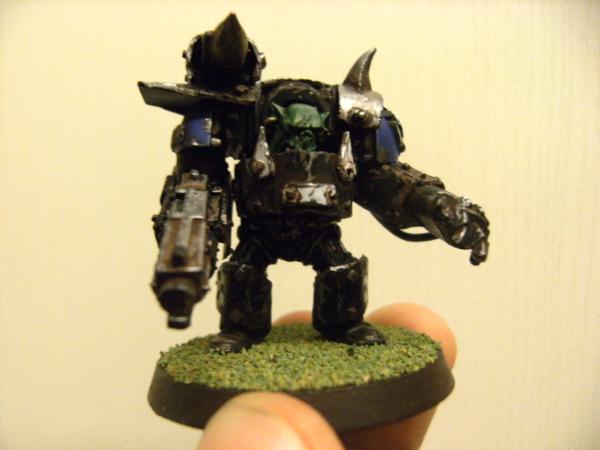
@ adamsouza: Could you post more pics of the Metal Dreadnought you have in that last set of pics? Also, what is it? I've only seen a dreadnought like that back in one of the old OOP Gorkamorka rule sets.
5462
Post by: adamsouza
Splashed some paint
26618
Post by: Two Spartan
Hey looking good, you planning to make all rusty and dirty?
5462
Post by: adamsouza
That's what I'm shooting for. The flash from my camera made that look way shinier and brighter than it looks in person
26139
Post by: Skalk Bloodaxe
This is excellent work. I always respect seeing modelers that can take their household recycling bin and turn it into functional wargame terrain.
I especially like the "futuristic" look that is above and beyond the "industrial" look. Paint is going to tie all of this together. Looking forward to seeing that.
The Dread conversion is fantastic! I loved going through the random bitz and remembering where they all came from.
Subbed and will be back for more.
5462
Post by: adamsouza
Thank you for the kind words and encouragement.
That Dread was a lot of work, but worth it.
The standard Necromunda terrain looks good with the bulkheads, but without them those same shapes are pretty lackluster. I wanted to do something unique, that didn't rely on using hundreds of dollars worth of GW models in the process.
26139
Post by: Skalk Bloodaxe
Oh, you mean like what I'm doing? Ha.
Luckily the majority of my stuff came 2nd hand and only cost me... uh... hundreds of dollars. But compared to what it would have all cost retail... I'm ok w/ it. 
37176
Post by: sir william the bold
The straws are nice  I really like how it turned out!
5462
Post by: adamsouza
Skalk Bloodaxe wrote:Oh, you mean like what I'm doing? Ha.
Luckily the majority of my stuff came 2nd hand and only cost me... uh... hundreds of dollars. But compared to what it would have all cost retail... I'm ok w/ it.
Your stuff looks fantastic. If I still had bulk heads I would have used them myself.
My gripe is more about the hobby in general. I watched a bunch of Youtube video on 40K terrain just before starting this project, and while many of them looked great, they all relied on using GW terrain and model kits. I got interested in 40K back inthe RT Era when you had to build everything yourself, and I just kind of miss that.
Heck, I remember casting plaster bunkers in a bucket of sand.
Maybe I'm getting old and I'm looking for something to complain about these kids today have it to easy 
57468
Post by: Bruticus
I agree! The city of death bits are great but I'd rather do without, for the most part. Besides, I don't think they are suitable for the underhive which I've always thought of as a more of a run down industrial looking place without so many gothic trappings.
BTW I posted a few pics of that spray paint I was on about in my blog, used it on the legs of my overpass.
26139
Post by: Skalk Bloodaxe
adamsouza wrote:My gripe is more about the hobby in general. I watched a bunch of Youtube video on 40K terrain just before starting this project, and while many of them looked great, they all relied on using GW terrain and model kits. I got interested in 40K back inthe RT Era when you had to build everything yourself, and I just kind of miss that.
I agree that the novice modeler has an overwhelming amount of pre-fab options available nowadays, but we can't really blame them for taking advantage of that opportunity. I know for sure I would have. GW changed everything with Necromunda terrain (plastic bulkheads and card stock that was not horrible) and since then has evolved into the incredibly detailed and durable terrain / scenery like CoD (etc) and other companies like Pegasus Hobbies (my personal favorite) provide equally amazing pre-fab greatness w/ various designs.
adamsouza wrote:Heck, I remember casting plaster bunkers in a bucket of sand.
That brought back a few memories- like when I used plaster in a sand castle mold to make a fortress bunker, or when made random indentations in the kid's sand box and poured plaster into that (ala "bigfoot cast" style) and painted it up for terrain. Both are great examples of trial and ERROR. Ha.
As far as the DYI aspect of things, I know it is still alive and well. While I doubt many people are still sand-casting, I know people are still making the same sorts of things we were, they are just using better (and much more easily acquired) materials, and the amount of information available to them to actually do it right the first or 2nd time (opposed to... how many casts did you throw away in your lifetime so far?) is staggering.
adamsouza wrote:Maybe I'm getting old and I'm looking for something to complain about these kids today have it to easy
Yeah, probably.
5462
Post by: adamsouza
Added some rivets and some more paint.
17738
Post by: Briancj
Given the economy, money woes, and the general overall shift of the hobby from vast armies down to skirmish-level games, DiY terrain, frankly, RULES. I, too, am from the RT era, and I think your terrain is ACES.
Totally SUB-Scribed.
--B.
PS: Expect an influx of like-minded terrain makers, and check everyone's sigs for their plogs. You'll find you're in good company, here.
48594
Post by: dsteingass
OMG! Man you're stuf is just fething amazing! If my blog inspired you why didn't you say anything? I love it when something I do inspires others to build stuff!
You are creating a "style" here, a cohesive"look" and it's really badass man!
5462
Post by: adamsouza
adamsouza wrote:Actually, seeing his blog the other day is what inspired me to start mine.
Well, technically I did
Didn't want to post in your thread and come across as just an attempt to promote mine.
You're thread made me instantly nostalgic for Necromunda. I had this in in the back of mind for years to do, but seeing how well yours turned out gave me the final push I needed to start my own.
Thank you for sharing your awesome Necromunda Terrain with us !
48594
Post by: dsteingass
Shameless self-promotion is not only allowed, but encouraged!!
Automatically Appended Next Post:
Remember...we're all in this together..keep yer stick on the ice!
51703
Post by: Launets
Everything looks so great *_*
I was just about to start to work on something like this and you can't even imagine how much inspiration you gave me.
Thanks and keep up with this super good work
24297
Post by: Viktor von Domm
hello adam... got drawn to this thread from dave by skalk... your stuff looks really good! and i just love the way you use all this commonly available stuff for your creations! and like the other said... your terrain pieces have a very unique look! that is something i really like!
and you even added rivets... which is a plus on everything whichever way you turn it^^
cheers, vik...< follows you from now on
5462
Post by: adamsouza
Bruticus wrote: BTW I posted a few pics of that spray paint I was on about in my blog, used it on the legs of my overpass.
Can you post an up close pic here of that.
I've been keeping up with your blog, but I'm not really certain what pictures you're refering to. I think I might, but I'm not certain.
Briancj wrote:Given the economy, money woes, and the general overall shift of the hobby from vast armies down to skirmish-level games, DiY terrain, frankly, RULES. I, too, am from the RT era, and I think your terrain is ACES.
Well sir, you are indeed the bees knees.
You are right. With the economy the way it is, it makes much more sense to play skirmish level games, that don't cost an arm and a leg, just a hand maybe
I've been checking out the other plogs, but work censors a lot, so I see mostly threads with no pics. The ones I can see, have been the ones I'm more active in. It's not really fair to the individual artists, but life isn't really fair either.
dsteingass wrote:Shameless self-promotion is not only allowed, but encouraged!!
I'll keep that in mind 
Launets wrote:Everything looks so great *_*
I was just about to start to work on something like this and you can't even imagine how much inspiration you gave me.
Thanks and keep up with this super good work
I can't tell you how nice it is to hear that. It really helps motivate me to continue what I'm doing when I receive encouragement like that.
Looking forward to seeing what you come up with.
Viktor von Domm wrote: your stuff looks really good! and i just love the way you use all this commonly available stuff for your creations! and like the other said... your terrain pieces have a very unique look! that is something i really like!
Thanks !
As I've probably said before, I did want to do somehting different. Every Hive World is different, so some different styles of architechture were probably bound to show up.
Viktor von Domm wrote:
and you even added rivets... which is a plus on everything whichever way you turn it^^
Rivets are like a guilty vice. It's pain staking to add tons of them, but they look sooooo good afterwards it's worth it.
Seriously though, I need to add more rivets to my terrain...
24297
Post by: Viktor von Domm
well i couldn´t say otherwise... rivets added add so much riveting look to everything^^ yet you do have design a very techy look... somehow reminds me a bit of tau stuff too... which quite subtle underlines your idea of each world their own remarkably style...
and the more rivets you add the more you get closer to that state of rivet- zen... you will feel it once you have reached that hidden modlers valley^^ after that you just feel mellow while riveting stuff^^
5462
Post by: adamsouza
Tau stuff would be rivet free. I think adding rivets will ground it back more towards human looking tech. Maybe humans that live in Tau space ?
48594
Post by: dsteingass
Non rivet-using humans are under the influence of the blasphemous xenos Tau. Those heretics are tracked down and purged...if their shoddy structures don't fall on them first
24297
Post by: Viktor von Domm
lol... why the xenos hate old mate? it´s all for the greater wood...er good... 
57468
Post by: Bruticus
Can you post an up close pic here of that.
Sure, although looking at the pics they are still not showing it particularly clearly. On the left is a chemical tank that has been sprayed with rustoleum and dusted with rust pigments, on the right are the cake lattices that were sprayed and then drybrushed boltgun before being dusted with rust pigment at the tops. Basically it just helps make smooth plastic look like it has a texture, before they were very smooth and flat looking. The chemical tank now looks like it is old iron, with the edges corroded and worn, it's a good way to add some texture to large smooth areas I think, a finer texture than sand but still enough to be noticeable. I am going to be spraying some more scenery with it in the middle of the week so could try and get a proper pic then.
51715
Post by: YELLOWBLADES
Amazing! i love the star wars, retro look on them! like the scene from SW episode 1 in the tower. probably the best necromunda sceneery i have seen ever!
keep up the good work
5462
Post by: adamsouza
Bruticus wrote:
I like that pitted look it gives it. I'll have to keep that in mind.
@YellowBlades
Thanks.
I hadn't thought about it looking like Star Wars, but I can see what your talking about. Rounded instead of blocky definitely fits the more organic look of Clone Wars Era tech.
BTW you have awesome taste.
5462
Post by: adamsouza
Walkway, now with Advanced Rivet technology
Another wasteland/Ork Buggy
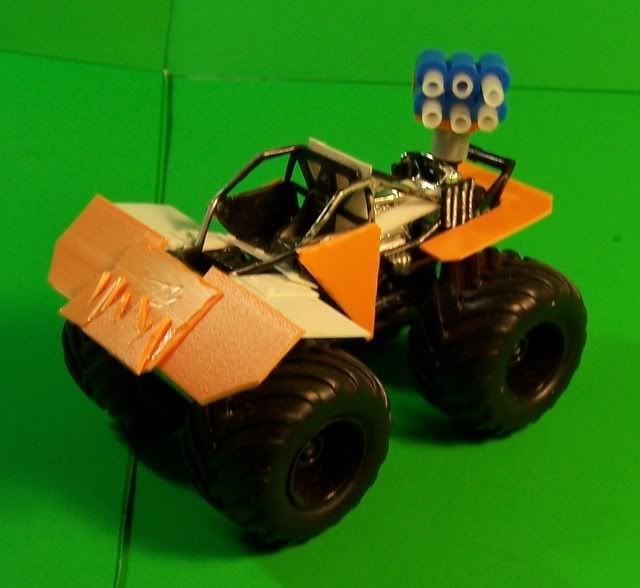
I call him Chompy
Arc Reactor
Cool looking Thingamabob
Walkway with Advanced Rivet Technology and sidewalls
24297
Post by: Viktor von Domm
"advaced rivet technology" or short: ART! now that is a man after my taste!!! and for the arc reactor i propose a membership in the league if you would like to get further involved with the lot of us... really arc reactor... just yesterday i watched iron man 2 on the telly and loved every bit of it...!
that cool looking thingamabob looks also really cool... what toy was it in former live?
and was the use of granny grating inspired by daves terrain too? just asking... ^^
so....when will we see your first painted piece of terrain?
5462
Post by: adamsouza
I would be honored to be considered for membership in the League of Extraordinary Riviters.
The Thingamabob was actually a stand from a DS9 toy from the 90's. I added a bit on top and applied ART.
The Granny Grating Idea I got from Matakishi. He used it to make barred windows, but once I had it in hand I thought i t would make a great grated floor.
Much cheaper than buying model grating sheets, and I really like how it looks.
44814
Post by: alabamaheretic
hey man popped on in through dstiens thread and thought i would have a lookie loo. i really like your stuff. You have given me so many ideas for the stuff that i would like to accomplish. well chop chop get more done wow me with your cool looking whatchahoosits and doohickeys and thingeymabobs.
24297
Post by: Viktor von Domm
adamsouza wrote:I would be honored to be considered for membership in the League of Extraordinary Riviters.
The Thingamabob was actually a stand from a DS9 toy from the 90's. I added a bit on top and applied ART.
The Granny Grating Idea I got from Matakishi. He used it to make barred windows, but once I had it in hand I thought i t would make a great grated floor.
Much cheaper than buying model grating sheets, and I really like how it looks.
for memebership just add the banner in your sig... just klick on our sigs and you go to the gallery and add the link to your sig as usual as you would add a pic to any comment...simple as that!
and yep... granny grating looks very good.. and tho i still have none it looks as if it is rather sturdy...which i like for my stuff!
24297
Post by: Viktor von Domm
awwwww... them so cute^^ and deadly^^
5462
Post by: adamsouza
Does anyone know if there are official rules for Stompas outside of the Armagedon rulebook ?
24297
Post by: Viktor von Domm
i think you need to ask that on a different thread... try to ask max for instanceor heck better ask shrike... he has one... he might know...
44814
Post by: alabamaheretic
deys all stompy and killy and stuff
looks good man
17738
Post by: Briancj
No, there are no "Official" rules for any of the Apocalypse units, because Apoc IS the only "Official" rules.
FW rules are, technically, unofficial.
BUT!
Make up your own.
24297
Post by: Viktor von Domm
what the man said!!!
5462
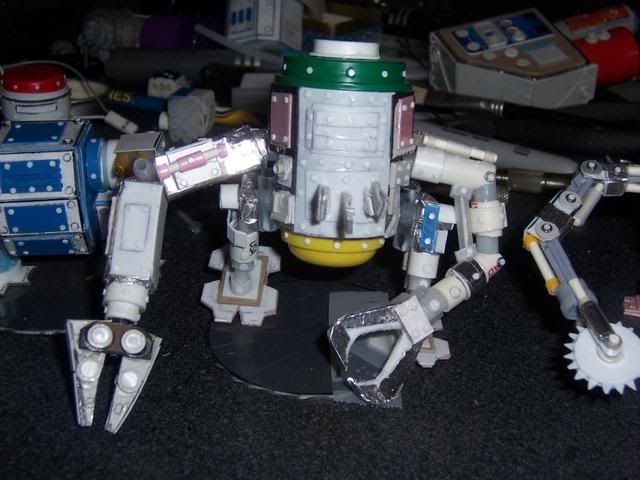
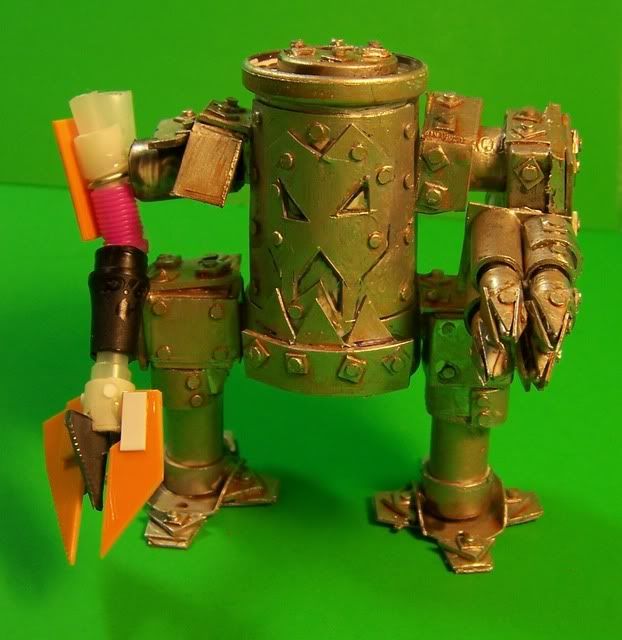
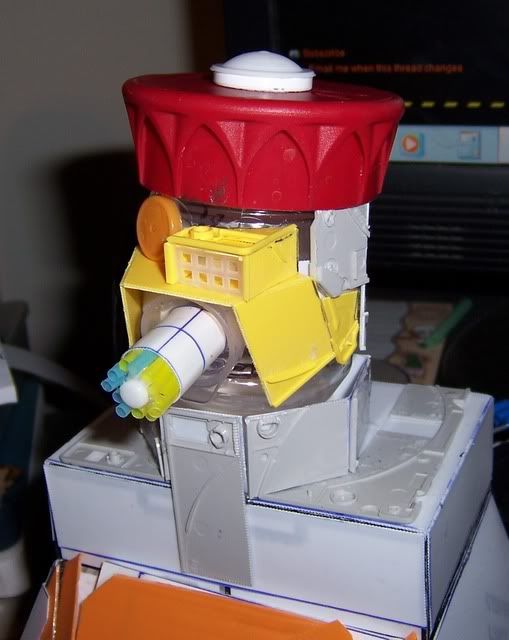
Post by: adamsouza
Okay, this is purely a case of me not being able to focus and having a good idea too good to put off and forget about later.
Came across this image on my Hard Drive. It's an EPIC scaled Stompa.
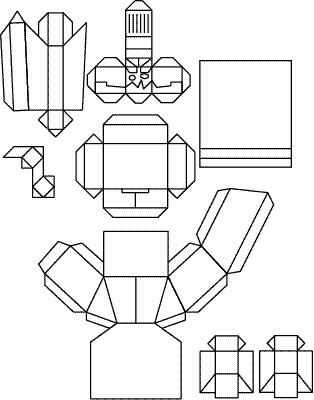
I thought to myself "Selt, why not use that to make a 40K scaled Stompa ?"
Keep in mind these are only a rough draft, and if they work out well I'll pretty them up and make a Dakka article on Stompa construction.
In the mean time, if you kids want to follow along at home, get your parents permission, and dig out the glue and paper !
     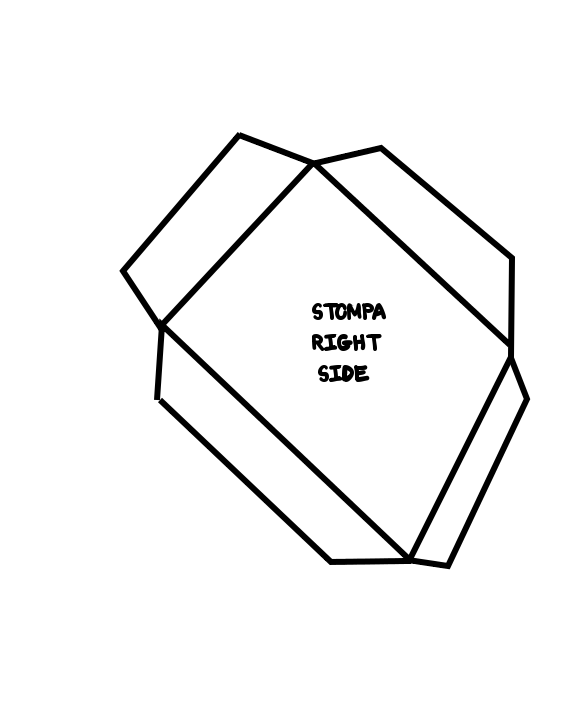 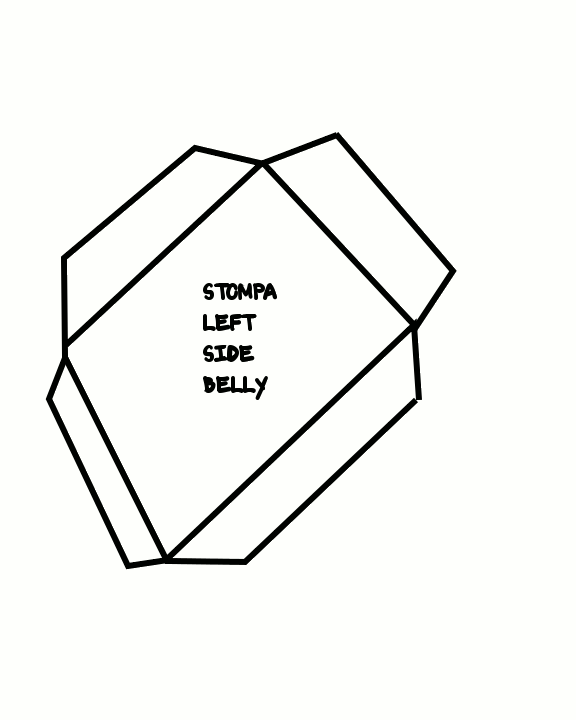 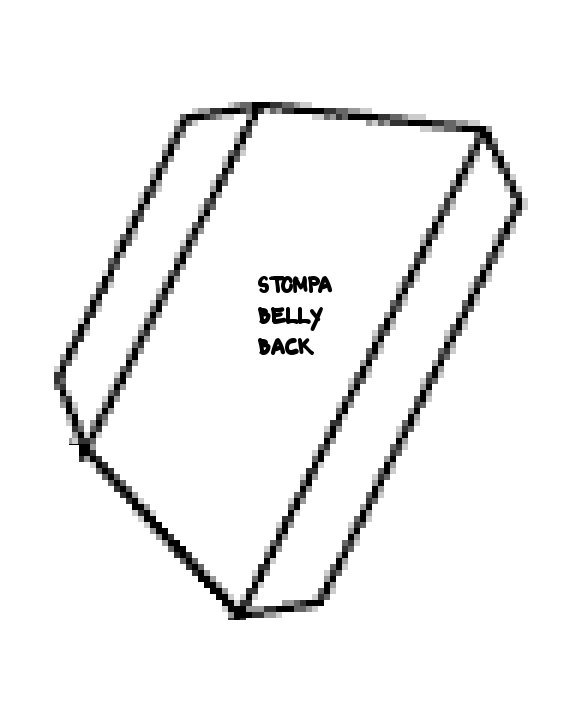 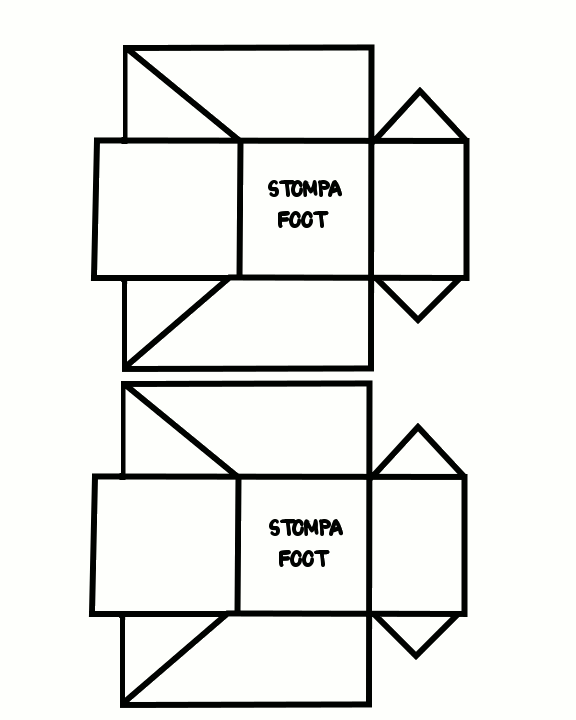
If you ckick in the thumbnails and print them out at 72DPI they should be in the correct scale for 40K use. They are all labeled so it should be pretty easy to figure out what piece gos where.
If anyone knows who the artist for the EPIC STOMPA is, let me know as I would like to give him some credit.
51703
Post by: Launets
Man this work is just extraordinary. I'm in love with every ork scratch build you do *__*
24297
Post by: Viktor von Domm
intersting concept to start from... once built it needs some serious detailing tho!
44814
Post by: alabamaheretic
and rivets!
24297
Post by: Viktor von Domm
lol...and washers too... orks have lots of both!
44814
Post by: alabamaheretic
indeed they do sir
24297
Post by: Viktor von Domm
5462
Post by: adamsouza
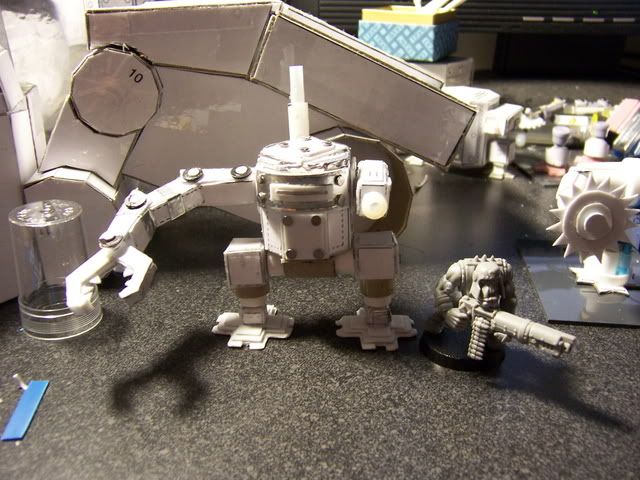
I've printed and done a quick test fitting. Will try and get some pictures of it up tonight. Just need to find my GW Stompa for a size comparison. This one looks to be more in line with the scale of the old Epicast model, if anyone remembers what those are.
I intend on building this one reguardless of scale, but I'll update the files for a larger model if needed. Epic used to have all different sized Stompas.
17738
Post by: Briancj
Yeah, you had Stompas, Gargants, and Mega-Gargants.
5462
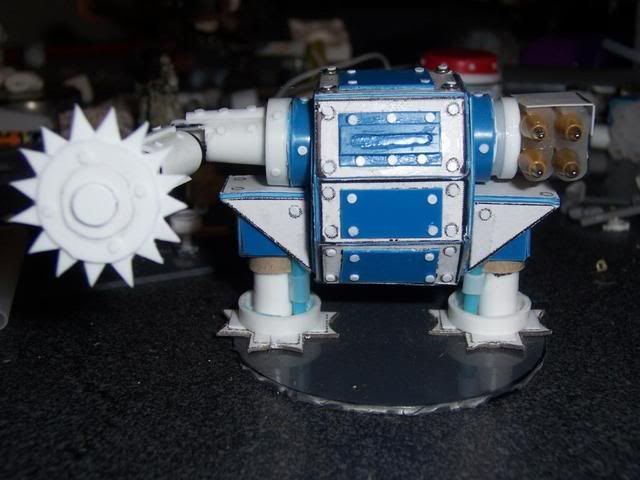
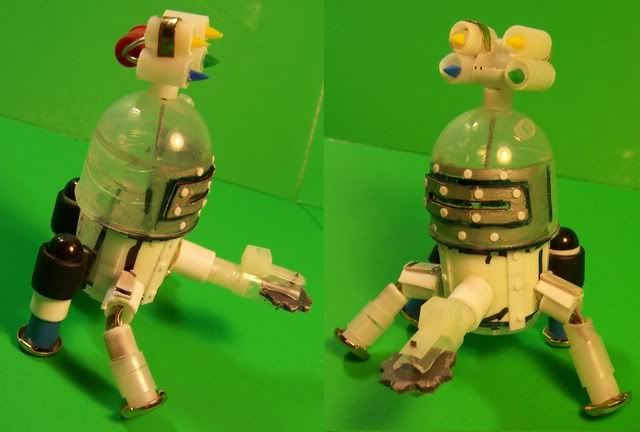
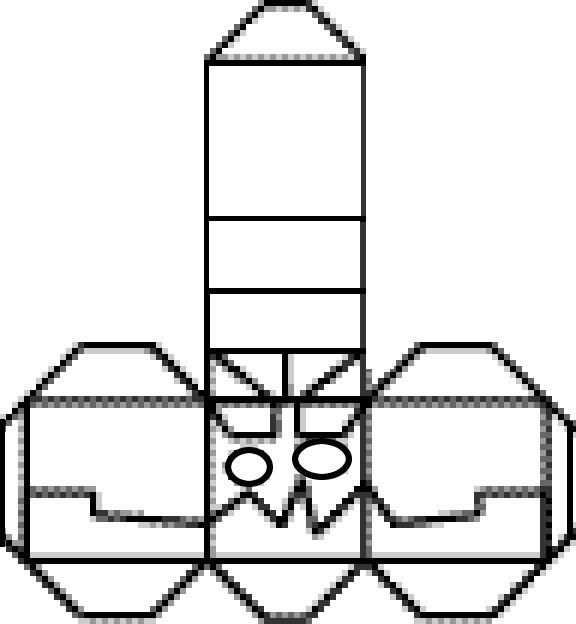
Post by: adamsouza
This is what I was thiking of
 Automatically Appended Next Post: Automatically Appended Next Post: Here is what those templates look like assembled.
4 1/2 inches tall at the shoulder
6 inches to the top of his head.
24297
Post by: Viktor von Domm
lol... lacks a bit in detail but makes it up with cuteness^^
5462
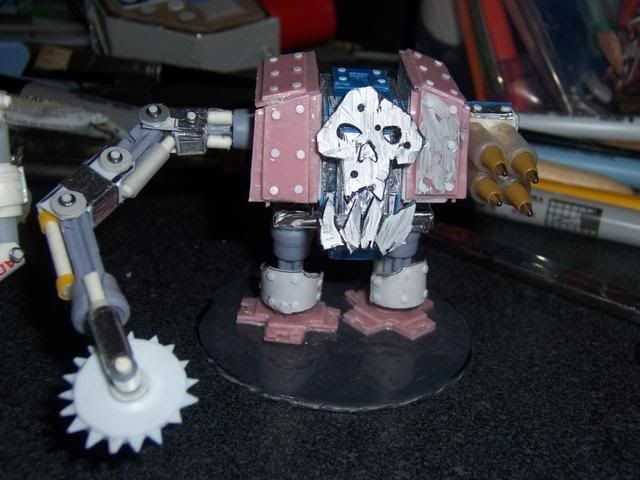
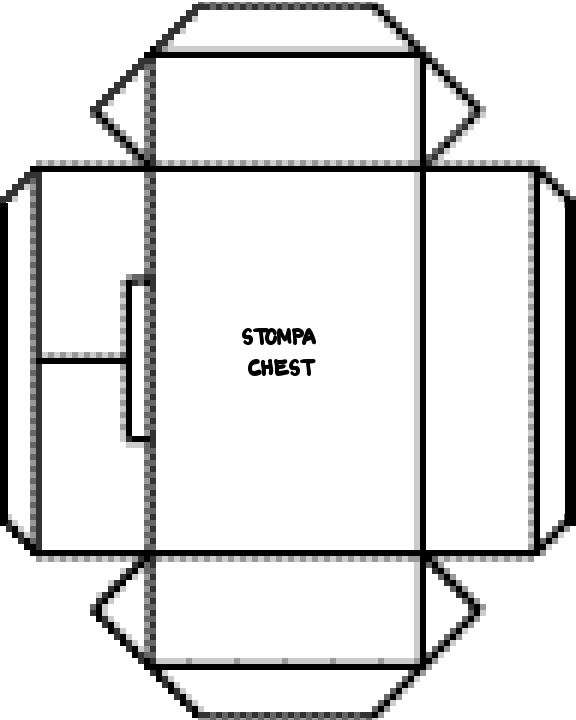
Post by: adamsouza
The idea is to have a frame on to which you can add your own Kustom Orky details. Although I may get obsessed and turn it into a complete paper model, but that would be very time consuming.
I dug out my GW Stompa for a size comparison, and added a 4 more pieces, that I haven't made templates for yet.
In true Orky fashion, I had crafted parts on the fly and immediately glued them on. It would have been a bit more helpful if I had stopped to scan them first. 
24297
Post by: Viktor von Domm
lol...but i can´t really tell what you added from that pic...
5462
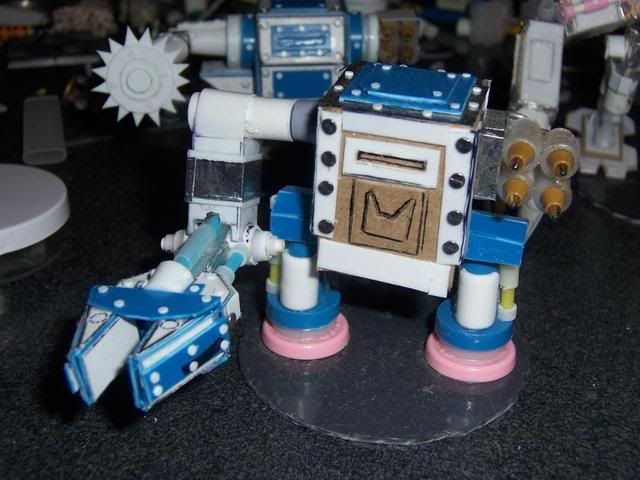
Post by: adamsouza
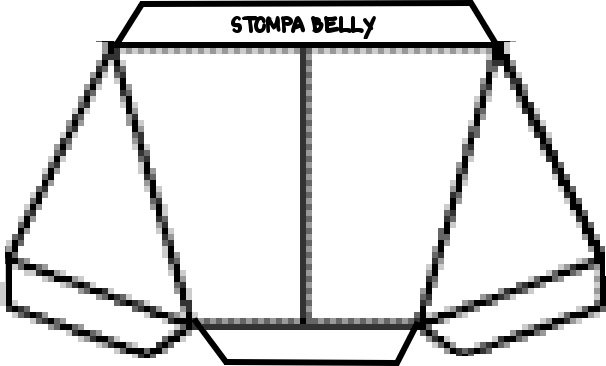
About 2 inches in height around the belly.
It's going to end up being turned in into an Evil Eye In Da Sky
I've already added the mount for the belly cannon,started armor plating it, and began working on a new head.
24297
Post by: Viktor von Domm
sounds cool^^
5462
Post by: adamsouza
That's because it is
I figured I already have a GW stompa, so I might as well make somethign different and go for some variety.
Stepping stones for the Gargant project I always wanted....
24297
Post by: Viktor von Domm
That's because it is
healthy dose of self esteem^^
5462
Post by: adamsouza
Viktor von Domm wrote: healthy dose of self esteem^^
When I'm in full swing my Ego can block out the Sun.

24297
Post by: Viktor von Domm
LOL...
48594
Post by: dsteingass
Holy Gargantcrap Batman!! The Kans and Stompas are fantastic!! I've been in an Orky mood lately myself
5462
Post by: adamsouza
Thanks !!
I got a lot of enjoyment out of making those. The Ork empahsis on Kustom instead of standard issue will always keep them my favorite 40K race to build models for.
48594
Post by: dsteingass
I think I'll take a trip to my FLGS this fine afternoon to try and score a new Ork Bomma kit! did you see the sprues for that thing??
24297
Post by: Viktor von Domm
yup... i had a look into the white dwarf for that.... and guess what... i bet someone could do a de-orkifysation with these...^^
5462
Post by: adamsouza
If there were still a FLGS within 30 minutes of here I'd own one of those Bommas already. It looks like there are 3 setups so plenty of left over bits. Although I should probably hold off until I at least get the Stompa done.
24297
Post by: Viktor von Domm
lol...that crown looks so hilarious! intersting improvement all over!
5462
Post by: adamsouza
I want it to look like a head, serve as a look out tower, and turret as well. The "Crown" looks a bit less traditional, but I like how it looks with it better than without.
My next big step is to figure out how to build the Dethakopta launcher. I was thinking either a catapult
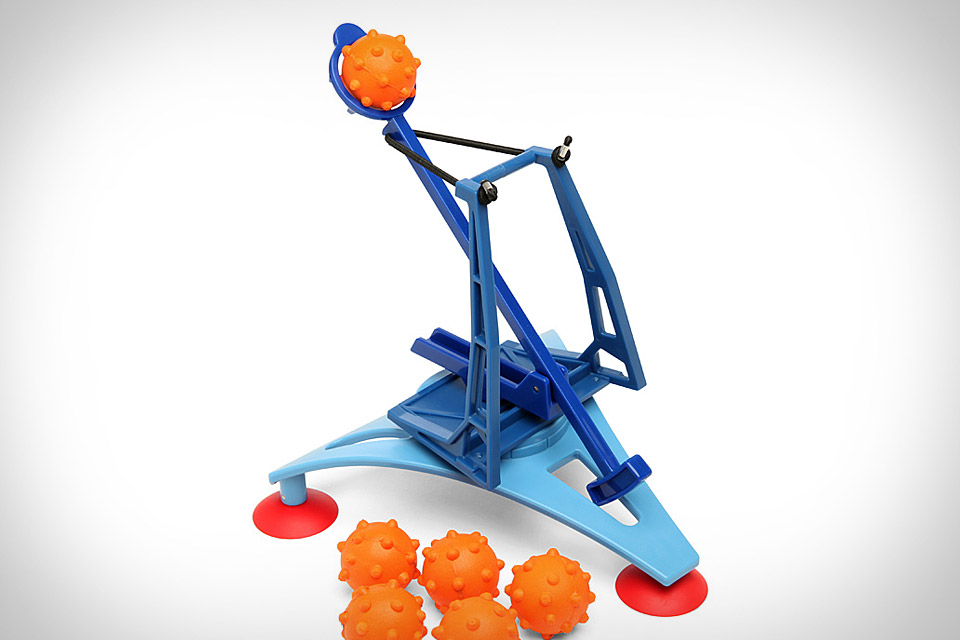
OR a launching arm, like they use for clay pigeons


24297
Post by: Viktor von Domm
wow... that is ambitious... but i bet it will be looking good... tho will it be a relaoding one? or just a take off means for one kopta only?
and yes... stompas have to look individual... so yours is totaly in the right direction!
5462
Post by: adamsouza
I thought about a loader device, but then I figured the Kopta pilot could just fly the Kopta onto the launcha.
24297
Post by: Viktor von Domm
why then the launcher? will it give benefits in movement then?
44814
Post by: alabamaheretic
do like a mortar drop em in a tube hit a pressure plate on the bottom and watch them go. i find that suitably orky.
5462
Post by: adamsouza
Viktor von Domm wrote:why then the launcher? will it give benefits in movement then?
It's in the rules and fluff. They just don't fly into battle. They are lauched into battle by the stompa.
alabamaheretic wrote:do like a mortar drop em in a tube hit a pressure plate on the bottom and watch them go. i find that suitably orky.
I hadn't thought about that. That's suicidal by any other races' standards, making it SUPA ORKY !!! 
With Grot piloted Dethkoptas , that are sphere shaped with a top propella....
5462
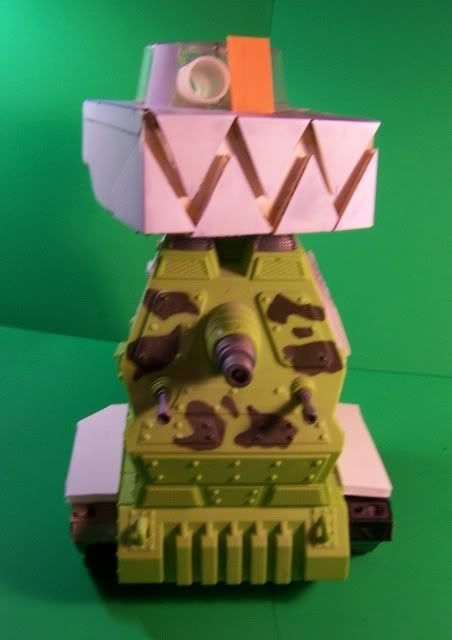
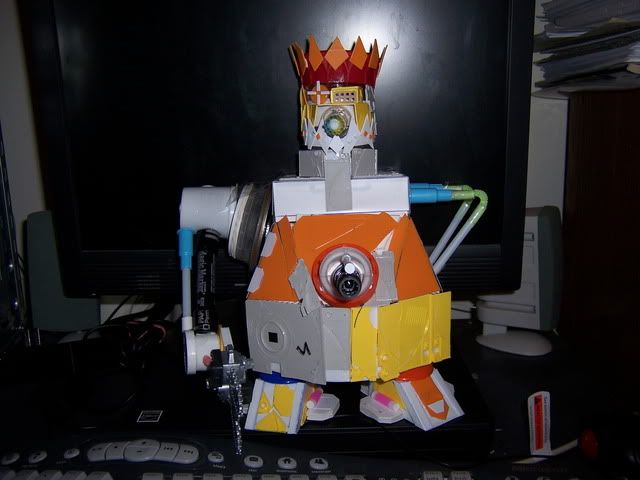
Post by: adamsouza
Worked a bit on the head.
26139
Post by: Skalk Bloodaxe
Hmm. This is the first one that is throwing me a bit. I know paint defines the piece, and I know from your other work that it will be amazing, but I'm not getting this one yet. The gun looks completely Orky, I especially like how each barrel is different lengths, not quite round, etc.
48594
Post by: dsteingass
Is that an orange juice lid with gothic arches?
33713
Post by: RSJake
I was trying to place the pieces that are used here. I agree with Dave on the OJ lid, and a Milk carton seal on the top? The little orange button thing looks familiar, but I can't place it. Granny grating in the window...and it looks like a syrup bottle top that the cannon is sitting in?
It does look very Orky at the moment.
Nice use of household stuff!
I'm constantly holding up random things trying to think of what it could be....my wife usually tells me, "If you're going to make that into something, it better happen quick, because if I see it laying around for a month, I'm throwing it out!"
At least she gets me, even if she isn't very patient with me.
44814
Post by: alabamaheretic
RSJake wrote:I was trying to place the pieces that are used here. I agree with Dave on the OJ lid, and a Milk carton seal on the top? The little orange button thing looks familiar, but I can't place it. Granny grating in the window...and it looks like a syrup bottle top that the cannon is sitting in?
It does look very Orky at the moment.
Nice use of household stuff!
I'm constantly holding up random things trying to think of what it could be....my wife usually tells me, "If you're going to make that into something, it better happen quick, because if I see it laying around for a month, I'm throwing it out!"
At least she gets me, even if she isn't very patient with me. [/quote
aint this the truth...looking good so far man just had to catch my self up with this thing. cant wait to see it complete.
24297
Post by: Viktor von Domm
I'm constantly holding up random things trying to think of what it could be....my wife usually tells me, "If you're going to make that into something, it better happen quick, because if I see it laying around for a month, I'm throwing it out!"
that cold have been said by my very own wife too... lol...tho she would never touch my stuff... it is to her off limits by her own design^^
and adam... good looking head there tho i have to chime in with skalk here that the barrels would lokl better if done evenly...
5462
Post by: adamsouza
My wife threatens me with that all the time, but I have a giant bitz box of crap that's off limits to her =)
The Gothic arched cap is from orange juice and the round bit on top was the seal from a container of half and half.
The left arm is a frame to rest 6 rokkits on. I need to come up with some large and suitabley orky close combat for the right
48594
Post by: dsteingass
What brand of Orange juice?
..You guys just need to do a better job of hiding your junk- Out of sight, out of mind
17738
Post by: Briancj
Tropicana provides the gothic arched caps, Dave. I've been collecting them.
5462
Post by: adamsouza
Funny thing, I don't drink Tropicana OJ, I buy the store brand. I fished 4 or so of those caps out of a friends recycling bin, while visiting. He obviously didn't know how to recycle them properly.
24297
Post by: Viktor von Domm
yup... the right place is of course inside a scratchbuilt suply box!!!
5462
Post by: adamsouza
I've had a bit of a set back, I can't find the half dozen toy missles I was planning on using for Rokkits, and it's just frusterated me enough that I haven't done much modelling, other than adding some surface detail to the feet.
26139
Post by: Skalk Bloodaxe
Setbacks happen. We'll still be here when you start working on this again.
5462
Post by: adamsouza
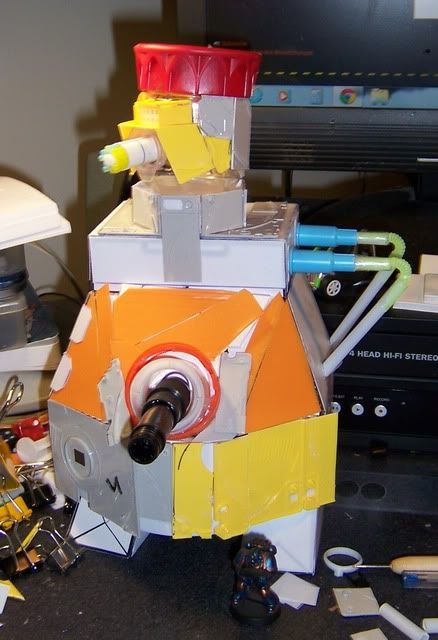
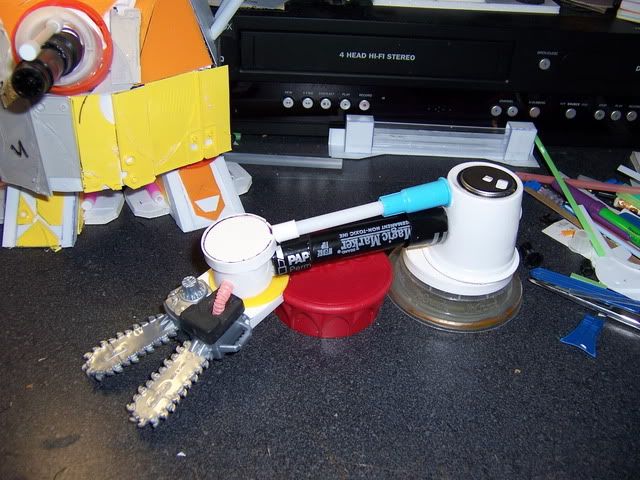
I'll post some pics later tonight, but I struck gold, and inspiration at the local dollar store.
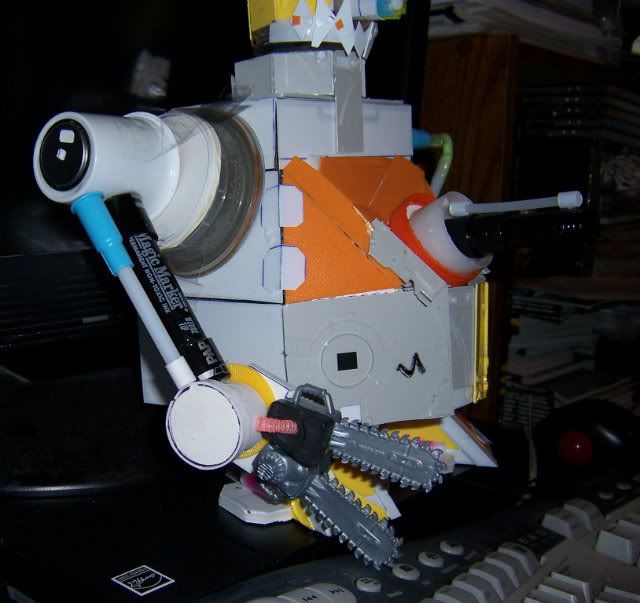
First off boiught some Chainsaws as tall as an Ork Nob, that will end up being the basis for my Stompa's Close combat arm. Secondly bought some fat markers for tubes to use to make new Rokkits.
With my luck, right after I finish scratch building six Rokkits I'll find the ones I was originally going to use..
5462
Post by: adamsouza
Did some work on the Stompa.
Added Teeth and a Headdress to the head.
Doubled the foot print of the feet and added a lot of detail to them.
Created the basis for the close combat arm.
Added a little detail to the central cannon.
24297
Post by: Viktor von Domm
lol... true chainsaws!!! that is super cool!!!
tho i still wait for the other side to get the weapons done there...!!!
but still...very promising!
9217
Post by: KingCracker
Its going somewhere! Im digging it man, definitely has more of a made by a Mek feel then the GW Stompas do IMO.
5462
Post by: adamsouza
Thanks. I've been trying to use Ork Design Theory, using whatever is on hand and cutting it until it fits.
26139
Post by: Skalk Bloodaxe
That is one of the more creative "DIY w/ common household items" project I've seen in a while. Have to admit I don't 'see' anything right now but a bunch of random plastics like marker pens, orange juice caps, etc. But I know paint defines a model and once all the name brands are covered w/ red paint and Ork glyphs this is going to look awesome.
24297
Post by: Viktor von Domm
adamsouza wrote:Thanks. I've been trying to use Ork Design Theory, using whatever is on hand and cutting it until it fits.
that is an epic mantra !!!!
5462
Post by: adamsouza
Viktor von Domm wrote:adamsouza wrote:Thanks. I've been trying to use Ork Design Theory, using whatever is on hand and cutting it until it fits.
that is an epic mantra !!!!
It's more fun that way. Just imagine what a Mek would do with the scrap on hand.
Trying NOT to look at GW ork stuff while doing this. Otherwise, I'll just end up trying to reproduce what I see in a larger scale.
I'm actually slowly working on another titan sized project as well. SooooooooooooooooooOooooOoooOoooo need to focus.
speaking of rivets...
Has anyone tried one of these ?

Steel Punch with 3/32", 4/32", 5/32", 6/32", 7/32", 8/32", & 9/32" punch tips.
That would 7, yes 7, different size of rivets !!!!
48594
Post by: dsteingass
no...but now I want one!
The Leatherpunch and punch set and hammer work pretty good for me, the Chop-it never fails me for the tiny rivets, but new and exciting riveting methods are ALWAYS encouraged!
26139
Post by: Skalk Bloodaxe
Wow. That looks really cool. Hmm. If you get one, let me know how it works out? I'm looking for about 1,000 easily made rivets for when I get back to my 40K / Necromunda terrain.
5462
Post by: adamsouza
I use a 1/16th hand held hole punch now, but I was entertaining the idea of expanding to other sizes when I came across that metal punch.
This is a pic of the one I use now.
I punch out 20-30 rivets at a time, before it gets uncomfortable, then dump them out and repeat.
17738
Post by: Briancj
I just noticed that Adam is another Massachusetts Dakknaught. Hi!
24297
Post by: Viktor von Domm
that certainly looks like a very useful too adam... but those diameters are still not translatable for me...what are they in mm?
5462
Post by: adamsouza
The hole punch I currently use is 1/16th of an inch and it is equal to 1.5875 mm
1/16th = 2/32 = 1.5875 mm
3/32" = 2.38125 mm
4/32" = 3.175 mm
5/32" = 3.96875 mm
6/32" = 4.7625 mm
7/32" = 5.55625 mm
8/32" = 6.35 mm
9/32" = 7.14375 mm
P.S. MASS RULES !!!
17738
Post by: Briancj
It does, indeed. Alas, you are very far away from me, so we'll only see each other at the occasional 'big event'.
32169
Post by: Rogue Wolves
Woh another =][_,= member I didnt know about?!? Welcome!
48594
Post by: dsteingass
You NEED 1mm rivets in addition to those, I haven't found a leather or paper punch to make them that small yet, styrene rod and a blade or better yet a Chopper or Chop-it is what I would recommend.
5462
Post by: adamsouza
I'm pretty comfortable with 1/16th (1.5mm)., at least for vehicles and terrain.
I just ordered a Martha Stewart Hexagon Glitter 12 pack.
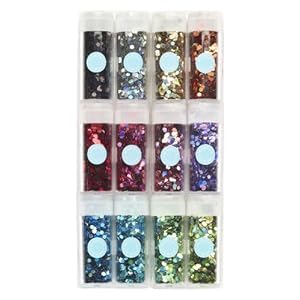
will post pics f how they work out.
15294
Post by: MeatShield
Martha Stewart: The fifth god of chaos. Damnation… It’s a good thing!
24297
Post by: Viktor von Domm
by the way... was always wondering what that avatar pic shows...^^
and thanks for the compareative measurements table...
and yes... it would be so nice to have a 1mm holepunch.... tho i think i have seen some on ebay some months ago... but being the stupid miser i didn´t get me one...
5462
Post by: adamsouza
My Avatar is a drawing of me, as a zombie..
26139
Post by: Skalk Bloodaxe
I'm curious how many NE Dakka folks we have? I know of ... 5 from VT (likely more I haven't met / chatted with), 4 from MA, any from NH? Upstate NY counts for me as well because it's right across the lake.
17738
Post by: Briancj
We have enough to try and arrange some semi-central location, and plan a big summer party.
24297
Post by: Viktor von Domm
looks almost like a zombie priest then^^
care for the big picture shown here?^^
5462
Post by: adamsouza
Brand new PC, so I don't have any pictures on it yet, but to answer your question I'm a minister and the artist was looking for interesting Zombie ideas to draw.
I was writing an Zombie related RPG earlier in the year and thought it would make for an awesome illustration in the book.
24297
Post by: Viktor von Domm
interesting! you are the second guy here that is with the church but still in the hobby... woulnd´t have thought that!
and it is a cool looking one by the way!
5462
Post by: adamsouza
Shhh !! Don't tell anybody, or I might have to deal with a torch wielding inquisition.
26139
Post by: Skalk Bloodaxe
...and of course, no one expects that.
24297
Post by: Viktor von Domm
hurhurhur... slak ... you´re a card...
torch...like these:

hurhurhur
5462
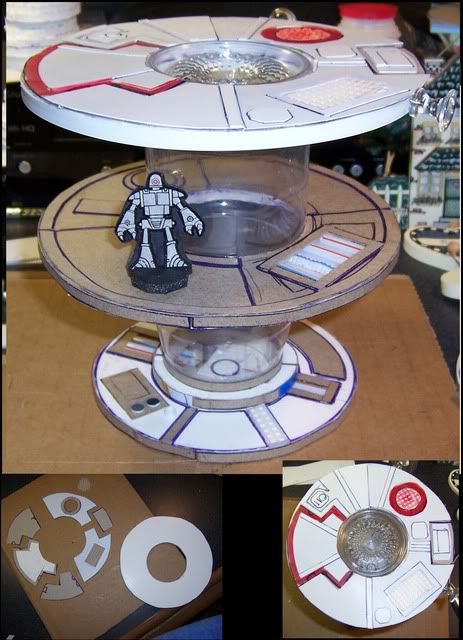
Post by: adamsouza
Okay the 6th Edition bug has bit me and I don't own any proper fortifications under the new rules, so It's time to build some.
Lets start with some foam core
4 pieces 1" by 6"
4 pieces 4" on top, 6" on bottom, 2" tall
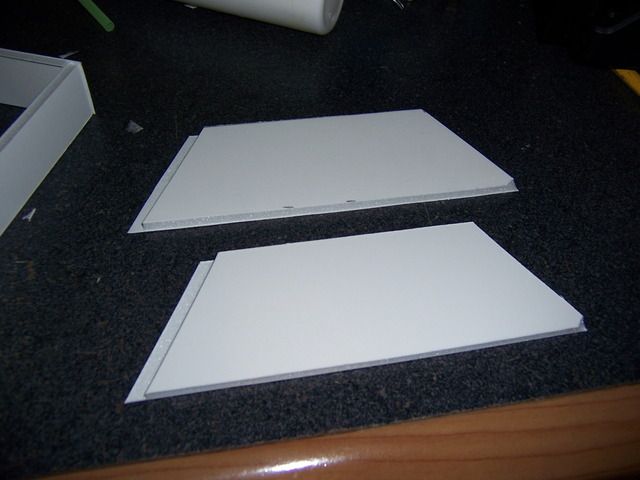
Make them into a box, sort of shape
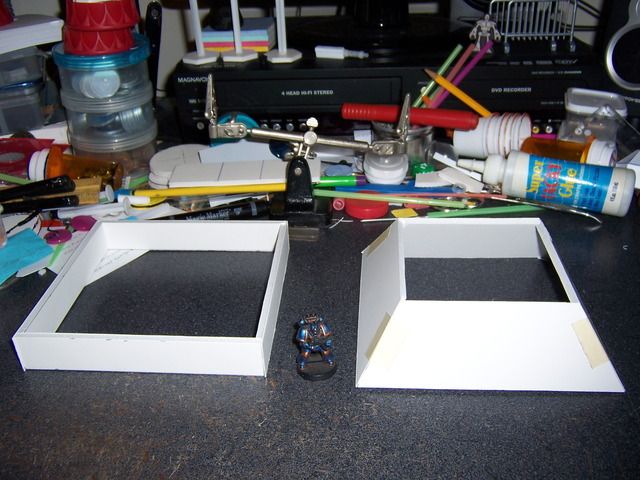
Make lid for box, 6" square, and rabbit cut the edges
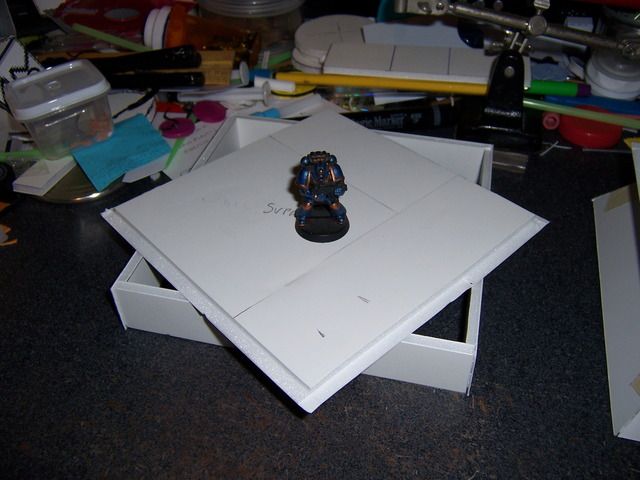
Make 4" square lid, and rabbit cut it, for slanted box thing
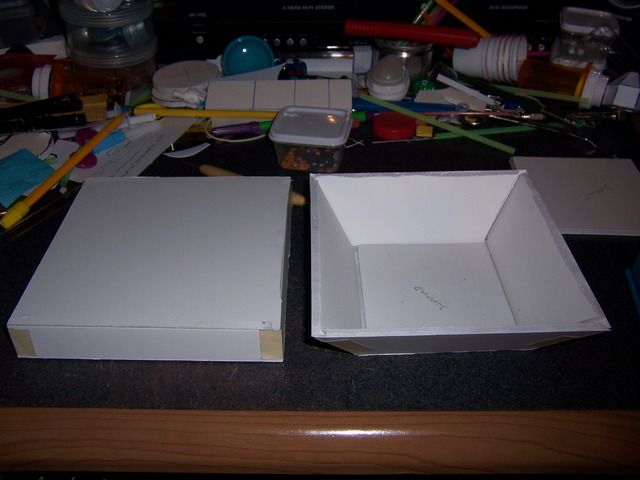
Glue both boxes together and while that's drying make a 4" cube with rabbit cut lid
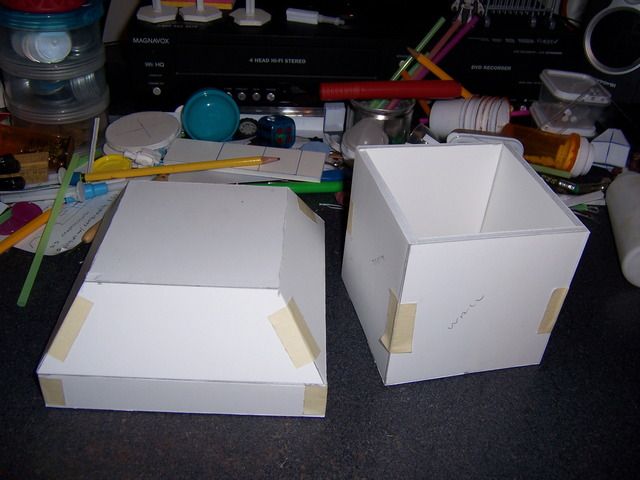
Glue that together
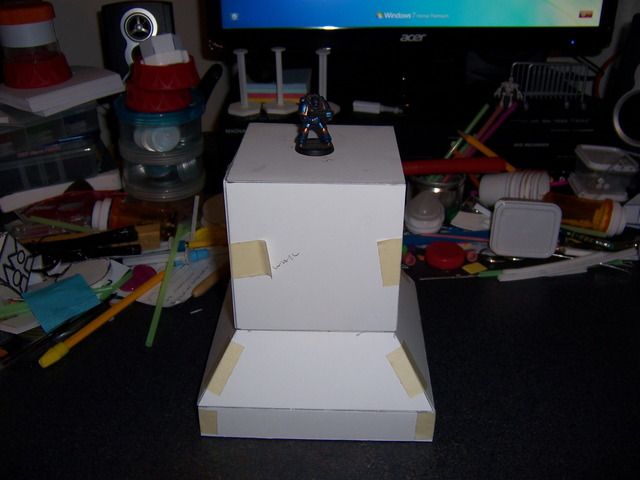
Add Slanty parts
Center piece is 8" long by 1"
Side pieces are 8" on one side, 5 1/2" on opposite side, 2" along bottom edge, and 1 1/2" accross the top
Add Corner Pieces
Corners are 3/4" squares, rabbit cut, and joined
48594
Post by: dsteingass
That's awesome Adam! Great job figuring out those angles!
5462
Post by: adamsouza
Thanks, I was proud of that.
I completely winged it though. It was easy once it occurred to me that the length of the bottom had to match the available surface area.
For example, once I knew I needed a piece 1 1/2 wide and 2" along the bottom I made a rectangle first and then used a ruler to make the angled portion 2" in length.
24297
Post by: Viktor von Domm
cool work... scrolling through the pics one would think that was a work of a moment... but for all those that did terrain they know what a timeconsuming work that is... very good looking!
how will you go on from here? with what material will you add more detail?
5462
Post by: adamsouza
First thing I need to do is figure out how I'm going to make the entrance. Figure I'll start with the door and then figure out the angled bits I need to make it join properly arond the edges.
Then I need to cut out the gun ports and find some Heavy bolters to jam in them. I'm still looking for an inexpensive quad cannon substitute, so if anyone has suggestions for that I'm all ears.
After that it's a matter of filling in the seems and sealing the edges. I'll probably do some paneling with thin plastic sheet as well.
I have an idea for an Ork equivlent, that doesn't look like scap metal bolted together.
Still working on the stompa as well. Added a ton of bolts to the head and got the basic shape of the rokkits worked out.
Got a deal for 4 Kans without the ranged weapon arms for about $20. Once they come in I'll be working on them as well.
24297
Post by: Viktor von Domm
do you feel like doing the quad guns by scratch? felt pens i bet would do the trick...
48594
Post by: dsteingass
Spare IG autocannons can make a nice quad AA gun
5462
Post by: adamsouza
I'll end up scratch building the Ork equivalent, but I was contemplating using these for Imperial

32169
Post by: Rogue Wolves
those guns look really cool, but i must admit, the name ForgePlanet did make me laught quite a bit...
5462
Post by: adamsouza
I may just break down and buy an Aegis Defense line for the quad gun. It will cost twice as much but I will get the defenese line, the Quad gun mount, and stand as well.
24297
Post by: Viktor von Domm
hmmm... i wouldn´t do this but who am i to argue... it will give you plenty of cool betz... so where is the harm in that?
5462
Post by: adamsouza
Well with the quad gun in hand I'll have something to compare to when I make of my own 
24297
Post by: Viktor von Domm
yup... Imitation is the highest form of flattery
5462
Post by: adamsouza
I really need to learn to focus on one project until it's finished.
Was trying to figure out the dimension so the Skypad and it lead me to doing this
Should lead to a pretty easy, print, glue to foamcore, and your finished\, terrain idea.
24297
Post by: Viktor von Domm
oh... for an easy project
but i like the way you tackle the concept phase... !
and focusing on just one project??? i couldn´t do this... no way^^ got at least three hobby related projects on my desk... and then honey do things... and also recently i am managing the treasure hunt of my six year old party for leaving nursery school...
48594
Post by: dsteingass
Awesome plan!!! -The thing is 12" end to end with the shields up btw
5462
Post by: adamsouza
Thanks!
A friend of mine is running a progressive 40K 6E League at the local comic book shop with at least half the players being 40K virgins. I want to have some terrain ideas they can easily implement for themselves.
It would be pretty humorus is everyone ended up with their own Skyshiels Landing pad.
I'm bulding at least two. Started building one before working on those illustrations and I'll build one based on the illustrated plans as a proof of concept. One will probably end up Orkified to add some diversity.
17738
Post by: Briancj
Man, now I need to drive to New Bedford to get a game with Adam?
5462
Post by: adamsouza
That would be great. I literally haven't played a game of 40K in the last 4 years, so I'm a tad rusty. Give me a month or two to figure out 6E first.
There are a few other Dakkaites that will be there as well. Mostly refugees from Grandmasters and Game Haven.
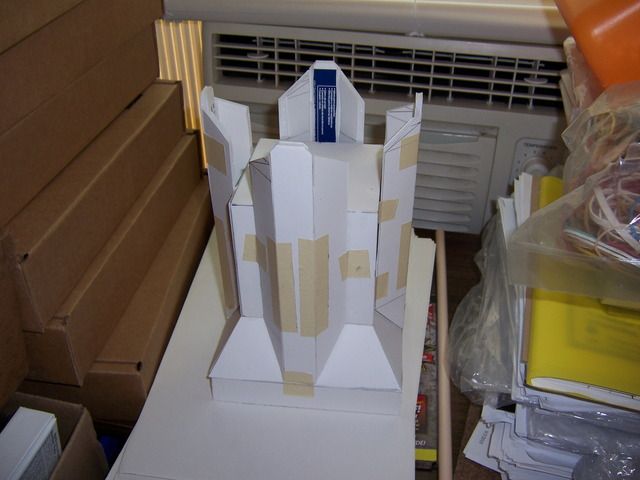
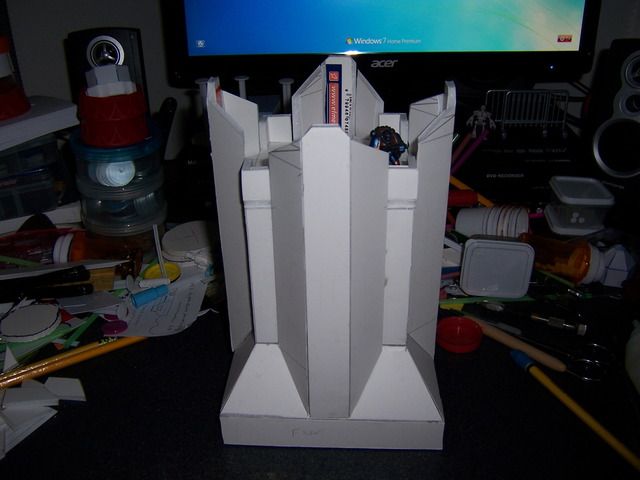
Automatically Appended Next Post: Added a door to get into the Bastion and cut some holes to create fire points.
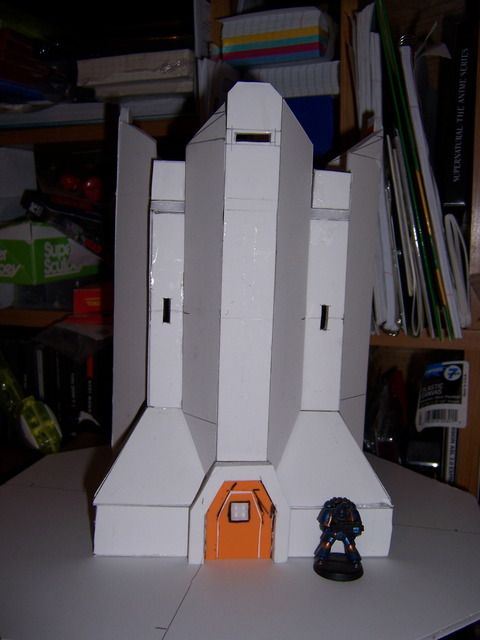
Forgot to show this Top Down pic earlier

5462
Post by: adamsouza
Possibly nuts, but I am working on two separate Skyshield landing pads. Each tackling it with a different approach.
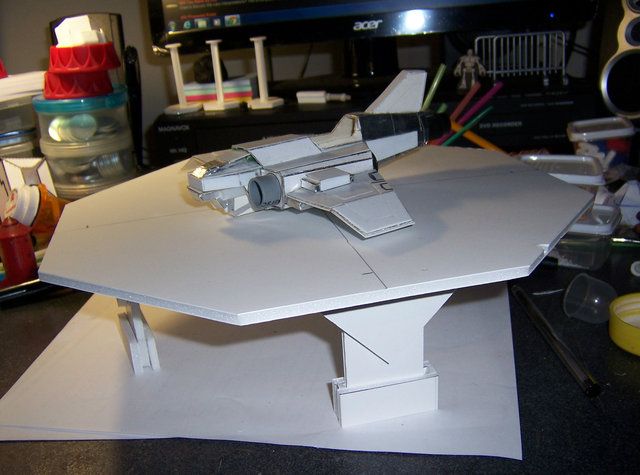
24297
Post by: Viktor von Domm
how do you inted to fill all those gaps on the tower? or will this look like details when primed?
the skyshield looks good....and...probably not nuts... i would see it as research... doing different approaches on a similar thing... it can only broaden your horizons...which is always a good thing...
by the way... nice lil flyer...got any more pics of that one?
48594
Post by: dsteingass
OMG! Dood! That scratched Thunderbolt is badass!!
5462
Post by: adamsouza
Viktor von Domm wrote: how do you inted to fill all those gaps on the tower? or will this look like details when primed?
Filling the gaps with home made Gap filler.
ADAM's "TOP SECRET" GAP FILLER RECIPE
2/3 Corn Starch
1/3 PVA (Elmers) Glue
I'll probably use it to give the walls some texture as well.
The model is quite sturdy, considering it's foam and paper. The PVA will give it a bit more scratch and dent resistance.
Viktor von Domm wrote:
the skyshield looks good....and...probably not nuts... i would see it as research... doing different approaches on a similar thing... it can only broaden your horizons...which is always a good thing...
Sleep deprived, at 2am, ideas come to me, and some times I act on them.
My FLGS is just starting up a 40K league so I donated a ton of my old scenery collection to the shop. Stuff I did a decade ago mostly, but with a little paint here and there it will look good enough. I'm experimenting with inexpensive ideas for terrain that I can teach the noobies about. That skyshield has cost me less than a dollar so far and it was very simple to make..
When it's done I was thinking about making an article on making them for the tutorials section here on Dakka.
Viktor von Domm wrote: by the way... nice lil flyer...got any more pics of that one?
It's just the hull really at the moment. Before the new Ork flyer came out I had the idea of Oks using a salvaged Thunderbolt as a bomma.
I can take a few pics if you like, but I wasn't palnning on finishing it until I could get my hands on the rules for the new Ork Flyers.
dsteingass wrote: OMG! Dood! That scratched Thunderbolt is badass!!
Thanks.
I guess when I finish it I'll have something to land on the skypads
24297
Post by: Viktor von Domm
corn starch? wow... i bet it is smother than say sand? hmmm.... if you have an already in use pic of said formula i would be highly interested... sounds like vcool thing to do...
and yes please... do make more pics of that flyer... also... after what templates did you build it? or is it your own design... ?
and sounds like a true samaritian deed to me... donating all that terrain and so on...
and by all means... make an artikel/tut on that... !!!
5462
Post by: adamsouza
Viktor von Domm wrote: corn starch? wow... i bet it is smother than say sand? hmmm.... if you have an already in use pic of said formula i would be highly interested... sounds like vcool thing to do...
Yup, smoother than sand. I don't have a pic yet, but I'm sure I'll be posting updated pics of the Bastion.
Viktor von Domm wrote: and yes please... do make more pics of that flyer... also... after what templates did you build it? or is it your own design... ?
I'll see if I can find the plans, or least point you in the direction to get them. They were not of my design.
Viktor von Domm wrote: and sounds like a true samaritian deed to me... donating all that terrain and so on...
Hey, hey, hey.. I never said ALL of my terrain. Gave them a huge box full. Enough for 2-3 tables at least.
I have a 4ft by 8ft gaming table in my basement and still have enough terrain to cover that a few times over. They inherited most of my Gorkamorka, Mordheim, a pyramid, and ruined city stuff. All stuff I made going back 15 years or so. Some sand cast plaster stuff. ruins made form GW foam trays (remember those ?) Admittedly not my best work, but more than sufficient. A friend of mine is going to give most of it a fresh layer of paint and bring it to the store. I'll try and take some pictures of it in use, once we get the league running smoothly.
Going though it all has made me want to touch up the part of my collection I kept. I'll post pics of stuff as I do.
Viktor von Domm wrote: and by all means... make an artikel/tut on that... !!!
I will for the Sky Pad at least.
Also working on a top secret project as well. Some one on a hobby forum let me get my hands on an early version of a cardstock model that serves as great proxy for a fortification kit. I'm test building it and providing feedback, but I had to swear not to tell anyone what the kit was, or who made it, until it's finished and ready to be released. The test copy I'm making is out of plastic sheet and as far as I can ell it's a dead on representation.
52201
Post by: evildrcheese
That skypad an flyer are looking great.
This thread is such an inspiration to do some scratch building.
D
24297
Post by: Viktor von Domm
ah you amaericans with your houeses and basements... how i envy you...^^
so then... you announced lots of stuff to be appearing here soon... till then i am looking forward to your updates!
5462
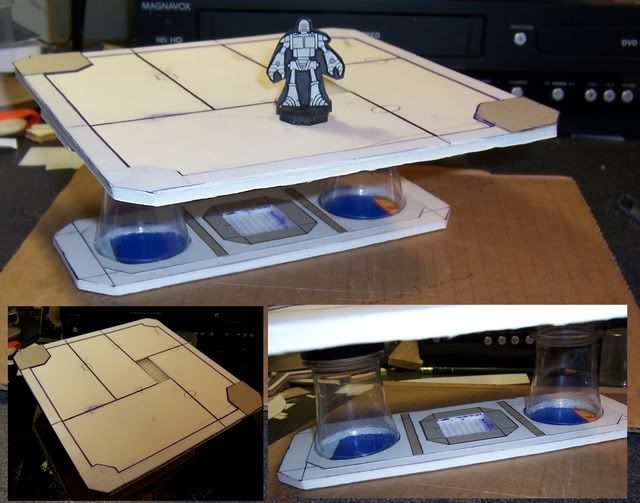
Post by: adamsouza
Some progress on the Skyshield
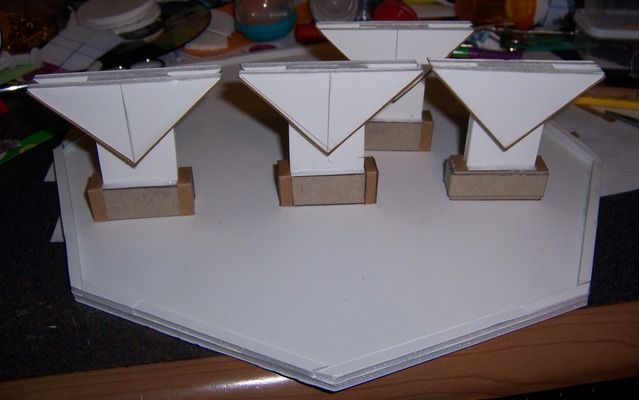
I'm debating whether I should magnetize the skyshield walls or attempt to construct hinges. Hinges would be truer to the original model, but I'm afraid the will be loose and floppy, or just fall apart.
so then... you announced lots of stuff to be appearing here soon... till then i am looking forward to your updates!
I'll take the camera into the cellar now and see what I can scare up. My gaming table is covered in boxes at the moment, but I should be able to find something
24297
Post by: Viktor von Domm
i wouldn´t do actual hinges then... too much bother with not much benefit... better glue them on...and those triangled things... those are the feets?
5462
Post by: adamsouza
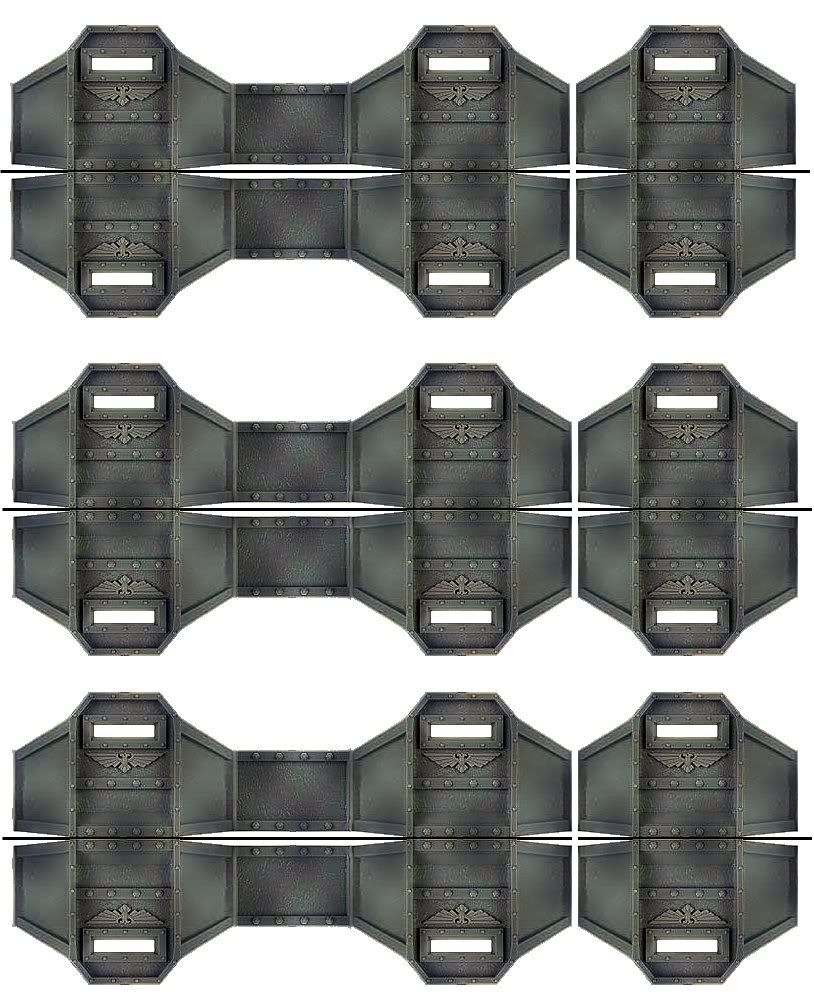
Super simple instructions for building a basic skyshield landing pad with the attached PDF.
1.) Print the attached PDF 4 times, preferabley on cardstock
2.) Glue cardstock to foamcore
3.) Cut out parts
4.) Assemble parts !!
EDIT: 2 of the pages need to printed Mirrored/Reversed. I missed that detail when I posted this. I will post an updated version of this soon
1
| Filename |
One Page Single Skyshield.pdf |
![[Disk]](/dakkaforum/templates/default/images/icon_disk.gif) Download
Download
|
| Description |
|
| File size |
113 Kbytes
|
48594
Post by: dsteingass
No..I'd pin and glue them solid..it needs to be able to take gaming abuse...
5462
Post by: adamsouza
Umm yeah, they need to be glued. I didn't mean to give the impression it was snap together or anything.
24297
Post by: Viktor von Domm
good work mate... would love to use it asap... but atm the competition takes up my hobby time... but i think this would be a nice piece for a complete table... to go with my current built...
downloaded for sure^^
5462
Post by: adamsouza
Some progress on the Skyshield Landing Pad

This is an Idol of Gork/Mork I carved out of a single block of that green plant pot foam, back when GORKAMORKA came out.
Tau Logo
That is from a Tau City Terrain I was experimenting with
Damaged Fuil Caniisters vintage Gorkamorka as well. They are all plaster castings.
Dumpsters
Gorkamorka Fort
Trench Warfare Battle Board
I put a ton of work into this board, but never quite got it where I wanted it. Over thought the design. Got obssessed with lines of fire, having a trench to kick grenades into, having room for vehicles, etc...
48594
Post by: dsteingass
You should check out HyenaJoe's thread, he has rebuilt several of the old card Gorkamorka buildings in plasticard!
http://www.dakkadakka.com/dakkaforum/posts/list/0/403465.page
5462
Post by: adamsouza
Some interesting stuff there, especially the idea about using dry wall tape. I'll have to look into that
24297
Post by: Viktor von Domm
that ork idol sure has a lot of possibilities in it... carving the green foam is a good idea... never tried it myself... but i had ideas about that stuff as well...
the trench is looking good... if completed it would make a great bottleneck scenic table...
and the tau buildings... simple start and a very effective finish... too bad you never came around to paint them...i bet they would look stunning... in fact i will remember this idea for later use... there are so many yoghurt caps in my family each week...^^
and last but not least... the work on the skyshield is making superb progress!!!... the details on those feet... very good! and the added rivets... i had to check that you are actually already a league member^^... extraordinary riveting repeated^^... ornamental riveting is a highclass from of the riveting process!!!
5462
Post by: adamsouza
Sorry, no pic at the moment, but I did get to add a ton of rivets to a pair of the Necromunda Towers I was working on at the beggining of this thread.
Looking back at my old terrain collection I realized I was really prolific in building terrain and gak at painting it beyond a black base coat. I do not want my Necromunda terrain I worked on to suffer that fate so I am determined to paint and finish them.
They definitely look more industrial and less sleak with a plethora of rivets attached.
Side note: octagon glitter makes piss poor rivets.
24297
Post by: Viktor von Domm
well... how could you second guess the impact rivets have on any structure???
care to show a pic of said glitter stuff? would like to see what to avoid...
48594
Post by: dsteingass
Oh no? The glitter didn't work? DAMN.
32169
Post by: Rogue Wolves
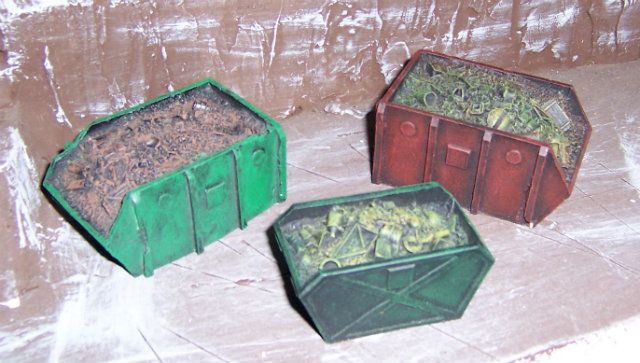
I like those dumpsters! how did you make them?
48594
Post by: dsteingass
YES!- Tell us about the dumpsters..I really like those too.
5462
Post by: adamsouza
I think the dumpsters in the picture are ancient Armorcast Models. Some of them, not all were pictured, were plaster castings made in a latex rubber mold. I hadn't moved on to silicone molds at that point. The latex molds would only survive a handful of castings.
Oddly enough I was scratch building another one. The basic shape is pretty easy to make in card or foamcoare. Add some supports cut from sprue leftovers on the side. A square of card of the flat on the side. Some glue, sand, and junk, for the garbage and you'd be done.
Since there seems to be an interest in the dumpster I'll finish and document that project, in the near future.
As for the glitter, the size and shape are great, but they are soooooooo thin I'm afraind they will be lost once I base coat the model. I'll post some before and after pics, after I get around to base coating the model.
48594
Post by: dsteingass
Just use thin coats of spray..don't overdo it...Perhaps dybrushing will bring it out?..I hope.
24297
Post by: Viktor von Domm
i thought they were armorcast models...
and i dunno where but i think i saw tuts out there too to make your own dumpsters...
if the glitter is too thin i wouldn´t bother using it as rivets... youo will probably waste lots of time applying them to be later lost after the painting... but you can maybe use them for uther uses... as terturized gound for terrian? or for that matter as contens for your new dumpster?
5462
Post by: adamsouza
Viktor von Domm wrote:. or for that matter as contens for your new dumpster?
That thought thought did occur to me...
24297
Post by: Viktor von Domm
5462
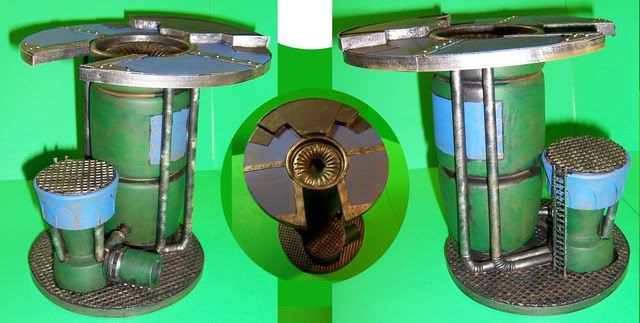
Post by: adamsouza
Went down into the cellar to get the dumpsters and came up with Open topped chemical tanks, think joker falling into them.
I had two of them made, probably a decade ago, and never got around to painting them. Really basic, functional, but not up to my standards as they are now.
Taking pictures of the rehab process as I go along. Rebasing, adding a grated floor and some gizmos and stuff to make it more interesting look. Will post pictures of my progress. Hoping to have paint on the first one later tonight.
Tutorial on how to make dumpsters coming soon. If I find the inspriation I will install my scanner and printer and make some printable templates for the dumpsters as well.
24297
Post by: Viktor von Domm
oh... the tanks i am also intersted in seeing...
and i never turn my eye away to free templates
5462
Post by: adamsouza
Too many projects going at the same time to keep them all straight.
Can't find the punch I use to make rivets. This is incredibly distressing since Rivets are about all my skyshield landing pad needs before I start painting it.
I've entered into a 40K league and I need to whip up 500pts of Orks. I wanted to go ALL dreads and Kans with Lootas, but the League rules won't let me play vehicles that aren't dedcated transports at 500 points, and they rules dreads and kans as vehicles. Conventional wisdom would involve about 60 boyz with shootas. I have about 90 boyz with slugga choppa. So my newest project, that I need to finish first is to make new boyz !!
I don't want to spend time and energy modelling and painting 60 boyz, that I won't use much a month later when the league bumps the points above 500, so I've decided on making 30 'Ard Boyz with shootas. Heck, I might not use them much later, but it's only half as many models to paint.
I figured out how to armor them up nicely. Big shoulder pads, arms guards, chest amor, and a big metal jaw, all with rivets !!
48594
Post by: dsteingass
I would just use the sluggas and choppas and Waaagh to run into their line, they can't do much but die if you get to them.
Automatically Appended Next Post:
..You can always changeup your strategy after the bump in points...
5462
Post by: adamsouza
It's also me wanting to be a bit silly. After 30 'Ard boyz and a Warboss, about all I have points left for is a squad of gretchin. I didn't have 'Ard boyz, so it's another option for my overall army once they are completed.
The league is going to have a bunch of 40K virgins, so I'm shooting for WBA (Win By Accident) more than WAAC
Automatically Appended Next Post: My future Dakkajet resting on the Skypad

24297
Post by: Viktor von Domm
cool looking wings! is that tinfoil there?
5462
Post by: adamsouza
Aluminum Tape actually. It's basically Aluminum Foil with adhesive on one side. Used for Duct work here in the states. Thicker than the cooking variety.
24297
Post by: Viktor von Domm
funny isn´t it... i have one too in my collection of varuious tape... tho i can´t really recommed ducktape for hobby uses... it isn´t keeping atached for too long... i used some for connecting the peaks of my steampunk airship... after half a year of storage the almost all came off...
5462
Post by: adamsouza
Tonight I'll get some pics up of me 'Ard Boyz and Warboss WIP.
I think the boyz are coming out great. Just time consuming to convert. Getting them done at an average 3 a day.
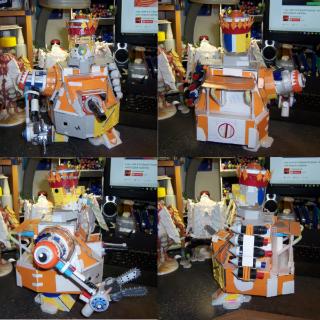
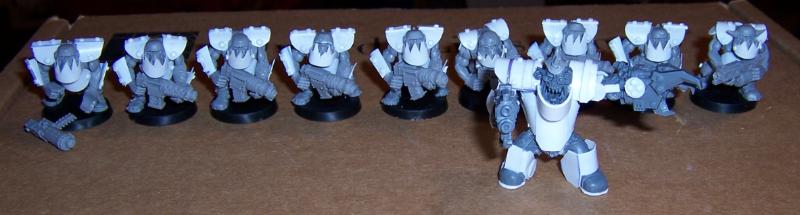
Part of it is that the Warboss is taking on a life of his own. Started off as a AOBR Warboss that I thought I would just tweak a bit. He got upgraded to 'Eavy Armor is and working his way towards full blown Mega Armor. To get Armor on him, Iarge amounts of his bling were surgically removed. Once the loin cloth, shoulder spikes, wife beater, power supply, cables, and back pack are removed he looks like a completely different model.
5462
Post by: adamsouza
Here is a pic of me Ard Boyz and Mega Armored Warboss
52201
Post by: evildrcheese
Looks good, can we get more pics of the Mega Armored Warboss those, it's hard to pic out the details.
Looking great though.
D
24297
Post by: Viktor von Domm
wow nice work there... care to share how you did them? looks like tubes cut down to size? added teef and then ready to go? i am very anxious to see those with a lick of paint on them...
5462
Post by: adamsouza
Here are the general parts layed out.
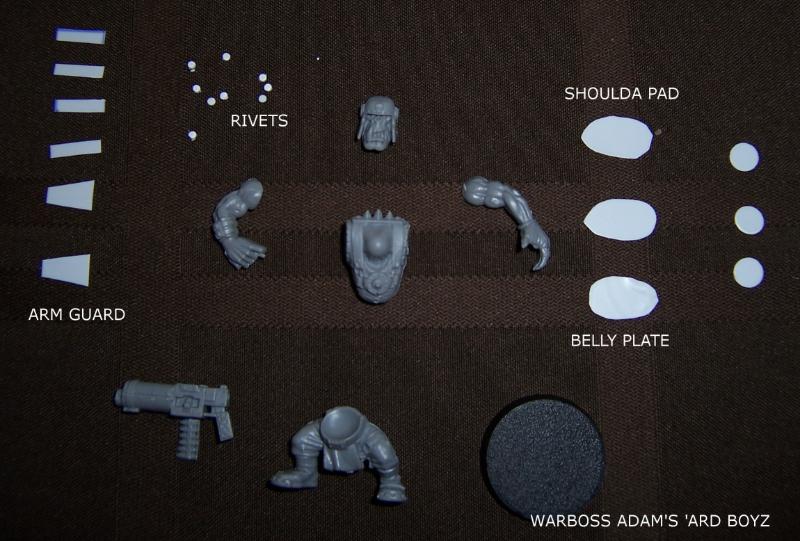
The shoulda pads, belly plate, and arm guards are curled around a rod to give them some shape.
Apply the belly plate BEFORE putting on the arms. The other armor plates go on after the model is assembled. I've been leaving the guns unglued to make it easier paint and work with.
The mouth guard is cut from the same oval shape as the other armor plates. 3 triangles for teeth and cut the rest down the middle to make the mounting bits.
Rivet as needed.
24297
Post by: Viktor von Domm
wow... that was quite informative!
thanks mate!!!
5462
Post by: adamsouza
Thanks. I have another 20 to build and I'm taking pictures here and there. When they are all finished I was thinking of writing a proper article/tutorial for them. Automatically Appended Next Post: Finished templates for both a Skyshield Landing pad and an Aegis Defense line. I want to test build them and take some pictures before I post the files. Neither has instructions yet. That's why I need to take the pictures
It's 2am and I can't see straight enough to cut them out at the moment.
48594
Post by: dsteingass
Yep, save your fingers, sleep, then cut!
24297
Post by: Viktor von Domm
what the man said...! they are handing out no medals for careless hobby heroism... 
5462
Post by: adamsouza
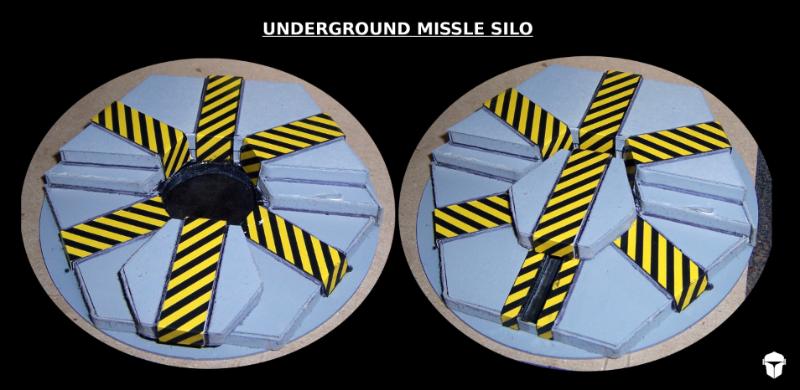
This is the most basic version of the defense line
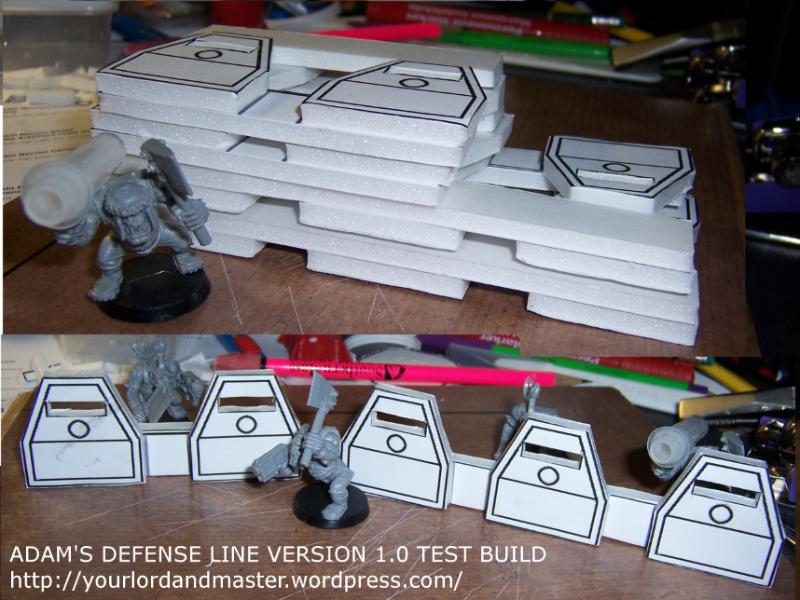
It stacks easily, is the simplest to assemble, and works pretty well.
There is an additional version with support struts, to make it more stable.
I've also worked out additional layers of detail to be glued to thin card to make it more 3 dimentional.
Just need more time to cobble them all together.
22619
Post by: inmygravenimage
Needs more rivets :thumbsups: but, stunning work.
24297
Post by: Viktor von Domm
seeing this now i am not totally sold... as inmygravenimage already said... needs more detail... raised one at that...rivtes is only one part... also i think the material is a bit too thick for that look... looks way more boxy thasn is good for that tiny piece...cardboard in lyers would have been better methinks...
just saying this as i already saw some way more brilliant stuff done by you!!! hope your toes are feeling better soon
5462
Post by: adamsouza
Thank you for the kind words and feedback.
I agree this version is pretty barren as far as details go. The premise I'm working on is a kit with 3 tiers of complexity. This is the simplest version. It's easy to build quickly and functional,.
The second level will have thin card detail.
The final level will have rivets and be suitable for painting.
The plans will work equally well with thick plasticard instead of foamcore, and be less chuncky that way.
I'm using foam core primarily because it's inexpensive, and I already have a large supply, but feel free to substitute what ever you have on hand.
24297
Post by: Viktor von Domm
understood... looking forward to further developments^^
52201
Post by: evildrcheese
Defence line is looking good so far. Can't wait to see the more detailed mk II.
D
5462
Post by: adamsouza
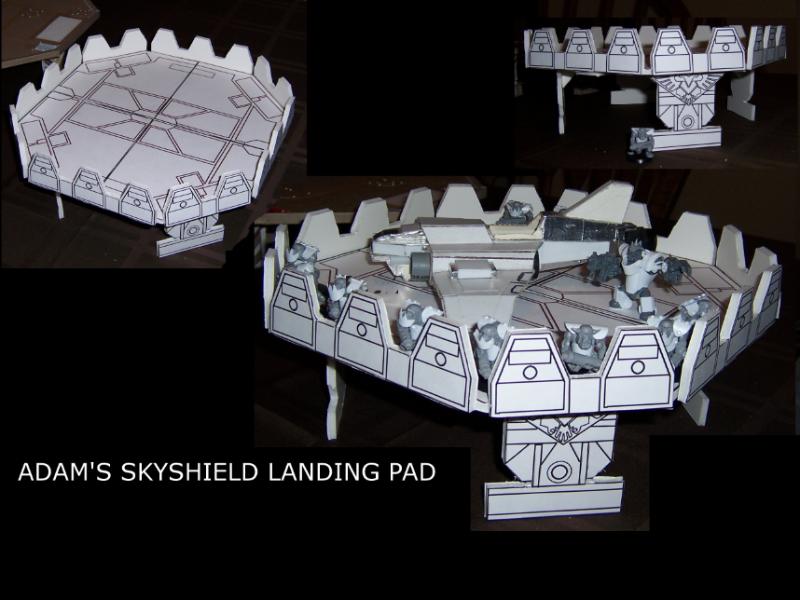
Okay, here is look at the first test build for the printable skyshield landing pad.
As with the Defense line this is a pretty bare bones build, just to make sure it works and everything is scaled properly.
24297
Post by: Viktor von Domm
well... i feel a bot shabby for earlier saying that i don´t like the barren look... that model now floors me... even tho it is only one layer each... very impressive!
5462
Post by: adamsouza
The skyshield will get a 2.0 with raised versions of all the printed on detail it has now.
I need to knuckle down and finish the boyz. The league starts this weekend and I literally have nothing finished for it.
Well 18 assembled Ard Boyz and an unbased Mega Armor Warboss. Going to try and get that up to a respecable 30 Boyz by Friday.
The Warboss is looking sweet. I need to set up a photo booth to take some good pictures of him. Right now all that white on white just shows up pretty poorly in pictures.
Did GW stop making Thrakka Green ? I couldn't find it on the site. Not a big user of GW paints but I don't feel like trying to experiment with random green washes.
Automatically Appended Next Post: Found this gem on Wargamming 101
It would get the job done, and I honestly can't think of any faster way to make an Aegis defense line.
17286
Post by: WvLopp
I use Biel-tan green on my boyz. The game store I go to has a GW painting guide that they sent out when the new paints came out. Biel-Tan green is what they use on the orks in it.
5462
Post by: adamsouza
WvLopp wrote:I use Biel-tan green on my boyz. The game store I go to has a GW painting guide that they sent out when the new paints came out. Biel-Tan green is what they use on the orks in it.
Thanks !!
Biel-Tam Green it is.

24297
Post by: Viktor von Domm
nice find adam, thanks for sharing...
and yes... they changed the whole range... i guess you have to experiment with the new "wash"... some say they changed the formulas a bit...
5462
Post by: adamsouza
From what I understand it's a completely different manufacturer, hence the new paint names.
I never used GW paints much, aside from a few washes. Assembled a collection of 200+ bottles of craft store paint, bought mostly on sale, over the years. I've made my own washes as needed in the past,.
This time I'm painting up a complete Ork army and I'm going to try to use a yellow base coat, instead of my ususal black. Figured buying a few bottles of the appropriate washes would make this significant'y asier.
This morning I built a few more 'Ard boyz and got to work conveting three rokkit launchas for them. I was orignally going to go Eavy Shootas, but I realized I had about Zero anti tank weapons in my 500 point force.
24297
Post by: Viktor von Domm
well... i tried to make my own washed too... really depends on the paint you start with... some actually work and some others just don´t flow as you want them to... so using the GW ones is still a more dependable way of getting things done... also i use plenty of the real old inks of citadel... i quite treasure these...
a yellow basecoat sounds really interesting for orks... then you build up the green hide with the washes i gather? i bet that looks cool...and thus you create easy and subtle shades as well...
and i too are often on hunting strolly myself for more paints... and gathered quite a nice collection of paints... for terrain i use more cheaper and thicker paints... but when it comes down to mini painting the GW paints are better... tho i will gradually start to get me some droper bottles from vallejo soon... starting with their devlan mud workalike wash...
5462
Post by: adamsouza
Painting the boyz in Bad Moon colors, so yellow save a lot of painful layering of lighter colors. Familar with the technique, just never applied it to Orks before.
This tutorial completely sold me on it Bad Moons Speed Painting Guide
No one within a 45 mintue ride carries and GW or Vallejo paints, so I figured I would start amasing the washes now, so I'd have them when I'm ready to start painting.
48594
Post by: dsteingass
Yep, I've been using Biel-Tan green on my Boyz too, It's good stuff! So is Fuegan Orange! -I used several coats of it on my Orange Burna Bomma.
Automatically Appended Next Post:
You should SERIOUSLY try the new GW base yellow Averland SUnset, One coat, I promise.
24297
Post by: Viktor von Domm
yes....that tut is a good one...and i like th idea to use other colors for priming too... and building up green from yellow... only white would still work... but that painter seems to be a really clean one... i dunno if i would be able aply washes that precise...
also... get your stock of washes to be full with extra suply too... you gonna need penty of them for that kind of methode...
17286
Post by: WvLopp
adamsouza wrote:WvLopp wrote:I use Biel-tan green on my boyz. The game store I go to has a GW painting guide that they sent out when the new paints came out. Biel-Tan green is what they use on the orks in it.
Thanks !!
Biel-Tam Green it is.
np. I am using the same tutorial for the base for painting boyz
5462
Post by: adamsouza
I give you exhibit A: Grey Knight Terminators

$50.00 for 5, so $10 each
Exhibit B: Ork Meganob

$22.25 EACH !!!
I was thinking of making a squad of Meganobs, but didn't want to convert as much as I am doing for the warboss. Frankly I would never get it done if I have to scratch build every little bit for a squad. Thinking of throwing Ork heads on Grey Knight bodies for the basis for Meganobs. Scratch built shootas and powerklaws, and some bolted on armor plating
What do you think ?
36809
Post by: loota boy
Grey knight termies are a bit too ornate for ork MANz. The "Ork head on a terminator" idea has been done quite frequently, and rarely well. Just google image it. If you can find a way to keep it unique, then go for it, but for that to work, you may end up doing just as much converting as starting it up from scratch.
5462
Post by: adamsouza
It hadn't occured to me that it had been done before, duh !!
I dunno, those look pretty decent.
RSJake wrote:That actually was easier than I thought!
found here: http://www.dakkadakka.com/dakkaforum/posts/list/30/317221.page#2177177
done by wib.
Obviously, you can't just stick an Ork head on a Terminator and call it good, but you can use that as a base and Orkify it. I stand by my previous comment, and say it CAN happen.
But yes, there are some out there that look like butt!
They still need conversion, but It's easier than starting with an Ork boy/Nob
36809
Post by: loota boy
If you like it, then by all means, go ahead. I'd try starting base with a box of chaos termies though. They look closest to orky for the base.
48594
Post by: dsteingass
I dunno, It still seems cheaper to scratchbuild the mega-armored body and just insert ork parts here and there....
5462
Post by: adamsouza
Progress report:
I'm up to 22 out of 30 Ard Boyz done, including a Nob and 3 rokkit Launcha Boyz.
Every day I keep adding more detail to my MegaNob. Still trying to find a good backpack for him. I'm toying with the idea of giving him an Ork version of a Space Marine Backpack.
dsteingass wrote:I dunno, It still seems cheaper to scratchbuild the mega-armored body and just insert ork parts here and there....
It is, but I really don't have the time to build 20 Meganobs from absolute scratch. I have the oppertunity to get 20 Grey Knight Termies from another player in trade. Most of the detaily bits are optional, so I can skip them. I figure once I add an Orc head, Jaw Piece, Shoulda pads, Power Klaw, Shoota, and a few extra armor plated is should look pretty orky wihtout me having to armor every millimeter of it, since anything I don't cover will aready be armored.
Somewhere I should actually have 2 boxes worth of AOBR termies, but I can't find them.
24297
Post by: Viktor von Domm
i think dave is right... beside i bet there are some tuts out there for that purpose already...
5462
Post by: adamsouza
I found templates for Mega Armor, but they were labor intensive, and required diffferent sized tubes.
If you have a link for any tutorials I would be interested in checking them out.
24297
Post by: Viktor von Domm
well it was rather speculative of me to say so... but... you know the old saying...
money =time and vice versa... if you want to save up on the fist you gotta invest in the latter...
48594
Post by: dsteingass
I would just look at pics online of the GW and other Mega Armors you find, from all angles if possible, get out some ork heads, legs, arms,weapons, etc. Then I would start looking at basic shapes and thinking in layers. Start with a chunk of plastic for the torso and start cutting and gluing shape layers, you can paint them however later, but just think and work in basic shapes.
24297
Post by: Viktor von Domm
actually if you think about using only ork heads already together with GK or other stuff the idea of scratchbuilding simple bodies and arms out of PC and styrene rods is rather simple...
maybe you could even use old dices for the main body and build up fromt here...
17738
Post by: Briancj
When the shark jumps, part 114.
"When it is cheaper to buy RT era, non-recast Ork Meganobz in power armour, than it is to buy new ones."
5462
Post by: adamsouza
Kicking myself now as I had a squad of 10 RT Era MegaNobs.
Had a huge Ork army for 2nd edition and sold it all when the 3rd edition plastics came out as I didn't care for mismatch in sculpting styles.
5462
Post by: adamsouza
Progress shot on Ard Boyz
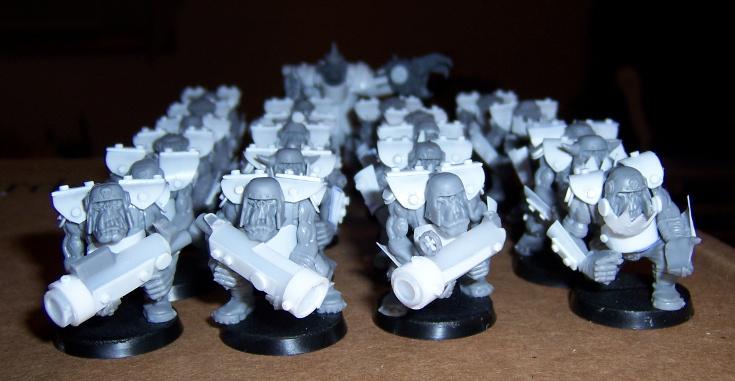
Defense Line with additional armor plating added
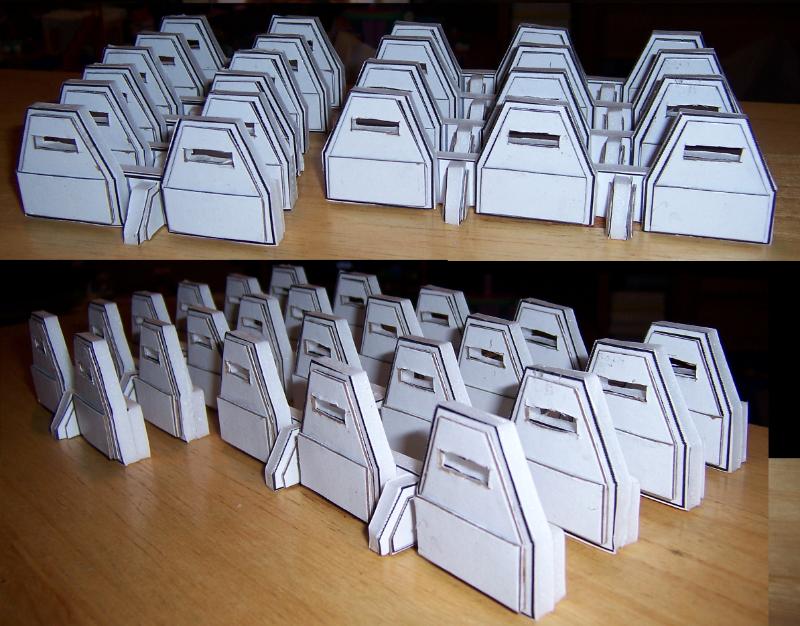
Two layers of metal plating bolted onto the front of the ferrocrete fortification for additional protection.
The most difficult part of this project is cutting out all the little rectangle openings
24297
Post by: Viktor von Domm
The most difficult part of this project is cutting out all the little rectangle openings
that is always the most difficult... if i had a rectangular holepunch it would be way easier... but maybe using the classic round holepunch could ease the workprocess?
and all those neat looking ´ard boyz look very classic and have a strong 60´s vibe to them
5462
Post by: adamsouza
The round punch might be neat to make boxes with rounded corners. I'll have to keep that in mind when making Xenos defenses.
Me 'Ard Boyz are a bit more uniform than regular ladz, but dat's cuz dey ded ard !!
I have to take a pic of the completed mob. 30 Ard boyz, including a Nob and 3 Rokkit Launcha ladz. The Rokkit launchas look more like Potato cannons. I never did like the rockkit on a stick look. For the Nob I used an AOBR Nob. Cut off his Choppa and added a Shoota Barrel and clip to his slugga. It makes an extra long shoota for him, but it looks more appropriate for his size, and I find it fluffy that the nob would have a ded shooty kustom shoota.
Automatically Appended Next Post: Just had a brainstorm, and I'm going to document it here before I forget about it.
Instead of the support leg being basically a triangle, make it more of a U shape and have it fit snuggly over the horizontally runing piece. That way it would support the model from tipping either way, make the models profile a tad bit more interesting, and not impare models sitting adjacent, the way side mounted supports would.
24297
Post by: Viktor von Domm
well i thought that the round holepunch could punch out the corners first of your rectangualr holes you want...then cut them to your wanted shape after that with a knife... i think in the end this would be a way to move on quicker...
and the U-shaped support "legs" sound like a good idea...
and as for more regular looking orks... i think orks don´t have to just look like green apes .... there is mmore to these than meets the eye at first glance... and beside... 40k has so much room for newer versions of old themes.... no telling how brighter orks would look...
5462
Post by: adamsouza
Viktor von Domm wrote:well i thought that the round holepunch could punch out the corners first of your rectangualr holes you want...then cut them to your wanted shape after that with a knife... i think in the end this would be a way to move on quicker...
I'm sorry, I knew what you were suggesting, I just kinda zoomed past it in my train of thought. If I was working with thisck plastic card that would be spot on advice. With card board and foam core, I think it may just add more work, having to go back in to round out the corners. Thank you for the suggestion though.
and the U-shaped support "legs" sound like a good idea...
It is defintely a better thought out idea. The way I did it is serviceable, but a U shaped support would be a better design.
and as for more regular looking orks... i think orks don´t have to just look like green apes .... there is mmore to these than meets the eye at first glance... and beside... 40k has so much room for newer versions of old themes.... no telling how brighter orks would look...
Everything is hand cut without measuring, so it defeintely has an Ork feel to it, just used to seeing people go out of their way to make each Ork extra unique, while I made my boyz look more like a cohesive unit of disciplined troops.
24297
Post by: Viktor von Domm
h card board and foam core, I think it may just add more work, having to go back in to round out the corners.
with this thought i am totally with you!!! absolutley right!
while I made my boyz look more like a cohesive unit of disciplined troops.
which is why i like them... i am not much of an ork fan... i like them but for now don´t intend to work on them atm... but your work i see as a logic that has a true appeal to me!!!
5462
Post by: adamsouza
You know what they say... Once you go Ork......nah, I got nothing.
52201
Post by: evildrcheese
Those 'Ard Boyz are looking sweet!
Also, I think I'm being a bit slow, I can't see where the U-shape you've mentioned is... (I do understand the logic though).
D
24297
Post by: Viktor von Domm
adamsouza wrote:You know what they say... Once you go Ork......nah, I got nothing.
hurhurhur...
5462
Post by: adamsouza
evildrcheese wrote:Those 'Ard Boyz are looking sweet!
Thanks !
Also, I think I'm being a bit slow, I can't see where the U-shape you've mentioned is... (I do understand the logic though).
No brain fart on your part, the U shape isn't there yet. I had the idea while at work and used the post to remind myself to do it.
52201
Post by: evildrcheese
^ Well that's a relief . Looking forward to seeing the results
D
5462
Post by: adamsouza
Remember when we were talking about scratch building Mega Nobs ?
TRANSLATED from ORKS FORGE Website
Original Article found here: http://orksforge.blogspot.fr/2012/04/tuto-scratchbuild-meganobz.html
 Tutorial: Scratchbuilt meganobz
You also create your MegaNobZ! As expected following the tutorial to help you and guide you in achieving your MegaNobZ. To do this you will need a number of tools and raw materials. As always, my concern is to save, that's what I took to the base of my MegaNobZ Black Reach Nobz. It is good to know that if you are motivated, we can easily do without the body, leaving only the arms, head and legs. But here I can not help you. And tools for the plastic card, I return to my folder: to provide plastic card and equipment . I myself have not made a specific plan, the tutorial presents itself more as a guide to help you in achieving your MegaNobZ, this is why I multiplied the photos, is often observed best thing to do. In this regard, last tip before you start: you provide an official MegaNobZ, it will be very helpful to inspire you in your building.
Step 1: "Nob Préparationné the Boss!"
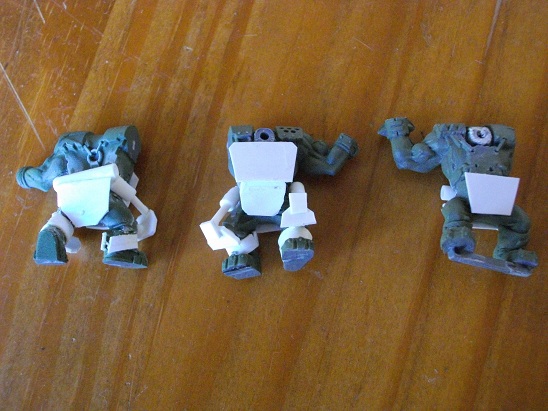
The first thing to do is to remove the ugly plastic bar under the feet. Wherever possible it is best to cut anything over and interfere too sodding plastic card: tip of the handles, objects hanging from their belts, etc. ...
Know that your MegaNobZ will differ with the installation of arms, they will determine the final shape of the figurine. You can cut them if you have rabiots of Nobz mass (because of arm boyz ca does not happen of course).
At this stage you should also shave his chest, underwear and knees to lay the plates of plastic card as desired

You must begin to prepare the structure that will comprise the mega-armor: - A plate chest (pic1 / 2) - A "slip" (pic1 / 2) - bands around the ankles (pic1 / 2) - Shoes: Warning! You must raise the sur-Nobz with these shoes, glue the plastic card so that the shoes become the top of the shoe. (Peak 2) - A tube in the back, above the slip (pic1) - 1 tube of each side of the slip, inclined to the front: they train future pistons hung on the knees. The fit is tight, I advise you to lock onto the tube in the back. Know that I recut some "slips" and later plates. It is better to cut fat and adjust later as needed.
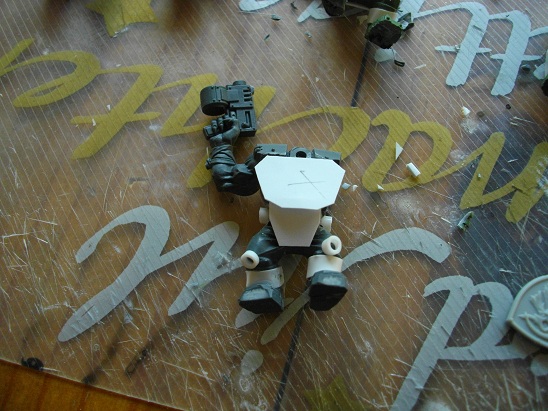
We then glue the pieces of tube that will host the knee (peak 3). You will have the beveled so that the knee does not collide with the shoe. Indeed the Nobz have difficult poses in the legs, you have to do with and provide to avoid having small balls.
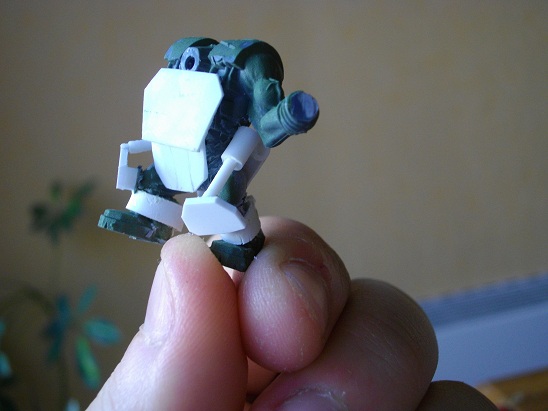
I realized the knee plastic card thicker (1mm I believe). Consider insert before the piston rods without fixing (peak 4/5). It's easier. Note that these pistons are a bastard horror to ask, do not hesitate to take it easy on the glue in the beginning because you will have to adjust them so that the whole is consistent. Sometimes I even "dig" in the figure to secure them in a credible manner (thank you mini-tools)


You see the peaks 4 and 5 of the base of the legs MegaNobZ. If we stopped there, it would be packed architecture (like the first one I made), we must raise her on-soles (peak 7). You can enjoy the waterfalls of plastic card to add some elements of the knee (clad plated 'in rab' / teeth / glyph: peak 6/7)
Step 2: "Met de plak of protéjassion boss!"
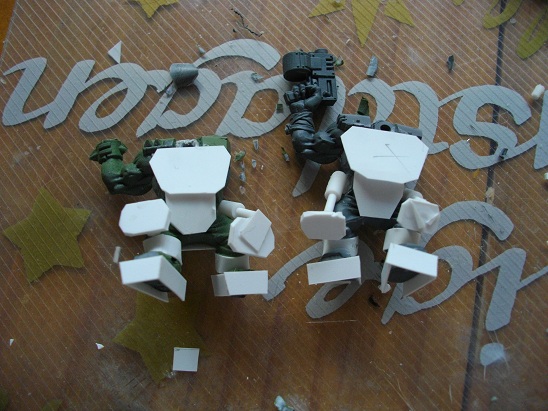
He then comes the agony of preparing boxes dorsal. Between planing figurines and a hassle to find a credible height (too high: MN giant, not high enough: the head and does not seem quite flat MN) is a real picnic. I began this stage by making "shoulder" (peak 8)
 (
This step will ask you tons of adjustments so that the shoulder pad to shoulder with the agreement of Nobz without leaving too many "empty". Ideally, the shoulder pads come lock on the chest plate, allowing the entire unit. Once this step is completed, we put a plaque above the shoulder (the larger plate, rework it later when the glue is dry). This often happens that elements come unstuck when reworking a plate, do not be discouraged!

At this level it is best to wedge a piece of plastic card behind the head of each figures. advantageously it hides the thickness of the plastic card and mask depth (peak 9).
It's time to stall the wings of our model aircraft! A number of Internet users exclaimed against these huge shoulder pads they are ugly or not credible. For me, this is what makes the beauty of my MegaNobZ, shoulder pads provide a solid side, almost chivalrous of clunky looking. You are free not to do or make smaller. See for yourself. At this stage (peak 9) MegaNobZ resemble the aircraft on legs, do not worry, the addition of arms and weapons rebalance all. A tip though: breaking up your form, fold in the tapping lightly of successive pliers to "round up", then file beveled so that the shoulder sticks easily on the shoulder pads. You will also notice on Peak 9 that I have at this stage, added the jaws of iron. They may seem prominent but again, it is better to cut off leaves behind to reshape.
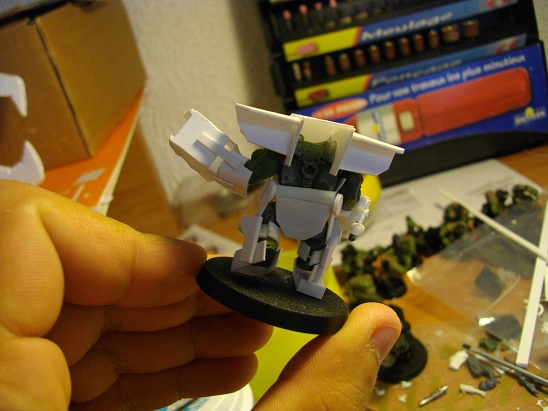
Once done you have to start giving "body" and "volume" for our MegaNobZ is more like airplanes. Glue the arms into thinking that the weapons will be there geffer impressive. You have the right to cheat! Genre paste a piece of tube to remove the arm from the body, the important thing is that it just do not see the end. I even remember a severed arm above the elbow, glued to a tube glued himself directly under the shoulder! Moreover, apart from worries to hold the tube is a position more credible because it is easy to orient the arm as desired. It should however improve the technique to fit the arms (a rod? From wire? I do not know).
Paste plates protections under the shoulder pads, slanted (peak 10). This has two functions: firstly it gives volume to the model by hiding the thickness of relatively thin plastic card, on the other hand it allows to hide the arms hacks (hack if there was).
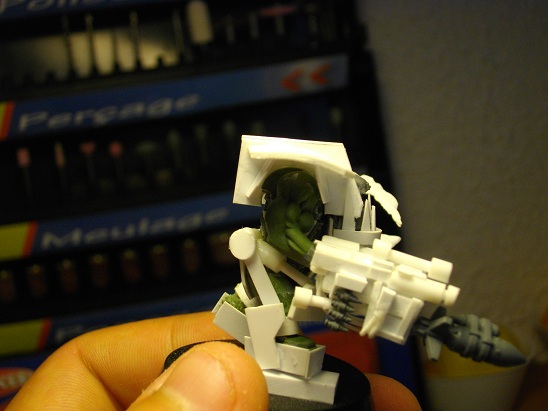
Finally attach the "hip" with their feet by creating these joints on the side of the figure. Keep in mind that the part of the thigh and gaut represents the lower tibia, this will help you visualize how to place each element. Watch the official MegaNobZ, it will also help you
Step 3: "Dakka Dakka DAKKA Boss!"
Now that a beautiful MegaNobZ well protected, it must be armed as a nag. Fortunately (or not ...) the codex is skinny at this level, and in melee you can choose between clip and clamp energy energy ... In terms of weapons, Fling 'twin, Kombi and Kombi LanceMissile Carbo. As we are a small band playing streak on the rules of distribution of damage in a unit with different equipment, so we made three of each. The basis for weapons, either forceps or fling ', are quite similar: the goal is to create a box of plastic card (peak 12) which will be grafted thumbs or rabiots to a weapon ( peak 13). I can not explain to you better than the picture (pic 14/15). Keep in mind that it is important to look at your official MegaNobZ and watch on the net to create things credible. Do not forget it takes longer seem that being in modeling. So even if in reality ca no chance of working, as ca appears credible when mounted, it's good.
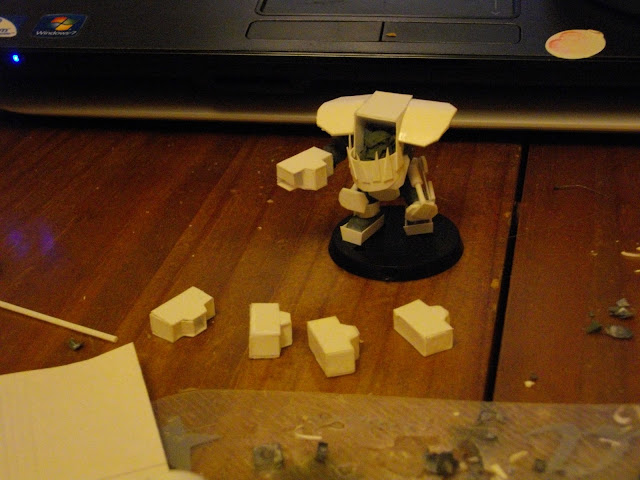

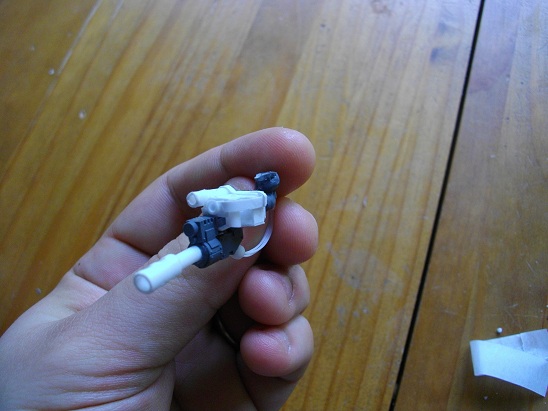

Once done you have made the biggest! You should get something approaching the peaks 16 and 17. This does not mean complete! We'll have to dress your figure severely to finish building its final volume and give it a unique charm.
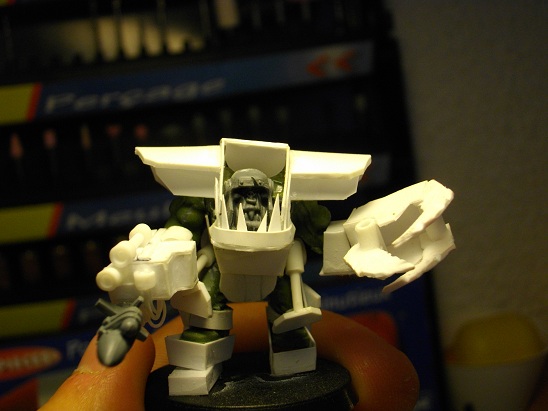
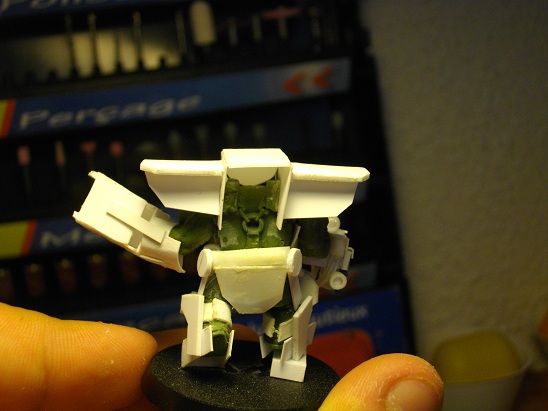 Step 4: "Ce me pluss bo head arf arf arf!"
MegaNobZ a self-respecting, this is a MegaNobZ not care who dazzle and whose second goal (after killing a lot by doing a lot of noise) is to make jealous all the boyz to burst out of the corner. To do this we'll have to burn the box and rabiots in crafting. It is for everyone to do what he wants and that is where the advantage of playing Orks: you can let go and do almost anything. However there are some elements that I feel bound to add good: - The mechanical: the mega-armor are lots of dubious Taules technology but inevitably noisy and conspicuous. even on mega armor the "softer" I created (peak 18) I let emerge mechanical. In this case a second helping of epic Thud Gun. You can see something more elaborate on the peak 19: rabiots diverse collection of elements on an old circuit board, son and electric wire, overall, a bit messy, gives a mechanical unit to the figurine.

- Rivets: It is mandatory to put rivets. If I made the choice of large rivets / bolts to give an imposing appearance to my MegaNobZ, it is quite possible to use or make smaller rivets. In all cases, it takes! - Chimneys and exhaust pipe: as you can see from the peak 20, it is possible to easily with the rods and tubes, very credible exhaust pipe and / or chimneys. We can let go again, but if you want to stay sober, one well placed pipe (peak 17) will fit the bill.
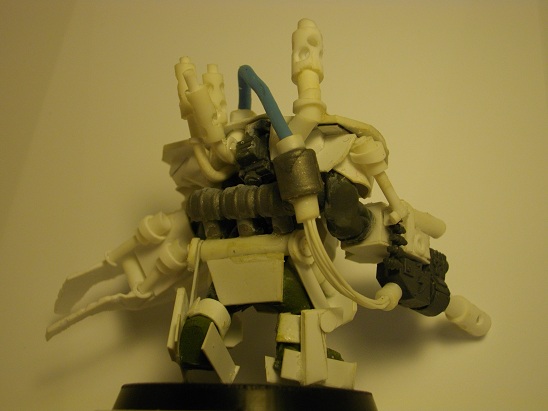
Finally here is a picture of a MegaNobZ finished with Battles Damages:
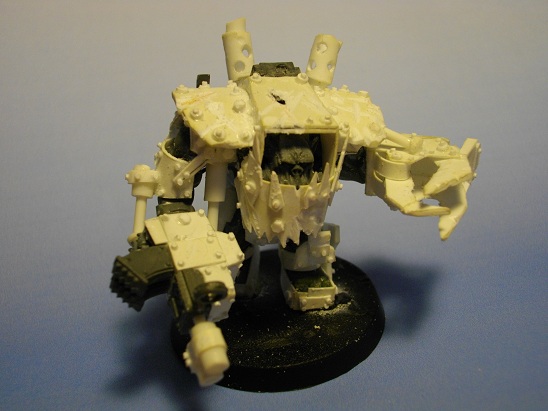
You will notice the addition of a plaque on the upper arm and the piston starting from under the shoulder to the arm (really handy at any point of view these shoulder pads ...). These are additions that I made on each MegaNobZ, they are long and tedious but bring a real visual impact. I also add extra skid plates underneath shoulder pads to add volume and help hide the start of the pistons (which are actually glued directly on the arms ... always seem to appear ...). It only removes the figure is impressive and credible and it is the only lens you need to assign (with of course the fact you like it). I hope this tutorial will help you. I appreciate in advance your feedback to this article, feel free to ask me for more information or show me what you have done with this issue.
17286
Post by: WvLopp
I've seen this guys stuff over on the Waaagh. He does great work.
52201
Post by: evildrcheese
Wow they are some seriously cool nobz in mega armour!
D
52802
Post by: Goresaw
Great looking 'ard boyz. I like their cannon/shootaz.
I don't blame you for wanting to find a quicker way to build meganobz. To scratch build one, it can take roughly 6-7 hours per nob. I made about 4 before I got so lazy I demoted my Ghazkull model to simple meganob to make an even 5. Mostly because mine turned out about as big as Ghazzy, heh.
My tactic was to use a standard Ork torso + head, and then build a plasticard box around it. I bought the nobz kit to 'borrow' the heads and arms (still have enough to make a set of normal Nobz too!). Just build boxes around the hands and the upper part of you model is done after you glue crap everywhere.
Legs were more difficult in I decided to use greenstuff to sculpt the non-armored part of the leg to keep scale (and make them HUGE). Thats the tricky part. I used glued together sprue parts to form the basis to add the greenstuff over. Then add the plasticard armor.
I saw another guy's variant, he had taken normal nobz, armored them up a bit, and then gave them really big riot shields and power klaws. Those looked pretty good too.
24297
Post by: Viktor von Domm
good find adam!
5462
Post by: adamsouza
Started toying with a meganob, just to see how time consuming it would be
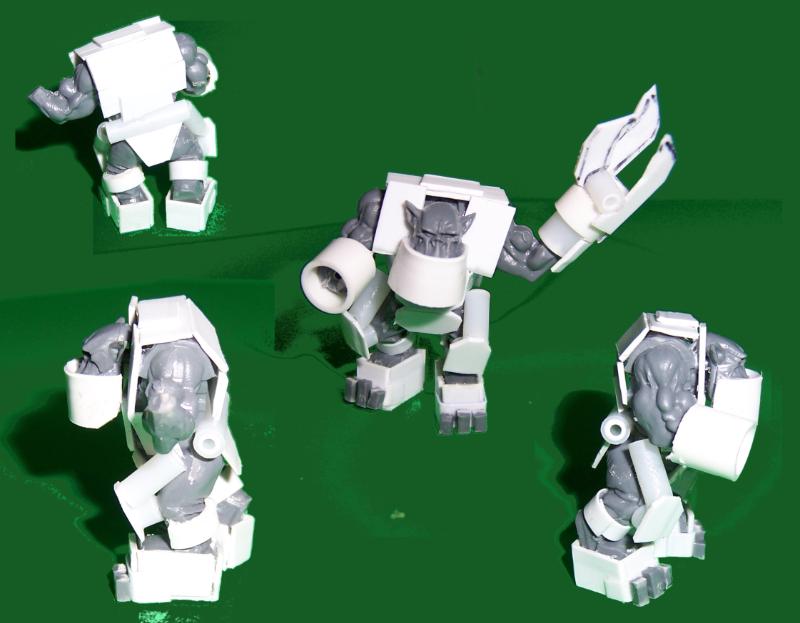
Used an AOBR Nob. I think I am going to get my money's worth out of that AOBR set.
52201
Post by: evildrcheese
Looking good so far. I bet my bottom dollar they'll look super sweet once you've done the detailing.
D
24297
Post by: Viktor von Domm
yup...gotta agree... a very good start!
31765
Post by: eldartau1987
They look riveting.
24297
Post by: Viktor von Domm
hurhurhur... i see what you did there eldartau
5462
Post by: adamsouza
Ork Boyz, completely forgot to prime them and just spray painted them yellow. Biel Tan Green on the flesh and toying with different combinations of black and metals.
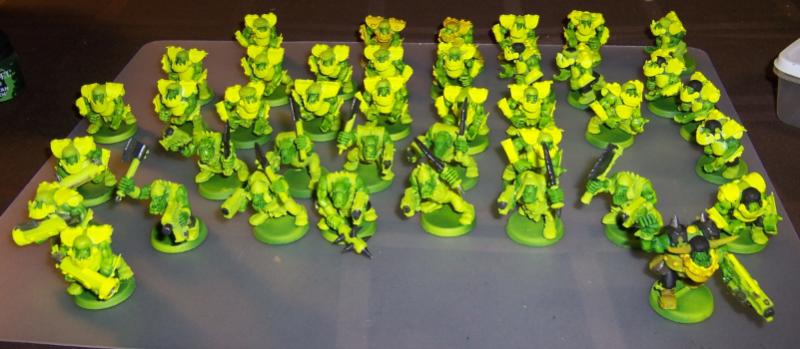
Close up of the Nob

20018
Post by: Hyenajoe
When I saw Luciusletroll's work on the french Warhammer Forum, I knew that if he posted his work on Dakka it would find an echo within the -=]_,=-.
Great start Adam. So, how long have you been working on your nob to get to this stage?
60576
Post by: tyrant of loserville
lookin good. I started a mega dread a few weeks ago after viewing your kans, hopefully i can finish it and post some pics. 
24297
Post by: Viktor von Domm
wow... that is certainly a nice amount of green and yellow... almost looks like a deadly amound of some freakish colored jellybabies
5462
Post by: adamsouza
Hyenajoe wrote:When I saw Luciusletroll's work on the french Warhammer Forum, I knew that if he posted his work on Dakka it would find an echo within the -=]_,=-.
Great start Adam. So, how long have you been working on your nob to get to this stage?
That Nob probably took shape over and hour or two while I was watching True Blood and Being Erica. Admittedly, I had no real sense of direction and lost time to scrounging the needed supplies.
I'm certain I could knock out comrades for him in less time if I worked a few simultaneously now that I have some experience doing it. It's basically figuring out how to glue square pegs into too small round holes.
tyrant of loserville wrote:lookin good. I started a mega dread a few weeks ago after viewing your kans, hopefully i can finish it and post some pics.
That would be great. I would love to see what you've come up with.
Viktor von Domm wrote:wow... that is certainly a nice amount of green and yellow... almost looks like a deadly amound of some freakish colored jellybabies
The Ard boyz are getting black helmets and pants to tone down the jelly bean factor.
Last night I took a break from working on me Boyz to play with a foam cutter and some paint to whip up some Necron Tomb World Themed terrain
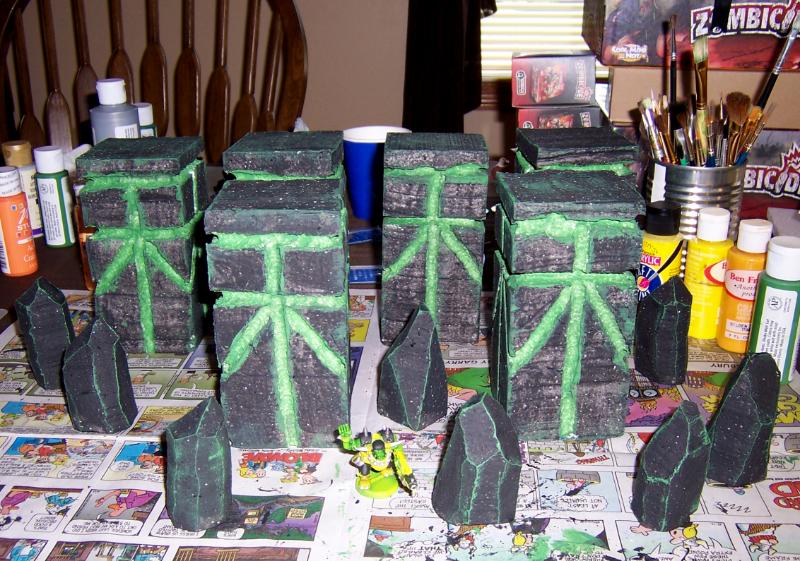
24297
Post by: Viktor von Domm
oh... foam cutter....

good looking necorn terrain there...tho i have to point out that stryrodur/pink insulation foam is better due to the smaller grain structure than styropor...just saying
5462
Post by: adamsouza
Pink/Blue is defeintely better than the white stuff I used, but I literally have almost a hunderd cubic feet of the white stuff I promised my wife I would either use or throw out.
I actually threw out a good amount in the past month and I'm just trying to find things to use the rest for.
24297
Post by: Viktor von Domm
i know your pain... throwing away still usable material... think of all the hungry fellas out there and what they could do with a chunk of styro...
no seriously... i can only force myself to get rid of stuff with great pain....
22619
Post by: inmygravenimage
If you have any thick, flat sheets you could build a trench system. Or with a really big block you could totally make a monolith. Just to add fuel to your crazy fire!
5462
Post by: adamsouza
An Idea I had for a terrain turorial is to make chemical vats. You know, those dangerous open top giant cauldrons just waiting for you Gangers to fall in. It worked for Joker didn't it ?
I'm not finished, but I have some preview pics
Step 1.
Start with some empty tape rolls
Step 2.
Add some edges. I used thin card cut to 1/2 inch and 1/4 inch widths
Step 3.
Cut a piece of scrap cardboard the same size as the inner diameter of the roll and stick it in a plastic Bag
Step 4.
Jam the cardboard disk about 3/4 of the way to the top

Step 5.
Pour PVA glue over the disk in thin layers, letting it dry each time, until your comfortable it won't break if you remove the disk.
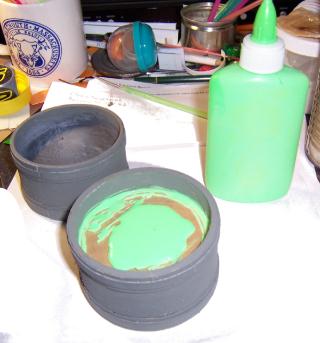
If you want the liquid layer to remain translucent, you should paint the vat before playing with the PVA. If your going to paint over it, it doesn't really matter.
48150
Post by: storag
Great blog fella! Really like the military unification element you've brought to the orc ranks. The scenery is cool also.
5462
Post by: adamsouza
Thanks Storag !!
The Mean Jelly Beans walked away with TWO victories at the league today. First some cowardly Tau tried to just sit in their deployment zone and blast away at my boyz, but through a combination of rolling buckets of dice and Eavy armor being worth it's points the ladz just stomped across the table shot up all the puny Tau, including der fancy flying Kans. Afta dat da boyz fought sum Blue marinez in dead ard armor of der own. Demz marinez is tuff, but not as Ard az da Ladz . Once da Warboss got into Hand to Hand it was all over, wiv Blu armor flying every wich way.
Basically, the Slugga&Choppa boyz are a 60 point distraction, that the enemy gleefully emptied plenty of ammunition into They made it into melee with some Fire Warriors in the first battle, well 3 of them did. The Ultramarines shredded them with Bolter fire before they could do anything more than act as a screen.
The Ard boyz never took more than a dozen casualties. The Rokkit launchas felt uselss against the Tau, but managed to claim a few space marines in the second battle. They made me understand the power of the Green Tide.
24297
Post by: Viktor von Domm
i really didn´t get the surface building.... i think that is a clever idea lying there but i don´t get it ??? i think i have to get that explained differently^^ sorry... i am a bit dense when it comes to english technical terms^^
but it looks very good nevertheless^^
5462
Post by: adamsouza
The PVA looks like liquid when it hardens.
61859
Post by: FettPrime
 adamsouza wrote: adamsouza wrote:Thanks Storag !!
The Mean Jelly Beans walked away with TWO victories at the league today. First some cowardly Tau tried to just sit in their deployment zone and blast away at my boyz, but through a combination of rolling buckets of dice and Eavy armor being worth it's points the ladz just stomped across the table shot up all the puny Tau, including der fancy flying Kans. Afta dat da boyz fought sum Blue marinez in dead ard armor of der own. Demz marinez is tuff, but not as Ard az da Ladz . Once da Warboss got into Hand to Hand it was all over, wiv Blu armor flying every wich way.
Basically, the Slugga&Choppa boyz are a 60 point distraction, that the enemy gleefully emptied plenty of ammunition into They made it into melee with some Fire Warriors in the first battle, well 3 of them did. The Ultramarines shredded them with Bolter fire before they could do anything more than act as a screen.
The Ard boyz never took more than a dozen casualties. The Rokkit launchas felt uselss against the Tau, but managed to claim a few space marines in the second battle. They made me understand the power of the Green Tide.
Great job. Just my luck to go to be busy instead of watching you mop up at the league. That Necron Terrain and dem Boyz are looking really good.
24297
Post by: Viktor von Domm
aye... that i understand^^
62587
Post by: Luciusletroll
 Hyenajoe wrote: Hyenajoe wrote:When I saw Luciusletroll's work on the french Warhammer Forum, I knew that if he posted his work on Dakka it would find an echo within the -=]_,=-.
Great start Adam. So, how long have you been working on your nob to get to this stage?
I post my work here
21932
Post by: ThePhish
 Viktor von Domm wrote: Viktor von Domm wrote:i really didn´t get the surface building.... i think that is a clever idea lying there but i don´t get it ??? i think i have to get that explained differently^^ sorry... i am a bit dense when it comes to english technical terms^^
but it looks very good nevertheless^^
\
I may be mistaken, but I believe the intention of building the pva up in thin layers is to simulate ripples in the surface as each layer dries on top of the previous layer. To do that though, you would have to apply each layer in a way that the edge of the layer below is still visible. Other than that, I don't get it either.
24297
Post by: Viktor von Domm
yes... i think that would be the way to go... in fact i think i will remember that soon too^^
5462
Post by: adamsouza
I mostly do it in layers so t dries thouroughly. If you do it too thick it stays gooey in the middle.
I've been on vacation and it's been hard getting back into the swing of modelling and blogging since I got back, but I'll try and post some updated pics and a more thourough explanation soon.
Also been working on my DakkaJet, since my league has lifted it's restrictions and bumped up to 750 points.
24297
Post by: Viktor von Domm
but that dakka jet sounds as if you didn´t loose too much swing^^
52201
Post by: evildrcheese
Full swing has not been fully initialised until we have pictures.
D
5462
Post by: adamsouza
He is correct. I'm doing a bit of modeling and half arsed blogging until there are pics to show somehting.
I spent the better part of a morning trying to turn old cd cases into a flight stand. Got the basic shape down easily enough, but I keep cracking or scratching the parts as I do it. one step away from trying to use a rotary tool on it.
In other news I bought a hot knife, to better inflict harm on styrofoam and my thumbs. Went to buy materials to try out Les' Wash Recipes, but they were out of black ink and flow improver. Couldn't find bottles to mix the paint in either. It may have been there but my kids were being impatient and driving me up a wall while I tried to shop. Settled for the hot knife, I stumbled upon randomly, and some $1 wooden planes.
24297
Post by: Viktor von Domm
I bought a hot knife, to better inflict harm on styrofoam and my thumbs
LOL... classic line^^
5462
Post by: adamsouza
Built a flight stand for my Dakka Jet. Still have to magnetize it, and detail it, and paint, it etc... Also put some guns and tail fins on the Jet itself.
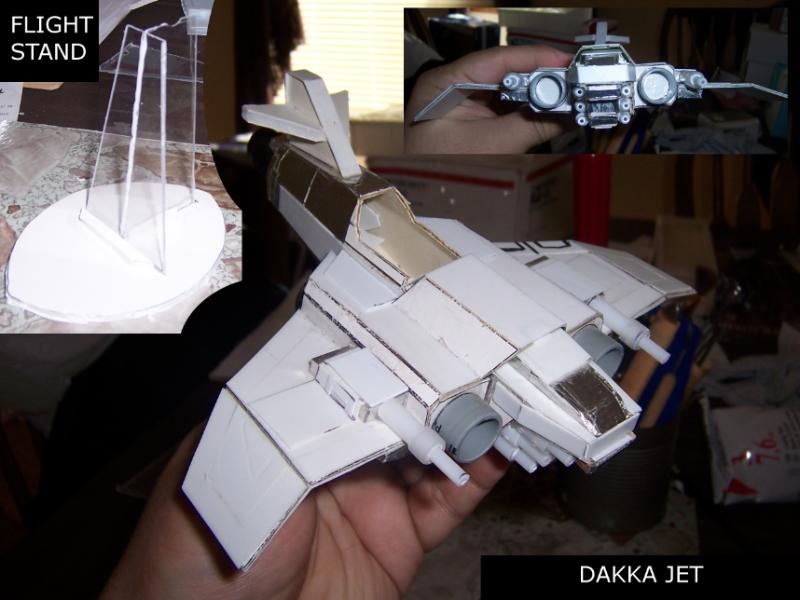
While the glue was drying I started fiddling with bits and started a second Dakka Jet as well. Right now it's not much more than a cockpit and tail area, but I test fit a whole bunch of bits and have a pretty good idea in my head how it's going to turn out.
62587
Post by: Luciusletroll
Your dakkajet is awesome. Have you some pattern ?
57039
Post by: Great Deceiver
Looks great dude!
5462
Post by: adamsouza
It's a salvaged Imperial Thunderbolt
I've magnetized and attached it to the base, as well as added extended thrusters, since the last pic.
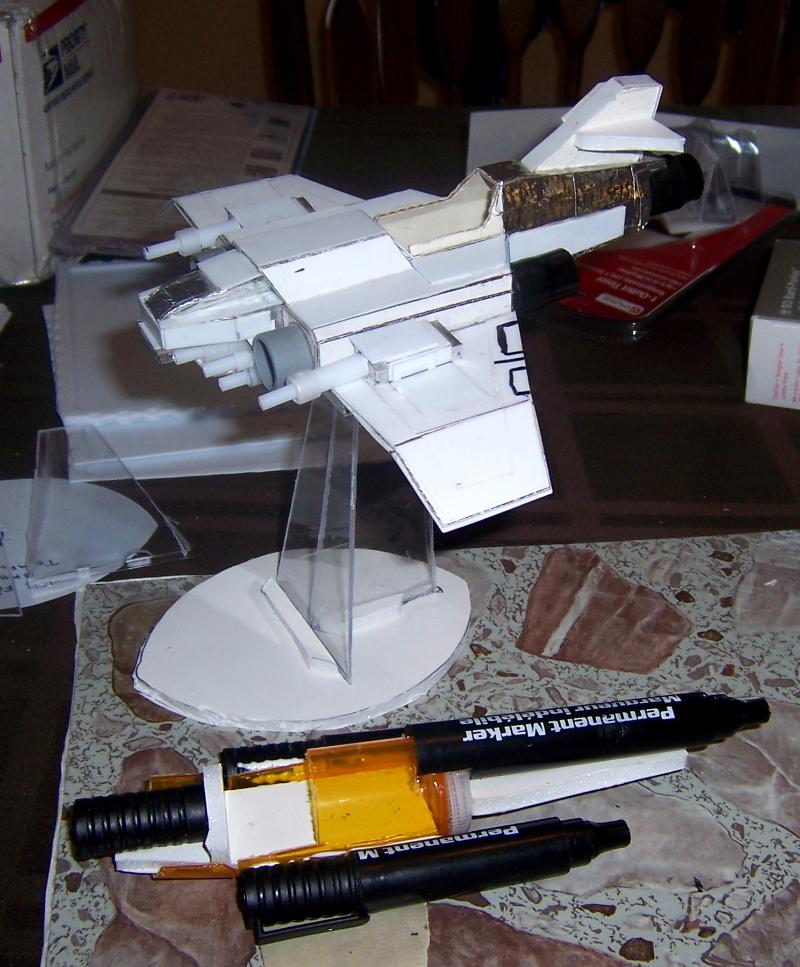
On the bottom is the beginning of another Dakkajet.
| Filename |
DIY - Thunderbolt Plans & Templates.pdf |
Download
|
| Description |
|
| File size |
749 Kbytes
|
52201
Post by: evildrcheese
Nice jet, and thanks for the template. It's always good see see how people do the modelling magic.
D
5462
Post by: adamsouza
Yeah, the template really helped get that Thunderbolt feel to it.
The next dakkajet is going to look like it was cobbled together entirely our of scrap.
For the Hat trick, I may just get lazy and use an actual dakkajet model.
24297
Post by: Viktor von Domm
i have to thank for the thunderbolt too... very nice template!!!
5462
Post by: adamsouza
Too many projects, and too many ideas, floating around in my head.
Today alone, I put thought and effort into 40K orks, 40K necrons, a light up Blood Bowl Pitch, figured out the size for the hexes on a DreadBall pitch so I could build one, and discovered 3 sets of AOBR Marines I thought I had lost. On lunch I figured out how much of a cash investment I would need for a platoon of Wargames Factory Longcoats for an Guard army. Also trying to find all the parts, I already bought and just need to assemble, to build a vacuum forming machine. I need to hi the lottery or something so I can not have to go to work and have the time I need to finish all these projects.
.......
The vacuum former will be small scale and handle 6 inch sheets of thin plasticard. Ballparking about 5" of usable surface area and maybe an 1" or so of max height with no undercuts.
What would you make with it ?
Right now I'm thinking about brick walls, doors, and window frames, for modern setting buildings.
5462
Post by: adamsouza
Been working on the second dakka jet a couple minutes at a time, here and there.
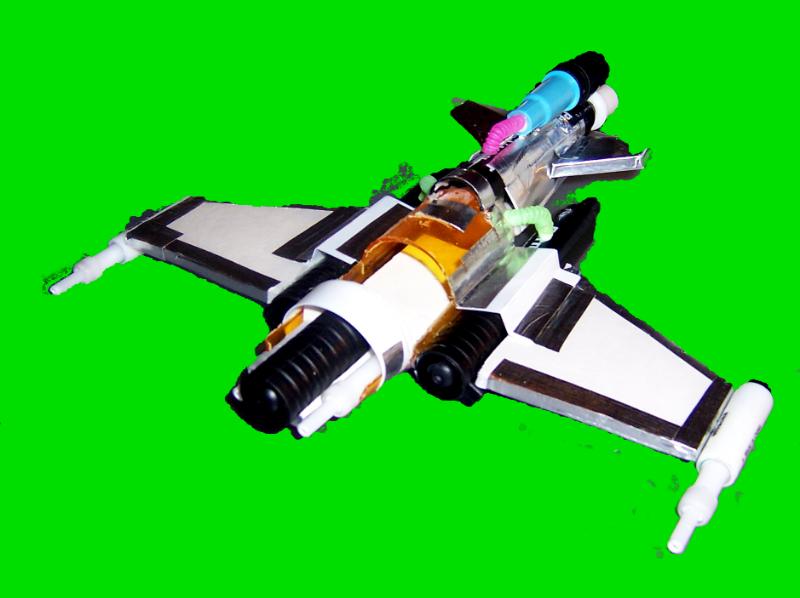
|
|