Very nice. The tower is excellent and it is not even finished. I'm really looking forward to seeing the top of the tower and seeing how you do the vents, without making the tower inhabitable for miniatures.
I've got a few of questions:
1. How did you cut out the rounded door hatch?
2. How do you cut your plasticard? I always find it awkward, it moves on the cutting matt, the edge isn't quite square, thin plasticard curls as I cut it etc.
3. What thickness of plasticard are you using for the raised details on the tower? You may have said somewhere else in the 20 odd pages but I reckon it will be easier to just ask than search for it.
mind if i just sit here by myself in awe... with a fareaway look in my eyes...just trying to get in the sheer deatils you cut out from that nasty plasticcard?
the round edges....oh man!
too tired to reply with any more praise as the joyous cheering exhausted me to a point of fatigue^^
Thanks Rogue and Vik.
@PDH
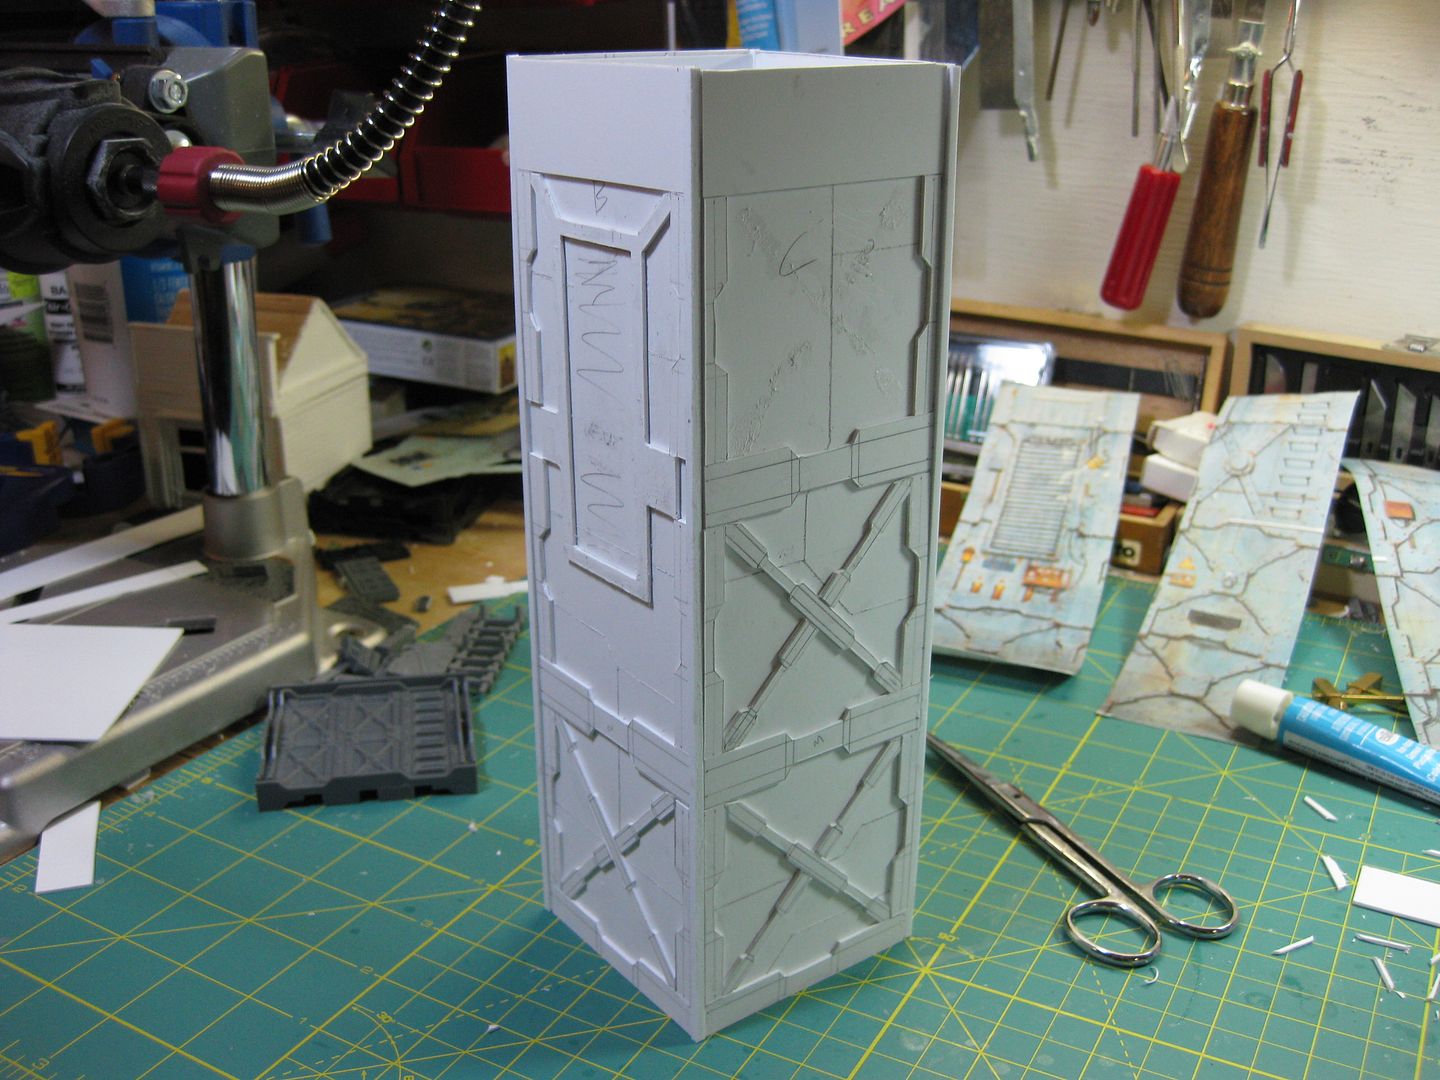
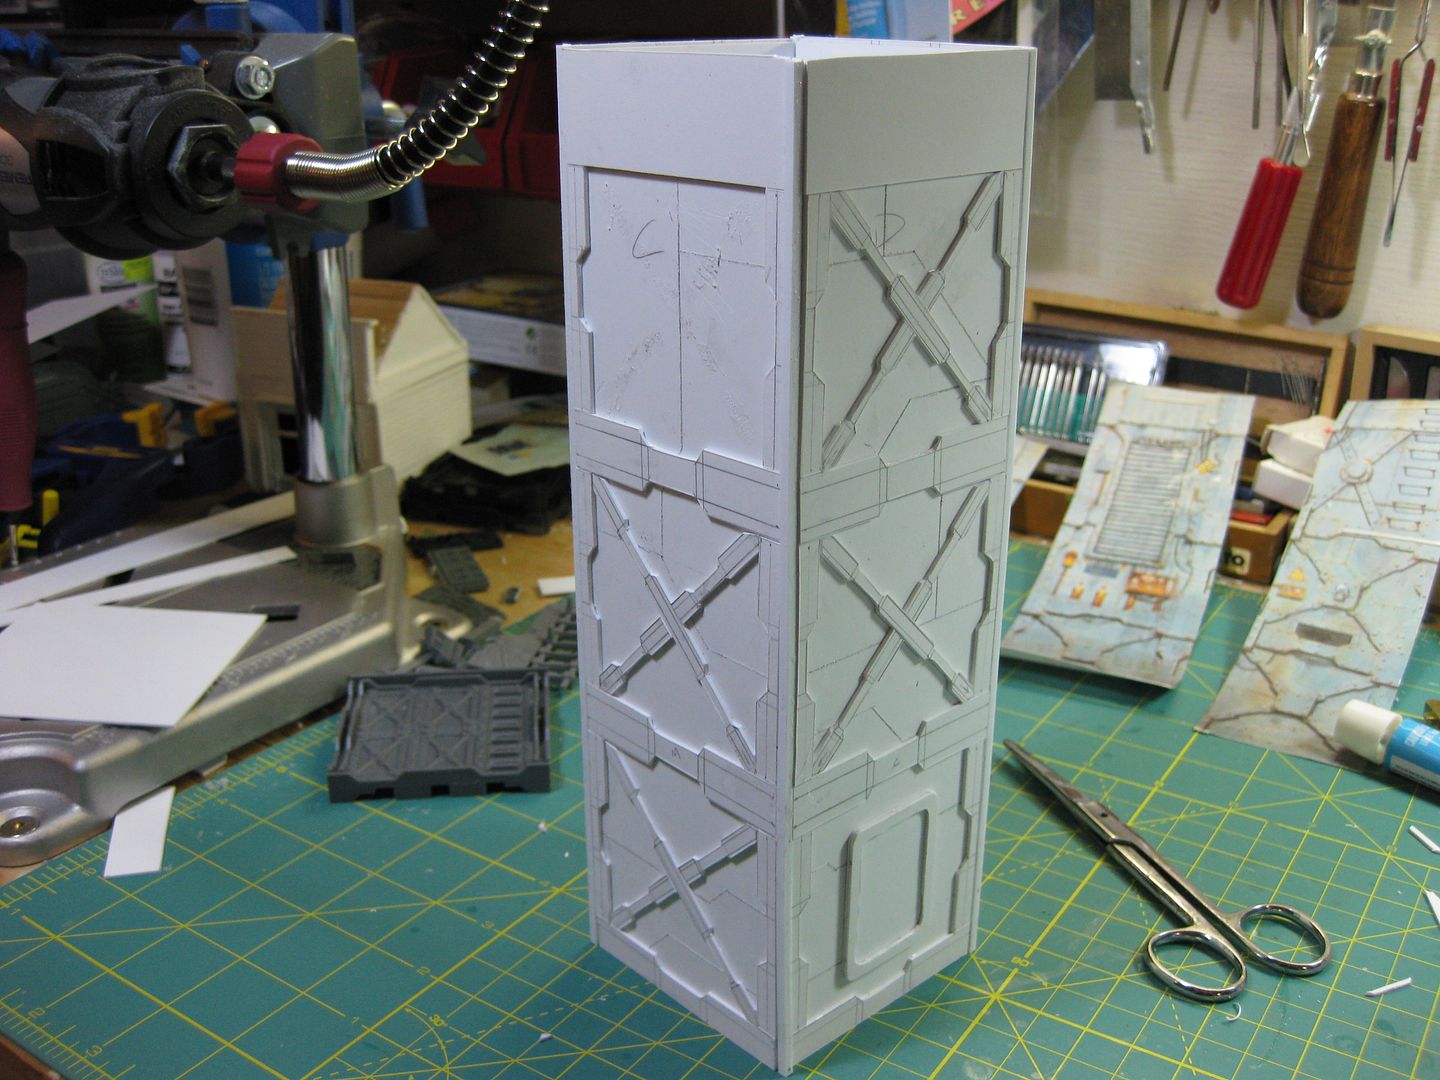
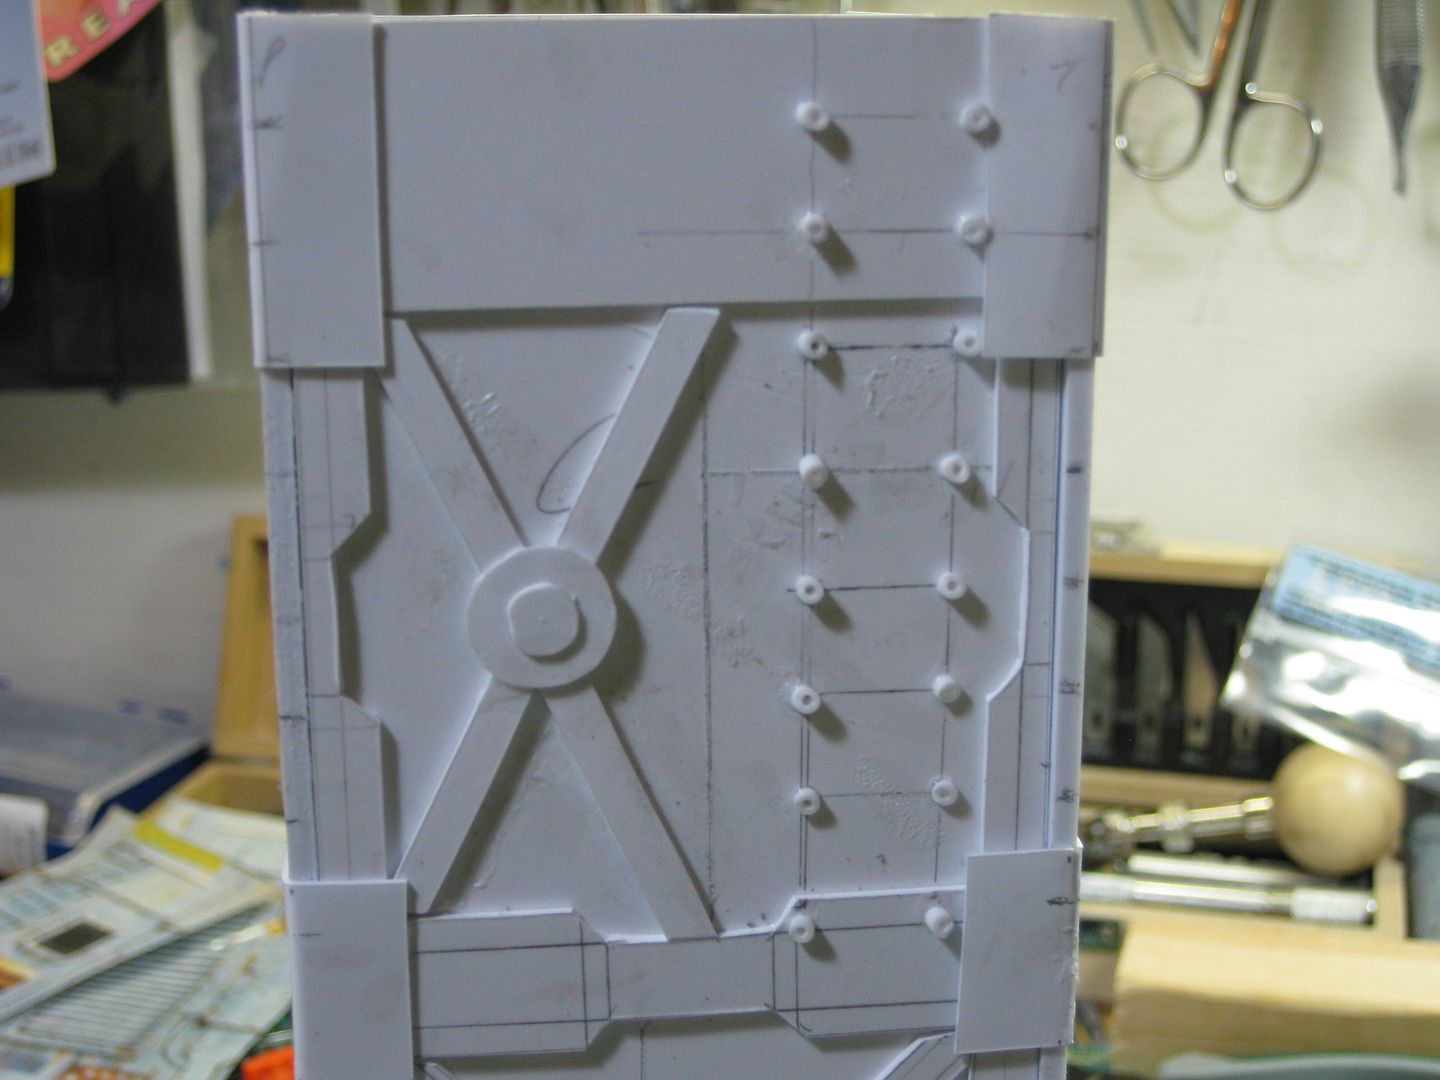
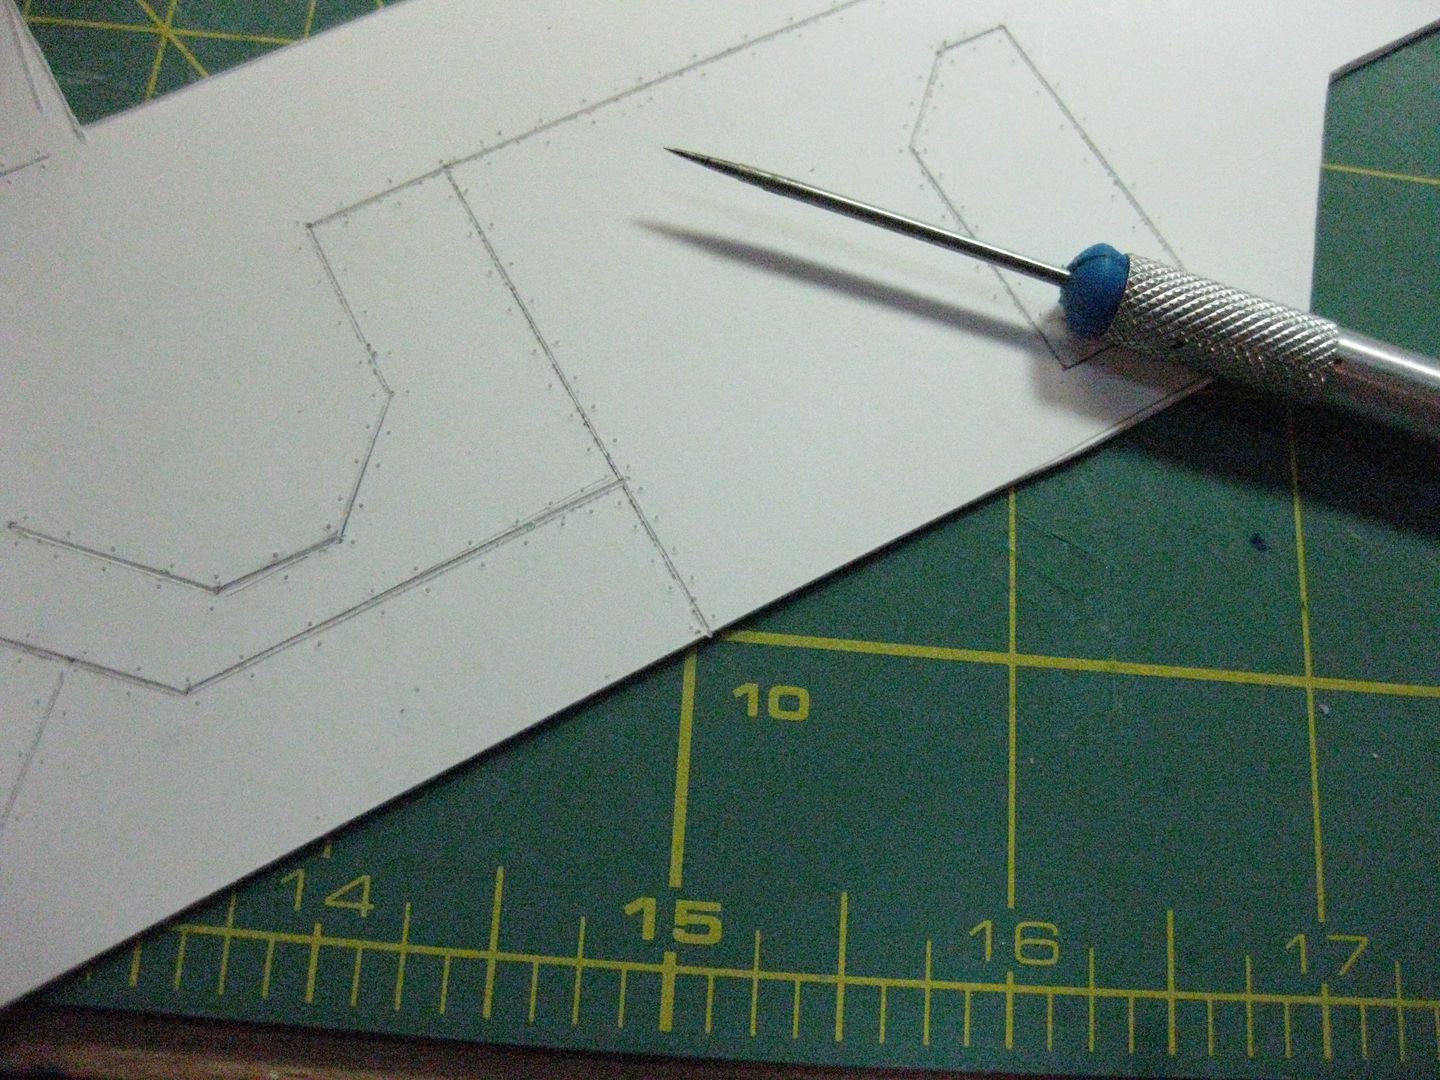
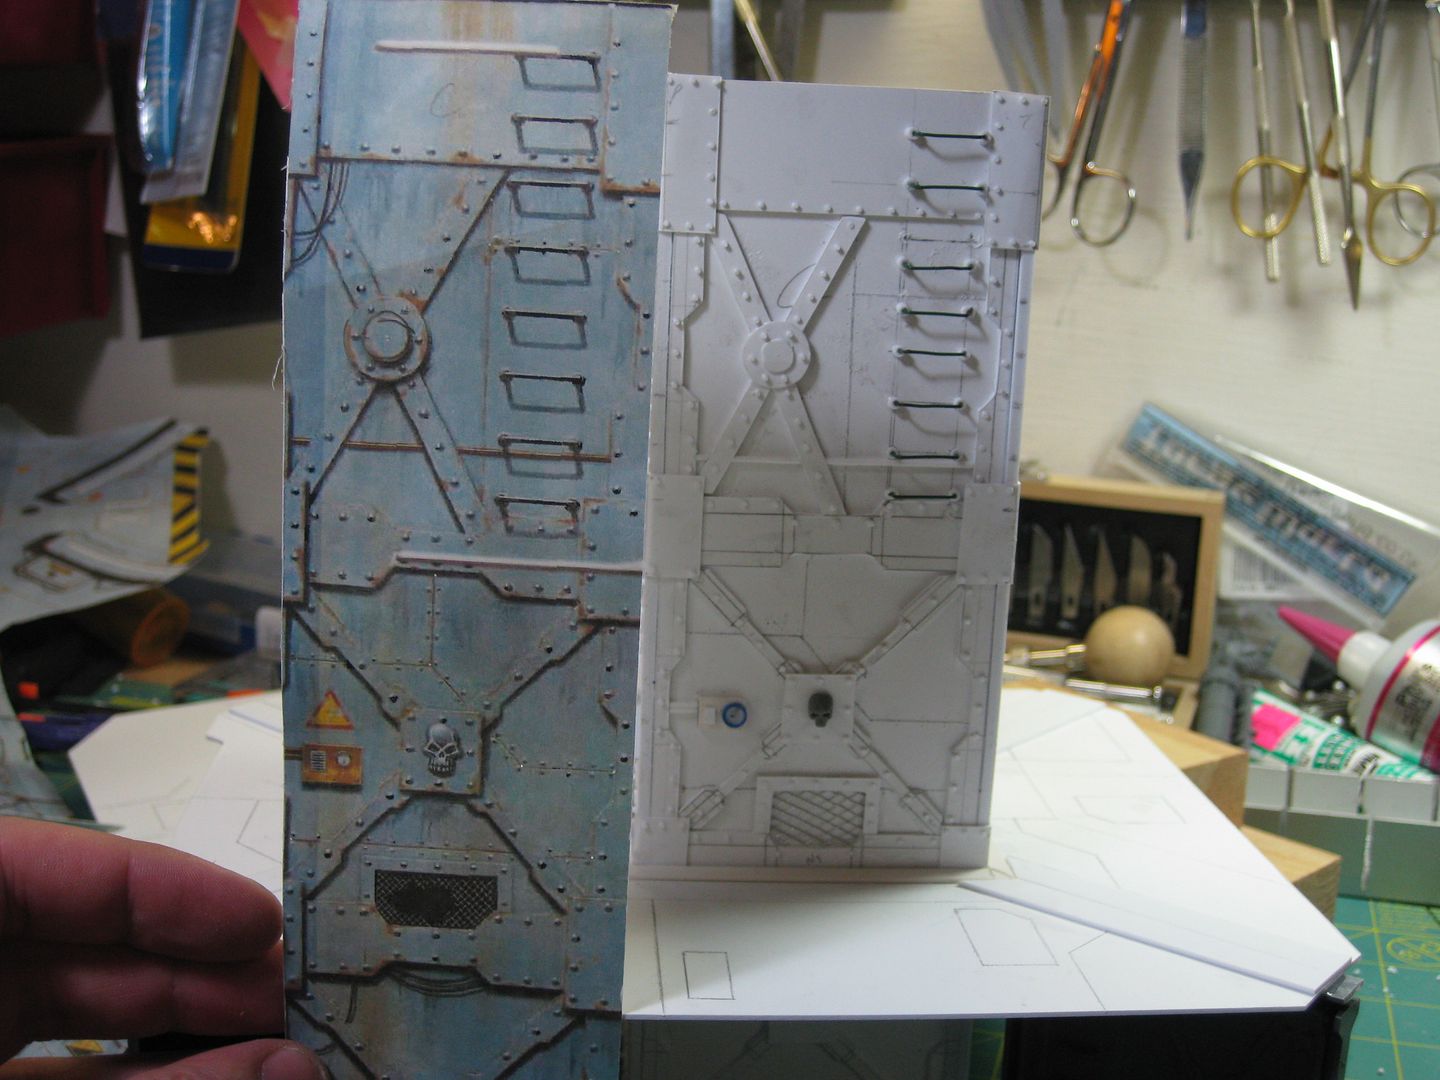
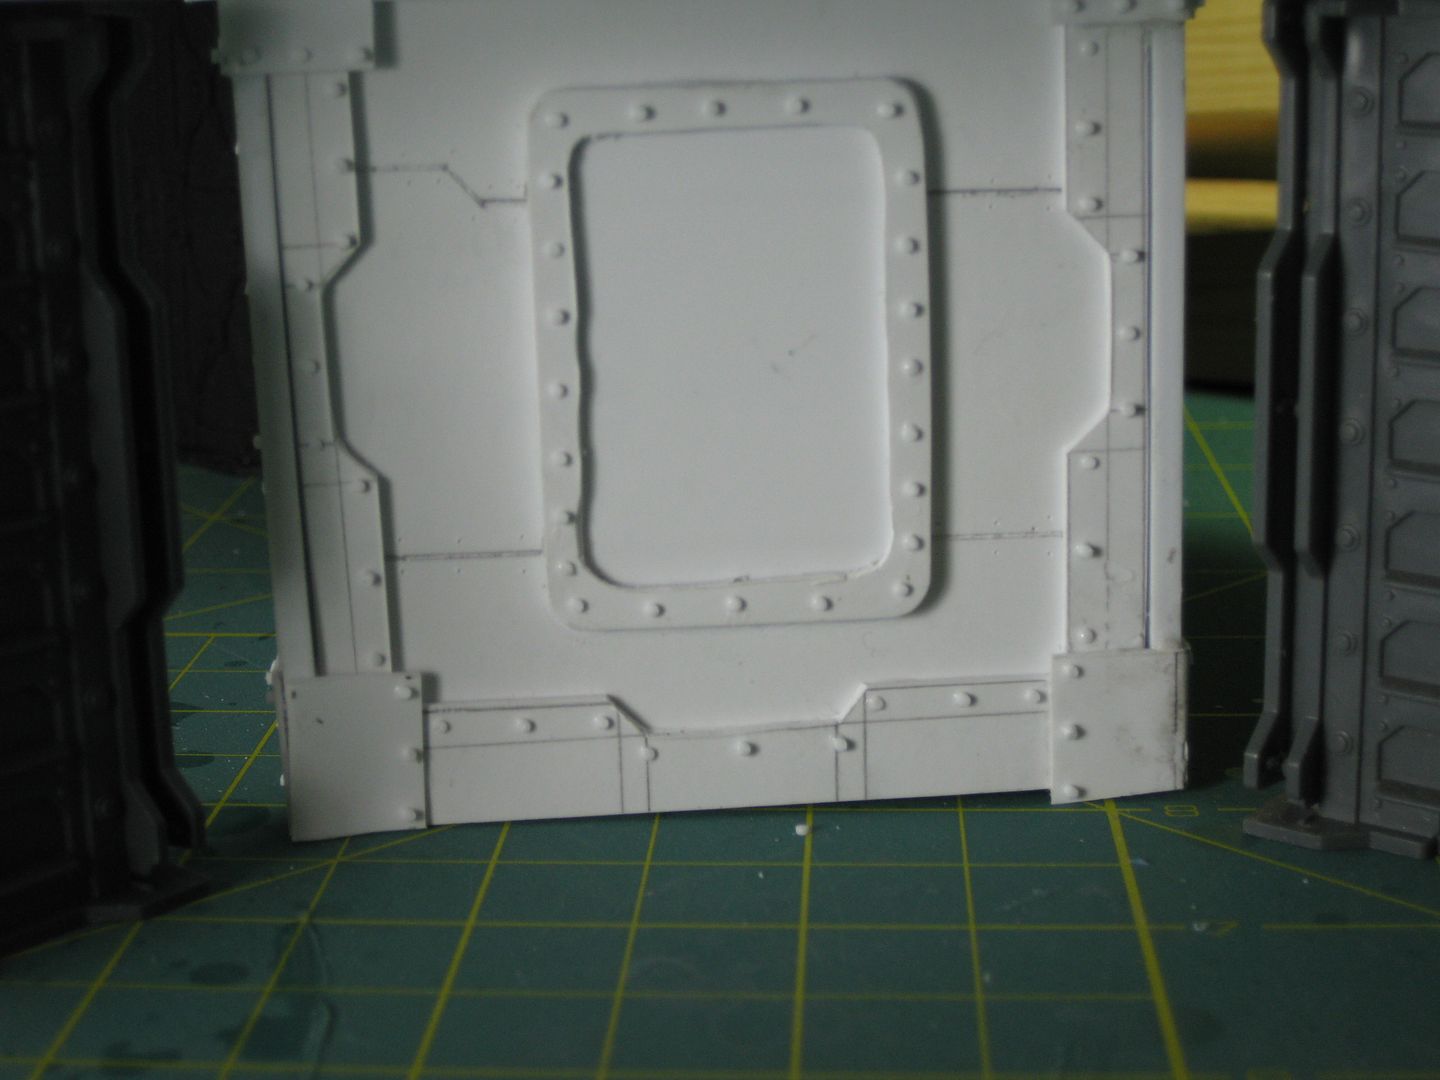
1. FRESH X-ACTO BLADES! I just cut out a rectangle very carefully then just sort of eyeball sketched the rounded corners to it. The hatch has a thin piece of 0.20" plasticard glued to the back to cover up the scribed lines below. Once the two pieces were glued together I just roughly sanded them. It still isnt perfectly round on the edges, but meh, at least it's consistant.
2. NEVER EVER EVER try to cut all the way (or even halfway) through the plasticard. score and snap, score and snap, repeat. I use flat pliers to help snap off the small bits. The little angles in the cross-members usually require some knife-point cleaning up since scoring and snapping rounds the inside corners, but it literally takes 2 seconds to do it. Having said that, when cutting something hollow, like the round hatch or that little vent on side A, you are left with no choice but to cut all the way through on the inside edge. In these cases, just lightly re-scribe over and over again until you can see the impression on the back side of the plastic, then turn it over and cribe that line and then it snaps out. These little bits take more cleanup but it isnt too bad.
3. All these details are 0.40" High Impact Styrene. anything thinner would definately curl the plastic, especially if you tried cutting all the way through. Score and snap, score and snap. It isnt ever truely square, but you don't really notice, since scoring and snapping will at least give you a uniform look.
Use FRESH blades, score and snap, score and snap, score and snap.
I do a lot of styrene work myself. nothing as epic as this thread. I use this for my straight line cutting.
Its a Fiskar rotary trimmer, I put the plastic in it close the bar and pass the cutting blade over the plastic once or twice using light pressure. Then I bend the board and it snaps cleanly where the scare was made by the blade. Like the OP said you score the plastic instead of trying to cut through it.
@theunicorn - lol, I was just being silly since dsteingass has said "score and snap" so many times. I should have used the [sarcasm] [/sarcasm] font...my bad!
My wife actually has one of those cutters, she uses it for scrap booking, but she won't let me use it because she doesn't want me to "ruin it". Whatever!
I have had that cutter for around 8 years now and I am still using the blades that came with it. I use it on plastic and my wife uses it for our family photos. We are still using the original blades that came with it and it works great. So borrow hers when shes not looking, she wont know
I am pretty excited today, I got some good news!
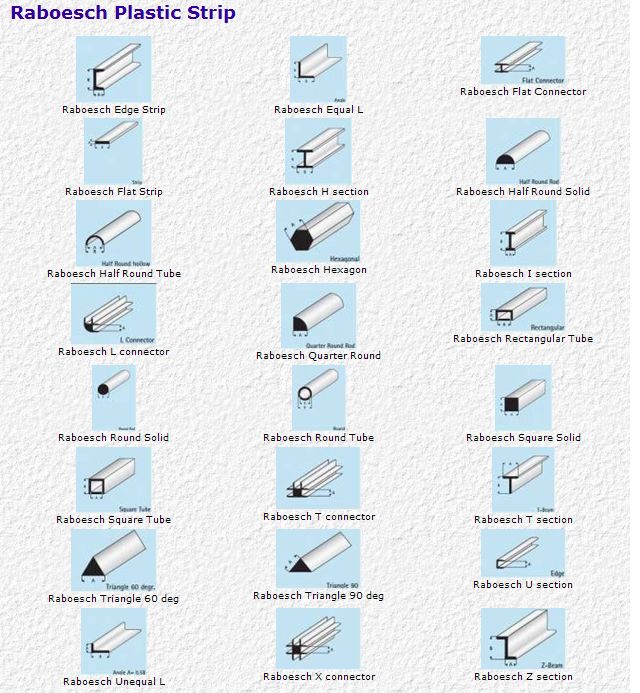
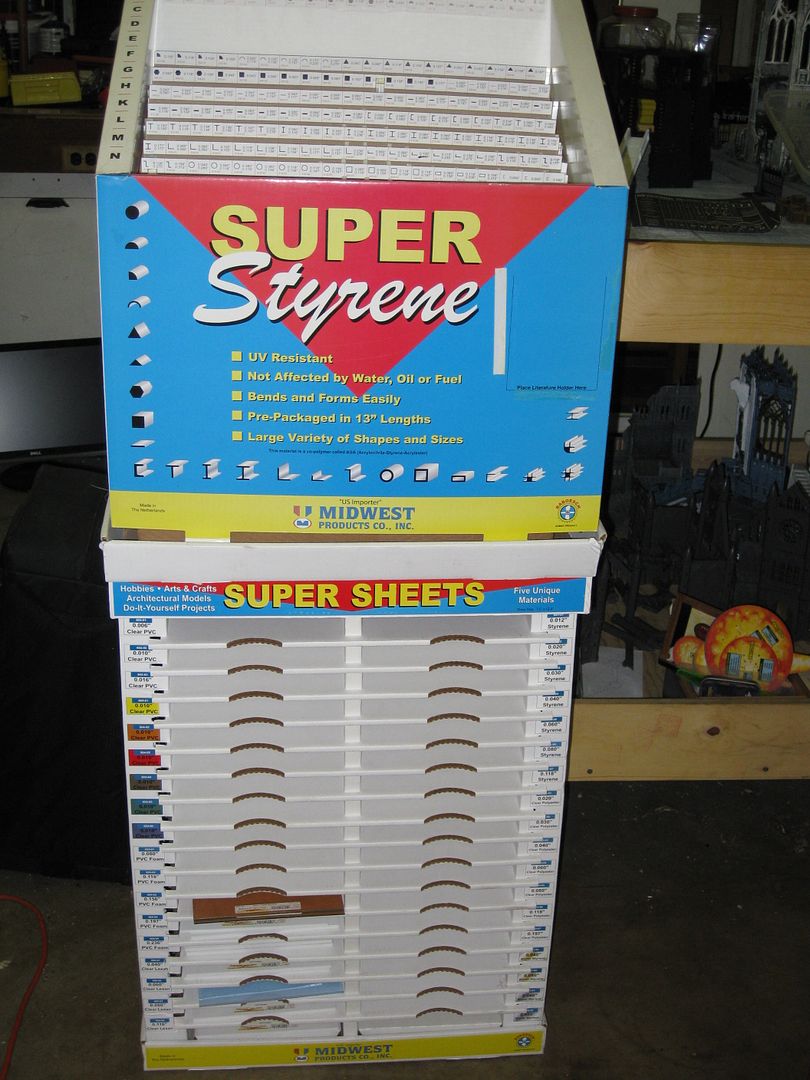
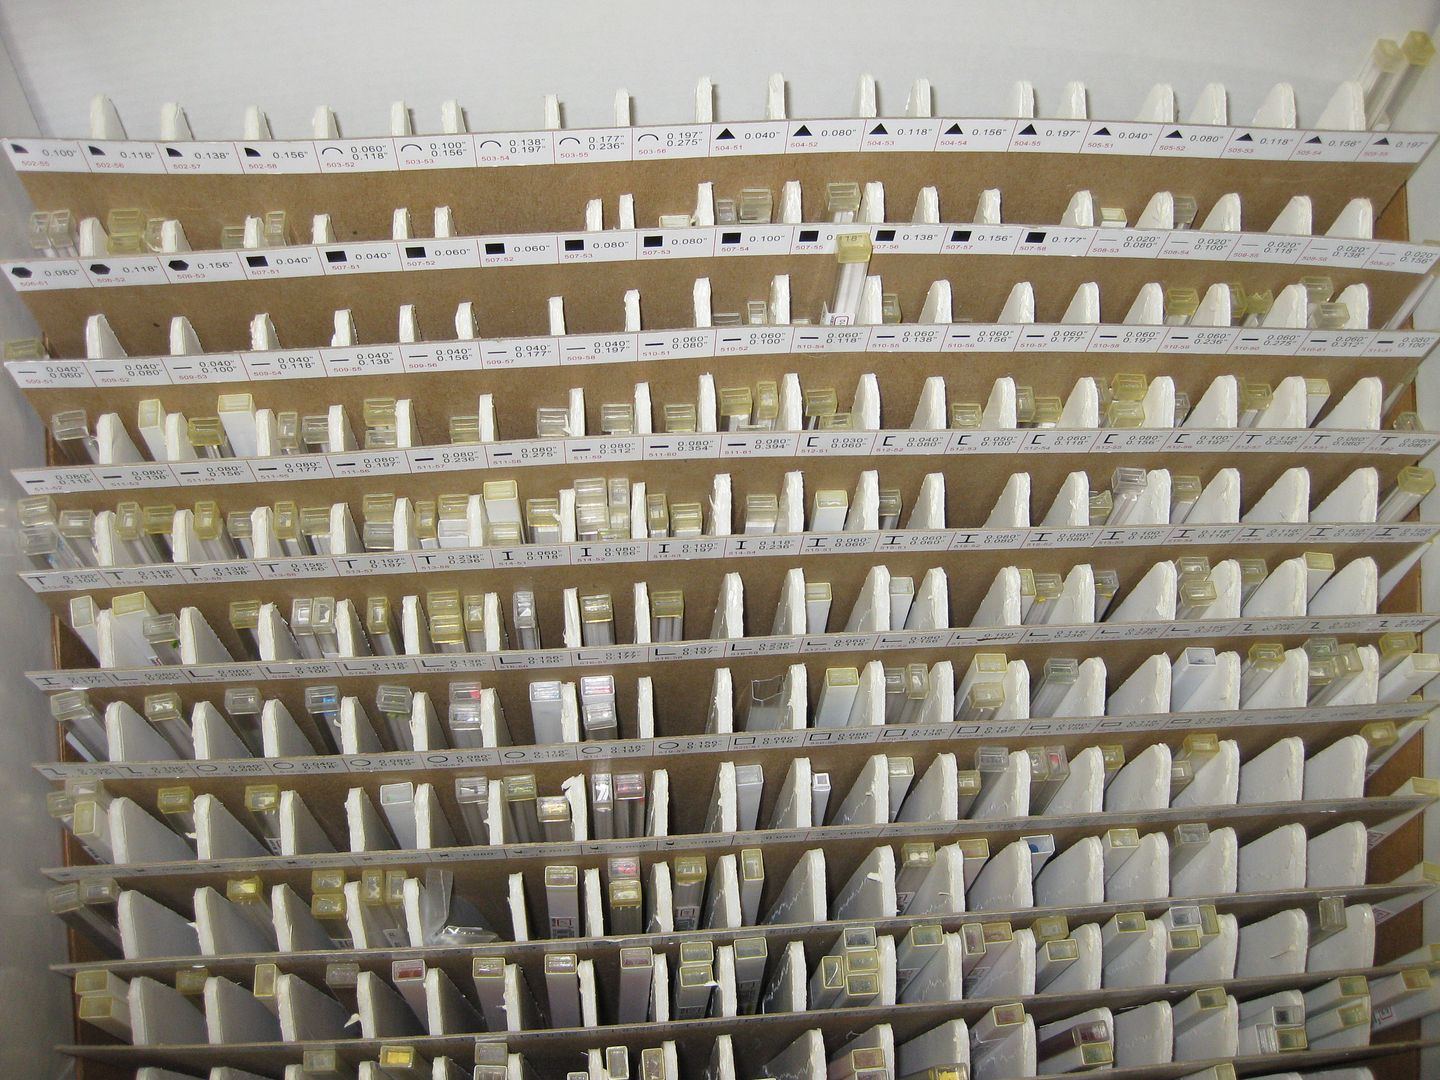
Ever heard of Raboesch Super Styrene? It's made in the Netherlands, and used to be imported to the US by Midwest Products, which is a major distributor in the US for Balsa Wood and other building materials used by model railroaders and R/C enthusiasts. Apparently you can still get it in the UKhttp://www.modelshopleeds.co.uk/catalog/index.php?cPath=136_343, but it is no longer sold in the US.
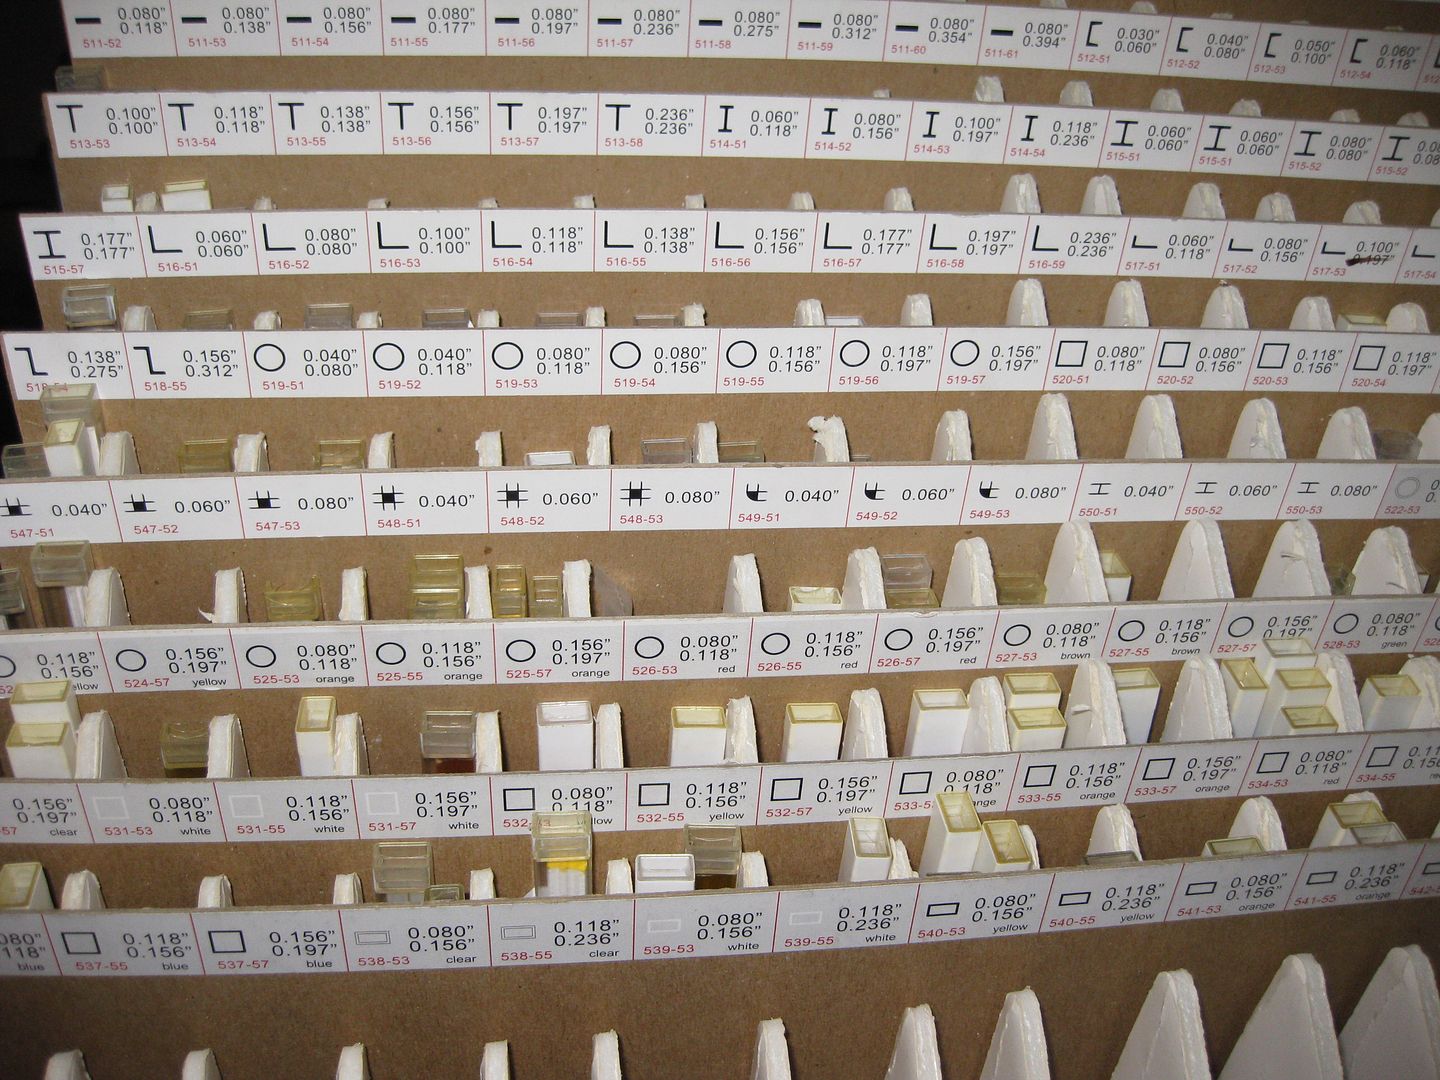
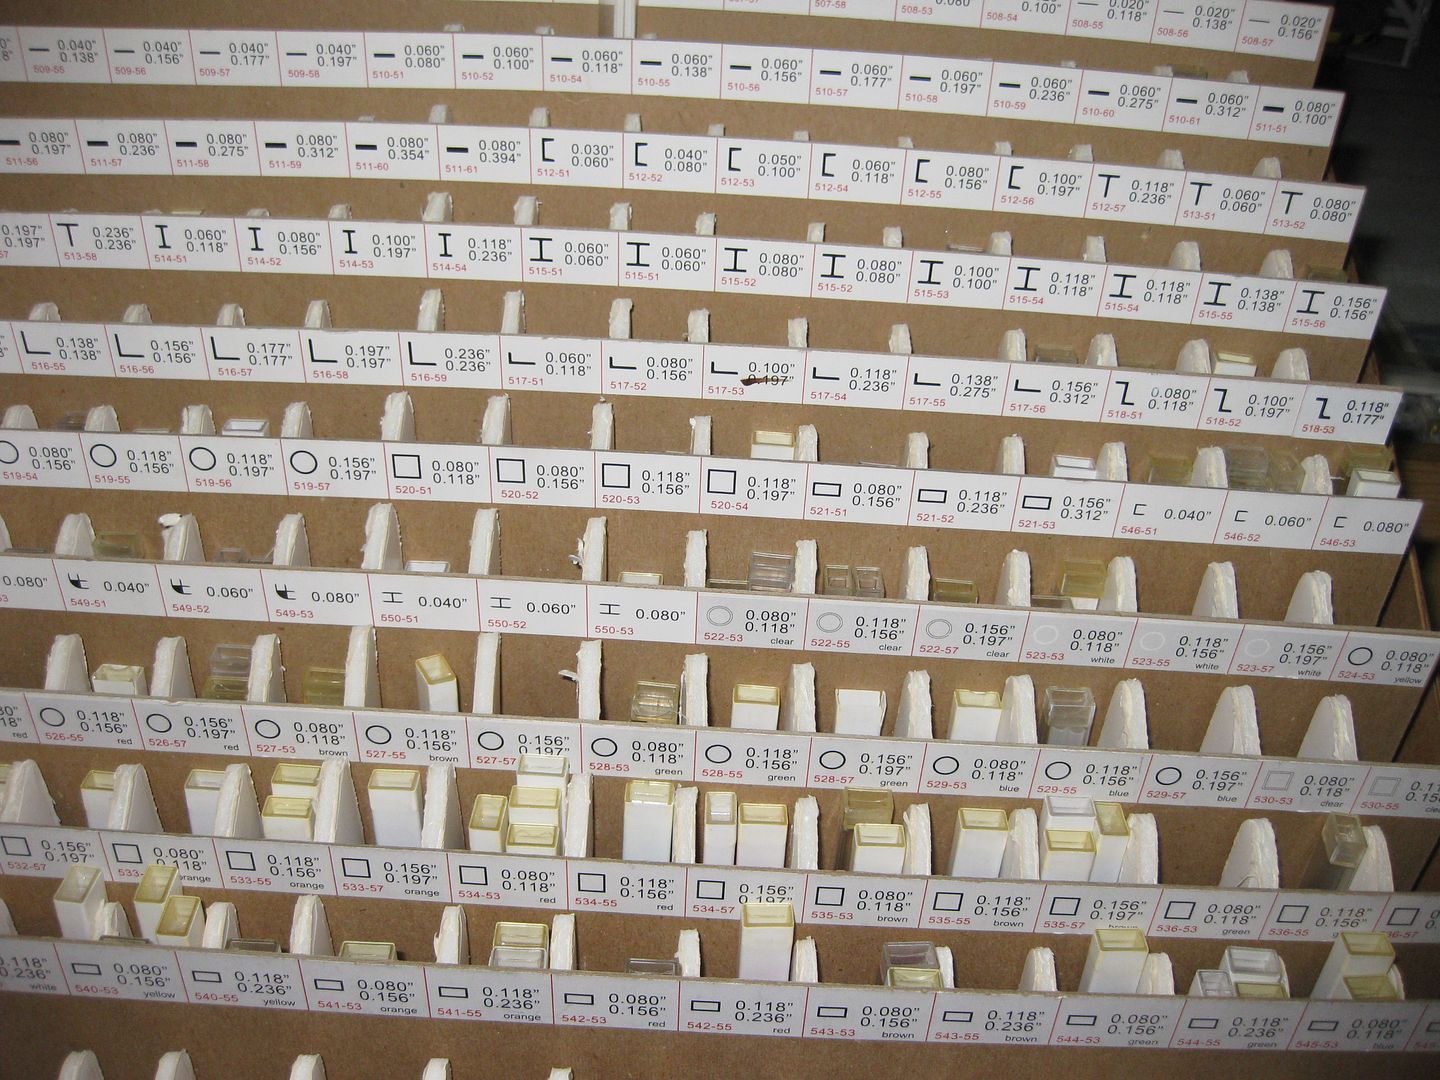
The plastic is of the specialty variety, it is still just regular white styrene, but the variety of shapes is astounding, things like
Triangles, quarter rounds, cross sections for slotting in plasticard sheets, etc.
Anyways, In my Local Hobby Shop there is an old display floor rack full of the Raboesch strip styrene that wasn't selling (partly because the shop never had them priced or organized) I have been trying to dicker with the owner for over a year now to just sell it to me, rack and all. He wouldn't budge, finally this last time when I was in the shop stocking up on styrene I told him that the dust on the rack was only an inch thicker than when it was a year ago! Today, the shop took my offer and tomorrow night after work I am heading over there to pick up my Uber-Cheap rack (mostly) full of Raboesch Super Styrene!
all i can ask is how much....and do they sell you all the above mentioned sorts of styrene??? i guess you will go balistic with that much possabilities^^ i suspect a new dimension of eyecandy coming our way...i once hold such styrene in my hand and i too saw the wide range of possible uses...
by the way...with you eye for detail and your ablility to 3D model terrain... have you thought about making your own walkers or tanks? i think you have a great imagination that could provide you with exellent vehicles...
Viktor von Domm wrote:
by the way...with you eye for detail and your ablility to 3D model terrain... have you thought about making your own walkers or tanks? i think you have a great imagination that could provide you with exellent vehicles...
hah!!! i see a knight or even a titan looming on the horizon with materials like those...well for a game off munda probably totally useless but i think for me it would be the challenge^^
that vent is looking ridiculous cool...awesomely straight and good placed parts here!!! on such a length it is not something to come lightly...
I would have no idea how to do big, round-ish titan plates in Plastic.. That would just frustrate me and make me say bad words and I would probably quit because it wasnt fun. lol
And again, thanks a lot for the comments, they really do push me ever onwards into the insane parts of my brain.
if i was you i would probably loot my lego box for that connectors box...but we already had that discussion regarding the unbtachable state of lego by your hobby so i guess you have to salvage some fitting item from some HO stuff you probably have secretly hidden away for such an ocasion^^
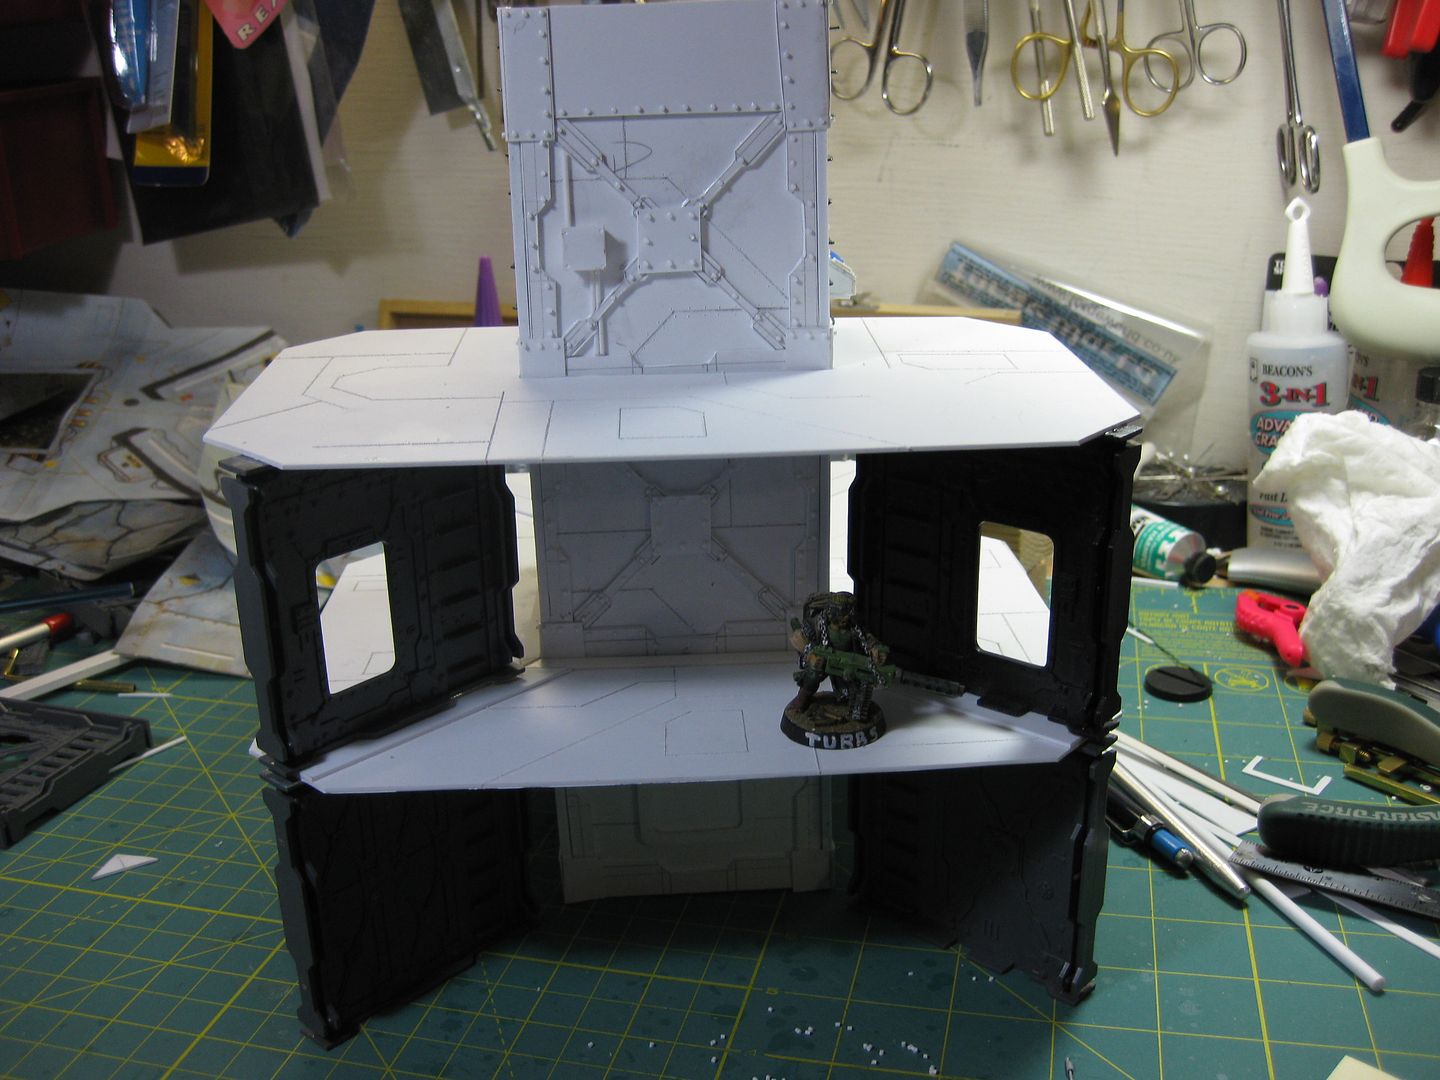
the tower is very cool and convincing looking with the now added floors...am i right that you will only loose fitt that attire so to better store and transport and also pose differntly? also the bulkheads have never look as good on a new pice as for this tower! even if this means i am have to lower my praise for your previous gems^^
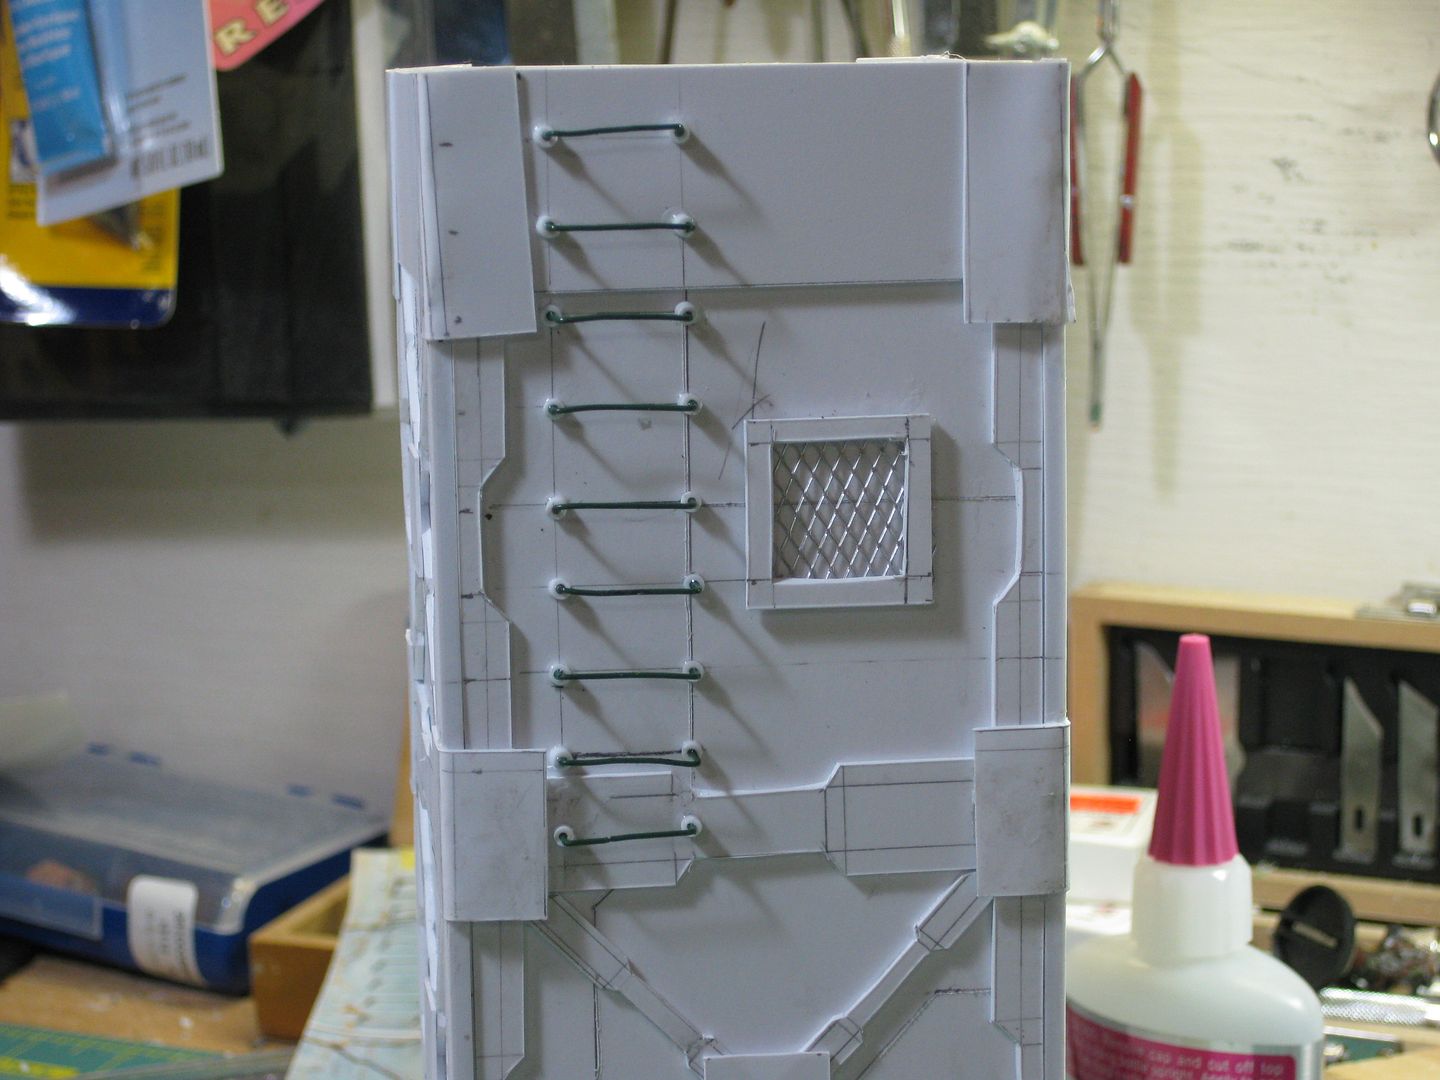
that ladder mounts is a very cool idea and i will have to nick that dea in the future.... exellent idea and execution!
Yes, Every Lego is sacred! Nope Vik, this and all of my towers will be permanently attached to bases. Too much work has gone into these to be thrown in a box for storage to get knocked around. I've built 7 feet of terrain shelving in my garage/studio which just needs a little reorganization someday to permanently store these on display.
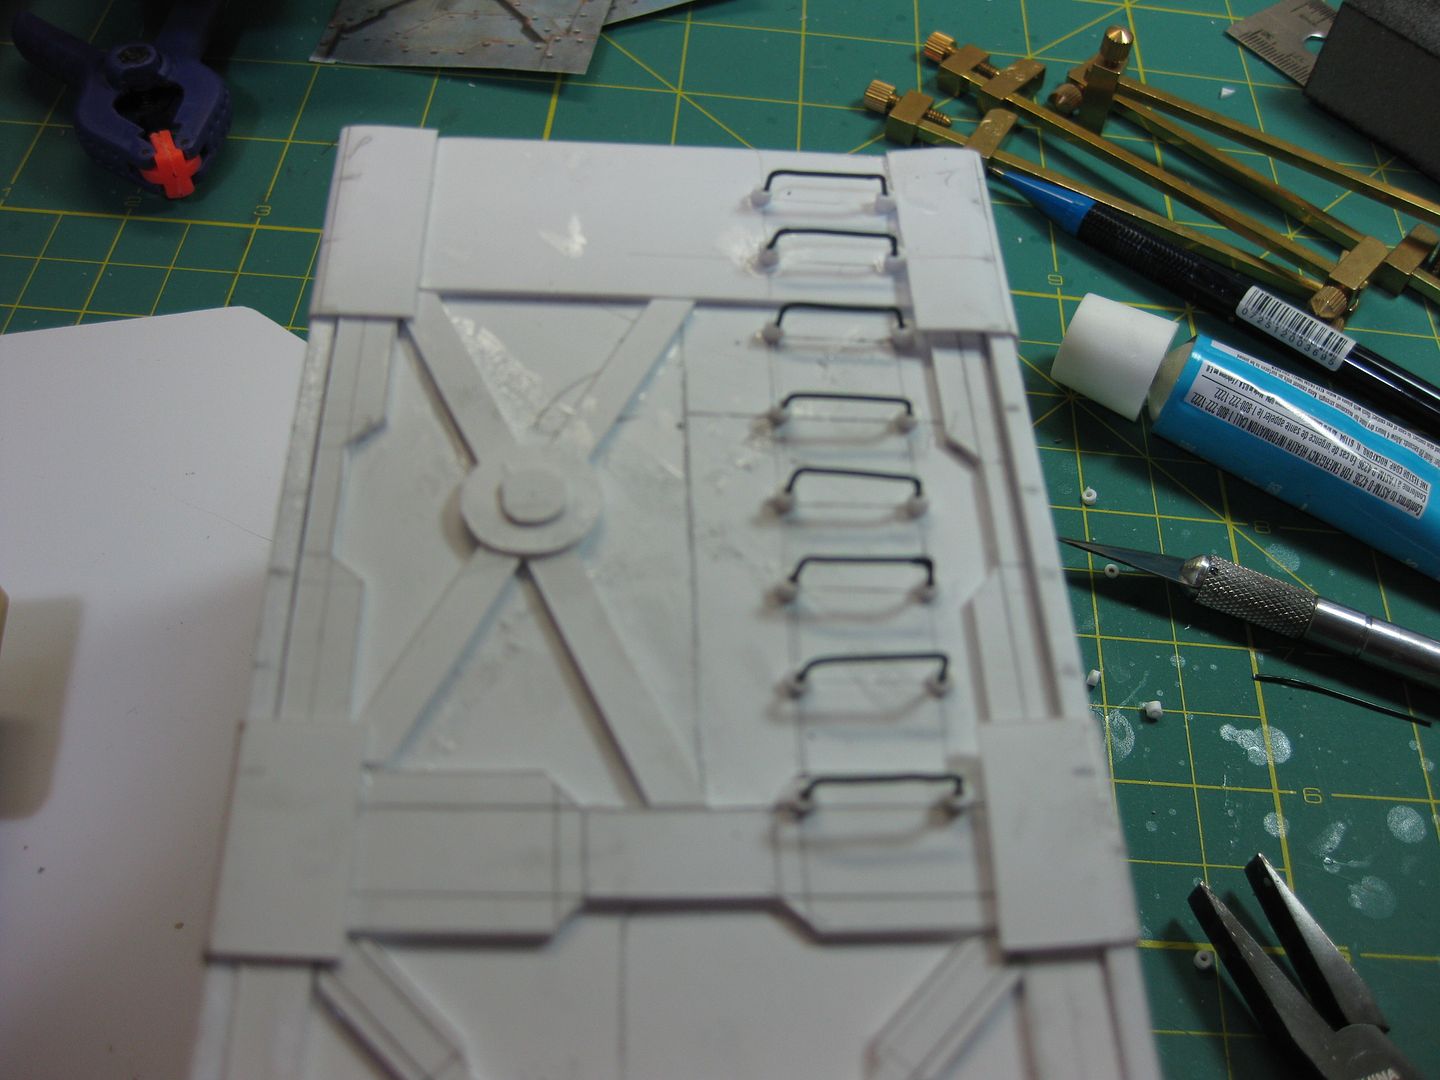
So I've raised my own bar now? I hope it will look OK with the rest of the set being so inferior? lol Nick away! The only problem I see is finding some copper wire that fits those slices of tubing for the ladder rungs. My usual aluminum Floral Wire (that I use for hatch handles) is too thin.
I am very excited to get the work day over with and go get my fantastic plastic tonight!
I have salvaged a good sized copper wire from the middle of old coaxial cables that don't seem to be used on today's fancier TV and such. It's about the same diameter (guage) as a small paperclip, but is about half as hard to bend into shape. Or you could use paper clips.
Seriously looking good! You make so much progress from day to day!
OMG! How could I have forgotten about the IT Technician's most useful tool? A paperclip! Thanks man! I've been using paperclips solely for pinning for so long I forgot that they can be used for other stuff!
And Thank you Soviet.Russia! That means a lot to me man! Much appreciated.
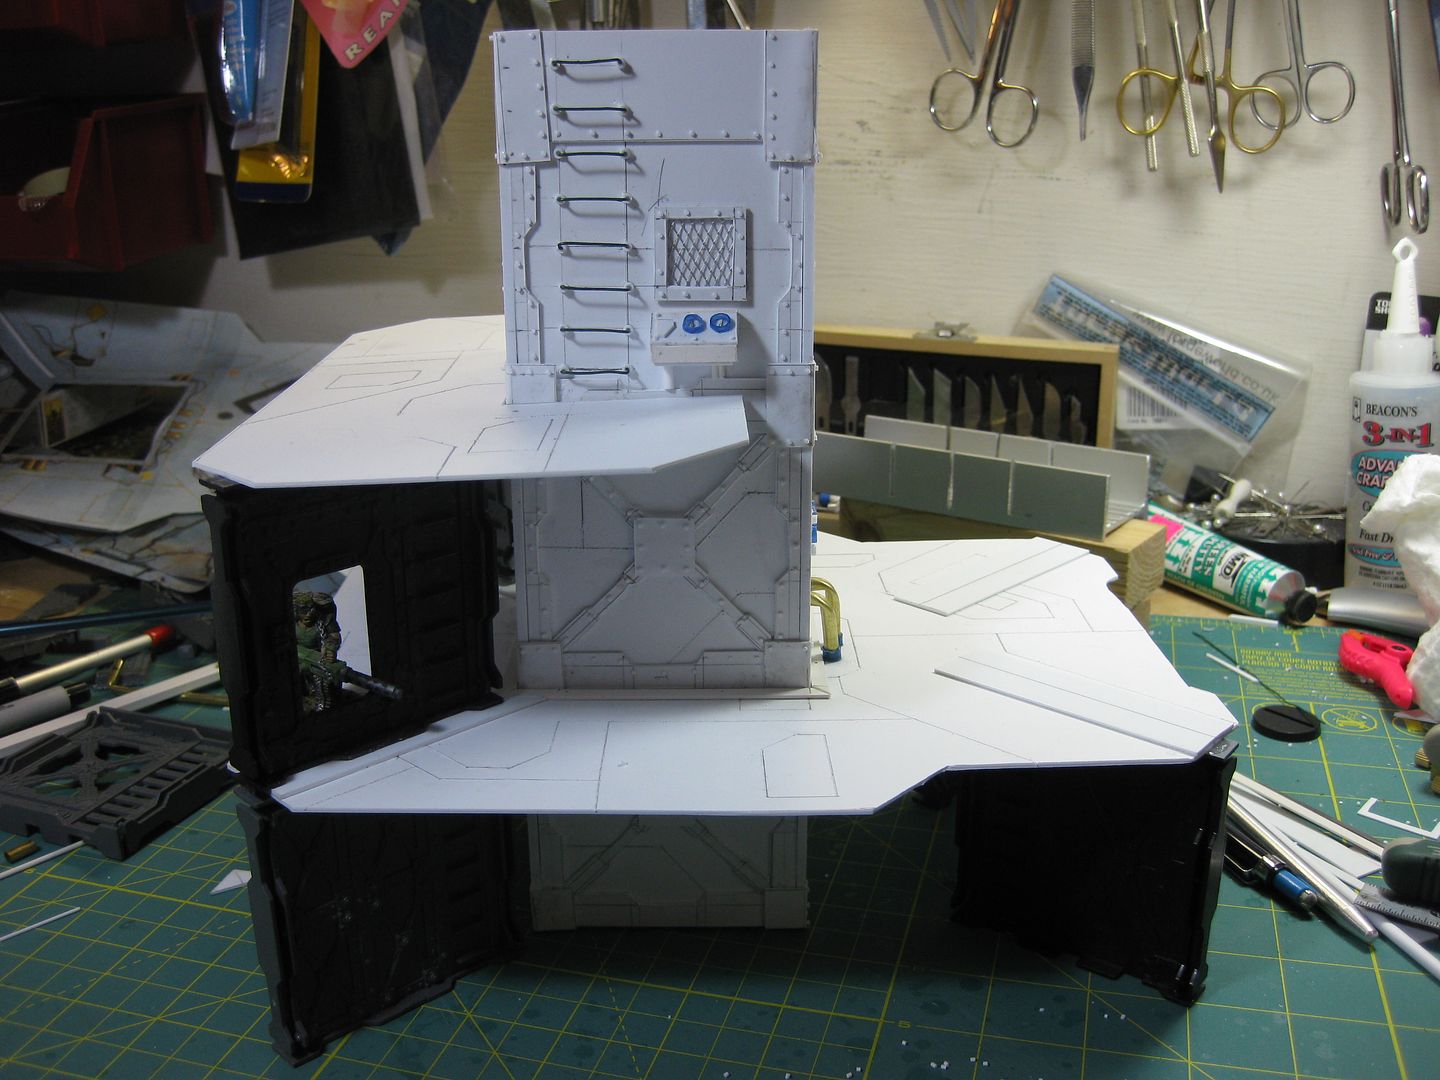
The tower is looking fantastic. The ladders are great. Seeing the other details take shape... it really makes me think this thing is gonna need SOME many rivets!
By the way, is The Onion Tower the catalog name, as it were, or did you name it that?
do you have a pic in mind... i fail currently to picture that... but i grant you a nice and good looking and even functioning elevator/lift would sure be a looker on the table...
@ Skalk, anytime!
@Green I named it that because it has so many layers.
And as always, thanks for all the comments. I look forward to everyone's opinions.
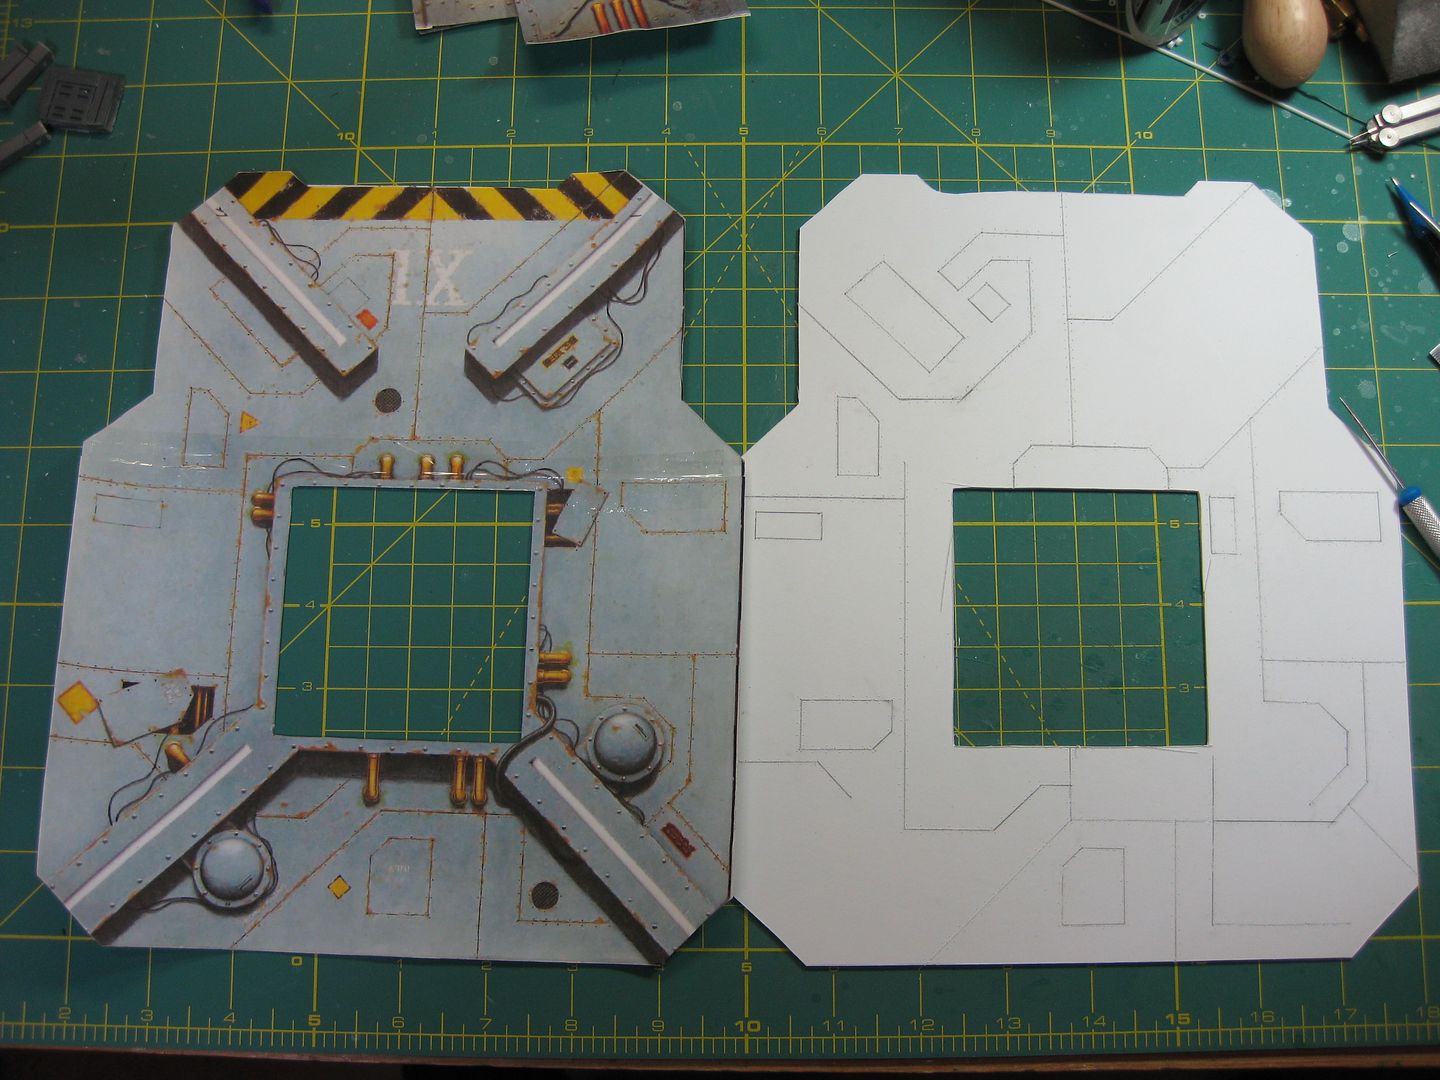
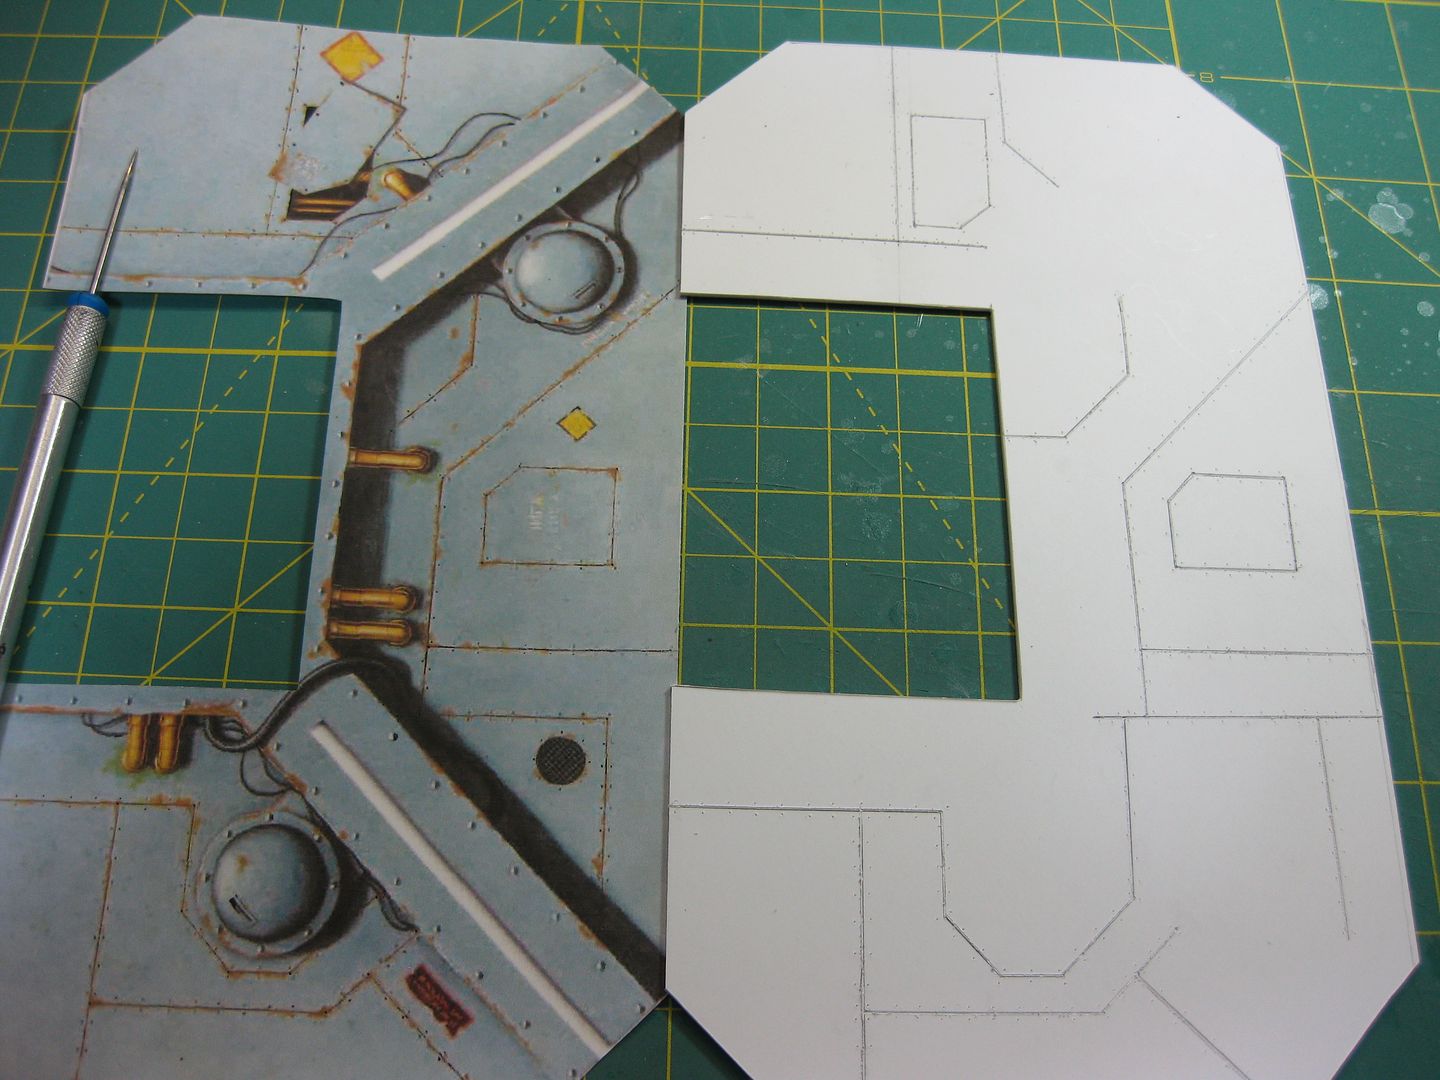
I can't really claim this as my "best" though, since this one is turning out to be a 1:1 copy of the original, all I did was reverse engineer the original graphic designs into 3D. So it's technically not my design.
dsteingass wrote:
I can't really claim this as my "best" though, since this one is turning out to be a 1:1 copy of the original, all I did was reverse engineer the original graphic designs into 3D. So it's technically not my design.
Regardless, your skills as an architect are really shining on this project. A design is just lines on paper until someone brings it to life. The methodical measurements and cuts. The variety of textures and materials. Quite an impressive work.
Thanks Depraved! Coming from an artist of your calibre really means a lot doood!
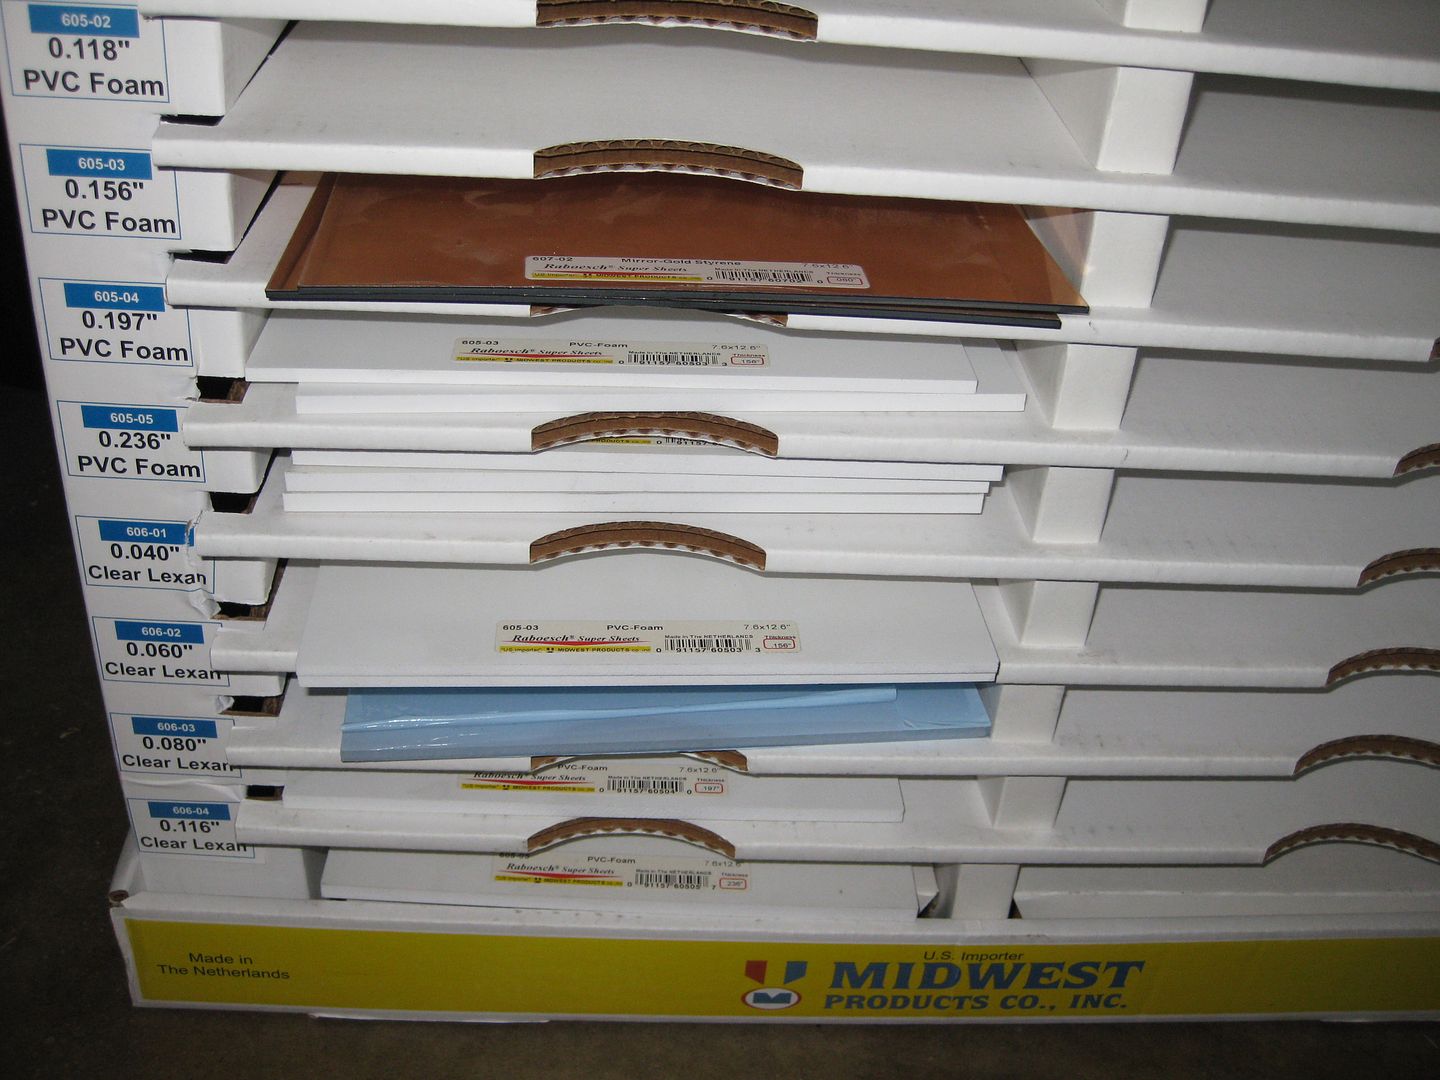
And now..>The moment I (and all of you) have been waiting for....
My MEGA UBER ULTIMATE SUPPLY DROP!
The cardboard rack is falling apart, but I can fix it!
A couple sheets of thick PVC foam, translucent Lexan, and shiny gold styrene!
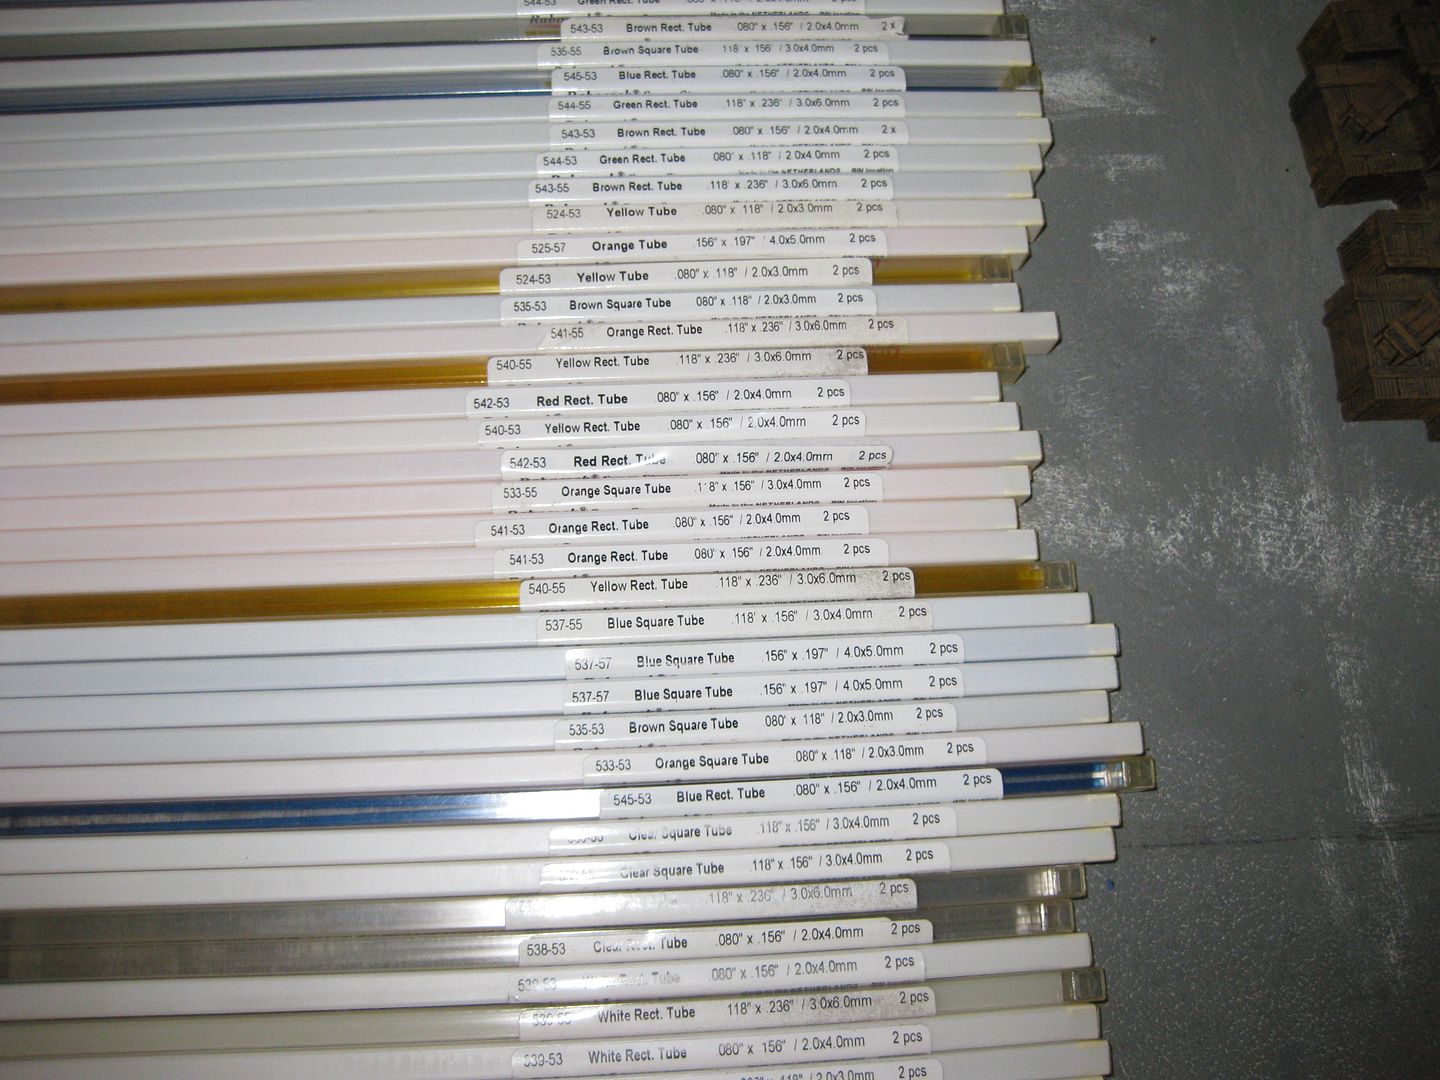
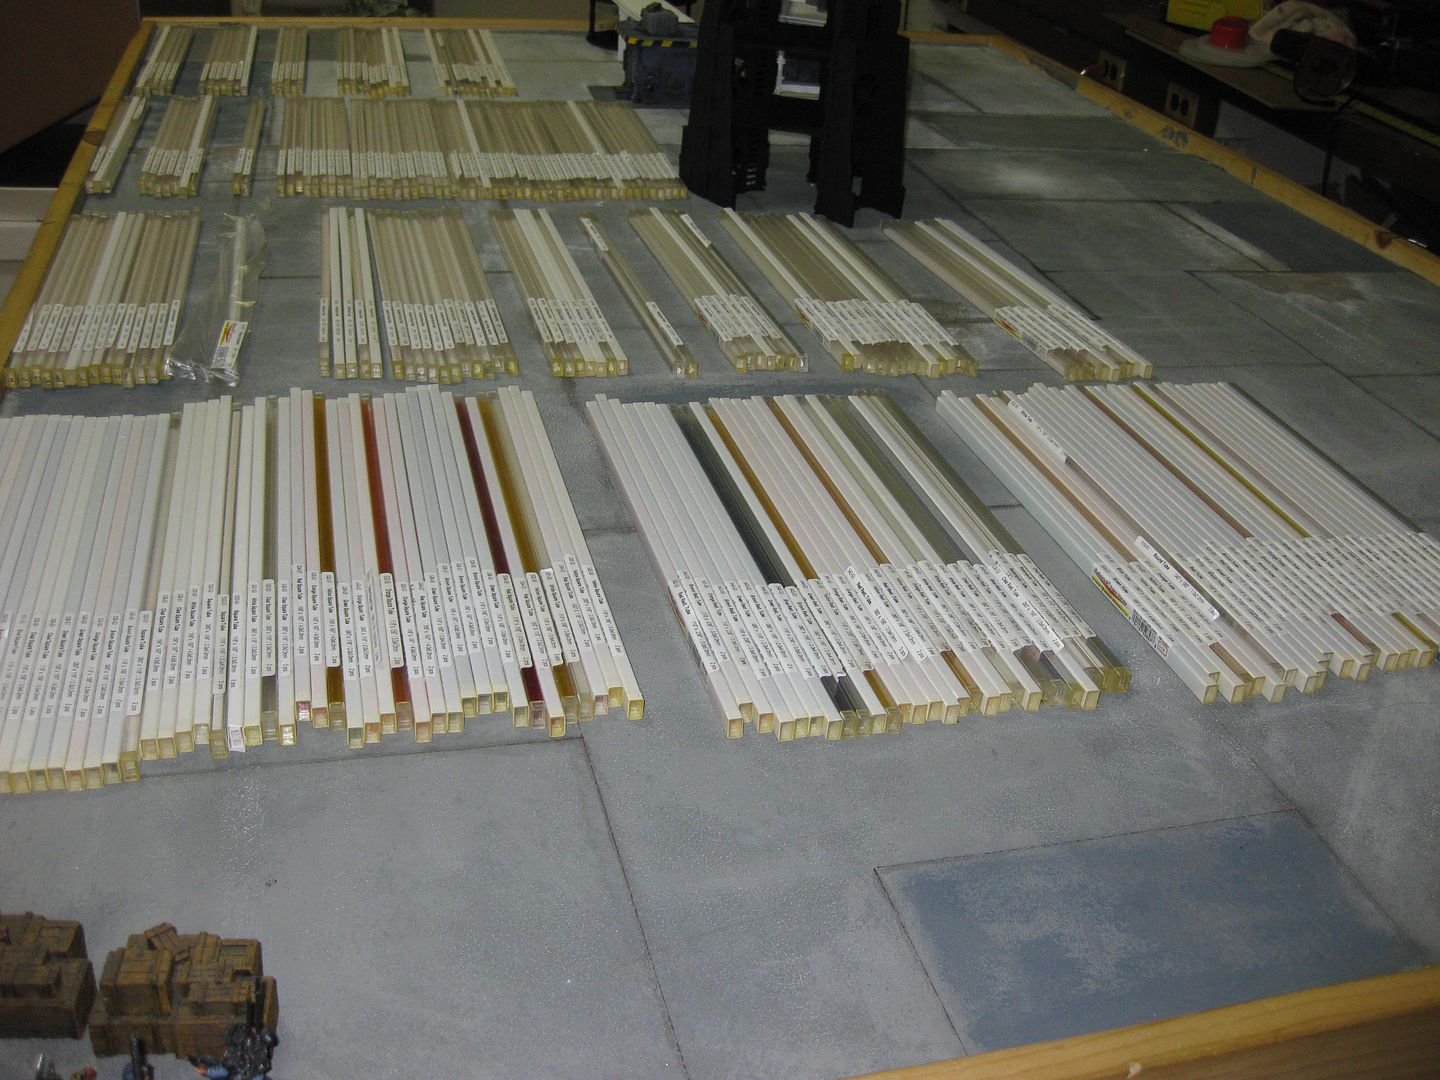
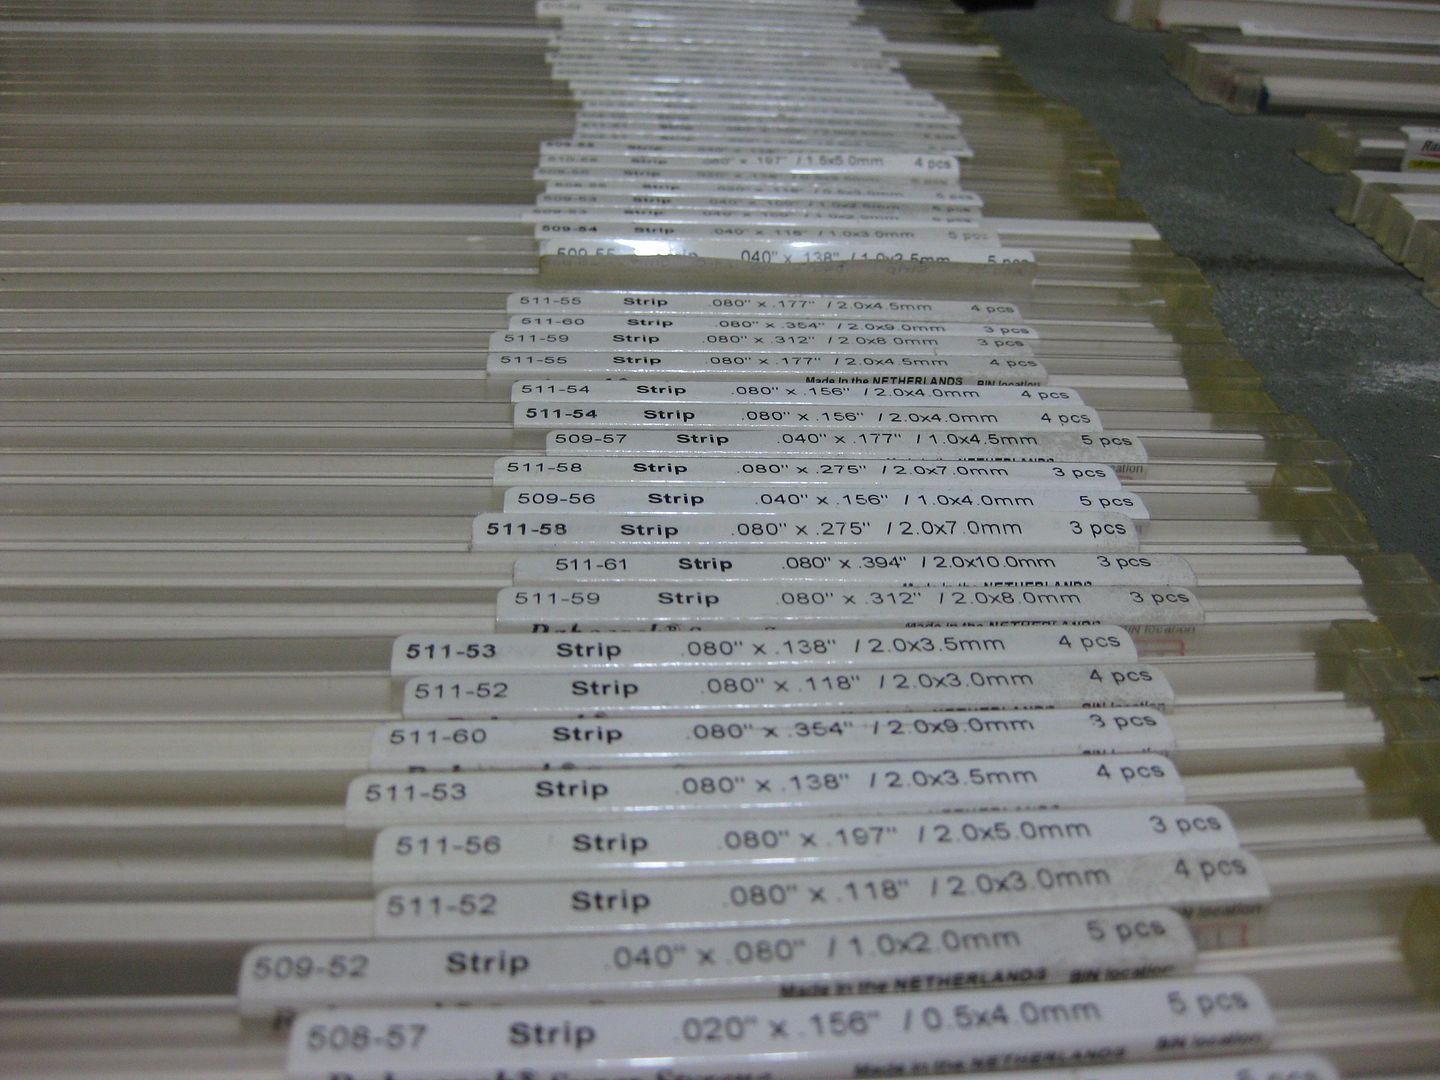
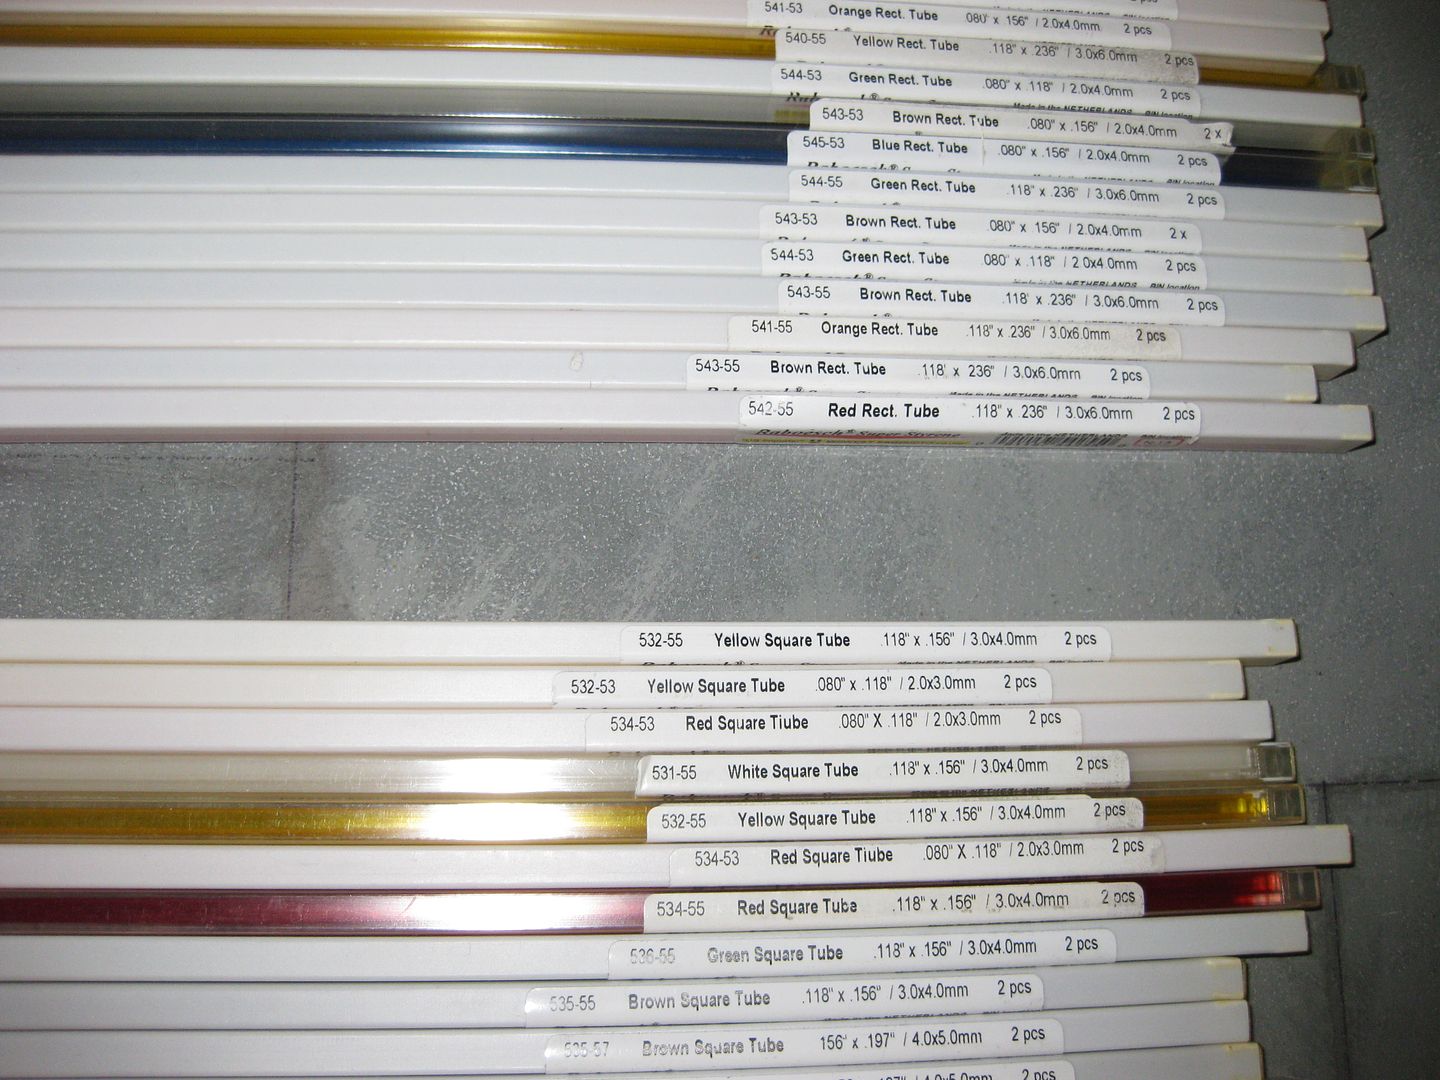
306 individual packages! All with a minimum of 2 peices in each package, depending of the size of the pieces in the packages.
Retail value of each package is between $2 and $5 a package, depending on the piece.
What did I pay?
......Wait for it.......
yup it sounds as much as stealing...and i think i am envious like hell...if it weren´t for you skill with that stuff you could make a fortune by selling it...but i guess that would be like selling your fingers now^^ a definite no go^^
the possibilities this offers... ain´t you the lucky one...no pay us back with an odplex of genuine terrain artwork^^
HAHA! I haven't even finished sorting the packages out yet! They were all in the wrong slot, and there are bitz (a few fallout Plastruct pieces from the rack next to it I suppose) OMG, there's sooo much cool stuff! Z-beams,I-beams, H-columns, T-beams, colored translucent tubes, angles, 1/2 angles (whatever the Frak those are).
(crushes another balsa wood building by "accident")
Dude I will say that if ANYONE I know deserved to score that, it is you. I'm going to bring my Cult army complete with Plague Zombie horde to your place next summer and play a 3-day death-fest.
lol... it is like having two times christmas holidays in a row...and...don´t let your girlfriend read you last post... not about that tiger shorts your wearing but about that best part in your life stuff... she might have a thing or two to say about that...
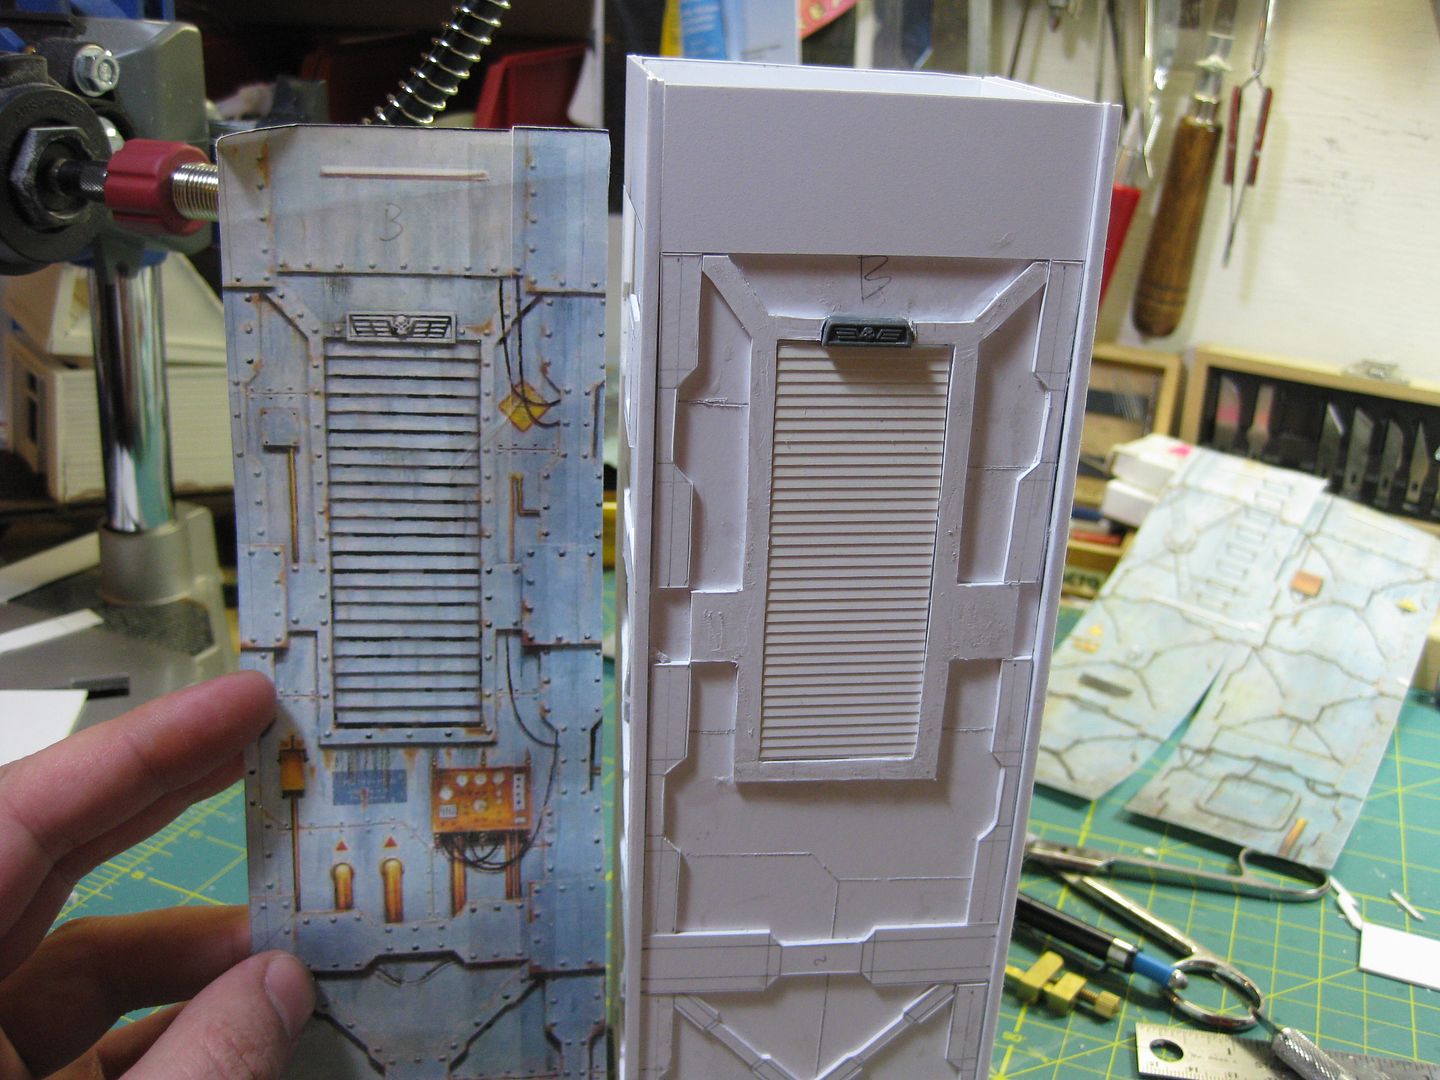
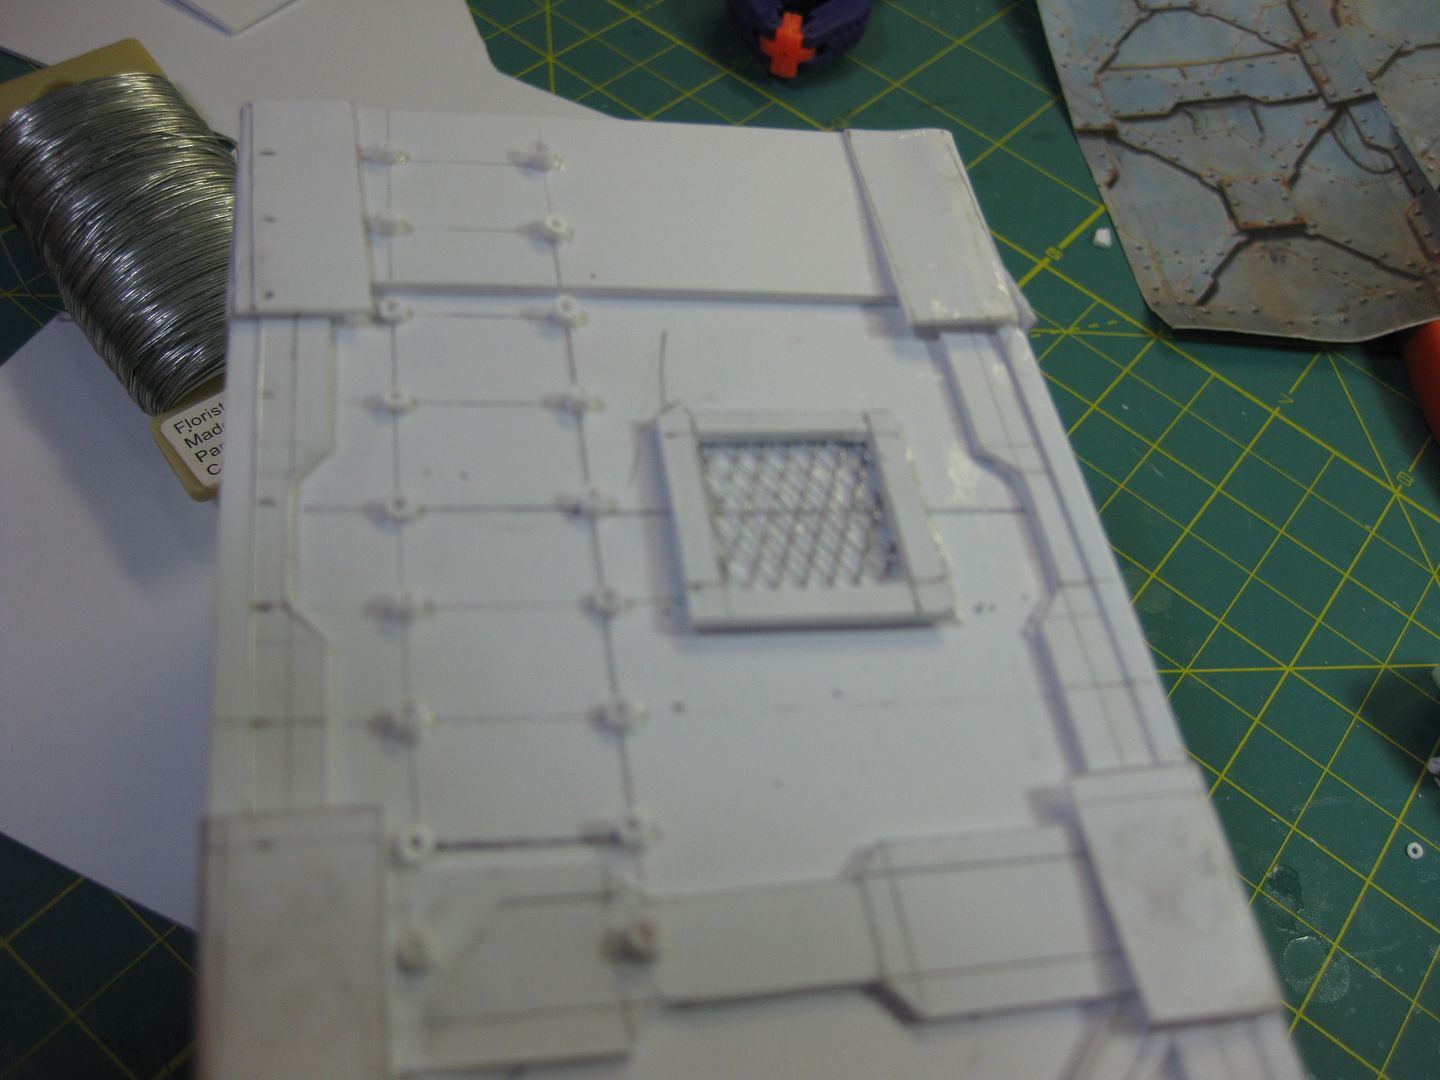
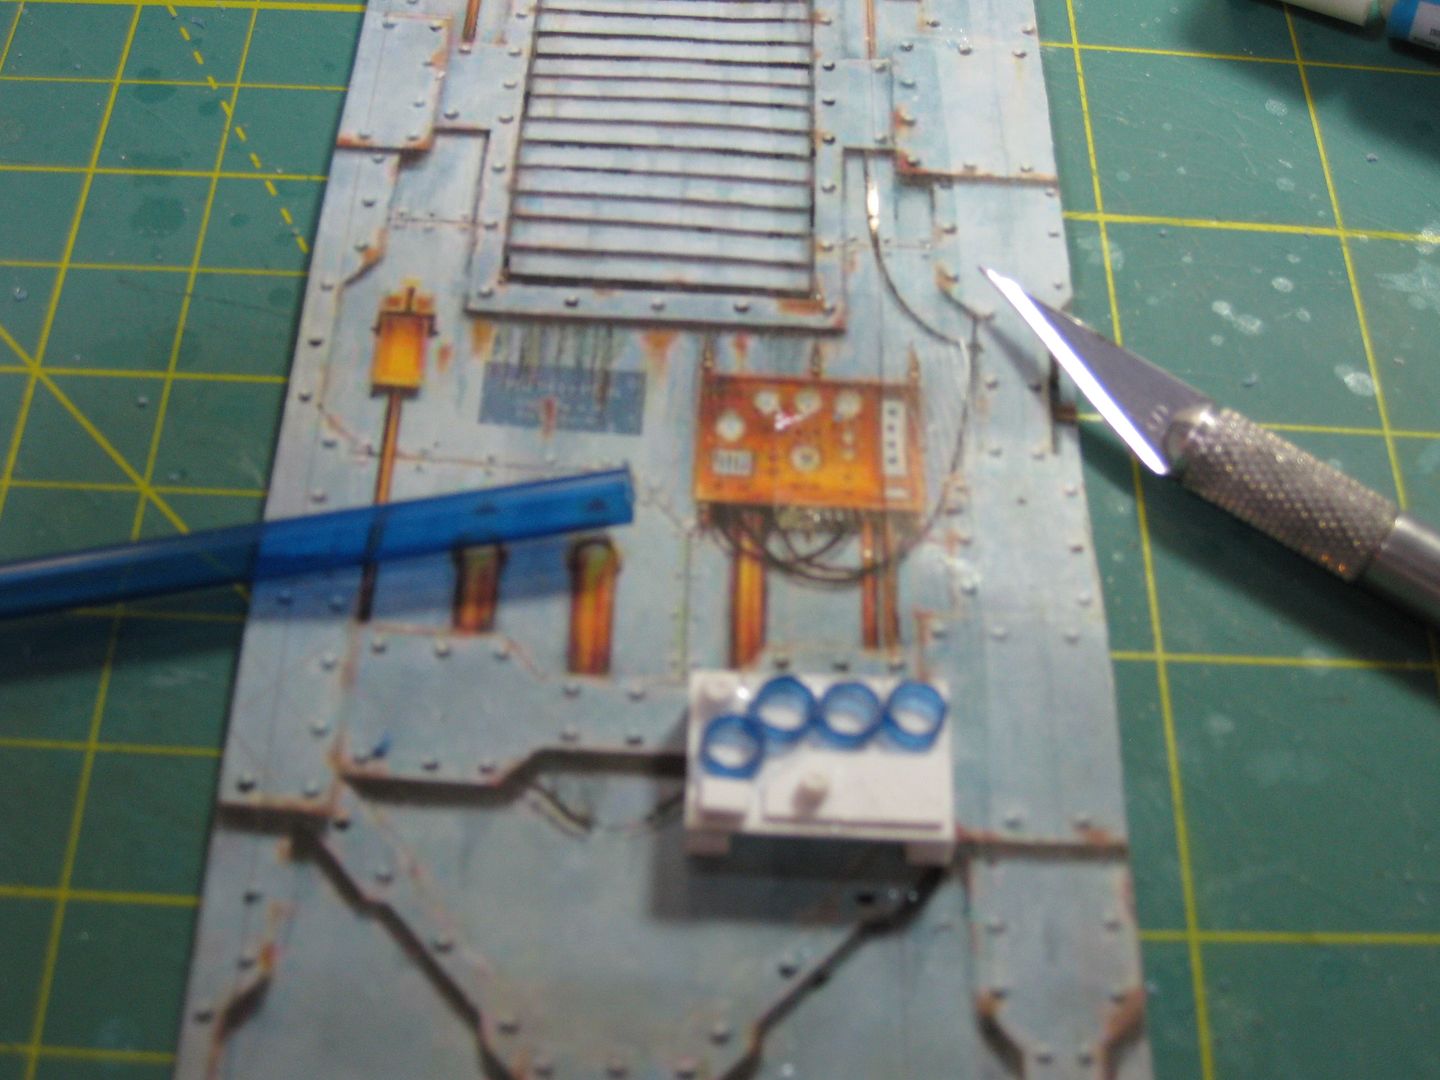
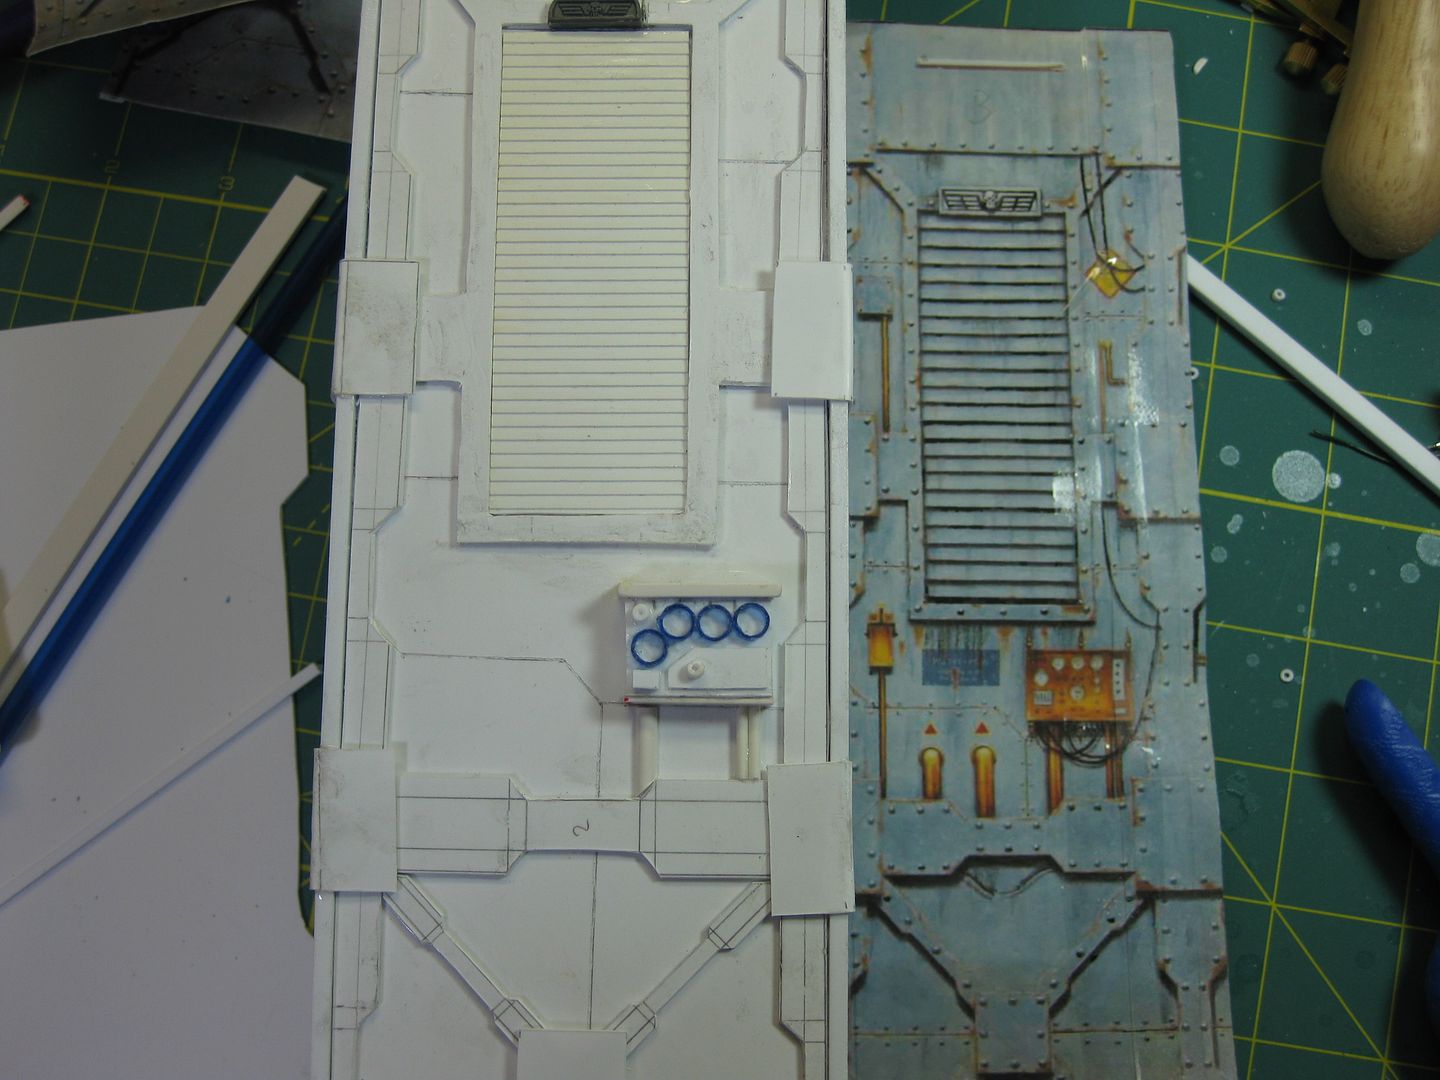
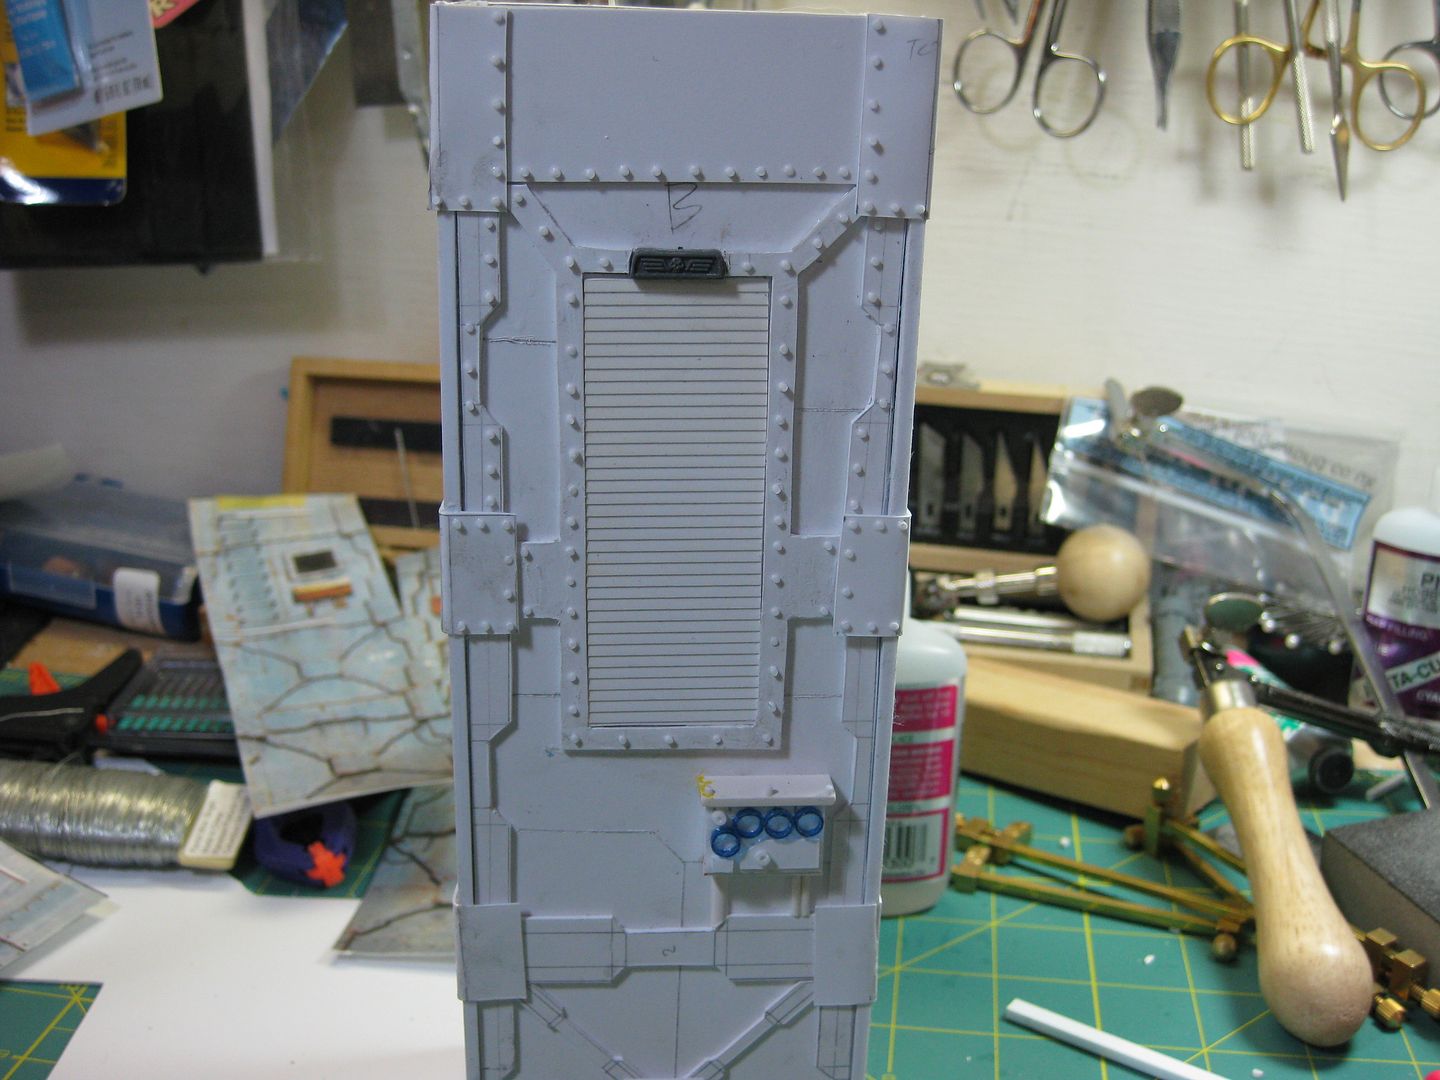
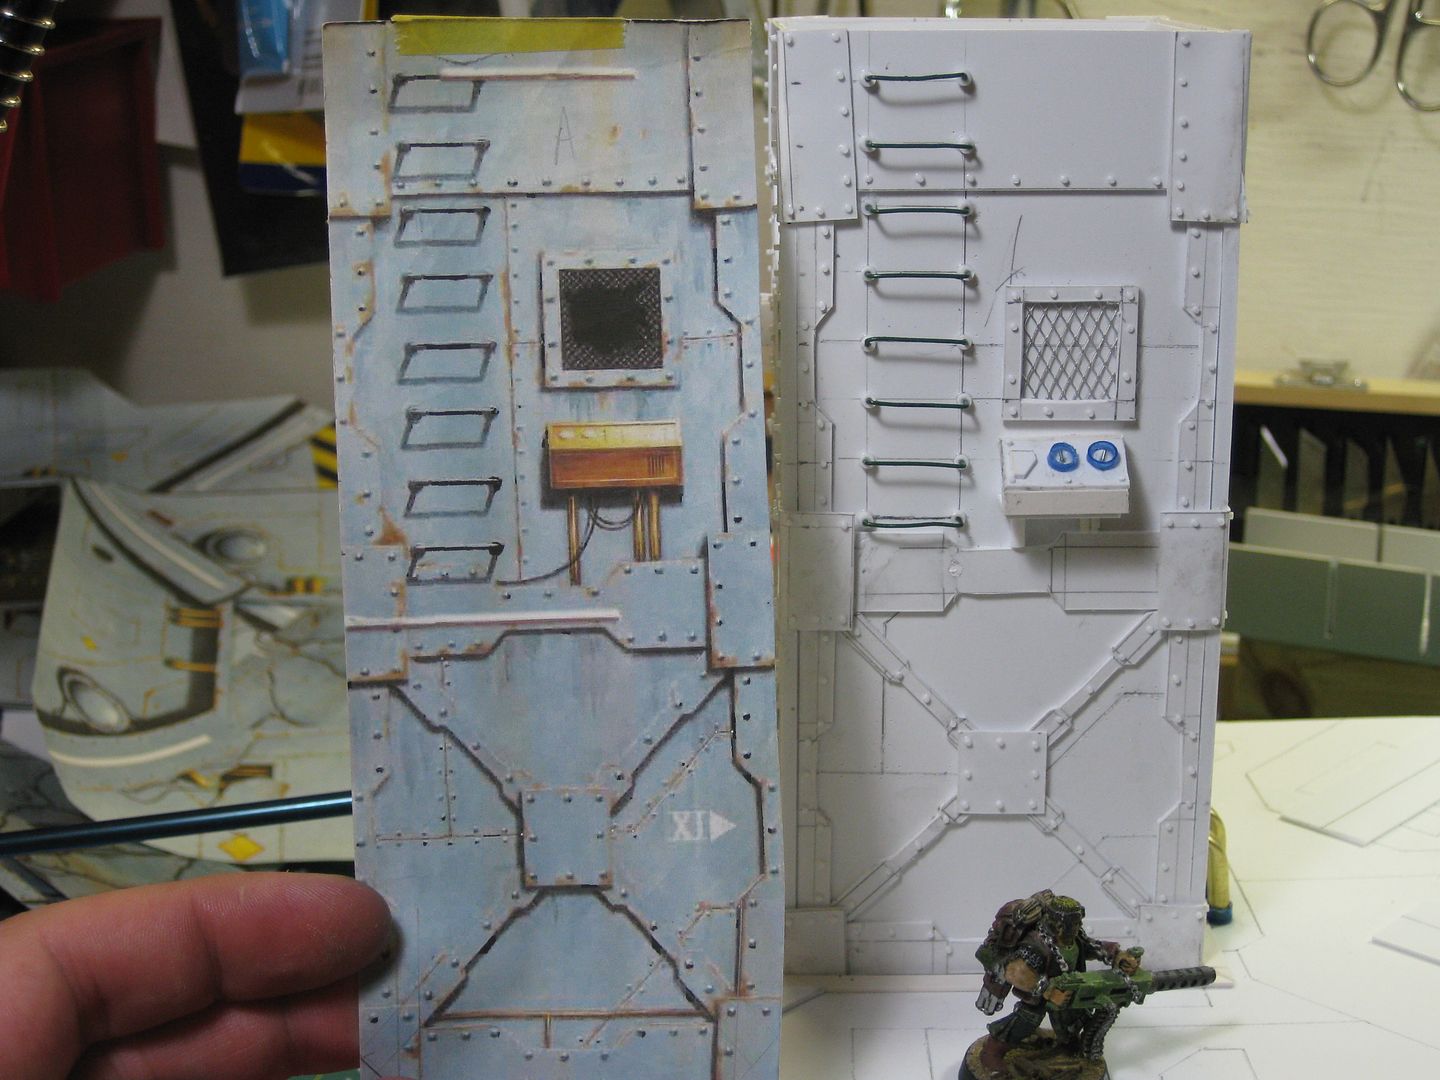
The tower is perfect! How did you build the ventilation panel (I'm not sure how t cal this part -under the imperial symbol-) is it a superposition of thin layers of plasticard or was it already shaped like?
I must also say I'm impressed with how fast you're working.
the vent thingy he said was from an old HO bit he still had left...
at dstein: that layout on your table pic looks like you already have a prebuilt terrain right there with all those rods lying about^^
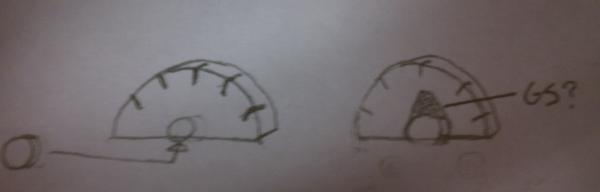
the halfround rods are a real blessing...i think some day some real investing is in order on my part too... the dials have a real good feel about them...now i would put a small fitting disc inside each and then the arrow bit...and you are set! the disc as i think the arrow shouldn´t be too deep situated...
will you do the bended bitz with GS or an other material? left to the dialconnector are bended tubes...just wondering...
and boy are you the lucky one when your partner is enjoying this bargain with you even as much as you do!!! i wish my grilfriend had a bit of a nerd in her too^^
Rogue Wolves wrote:what do you use for your imperial eagle on top of the vent?
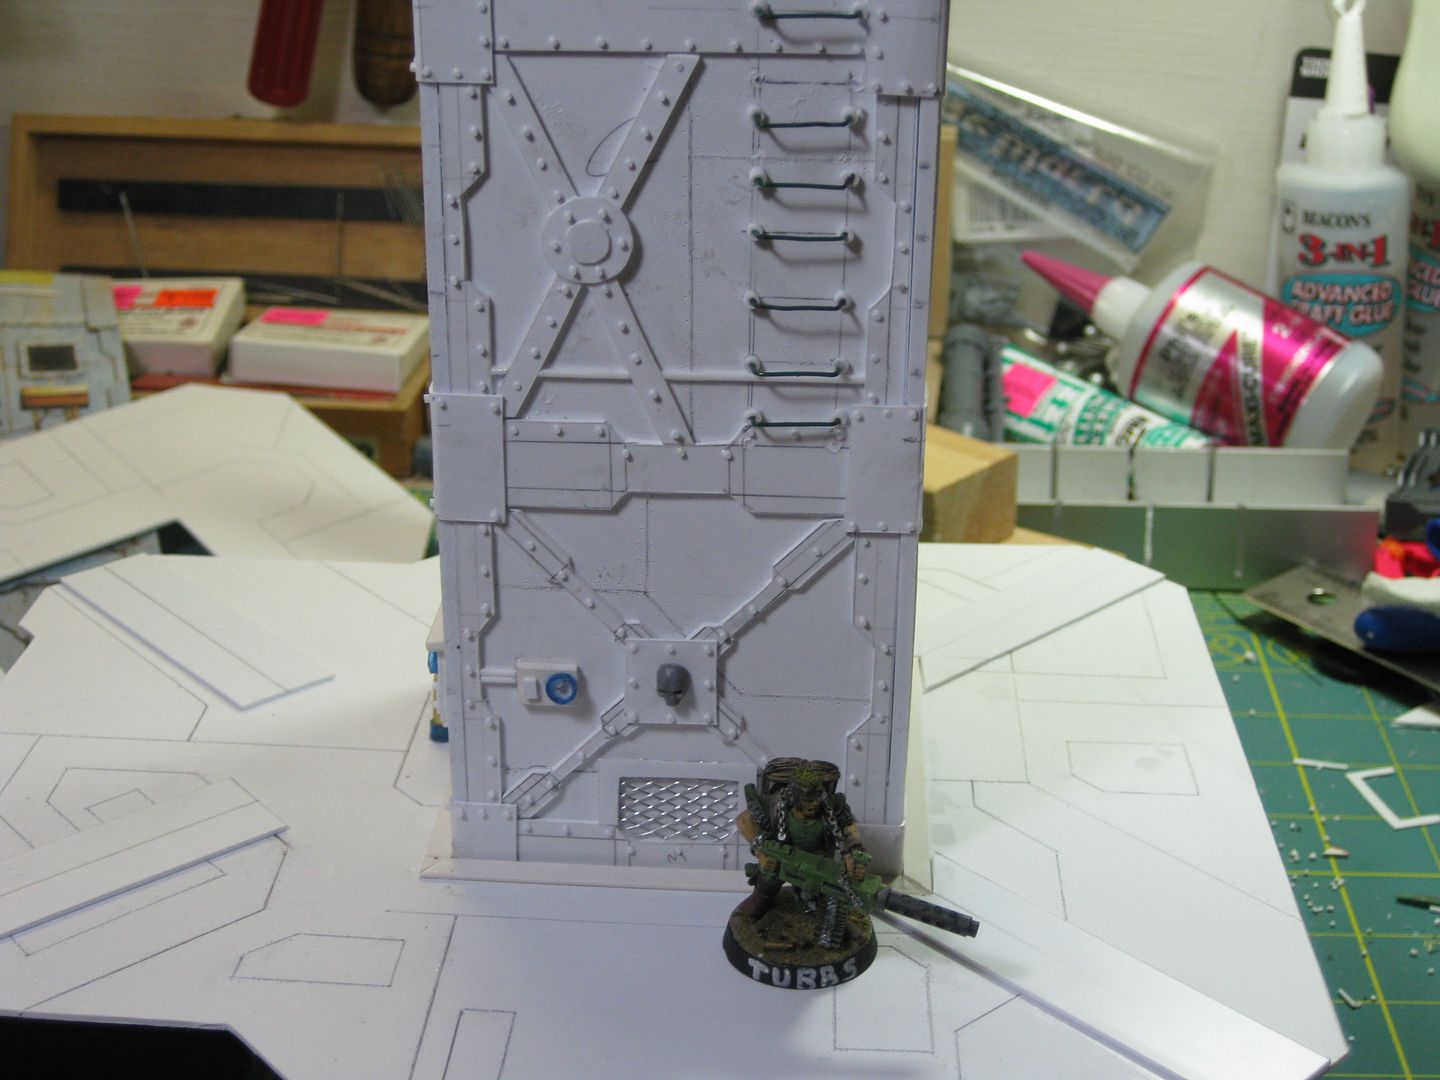
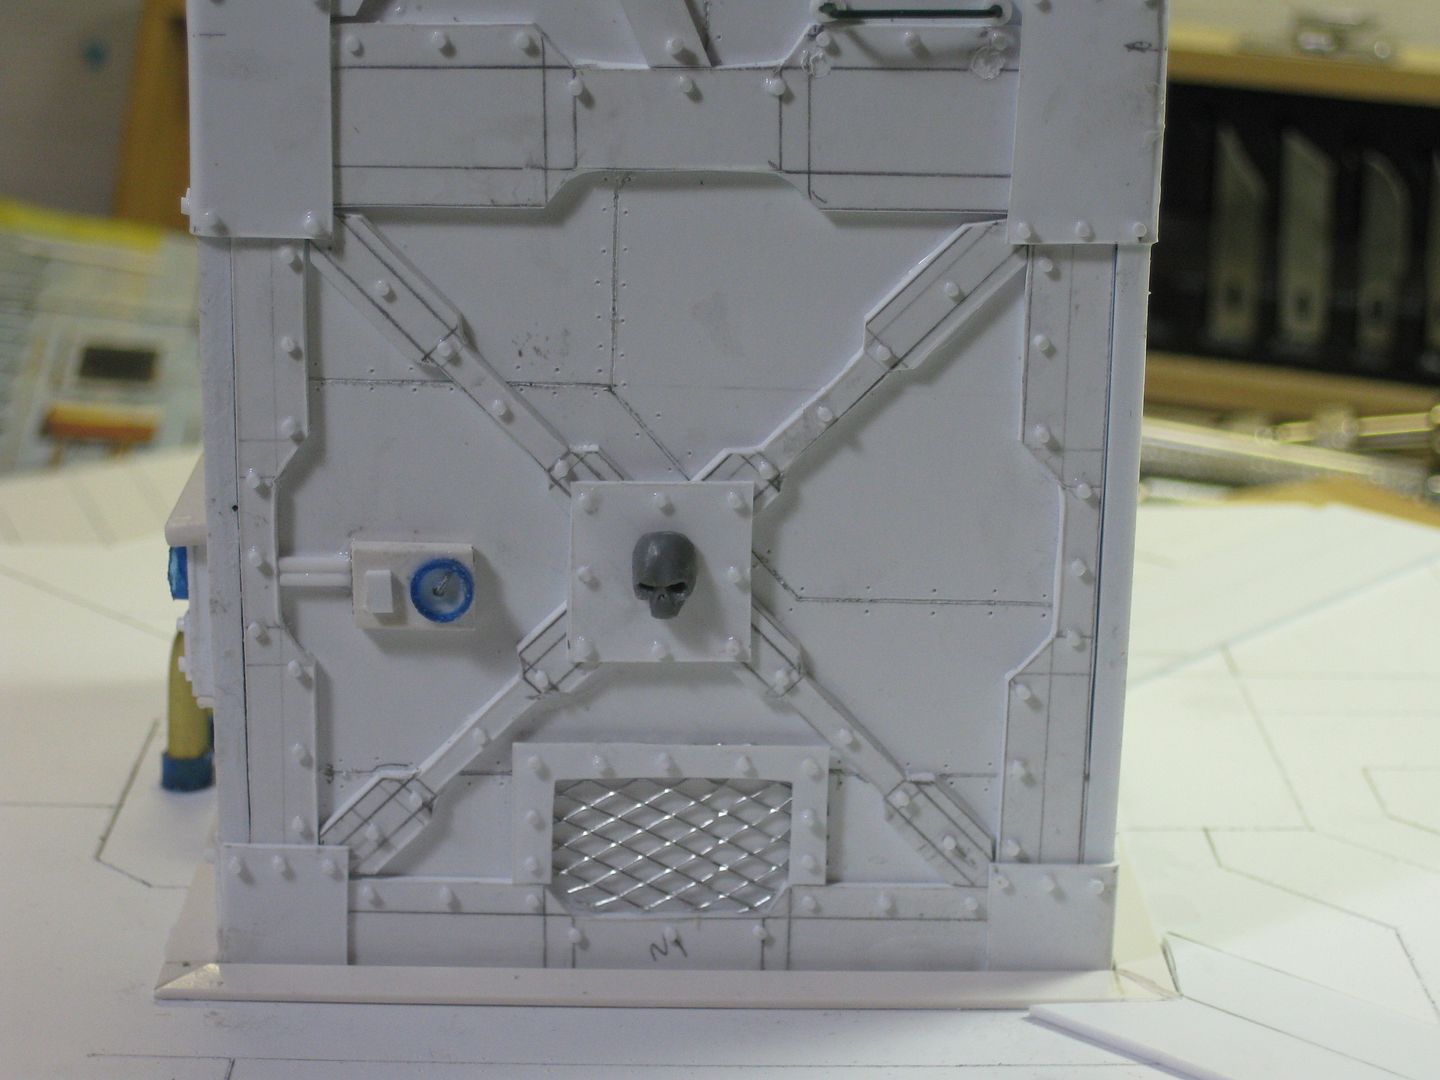
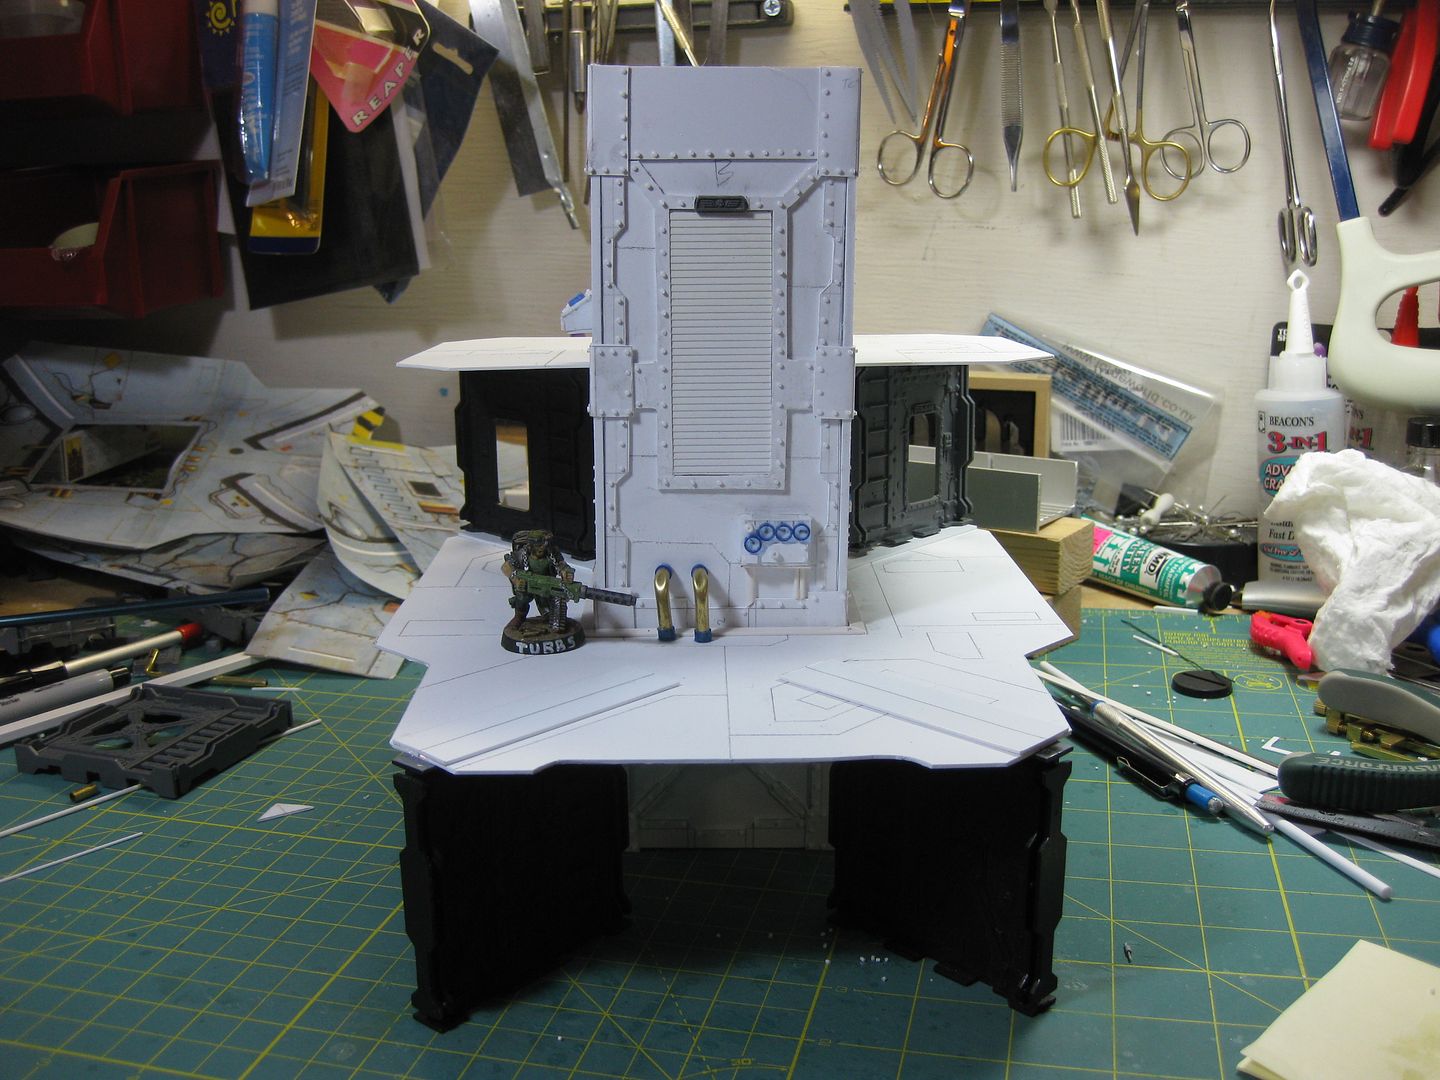
The winged skull is actually the bit from the top of the hatch from a broken Necromunda Bulkhead. I cut around it with a saw, then trimmed it up with a knife. I thought that was a very clever use of that bit myself.
Hyenajoe wrote:The tower is perfect! How did you build the ventilation panel (I'm not sure how t cal this part -under the imperial symbol-) is it a superposition of thin layers of plasticard or was it already shaped like?
I was originally thinking about laying courses of thin plastic, but I found a scrap piece of textured plasticard with an HO scale wood siding texture milled into it. The plasticard is old, you can tell by the yellowing it has next to the fresh, new white.
Viktor von Domm wrote:the halfround rods are a real blessing...i think some day some real investing is in order on my part too... the dials have a real good feel about them...now i would put a small fitting disc inside each and then the arrow bit...and you are set! the disc as i think the arrow shouldn´t be too deep situated...
will you do the bended bitz with GS or an other material? left to the dialconnector are bended tubes...just wondering...
and boy are you the lucky one when your partner is enjoying this bargain with you even as much as you do!!! i wish my grilfriend had a bit of a nerd in her too^^
I think you could do some amazing stuff in plastic Vik! Your tanks already epic in cardboard.
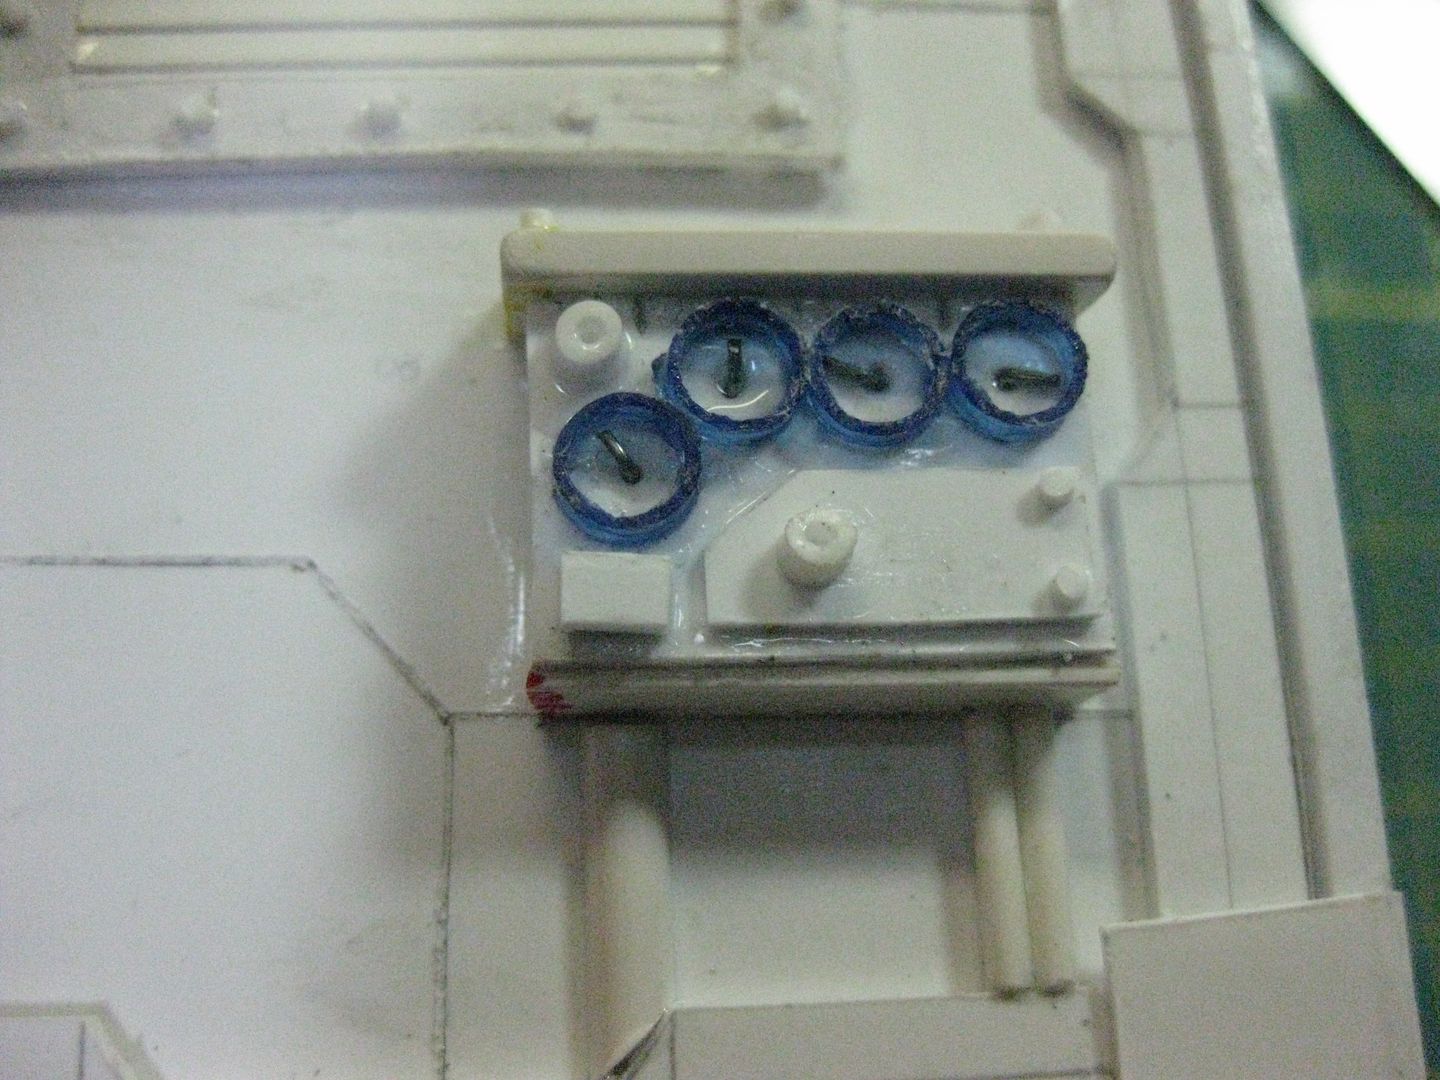
I was just going to paint the white faces of the gagues and use a micro pen for the dials, you think they need to be 3D too? You would almost need really really REALLY fine photo-etched brass for pointed dials. The slices of tube are only a 3mm diameter.
I'm not sure how to do those bended tubes, they bend then dissapear into the support steel, if I put any kind of bend in, it will extend beyond the support steel. The floor sits exactly in the middle of that support steel though, so maybe the pipes can terminate in the floor? What do you think? I don't know!
Looking good as always! For the "bended" tubes, I would just use the same half rounds, and gs the bend into the side.
Micro pen for the dails should work, but 3-D would look good! And if anyone can do it, you could! But try the pen first, if you are not happy with it, go 3-D.
I wish my wife understood about geeky stuff. She jsut shakes her head and sighs when I say I need more stuff.
I have plasti-envy right now! I may have to look into doing something similar. As most of my plastic work is very small scale having the right size when inspiration hits can make or break an idea.
Automatically Appended Next Post: For the dials I would go 3d for sure. If you have a punch, make a circle to fit inside your blue tubes, small strip for the increments and a slightly larger one for the needle. Then punch clear circles to cover it after its painted.
3mm is the outside diameter of the blue tube, they don't make punches in the odd inside diameter size. I appreciate the idea, and I agree that would look completely awesome when done, especially with a clear glass disc on top, but I just don't know how to make that happen practically. I'll play with the idea of strips though.
Automatically Appended Next Post: CORRECTION: The outside diameter of the tube is 5mm, the inside loooks to be exactly 4mm.....maybe. You guys are killing me here!
if you have the size you could also put a 4mm half round strip with some notches carved in it. I'm thinking of the Electric companies meter on my house. the top is a half circle gauge and the bottom has a few smaller circular gauges.
Love the vent so much. And you are an incredibly lucky bastard to get your hands on all that plasticard - I'd normally be jealous, but it's worth it to see all the stuff you can do with it! Exalted this thread btw - totally deserves it.
definatly give the 3D a go... will make you much more satisfied about your work!!! also i thought the hands of the meters could be done by GS?? wouldn´t that make the work much more simpler?
That is a great idea, to use the half and quarter rounds in the dials. I'd say, use them for the bottom part and GS the hands (as suggested above: another great idea!). Then paint on the hash marks for the reading. Then you can fill them with clear drying glue to create the window around them. Test that last idea on something that doesn't matter first tho.
How about this... cut the half round. gently score the increments with a razor knife just deep enough to show up after painting, the fashion the needle out of a rivet sized circle with some gs to make the needle, or plastic sliver.
The huge tube of GS that I have is about 6 years old, probably rock hard and not any good anymore. That shows you how much I use it. I'm just not comfortable with sculpting at all. Everything I try to sculpt turns out looking like gak every time i try, and when you fail repeatedly at something it isn't fun to do anymore.
A dial on a gauge IRL sits microns above the flat face of the dial (indistinguishable at this scale). Personally, I think it will look huge and bulky in 3D, you can't even see the dials on the original artwork, just the white faces, precisely because you wouldn't REALLY be able to see them at this scale! But despite my stubborn fatalistic argument on this subject, My public has spoken, and I have decided to at least try it. The very thin (>1mm) steel floral wire I use for the hatch handles is the only material I have that is even remotely thin enough. Problem is I stored the coil of wire on my magnetic tool-holder for so long it is now magnetized, so the little frakkin bits want to stick to the needle-nose pliers or knife blade, or tweezers. This is all sort of overwhelming right now. We shall see what happens tonight and this weekend when I can get in some uninterrupted working time.
But as always, thanks for your support Vik, I ALWAYS look forward to your C&C man.
Dials- dude, really? As if 1/32 rivets on 1/16 nuts isn't enough? Paint the face on the dial and call it done. If you get so deep into this sort minutia you're going to bog down and also set a precedent you may not want to copy all the time. You're already a slave to rivets.
To everyone re: dials- no disrespect intended to any of you at all. If he was going for a GD award I'd be all for it as well, but considering that other than a hi-res photo that will appear once in a thread on Dakka, almost no one is ever going to see this model that up close (and even from a foot away will still look more amazing than most terrain out there).
ok hold the presses...this is a very viable argument you brought forth... the scale...i like this discussion as it makes me think about the thing...GS wouldn´t work in that scale as you stated...would simply not make any sense...it would look way too cartoonish... so here is now my suggestion to solve this dilemma...i definatly would even make the markings of the numbers... i would go for colors... green, yellow and red...in the upper half...and the lower halv i would simply cover...
thanks for you valueing my C&C mate...but i am always open for reason too^^
Ahh! You mean like the "RED ZONE" on a tachometer means that you just burned out the clutch (and will shortly smell it) and are about to break something else if you don't shift NOW?
when you fail repeatedly at something it isn't fun to do anymore.
... this is absolutly understandable and prooves one point : we can´t and shouldn´t do everything to perfection as it is absolutly unlikly to be achieved... i won´t be trying to blend paints in a million years i think... and my GS skills are fairly mediocre at best^^ so every time i urge someone on to make something with that stuff i secretly try to get some hints how to do it good^^
What is your secret? I'm not even on about the quality of your buildings, which is mind blowing by the way, or even your motivation. How the hell do you work so quickly? Who has started selling hobby slaves? I need them more than you!
At first I thought he had Terrain Elves that came in the dead of night and build stuff for him, but he has progress pics during the day, so that put the brakes on that theory...
Maybe it has something to do with Sparkly Vampires...I mean, they have to be good for SOMETHING, right?
@Model Collector - I dunno, After awhile, the measuring, and marking with a pencil and laying out the cut, and snapping, and scoring becomes habit. I have to work faster to keep up with my always-on brain. I sketch ideas during rare quiet moments and read Dakka @ work. It helps that my GF not only tolerates it, but is always amazed at the crap I come up with. Oh, and I always have music or tv on in the background, I can't work in complete silence.
@ Jake- HAHA there will no damn elves in my workshop ever! This is a Proper Dwarfen Haus! Occasionaly I will glue something on during my lunch hour and post them, but no, terrain is only worked on by me I assure you. And I also prefer my Vampires wearing Tuxedos and Victorian Suits and being PLayas, the new sparkly vampires are not for me.
you know me for a rivet nerd that i am...on the side upper right plate...there is a rivet that casts a longer shadow... i think this rivet needs a trimming...^^
otherwise this tower looks really cool...one day you have to truly embrace the aesthetics of steampunk this style could really benefit from your terrainmaking^^
Hey dst.. love the work on the tower .. The attention to details so far reminds me of another marvelous blog ..
the infamous Baiyuan's attention detail blog..
couldn't help wondering what a joy it would be to see a marriage with his models and your terrain
The cad work is cool and very helpful for all of us out here with no funds for oop bulkheads , so thanks for that fella and congrats on your immense supply drop , that really is a bargain , and i really cant wait to see what you set your mind to next.
I really cant keep up with your work .. your making me feel rather ponderous tbh watching and learning
@ Neil, thanks for that link man! Good Stuff I'll be reading up and catching up on. And hearing comments like that from an artist like you is amazing, thank you!
So, to address an earlier poster, we don't really obsessively plan these things. If you look at the terrain plogs and converter plogs such as my own and other plasticard wielders, you'll see that we have this utterly insane "sense", born of habit and practice. We go into a project, and a few hours later, we come out of the fugue state, and try to remember that we have to sleep at some point.
So, the advice I can give is to just GLUE it. Hack cardboard apart, buy some plasticard, feel how it cuts, practice scoring and snapping. Don't be afraid to use up your supply, and buy some more. Look at things for their use in terrain or modeling. That orange juice bottle lid, or that grate you found at your Home Depot/DIY store.
Most of all, you have to do it. Take pictures, start a painting log, share with the world. People like myself, Vik, Dstein, and others will not mock, we will help.
The rivets and the platforms are looking good dstiengass. This thread, as well as one or two others, make it very difficult for me to wait to start my Naval Depot project. Not having the space to start it makes things easier... but not too easy
@Green, you can always start detail bitz, or whatever you have supplies for now. You never know, sometimes, when I do big projects, I find myself wanting to get done, and hurrying through some of the details at the end. If you start the detail bitz now, you can just add them in at the end.
Inverted Rivets
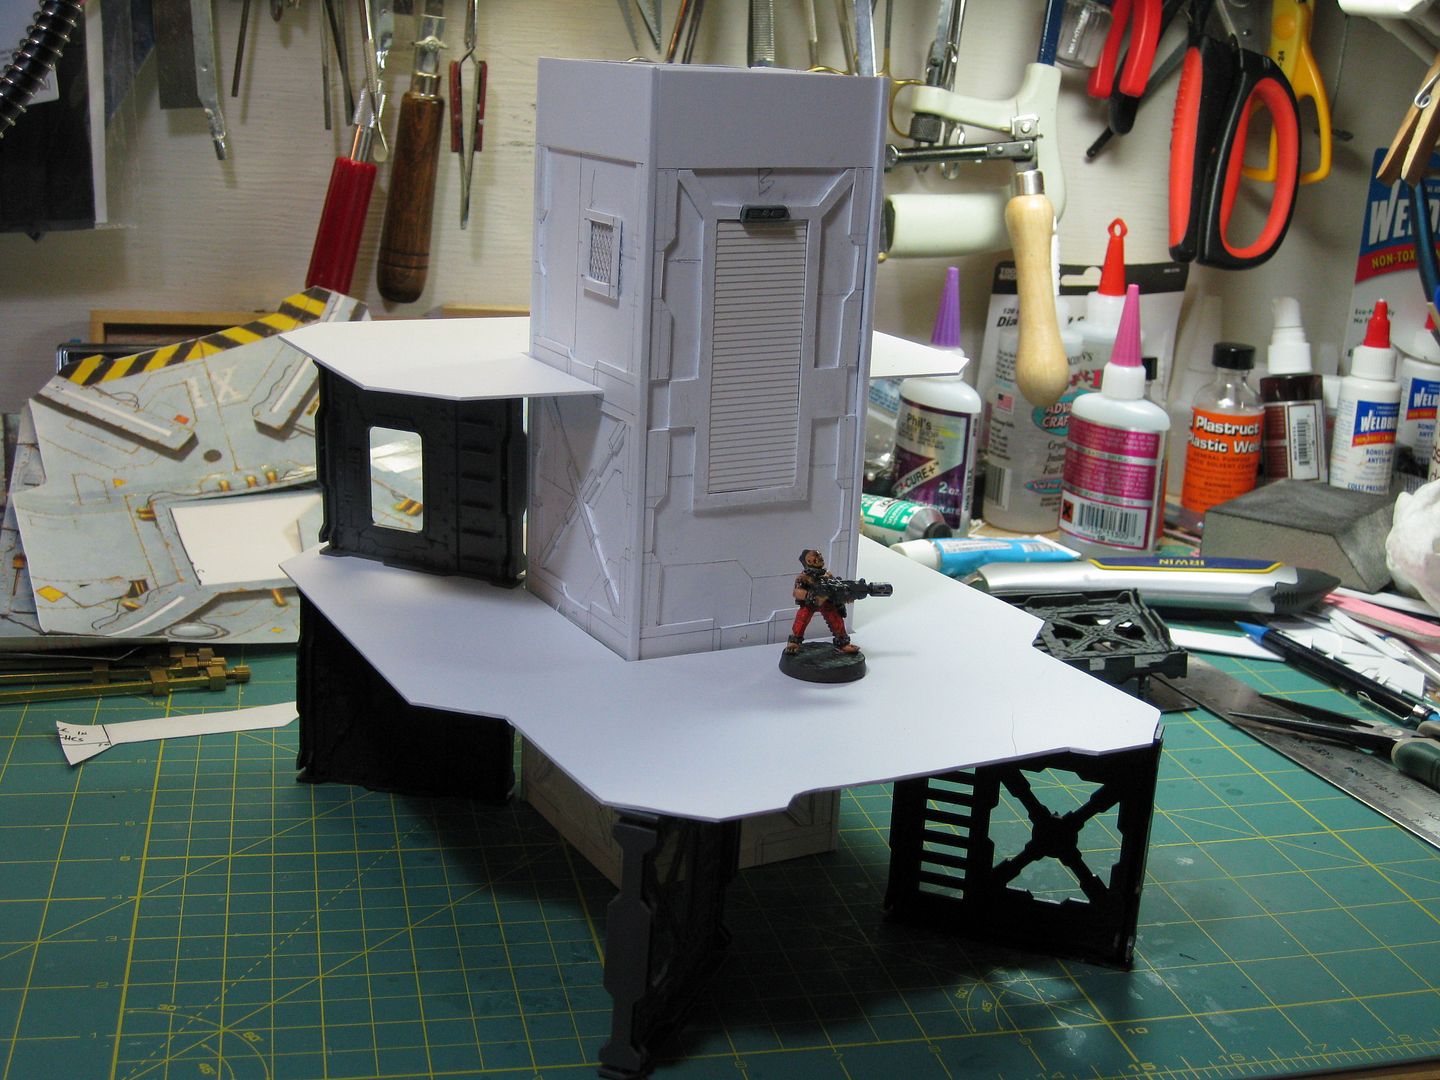
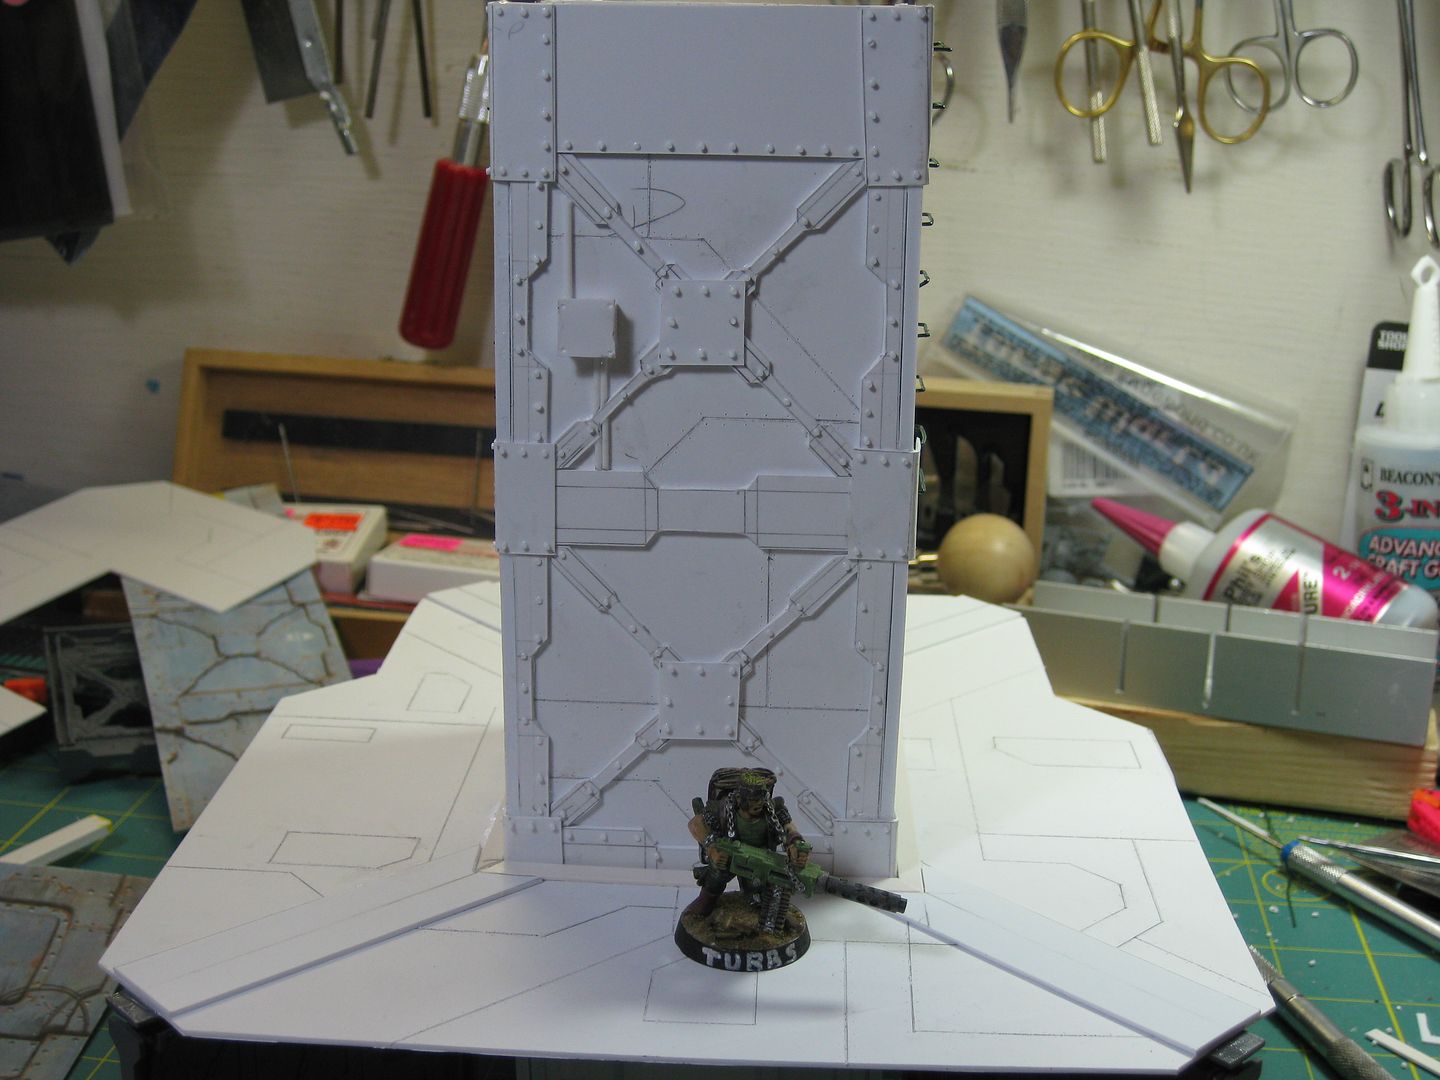
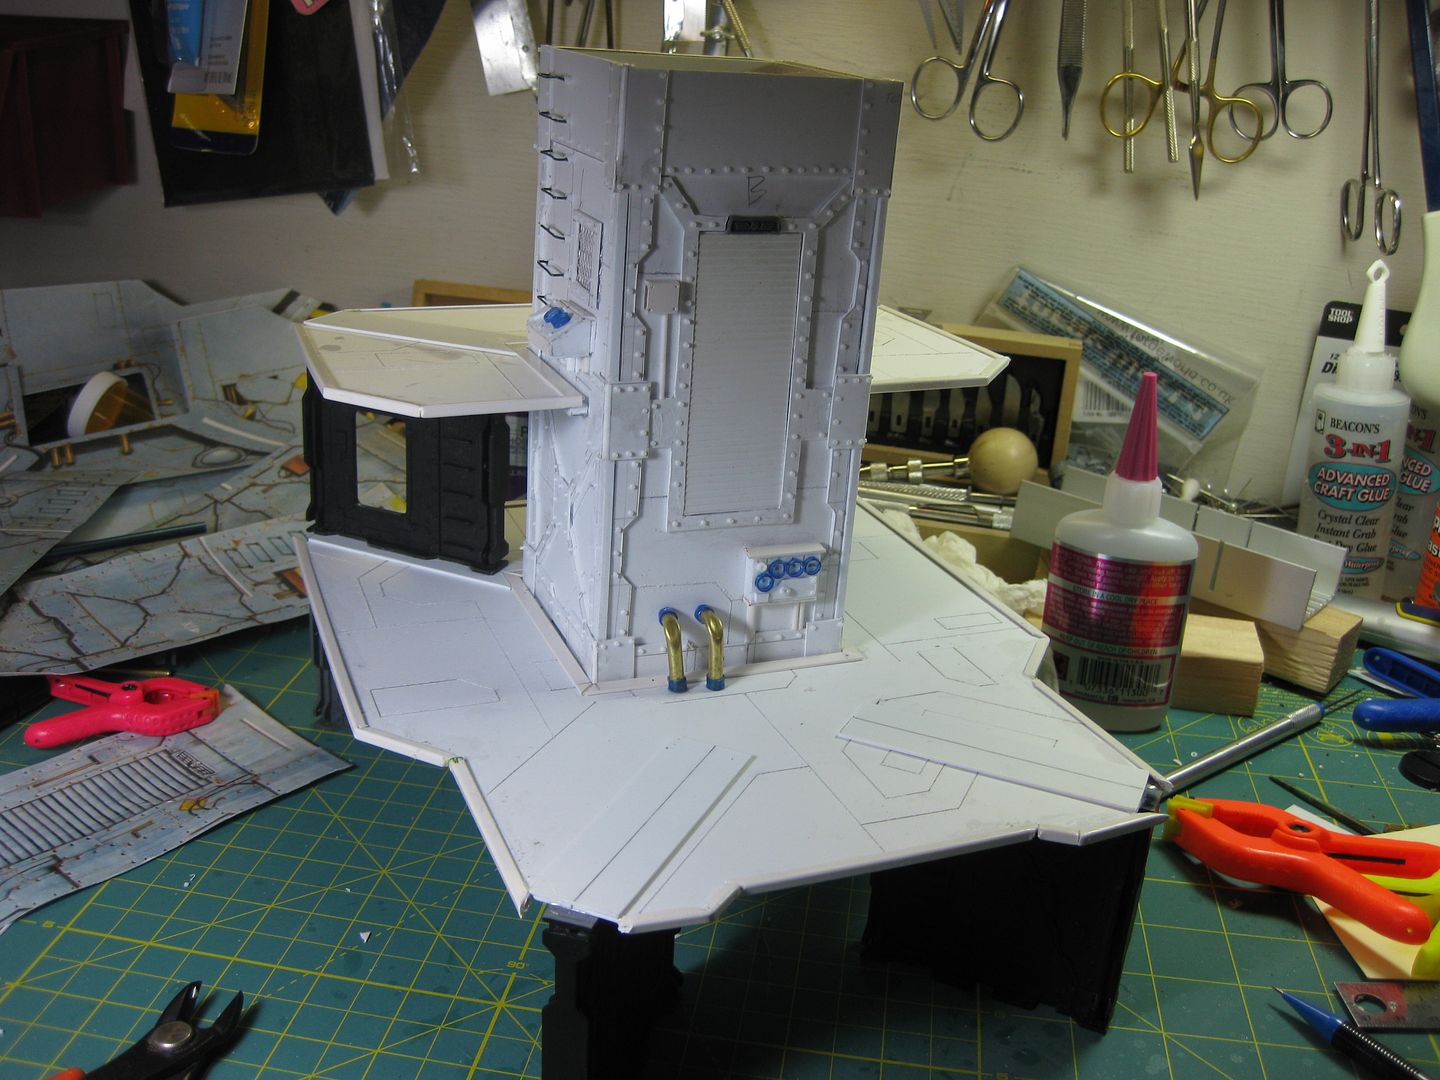
I hate these, I can't work as fast as I want to because the repeated act of pressing the point into the plasticard cramps my hand, so I have to take frequent breaks in order to rest and continue. However, looking at the one side of the tower riveted, these recessed rivets really need to be present, since raising these rivets would make miniature play absolutely impossible. That is a line I will not cross. A terrain piece you cannot play a game on is pointless and illogical and heartbreaking.
Automatically Appended Next Post:
You can't even really see them, but they are all done. They show up well once painted. see the second piece in the set.
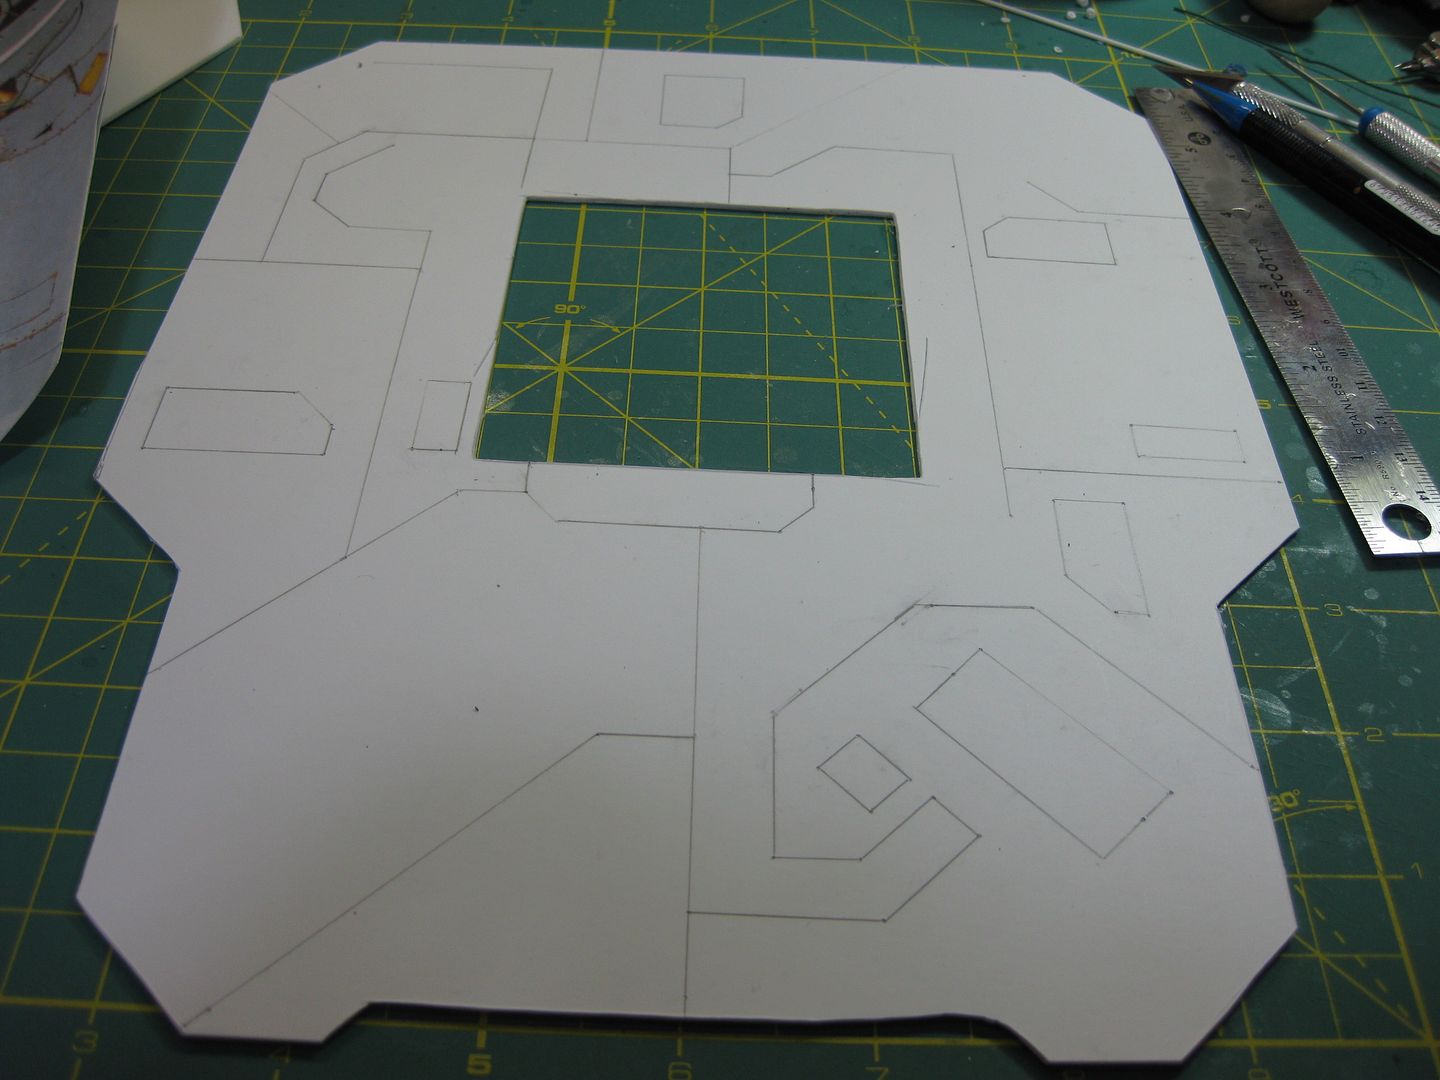
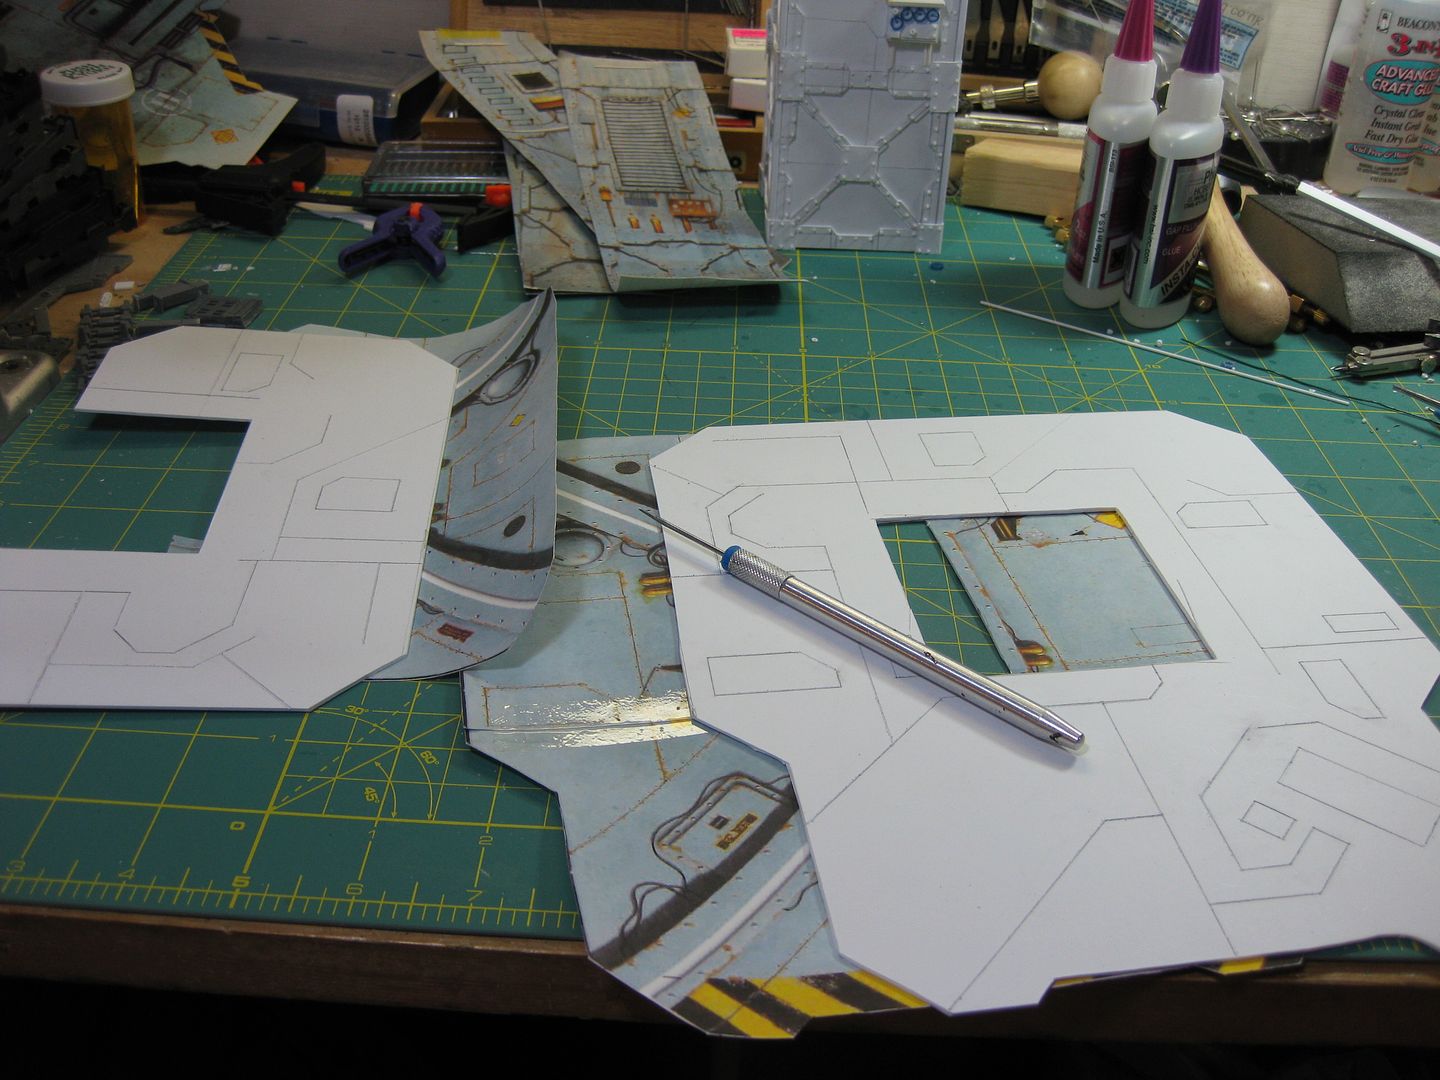
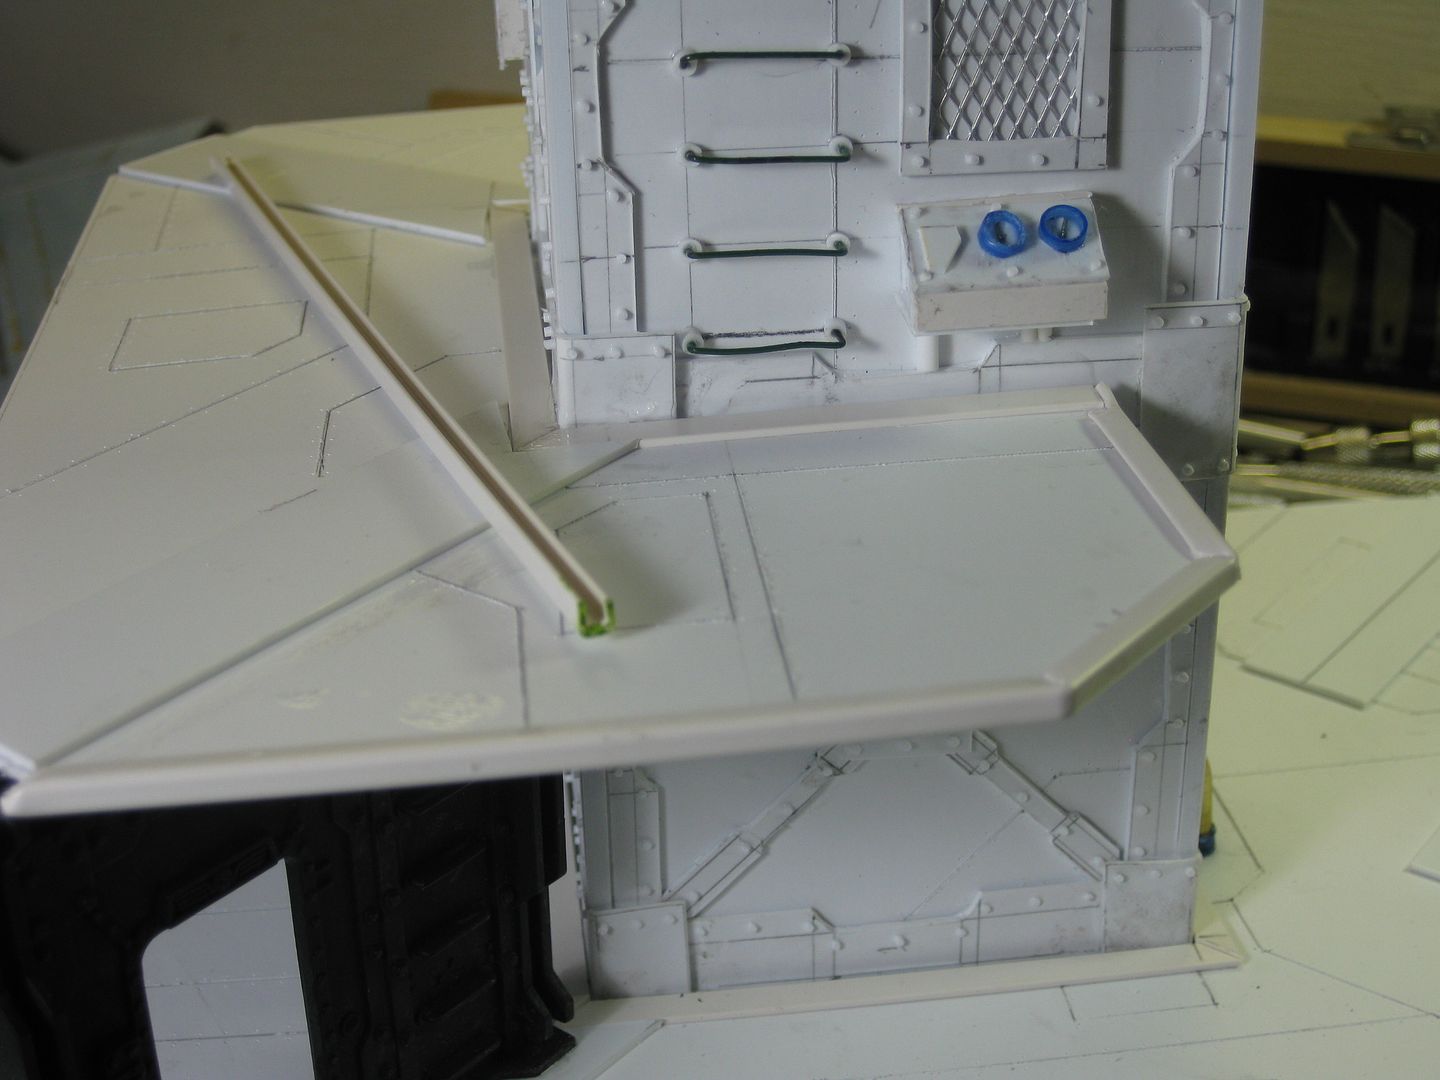
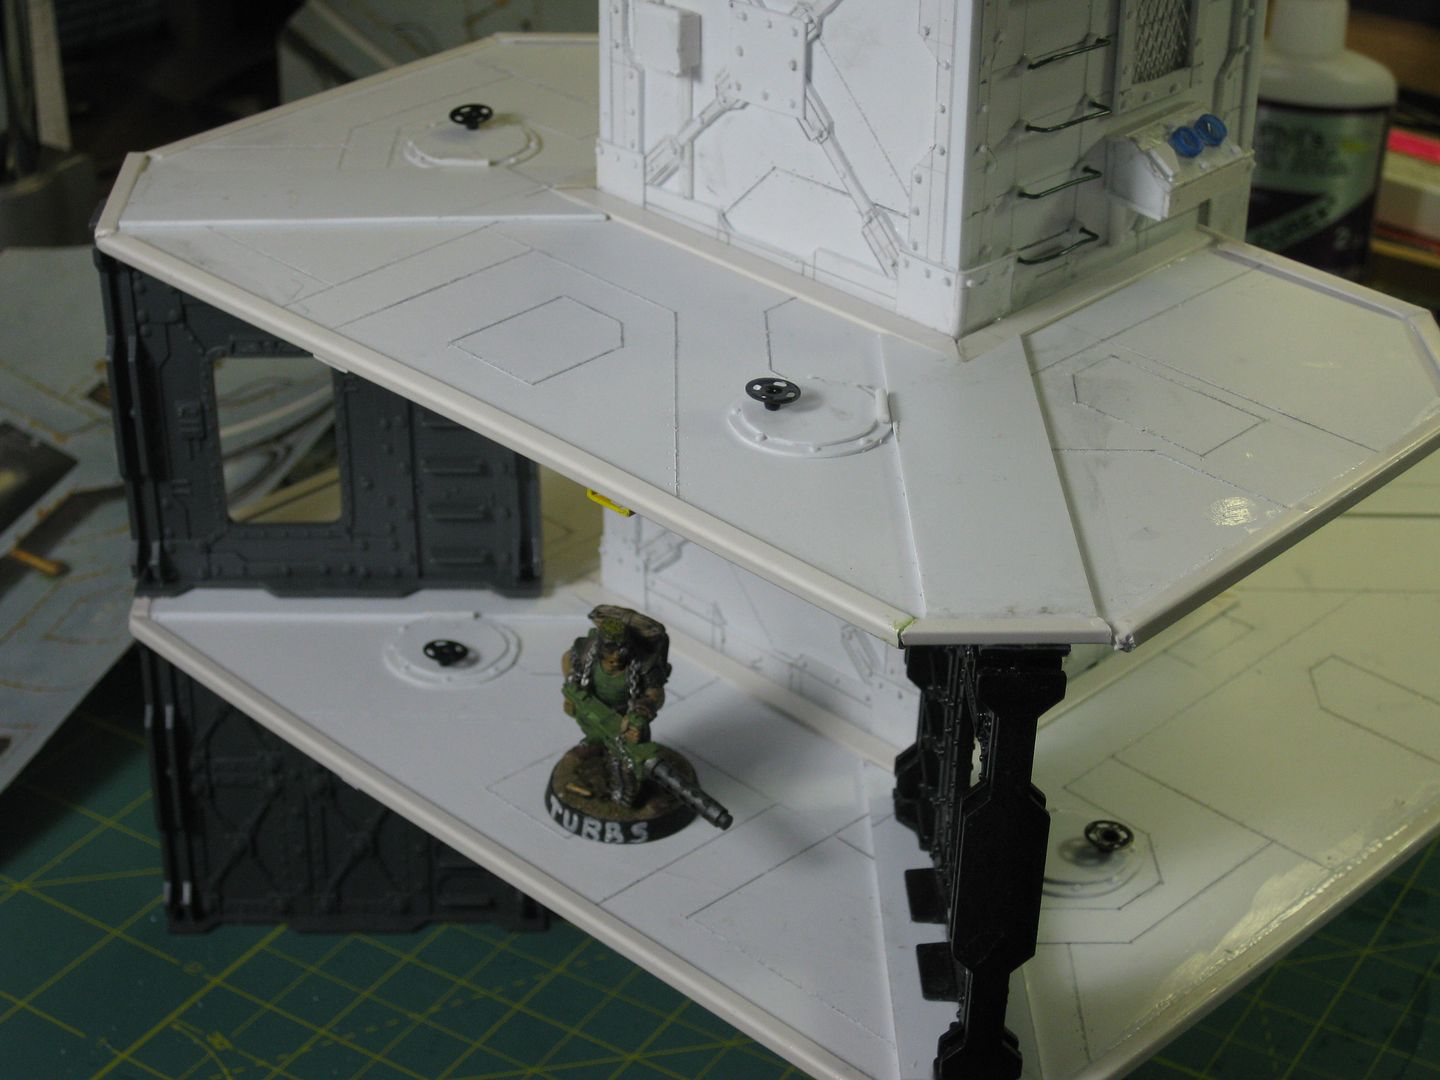
Automatically Appended Next Post: The fitting and mounting of the bottom platform
DOH! I was a little too enthusiastic with the rivets, I had to cut this bottom course of rivets from the crossmember to fit the floor. Good thing I waited to rivet the other sides, if I had the square slot on the floor wouldn't have fit over the tower! ..and I would've had to cut off MOAR RIVETS!
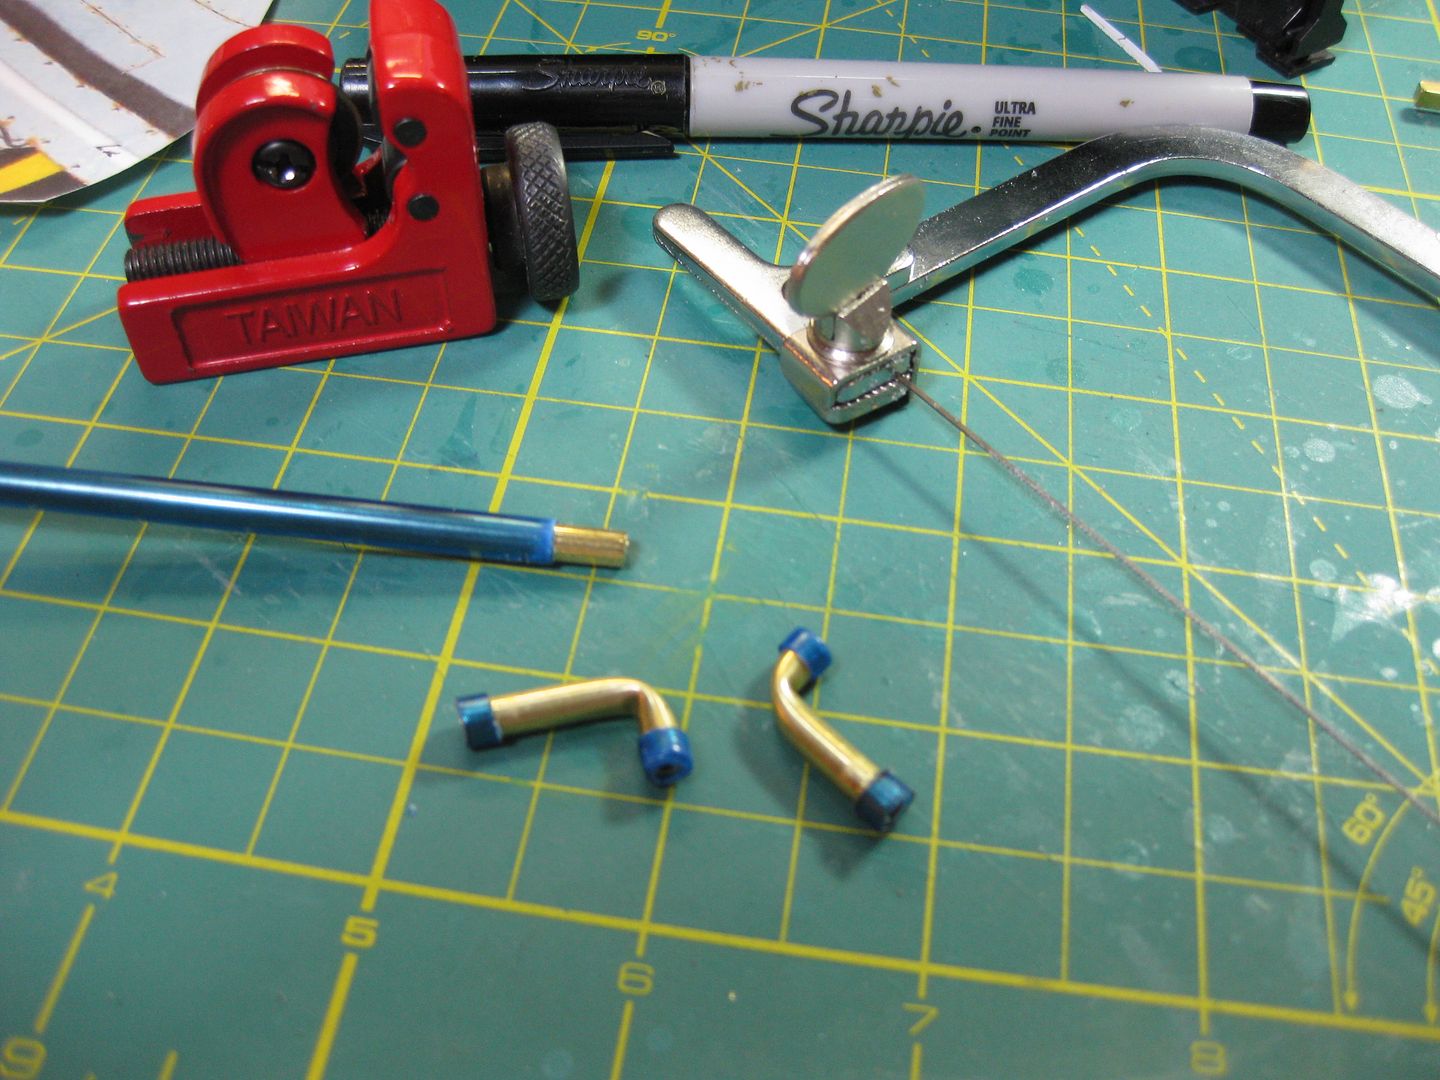
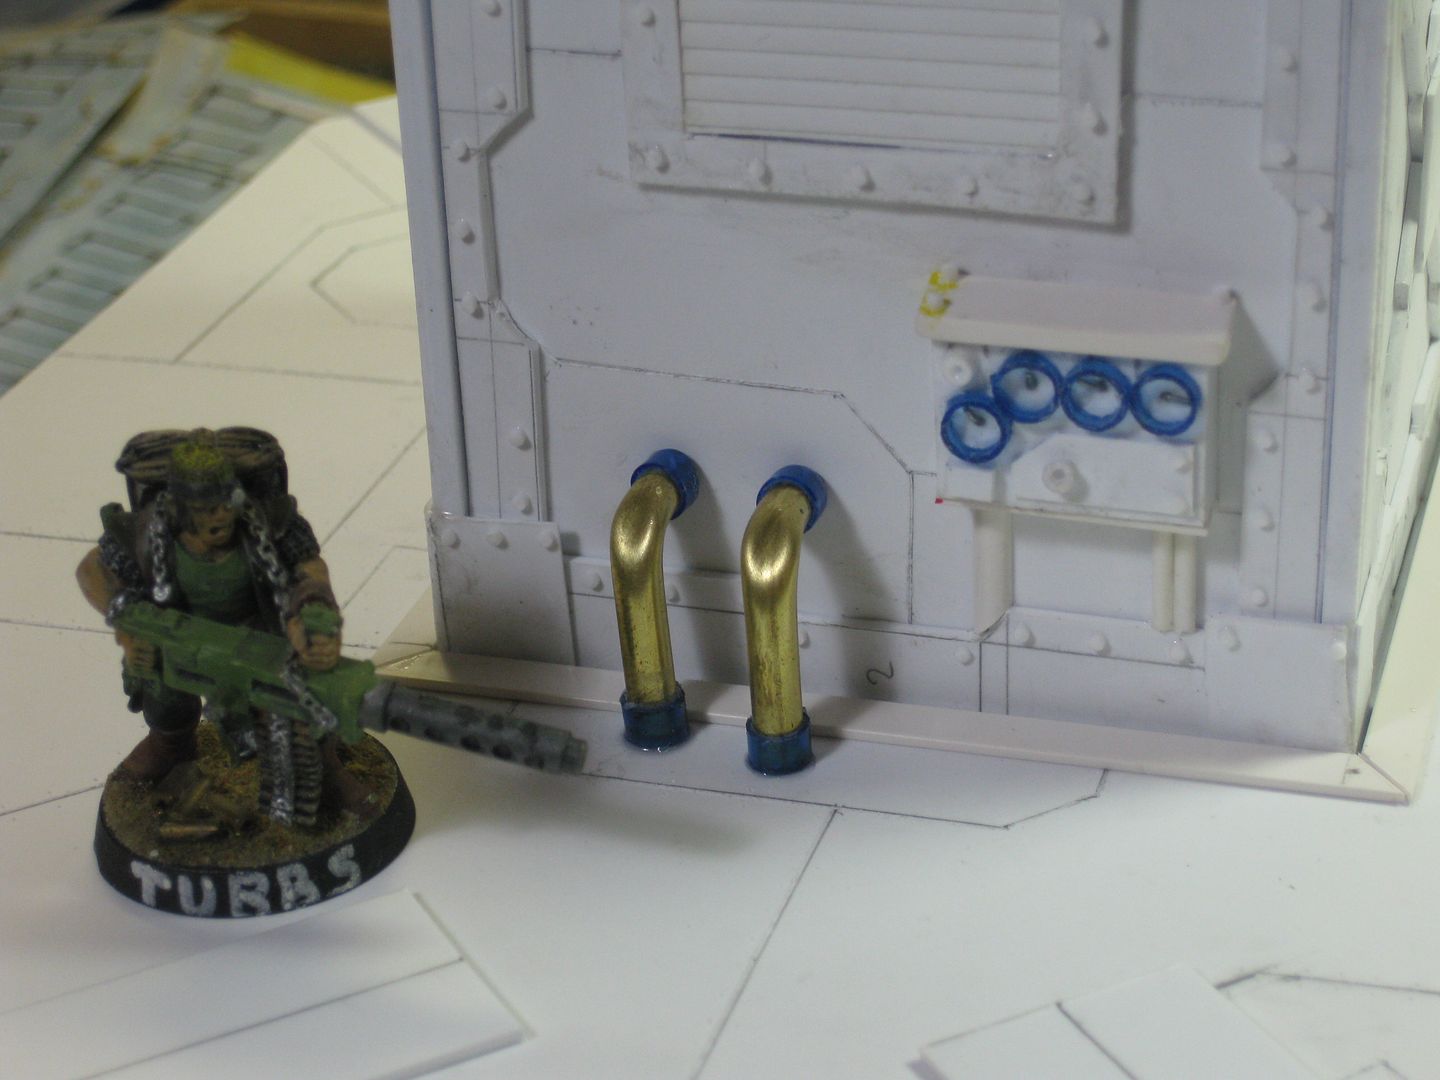
The artwork on the platform shows the pipes are terminated in the platform. So I used my handy dandy 1/16" pipe bender. Unfortunately, it always makes a flat bit, haven't figured out how to avoid that. This pipe fits perfectly in the blue tube that I used for the gagues.
Dood, this incessant riveting is making me cross-eyed and brain-dead exhausted. I rely on you guys to tell me if it's any good, it all looks the same to me lol
Yeah, rivets are the worst detail to get stuck on, but that tower is looking amazing- no wait- it's A-MAZE-ING!!! This is really an awesome set you're making.
Ah cool, always thought US was further back than that! Fair enough mate, just thought id mention it. Have you thought about doing any terrain thats been heavily built over and added to by the "residents" of the Underhive?
Hmmm, 8:41 here on the "left coast" and still working on the ideas for my tank Vik suggested. Love the tower/base set up. Make molds of your done stuff and sell resin copies as GW actually only made card board...although the bulkheads are plastic, but well, it is old stuff, made new again. I consider the work you have done as the masters.
Im not sure, but Ive had a shanty town/ cobbled together bazaar market thing in my head for ages now. Or maybe something like a slum or brazilian favela.
Vitruvian XVII wrote:Im not sure, but Ive had a shanty town/ cobbled together bazaar market thing in my head for ages now. Or maybe something like a slum or brazilian favela.
You could always make something that looks like "Megaton" from Fallout-3 as a shanty town or village.
Welcome Rawson, yeah, there's a lot going on in this thread I admit. I tend to post too many WIP shots, but I have to otherwise I forget how I did things.
Thanks Rogue, that was the plan anyways.
@Vitruvian and Shas - All the fiction I've read speaks of "Hab Stacks" I've always wondered what these look like.
Automatically Appended Next Post: Here is the project as it sits this fine morning.
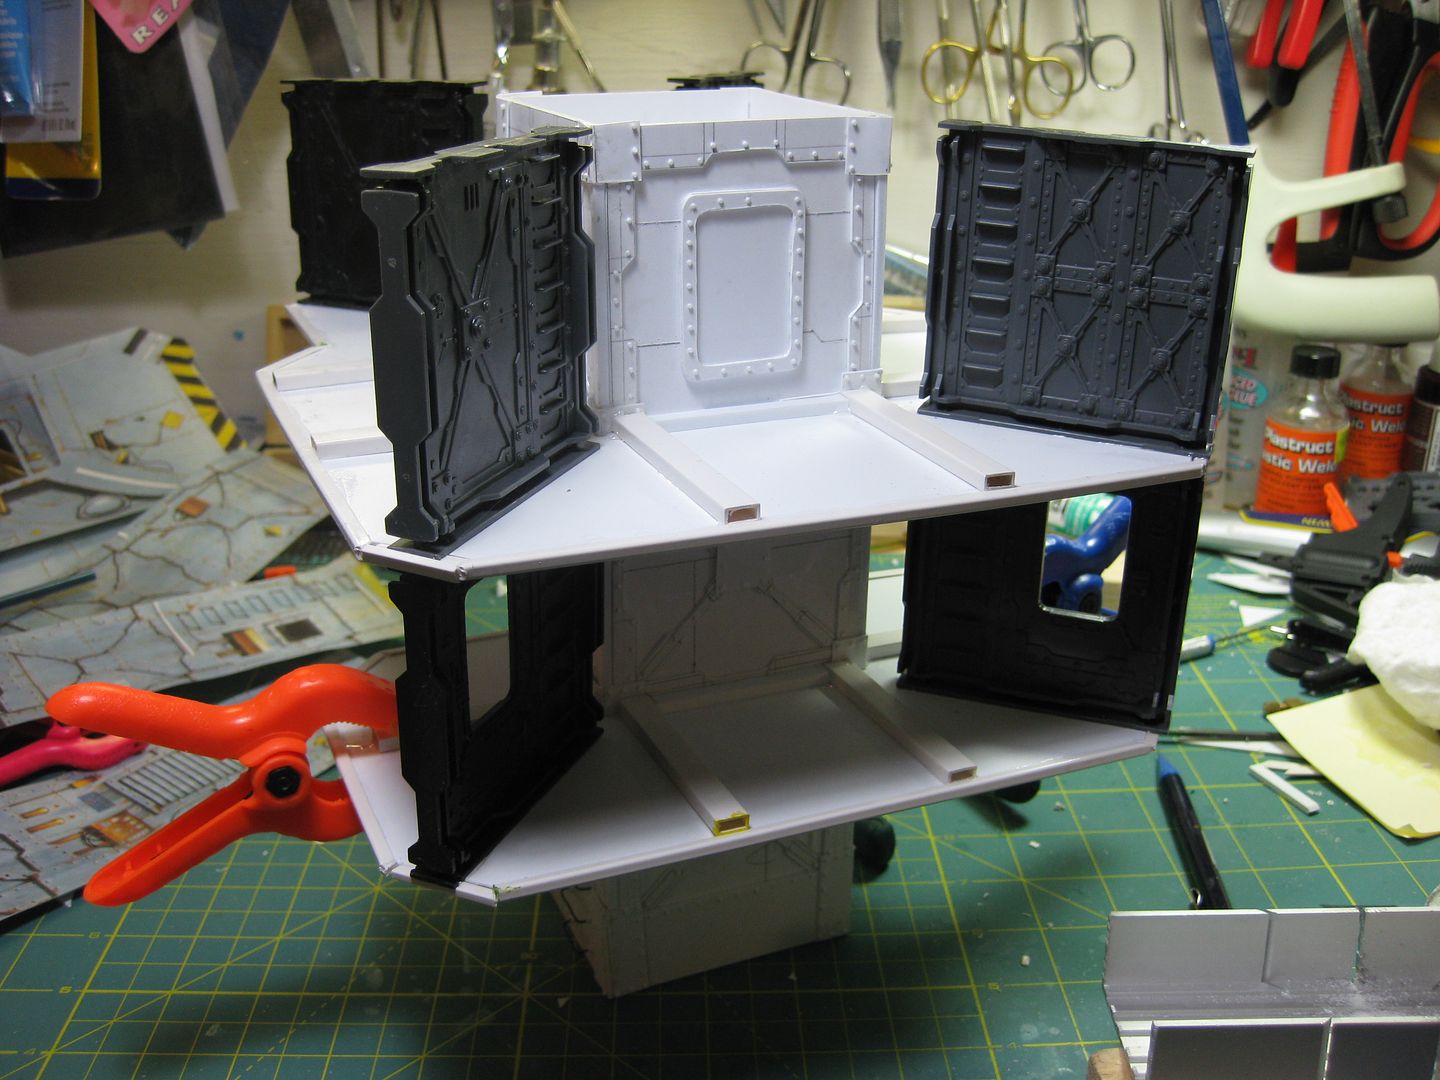
Still need to do MOAR RIVETS on the bottom sections, as well as around where the floors attach (and finish attaching the top floor), do the roof, and make hatches for the bulkhead ladders.
Automatically Appended Next Post: 13000 READS! Thank you EVERYONE! Very impressive!
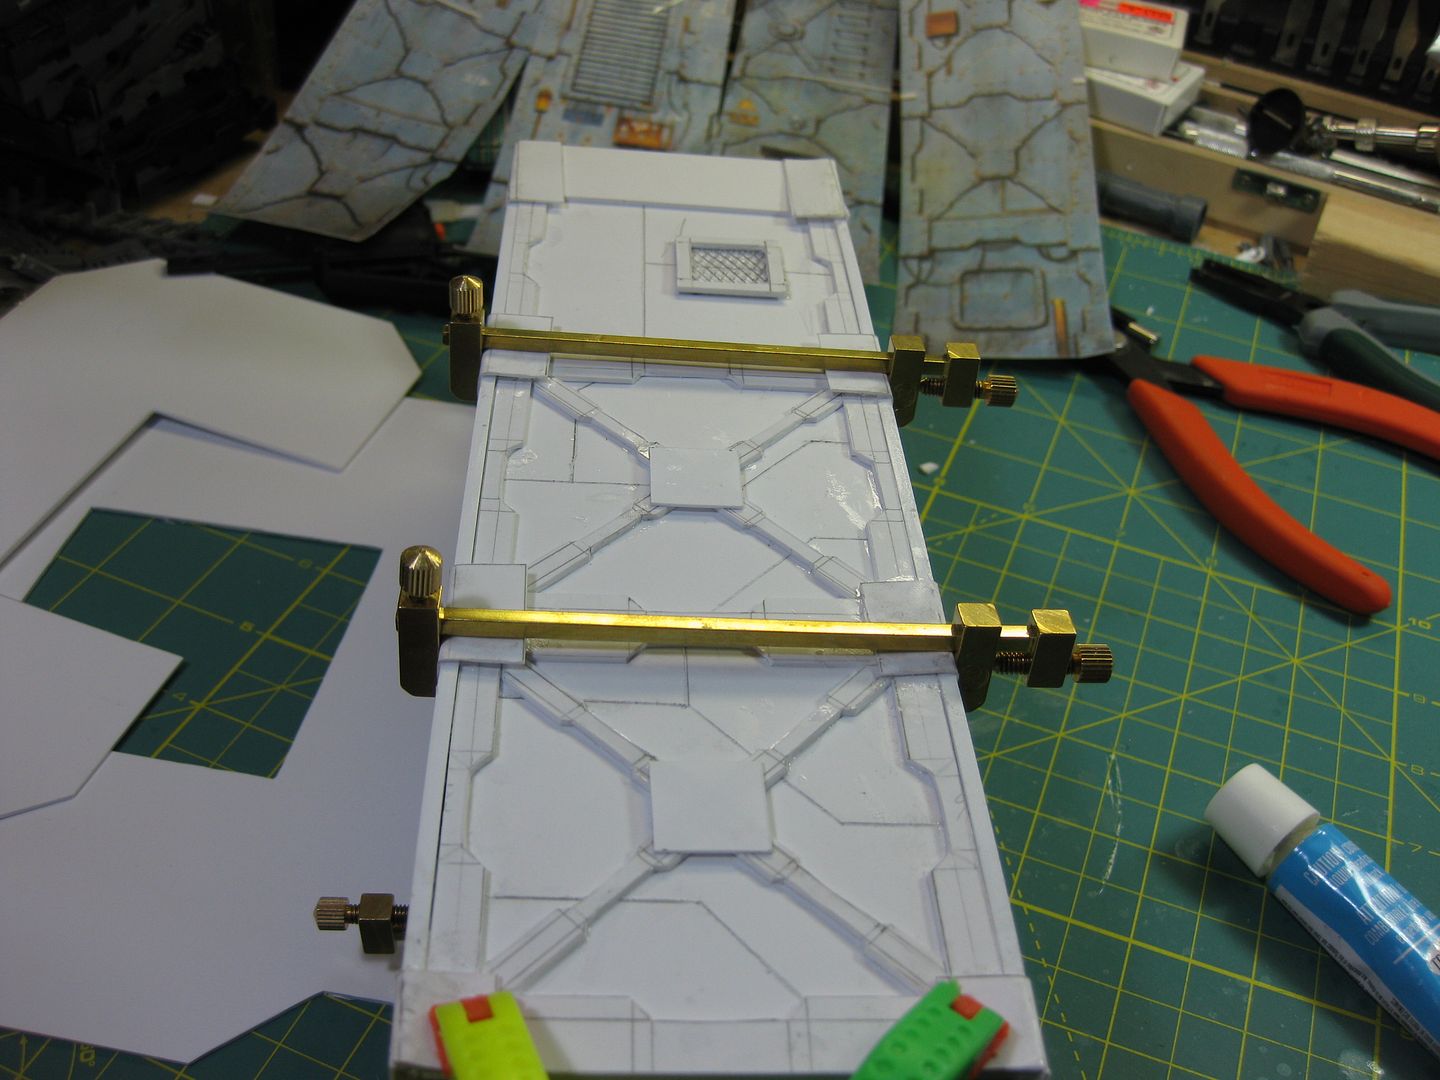
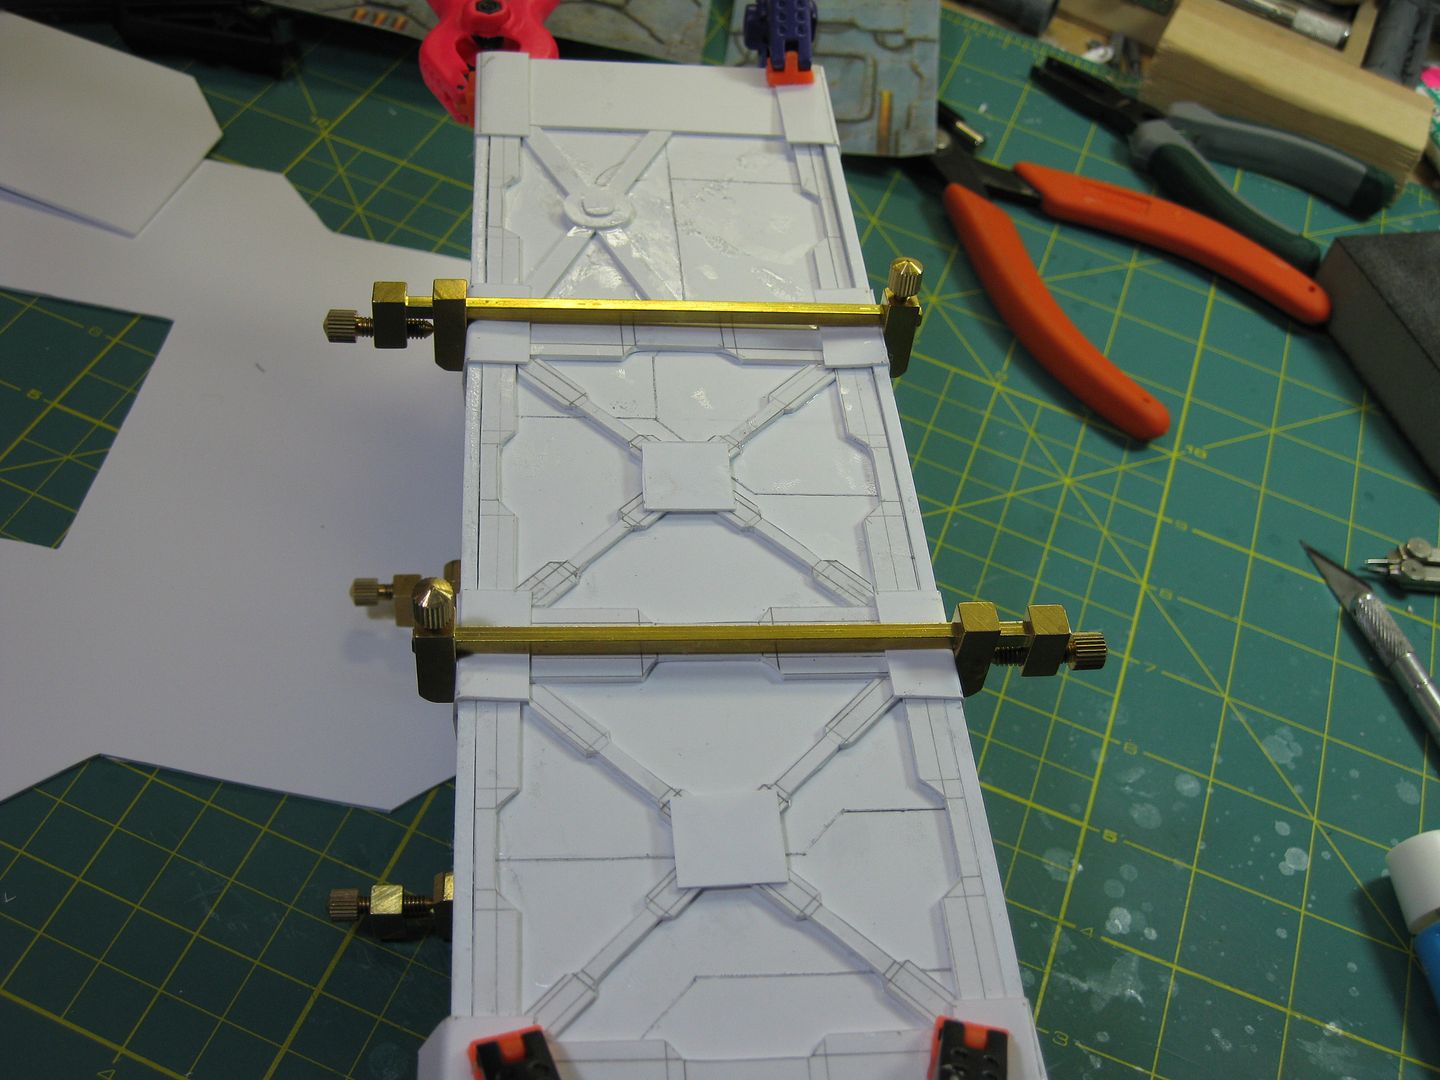
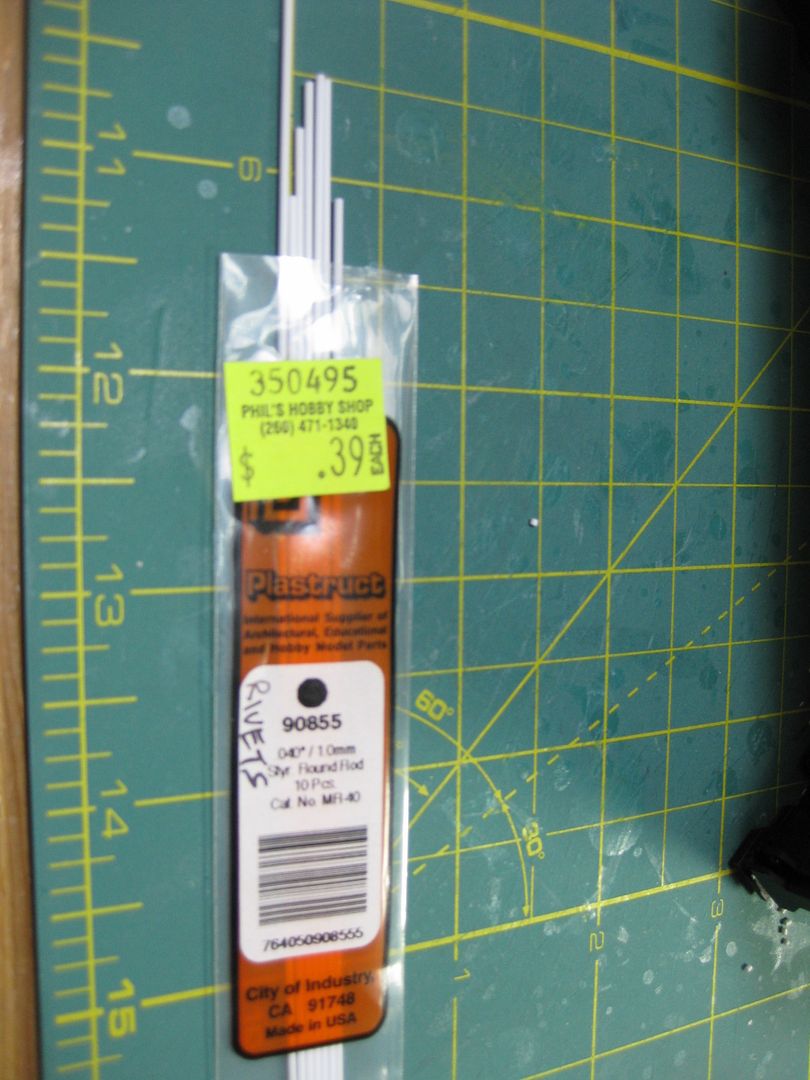
Each side of this tower is using up one of these 1mm Round Rods in just rivets.
lol vitruvian... how dare you come up with such gross pics after that beautifull terrain pieces of dstein^^ lol...
that is quite an amount of material just to rivet up one side of your tower...gosh! but fear not if i am up to the task of casting, your future rivet endeavors might be terminated for peacful solution^^
the tower is so cool looking... love the way you used the bulkhead bitz and then brought them into context with your selfmade pieces! that is so cool! also i like what you did to those pipes!
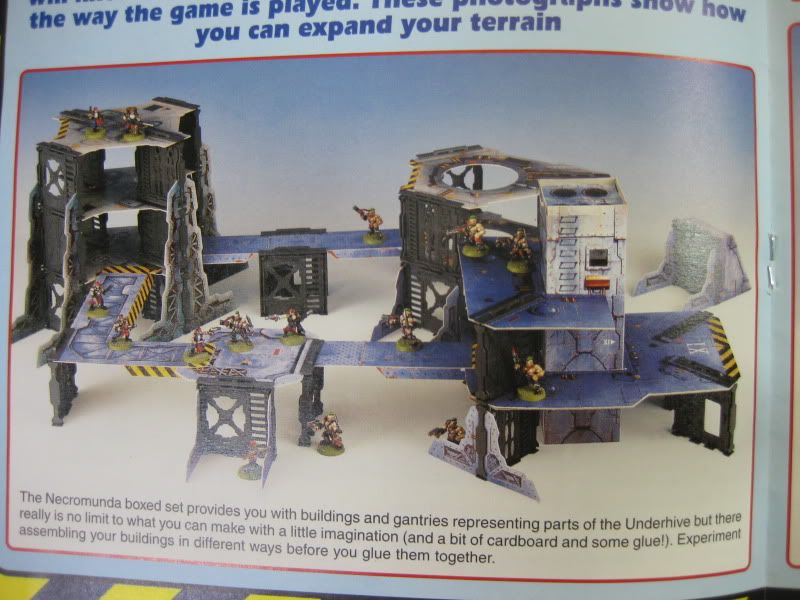
Remember, this is just a copy of the original card terrain, it is supposed to look like this
Automatically Appended Next Post:
Automatically Appended Next Post: In a bizzare moment, among the horde of styrene were these bits, 2mm edge strip. or a U-channel.
There were only 4 peices , exactly enough to rim the floors.
I think it makes a great addition, it adds depth to the only 1mm thick floors.
mate that is so wicked looking... definatly you need to get hold of more u-shaped rods in the future... these will look awsome when painted in hazard stripes! the floors have never looked better than with that new detail... proves you are not done with your own learning curve...because you get better on a constant pace...which seems almost unnatural^^
the fans look even more than sweet... boy somehow i now see your whole blog as a large and ongoing tutorial...a how to do course for us all, on how to create new and cool terrain...for us scratchbuilders this is really nice as i think in the future i will greatly benefit form all your ideas...
@ Unicorn - THAT is a LOT of elevators, of course you have yourself a giant space elf titan there, so you need em!
@Vik, well, remember, I can't get this stuff anymore in the US, so sadly this is probably all I'll ever have. I'm just glad I gave it a fitting use. That's the trick with all this plastic, make sure I optimize the use of the rare supply.
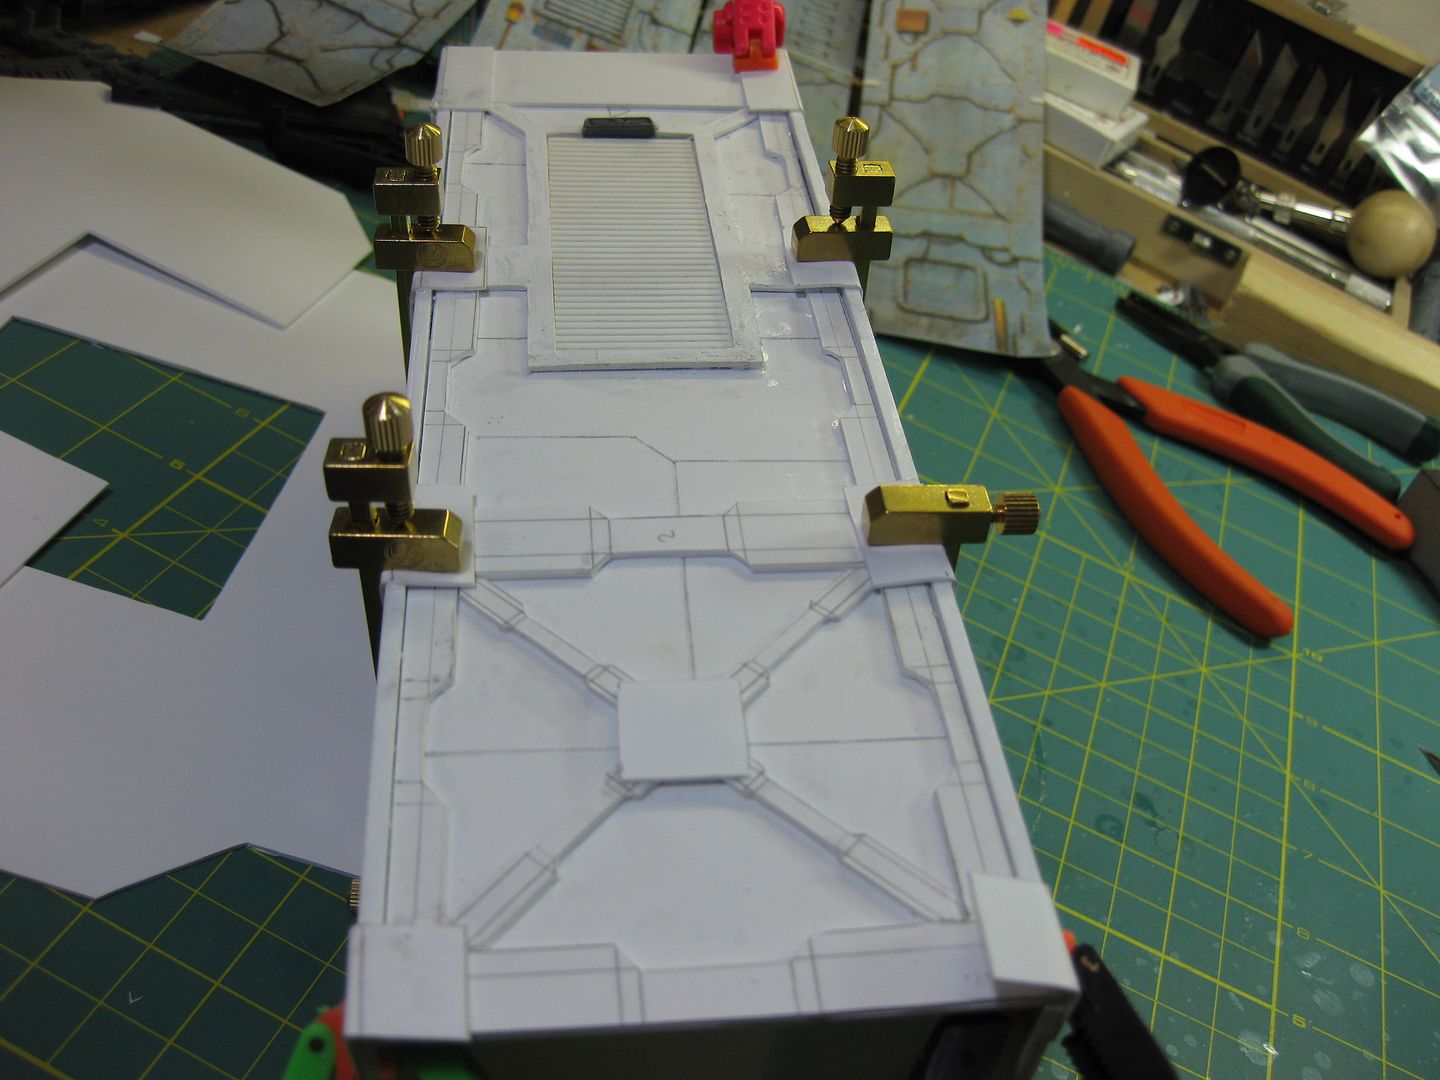
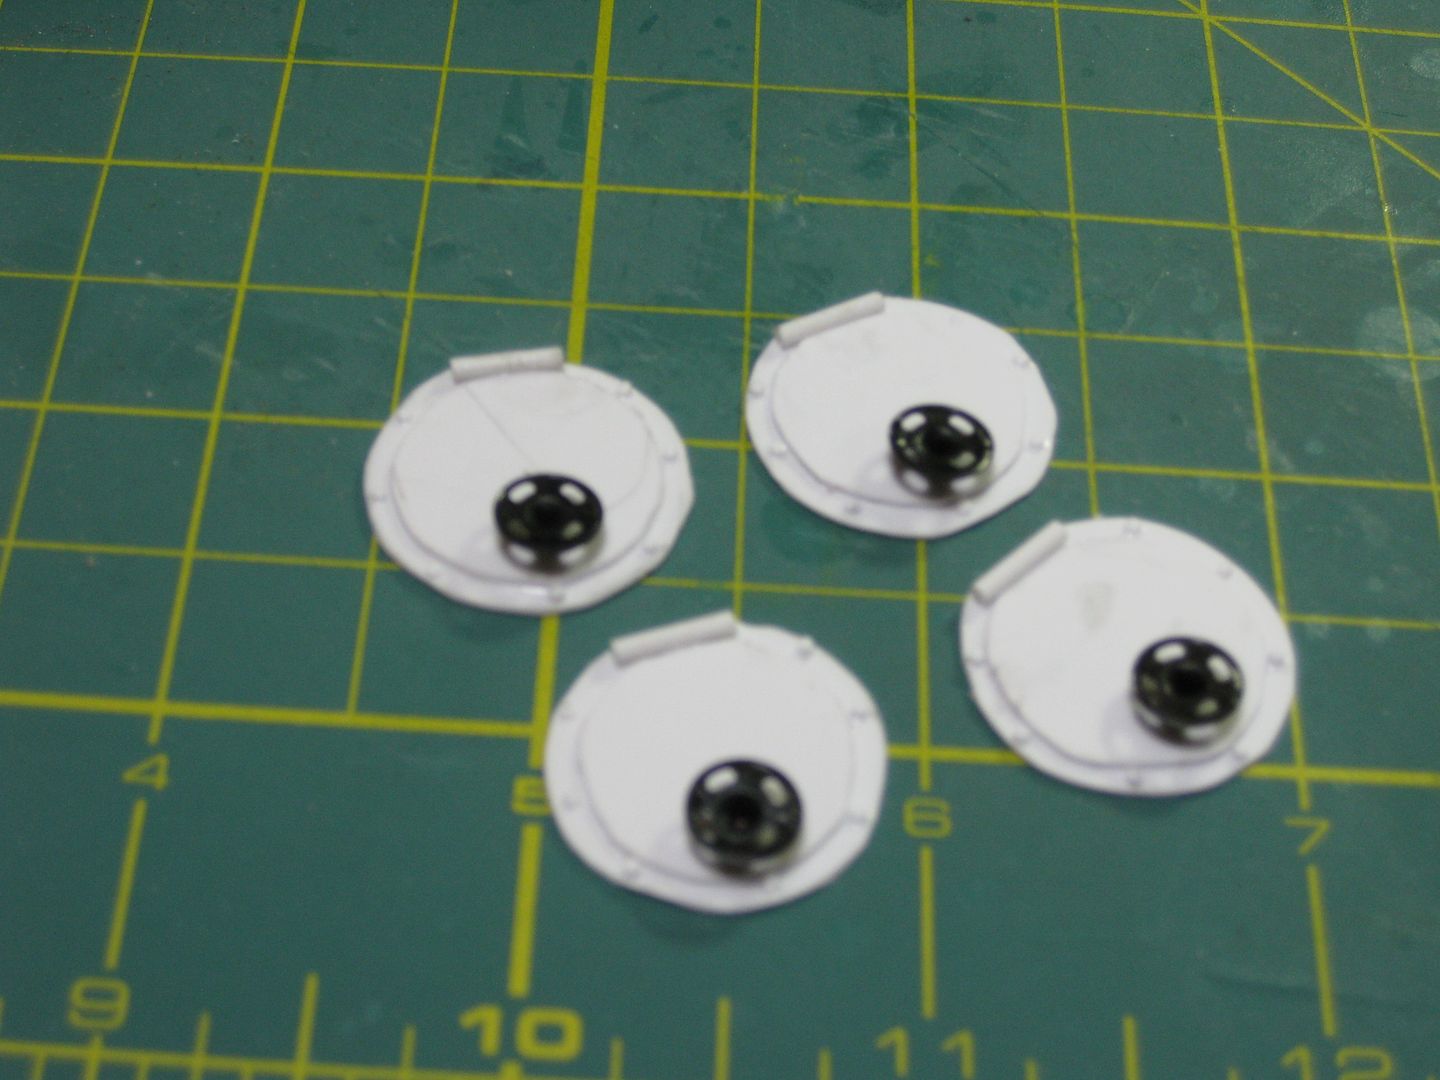
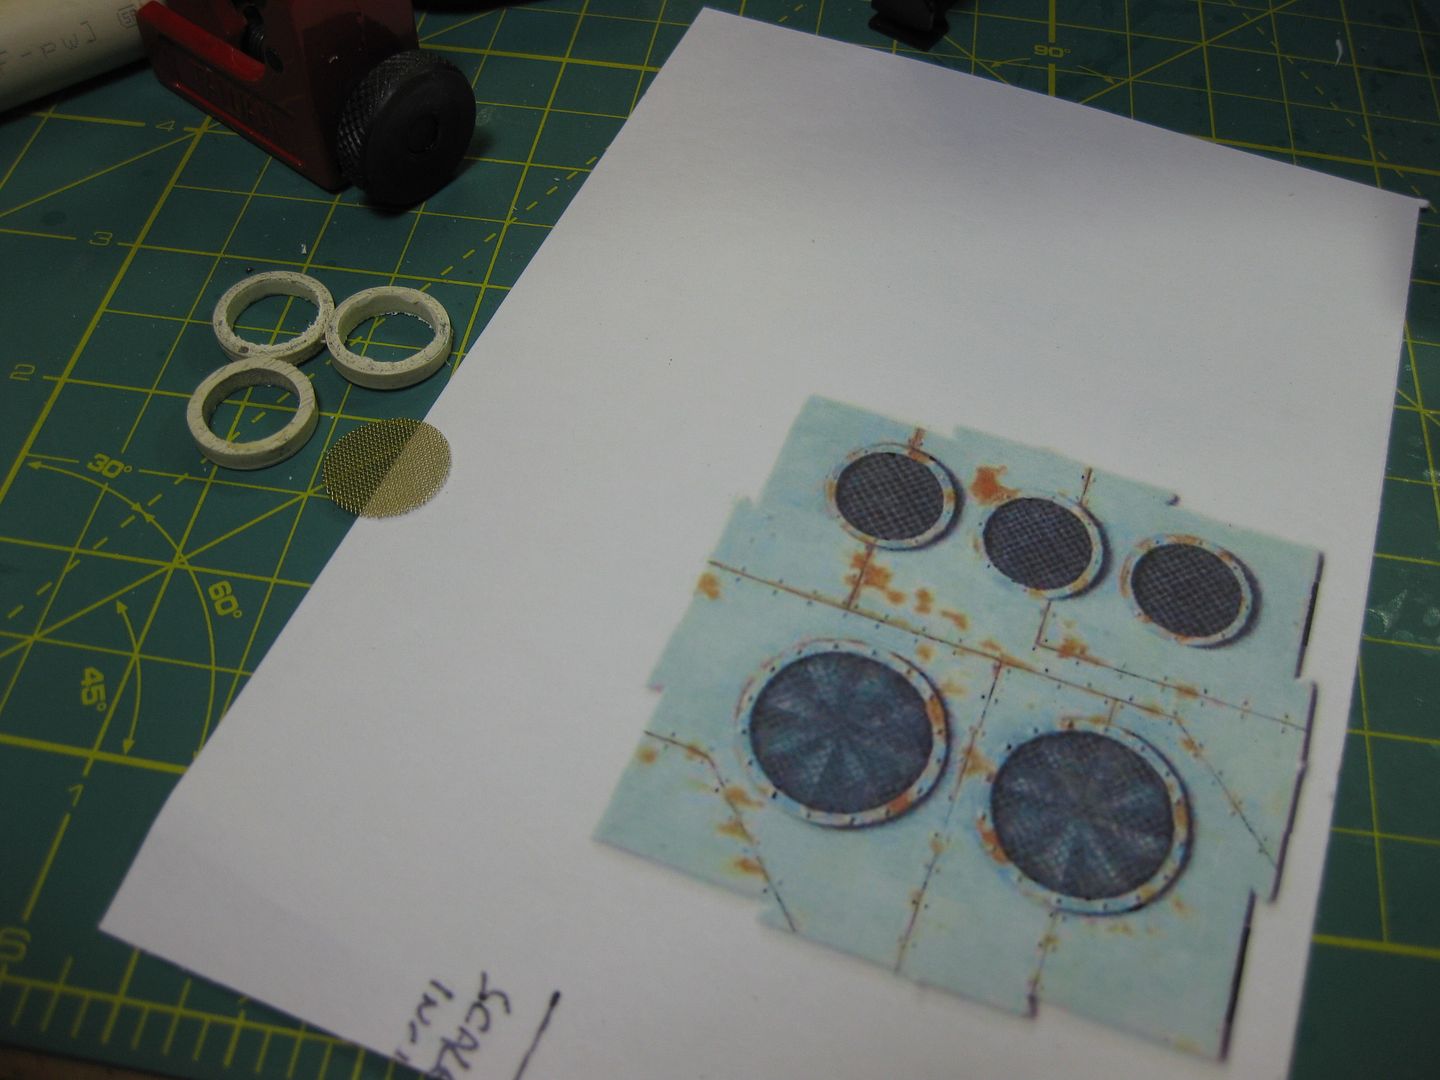
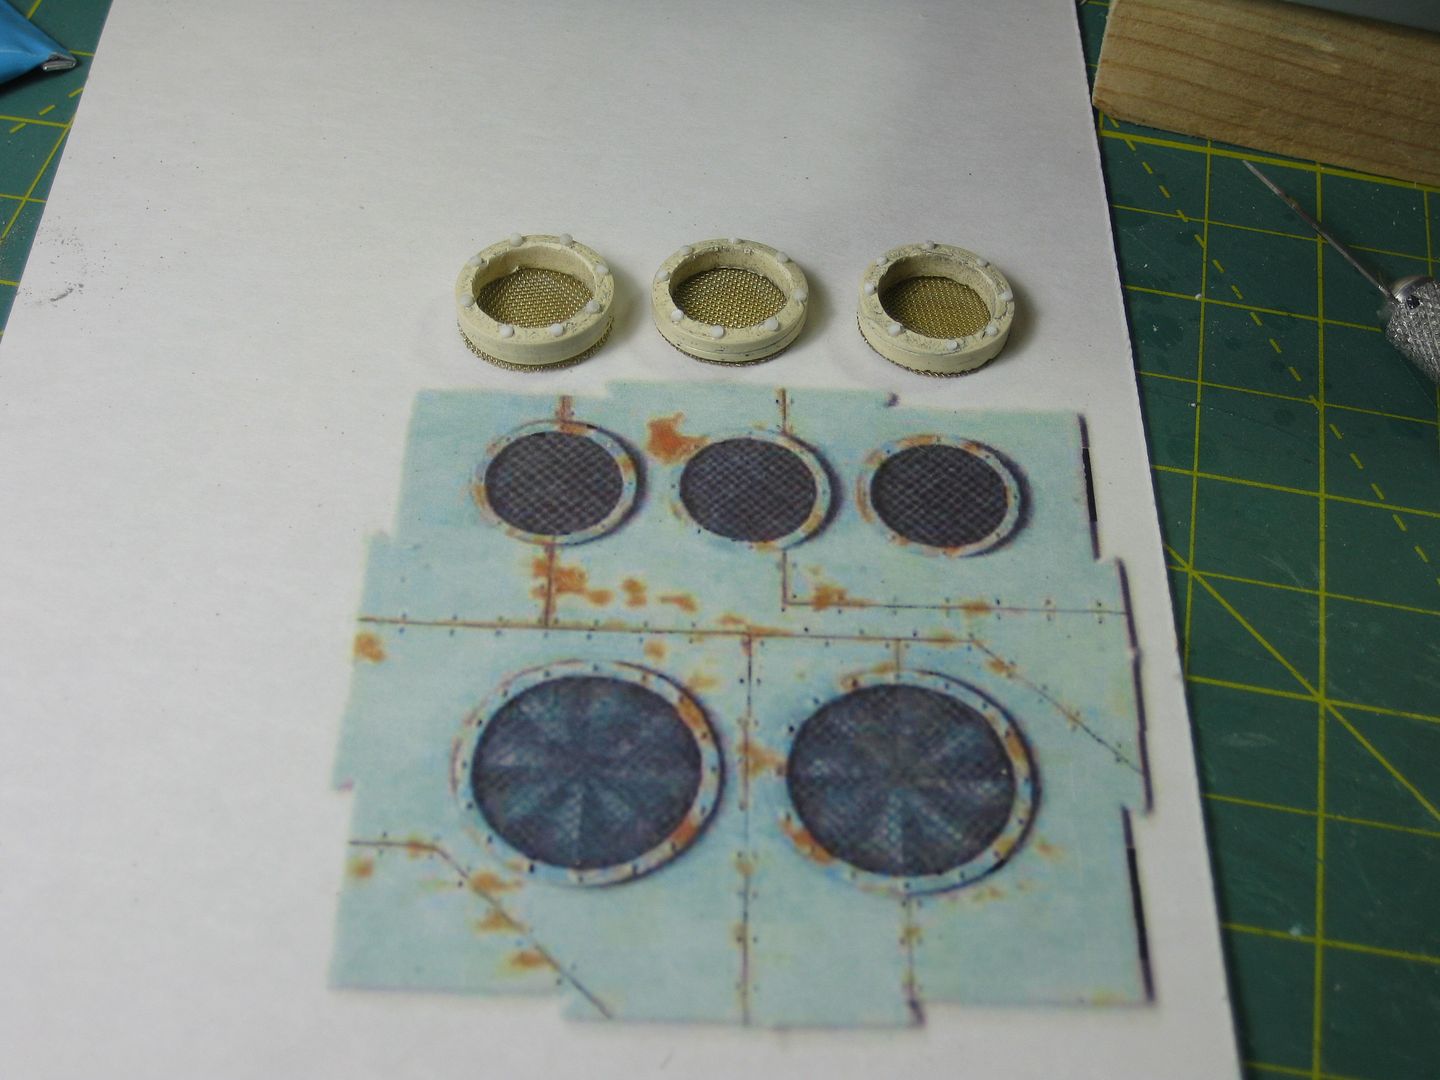
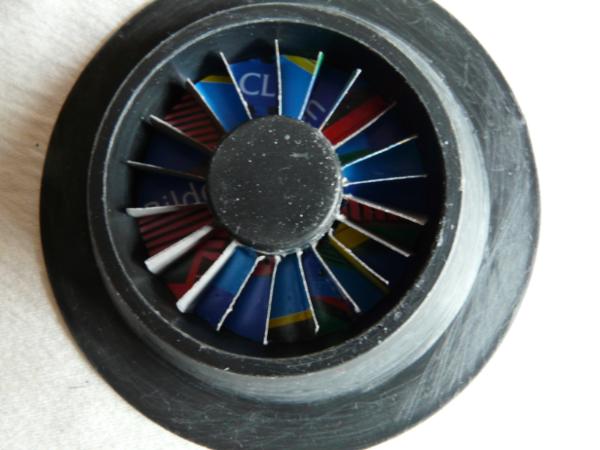
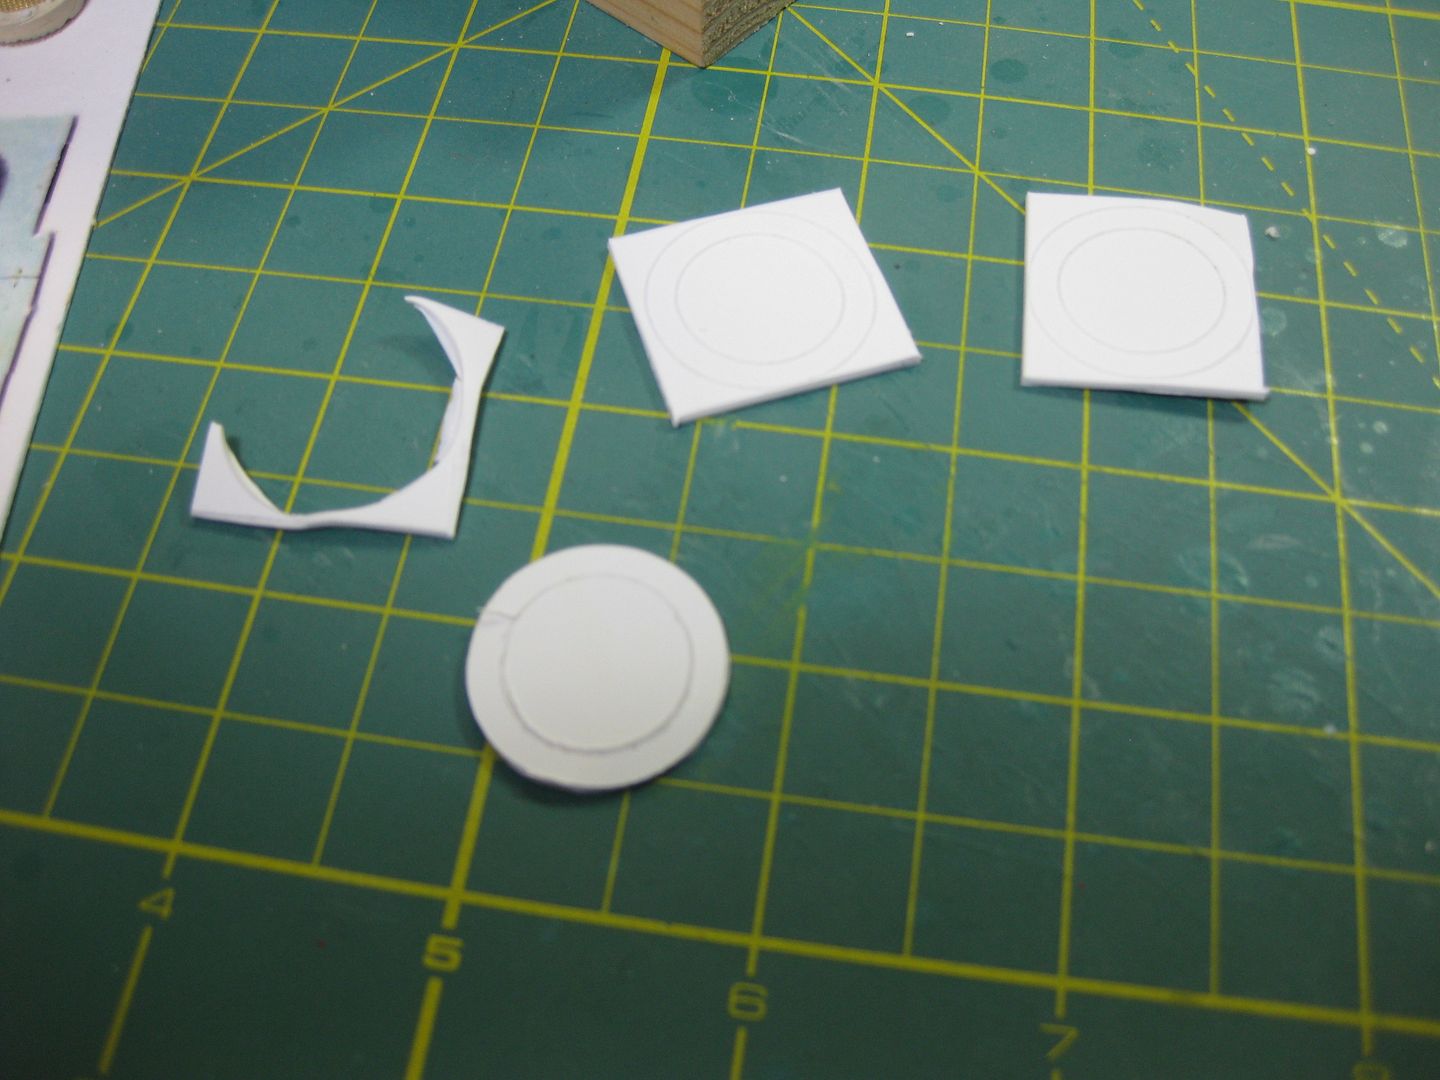
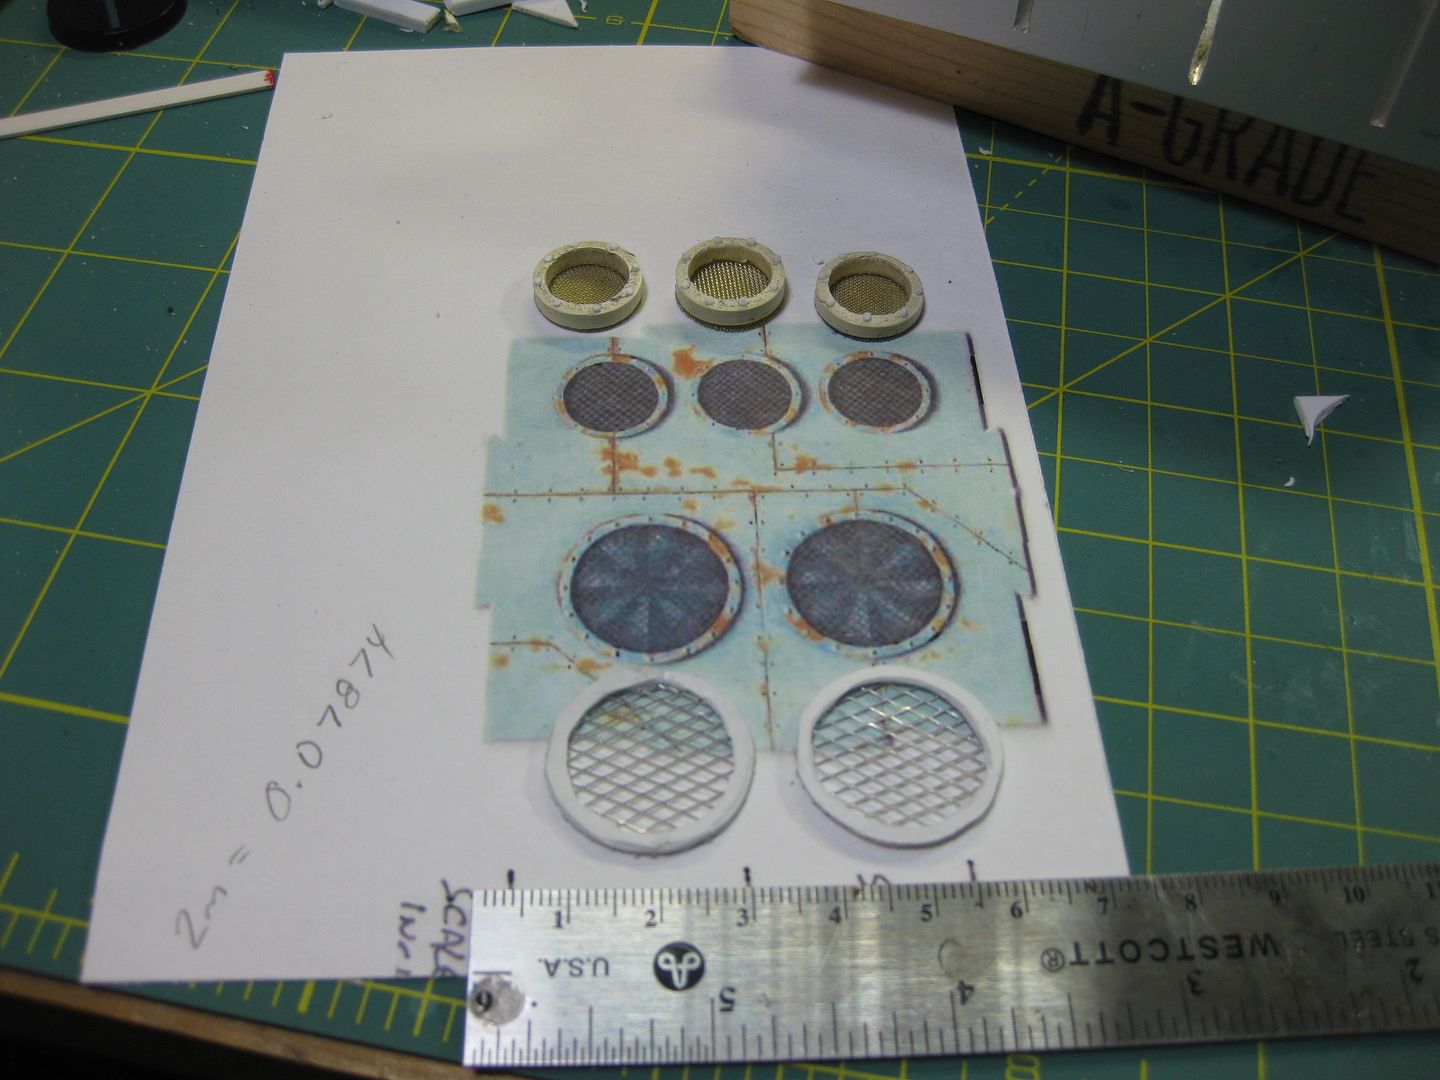
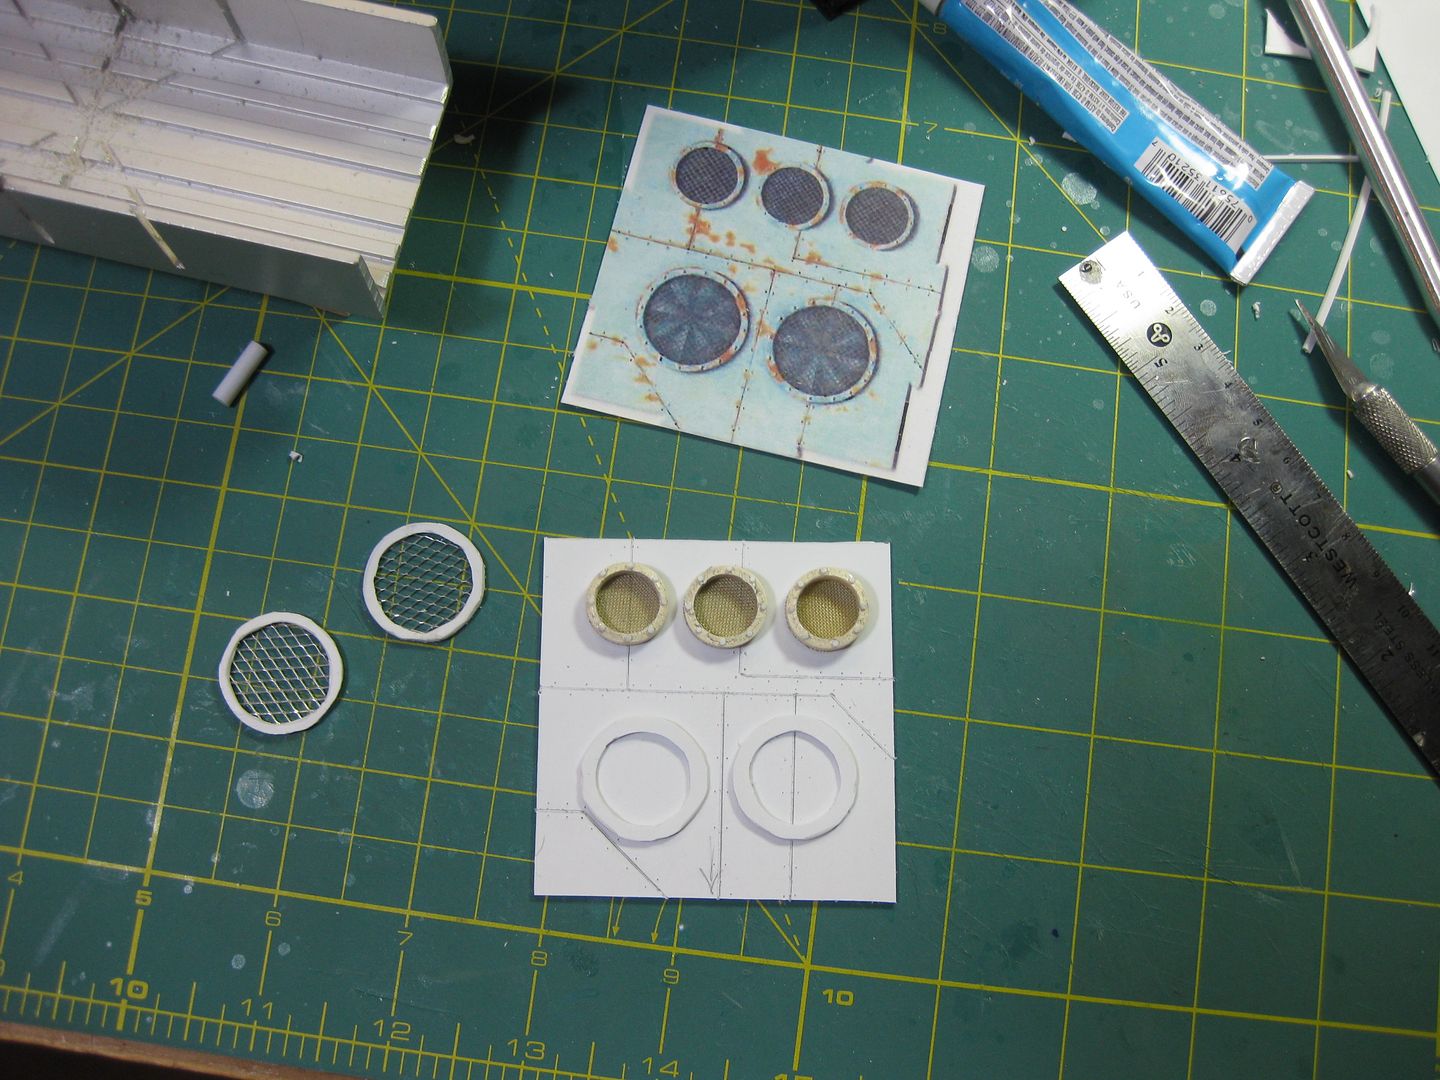
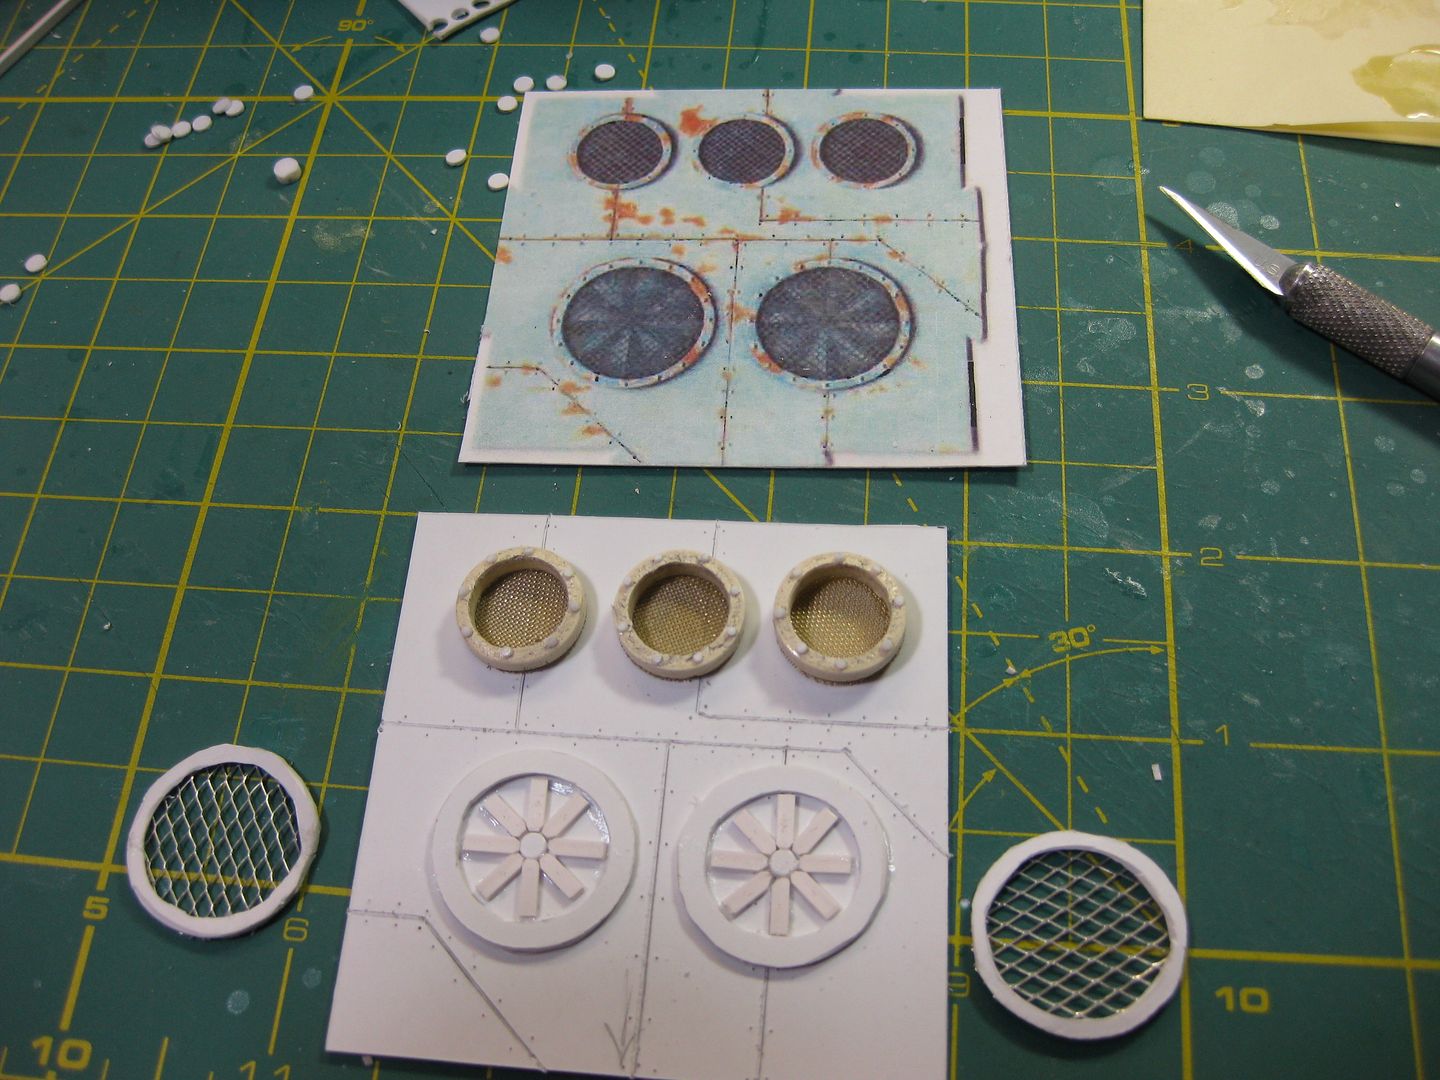
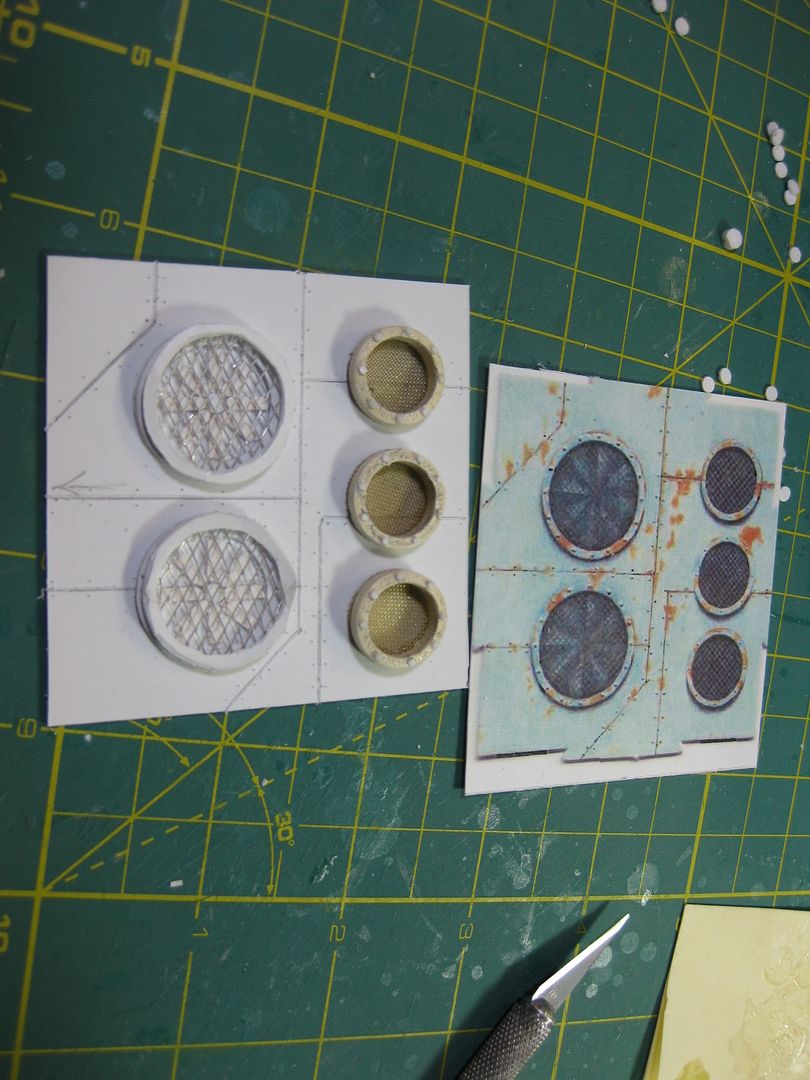
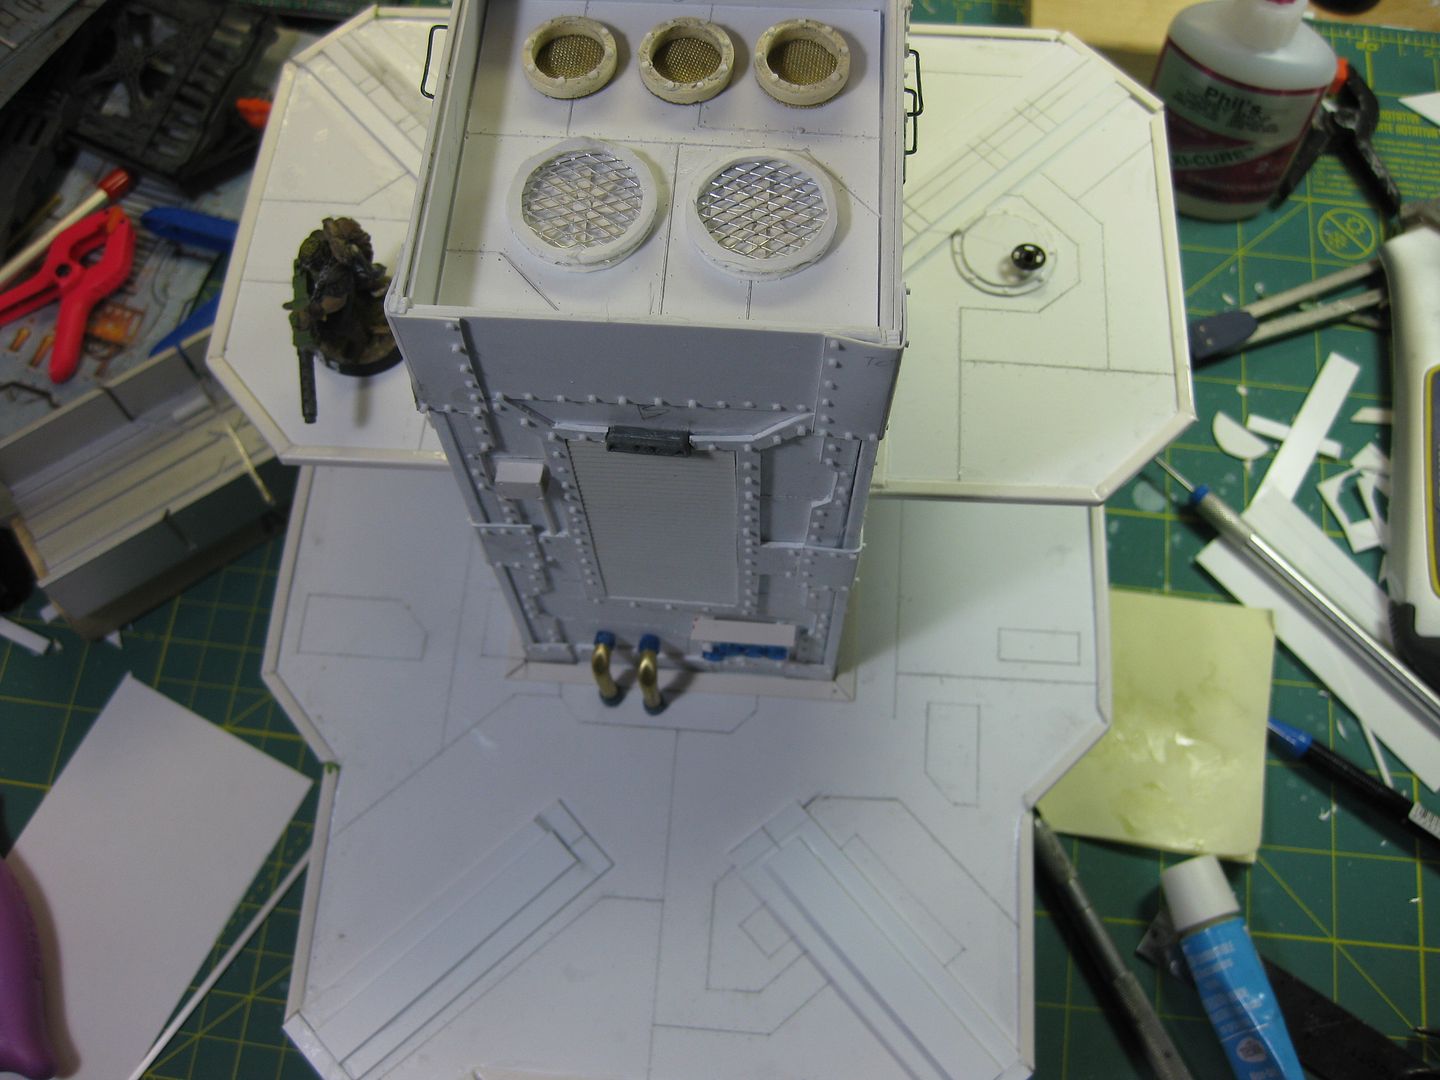
FANS..
Whoa, I sort of modeled my way into a corner here! The smaller vents were easy as you can see, a slice of PVC pipe, some brass mesh, and some rivets and viola, they are done. But the bigger fans...that's a different challenge.
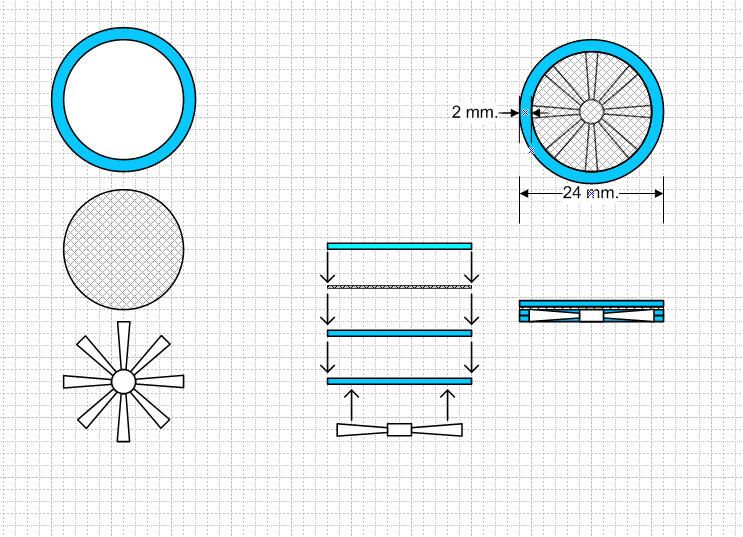
To start, the circles are 24mm or 15/16". I don't think they even make a pipe in that size, and I certainly don't have any, so I have to figure out a way to fabricate them. And if I want them to LOOK RIGHT they need to match the 2mm height and 1/8" thickness of the smaller PVC pipe vents.
Once I've got the rim figured out, then I need to fabricate fan blades to fit inside, that shouldn't be to hard. The hard part is then fitting mesh over the fan and still having a similar lip. I am thinking this will require more layers, which means multiple slices of some 7/16" round material.
Not sure about the rim, best advice would be to look for a correct sized pipe! Or if you own a dremel you could cut out the circle in 2mm plasticard, then dremel out the inside to leave a rim.
Perhaps you could put the fan inside the floor, so you can sort of see through below? Then just put the mesh and rim over the top.
hmmm....maybe there is a possiblily to get hold of suitable rings? maybe from a homedepot or DIY shop? and then get the layered work starting? i once did an attempt of making fans from scratch... used of course cardboard^^ und a base to build in from a firecracker base...:
Spoiler:
Spoiler:
Spoiler:
those two versions might work for you too if choosen with care for your situation...
Automatically Appended Next Post: or maybe a paintjob would even make do...
The artwork on the platform shows the pipes are terminated in the platform. So I used my handy dandy 1/16" pipe bender. Unfortunately, it always makes a flat bit, haven't figured out how to avoid that. This pipe fits perfectly in the blue tube that I used for the gauges.
I'm told that filling the tube with sand first will prevent them buckling.
Personally I have some springs that fit around pipes to distribute the force when bending, also preventing buckling.
Yes, I know, I'm a few pages late!
Those are great Orinoco, but not the right size for what I need unfortunately, however I will keep that site in mind, lotta good stuff there, thanks man!
@ Vik, Those are nice fans, thanks I will use your layout of the blades if you don't mind.
dsteingass wrote:The artwork on the platform shows the pipes are terminated in the platform. So I used my handy dandy 1/16" pipe bender. Unfortunately, it always makes a flat bit, haven't figured out how to avoid that. This pipe fits perfectly in the blue tube that I used for the gagues.
Or, simply cut a 90 degree triangle out of the inside corner of the bend you are trying to produce and bend that into shape. Still won't be perfect, but will be better.
Another instance where you have completely inspired me. I'm going to make 6 of those for "entry points" for my Plague Zombie Outbreak scenario. I have been using markers so far because I didn't know what I wanted for the tabletop. Now I really do.
Man, leave you alone for a couple of days and I have 2 and a half pages of updates to read through. When was the last time you went to sleep? Or went outside? Ha. Wicked excellent work, this tower is above and beyond anything else you have done on this project, it is way beyond amazing. This thread should be immortalized in the Dakka archives.
I'm at the end of my Zombie project. Once it is finished I'll get back to work on terrain.
dstein...are you able to cut that pipes in that thin layers? what material do you need in mm`s i could look out for such things here...the sketch of your plan looks very good and sound... it all but boils down on how you are able to cut the rings...hmmmm... would there be a way around that? like bending some tubing into a ring? could that work? or would the pressure of the plasticrod then let the ring snap? oh mate... i owuln´t want to be in your shoes...
could you maybe get the right diameter in a home depot for plumper wares? plastic pipes on that diameter maybe are there to be bought...could maybe be a chance...
dsteingass wrote:
No one makes pipes in 15/16" outside diameter.
Seriously, dst? I don't think anyone would hold it against you if you went with the 1" outside dia. It would save you a lot of trouble, bro. I mean, think about it: that's only a 6.25% error! I can live with that, and I used to be a construction inspector!
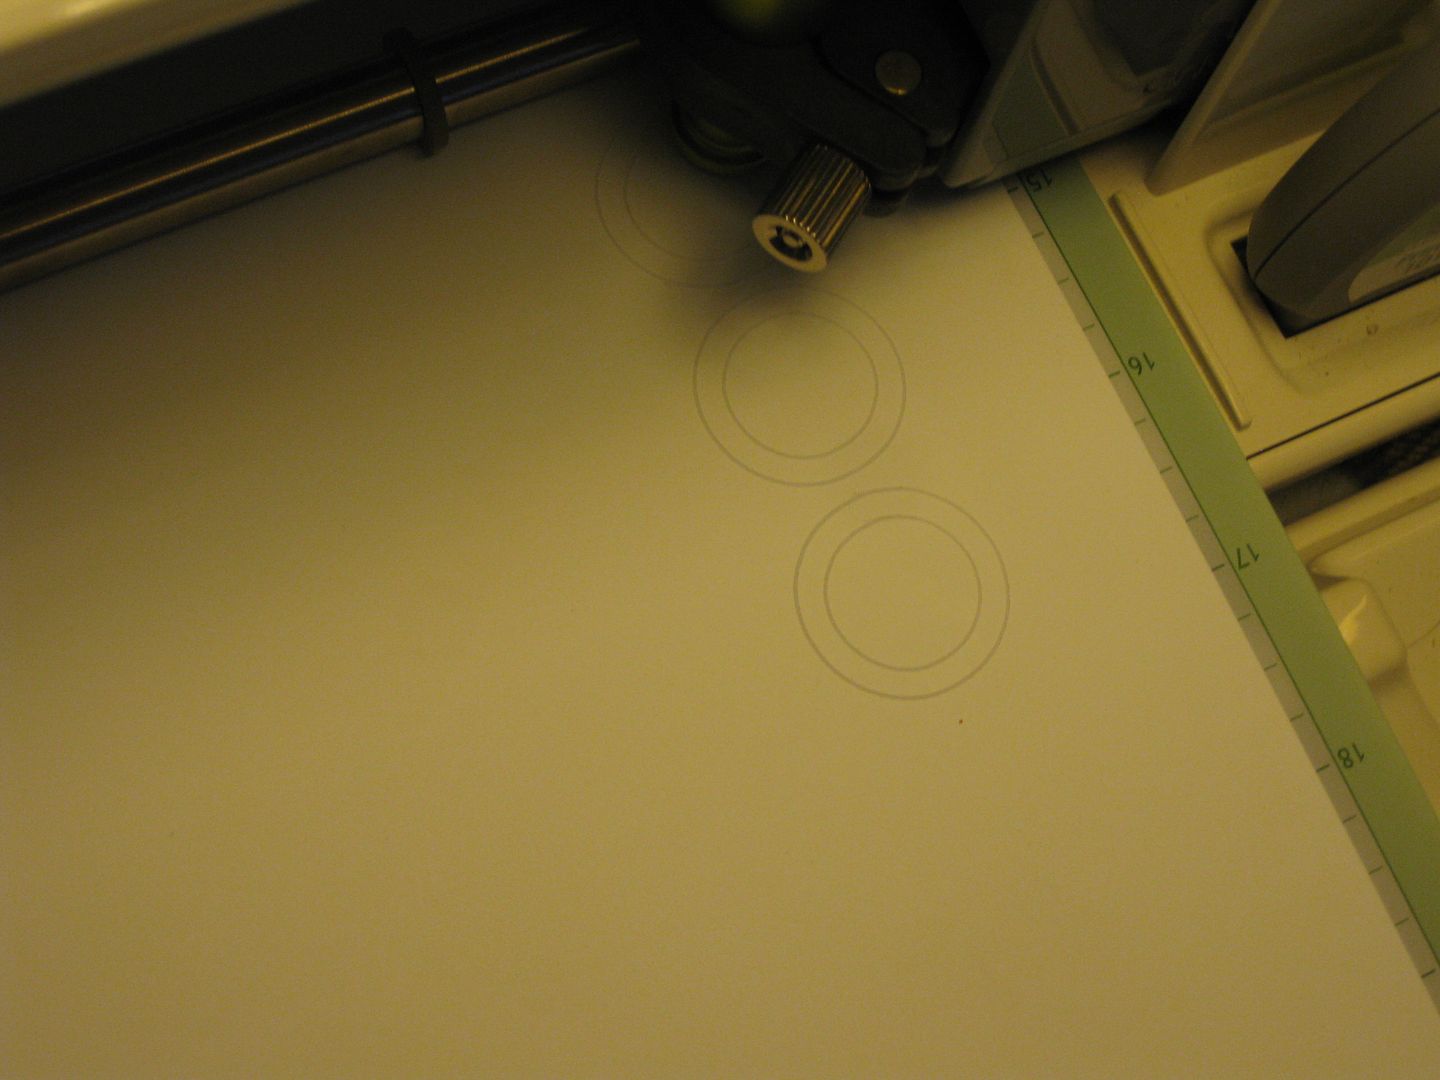
Heh, thanks guys! I don't have any 1" pipe either. I think I've found a way...
The cricut cuts simple shapes easily, but it only scores the 1mm styrene sheet sligtly, still, perfect machined scores..
It still needs knifework, snapping can .well.. snap it.
dsteingass wrote:Does my use of the Cricut count as cutting corners?
LOL! I might have suggested smoothing/rounding those frames more with say, a smaller tube or pole wrapped in sand paper emery cloth to makes them round inside. But nice screen usage there!
Damned fine work, sir. Wouldn't mind having such a nice set-up myself.
A suggestion for rivets. Use Shrinky Dinks plastic and punch the plastic with a hole punch. Bake the punches and they should be the right size. (I saw this on a Steampunk miniatures blog, but I don't remember where, or I'd provide the link.)
Shrinky Dinks also gives one other options, like printing out various signs (ideally in color) and shrinking them so they're in scale. Burger King and Coca-Cola signs for a post-apocalypse game anyone? Custom icons for your 40k army etc.
I cannot remember the last time I saw someone so perfectly maintain the balance between genius and madness. I have drawn so much inspiration and information from this thread since finding it. The techniques you employ are solid and the solutions for problems you encounter are amazing.
I'm looking forward to getting back on track and offering up some terrain goodness again. You can bet you'll be seeing a lot of your ideas in there.
I'm afraid it's more madness than genius. I've had some heavy things on my mind lately, allowing myself to become obsessed with this project has allowed me time to do a lot of heavy thinking, and forcing me to deal with some things. Your comments and praises, and wonderful ideas, and goading have all REALLY helped me along!
It would be the highest honor if I can teach someone some basic or obscure modeling technique, or have them steal an idea of mine outright! When you create something like art or music and share it with the world, that thing then becomes the property of everyone. That's just my philosophy though.
here are my fans! They don't have the depth to explore Vik's slanted, layered look, they are really too small for that, but they should pass inspection.
haha, I hought about it, but decided to just go for surface detail. Perhaps on a different project, when I can work with something bigger than an inch.
i had some issues at fist with the blades of the fans but stuffed them away as scale is indeed a way to set certain things in another perspective... but how will you paint them...? in layers? the circut thingy you own is a miravle and on all of us for not thinking earlier about that methode...
and i second dsteins comment about the lack of sanity in this work...a good genius thats worth his grain of salt is beyond good and evil... and you show us that the way to madness is littered with beauty all the way along!!! so hold hands mates and join the caravan to a land of mindless beauty^^
Don't throw anything at me for noting this... but one of the recurring themes on this project (other than rivets) has been playability, and I'm curious how well a dynamically-posed miniature is going to balance on that rather raised and crowded top platform?
a 25mm base will fit over each circle without even tipping. But even if it tips, none of the vents/fans are more than 2mm high. There is even half body cover around the lip of the roof (an improvement over the card version, which only covered a mini's ankles).
You could say that I've thought that bit through
I will pose an action shot if you don't believe me
I have used those painted-on vents to basically deep-strike onto the roof of that tower soo many times, just to get pwned by a flamer! Flamers are actually worth a Gak in Necromunda.
Oh, they are done! I'm not worried about it. I think I just should've posed the mini on the roof for scale. Scale is harder to judge without a mini in the shot, especially with some of the weird angles I shoot photos at.
Not necessary, totally believe you, was just wondering because it's come up so many other times and didn't see it addressed on this one and of all the things so far this looks the most "busy".
Flamers are AWESOME in Necromunda. My absolute favorite situations w/ Flamers is when the model saved against wounding but failed against catching fire and randomly runs off a platform or some other spectacular fail.
Yeah, I think I'd rather just take the Out of Action or outright killed gang member than have them survive a fall and have to deal with maybe hopefully rolling up a lobo chip or other augmetic just to make him less effective than he was lol
The top of the tower is the part you are going to see the most wen standing over the table. If I had skimped on that detail and not made it just the way I wanted it, it would've bugged me every time I played.
that is the best of reasons ... and if you embrace the spirit that comes from that for modeling... there is no stoping you from being a true awsome modeler...i know it is said all to lightly here but really if you start to not give in for mdiocre and keep on pushing for to have something that makes you feel proud about it you are a winner! i like that thought pattern... i urge everyone on for that to understand... ask my wife... when she is knitting or sewing something new i always bug her as much as i bug you to go for good, beauty and coolness... there is no other way...and i too try to get better by not giving in to just good enough^^ well mostly i get nice results^^
Yeah, but what Skalk is saying about "good enough", don't take that as meaning less quality or less detail, or anything negative. He is just saying that sometimes one can overthink, and overengineer things. And sometimes that extra work can be wasted once it is painted.
It's like painting eyes on guardsmen. IMO It looks cool up close, but when you are playing Guardsmen, all you are going to be doing is scooping them off the table by the handful when they die, so there really is no point in wasting the time doing it, unless of course your goal is to win a painting competition or something like that.
The fans and vents on the roof look great. All of the detail on the floor under it is looking good too. Your set is going to be (if it isn't all ready) the new premier Necromunda terrain!
hmmm my take on IG is.. like you i name my soldiers... thus i want to prevent me from thinking of them as toysoldiers but rather like my real soldiers... so i don´t wnat them to die...meaning i have to make good decisions... thus if i was able to paint eyes it would be worthwhile!
and i think the most uneasy feel you get for looking at a thing you did and knowing all the time...: if i had just spent some more time on it it wouldn´t look so ugly on that spot there... this is something that you don´t get rid of...only by retouching your work...^^
Lego amazes me with their stuff like that every time I see it. When I was younger, I had to make do with the basic pieces and imagination. Made a tower 3 ft high with the set at day school.
lol... yeah i was a brickhead all my life... my wife is always a bit annoyed and amused how i can identify most parts of lego...and know what it is usually used for and what you can creativitly do with it^^ it is a skill that will never get any rents paid but well^^ makes me feel proud about it^^
It was in an interview, his first job so many years ago, before fame, he would wear a rubber monster suit, (Godzilla or Gorgo like) and threaten the Legoland.
Some men are baptists, some men are catholic, my Dad was a Ford man. I morally cannot, will not deface a Lego. I am sorry my friends, this is something my consciousness will never let me do. Any other toy on earth is fair game for my x-acto and brush, but not a sacred, Holy Lego.
edit: Besides, like a good whiskey, time makes it better. It will eventually get a coating of my special patented shelf dust weathering powder.
but you do realise you are publically showing your weakest spot to all the world to see? what would some evil villian do with that knowledge? huh? better think of some counter action at once^^
Automatically Appended Next Post: by the way... i really like fresh new lego bricks... they have these sharp cutting edges... hands up everybody who can remember stepping barefooted on some legos and enjoying those sharp edges^^ anyone?^^
Viktor von Domm wrote:lol...yeah you mentioned that special formula^^
but you do realise you are publically showing your weakest spot to all the world to see? what would some evil villian do with that knowledge? huh? better think of some counter action at once^^
Automatically Appended Next Post: by the way... i really like fresh new lego bricks... they have these sharp cutting edges... hands up everybody who can remember stepping barefooted on some legos and enjoying those sharp edges^^ anyone?^^
I have stepped on them in my bare feet as a kid, did not like it at all, I would then throw the offending piece against the wall hard.
Skalk Bloodaxe wrote:I'm going to show that to my son, he's a Lego enthusiast and will really like what you have done here.
Actually, you could give him that set for Christmas. It's a Lego exclusive. The problem about those premium Lego sets is that I want to build them, but have no interest in them afterwards. I'd really like to build the Lego Death Star [3,803 pieces, $399.99], but then what? Did succumb and buy a Medieval Market Village, but that was was only 1,601 pieces and $99.99.
that black hole starship is by no means built from lego? or is it??? even if it is overused in the web: awsome!
lol dstein...yeah... that would work i guess...but i could get away with just threatning to cut a lego to pieces for getting what i want^^ a lifestream with say a harry potter mini....(er...i think this might be a not too threatening threat as he might deserve it even in lego version^^)
at shaso... yeah... me and about everyone i know would have done so too^^ and swear like anything too^^
Ancestral Hamster wrote:Actually, you could give him that set for Christmas. It's a Lego exclusive. The problem about those premium Lego sets is that I want to build them, but have no interest in them afterwards. I'd really like to build the Lego Death Star [3,803 pieces, $399.99], but then what? Did succumb and buy a Medieval Market Village, but that was was only 1,601 pieces and $99.99.
That is the beauty of Lego, once the set gets boring you have all those parts to build your own creation an infinate number of times! Parts collection takes a lifetime. If you want the Medival Market Village, you'd better order it, it will probably be discontinued as a set shortly. When these premium artisan sets are discontinued, the aftermarket price skyrockets
Just steamed through all 28 pages of this awesome thread, I think it's the first time I've actually wanted to buy someone else's work!
I can't think of a single micro critique to make anywhere. I used to love Necromunda (still got it all in boxes).
Just dug out the old box, from high shelf; inside were the two books, that terrain leaflet, the original building tiles + bulkheads, dice, counters, a couple of line of sight rulers, a set of the 'Outlanders' expansion buildings + bulkheads, and five extra untouched bulkhead sprues!
Total of 64 bulkheads. I put it all back in the box and walked away . . .
Ash 1 wrote:Just steamed through all 28 pages of this awesome thread, I think it's the first time I've actually wanted to buy someone else's work!
I can't think of a single micro critique to make anywhere. I used to love Necromunda (still got it all in boxes).
Just dug out the old box, from high shelf; inside were the two books, that terrain leaflet, the original building tiles + bulkheads, dice, counters, a couple of line of sight rulers, a set of the 'Outlanders' expansion buildings + bulkheads, and five extra untouched bulkhead sprues!
Total of 64 bulkheads. I put it all back in the box and walked away . . .
+1
just went through the entire thread start to finish and, well as i PM'd you've rekindled my project.
i know exactly where my old plasticard is and i've even found some online sites for more in the uk (http://www.antenocitisworkshop.com/) also some railway modelling companies who sell the sheets damned cheap.
expect to see some pics posted soon i've got itchy modelling fingers.
@ Ash- I am huge fan of your work man, this love means a lot from you! FRESH BULKHEADS!! OMG, (I would love to have some sprues of those! I want to re-build the Imperial Firebase too, but between this project and cutting up others for my other projects, my once abundant supply of bulkheads is sadly diminishing.
@Melonfish I can't wait to see your stuff! If you start a thread, please post a link here. I am horrible for missing people's threads when I intend to check them out.
cool thing mate... and somehow i didn´t knew other peeps were into the dark hole movie too.... it is a classical tale but somehow i thought it was so burried under dust that it isn´t widely known anymore... i only ever saw it once on TV looooong ago...
dsteingass wrote:That is the beauty of Lego, once the set gets boring you have all those parts to build your own creation an infinate number of times! Parts collection takes a lifetime. If you want the Medival Market Village, you'd better order it, it will probably be discontinued as a set shortly. When these premium artisan sets are discontinued, the aftermarket price skyrockets
Point. I regret not buying more of the Samurai series way back when. However, with my getting back into miniatures gaming I've spent a lot on supplies and figures, so I can't really add new Lego purchases on top of that.
As for the Medieval Market Village, I bought it immediately after it came out. It was a long running pet peeve of mine that the Castle series didn't have enough peasants, or a place for them to live, so I just had get the MMV!
BTW, dsteingass, once you've finished reconstructing the box set terrain, will you make custom pieces to personalize the layout? I thought it would be nice to have some obviously industrial pieces like a blast furnace or a crane as objectives. They would also have special rules.
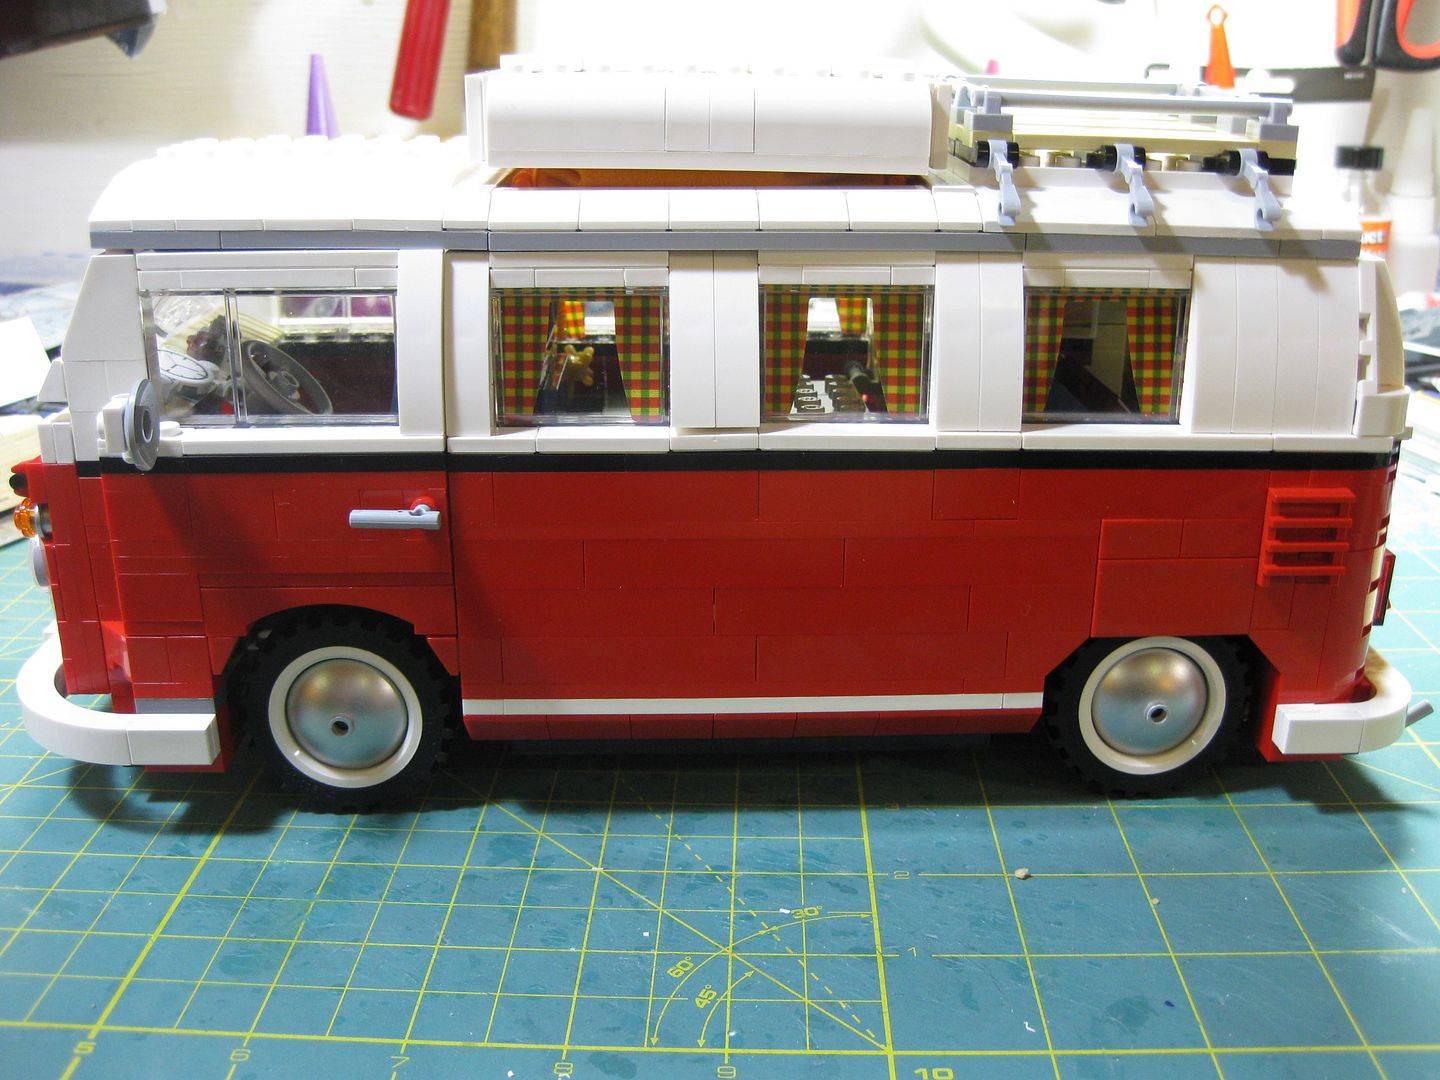
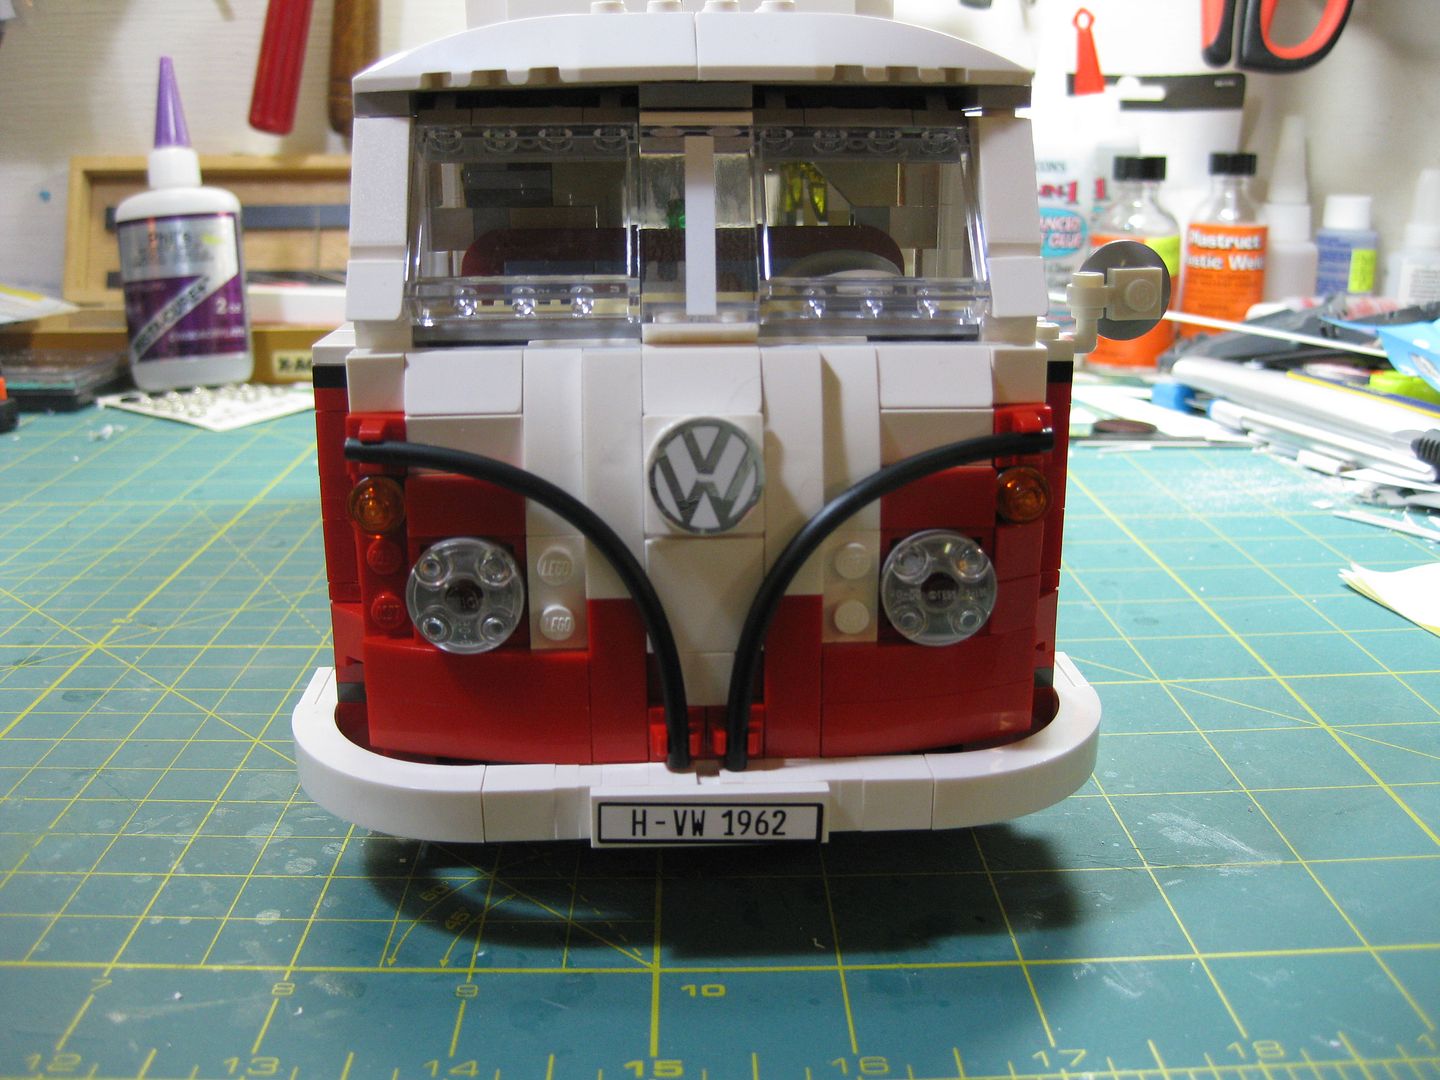
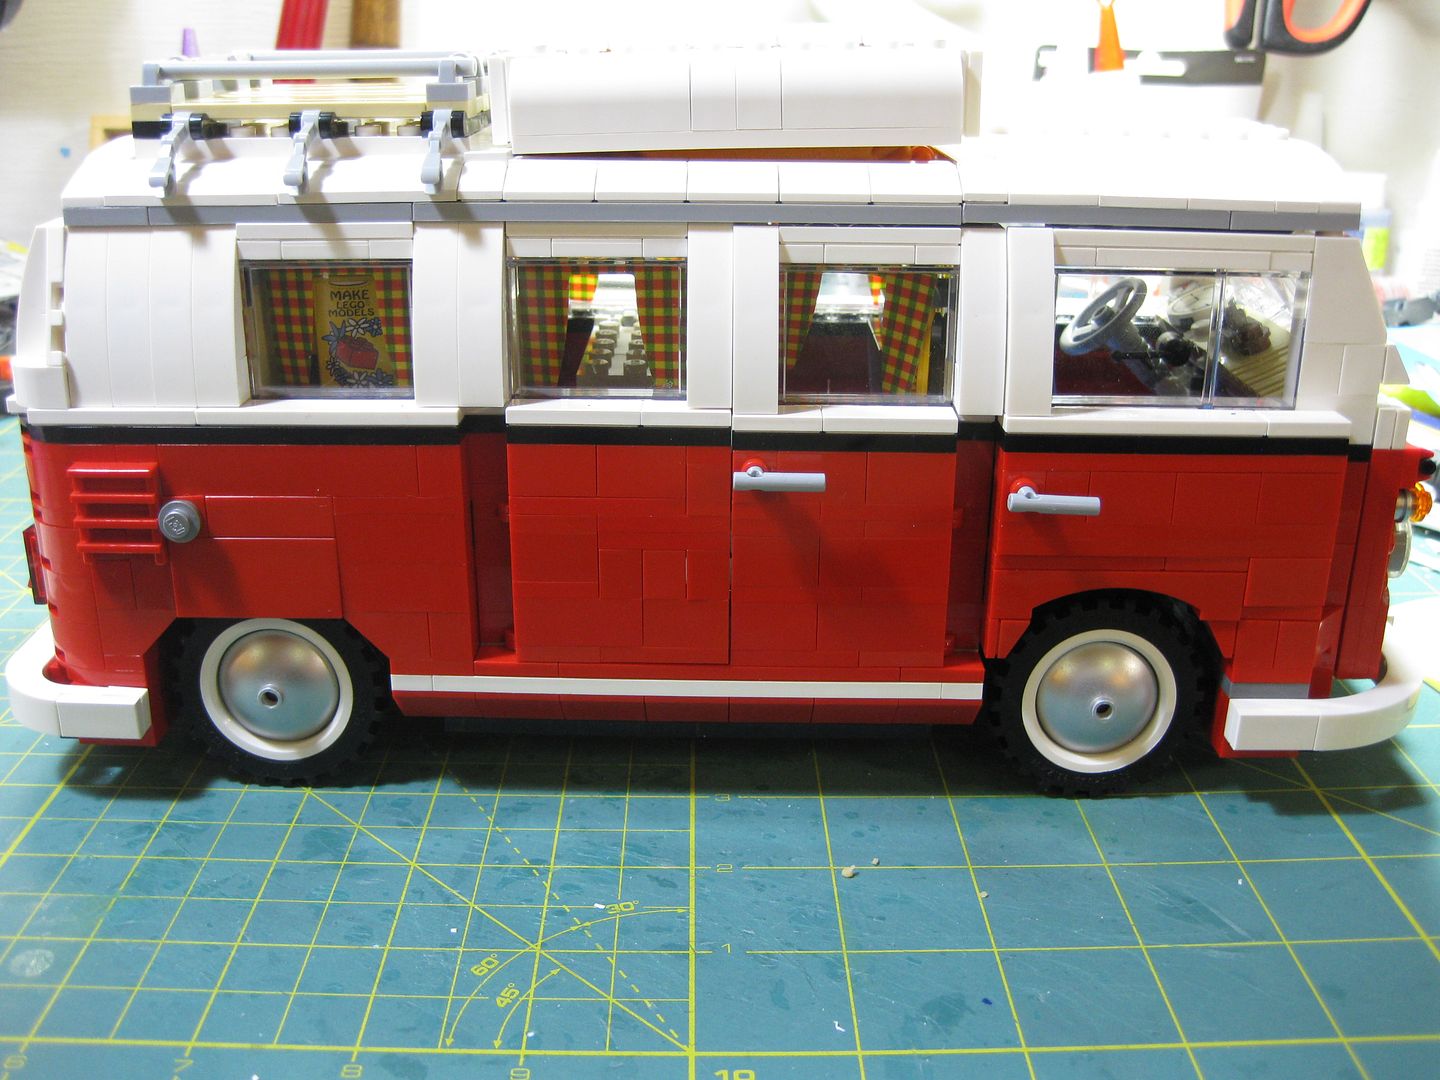
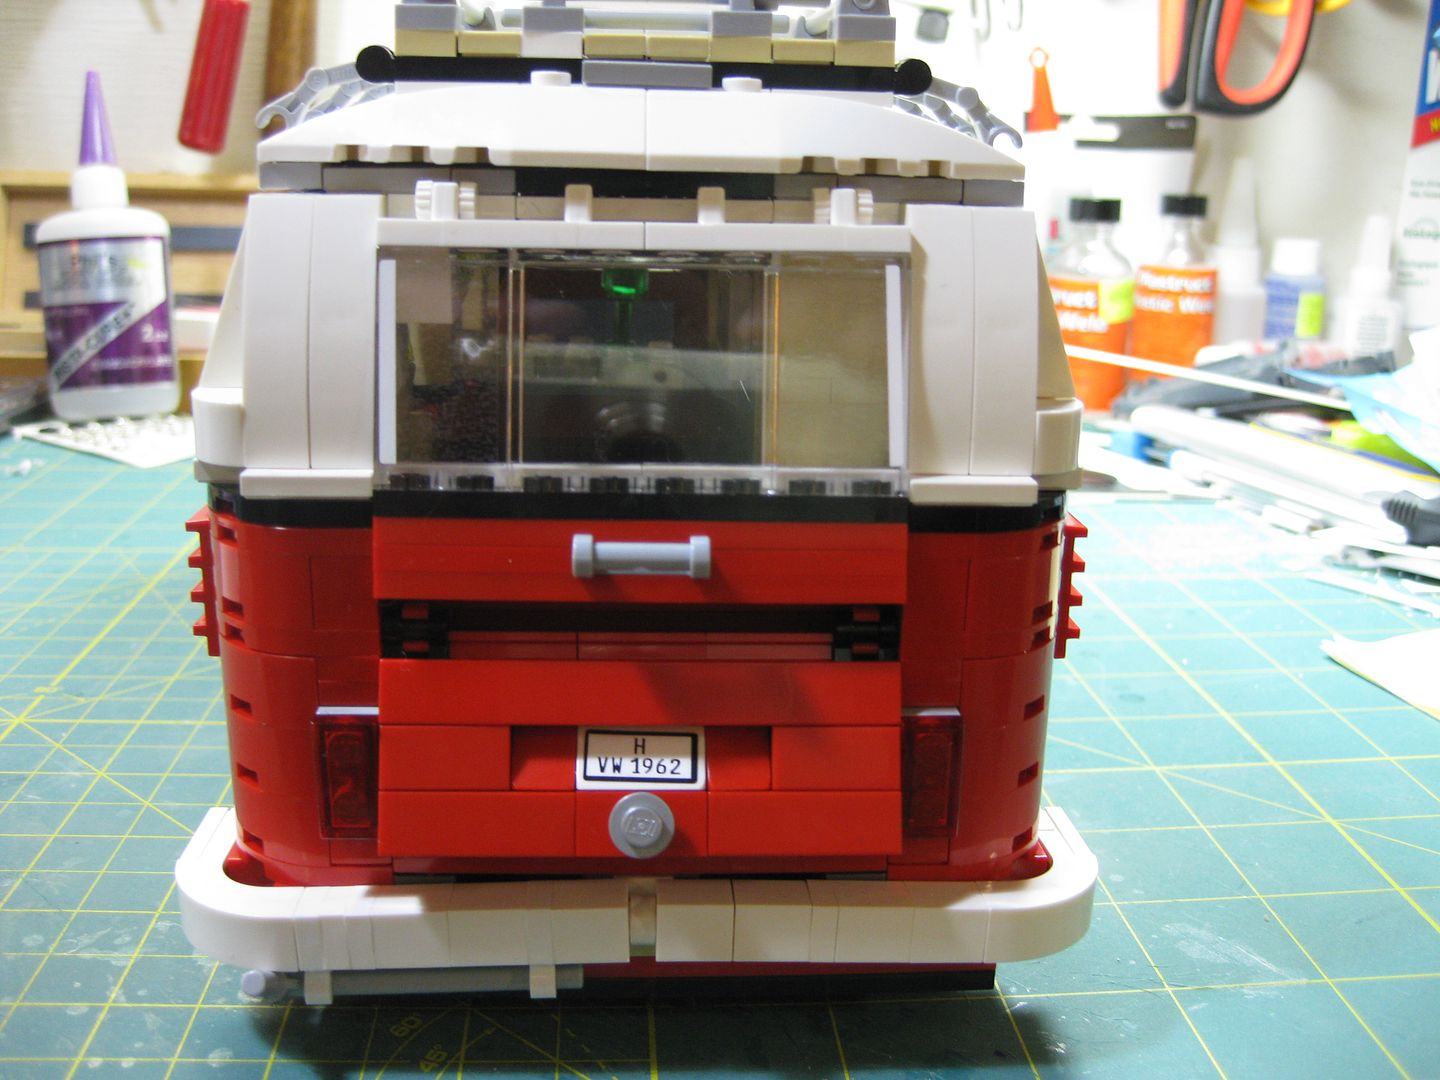
The Yamato is very impressive, My nicest is a lego jawa sandcrawler or small scale star destroyer. The wife and family often buy me legos at christmas b/c they don't know enough about me to buy my primary hobby interests. I like that VW kit too. I just got all my legos from the early 80s out of storage, and cleaned them so that they would be ready when my little boy gets old enough to play with them.
Ancestral Hamster wrote:BTW, dsteingass, once you've finished reconstructing the box set terrain, will you make custom pieces to personalize the layout? I thought it would be nice to have some obviously industrial pieces like a blast furnace or a crane as objectives. They would also have special rules.
Most definately, eventually. I want to at least get a standard layout ready to play some games. But then I have gangs to paint...I'm just not in the mood for paint yet. I really need to pace myself to avoid burnout. It's been nice to have a bit of a break. With it getting cold out I spent the evening putting the hardtop and doors on the Jeep, I will test the heat tomorrow morning I'm sure.
I've still got to finish my necro gang, painted about 70% of it atm, got lots more off'f the bay and did some conversions with some of the old weapon kits they used to sell.
anyhoo i've decided on my starter item this weekend. just the little triangular bunker entrance bit, its a bit small but a perfect place to start, pics incoming
the little bit behind the "wappy sticks of doom™"
We call our wappy sticks of doom "jams".
They're red and sticky...
I still remember the day they banned them in store, it made rules mediation almost impossible, before this we either had the two opponents fence or just take knuckle raps until one gave in...
why were they banned again
I have around 15 or so pairs of the knuckle whippers. They got banned in our stores because they weren't consistent some were longer than others even though they said the same length. And almost all of them were not accurate when compared to a tape measure.
theunicorn wrote:they weren't consistent some were longer than others even though they said the same length. And almost all of them were not accurate when compared to a tape measure.
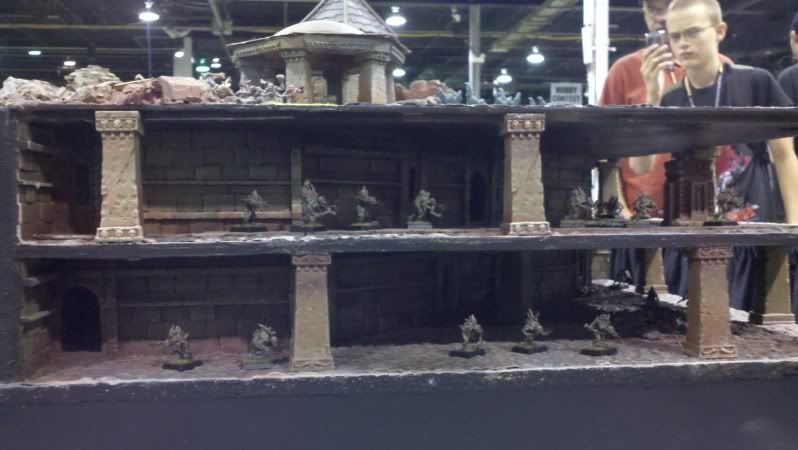
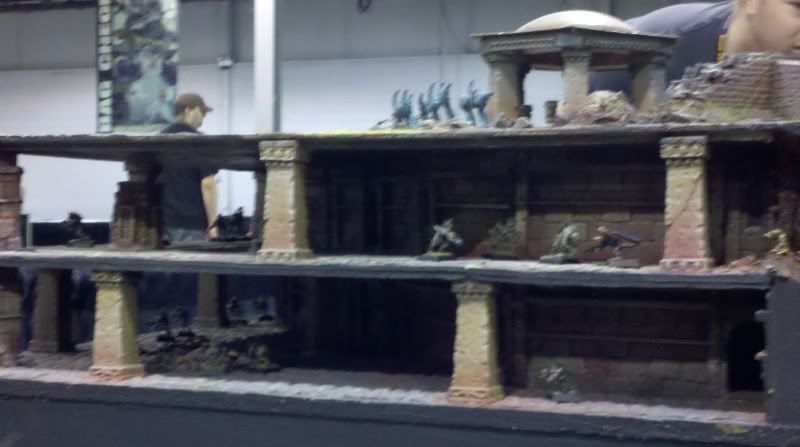
dsteingass wrote:OK, here i something Necromunda-ish to think/talk about...sewers, specifically big sewer pipes that figs can stand up and even fight inside.
Think of the artwork from the Outlanders rulebook cover.
Interesting idea. I think you'd have to model half of a sewer to be able to use it in game. Or were you thinking of just modeling the terminus of one?
I have no idea why I snagged a pic of the French language cover though...It must have smoked too much Slaught.
Automatically Appended Next Post: What if you raised the table level enough to enclose a sort of cross-section of a pipe network around the edges of the table?
i have seen someone do that swer idea on the net... i think this is a great idea and you could get that fairly quick with a great expense on watereffects... this could be even done in some version of space hulk... you know... like only hlf high walls with many offbranching new tubes...could be a whole new table setting....
What if you raised the table level enough to enclose a sort of cross-section of a pipe network around the edges of the table? ???? didn´t get that ....could you rephrase that for us speach handicaped^^
ok. Imagine the entire 4x6' game table was raised 3".
Now imagine a cross-section view of what is underground, set flush with the edge of the table.
Sort of like this
except all the way around the table
adding another dimension to a game.
no..It's a regular table at the regular height (I built my table as a stand-up table), but even on a sit-down table, just a regular table, but an underground pipe (or subway, train, whatever you want) sliced in half lengthwise, and set just around the perimeter of the table, below the surface
Now you've got it! Yeah, one important thing though is that you need to be abe to lean into the table edge to play on the regular table, ignoring the underground sections when you want to. Without breaking anything in the underground.
well then it is "just" a matter of materials to use for the table... strong enough material and of course hardware to work with that then and you are set... at least some 2cm strong MDF can survive much punishment...and you could get away with the thickness beause of "earthcrust"^^ i think this could be fun thing to build...actually we all have sen it done one way or the other in lots of museums... they tned to make dios that way...
heck come to that you could make something like a mine with that idea in multi layers/ levels... like a get out of the underground scenario...you create it not as a flat table but more like a sort of a half a meter thick cupboard... all the levels are playlevels...with ladders and such things...
that sounds like a fantastic idea, make 1 pipe going around the whole table, and make the apperance of other pipe entrences and such to make it look like a series of pipes
tomorrow i will show you what i mean... i have on my laptop a pic of our summer holiday... we visited a tin mini making foundery...there was a dio you might find inspiring...
well mates i am off for now... keep the creativity flowing^^
Whoa, that looks like a huge piece of terrain. oh wait, no. It's the table, with playable space around/under the edges... AWESOME! I can't wait to see you start on it.
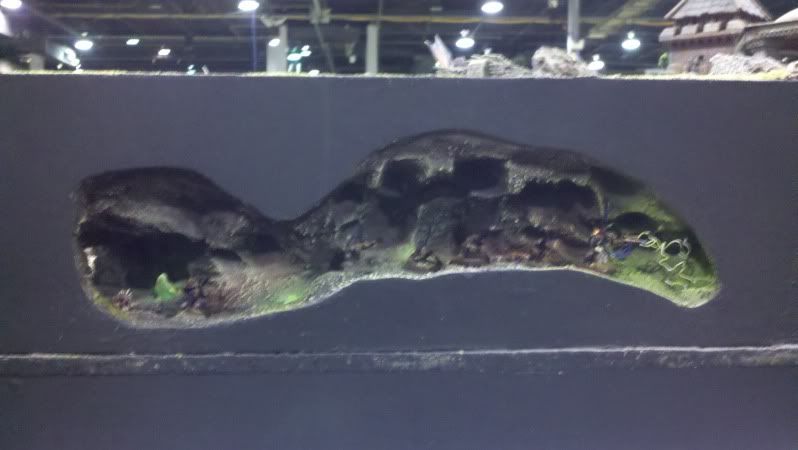
Its an awesome idea dstein, however at first i though you meant something like this, where the "under-table" would be just one pipe at 3/4 or 3/5, leaving space for minis to be placed. Could also stop things falling out...
you could even work in cave-ins or the pipe burst and you can see it from surface, or maybie they where replacing a pipe from the service, that way you can have another opening
You could also put a deep "cave in" hole in the middle of the table somewhere, maybe with a removable cover so if you didn't want a cave in you could cover it. That way you'd have a tunnel spot in the middle of the board too.
One could model the central sewer section separately, this way it could be fully "underground" yet accessible for figure placement. The center underground section is placed on a table nearby.
As part of this tunnel/sewer project, one could model a control station. This would give an option to flood the tunnels with raw sewage if a gang controls it and spends X amount of time at it. The flood shouldn't be too lethal though, but mostly debilitating.
@ dsteingass
If you get time away from sleep and plastic check out this guys blog posts there are around 11 HoA Table Progress posts. The guy built a multi-level table.
for sake of simplicity i would make angled swer tunnels... or you could at least make them like in the movie the third man...with lots of brickwork and steps and sewer rivers...i bet that you could actually could charge gamers for playing on that table^^
Have a look at this chap's Blog, scroll down. A ruined fort with dungeon basement, he's supported the 'table' above with a series of rather nice arches.
Interesting concept with the sewers. i always imagined that one levels sewers were part of another levels walkways. this is necromunda after all litterally anything is possiblw un terms of terrain from ash or rock dust deserts to acidic swamps or rains of chemicals.
btw just dug out my necro set and for curiosity's sake checked how many plastic bulkheads i have... 72!!!
apparently the original set one of those scenery sets, outlanders and some others yield a fair amount!
You could also embed some tunnels in the middle of the table with multiple hinged gratings over them to make them accessible in game without the hassle of having to pick everything up - just pull the tab to open the hatch.
It's ok I do that too when trying to explain my ideas boiling from my brain on the internet.
Automatically Appended Next Post: OR...What do you think of this:
What if we took the same concept of the cross-section of the terrain, but made it modular, say in 1x1' sections, with a thin piece of hardboard on the top, forming infinite ways of rearranging the underhive?
Ahh materials...hmmm much to talk about here.
Hardboard, wonderful stuff!
For those of us old enough to remember when Televisions used to be large, heavy square cabinets, hardboard was often used in the construction. Also those of us even older may remember floor-model hi-fi stereos with lifting lids, revealing turntables, 8-track players, and LP storage. These home stereo systems produced the most beautiful flat tones (no bass or treble overpowerment) from their tweed-covered speakers. But more relevant, is that the back panels of these behemoth stereo systems were usually constructed of hardboard, and if one has an old junk device such as this laying around in an attic, it is a good source of free hardboard. But of course, your local Menards, Lowe's, Home Depot will probably sell conveniently transported 4x4" sheets for about $8.
I find hardboard easier to work with than MDF, it is just as strong, and it won't warp when properly supported. The really thin hardboard can be cut with just a heavy utility knife and a straightedge. For me, I need to move outside my garage to cut with power tools to lessen the mess, and the weather in Indiana is just not getting better anytime soon.
I thought I would check here first, I was doing some fall cleaning and have some Necromunda terrain that I had planned on listing on the eBays.
It is 6 small angled buildings, 3 of the squarish 3 floor buildings, 3 of the triangle with a deadly hole 2 floor buildings, 2 of the split level tower buildings. The 4 sets of bulk heads are cemented together and the box at the top has 66 additional bulkheads (those bulkheads are all the solid sculpt)
If anyone is interested just PM me, otherwise I plan on putting them on eBay Sunday Nov 6th evening.
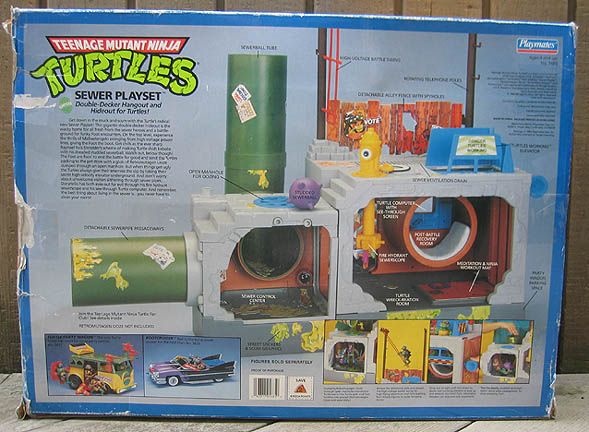
The mechanics of this TMNT playset is very interesting.
Automatically Appended Next Post: Anyways, I got the bench cleaned up.
But not much else yet. Watching My Ohio State Buckeyes tyeing up the game vs. the Hoosiers.
(I am a Buckye transplanted into Indiana soil, NOT a Hoosier)
Automatically Appended Next Post: THE Ohio State University 34, Indiana University Hoosiers 20
i know these old TV sets and radios sets... yup... you must be pretty old to know them or from a family that keeps the stuff even though newer stuff is around... the sets i knew had a lifetime expectancy of a millenia and would be servicable your whole life... giuving lifetime expectancy the right meaning...
but yup that could be a good material... about the 1x1 sections... the problem i see is it has to be planned real carefully... all connections have to be in a sort of puzzle arangement... like every connection has to be in a certain spot... if someone knows the game http://en.wikipedia.org/wiki/Carcassonne_(board_game)
this game here has tiles that are designt to fit truned either way to fit... i think this would be the first major aim of those sections... to be fitting either way with each other section so that you can arange them however you like them to be...other than that... brilliant idea and i truly shudder to see a clean workspace from you... what new stuff will you chuck at us now...*sweet shudder again*
Ya I know, I've been drooling at that table all day!
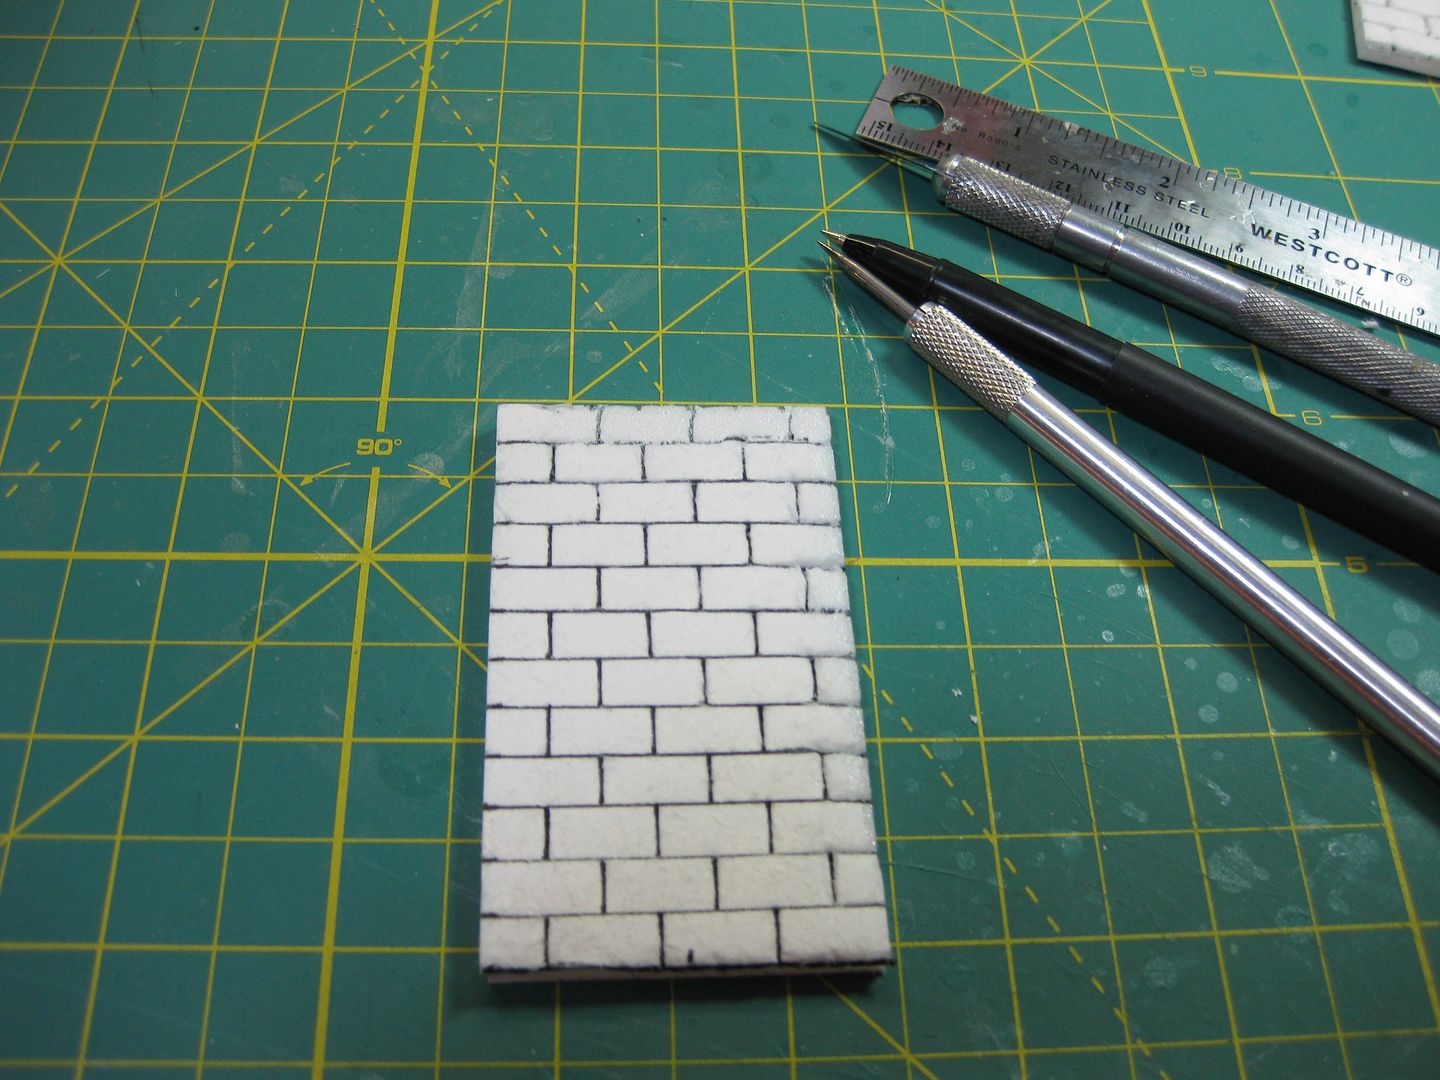
Automatically Appended Next Post: The idea of curved brickwork interested me, so I peeled off one cardboard side of a piece of 1/4" foamcore.
And used a scratch awl to deepen a V-Channel on the top mortar lines, all the way down to the intact cardboard layer. Now they take a curve easily
Now that is a great example of "A picture is worth a thousand words"! After I saw that, all kinds of sewer setting adventures sprang into my mind! Now you need to add the classic walkway next to the raw sewage slough!


 Can't wait to see moar!


 that is awesome!
 Thats a steal aint no mistake.
 .......


 yep after the glue is set...and now all:


 Curse you, von Domm! Curse you!
 just doesn't cut it