48594
Post by: dsteingass
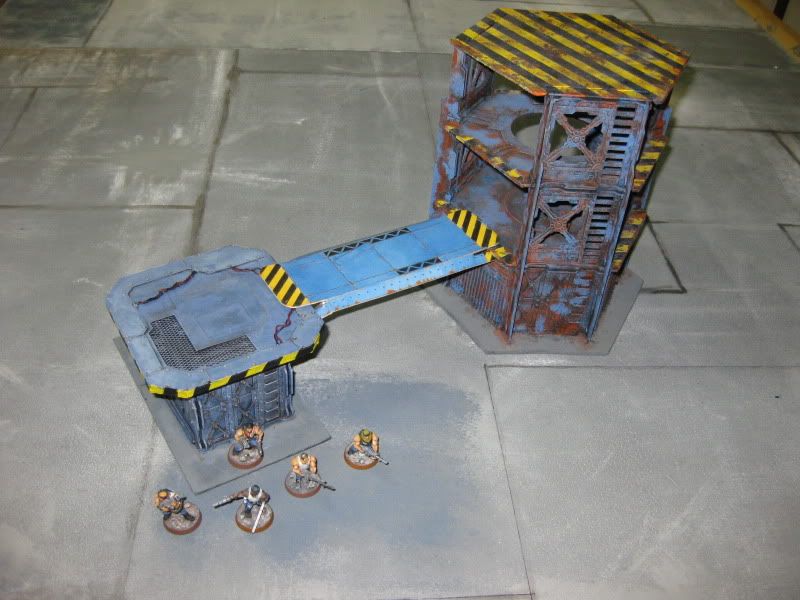
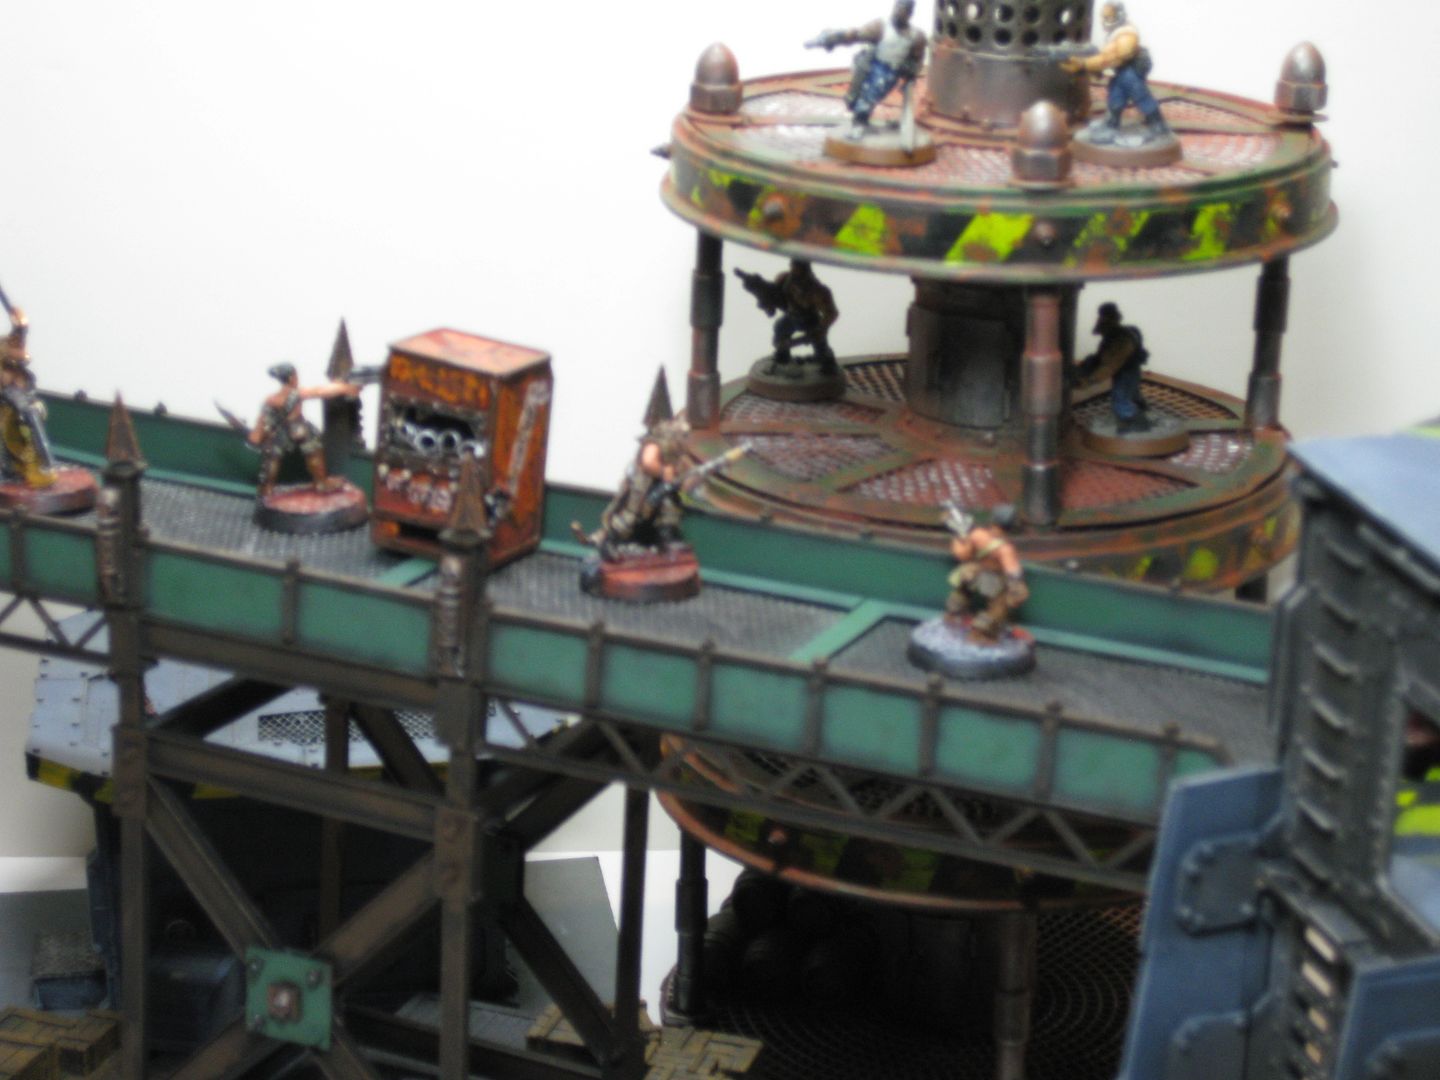
Another one of my long-term projects is to build a set of Necromunda Terrain that retains the look and style of the card terrain that came in the Necromunda box, supplements, and especially the original Studio Terrain.
Having reached 100 pages in this blog, I have decided to keep the first post updated with ( IMHO) milestone WIP shots on this first post as they are reached along this crazy project. I can't call them finished pictures, because I don't forsee an actual end to this project, ever. Even though I may abandon it at different stages along the way 
Theirs:
David Gallagher & Richard Wright's Excellent graphic artwork on the original printed game components and plastic bulkheads has always fascinated me and I have longed to remake them in 3D.

The original Studio terrain that were used in the GW publications was the catalyst that started my learning to build terrain all those years ago, and it still inspires me so much that I said "I can do that". This blog contains the evidence, you be the judge as to whether I can or not.
Mine:


The Blog is growing, but they are Vik's followers (He is a Cult Leader)
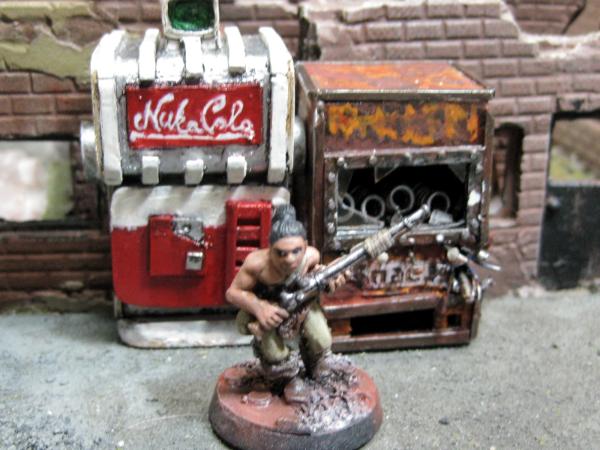
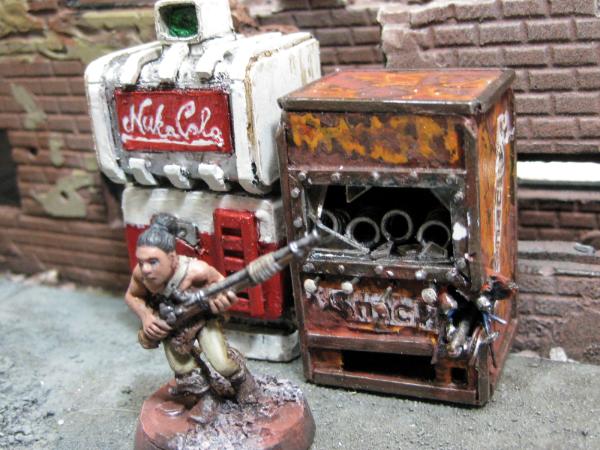
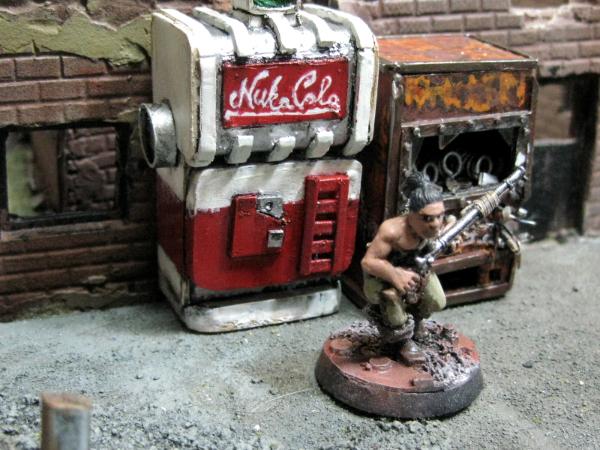
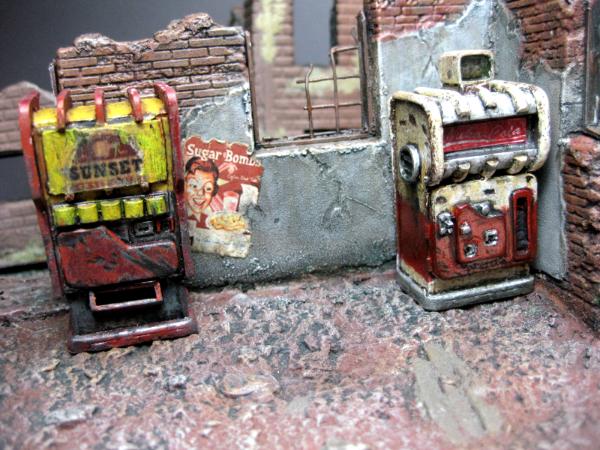
Nuka Cola Machine
Other photos
Sometimes, I take breaks from terrain, and This blog tends to go OT when I rotate hobbies. I ususally play video games for awhile, then I work on another long-term gaming project
I am -planning a LEGO Zombie Apocalypse game with LEGO, so my blog might go OT a bit from time to time.
But fear not, it will only last a while, and then I get back into terrain.
This is just part of my process, and it always has been. Sort of a controlled ADD I think.
Sometimes, (Page 260) I wonder why this is still called the Necromunda Project - I am soo far off here with what Scarper calls my "Bizzare Scratchbuilds"
....But I am really enjoying exploring Steampunk with these, unique models
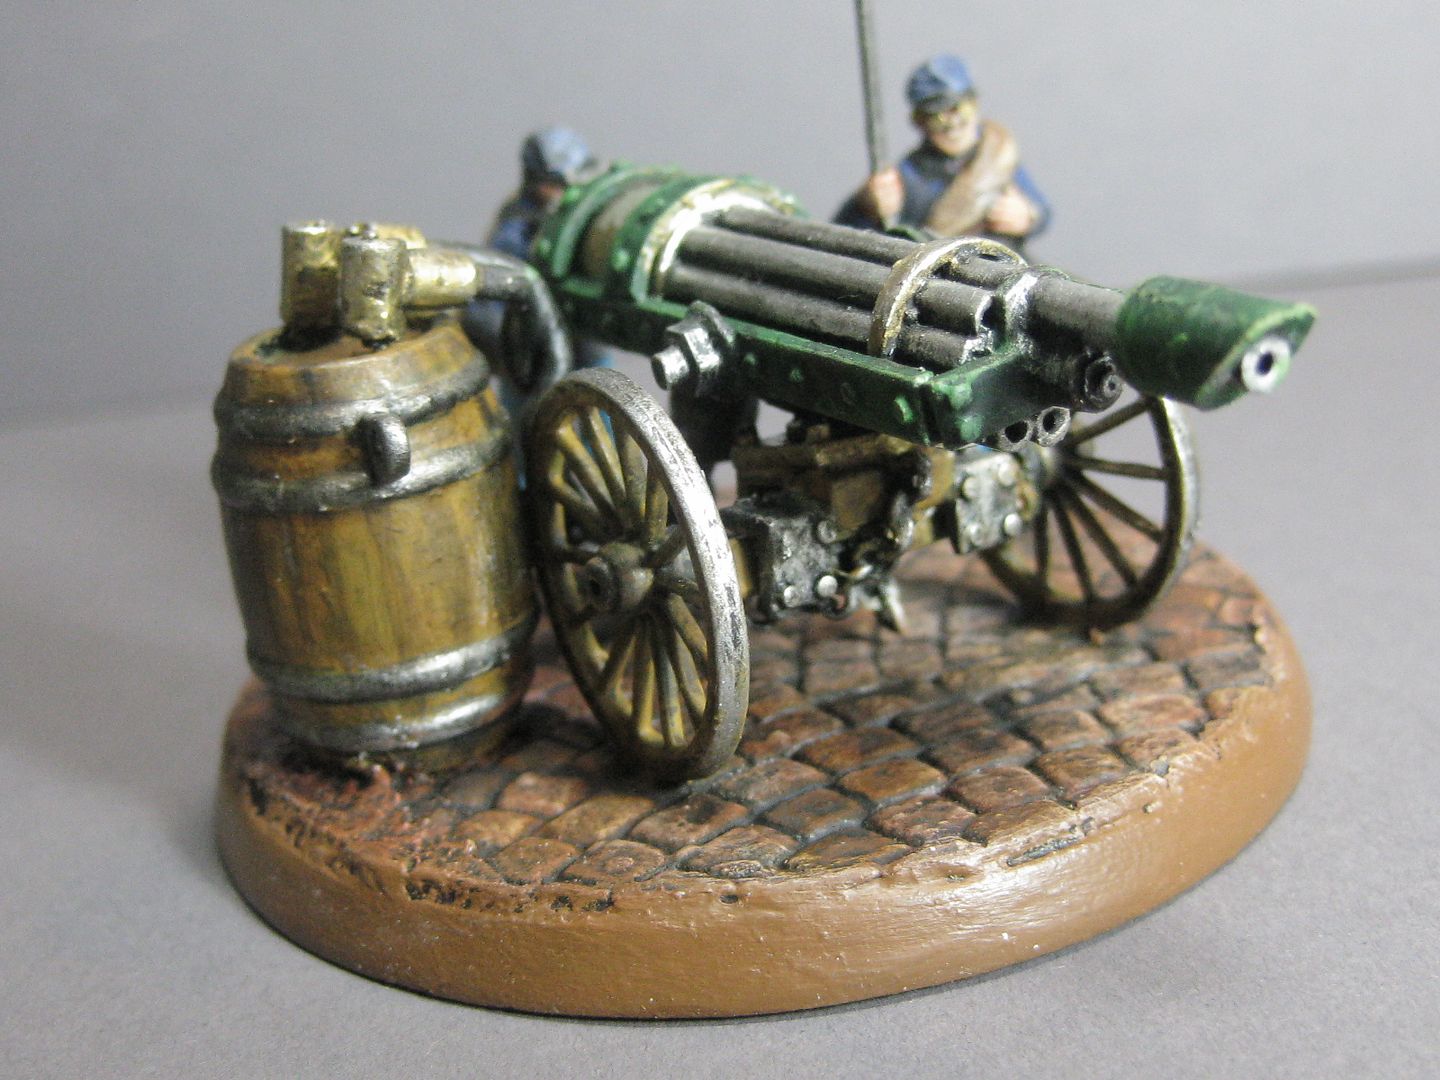
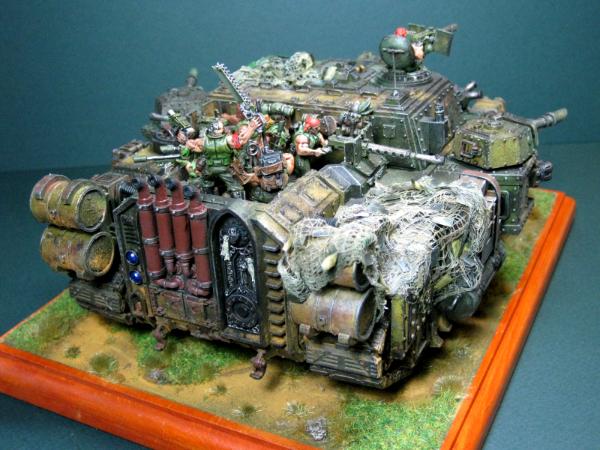
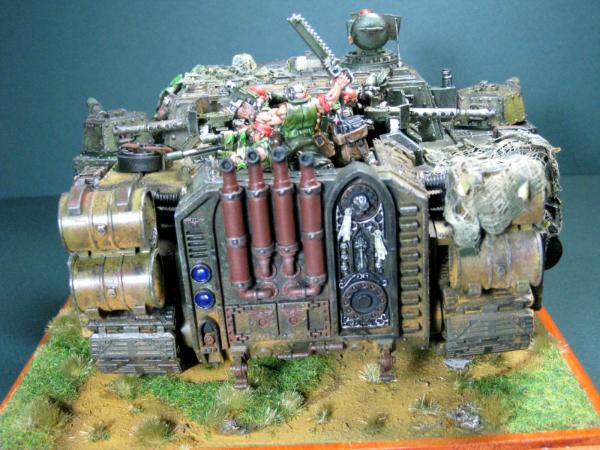
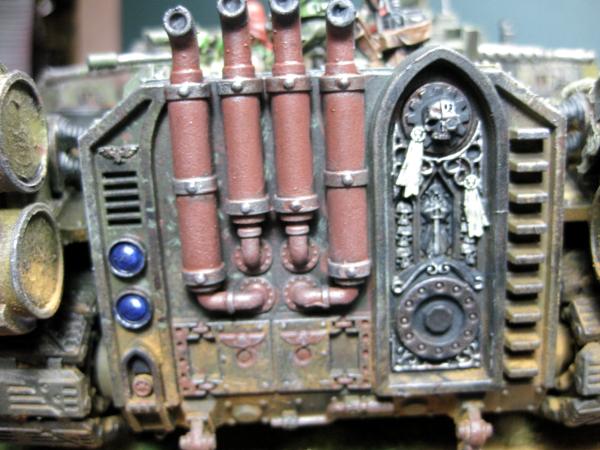
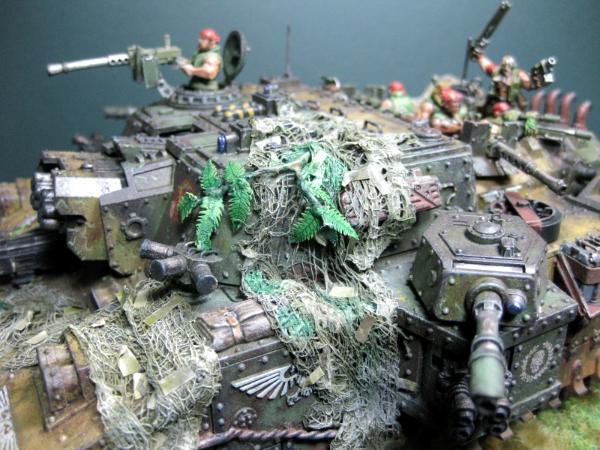
The WAAAGH fever has gotten ahold of me at about page 270
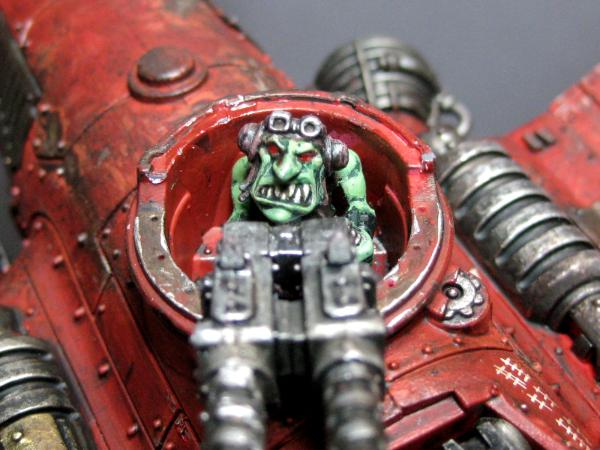
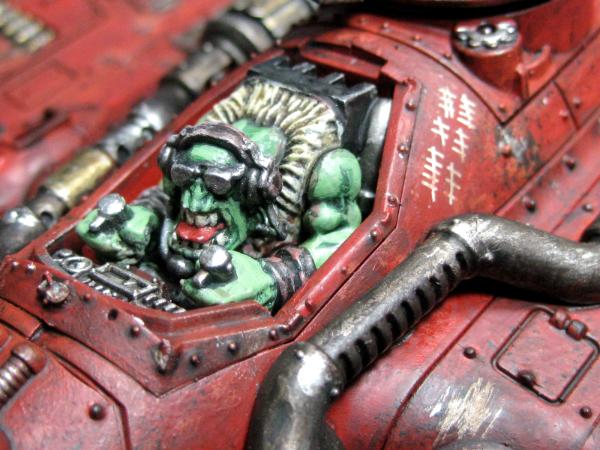

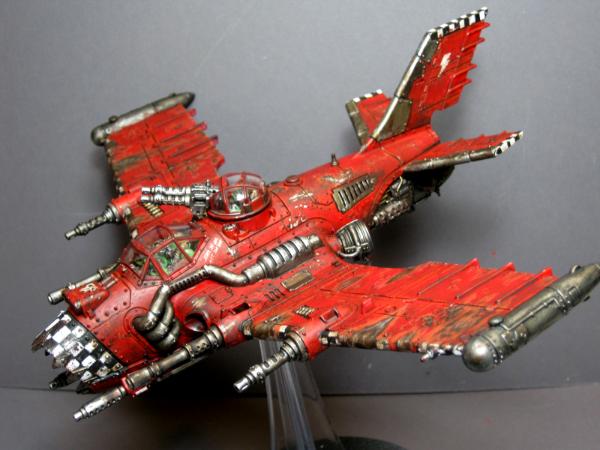
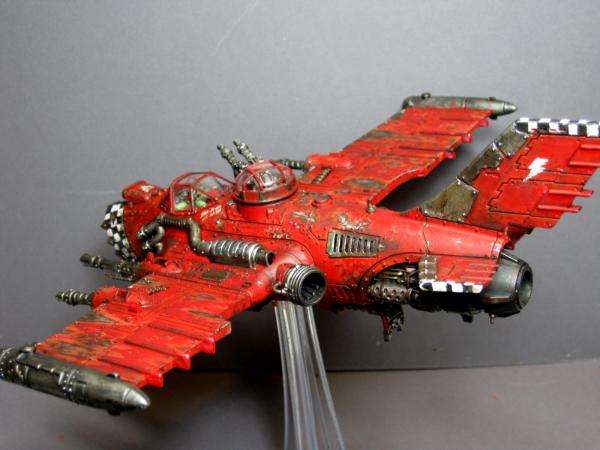
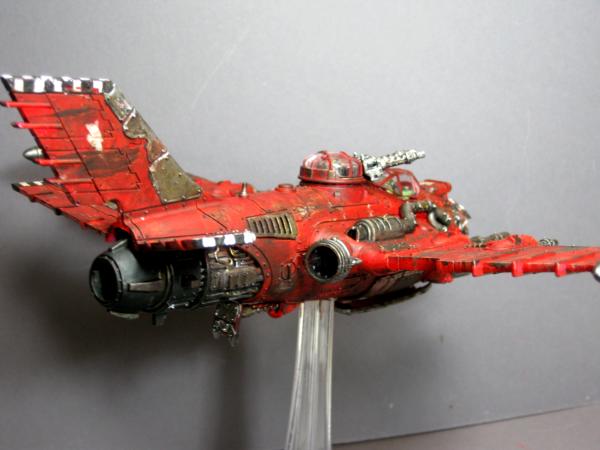
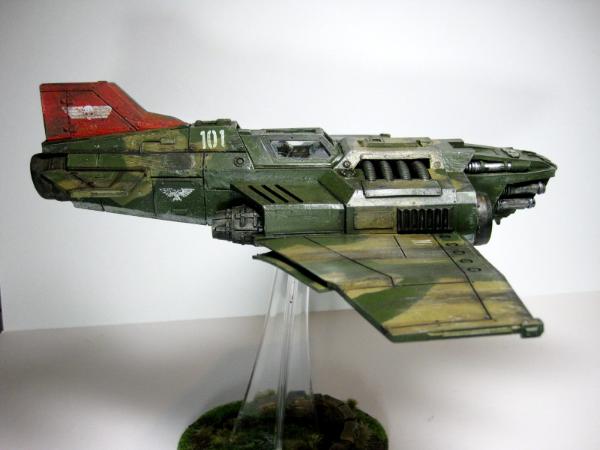
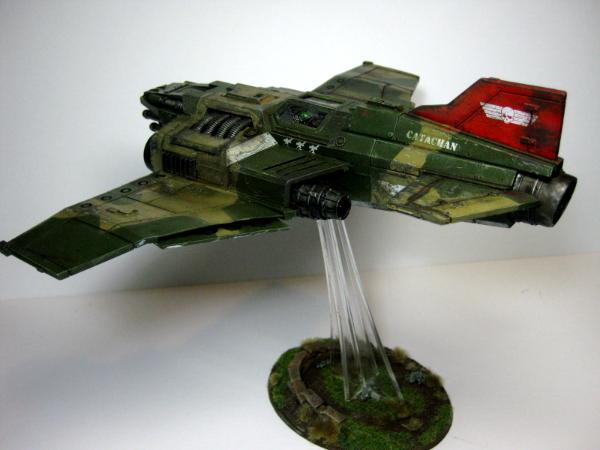
And then I did a Harrier-esque Burna Bommer.
Da Wheels from the talented, Zinge Industries www.zinge.co. uk
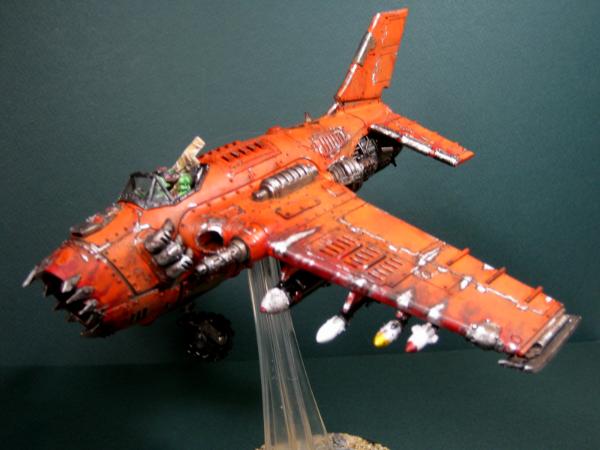
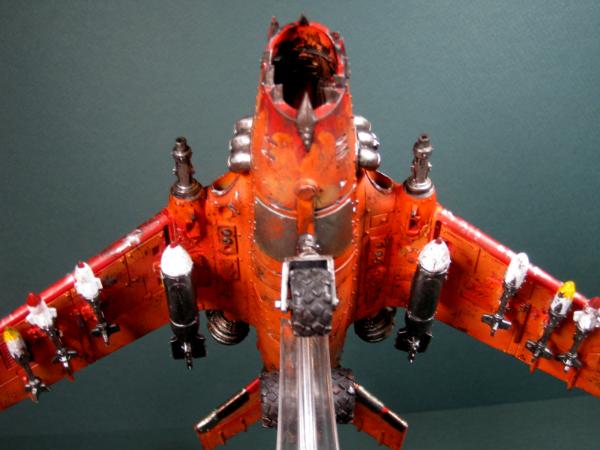

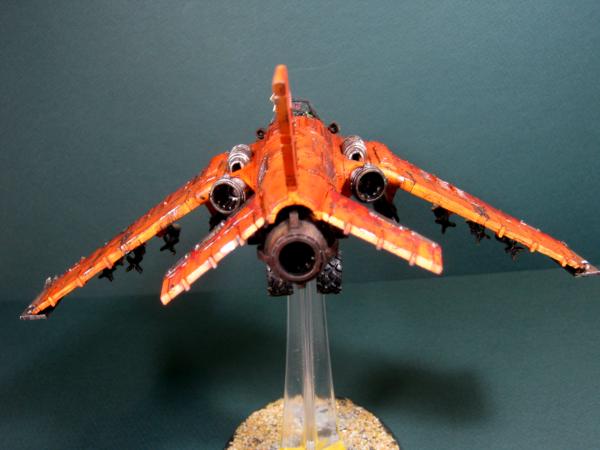
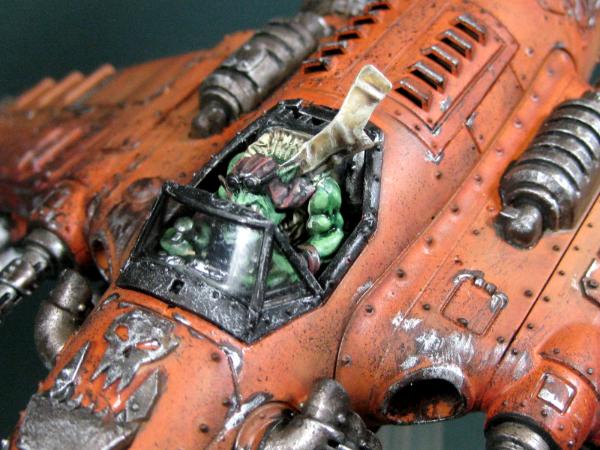
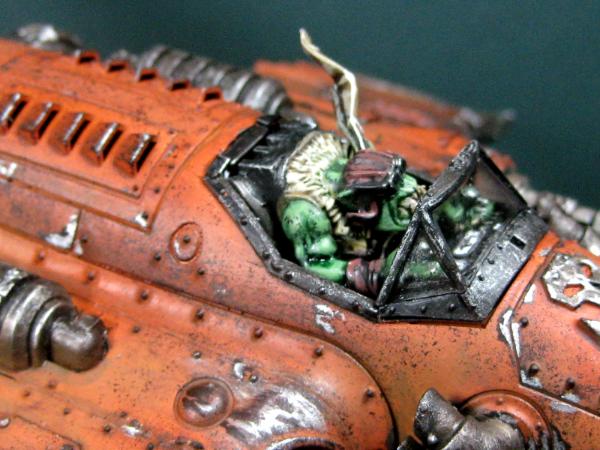
The longest paintjob of my life! 2 weeks!
What do you think?
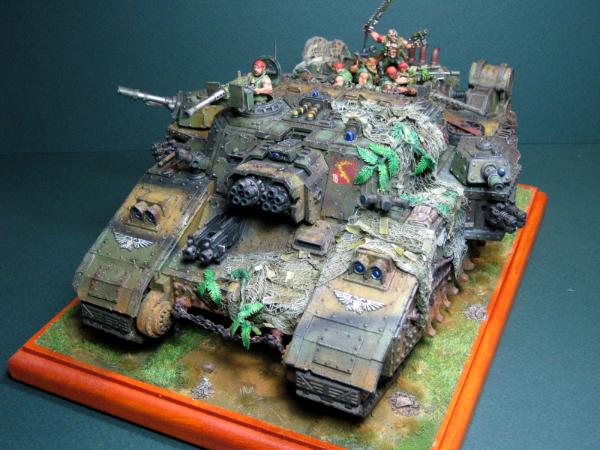
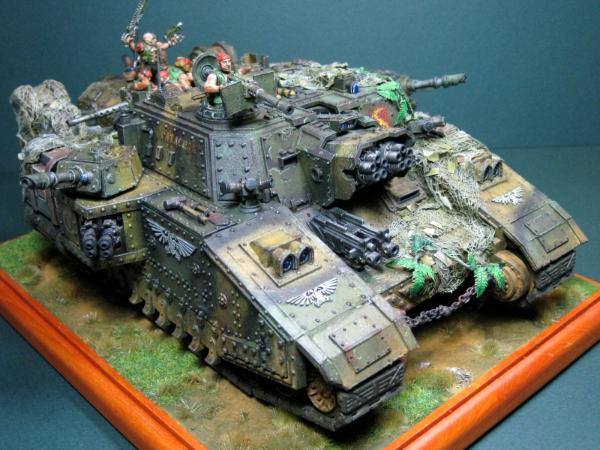
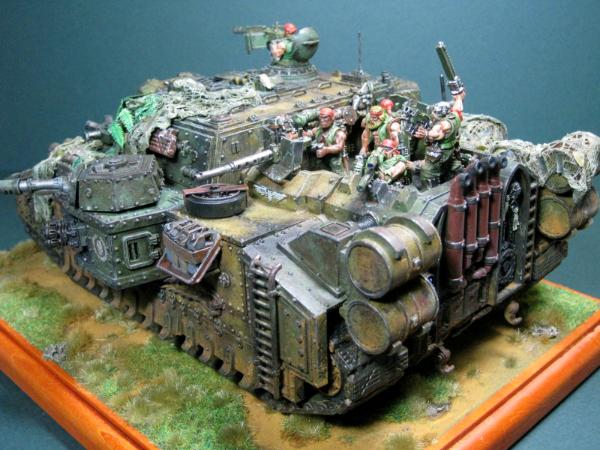
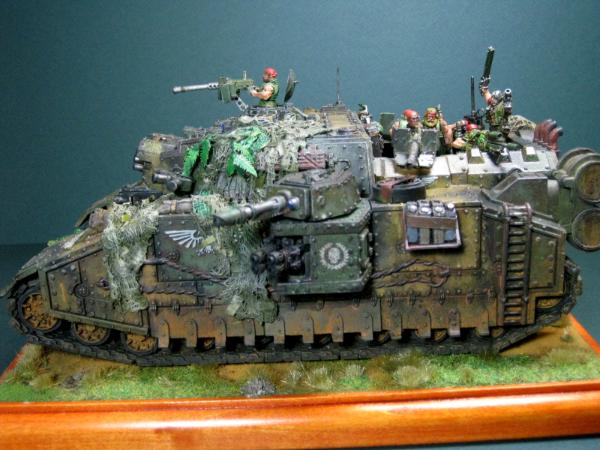
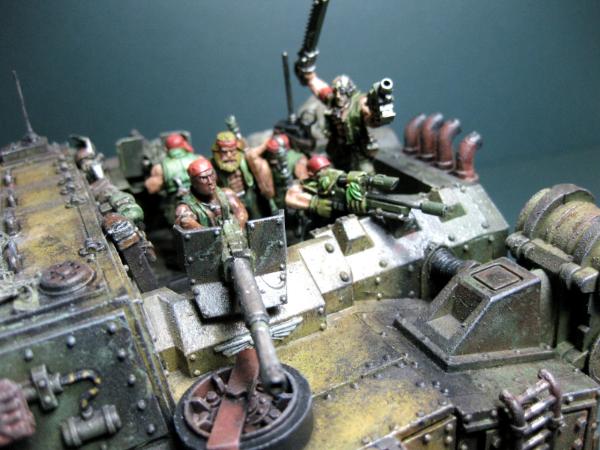
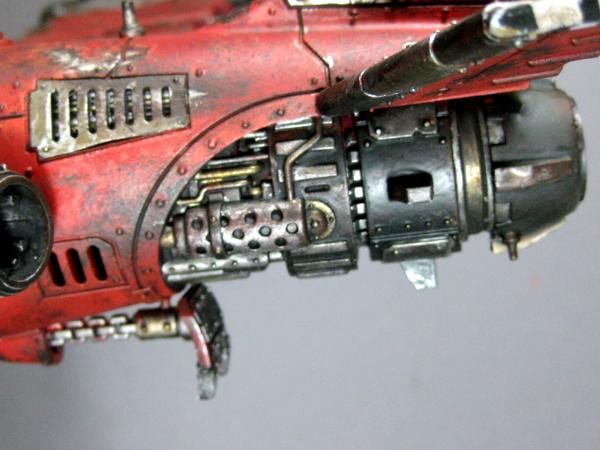
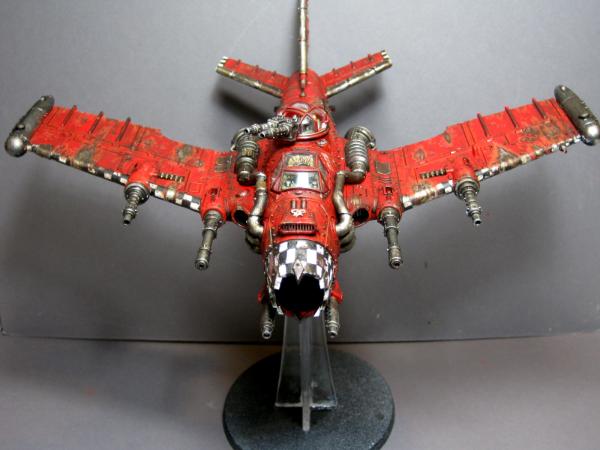
My best work so far. I took it to Games Day, entered it into the Golden Demon. I made the first Cut! -That was exciting, but I did not place, It just makes me want to try harder! It was fun!
At GD, I got some FW goodies.
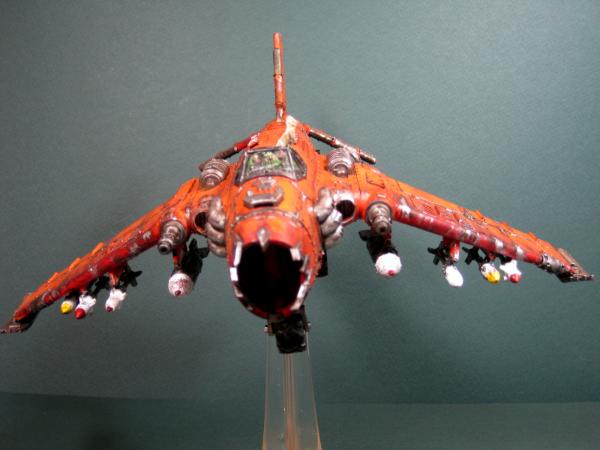
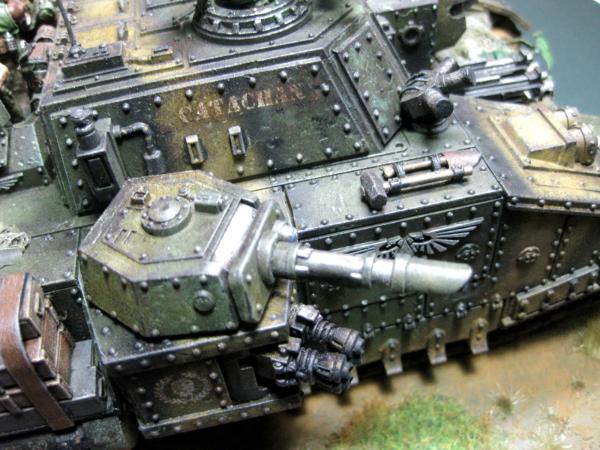
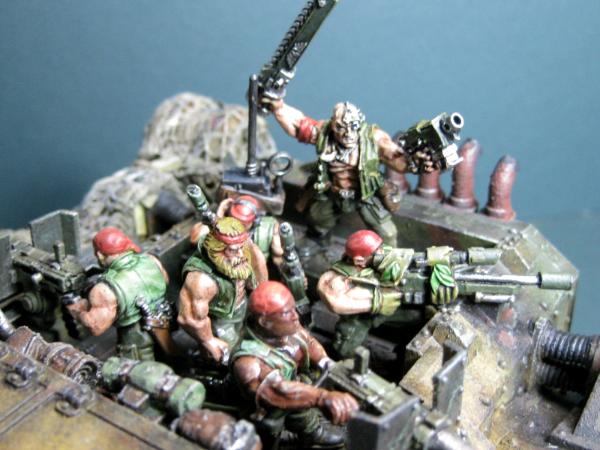
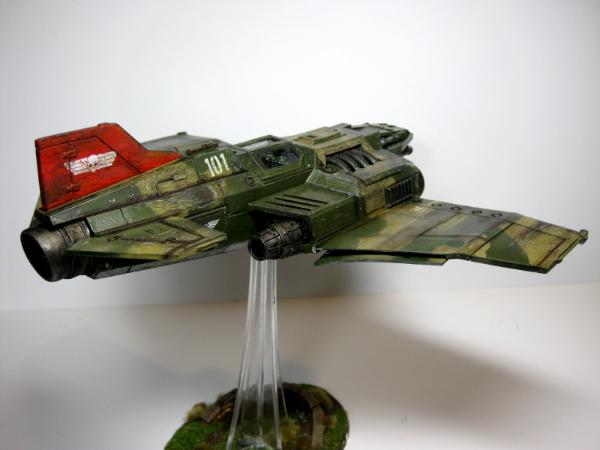
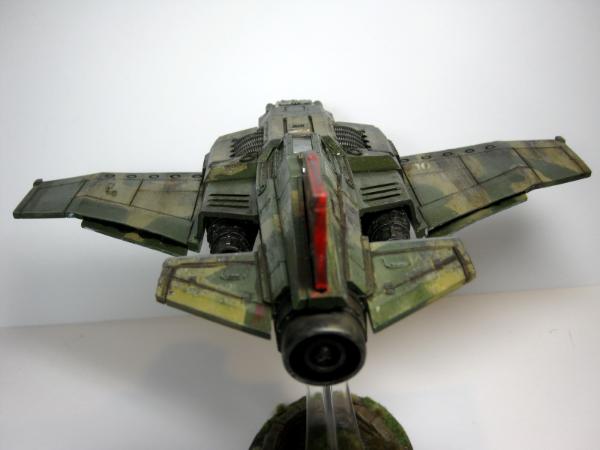
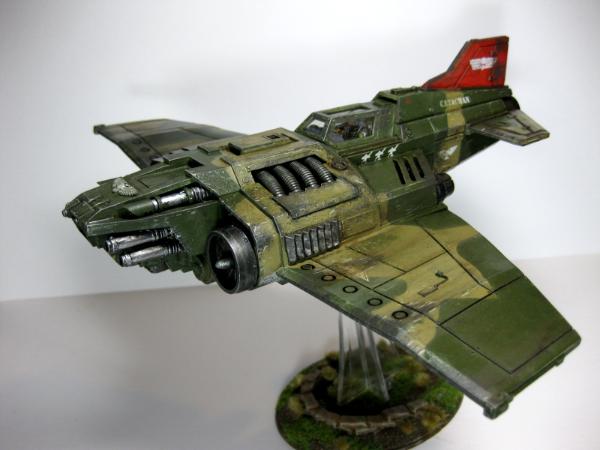
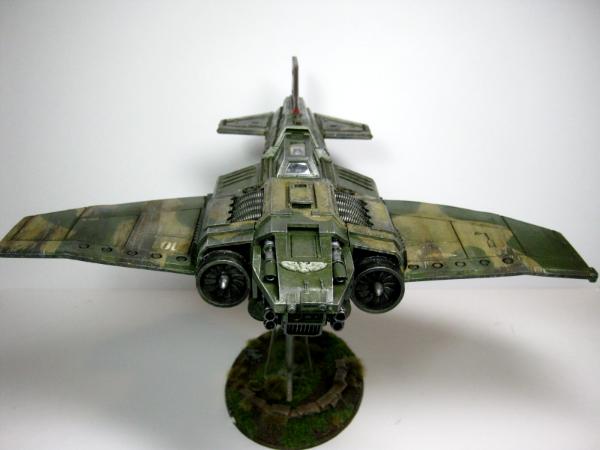
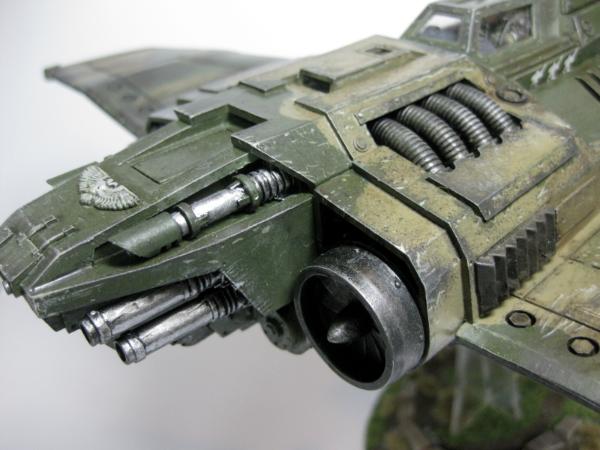
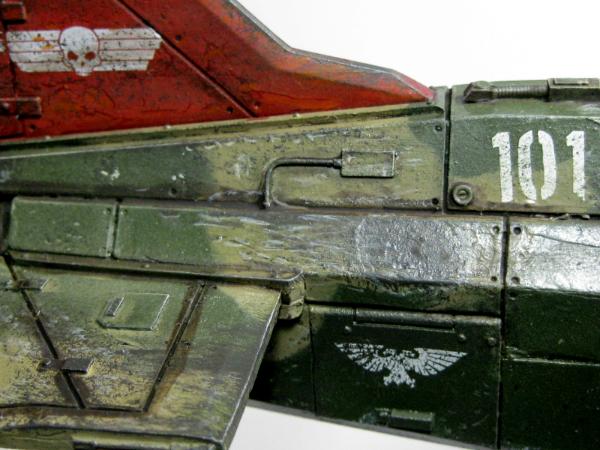
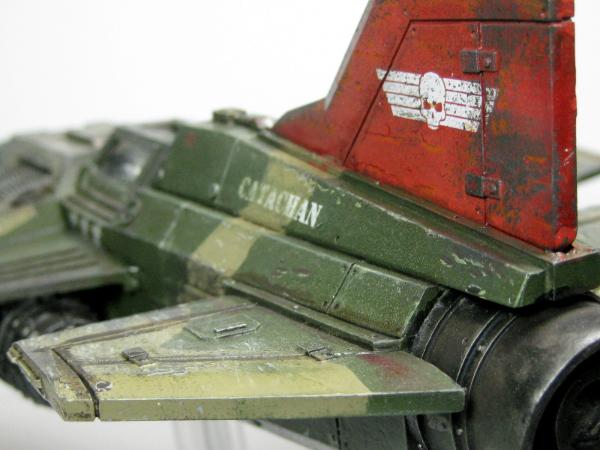
Here, is my FIRST Catachan Thunderbolt Fighter.

We're in business! Galorn is casting and selling my "Atomic Cola" and "Evening Rootbeer" machines at www.rivetzone.com!
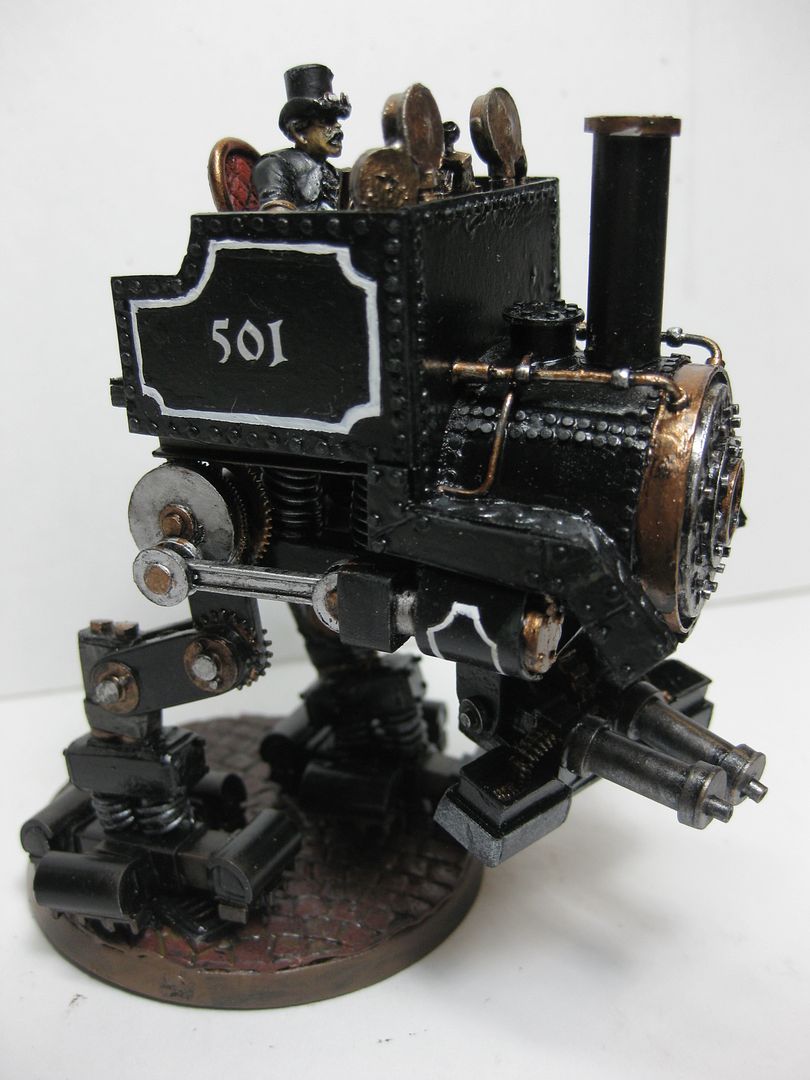
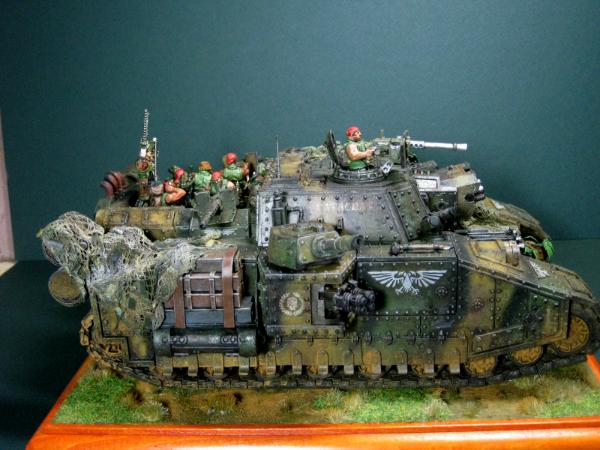
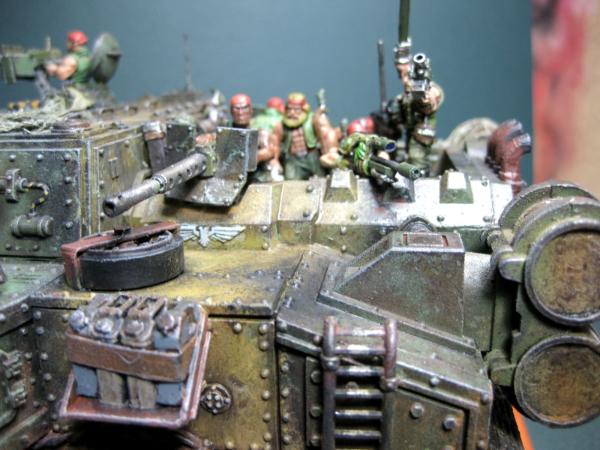
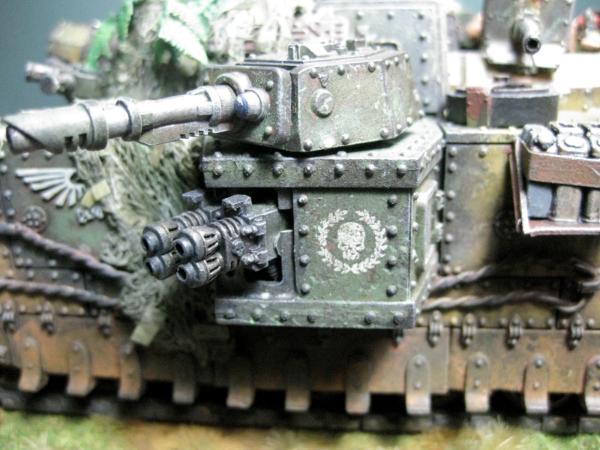
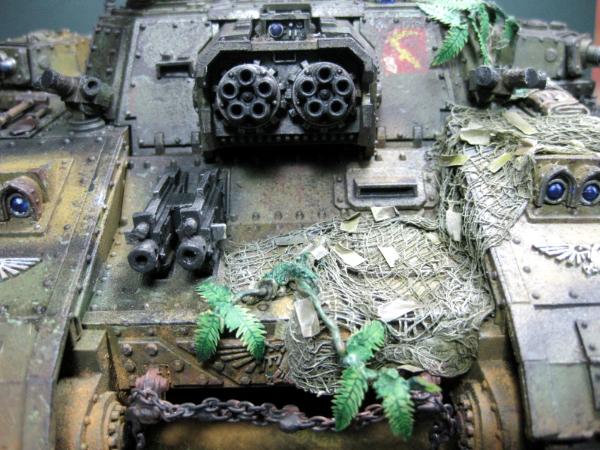
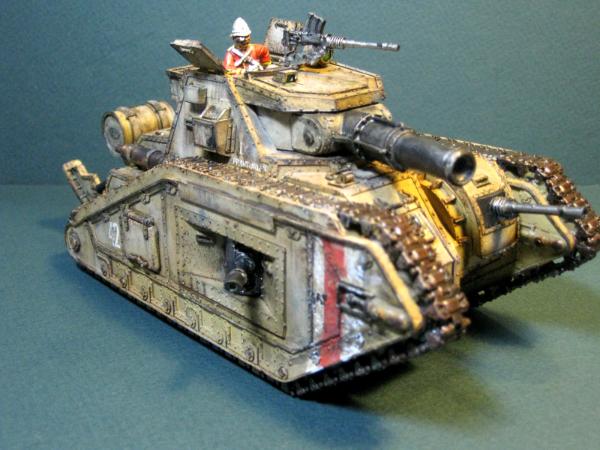
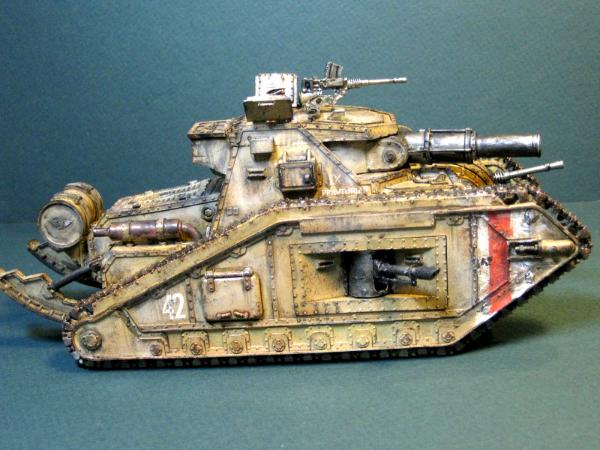
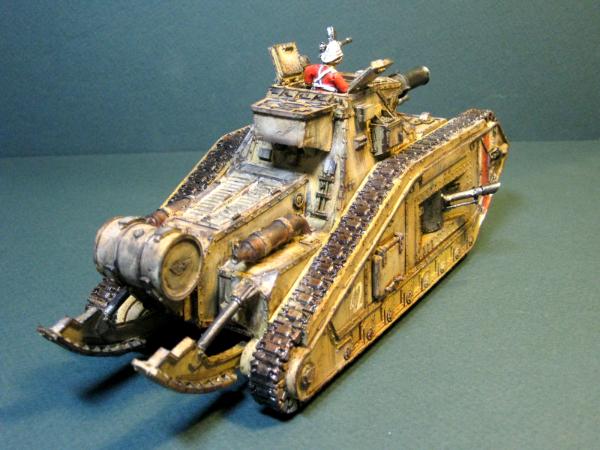
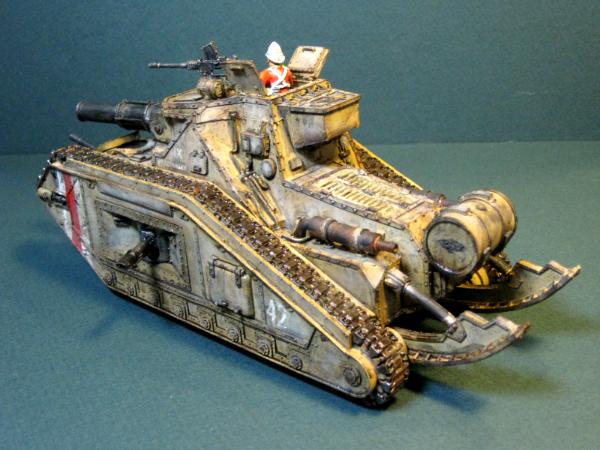
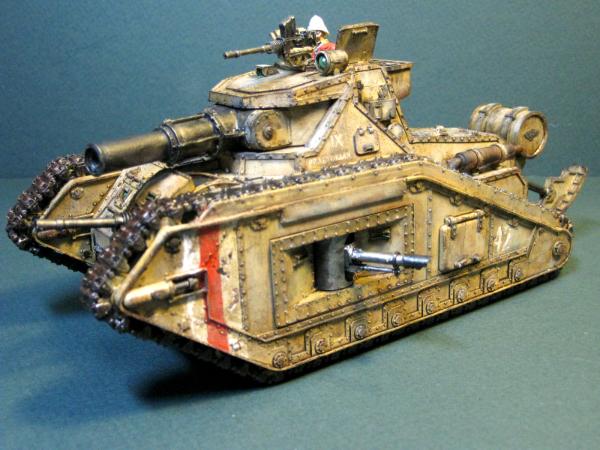
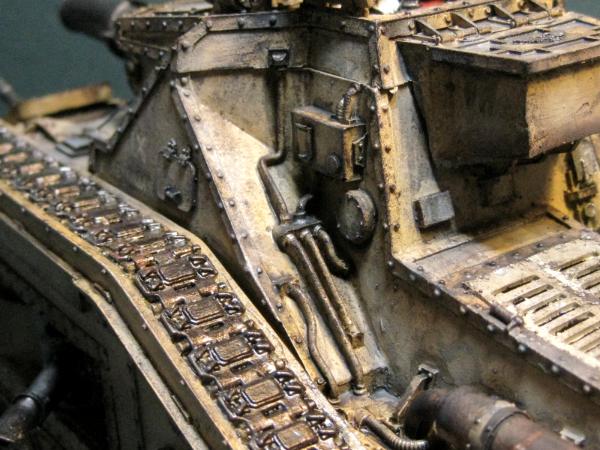
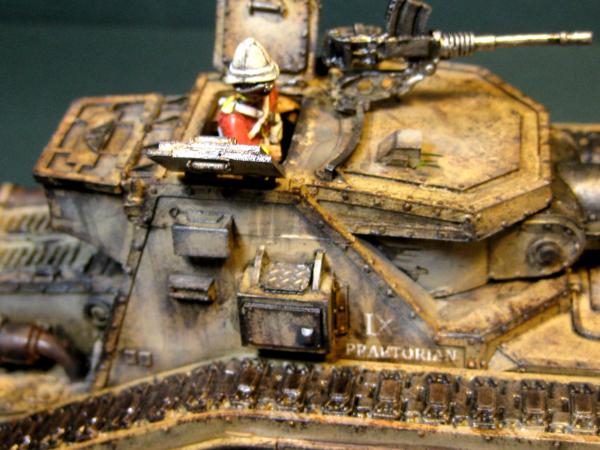
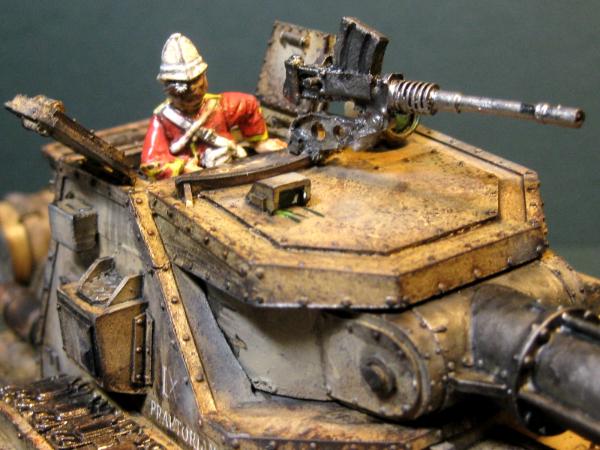
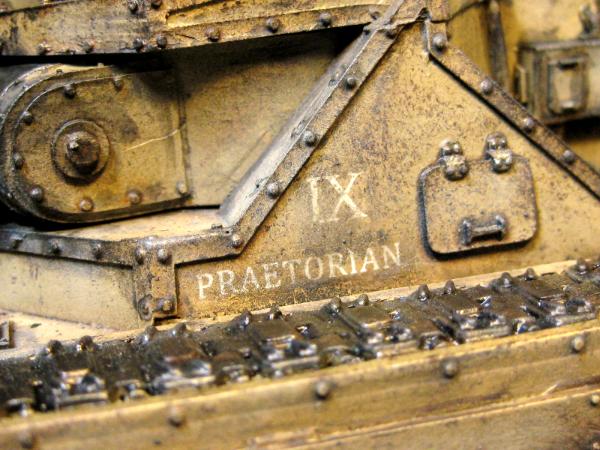
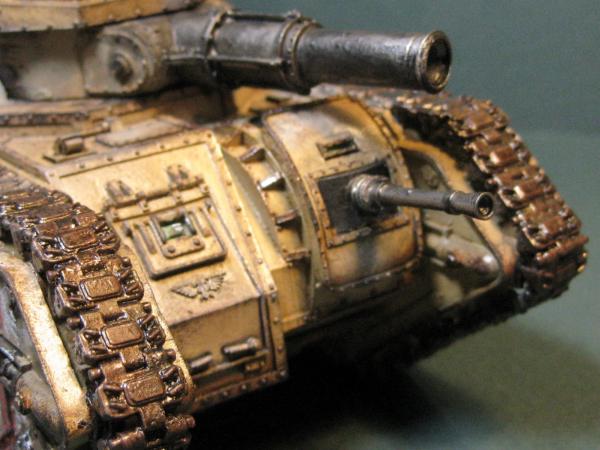
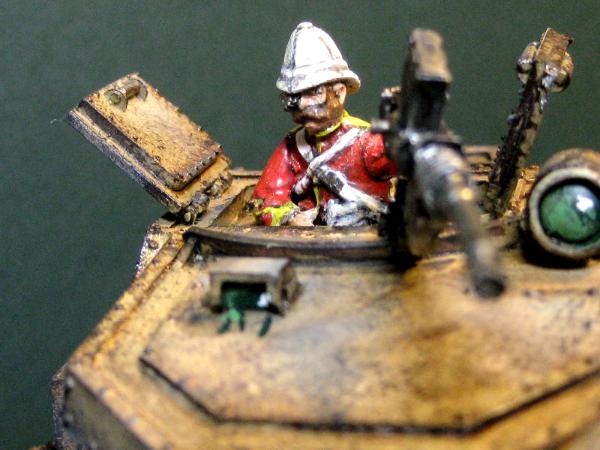
Just for fun, a Praetorian Guard Malcador.
The Hive gets new rules and models at page 450
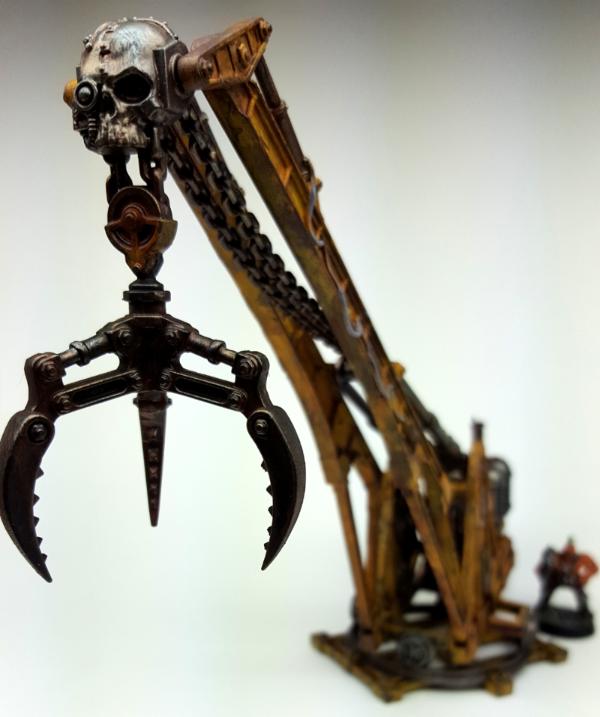
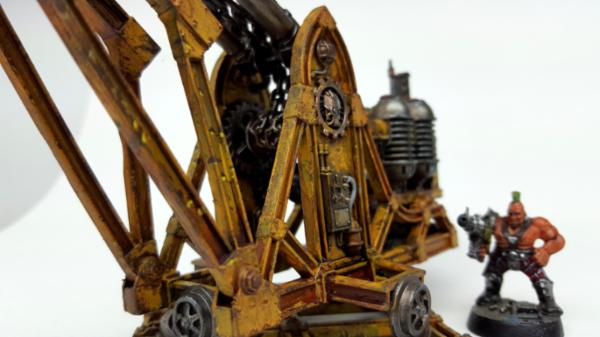
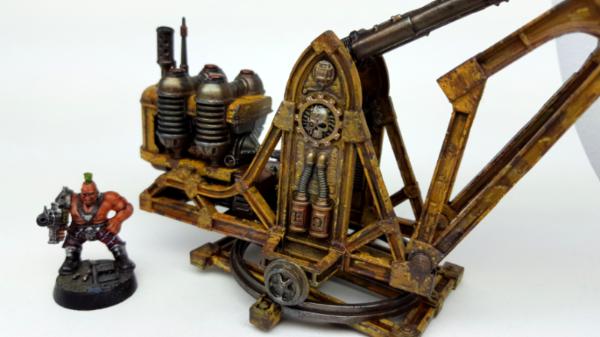
Sector Mechanicus Galvanic Crane


 Historic WIP blog starts here.
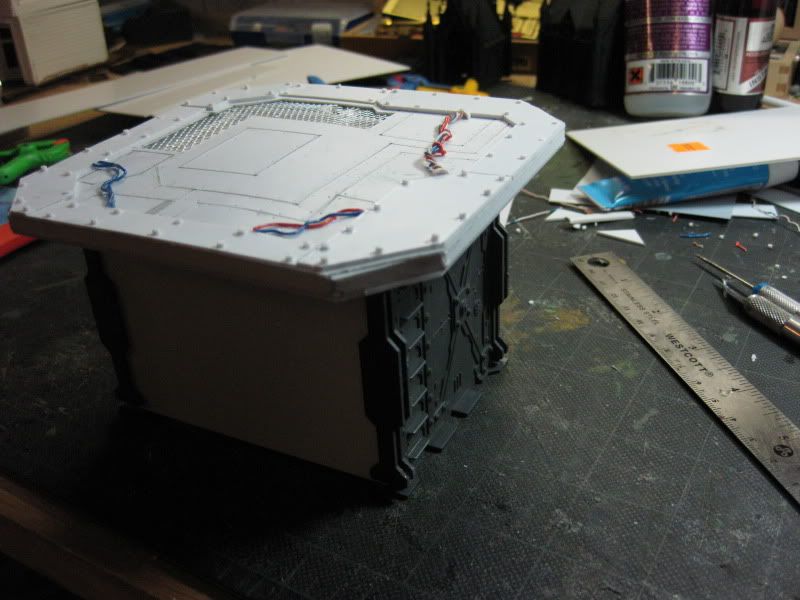
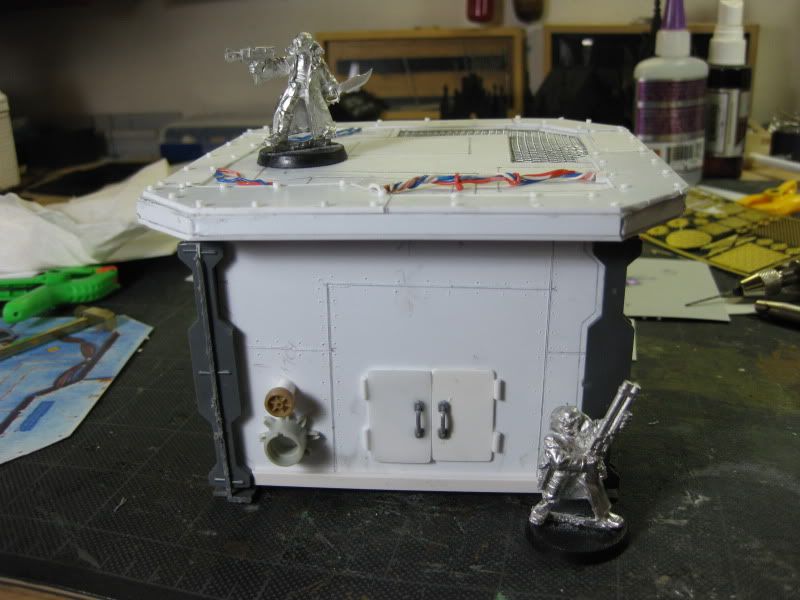
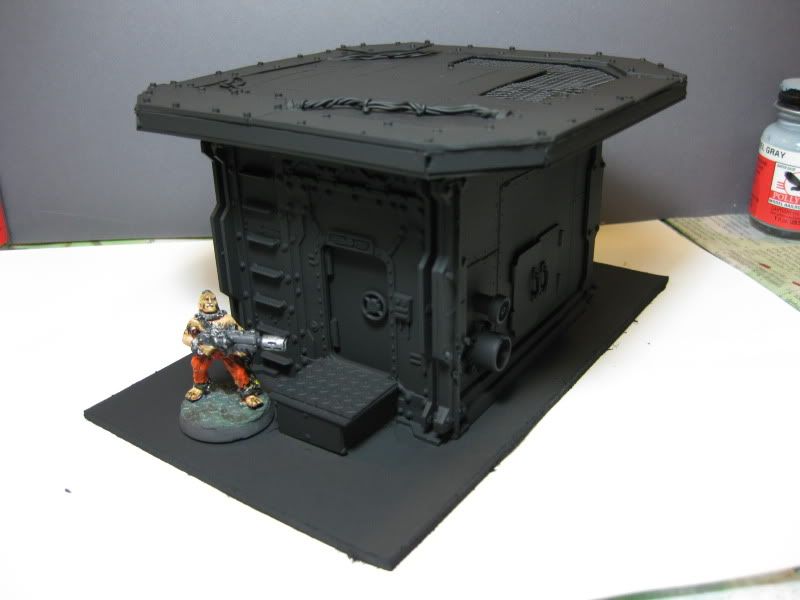
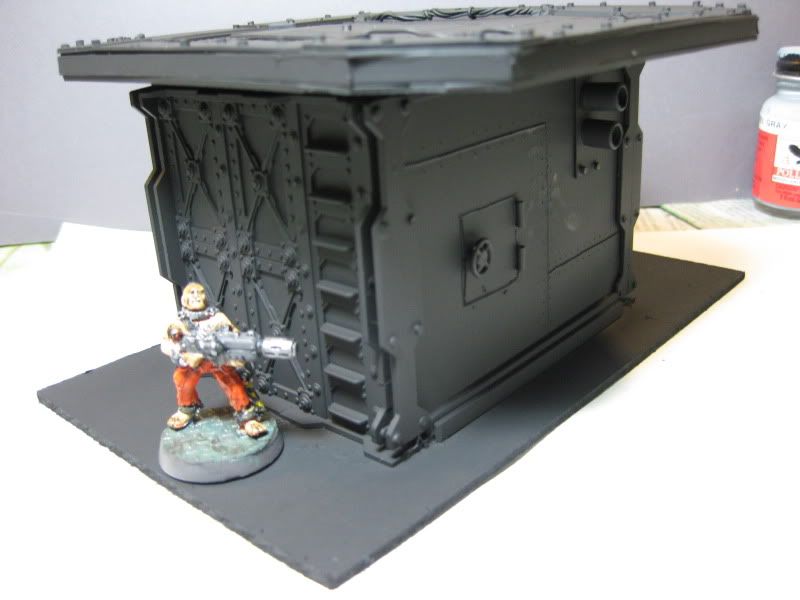
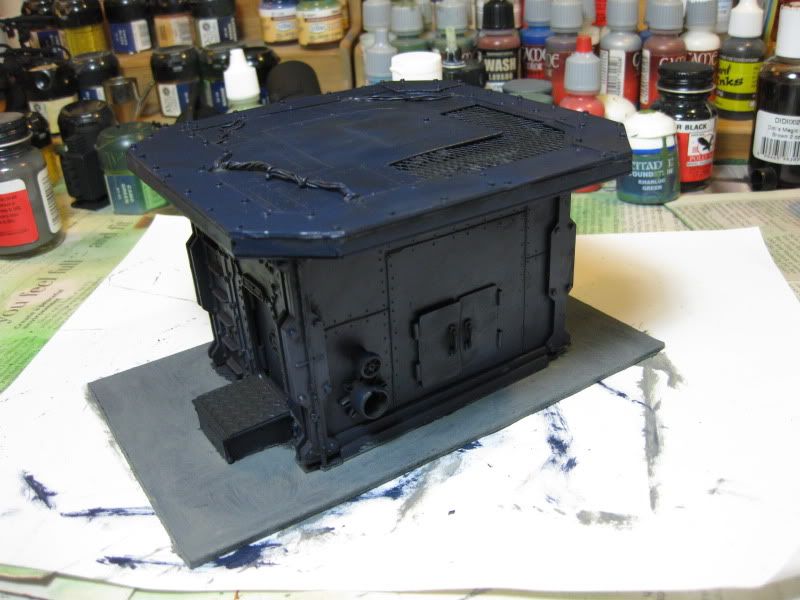
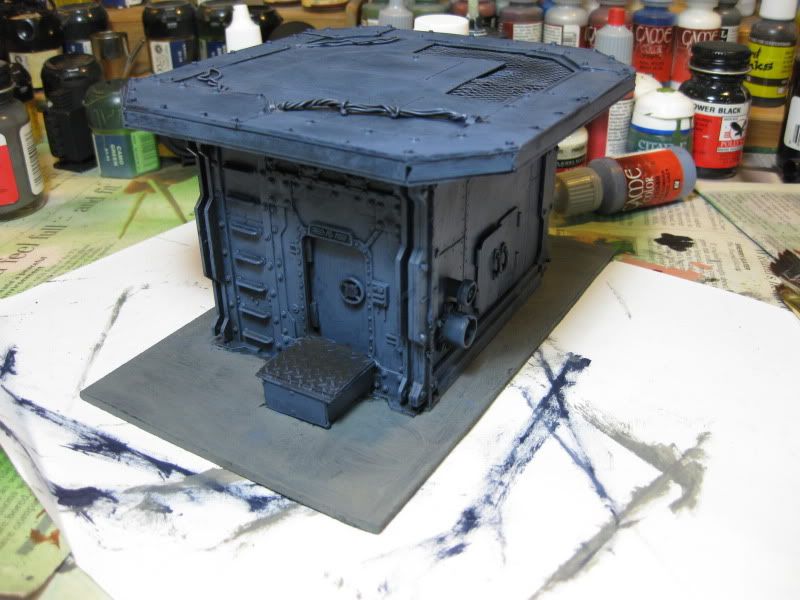
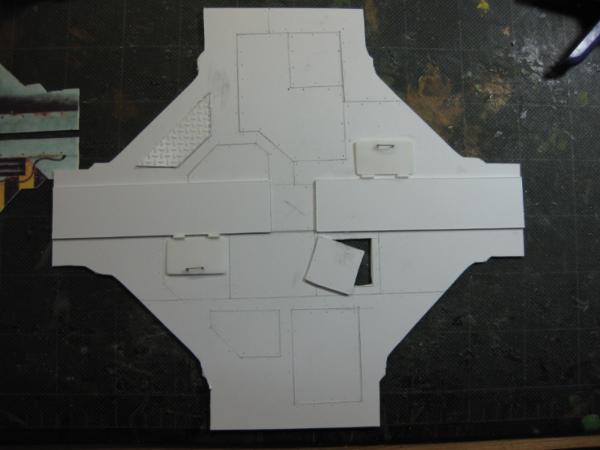
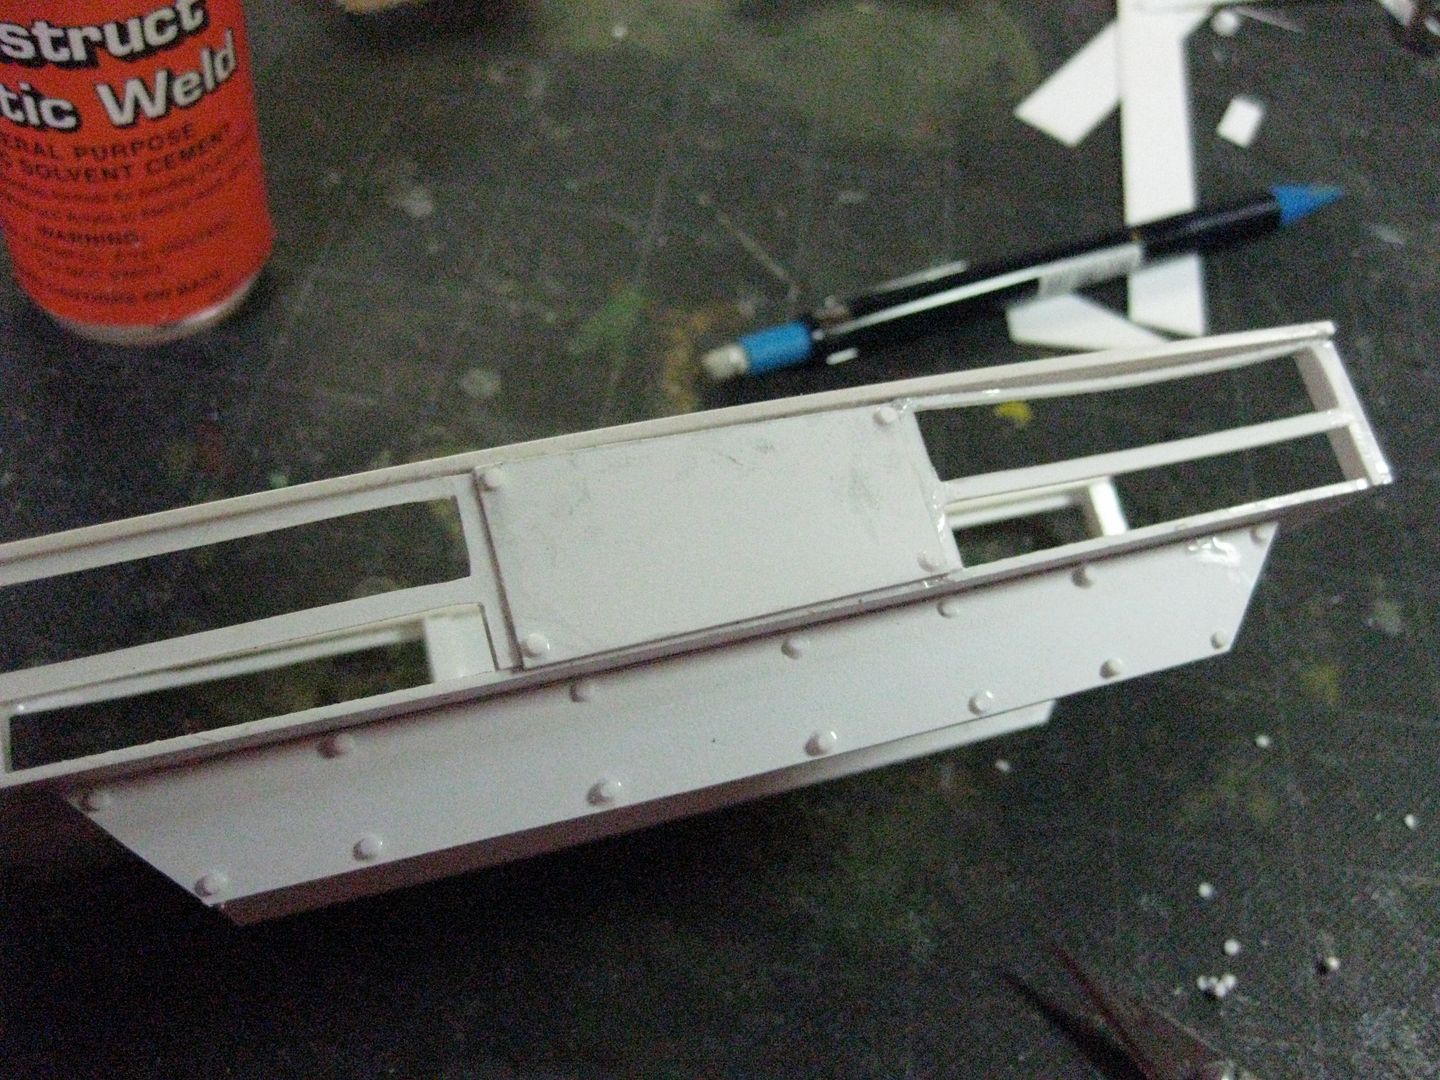
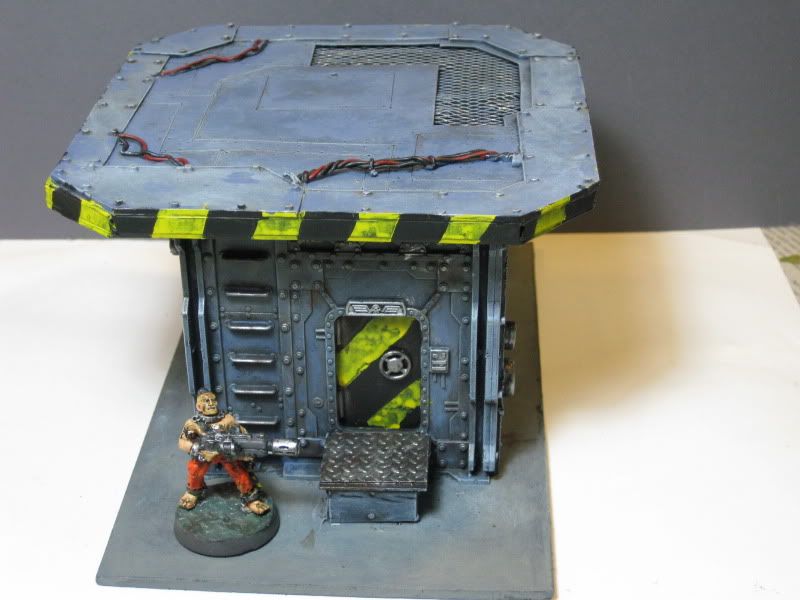
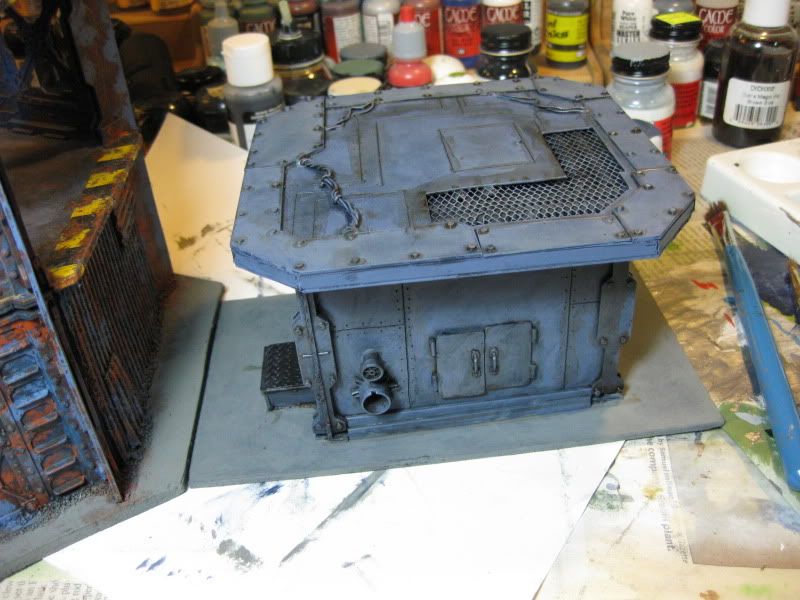
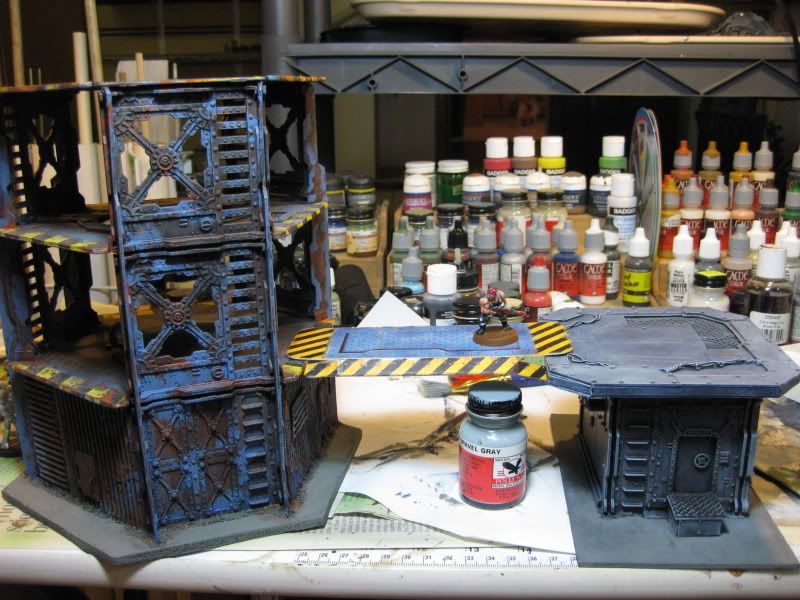
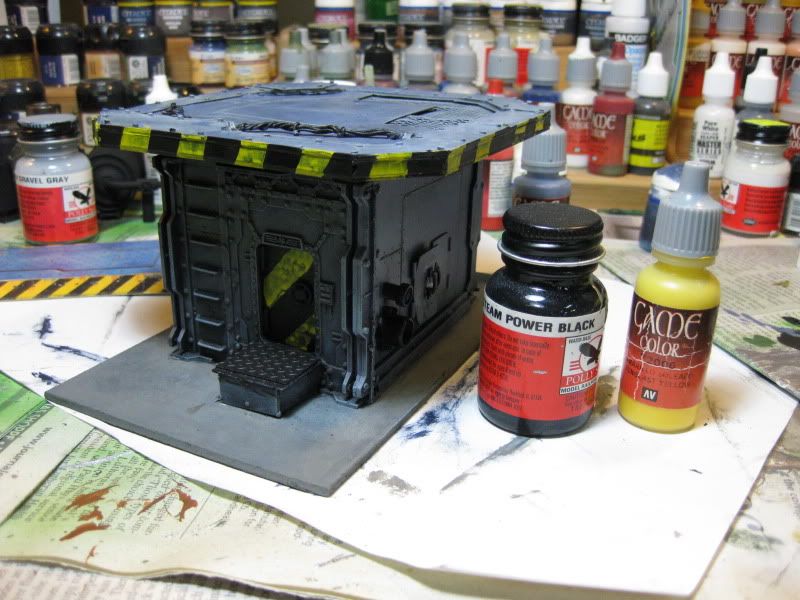
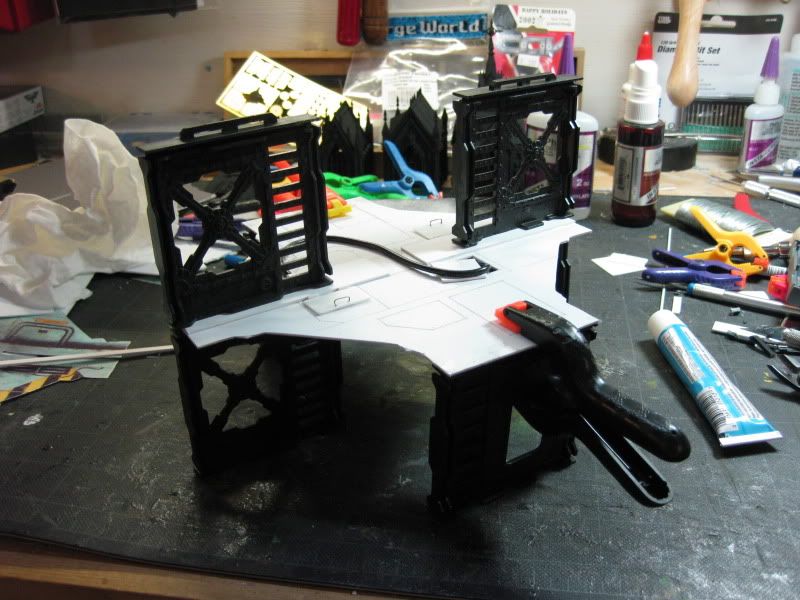
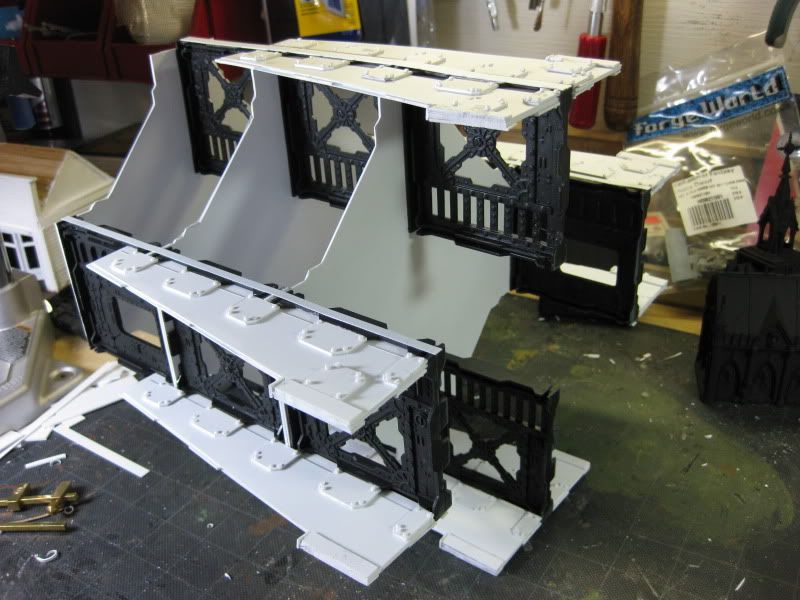
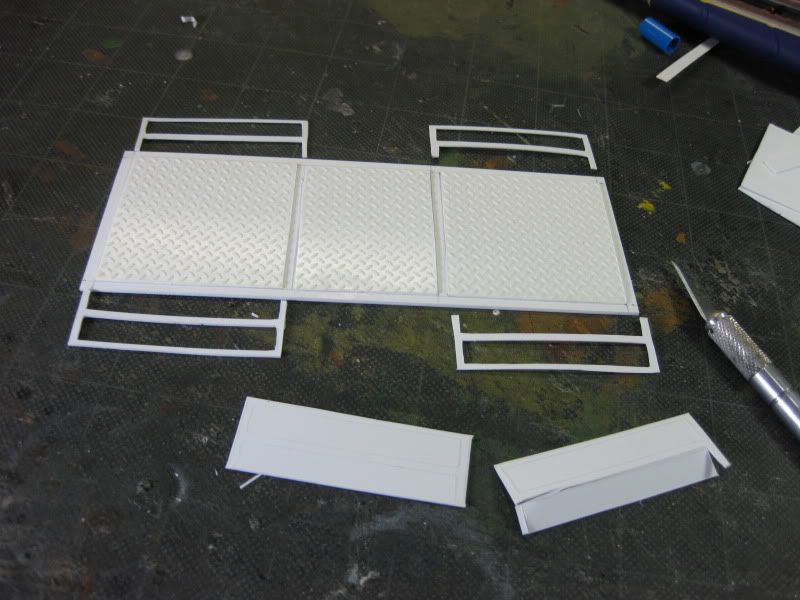
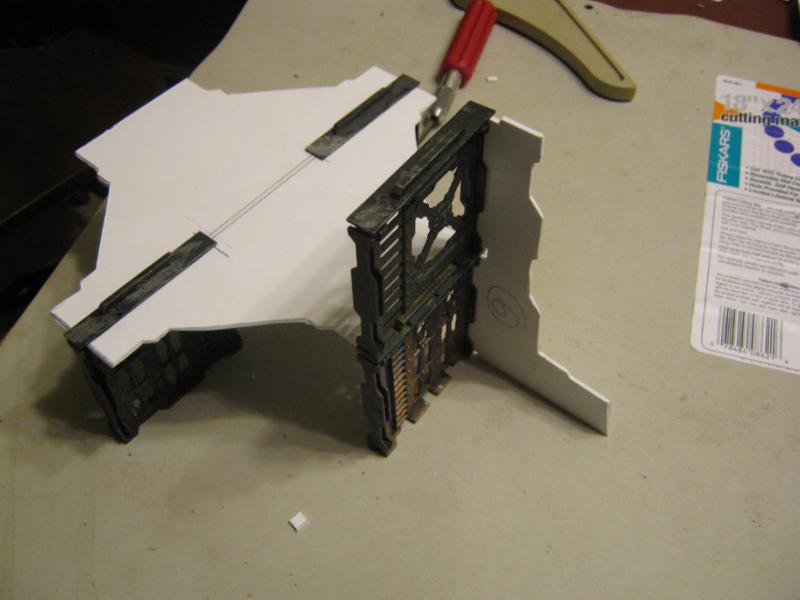
For this piece, a fitting use of some Necromunda Bulheads. I can't help my nostalgia.

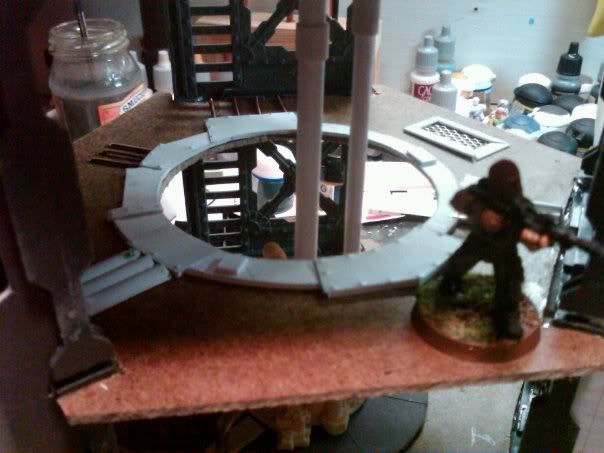
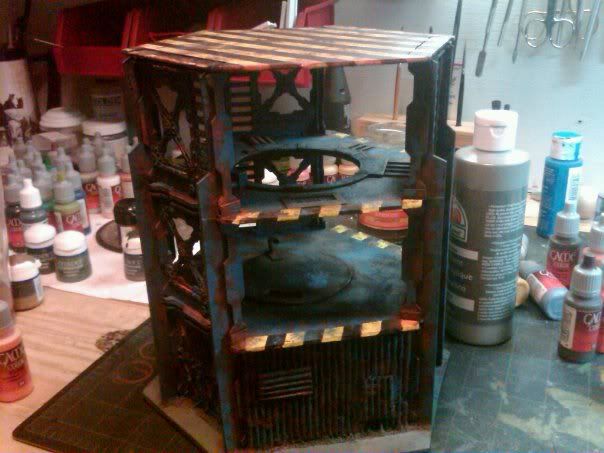
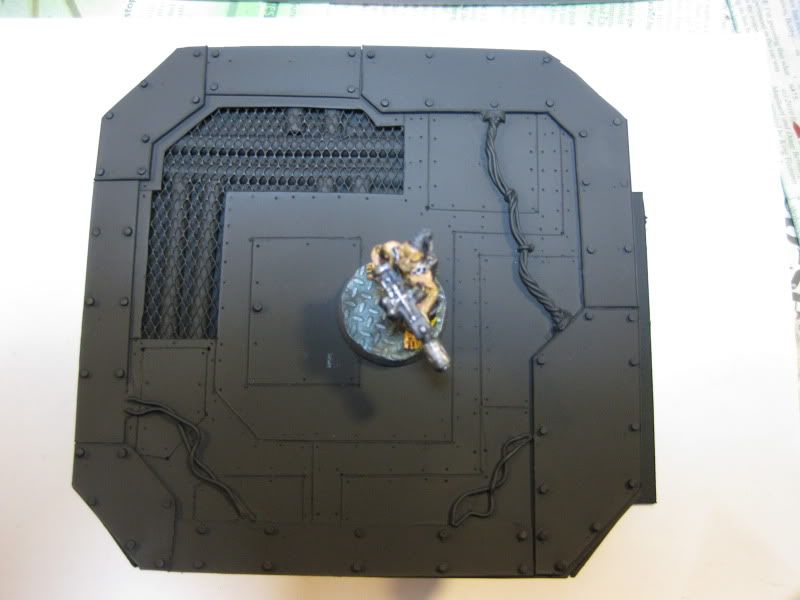
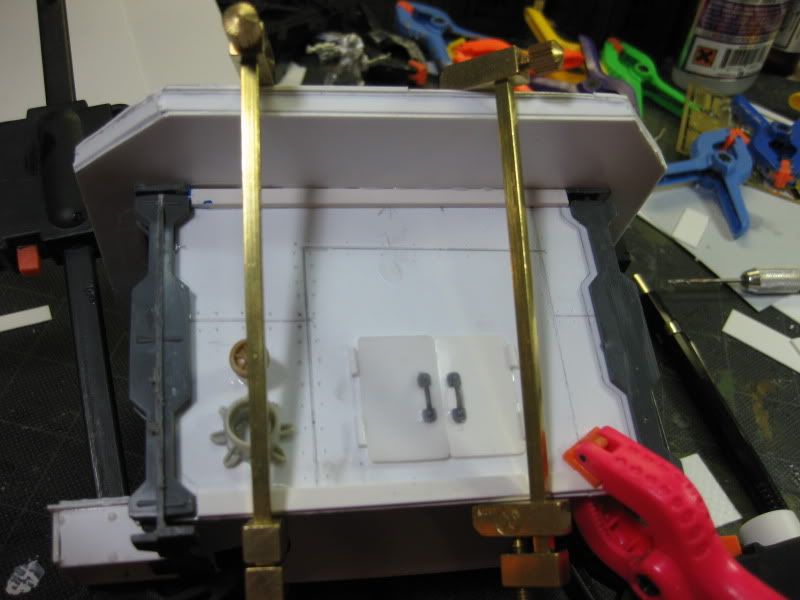
The top is removable for hand-access.
9804
Post by: Ultrafool
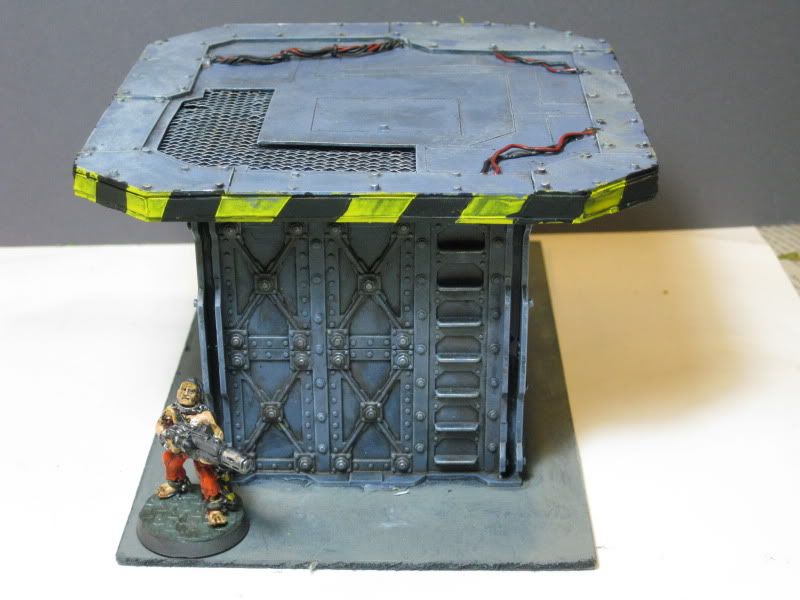
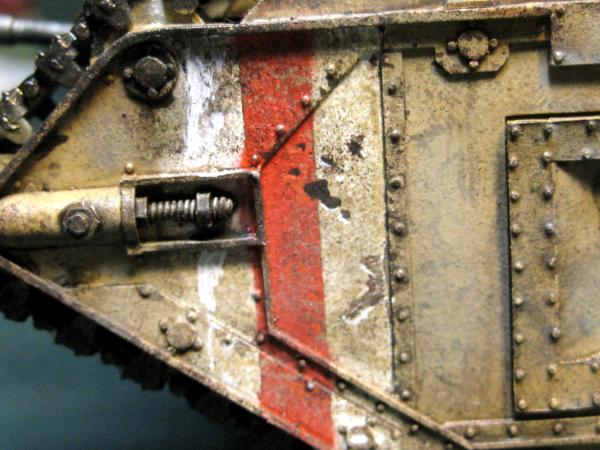
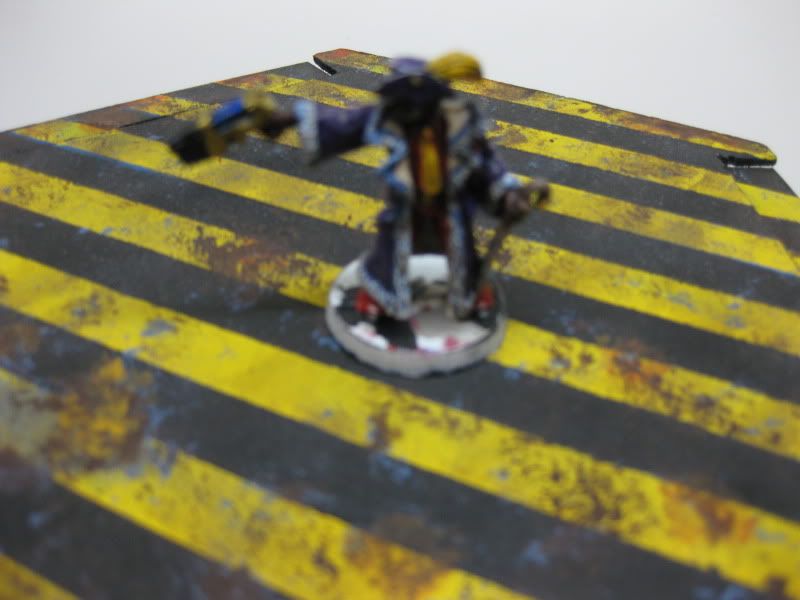
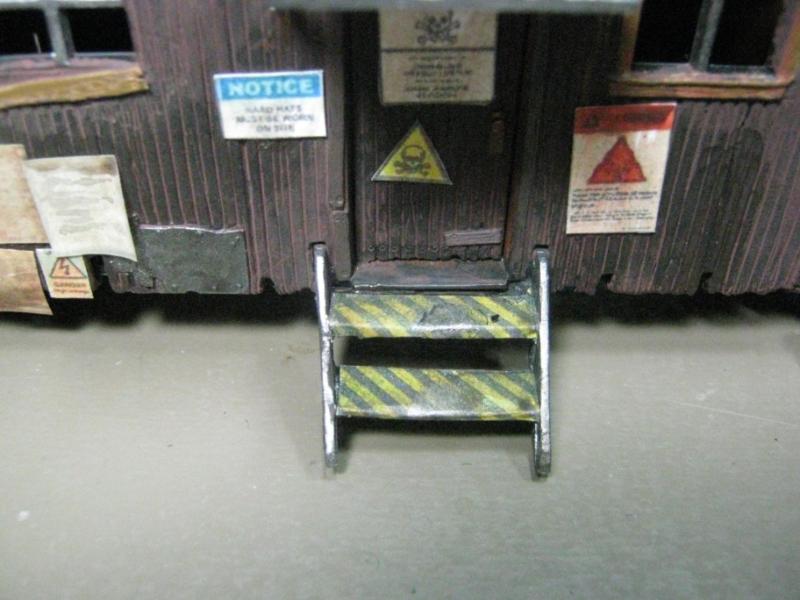
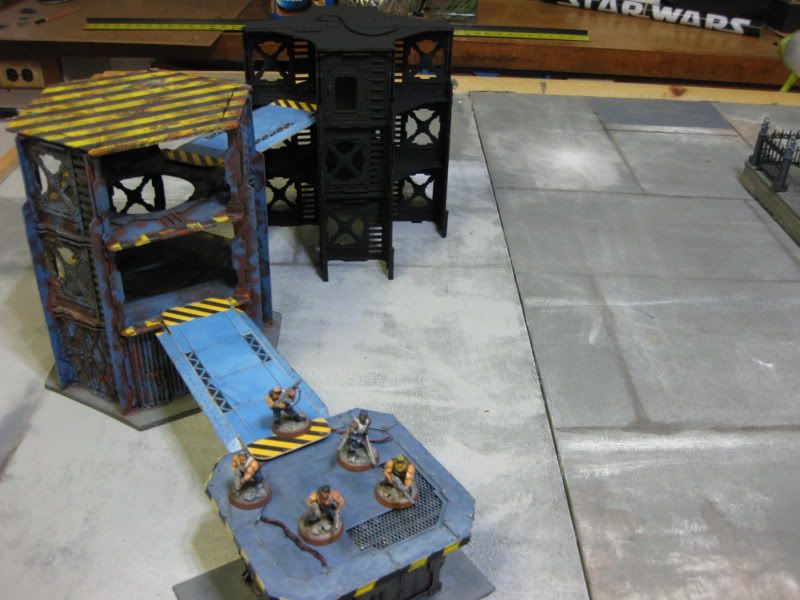
Wow really nice, wow do you get the hazard stripes looking so cool and straight.
48594
Post by: dsteingass
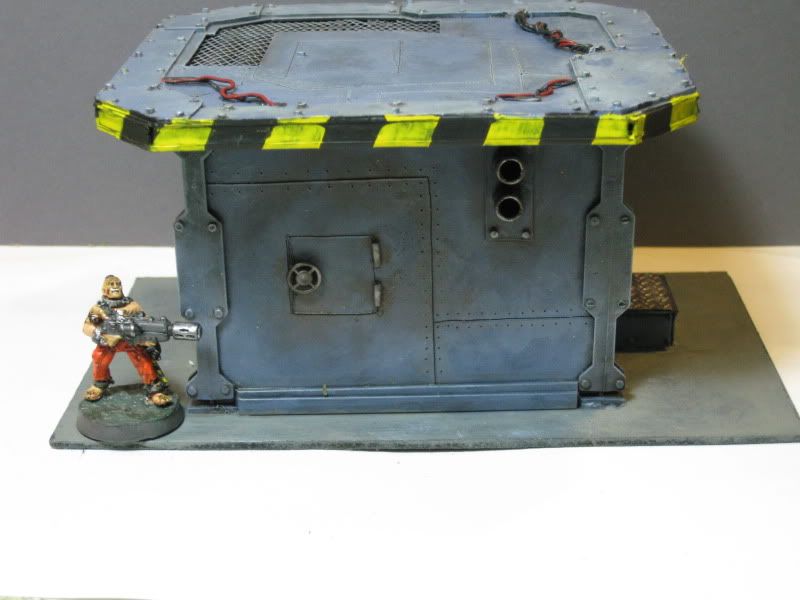
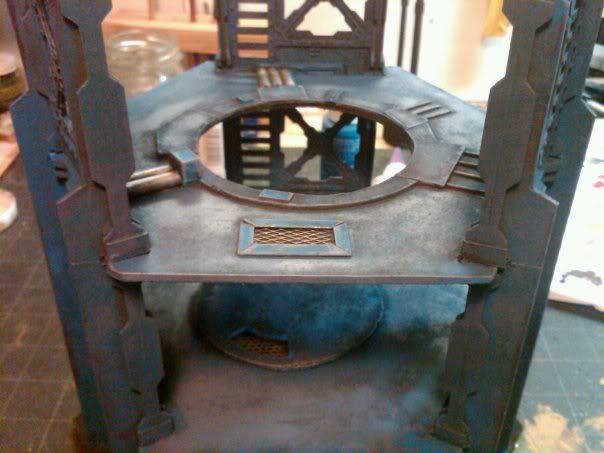
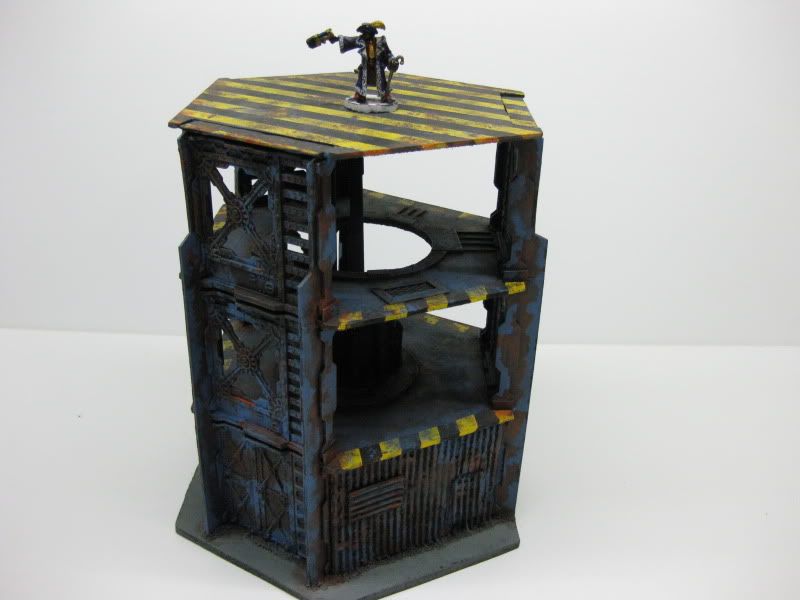
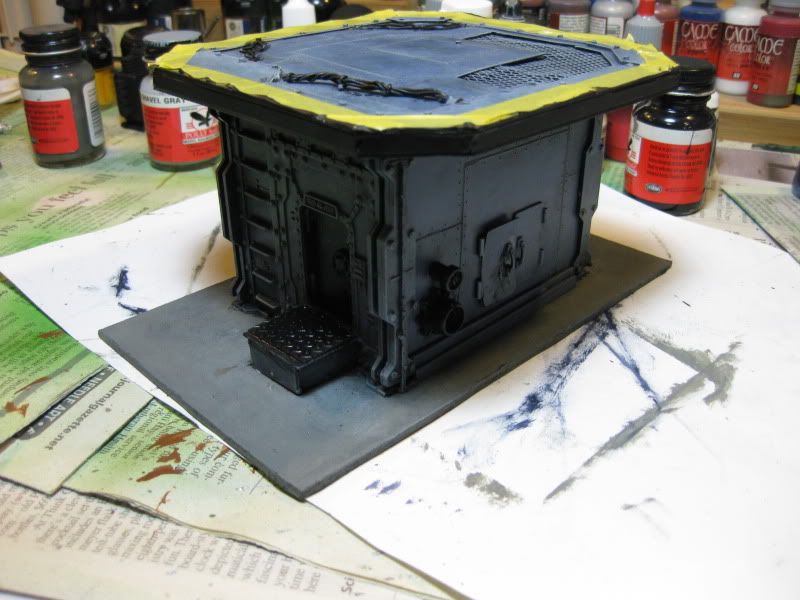
Thanks...I just used Tamiya 10mm masking tape! I paint the whole thing black first, then mask for the sunburst yellow, and brush it on thick.You weather and rust it later, it blends it all in.
46536
Post by: ishkatar
That's extremely cool terrain.
9804
Post by: Ultrafool
Awesome... Gotta find some tamiya tape, your advice should help me do some stripes on my Iron Warriors.
48594
Post by: dsteingass
Tamiya is just the brand I had, any tape would work in the right width. When removing the masking tape, do it just before it dries completlely, when it has that acrylic rubbery-ness to the paint. otherwise you may pull too much with it. Don't worry about any little flash to it, it pulls off with your knife.
9910
Post by: CommissarKhaine
Lots of memories there... Nice work!
48594
Post by: dsteingass
Thanks! Anyone have any ideas for the walkways? Should I magnetize them all or just build slip-slots like the card terrain? Magnets might limit the available configurations.
23897
Post by: Scarper
Really nice work! A fantastic tribute to the originals, but looks far better than the knackered cardboard ones I still play with! Quality paintjob too - awesome all round!
15358
Post by: Vitruvian XVII
This does indeed look sweet!!
Thanks Scarper for linking here
I think if magnets are going to limit the use of the terrain dont use them, though it would be cool.
34119
Post by: neil101
Nice work mate, i thought about doing this but those bulkheads are far too pricy. You have captured the exact same feel of the original .
but being a graphic designer i must say i miss the graphics
48594
Post by: dsteingass
Thanks guys! Scarper, I found your fantastic gangers, but where did you link my thread? I am fortunate enough to have a rather large stash of those bulkheads, even after I cut a bunch of them up for other terrain projects for my Imperial City table.
23897
Post by: Scarper
Aw, cheers, man, I'm really glad you like them! I just posted a quick link to your thread in PDH's thread here. He's a friend of mine who did some awesome scavvies and terrain a while ago, and I thought your stuff was pretty inspiring! There's an amazing necromunda community on here, and I thought you'd appreciate the feedback too 
(also, PDH, if you're reading this, I think I can hear your scavvy dogs howling for attention from that drawer of yours...)
48594
Post by: dsteingass
Very cool!,...I really had no idea! Necro has a huge warm fuzzy place with me! Thanks for the laurel, and the hearty handshake!
24297
Post by: Viktor von Domm
OMG yet another fine project to behold...man that man must be not able to go to sleep for years...splendid built and even nicer paintjob! love the weathering!
vik
48594
Post by: dsteingass
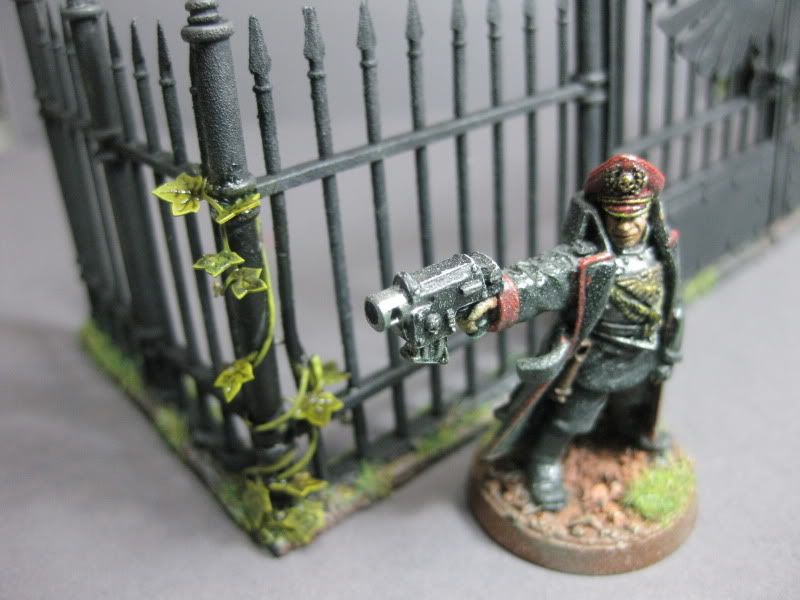
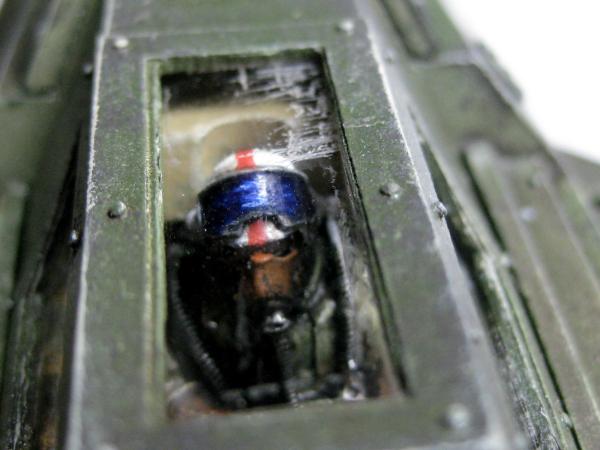
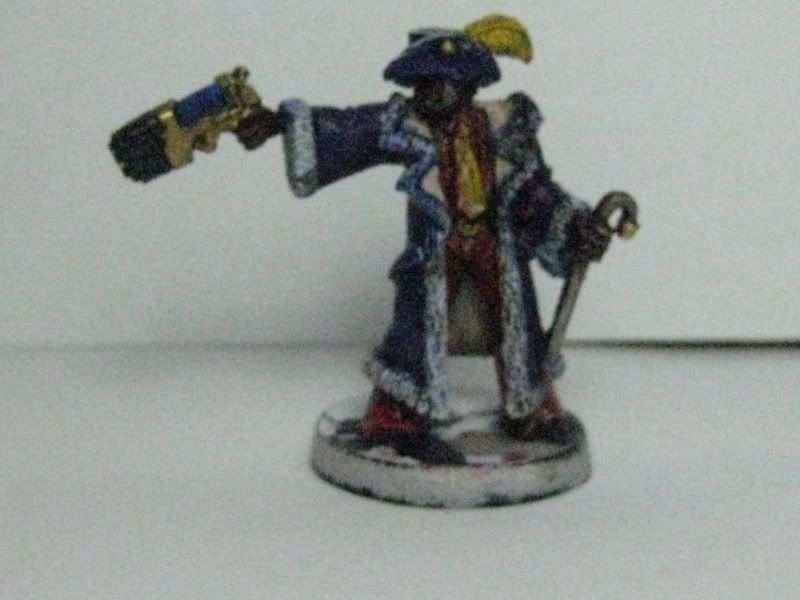
thx Vik, ....true, many of these are in fact, products of some insomnia. I built this last winter, I am a chronic photo-documenter when I work, always snapping wip shots..otherwise I forget how I did things myself. Automatically Appended Next Post: Hopefully some better pics (and a mysteriously pimp-dressed WIP Gang Leader)
VERY WIP
 Automatically Appended Next Post: Automatically Appended Next Post: And the girls can handle themselves....
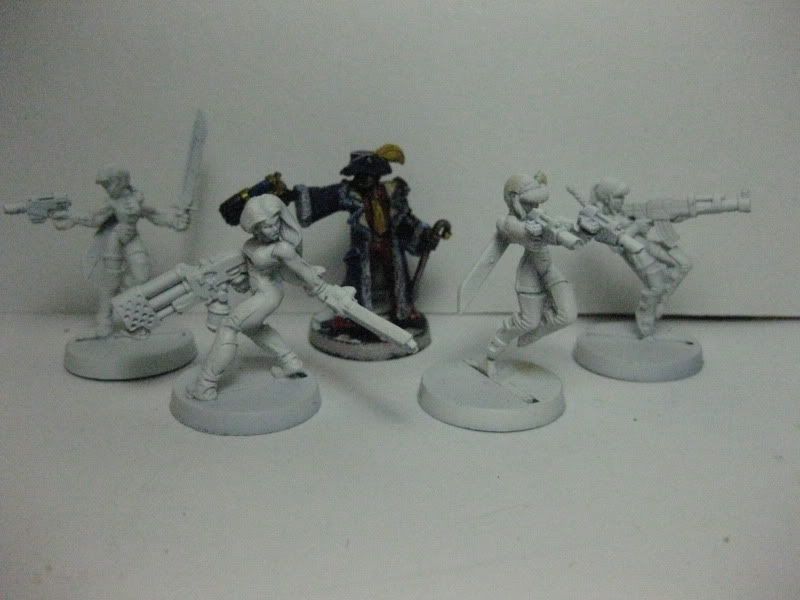 Automatically Appended Next Post: Automatically Appended Next Post: and...
24297
Post by: Viktor von Domm
lol... nice bunch of minis... most of the gals i own too^^ except the flamer girl...
that pimp is so cool... same goes to disco stu^^
that weathering is of the scale... powders yet again? feel free to bombard us with anything WIP you have... we can take it!^^
48594
Post by: dsteingass
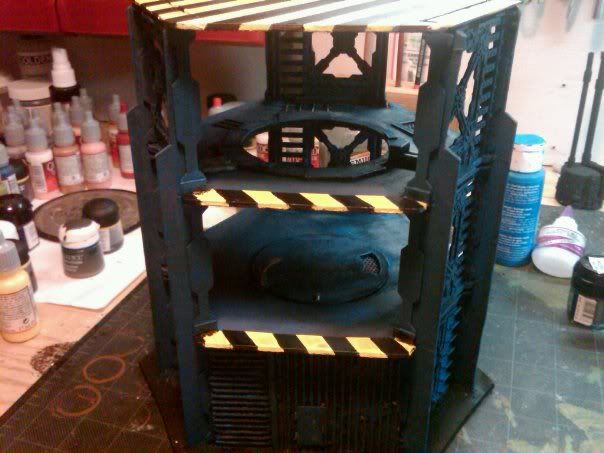
Nope, still haven't tried the powders, this is just stippling of the base blue, then stippling of rusty orange paint, that's all!
3947
Post by: 92acclude
Nice work man.
Glad to see someone else taking the old terrain and rebuilding it in 3D.
25141
Post by: Chibi Bodge-Battle
dsteingass wrote:Tamiya is just the brand I had, any tape would work in the right width. When removing the masking tape, do it just before it dries completlely, when it has that acrylic rubbery-ness to the paint. otherwise you may pull too much with it. Don't worry about any little flash to it, it pulls off with your knife.
Don't use ordinary decorators tape though
Tamiya tape is made for modellers so that it doesn't pull off any paint underneath when removed.
It is also quite thin which is a help
But any similar will indeed do
Great Necro tower!
love it Dstein 
48594
Post by: dsteingass
92acclude wrote:Nice work man.
Glad to see someone else taking the old terrain and rebuilding it in 3D.
Who else is doing it?? I want to see
24297
Post by: Viktor von Domm
just stippling you say...still haven´t bought me a good stippling brush...guesss this has to happen before painting my new tanks then...
48594
Post by: dsteingass
Nooo, no fancy brush needed, just use an old thick brush with some stiffness to it, stray hairs will actually help the effect. You just need to use a rough, downward stabbing motion a-la Bob Ross
24297
Post by: Viktor von Domm
actually i really like that guy, he could do wonders with spatels and brushes! whenever i stumble over one of his shows on latenight TV i just watch in awe...
yeah i will try that out...and thankfully i do have the brushes then for that^^
25141
Post by: Chibi Bodge-Battle
I tried that technique once, and failed to hit the right part of the model with the brush. 
But amazingly a tasty pastry appeared!
So it is true:
Missed the stippling makes exceedingly good cakes!
*coat*
48594
Post by: dsteingass
lolz. Over in my Imperial Table blog (link in sig), I just posted my experiment with the magnetized walkways. I have WIP shots from it too if anyone is interested.
24297
Post by: Viktor von Domm
if ye still have to ask... *shakes head*
at chibi:
But amazingly a tasty pastry appeared!
So it is true:
Missed the stippling makes exceedingly good cakes!
there is a pun there that i can´t seem to understand...and it proves you are a biscuit case^^
48594
Post by: dsteingass
Vik, I think it is because stippling is also a word used for making air vents in a pastry before baking.
24297
Post by: Viktor von Domm
ah! ok. now i see... the duality of speach^^
25141
Post by: Chibi Bodge-Battle
Sorry chaps
Correct Dstein and also a reference to a series of old adverts on the TV
24297
Post by: Viktor von Domm
this add shows precisly that chibis refference was not even off topic^^
48594
Post by: dsteingass
Meh, go off topic all you want!
24297
Post by: Viktor von Domm
well if peeps like chibi and me follow your threads there is a fair chance to this happening^^
32193
Post by: PDH
dsteingass - Wicked is the only word I can use to describe that building - along with your 40k terrain too. Really hope you're planning on making lots more. When doing your hazard stripes do you reundercoat the yellow areas white before applying the sunburst yellow?
As for walkway suggestions and a little shameless self promotion towards the bottom of page 6:
http://www.dakkadakka.com/dakkaforum/posts/list/180/309038.page They are undercoated but not painted yet.
Scarper - I can hear their howling again mother  . I'm planning on painting a couple of scavvies after the brute...I miss them.
Ok guys lets keep it on topic here...we all know Scarper's nerco thread is the place to go off topic. So fisherman jumpers and transvestites down, what's up next?
48594
Post by: dsteingass
Thank man! There will be more, I intend on raising the city into multiple elevations a-la Hive world, just haven't worked out exactly how to do that yet. I am enjoying your thread, but I still haven't found anything about walkways, not on page 6 anyways. Still reading through. As for the hazard stripes, nope no undercoat white. I never understood why people insist on doing that, I've never needed to do it. Just use about 2 coats right from the pot/bottle thick, you are going to weather it anyways, so any see-through just looks like wear and tear to my eyes. The black and yellow contrast so sharply I think you can get away with it, but I suppose if you were using some other color than black it might blend into ugly. And please, I'm no thread fascist, if we want to delve into jumpsuits or assless chaps or what not, go right ahead!
3947
Post by: 92acclude
dsteingass wrote:92acclude wrote:Nice work man.
Glad to see someone else taking the old terrain and rebuilding it in 3D.
Who else is doing it?? I want to see
I will be.
My plan is to get a bunch of stuff laser cut from the old card, like I did with the old command tower, http://dylangould.blogspot.com/2011/04/2nd-edition-terrain-in-progress.html
Should be cool whenever I get around to it.
47942
Post by: bebopdrums2424
I think it's time to make a catachan board....just saying 
48594
Post by: dsteingass
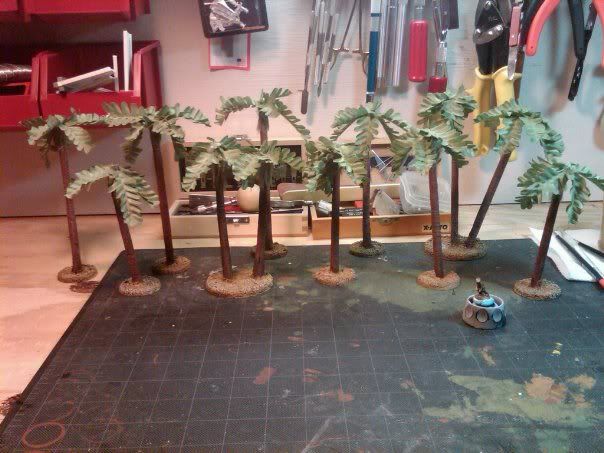
That is the coolest thing man! awesome! Catachan board? don't tempt me...the only thing stopping me is a lack of jungle plants and silk flowers and such. Currently though, I do have a slew of woodland trees for the other side of the concrete board (which has a vinyl grass mat glued to it.
@PDH...found them (page 7) , very nice, thank you! What lengths do you use for the walkways?
38276
Post by: M0rdain
Chibi Bodge-Battle wrote:But amazingly a tasty pastry appeared!
So it is true:
Missed the stippling makes exceedingly good cakes!
I nearly choked on my coffee reading that lol 
24297
Post by: Viktor von Domm
at 92acclude that defense station is brilliant! on so many levels!
48594
Post by: dsteingass
32169
Post by: Rogue Wolves
nice munda terrain thats i like the idea of making the card terrain 3d i might have to try that
224
Post by: migsula
Great terrain! Absolutely. The humor of the gangs dont work for my vision of 40k though
24297
Post by: Viktor von Domm
no....you didn´t just reverse punch the rivets into the card? now didn´t you...hell...whatever will they think of next... i think this new project will be heading into a nice and interresting direction!
48594
Post by: dsteingass
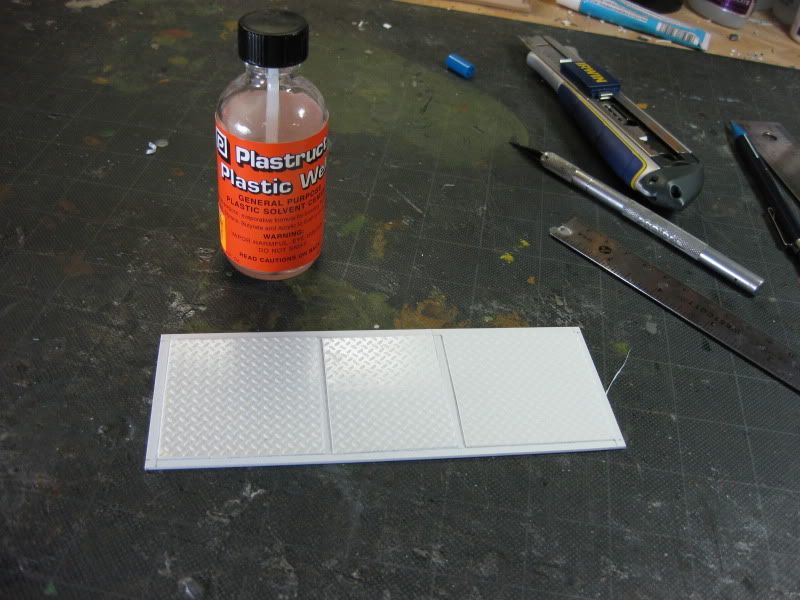
Yep, just eyeballed and started punching recessed rivet holes into the plastic card
24297
Post by: Viktor von Domm
what thickness is that plasticcard in mm?
48594
Post by: dsteingass
This is the thin outer skin, so it is just 1mm
24297
Post by: Viktor von Domm
that makes sense... the needler would do anything to a material anything thicker than that!... but it is a good way to get really tiny detail in a very acurate way!....have to investigate that one later on...
48594
Post by: dsteingass
When you use a bit blunter scratch awl on some thicker 0.40" stuff it will leave a nice raised rivet on the other side of the plastic.
24297
Post by: Viktor von Domm
thought about a blunt one too... i like the edged version i currently do a lot better than all too round ones....but thats just pure taste...
23897
Post by: Scarper
Ok, wow. If you pull this off (and I'm sure you will, based on what you've done so far!) it will be awesome. Did neil's graphic designer complaint inspire you?
Though i hope you're not going to cover up the detail on the flooring of the building you've already done - would be a real shame to lose that paintjob... Only solution: more buildings!
48594
Post by: dsteingass
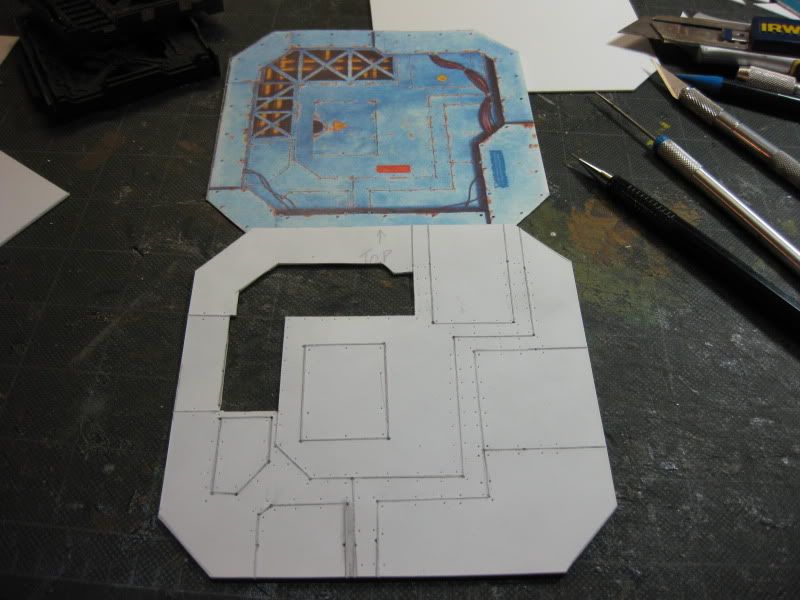
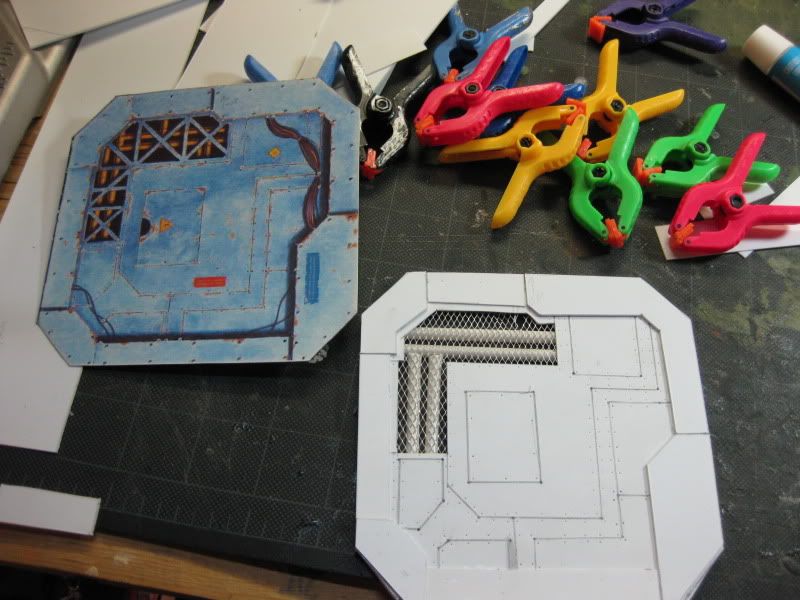
Oh no, this is going to be a different building! Although I'm not sure what the configuration of the building will be yet, I really just want to capture the original artist's style, Not go for an exact 1:1 copy, but the panel lines are just too cool not to copy!
48150
Post by: storag
Good job! Where the girls from?
48594
Post by: dsteingass
The triplets and the madam are old VOID 1.1 synthas I believe, They originally came with wings. I changed their weapons to Imperial though. No, they may not be classic Necromunda, but I'm sure the oldest trade in history is still peddled in a hive, and they need to defend themselves. Automatically Appended Next Post: 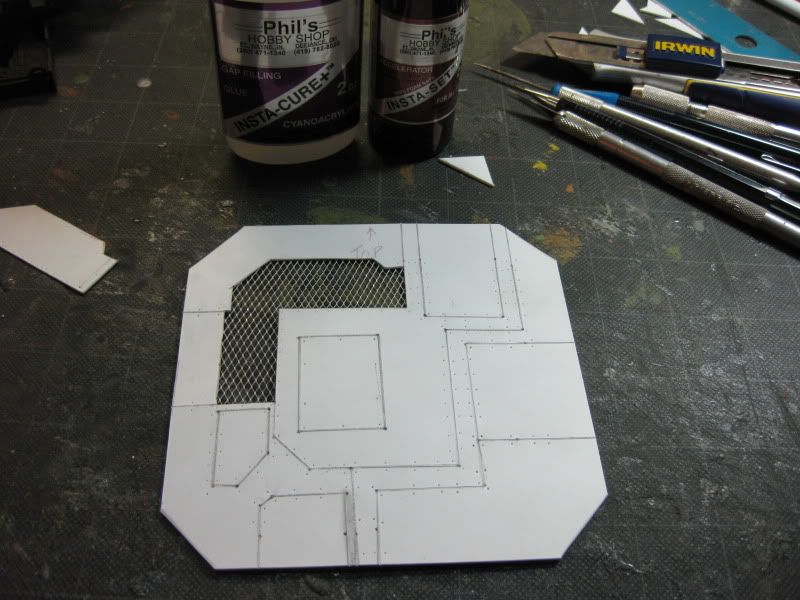 Automatically Appended Next Post: Automatically Appended Next Post: 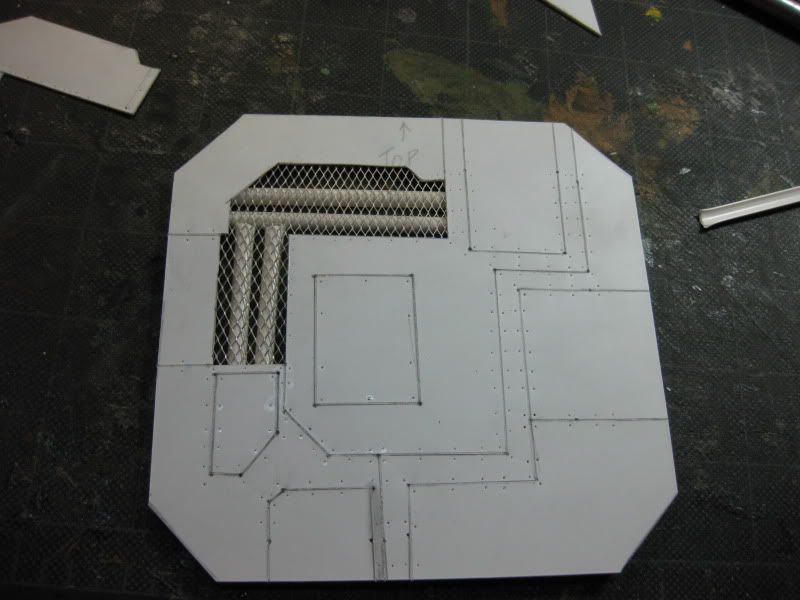 Automatically Appended Next Post: Automatically Appended Next Post: 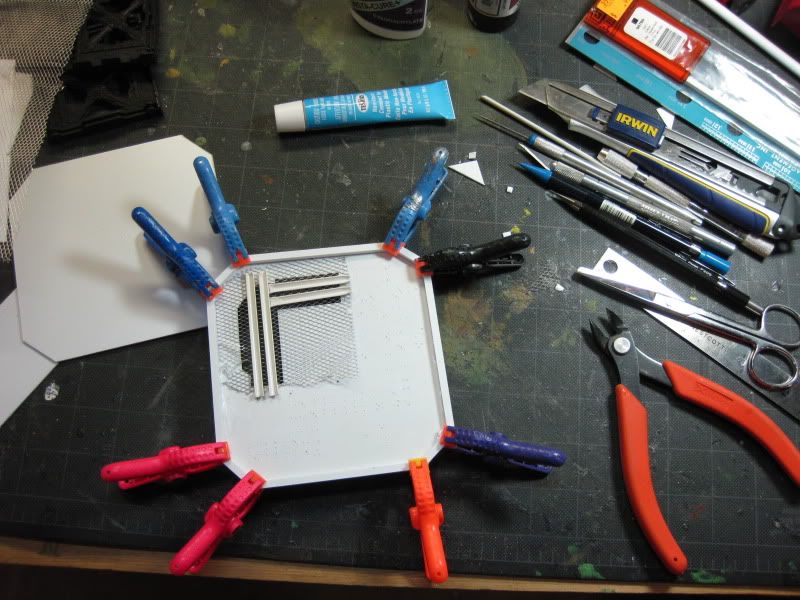
 Automatically Appended Next Post: Automatically Appended Next Post: 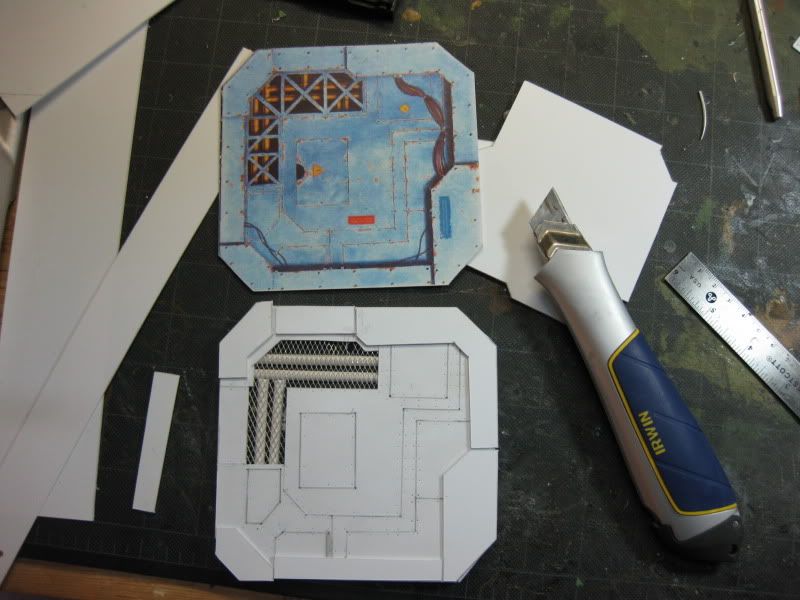
Not glued yet..and now I'm off to eat dinner. Automatically Appended Next Post: /burp... glue set...got a little grinding to do with the dremel....oops
 Automatically Appended Next Post: Automatically Appended Next Post: 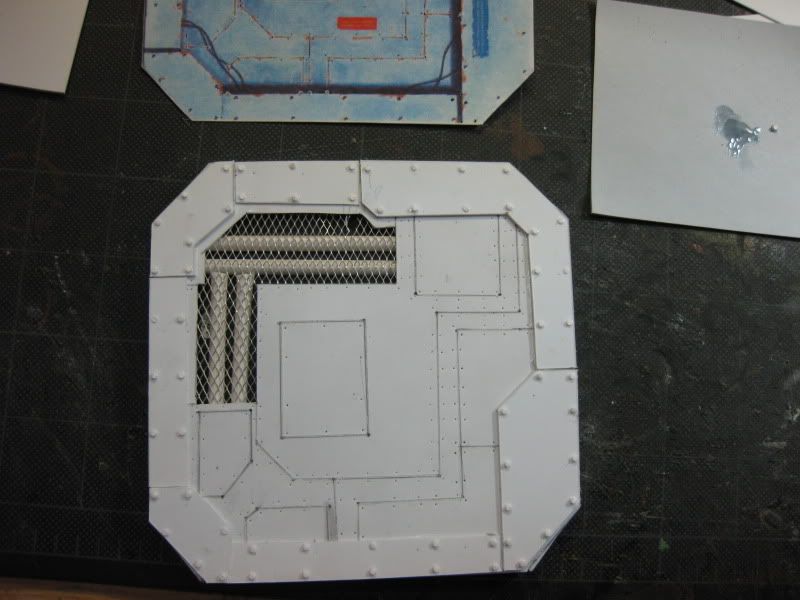
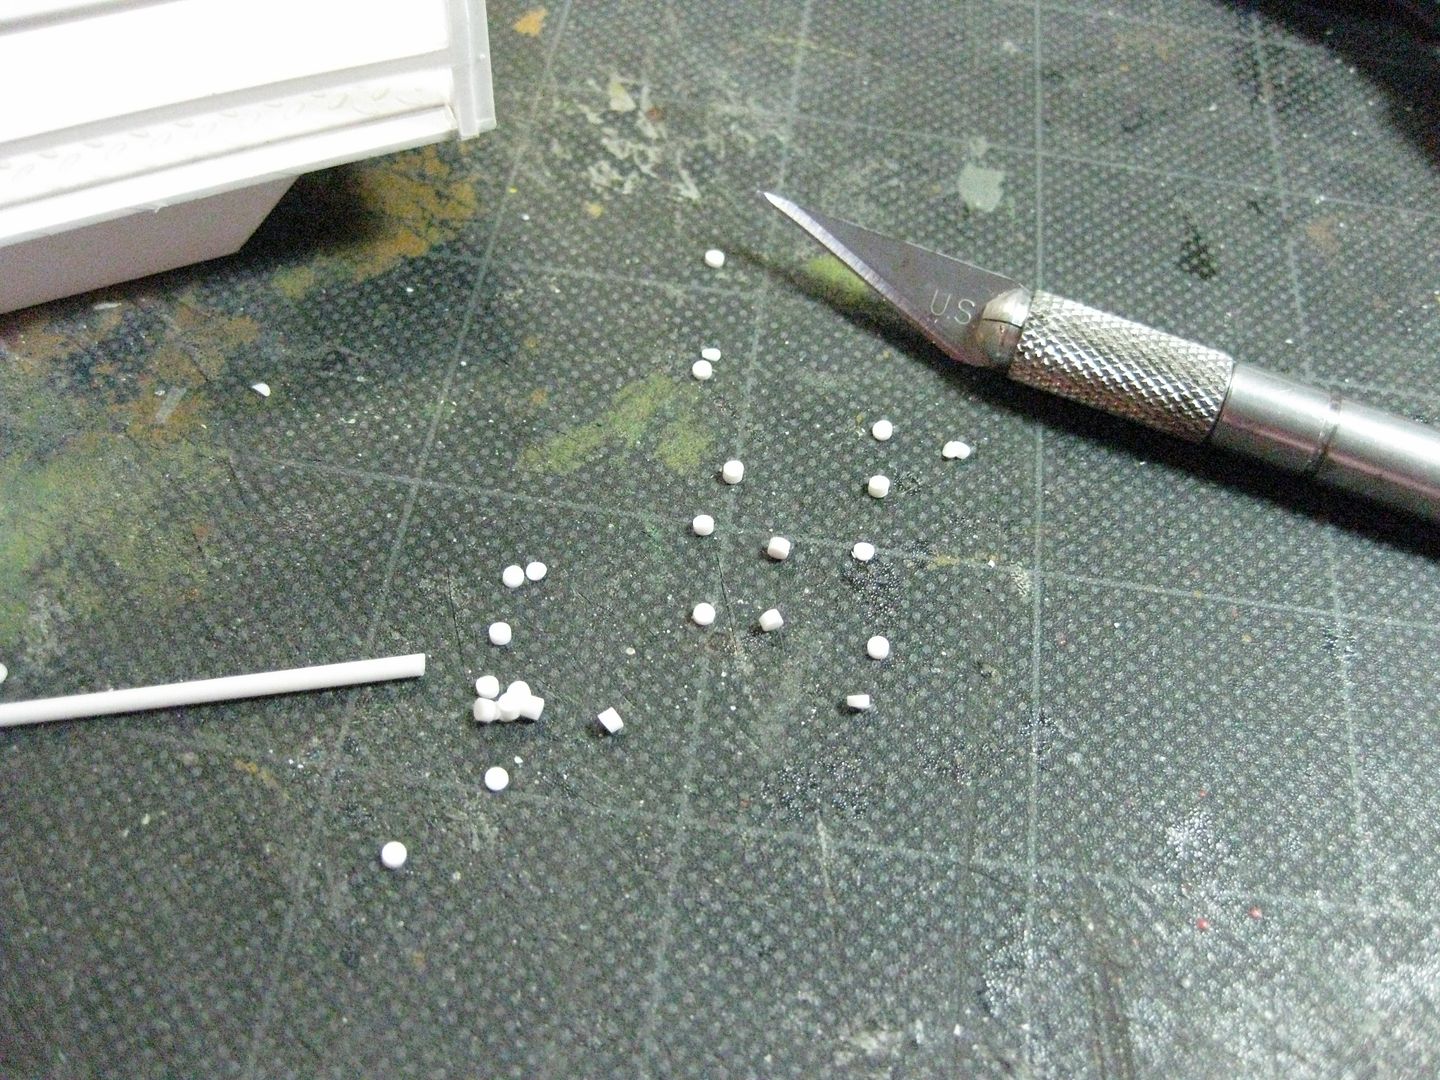
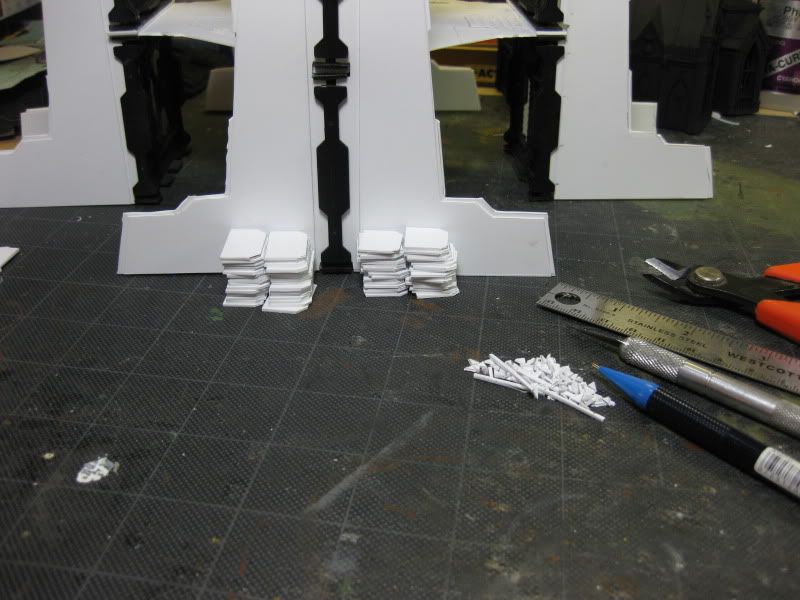
sliced styrene rod rivets (little bastards are now all over the damn place) Automatically Appended Next Post: And I think I'll call it a night, despite what Vik thinks, I need sleep.
Going to Brickworld tomorrow. Automatically Appended Next Post: Being the glutton for punishment I am, I finished the pipes...I can rest now.
48594
Post by: dsteingass
24297
Post by: Viktor von Domm
wow... nice sandwich ! delicious in so many ways!
the pipes, netting and the cables are the icing on the cake! also i know how making and setting rivets can be a major pain in the rear^^
will you keep the paintjob in the same manner as the cardboard version or something more sombre or muted?
have a good and restfull night...truly deserved^^
48594
Post by: dsteingass
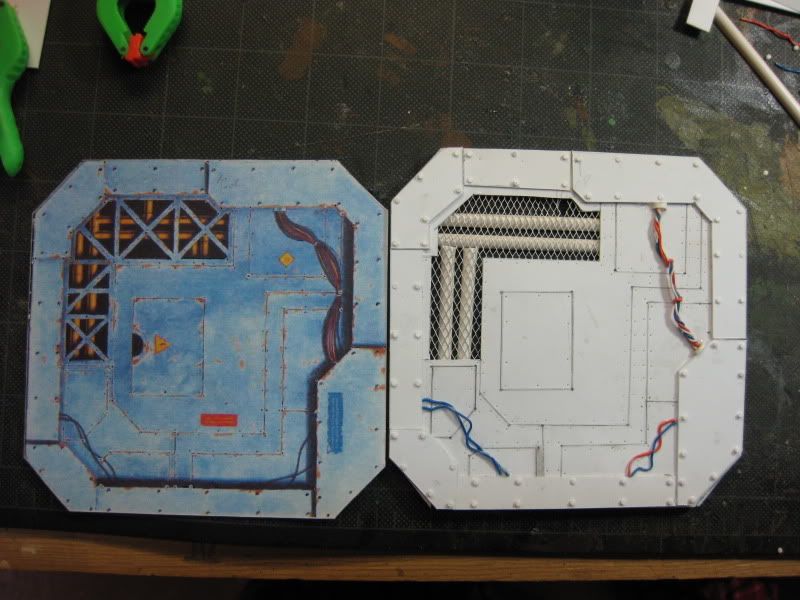
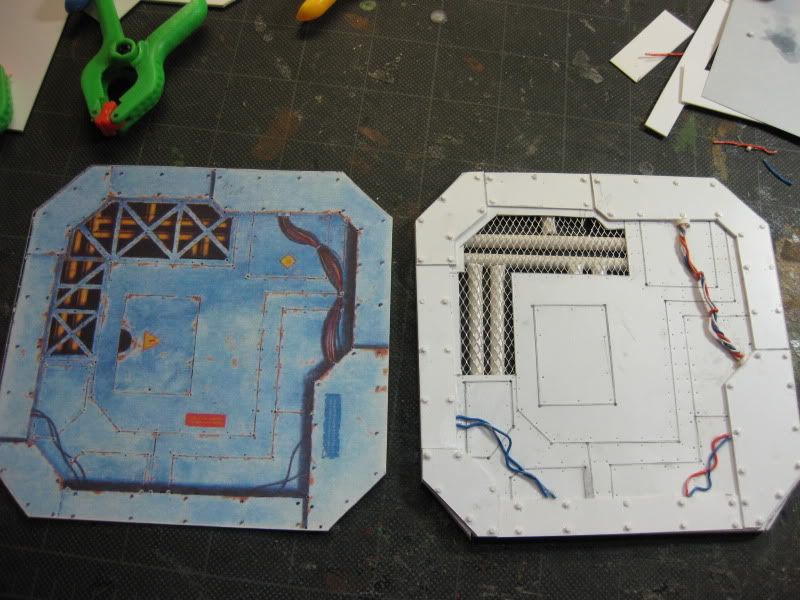
Thanks Vik! I think it'll be painted like the original, since it is so similar.
24297
Post by: Viktor von Domm
hmmm... i see where you are coming from... tho i think a tad darker would suit the piece better...welll thats just taste i guess...
47708
Post by: Zebra88
Woah!!! The Emperor Bless you Dsteingass..!! Amazing work....Really...
48594
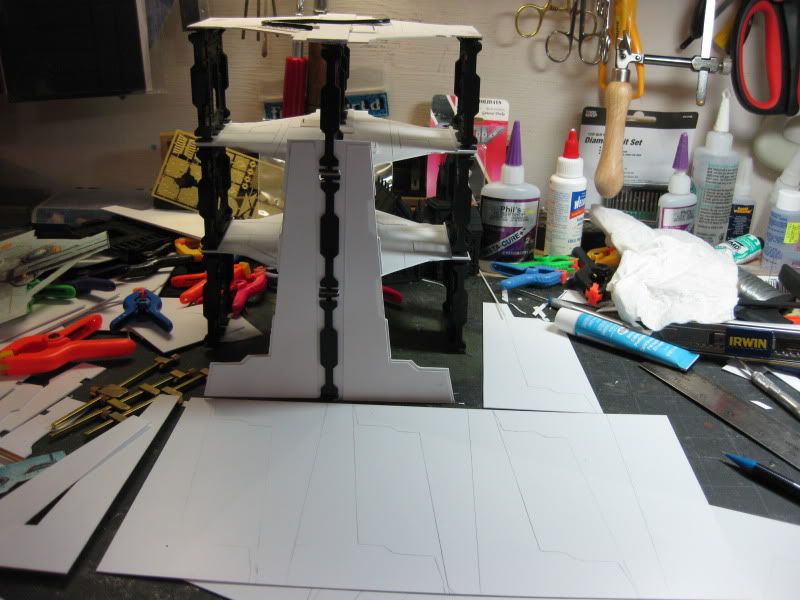
Post by: dsteingass
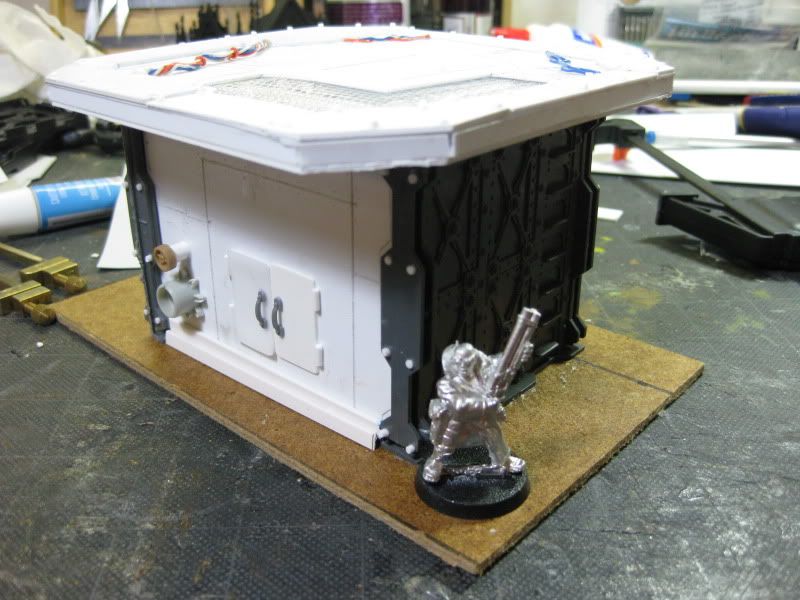
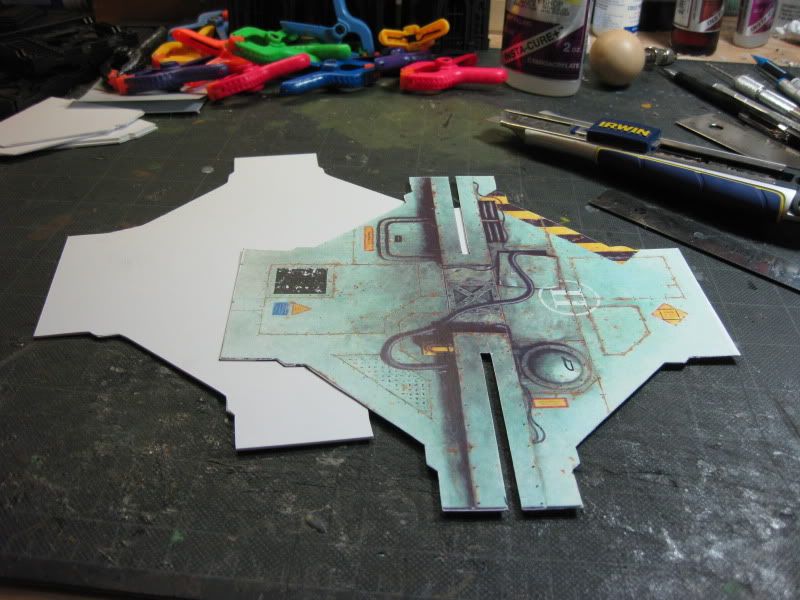
Thanks Zebra! It's the Munitorum that has blessed me with materiel!
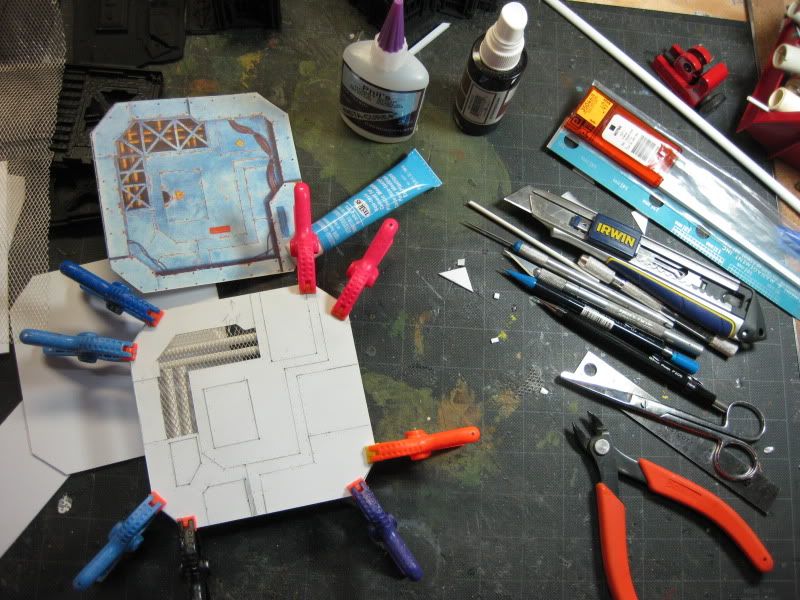
Vik, the model there is a color laser-printed pdf of the original card terrain, I only have a few of the original walkways still, but the color of the blue is dead on exactly like the original. That is where I got the paint sceme for the earlier piece, and I'll be continuing on this piece. Don't worry Vik, it will look allright, I won't ruin it, I promise! Trust me 
47942
Post by: bebopdrums2424
so as not to completeeely hijack that dudes thread...your terrain work is fantastic!! Seriously, its time for Catachan to come to life. Make it happen!
48594
Post by: dsteingass
Damn you! I have been imagining an ancient, ruined Imperial city with more Greek than Gothic influence, pillars, etc. overgrown by jungle. This presents some problems:
1. I need to 40k-ify the Greek ruins, that means a ton of aquiliae and skulls.
2. Jungle plants. How do I get enough, in enough variety without costing my right arm and left knut?
47942
Post by: bebopdrums2424
Pet co dude. Ive got so many freaking aquariam plants hence all my bases etc...ive probably spent over the course of 2 years maybe 40$ on the plants. Granted youll need alot more but still...not terrible..
48594
Post by: dsteingass
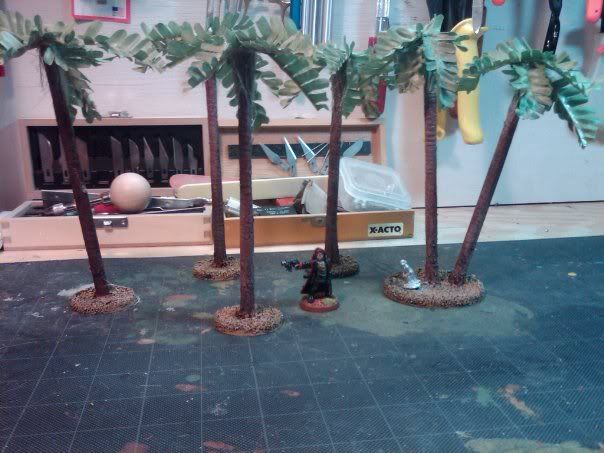
I've had some luck making palm trees from silk leaves from silk or other fabric-type plants
You think that stuff would work? Automatically Appended Next Post: Meanwhile....Breakfast had, groceries gotten, Laundry operations underway Football on the TV.....
 Automatically Appended Next Post: Automatically Appended Next Post: 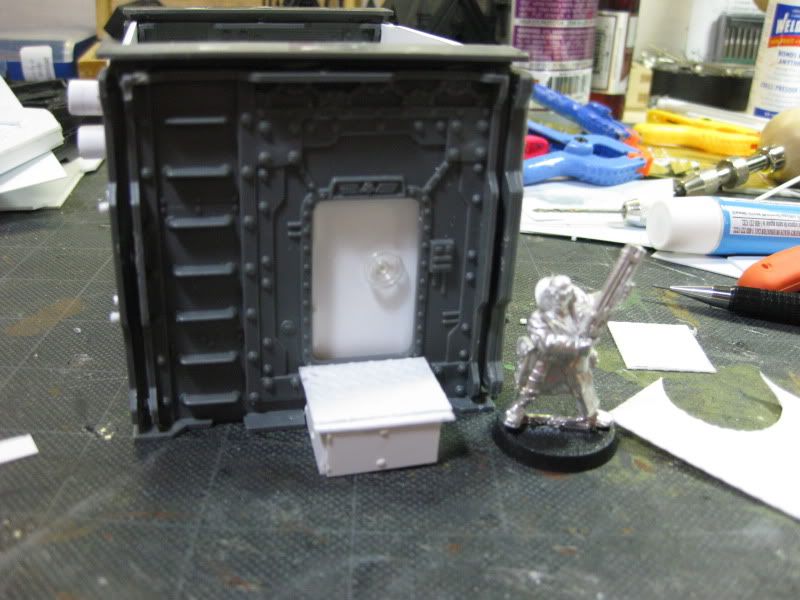
23897
Post by: Scarper

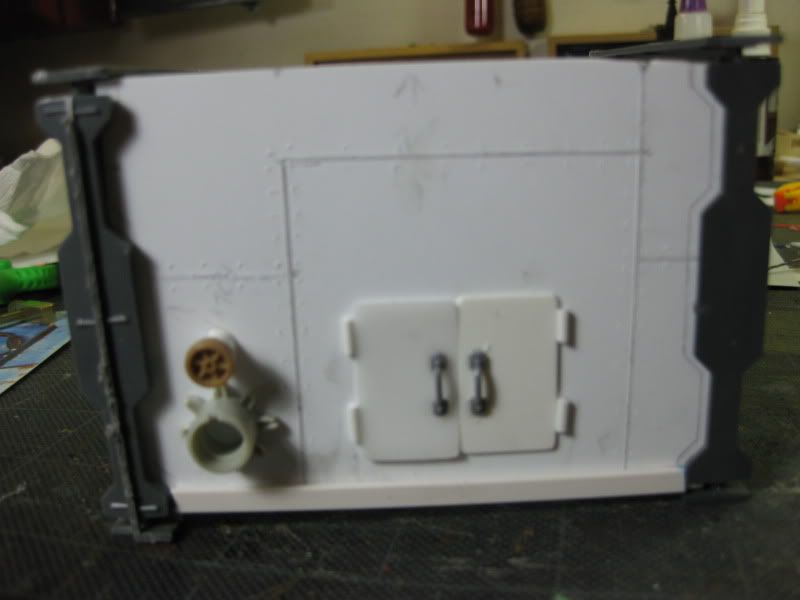
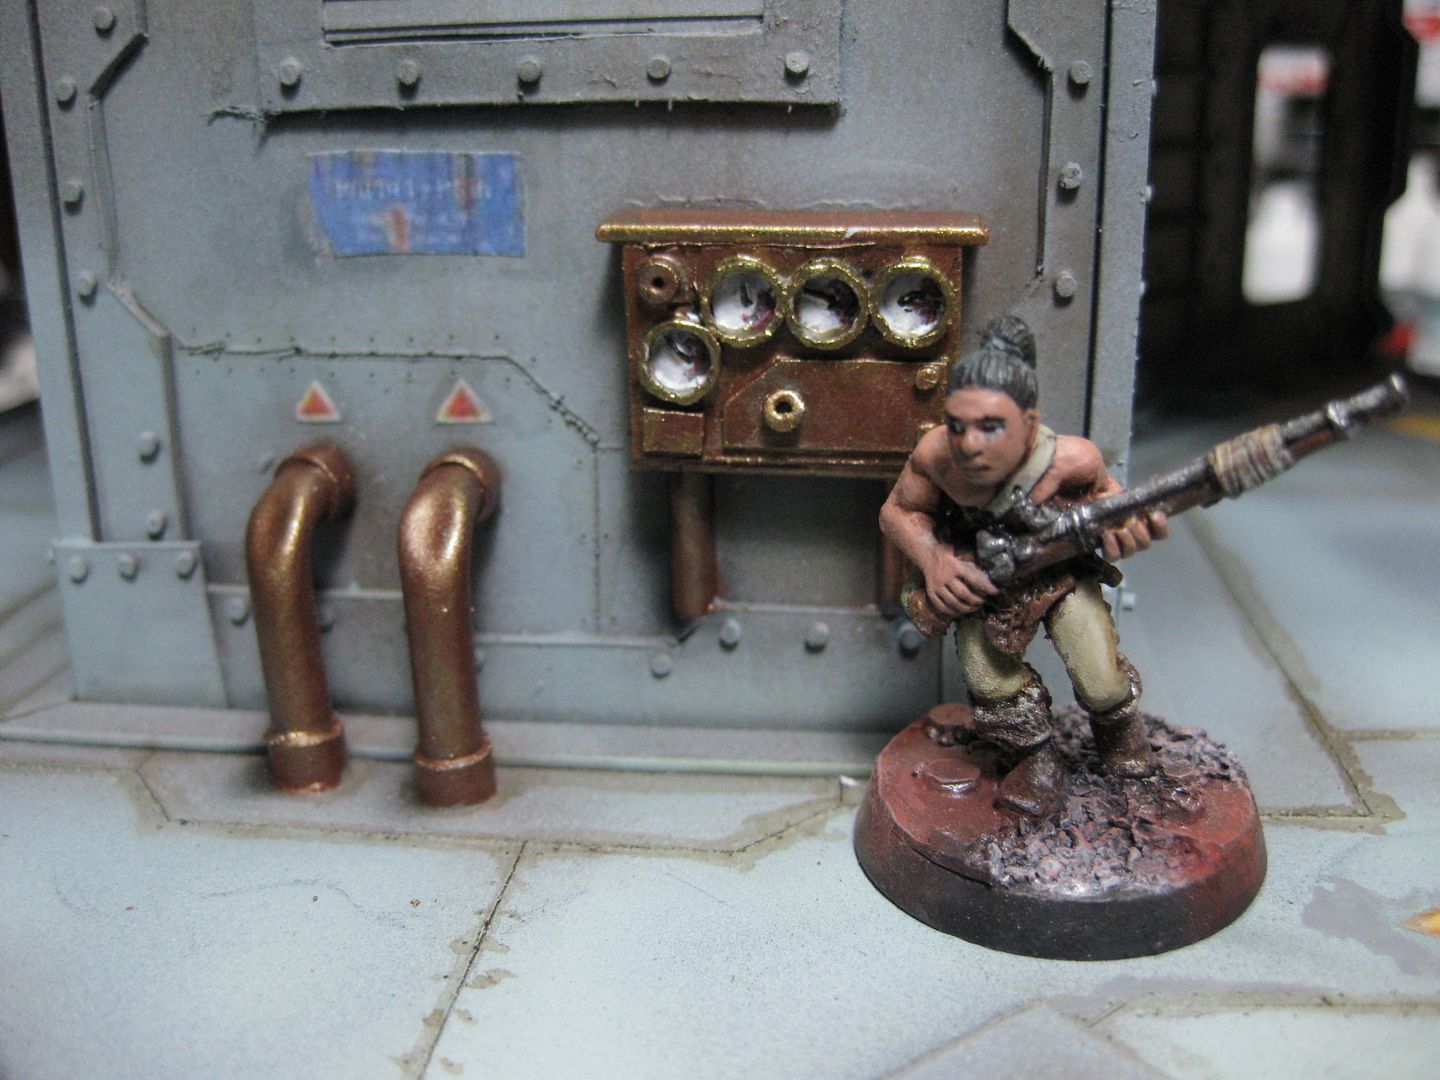
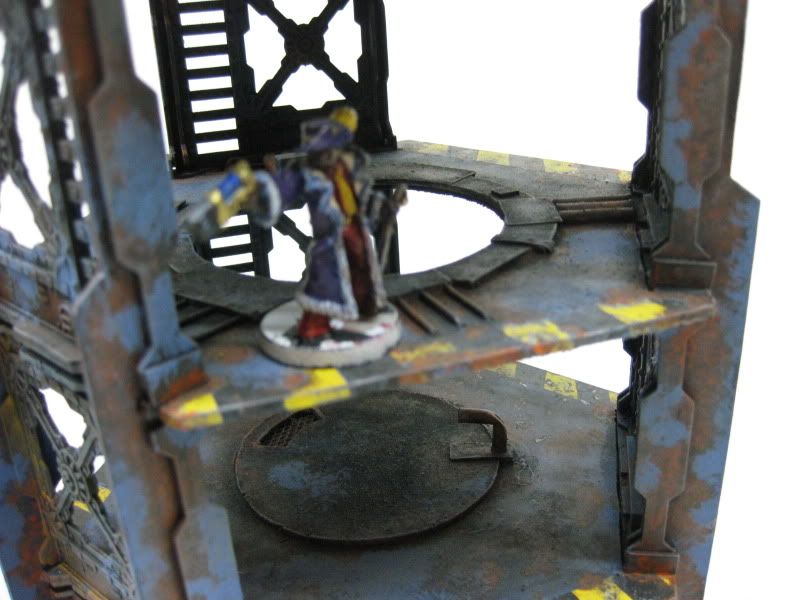
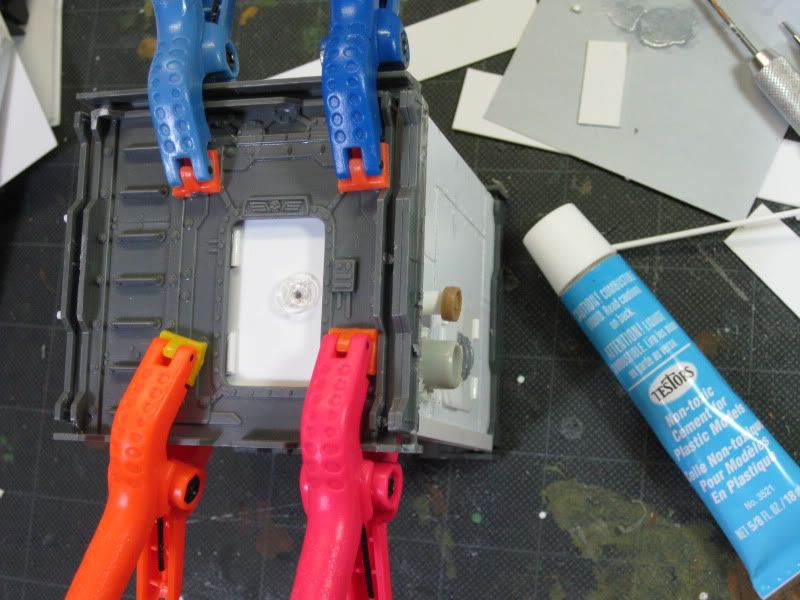
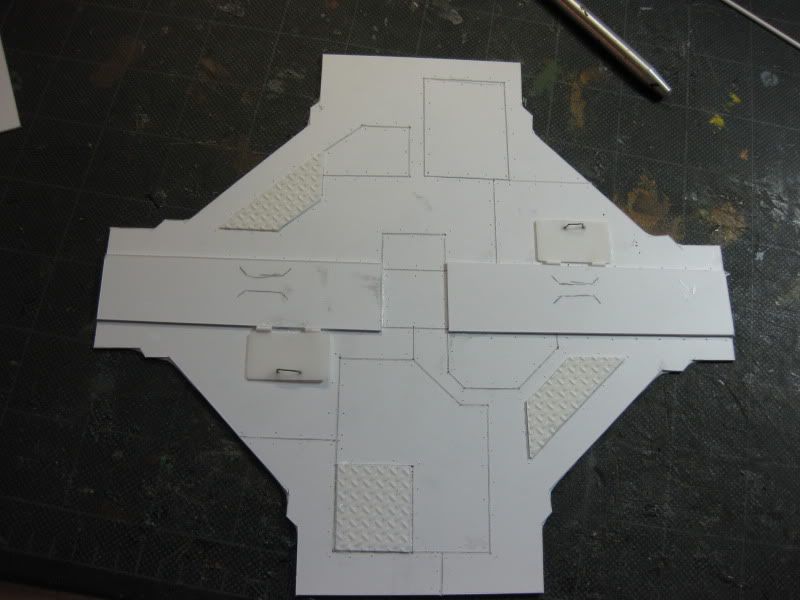
I would love to have a game on a table with some of your terrain. I can't believe how quick you work! Really awesome results on the flooring - it really looks like you've updated the original, which is pretty much the best outcome achievable, in my book What's that you're using for the door release? I can't tell if it's a button, or an actual, 28mm scale valve. Either way, keep it up, this is fantastic!
Unrelated - I need to find a nickname type thing for you, dsteingass is way too long to type
25141
Post by: Chibi Bodge-Battle
Dstein seems to work as an abbreviation - erm - in fact he seems to work very hard full stop! I hate it when people work so fast! The palms maybe could have a denser canopy, but tbh I feel that it should be great on the gaming table Must remember these in case I get around to some pirate themed terrain grand stuff as per!
24297
Post by: Viktor von Domm
lol...there is a very special protagonist of my favorite author terry pratchett... whenever this guy says trust me... he WILL do something fishy^^
48594
Post by: dsteingass
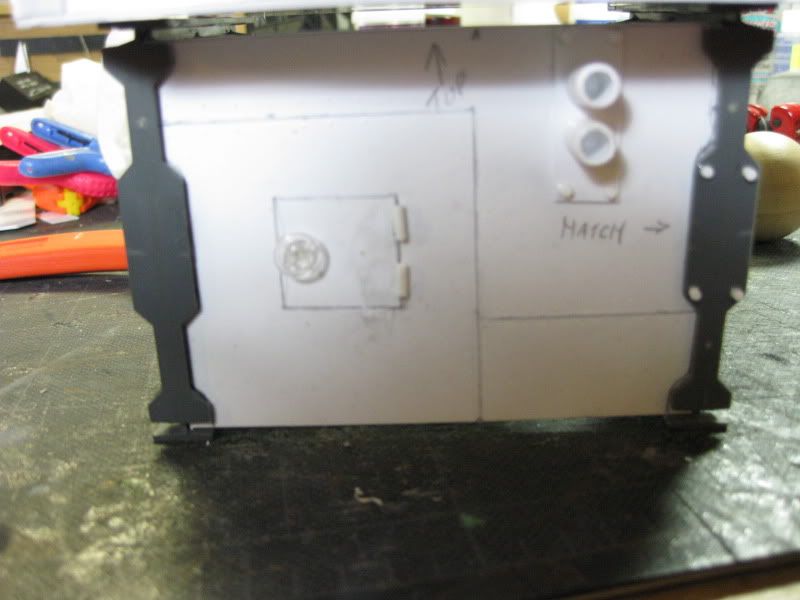
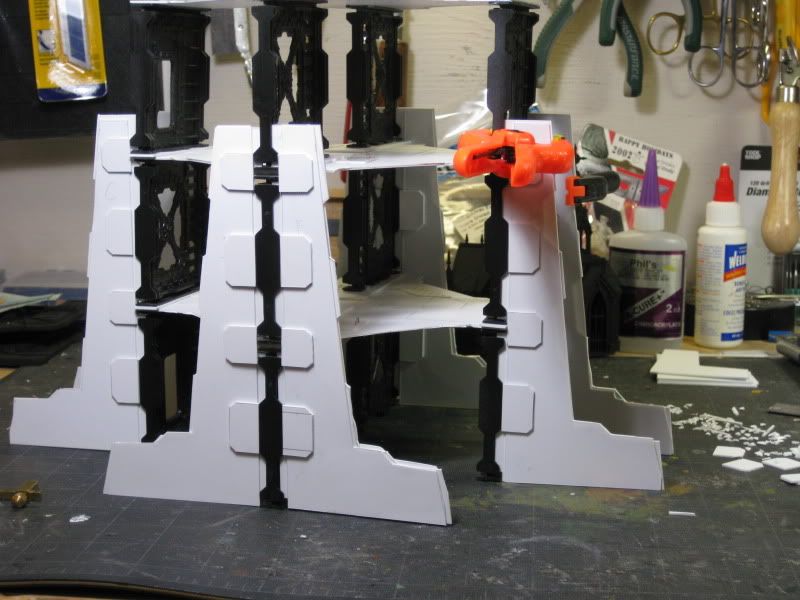
Thanks guys! The Hatch valves are these little snaps used for sewing snaps onto clothing. I found these plastic and some black metal ones at Wal-Mart I think. Here is a pic of the sprue. 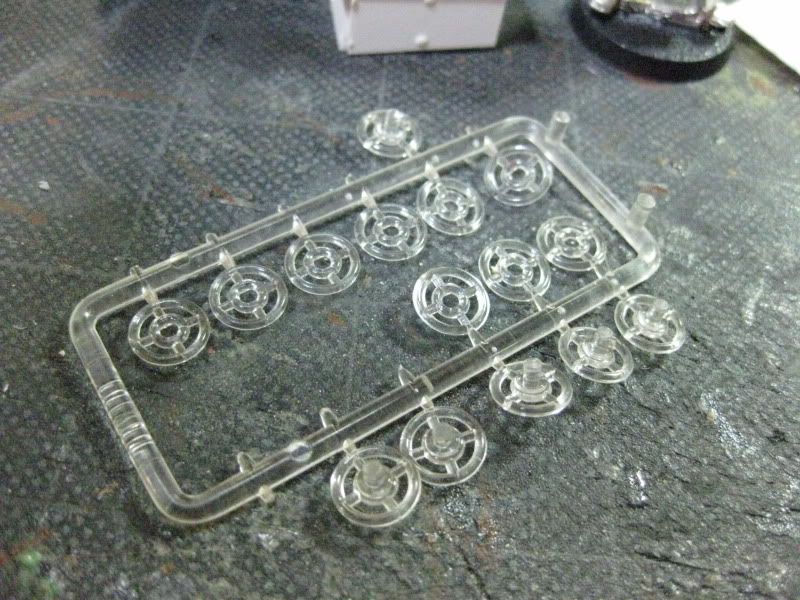
I really don't work that fast, this is the first thing I've done in real time hereo n Dakka, but thanks
25141
Post by: Chibi Bodge-Battle
Those are useful!
And you get some handy bent pipes for free!
Never seen these plastic ones before, they look just the job
48594
Post by: dsteingass
Yes, quite useful...You just have to look at everything in a store as "how would that look painted flat black?"
24297
Post by: Viktor von Domm
lol.... i have these buttons too lying around somewher n my scratchbuilding material box.... my wife gave them to me.... she is the sewing expert...yeah i know... she is a keeper^^
"how would that look painted flat black?"
that is the point in your life when you realize that you are addicted to the creating of new stuff from old and strange things...or was it the other way round?^^
48594
Post by: dsteingass
48594
Post by: dsteingass
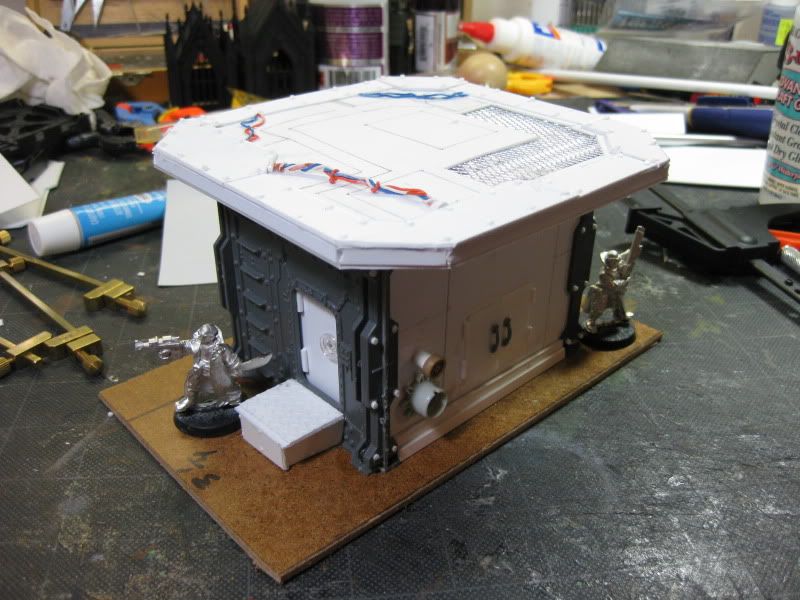
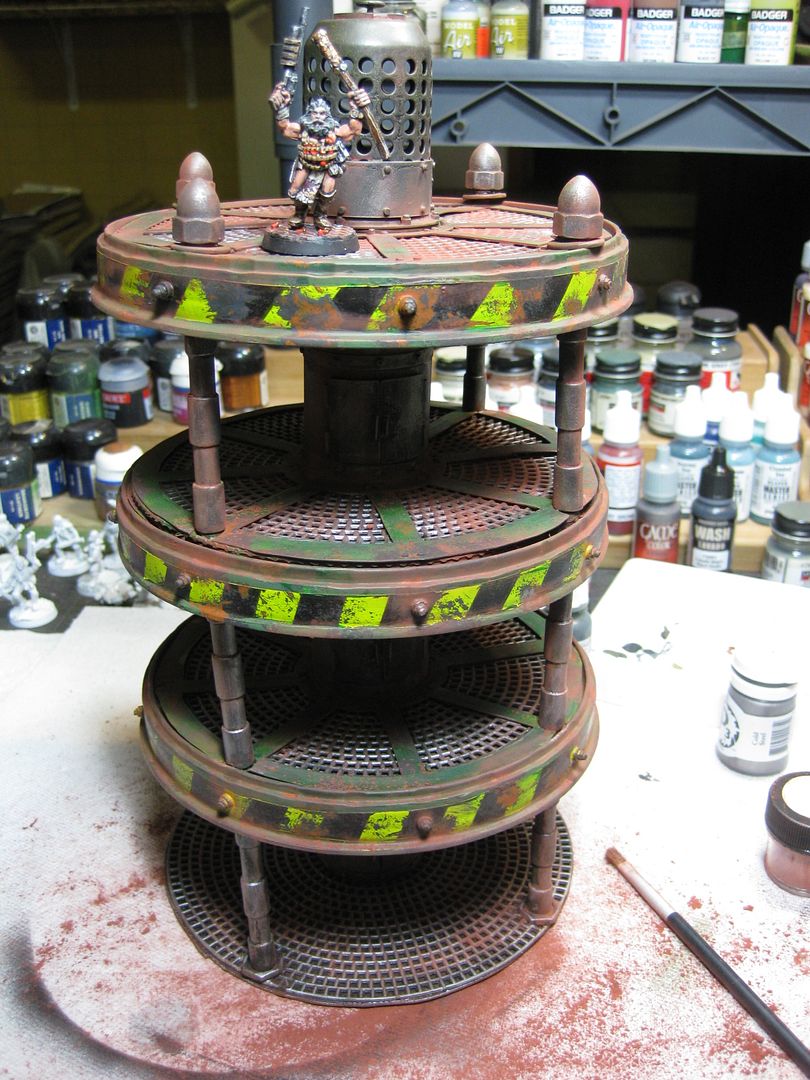
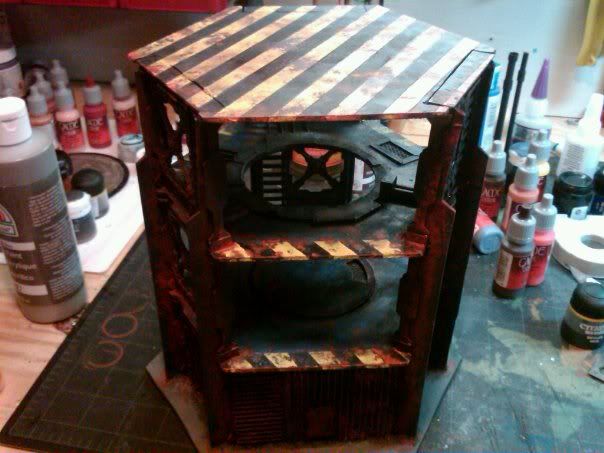
Used Didi's magic brown ink for shading..
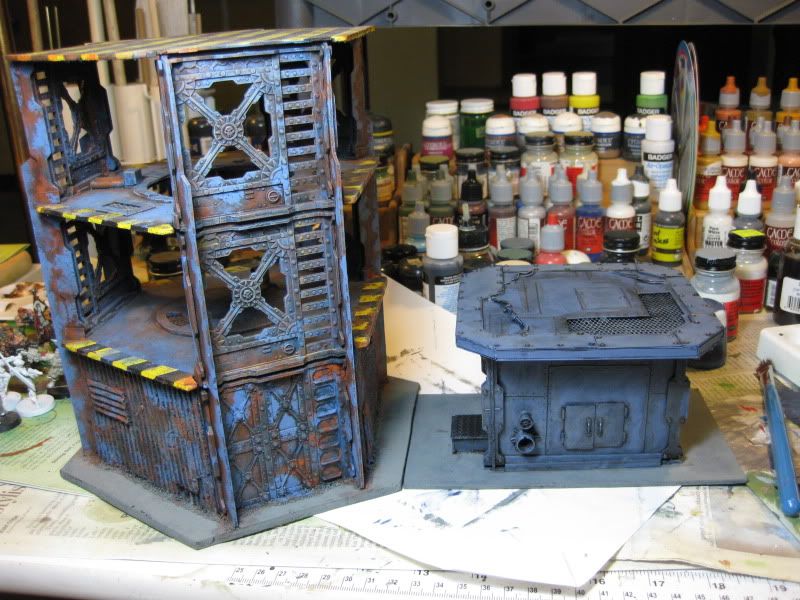
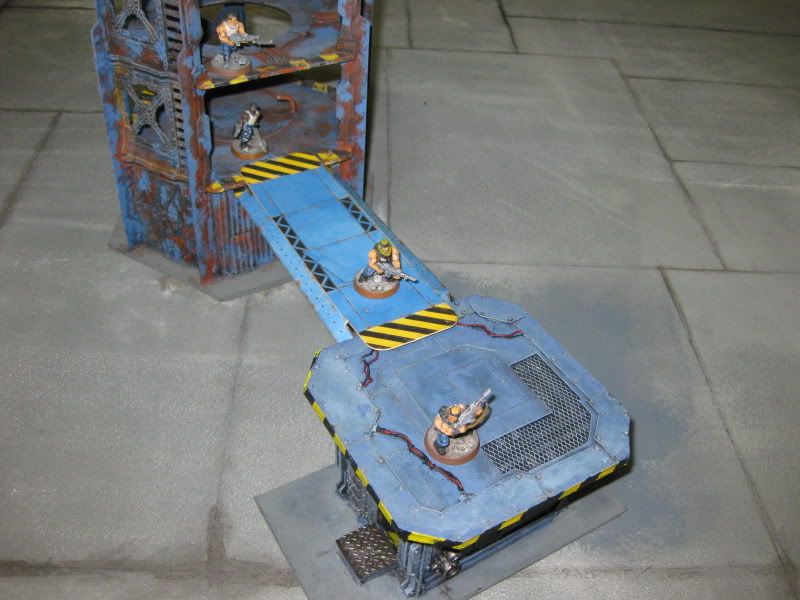
And next to the other tower for scale.....Yes I am adding stripes and rust. You know that walkways are next...
15358
Post by: Vitruvian XVII
Looks great DStein. Love the detail and the painting just tops it off!
48594
Post by: dsteingass
Thanks Vitruvian, I really appreciate it!
2326
Post by: shasolenzabi
Ah the memories! my arbites chasing down gangers in the old hive depths!
4362
Post by: Ozymandias
Simply fantastic work!
And so many ideas to steal...
48594
Post by: dsteingass
Feel free! I got my artistic license from a guy in the park anyways! lol..no seriously, feel free
2326
Post by: shasolenzabi
Once I move, looking like next spring, local store may be miles away, so making terrain will be good.
48594
Post by: dsteingass
Start buying stockpiles of plastic, balsa, and foamcore now..you'll thank me later!
17738
Post by: Briancj
Absolutely delightful terrain.
48594
Post by: dsteingass
Thank you to everyone!
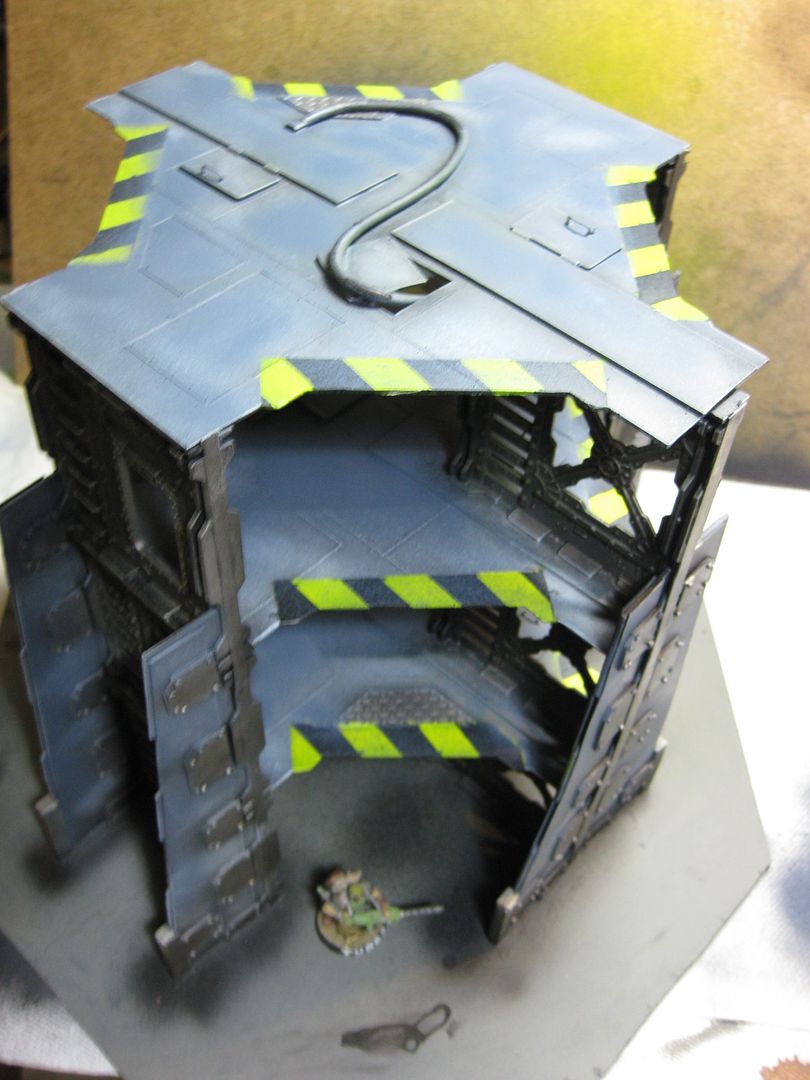
some masking and Polly S Steam Power Black paint Automatically Appended Next Post: 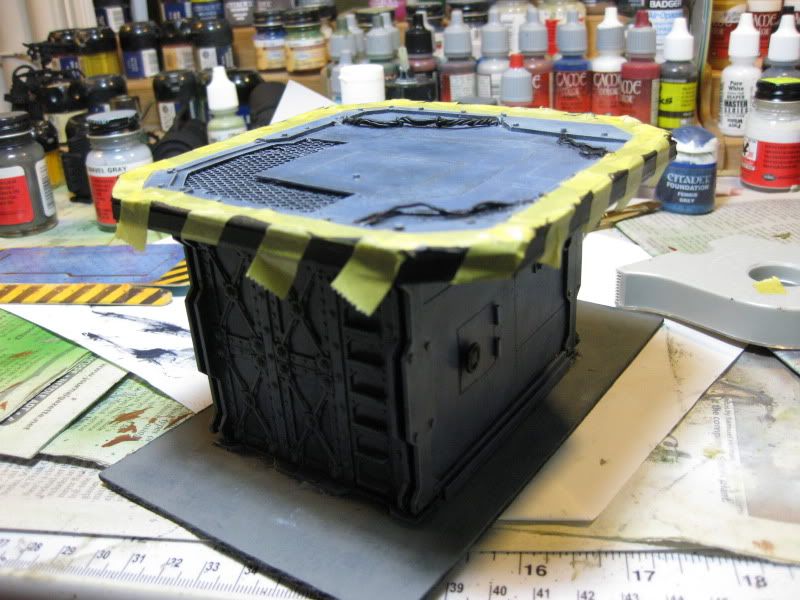
stripes masked
32169
Post by: Rogue Wolves
i wasnt too sure about the super flat roof at first but seeing it next to the tower with the walkway i feel bad i had my doubts i looks fantastic
48594
Post by: dsteingass
Thanks Rogue, I hate waiting for it all to finally pop too, but I love it when it does.
2326
Post by: shasolenzabi
Oh i will, when I have the income. That is shaping up nicely btw
48594
Post by: dsteingass
and I think we'll call it a night, thanks for all the reads and comments!
34119
Post by: neil101
Who wouldn't want to play on that ? It looks super , improved upon the spirit of the original by a long way. watching with glee to see what you do next.
48594
Post by: dsteingass
Thanks Neil!
My order from iplasticsupply.com came through today!
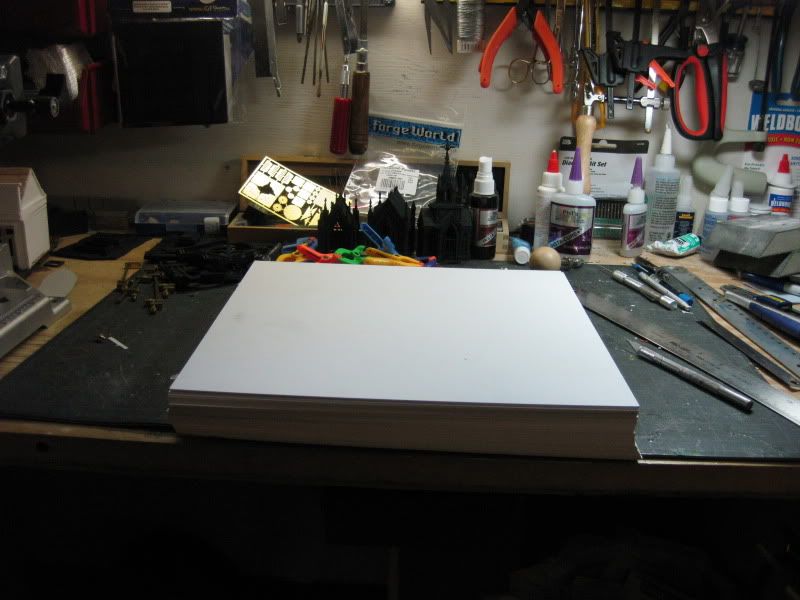
Supply Drop!
32 square feet of 0.40" High Impact Styrene
What will I build from this innocent looking pile?
25141
Post by: Chibi Bodge-Battle
I think you should just ship it to me Dstein
Not jealous not jealous not jealous etc etc
48594
Post by: dsteingass
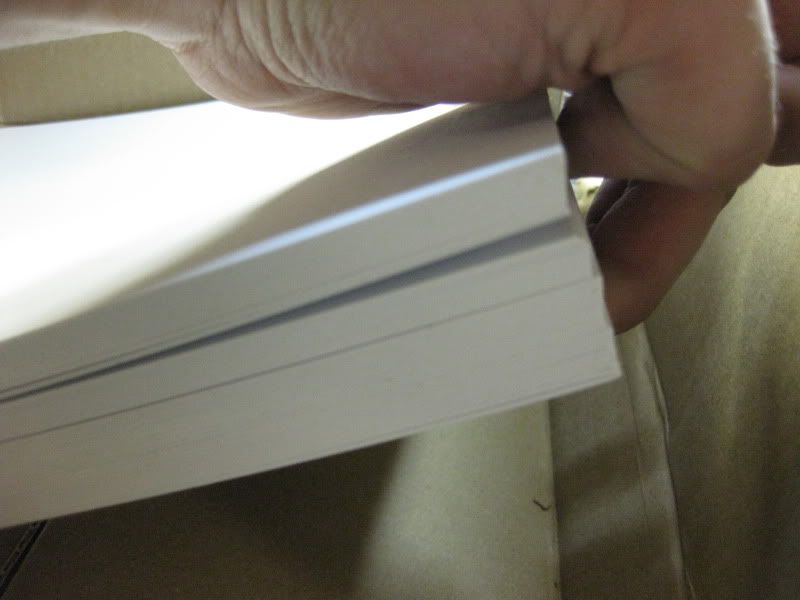
$40 shipped dood! you just can't beat that price!
15358
Post by: Vitruvian XVII
 Where from, thats uber cheap!
3947
Post by: 92acclude
Awesome stuff.
48594
Post by: dsteingass
@ Vitruvian www.iplasticsupply.com
@ 92acclude Thanks man, very much appreciated!
15358
Post by: Vitruvian XVII
Thanks for the link, will you let us know how good a product it is? Would be a great help Edit: Balls! They dont ship to UK 
48594
Post by: dsteingass
Aww crap! sorry I didnt know about the shipping. It is exactly like the 1/2 sheets you get from Evergreen or PLastruct, sans the glossy finish (this is flat white) only it averages out to a little over $1 shipped a 12x12" sheet, where Evergreen or Plastruct from a train shop is a helluva lot more expensive. Here it can be $4-$5 for a 6"x12" sheet
32193
Post by: PDH
The substation platform looks ace. Really enjoying your thread here
Peter
48594
Post by: dsteingass
Thanks PDH! You are the one who tipped me off to the iplasticsupply.com thing! Thanks again. I will put it to good use I promise lol.
26139
Post by: Skalk Bloodaxe
I am completely staggered back by this thread. I've started working on new terrain for my 40K table that looks "suspiciously" very similar to Necromunda terrain (I can't get my current game group to play Necromunda, but that doesn't mean they aren't battling in the Underhive... ) and the inspiration I've gained after reading this thread is so overwhelming that I feel like ditching work for the rest of the day, fo home, and have ago at this. I've been converting O-Scale model railroad buildings, but after seeing your platforms I'm going to try giving scratch-build a try again.
The platform is amazing, but what really got me going was this:
The step-by-step helps w/ confidence that I can do this, and the look is completely what I have been striving for but have been unable to achieve. Once I have some done I'll post it here and of course offer full credit to you for the inspiration.
Thanks for the www.iplasticsupply.com link, I'll be checing it out as soon as I post this msg.
Subbed and will be back for more! Thanks for sharing this!
48594
Post by: dsteingass
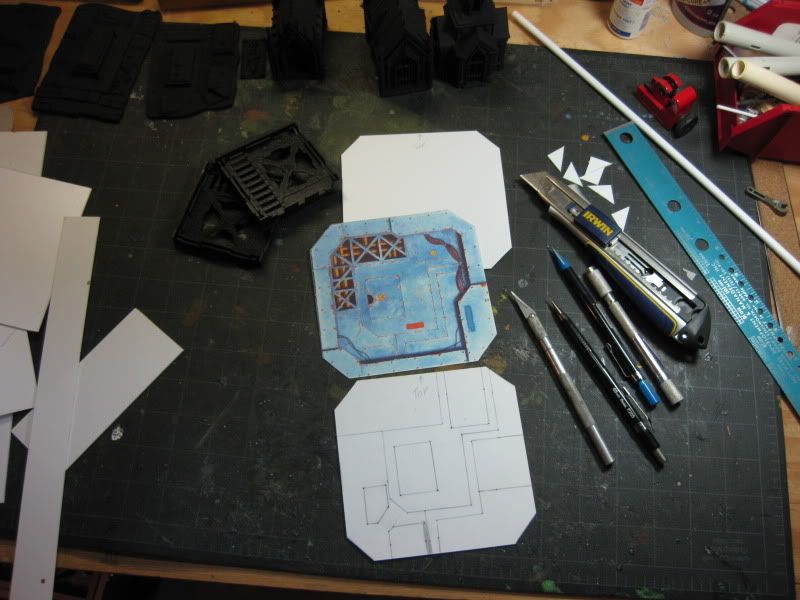
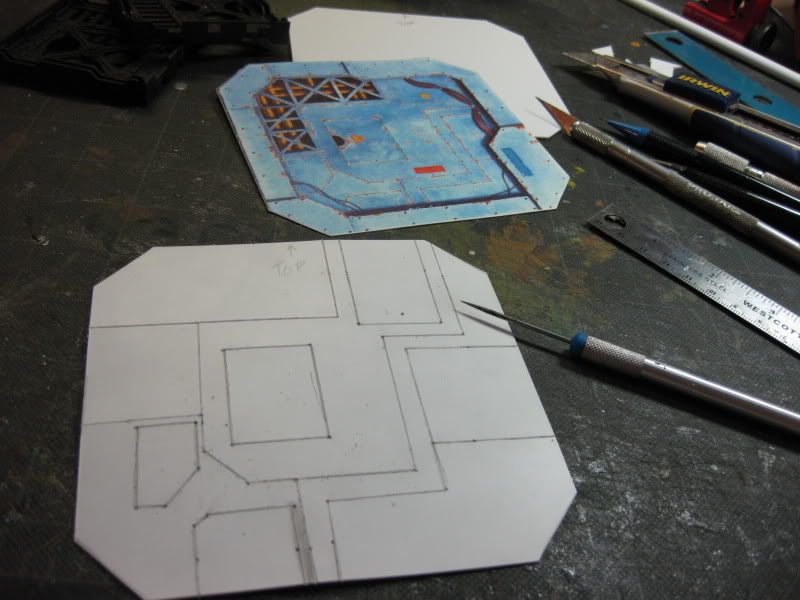
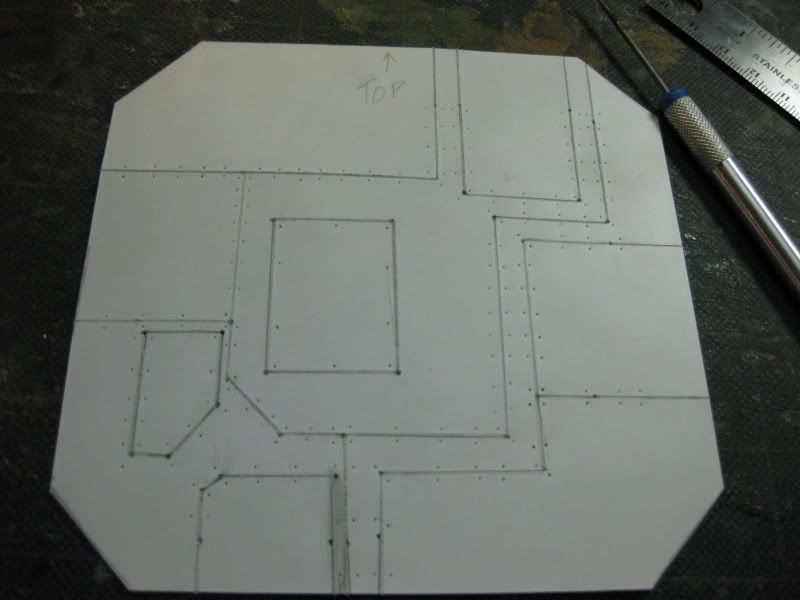
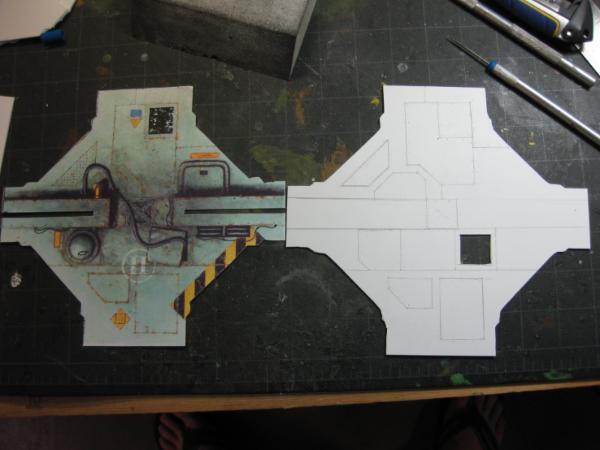
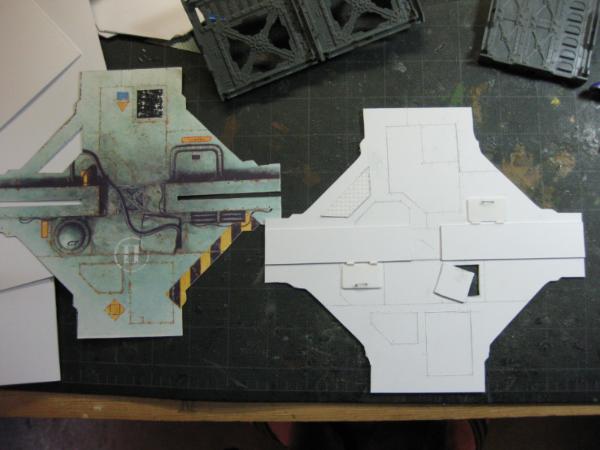
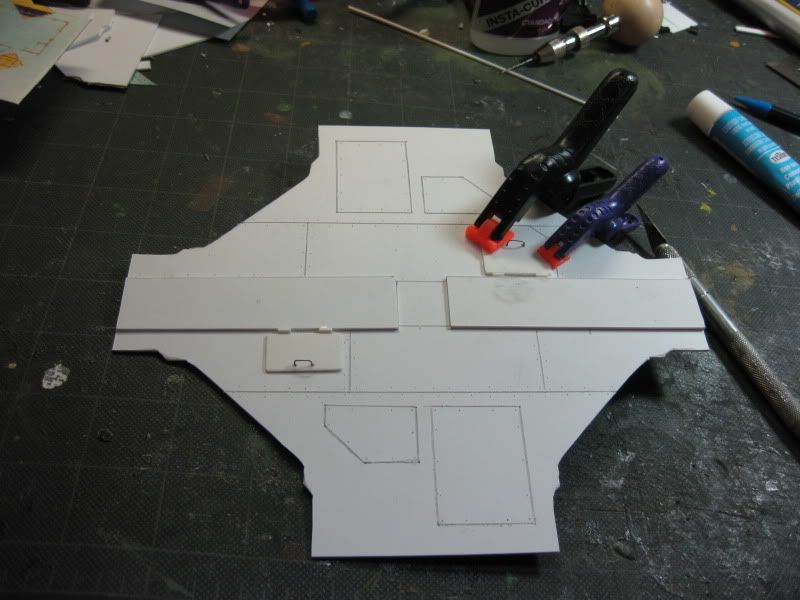
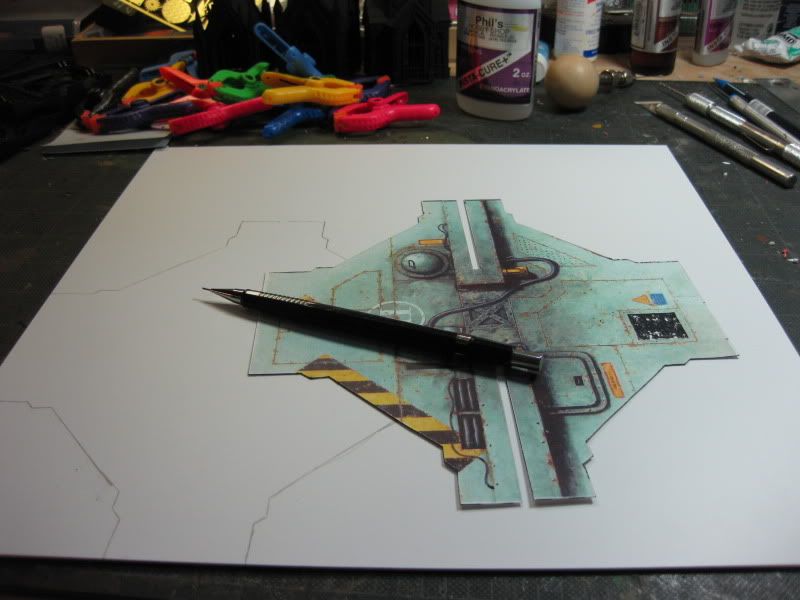
Thanks a ton Skalk! Please, no credit is needed really, But I really do want to see what you build! I started by downloading the scans of the original Necromunda and Outlanders card terrain at http://files.sigil.biz/data/necromunda_terrain.pdf
I am fortunate enough to be an IT guy with access to color laser printers, and printed them on one, but the design can be copied to plasticard from a B&W copy really. I laid the original template over the plasticard and poked holes through the paper at all the corner points and into the plasticard with a scratch awl, then removed the template and connected the dots with a pencil so to speak. It helps a lot if you suffer from measurement retardation like I do from time to time (I can measure thrice and cut once and it's still crooked). Some may call it cheating, but I call it a practical solution
47942
Post by: bebopdrums2424
Looking awesome man! I wish i could build terrain :(
48594
Post by: dsteingass
I wish I could paint miniatures!
26139
Post by: Skalk Bloodaxe
Just ordered (1/16″) Thick HIS Sheet (White, 16 @12″ X 12″) from https://www.iplasticsupply.com/, should be here in a few days!
This is going to completely ruin my focus on my Death Guard and Cultists for a while. But worse things have happened.
My wife works for a company that has an uber-awesome color printer. I'll be sending her some pictures soon.
Thanks again for the inspiration and the link! I'll be sure to share my work as soon as I have something to share!
48594
Post by: dsteingass
Have you seen my threads? I am the posterchild for ruined focus hobby ADD! lol
2326
Post by: shasolenzabi
Well, thanks to this lovely thread, I have the site for iplastics loaded and bookmarked for future sheet plastic needs for my mad projects!
I do like how the buildings and platforms have a more 3-d look to them than the old cardboard did, I mean they tried with the painted card stock, but it all still was so flat.
You have out done them!
48594
Post by: dsteingass
HAHA, yep Shas, That is partly why I wanted to do this, the original art was done so amazingly well that it looked 3D, but wasn't. I always wanted them to be in 3D, especially the 2-1/2 story building with the square tower..my favorite, and mine will be the centerpiece of this set, if not the death of me first lol.
Also, I no longer posess my beloved tattered card terrain (except a few laminated walkways and barricades), but I have bulkheads and I can scratchbuild the rest.
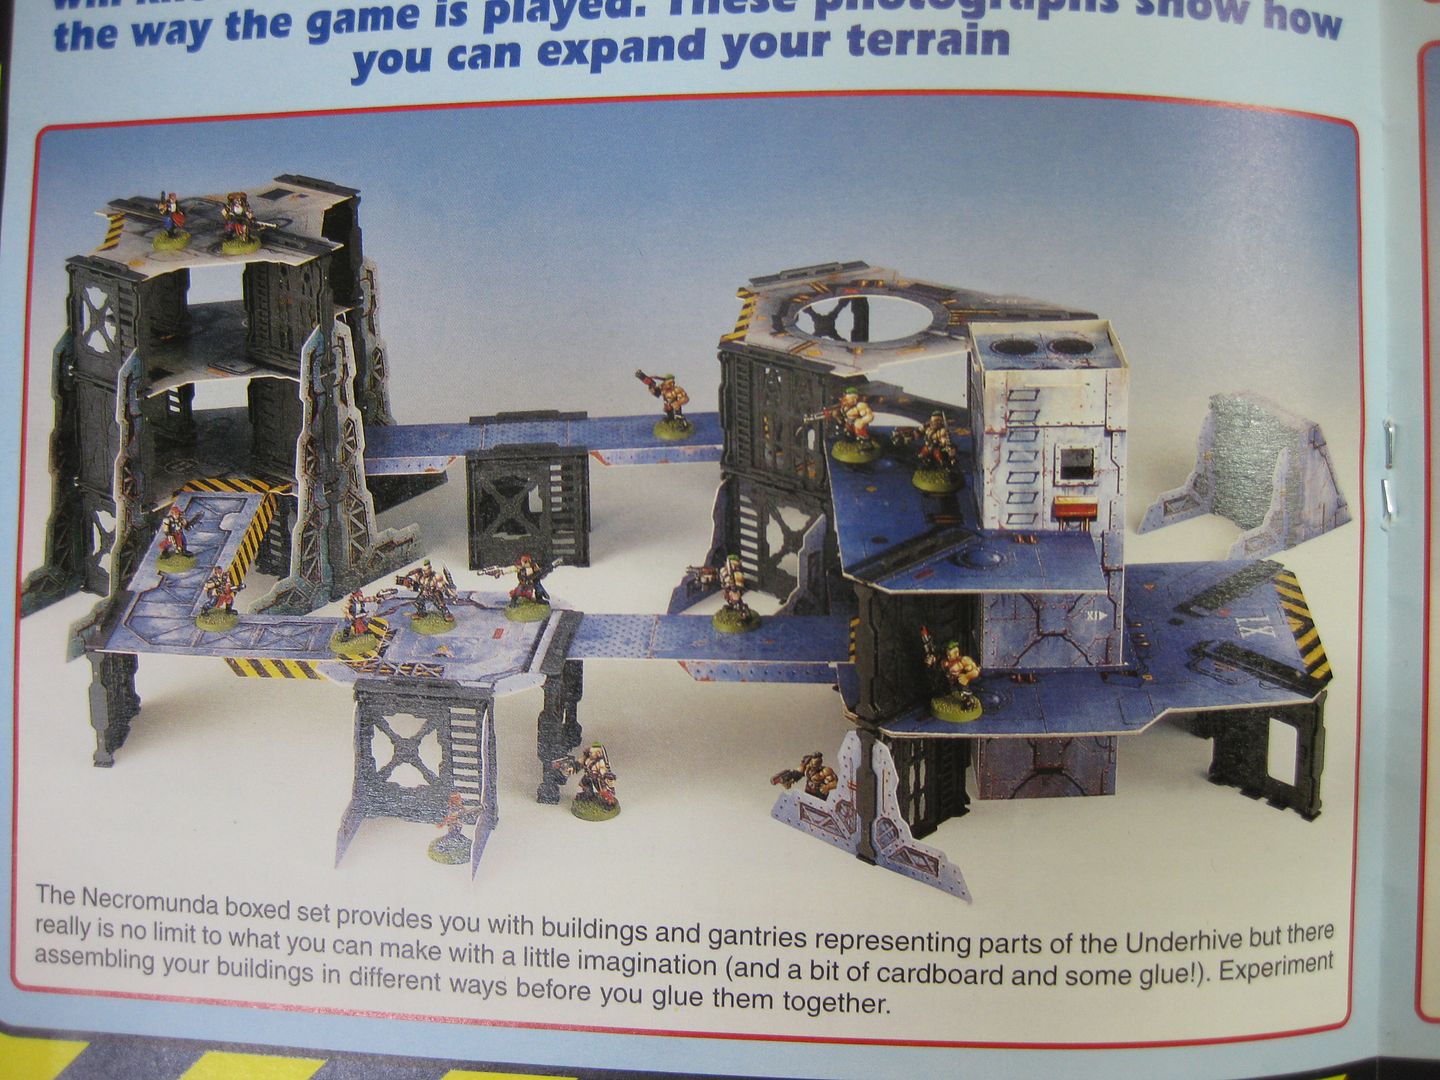
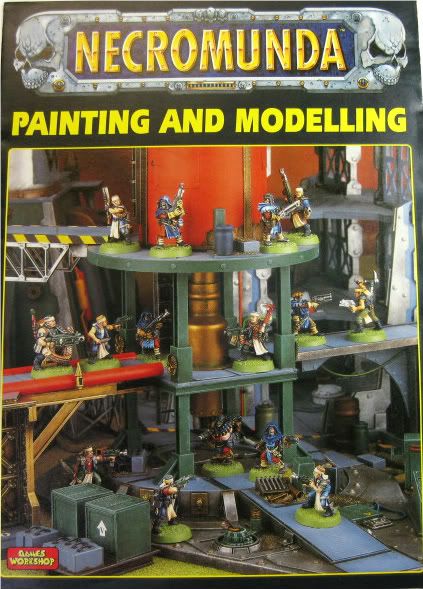
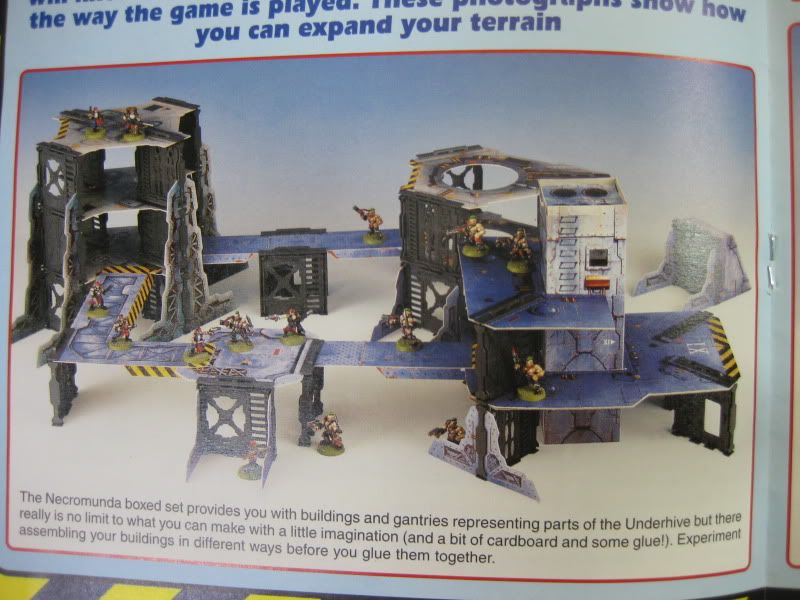
Speaking of inspiration, this is mine..the original staple-bound painting and modelling guide
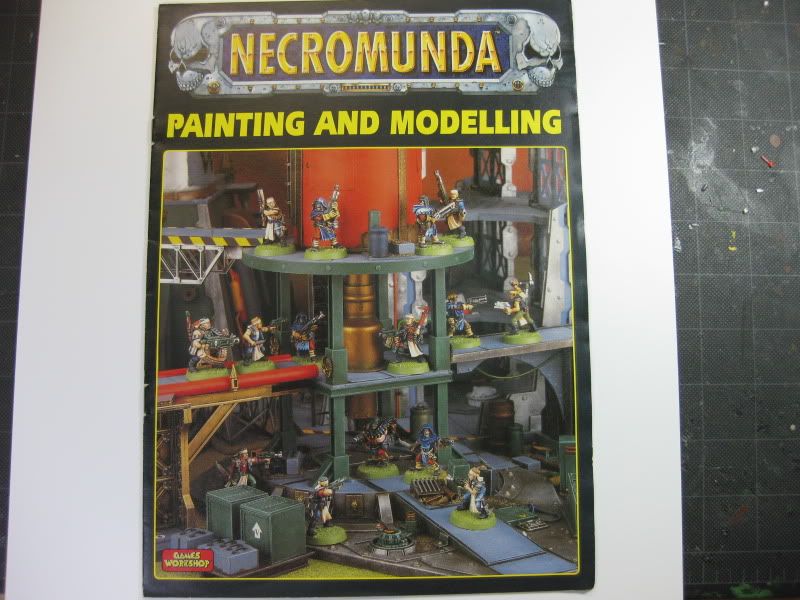
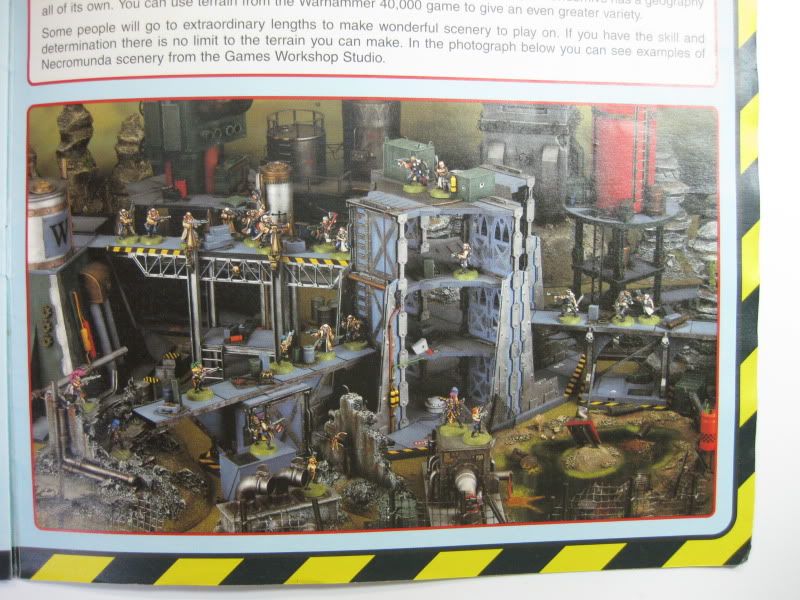
This is still some of the BEST GW Studio Terrain ever built IMO
Edit: and I think I have been brainwashed by the text in that last photo
2326
Post by: shasolenzabi
Well, you are a maestro at terrain making!
48594
Post by: dsteingass
47942
Post by: bebopdrums2424
BETTER than the GW stuff imo. Your gaming group is lucky to have you around thats for sure
2326
Post by: shasolenzabi
Well, the yellow stripes do show black through them, but if a bit if wash is put over them,, then it will just seem faded out and worn through.
Automatically Appended Next Post:
Down in the hives, only the AM are dedicated enough to go down and do re-paint and rerpairs, but only with an army of armed servitors or skitarii
48594
Post by: dsteingass
yeah, my bottle of Vallejo Sunblast Yellow clumped up in the middle, my paint was very thin that I could get out...need more I guess.
2326
Post by: shasolenzabi
Thought I recognized the pigmentation! I have a bottle of that laying around somewhere, but it may need some shaking up and mix work. Hmm, mine is topaz yellow, but looks like that on black paint base.
48594
Post by: dsteingass
Uh oh...what have I started now?
2326
Post by: shasolenzabi
That looks a doozy!
17244
Post by: The Good Green
OMG I want that book! The Necromunda Painting/Modeling book looks like it has a lot of juice awesomeness in it. Your terrain is looking amazing! Great work
25141
Post by: Chibi Bodge-Battle
Curse you GW for not making that book available to all and sundry!
Keeping it sweet Dstein!
29449
Post by: weetyskemian44
Cracking stuff.
Maybe they need a bit of tiny graffiti?
26139
Post by: Skalk Bloodaxe
Regarding painting hazard stripes- I've found that basing white, painting yellow, then painting black stripes works well to keep your yellow from having that "black bleed-though" look. But since I don't have the natural artist thing going on and my "straight lines" look more like a little kid with a crayon, I have started printing hazard stripes and putting them on like transfers. Here's some examples:

All stripes are printed. And seeing how you have access to a high-end color printer, you should have no problem with high resolution on decent paper.
Here's a link to the stripes I most commonly use. Feel free to download and print.
http://www.withstrengthweburn.com/stripes/
48594
Post by: dsteingass
Awesome thanks man! I'll definately do that for smaller stripes.
2326
Post by: shasolenzabi
Ah, those pages bring back memories! I poured over those kinds of books.
Hmm, cool idea for stripe printing.
6515
Post by: Starfarer
Awesome project! I had planned on doing something like this when I repurchased a copy of the Necromunda box awhile back, but just never got around to it. I'm hoping you keep up the steady progress so we can see a whole table's worth in the near future!
48594
Post by: dsteingass
Thanks! I want to keep up too, but it's been a rough week at work, not feeling well, perhaps this weekend, just not tonight.
32169
Post by: Rogue Wolves
man i will be honest im DIEING to get some munda bulkheads and those board peices ive wanted to do this for soooo long but never got around to it
26139
Post by: Skalk Bloodaxe
eBay is your best best, maybe Craigslist but it's sketchier w/o the same protection eBay offeres. In any case, they are not going to be cheap. I've been really lucky twice and gotten a good deal on some because they were included with other stuff I was getting and were not part of the auction description. Bulkheads usually got for quite a bit on eBay.
24297
Post by: Viktor von Domm
awsome work on that piece...when i saw the first primed pic of the thing i thought...how did he prime that one without hitting the mini....lol...^^
i feel a bit bad about thinking badly for the brighter paintjob dicussion earlier on.... seems i was so much in bad opinion state that moment^^ but you showed me the way! lovley faded blueish shade.... personally i see the seethrough yellow stripes as just that... faded yellow! which is a perfect thing to be seen when thinking about hiveterrain...
the new project is something i look forward too as i think this will be but a small piece in a very grande set of a big scheme^^
also i envy your amount of fresh plasticcard^^ but i think we wil see this all in the nearer future... all chopped up in small beatuful bits aranged to greatness!
vik
32169
Post by: Rogue Wolves
how come most great things gw makes (specialist games) they think hey people like these too much we need to force them into 40k or fantasy ): i play all of em and i want me my specialist games too!
48594
Post by: dsteingass
Ya really, Even at Games Day Chicago, they had every specialist game EXCEPT Necromunda represented...twas sad
32169
Post by: Rogue Wolves
are you serious thats rediculus WE MUST REVOLT!
48594
Post by: dsteingass
32169
Post by: Rogue Wolves
lookin good so far and weathering at the same time is definently the way to go! looking foward to seeing this bad boy
48594
Post by: dsteingass
Thanks Rogue!
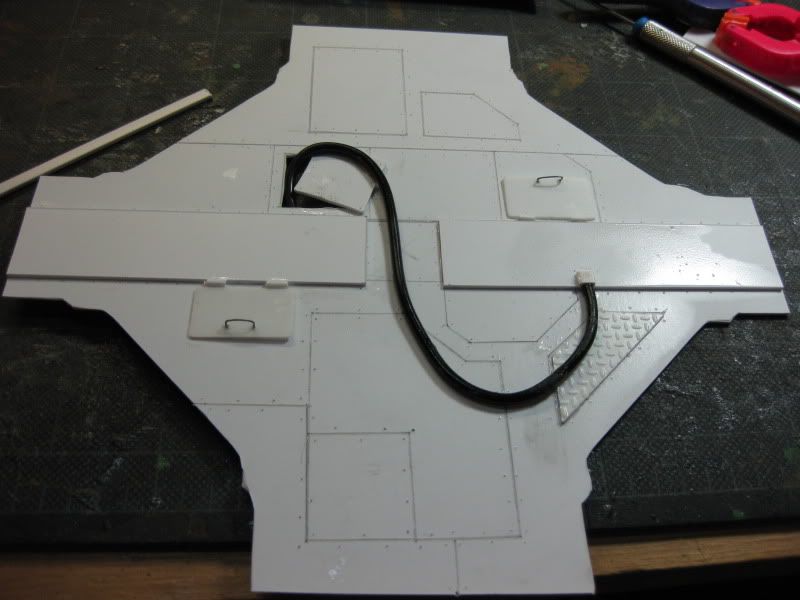
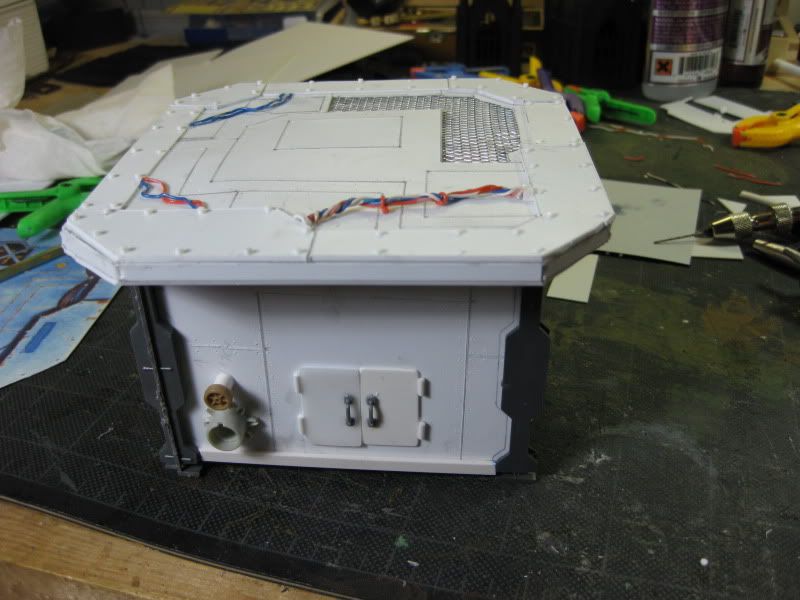
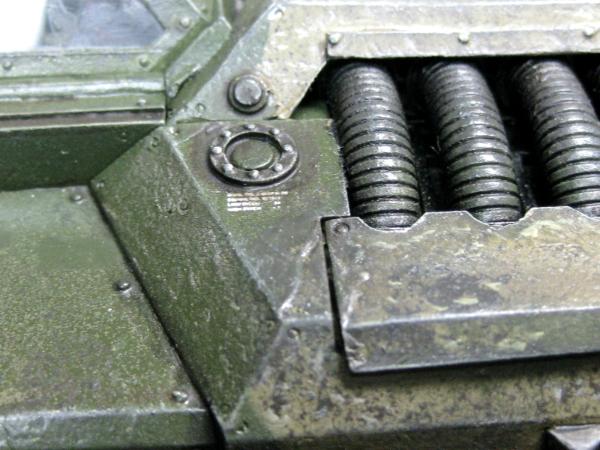
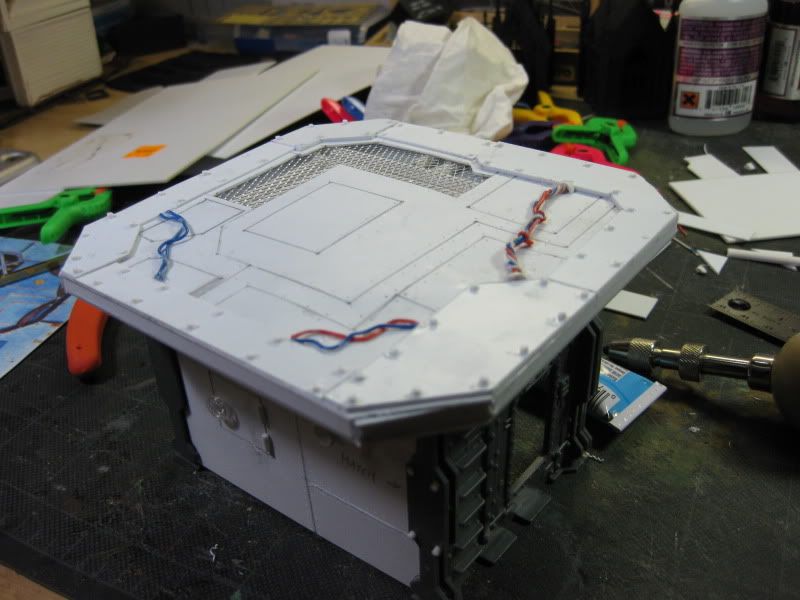
The ubiquitous power cable
24297
Post by: Viktor von Domm
if i may be to play the devils advocate.... could this raised detail like the cable and the handles of the hatches cause any difficulties in game?
other than that...a very promising start on the new piece... am i right in assuming that this piece will go into massproduction for some towers? you definatly need more for each level at least one...holy workload^^
as for the weathering... i guess i join in as weathering together all pieces sounds like the way to go...only on minor thought here... seeing the big tower now i think a blenind wash would help in making the weathering not look too outstanding...dont get me wrong the style and look of the weathering is super cool....it just looks now in comparrision to the new piece a tad strong and draws a lot of attention away from all the other details...anyone feeling the same way? or is that just me?
i don´t want to pull you down...i think waht you are doing is a wonderful thing and i only want to be helpful here...darn every time i have to say something like that i feel like a heel...
vik
48594
Post by: dsteingass
Nope, I notice it too Vik...It can always be fixed when it is paint, once I add the weathering powders though I'll be giving it texture, which I don't want to pait over if you get my drift.
Automatically Appended Next Post:
I tried to minimize the bits that stick out..It might hinder play some, but I don't care really. It'll look cool.
40687
Post by: soviet.russia
That is absouletely incredible. Been searching for a project like this for a while for inspiration. Also the fact that you showed each seperate stage actually makes me think i might be able to make something like that. Keep up the amazing work :-)
24297
Post by: Viktor von Domm
It'll look cool.
that is absolutly true^^ to the letter!!!
the bulkheads you primed before and now glued to the platform.... what glue are you using? does it bond well to primed stuff too?
also how flexible will be the builts later on.... will they allow different settings of the pieces?
48594
Post by: dsteingass
Testors in the blue tube. I sanded the primer off the painted surface partly, enough to make it hold. You can arrange the towers anyway you want, I just need to make a variety of walkways and gantries.
2326
Post by: shasolenzabi
Awesome! Liking the direction that new piece is taking, and yeah, it should have spots raised, too bad they don't seem to have trip-and-fall rules.
24297
Post by: Viktor von Domm
with walkways you can pretty much make each game a whole new setting...well you know you are making a good job...^^
ah... sanded gluespots so it is... that makes sense! ^^
48594
Post by: dsteingass
24297
Post by: Viktor von Domm
speedbuilding^^
48594
Post by: dsteingass
..and another floor
Yep Vik, you can say the production line is in full operation today!
15865
Post by: Da Big Mek
I love this necromunda terrain, as well as your gang. Being in the midst of a budding inquisimunda campaign myself. i'm always looking for good looking and well lets be honest cheap urban terrain, yours looks top notch and very 40k.
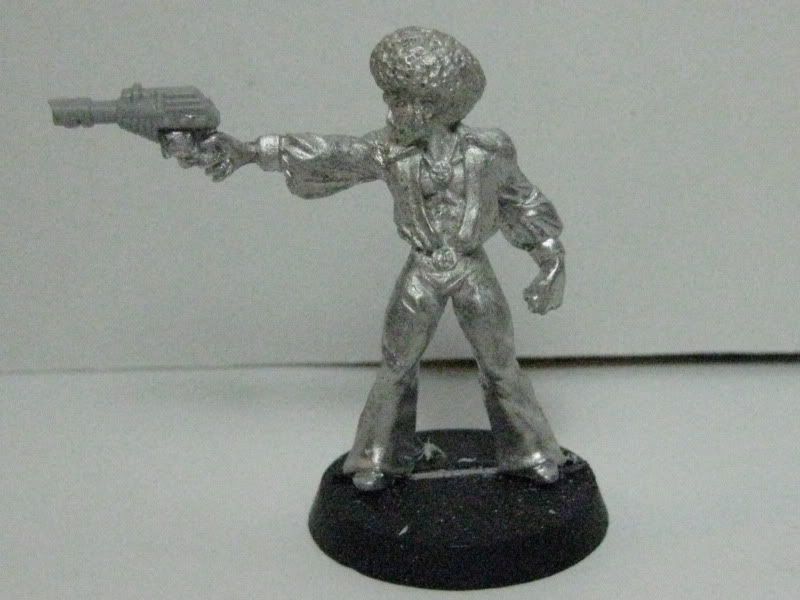
However i had a friend in my group ask, if you don't mind divulging your secrets, what model you used for your *ahem* leader.
48594
Post by: dsteingass
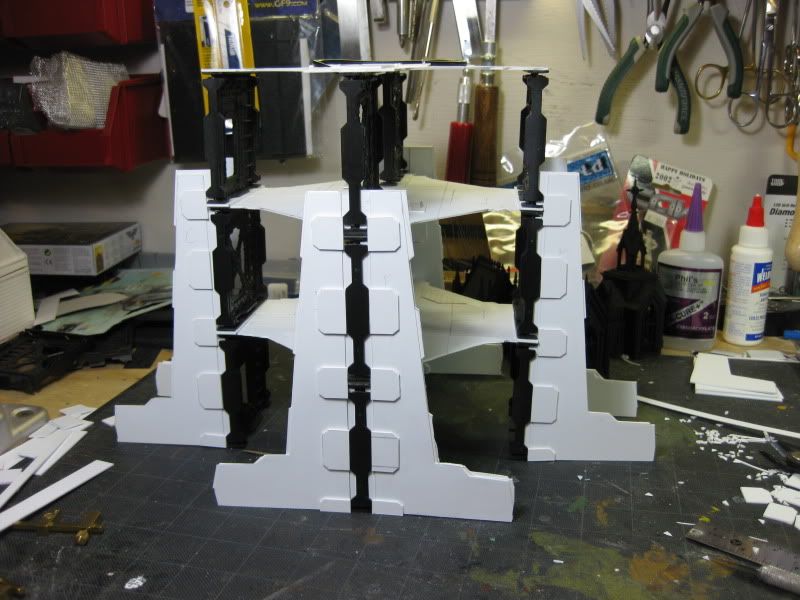
Thanks! Both the pimp and the disco Stu guy are from Reaper's Chronoscope line. I just replaced the weapons with 40k weapons and converted others. Automatically Appended Next Post: Supports cut and roughly fitted
26139
Post by: Skalk Bloodaxe
I am with the rest- weather everything. I also agree that the weathering effect on the first tower, while completely awesome, is grabbing too much attention. The sum is not greater than the whole, so to speak.
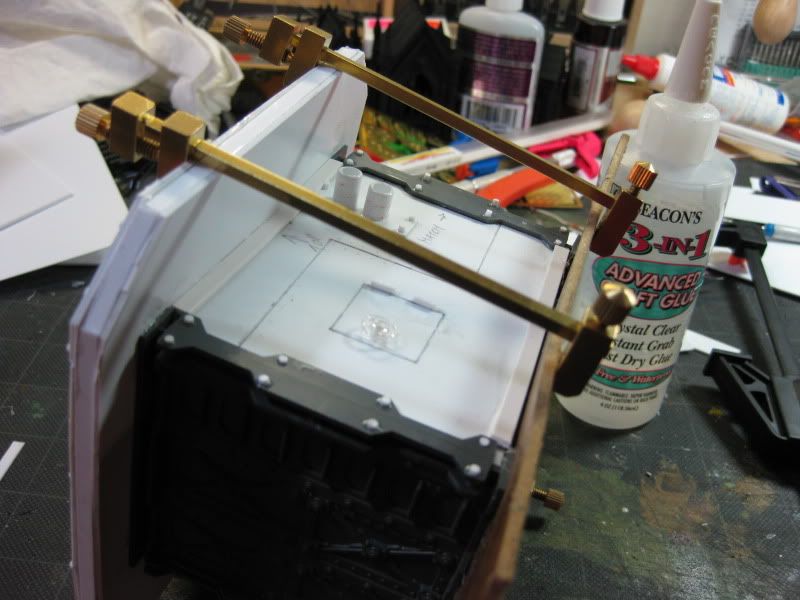
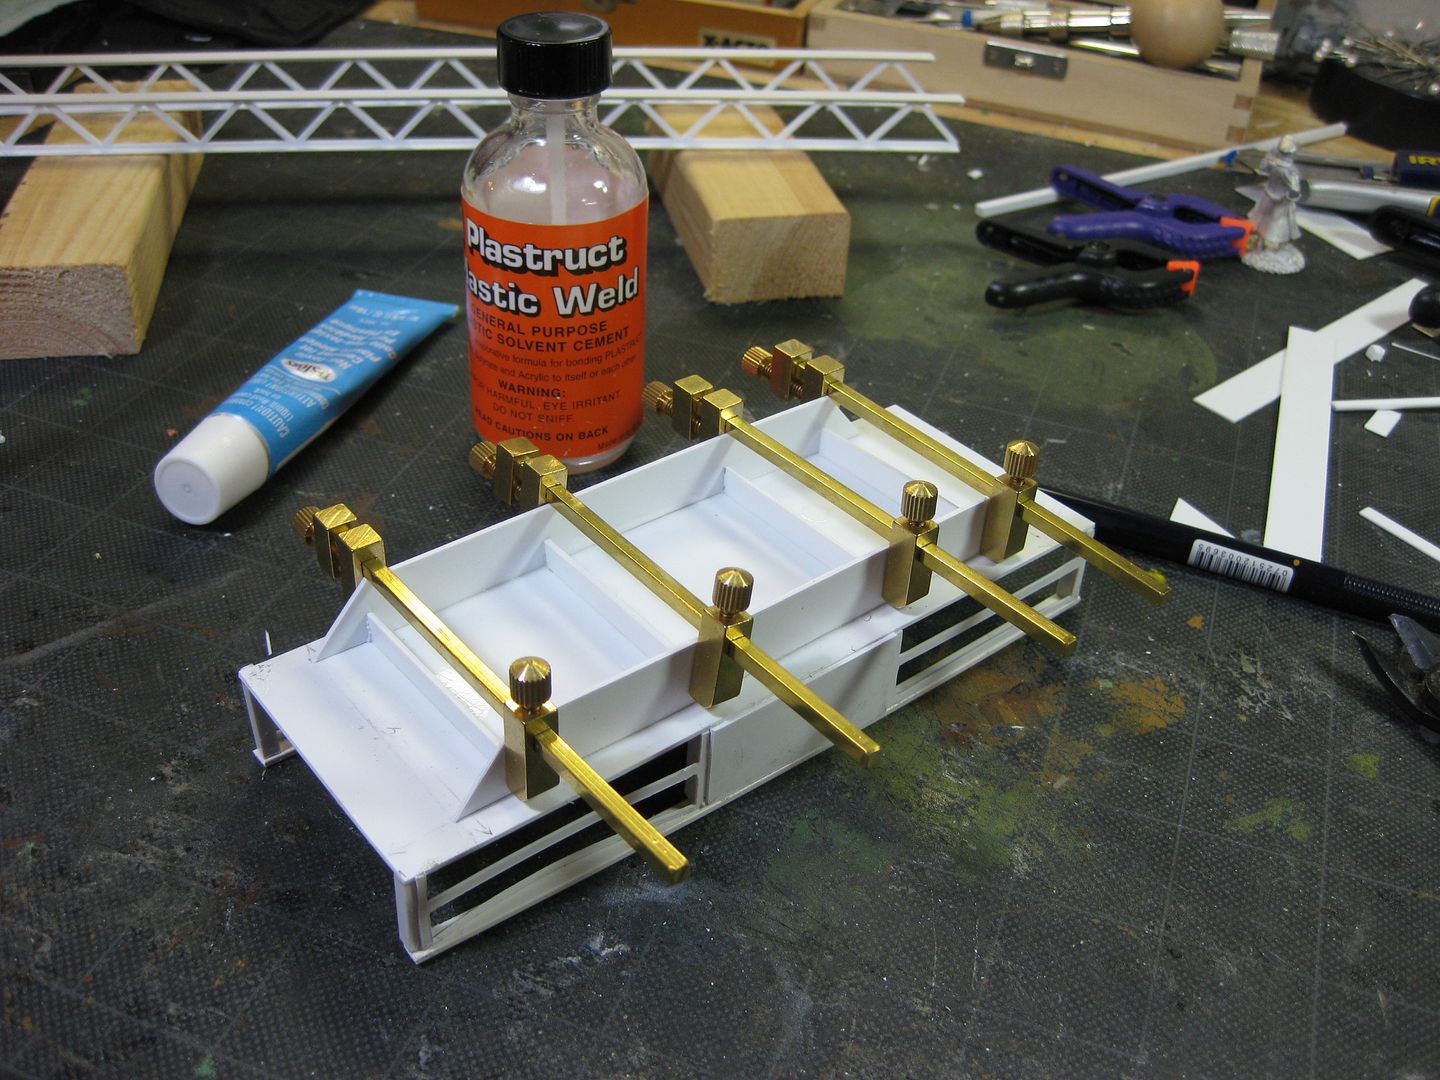
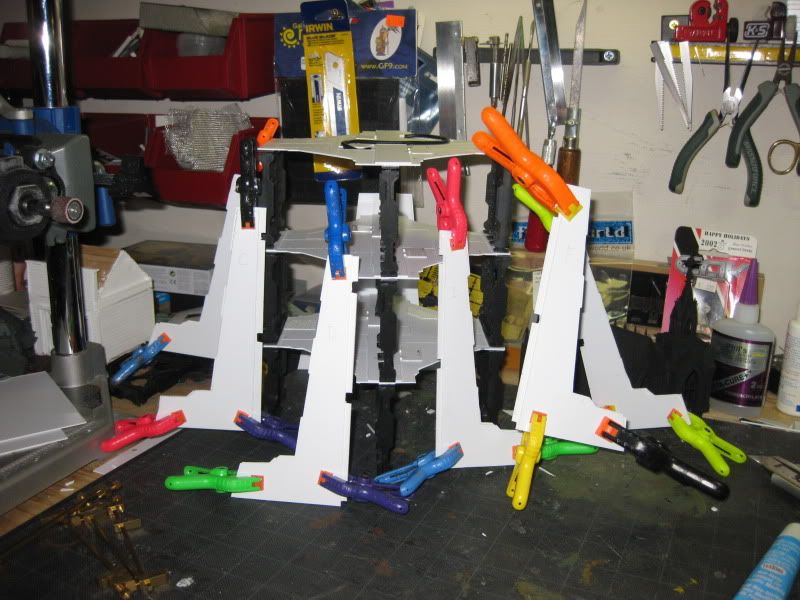
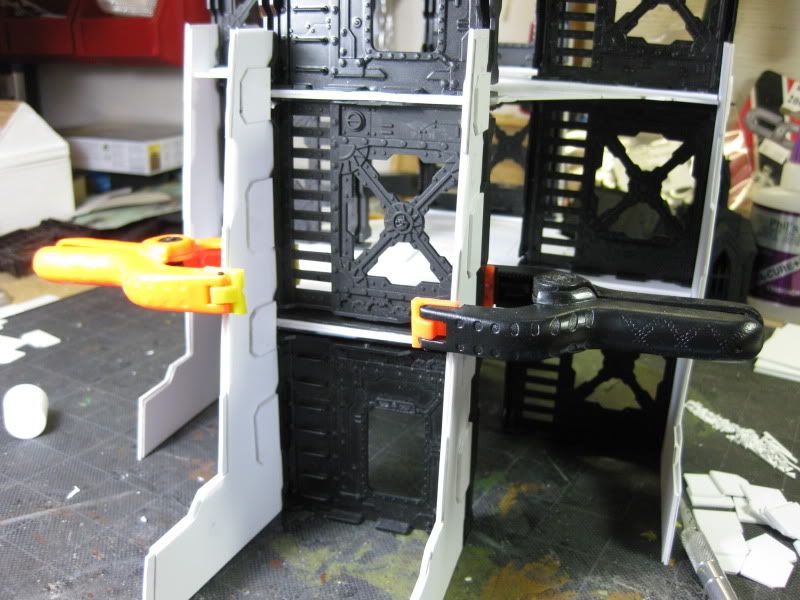
Another bizarre question (2 actually) but could you (if you have the time and inclination) take a picture of and detail what you use for your cutter and clamps? I need clamps like that,I usually take plates from my weight bench and hope they don't crush what I am gluing. What you are doing makes MUCH more sense but I have no idea what they are or where one would look for it.
48594
Post by: dsteingass
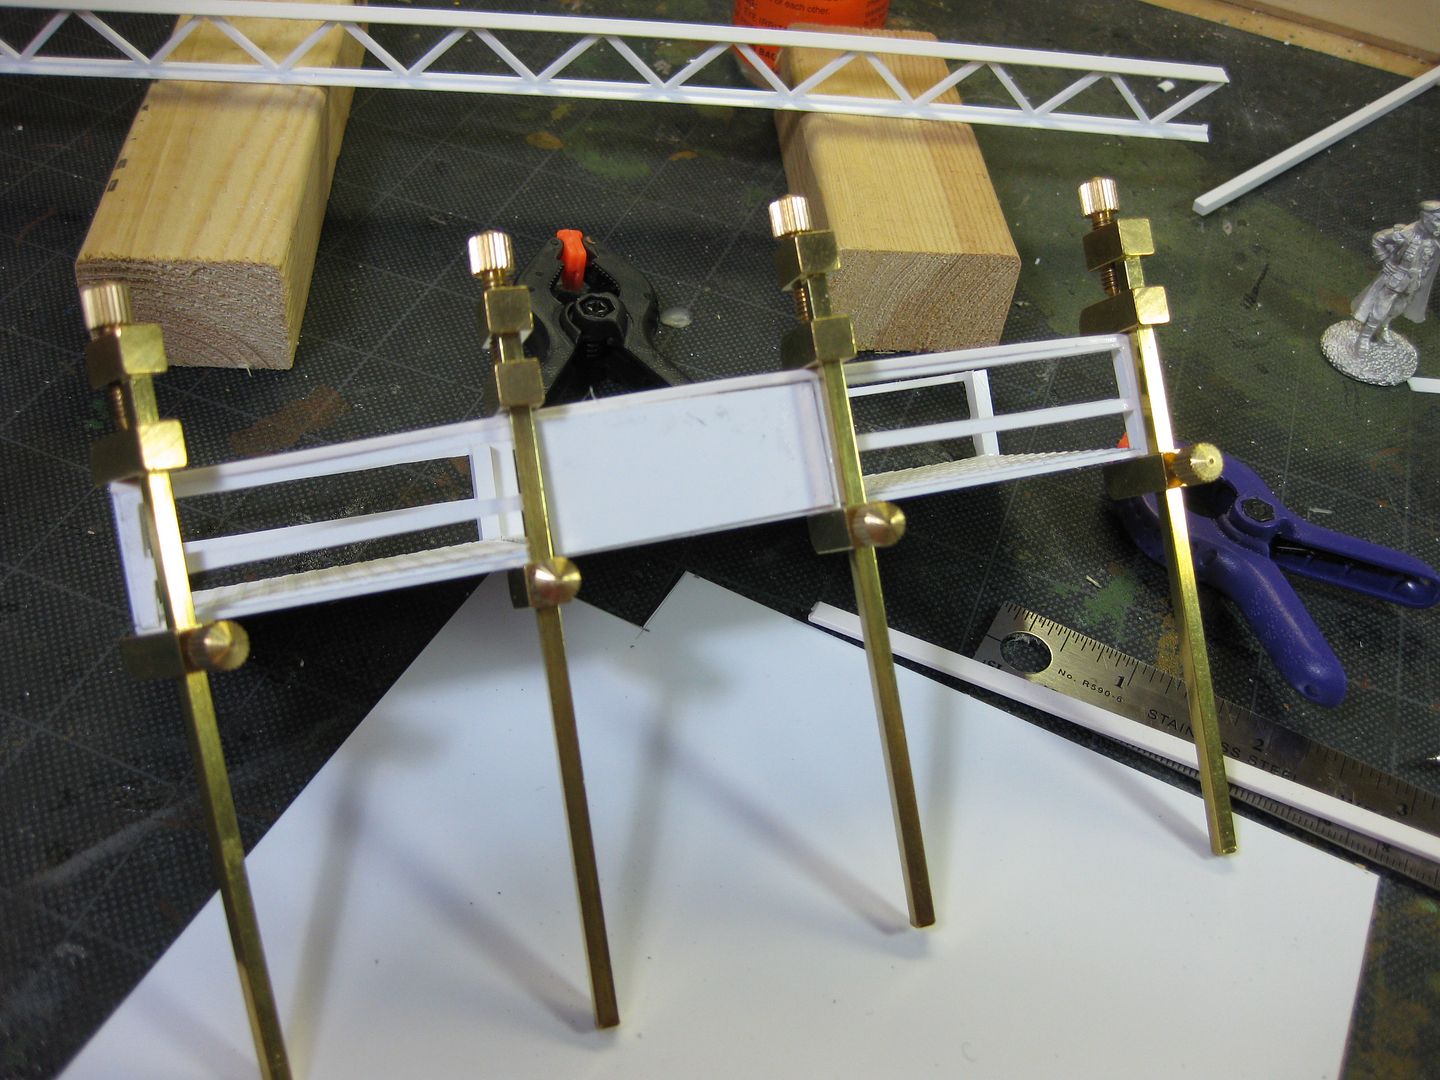
Sure, i love talking tools.
I use several types of clamps.
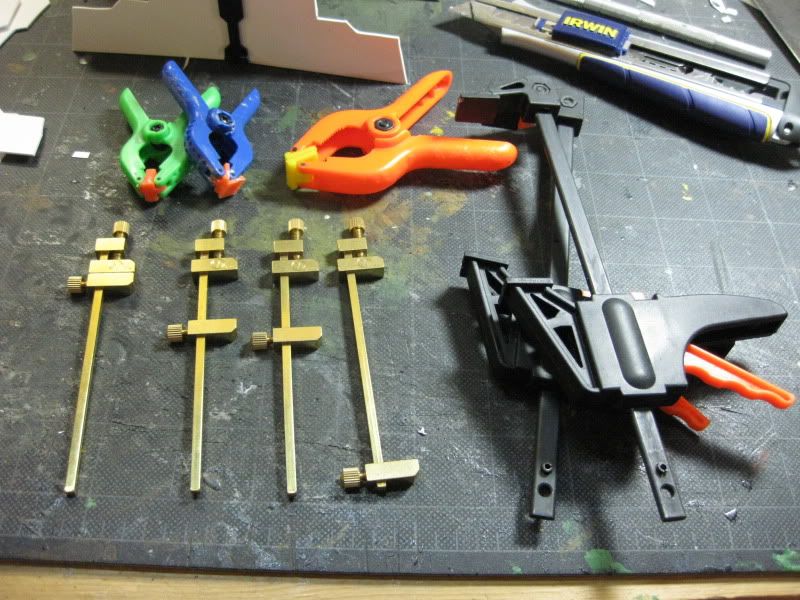
The spring clamps are the multicolored plastic ones that have VINYL grips (plastic glue won't stick to them easily)
I got these in several sizes in a plastic tube at Menards (DIY store) for a few bucks for the whole tube
The bar clamps with the orange squeeze triggers are also Menards finds. Bar clamps are essential IMO for building terrain.
The brass bar clamps I got from Micro-mark ( www.micromark.com) during a recent buy one get one free sale, they are only 3 1/2" though and have adjustable brass turners for precision tightening
As far as cutting goes, I stay well stocked with #11 x-acto blades. For cutting the sheet styrene I use a heavy duty sliding utility knife (snap-off blade system) but a traditional razor-blade knife would work fine. Plasticard gets the score and snap treatment
23897
Post by: Scarper
I actually love the weathering on the main tower - think it fits perfectly! Amazing work as always dstein, I'm running out of superlatives to describe it with
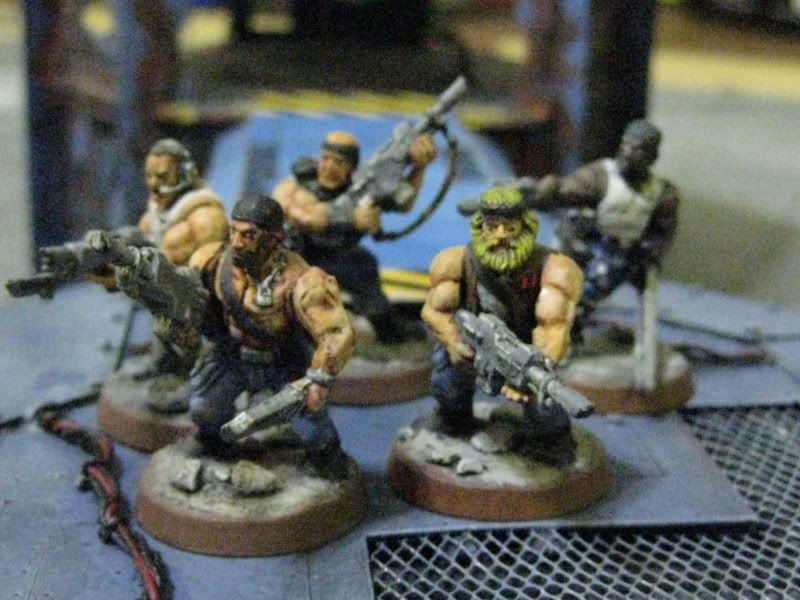
Apologies if you've already been asked this, but what thickness plasticard are you using? And any chance we could get a close up of the catachans in the denim who were so kindly posing on your terrain? I'm guessing they're an orlock gang
Keep it up, amazing work!
48594
Post by: dsteingass
You guessed right! they were in fact my first Orlocks, will snap one of them a bit later, am heading out for breakfast and grocery shopping.. The plasticard I am using is .040" High Impact Styrene from www.iplasticsupply.com.
26139
Post by: Skalk Bloodaxe
Thanks for the tools overview, it was helpful and I'll be checking a couple local stores.
My main issue w/ "freehand" cutting (even when using a T-square) I tend to cut at an angle so even though the "dotted line" cut is straight, the cut itself is "angled". Apologies if that is clear as mud, I'm all hopped up on cold meds and my brain not good think right now. What I'm trying to ask is how to you keep your blade from making an angled cut?
I know this is a "WIP' thread, not a tut, so believe me when I say that I appreciate your time.
48594
Post by: dsteingass
It always makes a beveled cut due to the "grain" of the styrene, no matter how straight you cut. I just use a stainless steel rule and use the bigger utility knife so that I can give it my best 90 degree cut. I keep several sanding pads handy for smoothing it up afterwards.
17738
Post by: Briancj
The BEST too for cutting regular lines, angles, whatever are the Northwest Shore Line (NWSL) Choppers:
http://www.nwsl.com/tools/cutting-tools-the-choppers-i-ii-iii
Not designed for large pieces of plastic, but aces for strips, rods, I-Beams, etc.
--B.
47117
Post by: Farty Wiffmas
Really nice terrain, can't wait to see more!
48594
Post by: dsteingass
Oh MicroMark sells those too, they really work that well?
Ugh..this repeated cutting is annoying, I wish I had the cricut figured out for these
and the requested shot of my first gang
24297
Post by: Viktor von Domm
those clamps are too highly on my to buy list for quite some time... every time i am in a DIY shop i am feeling the urge to buy them....will do this shortly^^ the brassen ones look highly useful too...hmmm...^^
the tower is rising niclely! but honestly i don´t see how it will turn out...but this is something i more look forward to as a sort of surprise^^
and i honestly dont envy you for that repetitive cutting work.... repetitive work is always something that puts me off...and i have today cut and holepunched about 100 shoes for my threads...so i feel your pain here^^
as for an almost 100% 90° cut i use several wooden rulers...i sawed different sized wooden planks.... their thickness is about 1.5 cm so the thicknesss helps me to provide guidance for the knife... if all fails i use two of these self made rulers to even more guide the blade...if this is hard to understand i will try to make a pic of my "workstation" i built....i am rather pleased with that built as i am quite clumsy when it comes to making precise cuts with just an average ruler...
48594
Post by: dsteingass
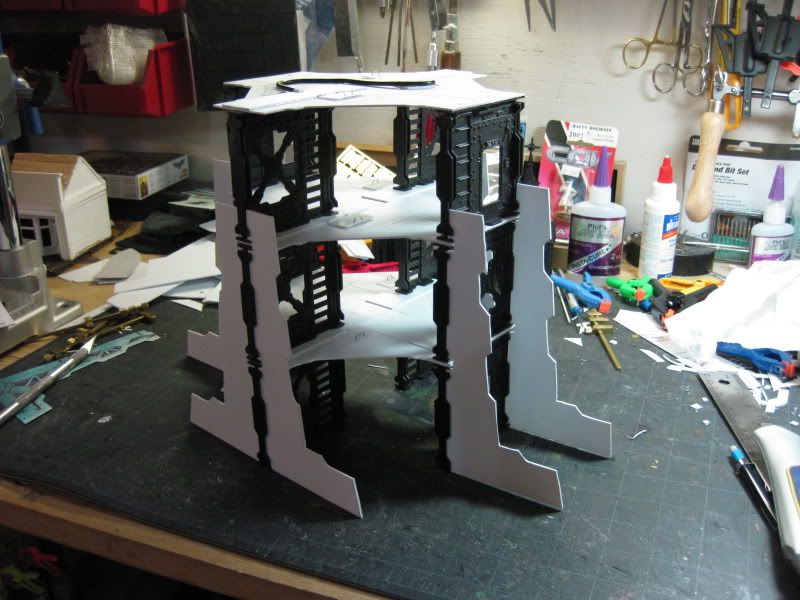
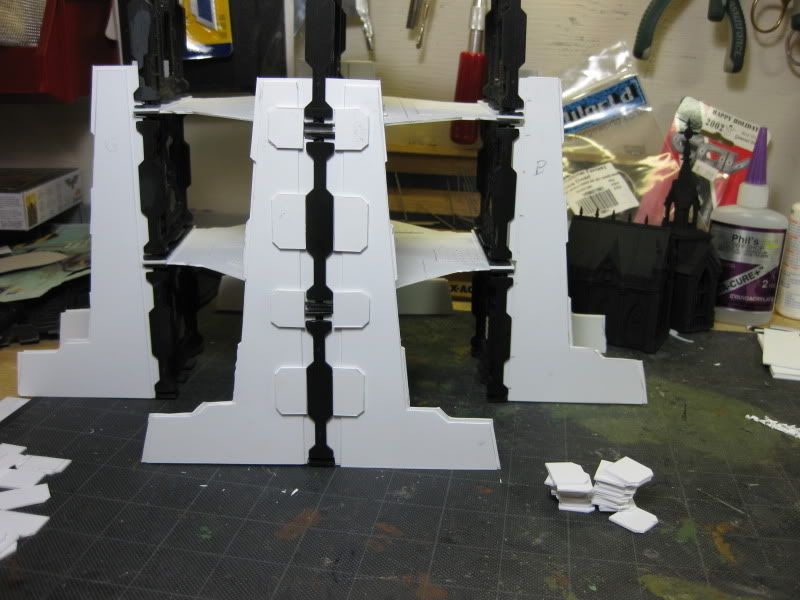
I'm not sure how it will turn out either Vik, the supports are frustrating me, I am not getting the "look" I am looking for, I will need to contemplate this more.
I made a run to Menard's just now, and besides some pumice hand cleaner (to get the damn glue off my fingers) and some laundry soap, here are my spoils
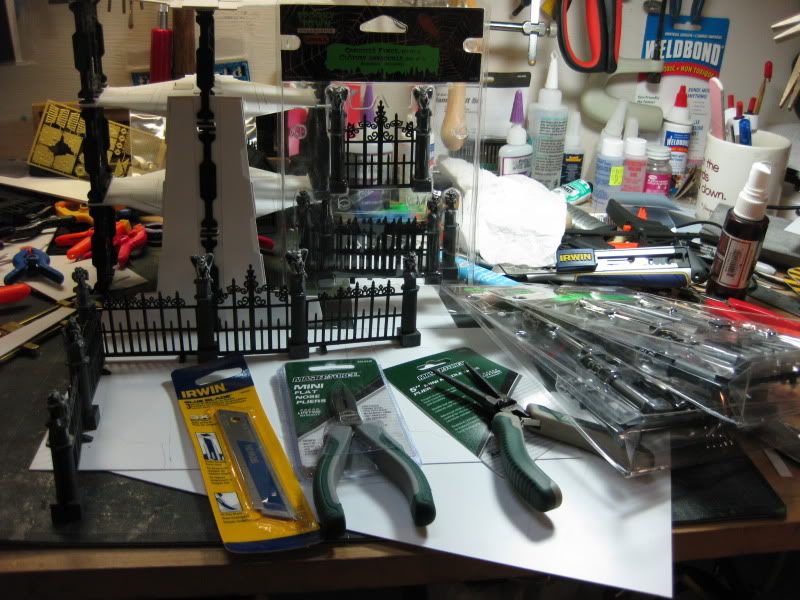
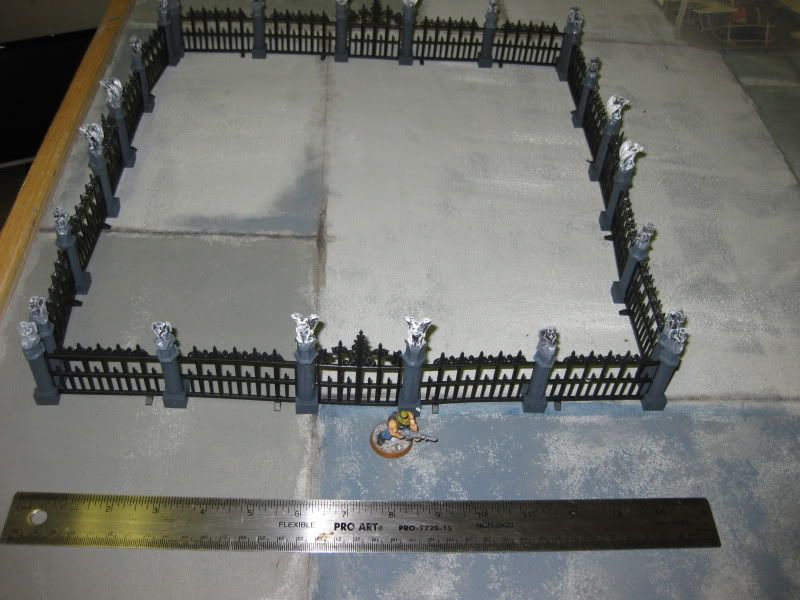
I found these Halloween fences with gargoyles for $2.99 a set of 5 (bought them out) I anticipate they will surround the Cathedral for the city table. Automatically Appended Next Post: I bought 4 packages of fencing and it' enough to make a 15" square!
 Automatically Appended Next Post: Automatically Appended Next Post: Back on project.....
 Automatically Appended Next Post: Automatically Appended Next Post: Still frustrated, they are too plain, whatever I do I have to do both sides of each support (16 times!!)
24297
Post by: Viktor von Domm
awwwww.....those fences....wow...you amreicans with your love for halloween....my supermarket that is selling some stuff for halloween is never going to stock such ready awsomeness....darn....*contemplating to get me a green crad....*
i think the support pieces are for now mostly lacking deatil and surface to be broken up...then i think they will look more working.... and this i think you already have planned out.... so i will sit this out from a safe place^^
damn.... had to look yet again after these cool fences...
34119
Post by: neil101
nice find with the fences. as for detailing you know there are no short cuts that you would be happy with. just 16x hard work .. : \
24297
Post by: Viktor von Domm
true!!!
48594
Post by: dsteingass
25141
Post by: Chibi Bodge-Battle
Whaaa I want that fencing
Suppose there is not any chance of getting some in the UK :(
48594
Post by: dsteingass
You have all the best stuff there in the UK that we don't have. I would imagine that a Dutch company would have to have distributorship in the UK.
After a delicious supper of fried red potatoes and sausage over a bed of sauerkraut I still don't know what to do with those damn supports..meh. Automatically Appended Next Post: 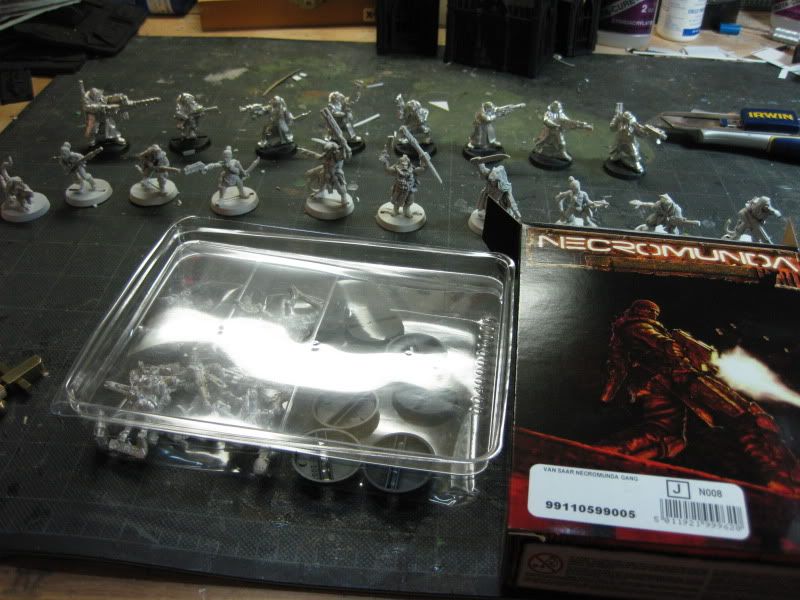
I don't feel like painting minis tonight, but here is what I've got. Ratskins, Delaques and Van Saar
25141
Post by: Chibi Bodge-Battle
The side supports I would treat as a single upside down T
Cables junction boxes and Reinforcemt plates will break it up
Some of that mesh you have used would be cool in places if you cut "windows" out
I would not worry about reproducing identical supports
Just re use shapes and ideas off the platform tops
hope that makes sense ad helps a little
48594
Post by: dsteingass
Good ideas Chibi..really..this is making sense to my mind's eye.
26139
Post by: Skalk Bloodaxe
What Chibi said, and maybe some X cutouts, like this:
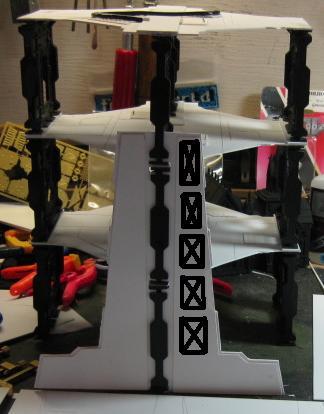
By "cutout"I mean one of 2 things- either literally cut them out, or make X design by using small bits of card glued over the top of what you have currently.
32169
Post by: Rogue Wolves
lookin good so far! cant waite to see this when it gets some more detail
39973
Post by: Galorn
Rivets will make em look much less plain once you paint the supports.
224
Post by: migsula
Lovely work! I can't but admire the dedication and goal of staying true to the original terrain, yet doing it "properly".
More!
32193
Post by: PDH
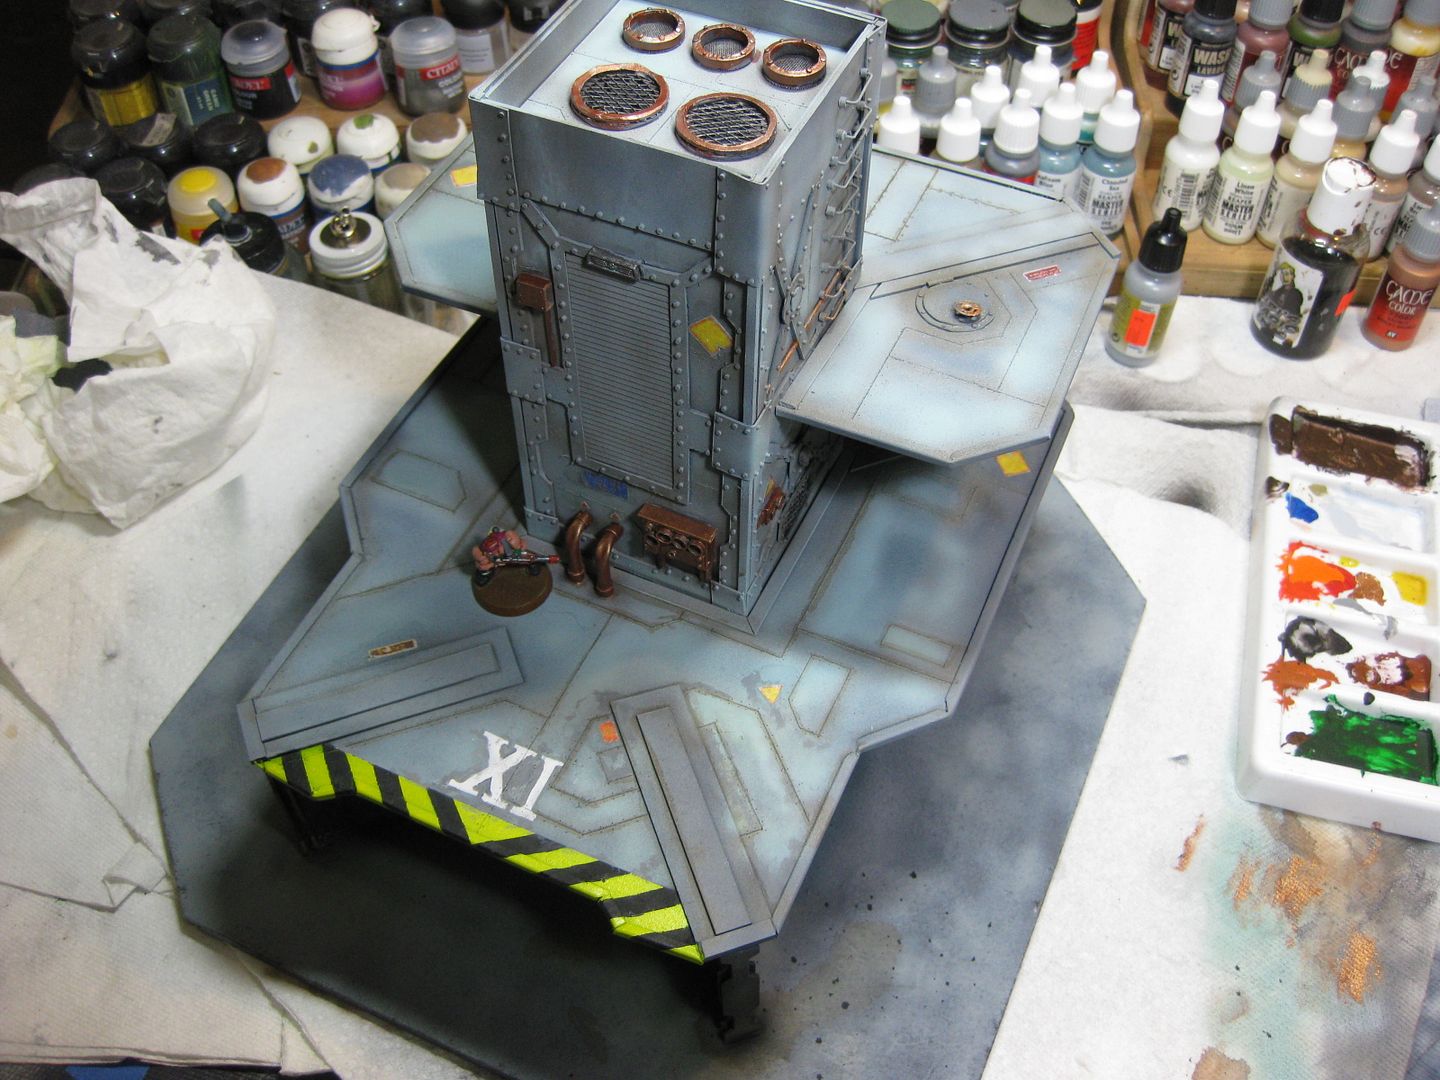
and I've decided to weather the substation platform when I weather the rest of the pieces to keep them similar. What does everyone think?
I really like the substation and it looks great linked up to the other building you've completed. When it comes to weathering I think less is more. For my taste I think there is a little too much weathering on the other building.
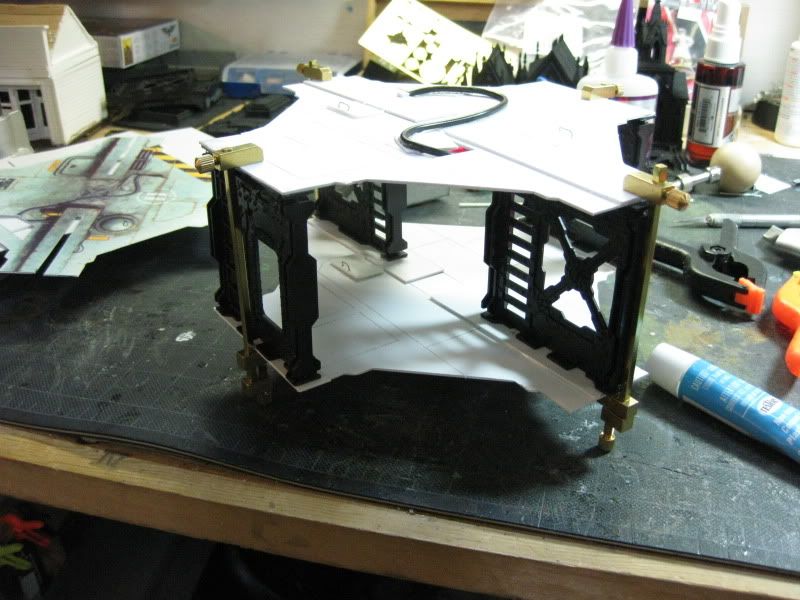
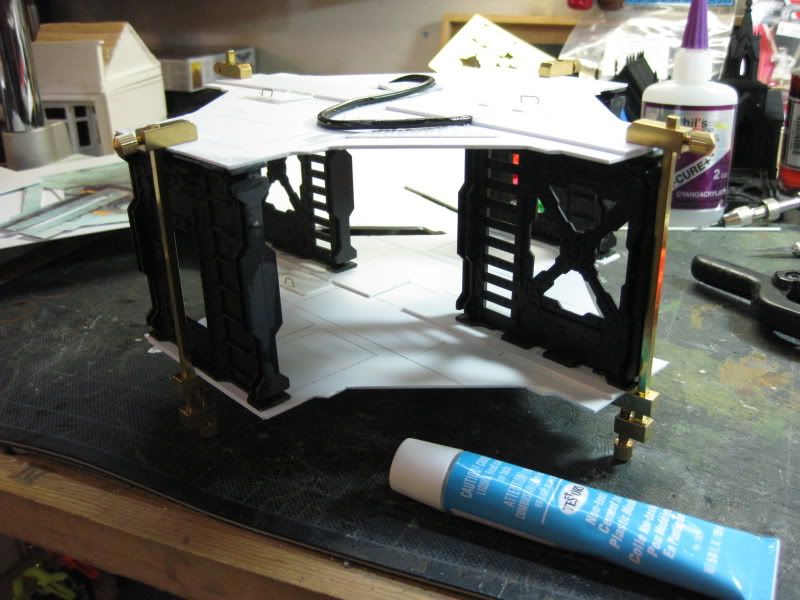
The all important supports....16 sides....the joy of modelling hey!
24297
Post by: Viktor von Domm
i think a mixture of skalk´s idea and then lots of rivets like galorn said sounds good... chibis idea of cables and plates would make this whole look complete!
and boy there is a fortune in minis on your table^^
48594
Post by: dsteingass
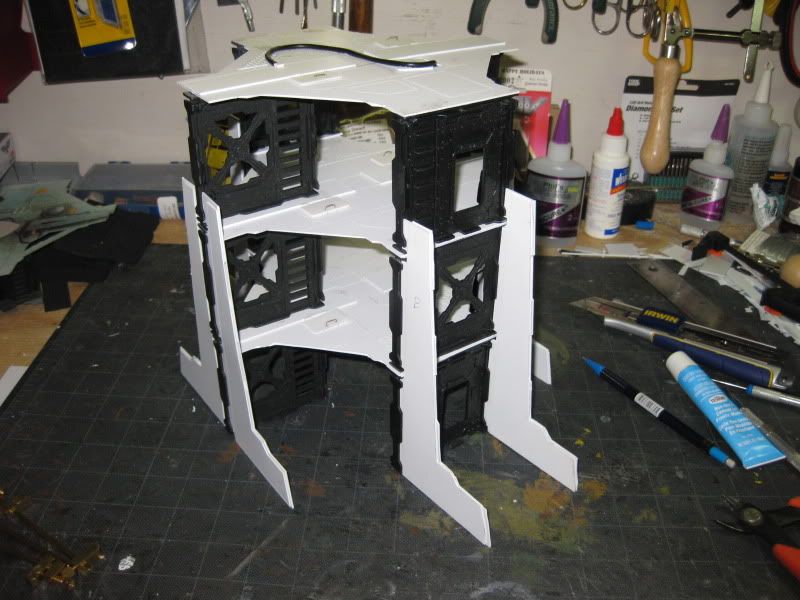
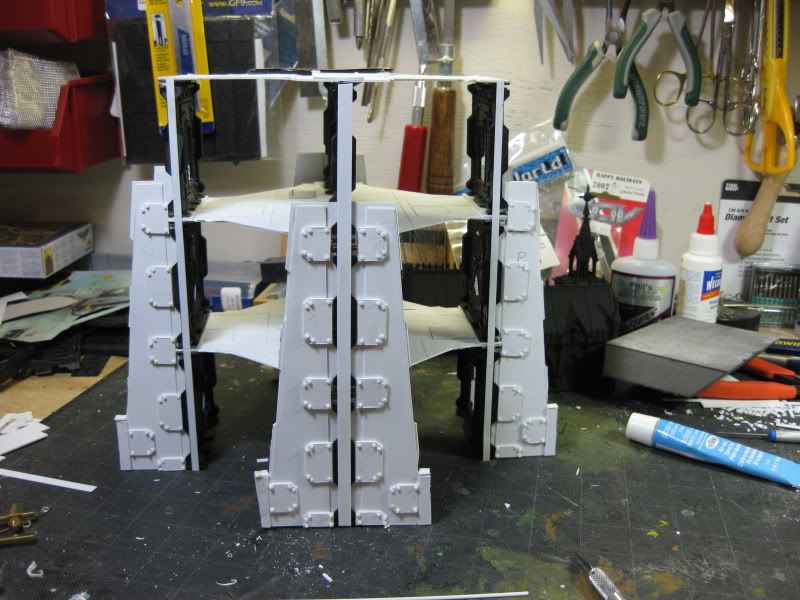
Thanks everyone for your support during my time of crisis! I already tried carving the original "cut out" design from the supports, it looked like crap, so I promptly cut the outside sandwich pieces of styrene to cover it up. Nope, it will have to be surface detail and glue-ons. Riveting will definately play a role in any free time I have in the evenings this week.
See everyone thought the rust looked good on the first piece until you saw it next to the shiny new piece!
24297
Post by: Viktor von Domm
See everyone thought the rust looked good on the first piece until you saw it next to the shiny new piece!
well this is a case of the new piece outshining the old piece and thus setting new standards... loyality is hard for eyes^^ we pick beauties whenever possible^^
26139
Post by: Skalk Bloodaxe
Regarding the "rusted" vs. "cleaner" look:
I spent some time going through photos of active and abandoned industrial sites, and one thing that stood out to me (beside the unbelievable overload of inspiration) was the stark contrast of decay rate between different materials and structures. Some of the structures in active sites (meaning people still work there) looked extremely weathered and rusted while some structures at long-abandoned sites still looked as if they were being maintained. Numerous factors would be involved here, like ferrous vs. non-ferrous metals, type of paint / sealer used (and if any were used at all), the conditions the structure is / was exposed to, the purpose of that structure, etc.
All of this leads up to a long-winded way to say that both of your finished structures look awesome and it's completely plausible to have them together.
48594
Post by: dsteingass
I did that too Skalk! I personally want to master the look of the rusted metal with the paint layer not just chipped, but cracked and lifting off in wafers
like this
...right over the hazard stripe paint too. I think the trick is to really work up those spots of charadon granite with visible layers of color, but damn..that's a lotta work. I need a break as it is..woof
26139
Post by: Skalk Bloodaxe
The good news there is that you should be able to pull that effect off w/ not as much effort as some of the other things you've been doing. My wife is a hobbyist as well, does $crapbooking and $tamping and $tuff like that. One thing she uses for an antique / crack effect is Hodge Podge and that gold or bronze stuff that cracks when it dries. The effect is pretty decent, have always wondered what it would look like on terrain buildings.
While researching industrial photos I found this and decided I have to build it. For scale ref. look at the door in the upper left. It would be three separate pieces that fit together (left wing, right wing, and then 1/4 pie in center)
Won't post the pic here because it is HUGE but figured you could use the distraction. Because you don't have enough of those.
http://www.withstrengthweburn.com/terrain/platforms003.jpg
48594
Post by: dsteingass
Oh cool! That woud be a very useful piece of terrain gaming-wise too! There is even cover on the top floor! It looks like it was once a theatre of some kind?
26139
Post by: Skalk Bloodaxe
Sent the link to you. Be careful, there's hours of time-sink there. You were warned.
2326
Post by: shasolenzabi
Hey Dsteingass, have you ever played Fallout-3? especially the Pitt? that screamed Hive to me all the time, and with the groaning of the old rusty industrial buildings as well. Like  Automatically Appended Next Post: Automatically Appended Next Post: Or:  Automatically Appended Next Post: Automatically Appended Next Post: More stuff to view here. http://www.bing.com/images/search?q=Abandonedfactories&view=detail&id=CD5A7C7F72C33201D69D1DAAF70B7F89D3ABCBF8&first=181&FORM=IDFRIR
32193
Post by: PDH
Skalk Bloodaxe - That is an amazing photograph to inspire necro terrain
dsteingass - About 3/4 way down the link there are some shoulder pads that have been painted with crackle effect.
http://www.coolminiornot.com/forums/showthread.php?31535-Space-Marine-WIP-Part-2./page6
At the bottom of page 4 it gives you a run-down of how to do it and what materials he used. Hope that helps
http://www.coolminiornot.com/forums/showthread.php?31535-Space-Marine-WIP-Part-2./page4
48594
Post by: dsteingass
@Skalk- you were right! but OMG the inspiration!
@PDH- I have some crackle glaze, but I've never been able to control the effect like he has, that is some absolutely stunning work! He can even control his airbrush to the point where he uses it to spray the Aquila on the Marine's chest! That is insanity!
@ SHas, no I have'nt played Fallout 3, but I will check it out!
20018
Post by: Hyenajoe
I'm really impressed by your work man!
I'm planning to do something similar, and your stuff will certainly be a huge inspiration.
48594
Post by: dsteingass
Thanks Hyenajoe!
I think I am not in the right mindset to achieve what Vik calls "Rivet Zen" yet, but I'm chopping up plasticard pretty repeatedly here.
15358
Post by: Vitruvian XVII
@steingass: Its amazing, but im pretty sure that is one of the large scale FW marines, its definitely not 28mm Those cutouts look interesting.
48594
Post by: dsteingass
Still..amazing control!
6967
Post by: The Tsunami
Loved this thread for so many reasons. Awesome Nec terrain. Looks like the original card board stuff I started out with 12 years ago. And I can't ever complain about pimps & hoes. "Make dat Imperial dolla'!!!
48594
Post by: dsteingass
Thanks Tsunami! That was really the purpose of this endeavor, not to make a 1:1 replica, but to retain the feel of the original cardstock goodness.
36711
Post by: Depraved
This is such an amazing project! I admire your ability to use plasticard on such a scale! So much to measure and cut! What really makes this project great to me is that you are recreating a classic, makes me want to update all the 1st gen space hulk tiles I have laying around. Very inspirational, keep up the good work!
48594
Post by: dsteingass
Oh Wow Depraved! That's a great idea! Thanks so much man. Automatically Appended Next Post: all glued in place
 Automatically Appended Next Post: Automatically Appended Next Post: And..
 Automatically Appended Next Post: Automatically Appended Next Post: 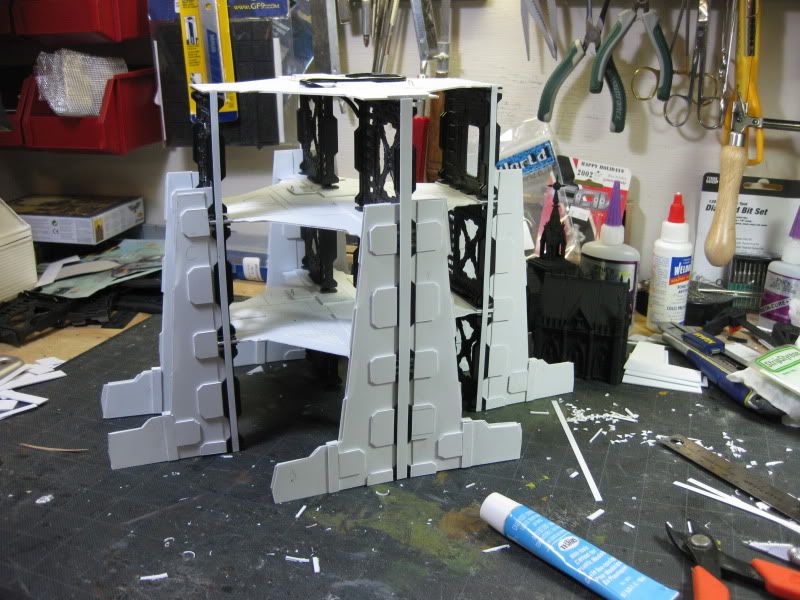 Automatically Appended Next Post: Automatically Appended Next Post: Rivet Zen!
or mindlessness enhanced
9394
Post by: Malika2
Very awesome! Can't wait to see it finished!
2326
Post by: shasolenzabi
Looking good! and now you have a possible new project to play with as suggested earlier by Depraved.
48594
Post by: dsteingass
Thanks Malika! I appreciate it.
@Shas naa I'll let Depraved do that one!
37819
Post by: LilLoser
That terrain looks awesome. Well done. CAn't wait to see it finished.
LilLoser
2326
Post by: shasolenzabi
dsteingass wrote:Thanks Malika! I appreciate it.
@Shas naa I'll let Depraved do that one!
No worries then. Keep up the awesome Necromunda stuff.
15358
Post by: Vitruvian XVII
Looks good with the rivets, i would fill the gaps in the grey plastic you can see though.
32169
Post by: Rogue Wolves
large towers coming along quite nicely
48594
Post by: dsteingass
rivets rivets rivets more rivets
@Vitruvian What? fill in the crosses in the bulkheads?
15358
Post by: Vitruvian XVII
Nah, these bits...
1
48594
Post by: dsteingass
Meh, I dont think that's gonna happen on this one, sorry bud.
25141
Post by: Chibi Bodge-Battle
The cost of the tedium of cuts and rivets is paying dividends Dstein
Is looking the part imho
32169
Post by: Rogue Wolves
are you planning on adding anything on the differing floors to fill them up a bit?
26139
Post by: Skalk Bloodaxe
How do you keep from going absolutely mad? The rivets look excellent and will really tie it all together, but wow. X-acto rivits? cut cut cut cut cut cut... glue glue glue glue... repeat 208 times.
My order should be here in a few days. I'm not going for the exact same project you are (specific Necromunda restoration) but it is certainly influenced. What I really want to do is recreate the terrain I had back when I had a Necromunda league (it's good to be the Arbitrator) and luckily I have most of it still, it's just torn down to bulkheads and plasticard, and it's all very plain. I'm looking forward to this project and I'm excited about FINALLY putting my terrain back together, especially knowing that this time I'm doing it as much for the artistry and hobby aspect as I am for the functionality and game play.
That said... I need to find a place online to buy rivets because there's no way my shattered attention span is going to let me chop up 200+ rivets per platform.
25141
Post by: Chibi Bodge-Battle
There are the water slide decal rivets but they are a tad pricey.
2326
Post by: shasolenzabi
@Skalk, some of us actually can sustain a pace with such "tedious" work. Is not easy even when doing PVA glue rivets, but the idea is once you get that rythm or groove going, stopping seems pointless.
14062
Post by: darkkt
Awesome stuff - really effective, and clearly a lot of painstaking work put in.
Respect
32193
Post by: PDH
How many rivets
Worth the time and effort. Looks really good....roll on the paint.
24297
Post by: Viktor von Domm
shaso you have put the finger on the spot! exactly rythem and an acording mindset and there is only material causes that could make me stop the riveting process...
and dstein... amazing that you cut all theses plates... and you do use a scissor of some sort? you are a brave man^^ the piece is under serious development atm and i really like where this is leading... call me a skeptic before but now i see that this is heading for win!!!
cheers, vik
47942
Post by: bebopdrums2424
dang steingass! This whole project is really gaining momentum! Im pretty excited to see the finished product
48594
Post by: dsteingass
Thanks everyone! I'm glad it looks good. 512 individually sliced, stabbed, and glued rivets, but who's counting? And Vik, no I just cut 5/8" and 7/8" strips of plasticard, then traced the master pattern for the plate over and over, scored, snapped, and then took the snips to it for the angled cuts. I tried to keep it as production line as possible but it still took a long time. Took me my entire day off to add that detail to the supports. I hope it was worth it.
@ Rogue yes I want to add the illusion of some thickness to the floors, but I havent figured that part out just yet.
However, I did make the decision to saw off the extra bits of cover from the bottom of the supports, no one seems to have noticed?
2326
Post by: shasolenzabi
Hey, it's been quite some time since I even saw that terrain in original format!
P.S. I got fresh pics to look at too!
Automatically Appended Next Post:
Yeah did look at that, stream lined it is!
15358
Post by: Vitruvian XVII
Oh yeah! It definitely looks better, the fact you had to point it out probably means it fits better that way.
24297
Post by: Viktor von Domm
now that you mention it is a more sensible look...maybe it was what bugged me in the first place^^
26139
Post by: Skalk Bloodaxe
^ what they said. It looks really good, and it looks "normal".
500+ hand-cut rivets. For this platform. I know who and what I am when it comes to modeling and attention spans. I can model for 12 hours straight, but I'll do 20 different things in that time. A task like this would take an amazing amount of modeling sessions time to complete.
I suddenly recognize the true value of http://www.nwsl.com/tools/cutting-tools-the-choppers-i-ii-iii
If not the actual product, the concept (meaning I might try making a DIY version). chopchopchopchop x500 times seems like it would go a lot faster on something like this. I can handle the gluing part because I'm seeing progress w/ every rivet.
I looked up buying pre-cut rivets, the were a bit expen$ive.
I just had another idea for this. Off to research.
48594
Post by: dsteingass
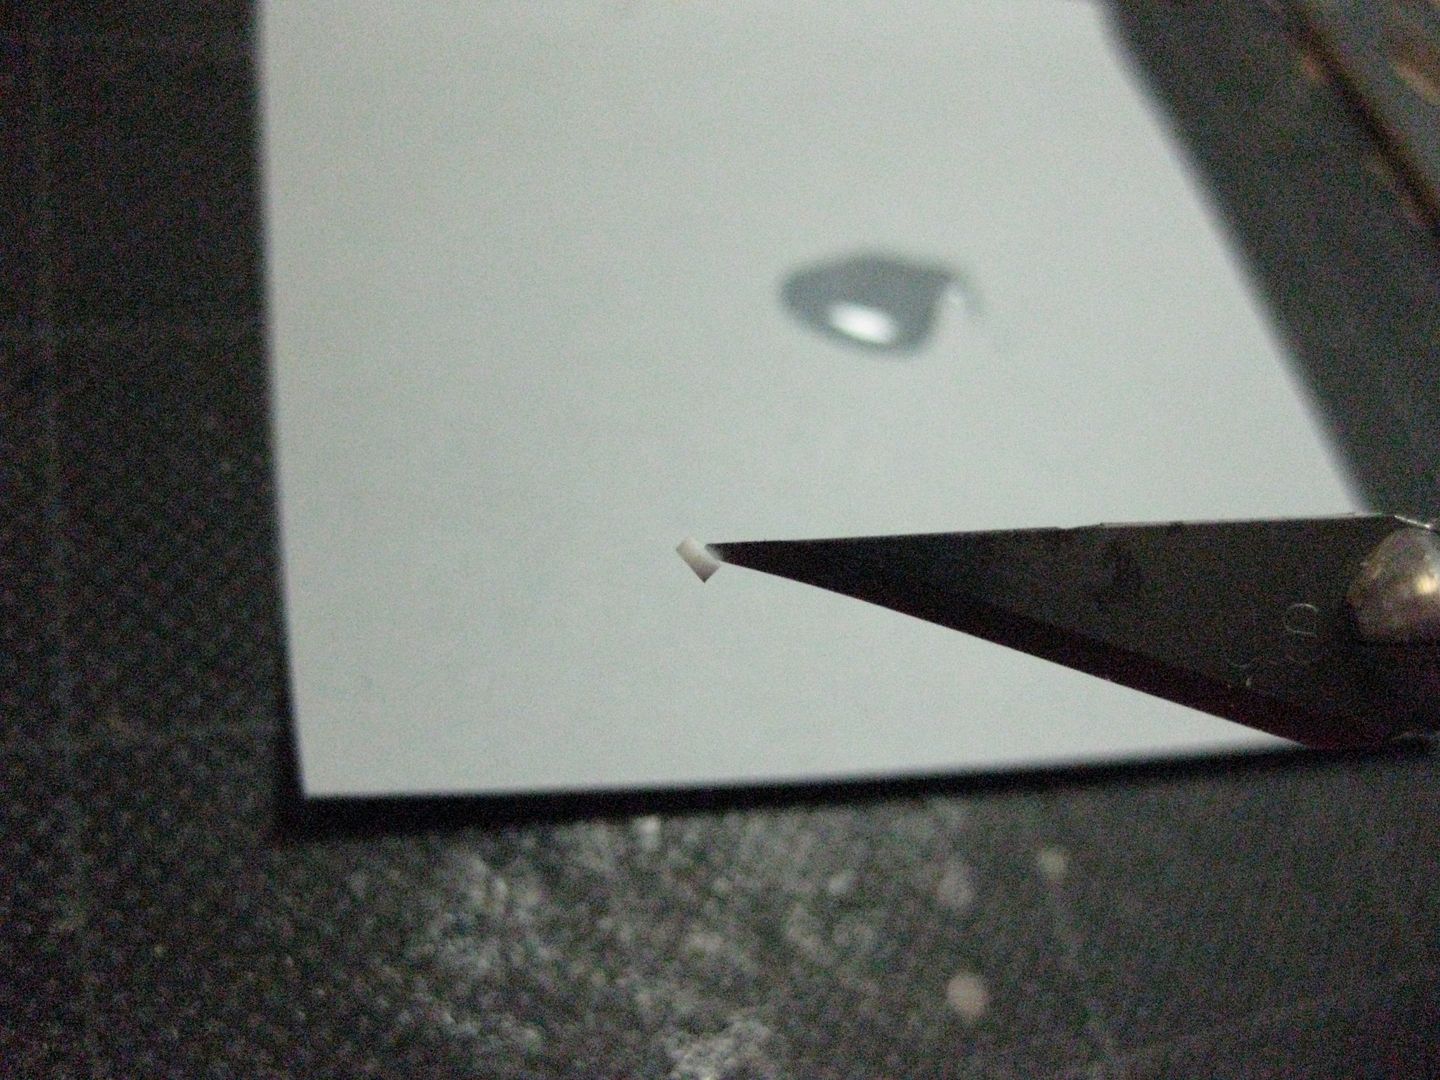
It's not as hard as it looks, the key is to use a new blade, plant the tip in your cutting mat and use a slicing chop like you are chopping celery, moving the styrene rod as you go. I didn't do them all at the same time, chop some, glue some, chop some more, repeat. If they fly across the room, your blade is dull, use a different part of the blade or replace it and continue. If you are using a proper slicing motion, they should just fall off the end into a pile, or get stuck to the oil on your x-acto blade. They also stick to your hand, arm, or any other body part you lean onto the pile.
26139
Post by: Skalk Bloodaxe
dsteingass wrote:If they fly across the room, your blade is dull ... They also stick to your hand, arm, or any other body part you lean onto the pile.
That cracked me up.
I'm going to stop looking for a solution to a "problem" I haven't encountered yet. I'll give the X-acto knife a try. If that doesn't work out for me I'll go back to obsessing about finding a tool for this.
Once you have this tower wrapped up, what's coming next? Walkways you say? That's excellent! I was wondering what you walkways would look like! Really looking forward that that.
25141
Post by: Chibi Bodge-Battle
Get some pins with rounded heads
Cut with pliers
drill small hole
Apply super glue to cut pin
pop "rivet" in hole
sorted
48594
Post by: dsteingass
The nice thing about the styrene rod rivets is you don't have to worry if you cut some too long, once the glue dries you can take a pair of clippers to them to even them out.
Automatically Appended Next Post:
@ Skalk - Yep thinking of some walkways and other non-bulkhead based structures next. I need to wrap this one up first tho.
17738
Post by: Briancj
Grandt Line O Scale Rivets. Package of 100, $3.00.
I'm just SAYIN'.
--Brian
48594
Post by: dsteingass
14" long 0.40" styrene rod= package of 10 $2.99
I used less than 1 rod for all 500+ rivets
24297
Post by: Viktor von Domm
i still prefer my holepunch made rivets if it is all the same to you thank, you very much^^ the chopersystem looks also very tiresome...the holepunch is quick and quite verstaile... if i ever need it for other uses it is still there... with this i made ornaments and lots of other stuff...the chopping of rods into small discs would drive me crazy...and it is thousand times more dangerous in my opinion... and you know the drill...safty first!
48594
Post by: dsteingass
I still have most of my fingers! You are given 10! If you can't sacrifice one or two for the hobby then I just don't know what to tell you man! lol
24297
Post by: Viktor von Domm
only ten...well i can count up to eleven if i have them hands in my trouser pockets...
48594
Post by: dsteingass
lol @ Vik
By the time you read this post, I have already commited to primer...i see a red door and I want to paint it black....
I don't have enough styrene I-beam to add the thickness to the floors, so rather than do a poor job, I am opting to not do that job at all.
24297
Post by: Viktor von Domm
yeah, paint it black^^ so...the thickness of the platforms stays as is? i think we can all live with that^^ after all the playablitity of the tower is second most important feat of a terrain piece!
48594
Post by: dsteingass
Ta Da

The set grows!
24297
Post by: Viktor von Domm
with a pace like that you have a fully functioning hive at the end of the year...
and yet again seeing all primed in black makes a lot of difference!!!
but one thing these pics show quite clear... we taht is you need new bridges done by you...cardboard isn´t filling the bill anymore^^
48594
Post by: dsteingass
Well man, I can't keep up this pace forever, I'll need to shift gears soon. The walkways will definately get made, but I have a shortage of material now, not sheet, I have plenty of that left, and I have plenty of rods and tubes, but I need to either take a trip to my overpriced, friendly local hobby shop or make a bulk order online somewhere to get square rods and I beams and girder/truss stuff first. there is nothing more annoying than having to conserve resources when you are in full creative top gear.
edit..and I've only got 1 sheet of tread plate textured plasticard left, I'll need more of that too. Walkways will need planning unfortunately.
24297
Post by: Viktor von Domm
oh.... yeah i feel your pain here... when in a creative frenzy and then the material is spent... that is like getting a RC car from santa and no battreies included but a full weekend before the shops reopen after holidays...maybe thats why i rely so heavy on cardboard... i just opens me a new box of cerials and i am set^^ but heck i think i need a new bottle of PVA... they tend to empty on two tanks quite fast^^
by the way i am currently thinking about some ways to get that textured feel to plates like the by you mentioned "tread plate textured plasticard "...any ideas of how to achieve that with cardboard? i was thinking maybe flynetting ontop of cardboard?
48594
Post by: dsteingass
What abput the nets that oranges and onions come in?
Glueing it might be a betch tho.
24297
Post by: Viktor von Domm
hmmm could be that the squares are a bit to wide? i guess i have to do some testings... if i recall correctly i have both at hand...
lol rivet tower prime time...nice roll of the tounge there^^
48594
Post by: dsteingass
ok, what if you found picture of tread plating online, resized it to O gauge or 40K scale, whatever looks right, printed it, then used a small screwdriver or other tap to sort of emboss each tread on the other side of the cardboard. It works for rivets in thin 0.20" plasticard using a dull nail or scratch awl.
24297
Post by: Viktor von Domm
*raises eyebrow* ...now here is a useful thought...hmm...this will be tested you can be sure off...tho it might be a case of how thick the cardboard has to be... but as i said this will be tested....
48594
Post by: dsteingass
Note: using a steel sculpting tool to do it doesnt work...I just tried lol
35871
Post by: Tekeino
Looking good man, if you do decide to order some I-beams and square plasticard rods online, please please please post where you would get them from, i havent found an online distributor and would love them for my necro terrain.
Thanks man
24297
Post by: Viktor von Domm
did you punch through?^^ the blunt screwdriver sounds like the best way to me...
as for ordering stuff... have you considered a search via ebay? there at least you can be sure to select a local suplier...
48594
Post by: dsteingass
I-Beam is normally expensive anyways, but a 15" length is a good sized piece of plastic really. Here I found 4-15" lengths of 1/2" stuff for $3.99..not bad really
http://www.hobbylinc.com/htm/pls/pls90520.htm
@Vik- it just made a distended bump, I think you really need a pressure plate and a negative plate so it doesnt poke through though.
32169
Post by: Rogue Wolves
seeing it undercoated black and lined up with the other peices it does look alot better then alone
48594
Post by: dsteingass
Thanks, yep it's all about how good the table looks as a whole when being played, scientifically proven to enhance a game.
14152
Post by: CT GAMER
This thread is making me want to break out my Necromunda stuff and play again.
Love it.
7942
Post by: nkelsch
Dear god this is great. Well done.
48594
Post by: dsteingass
Thanks guys, it is much appreciated!
2326
Post by: shasolenzabi
Now the tower is coated and ready for painting, looks so good!
48594
Post by: dsteingass
The paint will no longer let me hide my dirty little secret though. I made 2 major mistakes building this thing.
2326
Post by: shasolenzabi
I make some minor mistakes with the tanks I build, but come up with a good fluff reason for those, you can say that this tower had been repaired by someone who had the wrong prints, or a heretek, or the gangers didn't know how to make it look right, thus endangering a hide hole for a weapons cache or some such.
25141
Post by: Chibi Bodge-Battle
Quite
It's the Hive. They might not have all the materials/parts they need. Bits get added to structures as required over time.
A minor example that springs to mind is the new market place they built here in Penistone. Some kids hacked into the power points to recharge their mobile phones
So the council had to put some ugly covers over the sockets to stop them.  They should have put some covers on the ugly kids wot done it instead but that is another story!
A couple of other ad hoc things had to be done as well
TBH I have no idea what the mistakes are
I seem to be getting worse at (mis)reading posts. 
17738
Post by: Briancj
Everything always looks better primed.
The Rivets were for people who don't have your patience, D.
I would also like to second the dull flathead screwdriver on cardboard or thin plasticard, for cheap(er) raised tread material.
--Brian
48594
Post by: dsteingass
Will Vik's goading ever cease?
32169
Post by: Rogue Wolves
ooooo i cant waite to get myself some textured plasticard
48594
Post by: dsteingass
Maybe add some of my cricut-ed railings? Will need to mount them to a sturdy upright of some sort.
In the lower right, you can see how easily one of these can get ruined cutting the flash plastic out.
32169
Post by: Rogue Wolves
man all these updates in one day, your on a roll!
48594
Post by: dsteingass
Ya, but I'm off to roll over in bed now. Thanks for watching all.
2326
Post by: shasolenzabi
Vik does the same goading at me too so don't feel so bad
29449
Post by: weetyskemian44
Continually and consistently cool gantries and stuff. Makes me wish I had the room to build more. Your idea for making space hulk deck-plates sounds like a must-see
1340
Post by: Northen
Great looking stuff here, nice to see the modern take with the classical Necromunda terrain bits.
The space hulk board sounds like I must see indeed.
24297
Post by: Viktor von Domm
Will Vik's goading ever cease?
Vik does the same goading at me too so don't feel so bad
sorry guys but your spelling is simultaniously totally wrong... it is called guiding not goading...or do you spell english words as awful as you speak them?^^
the railings look superb! and i think you needn´t add much more detail there as it is a not really functioning area... no one would expect fancy levers or other stuff on a bridge...maybe the odd rivet^^ (see its guiding not goading^^)
and yep i know even if cardboard is easy that lots of stuff can get wrong when handling the knife... loss is to be ecpected...
and the idea of a slightly allowing material to be put underneath the soon to be punched material is something i had done anyway...wood for example...will try out the theory today! this will be then a research for the second grailknight...
vik
2326
Post by: shasolenzabi
Hey Vik, Guide: to supply (a person) with advice or counsel, as in practical or spiritual affairs.
Goad is another word, and means something that urges or stimulates into action
24297
Post by: Viktor von Domm
hurhurhur... that was me to sound like a clever person...seems i ruined it^^
i looked it even up as i thought you played a prank on me^^ so i thought this could be reversed^^
2326
Post by: shasolenzabi
Viktor von Domm wrote:hurhurhur... that was me to sound like a clever person...seems i ruined it^^
i looked it even up as i thought you played a prank on me^^ so i thought this could be reversed^^
Ah, well, a better joke would be to go, (Jabs with a pointy stcik)" Back ta work ya lazy git!"
24297
Post by: Viktor von Domm
lol...another slice in the same wound....*sobs*
48594
Post by: dsteingass
Thanks Everyone! Vik we love ya, that's why we pick on ya. And just to clarify the expectations here, Depraved had the idea for a Space Hulk board, Depraved is the one giving that a try, I don't need another project
2326
Post by: shasolenzabi
Plenty to do with the Underhive to make!
48594
Post by: dsteingass
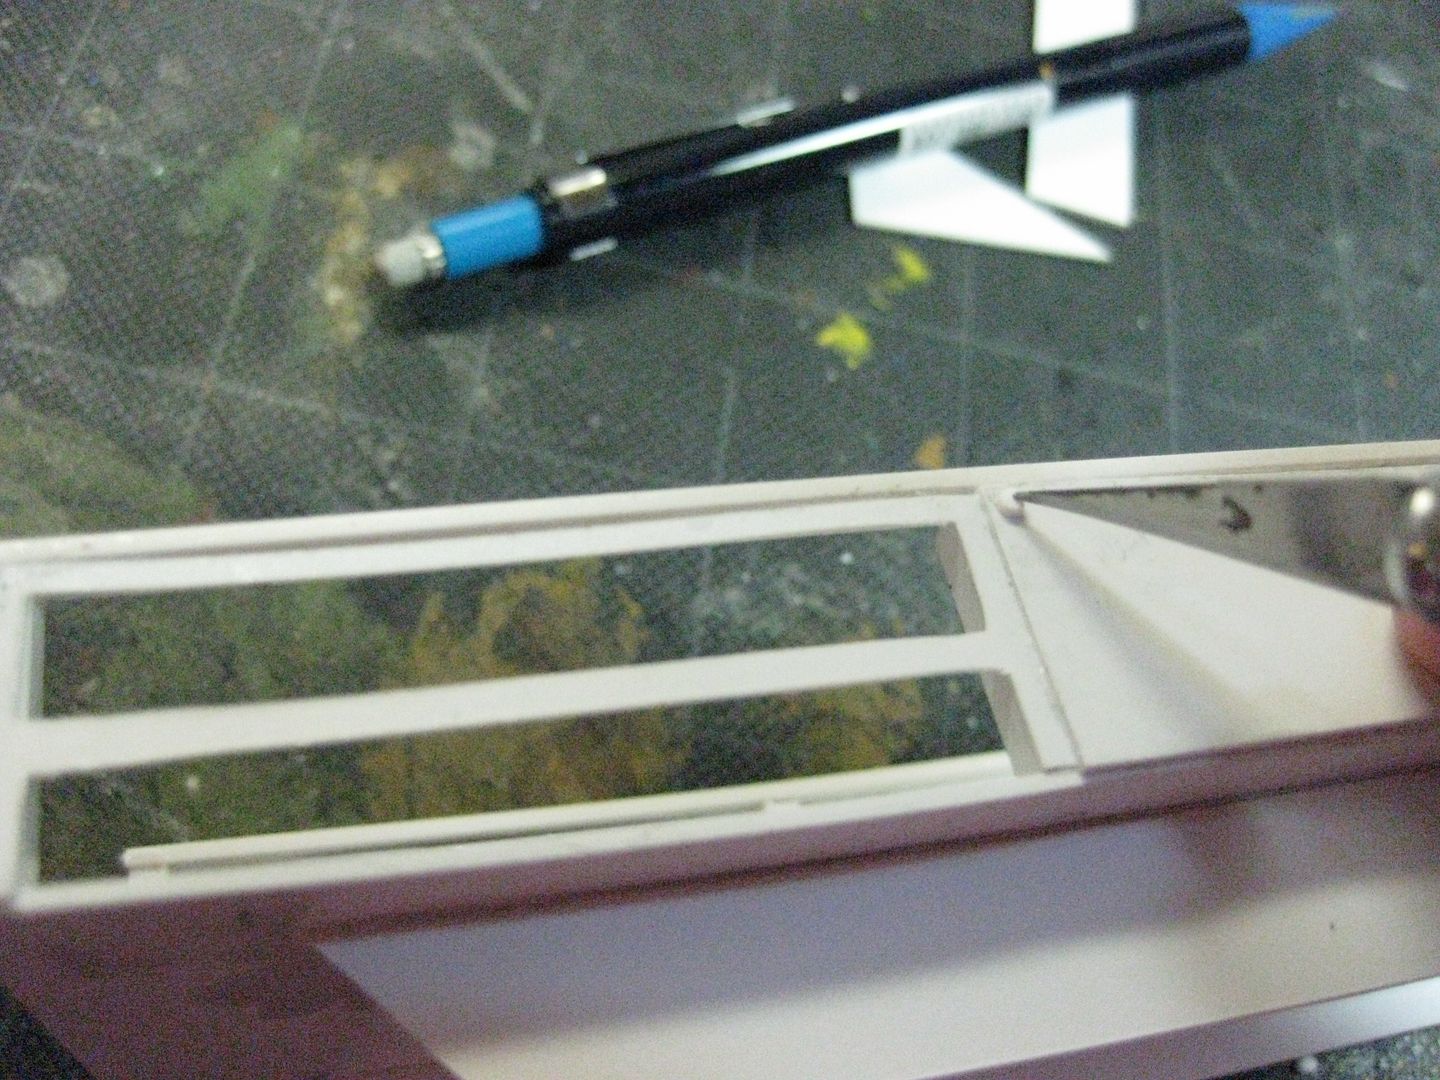
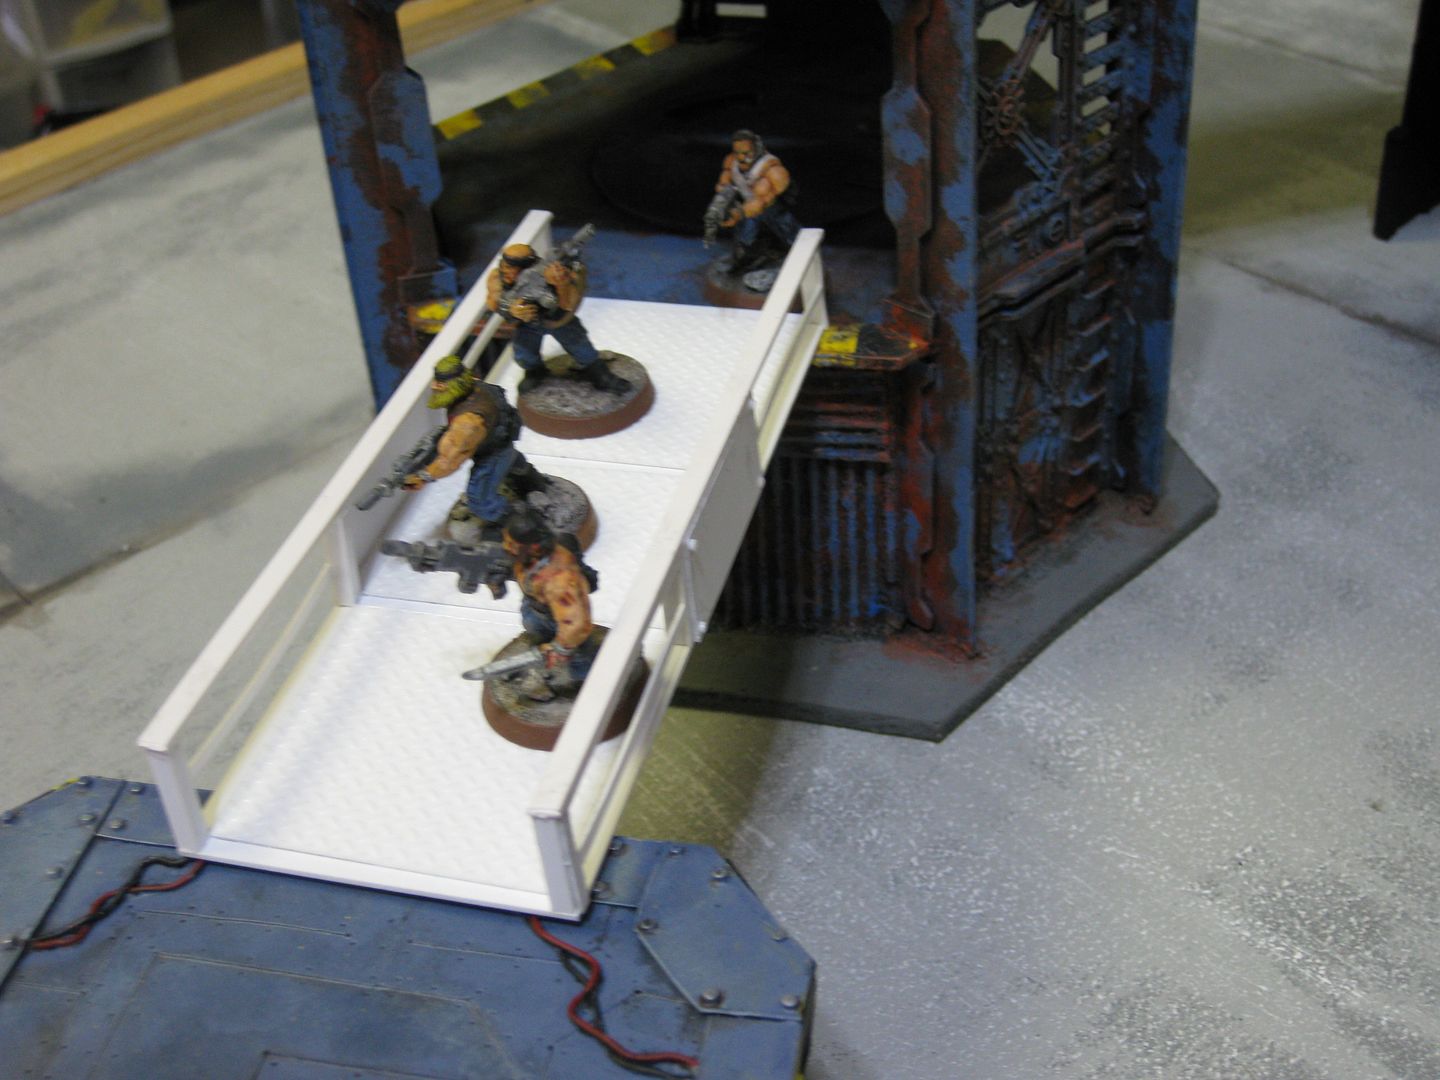
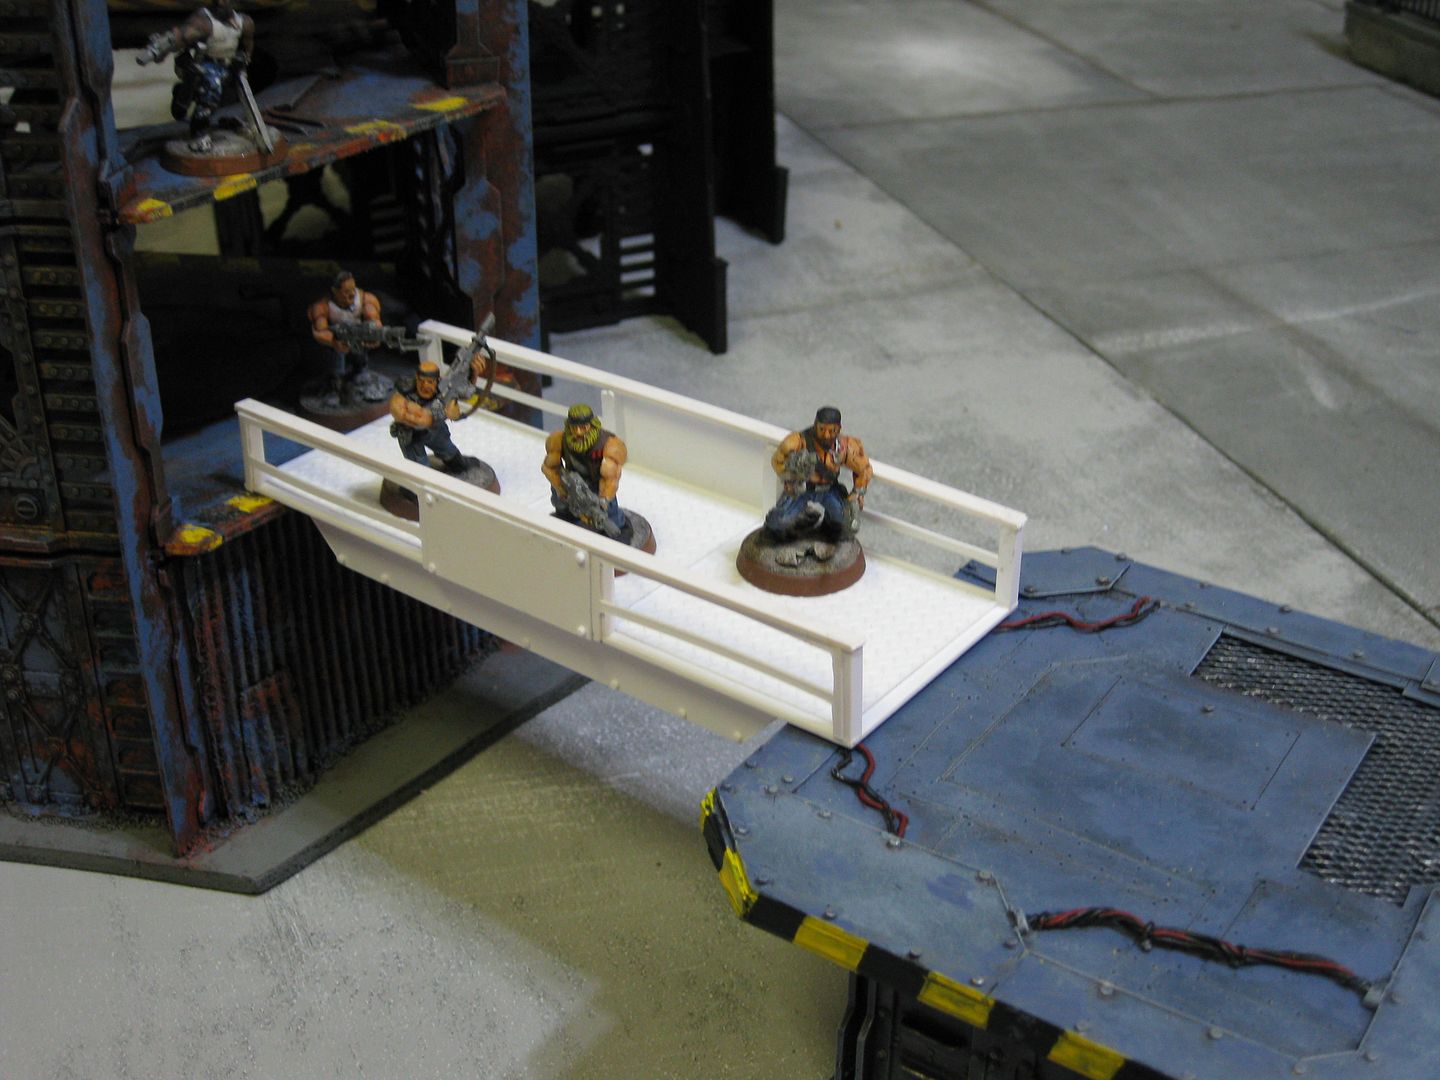
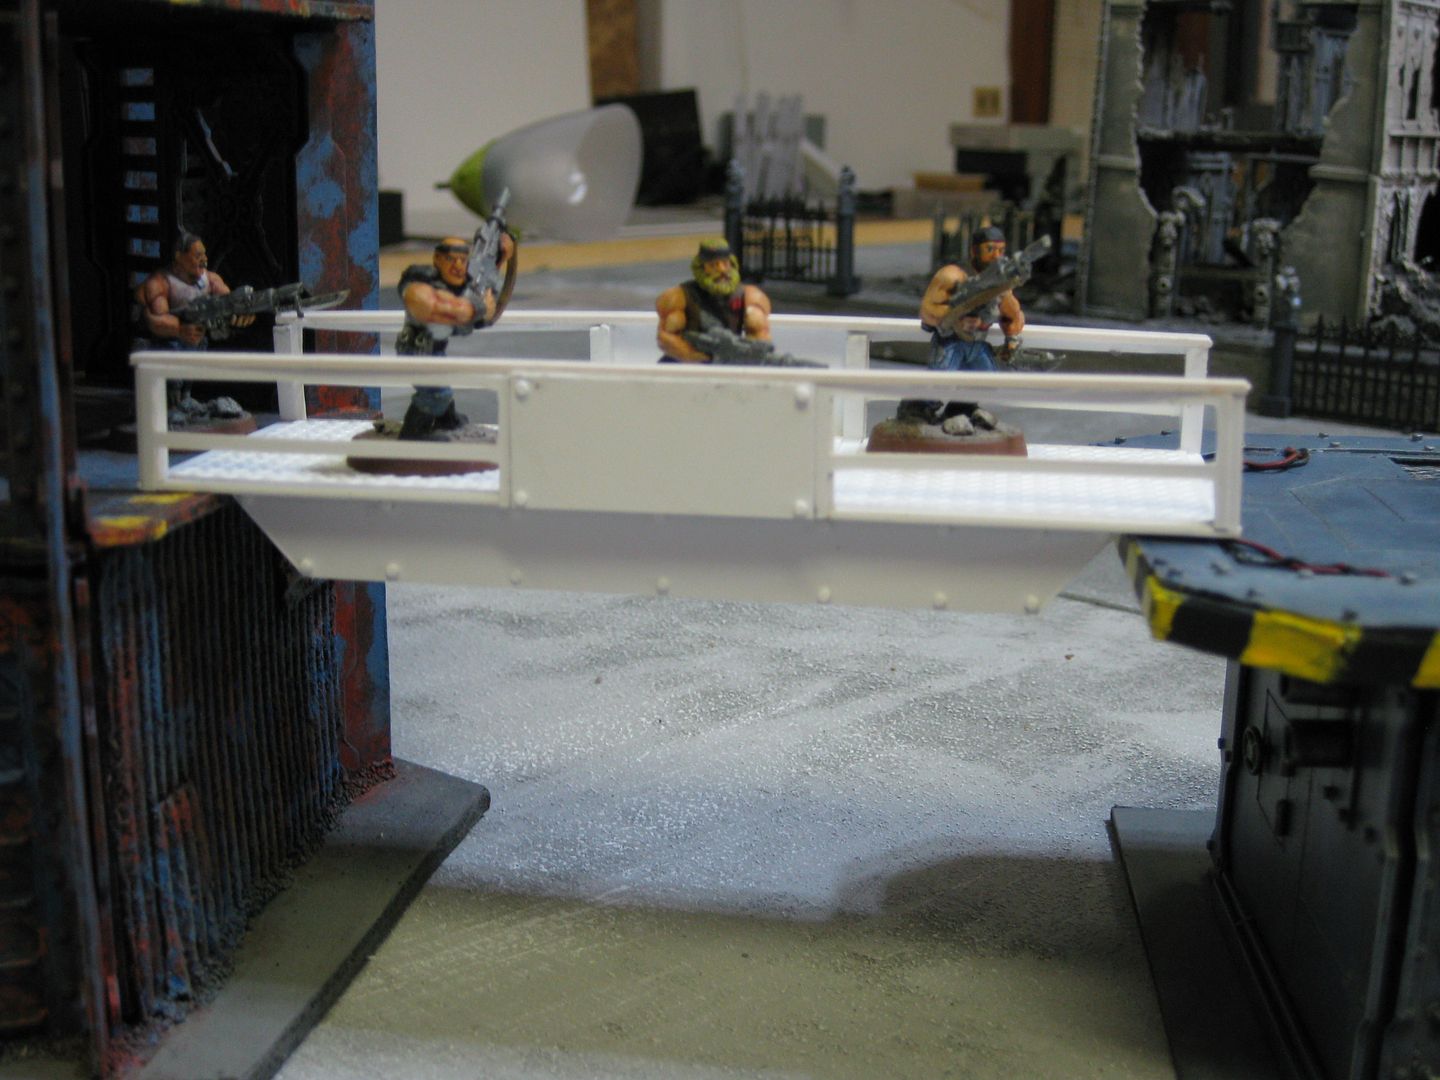
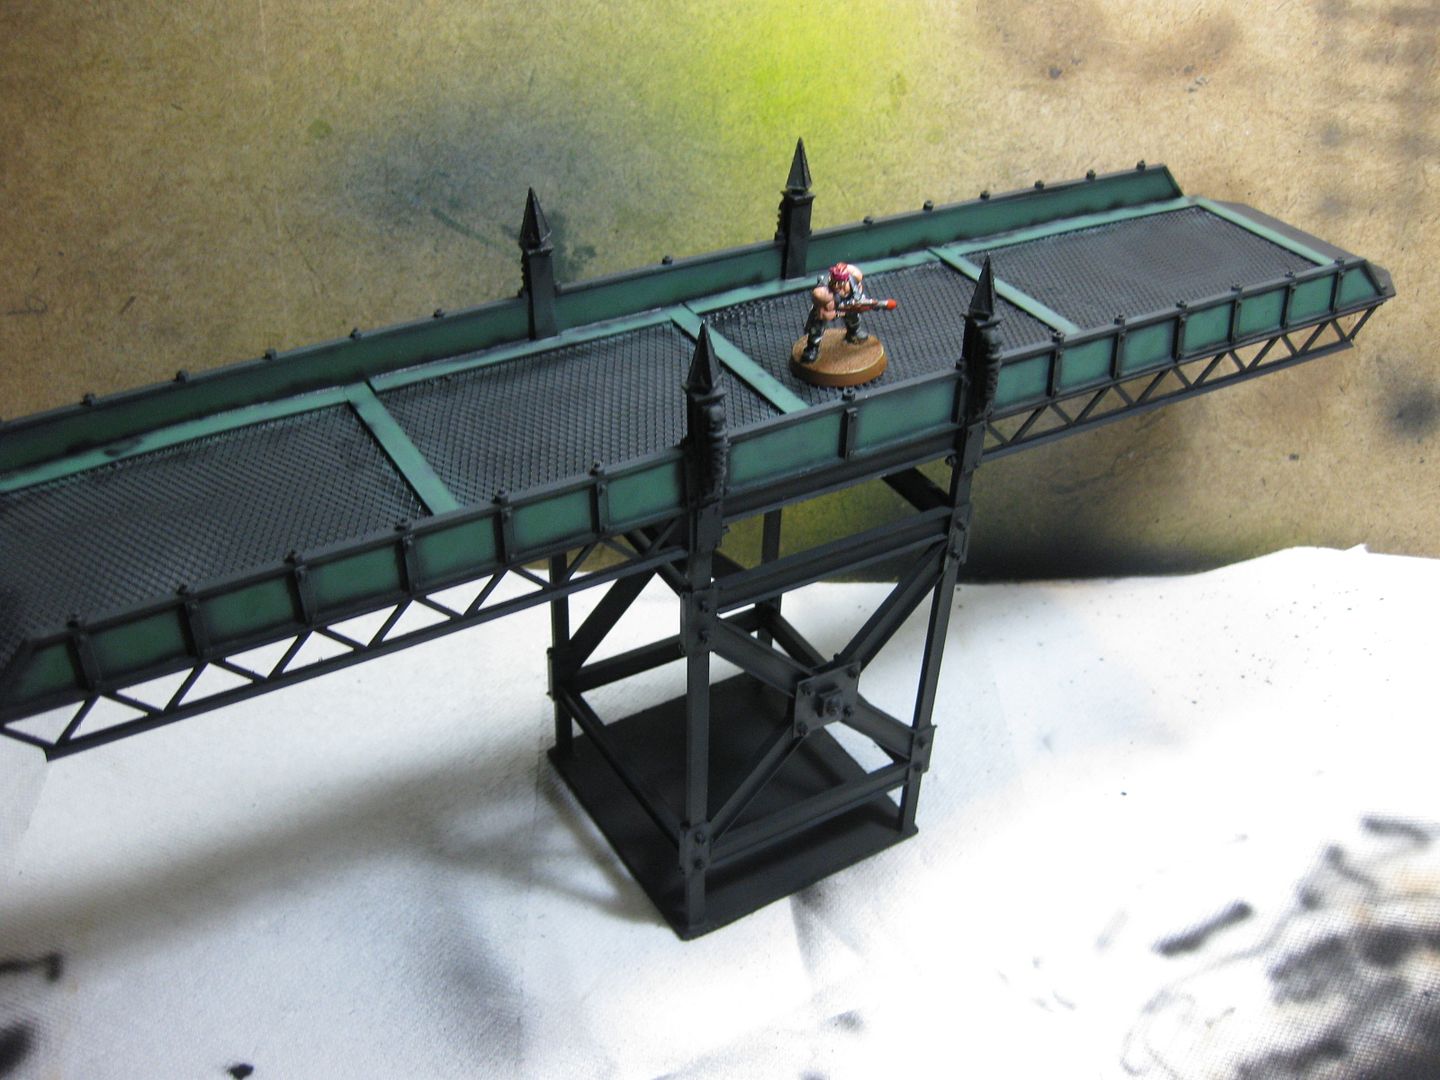
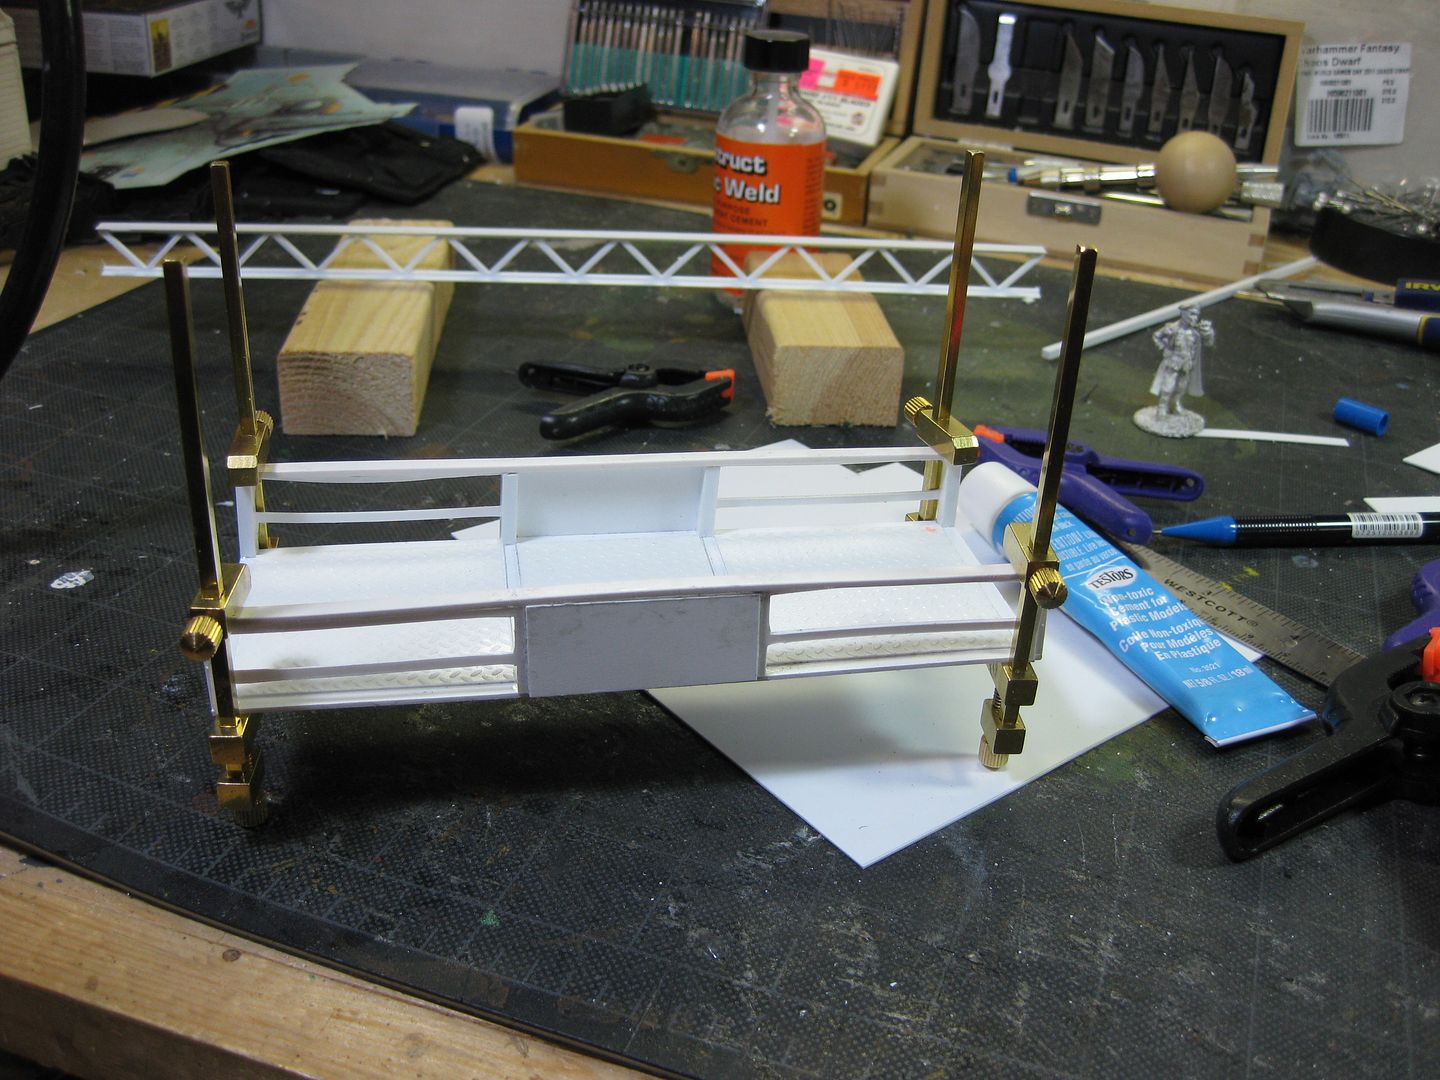
The thing is, this is simply just a small 6" walkway...there will be more, longer, supported, and even 90 degree turn walkways. Gotta have walkways AND you gotta have cover on walkways in Necromunda. If there isnt cover, no one will use them. Something about rushing into the open that gets models shot in Necro
2326
Post by: shasolenzabi
I do recall that being the case.
Automatically Appended Next Post:
Ohyeah, some fresh stuff posted for you to view.
17738
Post by: Briancj
I got the joke, Vik.
24297
Post by: Viktor von Domm
Something about rushing into the open that gets models shot in Necro
never happens when i am out in the streets....*bang....urgh....* briancj
26139
Post by: Skalk Bloodaxe
Wow, I take the night off from Dakka and miss all this. Where to start?
The new platform looks excellent! Nice plug for Ohio State, btw. I'm guessing that didn't happen by accident.
Thanks to Briancj and Vic for rivet inspiration, chances are I'm going to opt to spend $$$ instead of time when it comes to the rivets.
The walkway is looking good already. I am jealous that you have a Cricut. My wife wants one and I keep saying "no". Now that I might have an application for it though.... heh
I'm really hoping my UPS order arrives today! Every time the truck pulls in I start to twitch. I need that order to arrive.
48594
Post by: dsteingass
HAHA! You should tell your wife YES! we will go get a cricut (make sure you buy a heavy duty cutting blade and an extra cutting mat for your own personal use).
47117
Post by: Farty Wiffmas
Pics aren't working , by the sound of the comments it's amazing!
48594
Post by: dsteingass
Great! that means that I have hit 10Gb of bandwidth monthly limit from photobucket!
17738
Post by: Briancj
You should really host your pictures HERE.
36711
Post by: Depraved
dsteingass, you do not host your pictures here?????

47942
Post by: bebopdrums2424
i dont either ... is there a way to redo all my posts except have the pictures switched over to here on dakka dakka? But keeping the same thread obviously...sorry stein, for thread jacking you, id rather be commenting on your pics!
36711
Post by: Depraved
I think you would have to edit each post manually and replace the links... or you could just replace enough to get under the PB bandwidth restriction and then use dakka from then on out.
26139
Post by: Skalk Bloodaxe
My order just arrived.
I am quite happy.
48594
Post by: dsteingass
No I don't host all my pics here. It's not as user-friendly as PB is. I upgraded photobucket to Pro now, pics are back.
Automatically Appended Next Post:
Congrats Skalk! What did you get?
26139
Post by: Skalk Bloodaxe
.060″ (1/16″) Thick HIS Sheet (White, 16 @12″ X 12″)
All I want to do now is ditch work, go home, and start rebuilding my part of the Underhive.
48594
Post by: dsteingass
I did ditch work...took the afternoon off. You must work in IT as well? lol
iplasticsupply.com?
26139
Post by: Skalk Bloodaxe
You and I work in the same field. We enable the ignorant and reward the arrogant.
I have already emailed my wife and told her that whatever we had planned for tonight (if anything, I never really know until she tell me) is now cancelled.
First order of business- print the entire PDF!
Muaahhaha hhahhaha hahhhahah
48594
Post by: dsteingass
Tell me about it..I think we are pioneers in making the Adeptus Administratum of the 41st Millenium!
26139
Post by: Skalk Bloodaxe
...the very thought of that makes me want to work more on my Cultist army.
I'm all set to go. I have my plasticard, new X-Acto blades, the Necromunda PDF for reference, and a lot of inspirations. I also have the right glue, which helps.
All I need now is for it to be 6pm. I'll be home, set up, and ready to start cutting.
48594
Post by: dsteingass
Whoa, you have a few hours to burn! It'll be worth it, you'll have a lot of fun if you are already this jazzed up! Good luck, Have Fun, post pics Automatically Appended Next Post: And now, since I paid $25 for unmetered bandwidth for the next 365 days, lets use it!
Only hi-res images from now on.
34119
Post by: neil101
The walk way is coming along nicely mate, taking tips here .
17738
Post by: Briancj
You should share your Cricut patterns.
48594
Post by: dsteingass
It has quite a learning curve, but basically any raster graphic can theoretically cut with the cricut. I'm not very good at it yet, the potential is there though.
2326
Post by: shasolenzabi
Time to make a gallery here as I did.
48594
Post by: dsteingass
2326
Post by: shasolenzabi
That bridge/walkway is sweet!
48594
Post by: dsteingass
32169
Post by: Rogue Wolves
thats lookin good man cant waite to see it painted up
48594
Post by: dsteingass
Thanks Rogue! me either, but i'm going to build more before paint pieces together, greens and more blues probably. Automatically Appended Next Post: another...

26139
Post by: Skalk Bloodaxe
You work like a madman. So much progress in such a short period of time. This thread is legend, and is one of my favorite haunts right now. Thanks for sharing the work you are doing in such "step by step" detail, it's really awesome and I'm soaking up as much as I can.
Got started tonight. Very first thing I realized is that .060 is too thick, I should have gone 1 size down. But all is not lost, I've been able to work around it. Will detail what I'm doing when I start my new blog tomorrow. Here's a shot of where I finished up for the night:
More work tomorrow.
Thanks for being such an inspiration.
48594
Post by: dsteingass
Thanks a bunch Skalk! It should work, you just have to take clippers or a saw to those little knobby bits inside the channel. Or do like I did, don't use the channels at all. Looking great man! having fun?
26139
Post by: Skalk Bloodaxe
That's exactly what I did, nipped the knobby bitz inside the channel. I'm going to use the channels because I have other terrain that is already at the same measurement and I want to integrate everything. I have two new walkways I started last week in anticipation of the arrival of the plasticard and the start of yet another obsessive time-sink project.
I'm having fun for sure, but starting off with quite a few cobwebs and mistakes, it's been a long time since I worked with plasticard and had forgotten a few things, like how quickly it turns a razor-sharp X-acto blade into a cereal spoon, how you can't "Hulk out" on it and try to cut it in one go, how much trimming is needed after you break it out, etc.
But it's such a worthwhile endeavor and it's something I genuinely enjoy doing. And the "having" will be awesome because my friends will laud me with praise and I'll be the coolest kid on my block. I take pride in offering up the best game table I can, and I've made improvements lately that have completely changed the table I host. This project is the next extension of that effort. By the time I am done I want people to be able to honestly say my table is the most awesome they have ever played on. Considering one of my friends is an ex-Troll from GW I have my work cut out for me. But it's something I'm embracing.
I really enjoy this stuff. Someday I hope to be good at it. Ha.
17738
Post by: Briancj
Skalk. Vermont is just not that far away from me. I will drool over your table. Or on it.
--B.
24297
Post by: Viktor von Domm
although the thicker card is harder to cut i think it is worthwhile as it is more rewarding looking^^ good start there skalk...and by the way... pm me when you started your new thread!!!
at dstein:
looking good! the new one already is making me feel all tingly^^ the plte you put inside the middlesections of the former walkway is the "cover" you spoke earlier about?
my only nitpick about your tut of making rivets is that the rivets are a tad too uneven in size for my taste...if someone is interrested i could make a short tut on my take of rivet making...?
also very nice to see them musketeers lol... gets a bit of a new air around the builds^^ also what is the main reason you dont use the dakka gallery? not that i am complaining... heck as long as the pics come rollin`i wont complain at all^^
cheers mates!
vik
48594
Post by: dsteingass
Thanks Vik. Once the glue dries, you take clippers to them to even them out. Please do a tutoral! Because I'm lazy and I have thousands of pics and now I've paid for PB for a year. Automatically Appended Next Post: ..and because I don't like the extra crap formatting dakka gives it when you copy and paste the link from the gallery like this 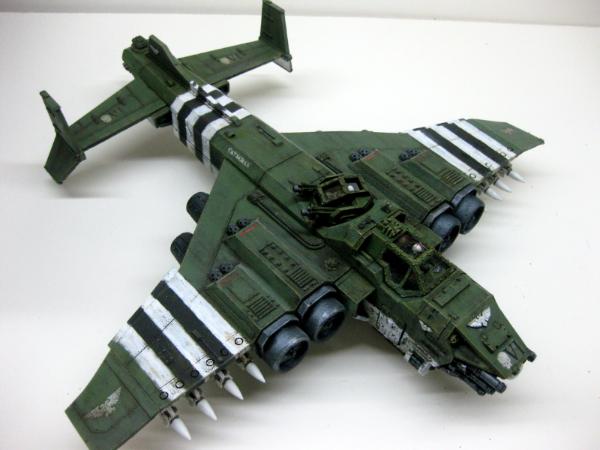
24297
Post by: Viktor von Domm
ok will see about that tut...
well i guess since you payed handsomly for the photobucket gallery^^
tho i miss the zoomaility of your models pics...
and yeah the auto adjusting thing in the dakka gallery gives me the uglies too^^
48594
Post by: dsteingass
So i've been to the doctor's office today and I have a nasty chest infection. SO I probably will need to get well before doing too much else with this project. Unless the cough syrup with codeine doesn't knock me out.
26139
Post by: Skalk Bloodaxe
Don't work with sharp tools. Not putting a "ha ha" on that.
Glue and paint! Hey, you have that huge tower that is primed! You could work on that. Worst you could do is dip your paintbrush in your drink and drink your paint water...
108
Post by: Orinoco
this is pretty awesome stuff.
48594
Post by: dsteingass
Thanks Orinoco! C&C are always welcome. No I'm having trouble operating the remote control and keyboard...bzzt. I think I'll just nap and forget about projects for now.
47117
Post by: Farty Wiffmas
The walkway is amazing and the tower is coming along nicely. Also you must have some patience to cut all those rivets!
48594
Post by: dsteingass
Thanks Farty! no not really, it's just like chopping celery or potatoes, you can get going at a pretty repeatative pace. It really isnt nearly as hard to do as I thought it would be. The only advice I can give is to just give it a try and see for yourself.
24297
Post by: Viktor von Domm
ouch you´re the second person i read has a chest infection...ohoh...i smell trouble... also i second skalks concern...no sharp tools...or tools at all...brishes tho doesn´t count^^
get well soon mate..not for health reasons...but because we need our daily dose of necro sweets...^^
|
|