Welcome to the 18th round of the League of Extraordinary Riveters Terrain Competition. "The Portal"
Welcome, one and all, to the 18th round of the League of Extraordinary Riveters Terrain contest.
For those who have not taken part before, this is a competition about terrain building (as you may have gathered from the title), but it is not strictly limited to pure terrain, dioramas that can be used as table top terrain are allowed (see rules below). To get a feel for how these competitions run and what to expect you may wish look at the previous rounds, linked below.
Each round has a “theme” or other defining attribute(s) that must in some way be applied to the your terrain project, to compete with other modellers for that most prestigious of prizes, membership into The League of Extraordinary Riveters [LoER].
The competition is open to everyone registered on Dakka Dakka, all are welcome to enter regardless of ability, etc.
The main aim of these competitions is to encourage gamers and model-makers alike to go that extra mile when building terrain that can be used for playing your preferred tabletop wargame (or similar pastime - for example, a board game playing piece would be acceptable). Those taking part can expect to receive ideas, inspiration, encouragement and feedback from each other, and at the end each of the participants is "rewarded" with a new piece of terrain for their own use (that's the thing you just built).
The winner of each round hosts the next round, and the cycle continues.
The theme, limitations, rules, judging and prizes are all the responsibility of the host, although he or she can get help from others for some of those things...
For those who are returning once again to compete a most sincere and heartfelt welcome back!
This round's theme is "The Portal".
I want you to interpret this in any way you see fit, but I will be impressed by any interesting, unusual and original interpretation thereof.
You can be in any scale or any system you like. Ideally, your first WIP photo should what you bits and pieces you are starting with, but I'm aware these things evolve organically. Also, it's about being innovative with what you have lying about or can scavenge - but using a kit part for a totally different purpose, or on a different scale, will also be rewarded.
I like to see how people build their models, and I'm sure I'm not alone in this. So please post as many WIP shots as you can. This can achieve more than just keeping me happy (and you want to do that anyway ): Regular posts in this thread will keep it in the public eye and will allow more people to find this contest. Also, if you post WIP shots, others can give you feedback and ideas before it's too late to change it (this will only help you as a participant and we all learn something new).
However, FINAL pictures should not be shown here. This is important for motivation, we are all our own worst critics, and seeing someone's brilliant work should not put us off but it can. I can't stop you posting in your own threads, but please not in here. PM me with the pictures / links instead when they are ready.
One last note on photographs. Please put as much effort into taking photos of your finished model as you have building it. Poorly lit, out-of-focus, blurred, and low resolution photos can harm your chances in any competition. Remember, If I can't see it in the photo, I can't judge it. Only you can hold the model in your hands and turn it around to see everything. Make sure everything you want me to see is in the photos. Thank you.
Rules:. 1: Talk about fight club the Competition. Tell everyone. Post it in your blogs. Add the banner to your signature.
HTML code for the banner.....
{url=http://www.dakkadakka.com/dakkaforum/posts/list/683041.page]{img]http://images.dakkadakka.com/gallery/2012/11/8/429237_md-.jpg{/img]{/url]
change all the "{" to "["
It should look and work like this one:
2: Must be completed by the deadline. And when I say "must", I mean "about". There is a fair amount of leeway given in these contests but assume there will be no extensions and we'll cross any problems when it arises.
The Deadline is 11 weeks which makes it midnight BST 31st MAY Which I believe is 19:00 EST or 16:00 PST!
But anything on that night though to midday will be accepted so that those of you living in the past can keep going until bed time.
3: Your piece should be scratch-built or heavily converted. Model kit parts can be used, especially if used in an unusual way, but you will get more points for something you sculpt yourself, so keep that in mind. Unconventional parts are highly recommended in addition to those you will be using as part of this competition.
4: Your model should be a piece of terrain or a diorama that can be used for gaming purposes. It cannot be a playable model in itself (a crashed tank must stay crashed), but removable models (people) are fine.
5: Any scale, any setting and any gaming system are welcome. A nice mixture of fantasy, sci-fi, historical, or modern will make this contest all the more interesting. If you don't play a game, that's fine too; just make a display piece, but keep rule 4 in mind.
6: The women are right, size doesn't matter. You can make as small or as large a model as you want. Bear in mind the time-scale and don't bite off more than you can chew. We've all made that mistake!
7: Final Entry: Six or more photos of your final entry, showing top, front, both sides, back and all the important parts - not to be posted in this thread. PM me with links to your galleries, albums, etc. As I said above, please take the time to take the best photos that you can.
Together with your photos, I would like a statement of the items (a photo would be ideal) that you used. This is not a must, but would be helpful.
Feel free to include some fluff or an explanation of the model/setting to allow the rest of us to fully appreciate your work.
8: AMBITION: Push yourself. Try something new! Always wanted to use leds? Go for it! Fancied weathering powders? Here's your chance! I'll be looking at your galleries for previous work, entries etc. I want everyone to feel that their best has a fair shot at this.
9: Not so much a rule, but it wouldn't be the League of Extraordinary Riveters if there are no rivets. This also means similar small details are highly valued (rivets are the best example of this level of detailing).
10: Sprue. Find a use for the often discarded wonder material and bonus points will be yours.
11. It being easter at present, I will be amused by eggs making an appearance.
12. THE RULE OF COOL trumps all.
If you are unsure of anything just ask away.
Judging: Modelling: 45 points total. (10 points) Skill and Techniques - No mould lines, gaps or rough edges (that are not meant to be rough). Show that you know the difference between a hobby knife and a spatula.
(5 points) Originality - You could have built anything, what did you choose?
(10 points) Materials - Choice of Ordinary items (ease of use / ambition / originality). Scratch-building Vs. recycled materials parts.
(5 points) Little details - Rivets, eggs, and other small details that add realism to the piece.
(5 points) The wonder material - Use of Sprue in is own right not just as a hidden support structure. Good, new and original use of sprue.
(10 points) Design - How well was the idea translated to the model? Layout of the piece; artistically and for playability. Well thought out design for the setting. Does the build fit the theme?
Painting: 40 points total.
(10 points) Between the lines - Crisp and clean paintwork. No slips or brushstrokes. Good
(5 points) Simple but effective - Use of basic techniques (washes, dry-brushing, layering etc.) to a high level. coverage of both the basecoat and final layers.
(10 points) Skill and Techniques - Use of advanced painting techniques such as blending, shading, OSL, weathering, edge highlighting, freehand, etc... And their execution.
(5 points) Thinking outside the box - Use of unusual methods to produce good results. Including the use of printed materials, or unusual media (iridescent paint, etc.).
(10points ) Final product - How does the piece look overall in all its glory.
Bonuses: 15 points total.
(10 points) Coolness: Rule of Cool is always in effect.
(5 points) Ambition: How far have you pushed yourself as a modeller and painter? Is this your usual standard, or have you tried new techniques, processes - or just played it safe?
100 points total.
Yes, there is more emphasis on modelling than painting. And Ambition points are there becuase I want to reward folk who go the extra mile on this.
Prizes: 1st Prize.
Membership to the League of Extraordinary Riveters as top prize. You will be allowed to fly the League's banner and be recognised as a modeller devoted to Rivets.
Also a commission piece of terrain to your specification, made by me, of a medium size (CD sized base ish) or a mystery prize
People's choice: As voted for by your fellow Dakkanauts.
Warm feelings inside and the bragging rights that your peers love your work.
And...
Anyone who completes a model for this competition will receive a full, detailed critique of your piece, written by me. No, really! This will highlight the good points and the parts I feel need work. I will give advice as to how I would improve the model and suggestions for alternatives. This is purely my opinions and is part of how I judge the pieces. It can be posted in this thread for all to see and learn from, or by PM if you want to see it first.
Judges:
Me (inmygravenimage)
So, go to it people. Get extraordinarily building!
Final list of entrants:
Guildenstern
Camkierhi
Nevelon
TheEyeOfNight
Terrainwalker
Tek Thornison
Viktor Von Domm
KINGPIN54
Back when I started my blog nearly 3 years ago, one of the first projects I planned on doing was to build a webway portal for my Eldar army. Either just for looks, or as a counts-as skyshield landing pad. I had an old desk art light/lamp thing I was planning on using as the core, the rest would be carved insulation wraithbone.
Well he said in time for Easter... the which is the 27th?
I'll let you guys know if I come up with something, I would like to participate but work starts back in high gear soon so I'm staying out for the moment.
my son oskar made me get us a box of tau start collecting... and these will need terrain...i ave no idea how a tau would see a portal...but that is part of the challenge^^...probably won´t have any rivets on tho...
For all our non-English natives, remember that Portal can also mean "Doorway" or "Opening"- a whirlpool or sinkhole could be a 'portal' into the underworld, a door or window could be a 'portal' into a building or house- heck, even an Eyeball could be a 'portal' into the soul!
Then again, I like the "Mystical swirling vortex" version myself.
Time to see what I can do with my 3d printer, now that recycled materials aren't required. Count me in!
Yeah, doesn't have to involve a high tech gun and wormhole time/space travel things, basically any doorway. I'm sure I can do something for this, even if it's as simple as the hatch to a vault or something. Still hesitant to let fly my hat for the ring, however.
Would a teleportation system be a viable idea for this theme? I am thinking about multiple similar pieces, on different positions on the table to enable a "hunt the rabbit scenario"...?
Anvildude wrote:For all our non-English natives, remember that Portal can also mean "Doorway" or "Opening"- a whirlpool or sinkhole could be a 'portal' into the underworld, a door or window could be a 'portal' into a building or house- heck, even an Eyeball could be a 'portal' into the soul!
Then again, I like the "Mystical swirling vortex" version myself.
Time to see what I can do with my 3d printer, now that recycled materials aren't required. Count me in!
Absolutely. Any version, variation, or interpretation of doorway, opening, point of departure..
GrimDork wrote:Yeah, doesn't have to involve a high tech gun and wormhole time/space travel things, basically any doorway. I'm sure I can do something for this, even if it's as simple as the hatch to a vault or something. Still hesitant to let fly my hat for the ring, however.
Do it! DO IT NOW!
KINGPIN54 wrote:Count me in again!! Will post as soon as have preliminary thoughts
Huzzah! Your last effort got me thinking about this very idea
gabezgull wrote:Count me in. I'll post a pic in the next day or two.
Good lad!
Viktor von Domm wrote:Would a teleportation system be a viable idea for this theme? I am thinking about multiple similar pieces, on different positions on the table to enable a "hunt the rabbit scenario"...?
What do your think peeps?
Cheers, vik
Yup, totally viable.
Keep em coming folks, I'll update the list shortly!
I like your idea vik, ive had an idea almost silar to that where you have objective markers as portals, when you within range of say no1-5 you have to roll a dice to see where you end up and when i. Range of say marker no.6 you can choose. I say go for it!
Automatically Appended Next Post: As for my idea, i will be using sprue to create a whirlwind style vortex.
Snap, I need a couple of those hotglue portals. I love hotglue. The little stringy bits that accrue while you use it are insanely frustrating but you can do so many neat things with it! Just watch out leaving your stuff in abnormally hot rooms or some things may disengage
As promised. I roll the dice on this one. Sign me up! Though you won't see much till after Adepticon ( After April 4th ). No worries. if Git can paint an army in a month I can do a portal in 3 weeks.. ( snaps finger )
Maybe. I may do something a little different just to be... different... but I may not. How thick in inches do you reckon a fallout vault cog seal would be? Half inch? Whole inch? Whole inch is nearly 5-6 feet thick in scale so maybe start with a piece of foam core for a more reasonable thickness to the door?
sooooo....this thread is in serious need for pictures...WIP pics...
so...i think i need to be the one that DELVERS...
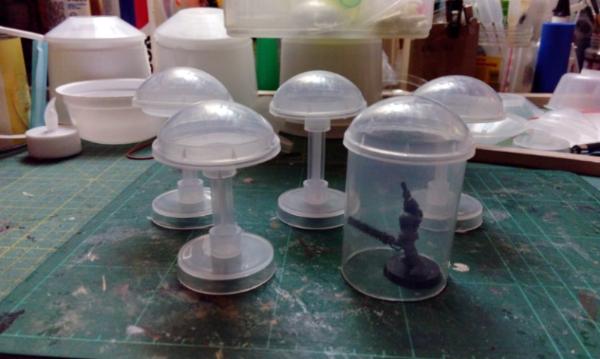
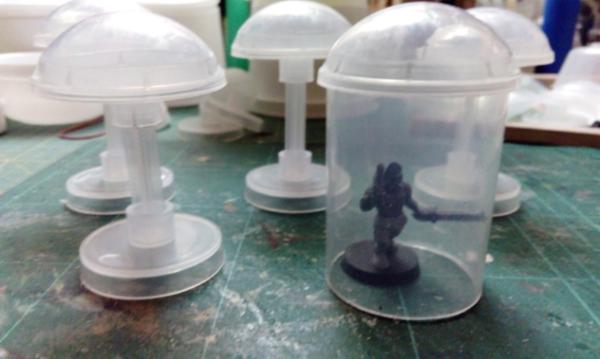
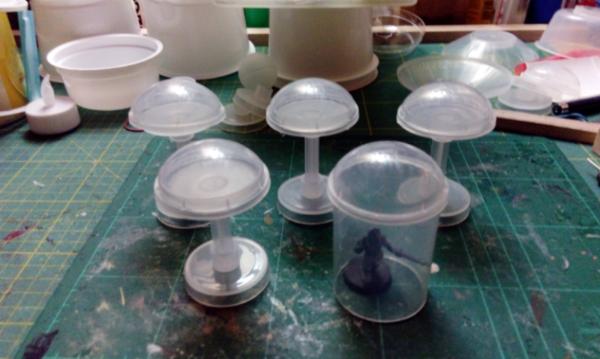
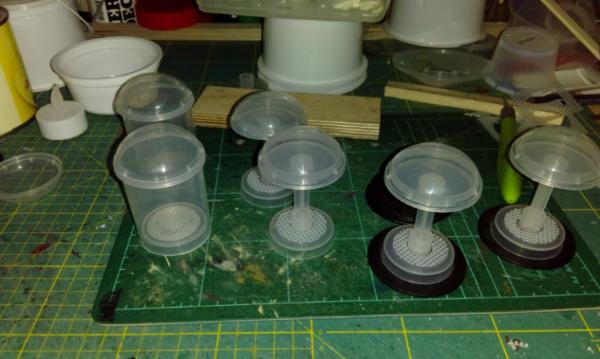
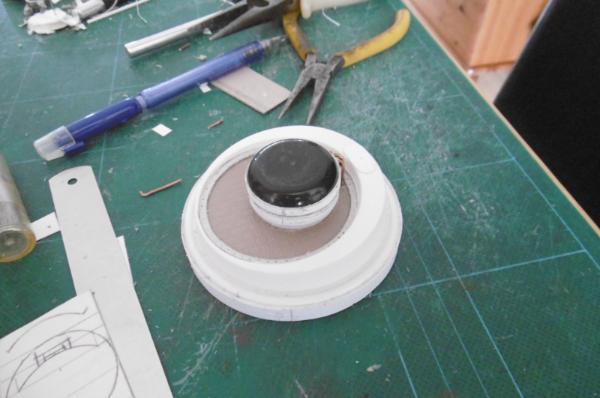
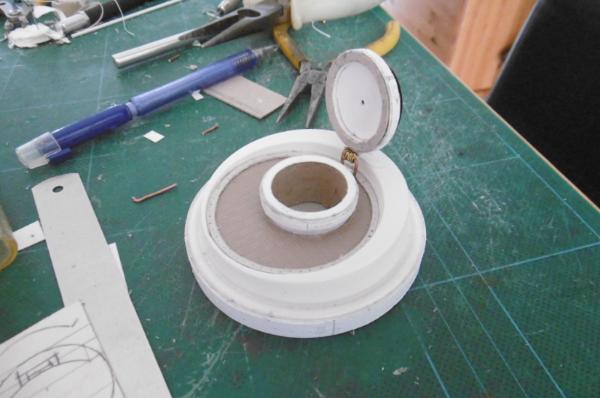
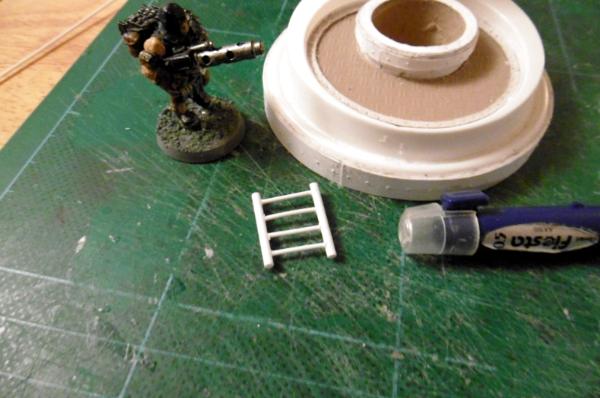
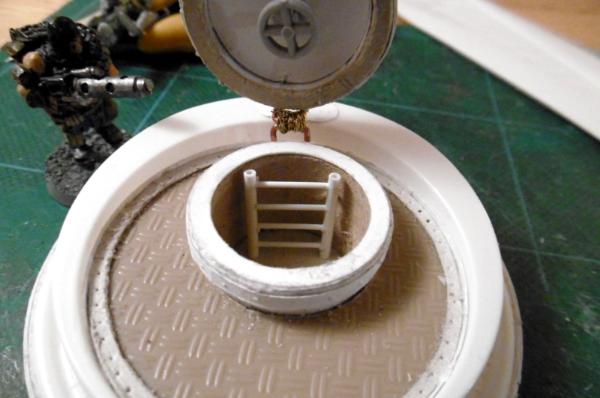
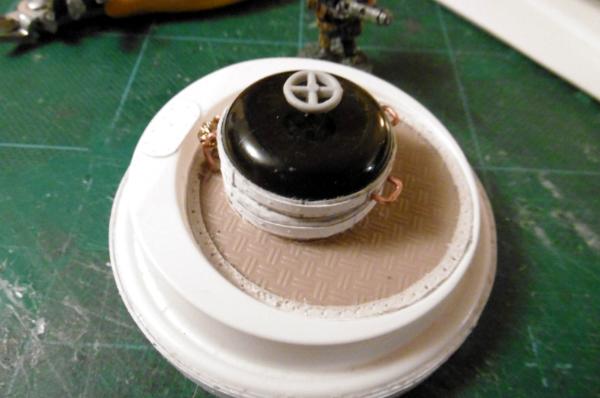
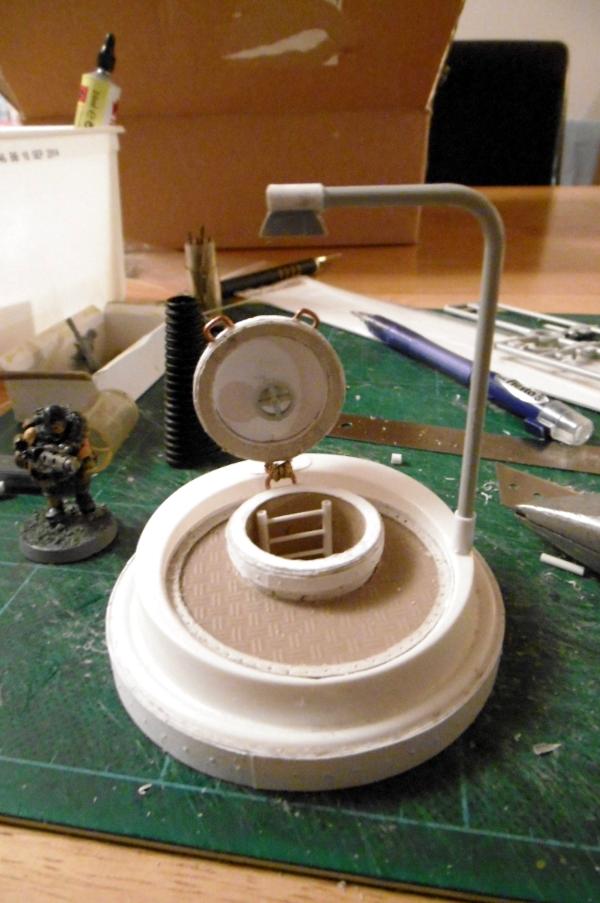
so...the idea is that these will be stationary teleporter...i will build six of them, two of these are able to hold a guardsman sized model...
materials atm i have used is multiple sets of ice cream pops maker...and granny grating...
later on lots of hot glue will follow to form energy/plasma structures...we´ll see about that...
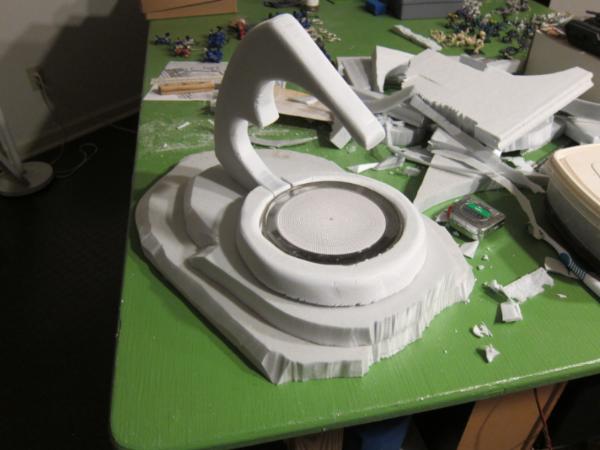
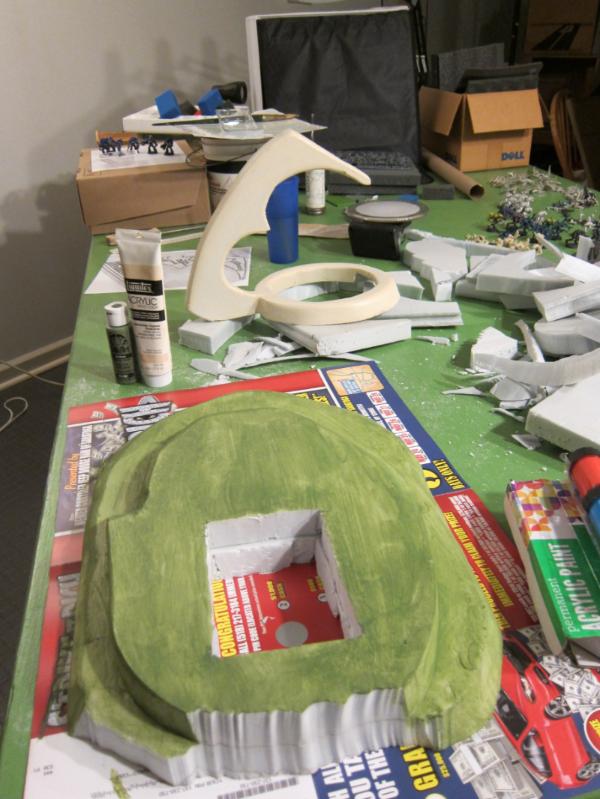
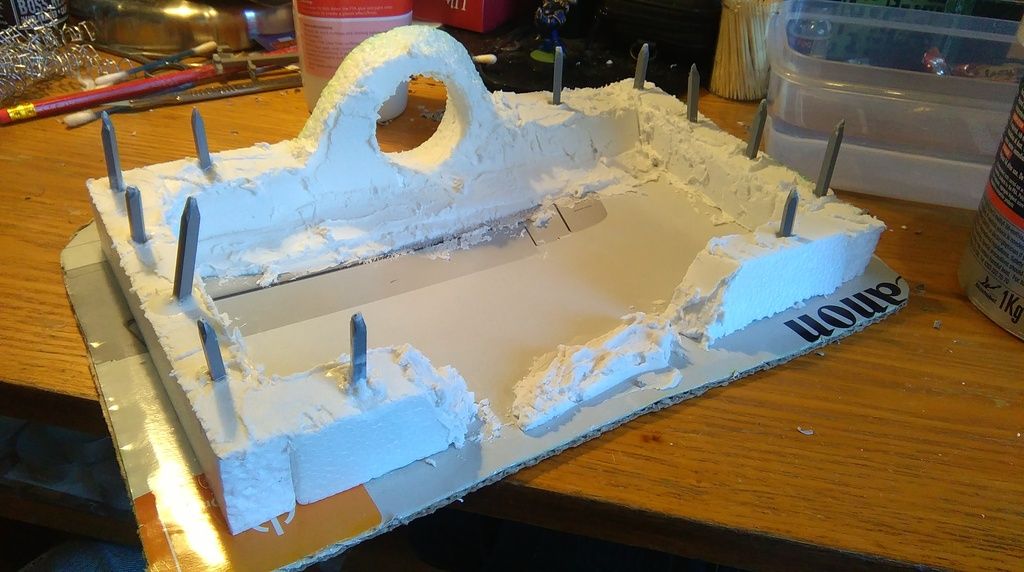
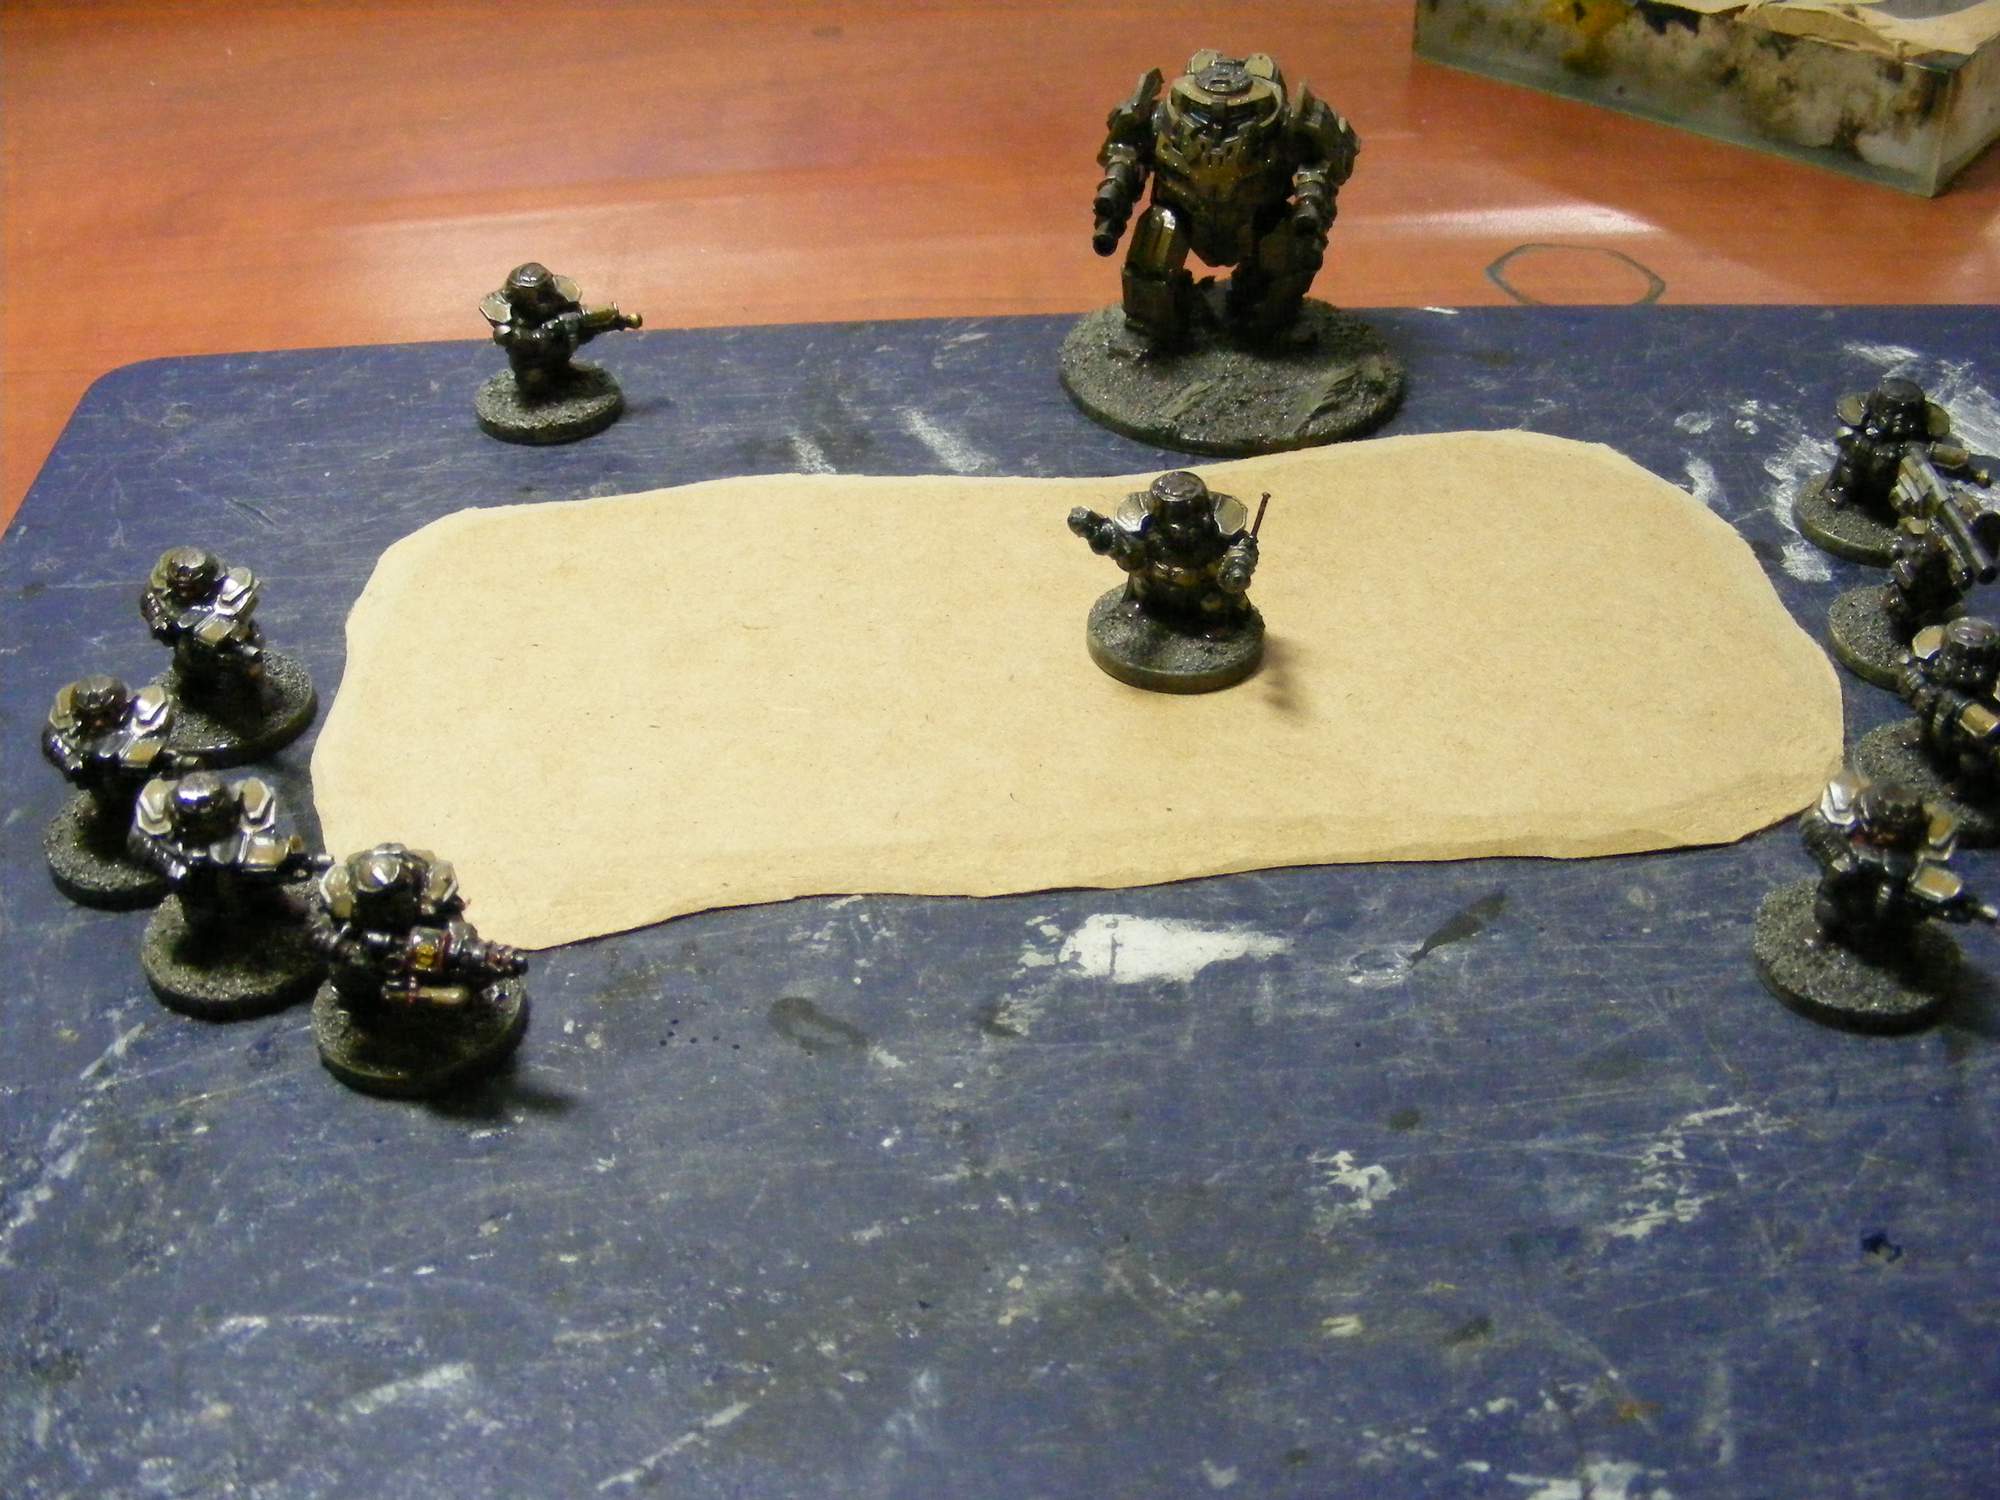
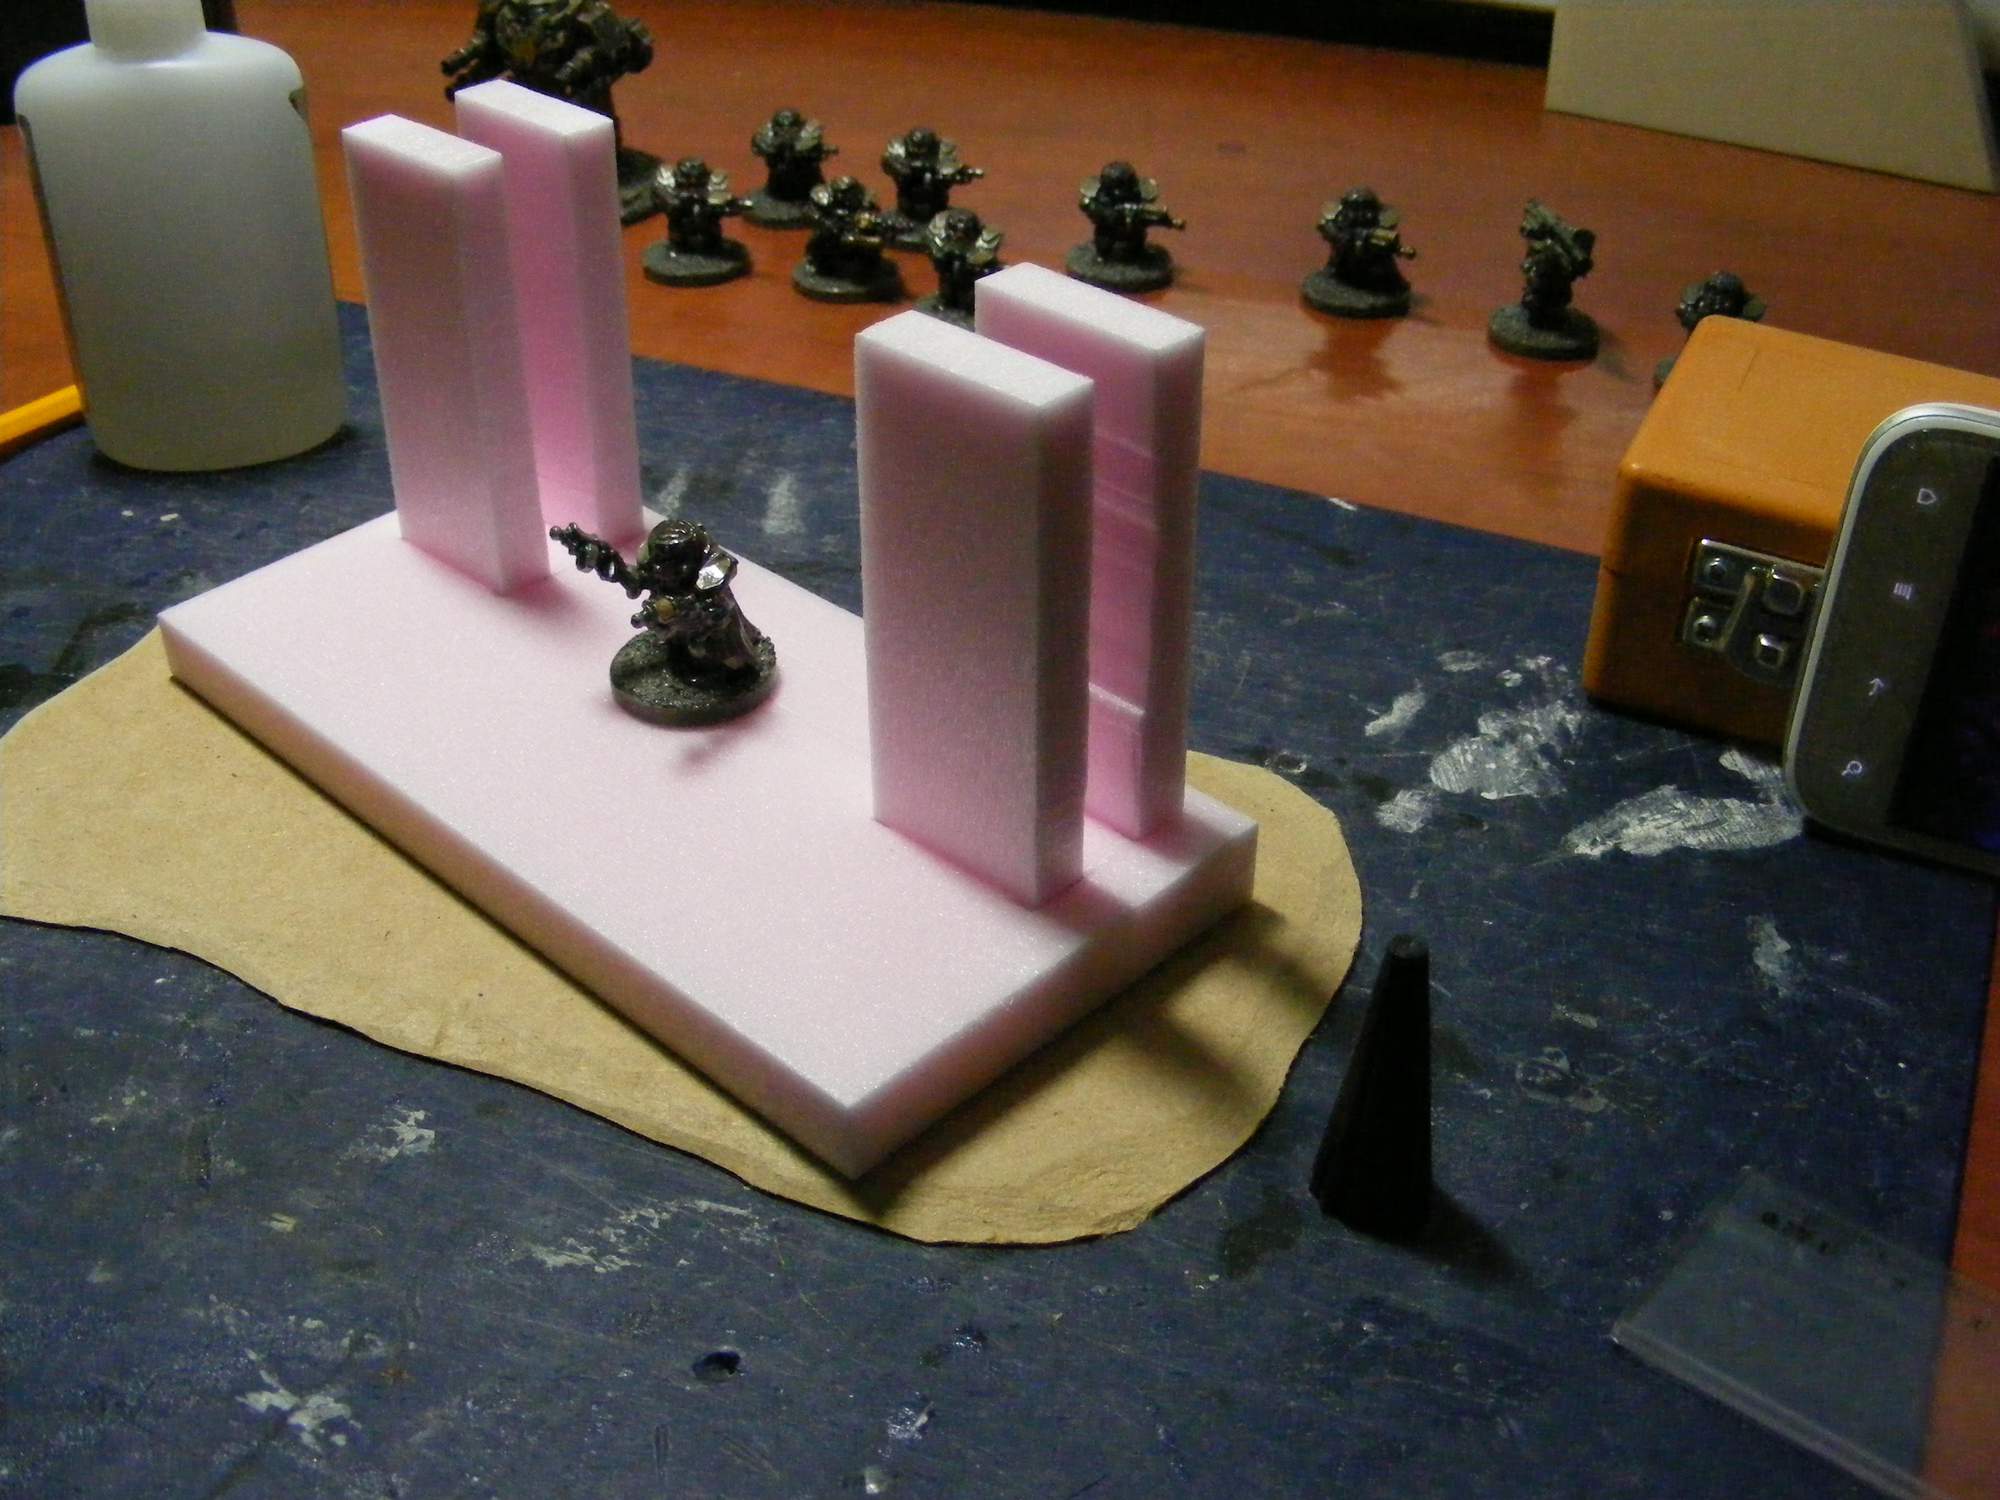
Still in the planning stages. Rough size mockup using some pre-built hills.
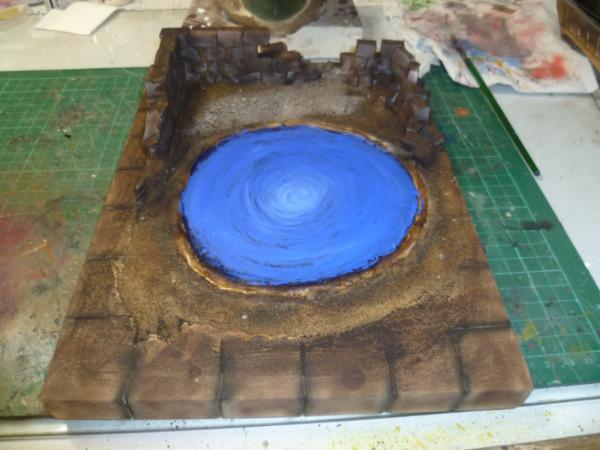
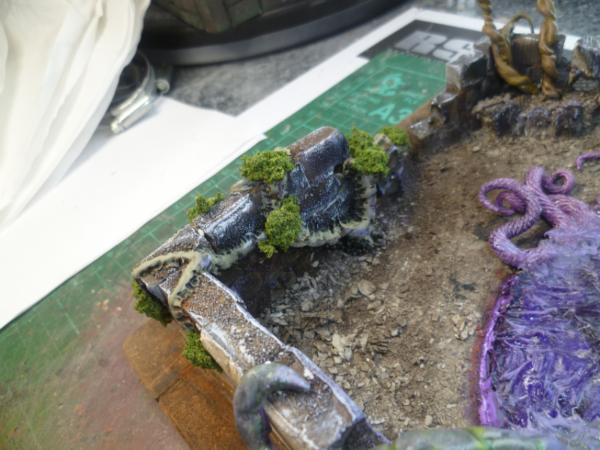
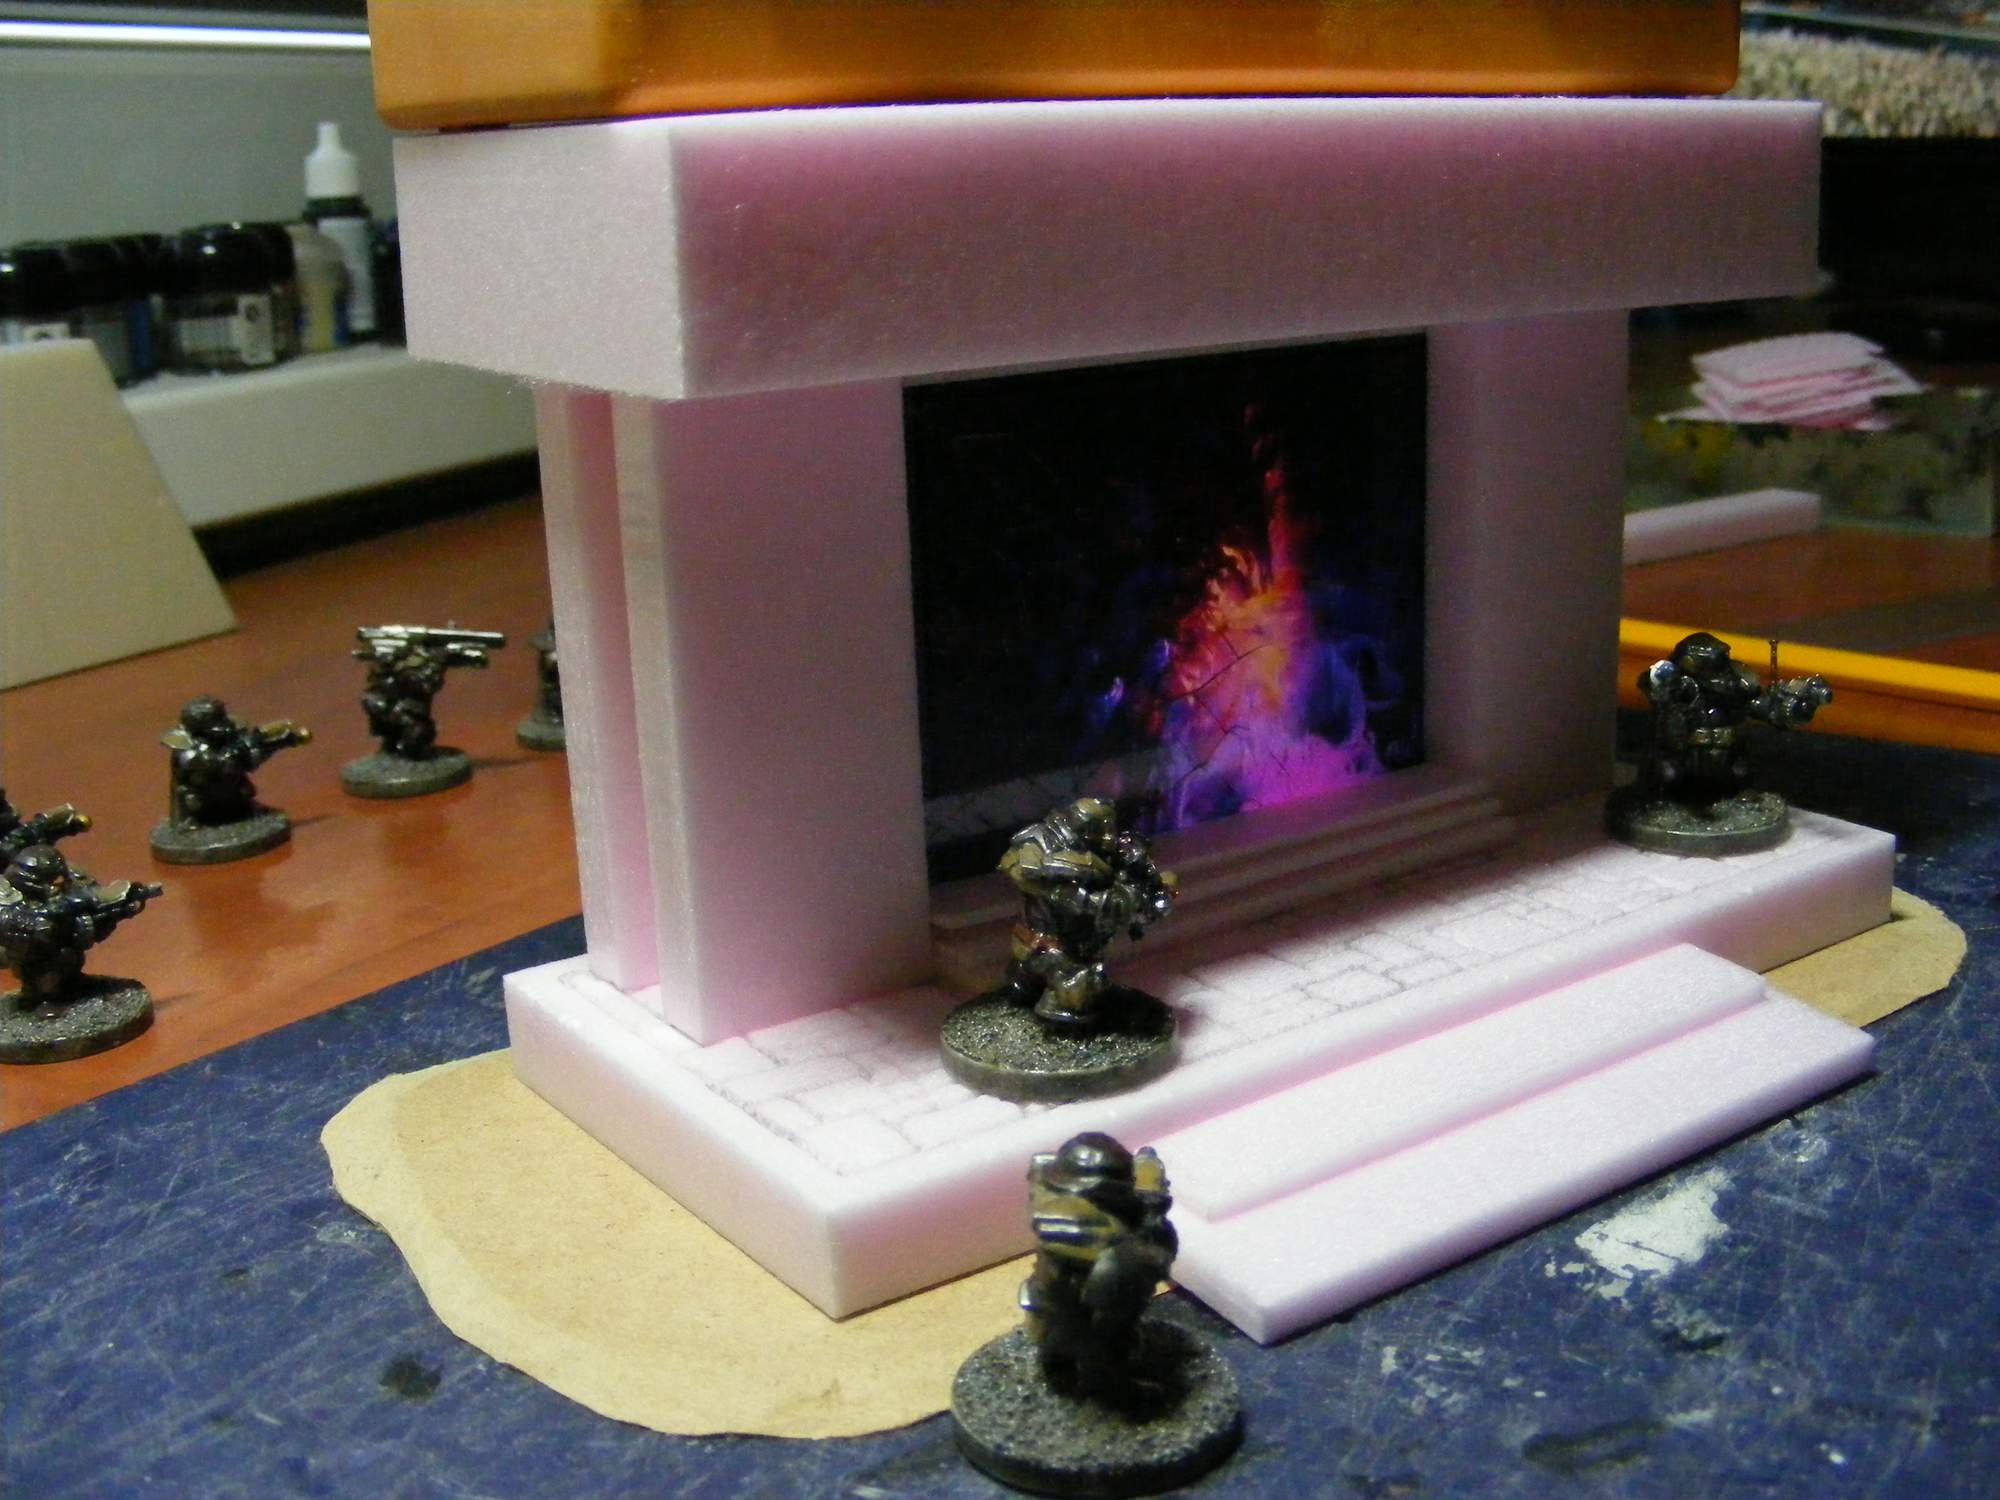
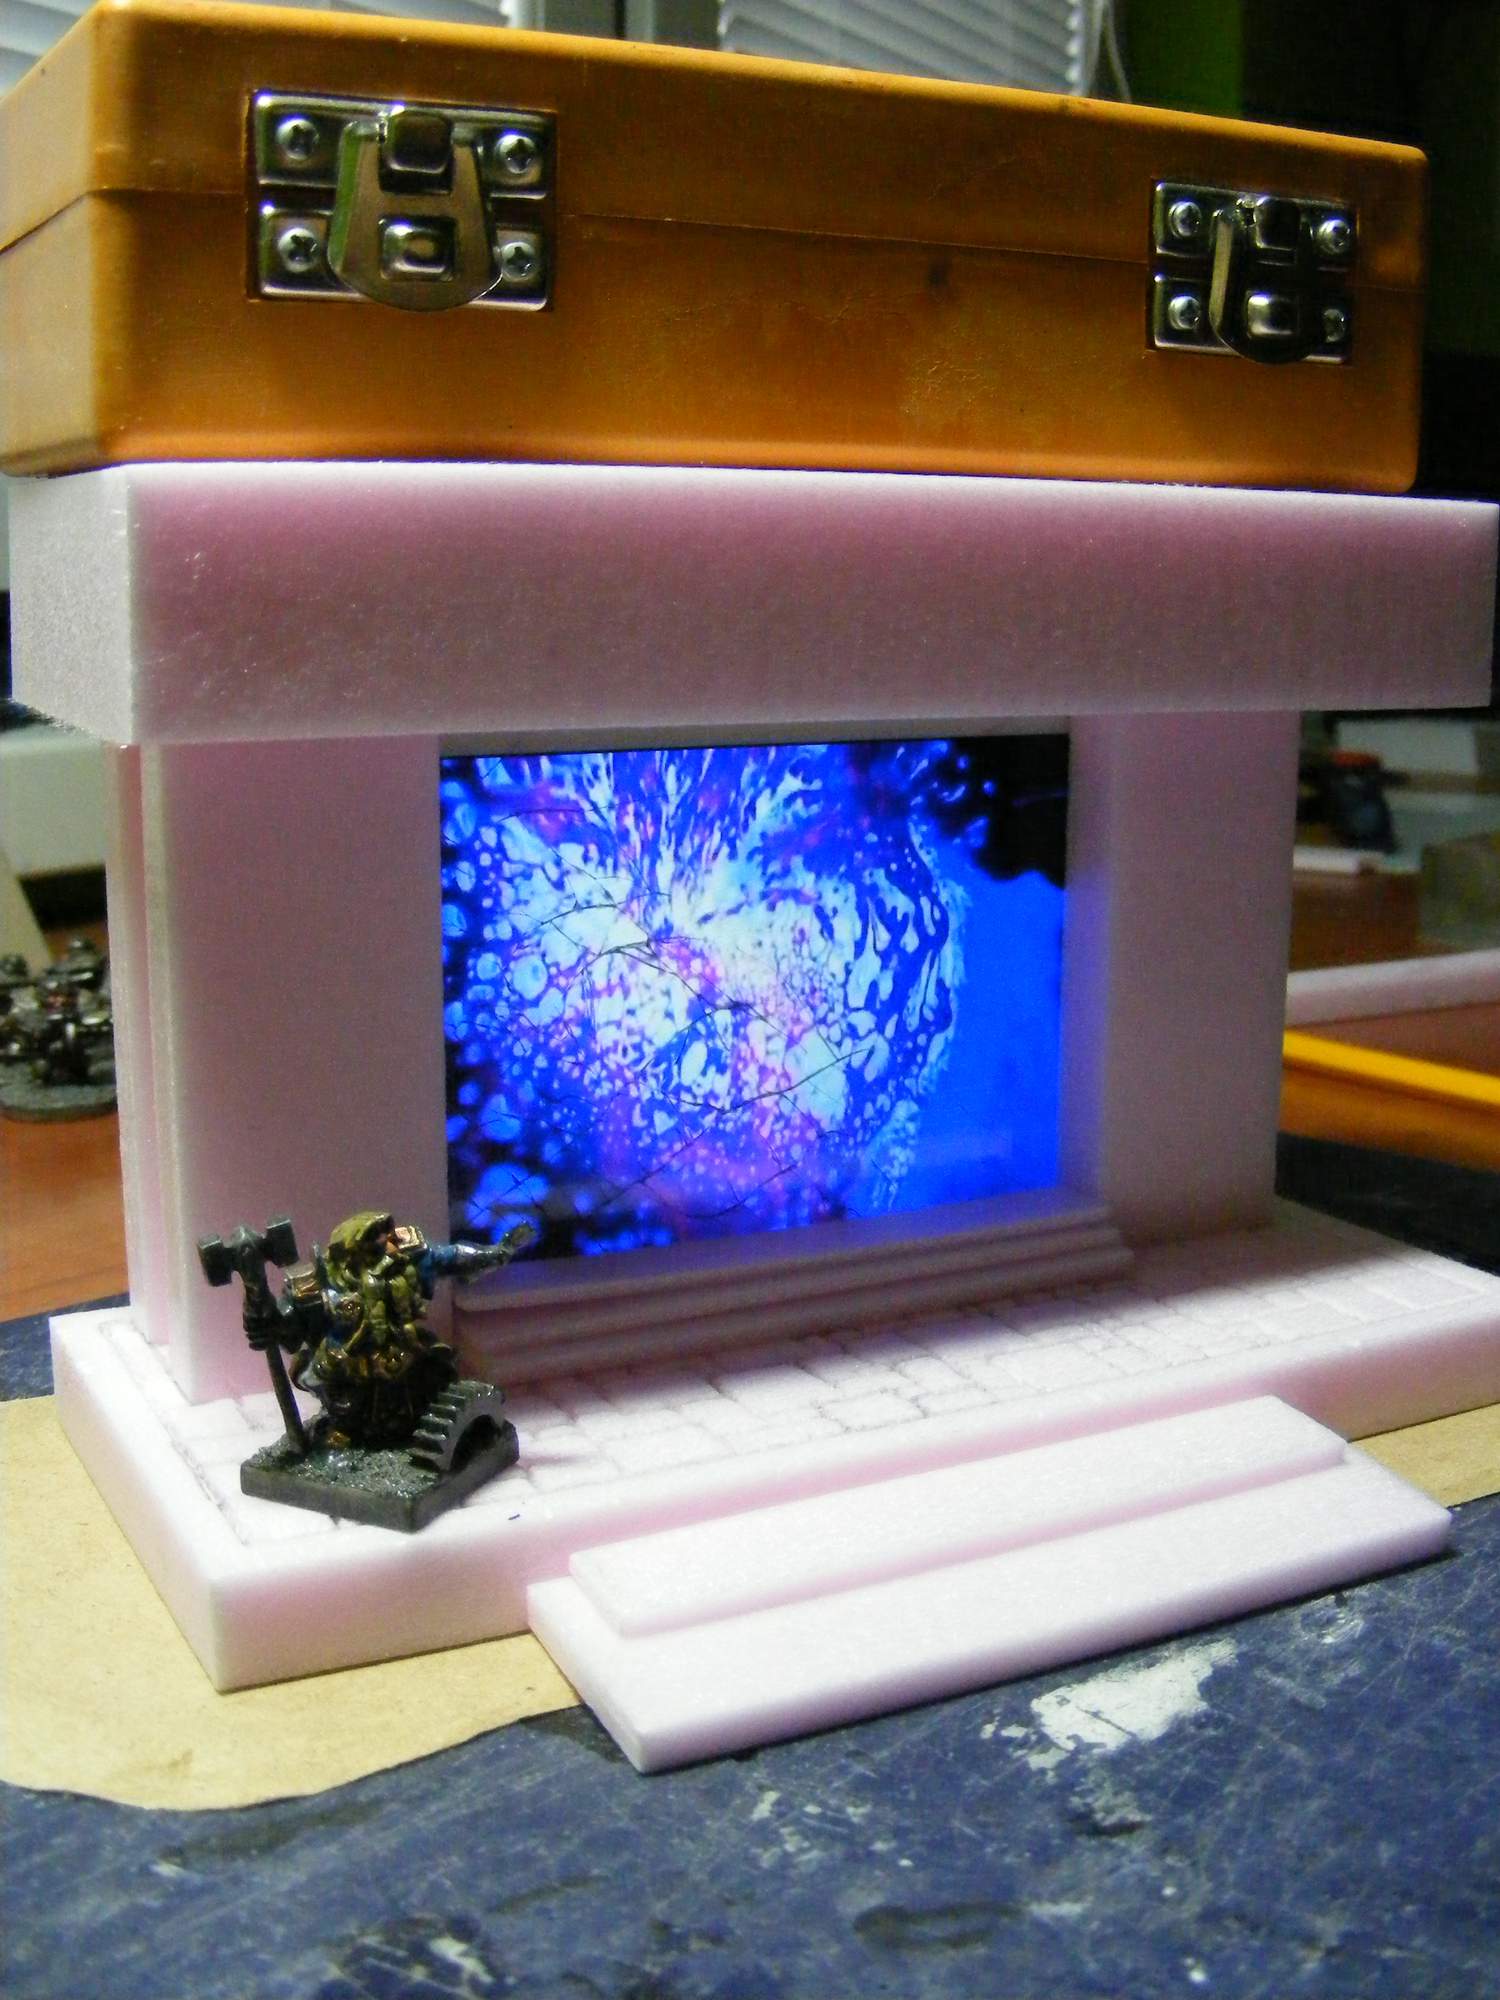
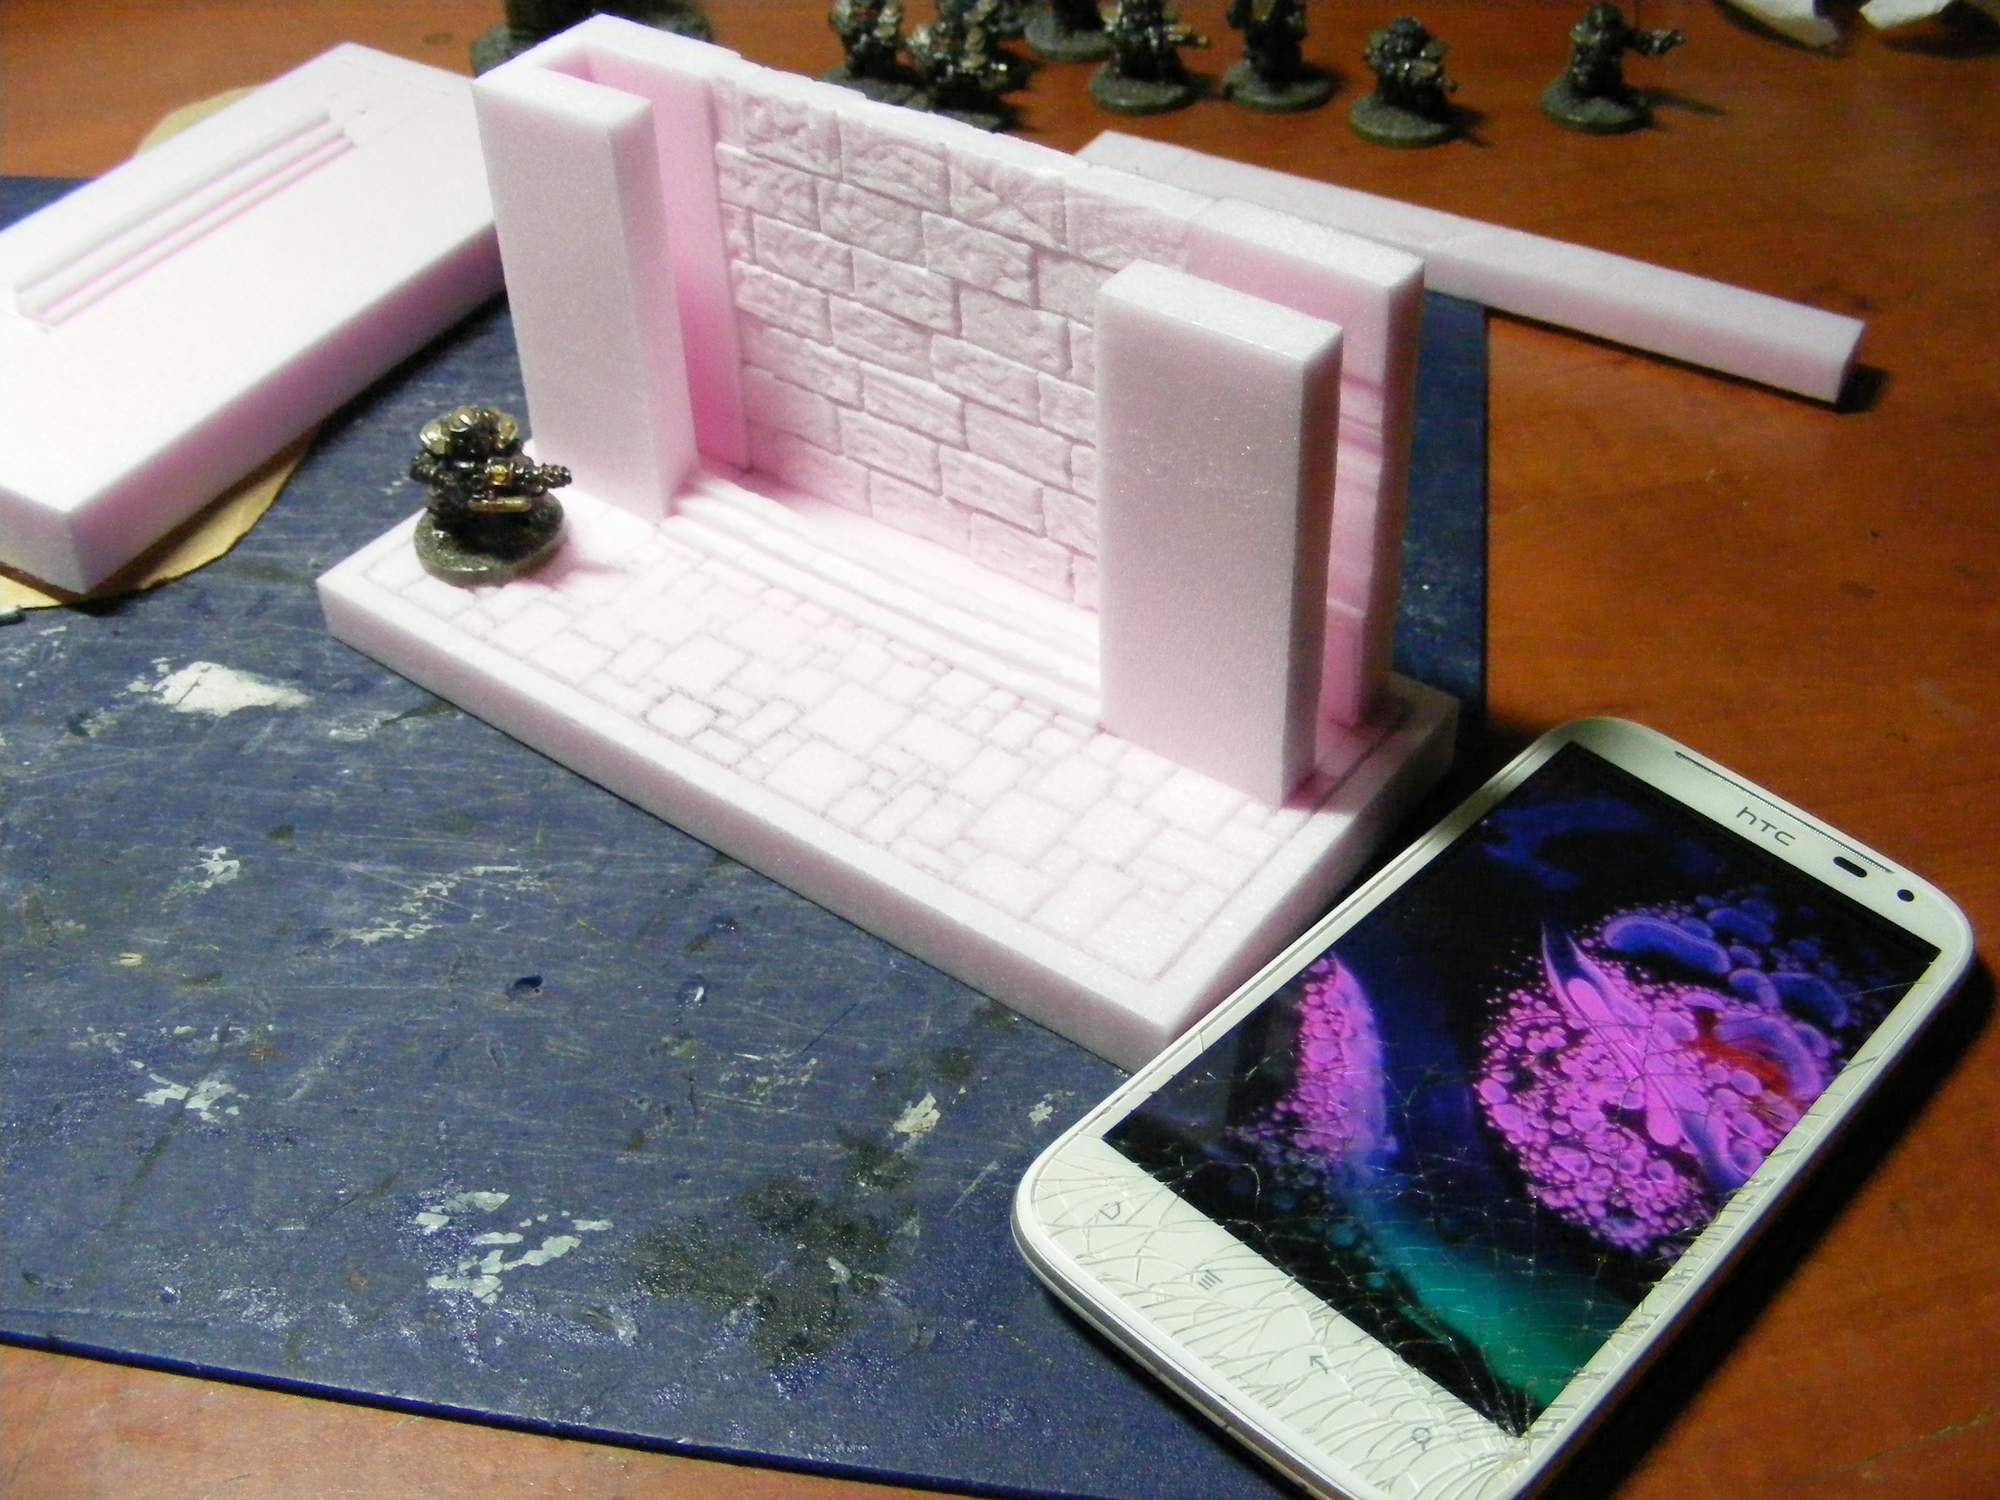
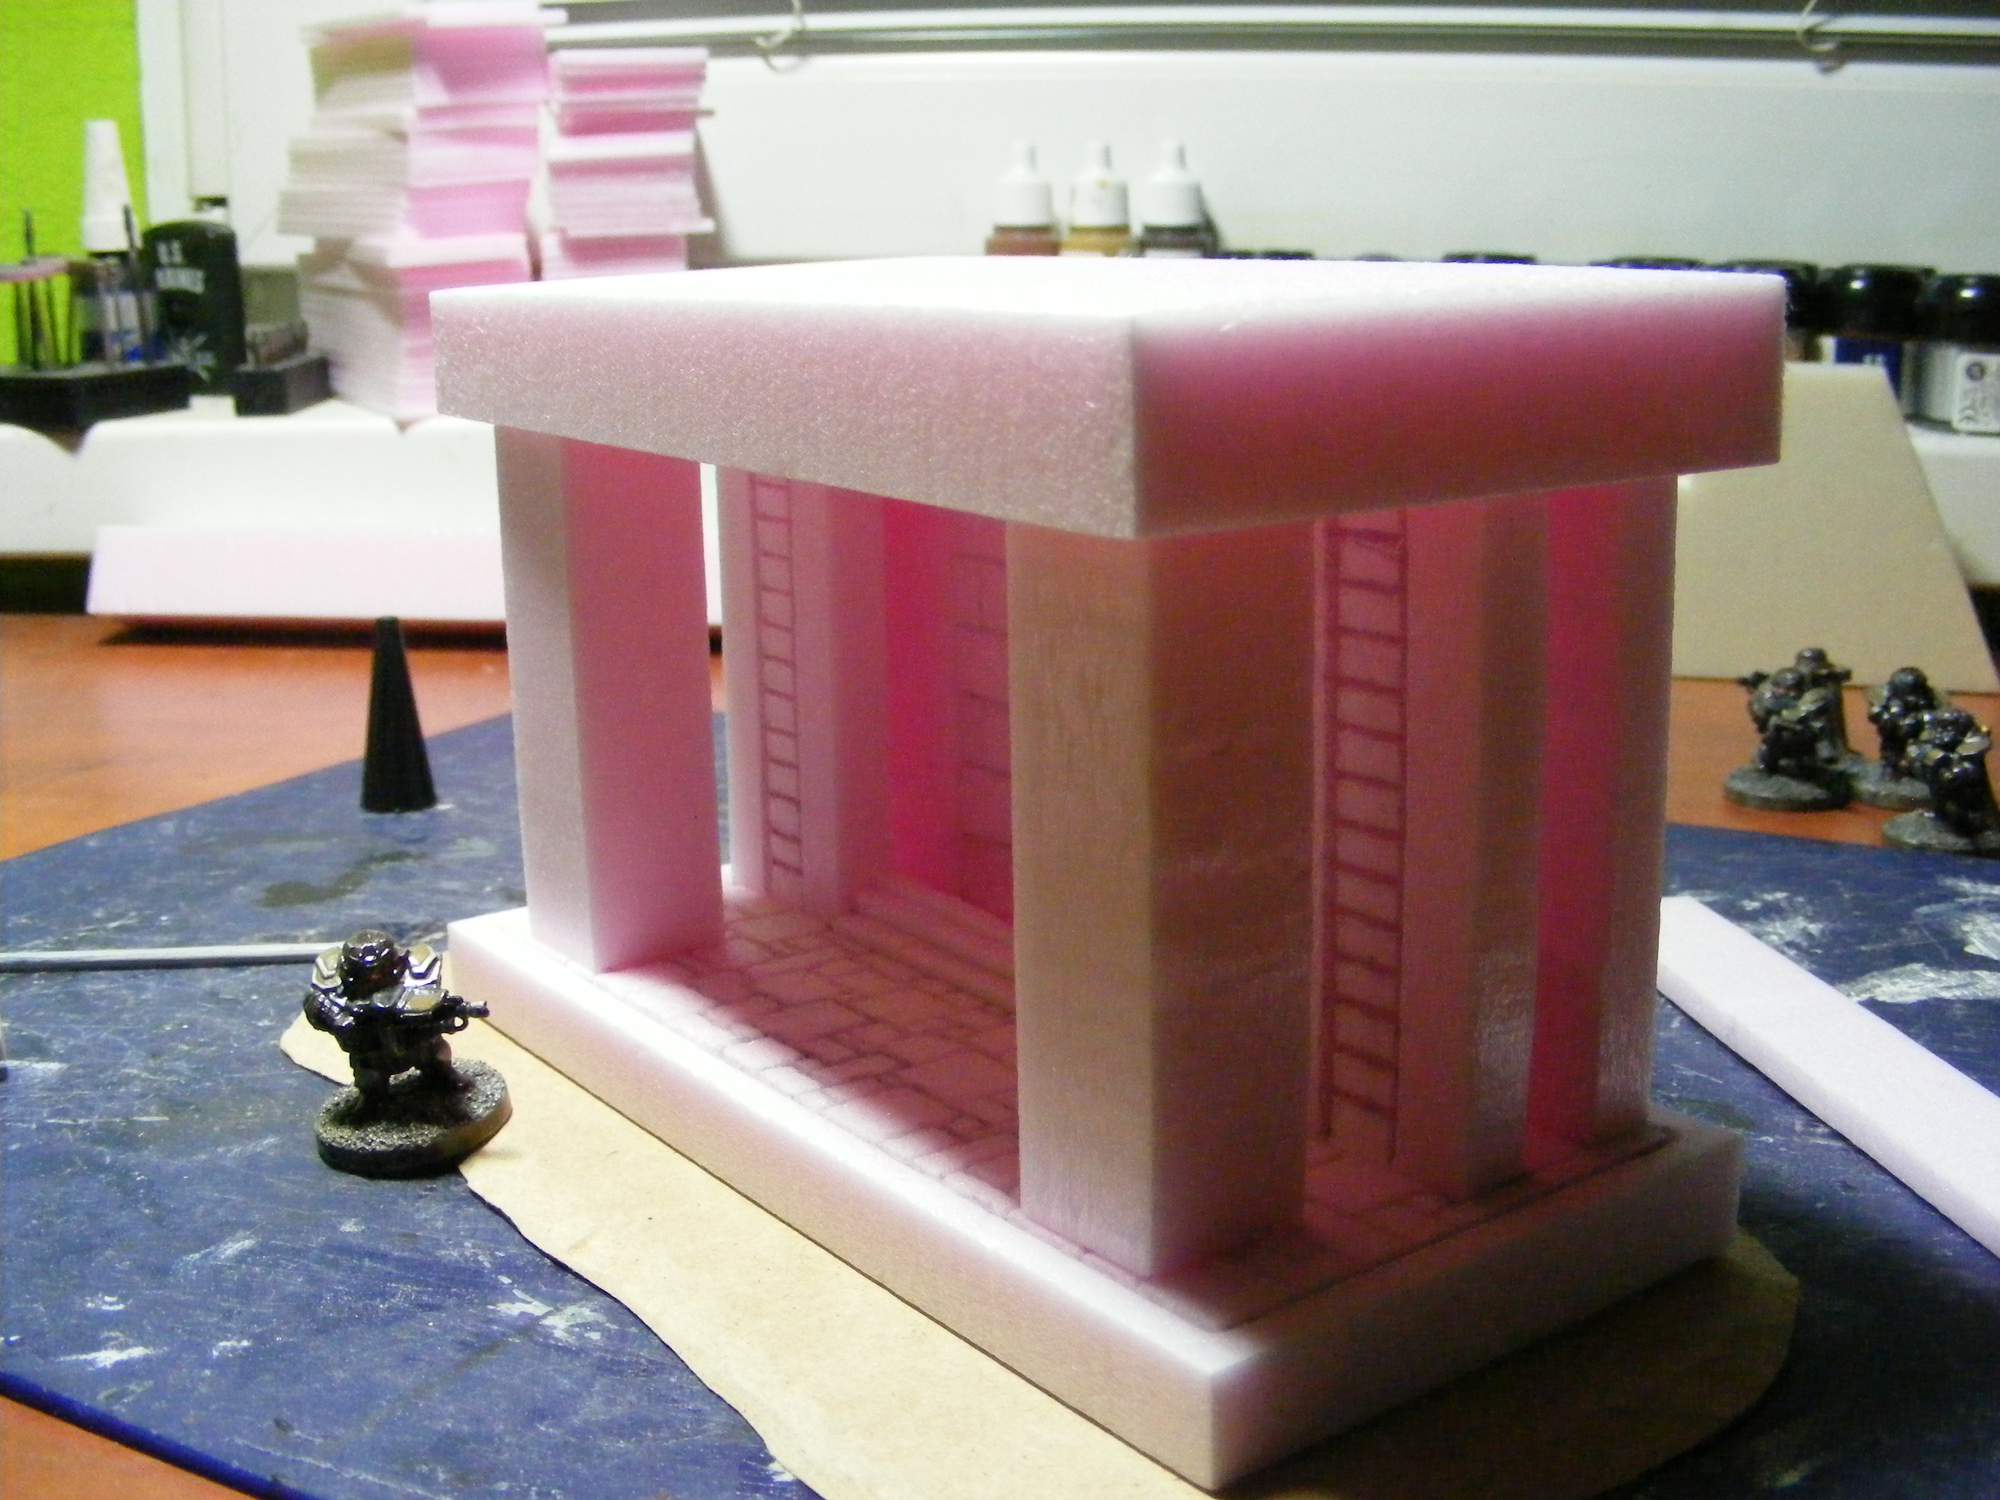
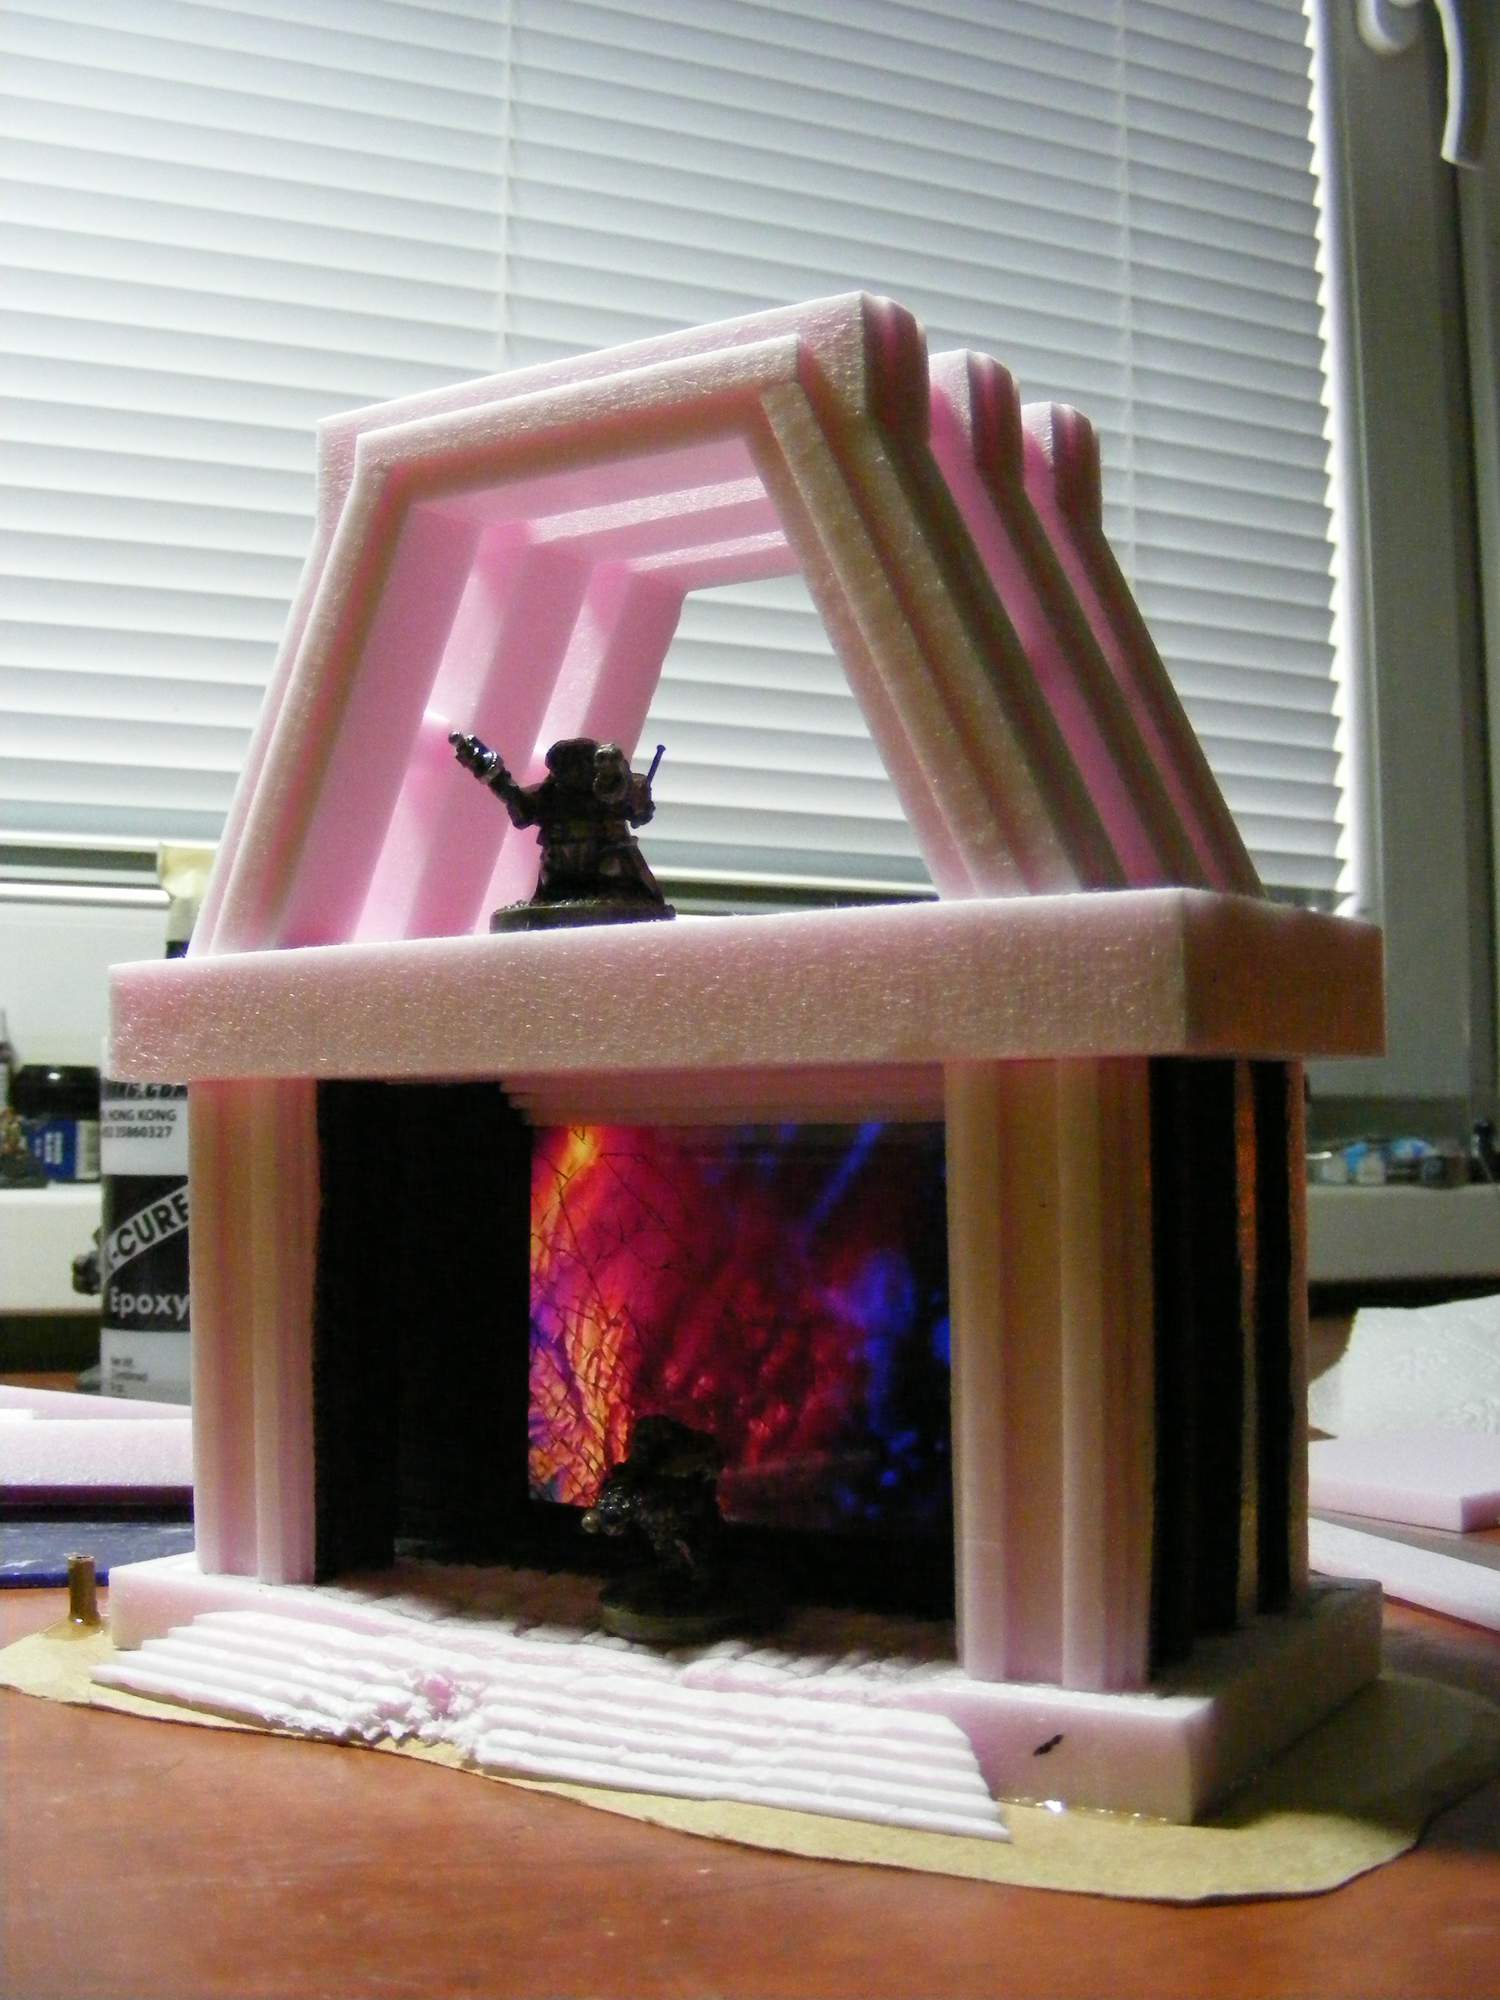
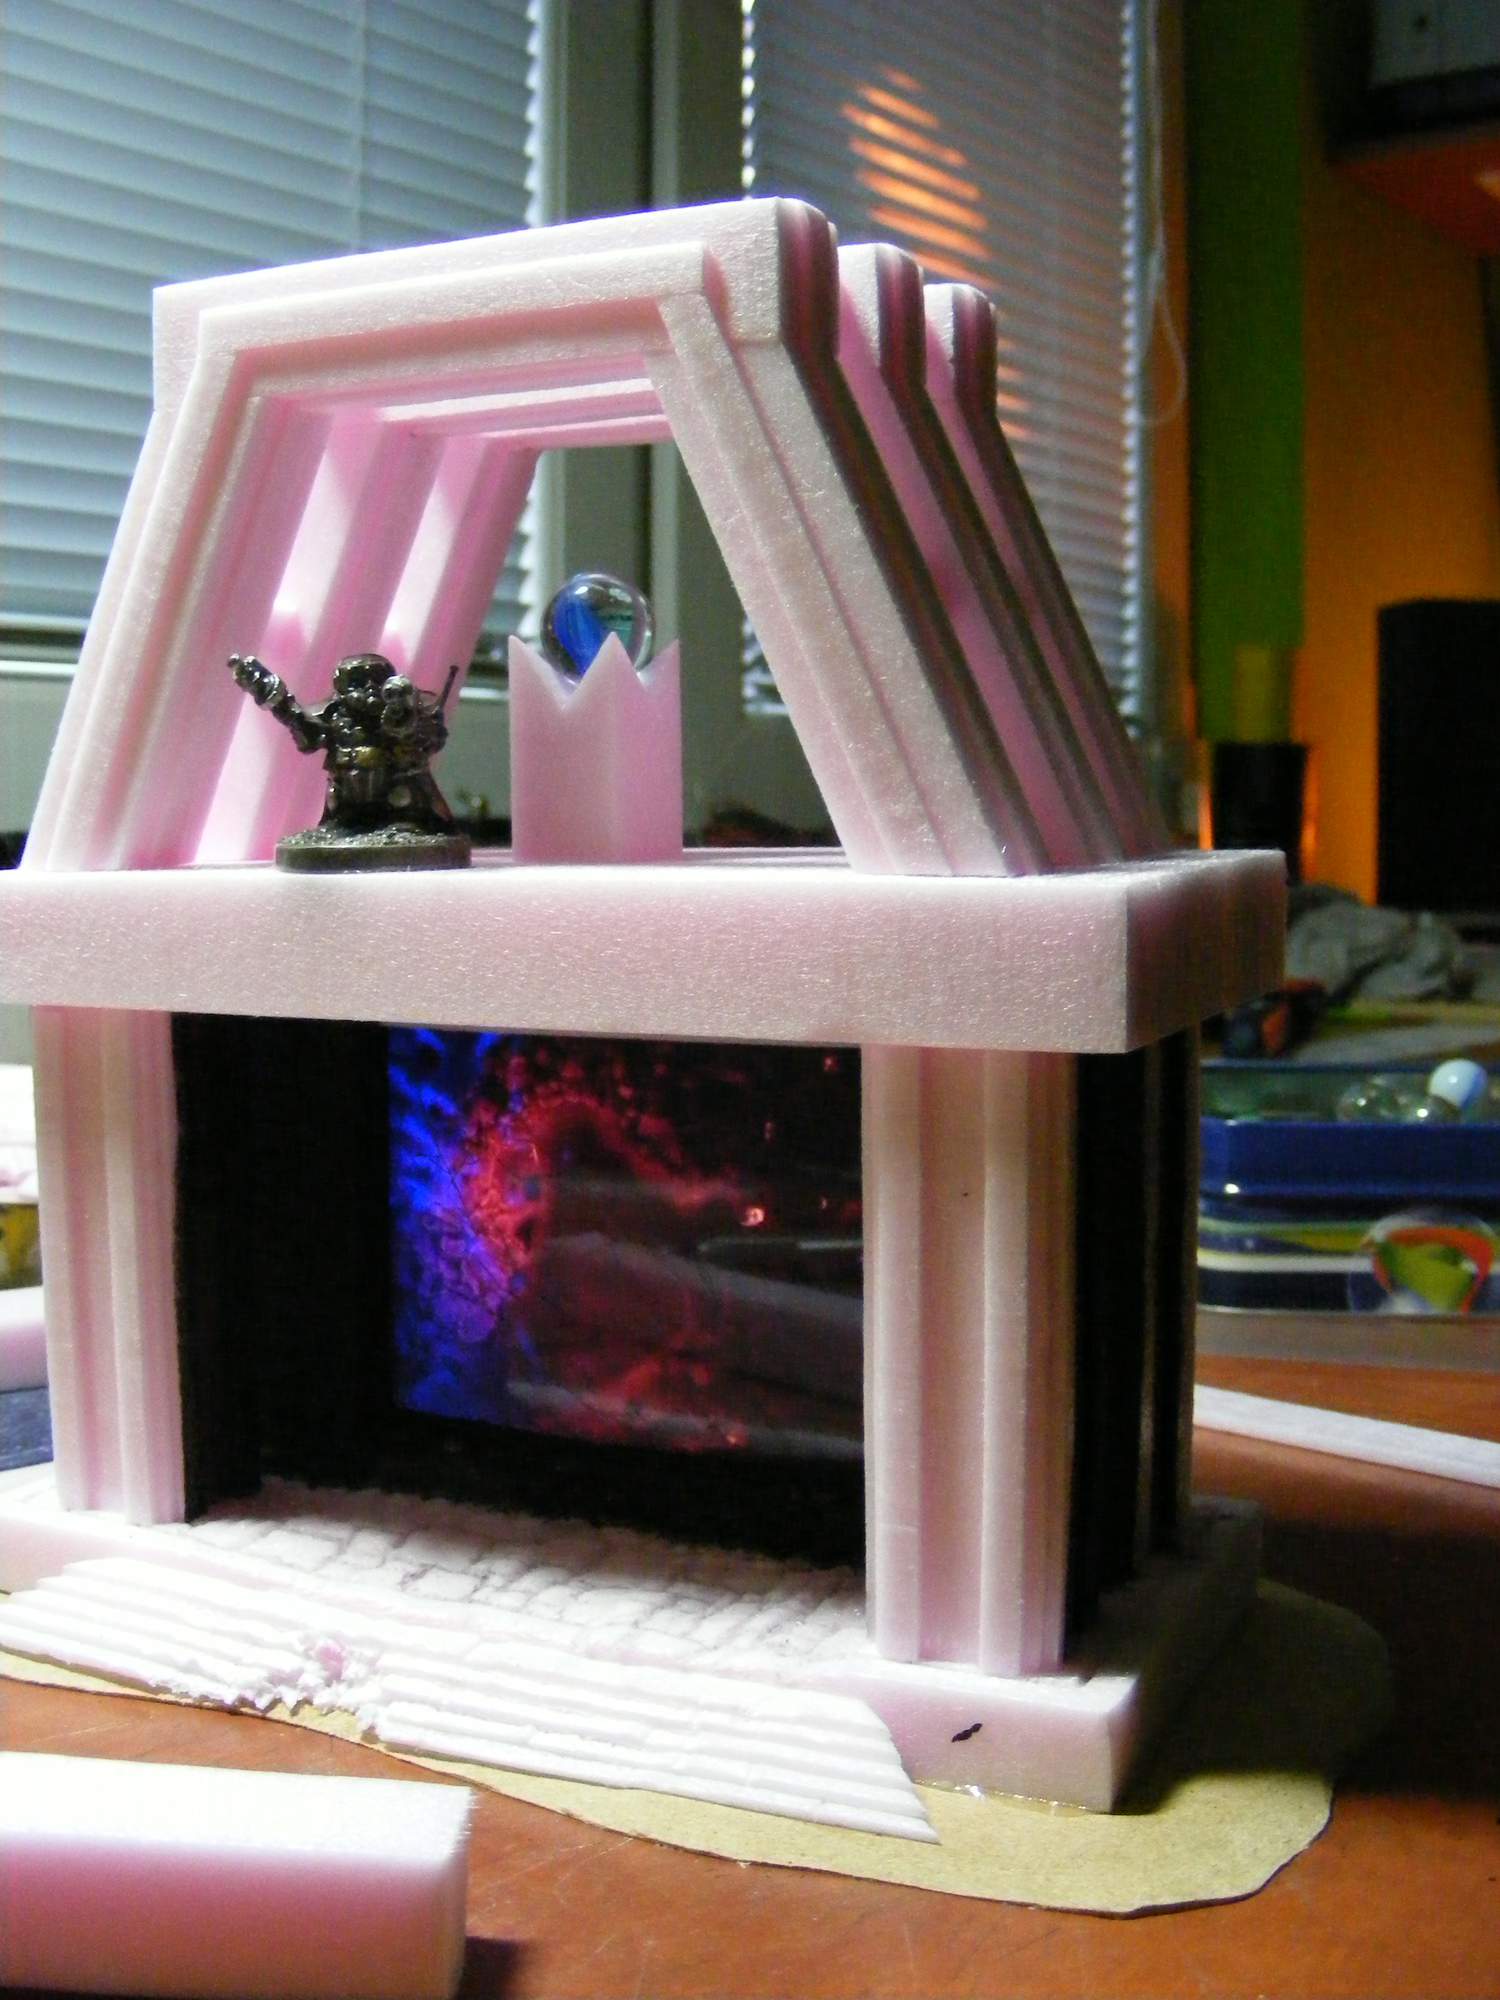
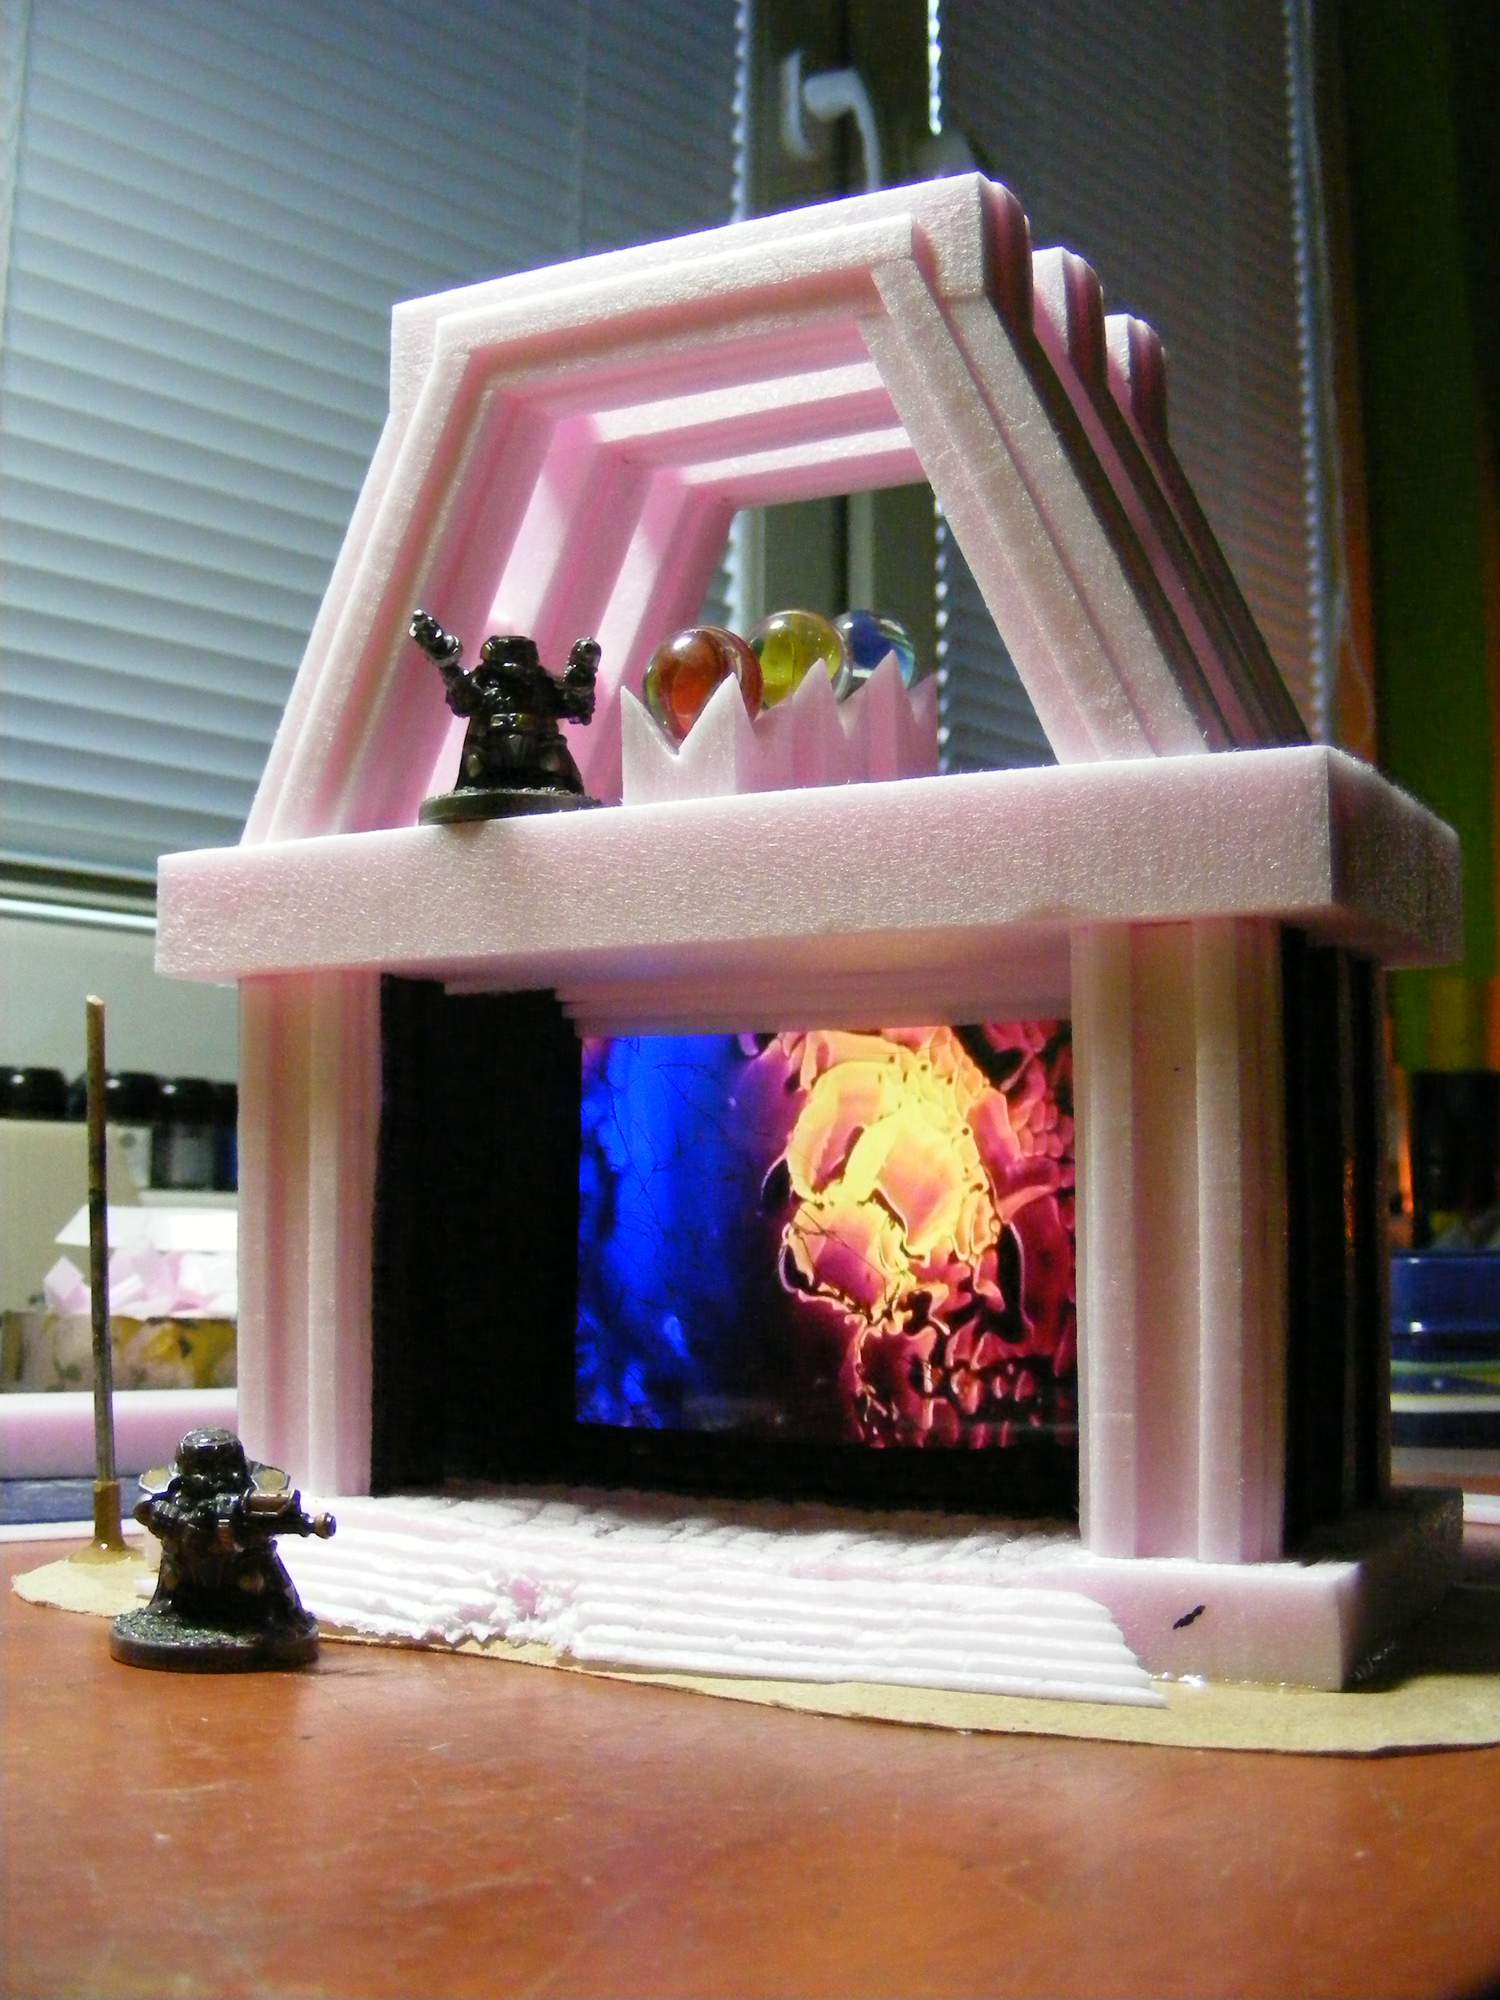
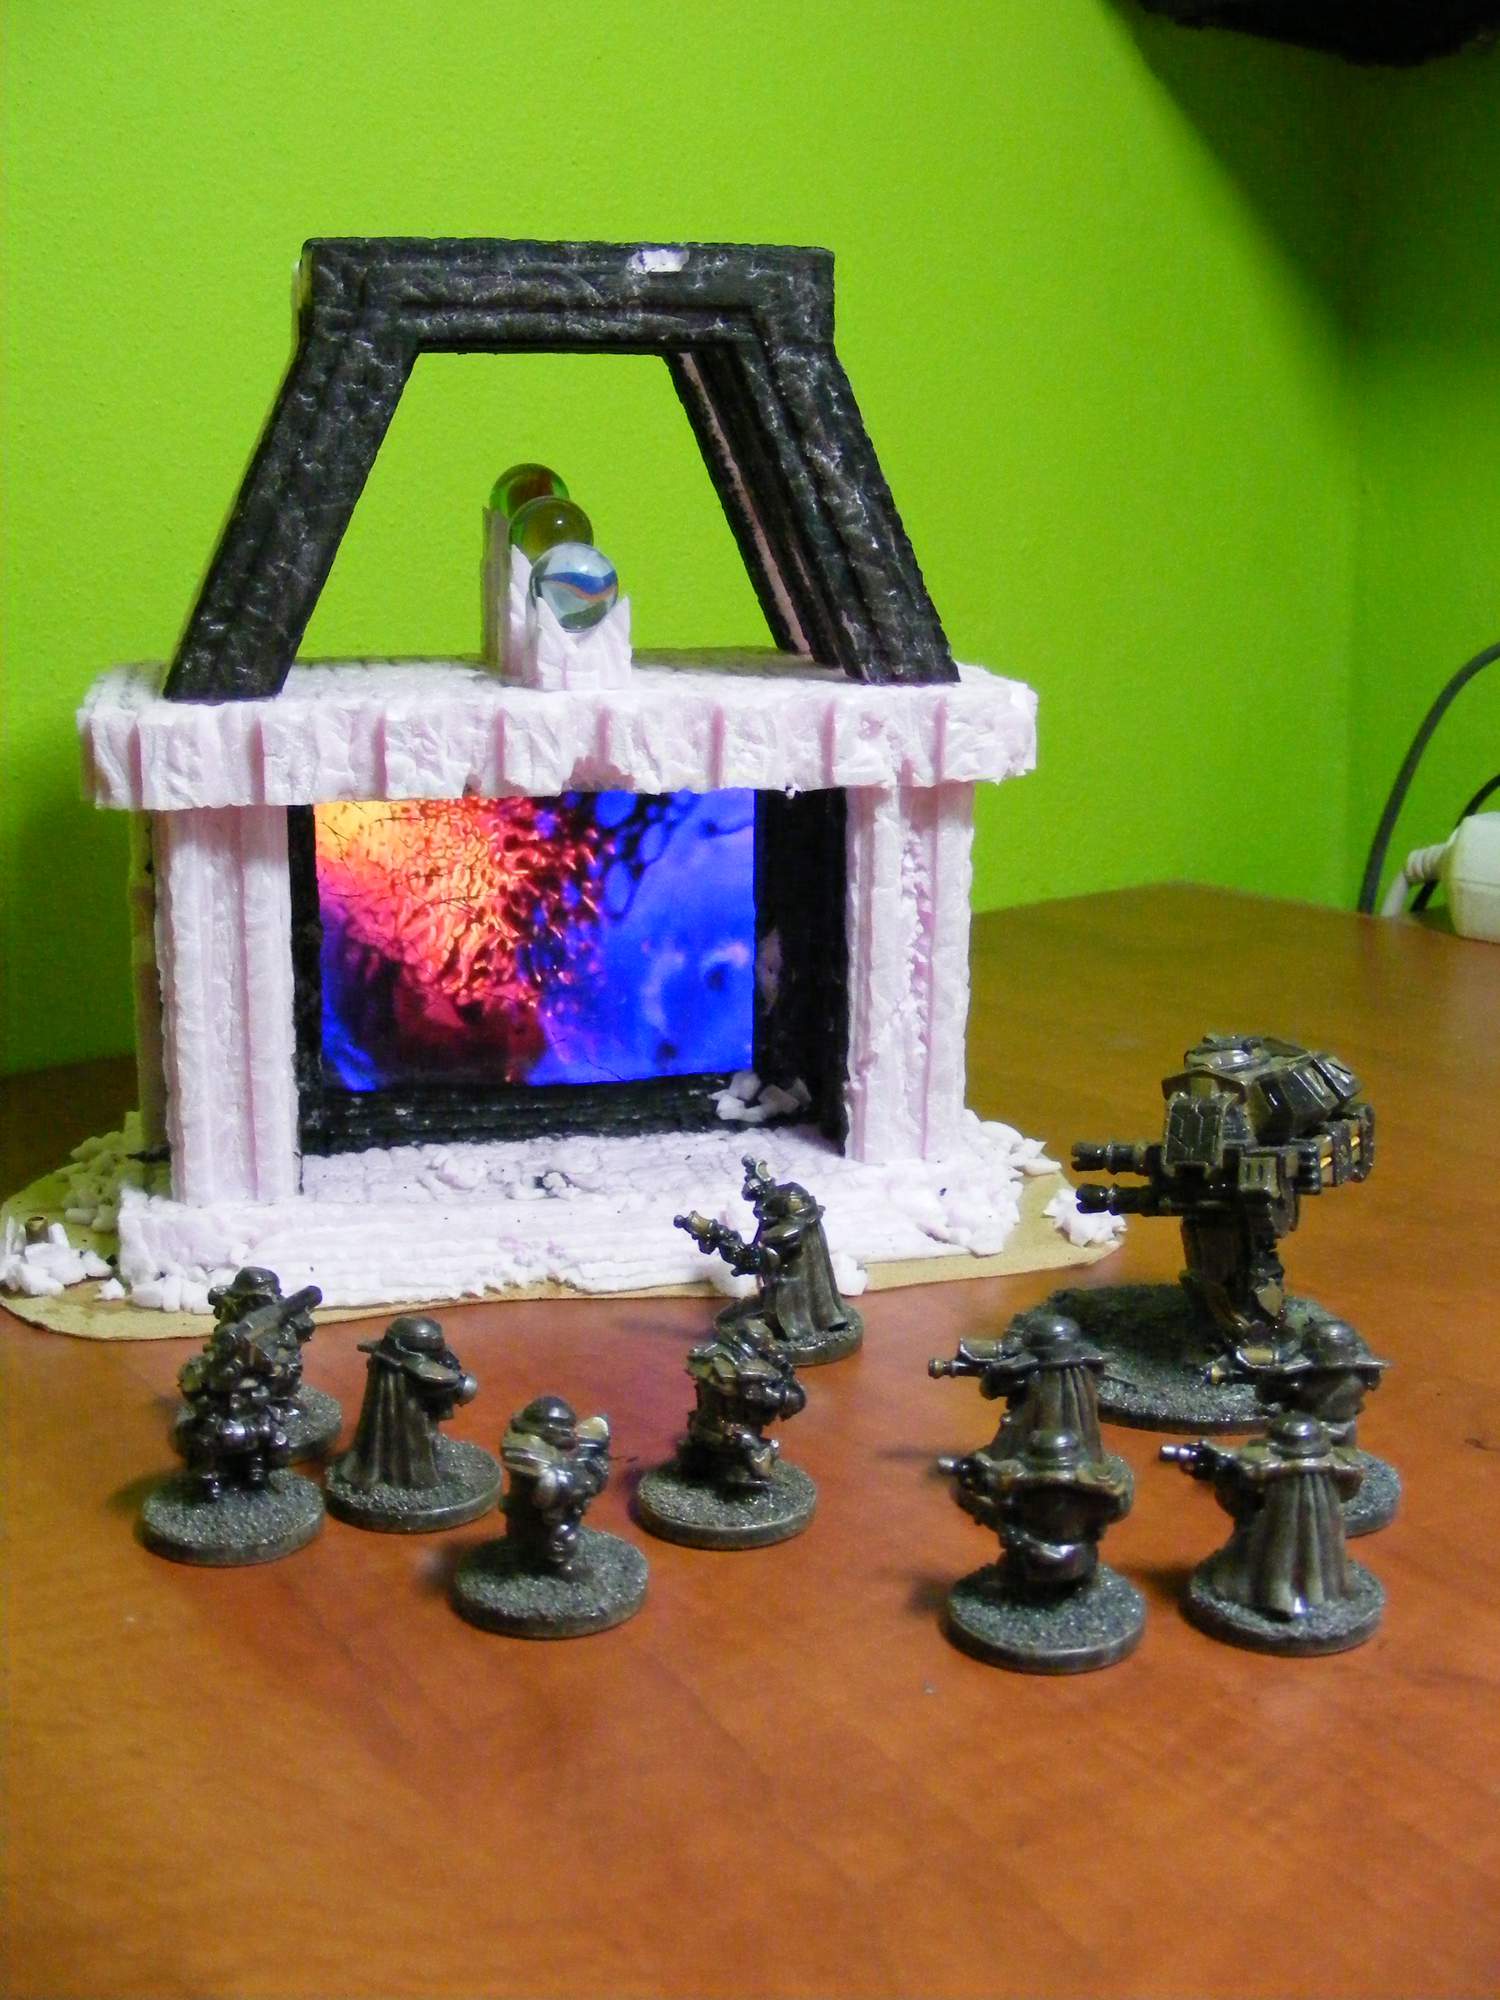
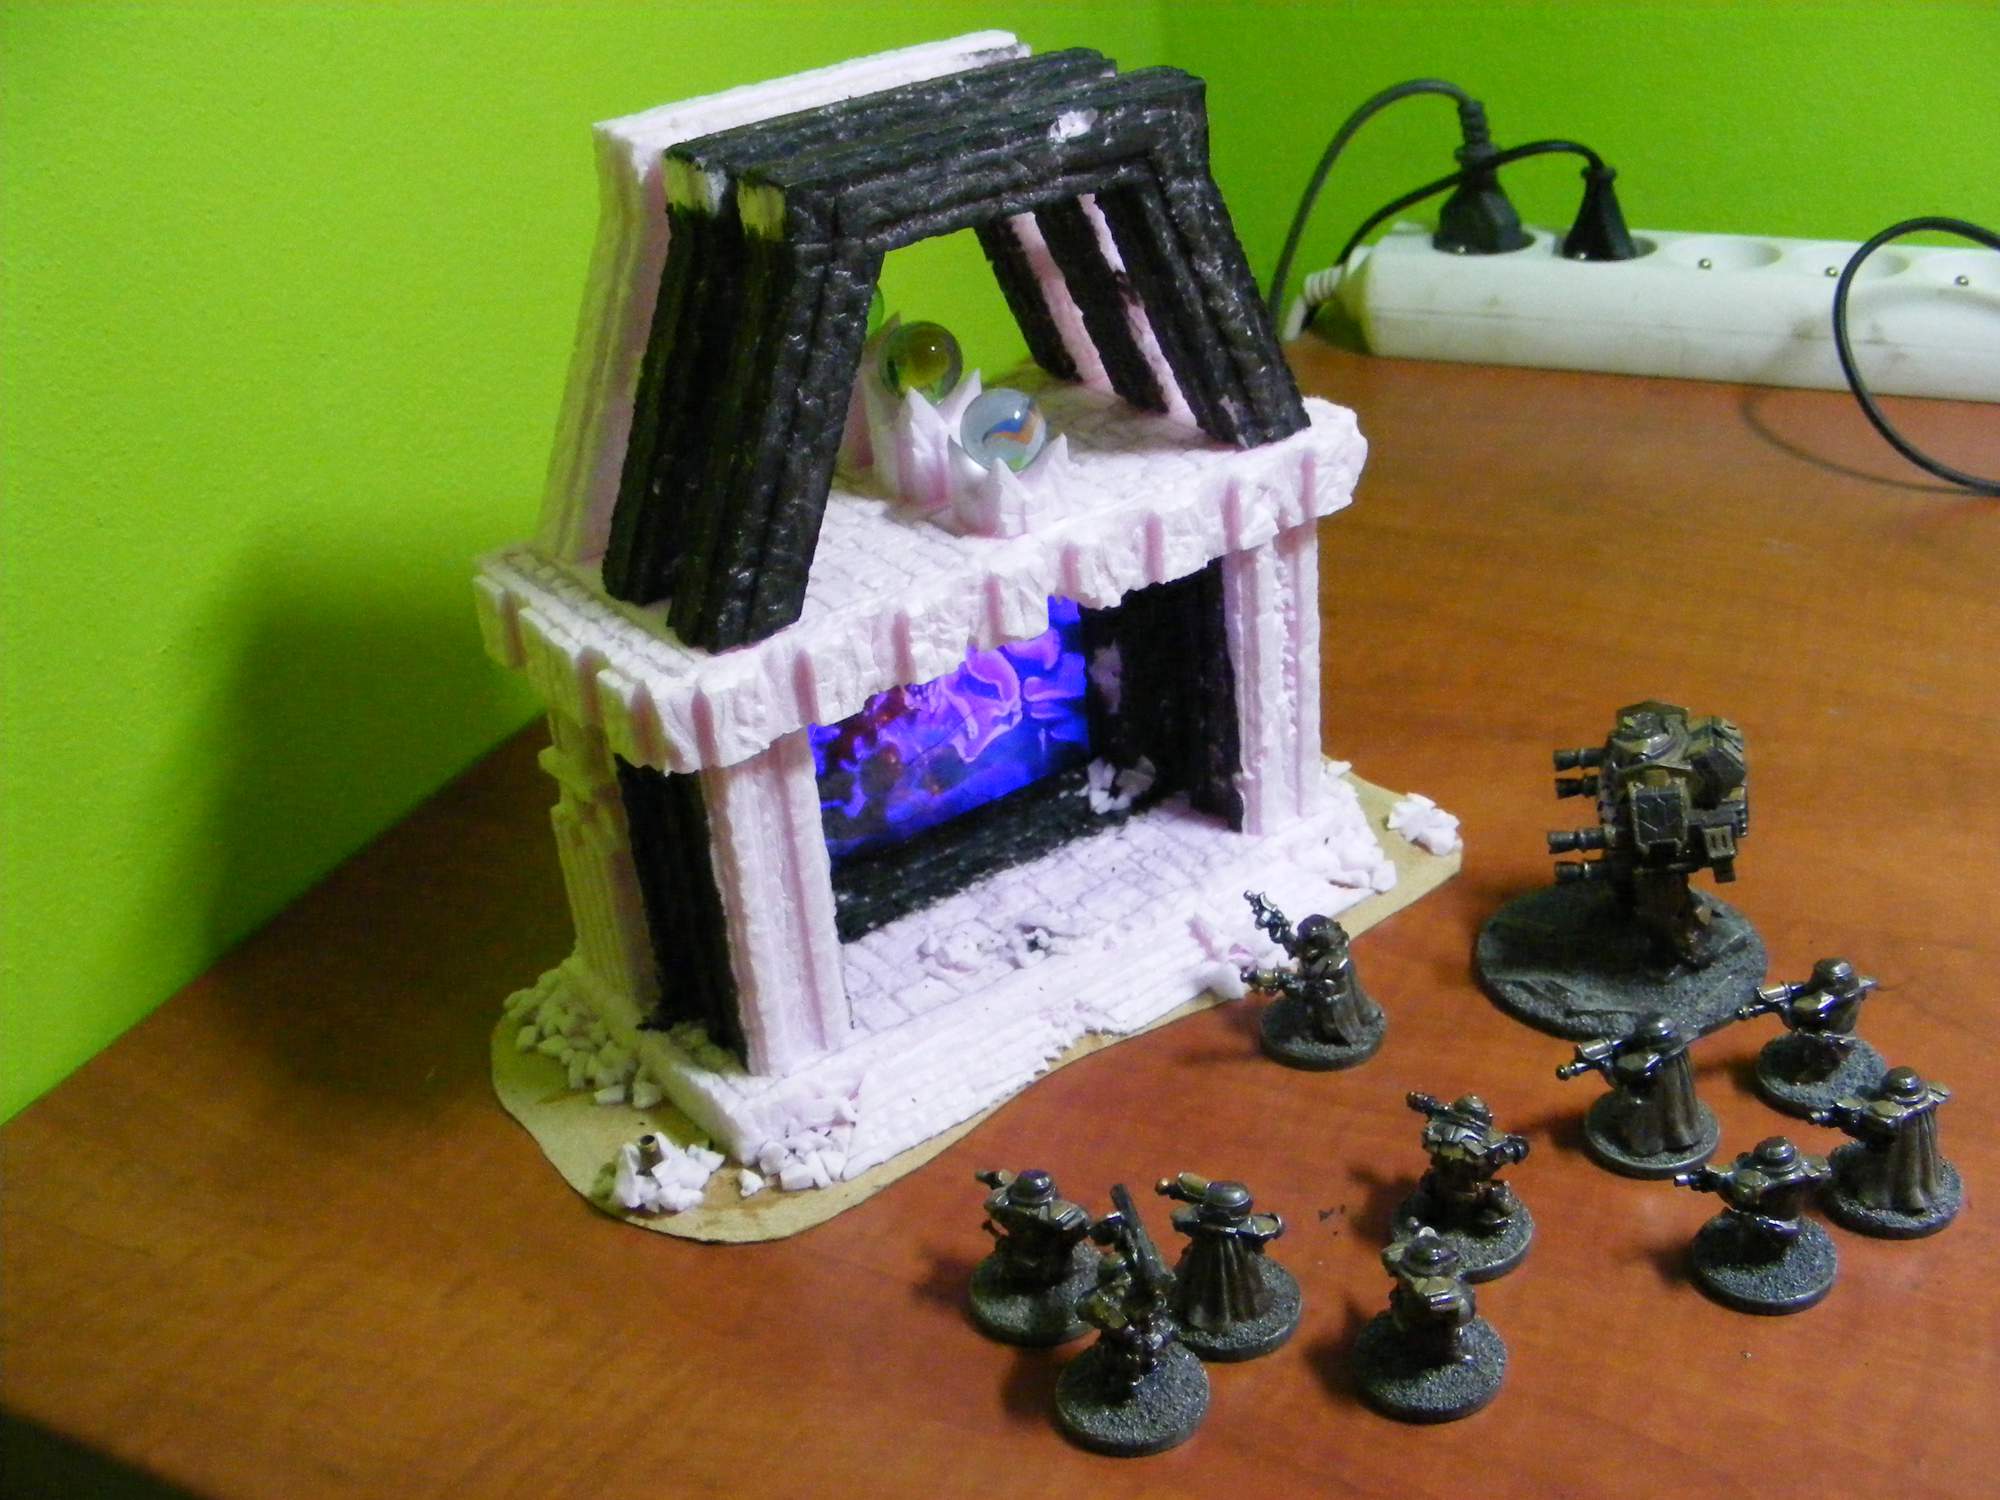
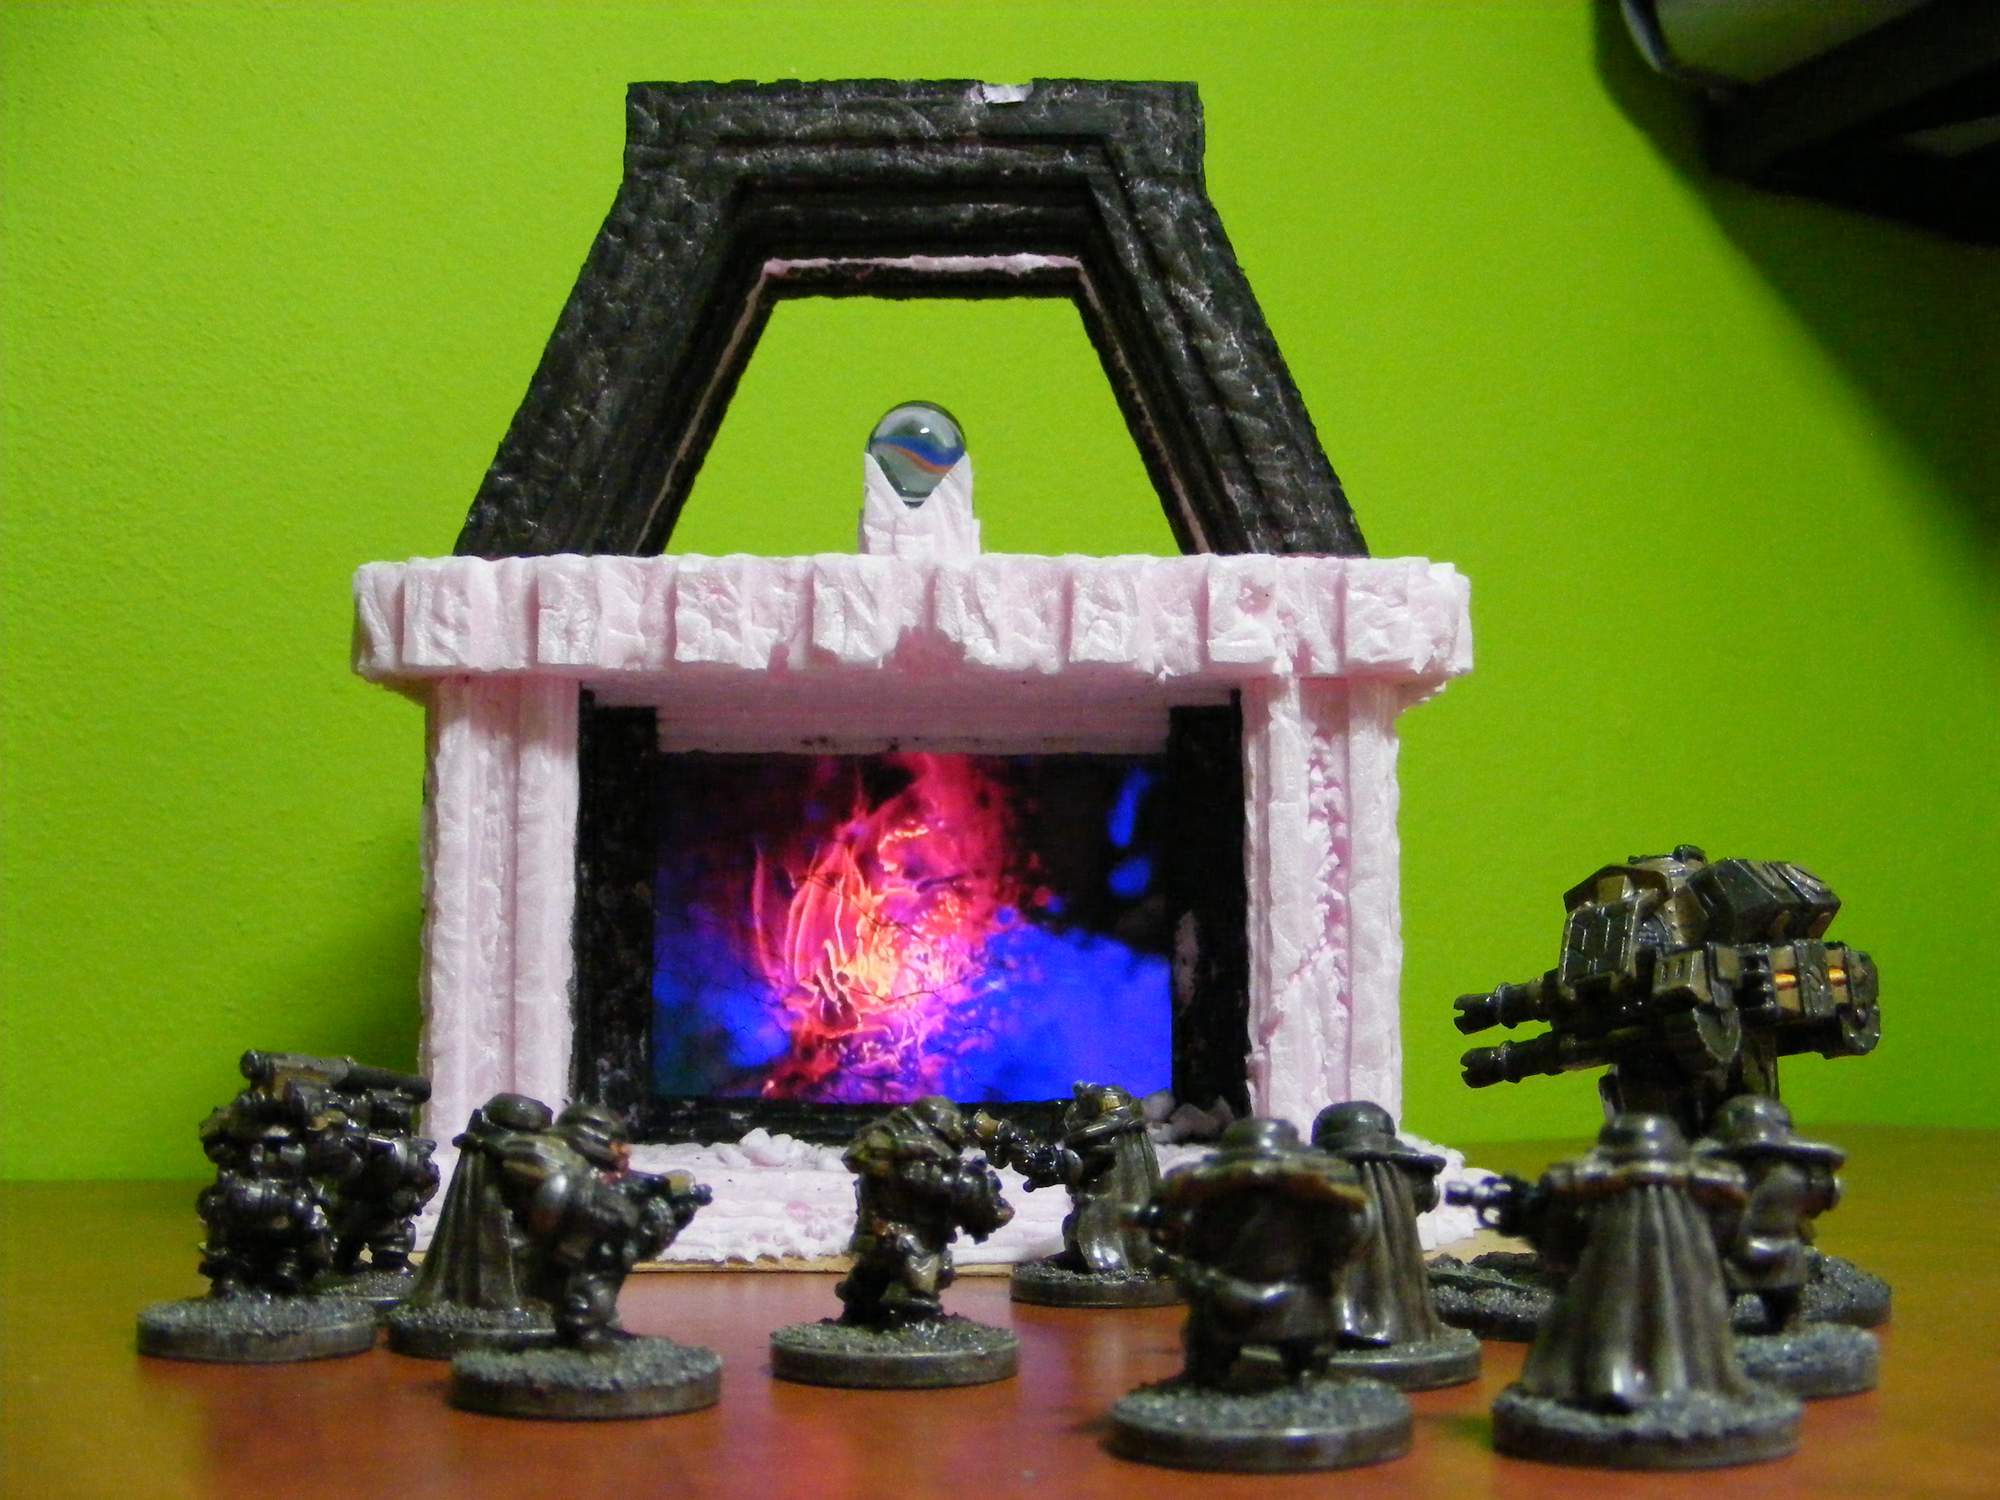
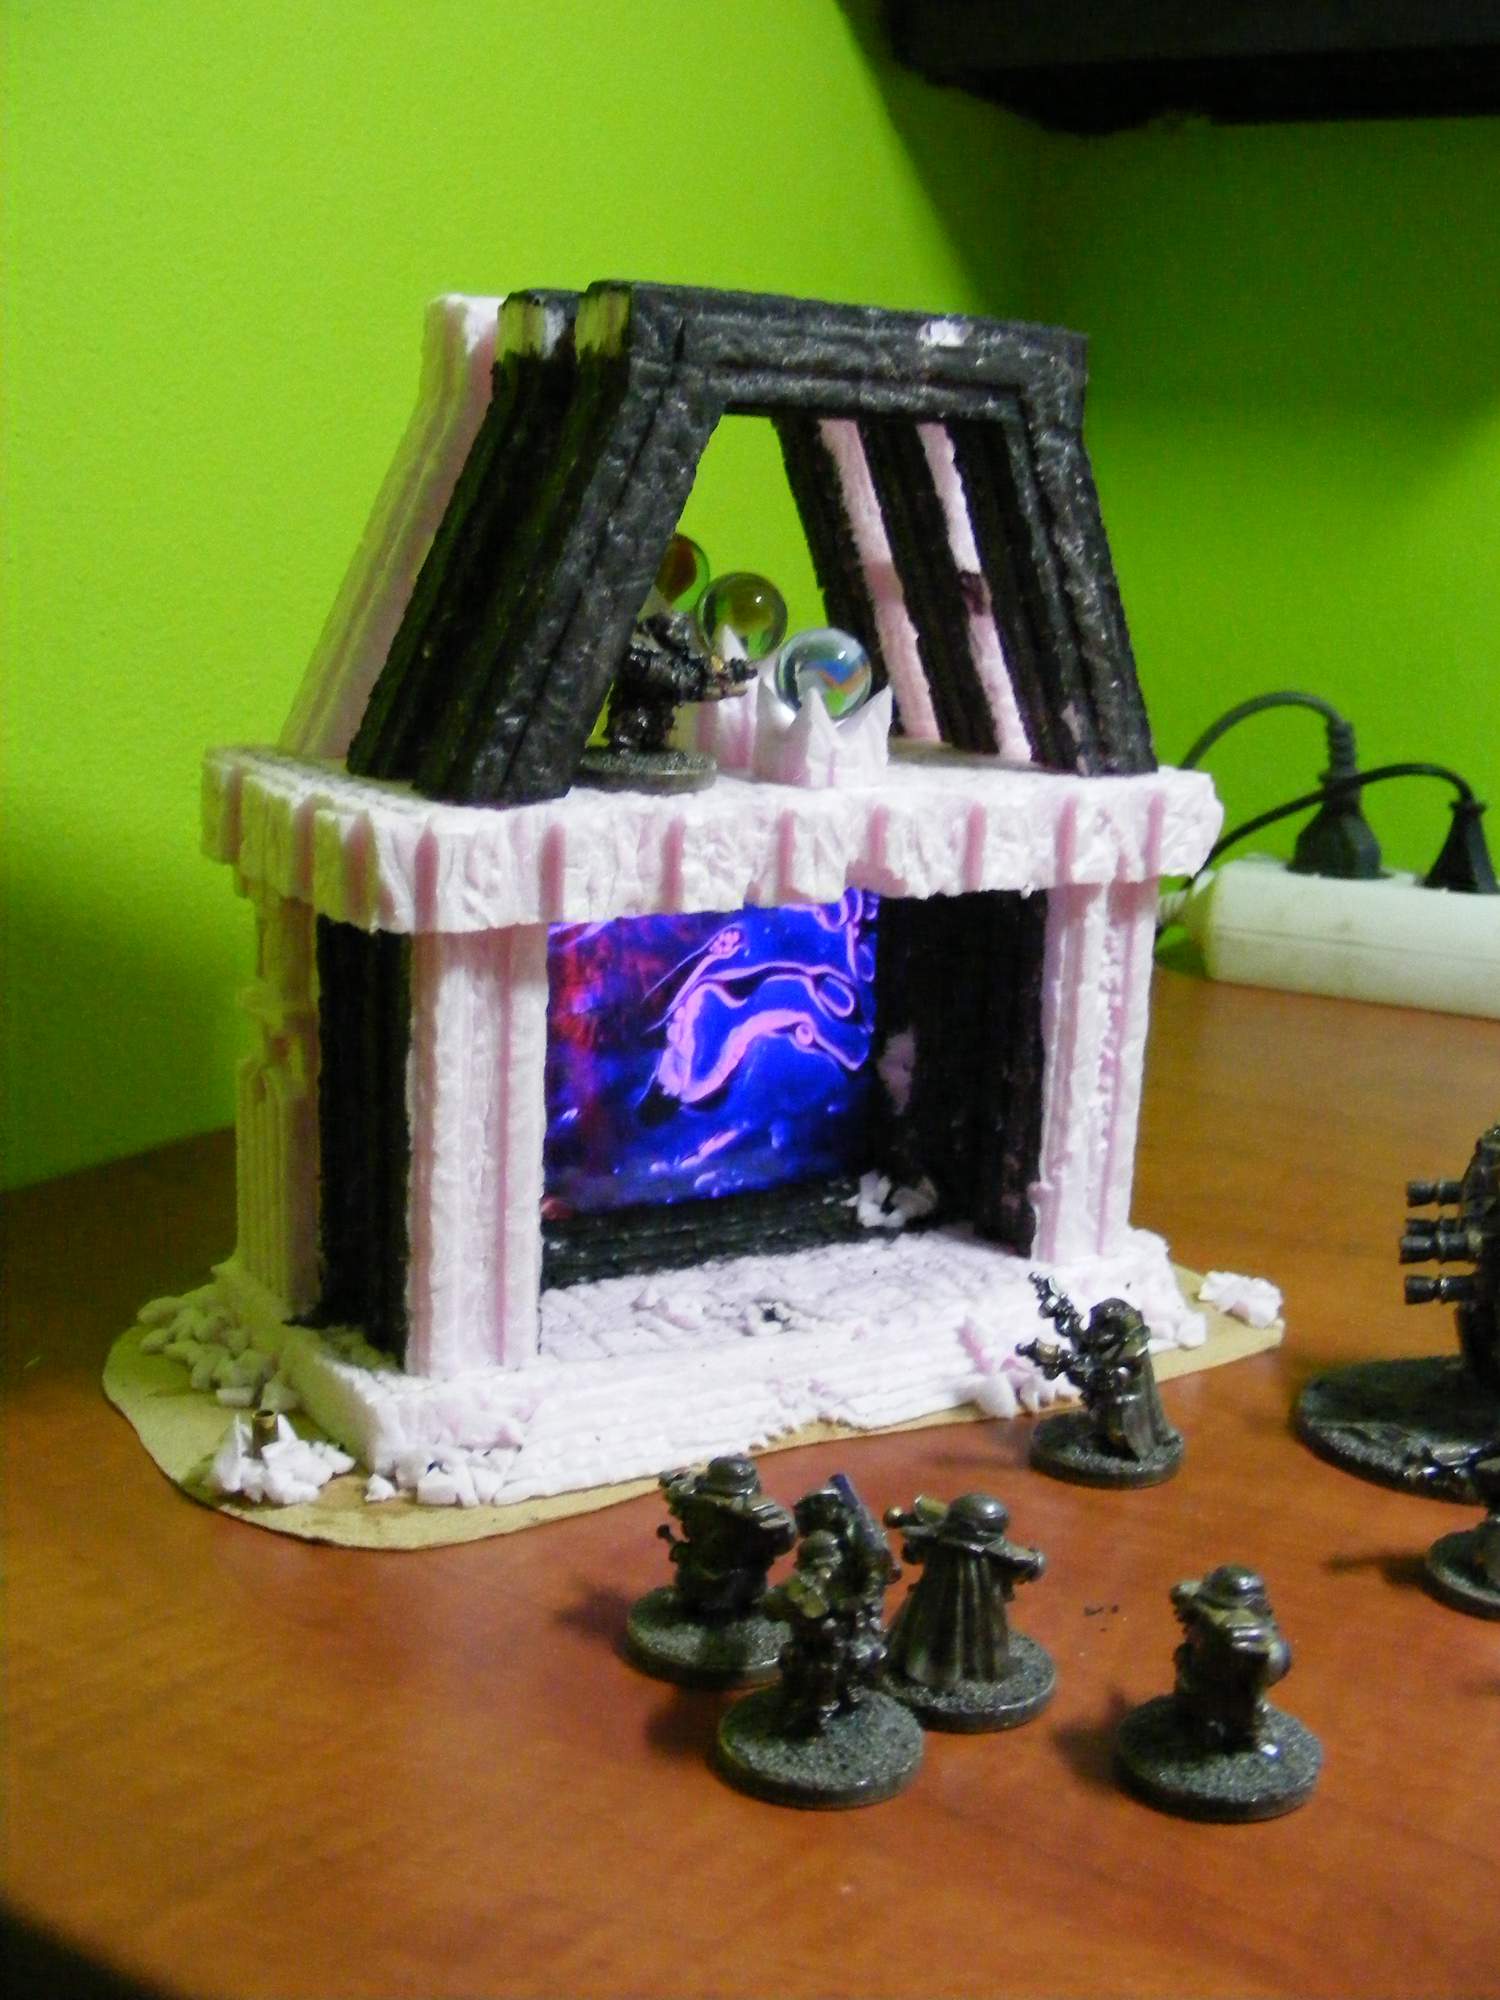
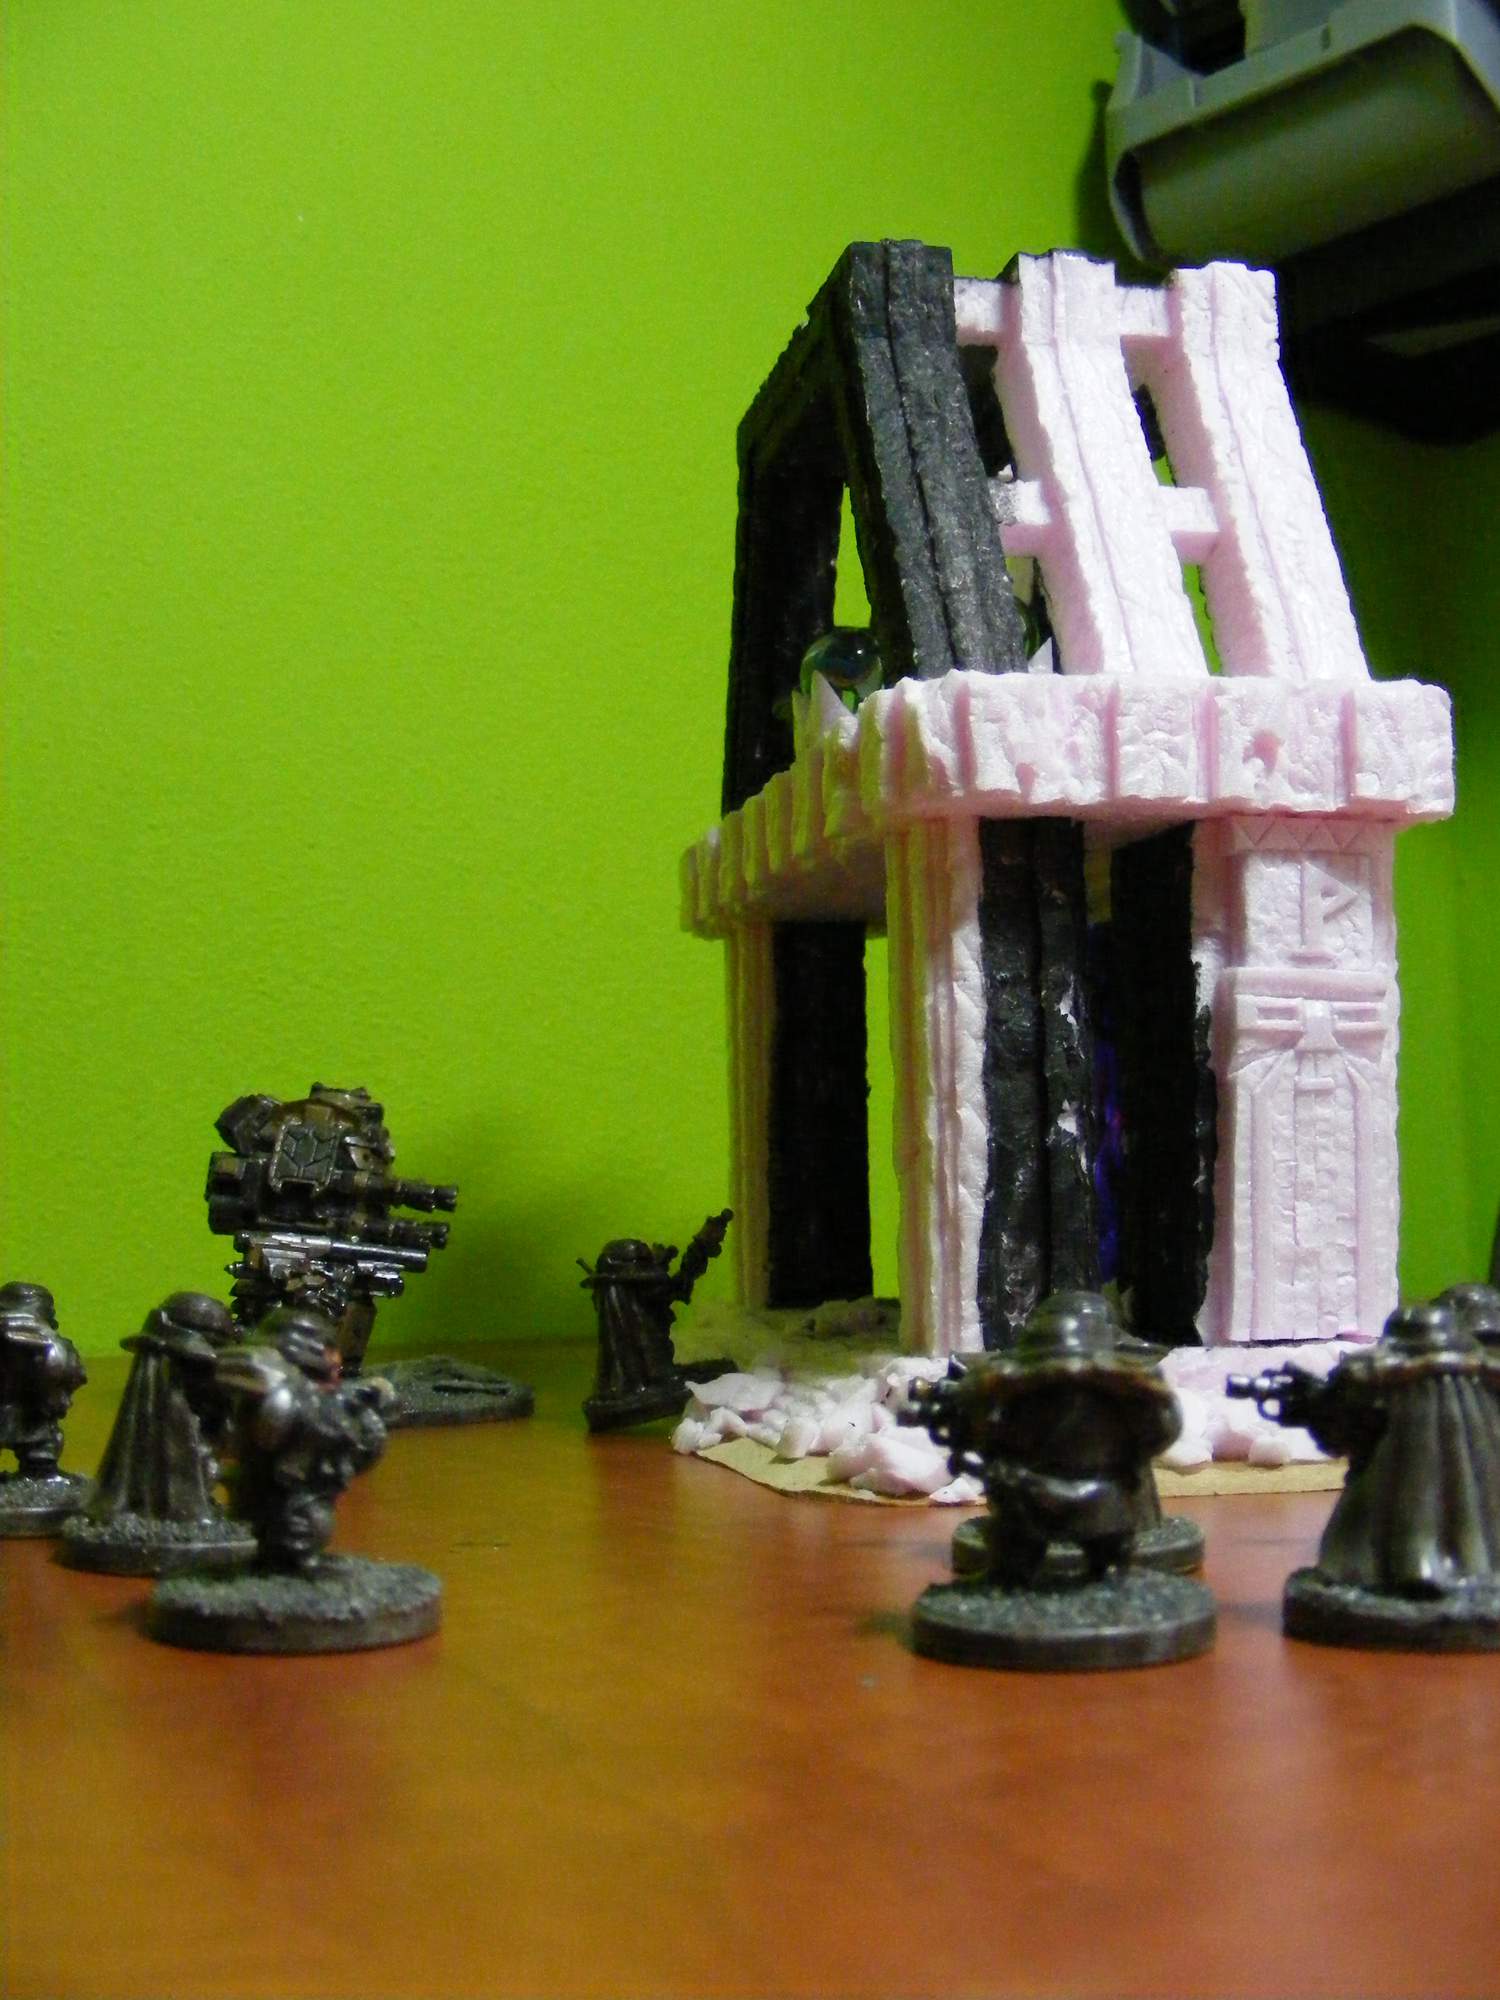
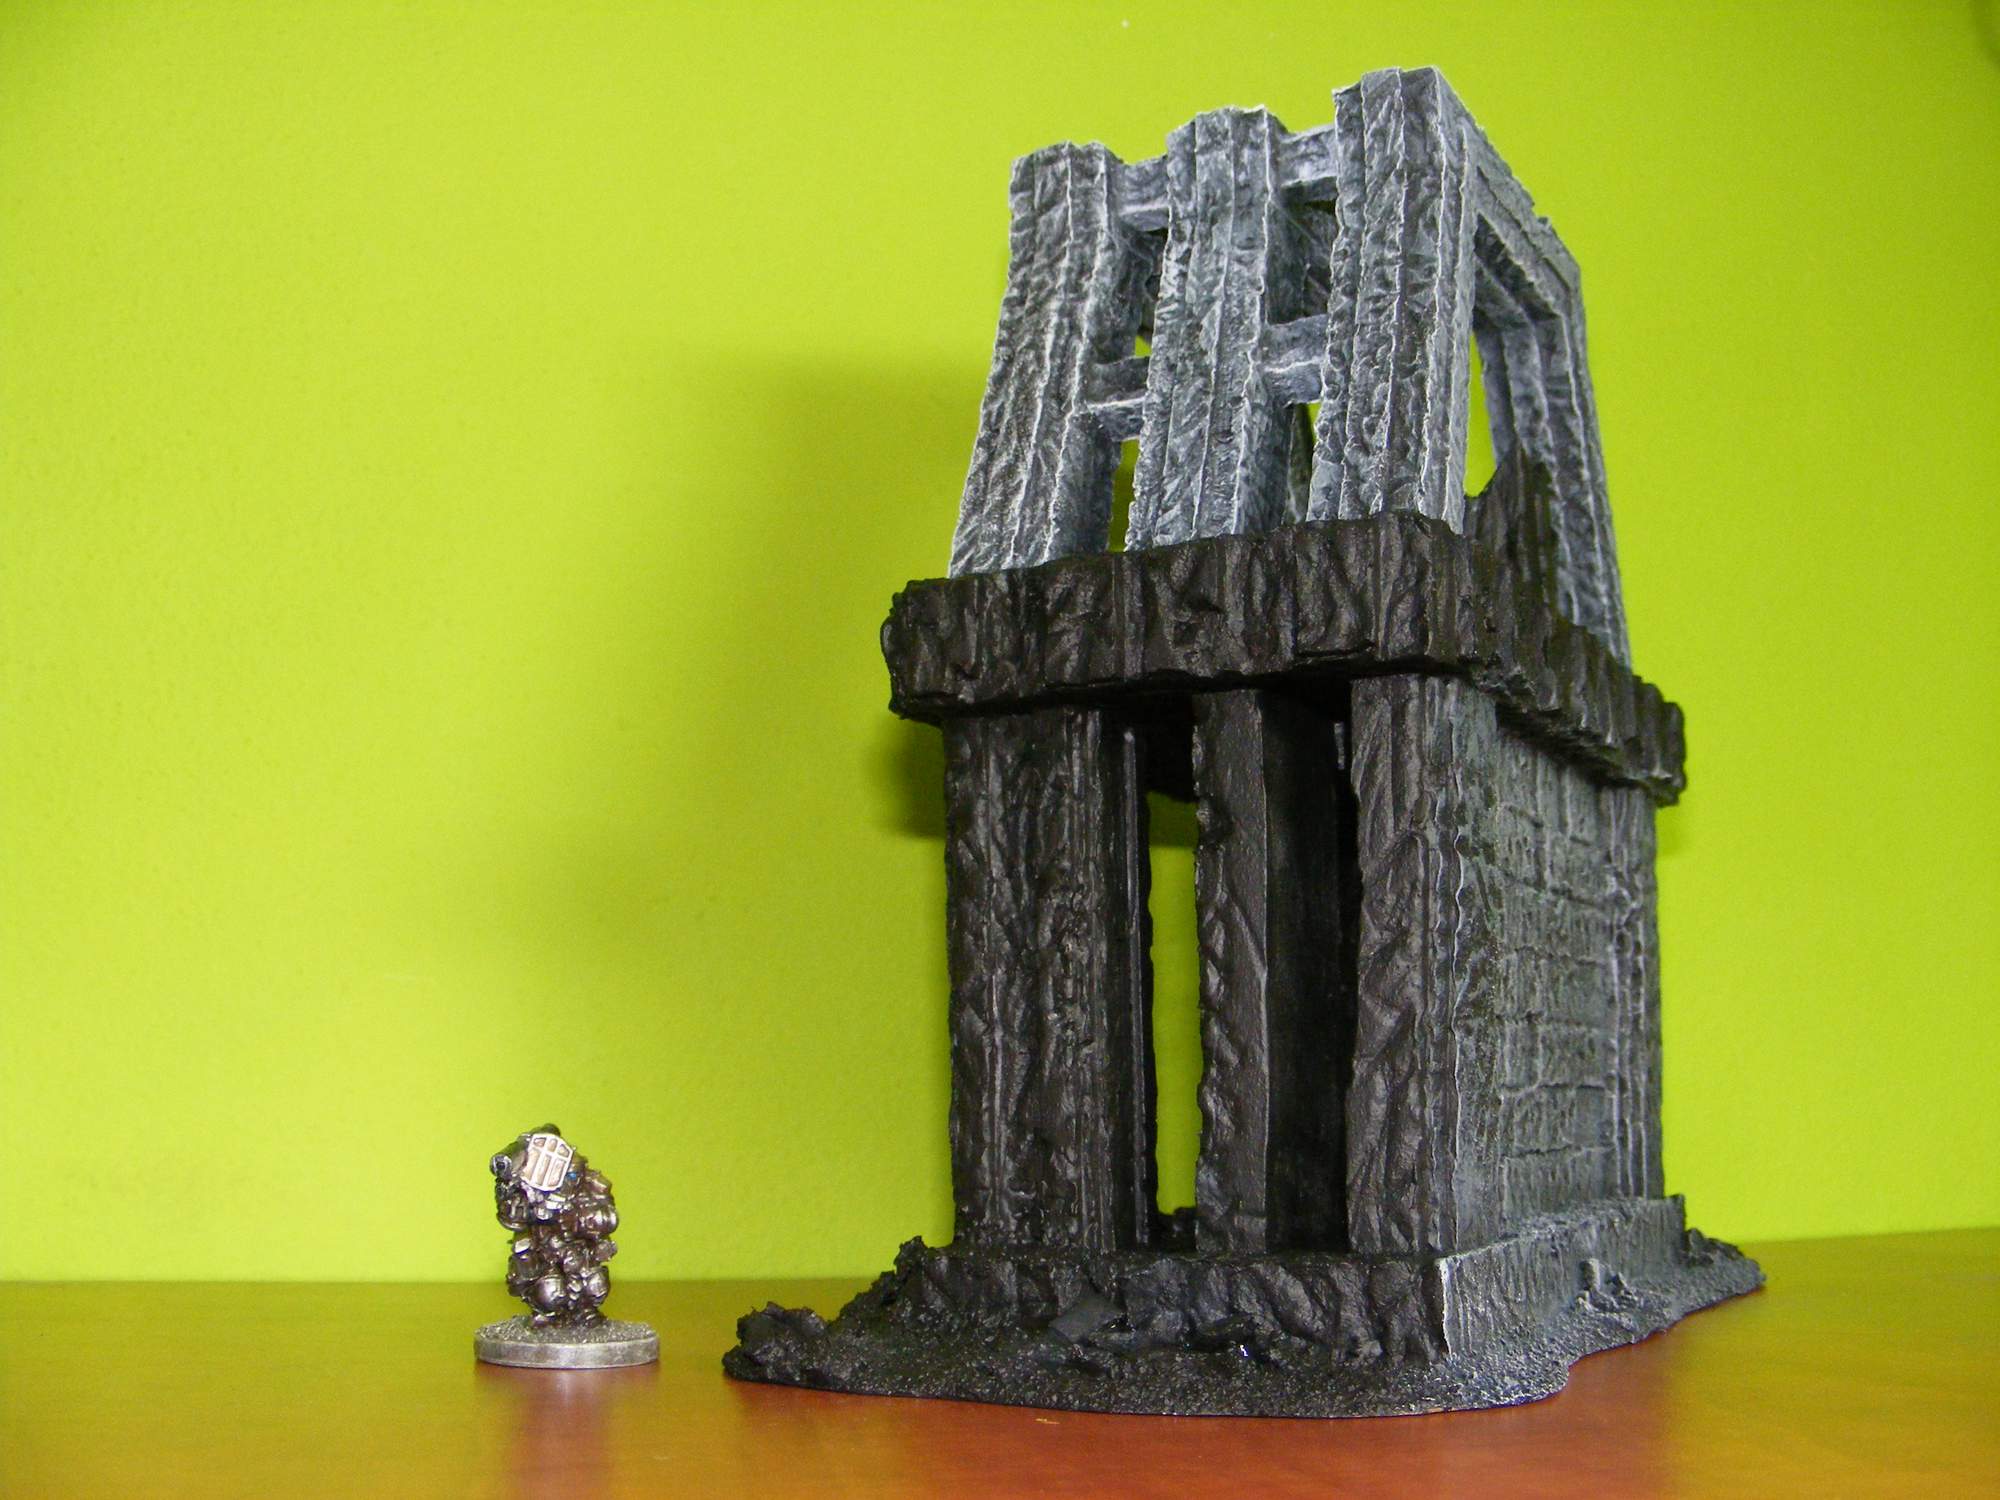
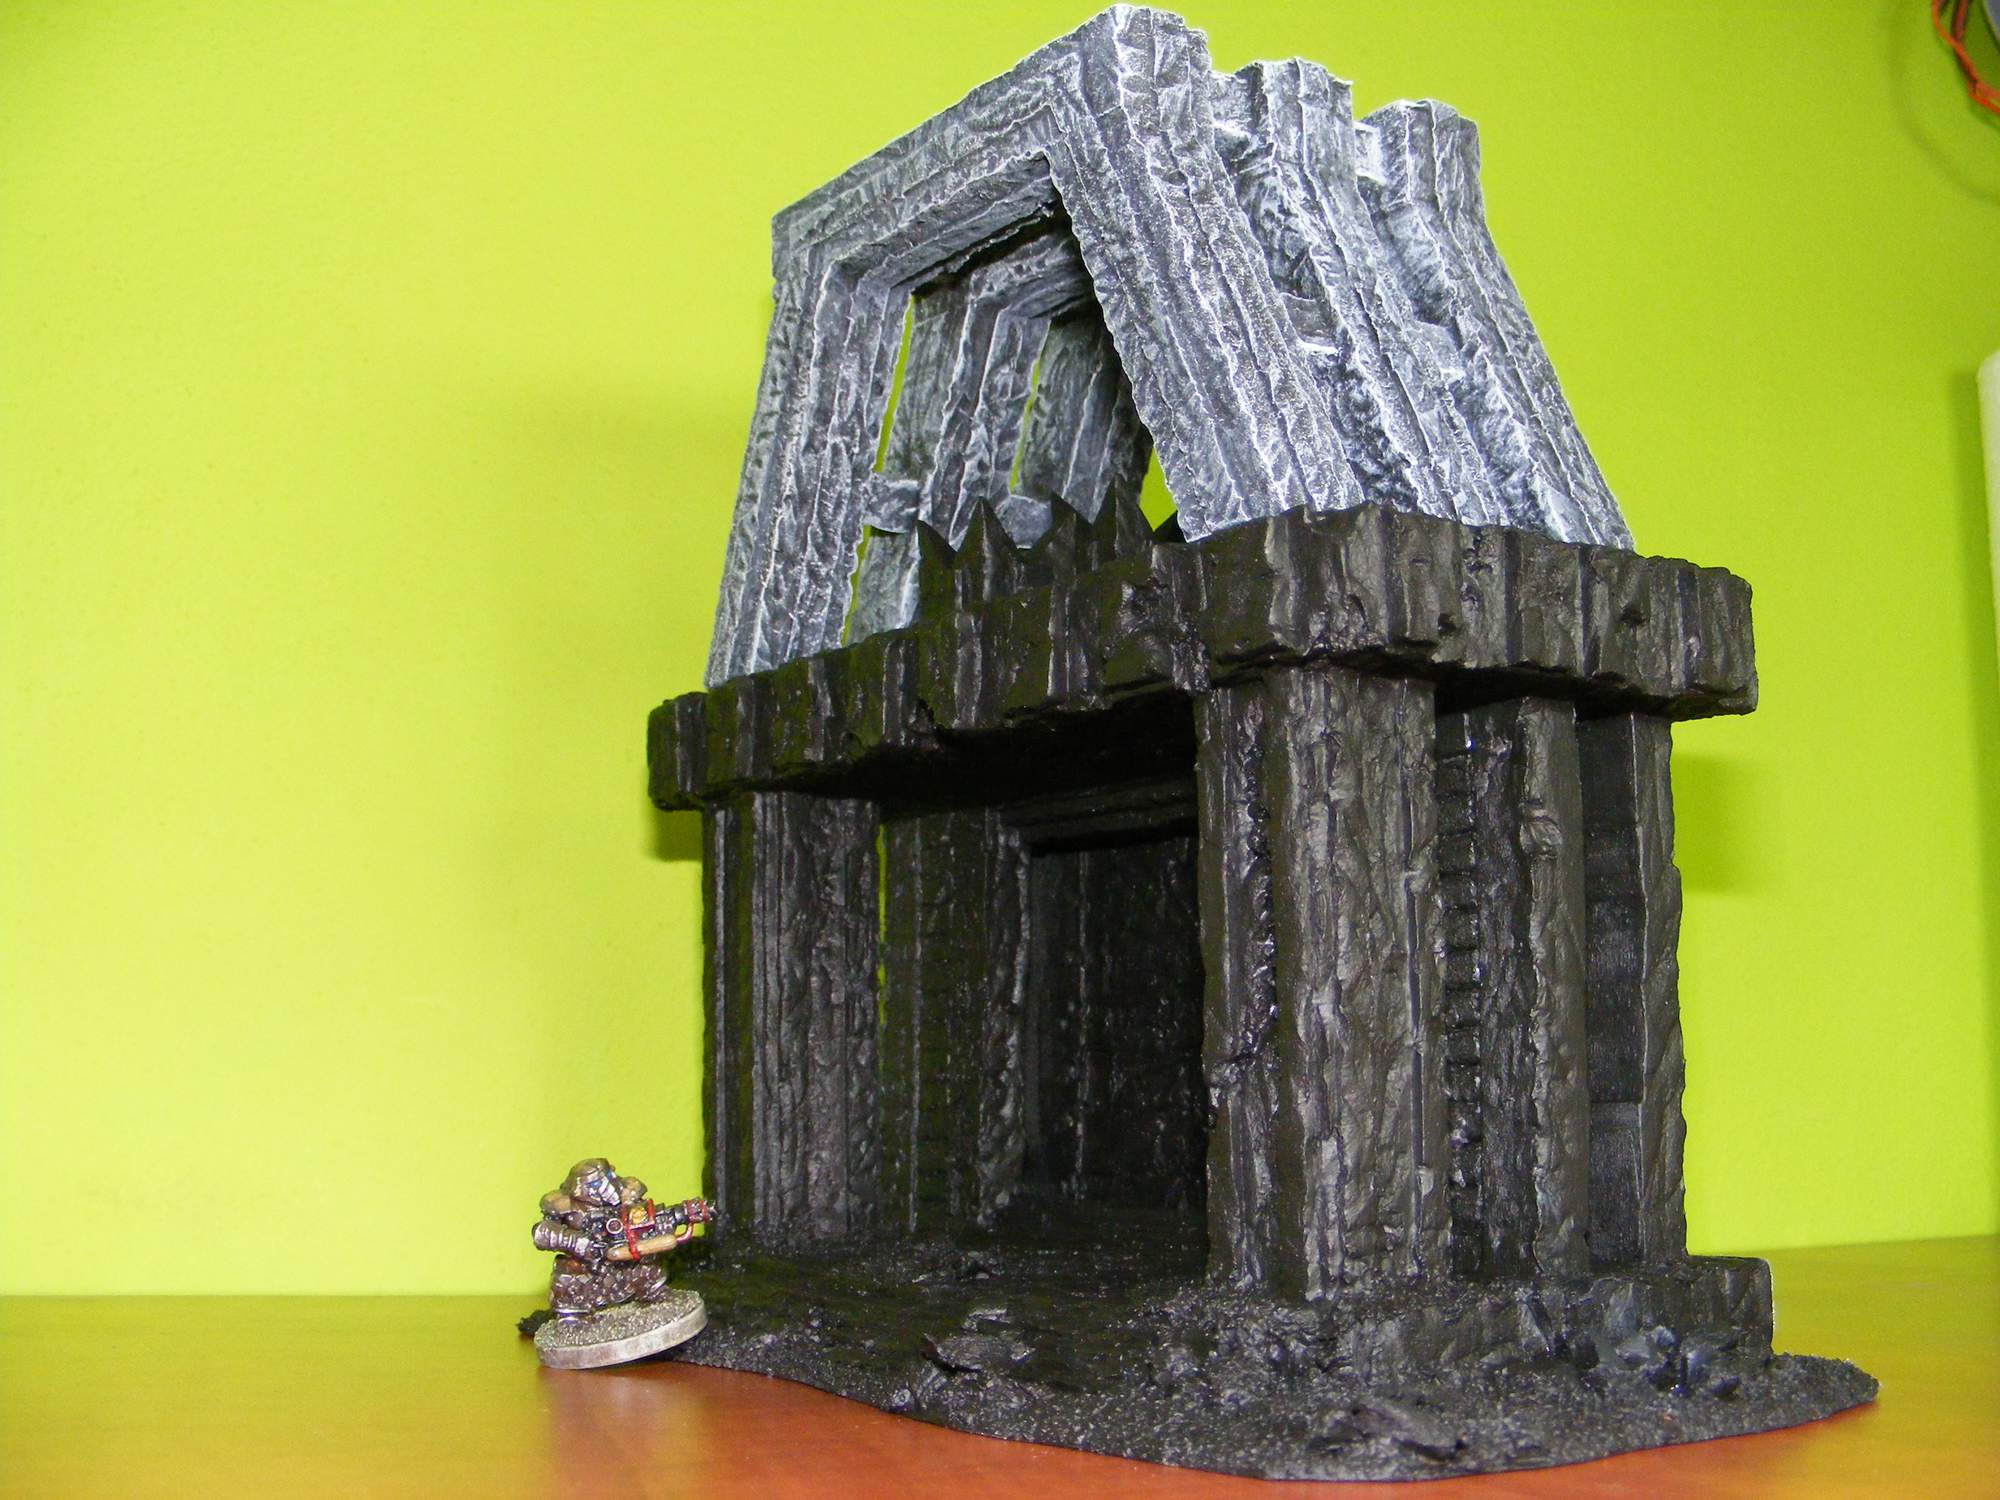
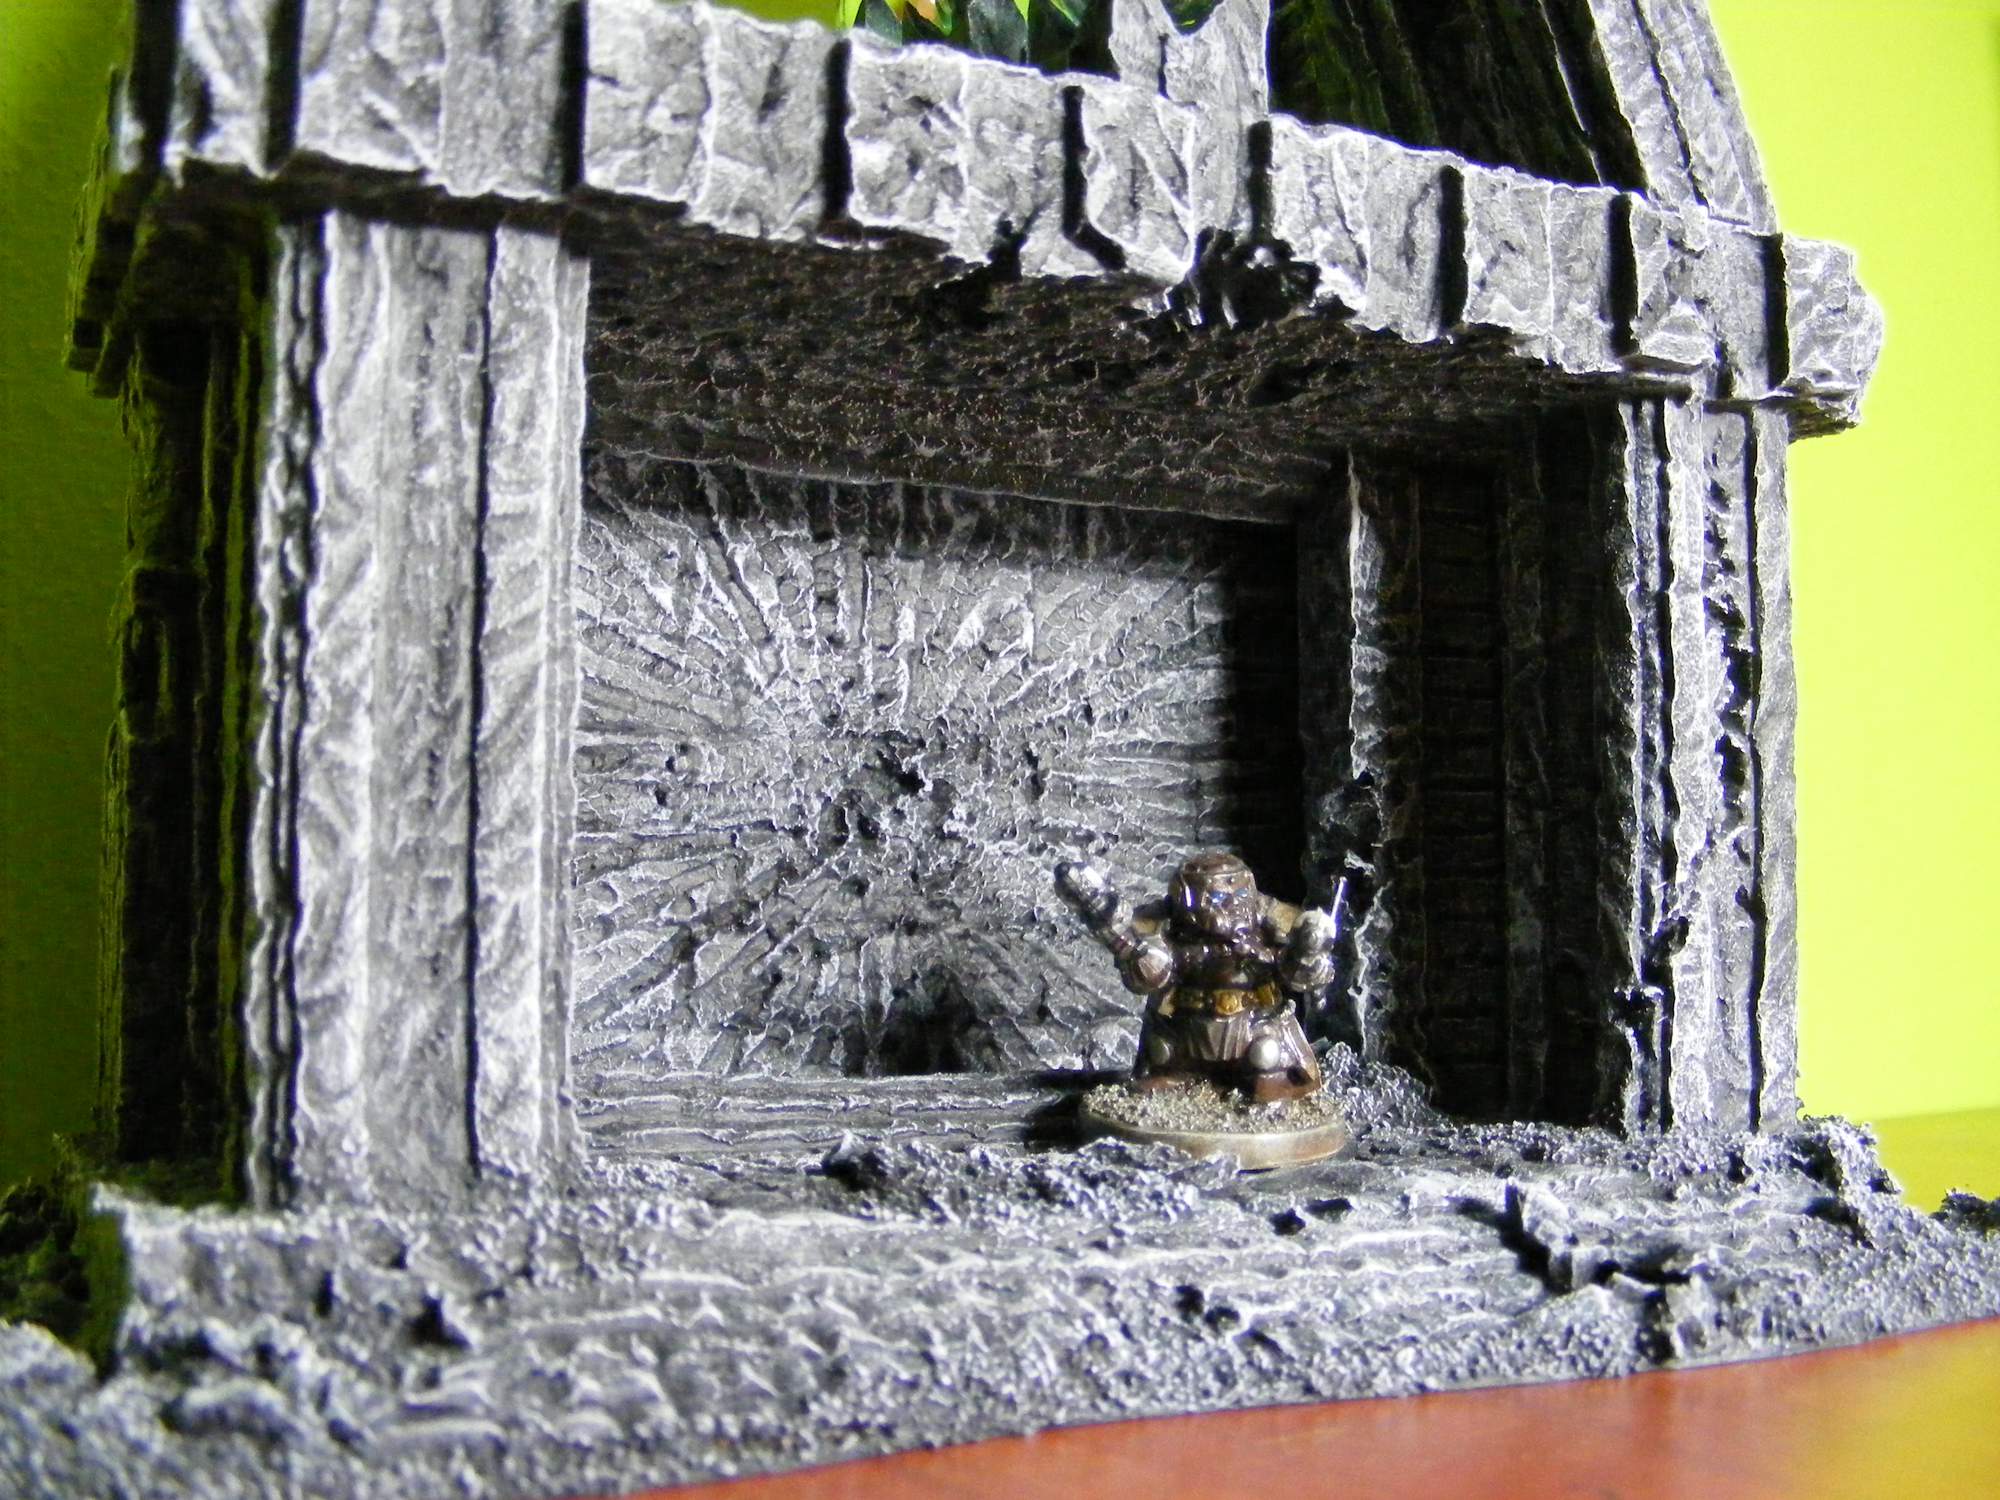
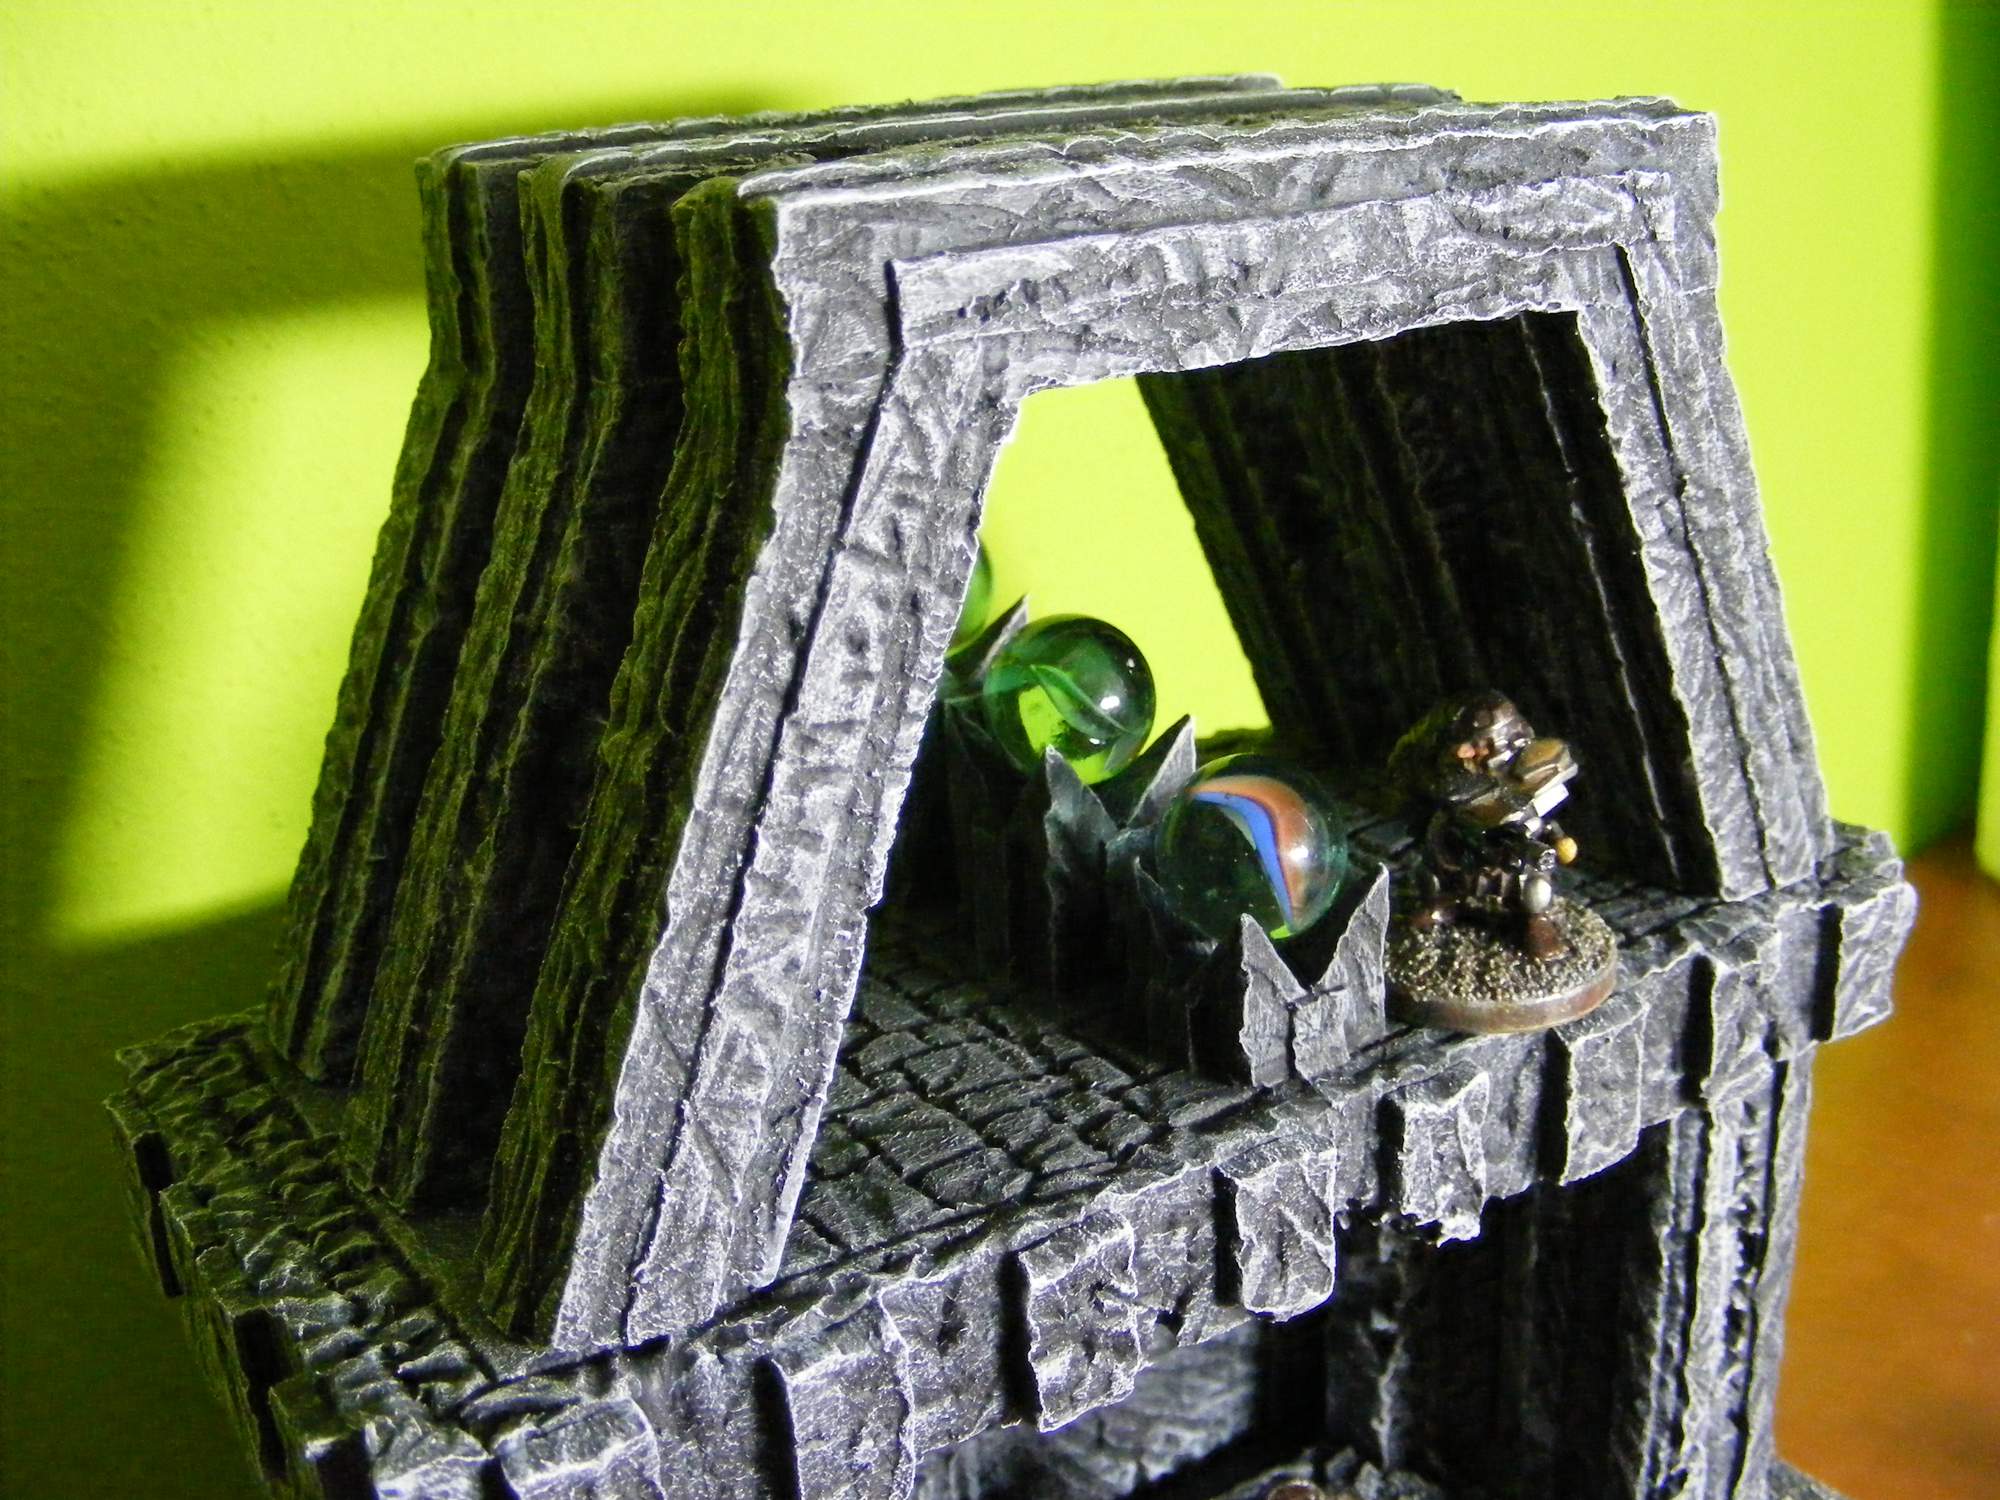
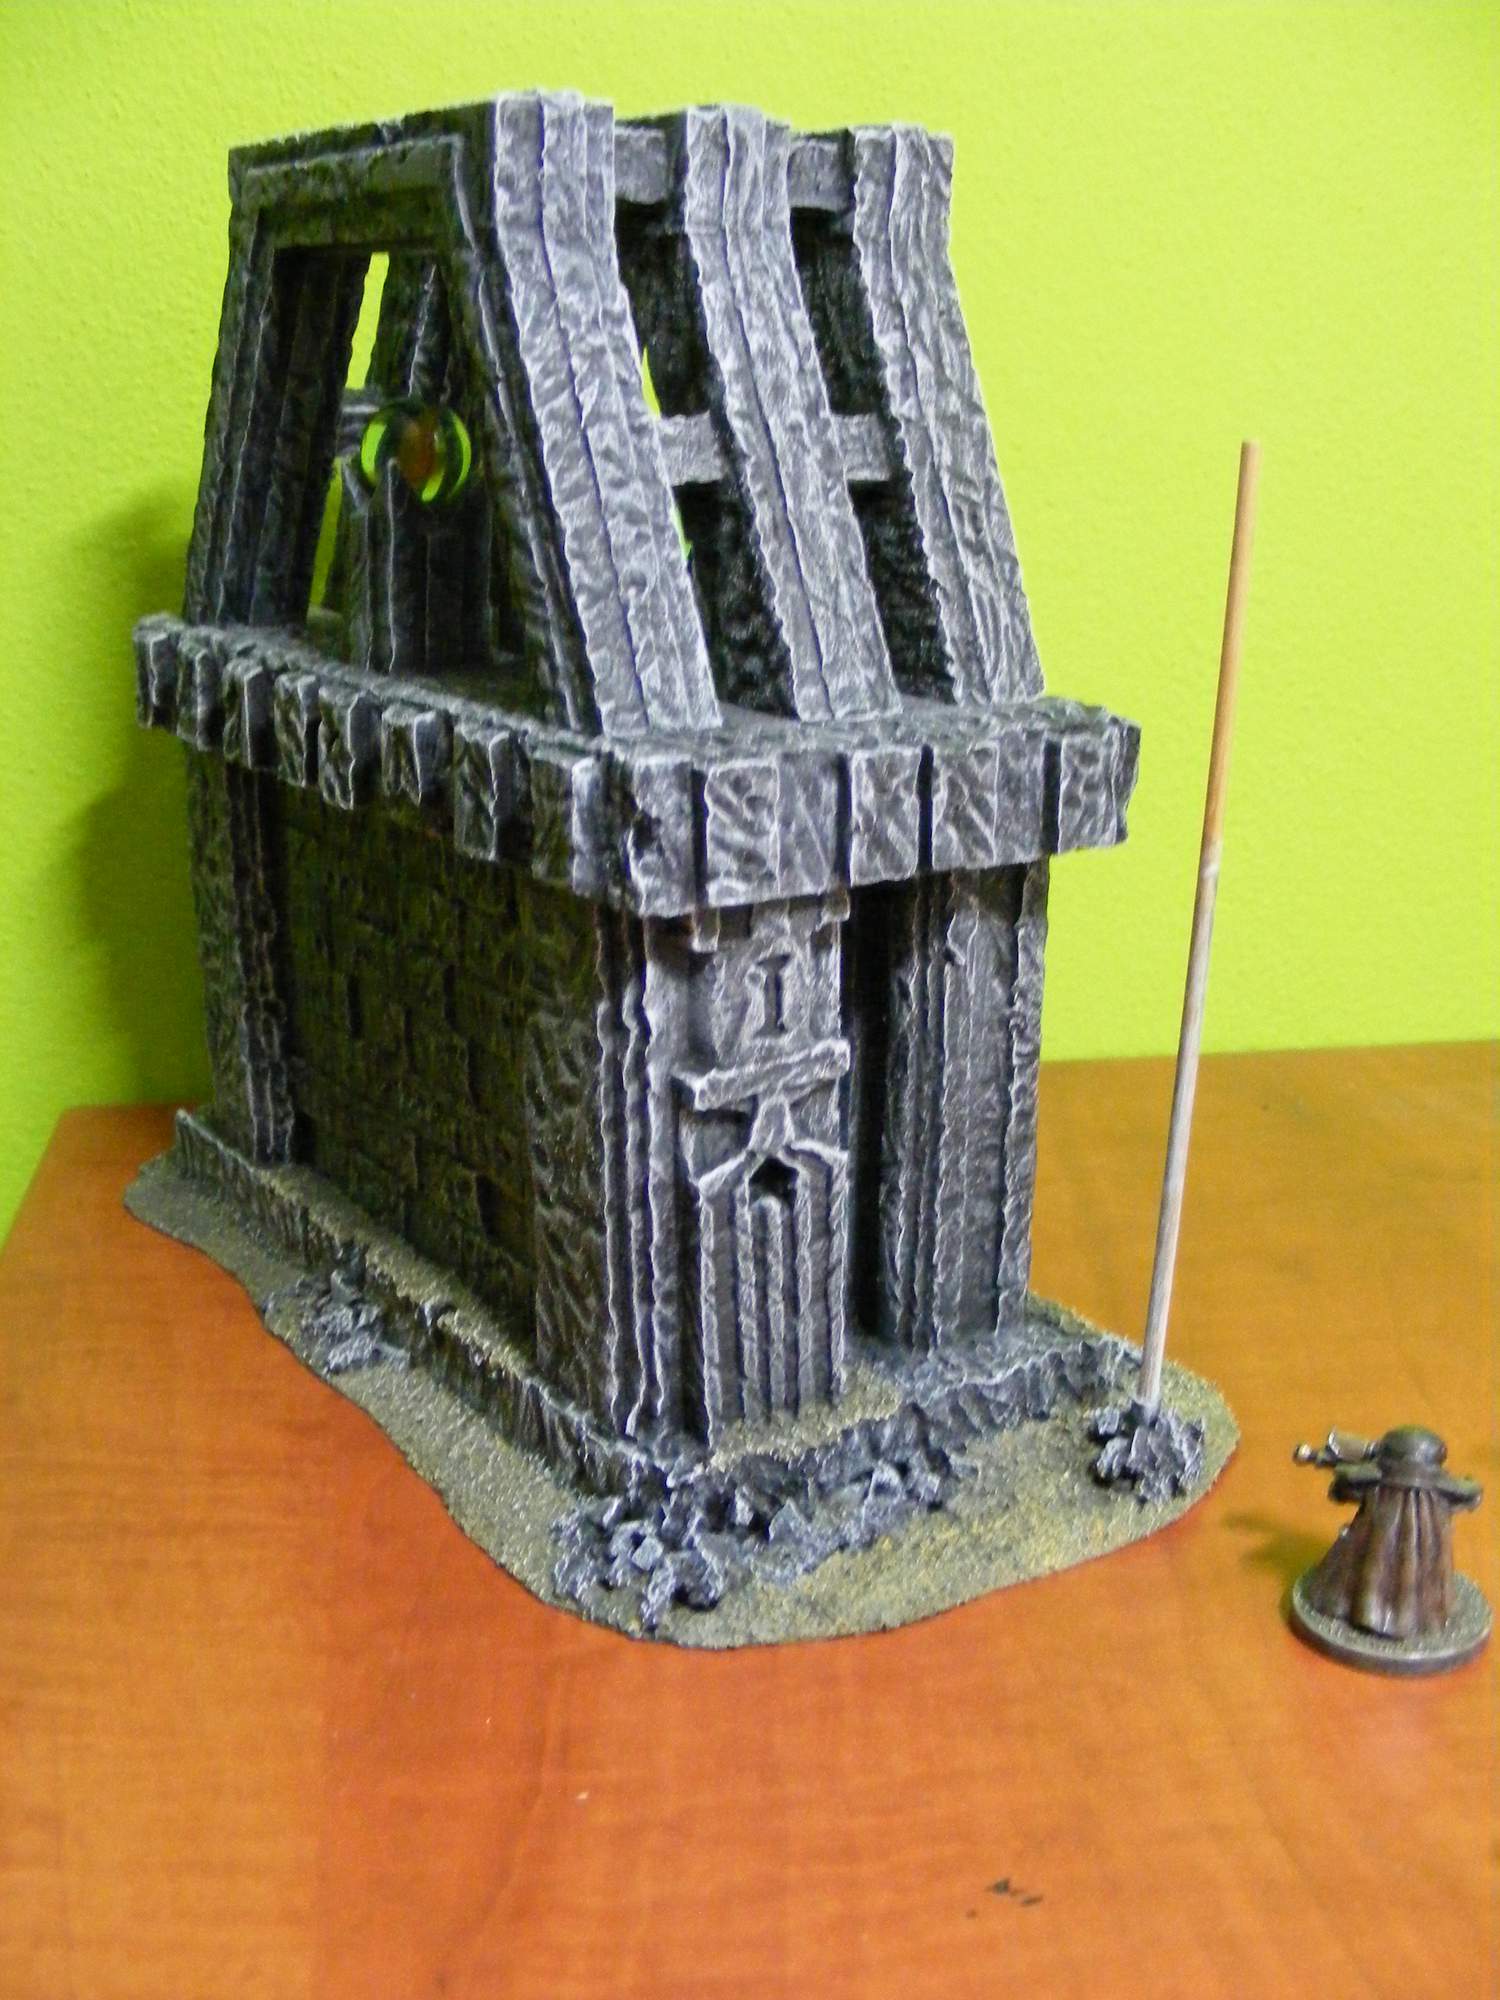
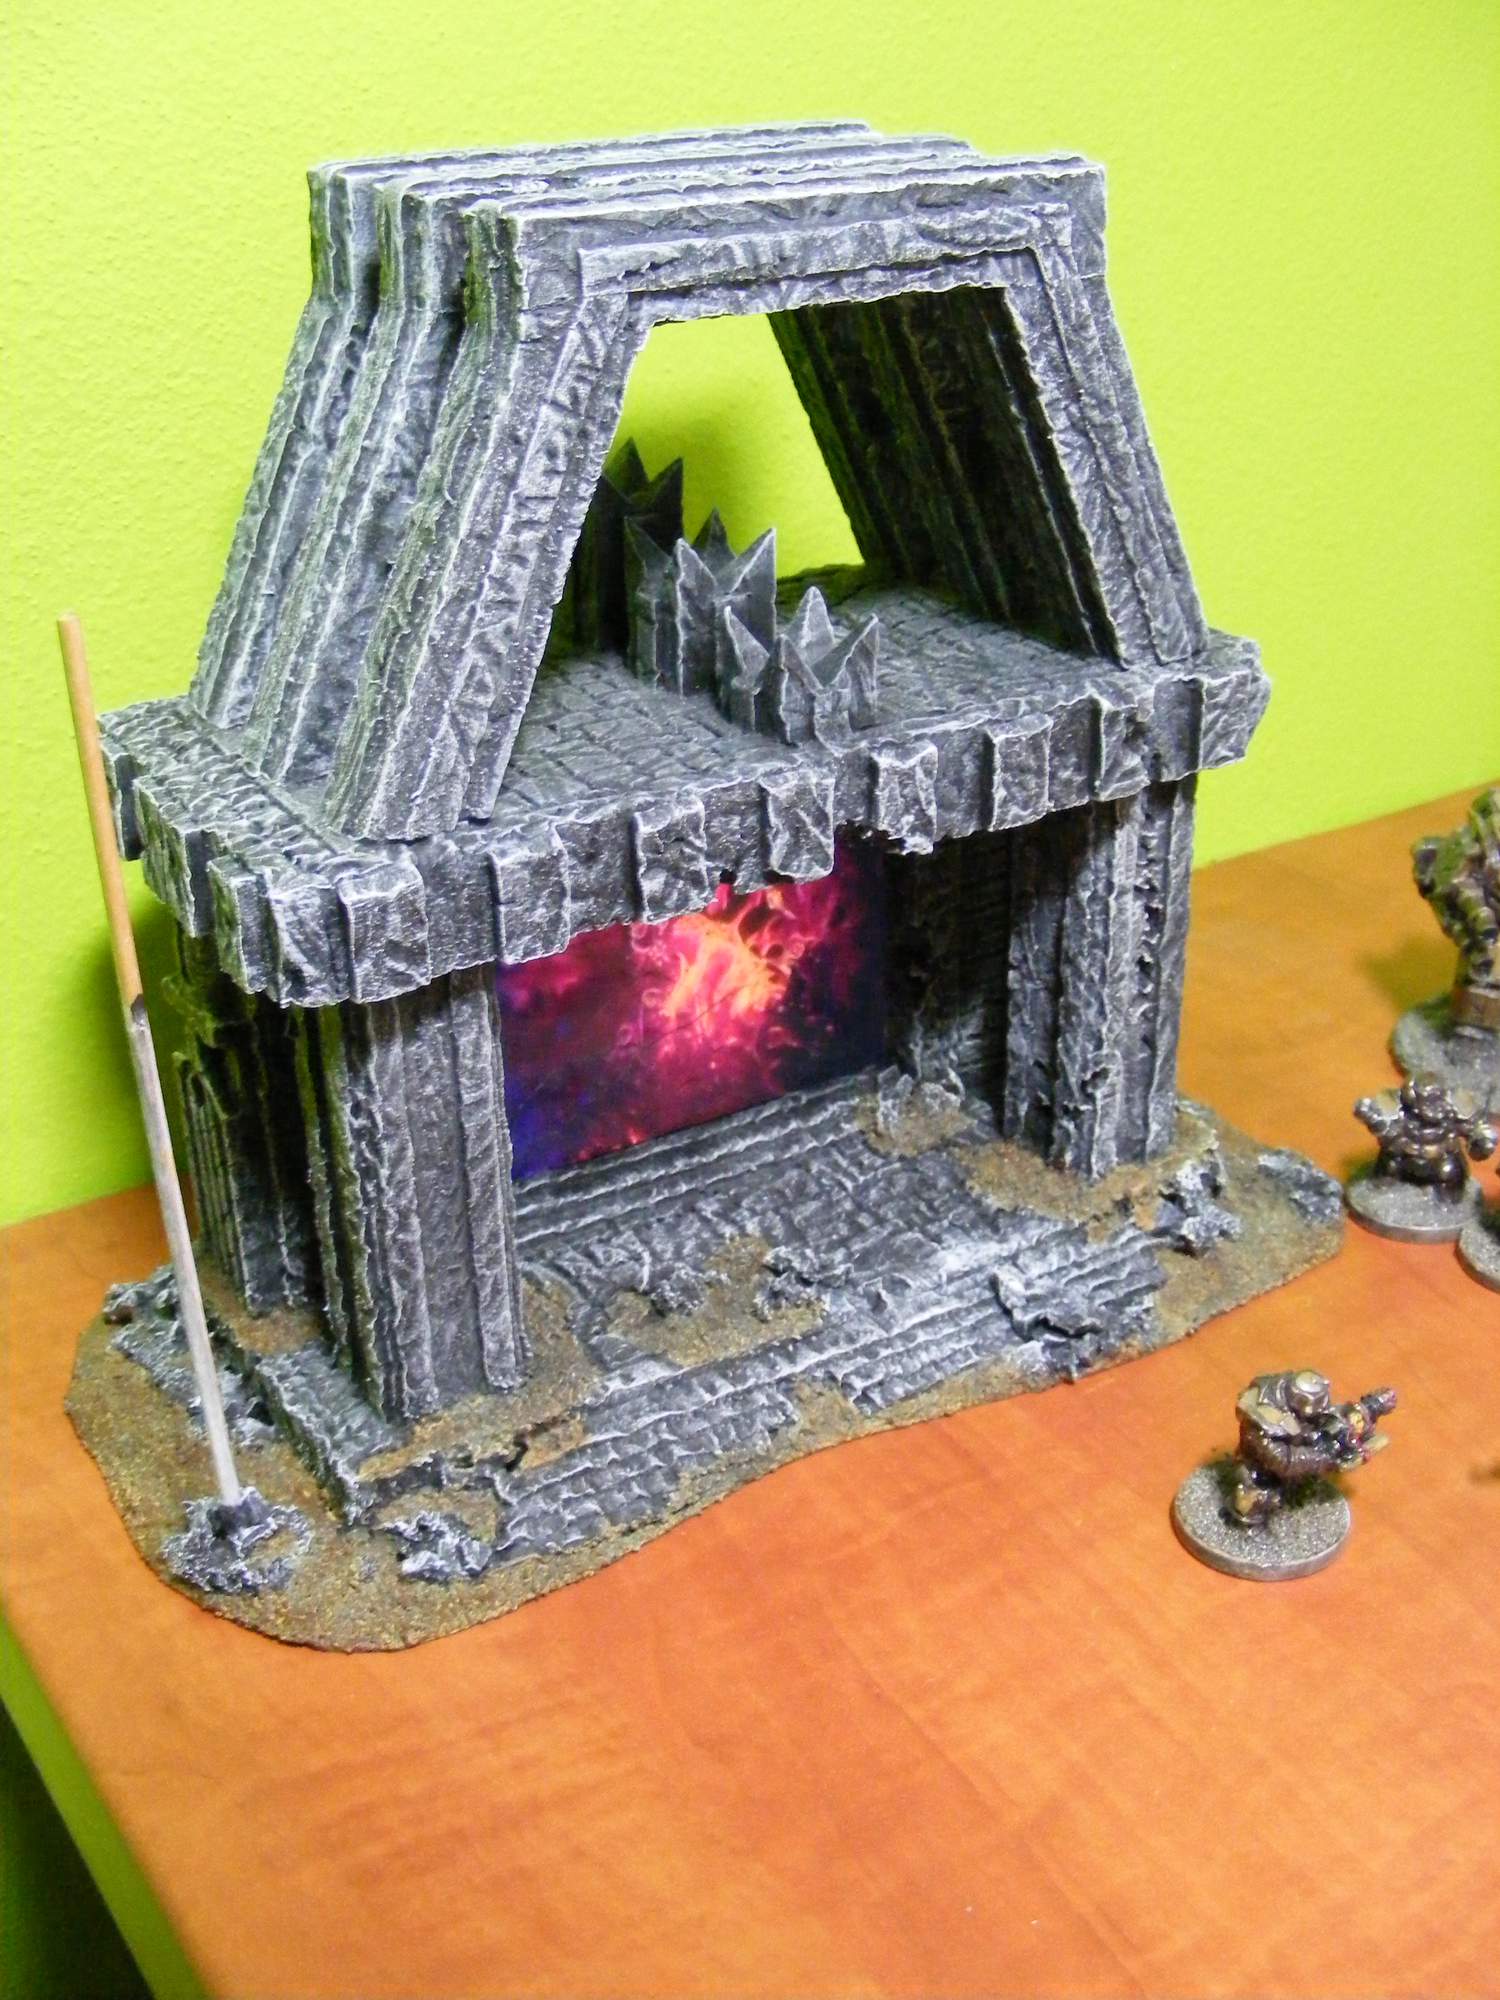
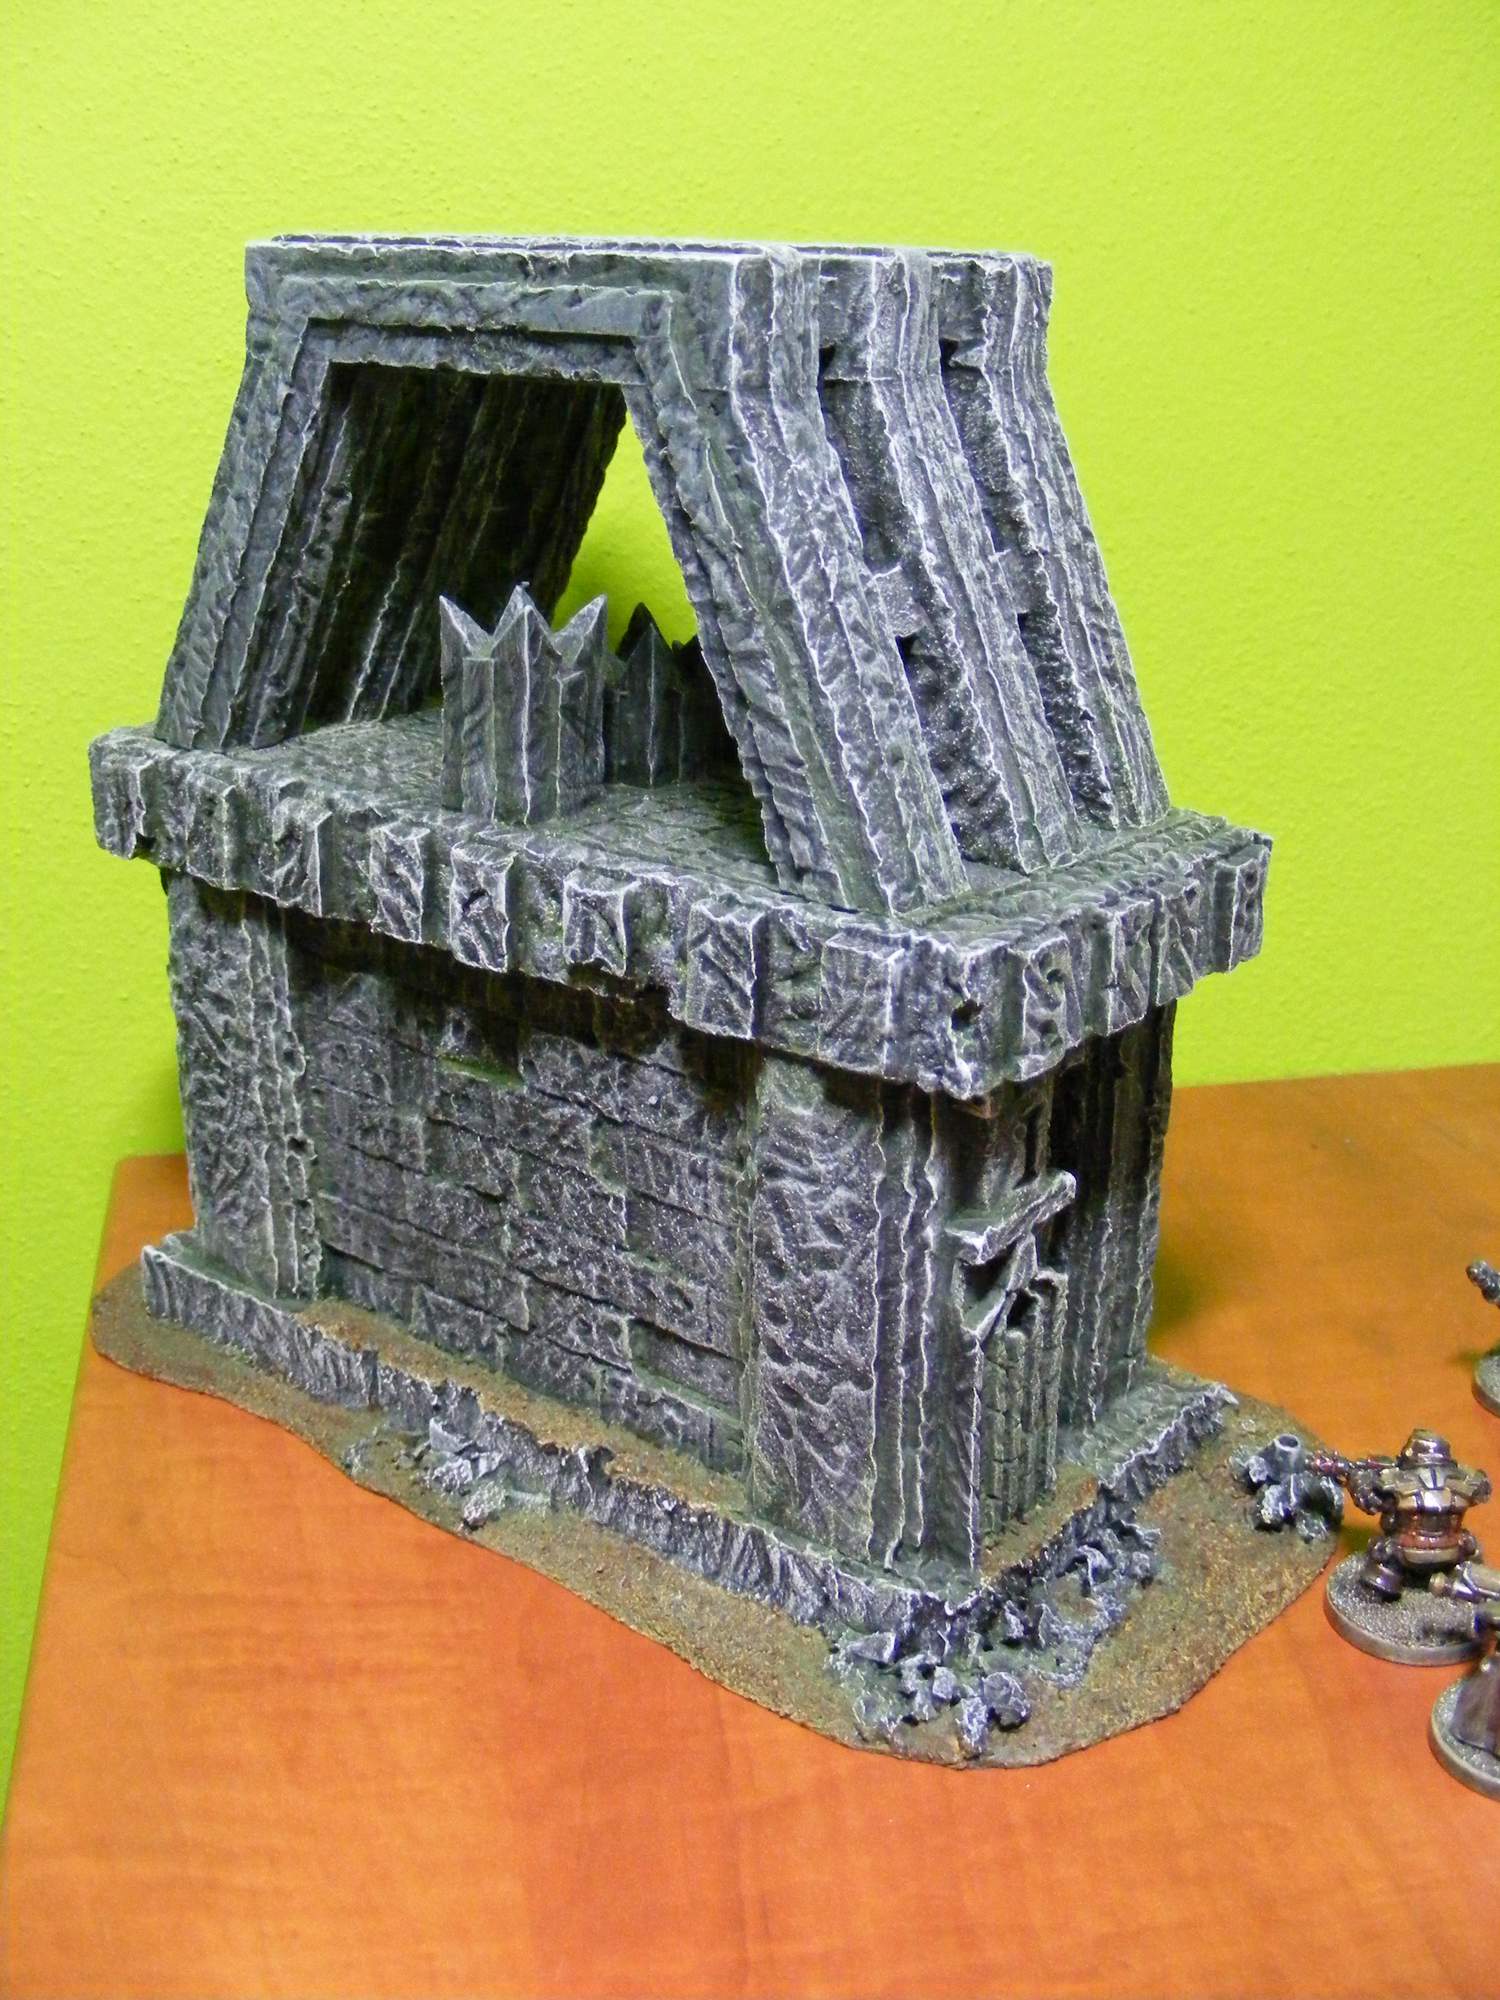
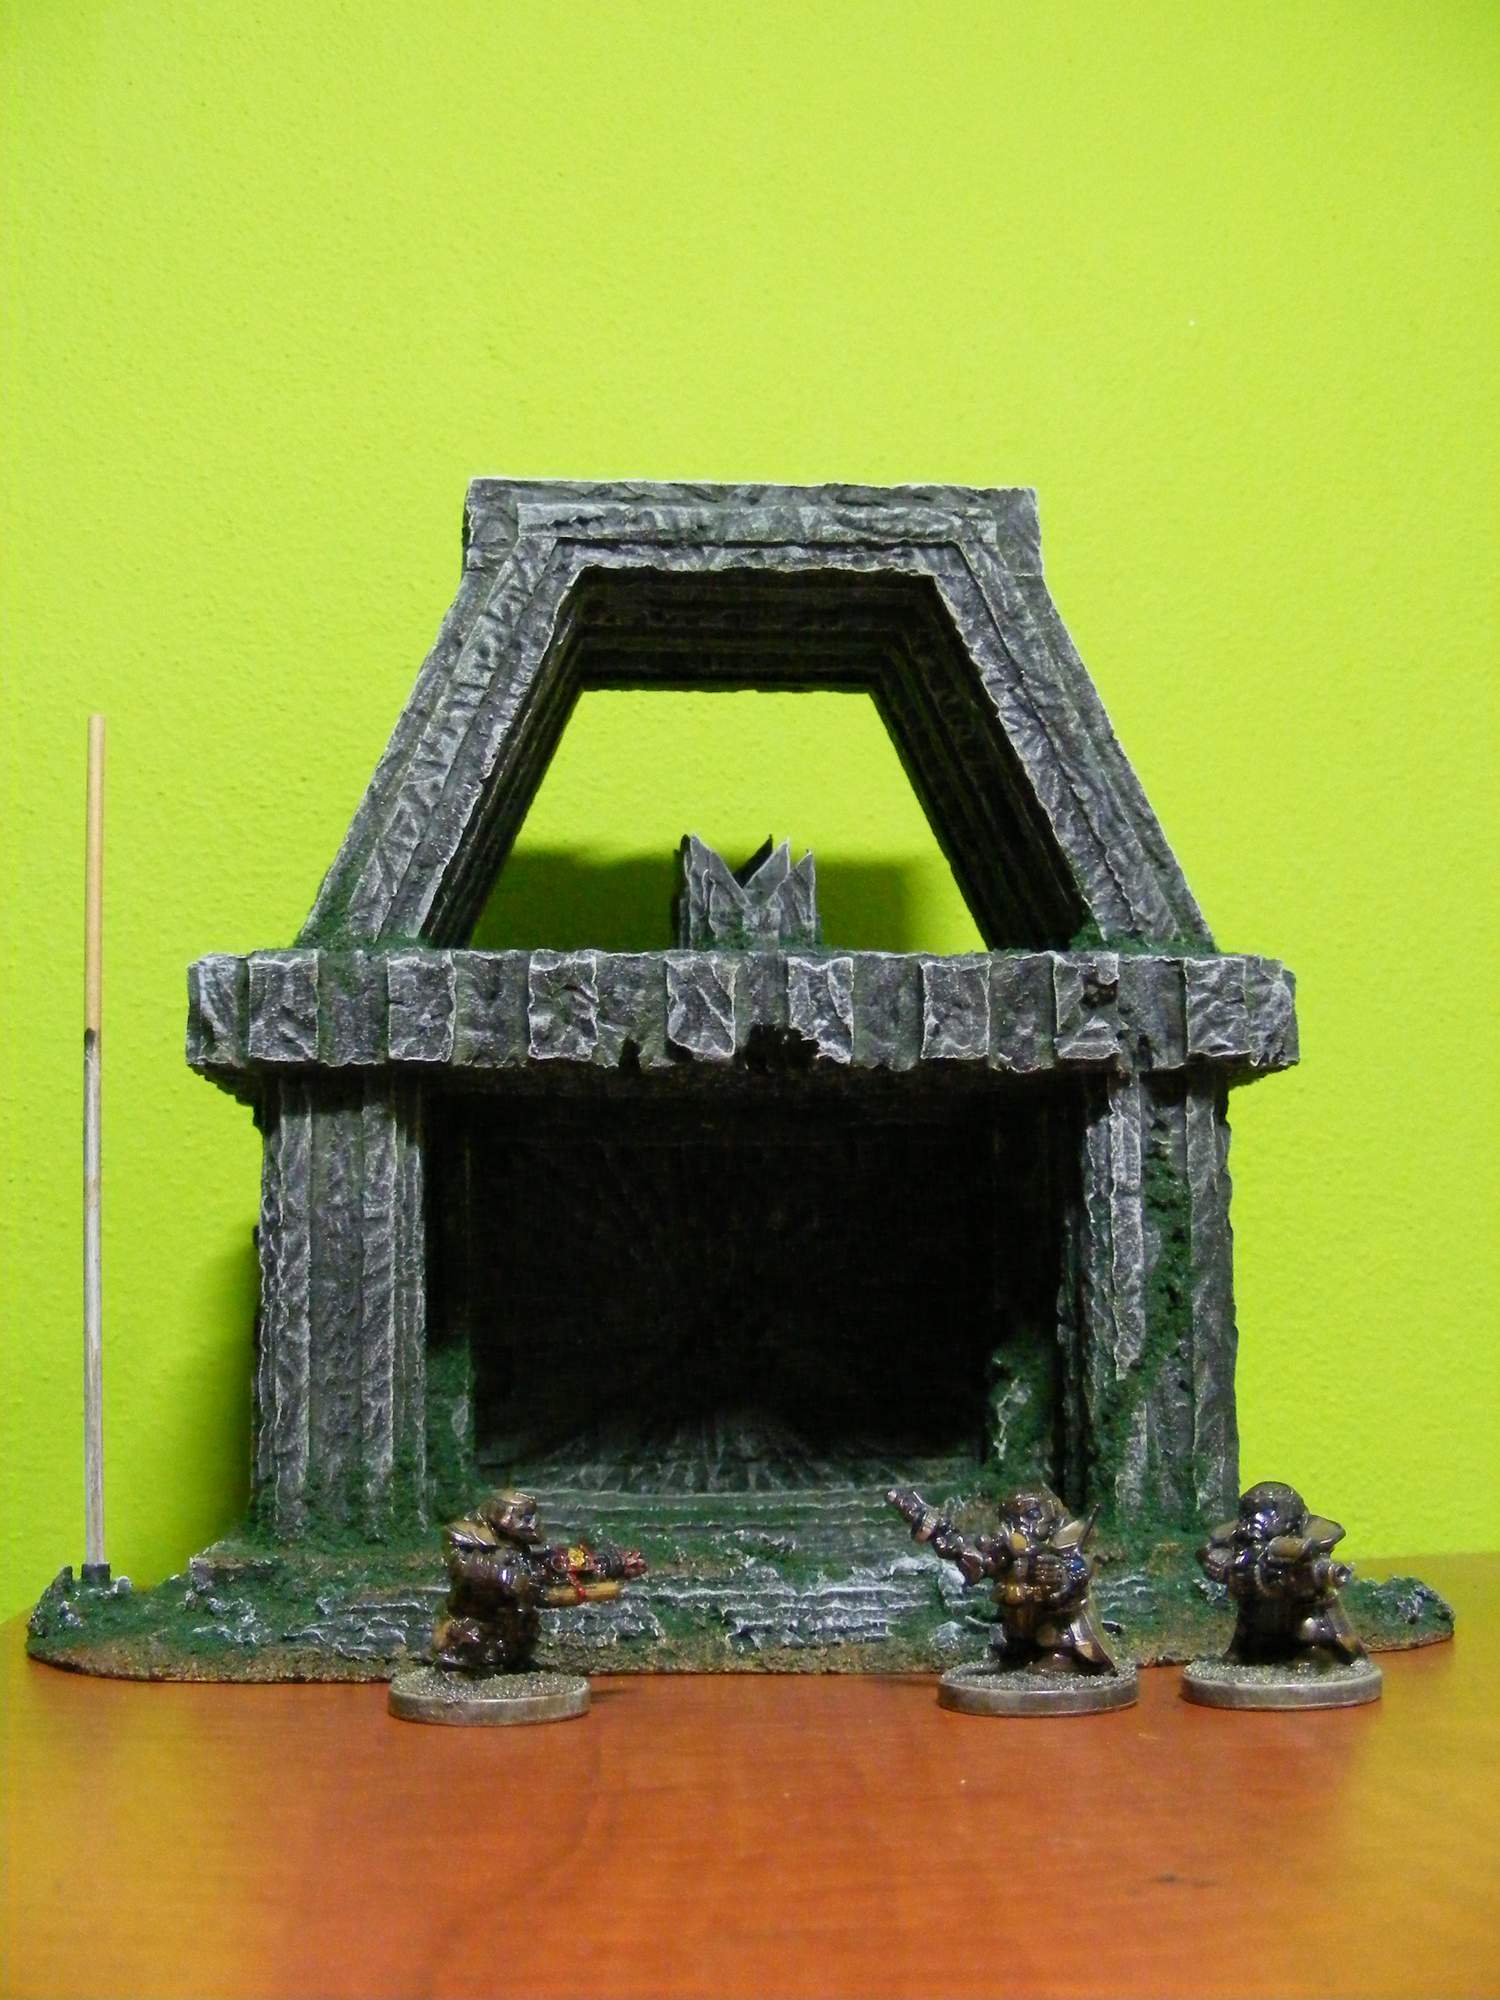
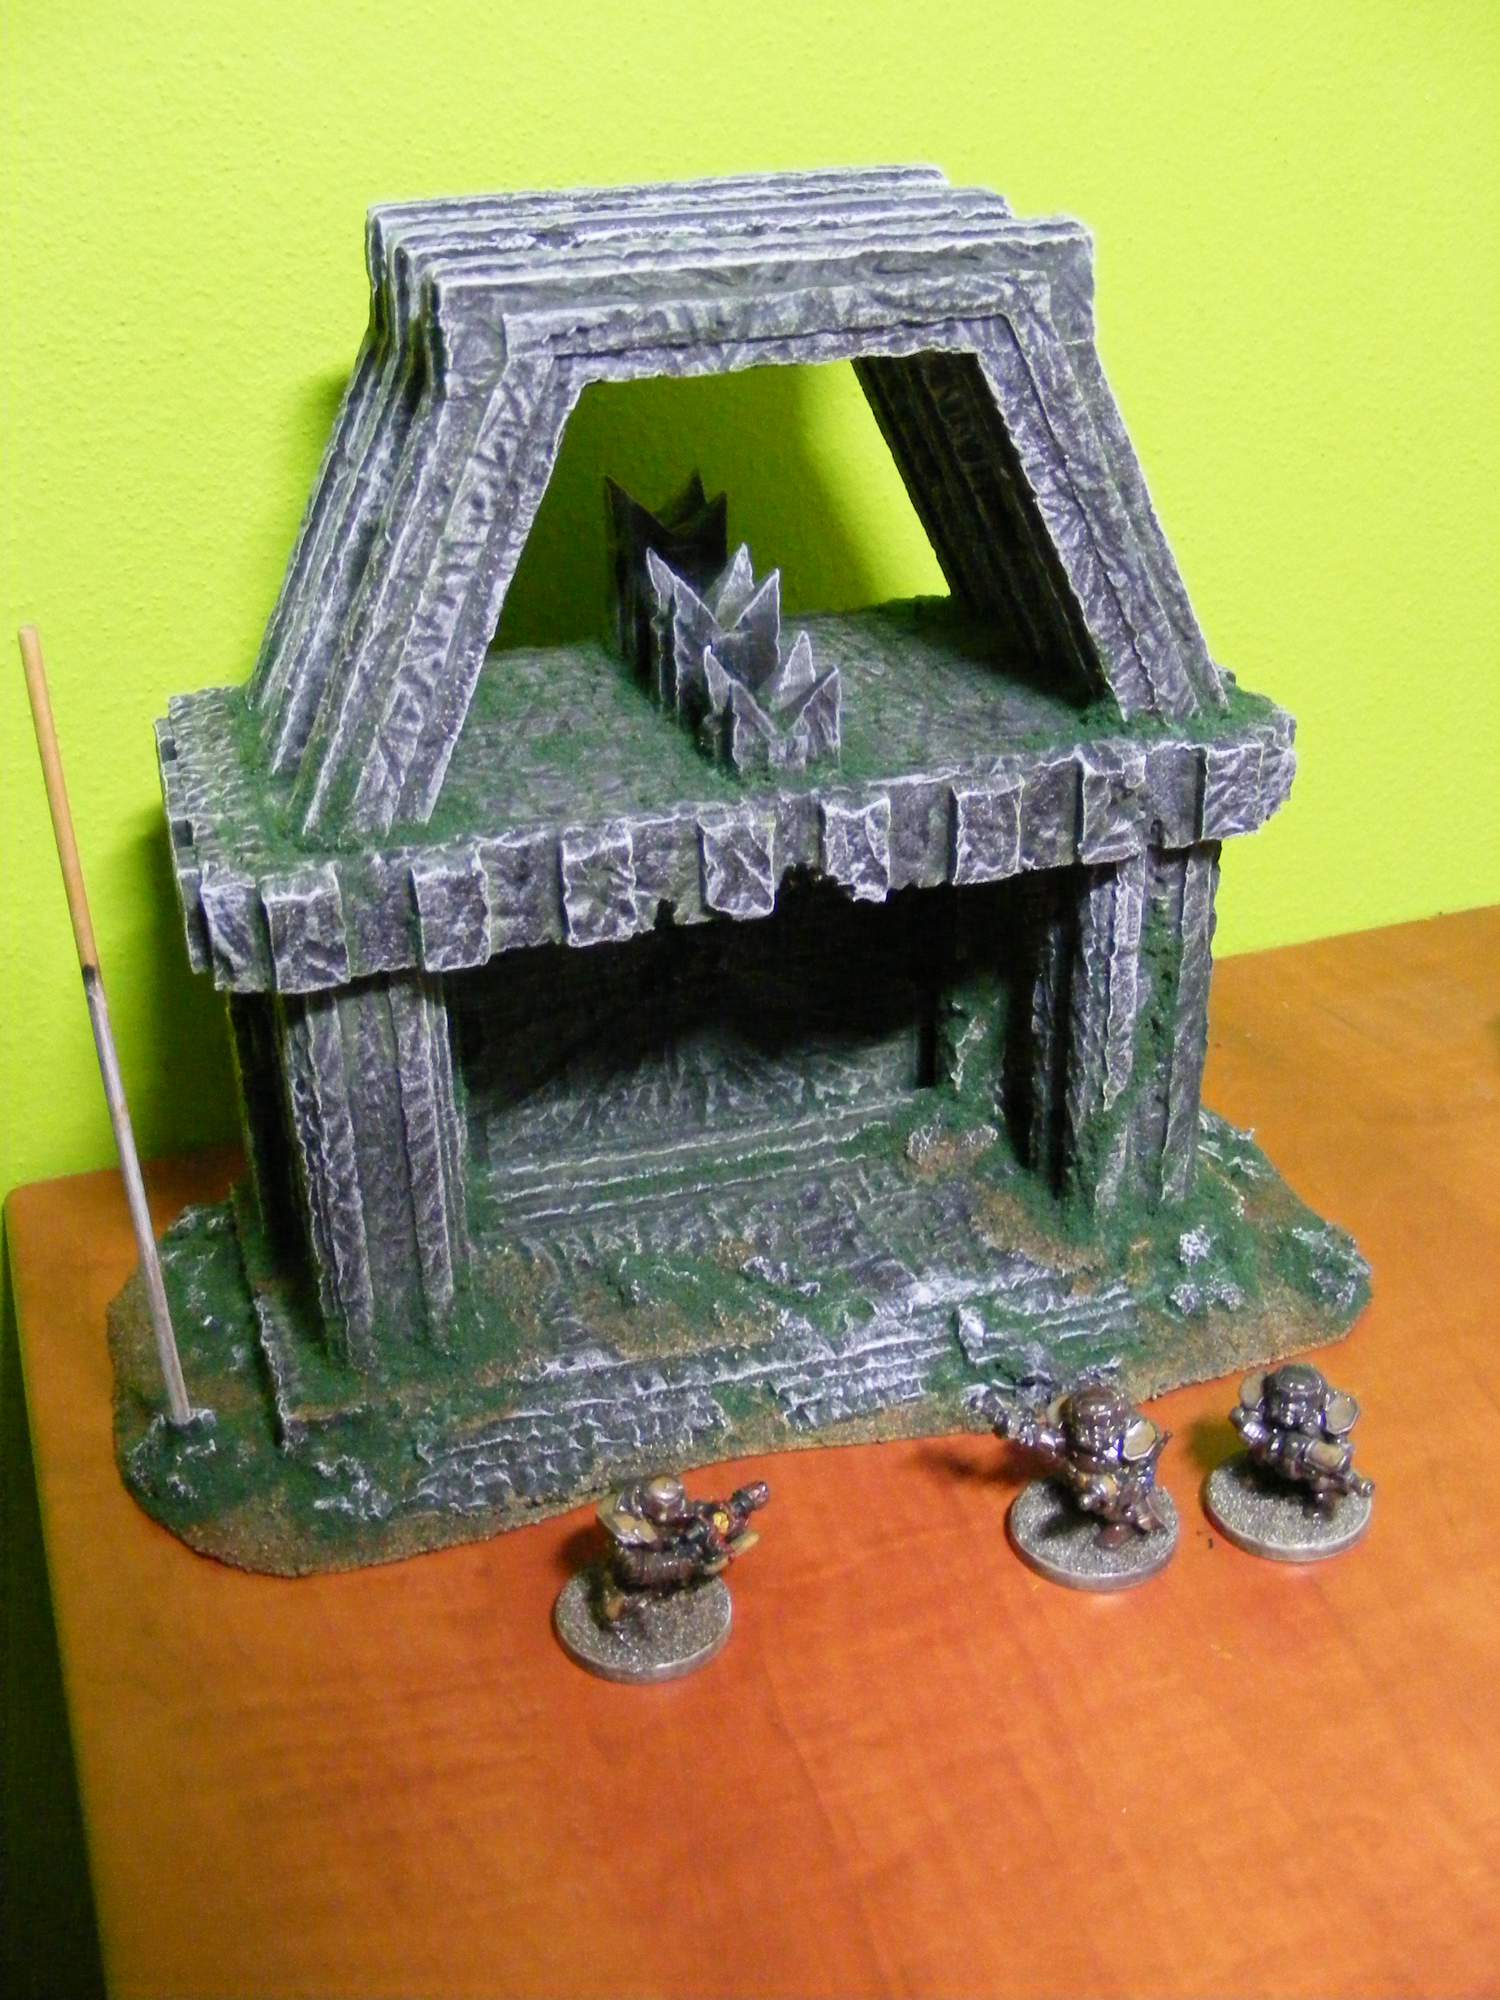
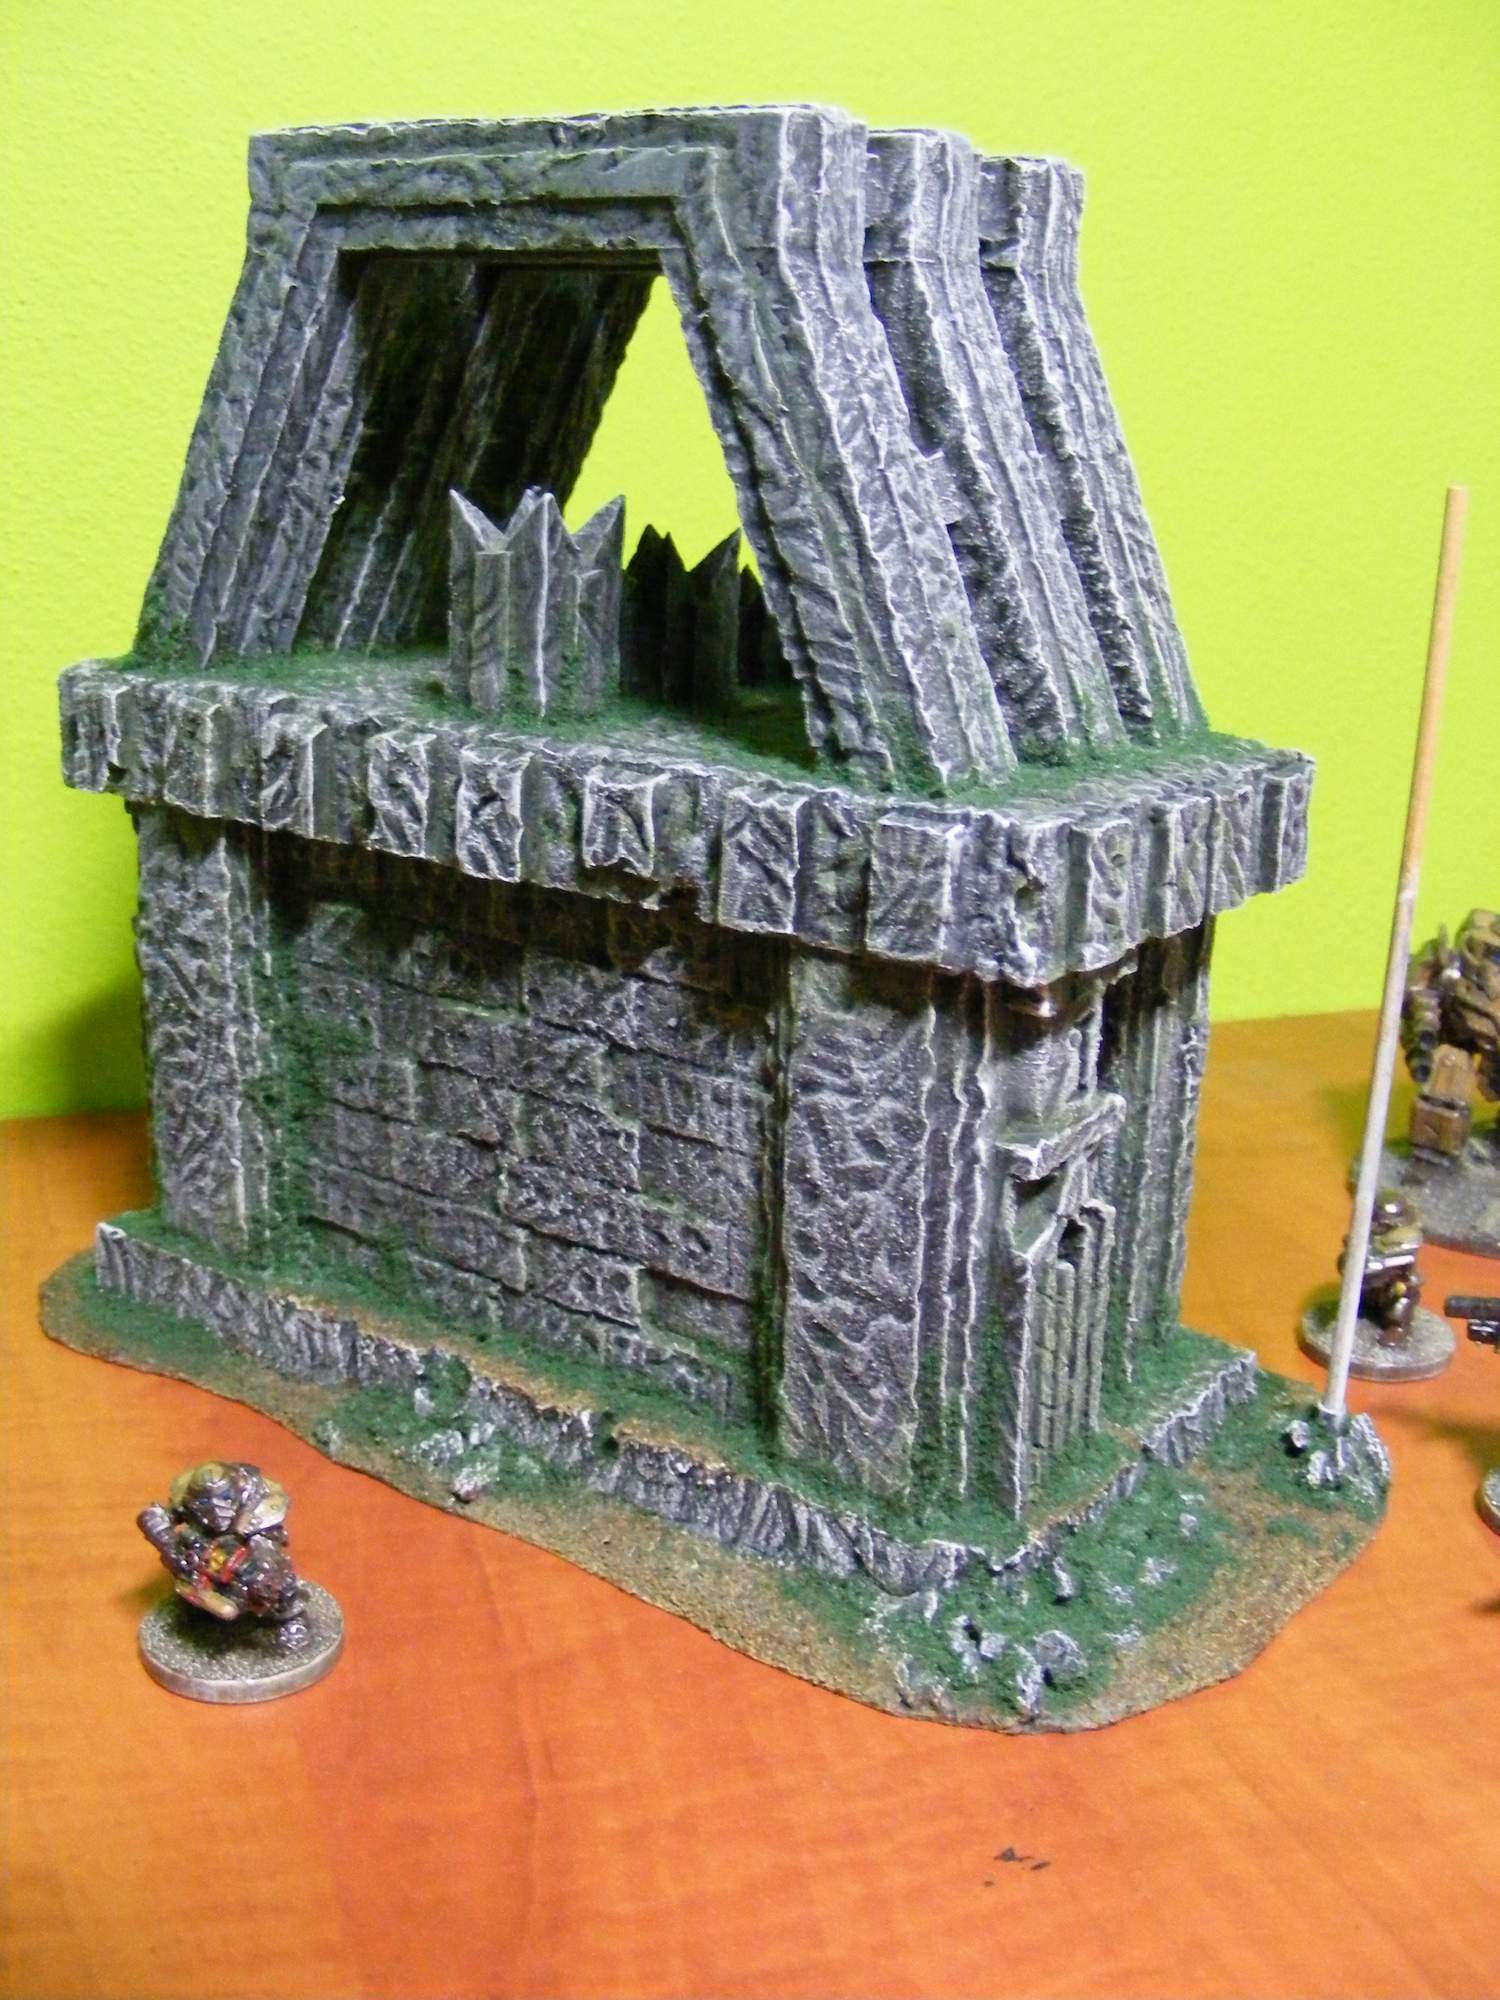
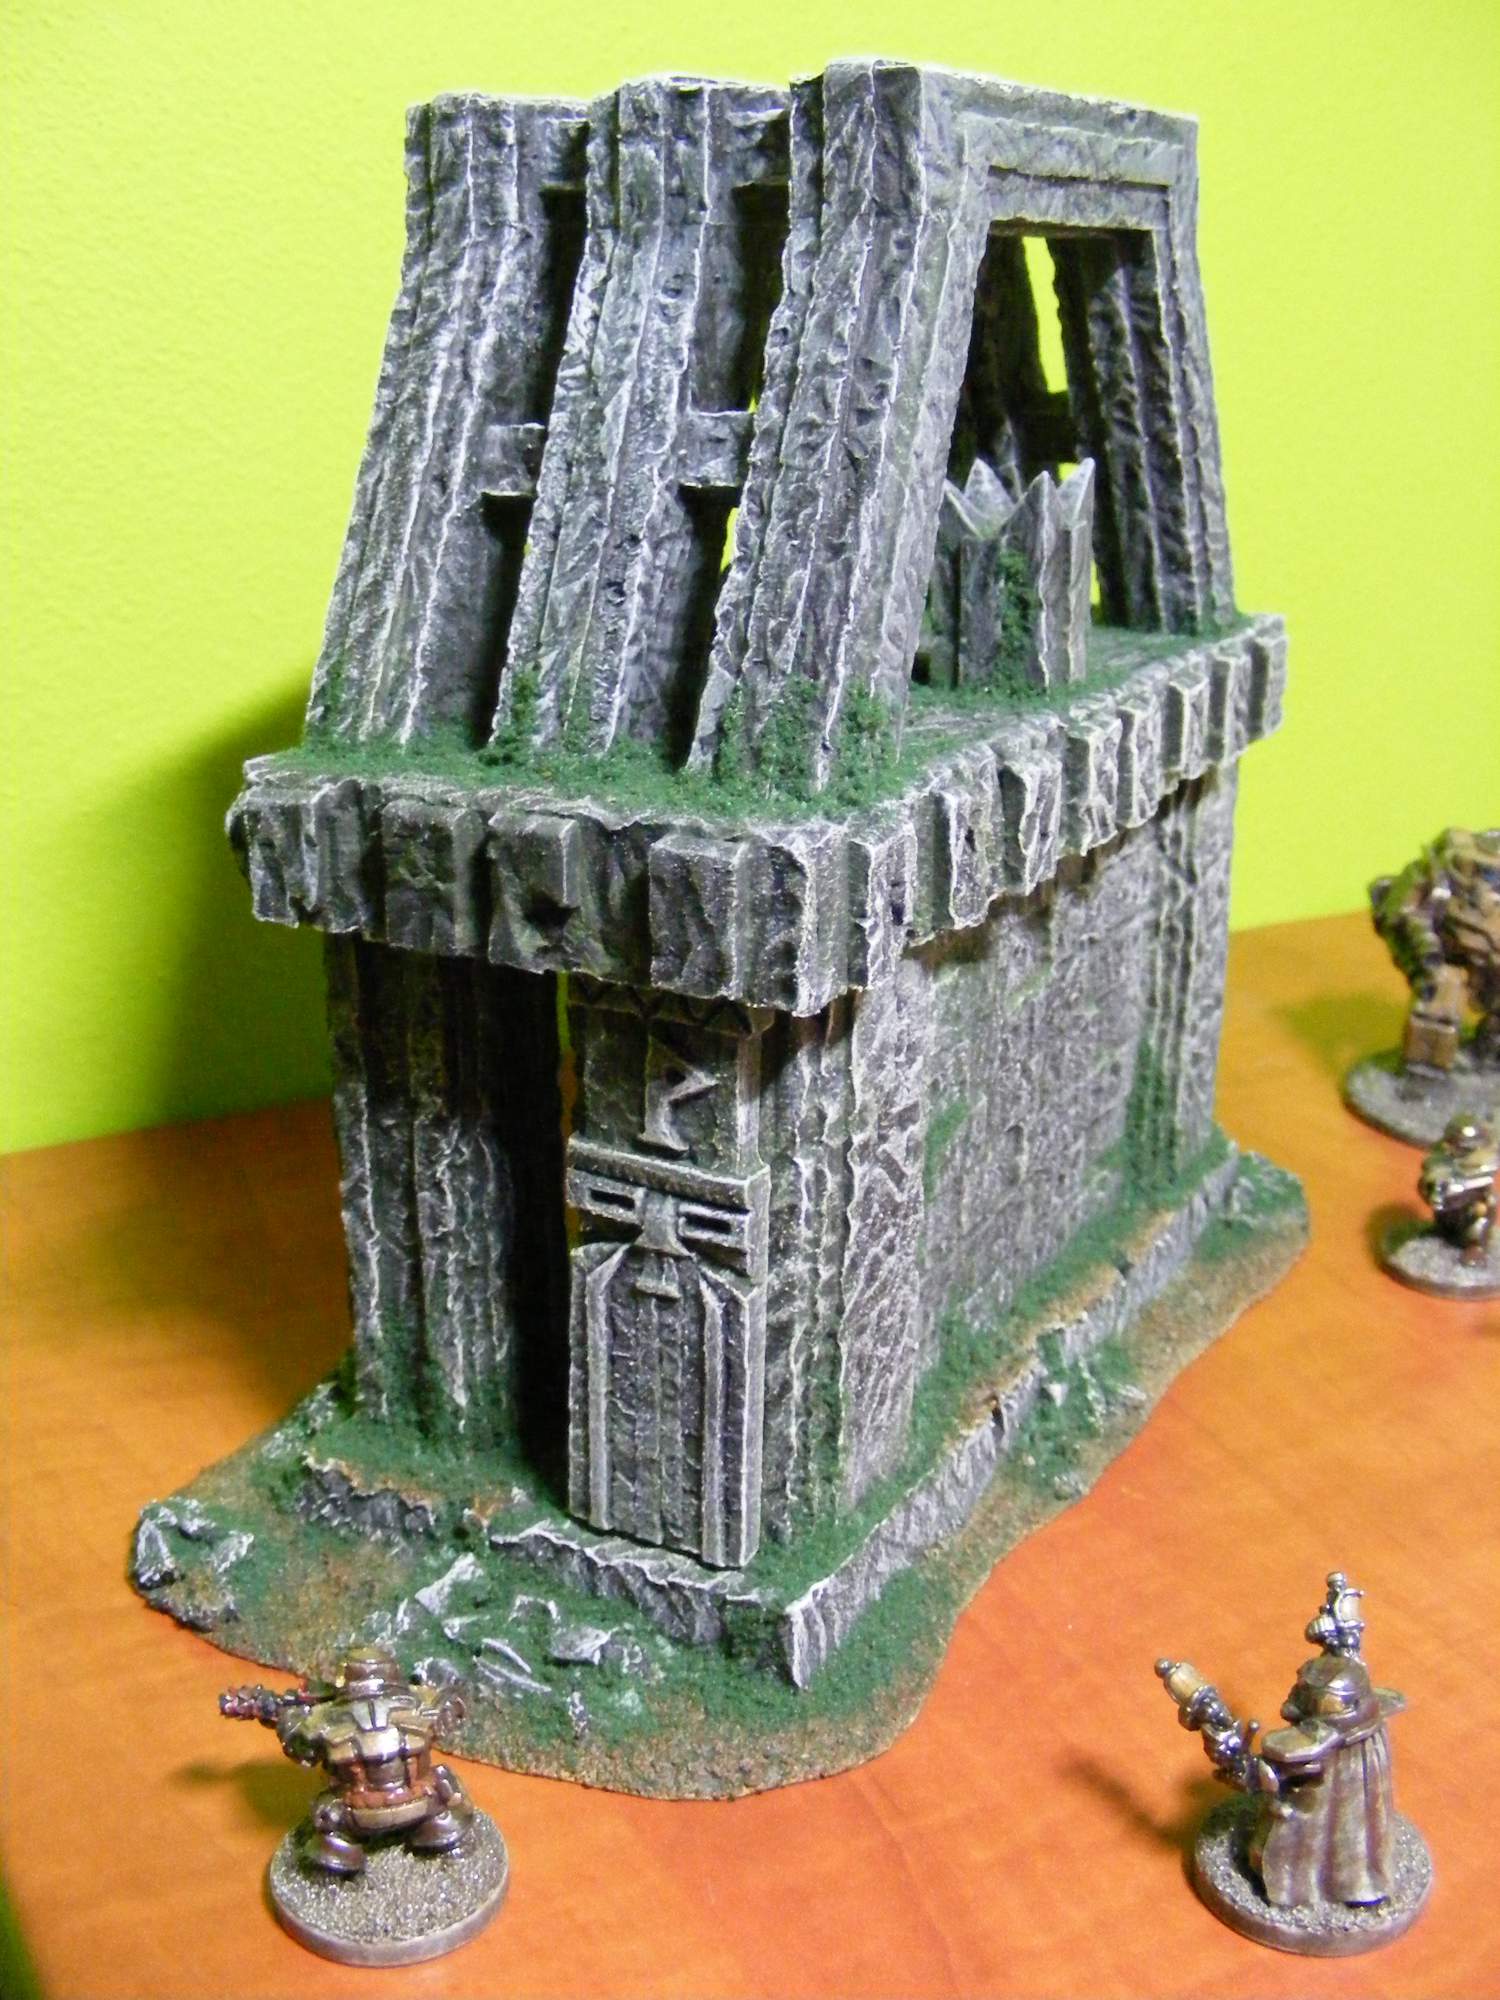
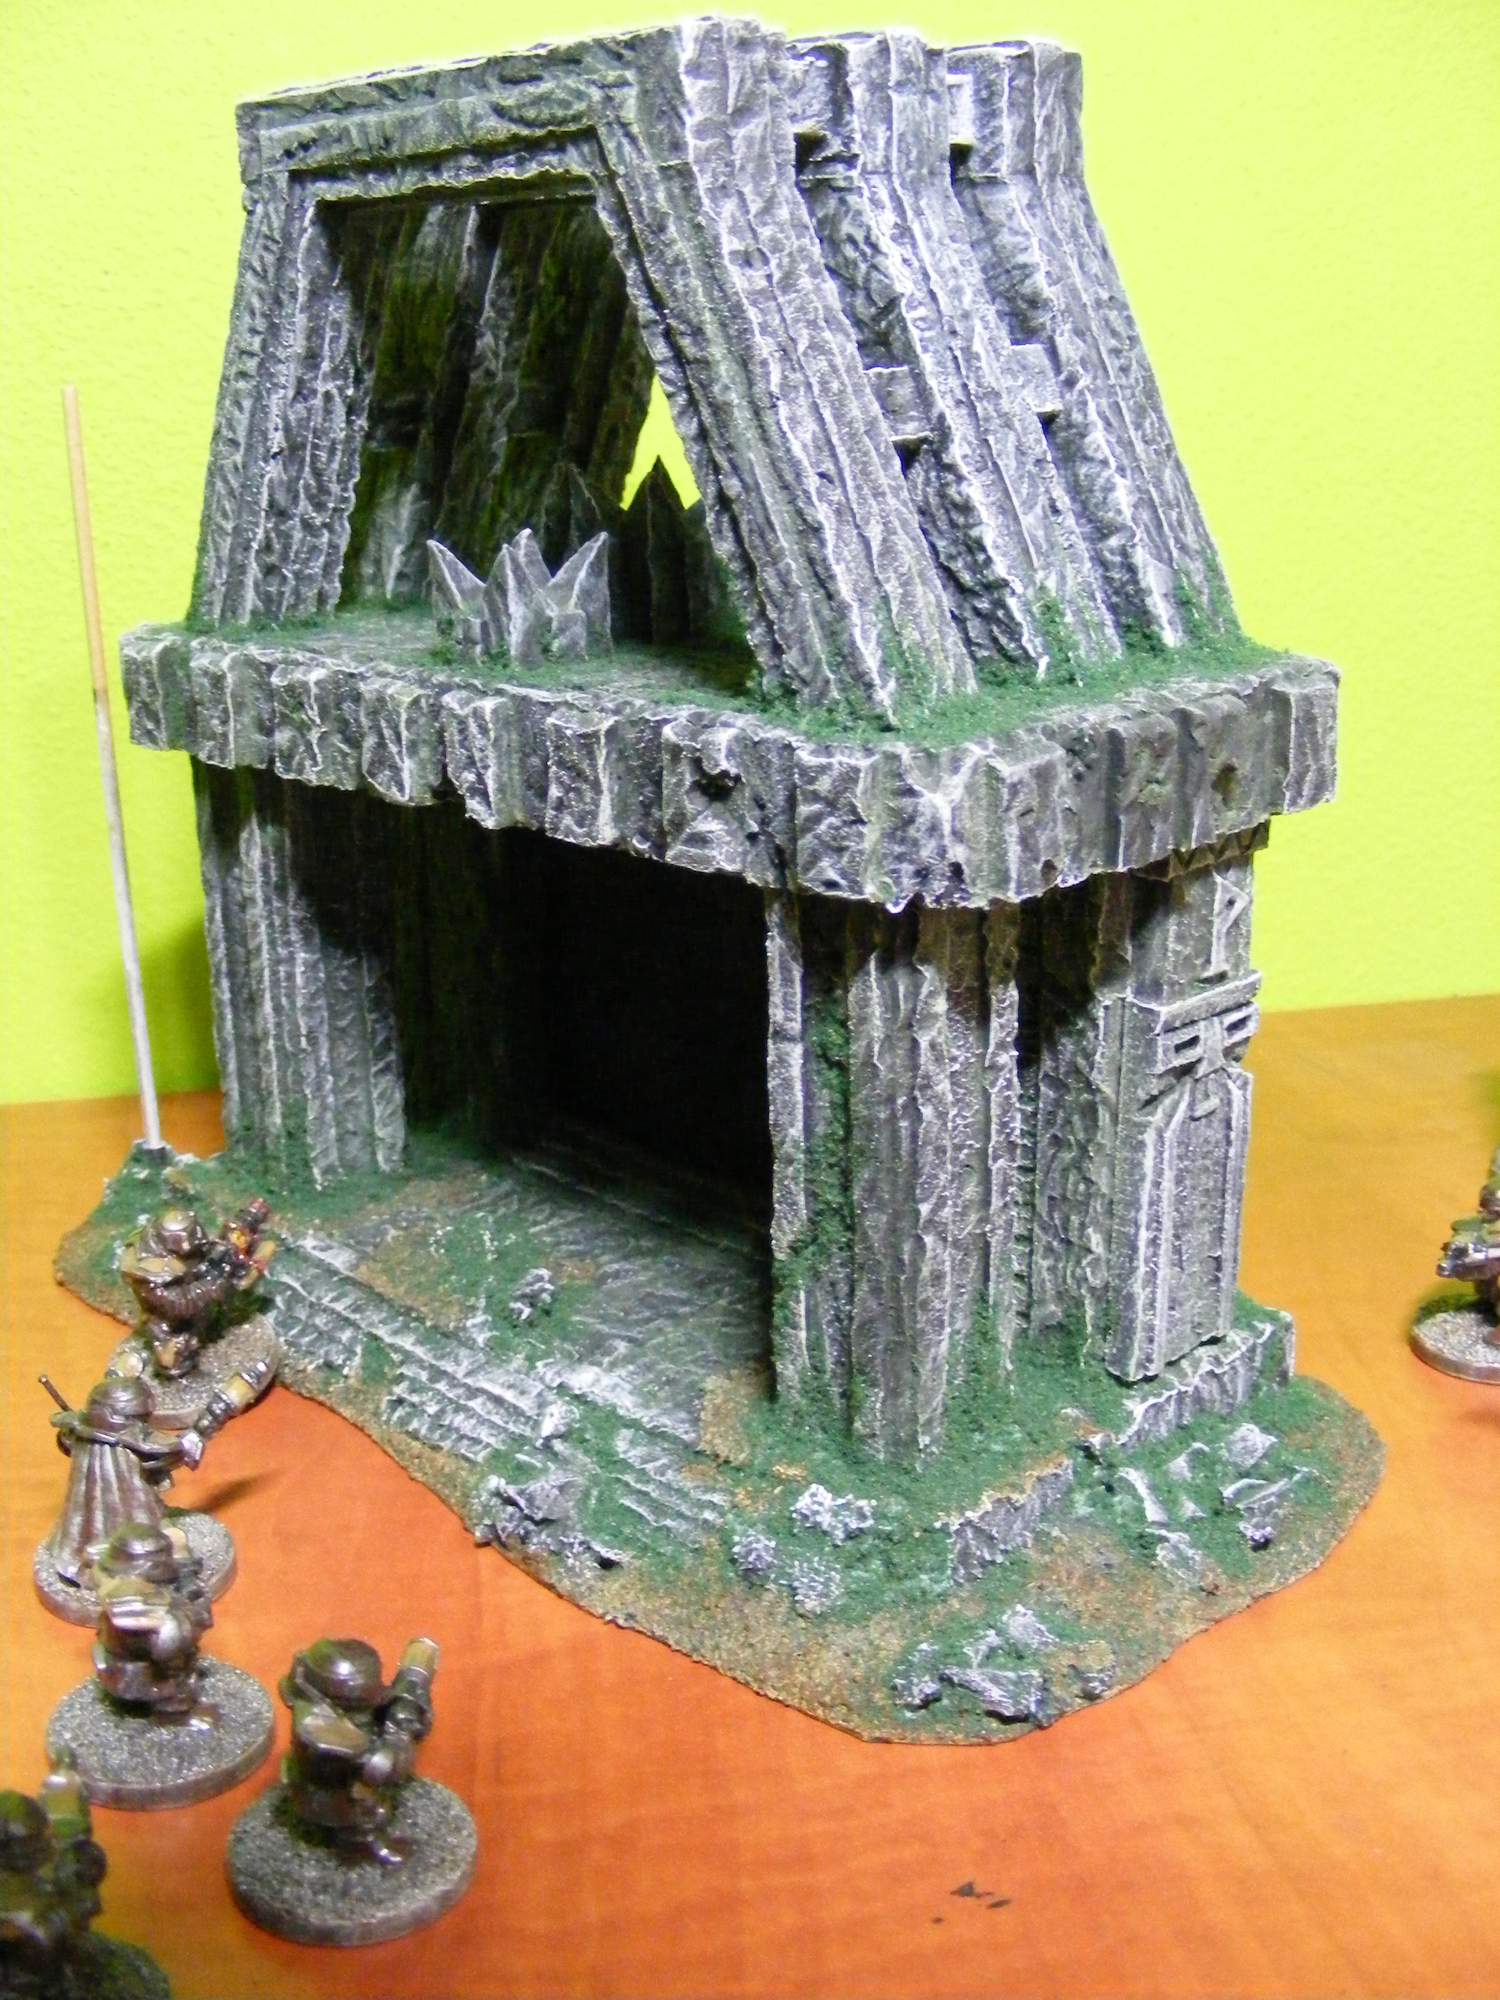
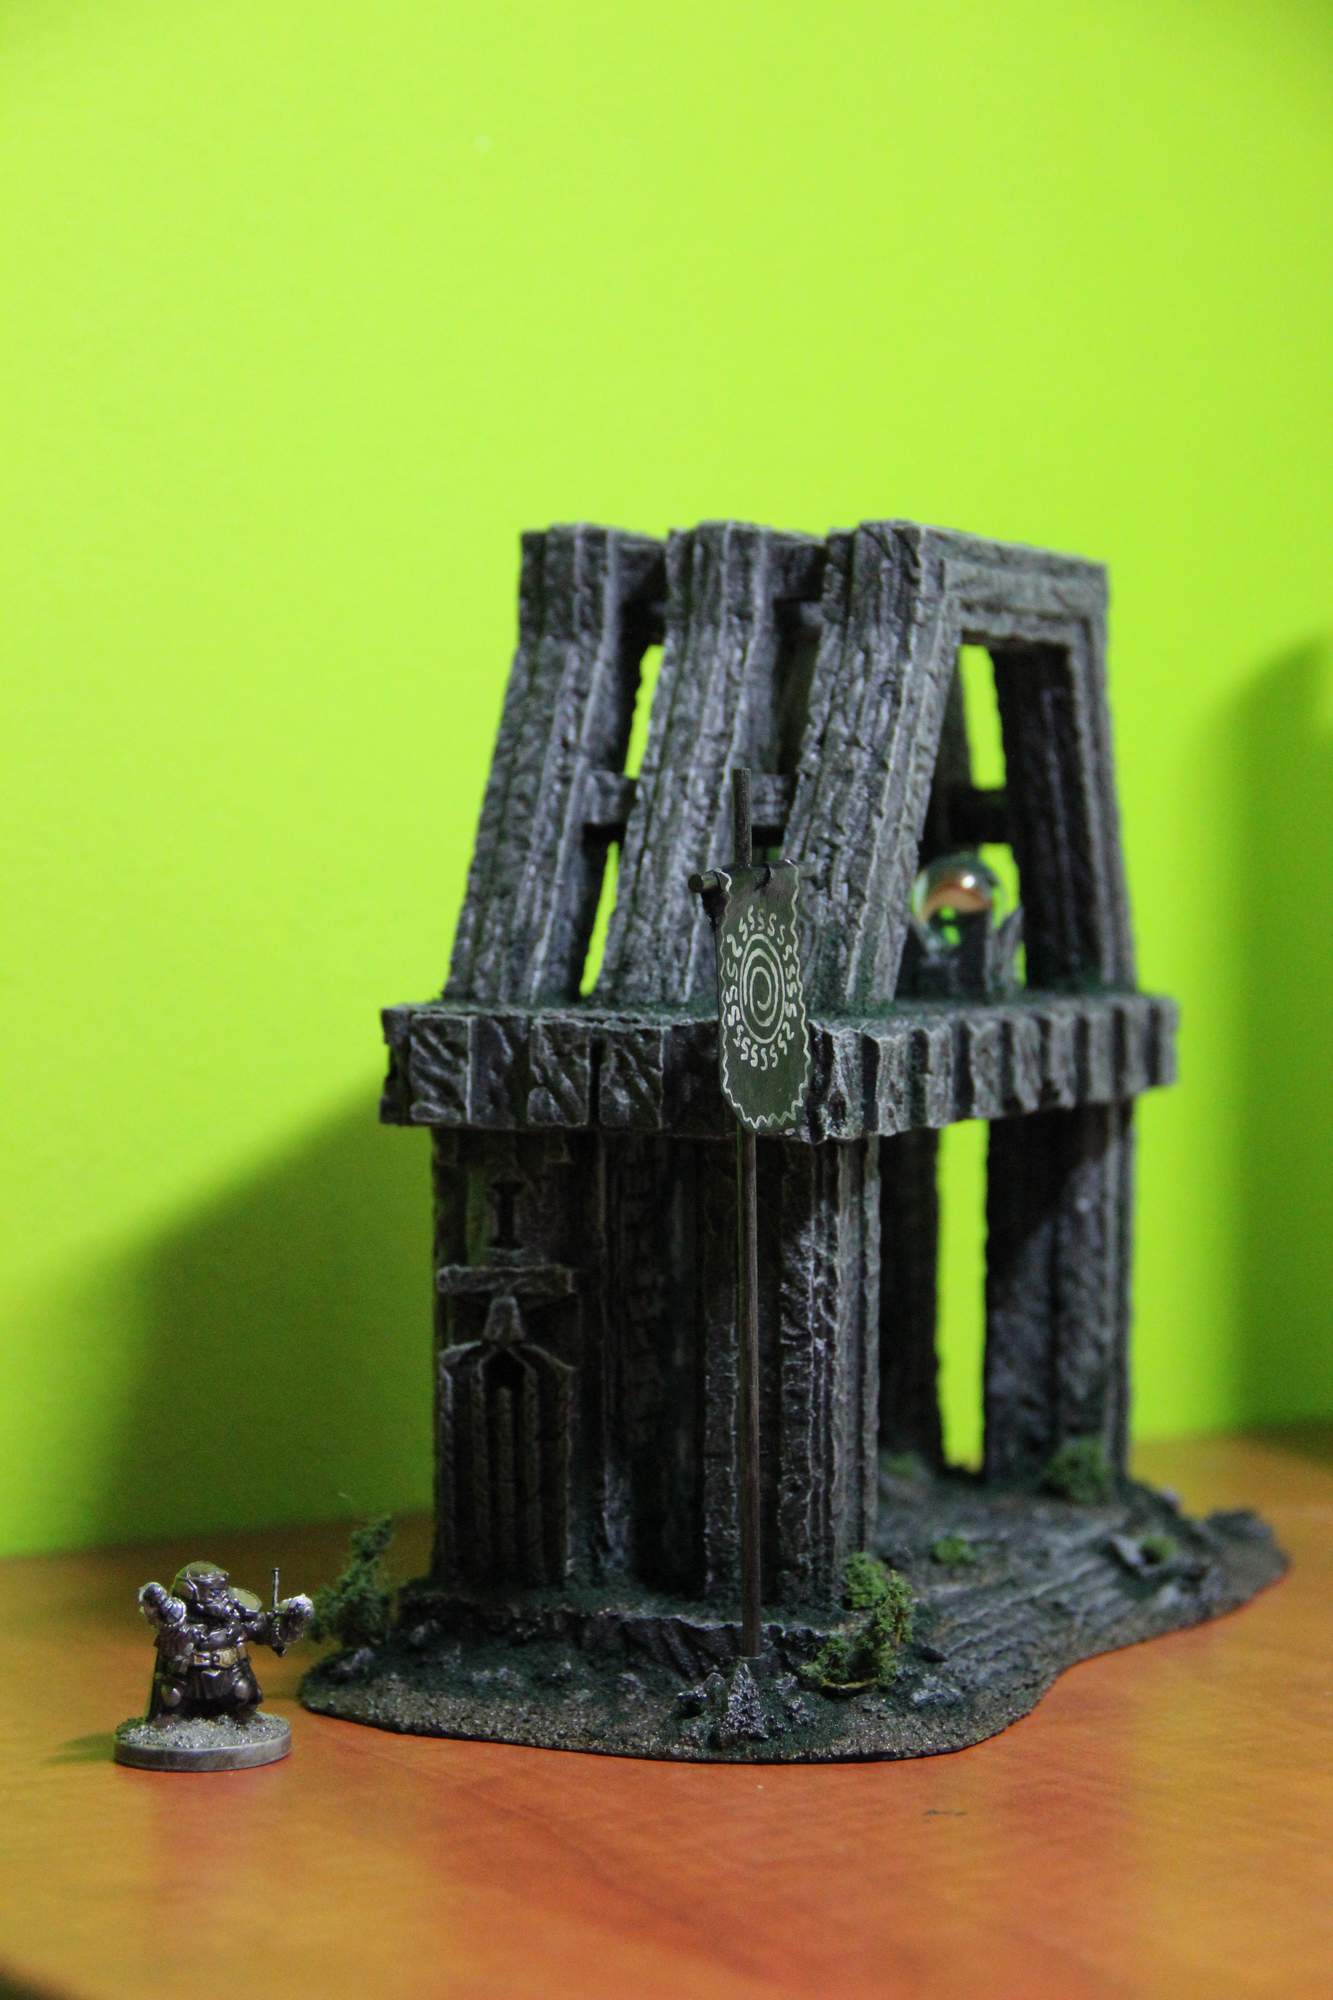
Portal is going to be flat, like a Star Trek transporter pad, with the webway arch over it. The two botom hills will be grass, top one (and the arch) will be wraithbone.
Top of the pad should be about 3” off the table, total footprint should be a square foot-ish.
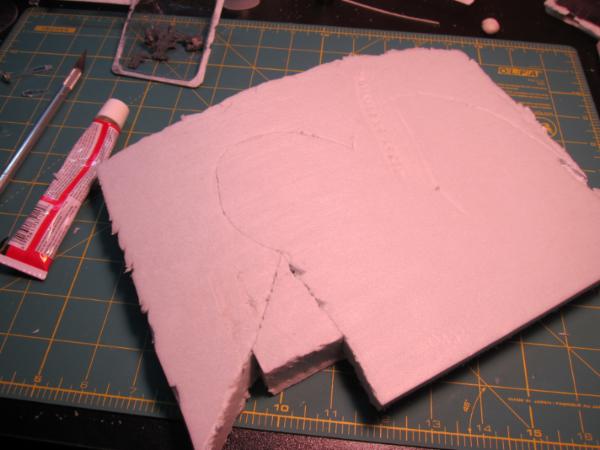
Dragged in the insulation foam that has been sitting in the garage awaiting me to make terrain with it for around a decade now. It was originally used to line a crate as padding for when The Wife shipped the liquor cabinet she made to a woodworking competition. Recycling!
Lots of good fighting talk everyone, great to see some extra bods, we are in trouble mind you, because we are attracting the big boys (looking shifty at Solar), going to have to up my game to get second this time round!
Heh, this is my first try at making anything more complicated then a scrap of paper with “difficult terrain” written on it. Never worked with insulation foam before, but I have plenty of it to screw up for practice.
I’m learning as I go here, I’ll be happy if I make it out of this with something not on fire.
Well some wip this is what i thought i was gonna be doing And after a bit if flaming this is what i came up with, not perfect, but still git to get a swirling effect
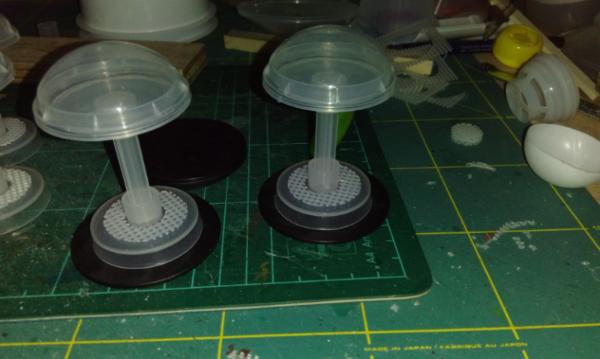
Victor!!! Those domes are cool! Those look like transporter pod thingy mebobs, and nevelon ,,,,the quality of the just your base work i think this is gonna be a awsome challenge
my wife mentioned the stargate...but i didn´t want to...too obvious...or rather i thought i couldn´t get it sturdy enough...
and thanks for the education matey... i probably never actively listened to Siouxsie & The Banshees...yet...your wisdom is so wide....
and nevelon....nice start... and i love eldar terrain...had thought about a webway portal too...
from my own experience with insulation foam long sharp knife...and slight cut and snap technique works best...
Automatically Appended Next Post: kingpin.... what an interesting idea.... that will create a nifty effect....
Being a colossal Stargate fan (eldest son is called Daniel after Daniel Jackson, which was actually down to my wife), I'll not say no to a Gate but it's all about meeting your needs. Great wips already guys!
Well mine gonna go with my imperial ghost chapter, gonna have two portals, one that brings a warior from each chapter to one place and then sending thrm to a destination to defend the imperial.
Viktor von Domm wrote: my wife mentioned the stargate...but i didn´t want to...too obvious...or rather i thought i couldn´t get it sturdy enough...
and thanks for the education matey... i probably never actively listened to Siouxsie & The Banshees...yet...your wisdom is so wide....
I had to make a killing jar when I was in the 7th grade ( 12-13 year olds) and to use it for a class project an insect collection. Pour a bit of plaster into a mayonnaise jar, let that set, then pour some nail polish remover (acetone) into it so that the plaster soaks it up. A nasty thing. The song though, pretty cool.
You know, I've been trying to figure out something to base my gate on that was more than 'dwarven and rock'- I think a Stargate (Well, Stonegate- maybe Planar portal?) could do the trick quite well.
I've been wanting to watch Stargate (all of them!) for a while now, since reading some awesome fanfictions crossing over with that world, but I can't find them anywhere. Anyone have any relevant legal sources? It's for... research purposes.
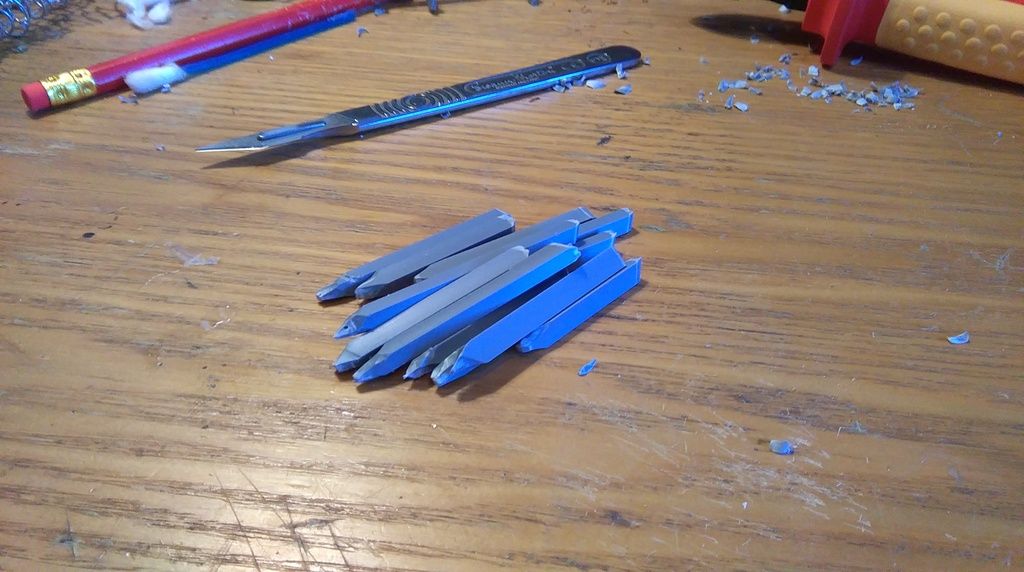
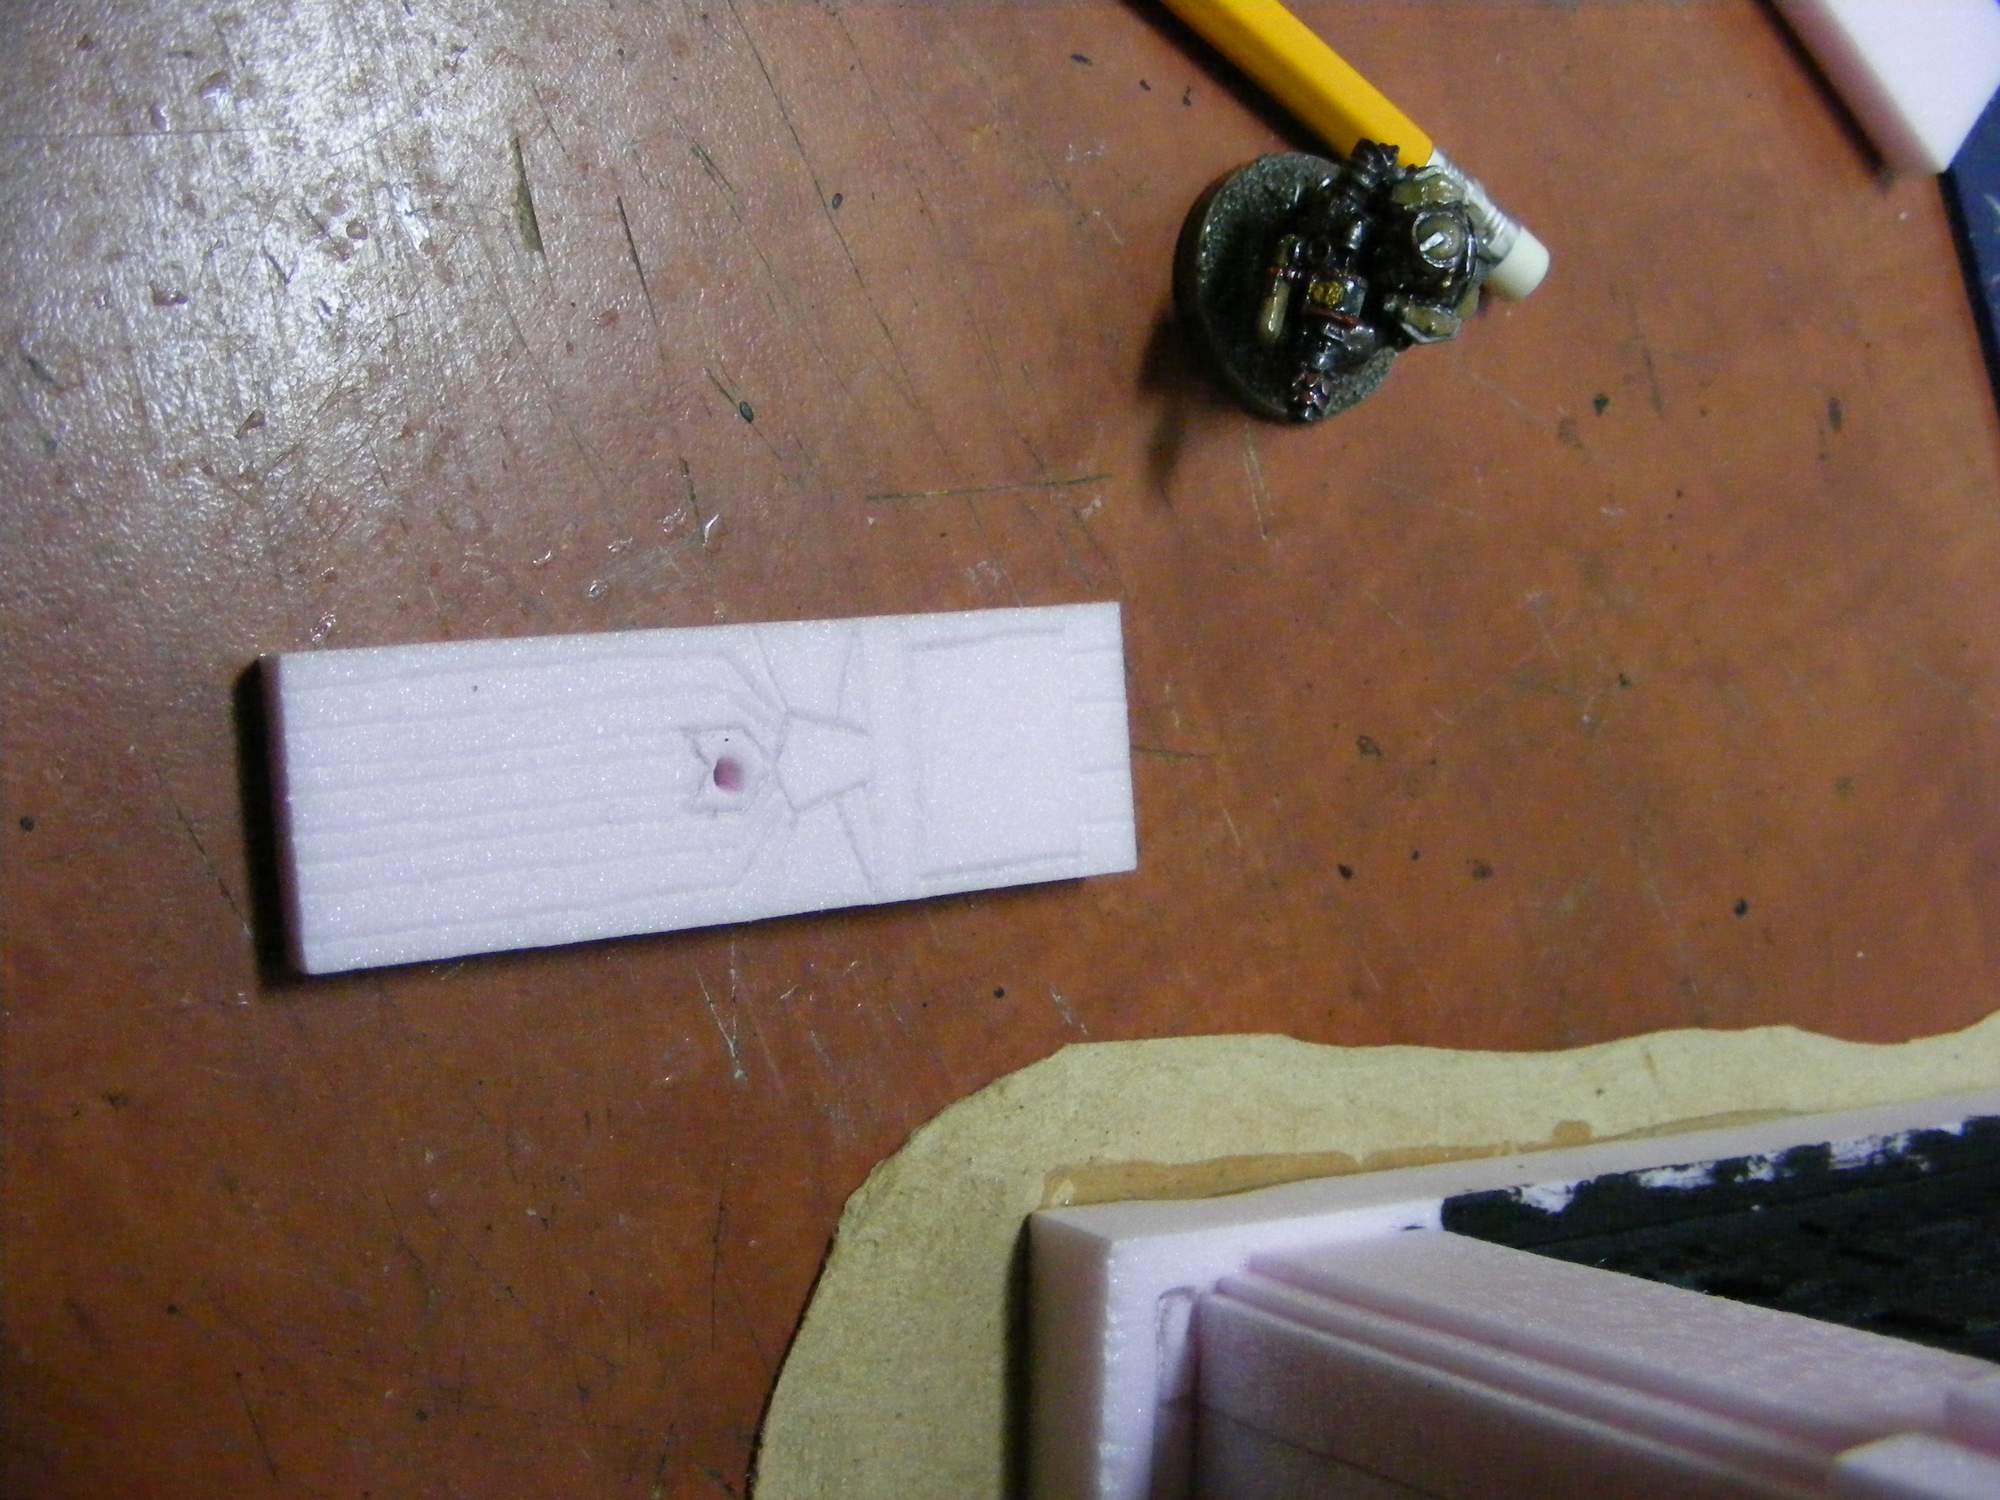
Enlarged and printed out a template. Laid it over the foam and traced it with a firm hand in pencil, to indent the foam. That part worked OK. The carving, not so much.
I’m not sure if I need new batteries in the cutter, or didn’t let it warm up enough, or what. But it did more of a jagged tear then the smooth carve I was expecting. I tried to score and snap, but that didn’t work as well as I’d like. I suspect I might need to use something more then the #11 exacto blade here. Oh well, I knew there was going to be a bit of a learning curve here.
If I recall the foamcutter shares some properties with a hot glue gun. You've gotta let it get maximum hot for results, red hot in this case, and using it will 'use up' the heat...like how a hot glue gun that's fully hot will have a really easy trigger action and the glue will practically rush out at first, but after a little bit you get further back up on the stick where it's not been heated yet and the glue comes out slower/barely at all. The foam cutter and hot knives work the same way, though probably somewhat different properties cause it.
Basically, it's gonna lose heat eventually and come to the point where it'll drag, and definitely drag if you don't let it heat up enough first.
Also watch out, hot knives and foam cutters cut a pretty wide swathe through insulation foam when they're fully fired up, moreso than you may expect, can practically deform the stuff just by being in proximity let alone contact.
Darn you guys, now I really can't decide between a stargate and a vault entrance =/
GrimDork wrote: If I recall the foamcutter shares some properties with a hot glue gun. You've gotta let it get maximum hot for results, red hot in this case, and using it will 'use up' the heat...like how a hot glue gun that's fully hot will have a really easy trigger action and the glue will practically rush out at first, but after a little bit you get further back up on the stick where it's not been heated yet and the glue comes out slower/barely at all. The foam cutter and hot knives work the same way, though probably somewhat different properties cause it.
Basically, it's gonna lose heat eventually and come to the point where it'll drag, and definitely drag if you don't let it heat up enough first.
Also watch out, hot knives and foam cutters cut a pretty wide swathe through insulation foam when they're fully fired up, moreso than you may expect, can practically deform the stuff just by being in proximity let alone contact.
Darn you guys, now I really can't decide between a stargate and a vault entrance =/
Thanks for the advice, I’ll give it another shot.
As for the gate/vault: why not both? Do a vault chamber to secure the stargate!
Sigh. That's how these always start for me. I wanna do X. Then Y. Then oh... if I'm gonna do two things why not a whole 2x2/2x4/4x4 table while I'm at it....
See the Vault entrance is a strong choice because it would let me tie my battle systems scifi scenery in with TNT (and well anything else that would be in a desert/wasteland). Of course the stargate is pretty versatile too as you can put it literally anywhere even floating around in freaking space.
Both could technically occupy the same board with a stargate in the wastes and the vault adjacent to it for whatever purpose. Dunno.
My phone and dakka are not getting on when it comes to uploading images for some reason, however I am going to use this as an excuse to create a base for my Abyssal KoW army.
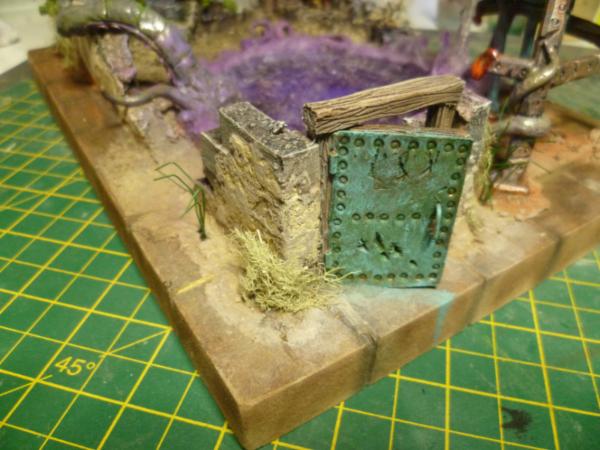
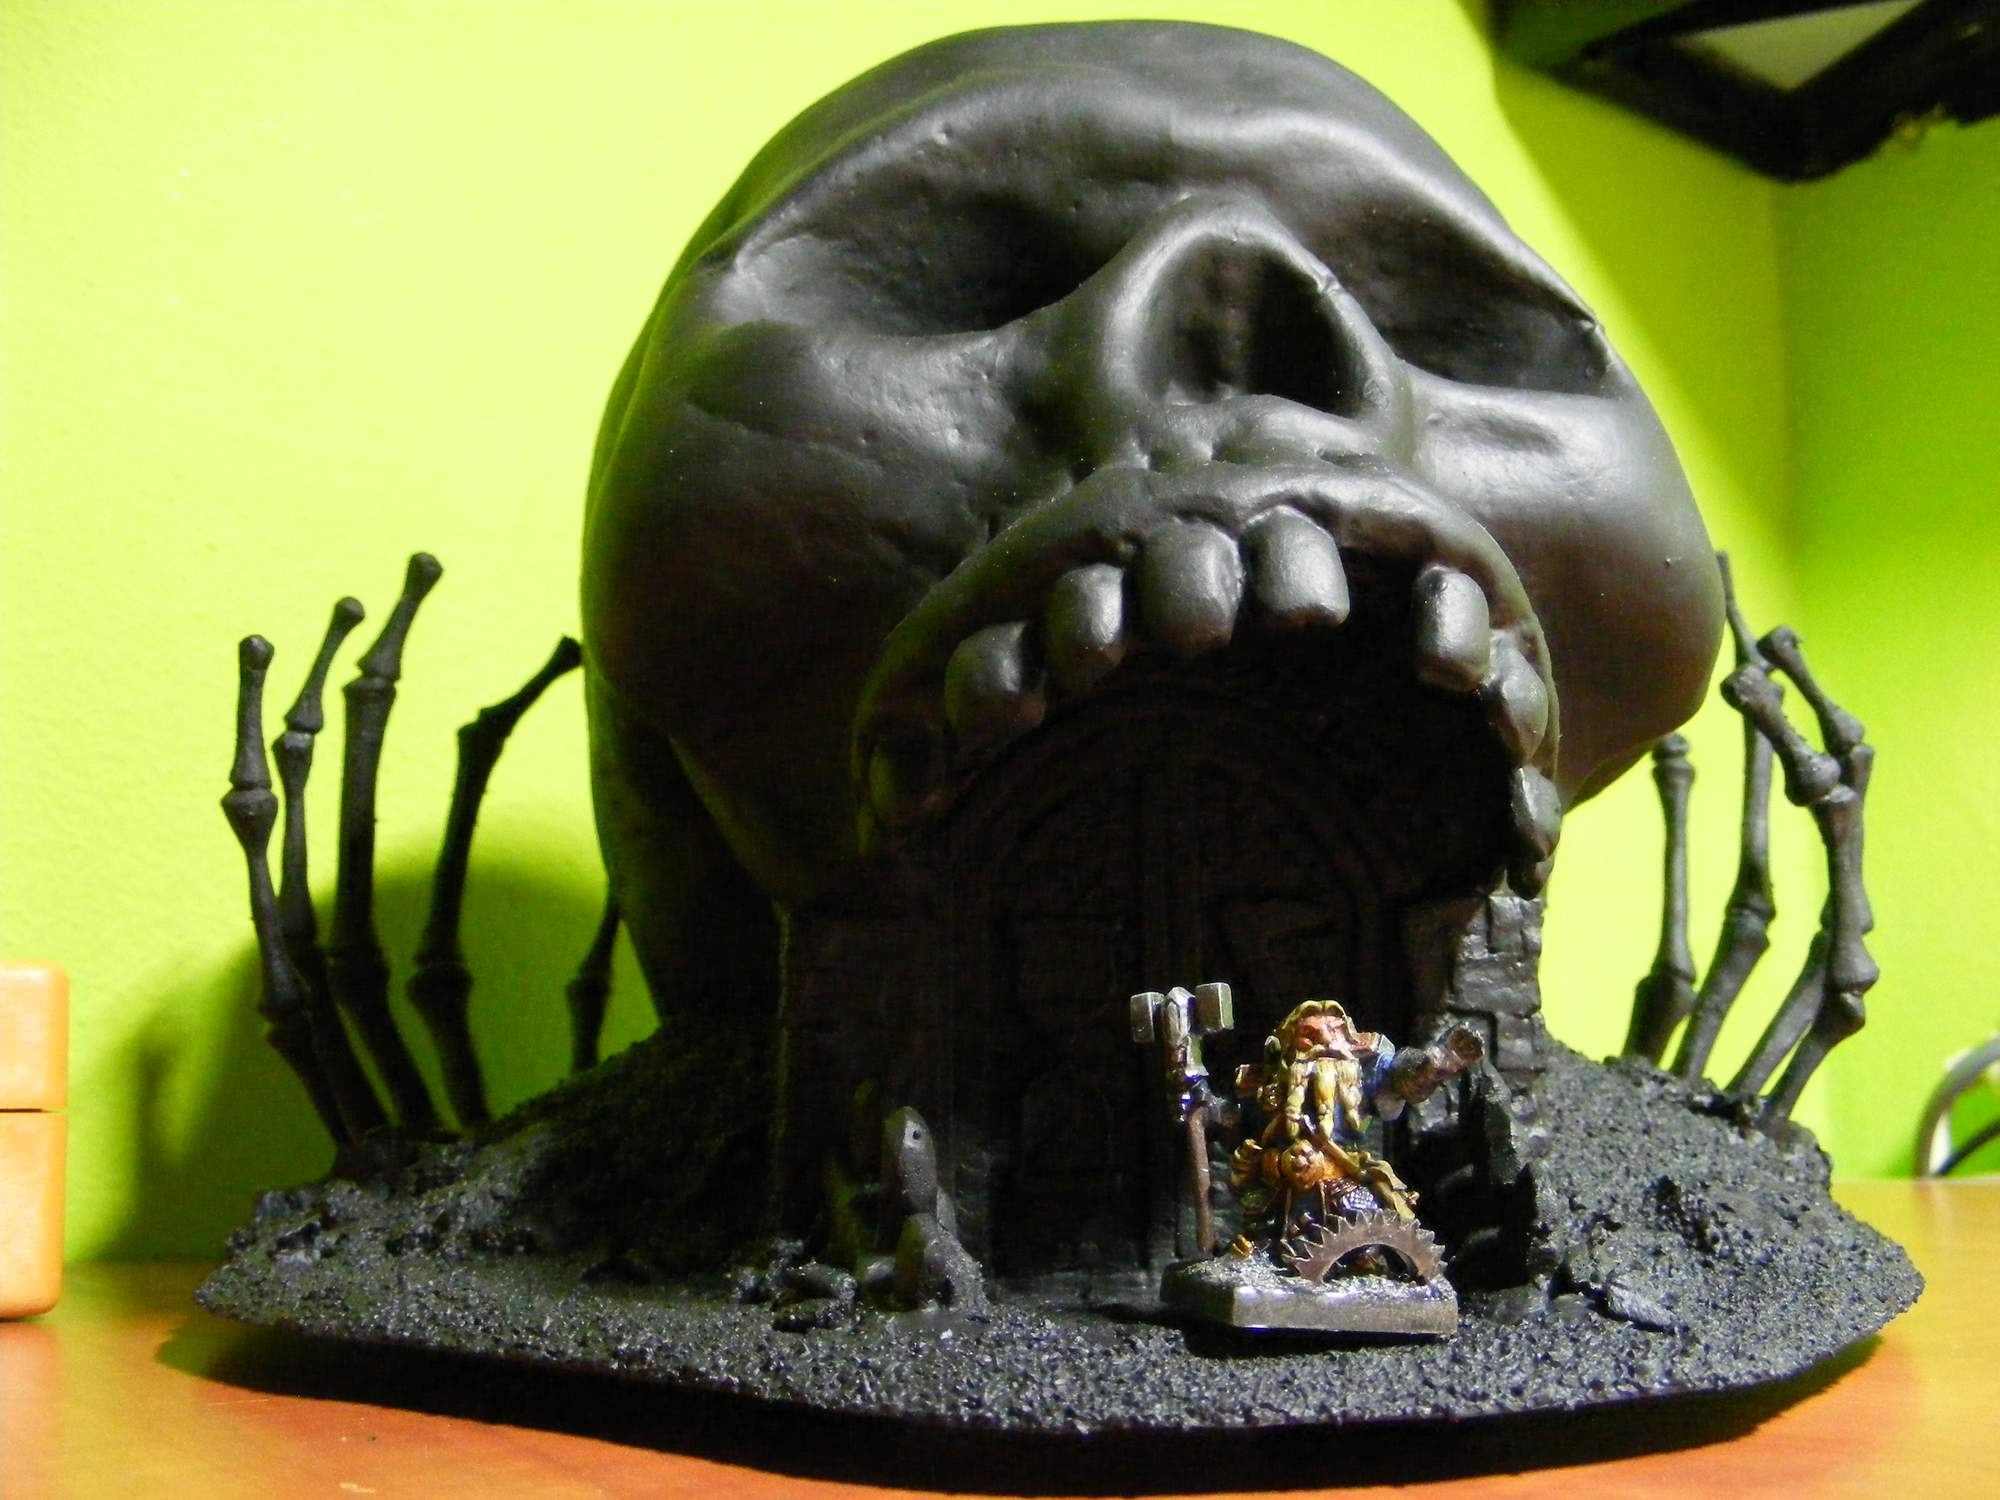
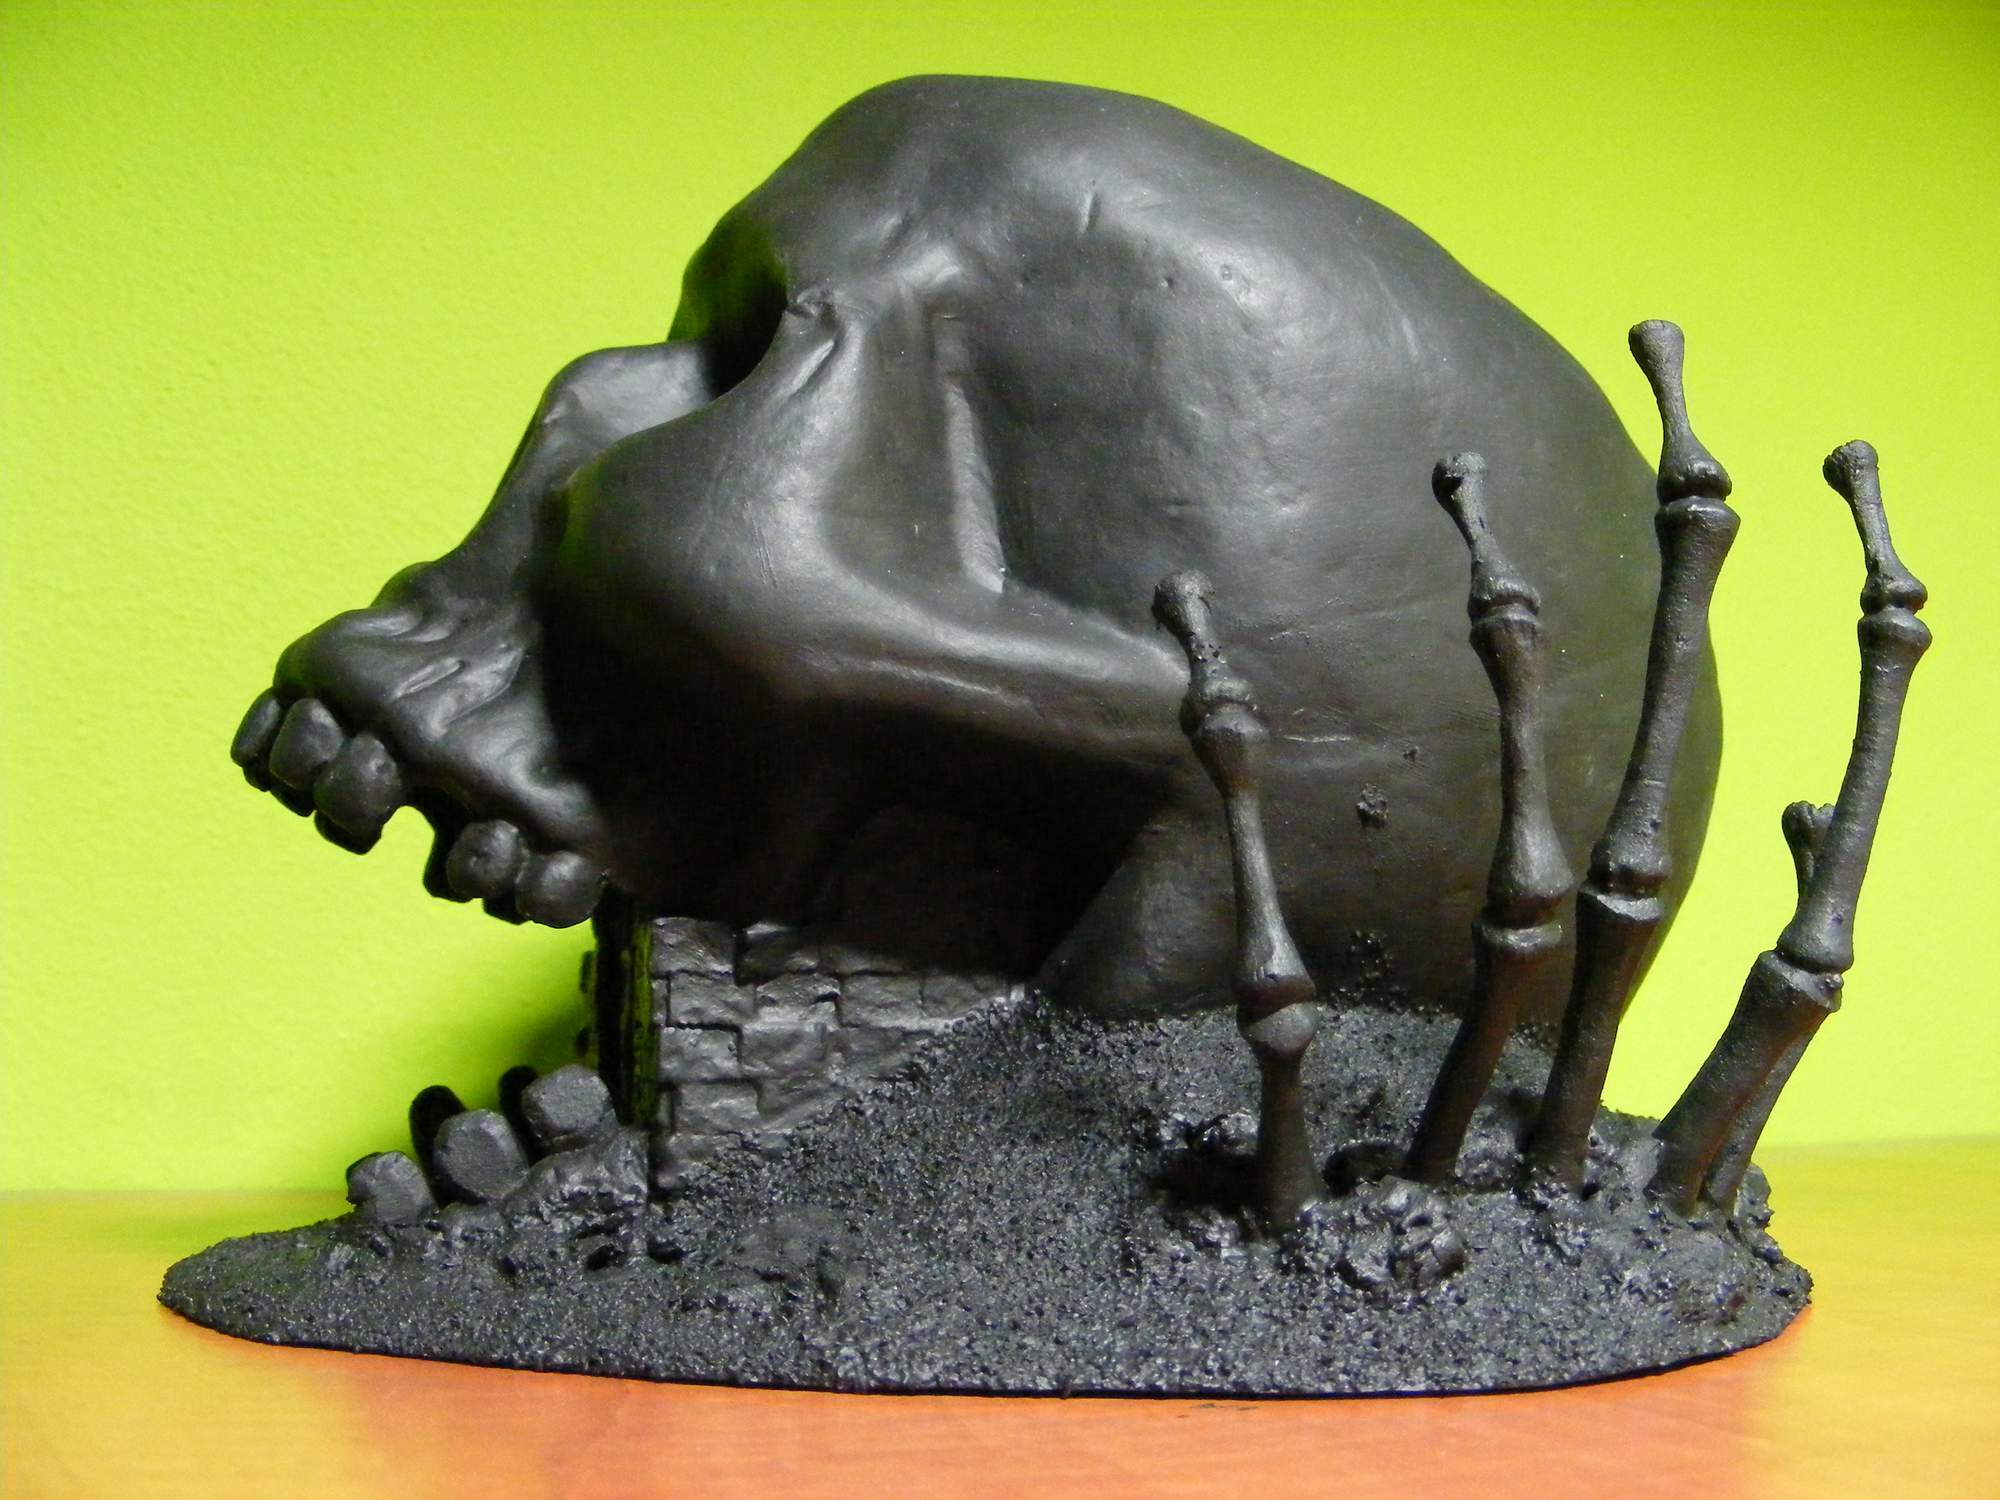
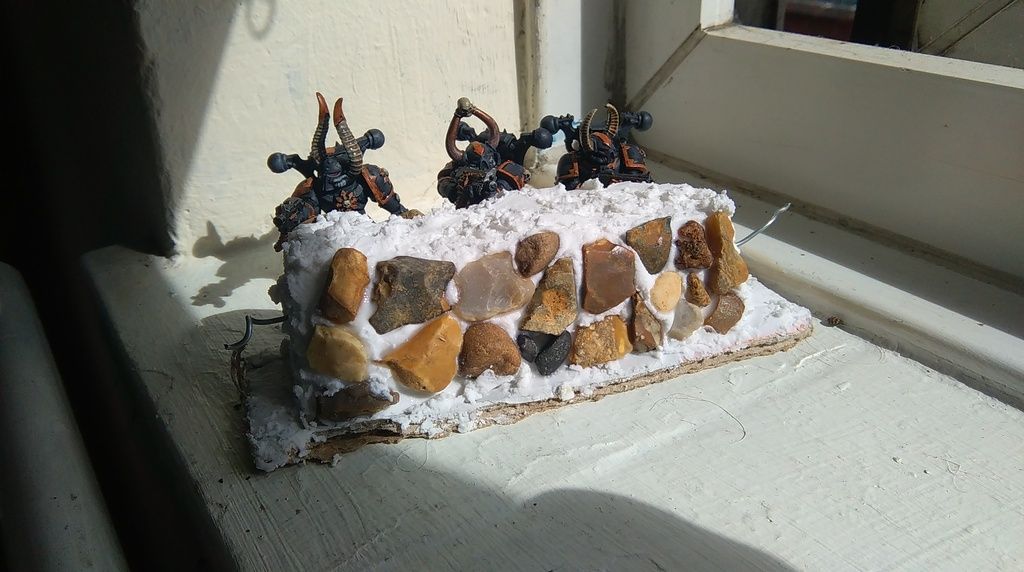
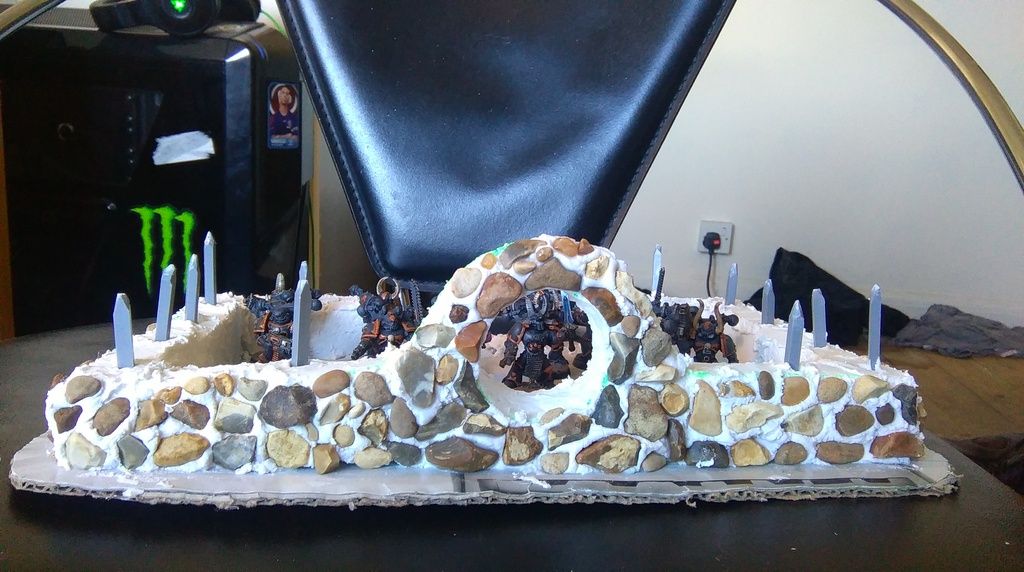
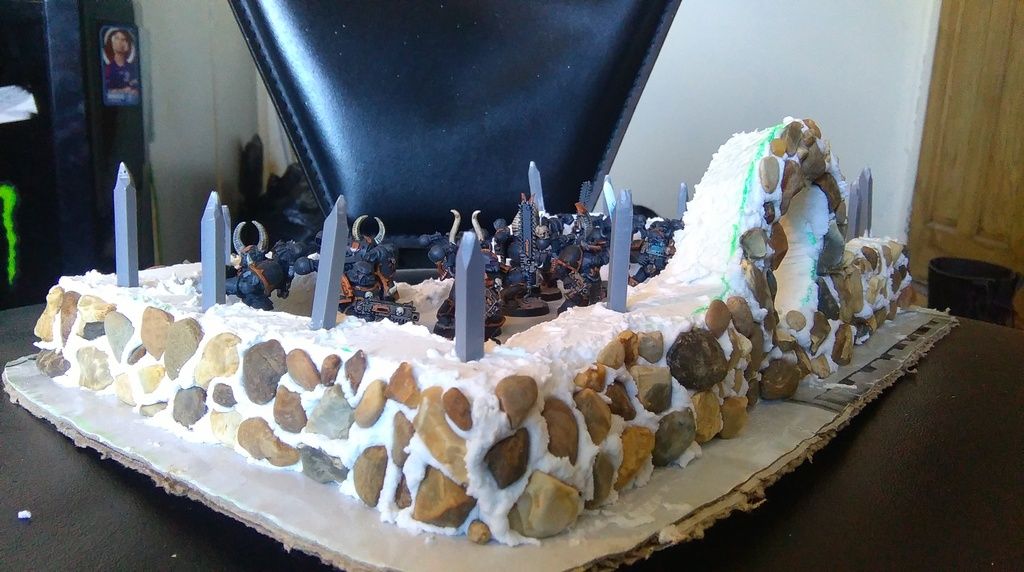
A portal through which a monster emerges; counting as a horde of larvae. Fairly standard chaos gate design made from some wooden packaging material from some furniture and some offcuts of foam from insulating the house.
Plus I am sure some other bits and peices as we go along!
Automatically Appended Next Post: at nevelon... if sharp edges don´t work with either knife and wire...then just accept the roughness... later on you can carve and even sand it down t you needs... by the way... depending on your plans i would suggest covering the whole piece with liberal amounts of PVA...(spray primer will melt it...but you surely knew that...)...or...covering it with tissue paper...
I'm betting that you're trying to cut to full depth all at once- that's what most people do to start with, but it'll give you raggedy edges. What you want to do, even with a super sharp knife, is a whole bunch off light, shallow cuts- that'll get you a much, much cleaner edge. It works for pretty much any type of cutting, on pretty much any material, too.
Basic shape coming together. About all I got time for tonight. I'm looking forward to covering it in Polyfilla (someone stop me quick if there is a good reason not to do this ) and adding lots of detail. I bought some really handy stickers (you can see them in my stash pic) which are going to make the flooring easy. The cardboard I used on the base is really solid so I'm hoping no curling will occur.
Anyway, tonight's effort;
It's looking a bit rough at the moment, hoping I can clean it up with filler. Since this is my first piece of terrain, I'm really trying to build something playable, so the design will not be too exciting on this one. Still, feeling optimistic
Really sorry, bit late maybe, silly bloody RL......
Nev I have done this..... borrow the bread knife from the kitchen, a slow saw action, after a little sanding you get a smooth sharp edge. And you could always make it ultimate foam core, by lining it in cereal packets, that will give you a paintable smooth surface with nice sharp edges.
Oh clean the knife thoroughly before using it in the kitchen again.
Fantastic stuff gang, really exciting. Sweating a little here, I wont get a start on this for a few as other things on the bench and RL being a pain. I am totally up for it, got an awesome idea, just need some free time.
Oh and Anvil is absolutely correct too, lots of clean small cuts make a great job, just need patience.
OK, a little more playing around, with some decent results.
Serrated knife seemed to help a little. The longer steak knife also was useful. The big issue was the curves and the width of the blade. Might try a hacksaw, or something thinner.
Getting those cutouts on the back to all be the same is going to be rough.
Sanding fixes all sins. I was just using some rougher stuff I had on hand, will need to get some finer grit. It actually shaves a lot of material down quickly.
Need a larger template. With a rough cut followed by sanding, I’ll need wider margins to end up with the shape/size I want. This is particularly noticeable in the thin tip.
Dust. Lots of it. Need to get a mask. Or cancer, one of the two.
GrimDork wrote: Maybe. I may do something a little different just to be... different... but I may not. How thick in inches do you reckon a fallout vault cog seal would be? Half inch? Whole inch? Whole inch is nearly 5-6 feet thick in scale so maybe start with a piece of foam core for a more reasonable thickness to the door?
Maybe 1/2 to 3/4" - it's a pretty big portal (opening), roughly 1 meter by 4 meters across (from memory) with a fairly thick door as well.
Anyway, discussed it with our family experts (my engineer hubby and son who've both played Fallout as well) and this is what they agree on lmao
So a lot of the actual construction of my piece for this contest is going to be Virtual- I want to really put my new 3d printer (a Micro3D if you want to know- little, cheap, super easy to use but still of decent quality) through its paces, and get used to using it. I'll print the parts in a couple runs, and put them together by hand, including all the necessary cleanup and surface texturing- I may need to either sand or putty over the printing layers near the end... and of course, final painting.
But in any case- I'm going to be making something I'm calling a Dwarfgate- it's Stargate inspired, but with a Dwarven flair- I'm going to be making it to be usable with DnD type modular terrain, as I really, really want to get into tabletop RPGs again/more (seriously, if anyone wants to play an Online, Skype-based game, let me know), so I figur, since I'm probably going to end up being the DM in most of them, I might as well re-purpose my Miniatures hobby into, well, that.
I might as well get some feedback, though- Do you guys prefer Option 1 or Option 2?
Option 1- the surrounding wall is thinner than the 'chevrons'- (which I'm calling Teeth, like the teeth on a gear or cog)
Option 2- the surrounding wall is thicker than the Teeth.
I like both of them, and can't figure out what to do. I suppose I could maybe do cutout windows showing them- heck, it might be possible (probably is, even) to construct this so that the Teeth can spin around inside the wall. The portal itself is going to have a thing printed out too, in clear plastic that I can then paint or whatever.
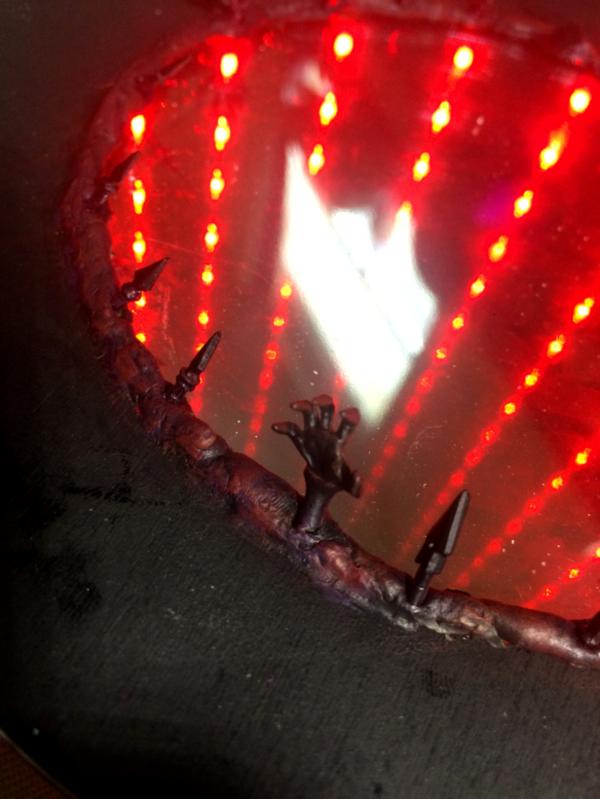
progress... glue has been used...and i started using hot glue to obscure certain structures to generate a plasma cloud like effect for the teleporters...now i just need to know how to paint that effect...
Edit: Vic, those are starting to look like some creepy mechanisms I'd rather not stand anywhere near
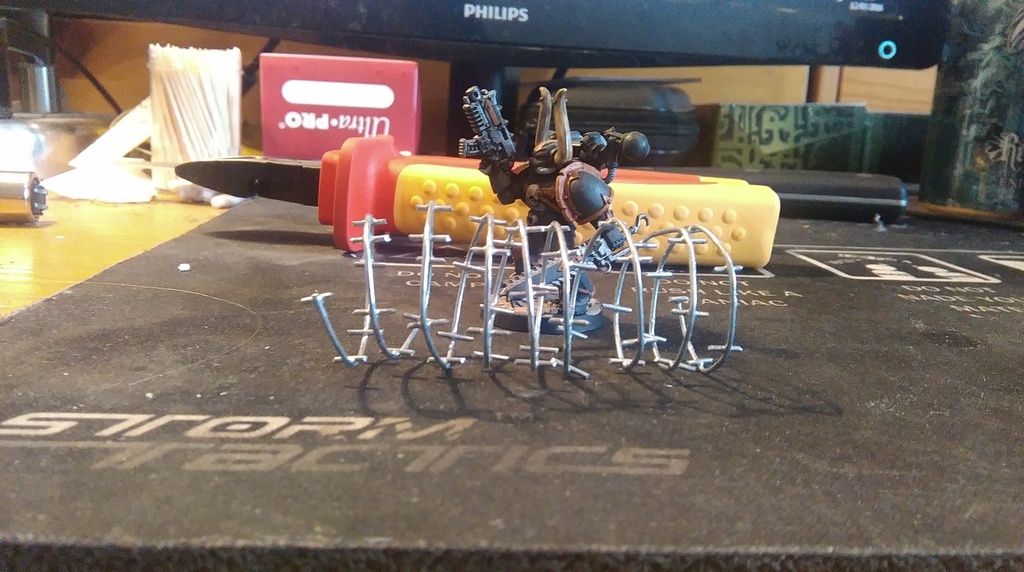
Before I brave my polyfilla experiment I decided to work on some of the details. I thought I'd share with you guys a quick, cheap method of mass producing razor wire. You've probably seen this method before, but it's something our gaming group came up with 'back in the day' and I always liked it for it's simplicity.
First we cut off a strip of some chicken wire fence, nice and roughly.
Then we coil it around something (NOT your fingers, which we used to do as teenagers. The wire hungers for flesh.)
Voila, instant fortifications.
As a bonus, the plastic packaging from the cutters I bought folds over into a perfect Sci-Fi desk so I will be using that to furnish In fact, I may have to pay the store another visit to see what other packaging gubbins I can liberate as there seemed to be a lot of it laying around, discarded.
Edit: Vic, those are starting to look like some creepy mechanisms I'd rather not stand anywhere near
well...actually quite te oposite...the teleporters are meant to be for just running through these small vortex´s...well...either brave or flatfooted^^
the barbed wire is a classic...my only suggestion here would be a thinner pen/ thingy to coil it around...btw...looks like lipstick??? i´d use a pen and then put two sections of barbed wre over each other....that will look MEAN!!!
I may have to pay the store another visit to see what other packaging gubbins I can liberate as there seemed to be a lot of it laying around, discarded.
THAT will be the end of your sanity...been there bought the junk, stored it...now my hobby area looks like a disposal site... i literally can´t go doing groceries anymore without looking for potential materials... ishould do a pic of my most recent stuff what i hide under my desk...and cuboards...and cardboard boxes....and on the floor...
the barbed wire is a classic...my only suggestion here would be a thinner pen/ thingy to coil it around...btw...looks like lipstick??? i´d use a pen and then put two sections of barbed wre over each other....that will look MEAN!!!
It's a cigarette lighter!
But I think you are right. More spikes = better. Sounds like solid logic to me!
Heh- at work we now serve these little applesauce pouches, and the caps are basically engine cowlings for aircraft- It's taking a lot of self-control to not grab a couple (buy them first!) to make myself a Dakkajet or other Orky airkraft.
I find that this sort of knife is good for foam cutting Extend the blade so that it is long enough to do the cutting. And foam cutting will dull the blade quickly too.
Ok so here's a suuuuuper rough outline of what may be going down... Remember folks that we're still in the 'plans are bigger than time to execute them will be but I'm still having ideas!' phase. Anyway.
Supporting structure for the vault-concealing hill. The X has to come out and so was the straight line but now I'm thinking that just making the dotted line come off/out would be enough and may be more doable.
And if I embed it permanently to a board section it may look like this. Watchtower would be more wasteland chic, and only some scatter would be permanently installed. Some kind of water tower at the far end (fence desirable) to offset the height advantage a tower on the far hill would allot one side.
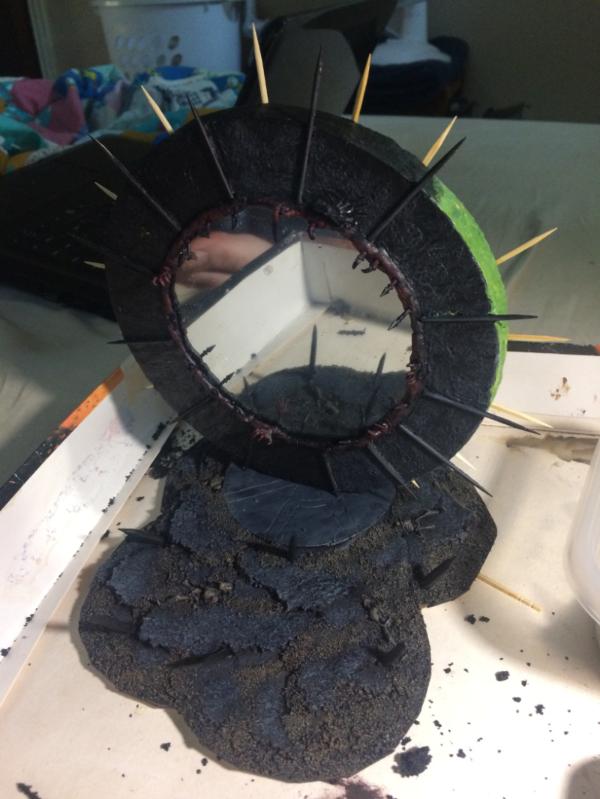
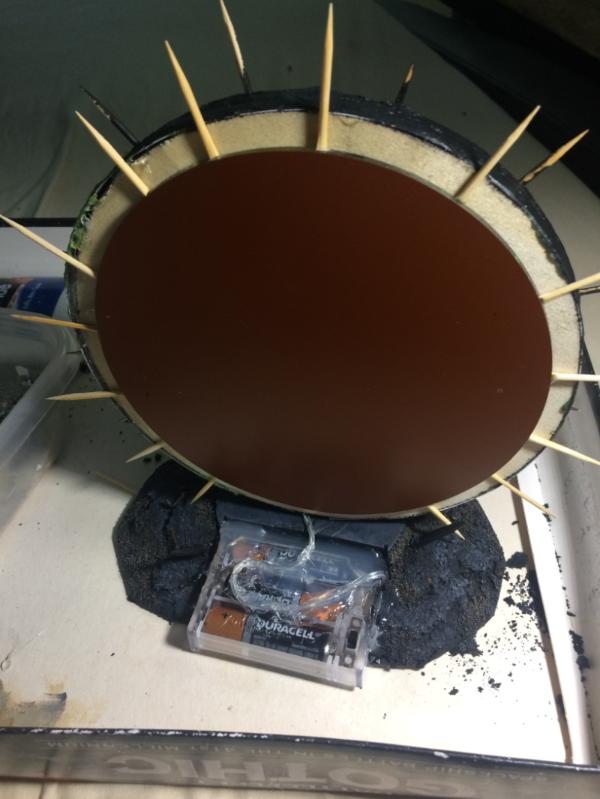
I've carves some sprue into spiky struts to make the posts for the barbed wire fence
Next I've covered this thing in filler to give it a nicer texture and hopefully strengthen it a little. Also installed the spikes (the huge, wonky one was fixed after looking at this picture!)
Once that's all dry, I'm going to cover the outside in filler and stick a bunch of stones to the outside wall to make the whole piece a bit more interesting. Then I've got a tiled floor to fit, and a bunch of gravel / rubble / gubbins to jazz it up. In the meantime, I return to "barbed wire factory" mode.
That's pretty neat! What purpose will the hole/opening serve? Right now the whole thing looks a bit like a sewer drain letting out into a fenced-in cesspit but if you're talking about fitting a tiled floor I'm assuming it's gonna go the building route (which the squareness readily suggests, I'm just running away with the opening).
Thanks TP, feeling better about it now I've done my filler experiment and gotten a nice shape together.
Grim, the opening is going to be the remains of an old entrance. I'm making terrain for a hot, wasteland world and I figure whoever used to use these dwellings before the war broke out had a thing for circular doors. I'll probably craft half a hatch door to put on the ground inside, all twisted up, or with a hole blasted through it.
Anyone know if a thick layer of filler will hold small stones in it? I was thinking of slapping PVA on the back of them before I press them in. I don't want the stones to be constantly falling out!
Edit: I'll do a small test piece to see how well it holds the stones. If it works, I'll have a nice little cobblestone wall.
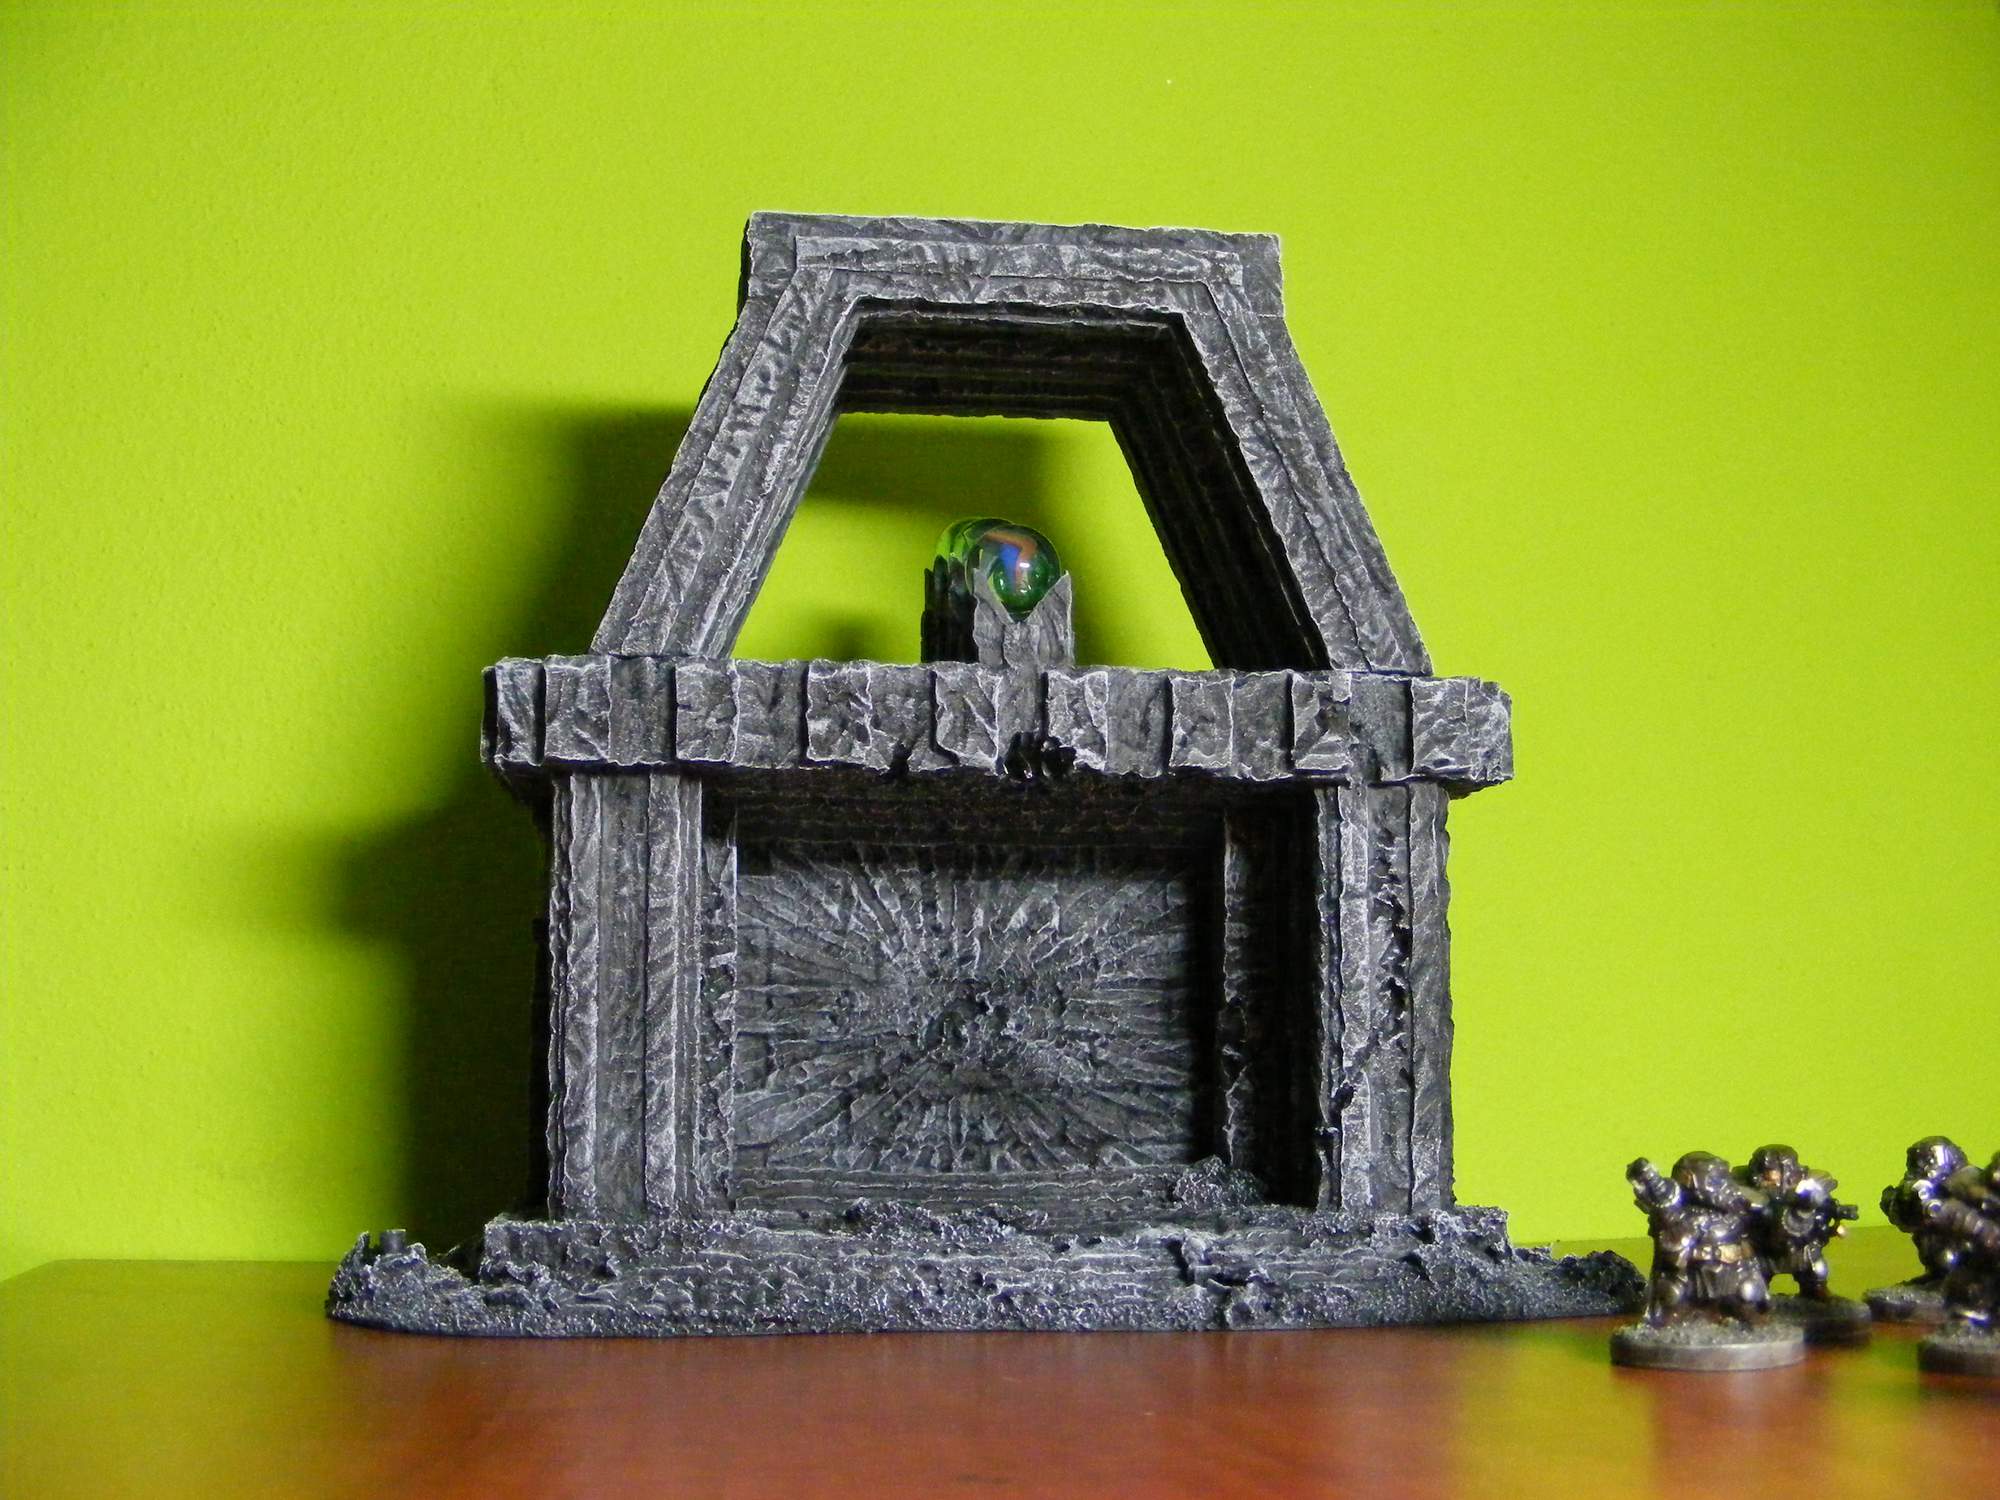
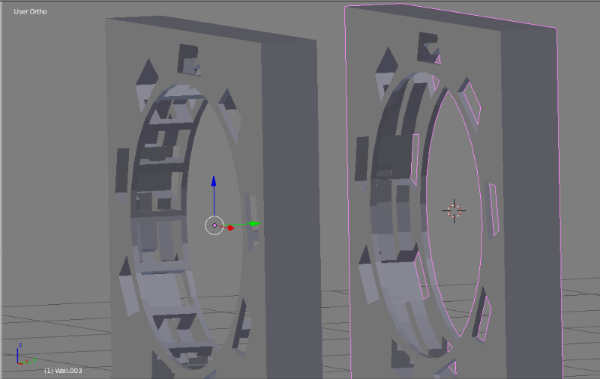
Having some fun with Boolean tools in Blender. I'll post some more picks in a bit, but suffice to say that I don't think I'll do the fancy thing and make it spin. It will be modularly constructed, though.
I'm looking forwards to all the fancy little details that'll be on this guy- inset runes, stone block wall textures, all that.
Not much progress, but just wanted to post something to show I’m still alive and in this.
Put new batteries into my hot wirecutter, and they did the trick! Warning: those things get hot. So now that I have my tools in order, I’m going to get to work on cutting some rough shapes out and get moving.
´m currently building a raised platform for the kids to sleep upon...i am still on the job with my entry...fear not... got everything primed too...just need to find time and space to really get going with the painting...^^
inmygravenimage wrote: Great to see what yall are up to! Remember, though there is plenty of time left, it does run away like... Tears... In the rain
OK, who’s going to do their portal as Tannhäuser Gate?
For those who don’t make the connection:
Spoiler:
I've seen things you people wouldn't believe. Attack ships on fire off the shoulder of Orion. I watched C-beams glitter in the dark near the Tannhäuser Gate. All those moments will be lost in time, like tears...in...rain. Time to die.
Awesome =D <3 blade runner
Really need to actually get something started here - but at least I found my Malifaux book! (Inspiration source)
inmygravenimage wrote: Great to see what yall are up to! Remember, though there is plenty of time left, it does run away like... Tears... In the rain
OK, who’s going to do their portal as Tannhäuser Gate?
For those who don’t make the connection:
Spoiler:
I've seen things you people wouldn't believe. Attack ships on fire off the shoulder of Orion. I watched C-beams glitter in the dark near the Tannhäuser Gate. All those moments will be lost in time, like tears...in...rain. Time to die.
Rutger Hauer improvised that, from what I hear. His best role, IMHO.
Just re-watched Blade runner. Appreciated it more this time as I've been reading a lot of various Detective/PI+ style books (Detective that is also a wizard, detective that happens to live in fantasy world, etc etc) and the narration and flow of it resonates more now than it ever used to.
I'm struggling a bit here guys, I have a strong suspicion that I'll either be downsizing or switching Ideas before the end. I still really want to make a vault and a whole wasteland board but work has picked up as it always does this time of year. I've also got some other projects that have snuck up on me, trying to hammer out some models for the tail end of a Pulp Alley campaign.
Poor old rig won't support FO4 so I'm not as familiar, though I do recall seeing one built straight down into the ground. I want to make the big scenery piece, but not really to rush it, so I may just have to find a smaller project for now.
You could always just do the Door itself GrimDork, leave the surrounding bit off for now.
I'm having a bit of trouble myself. I want to do this idea for Malifaux, the Great Breach, but i'm not sure my skills are up to it. I haven't had a chance to put much together yet, but we'll see.
Automatically Appended Next Post: And thus it begins (finally lol):
Well some nice work going on as per usual, some great ideas. And Grim, easy enough to make it a smaller flat piece for now, but later on lift it up and mount it in a cliff. For now just do its base as a concrete slab, then when you want to later lift it, it just becomes part of the cliff face.
Well here we go another LoER Terrain Competition.
Base...
Bit of stuff and some paint....
Bit more stuff and some paint....
A quick word on stuff!
This may be old news and I have just missed it before.
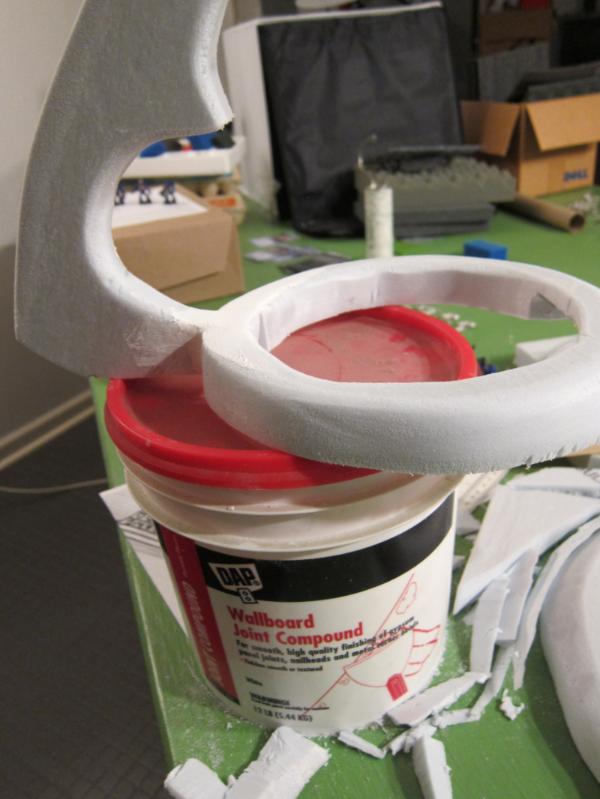
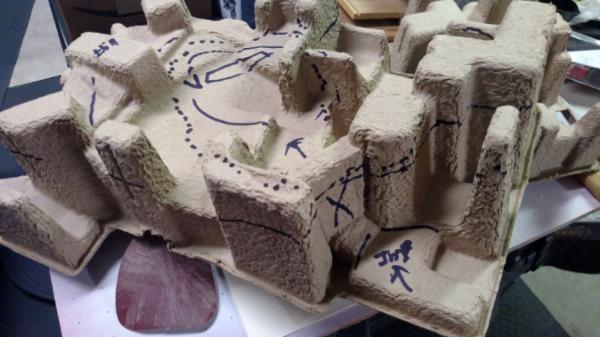
One of the stuff I am using this time was an accidental wonderment. I was going through some boxes and found a container I had some Air Drying Clay in, thought I would do a little sculpting, however the clay was rock solid. I thought well I will do it like and old master and carve it out of the block, but when I started carving this happened....
And in place with abit of PVA...
I think it looks spot on for rubble dust and rough stuff. Now I would not say necessarily let some go hard, but to be honest you could. But if you have a lump that has gone hard, this works fantastically. Nice mixed grade.
I use that all the time. Air Dry Clay is amazing for doing stonework- you model it into rocks when wet, and as it hardens it makes amazing little cracks along the edges, too.
Can I check. I don't think I am gonna be able to take part (maybe) but if I wanted to build say a tunnel entrance that concealed a door (portal???) that leads to a long-forgotten chamber. Would that count? I've got this model I want to paint and it would look awesome with a dio base and I have this plant pot staring at me and begging to be made in to something. Opinions?
Oh boy Cam - cut away from your thumb please.... What with that and your flamethrower technique for bending plastic - very ouchy !!!
Great work though (everyone...) I wasn't going to enter this round but I'm starting to have a few ideas of usable pieces of terrain that would fit the theme (just...) Hmmm... know to decide if I have the time to start 'another' piece...
That's actually correct paring technique- it gives you enough control when making little shaving or cutting motions that you're actually safer cutting towards your thumb that way.
GrimDork wrote:Wonder if that would work with my daughters deceased play dough...
Looks awesome Cam. Though it was neat before the lightning but now... Fancy.
I'm having ideas still, will certainly try to come up with something.
Do it!
TP^DC Deputy Manager wrote:Can I check. I don't think I am gonna be able to take part (maybe) but if I wanted to build say a tunnel entrance that concealed a door (portal???) that leads to a long-forgotten chamber. Would that count? I've got this model I want to paint and it would look awesome with a dio base and I have this plant pot staring at me and begging to be made in to something. Opinions?
Yup, fine with me
Ruglud wrote:Oh boy Cam - cut away from your thumb please.... What with that and your flamethrower technique for bending plastic - very ouchy !!!
Great work though (everyone...) I wasn't going to enter this round but I'm starting to have a few ideas of usable pieces of terrain that would fit the theme (just...) Hmmm... know to decide if I have the time to start 'another' piece...
Wow, this round is really taking off in fire-bending, plasma-glue style. Kudos all around.
I've been holding off committing to this competition, mostly because I wasn't able to finish the last one. But, I've made enough progress and had enough catastrophic failure that I'm confident I can finish before the deadline. So here goes:
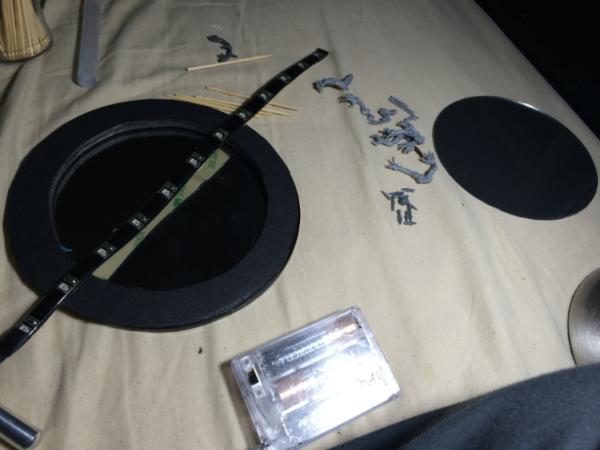
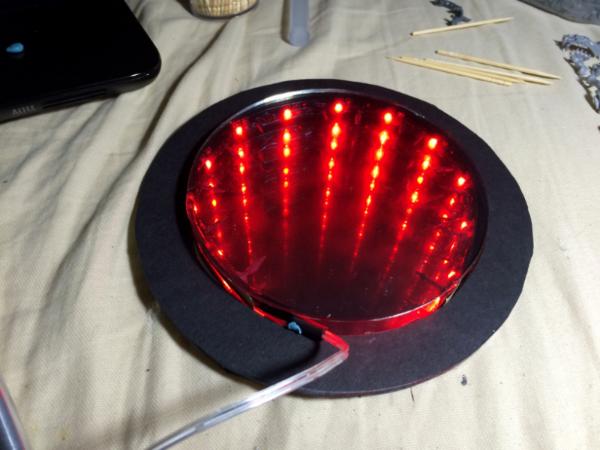
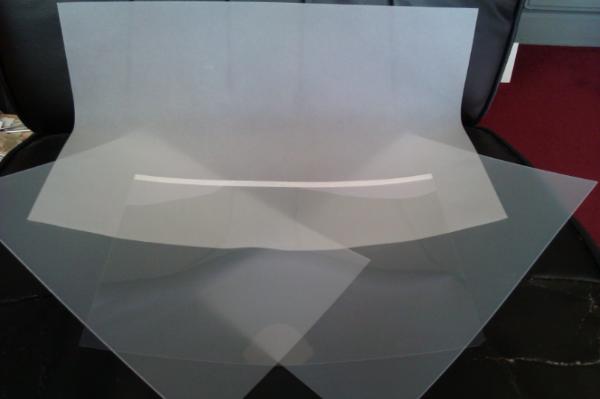
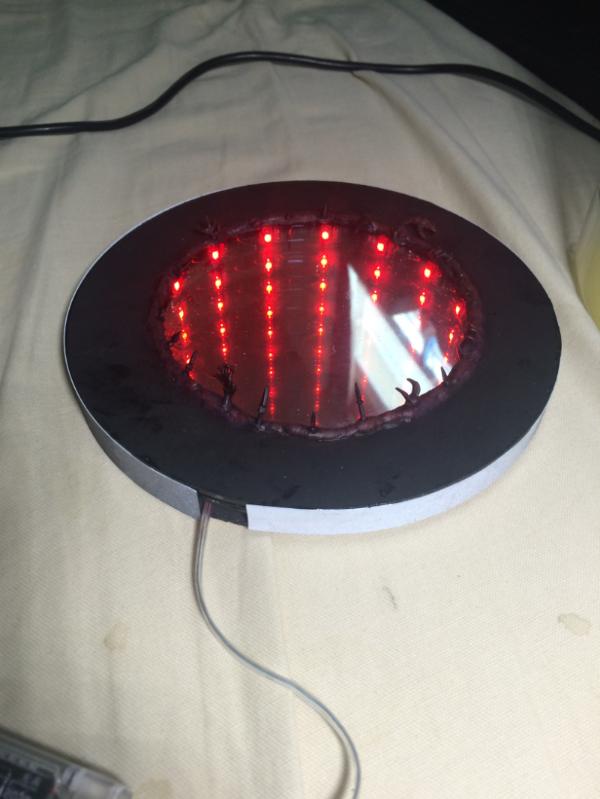
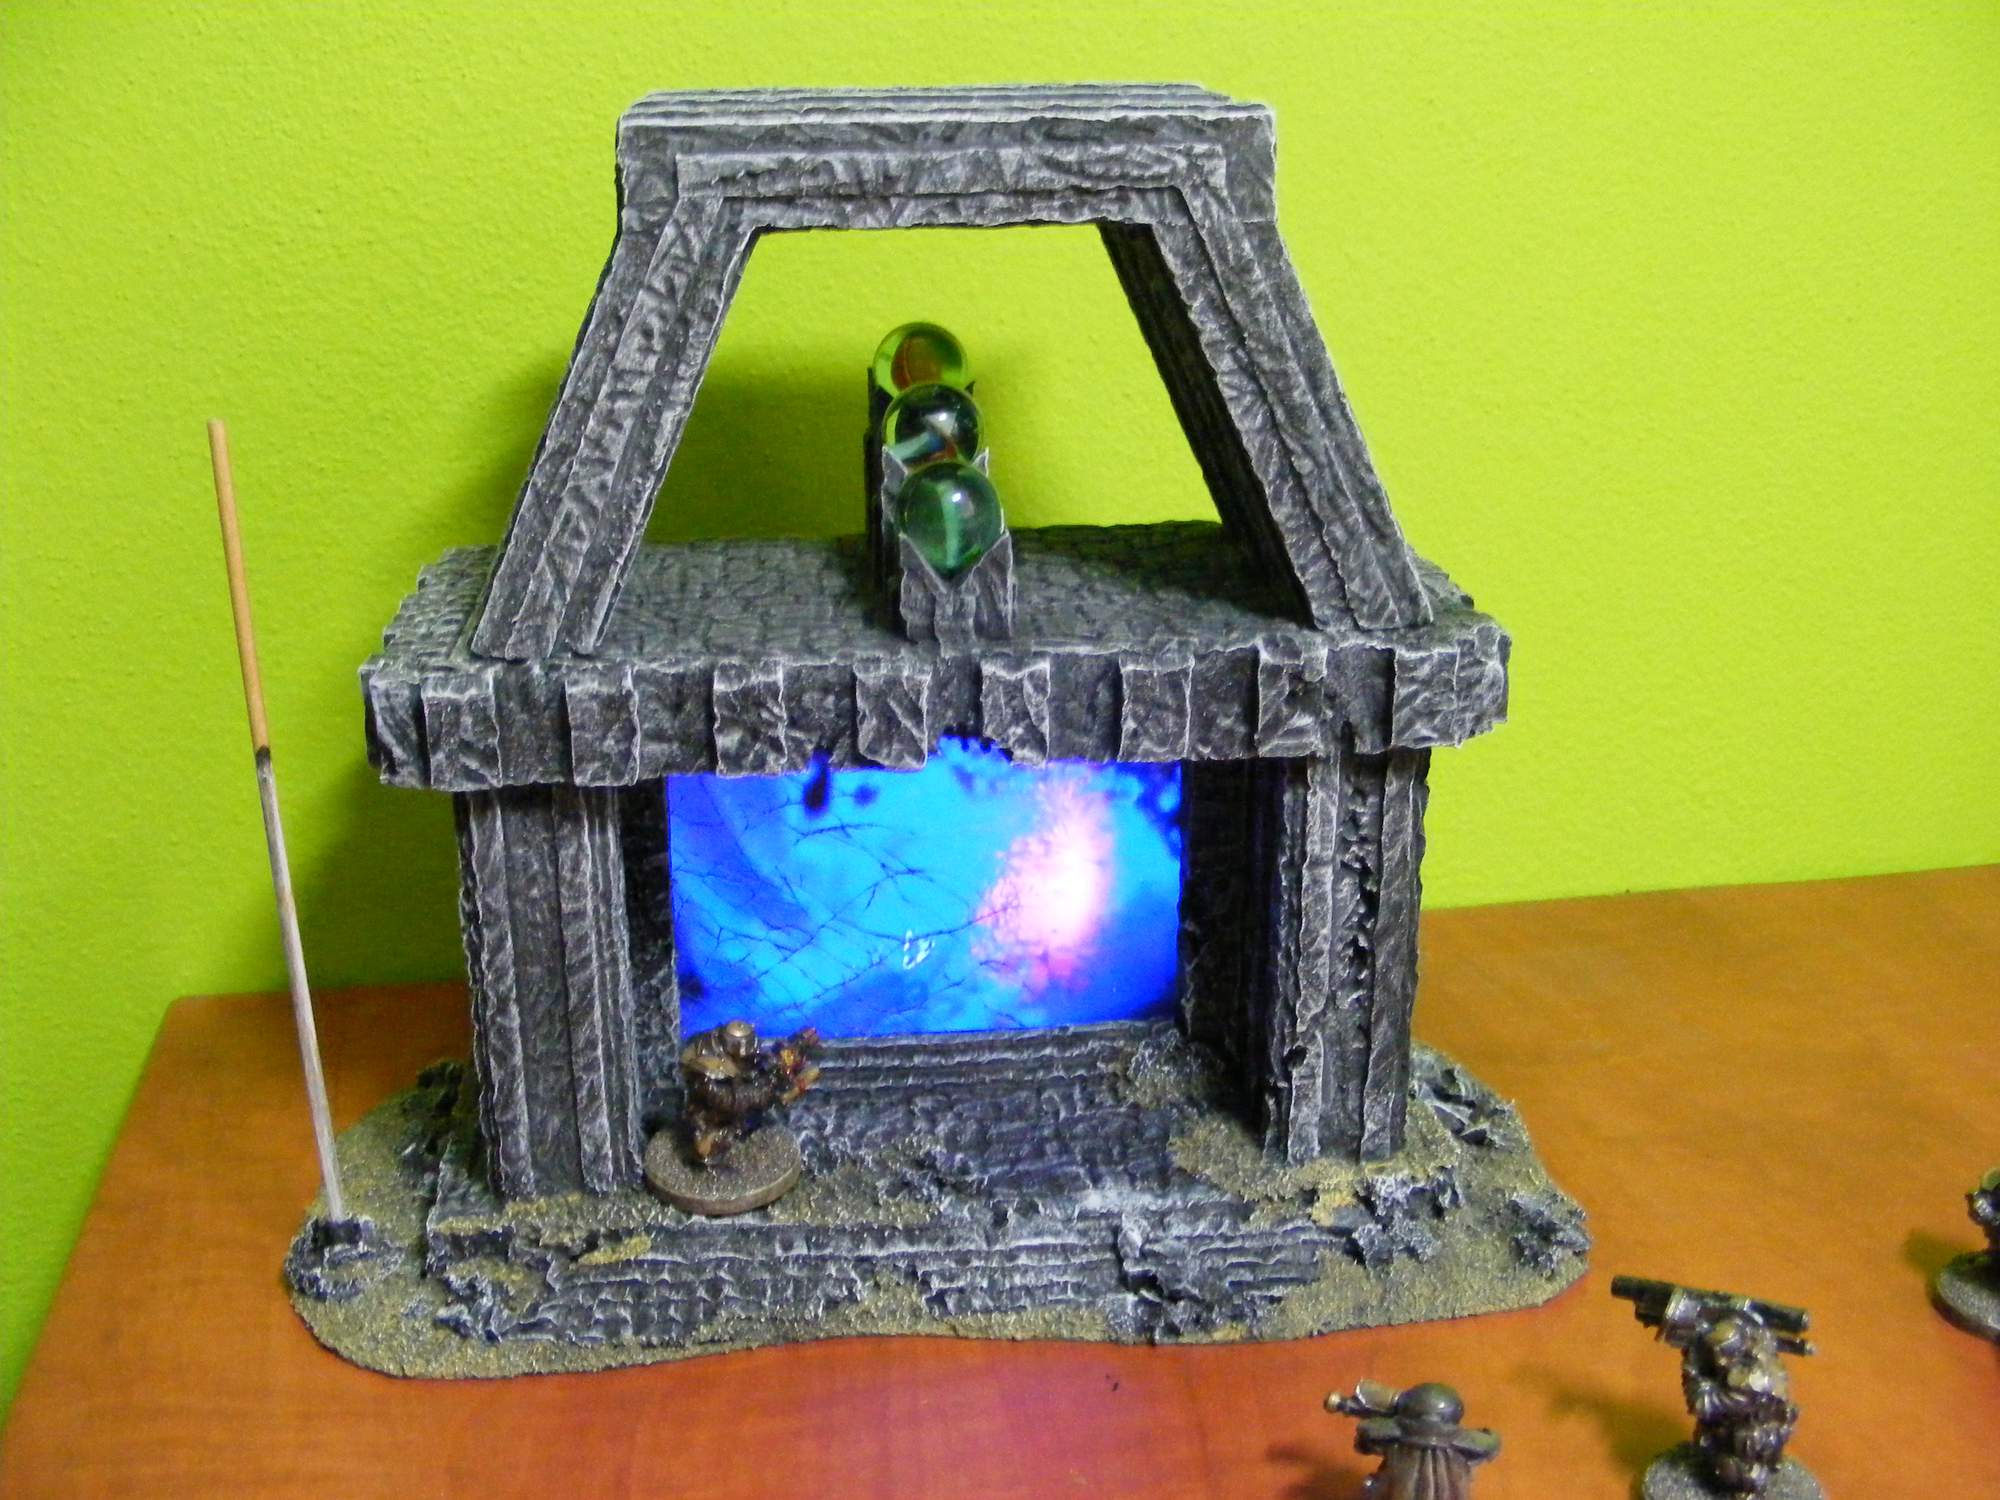
The effect I'm going for is called an infinity mirror. I started with a mirror, a string of LED lights, and a piece of glass with mirrored tint on it. Stack them all together, and the reflections of the LEDs creates a tunnel-like effect that appears to be several feet deep, despite the whole apparatus being only about an inch thick. Mock-up pictured below.
Spoiler:
Once I had the idea working, I cut some thin wood discs to hold the whole thing (it'll be about 6 inches across all told) and secured the mirror and the LEDs. The epoxy is drying on the tinted glass as I type, and we'll see where it goes from there.
Cutting towards myself is almost the only way I'll do it. Better results, and usually more control. Unless I'm applying a ridiculous amount of pressure of the order that can break the tool I'm using (like trying to use an xacto to cut a thick-ish arm on a metal model, for instance), in which case I'll be applying that ridiculous pressure directly away from myself.
Cutting towards yourself the wrong way is definitely bad, and there's always some risk when doing it 'properly' but there are some things that just pretty much don't work for me unless I'm doing them that way.
Having some board ideas, may be able to work a portal into one of them. We'll see how things time out.
That infinite light hole is awesome. If you wouldn’t mind doing a step-by-step tutorial, I’m sure it could be used for a variety of projects. I’m getting a Star Wars power core vibe off of it myself. Just need a walkway violating a few safety regulations and a pair of duelists and you have an epic diorama right there.
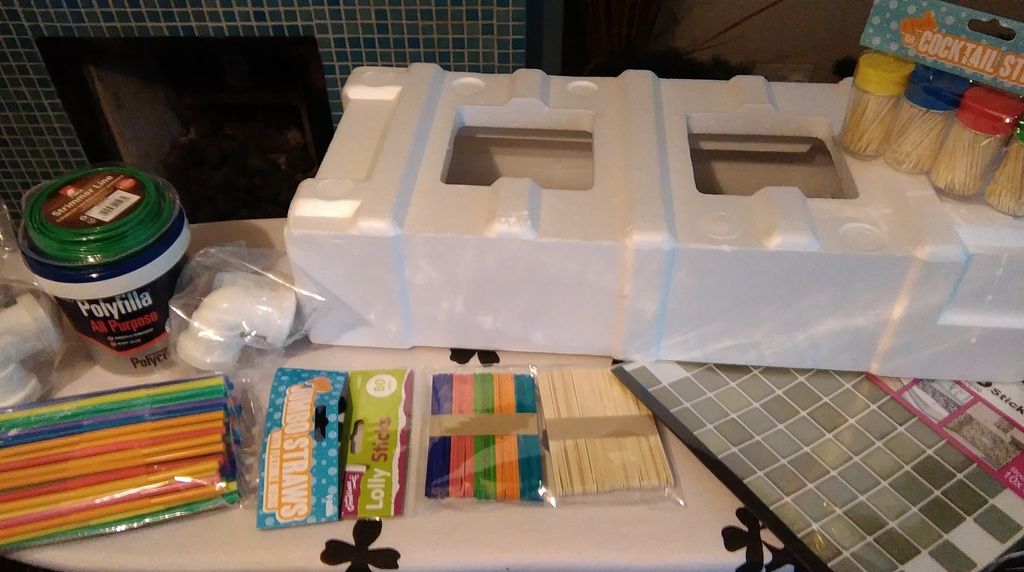
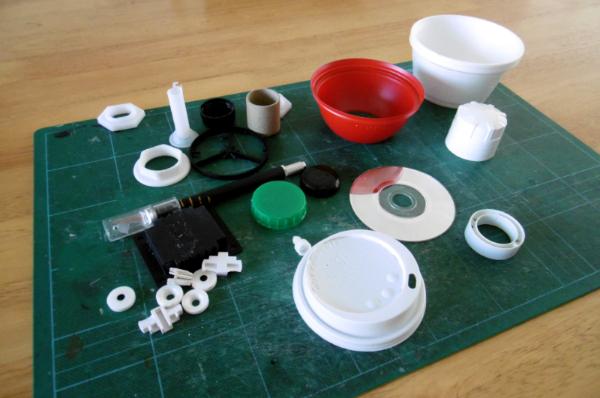
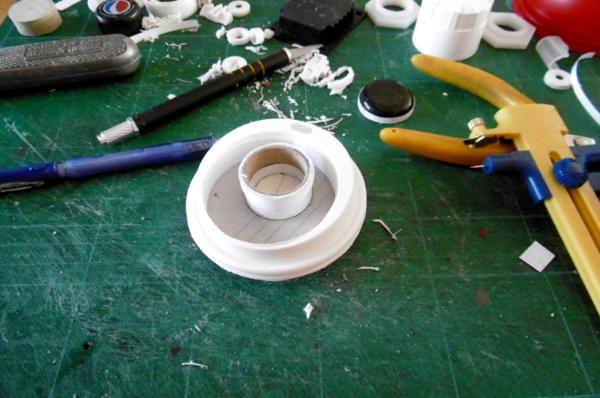
Well, here we go... pulled together some useful bits - likely wont use them all, but we'll see...
Main build so far uses a coffee cup lid, thick card tube (from a roll of aluminium foil) and some card of various thicknesses and a plastic lid from an empty tube of make-up (the wife's make-up of course...)
Inspiring work guys. Haven't been in the hobby zone for a good week now, one of these days when things slow down a bit.. Nice to see everyone else chug chugging along though
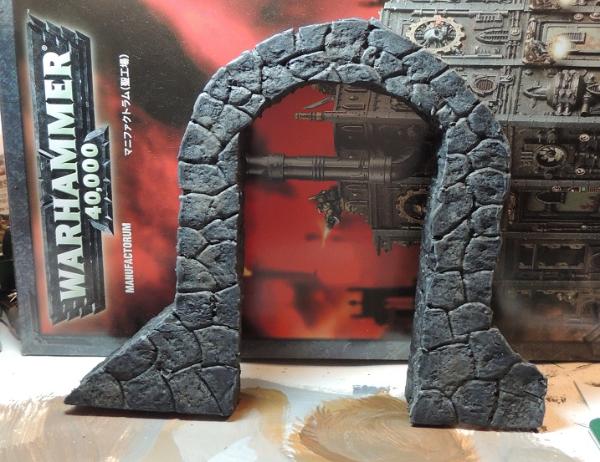
just a quick wip on the stone portal arch - got some background in mind but going out of town this weekend so no hobby time. Now that I've finished a couple other projects tho I should really be able to focus on this one and get some progress
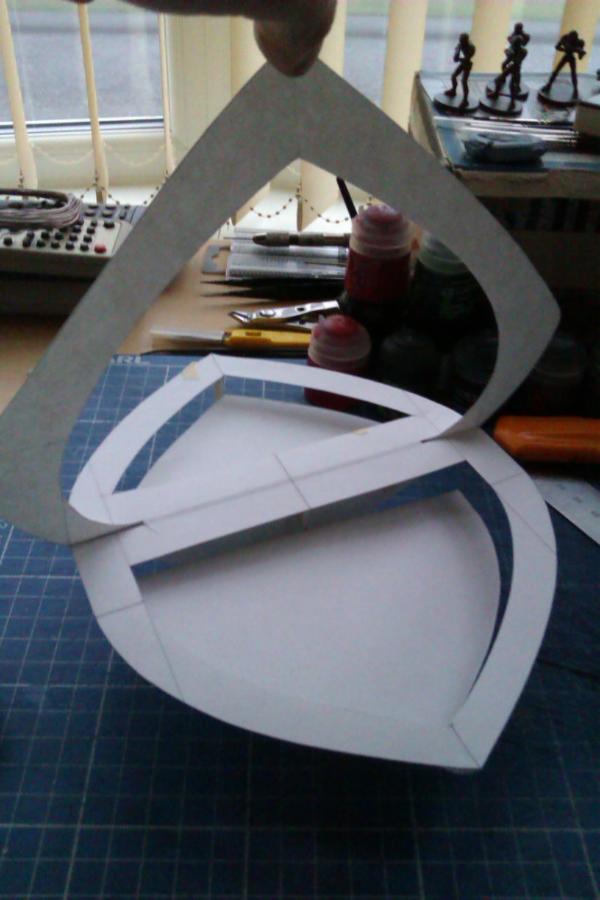
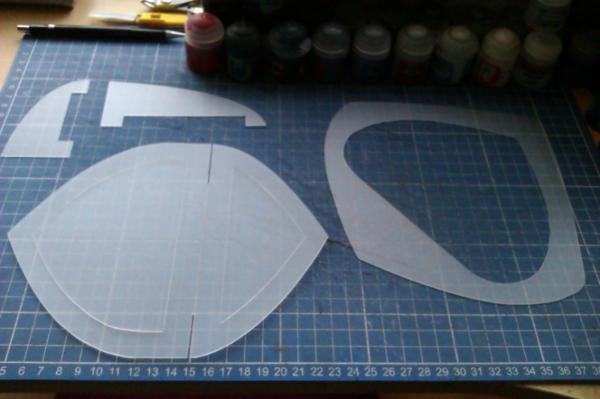
I may be making another attempt at trying to finish for once. The basic idea would be a webway gate/stage portal to go with my monochrome Harlequins so I'll be using mostly clear or slightly translucent materials so it looks like a glass or crystalline structure.
Spoiler:
- Frosted polypropylene, acetate and tracing paper for the main structure of the gate.
- 3D effect paper. This would be used for the actual gate, I also have some in clear and blue tint.
I'm not entirely sure if this is even eligible as there would be a minimal (if any) amount of actual painting involved.
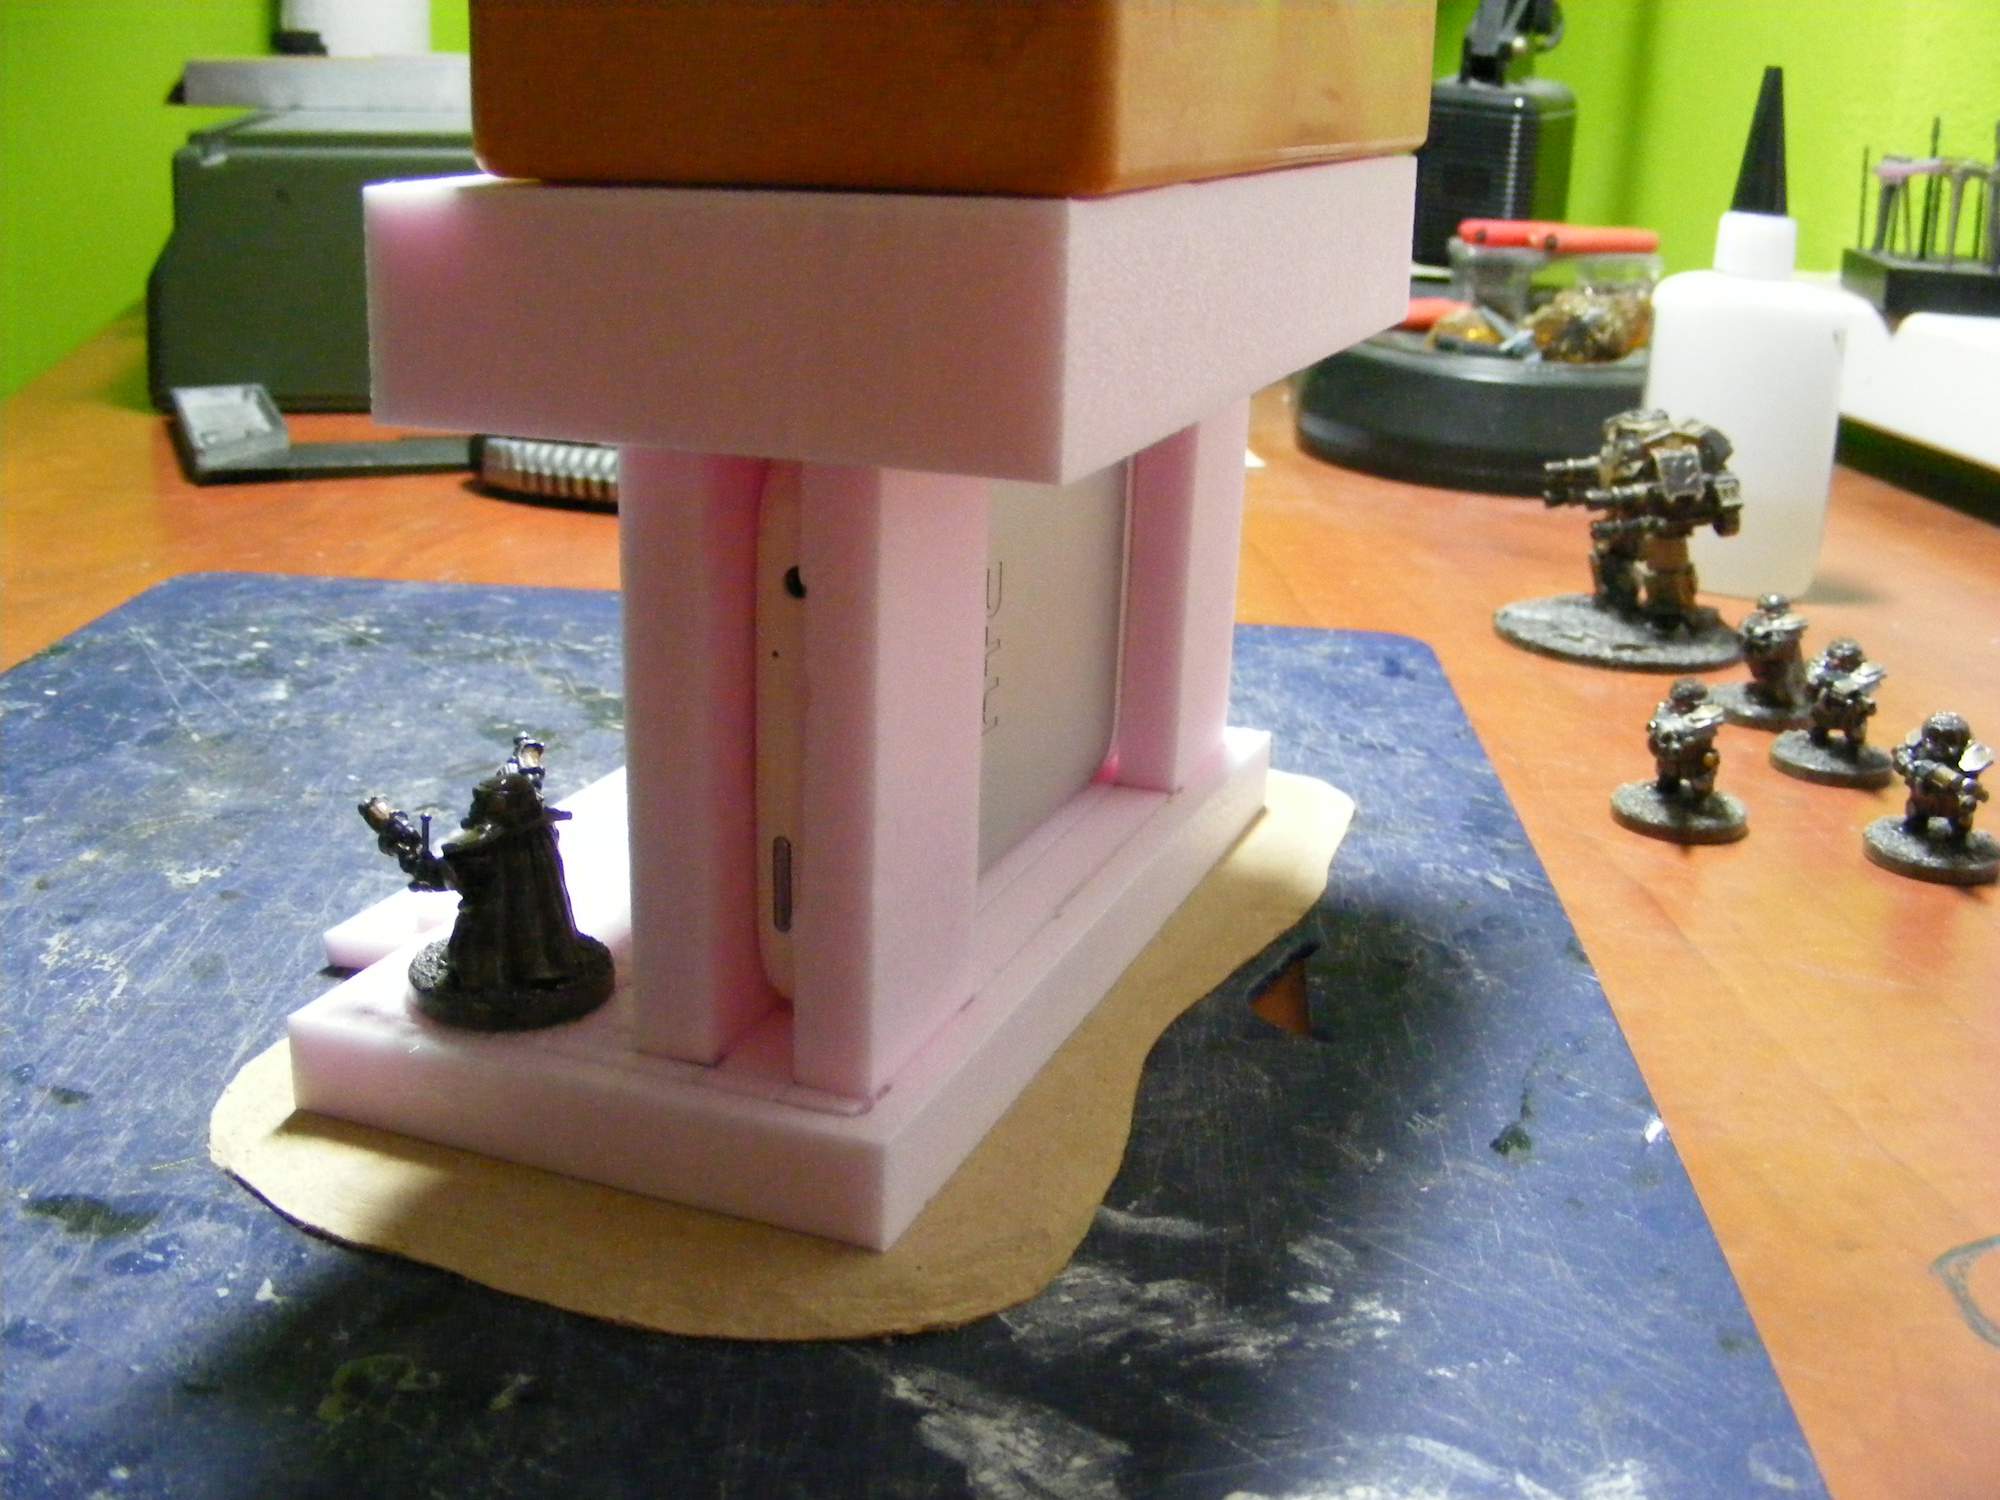
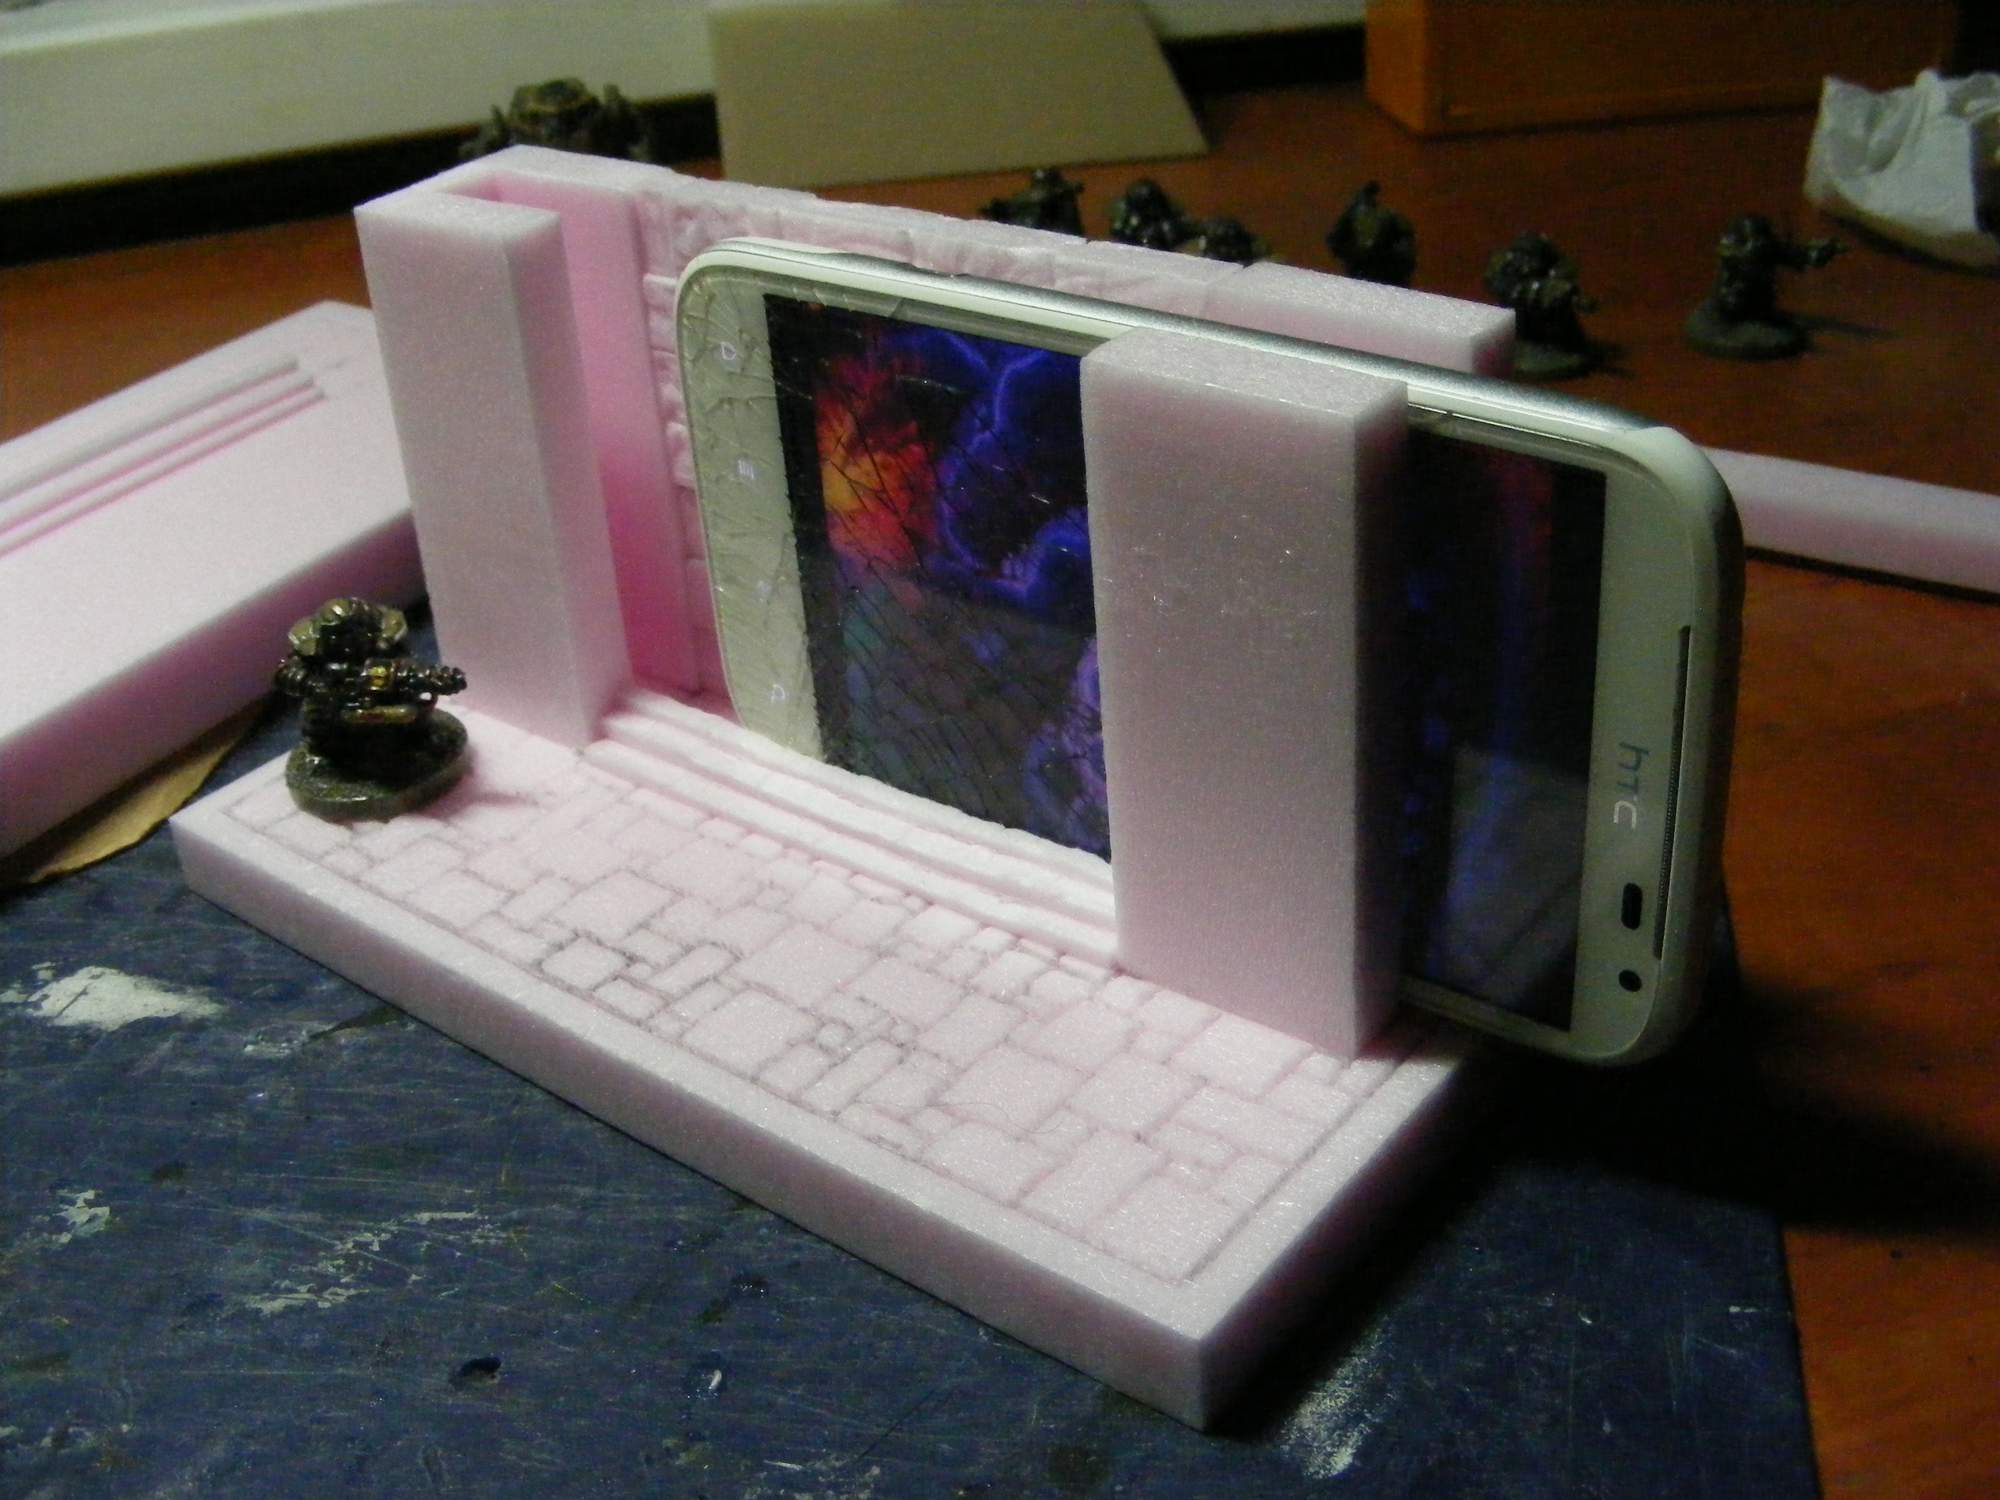
Dawi have good speed with construction... Damm only shame is, I have no demon for scale. It will look fantastic, how go out from rift.
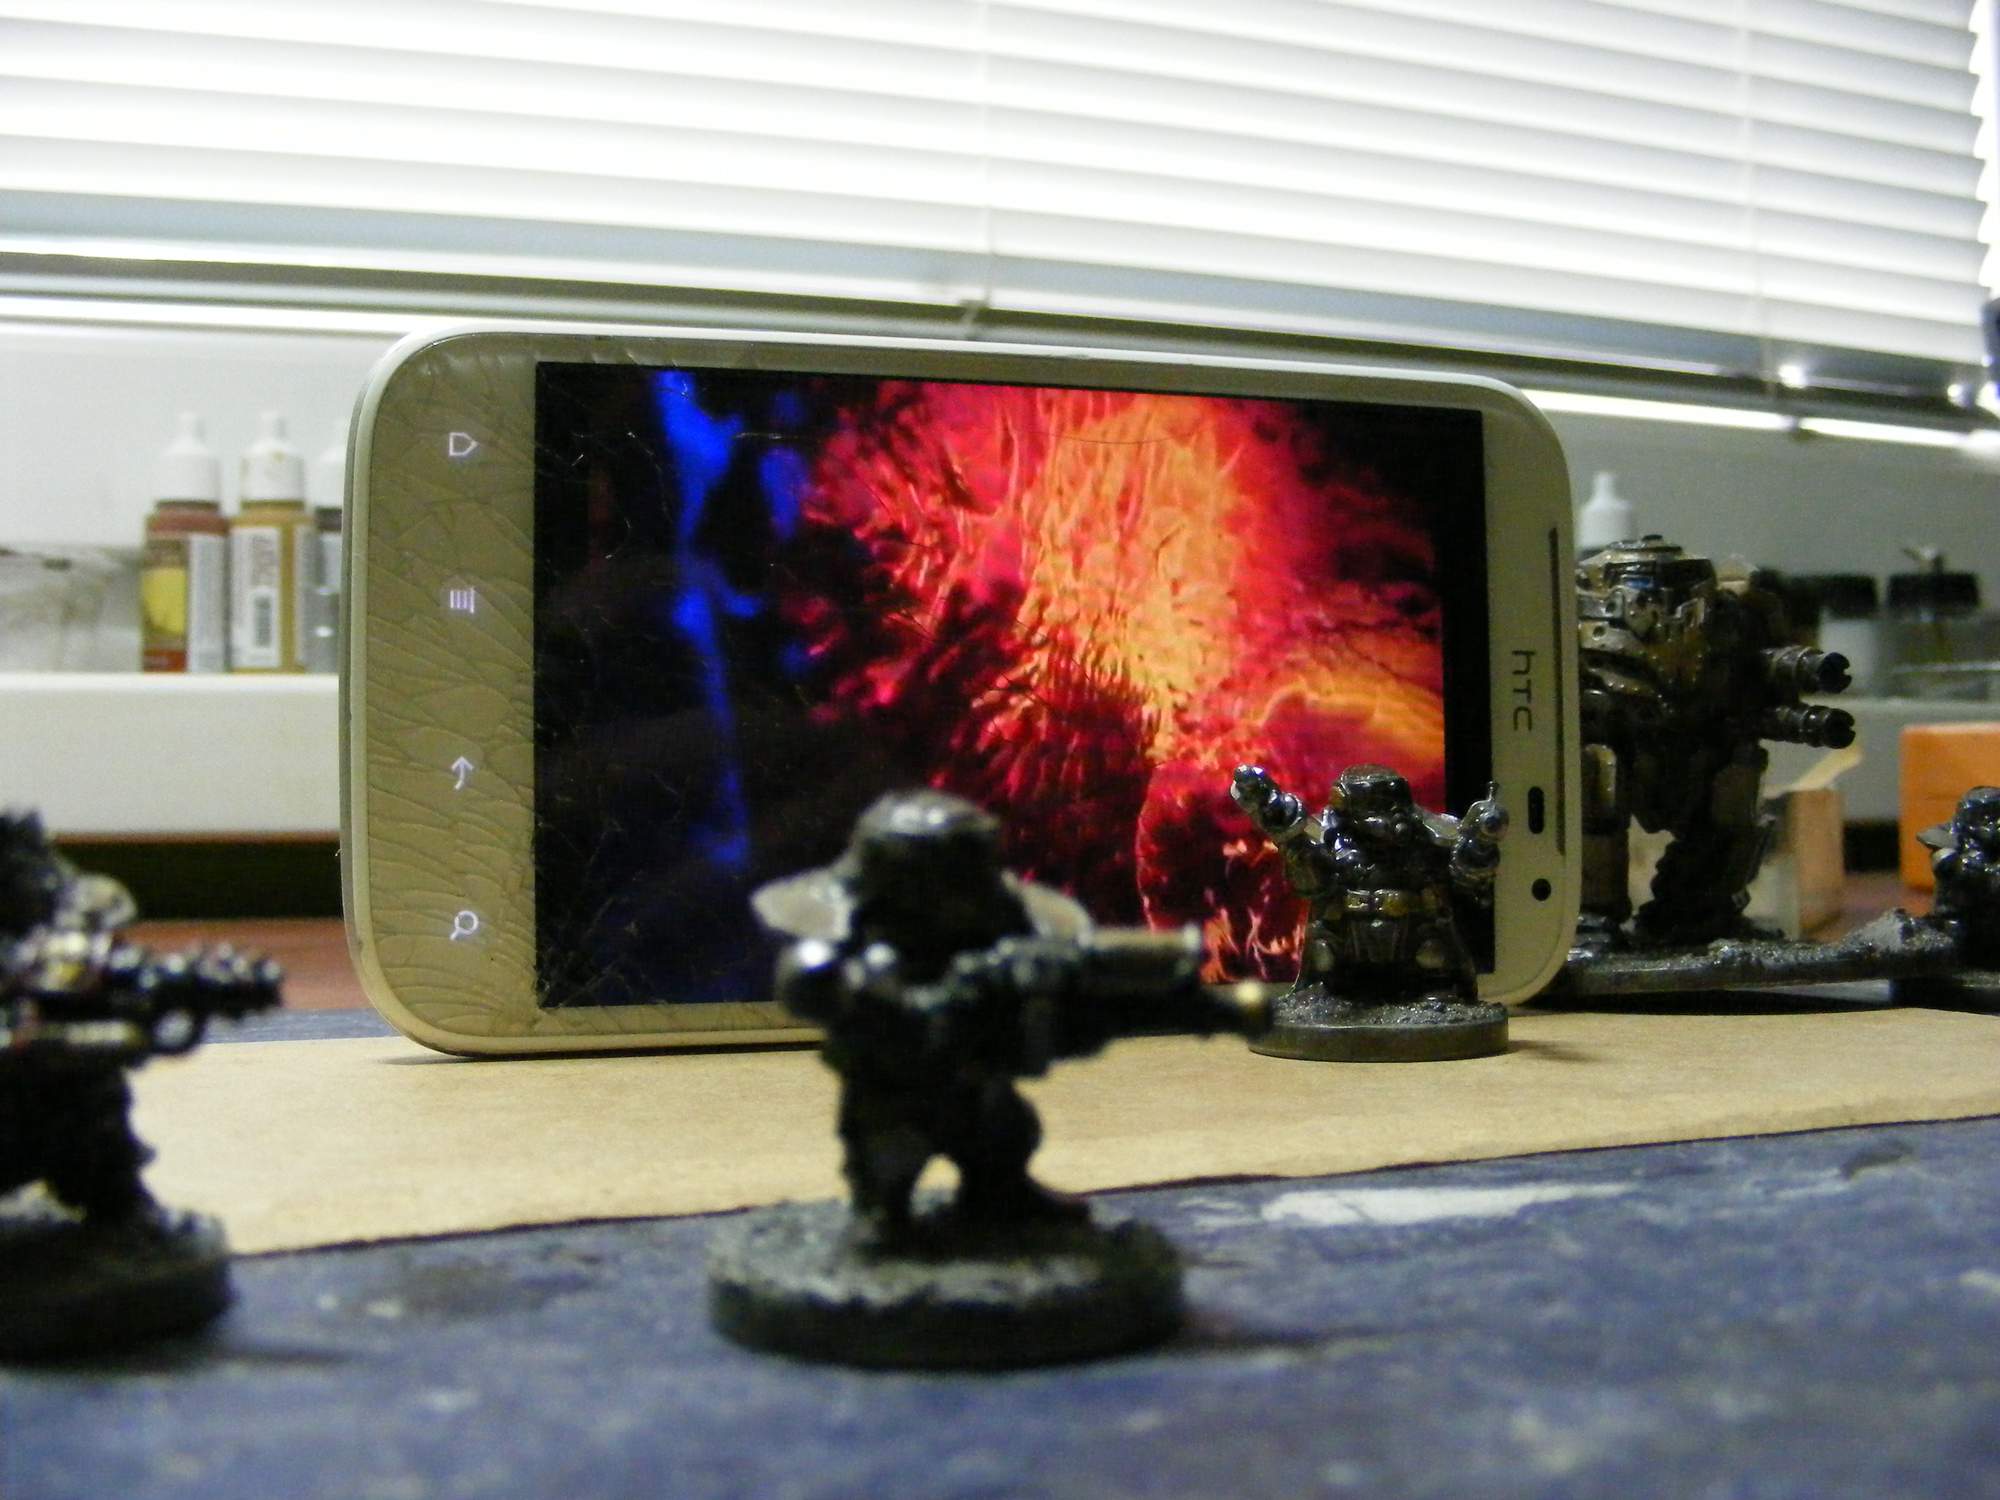
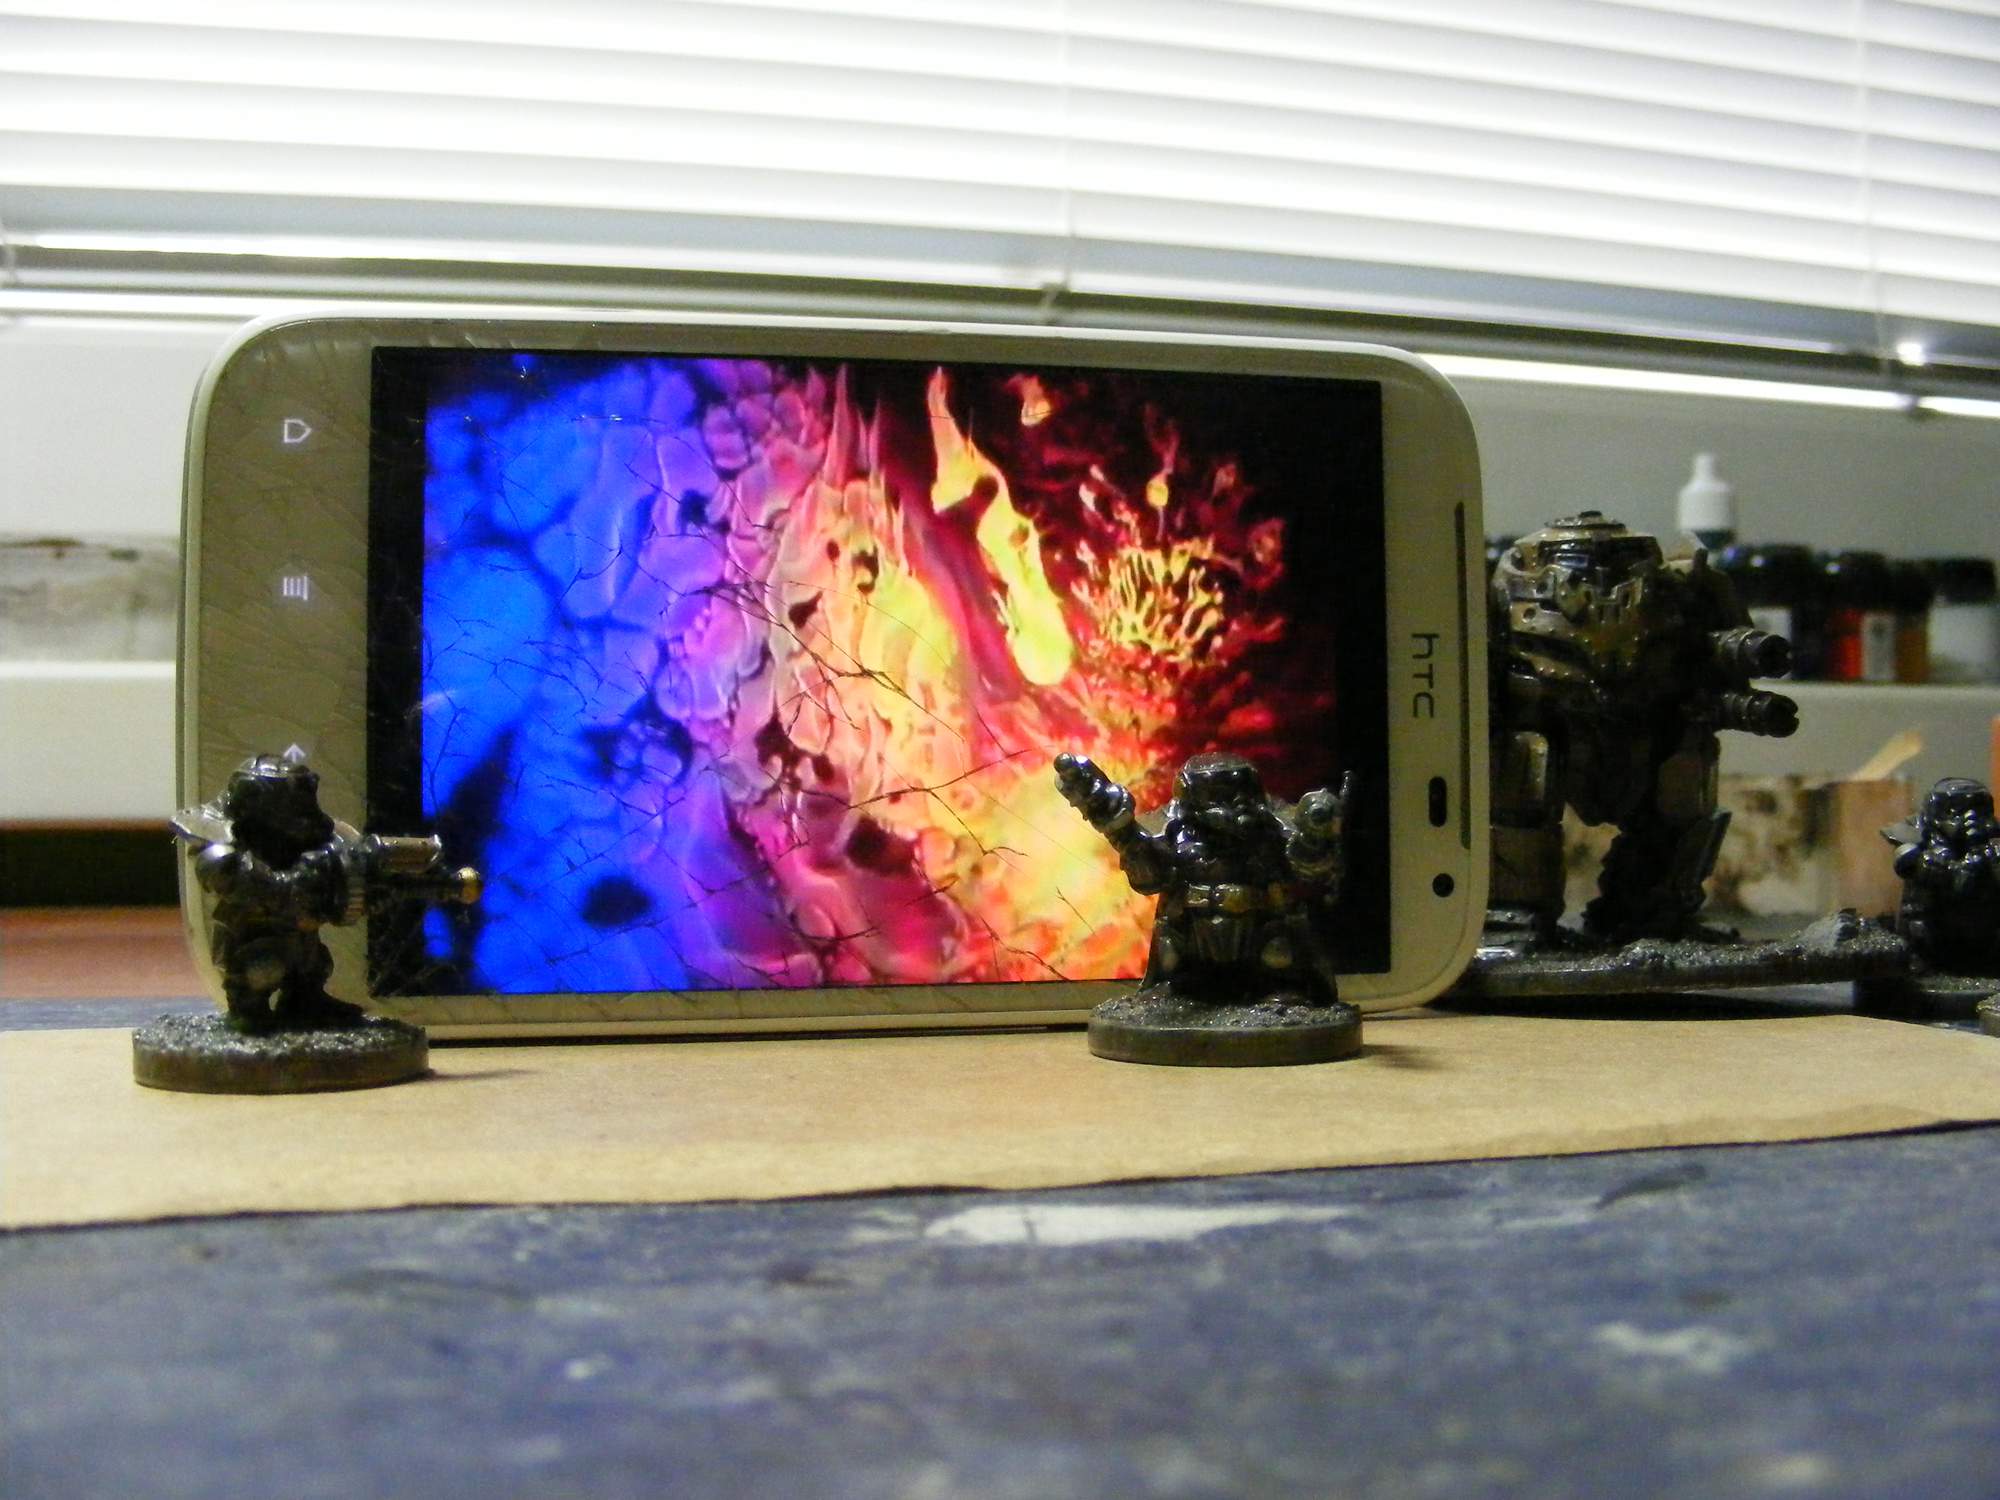
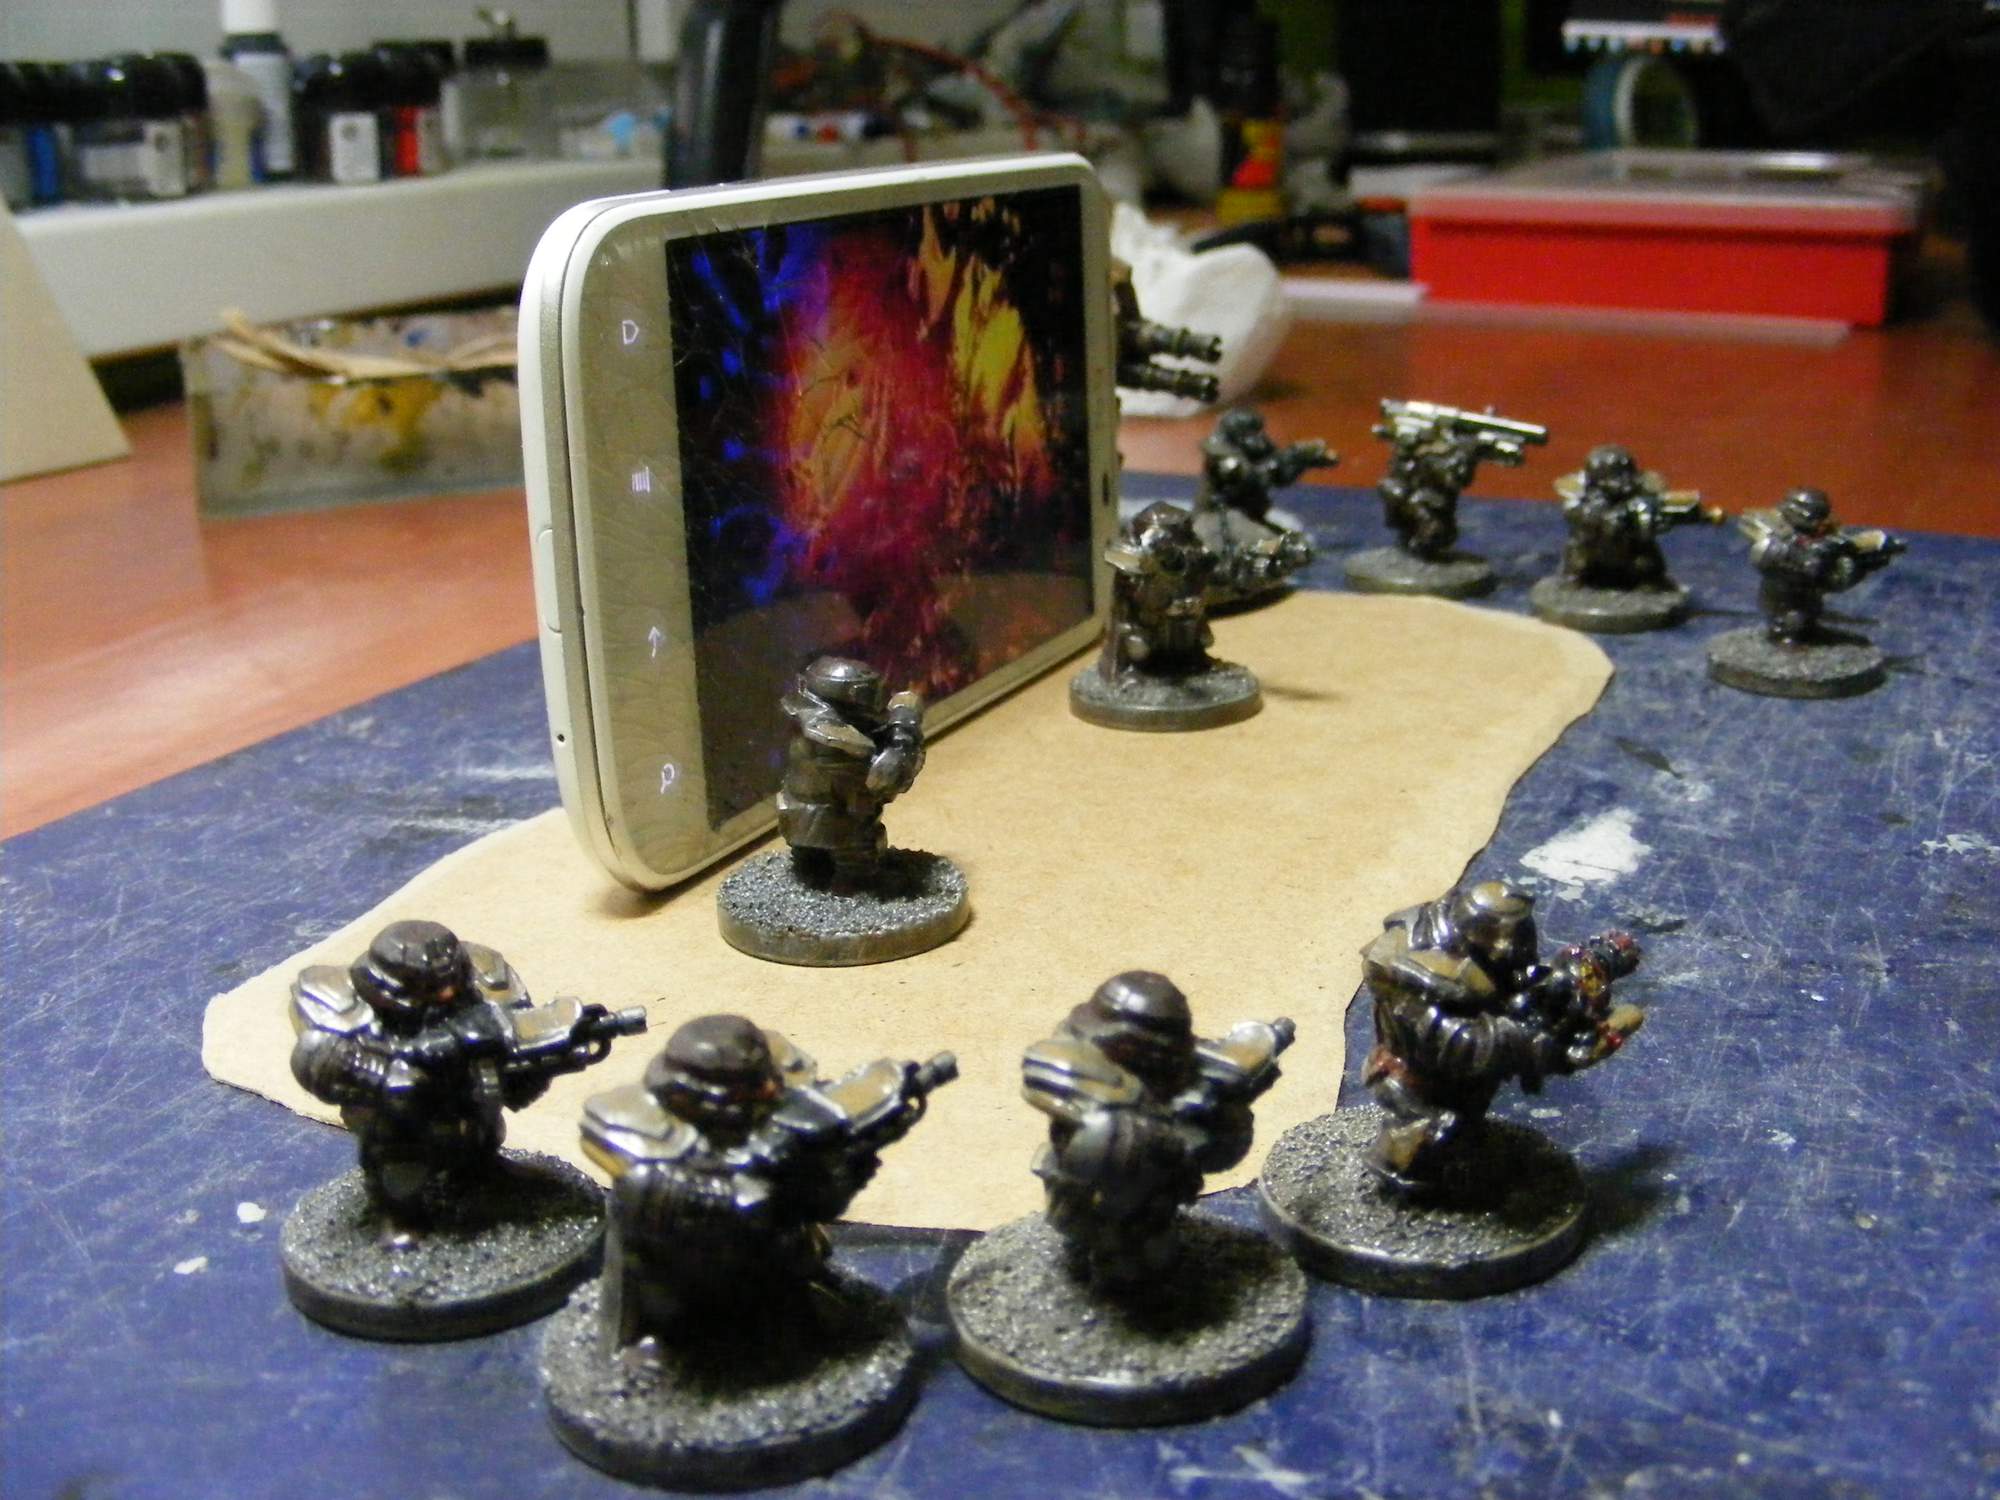
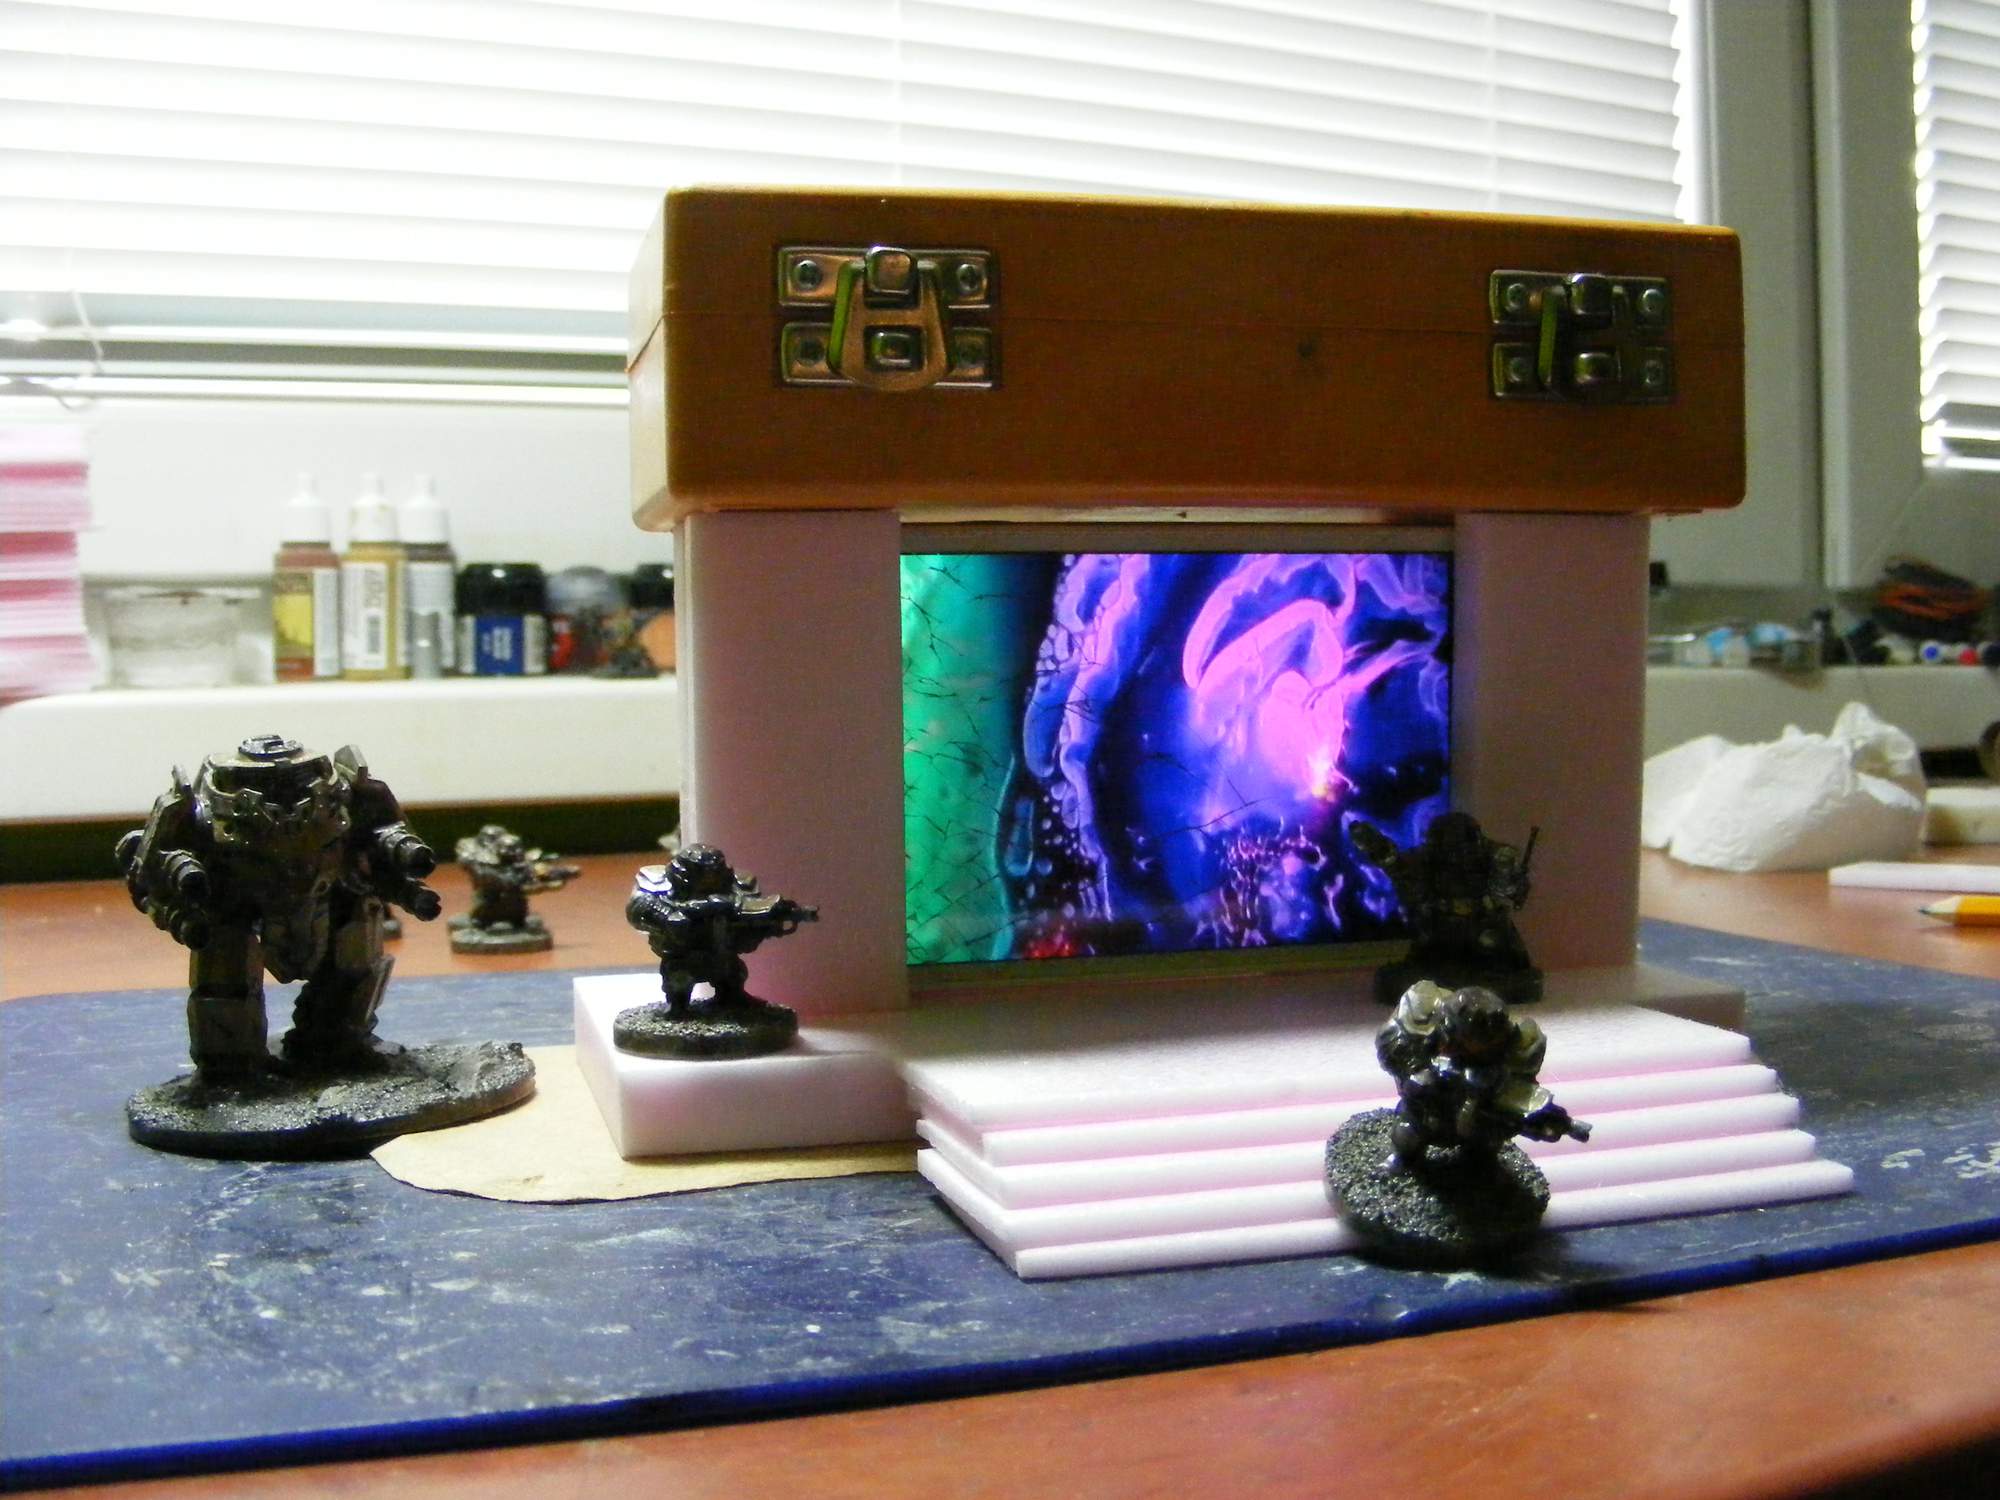
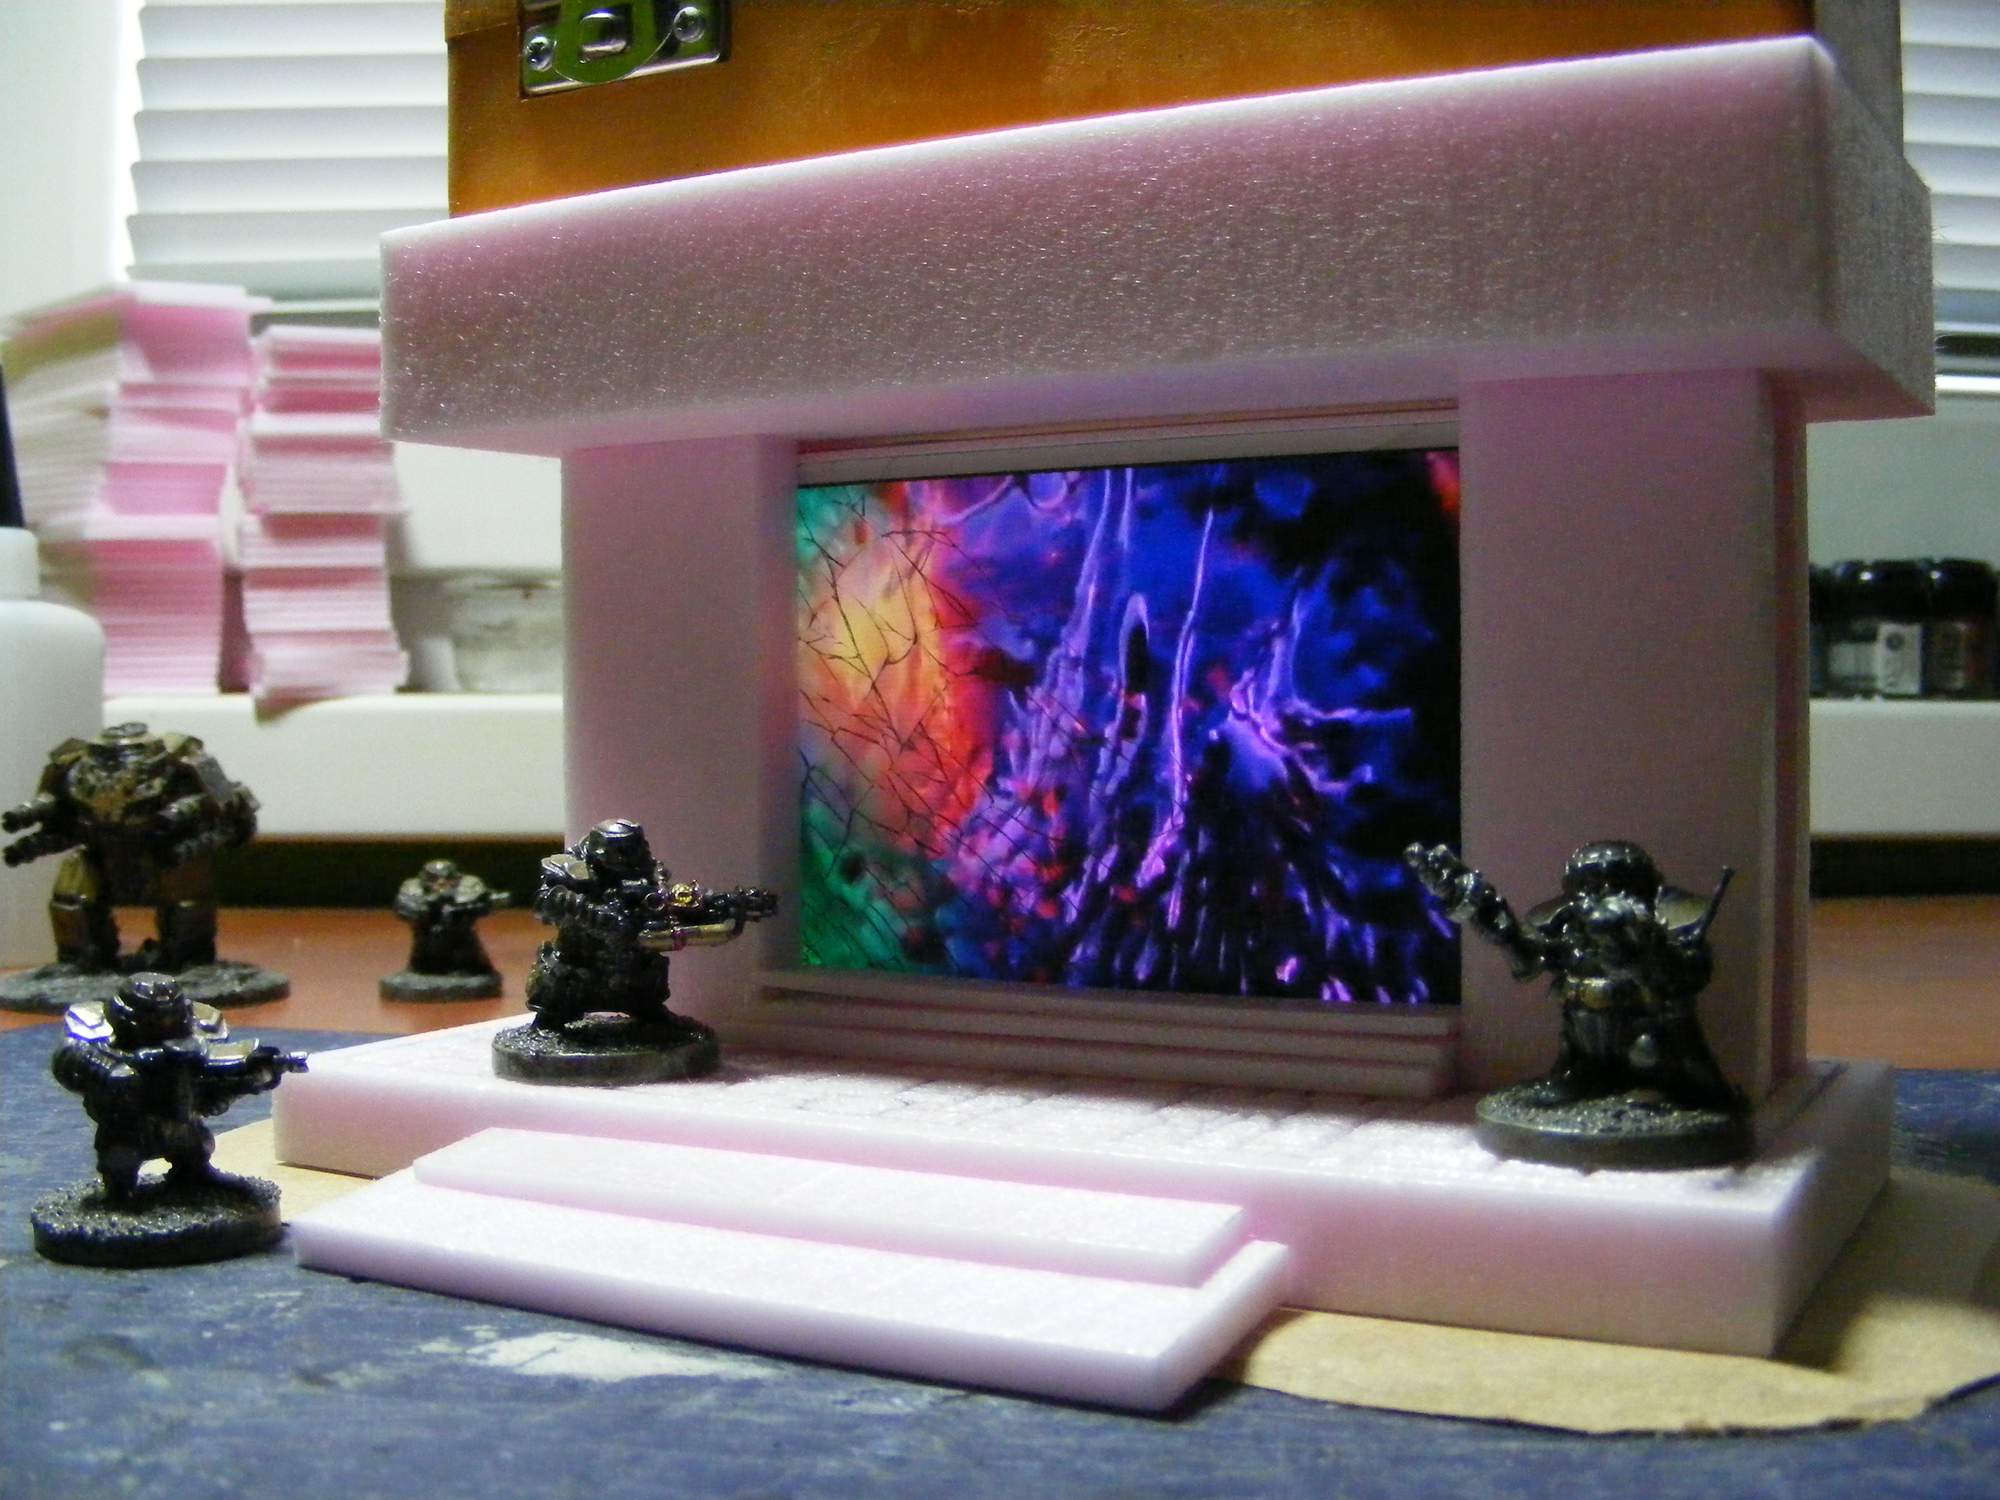
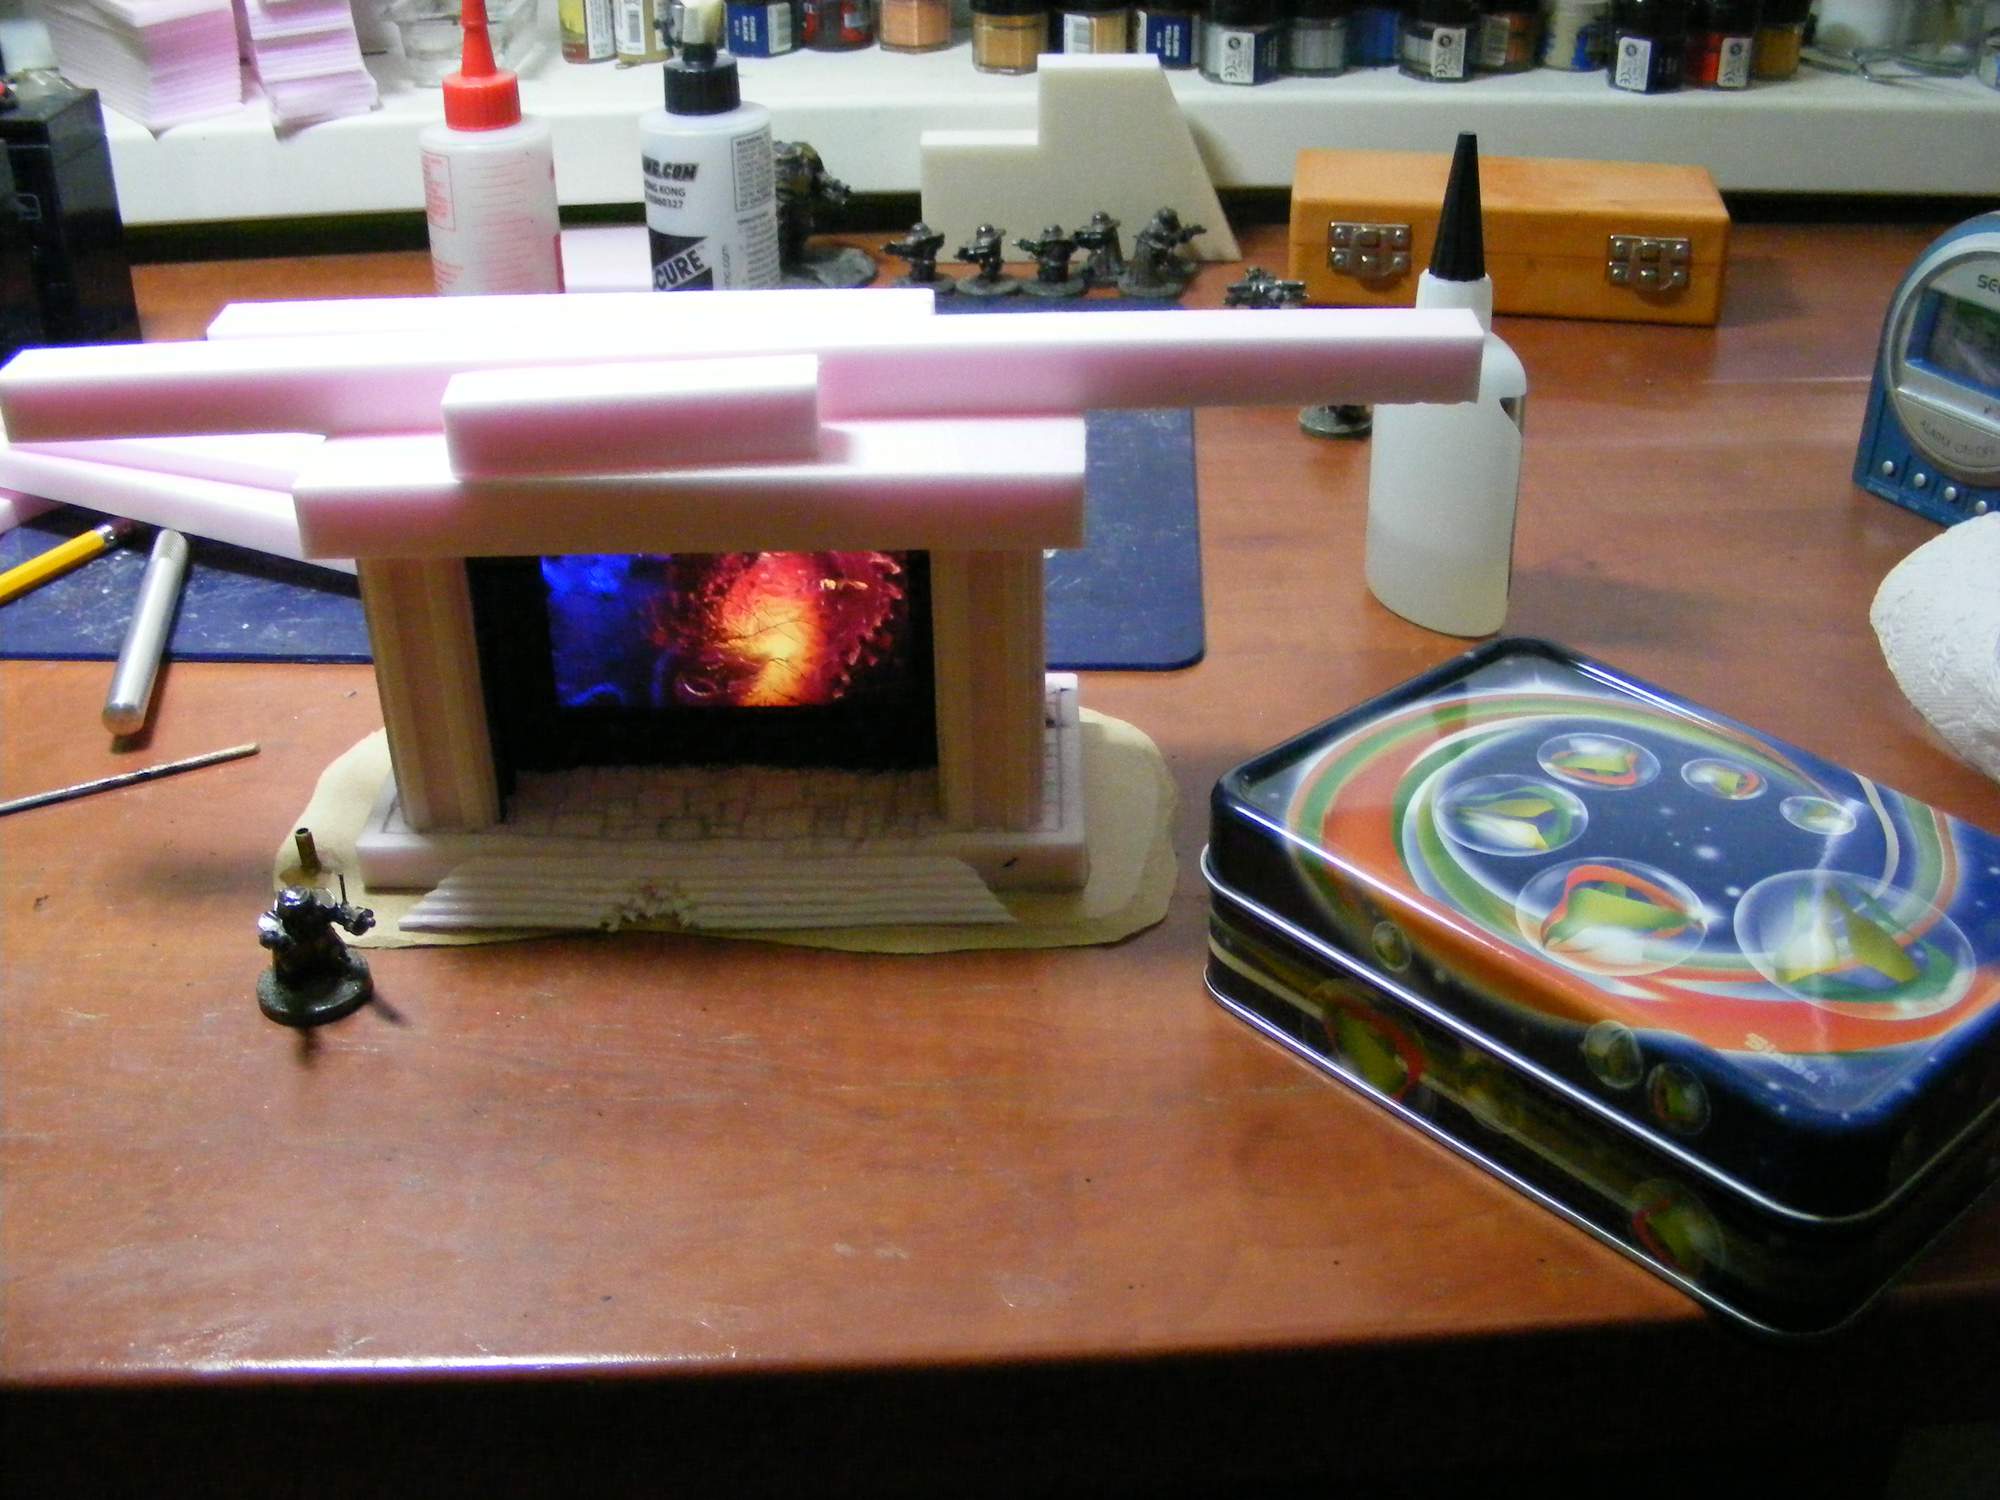
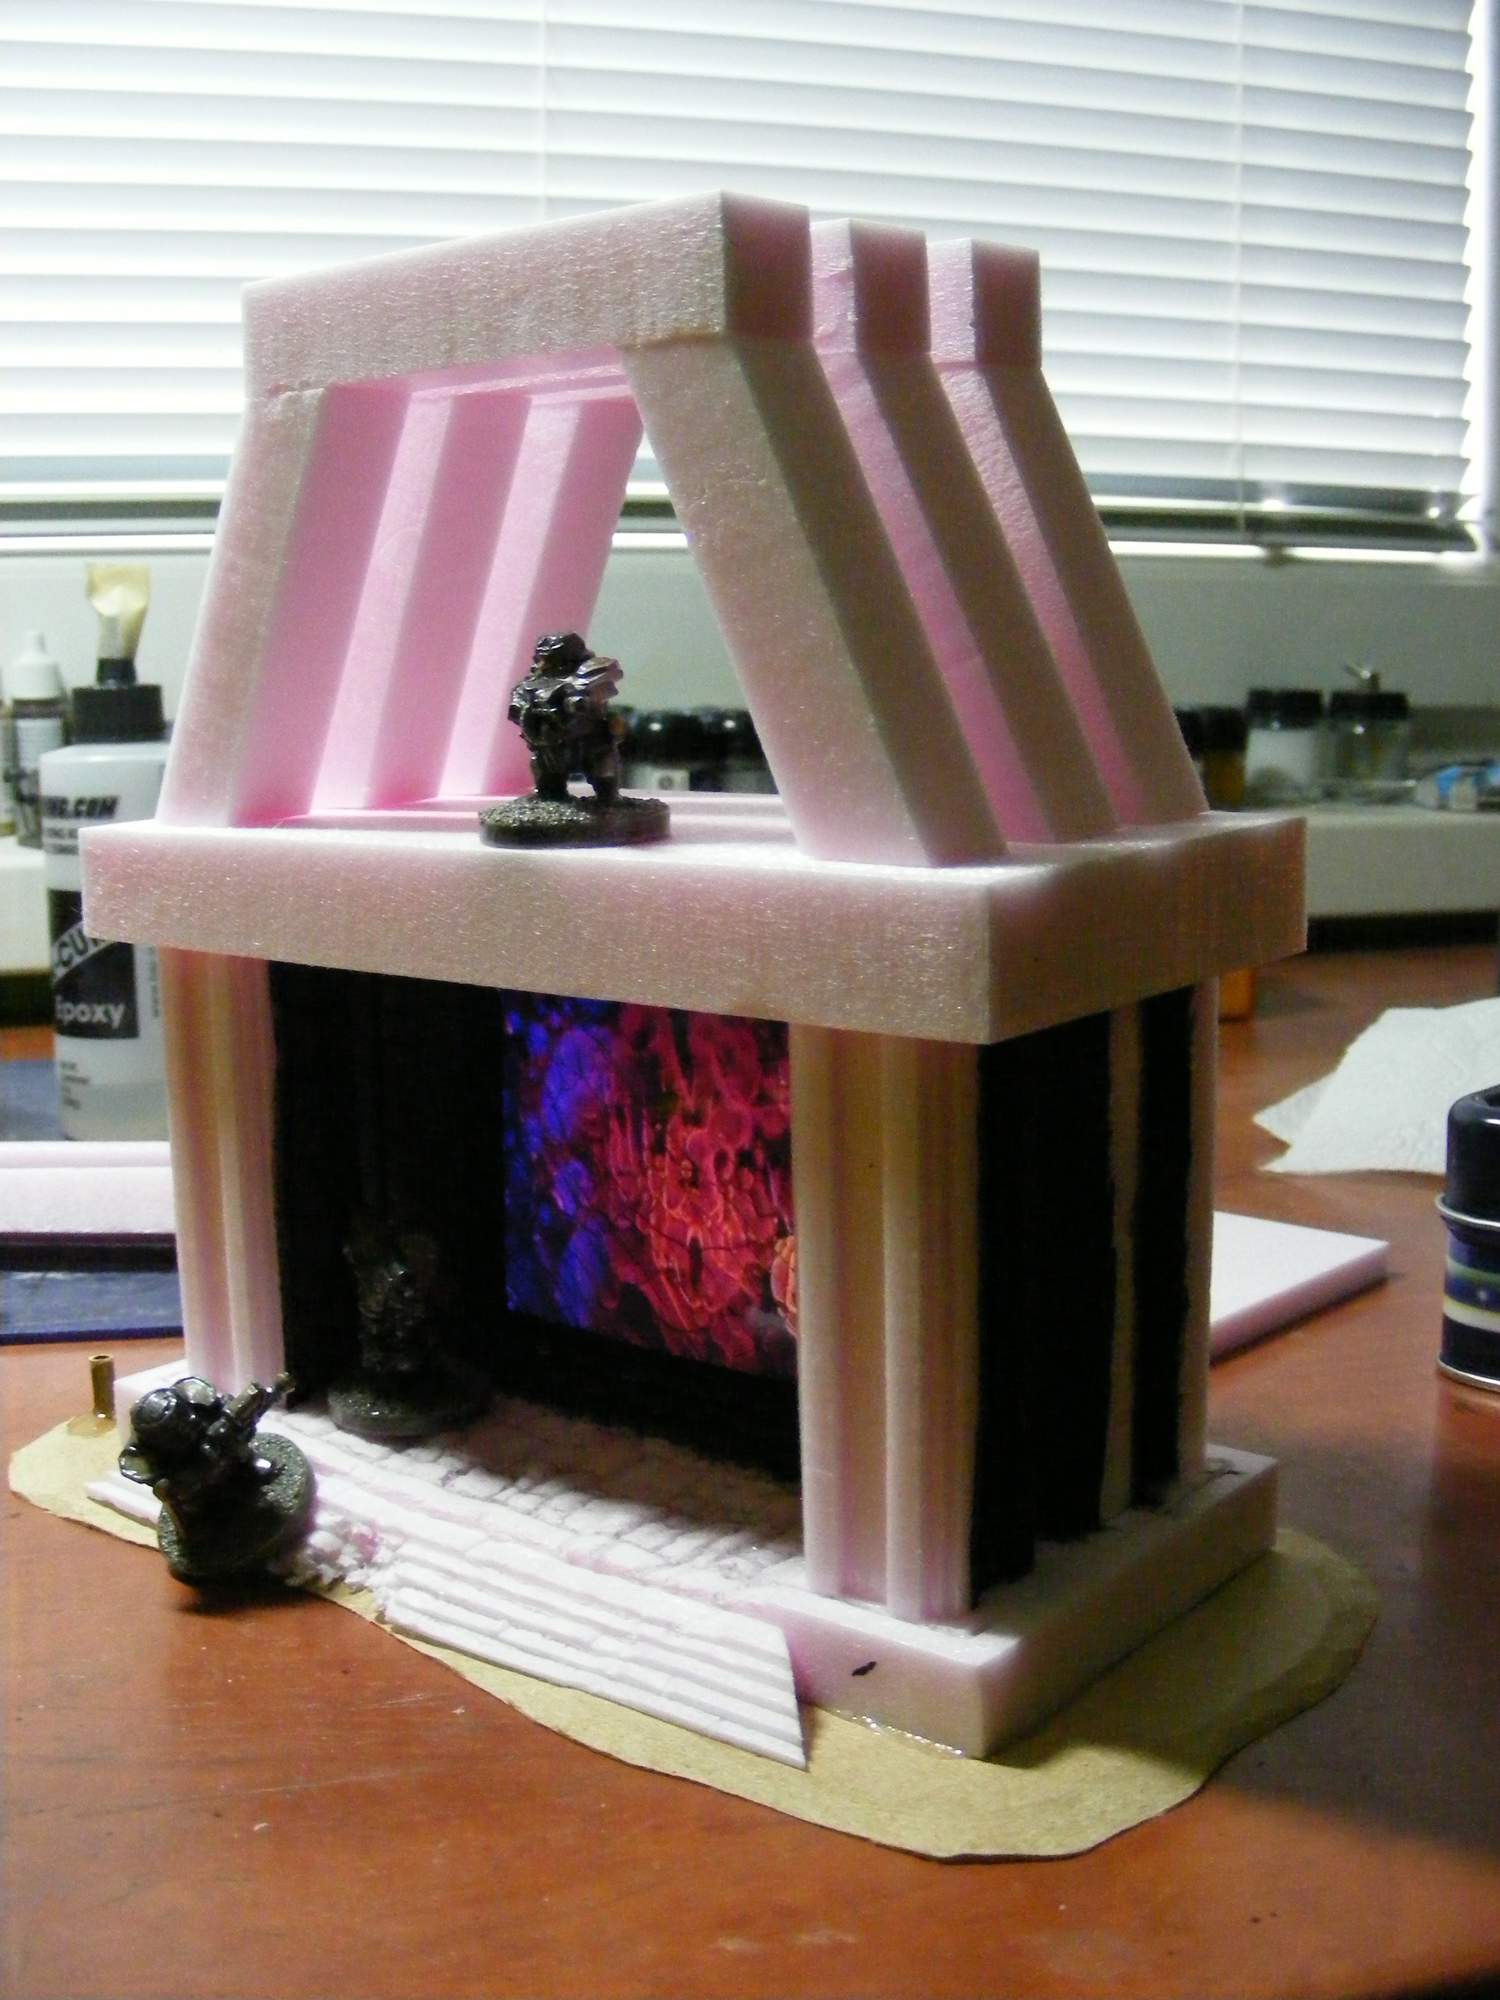
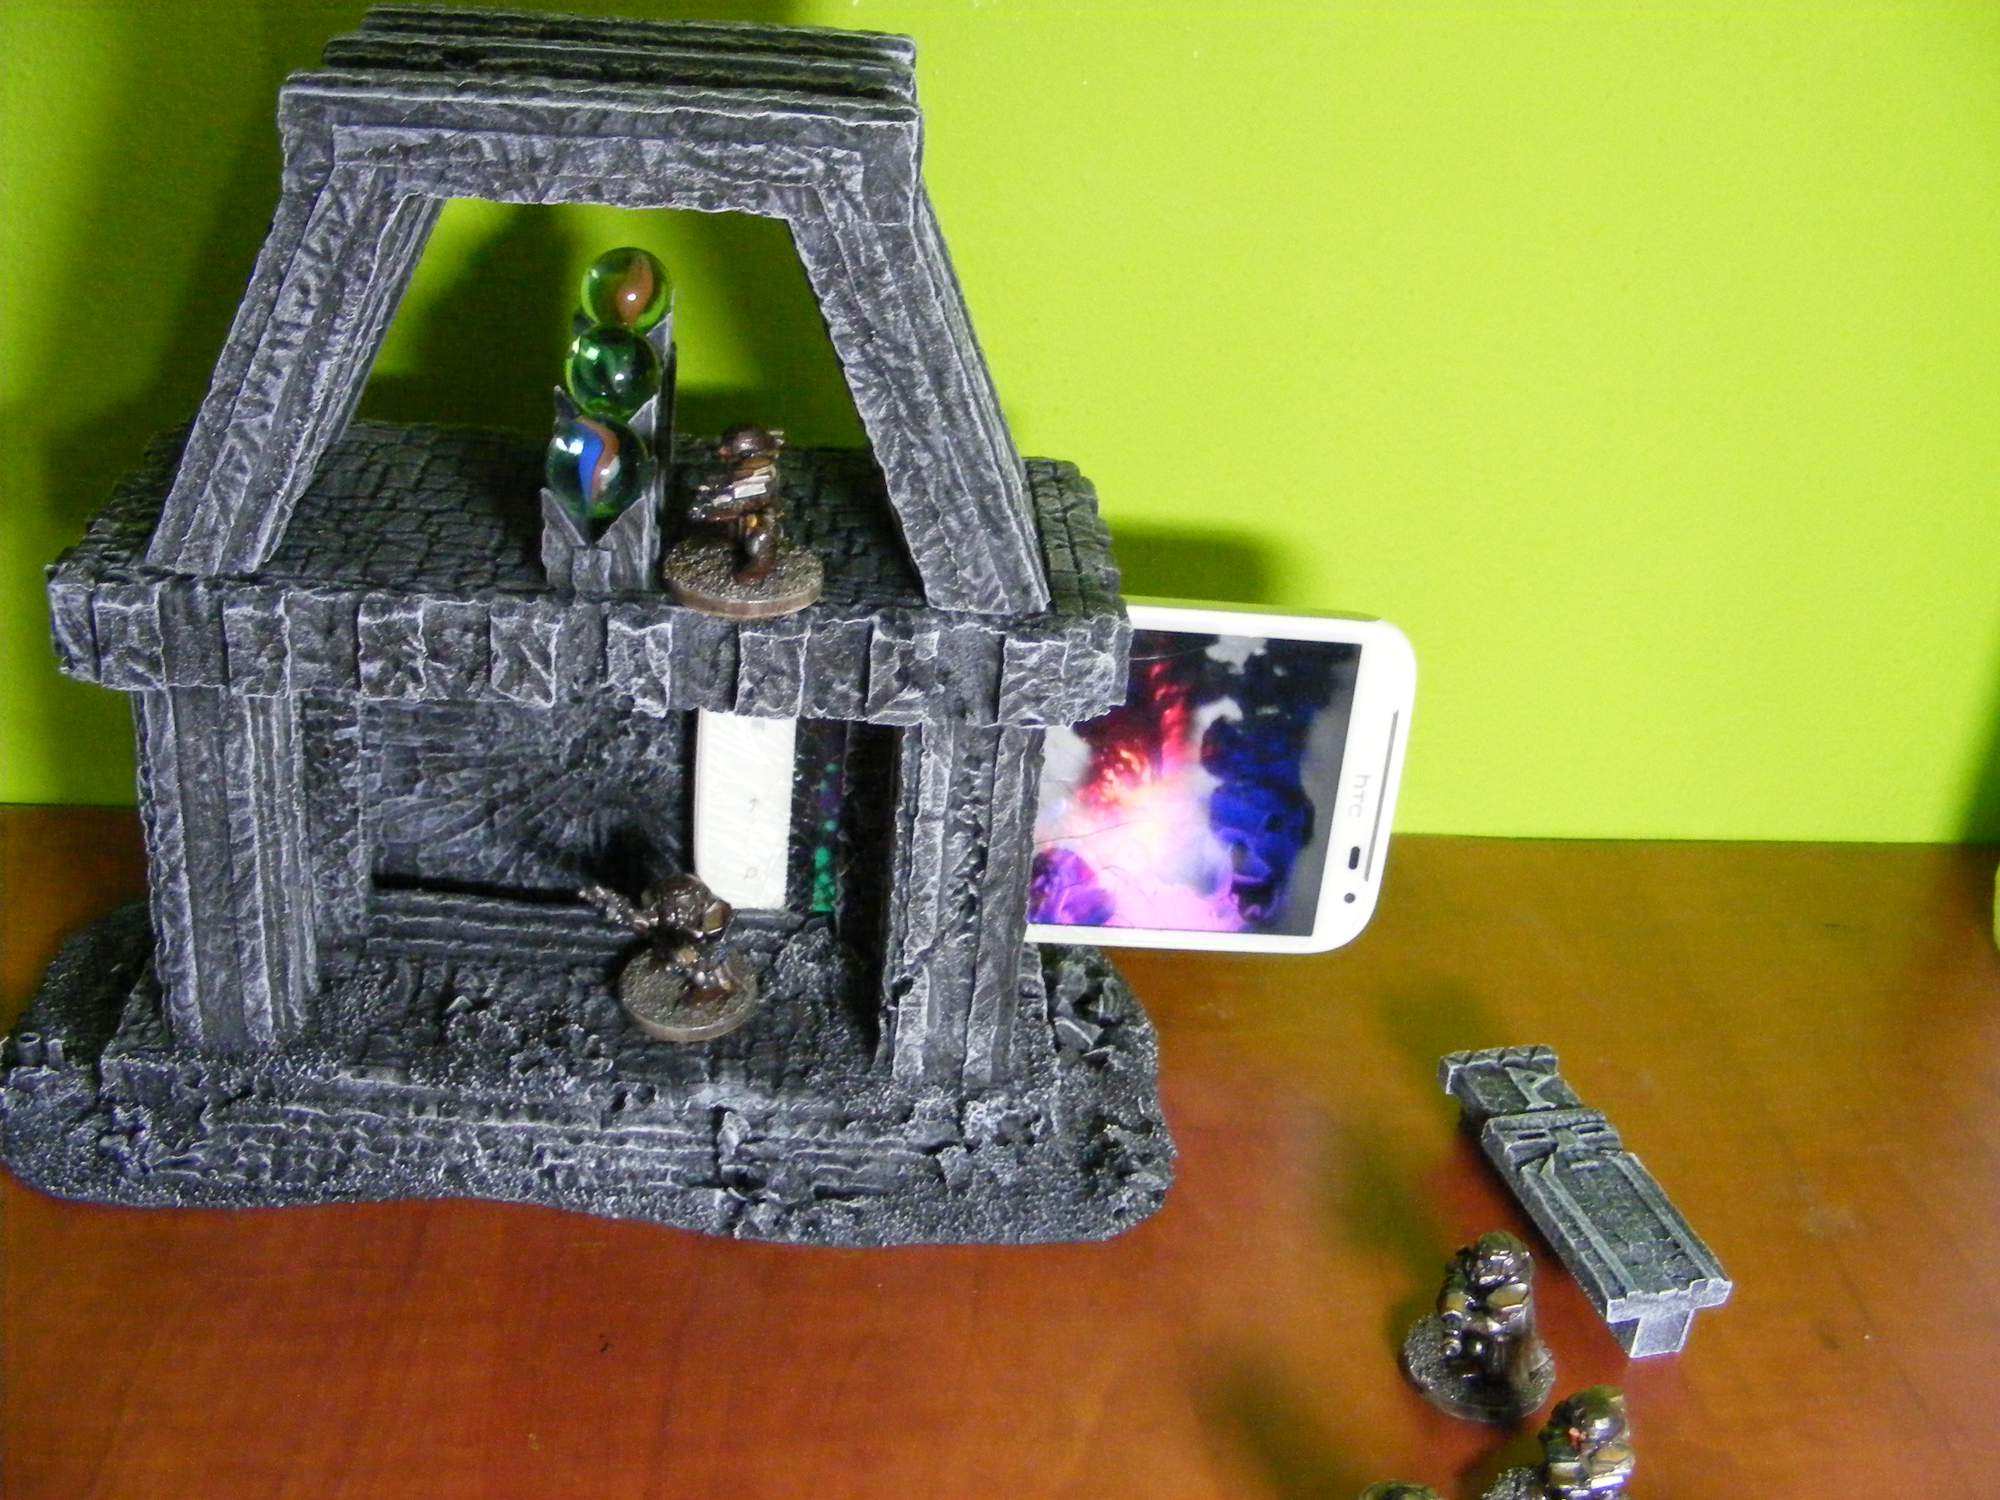
Good news is, smartphone can be taken out from it. So is somethink like docking station
Smartphone is a really cool idea, really curious to see the finale effect
Trim is on, and plenty of warp denizens are already reaching through to shake hands. Debating what kind of texture or finish to use for the flat surface.
Modern technology and terrain - who'd a thought it ! Great work guys, unique and innovative ideas both. Really looking forward to the finish line with these
inmygravenimage wrote: Guys I am so ridiculously excited by what I'm seeing here, from all of you, practically makes me want to pee.
Judging this will be a nightmare
On a separate note, if you have declared your intent to participate, can you checlk that you are listed in the top post please?
Cheers gang!
I don't think I'm listed
Some seriously cool stuff happening in this thread now. Although my own piece now seems a bit simple compared to all these fancy futuristic things, I'm still working on it. Been at an MTG pre-release all weekend so I don't have any updates - but expect some next week!
Very high-tech competition this time around I'd steal that smartphone portal if I were less scrupulous. Hmm, maybe I'll use it as a billboard for a future scifi project. I've got an old one kicking about as well...
I'm kind of thinking a subway entrance would be useful for my current city board project. I'm not sure it would be enough to justify for this project though. I mean they can be as little as stairs leading down and a simple railing. There are some reasonably fancy ones though. Cheap to buy in MDF too but this is all about making new stuff (preferably) from scratch. Hmm hmm..
weathering the car (front half only, yes it's on purpose)
And the final coat:
Here's my mockup for the whole piece:
I found a piece of art canvas I'd forgotten I'd bought. they're perfect for this. To be done is figure out how to age the chrome and "glass" windshield on the front of the car, top coat the whole car - maybe gloss the back? or a satin finish. Since it's supposed to look "new".
Then I'm going to start with colours, vegetation, other stuff (as yet to be determined!) and flock on the "Earth side". (It's suppposed to be the Great Breach for Malifaux)
@ thx guys for comments. I'm glad for it.
hmm, I start with damaged phone, but building this is total safe.(terrain is from foam, so nice soft for phone)
Shame is, it fit dimensions of one phone. If I want use another type(or bigger), must build new one progress...
And what is best, portal content can look how you want
Well remember it's about pushing yourself and your abilities. Don't get me wrong the tech is awesome, varied and imaginative but it's about how you bring the whole package to the table at the end.
now is closer to my idea.
I make video, so you can see, how it works.
Sorry for non HD camera and crap sound on backbround
(When i work on it, looking on film, weird camera have too good microphone )
I'm jumping in late since I just found out about this!
Going to put together something once I clear out a few projects from the bench. Initial plans are to make something for the Warmachine Cryx fans since that's been on the back burner for a while, now seems a good time to give it a go!
Tentative ideas to match the theme are:
Cryx Necrotite pump (for the liquidised form of necrotite obviously :p) [[theme elements being the bottomless pit into the earth]]
Cryx Mine Entrance [[theme obvious]]
Cryx Tunnel (with removable top and lots of green glowy studded walls and pipes and bits) [[portal cause it's a tunnel }}
I see lots of good stuff already! Thanks for the invite Red Harvest
I keep vacillating on what to do, of course...as usual. Still wanna make a vault entrance but now I'm trying to work it into my city. But the problem with that is that if it's in the city it's probably behind a more conventional door first. Bah, we'll see.
Keep getting distracted by all of these pretty and flashy high tech portals
thanks, thats red hardwood, wanted to do rustic rock but then hard edges would not work.
Its actually very easy, i sprayd it black, and have two brushes, ( im ambedecsturioz(sorry dont know how to spell it) but with one thin brush you do a little line and then just time it to smudge it with a brouder brush till it blends in, go over the entire piece you doing. Then start again , this time you dont smudge it in that much. I used rustoleum 2x ultra cover paint and primer satin canyon black in the tin and dor the veins i used game colour "cold grey" any grey would suffice depending on the marble effect you aiming for, im no pro at this, this is my first attempt at this...i had a chat with the chairman of the closest gaming shop and he gave me the tips
Automatically Appended Next Post: After getting the sprue part and the marbling effect here is where i stand
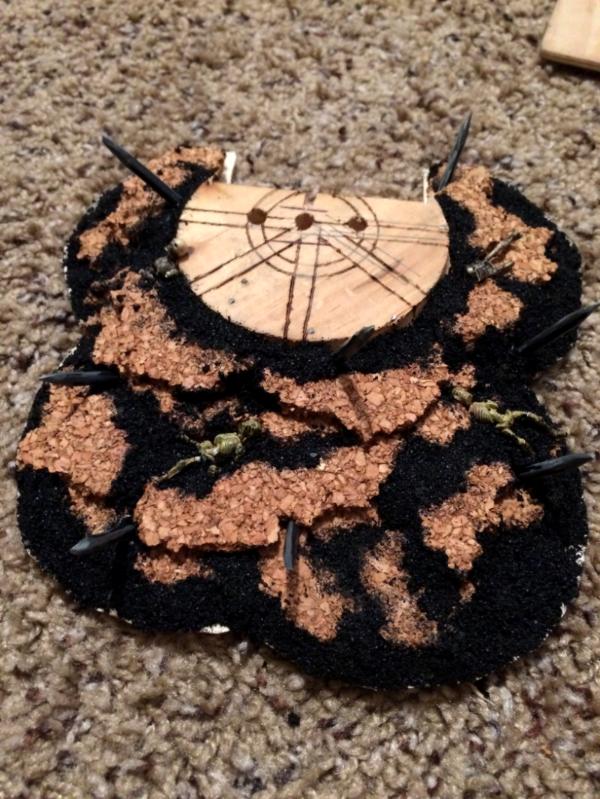
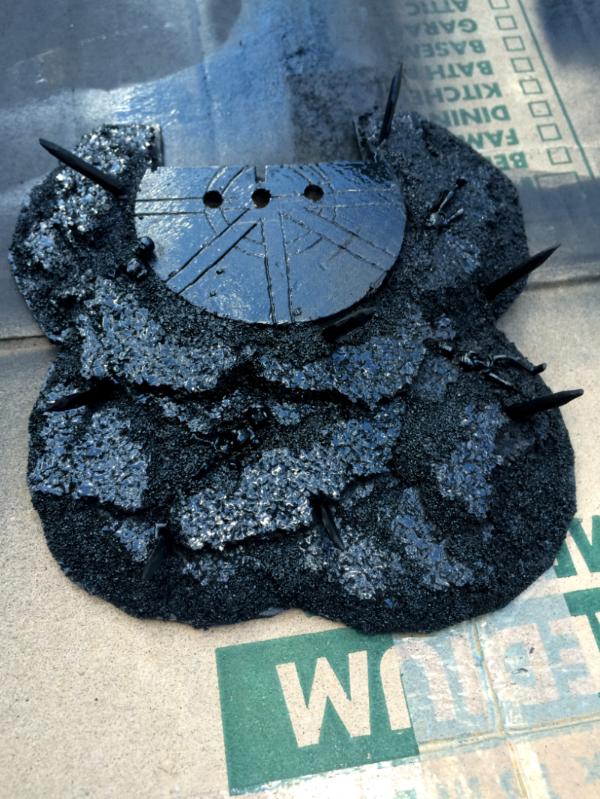
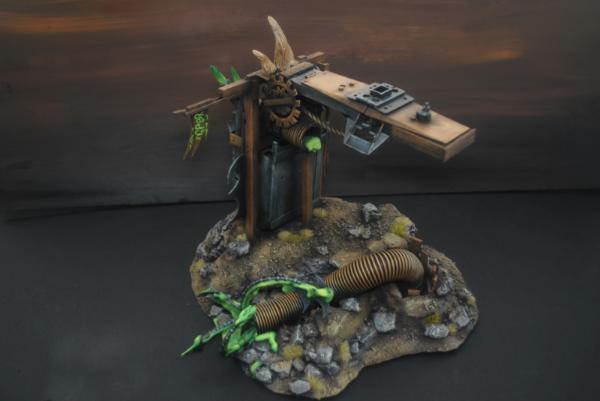
Here's a rough workup of the base to my piece. I decided to go with a bug mechanical pump sucking slime from the bowels of the earth..I guess that sounds vaguely colonic...regardless, that's my plan and I'm sticking to it! haha
I went ahead and roughed out the shapes with foam, then changed my mind and decided to use bark for the rocky edges to save time. I also went ahead and shaped the pit and put in a few wooden supports to brace it during the dredging. I imagine I'll have to paint that area completely before putting in the pipe. Which i suppose will also need to be painted...I was thinking of pouring in some green slime at the bottom of the pit.
Still debating whether to paint green and pour clear or to pour green...Probably the former. Maybe add a drop of radioactive ink to it if I can find some haha
That's all for a while. I have other stuff to wrap up first! Just wanted to make sure I started something
Yeah... I'm having a bit of trouble with the car =/ How to do dents? The weathering turned out fine imo, I also pulled off the bumper some, so it's hanging by a thread and a front tire. With the tire I'm thinking about trying to leave that side of the car on a cinder block, both to hide the ugly attachment point, and to show it's been there for a while. Otherwise, since this is a really cheap model, I'm not sure what else to do. The whole top is one piece, there's no engine (sadly) and nothing really opens, it just has lines.
Anyone got a thought lemme know!
Otherwise I'm starting work on the flora around the portal, and other filler type things (yet to be determined!). I expect to need quite a lot of more time to get the paint the way I want it.
Guildenstern, you're just looking for a way to dent the car? At risk of sounding like a smartass, why not just dent it with a ball peen hammer or something :p? If you mean add texture or weathering or some sort, you could resort to the old, "throw it in a box of rocks and shake it for a while till you like the look" trick.
Edit: just looked at your pictures again and realized that you've already painted it you still may be able to get away with precise hammering. maybe use a nail punch? Or just use next-level shading to make 2d dents that look 3d. But that's beyond my ability to advise on, so I'll leave that to my betters haha.
Looking great gang. @TerrainWalker sounds gross and interesting just make sure it's cleat how it's a Portal also (also check out new blog post with prize goodness!
TerrainWalker wrote: Guildenstern, you're just looking for a way to dent the car? At risk of sounding like a smartass, why not just dent it with a ball peen hammer or something :p? If you mean add texture or weathering or some sort, you could resort to the old, "throw it in a box of rocks and shake it for a while till you like the look" trick.
Edit: just looked at your pictures again and realized that you've already painted it you still may be able to get away with precise hammering. maybe use a nail punch? Or just use next-level shading to make 2d dents that look 3d. But that's beyond my ability to advise on, so I'll leave that to my betters haha.
I don't mind it's painted, I really only did the one coat so far so it's not as far along as it might appear, mostly the undercoat is the rust I was trying out and I a can always fake that again later with weathering. But honestly it's a plastic model and I don't see how to dent it/make it broken without making it obvious it's, well, plastic =/ and yeah, painting of dents may be beyond me.
Oh well, I'm going to keep looking through various youtube videos maybe I'll find a technique that'll help, model railroaders always have a lot of good tricks up their sleeve!
thanks for the help anyway, I'll keep you all posted how it goes ^_^
well...if hammering wont work for you...then you could "hack" small lumps of plastic out of the body of the car...in areas where bumps would be most likely... just with your trusty knife...since these then would be mostly square, flat surfaces then after cutting where the former shape was probably round, this would be a way to get that bumped feeling/ look to that spot... gosh... describing something like that is a feat...
Heat is the answer. you dont have to go as extreme as me and my blowtorch, a couple seconds over a candle or even a match will soften the plastic enough to give under a bit of pressure say from something angular, that would give the impression of dents and creases. Try it on a spare bit of plastic. WARNING! Fumes. DO NOT BURN THE PLASTIC.
Huh. I have a bigger soldering iron... Think I'll have to hold it in close proximity to my plastic cars and see if that will do . idea factory, you folks.
Camkierhi wrote: Heat is the answer. you dont have to go as extreme as me and my blowtorch, a couple seconds over a candle or even a match will soften the plastic enough to give under a bit of pressure say from something angular, that would give the impression of dents and creases. Try it on a spare bit of plastic. WARNING! Fumes. DO NOT BURN THE PLASTIC.
man... i always forget about heat...
how hot does any medium need to be to make plastic bendy? would hot water ...around 100°c be enough?...i´ve never tried that....hmmmmm
best part is, I really need these techniques because I'm planning a junkyard themed board for my malifaux stuffs soon! Which is why I was collecting model cars again in the first place lol
best part is, I really need these techniques because I'm planning a junkyard themed board for my malifaux stuffs soon! Which is why I was collecting model cars again in the first place lol
The potential epicness in this idea is astounding. Pics when it happens?
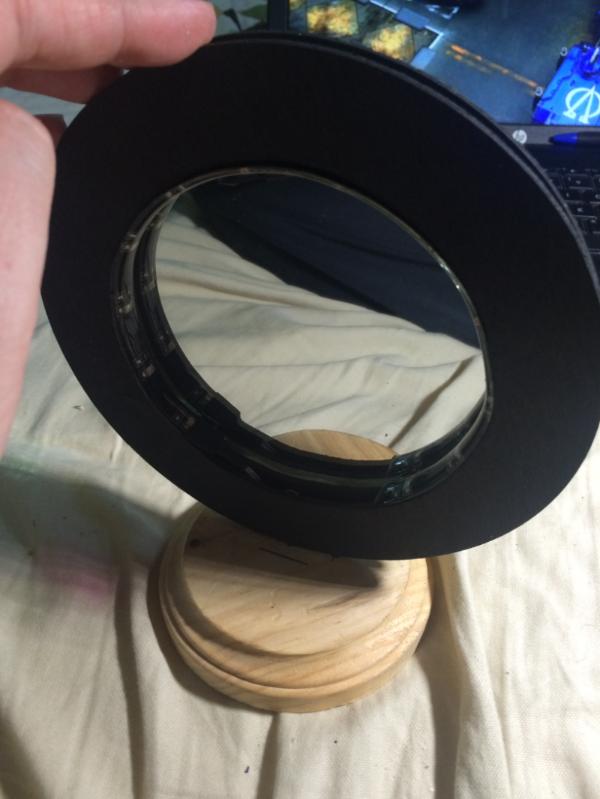
Automatically Appended Next Post: Okay, got the whole fething thing finally assembled, and the epoxy is drying now. I think it's important that it still look good even with the flashy LED mirrors off, so the detail work will take some time. But, since we don't post finished pics, this'll probably be the last WIP I submit.
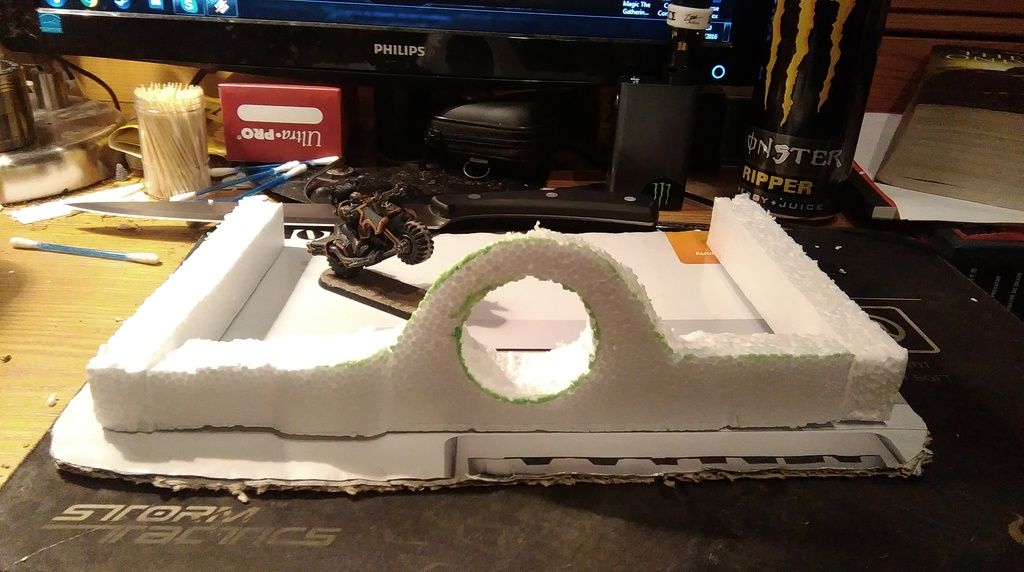
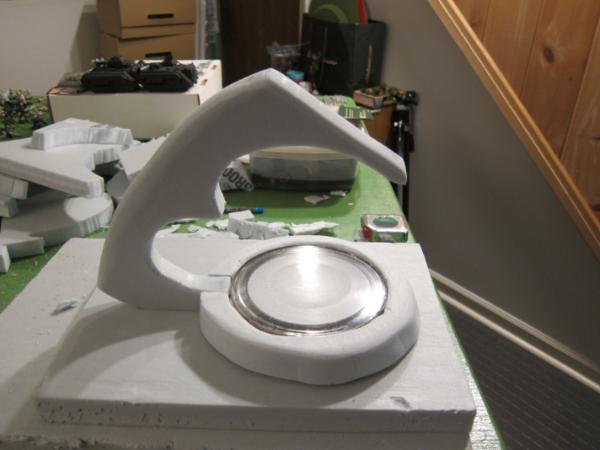
Carved out a slot in the hill potion for the light feature:
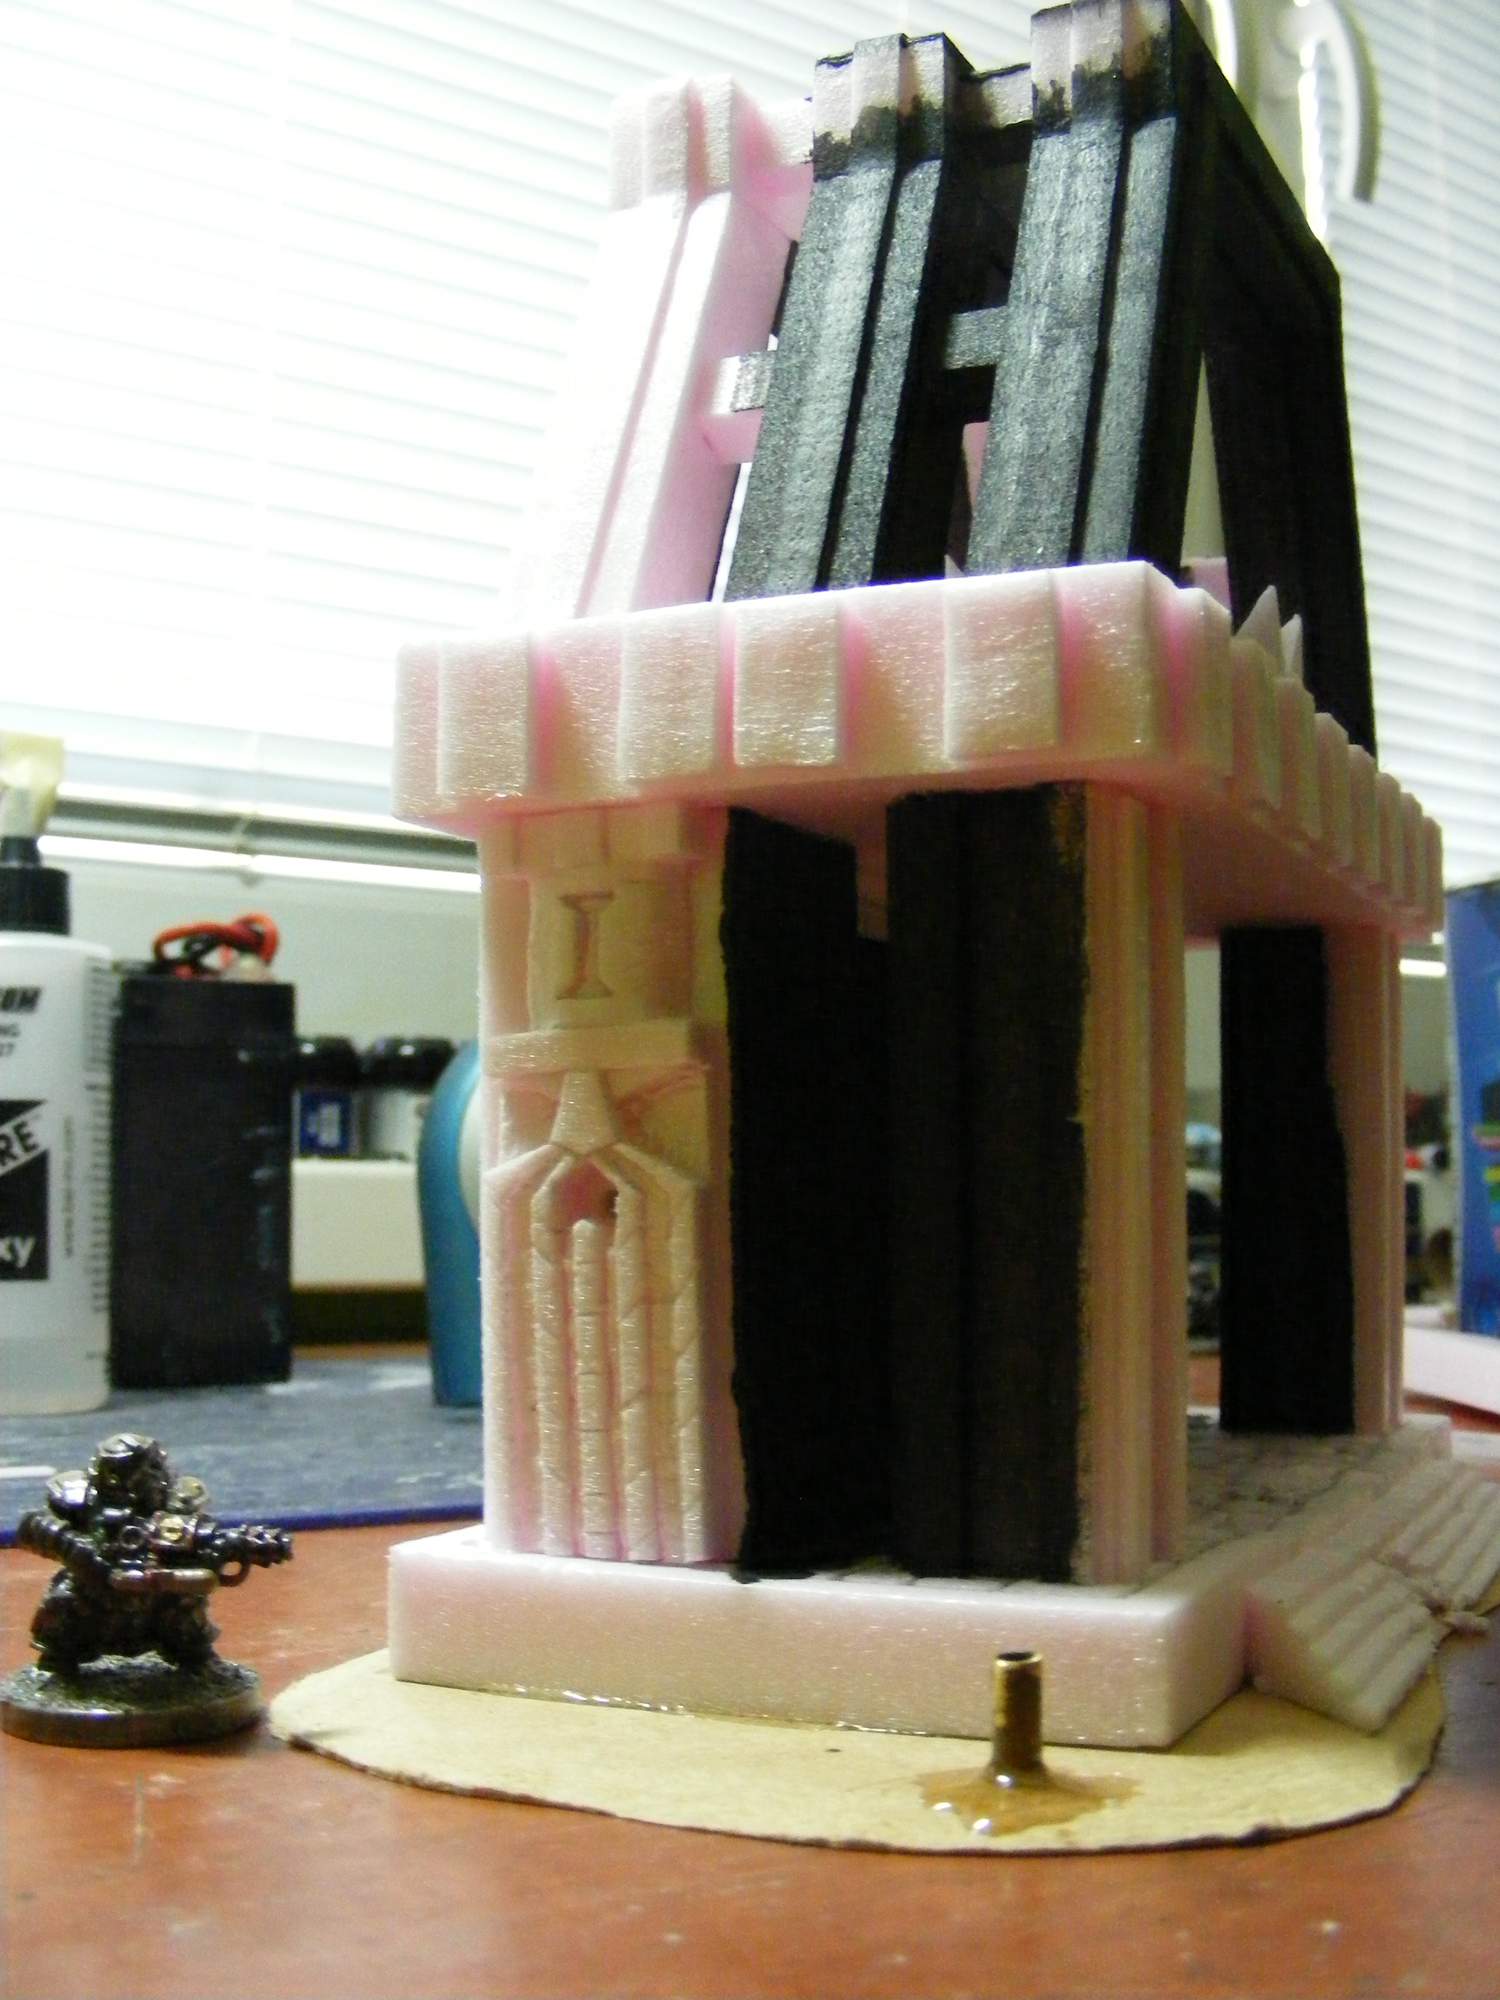
That was just a hack job with a knife, it should all be hidden. I took the hot wire to the top layer to make the ring base for the webway. Here is where I’m at:
I need to lower the arch, so the base meshes with the ring, and then a lot of smoothing. Plus carve the hill. Not sure if I want to do a gentle slope, cliffs, or some combination. Was also thinking about a path to the portal from table level.
Picked up some 150 grit medium sandpaper at the store yesterday. My experiments with the 100 grit corse I had on hand were a little to rough for finished work.
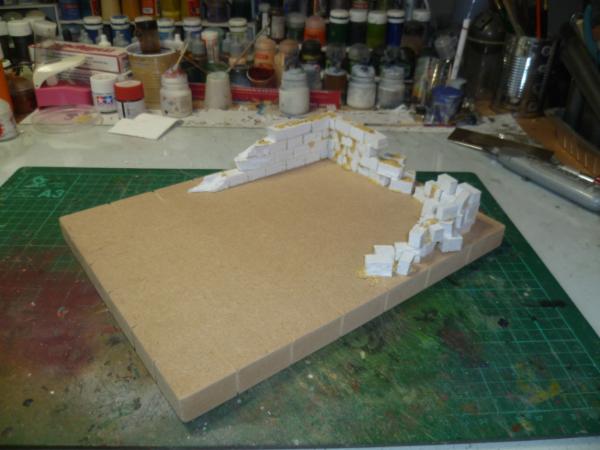
Only have a small update today. I've made a small wall section to test the method I'd like to use on the outside of my ruins. Assuming everything stays secure once it's all dried, I'll apply this technique to the outside wall of my ruins. Then it'll finally be time to add some nice detail and paint it up.
As a bonus, I think I've found a cheap and easy way of making a bunch of wall sections with some nice weight to them that I think will play really nicely in a game of 40k.
Spoiler:
Here's hoping those stones don't fall out too easily
Viktor von Domm wrote: You could always add a tad of curd to the plaster...makes a very strong natural bond...unlikely to have the stones ever fall out afterwards...
curd of ....?
I'm thinking just like cottage cheese here.
Also, got some stuff tonight to cast my portal! attempt #2, we'll see how it goes (tm)
well...cottage cheese is nearly the same...curd...or quark...well it is the "earl" cheese... thing is it bonds the stones with a calcite structure...basically it is like cement...a crystalline structure...can be tough enough to hold quite a mass of weight...
>: D
(we need a better evil grin. Just sayin.)
Now I'm thinking up all kinds of interesting experiments in the name of science terrain, I mean, terrain.
Got some work done. Decided to change the pump up a bit to help with theme. Now the pump hose has disconnected from the assembly and fallen oer oozing out slime and some of these little critters I'm scratch building. That should help. Also adding on a ton of bits and spikes and whatnot to the main body of the machinery.
Another WIP picture- I'm making further progress on the stuff that's more decorative, but this is more of the nitty-gritty- On the Left is the 'meshed to the spokes' version, on the right the 'spins "freely"' version. I was originally going to do the first, so that I'd be able to keep things locked in place better, but then I realized that was silly when it'd be easier to fit things in the second version.
I don't think I updated this thread with my latest WIP... cannot recall :( well if I did, please ignore
here was my attempt at casting a portal with resin, after the pouring. Colour nice. Unfortunately, the masking off did not work adequately, the tinfoil for a textured surface did not work, and I found out my desk wasn't level as everything leaked out.
Spoiler:
So this above, is the result. Not good. Sadness.
however, I have a new idea, and I'm going to run with the silcone mold of a sort (another test). I figure if you can't do anything well, it's better to fail spectacularly
I figure if you can't do anything well, it's better to fail spectacularly
that´s how i usually play every game...
i think i know what you want to achieve...ever tried to drop some super glue into a bit of PVA?...creates a nice random pattern you might find useful...
Guildenstern, casting is a steep learning curve but keep trying and don't throw away the miscasts.
As it's clear you could possibly layer them and pour on more resin to produce an interesting 3D effect.
@Guildenstern Saw that mold adventure on facebook...hope round two turns out better!
Finally am happy with the structure itself after a few more modifications. I sculpted some horns/spikes from sculpey and added some exhaust pipes for the machinery. I also added jets of flame coming out of the pipes - I used some old paintbrush bristles that I had used for epoxy before...Not sure how that's going to look, so I may end up pulling them out - we'll see.
Also finished texturing the base with a lot of PVA and dirt, sand, gravel, dental plaster stones and sawdust.
Once that all dries I'm going to figure out how to do the creatures emerging from the depths and slime puddles.
Finally got around to stone sticking. Took almost 2 hours to stick all those on there and get them to look acceptable. That's probably the hardest part done
Spoiler:
Spoiler:
Actually getting excited to start painting this, but we're not done yet!
edit: spoiler tagged because images are a little large
at nerazim...no offence...but currently i get a very strong birthday cake feeling from your piece... i am sure when you paint it this will be a fleeting memory
Viktor von Domm wrote: at nerazim...no offence...but currently i get a very strong birthday cake feeling from your piece... i am sure when you paint it this will be a fleeting memory
Hmm. I know I’ve seen rock look-a-like candy. Add a little frosting, there you are. I’ll keep this in mind for next time The Boy is fishing around for cool cake concepts. He wouldn’t get the 40k reference, but I could do The Battle at the Farm with frosting rock walls and some sheet cakes for hills.
Eating a slice of Death Star cake as I type this. Just a basic 9” round. Would have baked it in a mixing bowl for a nice dome, but I wasn’t sure if they were oven safe. The cupcakes decorated as assorted planets were eaten as his party. Including the scraps in a ramekin for Alderaan.
Sorry for the tangent. Doing wacky stuff with food is my other hobby.
Wife did me a deathstar cake a couple of years back , with m&M's insides for the destruction. Older boy got a falcon this year. I'm all about the cake. League of Eat-strawberry rivetters, or something.
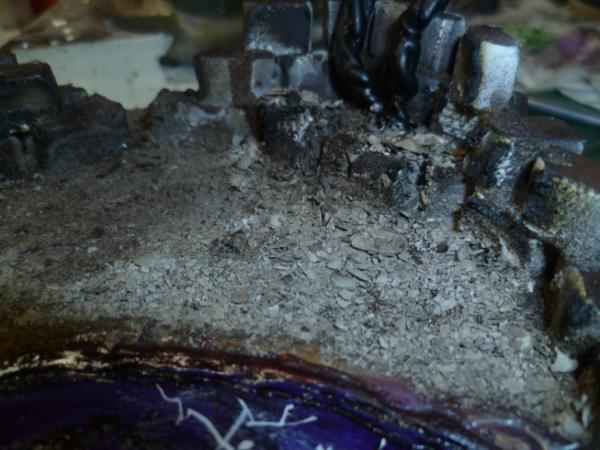
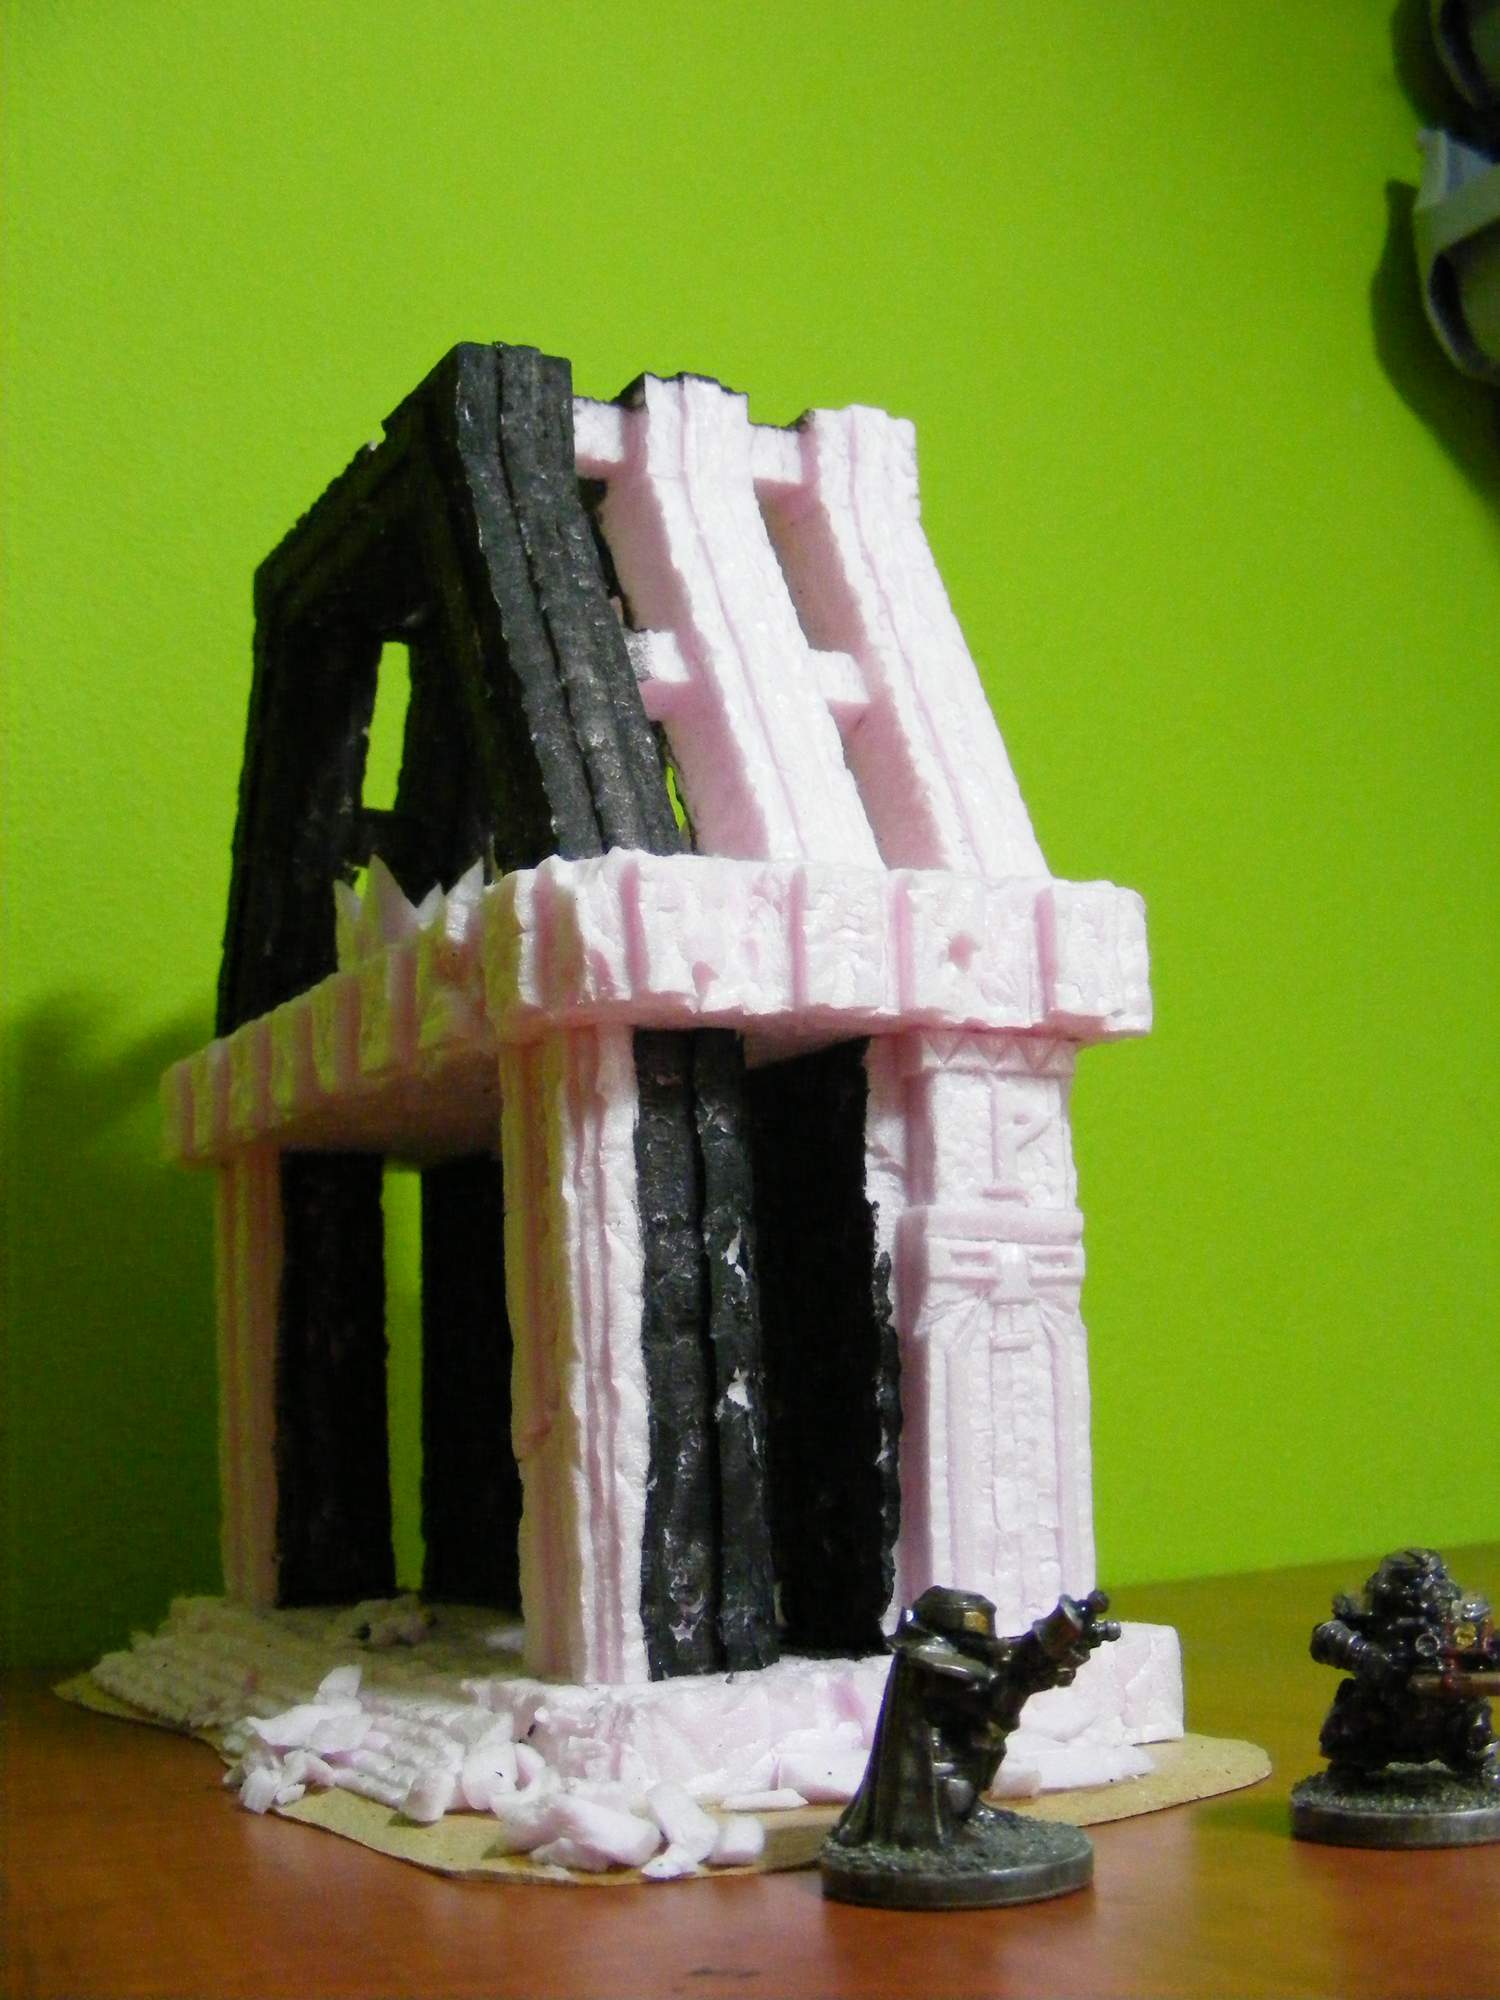
OK, took some 150 grit sandpaper to the WWP. Still has a lot of tooth, when I put a little too much pressure on, it ripped at the foam a little. I should probably go back with a finer grade for another pass. Also needed to be careful with the edges of the paper. I caught a few times. Also trimmed the base a little so it sits flush. I should look into getting some sort of spackle or paste to fill gaps.
I also need to make up my mind on the shape of the hill.
This is looking awesome indeed. Not to be a snot, however, but can I refer folk who finish to the OP? Rules on pics for LOER contests are pretty standard, it's more about not demoralising folk who aren't done with perceived awesomeness of others' finished work.
"7: Final Entry: Six or more photos of your final entry, showing top, front, both sides, back and all the important parts - not to be posted in this thread. PM me with links to your galleries, albums, etc. As I said above, please take the time to take the best photos that you can. Together with your photos, I would like a statement of the items (a photo would be ideal) that you used. This is not a must, but would be helpful"
I'm not going to penalise anyone, don't worry Just saying
KINGPIN54 wrote: Tried wuth a heatgun first but was not happy with the results, thankfully have alot of sprue
good to know
I have had pretty good results with multiple hot water + bowl in microwave attempts. Have to be darn careful tho grabbing it. Also, epic duck mike on MWG mentioned a method for warping/bending sprue (cuz I'd asked ages ago, when working on another project); note I didn't try this! user beware etc etc. Sometimes you have to be careful when playing with fire and so on
Your sacrifice will be remembered by Slaanesh and its cohorts.
I knifed myself in the hand really bad a while back, while working on my Titan, so I'm hoping Khorne is going to take note and give a few 6s when I finally get to use it.
must be a guy thing I just had to pull my youngest son off my power saw this last evening, thankfully before another emergency room trip. He's at that I'm 15 I know what I'm doing with everything kind of stage sigh
erm anyway, sorry off topic a bit. So, I'm really stuck on the portal part still. I'm going to just let that sit there for a while and stew whilst I work on other stuffs. Still need to do the vegetation I wanted to add on.
The main thing at this point with that, is I want relatively matching vegetation on both sides, but in keeping with my colours. So while the "earth" side can be natural colours, the "malifaux" side needs to be browns and sepias. I'm not sure I can repaint flock to do that is all. I'm going to try with some close as I can get type stuffs first, and see how that looks. Then if it needs help I'm going to try my airbrush I think. Once it's very well glued down... already blew a bunch of flock off something once accidentally working on it too soon lol
Make your own flock, easy to do and cheaper. Plenty of youtubes on it. I actually made some from kitty litter wood pellet stuff recently and very happy with results. (not so happy with cat squatting on the models after mind you! )
On the portal, try a little heat treatment on a laminated laminate pouch or maybe a big enough piece of clear acetate, that way you will maybe get a blurred vision through the portal?
Camkierhi wrote: Make your own flock, easy to do and cheaper. Plenty of youtubes on it. I actually made some from kitty litter wood pellet stuff recently and very happy with results. (not so happy with cat squatting on the models after mind you! )
On the portal, try a little heat treatment on a laminated laminate pouch or maybe a big enough piece of clear acetate, that way you will maybe get a blurred vision through the portal?
lmao oh lord that image!
and yeah the main thing for the flock is I dont have a blender, really want one... for terrain reasons. N stuffs. Need to get around to getting on lol (makes it a lot easier to make clump foliage as well)
and oooh you gave me an idea! I have a bunch of some stuff left over I think one year from those do it yourself shrinking type plastic covers for baskets...
@guildenstern, not sure where you live, but we got a small blender here for less than 10usd. Well worth it for making flock and clump foliage! Also, I throw in my table sweepings then dump the result into my rubble mix container occassionally
That marble/melty sprue altar/portal is coming well along, quite neat!
That foam looks really smooth Nev, good going!
Alright guys. I'm calling it. I know the deadline isn't here yet but between work and a teething baby I give up. I should have known better but there's just something about that 10 week window that gets me every time. I think it's like that thing you shouldn't do with money, y'know make payments so you can have it now but you have to watch out getting more payments than you have income over time etc. Like that, just because there are 10 weeks, doesn't mean we'll see that much productive hobby time to devote to such a project, and half-assing it kind of poops on the point of the competition (to stretch yourself as a hobbyist) so bah. Calling it
Grim, fear not. RL is fast more important. Cam looking good mate!
Two weeks left my friends! Nearly there and my goodness what impressive goodies you've come up with!
I'll post some final digital WIP shots either later tonight or tomorrow- I think I'm about ready to start printing. From there, it's just clean up, a little sculpting, and the paint. I'm hoping to do the paint right in this circumstance, as painting is definitely my weakest area.
Looking at the picks again i just might try do a better job at the photo submission, been out of action for about a week now due to flu but better now....some great stuff from everyone thus far.
Ruglud wrote: Struggling to motivate for the finish line - think I've hit 'the wall'... Must power through... maybe get something more done this weekend?
Have to break through that wall!
That way you'll have more rubble and a nice ruin
But yeah I know what you mean, I still need to finish my piece too =/
I'm building terrain too but nothing so much that screams portal. Only standard doors on my factory sigh. I tried but I couldn't keep motivation for the theme this time. Silly, because I like the theme, but my ideas for it were not coagulating into results.
The thing with trying new things is that there will be failures. The trick is to embrace the error and either work it into the piece or cover it over and go in a new direction (or you could fix it, but why fight the flow).
Although sometimes it's time to put the failed attempt on the "to be used as a crashed/ruined/burned/otherwise destroyed" pile for later.
And be sure to report your failures as well as successes on your blogs. Someone may just have the perfect tip to help, or you may help one of your readers when they come to try it.
I’m not giving up, but will probably not finish in time.
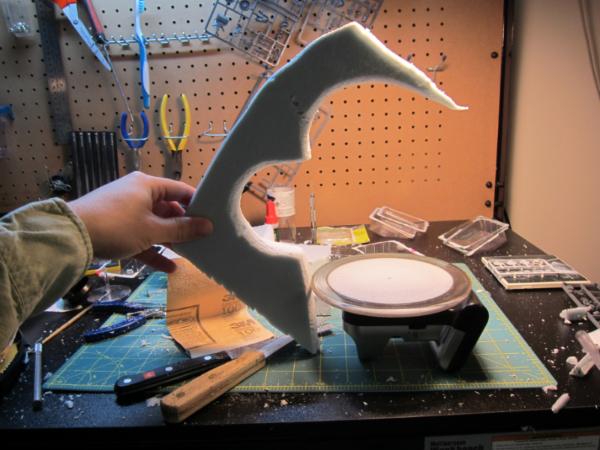
Did the glueing, and most of the rest of the sanding. I’d like to smooth out the parts of the webway proper.
But I still need to seal, paint, and flock the whole thing, and that might take more time then we have left. I’d rather take my time and do it right, then rush it to meet a deadline and get something sloppy.
There is still time left, so things might change. Been a fun trip no mater what ends up happening.
Well shoot. Just realized that the deadline is right when I get back from a trip. I'm not gonna be able to finish either- I'm just not going to be around.
I'll have something that I'll show, even if it's late.
it's near end of school year here (I'm a teacher's aide) so work is rather hectic anyways, but whatever everyone wants to do is fine. I may well be done, I'm just not 100% happy with what I have atm.
It’s amazing what useful stuff can be found in the dusty corners of the garage.
Patching the join between the circle and the arch makes me feel a lot better about this piece. Now I just need to put a seal coat of glue down, paint and flock.
TheEyeOfNight wrote: Pretty smooth finish, Nev. Did you sand it, or is it applied that cleanly?
I only applied it to the join, the rest is just sanded foam.
For the spots that I did use it, I went over it with a little water to smooth it out. Trick I remembered from a ceramics class I took a while ago for working with clay, figured it would work here. Just wet a finger and went over it lightly.
The green is going to be flocked, so I’m less worried about the coverage. Going to need at least one more coat on the portal itself. The cliff is going to be done in a white/black dappled technique. IIRC from seeing it done a couple decades ago, it makes for a nice stone effect.
We'll see. Right now, the material isn't adhering to the base for some reason- might be the temperature, might be that the base is dirty or something- either way, I'll have to see if I can get that fixed- 'cause I'm not doing an all-different project at this point.
OK, I’m officially done with my work. Still more I’d like to do, but not right now. I took some pictures, but will take some time to sift through them to grab the best ones.
Anvildude wrote:We'll see. Right now, the material isn't adhering to the base for some reason- might be the temperature, might be that the base is dirty or something- either way, I'll have to see if I can get that fixed- 'cause I'm not doing an all-different project at this point.
Fair enough mate. I shall cross fingers, toes, tentacles...
Nevelon wrote:OK, I’m officially done with my work. Still more I’d like to do, but not right now. I took some pictures, but will take some time to sift through them to grab the best ones.

 ): Regular posts in this thread will keep it in the public eye and will allow more people to find this contest. Also, if you post

 yup. Long day!


 One shot
 all is submitions, data bad! Ligging off!