After ten years of meandering aimlessly about from project to project over just shy of 50 pages, I decided it was time to retire my previous blog and start with a clean page on which I can meander aimlessly about from project to project once more without the distraction of a whole bunch of unfinished 10 year old projects that have taken on a life of their own and are now hiding in the laundry telling each other stories about how the creator will one day return and anoint the worthy with sacred pigment ...
I'm largely focused on Maelstrom's Edge these days, so a lot of what I am working on will obviously be related to that, but I also have a bunch of 40K projects in various stages of completion that I'd like to get finished off even if I have no intention of playing that game again, and a couple of boxes full of assorted minis from a whole slew of manufacturers that I've collected over the years just because I liked them and wanted to do something with them. So to kick things off, here's what I am currently working on:
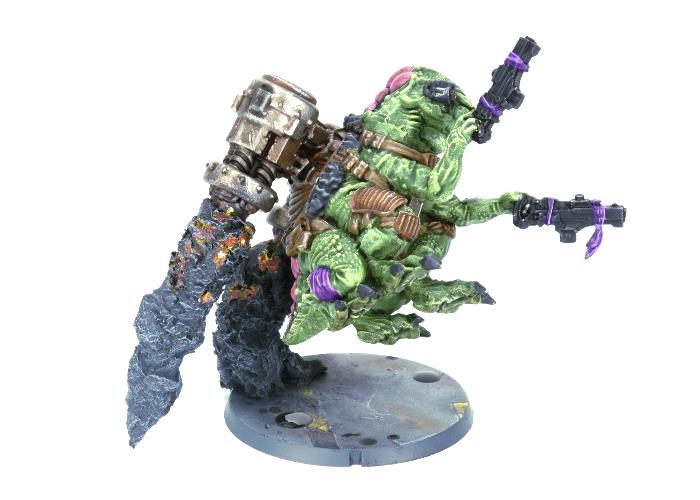
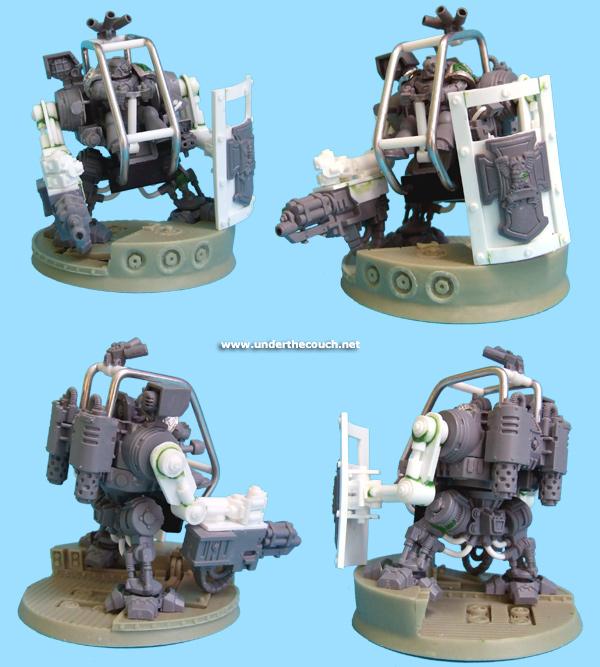
Wazdakka! It seems appropriate to kick the new thread off with the same miniature that started the last one. Although you could probably replace 'appropriate' with 'kind of sad'... But there it is. This was a conversion started a little over 10 years ago, back when Wazdakka had rules. Before the Dark Times...
Somewhere in the intervening time, he appears to have lost his power claw. I have a vague recollection of putting it somewhere safe to reattach it when I had time, so it's probably lost for good. So still to do - find or rebuild the power claw, rework the right arm a little to fix the dodgy musculature, finish sculpting detail around his waist, and finish off the detailing on the bike's guns. And paint it, obviously. But I felt that now that I'm no longer playing 40K, and he no longer has rules, it was the right time to get him finished!
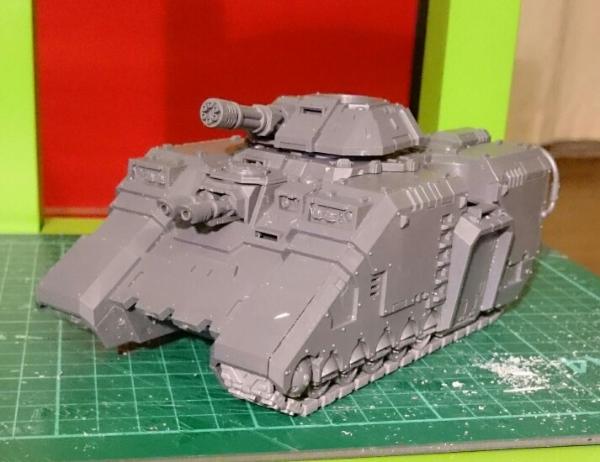
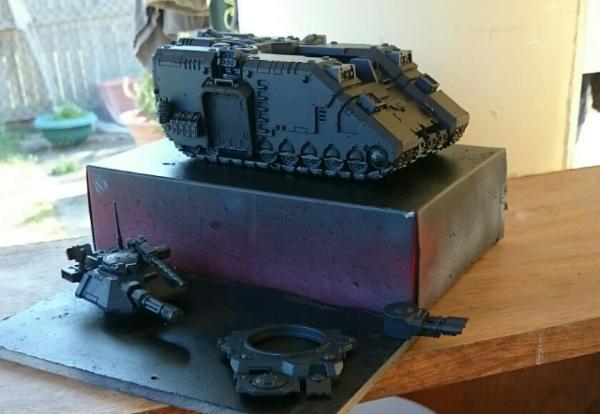
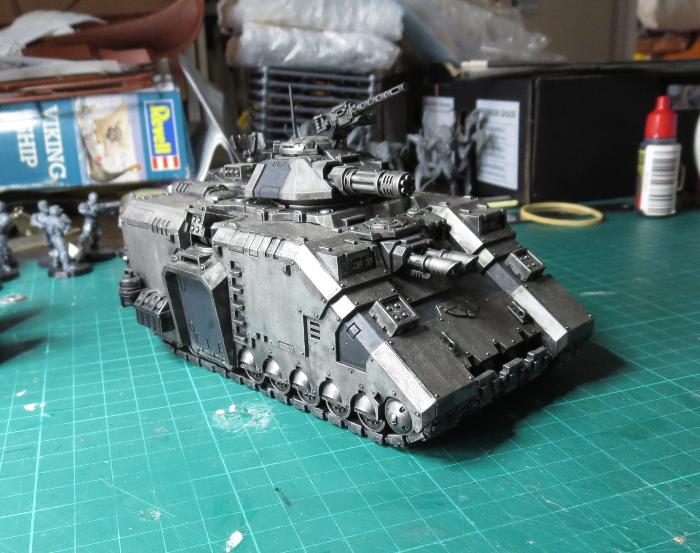
Terra Firma Pattern Repulsor A conversion I started back when the Repulsor kit was released, as I really didn't like it as a grav tank. I got busy halfway through painting it, so it's been sitting unfinished in the cabinet since then.
Mostly just detailing work to go at this point. It's being added to my Iron Wolves (Space Wolf) army.
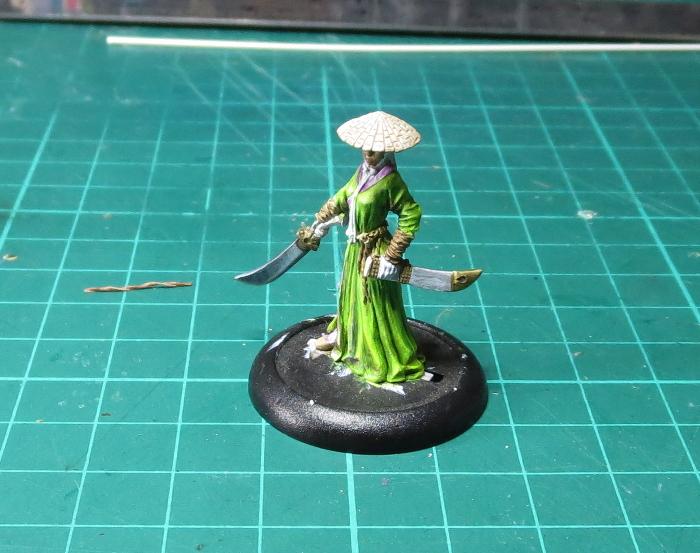
Yi Ling, from Guild of Harmony One of the afore-mentioned miniatures picked up just because I liked it. This is a mini from the (apparently now OOP) Guild of Harmony range, sculpted by Sebastian Archer. Bought a long time ago and left sitting in my to-paint pile until I felt I could do her justice.
Still a lot of work to do.
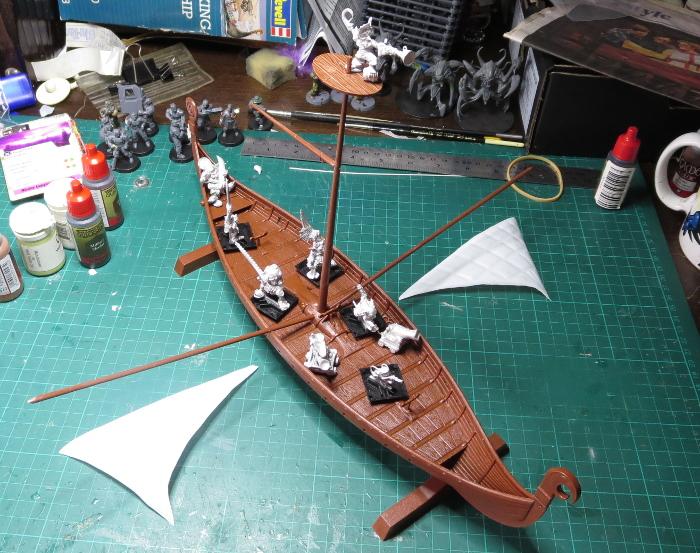
As-yet Un-named Goblin Pirate Boat 1:50 scale Revell Viking Ship, bought for me by my wife a few years back, after I had been trying to convince her that we should replace our car with a long boat (it seemed like a good idea at the time), and being converted for a crew of OOP Rackham pirate goblins bought back when Rackham went out of business.
A couple of minor details still to add (like a railing of some kind on the crow's nest) and then paint and rigging (which I will leave until after painting to make getting a brush in there easier).
And finally (for now):
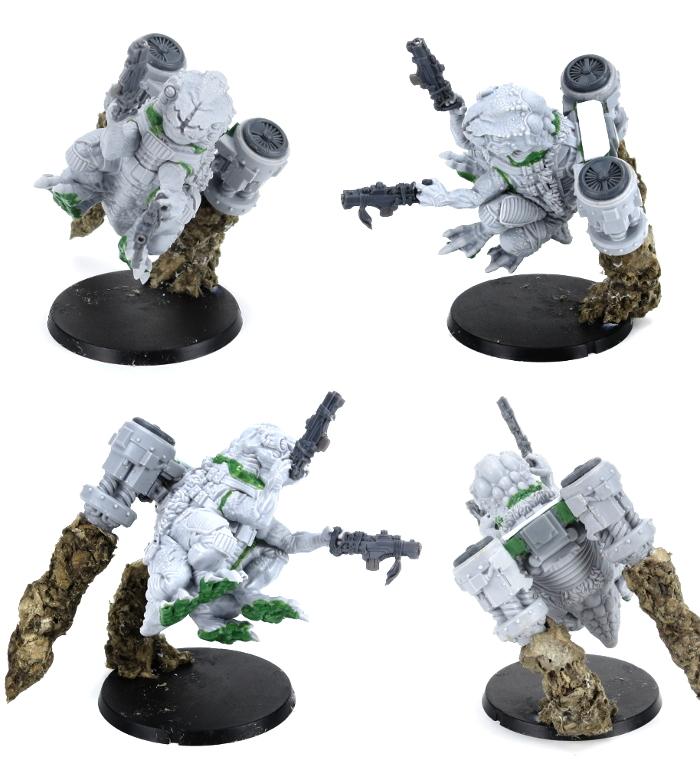
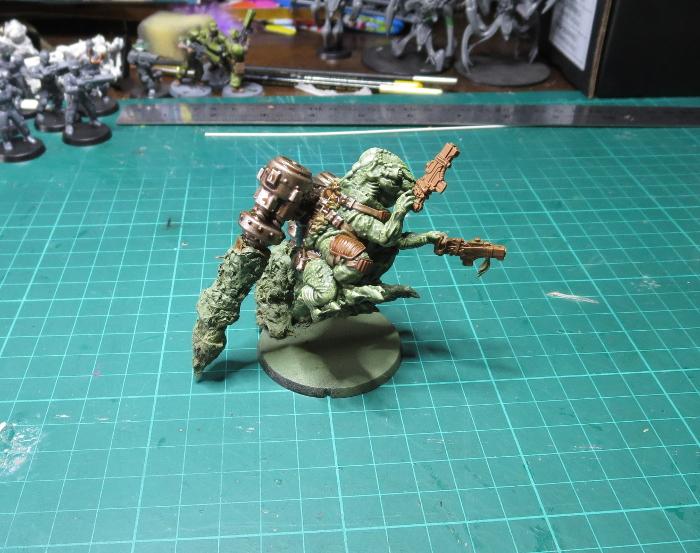
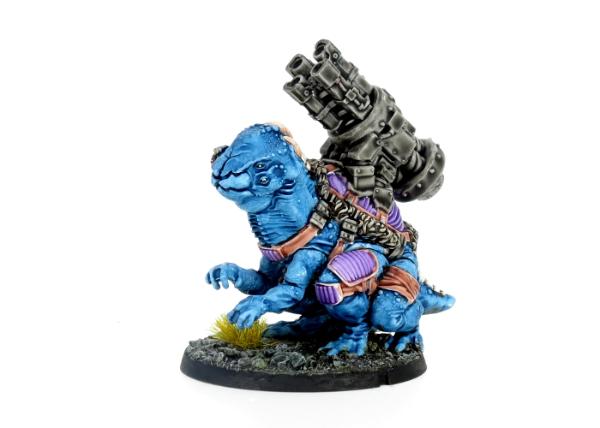
Jet Pa'ku Converted Pa'ku artillery model from Maelstrom's Edge. Converted the giant artillery weapon to a jetpack because, really, why wouldn't you?
Jet plumes added with shredded cardboard soaked in PVA glue. Rather experimental, but we'll see how they turn out...
As a completely out-there experiment, I'm going to try to keep the number of things I'm working on to a manageable number, and wherever possible finish something off completely before starting the next (which sounds like crazy talk, but seems like the only way to get the to-be-painted mountain down to a sensible level). We'll see how that goes...
Woohoo! Glad to be on the first page of the new blog. I always found your Maelstrom's Edge terrain inspiring, so it'll be good to be able to follow along with your miniature endeavours as well.
I saw the Pa'ku conversion in one of the Medge rumour threads, and straight away fell in love. I think it's great that you're able to show what players can do with the medge kits and a bit of time and effort.
just recently got back into the hobby myself - I played Orks in 3rd and always wanted to convert myself a Wazzdakka but never got around to it. Sad to hear that he no longer has rules, but excited to see him get a bit of love.
Whew- I'm glad the Inter-regnum was short and sweet- glad to see what's first up on the workbench this time! Love the Yi Ling figure- nice sense of balance and grace to it, marvelous.
Good luck with the dual themes of minimum projects and finishing old before new
Not seen the terra firma repulsor before, I like that (obviously that was in my wilderness years, as I recall being shocked when I saw a marine grav-tank in someone's thread)
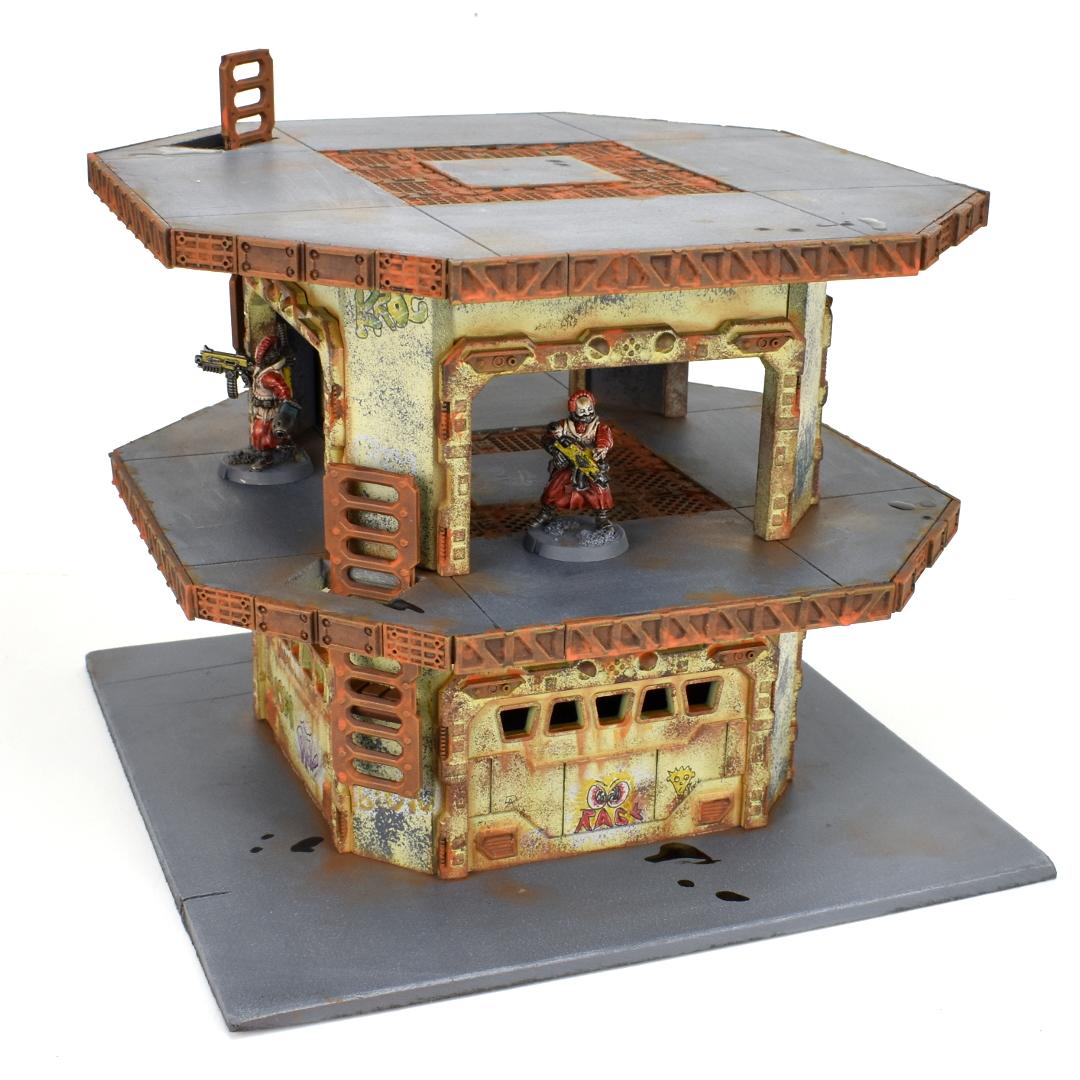
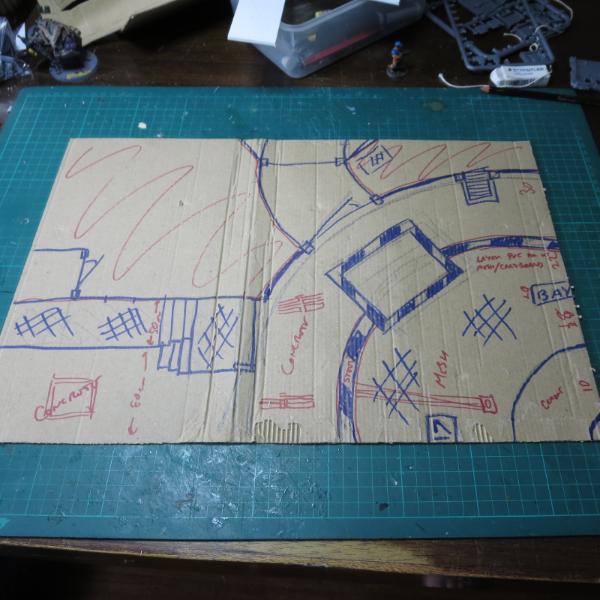
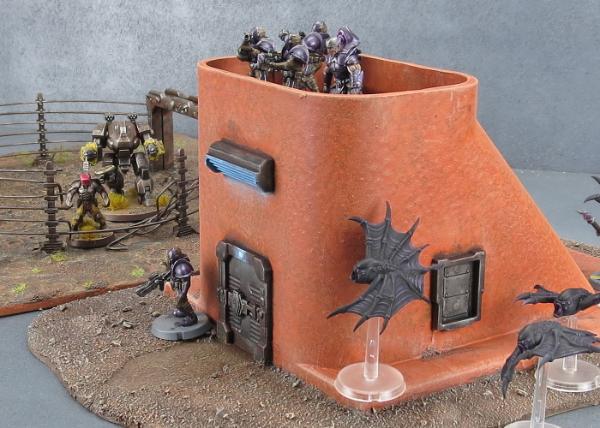
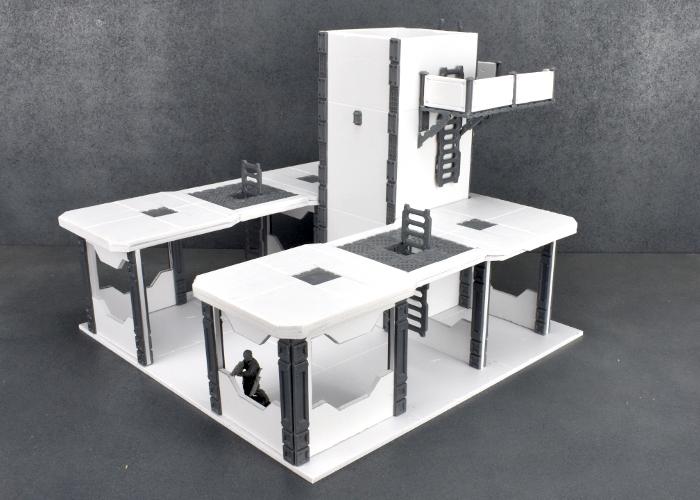
This week, I'm kicking off something a little different for the new year. It's a bigger project than normal, so I'll be spacing it out over a couple of articles, with the aim being to build a detailed display board to use as a backdrop for photographing miniatures. I wanted something that would have plenty of open areas for placing miniatures, and a few different contrasting areas to allow some variety in backdrops with just the one piece. And so 'Landing Pad 16' was born:
Normally when I'm building terrain, I have a rough idea in my head of what I'm going to build, and I just wing it from that. Because this one was a little more complicated, I started by sketching out a rough design, and then translated that into a 1:1 plan on a sheet of cardboard.
For the bulk of the structure, I chose to use foamed PVC sheet. This is a lightweight, but strong plastic material that is easy to cut and shape, and takes extremely well to superglue, which allows it to be used to build solid, detailed structures.
I took my plan and drew up a neater version on the PVC, and then used an exacto knife and steel ruler to cut it out.
I had a slight measuring mishap when scribing some panel lines on the floor piece. Rather than starting over, I just flipped the floor over, making the build a mirror image of my original design. The floor was layered, to allow for some depth in the detailing. With the floor marking out the basic shape for the structure, I could start adding the walls, shaping the PVC to the outline of the building.
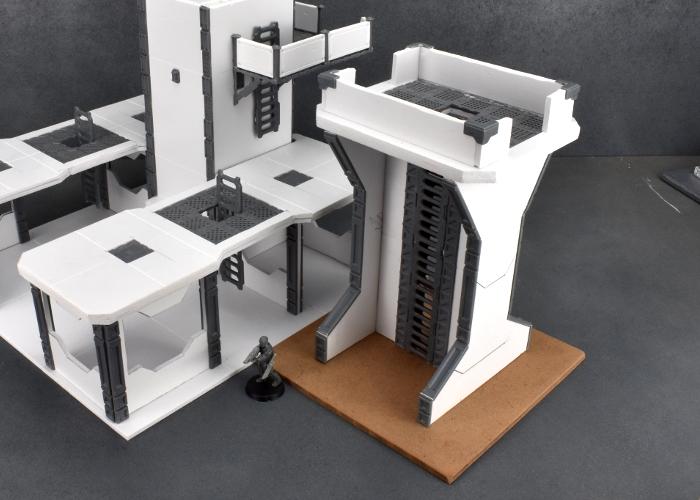
The foamed PVC is quite flexible, but I added a curve to the landing pad wall by heating the PVC in boiling water, curving it around a biscuit tin and letting it cool. This wasn't super-effective, but gave it enough of a lasting curve to let it bend more easily to the required shape. Having the natural bend in there means that the PVC isn't trying to spring back as hard against the glue line, giving a more solid joint.
As with all of my Maelstrom's Edge buildings so far, detailing on this one is added courtesy of the Maelstrom's Edge terrain sprue. I created two hexagonal windows for the landing bay freight access corridor by gluing together pairs of trapezoid windows along their long edges.
As I built up the structure, the plan changed a little from the original sketch. I added extra access between the two sides of the board, and brought the detail on the 'reverse' side down from the roof to a first-level courtyard.
The courtyard needed some depth to allow for some staggered model positioning, so I added a couple of descending platforms on the rear, using layers of PVC to create the steps between levels.
I had planned for a groove to run around the top of the landing pad wall, which would theoretically serve as a runner for a retractable roof - I'm not building the roof, but wanted it to be implied for completeness. For the roof groove to have depth, this needed to protrude into the back facing of the wall, so I built up a box structure using layers of PVC.
The doors on the terrain sprue have detail on both sides, but as they're intended to be used on external structures they only have the framework on the one side. I created a double sided doorway by removing the frame from the rest of the door using a razor saw. On a second door, I cut the door itself out leaving the frame intact, so I could have an open doorway for the freight access.
However carefully you cut and glue, you wind up with some gaps and rough edges. I used some putty to fill in wherever necessary, and once set used some fine sandpaper to smooth it down.
To give the walls some structural detail, I built up a recurring pattern using the support struts from the terrain sprue, and glued this on along the top and bottom of each wall. For curved walls, I carefully bent the strut to shape before gluing it in place.
Rather than having bare cement floors everywhere, I added tiles to the courtyard area using textured plasticard. By cutting out squares of tiles in a regular pattern, I inserted some decorative areas of smaller tiles - these will be painted up with the Epirian Foundation logo.
Using ladders from the terrain sprue, and posts cut from sections of the sprue itself, I added a handrail around the courtyard.
I left the handrail open in a couple of places, to allow some avenues for displaying models and show where the terrain would theoretically continue past the confines of the display board. I did extend the rail part of the way down the stairs, by cutting a piece of 2mm plasticard in a pattern matching the rungs of the ladder.
Down the other end of the board, behind the landing pad, I built some nice, hefty pipes using the large pipe fitting from the terrain sprue and some 13mm garden drip irrigation fittings.
I scattered some smaller pipes around the place using the small pipe fitting, some plastic tubing, and some more scrap sprue from the terrain sprue.
With all of that done, this side of the board is more or less done. There is still a little more gap filling and sanding to be done, and probably some more small details to add here and there. I'll need to add some sort of trim around the bottom edge to neaten everything up, but that will wait until the other side is finished so I can make it consistent.
Stay tuned for part two, detailing the landing pad side of the board!
You can pick them up the Maelstrom's Edge terrain sprue, along with the rest of the Maelstrom's Edge model range from the webstore here.
As always, feel free to pop along and share your work, or ask any Maelstrom's Edge- or hobby-related questions on the Comm Guild Facebook page!
For other Maelstrom's Edge modeling articles, including tutorials and walkthroughs of a wide range of different building and miniature projects, check out the article roundup here.
I'm champing at the bit to get some paint on it... Other side is about 90 percent finished, so should hopefully be able to start painting by the end of the week.
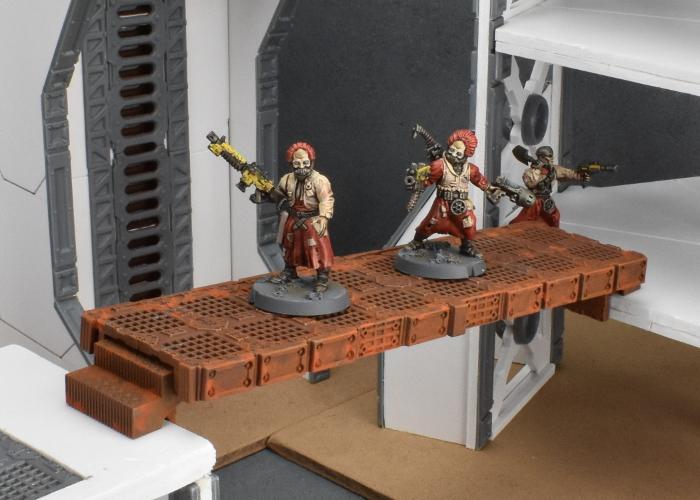
Slight break from other projects to whip up this week's modeling article for the Comm Guild - a quick and easy sculpting tutorial for making your cultists even more culty!
mcmattila wrote: The landing pad just keeps on getting better and better! Can't wait to see it finished.
Me too!
Btw, where do you get that grating that you use on the walkways?
The stuff I used here was found on Ali Express, but it's horrible - really hard and springy aluminium, and had a massive curve in it which I had to try to flatten out before I could use it. These guys were recommended by someone elsewhere, but I haven't tried them out yet: http://modelshop.co.uk/Shop/Raw-Materials/Mesh?orderby=1&top=120
Time to check back in on my landing pad display board build! (If you missed part one, you can find it here)
In the first instalment, I ran through the construction of the 'back' side of the display, so this time around I'm working on the landing pad area.
When I cut the foamed PVC for the floor, I left out a curved area that would form the main section of the actual landing pad itself. To fill this in, I cut a piece of 2mm thick cardboard.
On the top surface of the card, I painted a layer of superglue, and then laid a piece of fibreglass flyscreen flat over the card. Once the glue set, I trimmed the screen around the edges.
I wanted a section of the pad to have visible pipes under the mesh, and had cut a cavity into the cardboard for this purpose. Painting this with everything glued in place would be problematic, so I cut the screen neatly down one edge of the cavity so that it can be lifted up out of the way to paint the pipes. The pipes were made from sections of an assortment of plastic rods. Once the pipes and the rest of the pad are painted, I'll glue the screen back down and add a little trim over the top to disguise the joint.
As detailed last week, I built up the walls using foamed PVC. I left a recess around the top of the landing pad wall, along with the pad's retractable roof would slide.
I added support struts from the Maelstrom's Edge terrain sprue along the top and bottom of the walls, with an extra row of reinforcing
As I had pipes running into the wall from the back side of the board, I needed something on the pad side to match up to them. The first became a heat vent, using a trimmed down large pipe fitting from the terrain sprue and a pipe end from a 13mm drip irrigation setup. I shortened the pipe fitting by cutting across it with a razor saw.
For the second large pipe, I built a fuel storage tank using another drip irrigation piece, a piece of plastic packaging that I think came from a laser printer component, and a clear plastic cap - I don't recall exactly where this piece came from, but I think it was some piece of toddler-feeding paraphernalia. I added some connection ports to the front using the small pipe fitting from the terrain sprue and some plasticard.
For the smaller pipe, I ran a matching piece of pipe cut from the side of the terrain sprue, and fed this into an air conditioning unit built from foamed PVC and an assortment of gubbinz from the terrain sprue.
To the left of the pipe I had added a square hatch, just for a little detail, with the intention of this turning into a conveyor feeding into the pad area from elsewhere. For the conveyor belt, I glued in a bunch of plastic tubes to create rollers.
I broke up the vast expanse of flyscreen on the pad with a couple of strips of plasticard, and added a curved strip around the edges to conceal the join between the screen section and the solid floor.
The rectangle cut into the pad floor was intended to turn into a cargo lift. I built the lift platform using a piece of PVC, some support struts from the terrain sprue and a piece of chequer plate plasticard.
To allow for some variation in the display, I wanted to be able to reposition the lift. To this end, I built a hydraulic lift to go under the middle of the platform using some pieces of plastic tube and a couple of pipe fittings. Thanks to the magic of magnets, this all slots together when needed. Alternatively it can be left out, allowing the lift to sit on the floor.
Ships need to recharge as well as refuel. I built a charging port using a shutter window with most of the shutters cut out. Into the resultant opening, I glued a piece of plasticard and some assorted bits and pieces. The charging cable was made from a couple of pieces of plastic tube and the chain from a fob watch I had sitting in my bits box.
At the other end of the board, I wanted some stairs and decking platforms to create some vertical detail. I cut the shape of the platforms out of 1mm plasticard, and glued on some aluminium mesh cut to the same size.
On the bottom of the mesh, I glued matching pieces of plasticard, and then added some diagonal supports using I-beam plastic rod.
The supports for the platforms we made from foamed PVC, doubled-up to give it some extra thickness.
With the legs in place, I added some extra supports for staircases, cut from more PVC. I used strips of textured plasticard for the stair treads. For the moment, I left the platforms and the treads on the lower staircase unglued, to make it a little easier to paint underneath them.
I added some more support struts around the edges of the platforms and on the ends of the legs. I also glued on some posts for handrails, cut from the energy fence piece on the terrain sprue.
Some final small details:
- I added a spray gun (for vermin control) onto the wall using a chemtech sprayer from the Epirian Scarecrow kit with a pistol grip from a Guardian pistol added. For the mounting clips, I used a couple of leftover sections from the energy fence posts.
- I pillaged a clingfire sprayer and a leg from the Scarecrow kit, and a trimmed down Spider Drone head to create a security remote.
- And I made a billboard screen using sections cut from a garage door.
And with that, assembly is more or less complete!
The handrails are just a placeholder for the moment - I'm planning on using 1.6mm aluminium rods for these, so that they can be bent to shape to go down the stairs, but these won't be glued in until the platforms are painted.
Stay tuned for part three, where we get some paint on this little construction!
You can pick them up the Maelstrom's Edge terrain sprue, along with the rest of the Maelstrom's Edge model range from the webstore here.
As always, feel free to pop along and share your work, or ask any Maelstrom's Edge- or hobby-related questions on the Comm Guild Facebook page!
For other Maelstrom's Edge modeling articles, including tutorials and walkthroughs of a wide range of different building and miniature projects, check out the article roundup here.
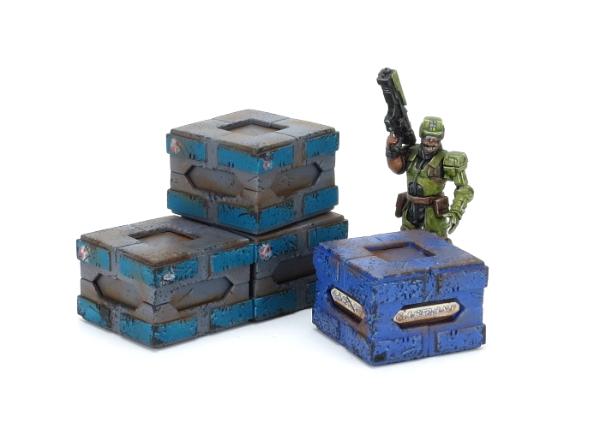
When you're waiting for that parcel, and then four come all at once... Some WIP shipping crates. Because every board needs some random stuff to hide behind.
The Maelstrom's Edge terrain sprue includes a nifty corner bracing piece, which would normally be used on the roof corners of flat-roof buildings to pretty them up a little. Because a lot of my buildings have angled buttresses or ballustraded roofs, I collect a lot of spares of this part. Looking for something easy and effective to do with them, I hit on the idea of turning them into shipping crates!
To replicate these, for each crate you will need some 1mm thick plasticard or cardboard - two pieces 21mm square, two pieces 21mm x 12mm, and two pieces 19mm by 12mm, and you will also need eight corner braces.
Start by placing the corner braces flat side down, and gluing them together in sets of four along the flat edges, as below:
Glue your large squares into the two resultant boxwork shapes. If you're using plasticard, you can use polystyrene cement for this. Use superglue if you have gone with cardboard.
Next, take the 21mm long strips, and glue them along the inside of one of the boxes, along opposite sides. It doesn't matter which two sides you go with, so long as they are opposite each other.
The 19mm strips should then fit neatly in on the other two sides. It's a good idea to check them for fit, and trim up if necessary before gluing them in. If you wind up with the corners of the strips not all meeting up exactly, it's not a problem, as they'll be hidden by the boxwork when you put the other side on.
Speaking of the other side, you can now glue this on by sliding it on over the strips, until it butts up neatly against the first side.
And that's it. They're really easy to put together, so (assuming you have enough corner braces knocking around) you can quickly assemble a few of them to stack up and scatter around the table for a bit of low cover.
They're fairly light, so while they sit neatly on top of each other, you may find it beneficial to glue the stacks together so that they don't get knocked awry mid-game. This also gives you less surface to paint, since you won't need to paint the faces that are touching other crates!
Keen to give it a go? You can pick up the Maelstrom's Edge terrain sprue, along with the rest of the Maelstrom's Edge model range from the webstore here.
As always, feel free to pop along and share your work, or ask any Maelstrom's Edge- or hobby-related questions on the Comm Guild Facebook page!
For other Maelstrom's Edge modeling articles, including tutorials and walkthroughs of a wide range of different building and miniature projects, check out the article roundup here.
You should print Kickstarter logos to put on those, maybe some of the old delayed ones will ship by that time in the ME timeline
Thanks! Turns out I had to go back and modify the base, as the top wasn't flat enough for the dress to sit right. So now I need to repaint the top of it :(
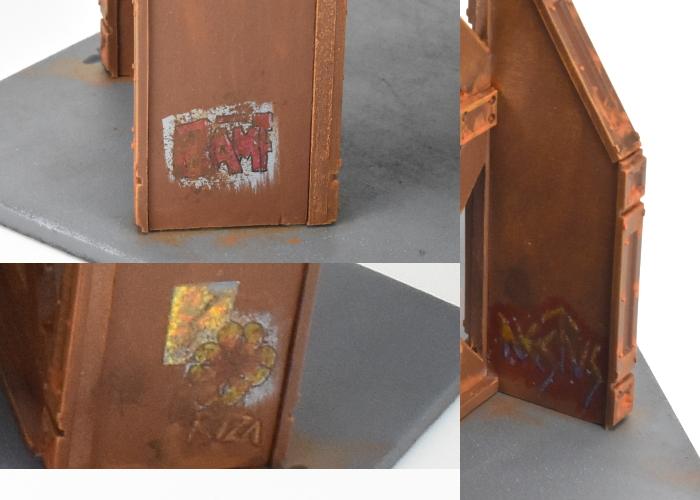
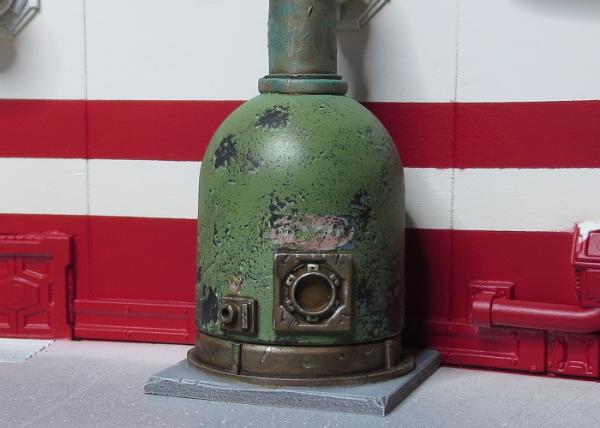
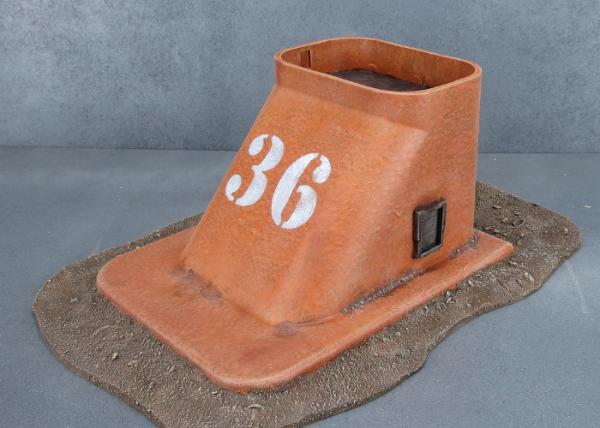
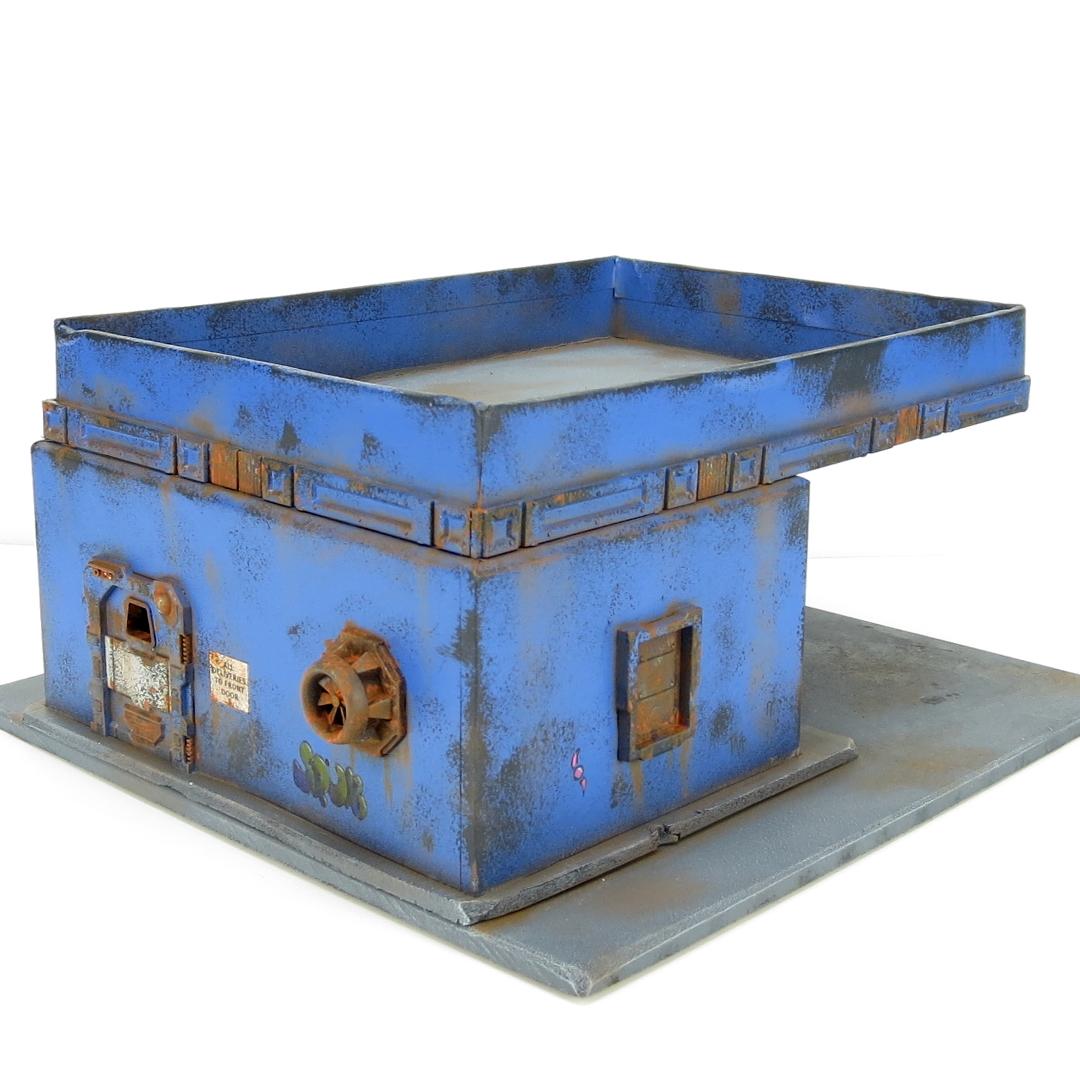
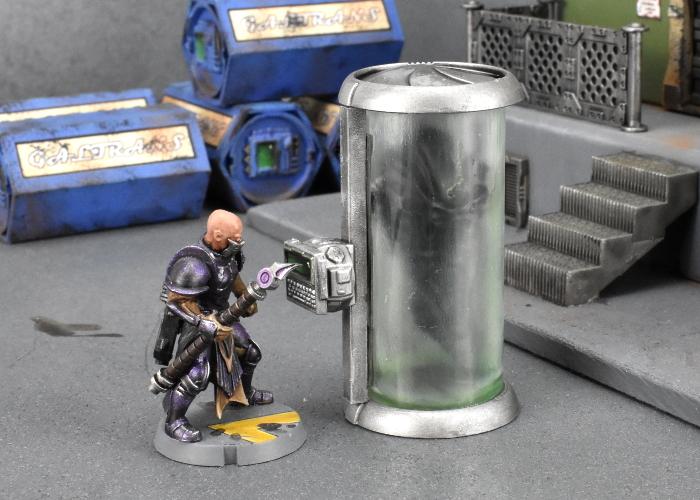
So, speaking of things that aren't cathedral bells... finished the fuel tank, and wrote up a quick tutorial on using photo paper to create weathered and faded signs like this:
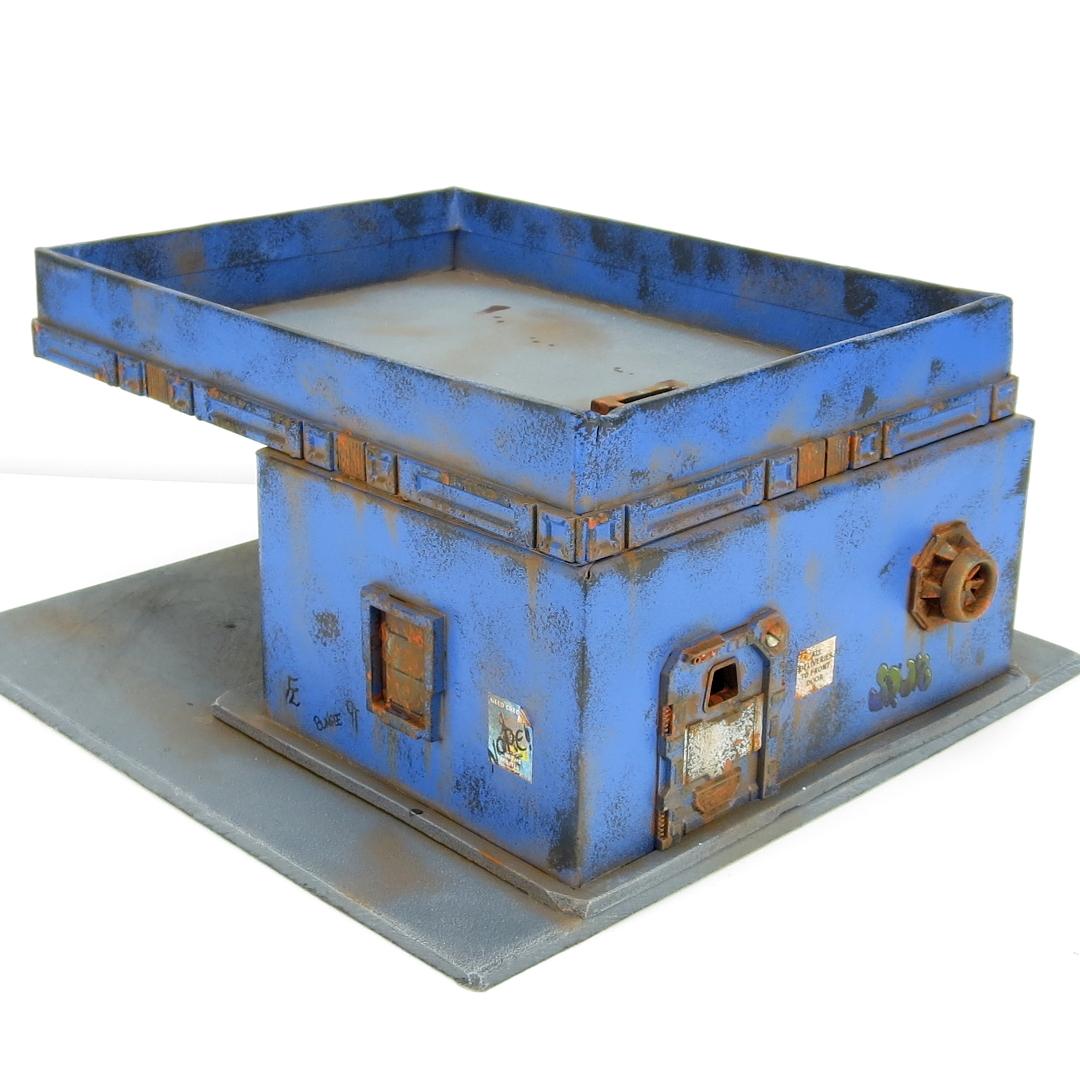
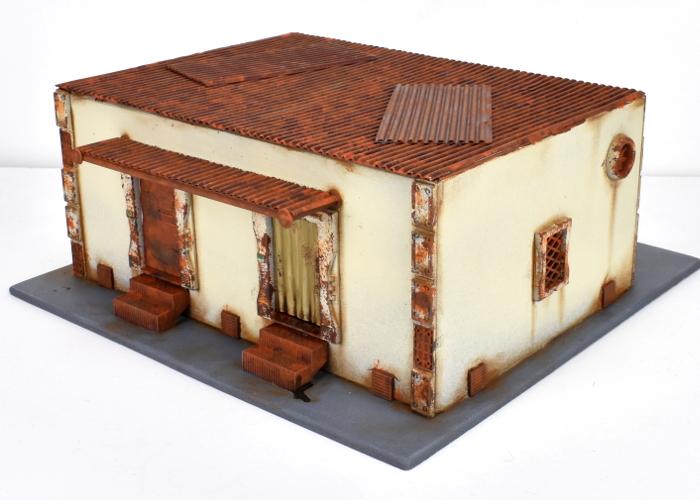
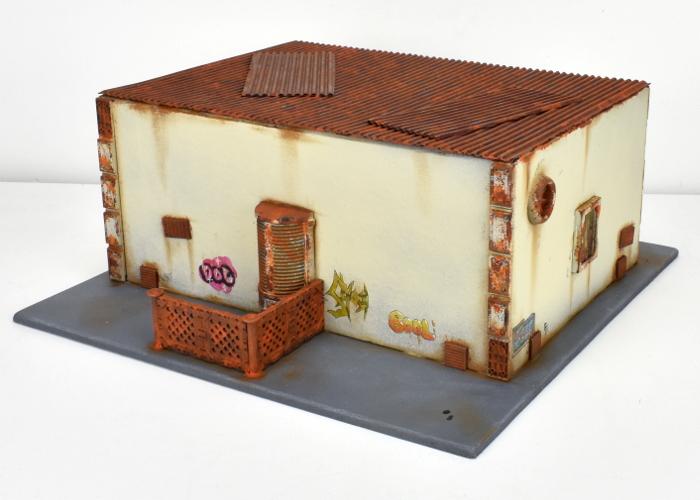
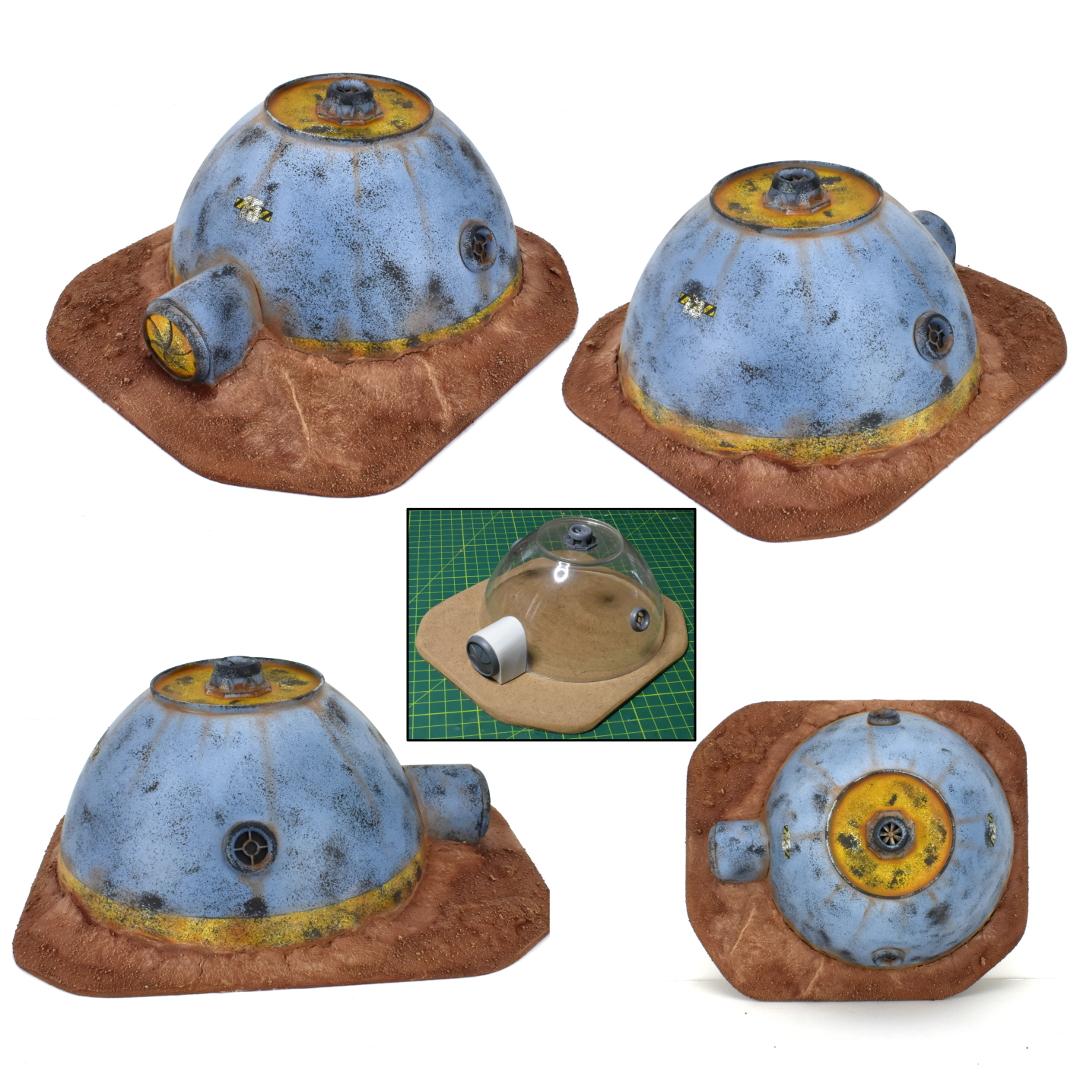
New week, new modeling article... This time a bunker made from an air conditioner fitting that I found while I was at the hardware store looking for something else entirely...
Yeah, they're not going to win any awards - there are slight mould lines in places and the colouring is mostly good but a little messy in places, but it's good enough at table height to pass muster for gaming.
There are paints out there that will stick to silicon, but it just didn't really seem like a worthwhile use of time
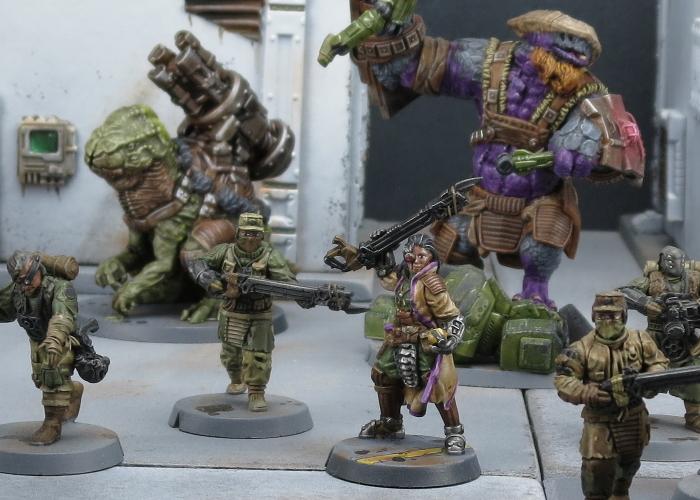
Saw this cross posted over in the Gates of Antares Facebook group. This sort of set up is great for hard SciFi games. GW is so stuck with ruins and buildings it’s kind of sad.
Dysartes wrote: They're looking good, insaniak - and it was nice to meet you at Salute. How'd you get on with the big terrain piece you were working on?
It's always fun to run into fellow Dakkanauts!
Didn't get very much done on the display board - too much else happening! More progress on that soon, although I have a couple of repairs to do after lugging it all the way to the UK and back again in my suitcase...
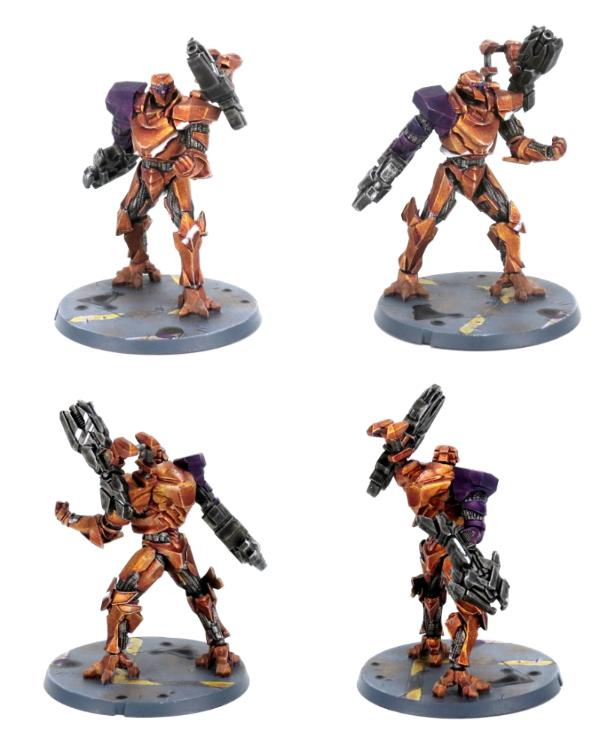
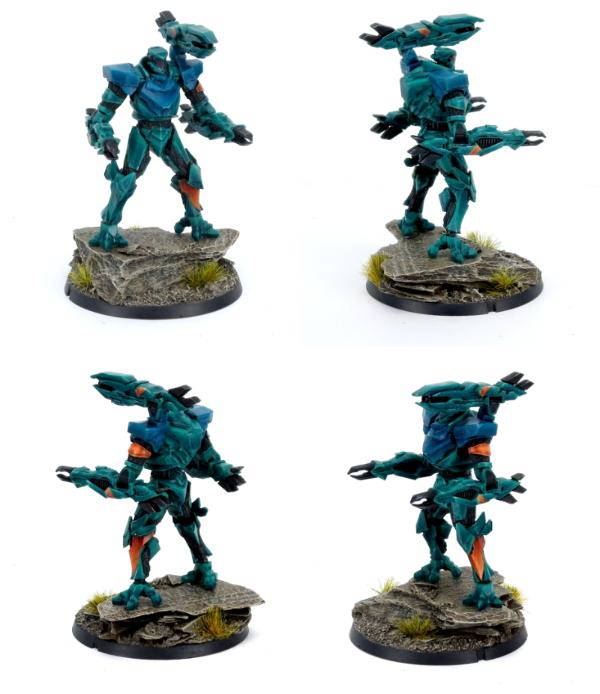
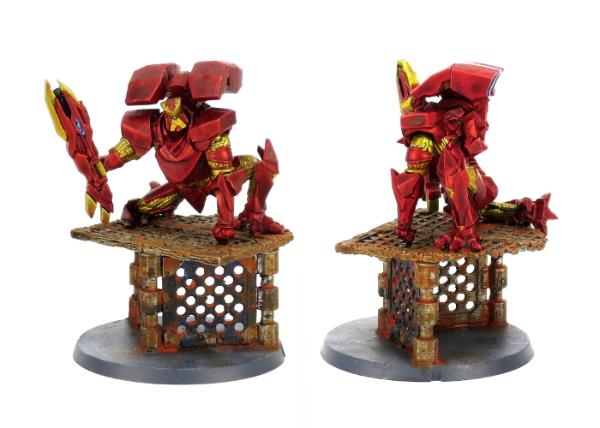
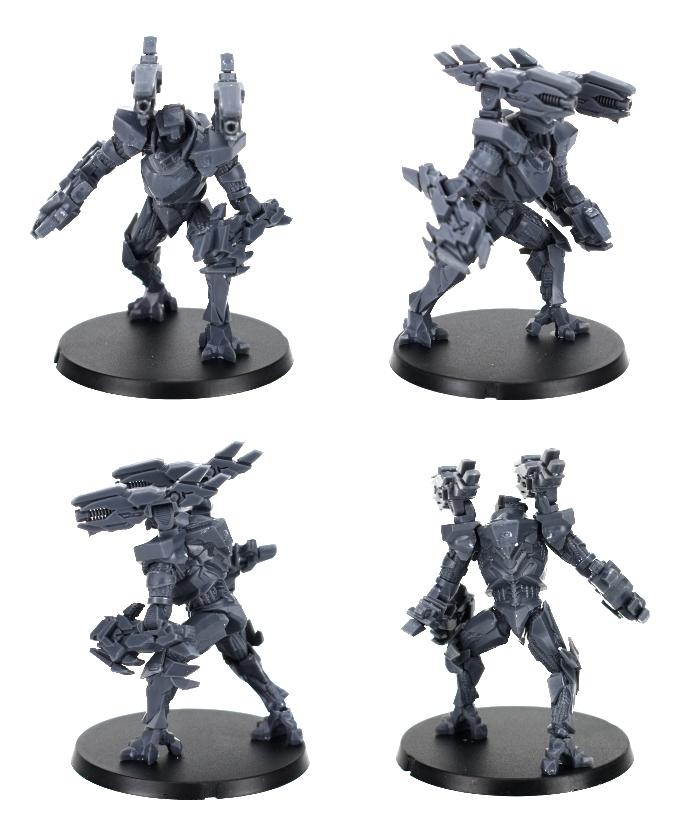
This month saw the release of a new faction, and a fantastic new multi-part, plastic kit for Maelstrom's Edge, in the form of the Artarian Remnant's Militus battlesuit. For this week's modeling article, I thought I would take a closer look at this kit and see what I could make with it.
The Militus kit comes with a single plastic frame, which includes one battlesuit, two each of the different ranged weapon options, fist and reflex shield options, two different shoulder pad options, two different backpack options, and more heads than you can poke a shock baton at, to allow for some very easy customisation between your different suits.
The Militus is fully articulated, with ball joints at ankles, knees, hips, elbows and shoulders, which allows for a wide range of posing options. The ranged weapons also have a multi-part gimble arrangement which allows both arm-mounted and shoulder-rig weapons to be positioned just how you want them.
As an alternative to the standard shoulder rig, you can leave the vertical arm off and flip the weapon over, attaching the gimbal directly to the shoulder pad.
As a handy extra, the connection point for the weapons onto the gimbal is a very snug fit, which actually allows you to leave the weapon unglued and just push them into place, so that you can switch between weapons as desired between games. Likewise, while the forearm-and-hand option uses a different upper arm to the ranged weapons, the shoulder joint is a tightly fitting ball and socket joint, so if you glue the shoulder pad on to the torso without gluing the arm, you can carefully wiggle the arms in and out of the shoulder socket to swap them.
The saw blades on the above suit are not from this kit, but came from a Warhammer 40000 ork vehicle, used here just because I thought it looked awesome!
The backpack options (a field generator and a jump pack) also slot on, fitting neatly over the suit's back. These aren't quite as snug as the shoulders, but you could easily leave them unglued and attach them when you want them with a little blue-tac or similar poster adhesive.
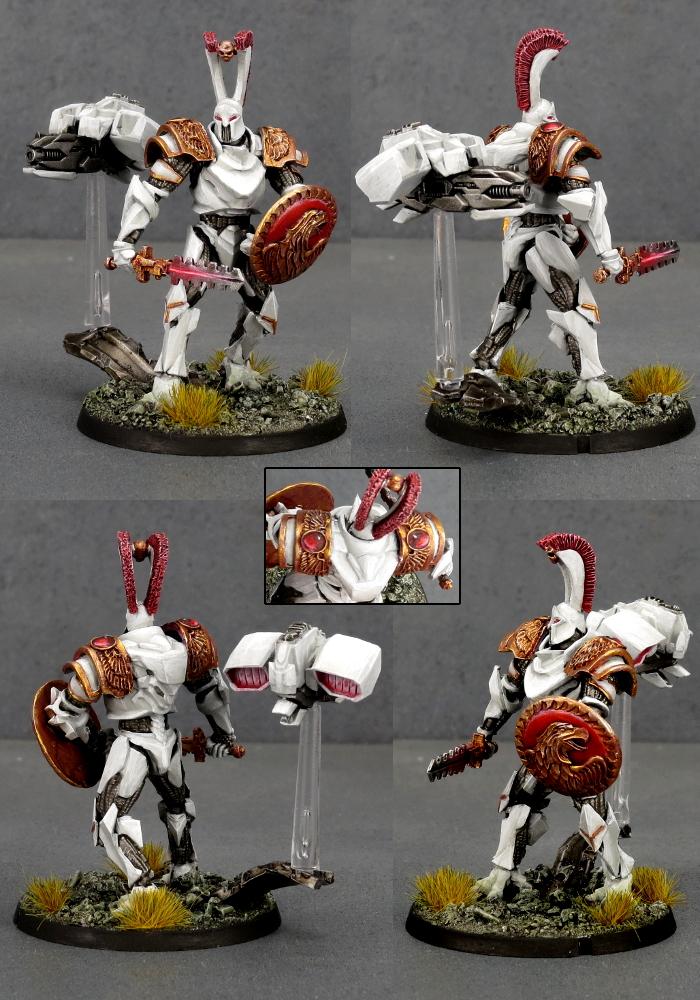
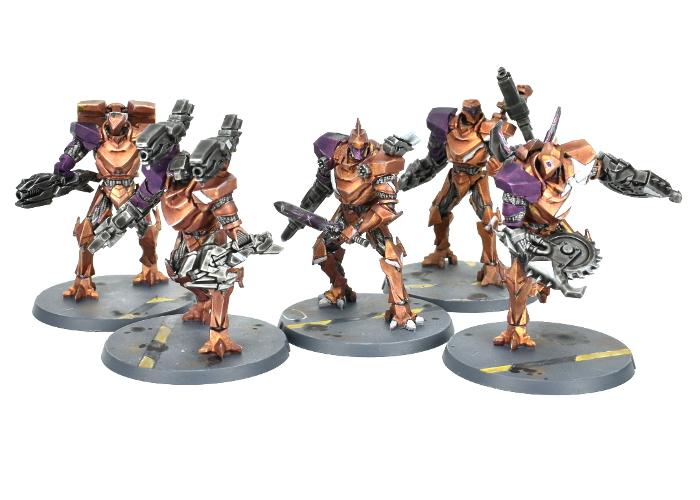
The fantastic thing about plastic, of course, is that it is simple to modify. So if the already wide range of posing available to the suit doesn't quite get it where you want it, it's an easy job to trim the joints a little to push them out even further. The below suit was posed by removing the top edges of the thigh armour plates, trimming the edges of the hip socket and leaving off the triangular piece that fits into the back of the shin.
Lorican Champions are highly individual souls, and love to customise their suits. For this reason, the frame includes a bunch of different heads, and we will be releasing a resin upgrade pack to add some extra options in the near future. You can also look at other 28mm resin add-ons for more distinctive customisation - the heads on the suits are more or less human-sized, although you may need to fill the neck socket with some putty. The below suit was customised with an assortment of resin parts I had laying around from an old grab bag. His weapon drone (representing a shoulder mounted weapo, rules-wise) was made from a chopped up jump pack.
Finally, you're likely to wind up with a bunch of extra heads after you have finished building your suits. As mentioned above, these are human-sized, so that opens up all sorts of potential for customising your troops from other factions!
What do you have planned for your Militus suits? Feel free to pop along and share your work, or ask any Maelstrom's Edge- or hobby-related questions on the Comm Guild Facebook page!
You can pick up the Militus suit along with the rest of the Maelstrom's Edge model range from the webstore here.
For other Maelstrom's Edge modeling articles, including tutorials and walkthroughs of a wide range of different building and miniature projects, check out the Hobby section of the Maelstrom's Edge website here.
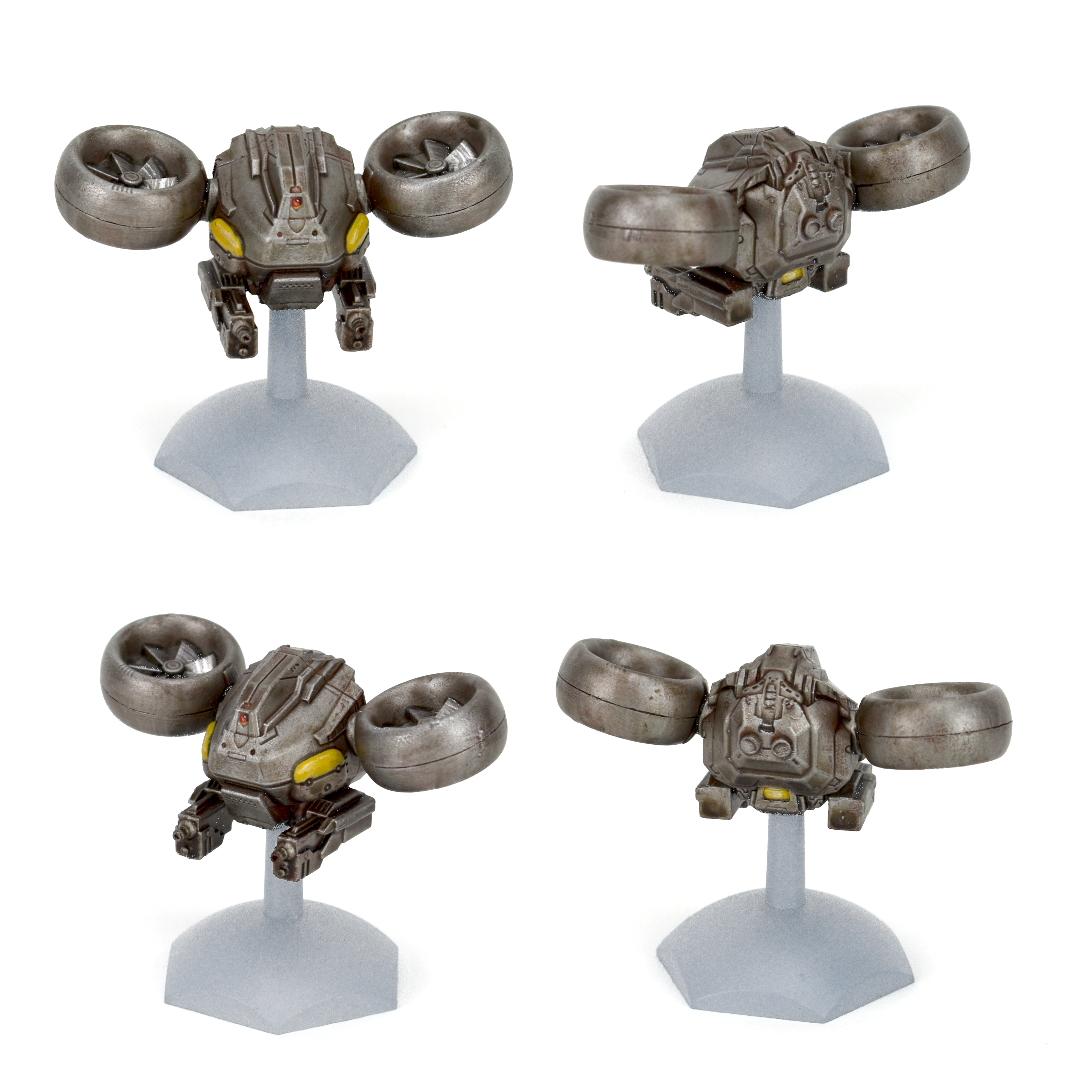
The hovercraft is excellent, as well as that board .
Am I the only one who gets so used to people’s avatars that when I see an actual shot of the person that they are let down by it not being a cat throwing dice against a robot or cartoon character?
insaniak wrote:Less so for people with non-human avatars, but yes, it still catches me by surprise that yakface doesn't actually look anything like Sean Connery...
I'm quite disappointed myself everytime I look into the mirror! Also, that picture is particularly not flattering, either!
Briancj wrote:I like the fact that you appear to be gaming in a shed built in the early 14th century.
You actually have no idea. We were playtesting in a proper British Manor, built some odd 800 years ago. The hows and whys that occurred I'm not quite at liberty to say, but it was quite the interesting atmosphere to be sequestered in to play war-games.
I guess "identify the rough time period of a structure by a single interior photograph and only be off by a century" is a reasonable skillset. I'll take it.
Thanks, guys! That one was a heck of a lot of fun to build.
This week, I got all environmentally-friendly:
Made from an old electric toothbrush head, a little plasticard, a piece from the Maelstrom's Edge terrain sprue, and a piece off the end of a superglue lid.
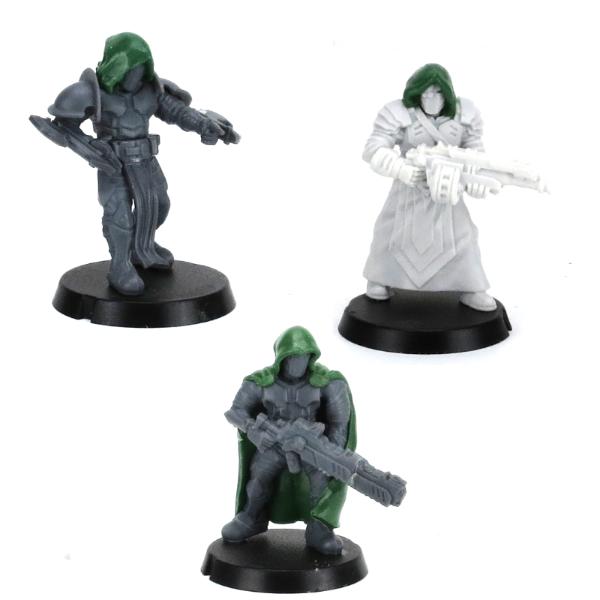
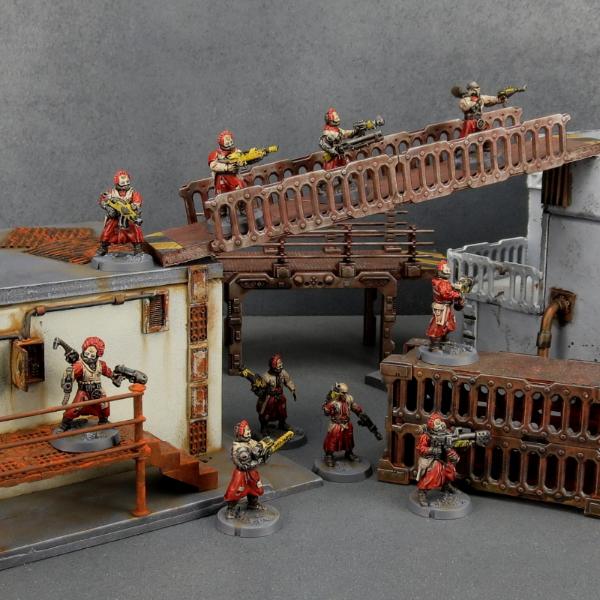
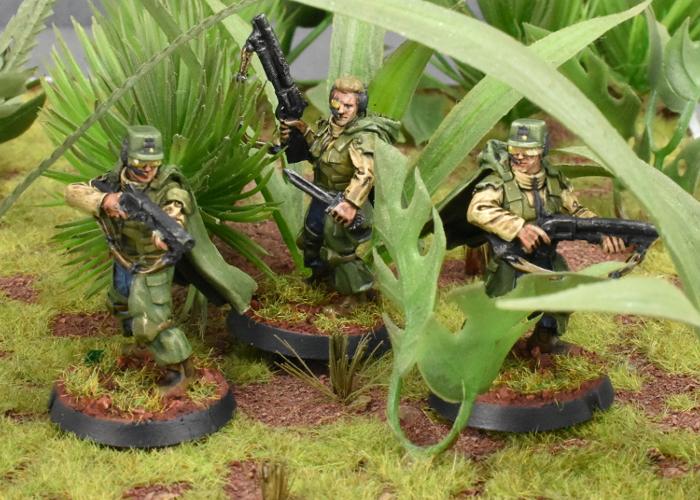
A friend and I recently talking about dusting off the original Necromunda rules for a bash has me feeling a little inspired. WIP Cawdor gang, using various assorted old 40K and Necromunda weapons and @maelstromsedge Broken Infantry for bodies. Two more gangers and a couple of juves still to build, and then I can get some paint on. \
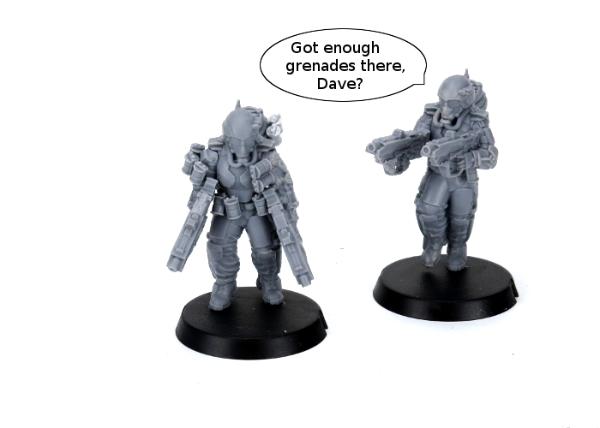
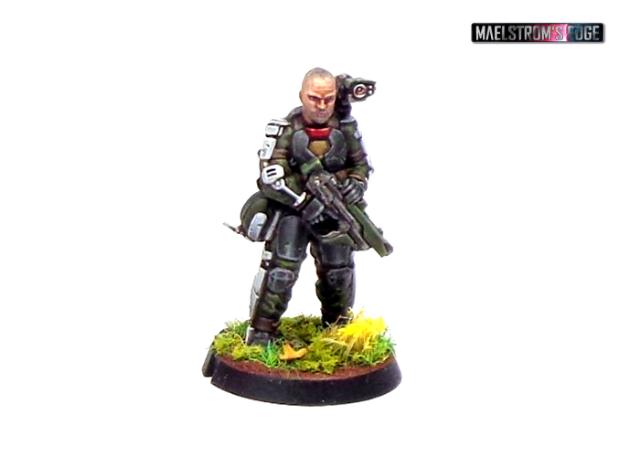
The Epirian SecDef received a boost right in the Command slot last month with the release of a resin Lieutenant model. This fleshes the SecDef out into a fieldable Epirian sub-faction in their own right, as you can now build a detachment solely from SecDef units. This week, I'm taking a closer look at this fantastic model, and some of the modeling options available to it.
The SecDef Lieutenant comes in five pieces (ok, six, if you count the base!) - body, head, targeter, and two different hand options equipped with maglock pistol or carbine.
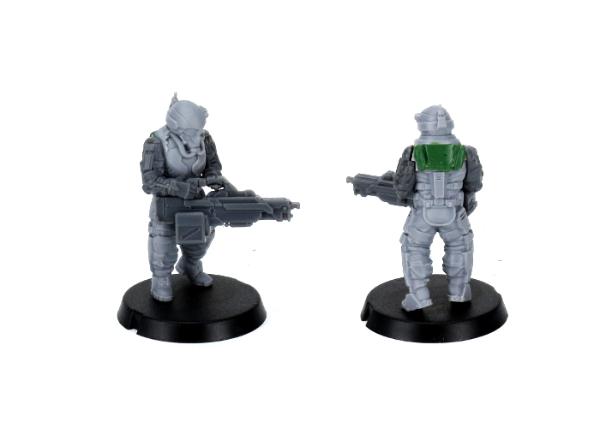
The head and targeter both have ball joints for full movement range, so you can position the targeter lined up with whichever way the Lieutenant is facing.
The head is also compatible with the SecDef plastics, so you can use a regular helmeted head for a slightly more safety-conscious leader. On the below model, I've used a regular SecDef Tactical head, and also clipped the helmet off his belt and glued on a plastic pouch from the Epirian Handler sprue to cover over the clipped detail.
You can also easily swap in alternate heads from elsewhere in the range. Here's a commander with a little more facial hair, for example, with a head lifted from the Broken Infantry sprue.
Carefully sawing through the waist with a razor saw allows you to swap in alternate legs to switch up the posing. Here, I've used a set of legs removed from a SecDef Boostpack Infantry model, and also given him a capped head from the Epirian Contractor sprue.
Of course, the compatible heads work both ways, so you can also swap in the Lieutenant's venerable pate for a regular SecDef Sergeant.
To get some of your own super-soldier action happening, you can pick up the SecDef Lieutenant, along with the rest of the Maelstrom's Edge model range in the webstore here.
As always, feel free to pop along and share your creations, or ask any Maelstrom's Edge- or hobby-related questions on the Comm Guild Facebook page!
For other Maelstrom's Edge modeling articles, including tutorials and walkthroughs of a wide range of different building and miniature projects, check out the Hobby section of the Maelstrom's Edge website here.
Progress on the Necromunda gang... Leader, two heavies, five gangers and two juves. Just need to do a little minor sculpting on the Leader, and then ready for paint.
Getting some paint on the Necromunda gang. I actually quite like the sepia-Sin-City thing that they have going on at the moment... it's tempting to just paint the bases and call them done
They're very poseable. This particular guy needed a little trimming on some of the joints to make the pose work, and the shoulder pads can be problematic for poses with the arms raised, but everything being a ball joint gives you an awful lof of freedom.
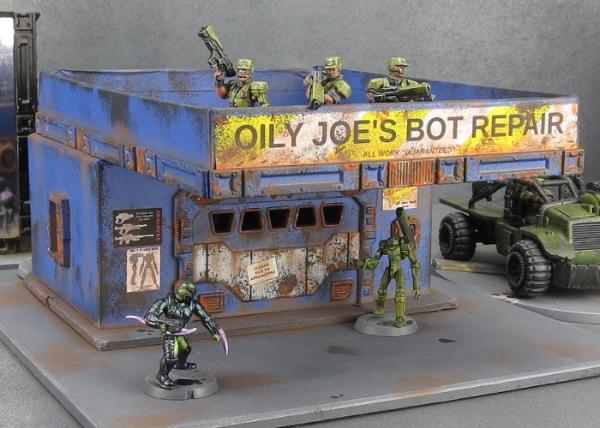
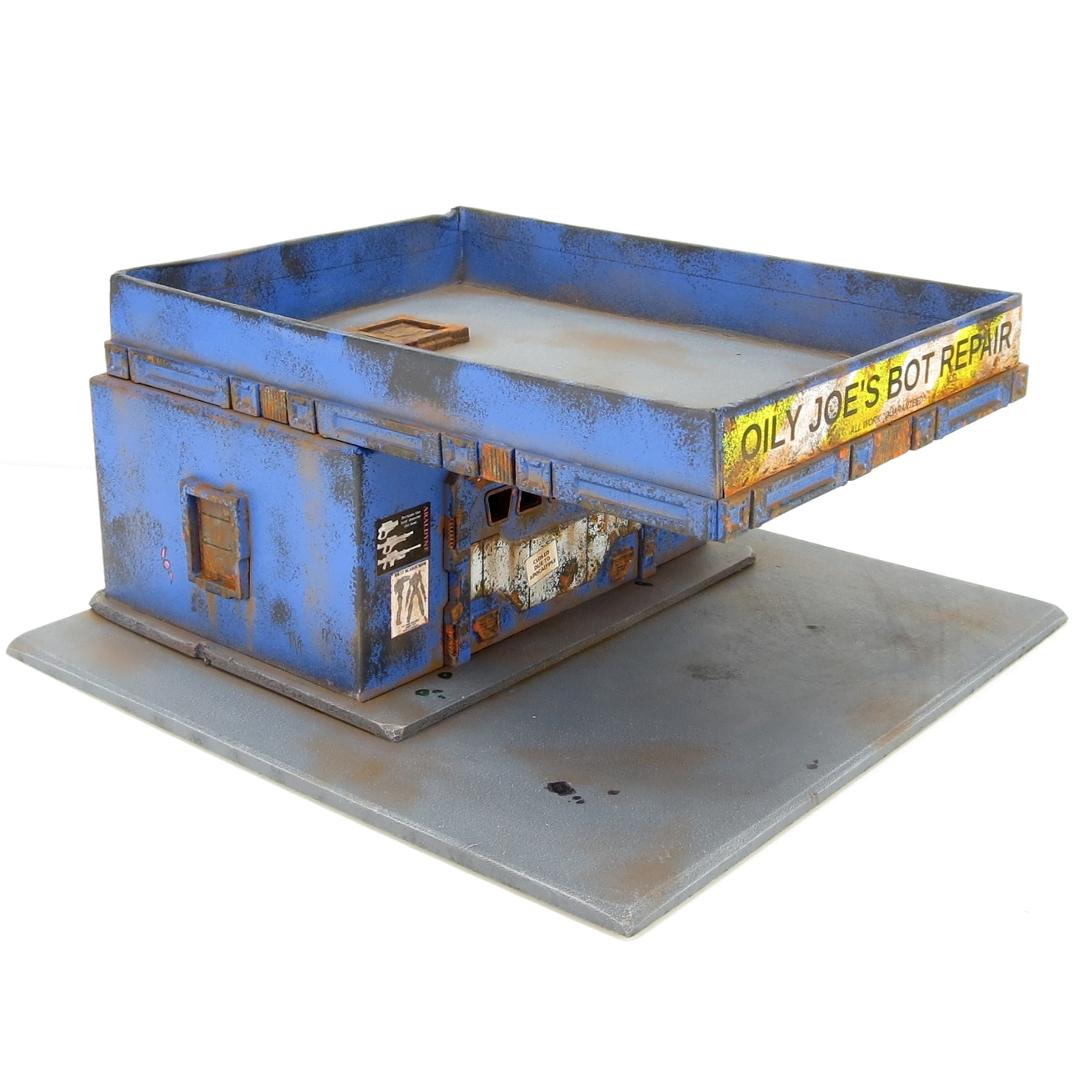
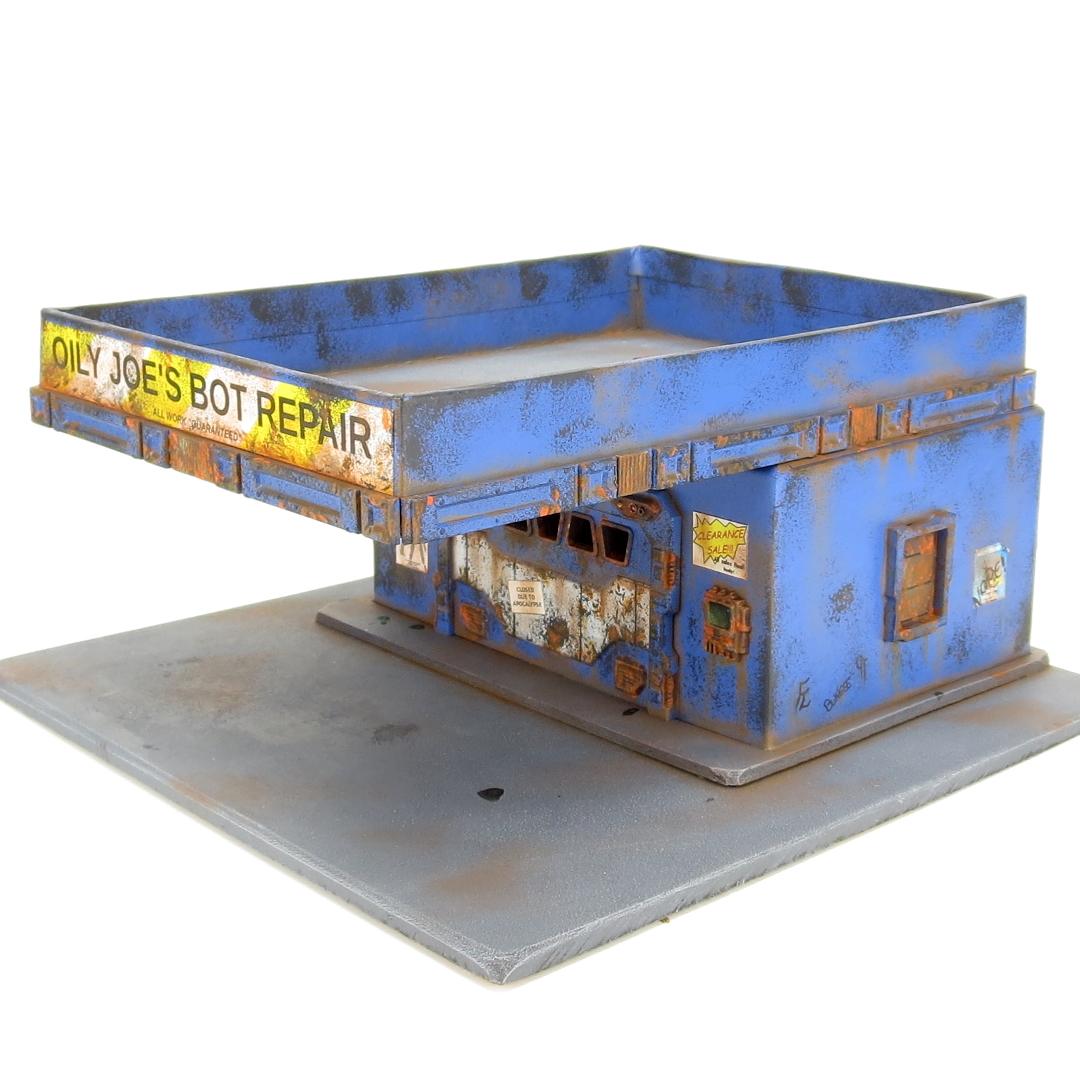
I did consider supports under the awning, but decided against for simplicity and to allow for easier model movement under there. Floating awnings aren't too impractical, provided they're built from strong enough materials.
Playing with Contrast paints some more, this time trying for a layered shading effect rather than just glopping it on. Mixed results, but seems to work.
The 'just slop it on' approach is obviously faster than traditional blending or layering, and I was actually fairly happy with the results - for normal gaming, it would be more than adequate.
The layered shading above obviously took longer than that. It was a little faster than the same technique using Quickshades, but at the expense of a little less control due to the heavier pigment, but I think I need to experiment a little more to decide whether or not it's worth it.
Oily Joe’s looks great. I agree support posts might look a bit more realistic but the model is cleaner and more practical for gaming without them. I love that terrain sprue. So simple and fun for turning junk into cool terrain. I really like your extra touches of detail with the posters and graffiti.
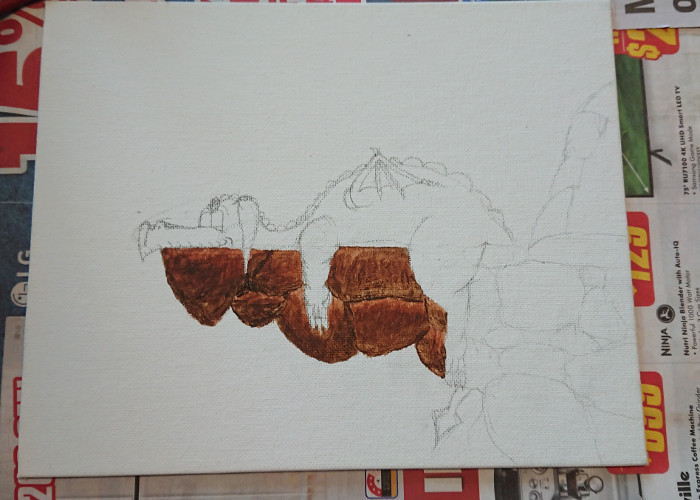
Trying my hand at something slightly different, because I've had these canvas boards floating around in the storage room for years and wanted to do something with them...
Wow great idea, i have thought about trying to paint on a canvas ( to learn more about painting for 3d models ), but im not too sure its necessary, but im sure it would teach me alot about painting in general. But i cant draw at all. You are very good at drawing.
EDit - I have been watching alot of oil painting videos though, don't know why i just found it interesting. And this guy wyou probably already know called Bob Ross, i have been randomly watching his videos aswell, pretty interesting stuff if you are learning how to paint models aswell ( even though its a way way different method ).
Wow, the battlefield looks really good with all the scratch build terrain all done in a consistent style. That will make for some epic games. Very nice work!
And now for something completely different... In my spare time, I'm working on 'updating' my 'Iron Wolves' Space Wolf army to be 2nd Edition compliant. They were originally put together in 5th edition, where Space Wolves had variable squad sizes, amongst other differences collected over the editions.
One of the other big differences is that back in 2nd edition, Space Marine armies of any flavour needed to include a Techmarine (or equivalent) in order to field most of their support options, including Dreadnoughts and any vehicles not bought as unit transports. In 5th edition, taking an Iron Priest had never been a particularly exciting option in my already character-heavy list, so I never bothered building one.
As not taking my Dreadnought was just not an option, and with 2nd edition also offering all sorts of other fun stuff like Rapiers and Tarantulas, I went for a rummage in the bits box and turned up an old, metal Iron Warriors Warpsmith that I bought way back in the day to do something clever with it. I promptly hacked off his head and shaved down the Iron Warriors-ish skull on his chest, added some Space Wolfy bits and voila! Iron Priest ready for painting:
...although I may wind up puttying on a bionic eye or something, as I just realised as I was uploading the pic to Dakka that I used that same head for one of my two Rune Priests. Or maybe they're twins...
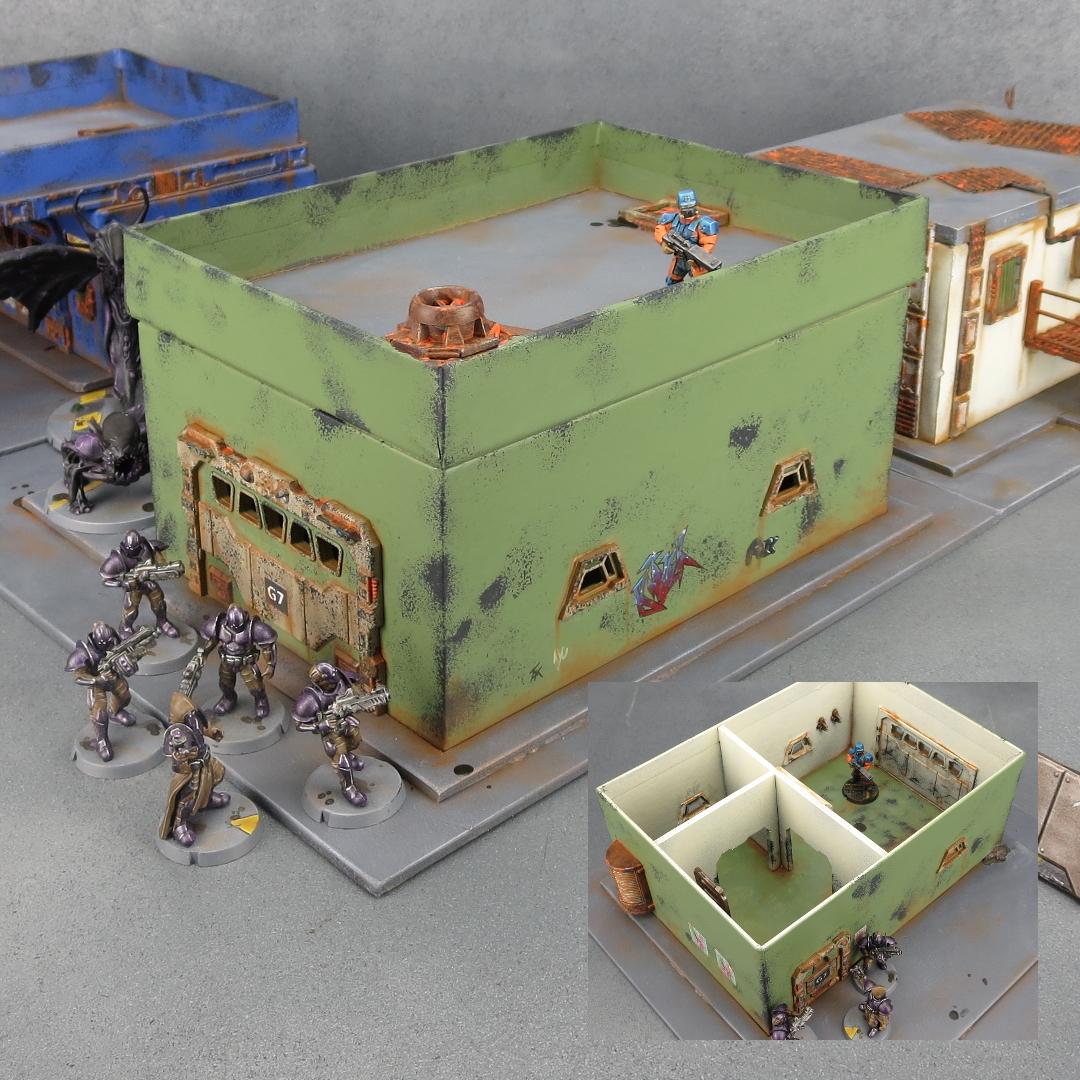
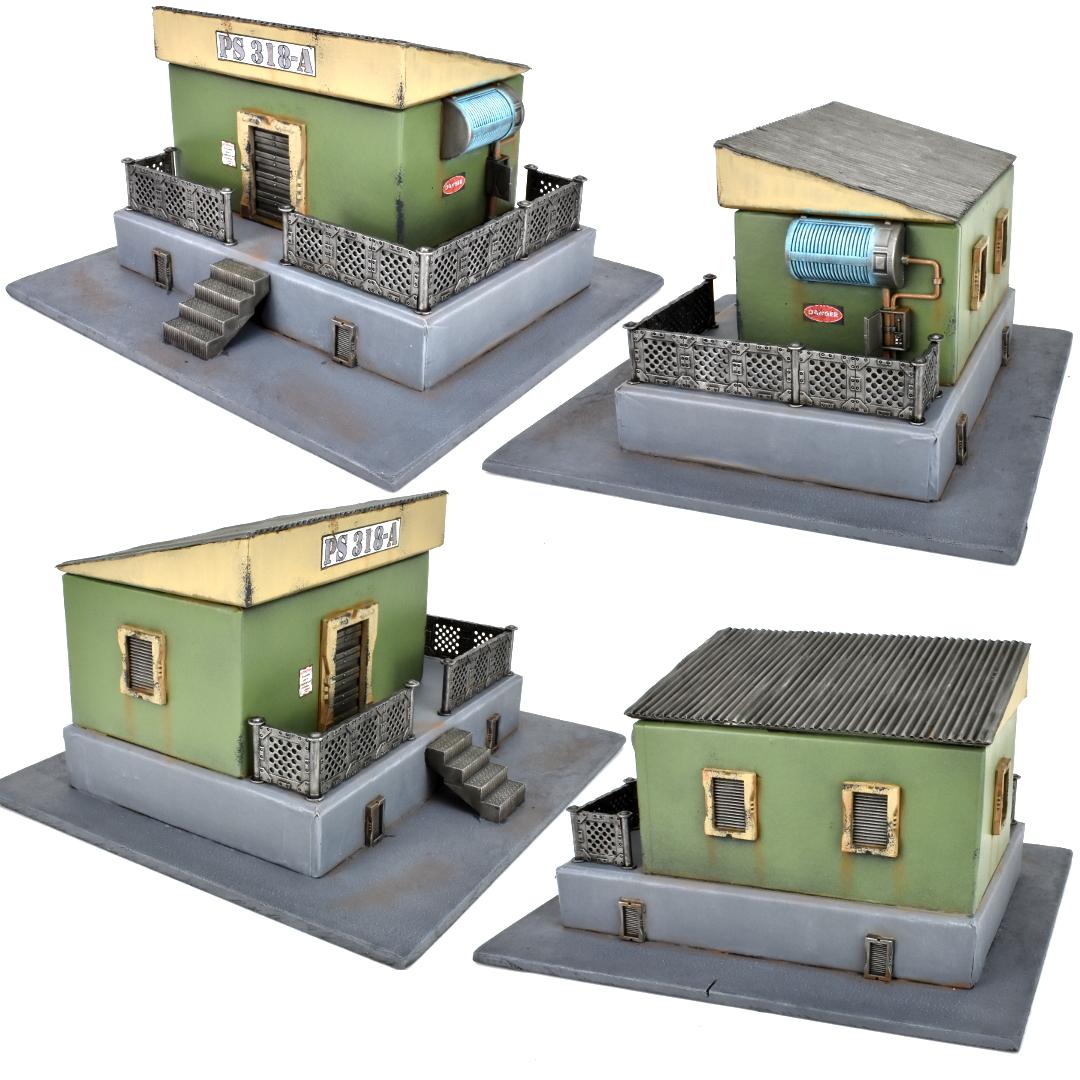
New building painted up for a painting tutorial, which you can find here:
Automatically Appended Next Post:
Not Online!!! wrote: Question, have you worked with clay for terrain building?
(especially in regards to fortifications?)
I've played with clay a little, mostly for craters and ruins, but it's a bit of a hassle unless you can find one that doesn't shrink as it dries. And it's heavy, which can be a pain if you want your terrain to be portable.
Surprisingly not. I did give it a very light spray with matte sealer before the basecoat of Army Painter Army Green spray, but I'm not sure it was actually necessary.
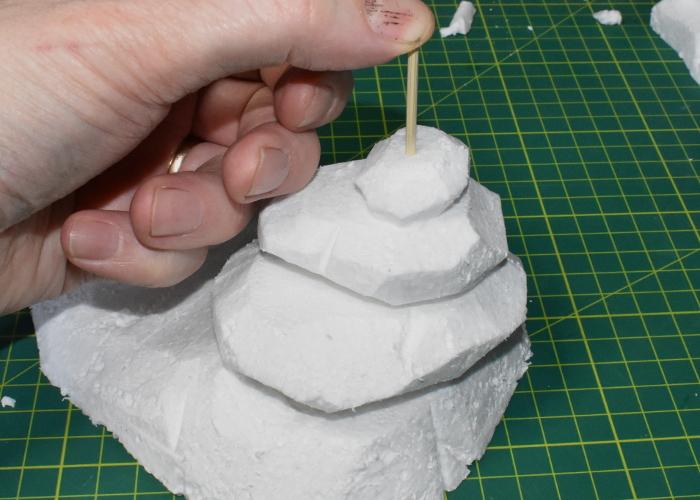
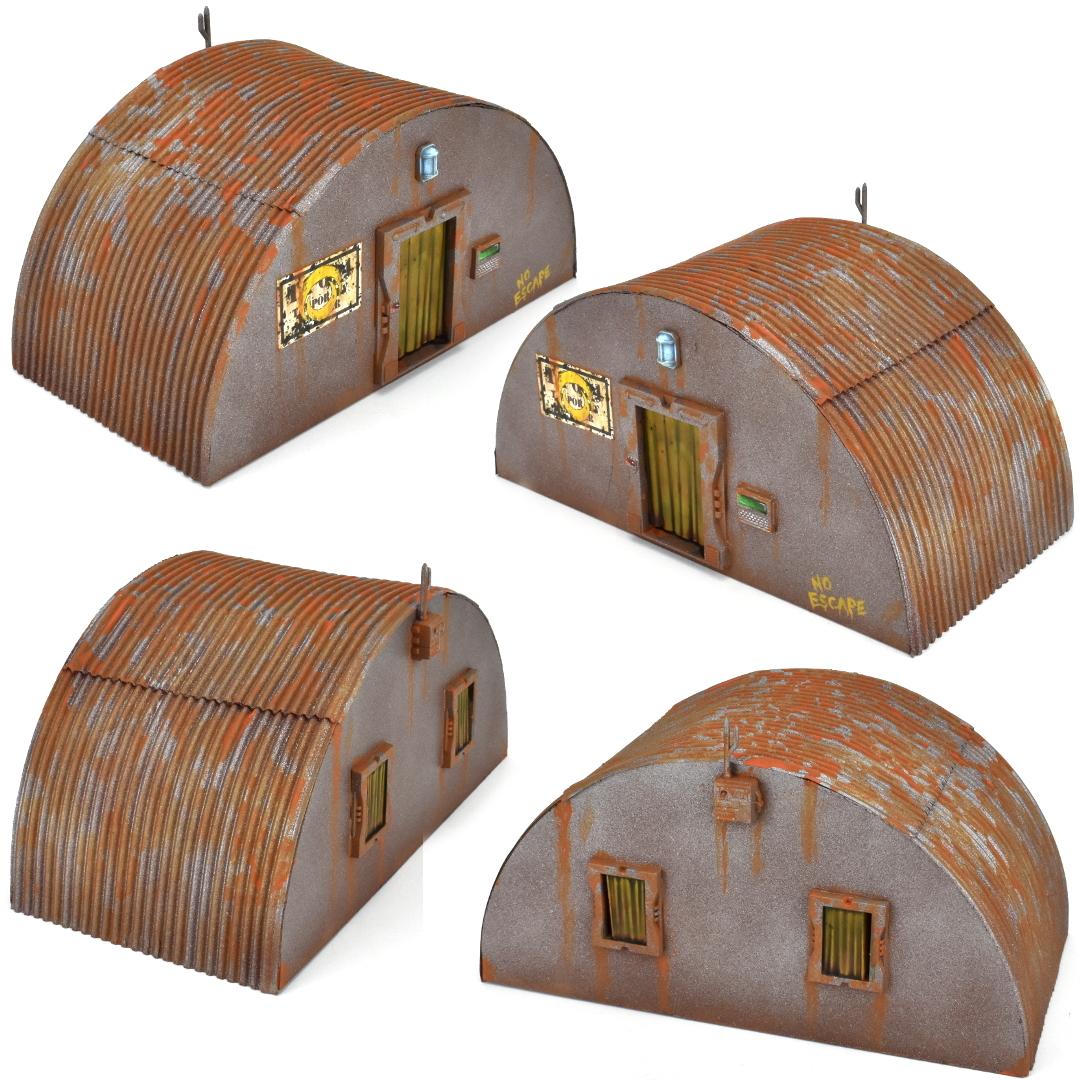
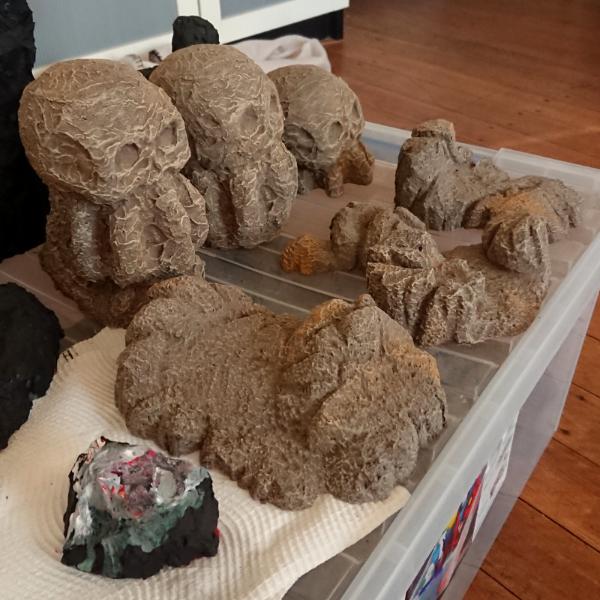
I came across a tutorial online a little while ago for making eroded rocky outcrops using stacks of corrugated cardboard coated in filling plaster, and then distressed with a wire brush. It was really effective, but I'm not a huge fan of using plaster on gaming terrain as it tends to chip easily. So I thought I'd have a go at making something similar, using foamed PVC.
From putting together buildings, I tend to wind up with a lot of small off-cuts of foamed PVC sheet. This would potentially work with any thickness of sheet, but the thicker the better. Here, I'm using 3mm sheet as that's what I had to hand.
I cut a series of roughly oval shapes from the sheet, slowly decreasing in size so that they would stack up to form the shape of the outcrop.
Using superglue, I glued the layers together, trying to not get glue right out to the edges of the PVC pieces as this would interfere with the texturing later on.
Next, I used a hobby knife to smooth down the layers, more or less. These didn't have to be perfectly blended, but enough to disguise the separate layers of PVC once the texturing was applied.
To apply the rock texture, I scraped horizontally around the edge of the outcrop with a wire brush. The aim here was to vary the depth and length of the scrapes to give a random, rock texture, without cutting in too deep and making it all too flimsy.
With a spray coat of black, and a drybrush of a mix of brown and grey paints, the outcrop was ready for the table.
It's not perfect - it could use some more defined layers running around the circumference, level with the flat areas. This would give it more of a stacked-rock effect and look less like a single lump. But it was an interesting experiment, and a fun way to use up some scraps. I'll have to tinker with the idea a little more and see where I can take it!
Do you have terrain creations you'd like to share? You can get feedback on your work, or ask any Maelstrom's Edge- or hobby-related questions on the Comm Guild Facebook page!
You can pick up the entire Maelstrom's Edge model range, including our plastic urban terrain detail sprue in the webstore here.
For other Maelstrom's Edge modeling articles, including tutorials and walkthroughs of a wide range of different building and miniature projects, check out the Hobby section of the Maelstrom's Edge website here.
A little too 'lumpish' - needs some more defined layers. My first prototype (at the back in the pic) had more layering, but the edges were a little too sharp, so it looked to artificial. I think something in between the two, with more defined layers but without the sharp top edges of the first one would be the way to go.
Makes sense. Here in the us, those kind of wind-carved striations show up mostly in the Southwest. You could also search for 'hoodoo' which are a form of wind-carved spires, large and small.
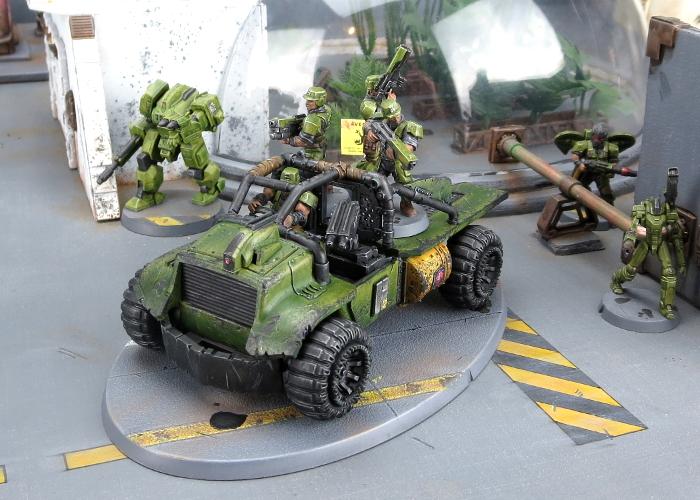
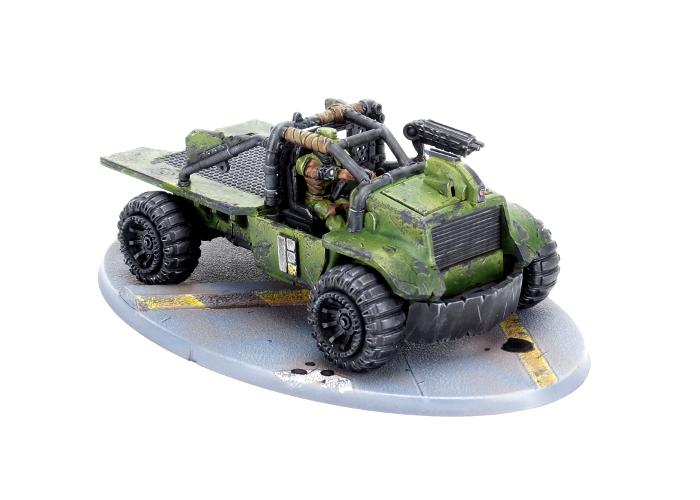
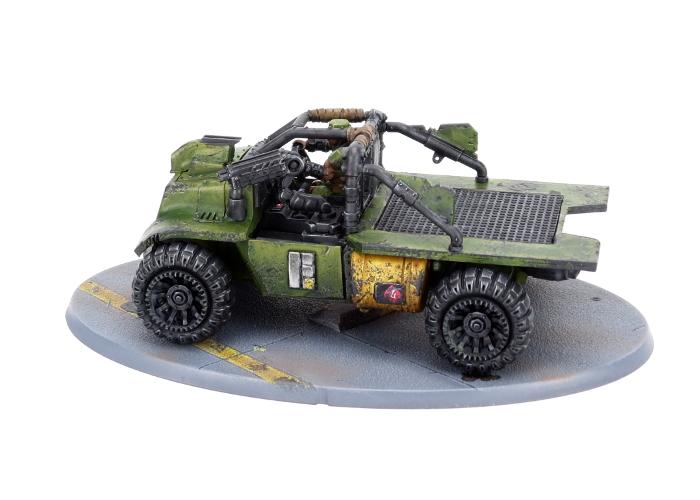
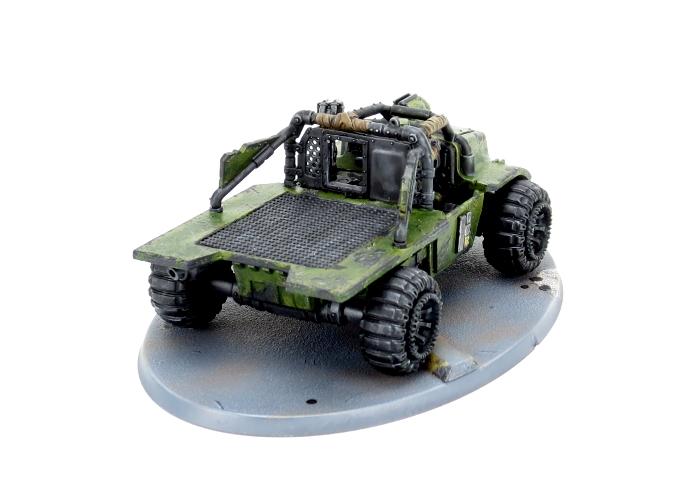
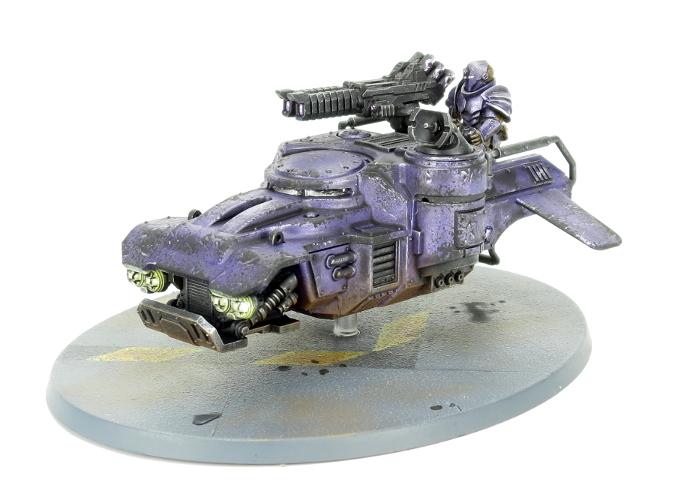
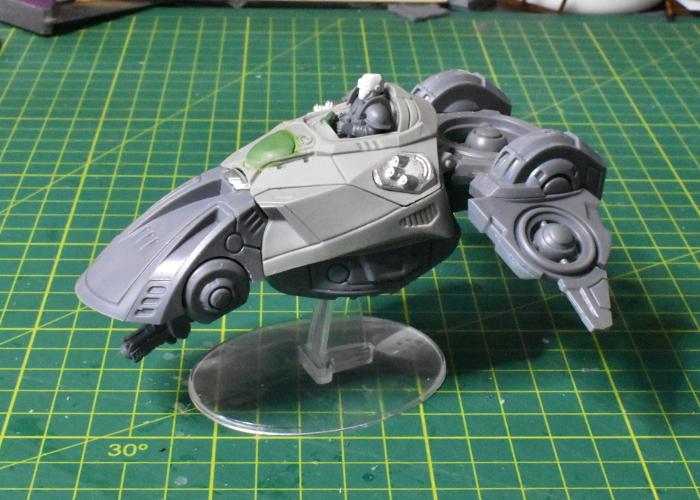
While I'm prepping some more terrain for the release of the new sprue ( [happy dance!] ) I'm also having a tinker with this peculiar blend of plastic, resin and metal parts from Beyond the Gates of Antares:
Converting it into a transport for my Maelstrom's Edge Karists.
Thanks - it's a nice little kit, if slightly too basic in some areas (like the gunner just being a head sticking up out of a flat space). Super-easy to assemble, though.
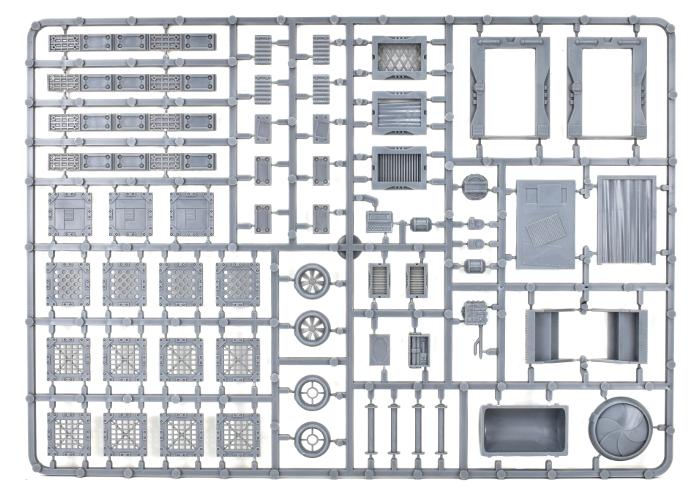
These sprues are just detail components, rather than full buildings - the idea is you use whatever you want to make the main structure, and then use the sprues to detail them up.
The first sprue is available through the Maelstrom's Edge website
The new sprue above is available from next monday.
VERY inspiring work Iain, I'm really looking forward to seeing how you paint these up. Are you going to go with those oldschool Munda colors like the blue-grey and green...with loads of rivets and hazard stripes?
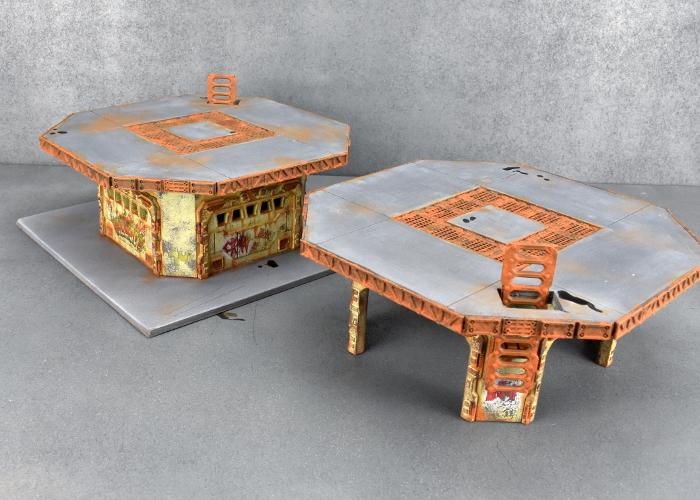
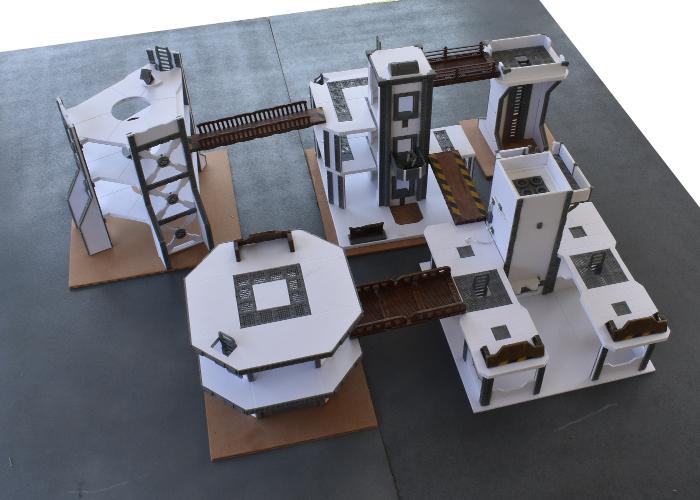
Snrub wrote: How much of this terrain have you assembled so far? Any chance of seeing a shot of it all set up?
There was a shot in this post of the lot together. That's in a fairly tight cluster, and obviously the flat-top platforms can be split into two pieces, but I think I still want another 3-4 decent sized pieces (and a minehead!) to flesh out a full table. Thinking of adding a water reclamation pool and possibly a modular canal, just because water features always look cool...
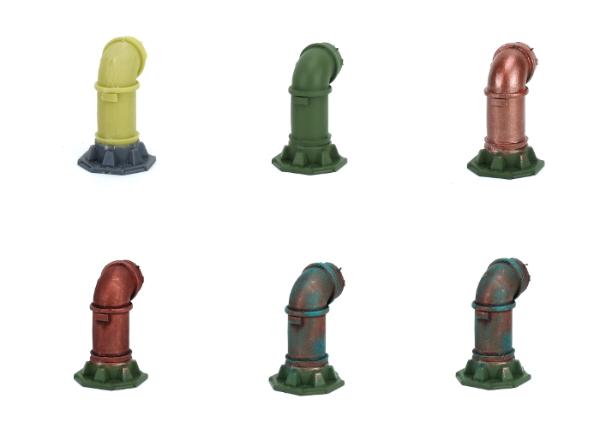
Gordy2000 wrote: Lovely stuff indeed - could you share your recipe for that great rust with the crowd?
It's a dark brown (AK Interactive Rust Base spray, or Game Colour Charred Brown brushed on, then a drybrush of P3 Ember Orange, a light drybrush of P3 Pig Iron for travelled bits like ladder rungs and steps, and then Army Painter Dry Rust dabbed messily on to upwards-facing surfaces.
Although the specific colours don't actually matter that much, since rust comes in such a wide range of shades...
Wow... even better than I'd pictured them pre-paint. That shade of blue is right on, and I really like your rust effects. I'll second Gordy's request for a quick recipe.
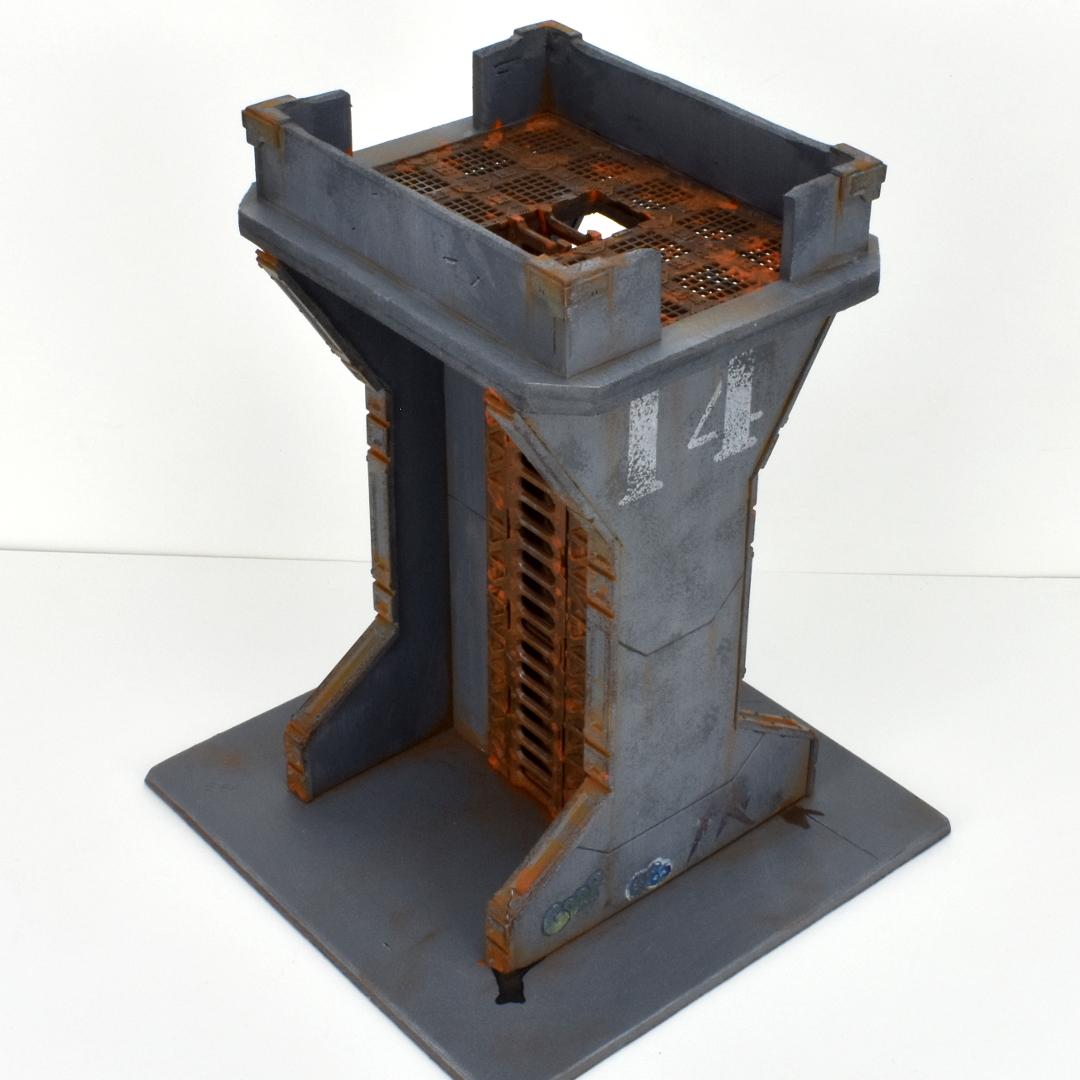
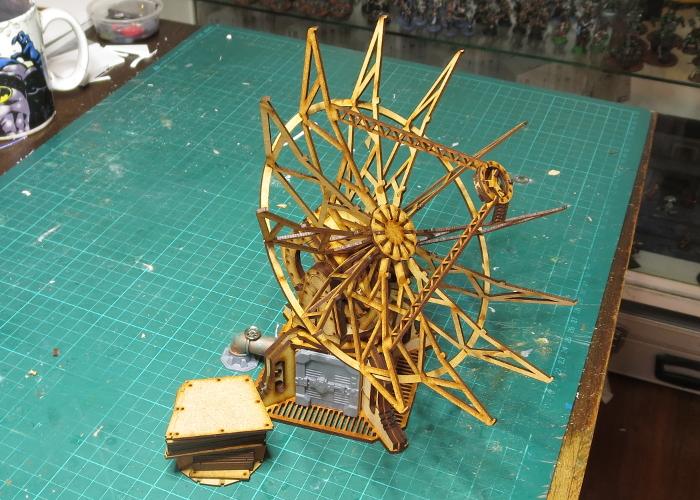
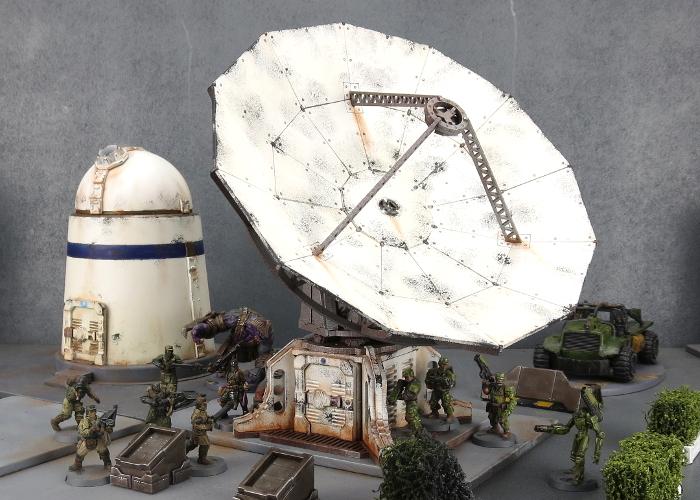
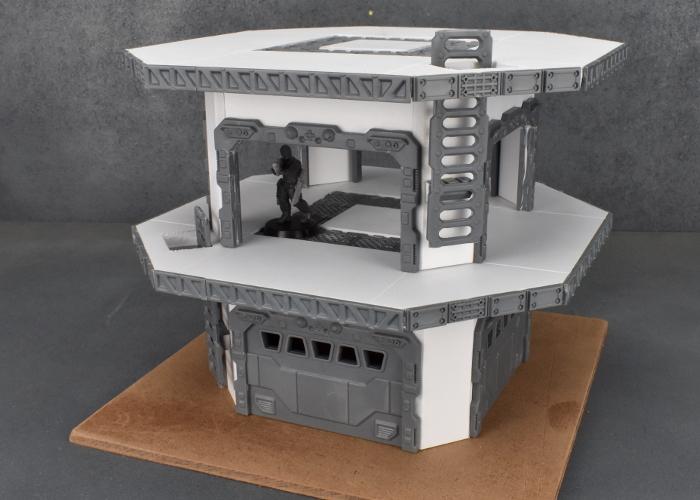
Good work on the generator tower, Insaniak. Personally I feel it's a little sparse for something like a generator, but it's a fine piece of terrain never the less!
Your tagging is also top notch. Complemented fantastically by the weathering.
Snrub wrote: Personally I feel it's a little sparse for something like a generator, ...
Actually, I agree that the generator piece could have stood to be bulkier, but it was really just an excuse to have something in the central shaft. My old cardboard version, I used to have a Pringles can that I shoved down the middle of it, but that was a bit too bulky for the look I was going for here.


 .
.


 .
.


 I like it even better than the preview one too


 you are a mad wizard, Sir. Outstanding.