Well guys, I am not the most technologically sophisticated individual there is, so we will start with that.
Many of you have seen my other blogs over the almost 10 years of my DakkaDakka career, and hopefully this one will be just as silly/ridiculous yet somehow still interesting as I hope the others have been.
The purpose I propose for this thread is an all comers thread. by that I mean I want everyone to feel free to post their 3D printed projects in this thread. That's right, this isn't about what I can do with a printer, but a thread about what we can teach each other or learn from one another in the grand realm of 3D. If your a 3D novice or have your own 3D empire all parties are welcome....well, check some ground rules that will constantly be evolving below.
Ground Rules
1. All DakkaDakka rules are in full effect (Be Polite, Stay on topic, no Politics ). I don't make these rules, I just follow them like everyone else.
2. As above with DakkaDakka rules of no discussions of FW knock offs, We cannot be posting 3D knock offs here. I don't want the big GW lawyers with their Thunder-ban-hammers coming at me/this site/anyone making designs out there of similar designs. Where is the line on this? Common sense . If you have even the smallest inkling that GW might get upset by someone giving/selling/making a design available that could steal some of their money, then don't post it.
3.Do not post/or otherwise give out files that you purchased or supported through Patreon, kickstarter or other platforms. The designers obviously put work into them and feel they should get some sort of compensation for the effort. Please respect that. If you post a design that others see and would like them definitely direct the people to the site or designer. Let's support and grow this market in our industry.
I'm sure more will follow, but it's one of those technologies that is still ahead of the curve when it comes to laws, rules and regulations.
So, Why now?
Well, the corona virus pandemic has me furloughed, and my wife figured i needed something to do . She is a teacher and our three teenagers are also all home with me while everything is shut down. Daddy needed something to keep him from going off the deep end, and I want to try printing and hopefully I will soon start doing some designing too.
What do I want out of this?
Well, I've always enjoyed scratchbuilding stuff, making terrain and all around making things, this was just the next logical step. I switch between projects so quickly that being able to rapidly produce items to fit the next game is important. plus i could not afford to buy them all.
So now onto where I'm at. Not Physically , though I am in St. Louis MO if anyone is nearby and wants to meet when we are allowed to hang out again. I purchased an Ender 3 (regular not pro) as I saw that they were below $200 shipped and had the best reviews for the below$200 market. I am totally impressed with it. I didn't want to deal with the possibility of chemical issues from resin printers and they were outside my budget anyway. The Ender series of printers has a lot of positive reviews and a pretty decent group of owners who answer questions. there are tons of modifications out there for Ender systems as well. I have been printing almost 24/7 since I got the printer and having tons of fun learning the ins and outs of it.
So what else can this Blog hold?
Well....Pictures. Show us your prints, let us know where you got them from and how much it cost for the design.
Links. Give us links to sites that are/were helpful to you, where you get your designs, where you get your supplies (definitely need this right now as it is getting hatder to source supplies while everyone is at home).
Kickstarters. Yes, share with us the Kickstarters that are out there with 3D designs, new printers or tools.
Question. Ask away. I want to hear them because sometimes I don't even know what questions are out there. I might know the answer, but there are enough of us out here and I'm sure at least one of us might know something. DakkaDakka has always been a great community, and I know you lot will step up and answer anything that gets asked.
Tips. Yes I take tips , but really if you figure something out that's been a pain, post your work around. I may have been befuddling someone else.
Fun................. Yeah. Lets have fun
That's all i got for now. the wife is setting dinner out.
Let me know what else we need in here. Specifically right here as I'll keep updating the main post when you lot tell me to.
It’s also highly likely to tip me over the edge and get one. As I don’t have a PC right now, how about I start off the questions. Is it possible to use a 3D Printer without a PC, say via an iPad or iPhone? Or even by the printers memory card slot?
It’s also highly likely to tip me over the edge and get one. As I don’t have a PC right now, how about I start off the questions. Is it possible to use a 3D Printer without a PC, say via an iPad or iPhone? Or even by the printers memory card slot?
Others may know better, but I don’t believe you can. At least with the Ender3 I have it uses a micro SD card to load the print files (gcodes). Now I don’t have a PC, I have a chromebook which I can use online software like Astroprint (uses Cura) to slice/change .Stl files to Gcode files. If your cell phone uses or can work with a micro SD card then you might be able to as the Astroprint website is pretty simple to use.
If you are looking for an Ender, their website (at least the US one) is doing some small sales with free shipping. I wouldn’t buy filament on there though as I can usually find stuff for about half that price, even with it being in high demand currently.
I'll hop on in here. Been a long-time dakkite, have something like 7000-8000 posts on my main account (which some of you probably have on your ban lists ), but decided to set up a "professional account" after launching ProtoKraken in order to act as a more official resource for information, etc.
I launched my first kickstarter at the end of January for some pretty neat (if I do say so myself) modular Necron-inspried terrain. I just launched late pledges through my web store (starting a business has made me learn all sorts of skills that I never thought i'd use before) and am now working my way through fulfilling the stretch goals, with the first set of stretch goals due out within the next few days working out to being significantly bigger than I initially intended or promised.
Some pics of the kickstarter stuff:
More in the spoilers:
Spoiler:
And you can see physical photography of the prints on the campagin page and in some of the updates.
Really looking forward to powering through these stretch goals and getting everything released. While this is the first project I've actually launched, its far from the first project I've actually worked on, and I'm really excited to put some of thsoe other projects out there too (when they are ready of course).
I have the freebie necron file sitting on my micro SD card waiting to print tonight. Just got my spool of filament which was due on Friday ( Amazon lost it for three days), I have a few small objectives to print before setting in motion on a large print such as that. It’s showing that printing it at a draft quality will take it 11hours, 23minutes and 15 seconds , part of what I really had no idea with going into the 3D printing was how long prints took. I’ll post the results here and on the News and Rumors page when I get it done :
Well wait no longer. Actual print only took 10 hours and 40 minutes. The print times are a mystery to me as the program is set with my Ender 3 as the printer and the times usually run pretty close. Although when I’m really checking Times it’s on smaller parts so a 40 minute variance on a 11 hour piece might be the same as a 5 minute on an hour. I’m not doing the math, Massive headache right now.
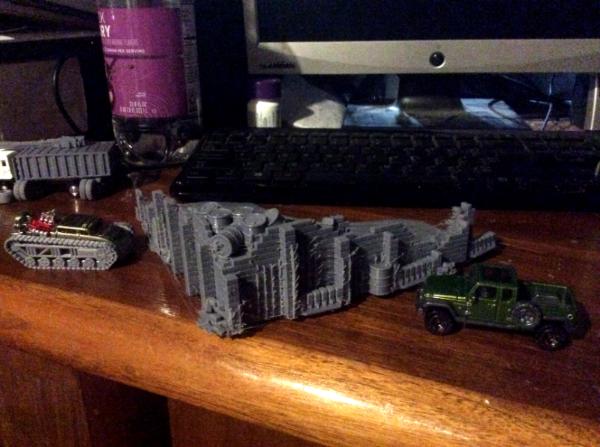
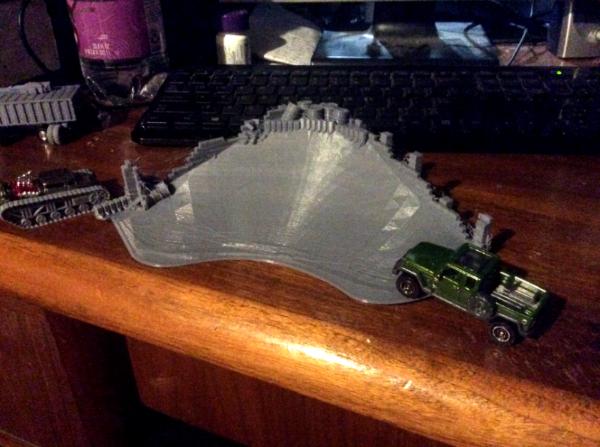
The tomb pillar is great. Awesome design. No problems with the design at all. The smaller side towers are roughly 3” tall and 2” in diameter at the base of those four towers. The overall width is just under 5 1/2” by 5 1/2” with the center tower being roughly 7 1/4” tall. I had a small lift on one corner at the base of the print. It was completely my fault, my print bed wasn’t level so that is no fault of the design. Being still new at printing I’m learning the ropes and making a larger print requires slightly more attention to detail than doing smaller ones. All the symbols came out great in the design. I printed this with no supports and with a 10% infill at draft quality. Not sure if the striations will show after priming, I’ll see later today. Painted Zombicide model for scale reference.
Next steps with this print. Well I don’t play Necrons, but this would be a great piece for them. I do however have a large Ghar force for Beyond the Gates of Antares, and it could be an style they could incorporate . Also I don’t have any battery operated tea light candles, but I think they could be fit inside each of the four smaller towers at their bases and drill down the center holes on each pillar to have light flashes come up out of them. Might also light up the center pillar as well. I’ll have to think about that project later as I don’t have the lights.
To me this is a great piece and the Late backer pledge being open is a tremendous deal if your a Necron (Or Ghar) player.
Will post primed pic shortly, eating breakfast first.
I have the Ender 3 Pro and an Elegoo Mars resin printer and have used the snot out of both of them. You do not need a computer to run the printer, buyt you do need one to slice your files into the language your printer understands - then you just shove the USB or SD card into the printer and off it goes.
Although the print plate is much smaller on the Elegoo printer, being a resin printer the resolution is fantastic and this is the printer you want to print your minis. My Ender 3 is for bigger stuff and terrain. However, before I got my Elegoo Mars, the Ender 3 did do a pretty good job on minis, as the resolution on the Ender is really good, but just takes a lot more finesse and upkeep with the filament and all.
Well, I got a good deal on a used Prusa i3, but it is going to be a little bit until I can really get it up and running. My brother in law has one, so he fixed what needed to be fixed on it but I need a place to put it. In theory I'd have had a place to put it in the house, but I put a computer set up there, plus, I'd rather it not be in the house anyway, too many "little fingers" with all the kids.
So I need to clean up our shop and make a desk/workbench to put it on before I can really do anything with it. It is something I'd need to do in any case, we've been using it as a dumping ground and it can be way more useful than that. I've got a ton of room out there, but it just needs some fixing up to be functional.
All in due time, I guess. But I am going to keep my eye on this thread, of course.
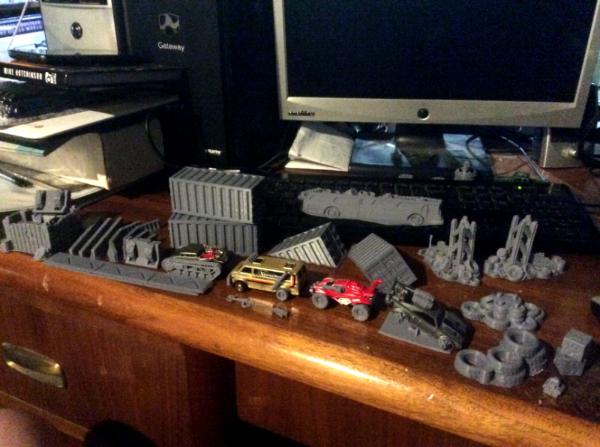
Well, the Ender 3 is doing just fine on small models. I’ll try and get a better quality picture. I’m reorganizing my hobby space and these latest Picts are with terrible lighting.
Master of Dungeons, but only on Saturday mornings many years ago.
23mm from toes to crown of his bald head.
Also I primed the necron Pillar.
You can see the Master of Dungeons there with the cocoon markers and the Dretch too. Print came out phenomenal. Very happy with it.
I personally have an Ender 3, an Anycubic Photon, and a Moai 130.
The Ender and the Moai are both kit printers; FDM and Resin, respectively. Both have issues that I haven't had time to iron out, but both should be good machines once I do.
I have been 3D Modelling/Sculpting and have printed a few things.
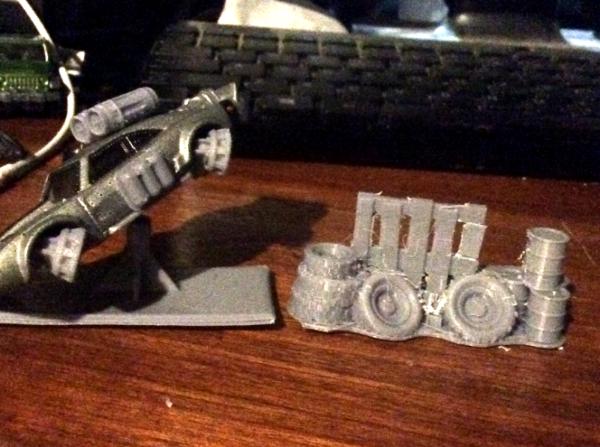
Here is one:
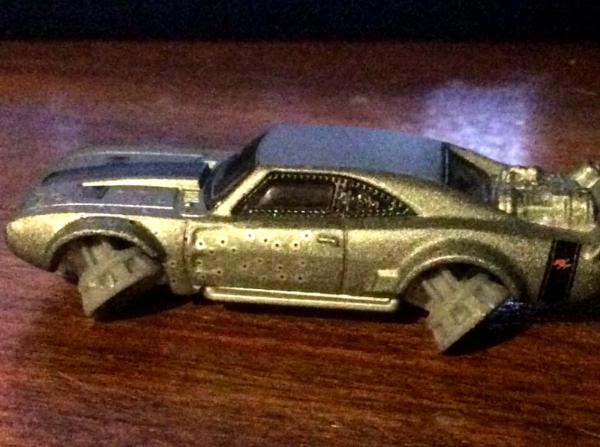
Never liked the tires that came with the Mule, so I designed and printed my own. Just to be clear, the light colored tires are the ones I made. The others are the tires from the original kit.
I had been having issues with the prints randomly being resized when printing on the Photon. Seems like the newest update of Chitubox has fixed whatever that issue was. Only problem with those prints is that I forgot to mirror a pair so that I had tread that was correct on both sides. Oops.
Working on some figures that I will share once I eventually get them printed out.
Taarnak wrote: I have been 3D Modelling/Sculpting and have printed a few things.
Never liked the tires that came with the Mule, so I designed and printed my own. Just to be clear, the light colored tires are the ones I made. The others are the tires from the original kit.
Wow, those are really nice, definitely an upgrade to what came with that kit.
I'd like to model some things myself, but I simply have no skill at all with it yet. I need to find some good tutorials and maybe I can learn a bit. I have some ideas of things I'd like to do, but right now, I don't know the first thing about actually modeling anything and the prospect seems a bit daunting.
Ive been looking for a file for all of them, unfortunately I’ve only found Dungeon Master and 3versions of Warduke (who was on todays list to print). There’s another version of Dungeon Master, but it’s a paid .stl file, and I am too cheap .
I started another building print last night before retiring to bed. It was supposed to be a ruin, it I should a ruin in more than one way .
I’m not a rocket scientist, but I quickly figured it was a nozzel jam. I checked the Creality website (makers of the Ender 3) and found a YouTube link on how to change and clean a nozzel. The kit came with a spare nozzel which was good as this one was so clogged they said not to bother trying to unclog it. I ordered a 10 pack of replacements from Walmart.com for $7.69 shipped and put the spare on.
So I was wondering of you fellow printers, how often have you needed to change a nozzle? The Ender site said maybe once a year. I’ve been printing basically non-stop for a month. What sort of time frame have you all gotten.
As for the print, I will save it by making it more of a ruin and basing it with rubble and debris. It looks like the base broke free of the plate adhesion early on I need the print and later broke free a second time as the last 1/8” was all string as well.
Other things that got printed yesterday that I didn’t show were.
12 basic giant flys. Very much like the toy ones we all had as kids, but I need them for Rangers of Shadow Deep. Found the free file for one and used the build plate program on Astroprint.com to make a 12 print set. Took about 1.5hours instead of 15minutes each. They aren’t perfect, but for cheap (think goblin) disposable troops they will suffice.
A Frostgrave branded measuring tool.with sides of 4”,2”,7” and 1” it’s a handy item. I’ll probably make a couple more, and they are accurate to my other rulers.
A summoning circle with a skull center. It’s just under 4” in diameter and the five pillars are at 3/4” tall. The file had options for 4 different centers. I did the demonic skull, but there’s also a pentagram a sun and another I can’t think of right now.
Also printed these two items from a small series. A fountain with a swirly top, kind of like an ice cream cone, and a marker post. Nice little sculpts, I believe the artist had a couple more designs, just not something I could easily use anytime soon.
New print and nozzle are chugging along fine. Off to work at church for a few hours.
This is an interesting blog as I am currently trying to work out which printer to get, and then the fun and games of trying to get it to work. I'll probably go for a resin printer, keep hearing about the elegoo mars but am undecided yet.
To get a printer, I asked:
What is my maximum budget?
Is clean-up an issue, or can I tidy up afterwards?
Is there a minimum print area I am happy with?
I went for the Prusa Mk2 FDM, which had probably the biggest print area at the time, and had support from the manufacturer.
I got the multi-material kit afterwards, for the option to print with disolvable supports. I've never use this yet, but being able to mix PLA and flex in the same print would be handy.
Skinnereal wrote: Which version did you end up getting? i3s have been around for years, and are still being improved.
I have a MK2, with the original MMU.
I am pretty sure it is a MK2, but some parts were changed/upgraded. The original owner seems to have messed up the build plate, so there is a new one of those as well. I think it ought to do well enough for some terrain, I will wait for a resin printer to try to do actual minis.
You can do minis on an FDM. I did a really basic paint job on Dungeon Master this morning. Unless you are trying to print models for painting competitions I think it turned out great.
Theophony wrote: You can do minis on an FDM. I did a really basic paint job on Dungeon Master this morning. Unless you are trying to print models for painting competitions I think it turned out great.
Oh, no doubt I am going to try it out and see. Most of the STL's I've gotten for minis are for fantasy sort of stuff and seem to have more fiddly little bits, which probably will end up working better on resin, but it likely doesn't hurt to try some of them on the FDM I am going to have already.
Ender 3 Pro vs. Elegoo Mars. Overall, the FDM Ender did a very good job on details, but the Elegoo does create a superior mini, especially that is also about 1/3 the time to print.
FYI - none of these were cleaned up at all, just the supports removed. Also, removing supports from resin printing is breeze compared to FDM supports...
Thanks for the replies Theo and MDSW, having to buy a PC is currently putting me off buying a Printer. I did do a quick look in the App Store and it seems a few manufacturers are starting to offer cloud slicing. The main one to come up was Creality, aren’t they the Ender 3 OEM?
Dungeon Master looks really cool Theo! You’d have to look pretty close to see he was printed.
@Gobert, yeah, I wish I had a full PC to work with as the chromebook has limitations too. But I’ve seen memory card options for IPhones where they go into the lightning port, so that’s still possible.
@MDSW, very cool. I’ll try and take some time today to go through that blog of yours. I remember looking at it back when you did it and thought, that would be cool. Getting the printer was a spur of the moment thing when I found out I was getting furloughed. Getting more money on unemployment and still getting my job back at the end of July meant the fear most are facing passed me by. Also helps the wife is working from home and the kids are home so my spouse said “you’ll need something to keep you busy and mentally learning (those crazy teachers).
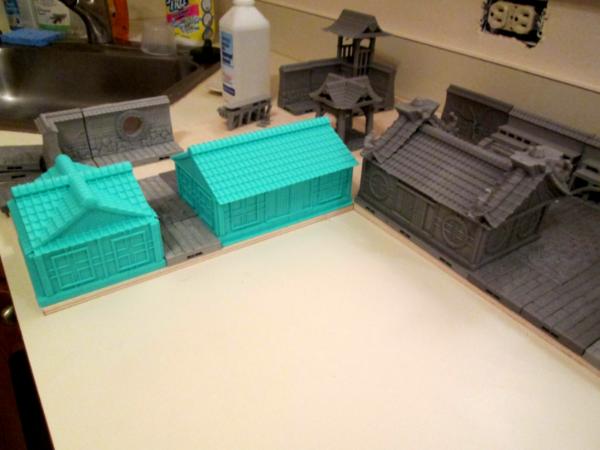
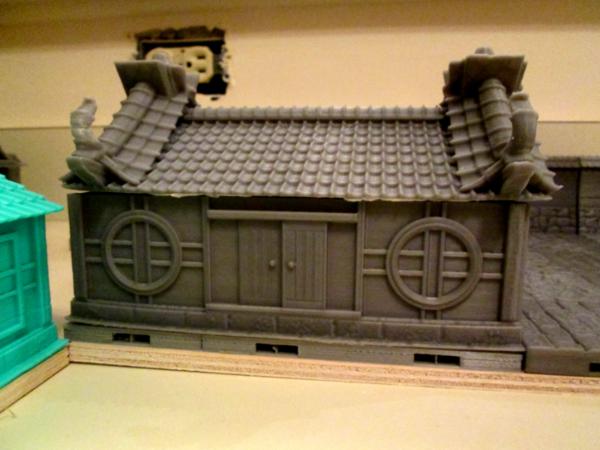
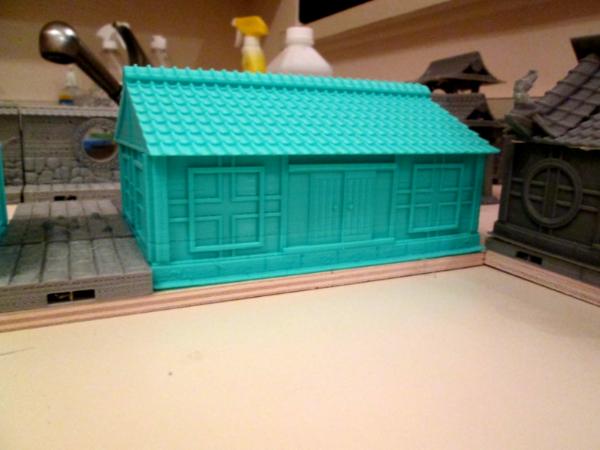
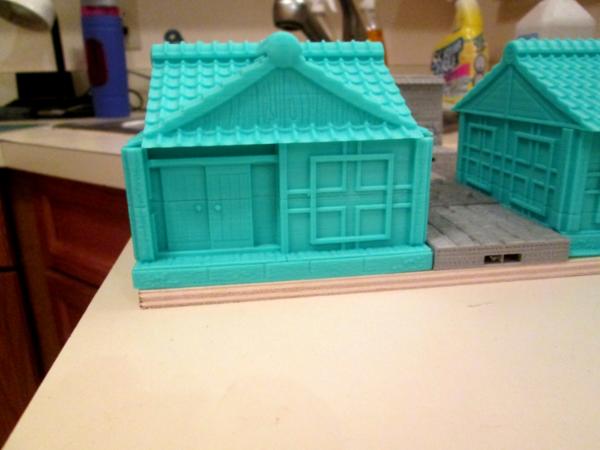
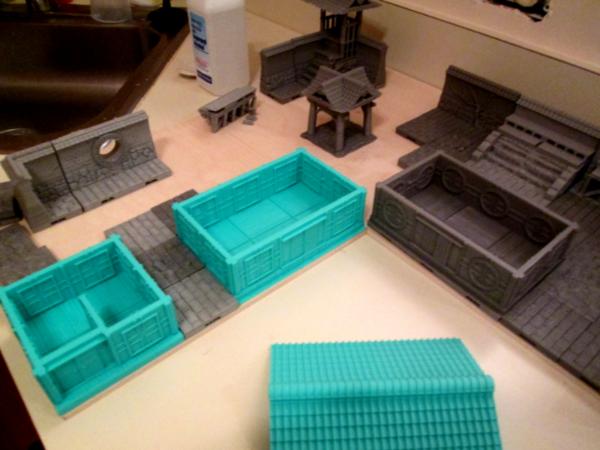
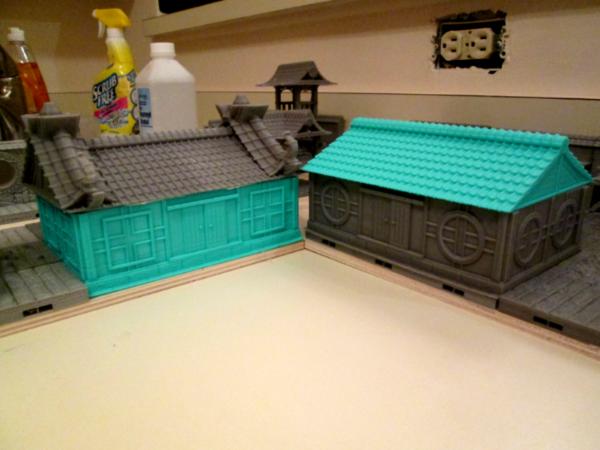
Well after the nozzle clogged and no way to clean it. Solid cluster in and through the nozzle . I replaced it and switched up to the newly arrived grey PLA. I got 3 1Kg spools of the grey and between the fail of the nozzle with the black and it’s extra shininess, I figured a change might be better. Between errands yesterday I found, sliced and printed some more terrain.
Another Ulvhiem building, these new files come with predone magnet holes in the tops and bottoms . The other four were a newer design I found yesterday and thought would help diversify the board with the larger stones. Not as happy with their look, especially the wood pieces, but they will work. Almost looks like a much larger scale was used.
So another question for you printers.
What do you wish you had done differently since starting to print?
For me, I wish I knew how much (not very, but enough from each print) waste there was and would of had a trash can next to my printing space. I know it sounds silly, but each print has a border that circles the outline of the print to keep the print from cooling too quickly and popping off the print bed. You remove it and it’s trash, I was lazy and just started putting the pieces in one of the empty drawers of the desk where I have the printer set up . Drawers full, got an empty box I was using while moving the basement around, have it half full of debris and empty water bottles (it’s all recyclable). But , I have 4 cats (I Blaime my grandmother in law), and any time one of those pieces misses the box or I don’t put a lid on it they find the piece and carry it around the house.
So what silly or should be common knowledge but isn’t spoken about thing have you learned since starting to print?
Come to think of it, yes, there is a large trash can right next to my desk! And it does get filled up pretty quickly, as it seems I have been printing almost non-stop with one or the other printer for about a year and a half.
My enormous issue now is not being able to get isopropyl alcohol for cleaning the resin prints since the Covid issue. It is cleaned out on every shelf I go.
Not Online!!! wrote: So i am slowy starting to get some funds and have never done this so what would i need to get started?
Beyond of course a printer, a programm to design the minis and resin aswell as a cleaner anyone any suggestions?
I can’t tell you about resin printers, but with my FDM printer you need some sort of computer to operate a program and transfer files to the printer. The FDM prints don’t need to be cleaned before priming or painting. The Ender comes with just about everything, all the tools to assemble it, the scraper to pop the models from the build plate. When you order it (Enders) they give you options for power plugs and you have to set your power level on it. A piece of paper to level the bed. The only other item to really buy is more Filament.
Not Online!!! wrote: So i am slowy starting to get some funds and have never done this so what would i need to get started?
Beyond of course a printer, a programm to design the minis and resin aswell as a cleaner anyone any suggestions?
You may not necessarily need a program to design at first, as there are thousands of designs for free on Thingiverse. For items needed you will need a few for resin printing, here is my list:
- medium sized container that you can seal up (tupperware, etc.) to put the alcohol into and swish around to clean your prints. I actually give it two baths, one in 91% and another in 70%.
- rubber gloves - disposable (another nearly impossible item to find nowadays)
- lots of paper towels and alcohol
- small paper paint strainers to strain back resin from your vat when you have a color change or a failed print
- spare FEP film
- a plastic putty knife to remove prints from the print bed
- lots of resin!
- a 405u UV lamp to cure your prints. I have a 60w UV lamp that I affixed into a fairly large plastic tub lined with tin foil. I have it hooked up with a timer, so I can set it for the few minutes needed. You can also set them outside, but that takes a while...
- For modelling and manipulation programs I use the Windows 3D Builder (already on Windows 10 machines) a lot, Meshmixer a little and Blender rarely - all of these are free.
A lot of this stuff might come with your printer already, so you won't need them right away, but I have found generic stuff for all the items works just fine and I do not have to get name brand stuff.
Prusa has their own slicing program, which I think is a tailored version of a common one. Before I used that, I used Cura, also downloaded from Prusa's site. This is not specifically for Prusa printers, and is just their recommendation, I expect.
I do not create my own prints, but various apps are listed in Facebook groups by people who do.
I just use a green pan scrubber from the kitchen to clear the bed between FDM prints. No bottles or supplies needed. This is for PLA and PETG, so far.
But, the sheet has pulled through now after 3 years, and I am expecting a new sheet any day now.
Not Online!!! wrote: So i am slowy starting to get some funds and have never done this so what would i need to get started?
Beyond of course a printer, a programm to design the minis and resin aswell as a cleaner anyone any suggestions?
You may not necessarily need a program to design at first, as there are thousands of designs for free on Thingiverse. For items needed you will need a few for resin printing, here is my list:
- medium sized container that you can seal up (tupperware, etc.) to put the alcohol into and swish around to clean your prints. I actually give it two baths, one in 91% and another in 70%.
- rubber gloves - disposable (another nearly impossible item to find nowadays)
- lots of paper towels and alcohol
- small paper paint strainers to strain back resin from your vat when you have a color change or a failed print
- spare FEP film
- a plastic putty knife to remove prints from the print bed
- lots of resin!
- a 405u UV lamp to cure your prints. I have a 60w UV lamp that I affixed into a fairly large plastic tub lined with tin foil. I have it hooked up with a timer, so I can set it for the few minutes needed. You can also set them outside, but that takes a while...
- For modelling and manipulation programs I use the Windows 3D Builder (already on Windows 10 machines) a lot, Meshmixer a little and Blender rarely - all of these are free.
A lot of this stuff might come with your printer already, so you won't need them right away, but I have found generic stuff for all the items works just fine and I do not have to get name brand stuff.
Thanks, will look further into, still i'd rather design something or another for my own as i intend to start out with bitz for minis moreso then actual minis.
H wrote:Wow, those are really nice, definitely an upgrade to what came with that kit.
I'd like to model some things myself, but I simply have no skill at all with it yet. I need to find some good tutorials and maybe I can learn a bit. I have some ideas of things I'd like to do, but right now, I don't know the first thing about actually modeling anything and the prospect seems a bit daunting.
Thanks. I appreciate it.
There are a range of Modelling software packages out there. I use zBrush. It does have a cheaper, feature limited version, but the full version is $800ish US. Probably the best for organic modelling and sculpting. It has a pretty steep learning curve, but there are dozens and dozens of tutorials on YouTube. Both official and not.
Fusion 360 has a free license for individuals working on personal projects. Full paid license would need to be obtained if you started doing anything else with it. It is an extremely powerful CAD/CAM software. Several good tutorials on YouTube.
Blender. Fully free and getting more powerful with every update. There are good tutorials on YouTube. Be sure to get the tutorials for the latest version though, because a good bit has changed from earlier packages. Look for version 2.8+. Blender also has sculpting capabilities that are not as good as zBrush, but getting better.
Theophony wrote:
So I was wondering of you fellow printers, how often have you needed to change a nozzle? The Ender site said maybe once a year. I’ve been printing basically non-stop for a month. What sort of time frame have you all gotten.
I haven't used mine enough to speak from experience, but I do know that the filament you use will make a big difference in nozzle life. Some materials are much more abrasive than others. For example, Wood filaments, carbon fiber filaments, and even glow PLA are much more abrasive then straight PLA.
Also, you can get steel nozzles which should increase the time between replacements.
MDSW wrote:
You may not necessarily need a program to design at first, as there are thousands of designs for free on Thingiverse. For items needed you will need a few for resin printing, here is my list:
- medium sized container that you can seal up (tupperware, etc.) to put the alcohol into and swish around to clean your prints. I actually give it two baths, one in 91% and another in 70%.
- rubber gloves - disposable (another nearly impossible item to find nowadays)
- lots of paper towels and alcohol
- small paper paint strainers to strain back resin from your vat when you have a color change or a failed print
- spare FEP film
- a plastic putty knife to remove prints from the print bed
- lots of resin!
- a 405u UV lamp to cure your prints. I have a 60w UV lamp that I affixed into a fairly large plastic tub lined with tin foil. I have it hooked up with a timer, so I can set it for the few minutes needed. You can also set them outside, but that takes a while...
- For modelling and manipulation programs I use the Windows 3D Builder (already on Windows 10 machines) a lot, Meshmixer a little and Blender rarely - all of these are free.
A lot of this stuff might come with your printer already, so you won't need them right away, but I have found generic stuff for all the items works just fine and I do not have to get name brand stuff.
Here is my list for a resin printer:
1. IPA at least 90% pure, but as close to 100% as you can get. A bit hard to come by these days.
2. 3 tupperware style containers:
A. Slightly used IPA
B. Pure, clean IPA
C. Clean water
I swish in the used IPA first, and use a soft bristle brush to brush down the print. Then in the clean IPA. Then in the clean water. Do that a couple times before you cure the print.
3. Rubber gloves. Go with nitrile because they have the best chemical handling properties. Resin can be nasty stuff and some people react worse to it than others. Nitrile is the best barrier that I know of. Unfortunately also a bit hard to come by these days.
4. A metal paint scraper for getting items off of the build plate. Slightly sand the edges to round them a bit and be careful of the plate when removing prints. I find this to be much better for removal than the plastic spatula.
5. A plastic spatula. This is for removing cured resin from the FEP film when you get an inevitable bad print. Don't get your metal tools anywhere near the FEP!
6. Spare FEP. They wear out. The Photon had a couple spares when I purchased mine, and other printers may as well. If not, they are common on eBay or Amazon.
7. A 405U UV lamp, as MDSW said. Lots of options available on eBay and Amazon. You will use this to fully cure your prints after you wash them.
8. Lots of paper towels, again as MDSW suggested. I use blue shop towels from the automotive department, but plain old paper towels will work just fine.
9. A couple lint free rags to wipe off the LCD screen and the FEP after you have cleaned and dried it. Make sure they are lint free and be very careful with their application.
10. A new USB stick or memory card (this is printer dependent). The ones you get with the printers are mostly garbage and cause tons of headache. New ones are cheap on eBay or Amazon. Go with a known brand like SanDisk.
Thanks Taarnak . I’m only using basic PLA for now. Cheap and easy for tons of terrain, which will eventually get painted, so no glow in the dark needed.
Theophony wrote: Thanks Taarnak . I’m only using basic PLA for now. Cheap and easy for tons of terrain, which will eventually get painted, so no glow in the dark needed.
No problem. Glad I can contribute a little bit.
My buddy, who prints tons and has for a couple years now, swears by PLA+. He has had parts made from straight PLA that came apart after a time. Has not seen the same issues with the PLA+. Might be worth looking into.
I’ll check it out, but honestly, cost wise I’ll just print another whatever if something happens. Most of my terrain is at 5% infill for speed and making it light.
Just wanted to throw this link in here, feel free to link any cool kickstarters you all see for 3D printing.
https://www.dakkadakka.com/dakkaforum/posts/list/789017.page#10822300 starts this coming Friday. It’s a 3D printing group who have designed prints to use on the FDM spools to make towers for both fantasy and scifi terrain. I haven’t dug deep into it yet, but options for lighting as well. Good timing as I was about to cut up the spool I have to make a paint rack I saw.
In other not related news, I’m chugging along on my lighthouse print. I’m about 20 hours into a draft print of it for Frostgrave terrain an have all three base structures, the first floor printed, two different light sources and I’m about half way done with the second floor. Should be over 1’ tall when done.
This is before the third piece of the base was done.
So my question today is: Am I the only one who wants to buy 3 more printers to have them all going at the same time so I don’t find myself sitting and watching it print ? Seriously, I just stopped by Miniaturemarket and my local shop and almost asked them if they want to go into business with me and start printing terrain cheap .
Half way there.....Oooooooohhhhhhhh O living on a prayer......(you young uns won’t know where that’s from and that’s okay .
Base and two layers done, three layers and a roof to go yet, about 6” tall.
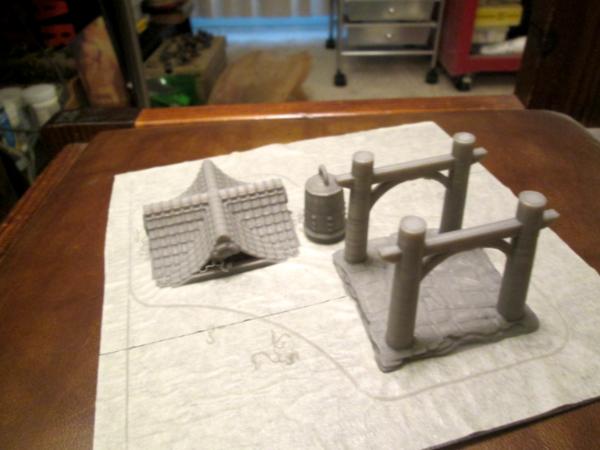
Needing to budget my time well, I decided to print the Mill main structure while setting up and sanitizing church between services. Took just over 6 hours. The roof will take 2.5hours and the wheel itself is a 4.5 hour print, but they will go after the rest of the lighthouse is completed.
Zombicide guy for scale.
“There’s trouble at the Mill!”
“What sort of trouble?”
“I don’t know, I wasn’t expecting some sort of Spanish Inquisition”
If you don’t know the rest then you are uncultured .
Finished up last night on the lighthouse, too tired to post it.
This morning the wheel was waiting for me on the print bed, and I did the roof in 2hours 26 minutes
Now I just need a misterEdwards figure from little house on the prairie sneaking his whiskey jug under the wheel.
Got a build plate of sundries going now, only 1 hour print time, but has 3different barrels, two bags and a pumpkin.after that I have a couple ideas, but no solid plans. I need to take an inventory of what I printed so far and go through some more books for ideas.
Printed in draft quality, tabletop terrain pieces, not diorama stuff. Just an hour and 6 minutes for all these pieces.
Barrel of limes, barrel of big potatoes, sealed barrel (thinking of cutting one in half height wise for a washing tub. Up front is a sack of potatoes, big pumpkin and large and small sacks. All would fit nicely in a market setting or by my lighthouse as provisions for the warband.
So a long time ago....when Black Plague came out and I got the Zombicide Monty Python Knights, I NEEDED a giant wooden bunny. So I made a sad little one out of wooden sticks. So today I started printing a replacement I found.
Unfortunately, I hadn’t recalibrated the print bed and I think there may be an actual bend to mine because the one corner I should where the print edge lifts keep happening. So when the corner of this really started to come loose I was worried I wasted a lot of time on this print. I was in hour 5.5 of a 6 hour print when I heard pop, and the last remaining piece to be finished(the rabbits head) popped off the print bed prematurely. So the tops of the ears are not there . Otherwise the curled corner could be disguised easily enough. It’ll be a while before I decide to reprint the head as it’s servicable right now. I feel like 4 models could fit inside like the Zombicide cars. If nothing else part of the warband can hide while the police arrest Arthur’s men for killing the documentary guy .
That's a very nice knight.. and some very cool looking terrain! I've got a resin printer but I only print small RPG type figs so it's nice to see others printing out terrain themselves.
@Taarnak, will you be making that model public, or selling him? He looks really cool. Also what scale is he set to print at?
Sitting around the house got old a while ago, but trying to maintain the sanity I’ve looked at older sections of my mountain range of shame and got a bit of a bug to look at Kings of War again. My grudge against Mantic is deep though, so it’s hard to think about pushing one of their games. After a bit of 3D surfing I found some items to print and may have an idea for army building (2nd edition style), not sure how it would align with their new third edition release.
Found the Logo online as well as some wound tracker dice holders.
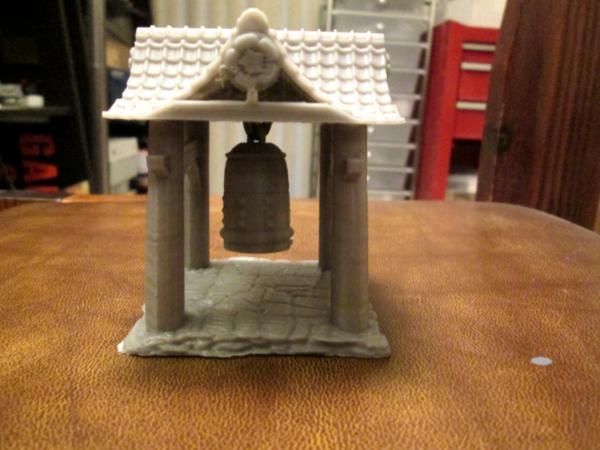
Also finishing up the Crypt for Frostgrave.
Doors
Roof with Zombicide dude for scale.
Fresh off the print bed right now.
Fully assembled, took about 23 hours total printing on my Ender 3 at Draft quality(tabletop) with a 5% infill and supports only on the roof section. Great print, designed by a guy named SableBadger on Thingiverse. I’ve printed a few of his designs, I should post this picture on their too .
One of the shows I loved as a teen was Star Trek Next Generation. Their was an episode where a scientist came up with the idea of Exobots. Basically drones that could replicate their own tools to complete a job and were given tasks to do. While I’m not worried that my Ender will become self aware, I have watched a few videos on additions people are making to their Enders and have even printed and installed a few myself. I won’t post pictures here, unless people ask for them, but I have printed a fan cover to protect the electronics better, two different filament guides that work together to keep the filament from bending or getting tangled and an x-axis adjustment plate to help keep alignment better over time.
Theophony wrote: @Taarnak, will you be making that model public, or selling him? He looks really cool. Also what scale is he set to print at?
First let me say that I am jealous of the output. Lol. Everythig is looking good.
Secondly, that sculpt is intended to be an adult version of Eric from the Dungeons & Dragons cartoon. It is going to be part of what I refer to as my Nostalgia Project. I'll be making miniatures of my version of toys, TV show characters, fantasy art, and book characters from my youth. Mostly the 80s. Not sure I'll be able to distribute the files, but I will let you know if I do.
As to the size, that is one of the things I am trying to learn about with this figure. Getting the exaggerations done so that they look good at 28-32mm (especially the chainmaille!) and then learning how to make the software print them at the correct size. zBrush has no native scale, so I can't just tell it something is 32mm and off we go. There are tools to help with scale now, but I am still learning how to use them.
I did make 2 prints of the figure. The first was more like a 20mm figure, and the second a 35-40mm one.
I'll try to get pictures up today.
Awesome , I’ve barely touched tinkercad, only making flat bases. Will be looking forward to the progress.
Always wondered if Eric ever pulled the sword out would he find out it’s magical too?
Edit: You cost me money on his page . Luckily most things I liked were on sale, so I’m not decimated. Got the elementals and hill giants as well as other things. I also joined his email list, good work .
Automatically Appended Next Post: Production is high, too high , I need to start painting again .
Remade the top of the Giant wooden bunny again with much better success, and a clump of Clods The guy in the front row had an issue in printing, looks like he got scalped, or I guess in clod terms that might be a divet FOUR!!! The one section with spear and shields come with arms attached, I have to print arms for all the others. They have left and right arm sets for clubs, axes, swords and open hands. There’s also a print for left arm shields, but sadly no right arm shields.
They don’t look great coming off the print bed because of the supports, but they clean up pretty quickly.
Also my first ever fully designed and printed by me item.
Spoiler:
you have to start somewhere . 75mm x 75mm x 2mm base for a Titan in Kings of War.
So for those that really don’t know me......I get crazy sometimes...and things get out of hand .
The Clod army begins to grow.
Some close ups
Sword or spears and shields. The spear and shield is a set model, no adjusting him, but the sword and stone(shield) as with most of the others have sockets for shoulders so arm placement is widely variable.
Two open arms and guys chucking rocks as big as they are(single print just multiple copies). The 5 clod smashers prints all came out with bad layer lines. Not sure if it’s the sculpt or an adjustment I made on the printer bed level. I have a different sculpt printing now so we will see if the issue continues.
Twin axe wielders and peltasts (rock throwers) the bigger ones in back are the same file just printed at 150%. I might mix up a few more prints doing 10% bigger than usual and 10% smaller than usual to give unit some more variety, but I think the 150% was just too big of a difference. I’ll probably use those for test paint colors.
So one issue I’ve run across is to dynamically pose them some of the models have gaps in the shoulder area.
I think I’ll overcome this issue pretty easy by applying Astrogranite debris from GW over the spots before priming them.
I have to say that while gluing the arms in place I absolutely have fallen in love with some of their faces . Just some great expressions on them.
Okay, I haven’t slept the day away . Just haven’t had time to sit and post, but plenty of time to walk by the printer and start stuff.
That would be 40 sets of clod arms with open hands and 40 left handed shields.
Behind it is a Zombicide figure for scale with a samurai themed Ogress next to him carrying a Kanabo.
Further to the right is a Clod riding a Dirtle (a dirt- turtle ) the top of the dirtle has a 1” diameter flat spot for miniatures to stand on, so a wizard or hero can stand their and I see easy to change out. Also a Mantic Orc for scale.
I’d been hearing a strange noise from the printer. As I started to type this up the filament supply couple came completely apart. I’ve put it back together, no major issue. It just needed to be threaded back in.
The bigger issue I had yesterday was when I was trying to break a model off the build plate, the build plate tore right in the center. It was a small hole, not even a quarter the size of an eraser on a pencil, so I kept printing with no problem except a little longer to take the models off the plate. Luckily I had ordered a new plate a few days earlier just to have a spare so I could clean this one while still printing. It and another item arrived that same morning, so I really wasn’t put out. The other item I received was a MicroSD card extension piece. I think the one really annoying part of the Ender3 is the location of the microSD card reader, it’s right under the bed and so low to the base that anyone with even normal sized fingers will have difficulty getting to it. Since I have two cards and swap them back and forth constantly it’s a hassle. I guess I’m not the only person who has an issue with it as there’s are multiple prints out there to fix the problem with the extension I ordered. I was ordering the extension and ordered the spare build plate to reach free shipping , what providence . So I printed the new card extension holder on the new build plate, which I hadn’t noticed was a magnetic one so no more messing with clips holding the build plate on and getting in the way of bed leveling. It also has an overhang which works as a handle so I’m not grabbing a hot bed. It’s also so much more flexible which makes popping the builds off easier and quicker.
The extension is now out from under the build plate, vertical and angled outwards slightly. So much easier to change out. It’s part of that gray plastic part on the front that says Ender 3 on it. The fan directly above it is another modification I did because that’s the air intake to cool electronics, but it’s directly below the build plate where small pieces of filament tend to drop . Lots of design out there to pimp the Ender 3, I have a few in place.
So cost of the two (card extension and magnetic build plate) came to $21,00 shipped :
Thanks for stopping by. Now go order your own Ender 3 . So worth it.
Yes, one of the first mods I did for my Ender 3 was the SD card housing with the extension cord built in, so it is off to the side and so much easier to get to. Other upgrades I printed for my Ender was the filament guide, tool box (great to use and take up all that empty space on the lower right front), filament turn dial and the control box covering. I also cut a piece of styrene to cover up the lower left rails, as they kept getting trash caught inside. Also, a few cord clips here and there...
And, yes, the Ender 3 is one of the best FDM printers in the lower price range available. I got the Pro version with the magnetic removal plate - OMG, I love that. It also moves the lower area fan to the bottom so crud does not fall into it from the top. Also, add a few washers to the bed spring bolts to tighten them up and it make bed levelling so much easier and consistent - no need to get the beefier springs. I also installed the TL smoothers, which may not be needed, but I swear it made my prints smoother.
MDSW wrote: Yes, one of the first mods I did for my Ender 3 was the SD card housing with the extension cord built in, so it is off to the side and so much easier to get to. Other upgrades I printed for my Ender was the filament guide, tool box (great to use and take up all that empty space on the lower right front), filament turn dial and the control box covering. I also cut a piece of styrene to cover up the lower left rails, as they kept getting trash caught inside. Also, a few cord clips here and there...
And, yes, the Ender 3 is one of the best FDM printers in the lower price range available. I got the Pro version with the magnetic removal plate - OMG, I love that. It also moves the lower area fan to the bottom so crud does not fall into it from the top. Also, add a few washers to the bed spring bolts to tighten them up and it make bed levelling so much easier and consistent - no need to get the beefier springs. I also installed the TL smoothers, which may not be needed, but I swear it made my prints smoother.
Thanks for that rundown . I have a few of those mods downloaded, and having gotten the magnetic removal plate was a god-send. I have also done the upper filament guide, I did the lower one, but it kept catching on the filament so I took it off. I’ll have to get washers as that sounds like a great cheap (also known as a Theo) fix.
What’s a TL smoother? I’ll look at doing one once I know what it is.
Have you done anything to the fan on the extruder? I’ve seen some videos, but most show they don’t really improve anything quality wise.
I had skipped the tool drawer and the clips as I just wasn’t bothered with the space under there, but if you say they are good I’ll move them up the list.
Have you done anything with the feet? I’m not sure it’s necessary, but I’ve also seen a lot of folks have done it to reduce the noise.
Spent the morning getting my filling replaced . Now my right side of my face is numb and I can’t get the Bill Cosby sketch out of my mind .
Also reworked the files. I was printing 16 Clods (4of which had shields and spears) and 20 sets of arms with 20 shielded left arms. It was a lot of waste. So now I have one file that does 10 clod bodies 2sets of 5 different ones) and 10 sets of open hands.
After looking at the weapons and single piece prints yesterday I’m thinking of a completely new idea to the army....and new colors . Thinking about painting them all orange . Yes, “It’s Cloddering Time!!!” Or something like that . Also as gamers what would you guys think about differentiating the units using different color markings. I really like the open hands and dislike the weapons, except throwing rocks, so what if I used basically all the same figures and just did some slight alterations. The Dwarf Berserker equivalents would have grass tufts on their heads(hoping I can make them look like mohawks ). The iron clad equivalents would have no ornamentation as they are the baseline guys. One group would have yellow flowers on their bases, another might have the dead grass around the bases. The hard parts are the missile troops. I was thinking the ones with bows would have the arm sets withers they are holding rocks in both hands, the crossbow guys would have just one hand with rocks (longer reload time ) .
Yes - Bill Cosby is still one of the great stand-up comedians. So sad his fall from grace...
I did not do anything to the feet and I agree, the fan extruder mods just seem to get in the way and does not provide any substantial benefit, so I did not do them either.
The TL Smoothers can be looked up on Amazon and they are not expensive. I only did them on the x & y (side-to-side and back & forth - z axis-up and down, not needed) - Not sure if I have the axes listed correct... What they do I will go off of my memory, so i might be slightly off, but they smooth the electrical current to the stepper motors so you do not get the tiny little jerks when the current reverses, goes off and on, etc.
MDSW wrote: Yes - Bill Cosby is still one of the great stand-up comedians. So sad his fall from grace...
I did not do anything to the feet and I agree, the fan extruder mods just seem to get in the way and does not provide any substantial benefit, so I did not do them either.
The TL Smoothers can be looked up on Amazon and they are not expensive. I only did them on the x & y (side-to-side and back & forth - z axis-up and down, not needed) - Not sure if I have the axes listed correct... What they do I will go off of my memory, so i might be slightly off, but they smooth the electrical current to the stepper motors so you do not get the tiny little jerks when the current reverses, goes off and on, etc.
You are exactly correct from my understanding of their use MDSW. I have them for my Ender but I haven't installed them yet.
Watched a couple videos about the TL smoothers, can’t say I’m too impressed with the difference, I’ll keep them in mind later on, $11 (for all 3 axis) isn’t much for a possible better print quality, just isn’t that noticeable of a difference to me for terrain that most times I’m printing in draft quality anyway.
Though maybe it would have helped with this mess.
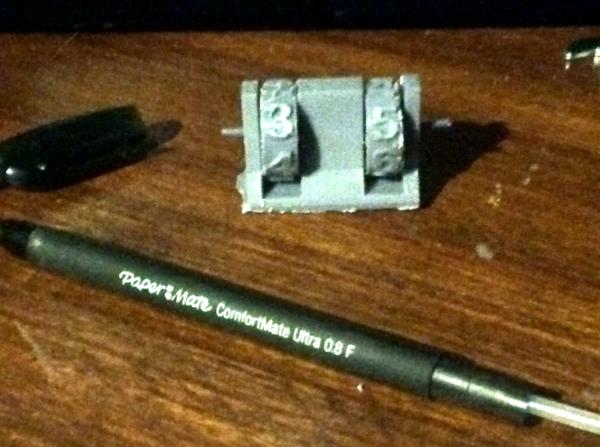
Woke up to find this still going on my printbed. 9 hours 46minutes and a whole lot of wasted filament . Obelisk 5 sheared off right at the top of the 5, which upon further inspection every one of them broke at that same height. There has to be something wrong with that design file. Obelisk six had come off of its base early on, but somehow replanted itself and almost survived until that same level on the design.
I was going to use these for a Frostgrave scenario, but the mix of a bad design and size of the base has me worried. Also the time and amount of filament wasted means I won’t redo the same file again. I will however try and adjust the file, cutting it at the mark above the numbers and hopefully get the obelisks to print still. Bases are 60x60mm the obelisks are 30x30.
edit: Lots of cussing today. Seems the blow out on the obelisk may have caused my second nozzle clog. luckily i ordered 10 replacements a couple weeks back. The constant use and long print times can cause these things i'm told. Only took me like three hours to figure it out and 5minutes to swap extruder tips. printing like a dream now.
also got another spool in. was down to 1.75 rolls . I may sign up for a bi-weekly amazon drop for $22 each time. I think thats safest and cheapest in the long run. I haven't seen my three spools for $50 dollar deal again.....I've been looking.
So yesterday was frustrating. Lots of failed prints, a clogged nozzle from the obelisk print. But even before I figured that out I got a couple small prints done which gave good detail, but then had horrible prints in between. I finally got pissed off enough I turned off the Ender 3 and walked away for a while (3-4 hours) came back, finally installed the z axis bed leveler, and cleared the clog.
First print afterwards. Absolutely .....I wouldn’t say beautiful as he has a face only a mother could love.
Yes, he’s a giant, so the print should be a bit cleaner than normal, especially since I’m using the detail level of print on him. I think I’ll call him Royce, cause he has Rolls.
I will now argue with anyone who says you cannot get details done nicely on a FDM printer .
Zombicide guy for scale.
The parts have joints like on resin casts, and fit perfectly together. Man they grow ‘em big in Indiana.
So this is part of a two giant set from Duncanshadow.com (Thanks Boss Salvage who pointed me to that site), I believe they were on sale for $1. Great design. He has it split into parts or able to print all as one file. It may take longer, but I’m doing all the parts separately in hopes of better detail. Seems to be working out. He has a Patreon page and tons of models. I downloaded a few more including a trio of Earth Elementals.
Check him out . More later, have to go work at church some this morning, but will print his legs while I’m gone.
Happy to help! And even happier to see more of Duncan's prints in the wild - Royce looks great already. How did his back rolls survive all those supports? I'm not really sure with how invasive FDM supports are on mini details.
Boss Salvage wrote: Happy to help! And even happier to see more of Duncan's prints in the wild - Royce looks great already. How did his back rolls survive all those supports? I'm not really sure with how invasive FDM supports are on mini details.
Yeah.....lots of scars on the back. I’ve been waiting to show that off and ask for some guidance there. Almost wondering if using the cutting feature to cut each part in half and then putting the supports on the cut sides to get all around clean prints would be helpful, just time consuming.
Legs and left foot are done, club and right hand are printing now leaving only left hand and right foot to print.
Up next is his naked brother who has no problem showing off his junk . You think the army around him would sew him a uniform so they wouldn’t have to see that.
Giant two is printed. Had some issues with the print of the body. Looks like mold slippage if it was a poured model. I guess the print bed or the whole model slipped at least twice during the print.ill give him a prime coat later, having our roof replaced now, so no safe way outside without having shingles drop on my head.
He looks angry....and naked....like someone stole his rubber ducky out of the pond while he was taking his yearly bath. I a man really tempted to make him a bath towel and a bar of soap and put him on a water base.
Started painting the other guy, was trying a lighter skin tone. Not really happy with it, but it’s just a start right now.
I love that guy!! Great job and will be a great addition.
Here are a couple of giants I found on Thingiverse. One was a chaos giant that I modified a bit to make it not so 'chaosy' which was printed in 3 parts on my Elegoo Mars with a Elven Seaguard for scale. The other was done on my Ender 3 and with a smaller version of it. And finally, a comparison between a resin print and FDM print of the fellow.
Nice , those are the types of side by side that I don’t normally see. It really showcases the difference, but also lets people who see know that if they are going for RPG models and not centerpiece displays that a FDM can handle things. I think it’s very similar to Bones material. FDM is good at larger models, but the smaller models lose some of that detail.
Printing a Wall switchplate cover right now ipwith the Batman Logo on it. Going to surprise the Pastor at church by swapping his out with this new one. He has hotwheels batmobiles and Lego Star Wars figures on his desk, so I think it will fit in great.
MSDW, found that same chaos giant model online , started to print him out. He’s a head height larger than the two guys I just printed. Same guy does a nice giant fuzzy elephant with optional warbus attachment on the back .
When things go sideways, they go sideways fast.
Replaced multiple nozzles, wound up being the Bowden tube assembly.
Got new Bowden tube replaced it, still issues.
Leveled, releveled, rereleveled the print bed, still popping prints.
Realized that when I was moving the unit around to make adjustments the spool fell off the top and smacked the print bed. Loosened the y axis nuts on one side so tightened them down.
Still popping prints Adjust, adjust, adjust. Popping prints while my back I started turned.
Ing cat climbs onto the desk while I’m printing......your messing with it when I leave aren’t you .
Sometimes it’s just being at the right place at the right time.
Plus now I’m printing most things on rafts to help with bed adhesion.
FDM printing comes with a whole list of potentials to deal with. I actually hate to fire up my Ender 3 when there is any possible way i can do it (even in multiple parts) on my Elegoo Mars.
Not to say the Ender 3 is not an outstanding printer (it is!), it is just so much more finicky that resin printing. You should have seen the issues and quality I was getting out of an A8 clone kit I had before I got my Ender - what a better printer the Ender is!! Keep at it, you will get it all looking good!
And, yes, EamannG is an amazing designer - here is the mammoth w/ armor, but not the howdah.
The Mammoth is great looking, right now I have his Shaggoth printing, or started to print before I left to grab groceries.
I have overcome one of the issues by printing everything on rafts with supports. It’s a waste of material, but it I should saving material by not having parts pop off the bed half way through a print. The cost of materials for FDM is so cheap that wasting any isn’t too bad.
Day 1 of Ender 3 ownership. 13 hours sitting in front of it watching many things go very wrong...
Turns out the Z axis motor hadn't been set up properly, fixed that and finally managed to get a clean print of something other than a base. Just a Space Marine shoulder pad (mainly for troubleshooting as it's a fast print of something I'm very familiar with), but still, progress is progress and once it worked, it's actually come out really crisp. With any luck, today's setup and calibration efforts should translate into proper minis actually working tomorrow... though probably not before a lot more swearing!
There is an Ender 3 x axis print which is two parts, it’s a small design fix, but definitely improves to outcome.
Well, the upper body is printed, 6hours. He’s a hoss. His body is printing now, it’s 12 hours on the lowest setting for quality . Overall the body section is 6” long by 5” tall by 2.5” across. It should be done when I get back from church tomorrow. Fingers crossed that the cat doesn’t mess with it .
Before starting the lower half of the Shaggoth I decided to print an evil Mutant.
Enter Apocalypse. Fan sculpt, he’s 50mm to the top of his head, supposedly scaled to 35mm figs. More evil mutants in the future, including myself in tights. Almost master of the world . Those rotten X-men always getting in the way of things .
11.5 hours into the bottom of the Shaggoth now, at 99%, it’ll take hours to remove the supports .
Pics later, or in my other thread.
Temporarily stuck together with poster tack, but he is big. 140mm toe to top of horn. 170mm long so far, but two tail sections each about 100mm to add on.
That giant doesn’t look so tough now does he .
A decent mini print with 48 hours of setup, I'll take it. Realised that my big issue yesterday was that I'd forgotten to set a bed temperature, so nothing was adhering even with a brim. Sorted that, and voila:
Spoiler:
Not the most exciting, and still needs a bit of cleanup, but I'll take it for a first successful print. Done a hag and a 9 part Marine since then, all went well. Let the addiction commence!
It’s thpe little things that mess us up. I’ve taken to setting special parameters for getting these models done, and when I forget one part and then wipe it out of the computer to save space only to see the print wrong because I set a parameter wrong it drives me nuts.
HAMMER TIME!!!
Reprinted the top of the hammer again, while hamfistedly trying to desupport it I broke the upper handle in two spots . I got it glued back together, but the handle I still mostly hollow so the heavier top means it won’t hold forever.
Have a print of myself going right now. Won’t be done for a while, so you’ll see me in all my glory tomorrow.
I have a few projects lined up and ready, but might change my genre again. I found some interesting alien flora but also have some Asian inspired stuff too. Not sure what path I will go on, or continue the dark chaos road.
Yeah, once you get the Ender dialed in, it does some of the best FDM work possible, IMHO.
I think it looks like your paint job on your giant smoothed it out quite a bit and looks good - I had usually added a bit of white glue to my paint for the undercoat to help smooth the lines and to strengthen the print, especially for smaller minis. Not sure if you just painted it straight up, but it looks really good!
Since I have the two printers, all large terrain and stuff is on the Ender and every other possible thing that will fit on the smaller plate goes resin.
Ender 3 folks, any tips on larger prints to save time/material without hurting quality? I've currently got layer height at 0.08, infill at 50% and that's working great for smaller minis, but when I slice larger ones i'm often looking at 20hr plus print times, and I don't have the CAD skills to cut the files into smaller parts if they don't come like that. So if I can cut down time without losing detail, that seems appealing.
Failing that, is using the Ender's Pause/Resume Print function multiple times during a large print safe/advisable? I'm not really comfortable leaving it running overnight just yet.
Paradigm wrote: Ender 3 folks, any tips on larger prints to save time/material without hurting quality? I've currently got layer height at 0.08, infill at 50% and that's working great for smaller minis, but when I slice larger ones i'm often looking at 20hr plus print times, and I don't have the CAD skills to cut the files into smaller parts if they don't come like that. So if I can cut down time without losing detail, that seems appealing.
Failing that, is using the Ender's Pause/Resume Print function multiple times during a large print safe/advisable? I'm not really comfortable leaving it running overnight just yet.
50% . Wow, all my models I’m printing at 5-10%...I did break the handle on the hammer of the Shaggoth, but that was because I was snipping too close and trying to cut a bunch of supports all at once.
I’ve only paused once or twice, but no issue with the prints from doing that.
Also, had an issue today with my micro sd cards. I downloaded some gcodes ontoone to print and all the files changed to gobbledygook. I had to completely erase and reformat it. The second card did the exact same thing. Frustrated as I had sliced 30+ files and saved them in the cards then deleted the files off astroprint to open up space. I have to reload the files, reslice them and start from scratch. Just a waste of time.
Huh, maybe I've been overestimating how much infill contributes to sturdiness then. I'd read not to go higher than 50 for most stuff, but that for minis, 30-50% was the ideal range to get good,durability and weight. Might try it much lower on a print tomorrow, see if that saves much time/filament or has any negative effect on quality, as so far I'm really happy with how my prints are coming out.
Paradigm wrote: Huh, maybe I've been overestimating how much infill contributes to sturdiness then. I'd read not to go higher than 50 for most stuff, but that for minis, 30-50% was the ideal range to get good,durability and weight. Might try it much lower on a print tomorrow, see if that saves much time/filament or has any negative effect on quality, as so far I'm really happy with how my prints are coming out.
All I know isn’t a lot of terrain and model designers post that they print “this model” with 10% infill and no supports. I’m sure depending upon handling more infill is probably better, but even a few videos showed the difference between no infill, 5, 10 and 20%. I did look at doing some bases at 30%, but the time used on a 2mm thick base was in the tens of hours .
Good to know. Doing a Bigby's Hand spell marker now with a lower infill and 0.12 layer height, so I'll see how it goes. I think it cut the print time from 6 to 3 hours, so if the result is still good I guess I'll switch my default settings closer to that (though for smaller minis,I don't fancy having the layer height larger than I need to)
I'll leave the speed as is, don't want to trade quality for pace.
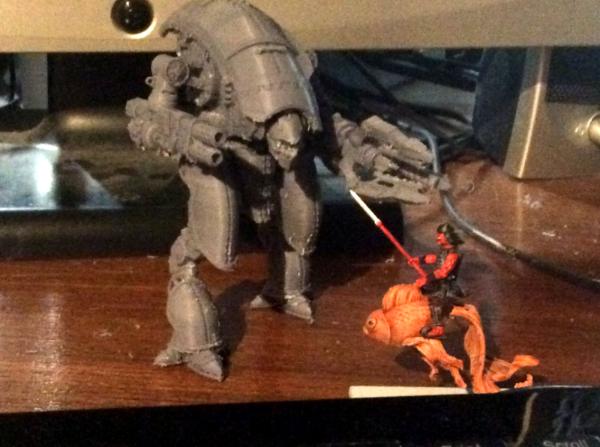
So 5% infill in a Goldfish is still strong enough to support a metal rider on top . These are the types of sentences I can hear coming out of a wise Oriental monk .
Where does one find a saddle maker who specializes in Goldfish?
I'm not Drunk.....
I haven't had anything alcoholic to drink today or this week.....
I might need something....
Because, This being a female Samurai Model, I'm tempted to call her Han......The Golden Samurai-Ko (I think that's the proper term for a Female Samurai).
That way she can be nicknamed..........Goldie Han
When she gets into Big Trouble she can call on her Ronin Samurai Jack.
Now I need Ronin Samurai Jack to Ride on a Pig (Pork Chop Express)...... Which as I'm typing this I remember I found some farm animals at the Dollar store a few weeks ago.....including a Pig.
We set up an sender 3 pro...well, my brother and his wife put it together without my knowing, and after three days he is completely frustrated.
For the first two days, everything has been shifting sideways during the print. After significant tinkering and choosing a new file, we have this (see picture).
Any clue what’s going wrong?
Automatically Appended Next Post: You can see how it should look in the bottom centimeter.
What temperature do you have the nozzle and bed set at?
Lastly I think the model definitely needs supports.
I would try reslicing the file and changing the filament settings in the program. I usually try to print horizontal more than vertical as it reduces the torque on the model which might be shifting it on the build plate. The bed temperature settings are really important as well as I have found out the hard way early on. Most spools of filament will have a card that comes with it suggesting what temperature ranges to use while printing.
Try a smaller file first, both to save material and key in on issues. The Ender 3 usually have test prints preloaded on the memory cards they come with. Try one of those. They have less details, but will help show where the issues are off the bat easier.
Here is my brother’s reply:
We were using creality slicer. The filament is pla, the nozzle is at 210 and the bed temp is 60. We were using supports where the support would touch the bed and a raft. We’ve switched programs to cura now and are trying to work through a bunch of issues with it.
I’m limited on slicers since I have only a chromebook. Astroprint.com (uses Cura 3.6.0) is what I’m able to operate with. I still get the stringing you got on that print. I think it’s a combination of needing to increase retraction and speed of printing.
When I print I use PLA as well, I have my nozzle set at 220 and bed at 60. I’ve thought about dropping the nozzle temp down to 215, but that temperature can vary between different manufacturers of PLA.
Support wise I go nuts and do supports everywhere. Not great for fine detail work, but on terrain it works well. These three samurai figures were done with full supports on a raft.
The fox samurai in the middle lost his trident, a combination of my overzealous snipping and the fact that I plan on replacing it with a yari or naginata anyway. The guy between him and the red masked guy had ankle issues. They were too thin in the print and all but came off when I was cutting away the supports. His weapon will also get replaced, unless I completely reprint him. The Wolf samurai with digitigrade legs came out the best of the bunch. His sword is super thin, but survived. All the little white dots are the connection points where I removed the supports. I’m thinking or redoing them all at 3-5mm larger (heroes), but if priming covers some of the blemishes they might just work out. Either way they will be used a sub painting test.
I've found enabling support interfaces a major benefit. Puts a thin surface between the supports and the print, which comes off way easier and leaves far less to clean up. Still got to be careful on the smaller parts, but it's so much better for when you are supporting larger areas like wings or printing minis on their side or back.
Something which is not a manifold means its not actually a fully enclosed volume--something is wrong with the mesh in your geometry file. Given to understand that usually is something like a missed or turned around triangle or vertex, and yes, it will cause printing issues. I know there's programs to fix it, though I don't recall the names at the moment--just starting out myself.
This is why you use supports.
One chaos spiney beast survived coming through the warp portal because he had support. Go it all alone like the one on the right and you lose your forelimbs, part of your chest and most of your lower jaw. Always thank your patron god and give proper tithes.
Filament for the Filament god!
PLA(stic) soldiers for the pile of shame!
An hour of taking off the supports later.
He is one scary chicken wolf. It has double decker claws on the front limbs and very Tzeentchian feathers covering him. Would be a fantastic mount for a Tzeentchian General.
That's a big beastie! How long did that print take?
Got some really solid results on the Ender today, a Mind Flayer that looks great next to my bought resin ones and a Manticore that's come out pretty damn sharp as well. I'll throw up some pictures tomorrow.
Taking a shot tomorrow at a multi part very detailed mini, it's somewhat daunting but i reckon I've got everything dialled in now so it should go fine... And if not, hey, that's the great thing about this stuff, mess up one print and you can just take another shot!
I know what you mean about being dialed in, I’ve gotten some nice prints lately and don’t want to futz around, even the stringing is really reduced.
Got a call from my job today . Looks like I’m headed back in about three weeks. I guess I need to start piling up some 9-10 hour print ideas to start when I leave for work .
Been printing, just not posting, kind of trying to find the right idea for my army. So I have a selection of spirits/oni/statues to try and get ideas.
Also building a wall to keep the murder goldfish out
That’s the type of push I need to work on the samurai project.
Also anyone looking for a Ender 3 right now, I just got an email on a price drop from Creality. The Ender 3 like mine, the basic one $179.99, the Ender3 Pro (which I would have gotten if I could have afforded it at the time) $209.99.
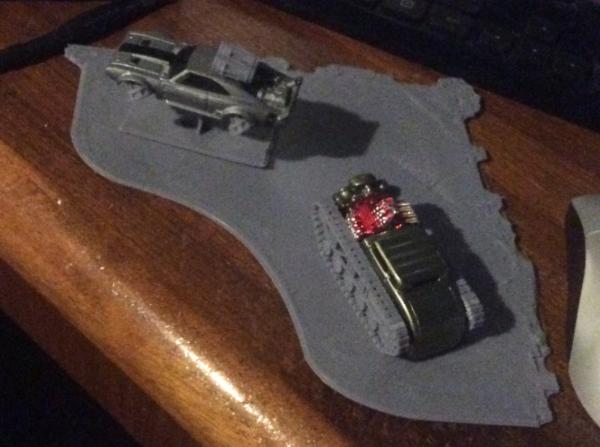
Thanks for all the help, guys. We’ve been dialing it in and testing things out, and I think we’re pretty close. We finally got a Bolo that looks good, but the attempted Necron ship still didn’t turn out. (It’s an original design by someone in the FB group.)
I'm not sure whats going on with the Necron ship. To me it looks like it slipped off of the supports while printing.
The Bolo tank looks pretty good. lots of layer lines, but i think at that scale its pretty decent.
I've been looking for the .Stl file for the Z-axis spacers that I printed and installed. I know I got it from watching one of a few dozen youtube videos showing essential (or top xx) Ender3 upgrades. It really keyed in my prints once I had it printed and installed. The video showed quite a few upgrades including the fan cover, cable clips, filament guide and the cable chain cover. You may want to watch a few of those and see what could work for you the best. I think the one I watched was by All3DP.
Shows it at right about 5 minutes.
Also, Just signed up as a patreon for a 3d site (titan-forge). Does anyone know how to get the .stl files? It shows my joining and I have access, but I cannot find where to get the files. I'm an idiot, so don't think that I have clicked the big logo that says go here, because I don't see that .
So I went and spent the $10 for the Dragon empires 2 bundle. Tried an old spoolof filament that had given me troubles before, it’s back I never the bad pile . Lots of stringing, but thankfully no clogs. Details came out good enough for me on the Kirin.
The worst part was that the spool was black and shiny. Made it hard to see what was supports and what was detail. One of the hero’s helmet crest horns was cut off because of this.
Scales are visible and defined.
The black spot on the mouth was because I primed it then saw that ALL the whiskers were just one whisker and a bunch of small supports.
Don’t tell the vet, but it may have gotten a snip between the legs where I thought it was supports and it turned out not to be .
Goldfish rider finally stayed glued to his base so he and a kitsune figure are primed and drying now.
That's a heck of a print, very detailed. I hear you on the difficulty of the black filament, I'm having similar problems with my semi-opaque white... really just need to get some grey.
Pretty sure I saw the Titanforge Empire of the Dragon bundle on MyMiniFactory earlier if you're still chasing it down, though it was $60.
Paradigm wrote: That's a heck of a print, very detailed. I hear you on the difficulty of the black filament, I'm having similar problems with my semi-opaque white... really just need to get some grey.
Pretty sure I saw the Titanforge Empire of the Dragon bundle on MyMiniFactory earlier if you're still chasing it down, though it was $60.
Over been using grey mostly and found one that’s a PLA+ for $23 a Kg on Amazon. I will most likely just go with it from now on, this black one was because nothing else was available at the time.
Yeah, I’ve seen the bundles on MyMiniFactory, they just had them available to patreons in smaller bundles for $10 each. They also promise a discount code for their stuff on MMF, but I didn’t get the code yet.
@LTMW, no training on that, but all my cats know I’m the one that took them to get it done .
Also, how is ABS or PETG different? Which is better for minis?
I have been warned to stay away from ABS. It gives off vapors that may be harmful to inhale. Quality wise it's like the first round of bones figures.
My understanding is Petg is stronger for making load carrying parts, cogs and wall brackets.
PLA is basically what most gamers are going to use. PLA+ is just a better quality.
No matter what they say the quality of their PLA is, you want something with less than a .03diameter variance.
The one I have been using the most is manufactured by eSun. I get it off Amazon. Runs about $23 for 1 KG.
When you do a search on Amazon, walmart or just about anywhere else and type in 1.75mm PLA filament, always doublecheck before you buy. twice I have used those parameters and been given a 3.00mm diameter filament.
Theres also wood filament (PLA with wood bits inside), metal, silk. all sorts of things.
www.esun3d.net. They send a trifold brochure with the 1Kg rolls that goes into details about each type and gives the suggested setting for each as well.
endtransmission wrote: The discount code would have been in the same patreon post as the download links to the month's files unfortunately.
Oh well I’ll know for next time .
I’ve given up on black PLA. The new one I got was so stringy and so shiny that I just can’t even bring myself to try and cut the supports off of this Chia pet looking lump.
I still have a full roll of my grey PLA+ which I will swear by and switching back to it.
Barzam wrote: Bob, did you do those tanks in one go? Nice work, if so. I don't trust mine to pull that off.
Are any of you guys finding that you have issues with stringing at all?
We did the Bolos in only one go, both sizes, because we haven’t learned how to cut the models apart for printing. Took several tries to dial in the printer and get anything usable out of it. The 40k Sicaran was printed in 6 pieces, and the sponson guns took about six tries.
Stringing is a pretty big issue, but my brother got it dialed in enough so that the printed item can be cleaned of webs fairly easily.”, although it’s time consuming.
I did this ship in one go, although this is the fourth attempt. It’s an original Necron ship from the FB group, about as fair game as buying a Battlefleet Helios ship in my opinion. The top looks great, but I have no idea why the bottom looks this way.
Automatically Appended Next Post: From what I understand, the temperature is a cause of the stringing. The printer can also be programmed to “wipe” between layers? Not sure I understand the complexities of this marvelous contraption.
I was having big stringing issues until yesterday, made a few setting changes that pretty much eradicated it in one fell swoop. Here's what I changed, if it helps at all:
Small changes really. but can't argue with the results. Yesterday's prints looked the the aftermath of a visit by Spider-man, today I printed four models together on a plate with nary a string between them. YMMV from filament to filament, but these certainly work for me.
Stringing issues here as well. I’ll try some adjustments later as I’m back to using my grey filament.
Bobthose prints are looking great. I think the underside is because of temperature, supports and bridging. It’s the issue I have with my prints on the support side if I don’t have enough supports. Basically the temperature is a bit too high which allows the filament to remain flexible longer and sag when bridging between the supports. I am looking into getting a desktop computer up and running to use a real slicer program so I can better adjust supports and bridges. I tried to dial back my temperature manually on the current print, I’ll see in a couple hours, but it was already looking so much better than before.
Paradigm, what filament are you running? And was it really 5mm to 60mm(that’s like a 1/4” to 2.5”, Or was that a typo?
Started trying to slice the big dragon from the Patreon. Printing the main torso at best quality with supports was 30+ hours .
Edit: Please post some before and after when you guys make adjustments, that way we can all see the improvements and decide if we are going to try them ourselves .
Sorry, yeah, 5mm to 6mm, not 60! At the minute I'm using a white PLA that I can't recall the brand of, I'll check tomorrow. Though I do have some eSun PLA+ arriving tomorrow that I'm probably switching to
Not got any un-cleaned minis with the old settings, but I'll post some pics tomorrow of my current results and a more thorough breakdown of the settings.
while it would not have pulled the filament completely out, I figured it wouldn’t have been productive that way .
So here’s a quick idea of the change from black PLA
Yes there is a model in that blob, actually three parts to a model on a raft. Can’t see details, so even trying to cut away the supports I know I amputated part of a bow, and both katana and wakizashi handles of the rider. The mount lost both front paws though I was able to find them in the cut offs and replace them. No idea how it will look once primed.
And here is the same print with same settings using the ESun PLA+
A lot less stringing. Clear details and very little sheen which makes cutting the supports off easier. In the end it looks more like GW HIPS sprue plastic.
The only adjustments I can make on the Ender itself without reslicing the model is temperature. I just started a new print, the three Ninja from Dragon Empire 2 patreon bundle. I’ve adjusted the temperature down to 210 to see what that will do for me. Pics in about 6 hours.
Edit: About 20 minutes of cleaning and assembly and the details are phenomenal. The bow is thinner than a spear shaft from WGF ashigaru. The textures and beads on the model are smaller than the textures on the HIPS plastic molded figs
Damn, that's magnificent! Great sculpt. and that print has come out lovely.
eSun's grey PLA really does seem a cut above the rest, in today's experiments I've not only found it prints sharper and cleaner than my other reel, but that the minis (and supports) feel a lot more sturdy and less brittle. Also much easier to see what needs cleaning versus the very reflective and slightly translucent white.
As promised, results and settings:
These were minis from Thingiveree and MyMiniFactory respectively, and sliced in Astroprint. I've removed the supports and given them a once over with the file, but that's all, no more than 5 minutes a model.
Settings (anything not mentioned is as per Cura/Astroprint's Normal Quality settings, or derived automatically from these)
Spoiler:
Layer Height 0.1mm (0.08 on very small models, 0.12 on larger ones)
Initial Layer Height 0.2mm
Line Width 0.4mm
Wall thickness 0.8mm
Infill Rensity 5% (Grid pattern)
Initial Layer temperature 220c
Print Temperature 198c
Bed temperature 50c
Retraction 0.6mm @ 50mm/s
Print Speed 45mm/s
Travel Speed 120mm/s
Jerk control on, 5mm/s for print, 30mm/s for travel
Supports on Everywhere, 10% density, 65 degree overhang angle, line pattern
Support Interface roof and floor enabled, 1mm thickness
Build plate adhesion: brim
Hope,that's of some use. Most of these settings are adapted from Tomb of 3d Printed Horrors/Fat Dragon Games on youtube, definitely the best advice I've,found for the technical side of this stuff.
Thanks for those settings. I’m going to give them a shot, just input them into my cura settings now.
In the mean time, I cleaned up the second set of Komainu archers.
If I use them in Kings of War, they will be an Elf Army. The Elf Elite rule seams appropriate to trained samurai warriors. With these guys as cavalry with bows they fit the Silverbreeze cavalry unit that can only be fielded as a troop 5 models on 25x50mm bases. Now I only have the second edition rules, so it might have changed, but if the rule of 1/2+1 models for multibasing still apply I think 3 would look better on the base I have laid out in front. I have a third batch in grey printing now so I can have two units.
I think I'm getting the hang of this... Though typically I now see some tiny loose ends on the photos
Dragonborn Paladin by Comet Lord Miniatures (who do some amazing stuff, go check them out). Printed upright with about a bazillion supports, but he's cleaned up lovely. Definitely feels like a mini designed to print in resin, but with results like this from FDM I'm very pleased nonetheless. Definitely finding that chunkier minis are printing far better on the Ender than more spindly true-scale stuff.
Tried the settings you had, still getting lots of stringing. I’ll try a couple adjustments today when I can.
That’s after plucking some strings off before I remembered to take a snap.
Huh, that's really odd, I've not had anything like that on those settings.
Have you checked your Z axis is completely straight and your bed is level? Could be the nozzle is catching the melted layers and dragging it as it moves?
Paradigm wrote: Huh, that's really odd, I've not had anything like that on those settings.
Have you checked your Z axis is completely straight and your bed is level? Could be the nozzle is catching the melted layers and dragging it as it moves?
I will check the z axis later this week, just started printing the Tailong dragon head 27hour print .the supports look great on the bottom layers so far, so I am not sure that it’s the nozzle hitting prior levels. I leveled the bed before I started, but other times when I level the bed It still doesn’t the stringing.
I put the eSun PLA+ on subscription with Amazon, right now it’s monthly, we will see if that gets upped to every other week.
One amendment to my earlier settings, something I assumed changed automatically based on the set temperature but I caught earlier that it didn't: initial and final print temps should also be at 198. Not sure if that'll solve any stringing, but just figured it worth mentioning if anyone else is trying that setup.
Paradigm wrote: One a,emd,ent to my earlier settings, something I assumed changed automatically based on the set temperature but I caught earlier that it didn't: initial and final print temps should also be at 198. Not sure if that'll solve any stringing, but just figured it worth mentioning if anyone else is trying that setup.
Pretty sure I adjusted that already, just made sense.
Spend the day at the hospital with my mom, she’ll be in at least 3 more days yet and then surgery later. Knowing I’d be there all day, I was the only one available today and they only allow 1 visitor per patient per day, can’t even be relieved by someone else, I was up there the full 8 hours allowed. Also since the timing was working out I started the 27hour print of the dragons head yesterday so it completed ten minutes before I returned home . Unfortunately at the 7 hour mark I was packing up the computer from my printing desk to take with me and I pulled the wrong cord out of the socket and unplugged the Ender by mistake . It has a power loss feature and resumed as soon as I plugged it back in and looked like it didn’t skip a beat.
Came out a big hairy mess still , and when I started to take the supports off it was apparent that when the power loss happened the top didn’t fully bond to the bottom and it split clean apart along that line. With the angle it was cut at I could have used the top of the print to have the dragon coming through a portal of some kind, but I was able to cleanly remove the supports from both top and bottom and the cut was clean enough to reassemble with superglue. If anything it will look like a slightly off join line when all done.
The strings/hairs are super fine and are more of a nuisance to clean than damage to the details which are amazingly crisp.
You can see the line near the top right of the picture.
Thanks for the details on the adjustments you made. I’ve resliced all the parts again with the new setting. I have one set of horns printing now and I’ll start the next part of the torso before bed so it’s ready when I get back from church tomorrow.
Copied from my thread:
I have been working on and finally finished another figure.
Sgt. Slaughter from G.I Joe. (WIP Sculpt)
Also, this happened while I slept last night:
The details on Sgt. Slaughter came out really quite well. Its hard to see that here but I think it will show them much better once painted.
Pretty excited.
I also started trying to dial in my Moai, and I can't wait to print the Sgt. on it. The detail level will be similar to the Photon, but the prints should be much crisper.
Well, still having the hairy stringing issue, causes lots of extra cleanup,but the details are amazing anyway. The Tianlong dragon is growing large enough to swallow the WGF ashigaru in one bite.
And he can join friends inside as there seems to be space.
Tried to take a nap, thunderstorms are great for that, guess we had a power surge as the Ender was stuck silent. I powered it off then on again and brought it back.the other set of horns I was printing is wasted. I didn’t want to try and restart in the middle again and it’s onlt a 2+ hour print. Once that’s done I might try and print one of the tail sections.....there are two more sections. This is a big dragon.
Two more!? And here's me still getting put off when a print previews at more than 6-7 hours! It's looking fantastic though.
Weirdly, I had stringing on these settings earlier when I tried printing two minis at once; both held the detail, but there was a bit of a mess between them. Going to try upping the retraction just a tad more tomorrow, will let you know if that fixes it.
Uh oh... I just checked out the stats on the Elegoo Saturn...OMG I want this. Resin printing with a build area of 7.55 x 4.72 x 7.87 in and a monochrome LCD meaning layer exposures of about 2-3 seconds. My poor Ender 3 may never see action again if I can print this big and fast in resin!
Pre-orders at $400 are already sold out, so will wait for next batch.
I can’t even look at resin printers till I get the Ender3 completely sorted. I guess my standards are lower because I’m getting just as good of quality from these prints as some HIPS kits out there. The only real issue I’m having that I can tell is the weapons and really narrow parts.
Cats woke me up at 3 a.m. I’m sure it’s to let me know they would like more food, but I hope at least one of them was trying to tell me my print was done.
Tail section A, stringing is a lot less than before. I’m wondering if it’s due to humidity. St. Louis is notorious for high humidity, and it’s been bad the last few days. The thing is I have a dehumidifier about four feet from this desk and it’s running constantly, so if that’s the case then I think I’m just screwed.
Though in the end, the outcome is still really nice.
Great work!! Yes, the Ender is an awesome machine. I found some filament brands definitely string more than others and the exact combo setting tweaks to the speed, retraction and temperature should get it taken care of.
I really think humidity is wrecking it with stringing. I’m going to look at building or buying a filament box to deal with that. This print was nearly flawless. Only two or three small hairs and I had emptied the dehumidifier before I started this print. Forgot to snap a pre cleanup picture, but with the final tail section added he is almost 10” snout to tail. Just think if someone stretched him out straight .
My planning got thrown off this morning so nothing printed all day while I was at the hospital. I just merged all the arms and legs onto one print. 13 hours till they are done, so around lunch time tomorrow.
Got a nice B-day gift from my mom (cash, best present for a 46year old ). Instantly I thought. “ I can buy two more Enders and more filament and start my printing farm “
More trouble with stringing, but now I have a much more serious problem. Someone messed with the settings on the supports, and now they are fused into the print. I am clipping off big pieces, losing fine details along the way, and wil still have to spend hours with an exacto knife.
Automatically Appended Next Post: How do I set it to have supports that snap off easily?
On the support side, mine have been just like that, but I use the snips that came with the Ender. If you get in and twist as close to the model as possible it will peel off. The whole dragon had that issue and I had a tiny loss of detail, but nothing significant. I am absolutely convinced that the stringing is due to moisture/humidity. It gets worse when there are multiple objects getting printed at one time, but happens to me on each print unless I am basically printing a solid item.
This video covers basically everything you need to know about supports for minis:
The main thing there is how to set up Support Interfaces. These put a layer at the top and bottom of the supports that then attaches to the model, which manes that you can cut or pull them away in chunks rather than one at a time; leaving a much smoother surface underneath that's way easier to clean up. I also found that dropping support density and overhang from 15%/50 degrees to 10%/65 degrees resulted in far fewer supports to clean with no loss of quality or print failure? Just check in the slicer that everything that needs supports has them, and increase either setting accordingly.
As for stringing, I'm afraid I can't help with the weather, but cranking retraction up to 6.5mm gas helped my prints a lot, albeit we haven't had much humidity or heat over here since.
Barzam wrote: Needs a bigger chin, but otherwise, you can retire whatever army you run. You have everything you need right there.
Done! lol
Thinking about resizing him to fit with Catachans, and doing a couple more prints to dial in resin settings, made me reevaluate his proportions.
Here is a shot of the 3 test prints next to a figure from Star Wars Legion:
As you can see, his proportions were much more "true scale" than "heroic scale". He looks tiny next to the Legion figure, even at the same height. I went back into zBrush and adjusted his proportions a bit.
In addition to that, I widened his body, and thickened it. Plus a few other little changes, mainly for print purposes.
Also, I decided to try to make an animated GIF of him. I had played around with this previously with other sculpts. Still not entirely sure I like the results. Needs more tweaking, I think.
I definitely think the 39mm one would be the route to go with. He is bigger than the average human and should be proportionally bigger than the guard models too.
Now he needs a big old Machette.
Edit:
These may be alien Maggots! But they know hi to fight Cobra!
Slaughter came out great in my opinion. His back suffered a bit from me taking the supports off,but not because of the design.
I've actually been experimenting with printing some BFG ships, myself. After playing Dropfleet Commander with BobtheInquisitor, I felt very inadequate not having a proper space fleet, so I've been looking to rectify that. Printing seems to be a cheaper alternative.
Behold, my terrible pictures! Gaze in awe at just how tiny that destroyer is! I actually can't believe I managed to print that thing on my fdm printer. So, as of right now, I've printed x2 cruiser, x1 escort frigate, x2 Sword class frigates, and x2 destroyers.
For now, they'll get the job done, but I think I'm going to need Highlord Tamburlaine to reprint the frigates in resin for me. I'm just not happy with how they came out.
Is that the Italianmoose cruiser, but printed as assembled? I forget who did that, MKHand? Beware that some of the BFG ships are not set to print at the correct size (although that one looks fine). Someone on FB printed some SM escorts off Thingiverse, and they came out larger than strike cruisers...which, of course means I have to try that.
Also, to print a BFG ship at DFC scale, the multiplier is 4.4 times the original size, linearly. I’ve been using 4 times for simplicity, though. A 20cm Sword Frigate seems ominous enough.
Automatically Appended Next Post: And Barzam, what’s wrong with the Cobra escort you printed?
I think the FDM prints are very suitable for using while one figures out exactly what they want to field in an army. Plus it’s great for terrain. I’m getting good results from mine, but then again I’m not a golden demon painter, so blemished minis aren’t terrible for me. Larger model work great though.
Using these at least while you try out a game is better than paying full price and then realizing you need a different set up or hate the game and have wasted the money.
PS: since most of the stl escorts were designed for a small size, they are under-detailed. I tried printing one of the more detailed file-rips from the BFG game by Wolfmaskman, but it didn’t turn out well. I contacted some of the guys on FB with resin printers, and neither of them could get it to work, either. Perhaps a smoother ship, like an eldar escort, would work, it my current plan is just to blow up a normal escort and enhance it with plasticard and printed terrain details.
I didn't think about scaling up. The cruiser is actually just about the same size as my midsized ships from my Covenant of Antarctica fleet. I think I used those ships as cruisers before, so that seemed about right. I figure if I do a battleship, it should be around the same size as my big Antarctic battleship.
I think the Cruiser I did is based off of Italianmoose's
It's a remix that was supposed to be sliced for better printing. It's not a one-piece build. I printed it in chunks.
The issue I had with my frigates was the prow. It didn't print a good curve on the prow. I split the model in half. Top part is fine, decent curve, bottom part has a jagged prow. Plus, some of the details on the prow are a bit too soft. They'll do for now until I can get resin prints though.
My escort frigate didn't turn out so hot either, but that's because I printed with supports. Every time I use them, I lose detail and get very jagged and visible lines. But again, it'll do for now.
Have you tried printing them vertically? We’ve had better results printing some spaceships nose-up in one piece than as several flat pieces.
It sounds like you might also have non-optimal support settings. Before something got changed on our settings, the supports used to come off fairly cleanly, with great detail underneath.
Well, I had an explosion while I was at church. Started a print, got home about 5 hours later to a huge glob of melted pla sliding around on my print bed. Popped it off and saw the gasket had been pushed off and it kept printing above it. Took the fan housing off to see how bad it was.
I think I need a whole new hot endextruder . Not sure I can even get the connections out. Oh well, off to YouTube to look for solutions.
Edit: Checked Amazon, new parts on order, had 9 minutes and 16seconds to order it and get it tomorrow . $16.99 and the cable comes with it to go all the way back to the controller, so no worries about the connection.
The glob that was rubbing around the print bed was about 5 times the clump on the extruded shown in the picture.
Not sure, but I had been worried that the stringing was due to a small clog in the nozzle. I almost took it all apart last night but was too tired after being at the hospital all day yesterday. So don’t freak out, but if you are printing constantly like me you may want to take the fan off and a few least inspect around the nozzle. This explosion looks more like there was a gap between the Bowden tube (the tube that channels the PLA down to the nozzle) and the nozzle itself. When you change the nozzles there should be no space between the nozzle and the Bowden tube or material will heat up and clog in that space which leads to insufficient flow. The white Bowden tubes that come with the Enders are not the best quality, and I replaced mine two full spools ago with a high end Bowden tube and better connectors so it does not pop free.
Woof, that's a mess. At least you can fix the problem.
I tried my hand at printing with PETG last night. The stuff requires a higher temperature, but is supposed to be a more resilient material than pla. I have some files for some small action figures I want to print and figured the higher quality material would be good. The results though... not so good. I'm going to have to play with this stuff more and get a handle on it. The test piece needed supports and they melted into the test piece!
I've tried adjusting my settings quite a few times now, and I still can't get a handle on the stringing I get.
Barzam wrote: Woof, that's a mess. At least you can fix the problem.
I tried my hand at printing with PETG last night. The stuff requires a higher temperature, but is supposed to be a more resilient material than pla. I have some files for some small action figures I want to print and figured the higher quality material would be good. The results though... not so good. I'm going to have to play with this stuff more and get a handle on it. The test piece needed supports and they melted into the test piece!
I've tried adjusting my settings quite a few times now, and I still can't get a handle on the stringing I get.
Any luck with the PETG? It sounds like a great product, but I think I’m sticking with my PLA Plus(Pro) for a while.
Also.
You know that feeling you get when you do something you’ve never done before.....lots of nerves...then an “I’ve got this” then.......real excitement.
Got the replacement part in. Quickly saw more wires than I hoped to mess with. Started to trace back to where it all connected and took apart way more screws than I thought I’d need to. Damned if you do, damned if you don’t. Snipped wires, cut cable ties, snaked Wired’s all around. Found that the end connectors were held in by hot glue . Cut through that waiting to hear the circuit board break. But it’s all back together now.
Even started a print.....
Then quickly stopped as I remembered I probably should level the bed as I’ve flipped the machine over three or four different ways.
Leveled and first print is well on the way and looking fabulous.
Well , first print was looking great until about 5 hours in when major electrical storms came through the area and flickered the power a few times in a couple minutes. The Ender is designed to restart where it left off, but with the power fluctuations so quick together I think it just lost memory of where it was. Plus it sat there for another hour with the heat going to the nozzle still. In the end.....another ruined print, and a clogged nozzle. Glad I still have 6 extras laying around, but I might order another dozen soon.
Didn’t realize the nozzle was really clogged at first, but the next few prints would not stick to the heated bed at all. I took the fan off and undid the nozzle. It was restricted, but still allowing material through, but so little was coming through that the pull of the extruded moving was more than the grip onto the bed.
So today’s class lesson is: If the print is not sticking, check your tip for a clog.
Current print is looking fabulous, no strings so far even with gaps between the parts.
I think I've really got to grips with the printer now, getting a good feel for what will print well versus what won't. Stringing is mostly gone (on the minis, at least, the supports still get some but that's a non issue really) except for the tiny strands I figure you're always going to get a handful of, and I'm definitely getting an adequate quality level for my purposes (mainly dnd stuff. where even meh minis beat the tokens we normally use)
Very pleased with how this Ogre came put, he's definitely my biggest print so far by bulk, though a couple have been taller. Was amazed that his chain came out so neat.
Printed at 0.12 height on his back, took just over 6 hours.
Also been taking a brush to some of my prints, again not spectacular work but certainly up to scratch for various DnD hero types. Also a good showcase for my favourite thing about this whole printing malarkey, the freedom to get to some really obscure stuff; Dragonborn and Tieflings you've got some limited options for with stock minis, but Tortles and Firbolgs? There's basically nada on the market, except at mad prices or super hard to get. So yeah, I'm revelling in the freedom to finally add stuff like this to my arsenal for PCs and as a DM.
Also painted up a river troll. Not a mini I'd normally buy on the off chance of needing. but for a few pence of filament and 3.6 hours of printing, iI'll happily add this cheerful chap to the collection.
Onwards and upwards! I'm now at the point where I'm thinking of days in terms of prints rather than hours.... That's good, right? Right???
Definitely a plus on number of prints per day instead of hours .
Ogre looks great. I am leaning more towards printing larger items, like the Necron Heavy stalker I’m doing now. Smaller items risk bad parts. The Dragon empire stuff is coming out good for the most part, but a lot of the bows, spear tips and muskets are breaking because they are so thin.
I’m looking at printing a 27 hour massive building as soon as I change to my new spool. Don’t want to start a huge print and run out of filament .
So, back with more samurai type action. All of these are free prints from Thingiverse.
Resized the Chinese dragon to 50mm wide, which isn’t true as it’s the whole print width with his arm sticking out one way and the tail the other, but I think he is a good size now and fits a 50mm square base easy.did I mention I printed two of him out at higher detail. Each print was just under 12 hours. Probably use them in Kings of War 3rd edition as Elven(counts as samurai) war machines.
Also printed lots of other items including open and closed gates and wall sections. Not the greatest print as whoever did the design barrowed another persons design and mashed them together, there is a split at the top of each “long” wall from the failed mash.
Also found .stl files for a lantern (35minutes) and a Taiko Drum (40minutes) to print. The 50mm square bases each took about 30 minutes and it (on the left of the picture) matches the Warlord Games 50mm square base on the right. The Warlord bases are actually thinner, but have tiny nubs on the bottom that bring it to the same height. My prints are just rectangular and fully smooth.
Another Taiko drum on the printer now. Not sure what I’ll print next, probably a half dozen lanterns for fun .
My latest project: printing out BFG ships in DFC scale. The first attempt was the Sword class frigate, which did not print well. I used a video game rip file by Wolfmaskman on Thingiverse, which was not print-ready. (I talked to a couple guys with resin printers, but they couldn’t get a good print either.). The second is a Cobra Destroyer by Italianmoose. I’m might have to add detail to get it to look right—to the Ravenwing Accessory Sprue reserve!
I am constantly bouncing back and forth between projects, especially with the printer (since I have not painted a lick in weeks )
Here is a smattering of small quick prints that I’m doing between the larger overnight prints.
Three 4” basic rings I designed in tinkerCAD. 100mx100mmx 2mm tall and 2mm wall thickness. I’ll use them for Bushido as the zones of control markers. I have an 8” version to print, but having issues with my deck level right now on large prints.
Tiny lantern, I’ll need 6 of those for small objectives.
The 60mm base with tree trunk is a print I found online. They fit the woodland scenic 3-4” tree armatures. I’ll print a few and maybe make a cherry blossom orchard from them.
Lastly there’s quite a few rows of Lettuce. Fairly decent prints for speed.the field print did not come out well. I was having issues with the printer last night, but too tired to do anything about it. All the edges curled up and didn’t adhere to the baseplate. Changed the nozzle just Incase it was a clog issue, but that didn’t help. Played with the deck leveling, so far that has helped on smaller prints.
More later, spool almost empty, so lots of small prints to do.
Hey, Theo - all of your pains, I have gone through with my Ender - yes, that huge glob all over the nozzle and into the fan housing is no fun at all.
But, don't be skeerd about eventually going to Resin - so much easier to print, even if the after clean up is a bit more. And, the supports on resin come off so easy, so not much mini clean up.
I am sure you will take the plunge into resin and then you will want to go back and reprint everything you did FDM.
MDSW wrote: Hey, Theo - all of your pains, I have gone through with my Ender - yes, that huge glob all over the nozzle and into the fan housing is no fun at all.
But, don't be skeerd about eventually going to Resin - so much easier to print, even if the after clean up is a bit more. And, the supports on resin come off so easy, so not much mini clean up.
I am sure you will take the plunge into resin and then you will want to go back and reprint everything you did FDM.
Love your blog - keep it up!!
Thanks MDSW,
I am pondering a resin printer, but not for a while. The Ender 3 was to keep me busy while I have been on Furlough due to Covid19, but it’s back to work Monday the 27th, so only a few more days of insane printing freedom.
The next hobby purchase will be models and stuff, and that’s just with birthday cash.
The next really large purchase hobby wise will be a decent computer that I can run a good slicer program on. The Astroprint using cura 3.6.0 is okay for what I have been doing, but doesn’t have key features that full cura and other have, like mirror printing. I’d love to be able to do some mirrored prints just to get twice the models out of a file and look just different enough. The twin dragons I’m going to use for KoW is an example of that.
After that, maybe I’ll jump to resin. Especially since most Patreon files are coming presupported now.
I'm in a similar boat, I do now see a resin printer as an inevitability but it's a much more complex investment, given that the FDM doesn't need anything peripheral beyond the filament, and there are no hazards or other concerns whereas resin you need to worry about gloves,safe storage ect.
I've been more than impressed by the quality you can get out of an Ender 3, but as a painter FDM is something to work around, whereas the resin prints I've painted have just been sublime to paint. I've actually got a massive (11" wingspan!) resin printed dragon coming any day now, I'll be sure to throw some pics of that in here.
Paradigm wrote: I'm in a similar boat, I do now see a resin printer as an inevitability but it's a much more complex investment, given that the FDM doesn't need anything peripheral beyond the filament, and there are no hazards or other concerns whereas resin you need to worry about gloves,safe storage ect.
I've been more than impressed by the quality you can get out of an Ender 3, but as a painter FDM is something to work around, whereas the resin prints I've painted have just been sublime to paint. I've actually got a massive (11" wingspan!) resin printed dragon coming any day now, I'll be sure to throw some pics of that in here.
Yeah, the quality of the resin prints are great, so much better than even what we have gotten out of the ender 3, but all the extras. My cats were too curious about the Ender3, I'd worry about the resin.
in the mean time. Tomb sentinel progress. The file doesn't have the weapon arms or a nice tail segment, but body and leg wise its nice.
I did a batch print on body sections while I stayed at my Mom's house to take care of her. The prints came out okay, but as you can see from the furthest left segment they all had a slip on the back. There were servere storms while I was gone, so not sure if it was a power failure/surge, but it looks similar to what happened with the Tianlong Dragon and another print during a power failure.
a few of the segments that top layer just peeled off while cleaning it. The other two parts were each individually printed. you can still see layer lines on the wings, but looks fine to me. Theres a double print of the legs in the background of the first photo . Besides stringing it looks like it came out well.
I've been discouraged about printing this last week or so. Every time I try printing something with supports, it strings like crazy. I need to just sit down and spend an evening doing nothing but string tests, and I really, really don't want to do that.
On the plus side, I found out Vallejo makes the shade of green I use for my Raptors in a spray paint. So, that means I'll be able to work on my multitude of printed vehicles at a much faster pace than if I painted them by hand.
Barzam wrote: I've been discouraged about printing this last week or so. Every time I try printing something with supports, it strings like crazy. I need to just sit down and spend an evening doing nothing but string tests, and I really, really don't want to do that.
On the plus side, I found out Vallejo makes the shade of green I use for my Raptors in a spray paint. So, that means I'll be able to work on my multitude of printed vehicles at a much faster pace than if I painted them by hand.
Good News on the paint front at least.
What sort of printer do you have again? Are the supports from presupported files? Because I have heard not to try those on a FDM printer.
I have found every file that comes w/ 'supports' are designed for a resin printer. However, I find doing them myself better, as once you get your preferences dialed in when you hit the auto-support button and maybe add or take away a few, they work flawlessly and you can pull them all right off super easy before you do the final cure. I am sure all resin printer slicers work differently, but the ChiTuBox for Elegoo works great.
The supports I've been printing are the slicer's auto supports. I've only tried printing a pre-supported build once that used resin supports. I know fdm printers can print resin supports. I've seen them do it. But, on the occasion I tried, it didn't work. Too thin, I think.
But yeah, both my auto-generated treelike and linear supports create a ton of strings. Linear supports seem to generally make a mess out of the surface they're attached to, too, but that just seems to be an issue with how the supports attach rather than a settings issue.
I haven't tried much more with the PETG. To be honest, the stuff kind of scares me because the printer has to run significantly hotter than what I usually run it at and having it go at those temps for hours on end, in California triple digit summer doesn't seem like it'd be very good for the printer's long term health. On top of that, the test piece I did used supports. The supports melted into the test piece, making it impossible to remove them. I'm sure with more practice I could get better results though. I think this material may best be suited to short prints that don't require supports.
A curious feature of the PETG though, the slower your print, the more transparent the material. It's weird.
No experience with the PETG to help with that, but support wise I’ve seen a couple videos and all of them seen to suggest using the zigzag supports over just lines as you won’t have ends, and ends are where the strings start from what I see.
My dialed in settings means that I am unhappy with some of my older prints. So I reprinted the Komainu rider and started throwing some paint.
It takes longer to print, and more prints as this time it’s not a 1 piece model but 5 pieces. Still this and my reprint of the Kirin are gorgeous.
Struggling with color options right now, not sure what color armor should be.
Italianmoose recently uploaded a new Eldar ship, the Sunjammer Tiny Dancer as a tribute to his mother, so I had tro print one out. It's a gorgeous ship. Unfortunately, even at 115% the thin ventral fins did not print. I'll have to try again at a different orientation, and maybe 140%.
Something a bit different for me today, 10 hours on the Ender and I have this rather cool Death Korps of Krieg bust ready to go. Printed in one piece, so a good hour of cleanup has gone into it (and as always, the lighttbox reveals what the desk lamp doesn't, so a few imperfections still need sorting) but overall I'm pretty darn pleased with it. Wanted something larger to paint as my eyesight is acting up at the moment, and he should fit the bill very nicely.
('scuse the crappy paintjob on the Oldmarine. he's only there for scale! )
Love the scope on the front if the plasma gun by the way .
Print looks great. I know what your saying about the light showing differently. I actually moved over to the paint desk and saw layer lines I couldn’t at my print desk. I even have gone back to start reprinting things that I thought were great only to find layers under the paint lights.
I haven't cleaned up any print line, I'm just reprinting at better settings. still adjusting the settings and printing the models in parts where I can. The Komainu models that I am reprinting above I had originally printed them all four parts on one build plate and at normal print settings. Now I have reprinted with my custom print settings which are giving me a better finish than the high quality preprogrammed settings.
Others like MDSW have stated that they add a little PVA glue into their paints to try and help cover the layer lines.
Okay, so while still Printing the Dragon Empire Bundle 2 stuff I bought on Patreon a month ago, I decided I want to grab the other bundles: Dragon Empire 1, and Dragon Empire 1.5. They are each $60, but they come with 100+ files and 40+ Files respectively, so to me it's a good deal. But we all know me by now and a good deal is not what I am after , I want the best deal. So I re-upped for another month of the Titan-Forge Patreon, which also allowed me to download the Titans of Adventure packs, Base packs, and Freebies they give away with the monthly pledge all for $10. That also Got me a discount code for 50% off their MyMiniFactory bundles (Will save me $60 of the $120 for the other two Bundles ). Also I got the Monthly Package in that $10 so I also got the Sons of (Chaos Dwarf Name Here).
That Centerpiece Robotic Minotaur
They also Previewed Next Months Membership which is in partnership with Brent from Goobertown Hobbies. RPG city folk with cultists and looks like a nice Inn Terrain Piece.
Also Their poll for September Releases is concluded.
Looks Like I'll be in through September at least . Amazons Riding Dinosaurs fighting Ogre Pirate invaders.
I'm going to need more printers
Also, Changed another setting. I'm printing everything on Rafts to keep them from moving around on the print bed, But I have changed the raft extra size down to only 1mm perimeter. The change saves me about 12 minutes per human sized model, but so far I haven't had any issue with the parts moving or sliding during print, so well worth it.
Oh that lettuce field is just what I need for my folk horror table!
I wasn't so keen on the chaos dwarves this month. I'm more of an old-school GW chaos dwarf look. I hope the Ogre pirates come through though as those look fun
The chaos dwarves aren’t as nice as GW chaos dwarves, but the big four armed minotaurobot looks great, plus it saved me a bunch on buying the other bundles.
Speaking of bundles, I was unaware that the dragon cavalry could be printed without riders.
Just over 12 hours total and it is gorgeous. Maybe one day I’ll print it at twice the size
I didn't look too carefully at what came with it, but you can get the photon s off the manufacturers site for about £300. Other sites also have it sub £300. Looks like a fake "deal on that amazon site.
Ah, fair enough. I just saw the discount from the 'original' price and assumed it was a good deal, didn't realise they were just being cheeky with the Amazon pricing.
So my Mars Pro arrived on Wednesday, here's what I've printed in two days:
That's a Swolbasaur (MyMiniFactory), a bunch of chaincannon barrels (Thingiverse), a growing pile of striking scorpion-esque marine helmets (Thingiverse), two full-size tree-critters by LOTP called Blight (MyMiniFactory) and six more of them at 75%. Next batch of 6 + 3 helmets is cooking right now.
Pretty blown away that I'm already pumping out units on this thing I also think it's interesting that with the most recent 3D print I bought off Etsy (which arrived the day I got this printer!), I can already troubleshoot where he cut corners a little (by using fewer, bigger layers) and didn't cure as long or in the same way I do. Tempted to buy the file and print it myself out of curiosity ... which I would have done anyway but I got this printer like 3 months early
Nice pile there, seems you've got to grips with it really fast. How long do those regular those minis take on the Mars?
If you're after more corrupted tree people types, you might want to look up Comet Lord Miniatures. He's had a really cool set up on Patreon this month that should hit his store any day now, a bunch of lance/sword and shield tree folk knights in a very similar style and a big (70mm odd at 100%) fey lord that would work really nicely as a boss for that mob.
Thanks for the recommendation, tho happily I already back Comet Lord The problem for me is that these are slotting into an existing army that just needs infantry, not monsters or large infantry, but sadly I've found a LOT of wonderful mucoloid / blight / fae sculpts that are much cooler than the stuff I've already painted So for now I'm pressing on with just the blight, in the interest of forward momentum. I will spoil that I'm planning to make a full KOW army using only his August Undersands bug dudes. I love bug-people and he's crushed it with these guys.
2x fullscale blight + 1x helmet printed in like 3.75 hours? Currently 6x smaller blight + 3x helmets are rolling in at just about 3 hours. I'll probably try a longer print this weekend, maybe Comet Lord's stone golem as big as I can make it while still one piece.
Those bugs are indeed pretty cool. Not something I have a use for right now so I've unsubbed for this month, but I'll 100% be grabbing that Tabaxi fighter from the store when it shows up.
Thanks for the speed info, seems a fair bit faster than FDM for multi-model prints. Man, the temptation to go resin is just going to keep getting stronger...
As for myself, finished up the Krieg bust, honestly didn't think ?i'd ever get an FDM print that I'd be happy throwing into the monthly competition, but t his guy has come out really nice, possibly even moreso in person.
Spoiler:
Today's print is one third pf a gargantuan Purple Worm for DnD, only 22 hours more to do across the other two pieces. Easily my biggest print project to date, and so far, coming out very nicely even at nearly double the original sculpt size. .
Boss: those tree people look great , I had started a Sylvaneth army, but they too have grown dormant.
Paradigm: great job. Just needs a “The Emperor needs you” sign. Reminds me of all the WWII Uncle Sam recruitment signs.
Well I was scared this morning because my printer would start up, but wasn’t printing. Turns out it has formed a union with our toaster demanding better conditions, service contracts and time off. Should know that during this pandemic they are easily replaceable. Got home to work and the prints are starting again. I shouldn’t run them both for four days straight in hindsight.
Broke up the Union good by pulling out the old toaster oven and leaving my laptop open to the Mars resin printer website . All is wonderful again .
So quick pic drop before heading to work at church for a few hours.
This might be why the machine was complaining. I’d start the wall sections when I got home from work and 11-12 hours later before I’d leave for my next shift the sections were done and i’d Start an ogre. Printer was working 20+ hours a day most of the week. With only quick breaks between those and doing human sized models or parts.
The tall wierd square at the end is another center tower to the walls, I just need to remove the excessive supports. Also you can see the bottom of the walls have a slight curve to them. I’ve long known my print bed has a bend to it.
Group of three Oni, there are two sculpts, the Kanabo and attached hand are separate, so I can vary them a little when they get glued together.
I have another printing right now. I think i’m Going to try and get two groups of three done this weekend to have something to paint as a whole unit this week.
And the human sized models.
Samurai lord has a separate katana, which with playing with different print angles I was able to get a really nice print of a blade which had no lines. A wizard, looks like David Lo Pan from Big Trouble in Little China . Also a ninja in mid leap being held aloft by his cape and twin Kusari -gamas.
Waiting for Oni weapon to finish before starting Oni and leaving for work.
Thanks for stopping in and showing off your guys progress. I think it helps to show others what they can do with printers and will help grow the community.
Love a good Oni, those are real meat. If you're after more, Duncan Shadow has a free one on the Gumroad store he puts his older sculpts on. I've got,it saved but not got to printing it yet.
https://gumroad.com/duncanlouca?sort=newest#AcrmR
"As for growing the community, I'm pretty sure Creality should just be giving you commission on Ender 3 sales at this point! In all seriousness though, you're right, this thread is an ever-running stream of inspiration.
"As for growing the community, I'm pretty sure Creality should just be giving you commission on Ender 3 sales at this point! In all seriousness though, you're right, this thread is an ever-running stream of inspiration.
Yep , I have him downloaded for a while.
So, another power glitch today, middle of a 5hour print. I need to figure out what’s causing it and kill it quick and painfully. It looks like the print will be okay, but it has a few minutes more to print before I can tell.
Also I have gotten another old PC(not nearly as old as the one I’ve been playing Alpha Centauri on) working and have just finished downloading Cura 4.6.2 onto it. Once I have completed these Oni I will play around with the setting on it and see what this much improved over Cura 3.6 program can do.
Edit: had my Patreon for Titan-Forge for August pull from my bank account. They will most likely be dropping the files tomorrow. Very D&D centric town of secrets with a huge tavern and they hint at other items as well, I’m thinking an underground lair for the cultists. Might start to see some of those pop in here and there in the coming weeks.
Finished Mage riding her Koi Fish named Wands tonight.
Having seen this painted up gave me the inspiration for the Goldfish Rider.
He isn’t trying to woo her.
I haven’t played around with the desktop computer at all to see about inverting models. If I can mirror the Goldfish then I will make a full unit of them . I’ll have to bring a bucket of tartar sauce with me when I play .
mirroring is eeeeeeeeeaasy and a great way to quickly add variety to things like the fish. The painted goldfish looks great, though I'm still not entirely sure about shoals of fish cavalry...
One of the reasons I didn't go for the tavern is that it is too big for the Mars. Hopefully the Saturn will be big enough to deal with that sort of thing though
Six days into printing and I'm finally getting some failed prints, which I've lowkey been waiting for so I can learn. One was a case of under-supporting, so some hoses just didn't print:
(red dots on the big lad in the back)
But then this morning I had some supports I think fail? So the print doesn't pick up until I'm guessing supports nearby pick up the resin feed. I was wondering what causes this? Dirty plate? Maybe dirty or old resin? I thought it might be an adhesion failure along the support. These failures were in pre-supported minis I've successfully printed 12 of already, also.
EDIT: I remembered the magic of mirroring to up your sculpt count this morning! Useful when you need 30x 2 sculpts.
Ah useful link, thanks! At some point you will need to disassemble and regrease the z axis of the Mars as the factory grease tends to harden a little over time and gunks up the threads. This can cause prints to shift a bit, causing parts of the model to vanish.
I’m getting plagued by overheating issues. A ruined 12 hour print (stopped at 6) a ruined 1.5 hour print an hour in. I thought it was just because of running it so much, but I’ve emailed Creality,
Sucks because I just got my computer all set with the settings from the laptop and was able to mirror the Oni print. Now I need the printer to work so I can make them.
I let the printer sleep last night but had sliced one of the Oni in mirror and had it print while I was at work today. The new set up using the Cura 4.6 software worked a dream. Even smoother finish with NO stringing at all. some of the supports stuck a little harder so a bit of scaring like the other version, but the rest popped off much easier. I'm wondering if the difference in computer power is the reason for the fix, that the desktop really was better at translating the file.
Also I took some time last night and decoded the hidden message in this months Titan-forge Patreon and unlocked the hidden area and extra sculpts.
@Endtransmission, I haven't looked at the size of the roof parts for the in, but all the walls are smaller sized, I think 4"x2" is the largest part.
Oh, that's good to know, thanks! I may be tempted for just the Inn as I am looking at redoing my entire gaming table (yes, I know I just finished it, *shut up brain*) and could do with a tavern!
The extra sculpts are an entire basement to the inn which has a summoning star on the ground, stone walls and floors and two ghost miniatures which are shown in blue on the monthly Patreon image. Everyone will get these as part of the $10 Patreon for the month, it’s just he wrote a riddle and you had to solve it to have the password to download it. They will release the password later this month, so I’m just ahead of others. A little bragging rights .
The roof sections are huge. I just sliced section A and it’s a 3.5 DAY print. 8”x8” footprint and I forgot to check height of it. It will take almost a quarter of a spool of PLA+ so about $5 . To me all the options for walls and floors are worth the $10 for the month and they are open lock compatible, so with lots of designers using that as a base you will have tons of options in a few months. I already have the files for the Dragon Empire Castle so lots of Genres.
Got the mirror function working and prints are even better with the settings on cura 4.6.2. So a better computer helps with quality turn out as it can process more functions.
What’s also great about cura 4.6.2 is that when it finishes slicing the model it tells me how much material in both weight and length of spool I used. I can then calculate off of my spool cost how much each model cost me . While I’m sure there’s a way to plug in spool cost and get that calculated already, I have overlooked it. I’ll play around some more later, but the Oni here cost me about $0.25 to print in materials each.
So tell me again why everyone isn’t printing armies
My Dragon Empire Army is slowly progressing. The Oni came in two designs, I have printed 3 of each of those and now have both designs mirrored and the third print of one of the mirrors is just started as I type this. It’s a 7.5 hour print and then his club is another 1.5. The last (4the design) I’ll start when I get home from work tonight. He is a more compact design and is only 5.5 hours with his club being 1.25hours. I’ll make three of each so I can either field four stands of three, or more likely 6 stands of two as I think three is too crowded and two will give me some room to show off some of the basing.
So you think the actual computer change is helping the quality, or just the fact it can run a better Cura version? Looks great dither way!
On am unrelated note. anyone know if presupported resin files would work on am FDM pronter at all? Obviously the supports themselves won't do the job. but is it possible to add FDM supports and print, without the presupports being an utter pain to remove? There's a LotR themed Patreon starting soon that I'd like to get in on,nut the files are already presupported for resin?n.
For FDM printing, you have a very slim chance of pre-supported files for resin working - it could just become a mess, but if you add FDM supports too, it could work. Most all pre-supported resin files also come with a free or unsupported version.
For resin printing, I have found when I start to get failed prints I re-level the plate and make sure my FEP film is good and no gunk in the resin vat and I will get a clean print again.
However, there has been the very rare case where no matter what I did the print has a failed spot on it. This has happened on multiple runs of the same file when all of a sudden the same spot goes bad no matter what else I do. So, I slice another file and then it works.
On a Samurai related note, I had an assembled and only partially painted a full Samurai army from the Wargames Factory kits and was looking for some Oni and yours are awesome!! This totally makes me want to take them out and finish the army and print some Oni.
endtransmission wrote: Ah useful link, thanks! At some point you will need to disassemble and regrease the z axis of the Mars as the factory grease tends to harden a little over time and gunks up the threads. This can cause prints to shift a bit, causing parts of the model to vanish.
I'm doing this today, after cleaning everything out last night. I'm tired of ~3 parts per print missing, hoping this helps get that down to 0 so I can do some longer prints and trust they'll completely print. Also during my last print the z-axis was making a grunt/grind sound that google tells me is a tell for the Mars needing lube :|
How long have you had your Mars and many runs do you think you have done so far? I have been printing multiple game pieces for about 9 months, so probably have ~400-500 runs on it so far and have not seen the need to lube it, but I think I will now!!
Ta for the info, I will contact the creator and see if there are unsupported files as well... though regardless, true-scale hobbits on an FDM is probably not the smartest call...
Which brings me to my next question, anyone got opinions or experience on the Photon Zero? I've seen a few reviews that say it's budget even by budget standards and that for 60 quid difference a Mars is a better shout, but equally, sub-£200 for getting one is that little bit more doable right now.
MDSW wrote: How long have you had your Mars and many runs do you think you have done so far? I have been printing multiple game pieces for about 9 months, so probably have ~400-500 runs on it so far and have not seen the need to lube it, but I think I will now!!
Just one week Probably a dozen runs on it. While the z-axis isn't necessarily the culprit, the weird sound and the way failures look (like the z-axis didn't lift during a certain layer) has convinced me it's worth addressing at the least. Could well have shipped under greased or something.
I think the big difference in the budget Photon is a lower resolution LCD screen and a lower wattage (30W vs. 40W) - this means a little less clarity in prints and probably having to run each layer a few seconds longer, so would result in longer print times. I also think the build plate is just a tiny bit smaller
However, at the way below $200 mark, it might be a good one to jump in and get acclimated. I am already looking to spring to the Elegoo Saturn in a few months.
Here was a snip I see from a review: While the resolution on the Zero is quite low — 480x854 pixels instead of the normal 1440x2560 pixels because the print bed is relatively small and has 16 times antialiasing — the prints still look good.
If you use the anti-aliasing, it is a double edged sword - it adds to the size of the file considerably the higher you have this setting and it is designed to smooth edges from layers, so you can actually start to blur some of the crisp details that are supposed to be there, so you might need to experiment with that. On my Mars, I found when running at .03-.04 layers i go with a setting of 2 or 4. If I am in the thicker range, maybe .08 or so, I will go to 8. In other words having the software capable of doing more anti-aliasing layers does NOT compare to the printer having better resolution, but does make the print smooth.
Sorry, the back to work routine is really hampering my online presence.
I think a better computer really does make a difference. I have been running new prints off of my old desktop which still has more processing power than my chromebook and its a night and day difference. I copied all my settings from the current 3.6.2 over to cura 4.6.2 and the prints are so much crisper. The supports are mixed, some are snapping right off, but others are causing a bit of damage when removed. Not much more than before, but it’s where I need to focus to improve overall parts now.
The only other thing I’ve done different is reformated the SD card that I’m using. I thought maybe there was some minor corruption causing poorer prints and the fails.
So an update, I leveled the printer out as exactly as I can and cleaned the vat and build plate real nice, and things seem to be going ok. There's still a clicking sound for the first several layers of a build, but once the plate gets higher that goes away as well. I just finished up a bunch of Cyber Forge stuff, I'll share it here when I get some assembled tonight.
Question time: I'd really like to slice a part out of a sculpt I've got (a shoulder joint for a dreadnought, essentially), and I've got Blender and have successfully used the slice (?) tool to edit simpler sculpts before, but I'm having no luck with this more complex CF sculpt. Is there a simpler program I can use? Or is somebody a Blender expert and wants to take a stab at it for me? I was just going to print the entire arm and saw the joint out, but that seems dumb if there's a way for me / others to do it in digital.
Question time: I'd really like to slice a part out of a sculpt I've got (a shoulder joint for a dreadnought, essentially), and I've got Blender and have successfully used the slice (?) tool to edit simpler sculpts before, but I'm having no luck with this more complex CF sculpt. Is there a simpler program I can use? Or is somebody a Blender expert and wants to take a stab at it for me? I was just going to print the entire arm and saw the joint out, but that seems dumb if there's a way for me / others to do it in digital.
I would personally use ZBrush, but unless you already have it that is an expensive addition to your software. I haven't learned enough about Blender to help you on that side.
I have seen where others have used Meshmixer for things like this though.
Theophony wrote: Sorry, the back to work routine is really hampering my online presence.
I think a better computer really does make a difference. I have been running new prints off of my old desktop which still has more processing power than my chromebook and its a night and day difference. I copied all my settings from the current 3.6.2 over to cura 4.6.2 and the prints are so much crisper. The supports are mixed, some are snapping right off, but others are causing a bit of damage when removed. Not much more than before, but it’s where I need to focus to improve overall parts now.
The only other thing I’ve done different is reformated the SD card that I’m using. I thought maybe there was some minor corruption causing poorer prints and the fails.
Interesting. Just downloaded Cura onto a family member's new computer and set up a slice profile, will try some prints from that tomorrow.
Had a very odd fail today, printing a Terrorgheist type bat zombie thing, and along one of the wings it seemed to completely mis-align and at one point, suddenly start printing abput 5mm behind where it was/should have continued.From there, it kept printing almost on thin air... what's odd is that this only happened on one part of the model, the rest on that layer was perfectly aligned and straight. Will throw up a pic tomorrow, but in the mean time, anyone got any idea what caused this?
Could that wing have been bumped or slightly cracked? If it got moved out of alignment while the rest of the model stayed put that would explain why the rest printed fine. The only other idea I would have is because that part got cooled more somehow?ive seen some of my prints get slightly warped because the AC kicked on and cooled one layer faster than another and caused it to pulloff the build plate or away from another layer. Besides that all i could think would be bad filament, the material somehow got messed up in production and one layer was not like the other so they cooled at different speeds causing them to warp/split.
Hmm. Not sure it was knocked, as it was still perfectly attached to the buildplate, not bent or loose. Could be a cooling issue, but it wasn't any hotter or cooler than the day befpre where I got a fine print out.
Pic attached below, the points where it separated are highlighted (but also just really obvious! ) Printing it again today from Cura, hopefully this doesn't happen again. It's an Artisan Guild file, so I don't imagine it's an issue with the STL itself.
To me, it looks like the front claw at the bottom separated from the build plate and bent forward, from my zoom at the very bottom it looks like the print is partially separated from the support skin and you can see some change in the spacing of the conical rafting. it may have been the nozzle slightly dragging on the print which was slowly pulling the claw out of alignment. it looks like it could have started at the level of separation because of the stringing over on the leftmost side of the supports. I think the bed may have been the slightest bit off level combined with a little bit of material not retracting enough. The tiny bit of extra sticking out cools enough in the travel that it bumps the print ever so slightly loosening it on the supportwhich pulls it out of alignment to a greater extent the next time you make a pass through. eventually it pops free and you get the big separation. it "recovers" when the material catches again and starts making new layers, but then happened and again on you.
so I think one tweak you may want to consider is reducing the degree of overhang for supports on this model. That will mean more supports, but that arm sticking out there by itself will allow more wobble in printing it. I believe thats where I'm having troubles right now printing this Oni weapon of mine. The original print had some issues, but when I switched machines and now I'm doing a mirrored image of it i may have reduced the supports by switching from zig-zag supports to straight line supports. The base of the kanabo doesn't have enough grip to hold to the raft and isn't getting a foundation to build on. (Talking through your issue just helped me solve mine, so Thank You )
I've had this same issue with my other prints before and it gets real frustrating especially on larger pieces when you watch to make sure it gets a good start and then walk away to let it do all the work only to come back to a disaster.
Last thing. When you are printing are you hearing a clickingevery now and again? It would be up at that level where the problem is. That would be the extra material dragging across the lower level of the print. Kind of like the click noise of when you stick a baseball card in a bike tire spoke. Its the material clicking until it is past the obstruction which is the under layer, which is putting the force on the under layer and causing the shifts.
Now I must get caffeine and head to work as I don't know if what i just rambled made sense.
The good news I don't think you have a clog, as your print is still coming out really nice looking with no signs of under extrusion. A clog could also cause the same issue as material will still push out while traversing the gaps due to back pressure.
Edit: got a response from Ender on my machine stopping mid prints. They want me to reset to factory settings (I'll do that later), I never changed any of the printers internal settings though . They also told me to make sure and limit the file name sizes to no more than 16 characters . i mean that could be a thing I guess, I'm not a computer person by any stretch, just sounds like a ridiculous thing to me.
I would have imagined that a file name length thing would have stopped the file printing at all. For example, the Mars won't print anything that begins with an underscore as it thinks it is a folder.
For the factory reset, sometimes a system will get some corruption from somewhere (possibly files that don't print properly?). It is like the old IT joke of "have you tried turning it off and on again?" As half the time it works. Fingers crossed the reset works for you
endtransmission wrote: I would have imagined that a file name length thing would have stopped the file printing at all. For example, the Mars won't print anything that begins with an underscore as it thinks it is a folder.
For the factory reset, sometimes a system will get some corruption from somewhere (possibly files that don't print properly?). It is like the old IT joke of "have you tried turning it off and on again?" As half the time it works. Fingers crossed the reset works for you
It sure seems more like they are treating me with the old I-D 10 T customer answer . I was having card read errors on both my chromebook and on the Ender, so maybe some sort of corruption was involved , I was trying to slice some not 30K chaos models while I was bored. GW screwing me again . Chaos scrap code.
I've got to come here to vent.
I've been trying to print my space hulk corridors and I've now had three prints that got hours in only for the end to jam. The clicking noise of the extruder grinding down the stuck filament was driving me nuts - I'm thinking my filament is bust, my end is full of crap, my nozzle Z axis os off.
No. Turns out the problem is Prusa's BS design, which is supposed to help with multi-material prints but causes jams when a print has a lot of retractions. I've now got to up my temp by 10 degrees just to stop it from jamming.
Wow , sorry to hear that. I know we all have had issues with our machines at some point, but that just sucks. I have no experience with that type of printer, hopefully you can get it sorted. My biggest problem with clogs I think was due to crap filament. That led into nozzle issues and then my Bowden line failure. Once I switched to a better filament and changed the Bowden line to a Capricorn tubing and connectors ($16) it just came down to learning my new filament and getting it keyed in. I’ve had very few problems since then, and all have been pretty basic fixes so far.
Good luck.
If anyone has a Prussia that can give him some advice that would be awesome.
Oh, there is a fix - change the heating block to one that is a single size all the way through instead of the stepped one the Prusa. It's just annoying that something like this (which has apparently be known about for years) is allowed to happen because they're catering for a niche of people who print multi-material.
Took almost 10 hours, but now my wife has a friend to remind her it’s time for coffee.
Will print one for the pastor too, he’s a big Star Wars fan and Coffee Drinker as well.
It was a free design on Thingiverse, either in parts or all one piece like this. I would do the one with a mug, but it cost money .
At that price it seemed rude not to, so I went for the photon and also the wash and cure machine. Once it arrives I'll be sure to post some of my prints.
Nice , just FYI, Titan forge does drawings for free resin for the anycubic with contests. This most recent one was based off of terrain of theirs I believe.
Boss Salvage wrote: So an update, I leveled the printer out as exactly as I can and cleaned the vat and build plate real nice, and things seem to be going ok. There's still a clicking sound for the first several layers of a build, but once the plate gets higher that goes away as well. I just finished up a bunch of Cyber Forge stuff, I'll share it here when I get some assembled tonight.
Question time: I'd really like to slice a part out of a sculpt I've got (a shoulder joint for a dreadnought, essentially), and I've got Blender and have successfully used the slice (?) tool to edit simpler sculpts before, but I'm having no luck with this more complex CF sculpt. Is there a simpler program I can use? Or is somebody a Blender expert and wants to take a stab at it for me? I was just going to print the entire arm and saw the joint out, but that seems dumb if there's a way for me / others to do it in digital.
I use the 3D Builder tool that came standard on my Windows 10 machine. It is a really great tool to slice apart stl files, resize, blend them together, etc. I use it almost exclusively to edit most files and only when I need to actually change or blend down a part will I transfer it into Blender or the like.
MDSW wrote: I use the 3D Builder tool that came standard on my Windows 10 machine. It is a really great tool to slice apart stl files, resize, blend them together, etc. I use it almost exclusively to edit most files and only when I need to actually change or blend down a part will I transfer it into Blender or the like.
Unexpected utility! I'll check it out, tho currently endtrasmission is giving my hack job a punt
If that don't work, sent it to us and I can give it a punt.
Well, I've had a fun time. My printer got a clog last week. It's been out of service for a few days now. I had to attempt to disassemble the extruder to find the problem. Despite multiple people and tutorials showing that the stepper motor is held in with two screws and will easily come put once they're removed, I cannot remove it. The thing seems to be fixed to the frame holding the fan in place, which at this point has one tiny screw hidden under the motor holding it in place. It's so frustrating that I couldn't get the motor out.
Last night I managed to break through the clog. Multiple nights of heating the thing up and just letting it run so as to melt the blockage actually worked. I was able to clear the block with brute force yesterday and now filament appears to flow smoothly again. Problem is, I have no clue if the blockage is actually clear. I'm going to try running it hot again tonight. See if anything further drips out.
What fun it's going to be, trying to figure out where all of those screws went.
Barzam wrote: Well, I've had a fun time. My printer got a clog last week. It's been out of service for a few days now. I had to attempt to disassemble the extruder to find the problem. Despite multiple people and tutorials showing that the stepper motor is held in with two screws and will easily come put once they're removed, I cannot remove it. The thing seems to be fixed to the frame holding the fan in place, which at this point has one tiny screw hidden under the motor holding it in place. It's so frustrating that I couldn't get the motor out.
Last night I managed to break through the clog. Multiple nights of heating the thing up and just letting it run so as to melt the blockage actually worked. I was able to clear the block with brute force yesterday and now filament appears to flow smoothly again. Problem is, I have no clue if the blockage is actually clear. I'm going to try running it hot again tonight. See if anything further drips out.
What fun it's going to be, trying to figure out where all of those screws went.
What type of printer is it again? I know with the Ender 3 I had 4 screws to get the fan shroud and extruded off, then about 8 more to disconnect the covers all the way back to the circuit board to replace my extruded head. It was scary and then I found hot glue used to connect the wires to the motherboard . Sound s like you got it cleared though, hopefully.
Automatically Appended Next Post: Another day, another bunch of miniatures to show off.
A chariot for the Dragon Empire army. The wheels have ornate spokes, but the supports didn’t do them any favors. I might try them again printing them at an angle where the supports would be on the inside facing the chariot. I’m glad the Komainu didn’t have integrated harnesses, I can make actual temple guardians out of them. Plus I think changing them out for a pair of Oni pulling with an Oni rider will actually be possible.
And suffering a bit of burn out on the Asian theme I looked at the Sons of KV(forget the spelling), also by Titan Forge. I found a Minotaur that I think will fit Bloodbowl just fine.
I couldn’t find my newer Bloodbowl figs, but he is on a 32mm base and next to Old Lord Borak and a newer Shadespire Orruc for size comparison. He has an Axe wielding brother who I’ll print while I’m at work today.
One thing I don’t thing I have mentioned, or not recently that needs repeating, is probably the best upgrade I made on the Ender 3. It I started a noise squelcher. Just a plastic cap that gets attached by pushing it over the beeper on control board. It deadens the noise and no more beeps. Makes sitting in the room so much more pleasant and I can’t hear the machine running from upstairs. Definitely worth the maybe hour of printing. Make sure to print with 100% infill. It’s small and thin, so really won’t take up much filament and it’s a huge benefit.
Anyone ever had trouble with the Ender 3 operating in hot weather? In the last couple of days I've gone from prints coming out fine to no end of trouble with leveling the bed and getting the first layer to stick, even on files that have worked fine half a dozen times before. Only real change I can put my finger on is that it's been a very warm and stuffy few days here, could that have affected the leveling or anything?
Only other thing I can find is the tiniest bump in my build plate right in the middle, so I guess I'm going to need to replace that... but I can't see how it's be causing the leveling elsewhere to be so wonky.
Seems it was only temporary. Whatever opening I made in the blockage filled back in and I wasn't able to reopen it.
My printer is a Flashforge Finder Lite.
I'm contemplating removing the fan and running it again. I just kind of fear the wear and tear that puts on the parts. Since I can't actually open it up to get at the clog, it seems my only option is to try and melt out whatever is in there.
Paradigm wrote:Anyone ever had trouble with the Ender 3 operating in hot weather? In the last couple of days I've gone from prints coming out fine to no end of trouble with leveling the bed and getting the first layer to stick, even on files that have worked fine half a dozen times before. Only real change I can put my finger on is that it's been a very warm and stuffy few days here, could that have affected the leveling or anything?
Only other thing I can find is the tiniest bump in my build plate right in the middle, so I guess I'm going to need to replace that... but I can't see how it's be causing the leveling elsewhere to be so wonky.
Humidity has been a pain for me, I have a household dehumidifier in the basement a few feet from my ender. When I had issues like you mention it was because the dehumidifier was off. Also make sure you bring the deck up to heat (I do 50C) before you level it as heat will adjust the bed height. I also do a raft now, but like they were sticking beforehand.
They make dehumidifier containers for spools as the filament will absorb ambient humidity which causes problems with sticking.
Barzam wrote:Seems it was only temporary. Whatever opening I made in the blockage filled back in and I wasn't able to reopen it.
My printer is a Flashforge Finder Lite.
I'm contemplating removing the fan and running it again. I just kind of fear the wear and tear that puts on the parts. Since I can't actually open it up to get at the clog, it seems my only option is to try and melt out whatever is in there.
Does the flash forge have a Bowden tube? If so the clog is probably up in the extruded and the Bowden has backed out just enough to keep causing the clog to reappear. It was happening with my ender so I changed the Bowden over to Capricorn tubing (better heat resistance) and the connectors come with it are better and won’t allow it to back out. Haven’t had any issues since switching.
On lunch break, so I’ll check back later to see if that sorts anything out.
Think I've got the leveling sorted now, but still having trouble with adhesion, though weirdly it only see,s to affect the first few mm of a line. I use a series or concentric squares to yest my leveling, and consistently on the last three runs, the first part of the first edge lifts away or gets caught and folds back on itself, but the rest of each square then adheres and prints very neatly.
It's just that initial point of contact that isn't sticking, wherever it is on the plate. I'd guess that's a nozzle or filament issue? I've checked for a clog, seems clear. Will have to crack on with the troubleshooting tomorrow, any suggestions?
I put painter's tape on my build plate and it works great. When it cools down you will see some wrinkles, but once the build plate heats up you can smooth them out and it works for me.
Paradigm wrote: Think I've got the leveling sorted now, but still having trouble with adhesion, though weirdly it only see,s to affect the first few mm of a line. I use a series or concentric squares to yest my leveling, and consistently on the last three runs, the first part of the first edge lifts away or gets caught and folds back on itself, but the rest of each square then adheres and prints very neatly.
It's just that initial point of contact that isn't sticking, wherever it is on the plate. I'd guess that's a nozzle or filament issue? I've checked for a clog, seems clear. Will have to crack on with the troubleshooting tomorrow, any suggestions?
With it being warmer where you are and stuffier, have you changed the air conditioning settings in your house or added a fan for ventilation? if it's the edges of the print it could be cooling quicker and causing the warp up.
The Finder does use a Bowden Tube. I don't think that's the issue, though I probably should replace it soon.
I actually managed to get the motor off last night and got a clear look at the extruder. Sure enough, there was some material sitting there. I prodded it with a knife and cut it down a little. Ran the printer as hot as it would go, and gave the blockage a shove with the cleaning rod. A big blob of molten plastic shot out and I was able to put the rod all the way in. So, it sure looked like I cleared the blockage last night. I'll do the same again tonight, just to make sure, but I'm pretty sure I cleared it. I' lmao going to have to recalibrate everything, unfortunately. Hopefully I got it all back together correctly.
On the plus side, next time this happens, I know how to get to the problem area.
Though, I don't get why it worked this time without the motor, but none of my previous attempts to clear it worked.
You know the feeling when you plan out your days prints and you set up the first to start and walk away only to come back 13 hours later to see that a 10hour print is only 30% done???
I do . Totally forgot that when printing this wall section which took 10hours or so with the old settings, that the new settings (much more crisp) was 20+ . Well there went a days worth of printing small items . !8hours ad 40minutes later i'm now at 85%. oh well, It's going to be a lovely wall section on the side of the board providing absolutely no value except to look at .
I am now really wishing I hadn't dropped $200+ on Conquest and just bought a second Ender3 or a resin printer. First world problems.
Theophony wrote: You know the feeling when you plan out your days prints and you set up the first to start and walk away only to come back 13 hours later to see that a 10hour print is only 30% done???
Oh I know that one, Putting on a 9 hour print, coming back the next day to find most of it stuck to the bottom of the resin tank because the print plate looks to have un-levelled itself somehow *face/palm*. Now I need to clean it all out and reset everything before I try again. Kind of put a dampner on getting some of these tanks finished over the weekend!
BobtheInquisitor wrote: Spent hours today fixing my printer and helping my dad figure out why his computer is slicing files all wrong. Still no answer on that one.
How is it slicing things all wrong? What’s coming out? What program are you using?
Still having the same issue with my printer, going slightly mad about it now. Having bought and installed a glass bed,corrected the Z offset, relevelled a billion times, checked for clogs, removed and reattached the filament, I'm still consistently seeing the first 2-3cm of any given line not adhere properly. Doesn't seem to matter where it is on the plate, whether I'm using the glass or the stock plate, what temperature or shape I'm printing, it's consistently the same failure...
On shapes where there's enough room for it to do so, the rest of he line after that point then adheres fine, but for anything actually i
useful and not just straight flat lines, the loose part is catching on itself and causing the whole layer to lift away, if it even gets that far.
Somehow, I managed to get a single successful print of a base in the middle of this, but the next print I tried, having changed absolutely nothing. the same issue occurs.
Any ideas? Apologies if this seems ranty. it's just really starting to iritate me now as I just can't trace the issue. Thought it might have been the heat but it's been much cooler the last dew days and yet it's still happening.
BobtheInquisitor wrote: Spent hours today fixing my printer and helping my dad figure out why his computer is slicing files all wrong. Still no answer on that one.
How is it slicing things all wrong? What’s coming out? What program are you using?
So, he has Cura on his computer. He downloaded it around the same time my brother and I downloaded Cura. For some reason, his version of Cura has a different-looking interface, along with a lot of options for 2 extruders that make no sense for the Ender 3 Pro, even though the program was told the printer was and Ender 3 pro.
When he slices a file, it does not save as a gcode file. I have helped him manually change some files to gcode to try them on the printer as it does not “see” the other files. When we print anything sliced on his computer, the bed does not heat up (even though Cura has it set to 60 degrees C). Since the bed doesn’t heat up, nothing prints except a bunch of stringy goop that moves with the extruder.
I had to repair the printer because some of the PLA had hardened in the white tube and then the filament broke at the feeder mechanism. Getting the plug out was ....involved.
Automatically Appended Next Post: Oh, and he says he already uninstalled and renstalled Cura once.
Bob, I just downloaded Cura 4.6.2 off their website a couple of weeks ago. 4.6.2 gives you a bajillion options that you don't need, such as the two extruder options. So to make things function right you just have to dumb it down some.
1.First option is make sure that you have cura select the Ender 3 Pro as your printer, it will have preloaded info for it there (top left of the cura screen, then manage printer button). Make sure that the settings are set for the bed temperature you want in there as well as also on the Ender itself. I think someone probably set the ender to have no bed temperature as the default and it may be overriding your cura settings. Adjust the Ender using the knob dial. You may even reset it to factory specs if you haven't already.
selecting that will pop up this screen
put checks in the boxes that you want to have available to select and modify later (unselect the box for multiple extruders). Some you have to select the base of the tree to unlock the set back options.
2. Then select your material in the second toggle box (middle). They have the Esun PLA+ grey preloaded in the system, I think I tweeked it a bit, but it should still work by selecting whatever material you are using. This could also have a default temperature set in it, so go through all the options to make sure.
3. the third and rightmost toggle box is where the meat and potatoes are. This is where you input all your custom values and can select if there are multiple extruders or not. while all the available options are listed here, you can weed the ones you don't need out by selecting settings on the top bar on the upper left of the screen. I'm not sure right now exactly where the option is to reset them to basic, but I know it's in there. If your dad has uninstalled and reinstalled the program it might still be finding the old settings and using those again. so uninstall, reinstall, set all values to the basic print functions and then you can go back and tweek away. I hope that helps.
So even though you selected to make the options possible in #1 above, you have to go into the print settings and set the actual values here for them to be used.
Paradigm. While looking at bob's issues I wonder if your cura settings on the third toggle above have the build plate adhesion turned to off. Even if the settings say they are on and you have a raft or whatever style adhesion your using, if in that third bar it shows off then that may be over ridding the actual setting under it. The image directly above shows to the far right an image that looks like a plate with an arrow pushing it down on a table. thats your build plate adhesion setting. In the image It shows ON, then in the box below I have scrolled down to the bottom to show I'm using a Raft with 1mm extra around the model base(I go larger if it's a really small item such as a helmet or an arm, usually 5mm extra does the trick unless it's also tall so a larger raft will help with it wiggling).
I hope some of this helps and not just what you all have already tried.
I'll take a few pictures and be back in a bit.
I’ll give that a try. It could be that the uninstall didn’t get rid of all the old settings, so I’ll reset it and start over.
The thing is, my brother and I both downloaded Cura 4.6.2 on our computers, and it looks the same and works the same. The Cura on my dad’s computer looks different, the way Windows 3.5 looked different from Windows 98. I think I’ll have to sit down with him the entire uninstall/reinstall process to make sure all the right buttons are pressed.
BobtheInquisitor wrote: I’ll give that a try. It could be that the uninstall didn’t get rid of all the old settings, so I’ll reset it and start over.
The thing is, my brother and I both downloaded Cura 4.6.2 on our computers, and it looks the same and works the same. The Cura on my dad’s computer looks different, the way Windows 3.5 looked different from Windows 98. I think I’ll have to sit down with him the entire uninstall/reinstall process to make sure all the right buttons are pressed.
See, my laptop (a chromebook) won't install programs, so I was stuck with using an older version of Cura which was based online(cura 3.6 i believe) and it looks completely different. Maybe your dads system won't take the newer 4.6.2 so is stuck on an older setup, which could also be part of the culprit.
Thanks for the suggestions. Theo. Pretty sure it's not a settings issue though, as 1) I'm still slicing on Astroprint, where I've only made incremental changes to my previous successful profile and 2) it's happening even on files (as in gcodes, rather than stls) that I've printed fine half a dozen times before. I do always print with a brim, which has not really failed me, but at the moment I'm not even getting that far, it's the very first deposit of PLA that's not adhering, rather than a part-done print coming loose from the plate.
I'll do some more,tests later, and take some photos of what's going on, as it doesn't seem to match anything I'm finding in troubleshooting guides.
Paradigm wrote: Thanks for the suggestions. Theo. Pretty sure it's not a settings issue though, as 1) I'm still slicing on Astroprint, where I've only made incremental changes to my previous successful profile and 2) it's happening even on files (as in gcodes, rather than stls) that I've printed fine half a dozen times before. I do always print with a brim, which has not really failed me, but at the moment I'm not even getting that far, it's the very first deposit of PLA that's not adhering, rather than a part-done print coming loose from the plate.
I'll do some more,tests later, and take some photos of what's going on, as it doesn't seem to match anything I'm finding in troubleshooting guides.
Try using a raft instead of a brim. maybe a little change like that will fix the issue. tiny bit more material and time, but since it forms differently maybe that will be the thing. The other suggestion is to slow print speed just a little. I know in the higher Cura settings you can adjust travel speed on the brim and lower levels. I haven't messed with those settings, but I did adjust my speed up when not actually laying material.
I won't bash astroprint, it's where I started and it worked well for terrain and large objects. I think with a better computer I am able to do better prints. I know it's not always feasible to upgrade, especially with computers, but I am using a 8-10 year old desktop that had been running windows 7 and using cura 4.6.2 (free). With the current economy im sure lots of pawn shops have some decent options available.
As a testament to how much I print, I'd judt like to point out I need another ender print bed cover. I don't let my machine rest much/at all, and the constant heat has basically ruined another spot on this one about the size of a marine head. I have since placed a section of blue painters tape over the hole and have done a few prints on top with no issue.
I've also looked at getting a resin printer . They are more expensive andthe print beds are so much smaller, but I'm still having trouble arguing that the quality difference can be made up. The bulk of my armies would be better printed in resin for detail sake, but I'm not sure I can jsutify the expense of another printer right now......unless it's another Ender .
At the very least, I seem to have found a workaround for the problems and got a couple of prints out this evening. An extra 0.1mm on the initial layer, a wider brim and another 10° for the bed and gets that first bit to stick pretty solidly, without having to resort to rafts. Doesn't help me figure out precisely why the old settings suddenly stopped working, but at least it's running again.
Does seem like I've changed enough that I'm back to square one with regards to quality though. Had some zits and delaminations on tonight's print worse than I've seen in weeks. But hey, I was planning a settings revamp anyway, so it's a good enough excuse to put some thought into that.
Paradigm wrote: At the very least, I seem to have found a workaround for the problems and got a couple of prints out this evening. An extra 0.1mm on the initial layer, a wider brim and another 10° for the bed and gets that first bit to stick pretty solidly, without having to resort to rafts. Doesn't help me figure out precisely why the old settings suddenly stopped working, but at least it's running again.
Does seem like I've changed enough that I'm back to square one with regards to quality though. Had some zits and delaminations on tonight's print worse than I've seen in weeks. But hey, I was planning a settings revamp anyway, so it's a good enough excuse to put some thought into that.
could the temperature increase you've done be a compensation from the magnetic plate to a glass plate? I know someone mentioned a glass bed, I'm just wondering if that may have been an issue .
I feel it my duty to say I just got an email from Creality.com
Ender3 sale $155 with coupon code “Crazyender3usa”
I’m not sure it will be an actual deal as it looks like they may be charging shipping and the regular price is $167 with free shipping.
Been busy with some print projects, four baby Yodas are done and gifted (one on my desk at my job at the children’s hospital ). A pretty cool gift to give to our music pastor (cool to me anyway, we’ll see how he likes it when I give it to him Sunday), no picture right now, but it’s a dual print of a treble cleft that when you turn it on the side it says music. Have to see it to understand, just wondering if I should paint it or leave it raw, looks good raw, but you always see the notes and symbols in black.
Anyway while watching some YouTube videos I got envious of some BIG dice turn counters, so I tried printing one I saw but it wasn’t manifold and had wierd gaps and stuff. Would work fine, just not pretty, so I found this guy. A die with 1-6 in Japanese on it, I better start relearning my Japanese 1-10 that I learned 36 years ago .
I blew it up to 48mm on each side, so it’s equal to 3 16mm sized dice wide and tall. It also happens to be equal to 4 12mm on each side, which wasn’t planned for but glad it I still as those are the common dice sizes.
That’s cool and all Theo, but those legs in the back.....What are those?
Glad you asked, I stumbled upon some not Armiger knight legs and I was feeling the pull back into 40k. Must resist......but it’s futile .
So while I was at work yesterday the legs printed out. 14hours. There are some manifold spots and areas that need hoses, but otherwise a wonderful design. Plus it cost $0.56 of plastic. The arm was 7+ hours and $0.29 of plastic. I started the main body 22 minutes ago and it should be done when I get home, it is only $0.44 of plastic. All the other arms take 3-4 hours and cost between $0.12-$0.17 to print. So less than $2 for an Armiger, less than $3 with a base. The only pauldrons I’ve found are Nurgle ones thus far, and still need the top mounted weapons to complete the model, but I’ll find some. Heads are another item I’m looking for, not liking the designs I’ve seen thus far, but as the kits come with spare heads I might be able to source some locally. I’ll finish this guy off and then consider building a household.
Also printed were a bunch of scatter terrain including boxes both solid and with separate lids.
I like the design too them, nothing too contemporary, and the little bumps on the side look more like rough wood.
You might also see in the bottom corner some marine shoulder pads and a helmet (Mark IV) with a samurai helmet on top . It’s hard to get a good shot of these small things as the sheen is bad on a tight zoom.
Any suggestions on a resin printer? I’d like a larger build plate, but I guess the big things are coming off nicely on the Ender, so fine detail stuff can be resin if I so choose to go down that path.
For resin, the Elegoo Mars is the best out there at the price, hands down. However, if you want a build plate almost 60% bigger, wait for the Saturn model to get on Amazon, estimated around November - it will be in the $400-$500 range, where the Mars is right at or under $200. Honestly, I love my Ender 3 Pro, but I just find resin so much simpler to use, even with the post print routine that I only use the Ender if I ABSOLUTELY have to, due to size.
...I'm saving now for the Saturn and will get it early 2021 - I can't wait!!
Theophony wrote: The only pauldrons I’ve found are Nurgle ones thus far, and still need the top mounted weapons to complete the model, but I’ll find some. Heads are another item I’m looking for, not liking the designs I’ve seen thus far, but as the kits come with spare heads I might be able to source some locally.
My favorite armiger carapace guns are these and these. The design is a little different but I think superior. I also found, in my searching for knight files, that there's really a lack of alternate heads/masks, especially when it comes to chaos armigers. I ended up going with these Space Skaven ones, out of a lack of options and because I dig them and they're different from the Imperial ones.
Any suggestions on a resin printer? I’d like a larger build plate, but I guess the big things are coming off nicely on the Ender, so fine detail stuff can be resin if I so choose to go down that path.
I've had an Elegoo Mars Pro for a few weeks now, and it's a brilliant machine that continues to surprise me with how easy it is to produce minis in my own basement. I paid $280 on Amazon, but it looks like it's $250 right now! So worth the price. Unless you want to hold out for the Saturn, I'd say Mars Pro is the answer.
The Elegoo printers are all fantastic machines. I've got the standard Mars and love it, but I'm eyeing the Saturn to do larger prints. Printing an entire tank in one go? yes please!
The thing to keep in mind with the Saturn is that it's a monochrome screen, so it is faster than the Mars and the screen should last a lot longer too. So yeah, currently saving my pennies for that one to go up on Amazon
I will say that on my Mars I just had to replace my LCD screen. I had ordered a spare for $29 shortly after I got it almost a year ago. I had read this is considered a consumable item, so thought I would be prepared. A quick look online for a video on how to do it and I had it replaced in about 8 minutes and removed only four screws.
I had been using my machine literally non-stop for a solid 9-10 months and probably have over 600 runs on it. And, yes, the Saturn will probably be just about half the exposure time, so the prints will be faster and the screen lasts longer AND a much bigger build plate? As endtransmission just said, "yes, please!"
With the move to a 4k screen on the Saturn the increase in xy resolution puts it right at the Mars (.047 vs, .050, IIRC) so this would be imperceptible. The original plan was a 2k screen at .075, which would have been noticeable on small minis. However, it will be at least double the cost of the Mars, so for what you are looking to do the Mars should be plenty. As far as the extra cost for the Mars Pro, my only complaint on my original was having the USB port in the back, but a short USB patch cord for about $3 so I can plug my drive in without having to reach around the back all the time is a perfect fix.
I have seen prints on the Longer Orange 10, which I think is in the .075 range and the details do mush a bit; however, your original stl file matters greatly and there can be huge variations in quality and details, so sometimes a mushy print is the fault of the stl file you sliced and not the printer.
edit: I will have to admit, as much as I loved the minis I printed on my Ender 3 Pro, once I got the Mars I could not resist reprinting all of them in resin, as they just looked so much better... I did try to resist, honest, I did! But, alas, I was weak...
As MDSW said, for the price difference in for the Pro, if you're just looking to get a decent resin printer for doing figures on, I'd go for the standard Mars and buy a usb extension cable. While you're at it, but some spare FEP sheets and a spare screen just in case. Mine lasted a year of fairly heavy printing, so I'm happy to consider a £20 screen a consumable item
I'm mainly considering the Saturn because I don't want an Ender kicking around as well for terrain; though it is tempting for the larger pieces.. I only have space for one printer though so Saturn it will be.
Hello! I am so happy to see you liked the legs I made. I have arms and an armored torso available also, although I think I might want to shrink the leg. It feels a little big when I print it. Maybe drop it by 5%. Or make the torso bigger.... I was also reading about someone encountering a weird bed adhesion issue. I had the same issue with one of my printers and it drove me nuts. The solution I found was that the raft is preset in the slicer software at .04mm (the stock nozzle size). Switch to no skirt, brim or raft. This allows the software to start at the proper Z axis point for the changed nozzle size I was using. (.02mm nozzle with .01mm layer) Suddenly all my prints began working again. Apparently the slicer software I was using (Ideamaker from Real 3D) does not have a means to manually change the preset layer height for the rafts, skirt or brim. This would put your nozzle waaay too high to adhere during the initial layers of the actual print, and the raft created would even fail sometimes part way through.
airinhere wrote: Hello! I am so happy to see you liked the legs I made. I have arms and an armored torso available also, although I think I might want to shrink the leg. It feels a little big when I print it. Maybe drop it by 5%. Or make the torso bigger.... I was also reading about someone encountering a weird bed adhesion issue. I had the same issue with one of my printers and it drove me nuts. The solution I found was that the raft is preset in the slicer software at .04mm (the stock nozzle size). Switch to no skirt, brim or raft. This allows the software to start at the proper Z axis point for the changed nozzle size I was using. (.02mm nozzle with .01mm layer) Suddenly all my prints began working again. Apparently the slicer software I was using (Ideamaker from Real 3D) does not have a means to manually change the preset layer height for the rafts, skirt or brim. This would put your nozzle waaay too high to adhere during the initial layers of the actual print, and the raft created would even fail sometimes part way through.
Awesome . I had downloaded all of those already and have since completed printing the whole robot.
You did a fantastic design. Just needs some shoulder pads now. I got a head printed and a multi-melta type arm for the other side as well. Better pictures at some point today. Glad to see that you are “Local” (on DakkaDakka). I was just at Miniaturemarket’s retail store and almost bought a couple knights to go with him.
The only issues I’ve found are the designs have some gaps. The torso armor on both sides of where the head would go had issues and one side didn’t connect and the other side had a manifold gap. When I get the pictures up I hope they will explain it better. I’m still figuring out the support skins and they keep sticking too much to the models and causing damage when I remove them, once I figure that out I think I’ll be golden.
What software do you use in your designs? I haven’t even begun to think about designing my own stuff yet, but there are some projects I’d love to tackle when I get around to it.
Thanks for stopping in and giving some of your insight .
Thank you. I did the modeling on Windows 3D builder. You can play around with the X, Y, and Z sizing to make parts fit as long as you click the little lock icon that displays for resizing. Everything else was just sticking the new part on top of an existing item and then merging the two objects together. Trouble with that is, any hidden gaps I miss (or worse, if things are not aligned properly) and the software merges into the new, imperfect form. I tried to get into Blender, but woo that is a completely different level for training. So I shall stick to my cut and paste versions for now. I do use meshmixer to examine the files for any flaws. You can lose detail, so I try to balance printability versus detail. I printed these with my Photon and it seems to be more forgiving. I am running into a similar problem building the rear torso on a pair of Warhounds. The vent at the back delaiminates and I an struggling to get it to stay still and form properly. And the point of the lower jaw armor simply does not want to form properly either. Printing is very much in the experimental stages still, but I am amazed at the raw material out there to work with.
There is an "Dominion Crusader Mark 3 Alternate SHoulder Pads" download you can look at for some different Pauldrons for the doggies. I have built some for them with resized shoulderpads from the Dominion Crusader Tartar armor (I used the torso armor there to make the 'doggie' torso).
airinhere wrote: Thank you. I did the modeling on Windows 3D builder. You can play around with the X, Y, and Z sizing to make parts fit as long as you click the little lock icon that displays for resizing. Everything else was just sticking the new part on top of an existing item and then merging the two objects together. Trouble with that is, any hidden gaps I miss (or worse, if things are not aligned properly) and the software merges into the new, imperfect form. I tried to get into Blender, but woo that is a completely different level for training. So I shall stick to my cut and paste versions for now. I do use meshmixer to examine the files for any flaws. You can lose detail, so I try to balance printability versus detail. I printed these with my Photon and it seems to be more forgiving. I am running into a similar problem building the rear torso on a pair of Warhounds. The vent at the back delaiminates and I an struggling to get it to stay still and form properly. And the point of the lower jaw armor simply does not want to form properly either. Printing is very much in the experimental stages still, but I am amazed at the raw material out there to work with.
There is an "Dominion Crusader Mark 3 Alternate SHoulder Pads" download you can look at for some different Pauldrons for the doggies. I have built some for them with resized shoulderpads from the Dominion Crusader Tartar armor (I used the torso armor there to make the 'doggie' torso).
Good to know . I downloaded those files this week as well. Considered shrinking them down, guess I’ll go that route.
Pic of poster tacked together knight.
His melts gun seams small, but easily enough to fry up the goldfish. “Where’d I put that tartar sauce?”
So I was having an issue with a corrupt SSD card again, then it turns out my computer wiped away my Cura settings . Downloading cura again and will have to reload my settings all over again. Hope I can get back to the old settings.
So new day, new issue, seems par for the course in the life of a 3D printer.
I knew I shouldn’t do a huge print with the current bed I have on the Ender3. Me using it constantly without proper cooling and cleaning down occasionally with some isopropyl alcohol led to the surface tearing a little. Not even the size of a space marine helmet, but it’s in the center of the magnetic bed. I covered it with blue painters tape which seems to be working fine, but an old nemesis has arisen. curling of the base of the model. I think it’s more due to a settings issue as my computer glitched and I had to reinstall cura 4.6.2 and I’m sure I didn’t have the settings exactly the same. Unfortunately I’ll never know as the glitch may have been a corrupt file which also messed up both micro SD cards I’m using so all my sliced files got deleted.
Anyway I started the 30+ hour print as I have a lot going on right now with my wife and all three teens starting back to school this week and the church repairs. I figure let the printer run and see what will come of it. So before bed I started the print and when I woke I came down to check it out. 6-7 hours in and the corners were curling badly.
It’s a corner turn bank for Gaslands.
Then I noticed that nothing was coming out of the nozzle . A clog. Dead stop. Pulled the filament, which snapped in the Bowden tube. Pull the Bowden tube, replace it, and tighten it back down too hard cracking the connection to the retraction housing. Its one of those things that I wanted to replace, but just have not yet. Guess I’ll order one of those now. It’s not expensive and the replacement is milled aluminum instead of plastic, so much more durable.
After all is said it’s printing again with what seems to be a clear nozzle and so far a very flat base layer. Can’t tell if it’s making the melting plastic smell now or if that’s from earlier.
One of the last prints I got before this mess was this gear and hazard counter.
It’s a 3 piece print, but the curling and raft adhesion issues I was having really messed it up. One of the back base corners has a bad lift to it, and both wheels have rough sides that didn’t pop free of the raft/support. I sanded those down and used a clipper which with my hamfisted techniques caused more issue. But then I assembled it. It’s a great design. The wheels are held in place by a length of my PLA+ that runs through guide holes in the design. And the wheels are locked in place by indents in them which fit a BB pellet. The BBs are pushed apart in the center section by a spring which I took out of the pen in the photo. The pressure holds everything in place, but you can easily spin the dial with little pressure and it satisfyingly clicks when the numbers are set. You read it top down so in the picture the counters are on 2 and 4.
It’s a great design and when I have my prints tuned again I’ll be making more as I’ll need one for each car. One side will tell what gear I’m in and the other is for tracking hazard tokens.
A flat tire means you I’m still home to check progress on the new print. Chaos has followed me to Gaslands. The Warp is strong here.
Going to let it continue. It’s a 40’ scale container, so almost the width of the bed. If it warps bad I’ll do the next one diagonally on the print bed.
So, an oddity to report that I had not had happen on the Ender-3 Pro, which is the Monoprice MP10-Mini decided to shed all the little brass teeth from the PTFE (Bowden ) tube coupler from the extruder end of the tube. Never heard of that happening before.
On the MP10-Mini, the tube is not intended to be serviced- it and the hot end cabling are all wrapped together inside I woven material sleeve which is secured with zip ties- very strong, very neat. I found the problem when I went to set up the next print, and saw the filament sticking out of the wrap like a bone protrusion from a compound fracture.
Fortunately, the machine came with a spare, but it's a non-standard type of coupler (not an M6 or M10, like most other printers have). And worse, Monoprice themselves don't carry them at the moment, and I didn't find any on Amazon, eBay or Etsy.
I may have to refurbish the old one somehow, or adapt a coupler from a different printer. I'll get a pic of it up here tomorrow.
"Whom the gods would make great, they first make mad."
Ouch, that's strange. I'm sure you could probably find the part on one of those chinese sites that sells replacement parts for everything. Can't think of the name right now.
My Ender replacement parts were here today over a day and a half early. I have already replaced the magnetic pad. I would have jumped into the other stuff, but had to replace four tires today and then had company this evening. Right when I was about to i turned on the computer to see that Ultimaker has released Cura 4.7.0, so I have just now downloaded that. Hopefully the new plate helps with the warped bases as I printed a Ramp for gaslands which is a partially sunken bus. The edges were curled again. I got a few other prints done as well, but none large enough to show me thewarp of my print bed.
The other parts that came will mean a major overhaul for the Ender, so I need extra time to disassemble and replace certain things like the stock springs.
The drive gear for the filament does not take much to strip if you have the factory brass. Lots of stainless steel replacements out there fairly cheap. When I bought the aluminum extruder drive replacement it came with a SS gear.
Also, if referring to the springs on the bed, I just added a few washers to greatly increase the tension and they work great.
I got a good deal off amazon. At least in my eyes. $22 for the capricorn tubing (1m), nice new heavy duty springs and replacement extruder top with gears. Just too busy to mess with that till this weekend.
When I get tired of Gaslands stuff I'm going to pimp my Ender3 some more. When I change the springs I'll finally attach the handle I made for the print bed. Also want to add some rail covers in spots.
In the words of Chancellor Palpatine, 'DO IT!' Not sure of it's still active, but Creality had a ludicrous price drop on the Ender 3 last week, almost a hundred quid less than what I paid for mine on Amazon.
Going to sit down and properly calibrate my Ender tonight, hopefully kill a few birds with one stone and sort out my stringing and blobbing problems along with what I suspect to be either general over-extrusion or a slightly wrong Z offset that's caused a few supports to be knocked over even on an ostensibly level bed. I'm happy enough with my slice settings for the time being, but I think I can get more out of a more precisely dialed in printer.
Paradigm wrote: In the words of Chancellor Palpatine, 'DO IT!' Not sure of it's still active, but Creality had a ludicrous price drop on the Ender 3 last week, almost a hundred quid less than what I paid for mine on Amazon.
Going to sit down and properly calibrate my Ender tonight, hopefully kill a few birds with one stone and sort out my stringing and blobbing problems along with what I suspect to be either general over-extrusion or a slightly wrong Z offset that's caused a few supports to be knocked over even on an ostensibly level bed. I'm happy enough with my slice settings for the time being, but I think I can get more out of a more precisely dialed in printer.
I know I’ll be retuning mine this weekend with replacing the deck, springs and other items. I feel I wasted a days print by going too soft on detail to cut a print down to 11hours instead of 20. I can probably save it with effort, just have such a backlog of things I want to do that any hiccup hurts .
So I didn’t replace springs or anything major this weekend . Instead I removed the old magnetic base which had bubbles and played around a bit.
Productivity was good .
That’s about a weeks worth of prints with a couple large failures that were half day prints. (F15 crash/ramp and a 40’ container which didn’t stick to the old bed).
So some Gaslands highlights.
Two pack of 16mm knobby tires (printed two sets), the two tire print takes about 16 minutes.
BoomBox. Don’t think I’ve seen a Miskin van before, so why not .
The tires are fatties(double the width of normal tires) and a pair of them takes 38minutes. The exhaust stacks are 14minutes each and the speaker system up top also took 38 minutes. Still needs stuff, but getting there. Tempted to paint him like the A-team van.
Lastly my flying car.
I’ll probably use it as a gyrocopter even though it’s far too beefy looking. Added the three canister pack on the doors on each side. 6minute prints each.
The fence is one of three from a set and will just be nice scatter terrain.
I know Gaslands is a post apocalyptic game, but I’m terrible at ramshackle builds. So I’m thinking my table will probably be more of an aircraft tarmac, though some prints just won’t make sense there either . I looked for inspiration in different places, but most everyone just has wastelands. My car destruction desires come more from playing Twisted Metal than Mad Max, and I loved the different fields like the race track, Paris and LA. Oh well, no paint until I have enough crap made so I have time.
So I playeda bit with a larger print today(40' container, the ones in the picture above were 20'). For a long while i have been printing everything on rafts because of my old print bed. Having replaced it i printed without a raft and got a good print. So some larger prints will be tested without now(it saved an hour on print time and saved material as well. I also dropped my print resolution down with very little loss of detail, though it was a shipping container, so not much detail to start with, I'll slowly try it out on other models as that too saves time.
BIG QUESTION FOR YOU ALL.
How much is your hobby time worth?
What do I mean?
(Begins ramble) So With the cura 4.6.0 and now 4.7.0 upgrade i did, i can tell how much each print costs me. It's great to make something from a free file and $0.02 cents of material that would cost me $5-8 to buy for my hobby horde, but what's the real price? I mean it might take me 5 minutes to find the file and slice it, 2 hours to print it, so what's the real price? Minimum wage is like $9 around here i think, so i spent 2 hours is that print really $18 and I just wasted money? Or is it still only $0.02 so I have saved $4.98. I guess i'm trying to decide if I'm wasting time on smaller prints or if I'm actually making something valuable to me. I know I'm enjoying the time, and it's not taking away from anything, but i just wonder where my efforts should be.
No, it makes sense, but I think you have to factor in what you’d pay for 2 hours of entertainment to balance the cost of your time against. I guess you also don’t need to sit and watch the print, though I can see how they’d be mesmerising! When you factor that in I think you’ll be much closer to the cost of materials. The Project Manager in me loves that the program shows you the cost of the print! I’m closer to justifying a printer myself, but I need to trim the pile first before I add infinitely to it!
gobert wrote: No, it makes sense, but I think you have to factor in what you’d pay for 2 hours of entertainment to balance the cost of your time against. I guess you also don’t need to sit and watch the print, though I can see how they’d be mesmerising! When you factor that in I think you’ll be much closer to the cost of materials. The Project Manager in me loves that the program shows you the cost of the print! I’m closer to justifying a printer myself, but I need to trim the pile first before I add infinitely to it!
See, I don't watch the print......most of the time , though i wish I did last night. My 10 hour print I started before dinner stopped less than 2 hours into the print, so my machine sat for 8 hours powered on, but not printing and the heat went down to idle temperatures. This happens to me quit a bit as I don't give it "Down time". Basically it goes on strike and collapses.
While the machine is printing I'm either at work, asleep(not at work ), with my family or sitting at the computer next to it looking for and slicing files. I could also be cleaning the supports or modifying the Gaslands cars that I'm printing parts for, so I'm double dipping as it were.
I guess I'm just trying to still justify what I'm doing. Not getting to game still I guess I don't see the possitive side right now.
The thing to keep in mind though is what else are you doing while it prints? You're unlikely to be sat staring at the printer throughout... so you don't really need to take into account the minimum wage for the print time? If you consider the print may be running while you're at work or sleeping... that's not wasted hobby time for you. That's *extra* hobby time. for example, when it doesn't fail, a resin tank will cost me somewhere in the region of £4 for something that Forgeworld would charge £80 for and the printing is done overnight... so that's definitely a win.
The main thing is if you're enjoying printing these files it isn't wasted at all, that's what our hobby is.
Well, if you wanted to calculate the hours and charges you spend doing a lot of things it would drive you crazy.
"I will save money tonight and make dinner for my family. I spend the time to shop, cut, prepare, cook, clean and serve - probably almost 2 hours in total. The food itself only cost 11.49, but factor in my time at a minimum of $20/hr, it just became a $50 meal - heck, let's just go to McDonalds..."
I guess what got me calculating is my new office I’ll be opening in October is about 45 minutes from my house. Trying to calculate whether it’s worth it time wise for me or not. So I started looking at it economically and then I looked at the printer from an economic stand point as well.
Anyways, tried reducing the print quality to get a massive terrain piece done in less time. While the details are good enough on some sides, the beveled edge was just so wavy that I said stop and popped it off the print bed before looking at the rest. Hindsight , I should have let it go as I’ll just cover the sloped part with texture paste anyway . Wasted 9 hours or about $1 worth of material, but I’ve learned again I’m an idiot .
The neat little bit I take away from the image is the reflection of the polygons. Kind of cool.
So the trade off of speed versus final print. I don’t think I want to take the full 42 hours to print this at detail level of 0.08, this I had at .2 I believe, which would have been about 16 hours. Slicing right now at 0.16 would have it coming in at 19hrs. Will realize at 0.12 which I know will still be fine and see where that ends up (25hrs).
So dropping the quality down to 0.16 (1/2 my usual print quality) completed the job in 18hours and 4 minutes.
I did not use a raft on it as it was so big it would have added another 1-2 hours and it was not going to move around on me anyway. Plus there are some “loose bricks” at the base which would most likely have stuck to the raft and me off when I would try to remove it. There are some strange support structures that I don’t know why they even exist, but otherwise a decent print quality.
The inside bank layer height still has some visible layers, but texture pate would cover that.
Stringing has returned, I think that I’m going to bump my retraction levels up. The Cura settings default was at 3mm , I’ve been at 0.65 I think
I almost have a full tables worth of terrain to plop down for Gaslands, but there’s more variety that needs to be printed still.
Back to reslicing my lost files.
Some projects I need to mull over.
F15 ramp (even bigger/inker print than this piece) but I think it would be a great centerpiece, just not sold on print time as I’d want a much better quality print for it than this one.
Resizing the Gear Phase tracker. It’s a nice piece, just needs to be bigger (x2 or x3) for actual gameplay/tabletop use.
More hazard/gear counters. I have four working ones (broke the original), but I could do with another 6 for a full sized game.
Bullet Dice......yes. Have sliced 12, it’s a 9 hour print, so probably when I go to bed tonight.
Guns, more guns, bigger guns.
Well, after way too much procrastination, I finally tried taking apart the extruder's internals on my Finder. Even after I'd cleared the earlier blockage, i was still having issues. So, the only other option left to me was to take out the heating element and see what's going on inside those parts.
I found that there was another blockage in the opening of the extruder where the filament feeds into it and a blob of plastic sitting at the bottom of the Bowden Tube. So that explains why I couldn't push anything through. The blockage up top prevented my tools from getting in, though I doubt I could have fully cleared it anyway. The tube was pretty badly blocked up. So, I swapped out the tube for a higher quality one that I bought and I replaced the nozzle as well for good measure.
After a small issue with the servo arm getting in the way. I am now able to print again! I seem to be having issues with under-extrusion on the initial layer for some reason, but everything I've printed out so far has been decent.
Now, if I could just take care of my stringing problem.
Barzam wrote: Well, after way too much procrastination, I finally tried taking apart the extruder's internals on my Finder. Even after I'd cleared the earlier blockage, i was still having issues. So, the only other option left to me was to take out the heating element and see what's going on inside those parts.
I found that there was another blockage in the opening of the extruder where the filament feeds into it and a blob of plastic sitting at the bottom of the Bowden Tube. So that explains why I couldn't push anything through. The blockage up top prevented my tools from getting in, though I doubt I could have fully cleared it anyway. The tube was pretty badly blocked up. So, I swapped out the tube for a higher quality one that I bought and I replaced the nozzle as well for good measure.
After a small issue with the servo arm getting in the way. I am now able to print again! I seem to be having issues with under-extrusion on the initial layer for some reason, but everything I've printed out so far has been decent.
Now, if I could just take care of my stringing problem.
Yeah, switching the bowden tube over to the Capricorn tubing and making sure it was all the way in is important. On one of my earlier pages I showed my extruder engulfed in plastic due to a clog and had to replace the whole part.
all have some take aways with stringing. I have not made my sleeve insert yet, so not sure how that fairs. Using the better program has helped some, but I am still getting some stringing.
Yep, Capricorn was what I bought. So far, so good. Though, I have printing on hold right now due to our excessive heat. I'd hate to have a 23 hour print interrupted by a rolling blackout.
So far, I haven't been able to find advice on stringing that's actually worked. I'll check those videos later. Maybe they'll have some suggestions I have tried yet. I'd love to build some Makerscult tanks, but that isn't happening until the stringing is conquered.
Still not tired of winning with the Monoprice MP-10 Mini (print bed size equivalent to the Ender-3).
This was such a nice print, I wanted to post two pics here, more on my own thread; this is the bell shrine from the first Iain Lovecraft kickstarter the 'Hobgoblin City':
I arranged it to print all three pieces as one print job in Cura (using 4.6.2 currently, but will update to 4.7 when time permits). You can see in the first pic the ordinary masking tape I have to put down because adhesion is too strong!
I am so looking forward to making that print once this KS ends and delivers.
Automatically Appended Next Post: So while looking for an answer to fixing my SD card I may have learned the issue. I bought a 64GB micro SD, seems with having to format it as a FAT32, FAT32 cannot save files over 4GB . No wonder its larger prints that I keep loosing. Plus i'll need to partition ( ) the drive. I'll look into that later. Basically even though I have a 64GB drive it can also only hold up to 32GB of material or it'll crash. Makes no sense to me, but TECHNOLOGY .
Sorry to hear of the tech limitation with the SD card/printer operating system, Theo. Can the motherboard be upgraded for more memory? And I agree- sometimes 'Technology!' (said in Thomas Dolby's voice from his song "She blinded me with science") is all you can say sometimes in Family-PG friendly shows. Not nearly as satisfying, of course.
Here's the three different houses from Iain Lovecraft's first Asian Kickstarter (Hobgoblin City) that I've got completed (the roof for the second style of house- in grey PLA) wasn't quite done before I had to leave last Friday morning):
Some quick notes:
The roofs of the larger houses are interchangeable, as you can see- I actually like the ornate roof on the square pattern decoration house base, but they both look good, I think.
All three have playable interiors.
I think it would be easy to cut out the doorways and build simple sliding doors, to be able to represent locked/unlocked houses.
Even with the printed 'base' for the houses to sit on, they're a bit lower than the courtyard tiles around them. I think a piece of poster/foam core board cut to shape would be the perfect spacer to get them to the right height.
I tells ya, after this walled estate project is printed, I'm half tempted to try printing out the pagoda- all seven stories of it! Fingers crossed that the printer holds up!
Are you doing those with FDM? Highlord Tamburlaine has been threatening to make me print some of that guy's stuff as well. Any issues I need to be aware of, or are these some of those wonderful "fdm optimized" files where I don't need any supports?
Hi Barzam! Yes, these are the mythical, unicorn-like FDM-optimized .stl files that do not need supports. Even the wall section with the completely circular 'porthole' opening in it needed no supports. I'm using the Monoprice MP10-Mini and Cura 4.6.2 as my slicer. Cura doesn't yet have settings for the MP10-Mini, so I'm using the stock profile for the CR-10 with heat settings adjusted to 205 for the hot end, 65 for the bed. At the moment, I'm using Creality PLA left over from trying to make an Ender-3 Pro work and it seem to be doing fine, but there are a lot of good PLA filament makers out there.
The pieces from the kickstarter have very good detail and the subject matter lends itself to FDM printing (I think) in that everything is given a bit of texture by the depositional process. I smoothed it on the first batch by undercoating with some matt varnish, but this ate away (loosened the thread layers) in some places, so in future I plan to just use two thin primer coats and call it good.
Overall, I'm very happy with Iain's files and the work in the new campaign is everything from the old one, plus an equal amount of new designs.
Like Theo, I need about ten printers going full time to crank out everything I want to print!
Automatically Appended Next Post: Oh, and another very good designer is Evan Carothers- I've backed several of his campaigns and his stuff is also optimized for FDM, no supports. Everything from Norse to Persian Medieval and everything in between!
Meer_Cat you are making me jealous with those. I can’t wait to get all of these files and start building away.
I have found a file finally for a GW paint pegboard piece that I halfway like. I’ve printed a few, but have to do them one at a time due to the slight curve in my print bed .
I have also gotten a ton of Gaslands stuff printed out and am actually impressed with the finish of some Gaslands car drivers with guns. 8-10minute prints each. Pics at some point in the future as I’m tired and lazy right now.
Meer_Cat wrote: I've been looking around for a good paint storage system- do you have a pic of one of your pegboard prints? And where did you get the file?
On the other hand, didn't you build a great paint storage system out of PVC pipe pieces? That project was ace!
Thanks, The PVC rack was good for a time, and dirt cheap, but the thickness of the pvc meant that it took up a LOT of space. So when I saw the designs on thingiverse I printed the army painter/vallejo racks. I need to print another section now as i have more paints.
Then I have a ton of GW paints as well. Still not sold on this option, but it's the best I found so far for a pegboard set up.
You can see the bamboo Drawer spacers that i had used for the paints, but they also worked great for models, so if I can get back to using those for models it would be Ideal.
There's also stacking GW paint racks thay I might give a try.

 ). I don't make these rules, I just follow them like everyone else.
 . If you have even the smallest inkling that
  . She is a teacher and our three teenagers are also all home with me while everything is shut down. Daddy needed something to keep him from going off the deep end, and I want to try printing and hopefully I will soon start doing some designing too.
 when we are allowed to hang out again. I purchased an Ender 3 (regular not pro) as I saw that they were below $200 shipped and had the best reviews for the below$200 market. I am totally impressed with it. I didn't want to deal with the possibility of chemical issues from resin printers and they were outside my budget anyway. The Ender series of printers has a lot of positive reviews and a pretty decent group of owners who answer questions. there are tons of modifications out there for Ender systems as well. I have been printing almost 24/7 since I got the printer and having tons of fun learning the ins and outs of it.
 , but really if you figure something out that's been a pain, post your work around. I may have been befuddling someone else.
 Yeah. Lets have fun


 .
.
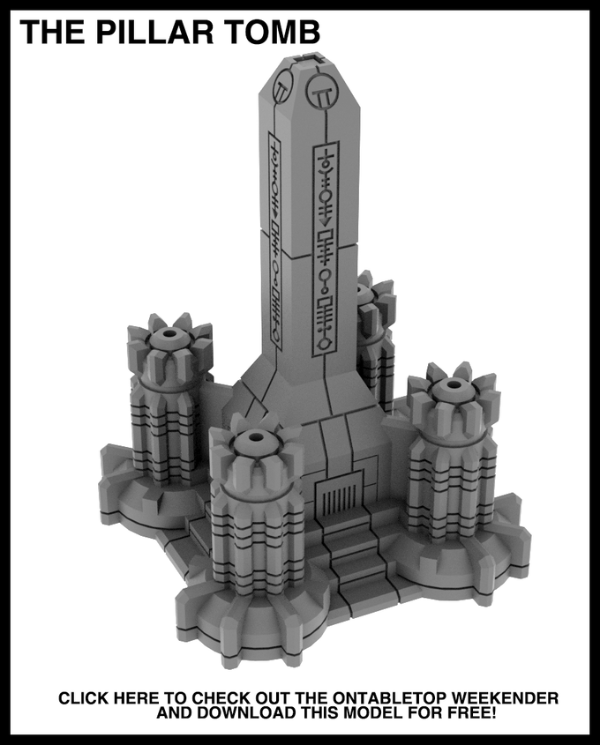

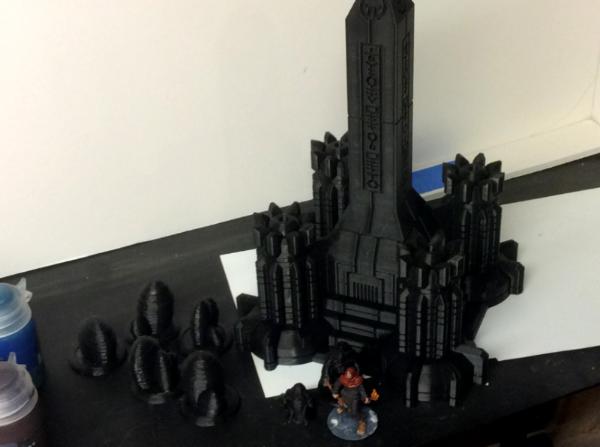
 I do however have a large Ghar force for Beyond the Gates of Antares, and it could be an style they could incorporate
  . Also I don’t have any battery operated tea light candles, but I think they could be fit inside each of the four smaller towers at their bases and drill down the center holes on each pillar to have light flashes come up out of them. Might also light up the center pillar as well. I’ll have to think about that project later as I don’t have the lights.
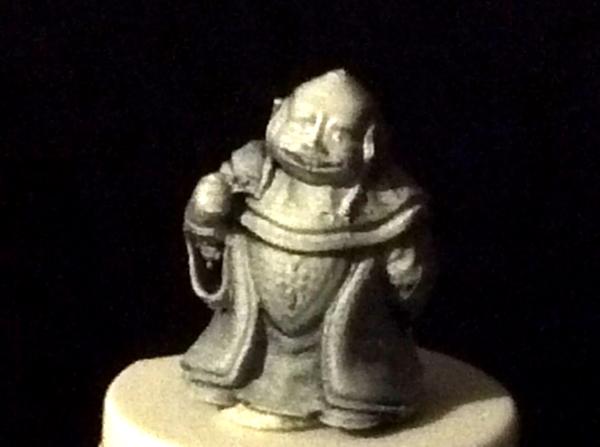
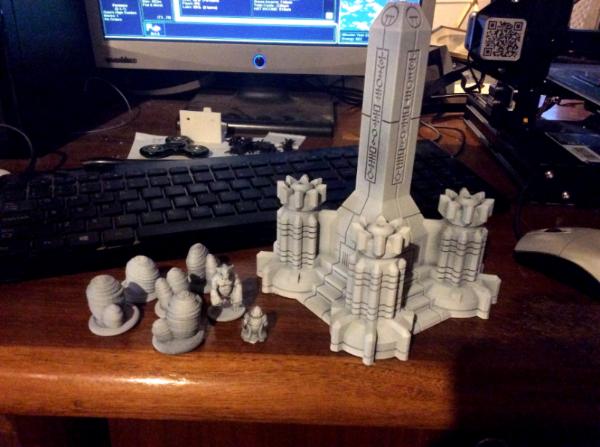

 .
.
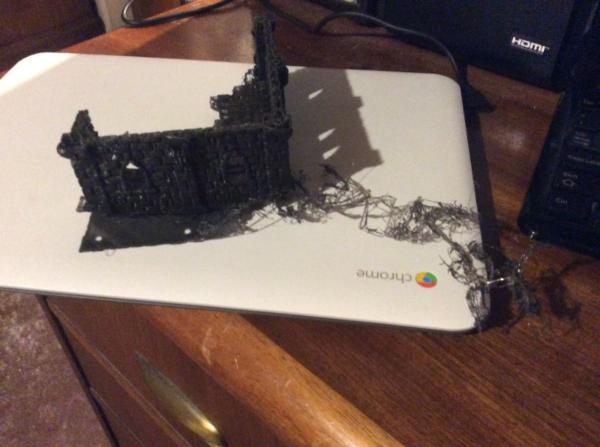
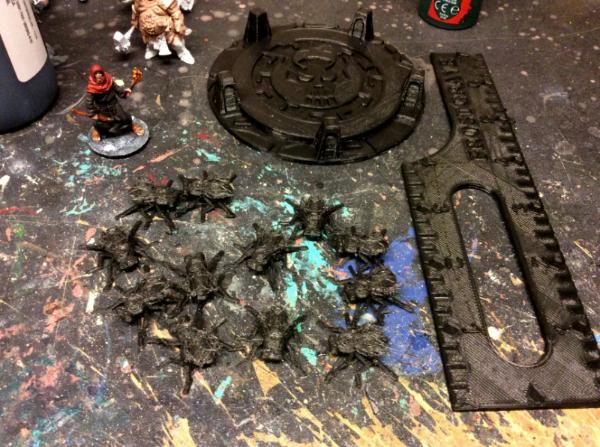
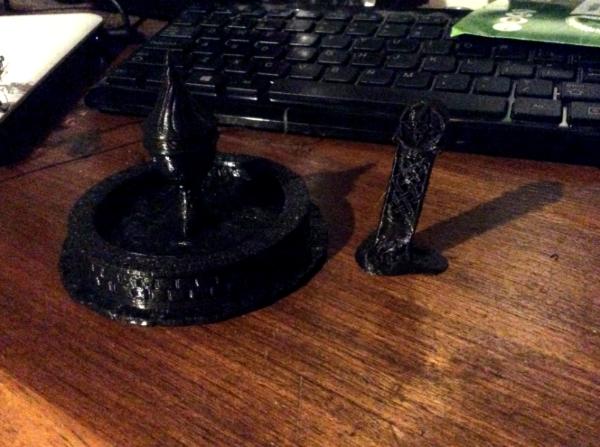
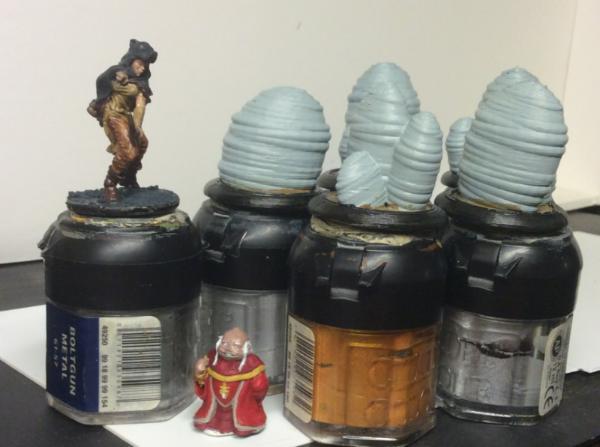


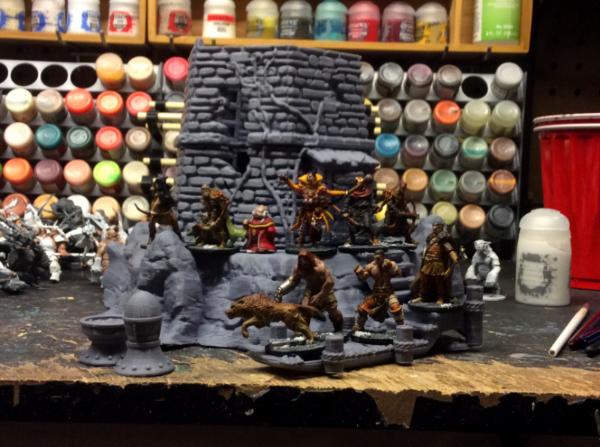
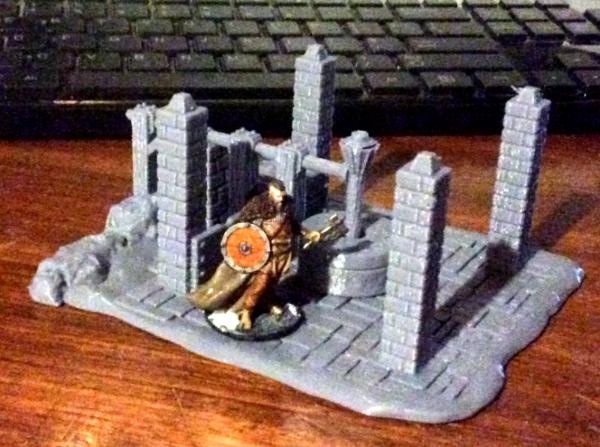
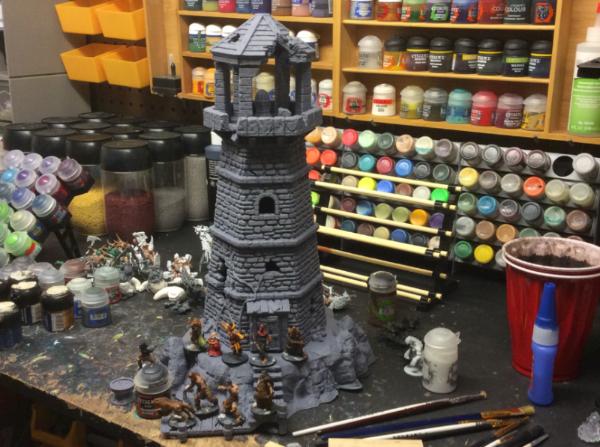
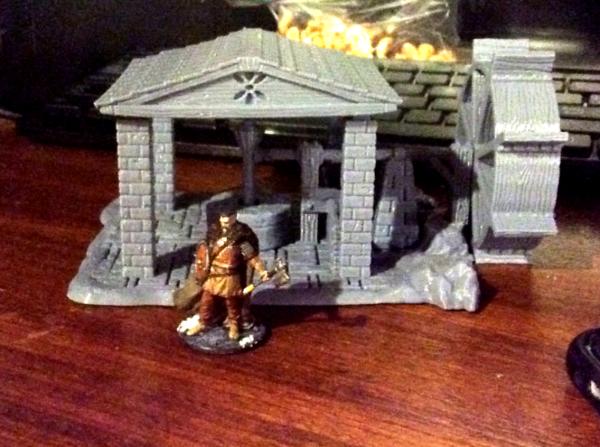
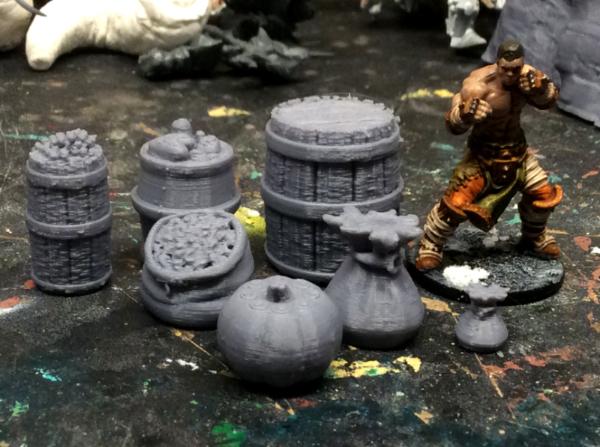
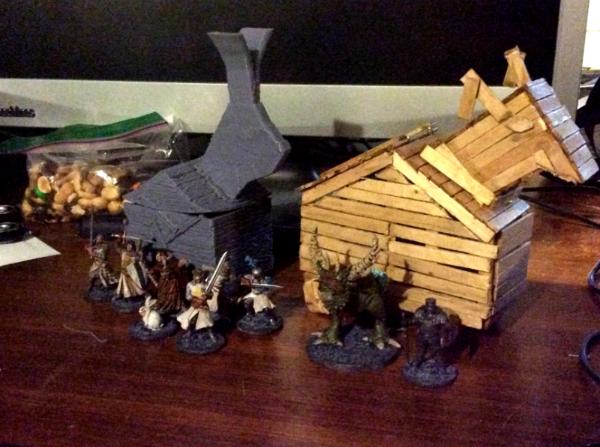
 . Otherwise the curled corner could be disguised easily enough. It’ll be a while before I decide to reprint the head as it’s servicable right now. I feel like 4 models could fit inside like the Zombicide cars. If nothing else part of the warband can hide while the police arrest Arthur’s men for killing the documentary guy


 .
.
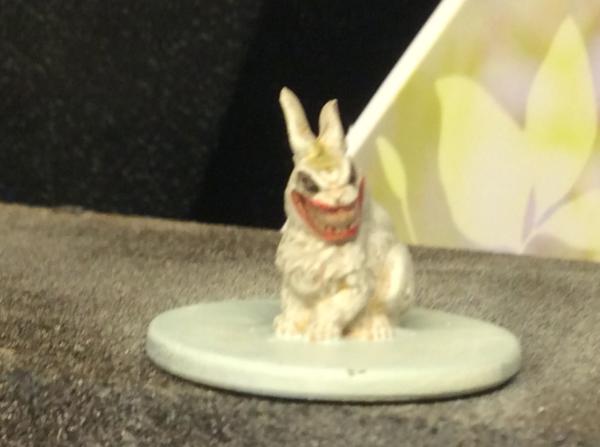
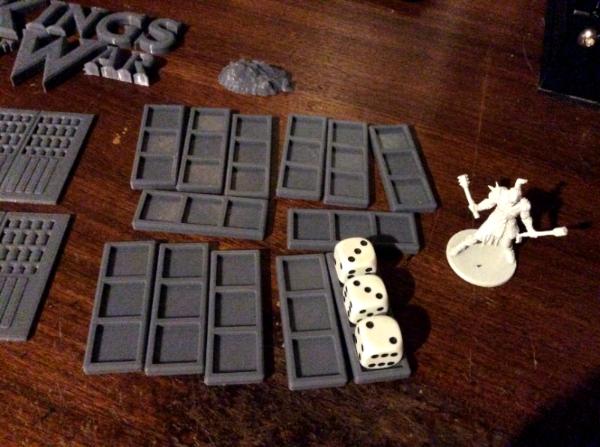
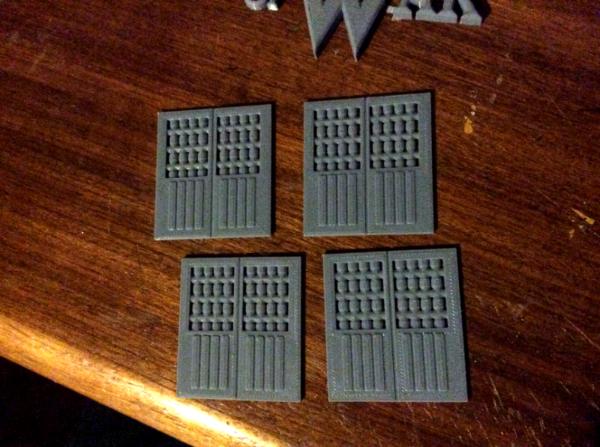
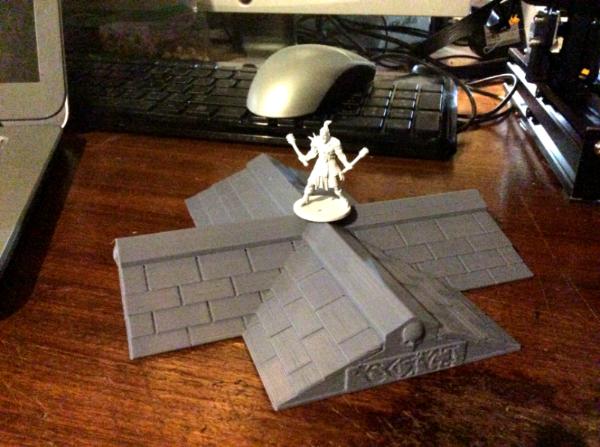
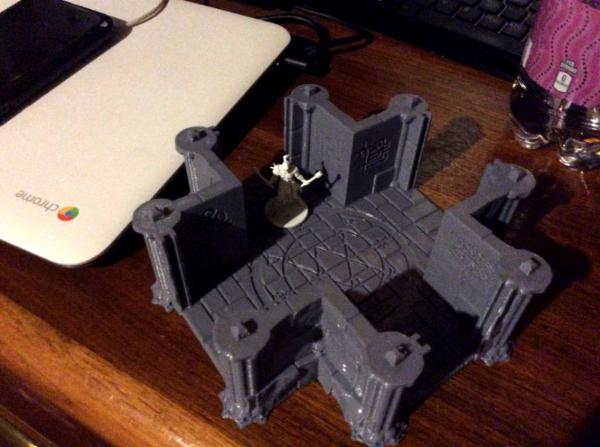
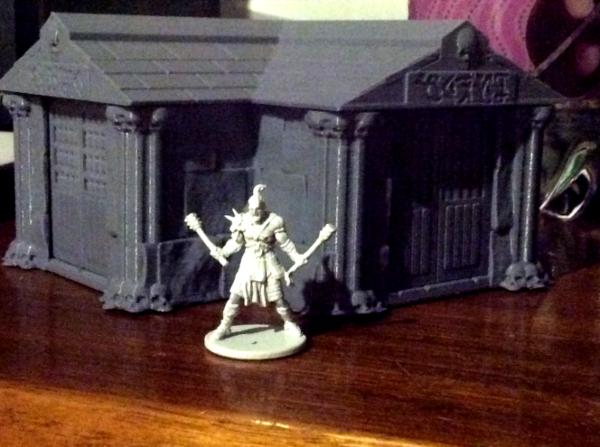

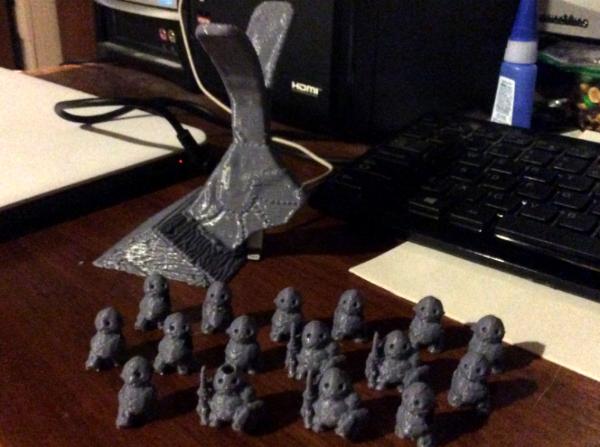

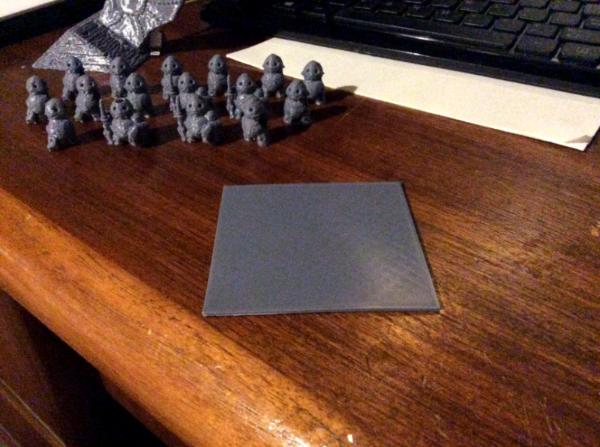
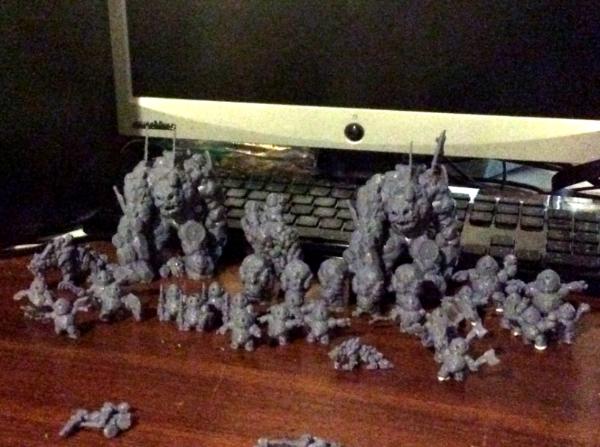
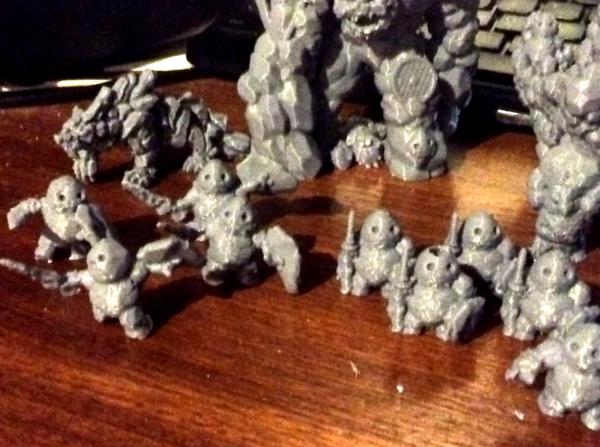

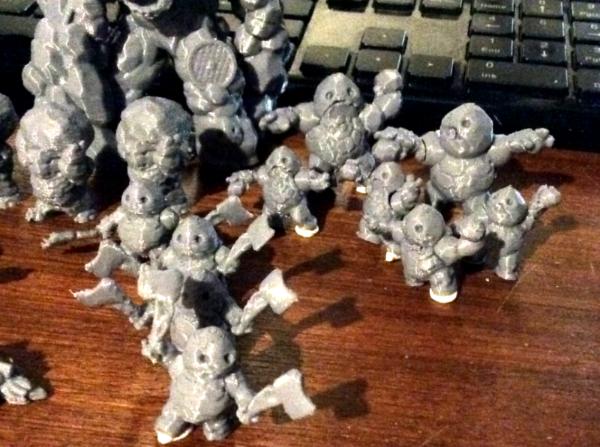
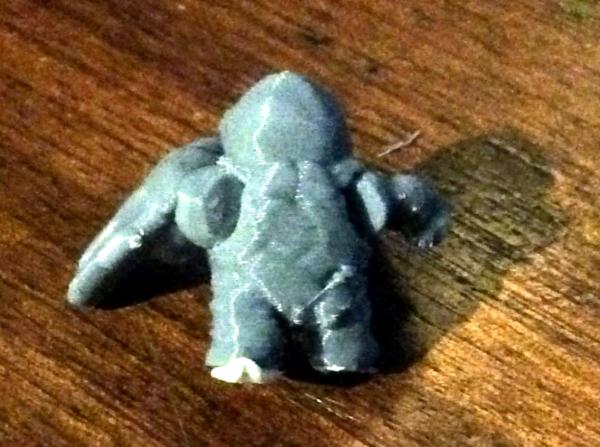


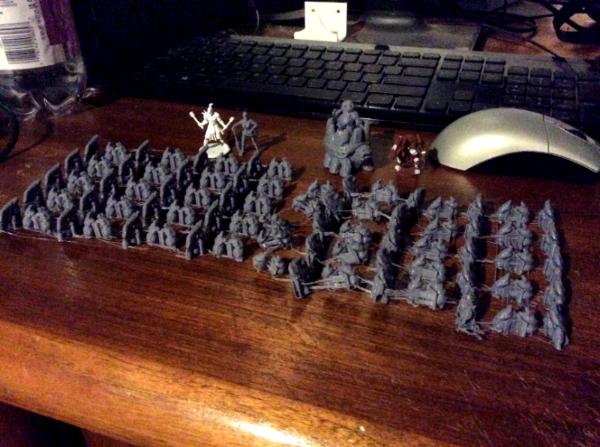
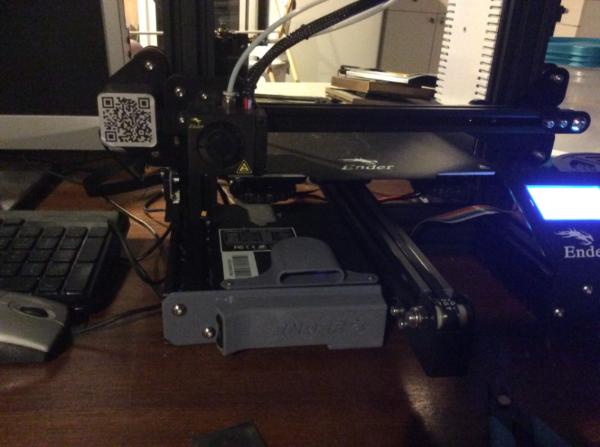
 . Yes, “It’s Cloddering Time!!!” Or something like that
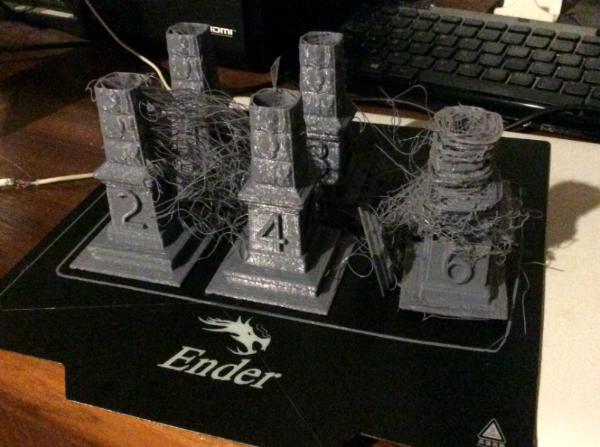
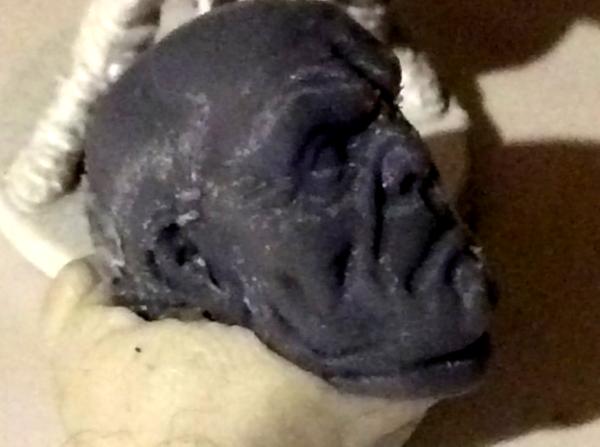
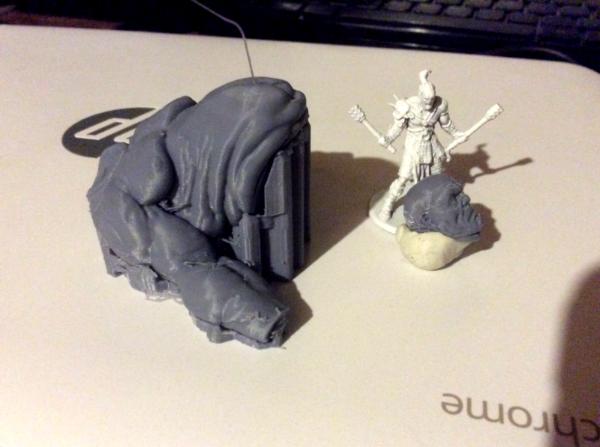
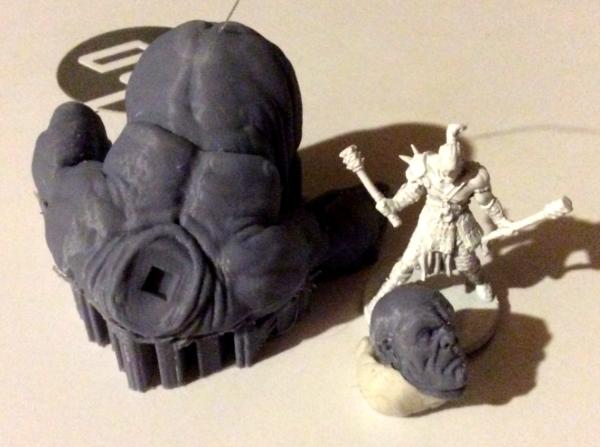
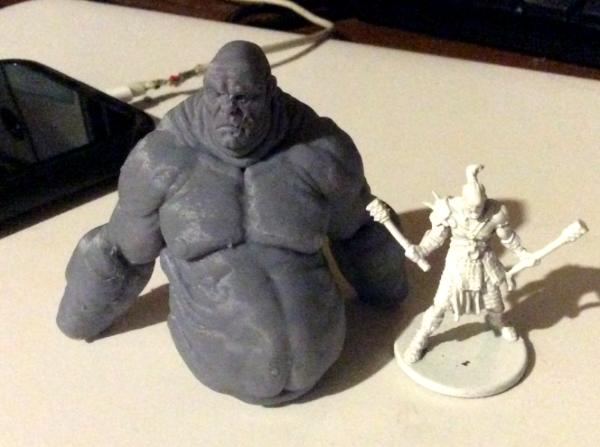
 . Held together temporarily by poster tack.
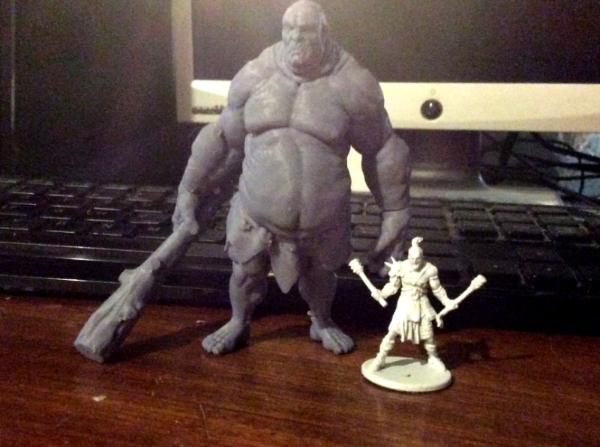
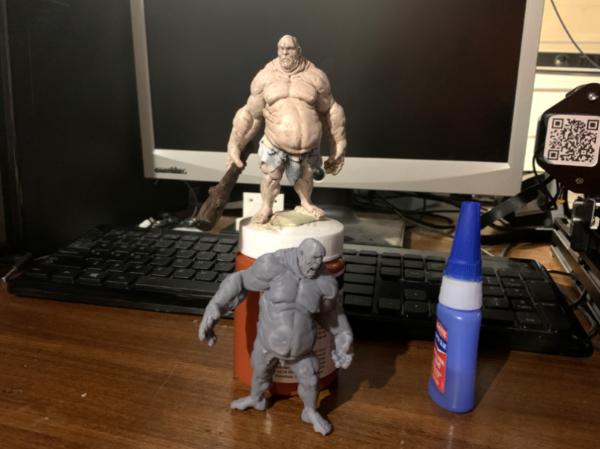
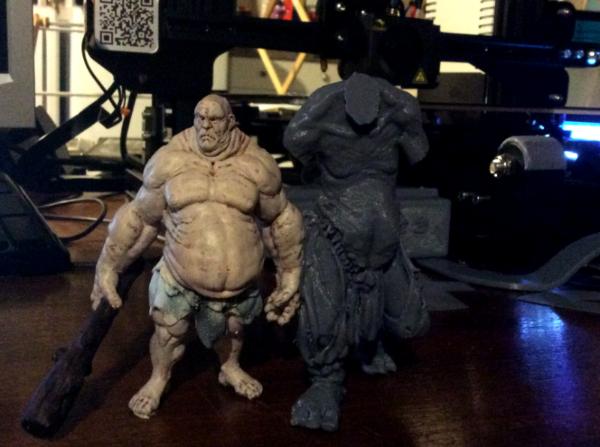
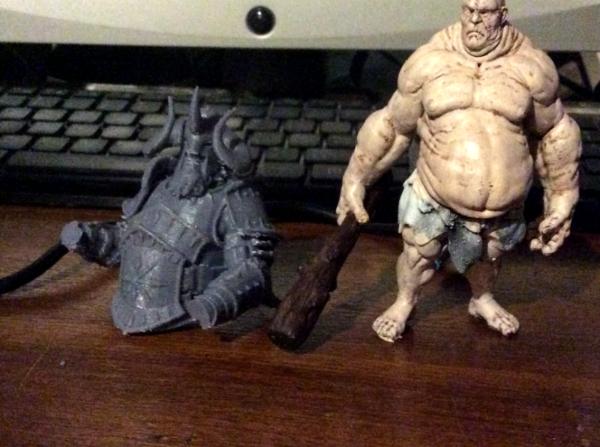
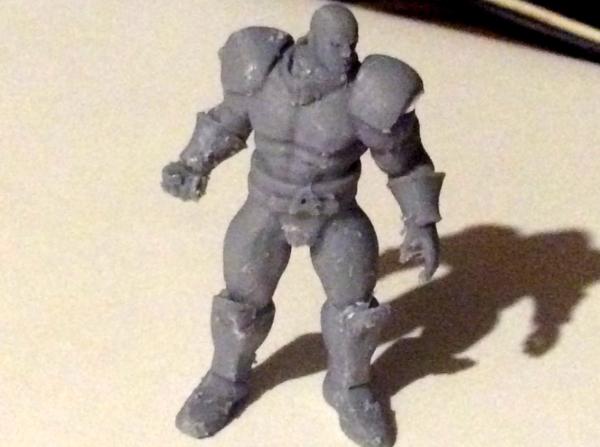
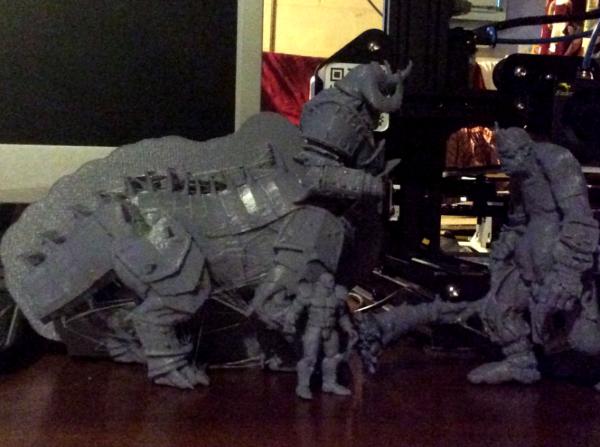

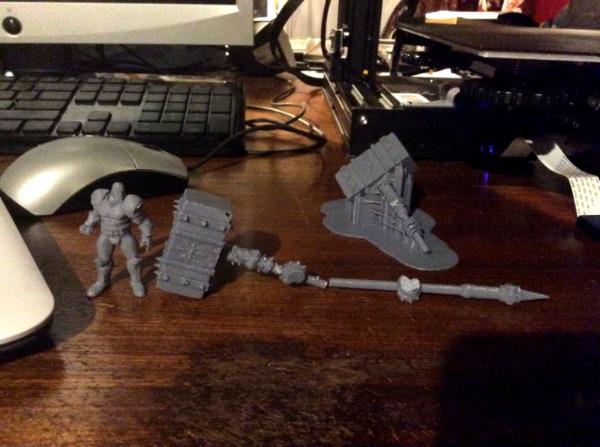
 . Wow, all my models I’m printing at 5-10%...I did break the handle on the hammer of the Shaggoth, but that was because I was snipping too close and trying to cut a bunch of supports all at once.

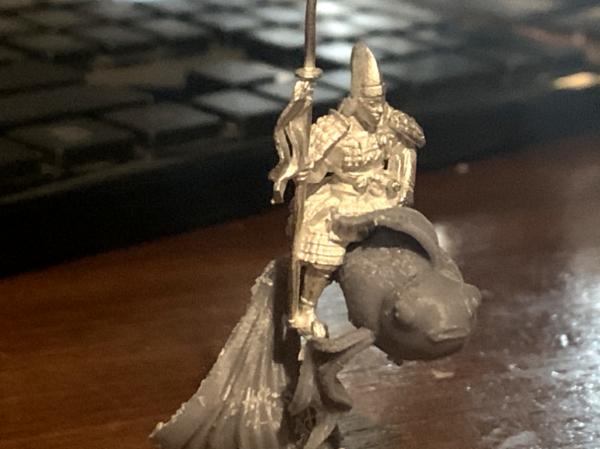
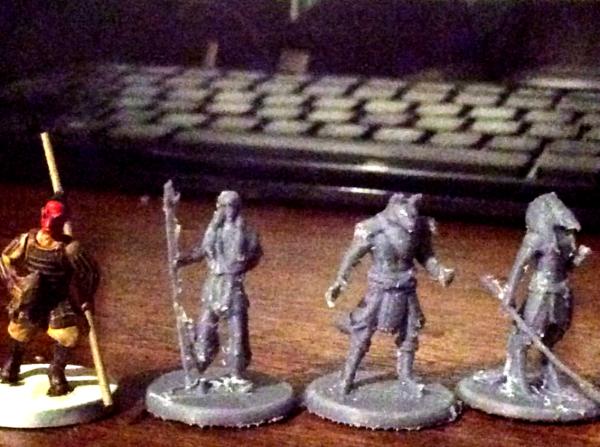
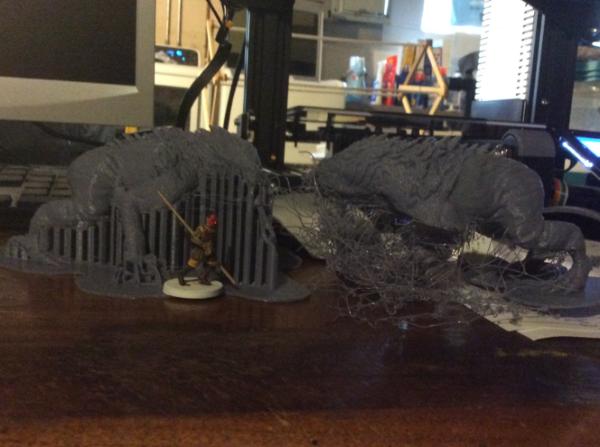
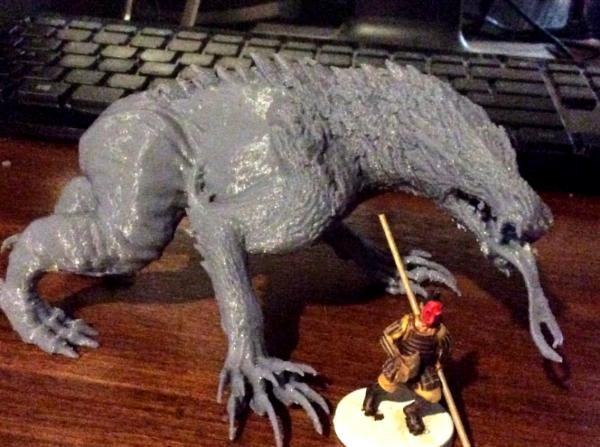
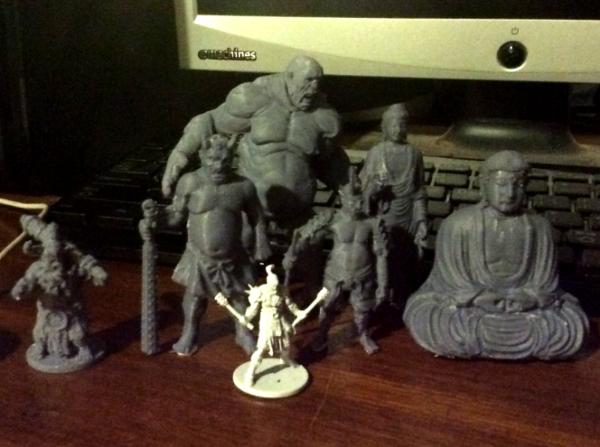
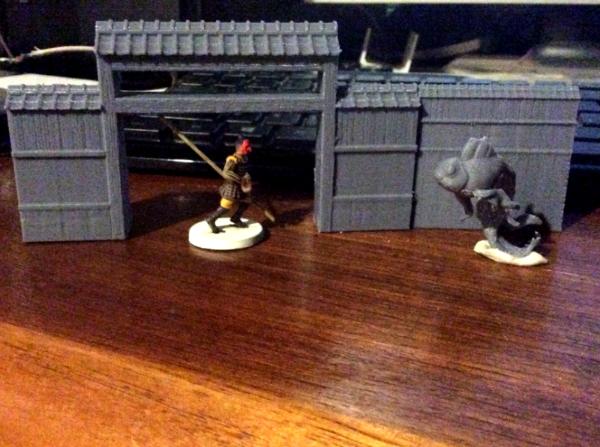
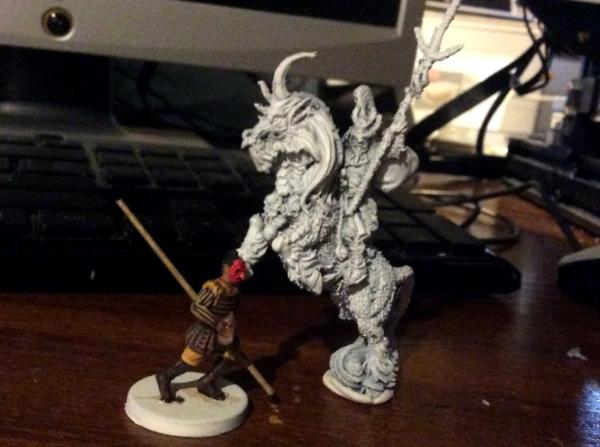
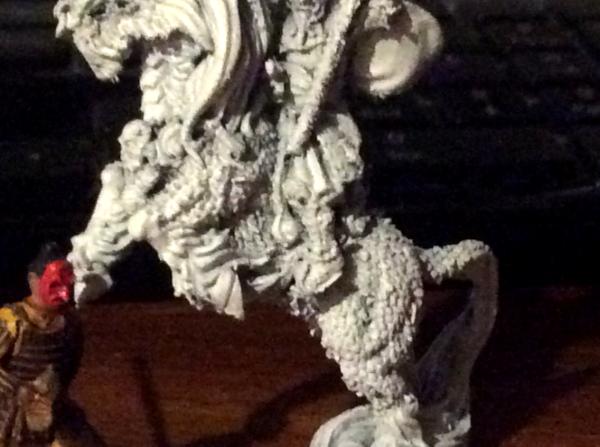
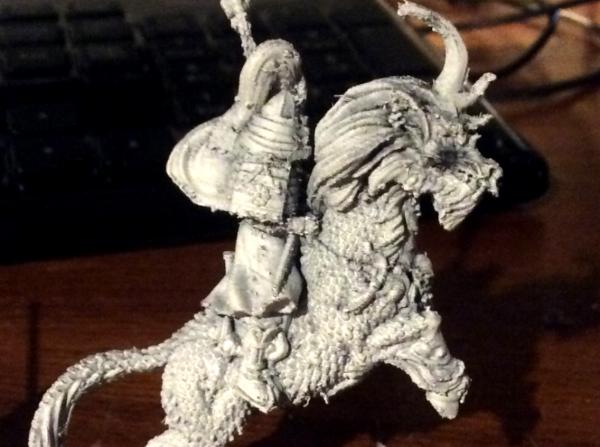

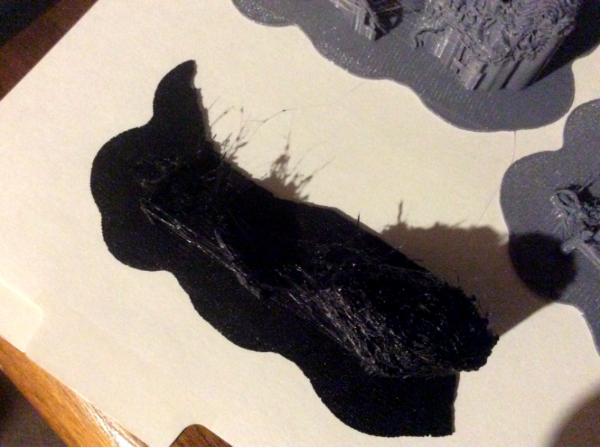
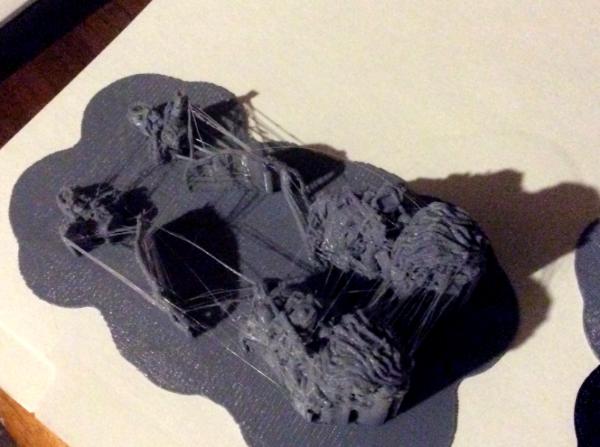
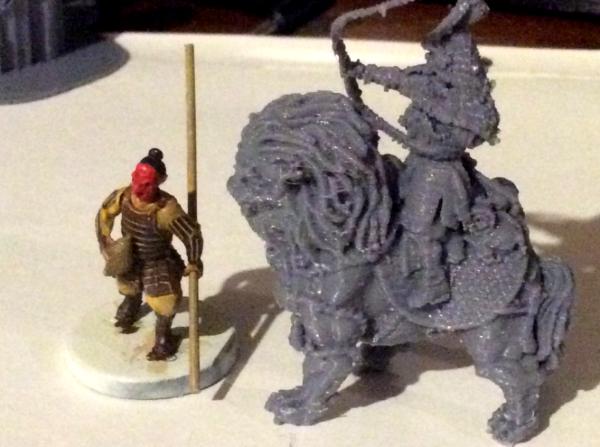
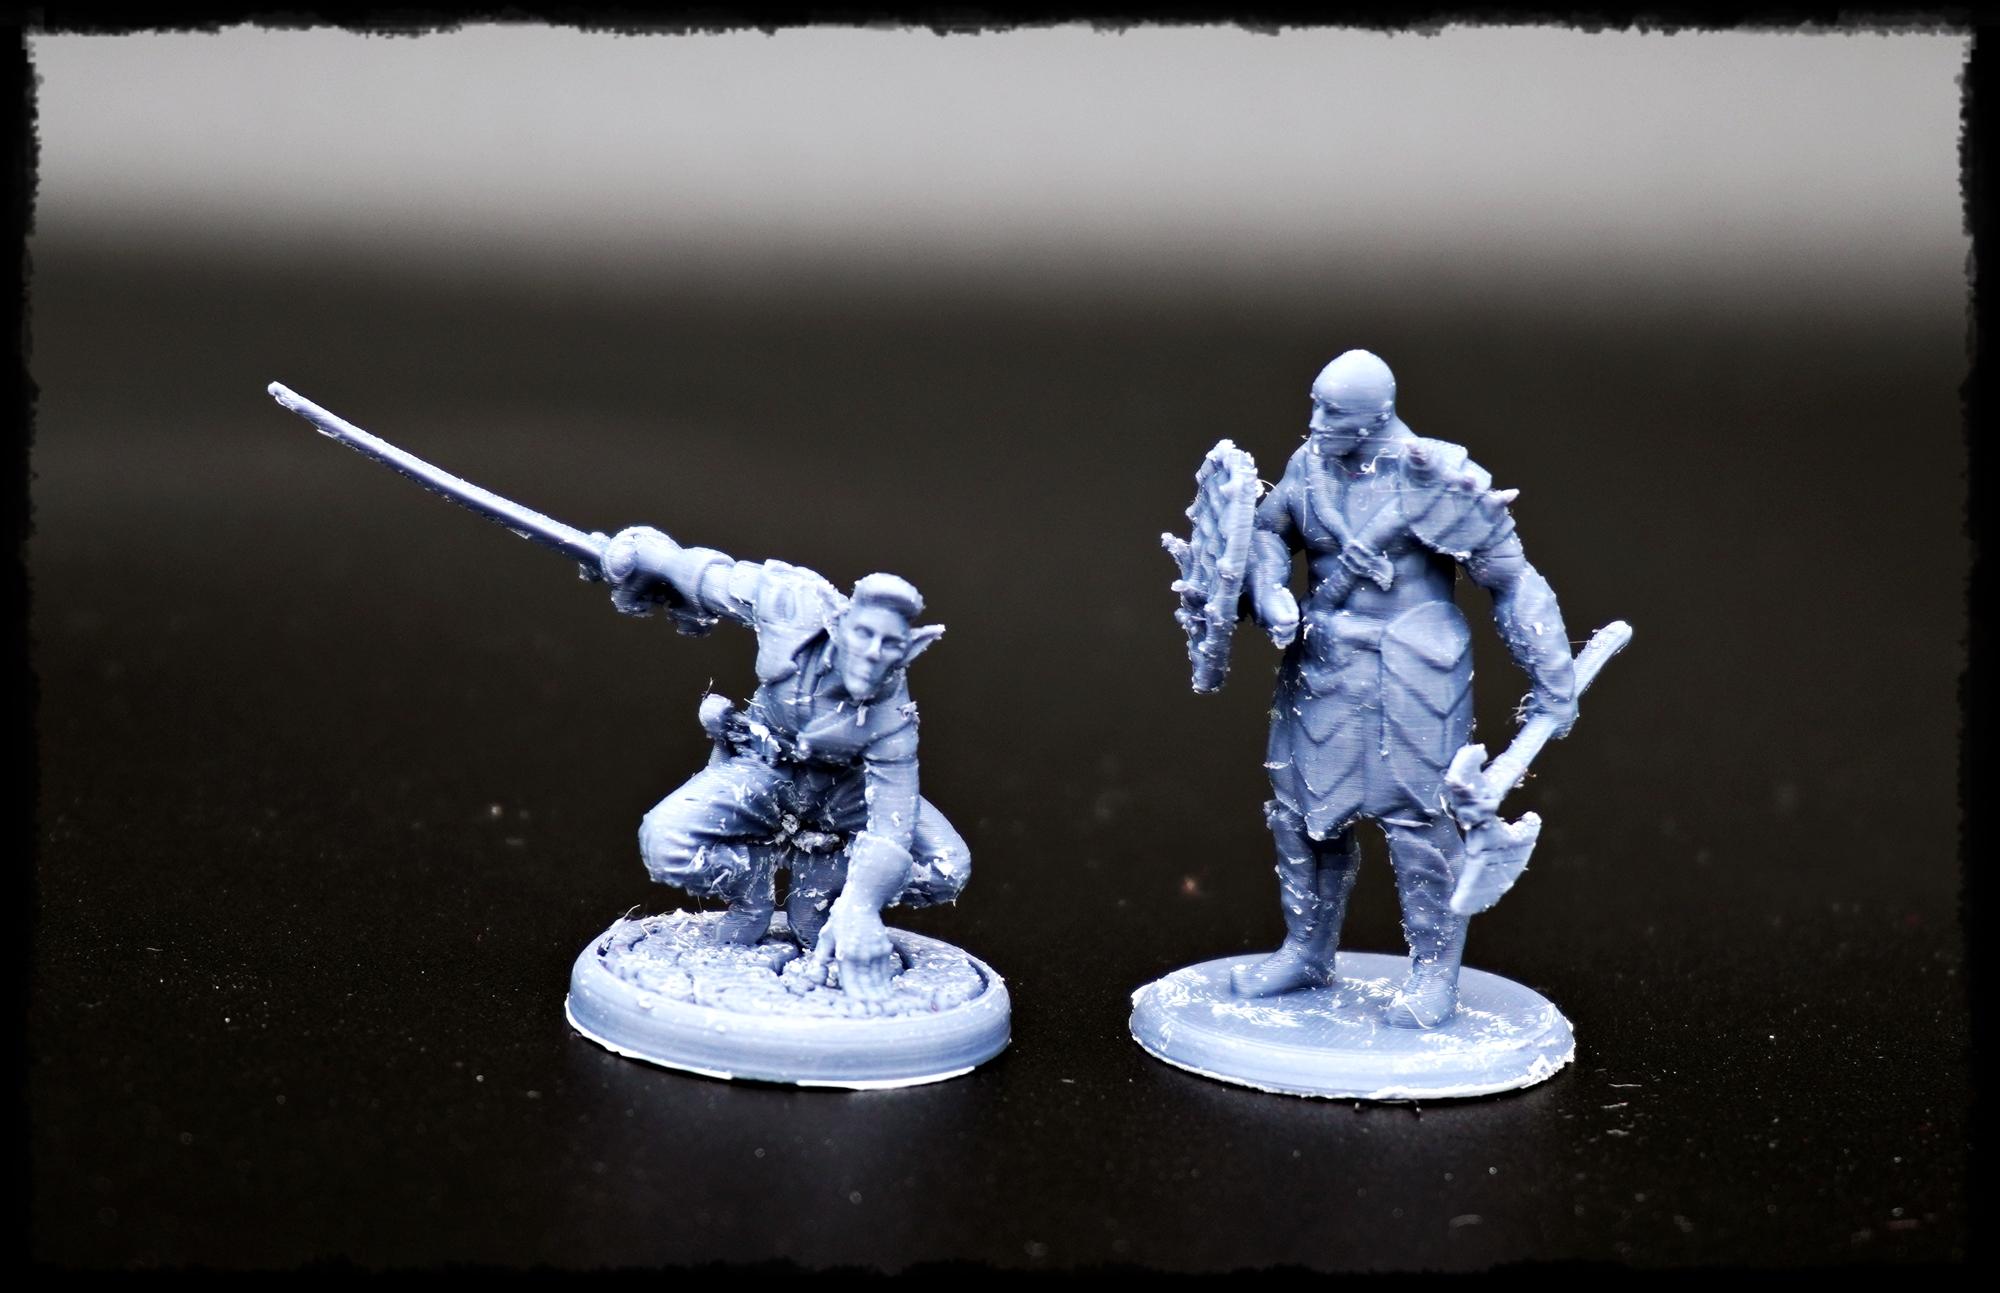
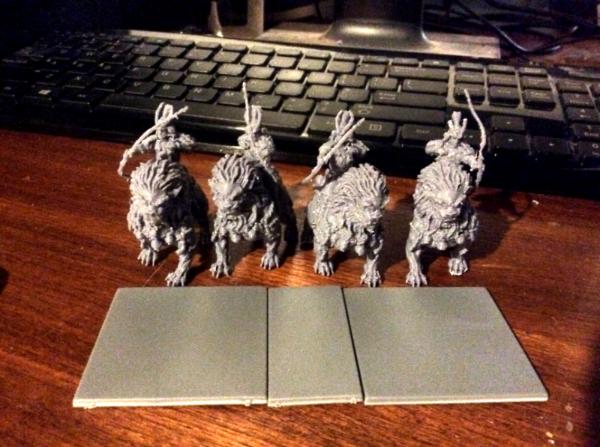
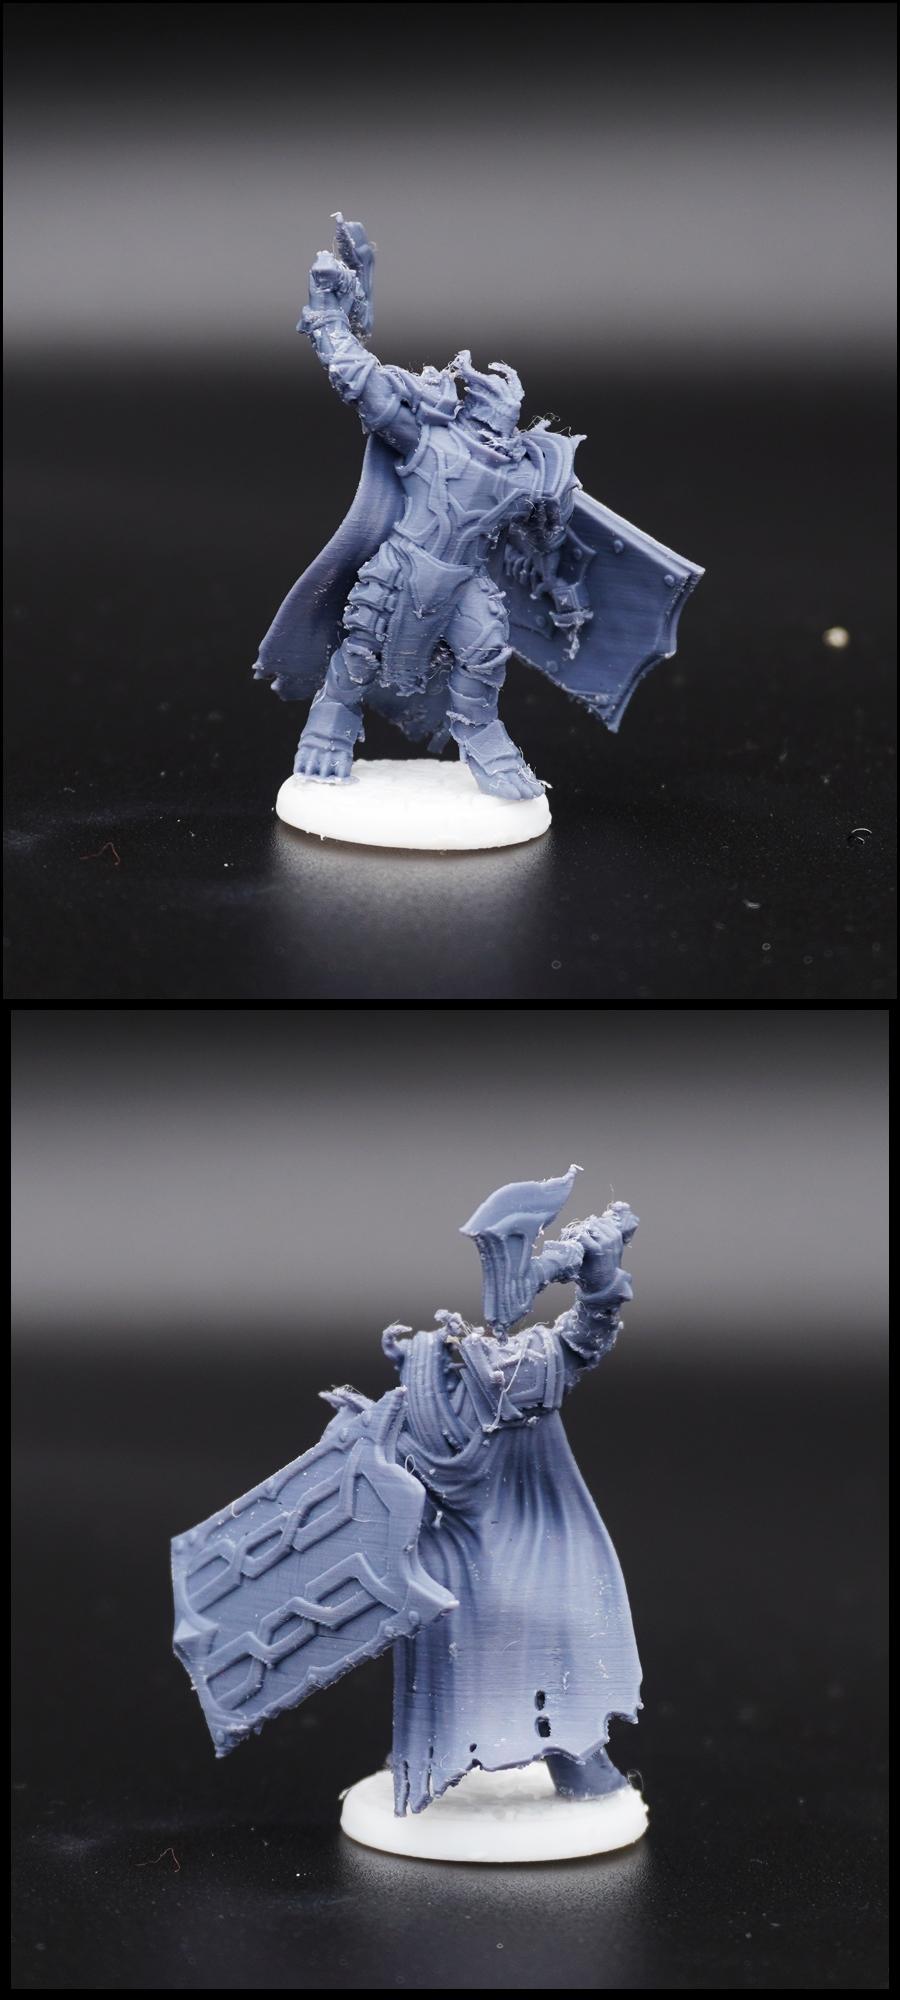
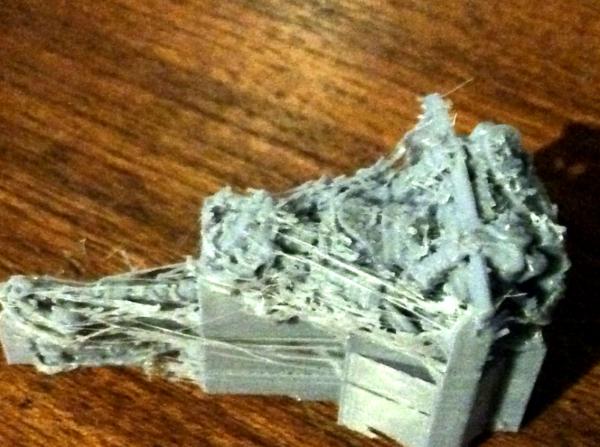
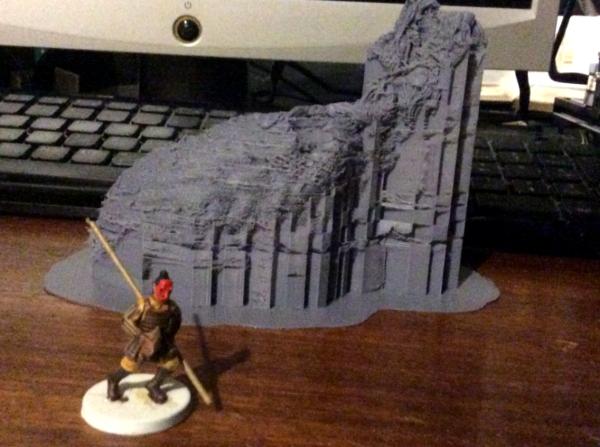
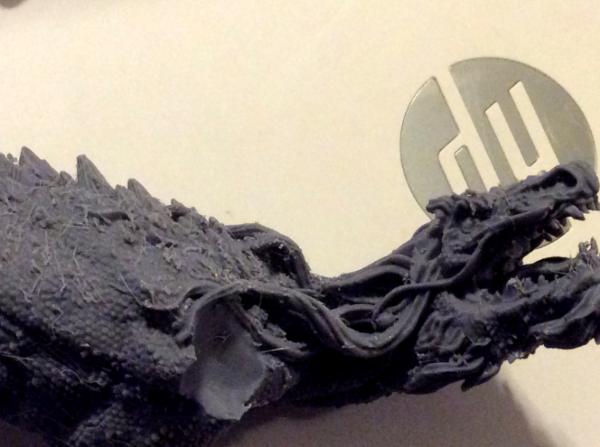
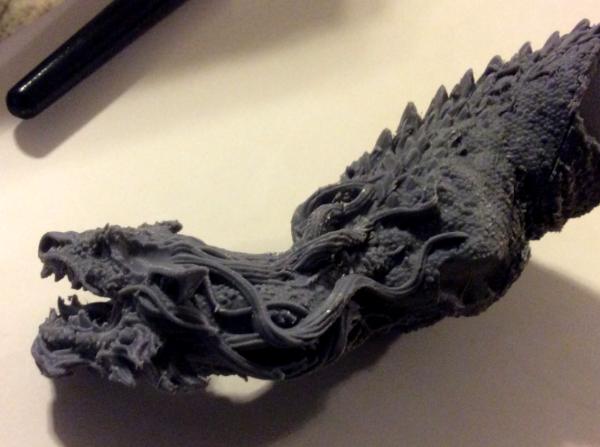


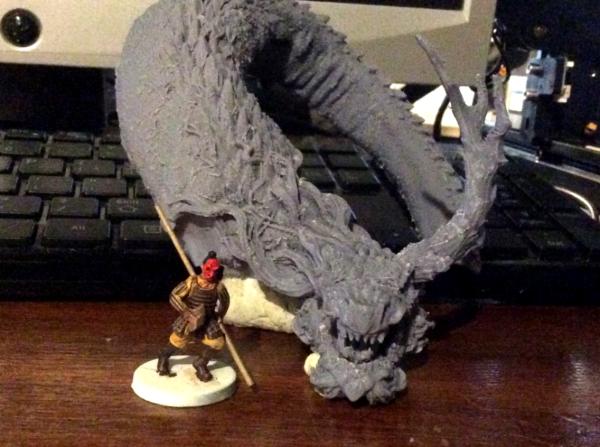
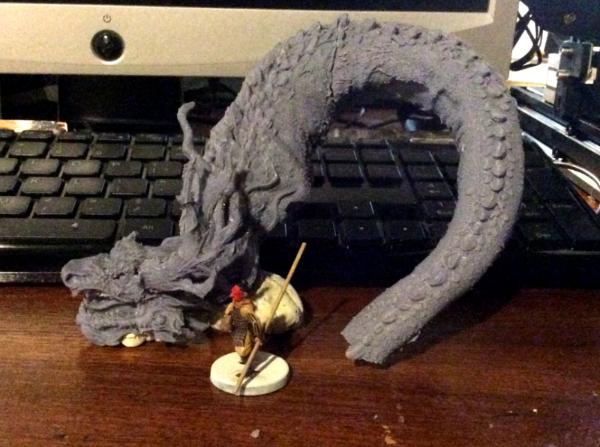
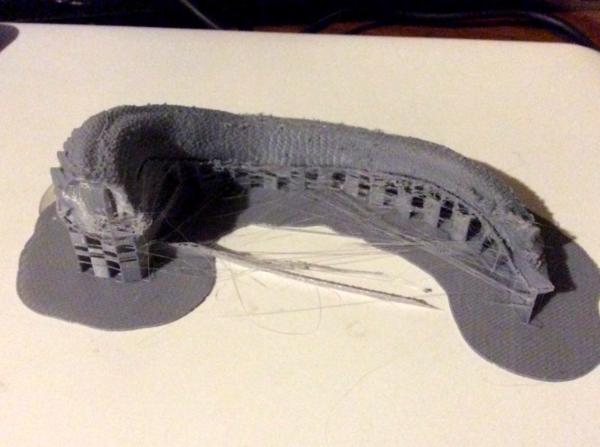
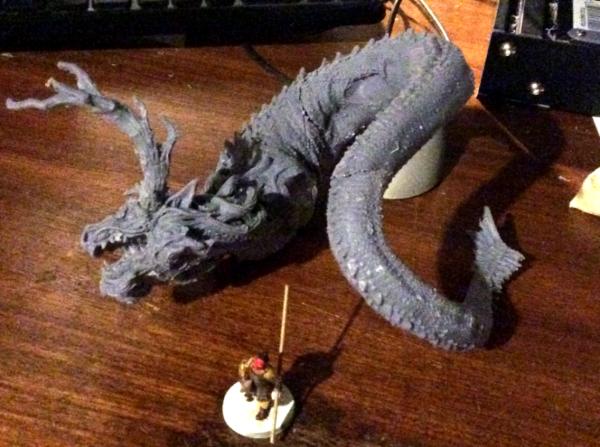
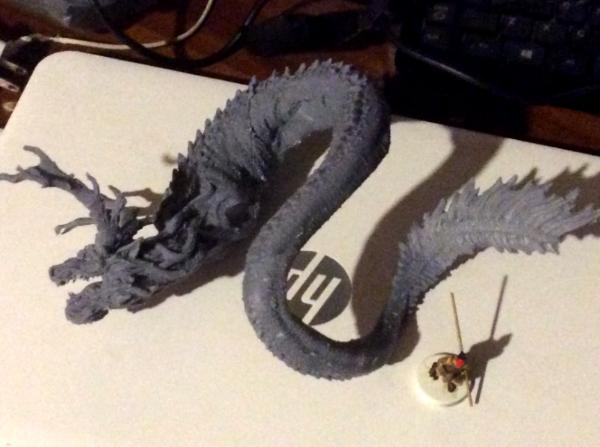
 “
“


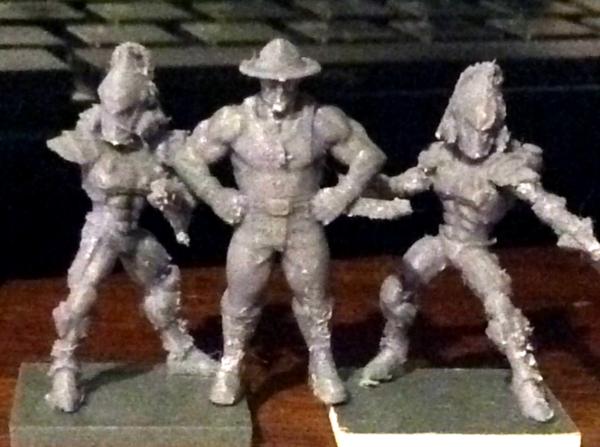
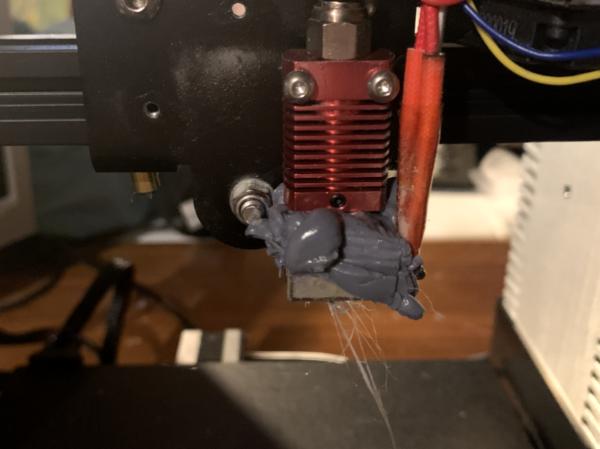
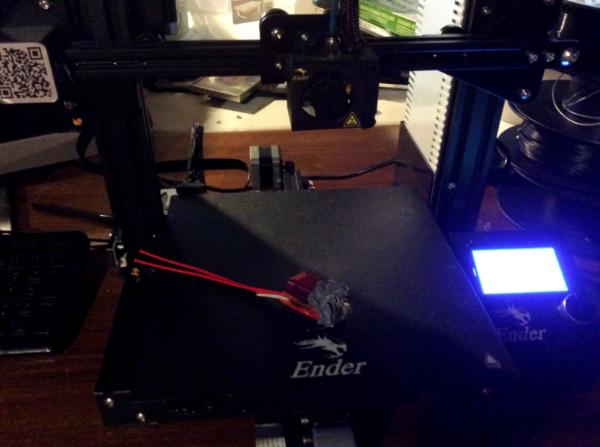
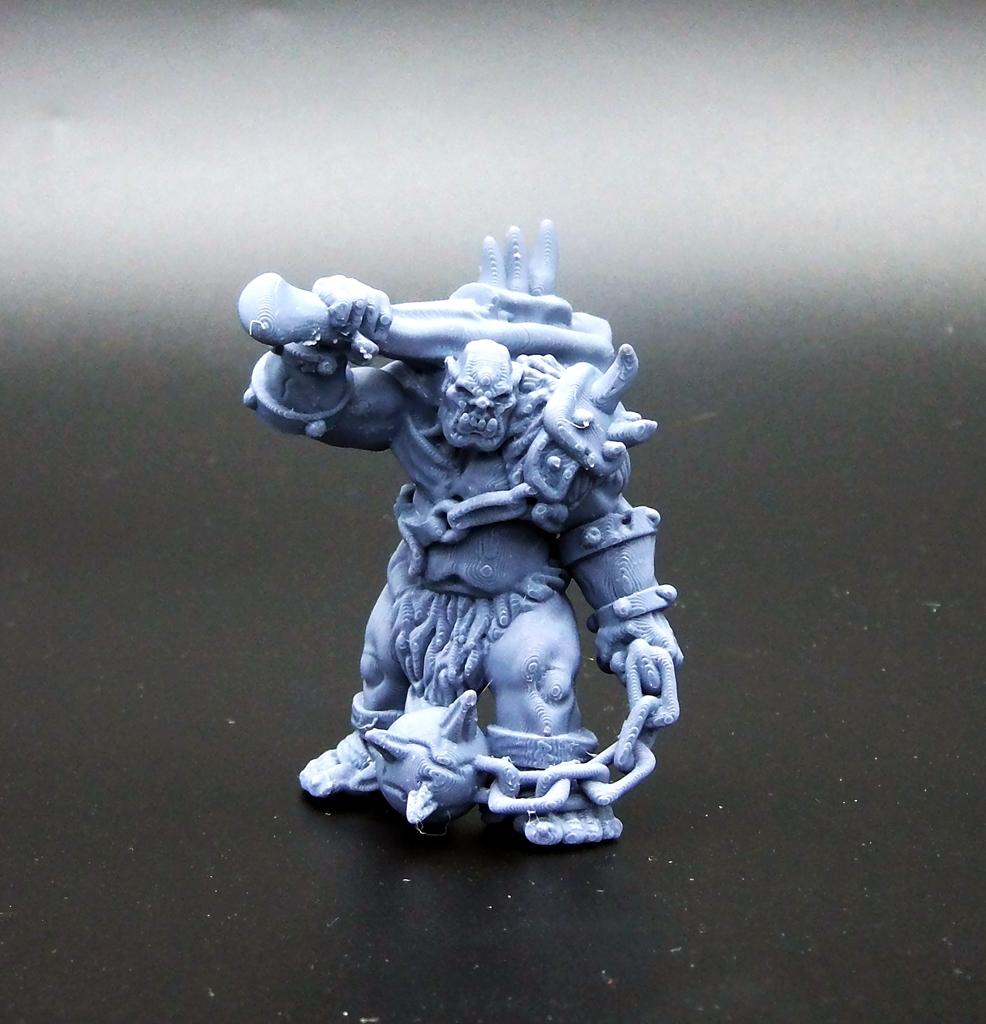
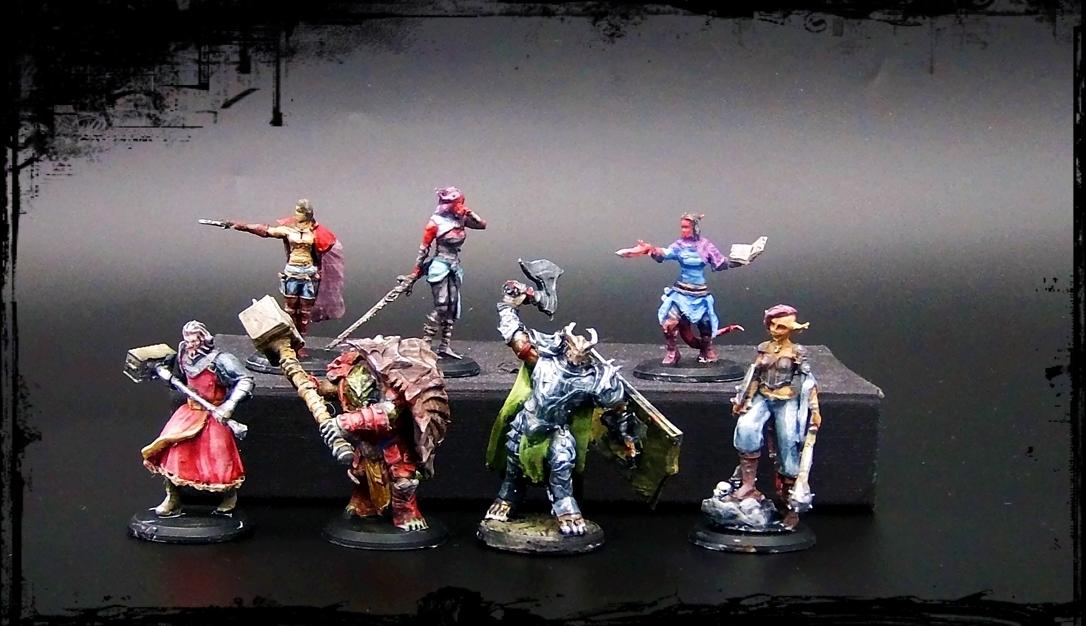
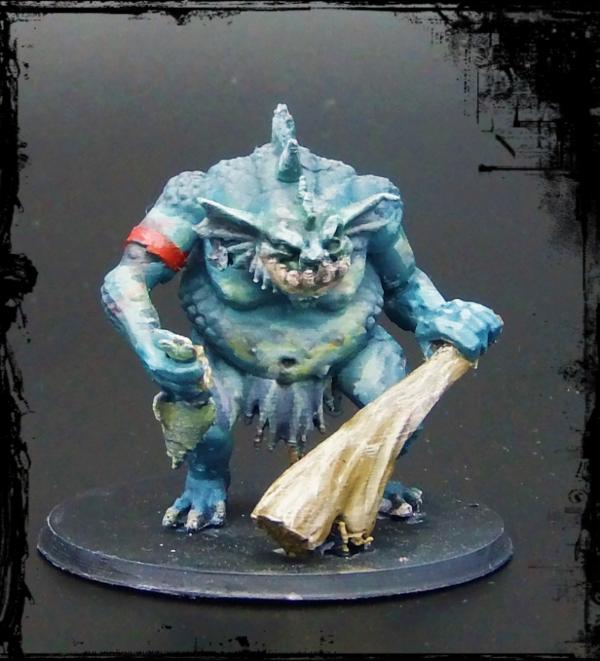
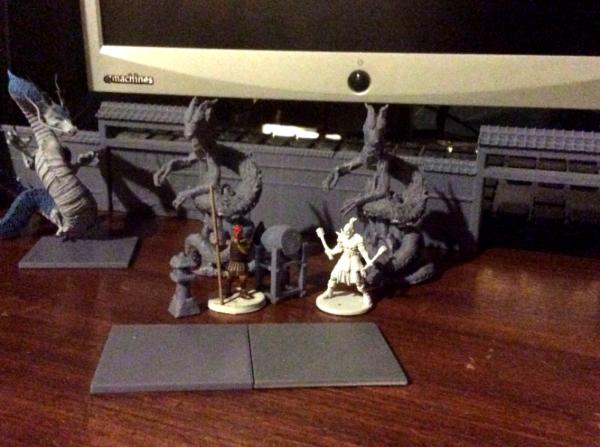
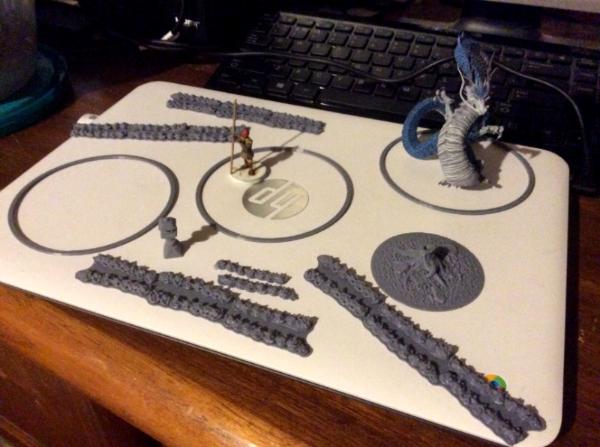
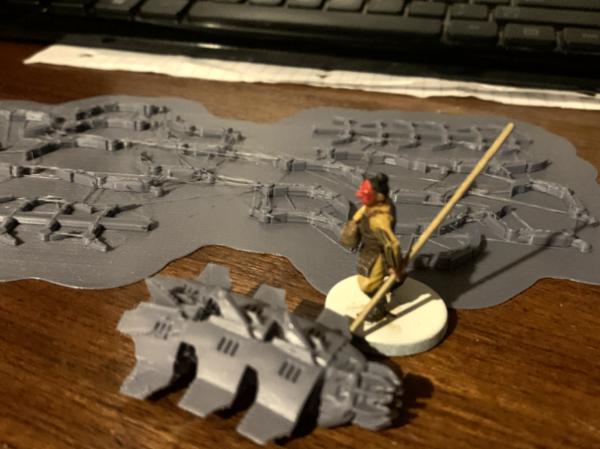
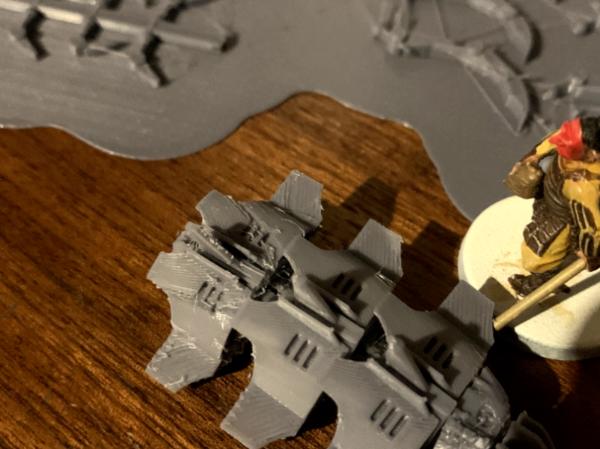
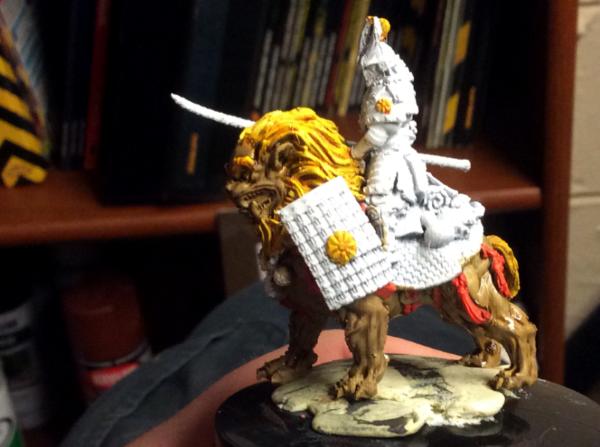
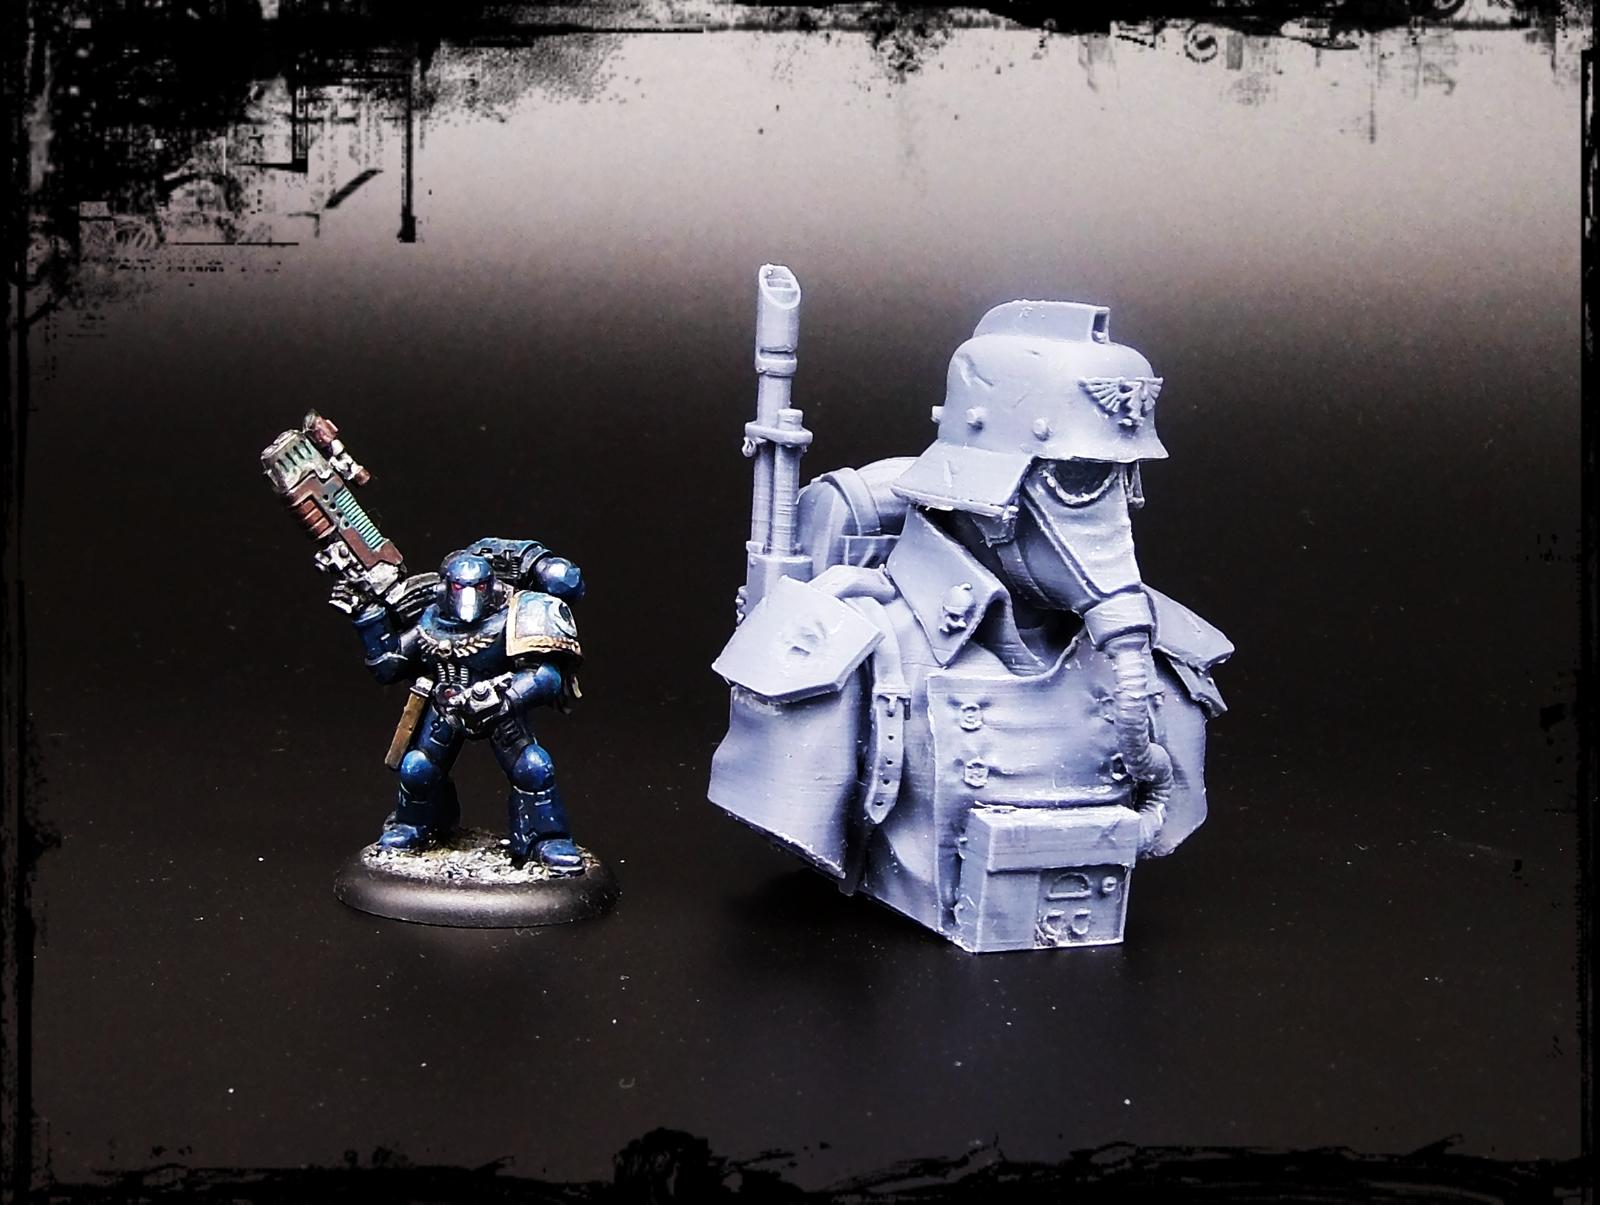
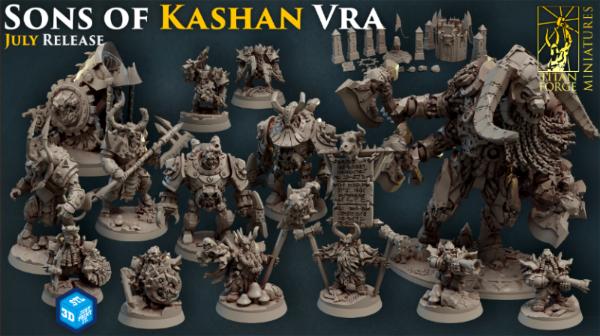
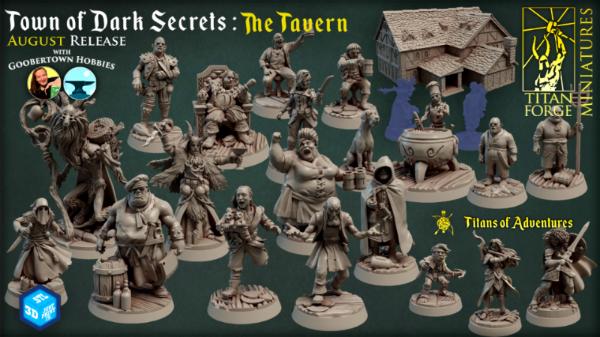
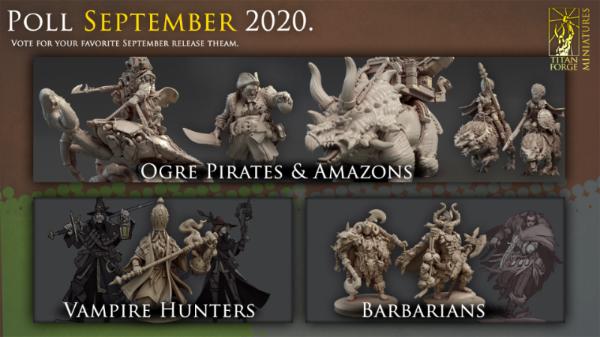
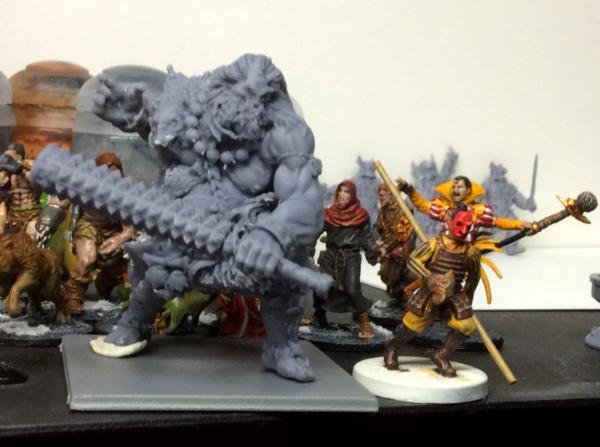
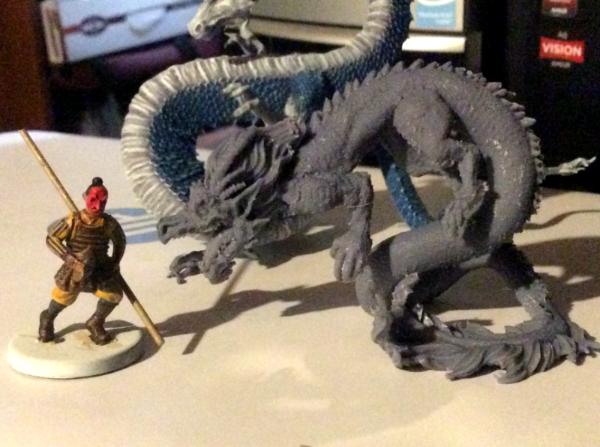


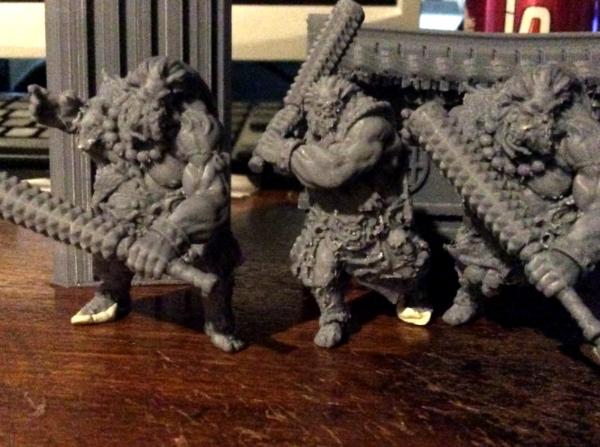
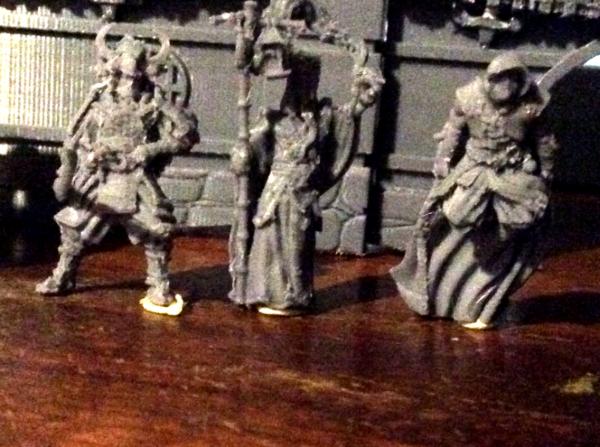
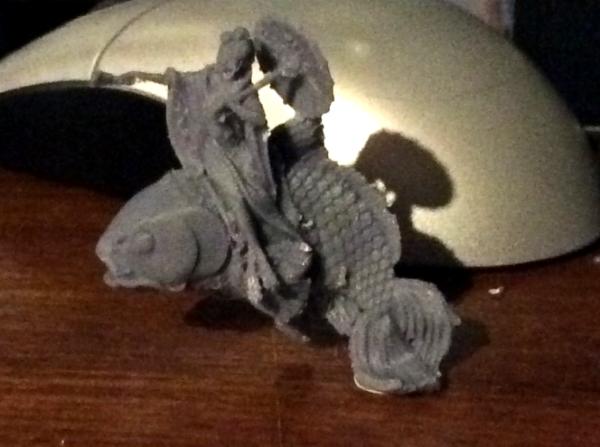
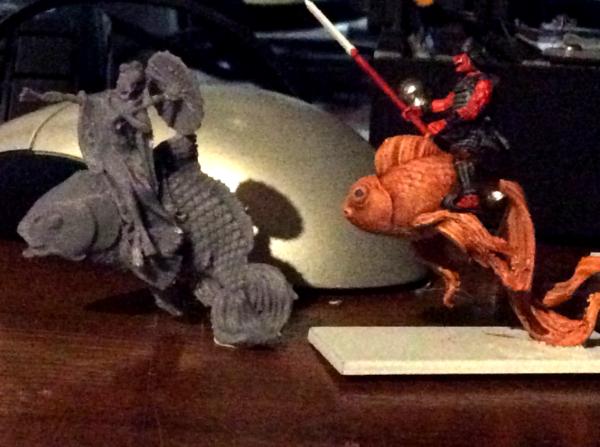


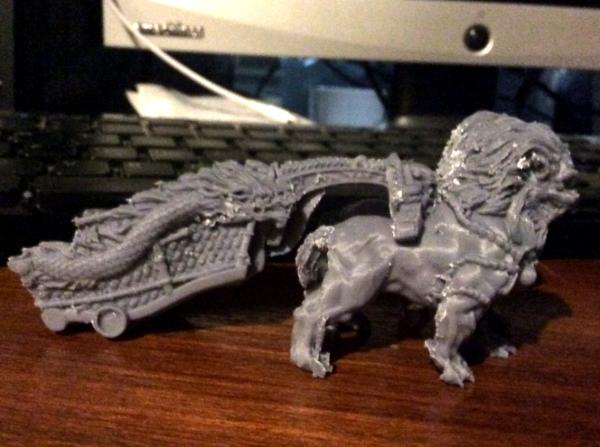

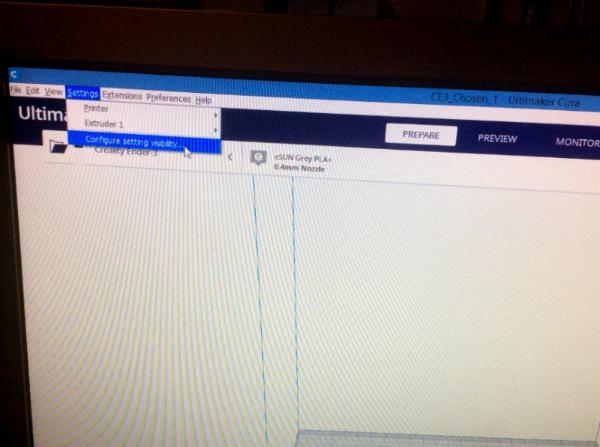
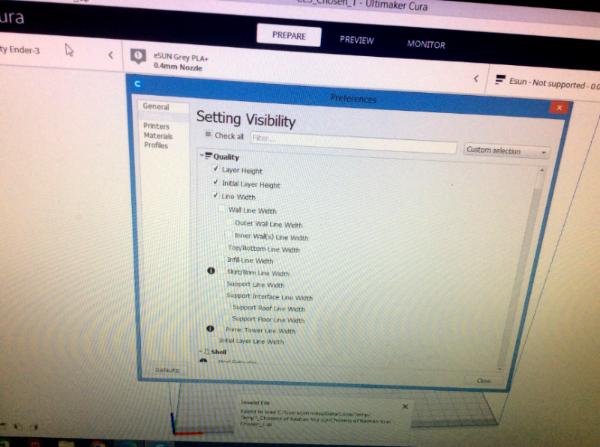

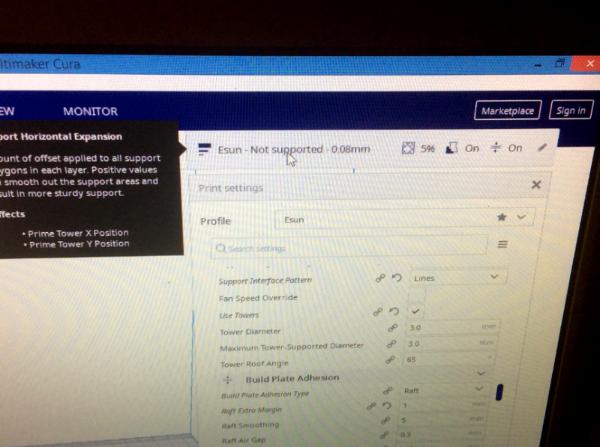
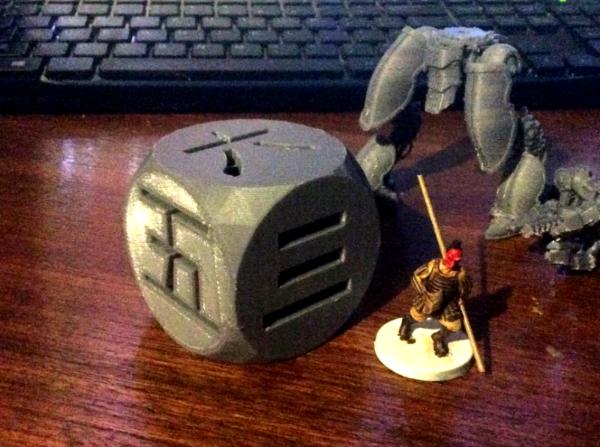
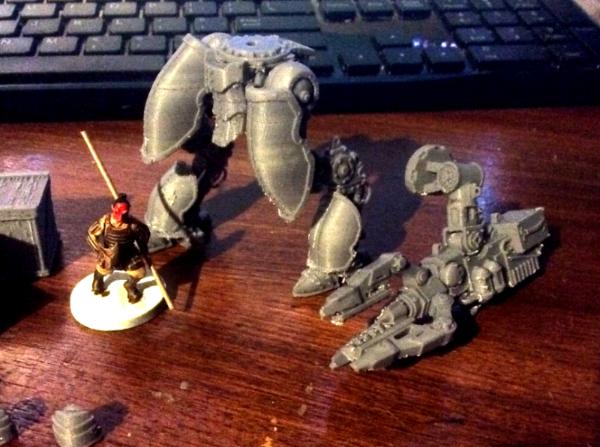
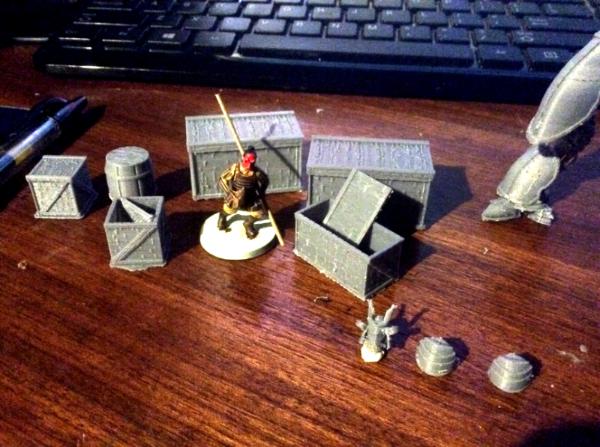
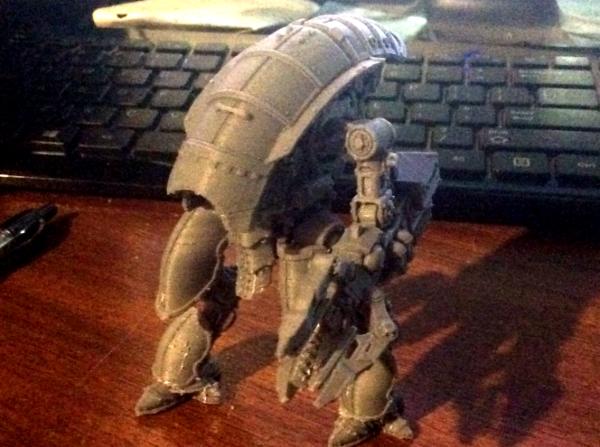
 .
.