| Author |
Message |
 |
|
|
|
|
Advert
|
Forum adverts like this one are shown to any user who is not logged in. Join us by filling out a tiny 3 field form and you will get your own, free, dakka user account which gives a good range of benefits to you:
- No adverts like this in the forums anymore.
- Times and dates in your local timezone.
- Full tracking of what you have read so you can skip to your first unread post, easily see what has changed since you last logged in, and easily see what is new at a glance.
- Email notifications for threads you want to watch closely.
- Being a part of the oldest wargaming community on the net.
If you are already a member then feel free to login now. |
|
 |
2020/08/11 21:23:48
Subject: 3D Printing Blog, Come gather round the printer kids
|
|

Is 'Eavy Metal Calling?
|
Think I've got the leveling sorted now, but still having trouble with adhesion, though weirdly it only see,s to affect the first few mm of a line. I use a series or concentric squares to yest my leveling, and consistently on the last three runs, the first part of the first edge lifts away or gets caught and folds back on itself, but the rest of each square then adheres and prints very neatly.
It's just that initial point of contact that isn't sticking, wherever it is on the plate. I'd guess that's a nozzle or filament issue? I've checked for a clog, seems clear. Will have to crack on with the troubleshooting tomorrow, any suggestions?
|
|
|
|
 |
|
2020/08/11 21:58:52
Subject: 3D Printing Blog, Come gather round the printer kids
|
|

Courageous Questing Knight
|
I put painter's tape on my build plate and it works great. When it cools down you will see some wrinkles, but once the build plate heats up you can smooth them out and it works for me.
|
|
|
|
|
|
2020/08/11 22:40:55
Subject: 3D Printing Blog, Come gather round the printer kids
|
|
Is 'Eavy Metal Calling?
|
 Paradigm wrote: Paradigm wrote:Think I've got the leveling sorted now, but still having trouble with adhesion, though weirdly it only see,s to affect the first few mm of a line. I use a series or concentric squares to yest my leveling, and consistently on the last three runs, the first part of the first edge lifts away or gets caught and folds back on itself, but the rest of each square then adheres and prints very neatly.
It's just that initial point of contact that isn't sticking, wherever it is on the plate. I'd guess that's a nozzle or filament issue? I've checked for a clog, seems clear. Will have to crack on with the troubleshooting tomorrow, any suggestions?
With it being warmer where you are and stuffier, have you changed the air conditioning settings in your house or added a fan for ventilation? if it's the edges of the print it could be cooling quicker and causing the warp up.
|
LOL, Theo your mind is an amazing place, never change.-camkierhi 9/19/13
I cant believe theo is right.. damn. -comradepanda 9/26/13
None of the strange ideas we had about you involved your sexual orientation..........-Monkeytroll 12/10/13
I'd put you on ignore for that comment, if I could...Alpharius 2/11/14 |
|
|
|
|
2020/08/12 19:45:53
Subject: 3D Printing Blog, Come gather round the printer kids
|
|
Thermo-Optical Tuareg
|
The Finder does use a Bowden Tube. I don't think that's the issue, though I probably should replace it soon.
I actually managed to get the motor off last night and got a clear look at the extruder. Sure enough, there was some material sitting there. I prodded it with a knife and cut it down a little. Ran the printer as hot as it would go, and gave the blockage a shove with the cleaning rod. A big blob of molten plastic shot out and I was able to put the rod all the way in. So, it sure looked like I cleared the blockage last night. I'll do the same again tonight, just to make sure, but I'm pretty sure I cleared it. I' lmao going to have to recalibrate everything, unfortunately. Hopefully I got it all back together correctly.
On the plus side, next time this happens, I know how to get to the problem area.
Though, I don't get why it worked this time without the motor, but none of my previous attempts to clear it worked.
|
|
|
|
|
|
2020/08/16 20:24:00
Subject: Re:3D Printing Blog, Come gather round the printer kids
|
|
Is 'Eavy Metal Calling?
|
You know the feeling when you plan out your days prints and you set up the first to start and walk away only to come back 13 hours later to see that a 10hour print is only 30% done???
I do  . Totally forgot that when printing this wall section which took 10hours or so with the old settings, that the new settings (much more crisp) was 20+ . Well there went a days worth of printing small items  . !8hours ad 40minutes later i'm now at 85%. oh well, It's going to be a lovely wall section on the side of the board providing absolutely no value except to look at .
I am now really wishing I hadn't dropped $200+ on Conquest and just bought a second Ender3 or a resin printer. First world problems.
|
LOL, Theo your mind is an amazing place, never change.-camkierhi 9/19/13
I cant believe theo is right.. damn. -comradepanda 9/26/13
None of the strange ideas we had about you involved your sexual orientation..........-Monkeytroll 12/10/13
I'd put you on ignore for that comment, if I could...Alpharius 2/11/14 |
|
|
|
|
2020/08/17 03:36:49
Subject: 3D Printing Blog, Come gather round the printer kids
|
|
Legendary Master of the Chapter
|
Spent hours today fixing my printer and helping my dad figure out why his computer is slicing files all wrong. Still no answer on that one.
|
|
|
|
|
|
2020/08/17 06:16:07
Subject: Re:3D Printing Blog, Come gather round the printer kids
|
|
Calculating Commissar
|
 Theophony wrote: Theophony wrote:You know the feeling when you plan out your days prints and you set up the first to start and walk away only to come back 13 hours later to see that a 10hour print is only 30% done???
Oh I know that one, Putting on a 9 hour print, coming back the next day to find most of it stuck to the bottom of the resin tank because the print plate looks to have un-levelled itself somehow *face/palm*. Now I need to clean it all out and reset everything before I try again. Kind of put a dampner on getting some of these tanks finished over the weekend!
|
|
|
|
|
|
2020/08/17 06:37:51
Subject: 3D Printing Blog, Come gather round the printer kids
|
|
Is 'Eavy Metal Calling?
|
 BobtheInquisitor wrote: BobtheInquisitor wrote:Spent hours today fixing my printer and helping my dad figure out why his computer is slicing files all wrong. Still no answer on that one.
How is it slicing things all wrong? What’s coming out? What program are you using?
|
LOL, Theo your mind is an amazing place, never change.-camkierhi 9/19/13
I cant believe theo is right.. damn. -comradepanda 9/26/13
None of the strange ideas we had about you involved your sexual orientation..........-Monkeytroll 12/10/13
I'd put you on ignore for that comment, if I could...Alpharius 2/11/14 |
|
|
|
|
2020/08/17 17:23:47
Subject: 3D Printing Blog, Come gather round the printer kids
|
|
Is 'Eavy Metal Calling?
|
Still having the same issue with my printer, going slightly mad about it now. Having bought and installed a glass bed,corrected the Z offset, relevelled a billion times, checked for clogs, removed and reattached the filament, I'm still consistently seeing the first 2-3cm of any given line not adhere properly. Doesn't seem to matter where it is on the plate, whether I'm using the glass or the stock plate, what temperature or shape I'm printing, it's consistently the same failure...
On shapes where there's enough room for it to do so, the rest of he line after that point then adheres fine, but for anything actually i
useful and not just straight flat lines, the loose part is catching on itself and causing the whole layer to lift away, if it even gets that far.
Somehow, I managed to get a single successful print of a base in the middle of this, but the next print I tried, having changed absolutely nothing. the same issue occurs.
Any ideas? Apologies if this seems ranty. it's just really starting to iritate me now as I just can't trace the issue. Thought it might have been the heat but it's been much cooler the last dew days and yet it's still happening.
|
|
|
|
|
|
2020/08/17 17:46:09
Subject: 3D Printing Blog, Come gather round the printer kids
|
|
Legendary Master of the Chapter
|
Theophony wrote: BobtheInquisitor wrote:Spent hours today fixing my printer and helping my dad figure out why his computer is slicing files all wrong. Still no answer on that one.
How is it slicing things all wrong? What’s coming out? What program are you using?
So, he has Cura on his computer. He downloaded it around the same time my brother and I downloaded Cura. For some reason, his version of Cura has a different-looking interface, along with a lot of options for 2 extruders that make no sense for the Ender 3 Pro, even though the program was told the printer was and Ender 3 pro.
When he slices a file, it does not save as a gcode file. I have helped him manually change some files to gcode to try them on the printer as it does not “see” the other files. When we print anything sliced on his computer, the bed does not heat up (even though Cura has it set to 60 degrees C). Since the bed doesn’t heat up, nothing prints except a bunch of stringy goop that moves with the extruder.
I had to repair the printer because some of the PLA had hardened in the white tube and then the filament broke at the feeder mechanism. Getting the plug out was ....involved. Automatically Appended Next Post: Oh, and he says he already uninstalled and renstalled Cura once.
|
|
This message was edited 1 time. Last update was at 2020/08/17 17:48:27
|
|
|
|
|
2020/08/18 00:15:55
Subject: 3D Printing Blog, Come gather round the printer kids
|
|
Is 'Eavy Metal Calling?
|
BobtheInquisitor wrote: Theophony wrote: BobtheInquisitor wrote:Spent hours today fixing my printer and helping my dad figure out why his computer is slicing files all wrong. Still no answer on that one.
How is it slicing things all wrong? What’s coming out? What program are you using?
So, he has Cura on his computer. He downloaded it around the same time my brother and I downloaded Cura. For some reason, his version of Cura has a different-looking interface, along with a lot of options for 2 extruders that make no sense for the Ender 3 Pro, even though the program was told the printer was and Ender 3 pro.
When he slices a file, it does not save as a gcode file. I have helped him manually change some files to gcode to try them on the printer as it does not “see” the other files. When we print anything sliced on his computer, the bed does not heat up (even though Cura has it set to 60 degrees C). Since the bed doesn’t heat up, nothing prints except a bunch of stringy goop that moves with the extruder.
I had to repair the printer because some of the PLA had hardened in the white tube and then the filament broke at the feeder mechanism. Getting the plug out was ....involved.
Automatically Appended Next Post:
Oh, and he says he already uninstalled and renstalled Cura once.
Bob, I just downloaded Cura 4.6.2 off their website a couple of weeks ago. 4.6.2 gives you a bajillion options that you don't need, such as the two extruder options. So to make things function right you just have to dumb it down some.
1.First option is make sure that you have cura select the Ender 3 Pro as your printer, it will have preloaded info for it there (top left of the cura screen, then manage printer button). Make sure that the settings are set for the bed temperature you want in there as well as also on the Ender itself. I think someone probably set the ender to have no bed temperature as the default and it may be overriding your cura settings. Adjust the Ender using the knob dial. You may even reset it to factory specs if you haven't already.
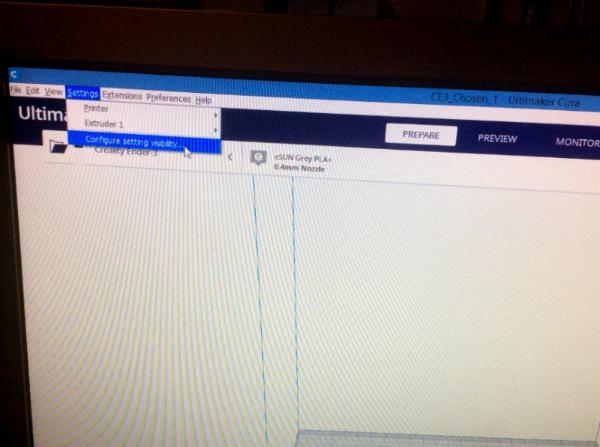
selecting that will pop up this screen
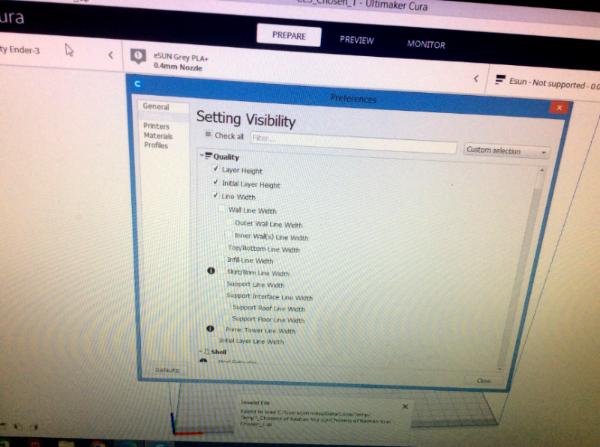
put checks in the boxes that you want to have available to select and modify later (unselect the box for multiple extruders). Some you have to select the base of the tree to unlock the set back options.
2. Then select your material in the second toggle box (middle). They have the Esun PLA+ grey preloaded in the system, I think I tweeked it a bit, but it should still work by selecting whatever material you are using. This could also have a default temperature set in it, so go through all the options to make sure.

3. the third and rightmost toggle box is where the meat and potatoes are. This is where you input all your custom values and can select if there are multiple extruders or not. while all the available options are listed here, you can weed the ones you don't need out by selecting settings on the top bar on the upper left of the screen. I'm not sure right now exactly where the option is to reset them to basic, but I know it's in there. If your dad has uninstalled and reinstalled the program it might still be finding the old settings and using those again. so uninstall, reinstall, set all values to the basic print functions and then you can go back and tweek away. I hope that helps.
So even though you selected to make the options possible in #1 above, you have to go into the print settings and set the actual values here for them to be used.
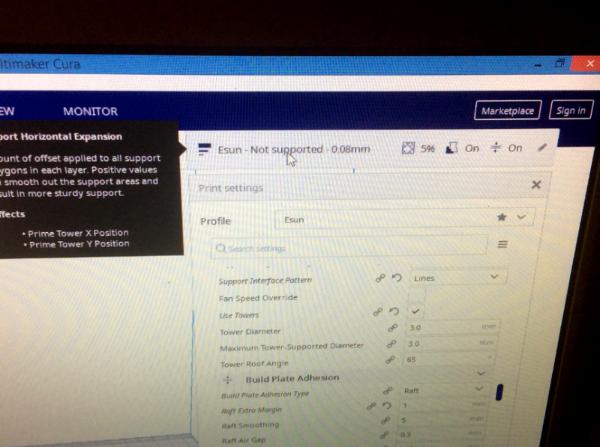
Paradigm. While looking at bob's issues I wonder if your cura settings on the third toggle above have the build plate adhesion turned to off. Even if the settings say they are on and you have a raft or whatever style adhesion your using, if in that third bar it shows off then that may be over ridding the actual setting under it. The image directly above shows to the far right an image that looks like a plate with an arrow pushing it down on a table. thats your build plate adhesion setting. In the image It shows ON, then in the box below I have scrolled down to the bottom to show I'm using a Raft with 1mm extra around the model base(I go larger if it's a really small item such as a helmet or an arm, usually 5mm extra does the trick unless it's also tall so a larger raft will help with it wiggling).
I hope some of this helps and not just what you all have already tried.
I'll take a few pictures and be back in a bit.
|
|
This message was edited 1 time. Last update was at 2020/08/18 00:29:56
LOL, Theo your mind is an amazing place, never change.-camkierhi 9/19/13
I cant believe theo is right.. damn. -comradepanda 9/26/13
None of the strange ideas we had about you involved your sexual orientation..........-Monkeytroll 12/10/13
I'd put you on ignore for that comment, if I could...Alpharius 2/11/14 |
|
|
|
|
2020/08/18 01:57:40
Subject: 3D Printing Blog, Come gather round the printer kids
|
|
Legendary Master of the Chapter
|
I’ll give that a try. It could be that the uninstall didn’t get rid of all the old settings, so I’ll reset it and start over.
The thing is, my brother and I both downloaded Cura 4.6.2 on our computers, and it looks the same and works the same. The Cura on my dad’s computer looks different, the way Windows 3.5 looked different from Windows 98. I think I’ll have to sit down with him the entire uninstall/reinstall process to make sure all the right buttons are pressed.
|
|
|
|
|
|
2020/08/18 02:11:22
Subject: 3D Printing Blog, Come gather round the printer kids
|
|
Is 'Eavy Metal Calling?
|
BobtheInquisitor wrote:I’ll give that a try. It could be that the uninstall didn’t get rid of all the old settings, so I’ll reset it and start over.
The thing is, my brother and I both downloaded Cura 4.6.2 on our computers, and it looks the same and works the same. The Cura on my dad’s computer looks different, the way Windows 3.5 looked different from Windows 98. I think I’ll have to sit down with him the entire uninstall/reinstall process to make sure all the right buttons are pressed.
See, my laptop (a chromebook) won't install programs, so I was stuck with using an older version of Cura which was based online(cura 3.6 i believe) and it looks completely different. Maybe your dads system won't take the newer 4.6.2 so is stuck on an older setup, which could also be part of the culprit.
|
LOL, Theo your mind is an amazing place, never change.-camkierhi 9/19/13
I cant believe theo is right.. damn. -comradepanda 9/26/13
None of the strange ideas we had about you involved your sexual orientation..........-Monkeytroll 12/10/13
I'd put you on ignore for that comment, if I could...Alpharius 2/11/14 |
|
|
|
|
2020/08/18 08:08:10
Subject: 3D Printing Blog, Come gather round the printer kids
|
|
Is 'Eavy Metal Calling?
|
Thanks for the suggestions. Theo. Pretty sure it's not a settings issue though, as 1) I'm still slicing on Astroprint, where I've only made incremental changes to my previous successful profile and 2) it's happening even on files (as in gcodes, rather than stls) that I've printed fine half a dozen times before. I do always print with a brim, which has not really failed me, but at the moment I'm not even getting that far, it's the very first deposit of PLA that's not adhering, rather than a part-done print coming loose from the plate.
I'll do some more,tests later, and take some photos of what's going on, as it doesn't seem to match anything I'm finding in troubleshooting guides.
|
|
|
|
|
|
2020/08/18 11:30:06
Subject: 3D Printing Blog, Come gather round the printer kids
|
|
Is 'Eavy Metal Calling?
|
Paradigm wrote:Thanks for the suggestions. Theo. Pretty sure it's not a settings issue though, as 1) I'm still slicing on Astroprint, where I've only made incremental changes to my previous successful profile and 2) it's happening even on files (as in gcodes, rather than stls) that I've printed fine half a dozen times before. I do always print with a brim, which has not really failed me, but at the moment I'm not even getting that far, it's the very first deposit of PLA that's not adhering, rather than a part-done print coming loose from the plate.
I'll do some more,tests later, and take some photos of what's going on, as it doesn't seem to match anything I'm finding in troubleshooting guides.
Try using a raft instead of a brim. maybe a little change like that will fix the issue. tiny bit more material and time, but since it forms differently maybe that will be the thing. The other suggestion is to slow print speed just a little. I know in the higher Cura settings you can adjust travel speed on the brim and lower levels. I haven't messed with those settings, but I did adjust my speed up when not actually laying material.
I won't bash astroprint, it's where I started and it worked well for terrain and large objects. I think with a better computer I am able to do better prints. I know it's not always feasible to upgrade, especially with computers, but I am using a 8-10 year old desktop that had been running windows 7 and using cura 4.6.2 (free). With the current economy im sure lots of pawn shops have some decent options available.
As a testament to how much I print, I'd judt like to point out I need another ender print bed cover. I don't let my machine rest much/at all, and the constant heat has basically ruined another spot on this one about the size of a marine head. I have since placed a section of blue painters tape over the hole and have done a few prints on top with no issue.
I've also looked at getting a resin printer . They are more expensive andthe print beds are so much smaller, but I'm still having trouble arguing that the quality difference can be made up. The bulk of my armies would be better printed in resin for detail sake, but I'm not sure I can jsutify the expense of another printer right now......unless it's another Ender .
|
LOL, Theo your mind is an amazing place, never change.-camkierhi 9/19/13
I cant believe theo is right.. damn. -comradepanda 9/26/13
None of the strange ideas we had about you involved your sexual orientation..........-Monkeytroll 12/10/13
I'd put you on ignore for that comment, if I could...Alpharius 2/11/14 |
|
|
|
|
2020/08/18 20:59:22
Subject: 3D Printing Blog, Come gather round the printer kids
|
|
Is 'Eavy Metal Calling?
|
At the very least, I seem to have found a workaround for the problems and got a couple of prints out this evening. An extra 0.1mm on the initial layer, a wider brim and another 10° for the bed and gets that first bit to stick pretty solidly, without having to resort to rafts. Doesn't help me figure out precisely why the old settings suddenly stopped working, but at least it's running again.
Does seem like I've changed enough that I'm back to square one with regards to quality though. Had some zits and delaminations on tonight's print worse than I've seen in weeks. But hey, I was planning a settings revamp anyway, so it's a good enough excuse to put some thought into that.
|
|
This message was edited 1 time. Last update was at 2020/08/18 21:00:16
|
|
|
|
|
2020/08/18 23:46:20
Subject: 3D Printing Blog, Come gather round the printer kids
|
|
Is 'Eavy Metal Calling?
|
Paradigm wrote:At the very least, I seem to have found a workaround for the problems and got a couple of prints out this evening. An extra 0.1mm on the initial layer, a wider brim and another 10° for the bed and gets that first bit to stick pretty solidly, without having to resort to rafts. Doesn't help me figure out precisely why the old settings suddenly stopped working, but at least it's running again.
Does seem like I've changed enough that I'm back to square one with regards to quality though. Had some zits and delaminations on tonight's print worse than I've seen in weeks. But hey, I was planning a settings revamp anyway, so it's a good enough excuse to put some thought into that.
could the temperature increase you've done be a compensation from the magnetic plate to a glass plate? I know someone mentioned a glass bed, I'm just wondering if that may have been an issue  .
|
LOL, Theo your mind is an amazing place, never change.-camkierhi 9/19/13
I cant believe theo is right.. damn. -comradepanda 9/26/13
None of the strange ideas we had about you involved your sexual orientation..........-Monkeytroll 12/10/13
I'd put you on ignore for that comment, if I could...Alpharius 2/11/14 |
|
|
|
|
2020/08/19 12:20:59
Subject: Re:3D Printing Blog, Come gather round the printer kids
|
|
Is 'Eavy Metal Calling?
|
I feel it my duty to say I just got an email from Creality.com
Ender3 sale $155 with coupon code “Crazyender3usa”
I’m not sure it will be an actual deal as it looks like they may be charging shipping and the regular price is $167 with free shipping.
|
LOL, Theo your mind is an amazing place, never change.-camkierhi 9/19/13
I cant believe theo is right.. damn. -comradepanda 9/26/13
None of the strange ideas we had about you involved your sexual orientation..........-Monkeytroll 12/10/13
I'd put you on ignore for that comment, if I could...Alpharius 2/11/14 |
|
|
|
|
2020/08/20 11:35:16
Subject: Re:3D Printing Blog, Come gather round the printer kids
|
|
Is 'Eavy Metal Calling?
|
Been busy with some print projects, four baby Yodas are done and gifted (one on my desk at my job at the children’s hospital  ). A pretty cool gift to give to our music pastor (cool to me anyway, we’ll see how he likes it when I give it to him Sunday), no picture right now, but it’s a dual print of a treble cleft that when you turn it on the side it says music. Have to see it to understand, just wondering if I should paint it or leave it raw, looks good raw, but you always see the notes and symbols in black.
Anyway while watching some YouTube videos I got envious of some BIG dice turn counters, so I tried printing one I saw but it wasn’t manifold and had wierd gaps and stuff. Would work fine, just not pretty, so I found this guy. A die with 1-6 in Japanese on it, I better start relearning my Japanese 1-10 that I learned 36 years ago .
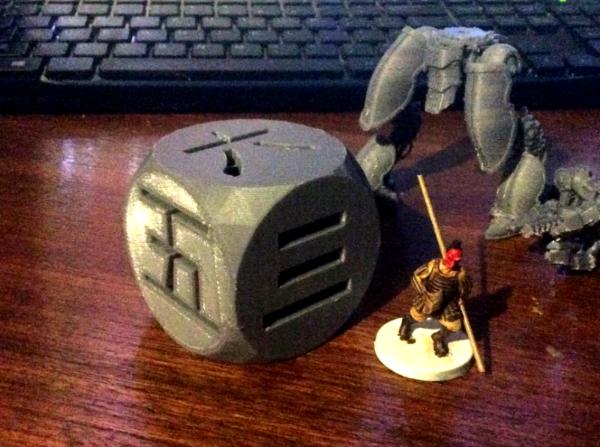
I blew it up to 48mm on each side, so it’s equal to 3 16mm sized dice wide and tall. It also happens to be equal to 4 12mm on each side, which wasn’t planned for but glad it I still as those are the common dice sizes.
 That’s cool and all Theo, but those legs in the back.....What are those?
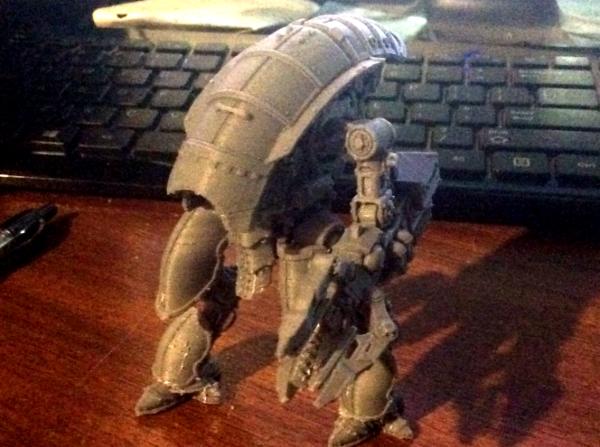
Glad you asked, I stumbled upon some not Armiger knight legs and I was feeling the pull back into 40k. Must resist......but it’s futile .
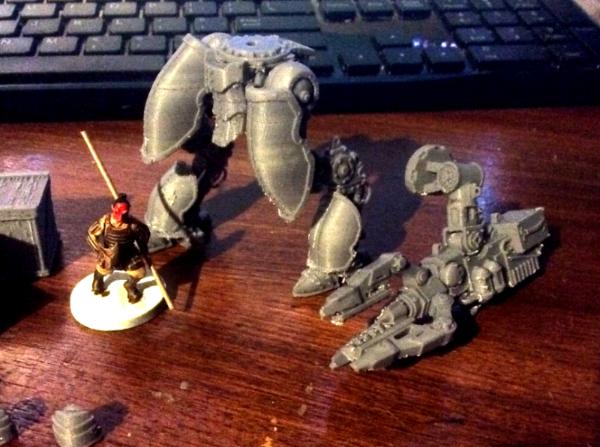
So while I was at work yesterday the legs printed out. 14hours. There are some manifold spots and areas that need hoses, but otherwise a wonderful design. Plus it cost $0.56 of plastic. The arm was 7+ hours and $0.29 of plastic. I started the main body 22 minutes ago and it should be done when I get home, it is only $0.44 of plastic. All the other arms take 3-4 hours and cost between $0.12-$0.17 to print. So less than $2 for an Armiger, less than $3 with a base. The only pauldrons I’ve found are Nurgle ones thus far, and still need the top mounted weapons to complete the model, but I’ll find some. Heads are another item I’m looking for, not liking the designs I’ve seen thus far, but as the kits come with spare heads I might be able to source some locally. I’ll finish this guy off and then consider building a household.
Also printed were a bunch of scatter terrain including boxes both solid and with separate lids.
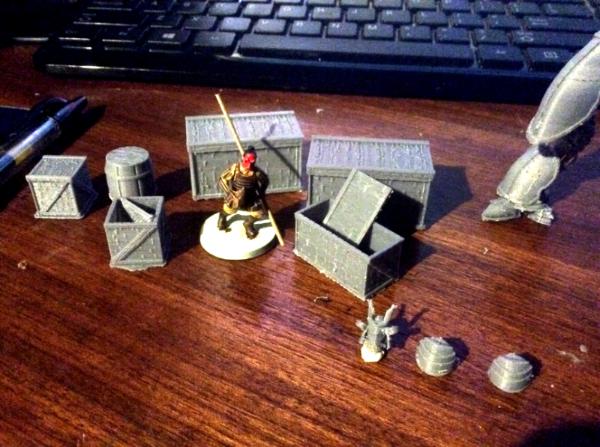
I like the design too them, nothing too contemporary, and the little bumps on the side look more like rough wood.
You might also see in the bottom corner some marine shoulder pads and a helmet (Mark IV) with a samurai helmet on top  . It’s hard to get a good shot of these small things as the sheen is bad on a tight zoom.
Any suggestions on a resin printer? I’d like a larger build plate, but I guess the big things are coming off nicely on the Ender, so fine detail stuff can be resin if I so choose to go down that path.
|
LOL, Theo your mind is an amazing place, never change.-camkierhi 9/19/13
I cant believe theo is right.. damn. -comradepanda 9/26/13
None of the strange ideas we had about you involved your sexual orientation..........-Monkeytroll 12/10/13
I'd put you on ignore for that comment, if I could...Alpharius 2/11/14 |
|
|
|
|
2020/08/20 13:55:55
Subject: 3D Printing Blog, Come gather round the printer kids
|
|
Courageous Questing Knight
|
For resin, the Elegoo Mars is the best out there at the price, hands down. However, if you want a build plate almost 60% bigger, wait for the Saturn model to get on Amazon, estimated around November - it will be in the $400-$500 range, where the Mars is right at or under $200. Honestly, I love my Ender 3 Pro, but I just find resin so much simpler to use, even with the post print routine that I only use the Ender if I ABSOLUTELY have to, due to size.
...I'm saving now for the Saturn and will get it early 2021 - I can't wait!!
|
|
|
|
|
|
2020/08/20 16:25:13
Subject: Re:3D Printing Blog, Come gather round the printer kids
|
|
Omnipotent Lord of Change
|
Theophony wrote:The only pauldrons I’ve found are Nurgle ones thus far, and still need the top mounted weapons to complete the model, but I’ll find some. Heads are another item I’m looking for, not liking the designs I’ve seen thus far, but as the kits come with spare heads I might be able to source some locally.
My favorite armiger carapace guns are these and these. The design is a little different but I think superior. I also found, in my searching for knight files, that there's really a lack of alternate heads/masks, especially when it comes to chaos armigers. I ended up going with these Space Skaven ones, out of a lack of options and because I dig them and they're different from the Imperial ones.
Any suggestions on a resin printer? I’d like a larger build plate, but I guess the big things are coming off nicely on the Ender, so fine detail stuff can be resin if I so choose to go down that path.
I've had an Elegoo Mars Pro for a few weeks now, and it's a brilliant machine that continues to surprise me with how easy it is to produce minis in my own basement. I paid $280 on Amazon, but it looks like it's $250 right now! So worth the price. Unless you want to hold out for the Saturn, I'd say Mars Pro is the answer.
|
|
|
|
|
|
2020/08/20 18:41:38
Subject: 3D Printing Blog, Come gather round the printer kids
|
|
Calculating Commissar
|
The Elegoo printers are all fantastic machines. I've got the standard Mars and love it, but I'm eyeing the Saturn to do larger prints. Printing an entire tank in one go? yes please!
The thing to keep in mind with the Saturn is that it's a monochrome screen, so it is faster than the Mars and the screen should last a lot longer too. So yeah, currently saving my pennies for that one to go up on Amazon
|
|
|
|
|
|
2020/08/20 18:54:08
Subject: Re:3D Printing Blog, Come gather round the printer kids
|
|
Willing Inquisitorial Excruciator
|
Since we are talking about it, I am thinking about getting this:
Sonic Mini 4K Mono
Good reviews on their products from what I've seen. This is decently priced and still a good size for printing miniatures.
I already have a Peopoly Moai and an Anycubic Photon, but the mono screen and the xy resolution bump are making me consider adding that to my arsenal.
|
|
|
|
|
|
2020/08/21 13:23:39
Subject: 3D Printing Blog, Come gather round the printer kids
|
|
Courageous Questing Knight
|
I will say that on my Mars I just had to replace my LCD screen. I had ordered a spare for $29 shortly after I got it almost a year ago. I had read this is considered a consumable item, so thought I would be prepared. A quick look online for a video on how to do it and I had it replaced in about 8 minutes and removed only four screws.
I had been using my machine literally non-stop for a solid 9-10 months and probably have over 600 runs on it. And, yes, the Saturn will probably be just about half the exposure time, so the prints will be faster and the screen lasts longer AND a much bigger build plate? As endtransmission just said, "yes, please!"
With the move to a 4k screen on the Saturn the increase in xy resolution puts it right at the Mars (.047 vs, .050, IIRC) so this would be imperceptible. The original plan was a 2k screen at .075, which would have been noticeable on small minis. However, it will be at least double the cost of the Mars, so for what you are looking to do the Mars should be plenty. As far as the extra cost for the Mars Pro, my only complaint on my original was having the USB port in the back, but a short USB patch cord for about $3 so I can plug my drive in without having to reach around the back all the time is a perfect fix.
I have seen prints on the Longer Orange 10, which I think is in the .075 range and the details do mush a bit; however, your original stl file matters greatly and there can be huge variations in quality and details, so sometimes a mushy print is the fault of the stl file you sliced and not the printer.
edit: I will have to admit, as much as I loved the minis I printed on my Ender 3 Pro, once I got the Mars I could not resist reprinting all of them in resin, as they just looked so much better... I did try to resist, honest, I did! But, alas, I was weak...
|
|
This message was edited 1 time. Last update was at 2020/08/21 13:28:43
|
|
|
|
|
2020/08/22 10:42:40
Subject: 3D Printing Blog, Come gather round the printer kids
|
|
Calculating Commissar
|
As MDSW said, for the price difference in for the Pro, if you're just looking to get a decent resin printer for doing figures on, I'd go for the standard Mars and buy a usb extension cable. While you're at it, but some spare FEP sheets and a spare screen just in case. Mine lasted a year of fairly heavy printing, so I'm happy to consider a £20 screen a consumable item
I'm mainly considering the Saturn because I don't want an Ender kicking around as well for terrain; though it is tempting for the larger pieces.. I only have space for one printer though so Saturn it will be.
|
|
|
|
|
|
2020/08/22 16:38:01
Subject: 3D Printing Blog, Come gather round the printer kids
|
|

Regular Dakkanaut
|
Hello! I am so happy to see you liked the legs I made. I have arms and an armored torso available also, although I think I might want to shrink the leg. It feels a little big when I print it. Maybe drop it by 5%. Or make the torso bigger.... I was also reading about someone encountering a weird bed adhesion issue. I had the same issue with one of my printers and it drove me nuts. The solution I found was that the raft is preset in the slicer software at .04mm (the stock nozzle size). Switch to no skirt, brim or raft. This allows the software to start at the proper Z axis point for the changed nozzle size I was using. (.02mm nozzle with .01mm layer) Suddenly all my prints began working again. Apparently the slicer software I was using (Ideamaker from Real 3D) does not have a means to manually change the preset layer height for the rafts, skirt or brim. This would put your nozzle waaay too high to adhere during the initial layers of the actual print, and the raft created would even fail sometimes part way through.
|
|
This message was edited 1 time. Last update was at 2020/08/22 17:18:51
|
|
|
|
|
2020/08/22 18:05:46
Subject: 3D Printing Blog, Come gather round the printer kids
|
|
Is 'Eavy Metal Calling?
|
airinhere wrote:Hello! I am so happy to see you liked the legs I made. I have arms and an armored torso available also, although I think I might want to shrink the leg. It feels a little big when I print it. Maybe drop it by 5%. Or make the torso bigger.... I was also reading about someone encountering a weird bed adhesion issue. I had the same issue with one of my printers and it drove me nuts. The solution I found was that the raft is preset in the slicer software at .04mm (the stock nozzle size). Switch to no skirt, brim or raft. This allows the software to start at the proper Z axis point for the changed nozzle size I was using. (.02mm nozzle with .01mm layer) Suddenly all my prints began working again. Apparently the slicer software I was using (Ideamaker from Real 3D) does not have a means to manually change the preset layer height for the rafts, skirt or brim. This would put your nozzle waaay too high to adhere during the initial layers of the actual print, and the raft created would even fail sometimes part way through.
Awesome . I had downloaded all of those already and have since completed printing the whole robot.
You did a fantastic design. Just needs some shoulder pads now. I got a head printed and a multi-melta type arm for the other side as well. Better pictures at some point today. Glad to see that you are “Local” (on DakkaDakka). I was just at Miniaturemarket’s retail store and almost bought a couple knights to go with him.
The only issues I’ve found are the designs have some gaps. The torso armor on both sides of where the head would go had issues and one side didn’t connect and the other side had a manifold gap. When I get the pictures up I hope they will explain it better. I’m still figuring out the support skins and they keep sticking too much to the models and causing damage when I remove them, once I figure that out I think I’ll be golden.
What software do you use in your designs? I haven’t even begun to think about designing my own stuff yet, but there are some projects I’d love to tackle when I get around to it.
Thanks for stopping in and giving some of your insight .
Also where I’m going next I don’t need roads  .
|
LOL, Theo your mind is an amazing place, never change.-camkierhi 9/19/13
I cant believe theo is right.. damn. -comradepanda 9/26/13
None of the strange ideas we had about you involved your sexual orientation..........-Monkeytroll 12/10/13
I'd put you on ignore for that comment, if I could...Alpharius 2/11/14 |
|
|
|
|
2020/08/22 19:01:50
Subject: 3D Printing Blog, Come gather round the printer kids
|
|
Regular Dakkanaut
|
Thank you. I did the modeling on Windows 3D builder. You can play around with the X, Y, and Z sizing to make parts fit as long as you click the little lock icon that displays for resizing. Everything else was just sticking the new part on top of an existing item and then merging the two objects together. Trouble with that is, any hidden gaps I miss (or worse, if things are not aligned properly) and the software merges into the new, imperfect form. I tried to get into Blender, but woo that is a completely different level for training. So I shall stick to my cut and paste versions for now. I do use meshmixer to examine the files for any flaws. You can lose detail, so I try to balance printability versus detail. I printed these with my Photon and it seems to be more forgiving. I am running into a similar problem building the rear torso on a pair of Warhounds. The vent at the back delaiminates and I an struggling to get it to stay still and form properly. And the point of the lower jaw armor simply does not want to form properly either. Printing is very much in the experimental stages still, but I am amazed at the raw material out there to work with.
There is an "Dominion Crusader Mark 3 Alternate SHoulder Pads" download you can look at for some different Pauldrons for the doggies. I have built some for them with resized shoulderpads from the Dominion Crusader Tartar armor (I used the torso armor there to make the 'doggie' torso).
|
|
|
|
|
|
2020/08/22 19:20:04
Subject: 3D Printing Blog, Come gather round the printer kids
|
|
Is 'Eavy Metal Calling?
|
airinhere wrote:Thank you. I did the modeling on Windows 3D builder. You can play around with the X, Y, and Z sizing to make parts fit as long as you click the little lock icon that displays for resizing. Everything else was just sticking the new part on top of an existing item and then merging the two objects together. Trouble with that is, any hidden gaps I miss (or worse, if things are not aligned properly) and the software merges into the new, imperfect form. I tried to get into Blender, but woo that is a completely different level for training. So I shall stick to my cut and paste versions for now. I do use meshmixer to examine the files for any flaws. You can lose detail, so I try to balance printability versus detail. I printed these with my Photon and it seems to be more forgiving. I am running into a similar problem building the rear torso on a pair of Warhounds. The vent at the back delaiminates and I an struggling to get it to stay still and form properly. And the point of the lower jaw armor simply does not want to form properly either. Printing is very much in the experimental stages still, but I am amazed at the raw material out there to work with.
There is an "Dominion Crusader Mark 3 Alternate SHoulder Pads" download you can look at for some different Pauldrons for the doggies. I have built some for them with resized shoulderpads from the Dominion Crusader Tartar armor (I used the torso armor there to make the 'doggie' torso).
Good to know . I downloaded those files this week as well. Considered shrinking them down, guess I’ll go that route.
Pic of poster tacked together knight.
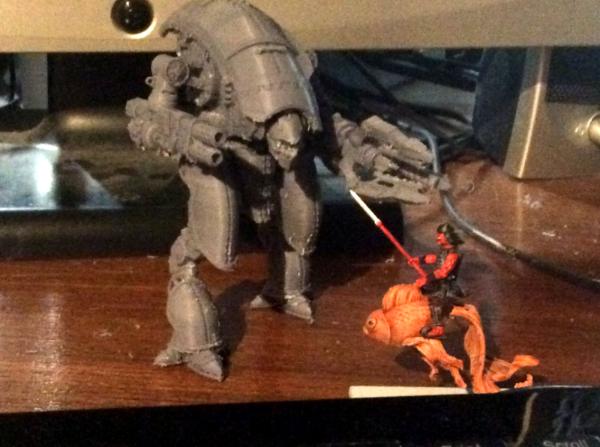
His melts gun seams small, but easily enough to fry up the goldfish. “Where’d I put that tartar sauce?”
So I was having an issue with a corrupt SSD card again, then it turns out my computer wiped away my Cura settings  . Downloading cura again and will have to reload my settings all over again. Hope I can get back to the old settings.
|
|
This message was edited 1 time. Last update was at 2020/08/22 21:26:15
LOL, Theo your mind is an amazing place, never change.-camkierhi 9/19/13
I cant believe theo is right.. damn. -comradepanda 9/26/13
None of the strange ideas we had about you involved your sexual orientation..........-Monkeytroll 12/10/13
I'd put you on ignore for that comment, if I could...Alpharius 2/11/14 |
|
|
|
|
2020/08/24 11:35:26
Subject: Re:3D Printing Blog, Come gather round the printer kids
|
|
Is 'Eavy Metal Calling?
|
So new day, new issue, seems par for the course in the life of a 3D printer.
I knew I shouldn’t do a huge print with the current bed I have on the Ender3. Me using it constantly without proper cooling and cleaning down occasionally with some isopropyl alcohol led to the surface tearing a little. Not even the size of a space marine helmet, but it’s in the center of the magnetic bed. I covered it with blue painters tape which seems to be working fine, but an old nemesis has arisen. curling of the base of the model. I think it’s more due to a settings issue as my computer glitched and I had to reinstall cura 4.6.2 and I’m sure I didn’t have the settings exactly the same. Unfortunately I’ll never know as the glitch may have been a corrupt file which also messed up both micro SD cards I’m using so all my sliced files got deleted.
Anyway I started the 30+ hour print as I have a lot going on right now with my wife and all three teens starting back to school this week and the church repairs. I figure let the printer run and see what will come of it. So before bed I started the print and when I woke I came down to check it out. 6-7 hours in and the corners were curling badly.
It’s a corner turn bank for Gaslands.
Then I noticed that nothing was coming out of the nozzle  .  A clog. Dead stop. Pulled the filament, which snapped in the Bowden tube. Pull the Bowden tube, replace it, and tighten it back down too hard cracking the connection to the retraction housing. Its one of those things that I wanted to replace, but just have not yet. Guess I’ll order one of those now. It’s not expensive and the replacement is milled aluminum instead of plastic, so much more durable.
After all is said it’s printing again with what seems to be a clear nozzle and so far a very flat base layer. Can’t tell if it’s making the melting plastic smell now or if that’s from earlier.
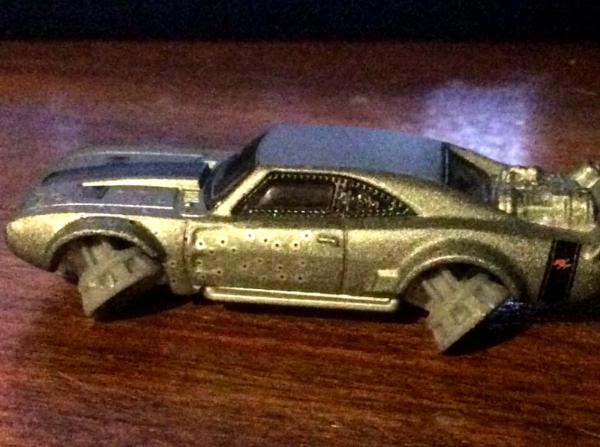
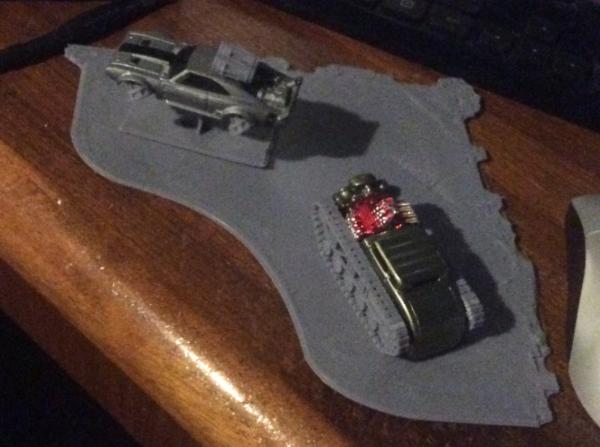
One of the last prints I got before this mess was this gear and hazard counter.
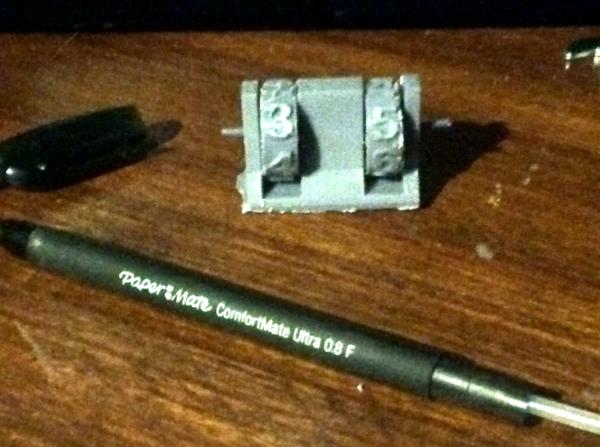
It’s a 3 piece print, but the curling and raft adhesion issues I was having really messed it up. One of the back base corners has a bad lift to it, and both wheels have rough sides that didn’t pop free of the raft/support. I sanded those down and used a clipper which with my hamfisted techniques caused more issue. But then I assembled it. It’s a great design. The wheels are held in place by a length of my PLA+ that runs through guide holes in the design. And the wheels are locked in place by indents in them which fit a BB pellet. The BBs are pushed apart in the center section by a spring which I took out of the pen in the photo. The pressure holds everything in place, but you can easily spin the dial with little pressure and it satisfyingly clicks when the numbers are set. You read it top down so in the picture the counters are on 2 and 4.
It’s a great design and when I have my prints tuned again I’ll be making more as I’ll need one for each car. One side will tell what gear I’m in and the other is for tracking hazard tokens.
A flat tire means you I’m still home to check progress on the new print. Chaos has followed me to Gaslands. The Warp is strong here.
Going to let it continue. It’s a 40’ scale container, so almost the width of the bed. If it warps bad I’ll do the next one diagonally on the print bed.
|
|
This message was edited 1 time. Last update was at 2020/08/24 12:32:36
LOL, Theo your mind is an amazing place, never change.-camkierhi 9/19/13
I cant believe theo is right.. damn. -comradepanda 9/26/13
None of the strange ideas we had about you involved your sexual orientation..........-Monkeytroll 12/10/13
I'd put you on ignore for that comment, if I could...Alpharius 2/11/14 |
|
|
|
|
|
|


