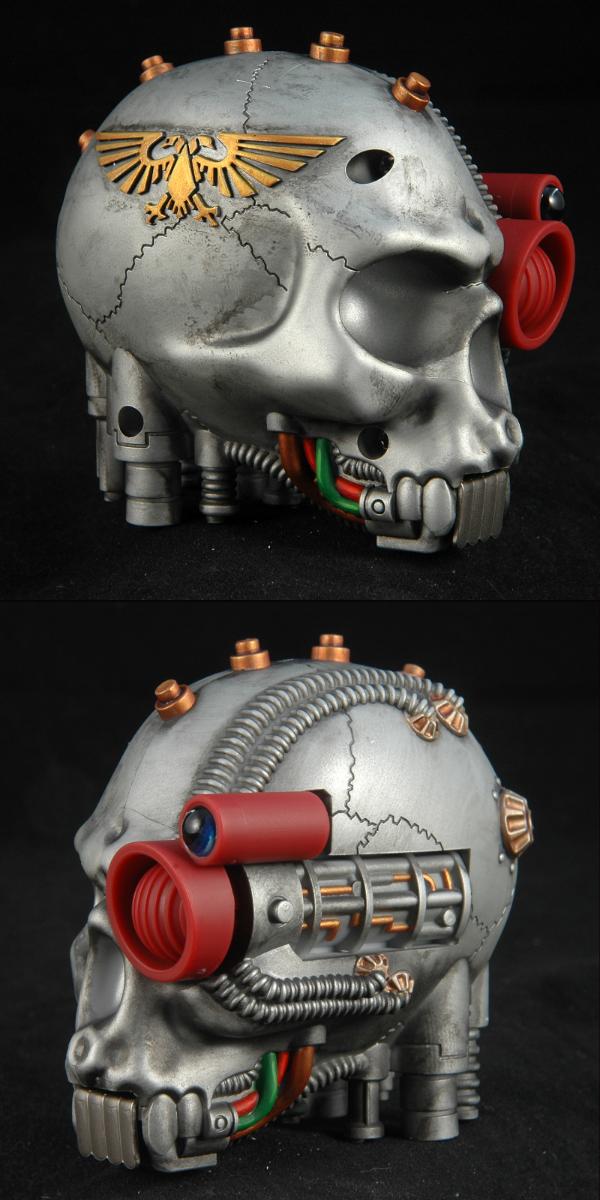
I picked up one of the servo skull tape measures GW started making. Mine works fine and seems very solid. Anyway, I could see getting it confused with everyone else's so I did a little custom painting. I could paint more of course but I didn't want to go overboard with it.
One of my biggest peeves, and part of what I feel makes it look tacky (though painting it goes a long way to helping that) is the screw holes. - Fill those with greenstuff and paint over it and I reckon it'll look significantly more solid and a lot better
dsteingass wrote:I see them as sort of a limited run novelty thing. I like the tape measure myself, If I see one, I will most likely pick it up for the novelty of it, but in a game, I'll just use my simple hardware-store type tape measure and my plain old plastic templates.
I might buy the templates to use for the bolts. that is a good idea!
Well, it's definitely not as sturdy as a real tape measure from say, Stanley or some such. But then they don't make tape measures that look like servo skulls. Yes, it was expensive for a fairly cheaply made tape measure... but I didn't buy it because I expected to get good value for my "tape measure dollars"... I bought because it was unique and cool. When it stops working all together... it'll still be unique and cool and I'll probably finish the paint job and turn it into an objective or a turn counter. No biggie.
I guess what I'd say to people who object to it's quality is... "Really? You expected something different from GW, which is remember... a TOY company?" It's a novelty, not a tool & should be viewed in that context. Most "novelties" are crap... but just because they're built poorly doesn't mean they have no charm or aesthetic value. Accept it for what it is... a cheap tape measure with a one-of-a-kind shape. Then make your decision to buy it or not given those facts.
I'd have to argue with that sentiment.
Games Workshop is a premium toy company.
Their products are expensive, and generally to a rather high standard (ignoring the whole finecast debacle).
The model kits, tools and paints they provide are mostly rather well made (if overpriced), and yes it's a novelty - but that doesn't mean it has to suck, and from a company that supposedly prides its stock as 'the best in the world' it's not an unrealistic expectation.
But in the end - it's a bulky tape measure for £10 that looks and feels cheaper than the £3 on they offer.
If you're happy with it that's good, and painting it has made it look a lot better, and I think if you fill the screw holes it'll look better still, but for me I have 2 £1 tape measures I've been using for the last 2 years ( I lost one for a while, and quite typically, found it as soon as I bought a replacement...), so I'll stick with them
I guess I've always assumed that a certain percentage of GW stuff is crap... it just comes with a great story. Their models have nearly always had issues. The RT rulebook completely fell apart when the glue failed, Finecast is garbage for the most part. A good chunk of the vehicle kits (across time) have never fit together properly. When you buy the skull tape measure... you aren't buying a tape measure... your buying a model servo skull in the guise of something related to gaming. Expecting it to be a good tape measure is inconsistent with everything we know and love about GW, so why set yourself up for disappointment? It's just a cool looking little gadget, that's all. No more overpriced than anything else they sell. If you want to blow the money, go for it... if not, you're probably better off for saving your money (though, they're going to get it from you eventually... one way or the other).
The words "GW" and "value" should rarely if ever be used in the same sentence. That's just how it is.
LOL Victor! You just came in on the debate that tape measure sparked. Yes, it's an overpriced little gadget they're making available along side the templates and such. It's NOT a quality tape measure, and it's expensive. But I think it's a neat little novelty all the same. When it ceases to function, I'll probably make it into a turn counter or some such.
and i just had a look... it costs 13 €s ... well for a tape measure thingy it is a bit steap...but for the look...it is not too overpriced in my view... beside.... who could compare...as i bet there aren´t many other skulls for that tool out there...^^
Those would be BIG servo skulls. Hate to see the species those came from. Perhaps you can wait a month or two and when all the tape measures break you can pick them up from other members of your gaming group for a song?
Automatically Appended Next Post:
Might make a cool flying gadget for a tech marine (counts as a bike).
There £10 (GB) here same with the dice that I'm wanting to get both of... But 10 quid is steep even if a normal GW tape mesure costs £10 too. So its no difference really, but you can get a decent one for about £1.00 form B&Q? Or £10.00 for a smaller not as good one???? (This is the normal one not the skull, but people will be wantig £25 for the skull on ebay tho)... I bet you...
How big is the thing??
Also, where is the slider/button that you use to hold the tape out? Please, please please tell me that you have to pick the things nose in order to measure range. That would make my day and make me buy one!!
See the ugly red eyepiece? Push that and the tape moves (in or out), release it and it locks in place. The reason I didn't paint more is that I wanted to lay off the places that would get the most wear (like the red button).
HAZZER wrote:There £10 (GB) here same with the dice that I'm wanting to get both of... But 10 quid is steep even if a normal GW tape mesure costs £10 too. So its no difference really, but you can get a decent one for about £1.00 form B&Q? Or £10.00 for a smaller not as good one???? (This is the normal one not the skull, but people will be wantig £25 for the skull on ebay tho)... I bet you...
The normal red GW Tape Measure is £3.10 (I actually have on laying around somewhere that I got given 2-3 months ago) and it's actually pretty good, with a decent case etc.
I don't tend to use it much, mostly because the ones I bought from B&Q for £1 each, are perfectly fine, but half the size - so takes up less room in my bag. The main bonus the GW red one has is the rubber case.
I normally use tape measures produced by a quality tool company here in the U.S. called "Stanley". They aren't exactly cheap either but the quality is excellent. Since they're tools, not toys... they've got to perform well and be durable.
My Stanley tape measure just bit the dust. Serve me right for using it for work as well as play :( It was probably a bit overspecced for 40k anyway, though, in that it had a 5m length...
The servoskull is amusing, but then I even bought the laser pointer they sold for the last edition
dsteingass wrote:It is the size of a TAPE MEASURE!
I'd assumed that, but firstly all pictures of it have made the thing look huge and detailed (besides you get varying sizes of tape measure like everything thing else!) and GW might have decided to make an off-scale "heroic" scale measure!
HAZZER wrote:There £10 (GB) here same with the dice that I'm wanting to get both of... But 10 quid is steep even if a normal GW tape mesure costs £10 too. So its no difference really, but you can get a decent one for about £1.00 form B&Q? Or £10.00 for a smaller not as good one???? (This is the normal one not the skull, but people will be wantig £25 for the skull on ebay tho)... I bet you...
The normal red GW Tape Measure is £3.10 (I actually have on laying around somewhere that I got given 2-3 months ago) and it's actually pretty good, with a decent case etc.
I don't tend to use it much, mostly because the ones I bought from B&Q for £1 each, are perfectly fine, but half the size - so takes up less room in my bag. The main bonus the GW red one has is the rubber case.
Wow? Really a freind who blamed me for blaiming his (when I dident lol) said it cost £10!!!! Rage!!!!!! LOL! Then started to say about when I haddednt bought fomr GW once or twice before? £3.10 is pretty reasonable for a tape mesure baring in mind that lumps of plastic can cost up to 100+...
Flinty wrote:My Stanley tape measure just bit the dust. Serve me right for using it for work as well as play :( It was probably a bit overspecced for 40k anyway, though, in that it had a 5m length...
The servoskull is amusing, but then I even bought the laser pointer they sold for the last edition
I got one of those laying around too... But needs new bateries tho...
^^THAT^^ Would be badass!
I bet if you bisected one it would look good on a Shrine of the Aquila wall section too, between the wings? Or even quartered to make a huge Admech logo on a building!
I think it is overpriced stuff I will avoid as I can buy effective tape measures far cheaper at the local Lowe's. Effective marketing if they sell enough of them.
Cool skull gits. I had the same idea when I first saw that tape measure though I never did buy one. Was thinking about painting it bleached bone like a real skull. Yours looks sweet too though you should think about sanding that mold line running down the center
@Egg: It's a fething tape measure!! I don't care about mold lines or screw holes! *grin*
@Haz: Well, there's nothing new about either of them really, but folks were asking so I wrote them up. The are very focused though & I tried to make them as step-by-step as I could... so perhaps there's something helpful there. I did check out the existing dakka tutorials before I wrote them and it doesn't look like they're a direct duplicate of something else.
Hi Gits! Just popping in again after some lurking, I too bought the skull tape measure and it was in action yesterday for a tournament, worked fine no issues. I also think I will be customising it a bit. Yes i think it was a bit pricey but on the other hand a tenner only buys you three pints down the pub nowadays with a bit of small change. Don't really see what all the fuss is about if you don't want it don't buy it then, no one is forcing you, I took it as a bit of fun.
Thanks for stopping in Reaper. Sorry, not much Mantis Warrior action. Though I think I'm about ready to start fiddling with the LoTD again after a nice ork-break. Check back next week and maybe theyr'll be something interesting to show. In the mean time, the "great tape measure debate" has proven to be a most amusing distraction from the fact that I'm not getting any marines painted.
Gitsplitta wrote:
@Egg: It's a fething tape measure!! I don't care about mold lines or screw holes! *grin*
Heh, well once you start down the road of customizing something, you might as well do it all Unscrew that thing into the two halves, sand down that mold line in the middle and primer that bad boy up for a nice new coat of paint! Then varnish the whole thing to make all the others jealous of your one of a kind limited edition servo skull measuring tape!
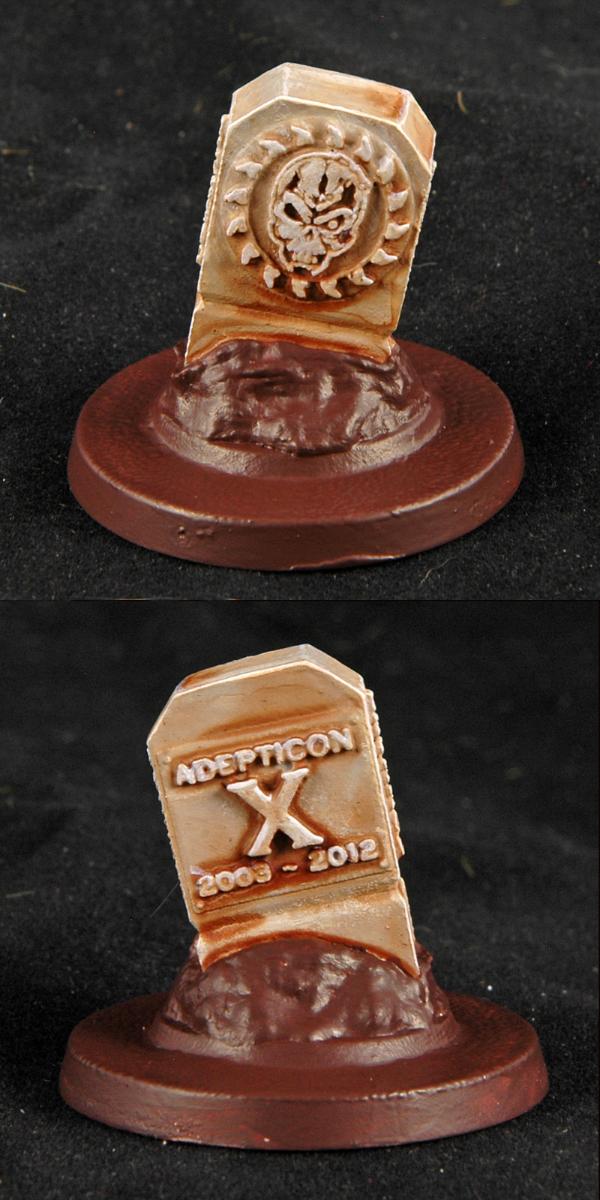
Just to prove that I am still painting... did a quick job on the command token from the last Adepticon. I needed something for a basing class I'm teaching tomorrow, and this was a good candidate (easy to paint).
I'll post an "after pic"... probably Sunday.
Automatically Appended Next Post:
Those of you who are DCMs can check out my main project here. I'll post it on a public forum when the time comes.
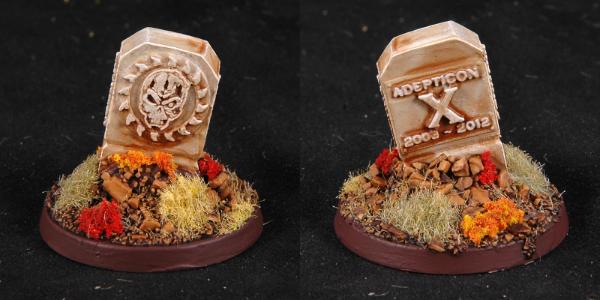
Well, had my basing class yesterday. Unfortunately no one actually showed up, which is a bit disappointing as there are a lot of new players at this store and there's a tournament coming up in a couple weeks... thought their'd be more interest. Anyway, the owner jumped in as well as a young bloke he recruited who was just hanging out. We had a really nice class, went over all the basics & they both turned out some very nice looking bases. Nice thing for me of course is that with only two people there was plenty of time for me to work on my own things... partly by way of giving them an example. So here's what I cooked up...
The objective I posted the other day, made from the command counter from last year's Adepticon.
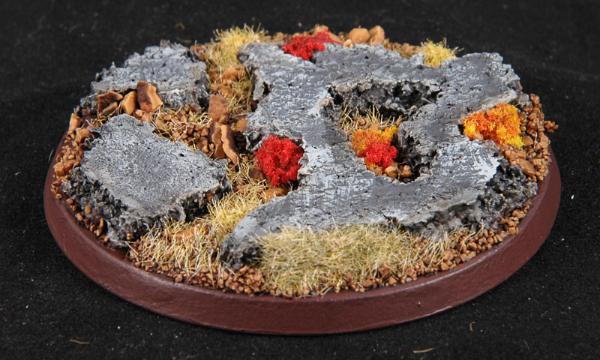
And a 60mm base that I made up just for the heck of it (mainly to talk about making cork rocks). No idea what I'm going to do with it.
Also nearly done basing up 7 old-school burnas. Have two more of those to paint. Suppose I should start poking around and see if I can't chase up a few more.
Briancj wrote:Well, they'd be less a Servo Skull, and more of a GIANT FLOATING SKULL OF DEATH.
Sadly, I don't have a local gaming group, but I will wait for them to show up on eBay...
Pretty sure they would be the skulls of the Flying Spaghetti Monster!
Automatically Appended Next Post: I like the skull and honestly will end up buying and painting it just for the fun as I know no one around here would have the same thing!
Well, we may have over-estimated the amount if interest newer gamers would have in fancy basing. Or it may be with a little more planning and advertisement we'd get a bigger response (that, and have people pay when they register so there's some incentive to actually show up). In any case the two guys that were there really enjoyed it & I got some work done so I'm content enough.
I'm busily working, just not MW stuff. There is a MW on the horizon though... so it'll be good to have the thread back on track.
I do have one more kan to build and paint. just have to see if his legs will fit properly on any of the rock outcroppings.
@rodgers: Take a look at the last link in my sig. It covers making everything except the rocks, which are quite simply done out of sheet cork. Just pick away at the edges with any metal object (I used a small file in this case) in order to get the ragged, rocky looking surface you want. Stack them of you want taller rocks.
The bases look nice, Gits. Too bad you didn't have a better turn out. If I lived a little closer, I might have come out for it. Let em know know if you plan on doing a chipping-soot-rust class; I'll see if I can come down for it.
Agreed, the objective marker/extra base looks great. Shame about the turnout, but you go to do your own stuff and turned out some lovely work too so not necessarily a bad thing in the end...
Hmmm... the pic doesn't seem to be working Reiko, but thank you! Actually, SL, whalemusic and I all share a b-day. Different ages of course, though SL and I are very close.
Yeah, there werent exaclty any 'grown up' Mantis pictures im afraid! (although, when i searched 'Mantis Warriors cake' the whole of Google filled with pics from this thread, i liked it )
facebook is blocked here so i cant see it either...time to browse when im home....
Oh... I've been through that before (not the birthday thing... the other thing) when I was in college and shared a house with 3 female room mates. (no, I was not romantically involved with any of them)
I'd spend a full week each month cowering in the basement where my room was. Only creeping out to make dinner (the kitchen was at the top of the stairs) and exit the house (the front door was also at the top of the stairs). *shudder* Those were dark times....
Is this something that happens to longtime Dakka users, their birthdays start to sync up?
I'm pretty sure there was no internet when I was born. Thank the heavens I'll have lots to surf when I'm in my nursing home! I'm hoping to get Ice's GMS done by then! ( on my bucket list)
A belated happy birthday Gits' Nice work on the Necron stuff. Do I detect the influence of Mechanicum Jon's Dark Eldar there with the weathered blue? Either way they look great.
Thank you, and yes... definitely. Doesn't look like his, but definitely influenced by his fine work.
OH, and the boy finally got his presents today. They went over very big... for about 3 minutes... until he opened the ipad Touch his mom gave him. The Tomb Stalker especially as he'd been eyeballing that model ever since he started collecting 'Crons. Also managed to sneak in finishing a Cryptek... which he also needed badly.
For my part... I got a box of ork bikers which I plan on converting (along with others) into a nob bike squad. My main gifts were two gadgets that I can use with my Foredom (flex shaft) that converts it into a type of lathe and a drill press. The lathe gadget has already proven it's usefulness as it was required when repairing that Tomb Stalker.
Ouch, one-upped by an iPod touch....still the presents look GREAT and im sure he appreciates them, lovely work Gits!
sounds like quite the gift for you as well, more things to go in the man-draw/man-basement? Your orks are coming along nicely as well, happy to see them get some love.
Yes, the man-cave (man-loft I guess) is filling up with all sorts of useful gadgets. Can't complain about that.
As soon as I finish converting the last of the larger 'Cron stuff to the new paint scheme (won't take long), it'll be back to my orks *and* some marines... starting to get that itch again. (which is why I take breaks... the itch is an important creative element and usually worth waiting for).
Gitsplitta wrote:Yes, the man-cave (man-loft I guess) is filling up with all sorts of useful gadgets. Can't complain about that.
Man-CAVE! Thank you, couldnt think of the term....Gadgets are never a bad thing to have building up
As soon as I finish converting the last of the larger 'Cron stuff to the new paint scheme (won't take long), it'll be back to my orks *and* some marines... starting to get that itch again. (which is why I take breaks... the itch is an important creative element and usually worth waiting for).
I REALLY like the new paint scheme, blue and brass right? Looks gorgeous.
yay, i would make an 'itch' joke, but im now just excited about seeing some more MWs...!
As for losing all that work, I sympathize, I've done that many times. If I know Im writing a long one I usually use MS word and save often. Then post and add pics
And of course I miss your birthday..... HAPPY SUPER ULTRA LATE BIRTHDAY!!!! Also high five on painting up the objective marker. I'm seriously doing the same thing with mine.
Believe it or not I will have an update, probably later today. Finally back to doing a little marine work. Starting slowly but will eventually get back into the swing of things.
OK, long awaited update. Sorry for the long hiatus folks... needed a break from the marines.
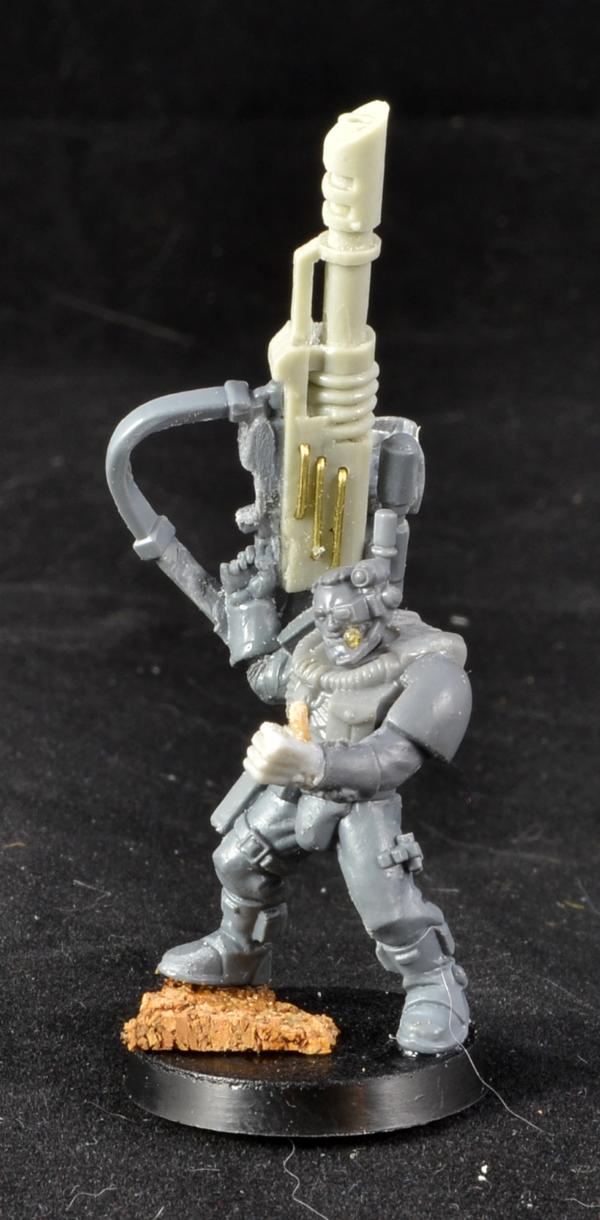
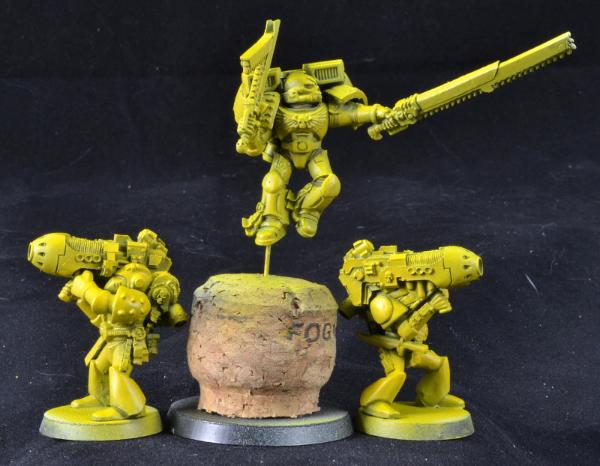
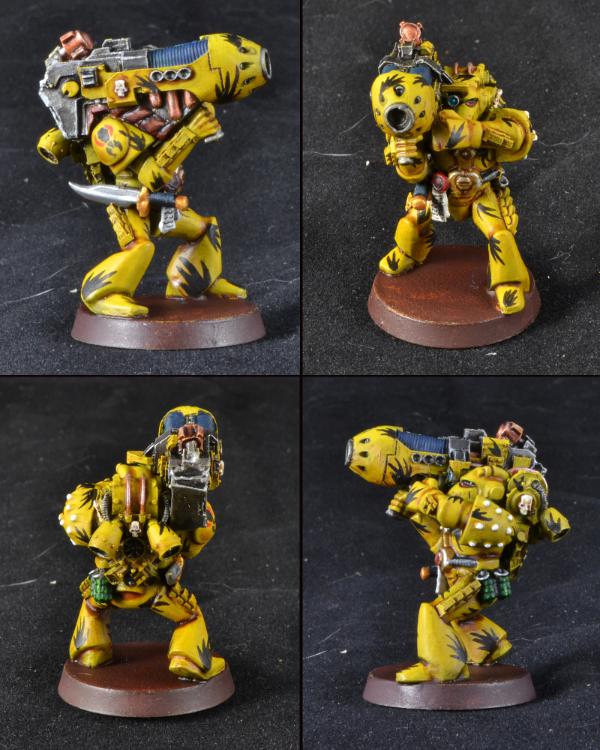
What I present is a fun little project I'm making for graven's Deathwatch competition. It won't be done in time but I'll finish it anyway. It's a Mantis Warrior scout that's been recruited into the Deathwatch (there is fluff to support this). The Mantis Warriors being somewhat famous for their snipers, the chapter thought they'd send him away with a bit of an edge.
I call it... "One shot, one kill." (and yes, that is a las cannon)
Hope you like it. It was a lot of fun to conceive and build. Both arms got re-build several times before I was satisfied.
Well, he's using his frame to support most of it's weight, all he has to do is steady it.
I also thought about having 2 or 3 servo skulls tethered to it as if they're helping to hold it up... Thought that might be a bit too over-the-top though.
YES! Deathwatch Scout for the win! I dig it. Obviously he will be promoted to a devastator squad quickly, should he return from this mission. I like the name too. Is that a cigar in his mouth?
ps: shouldn't the shoulder strap for the cannon be hanging the other way?
Details, details. The sling is just for transporting it and helping it to stabilize it... it's not really a shoulder strap. Typically, gun slings are mounted on the bottom. Remember, he's a sniper, he doesn't shoot from the hip. Come "business" time the gun will be set on it's bi-pod, stabilized and motionless.
To true, about the bipod... but I meant the dip in the strap. Shouldn't it be on the lower end?
Ok that's the last I'll mention it, change it or not. I think the model looks sweet, and I love the Death Watch scouts. To me the idea seems cool, and I think there are a few tiny bits of fluff to support it. Additionally I feel like the scouts that are sent are on the verge of being inducted as full battle brothers with a clear career path ahead of them. Like your sniper, who is clearly going to become a devastator.
OK, finally having a chance to consider the figure given GG's comments on something other than my iPhone screen, I agree and will be re-doing the strap. I could see if he was swinging the gun around the strap may fly out like that, but if he was swinging the gun around he'd never be able to strike the pose (there is a back part of the stock by-the-way... you just can't see it from this angle.)
So. Some progress to show soon I hope, perhaps as early as tomorrow (day off). I might try to rebuild the strap tonight so I can paint tomorrow... but it's been a very long week, I'm pretty bushed.
Lots of Zinge goodness came in the mail today though... happy, happy!
Bunches of stuff... power fists, power klaws, orky trim bits, rivet strips and chainsword teeth/chains/whatever else comes on the sprue. Got a freebee light thingie which I really like.
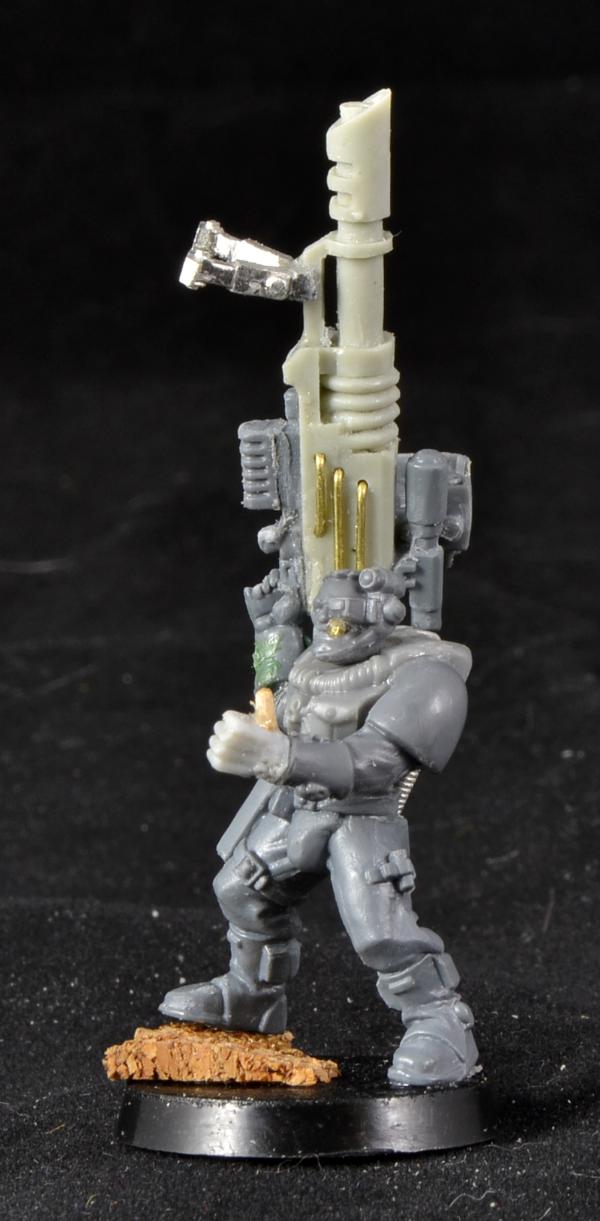
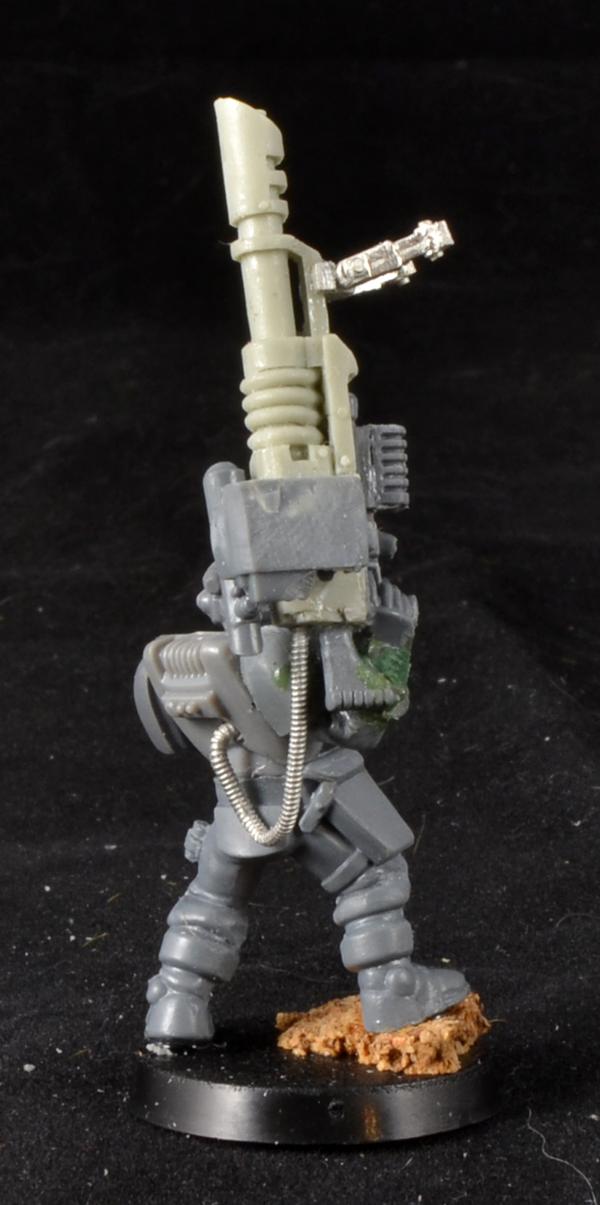
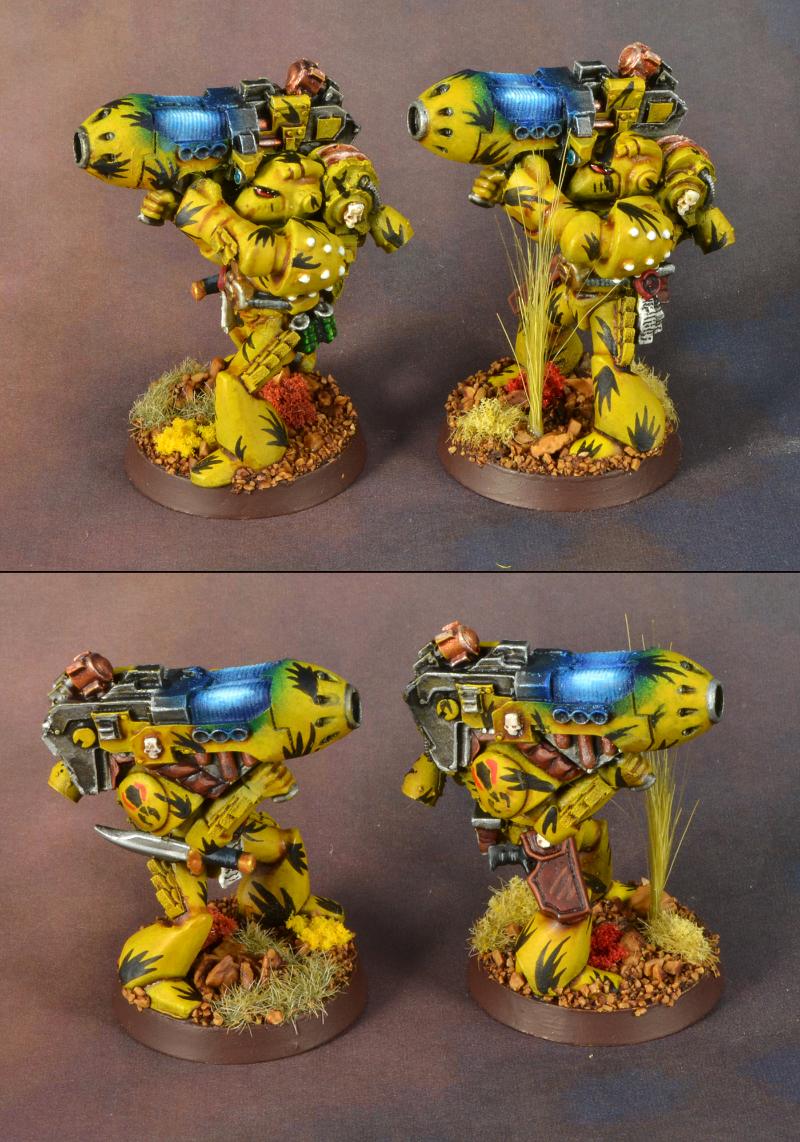
OK, fiddled with the build a bit. Got rid of the sling, GS'd the resulting damage, removed some of the gun understructure and replaced it with the forward grip from a bolter. Also added the bi-pod. Slightly different angle on the pic and the head isn't permanently attached yet, so the angle is just random.
I'll clean things up a bit more before I begin the painting.
The bipod angle looks good. Thinking that this 'sniper' would take an elevated position over his target its fair to think that the pod would have that slight lean to it.
To be honest I didn't have much choice with the bi-pod, it comes that way (angled I mean)... so I just had to make a decision about angled back or angled forward & I felt angled forward would push the gun back into the firer's shoulder... giving it firm support from both directions & keeping it as stable as possible.
Including pics from other POV as requested. Just one cable from the backpack to the gun. The little ribbed part of the pack will be painted like the power coil on the gun to indicate that's where the charge is coming from. I do not intend for the back-back to be able to provide more than a couple of shots worth of power to the las cannon as he is a sniper rather than a regular devastator.
I remember painting the derriere of one of the original Banshee models when it struck me that I'd seen those curves before... Made me appreciate what I had (in a girlfriend) all the more.
Hey Gits when I see this conversion for some reason the wrestler The Rock comes to mind for some reason and can picture him talking out of your model looks good can't wait to see it painted.
Automatically Appended Next Post: Hey Gits when I see this conversion for some reason the wrestler The Rock comes to mind for some reason and can picture him talking out of your model looks good can't wait to see it painted.
Hey GDO, sorry, with page rollover I couldn't see your response.
GreyDeathOne wrote: Hey Gits when I see this conversion for some reason the wrestler The Rock comes to mind for some reason and can picture him talking out of your model looks good can't wait to see it painted.
Oh, yes... my agent is talking to his agent about a film project based on the model. News at eleven. Unfortunately RL has dominated for a couple of weeks now as we are feverishly trying to get work done around the house (fall is here, winter aproacheth). Didn't see a single football game on Sunday as I was working like a mad man outside all day (and now my body is complaining bitterly). Work has also been throwing me some curves with lots of little business trips at the last minute. I guess summer is *definitely* over. *sigh*
Good news everyone!nerdfest09 is sponsoring a "Squad Leader" painting competition! The prize is the first-ever "Golden Bathtub" award (inspired by a photo that was hilarious but gave wayyyy too much personal information). Here's the link: Nerdfest's Squad Leader painting competition. I encourage everyone to stop by and sign up. Sounds like it'll be a whole lot of fun and I've heard a rumor that Nerdy's gotten some top quality judges for his event! Nothing but the A-team will do.
Well, I only got a couple of bits of foam each... two infantry trays for my orks and an infantry tray and the barge + 1 ark tray for the Crons. Still a long way to go but I think it'll make me feel a lot better about life if we can get this stuff safely put away. It's a lot easier buying foam for the Necron army as it isn't "open ended" (i.e. I don't just keep adding stuff to it for the sake of adding stuff). With the orks and marines it's more of a finger-in-the-dike kind of thing.
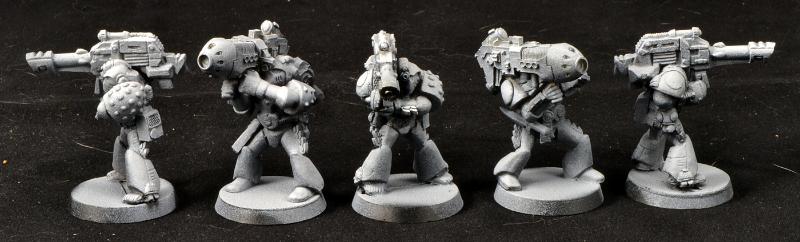
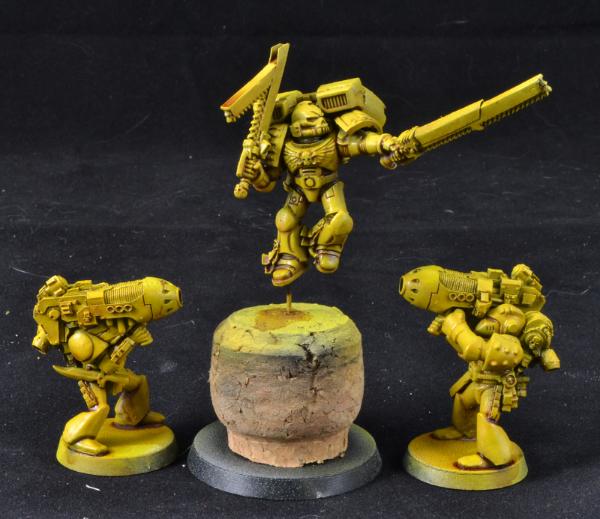
First thing's first. Getting ready for Adepticon next year and I only have a dozen models to paint. Two sternguard and the rest regular livery in varying units.
I'll start with the sternguard and Yggsdrasil's GMS marine as that's also in tranquility camo. Once those are done, I'll build the rest and paint them in one fell swoop.
To start off with though, I thought I'd assemble the las cannon guys. It rankles me that with 4 different OOP las cannons to choose from, I couldn't get a single style to fit on this figure without modification... so I picked the one I had to modify the least.
The plasma cannons have required some major modifications, but I think I've really pulled it off. The GS work is curing right now & I hope to have some pics for you tomorrow of the completed marines. Then, having been appropriately "warmed up"... I'll start Yggsie's build which is going to be a major challenge (but fun because I get to work with marine bits I don't usually get to use).
More in a day or two! Thanks for not giving up on me. Gits
We shall never give up on you Gits! it's like waiting for the Hobbit and Lord of the rings movies, you know they're coming and they're going to be awesome but it takes time for awesomeness right! and it's great to see some progress! did you need any more of the old school lascannons? i have some FW ones if you want?
No ETA's on these projects, but I will get to them.
Gitsplitta wrote:
I'll start with the sternguard and Yggsdrasil's GMS marine as that's also a sternguard. Then, having been appropriately "warmed up"... I'll start Yggsie's build which is going to be a stone cold b***.
More in a day or two! Thanks for not giving up on me.
Gits
Please tell me he's still going to be a Tranquility Vanguard
@nerdy & proto: Thanks mates! I think I'm ready to jump back in. Cleaned my desk of half-a-dozen unfinished projects... got some things done for the kids... Thus, creatively renewed and cleansed & ready to take up the torch where I left off.
@Yggs: It is (fixed)... what I was referring to is that it'll have the same paint scheme as a sternguard. Since I was talking painting strategy in my last post, I referred to it as a sternguard, not vanguard (as the vanguard aspect wasn't relevant). I'm trying to get better at maximizing my productivity. In this case, that means building all of the like-scheme marines first & then getting the basic painting (airbrushing, washes, basic highlights) done en-masse. Then I can come back and spruce them up individually. That way I should be able to turn out some great figures while not wasting time going back and forth between techniques for each figure.
Well, I've got to psyche myself up for it... and get some practice in. Yours is going to be a serious challenge, though I'm hoping that if I'm successful it'll be a real show-piece. I've had a pile of bits sitting on my painting table with your name on the bag for months now... high-time I did something with them.
@nerdfest: Actually, the FW las cannons were one of my 4 options... they don't fit either. The versions I chose (see figure) were the closest to fitting. But thanks!
@Vit: Sorry to keep you waiting so long.
Well, I just assembled the torso and weapon of the first plasma cannoneer. Worked perfectly as far as I can tell... which I have no problem taking full credit for! I'll let you guys be the judge when I get a pic up later today or tomorrow... depending on how much of a pain it is to find or convert some legs that fit the model.
Glad to see you back Gits' - Dakka just wasn't the same without you! Nice to see those old school minis - got a few of those on the display shelf myself. When I'm back from China, I'll dig around and see if I can find you a few more shoulder mounted weapons if you like?
Update: The second plasma cannon is going together better than the first... I want a patent on this design! (OK, it's not that good... back pack has a rather unorthodox curvature to fit the helmet.. but still. Not bad for government work!) No pics yet... soon.
Automatically Appended Next Post:
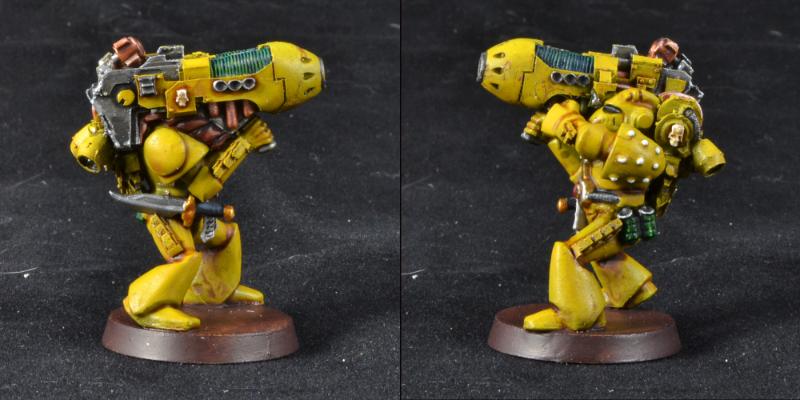
Further update:
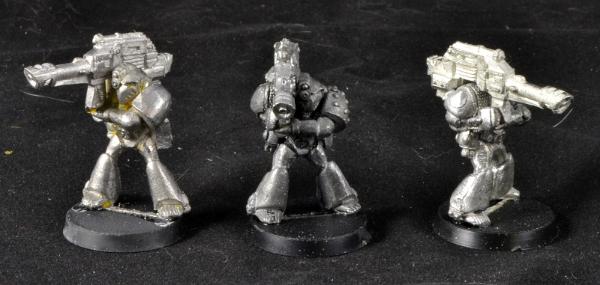
Builds on the heavy weapons are complete. The las cannons are straight-forward OOPGW. The plasma cannons are original plastic beakie bodies with FW plasma cannons and back packs. Really pleased with how they went together.
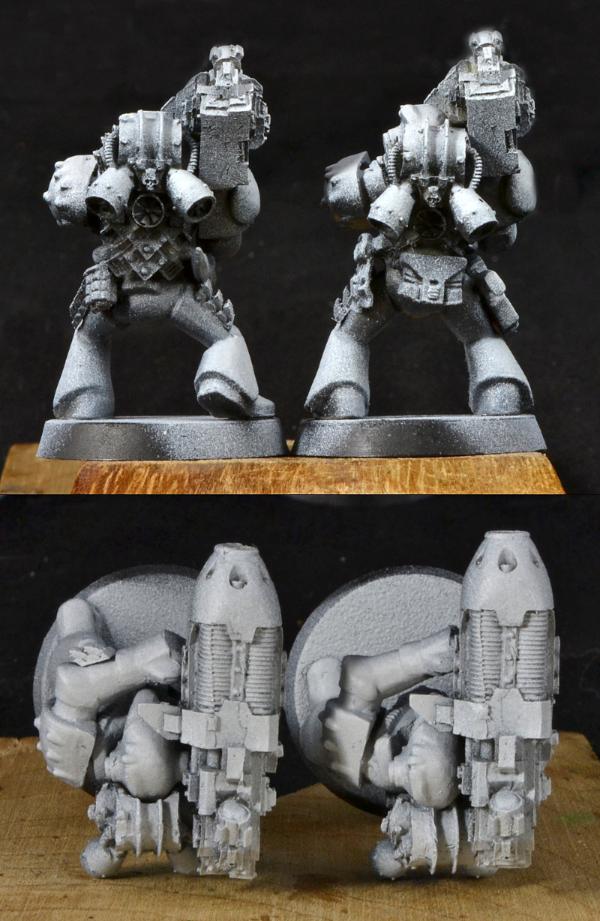
I'm experimenting with dynamic priming mooched from Major Tom. Black underneath, grey on the sides and white on top. Be interesting to see how this effects the paint, especially with the yellow sternguard.
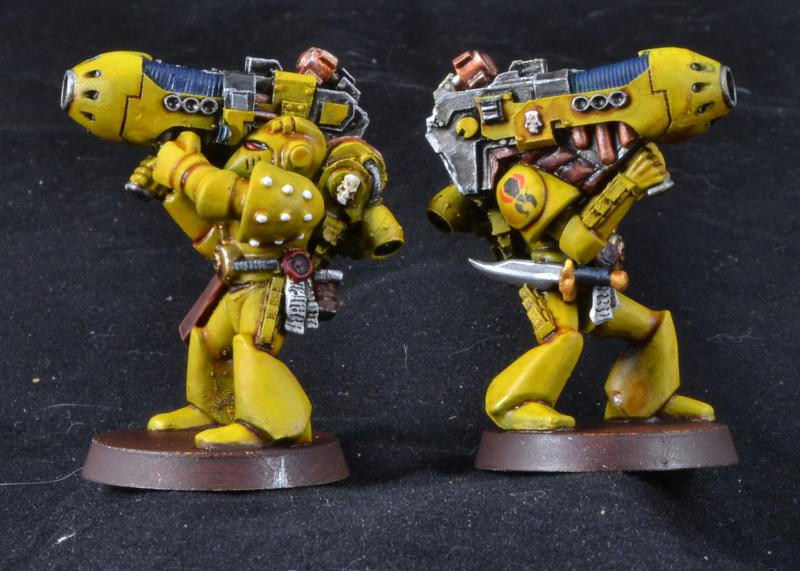
Here you go. As you can see there's virtually no visible difference in the two methods I employed. The divot for the head in the pack of the second one (left) is more noticeable... but for some reason that's the one I feel is better. Something to do with the head positioning on the body I think. On the right-hand marine, I simple used some end nippers to remove a rather unimportant extension of the back pack in order to accommodate the plasma cannon. Hmmm, and there looks to be a casting error on one of those PCs that I've got to address...
You'll also notice the chainsword blades on the figures... those are care of Zinge Industries. NEVER has getting those chainsword teeth onto my figures been that easy and stress free. Thank you Zinge!
Automatically Appended Next Post:
OK, fixed that.
On a side note, Ygg's build is going nicely but slowly. Still selecting bits, filing, fitting things together, GSing gaps. You know the drill. I decided to stop trying to force it into a specific pose and just let it flow into whatever form it wants to take, as a result... progress is now steady and I have high hopes the model will turn out to be quite interesting.
Intresting that the left PC sits on the side of the cable and the right one sits in front. A bit more forward!.. Love the backpacks. Did they come with the PC's?
@SL: Those are Mk 2 back packs. I get things bit by bit so I'm not sure what normally comes with what.
@Yggs: A little teaser for you. This isn't the pose we discussed but I just couldn't get that to work. As I mentioned before, time and experience have taught me not to force it. I think once I get this puppy finished and based... you'll like him (and he'll be more playable than the other version). Still a lot more work to do so don't panic about sprue marks or the crudeness of the swords.
@wyfox: Meh, easy enough to fix. It's the plasma coils that are tricky but with the right tools (a fine pick and a stiff bristled brush) they're doable too. Also nice if you have some feathering files to get at issues on flat surfaces.
Gitsplitta wrote: @Yggs: A little teaser for you. This isn't the pose we discussed but I just couldn't get that to work. As I mentioned before, time and experience have taught me not to force it. I think once I get this puppy finished and based... you'll like him (and he'll be more playable than the other version). Still a lot more work to do so don't panic about sprue marks or the crudeness of the swords.
Hey, looks pretty threatening from here !! Can't wait to see moar progress on him !!!
I should finish cleaning up the torso in the next day or two. Need to sort out how I"m going to handle the swords which has always been an issue (and the main problem with this whole concept). I need some parts company out there to make a couple of poses of hinged chainsword blades that look decent... like that's going to happen. I've got the legs cleaned up and ready to go, so once I get the swords sorted it's down to the chaos specific sculpting... *gulp!*
Wait! It's really happening!? Gits is posting new stuff again.
Liking the overview for things to come and look forward to seeing the construction, painting and basing of the Vanguard (as your techniques always provide ample inspiration, sensei).
P.S. I also like how your hiatus from this blog managed to coincide with my absence from Dakka, meaning that I haven't had 30+ pages to catch up on.
Hey GS, good to have you back again. I think the days of record setting are long behind me. That kind of pace took years of daily effort to build up. Drop off the face of the earth for 4 months takes you out of the net gestalt. You know how the internet goes.
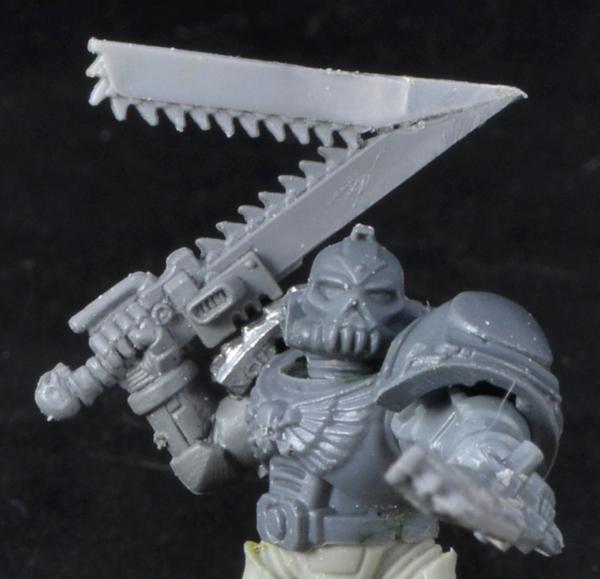
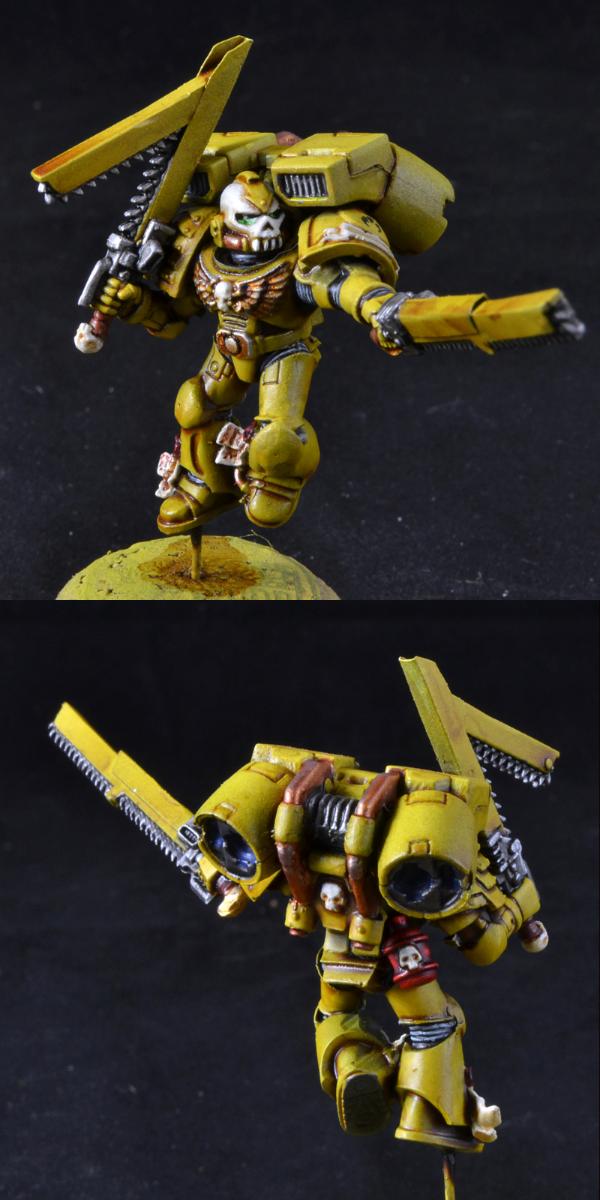
In any case... for those of you who're still watching, I finished the build for Yggs' tranquility vanguard & even snuck in the dynamic priming. Yggs wanted a non-MK6 MW that had been corrupted by chaos. Problem is my "new" MWs just got back and I can't really see a guy going through everything, finally getting back into the good graces of the Imperium (officially anyway) and then jumping ship. So the compromise is a Mk-7 marine with non-integrated mantis swords (which in my view are strictly produced and controlled by the new forge worlds assigned to re-supply the chapter). The only outwardly chaotic thing (at this stage) is the helmet... and that's pretty subtle. I did go with a general skull motif and everything that can has skull decorations.
The experiment here is the blade guard as a way of handling the transition from one sword section to the next. I kind of borrowed this from my tablesaw's design, but I think you get the idea. I think it's the best I've come up with so far. The biggest issue was how to do it without adding huge hunks of very complex plastic to the model. The solution... paper! Yes, that's just paper that's been saturated with dilute 50/50 PVA to give it strength. So, Yggs will have to be a bit careful with it, but it should hold up just fine with a little attention. I've become very fond of using paper as a way of adding detail to figures. My mantis warrior badges for vehicles are just printed on regular paper and they look just fine, are easy to make and so much easier to work with than decals that it's not even funny. I also really like the thickness of paper in relation to the blobby plastic we're all used to. In relation to the marine's size... that chainsword is probably 8" across... that's stupidly ridiculous (though I fully grasp the practical, toy-making reasons why). I didn't want to make it worse by adding a couple more inches of shielding in plastic. So, while I still consider the mantis sword a conceptual work... I think I'm getting closer to the final design.
There will also be some GS work added when I get to painting the camo pattern, but I'm not good enough at planning to do it now, I'll work on it & add it after the base painting is done (which is ass-backwards, but humor me).
Automatically Appended Next Post:
Oh, and I just noticed the blog is over a half-million views. Bet only 250k of those are mine!
Automatically Appended Next Post:
Got the airbrushing done. Not bad. One advantage to the dynamic priming is that it accentuates the differences in the base colors more. The photo here shows two base colors, I eventually did two very light sprays of lighter shades. I think a brown primer would be a better base for yellow than black. Next time I'm at my FLGS I'll see if I can hunt some down.
The sword design is coming along nicely, and I have heard that doping paper with super glue gives it a decent amount of rigidity as well and obviously cures faster than PVA.
Oh and don't worry, EVERYONE IN THE INTERNET IS STILL WATCHING THIS THREAD!
PC #1: "I got him! I got him!" PC #2: "I got him! I got him!" Chaos Mantis: "Cant catch meeeee~!" *flies away*
Then the PCs shoot each other in the crossfire
Heh, in any case, the marines are looking great, and its awesome to see you back painting! Im really liking the new version of the mantis swords too. I think this is close to the perfect look! Id add some rivets to the plates, but thats just me.
And is it just me, or did the old beakies have really thin feet?
It's not just you. I very frequently have to completely re-build the feet if I'm going to do anything interesting with the basing (which in this case, I'm not). I make a sole out of plasticard and build a foot over it with GS, then can position it however I like.
Love your narrative.... very appropriate! The only error is that the plasma cannons never actually fire, they just overheat and kill their operators on-the-spot.
Hi Gits'. Had a rummage through the bits box - I've got an old shoulder mounted heavy bolter, multi melta and a (kind of) shoulder mounted conversion beamer if you want them. Just pm me an address to send them to.
Gits, seriously dude I would love a real boring step by painful step by step on that yellow armor please? i'm following this progress but all in one post would be sweeeeeet!
needless to say, it's looking inspiring and marvelous as I would expect from you by now! :-)
Nerdfest, i knew there was a link somewhere....Its from the front page, may not be the way Gits does it now, but heres the(/a) 'How to do Mantis Yellow Tutorial':
No problem, i knew Gits had done one, but i thought the link was in his sig...hope it helps
Galorn wrote:Very nice yellow. Why the Chaos Khorneate helmet on the assault marine?
Its a GMS Marine for Yggdrasil (sp?) and is meant to be a Mantis Warrior that has turned to Chaos. However, that plan changed due to the new fluff that Gits has written for his Mantis Warriors (meaning that there would be less of a chance of a current Mantis Warrior turning Renegade) to being just Chaos-ified a bit, Gits explained it when he put up the first WIP, go have a look....
Yes, the intent is that he's not blatantly chaotic... but there will be more obvious clues that he's being affected in both modeling and painting as I go along. Right now he's pretty straight-forward though.
That tutorial is for the wet-blending technique. It's the absolute best method... but now I'm lazy and constantly in a hurry, so I use an airbrush. I'll see if I have enough pics to piece together a little tutorial. If not, I'm sure I'll have another chance to do the tranquility pattern & will crank one out then.
Thanks Styro, wonderful to see you commenting! I think this is the 4th version of them (the swords) I've tried... and the first one I've actually liked from a mechanical perspective.
It's always a privilege to see your wonderful technique for yellow, even if it makes me miss my 40k stuff rather dearly (it is currently in loft storage while I'm at university). They look wonderfully eye catching with their refined shadow
@GS: Good to see you again mate. I'm glad I took the time off from the marines... I'm looking forward to painting them again and have regained that "spark" that I think inspired my better work of the past. It also helps that I don't have a ton of figures to paint for Adepticon, which means I can enjoy the process a bit more.
Unfortunately I've been battling a cold so bed times have come early (i.e. no progress). I'm kind of scratching my head as to how to paint the plasma cannons... not the coils but the rest of it. Got a supply drop from Chicago Airbrush Supply which was sorely needed. OH, and I did find a brown primer that with a little modification, should work well as a base for the yellow. Hoping I can get something done tonight after work.
Gitsplitta wrote: I'm glad I took the time off from the marines... I'm looking forward to painting them again and have regained that "spark" that I think inspired my better work of the past.
Oh I know that feeling all too well. Before my hiatus I was working on lots of blue Chaos Space Marines (Chosen; Regular and Berzerkers) and in large quantities all that smooth armour just breaks you. Thankfully I had a lot of old metal Flamers that were lying around, so painting daemon flesh was a nice change in dynamic (even if they were also blue... ) And I got to discover the joys of painting things under pressure in preperation for a tournament that I wasn't even competing in (I was bailing out my sibling, like any kind/gullible older brother would do).
And be sure to rest up good Gits, so that you can be fighting fit for further painting. Hmmm... I have to admit, I'm not sure how you should tackle the plasma cannons either. Silver as the base with further details, such as a brass or copper muzzle would compliment the yellow nicely. Or copper, brass or gold as the base, as a means of "blending" in with the rest of the marine, perhaps with camo details? Or leave the majority yellow and use the camo details?
Or you could just go with the purple that you've been using with the other plasma weapons in your army, even if it's a direct contrast with yellow... slightly removing the plausibility of the marines being stealthy.
I have been making progress guys, just incremental. Been getting up a half-hour early and sneaking in a little painting before heading off to work. As such, I'm just picking out little projects each morning that I can complete... grenades, holster, metal parts of the chainswords, etc. So while I am moving forward, it's not very photogenic. Perhaps one more day will provide enough interest for a pic.
Morning snooze!? what the hell is that? i'm always awake when you slackers are sleeping! probably because i'm at work when everyone sleeps but that's no excuse! ;-)
Started to pick out the details on one of the plasma cannons. This is still very WIP. Plasma coil is not in it's final color, though this is an interesting effect. I have made similar progress on both other figures, but not quite to this extent.
Plasma cannoneers are looking great so far, well done on getting up extra early to get some progress in - I couldn't function on a level required for hobby stuff till I've been up a while, had tea etc.
@Styro: Thanks! Yeah, it's kind of a neat look, but I had my heart set on trying to airbrush some glowing plasma coils on these (they're so big... should be easier than normal). However... we'll see if I chicken out at the last minute. As to the camo... yeah, they're pretty boring without it. I do like the way the near-black handle on the knife came out. It's much more military looking than my usual wood-brown handles. He's getting close though... chapter badge, eyes, fix up the skulls. Then just the two "problem" items remain... the nose of the plasma cannon and the coils. The camo used to be something I stressed over but now I've done so much of it that it's not an issue any more.
@mt: Thanks mate! I never do anything too complicated in the morning... but since I have to get up fairly early for work (5:30 AMish), I actually tend to be a bit more intellectually sharp then. Unfortunately my eyes aren't usually all that great early on... they seem to need a couple of hours to "warm up" and start focusing correctly (well, that's a relative term), so I keep things simple in the morning. Base coats, highlights, washes... That's 90% of it anyway.
Looks like you got a few "wash rings" where the wash dried funny on the gun and lower leg as seen on the pic to the right. Curse those close up photos!
I actually broke out the air gun for the first time to base my gargoyles, tervigon, ect for this weeks tournie. Can't say that it was quicker than spray primer I normally use. It did come out smoother. Also, the Valejo Surface Primers don't bond as well as the Krylon Rust Tough Primers(which normally perform smoothly). Much easier to scrap the more rubbery Valejo primers off.
I know you mentioned using the Valejo Surface Primers. Did you encounter similar issues? Are you using a different brand?
Yeah, the inside of the legs elude me when I'm checking for drips and rings. I'll fix that, thanks for the heads-up. I agree with your assessment of the Vallejo primer, but for my money, the purpose of the primer is to make the paint stick... not to be scratch resistant. I'd rather have a fine coat that doesn't obscure detail. That... and the fact that I can mix my own primer colors makes it my primer of choice. Can't do that with a spray can.
Yeah, I've found the Vallejo primers much better than my old rattlecans. I've never experienced any rubberiness like you spoke about. It's always very, very fine, and even on metal models, I don't get those damn corner nicks with it like Rattlecans.
Are you using water to thin your Vallejo primer? It's best to use a real acrylic thinner with Vallejo primers, because of the chemical tech they use to make it airbrushable.
I wonder if wyfox's bonding issue is really just a reflection of primer thickness. Unless it's actually flaking off, I wouldn't think it's the bonding... it's just a much thinner coat so it's easier to scrape off.
I still use cans when I'm really in a hurry, feeling lazy or am working on something I know won't be painted beyond a basic tabletop level (like Thing 2's Nids). But for my best work... the air primers are the only way to go.
No, I wasn't using any thinner. Per the directions on the bottle you are suppose to use it straight up.
I have found Krylon can primers to be very difficult to even scrap off with a tooth brush after several hours in simple green...and even then it often permanently stains the plastic. After 30 minutes in simple green, the Vallejo primer washed off with a simple water rinse (had to redo the job because I got the paint on too thick and had a few runs). Definately less tackier.
The Krylon Rust Tough cans normally go on smooth as well. I can give you my two Tyrant sword arms, one done with Krylon and the other with the airbrush, and you wouldn't know the difference.
All done save for the camo, OSL and fixing the sepia drip on the lower leg of one of them... which I already fixed once and managed to muck up a second time.
Update: Camo scheme on cannoneer #1 is done. This is more involved a spread than I'd usually do for a WIP but I know some of you are interested in the camo scheme. As I said... it's pretty simple. It took me between 10-15 minutes to do this, closer to 10 than 15. There's a few spots where the paint was a bit thin, I'll go back in and darken them up before completion.
Excellent my friend. I like the copper very much. I'm going to hold off judgement on the plasma coil till it's done; not sold yet, but I have faith in the mighty gitsplitta.
On the subject of priming, does anyone else find that below about 8 degrees C (what's that it $?) airbrush primer doesn't stabilise well? I'll be back on the VJ cans for a bit, I think.
inmygravenimage wrote: Excellent my friend. I like the copper very much. I'm going to hold off judgement on the plasma coil till it's done; not sold yet, but I have faith in the mighty gitsplitta.
On the subject of priming, does anyone else find that below about 8 degrees C (what's that it $?) airbrush primer doesn't stabilise well? I'll be back on the VJ cans for a bit, I think.
Hey Sam, I think one should refrain from priming your models outside when one lives in the UK !!!
Apart from this, Gits, progress is steady & great !
A bit sad not to see more progress on my models, but hey... It's not like I haven't waited for long already !!!
I still LOVE that camo pattern. Even as simple as you say it is, it pays off in the long run. I think it really sets the model off!
@graven: I think thats like 45 F or something near there. Ive noticed the same, but also with cans! I pretty much make it a point to only prime when weather is warm, so winters all but shut me down priming-wise. Though ive found the garage keeps a couple of degrees warmer in the winter, and thats just enough to get a good primer coat down. You just cant lollygag around for too long!
- graven is "not sold" on the plasma coil OSL... even though I hadn't actually done it yet. - Yggs in concerned about no progress on his "figures" (note the plural... I thought it was only one). I thought it prudent to practice on the two plasma cannons as I haven't done one of these since last May and I didn't want to screw yours up.
Cripes... tough crowd.
Well, for what it's worth, finished the plasma cannons. This is a side shot of each one. My first "finished" photograph revealed a number of issues that I had to go back and fix. I'm clearly not as good with the airbrush as MajorTom is, though I did find his advice very useful. My aim is off and my brush spatters a bit. New needle so it's not that. Re-did one of them twice before I got it close enough. So, I'm not satisfied with the OSL, but I did try my best. I remember that the first time I took my airbrush apart (way back when), something flew out of it that I'm not sure I found and put back in... that may have something to do with it... or not, may just be me.
Thanks... it always makes me nuts when glow goes around corners... because light just doesn't work that way. But on these models you've kinda got to do that or the "glow" would be so small it would probably just look like sloppy painting. Very much stuck to the example and advice MajorTom gave though. I'm not as good at it as he is by a long stretch... but I think it did point me in the right direction.
I'll be finishing up the details on yours probably later today... then I have to think about how I'm going to work the camo with the sculpting and all. We'll see what I can come up with.
Looks great Gits! Very understates though, like its only just been turned on Maybe a bit more would help with the effect next time, especially if your aiming for it to 'pop' significantly on the tabletop.
Great work though, it certainly looks convincinvg.
Have to say, ive become so used to seeing the beautiful copper that you do on the Necrons that i didnt even notice it on the MW...my bad. Just goes to show that even on hiatus from Marines you are learning and adding to your repertoire all the time....well done mate.
Tranq plasma vets look awesome. I think the OSL on the coils looks amazing, I'm not crazy about the green spill over onto the cannon itself though. I don't have any suggestions on fixing it. Just blathering on. I'm diggin' the bronze/brass items they have going on and of course, their bases look great. Nice work, Gits!
Oddly enough, the green spill over is actually blue spill over... thin coating of blue over yellow = green. (and I'd be happier with blue too... this is just the way it turned out) Fore some reason a number of the dark blues out there (from various companies) are somewhat translucent, making this a not-uncommon problem.
I knew it was the blue spill over, but wasn't sure how it became green when the yellow was dry. But the translucence (is that a word?) explains it. Cheers
Looking good Gits.
The plasma coil looks the part. Good effort.
Actually, when shining a coloured light on a differently coloured surface it will appear to either take on the colour of the light (due to reflection of the light) or will appear almost black because...and here's the science part... the colour of a surface is due to the wavelengths of light that are reflected or scattered from the surface (e.g. yellow reflects yellow wavelengths), all other wavelengths of light are absorbed. So a yellow surface in the absence of yellow wavelengths of light will not reflect any yellow light and therefore look black. However, you can argue that as the marine is standing in a well lit (by sunlight) environment that is supplying ample yellow light
(as sunlight is generally "white", containing all wavelengths of light) that will mix with the blue light that is reflected from the shiny surface and therefore appear green...
In short, it looks fine and noone short of a science degree will be worried by it.
I like it, it went fro powering down to powering up! Its not full power, ready to fire yet, but it's charging. As for the green over spray, Im not a fan of it. I dont think the Light source is bright enough to radiant that far.
the small circle is the Light source and the other should be the glow
Now, I'm not an expert of any kind, and I'm scared to attempt OSL. But in my opinion to get the glow radius that you have you need a brighter source. Right now your glow barely reaches the end of the coils and therefore shouldn't touch the yellow areas much.
If you make the source larger as shown, it will cover your yellow areas and then some.
Me personally I like the low power glow and I would clean up the yellow
Apologies for sounding picky: I meant I wasn't sold on the colour palette. However, I really like it. Nice job! Anyway, when do I get a gms ?
Automatically Appended Next Post: @Ramos - thanks! My garage is an icebox come winter, but it's where I do all my priming. There's always manual I suppose *sigh*
I appreciate everyone's input. Unfortunately given the limitations of my skill with an airbrush, I think any attempts to "fix" it would just make the figure look worse (this includes fixing the yellow... you just can't fix the area around an airbrushed gradient... at least I cant). I'll keep everyone's comments in mind for the next OSL attempt though.
@graven: Finishing your GMS marine is next up after I get done with Yggs' marine. They'll be another opportunity for botched OSL on him too.
All right you slave drivers. I took the plasma cannons and by hand mind you... adjusted both the glow of the coils and the OSL around them. Took some really delicate blending to slightly increase the size and gradient of the coil glow... also made the innermost part brighter as MajorTom suggested. Then some super-thin wet blending on the guns in order to beat back some of the excess OSL/overspray which is what the "wandering green" amounts to. (Thanks for making me do this Styro... didn't think it was possible but it turned out OK.)
That looks very good Gits! You got everything right, but there is one thing you need to cheat on, for a very specific reason.
Glow must always leave the surface it sits on brighter or the same. The issue I bet you are having is that the dark blue, on the yellow is staining it a dark green, which is the thing that is bugging you I think. What I would do is repaint the yellow where it went over, and do a sky blue edge highlight on the closest surface to the coils.
Your technique is on-target, and with any other colors than blue and yellow, would have worked great. On black or metal it would have been particularly effective. I may suggest that for blue in future you start with that dark blue only on the light source, but then go right over the top of it with a sky blue, then to white, leaving only hints of the dark blue under the sky blue overcoat.
Overall though, you should be pretty happy sir, that is head and shoulders ahead of where you were, great job!
LeadLegion wrote: Great looking objective lighting there. Personally, I think you have a particularly picky audience
Not looking at anyone in particular here, right Graven
(He pm'd me and asked me to look because something was off to him, otherwise it would have been a simple 'great job!' from me because it is... just an FYI so I don't look like a picky jerk lol!)
Sorry about that Major Tom. I wasn't referring to you (I understand from the thread that you're a dab hand with the airbrush and have been helping out Gitsplitta). I was just poking fun at Graven for thinking the OSL was already in place. He's a longstanding gaming buddy of mine from the local gaming group.
Wow, looks great Gita, the cannon is very cool, and kudos for re-working it. MT makes sense with his suggestion - as to be expected - but it's understandable if you don't want to do further re-working.
I've yet to make OSL look like anything other than sloppy painting myself, so I'm in awe once it passes the half-decent mark - which yours did a while back
@Tom: Thanks once again for the excellent advice, I'll heed it. Next time we get to the same place the first round's on me. Indeed LL's jibe was intended for graven as he was giving me sh** earlier. (good one LL!) Just for the record... I *need* people to be picky jerks... otherwise I get complacent and I don't push myself, i.e. I don't get any better.
Now... I want everyone to think only good thoughts. I need to finish up Yggs tranquility vanguard figure and I've got some really tricky GS work to do which is NOT a strong point of mine. Wherever you are across the globe... think good thoughts, say a prayer, light a candle... whatever is in your theology or tradition. I'm going to need either luck or divine intervention to pull this last bit off. (also I just dumped a half-a-cup of coffee onto my keyboard so this may be the last you hear from me for a while)
The payoff... is that once Yggsie's figure is done and on it's way across the pond, I'm going to being working on 4 las cannon figures... 3 for me, one for graven. (though graven's is by far the coolest... mine are kind of boring)
lol ok ok, just wanted to make sure! In all fairness without knowing that you had asked and were open to advanced advice it would have been an insanely nit-picky comment for a non-display only model. Just wanted to make sure lol!
<Lights ylang-ylang incense, plays whale song CD, adopts soothing voice> Goooood green stuff, lovely, nice, sweet green stuff. Be good for Gits, go where he wants, and do as he says, it'll all be worth it in the end. You'll feel good about yourself, and you'll look fantastic.
[edit : Tom, please stop giving good advice to people ! Not only are you an insanely good painter, if, on top of that, you begin giving advice, that'll be true patronizing to those who asked for it (yeah, me included lol)... I definitely hate you ]
Gitsplitta wrote:Isn't that mixing pagan and Christian symbolism?
monkeytroll wrote:Depends who he's praying to
A purposeful mix designed to invoke the notice of both sides (as they cant stand the competition), therefore increasing the good fortune coming your way.....
I feel your pain. I'm not the great at sculpting myself.
Found one thing that helps me though: mix green stuff 50:50 with good quality miliput. The miliput makes the green stuff less sticky and easier to handle. The green stuff makes the milliput less prone to crumbling.
Match made in heaven.
Now if only I had the sculpting skills to put that knowledge to good use.
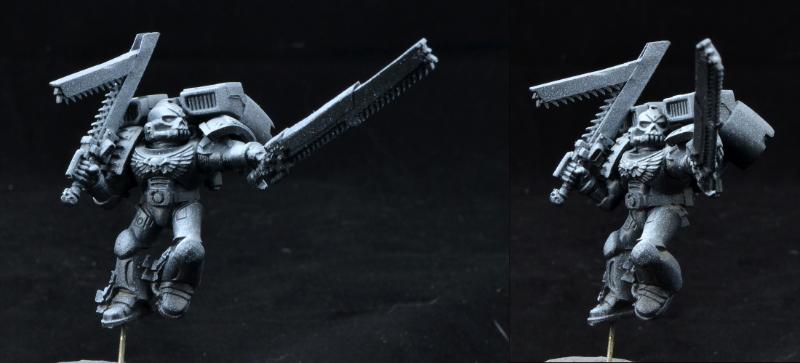
I'm sure Yggs is impatiently waiting for something new... well... here 'tis. Figure is basically finished save for the camo and some OSL on the jets of the backpack (which no one will probably notice unless the turn the figure upside-down). I want to deface the chapter badge and purity seals somehow... MAYBE. I'm not sure at this point. The point of this figure is the subtle application of chaos... don't want to overdo it. So I'll wait until the camo is done and make a decision based on what I see then.
This helmet is my all-time favorite helmet of the GW universe. If I could... I'd put it on EVERYTHING!!
Dee-Zaamn! That dude looks awesome, Gits! I love that helmet too. It works for everything. Yellows look good, as usual. Excited to see him with the Tranquility pattern applied.
Looks good.
I like your yellow.
And the chainswords, the hinge works well.
Agreed, the helmet is cool.
For the purity seals, you could make it look like he's ripped most (but not all) of the paper off leaving the seal with a scrap of torn paper still attached. Probably not easy if they are molded on seals tho. Just a thought.
And what is that red thing with a skull on, on his hip? looks like a hip flask...
It is a cracking helmet. Sometimes hard to find when shopping on bitz sites because it's so popular. I'd give it to all my loyalist marines if I could find enough of them. But even I'm not mad enough to buy Chaos Space marine kits just for one head.
I like the idea of defacing the seals somehow - might be tricky to show well though, I thought of crossing it all out or drenching them in blood, but not sure how well that would actually translate on a mini. Maybe blank out the text and add partial chaos stars to the parchment - depending on colour that might work over the top of the script.
And I love Blackhand's idea for barbed camo!
Not a melta bomb - that is a hip flask, nothing like a quick slug of Ezekial's Old Style Hooch to quench your thirst in the heat of battle.
Automatically Appended Next Post: Ooops! Lost in the warp due to roll-over.


 )
)