| Author |
Message |
 |
|
|
|
|
Advert
|
Forum adverts like this one are shown to any user who is not logged in. Join us by filling out a tiny 3 field form and you will get your own, free, dakka user account which gives a good range of benefits to you:
- No adverts like this in the forums anymore.
- Times and dates in your local timezone.
- Full tracking of what you have read so you can skip to your first unread post, easily see what has changed since you last logged in, and easily see what is new at a glance.
- Email notifications for threads you want to watch closely.
- Being a part of the oldest wargaming community on the net.
If you are already a member then feel free to login now. |
|
 |
2009/03/27 17:35:44
Subject: "Forward to Germany" - Soviet WW2 T34/76 Diorama
|
|

[ARTICLE MOD]
Huge Hierodule
|
I like using a dark brown, like Scorched Brown to block out eye sockets, a thin line of white over that, and then some more Scorched Brown for the middle. It's not as stark as black, but give the shading I like.
|
|
|
|
 |
|
2009/03/28 23:39:06
Subject: Re:"Forward to Germany" - Soviet WW2 T34/76 Diorama
|
|

Regular Dakkanaut
|
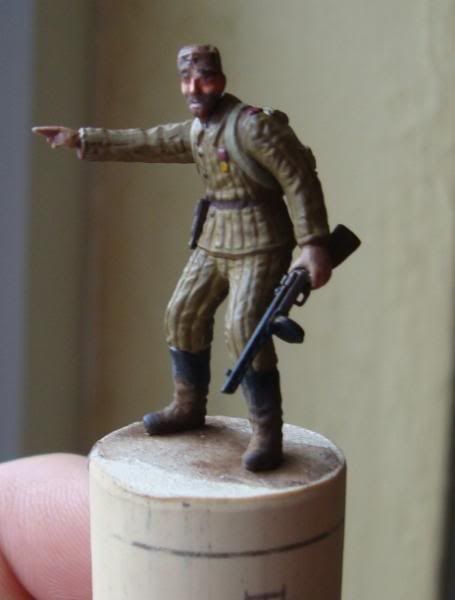
Thanks Ifurita, nice tips.
Did some more work on the eyes. The light was pretty bad so these photos aren't great, I will try to get some in natural light tomorrow.


I removed the dark eye lining and blended in some light red oil paint, I also toned down the whites of the eyes and the size of the whites and added some light grey to the pupils to give them some colour and bigger shape.
|
|
|
|
|
|
2009/03/28 23:55:21
Subject: "Forward to Germany" - Soviet WW2 T34/76 Diorama
|
|
Rampaging Reaver Titan Princeps
|
That is literally a hundred times better I'm so surprised and impressed that such a small thing can make such a huge difference into how you perceive a model. It now looks great whereas before it looked o.k.
|
"But me no buts! Our comrades get hurt. Our friends die. Falkenburg is a knight who swore an oath to serve the church and to defend the weak. He'd be the first to tell you to stop puling and start planning. Because what we are doing-at risk to ourselves-is what we have sworn to do. The West relies on us. It is a risk we take with pride. It is an oath we honour. Even when some soft southern burgher mutters about us, we know the reason he sleeps soft and comfortable, why his wife is able to complain about the price of cabbages as her most serious problem and why his children dare to throw dung and yell "Knot" when we pass. It's because we are what we are. For all our faults we stand for law and light.
Von Gherens This Rough Magic Lackey, Flint & Freer
Mekagorkalicious -Monkeytroll
2017 Model Count-71
|
|
|
|
|
2009/03/29 02:53:32
Subject: "Forward to Germany" - Soviet WW2 T34/76 Diorama
|
|
Tough Traitorous Guardsman
|
Much better. This guy looks like he hasn't slept in days, driving the fascist invader from the Motherland! Nice one.
Cheers
Dave
|
|
|
|
|
|
2009/03/29 17:49:14
Subject: Re:"Forward to Germany" - Soviet WW2 T34/76 Diorama
|
|
Regular Dakkanaut
|
Thanks guys, I was reading some really interesting articles on painting eyes on scale models recently. There is the school of thought that says paint the whites of the eyes and those that say only paint the pupils and leave the whites out.
The argument being that in actual real life you rarely see the whites from a distance. It's an interesting point, but I'm not sure how applicable this is to 1:48 (28mm) figures. I think the guys article was aimed at 1:35 and even 1:16 scale figures (scale was not mentioned directly) and some of the techniques for panting both the colour of the iris and the black dot of the pupil seem to be very difficult if not impossible at 1:48 scale.
It was interesting food for thought all the same.
Here are some photos taken in natural light, they are a little clearer than the ones I took last night, however even these aren't great and I've found photographing the faces rather tough, they just never seem to do the minis justice. For example in the photos the colours always end up coming out too stark and strong, in actuality they are more subtle.


|
|
|
|
|
|
2009/03/29 18:11:57
Subject: "Forward to Germany" - Soviet WW2 T34/76 Diorama
|
|
Lone Wolf Sentinel Pilot
|
Wow, nice work. I like the stubble, and I recognize how you pulled off the weathering on the boots. It's often hard to work on more real scale models such as these after doing the Heroic scale for so long -- I can't imagine getting anywhere near that quality for a long time!
Stay safe,
sA
|
My Loyalist P&M Log, Irkutsk 24th
"And what is wrong with their life? What on earth is less reprehensible than the life of the Levovs?"
- American Pastoral, Philip Roth
Oh, Death was never enemy of ours!
We laughed at him, we leagued with him, old chum.
No soldier's paid to kick against His powers.
We laughed - knowing that better men would come,
And greater wars: when each proud fighter brags
He wars on Death, for lives; not men, for flags. |
|
|
|
|
2009/03/29 21:39:54
Subject: Re:"Forward to Germany" - Soviet WW2 T34/76 Diorama
|
|
Regular Dakkanaut
|
|
|
|
|
|
|
2009/03/29 21:48:13
Subject: Re:"Forward to Germany" - Soviet WW2 T34/76 Diorama
|
|
Regular Dakkanaut
|
Thanks SA - I'm hoping once they are all laid out and together as a large group that these figures will have a much better impact on the scene.
As you say figure painting heroic scale opposed to historical scale (1:48) minis is actually alot more different than you'd think. It certainly took some getting used to, but I'v enjoyed it alot. I'm hoping that the improved quality of the ICM figures for my next project will give me some better results.
|
|
|
|
|
|
2009/03/29 22:00:14
Subject: Re:"Forward to Germany" - Soviet WW2 T34/76 Diorama
|
|
Regular Dakkanaut
|
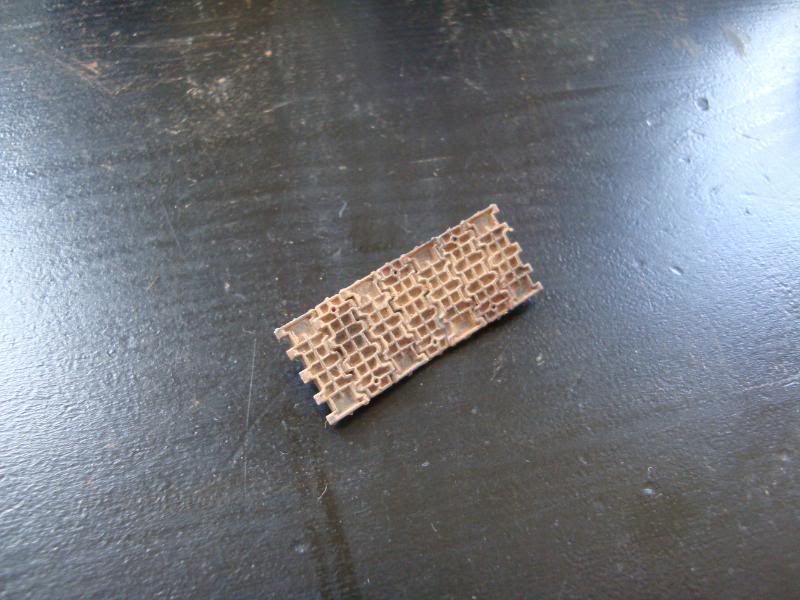
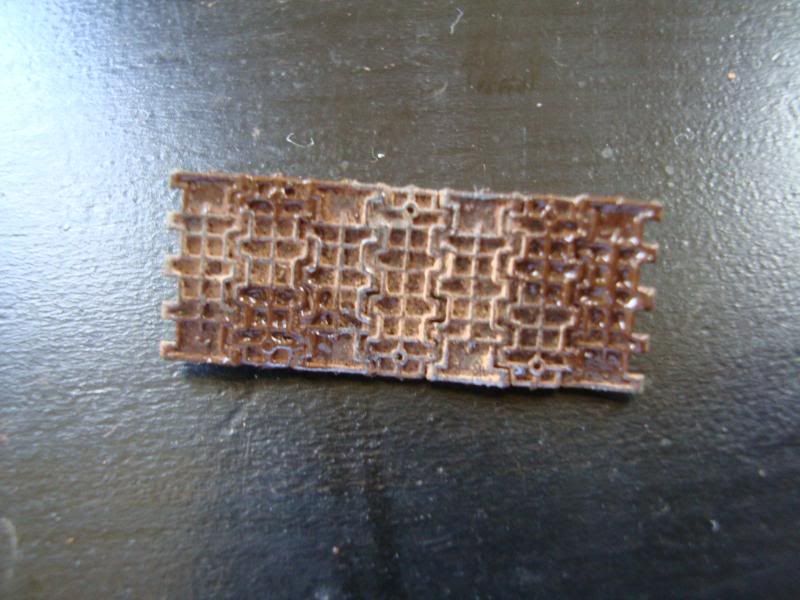
On a side note I put together this little tutorial on the techniques used on the tracks for some guys over on Warseer. Thought I'd post it here if anyone is interested in the different stages of weathering:
Heres a little walkthrough on painting and weathering the treads and tracks.
First off you will need:
Mig pigments, I used Vietnam Earth, Europe Dust, and Dark Mud. However any earth colours are fine.

Acrylic Resin
Tamiya Acrylic Thinner X-20A
Gloss Acrylic varnish
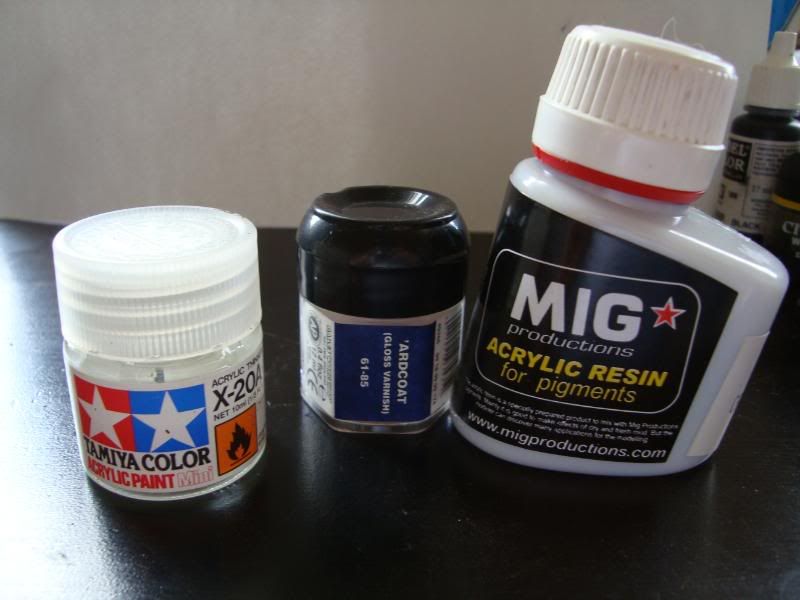
Kommando Khaki
Desert Yellow
A dry brush, standard brush, and an old Pencil.
The painting:
From a black undercoat/base lightly drybrush a layer of khaki and Desert Yellow:

Mix some vietnam earth pigment with water to make a wash


Next mix some thinner with some Kommando Khaki

Then dust the tread with some europe dust pigment, this is a bit like dry brushing. Load your brush with some pigment powder and carefully apply directly to the tread dry.
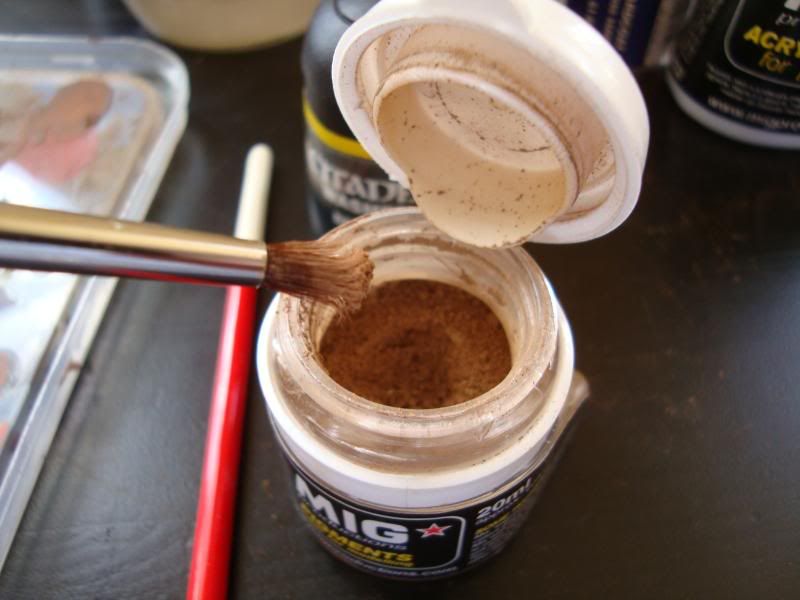

Mix some gloss varnish with some dark mud pigment to make the wet mud, and flick directly onto the tracks by flicking the drybrush with your finger.

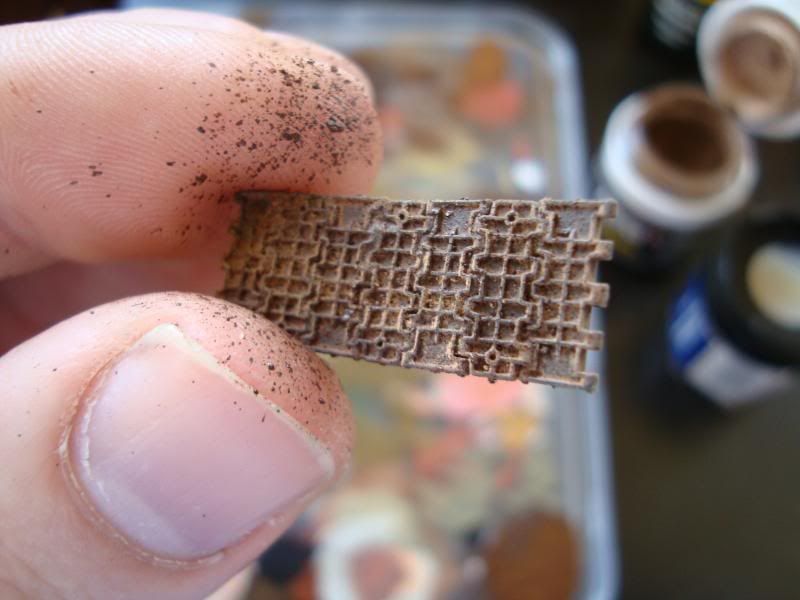
Next mix some acrylic resin with some dark mud pigment to make the thick mud and either apply via the blowing method using an empty airbrush (holding the loaded brush infront of the air stream) or brush directly to the model.

Next use a pencil to mark out metallic areas either by drawing directly or using graphite dust.

The end result:

|
|
|
|
|
|
2009/03/29 22:01:52
Subject: Re:"Forward to Germany" - Soviet WW2 T34/76 Diorama
|
|
Crafty Bray Shaman
|
Hey GM, one thing I have found out about taking photos so that you get clearer pictures is a bit of a same rule of thumb when doing actual paintings, specifically still lifes. If you can have 3 sources/types of light then it will bring out a higher range of color and make the color more 3 dimensional. Check out my gallery on my claws of lorek for examples of this. I essentially used flourescent, incandescant, and natural light with a white reflector on the opposite side to get well lit photos. Sometimes a gradient background will help too as it will be similar to differnt shades/hues of color.
|
Jean-luke Pee-card, of thee YOU ES ES Enter-prize
Make it so!
  |
|
|
|
|
2009/03/29 22:17:42
Subject: "Forward to Germany" - Soviet WW2 T34/76 Diorama
|
|
Lone Wolf Sentinel Pilot
|
Thanks for the tut' on the rust/dust/must, it looks brilliant. The base for the taking is incredible too, as if the firing mechanism of the gun. Heck, the whole thing is great.
sA
|
My Loyalist P&M Log, Irkutsk 24th
"And what is wrong with their life? What on earth is less reprehensible than the life of the Levovs?"
- American Pastoral, Philip Roth
Oh, Death was never enemy of ours!
We laughed at him, we leagued with him, old chum.
No soldier's paid to kick against His powers.
We laughed - knowing that better men would come,
And greater wars: when each proud fighter brags
He wars on Death, for lives; not men, for flags. |
|
|
|
|
2009/03/30 06:06:17
Subject: "Forward to Germany" - Soviet WW2 T34/76 Diorama
|
|

Paingiver
|
The eyes look great and thanks for the dust/ mud tutorial. The scene is starting looking really great. The tank is looking right at home in that field.
Have you thought about the snow on the tank, in real life it would stuck in to the tracks and lower hull, but the effect maybe too difficult to try on this scale.
Great work again!
|
|
|
|
|
|
2009/03/30 06:32:14
Subject: "Forward to Germany" - Soviet WW2 T34/76 Diorama
|
|

Junior Officer with Laspistol
|
Thanks for the tutorial on paiting rusted/dusty tracks,still lookin good can't wait to see the finished scene.I personally like the way you painted the eyes might give it a try in future.
|
"I refuse to join any club that would have me as a member."-Groucho Marx
|
|
|
|
|
2009/03/30 09:20:53
Subject: Re:"Forward to Germany" - Soviet WW2 T34/76 Diorama
|
|
Regular Dakkanaut
|
Thanks guys, it's great to hear feedback from other people. After a while of painting one thing for such a long time, you start to get paranoid! I actually think the mini is growing on me now, its not my favorite sculpt in the set, but it isn't the worst either. That dubious honour goes to another trooper who I'm also loathing painting at the moment. 
VermGho5t - Thanks for the tips on photography. The light in my apartment is really terrible. My landlord didn't fit proper lighting and in my living room all I have is this silly wall mounted lighting on one side, the kind that funnels light directly up into the ceilling!
I use a lot of lamps but they have quite strong bulbs, so the difference in how you percieve colour when painting during the day and night is quite remarkable! I really want to get myself one of the artists lamps with the daylight bulbs.
I should also think about using background screens or a some card etc when takin the shots of the figures as well I guess, I think this would help alot.
SA, Metsuri, Deff - I'm glad you guys liked the tutorial. It came about from a Warseer user asking some tips on weathering, as I have found on Warseer people often ask for advice or tips and give little back. It's quite different in that respect to Dakka. I was also asked by a guy from Warseer for some tips on doing weld lines on armour, actually for my next project I plan to do alot of weld detailing on my KV-1 as it's a detail thats missing on the Tamiya kit. So I will most likely end up doing a little tutorial on that also at some point soon.
|
|
|
|
|
|
2009/03/31 06:01:42
Subject: Re:"Forward to Germany" - Soviet WW2 T34/76 Diorama
|
|
Paingiver
|
Gundam-Mecha wrote:I should also think about using background screens or a some card etc when takin the shots of the figures as well I guess, I think this would help alot.
That helps a lot as the eye isn't distracted and camera also has easier time in guessing the right color. Get some light gray or blue card for the back ground. I shoot my minis using a light gray and for most of the time it works ok.
|
|
|
|
|
|
2009/03/31 08:02:12
Subject: "Forward to Germany" - Soviet WW2 T34/76 Diorama
|
|
Lone Wolf Sentinel Pilot
|
Wow that tank looks great. I have really no constructive comments other than that.
|
My Blog http://ghostsworkfromthedarkness.blogspot.com/
Ozymandias wrote:
Pro-painted is the ebay modeling equivalent of "curvy" in the personal ads...
H.B.M.C. wrote:
Taco Bell is like carefully distilled Warseer - you get what you need with none of the usual crap. And, best of all, it's like being a tourist who only looks at the brochure - you don't even have to go, let alone stay.
DR:90S+GMB+I+Pw40k01-D++A++/areWD 250R+T(M)DM+ |
|
|
|
|
2009/03/31 10:47:46
Subject: Re:"Forward to Germany" - Soviet WW2 T34/76 Diorama
|
|
Regular Dakkanaut
|
Thanks guys, I'll try light grey or blue as a screen Metsuri. Think I have some coloured card lying around at home.
Cheers Ghost! I didn't get to do any painting yesterday like I had hoped, but I'm planning to get some more done tonight. Once the infantry are done (some already are) I move onto the next step, attaching and gluing them to the base and then blending htem into the diorama with mudd effects and snow etc.
On a similar vein I'm also considering adding some snow to the tracks and the tank hull or fenders...
|
|
|
|
|
|
2009/03/31 11:28:59
Subject: "Forward to Germany" - Soviet WW2 T34/76 Diorama
|
|

Been Around the Block
|
The project is coming nicely together. Seeing that soon I'll start working on my battlesuits and tanks for my Tau army i'm getting more and more interested in the use of pgiments etc. for weathering effects. However I'm in doubt about the durabilty of the effect for tabletop use.
A far layers of matte varnish might solve this?
|
|
|
|
|
|
2009/03/31 11:48:20
Subject: Re:"Forward to Germany" - Soviet WW2 T34/76 Diorama
|
|
Regular Dakkanaut
|
Hi Kagar,
Pigments are durable if fixed correctly and protected by varnish.
You can fix with turpentine, thinner, or specially formulated "fixer". A few coats of varnish spray and you should be set to go.
|
|
|
|
|
|
2009/03/31 21:47:57
Subject: Re:"Forward to Germany" - Soviet WW2 T34/76 Diorama
|
|
Regular Dakkanaut
|
|
|
This message was edited 1 time. Last update was at 2009/03/31 21:50:29
|
|
|
|
|
2009/03/31 22:45:32
Subject: "Forward to Germany" - Soviet WW2 T34/76 Diorama
|
|

Homicidal Veteran Blood Angel Assault Marine
|
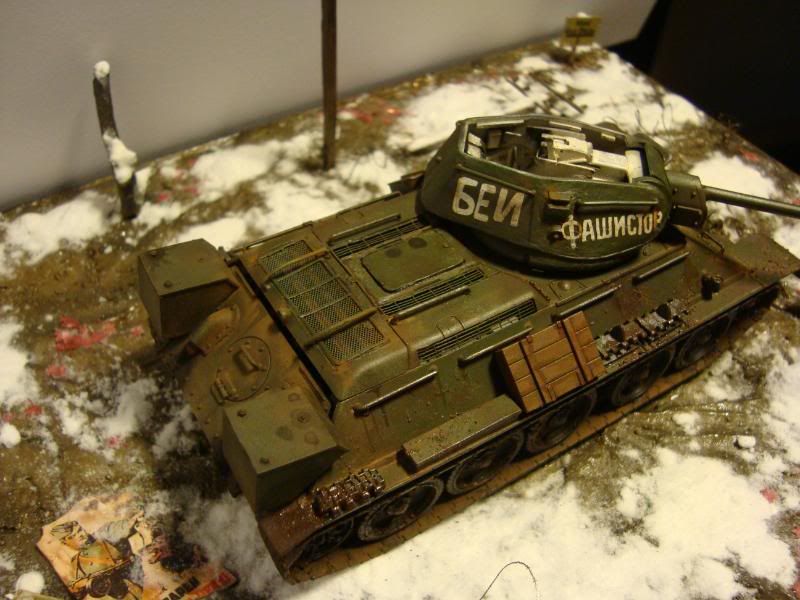
Snow effects on the tank look awesome GM.
|
|
|
|
|
|
2009/04/01 06:36:50
Subject: "Forward to Germany" - Soviet WW2 T34/76 Diorama
|
|
Paingiver
|
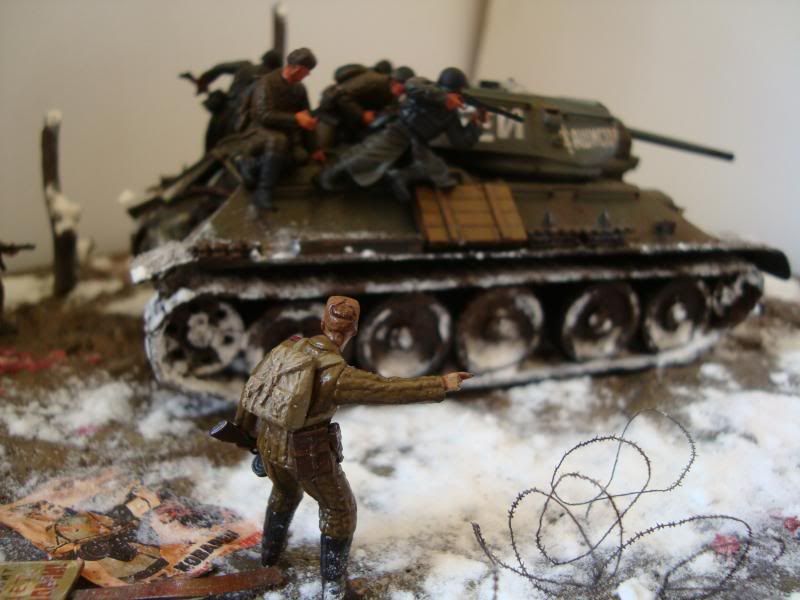
Now that's impressive. I was a bit sceptical on the amount of snow when looking at the pics without the scene, but when the tank is put to the diorama it looks flawless.
How did you attach the snow to the tank, it looks really life like, especially on the front of the tank.
|
|
|
|
|
|
2009/04/01 10:56:59
Subject: Re:"Forward to Germany" - Soviet WW2 T34/76 Diorama
|
|
Regular Dakkanaut
|
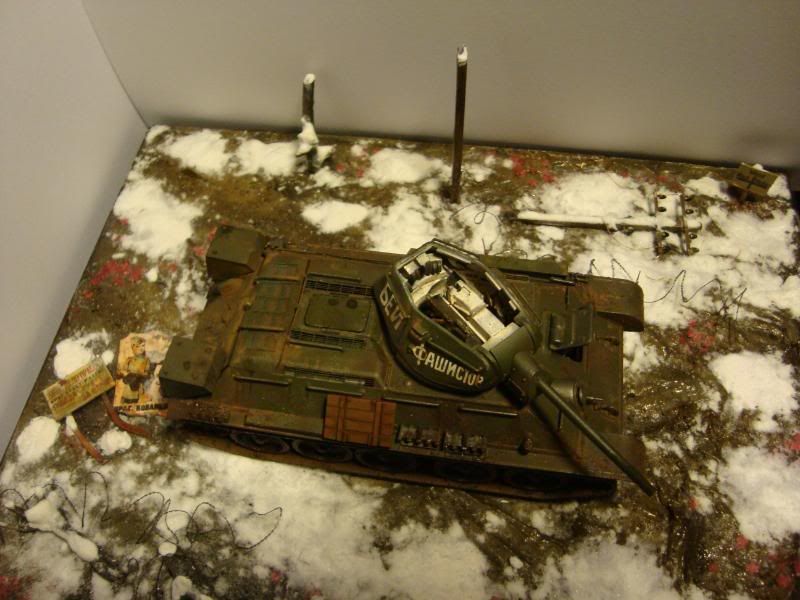
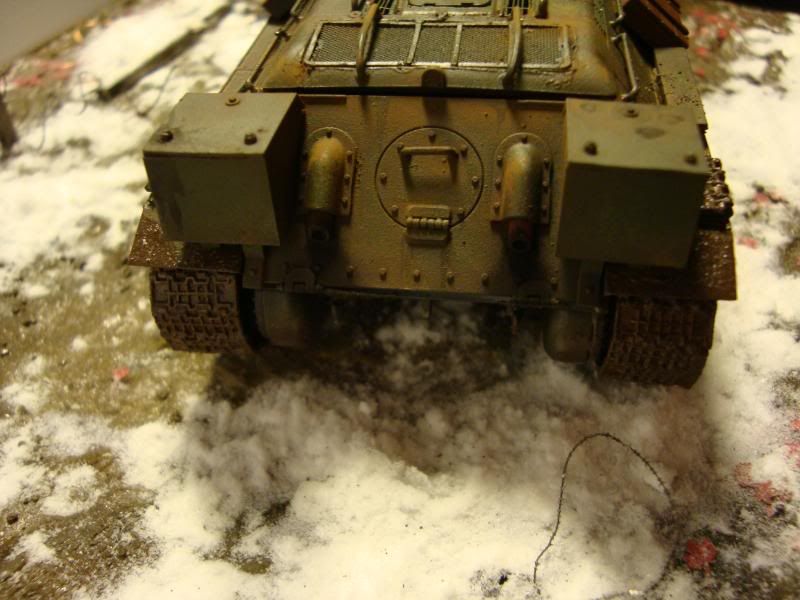
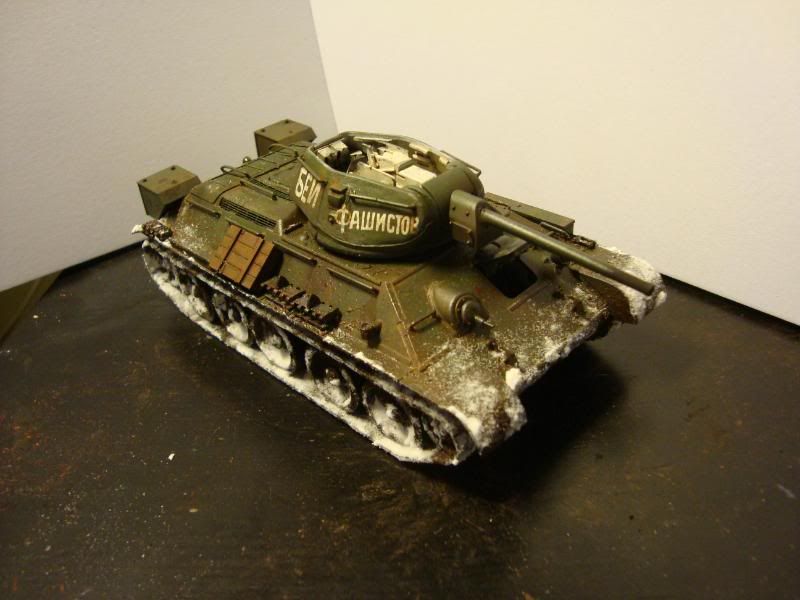
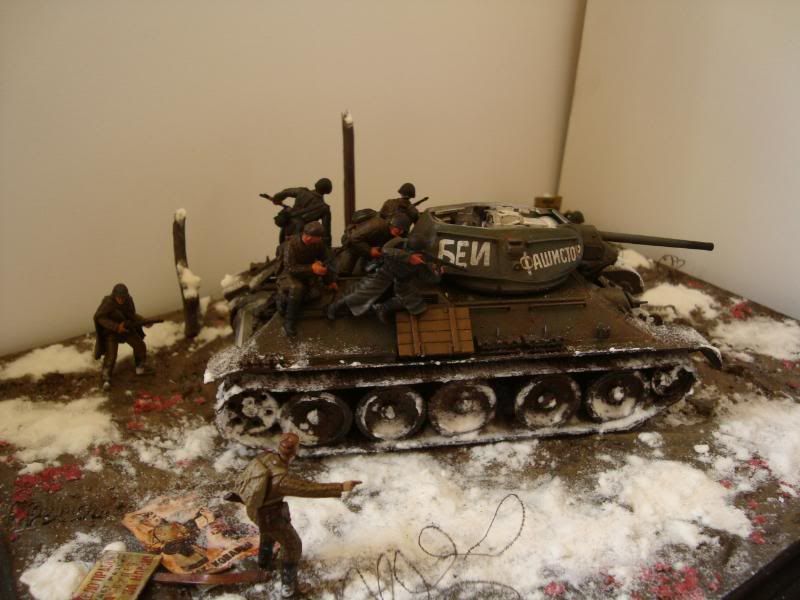
Thanks guys. I had a look at a lot of different examples of snow modelling on armour in my scale magazines, it was very interesting to see the different approaches that people took towards it. Some people went for thick clumps of snow, others for light snow scatter, and some for ice and slushy snow.
In my case I modelled the snow in two seperate stages.
Firstly I mixed bi-carbonate of soda, PVA, water, and some Vallejo white paint to make the clumps of heavy settled snow that had been pulled up into the road wheels and treads and also throw up across the front of the hull. The white paint helps keep the mixed bi-carbonate white as without it it can get muddy and discoloured due to the glue and water etc.
This was applied very lighty with an old brush to areas on the roads wheels, treads, and the fenders and front hull. The trick is to be very subtle at this stage, too much snow and it looks like your vehicle has been sitting still in the elements without action. Getting the balance right to make it look like its been driving through the heavy snow and lifting and splashing snow is very important.
This was then left for a few hours to dry, and the second stage started.
Now we have our heavy clumps of snow we can work on blending in the lighter snow fall and the natural scatter that comes from the motions of the tank. Ever been driving with snow on your car? Even the settled snow on your hood will throw little streams of light snow particles over the car as you drive as soon as the wind hits it. Exactly the same principle here.
The tracks and road wheels were sprayed with hair spray, and when this was still wet pure bi-carbonate of soda powder was sprinkled over the areas from a height to replicate natural snow fall. You can also blow the powder in directions you want once its settled by blowing with your mouth or very carefully using an airbrush.
Once the excess powder that hasn't bonded is blown away the surface is given another light coat of hairspray to seal everything in.
This allows you to get a really nice gradual blend between the thicker areas and the natural weathering and also allows you to cover snow without completely obscuring the weathering and details underneath. Showing the various different layers of weathering the same as you'd see in real life.
|
|
|
|
|
|
2009/04/03 08:59:31
Subject: Re:"Forward to Germany" - Soviet WW2 T34/76 Diorama
|
|
Regular Dakkanaut
|
Talking about some of the techniques I've used on this Diorama, I have recently found this book that is published by the people who do Xtreme Modeller Magazine.
Its called Frozen Hell, and is part of their elements in combat series.
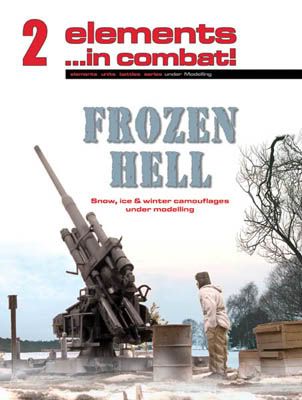
This really is a fantastic series of books and covers various different environments in diorama's and gives some first class tips and techniques. This particular one focuses completely on winter settings, how best to paint winter camo on armour, how to model snow, different ways of modelling ice and water etc.
They also have this one which is the first in the series that covers water features, rivers, oceans, ponds etc.

I can't recommend them enough, not only are they a very interesting read they also have some amazing examples of some fantastic artists and modellers.
|
|
This message was edited 1 time. Last update was at 2009/04/03 09:00:11
|
|
|
|
|
2009/04/03 22:13:21
Subject: Re:"Forward to Germany" - Soviet WW2 T34/76 Diorama
|
|
Regular Dakkanaut
|
|
|
|
|
|
|
2009/04/04 00:02:46
Subject: "Forward to Germany" - Soviet WW2 T34/76 Diorama
|
|
Battle-tested Knight Castellan Pilot
|
I love it!! The snow on the guys cloak is my favourite. Is there much left to do? It looks great.
|
Stick to the shadows - Strike from the darkness - Victorus aut Mortis - Ravenguard 1st Company |
|
|
|
|
2009/04/04 06:40:20
Subject: Re:"Forward to Germany" - Soviet WW2 T34/76 Diorama
|
|
Regular Dakkanaut
|
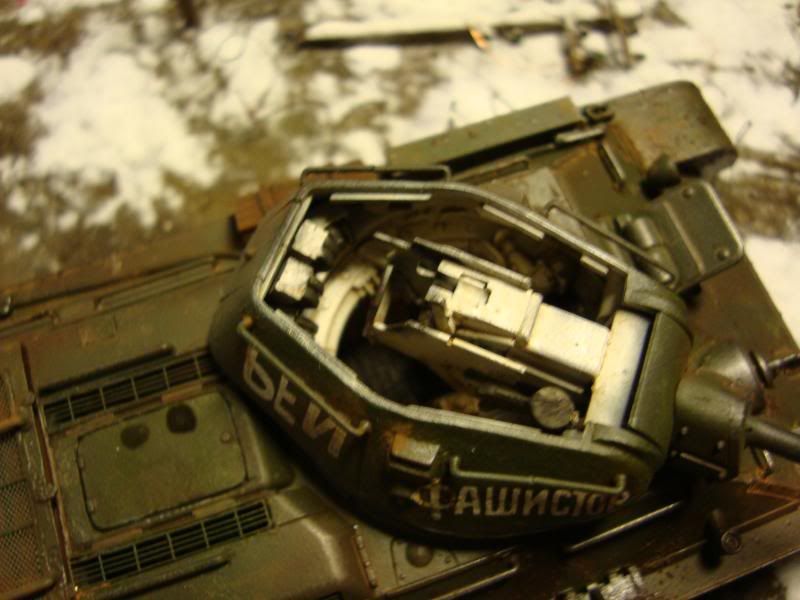
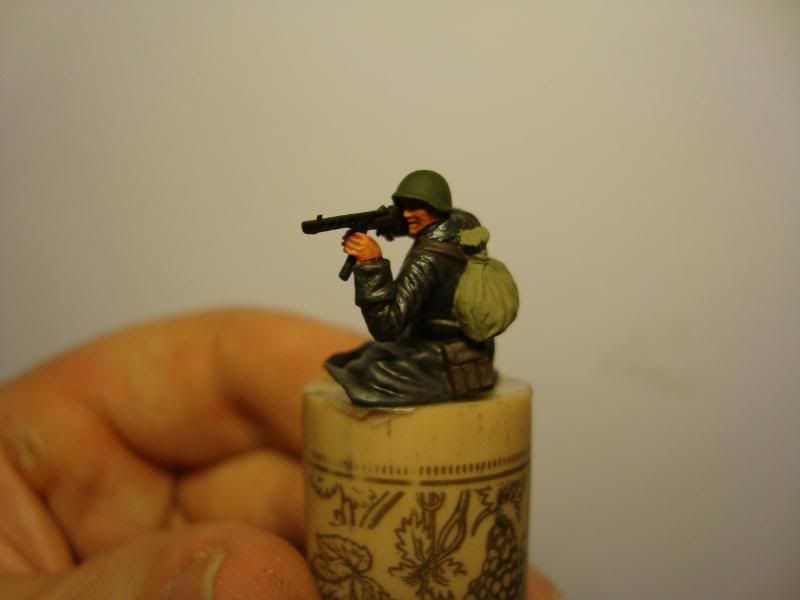
Thanks S.J, theres still a fair bit to do. The Tank riders need a lot more work, I also have to finish the Tank Commander and the Tank Driver. Some of the figures look a bit shiny right now in these pics but thats as the fixer I used to attach the snow looks glossy when wet.
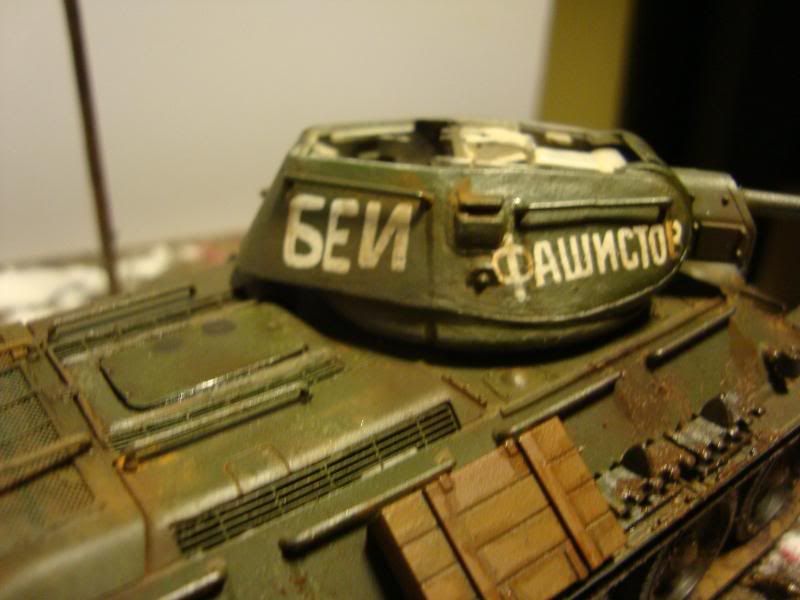
Most of the things left to do are now mostly figures though. The Tank is pretty much done as is the base. I just need to add the Soviet Flag to the T34, but I've been waiting till the figures are all in place first.
The snow effects on the troopers were a bit tricky and I wasn't sure how it would pan out, so I'm glad you like them. I was quite pleased with the end result on the cape myself.
|
|
This message was edited 1 time. Last update was at 2009/04/04 06:41:32
|
|
|
|
|
2009/04/06 20:38:11
Subject: Re:"Forward to Germany" - Soviet WW2 T34/76 Diorama
|
|
Regular Dakkanaut
|
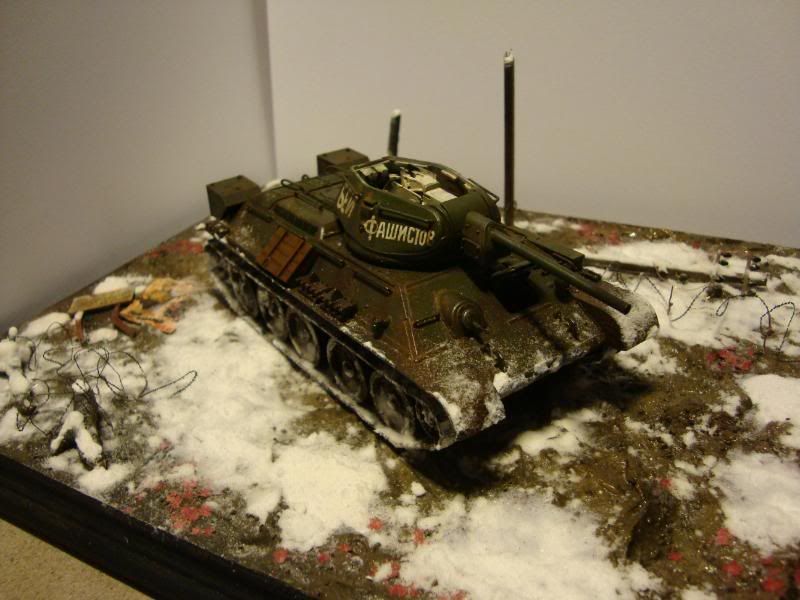
Today I spent some more time on the Diorama and worked on both attaching the T34 to the base and painting the figures.
I came across some problems with the Tankers, I have conflicting and contradicting evidence about their uniforms.
Some books state that Russian Tankers wore black or Steel grey overalls, a one piece jumpsuit. Others show them as wearing khaki dress. One book even states in the main text that Russian Tankers following 1935 wore black or steel grey, then in the plates and plate notes depict them as wearing khaki overalls, saying that after the outbreak of war the black was replaced with khaki jumpsuits...
Russian uniforms are notoriously difficult, as Stalin changed the dress from Soviet patterns back to Tsarist style near the end of the war. Supplies were also a problem and fabric was often sourced from whatever was available, be it local materials or lend lease stock. This meant that regular infantry often had a huge variation in colours of uniform from light beige and khaki all through to light green!
A Soviet Tank Officer centre (according to Army Uniforms of WW2
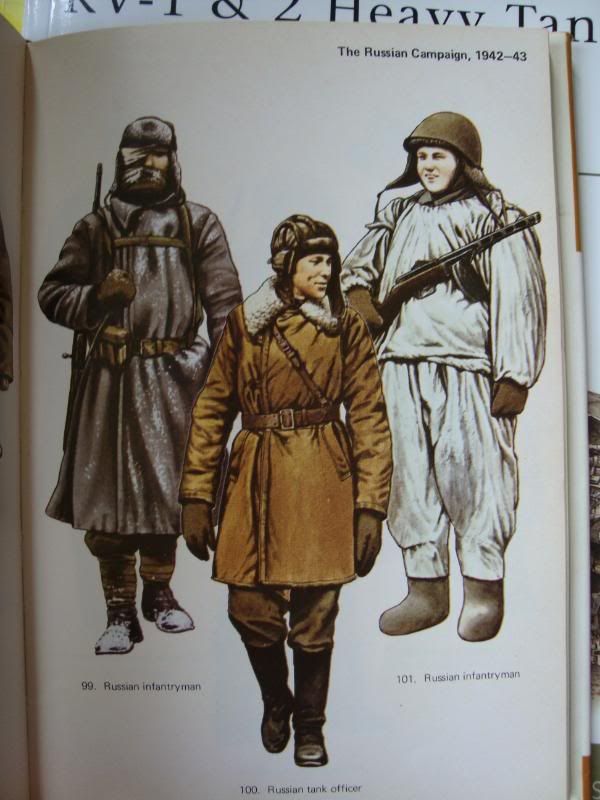
A Soviet Tanker circa battle of Kursk (1943 after the supposed change of uniform from black to khaki) according to Kursk by Osprey Publishing

A Soviet Tanker (first left) according to Army Uniforms of WW2 Circa 1941 (again after the apparent change showing khaki).

In the end I decided to settle with the Kursk example and go for Steel Grey/ Black overall using the brown leather and sheepskin jacket.

Attaching the Tank to the base:
 WIP
WIP of the infantry:


|
|
This message was edited 1 time. Last update was at 2009/04/06 20:39:41
|
|
|
|
|
2009/04/06 20:42:29
Subject: "Forward to Germany" - Soviet WW2 T34/76 Diorama
|
|
Junior Officer with Laspistol
|
Really nice now get it done,LOL!!
|
"I refuse to join any club that would have me as a member."-Groucho Marx
|
|
|
|
|
2009/04/06 20:54:22
Subject: "Forward to Germany" - Soviet WW2 T34/76 Diorama
|
|
Lone Wolf Sentinel Pilot
|
Awesome!
sA
|
My Loyalist P&M Log, Irkutsk 24th
"And what is wrong with their life? What on earth is less reprehensible than the life of the Levovs?"
- American Pastoral, Philip Roth
Oh, Death was never enemy of ours!
We laughed at him, we leagued with him, old chum.
No soldier's paid to kick against His powers.
We laughed - knowing that better men would come,
And greater wars: when each proud fighter brags
He wars on Death, for lives; not men, for flags. |
|
|
|
|
|
|