| Author |
Message |
 |
|
|
|
|
Advert
|
Forum adverts like this one are shown to any user who is not logged in. Join us by filling out a tiny 3 field form and you will get your own, free, dakka user account which gives a good range of benefits to you:
- No adverts like this in the forums anymore.
- Times and dates in your local timezone.
- Full tracking of what you have read so you can skip to your first unread post, easily see what has changed since you last logged in, and easily see what is new at a glance.
- Email notifications for threads you want to watch closely.
- Being a part of the oldest wargaming community on the net.
If you are already a member then feel free to login now. |
|
 |
2009/03/11 08:15:03
Subject: Re:"Forward to Germany" - Soviet WW2 T34/76 Diorama
|
|

Regular Dakkanaut
|
Thanks Tallmantim! More to come, I'm hoping to finish the interior this evening.
@ Holden, thanks for the feedback and the suggestions. I was following the Tamiya guide when I attached the components to the Hull. Come to think of it though you have a point. I had a look this morning at my reference photos this morning and on some cases there doesn't seem to be any visible straps holding down the spare track links. They are placed onto the flat areas that overlap the tracks. Similarly with the long crates they seem to be placed on the tank and held by their own weight or perhaps some subtle clips or something underneath.
I'll post up some of the photos of this later, it puzzled me too, so any suggestions you might have would be very welcome.
|
|
|
|
 |
|
2009/03/11 08:49:32
Subject: Re:"Forward to Germany" - Soviet WW2 T34/76 Diorama
|
|
Regular Dakkanaut
|
|
|
|
|
|
|
2009/03/11 09:19:00
Subject: "Forward to Germany" - Soviet WW2 T34/76 Diorama
|
|
Lord Commander in a Plush Chair
|
I think there are clips holding all the stuff on, they just aren't obvious. Although the rear end of the tank in your second picture appears to have bunches of track links with brackets around them.
|
|
|
|
|
2009/03/11 10:33:53
Subject: Re:"Forward to Germany" - Soviet WW2 T34/76 Diorama
|
|
Regular Dakkanaut
|
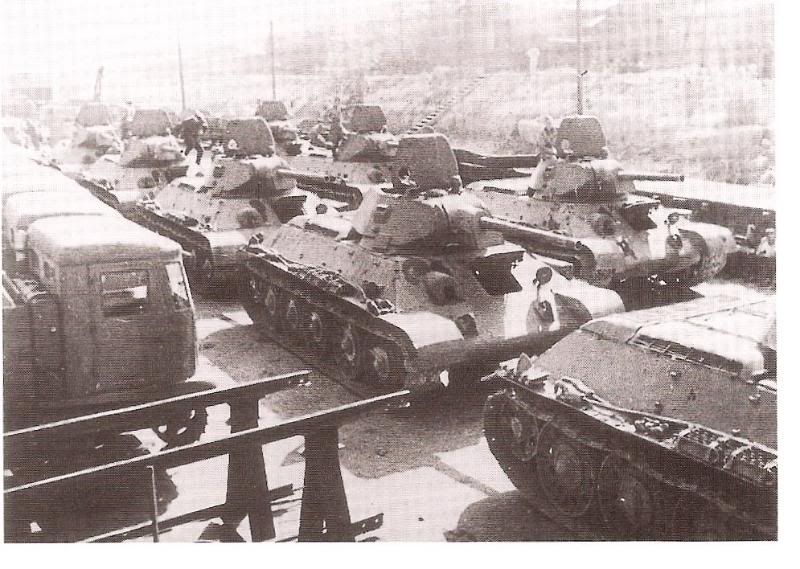
In the second example the tank in the front has treads that seem to be placed ontop the fenders without straps or clips...
In some they have small clips near the edges, but in others like the third picture they also seem to be laid directly onto the fenders again.
I can only guess that the track links are bolted onto the fenders insome way, or held in place by small brackets near the sides. At 1:48 Scale such small detail is a bit harder to represent than in 1:35 which gives you more scope due to the enlarged size. I may try to custom make some clips or something out of spare photoetch parts. Either that or perhaps some very thin straps from plasticard.
|
|
This message was edited 1 time. Last update was at 2009/03/11 10:35:37
|
|
|
|
|
2009/03/13 16:09:53
Subject: Re:"Forward to Germany" - Soviet WW2 T34/76 Diorama
|
|
Regular Dakkanaut
|
I've been doing some reference research and giving the base and the tank a lot of though recently.
I'm pretty much settled now on what I'll do with the crates and track links, but I've been debating whether or not I should add a fading whitewash coat to the tank for winter operations. I've been planning to model some snow on the diorama base and the idea of winter camo on the tank lingers in the back of my mind.
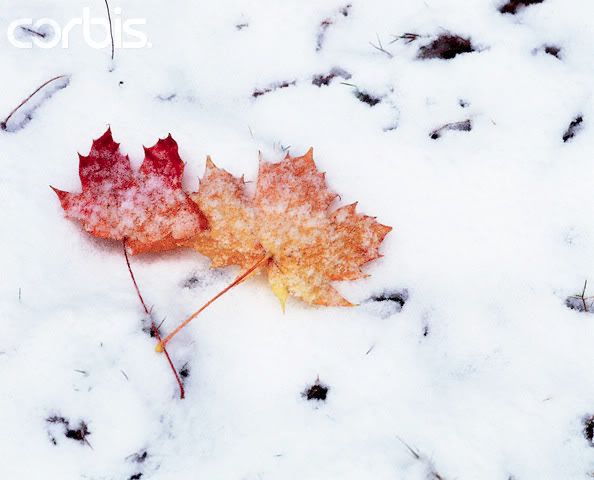
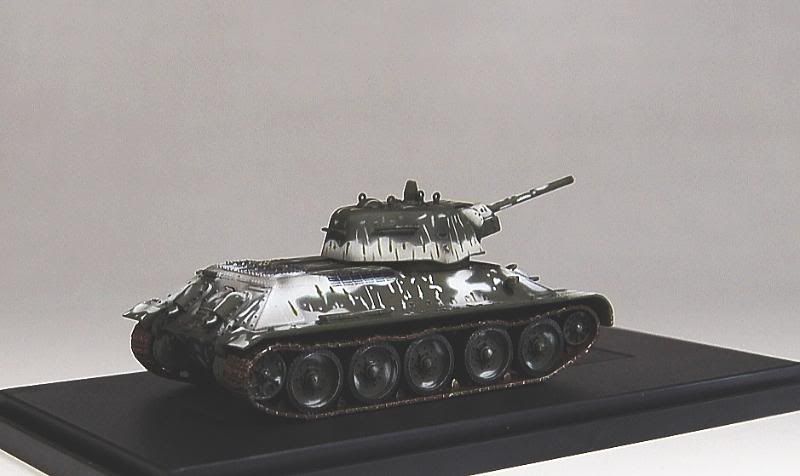
I was looking at Mig's snow camo T34 in my Osprey Book and also saw this example today:
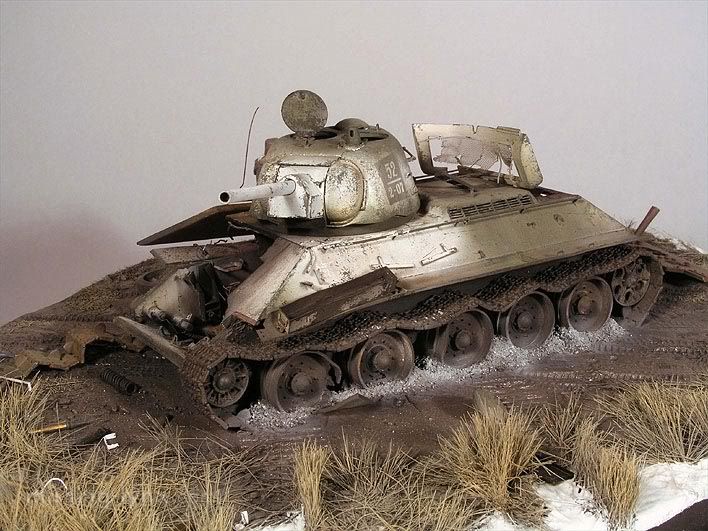
I was also quite interested in this unusual example also
I quite like the idea of patches of dull faded white, quick poor quality washes of white were often given to tanks during winter time and faded and wore off during operations. It would also give me a chance to try the hairspray technique mentioned in the Modeling Masterclass book thats really intrigued me.
What are peoples thoughts on this? It would be interesting to get some feedback and ideas from fellow modelers here at Dakka, keep the T34 Green and let the weathering speak for itself, or incorperate some subtle white wash patches?
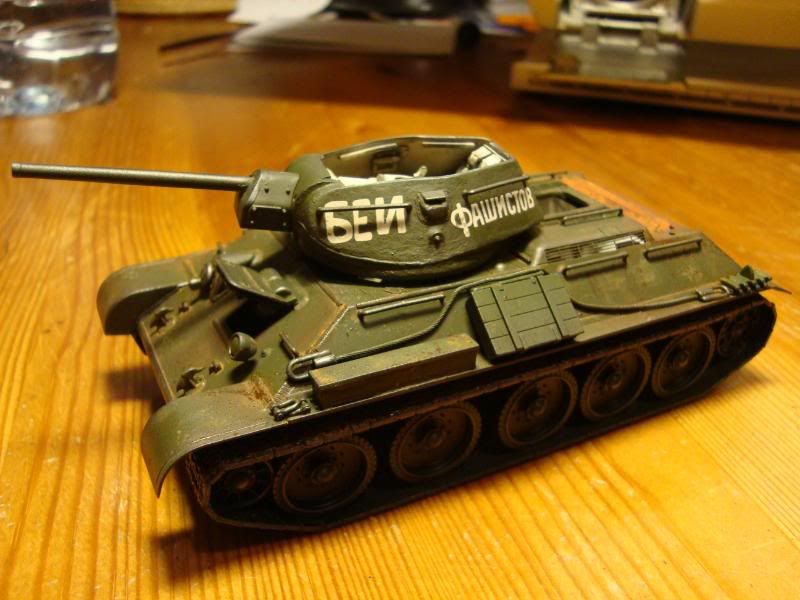
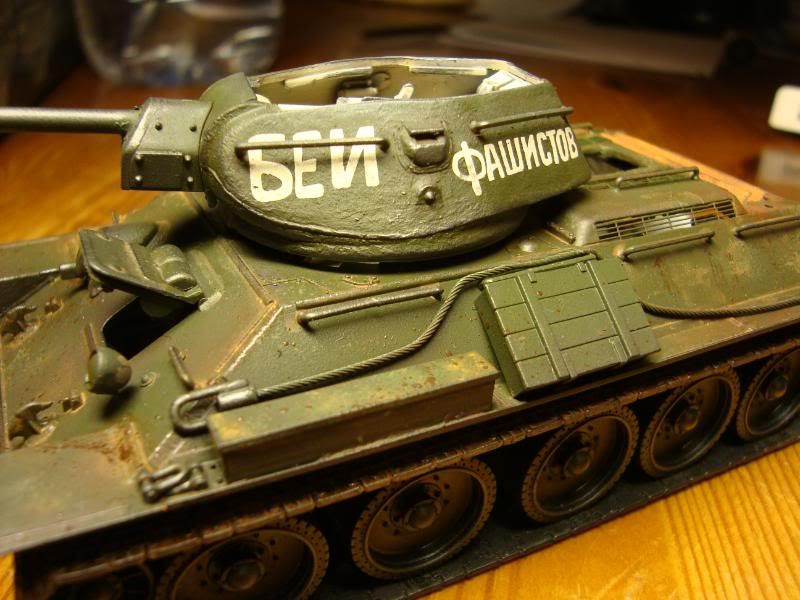
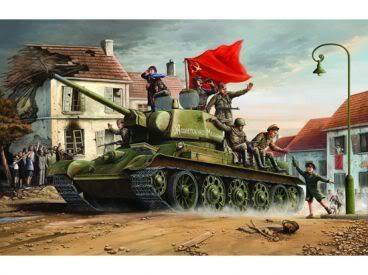
I've also been working on the banner for the Tank, and based the idea from this picture:
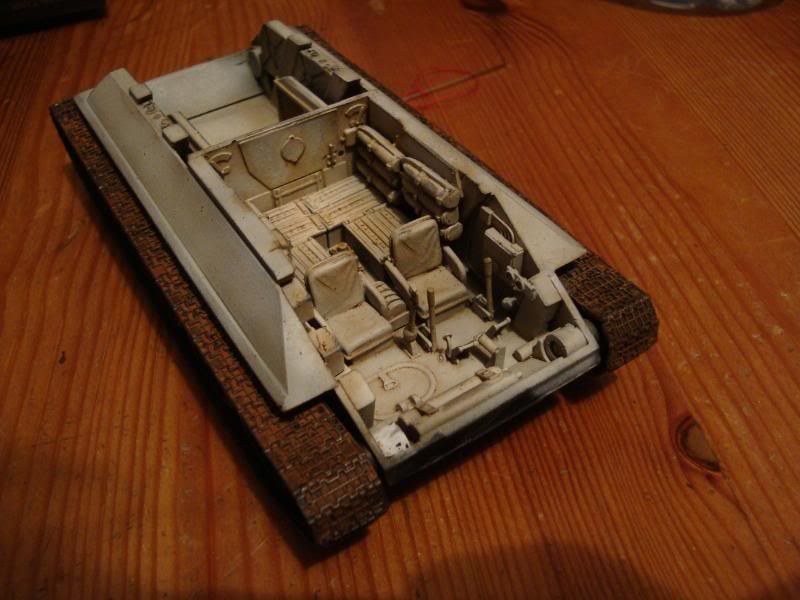
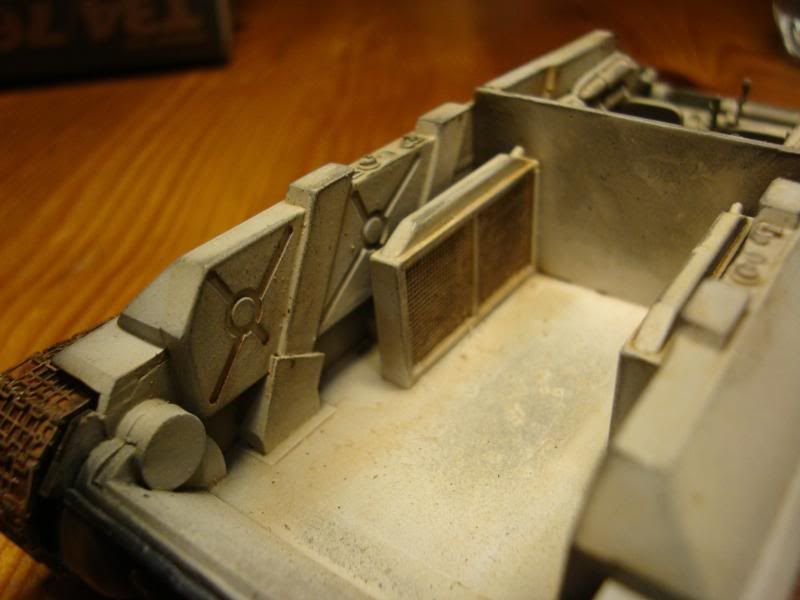
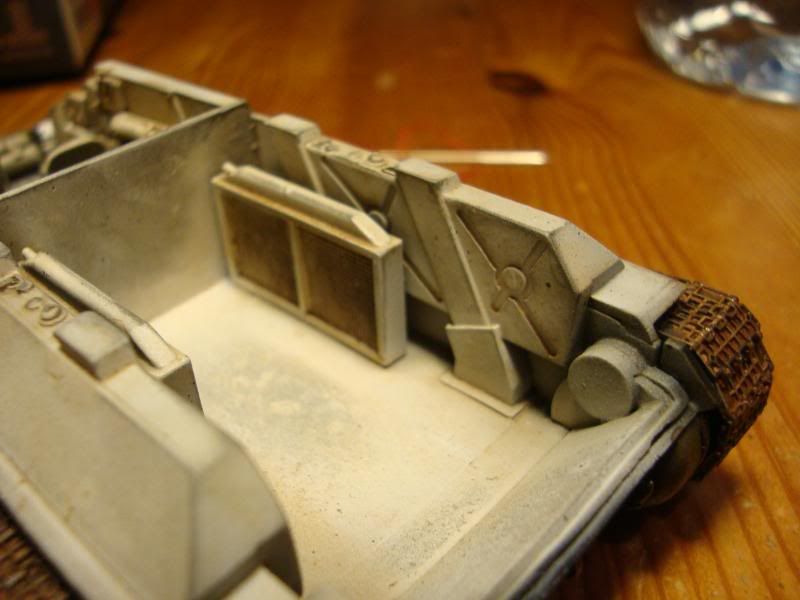
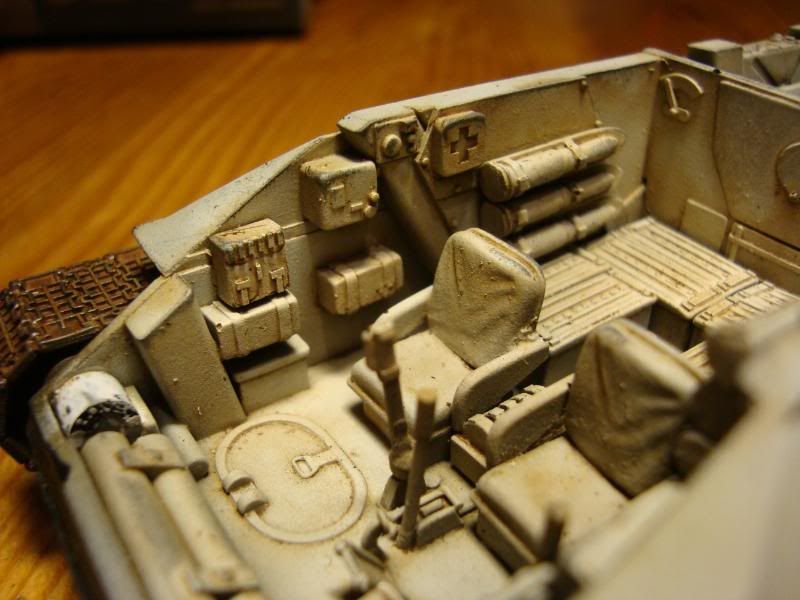
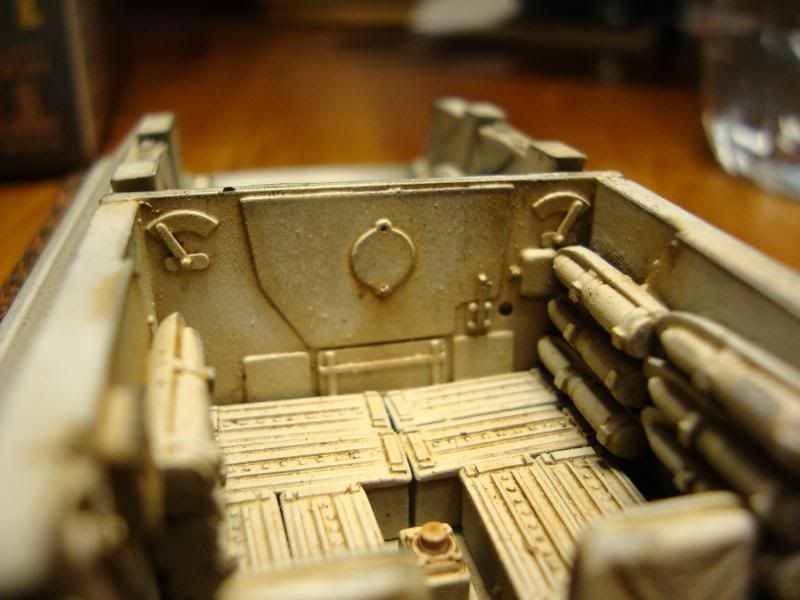
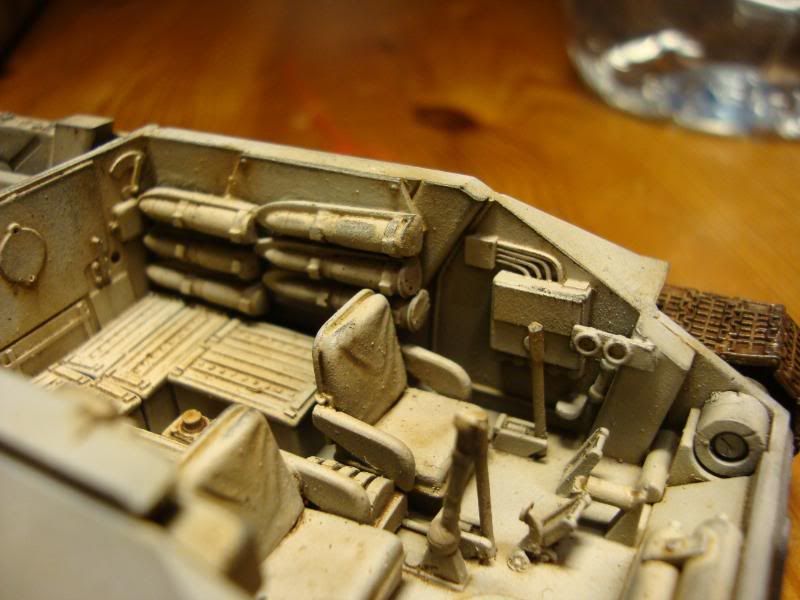
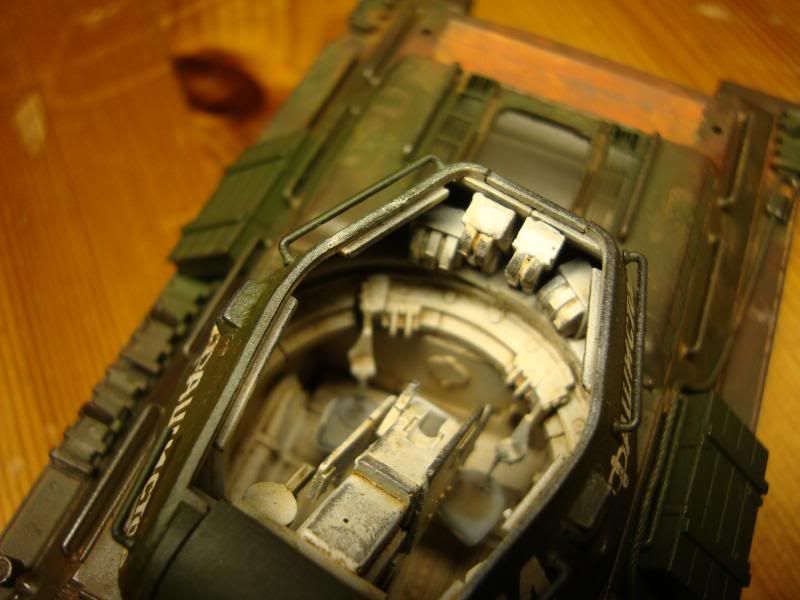
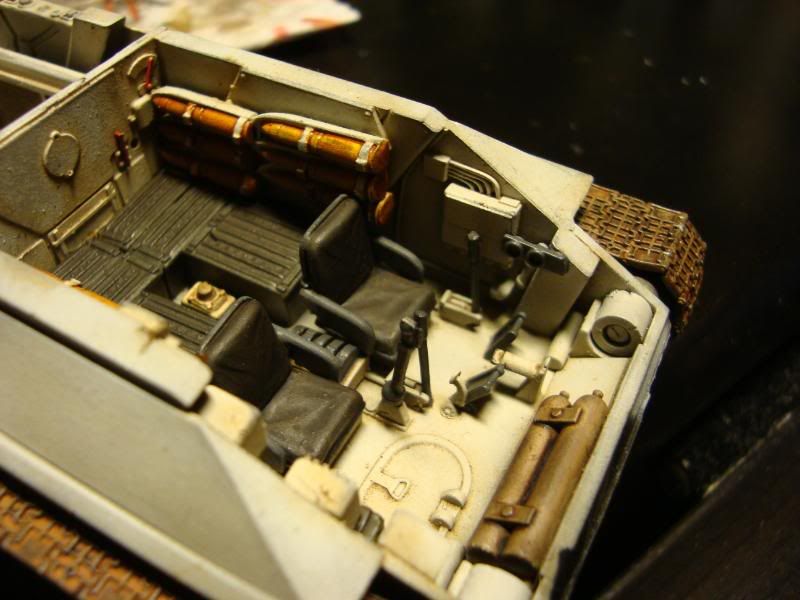
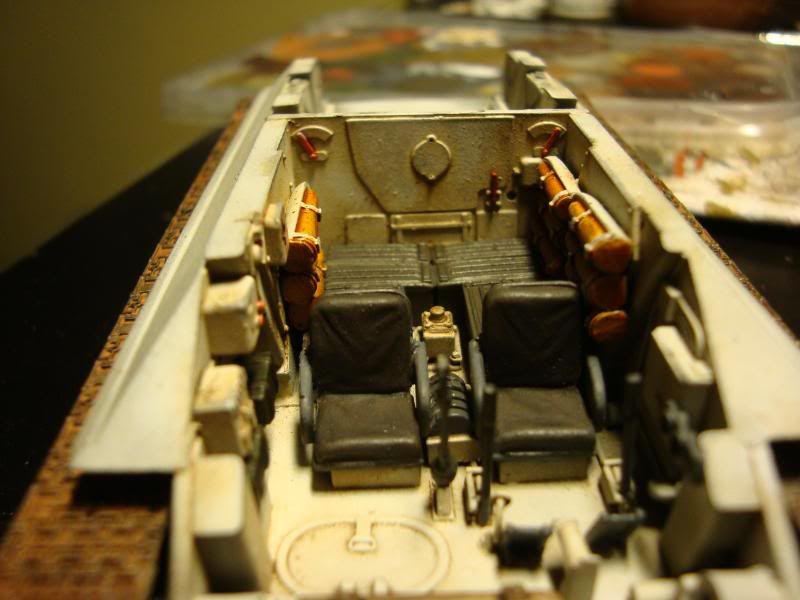
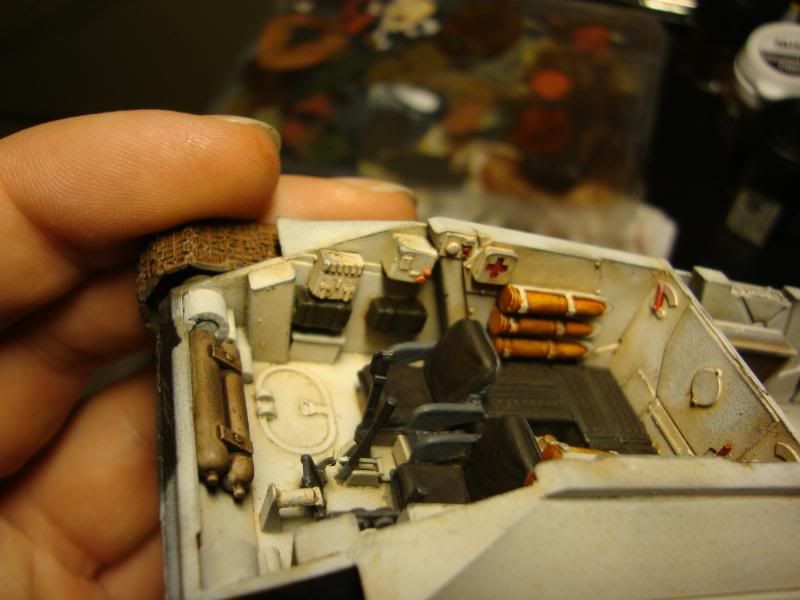
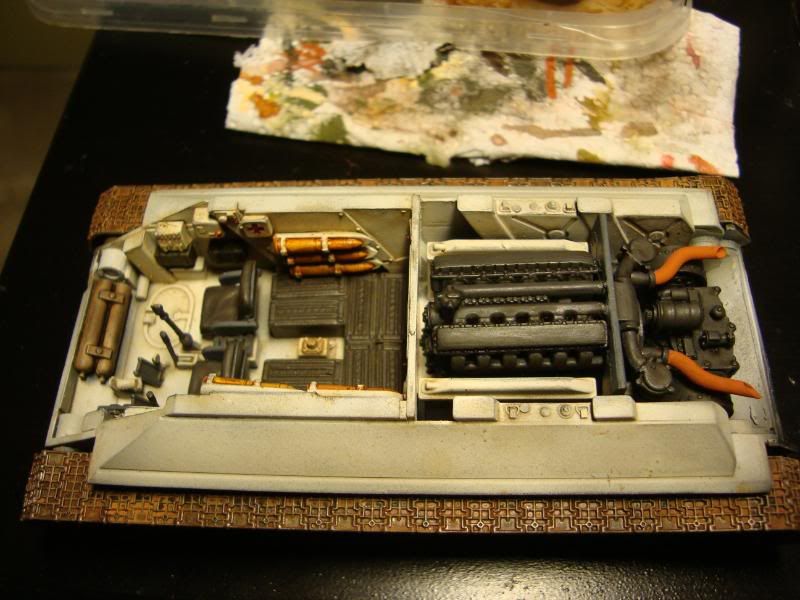
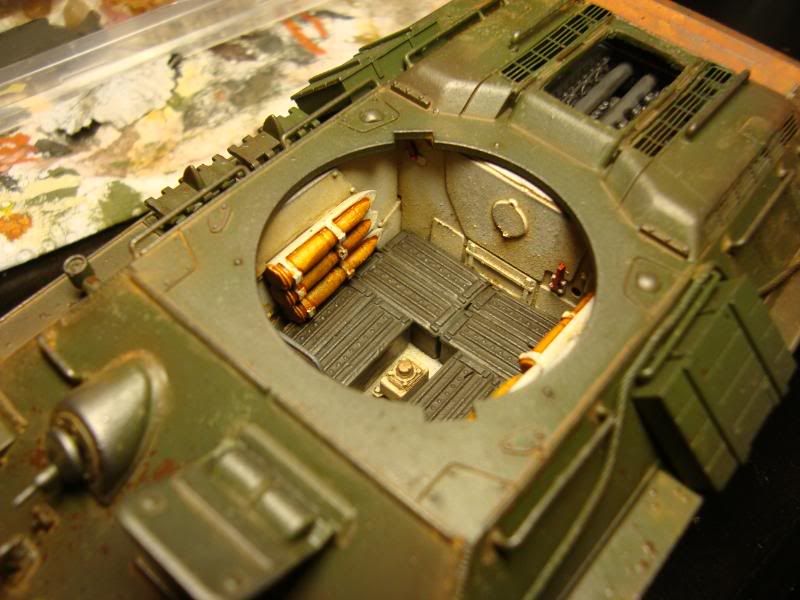
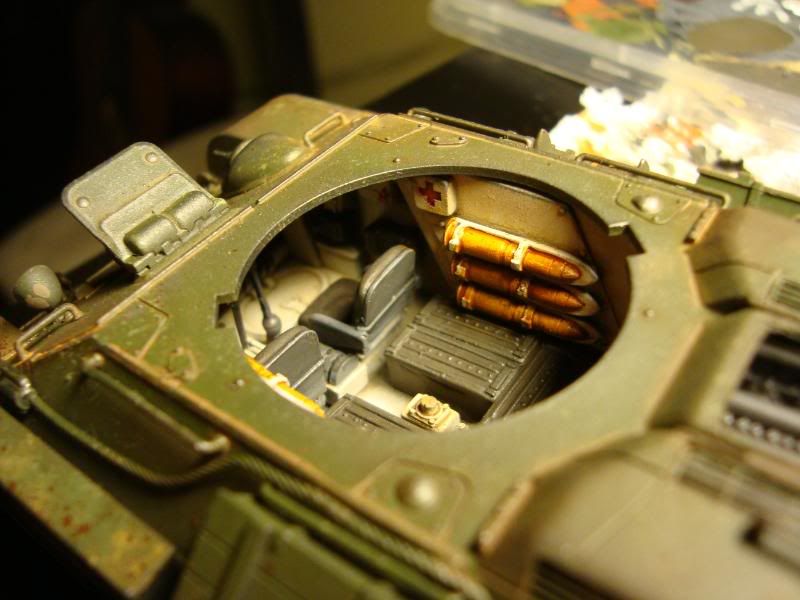
I've also had problems sourcing colour images of the T34/76 interior. I have lots of black and white but not many colour and most of these are from other models. General consensus seems to be that the inside of the T34 was painted white, as to the controls and other fitting on the inside I'm not so sure. I will have to look into that. I'm using these images as a guide at present:
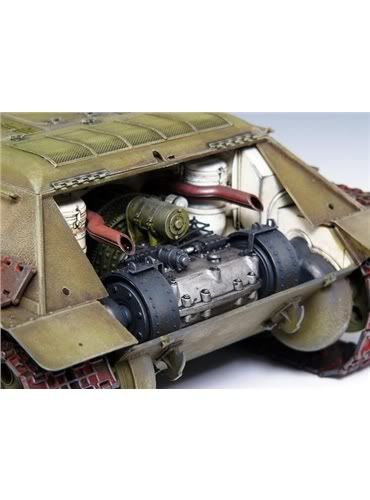
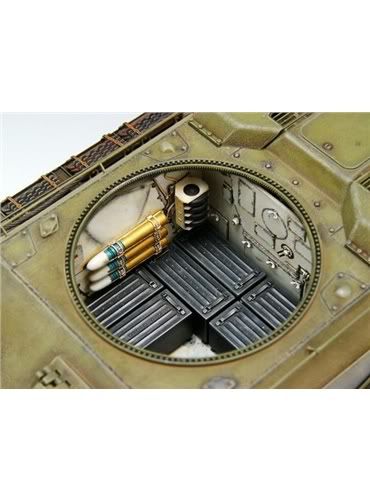
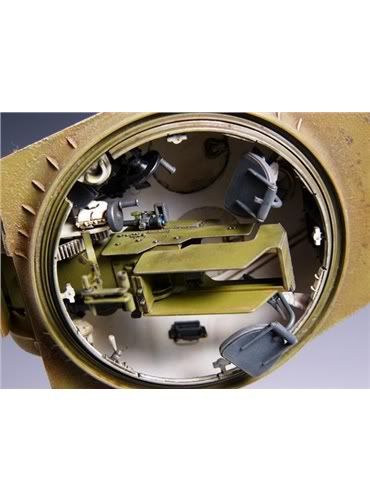
I'm not sure about the gun breech though, this example shows it as green but others I have seen have shown it as white or grey. Sadly I don't have a photo of the breech in my reference images.
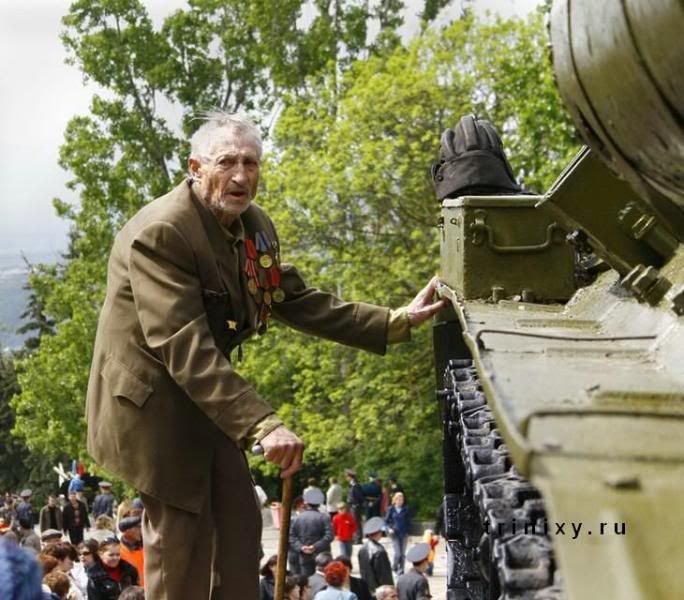
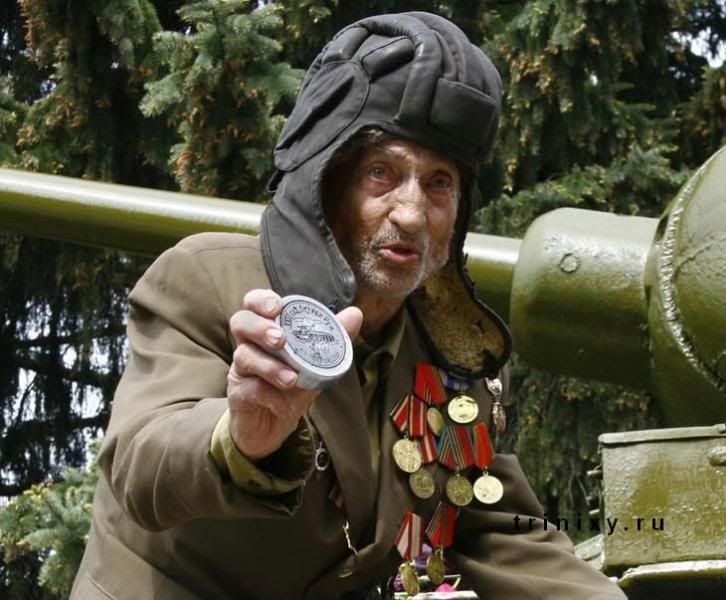
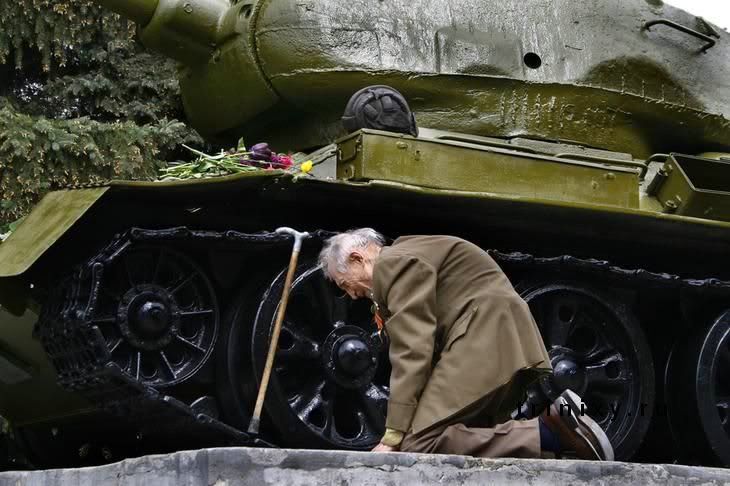
On a seperate note I found these remarkable images today while I was searching, they show a Veteran Russian Tankman being re-united with the AFV that he crewed throughout the entire length of the war. He came across the tank purely by accident finding it as a memorial in a small Russian Village. They really are very touching pictures and I'm sure it must have been a very emotional experience to see the vehicle that he served with again after so many years:
|
|
This message was edited 3 times. Last update was at 2009/03/13 16:14:39
|
|
|
|
|
2009/03/13 20:33:10
Subject: Re:"Forward to Germany" - Soviet WW2 T34/76 Diorama
|
|

Regular Dakkanaut
|
After doing some research it appears that the track links and boxes are bolted onto the exterior of the tank. These bolts are sometimes hidden underneath the stowage which is why it looks like the objects are merely resting on the fenders. Let me assure you anything not secured to the tank would be lost when the tank starts moving. Here is a great website with some good colour close-up shots.
http://www.ipmslondon.ca/old%20site/ipmslondon.tripod.com/armourreferencearticles/id29.html
Keep up the great work.
|
|
|
|
|
2009/03/13 23:25:59
Subject: "Forward to Germany" - Soviet WW2 T34/76 Diorama
|
|
Rampaging Reaver Titan Princeps
|
I think how you paint the tank should be based on three key factors;
What season do you see the model in?, If it's late autumn chances are the tank may well have not been painted yet if it has the weathering will be less pronounced. In late winter/ early spring chances are it will have been painted but will be more weathered.
How early in the war is it? The later in the war it is the greater the chance I think the tank will have been repainted as earlier in the war the Soviets would have had trouble removing the tank from the frontline for painting.
How fresh is the tank & crew? A veteran crew would probably have more leeway to paint the tank in winter camo unofficially, than a fresh unit. A fresh unit would also be less likely to realise the necessity as well.
At the end of the day it's whichever you prefer. Personally I'd probably go for the unofficial winter camo as it gives you more room to play with the model.
Brilliant work as ever I especially like the morass of the base. Reminds me of a lot of places I've worked where we've regularly had tracked vehicles about.
|
|
This message was edited 1 time. Last update was at 2009/03/13 23:27:28
"But me no buts! Our comrades get hurt. Our friends die. Falkenburg is a knight who swore an oath to serve the church and to defend the weak. He'd be the first to tell you to stop puling and start planning. Because what we are doing-at risk to ourselves-is what we have sworn to do. The West relies on us. It is a risk we take with pride. It is an oath we honour. Even when some soft southern burgher mutters about us, we know the reason he sleeps soft and comfortable, why his wife is able to complain about the price of cabbages as her most serious problem and why his children dare to throw dung and yell "Knot" when we pass. It's because we are what we are. For all our faults we stand for law and light.
Von Gherens This Rough Magic Lackey, Flint & Freer
Mekagorkalicious -Monkeytroll
2017 Model Count-71
|
|
|
|
|
2009/03/16 09:32:21
Subject: Re:"Forward to Germany" - Soviet WW2 T34/76 Diorama
|
|
Regular Dakkanaut
|
Hi guys thanks for the comments
Holden - thanks for that link very useful. I figured that they may have done something like this with regard to bolting track links o or using clips. Although I imagine a much quicker and easier field method would be as you described to hold them in between the hand rails. Thats something I'll definitely keep in mind for my next build. I'd like to do a 1:35 scale T34 for myself, as I'll be giving this one away as a gift.
Llama - Thanks, great ideas and useful comments. I was thinking sometime around late autumn or early winter. Of course the issue s with that the the winter whitewash would be more pronounced and less weathered. The only issue I have for choosing that season was because the 1:48 scale leaves I have are brown, so I was thinking to use those. By late winter most leaves and ground fall would be not so pronounced, but I guess I could still get away with it. Leaves do stay on the ground through out winter after all.
I think I'll do some test runs with the hair spray technique on something and see what I think.
Next post will have some updates.
|
|
|
|
|
|
2009/03/16 09:37:29
Subject: Re:"Forward to Germany" - Soviet WW2 T34/76 Diorama
|
|
Regular Dakkanaut
|
|
|
|
|
|
|
2009/03/16 11:13:09
Subject: "Forward to Germany" - Soviet WW2 T34/76 Diorama
|
|

Been Around the Block
|
Looking better and better, can these weathering effects also be accomplished with GW products or do you "need" mig pigments and filters etc. ?
|
|
|
|
|
|
2009/03/16 11:32:09
Subject: "Forward to Germany" - Soviet WW2 T34/76 Diorama
|
|
Regular Dakkanaut
|
Kagar wrote:Looking better and better, can these weathering effects also be accomplished with GW products or do you "need" mig pigments and filters etc. ?
Filters are very helpful but not essential, they let you build up gradual subtle variations in colour and act as a surface for further weathering. You can get the same effect for weathering surfaces using GW purity seal, or any other spray varnish.
As far as the rust effects go I would say that pigments are very important. They don't have to be Mig ones, you can easily make your own pigment powder by grinding a artists colour pastel with a scalpel blade.
The metalic areas are graphite from pencil lead. Just grind some pencil lead with a scalpel and apply with your finger or a small cosmetics applicator (those little sticks with sponge tips).
A lot of the effects can be achieved on the "cheap" so to speak if specialist modelling supplies are hard to come by for you.
|
|
|
|
|
|
2009/03/17 06:34:15
Subject: "Forward to Germany" - Soviet WW2 T34/76 Diorama
|
|

Homicidal Veteran Blood Angel Assault Marine
|
GM - starting to look really realistic!
keep it up!
|
|
|
|
|
|
2009/03/17 07:46:09
Subject: "Forward to Germany" - Soviet WW2 T34/76 Diorama
|
|

Junior Officer with Laspistol
|
One word and one word alone sums up what I feel,brillant!
|
"I refuse to join any club that would have me as a member."-Groucho Marx
|
|
|
|
|
2009/03/17 09:38:14
Subject: Re:"Forward to Germany" - Soviet WW2 T34/76 Diorama
|
|
Regular Dakkanaut
|
Thanks guys!
@ Tallmantim, yesterday I worked some more on the base and added the snow effects and some other scienic materials. I used these great 1:48 scale leaves from plus model. They are tiny little cut paper leaves with embossed patterns. Really easy to apply and a brilliant finish.
@Deff Dread, thanks! In response to your PM here's some ideas on weathering. I'm no master at it as I've only been playing with the technique myself recently but these are my experiences and observations.
Mud:
This can be achieved through various ways depending on the kind of mud you are looking for. If you want very wet fresh mud you can mix pigments, water, and some gloss varnish. This will give you a thick mix thats shiny and "slick" looking. I find this method is best for splashes or splatters of mud. When using this method its best to just flick onto the model directly by flicking the brush against either a hard surface like a plasticard stick or your thumb.
If you want thick dry mud you can mix pigments, earth, and acrylic resin. Some people even like to add in things like household filler and sand to this mix as well. For natural looking results when applying this kind of mud use an airbrush, load you regular paint brush with the mix and then hold it in front of an empty airbrush using the air from the airbrush to splatter the mix onto the model. You can easily control the flow of the air going through the airbrush (depending on if you are using a double action airbrush of course) and the effect won't be too heavily loaded on.
Rust:
It can be tempting to go too far with rust. It looks great and is fun to do but a little goes a long way. Try to look at as many reference photos as you can and think about your tank and the conditions. Is it a wreck thats been abandoned on the field? If it a campaign hardened vehicle thats seen a great deal of action, or is it a newer vehicle in service with a fresh regiment? These are important things to consider as obviously working vehicles will have far less rust than wrecks.
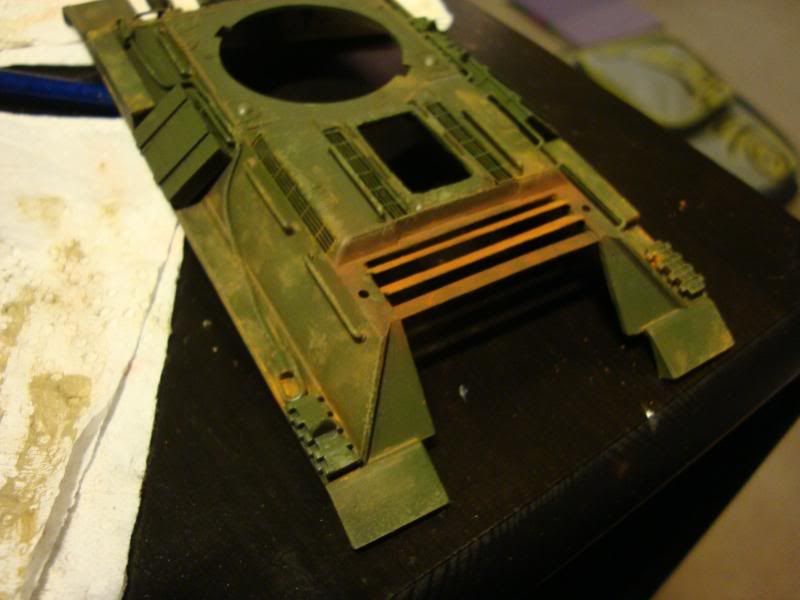
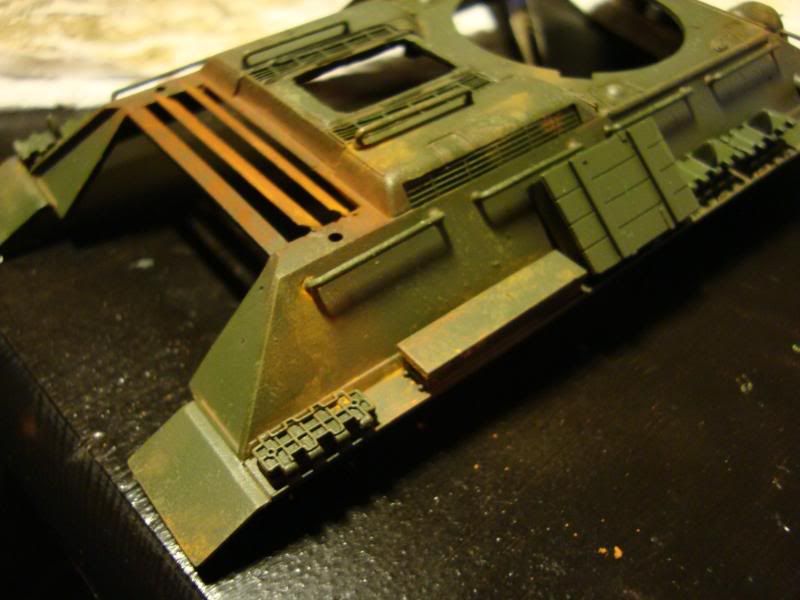
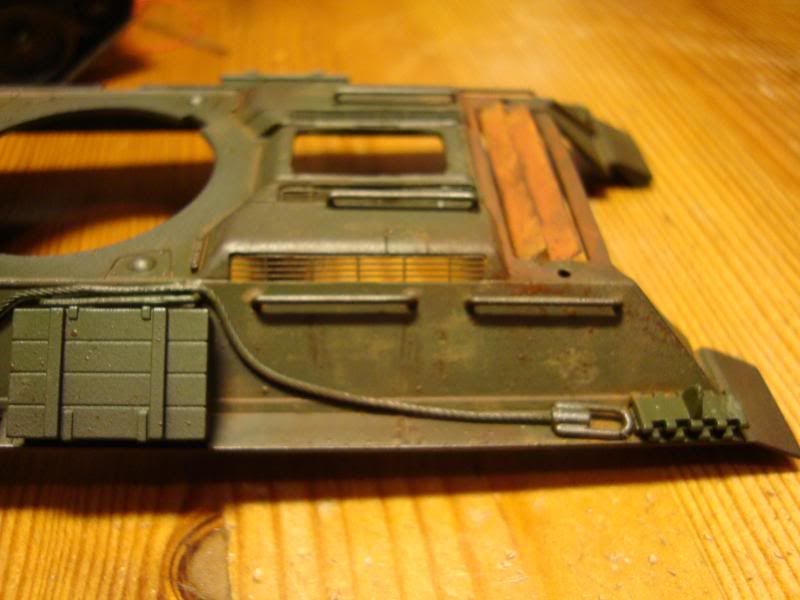
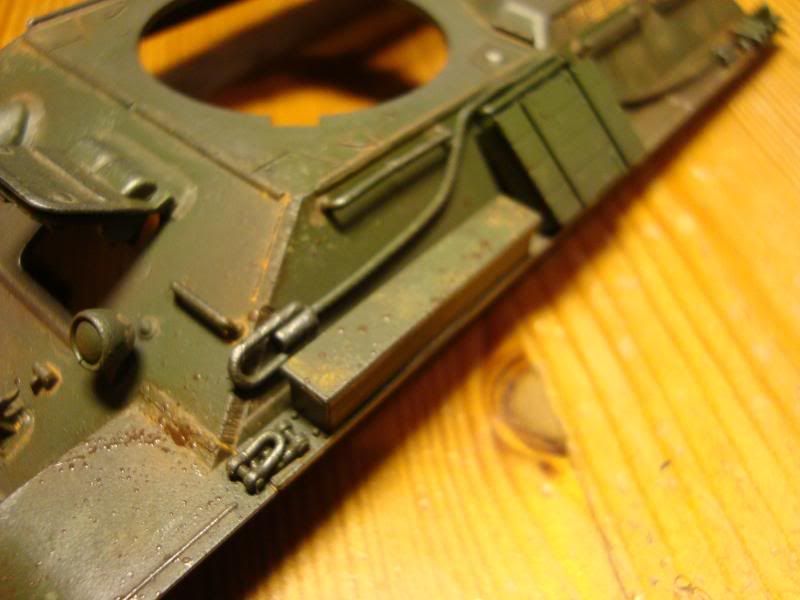
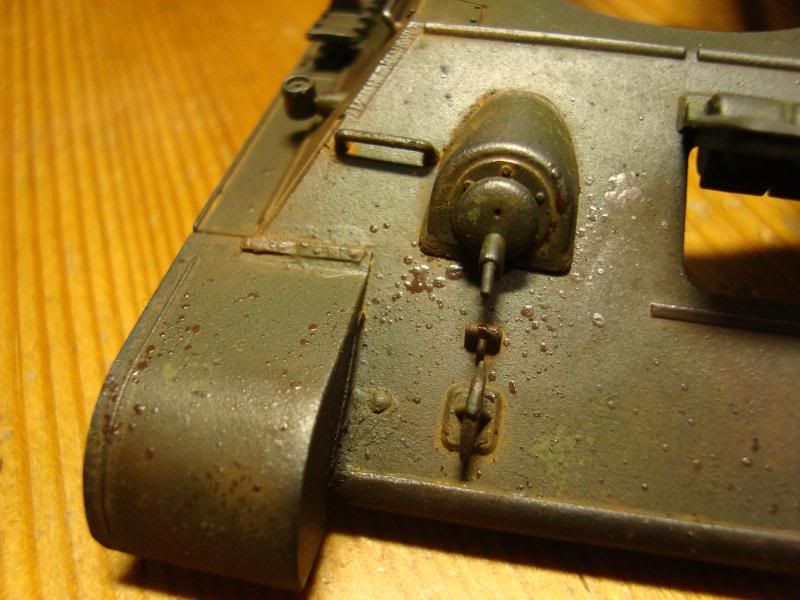
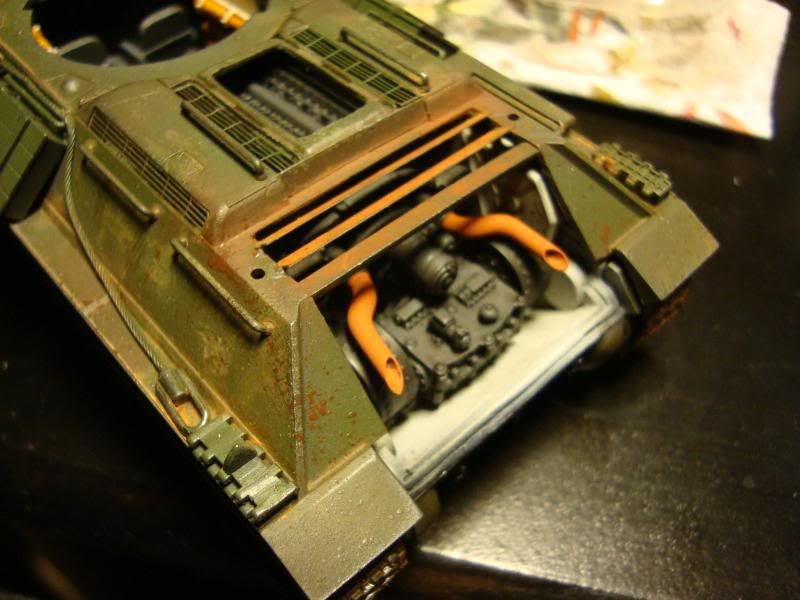
Try to get some good quality pigments for this. and in various shades. I myself have Old Rust, Standard Rust, and light Rust. For example on the T34 the areas around the engine hatches have a mix of all three and show heavy weathering. Old rust around the edges near the engine block, and standard rust on the flaps by the hatches, with little bits of light rust on the top edges. This is because the engine hatch vents unlike the exterior armour are not painted and are a different kind of metal. Also the vent grille on the main outer hatch lets water and the elements through much more easily, increasing the weathering of these components.
On the outer hull I used only light rust to show the minor weathering, as this tank is a worn tank on campaign fighting during winter its more likely that snow, rain, and the elements would have taken their toll. However no tank crew would ever allow it to errode seriously as this would impeed the functioning of the tank. So rust on the exterior would only be mild.
When looking at reference photos remember that modern images of tanks that are outside as museum peices or monuments whilst in better condition that wrecks would have different weathering and rust than combat active vehicles. It is much more likely that a combat active tank even during the darkest days of the War would be repaired and maintained by the crew as much as supplies could afford.
Dirt/grease/soot:
Dirt, grime, soot, and grease are much more likely on a combat active tank than heavy rusting, so these effects give you a bit more realisitic leeway.
Dirt grime, dust, and grease gather on the edges of fenders, on areas of wear such as crew areas and handles, and near rivets and weld seems, panel lines. you can replicate dust and dirt by using washes of inks, Citadel washes, filters, washes of Oil paints, or pigments. The possibilities are very diverse all depending on what you are trying to represent.
For my T34 I used Filters first for natural shading, followed by burnt umber oil paint washes mixed with turpentine, and light earth pigment washes. I also dry brushed scorched brown paint around areas of wear such as crew hatches, fenders, and the top of the tank where the crew would be riding as this diorama is a mechanised rifle unit (the Soviets did not use universal carriers or APC's, they attached tanks to infantry units and troops rode the back of the AFV's).
Soot is important around the exhausts, engine areas, and gun barrels and breech. For soot effects I use Mig pigment black soot. I usually apply this by thinning with a little water.
Grease can be easily made by mixing black or brown inks with house hold cleaners like Johnson Klear. This wash gives a very slimy look. Make sure you apply to grease to areas of movement and motion, such as around the gun mantle, barrel, and road wheels etc. Don't just apply it anywhere, try to use reference photos as a guide.
Oil can be replicated by mixing black inks or oil paint with thinners, Mig Jimenez has a really great guide for realistic oil puddles in the Osprey modelling book on the T34/76 that I've been using as a reference.
worn paint/ visable metal:
There are two main ways to show these effects, either showing worn coats of paint or chipped paint, or showing totally chipped paint exposing the metal underneath. For worn or chipped paint use a shade of paint lighter than the base colour and apply using the sponge method. This is a great technique and is a little like dry brushing. Take a small peice of sponge soak in a little paint and wipe off the excess on tissue paper, then when there is hardly any paint left on the sponge dab the surfaces to make little areas of chipped or worn paint. Its great fun to do and easy to master, the trick is not to over do it. Too much sponging can ruin the model. Look for areas where you expect wear and chips and dab very lightly. The more confident you get with the technique then the firmer you can apply.
Visable metal is done best with graphite. Just grind up a pencil lead and apply carefully using your fingers or a small cosmetics applicator. Again here too a little goes a long way.
As far as general application of these techniques goes there are various methods. You can mix pigments with water to get a light semi transparent effect, this is often good for areas of rust or dirt or rain staining, or you can mix oil paints with turpentine or white spirit, this gives great options for blending naturally and fading colours. you can also coat an area with turpentine or thinner and then directly apply pigment powder, or apply powder in light dustings and then fix with turpentine or thinner.
The key I think is to keep experimenting and always have sometihng in mind, a reference photo of a real vehicle maybe or even just the rusty BBQ in your back garden! Don't just apply the weathering how you think it should look in your mind. Most importantly don't over do it, subtle and light applications are always best.
|
|
|
|
|
|
2009/03/17 16:08:36
Subject: Re:"Forward to Germany" - Soviet WW2 T34/76 Diorama
|
|
Regular Dakkanaut
|
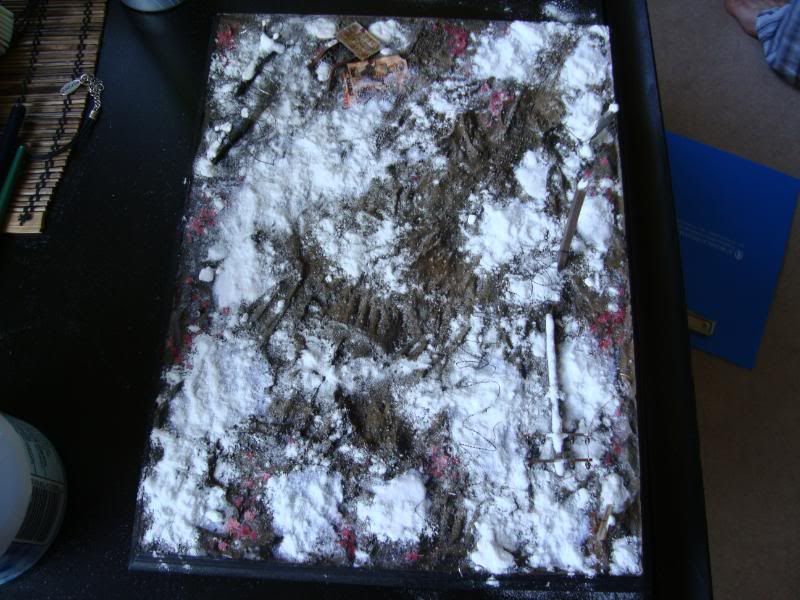
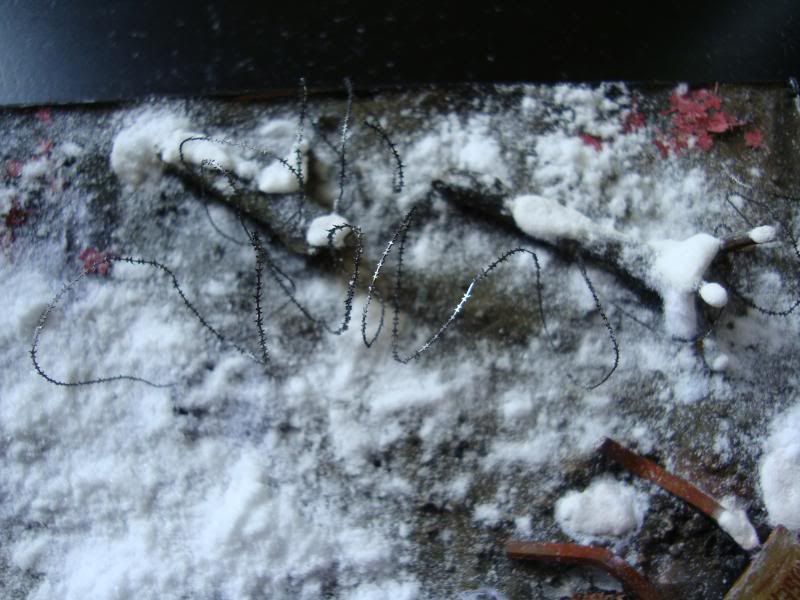
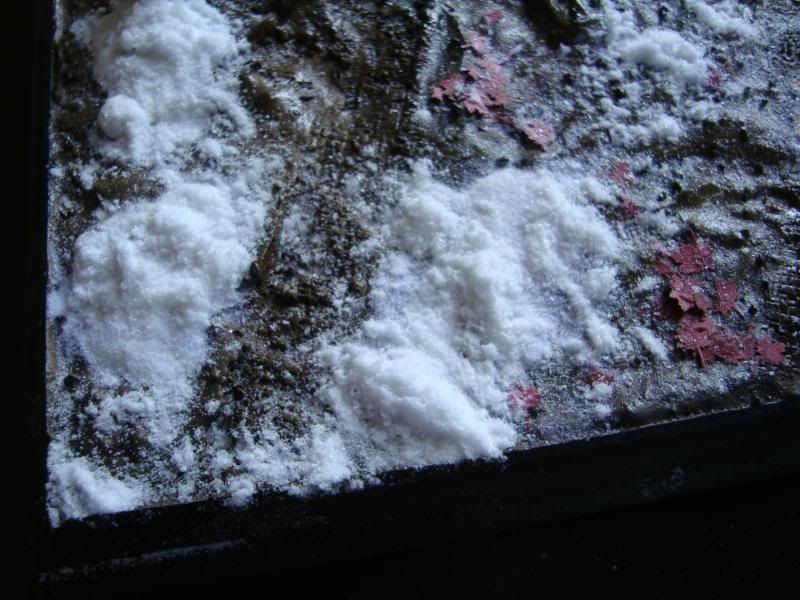
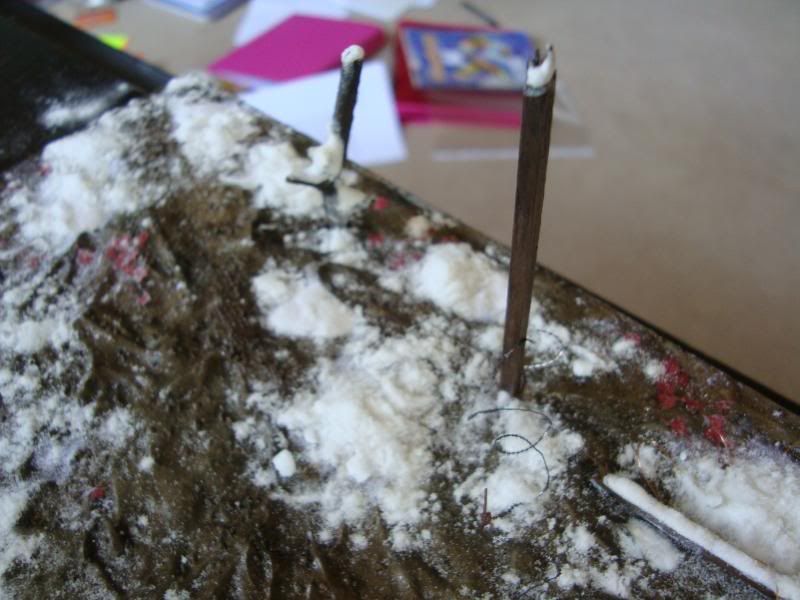
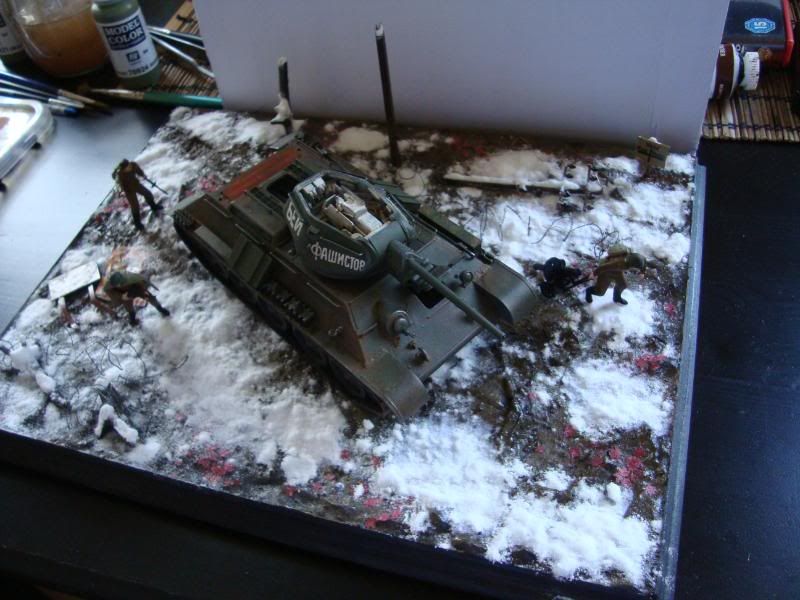
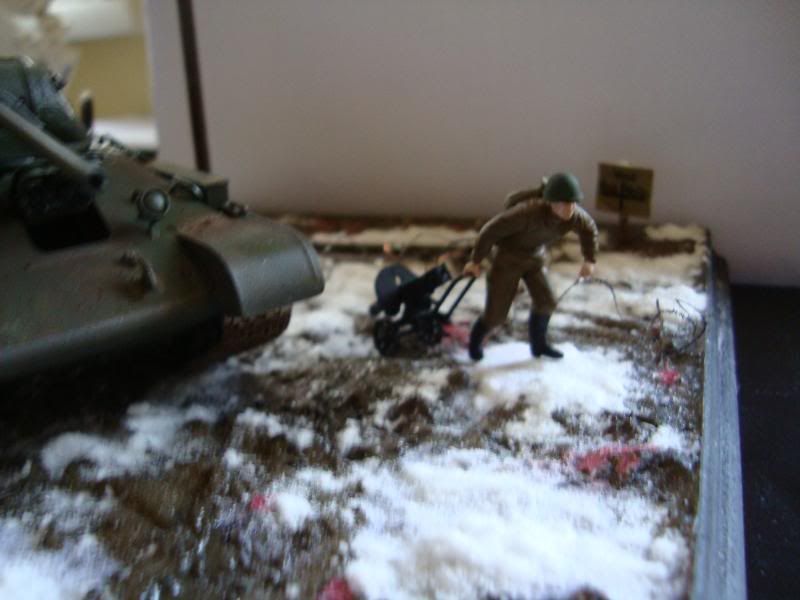
Quick update on the scenic base:
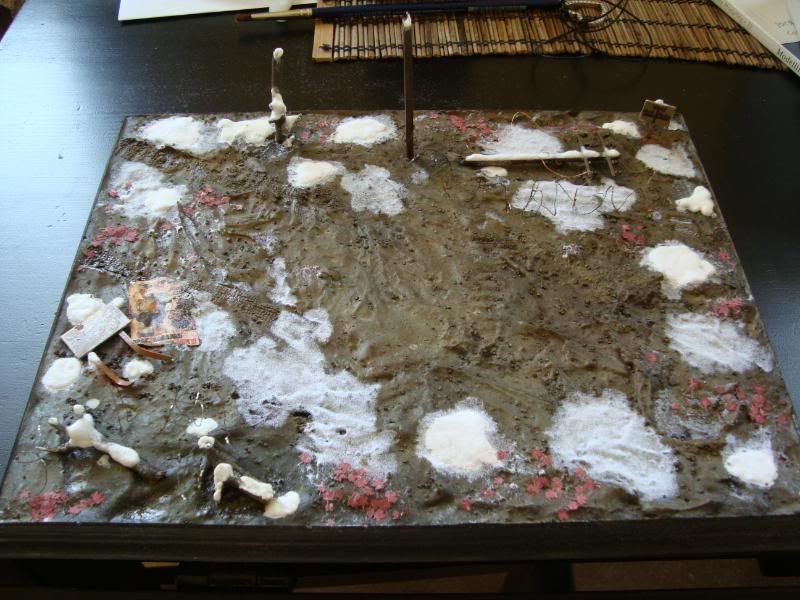
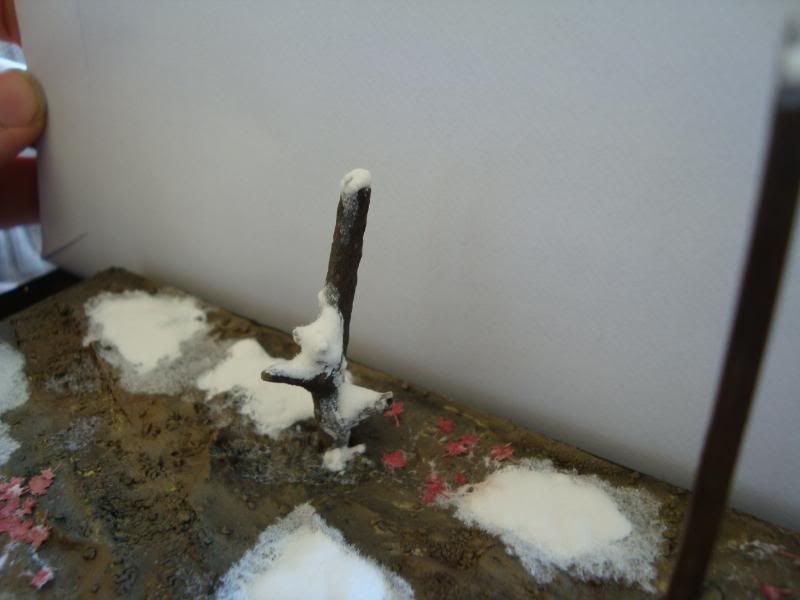
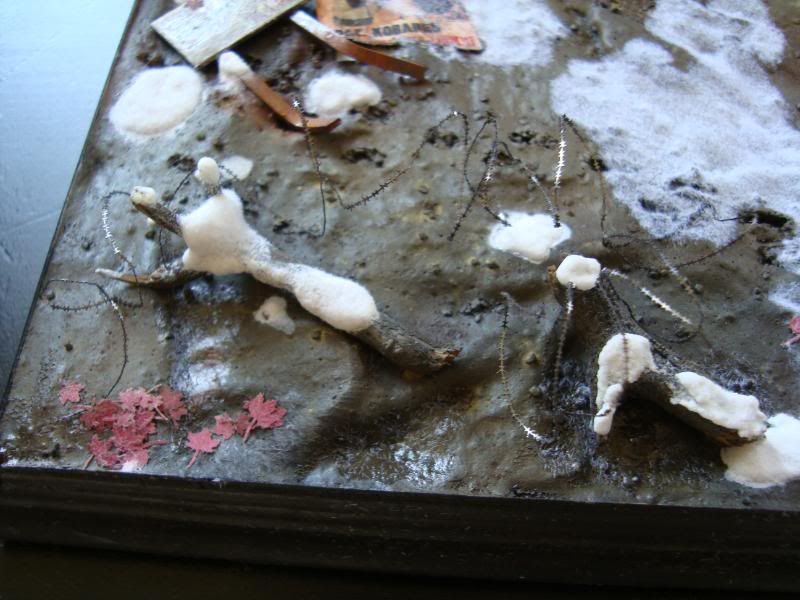
I used two different methods for the snow effects, my preferred method of bi-carbonate of soda, PVA, water, and paint mix and some woodland scenics snow scatter (the same product the GW package as their Citadel Modeling snow). I didn't really like the Citadel/woodland scenics snow, after it was applied it looked too furry, so I wasn't really satisfied with it. It's the first time I've used it before and followed the example from the Forgeworld Masterclass.
I decided afterwards to re-coat those areas with a thin watered down mix of bi-carbonate snow to dull down the fluffy effect and make it look more natural. I will probably do this later tonight.
|
|
|
|
|
|
2009/03/17 18:31:30
Subject: Re:"Forward to Germany" - Soviet WW2 T34/76 Diorama
|
|

Tough Traitorous Guardsman
|
Hi Gundam-Mecha
This project is coming along very nicely. I'm loving the weathering and your work on the internal detail is great. You have a ton of patience!
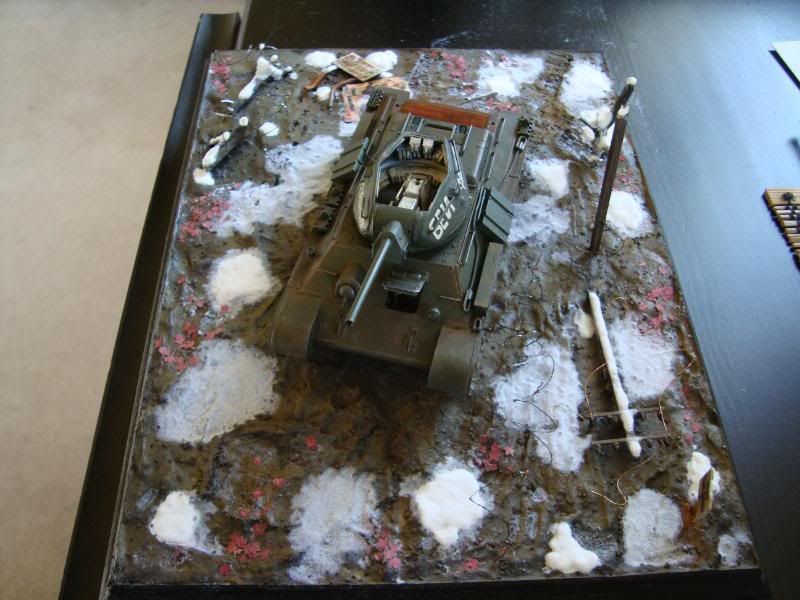
When I look at your latest post I agree with you on the result of the snow, a bit too furry. I think that material can work well on the base of lots of wargaming miniatures, but when it comes to a display piece of this scale it isn't working too well. I hope your solution works.
Two other things I noticed are that there is no snow under the tank (an area you'll be able to see, not very well mind you) and that the "patches" of snow are very regular (almost all a similar size and almost evenly spaced around the tank). I'm not sure how you feel about that, but in my humble opinion I'd be inclined to join up a couple of the areas of snow, making one or two large patches, a few medium size, and a couple of smaller ones. Just a thought.
As I said, however, looking great. Your relative will be very proud to receive this!
Cheers
Dave
|
|
|
|
|
|
2009/03/17 18:50:07
Subject: Re:"Forward to Germany" - Soviet WW2 T34/76 Diorama
|
|
Regular Dakkanaut
|
davetaylor wrote:Hi Gundam-Mecha
This project is coming along very nicely. I'm loving the weathering and your work on the internal detail is great. You have a ton of patience!
When I look at your latest post I agree with you on the result of the snow, a bit too furry. I think that material can work well on the base of lots of wargaming miniatures, but when it comes to a display piece of this scale it isn't working too well. I hope your solution works.
Two other things I noticed are that there is no snow under the tank (an area you'll be able to see, not very well mind you) and that the "patches" of snow are very regular (almost all a similar size and almost evenly spaced around the tank). I'm not sure how you feel about that, but in my humble opinion I'd be inclined to join up a couple of the areas of snow, making one or two large patches, a few medium size, and a couple of smaller ones. Just a thought.
As I said, however, looking great. Your relative will be very proud to receive this!
Cheers
Dave
Thanks Dave
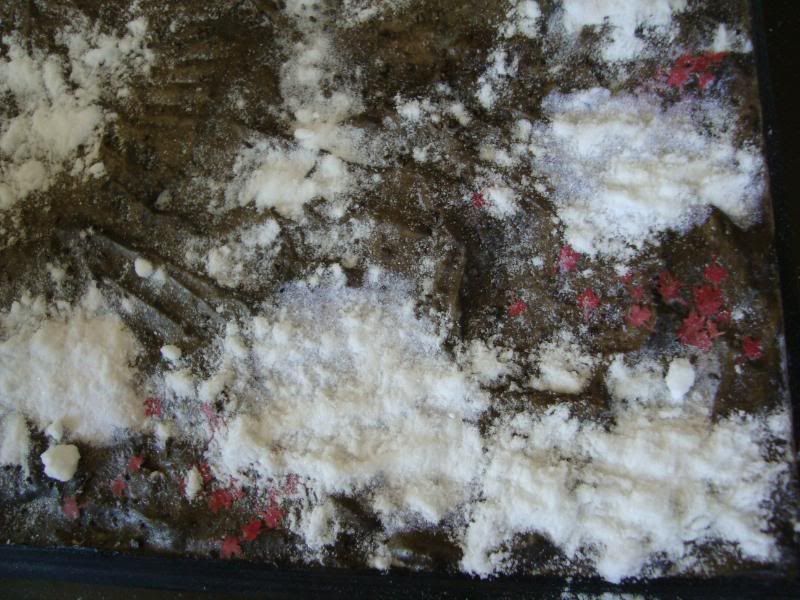
I totally agree, what actually happened here is the result after I blew away all the loose snow flock.
I originally had soaked the surface in watered down PVA and scattered the flock from above much like you would with real snow. I then left this over night. When i shook off the excess however I noticed quite rightly as you say that the base had only formed small isolated patterns.
I think that the texture of the snow can be easily fixed by adding the bi-carbonate mixture.
I'll play around with it tonight.
|
|
|
|
|
|
2009/03/18 09:50:42
Subject: Re:"Forward to Germany" - Soviet WW2 T34/76 Diorama
|
|
Regular Dakkanaut
|
|
|
|
|
|
|
2009/03/18 11:30:45
Subject: "Forward to Germany" - Soviet WW2 T34/76 Diorama
|
|
Battle-tested Knight Castellan Pilot
|
That looks cold. Good job.
|
Stick to the shadows - Strike from the darkness - Victorus aut Mortis - Ravenguard 1st Company |
|
|
|
|
2009/03/18 11:46:57
Subject: Re:"Forward to Germany" - Soviet WW2 T34/76 Diorama
|
|
Regular Dakkanaut
|
Thanks S.J, I'm also working on some little ice patches at the moment. The super glue trick in the Forgeworld Masterclass book is really great. I hope to try that out tonight.
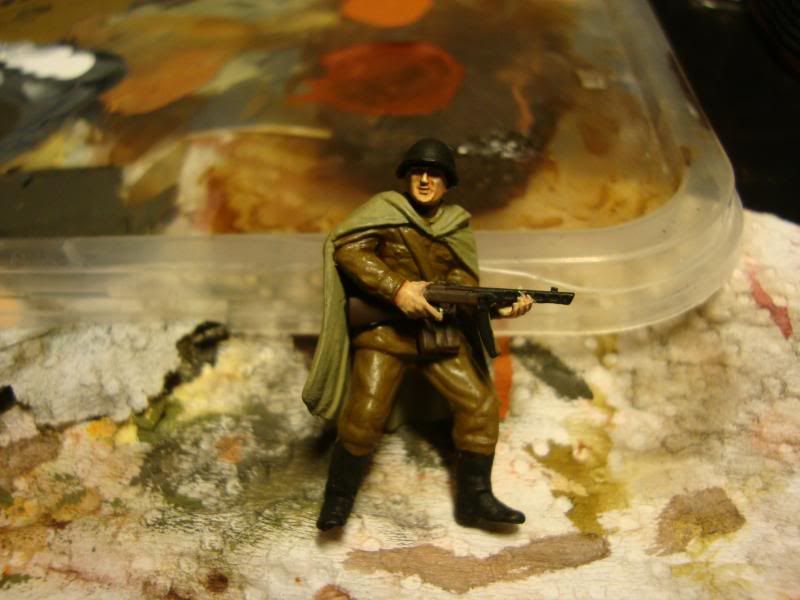
Hopefully after that the base will be finished. The Tank is nearly there, so that just leaves me with the infantry now.
|
|
This message was edited 1 time. Last update was at 2009/03/18 11:47:26
|
|
|
|
|
2009/03/18 21:28:08
Subject: Re:"Forward to Germany" - Soviet WW2 T34/76 Diorama
|
|

Fresh-Faced New User
|
Just stumbled on the thread and really glad I did due to your outstanding efforts - I've had a couple of military vehicles made up but unpainted and you've given me inspiration to dust them off and get them started. Particularly like the metallic feel and the excellent attention to detail such as the bubbling paint etc.
Good luck with the snow - I've had trouble myself in the past with it and know how tricky it can be to get the right distribution and texture. I can see you're not short of skills though and it is certainly improving with each picture.
|
|
|
|
|
2009/03/18 22:13:27
Subject: "Forward to Germany" - Soviet WW2 T34/76 Diorama
|
|
Homicidal Veteran Blood Angel Assault Marine
|
Looks good, but I'm not a fan of the red leaves. This looks like a winter scene and the red leaves remind me of Autumn.
The snow looks nice though.
|
|
|
|
|
|
2009/03/19 08:24:02
Subject: Re:"Forward to Germany" - Soviet WW2 T34/76 Diorama
|
|
Regular Dakkanaut
|
|
|
|
|
|
|
2009/03/19 08:37:03
Subject: "Forward to Germany" - Soviet WW2 T34/76 Diorama
|
|
Junior Officer with Laspistol
|
Nice work,hope your family member is happy with the diorama when presented with it.Now finish it quick!!!
|
"I refuse to join any club that would have me as a member."-Groucho Marx
|
|
|
|
|
2009/03/19 10:50:56
Subject: Re:"Forward to Germany" - Soviet WW2 T34/76 Diorama
|
|
Regular Dakkanaut
|
Thanks Deff, its for my (soon to be) father in law. He used to be a military man himself and the diorama is a late gift for the Russian version of all mens day (they have all womens day and all mens day there), it's called patriotic heroes day or something. Basically during the Soviet period it was celebrated as Heroes of the Soviet Union Day, but since the end of the USSR it was adapted and renamed.
I hope he likes it, and as Dave said I hope it's something he's proud of!
On a seperate note, I can't make up my mind about the new(ish) Citadel Washes. Some shades seem to work very well but others not so nicely. I think Devlan Mud, and Badab Black are good, but I can't make up my mind of Griphonne Sepia and Ogryn flesh. As for the other shades I don't have much of a reason to use them since my palate is normally more subtle natural colours.
They claim that the washes dry to a matt finish but I've found that with the lighter shades especially the Sepia that they don't. That one often dries to a shiny finish which I'm not too keen on at all. For example on the khaki fatigues once the Sepia had dried I just wasn't that into it. I'm thinking to go back to other methods such as acrylic washes and oils for figures, although I do think the darker shades work well on machinery and vehicles.
Has anyone else found that? I know lots of people love them, but personally I think I prefer the old inks for the most part.
|
|
This message was edited 2 times. Last update was at 2009/03/19 10:52:30
|
|
|
|
|
2009/03/19 14:20:35
Subject: Re:"Forward to Germany" - Soviet WW2 T34/76 Diorama
|
|
Fixture of Dakka
drinking ale on the ground like russ intended
|
Don't forget mud on the tracks, wheels, and rear fenders.
|
 Logan's Great Company Oh yeah kickin' Logan's Great Company Oh yeah kickin'  and not even bothering to take names. and not even bothering to take names.  2nd company 2nd company  3rd company ravenguard 3rd company ravenguard  House Navaros Forge world Lucious & Titan legion void runners House Navaros Forge world Lucious & Titan legion void runners    314th pie guard 314th pie guard  warboss 'ed krunchas waaaaaargh This thred needs more cow bell. Raised to acolyte of the children of the church of turtle pie by chaplain shrike 3/06/09 Help stop thread necro do not post in a thread more than a month old. "Dakkanaut" not warboss 'ed krunchas waaaaaargh This thred needs more cow bell. Raised to acolyte of the children of the church of turtle pie by chaplain shrike 3/06/09 Help stop thread necro do not post in a thread more than a month old. "Dakkanaut" not "Dakkaite"
 Join the Church of the Children of Turtle Pie To become a member pm me or another member of the Church Join the Church of the Children of Turtle Pie To become a member pm me or another member of the Church  |
|
|
|
|
2009/03/19 14:25:18
Subject: Re:"Forward to Germany" - Soviet WW2 T34/76 Diorama
|
|
Regular Dakkanaut
|
Thanks Russ, yes theres a lot more work to do on the wheels.
As for the tracks and fenders theres some light mud at the moment. I was thinking to move away from the very heavy mud weathering that I've seen on some examples. What I will most likely do is cover tracks and fenders with fresh snow, since alot of the mud will actually be pretty firm and solid in the cold. It's more likely that the treads will be picking up and throwing snow and some muddy water thats trapped beneath thin ice.
|
|
|
|
|
|
2009/03/19 14:29:05
Subject: Re:"Forward to Germany" - Soviet WW2 T34/76 Diorama
|
|
Homicidal Veteran Blood Angel Assault Marine
|
Gundam-Mecha wrote:
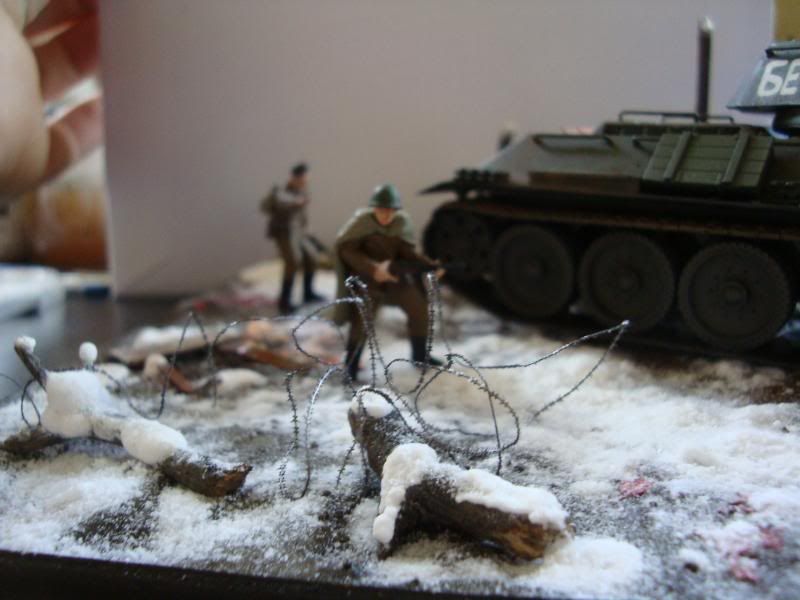
Thanks Tallmantim, the scene is set in early winter, which is why the snow fall in light (by Russian standards!), and also why the tank isn't in a full winter white wash coat yet. A lot of Autumn fall would still be on the ground at this time like in these pictures for example:
LOL - you can tell I come from a country without snow (and mostly with evergreens to boot!)
|
|
|
|
|
|
2009/03/20 08:04:52
Subject: Re:"Forward to Germany" - Soviet WW2 T34/76 Diorama
|
|

Paingiver
|
Gundam-Mecha wrote:Has anyone else found that? I know lots of people love them, but personally I think I prefer the old inks for the most part.
I use ogryn and devlan washes as a shortcut to in metallics, but the sepia has been a disappointment so far. The old inks have much more uses as the washes are what the name says. Still I have found them both to have uses in my painting.
|
|
|
|
|
|
2009/03/20 12:19:33
Subject: Re:"Forward to Germany" - Soviet WW2 T34/76 Diorama
|
|
Regular Dakkanaut
|
Metsuri wrote:I use ogryn and devlan washes as a shortcut to in metallics, but the sepia has been a disappointment so far. The old inks have much more uses as the washes are what the name says. Still I have found them both to have uses in my painting.
Hi Metsuri, yeah I feel the same, I think they are useful (similarly I use them on metalic areas and vehicles), however I do really miss the old inks and I agree that they are much more versatile.
It's a shame that they didn't maintian both lines simultaniously like they did with Citadel Colour and Foundation Colour. I think there would have been a market for that. Its annoying though especially when the Forgeworld Masterclass book makes heavy use of inks. I have only a few pots left and not so many different colours, so its hard to replicate some of the techniques.
Does anyone know who produced these inks for Citadel? Is it possible to buy them via another company like with the old cote de arms(?) paints?
|
|
|
|
|
|
|
|