Forum adverts like this one are shown to any user who is not logged in. Join us by filling out a tiny 3 field form and you will get your own, free, dakka user account which gives a good range of benefits to you:
No adverts like this in the forums anymore.
Times and dates in your local timezone.
Full tracking of what you have read so you can skip to your first unread post, easily see what has changed since you last logged in, and easily see what is new at a glance.
Email notifications for threads you want to watch closely.
Being a part of the oldest wargaming community on the net.
If you are already a member then feel free to login now.
2023/04/27 22:28:34
Subject: Thumpingbear does Mordheim: 04/27/2023: Astrologer's Tower finished build.
The tower, board, bridge, tunnel are all amazing and look great even before paint. The characters are all very well, characterful, impressive work.
ph34r's Forgeworld Phobos blog, current WIP: Iron Warriors and Skaven Tau +From Iron Cometh Strength+ +From Strength Cometh Will+ +From Will Cometh Faith+ +From Faith Cometh Honor+ +From Honor Cometh Iron+
The Polito form is dead, insect. Are you afraid? What is it you fear? The end of your trivial existence?
When the history of my glory is written, your species shall only be a footnote to my magnificence.
2023/04/28 00:08:24
Subject: Thumpingbear does Mordheim: 04/27/2023: Astrologer's Tower finished build.
Brilliant work, nice to see the tower fully built. It's very eye catching and lots of little details which make it very impressive. Good luck with painting it up!
@ph34r: Thanks! The board is unfortunately on hiatus - there are some major issues with it, down to the construction. I need to revamp the entire project, which I'll probably get to in a few months.
@makeitorky: Thanks man, the painting took longer than expected but I'm happy with it.
@Captain Brown: Thanks! I think I'm approaching my end game for base Mordheim terrain, so the scratchbuilds will be slowing down soon (until I make the rural board for the Mordheim "Empire In Flames" expansion!)
@gobert: Thanks, I took longer than I thought but it's done, and that's the important bit!
@Olthannon: Thank you kindly, I think this is the one I've put the most effort into (so far!).
@niel101: Thanks man, that's high praise - your Yggdrassilium board is one of the aspiration metrics I hold my terrain against.
Some updates:
Life got in the way of finishing the Astrologer's Tower in a timely manner for the League of Extraordinary Riveters challenge, but I managed to get it done a few days late:
When the good news of the twin-tailed comet appearing in the skies above Mordheim spread across the Empire, pilgrims seeking enlightenment and redemption were drawn to the city like a moth to flame. It wasn't just pilgrims though - along with them came merchants, tradesmen, and anyone with a keen nose for making coin. Chief amongst these new peddlers were the astrologers, a new industry of soothsayers who would tell one's fortune by reading the comet's trails - for a nominal fee, of course. The seer, the charlatan, and all those in-between slithered into Mordheim and set up shop, making fortunes in the fevered anticipation of Sigmar's blessed return.
Unsurprisingly, not one of these astrologers made the most important prediction of all.
I've talked about this before, but there's an old article (that I can't find anymore) all about how to craft narrative of your wargame setting through terrain. It had an impact on how I approach making terrain, so I always try to have at least a little narrative (in my head at least) as to what the structure was before the comet fell and destroyed Mordheim. For this one, I imagine this tower was the home of one of the many astrologers that moved into Mordheim to peddle his predictions, made some major moolah, and was in the process of constructing more additions to his tower - hence the scaffolding, crane, and ramshackle additions to the balcony.
All in all, I'm happy with how it turned out. There were some issues in painting the stone - my usual method is basecoat in a variety of greys, successive drybrush highlights, hit it with a custom wash of brown, black, green, flow improver, and paint retarder, then top it off with a final drybrush highlight. My paint retarder was, for some reason, dried out and goopy, so I thought I could throw a little water in to thin it out and it'd be fine. It didn't work, it darkened the stone significantly and pooled on the surfaces. I had to drybrush basically from scratch again, and the result is the stone is darker and has quite a bit more contrast than usual. It still ties into the table just fine though, so no big deal.
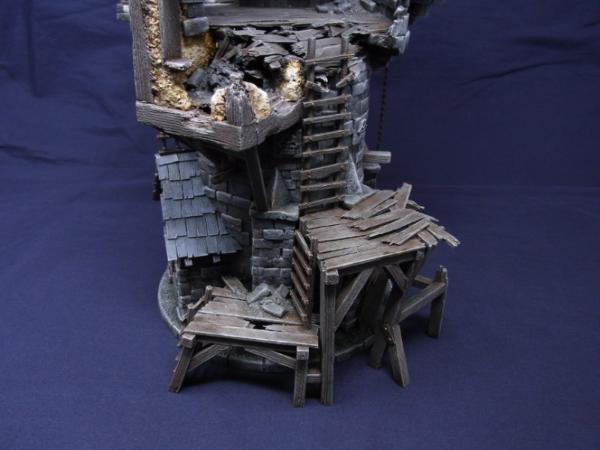
I'll start from the bottom and work my way up:
The doorway and the scaffolding. The riveted lining around each door is supposed to be metal, unfortunately there's not quite enough contrast between the metal and the wood. I may revisit it and throw a black wash over it to get a blackened metal look. Other than that, I really didn't need to put the handles on it, but it looks cool. To be honest, I'm not very keen on having doors there at all - I needed a visual to show the doors were unusable, and having a doorway with planks achieves that goal. I wanted to have the door blown out with rubble pouring out from the interior, but decided it would've been too much work. That being said, it's good enough.
The scaffolding was difficult, but fun to make. I love making ramshackle wood stuff, it gives off such a chaotic vibe, especially when contrasted against orderly buildings. I forsee that this scaffolding will be an annoying sniper spot, as the stepped construction allows placement of bodyguards for ranged attackers. The small ladders are each 1 1/2", meaning it takes 3 inches of movement to climb both, and the large one to the tower interior is 6".
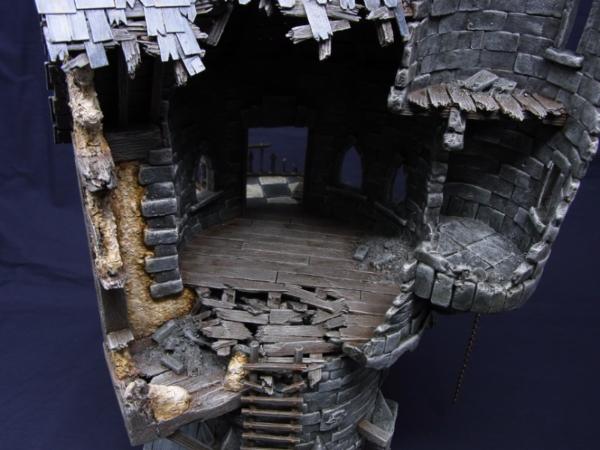
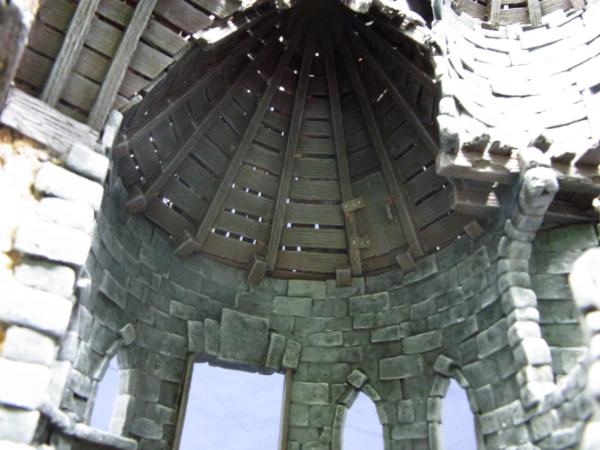
Moving up from the scaffolding ladders, we see the tower top interior and roof. The rubble beneath the collapsed portion of the floor was prepainted before placing all the planking, in retrospect I could've just painted it black, but it looks great when viewed up close. I forgot that I need to make a small stair leading up to the turret tower as it's over 1" to access it, so that'll be done later. The turret tower itself has a second story with enough room for 2 models and a sniper window - unfortunately I couldn't figure out a way to attach a rope or ladder that wouldn't interfere with the floor below, so it'll have to be accessible only through climbing.
The second shot is just to show off the painted rafters, decking, and roof door to the telescope room inside the tower. Is this a portion of the tower that will be totally unviewable to the player and was waaaaaayyyy to much work? Yes. Am I happy I did it? Also yes.
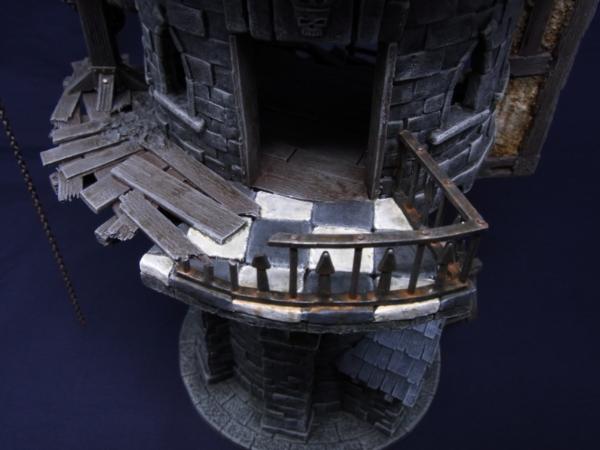
Moving out from the tower, we arrive at the balcony. I wanted the balcony to have a little more visual interest, so I painted the stones in a Warhammer checkerboard. The railing was some plastic ladder thing I had received from a fellow hobbyist (at the time, I had no idea how I'd use it - such is the life of a scratchbuilder), with some cocktail spears glued and resined in for extra detail. Part of the railing was destroyed for the additions to the balcony, which the previous inhabitant had hastily installed with wood planks.
Below the balcony, the skeleton corbels hold it up. Also a bit of a view at the haphazard construction of the balcony extension.
On the makeshift balcony, we have the crane. I wanted to have this as another access point to the balcony. It's a 6" movement to the top of the tower, so even Dwarfs will be able to get to the top in one movement (if they're up against it, of course). Again, the metal is mostly lost against the wood, but whatever.
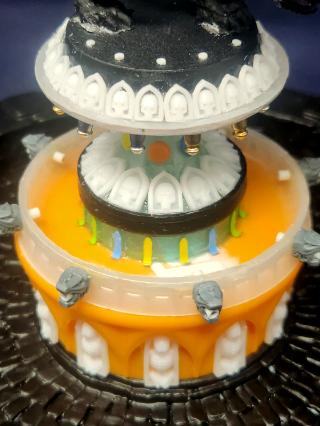
Finally we reach the telescope room and the roof. The telescope was made from shields (for the lenses), tubes of different dimensions (for the entire small telescope body and the thick portion of the large one), a bomb taken from a model aircraft (for the smaller tapered portion of the large telescope), and a small gear from a toy I deconstructed for Ork scratchbuild parts. Overall I like it and love the how it breaks up the silhouette of the tower, but I'm not terribly pleased with my paintwork on the lenses - it looks good at the angle I took the photo at, but from other angles it looks off. I'll be revisiting it in the future.
On the roof, we have a lil' comet adornment with a flag. I tried to do a hammered metal look on the tower cap by greenstuffing it and embossing it with a rounded thingy, I like the way it turned out. I also wanted this picture to show off the shingle paintwork and texture - the lightbox I'm using doesn't diffuse it's light very well so the detail wasn't captured well in the profile shots.
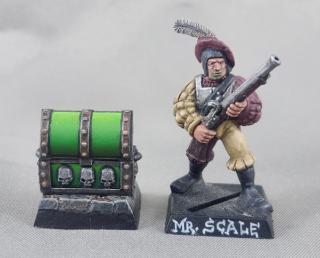
Finally, an obligatory shot with Mr. Scale. I also wanted to compare the build against my original concept. I think I did pretty well, but had to make some adjustments to the silhouette to allow for better gameplay. I'm happy with the final result, and I'm happier that it's finished.
Terrain projects are being shelved once again, as the field season for archaeology is starting up pretty soon here in Canada (that is, when the rampant wildfires currently ripping through my province are contained). I'm thinking I'll bring my Orc warband out to the field and work on it during my downtime, try to do an hour or so daily.
More updates soonish!
This message was edited 2 times. Last update was at 2023/05/12 23:01:35
2023/05/10 03:14:58
Subject: Re:Thumpingbear does Mordheim: 05/09/2023: Astrologer's Tower Showcase
Thumpingbear,
So sorry to hear about life. It certainly has a way of piling up. But, I'm super glad you were able to finish the tower. Hopefully it didn't come at too much of a life-cost. It is such an incredible piece and I think the coolest in show at the League.
I haven't been by in a while, turns out, because I hadn't seen the dwarves. They are fantastic. I did some tartan recently-ish and I agree it was surprisingly easy compared to what I expected.
Keggy is a fantastic model. Really well done.
So much character in those models.
Stunning! So many details to discover, no square-inch of the building seems half-assed! And not only is the build excellent, the paintwork complements it beautifully.
That's a beautiful build mate, definitely something to be proud of - concept to execution. Things like all the internals and the rust from the metal cap on the roof bleeding down into the tiles, the details are just amazing.
A real labour of love. Thanks for sharing it with us!
t z you are k
2023/05/13 10:18:47
Subject: Re:Thumpingbear does Mordheim: 05/09/2023: Astrologer's Tower Showcase
Absolutely stunning work again Thumpingbear! The narrative certainly gives it a special feel and must’ve helped you identify what cool little details to add. Most Excellent!
Goberts Gubbins - P&M Blog, started with Oldhammer, often Blackstone Fortress and Void Panther Marines, with side projects along the way
2023/05/14 15:46:29
Subject: Thumpingbear does Mordheim: 05/09/2023: Astrologer's Tower Showcase
I know I’m a bit late but the finished tower looks absolutely beautiful Thumpingbear! And I’ll second muette, if that was a kit I’d buy it in a heatbeat. Looking forward to seeing your next update
2023/12/27 20:41:02
Subject: Thumpingbear does Mordheim: 05/09/2023: Astrologer's Tower Showcase
@DJJazzyJeff: Thanks man, appreciated. Making characterful models is one of the most rewarding aspects of Mordheim, made possible by the small model count that lets you give some attention to each individual.
@Gwyn chan 'r Gwyll: Thanks bud!
@muette: Thanks a lot! I showed it to one of my coworkers who plays Fantasy and told him it was scratchbuilt, he told me to off. Your comment was nicer lol.
@mcmattila: Thank you! If no part of it looks half-assed, then I did my job correctly (there is a LOT of half-assed stuff that's hidden ).
@tzurk: Thanks! I don't know if "labour of love" was quite accurate, more like "get this thing done and out of my sight", but I was very satisfied to finish it.
@gobert: Thank you gobert. The narrative evolved with the tower, I really wasn't sure what the story was until I thought that the little building on the roof needed something extra, and a telescope sticking out seemed like a good idea.
@Olthannon: Thanks man, I definitely was relieved to get it done with. I was cutting it pretty close to the beginning of my work season, so I was happy to wrap it up before then.
@zahnib: Thank you! If I had any 3d modelling skill I'd give it a go, that may be something to try out in the future.
@Captain Brown: Cheers Captain, thank you kindly!
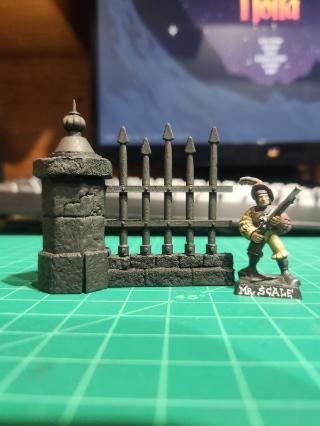
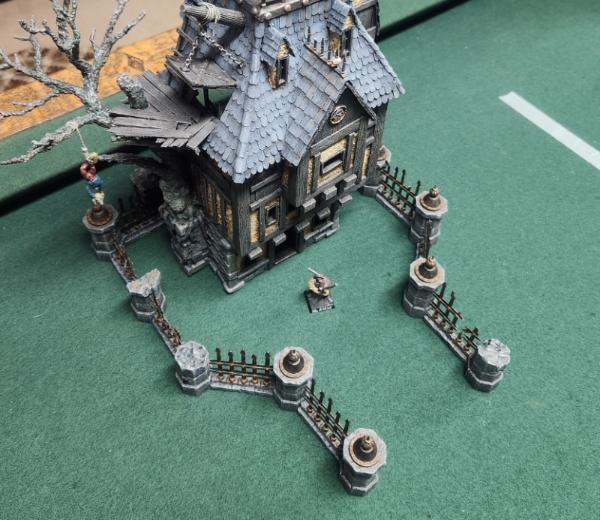
Recently I decided that I needed to do something about the fences I had built for the Mordheim table:
These are a previous attempt that I made quite a few years ago. The construction is XPS foam for the stone, toothpicks and cardboard for the wrought iron fence, and a bead with bamboo skewer for the fencepost cap. They work great in game as a way to block off areas, and to provide cover for any model standing behind it. Unfortunately I was dissatisfied with 3 things about them:
1. The design of the sections. Having a post on either side of the fence makes a complete section, but it looks weird when putting 2 pieces together, like in the photo. Additionally, the square shape of them doesn't allow for any smooth joints of the two pieces except for at 180 and 90 degrees - also visible in the photo, with the obvious gap between the 2 pieces.
2. The weight. The advantage of XPS foam (and scratchbuilds in general) is that they're relatively lightweight. However, these fence sections are so light that a careless whisper will send them flying across the board. I can't count the times one's been knocked over in game, often taking several models with it.
3. Their appearance. My hobby skills have advanced since I made these, and I think I can do better now.
So I whipped up a prototype for modular fence sections, which resulted in this:
I'll go through each element separately:
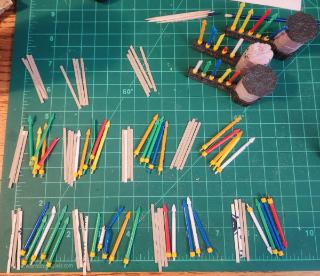
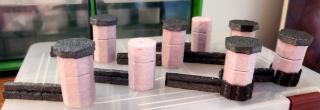
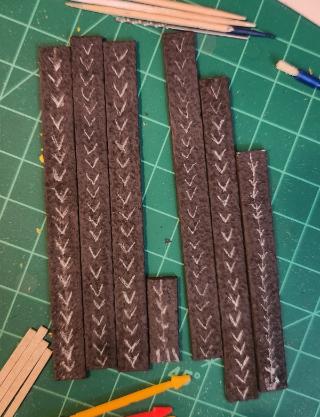
- Fencepost: These are XPS foam that have been cut into an octagonal pillar using a hot wire table. The black portion on top is more XPS foam to represent the top of the pillar, and there will be an ornate fencepost cap on the very top (not pictured - see later in post). The bottom of the pillar has been hollowed out with a washer placed in it for weight. The black segments on the bottom of the pillar are sheet magnets, which allow the fence sections to stick to each other more effectively and not get knocked around during games.
- Wrought iron fence: The fence is made of cocktail spears, cut to different lengths to give a staggered appearance. They are embedded in the 2 rectangles of XPS foam along the bottom. The very bottom XPS foam rectangle has a nail running through it to add more weight. The fencepost on the opposite side has been removed, and the 2 rectangles of XPS foam on the bottom are capped with more sheet magnet, which allows the fence sections to magnetically stick and create a seamless fence (pictures below).
I've planned to make 12 of these sections, which will make 31.5" of fence (each piece is 2 5/8" long). Here are the fence components and the fencepost components, ready for assembly:
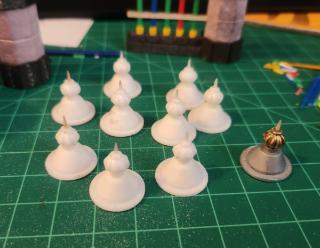
I was having a bit of a hard time trying to figure out how to make the fence caps. I bought some nice beads that would work with it, but was having a hard time finding a plentiful and non-wasteful source for a cone component. When I found a suitable Lego piece that would work, I decided to build one and then just cast the rest. Here are the fencepost cap casts along with the master on the right, and what they'll look like on top of the fenceposts:
I also included a picture of the magnets. They're cheap magnetic sheets that I bought at Michaels, used for making custom fridge magnets and the like. The arrows indicate the orientation of the magnetic field, if I don't glue them on correctly the magnets repel each other, which kinda defeats the purpose of magnetizing terrain. They were roughed up with a dremel to give them a more stone-like appearance.
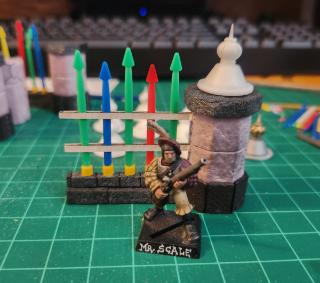
Here's a quick shot of some of the fence pieces combined. They fit together very nicely and are very sturdy. They can be fit together normally with a fencepost on both ends, or the 2 fence sections can be fit together to make one long unbroken fence section, which can be seen in the middle (and which I skilfully obscured with another fence section, whoops).
These are still very WIP, but I should be able to finish them up fairly quickly now that the all the prep work on the components is done. Overall I'm pretty happy with how the magnetization and modularity of the sections went, I'm gonna be very happy to get them on the table and not have to worry so much about breathing the wrong way and knocking over a fence (yes, this happened with the old pieces. More than once).
I had a thought a couple nights ago that I can easily make some gates to fit with this fence set - but I need to take one project on at a time, and right now I'm working on several. I'm also working on painting an Orc warband, as well as modelling a Freelancer Knight Hired Sword (which needs 2 versions of the model: on foot and mounted!). No pictures of these yet, I'll be posting when more progress is made.
More updates soonish!
2024/05/22 06:40:50
Subject: Thumpingbear does Mordheim: 05/20/2024: Modular Magnetic Fence WIP
The new fences look fantastic. As other have said, the modular aspect is top tier. Look forward to seeing them painted up. Also looking forward to seeing your orc warband and Freelancer Knight!
2025/03/11 05:59:38
Subject: Re:Thumpingbear does Mordheim: 05/20/2024: Modular Magnetic Fence WIP
I've been letting the hobby slip through my fingers lately. Life's been kicking my over the last couple years with some health issues and I haven't had the drive to keep up with regular hobbying nor updates. The Canadian Universal Healthcare system has it's merits, but expediency is not one of them.
Anyways, here's some stuff I've worked on.
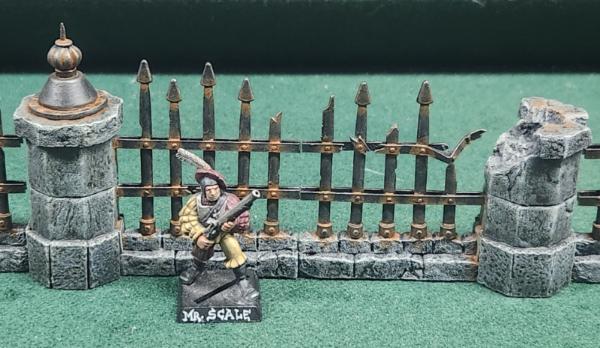
The modular magnetic fence sections construction was finished up:
They were then primed black:
And fully painted:
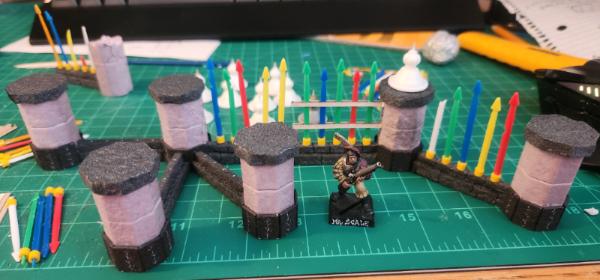
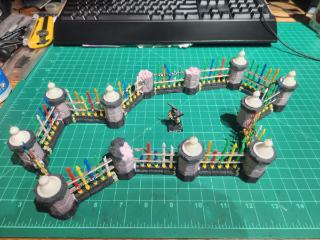
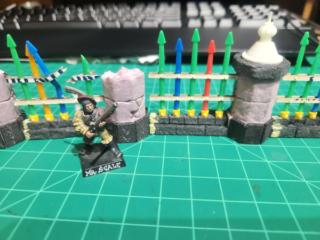
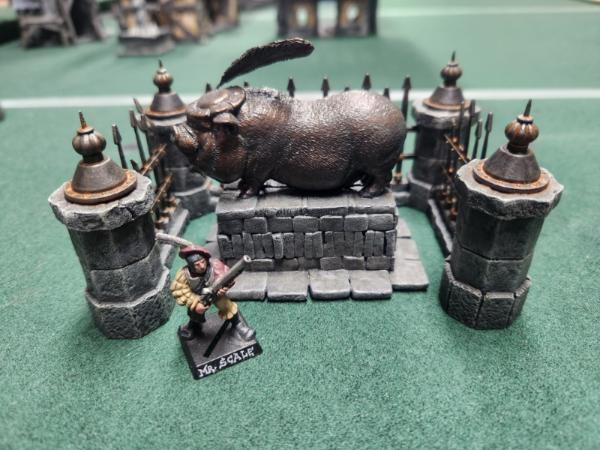
There is still a slight gap in between the fence sections, but they're not noticeable unless you look up close. But yeah, they're great! They work well as little statue enclosures:
Or as yards for homes:
Or as stair blockers (making this stairway incredibly defensible):
All in all, extremely happy with the ways these turned out. The magnets keep the pieces snugly together, and their weight make them very resistant to tipping and bumping. I may make some solitary columns to act as end pieces (they look a little jarring when they don't end in a column), and I plan on making 2-3 gate sets to go along with them.
---
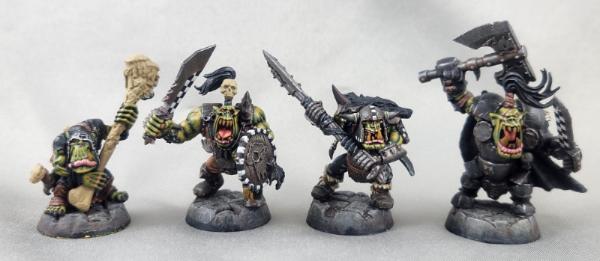
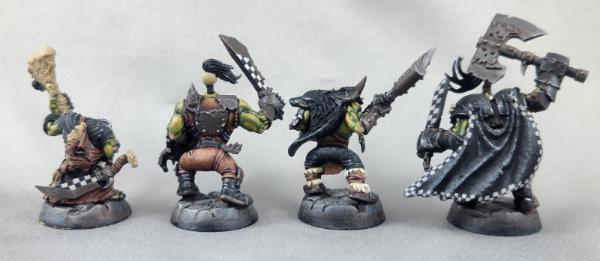
Moving on to the Orc and Goblin warband I mentioned last update. Still plugging away on them, but here's some shots.
Heroes:
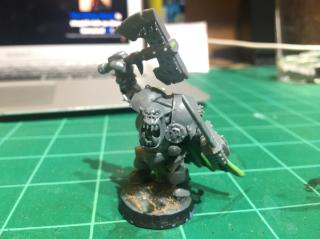
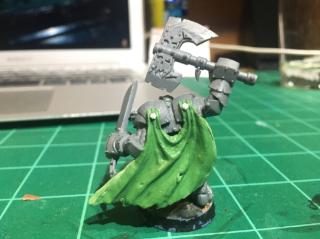
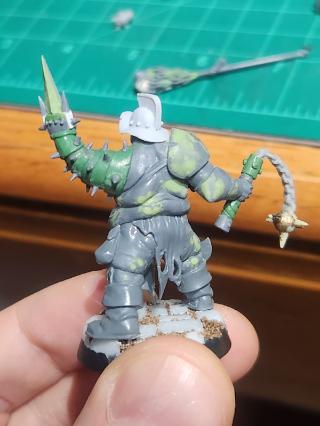
Left to right is the Shaman, Big Un' 1, Big Un' 2, and the Warboss. The Shaman is just the base Orc Shaman (aka Nazgob) model, which is one of my favourites in the Orc range. Took like a 2 month break in painting because I psyched myself out about painting the flames on his hood, but I'm satisfied with the way they turned out (not clearly visible in these picture, unfortunately). Big Un' 1 is a mix of Ork and Orc pieces, can't remember exactly which are which. The Big Un' 2 is made from the Warboss kit, with the axe head replaced with an appropriately scaled one from the Back Orc kit. The Warboss is mostly the Black Orc kit, the head is from the Savage Orc kit, and not sure where the topknot was from. I painted checks on the heroes to denote their higher status and to help my opponents visually identify them (which means less clarifications in-game!). No heavy sculpting on these guys save for some bubble filling on the Shaman (Finecast, what a surprise) and the Warboss, on whom I sculpted the tongue and cape. I actually took a picture of him back when I sculpted those portions a few years ago:
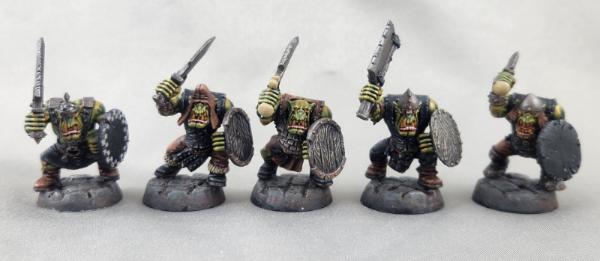
Boyz Group 1:
These are standard from the Orc Boyz box with choppaz and shields. Since there's always the possibility of a Boy becoming a Hero in the post game phase, I decided to paint checks on the one on the far left in case that happens.
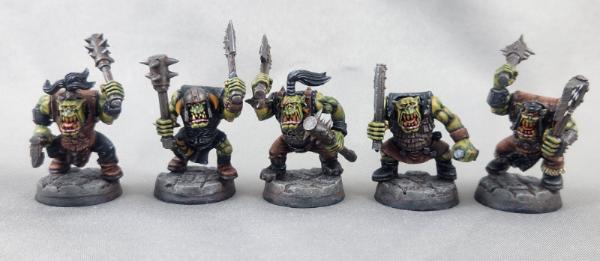
Boyz Group 2:
These took some minor conversion work to give them double weapons, which were sourced largely from the Black Orc kit. The possible hero from this group at the far right with the checkered axe sourced his head from the Ork Runterherder model. Also please ignore the one missing a weapon, his mace broke off during painting and I decided to fix it once the warband is finished.
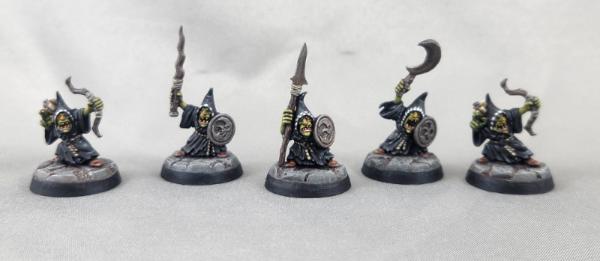
Goblins:
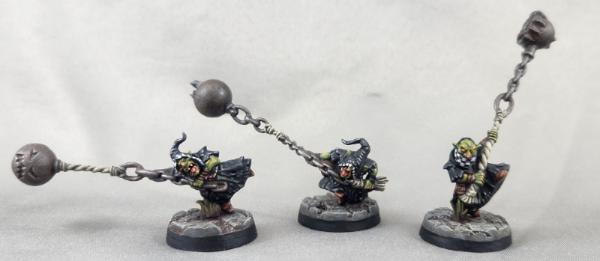
These guys are totally finished, save for maybe some more metal work on the blades. Despite the freehand all over them, goblins can't become heroes and will be removed from the warband roster (ie. squashed) if they try to boss the Orcs around. I just wanted to freehand them, the Night Goblin hoods are a perfect canvas for it. The guy with the spear represents the Squig Prod, which gives a larger radius of control for Squigs - which is very necessary because if they go out of control, they randomly wander the board until the game ends, attacking all models they run into (friends included!). The Fanatics will represent any Goblins that get their hands on a Ball n' Chain, which I've found is mostly a psychological deterrent for my opponents rather than an effective choice (I've killed more teammates than enemies with them. This includes the Fanatics themselves through tripping and strangling themselves, or slamming into walls and crumpling, or careening off bridges and splatting on the ground below. Although not as satisfying killing an enemy model, far more entertaining).
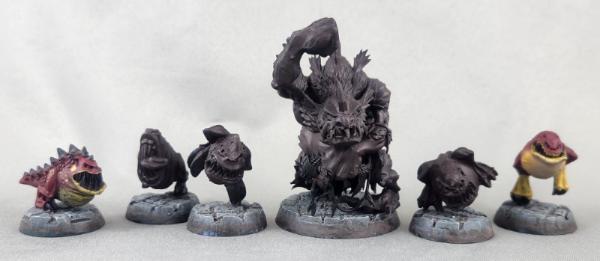
Squigs and Troll:
I haven't really started painting these, but I was playing around with paint schemes on the squigs. The troll was converted to remove a weapon from it's hand. Personally I love the Swamp Troll models, I think they're very foul looking and make more sense to be found in Mordheim, where the river Stir would've been choked with all sorts of foulness even before the comet hit the city.
Painting-wise, the main crew is around 85% complete, I just need to hunker down and finish em'. I dislike painting over modelling so I'll be dragging it out longer than I should.
---
One way that I procrastinate with painting is working on Hired Sword models. I'll start with the simplest ones.
Thief/Assassin:
This model is a metal figure from Reaper, bought it years ago and can't remember the name. It may not be super Mordheim-y, but it's such a striking model that I can't resist. I plan on painting him entirely black with the face white as marble, representing a grimacing death mask of a famous Tilean general looted from his crypt. In game, he will either represent a Thief or Assassin, whichever the player wants to hire.
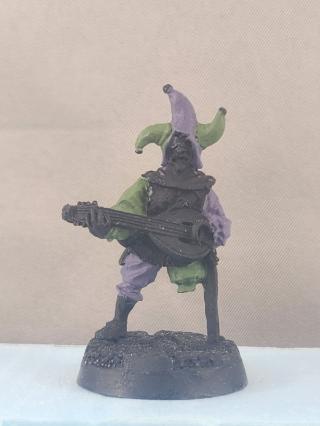
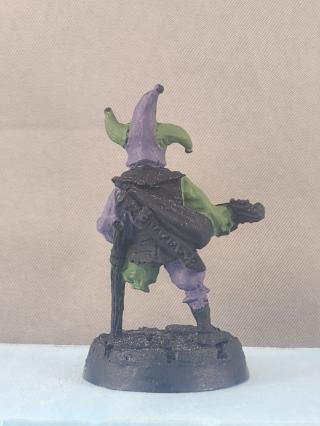
Bard:
This guy is "Tristan il Fortunato" from Grimforge Miniatures, which is a superb miniature company with a small but top quality catalogue. No work was done on him, he's perfect. I've decided that a gaudy green and purple colour scheme (a la' Joker) would suit him well.
Witch:
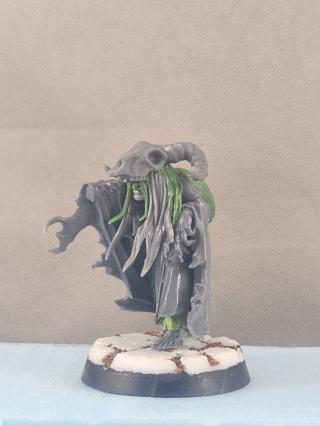
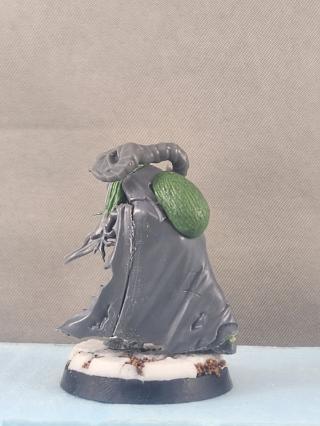
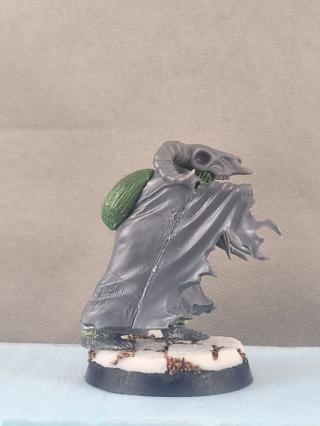
She's made from the Corpse Cart necromancer body, hair from Daemonettes, head from the Empire Free Company kit (the one with the kettle helmet with a crooked nose sculpted on), and feet from various unknown kits. The ram skull is a 3d print from Goonmaster (Basing Bits: Animal Skulls). Work left to do is a backpack thing filled with twigs and various forest things, a staff, and gap filling on the cloak.
I'm very pleased with this model, I think I captured the essence of a crusty forest hag that smells like mildew and fungus. Unfortunately, I doubt she'll see any action in game unless fielded as Wizard. The Witch as a Hired Sword is really interesting as she's essentially a non-combatant model. She has no ranged weapons and while she'll defend herself if attacked, she can't voluntarily charge into combat - in fact, she is forced to move away from any models that get too close (w/in 8"). What she does have, though, is the Hexes and Charms spell list, which is entirely comprised of buffs and debuffs that are alarmingly easy to cast. The spell list is so good that The Witch banned by most player groups and tournaments, which is a shame.
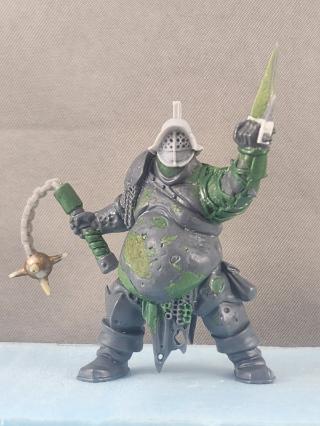
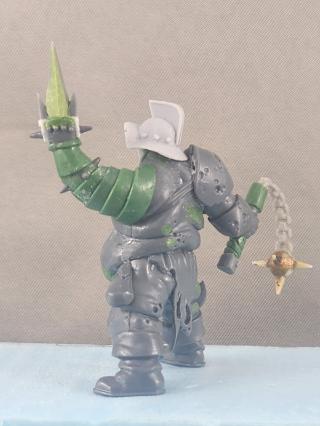
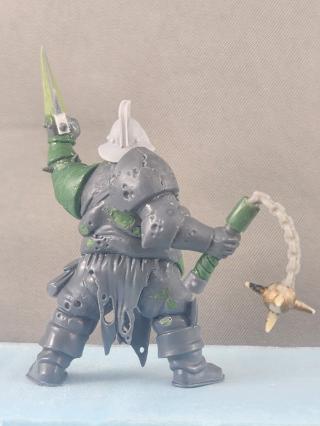
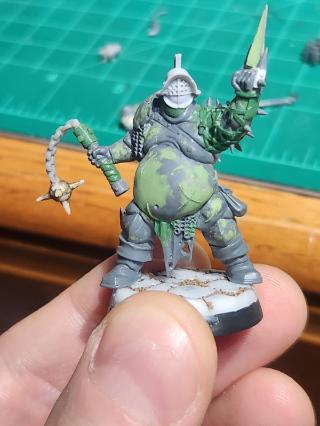
Glotto the Burg (Pit Fighter):
Body is a Blightking, the flail is from the old-old Skeleton kit, and the head is from Maxmini (Gladiator Helmets). Like many others, I was recently informed that most Roman gladiators were actually quite chunky, which helped to both protect internal organs and to create superficial wounds that would bleed a lot to please the crowd. So, I figured a tubby Pit Fighter would be historically appropriate. I took a lot of inspiration of his pose, armour, and weapons from the official Pit Fighter art in the Mordheim rulebook. Still some work to do on him - on the manica straps need fat bulges where they press into his arm fat, the straps themselves need ties, the plates need spikes, he needs to be de-Nurglefied by smoothing out his skin and some of the armour, then he needs scars all over his big belly from his gladiatorial occupation. Pleased with the way he's turned out so far!
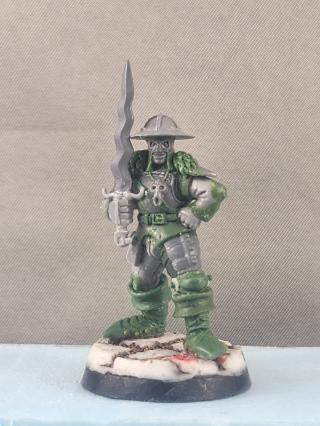
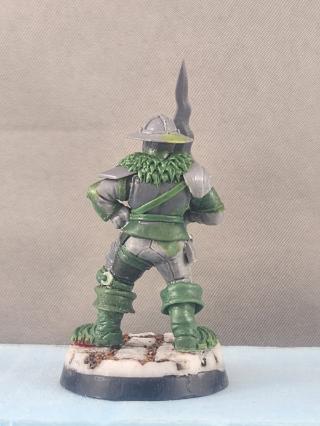
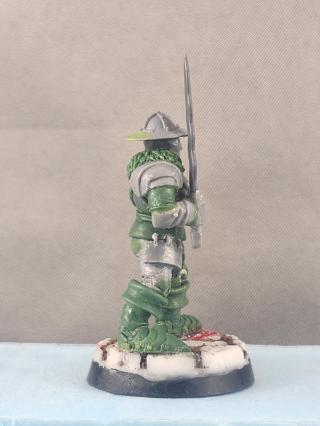
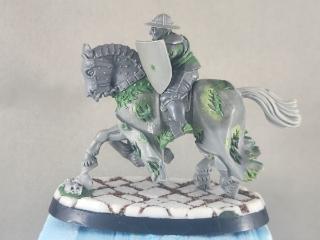
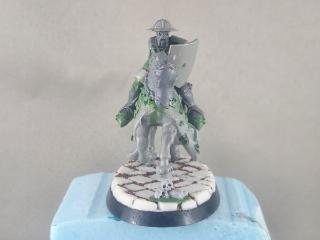
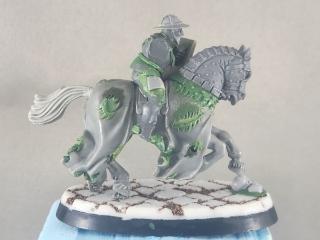
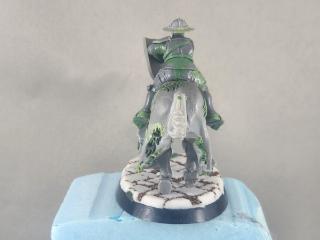
The Mongrel Knight (Freelancer):
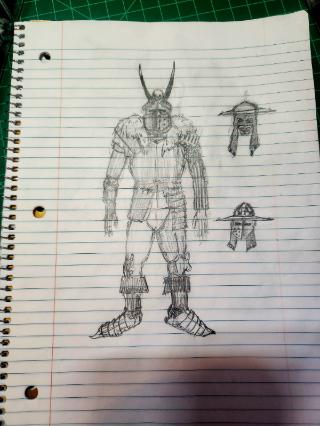
A mercenary of ill repute, the Mongrel Knight received his moniker from his distasteful habit of looting corpses after battles, taking treasure and trophy whilst snarling and snapping at the starving dogs of war that haunt the battlefield searching for a meal of unspoilt flesh. Or is it because of his heraldry, depicting an inverted decapitated hound? Whatever the case, the Mongrel Knight's proficiency for violence has led him from battle to battle across the Old World and beyond. His skill with sword and lance whisper to a noble upbringing, but during war the Mongrel Knight eschews the company of other knights - keeping to his pitiful urine-soaked tent, barking and growling like a chained dog at any that approach, much to the disdain of the proud knights and to his own foul amusement. It's no small wonder that the Mongrel Knight would find himself drawn to dread Mordheim, where the looting is plentiful and the bloodshed unending, where a creature like him can howl at the moons with the rest of the madmen.
Concept Art:
I originally planned the model around the helmet (from the Empire Demigryph Knights kit), but after some initial mockups I found it looked too big and kinda goofy. So I drew a couple other designs on the side and figured somewhere between the two would be the answer.
After some work, here are the results.
On foot:
This version of the model is finished. Whole buncha bits went into him: Helmet is from the Bretonnian Men-at-Arms kit, face is from the Necromunda Cawdor kit, torso and sword blade from the Empire Greatsword kit, legs are from an Empire Handgunner from the 6th edition Warhammer Fantasy Boxed Set, armoured right arm is from the Empire Knight kit, unarmoured left arm is from Dwarf Warrior kit, left shoulderpad is a 40k Imperial Guard shovel, left leg armour is from the Empire Outrider kit, right leg armour is from the old 40k Kroot kit, sword guard and pommel from an unknown High Elf sword, and the skull necklace from the Skaven Plague Monk kit. There's also an old Empire shield that'll hang on his back not included in these pictures (see mounted version for the same shield).
Mounted:
WIP. Some different bits on this one. Torso and legs are from the Empire Outriders kit (cut the left leg armour off and used it for the Foot version's right leg). For the horse, the head is from the Empire Knight Command and the body is likely a Bretonnian one, but this caparisoned body was used for multiple models across factions.
Extremely proud of this guy. I emulated the pose and some elements of the old Mordheim Freelancer model cause it's such a rad mini, but rudely and unfortunately expensive. I wanted to give him a scavenged armour look with very little matching, fitting in with his lore. The mounted version received the same treatment by combining Empire and Bretonnian horse bits, then making em raggedy with green stuff. Still gotta figure out the lance for the mounted version, and I also plan on modelling a bunch of battlefield loot and trophies haphazardly strapped onto the back of the horse.
---
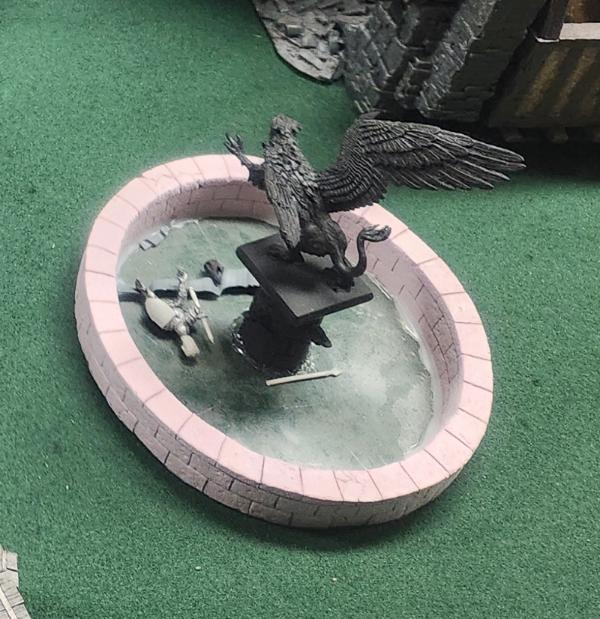
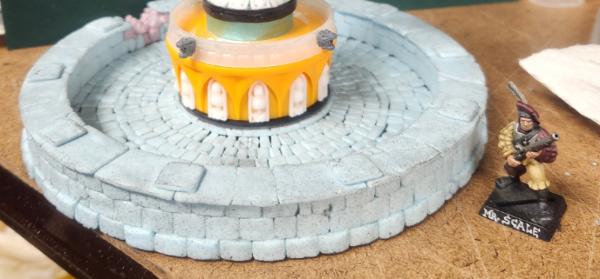
There's still a lot of work to do on the Hired Swords, which is why I decided to redo one of my old half-finished terrain pieces instead: a fountain.
Don't have many pics of this fountain before I redid it, but here's one in-game (ignore the figures in the pool basin):
Not much to it. It was a ring of xps foam 1" in height with carved bricks, based in clear acrylic sheet for some reason. The statue was a Reaper Bones Griffon stuck on a plinth, the square parts of which were 2 bases glued together, and the round part was a large wooden dowel with carved stone facing and gargoyles from the 40k Chaos Landraider kit (I think...). I made it quite a while ago and it was good enough as scatter, so I left it for quite a few years. Recently I looked at it and inspiration struck - perhaps it was the return of the Old World model range? - and decided to redo it.
First thing I did was the basin (cropped to avoid full reveal spoiler)
Took the original circle, rebased it on some hardboard, thinned it slightly and reduced the height to ~3/4". Bricked it all in xps foam. The circular stonework in the middle was a major pain in the and I'm kicking myself for not taking any pictures of the template I made to create it - oh well!
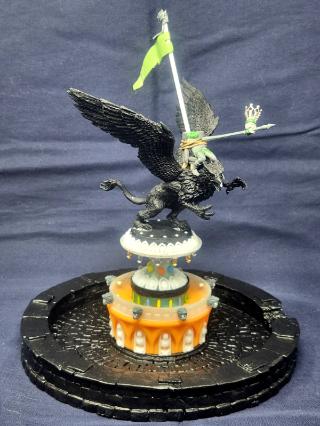
Here's the finished build - The Fool's Fountain:
The plinth is made up from multiple materials - Tropicana orange juice lid (the cream of the crop for Warhammer scratchbuilding), prescription bottle, film cannister, metal brads, plastic wine glass, disposable container lids, and bases. The white skulls and skeletal facades are resin casts from one of the old 40k terrain kit wall segments that I created a mold for, don't know which one it is. Including the skull on the top of the flagpole, there are exactly 50 skulls on this fountain, which is honestly kinda pathetic compared your average Warhammer building - I'll have to do better next time.
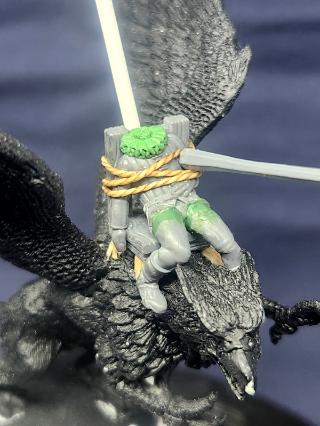
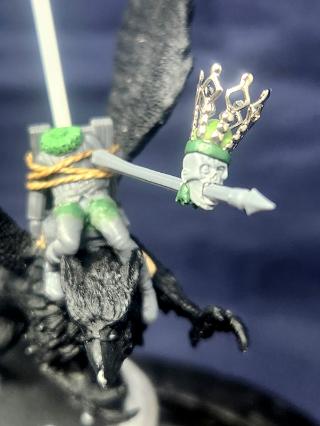
The statue is mostly the same, though I disliked how the tail was positioned and couldn't get it to hold the shape that I wanted, even after using the boiling water trick recommended for Reaper Bones models. I ended up cutting it off, drilling a hole through the length of it, and inserting a paperclip before bending into place and re-attaching. The chair and corpse are resin prints from Tiny Furniture (Drunk Visitors). Chopped the head off and drilled a hole through the crook of the arm, attaching the lance from the Empire Knight kit. The zombie head is from the old Fantasy Zombie hit, and the crown is a bead. Wrapped him in rope made from waxed leather thread, and made the flag from greenstuff and milliput. My intention is that the corpse is supposed to be one of Mordheim's nobility and I wanted to sculpt some fancier puff-and-slash clothing on him to convey that, but the ropes got in the way and I figured it'd be more trouble than it's worth. So I sculpted the ruff collar on and hope it'll be enough to represent the upper crust of Mordheimian society.
There's still a bit more to do with the basin before painting - I need to put some rubble by the broken portion of the wall, glue in some small sprue bits to represent Wyrdstone shards, I want a rusted sword sticking straight up somewhere, and maybe some gross looking fish. The plan is to do a resin pour on this, including spouts coming out of the gargoyle's mouths. That'll be for a later date though. All in all, very pleased with the way this turned out. Unfortunately I used Mod-Podge to seal the foam bricks and it left big brushstrokes that I fear may come out with drybrushing. Apparently you can sand it down a bit, but we'll see.
In game, it'll be a nice bit of scatter. The walls are under 1" so any model may move over it freely, while it also can provide cover. We used to run straight across the basin in-game, but I think it'll be categorized as Difficult terrain in the future (maybe with rules that any Stunned models who fall into it are automatically taken Out of Action), so I foresee some fun moments of precarious duels on the rim of the fountain. It'll also be great for the multiplayer scenario "The Pool" in which warbands have to search a watery pool for shards of wyrdstone, then battle each other to keep them.
---
Just remembered I made some game tokens, so might as well show them too:
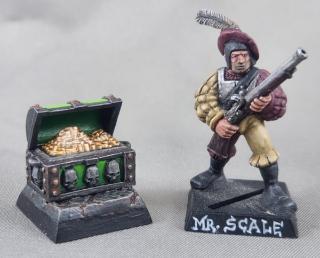
Treasure Chest
The Mordheim Accessory Sprue had a treasure chest in it, and I found only the treasure part in a box of bits I bought years ago. I decided to recreate the rest of the box to the best of my ability, which I think I did okay with. The skulls were a greenstuff press from mold, they're a little low-quality but good enough. I'm a big fan of the silver and green colour scheme I painted it in, with the green meant to invoke the Wyrdstone the adventurers battle over.
The chest is used exclusively in the "Hidden Treasure" scenario in which warbands search ruined buildings for the chest, then make a mad dash off the table, slowed down by the chest while fighting off enemies. It's a fun scenario, but there's a weird metagame which I hope to get rid of with these next tokens:
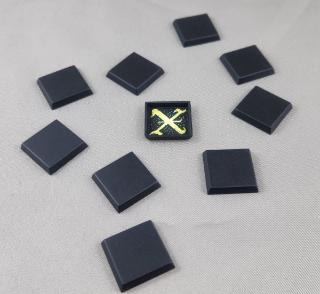
Treasure Markers
In the "Hidden Treasure" scenario, the treasure chest is searched for by models entering buildings and making a singular 2d6 search roll, which is then found in 2 ways:
1) Rolling double 6s on the search roll, or
2) It spawns automatically in the last building to be searched.
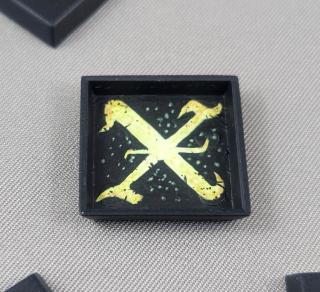
So the metagame I mentioned is this: If you leave the building closest to your table edge unsearched, the treasure chest will spawn there and let you get off your board edge very quickly, which is great because dragging the chest slows your model down to half speed. This leads to the scenario being less about finding the treasure and more about defending the building near your deployment zone while also attacking the building near your opponent's deployment zone, with the goal being to search your opponents building to spawn the treasure in your zone and bolt off the table. This honestly is a pretty fun objective to play, kinda like a weird version of Capture the Flag, but it's not really in the spirit of the scenario. Someone mentioned on the Mordheim reddit page that an "x-marks-the-spot token" was a common solution to this metagame, so I whipped these up in an afternoon. Had a lot of fun painting it, using a lot of texture and glazing to create the look. I haven't gotten a game in with these tokens yet, but I'm looking forward to it!
Also noticed it's quite luminous in shadow, very fitting for what it represents:
---
Big update, probably won't post again for a long while. I've decided to go back to school for a two-year degree while my health issues continue, so that'll be eating up a lot of my time. The school is in a different city with an pretty active Mordheim community though, so we'll see. More updates at some vague point in the future.
This message was edited 2 times. Last update was at 2025/03/11 06:05:18
Wow - I absolutely love the world building, character design, sculpting and painting. Everything looks fantastic. One questions about the fences though - would you make a damaged pillar section too? Or longer pieces as well? Most of the modular things look the same length in the pictures - just curious! I'm definitely stealing the plastic cocktail stirrers idea.
Another problem with the toothpicks is they can injure you too
Good to see you back Thumpingbear, sorry to hear that your health hasn’t been too good. The update is chock full of amazing stuff, your new Mordheim community is very lucky!
Goberts Gubbins - P&M Blog, started with Oldhammer, often Blackstone Fortress and Void Panther Marines, with side projects along the way
@everyone: Thank you for the kind words.
@blockade23: I may make some damaged pillars as end caps of sorts to hide the fact that they're modular. I won't make any longer fence sections, I did indeed make them all the same length because it makes storage easier and I dislike making them non-uniform. I definitely stabbed myself with the old toothpick fences too lol.
There are been updates to the stuff I was working on, and a few new things, but I haven't taken pictures of pretty much any of them so I'll wait to make a proper update.
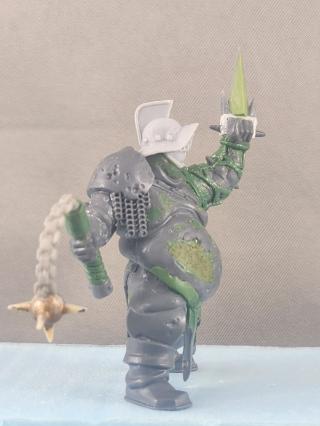
I've got quick pics of the finished Pit Fighter, Glotto the Burg:
He was pretty well finished in the previous photos, but needed a bit more polish. So I smoothed his skin and armour, gave him some scars on his belly, and put spikes and straps on his manica (arm armour). Very pleased with him. Painting-wise, the only thing I know I want to do is put a "SIGMAR" tattoo in gothic script on his belly.
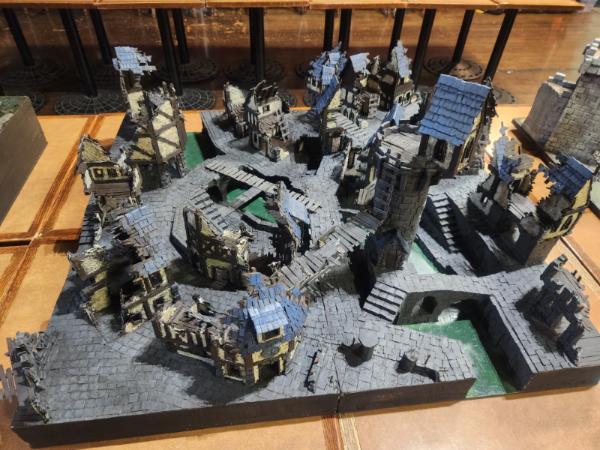
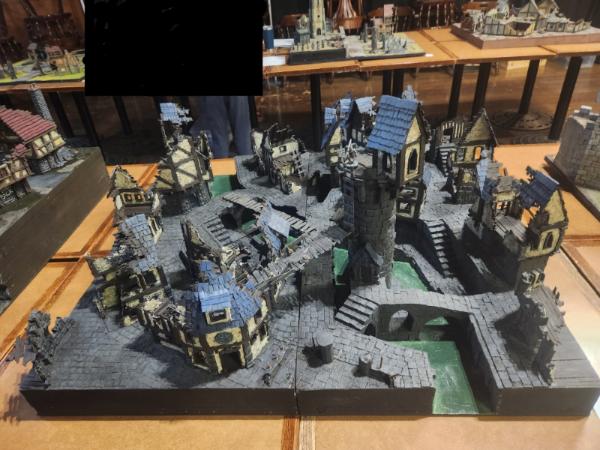
Apart from the models, I started a pretty big project in August. The 2025 Alberta Mordheim Open was scheduled for August 31, part of Dungeon Fest 2025 in Calgary, Alberta. I missed last year and was determined to go this year. The call was put out for Mordheim boards for the event, and I figured I'd make one. I had very high aspirations that were slowly pruned as the deadline got closer and closer, and the last week was working about 10-12 hours a day on the board to get it finished. It was an incredibly stress-inducing endeavour, and in the end I was so upset and anxious about the quality that I was debating withdrawing from the event entirely. Fortunately I had also communicated with the Dungeon Fest coordinators that I was bringing a board and wasn't about to go back on my word, so I drove to Calgary with it and entered the tournament.
Here's the board in the hall. Second photo has a scale model in the tower (the black box is to protect the privacy of a couple attendees):
It's a 3x3 board, smaller than the standard 4x4 which seems to be Mordheim tourney standard. It's entirely scratchbuilt, and the constructions that I completed I'm happy with. But like I said, there were a LOT of cut corners on the board, and a lot of things I consider very low quality by my own standards. The most egregious things were the building interior floors, which I planned to be all wooden but instead scribed tiles into (and VERY poorly, I may add), and the paintjob, which was just an overbrush over the brown sea/basecoat and a brown wash (not even a drybrush - I didn't have time!). I sealed and painted it the day before I had to head to Calgary and worked on it until there was no time left, the paint was still wet when I loaded it into the car.
So I hated the quality of the board and was very self conscious about it, but pushed it to the back of my mind when the tournament proper started. It was a 3 round Swiss tournament, and there's a brief batrep in the spoiler if anyone is interested in how the matches went.
Spoiler:
I brought my Ostermark Reclaimers Mercenary warband (running as Reiklanders).
Round 1: My opponent, Alem, brought the core Undead warband. He was a lovely guy, and a Mordheim veteran who knew the rules front to back, which was helpful as I hadn't played in a few months. Unfortunately for me, as a Mordheim vet, Alem knew what he was doing. We played the Breakthrough scenario, in which my Mercs started on one table edge and had to get 2 models to the other side in order to win, and Alem could place his models anywhere on the board at least 10" away from mine. Alem played masterfully, hiding in cover and closing the gap against my ranged-focused warband. We had a slap fight for a couple rounds, then the Vampire and his ghouls wiped out about half my warband in a single turn. At that point I voluntarily routed without taking out a single of Alem's models, despite the house rule which awards extra exp for sticking the match out until a forced rout. In the post-game, my two expensive Swordsmen henchmen died, and one of my Youngblood heroes lost an arm (a meal for the Ghoul he fought against!). Instead of rebuying the swordsmen, I took a Dwarf Slayer as a Hired Sword.
Round 2: In this round, my opponent was Graeme, who was from BC and was fairly new to Mordheim. He was playing the Restless Undead warband, which is a warband I'm not terribly familiar with. We played the Defend the Find scenario, in which my warband had to defend a 6" bubble around a central building, and whoever had more models within the bubble when one of the warbands routed would win the match. I set up my ranged warband with good vantage points around the building, while Graeme started his warband in cover. I got some lucky kills with the Blunderbuss, and a magically-hastened skeleton who got into melee was quickly dispatched, forcing Graeme to begin taking rout tests, and unfortunately he failed the very first rout test and lost the game. We did our post-game rolls but continued playing for fun. Once Graeme got his undead in, the match became much more evenly matched, and I had one of my Champions die when his rifle misfired and blew up in his face. Graeme was very gracious, and it was a real shame the match ended so quickly, but that's Mordheim. In the post game, I hired a Bounty Hunter hired sword.
Round 3: I got to play on my own board for this round and played against Desmand, another Mordheim veteran who played Lizardmen. I had never played Lizardmen before so was excited to see what they were like (spoiler: they're tough). One thing that was fun is Skinks are semi-aquatic and can move through water features (while hiding), which Desmand and myself were tickled about because it meant the canal on the board could be utilized. We played the Skirmish scenario, which is just a straight punch-up. Desmand played masterfully, utilizing the terrain against my ranged attacks, and using his Skinks to erupt out of the water to ambush my fighters. I once again had several gun misfires, but thankfully no deaths, though my one henchman's gun was destroyed. Though not as bad as the first match, it was still incredibly one-sided. The time ran out before I routed so it was technically a draw, but me and Desmand both knew he was the clear victor. In the post-game the Slayer died, but everyone else survived.
All in all it was a lot of fun, everyone there was lovely, and I'm looking forward to next year.
After the tournament there were awards given to the participants, and I won the Best Board for the event. While I feel very honoured and grateful, I'm still surprised because there were many more highly polished boards there, but I guess I'm my own worst critic.
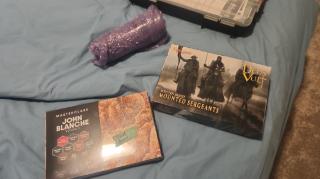
Prizes were a Fireforge Games Deus Vult kit, a glass from a local brewery, and one of the John Blanche Army Painter sets, which I was very happy with because I was planning on purchasing them at some point anyways.
I wish I could say that I learned a lesson about being too critical with myself, but in my mind the board is incomplete. I have a LOT more that I want to do with it. I'll be working on it again to get it up to the standard I want for Dungeon Fest 2026. I'll take some proper pictures of the board (with models too!) when I get it finished.
---
As I said above, I have updates to all the other things I've been working on but just haven't gotten around to taking proper photos of. I'll get to them, eventually...
This message was edited 1 time. Last update was at 2025/09/03 20:59:26


 Finished Forge World Elysian Army
  Finished Tau Sept Cadre
  Alaitoc Eldar Warhost
  Finished Order of Our Martyred Lady - Sisters of Battle
  Finished Necromundian Imperial Guard Regiment


 off. Your comment was nicer