| Author |
Message |
 |
|
|
|
|
Advert
|
Forum adverts like this one are shown to any user who is not logged in. Join us by filling out a tiny 3 field form and you will get your own, free, dakka user account which gives a good range of benefits to you:
- No adverts like this in the forums anymore.
- Times and dates in your local timezone.
- Full tracking of what you have read so you can skip to your first unread post, easily see what has changed since you last logged in, and easily see what is new at a glance.
- Email notifications for threads you want to watch closely.
- Being a part of the oldest wargaming community on the net.
If you are already a member then feel free to login now. |
|
 |
2021/01/16 03:59:36
Subject: Re:Thumpingbear does Mordheim: 08/01/21 - Culverhouse PIP, Mercenary Warband WIP
|
|

Confident Halberdier
|
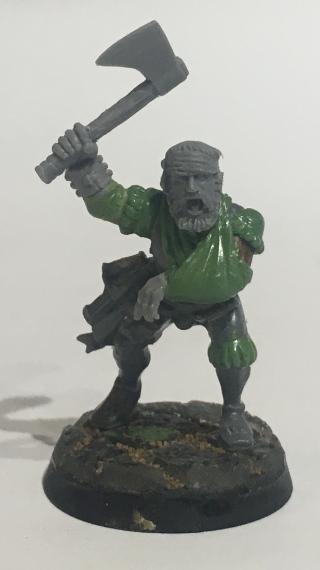
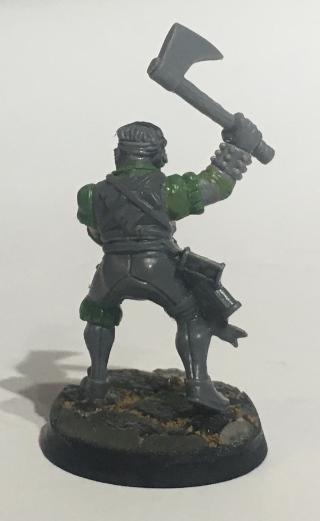
@Viterbi: thanks man! Yeah sometimes you just have cursed minis in a campaign that are useless, i feel ya.
Funnily enough, the axe is the non-negotiable part of the model  I don’t have any models with an axe, so I needed to put one in there. You are right about the hammer and stake though, that would’ve been the best fit. I decided to take it in a pretty different direction though.
@Monsterzonk: thank you! Pragmatism is a tenet I try to live by, a very nice compliment.
Some updates:
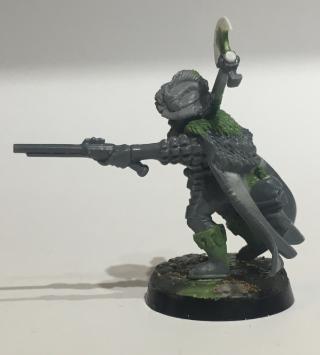
Made The Spearman
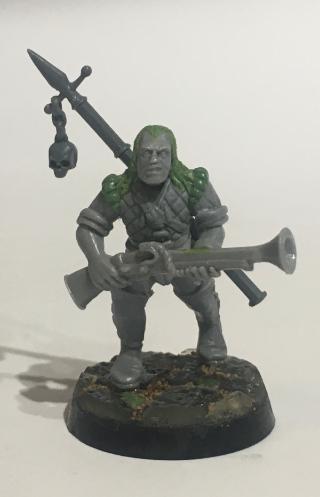 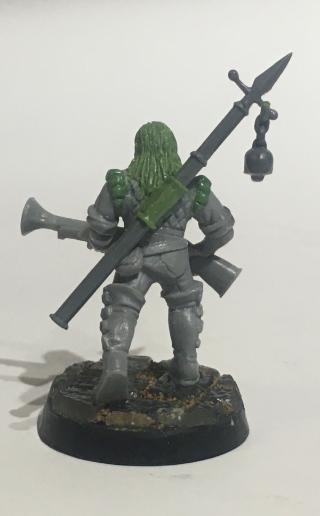
I wanted a guy with long hair, so here’s my attempt. It was my first time doing hair, I think it came out pretty good. It’s not perfectly smooth, I could’ve gotten to that point if I worked a little longer at it. I was working on multiple sculpts at the time though, so whatever. Dude definitely has a mean look to him though, I’m pretty happy.
Next up is the Meh mini. Viterbi’s suggestion made me realize the stake hand was not going to work with the axe, so I removed the stake. I also switched the head. I’ve had an idea floating around for a mini and decided make that vision.
Here’s the Meh mini, now The Patient:
Much happier with this guy now. The idea of him going out treasure hunting with a broken arm gives an air of desperation and toughness to the model. I think might sculpt some taller boots on him too, not sure yet.
Also, need opinions again: I’m debating putting a shield on his sling arm. Here’s a pic of the mock-up:
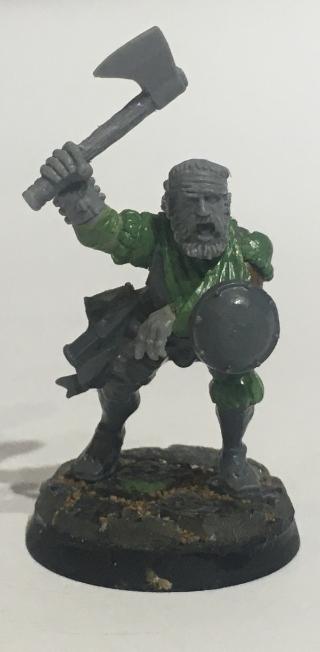
I’m a bit worried that the sling will be covered up too much. I’d love input on it.
The Culverhouse is coming along, next post will have an update on that. Tbh I’m focusing more on the Warband right now, I’m having fun challenging myself with the sculpting.
More updates soonish.
|
|
|
|
 |
|
2021/01/16 07:49:20
Subject: Thumpingbear does Mordheim: 15/01/21 - Culverhouse PIP, Mercenary Warband WIP
|
|

Longtime Dakkanaut
|
Love the long hair on spearman and it works better, if it's not too smooth. Man is walking through grime the whole time, so it stands to reason it is cared for very well.
Great work on the patient, the mini now looks great, amazing work with the sling. I would omit the shield, because the guy is running into Mordheim with a broken arm and a head bandage, he doesn't need a shield
|
|
|
|
|
2021/01/16 21:36:24
Subject: Thumpingbear does Mordheim: 15/01/21 - Culverhouse PIP, Mercenary Warband WIP
|
|

Painting Within the Lines
|
Absolutely love these models. You've given them so much character with your posing and greenstuff work. Looking forward to seeing them painted.
And I'd say a definite NO on the shield - that sling oozes Mordheim and doing anything to obscure it would be virtually criminal.
|
|
|
|
|
2021/01/17 08:20:36
Subject: Re:Thumpingbear does Mordheim: 15/01/21 - Culverhouse PIP, Mercenary Warband WIP
|
|

Sinewy Scourge
|
Amazing greenstuff work there mate! Really gives some character to the minis.
The hair is really good and fits the guy perfectly!
Looking forward to that glamour shot from the buildings, if you are still thinking about doing that! 
|
|
|
|
|
|
2021/01/17 14:19:07
Subject: Thumpingbear does Mordheim: 15/01/21 - Culverhouse PIP, Mercenary Warband WIP
|
|
Grisly Ghost Ark Driver
|
Agreed, don't hide the sling with the shield! The more noticeable the sling is (accentuate it with the paint job; like maybe the sling is made with a scavenged flag) the better!
|
|
|
|
|
|
2021/01/20 03:10:16
Subject: Thumpingbear does Mordheim: 15/01/21 - Culverhouse PIP, Mercenary Warband WIP
|
|

Ragin' Ork Dreadnought
|
Also, I’m not sure how effective a shield is going to be on a broken arm. I also agree to leave it off. Could always put it on his back.
|
|
|
|
|
|
2021/01/20 03:49:03
Subject: Thumpingbear does Mordheim: 15/01/21 - Culverhouse PIP, Mercenary Warband WIP
|
|
Morphing Obliterator
|
Ah mordheim - I have a bunch of plastic mordheim models that my kids painted. maybe I should dig them out....
(these are sweet looking conversions too!)
|
|
|
|
|
2021/02/07 06:58:11
Subject: Re:Thumpingbear does Mordheim: 15/01/21 - Culverhouse PIP, Mercenary Warband WIP
|
|
Confident Halberdier
|
Thank you for your input and kind words everyone, I left the buckler off of The Patient.
@Ezki: the glamour shots will come eventually, I think I’ll do it after I finish the Culverhouse. I don’t have a large enough lightbox to fit any terrain pieces in, so I have to jerry-rig a lighting system. It’s a real pain to set up and I’d prefer just to do all the shots at once. So yup, eventually!
@Gwyn: a salvaged flag sling is SUCH a good idea, I’ll see if I can pull it off. Need something that looks interesting but not distracting.
@darkkt: do it! Mordheim needs more love on this forum.
Some updates:
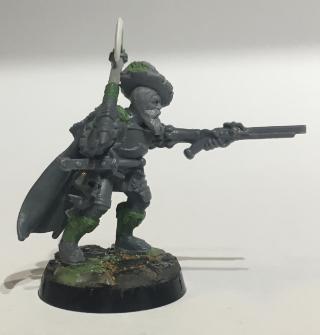
Made a scope for the Nuln Gunner.
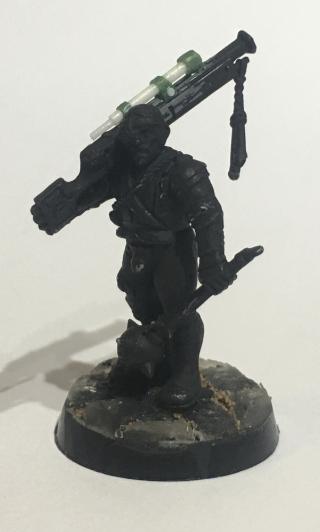 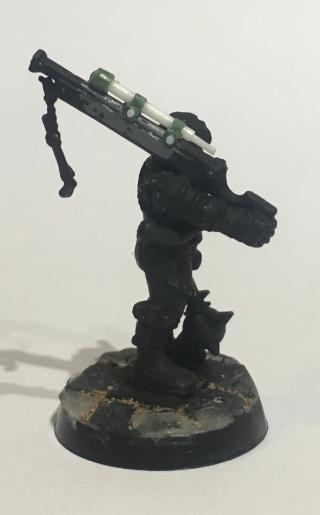
Made with green stuff and plastic tubing. I’ve also started priming the models and will start painting as soon as I’m done building the rest of the models.
Speaking of which, here’s The Captain of the Warband:
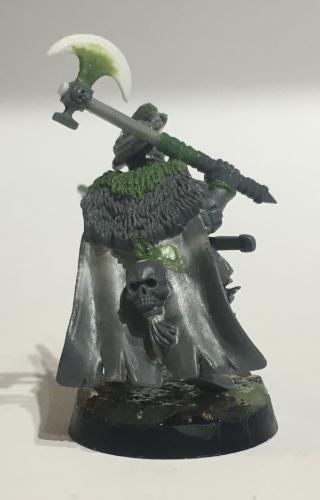 
Made him have the most unique markers of rank with a full cape, pistol, and feather in his cap. I’m particularly happy with his 2 handed axe, i think it looks very imposing. The tassels on the boots were also fun to sculpt.
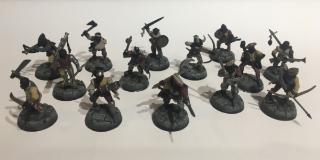
So that makes 15 members, the max amount for a Mercenary Warband. However, I’m unhappy with The Templar model as I think he’s too menacing and doesn’t fit with the rest of the models. So I’ve reserved that model for other use in the future - I’m pretty sure you can get a Witch Hunter hired sword...
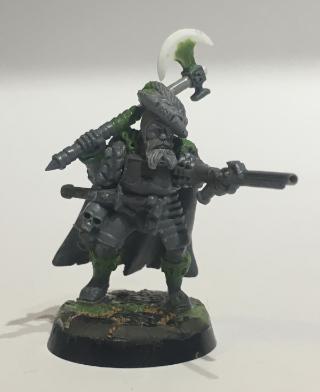
One thing that I want to do with this Warband in a campaign is get a Warlock Hired Sword for some sweet n’ tasty magic. Casters can be pretty devastating in Mordheim, and are always fun to play with. So here’s Cassander, the Mad Mage of Mordheim:
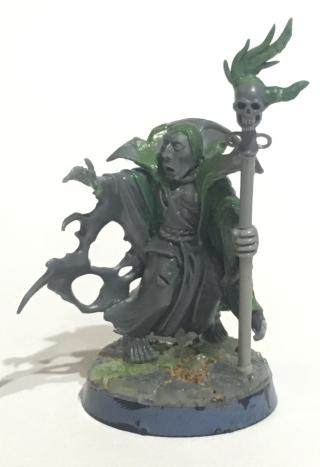 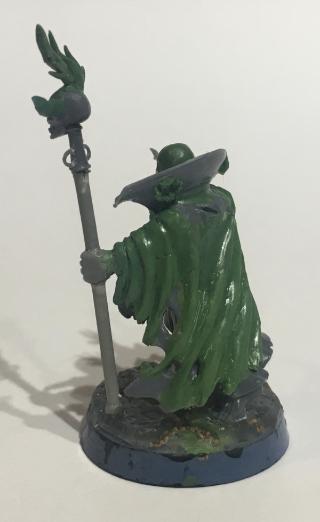
Made with a flagellant body, arms from the Vampire Corpse Cart, head from the Zombie kit, and the collar from a High elf torso. He’s still a WIP, I need to do some tidying and finish the flames on his skull staff, burning endlessly in the shape of the twin tailed comet of Sigmar. The head was a bit difficult to get right, as the zombie heads are ridiculously out of scale and I needed that dazed, confused look on his face - it looks a little weird but not terribly so. I tried to model him as a Celestial Wizard, I’m missing some astrological imagery but i think I’ll be able to freehand some on. I’m coming up with some fluff for him too which I’ll post eventually - as Cassander is the male equivalent of Cassandra, you may already have an idea of what the fluff is. Quite proud of this one.
More updates soonish.
|
|
|
|
|
|
2021/02/07 09:48:17
Subject: Thumpingbear does Mordheim: 06/02/21 - Mercenary Captain WIP, Warlock Hired Sword WIP
|
|

Ancient Venerable Dreadnought
|
Wow! Great work on these Mordheim conversions, the mage is a particular work of art. They’re going to look immense crawling all over your terrain pieces
|
Goberts Gubbins - P&M Blog, started with Oldhammer, often Blackstone Fortress and Void Panther Marines, with side projects along the way |
|
|
|
|
2021/02/07 14:50:37
Subject: Thumpingbear does Mordheim: 06/02/21 - Mercenary Captain WIP, Warlock Hired Sword WIP
|
|
Longtime Dakkanaut
|
Very cool update, captain is an amazing kitbash and the mage is already shaping up nicely!
|
|
|
|
|
2021/02/08 21:16:09
Subject: Thumpingbear does Mordheim: 06/02/21 - Mercenary Captain WIP, Warlock Hired Sword WIP
|
|
Fixture of Dakka
|
Nice greenstuff work Thumpingbear.
Cheers,
CB
|
|
|
|
|
|
2021/02/17 23:04:23
Subject: Re:Thumpingbear does Mordheim: 06/02/21 - Mercenary Captain WIP, Warlock Hired Sword WIP
|
|
Confident Halberdier
|
@gobert: thanks, I’m looking forward to getting everything painted and doing some batreps. Gotta convince my buddies to paint their models though...
@Viterbi: thankee, I realized after I made the captain that I ripped the pose off of an oop empire general model. Still, very pleased with him.
@Captain Brown: thanks man. It’s been fun improving my sculpting technique with these guys.
A quick update:
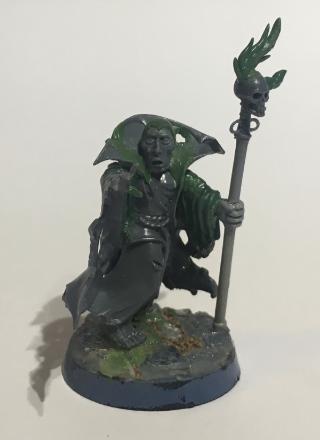
Cassander the warlock Hired Sword is finished:
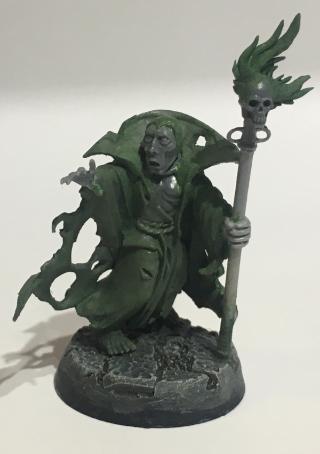
Layered the flames on his skull staff, and gave his robes and feet a quick layer of liquid green stuff to give em a rough texture. Will be painting him at a later date.
I’ve also started basing the rest of the Warband:
One thing I love about Empire armies is the unified yet chaotic approach to their colours. Everything should generally share the same colour scheme, but expressed in different ways. I’ve taken that approach to the Warband, with each model having the yellow and purple fabrics of Ostermark on them somewhere, accompanied by black and brown leather, and off-white cloth. They’re still early stage but I already dig their vibrancy.
I’ve burnt myself out a bit on the basing though, and have been putting work into the Culverhouse:
Since the last update I’ve finished the stone and wood, and I just finished basing the main blue for the shingles. I’ll be continuing the roof by picking out random shingles with lighter and darker blue tones, washing it all with a brown, and highlighting with drybrushes of creamy greys. I’m aiming to have the building done by next week.
More updates soonish
|
|
|
|
|
|
2021/02/24 20:46:14
Subject: Re:Thumpingbear does Mordheim: 17/02/21 - Mercenary Warband PIP, Culverhouse PIP
|
|
Confident Halberdier
|
Some updates:
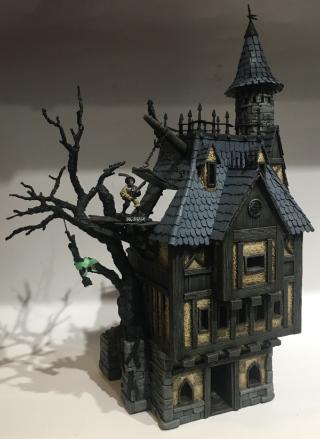
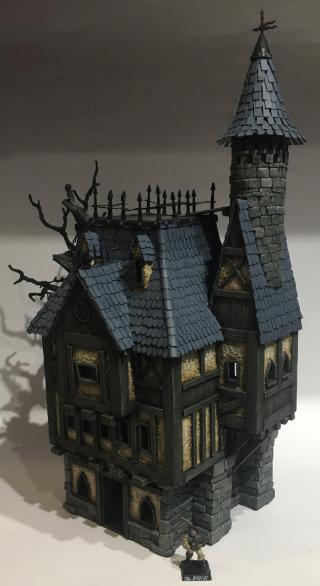
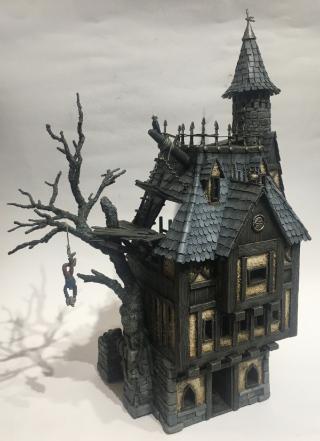
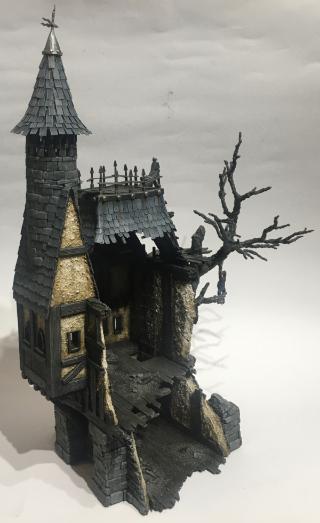
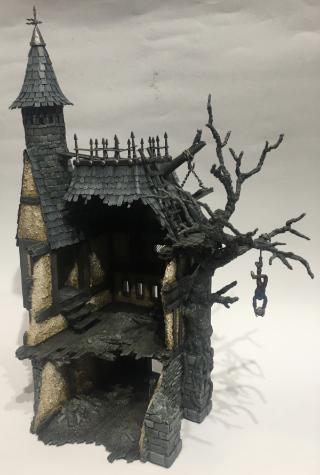
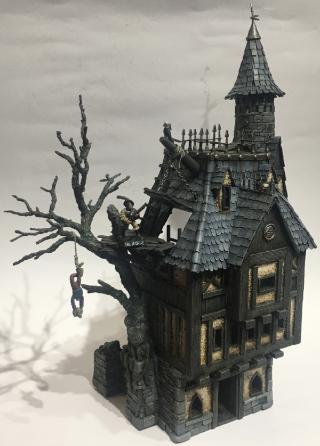
I finished the Culverhouse over the weekend, but didn’t have time to take photos and post until today. Here’s the finished product:
 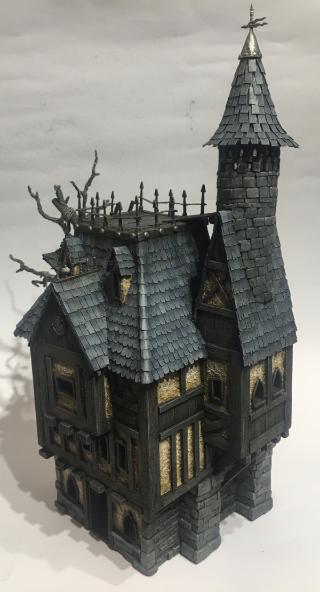
I tried a new painting method on the roof tiles to increase contrast - not much of a change, just an extra wash and more selective dry brushing. I’m happy with the result.
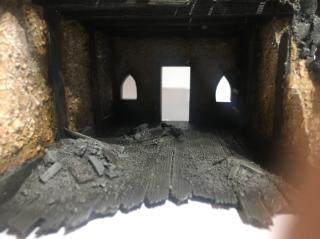 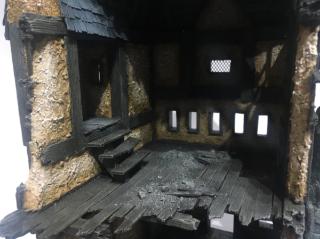
Views of the interior. Forgive the darkness, it’s difficult to get a good photo of the interior. Also forgive my thumb in the ground floor pic. 
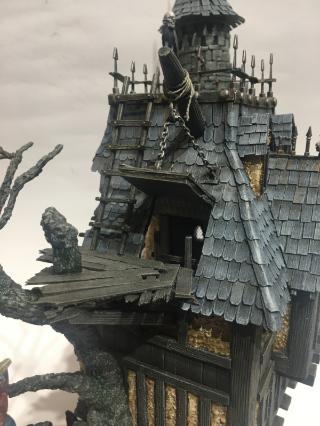 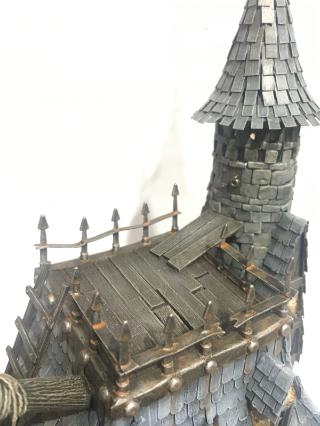
Here’s some shots showing the path to the roof from the ground floor: the long ladder with access to the second floor and roof hatch, the tree platform from the roof hatch, ending on the roof. I’m excited to use this piece in a game as more than an inaccessible sniper platform.
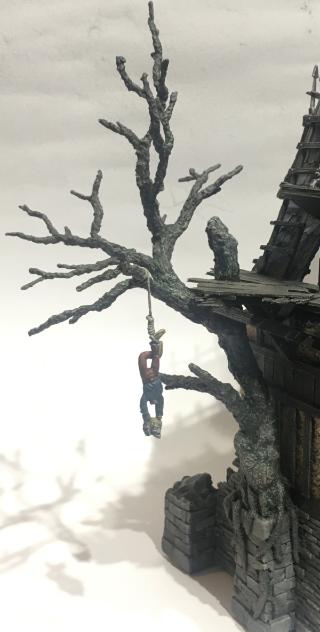
Here’s the tree painted up. It was painted with a brownish grey, with more white added in multiple dry brushing layers, a thinned brown wash, and a green wash in selective areas. I’m not entirely happy with it, I think a black/brown wash would have been better, and the green needed thinning. Other than that though, I’ll give it a “good enough”.
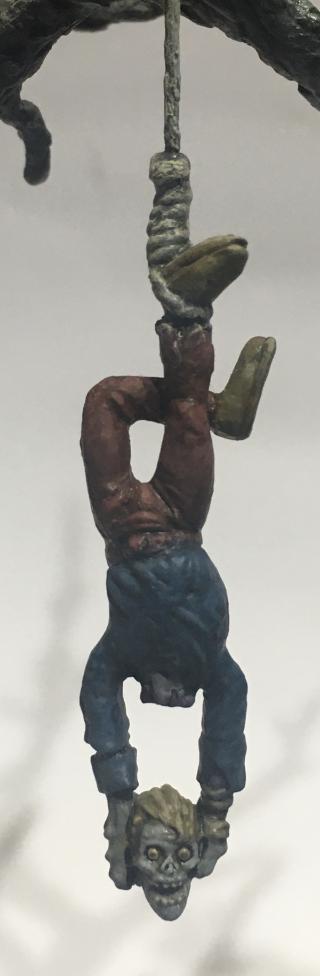
The Hanging Man came out decently. I was matching his colours to the depictions on tarot cards. The pants are a bit too vivid compared to the rest of the building, but overall it’s good.
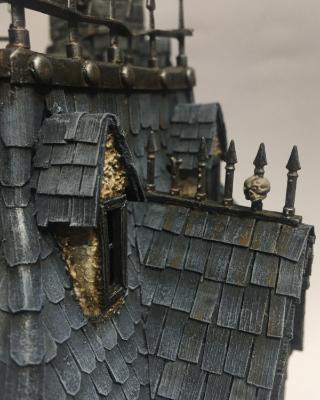
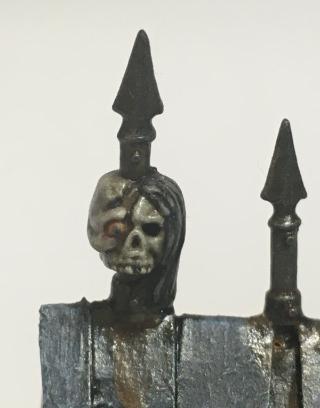
The spikes and skull on the gable.
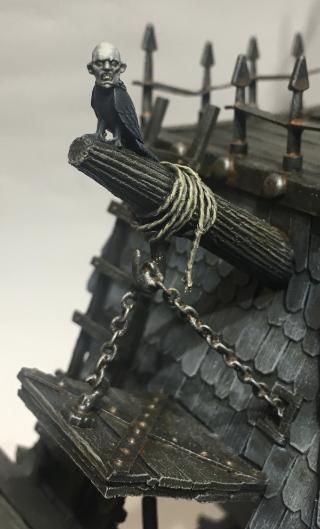
The roof hatch and mutant bird. I’m very happy with the mutant bird, he was painted with blues, browns, and greys that match the roof, so he blends in nicely while still being bright enough to be distinct. He just looks like such a vile little creature, I adore him.
And here’s the obligatory shot with Mr Scale:
A while ago I said I’d do some shots of the scatter terrain I’ve made so far. So here we go:
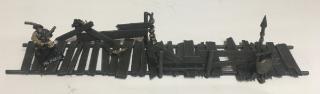
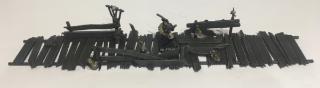
First up the bridges:
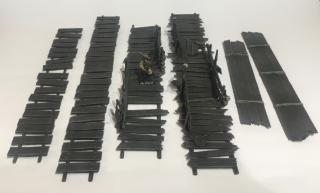
The large ones (12” and 10”) are made from bamboo skewers and popsicle sticks, while the smaller (6.5” and 8.5”) are balsa and leather working thread for the rope. The bridges with the walls also have a bunch of random bits thrown on, which you can see in more detail:

Next up are the Crates n’ Barrels:
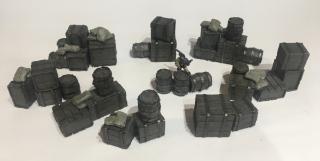
Crates are made from blocks of wood covered in coffee stirrer sticks and cardboard strips. Barrels are entirely paper, I made them a few years back so I can’t quite remember the exacts of it. It was a modified version of Bugbait_nz’s method of making barrels somewhere in his thread over on Warseer. The grain bags are Milliput, they were repurposed from a bunch of sandbags I had previously made.
My skill in making terrain is much higher now than when I made these, but they’re still pretty okay. I do like the haphazard way they’re glued together, they look fairly natural in any organization they’re put in - separate like in the first pic, or in a defensive ring:
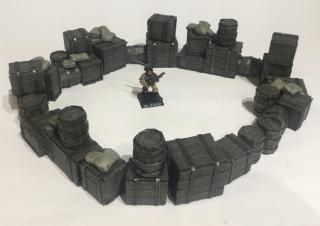
Or just jumbled together:
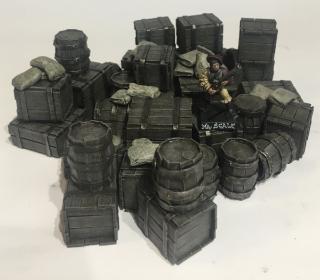
The crates and barrels are mostly under 1” in height, so models can move over them without penalty while still getting cover bonus.
Next up is my favourite terrain piece: The Hero Pig Statue.
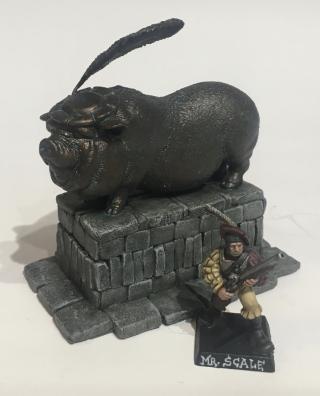 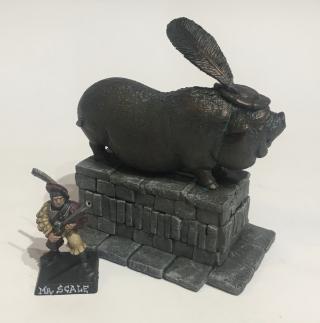 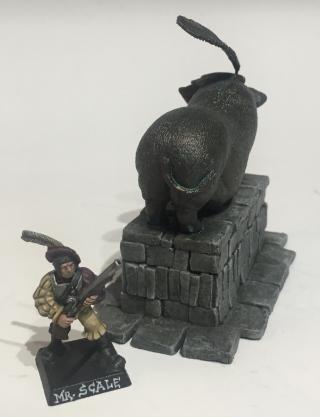
Made from a sow toy, and a green stuffed hat and feather. This pig heroically saved Mordheims nobility from starvation during a siege of the city. It’s just a goofy little piece.
Next up are some more traditional statues:
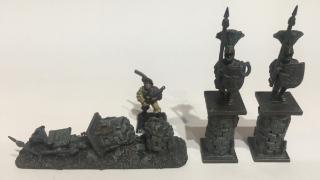 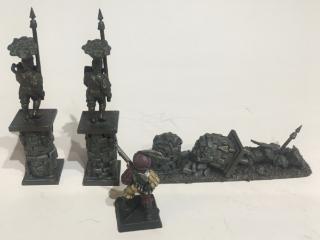
Made from dowels and some old Empire spearmen. The upright statues are actually pretty useless as far as gameplay utility goes, but they add a little bit of detail to the board.
Next up are some urban barricades:
 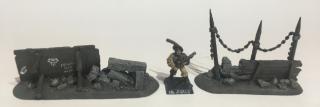
Made from a bunch of different items. These are higher than 1”, so these are hard barricades in-game.
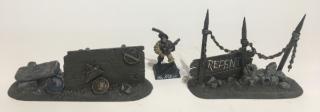
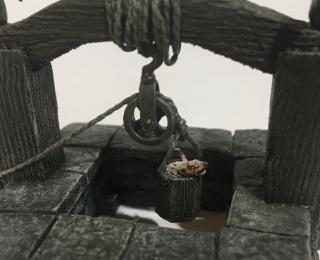
Next are the wells:
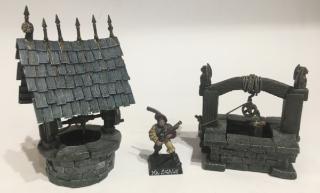
These are some of the first pieces I painted, did a lot of experimentation to get the look I wanted.
Some detail shots of the roofed one. The turning wheel was entirely scratchbuilt from plasticard, and the bucket was made from a mechanical pencil tube.
 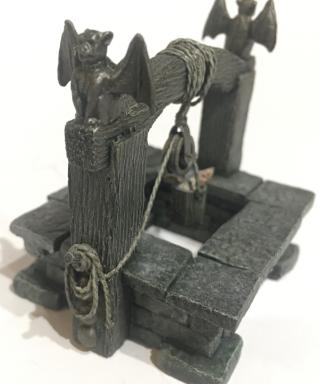
And some details of the unroofed one. The pulley was also scratchbuilt from plasticard, a really unnecessary bit of effort i put into the piece. The gargoyle bits are from one of the Pegasus Gothic kits. The backs had a tab to fit into the walls of that kit, so I had to clip them and sculpt the back on, including the butt cheeks. Exhilarating stuff.
Finally, I did a quick setup of a board with the finished terrain:
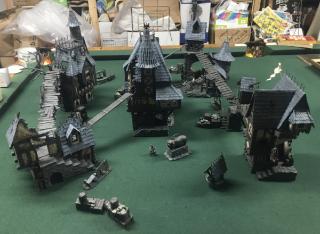  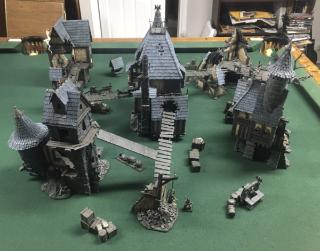 
Currently it fills a rough 3’x3’ board, which isn’t quite big enough for the 4’x4’ Mordheim recommends. This isn’t all the terrain I currently have, it’s just the painted stuff - i don’t have the unpainted stuff on because I’m unhappy with them and will be redoing them all, and also I didn’t feel like taking more pics today. I also wish I had a fully painted Warband to spread out over the board for some sweet diorama shots, but c’est la vie.
Whew! Update over. I’ll be focusing on the Merc Warband for the immediate future, then I’ve got some ideas for more terrain in the works.
More updates soonish.
|
|
This message was edited 1 time. Last update was at 2021/02/24 20:51:44
|
|
|
|
|
2021/02/24 21:23:44
Subject: Thumpingbear does Mordheim: 24/02/2021 - Culverhouse Showcase, Scatter Terrain Showcase
|
|
Ragin' Ork Dreadnought
Deep in the Outer Boroughs of NYC
|
Fantastic terrain. I love how enthusiastic that hanging zombie seems to be.
|
|
|
|
|
|
2021/02/25 00:32:35
Subject: Thumpingbear does Mordheim: 24/02/2021 - Culverhouse Showcase, Scatter Terrain Showcase
|
|
Preacher of the Emperor
|
Excellent work, Thumpingbear! I knew watching the individual pieces come together that the total effect would be excellent, and I'm not disappointed. Will you build and texture a tabletop, use neoprene, or something else?
|
|
|
|
|
|
2021/02/25 09:02:56
Subject: Thumpingbear does Mordheim: 24/02/2021 - Culverhouse Showcase, Scatter Terrain Showcase
|
|

Potent Possessed Daemonvessel
|
Truly magnificent !
|
|
|
|
|
|
2021/02/25 14:18:20
Subject: Thumpingbear does Mordheim: 24/02/2021 - Culverhouse Showcase, Scatter Terrain Showcase
|
|
Grisly Ghost Ark Driver
|
Magnificent town! Very gothic.
|
|
|
|
|
|
2021/02/25 15:19:17
Subject: Thumpingbear does Mordheim: 24/02/2021 - Culverhouse Showcase, Scatter Terrain Showcase
|
|
Shrieking Guardian Jetbiker
|
Brilliant, both the dusky atmosphere in general and the weird details like the mutant bird & the Hero Pig. Must be extra fun to play with terrain that tells this kind of little stories!
|
~~~ I Love The Power Glove. It's So Bad. ~~~ |
|
|
|
|
2021/02/28 07:29:39
Subject: Re:Thumpingbear does Mordheim: 24/02/2021 - Culverhouse Showcase, Scatter Terrain Showcase
|
|
Longtime Dakkanaut
|
What an update post  Finished culver house looks so great, like it escaped an early Burton movie. Love the setup of the whole board and the pig statue. Currently watching Disenchantment, so was instantly thinking of Merkimer, when I saw that statue
|
|
|
|
|
2021/02/28 14:32:29
Subject: Thumpingbear does Mordheim: 24/02/2021 - Culverhouse Showcase, Scatter Terrain Showcase
|
|
Crushing Black Templar Crusader Pilot
|
A great update, and some cracking terrain and conversions to pore over for inspiration.
Terrain is gorgeous, and really excited to see your chaps up and running around them!
Thanks for sharing
|
  
Relapse wrote:
Baron, don't forget to talk about the SEALs and Marines you habitually beat up on 2 and 3 at a time, as you PM'd me about.
|
|
|
|
|
2021/04/28 17:27:53
Subject: Re:Thumpingbear does Mordheim: 24/02/2021 - Culverhouse Showcase, Scatter Terrain Showcase
|
|
Confident Halberdier
|
@Warboss_Waaazag: Thanks. Yup, the zombie is stoked to see some bloodsport on the streets of Mordheim!
@MacPhail: Thank you, I plan to build 2x2 ft board tiles in the future. I've recently discovered MSTerrainLab's Youtube channel, he's doing a series on building Mordheim board tiles, it's given me tons of inspiration.
@KernelTerror: Thank you very much man!
@Gwyn chan 'r Gwyll: Thanks! Gothic is what I'm going for!
@MobileSuitRandom: Thank you. I remember reading an article on Dakka that I now can't find that was about incorporating narrative into your terrain. I thought it was cool, so I try to do it as much as I can.
@Viterbi: Thanks man! Good thing you qualified an "early" Burton movie, or else I'd be insulted . Haven't watched Disenchanted yet, I've been meaning to but just haven't gotten around to it. Hopefully soon!
@IGtR=: Thank you very much. I'm also looking forward to the day I can do some in-game shots. I really want to do some campaign bat-reps after reading Thor665's incredible Pyres of Petod campaign. Gaming is fun, and telling stories at the same time is even more fun!
Some updates:
Haven't done much hobby stuff in a while, it's been a rough few months and I've lost a lot of drive for most things, including the hobby. Seasonal depression is a problem on my Dad's side of the family and I was not exempt. Merc warband is still in the works, not sure when I'll finish it. In the meantime I wanted to share this statue I finished a while ago and decided to photograph today:
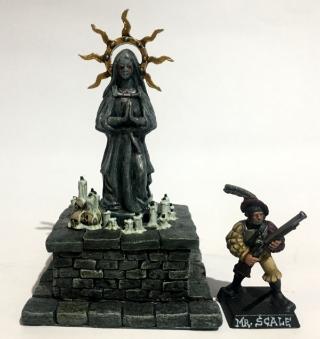 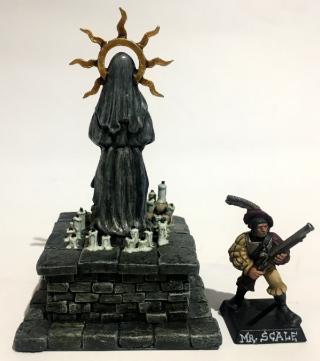
This is the statue of the Nameless Saint. The holiness of the saint spared her image from the destruction that visited Mordheim. Recently the statue has begun to weep blood - is it a sign from the Saint, or indicative of the insidious Chaos infection that permeates the city?
Base and bricks are foam, statue is a little dollhouse piece from Michaels. The halo is plasticard, and the candles are plasticard tubes with a wire wick, with candlewax buildup made from PVA mixed with plaster powder, built up in multiple layers for a nice dripping effect.
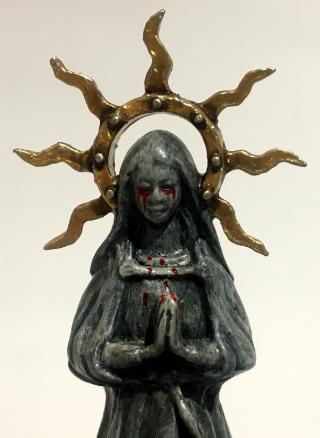 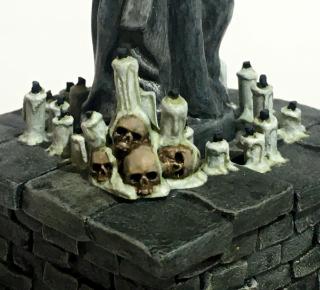
A couple closeups of the blood tears and the skull pile + candles. As you can see, the skull pile floats a bit above the tiles, but it's not noticeable from afar so I'm not worried about it.
That's it, just a small update. Hopefully I'll be able to start working soon and get some more drive for the hobby. More updates soonish 
|
|
|
|
|
|
2021/04/29 10:01:38
Subject: Thumpingbear does Mordheim: 28/04/21 - Nameless Saint Statue Showcase
|
|
Shrieking Guardian Jetbiker
|
Very atmospheric, again! And thanks for writing up the DIY candles process, this might come in handy ^^
|
~~~ I Love The Power Glove. It's So Bad. ~~~ |
|
|
|
|
2021/05/02 06:43:15
Subject: Re:Thumpingbear does Mordheim: 28/04/21 - Nameless Saint Statue Showcase
|
|
Longtime Dakkanaut
|
Now that's a proper statue for the streets of Mordheim. Love the story behind her and great scratchbuild!
|
|
|
|
|
2021/05/05 01:58:50
Subject: Thumpingbear does Mordheim: 28/04/21 - Nameless Saint Statue Showcase
|
|
Fixture of Dakka
|
Great stuff Thumpingbear.
Exalted.
Cheers,
CB
|
|
|
|
|
|
2021/05/05 14:35:51
Subject: Thumpingbear does Mordheim: 28/04/21 - Nameless Saint Statue Showcase
|
|
Calculating Commissar
|
Not sure how I missed this, but fantastic work throughout! The statues are great, I'm especially loving Hero Pig!
|
|
|
|
|
|
2021/05/26 19:35:38
Subject: Re:Thumpingbear does Mordheim: 28/04/21 - Nameless Saint Statue Showcase
|
|
Confident Halberdier
|
@MobileSuitRandom: Thanks, hope you find some use with the candles! Just remember to do multiple layers with the glue, and go slowly with it.
@Viterbi: Thanks my dude.
@Captain Brown: Very kind of you, thanks man.
@endtransmission: Thanks, glad you stopped by. Hero Pig's my favourite too, I've got a couple more ideas along the same vein I'll be building in the future.
Some updates:
A confession: I don't like painting minis. I like building/creating them, and I tolerate painting terrain, but mini painting doesn't do it for me. Might be an anxiety thing, I feel there's a lot of pressure in painting in that scale, especially if you screw up and have to redo multiple steps to try again. Regardless, this was a roundabout way to say the Merc warband is still a WIP.
To avoid the judgmental stares of the unpainted minis on my desk, I've started a new summer project: building terrain tiles.
Recently I've been enamoured with MSTerrainLab's excellent Tower Board build series and decided to try my hand at it, using his videos of the construction as a rough guide. It's been a learning process, to say the least.
To start, I bought enough 2x1s to build 4 2x2' boards. I quickly learned that 2x1 is a ratio, and not a measurement: the lumber measured to 1.5x.75". This was annoying because I had specifically wanted 2" in height to match a bunch of 2" XPS foam I received from a family member from their house construction. No matter though, I thought, and picked up some cheap 1.5" EPS foam to bulk out the tiles (more on this later).
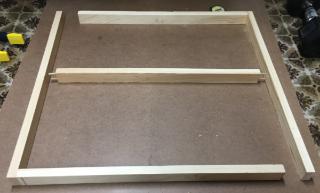
Anyways, the 2x1s were cut into x2 23.625" and x3 22.125" segments, which were dowelled and glued into place. This leaves a 3/16" gap on each end that will be covered with hardboard at the end of the build to protect the foam as it's build up.
After the frames were glued, I glued and screwed them onto 2x2" plywood with a thickness of .5". This was a mistake because the boards, while incredibly sturdy, are now also pretty damned heavy. Lesson learned for the future: use thinner boards for the bottom.
The results of this: 4 2x2" frames that fit together pretty well!
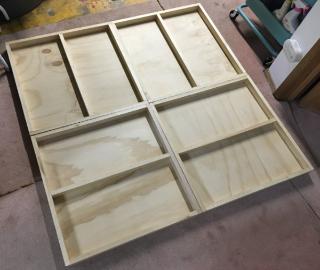
The next task was putting in the EPS foam:
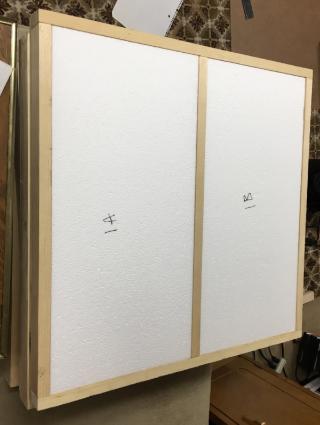
This is where I ran into my next problem. As you can see in the picture, there is a slight gap between the foam and the frame. At first I thought the lumber the frame was cut from had inconsistent height and would have to plane it down, but then I measured the foam: The foam labelled as 1.5" was actually 1 & 3/8". I'm quickly learning that I have to bring a tape measure and measure everything in store when I make purchases, which is some  .
Anyways, I used acrylic caulking to fill the gap and glue the foam in place.
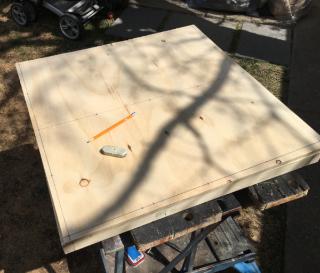
With the boards built, I made some plans on some 12x12 grids. The things I wanted from the board were 1) a canal system and 2) built-in platforms. As I planned, I realized I couldn't have one without the other while still being highly modular, so I'm settling for just a canal system. Anyways, here are the plans:
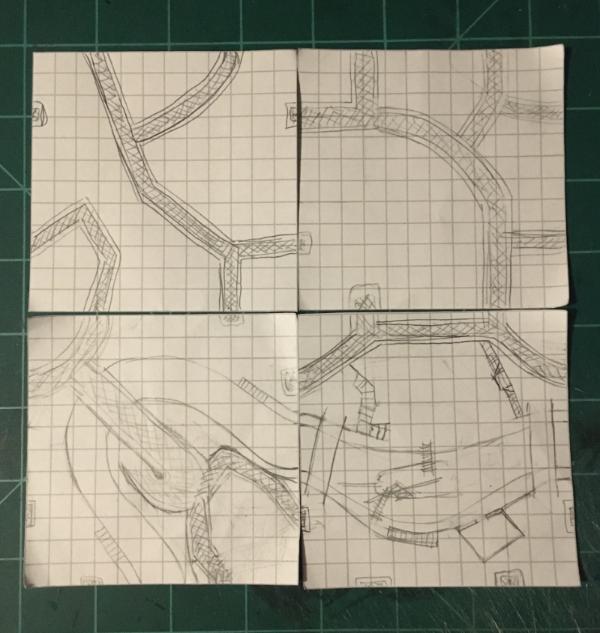
The crosshatched areas are roads, the winding thing is the canal. It may be hard to make out, but there are outlined areas near the canal which are walkways running alongside them, which will be at a lower level than the majority of the board, with stairways leading up and down them. I also put the sunken bow of a ship in the canal as a makeshift bridge - talking to one of my friends I play with, he made a great suggestion of having the mast and crows nest be in place too for a sniper nest, which I am all for. The roads all are connected at the 5" mark, so they all line up very well. Goes without saying you can rotate the pieces and they fit together in all positions.
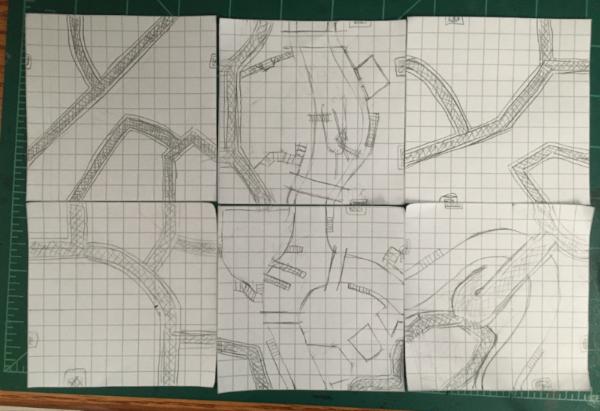
The 4 tiles are just the initial plan. I want to extend the board to the full 4x6' table, which I also made plans for:
So this is where I'm at. Still very early stages, it will take time to make lots of progress on this. I recently got an interview with an archaeological consulting company, which I hope I did well enough on to get hired on for the season. If that's the case, I won't have much time to work on this over the summer, so I'm gonna try to make as much progress as possible while I still have the time.
More updates soonish.
|
|
|
|
|
|
2021/05/27 10:17:23
Subject: Thumpingbear does Mordheim: 26/05/21: Terrain Tiles WIP
|
|
Ancient Venerable Dreadnought
|
Amazing plans thumpingbear, I can already imagine the details you’re going include on the board. Looking at the last image particularly the bottom two canal tiles, would it work better for modularity to have each canal/road meet the edge of the time at right angles? That way you’ll not have odd angles to try to figure out the correct roadway widths
|
Goberts Gubbins - P&M Blog, started with Oldhammer, often Blackstone Fortress and Void Panther Marines, with side projects along the way |
|
|
|
|
2021/05/27 10:32:23
Subject: Re:Thumpingbear does Mordheim: 26/05/21: Terrain Tiles WIP
|
|
Regular Dakkanaut
|
fantastic, used to make mordheim models using similar methods so i know how much effort goes into every one of those pieces, subscribed look forward to seeing it progress
|
|
|
|
|
2021/05/29 06:25:40
Subject: Re:Thumpingbear does Mordheim: 26/05/21: Terrain Tiles WIP
|
|
Longtime Dakkanaut
|
That looks like a really cool project, excited to see it develop!
|
|
|
|
|
2021/10/30 04:06:25
Subject: Re:Thumpingbear does Mordheim: 26/05/21: Terrain Tiles WIP
|
|
Confident Halberdier
|
@gobert: Thanks man. Yeah, it's not clear from the plans but I intended to leave about 3/4 to 1 inch at each canal join and ~1/2 inch at the roads.
@bobbuilder: Thank you kindly, it's a labour of love for these models.
@Viterbi: Cheers my dude!
I've done sporadic work on both the board tiles and the Mercenary warband, with the Mercs being nearly finished and the tiles being pretty far from finished. I'll make a proper post of both the tiles and the Mercs when I finish off the warband and get a bit more work done on the tiles.
In the meantime, a small update. I was getting a bit burnt out so I painted up this bounty hunter Hired Sword I had made ages ago, now christened as Rabiat the Bounty Hunter:
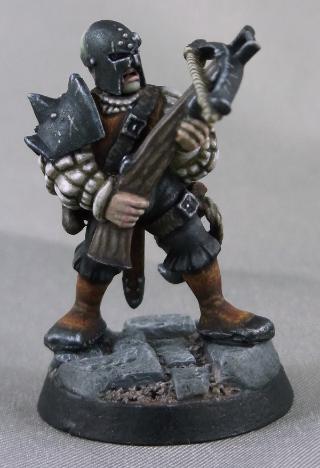 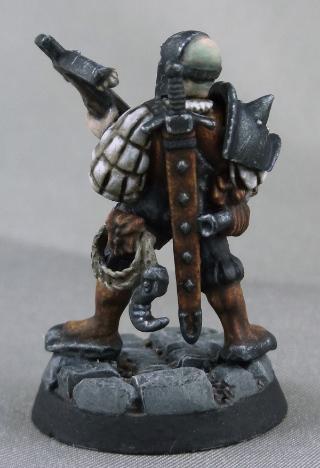
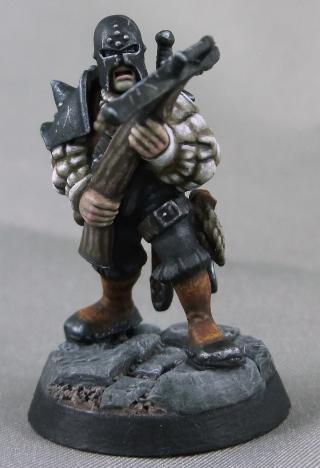 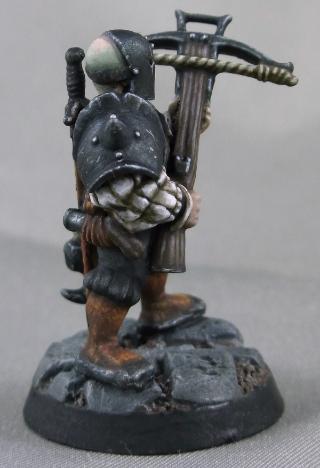
The body is an old Empire soldier holding a rifle which I replaced with a crossbow, a head and shoulder pad from the Chaos Maurader horsemen (I think), and a few other bits. The rope and hook are scratchbuilt from a random hook bit and a metal rope I had made ages ago, and the pistol was a tube, bit of plastic to look like a handle, and a sculpted pouch/holster. The model has nearly everything the Bounty Hunter comes equipped with, save for a lantern because I couldn't figure out a good place to put it.
The colour scheme was based on this artwork which is apparently a Black Library book that I haven't read. Everything was shaded with a wash of Asurman Blue mixed with my homemade washes of black and/or brown, which I think helps unify it. I tried the trick of glazing the skin with a dark turquoise to represent stubble on his chin and bald head (which he shaves - you can see his bald spot), however without the rest of the face for contrast the stubble just looks green. I'll have to plan my paint schemes accordingly in the future. I also feel the reddish brown of the leather is a little too contrasting, especially on the boots. The blackened iron of the helmet and shoulder pad was also a little too heavy on the washes - 1 less would have been optimal.
My self criticism aside, I'm still happy with how Rabiat turned out - a real nasty looking denizen of the ruins of Mordheim. It was nice to plan a paint scheme for a single model and just focus on that, rather than the monotonous batch painting. I may go in later and add a blood spray across his helmet to ramp up his vicious image, but we'll see.
More updates soonish.
|
|
This message was edited 1 time. Last update was at 2021/11/03 17:14:59
|
|
|
|
|
|
|

 Da Dark Angelz
 Arakasi vs Infinity
 Finished Tau Sept Cadre
  Alaitoc Eldar Warhost
  Finished Order of Our Martyred Lady - Sisters of Battle
  Finished Necromundian Imperial Guard Regiment
