| Author |
Message |
 |
|
|
|
|
Advert
|
Forum adverts like this one are shown to any user who is not logged in. Join us by filling out a tiny 3 field form and you will get your own, free, dakka user account which gives a good range of benefits to you:
- No adverts like this in the forums anymore.
- Times and dates in your local timezone.
- Full tracking of what you have read so you can skip to your first unread post, easily see what has changed since you last logged in, and easily see what is new at a glance.
- Email notifications for threads you want to watch closely.
- Being a part of the oldest wargaming community on the net.
If you are already a member then feel free to login now. |
|
 |
2017/03/07 22:41:14
Subject: Scarper's Post-apoc Dregs and Strays: Damaged Hab Block 23/2
|
|

Mastering Non-Metallic Metal
|
Looks great, Scarper. I like the floating steps on that last one.  Automatically Appended Next Post: Automatically Appended Next Post: Quoted for rollover...
 Scarper wrote: Scarper wrote:Thanks for the suggestions guys! I'll see what I can do.
@Roddy - Hey man! Hope you're doing well down South. I've not had a chance to play much lately, but I'm actually seeing P tomorrow for a game of zombicide! We'll have to open an extra beer for you.
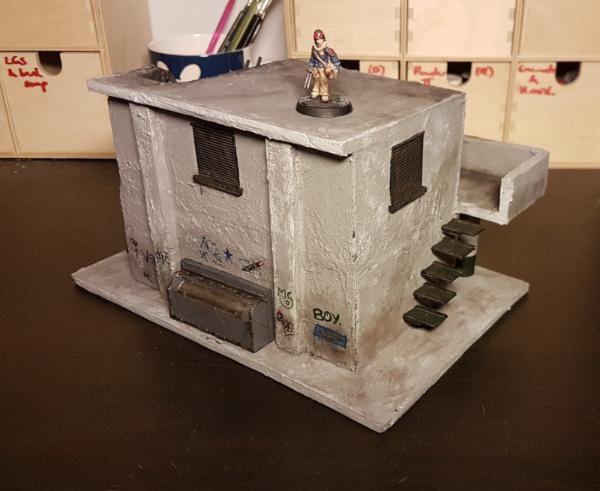
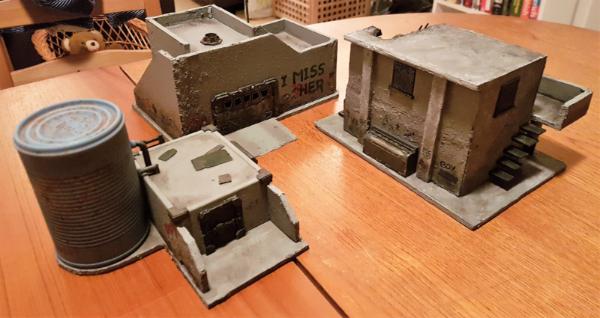
So who knew having a kid takes up so much free time?! Finished up the building I was working on, and all in all I'm pleased with how it's come out. Needs a wee bit of stencilling of a hab block number and maybe a few posters here and there, but I'll do those at the same time for all my buildings.
The idea is that it's a 'hot bunk' type dorm system for workers, now left abandoned. Gameplay wise it allows for hard cover on one level, two-directional cover on the second, and a flexible third level which can have varying scatter terrain. Should sync up well with connections to the other buildings too!

I'm quite proud of some of the smaller details - the doors are mostly card, and the pillars are made of tubing a paintbrush arrived in.
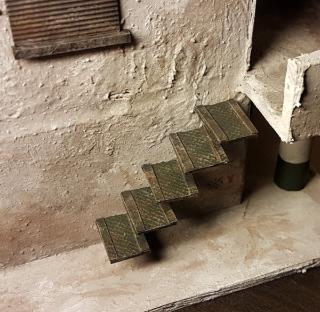
These stairs are card with press moulded grey stuff detailing, pinned into the wall
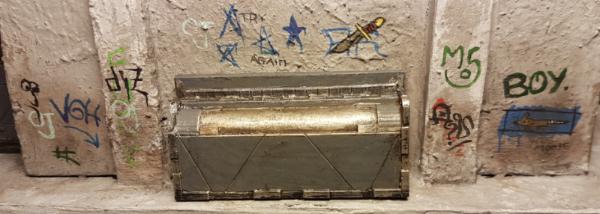
Some of the graffiti round the back
And finally a shot of all the buildings so far together. Coming together into a nice little outpost!
Next on the list is probably some scatter terrain or makeshift bridges, just to break things up a bit. Please let me know what you think though - I'd really like any tips or comments.
|
|
This message was edited 1 time. Last update was at 2017/03/07 22:42:00
     Mastodon: @DrH@warhammer.social Mastodon: @DrH@warhammer.social
The army-                   ~2295 points (built). ~2295 points (built).
 
* -=]_,=-eague Spruemeister General. * A (sprue) Hut tutorial *
Dsteingass - Dr. H..You are a role model for Internet Morality!  // inmygravenimage - Dr H is a model to us all // inmygravenimage - Dr H is a model to us all 
Theophony - Sprue for the spruemeister, plastic for his plastic throne! // Shasolenzabi - Toilets, more complex than folks take time to think about! |
|
|
 |
|
2017/06/05 20:31:34
Subject: Scarper's Post-apoc Dregs and Strays: Damaged Hab Block 23/2
|
|
Using Inks and Washes
|
Thanks a lot, Dr. H! I wasnt sure how sturdy they'd be, but with some decent pinning, they can definitely take the weight of a lead figure, which is always useful!
Lots of little projects on the go, but I thought I'd do a quick summary post on where I am just now.
Tried out Rogue Stars with my friend @Ragsta, and test game featured a little droid robot that annoyed the hell out of him. Anything that irritating of course required a proper model, so I've knocked up Dipper (DP714, a repurposed maintenance droid) out of green stuff and plasticard.
He's tiny, and was lots of fun to make.
Willow, the tech who made him, will feature in a future post.
I've also been working on a larger building. Still very WiP, but you can see where I'm going with it:
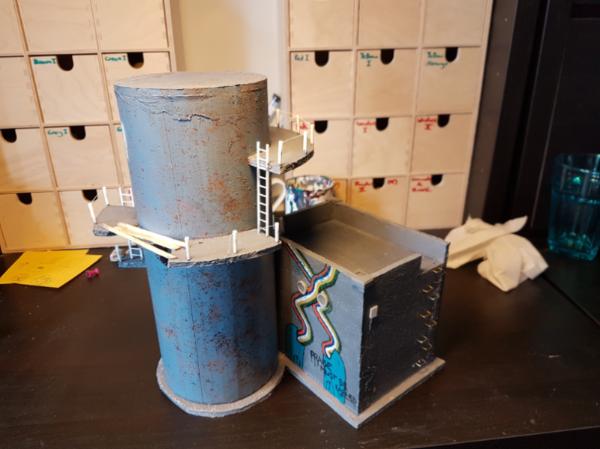
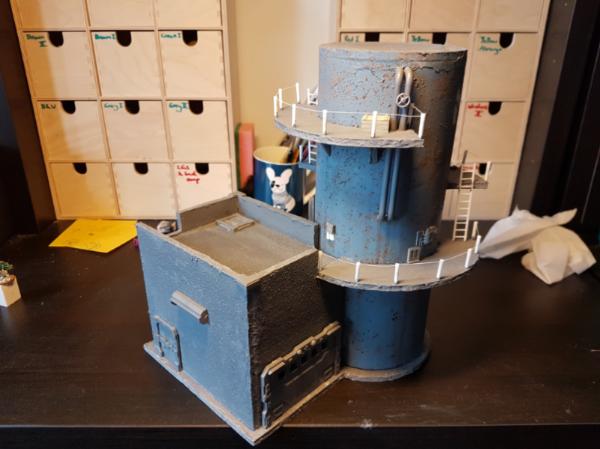
I've tried to take some advice regarding detailing from comments on the previous buildings. The painting has only just started, obviously. Needs more detailing, a lot of weathering and some more graffiti. In particular, I'm planning on making a little access ramp to cover the gap between the building / walkway before doing any more painting.
I've also made a few quick barriers:
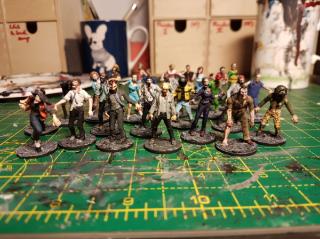
And (off-topic), made tons of zombies for zombicide.
Please let me know what you think - comments are always much appreciated, and often give a lot more inspiration than you think!
Tom
|
|
This message was edited 1 time. Last update was at 2017/06/05 20:33:23
|
|
|
|
|
2017/06/25 13:42:03
Subject: Scarper's Post-apoc Dregs and Strays: Maintenance droid, a building and some zombies 5/6
|
|
Using Inks and Washes
|
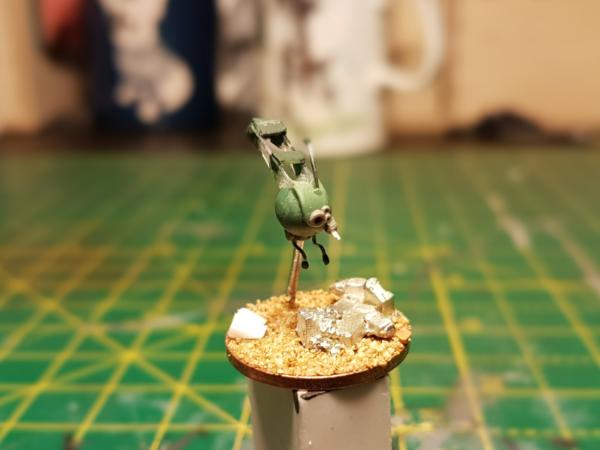
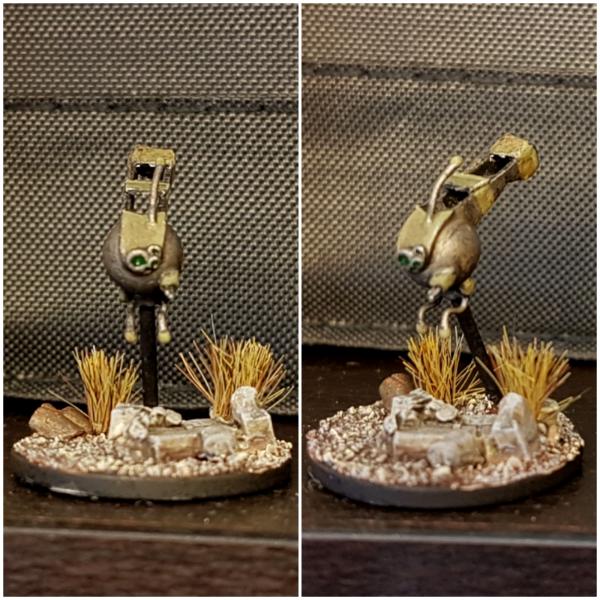
So Dipper is finished - really pleased with how he came out. First model I've ever made completely from scratch, and the final thing is pretty close to the image I had in my head! He's equipped with a wee probe for maintenance and repair work, which can also deliver a nasty zap to any unfriendly individuals that get too close.
Paintjob's a little lacking, but he's a tiny thing, so I'm not too fussed.
Please let me know if you like him, or you don't. It's been a little quiet in here lately!
|
|
|
|
|
2017/06/25 15:00:32
Subject: Scarper's Post-apoc Dregs and Strays: Finished maintenance droid 25/6
|
|

Boom! Leman Russ Commander
|
The tiny robot is cool, good work building it from scratch
|
|
|
|
|
|
2017/06/25 22:28:02
Subject: Scarper's Post-apoc Dregs and Strays: Finished maintenance droid 25/6
|
|
Mastering Non-Metallic Metal
|
Terrain looks good.
Nice work on the little robo. Like it. 
|
Mastodon: @DrH@warhammer.social
The army- ~2295 points (built).
* -=]_,=-eague Spruemeister General. * A (sprue) Hut tutorial *
Dsteingass - Dr. H..You are a role model for Internet Morality! // inmygravenimage - Dr H is a model to us all
Theophony - Sprue for the spruemeister, plastic for his plastic throne! // Shasolenzabi - Toilets, more complex than folks take time to think about! |
|
|
|
|
2017/06/29 10:38:11
Subject: Scarper's Post-apoc Dregs and Strays: Finished maintenance droid 25/6
|
|

Stealthy Warhound Titan Princeps
|
Great work with the droids - I especially love the Yakuza based one. And the graphiti is excellent! You must have a ton of terrain at this point - will you be doing a full table shot?
|
|
|
|
|
2017/06/30 21:17:45
Subject: Scarper's Post-apoc Dregs and Strays: Finished maintenance droid 25/6
|
|
Using Inks and Washes
|
Thank you very much for the kind words @Dr H and @Illumini, they're much appreciated.
@Kestral - thanks! It's always satisfying to find a use for something that's been sitting around a long time. I unfortunately gave away a lot of terrain when I moved country a few years ago, but I'm slowly reaccumulating it. I'll post a shot of the table next time I play a game!
|
|
|
|
|
2017/07/01 14:33:10
Subject: Scarper's Post-apoc Dregs and Strays: Finished maintenance droid 25/6
|
|
Journeyman Inquisitor with Visions of the Warp
|
Loving those scratch built buildings, as ever , very creative work scarper .
|
|
|
|
|
2017/07/04 20:10:18
Subject: Scarper's Post-apoc Dregs and Strays: Finished maintenance droid 25/6
|
|
Using Inks and Washes
|
Thanks a lot, Neil!
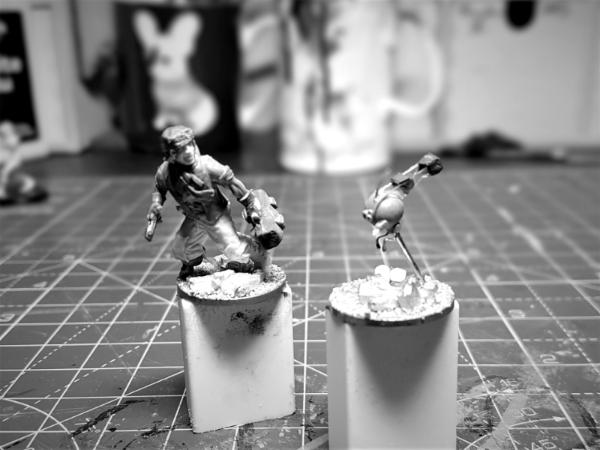
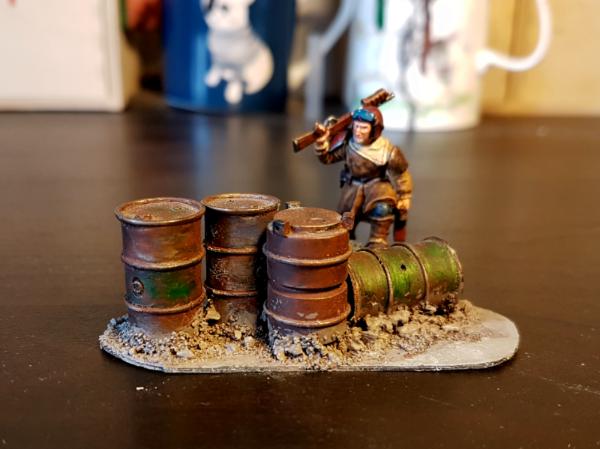
Quick update today, a model that's gone unpainted for a long time. Levin Grigg ("Riggs"), mechanic for the crew I'm putting together.
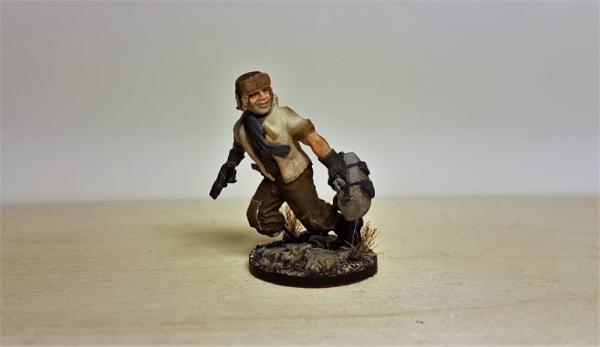
Lots of green stuff work and a pose I liked made me put off painting this gent for a long time. He's older than the days he ran with the Jackals, and I had a lot of fun with details like the prosthetic.
What do you reckon?
|
|
|
|
|
2017/07/04 20:26:05
Subject: Scarper's Post-apoc Dregs and Strays: Runner with lots of GS work 4/7
|
|

Dakka Veteran
|
Looks great, dynamic posing and the face is brilliant 
|
|
|
|
|
|
2017/07/04 21:46:57
Subject: Scarper's Post-apoc Dregs and Strays: Runner with lots of GS work 4/7
|
|
Mastering Non-Metallic Metal
|
Looks great. Can't tell what's been changed or added.
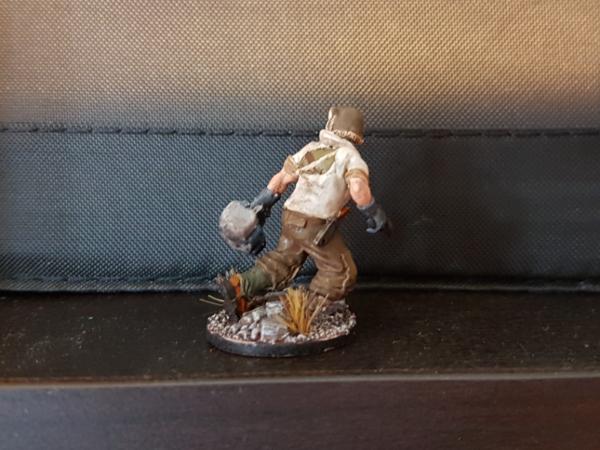
Any chance of a reverse angle so we can see the leg better (and the other 50% of the model)?
|
Mastodon: @DrH@warhammer.social
The army- ~2295 points (built).
* -=]_,=-eague Spruemeister General. * A (sprue) Hut tutorial *
Dsteingass - Dr. H..You are a role model for Internet Morality! // inmygravenimage - Dr H is a model to us all
Theophony - Sprue for the spruemeister, plastic for his plastic throne! // Shasolenzabi - Toilets, more complex than folks take time to think about! |
|
|
|
|
2017/07/05 06:03:28
Subject: Scarper's Post-apoc Dregs and Strays: Runner with lots of GS work 4/7
|
|
The Hammer of Witches
|
It is good - a very nice paintjob especially the face.
|
|
|
|
|
|
2017/07/05 11:04:21
Subject: Scarper's Post-apoc Dregs and Strays: Runner with lots of GS work 4/7
|
|
Using Inks and Washes
|
Thanks a lot for the replies folks!
@PossumCraft - Thank you! I love painting faces as they carry all the character of a model. It's often the first thing I paint, and then spend the rest of the paintjob being terrified of slipping and ruining the face
@Dr H - Cheers! The model is actually an amalgamation of lots of different bits, mostly from Victoria minis, but also the DE hellion kit and a few other things.
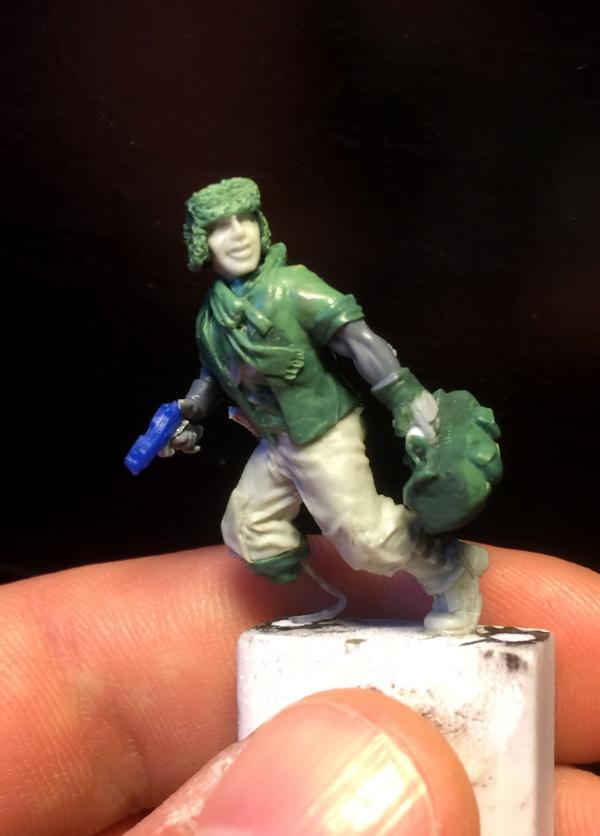
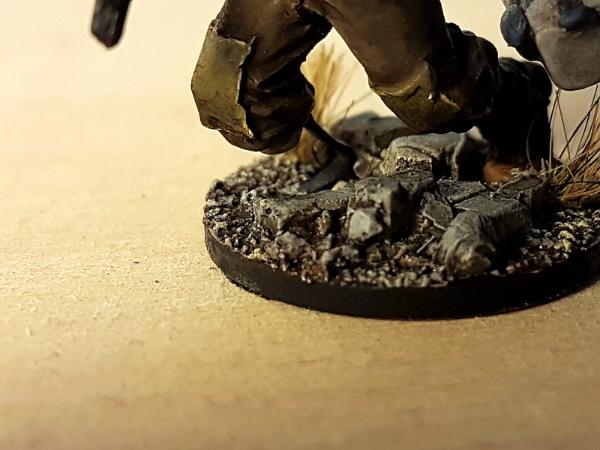
I tried to take some extra shots, but his leg is mostly hidden by one of the grass tufts. There's an unflattering close up under the cut.
@Weety - Thanks very much! Wish I could have an output of painted models like yours
|
|
|
|
|
2017/07/05 13:54:28
Subject: Re:Scarper's Post-apoc Dregs and Strays: Runner with lots of GS work 4/7
|
|
Is 'Eavy Metal Calling?
|
That is excellent
Now make another one and paint it as a statue
|
LOL, Theo your mind is an amazing place, never change.-camkierhi 9/19/13
I cant believe theo is right.. damn. -comradepanda 9/26/13
None of the strange ideas we had about you involved your sexual orientation..........-Monkeytroll 12/10/13
I'd put you on ignore for that comment, if I could...Alpharius 2/11/14 |
|
|
|
|
2017/07/06 21:01:49
Subject: Scarper's Post-apoc Dregs and Strays: Runner with lots of GS work 4/7
|
|
Using Inks and Washes
|
Thanks Theo! The rubbers I mount them on to paint do look a lot like a pedestal, right?
I'm off work for a few weeks after another op on my foot, and I thought I might try something I've been meaning to do for a while - sculpt a mini from an armature!
I'll be following some step by step tutorials, and I thought it might be fun to post here as I go. Maybe someone else wants to have a go and we can compare notes? There's some good videos here. I'll be personally cheating a wee bit and using an existing head and maybe some hands.
Anyway, here's the inauspicious start of Imogen Bracken, the leader of the Broken Tree Salvage Company. Hopefully will turn into something fun!
|
|
|
|
|
2017/07/07 06:39:35
Subject: Scarper's Post-apoc Dregs and Strays: Sculpting challenge day 1
|
|
Fighter Ace
|
Go for it, mate, your green stuff skills have always been highly respectable so this should be very interesting to see.
Did you ever shift all those bits in your earlier post by the way? Cos I'll take them off your hands if not...
|
|
This message was edited 1 time. Last update was at 2017/07/07 06:54:07
|
|
|
|
|
2017/07/07 11:11:56
Subject: Re:Scarper's Post-apoc Dregs and Strays: Sculpting challenge day 1
|
|

Regular Dakkanaut
|
Very cool terrains!
|
|
|
|
|
|
2017/07/07 12:49:22
Subject: Scarper's Post-apoc Dregs and Strays: Sculpting challenge day 1
|
|
Using Inks and Washes
|
@Peyma - You should try too! Would be fun to see them side by side. I'm afraid I did send off all those bits in the end. Ebay has its uses.
@b-tone - Thank you! They were a lot of fun to make, and I'm hoping to eventually have a full tables worth.
Two fairly unexciting further steps completed today -

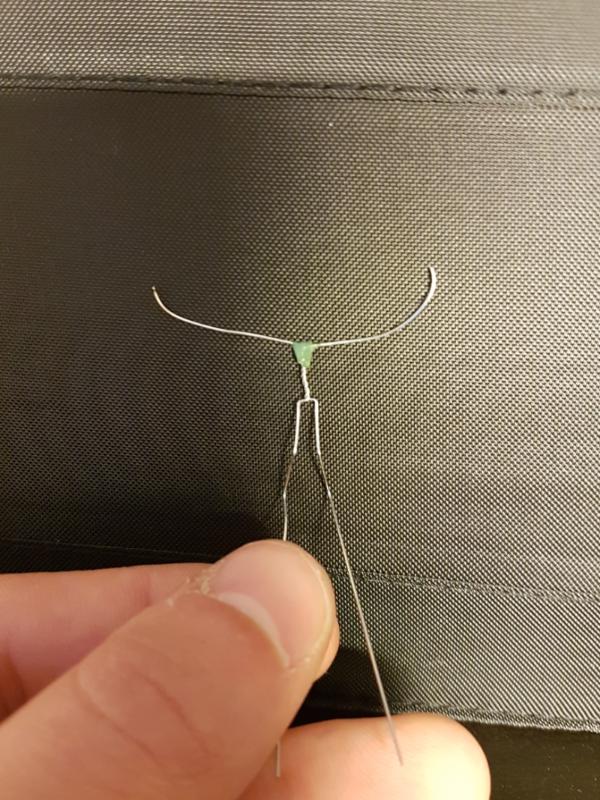
Armature posed and filed - the filing is supposed to help the first layer of greenstuff stick to the wire a little better, though I'm not sure how much it helped!
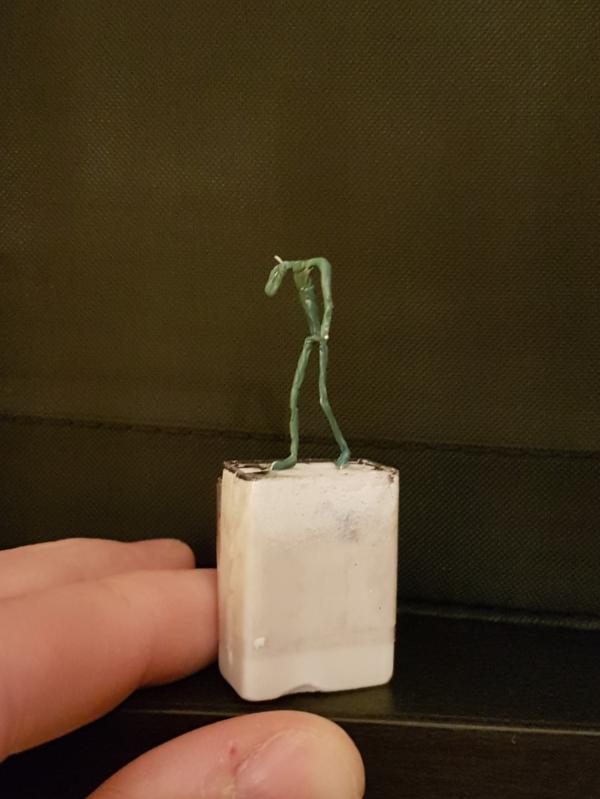
Thin rough coat of greenstuff, acts as a layer for later, bulkier sculpting. Apparently trying to sculpt larger things directly over the wire results in it sliding around and forming air pockets, which make it weaker and tough to cast. Learning things at each stage!
Not looking like much yet, but it's been fun so far. If anyone knows much about sculpting or armatures, please feel free to chip in or correct me at any point! I'm flying blind here.
|
|
This message was edited 1 time. Last update was at 2017/07/07 12:50:20
|
|
|
|
|
2017/07/07 13:17:43
Subject: Scarper's Post-apoc Dregs and Strays: Sculpting challenge day 2
|
|
Decrepit Dakkanaut
|
Watch Scarper turn a stick figure into a miniature!
|
"dave you are the definition of old school..." -Viktor Von Domm    My P&M Blog : My P&M Blog :
It's great how just adding a little iconography, and rivets of course, can make something look distinctly 40K-adamsouza
"Ah yes, the sound of riveting.....Swear word after swear word and the clinking of thrown tools" "Nope. It sucks do it again..."- mxwllmdr
"It puts together more terrain, or else it gets the hose again...-dangledorf2.0
"This is the Imperium, there is no peace, there are only rivets" -Vitruvian XVII
"I think rivets are the perfect solution to almost every problem"- Rawson
More buildings for the Building God! -Shasolenzabi
  |
|
|
|
|
2017/07/09 08:56:35
Subject: Scarper's Post-apoc Dregs and Strays: Sculpting challenge day 2
|
|
Using Inks and Washes
|
It really looks that way, doesn't it? Kind of creepy at this stage!
Slightly delayed post, but yesterday I did some bulking on the legs and hips. Still very rough, but trying to get some vague muscle group shapes on the go for my own practice. Just looks more like she's wearing big pants!
Will hopefully get the top half bulked this evening.
EDIT: Also today I realised that I finished the sculpt for Riggs 3 YEARS AGO. What. Where on earth does time go?! Doesn't say much about my painting efficiency either...
|
|
This message was edited 1 time. Last update was at 2017/07/09 08:57:55
|
|
|
|
|
2017/07/09 11:22:38
Subject: Re:Scarper's Post-apoc Dregs and Strays: Sculpting challenge day 3
|
|
Decrepit Dakkanaut
|
Perhaps he needs a dose of...

|
"dave you are the definition of old school..." -Viktor Von Domm My P&M Blog :
It's great how just adding a little iconography, and rivets of course, can make something look distinctly 40K-adamsouza
"Ah yes, the sound of riveting.....Swear word after swear word and the clinking of thrown tools" "Nope. It sucks do it again..."- mxwllmdr
"It puts together more terrain, or else it gets the hose again...-dangledorf2.0
"This is the Imperium, there is no peace, there are only rivets" -Vitruvian XVII
"I think rivets are the perfect solution to almost every problem"- Rawson
More buildings for the Building God! -Shasolenzabi
|
|
|
|
|
2601/03/12 22:15:50
Subject: Re:Scarper's Post-apoc Dregs and Strays: Sculpting challenge day 3
|
|
Using Inks and Washes
|
Nah, that only lasts a few minutes. Maybe one of these?

Did some more bulking on the legs and lower torso today. Trying to get female proportions without going too OTT. Think it's coming out okay!
|
|
|
|
|
2017/07/11 21:47:25
Subject: Scarper's Post-apoc Dregs and Strays: Sculpting challenge day 4! 10/7
|
|
Using Inks and Washes
|
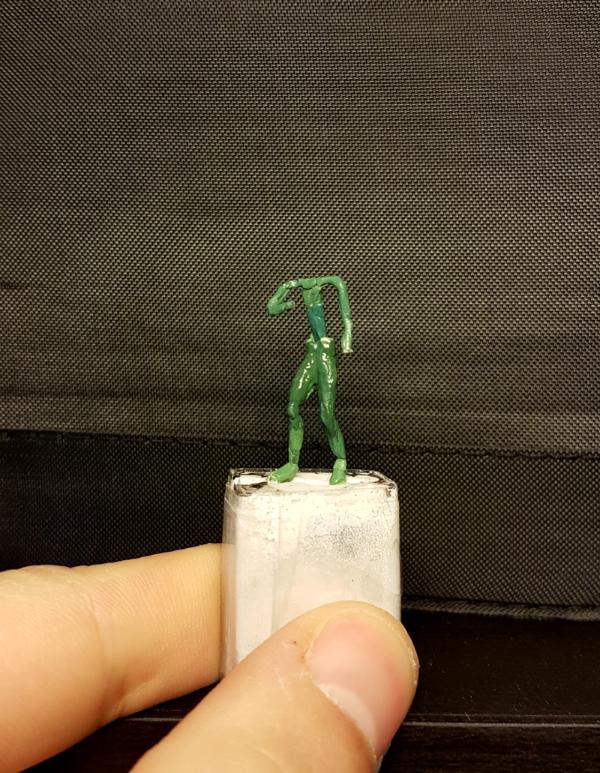
Baby steps! Some more bulking on the torso and the start of a few muscle groups on the right arm.
Head is bluetacked on for a better idea of pose. Imagine it a few mm lower down!
Still fighting with proportions. Hopefully looking okay
|
|
|
|
|
2017/07/14 21:14:52
Subject: Scarper's Post-apoc Dregs and Strays: Sculpting challenge day 4! 10/7
|
|
Using Inks and Washes
|

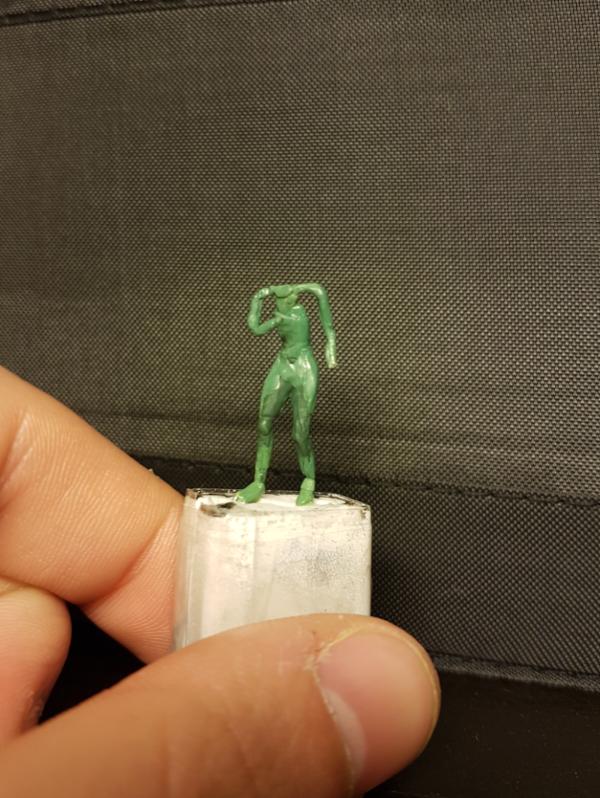
Done with bulking, and finally starting on some details! A few simple details below the knees. The left arm has been deliberately stripped down as it's going to be a bionic!
|
|
|
|
|
2017/07/14 23:11:08
Subject: Scarper's Post-apoc Dregs and Strays: Sculpting challenge day 5! 14/7
|
|
Decrepit Dakkanaut
|
Mmmm Curvy!
|
"dave you are the definition of old school..." -Viktor Von Domm My P&M Blog :
It's great how just adding a little iconography, and rivets of course, can make something look distinctly 40K-adamsouza
"Ah yes, the sound of riveting.....Swear word after swear word and the clinking of thrown tools" "Nope. It sucks do it again..."- mxwllmdr
"It puts together more terrain, or else it gets the hose again...-dangledorf2.0
"This is the Imperium, there is no peace, there are only rivets" -Vitruvian XVII
"I think rivets are the perfect solution to almost every problem"- Rawson
More buildings for the Building God! -Shasolenzabi
|
|
|
|
|
2017/07/16 16:51:04
Subject: Re:Scarper's Post-apoc Dregs and Strays: Sculpting challenge day 5! 14/7
|
|
Using Inks and Washes
|
Thanks again Dave!
 [
Lower body is coming along. I'd love to hear any tips people may have, but it's been a fun learning process so far. Lots of tutorial videos!
|
|
|
|
|
2017/07/16 18:18:48
Subject: Scarper's Post-apoc Dregs and Strays: Sculpting challenge day 6! 16/7
|
|
Decrepit Dakkanaut
|
I don't know much about sculpting, so the only tip I can give you is keep doing what you're doing.
|
"dave you are the definition of old school..." -Viktor Von Domm My P&M Blog :
It's great how just adding a little iconography, and rivets of course, can make something look distinctly 40K-adamsouza
"Ah yes, the sound of riveting.....Swear word after swear word and the clinking of thrown tools" "Nope. It sucks do it again..."- mxwllmdr
"It puts together more terrain, or else it gets the hose again...-dangledorf2.0
"This is the Imperium, there is no peace, there are only rivets" -Vitruvian XVII
"I think rivets are the perfect solution to almost every problem"- Rawson
More buildings for the Building God! -Shasolenzabi
|
|
|
|
|
2017/07/17 13:49:18
Subject: Scarper's Post-apoc Dregs and Strays: Sculpting challenge day 6! 16/7
|
|
Mastering Non-Metallic Metal
|
Good work on the legs.
Good choice to avoid the head and hands, they are the hardest parts to sculpt (because they are so recognisable).
Can't add to the sculpting tips, I just stress at what I'm doing and keep poking at it until it looks right.
|
Mastodon: @DrH@warhammer.social
The army- ~2295 points (built).
* -=]_,=-eague Spruemeister General. * A (sprue) Hut tutorial *
Dsteingass - Dr. H..You are a role model for Internet Morality! // inmygravenimage - Dr H is a model to us all
Theophony - Sprue for the spruemeister, plastic for his plastic throne! // Shasolenzabi - Toilets, more complex than folks take time to think about! |
|
|
|
|
2017/07/17 17:16:09
Subject: Scarper's Post-apoc Dregs and Strays: Sculpting challenge day 6! 16/7
|
|
Preacher of the Emperor
|
Those buildings are fantastic... definitely motivating me to move my own projects forward. Also, excellent scratch building, very ambitious!
|
|
|
|
|
|
2017/07/20 09:46:42
Subject: Re:Scarper's Post-apoc Dregs and Strays: Sculpting challenge day 6! 16/7
|
|
Using Inks and Washes
|
Thanks very much for the comments, guys!
@Dave - Thanks! I'll try
@Dr. H - Cheers for the kind words. I might have a go at sculpting hands and the like in the future, just seemed sensible to do one massive step at a time...
@MacPhail - Thank you! They're a lot of fun to put together, and actually pretty easy to end up with something nice. Has made me start hoarding boxes and trash for potential use though, which my wife isn't too happy about...
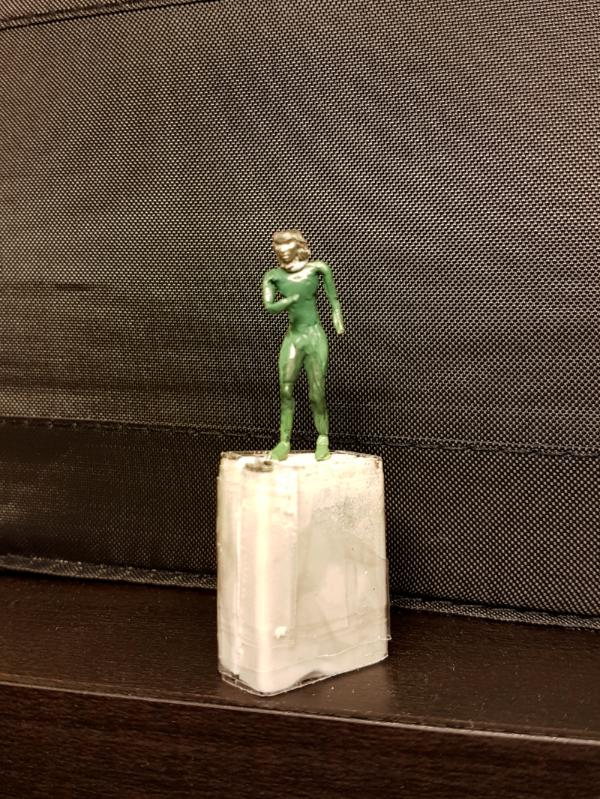
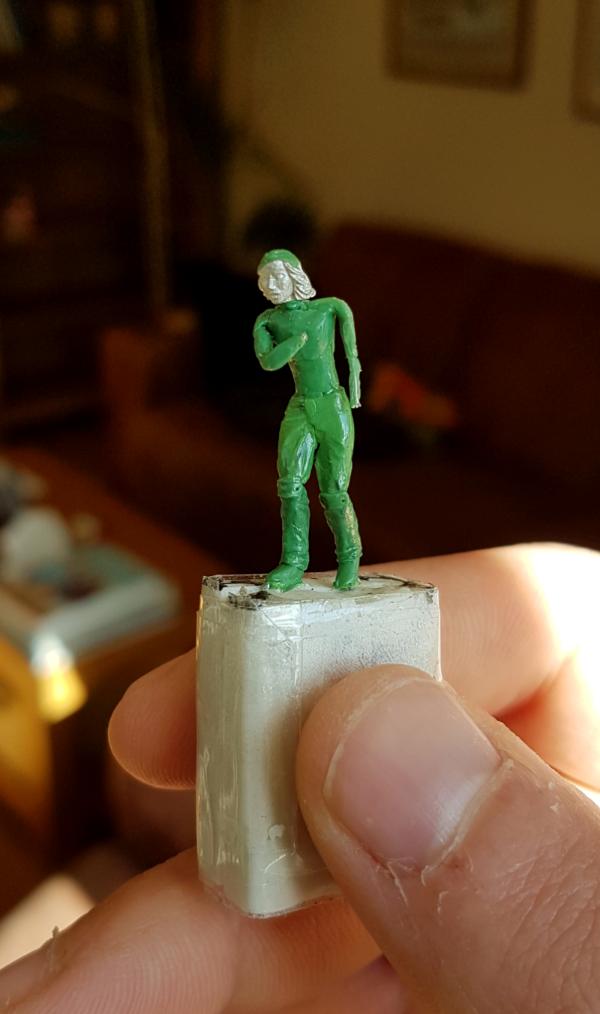
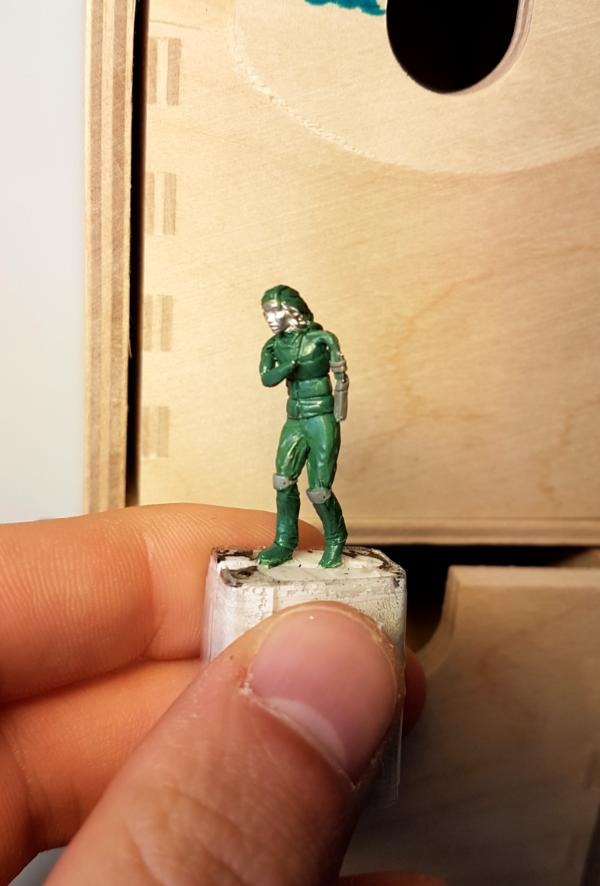
Two updates in one today! First i didn't think really warranted an update in itself, but I made a few belts and straps, accentuated the knee pads and started some work on her hair. Also began bulking out the bionic arm.

Today I've been working on a bodywarmer similar to this:
with a hood and bandana thrown in as well. I've been working on her hair as well, almost done. Just the back end of the ponytail to detail once the putty sets. Going for something along these lines:
Not finished yet, still a lot of work to do at the upper end and around the shoulders, but you get the idea. I'm still trying to show each step, but let me know if it's becoming too repetitive.
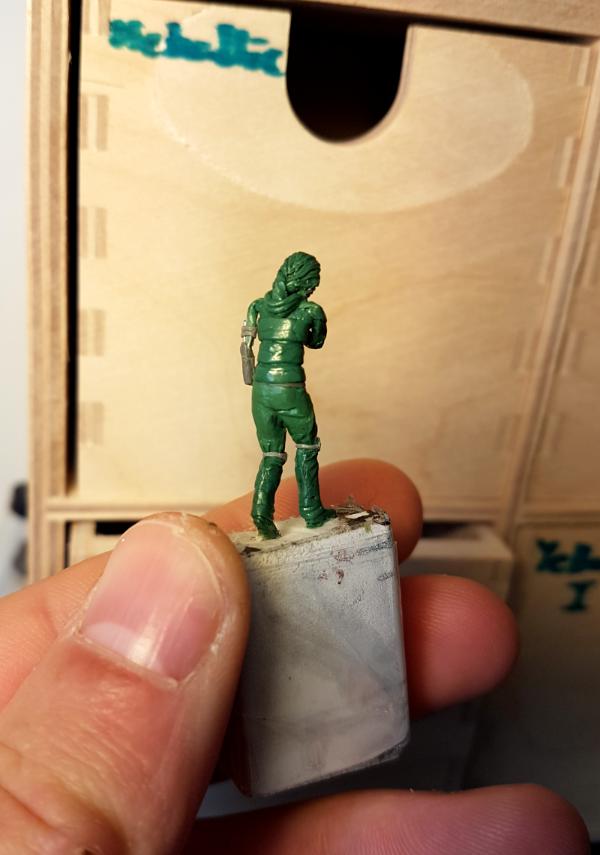
As always, very much appreciate any comments or criticism, so please fire away! Automatically Appended Next Post: Last update for today:
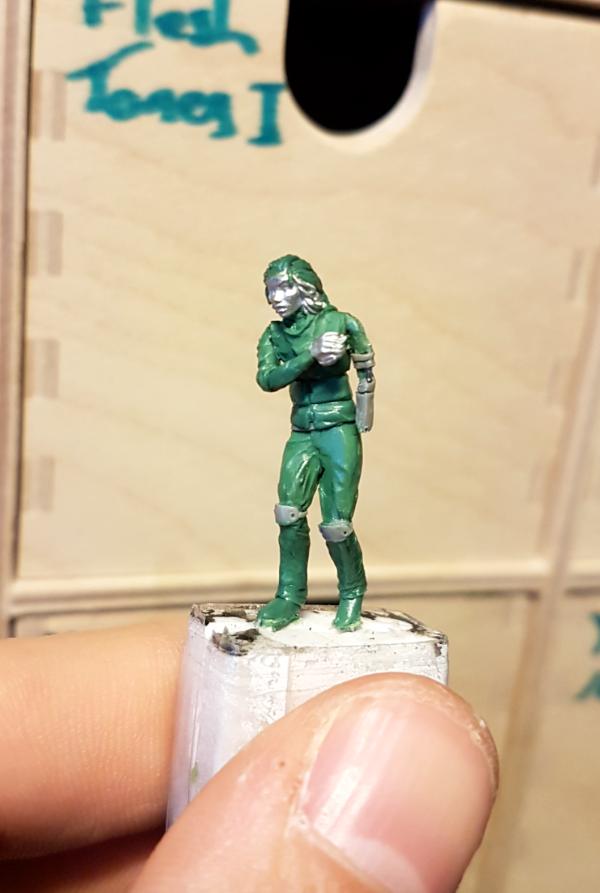
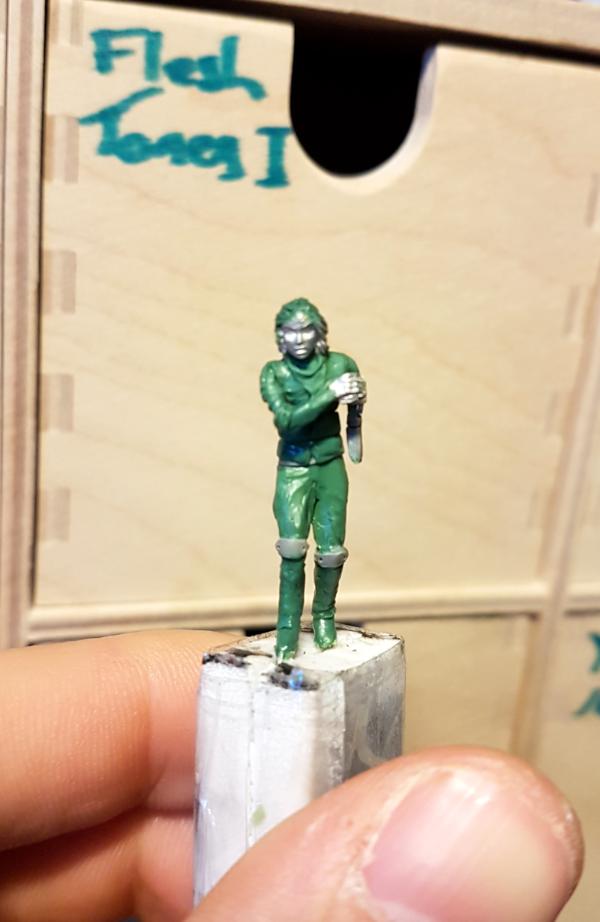
Apologies for the slightly blurred photos, will get better ones on the next round!
|
|
This message was edited 1 time. Last update was at 2017/07/20 20:13:34
|
|
|
|
|
|
|