Forum adverts like this one are shown to any user who is not logged in. Join us by filling out a tiny 3 field form and you will get your own, free, dakka user account which gives a good range of benefits to you:
No adverts like this in the forums anymore.
Times and dates in your local timezone.
Full tracking of what you have read so you can skip to your first unread post, easily see what has changed since you last logged in, and easily see what is new at a glance.
Email notifications for threads you want to watch closely.
Being a part of the oldest wargaming community on the net.
If you are already a member then feel free to login now.
2013/07/19 15:55:44
Subject: Re:.\o|o/. July 18th, 2013 - Terrain Contest: Win my stuff! .\o|o/.
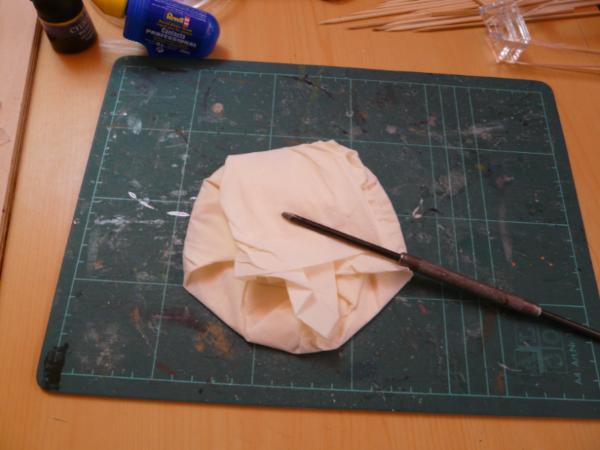
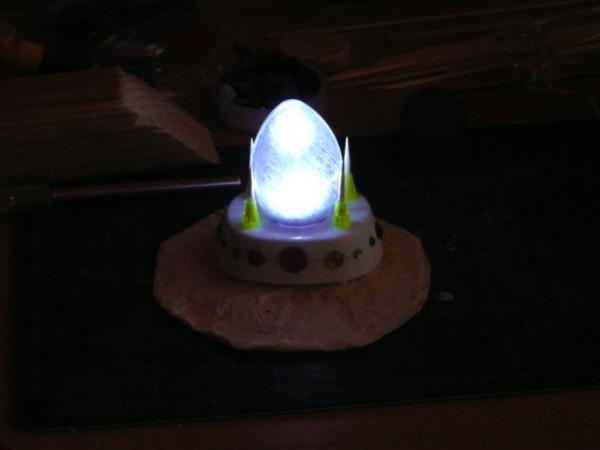
so... my one entry is an eldar energy thingy...with glow effect...:
Spoiler:
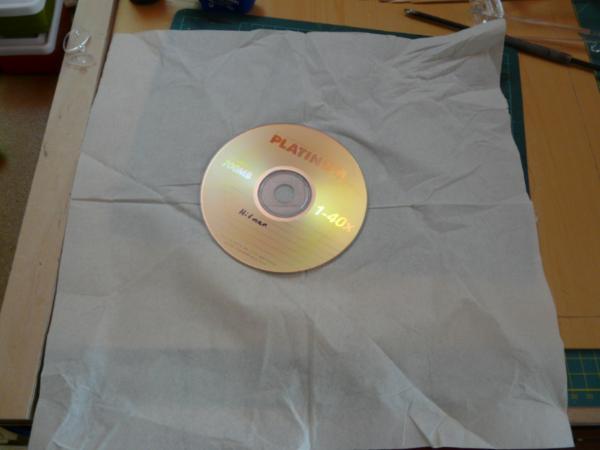
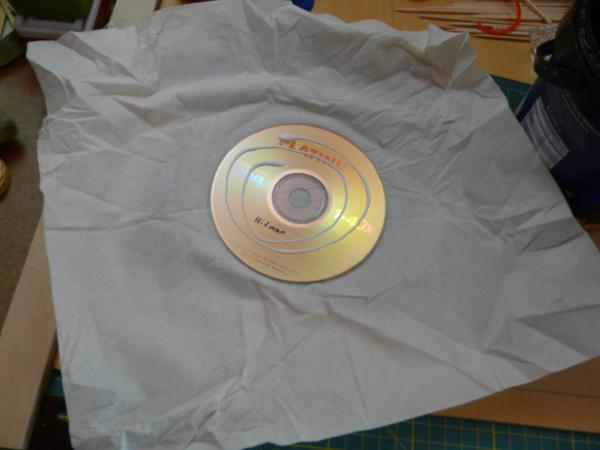
First the ingridients... as per regulations it must come with a CD as a base... an old copied version of the first Hitman game... and a tissue..
then cover the CD with PVA and wrap the tissue around it so to have a covered CD that never lets loose of the tissue again...cover everything with watered down PVA... let it dry...
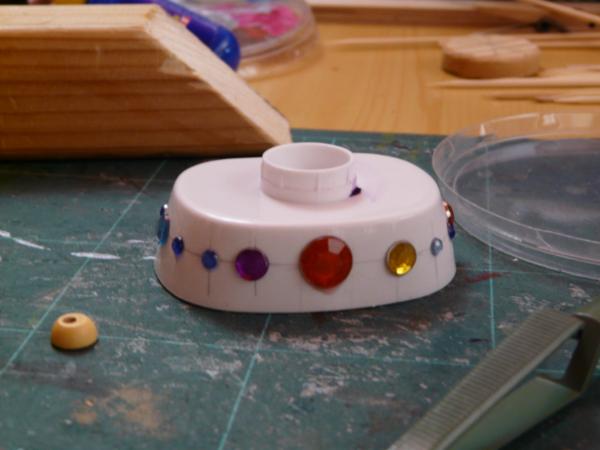
then to the glowy stuff and the main ingridients of the terrain piece...i took an old illumiated picture holder... added gemstones i have in abundace to the body...
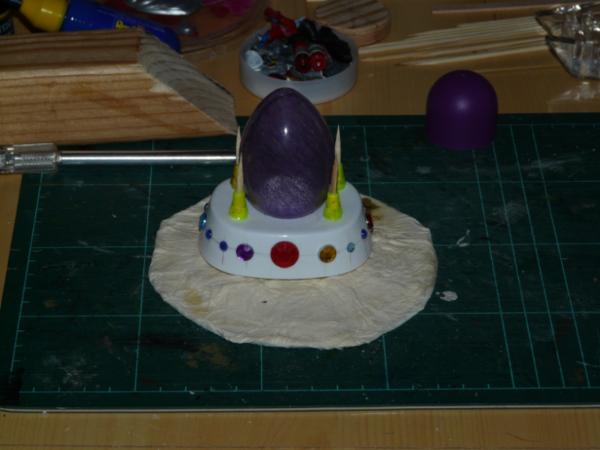
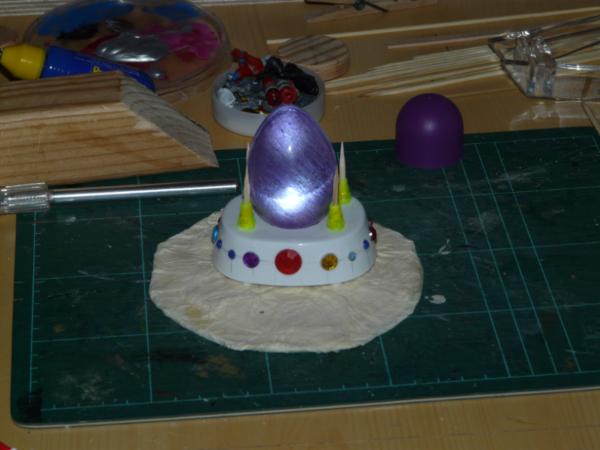
and what you currently cant see in preperation is an old clear plastic egg i got from a fleamarket... i scribbled some lines inside...and then roughed up the inner surface with a dremel tool... now it has an almost flowery or crystal like look to it... added a wash of puple wash to it... done!...
then i added four lego bricks of a nice shape and inserted tooth picks into them... gloed them also to the body...done...
the still unprimed WIP is here:
next... add a carboard control panel to the back...
Everything is Viable. The CD/DVD is not a requirement, just the 'size limit'. And an easy thing to use to make scenery from, for new players.
Falling down is the same as being hit by a planet — "I paint to the 20 foot rule, it saves a lot of time." -- Me
ddogwood wrote:People who feel the need to cheat at Warhammer deserve pity, not anger. I mean, how pathetic does your life have to be to make you feel like you need to cheat at your toy army soldiers game?
2013/07/19 16:11:17
Subject: .\o|o/. July 18th, 2013 - Terrain Contest: Win my stuff! .\o|o/.
did you know that CD´s are quite easy melted down? some mere minutes in the oven and you have a nice melted down amount of raw plastic ... you can even cast simple shapes from it...and a chemisty teacher told me it isn´t hazardous to do so in your kitchen... no poisonous vapors and stuff...
Now that's handy! I've even been reduced to using glue in my instamould from time to time. Slightly concerned that the hot plastic might not be good for the instamould, mind you, but it's worthwhile giving it a go.
2013/07/19 17:13:16
Subject: .\o|o/. July 18th, 2013 - Terrain Contest: Win my stuff! .\o|o/.
assuming the instamould is a RTV silicone rubber, I think it might be safe. Many of the silicone rubbers can be used for low temp metal casting, so why not relatively cool plastic?
Viktor von Domm wrote: so... my one entry is an eldar energy thingy...with glow effect...:
Spoiler:
First the ingridients... as per regulations it must come with a CD as a base... an old copied version of the first Hitman game... and a tissue..
then cover the CD with PVA and wrap the tissue around it so to have a covered CD that never lets loose of the tissue again...cover everything with watered down PVA... let it dry...
then to the glowy stuff and the main ingridients of the terrain piece...i took an old illumiated picture holder... added gemstones i have in abundace to the body...
and what you currently cant see in preperation is an old clear plastic egg i got from a fleamarket... i scribbled some lines inside...and then roughed up the inner surface with a dremel tool... now it has an almost flowery or crystal like look to it... added a wash of puple wash to it... done!...
then i added four lego bricks of a nice shape and inserted tooth picks into them... gloed them also to the body...done...
the still unprimed WIP is here:
next... add a carboard control panel to the back...
i hope this counts as a viable entry?
cheers, vik
I'm not kidding wheni saw the beginning of it before the egg and though old Star Trek prop. Then I thought vik was making Area 51. It looks great vik.
LOL, Theo your mind is an amazing place, never change.-camkierhi 9/19/13
I cant believe theo is right.. damn. -comradepanda 9/26/13
None of the strange ideas we had about you involved your sexual orientation..........-Monkeytroll 12/10/13
I'd put you on ignore for that comment, if I could...Alpharius 2/11/14
2013/07/19 17:35:21
Subject: .\o|o/. July 18th, 2013 - Terrain Contest: Win my stuff! .\o|o/.
i already did the console... looks suitable alien... quite in line with the rest of the model... will take the last pre pimer pics tomorrow... then priming and painting... this will be a quick one for a change...
So, I've decided what I'm going to create and will start work on Saturday. The build will include the following materials;
1x CD (for the base), plastic sprue, rough grit sandpaper, 80gsm paper, cereal box card, paperclips, tissue/paper towel and some gauze or fine netting
I'll document the build as comprehensively as possible on my random stuff blog so as to make a newbie friendly tutorial... will also throw some WIP pics on here
Oh and Vik, that's looking great...
This message was edited 2 times. Last update was at 2013/07/19 23:49:17
Ramos Asura wrote: assuming the instamould is a RTV silicone rubber, I think it might be safe. Many of the silicone rubbers can be used for low temp metal casting, so why not relatively cool plastic?
instamould is a plastic compound not an RTV silicone.
Ramos Asura wrote: assuming the instamould is a RTV silicone rubber, I think it might be safe. Many of the silicone rubbers can be used for low temp metal casting, so why not relatively cool plastic?
instamould is a plastic compound not an RTV silicone.
Please don't pour anything hot in your Oyumaru guys, if it becomes pliable in boiling water your going to have a serious accident with anything the same temperature nevermind hotter!
Ruglud wrote: So, I've decided what I'm going to create and will start work on Saturday. The build will include the following materials;
1x CD (for the base), plastic sprue, rough grit sandpaper, 80gsm paper, cereal box card, paperclips, tissue/paper towel and some gauze or fine netting
I'll document the build as comprehensively as possible on my random stuff blog so as to make a newbie friendly tutorial... will also throw some WIP pics on here
Oh and Vik, that's looking great...
thanks mate... and your list of ingredients sound totally old school... this sounds already failproof!
Priming already Vik I've not even finished making the bits I need to make the bare frame of the model nevermind thinking about sticking it together or doing little details or painting it...
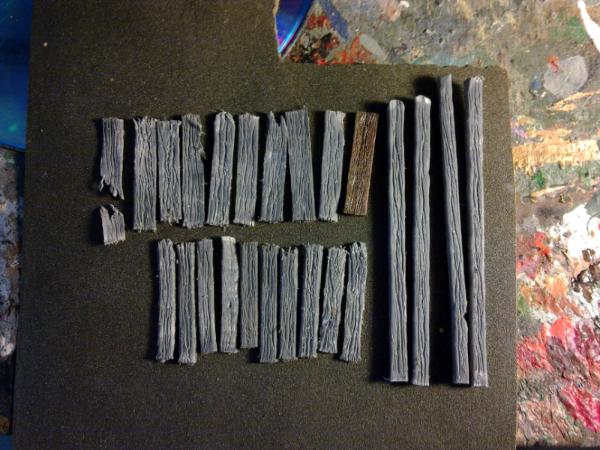
On that note, Got Wood...
Spoiler:
this is all the wood so far
The long poles are the uprights for the hut (the two slightly longer ones for the front and the shorter at the back).
And two "flavours" of plank; the thinner ones from the upper half of the sprue trapezoid and the thicker from the lower half.
I'm aiming for as much variety as possible
I can do a "how to" tutorial section for your cheap starter's terrain tutorial Brian if you want? It's not terribly difficult and may be obvious, but I'm taking plenty of pictures just in case.
Mastodon: @DrH@dice.camp
The army- ~2295 points (built).
* -=]_,=-eague Spruemeister General. * A (sprue) Hut tutorial * Dsteingass - Dr. H..You are a role model for Internet Morality! // inmygravenimage - Dr H is a model to us all Theophony - Sprue for the spruemeister, plastic for his plastic throne! // Shasolenzabi - Toilets, more complex than folks take time to think about!
2013/07/20 14:47:32
Subject: Re:.\o|o/. July 18th, 2013 - Terrain Contest: Win my stuff! .\o|o/.
Falling down is the same as being hit by a planet — "I paint to the 20 foot rule, it saves a lot of time." -- Me
ddogwood wrote:People who feel the need to cheat at Warhammer deserve pity, not anger. I mean, how pathetic does your life have to be to make you feel like you need to cheat at your toy army soldiers game?
2013/07/20 16:06:15
Subject: Re:.\o|o/. July 18th, 2013 - Terrain Contest: Win my stuff! .\o|o/.
@ DR H - Please show how you made that wood out of sprue leftovers, looks very nice.
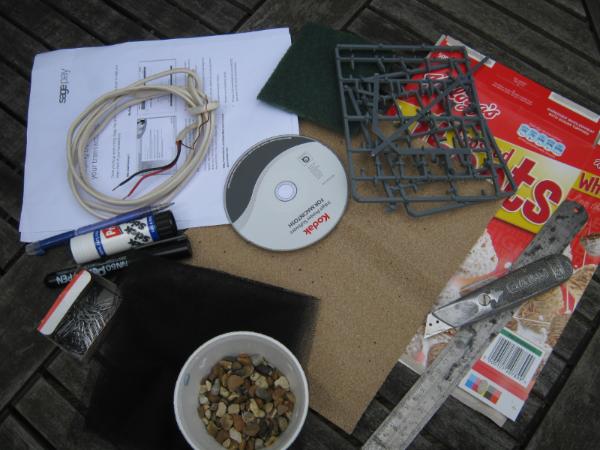
Ok, so here is a pictures of some of the materials i'll be using.
A cd, dentalfloss container, bottle, dust filter from a washing machine, hairbands (girls use to make pigtails), bottle caps, some weird green gizmo from a surprise egg, gardenhose connector, pen, lego thingie, tracks from a kids educatlional kit and some left over plasticcard.
I put the bottle and the gardenhose connector together.
Made the basic shape for the building from the plasticard and put both together on the cd, with the bottlecap on top.
We refuse to take sides in this anymore. And we refuse to let you turn us against one another. We know who we are now, we can find our own way between order and chaos...
It's over because we've decided it's over. Now get the hell out of our galaxy! Both of you.
"Whoever takes purple sash is purple, and follows purple leader." I follow purple tau. Theophony
2013/07/20 17:14:47
Subject: Re:.\o|o/. July 18th, 2013 - Terrain Contest: Win my stuff! .\o|o/.
Popped in and out of your blog Braincj, not sure of I've commented before. Some nice work from what I've seen, will have a proper look through later!
Anyway, the competition sounds very interesting, I'll try and give it a go as I've never completed a competition on here before, despite signing up for a few :/ not sure I have much left over war gaming stuff at the moment, haven't built any models or done anything for absoltutley ages. But I'll give it a go.
While I let my fingers/back/arms etc... relax a little from making wood, I've done the tutorial.
Spoiler:
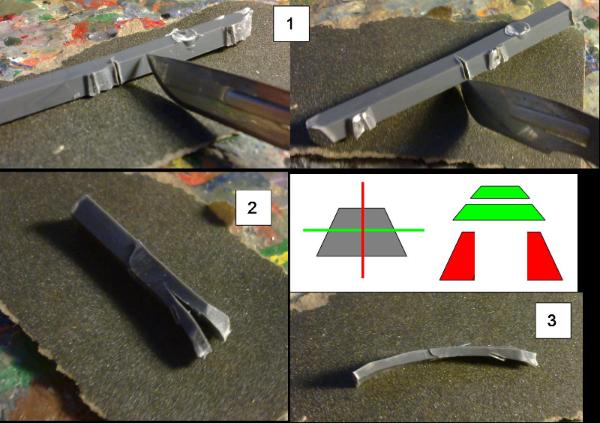
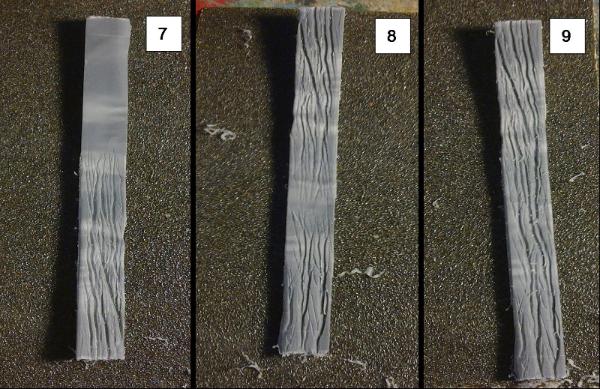
Just a quick tutorial on how I make my sprue wood:
1. First find yourself a piece of sprue and remove all the sticking out bits (clippers will be fine for this as it'll be tidied up later).
Then, cut it to length. I use a Number 10 blade in my scalpel and this allows me to use a rocking motion to cut the sprue, little by little, into two (Don't try to go all the way through in one go as you'll likely end up snapping your blade and/or cutting yourself).
Clean up any rough edges from where you removed bits before continuing.
2. This is probably the most difficult step (yep, it's downhill from here).
Using the same technique that you used to cut the sprue to length, cut the sprue in half, lengthways (the shorter the plank/sprue the easier this step is).
There's two ways this can be done and will give you the results shown in the diagram (I'm cutting along the green line as this leads to a variety of sizes of wooden planks. The red line will give you all identical pieces. Probably just a matter of taste).
You have to be careful to get the cut as straight as you can, but a little unevenness can be solved afterwards with your scalpel and/or gives a bit of variation to your wood.
3. You pieces will likely end up bent after this but can just be straightened by hand.
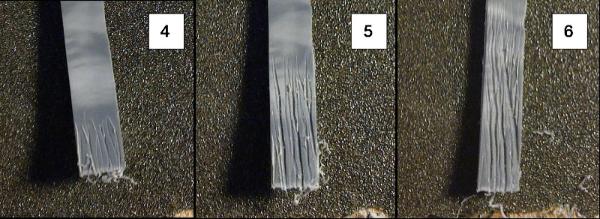
4. The texture is built up by successive scratches with the side of the point of your scalpel (this gives thicker lines than using the "front" of the tip).
Starting at one end, make many small scratches of roughly the same length and try to cover the whole width of the sprue, the more lines the better the result.
5. Moving further up the sprue, keep making small scratches of even depth to the same length, making sure that you fit in as many lines as possible.
However, continue your scratches to the bottom end of the sprue and allow the scalpel to follow whatever path it likes. This will deepen certain grooves that were there from the previous step and eventually the scalpel will only fall into those grooves and will therefore leave some of the grooves as smaller scratches.
6. Continue this way along the sprue.
Once the grooves are deep enough at the lower end of the sprue you do not need to keep going over them and you therefore work your way up the sprue, all the time keeping the leading end of your scratches as evenly spaced as possible and allowing repeated passes to deepen grooves at random.
7. Keep this going until you reach about half way up the sprue, then turn it around...
8. Using the same technique, start at the other end and work your way towards the middle.
9. Make sure to go over the middle, where the two halves meet, until the grooves are an equal depth and appear to continue the whole length of the piece.
10. Repeat this for each side of your piece of sprue.
Then paint in your desired manner.
Mastodon: @DrH@dice.camp
The army- ~2295 points (built).
* -=]_,=-eague Spruemeister General. * A (sprue) Hut tutorial * Dsteingass - Dr. H..You are a role model for Internet Morality! // inmygravenimage - Dr H is a model to us all Theophony - Sprue for the spruemeister, plastic for his plastic throne! // Shasolenzabi - Toilets, more complex than folks take time to think about!
2013/07/20 18:19:26
Subject: .\o|o/. July 18th, 2013 - Terrain Contest: Win my stuff! .\o|o/.
I also forgot to mention that you can add small cuts to the ends of the finished planks to roughen them up, or a deeper cut to produce a split, or just cut random diagonals to give a broken look.
Mastodon: @DrH@dice.camp
The army- ~2295 points (built).
* -=]_,=-eague Spruemeister General. * A (sprue) Hut tutorial * Dsteingass - Dr. H..You are a role model for Internet Morality! // inmygravenimage - Dr H is a model to us all Theophony - Sprue for the spruemeister, plastic for his plastic throne! // Shasolenzabi - Toilets, more complex than folks take time to think about!
2013/07/21 13:52:26
Subject: Re:.\o|o/. July 18th, 2013 - Terrain Contest: Win my stuff! .\o|o/.
Mastodon: @DrH@dice.camp
The army- ~2295 points (built).
* -=]_,=-eague Spruemeister General. * A (sprue) Hut tutorial * Dsteingass - Dr. H..You are a role model for Internet Morality! // inmygravenimage - Dr H is a model to us all Theophony - Sprue for the spruemeister, plastic for his plastic throne! // Shasolenzabi - Toilets, more complex than folks take time to think about!
2013/07/21 14:00:03
Subject: .\o|o/. July 18th, 2013 - Terrain Contest: Win my stuff! .\o|o/.
LOVE the vent caps and the power conduits from the green thing handle!
"dave you are the definition of old school..." -Viktor Von Domm My P&M Blog : It's great how just adding a little iconography, and rivets of course, can make something look distinctly 40K-adamsouza
"Ah yes, the sound of riveting.....Swear word after swear word and the clinking of thrown tools" "Nope. It sucks do it again..."- mxwllmdr
"It puts together more terrain, or else it gets the hose again...-dangledorf2.0
"This is the Imperium, there is no peace, there are only rivets" -Vitruvian XVII
"I think rivets are the perfect solution to almost every problem"- Rawson
More buildings for the Building God! -Shasolenzabi
2013/07/21 14:26:15
Subject: .\o|o/. July 18th, 2013 - Terrain Contest: Win my stuff! .\o|o/.
Oh, didn't see the control box last time I looked. That's awesome Chelnov.
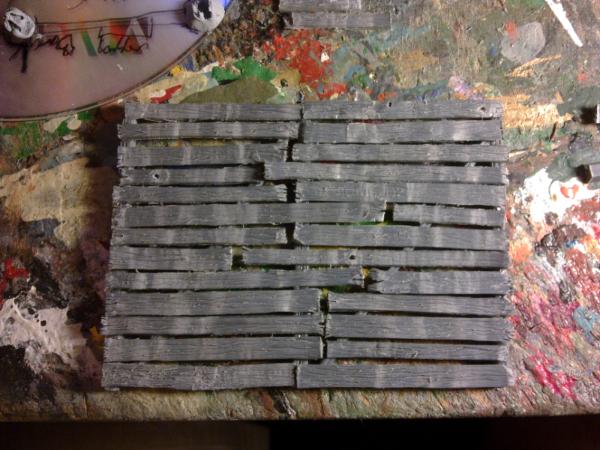
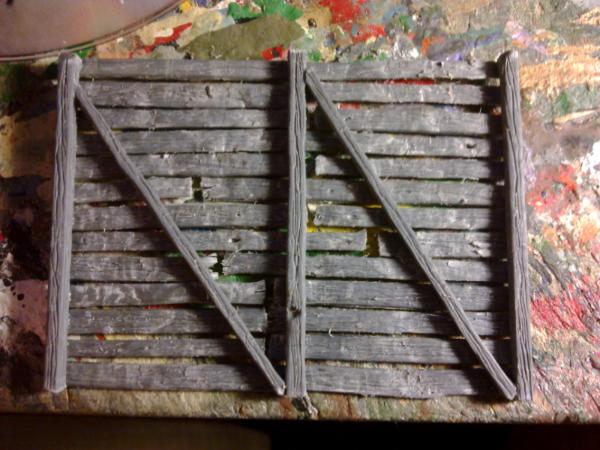
I've finished building the back wall of my hut. Just three more walls to do...
There's more pictures in my blog/gallery as well as a little discussion.
Mastodon: @DrH@dice.camp
The army- ~2295 points (built).
* -=]_,=-eague Spruemeister General. * A (sprue) Hut tutorial * Dsteingass - Dr. H..You are a role model for Internet Morality! // inmygravenimage - Dr H is a model to us all Theophony - Sprue for the spruemeister, plastic for his plastic throne! // Shasolenzabi - Toilets, more complex than folks take time to think about!
2013/07/21 21:26:17
Subject: Re:.\o|o/. July 18th, 2013 - Terrain Contest: Win my stuff! .\o|o/.
@ Dr H - Thx for the wood tutorial, it actually looks like wood, i think it's brilliant. The wall looks great, can't wait to see the finished product all painted up. Goodluck
Excellent work from everyone, you guys are fast! I've produced some sketches for reference and knocked out a full size test version. I'm starting the real version tomorrow and I'll take lots of pictures at each stage.


 I've not even finished making the bits I need to make the bare frame of the model nevermind thinking about sticking it together or doing little details or painting it...


 // inmygravenimage - Dr H is a model to us all


 My P&M Blog :

 and
and  WIP
WIP