| Author |
Message |
 |
|
|
|
|
Advert
|
Forum adverts like this one are shown to any user who is not logged in. Join us by filling out a tiny 3 field form and you will get your own, free, dakka user account which gives a good range of benefits to you:
- No adverts like this in the forums anymore.
- Times and dates in your local timezone.
- Full tracking of what you have read so you can skip to your first unread post, easily see what has changed since you last logged in, and easily see what is new at a glance.
- Email notifications for threads you want to watch closely.
- Being a part of the oldest wargaming community on the net.
If you are already a member then feel free to login now. |
|
 |
2010/04/19 23:06:51
Subject: My first scratchbuild: Warhound
|
|

Daring Dark Eldar Raider Rider
|
So as shown in the subject I have just started on my own warhound (yay I get to join the club). I am/will be using the templates that can be found on this page , www.dakkadakka.com/dakkaforum/posts/list/270617.page , I am going to be using 3-4mm foamcore, I have 4 A3 sheets, and some plasticard, I have 4 A4ish sheets, If I need more I'll get more. This project will probably be slow moving as I have my GCSE exams in about 6 or 7 weeks. However I do intend to finish this one (I tried a warlord a while back and gave up because I felt sick due to excess folding of paper, I nearly didn't make it  ). Basically my motivation for this it to get a titan in my army so that I have some serious firepower as my current most powerful is my baneblade and that doesn't feel quite right with the rest of my Space Wolf army. I am not sure on equipment yet so suggestions are welcomed gladly.
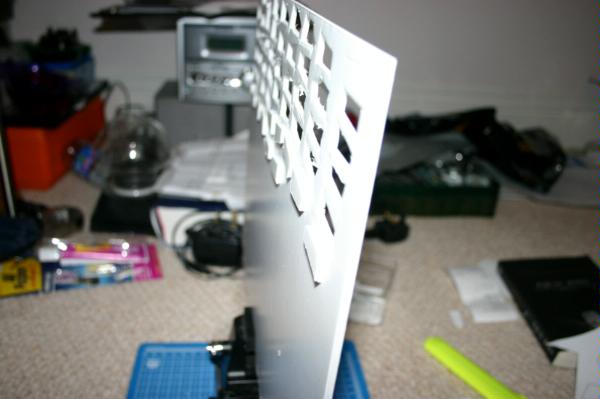
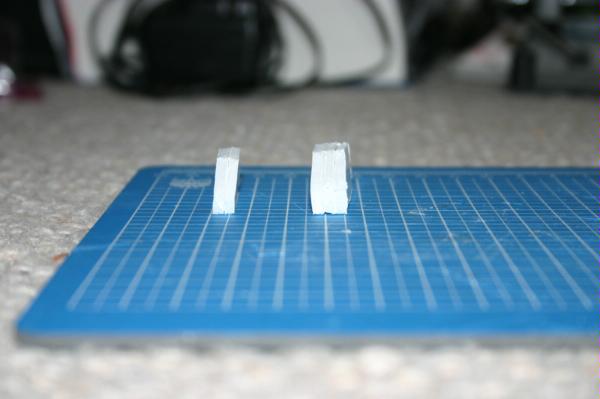
So fare I have started on the toes. I have the middle part of each toe done as i used a nice trick that one of my friends thought of. I cut out one of the template and if I wasn't happy with it I'd cut out another. when I got one that I thought was good enough I cut out 8 by going round its edge with a Stanley knife (this is all in foamcore btw). I then used some strong multi-purpose glue to stick each one onto the sheet of foamcore I am currently using. I waited for the glue to dry then cut round them very closely. By doing this I have ended up with 8 toe pieces at a thickness of about 8mm each. I am now using the same technique for the next pieces of the toes. I will try to get a few pics up soon but for that the steps will go ; 1: install drivers 2: port photos and clear camera 3: take pics 4: port pics to PC 5: work out how the heck I am supposed to attach them to a post  . anyway I should be updating this fairly regularly. My steam name is [ TWL-Imperator-] Bloodhowl if anyone wants to add me and give me a reminder to keep at the titan. Anyway I will try to get the next bit of the toes done tomorrow which should involve cutting out 22 more bits of foamcore I think (actually 11 and using that nice replication trick) which should take a while. will hopefully update this tomorrow.
Foam core piece one with toes cut out so far and some showing the technique I am using:
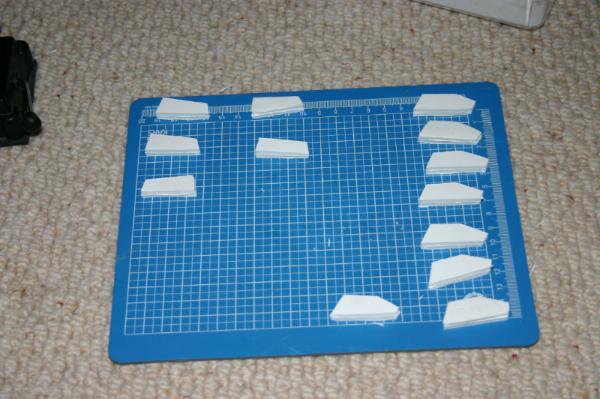
Toe pieces so far:
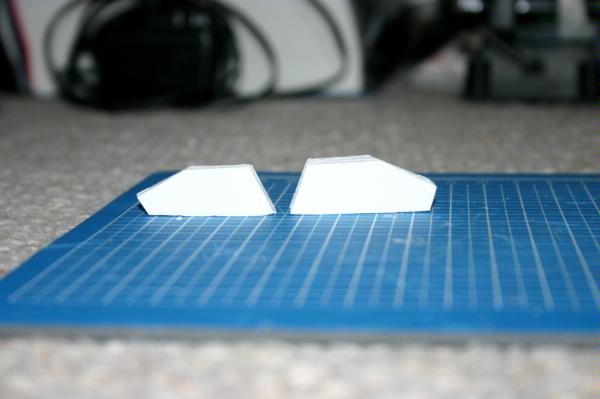
Mock up toe assembly:
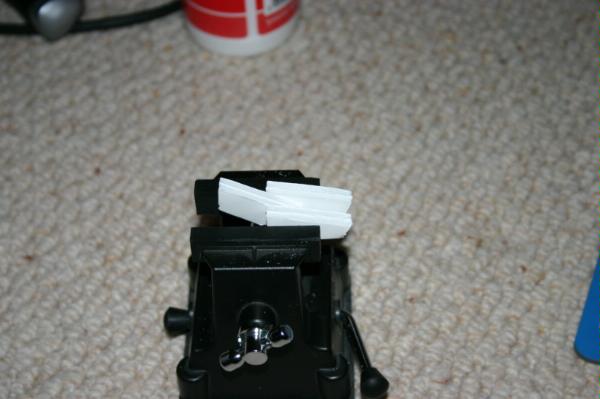
Mock up toe assembly size comparison:
|
|
This message was edited 2 times. Last update was at 2010/04/22 17:18:16
Rangerrob wrote:
Since we have yet to get an answer as to why the Devilfish was on the floor, I'll take a different approach.
Why was the guy walking on the gaming table?
|
|
|
 |
|
2010/04/20 12:24:19
Subject: My first scratchbuild: Warhound
|
|
Junior Officer with Laspistol
|
That's nice and everything, but generally it's best to wait until after you've figured out step five before making a topic about it.
|
|
|
|
|
|
2010/04/20 15:59:22
Subject: Re:My first scratchbuild: Warhound
|
|
Daring Dark Eldar Raider Rider
|
heh yeah probably but I reckon I can work it out and if I can't I'm sure another person on DakkaDakka would be kind enough to help 
|
Rangerrob wrote:
Since we have yet to get an answer as to why the Devilfish was on the floor, I'll take a different approach.
Why was the guy walking on the gaming table?
|
|
|
|
|
2010/04/20 17:43:07
Subject: Re:My first scratchbuild: Warhound
|
|

Decrepit Dakkanaut
|
Upload the pics from your pc to the DAKKA gallery? Thats it....unless I missed what your getting at
|
|
|
|
|
2010/04/20 17:48:04
Subject: My first scratchbuild: Warhound
|
|
Dakka Veteran
|
Sounds good, like KingCracker said, PC - Gallery - Thread.
|
Okay, I've been on a bit of a hiatus 2011-14
Currently working on my Riot Guard.
DA:90-S+++G+M++++B+++I+Pw40k99+D++A+++/cWD142R++T(M)DM+ |
|
|
|
|
2010/04/20 19:09:03
Subject: My first scratchbuild: Warhound
|
|
Nasty Nob
|
YEAH! Looking forward to the PICS! You will get way more feedback! But it looks like you are actually MOVING on this project which is the number one task.
For the Emperor!
|
|
|
|
|
|
2010/04/20 20:00:21
Subject: Re:My first scratchbuild: Warhound
|
|
Daring Dark Eldar Raider Rider
|
Thanks for the enthusiasm Solorg I ahve got all the pieces for the toes, next step will be plasticard on them I think.
edit: Ok now I'm annoyed, apparently since I upgraded to windows 7 my camera drivers dislike me so pics my take longer than expected 
edit2: Right I have found the problem. Basicaly my camera (a cannon EOS 300D) is apparrently too old for cannon to bother making drivers for so until I can get my hands on a card reader there isn't going to be any pictures. I have tried using both XP and Vista drivers and neither work so I will have to get a card reader. (edit 3) This will probably be the most expensive part of the build 
edit 4: well I have found a card reader in argos and will see if I can get it this weekend, wish me luck 
edit 5: well the card reader isn't compatible with windows 7 but my mum has windows vista laptop so I have used that to get the pics from the card to a memory stick and from that to my PC so...
|
|
This message was edited 5 times. Last update was at 2010/04/22 16:40:46
Rangerrob wrote:
Since we have yet to get an answer as to why the Devilfish was on the floor, I'll take a different approach.
Why was the guy walking on the gaming table?
|
|
|
|
|
2010/04/22 18:38:30
Subject: My first scratchbuild: Warhound
|
|
Nasty Nob
|
Hey! Looks like this is coming along nicely! Thanks for posting up the new pictures! For what it is worth, I hear that there's a special kind of spray paint you can get (zero-something-or-other) that you can safely spray onto foam. Since you're using foamboard, that might be your best bet when laying down your base color. Maybe someone else knows the name of it.
Keep up the good work!
Solorg
|
|
|
|
|
|
2010/04/22 19:21:29
Subject: My first scratchbuild: Warhound
|
|
Daring Dark Eldar Raider Rider
|
cool I may ask around to see if anyone else has heard of that, sounds like a good idea.
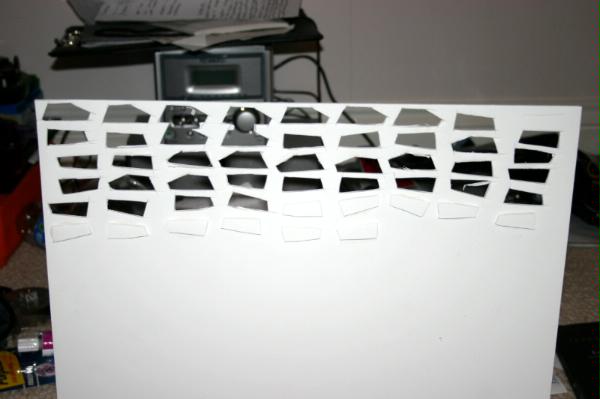
Edit: Well if any of you have downloaded the templates I may need some creative thinking about the main block of the feet. After looking at them for about 15 mins I think I may opt for adding an extra layer of foam core to, and sinking in the, ankle base. Otherwise I would have to stick paper to foam core to locate where to stick the ankle base to, which could compromise integrity.
The red circles show problem areas and the "# layers" is how many layers of my 3mm foam core I'd need if I cut the shape our of it.
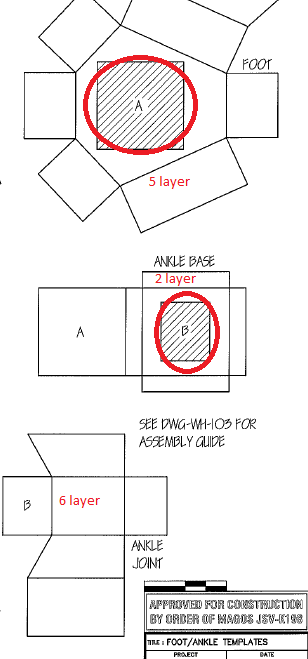
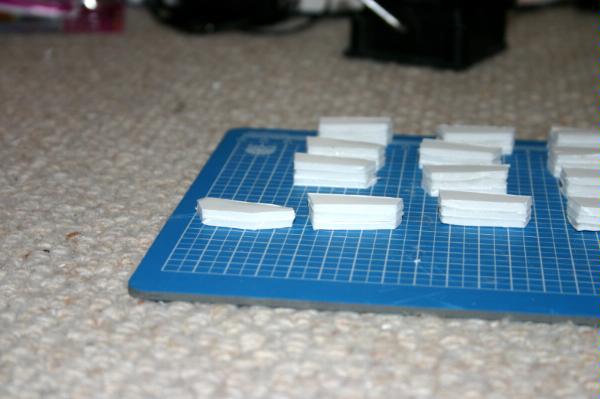
Edit2: well I just noticed a second problem whilst looking at the templates. I though the toes would slot together in some way but they don't. While I have made 16 sets of 2 thick foam core parts for the ends what I need is 8 sets of 6 thick foam core and so I have enough cut out so far for 5 complete toes.
The below image indicates the problem area, in the red circle, and shows the construction of the other part of the toe.

|
|
This message was edited 4 times. Last update was at 2010/04/22 22:24:59
Rangerrob wrote:
Since we have yet to get an answer as to why the Devilfish was on the floor, I'll take a different approach.
Why was the guy walking on the gaming table?
|
|
|
|
|
2010/04/23 23:18:48
Subject: My first scratchbuild: Warhound
|
|
Daring Dark Eldar Raider Rider
|
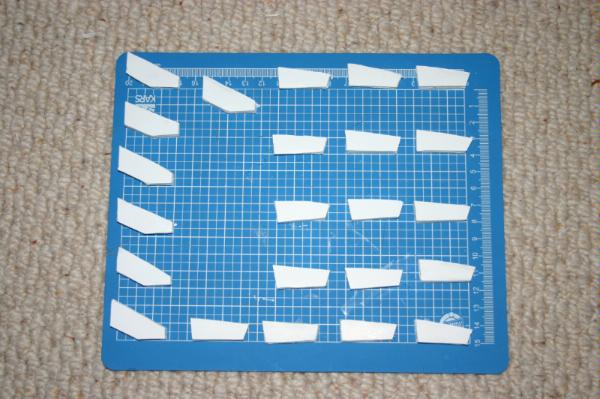
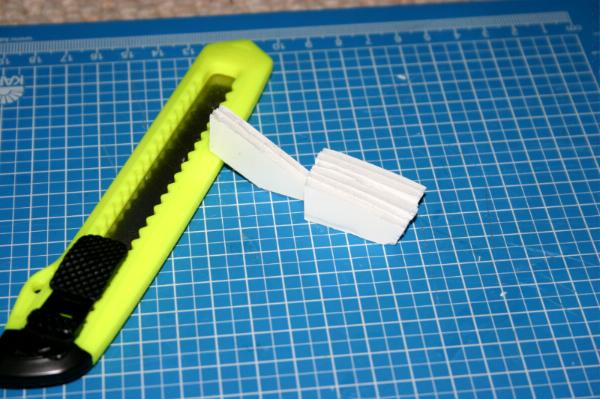
Workedd out how to fix my problem with the toes. I will just stick each end piece of the current ones to the foam core again to add an extra layer to each half. hopefully that shouldn't have too much scope for problems. I hope
edit: pic
what I thought was all I needed for the toes
|
|
This message was edited 1 time. Last update was at 2010/04/25 18:05:50
Rangerrob wrote:
Since we have yet to get an answer as to why the Devilfish was on the floor, I'll take a different approach.
Why was the guy walking on the gaming table?
|
|
|
|
|
2010/04/25 17:30:43
Subject: Re:My first scratchbuild: Warhound
|
|
Daring Dark Eldar Raider Rider
|
Followed my plan for the fix and it worked fine. more pics up later today. uploading as I speak
Automatically Appended Next Post:
Pictures of the small ammount of progress I have made today and yesterday. Had lots of work to do too so not as much progress
This just shows the difference in size and as such the potential flamingo up it could have been
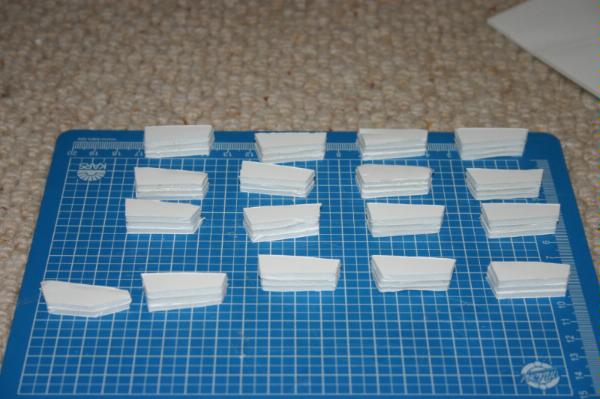
Lower angle same purpose
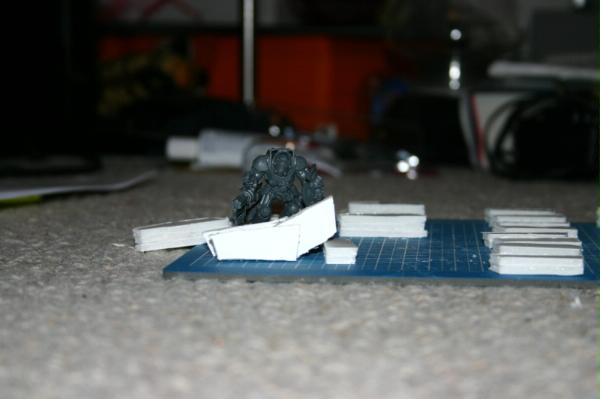
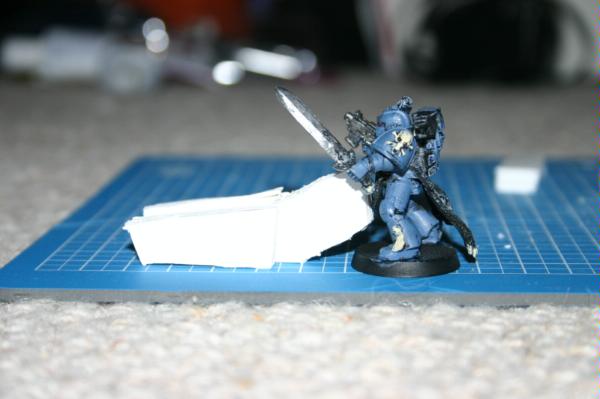
A mock up of a complete toe
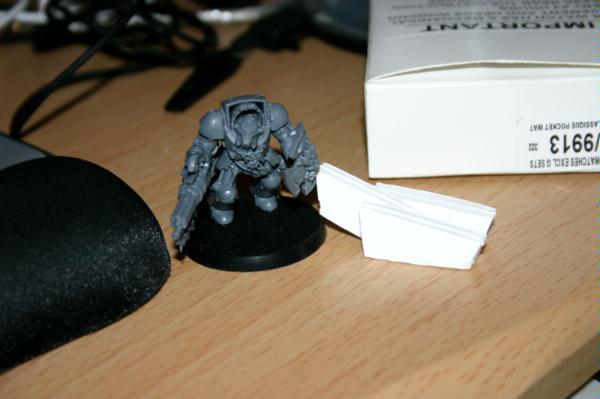
Size comparison with terminator again
Another size comparison at a lower angle
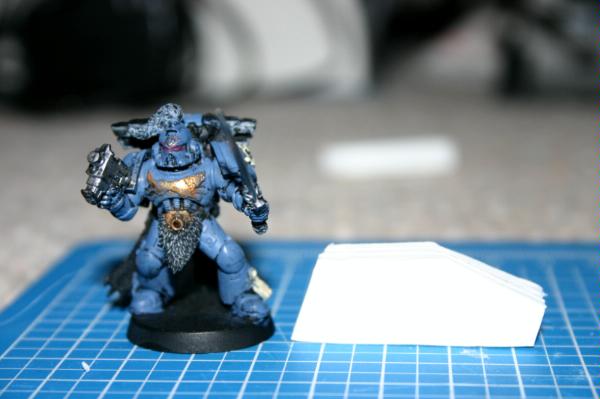
so I have all the pieces for the toes now. I will assemble them soon and possible coat them in plasticard. Oh also I have been using a terminator for comparisons as that is the only model I have on my desk at the moment except for a chaos dread from a few years ago. should I swap to a standard marine for the next few comparisons?
edit: ALL the pictures I take for this project can be found here http://www.dakkadakka.com/gallery/user/9639-rowan341.html under "Warhound Wip" as some of them I will not put in this forum. I will however put what I think are the best ones on the forum.
Automatically Appended Next Post:
 I am faced with a difficult decision. It turns out my printer scaled the templates and I didn't check to see if it was right in the first place. So I am faced with the choice of continue but end up with a Warhound quite a bit smaller than it is meant to be and have major issues when I get to PVC joints or start again from scratch and not have any major foreseen issues later on in the build. This is something I genuinely need help deciding on. Please anyone post what you think I should do. Consider the following:
pros: end product would be nicer, no problems with piping, scaling to standard marines would be right, details would be easier to add in later, only half a sheet of foamcore used so far so good that this problem arrived now not after the construction of all the non PVC leg pieces.
cons: I WILL have to buy more foamcore although that is not much of a problem, all the work so far is useless except as experience, time consuming restart.
Automatically Appended Next Post:
I will cut out a toe piece to show size difference I guess
Automatically Appended Next Post:
The pic will go up tomorrow.
|
|
This message was edited 10 times. Last update was at 2010/04/25 22:53:15
Rangerrob wrote:
Since we have yet to get an answer as to why the Devilfish was on the floor, I'll take a different approach.
Why was the guy walking on the gaming table?
|
|
|
|
|
2010/04/26 03:06:52
Subject: My first scratchbuild: Warhound
|
|
Drone without a Controller
Florida
|
I would say, restart with the correct scale, the pros far outweigh the cons. best of luck
|
|
|
|
|
|
2010/04/26 03:16:18
Subject: Re:My first scratchbuild: Warhound
|
|
Decrepit Dakkanaut
|
I agree, your only at the very beginning. If you were alot farther in Id say screw it and go for it. Scale is a pretty important thing in this game
|
|
|
|
|
2010/04/26 07:34:17
Subject: My first scratchbuild: Warhound
|
|
Daring Dark Eldar Raider Rider
|
Yeah you're probably right. Going to need lots more foam core
The thing that annoys me most is that when I did the thirst size comparison pic I didn't think it looked right.
Edit:
Picture to show size difference (width of "Toe Joint #1") Left is old right is new.
Picture to show size difference (lenght and height of "Toe Joint #1") Left is old right is new.
Should probably say that it is worth taking into account that these are pretty much the smallest parts apart from the head and possibly gun detailing.
|
|
This message was edited 2 times. Last update was at 2010/04/29 18:44:14
Rangerrob wrote:
Since we have yet to get an answer as to why the Devilfish was on the floor, I'll take a different approach.
Why was the guy walking on the gaming table?
|
|
|
|
|
2010/04/26 20:09:09
Subject: My first scratchbuild: Warhound
|
|
Nasty Nob
|
Or you know, if you decide to move forward with it, hey why not? Because you'll only be using it in Apocalypse anyway (probably) which means you can use the "counts-as" rules or you could make your own Kustom Datasheet for it.
The comments of the others here are well-taken, however. I think it all boils down to how important it is to you to have the standard scale. Although if you think that having an incorrect scale will make the rest of the build harder and cause you more problems down the road, I wholeheartedly advocate starting fresh. It is not uncommon to build a prototype before moving on to the genuine article - just consider the toes to be part of the prototyping phase. And then throw them in the Bitz Box for later terrain projects (like a wrecked titan or walker!)
Great energy on this project! Keep up the good work!
|
|
This message was edited 1 time. Last update was at 2010/04/26 20:13:48
|
|
|
|
|
2010/04/26 20:59:00
Subject: Re:My first scratchbuild: Warhound
|
|
Daring Dark Eldar Raider Rider
|
Yeah and I guess I could always finish it at a later date and give it some custom rules As for the project I will do what has been suggested by all of you, thank you all for the advice, and start afresh making sure I don't make such a foolish mistake. One thing that did cross my mind is this, seeing as I am at school still (can leave compulsory education if I want in a bit more than a month (I won't though)) and the "systems and controls", basically electronics dt, teacher is one of the people that runs the warhammer club I may be able to get him to cut some of the template out of acrylic using a "computer aided manufacture" machine which would just cut out a specified design. I could then use these for better templates to cut round, thus ensuring that all identical pieces would be identical. What do you guys think of that as a concept?
|
Rangerrob wrote:
Since we have yet to get an answer as to why the Devilfish was on the floor, I'll take a different approach.
Why was the guy walking on the gaming table?
|
|
|
|
|
2010/04/27 15:25:04
Subject: My first scratchbuild: Warhound
|
|
Nasty Nob
|
Wow, that's a great idea! You know, that's what it is all about - figuring out what tools are at your disposal and going with it. On that subject, do you think that the CAM machine could cut out ALL your pieces? WOW, that would speed up the process and then you could possibly get enough parts done quickly to make more than one Titan if you wanted! It would more than make up for your small setback and maybe even give you some pieces to share with other gamers if you wanted to!
|
|
|
|
|
|
2010/04/27 16:10:15
Subject: Re:My first scratchbuild: Warhound
|
|
Daring Dark Eldar Raider Rider
|
The Cam machine takes quite a long time to do things if I remember due to it using a drill to go round everything but I think I will ask the person tomorrow because in the past they offered to make me some blast templates if I sorted out the files so they may let me. If they do I could theoretically make 2 of every part I will need and thus be able to give another set to someone else or let people borrow the copies of individual pieces. Only problem is it could cost a bit in materials but I am still going to find out just glad I may potentialy have it at my disposal seeing as it is a machine that costs a few thousand pounds and so would not be able to get one easily . See  Scratch builds is never beaten sorry couldn't resist 
EDIT: I have just sent an email to the teacher 
EDIT2: Sorlog I meant that I could use it for templates not pieces themselves as it only cuts on a 2D plain and that would make it nigh on impossible to use for some of the actual pieces. If I did use it for actual pieces they would also be incredibly brittle
|
|
This message was edited 3 times. Last update was at 2010/04/27 16:41:28
Rangerrob wrote:
Since we have yet to get an answer as to why the Devilfish was on the floor, I'll take a different approach.
Why was the guy walking on the gaming table?
|
|
|
|
|
2010/04/27 16:29:22
Subject: My first scratchbuild: Warhound
|
|
Noble of the Alter Kindred
United Kingdom
|
Sorry if this has already been said
having trouble with reading at the moment
Could you not build the TOE JOINT#2 around the JOINT#2 section?
If you put the sides on tou just need to fill the centre.
hope that makes sense
|
|
|
|
|
|
2010/04/27 16:33:28
Subject: My first scratchbuild: Warhound
|
|
Daring Dark Eldar Raider Rider
|
If you mean build the shell then fill it with the end of #1 and some other foam core I did actually consider that but I am unsure about one issue and it is that there would be a gap between the top of the shell and #1
|
Rangerrob wrote:
Since we have yet to get an answer as to why the Devilfish was on the floor, I'll take a different approach.
Why was the guy walking on the gaming table?
|
|
|
|
|
2010/04/27 16:49:17
Subject: My first scratchbuild: Warhound
|
|
Noble of the Alter Kindred
United Kingdom
|
Yes that is correct if I understand you right
All you need do is insert some foam core in the gap and then trim it flush with the outer pieces
if necessary just fill and gaps with filler of choice or maybe skin it with some plastic card
|
|
|
|
|
|
2010/04/27 20:30:31
Subject: Re:My first scratchbuild: Warhound
|
|
Daring Dark Eldar Raider Rider
|
Just found out that the part labled toe joint #2 will require half an A3 sheet as I will need 8 of them and if I have solid blocks it is 7 layers thick That will take a ruddy long time and a lot more glue.
@ Chibi: I think the problem there that I would have is that it would be difficult to get the shell the right size and as until the filler was injected it would have almost no support and due to the way the pieces will but the pieces of foam core on each end wouldn't be exactly the same size. I also know that the method I am currently using works a treat (even if it does take a long time) so I think I will stick with that for now.
Edit: @ Chibi: ruddy hell it appears I misread the templates and now owe you an apology. Sorry for being dismissive in anyway I hope you will accept my humble apologies. Wow I am really going to have to look closely at some of these. 
@ everyone: Any advice is welcome, please feel to criticise but if you really want to help please download the templates as it will be a lot easier for me to relate to diagrams with text than descriptions. Automatically Appended Next Post: Ok all of the new toe piece #1s are done. I swear most of the time I am spending on this is just being sure glue is dry. Anyway I will put some pictures up in a bit Automatically Appended Next Post: edit: Correction I will add the pics when I get home tomorrow
|
|
This message was edited 4 times. Last update was at 2010/04/27 22:20:51
Rangerrob wrote:
Since we have yet to get an answer as to why the Devilfish was on the floor, I'll take a different approach.
Why was the guy walking on the gaming table?
|
|
|
|
|
2010/04/28 16:00:48
Subject: My first scratchbuild: Warhound
|
|
Daring Dark Eldar Raider Rider
|
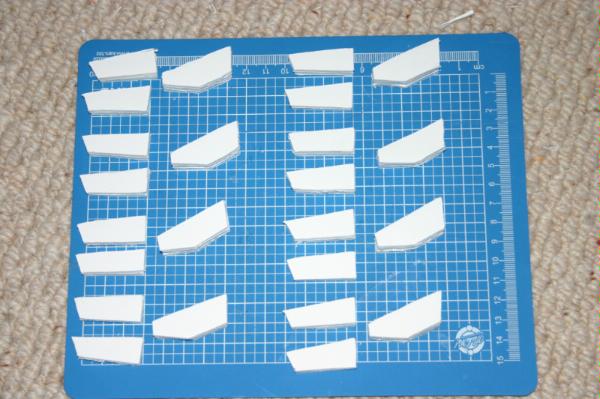
Now starting toe joint #2. after I have cut out 16 of them I will start uploading the new photos. nothing exciting really just a few comparisons
EDIT:
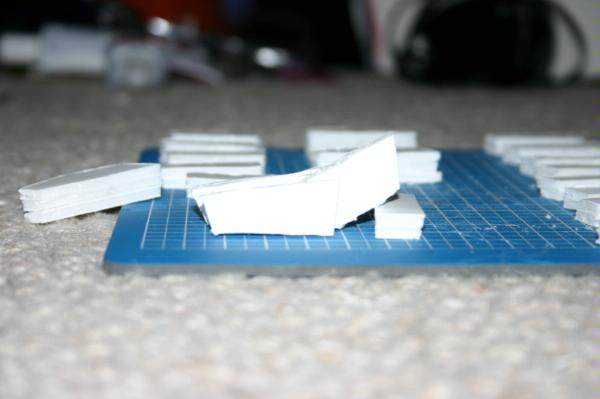
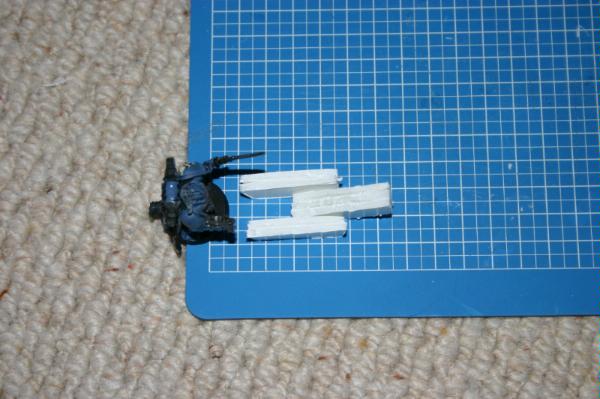
Nothing exciting just all the toe pieces I will need (not including the plasticard shell)
Edit:2
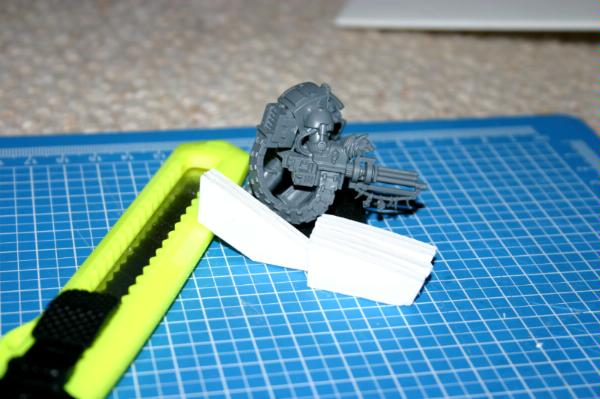
A quick pic of a "Toe Joint #1" piece next to a badly painted Blood Claw.
|
|
This message was edited 3 times. Last update was at 2010/04/29 18:45:54
Rangerrob wrote:
Since we have yet to get an answer as to why the Devilfish was on the floor, I'll take a different approach.
Why was the guy walking on the gaming table?
|
|
|
|
|
2010/04/29 15:26:16
Subject: My first scratchbuild: Warhound
|
|
Nasty Nob
|
Wow, you're making fast progress now. Keep up the good work!
|
|
|
|
|
|
2010/04/29 16:28:51
Subject: My first scratchbuild: Warhound
|
|
Dakka Veteran
|
Yeah, looking forward to seeing this go further.
|
Okay, I've been on a bit of a hiatus 2011-14
Currently working on my Riot Guard.
DA:90-S+++G+M++++B+++I+Pw40k99+D++A+++/cWD142R++T(M)DM+ |
|
|
|
|
2010/04/29 17:06:23
Subject: My first scratchbuild: Warhound
|
|
Daring Dark Eldar Raider Rider
|
Newest pics are uploading now although not all will bee added to thread as one of them is a bit crazy due to the flash. As you will soon see I have swapped to a standard marine for size comparisons.
EDIT: Here they are
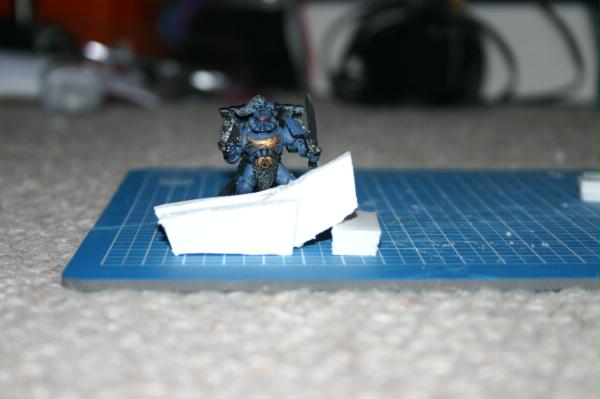
Terminator comparison with toe mock up
Another mock up
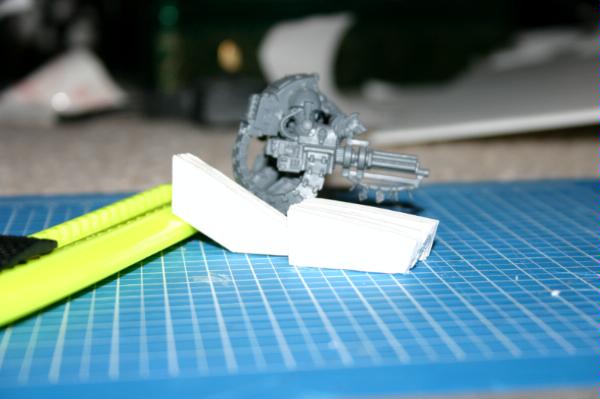
Blood Claw comparison mock up (sorry for the bad painting I'm not very good and it's are a couple of years old)
Another Blood Claw comparison mock up (this and next pin the model is next to the mock up so distance is approximately equal)
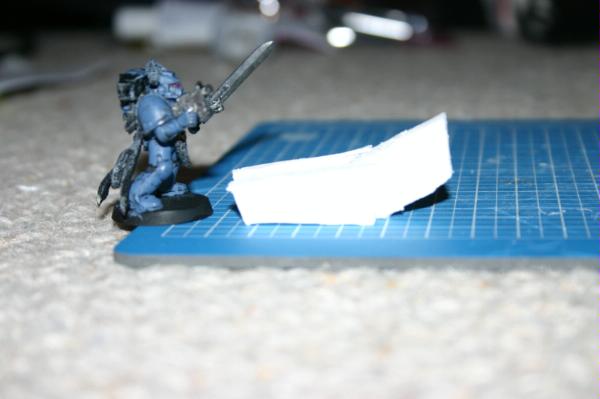
You guessed it, another Blood Claw comparison mock up
And one from above
Will add some more after I have taken some more. I am, however, back to the same point as last time wondering how to strengthen the toes. Automatically Appended Next Post:  HA I figured out the support issue about the end of the toe. Thank you Chibi you gave me a killer Idea. Well you mentioned about using offcuts and last night I realised the support didn't need to go very deep into the toe. Well ,And here's the clever part(always wanted to say that), Due to me restarting and me having misread the blueprints last time round anyway I have lots of "Toe Joint #2" pieces that are the same width as the "Toe Joint #1" pieces for this time round. I wonder if the people reading this can see where this is going. These "Toe Joint #2" pieces also are have the same angle corners as the one that are the correct scale. So I will butcher half of those to create end support for each toe thus solving one of the problems I was having
|
|
This message was edited 2 times. Last update was at 2010/04/29 18:35:20
Rangerrob wrote:
Since we have yet to get an answer as to why the Devilfish was on the floor, I'll take a different approach.
Why was the guy walking on the gaming table?
|
|
|
|
|
2010/04/29 19:22:32
Subject: My first scratchbuild: Warhound
|
|
Nasty Nob
|
Looking GREAT! I noticed that the toes are just a little chewed up. That won't matter to the end product, but I thought I'd share what I learned when I worked with foamboard. The short story - you need a really sharp blade to cut it (razor). Of course, be VERY CAREFUL with these - they are not to be messed with - but if the blade is a little dull, well, it really chews up the foamboard.
I learned this when working on some scratchbuilt Ork Trukks. By the way, they turned out great - but I did have to sort of fortify the sides with a little plasticard because otherwise it was REALLY jagged.
Just thought I'd share. Keep up the good work!
Automatically Appended Next Post:
After looking at your pics, you know, I don't think yours look that jagged. I think it was just the way I was looking at the picture.
|
|
This message was edited 1 time. Last update was at 2010/04/29 19:23:34
|
|
|
|
|
2010/04/29 19:43:55
Subject: My first scratchbuild: Warhound
|
|
Daring Dark Eldar Raider Rider
|
The reason it is chewed up is trimming it. Basically I am using a new Stanley knife as moth my scalpels have disappeared. The foamboard doesn't come out of the sheet chewed up at all but if I trim it for some reason that happens. I plan on cladding them in plasticard anyway but that's the reason for it. Although I could redo the pieces that look chewed up and save myself some plasticard. It appears there are just 2 messed up toes (messed up as in tatty round the edges), and only one edge of one layer each. Doesn't get more annoying than that. Automatically Appended Next Post: If I have learnt anything about what scratch building is about. I't not so much bout having that centre piece to your army(although it will be nice), it isn't even so much the fact that you can literally save hundreds. I would say that the best bits are knowing that the finished product will be one of a kind and that scratch building itself is about overcoming any and all obstacles using the tools you have at your disposal. A disaster isn't necessary a disaster and can in fact turn into a stroke of luck. I just felt like I should say that. Automatically Appended Next Post: I have put my previously mentioned plan into action and there is now no going back. Luckily it does look like it is going to work
|
|
This message was edited 3 times. Last update was at 2010/04/29 22:46:57
Rangerrob wrote:
Since we have yet to get an answer as to why the Devilfish was on the floor, I'll take a different approach.
Why was the guy walking on the gaming table?
|
|
|
|
|
2010/04/30 01:45:22
Subject: My first scratchbuild: Warhound
|
|
Noble of the Alter Kindred
United Kingdom
|
No Probs mate
Good move putting the figure in for a scale comparison
Yikes he's a big chap!
Spot on about scratching. Not that I have attempted anything of the monumental proprtions you are doing here
You will find that you will learn a lot and gain a great deal of confidence. So even any errors are a positve
good luck with the project and looking forward to seeing the progress
|
|
|
|
|
|
2010/04/30 16:58:36
Subject: My first scratchbuild: Warhound
|
|
Daring Dark Eldar Raider Rider
|
Started plasticarding 1 toe
Automatically Appended Next Post:
Back 7pm Sunday so no more progress today
|
|
This message was edited 1 time. Last update was at 2010/04/30 17:11:16
Rangerrob wrote:
Since we have yet to get an answer as to why the Devilfish was on the floor, I'll take a different approach.
Why was the guy walking on the gaming table?
|
|
|
|
|
|
|


