| Author |
Message |
 |
|
|
|
|
Advert
|
Forum adverts like this one are shown to any user who is not logged in. Join us by filling out a tiny 3 field form and you will get your own, free, dakka user account which gives a good range of benefits to you:
- No adverts like this in the forums anymore.
- Times and dates in your local timezone.
- Full tracking of what you have read so you can skip to your first unread post, easily see what has changed since you last logged in, and easily see what is new at a glance.
- Email notifications for threads you want to watch closely.
- Being a part of the oldest wargaming community on the net.
If you are already a member then feel free to login now. |
|
 |
2010/05/01 00:52:52
Subject: My first scratchbuild: Warhound
|
|

Tough Tyrant Guard
|
Dont do that much detail to the toes , Im making a new blue print that will have hinged toes and and will be able too move them around.
My thrid warhound is in the same area as his right now but im Resin casting all the parts so its taking a lot longer to build .
As for progress on urs its looking great , for the shin armour i been using a 3mm thick plastic card its been working for me for battle damage and stableableity too
thom
|
|
|
 |
|
2010/05/01 11:46:40
Subject: My first scratchbuild: Warhound
|
|

Member of the Malleus
|
i demand that this thread be named TOE OF WARHOUND!  i have always wanted to make one of these, good luck mate
|
 "I am the hammer, "I am the hammer,
i am the right hand of my emperor,
the instrument of his will,
the tip of his spear, the edge of his sword"  |
|
|
|
|
2010/05/01 19:06:14
Subject: My first scratchbuild: Warhound
|
|

Daring Dark Eldar Raider Rider
|
Thanks for the support guys I just got home. I would be further than the toes is it wasn't for that scaling **** up so I am still a bit annoyed by that. I probably wont add detail to the toes until the end when I do other detailing and assemble the modular parts.
p.s. I love the word modular
p.p.s No I'm serious I really like how it sounds
Automatically Appended Next Post:
EDIT: Star gate what did you use to basecoat your titan? due to there being foamcore and so on. Solorg mentioned that there was some sort of spray I could use but he couldn't recall the name of it.
Automatically Appended Next Post:
edit 2: finnished cladding one foot I think. unless I clad the card sides that is. Is it worth it?
|
|
This message was edited 2 times. Last update was at 2010/05/01 23:17:56
Rangerrob wrote:
Since we have yet to get an answer as to why the Devilfish was on the floor, I'll take a different approach.
Why was the guy walking on the gaming table?
|
|
|
|
|
2010/05/02 07:15:55
Subject: My first scratchbuild: Warhound
|
|
Daring Dark Eldar Raider Rider
|
After I get back from work will try and finish plasticarding the three sides that REQUIRE plasticard cladding. Maybe some more pictures up later 
|
Rangerrob wrote:
Since we have yet to get an answer as to why the Devilfish was on the floor, I'll take a different approach.
Why was the guy walking on the gaming table?
|
|
|
|
|
2010/05/02 08:53:55
Subject: My first scratchbuild: Warhound
|
|
Scarred Ultramarine Tyrannic War Veteran
|
Cant wait to see it finnished
|
 "Whilst we stand, we fight. Whilst we fight, we prevail. Nothing shall stay our wrath" "Whilst we stand, we fight. Whilst we fight, we prevail. Nothing shall stay our wrath"
 Guilliman and the Ultramarines are like Manchester United, everyone hates them because they are so awesome! Guilliman and the Ultramarines are like Manchester United, everyone hates them because they are so awesome!
|
|
|
|
|
2010/05/02 17:52:48
Subject: My first scratchbuild: Warhound
|
|
Daring Dark Eldar Raider Rider
|
Thanks flying but I will need to warm up before doing more tonight. Automatically Appended Next Post: Ok I plasticarded a couple more toes. I now have enough toes for a foot  Any thoughts on what I said about the feet yet?
|
|
This message was edited 2 times. Last update was at 2010/05/03 00:00:39
Rangerrob wrote:
Since we have yet to get an answer as to why the Devilfish was on the floor, I'll take a different approach.
Why was the guy walking on the gaming table?
|
|
|
|
|
2010/05/03 22:12:29
Subject: My first scratchbuild: Warhound
|
|
Daring Dark Eldar Raider Rider
|
I have taken a few more pics of the sort of expected foot area. looks a bit... well... massive. However I was following the templates to the correct scale so should be fine when the next few bits are added.
|
Rangerrob wrote:
Since we have yet to get an answer as to why the Devilfish was on the floor, I'll take a different approach.
Why was the guy walking on the gaming table?
|
|
|
|
|
2010/05/04 21:31:08
Subject: My first scratchbuild: Warhound
|
|
Nasty Nob
|
I don't know the name of the spray paint you need - someone in the Painting Forum was talking about it, it was "Zero" something or other. You might ask there and see who bites - the stuff does not eat foam.
Keep up the good work. Today the Toes, Tomorrow the World!
|
|
|
|
|
|
2010/05/04 22:12:44
Subject: My first scratchbuild: Warhound
|
|
Daring Dark Eldar Raider Rider
|
Thanks as always for your support Solorg the progress will be very slow over the next four to five weeks as my GCSE exams start in a couple of weeks and they actually count for something.
EDIT: New pics up soon. I have 6 uploading now
EDIT2: Here they are. The following pics are all size comparisons with an approximation of how big the feet will be when done.
Well here is a terminator size comparison (only just noticed I haven't put the massive shoulder armour on him yet) as you can see I have plasticarded those toes. The two joints are however not yet glued together yet.
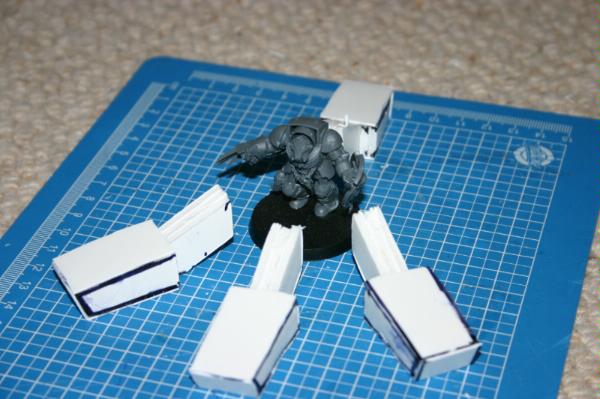
Here's another comparison with the terminator. Just thought I'd show the length of the foot
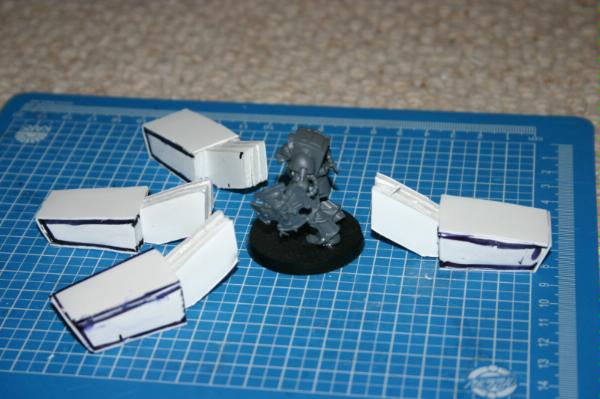
And another to show width
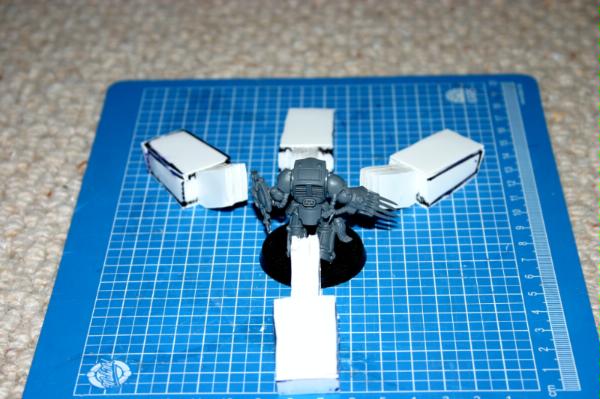
Same with standard marine again
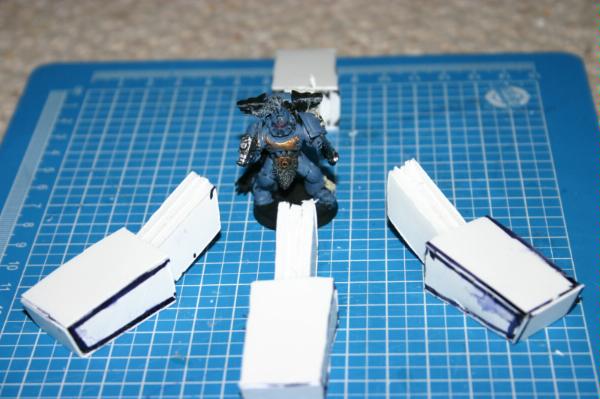
And another
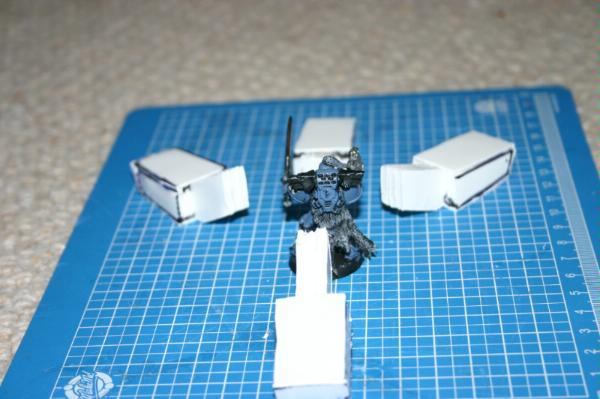
And last but not least
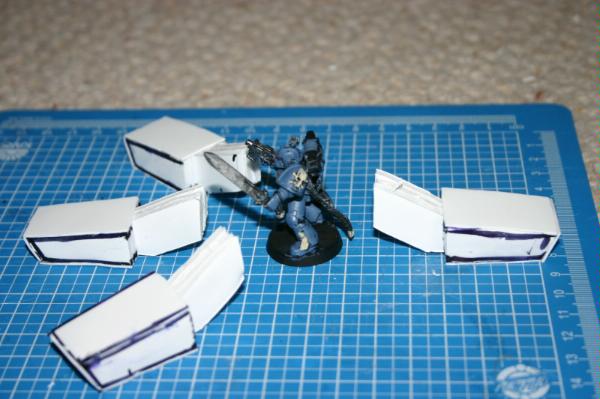
One question. does anyone else think those toes make the marines look really small? Automatically Appended Next Post: Should probably have mentioned the dark blue is permanent marker and apparently the glue acts as a solvent for it.
|
|
This message was edited 3 times. Last update was at 2010/05/04 22:36:28
Rangerrob wrote:
Since we have yet to get an answer as to why the Devilfish was on the floor, I'll take a different approach.
Why was the guy walking on the gaming table?
|
|
|
|
|
2010/05/04 23:18:44
Subject: My first scratchbuild: Warhound
|
|
Noble of the Alter Kindred
United Kingdom
|
He doesn't want to be standing there when the Titan is completed!
Who said SM's ain't squishy
keep up the good work when you can - but get that head down and good luck with the GCSE's
|
|
|
|
|
|
2010/05/05 00:11:14
Subject: My first scratchbuild: Warhound
|
|
Daring Dark Eldar Raider Rider
|
Thanks Chibi I should be ok I am averaging As or more on all except english lit which is stupidly hard. And yeah that guy would not want to be there. He'd be squashed down to his shin
|
Rangerrob wrote:
Since we have yet to get an answer as to why the Devilfish was on the floor, I'll take a different approach.
Why was the guy walking on the gaming table?
|
|
|
|
|
2010/05/07 15:47:53
Subject: My first scratchbuild: Warhound
|
|
Daring Dark Eldar Raider Rider
|
Just thought I'd give a little status update. I am still plasticarding the toes but haven't had much time recently. My exams start in 2 weeks. will be finished some point 5 weeks from now
|
Rangerrob wrote:
Since we have yet to get an answer as to why the Devilfish was on the floor, I'll take a different approach.
Why was the guy walking on the gaming table?
|
|
|
|
|
2010/05/07 20:36:06
Subject: Re:My first scratchbuild: Warhound
|
|
Been Around the Block
St. Louis, MO
|
Keep up the work, and dont get discouraged by the feet I have found that they are 40% of the work on a titan and have more parts than just about any other part of the titan. I cannot wait to see it finished.
|
|
|
|
|
|
2010/05/08 09:43:37
Subject: My first scratchbuild: Warhound
|
|
Daring Dark Eldar Raider Rider
|
Thanks siegemaster I will not give up on this build. After my exams I have a holiday going from then up until September so I will have lots of time then to get it done. I am still thinking about what weapons I will go for on it I should probably get the apocalypse rule book but it's ridiculously expensive. For my baneblade I resorted to copying all the relevant rules and its stats out by hand to avoid copy write
|
Rangerrob wrote:
Since we have yet to get an answer as to why the Devilfish was on the floor, I'll take a different approach.
Why was the guy walking on the gaming table?
|
|
|
|
|
2010/05/08 15:32:24
Subject: My first scratchbuild: Warhound
|
|

Hardened Veteran Guardsman
|
Looks like you're using the same templates I did to build my warhound; its a great set of prints but you gotta remember that they're intended for paper craft and thus have to keep thinking of how to modify them as you go.
http://i114.photobucket.com/albums/n265/dracheous_fur/IMG_1996.jpg
http://i114.photobucket.com/albums/n265/dracheous_fur/IMG_1995.jpg
http://i114.photobucket.com/albums/n265/dracheous_fur/IMG_1753.jpg
If you got questions I'm more than happy to answer them. Mine is sitting pretty waiting for paint, I just havn't had the time to sit down and make my "masks" for painting the scheme I have intended ((will involve a lot of painted surface detail, ie. hatches, armor plates etc.))
Also the name of the paint you want for spraying on foam is H2O paints from Krylon. Its a water based spray, its actually great for coating scenery peices do because after a coat of that and letting it dry for a couple days you can spray regular paint spray over it ((just don't go nuts where you have runs everywhere cause that'll start to mess with the water paint itself)) and you're good to go.
|
"Of course I have, have you ever tried going insane with out power? It sucks! Nobody listens to you." |
|
|
|
|
2010/05/08 23:43:37
Subject: My first scratchbuild: Warhound
|
|
Daring Dark Eldar Raider Rider
|
Here's a question, How did you make the centre foot part? did you go for layers of foamcore for durability or a shell to use less of it?
|
Rangerrob wrote:
Since we have yet to get an answer as to why the Devilfish was on the floor, I'll take a different approach.
Why was the guy walking on the gaming table?
|
|
|
|
|
2010/05/09 03:35:54
Subject: My first scratchbuild: Warhound
|
|
Hardened Veteran Guardsman
|
I built mine entirely out of sheet styrene; the center of the foot was sheet after sheet of cut to size styrene, I decided this route over a hollow with honey comb for strength because ALL of the models weight will travel to that one point and then down into the toes.
If you're going to do the foamcore, I'd suggest cutting a band of sheet styrene to go around the outside of the shaped foamcore. I used a red filler puddy to sand down to make square edges after on the feet ((as you can see in the in progress pictures)). everything above that point is hollow with honey comb inserts inside. What I mean by honey comb is really just a bunch of triangles that were cut at 90 degrees and then glued them to the inside of two "wall" parts. However the legs are now solid because I used a TONNE of hot glue to connect the copper pipe joints. The hollow legs allowed the glue to travel into the leg and get more surface area to bond too.
The torso and hull are all the same method, which triangles made to fit the peices to keep them all the same angle to help keep it linear. The larger parts in the hull have spacers that go all the way across top to bottom which also act as rails for some of the side peices as well.
Really the best advice I can give is to make several supports to glue corners together to keep the peices at the angle you want so that when you attach them all at the end it states true.
|
"Of course I have, have you ever tried going insane with out power? It sucks! Nobody listens to you." |
|
|
|
|
2010/05/09 03:45:01
Subject: Re:My first scratchbuild: Warhound
|
|
Noble of the Alter Kindred
United Kingdom
|
the center of the foot was sheet after sheet of cut to size styrene,
Laminated is the technical term Dracheous
Sorry to be pedantic
Any hoo your comments made me think about CoG and weights at the base (ie feet)
Did the laminated method help to stop the Titan falling over, or is it generally not a problem?
|
|
|
|
|
|
2010/05/09 03:54:39
Subject: Re:My first scratchbuild: Warhound
|
|
Hardened Veteran Guardsman
|
I get booted off forums when I start using big words  .
Yes, laminating the peices will help make it bottom heavy; but truthfully the ONLY real way to deal with stability is going to be posture. As you can see in mine it is leaned forward sitting on the left foot with the right raised as if its taking a step. I turned the hull so that it is pointing the same direction of that foot to help pivot its center of balance towards that foot rather than the one with only a few toes in contact with the table. However the toes are so wide spread that I was able to literally turn the hull in any direction before gluing it with out issue. However I did only test that theory before the arms were mounted.
OH! Another thing to note; if you decide to go with using magnets like I did for the arms ((extremely good idea if you want to change up weapons later with out body work to the warhound. Remember to glue your magnet or washer BEFORE closing the hull up. I have my steel washer magnet counter part apoxied to th exterior of the hull; and its nothing but trouble. The magnets are contained within pop bottle caps that were trimmed on angles ((actually I just held it over a belt sander to get a flat edge to change the angle of the cap so that the guns point up or down for position.)) and those hold very well. But until I used the apoxy on the washers the steel of course doesn't model well to many glues. At least if it is inside the hull and breaks free you can still attach it and then position it by magnetization. It also lets you swing the guns back and forth if you're playing against someone who has a thing against static models and line of sight ((specially if you're imobilized and they only give you that 45 degree arc because the arm is glued in one position. ))
|
"Of course I have, have you ever tried going insane with out power? It sucks! Nobody listens to you." |
|
|
|
|
2010/05/09 04:04:32
Subject: My first scratchbuild: Warhound
|
|
Servoarm Flailing Magos
|
I can see this is going to take a while... but it won't look like a bucket of grot-slop like my titan did... that's what happens when you try to make one in 12 hours I suppose.
|
http://www.teun135miniaturewargaming.blogspot.com/ https://www.instagram.com/teun135/
Foxphoenix135: Successful Trades: 21
With: romulus571, hisdudeness, Old Man Ultramarine, JHall, carldooley, Kav122, chriachris, gmpoto, Jhall, Nurglitch, steamdragon, DispatchDave, Gavin Thorne, Shenra, RustyKnight, rodt777, DeathReaper, LittleCizur, fett14622, syypher, Maxstreel |
|
|
|
|
2010/05/09 14:57:27
Subject: My first scratchbuild: Warhound
|
|
Daring Dark Eldar Raider Rider
|
Thanks for all the help guys. unfortunately I will be making little to no progress for the next couple of weeks as I have quite a lot to do. But after 15/06/210 I will have a summer holiday till around September the 2nd so I will definitely finish this no matter how long it takes.
Automatically Appended Next Post:
Ok here is my plan for the centre of the foot. I am going to use layers of foam-core then use plasticard to clad round the sides with exposed foam. I am contemplating cladding the bit of toe joint to that joins joins the the main part of the foot but am unsure if it is a good idea
|
|
This message was edited 1 time. Last update was at 2010/05/09 18:02:18
Rangerrob wrote:
Since we have yet to get an answer as to why the Devilfish was on the floor, I'll take a different approach.
Why was the guy walking on the gaming table?
|
|
|
|
|
2010/05/09 19:36:15
Subject: My first scratchbuild: Warhound
|
|
Blood Angel Terminator with Lightning Claws
|
It's a good idea if you want it to look as good as possible. Odds are 99% people would notice it though. I'm not a big fan of short cuts, I almost pasted out when you said you might not start over at the right scale.
|
|
|
|
|
|
2010/05/09 21:14:04
Subject: My first scratchbuild: Warhound
|
|
Daring Dark Eldar Raider Rider
|
Heh where did I say that? oh and I have to ask a really big favour. I don't have the apocalypse rulebook and I need the weapon stats. any chance of being able to get a stat line up? I would really appreciate it.
Edit: Oh yeah I forgot, the status report. I have 2 end toe joint pieces still to palcticard and then I will be done with those bits and I will feel relieved. But only for a little while sa I am still not entirely certain on the foot centre in terms of how I am going to template it.
|
|
This message was edited 1 time. Last update was at 2010/05/09 21:26:01
Rangerrob wrote:
Since we have yet to get an answer as to why the Devilfish was on the floor, I'll take a different approach.
Why was the guy walking on the gaming table?
|
|
|
|
|
2010/05/09 23:45:15
Subject: Re:My first scratchbuild: Warhound
|
|
Hardened Veteran Guardsman
|
Your safest bet is to just build the turbo lasers for the first weapons. They're strength D which is awesome for you, bad for everyone else . That and they're the easiest in terms of scratch building up. Just a box housing arm, and two barrels.
The BEST way to "clean up edges" is to get a filler puddy/plaster that adheres to plastic ((check your local automotive store if you want to buy in bulk for something to do this; just tell the store rep that you want a fast dry easy sand filler that will bond to plastics with out warping them)) Take that filler and coat the peice, and do each peice before you start assembling the large block parts together to let you sand it so you get flush edges. Then you can hop down to the hobby shop to snag some thin narrow strips of styrene for a few dollars and do edging for some places to build up detail if you wish. For the most part I'm going with painted detailing on my war hound.
|
"Of course I have, have you ever tried going insane with out power? It sucks! Nobody listens to you." |
|
|
|
|
2010/05/10 08:07:50
Subject: My first scratchbuild: Warhound
|
|
Daring Dark Eldar Raider Rider
|
Dreacheous where did you find those pistons?
|
Rangerrob wrote:
Since we have yet to get an answer as to why the Devilfish was on the floor, I'll take a different approach.
Why was the guy walking on the gaming table?
|
|
|
|
|
2010/05/10 10:08:59
Subject: My first scratchbuild: Warhound
|
|

Bounding Ultramarine Assault Trooper
|
Hey good job so far i would like to see it done and wnay who has made it add me then show me k.
|
"Straight Fething Silver"  Tanith first and only Tanith first and only
I have a reputation, Modile, a reputation as a fair, honest man who treats his soldiers well and supports them in the face of darkness. Potentially, that reputation makes me soft. It seems I understand failure and forgive it. Some, like Kowle, believe me to be a weak commissar, not prepared to take the action my rank demands. Not prepared to enforce field discipline where I see it failing. I am an Imperial commissar. I will enflame the weak, support the wavering, guide the lost. I will be all things to all men who need me. But I will also punish without hesitation the weak, the incompetent, and the treasonous.
I am a Commissar. I am empowered to deliver justice wherever I see it lacking. I am empowered to punish cowardice. I am granted the gift of total authority to judge, in the name of the Emperor, on the field of combat.
— Colonel-Commissar Ibram Gaunt, prior to the field execution of his uncle General Aldo Dercius |
|
|
|
|
2010/05/10 13:20:07
Subject: My first scratchbuild: Warhound
|
|
Hardened Veteran Guardsman
|
I made the pistons from from tube and rod you can get at a hobby store; again I forget the size I used off hand.
|
"Of course I have, have you ever tried going insane with out power? It sucks! Nobody listens to you." |
|
|
|
|
2010/05/10 15:49:19
Subject: My first scratchbuild: Warhound
|
|
Daring Dark Eldar Raider Rider
|
Ah, ok. I will go in next chance I get and ask around.
|
Rangerrob wrote:
Since we have yet to get an answer as to why the Devilfish was on the floor, I'll take a different approach.
Why was the guy walking on the gaming table?
|
|
|
|
|
2010/05/11 19:28:28
Subject: My first scratchbuild: Warhound
|
|
Daring Dark Eldar Raider Rider
|
I have a sneaking suspicion the glue I was using was eating foam. So I am switching to PVA for obvious reasons.
Edit: luckily no structural parts have been in contact with it
|
|
This message was edited 1 time. Last update was at 2010/05/11 19:33:20
Rangerrob wrote:
Since we have yet to get an answer as to why the Devilfish was on the floor, I'll take a different approach.
Why was the guy walking on the gaming table?
|
|
|
|
|
2010/05/11 19:45:21
Subject: My first scratchbuild: Warhound
|
|
Noble of the Alter Kindred
United Kingdom
|
Hi Rowan
For sticking polystyrene together I use No Nails glue from Poundland. The parts can slide a bit at first but once lined up and clamped they should hold really well.
Leave clamped to cure but if clamping foam it may be an idea to use something to spread the pressure so you don't dent it if you see what I mean
hth
|
|
|
|
|
|
|
|

 Orks is never beaten.

