| Author |
Message |
 |
|
|
|
|
Advert
|
Forum adverts like this one are shown to any user who is not logged in. Join us by filling out a tiny 3 field form and you will get your own, free, dakka user account which gives a good range of benefits to you:
- No adverts like this in the forums anymore.
- Times and dates in your local timezone.
- Full tracking of what you have read so you can skip to your first unread post, easily see what has changed since you last logged in, and easily see what is new at a glance.
- Email notifications for threads you want to watch closely.
- Being a part of the oldest wargaming community on the net.
If you are already a member then feel free to login now. |
|
 |
2012/07/06 16:23:46
Subject: The Mars Warlord Titan Project
|
|

Regular Dakkanaut
|
Good question, it's largely because when I've tried plasticard curves I could never shape it properly. It always creased where I wouldn't want to, and it was horrible to try and glue down. If I used thinner plasticard to reduce this, then other problems arose like the glue making it sag when using layers to give strength, or slight sagging where it glues to any internal support vanes. On top of that it sands amazingly, the filler, so it's far easier to adjust if something does go wrong. In terms of the cylinders it's so difficult to use plasticard too because you have to eventually join the two halves that wrap around the piece together, the filler gives a seamless finish. The only problem I'm aware of for filler, is that it soaks up the solvent like a sponge, and it then doesn't dry properly, it becomes rubbery, I think this is because it's partly styrene and porus. It means I can't use much solvent afterwards, and none on the surface of the filler, but superglue should suffice. Hope that all makes sense 
|
|
|
|
 |
|
2012/07/06 16:30:11
Subject: Re:The Mars Warlord Titan Project
|
|

Posts with Authority
Boston-area [Watertown] Massachusetts
|
Makes sense to me. You seem comfortable with the process, and are making fast headway.
Eventually, someone's going to come in here, and ask you to cast up a copy for them.
|
Falling down is the same as being hit by a planet — "I paint to the 20 foot rule, it saves a lot of time." -- Me
ddogwood wrote:People who feel the need to cheat at Warhammer deserve pity, not anger. I mean, how pathetic does your life have to be to make you feel like you need to cheat at your toy army soldiers game?
 |
|
|
|
|
2012/07/06 17:11:52
Subject: Re:The Mars Warlord Titan Project
|
|
Ork Boy Hangin' off a Trukk
|
Dat iz purdee!
Gotz ta git me spannaz an' mekboyz ta staht up me Gargant pictures!
Very cool.
|
" It says in the rules that if there are no models from one side left on the table, then that side has lost. What it DOESN'T say is that I can't pick my opponent's models up and throw them on the floor, so if I'm losing the game, all I have to do is pick my opponents models up and throw them on the floor, and then I WIN! YAY! Woohoo. Loophole: FOUND! "
by Sgt Sixkilla
 13k WAAAGH!!! Skipphag 13k WAAAGH!!! Skipphag
 3k (Angels of Absolution); DV (Dark Angels); 3k (Angels of Absolution); DV (Dark Angels);  3k (Fire Serpents - Salamander successor) & 2k Salamanders 3k (Fire Serpents - Salamander successor) & 2k Salamanders
 75 (Death Korps) 75 (Death Korps)
 3k (Kabal of the Twisted Razor), 4k Tau 3k (Kabal of the Twisted Razor), 4k Tau |
|
|
|
|
2012/07/07 02:44:53
Subject: Re:The Mars Warlord Titan Project
|
|
Regular Dakkanaut
|
Well, If I seem comfortable in what I'm doing it's probably because I've tried to think of every possible detail as well as I can. I have a tendancy to 'over analyse' in that way, probably one of the reasons I'm naturally good at physics. It just means I can feel I understand every part of the model in great detail, and because it's taken me such a long time to design I've just slowly absorbed tons of information online in how to do things and which parts of my model they apply to. The filler technique for example, although I did link to the Will Hayes video where he talked about it, it's not where I learnt it. I learnt that several years ago through a website called the 405th, which is a halo replica prop forum. They use this technique to strengthen and detail the costumes they build. The reason I was on that website in the first place was that they use the same technique that I use to create the basic templates I construct from. This very long chain of knowledge has just been built up over the years to a point that I'm very comfortable to use as much as I possibly can, and whilst I know that there are bound to be parts of which i could do better. I think I should at least be able to manage a satisfactory level with the knowledge I have. That probably makes me sound cockier than it should, but I'm just saying I've done my research
Well, if somebody did ask, that would just be cool that they think that highly of the model. Yea, I'm going as fast as I can, It's been a long time coming this project, and I'm not going to waste the time that I'm inspired enough to run at full speed. I also anticipate large delays when I get into the casting and the large armour plates, so I intend to give as much time as possible to those.
Thanks skipphag da devoura, much appreciated
Also, Dakka Dakka's fast becoming my favorite forum, you guys seem much more enthusiastic and involved than other places, and whilst I appreciate it might be because this thread is in what I anticipate as a high volume sub forum, being the general P&m compared to P&M blogs section, It's been really friendly and welcoming, thanks 
I just got back from my prom, at 3ish, good night, but I'm going to see what I can get done whilst I'm still awake, I don't need sleep... Much...
|
|
This message was edited 1 time. Last update was at 2012/07/07 02:47:35
|
|
|
|
|
2012/07/07 02:53:45
Subject: Re:The Mars Warlord Titan Project
|
|
Posts with Authority
Boston-area [Watertown] Massachusetts
|
As long as you stay in the Painting and modelling section (and the DCM section), you're fairly safe. The various game sub-forms are good, but stay out of the YMDC threads.
*ALL* good hobbyists, all good modelmakers learn from a long, long chain of events.
For example, my skills are from making regular models, some prop work, and Model Railroading, as well as a light background in "Fine art". Which, of course, makes me laugh when people "Discover" something like Verdigris of "Zenithal" airbrushing...and claim them to be new, or just discovered. These techniques have existed for decades, if not centuries (Verdigris).
Anyways. I really enjoy the fact that you ARE writing out the "Thought process" with step by step examples. Unlikely folks are going to follow your steps, but for the ONE PERSON who does...you're there for them. I try to do the same in my plog, when I do something 'weird', like salvaging clear plastic canopies.
Keep up the work, get some sleep, glad you had a great prom!
|
Falling down is the same as being hit by a planet — "I paint to the 20 foot rule, it saves a lot of time." -- Me
ddogwood wrote:People who feel the need to cheat at Warhammer deserve pity, not anger. I mean, how pathetic does your life have to be to make you feel like you need to cheat at your toy army soldiers game?
|
|
|
|
|
2012/07/08 04:48:48
Subject: Re:The Mars Warlord Titan Project
|
|
Regular Dakkanaut
|
Yea, I guess you're right about the learning thing. Thinking about it, it's normal, but just seems such a different way to the school learning I've spent most of my life receiving. What you mention is also why I'm doing it the way I am, because I know that this is the kind of thread that I myself would love to have found being done by somebody else.
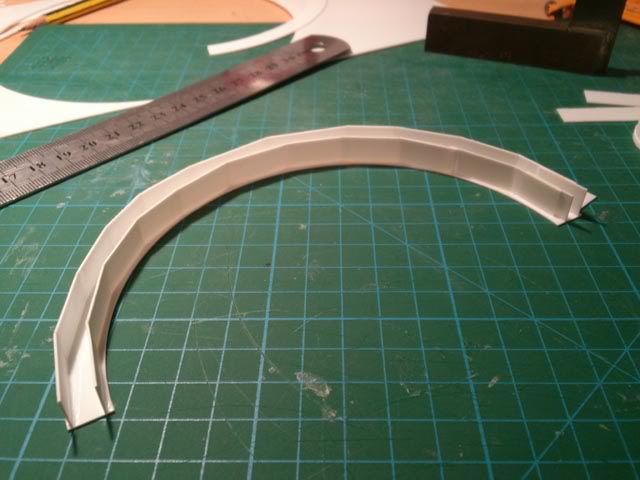
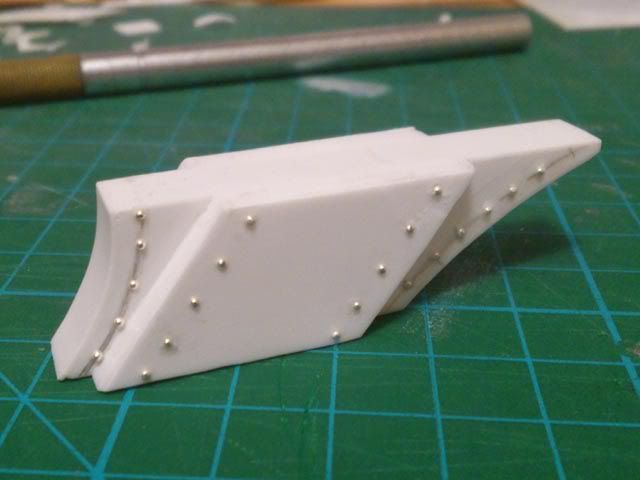
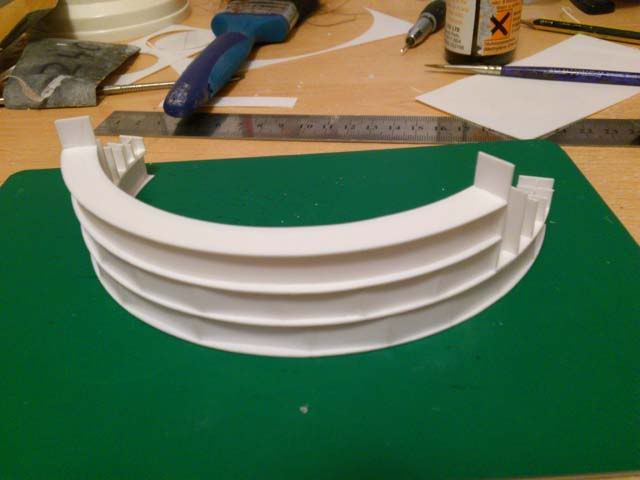
I started of tonight by beginning the curved heel plate, it was quite daunting and I think I was avoiding it slightly, but I pressed on. This is the way I'm choosing to give it internal structure, the two walls are assembled from lots of fixed width rectangles. Because I was sure to make all the angles, right angles, when I joined two of the plates together to make the curve, they stand perpendicular, meaning the entire wall has a uniform height. This just means I can easily build another layer on top. The walls are slightly behind the edge of the true curve as I will fill the created gap with the filler, smoothing to give the curved plate.
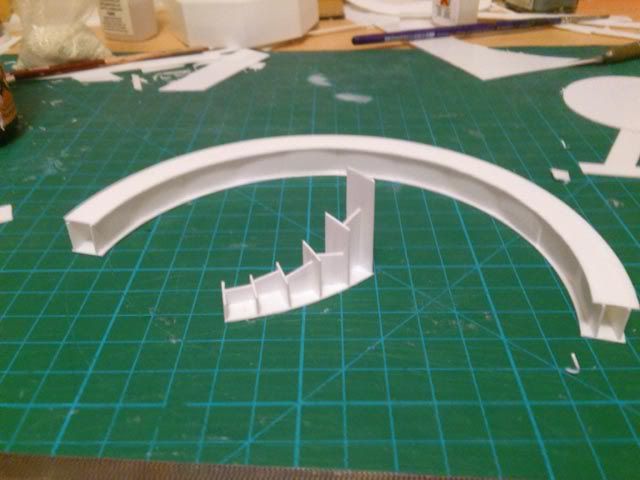
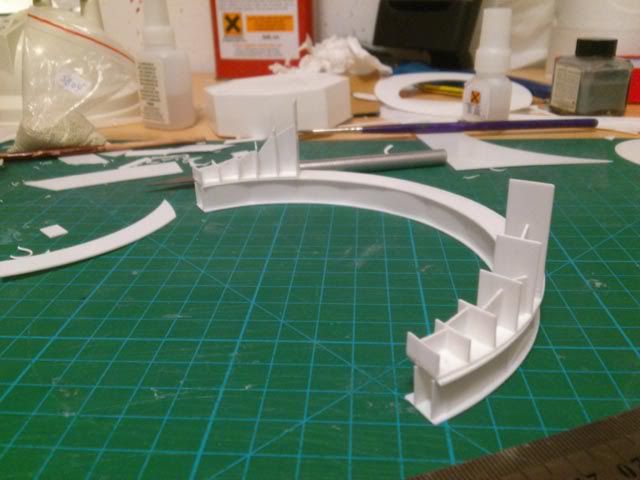
This shows the end curve where a gap exists so that the ankle caps don't intersect. To build this I cut each of the vertical pieces according to my templates and spaced them correctly before adding spacers between to provide support. The spacers also guarantee they are perpendicular. I built two of these, and this is just showing the placement on the heel piece. Compare this to the back plate of the foot on the renders if anybody wasn't sure what I meant.

I will be continuing to build the centre part to match the height needed. This is just using the same wall method as before, take ages though so it shall be completed another day. Once that is completed I'll begin to apply filler just as in the other curved pieces.
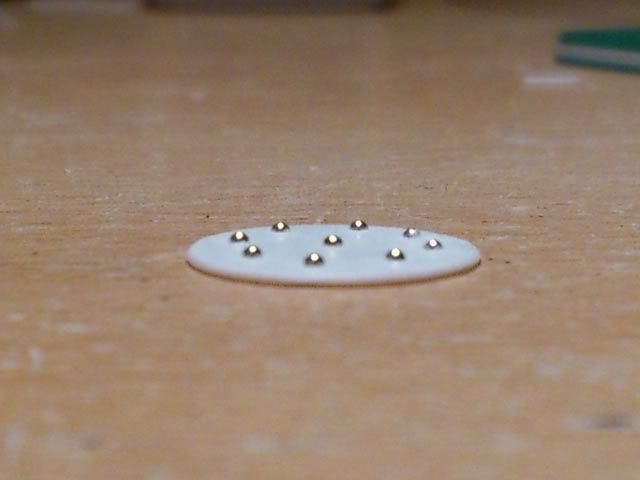
I have finished a piece, just the toe armour connecter, but it is detailed as much as I wish. For the rivets I'm using some 1mm diameter steel balls. I got them on ebay on some craft shop. To place them; I drill a hole with a 1mm drill bit of sufficient depth, then I place superglue in the hole, put the rivet in the hole, then use a 0.5mm piece of plasticard with a hole in it as a spacer to level the height of the ball using a ruler. If this method isn't clear just ask and I shall try to make a picture tutorial. Also, as a tip, when drilling the holes I used a template, with pre-measured holes drilled in, this way I wasn't measuring on awkward pieces, or just guessing.
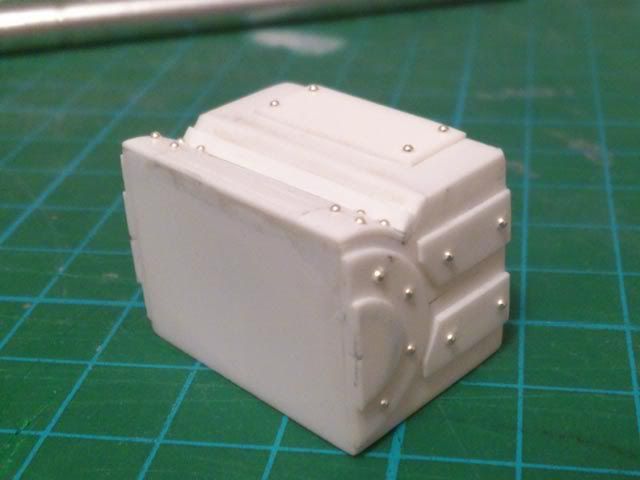
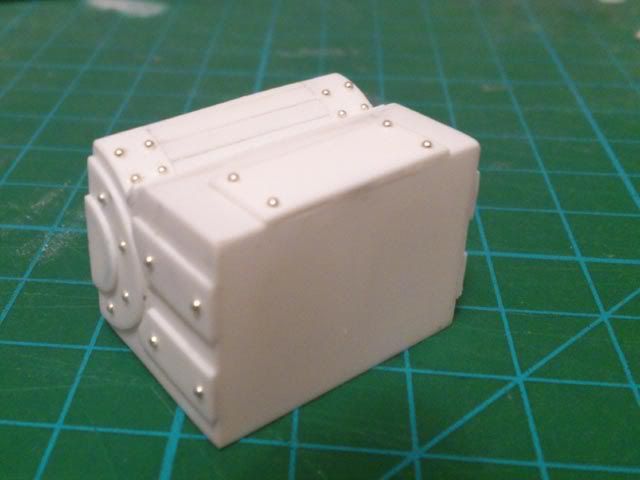
I feel comfortable enough to say that I have completed the toe mid piece too. Although there are slight details on it I would wish to change, the effort to re-do the piece wouldn't be worth it. Instead I'll accept it was an early piece and that I made some possibly avoidable mistake, but shall just have to learn for in the future. The curved section on the top with the slats is a style I intend to reproduce on the the joint for the ankle. I like the way it looks and think it should scale up well enough. The only problem with that style of curve is making the slats appear individual enough. To achieve that I had to cut individual slats and then sand the edges so that they more resembled a trapezium. The slanted sides meant that the gap was much more visible. I did these ones by hand, but I shall try to assemble some form of jig for sanding the larger slats down when I reach the ankle joint.
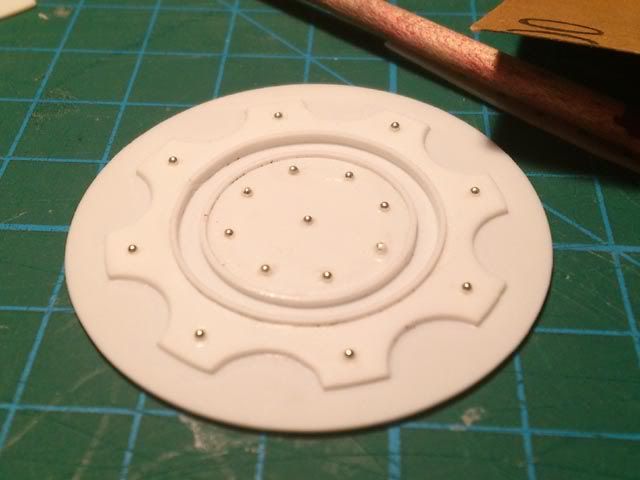
I also completed the ankle cap detail. In addition to the rivets I added a raised trim around the edge of the cog and inner circle. It was just a bit more detail that I felt helped to make it seem more 3 dimensional. It was difficult to achieve however and took a long time with gluing parts and holding them in place to dry, as I had no suitable sized clamps. The effect was worth it however...
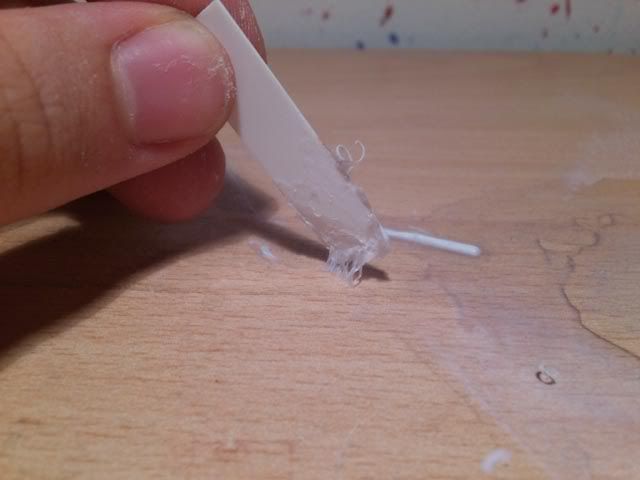

...Not that it matters. This is just a picture of some plasticard stuck to my table. If you haven't guessed it yet I managed to knock over the small bottle of plastic weld that I use. It flooded over my plasticard covered desk and stuck loads of loose plasticard onto the table, even my speakers were melted into place. In terms of damage to my model it could have been much worse. Just managing to splash over the octagonal foot base. As the ankle cap detail was on top of it though, it glued them together and effectively melted all of the detail on the ankle cap piece. The foot base fared better, with just slight cosmetic detail and no lasting structural damage. I may choose to only replate the part which shouldn't take long and will fix it easily. The rest of the parts were saved as I was storing the pieces with the filler on in a plastic bag, and the two finished parts on my shelf just above the desk. As a side note I use the plastic bag as for a while after setting the filler gives of an unpleasant smell, so I bag them up when not in use. The bag itself was splashed but saved the contents.
I will hopefully manage another update tomorrow, but after that I'll disappear for 5 days on a short holiday. Soon as I get back though I'll be working away, and no doubt I won't be able to stop thinking about the model whilst on holiday
|
|
|
|
|
|
2012/07/08 05:00:43
Subject: Re:The Mars Warlord Titan Project
|
|

Stormin' Stompa
|
Rivets, rivets everywhere.
|
Ask yourself: have you rated a gallery image today? |
|
|
|
|
2012/07/08 05:10:40
Subject: The Mars Warlord Titan Project
|
|
Regular Dakkanaut
|
Well, That's the plan 
|
|
|
|
|
|
2012/07/08 06:17:40
Subject: The Mars Warlord Titan Project
|
|
Towering Hierophant Bio-Titan
Somewhere In Time And Space
|
Are those ball-bearings your using for rivets? If so, bloody ingenious method, wish I thought of it lols!!!
|
|
|
|
|
|
2012/07/08 06:54:15
Subject: The Mars Warlord Titan Project
|
|
Regular Dakkanaut
|
Yea, they are. I also have the contents of a water filter cartridge, but because they're mixed in terms of size I find that the predefined diameter ball bearings are easier to use. Still not exactly very easy to use though, as drilling a hole in the wrong place is a lot worse than gluing a flat backed rivet in the wrong place. Really I'd like to buy some of the premade ones from the grandt line but these will do for now. The other method I have tools for is the hole punch, I use a leather punch. The only problem with that is that the rivets are directional, as they are rough on one side. So I have to take more care when placing them down. Also the diameters available are 2mm and above, so it wasnt suitable. Something I might have a go at trying though is some of the lion roar rivets from here, http://www.antenocitisworkshop.com/wargaming-materials-tools/augmentables-nuts-rivets-bolts.html, They might be the best of all of them.
|
|
|
|
|
|
2012/07/08 12:42:56
Subject: Re:The Mars Warlord Titan Project
|
|
Posts with Authority
Boston-area [Watertown] Massachusetts
|
Well, if you would just read some of OUR threads you'd see that cheap rivets are best done by buying a NWSL or Micromark Chopper, getting some plastic rod of the appropriate size, AND GOING TO TOWN.
It allows you to make any size rivet, as well as full-on bolts, using hexagonal stock from Evergreen or Plastruct.
--B.
|
Falling down is the same as being hit by a planet — "I paint to the 20 foot rule, it saves a lot of time." -- Me
ddogwood wrote:People who feel the need to cheat at Warhammer deserve pity, not anger. I mean, how pathetic does your life have to be to make you feel like you need to cheat at your toy army soldiers game?
|
|
|
|
|
2012/07/09 09:03:24
Subject: The Mars Warlord Titan Project
|
|
Regular Dakkanaut
|
Ahh, if only i could buy a chopper, I've wanted to get one of those for years, could never quite justify the price, I'd rather spend the money on something like an airbrush instead. That said it would massively increase the speed if I were able to use one. Takes me ages just ensuring all my angles are right angles...
In terms of rivets though that's how I first did them, sort of, by using a knife and some rod, I could never regulate the height of the rivets well enough and although it would be easier I quite like the uniformity I can get with the balls. The other rivet method I've seen, but don't know much about is a type of hand held punch that's got a spherical shaped hole in the end of the tool, so it digs out hemisperes, something like that atleast, as I said I can't remember much about it.
|
|
|
|
|
|
2012/07/09 13:26:35
Subject: Re:The Mars Warlord Titan Project
|
|
Posts with Authority
Boston-area [Watertown] Massachusetts
|
From Micro-Mark:
Was: $23.95
Sale Price: $20.75
Item #: 84046
Way, WAY less than an airbrush.
|
Falling down is the same as being hit by a planet — "I paint to the 20 foot rule, it saves a lot of time." -- Me
ddogwood wrote:People who feel the need to cheat at Warhammer deserve pity, not anger. I mean, how pathetic does your life have to be to make you feel like you need to cheat at your toy army soldiers game?
|
|
|
|
|
2012/07/09 14:08:20
Subject: The Mars Warlord Titan Project
|
|
Towering Hierophant Bio-Titan
Somewhere In Time And Space
|
Dude, your looking at roughly £20 for the micromark version including delivery!!! Invest in one, you won't regret it
|
|
|
|
|
|
2012/07/09 14:33:26
Subject: The Mars Warlord Titan Project
|
|

Esteemed Veteran Space Marine
|
im soooo glad i subscribed to this thread! looking good so far
|
|
|
|
|
|
2012/07/09 19:51:39
Subject: Re:The Mars Warlord Titan Project
|
|
Tail Gunner
|
How are you going to lug around the Titan when it is finished? (especially if you ever try to take it on an airplane...)
|
|
|
|
|
|
2012/07/09 20:25:35
Subject: The Mars Warlord Titan Project
|
|
Lieutenant Colonel
|
Wow, it might be quicker to build one of these for real than out of plasticard. Honestly I admire your perseverance on this, never mind the cost of the materials, this is a labour of love.
|
Collecting Forge World 30k????? If you prefix any Thread Subject line on 30k or Pre-heresy or Horus Heresy with [30K] we can convince LEGO and the Admin team to create a 30K mini board if we can show there is enough interest! |
|
|
|
|
2012/07/09 21:18:35
Subject: The Mars Warlord Titan Project
|
|
Ferocious Blood Claw
|
It is all looking awesome, to say i am impressed is an understatement!
Just a thought and i know it is too late now, but for your templates, you could have bought a can of spray adhesive to mount the templates on the plasticard, and the good thing about it is that you can reposition it.
Keep up the fantastic work!!
|
Walk softly and carry a big gun! |
|
|
|
|
2012/07/10 00:48:28
Subject: The Mars Warlord Titan Project
|
|
Veteran Inquisitorial Tyranid Xenokiller
|
Epic stuff. Following this for sure.
|
|
|
|
|
|
2012/07/15 00:50:12
Subject: Re:The Mars Warlord Titan Project
|
|
Regular Dakkanaut
|
@briancj and @anunearthlychilde, I looked on their website and whilst it is only $20, it's another 20$ for shipping to the UK. Which puts it back to being expensive. I did still end up ordering something though. What I got admittedly isn't as nice as the NWSL chopper or the micromark chop-it as it's made from plastic. That said though it doesn't look like a bad product at all, and at £8, I'm happy to get it instead. Bought from here, http://www.proopsbrothers.com/acatalog/Online_Catalogue_Paper_Card_Cutting_12.html, and pictured below. I intend to be doing a complete review as soon as I receive it, I don't think many of the warhammer modellers will have heard of this, the only references I found to it were crafty and model railroads. If it works well It'll be fantastic value. One downside is the stops are different, and I may have to figure a way to place a ruler along the back like on the chopper, but this is something I think I can manage.

@dijnsk, I'm glad you're happy so far, I'm hoping for it get much better though
@scout sniper J, I haven't thought too much about that so far, but I expect I shall want to buy some custom foam packaging from somewhere like battlefoam. This way I can figure out the best layout and then have it professionally finished. Something similar to these two examples I hope.
http://www.dakkadakka.com/gallery/347523-.html
http://www.dakkadakka.com/core/gallery-viewimage.jsp?i=329874&m=2&w=800
@mwnciboo, Thanks, You're right about the love thing, but I may turn to hate this thing if I manage to spill my glue again
@doofry, Thanks as well. Regarding the spray mount though, I have tried it but it wasn't strong enough to stick properly, and just ended up ripping away mid cutting. Which wasn't great and just made it worse. The pin method I'm using now feels the most effective for the low effort required, don't have to wait to glue and don't have to cut out parts ect. That is unless I'm able to find these A4 sticker sheets.
@demetridominov, Thanks for tagging along with me on this
Well, I'm back from holiday, aside from trying to find a job and then doing that job, I'm intending to spend most of my time on this for the next few months. Whilst away I had a good chance to think about the construction of parts, and I think I'm going to buy some acrylic pipe. I've figured out that by combining different wall thicknesses and overall diameters I can minimise the cost of the piping by using parts for more than one place. For example I intend to use a 34mm OD piece on the male ankle join section, paired with a 40mm OD piece and a 3mm wall thickness for the female part. This gives an 34mm ID which means the two will 'telescope' to use evergreens terms. The The 40mm OD piece will also be used for the axle part of the hip. On the hip it will slot within a 50mm Od piece with a 5mm wall giving a 40m ID, again telescoping. This 50mm OD piece will also fit in a 60mm OD 5mm wall 50mm ID piece to give the biggest diameter section at the top of thigh. As the knee will also use the 50mm OD for the male part, the female part will be the 60mm OD part. Also the inside of the calf will use the 50mm OD piece. In this way I only need 4 pipes, instead of the probably 7 or 8 diameters I was going to be making using the filler. This does mean that the diameters are slightly different to those on my original plans, but I'm sure that nobody else but me will have noticed, and that plasticard detail would have altered this anyway. It's going to be interesting figuring out how to effectively cut the tube accurately, but I'll get around to that once I've received the order.
In other news I've been able to turn more parts of my 3d model into templates, so I'll print those and begin on stuff like the thigh and hip whilst I wait on the pipes. I'll also attempt to finish the toe and toe armour pieces as soon as possible along with repairing the foot base to completion and the heel plate. Lots to do for now but I will update as soon as I'm able to. Lastly, Anybody have any thoughts on names? If people can give me suggestions I'd take the ones I most enjoy and do a small poll.
|
|
|
|
|
|
2012/07/16 04:06:07
Subject: Re:The Mars Warlord Titan Project
|
|
Regular Dakkanaut
|
Update as I promised then

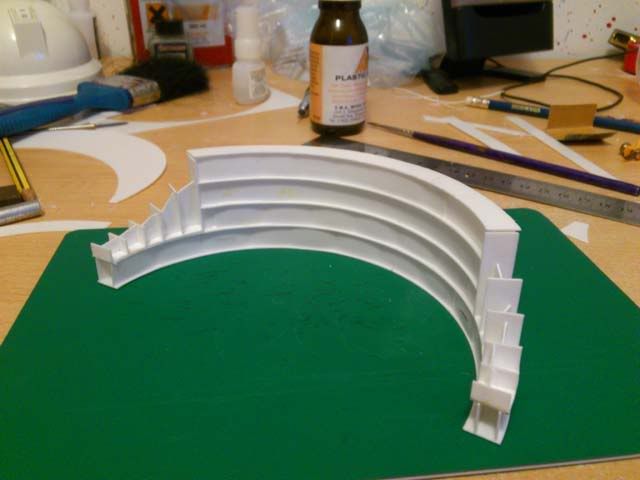
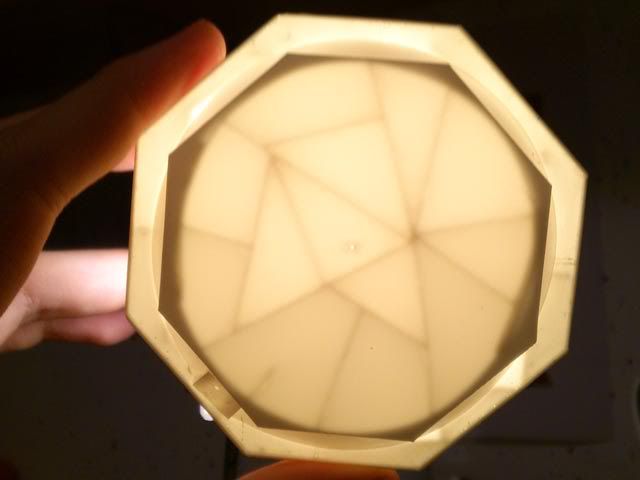
I continued with my work on the heel plate, with the intention to reach a point at which I could begin to apply filler to give the main shape of the piece. When I returned to it I realised that my previous method of cutting rectangles and forming a wall was very time wasting. I get the exact same result by just bending a single piece in a curve.. Felt smart realising that half way through the part. Well, I continued in that manner and had completed the internal structure as shown in the pictures.


I then placed an edging onto this, going all the way around the part. This was done wider than the internal structure so that when I smooth the filler out it sands evenly. Where the plasticard peeks through the filler it can sand slightly uneven because the filler and styrene are different materials. It will sand like this at the edges but it won't be as noticeable here, and I intend to be adding an edging onto the piece anyhow which will go over any unevenness at the side. This part is now done until I begin to apply filler, I may need to buy some more however as it is a large part.
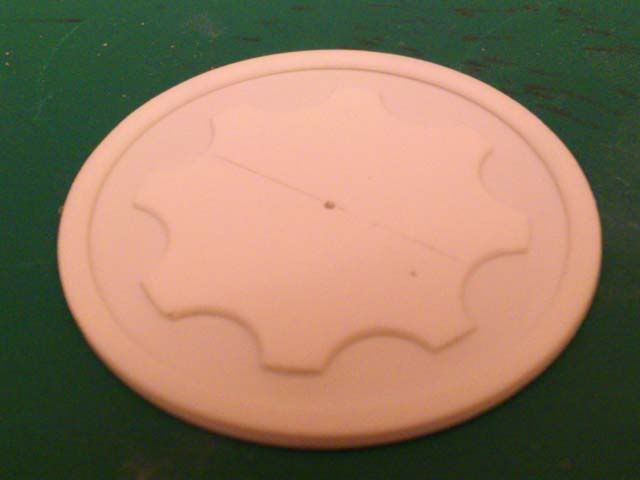

I also got around to rebuilding the part that was melted when I spilled the glue. This time hoever the cog is slightly smaller and I fancied adding a thicker edging around the edge and keeping the same edging on the inside of the cog, except only on the cog part, not on the central circle. Unless there's significant protest /i felt this looked better and intend to stay with it instead. The parts aren't currently glued together, but I will do so when I add the rivets to the piece.
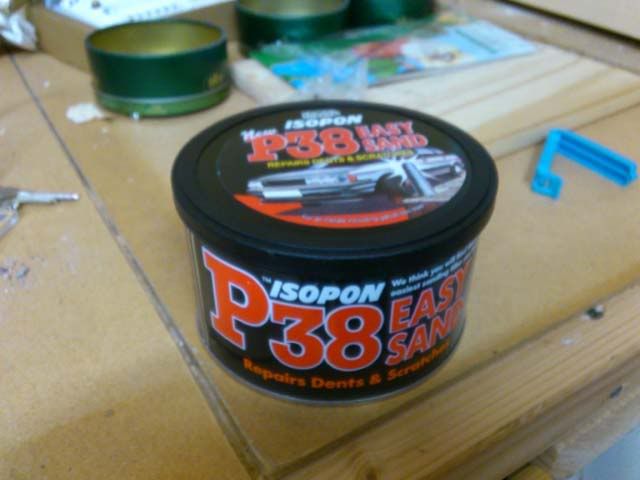
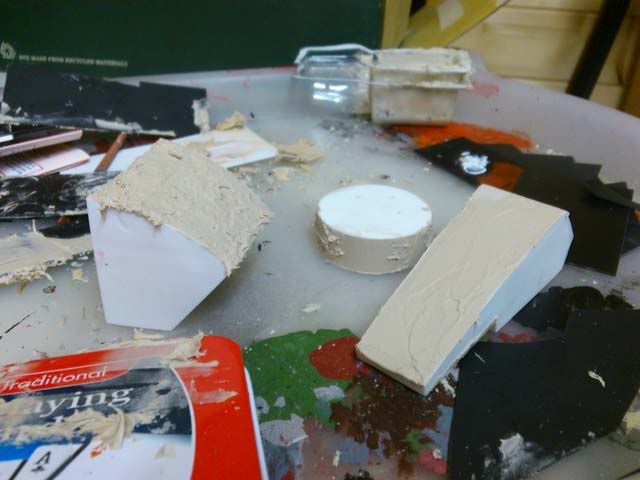
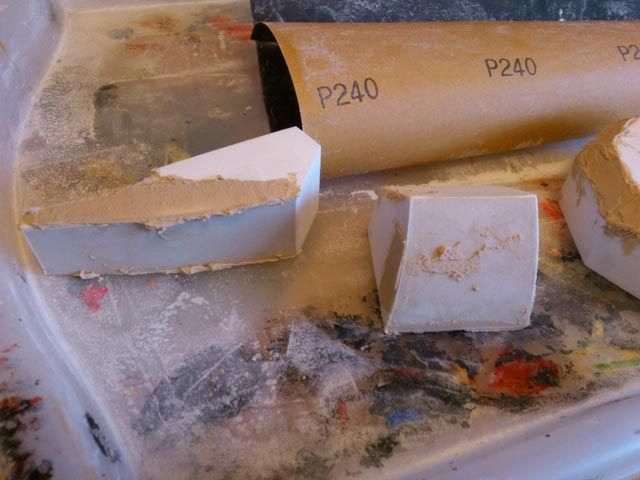
This is the filler I use, having just picked it up at halfords one day. I may try other brands in the future, but this stuff seems good for now. Today I did however realise that I hadn't been using enough of the catalyst. The material on the parts such as the toe end that I had already done was not completely mixed and as a result it softened part of the plastic along the edge of the toe end. I plan to use the filler to repair this but it is a little annoying. I hope that it's because I haven't mixed it well enough with enough catalyst, the material under the softened plastic parts was still soft, so I think I'm right. The second picture is just the parts right after applying the filler. I applied it to the toe armour piece, then the ankle cap then the toe end, and you should be able to see that as it has hardened in the 15 minutes or so of work time it's become less smooth to apply. Which is why I did it in the order I did, doing the most desired smooth piece first.
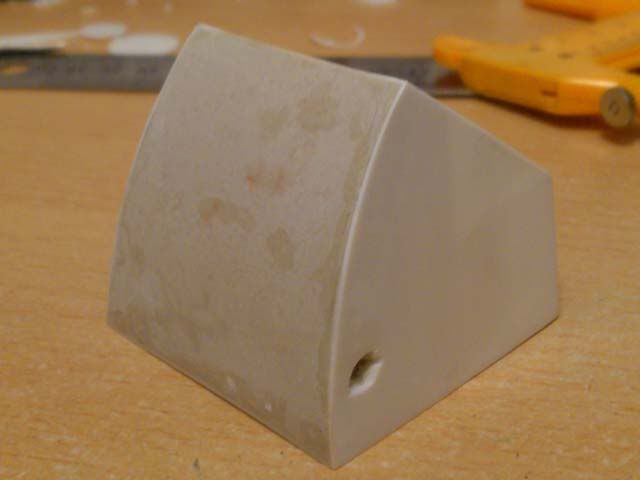
The two pieces are now sanded and very smooth to touch, smoother than the plastic in the case of the toe armour piece even. Aside from the gouged holes in the toe end piece, I'm slightly unhappy with the toe armour piece too. Where I used supports on the inside the outside plastic has bowed inwards, I think this is because I haven't used enough supports. You can just about see this on the photo where, at the edge of the filler and plastic, the sanding didnt give a straight edge but a bowed line, this is because the join is uneven due to that bending between supports. In order to fix it I think I should be able to apply some of the filler and then sand this down into a right angle, but I have already attempted to minimise the visibility by sanding some of the plastic down too. I think I'll spray paint the piece white too in order to better see how smooth the joins are and where I can improve the piece, likewise with the toe end.
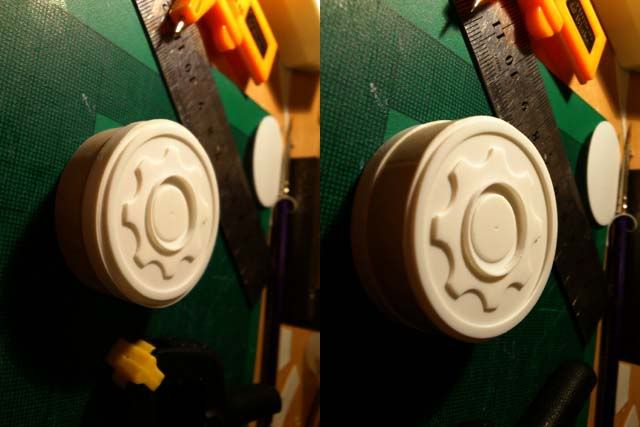
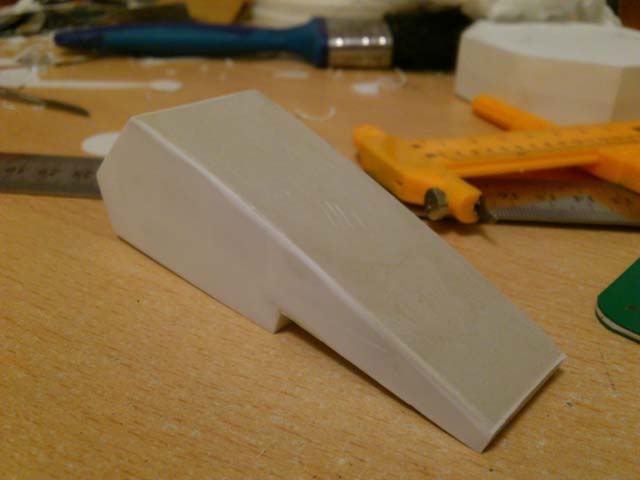
This is the sanded down ankle cap piece with the detail placed on top. The two variations are so that I could see which way is best for the positioning of the edging I've placed on the part. I prefer the edging at the top as in the left picture, but I would like other peoples opinions too, bearing in mind the positioning from the earlier renders.
I still have a long way to go, but I intend to begin working on the main thigh part and the hip soon as I've only got to print the templates out before I can begin. Tomorrow I hope to have been able to get some work done on the base of the foot, and possibly the filler work on the heel plate. Hope that satisfies everybody's interests for now
|
|
|
|
|
|
2012/07/16 04:36:09
Subject: Re:The Mars Warlord Titan Project
|
|
Posts with Authority
Boston-area [Watertown] Massachusetts
|
Hope the chopper works out for you! Again, thanks for showing us the FULL development process. While most people won't follow your lead, seeing the design-in-progress shows us all the techniques you're using, and hopefully someone will use them in THEIR project.
Good luck with the job search!
|
Falling down is the same as being hit by a planet — "I paint to the 20 foot rule, it saves a lot of time." -- Me
ddogwood wrote:People who feel the need to cheat at Warhammer deserve pity, not anger. I mean, how pathetic does your life have to be to make you feel like you need to cheat at your toy army soldiers game?
|
|
|
|
|
2012/07/16 05:22:25
Subject: The Mars Warlord Titan Project
|
|
Veteran Inquisitorial Tyranid Xenokiller
|
There's more detail in that ankle than there is in some armies....
|
|
|
|
|
|
2012/07/18 19:45:45
Subject: Re:The Mars Warlord Titan Project
|
|
Regular Dakkanaut
|
Haha, thanks guys again. I've been a bit busy the past couple of day's, I'd forgotten about going to a theme park so I missed most of a day then and I've been job searching too. I do have some updates however.
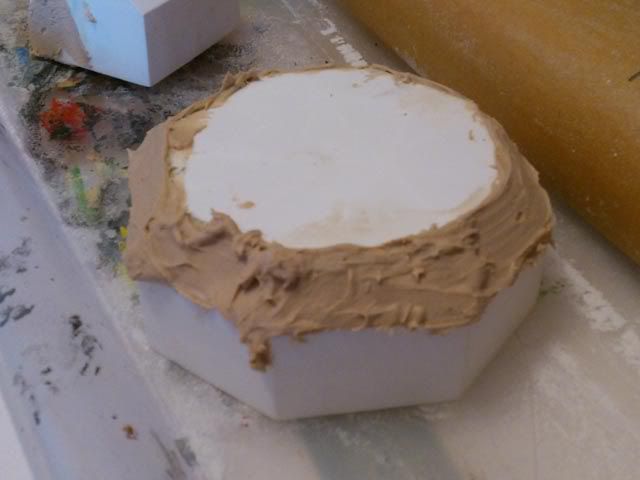
To continue on the foot base I begun by building the spacing and then placing the top part of the foot base. I had intended to use plasticard to do the angled edges, but I considered that this would end up weaker than the alternative use of filler, so I used that instead and plan to sand down until I have crisp edges. In terms of detail I plan to add riveted plates, but little else as other things will need flat spaces to attach to the foot base.
I also used the filler to attempt to repair the edges on the toe armour piece, and to fill the holes in the toe end piece and level the base of the piece too. Once these two have been sanded down I think I'll complete them in just a few days as the detail is minimal.

I thought I'd run down the rivet process for anybody who's interested in it. First I drill the holes in the part, I go all the way through as otherwise they won't all fit to the same height. Once drilled I force the balls into the holes, but without glue yet. I also make sure to press each through so that the bottom of the ball is level with the bottom of the o.5mm plasticard. This ensures that half of the ball is above the surface, and half beneath, and means that all the rivets will be of equal height. Once placed I flip the part and then I apply the super glue on the bottom, this stops and from bleeding over the surface which happens if the glue is placed and then the rivet placed in the hole. Once this is done the piece is finished, and provided the spacing between rivets is even, they will look good. Even heights go a long way to adding a manufactured feel.
Also, I went to collect the chopper from the post office today, and I'll try to upload a review and some pictures soon. It seems suitable so far.
|
|
|
|
|
|
2012/07/19 00:46:22
Subject: The Mars Warlord Titan Project
|
|
Gargantuan Gargant
|
This is coming alongnicely. Looking forward to seeing how it turns out.
|
|
|
|
|
|
2012/07/19 01:19:59
Subject: The Mars Warlord Titan Project
|
|
Towering Hierophant Bio-Titan
Somewhere In Time And Space
|
Dude, I could kiss you... you know, if it wasn't for the fact a) your a man (possibly?), and b) I have no idea where you live 
keep up the awesome work!!!
|
|
|
|
|
|
2012/07/19 02:01:13
Subject: The Mars Warlord Titan Project
|
|
Steady Space Marine Vet Sergeant
Hanging out on the Great Plains
|
Great job and very informative can't wait to see more and finally the finished Warlord Titan.
|
Eastern Frontier Exploratores
224th Astra Legion (main army)
 628th Praetorian Guard Cohort (wife's army) 628th Praetorian Guard Cohort (wife's army)
 827th Auxilia Cohort (ad mech fun) 827th Auxilia Cohort (ad mech fun)
 825th Foderati Cohort (in the beginning army) 825th Foderati Cohort (in the beginning army)
 1212th Foederati Cohort - Jokaero (cause I like apes with guns) 1212th Foederati Cohort - Jokaero (cause I like apes with guns) |
|
|
|
|
2012/07/19 02:40:27
Subject: The Mars Warlord Titan Project
|
|
Guard Heavy Weapon Crewman
IN YOUR CLOSET!!!!!!!!
|
Hey can you pm me a link to the templates
|
 BOW TO MY BADGER BOW TO MY BADGER
|
|
|
|
|
2012/07/19 10:51:27
Subject: The Mars Warlord Titan Project
|
|

Yellin' Yoof on a Scooter
|
I'm very impressed by your work. cant imagine scratch building anything that big cant wait to see your progress.
|
 NEEDS MORE DAKKA NEEDS MORE DAKKA
armies:
- 3000pts
 - 3000pts - 3000pts
 - 1750pts - 1750pts |
|
|
|
|
2012/07/19 14:23:03
Subject: The Mars Warlord Titan Project
|
|
Mekboy Hammerin' Somethin'
|
your doing really well so far but be cautious about how much hardener you add to your body filler because the more hardener the more it shrinks and shrinking may seperate the body filler from the plastic
|
|
|
|
|
|
|
|

 "This is why I hate the novels. They squash our imagination and creativity and create way to many fluff lawyers. To many "you can't do that because Fluffy Kitty novel says Captain Ichypants lost his pointer finger in the battle of Dogtown"."