| Author |
Message |
 |
|
|
|
|
Advert
|
Forum adverts like this one are shown to any user who is not logged in. Join us by filling out a tiny 3 field form and you will get your own, free, dakka user account which gives a good range of benefits to you:
- No adverts like this in the forums anymore.
- Times and dates in your local timezone.
- Full tracking of what you have read so you can skip to your first unread post, easily see what has changed since you last logged in, and easily see what is new at a glance.
- Email notifications for threads you want to watch closely.
- Being a part of the oldest wargaming community on the net.
If you are already a member then feel free to login now. |
|
 |
2012/06/30 02:46:33
Subject: The Mars Warlord Titan Project
|
|

Regular Dakkanaut
|
Welcome to my Project log, I'm Rory. I've started this project log as one last attempt to build myself a Warlord Titan before I head off to university in 3 months time. I've intended to build one before, but never quite had the motivation, nor time, so it didn't get beyond the planning stage. However, last night I finally started on my Warlord for the first time and now I hope I will be able to see it through to the end. This project log, which is being posted on the Ammobunker, Warseer, Work in progress and Dakka Dakka simultaneusly is intended to both inspire others like myself, and to ask you guys to give me to motivation to complete this project, by not letting me give up. This is why I will be writting as much as I can about why I'm going about it the way I choose, if this rough guide helps just another person to go on and make a titan I'd consider it worth the time.
I'm going to warn you before hand that even though there are only 8 photos in this post, I discuss each quite thoroughly, I'm sorry if you get bored. I'm suspicous that even among fellow 40k players i'll go into so much detail that you'll look as bored as 'normal' people do when I try to explain warhammer to them. So just feel free to simply subscribe and look at the pretty pictures, I won't be insulted. The same will probably be true of the whole project, if you like detail though, then I hope you'll enjoy it too.
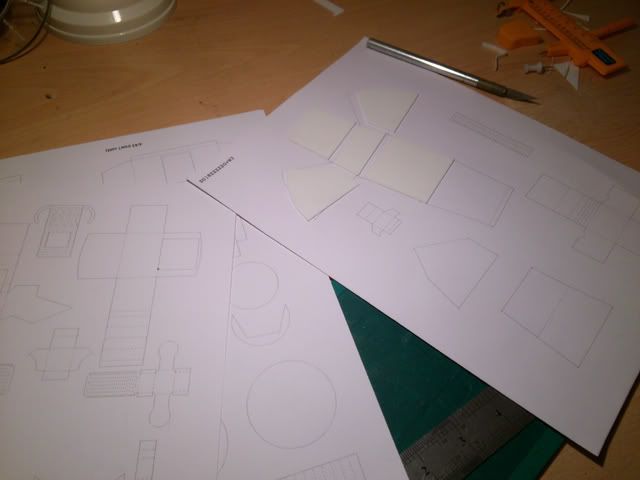
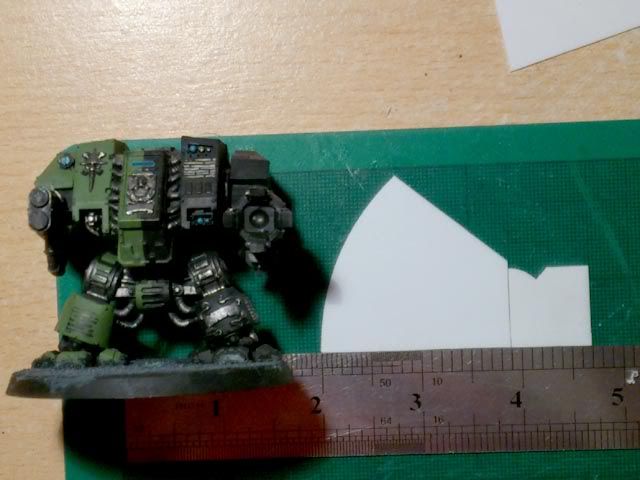
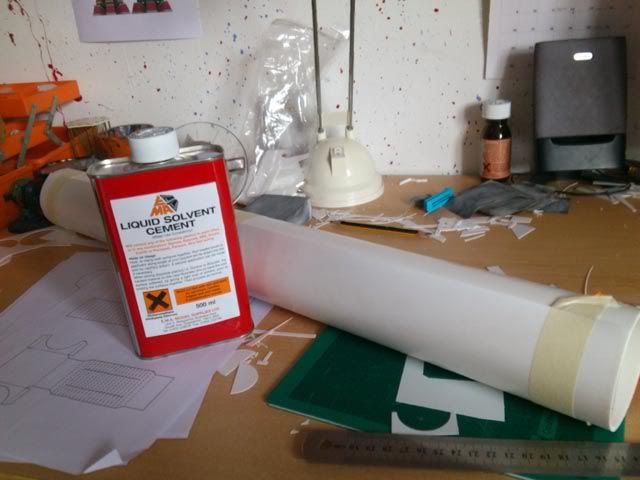
Okay, so this is my progress so far, I've printed my first copy of the templates off onto some card (180gsm) and traced onto my plasticard (0.5mm) to cut the first shapes. To trace onto the plasticard I've tried various things, the best of which I found was to poke a sharp pin (I actually use the end of my circle cutter) through the card whilst holding it securely to the paper, the only other possibly improved method is using sticker based A4 paper to print the templates onto directly. This would then be fixed to the sheet whilst cut, then removed afterwards. Rather irritatingly I've been unable to find any printable A4 sticker sheets, if anybody has a link to anything decently priced I'd be greatful. The pieces laid out onto the card in the picture are for the toe, in another post when I begin to assemble the structure I'll explain more about how I intend to achieve the toe shape. There isnt really much to go on right know, I'm waiting to order some glue. The rest of this intial post I'll explain the rest of the design as a starting point.
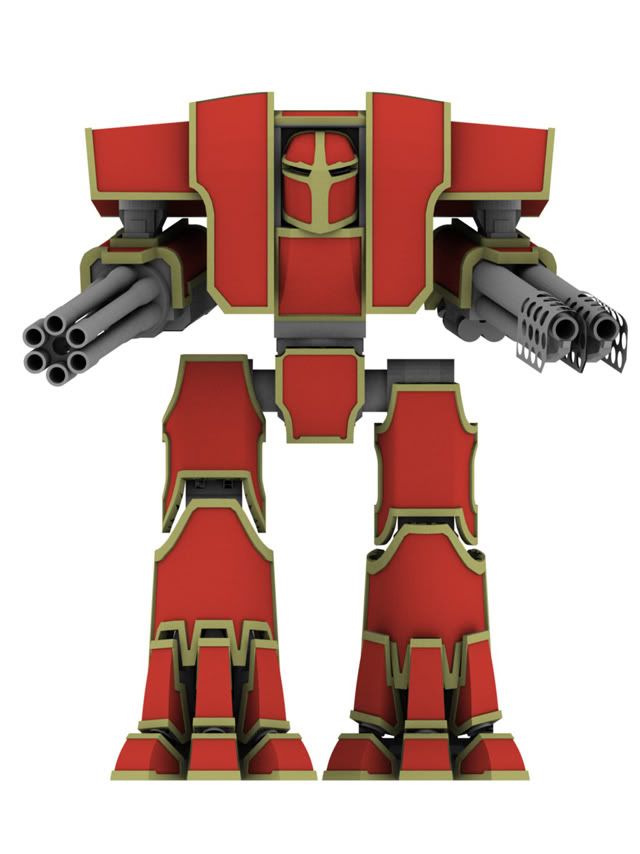
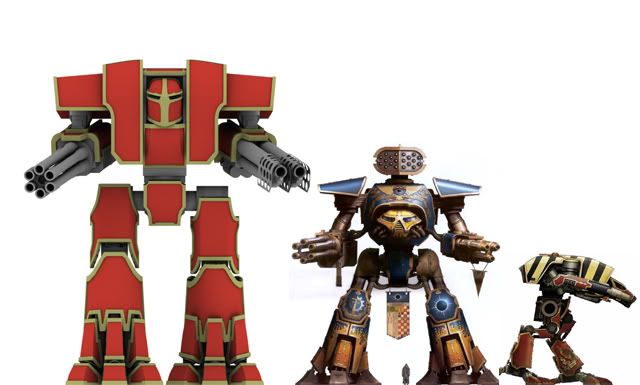
This is the latest image of my planned Warlord titan. It's quite obviously just a 3d model, and this is what I spent the last few years tweaking and adjusting in my spare time, whithout actually building it. I think the most obvious thing, as I intended, is the departure from the classic Warlord profile in the Epic model. Mine is curvy, makes it a bit sexier I thought. It's more than that really though, from the outset I wanted to be able to make something that would fit in with, at the time, the Mars pattern Warhound titan. But my first designs were not too curvy, and it was only when the Reaver was released that I begun to be able to change the design getting it to fit more with that aesthetic. From that I pulled stuff such as the gun shapes, the leg design and the toes. Although the toes are more from the gamesday prototype and other parts from the Warhound, ie the crotch armour plate. The part of the titan that I was most able to seperate and begin to design on my own was the torso. shoulders and head.
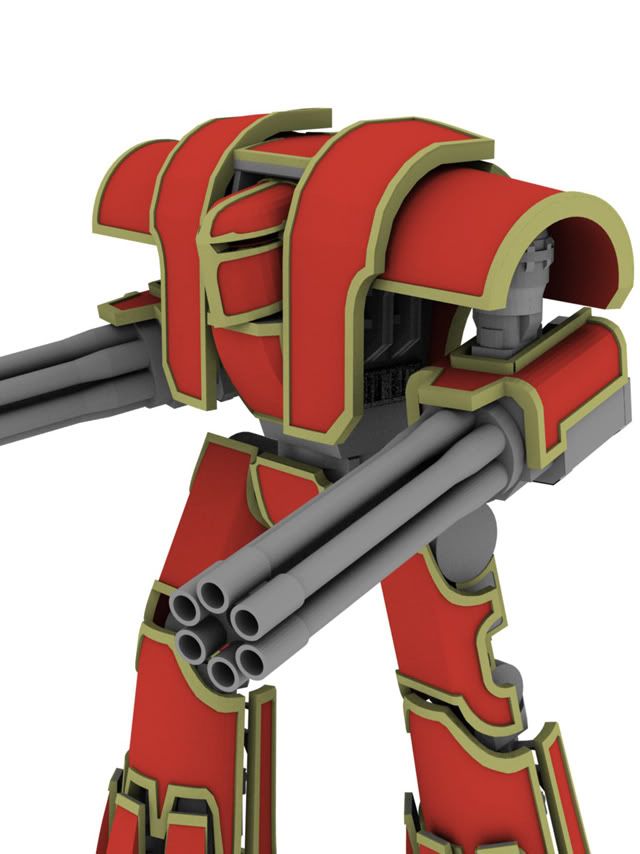
This picture shows much better my attempt to blend the boxy Epic Warlord into the curved Forgeworld titans. I took the inspiration for the abdomen from the apocalypse rulebook Warlord illustration, although mine now curves at the edges rather than being a simple extruded arc of a circle. The large upper shoulder plates were inspired by converted dreadnought I found online, credit to Vaaish here. From that model I really liked the style given and after altering the shape but maintaining the same impression, I got what I wanted. The render doesnt have the carapace weapons on yet and they will be added to the flat section of each of the top shoulder plates similar to the Reavers carapace weapon, with a similar style.
The 'lower' shoulder plates that extend further out are the most differently designed component to any other titans I've seen. I decided to slant both them and the upper shoulder plates so that the silhouette of the titan further lost the boxyness of the Epic model, whilst keeping the hulking proportions. This picture also shows the gun and arm better, the gun quite obviously 'borowed' from forgeworlds Reaver. The arm on the otherhand is similar to some of my favourite titan models, the very limited production dreamforge levithan mortis blockhead and crusader variants. A good interview with some decent pictures of the titans can be found here. I hated that I was never able to get my hands on one of these as they're fantastic, thankfully the designer has made some new titans, of which I definitely recommend you look at. The other part shown is the head. This was probably the hardest part to figure out, and I'm still not entirely happy with it, I simply don't think I can do better. In my opinion the Forgeworld heads are easily the best parts of them, both have complicated compound curves which my overly analytical mind can't understand to well, as I can't model them on a computer so I can't easily build them. Yet both look great. In making mine I felt that copying a knights helm had the right kinds of straight lines and curves that made it look noble enough for a titan.

This shot of the back of the titan shows most of the block detail I plan to add to the technical parts. I've obviously excluded stuff like rivets and a lot of plate detail though, especially on the caps to the cylindrical joints and gun ends which I intended to have a combination of cogs and circles layered on. I also haven't included multitudes of small pipes and cables, things that add detail when loosly scattered about mechanical surfaces. I'm not going to be sneaking any bits of building in, instead I will rely on layered sheets of plastic card to form evenly detailed surfaces across the model. I've always been of the opinion that a model with only one or two detailed areas looks much worse than a model with a lot of mediocre detail because of the contrast. So I don't intend to add anything like parts of plastic model kits unless absolutely necessary.
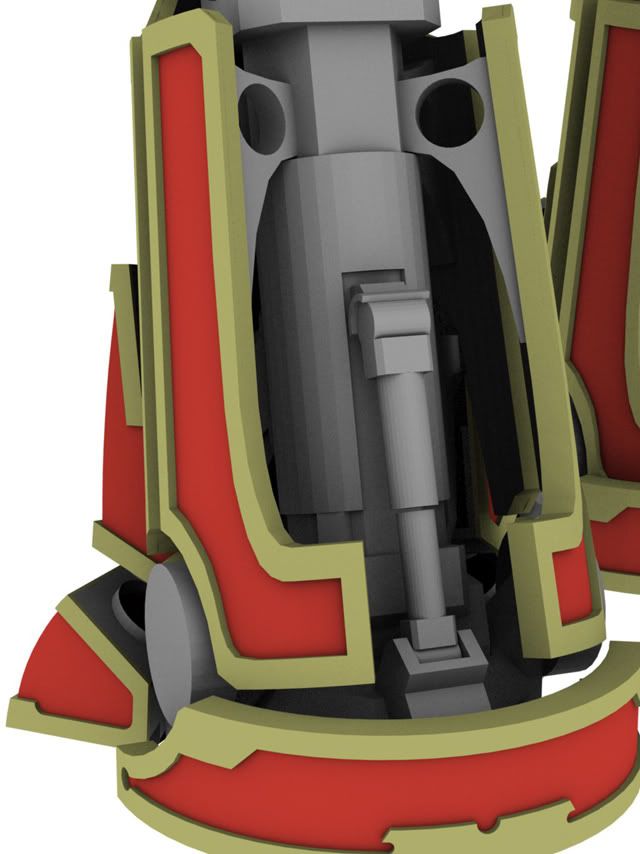
The last design picture is showing the part I'm intending to build first. This also borrows heavily from the Reaver, with the curved armour surfaces, but is still quite different, for one thing i'm not using a ball joint on the ankle. I know that the ball joint is much better for stability, but I didnt want the hassle of loads of pistons. Instead I only have a couple on each leg, at the ankle and back of the knee. A different departure in design the the curved heel plate, this was something I had from the begining on the intial model thanks to the picture of the Warlord in the Apocalypse rulebook. Something too interesting to leave off I thought.
On the Reaver titan the armour plates on the 'toe' part of the leg were attached to pistons fitted on a line to the base of the foot. From seeing in build photo's it's always appeared to be incredibly awkward to position correctly. Instead of this on my titan the toe armour plates are attached by a connector to the core shin piece alone, with the intention of raising or lowering along this plate as the leg tilts. I'll be able to explain this better one built. I do however intend to attach some form of ribbed tubing between the toe and toe armour plate but this again is something that I can do at a later stage so isnt on the render. This was all part of my intention to reduce the number of pistons I would need to build and position, it also solved a problem I've seen on one or two reavers, where the join of the toe armour piston doesnt appear fit correctly due to the angle they're posed at, it isnt designed to rotate along one axis where the position of the leg means it should, so doesnt fit correctly. I may see if I can find a good example picture of this for another posting.
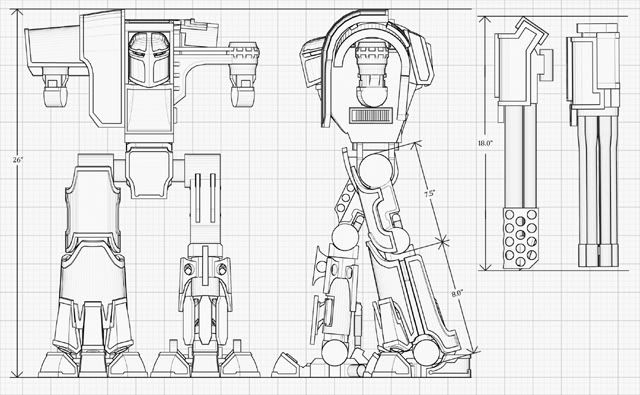
This is a schematic styled picture I threw together for fun. It does however bring me to the issue of scale. As you can see I decided that 26 inches, excluding carapace weapons, was sufficient. There are several reason for this, but the biggest I found wasn't a matter of converting the scale from epic, or from converting the scale from fluff, but instead going with what looked best in comparison to everything else. Whenever I see people attempt to calculate scale from fluff or models it always seems flawed given that no uniform scale exists across everything, everybody knows that marines aren't truescale, and that a rhino couldnt fit 10, and nobody agrees on fluff sizes, so I see these calculations as almost impossible to reasonably argue for. On the otherhand it's quite easy to take a look at a rhino, a few men and a reaver, then to scale up or down to the best fitting size for a game. It's even what the guys at forgworld appear to do, check out the reaver titan design video by will hayes where he talks about printing different scales to find a best fit compared to other models. Part one here, and part 2 here.
These last two pictures help to demonstrate what I mean, it puts the 10.5" Warhound and 16" Reaver alongside my Warlord scaled to 26". This size just appeared the most managable but fitting too. Much bigger made the others appear too small, and much smaller didnt fit either.
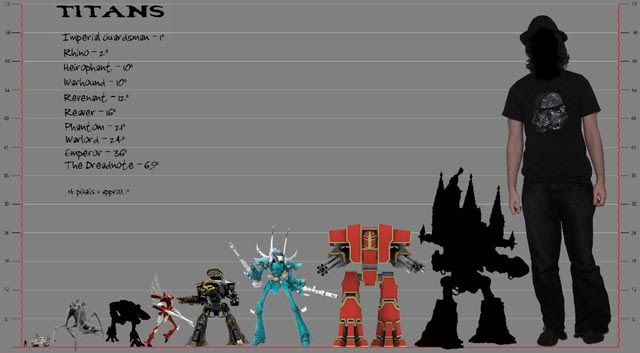
The final picture is an edited version of The Dreadnote's scale diagram from Dakka Dakka, taken from The Dreadnote's gallery here. As it's the best scale picture I've found online I hope he doesn't mind that I'm using it to justify my scale, although I would suggest the Imperator titan is a tad small. Thanks to him for making the image. My only ptoblem is that the heights of our Reaver titans differ, I believe it's because I measuered to the carapace top, and he measured to the weapon top, but if anybody has a reaver would they mind measuring and posting a picture here so I can figure our which is correct. You might also notice that it's listed at 24" inches on the left hand side, but it's still scaled correctly anyway.
Now I suppose I should thank anybody who made it through all of my rambling, well done! If you have any questions please ask me and I will do my best to answer them. Other than that feel free to give me your opinion on my design, I can still change things if I haven't built them yet and I'd love to see how this goes. And if I forget to update this thread within the week, just send me a PM, which should hopefully reach me and get me to do my best to show some progress.
|
|
|
|
 |
|
2012/06/30 06:59:23
Subject: The Mars Warlord Titan Project
|
|

Implacable Black Templar Initiate
|
Looks good! Curious though, is it a feature of your particular variant that it not have the shoulder/top mounted weapons, or just something you wanted to avoid on your build to keep the curviness of the model?
Eager to see how this build turns out.
|
 Just a handful... Just a handful...
 Emperor's Imperial Meat Shield... Emperor's Imperial Meat Shield... |
|
|
|
|
2012/06/30 14:35:36
Subject: The Mars Warlord Titan Project
|
|
Regular Dakkanaut
|
Nephilem, yes, the shoulder weapons should indeed be there. But I just keep on forgetting to put them there, it's just something that I'll get around to towards the end of the model. I need to decided on weapon choices first and it wasn't important for the scaling, as i only measured to the top of the shoulders.
|
|
|
|
|
|
2012/06/30 15:19:55
Subject: Re:The Mars Warlord Titan Project
|
|

Decrepit Dakkanaut
|
Cool, another Titan build. Ill keep watch for sure 
|
|
|
|
|
2012/06/30 15:21:47
Subject: The Mars Warlord Titan Project
|
|
Wolf Guard Bodyguard in Terminator Armor
|
Very interested in seeing how this goes! Good luck
|
|
|
|
|
|
2012/06/30 17:50:23
Subject: Re:The Mars Warlord Titan Project
|
|

Stormin' Stompa
|
I look forward too seeing more.
|
Ask yourself: have you rated a gallery image today? |
|
|
|
|
2012/06/30 18:24:40
Subject: The Mars Warlord Titan Project
|
|
Neophyte undergoing Ritual of Detestation
|
I enjoy seeing these come together, looking forward to seeing progress!
|
|
|
|
|
2012/06/30 18:27:09
Subject: Re:The Mars Warlord Titan Project
|
|
Dakka Veteran
|
oh am I soooo going to be following this !!!! Great work so far.
|
For The Greater Good….. says who?
 7000 pts + Going through a re-do & growing 7000 pts + Going through a re-do & growing
 3500 pts + growing 3500 pts + growing
Cygnar - 100 pts + growing
 IG slowly gathering IG slowly gathering |
|
|
|
|
2012/06/30 20:16:52
Subject: The Mars Warlord Titan Project
|
|
Bounding Ultramarine Assault Trooper
|
That's quite an ambitious project. Looks like it will be just a bit taller than my titan.
|
|
|
|
|
|
2012/06/30 22:59:30
Subject: Re:The Mars Warlord Titan Project
|
|
Tail Gunner
|
I'll definitely be keeping an eye on this project! (=
|
|
|
|
|
|
2012/07/01 12:36:31
Subject: Re:The Mars Warlord Titan Project
|
|
Regular Dakkanaut
|
Thanks for the response so far, really encouraging, I've just got to try and not disappoint anybody now  Also, nice titan bibbles, classic, but well built. In terms of progress I got some more of the templates cut out yesterday, I'm going to be doing a bit more cutting, but I should hopefully be able to start building soon. Later I'll try to get some more pictures to show you what I've done, and hopefully some renders to show you more of the foot area being broken down as I intend to be building. Please continue leaving questions, nice comments, or even nice questions
|
|
|
|
|
|
2012/07/01 19:09:40
Subject: The Mars Warlord Titan Project
|
|
Bounding Ultramarine Assault Trooper
|
Yeah, just so long as you avoid the mistakes I made, don't start with the torso and expect to just stick legs on it... that will not work. Build up, feed first like blackadder did.
|
|
|
|
|
|
2012/07/01 19:18:07
Subject: The Mars Warlord Titan Project
|
|
Highlord with a Blackstone Fortress
Adrift within the vortex of my imagination.
|
Nice you are trying to scale it properly, its about 2" too tall, and that height includes carapace weapons, 24" is right, as Dreadnotes wallchart says.
You could use torso mounts for the two other weapons, it could also be used to explain away the extra height of the model.
|
n'oublie jamais - It appears I now have to highlight this again.
It is by tea alone I set my mind in motion. By the juice of the brew my thoughts aquire speed, my mind becomes strained, the strain becomes a warning. It is by tea alone I set my mind in motion. |
|
|
|
|
2012/07/01 22:53:53
Subject: Re:The Mars Warlord Titan Project
|
|
Regular Dakkanaut
|
@ bibbles, That's pretty much why I first decided to use the CAD route unlike most people. It lets me have a complete understanding of my model far before it's even started. I'm totally happy with stuff like proportions after a lot of testing, and testing with the computer is so much easier than it would have been if I made mistakes and had to do things repeatedly. If I can manage to be even partly as detailed as blackadders i'd be pleased. His models are just remarkable feats of engineering, that Thunderhawk, Warhound and Warlord. I think it's mostly about layers, and layering simple detail over and over, a little like layers in a painting I guess. But that's not saying it's easy, we'll see how it goes when i get started constructing I guess.
@Orlanth Check out what I said before. I know that 24 is the generally decided height by most scratch builders, but I felt that it could be just a bit bigger and still come out good. That said I largely based my chosen height on comparisons with the Reaver and Warhound, and if I should have measured the Reaver to the top of the gun rather than the carapace then it might need to be smaller. But on the other hand, even if I am wrong in measuring, I don't think the extra couple of inches will look bad, and will just make it look a bit more imposing than I'd intended. Still within the realm of acceptable with either height. The guns will also be on the shoulders, I just need to model them. Think I need to do that soon, a few people aren't noticing what I said on the other forums too.
Right, I've got another update, so on with the pictures.
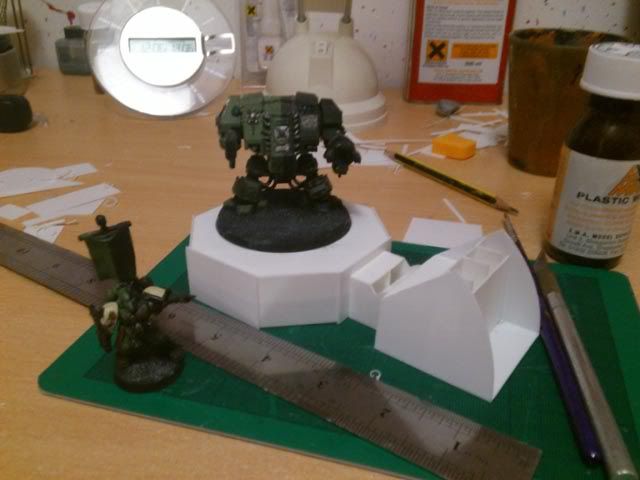
Thought I'd start off with a scale image tonight, it's not going to be the smallest of models really.
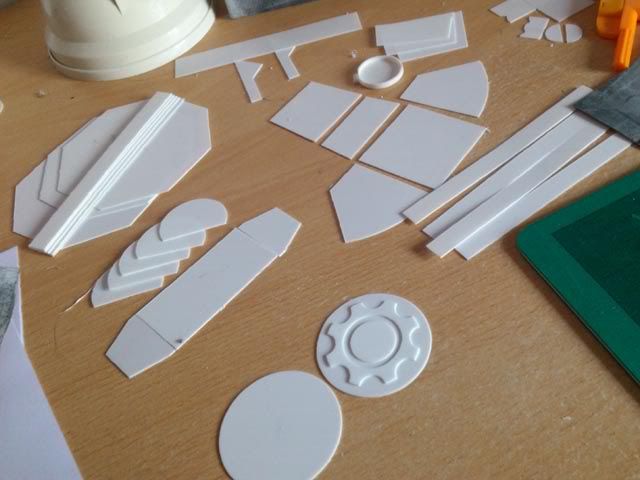
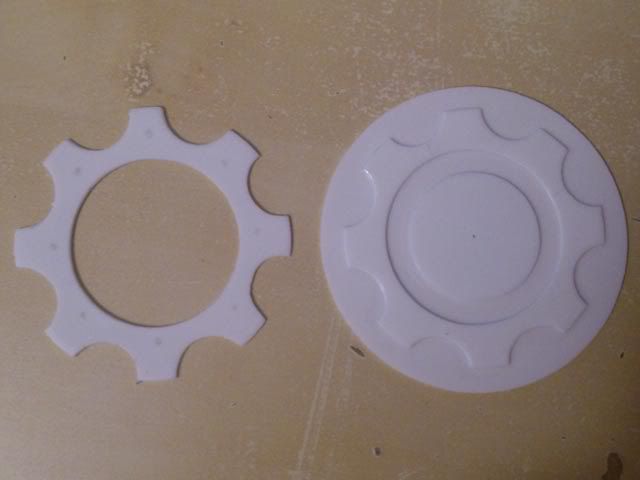
This one actually shows what I've been up to. I continued with cutting out templates, as I'm still waiting on my glue to arrive, hopefully it'll be here within a few days. This shows the first pieces of the base of the foot, that's the octagonal plates to the left, they along with the strips on top will form the inside of the foot. Basically being the strengthening structure within. The 'male' part of the ankle joint, that's the series of 5 circles beneath that. The ankle caps, that's the circles with cog detail placed on top, they will have a spacer between them before being smoothed using car body filler. A technique I will use on all the curved surfaces. The parts of the toe middle have also had some detail cut out for them, and a bit of detail for the toe end built. Not loads of progress I suppose, but I work slowly most of the time, everything has to be perfect.
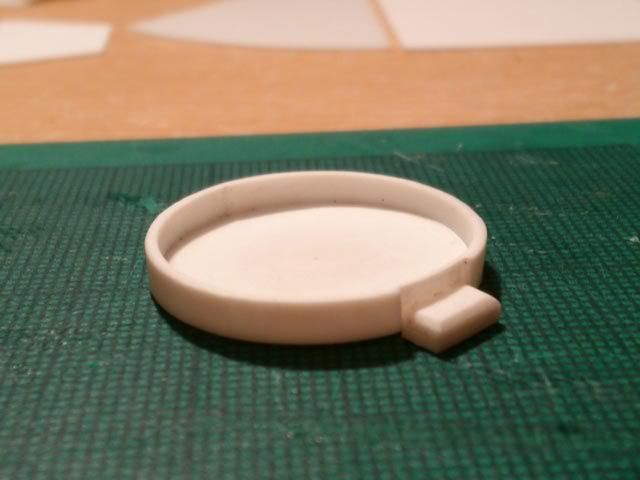
I built this using superglue, it's the circular pipe connector that can be seen on top of the toe ends. A piece of pipe will stretch between this and the toe armour plates. I cut the inside circle and then wrapped a strip around the edge which I glued. This is also raised a little with another circle underneath, and the small bit of detail was made with a bit of thicker plasticard I had lying around. It's not much but I wanted to actually build something rather than cut pieces out.
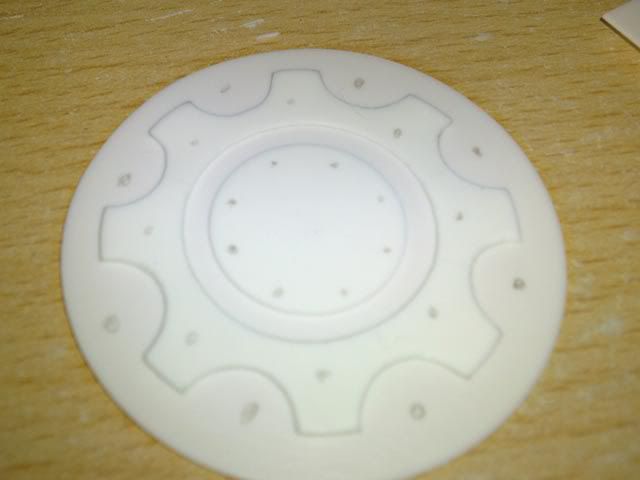
This is just showing the cog detail, where I've also penciled in the placement of rivets. To make the rivets I have a bag of 1mm diameter steel balls which will be superglued in, I only haven't done this as I want it to be the last thing I do on the part.
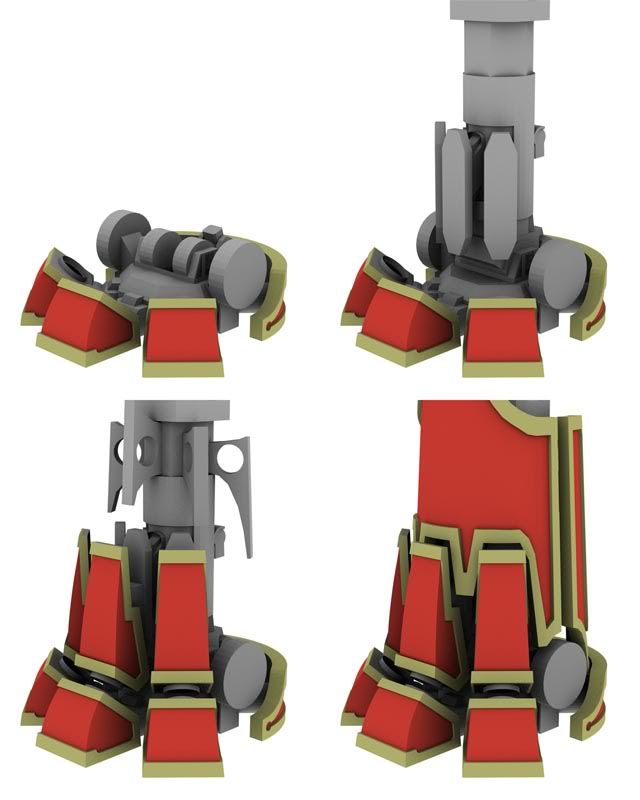
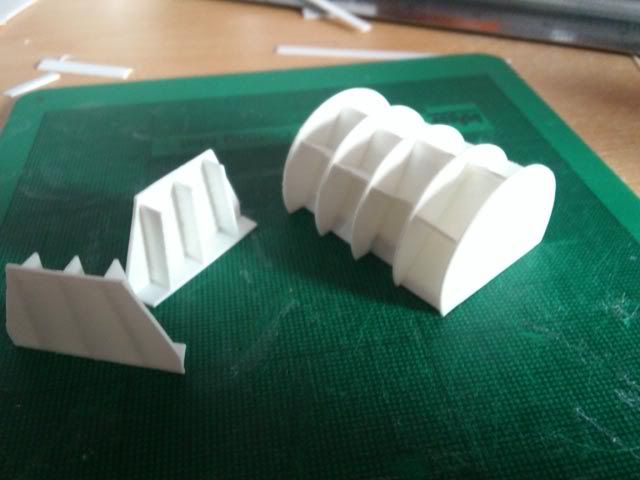
I also made a new render which should show the breakdown of the feet a little more. In the first picture it's just the base of the foot, octagonal with a beveled edge. The toe end and middle. The Heel plate and ankle caps, which will have that cog pattern on. The second bit shows the addition of the leg column and the toe armour connectors. Those connectors are fixed, and the toe armour plates will move up or down depending on the rotation of the leg. The last two show the armour plate connectors, toe armour pieces and the full armour plates. I just thought it was handy to show you it in more pieces than before.
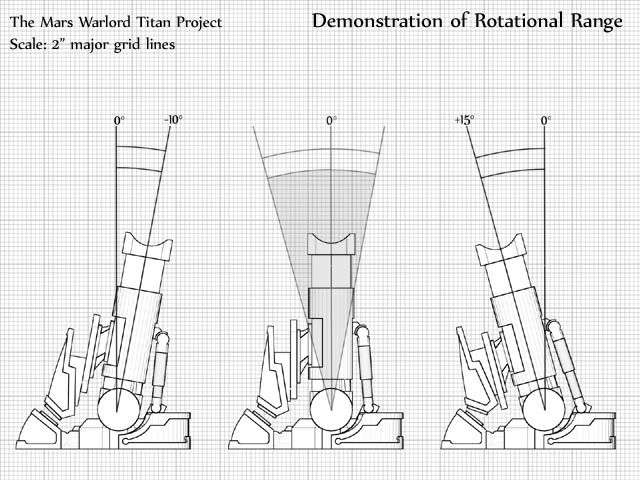
A few people liked the technical drawing so I made another one. This has the scale of about 2 inches to every square. It's intended to show the various angles that the leg is able to manage. If rotated much more to either direction there's intersection with the leg armour plates and the other parts of the foot, but I'm happy this should be enough articulation for the stance I want.
That's pretty much it for now though, really needing that glue to arrive soon. Because it hasn't I've been doing some work on the templates I use instead, I need to unfold the model for the thighs and upwards. I also haven't gotten around to modelling those shoulder weapons, but when I do i'll be sure to update my images to show you how they change the silhouette of the model.
|
|
|
|
|
|
2012/07/01 23:00:18
Subject: The Mars Warlord Titan Project
|
|
Battleship Captain
|
I officialy am following this! Epic
|
|
|
|
|
|
2012/07/01 23:01:25
Subject: Re:The Mars Warlord Titan Project
|
|
Posts with Authority
Boston-area [Watertown] Massachusetts
|
I like the THOUGHT that is going into this project, Sub'd! Good luck meeting your deadline!
|
Falling down is the same as being hit by a planet — "I paint to the 20 foot rule, it saves a lot of time." -- Me
ddogwood wrote:People who feel the need to cheat at Warhammer deserve pity, not anger. I mean, how pathetic does your life have to be to make you feel like you need to cheat at your toy army soldiers game?
 |
|
|
|
|
2012/07/01 23:02:25
Subject: The Mars Warlord Titan Project
|
|
Grey Knight Psionic Stormraven Pilot
|
these plans look legit as hell.
|
|
|
|
|
|
2012/07/02 01:25:11
Subject: Re:The Mars Warlord Titan Project
|
|
Tail Gunner
|
I can't wait to see it painted!
|
|
|
|
|
|
2012/07/02 02:45:01
Subject: The Mars Warlord Titan Project
|
|
Charging Wild Rider
|
Your titan is far better thought-out than mine. I built mine around materials that were available from the local Lowes and around the house. Give a bit of thought to the materials you're using, however. It may not look like it, but they get very top-heavy when you add the weapons, and plasticard won't stand up to it. I suggest a wooden frame for at least the lower half. If not that, then at least some sturdy PVC with resin poured through the center to strengthen it.
|
WHFB:
Painted
Wood Elves 4k pts
High Elves 4k pts
Dark Elves 3k pts
Chaos Daemons 3k pts
Empire 3k pts
Vampire Counts 4k pts
Orcs and Goblins 4-5k pts
Tomb Kings 2k pts
Ogre Kingdoms 1.5k pts
40k
Dark Eldar 2k pts
SW 3k pts
Tau 2k pts
Orks 5k pts
IG 5K pts
Deathguard 5Kpts
AdMech 2Kpts |
|
|
|
|
2012/07/03 11:29:59
Subject: Re:The Mars Warlord Titan Project
|
|
Regular Dakkanaut
|
@capitansolstice, epic? not quite, different scale 
@briancj thanks, I'm quite doubtfull I'll manage to meet the deadline, but I can hope
@kiryumk3, Can't say if I'm sure that's a compliment or not, I'll take it as one though, so thanks
@scoutsniperj, Paint wise I need to figure that out, I think I'll go with red and gold, as in the render's I posted. Other than that 'm not too sure how I'll manage it, If anybody has any good tutorials for strong red's and gold's I'd be grateful, also weathering both moderate and strong. I'm also thinking about getting an airbrush or some kind, I know that I'll have brush lines all over the massive plates otherwise.
@eldamris, In terms of strength, the lower half should be cast in resin, which I expect to provide sufficient weight and strength. Further to that I've always seen people say that these things need a wooden or pvc support because they're collapse otherwise, but I've yet to see one where somebody built one that actually collapsed in plastic. If I saw something like that which suggested to me I am doing something wrong then I'd be inclined to change materials, currently I expect that as long as I keep to the planned internal supports, effectively a grid, it should easily be strong enough.
I finally got my glue and another big sheet of plasticard, so I'm going to be able to start constructing now, hopefully I'll have something nice to show you soon.
If any Mods are reading is it possible to move the thread into the more appropriate painting and modelling blogs section, I didn't realise it should have been there instead when I made the thread, thanks.
|
|
This message was edited 1 time. Last update was at 2012/07/03 11:30:30
|
|
|
|
|
2012/07/05 02:06:39
Subject: Re:The Mars Warlord Titan Project
|
|
Regular Dakkanaut
|
Finally some decent updates and some progress, as having gotten the glue I began building things. Picture heavy post ahead.
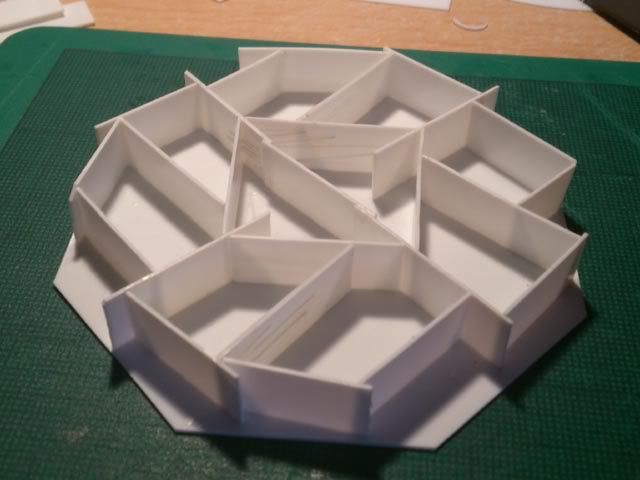
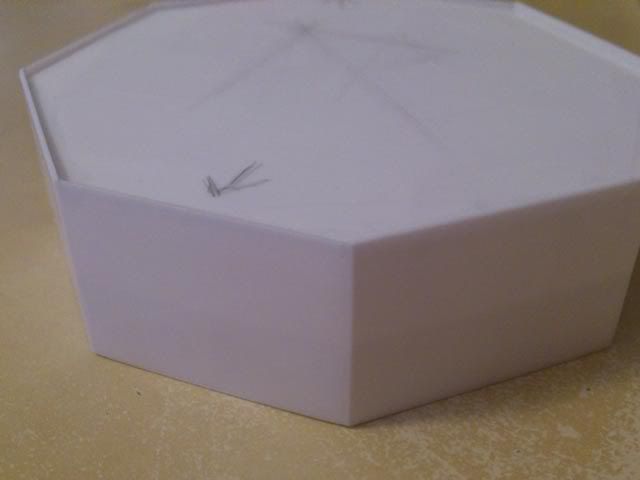
I started by building the base of the foot, I plan for most of my parts to build a form of internal structure, for support. With the base I Cut spacers of an even width and an extra few octagonal plates. These were used to build a weblike structure inside that's used to add strength.
This is the assembled internal structure for the main base part, I took special care to align the 3 octagons on each edge. Didnt work that well though so I had to sand it perpindicular.
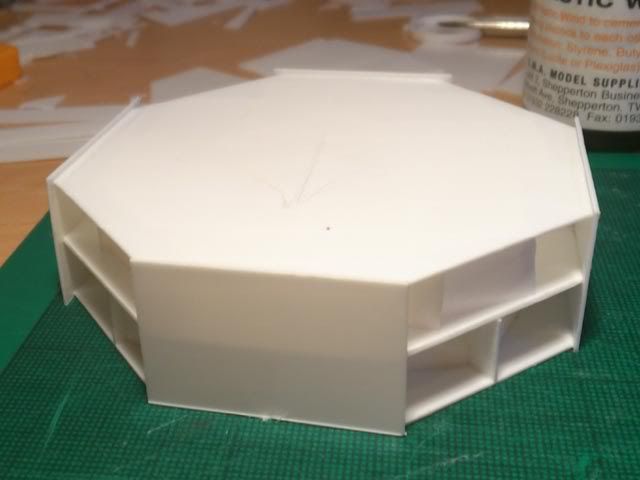
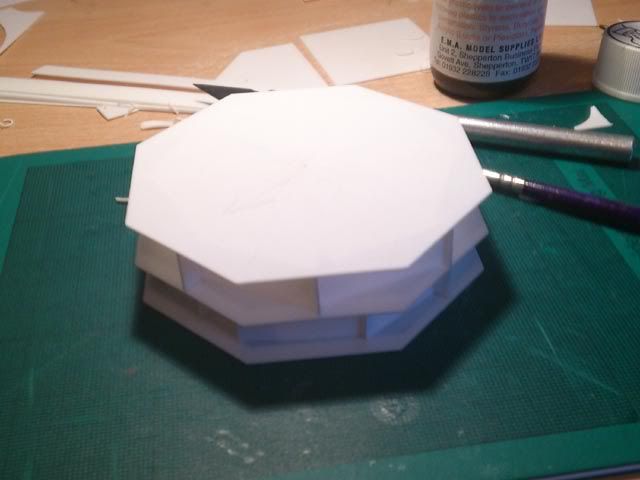
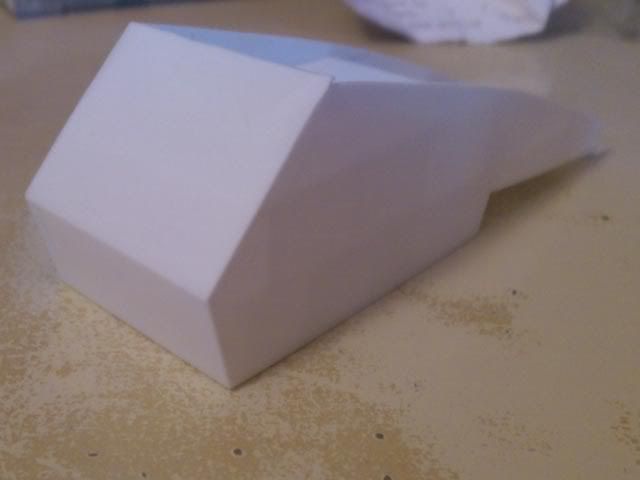
When adding the side plates I leave an edge over where I intend the final edges to be. This then gets sanded down and leaves a neater finish than I can manage by cutting first.
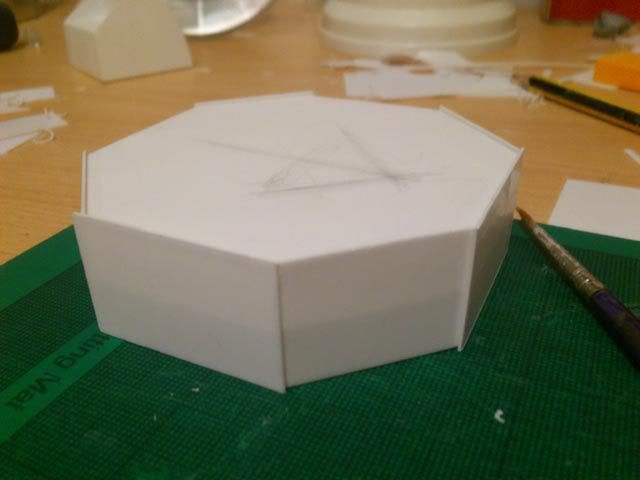
After sanding those edges flat to the next edge, the next ones are placed over those, these will be sanded next.
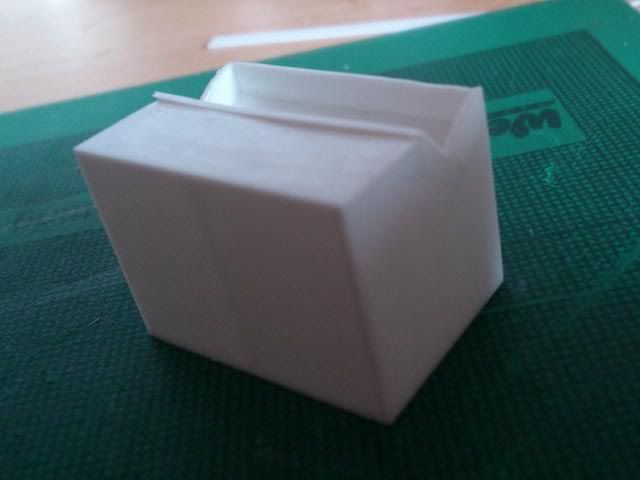
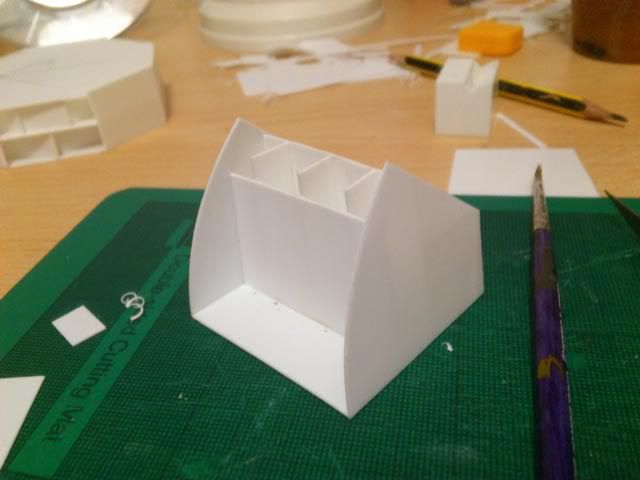
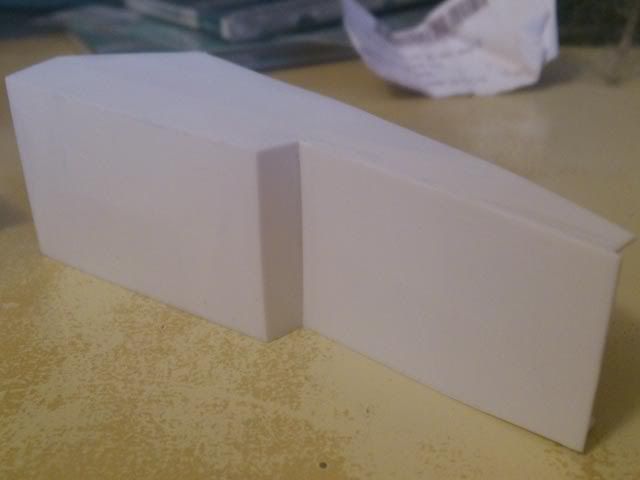
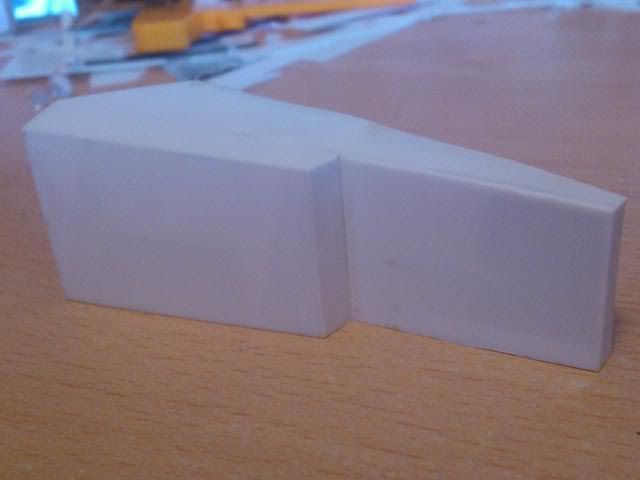
The next part I built was the toe mid piece. Same as the other piece, it involved using an internal structure, parts slightly bigger and sanding them down again. I still need to put some surface detail on, but first I need to give the curved surface of the joint part using filler.
The toe end. Internal structure, sanding down again, this needs another plate on the top, and then the filler over the curved area, then the plan is to put edging and rivets on.
Bit of scale shot of the foot, it's getting quite big, and I still havent begun to build the curved heel plate or done the ankle circle things.
This is the jointed part of the ankle. I've done the internal structure and the curved circles, I have yet to sand the edges even and then I'll be able to add filler to give the curved joint. Onto this I'll put plasticard detail. The two other pieces to the left will cap of either end and need to be edged, and need to have detail plated on.
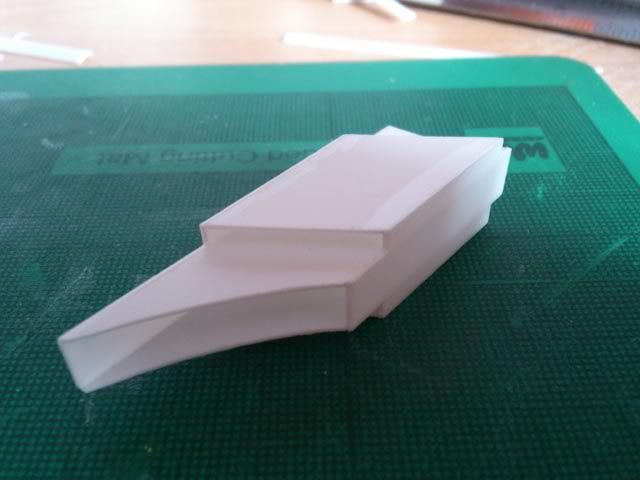
This is the part that connects the toe armour plate to the leg, I fancied something different to the foot parts, and I know this is an interesting piece so I built it. Still in need of sanding and edging and detail though.
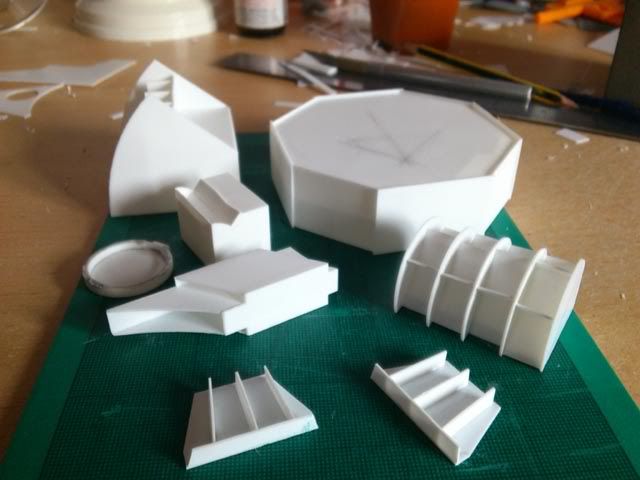
Just the complete shot of all the work I got done yesterday, one thing visible is a sort of grey paste on the circle piece for the top of the toe end, this is a plastic paster i'm using to fill some gaps and even it out.
I'm progressing forward as much I can and hopefully I'll be able to update soon with the real interesting work when I get to forming curved pieces with the filler material. As usual, ask question if you with or just leave helpful comments, thanks.
|
|
|
|
|
|
2012/07/05 02:31:29
Subject: The Mars Warlord Titan Project
|
|
Morphing Obliterator
|
1) Im amazingly impressed by the work done here.
2) Im not sure how this is going to work on the table-top (wont it take up all the table, and be brushing its head on the ceiling!??!)
Sitll, awesome in concept and design - love it.
|
|
|
|
|
2012/07/05 02:43:04
Subject: Re:The Mars Warlord Titan Project
|
|
Thunderhawk Pilot Dropping From Orbit
|
Im glad you plan on adding shoulder weapons, it adds much needed bulk to the main torso, but I do like its sleak streamlined curves. It almost looks agile. Great concepts. Keep it up!
|
|
|
|
|
2012/07/05 10:33:04
Subject: The Mars Warlord Titan Project
|
|
Bounding Ultramarine Assault Trooper
|
darkkt wrote:
Im not sure how this is going to work on the table-top (wont it take up all the table, and be brushing its head on the ceiling!??!)
He raises a good point, the lucas patern warlord (like mine) is 24 inches (26 with carapace weapons), you are aiming for what? 26 before carapace weapons, so nearly 30 inches once those are installed...
I hate to say it after you've gotten started, but your scale may be too large.
That said, it probably won't matter at your FLGS but it WILL matter for transporting it because 30 inches is going to be immense in a car.
|
|
|
|
|
|
2012/07/05 11:16:28
Subject: The Mars Warlord Titan Project
|
|

Esteemed Veteran Space Marine
|
subscribed! i wanna see where this awesome stuff is going!
|
|
|
|
|
|
2012/07/06 08:48:16
Subject: The Mars Warlord Titan Project
|
|

Storm Trooper with Maglight
|
DijnsK wrote:subscribed! i wanna see where this awesome stuff is going!
I totaly second that! really great work so far!
|
|
|
|
|
|
2012/07/06 09:07:40
Subject: Re:The Mars Warlord Titan Project
|
|
Regular Dakkanaut
|
@darkkt & @bibbles, thanks darkkt, In terms of using on the table I'm not entirely sure how I'll manage either. From the beginning this wasn't a model I wanted to build for the gameplay, and still isn't. Instead it's something I greatly enjoyed designing, am greatly enjoying building, and hope to enjoy painting it too. Afterwards I'll have a model that's far more for showing off that anything else. That said I would like to be able to use it in a few large apocalypse games. Usability wise I'll probably put a base on the thing, which would add strength at the cost of room, but is something I think I'd need to do, I doubt it would move all that much during a game however so this might not be too bad. Also, I took some parts into my flgs to ask the opinion of the manager, too small he says, but I think he'll still let me use it.
@midnightdeathblade, Thanks for the compliments, the agile thing I like, it's something that the mars Warhound captured really well, same with the Reaver too.
@DijnsK Thanks for the encouragement
Some more progress and pictures.
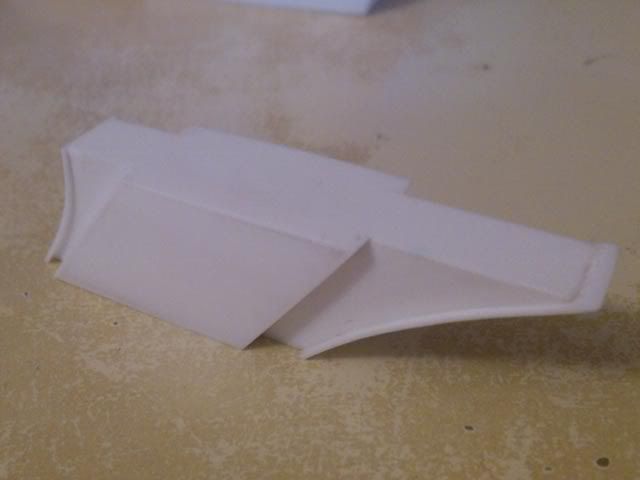
The toe armour piece has now been mostly plated right, I have a panel I intend to redo however. In the last photo of the two you should be able to see that the narrowest end to the right doesn't lie flat. When I sanded the rough edges down I didn't notice it hadn't glued properly, letting me over sand it down, I tried to get it to work but having looked at it I'll just redo the plate there. Shouldn't be too difficult.
This is the connector piece I showed before with the edging added. I still need to sand down the edging at the ends, but the middle parts I'm satisfied with, I need to put rivets on this afterwards then should have my first finished part.
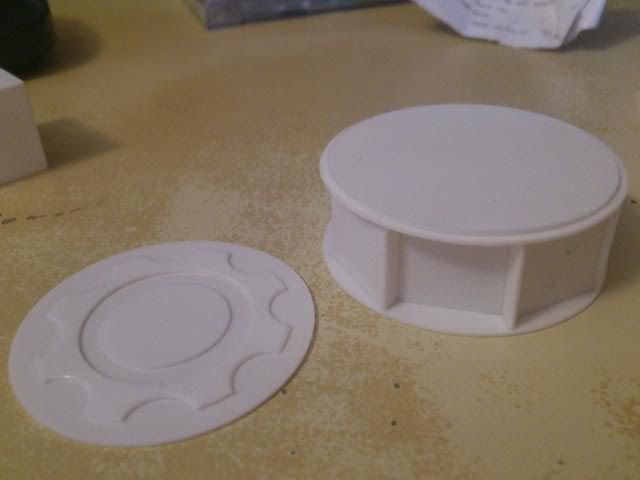
This is the ankle cap circle thingy, I could really come up with a definitive name for this part... It's been reinforced with spacers between the two circles and is waiting to have the filler applied so that it is sanded down to a cylinder. The cog detail is glued onto another circle which will go on the side, as the other circle has been placed. The detail on the cog itself was redone because I wasn't quite happy with how even the smaller indented circles on the edges were. Hence the comparison shot, I know there isn't a huge change but felt more comfortable with it a little neater.

Somewhat blurry picture of the toe mid piece, I only need to apply the filler now, it's been sanded down on all sides and I'm happy with the seamless appearance. I've been using my phone for the photo's, but I might need to steal a camera that can handle a bit of macro in order to show some of the finer detail when I get started.
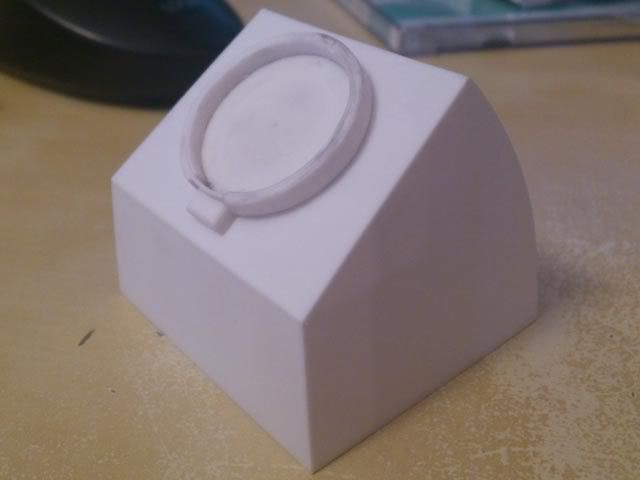
I've blutacked in place the circle connector thing to show the placement. The grey plastic paste stuff, which is a mixture of old sprue and some of the liquid solvent I use, makes it appear unsmooth, but it actually is. Again this is showing the more seamless effect of the sanding, and is another piece that's awaiting the filler before I can add the last detail to it.
The Edges on the foot base have also been finished, now I need to begin to build another slightly raised section on the part to give the beveled edge. This is why I've left a lip to the edges. This will let me push the angled plates into the edge so that they have some extra support, and that when it's sanded it appears even.
Not sure how much work I'll have done today. It's my school's leavers ball so I'm occupied for the evening. But I'll try to do some stuff during the day.
|
|
|
|
|
|
2012/07/06 10:35:28
Subject: The Mars Warlord Titan Project
|
|

Blood-Raging Khorne Berserker
|
this is SWEEEEEEEEEEEEEEEET! keep up the good work ;D
|
|
|
|
|
|
2012/07/06 15:10:37
Subject: Re:The Mars Warlord Titan Project
|
|
Regular Dakkanaut
|
Thanks rutgerman
Short update for today's stuff
I fixed the problem mentioned before with the over sanded plate. Didnt take long as I expected which was handy.
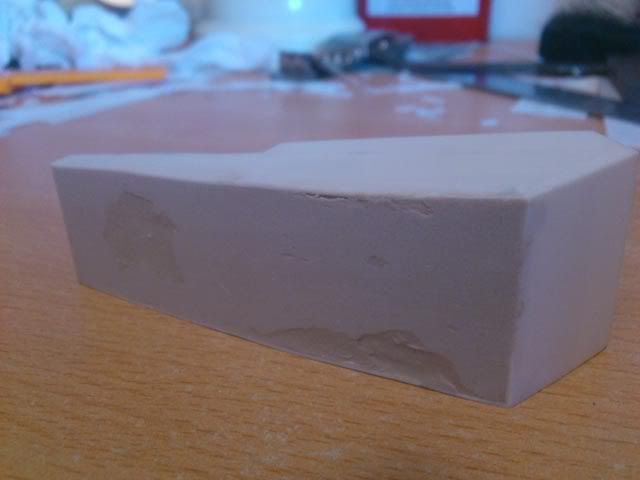
I also got around to using the filler, this first application is more of a rough coat. After sanding this down, hence the smooth parts, I'll apply another coat and sand that down, hopefully that will leave me with a very smooth curved surface, onto which I can build the edging and the box for the connector to attach to.
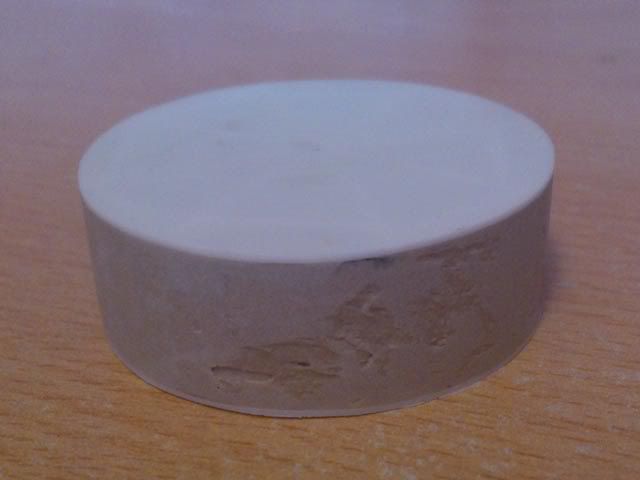
The ankle cap was also filled, here you can see another part that's lower than the desired level hence needing a top up before sanding again.
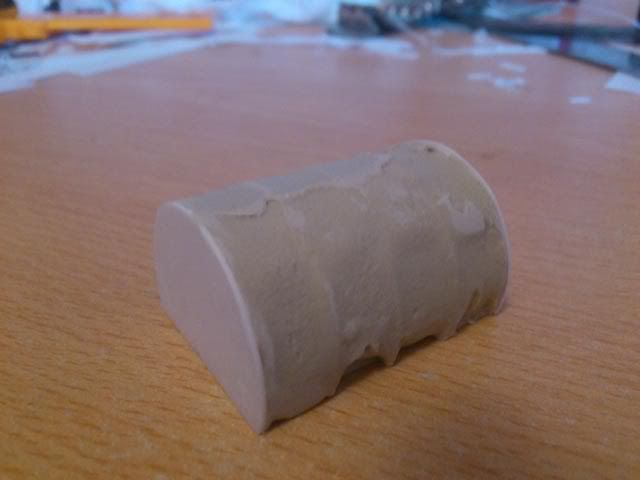
Same again with the toe, although this is much more roughly filled as I didn't mix enough to completely fill the cavity, I should have reduced it's size really, but it will be fine after a second coat another day.
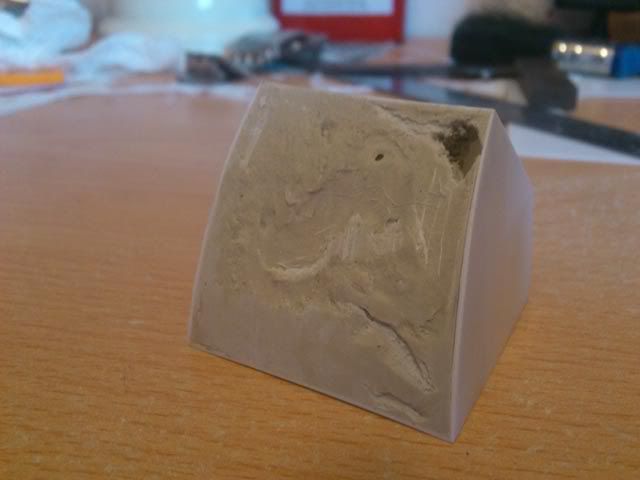
The ankle joint. This needs the second coat obviously, but I may decided It's easier to search for an appropriate diameter tube, that's if this doesn't work well enough, but I have hopes it should suffice.

The toe midpart has been filled in enough, this will now get close to me finishing it as I need to add some small detail now and it's effectively done.
That's what I've been up to this morning, I may get some more work done when I return from my prom. I often stay up to between 4 and 6 in the morning doing work, I find I think clearer then. So there might be an update tomorrow morning or if not, then the evening.
|
|
|
|
|
|
2012/07/06 16:08:59
Subject: Re:The Mars Warlord Titan Project
|
|
Posts with Authority
Boston-area [Watertown] Massachusetts
|
Out of curiosity, why are you using filler, instead of, say, thin plasticard, shaped around?
|
Falling down is the same as being hit by a planet — "I paint to the 20 foot rule, it saves a lot of time." -- Me
ddogwood wrote:People who feel the need to cheat at Warhammer deserve pity, not anger. I mean, how pathetic does your life have to be to make you feel like you need to cheat at your toy army soldiers game?
|
|
|
|
|
|
|


 4000pts


 My IG blog:

 : AVENGERS ASSEMBLE! <= fully in painting process. View progress in this thread =