| Author |
Message |
 |
|
|
|
|
Advert
|
Forum adverts like this one are shown to any user who is not logged in. Join us by filling out a tiny 3 field form and you will get your own, free, dakka user account which gives a good range of benefits to you:
- No adverts like this in the forums anymore.
- Times and dates in your local timezone.
- Full tracking of what you have read so you can skip to your first unread post, easily see what has changed since you last logged in, and easily see what is new at a glance.
- Email notifications for threads you want to watch closely.
- Being a part of the oldest wargaming community on the net.
If you are already a member then feel free to login now. |
|
 |
2012/07/19 23:56:36
Subject: Re:The Mars Warlord Titan Project
|
|

Regular Dakkanaut
|
@adamsouza, thesilverback, warboss skul-krak, Thanks guys.
@anunearthlychilde, Haha thanks I guess...
@brother maximus, Won't do I'm afraid, the templates are a mess to say the least. Because of the way I work they're very incomplete, having no tabs or complete layouts, in many places just including a single profile panel type from which I figure the rest out through knowing the model really well. On top of that I'm just not all that comfortable releasing the past 4 years of work on this one model for other people to play with, somewhat selfish I understand, but I'm simply not very comfortable with it. Sorry, I have released templates in the past, and they should still be on either the bwc 1 or two. They're much older warlord templates, and aren't as mars smooth as my current ones, and are still badly designed, but they should still be good enough to build something from given enough determination.
@mullet steve, Thanks, I'll admit I wasn't aware of the shrinkage problem, having mixed too little catalyst and destroyed stuff with unset filler I've attempted to put as much in as possible without being silly. I'll try to be more cautious though. Given you sound to have more experience with it is there anything else that might catch me out? Like I mentioned before about it seeming to melt parts of the styrene, is that common?
More updates
I glued the ankle cap detail on, so the piece is completed for now. I next need to begin building the connector that holds this onto the foot base part.
I used the filler to fix the edge on the toe armour piece, so it's now straight enough. I'm pretty happy with it and I will start to put another part onto it, which is a box at the back, after which I will rivet and add plating.
I also sanded down the first coat of filler on the foot base, the edges are all crisp and I'm pleased with them and don't think I'll need much more than just one more coat of filler then a bit of detail, as I've said before however this is going to relatively sparse in detail.
I also started on the armour plating, however I'm not too happy with the design I've done and think that I will remove it and go with the detail I had in the 3d model. I didn't expect a departure from that to look any worse, but I'm not as pleased with it.
Not loads of updates, but something. I'm waiting to get a job before I begin the main parts of legs as I need to order acrylic pipe, and just don't have the money for it now. But I will try to do any detail that will go onto the parts, and much like when I waited for glue, will do as much as possible. Also, is anybody able to confirm what I believe and tell me that the solvent weld, dichloromethane, will bond acrylic to styrene? I did a small test which seemed to work but if somebody can confirm more thoroughly I'd be happier for it.
|
|
|
|
 |
|
2012/07/20 00:11:06
Subject: The Mars Warlord Titan Project
|
|

Boosting Black Templar Biker
|
Very awesome fiorehellheart. Yes, is there a way to view the templates/ plans you used to make this?
|
 10k Black Templar 10k Black Templar
 Warhound Titan "Legio Matallica" Warhound Titan "Legio Matallica" |
|
|
|
|
2012/07/20 00:14:25
Subject: The Mars Warlord Titan Project
|
|
Towering Hierophant Bio-Titan
Somewhere In Time And Space
|
Fiore, I sincerely hope your casting these parts as you go, because it'll save you from making them twice 
|
|
|
|
|
|
2012/07/20 23:55:57
Subject: The Mars Warlord Titan Project
|
|
Mekboy Hammerin' Somethin'
|
the chemicals in the filler will soften the plastic which is very common... I'd leave them to reset before you do too much sanding to be honest.
to avoid dipping (where the filler sands away quicker than the plastic ribs) I'd suggest making yourself some snading blocks... Take a piece of flat material which you can comfortably hold and spraymount onto it and the sandpaper then trim the sandpaper to fit.
|
|
This message was edited 1 time. Last update was at 2012/07/20 23:56:14
|
|
|
|
|
2012/07/21 02:39:34
Subject: Re:The Mars Warlord Titan Project
|
|
Regular Dakkanaut
|
J99Pwrangler, See my last post, whilst I am roughly using templates myself I'm not going to be releasing them. Sorry for that, but thanks for the compliment 
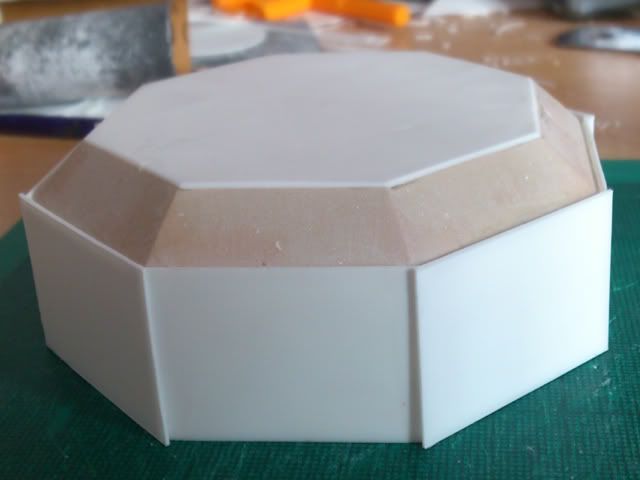
Unearthly, Yea, that's the plan, not just because I don't want to have to make them twice, but more because it means they'll all be the same. I'd prefer identical pieces even if it was more effort, which casting may well be. Even on parts of the stuff I've made it bugs me how imperfect they are, the octagonal base for example isn't exactly octagonal, which isn't noticeable, but annoys me to just know it isn't. At least if I cast them they'll all be the same. On top of that though casting looks like an interesting skill that I'd love to learn and have a go at.
That's what I'd expected mullet_steve, just something I'm going to have to work around then. With regards to leaving them a while to set IIll probably give a longer wait time on the larger filler areas, such as when I start the leg plates and shoulders ect, but I want to get as much done as possible so I've rushed of sorts so far. Nothings gone wrong yet and I'd like to keep it that way so I might slow down a bit before I get overly cocky. I'll also look into the sanding block, I intend to make some irregular ones when I do the legs plates anyway, so that I can sand the filler on the inside of the leg, but I'll get to that later.
More updates today, more pieces essentially finished.
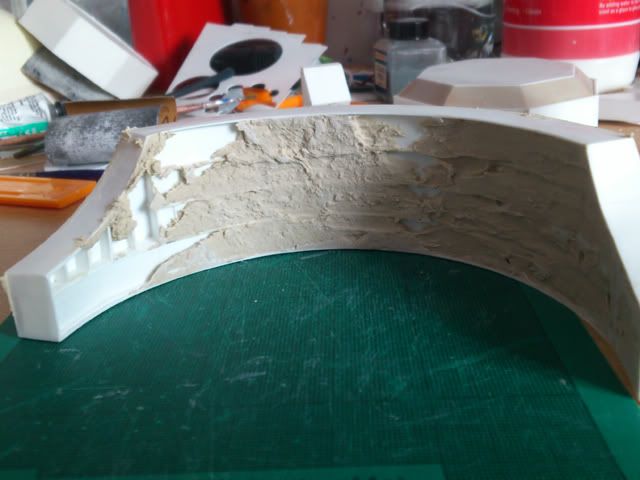
I decided I really didn't like the plating look, so it was scrapped. Just thought I'd show what a mess I made of it. I'd used the plastic solvent so it was welded together, in future I plan to do the edgings all with superglue. It's much easier to separate the join of superglue and the residue can be sanded down more easily. The new plating is more angular than the other stuff, but it's closer to the render and I'm much happier with it. I'm also not too fussed about the angular edges as the Reaver toes are very angular in their edging, whilst the rest isn't. So I don't feel like I'm making too large a departure in style here. I also glued the housing for the connecting pipe between the toe armour plate and toe end piece. I'm not entirely sure how I'll do the connecting piece itself, but I at least doubt I'll put another housing on the underside of the toe armour piece, it would take up too much room and won't be seen due to the angle anyway.
This is the connector between the base of the foot and the ankle cap piece. I'm undecided on how much detail and riveting to put on this part, but I may have to do it heavily riveted to match the rest of the pieces, in the picture later on in this post it looks a little sparse. I've left the end unplated as I plan to use filler in order to match the height of the part to the position on the foot base as best as I can. It also isn't noticeable in the picture but I need to use some filler to repair some melting from overzealous glue usage, and uneven sanding. It's not the bst part I've made but I'll try to improve it.
For the plating on the toe armour piece I decided to start to introduce the curves into the edgings. I'm quite happy with the effect and depending on how I feel whilst edging other parts, my titan may end up more angular in terms of the edgings than the forge world ones. I still need to decide how and where to place rivets onto the edgings before these are finished though. Ideals I need a set of 2mm spheres that don't cost a lot of money, so far the only thing I've seen is ball bearings which are more expensive than I can use. I could use the leather punch pressed rivets, that are flatter and more disk like for the 2mm upwards rivets I want. I'll try some things out and come back with the results another time, but if anybody happens to know where I could get some 2mm spheres that aren't very expensive, I need a few hundred I think, I'd be grateful.
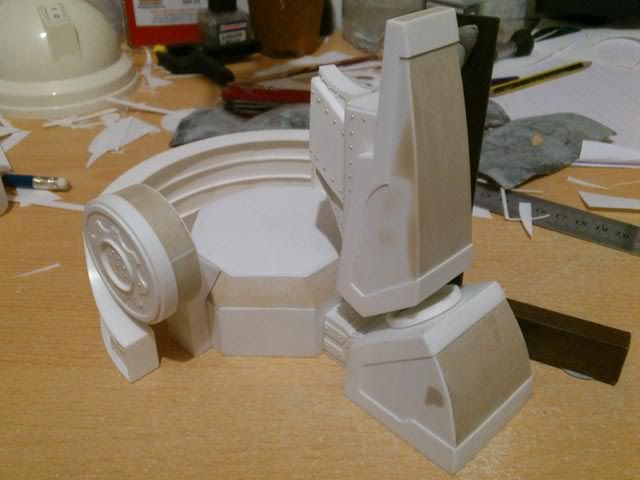
Lastly just a blu-tacked shot of the parts so far. I'm pretty chuffed at how stuff's going so far, although it is slower than I'd need to meet the deadline of October, it's faster than I'd actually expected to achieve. There is a larger image that's 1024x768 in resolution in my photobucket gallery here:
http://i852.photobucket.com/albums/ab86/fiorehellheart/Warlord%20Titan%20Project/Update%2010/10_08.jpg
If you want to check it out in more detail that the small images I use for the forum posts.
If anybody has any questions, just ask, thanks again.
|
|
This message was edited 1 time. Last update was at 2012/07/21 02:41:32
|
|
|
|
|
2012/07/21 02:42:22
Subject: Re:The Mars Warlord Titan Project
|
|
Posts with Authority
Boston-area [Watertown] Massachusetts
|
|
Falling down is the same as being hit by a planet — "I paint to the 20 foot rule, it saves a lot of time." -- Me
ddogwood wrote:People who feel the need to cheat at Warhammer deserve pity, not anger. I mean, how pathetic does your life have to be to make you feel like you need to cheat at your toy army soldiers game?
 |
|
|
|
|
2012/07/21 03:09:53
Subject: The Mars Warlord Titan Project
|
|
Regular Dakkanaut
|
Ahh, fantastic, trust the hive mind to succeed where I'd missed. Although,you're technically wrong  It's under 6 quid, excluding VAT still not too bad though.
It doe leave me undecided now on what to do. If I buy a lot, 500 odd, then I could use them with the holes, in which case I'd be making some big holes to make them flush, which could go wrong. Or whether to get only a few or so and make some green stuff molds of hemispheres so that I can just superglue the greenstuff parts on top. I'll need to look into some greenstuff mold tutorials, and try something out first, but I'ts nice to have the choice now, thanks.
On warseer somebody also suggested I look into a solvent dispensing pump bottle. I guess most of you won't know what one of those is, and I wouldn't blame you, but I've wanted one for a while after I found a you tube video demonstrating one. https://www.youtube.com/watch?v=myh8-zpJt9Q
I did a quick search and found one on ebay that I fancied as it was much cheaper at just 1.50, compared to the 22 I'd seen at my plasticard suppliers site. Just as with the chopper I intend to get one and try it out partly because It's something I haven't seen other wargamers use.
http://www.ebay.co.uk/itm/200ml-Cleaning-Chemical-Agent-Alcohol-Makeup-Remover-Pump-Push-Down-Dispenser-/390422022379?pt=UK_Health_Beauty_Nails_Manicure_Pedicure_CA&hash=item5ae6f748eb
|
|
|
|
|
|
2012/07/21 05:10:16
Subject: Re:The Mars Warlord Titan Project
|
|
Perturbed Blood Angel Tactical Marine
|
i plan to build a knight class titan one of these days, im gonna keep an eye on your project and see if i can get a few good ideas from what your doing
|
 aprox 1500 pts aprox 1500 pts 
|
|
|
|
|
2012/07/21 11:55:54
Subject: The Mars Warlord Titan Project
|
|
Regular Dakkanaut
|
Awesome blood red. Personally, I'd take inspiration from dreamforge if I were to make a knight. His new models are pretty much perfect and would just need the mars style armour plates and edgings to look complete, certainly all the working parts are there and it looks sufficently mechanical.
http://www.dreamforge-games.com/forum/index.php/topic,62.0.html just that thing with edging on the plates, at least that's what I'd look towards, hope that you might get what want with a bit of inspiration from here though
|
|
This message was edited 1 time. Last update was at 2012/07/21 11:56:21
|
|
|
|
|
2012/07/21 12:14:58
Subject: Re:The Mars Warlord Titan Project
|
|
Towering Hierophant Bio-Titan
Somewhere In Time And Space
|
fiorehellheart wrote:Unearthly, Yea, that's the plan, not just because I don't want to have to make them twice, but more because it means they'll all be the same. I'd prefer identical pieces even if it was more effort, which casting may well be. Even on parts of the stuff I've made it bugs me how imperfect they are, the octagonal base for example isn't exactly octagonal, which isn't noticeable, but annoys me to just know it isn't. At least if I cast them they'll all be the same. On top of that though casting looks like an interesting skill that I'd love to learn and have a go at.
Don't worry I'm the same, and so is Blackadder (another titan builder on here, he's doing a lucius warlord with interior currently). I've learnt to let go more though these days, as if I am the only person who see's the imperfection, then I can let it slide... otherwise I'd resculpt/redo pretty much all my models
keep up the awesome work dude, I am really enjoying seeing this come to life!!!
|
|
|
|
|
|
2012/07/21 12:25:14
Subject: The Mars Warlord Titan Project
|
|
Regular Dakkanaut
|
I'm in total awe of blackadder, I followed his warhound build, which was amazing, and I really like his warlord even if it's the style I like less. We present pretty different methods me and blackadder, his is a somewhat more gung ho take it as it comes and build just the next part in the line before thinking about the one after that, where as I've planned almost every detail as well as I can, I even have a head interior planned already. His stuff's more detailed though, and I envy how he manages to do that stuff so well.
But yea, the perfectionism is annoying at times, when I can't let go of some tiny detail for example, but it does push me to do the best I can which I appreciate. And I hope it's likewise with yourself
|
|
|
|
|
|
2012/07/21 12:42:36
Subject: The Mars Warlord Titan Project
|
|
Towering Hierophant Bio-Titan
Somewhere In Time And Space
|
Lols Blackadder is far from gung ho tbh, he's OCD like myself so needs to do things ina logical step before going on.
oh of course, I wouldn't consider a model finished if I ever thought it was sub par... I love to convert more than anything, scratch builds less so as they are more time consuming, but as my entire Tyranid force requires converting in some form or another its get a tad tedious lols
|
|
|
|
|
|
2012/07/21 12:56:12
Subject: The Mars Warlord Titan Project
|
|
Regular Dakkanaut
|
Hmm, after a google gung ho doesnt mean exactly what I'd thought it did, just means over excited about something, which I suppose he is, but I meant it to mean how much he sort of tries things as he goes, designing along the way. Not sure I'm making my point very well, but he's great anyway.
haha, yea, I used to be a converter, that's how I began proper modelling at least. Then I started to go bigger when I tried a warhouond, after that I also have a few orky constructs. An old bomber and fighter I scratch built, and an orky thunderhawk, I might get a photo of them just to show what i've done before now. All of them are in pretty bad shape after so many years, but I keep on telling myself I'll finish them sometime.. I was always more of an imperial converter though, making converted techmarines and such rather than nids, which I've never collected before. Might have helped the shocking gap in greenstuff knowledge if I had done though.
|
|
|
|
|
|
2012/07/21 13:47:33
Subject: The Mars Warlord Titan Project
|
|
Grey Knight Purgator firing around corners
|
Looking good so far, updates few and far inbetween but quality assurance is always appreciated!
|

 (Click my Thread link, and the Inquisition will Virus Bomb your home world. i mean or... or do i?) (my Knights of Draigo Wip) (Click my Thread link, and the Inquisition will Virus Bomb your home world. i mean or... or do i?) (my Knights of Draigo Wip) |
|
|
|
|
2012/07/21 14:02:53
Subject: The Mars Warlord Titan Project
|
|
Towering Hierophant Bio-Titan
Somewhere In Time And Space
|
haha, I kinda figured what you meant anyways Fiore, even though he does it as he goes along, the thought process he goes through is amazing, kinda like yourself with it all tbh!!!
GS ability is just something that comes with practice, no matter what army you do really, its just a matter of practice imo, I don't think its something that comes naturally to anyone. Having said that I'm an artist and love to sculpt but yeah, I don't think any of my tallent (or lack of it lols) is natural 
|
|
|
|
|
|
2012/07/23 12:18:52
Subject: Re:The Mars Warlord Titan Project
|
|
Quick-fingered Warlord Moderatus
The Great Satan (East Coast)
|
Now this is how to scratchbuild a Warlord. Well drawn and thought out plans. CG illustrations. None of the hit or miss fumbling that I employ. It's a pleasure to see this come to fruition. I found your work on another forum and referenced it to here where I can subscribe.
I like the fact that you meticulously plan out your work. Not only does it rule out mistake but it's easier to replicate duplicate parts.
I almost have a hankering to attempt a Mars pattern as well for your amazing effort but I have so much scrap lying about I think I might cobble together an Ork Titan.
|
"It is easier to deceive people than it is to convince them that they have been deceived."
|
|
|
|
|
2012/07/23 17:30:14
Subject: Re:The Mars Warlord Titan Project
|
|
Towering Hierophant Bio-Titan
Somewhere In Time And Space
|
The_Blackadder wrote:Now this is how to scratchbuild a Warlord. Well drawn and thought out plans. CG illustrations. None of the hit or miss fumbling that I employ. It's a pleasure to see this come to fruition. I found your work on another forum and referenced it to here where I can subscribe.
I like the fact that you meticulously plan out your work. Not only does it rule out mistake but it's easier to replicate duplicate parts.
I almost have a hankering to attempt a Mars pattern as well for your amazing effort but I have so much scrap lying about I think I might cobble together an Ork Titan.
Build a megga Gargant!!! I double dare you!!!
|
|
|
|
|
|
2012/07/24 18:39:05
Subject: Re:The Mars Warlord Titan Project
|
|
Regular Dakkanaut
|
Yea, I intended to put some practice in with greenstuff but never got around to it.
Thanks blackadder, I noticed your post on the ammobunker as well, think I've commented on your threads in there before now too. I think its quite interesting our differing approaches, as you said my planning and your 'hit and miss fumbling', which really does it a disservice. I don't know how you manage to do what you can as fast or as detailed as you do, it's taking me huge amounts of time to do just little things on this, part of the reason my momentum's slowing a little. Still, I'll keep slogging on with the plan. My votes for a lucius reaver titan next from you, some blend of the epic forgeworld and the mars forgeworld one, but I can also see the appeal of heading orky with scrap. I've only been doing this a short while but my desk looks like I'm building in a miniature scrap heap.
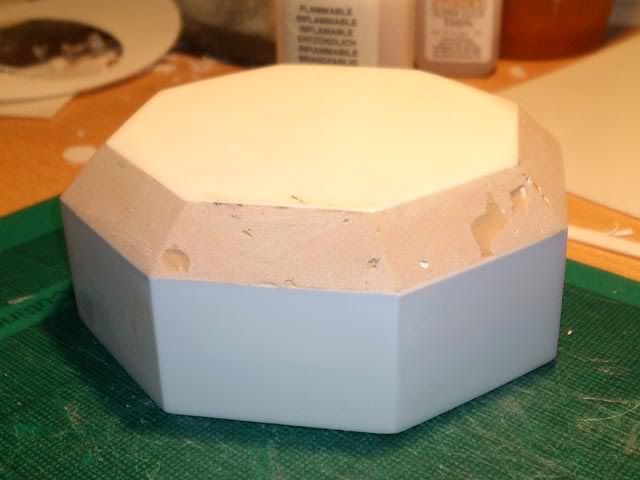
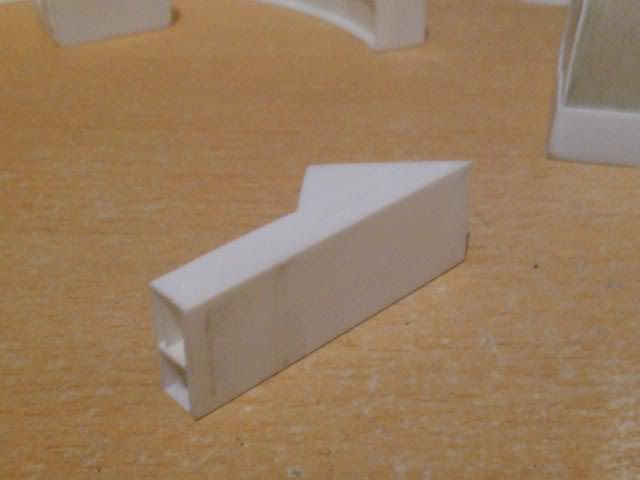
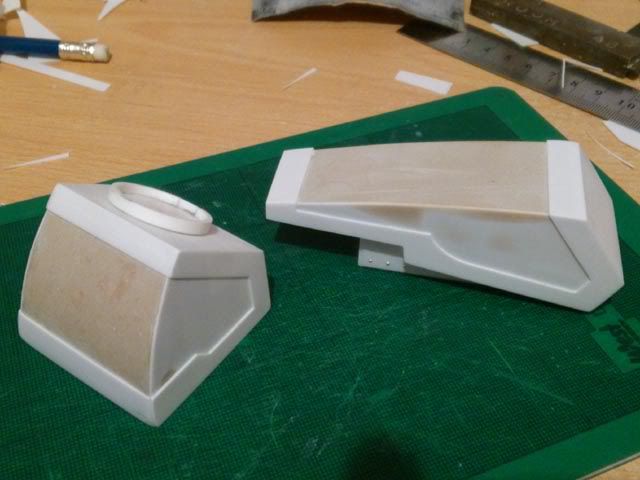
It's been a while coming, but I've got some more updates, again, not much but I have an excuse. A couple of days ago I felt that the foot base wasnt good enough, when I first sanded I did it on a tray that had a lip on the underside I hadn't noticed, meaning the surface of the tray was slightly raised above the surface of the table. When I sanded it meant that it bowed downwards slightly, so all of the edges on some of my early sandings are slightly curved. I've sorted this now and put a piece of wood under the tray to raise it so that it doesnt sand wrongly, but I'd already done the foot base. Because of this I decided to rebuild the foot base all over, so spent a long day recreating it so that all of the edges were perfectly flat and perpendicular. After I'd done this though I spent a short amount of time sanding the original one, which I'd already put filler on, and after a short amount of sanding the edges are close enough that it's not noticeable anymore. So in effect I wasted a good deal of time duplicating a part for no reason. Which is why the updates taken so long. I intend to learn from this lesson though...
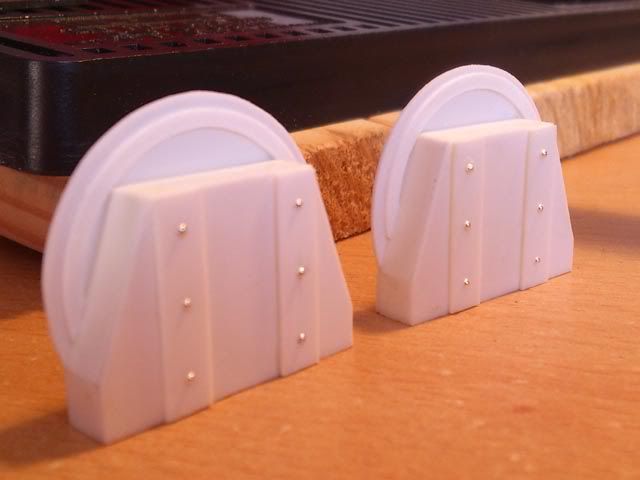
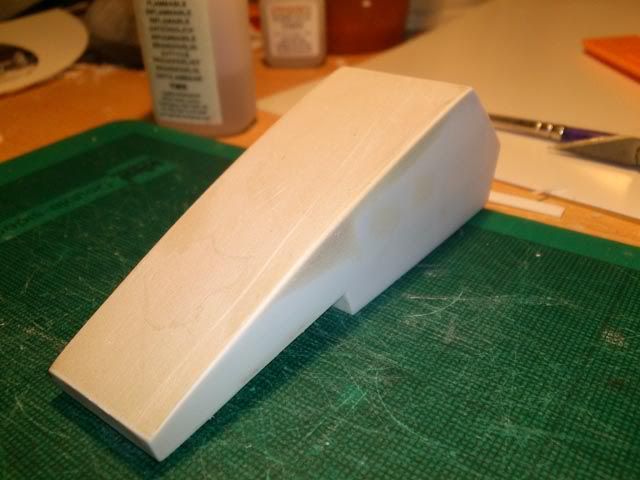
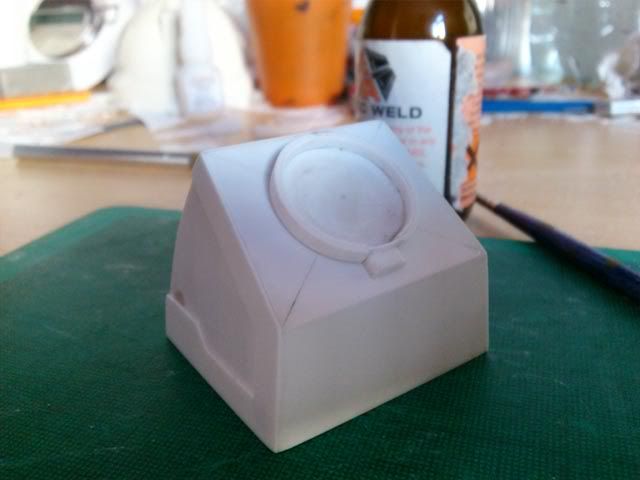
After that I decided to get started on some other parts. These are the two pieces that will cap the end of the ankle joint tube. I've cut the circles to slightly less than the 34mm outside diameter of the pipe. This is so that when I get the pipe I'm sure that it will fit within the tolerances of the pieces and happily fit onto the end without much fuss. If there is a slight increase in size It's just appear to be more edging and not matter. Building this I'll say that the chopper was really useful, I used it to ensure that both of the trapezium type parts were correct using the adjustable angle guides and it was a lot quicker when cutting right angles for the 0.5mm width edging.
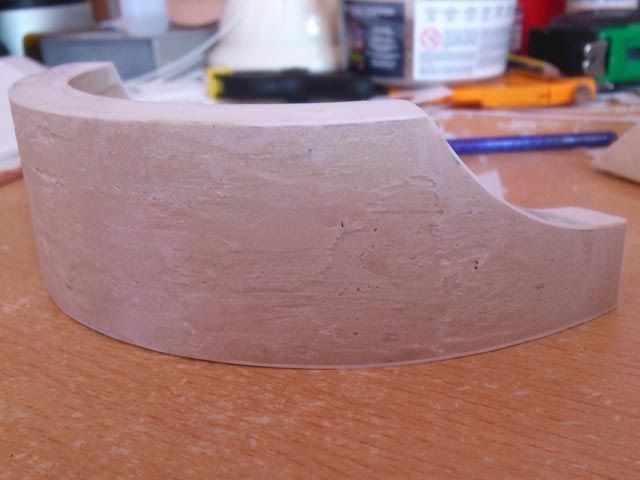
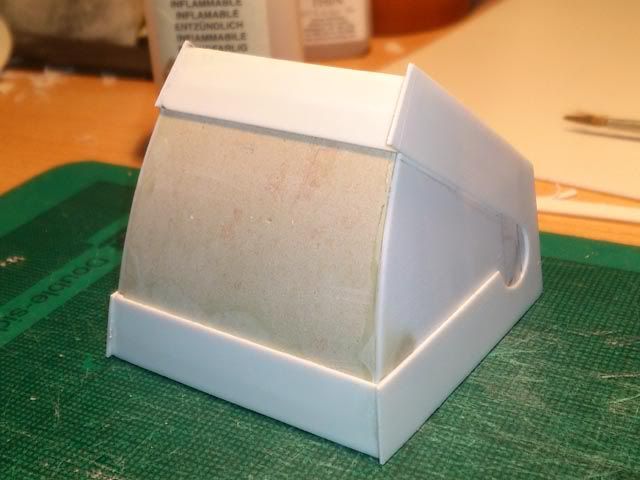
I haven't got and earlier picture, but this is the second coat of filler on the heel piece. I'm pretty much out of filler now so probably need to get some more, but as soon as I have done I'll be able to get close to finishing this. The inside isn't as close and has only had one coat of filler, but I have figured out how to easily sand it now. Using a large diameter piece of tubing that my plasticard was shipped in, I just wrap it with sandpaper and sand using that. Because the curve is smaller than the curve on the part it isn't perfect, but it's better than any other method of sanding I have and has worked well so far.
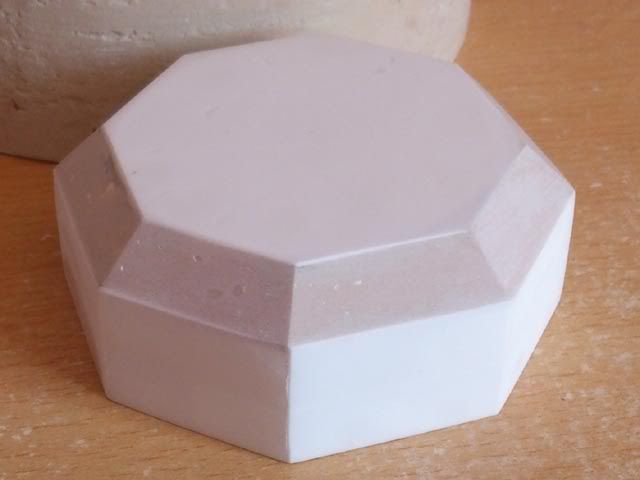
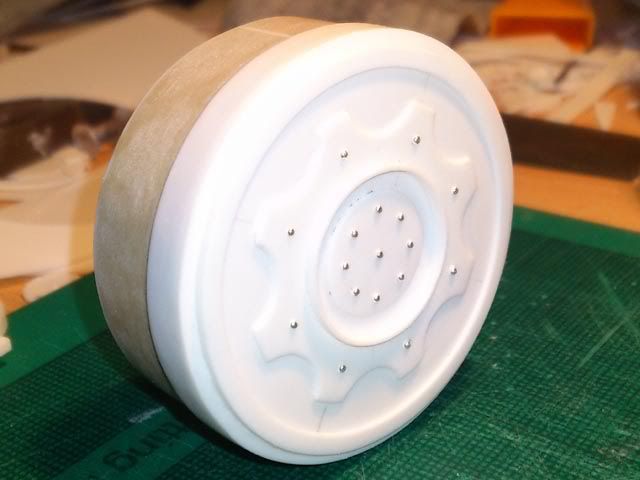
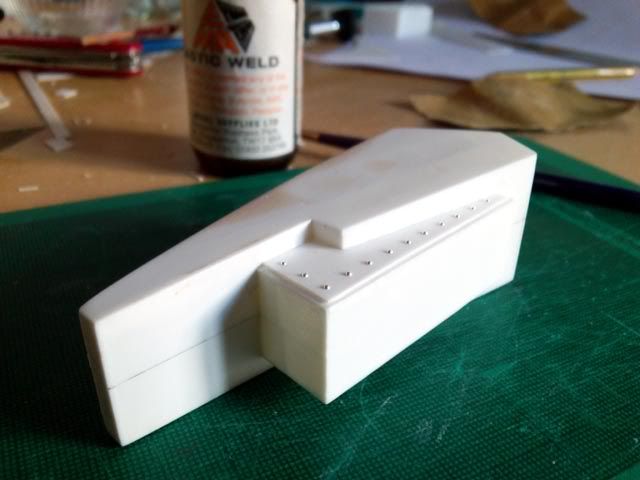
I also put a second coat of filler onto the foot base part. You should be able to see that now the edges are all fairly crisp, I've also been careful to get a very similar angle on at least two of the faces opposite one another, as they will take the ankle cap support piece. The sort of P shaped one. On the left of the closest edge in the picture you might notice that theres a slight imperfection at the corner. This is because I've almost sanded all the way through the plasticard whilst trying to fix the curve and the slight slant. As luckily it's the same only on the opposite face, I'll add some extra plating to this which will act as a placement guide for the ankle cap supporting piece. this should solve the problem and make it clear as to the orientation of the part, given that some of the faces are slightly dodgey fits It'll avoid misplacement by accident.
I decided it might help to give a diagram of the progress, and I'll try to update this picture every few updates. That way people can tell where I am in the build without figuring out all the different pieces I've built so far. Things coloured green are finished, things orange are a work in progress, and I haven't started the white stuff. So I've got a lot to go.
|
|
This message was edited 1 time. Last update was at 2012/07/24 18:43:55
|
|
|
|
|
2012/07/24 19:29:52
Subject: Re:The Mars Warlord Titan Project
|
|
Ork Boy Hangin' off a Trukk
|
Holy Crap!!!! This is turning out beautifully!!!!
As to your research... Where did you find the dimensions? I've been trying to scale up the image from the Apoc book, based on what I know from the the Warhound, and it's pic... but it's coming out a little wonky...
I am a mechanical engineer, so I do understand how to scale... but it's still a little off...
|
" It says in the rules that if there are no models from one side left on the table, then that side has lost. What it DOESN'T say is that I can't pick my opponent's models up and throw them on the floor, so if I'm losing the game, all I have to do is pick my opponents models up and throw them on the floor, and then I WIN! YAY! Woohoo. Loophole: FOUND! "
by Sgt Sixkilla
 13k WAAAGH!!! Skipphag 13k WAAAGH!!! Skipphag
 3k (Angels of Absolution); DV (Dark Angels); 3k (Angels of Absolution); DV (Dark Angels);  3k (Fire Serpents - Salamander successor) & 2k Salamanders 3k (Fire Serpents - Salamander successor) & 2k Salamanders
 75 (Death Korps) 75 (Death Korps)
 3k (Kabal of the Twisted Razor), 4k Tau 3k (Kabal of the Twisted Razor), 4k Tau |
|
|
|
|
2012/07/24 20:03:15
Subject: Re:The Mars Warlord Titan Project
|
|
Quick-fingered Warlord Moderatus
The Great Satan (East Coast)
|
At the risk of this turning into a mutual admiration society I feel I must state that I find your drawings fascinating. I wish I had the wherewithal (read patience) to produce such drawings for my Lucius Pattern. Right now I am scaling down the carapace from my posterboard mock up. I'm glad I saved it as many times I was tempted to toss it during my move to new digs but by scaling it down by 0.9 it has saved me a lot of re designing.
I notice from your text that you are having a bit of problem with sanding. Forgive me from stating what you may already know but the information may be useful to those who follow these threads. I use two methods to sand: first on a flat and true surface such as a formica countertop I lay a full sheet of coarse sandpaper; good stuff such as 3M aluminum oxide paper 60 grit. Next I sand only in one direction. If you sand back and forth you can't help but start rocking and end up with a convex cut. anytime you sand or file, only cut in one direction.
My second method of sanding is a square and true sanding block. I cut half a dozen of these 5/4 by 3 inch by 6 inch blocks many years ago and affixed the sandpaper (3M aluminum oxide) with 2 inch double back tape. when the paper wears out I peel it of and apply new. Again only sand in one direction and it is helpful to rest the piece to be sanded on the table so your cut is clean and true. I also use a steel emery board for tight places although I lost my best one in the move..........Drat!
Once the piece approaches the scribed or penciled line I switch to a medium grit paper for the final dressing. As the edge will probably have glue solvent applied it isn't necessary to use any finer than medium grit. Once glued and the edge is squre but must be beveled I use medium or fine paper on block to true the edge.
I also use a really good and clean single cut file with a medium and fine tooth again only file in one direction not back and forth.
I'm going to copy this to my own Warlord thread because although I have stated this tutorial before it bears repetition.
|
|
This message was edited 1 time. Last update was at 2012/07/24 20:11:57
"It is easier to deceive people than it is to convince them that they have been deceived."
|
|
|
|
|
2012/07/24 20:18:05
Subject: Re:The Mars Warlord Titan Project
|
|
Tail Gunner
|
You might want to pick up the pace if you have two months left to finish...
(just saying)
|
|
|
|
|
|
2012/07/24 21:07:04
Subject: The Mars Warlord Titan Project
|
|
Krazed Killa Kan
|
Holy hell dude. Don't use bond-o for the whole thing... you won't be able to lift it! Or there will be so much torque on the skeleton that you'll need a metal internal structure. Good idea though if you just are keeping it on the feet.
Great work! Enjoying the progress.
|
|
|
|
|
2012/07/24 21:34:51
Subject: Re:The Mars Warlord Titan Project
|
|

Ground Crew
|
Really loving the work here. Is there any way you could post a link to the template you based all this off of? I'd certainly be grateful.
|
|
|
|
|
2012/07/24 21:42:52
Subject: Re:The Mars Warlord Titan Project
|
|
Regular Dakkanaut
|
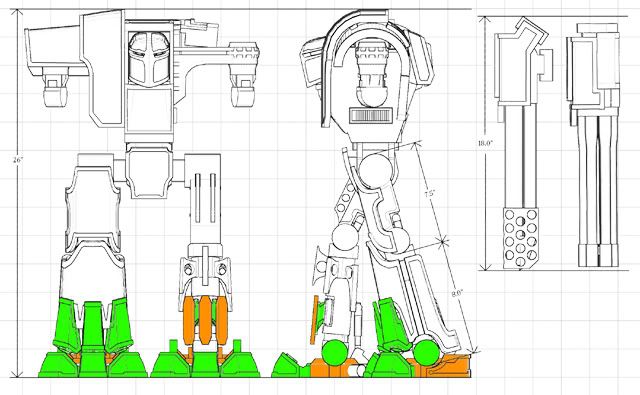
Thanks skipphag, I just took what looked coolest compared to the other large models made my forgeworld, check out a couple of the pics on the first post for this. It just felt right. In regards to proportions, which might also be where your plans are coming out wonky, it's just trying and trying again and again. I've been subtly changing the digital file for these over the past 4 years, it's changed a lot in terms of just proportions. I found it's the relative sizes that makes them look odd. Part of why I like the digital method, I can easily test different scales. Other than that I can't really suggest what sizes are best, but feel free to measure proportions from my technical picture if you want, and if you need a larger resolution version just ask and I could upload it.
Haha, thanks blackadder, that's some great advice there. I've already made some way towards that stuff though, eventually. Like I said I use a flat piece of wood beneath my sanding, and I have a block that 1 * 4 * 6 inches squared on all edges and I've glued sandpaper on two of the edges. It's with those that I've been able to 'fix' or at least make acceptable the base of the foot, the angled edges are also much squarer after this second coat of filler because this time I changed my sanding style, I was still using both strokes, which I will try without as you suggest, but went slower ensuring that I didnt rock and maintained a steady angle. This made a big improvement and taking my time more gave me much greater control.
In terms of the grit I use some 240 grit for the large material removal, then 400 or 600 to give a cleaner finish, like on the filler. I also have some 1200 which I'll probably not use much, but might run over the filler to give the best finish possible. I do need to get a few emery boards though, I have some from GW, not very good though, got them ages ago, but I can see some steel ones being useful, where did you get yours?
Yea, I'm very doubtful of meeting that deadline. I get exam results on the 16th, and shortly after that I expect I'll be contacted with work that I need to begin before term starts. If indeed I don't finish, it just means I'll have to stop and continue it in between term times.
Edited, people posted whilst I was typing...
doktor_g, I intend to cast duplicates of the lower halves anyway, I can't make exact copies any other way, but the top might be heavy, on the large curves. I'll probably be making the layer of filler as thin as possible, so it should be able to take it. If not, then I'm screwed, but that's not going to stop me going ahead.
thanks luckless, I talked about that a couple of updates back. Long story short though, nope, they're not really templates in the first place, and I'm not too comfortable giving them out. There are some old templates for a warlord of mine on the bwc paper archive, but they're not great, though the best I'll release. Sorry
|
|
This message was edited 2 times. Last update was at 2012/07/24 21:48:02
|
|
|
|
|
2012/07/24 21:54:13
Subject: The Mars Warlord Titan Project
|
|
Ichor-Dripping Talos Monstrosity
|
What software are you using for the models?
|
|
|
|
|
|
2012/07/24 23:09:05
Subject: The Mars Warlord Titan Project
|
|
Regular Dakkanaut
|
To build the model itself I use blender, not the best program for it really. It's more for animation that for technical model design, I can't measure distance for example. My skills at it are also relatively weak and I can only do a few simple things. If I could I would use something like rhino or a program from autocad. From the 3d model the templates are generated in pepakura, a paper modelmaking program. I don't use it as it's intended though and my 'templates' are made missing most of the panels, and nets, as I don't need them, and with no flaps. They're impossible to make something from unless you know it well like I do as I'm lazy and it takes time to arrange them into a workable set of templates. It's a fantastic piece of software though, links to both below if you're intrigued. I use the licensed version of pepakura, but you can still use the free version like I used to, by using a pdf printer to create template files without being able to save them.
http://www.blender.org/
http://www.tamasoft.co.jp/pepakura-en/
|
|
|
|
|
|
2012/07/25 10:23:09
Subject: The Mars Warlord Titan Project
|
|
Ichor-Dripping Talos Monstrosity
|
I'm familiar with Blender (well, I know it exists xD) and have Pepakura.
If you want to switch up to a CAD based program I'd reccomend Solidworks, it's what I use and it shouldn't be too hard for you to pick up (plus there's plenty of tutorials floating about.) which will help you make schematics etc.
But this is looking great so far and I look forward to seeing the finished product.
|
|
|
|
|
|
2012/07/25 10:29:35
Subject: The Mars Warlord Titan Project
|
|
Ragin' Ork Dreadnought
Ingelheim am Rhein, Germany
|
Amazing work so far dude, subbed for sure!!
|
|
|
|
|
|
2012/07/26 17:48:12
Subject: The Mars Warlord Titan Project
|
|
Regular Dakkanaut
|
I've been tempted to change before to similar programs but always felt that beginning another learning curve would be more difficult than beneficial as I can manage to work around some of the problems with blender not being designed for this type of work already. but thanks for the suggestions and encouragement too.
thanks MrMerlin, and great avatar btw.
Another small update again, and a change in plan.
The foot part was still not working well enough. As I'd mentioned before the thinness of the 0.5mm plasticard and my early failures at flat sanding caused the faces to be worn down considerably. I managed to break one of the faces at the edge due to the thinness and decided to plat the part all over with plasticard instead of just the broken face. This is it just after initial plating and I'll sand it down to a neat finish soon. Then I plan to finish this most incredibly irritating piece once and for all.
I also restarted the ankle cap connector piece. I was having trouble with the point, it wouldnt form as crisp as I wanted and looked slightly crooked when sanded down. So I redid the part without the point at all, I also improved the way I made it and sanded better this time so the part will fit better onto the model. I'm much happier with it now and the detail that I built into it works better.
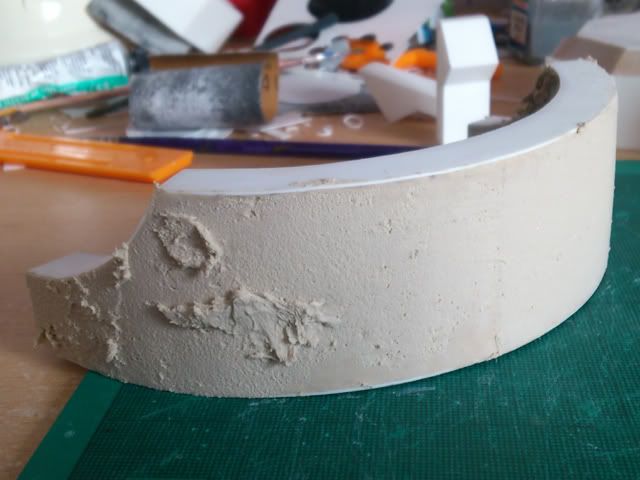
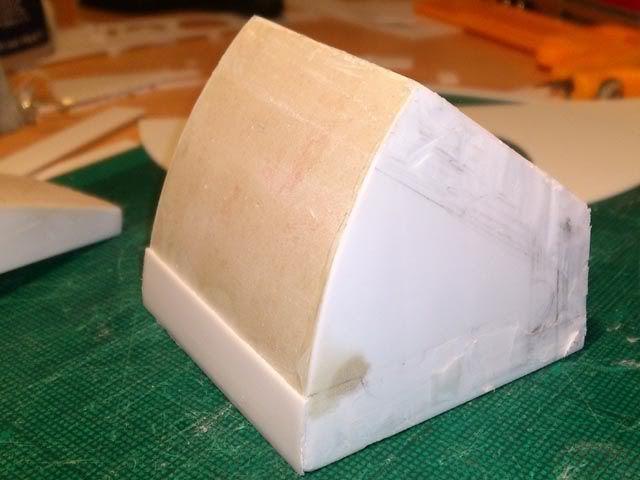
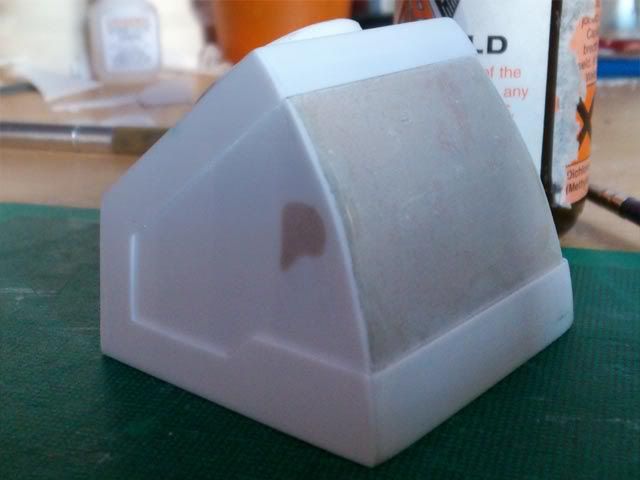
What I hope to be the last coat of filler on the external curve of the heel armour has been applied. As you can see though the inside is still incomplete, at only the 1st coat. It's not going to change soon as I've run out of filler, but I will pick some up soon and improve the part. More later when I've done the foot base I hope.
|
|
|
|
|
|
2012/07/28 14:19:00
Subject: The Mars Warlord Titan Project
|
|
Regular Dakkanaut
|
I've finished as much as I can two more parts, but just a seemingly small update.
I've built the parts of the calf that I can do without having the acrylic tube. The part on the right is the ankle joint part and needs an acrylic insert to be completed. The part on the left is where the calf armour connectors are mounted. On top of this piece will go a part of the knee joint, which I will start next. Onto the faces go the armour mount parts, which I also need to begin. For the ankle joint part the design is different to what I'd intended, This is because I didn't like the idea of doing a very small beveled edge, so instead went for right angles and some plate detail. I don't think It's a bad change at all though, but demonstrates how my more practical build changes as opposed to the completely theoretical plans.
|
|
|
|
|
|
|
|

 "This is why I hate the novels. They squash our imagination and creativity and create way to many fluff lawyers. To many "you can't do that because Fluffy Kitty novel says Captain Ichypants lost his pointer finger in the battle of Dogtown"."