| Author |
Message |
 |
|
|
|
|
Advert
|
Forum adverts like this one are shown to any user who is not logged in. Join us by filling out a tiny 3 field form and you will get your own, free, dakka user account which gives a good range of benefits to you:
- No adverts like this in the forums anymore.
- Times and dates in your local timezone.
- Full tracking of what you have read so you can skip to your first unread post, easily see what has changed since you last logged in, and easily see what is new at a glance.
- Email notifications for threads you want to watch closely.
- Being a part of the oldest wargaming community on the net.
If you are already a member then feel free to login now. |
|
 |
2012/07/28 23:19:15
Subject: The Mars Warlord Titan Project
|
|

Veteran Inquisitorial Tyranid Xenokiller
|
Gorgeous. Keep up the good work.
|
|
|
|
 |
|
2012/07/28 23:42:46
Subject: The Mars Warlord Titan Project
|
|
Longtime Dakkanaut
|
This might come in handy as you get further down the road:
http://futchfactor.com/rivettool/prog1.html
GW Imperial stuff likes their rivets and this is one of the fastest, most cost effective and consistent techniques which I have ever come across.
It is a somewhat old technique (I recall seeing it in a magazine back in the 80s) but the info on that page cover it well. See page one for the tool, and page 3 for making the domed rivets.
|
|
|
|
|
2012/07/29 05:18:38
Subject: The Mars Warlord Titan Project
|
|

Regular Dakkanaut
|
Thanks again demitri.
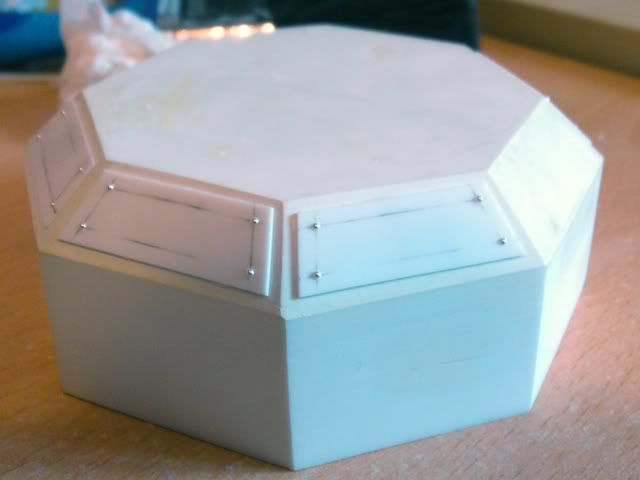
Yea, I've seen that rivet method before and liked the result, but I'd forgotten what it was called and couldn't find it again. I'd be tempted by it if I hadn't already progressed with the 1mm ball bearings, as I've started with them it seems odd to switch to a different method and reduce the uniform nature of the rivets, thanks for the suggestion though.
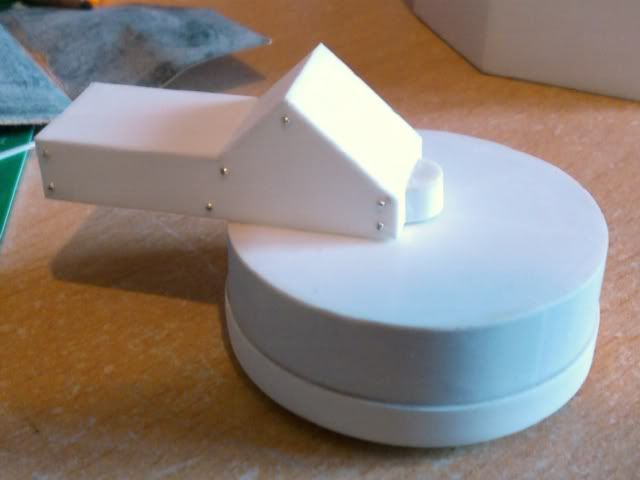
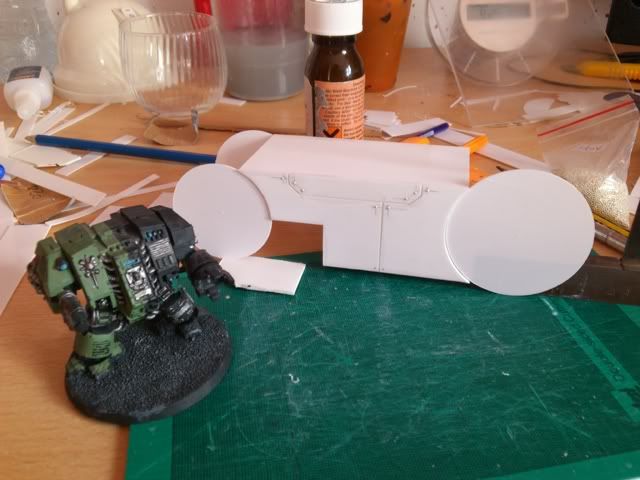
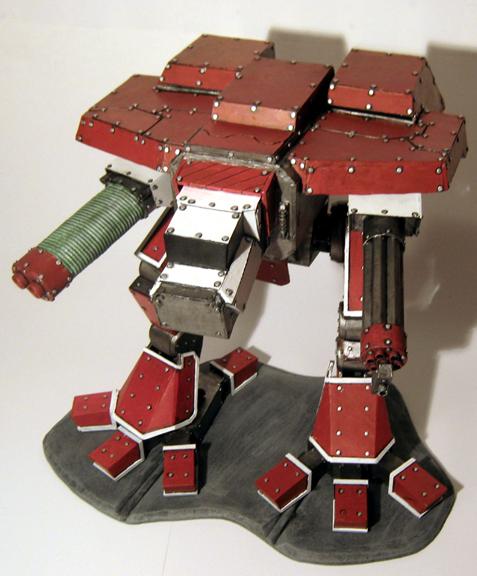
I have another part built, so another photo of that to show, and I built another mock up with the parts I have to show the scale of the calf.
This is the 'female' part of the knee joint and will sit atop the hexagonal piece shown before. It like the female part of the ankle joint is awaiting the right acrylic pipe to fit the curve, before I plate of the sides to finish it. I'm currently in the process of determining the length of different tubes all over the titan. As said before I can use the same tube in different parts, and am taking the time to redesign the arm gun mounts and parts of the guns in order to make use of the acrylic tube I'll have spare from the legs.
In this process I've decided to increase the size of the shoulders to make them look beefier and to fill more space with the arm supports along the side of the body. I think I will also finally design the shoulder gun mounts so that I can again make use of the acrylic tube. I'm trying to find the best place that will cut the suitable parts to length and I think I have the right place, but I'm waiting for a reply to my email first. The necessary drill bits or saw blades are too expensive as I don't have any tools suitable now, so I need them cut for me if possible.
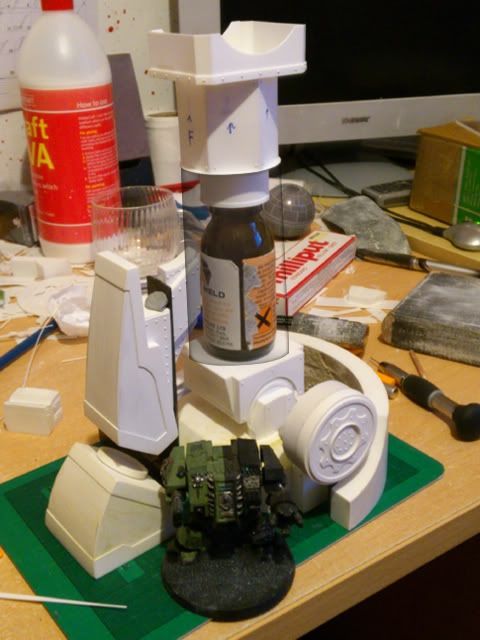
This is the mock up of parts so far, held together with bits of blu tack. The glue bottle is the right height for the main calf part so I've substituted it there for the shot. I can't start that part until I have the tube at hand because of the way it has a cutout. You should be able to make out that I've deviated from the design at both joints, on the knee joint I've increased the length to fit the pipe chosen, and to make up for this I'll ad some extra length into the hexagon part beneath the large overhanging lip on the front and back of that part.
All together it's about 23-24cm tall to the knee, and I'm quite pleased so far. Next up is the thigh and waist parts. I hope I can progress quicker with those, as the build is more straightforward and boxy.
|
|
|
|
|
|
2012/07/29 12:24:40
Subject: The Mars Warlord Titan Project
|
|
Grey Knight Purgator firing around corners
|
Are you planning on selling parts at all? I'm assuming you will be making a mould of all your parts.
|

 (Click my Thread link, and the Inquisition will Virus Bomb your home world. i mean or... or do i?) (my Knights of Draigo Wip) (Click my Thread link, and the Inquisition will Virus Bomb your home world. i mean or... or do i?) (my Knights of Draigo Wip) |
|
|
|
|
2012/07/29 14:37:49
Subject: The Mars Warlord Titan Project
|
|
Regular Dakkanaut
|
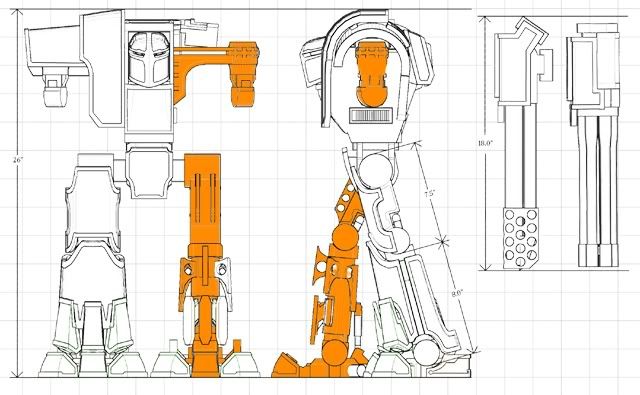
The plan currently is to make myself a set of molds to cast parts of the legs and arms that need to be duplicate for the mirror halves of the body. That is to say, everything coloured orange in this picture is going to be copied to either the same or opposite leg so that I have consistent parts.
The rest will be custom made and not cast. Although I am considering casting the leg armour plates too, but that depends on how I am with making them. If once I've finished a few people want a copy themselves, then I would look into how cost effective it would be to hire a company to make a short run of them, selling the better quality casts to people prepared to buy them at a reasonable price. As far as selling parts, I assumed you meant selling the titan, as parts of a titan aren't much good incomplete.
I'd love to be able to do this in the future, but I expect that I'd only be able to actually do that next year, as I won't have it done in time this summer.
|
|
|
|
|
|
2012/07/29 15:37:51
Subject: The Mars Warlord Titan Project
|
|
Grey Knight Purgator firing around corners
|
That's what i meant. But casting it would be the only reasonable way to sell it. as i would not sell something i put that much time and effort into if it was going to be the only one!  Automatically Appended Next Post: Automatically Appended Next Post: also if your project turns out as good as the first few bits have turned out so far, i would try to venture a negotiation with forge-world or something of the kind. for every model they cast/sell they owe your a percentage of the overall sale. Just IMO.
|
|
This message was edited 1 time. Last update was at 2012/07/29 15:43:06
(Click my Thread link, and the Inquisition will Virus Bomb your home world. i mean or... or do i?) (my Knights of Draigo Wip) |
|
|
|
|
2012/07/29 16:37:57
Subject: The Mars Warlord Titan Project
|
|
Longtime Dakkanaut
|
Wh40kPicasso wrote:also if your project turns out as good as the first few bits have turned out so far, i would try to venture a negotiation with forge-world or something of the kind. for every model they cast/sell they owe your a percentage of the overall sale. Just IMO.
More likely to recieve a C&D and a demand to relinquish all molds, as well as any profits gained...
In any case, molding/casting is a somewhat quick and easy way to do duplicates - but it is quite pricey when doing just one or two of them (especially when they are this large). That is a whole lot of rubber. You might instead look at doing a plaster buck and then build them up from that (you can paint layers of resin on to build up a shell or use various other methods like FRPs. Although the plaster buck is a lot more of a pain to move around than rubber molds are - they are very useful for larger items...and plaster is cheaper than any other compound you will come across.
Anywho, as I said before - excellent work so far. One of these days I may get around to doing my large scale Warlord. Other things have been occupying my time/space though. I had started one a few years ago for a customer - but once I had the small scale mock up done (right around 1/100) and the final price was calculated...he figured it would be better to buy a used car instead.
|
|
|
|
|
2012/07/29 17:27:22
Subject: The Mars Warlord Titan Project
|
|
Ichor-Dripping Talos Monstrosity
|
Sean_OBrien wrote:Wh40kPicasso wrote:also if your project turns out as good as the first few bits have turned out so far, i would try to venture a negotiation with forge-world or something of the kind. for every model they cast/sell they owe your a percentage of the overall sale. Just IMO.
More likely to recieve a C&D and a demand to relinquish all molds, as well as any profits gained... In any case, molding/casting is a somewhat quick and easy way to do duplicates - but it is quite pricey when doing just one or two of them (especially when they are this large). That is a whole lot of rubber. You might instead look at doing a plaster buck and then build them up from that (you can paint layers of resin on to build up a shell or use various other methods like FRPs. Although the plaster buck is a lot more of a pain to move around than rubber molds are - they are very useful for larger items...and plaster is cheaper than any other compound you will come across. Anywho, as I said before - excellent work so far. One of these days I may get around to doing my large scale Warlord. Other things have been occupying my time/space though. I had started one a few years ago for a customer - but once I had the small scale mock up done (right around 1/100) and the final price was calculated...he figured it would be better to buy a used car instead.
In this instance they couldn't really issue a C&D or make it stick. Because this is a custom built porject from the ground up. He's created the design himself, built it himself, it's all HIS property. Furthermore, there's no GW Warlord model in production for it to be in competition with. AT WORST, they could make a little fuss over the name, but ultimately, 'Mars', 'Pattern', 'Warlord' and 'Titan' are not, nor can they be, copyrighted terms. Even if they try it on with that, all he needs do is sell it as 'Hellheart Mars Walker' or 'Mars Titan' or something somewhat unrelated, and he's safe. Also - wouldn't making a 'spacer' thats the vague shape of the piece, filling the bulk of the mold box with plaster (putting the spacer on top), then making the silicone mold in the gap made by the spacer be a lot cheaper / easier?
|
|
This message was edited 1 time. Last update was at 2012/07/29 17:28:13
|
|
|
|
|
2012/07/29 17:50:19
Subject: The Mars Warlord Titan Project
|
|

Storm Trooper with Maglight
|
WOW! that thing's really going to be huge! now that you see it with the dreadnoth.. looks great!
|
|
|
|
|
|
2012/07/29 18:23:57
Subject: The Mars Warlord Titan Project
|
|
Longtime Dakkanaut
|
Ovion wrote:Also - wouldn't making a 'spacer' thats the vague shape of the piece, filling the bulk of the mold box with plaster (putting the spacer on top), then making the silicone mold in the gap made by the spacer be a lot cheaper / easier?
Yeah, similar methods are used in making masks. In that case, you usually will paint over the surface with your rubber first till it is about 1/2" thick over everything. Then with the rubber still on the mold create a hard shell to support it. You can either build up the hard shell using fiberglass type materials, a plaster cast type form or use a plaster box mold. The rubber holds details a bit better - but you avoid the costs relating to a huge rubber mold. The specific method chosen sort of depends on the result you want in the end. On bigger stuff like this, I often prefer the result from a plaster mold - as each one tends to be more customized. Smaller and more detailed items are good candidates for the rubber.
You can see an example of the process here:
http://protagonist4hire.blogspot.com/2009/10/haloween-is-getting-closer.html
In that case they are making molds for some HALO armor - but the same principles apply here.
The legal action is irrelevant to whether or not they have a claim to it. The most likely response from GW would be a C&D if you were trying to move commercial and contacted them about it. If they decided to go to court - their likelihood of winning...well, there is enough about that in the Chapterhouse thread. Point being...there is no requirement for being right before sending a C&D letter. There isn't even anything that says they have to believe they will win before filing a lawsuit. It is a tactic used by lots of companies to stifle competition.
|
|
|
|
|
2012/07/30 11:45:30
Subject: The Mars Warlord Titan Project
|
|
Grey Knight Purgator firing around corners
|
I was actually trying to say that you could try to get GW or FW to buy the concept mold and designs and sell it themselves and recieve a royalties check. Not just make your own models and sell them on an E-bay store or something as a "warhammer 40,000 Mars Pattern Warlord Titan."
Just saying, game companies are always looking for good designs/designers!
|
(Click my Thread link, and the Inquisition will Virus Bomb your home world. i mean or... or do i?) (my Knights of Draigo Wip) |
|
|
|
|
2012/07/30 18:38:23
Subject: Re:The Mars Warlord Titan Project
|
|
Regular Dakkanaut
|
Thanks DiDDe, I look forward to plonking it onto the table to the horrified looks of other players.
Yea, I'm never going to make another one of these from plasticard, that's for sure. For casting I think a few different methods will need to be taken, here's what I plan to do, which is a combination of things already mentioned.
1part silicone molds:
I'll use these on flat faced parts without detail that can be extracted from a mold easily, Ie no major overhangs. The parts I intend to do this with are mainly those on the foot. If I ever did sell these I might even make a one pull mold of most of the foot anyway, as assembly of that would always be the same, but that's unimportant now. to make them I'll just build an enclosure about 1/2 an inch around the part and fill it to another half inch above the part, possibly thicker for larger parts to prevent any bending of the mold while casting.
2 part silicone molds:
I'll use these on mainly blocky shaped parts, so the calf and thigh pieces will be these, along with some more complicated shapes like the toe armour pieces that can't be one part mold based. To make these I'll assemble a box around the part again, and then will place the part into the mold and build plasticine up the seam between the intended halves. This leaves the top half of the model open and I pour silicone into that, then I flip the mold and remove the plasticine, and fill the other half from the other side, this leaves a seam where the first pour met the plasticine and ensures both halves fit, Into the plasticine a number of 'keys' which are locating bumps that interlock the two halves, will be moddelled to align the halves when casting.
brush on silicone/latex molds:
I'm not sure as of yet which material is best for this type, but I'll find out sometime, I'm sure you can get brush on variants of both. As in the link posted by sean_obrien, check it out if you haven't, I'll paint it over then thicken it and finaly use a plaster forming box around the whole thing. I'll use plaster rather than the resin retaining box as I expect it's quicker and cheaper to do. Even if it will leave me with a big heavy block of plaster. The parts i'd do this on are pretty much anything oddly shaped, like the armour pieces, and the big parts, like the body. of which I need to figure out how to make hollow so I don't crush the model beneath itself. I'm thinking of having a large hole from the bottom that will also be used an axle type thing from the waist to rotate on.
That's the plan at least.
In terms of copyright and selling to forgeworld. I don't think that they could do much apart from try to scare me off with the C&D or bankrupt me with legal proceedings... There's a group of people on facebook acting under the name titan manufactorum that cnc cut warlord titan and have been running for several months now with no outward sign of problems due to gw, they seem to be ignoring them for now. As mentioned before my design is original compared to anything they've made, so I assume it would be difficult for them to do anything which they might know. But as also pointed out they could just try anyway with the intention of bankrupting me or scaring me off.
I doubt that they'd take the model for a fraction of sales profit though, prefering to buy the model outright I expect, or just ask will hayes to copy and update it. Aside from that, as cool as it would be to have them sell it, I don't really want my model taken from me, this is my baby, It's been growing for the last 4 years and I've got little intent to just give it away.
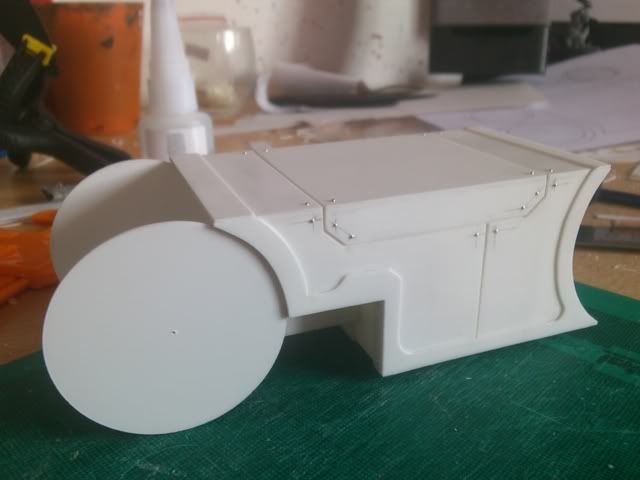
Right, I've been busy the past few days with this.
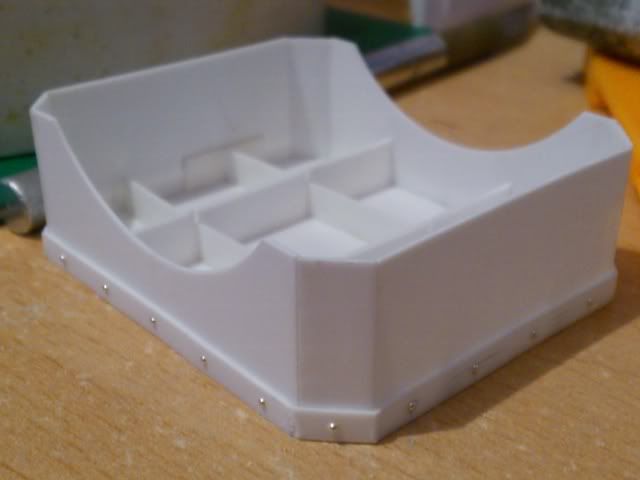
I've now finally finished the foot base, I'm happy with it now so it will remain like this. There's a slightly yellow tint that might be visible on it where I used milliput, I also used this on the heel armour to smooth out the surfaces.
I made a small alteration to the ankle cap connector, just to give it a bit more height, really it should be positioned as in the photo, but will be changed on the model to fit however the spacing in relation to where the leg armour is.
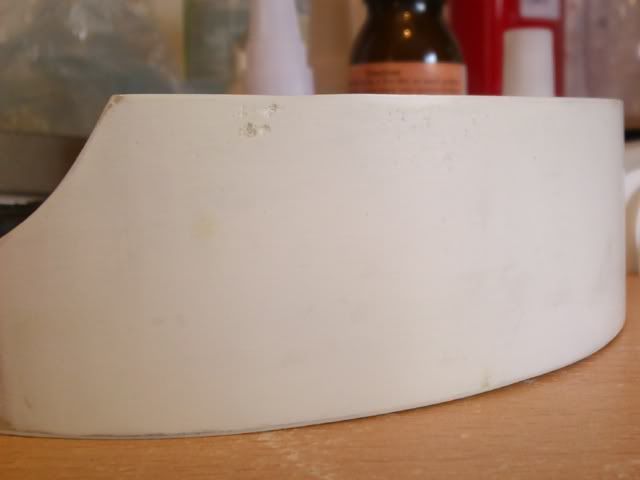

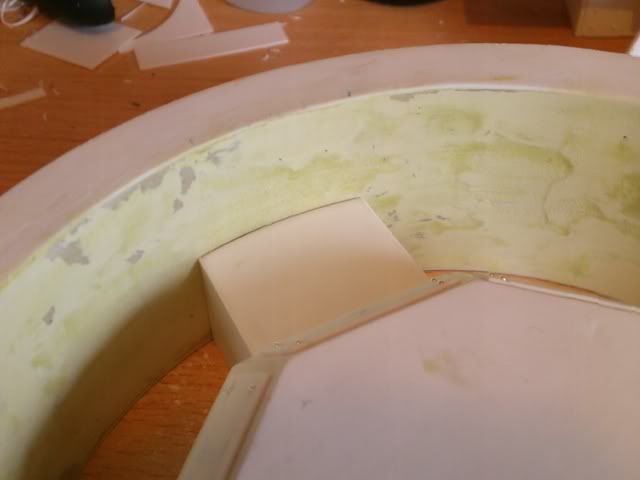
I'm now getting close to finishing the heel armour piece, I consider the outside done as I've said before, but now I'm also done with the inside curve. I'm going to try to finish this today by doing the plating work on the inside and outside. The different coloured filler is a new different type to my previous stuff. Aside from being yellow, this filler is much smoother than what I had before, and feels of a much higher quality, being denser I think. The upshot to this is that a large number of pinholes, which had to be filled with milliput on the old filler's curves, won't be nearly as common. It should make it easier for me to use and quicker.
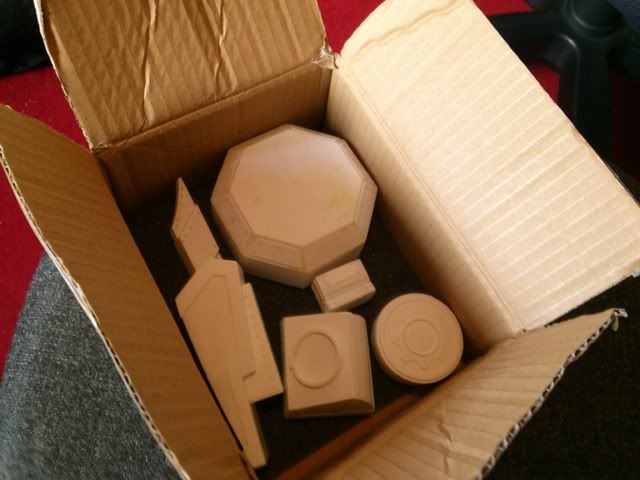
I'm also running out of space to put my finished awaiting casting parts, which shows you what's completed so far.
|
|
|
|
|
|
2012/07/30 19:00:39
Subject: The Mars Warlord Titan Project
|
|
Towering Hierophant Bio-Titan
Somewhere In Time And Space
|
looking good Fiore!!!
brush on silicone/latex moulds
my advice is do not use them or attempt them... they shrink as opposed to block moulds. plus the rigidity of a block mould lends itself better to casting large shapes. brush on moulds are for when your wanting to cast relief detail and so on.
block moulds will be expensive, but, if you cast to sell on you will make your money back with no problems.
Also I suggest using Oomoo Silicone for making your moulds with, unless you can afford the higher grade stuff the likes of which tiranti.co. uk sell.
|
|
|
|
|
|
2012/07/31 18:55:22
Subject: The Mars Warlord Titan Project
|
|
Lieutenant Colonel
|
I applaud you, but in all honesty how much is this gonna cost in Resin alone. Silicon Rubber Block Moulding will be expensive and you are barely at the large sections (moulding toes and ankles). It's going to cost hundreds unless you use a Metal Frame inside the model to help it hold it together.
I'm not naysaying, I want this to succeed, but given the fact this is enormous compared to a FW Titan, is your market going to be big enough to recoup the cost of the Silicon Rubber Block Moulds?
All things aside, as a Labour of love and endeavour, I've got to say this is inspirational.
|
Collecting Forge World 30k????? If you prefix any Thread Subject line on 30k or Pre-heresy or Horus Heresy with [30K] we can convince LEGO and the Admin team to create a 30K mini board if we can show there is enough interest! |
|
|
|
|
2012/07/31 20:38:55
Subject: The Mars Warlord Titan Project
|
|
Towering Hierophant Bio-Titan
Somewhere In Time And Space
|
mwnciboo wrote:I applaud you, but in all honesty how much is this gonna cost in Resin alone. Silicon Rubber Block Moulding will be expensive and you are barely at the large sections (moulding toes and ankles). It's going to cost hundreds unless you use a Metal Frame inside the model to help it hold it together.
When something is worth doing, it is worth doing properly. Now sure Resin and silicone can be expensive. But it depends on what grade you use. I suggest a hard grade silicone as it will lower the chance of warpage during the casting stage (NOTE: a high grade will be firmer but sometimes will tear more easily) Now looking on ebay, I have found Polycraft GP-3481-F RTV Silicone Mould Making Rubber 1.1kg Kit Shore A27 @ £20 + 7P&P (eBay). now as for wastage you always keep left over hardened silicone to chop up to reuse as filler to save on more silicone in other moulds. But in regards to cost, as a rule of thumb, the more you buy the cheaper it'll get. Also, once you have gotten the skills down for casting you will learn how to make smaller block moulds to save on waste. Also, there is a high chance of making money from these moulds as most high grade silicone will have a high tear strength to it as well, which means multiple castings from one mould as for Resin, you can get Polycraft SG2000 - 2kg Fast Cast Polyurethane Liquid Plastic Casting Resin Kit for £30 +9P&P (also ebay). with Resin you hardly ever have wastage, so cost is less of an issue. sure, it will cost a fair chunk of money in the long run to buy, but weighed against the laborious process of building I'd rather cast>mould>reproduce. I'm not naysaying, I want this to succeed, but given the fact this is enormous compared to a FW Titan, is your market going to be big enough to recoup the cost of the Silicon Rubber Block Moulds?
All things aside, as a Labour of love and endeavour, I've got to say this is inspirational.
As I've worked in mould making for some time now, so I hope I know enough to get by (fingers crossed). In the case of both Fiore's and Black's titan's it is great to see the masters made, but in the long run, unless you are purely interested in making it because your the biggest geek in all of 40k-dom... you are better off casting to order and selling the parts. now for legal issues you can't sell it as a "Titan" obviously, but if you were to sell it, I think there is a niche out there for large scale warmachines of doom. either way, good luck in your endeavours Fiore, and don't hessitate to ask!
|
|
This message was edited 1 time. Last update was at 2012/07/31 20:45:07
|
|
|
|
|
2012/08/01 13:15:04
Subject: Re:The Mars Warlord Titan Project
|
|
Regular Dakkanaut
|
Right, questions then...
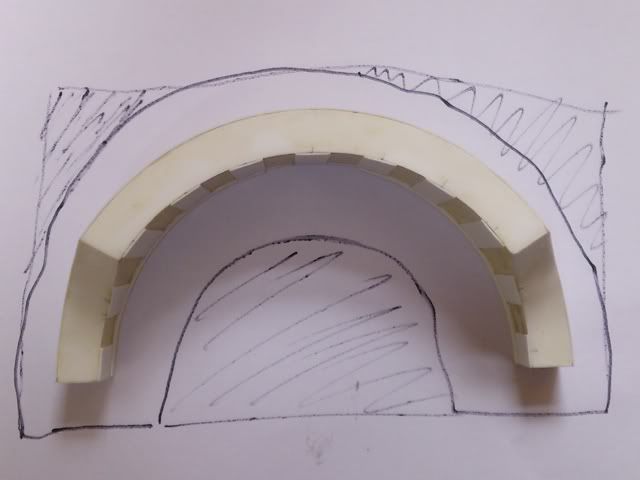
You say that the brush on moulds are susceptible to shrinking, I assume this is because of the thickening agent. Having thought about it however I should be fine as none of the shapes are too complicated and I can relatively easily build even thickness enclosures for them. Just to check though, in the picture given below there's 3 possible methods for block poured molds. The first is an enclosing wall the shape of a rectangle block with just 4 straight edges, this is most wasteful, but easiest to do. The 2nd is the more form fitting enclosure, Ie the curved lines about an inch away from the part. The 3rd being the form fitting with the remainder of the shape being taken up by plaster, the most time consuming, as I need to cast both parts. Which would be best in terms of minimum mould material to maximum casting quality. I currently don't think that the 2nd option and the 1st differ much cast quality. Correct me if i'm wrong. But the 3rd seems the way to go if I intend to do many casts as it offers both advantages. That said as I know that the silicone can be re-used within a different mold the 1st option might not be wasteful once I've managed to mess things up and been left with excess silicone. What's your opinion on these three options?
I never understood before now the shore values. From checking wikipedia it says it's a measure of hardness, with shore A being the type of hardness test and the 0-100 for the actual hardness, higher values the harder the substance. You mentioned that I want a hard grade to lower warping, I take this to be a higher value. However you also say that this would make it susceptible to tears. I wanted to know at what point the tearing becomes a problem, and as most silicone for molds appears to be in the range of 25-30, is it beyond this and not something to worry about too much?
Also, do you agree with what I'm thinking of now, which is going for as higher shore value that remains usable, and accepting tears, if they occur, but reducing their impact by using them as filler for other molds later on in the model. I was thinking of ordering the shore25 silicone from tiranti, oddly labelled T28, when I get around to mould making. Starting with a single kg then ordering more if I'm happy with the material. http://www.tiranti.co.uk/subdivision_product_list.asp?Content=T28+Silicone+Rubber+-+Silicone+Rubber+-+Mouldmaking&Subcategory=51&Subdivision=175
In regards to the casting material itself, are fillers recommended as a way to reduce the density and weight of the resin. I'm unsure whether using them will alter the finish on the resin itself and make it adhere much less well to paint, instead thinking that making the parts have cavities to reduce mass is easier.
The type of resin is also more varied than I expected. I've seen fastcast resins like that which you mentioned, those with short cure times. Are these advisable for beginner? Might it be better for me to gain experience with a longer cure time first, before speeding up. Same again with much lower viscosity resins, the easy pour types, should I get experience in general before I go onto something that seems trickier, but could reduce defects such as bubbles?
I think that's all the questioning I have for now.. as you said to ask away
You're right about what you said earlier though, if somethings worth doing it's worth doing properly, so I think I'm going to accept that to get the best results I may need to spend a bit more than I'd intended. As I still don't have a job, and doubt I'll get one in the next few weeks, I'm going to start diverting some of my time to some other 40k projects, with the intent to sell them soon. I have gaming board and a full set of cityfight terrain that I intend to repair, paint and sell along with a couple of ork vehicles, one which is going to be a 40k ork airship, and another the ork thunderhawk I built. I want to get these done as soon as possible, but don't know how long they'll take as I still want to do some work on the warlord alongside.
I'll upload pictures later as I begin working on them, and if anybody's interested pm me about them and we'll try to sort something out.
|
|
|
|
|
|
2012/08/01 15:33:18
Subject: Re:The Mars Warlord Titan Project
|
|
Towering Hierophant Bio-Titan
Somewhere In Time And Space
|
fiorehellheart wrote:Right, questions then...
You say that the brush on moulds are susceptible to shrinking, I assume this is because of the thickening agent. Having thought about it however I should be fine as none of the shapes are too complicated and I can relatively easily build even thickness enclosures for them. Just to check though, in the picture given below there's 3 possible methods for block poured molds. The first is an enclosing wall the shape of a rectangle block with just 4 straight edges, this is most wasteful, but easiest to do. The 2nd is the more form fitting enclosure, Ie the curved lines about an inch away from the part. The 3rd being the form fitting with the remainder of the shape being taken up by plaster, the most time consuming, as I need to cast both parts. Which would be best in terms of minimum mould material to maximum casting quality. I currently don't think that the 2nd option and the 1st differ much cast quality. Correct me if i'm wrong. But the 3rd seems the way to go if I intend to do many casts as it offers both advantages. That said as I know that the silicone can be re-used within a different mold the 1st option might not be wasteful once I've managed to mess things up and been left with excess silicone. What's your opinion on these three options?
Having never tried the third option I can't honestly give you an experienced answer to that, but... Logically it does provide stability that you require from casting. as to my knowledge FW cast in silicone moulds with a rigid frame to lessen warping.
I never understood before now the shore values. From checking wikipedia it says it's a measure of hardness, with shore A being the type of hardness test and the 0-100 for the actual hardness, higher values the harder the substance. You mentioned that I want a hard grade to lower warping, I take this to be a higher value. However you also say that this would make it susceptible to tears. I wanted to know at what point the tearing becomes a problem, and as most silicone for molds appears to be in the range of 25-30, is it beyond this and not something to worry about too much?
The stuff I have used before can be found here: http://www.tiranti.co.uk/subdivision_product_list.asp?Subcategory=51&Subdivision= The lower the number, the more easy it is to tear, but the greater the detail quality will be, so if detail is not a problem then a high grade would be more suitable (I had the numbers the wrong way around lols  )
Filler won't be nessesary, because as I say, I got the numbers the wrong way around lols... If you want a mid range Silicone try then the T28 will be fine to use, but as I said before, if detail is not a problem then possibly try the T30. but as I say the T28 should be what you require.
In regards to the casting material itself, are fillers recommended as a way to reduce the density and weight of the resin. I'm unsure whether using them will alter the finish on the resin itself and make it adhere much less well to paint, instead thinking that making the parts have cavities to reduce mass is easier.
I have only used solid Resin before, so the only advice I can give is try it with a small part, if it works it works, if it doesnt it won't be much of a loss really. Trial and error is a massive part of learning to make moulds... and I've had a stupid amount of errors in my time.
The type of resin is also more varied than I expected. I've seen fastcast resins like that which you mentioned, those with short cure times. Are these advisable for beginner? Might it be better for me to gain experience with a longer cure time first, before speeding up. Same again with much lower viscosity resins, the easy pour types, should I get experience in general before I go onto something that seems trickier, but could reduce defects such as bubbles?
As you've never used Resin before I suggest using GP (General Purpose) resin, which you can find on Tiranti. Also Tiranti also offers a guide to casting on their site ( it costs, but is worth the money to have about as a refresher or for beginners)
I think that's all the questioning I have for now.. as you said to ask away
That I did... I may perhaps regret this lols 
You're right about what you said earlier though, if somethings worth doing it's worth doing properly, so I think I'm going to accept that to get the best results I may need to spend a bit more than I'd intended. As I still don't have a job, and doubt I'll get one in the next few weeks, I'm going to start diverting some of my time to some other 40k projects, with the intent to sell them soon. I have gaming board and a full set of cityfight terrain that I intend to repair, paint and sell along with a couple of ork vehicles, one which is going to be a 40k ork airship, and another the ork thunderhawk I built. I want to get these done as soon as possible, but don't know how long they'll take as I still want to do some work on the warlord alongside.
I'll upload pictures later as I begin working on them, and if anybody's interested pm me about them and we'll try to sort something out.
Well I love seeing your work so these will be interesting to see.
A last point to leave you on... I'm sure your aware of this, but I thought I would state it anyways... A bonus of Alec Tiranti's site is you can get discount in bulk... I advise you do order in bulk once you know what it is you want, as it'll save on cost. But remember all prices on tiranti are shown with and without VAT. So be sure to make sure when ordering youhave the right price in your head... unlike me when I first did an order and wondered why I had no money left, as I said... I have made many mistakes... but at least I've learned how to do it properly lols.
|
|
|
|
|
|
2012/08/01 20:05:22
Subject: The Mars Warlord Titan Project
|
|
Lieutenant Colonel
|
Wow, this proves why Dakka is awesome. I have no desire to use resin or produce moulds, but with all the advice above I reckon I could make a decent fist of it if I chose too.
You need to turn this into an Article. EXALTED +1
|
Collecting Forge World 30k????? If you prefix any Thread Subject line on 30k or Pre-heresy or Horus Heresy with [30K] we can convince LEGO and the Admin team to create a 30K mini board if we can show there is enough interest! |
|
|
|
|
2012/08/01 20:07:53
Subject: The Mars Warlord Titan Project
|
|
Towering Hierophant Bio-Titan
Somewhere In Time And Space
|
mwnciboo wrote:Wow, this proves why Dakka is awesome. I have no desire to use resin or produce moulds, but with all the advice above I reckon I could make a decent fist of it if I chose too.
You need to turn this into an Article. EXALTED +1
lols its all stupid information I learnt at uni making latex masks... and I don't think I have the patience to write it up... chalk it up to laziness lols 
|
|
|
|
|
|
2012/08/02 00:31:39
Subject: The Mars Warlord Titan Project
|
|
Regular Dakkanaut
|
That's some pretty useful information there, thanks, I second the article request, although I'll be writing something similar when I get casting I imagine. I'll go for the shore 25 rubber and some general resin, and see what I can do with the plaster surrounding boxes.
Yea, I promised some pictures of what I've been up to so here you go. Shamefully untitany...
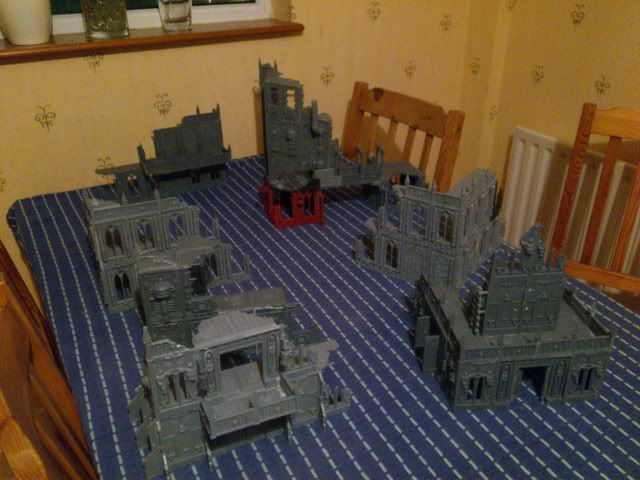
The cities of death buildings I have, minus one I was spraying to test colour schemes on. there are 8 there which I plan to base on 1' square bases, giving 9 square feet of the 16 for a 4' by 4' board. As I'll buy some mdf for the tiles I'll be using the spare to create a set of 6" wide roads to go inbetween the buildings giving a very customisable board all together. I may even make some blanks to give open spaces if desired as the wood I'm ordering will be bigger than the 4' by 4' anyway. If anybody is interested in this and lives near enough to chester in cheshire, to pick it up pm me an I'd love to try and sort something out. If not it'll be up on ebay in a week or two once it's finished.
Also for sale, pm me if interested, is the ork thunderhawk. It has a wingspan and length of 45cm or about 18". Currently it's missing parts such as the cockpit and mini wings, but once I've repaired it I intend to arm it with a similar arrangement to the space marine one, just ork based instead. I don't plan on painting this and well spray it black for sale, the current paint job is from a fair few years back when I gave up deciding I need an airbrush, as I don't have one it'll be sold unpainted.
This is the soon to be ork airship. As you can see it lacks a hull which I removed because it was flimsy, the current plan is to support the underside with some filler and replate the hull. The balloon will be made with a cardboard internal skeleton and a paper mache skin. I'll also research ways of making a fabric appearance over that. If anybody has any tips please share them. Again, I don't plan on painting this but will sell it later on ebay of with a pm.
So yea, that's what I'm up to. If anybody fancies any of thse contact me and you'll be able to get a cool model and help me on my way to finishing the titan. Thanks
Also, I've pm'ed for this to be moved so look for me in the blogs section from now on
|
|
This message was edited 1 time. Last update was at 2012/08/02 00:49:09
|
|
|
|
|
2012/08/02 01:02:50
Subject: The Mars Warlord Titan Project
|
|
Towering Hierophant Bio-Titan
Somewhere In Time And Space
|
Then I think I shall leave it for you then Fiore, I never was one for public speaking... ask me a question and I'll always give an answer to the best of my abilities, but make me write an article, and well... I forget
Interesting builds you have there, can't wait to see them evolve!!!
|
|
|
|
|
|
2012/08/05 21:22:09
Subject: The Mars Warlord Titan Project
|
|
Regular Dakkanaut
|
I can't say I'm much for public speaking either, but if I get some time that I feel like filling with a writeup I'll get one out for the chopper I bought, which is great so far although I plan to make some custom guide rails for it, and write up something to do with casting. I should probably get experience on the casting and mold making first though so it will come later. Remind me if I forget, which I probably will.
I got back to working on the titan as I was finding the other stuff of mine a little boring, although I have now mostly repaired the thunderhawk and now need to figure out how to base it. I have figured out the balloon for the blimp, but that needs to be started. I'll get around to it when I'm motivated enough to give it a shot.
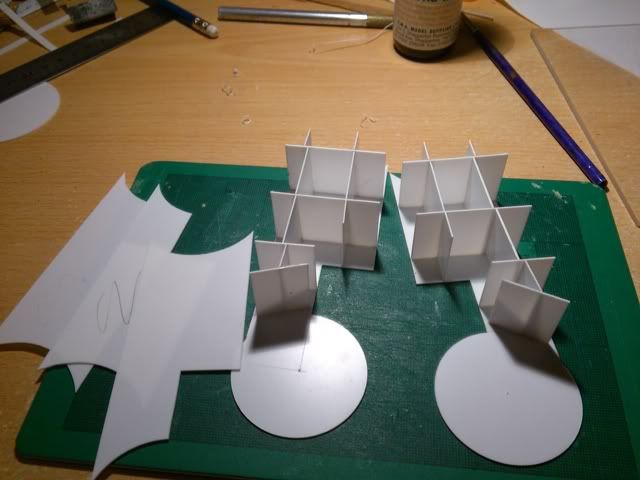

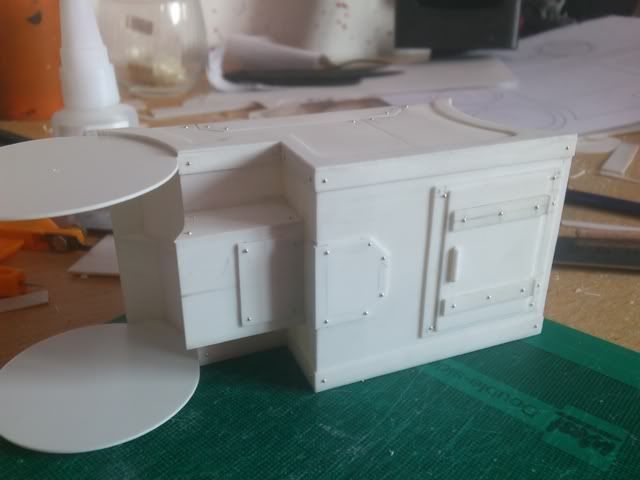
I've started on the thigh part of the leg. These just show the parts that I cut out to begin with. Just as with the foot I'm doing an internal structure for a bit of strength. Also as I'd built a spare foot base when I thought the current one wouldnt do, I decided to demonstrate to my brother the benefit of the internal structure. It took my full weight of 78kg with me balancing on my heel no problem at all, and wouldn't budge when I stamped on it. The parts should survive the mould process, and nonsense to people who say titans need big internal structures of pvc pipe or wood, just give it some structure, it still weighs next to nothing anyway.
I then begun plating the detail on, which was designed to mimic some of the panel lines on the warhounds. It looks quite lucius style, It'll have a mars edging added. I've begun the edging as you can see in the last picture, this was also to cover an edge that appeared because I miscut the detail panels. The side edging will match the style of the penciled in line on the last picture and meet the edge to cover the edge. After that's done I'll start to do the detail on the cicular caps.
I'm changing my planned designs here yet again. Because I only want to have a single thigh to cast that can be used on either side, I need to change how the tube at the top is weighted. On my plans it was flush on the outside to the thigh piece, but extended on the inner side a little. I'm now going to make it extend outside of both edges by a small amount. I then intend to cast the part with a hole through that tube, for the axle, and completing the piece by capping of the outside edge with an appropriate diameter part to fit the open hole. The hole on the other side will fit along the central axle pipe through the hip. this way I can cast one part but use if for both sides of the model. Of If I find casting it is particularly difficult. I cast just 2 of the open pipe ones, chop up the mould and remake two moulds. On each of the casts that has been completed to make a left and right version. Hopefully I won't need to do this.
|
|
|
|
|
|
2012/08/06 11:52:20
Subject: The Mars Warlord Titan Project
|
|
Grey Knight Purgator firing around corners
|
May i ask something? it may sound like a stupid question as i am not a designer in any fashion, but why use an axle or a bi-directional arm mount when a ball joint would be much more manouverable and stable? also it would allow for better poses! Just wondering. Lookin great so far btw, and i totally agree with your structure, its kind of rediculous to build something like that out of wood or something similar, might as well be schepetto and he pinochio.
|
(Click my Thread link, and the Inquisition will Virus Bomb your home world. i mean or... or do i?) (my Knights of Draigo Wip) |
|
|
|
|
2012/08/06 16:49:20
Subject: The Mars Warlord Titan Project
|
|
Regular Dakkanaut
|
A perfectly sensible question, and something I'd have liked to have done. I could have done ball joints at the ankle and at the hip, but decided not to based on practical stability of the model,. Whilst in design it would let it have more stability through a more flexible footing, I felt a thick axle extending from the left thigh to the right through the whole hip would be stronger for the model than two ball joints. It Also feels much easier to accomplish as I don't know how well I could make the receiving part of the ball socket. I would need to add pistons to make it believable as well, and I wanted to avoid those because they're fiddly and look annoying to scratchbuild.
Interestingly though I don't think that there's too much preventing me from later opting to change it to a ball joint. If I keep both parts of the ankle joint seperate from the limb and the calf, I can replace them with a ball set of joints. Likewise I could swap the axle for a ball joint by making a joint that slots into the waist on one side and the leg on the other with a ball joint. As I feel pressed for time I thought that I would go for simple, but quick and effective and leave it at that.
I would like the cooler poses though...
|
|
|
|
|
|
2012/08/06 19:07:38
Subject: The Mars Warlord Titan Project
|
|
Ichor-Dripping Talos Monstrosity
|
From a motion point of view, while a balljoint is better, for construction, an axle and simple mount will be stronger and a LOT easier to make.
|
|
|
|
|
|
2012/08/06 21:13:03
Subject: The Mars Warlord Titan Project
|
|
Regular Dakkanaut
|
Yea, exactly as I thought.
Another update, I've almost finished the layered detail on the thigh piece, excluding the circular caps, which I'll do now, I didnt get around to finishing it because I was distracted by watching the curoisity rover landing (brilliant achievement) I will try to finish it now along with the other small pieces left on the foot, then I plan to begin on the armour pieces for the leg, having finished the necessary plans for them.
The detail speaks for itself really, and just needs to have a couple of gaps filled along the edging to finish it off. I hope the tube I order will fit the cutout on the detail, but I can gap fill if I doesnt or sand it down.
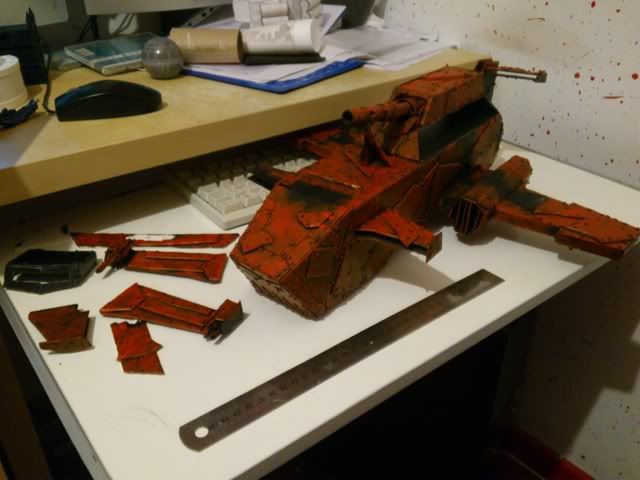
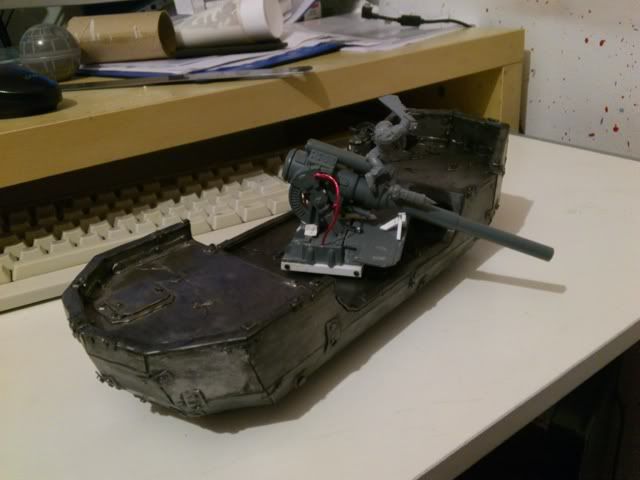
I'm also uploading a few pictures of the thunderhawk in it's current state with repaired panels awaiting rivets, it will be left along for a while from now as I wait to order that tubing, I'm still indecisive about some measurements on it but will try to experiment and order anyway as it looks like I have a job for a few weeks at my old workplace and can now afford to test more ideas out. I still plan to sell this and the blimp as I have little use for them, although I may be practicing some painting on the blimp.
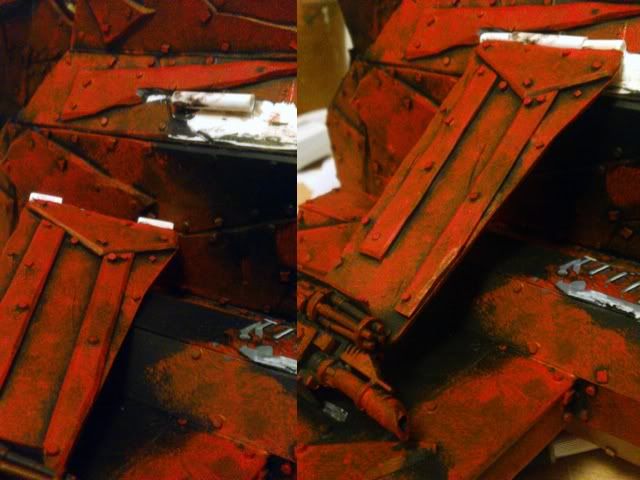
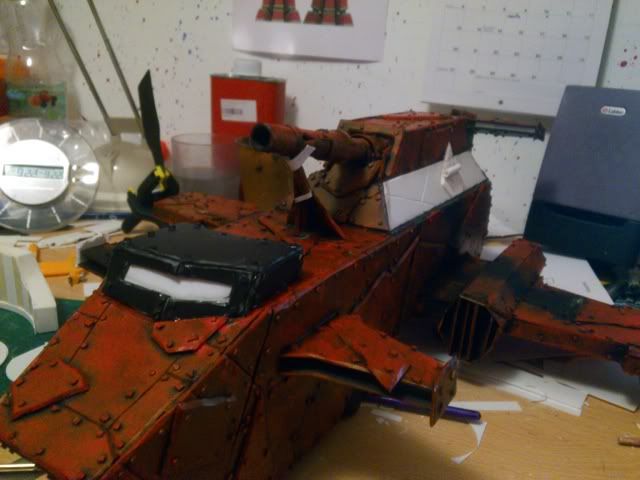
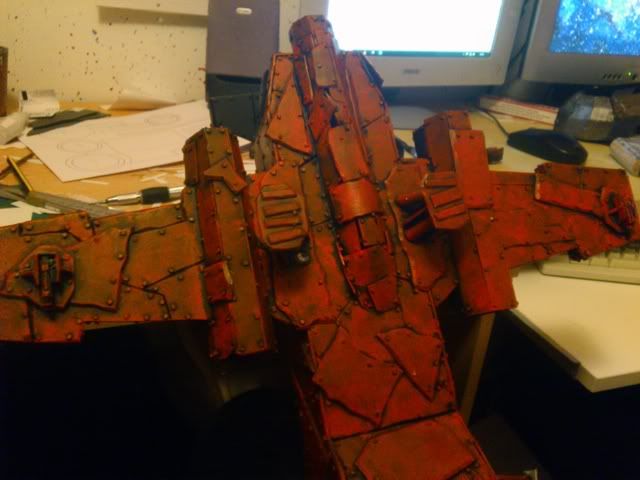
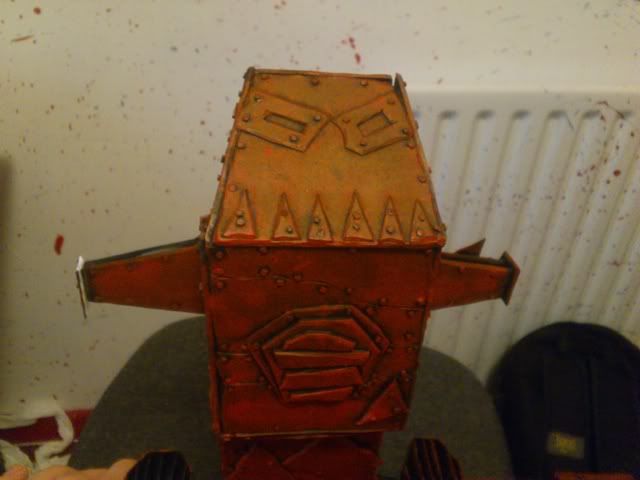
The top image shows the locating hinge on the small wings, which I'm not going to glue into place for painting, the rest just show various bits of detail and views of the ship. Ignore the paintjob please by the way, I painted the red right over black and it came out quite weak in person and very orange in the photo's although I did my best to colour correct them, going to be sprayed black though so it's no big deal.
|
|
|
|
|
|
2012/08/06 23:03:52
Subject: The Mars Warlord Titan Project
|
|
Regular Dakkanaut
|
Your styrene work is stunning, its good to see something built entirely from scratch, Do you do other model based work as its professional level
|
|
|
|
|
2012/08/06 23:23:38
Subject: The Mars Warlord Titan Project
|
|
Regular Dakkanaut
|
Thanks for the compliments, but no, I've never tried anything anywhere near as ambitious as this before, and certainly not professional. I don't feel my work is near that level anyway, not yet. It's largely just about lots of practice and patience, and layers, lots of layers....
The only previous work I've done, besides the thunderhawk and blimp shown is another two ork planes, and then two warhound titan, which aren't fantastic in detail at all, but they're rather special to me as my first scratchbuilt titan.
|
|
|
|
|
|
2012/08/06 23:54:25
Subject: The Mars Warlord Titan Project
|
|
Regular Dakkanaut
|
I have a HND in Professional model making and the crispness of your work and the accuracy of the cuts is what id expect from a high end model maker.
Awesome work
|
|
|
|
|
2012/08/07 00:55:23
Subject: The Mars Warlord Titan Project
|
|
Regular Dakkanaut
|
That's a very cool qualification, and thanks again. I think the perception of quality is improved by the low quality cell phone camera I've been using for all my pictures. I tend to feel that there's a lot that could be improved although some of the things I think of improving are a bit unrealistic, like when I removed the inset part of the calf detail, the box that fits into the circle on one edge, because it was about 1mm off centered. It took me ages to figure out what felt slightly wrong about the part as you couldn't tell by looking at it. I still decided to remove and recentre it though. It's this kind of attempt at perfect that's making me take so long to complete it. Still, I'm glad you like it
|
|
|
|
|
|
|
|


 My IG blog:

 "This is why I hate the novels. They squash our imagination and creativity and create way to many fluff lawyers. To many "you can't do that because Fluffy Kitty novel says Captain Ichypants lost his pointer finger in the battle of Dogtown"."