| Author |
Message |
 |
|
|
|
|
Advert
|
Forum adverts like this one are shown to any user who is not logged in. Join us by filling out a tiny 3 field form and you will get your own, free, dakka user account which gives a good range of benefits to you:
- No adverts like this in the forums anymore.
- Times and dates in your local timezone.
- Full tracking of what you have read so you can skip to your first unread post, easily see what has changed since you last logged in, and easily see what is new at a glance.
- Email notifications for threads you want to watch closely.
- Being a part of the oldest wargaming community on the net.
If you are already a member then feel free to login now. |
|
 |
2017/06/25 21:01:39
Subject: Paradigm's Hobby Blog: Deathwatch Master DONE!
|
|

Fresh-Faced New User
|
 Paradigm wrote: Paradigm wrote:Thanks everyone.
On an unrelated note, I'm thinking of putting together that article on my painting style that I mentioned a while back over the weekend if I'm not too busy. I'm thinking it'll be more of a style guide than an actual tutorial in the step-by-step sense, discussing techniques rather than actually explaining them, but is there anything specific anyone wants to see in there?
Para, did you ever wrote that article? Because that is something I'd really like to read (and feel free to go into specifics... 
|
|
|
 |
|
2017/06/25 21:28:51
Subject: Paradigm's Hobby Blog: Champion of the Just- Black Templar Swordsmaster
|
|

Is 'Eavy Metal Calling?
|
I've not got around to it yet, but it's still on the to do list (planning, taking and collecting suitable WIP pics is the sticking point at the mo). I'm the mean time, I'm happy to cover any questions via pm if that is of any help.
|
|
|
|
|
|
2017/06/25 22:41:05
Subject: Re:Paradigm's Hobby Blog: Champion of the Just- Black Templar Swordsmaster
|
|

Bounding Ultramarine Assault Trooper
|
Beautiful work! Stroud looks awesome.
|
|
|
|
|
2017/06/25 23:27:58
Subject: Paradigm's Hobby Blog: Champion of the Just- Black Templar Swordsmaster
|
|

Chaplain with Hate to Spare
|
Man those Nurgle dudes look gritty and great! you have this flair with that style that I honestly haven't seen anywhere else, your 'dirty' models are always done perfectly for what they are and look very desaturated which also gives them a real edge and makes you look and want to look harder at them!
|
 Flesh Eaters 4,500 points Flesh Eaters 4,500 points

" I will constantly have those in my head telling me how lazy and ugly and whorish I am. You sir, are a true friend " - KingCracker
"Nah, I'm just way too lazy to stand up so I keep sitting and paint" - Sigur
"I think the NMM technique with metals is just MNMM. Same sound I make while eating a good pizza" - Whalemusic360 |
|
|
|
|
2017/06/26 00:17:53
Subject: Paradigm's Hobby Blog: Champion of the Just- Black Templar Swordsmaster
|
|
Member of the Malleus
|
I really love the nurgle marines. And that test mini came out great, your style fits orks well.
|
|
|
|
|
|
2017/06/26 06:36:41
Subject: Paradigm's Hobby Blog: Champion of the Just- Black Templar Swordsmaster
|
|
Fresh-Faced New User
|
Paradigm wrote:I've not got around to it yet, but it's still on the to do list (planning, taking and collecting suitable WIP pics is the sticking point at the mo). I'm the mean time, I'm happy to cover any questions via pm if that is of any help.
That's very kind of you, but I'm afraid I'd like to read about the whole process, painting and weathering and etc. Mere PMs won't help *this* fan of your work (Yes I DID read through all 107 pages of this thread )
|
|
|
|
|
2017/06/26 09:43:52
Subject: Re:Paradigm's Hobby Blog: Champion of the Just- Black Templar Swordsmaster
|
|
Is 'Eavy Metal Calling?
|
Ok, time for an experiment! Since a few people have asked me about the tutorial/guide, and I have a relatively free day, time to finally get to it, but naturally, we're going to do things a little bit differently. The whole thing will eventually make it to the Tutorials section as a collated post, but in the mean time, over the course of the day (and possibly tomorrow) I'm going to be 'live posting' the process, with commentary, start to finish.
So we start with Step 1: The Build
The build stage is perhaps the most important part in getting a model that's high on character and context; a paintjob can do good work to 'sell' the idea of a mini and setting, but the build is where you make it look like it's actually there, a part of that world and narrative.
This is a Space Marine Sergeant, built using pretty much exclusively parts from the Tactical Squad kit, the only exception being the Imperial Fists pad from the Deathwatch set and the old bolter as the new ones don't have handles attached. Pics are in greyscale for better contrast, and because some parts were previously painted a different scheme. I' using a Marine simply because that's what I had to hand and because the kits lend themselves to displaying these techniques nicely due to their relative size, modularity and the fact they're the type of model I've painted more of than anything else.
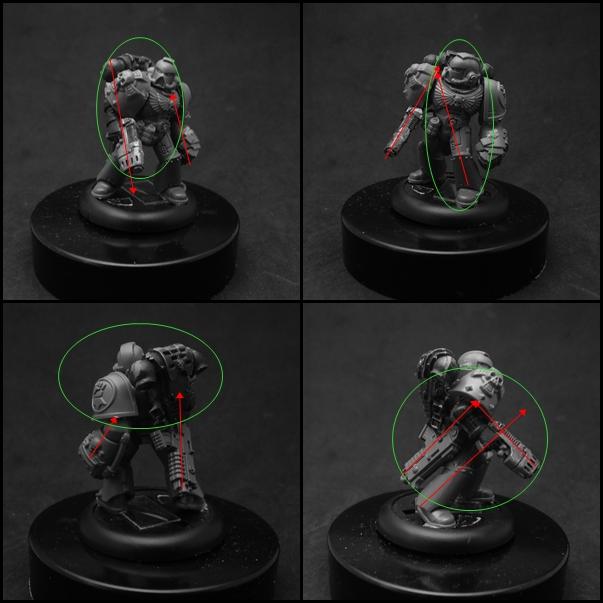
The red lines indicate what I refer to as 'lines of motion', it's these that inform the direction the model appears to be moving in and how the eye will scan over the model when it's viewed from each angle. The lines here are trending towards vertical, which gives an impression of a solid, static pose, and draw the eye towards key areas of the model. In general, the more vertical the lines, the more static/stoic/imposing/heroic the model will look, the more horizontal, the more aggressive/fast/agile it'll appear.
The trick to a good pose is in the parallels and intersections of the lines. For instance, when viewed from the top left angle in that collage, the lines of the pistol and fist 'frame' the centre of the model, drawing the eye towards the weapons, chest and head (as indicated by the green oval). The same can be seen in the top right hand view, but in this case, the line of the pistol arm and the foremost knee also intersect just in front of the Marine's eyes, giving a sense of direction and purpose even though the pose itself is mostly static; it draws the eye to where the 'intent' of the model is most clear; he's pausing on the battlefield, locking eyes on his next target.
From the back view, bottom left, the two lines along the bolter and fist draw the eye to the backpack and shoulder pad respectively. In this case, the aim is more technical than narrative; the nature of those areas as physical parts means they'll receive heavy highlighting and shading, thus making them a good place to observe the variation in the model's dominant colour. Basically, they're the best areas to show off! 
The bottom right image uses intersections again to draw the eye to the shoulder pad and plasma pistol (specifically to the plasma coils themselves, which the paintjob will also accentuate). Again, this is to frame the model to show it off best, as the pistol and pad will show light effects and weathering respectively in the final paintjob.
Leaving aside the technicalities for a moment, the aim here is also to think about the kind of character you want to convey in the model. Here, we have an Imperial Fist, so the Power Fist was a natural choice for that theme. I also want him to appear prepared and battle-ready, hence the stowed Bolter and grenades; he's ready to adapt as the battlefield demands it. The Plasma Pistol and Crux Terminatus shoulder pad indicate a veteran status, while not detracting from the practical IF aesthetic; if this were an Ultramarine or Blood Angel, I'd be using more ornamentation to convey the same effect, if it were a Space Wolf there would be furs and totems heavily used.
Thus concludes part 1 of this process, I'm happy to answer any questions as we go along and I'll have part 2, probably on the yellow armour, up some time this afternoon. Thanks for looking!
|
|
|
|
|
|
2017/06/26 10:15:33
Subject: Paradigm's Hobby Blog: Paradigm LIVE- The Tutorial (at last!)
|
|
Fresh-Faced New User
|
Thank you for doing this, Para!
|
|
|
|
|
2017/06/26 12:52:48
Subject: Re:Paradigm's Hobby Blog: Paradigm LIVE- The Tutorial (at last!)
|
|
Is 'Eavy Metal Calling?
|
Part 2: Armour
While the pics deal specifically with how I cover Imperial Fists yellow armour, the components of this approach cover my approach to any large, hard, non-metallic surfaces, from the If yellow to BA red, Ork 'Eavy Armour to a Khorne Blood Warrior. Anything coloured, with hard edges and large surfaces, this approach can be used for. For colour conversions, here, Vallejo Dark Earth is what I'll call the Base, Averland Sunset is the Mid-tone, Vallejo Ivory is the Highlight and Agrax Earthshade is the Shade. This doesn't really correspond to GW's Base/Layer/Edge/Wash system, but the principle is somewhat similar.
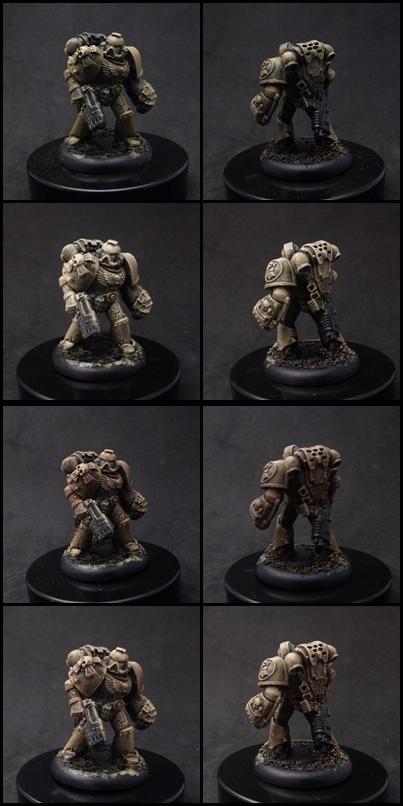
So the step-by-step itself, following the pics in rows from the top:
- Basecoat with Dark Earth, apply a heavy drybrush of 1:1 Dark Earth and Averland Sunset, with the brushstrokes always going from top to bottom, strongest at the points where light hits the model, barely touching the shadows.
- Apply a lighter drybrush of pure Averland, then another, lighter of a 1:1 mix of Averland and Ivory. Finally, do an even lighter drybrush of pure ivory, only hitting the uppermost edges. At this point, you model will look far too bright and pale, but this will be fixed in the next step
- Apply a heavy Agrax wash over the whole model, but add a tiny amount of red into the wash before applying it, this will help counteract the lack of saturation caused by the pure ivory in the previous step and add some warmth back into the colour. Apply a further wash of straight Agrax directly into the recesses to accentuate the shadows.
- Apply a final, light 1:1 Averland:Ivory drybrush to the areas the light catches or that you really want to draw the eye to (helmets, shoulder pads, weapons ect). The yellow armour is now complete.
This method pretty much covers how I paint any type of non-metal armour:
A) Pure Base
B) Drybrush 1:1 Base:mid-tone
C) Drybrush pure mid-tone
D) Drybrush 1:1 mid-tone:highlight
E) Drybrush pure highlight
F) Wash with Shade (add complementary colour as necessary. Green works for blue, purple works for red, red works for yellow, blue works for grey, as examples)
G) Drybrush with either C or D, depending on how stark you want the final highlights.
So on to general methodology and observations...
- Why do I drybrush? Mainly as it lends itself to the aesthetic my style is built around; it's not necessarily neat, but it gives a very 'real', desaturated look which stark edge highlights or smooth layers don't really offer, which suits armour and similar surface, the purpose of which is to take hits and damage so the squishier thing inside doesn't. Especially for 40k, clean armour has never sat right with me, especially on Marines; the moment the Drop Pod doors pop open they're under fire and taking hits that can knock out tanks, they're not staying shiny for long.
Time is also a factor, though not a primary one. This whole process took around 20 minutes, including taking the pics (and with a little help from a heat dryer to speed up the wash), which is far quicker than painstakingly lining every edge or meticulously blending. It's also pretty easy to replicate from a technical PoV as there's not a ton of variation/guesswork, so it's well-suited for quickly and consistently painting a squad or even army. Like I say, that's not the main reason I do this, but it's a happy side effect!
- Why do I use mixes rather than progressively lighter individual paints? Initially, the reason was purely economic; when you can't afford 3 reds, one and a lightening/darkening colour will do. But this also ties into a bit of pseudo colour theory; If something is all one colour, that colour doesn't change, it just interacts with light in different ways. Take a piece of dark blue cloth for instance; if left creased and under stark light, it's going go have almost black shadows and look almost white where the light hits it (assuming it's a moderately reflective material), but if it were evenly spread and fully lit up, it'd still all be the same blue. That's why, in the example above, I only use one actual yellow paint because that's ultimately the yellow the armour is, but the (simulated) light makes it appear darker or lighter; it's still not a different colour though.
In theory, then, everything should go from black, through the colour it actually is, to white, and in fact that's the basis of non-metallic metal techniques. However, the less reflective a material is, the less pronounced those shadows and highlights are, and thus the use of dark brown->yellow-> ivory rather than black->yellow->white. Here, you have to make a choice whether to go for a brown/warm transition or a grey/cold one, and really this is down to whatever the look you're trying to achieve is. For example, this guy uses a warmer colour as I want the yellow to still be quite strong, starting from dark grey and highlighting to a pale grey would have worked by the yellow would be so pale it wouldn't really look like an Imperial Fist any more.
That just about covers it. Armour is the thing I get asked about the most so hopefully this helps people out, I'll be back later with some stuff on metallics and weathering!
|
|
|
|
|
|
2017/06/26 12:58:14
Subject: Paradigm's Hobby Blog: Paradigm LIVE- The Tutorial (at last!)
|
|
Decrepit Dakkanaut
|
That's an interesting post Para, thanks!
|
|
|
|
|
|
2017/06/26 18:05:33
Subject: Re:Paradigm's Hobby Blog: The Tutorial (at last!)
|
|
Fresh-Faced New User
|
Awesome post, Para
|
|
|
|
|
2017/06/26 21:07:24
Subject: Paradigm's Hobby Blog: The Tutorial (at last!)
|
|
Steady Space Marine Vet Sergeant
England
|
Thanks Para for that. It's perfectly detailed enough, but not mind boggling. Thanks again for that!
|
 If you can't believe in yourself, believe in me! Believe in the Dakka who believes in you! If you can't believe in yourself, believe in me! Believe in the Dakka who believes in you! |
|
|
|
|
2017/06/30 03:14:32
Subject: Paradigm's Hobby Blog: The Tutorial (at last!)
|
|
Longtime Dakkanaut
|
Excellent work. Love seeing insights into the talented painters of Dakka Dakka. I have been in hobby limbo recently so hope o can get back into it and I may give your techniques a go on my next Marine army.
|
See My Crazy Army plan here: http://www.dakkadakka.com/dakkaforum/posts/list/0/521618.page#5517409
[40k] Orks - Kaptin Grimskragas Razorfangs; Tyranids - Hive Fleet Acidica; Astra Militarum - Murdochs 5th Armoured Detachment & 7th Abhuman Detachment, 17th Tullarium “Immovables” + Remnant of the 6th Tullarium Rifles “The Lucky Few”; Necron - Reclamation Legion of Tomb World Fordris; Inquisition - Ordos Hereticus Witchfinder Tasetus and Coven; Iron Hands - Taskforce of the Garrsak Clan Company; Alpha Legion - XII Ambush Cell; Aeldari - Guiding Light of Yarn Le'ath;
[Warhammer] Empire - Obsidian Order; Bretonnian - Vain Quest for the Grail; Dwarf - Throng of Kark Veng; Ogre Kingdoms - Wondrous Caravan of the Traveller; Tomb Kings - Bronze Host of Ka-Sabar; Chaos Dwarf - Protectors of Hashuts Holy Places; High Elf - Dragonriders of Caledor; Beastmen - Harvesters of Morrslieb; |
|
|
|
|
2017/06/30 05:22:02
Subject: Paradigm's Hobby Blog: The Tutorial (at last!)
|
|
Pious Palatine
|
Nice tutorials. Great insights from one of the masters of Dakka!
EDC
|
|
|
|
|
2017/07/01 14:47:17
Subject: Paradigm's Hobby Blog: The Tutorial (at last!)
|
|
Is 'Eavy Metal Calling?
|
Sorry for the delay, here's the rest of the tutorially bits! Internet has been a bit on and off the last few days.
Part 3: Metallics
My methods for metallics remain pretty similar regardless of what colour metallic I'm going for, and basically boils down to this 3 step process:
- Drybrush the area silver, concentrating more heavily on the uppermost areas.
- Apply a wash of the desired colour over the area. For gold, I use Agrax, for darker brown metals I go for Vallejo Smoke Ink and for black or dark gunmetal, I go for Nuln Oil. For things like the red gun casing, I just use a dark red wash.
- Finally, I add some scratches and extreme highlights in silver, and some further washes to bring out the shading a little more. I tend to use Agrax for this on most colours, but for golds I'll add a (very) little red or purple to the wash as well to really get it to pop.
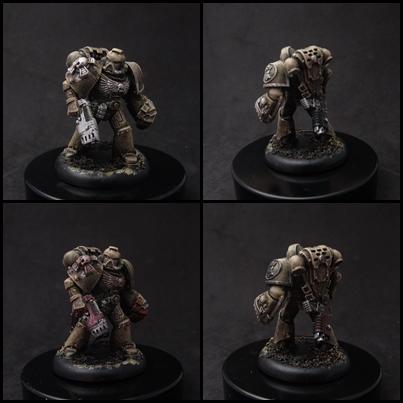
This I find is the best way to achieve natural and textures on metallics. I've got a more detailed method breakdown here, this is for black metal but it can be applied to anything else really: https://www.dakkadakka.com/gallery/831250-Deathwatch%20Armour%20Tutorial.html
And so here's the final thing, with final weathering and details added. As I couldn't really get any decent WIP shots of those techniques, I'm thinking I'll do a third part to this focusing purely on how I go about weathering and detailing, so if there's any specific requests for that do let me know. I'll be covering battle damage, blood and battlefield grime, probably on a plainer model to show them most effectively.

Thanks for looking, more soon!
|
|
|
|
|
|
2017/07/01 21:46:22
Subject: Paradigm's Hobby Blog: The Tutorial (at last!)
|
|

Sinister Chaos Marine
|
I love your work.
You really bring the grim dark vibe into your miniatures.
Just amazing.
|
|
|
|
|
|
2017/07/13 18:11:06
Subject: Paradigm's Hobby Blog: The Tutorial (at last!)
|
|
Is 'Eavy Metal Calling?
|
After a couple of weeks of not getting much done at all, I'm back today with a couple of minis that provided a spark of inspiration to get back into the swing of things.
First up is a Dark Angel Veteran put together from various salvaged bits and bobs, on which I experiments a little further with the cleaner, smoother style I used on that Black Templar a while ago, and I think it's worked quite nicely, and I've managed a nice strong green that's hopefully not too garish.
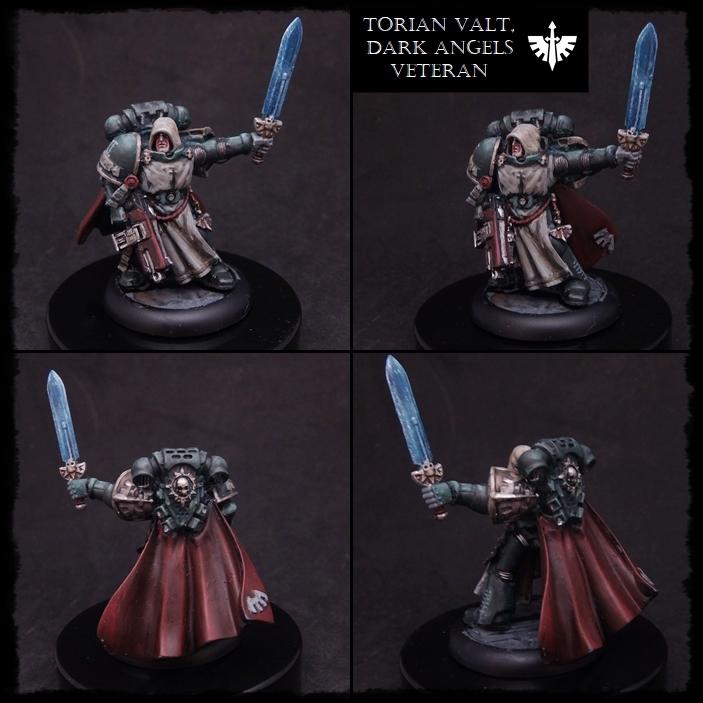
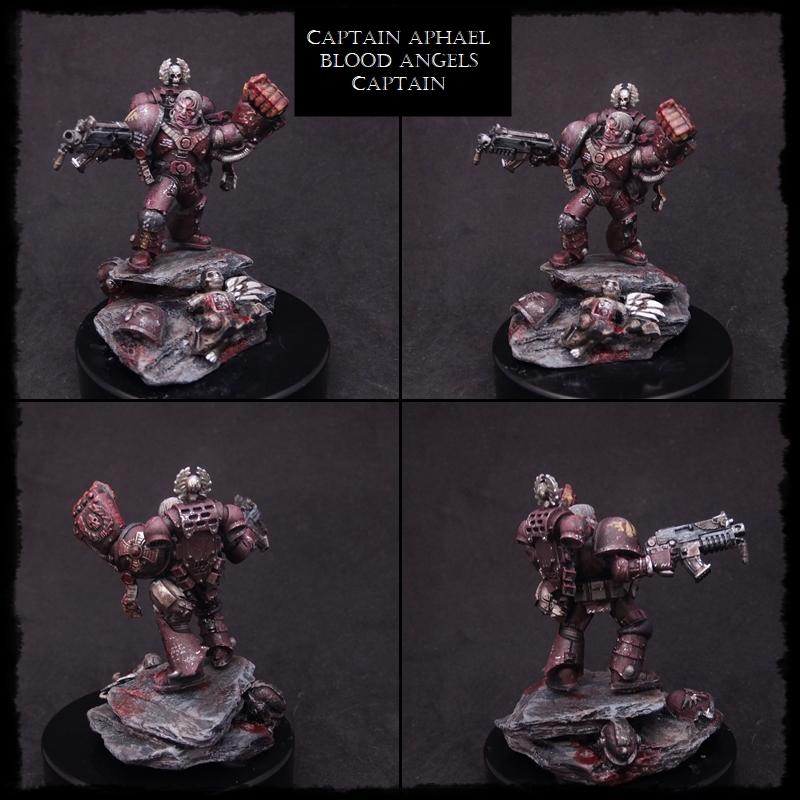
And secondly, a mini done in almost the opposite style; this model is an homage to the classic 2nd Edition cover Captain, but reimagined as a gritty, modern piece. The faces on both him and the Dark Angel were painted using a method I picked up from Nerdfest's blog, so head over there for a link to that, it's a simple method for much more natural-looking faces.
That's all for now, thanks for looking and of course, any thoughts welcome!
|
|
|
|
|
|
2017/07/13 18:54:51
Subject: Paradigm's Hobby Blog: Angels of Death
|
|
[SWAP SHOP MOD]
Decrepit Dakkanaut
OH-I Wanna get out of here
|
"Ooh, a sculpted BA shoulder pad. I should use that on this BA captain. On the base. Like a monster"
-Para, probably.
|
|
|
|
|
2017/07/13 19:02:53
Subject: Paradigm's Hobby Blog: Angels of Death
|
|
Is 'Eavy Metal Calling?
|
Haha To be fair, I had planned to use it on the model, but during the assembly it suffered a fatal superglue explosion that rendered it far too messed up to actually use on the model. I thought I had a spare, but it turns out that was my last one. I figured blank and (hopefully) ok freehand beat sculpted by mangled by glue.
|
|
|
|
|
|
2017/07/13 19:23:40
Subject: Re:Paradigm's Hobby Blog: Angels of Death
|
|
Grim Dark Angels Interrogator-Chaplain
|
Cool to see you paint a Son of the Lion in your style. The Blood Angel looks good too!
|
|
|
|
|
|
2017/07/13 22:00:40
Subject: Paradigm's Hobby Blog: Angels of Death
|
|
Walking Dead Wraithlord
|
Great reading. Thanks for doing this.
|
|
|
|
|
2017/07/14 13:05:11
Subject: Paradigm's Hobby Blog: Angels of Death
|
|
Decrepit Dakkanaut
|
In general, I'm not very fond of the DA color scheme... but yours I like. Nicely done.
|
|
|
|
|
|
2017/08/30 19:09:47
Subject: Re:Paradigm's Hobby Blog: Angels of Death
|
|
Is 'Eavy Metal Calling?
|
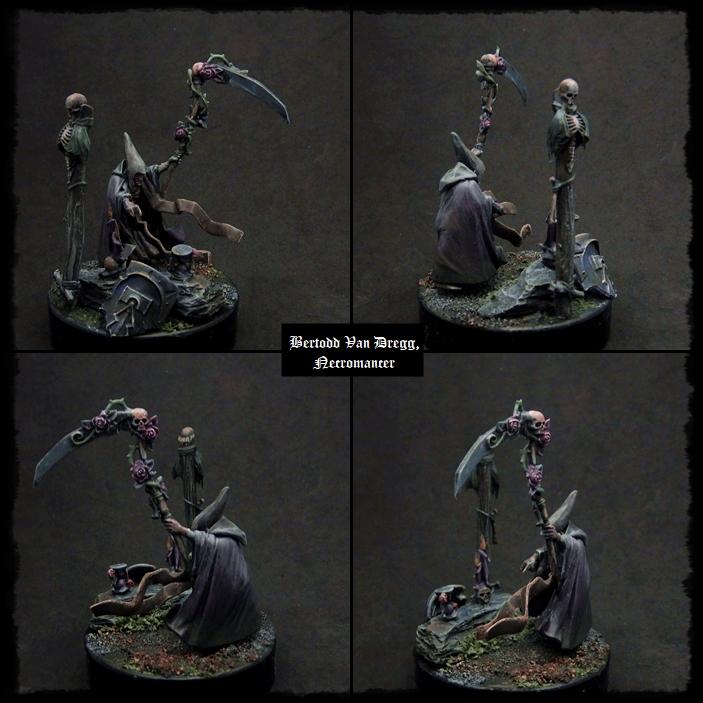
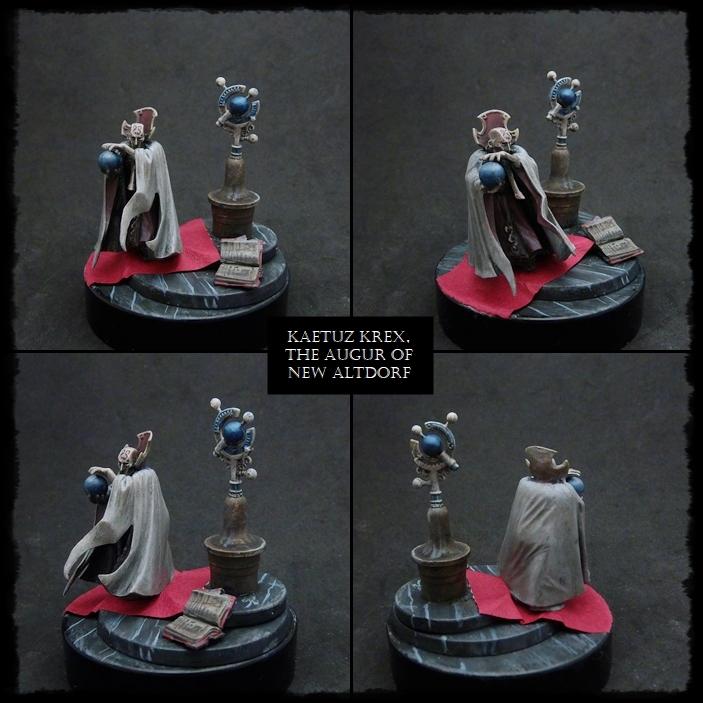
Blimey, it's been a while! For the last few weeks I've just really struggled to find the time or motivation to get painting, but with the purchase of one of the new AoS discounted sets I'm back in the game. Specifically, the Battle Wizards set; I love the old WFB multi-part hero kits, so getting 4 wizards for a few quid more than 2 was too good a deal. Rather than go for gaming potential, I decided I'd do at least a few of them as mini-diorama pieces.
First up is the Necromancer Bertodd Van Dregg, seen conducting a ritual by moonlight and generally being a creepy bastard. I wanted some kind of skeleton or zombie coming up in front of him but lacked the bits, so he got some necromancer paraphernalia set out instead. Paintwise, Deliberately very muted and with cold grey highlights to create a sort of moonlit look. Lots of washes splodged here and there, this is not a guy who cares much about cleanliness.
And almost the opposite, Kaetus Krex, the Augur of New Altdorf. Much more of a classic good guy wizard, bright robes, glowy orb and all. The mask I think adds a bit of a sinister element though, and the staff top re-purposed as some kind of celestial device hints at the fusion of magic and science that comes up in AoS and WFB a fair bit.
And while playing around with these in the editor, I came across a cool effect entirely by accident, and a few minutes later, finally had a proper banner for my blog/commission site!
That's all for now, more soon! As always, ta for looking, any thoughts welcome!
|
|
|
|
|
|
2017/08/30 21:41:16
Subject: Paradigm's Hobby Blog: Yer A Wizard...
|
|

Roaring Reaver Rider
|
Very nice dude. I especially like the necro colour choices. The pinkish hue on the skull and roses adds a bit of warmth to the model that ties in with the warmer toned base. Very nice mini dioramas on both though, good job.
|
 1500 1500  1000 1000
Please check out my project log on Dakka here  |
|
|
|
|
2017/08/31 07:00:28
Subject: Paradigm's Hobby Blog: Yer A Wizard...
|
|
Longtime Dakkanaut
|
Very nice para, both on the models and the banner.
|
|
|
|
|
|
2017/08/31 10:36:53
Subject: Paradigm's Hobby Blog: Yer A Wizard...
|
|
Is 'Eavy Metal Calling?
|
Cheers chaps!
|
|
|
|
|
|
2017/08/31 11:28:56
Subject: Re:Paradigm's Hobby Blog: Yer A Wizard...
|
|
Is 'Eavy Metal Calling?
|
Welcome back in style dude . Those wizards are top notch and very characterful. Some of the AOS stuff is calling me, but I have to be realistic with my budget  ....and Necromunda.
|
LOL, Theo your mind is an amazing place, never change.-camkierhi 9/19/13
I cant believe theo is right.. damn. -comradepanda 9/26/13
None of the strange ideas we had about you involved your sexual orientation..........-Monkeytroll 12/10/13
I'd put you on ignore for that comment, if I could...Alpharius 2/11/14 |
|
|
|
|
2017/08/31 12:17:40
Subject: Paradigm's Hobby Blog: Yer A Wizard...
|
|
Is 'Eavy Metal Calling?
|
Oh, I'll be hard pressed to resist Necromunda for long... Blanchey, Inq28y stuff in plastic is a dream come true for me. Trouble is it's launching just opposite Modiphius's Fallout Wasteland Warfare, which to be honest appeals to me even more.
|
|
|
|
|
|
2017/08/31 12:29:06
Subject: Paradigm's Hobby Blog: Yer A Wizard...
|
|
Agile Revenant Titan
|
Lovely work Para
Can't speak to Fallout, but I can't wait for Necromunda either. Just access to a sprue of 10 female torsos is a massive boon to a kitbasher like myself 
|
|
|
|
|
|
2017/08/31 14:25:34
Subject: Paradigm's Hobby Blog: Yer A Wizard...
|
|
Grim Dark Angels Interrogator-Chaplain
|
Do like these battle wizards . Great job, Para.
|
|
|
|
|
|
|
|

 Chaos Warband & Inquisition

 ~16000 Astra Militarum:
  ~1200 | Imperial Knights:
  ~2300 | Leagues of Votann:
  ~1300 | Tyranids:
  ~3400 | Stormcast Eternals:
  ~5000 | Kruleboyz:
  ~3500 | Lumineth Realm-Lords:
  ~700
~700
