| Author |
Message |
 |
|
|
|
|
Advert
|
Forum adverts like this one are shown to any user who is not logged in. Join us by filling out a tiny 3 field form and you will get your own, free, dakka user account which gives a good range of benefits to you:
- No adverts like this in the forums anymore.
- Times and dates in your local timezone.
- Full tracking of what you have read so you can skip to your first unread post, easily see what has changed since you last logged in, and easily see what is new at a glance.
- Email notifications for threads you want to watch closely.
- Being a part of the oldest wargaming community on the net.
If you are already a member then feel free to login now. |
|
 |
2012/06/21 08:13:43
Subject: Re: Terrain Project- Building a Better Battlefield
|
|

Contagious Dreadnought of Nurgle
|
Skalk Bloodaxe wrote:@ RSJake- Thanks for the words of encouragement! I know I've been running you all around today. Bottom line is I'n highly motivated to find new and effective methods to create the best terrain I possibly can, and this is another example of how that process is going for me. I'm making better terrain today than I did a month ago. That terrain is better than the stuff I did 6 months ago. The terrain I make in 3 months from now will be even better. Attention to detail, more "real world" effects, and practicing the techniques my role models use will get me as far as I can go. I'm feeling really good about all of this, and it's been a long time since I've genuinely felt this way.
  SUPPLY DROP!!!
So the other day Galorn asked if I'd like him to send me a wall section. I said "Sure, that would be cool!" because who doesn't want a free sample of terrain goodness?
A few days went by and then a few more went by because my wife only goes to the PO once a week (or less)... but today she sent me a msg that I had a huge heavy box. Hmm. Ok.
I got home tonight and indeed there was a huge box w/ my name on it sitting on the kitchen counter. The return address didn't say Galorn, but I figured out all by myself that it was from him. I picked it up and woah... yeah, it was heavy. $13 USPS heavy. I took into my hobby room and opened it up.
This is what he sent:
Unsure if the USPS broke this or if it was a "factory 2nd" casting. Either way it is an easy fix and I'm all over it later tonight.
Looks like the Mordheim project just got bumped back a bit. I recently accused dsteingass of 'project schizophrenia'. I think I'm in good company. 
More coming later. I'm off to wash some resin and prime some plaster!
That broke in transit... not the USPS's fult I probably could have packed it better. On the plus side the best adhesive to fix it easily is Elmer's glue.
dsteingass wrote:Galorn gives hefty samples!
I need to build up the ones he sent me...bad Dave!
Go big or go home...  
|
Link to my Index Thread here on dakka


Find me on Twitter Sam Butler @Rivet_Zone
Winner "Best 40k Table" Daboyz GT 2010,2011
"Sic Vis Pachem Parabellum" - Publius Flavius Vegetius Renatus
Veni, Vidi discessi.-Galorn. |
|
|
 |
|
2012/06/21 09:23:53
Subject: Re: Terrain Project- Building a Better Battlefield
|
|

Using Inks and Washes
|
Skalk Bloodaxe wrote:
This is a couple bitz I had for my Necromunda terrain way back. I've made what I hope looks like a node or panel box or something like that. The smaller round thing I was envisioning as a generator or an AC unit. The barrels are there because I can't make myself throw them away but man I am really starting to hate those things. I think before this piece is done it will have different barrels. But yeah, I'm pretty psyched on it so far:
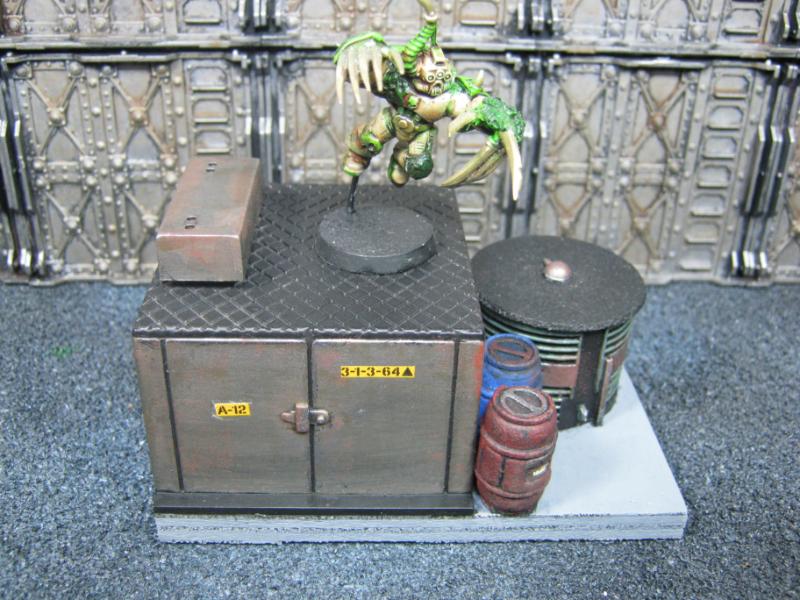
Hey Skalk! Sorry I've been away for a while - just finished my finals, so I've been a bit off the radar  This piece is absolutely fantastic - i immediately thought of one of those power junction boxes or small generators you always see off main streets. The mini on top is pretty ace too - home brewed spyrer? What don't you like about the barrels though? They look good!
The hair spray technique I have heard great things about and have been meaning to try - I've heard you can get some great effects if you concentrate the salt on edges and surfaces that would get chipped. Yours looks brill anyway, especially if you haven't even touched it up yet! Can't wait to see what you do with all the wall sections
|
|
|
|
|
2012/06/21 14:54:23
Subject: Re: Terrain Project- Building a Better Battlefield
|
|
Longtime Dakkanaut
|
@ RSJake- Yeah, a "sample". It's like going to the ice cream shop to get a taste of Crunchy Frog and having them give you a gallon. I am wicked psyched.
@ dstein- oh man. Yeah, you really should. It's really awesome stuff. The "gothic arch" piece has so much potential w/ a project I already started... I think my first few games of Mordheim are going to be on a cardstock table.
@ Galorn- Dab of Super Glue and I was back to action. See below for more info!
@ Scarper- No worries man. It's Dakka, not life. Glad you are liking the "mystery utility company box". I have no idea what it is or what it is other than some random thing that looks cool on the table. Ha. As far as the salt thing goes, absolutey try it. You already have mad modeling skills, this is something you'll pick up quickly and master within a few pieces.
Last night I spent some time cleaning up and base coating a few pieces. I took pics of everything and I'll upload tonight if I can. Things are getting a bit hectic here again and it's messing w/ my bike and modeling time.
I started working w/ the large wall sections. I realized after starting them that I am missing a "back wall" so I'm likely going to cut one of the broken pieces and make it work to fill things in. I based black, sprayed silver, hairspray / salt, rust, more hairspray / salt, sprayed gray, then light spray white. Will know how it went tonight (if I get the chance).
In other news, I'm picking up the 6th Ed rulebook 07/01. I know 6th will have challenges and issues, but the fact that is isn't 5th Ed already makes it better by default. I've been reading leaks online and am loving what I've seen, such as a vehicle can move up to 6" and still shoot ALL of its weapons. That was driving me mad. Nothing like having 220 points of Land Raider playing the role of static Lascannon battery, or as an "assault vehicle" that does NOTHING to soften up the target before my Plague Marines charge into certain death. Feh.
Buh-bye 5th. Take your well-deserved seat next to Windows Vista, Ubuntu anything, and the default Android email client. 
|
|
|
|
|
|
2012/06/21 17:35:42
Subject: Terrain Project- Building a Better Battlefield
|
|
Decrepit Dakkanaut
|
I haven't gotten any of Galorn's new pieces yet, just the basic wall parts.
|
"dave you are the definition of old school..." -Viktor Von Domm   My P&M Blog : My P&M Blog :
It's great how just adding a little iconography, and rivets of course, can make something look distinctly 40K-adamsouza
"Ah yes, the sound of riveting.....Swear word after swear word and the clinking of thrown tools" "Nope. It sucks do it again..."- mxwllmdr
"It puts together more terrain, or else it gets the hose again...-dangledorf2.0
"This is the Imperium, there is no peace, there are only rivets" -Vitruvian XVII
"I think rivets are the perfect solution to almost every problem"- Rawson
More buildings for the Building God! -Shasolenzabi
  |
|
|
|
|
2012/06/21 18:57:38
Subject: Terrain Project- Building a Better Battlefield
|
|
Contagious Dreadnought of Nurgle
|
Guess i should remedy that huh...
|
Link to my Index Thread here on dakka
Find me on Twitter Sam Butler @Rivet_Zone
Winner "Best 40k Table" Daboyz GT 2010,2011
"Sic Vis Pachem Parabellum" - Publius Flavius Vegetius Renatus
Veni, Vidi discessi.-Galorn. |
|
|
|
|
2012/06/21 21:28:29
Subject: Terrain Project- Building a Better Battlefield
|
|
Decrepit Dakkanaut
|
@ skalk: did you clock the rumour about terrain pieces such as gun emplacements being purchasable with force slots?
|
Theophony"... and there's strippers in terminator armor and lovecraftian shenanigans afoot."
Solar_Lion: "Man this sums up your blog nicely."
Anpu-adom: "being Geek is about Love. Some love broadly. Some love deeply. And then there are people like Graven.  |
|
|
|
|
2012/06/22 15:16:41
Subject: Re: Terrain Project- Building a Better Battlefield
|
|
Longtime Dakkanaut
|
@ inmygravenimage- I did. Not sure what that is exactly yet (meaning how it works) but looking forward to seeing it. Looking forward to all of this.
Just text this morning, which is too bad becasue I managed to get a lot of modeling done last night. I did some more work on the Galorn walls, and I also really cranked on my Mordheim buildings. I'm going to 90% finish the buildings and then start work on scaffolding / walkways / bridges. That part I am expecting will be awesome fun because it will go fast and look great. Then I'm going to bring it all together get to playing!
Tonight I'll be taking a bit of a break from building / painting so we can roll up new warband sheets. Getting pretty excited about playing this game again. I haven't played in 13 years.
Automatically Appended Next Post:
Been spending a good part of the afternoon surfing images for ideas / inspiration, and man I found plenty. Really looking forward to this.
One thing that was really cool was I found a map of the city of Mordheim. Very similar layouts but each district has at least one distinctly unique landmark. I'm going to focus on general / generic buildings at first, but if I keep going on this project I'm eventually going to try try building a couple of the more interesting ones like Cemetery of St. Doffer and Middle Bridge (that would be an awesome scrap... bridge battles are brutal and unforgiving).
Another thing I am liking is that the buildings aren't towering spires of of ridiculousness. Vast majority of residential / commercial buildings seem 2-3 stories, 4 at most (and those are rare). Government and specialty buildings are larger, but they are the extreme minority. Most of the city seems to be made up of reasonably sized building. I'm also noticing that the most significant damage is in the vicinity of the Pit and it doesn't seem to spread outward a lot. What that means for me is a lot of regular buildings w/o having to make the CoD- Old World layout to have a decent table. I'll have the random ruins, but they won't be the majority of my available pieces.
Anyway, just sharing what's on my mind. Will make a point of pics tonight.
|
|
This message was edited 2 times. Last update was at 2012/06/22 19:54:54
|
|
|
|
|
2012/06/22 20:53:25
Subject: Terrain Project- Building a Better Battlefield
|
|

Shroomin Brain Boy
|
one day i have to test that salt spray weathering too... looks ace! and no mistake mister!!!
|
|
|
|
|
|
2012/06/23 04:11:19
Subject: Re: Terrain Project- Building a Better Battlefield
|
|
Contagious Dreadnought of Nurgle
|
Skalk Bloodaxe wrote:@ inmygravenimage- I did. Not sure what that is exactly yet (meaning how it works) but looking forward to seeing it. Looking forward to all of this.
Just text this morning, which is too bad becasue I managed to get a lot of modeling done last night. I did some more work on the Galorn walls, and I also really cranked on my Mordheim buildings. I'm going to 90% finish the buildings and then start work on scaffolding / walkways / bridges. That part I am expecting will be awesome fun because it will go fast and look great. Then I'm going to bring it all together get to playing!
Tonight I'll be taking a bit of a break from building / painting so we can roll up new warband sheets. Getting pretty excited about playing this game again. I haven't played in 13 years.
Automatically Appended Next Post:
Been spending a good part of the afternoon surfing images for ideas / inspiration, and man I found plenty. Really looking forward to this.
One thing that was really cool was I found a map of the city of Mordheim. Very similar layouts but each district has at least one distinctly unique landmark. I'm going to focus on general / generic buildings at first, but if I keep going on this project I'm eventually going to try try building a couple of the more interesting ones like Cemetery of St. Doffer and Middle Bridge (that would be an awesome scrap... bridge battles are brutal and unforgiving).
Another thing I am liking is that the buildings aren't towering spires of of ridiculousness. Vast majority of residential / commercial buildings seem 2-3 stories, 4 at most (and those are rare). Government and specialty buildings are larger, but they are the extreme minority. Most of the city seems to be made up of reasonably sized building. I'm also noticing that the most significant damage is in the vicinity of the Pit and it doesn't seem to spread outward a lot. What that means for me is a lot of regular buildings w/o having to make the CoD- Old World layout to have a decent table. I'll have the random ruins, but they won't be the majority of my available pieces.
Anyway, just sharing what's on my mind. Will make a point of pics tonight.
soooo pics?
|
Link to my Index Thread here on dakka
Find me on Twitter Sam Butler @Rivet_Zone
Winner "Best 40k Table" Daboyz GT 2010,2011
"Sic Vis Pachem Parabellum" - Publius Flavius Vegetius Renatus
Veni, Vidi discessi.-Galorn. |
|
|
|
|
2012/06/23 12:57:00
Subject: Terrain Project- Building a Better Battlefield
|
|
Decrepit Dakkanaut
|
Yeah!....why you sandbagging us?
|
"dave you are the definition of old school..." -Viktor Von Domm My P&M Blog :
It's great how just adding a little iconography, and rivets of course, can make something look distinctly 40K-adamsouza
"Ah yes, the sound of riveting.....Swear word after swear word and the clinking of thrown tools" "Nope. It sucks do it again..."- mxwllmdr
"It puts together more terrain, or else it gets the hose again...-dangledorf2.0
"This is the Imperium, there is no peace, there are only rivets" -Vitruvian XVII
"I think rivets are the perfect solution to almost every problem"- Rawson
More buildings for the Building God! -Shasolenzabi
|
|
|
|
|
2012/06/23 15:34:48
Subject: Re: Terrain Project- Building a Better Battlefield
|
|
Longtime Dakkanaut
|
@ both of you-
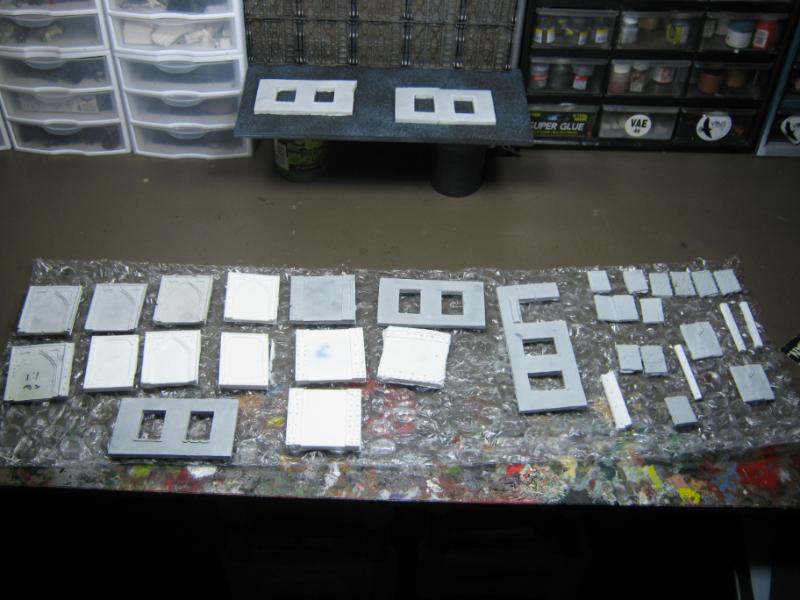
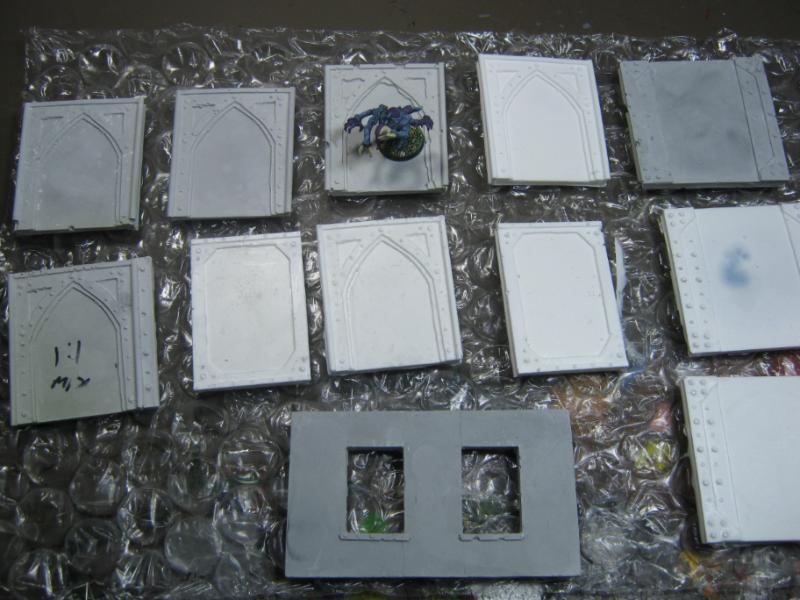
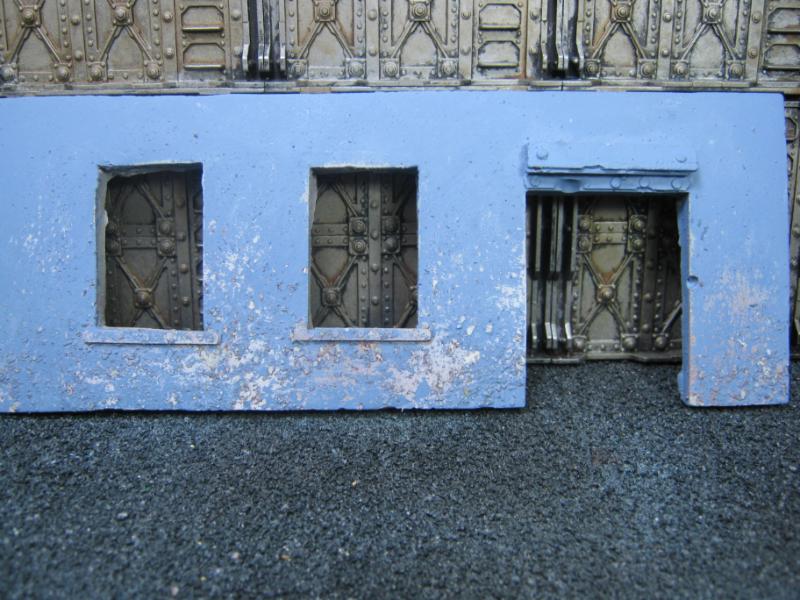
Here's pics of the Galorn walls from the other night, and a few WIP pics from the Mordheim project last night and this morning.
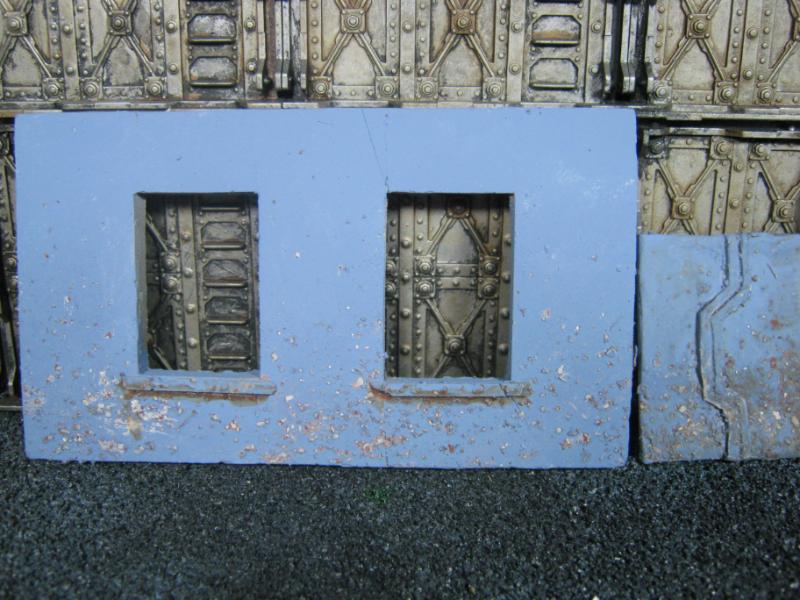
Salt and light wash on door / under windows
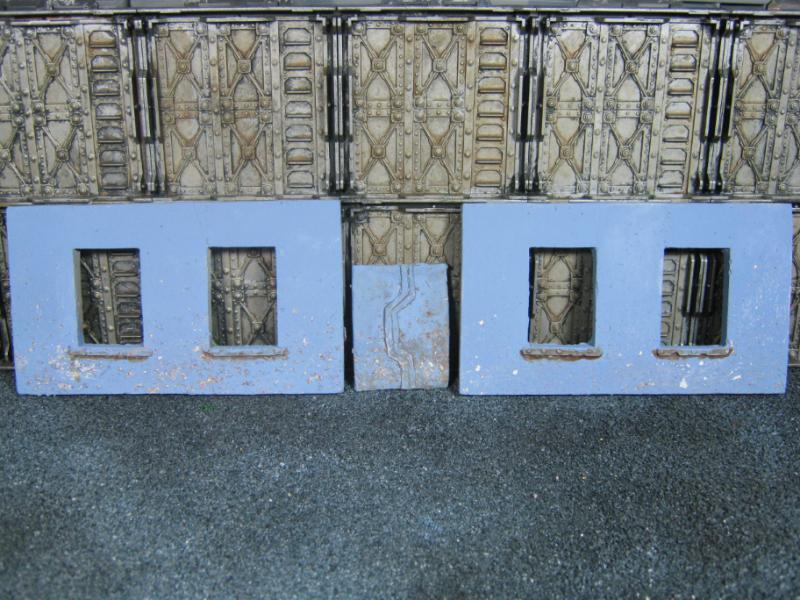
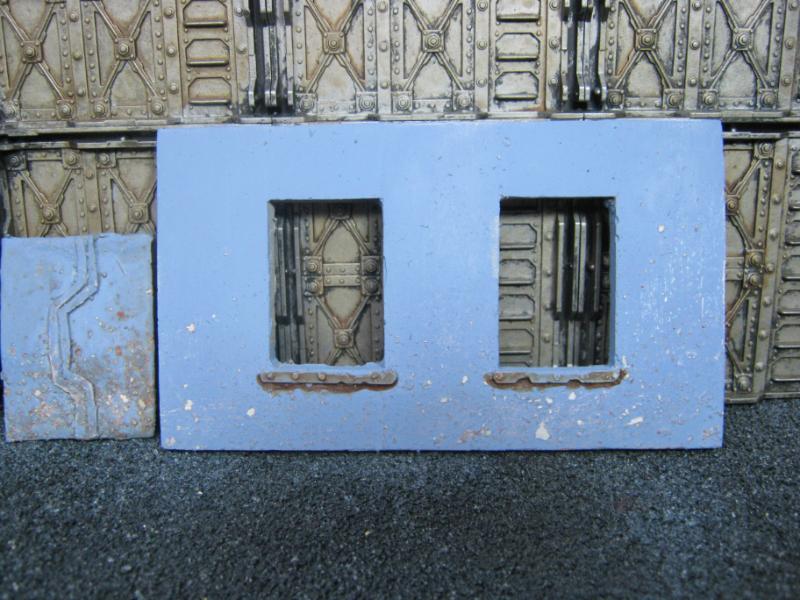
Salt method, nothing else:
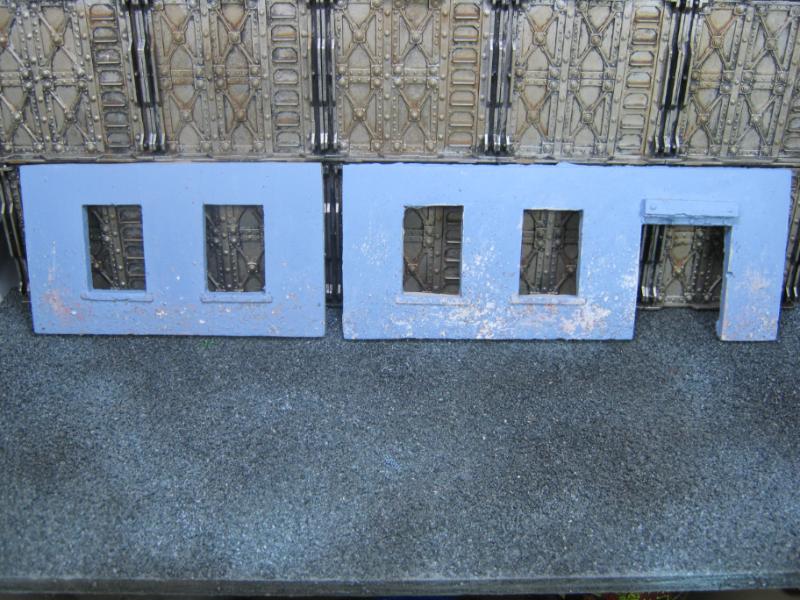
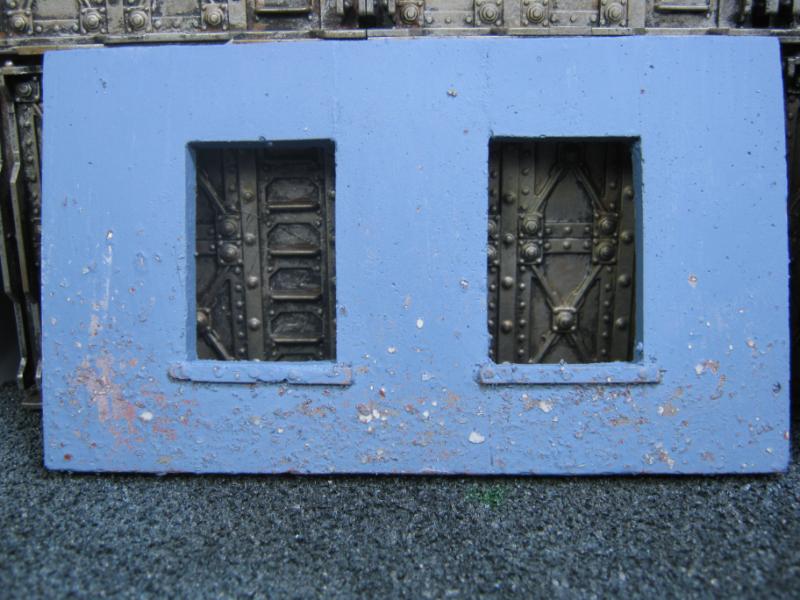
I really like how the layered look is coming. The 'bubbles' of paint remind me of corrosion that happens under the paint, hasn't eaten through the paint yet but is definitely corroding underneath. I also really like the different degrees of "reveal" I have achieved. Again, much of this was happenstance, but it was part of what I was trying to do and I paid attention to what I was doing, so now I remember and I can replicate this. Still a bit of a challenge to get the color layering right, but I'm thinking I'll do this a few more times before I nail the technique and can intentionally reproduce the same results over and over.
More work on these walls (as well as most of the remaining pieces from the Galorn collection) is going on hold for now because I'm shifting my entire focus to 
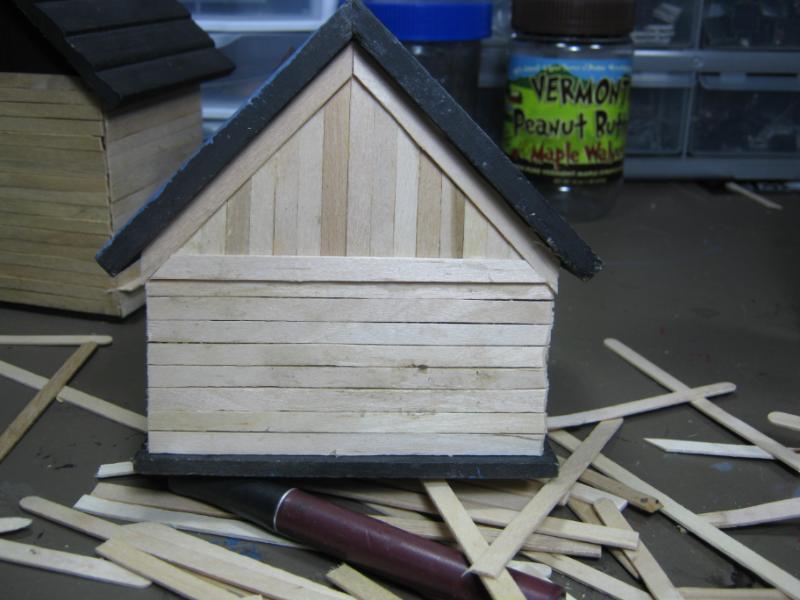
Here's some WIP shots. These are just the 'blanks' that I'll be adding detail to once the standard builds are completed. C&C is always welcomed and encouraged, especially when I'm at the start of something that I can change for the better. I'll explain the process I'm using a bit in case anyone has questions about what I'm doing here.
Note up front- all the rough edges are going to be hidden by something else. This is the rough-in, finish work is going to hide a lot of the shortcuts I'm taking right now.
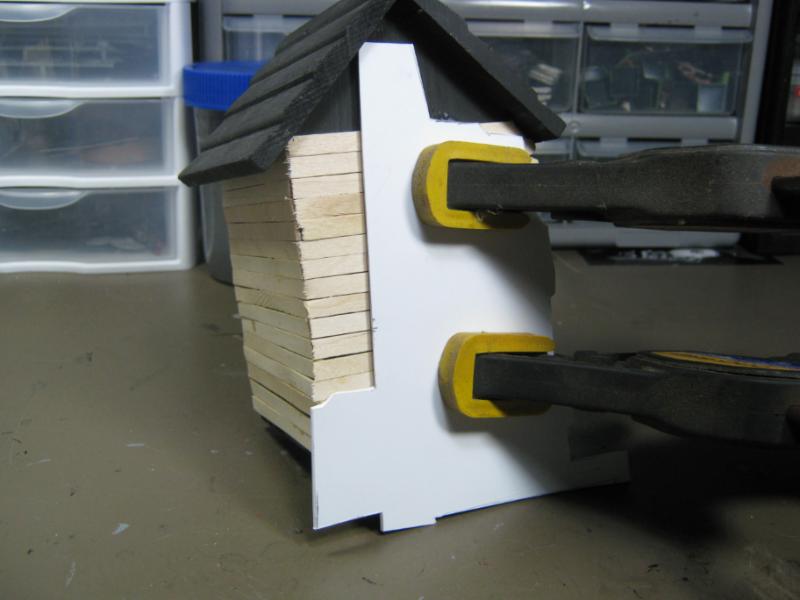
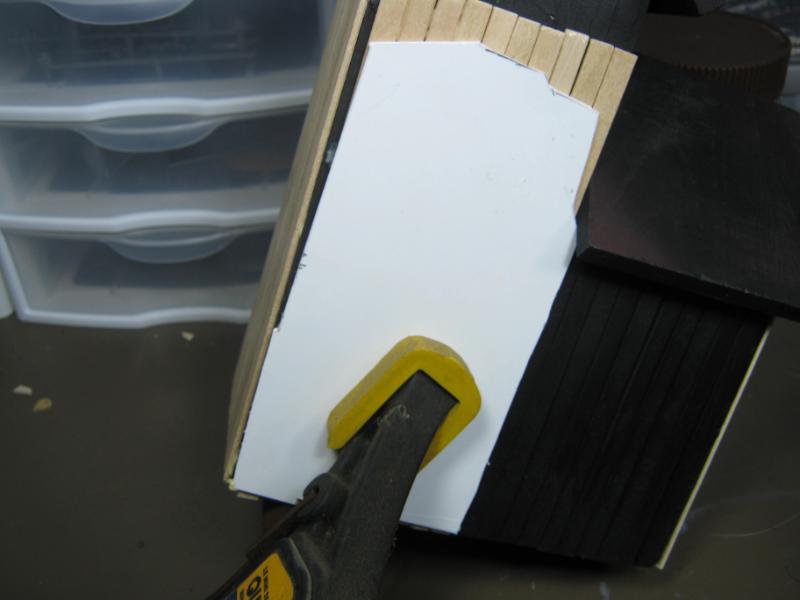
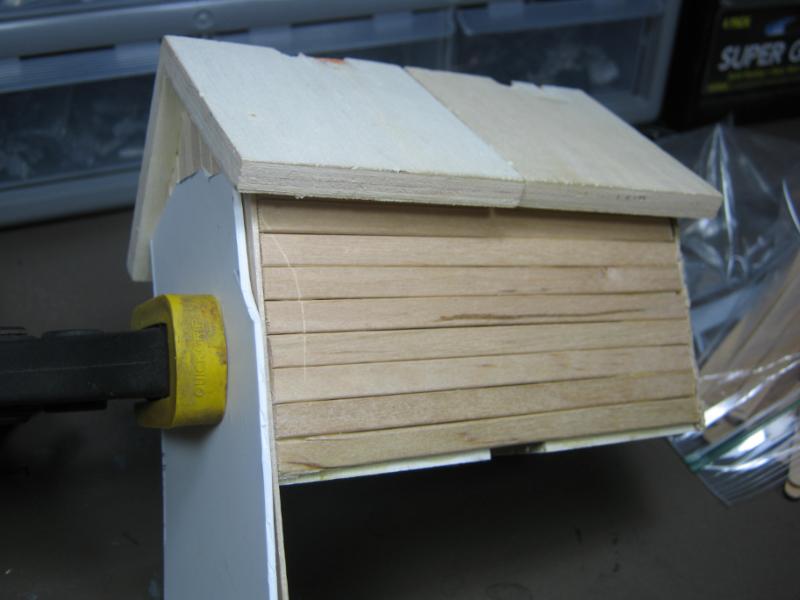
Here I'm adding planking to one of my larger buildings. I know it would have looked more "real" if I had cut the 'boards' to look like they were pieced together like a real building. The idea behind these builds is to slap them together as quickly as possible and then create the illusion of detail later. If what I have in mind doesn't work I will have many examples of what not to do next time. 
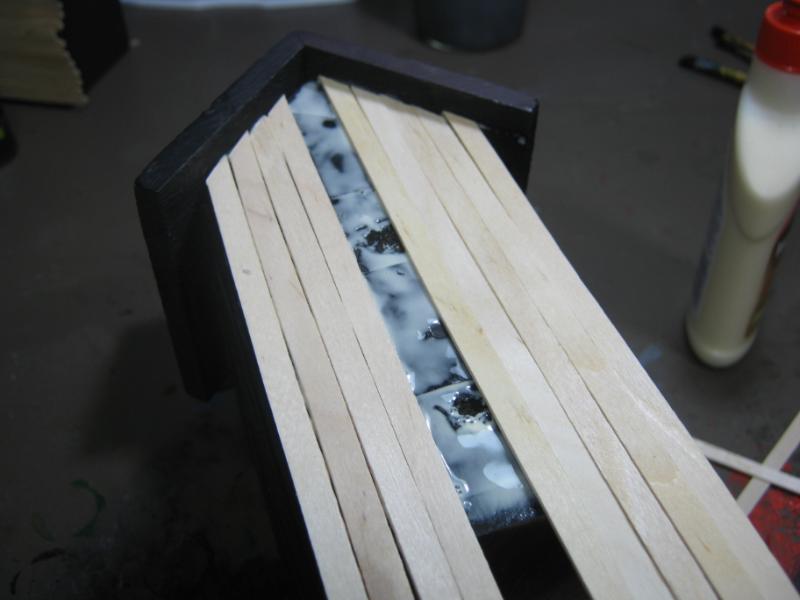
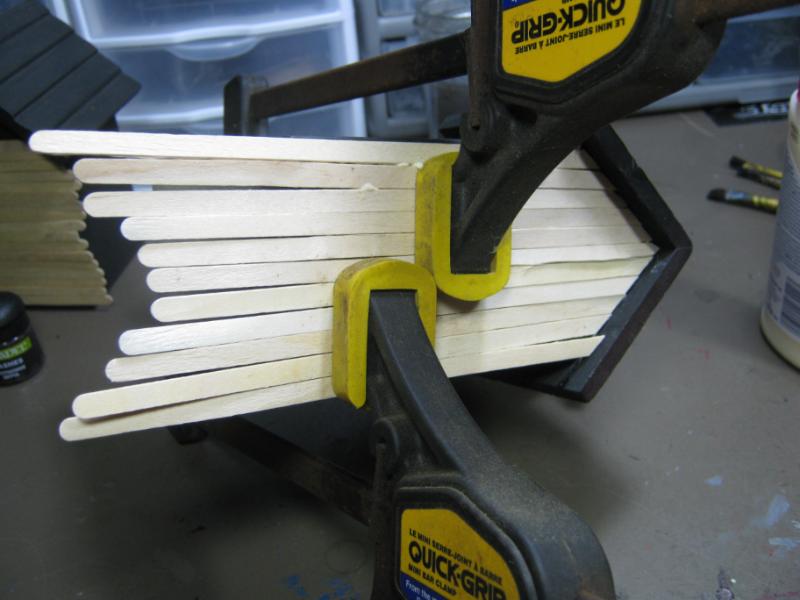
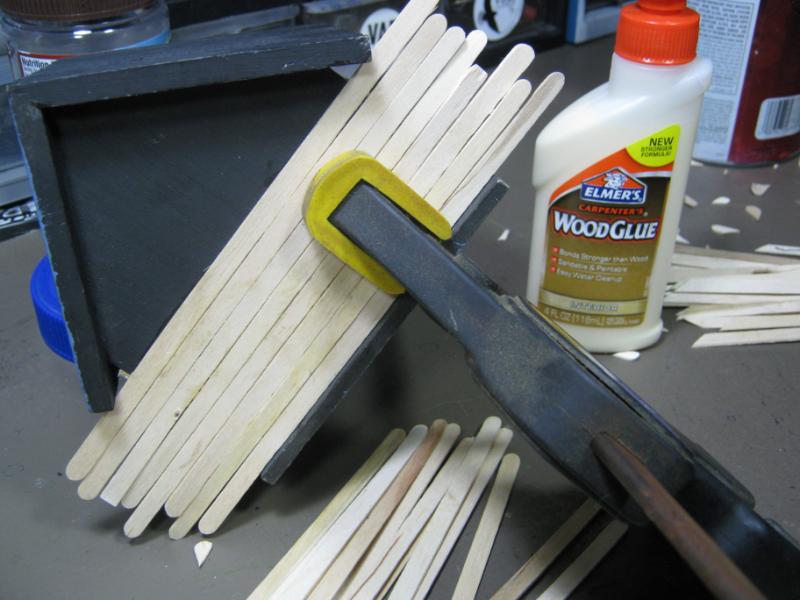
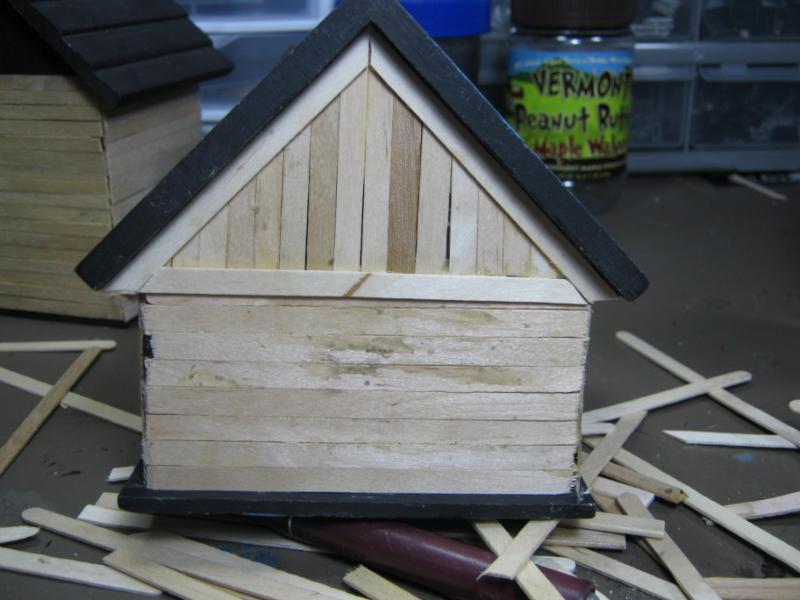
Another quick and dirty time saver. Glue the sticks on way too long, let dry, score w/ an Xacto blade on inside corner edge, bend over next facing wall, glue, and clamp. Move on to next project while this dries.
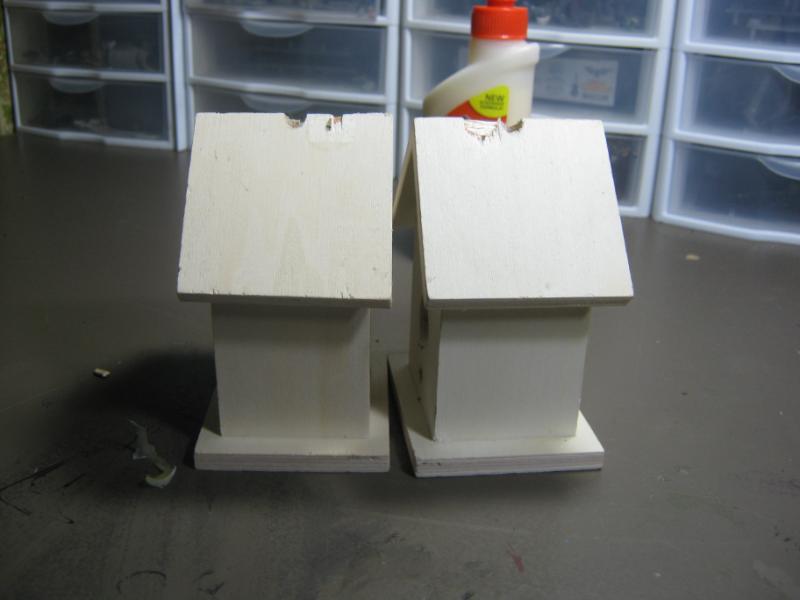
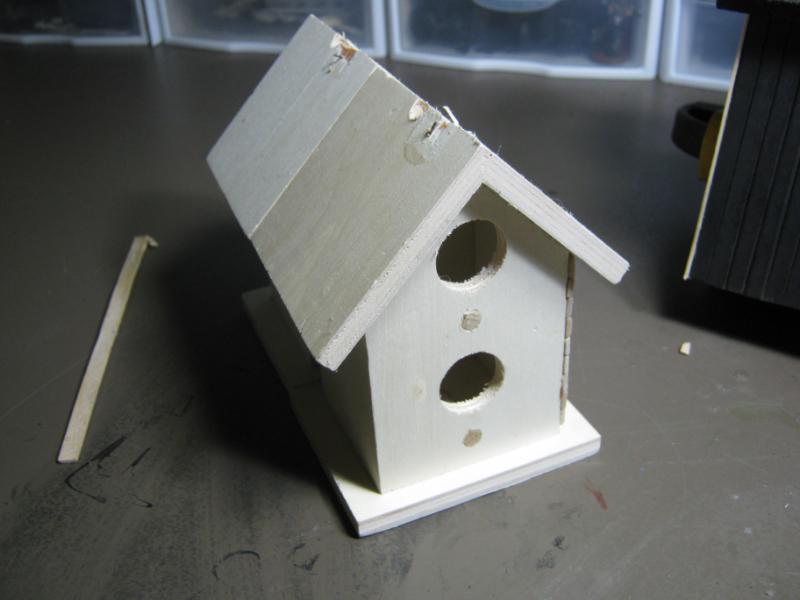
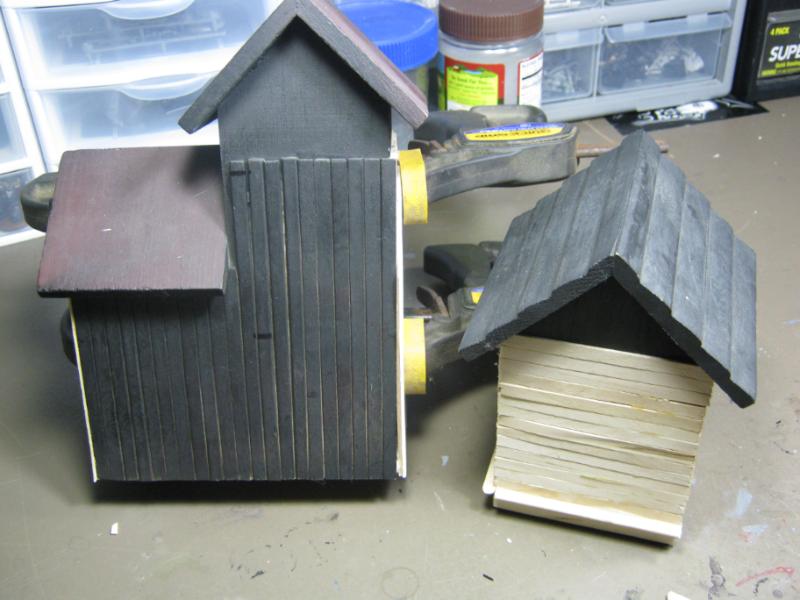
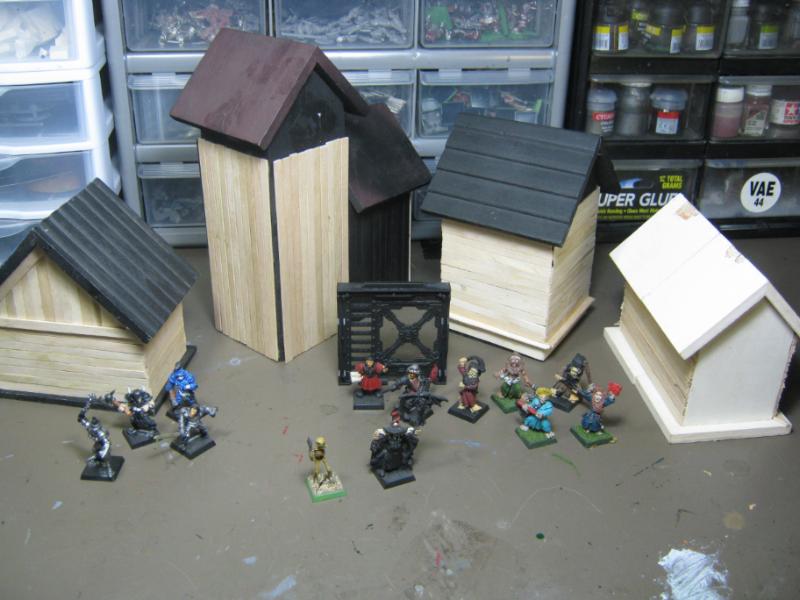
These two small houses I found in my Woods last night so they didn't make it into the original "group shot" but since I've decided to not use the O-Scale plastics they can take that spot. I'm taking the two and building them into one:
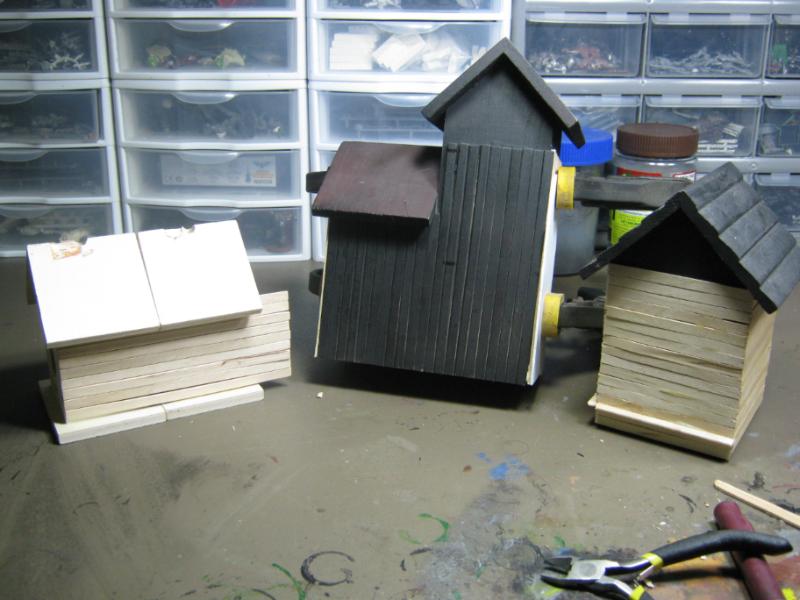
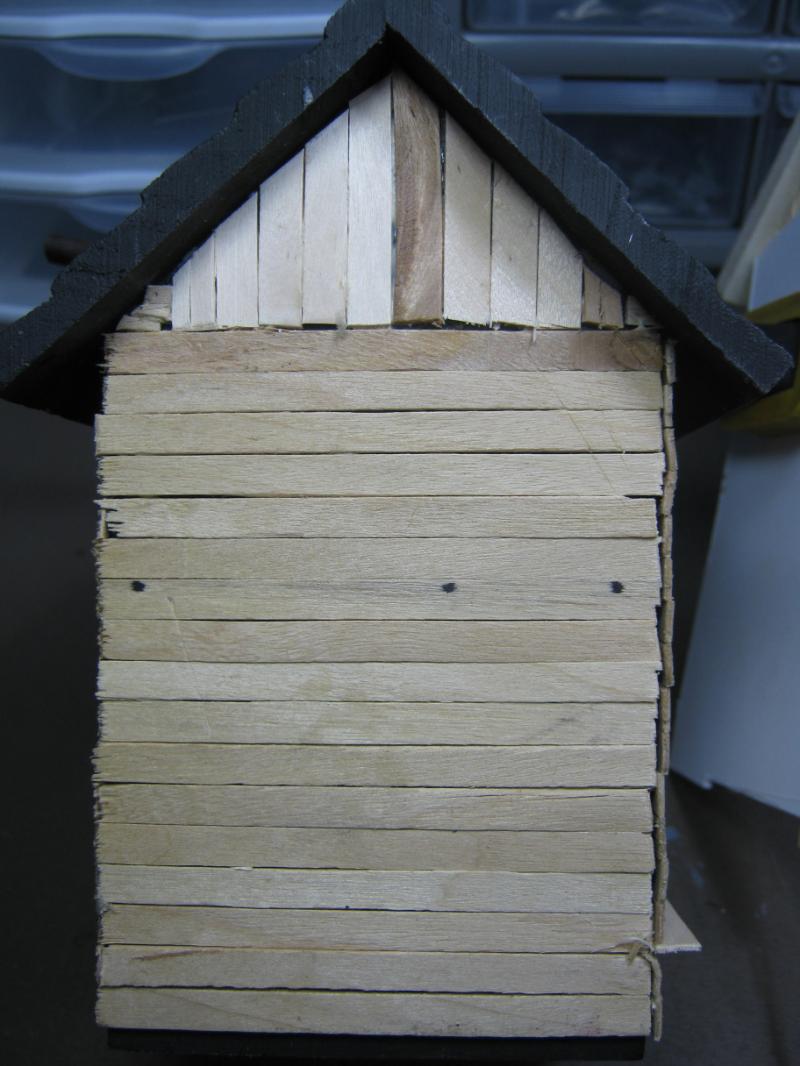
More random WIP shots of progress here and there. Note the marker points on the middle building- those indicate levels measured from the Necromunda bulkhead. This "stock" building will not stay that way long after I get the basic facade finished.
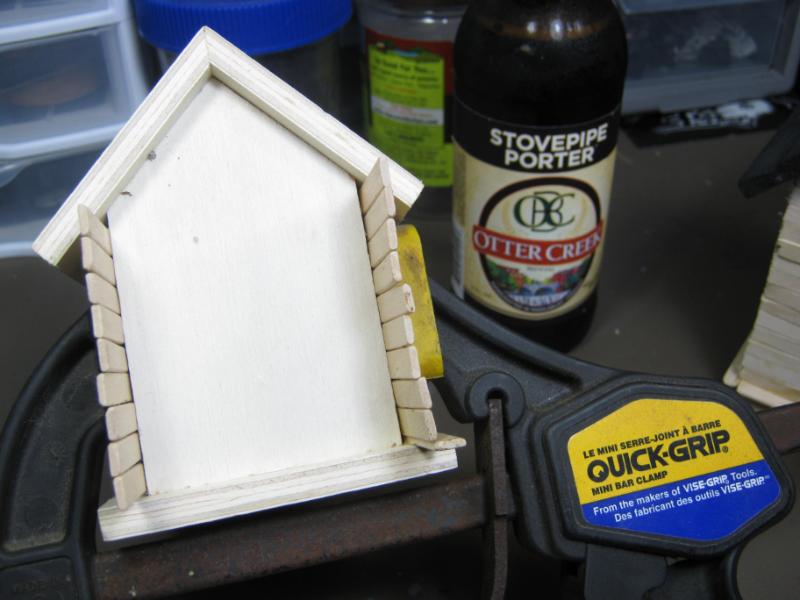
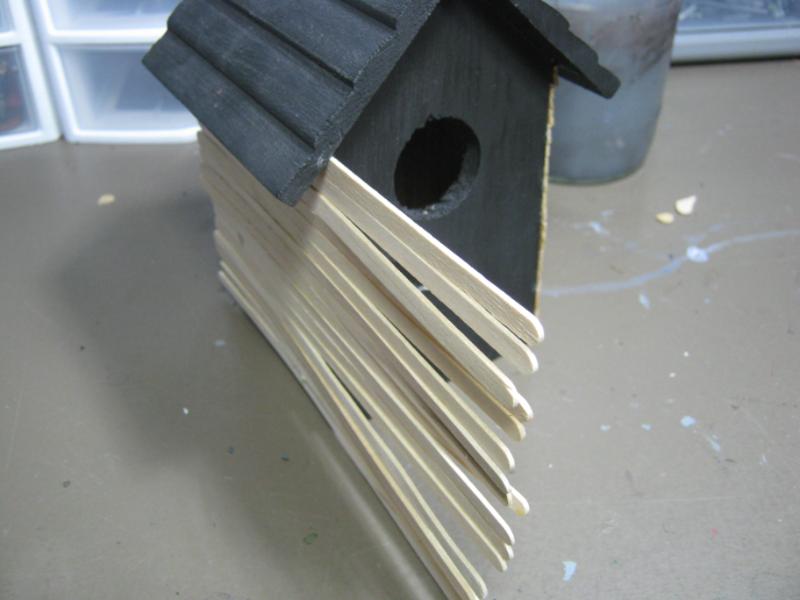
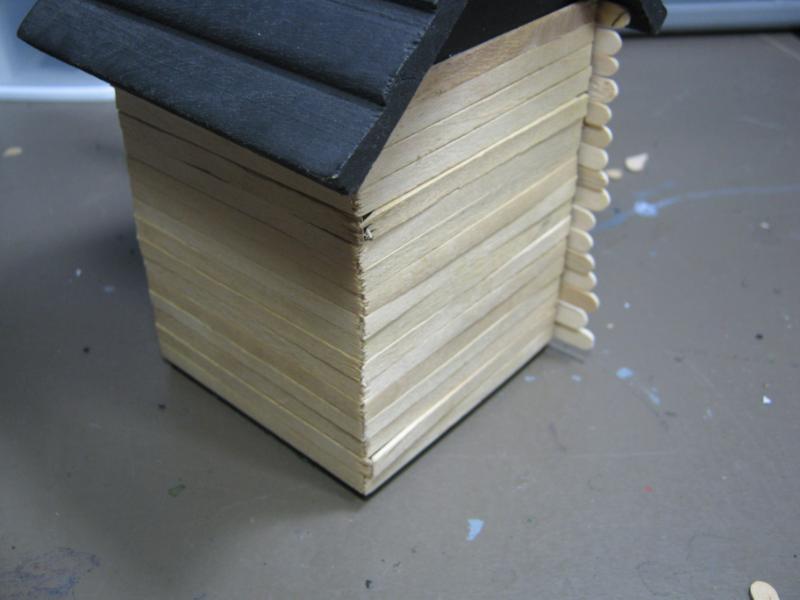
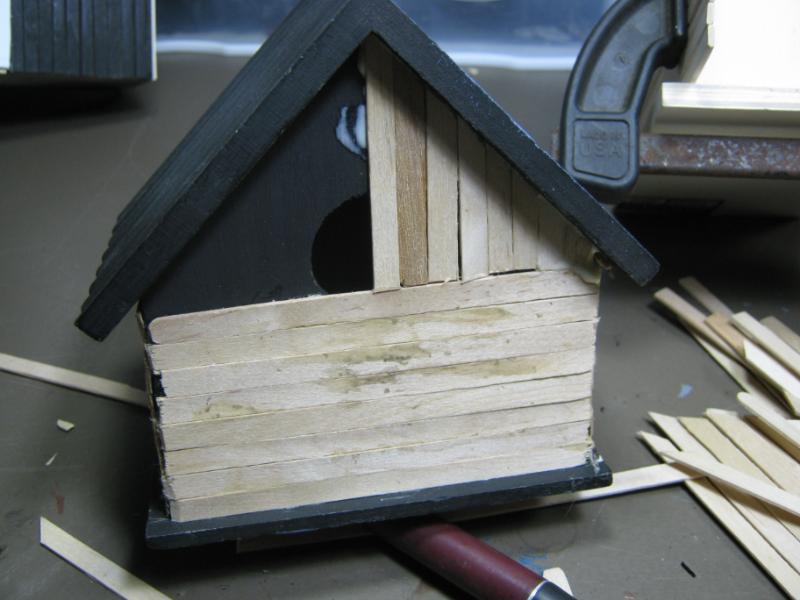
This is the first bit of detail I've done. I did the same thing on both sides. Yes, I've cleaned up the excess / smeared glue. I really like these pics because it's an example of the very minor changes I can employ in my building techniques that is going to make the scale and detail really pop out once I get to the painting stage.
Group shot of the work I've gotten done so far (with Necromunda bulkhead and miniatures added for scale).
That may be if for the weekend, but I'll be back if I can. Thanks for looking, C&C always welcomed and appreciated.
|
|
|
|
|
|
2012/06/23 15:39:33
Subject: Re: Terrain Project- Building a Better Battlefield
|
|
Frenzied Berserker Terminator
|
The painting on the Galorn Walls looks great! It really looks like old weathered concrete wall!  It even looks like someone got fragged by a shotgun on one of them. 
And those birdhouses look GREAT with the sticks added!  Nice one!
|
|
|
|
|
|
2012/06/23 16:47:02
Subject: Terrain Project- Building a Better Battlefield
|
|
Aspirant Tech-Adept
|
Nooo you boarded them up! Where will the Lord of Change live now? Poor homeless Lord of Change, on the streets begging for erm... change.
They look really good. Antenocitisworkshop.com (great website) sells a range of fantasy accessories if you need windows etc to stick on.
|
|
|
|
|
|
2012/06/23 22:44:54
Subject: Terrain Project- Building a Better Battlefield
|
|
Shroomin Brain Boy
|
good to see that the salt and hairspray methode is totally versatile for so many things...
and the mortheimer houses look very good... tho one has to wonder why you cut after glueing? why not measure them and then cut them before glueing... i would have been afraid of ruining the sticks ...
|
|
|
|
|
|
2012/06/23 22:59:01
Subject: Terrain Project- Building a Better Battlefield
|
|
Decrepit Dakkanaut
|
Oh Dood! I KNOW how much fun you are having! Theyre looking great!
hey..a tip for you..with those craft sticks..they are really soft, so if you carve irregular chunky slices out of the edges with a sharp knife..it really gives a great hard edge detail later in painting!!
|
"dave you are the definition of old school..." -Viktor Von Domm My P&M Blog :
It's great how just adding a little iconography, and rivets of course, can make something look distinctly 40K-adamsouza
"Ah yes, the sound of riveting.....Swear word after swear word and the clinking of thrown tools" "Nope. It sucks do it again..."- mxwllmdr
"It puts together more terrain, or else it gets the hose again...-dangledorf2.0
"This is the Imperium, there is no peace, there are only rivets" -Vitruvian XVII
"I think rivets are the perfect solution to almost every problem"- Rawson
More buildings for the Building God! -Shasolenzabi
|
|
|
|
|
2012/06/24 20:47:51
Subject: Re: Terrain Project- Building a Better Battlefield
|
|
Longtime Dakkanaut
|
@ RSJake- I really like how the weathering came out. A bit more practice and I'll start getting semi-consistent results. And thank you for the compliment on the bird houses. I don't doubt that more than just a few people said  "huh?". I've made three of them before this and know they will come out decent for WFB, right now I'm curious how the will work for Mordheim.
@ Bruticus- Once again, that completely cracked me up. Were I a more 'diorama' inclined modeler I would completely run with that idea. Thanks for the link, it got me thinking about the stuff I have here and I went digging. See pics later in update.
@ Vik- Hope you had a good holiday. The hairspray / salt thing is going to get used a lot more now that I see the results. Even as a novice with limited application experience I can already see a significant improvement in how my terrain is going to look overall. I will be revisiting some old pieces w/ the method after the Mordheim project winds down. On that note, I cut the sticks after gluing for a couple reasons, but most significant is because it is way faster. This is the 'rough' work part. It doesn't matter if I have a 5mm gap or a .0005mm tolerance, it's all going to get covered up with trim and edging. So I'm ripping through this part to get it done and then move on to the bitz that make people go "ooooooh!!" and "awwwwww!!". As far as ruining the sticks go, the vast majority of time they break where I want them to when they are properly scored first. And for those moments that they do not, that's just an added detail feature!
@ dstein- There's a part of me that has been 8 years old during this project... I used to glue Popsicle sticks together for my army men. Then I did it in school to build dioramas for class projects. Now I'm doing it again. If I ever grow up I am going to be so very disappointed with myself. Regarding the sticks and detail, right there with you and what you are looking for is coming. Check out the walkway below, it's a test of a technique I hope works out because it is quick and really easy.
Havn't had a lot of time to work on this, but wanted to stop by and offer something because I know you are an impatient fickle lot and I need to continuously earn your readership.
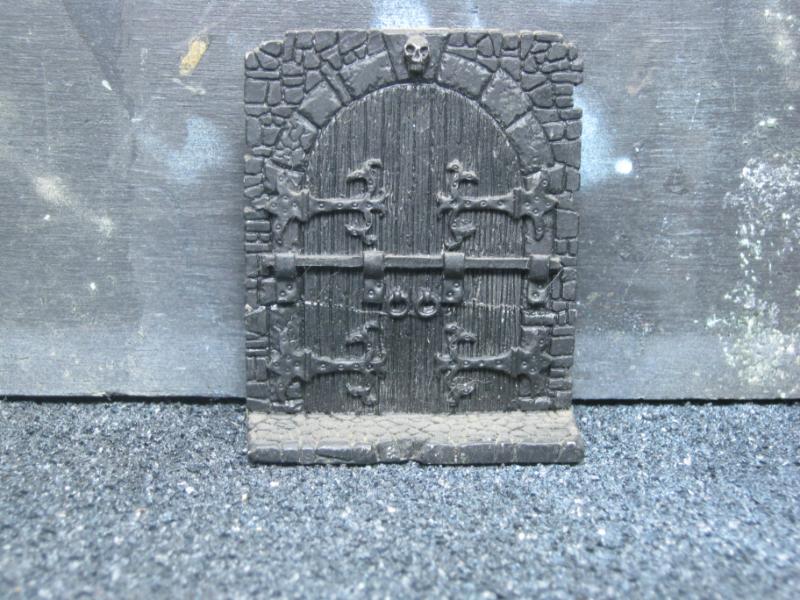
First up are some doors I've found. I also have some GW stuff but I didn't include those here today. I am thinking about making molds of these and casting up some. If another else would be interesting in taking on that task I'd be happy to drop any of these in the mail (even the painted ones) and send them along.
This is one of my favorites. Never painted it because I never got around to it, was using these for AD&D. It has finally found a higher purpose. I absolutely need to some impression molds of this.
front:
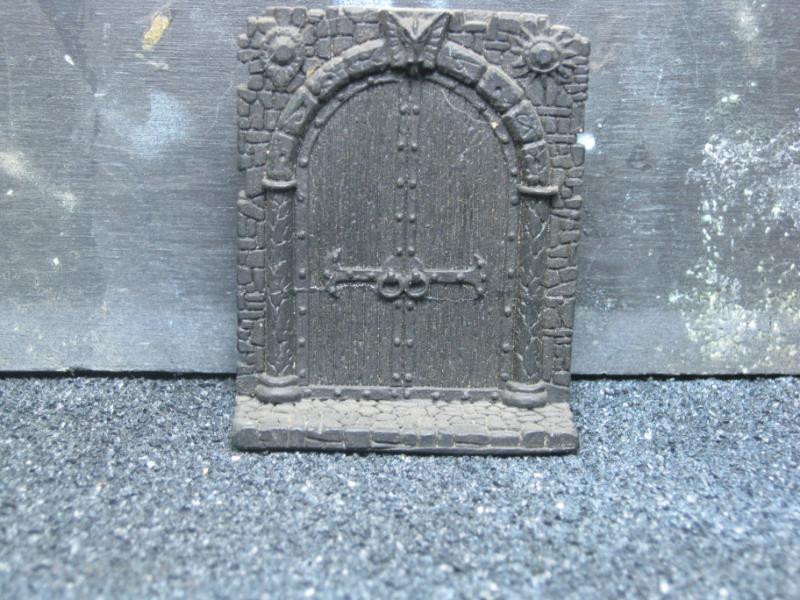
back:
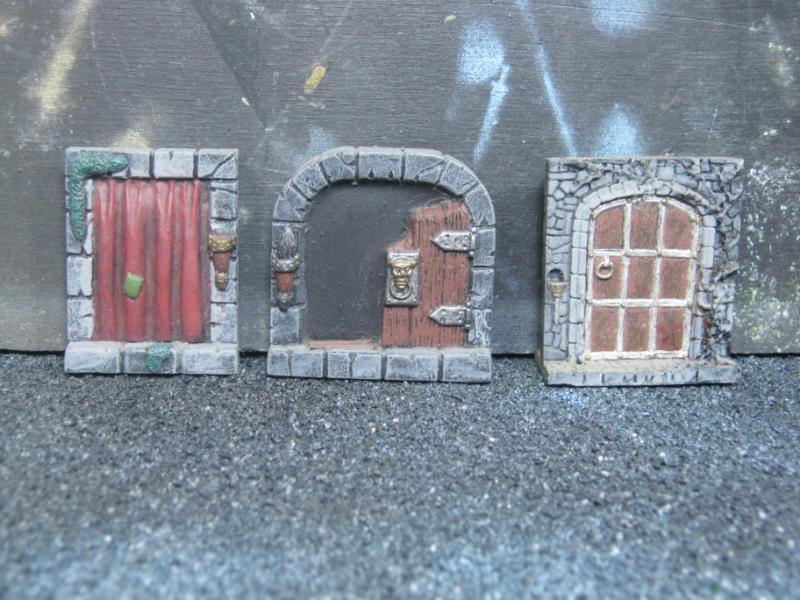
Next are smaller doors I once had completely painted, THEN decided I wanted to make molds of them, had no idea what I was doing, squished them into a splop of latex caulk, ruined my paint jobs, took a long time to clean up the damage. If anyone would like to try it the PROPER way, PM me.
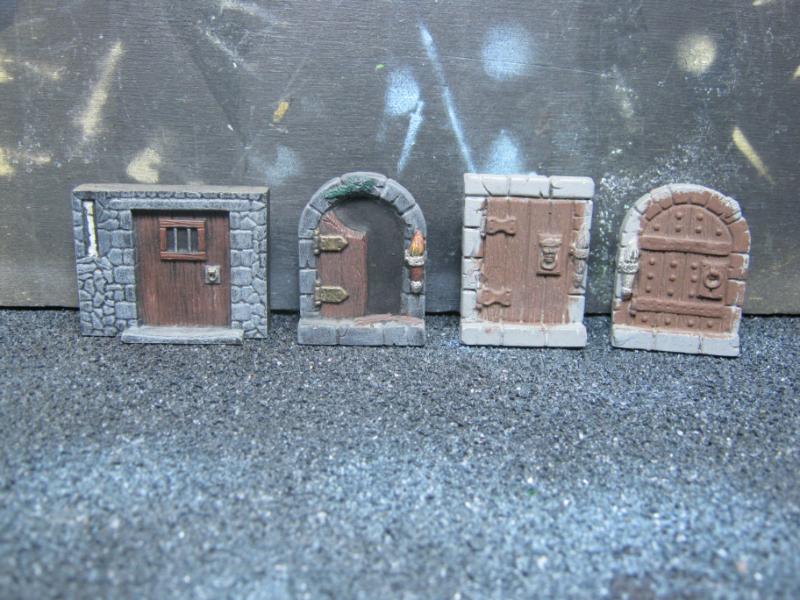
These didn't get the same treatment as those above.
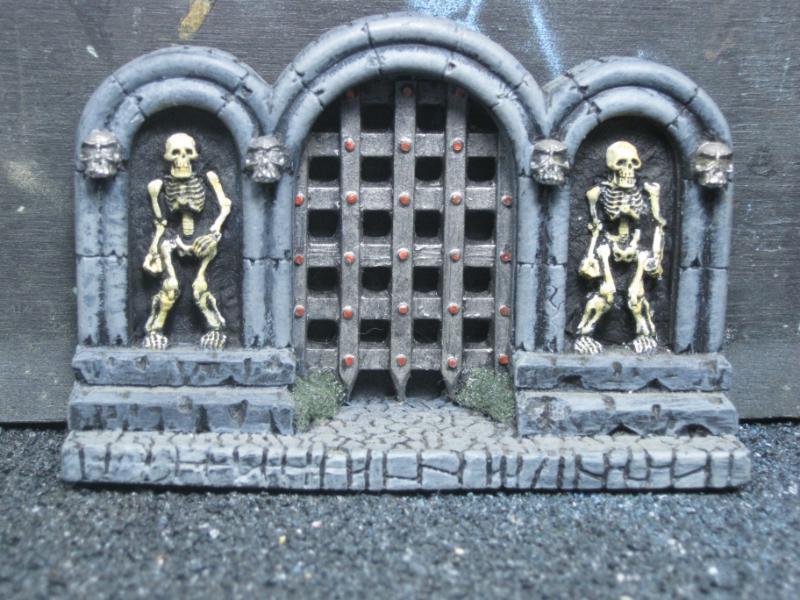
This I would sacrifice the paint to have a few copies of it. It's wicked cool.
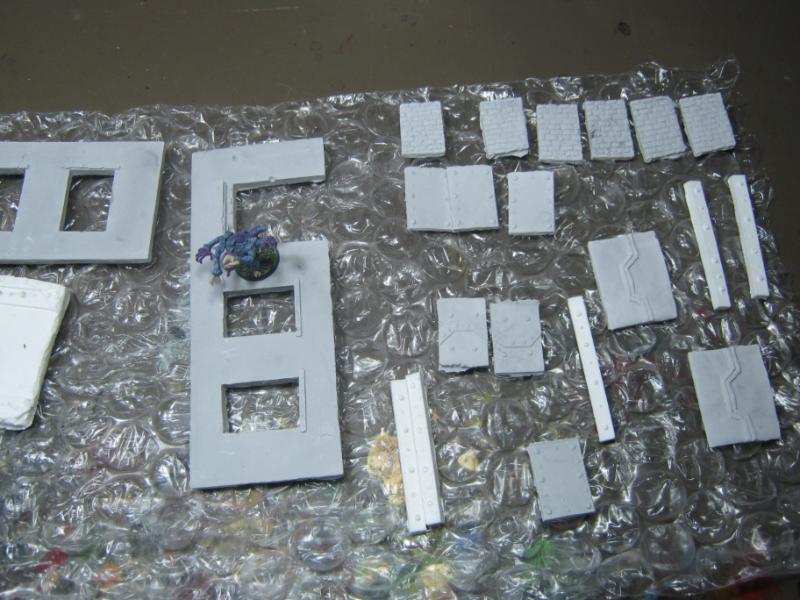
These walls are pretty awesome. Low and thin, nice for walkways, etc.
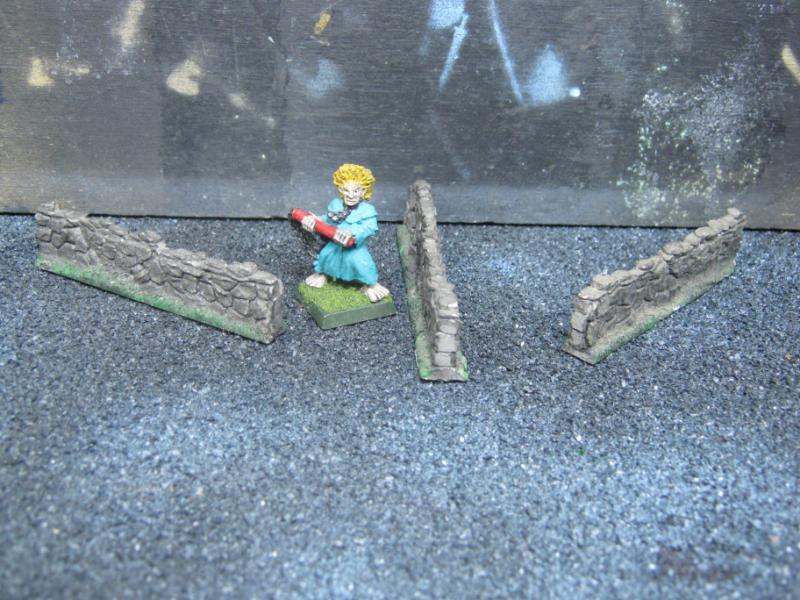
I have a bunch of this stuff. not looking to cast more, just adding it here as an example of the level of detail I'll be adding here and there once I get to that phase of this project.
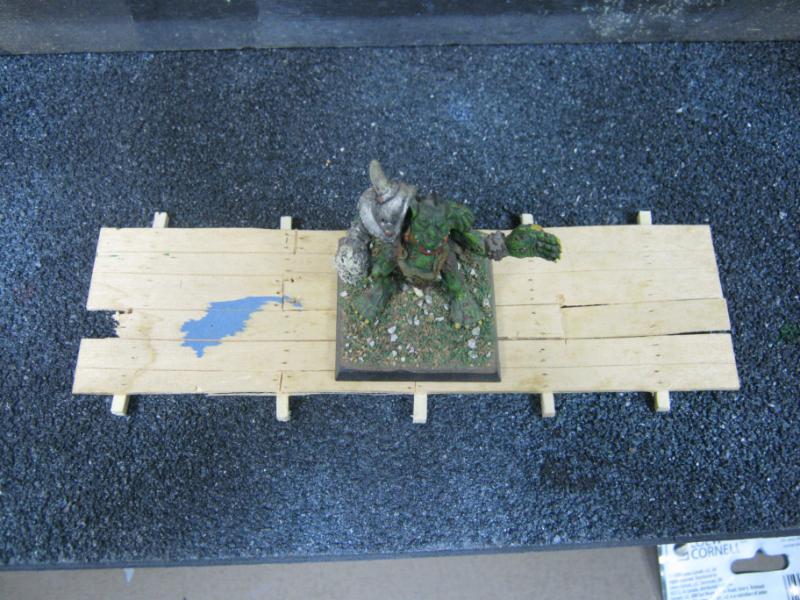
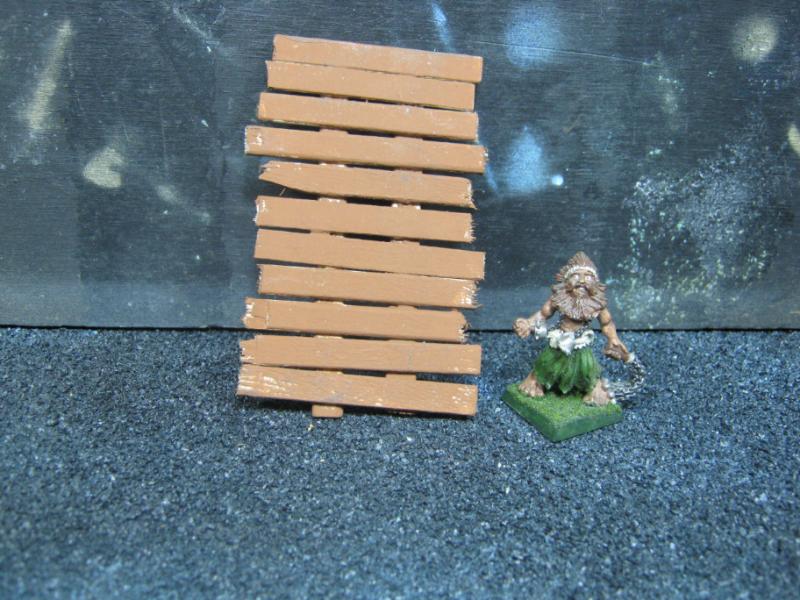
Here's a pic of something I'm actually working on. It's a walkway w/ some detail work. Believe it or not, the planking was 1 single piece of wood that I cut grooves into to make 'boards', even cut a few out to show wear / disrepair. The nail holes were done w/ one of my sculpting tools, just a sharp point. As you can see, this technique would look awesome on my buildings as well. That part is coming soon.
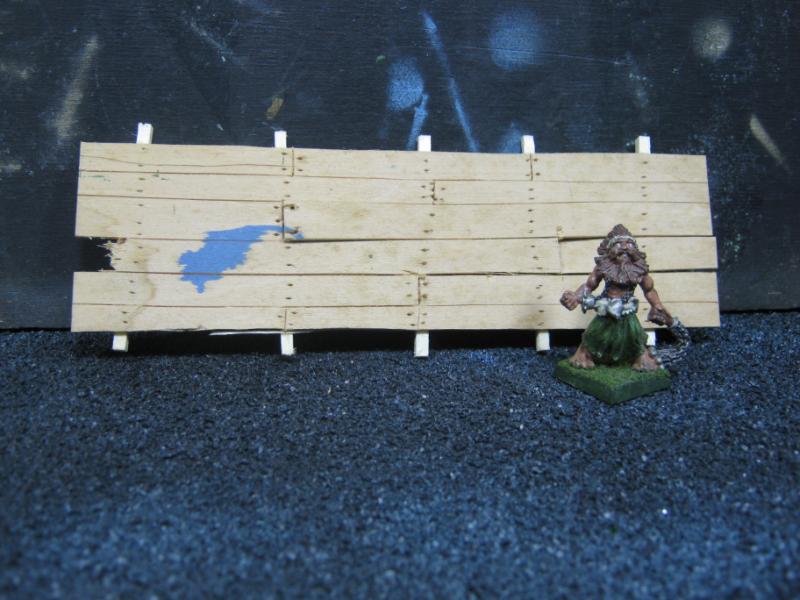
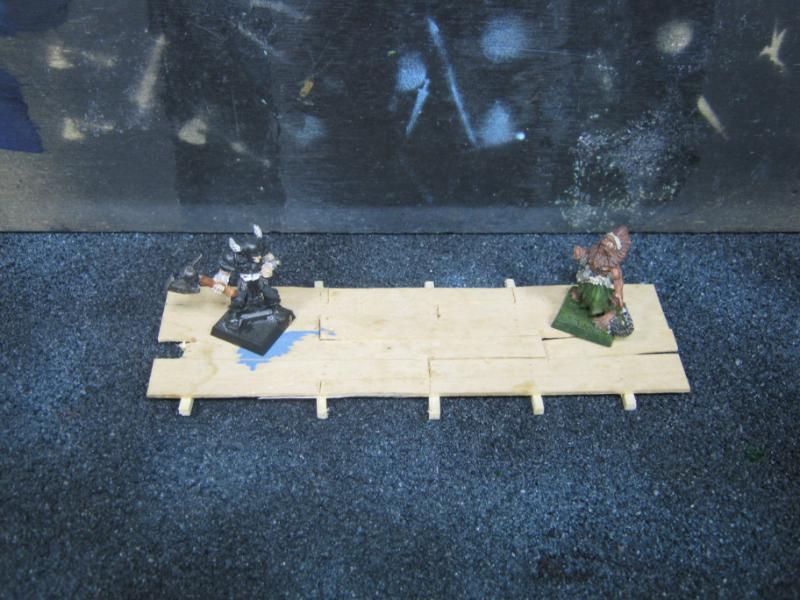
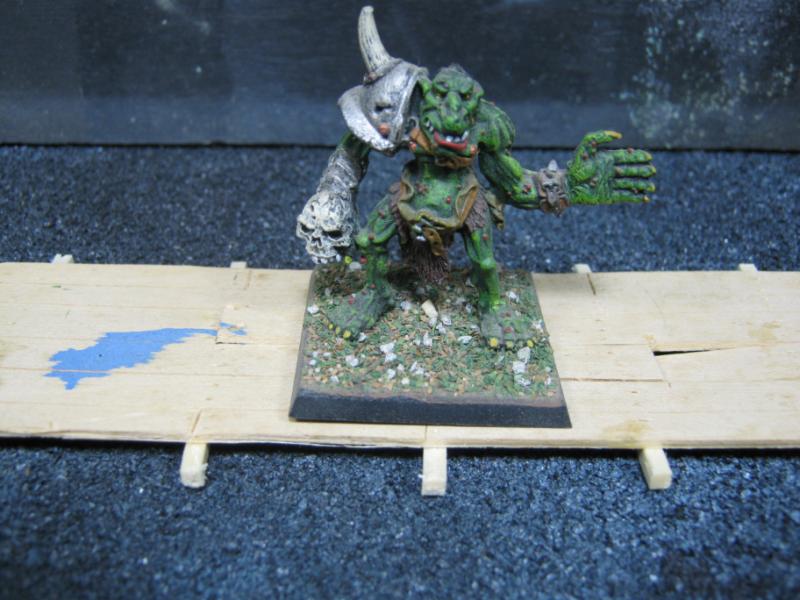
To answer the question of "why so big?", it's a game play issue. These guys have to fit on at least SOME of the walkways:
Last pic is something my son made for me in '09 while he was sitting w/ me doing some modeling stuff. I'm going to put this out there somewhere 'as is'.
I have a lot more stuff coming. Getting really excited about making my first walkways and scaffolding. Thanks foir reading, more coming later!
|
|
|
|
|
|
2012/06/24 21:43:47
Subject: Re: Terrain Project- Building a Better Battlefield
|
|
Contagious Dreadnought of Nurgle
|
Skalk Bloodaxe wrote:@ RSJake- I really like how the weathering came out. A bit more practice and I'll start getting semi-consistent results. And thank you for the compliment on the bird houses. I don't doubt that more than just a few people said "huh?". I've made three of them before this and know they will come out decent for WFB, right now I'm curious how the will work for Mordheim.
@ Bruticus- Once again, that completely cracked me up. Were I a more 'diorama' inclined modeler I would completely run with that idea. Thanks for the link, it got me thinking about the stuff I have here and I went digging. See pics later in update.
@ Vik- Hope you had a good holiday. The hairspray / salt thing is going to get used a lot more now that I see the results. Even as a novice with limited application experience I can already see a significant improvement in how my terrain is going to look overall. I will be revisiting some old pieces w/ them method after the Mordheim project winds down. On that note, I cut the sticks after gluing for a couple reasons, but most significant is because it is way faster. This is the 'rough' work part. It doesn't matter if I have a 5mm gap or a .0005mm tolerance, it's all going to get covered up with trim and edging. So I'm ripping through this part to get it done and then move on to the bitz that make people go "ooooooh!!" and "awwwwww!!". As far as ruining the sticks go, the vast majority of time they break where I want them to when they are properly scored first. And for those moments that they do not, that's just an added detail feature!
@ dstein- There's a part of me that has been 8 years old during this project... I used to glue Popsicle sticks together for my army men. Then I did it in school to build dioramas for class projects. Now I'm doing it again. If I ever grow up I am going to be so very disappointed with myself. Regarding the sticks and detail, right there with you and what you are looking for is coming. Check out the walkway below, it's a test of a technique I hope works out because it is quick and really easy.
Havn't had a lot of time to work on this, but wanted to stop by and offer something because I know you are an impatient fickle lot and I need to continuously earn your readership.
First up are some doors I've found. I also have some GW stuff but I didn't include those here today. I am thinking about making molds of these and casting up some. If another else would be interesting in taking on that task I'd be happy to drop any of these in the mail (even the painted ones) and send them along.
This is one of my favorites. Never painted it because I never got around to it, was using these for AD&D. It has finally found a higher purpose. I absolutely need to some impression molds of this.
front:
back:
Next are smaller doors I once had completely painted, THEN decided I wanted to make molds of them, had no idea what I was doing, squished them into a splop of latex caulk, ruined my paint jobs, took a long time to clean up the damage. If anyone would like to try it the PROPER way, PM me.
These didn't get the same treatment as those above.
This I would sacrifice the paint to have a few copies of it. It's wicked cool.
These walls are pretty awesome. Low and thin, nice for walkways, etc.
I have a bunch of this stuff. not looking to cast more, just adding it here as an example of the level of detail I'll be adding here and there once I get to that phase of this project.
Here's a pic of something I'm actually working on. It's a walkway w/ some detail work. Believe it or not, the planking was 1 single piece of wood that I cut grooves into to make 'boards', even cut a few out to show wear / disrepair. The nail holes were done w/ one of my sculpting tools, just a sharp point. As you can see, this technique would look awesome on my buildings as well. That part is coming soon.
To answer the question of "why so big?", it's a game play issue. These guys have to fit on at least SOME of the walkways:
Last pic is something my son made for me in '09 while he was sitting w/ me doing some modeling stuff. I'm going to put this out there somewhere 'as is'.
I have a lot more stuff coming. Getting really excited about making my first walkways and scaffolding. Thanks foir reading, more coming later!
Im up for making molds of damn near anything...
|
Link to my Index Thread here on dakka
Find me on Twitter Sam Butler @Rivet_Zone
Winner "Best 40k Table" Daboyz GT 2010,2011
"Sic Vis Pachem Parabellum" - Publius Flavius Vegetius Renatus
Veni, Vidi discessi.-Galorn. |
|
|
|
|
2012/06/24 22:26:58
Subject: Terrain Project- Building a Better Battlefield
|
|
Aspirant Tech-Adept
|
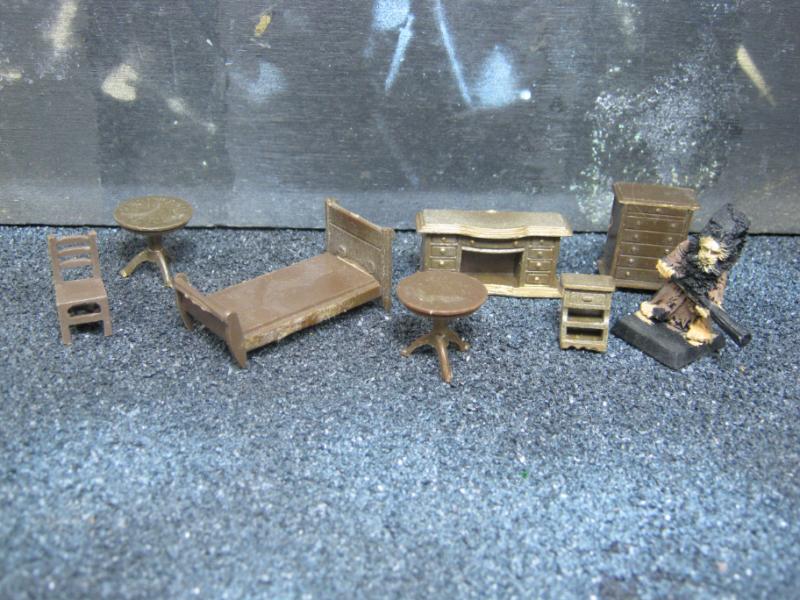
Wow you have some cool stuff there. The plank scoring looks very good and the tiny furniture is great. Have you got an old copy of Heroquest? It comes with a bunch of cool bits like a torture rack, alchemists desk and treasure chests.
I got very tempted by a Mordheim board after seeing the one on Iron Archives (it looks even cooler than his Necro board) but I don't think I can store another tiny city.
|
|
|
|
|
|
2012/06/25 14:12:32
Subject: Terrain Project- Building a Better Battlefield
|
|
Decrepit Dakkanaut
|
Nice, simple and effective! I love it! I also love that you are testing new techniques man!
|
"dave you are the definition of old school..." -Viktor Von Domm My P&M Blog :
It's great how just adding a little iconography, and rivets of course, can make something look distinctly 40K-adamsouza
"Ah yes, the sound of riveting.....Swear word after swear word and the clinking of thrown tools" "Nope. It sucks do it again..."- mxwllmdr
"It puts together more terrain, or else it gets the hose again...-dangledorf2.0
"This is the Imperium, there is no peace, there are only rivets" -Vitruvian XVII
"I think rivets are the perfect solution to almost every problem"- Rawson
More buildings for the Building God! -Shasolenzabi
|
|
|
|
|
2012/06/25 14:13:10
Subject: Re: Terrain Project- Building a Better Battlefield
|
|
Longtime Dakkanaut
|
@ Galorn- PM sent
@ Bruticus- Oh man, yes I have a BUNCH of that stuff and had completely spaced it. I am giong to dig through it and see what looks cool to use in this project.
@ dstein- you know, every time I *don't* take one more look at the thread before posting, someone sneaks in one last post. Ha. I am really enjoying this new technique stuff. I'll be taking my first try on wood in the next few days. I'm going to try to replicate that "rainwater stains / decay" look on the sill and try sponge work on the roof shingles. See photo:
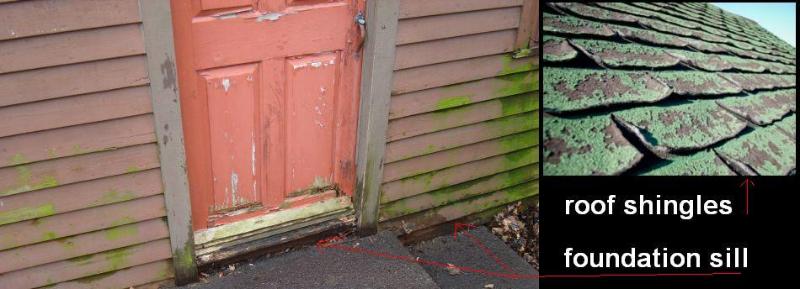
For the salt method I'm going to try is base flat gray, salt, spray black, salt again, drybrush brown / red / whatever the primary color is going to be, rub salt from baseboards, wash / touchup detail as needed. For the roof I'm going to try basing slate and add moss / rot afterwards.
Text update for now. Got a lot of work done yesterday (lots of WIP pics) but no change to upload or update yesterday. I focused on finished the "rough in" on 3 houses, they are now based black and I've started to cut rook shingles. I have a lot of trim / edging to do.
It may seem like this process is really dragging on but it's really not, it's flying by when I have the chance to work on it. If I could dedicate 4-5 hours to this I'd have a lot more done. Most of what I'm doing right now is 1 hr here, 45 min there, etc. Too much stuff is going on to offer me much modeling time, but this is something I am enjoying and genuinely want to do, so I'm taking as much time as I can to work on this.
Looking at this project realistically I'm guessing it'll be a few months worth of work to have the layout I'm hoping for. Knowing that 6th Ed is here adds a bit of stress to that becasue my modeling time is likely going to shift back to miniatures instead of terrain. I will find a way to strike a healthy balance that keeps me motivated and interested in working on projects. I've been active and productive since coming back, and in the last couple weeks I've taken the next step towards becoming better at what I'm doing. I'm not going to let that new skill atrophy.
More coming soon, not sure if it will be tonight or whenever, but I will have something new up this week for sure. Thanks for reading!
|
|
This message was edited 1 time. Last update was at 2012/06/25 14:56:04
|
|
|
|
|
2012/06/25 15:24:39
Subject: Terrain Project- Building a Better Battlefield
|
|
Contagious Dreadnought of Nurgle
|
One way is an "army display board" (they come in handy at tournaments and such like) to carry your army about on. (no need to Pack/unpack for each game.)
|
Link to my Index Thread here on dakka
Find me on Twitter Sam Butler @Rivet_Zone
Winner "Best 40k Table" Daboyz GT 2010,2011
"Sic Vis Pachem Parabellum" - Publius Flavius Vegetius Renatus
Veni, Vidi discessi.-Galorn. |
|
|
|
|
2012/06/26 00:51:48
Subject: Re: Terrain Project- Building a Better Battlefield
|
|
Longtime Dakkanaut
|
@ Galorn- was that for me? If so, apologies, I'm completely missing the reference.
Ok. Taking the time to post those pics I mentioned earlier.
Here's some shots of work where I'm finishing up the "rough in" on a few buildings:
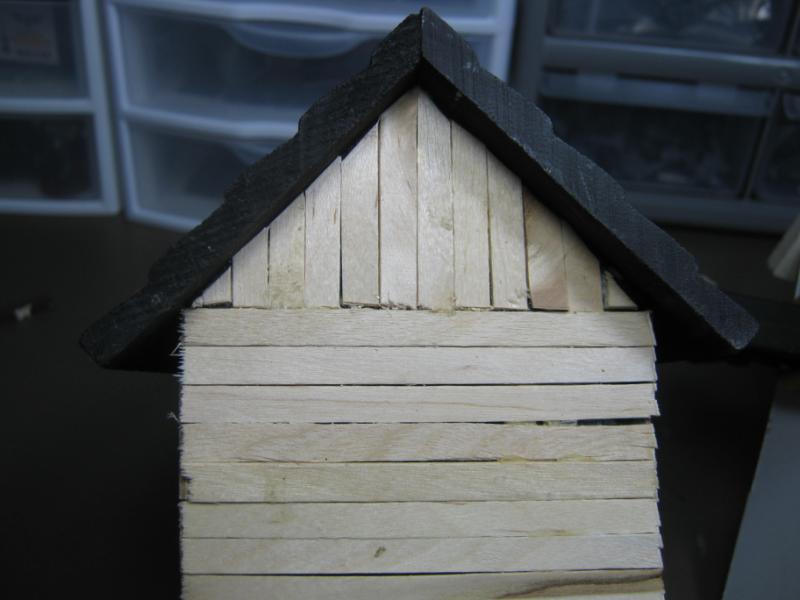
Here I'm pulling out the necessary items so start in on my equivalent of rivets in Warhammer Fantasy- shingles.
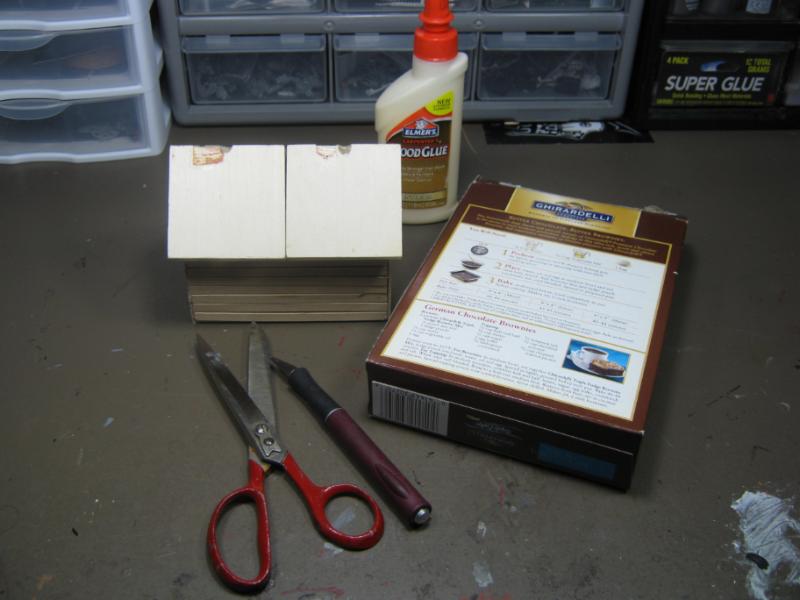
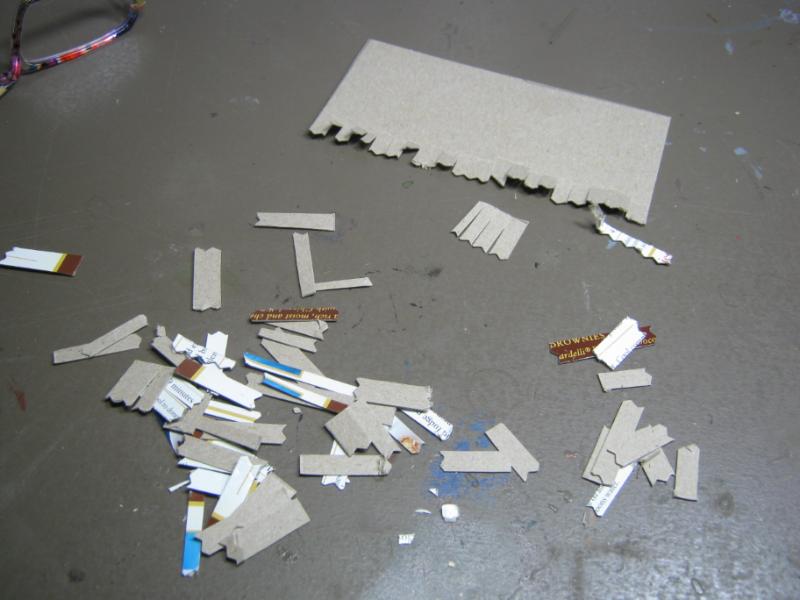
I'm cutting the box into thin strips, and then later cutting the strips into shingles with a serrated hobby knife. This is what I make my shingles out of.
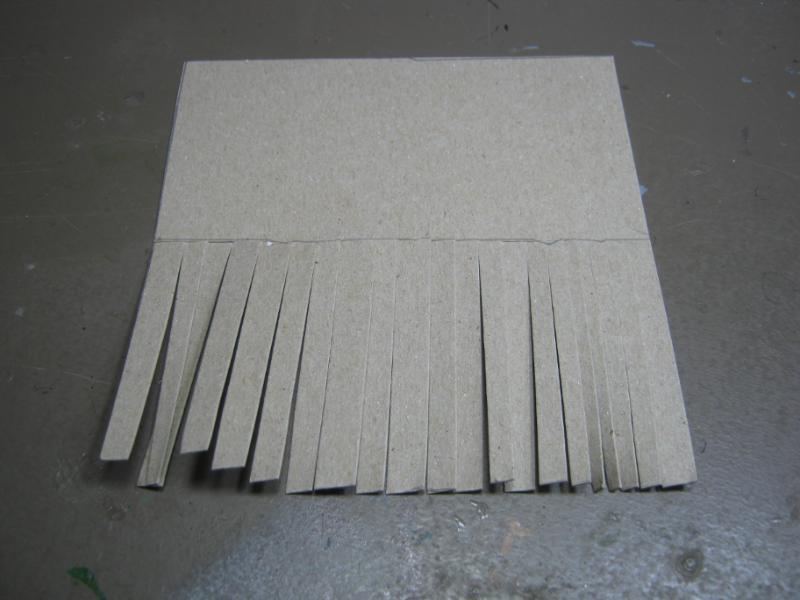
In this pic I've also created a shingle strip. I really like these as they go on very quickly, and I used individual shingles as fillers or to break up patterns.
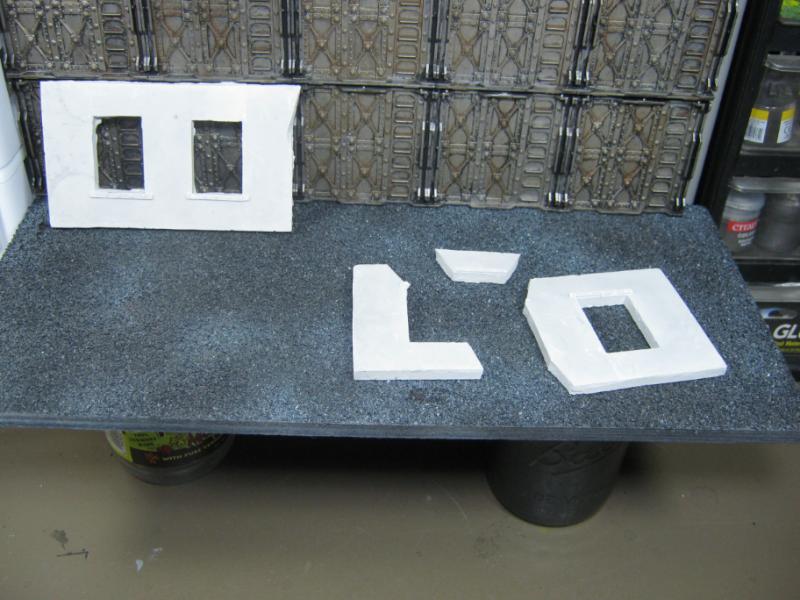
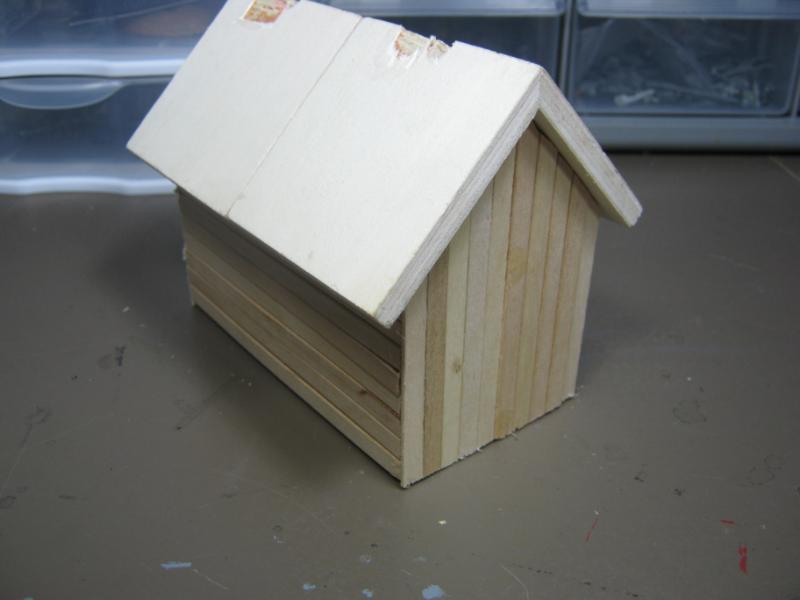
Here are my first three "roughed in" buildings. I'm really excited about having reached this stage because quite honestly I thought these things were going to wind up as kindling for my wood stove 20 years from now when I finally accepted that I wasn't ever going to get around to finishing them. It's a weird energy. I'm nowhere near done but already feel a sincere sense of 'accomplishment' because I've taken something else off my metaphorical Shelf of Shame. I'm actually finishing an idea I had a long time ago.
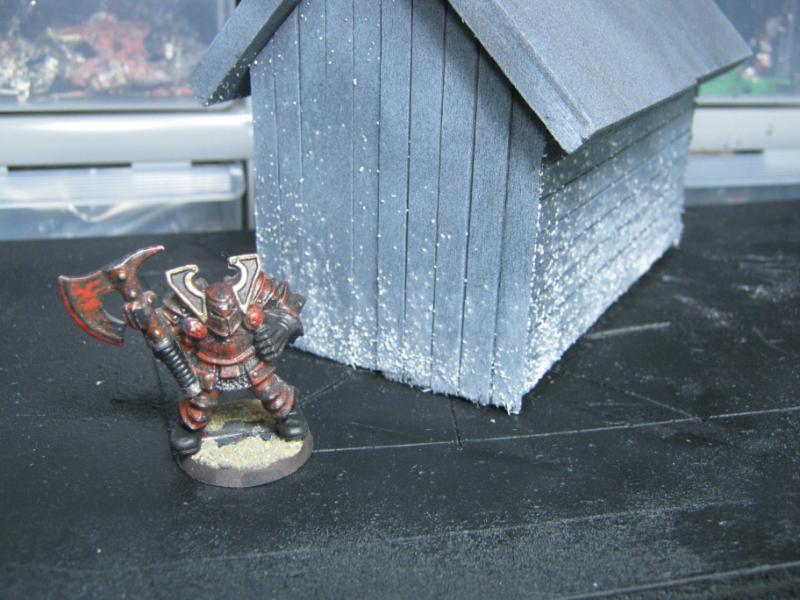
This is pretty cool. This is my "triumph" so far w/ this project. Check it out. It's not much to look at yet, but it's a pretty important stage for me.
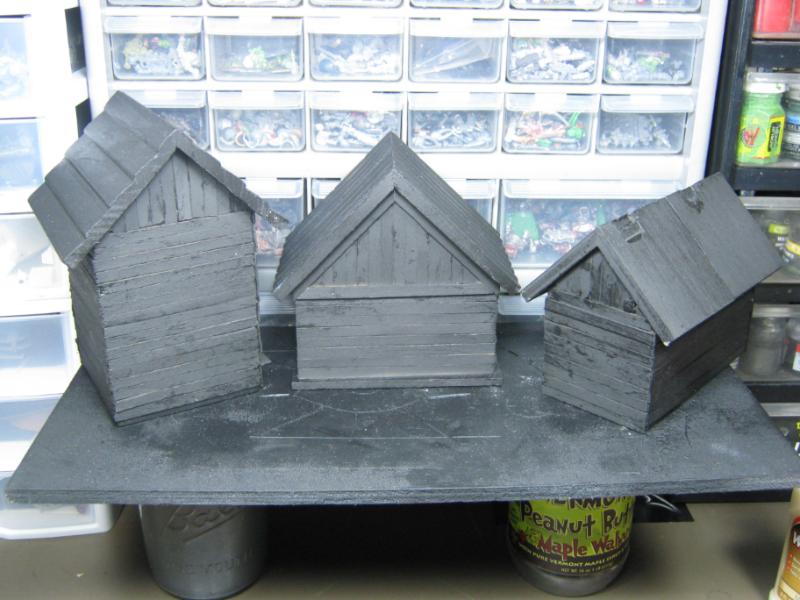
Also take a moment to say "hello" to our new official Mordheim Terrain Project scale representative Mr. Kvlt Grymdark! Kvlt's interests include spilling blood for the Blood God, collecting skulls for the Skull Throne, and enjoys long walks on the beach... of 1,000,000,000 CORPSES!
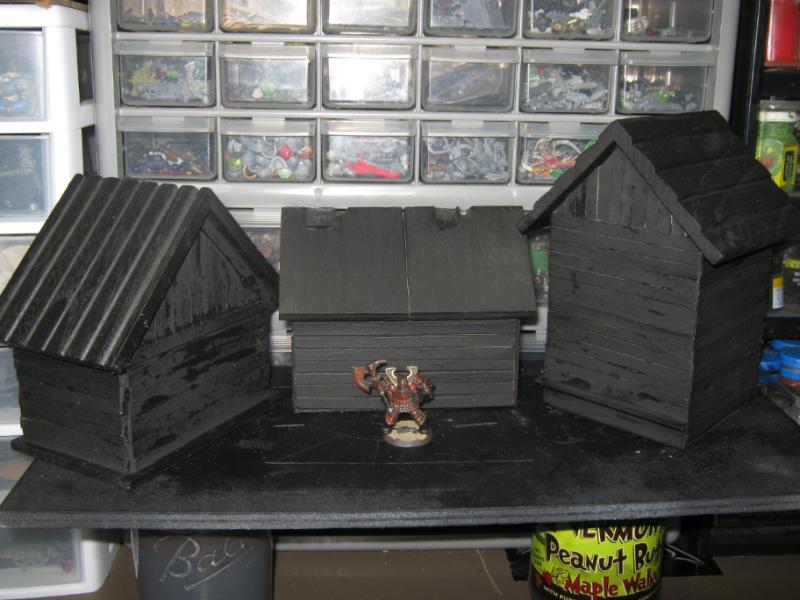
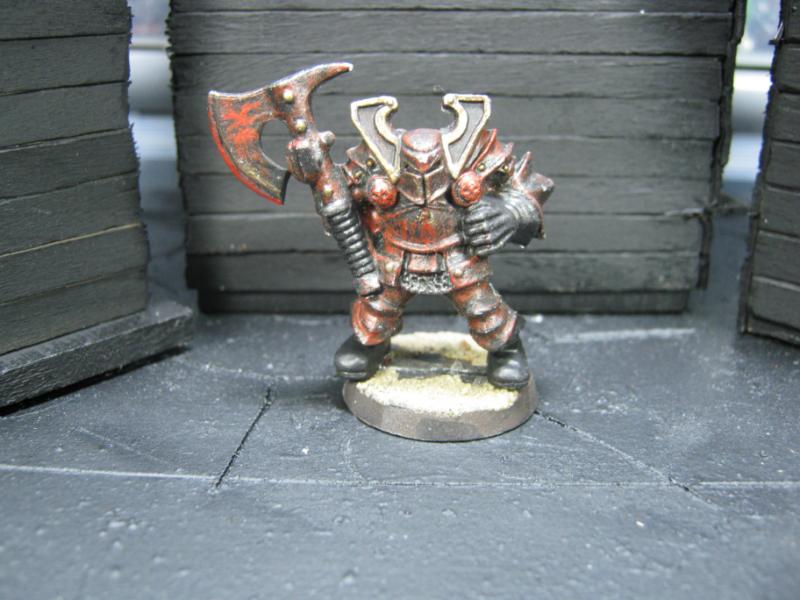 BLOOD FOR THE BLOOD GOD!!! SKULLS FOR HIS THRONE!! RRRRRRRAAAGGGHHHHHHHH!!!!!!
|
|
|
|
|
|
2012/06/26 01:02:29
Subject: Terrain Project- Building a Better Battlefield
|
|
Aspirant Tech-Adept
|
Perhaps you ought to start a league of extraordinary shinglers. It looks like everything is going very well so far although I think you ought to be doing Necromunda stuff I can't really hold it against you for doing Fantasymunda instead. What do you plan on doing for doorways and windows?
By the way I remembered another awesome link that might be useful: Zuzzy gaming mats - I was planning to get this flagstone mat for bloodbowl but it would be the perfect way to transform a regular gaming board into a Mordheim townscape.
|
|
This message was edited 1 time. Last update was at 2012/06/26 01:02:49
|
|
|
|
|
2012/06/26 01:03:18
Subject: Re: Terrain Project- Building a Better Battlefield
|
|
Posts with Authority
Boston-area [Watertown] Massachusetts
|
A BILLION corpses? I don't think the Fantasy world has produced that many bodies.
|
Falling down is the same as being hit by a planet — "I paint to the 20 foot rule, it saves a lot of time." -- Me
ddogwood wrote:People who feel the need to cheat at Warhammer deserve pity, not anger. I mean, how pathetic does your life have to be to make you feel like you need to cheat at your toy army soldiers game?
 |
|
|
|
|
2012/06/26 02:55:30
Subject: Re: Terrain Project- Building a Better Battlefield
|
|
Contagious Dreadnought of Nurgle
|
Skalk Bloodaxe wrote: Knowing that 6th Ed is here adds a bit of stress to that becasue my modeling time is likely going to shift back to miniatures instead of terrain. I will find a way to strike a healthy balance that keeps me motivated and interested in working on projects.
Galorn wrote:One way is an "army display board" (they come in handy at tournaments and such like) to carry your army about on. (no need to Pack/unpack for each game.)
Relevant bit that I was referring to now bolded.
|
Link to my Index Thread here on dakka
Find me on Twitter Sam Butler @Rivet_Zone
Winner "Best 40k Table" Daboyz GT 2010,2011
"Sic Vis Pachem Parabellum" - Publius Flavius Vegetius Renatus
Veni, Vidi discessi.-Galorn. |
|
|
|
|
2012/06/26 12:38:29
Subject: Re: Terrain Project- Building a Better Battlefield
|
|
Longtime Dakkanaut
|
@ Bruticus- LoES? I'm hoping to not be on this project long enough to qualify a following for shingles. I'm enjoying it and looking forward to getting in a game this weekend if possible, but my main goal interest is still the grimdark of the far future. I'm going to be doing a lot of shuttered windows (there's monsters outside after all) and doors will be taken care of w/ resin / plaster cast items or scratch built.
@ Briancj- I said 'billion' because I remember what happened to Dr. Evil when he said 'million'.
@ Galorn- Ah. Sorry. That is a good idea. I've seen a few that I really liked, and have always thought it would be cool to have a carrying case w/ some character instead of just base utility. I'll keep that in mind.
|
|
|
|
|
|
2012/06/26 13:48:10
Subject: Terrain Project- Building a Better Battlefield
|
|
Decrepit Dakkanaut
|
I really like the grey paint on the wood Skalk! That is definitely the color that cut wood weathers to!
|
"dave you are the definition of old school..." -Viktor Von Domm My P&M Blog :
It's great how just adding a little iconography, and rivets of course, can make something look distinctly 40K-adamsouza
"Ah yes, the sound of riveting.....Swear word after swear word and the clinking of thrown tools" "Nope. It sucks do it again..."- mxwllmdr
"It puts together more terrain, or else it gets the hose again...-dangledorf2.0
"This is the Imperium, there is no peace, there are only rivets" -Vitruvian XVII
"I think rivets are the perfect solution to almost every problem"- Rawson
More buildings for the Building God! -Shasolenzabi
|
|
|
|
|
2012/06/26 15:14:05
Subject: Terrain Project- Building a Better Battlefield
|
|
Using Inks and Washes
|
The houses are looking great! I'm really impressed with the breadth of different materials you use for scenery making - really inspiring stuff! The salt weathering on the walls at the top of the page is particularly well done - I know exactly what you mean about the bubbling paint, as it exists in almost every student flat in Edinburgh. It's very realistic - did you just spray the blue over a salted brown layer? And I'm guessing the whitish parts are the plaster showing through underneath. It looks ace - I'm definitely going to have to try that out! Kvlt seems like a friendly chap too.
When I'm in my new flat in a few weeks I'm actually going to have space for a table - it's going to be idea stealing season
|
|
|
|
|
2012/06/26 16:34:17
Subject: Re: Terrain Project- Building a Better Battlefield
|
|
Longtime Dakkanaut
|
@ dstein- Yup. Hoping to really sell the "weathered and unmaintained" look. Really excited about moving on to that next step but I have a lot of work to do first. The temptation to jump ahead is pretty strong. I'm resisting so far.
@ Scarper- Thanks for the compliment! Every $ I save on projects like these is another $ I can use for beer. Or other modeling things. Or whatever. Ha. The blue was brushed on, it's a "color match" of Shadow Grey. I have a gallon of it. The whitish parts are actually silver paint, I wasn't sure what to do at first and may have to dot those out w/ a more gray concrete look, there's a lot of 'afterthought' when I'm doing these projects. Steal away, I love it when people can pick something up from what I am doing. Most of what I am doing is stuff I learned elsewhere (salt being the most recent, just started that and sponge painting). The cardboard shingles came from a White Dwarf many years ago. But the birdhouses were all my idea. I originally got them to paint black / drybrush brown / done. Yeah. it looked like a brown birdhouse. A few coffee sticks and strips of cardboard later and I had a wee house for Fantasy. It's been evolving from there. The bird houses cost anywhere from $1 to $5 each, the sticks are free (thank you Starbucks!) and the cardboard is rescued from recycling. That's about as "on the cheap" as I can imagine for somehting like this.
|
|
|
|
|
|
2012/06/28 02:13:11
Subject: Re: Terrain Project- Building a Better Battlefield
|
|
Longtime Dakkanaut
|
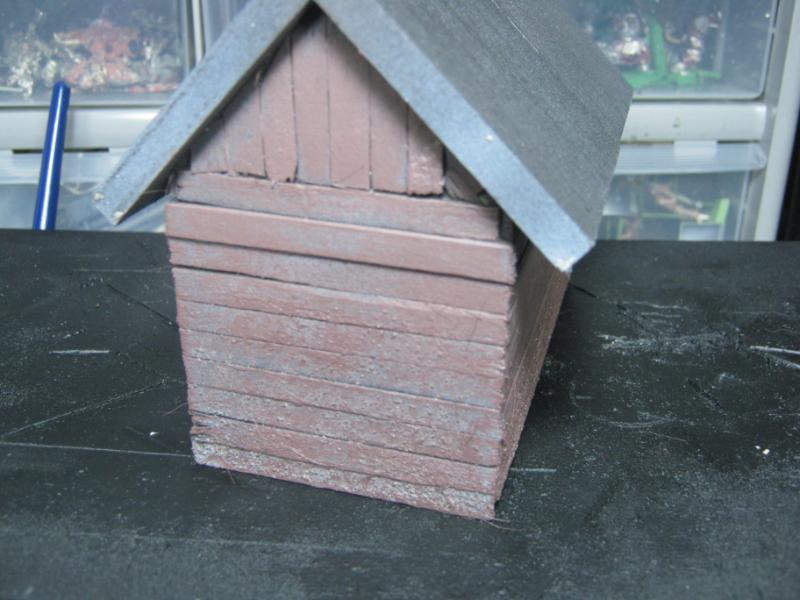
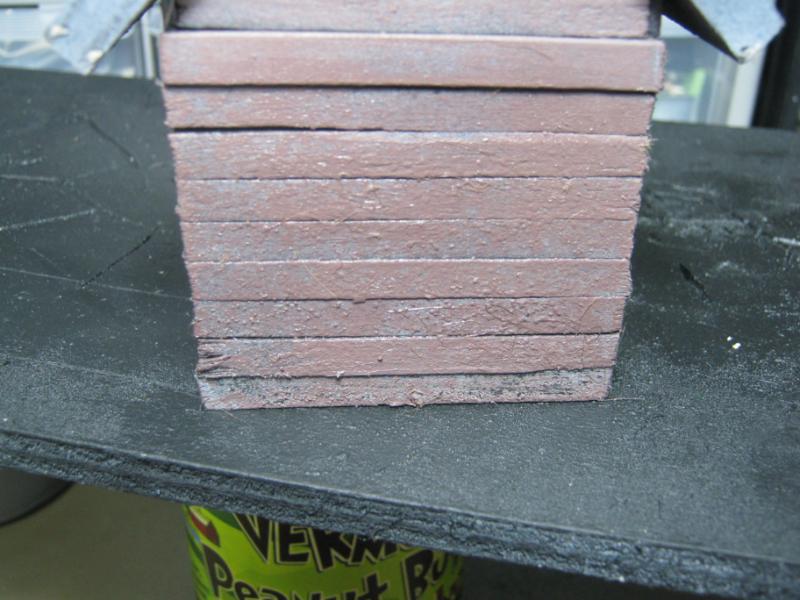
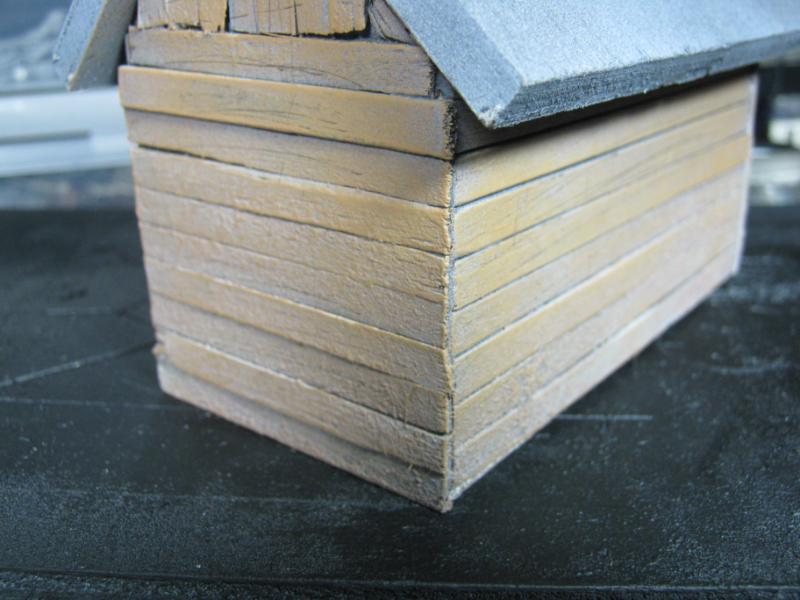
Ok, update w/ photos tonight. Took some time to work on one building. This is a test of the salt method on my buildings. I tried a different process this time, which I'll explain as I go along. I don't know how it turned out, leaving that opinion to you all. I know some things worked out, some things didn't. Some things I'm going to fix, other things are what they are. I will say that this looks way better in person, but then most of my works looks pretty awesome from 3-5 feet away.
Here I'm setting up to get going. Cheap hairspray, cheap spray paint, and cheap salt. I really like the paint because it is FLAT, like "absorb the light around it" kind of flat, and the salt is almost like powder. I'll be using both of those a lot during my future terrain projects.
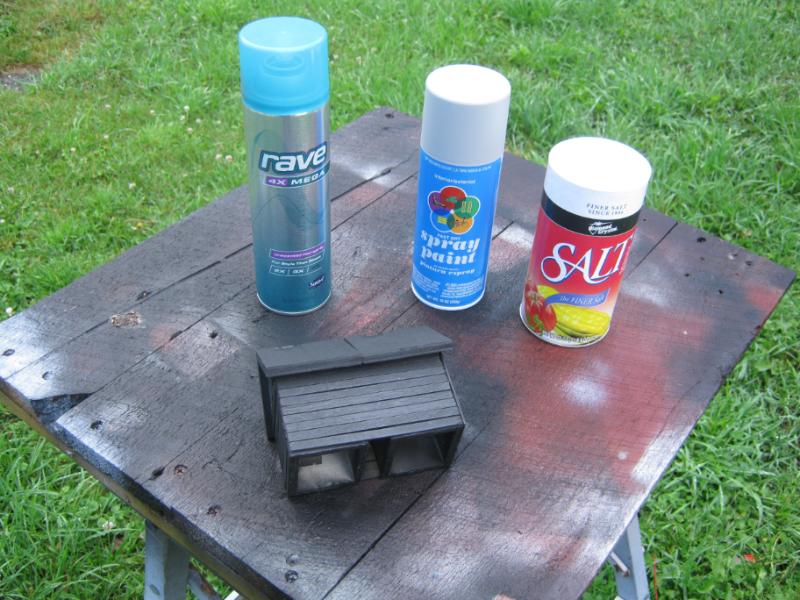
First I sprayed the lower boards on the building w/ hairspray and then randomly salted.
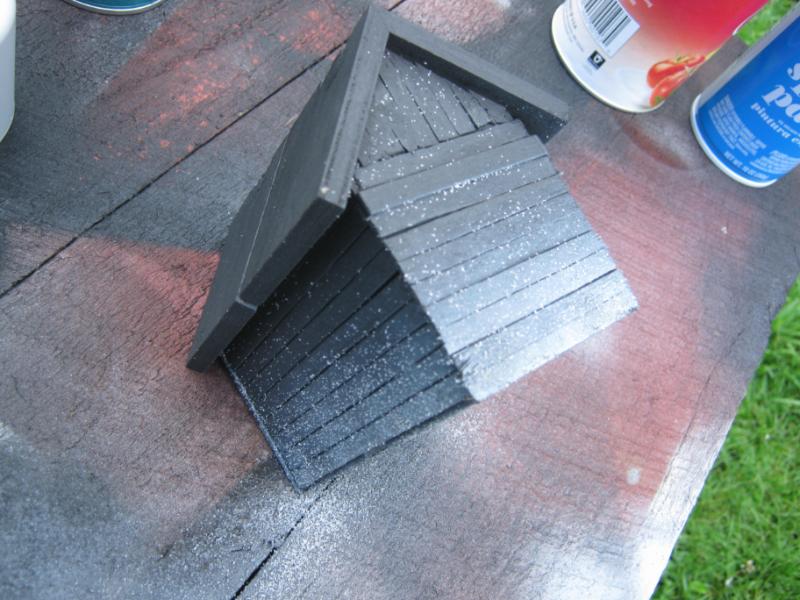
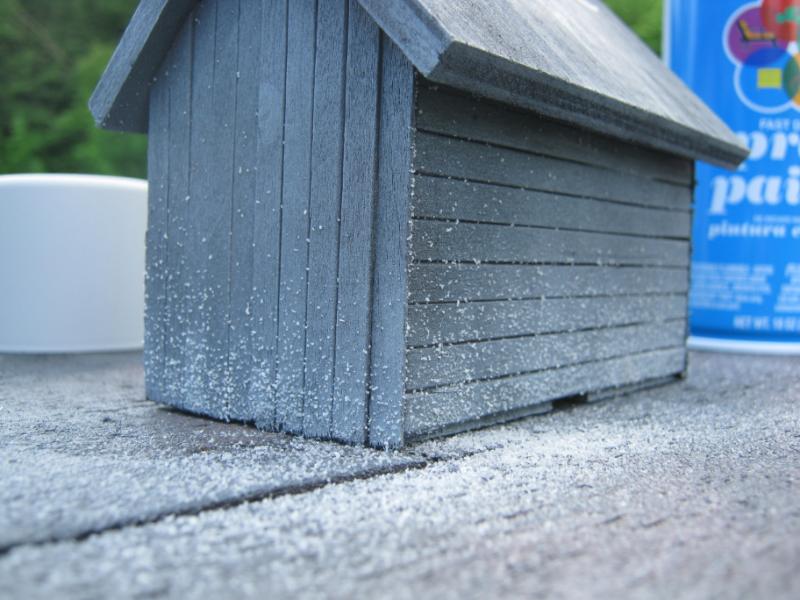
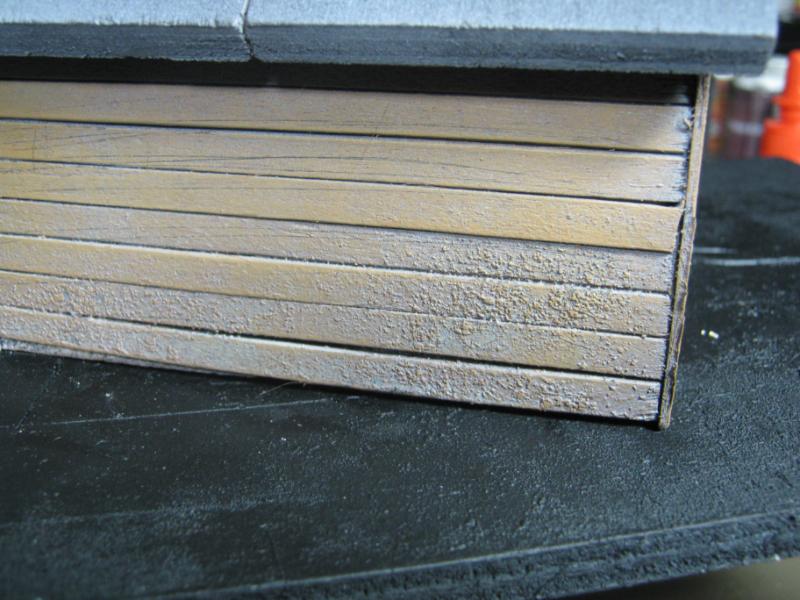
In typical Skalk Bloodaxe fashion I didn't let it dry, I just sprayed it gray, hit it w/ hairspray again again, salted again, sprayed w/ hairspray again. Mistake #1 for the evening. Won't be doing that again. Kvlt Grymdark did not approve.
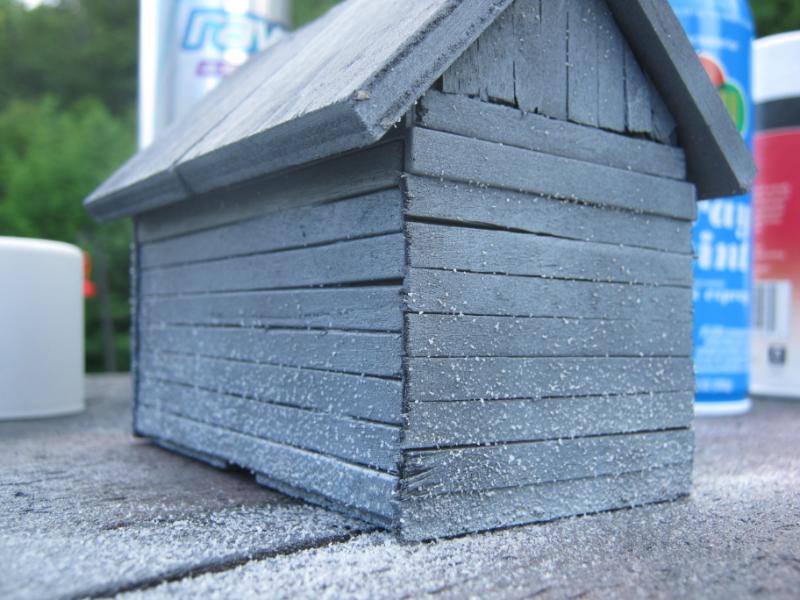
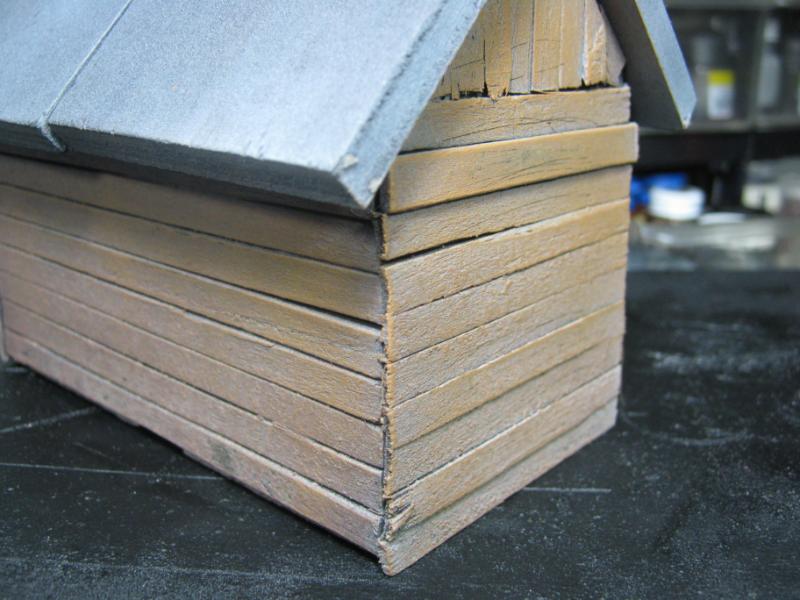
I did however have the presence of mind to dry the last coat of hairspray. I used my hair dryer for a couple minutes and then drybrushed dark brown. Mistake #2 of the evening? I trimmed my paintbrush and didn't get all the hairs out of it before using it. But not to worry, as you can see they eventually did come off.
Feh. I hit it with the hair dryer again after drybrushing and then gave it a light rub to take some salt off and see what it was looking like.
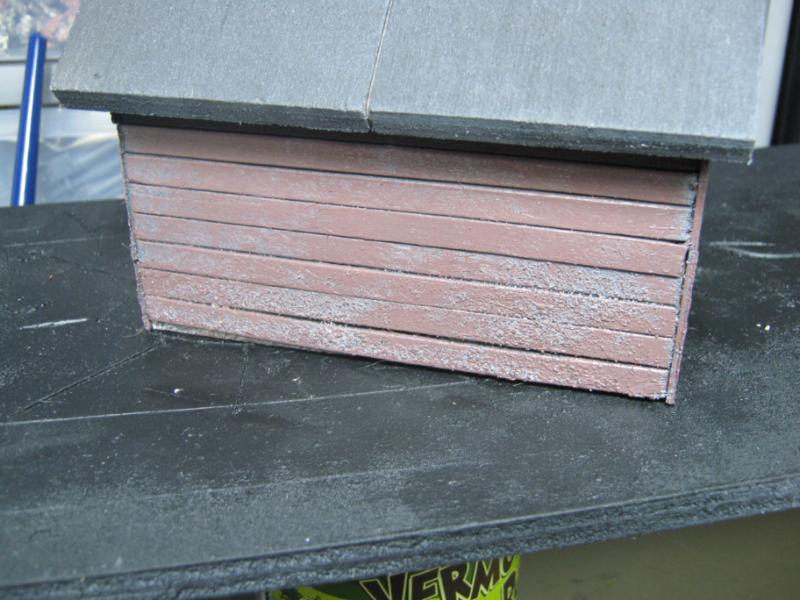
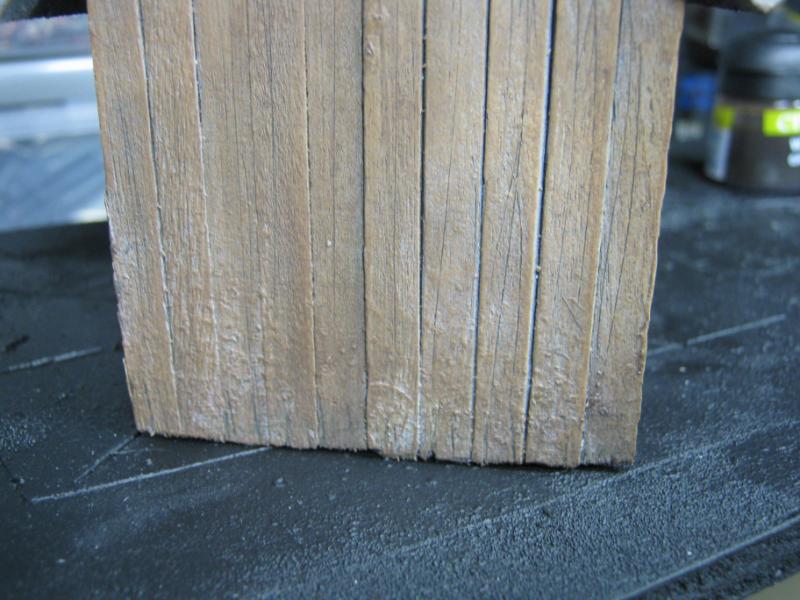
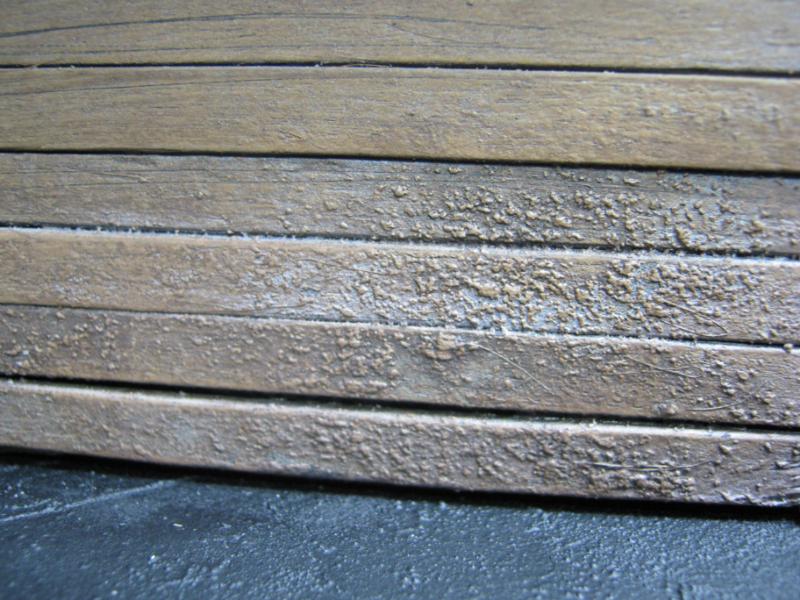
Clumps. Ugh. Mistake #3. But I kept going with it to see what happened. I also used my xacto knife to scrape some simulated 'wood grain' into the boards:
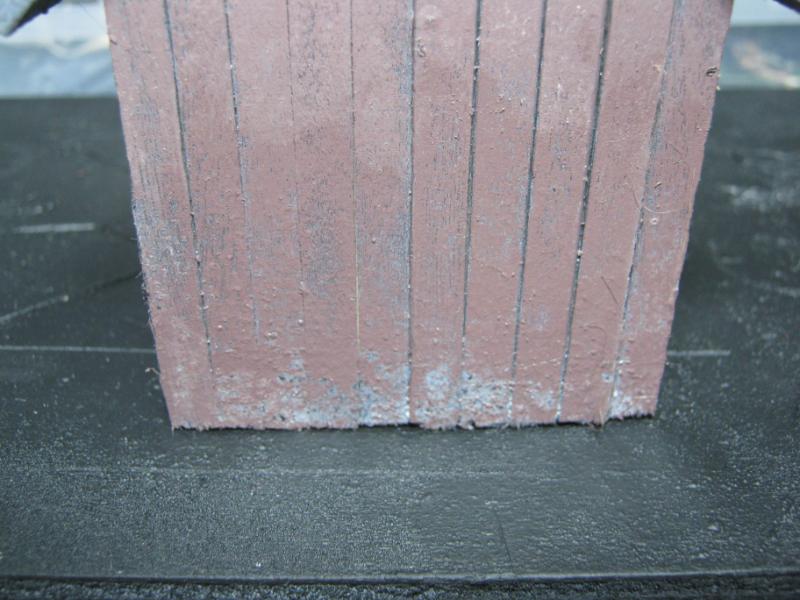
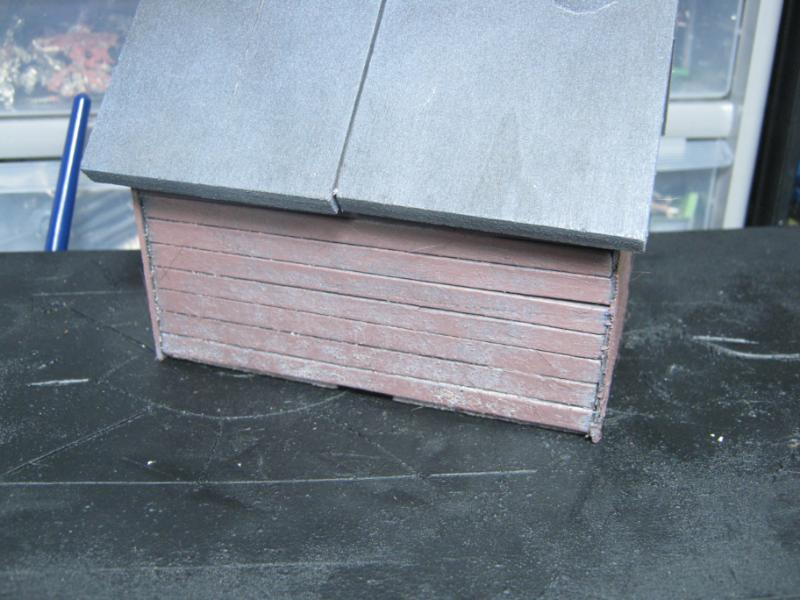
Some of it didn't come off at all, some of it went all the way to the black undercoat. Really need to take my salting / hairspray in steps from now on. Lesson learned. Next I sprayed everything with a light dusting of gray again.
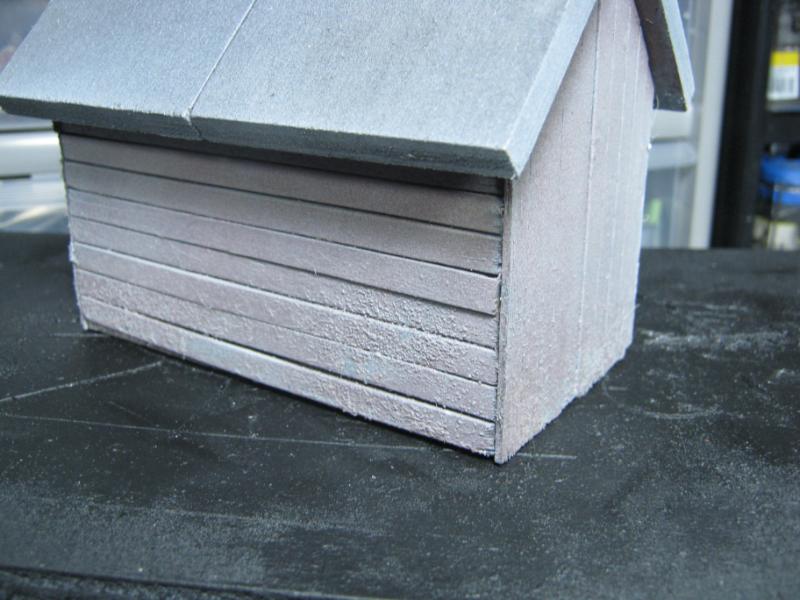
Next I drybrushed a light brown. I like this effect.
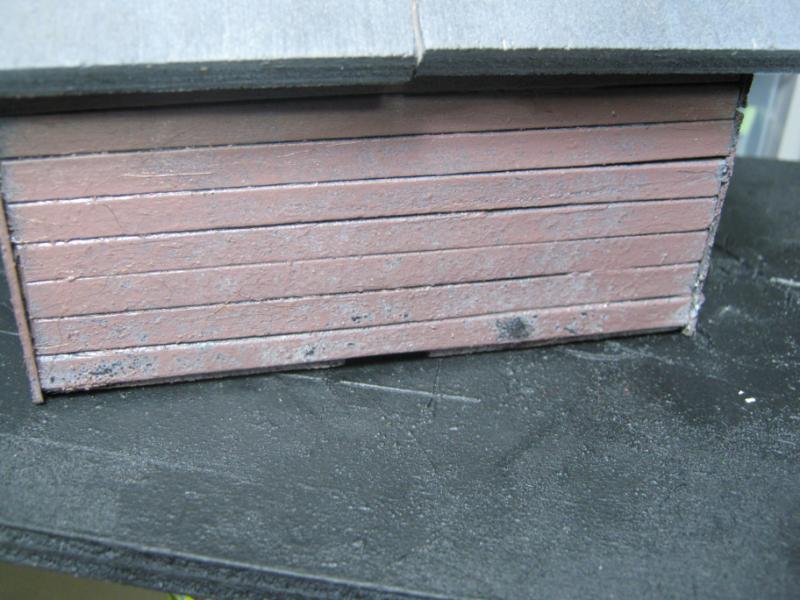
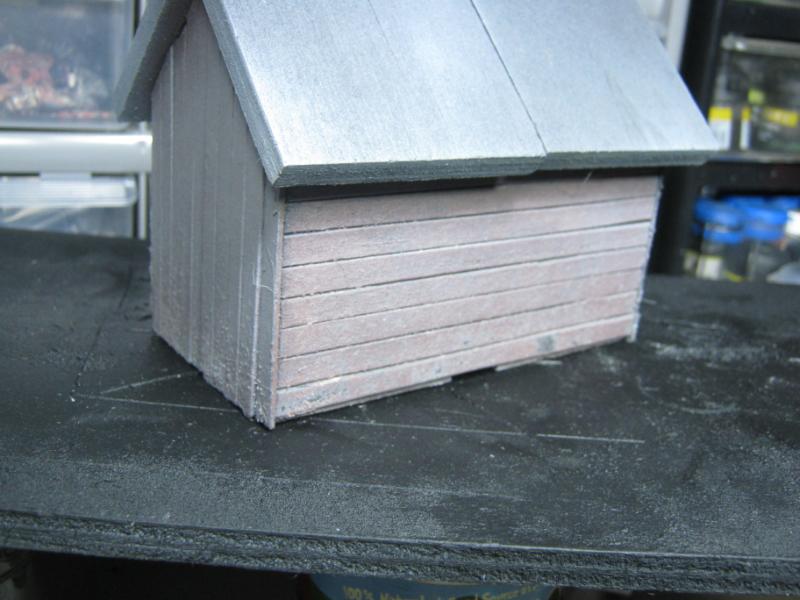
Next I gave it a light wash with Devlin Mud. I think this is where it started to come together. Yes, I know some of the scratches look terrible and I am going to fix them.
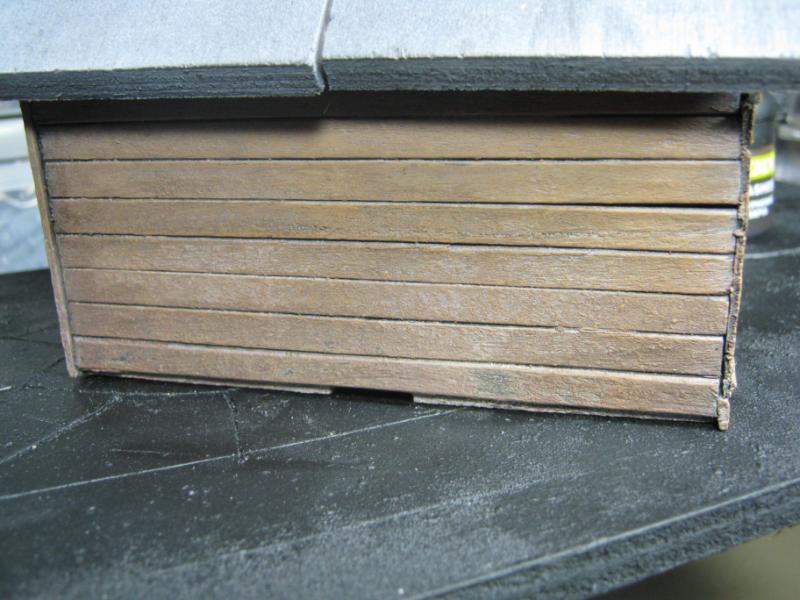
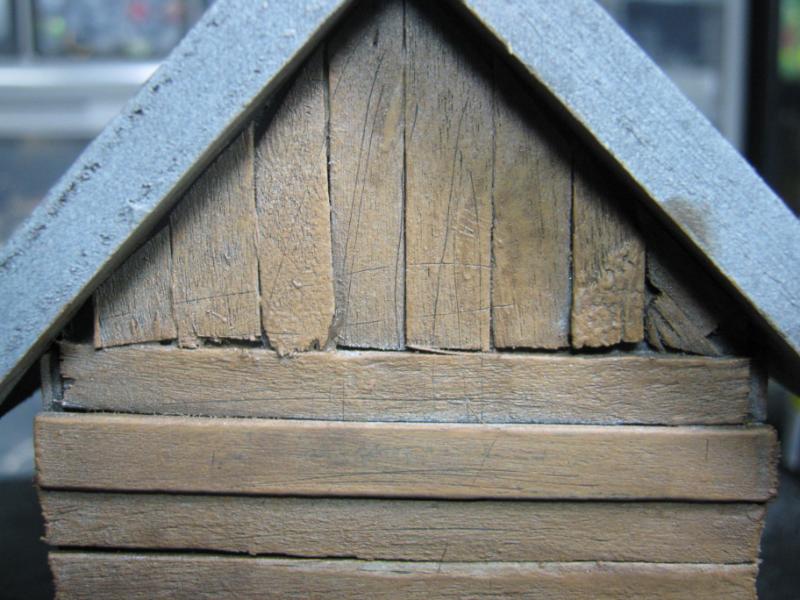
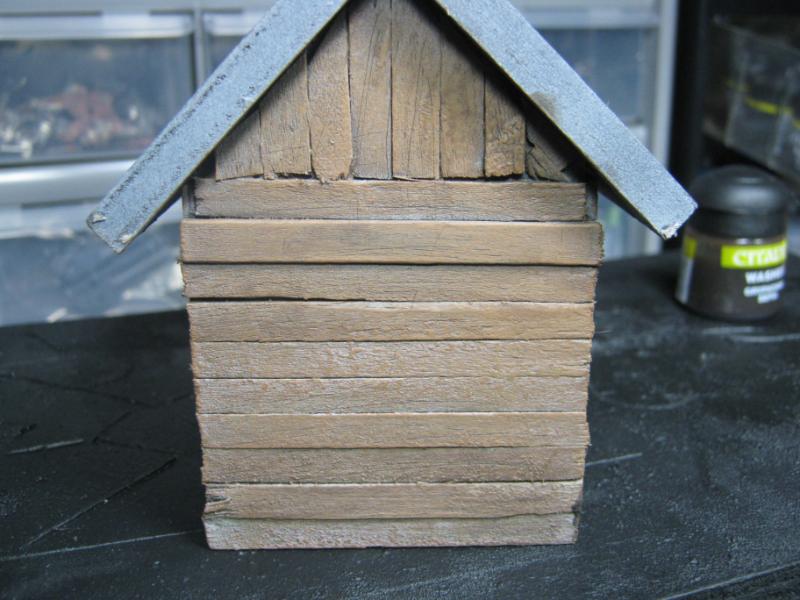
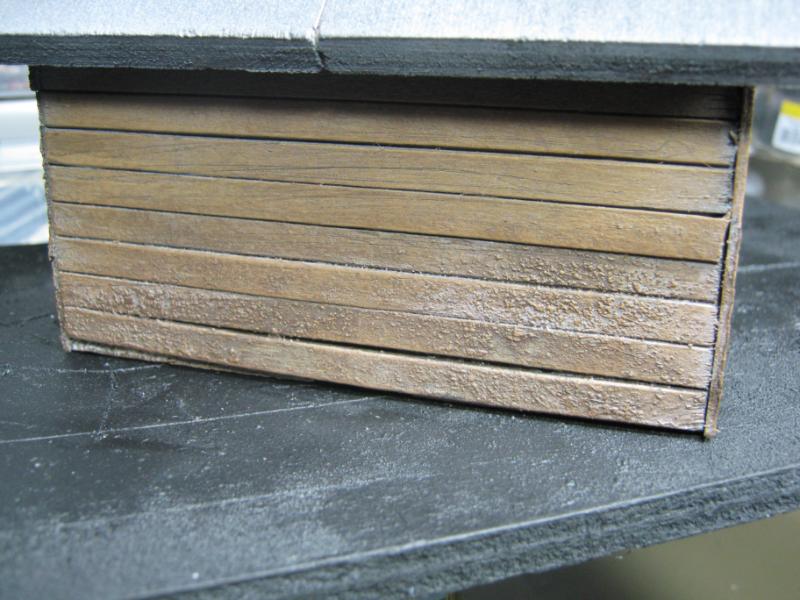
It needs more recessed shading and maybe some highlights on the wood to contrast, but it's not the worst work I've done. Kvlt Grymdark approves and said this house is on his Top Ten list of buildings he'd like to burn to the ground. I took that as a compliment.
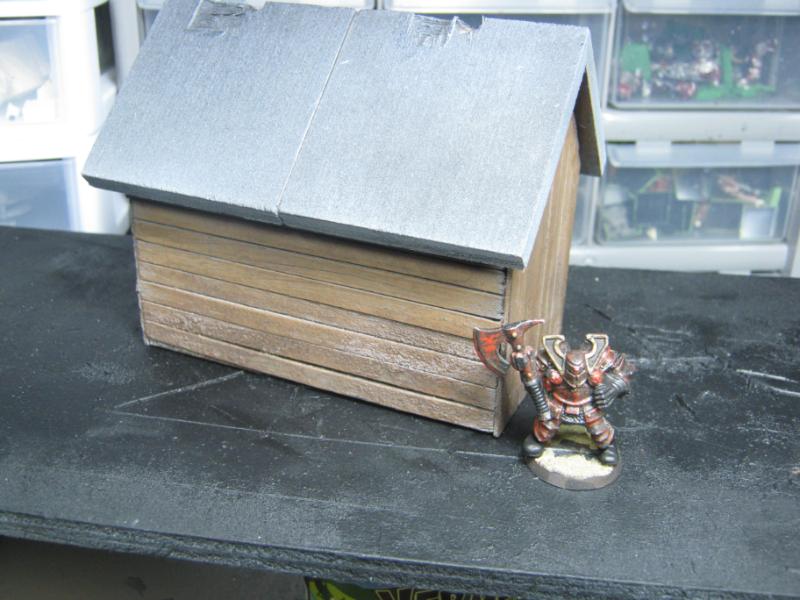
That's it for tonight. Thanks for reading, C&C always welcomed.
|
|
|
|
|
|
|
|


