| Author |
Message |
 |
|
|
|
|
Advert
|
Forum adverts like this one are shown to any user who is not logged in. Join us by filling out a tiny 3 field form and you will get your own, free, dakka user account which gives a good range of benefits to you:
- No adverts like this in the forums anymore.
- Times and dates in your local timezone.
- Full tracking of what you have read so you can skip to your first unread post, easily see what has changed since you last logged in, and easily see what is new at a glance.
- Email notifications for threads you want to watch closely.
- Being a part of the oldest wargaming community on the net.
If you are already a member then feel free to login now. |
|
 |
2018/06/27 09:36:31
Subject: sCratchbuilding and Citbashing by Meer_Cat: 6/26: Making muzzle flashes, learning greenstuff
|
|

Dakka Veteran
|
 Meer_Cat wrote: Meer_Cat wrote:In between running between the raindrops with RL, I have been getting some things done on wrapping up the mortar battery. When last we tuned in, our hero was attempting to make a better muzzle flash for Number 3 Gun (which has been renamed from "Splash, Over" to "Shot, Out").
I'm trying two different techniques: one using cotton ball wisps and some other odds and ends, and the second going with greenstuff work, a' la Klaus- Not Santa. Up to this point, I'm having a lot of fun with both and look forward to all y'alls feedback when I can get finished pictures up.
Here are the materials for the cotton ball approach:
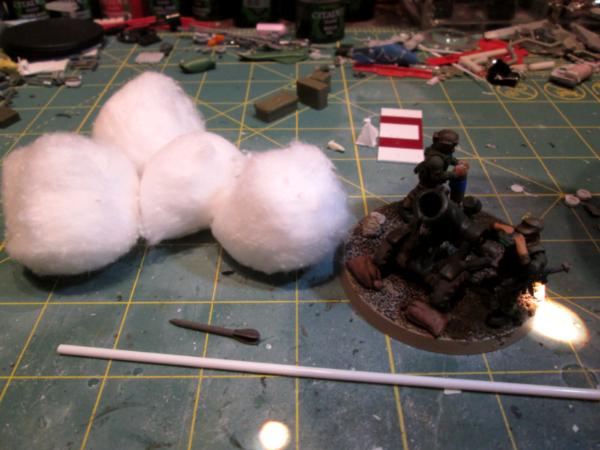
I've got a short ring that is the diameter of the interior diameter of the mortar tube (not in this picture, naturally), a very small diameter bit of tube to attach the cotton wisps to, the cotton balls and I'm embedding one of the steel flechettes I picked up awhile ago to give the suggestion of the round going up.
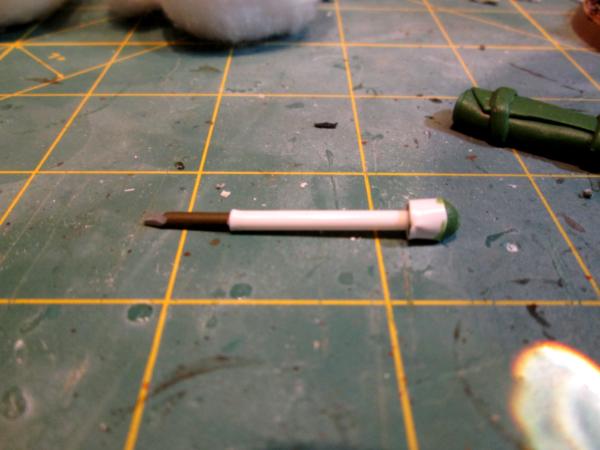
As it turns out, I couldn't cut the flechette with anything I had in my apartment in Virginia, so instead sharpened a bit of sprue and glued it into the pipette and ring collar:
Here's for the greenstuff route:

As it turns out here, I didn't need the central pipette to use as a foundation to support the greenstuff, I just had to straighten the GS as it cured as it wanted to slump a bit until it had hardened fully. I also (never having worked with GS before) 'way over-estimated the amount of GS I needed to do the job. I made _two_ muzzle flashes (in case I wanted to amke Gun 2 in the act of firing, or need it for a future project) and still had a ton left over:
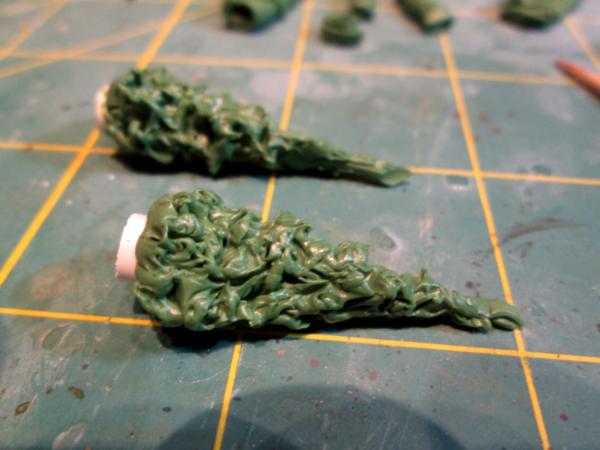
I may try to make another (one or two or three, depending on how closely I jusge the GS amount) tonight, as these are a bit more rounded than what Klaus demonstrates in his blog (although for low-velocity weapons like mortars, that may be a good thing) and I want to try adding a belt around the bottom third mark, to pull out into a smoke ring like the real life photos show- we'll see if there is time. And I'm anxious to get to painting these, to see how they look with paint and washes on.
So here's what I did with the rest of the GS:
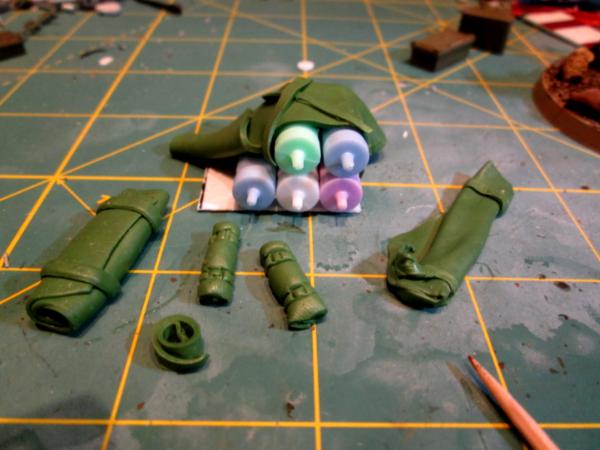
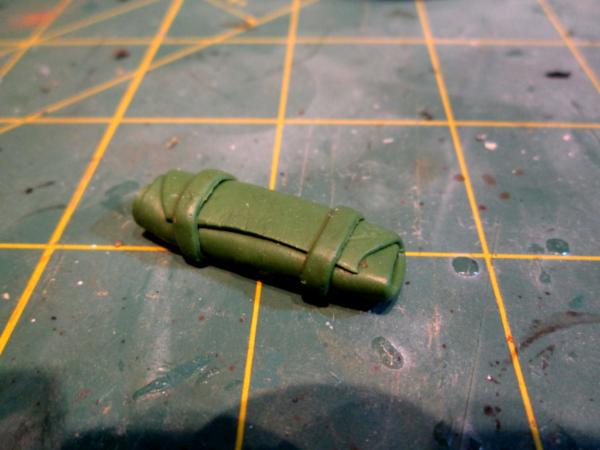
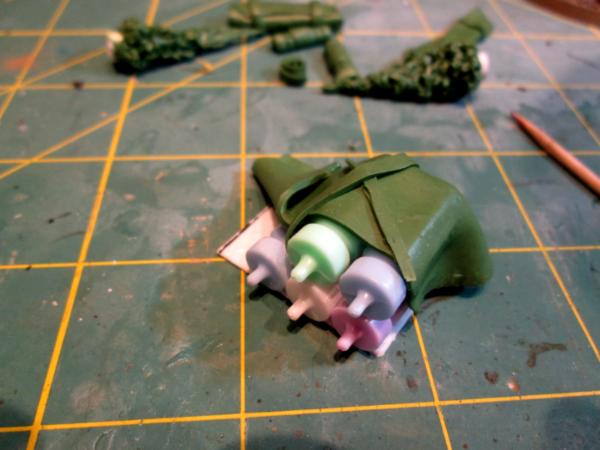
It came out to a couple of tarps with straps, a couple of blanket or tent rolls, an extra cargo strap coiled up and a pallet pile of goods (a' la Dr. H) with a tarp partially covering a pile of artillery shells (or gas canisters, rice containers or whatever is needed).
I'm actually pretty chuffed with this last bit, as the 'shells' are actually baby bottle party favors from the dollar store, glued down to a scrap piece of diamond pattern tread plate, with the tarp partially slung over the top. I think it looks pretty good already- but you guys will gently steer me back to reality if I'm kidding myself! This, I know! 
So, more follows soonest. I have to pick aprt the cotton on the other muzzle flash and finish that off with some washes, and get some primer on the two greenstuff flashes to see how that comes out.
Your comments, observations, criticisms and suggestions are always very welcome.
It ain't done, until it's overdone! 
Wow!
And this is really the first time you use GS?
Very WELL DONE!
The belt buckles look fantastic!
|
|
This message was edited 2 times. Last update was at 2018/06/27 09:38:11
|
|
|
 |
|
2018/06/27 18:04:15
Subject: Re:sCratchbuilding and Citbashing by Meer_Cat: 6/26: Making muzzle flashes, learning greenstuff
|
|

Posts with Authority
Boston-area [Watertown] Massachusetts
|
VERY well done, you're a natural. Remember, wet your fingers/tools when working with GS. 
|
Falling down is the same as being hit by a planet — "I paint to the 20 foot rule, it saves a lot of time." -- Me
ddogwood wrote:People who feel the need to cheat at Warhammer deserve pity, not anger. I mean, how pathetic does your life have to be to make you feel like you need to cheat at your toy army soldiers game?
 |
|
|
|
|
2018/06/27 18:48:35
Subject: sCratchbuilding and Citbashing by Meer_Cat: 6/26: Making muzzle flashes, learning greenstuff
|
|

Leader of the Sept
|
Really liking the GS work. Fantastic start
On the pallet, I would suggest something underneath to.raise it up.a bit like a real pallet. I have used some simple.sprue offcuts for this purpose myself, but any vaguely oblong thing in 2 or 3 strips.underneath would.do.
|
Please excuse any spelling errors. I use a tablet frequently and software keyboards are a pain!
 Terranwing - w3;d1;l1 Terranwing - w3;d1;l1
 51st Dunedinw2;d0;l0 51st Dunedinw2;d0;l0
 Cadre Coronal Afterglow w1;d0;l0 Cadre Coronal Afterglow w1;d0;l0 |
|
|
|
|
2018/06/27 21:12:26
Subject: sCratchbuilding and Citbashing by Meer_Cat: 6/26: Making muzzle flashes, learning greenstuff
|
|
Mastering Non-Metallic Metal
|
Good work.
For cotton wool, Take a look at my two Bladerunner vehicles I did. You can flatten the wool out into a directional "flow" and then don't mess with the fluffy side of things too much, let it do it's thing.
Good effort on the GS things.
I've used little metal things, or card for buckles in the past. Works better for me than sculpting them.
|
     Mastodon: @DrH@dice.camp Mastodon: @DrH@dice.camp
The army-                 ~2295 points (built). ~2295 points (built).
 
* -=]_,=-eague Spruemeister General. * A (sprue) Hut tutorial *
Dsteingass - Dr. H..You are a role model for Internet Morality!  // inmygravenimage - Dr H is a model to us all // inmygravenimage - Dr H is a model to us all
Theophony - Sprue for the spruemeister, plastic for his plastic throne! // Shasolenzabi - Toilets, more complex than folks take time to think about! |
|
|
|
|
2018/06/28 00:09:33
Subject: Re:sCratchbuilding and Citbashing by Meer_Cat: 6/26: Making muzzle flashes, learning greenstuff
|
|
[DCM]
Boom! Leman Russ Commander
|
Thank you all for your very generous comments. I really don't believe I have any natural talent with greenstuff- but what I do have is the benefit of everything I have seen here and on YouTube to help learn how it's done before ever I touched the stuff! As Sir Isaac Newton said as he was accepting recognition from the Royal Society after devising calculus: "Gentlemen, if I have seen anything at all, it is because I stand on the shoulders of giants." And yes- I just equated our modeling hobby with calculus.
Klaus- thank you very much for your kind words. I can't tell you how much it means that someone with your DakkaDakka accomplishments checks in to see how I'm getting on- thank you!
Briancj: Thank you as well- you also have a great record of accomplishment here. The one thing I did learn by myself was to wet my fingers and my tools as I went along- none of the videos thought to show that part! One fellow did recommend using a bit of dollar store mirror as a working surface though- slicker, less apt to have thin, delicate parts stick.
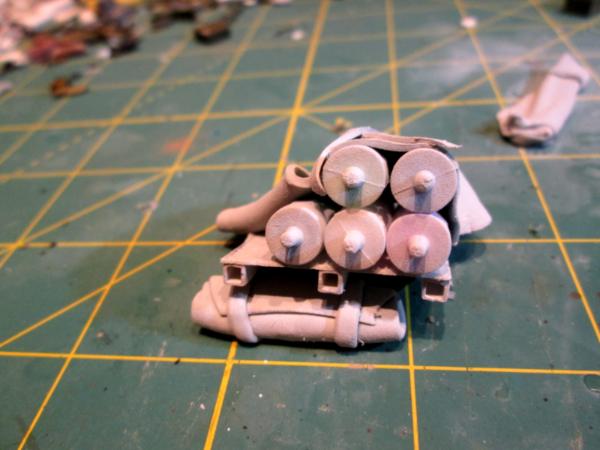
Flinty: You have work that has pushed me to try to emulate- thank you also. I took your advice and added some skids to the underside of the diamond pattern tread plate and I agree, it looks a lot more realistic. I think originally I had envisioned this as welded to an AFV hull- but this is more gooder and a lot more versatile to use. Primered here and a start to basecoating:
Doc: Thank you too- I hold your work in high esteem. I've revisited your Bladerunner vehicles and will be employing those techniques on Muzzle Flash Type 1. I definitely want to add the buckles- the straps do truly look 'off' without something to show they are functional.
I wasn't kidding when I mentioned on Gitsplitta's blog the other day that I had also dropped US$30 on more Technolog/Robogear bits- here's $12 of it:

I included the counts-as Hydra conversion (which is a Bronekorpus SPAAG) nd the Eisenkern Panzerjaeger for scale. The artillery pieces are hard plastic- not engineer/soft plastic or resin, and I'm pretty sure that I can get the bend out of the barrels with some gentle pressure. For the first time ever (and I've bought a lot of junk from them) a piece came damaged- you can see the one tire broken off. Which is okay, as I'm going to be cutting the guns off the carriages anyway and trying to build something like this:
You guys have ruined me. First I no longer buy model kits to bash together- you've got me scratchbuilding things. Now you've got me carving my own bits and fashioning things from greenstuff. What's next? Go full Camkierhi and blend my own resin casting powders from iron filings and iguana spit? I truly can't thank you guys enough for the ideas, the examples, the advice and the encouragement.
I'm on a building and painting waaaauuuuggghhh!!! just now and having a blast.
|
"He fears his fate too much, or his desserts are small, who will not put it to a single touch; to win- or lose- it all."
Montrose Toast

|
|
|
|
|
2018/06/28 02:42:54
Subject: Re:sCratchbuilding and Citbashing by Meer_Cat: 6/27: More fun with greenstuff
|
|
Krazed Killa Kan
|
I really like how the tarps turned out. Like monkettroll said, very good use of extra green stuff. It looks like you put a lot of time and effort into those two green stuff muzzle flash explosions of smoke. I hope to see more sculpting from you in the future.
|
|
|
|
|
|
2018/06/28 16:53:47
Subject: Re:sCratchbuilding and Citbashing by Meer_Cat: 6/27: More fun with greenstuff
|
|
Posts with Authority
Boston-area [Watertown] Massachusetts
|
I want those cannons. o.O
My order came in. We should team up and do a series of 'upcycling' these.
|
Falling down is the same as being hit by a planet — "I paint to the 20 foot rule, it saves a lot of time." -- Me
ddogwood wrote:People who feel the need to cheat at Warhammer deserve pity, not anger. I mean, how pathetic does your life have to be to make you feel like you need to cheat at your toy army soldiers game?
|
|
|
|
|
2018/06/28 22:05:09
Subject: Re:sCratchbuilding and Citbashing by Meer_Cat: 6/27: More fun with greenstuff
|
|
[DCM]
Boom! Leman Russ Commander
|
Hey Syro- thank you! Believe it or not, the flashes themselves didn't take all that long (but we'll see how they come out painted up!). Klaus- not Santa has a couple of places in his blog where he shows how to do this- I'll try to scout through and pull the pages numbers so they're easier to find. The hardest things to do were not get fingerprints on 'em as I worked and keep them from slumping as they cured.
Hey Briancj- you're on! I've done a couple of conversions using Robogear/Technolog bits now- would love to collaborate on a tutorial or even an article. We just have to figure out what we're going to do!
I hope to get some painting on the muzzle flashes in tonight- anxious to compare cotton ball wisps to greenstuff approaches. More follows soonest!
|
"He fears his fate too much, or his desserts are small, who will not put it to a single touch; to win- or lose- it all."
Montrose Toast
|
|
|
|
|
2018/06/30 13:08:02
Subject: sCratchbuilding and Citbashing by Meer_Cat: 6/27: More fun with greenstuff
|
|

Druid Warder
|
Very good scatter! Looks fairly believable and add a neat touch to the battlefield. Technolog is good, it is just me being a spoiled old brat that stays with more serious boxes... please ignore me grumbling. Regarding cotton balls - sometimes it works when wetting them in PVA glue, leaving them to dry overnight and then tearing them into small blobs before glueing them back together into a single fluff. Takes some time and more effort, but may better represent the fine structure of muzzle gases expanding. Elaborating a bit on what Dr. H have said - take a toothpick or a bit of wire like a straightened paper clip, coat it with undiluted PVA and let it dry completely. Then wrap it around with cotton dipped in somewhat diluted PVA and holding it like a brush start slowly pull its strands down and out. Can make a nice muzzle flash - or a minor explosion.
Cheers!
|
Painting progress tracker:
2017: 50 of 50 planned; 2018: 80 of 60 planned; 2019: 75 of 75 planned
Pledge 2020:
6 to sculpt, 75 to paint (2/57 done) |
|
|
|
|
2018/06/30 22:57:40
Subject: Re:sCratchbuilding and Citbashing by Meer_Cat: 6/27: More fun with greenstuff
|
|
[DCM]
Boom! Leman Russ Commander
|
Thanks for the tips, Wirecat- I'm still fooling around with the start of the cotton-wisps one, so can incorporate what you're suggesting here. I should be able to wrap this little experiment up on Monday!
|
"He fears his fate too much, or his desserts are small, who will not put it to a single touch; to win- or lose- it all."
Montrose Toast
|
|
|
|
|
2018/06/30 23:09:33
Subject: sCratchbuilding and Citbashing by Meer_Cat: 6/27: More fun with greenstuff
|
|
Dakka Veteran
|
Love what your coming up with, lots of inspiration.
|
|
|
|
|
2018/07/01 21:06:10
Subject: Re:sCratchbuilding and Citbashing by Meer_Cat: 6/27: More fun with greenstuff
|
|
[DCM]
Boom! Leman Russ Commander
|
Thanks Alaricuk! I'm looking to wrap this project up and get on to the next- I've got a ton of things I want to try:
- Got a new AA cannon from Tehnolog that I want to mount a on a scratch-built chassis for a mobile flakveirlung
- Got a set of Concorde infantry that need building
- Have an idea to do a UAV team launching a light Talon-class platform with rockets
- More stuff bouncing around
More follows soonest!
|
"He fears his fate too much, or his desserts are small, who will not put it to a single touch; to win- or lose- it all."
Montrose Toast
|
|
|
|
|
2018/07/08 07:18:36
Subject: sCratchbuilding and Citbashing by Meer_Cat: 6/27: More fun with greenstuff
|
|
Gargantuan Great Squiggoth
|
Dude that GS work was brilliant. Excellent stuff, looking forward to seeing that list of projects develop.
|
|
|
|
|
|
2018/07/09 23:16:07
Subject: Re:sCratchbuilding and Citbashing by Meer_Cat: 6/27: More fun with greenstuff
|
|
[DCM]
Boom! Leman Russ Commander
|
Thanks Cam! I'm afraid my modeling 'waaauuugghhh' became more of a 'wheeee!' as real life kicked in (nothing bad, just had a couple days catching repairs and general maintenance up on the farm), but I'm getting back into stride again. _Sooo_ many things to try!
|
"He fears his fate too much, or his desserts are small, who will not put it to a single touch; to win- or lose- it all."
Montrose Toast
|
|
|
|
|
2018/07/10 11:08:29
Subject: Re:sCratchbuilding and Citbashing by Meer_Cat: 6/27: More fun with greenstuff
|
|
Is 'Eavy Metal Calling?
|
Your green stuffing skills are just crazy good.
Now you have me thinking with those cannons...man I don’t need another side project  .
|
LOL, Theo your mind is an amazing place, never change.-camkierhi 9/19/13
I cant believe theo is right.. damn. -comradepanda 9/26/13
None of the strange ideas we had about you involved your sexual orientation..........-Monkeytroll 12/10/13
I'd put you on ignore for that comment, if I could...Alpharius 2/11/14 |
|
|
|
|
2018/07/12 02:51:51
Subject: Re:sCratchbuilding and Citbashing by Meer_Cat: 6/27: More fun with greenstuff
|
|
[DCM]
Boom! Leman Russ Commander
|
Thanks Theo- there are a lot of other things to try with greenstuff; right now I'm at the 'Becky Home-ecky' with her rolling pin stage, kinda.
Here's a shot of how those little extra bits of greenstuff came out:
I'm finishing up painting the muzzle flashes, to include finishing up the one made with cotton ball wisps and hope to have pics of those up tomorrow so you' ns can tell me which looks the best. There's one more style I want to try to make out of greenstuff, but I'm also itching to get going on another project, and so far I've been pretty good about sticking to one job at a time, mostly.
The next project? Even with this bad picture, if I can't make something Necromunda-ish/Industrial terrain out of all this junk, then I need to get off DakkaDakka!
More follows soonest! 
|
"He fears his fate too much, or his desserts are small, who will not put it to a single touch; to win- or lose- it all."
Montrose Toast
|
|
|
|
|
2018/07/12 04:09:34
Subject: Re:sCratchbuilding and Citbashing by Meer_Cat: 6/27: More fun with greenstuff
|
|
Krazed Killa Kan
|
Those tarps and other gear you made out of extra green stuff turned out great!
I'm looking forward to seeing what you create out of that pile of junk
|
|
|
|
|
|
2018/07/14 15:46:14
Subject: sCratchbuilding and Citbashing by Meer_Cat: 6/27: More fun with greenstuff
|
|
Mastering Non-Metallic Metal
|
Good use of spare GS. I tend to make tentacles out of spare putty... they come in handy from time to time.
Look forward to what becomes of that collection of stuff. 
|
Mastodon: @DrH@dice.camp
The army- ~2295 points (built).
* -=]_,=-eague Spruemeister General. * A (sprue) Hut tutorial *
Dsteingass - Dr. H..You are a role model for Internet Morality! // inmygravenimage - Dr H is a model to us all
Theophony - Sprue for the spruemeister, plastic for his plastic throne! // Shasolenzabi - Toilets, more complex than folks take time to think about! |
|
|
|
|
2018/07/16 23:18:33
Subject: Re:sCratchbuilding and Citbashing by Meer_Cat: 6/27: More fun with greenstuff
|
|
[DCM]
Boom! Leman Russ Commander
|
Thanks Syro, Doc! briancj made me aware of the defensive terrain contest for the next League of Riveters thing and I may have to see if I can find a way to bend the junk into a warren stronghold, or some such.
I also just saw Alariuk's latest 'afternoon's fun work' on his Craneblade blog- an industrial complex made out of a couple of cans and some plastic caps and looks proper awesome! And I'm wild to try something like that too.
So far, a lack of imagination and inspiration is not one of the problems I suffer from!
|
"He fears his fate too much, or his desserts are small, who will not put it to a single touch; to win- or lose- it all."
Montrose Toast
|
|
|
|
|
2018/07/18 23:59:45
Subject: Re:sCratchbuilding and Citbashing by Meer_Cat: 6/27: More fun with greenstuff
|
|
[DCM]
Boom! Leman Russ Commander
|
So, this is as much fiddling with muzzle flashes and smoke plumes as I'm going to do, for now. I'm not entirely satisfied with the look, but I'm going in the right direction and I've learned a lot during the trip.
First, here's the 'store boughten' smoke I found on eBay- it really is for more of a steam engine, burning fire kind of effect and not a mortar detonation, but I'm not actually that unhappy with it. I still maintain, if they are still using rivets in the 41st millennium, then they probably lost the art of smokeless powder, gun cotton and advanced propellents as well:
Now, here's a couple of shots of the 'cotton wisp' method. I know I can do better, even with this one (which probably could have used some ersatz-nuln oil wash to darken it, for starters). This particular effort looks too much like a rocket exhaust, not so much a mortar round going off. Again, not terribly disappointed, but I like my greenstuff flashes (coming up) better:
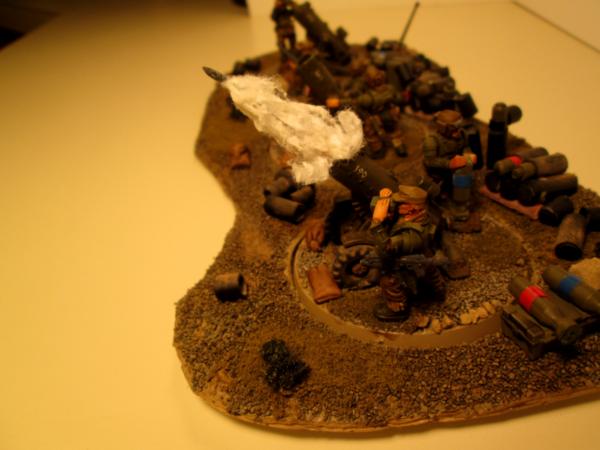

Next, here's Gun Three with a muzzle flash fashioned from greenstuff. There's a basecoat of White on there, and then 87 layers of various washes. Not entirely satisfied, but more towards what I wanted. When/if I hit this again, I want to add a 'belt' of greenstuff around the base of the plume, so that I can tease that out into a smoke ring (looking much more like the pic that Klaus, Not Santa posted here earlier). For one thing, the 'smoke' part is too yellow/brownish- I was going for more white/grey/black with yellow and red 'fire' flecks:
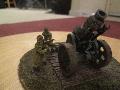
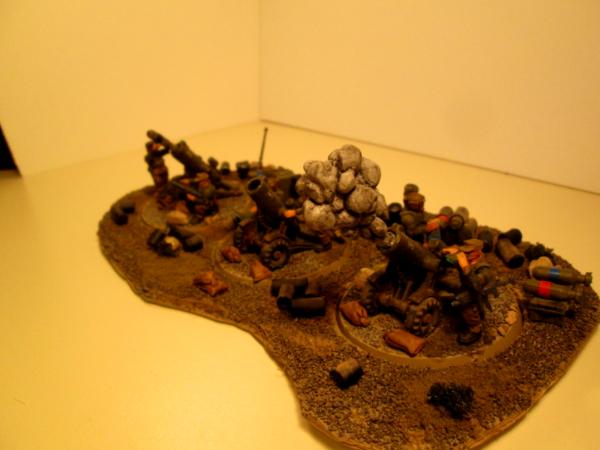
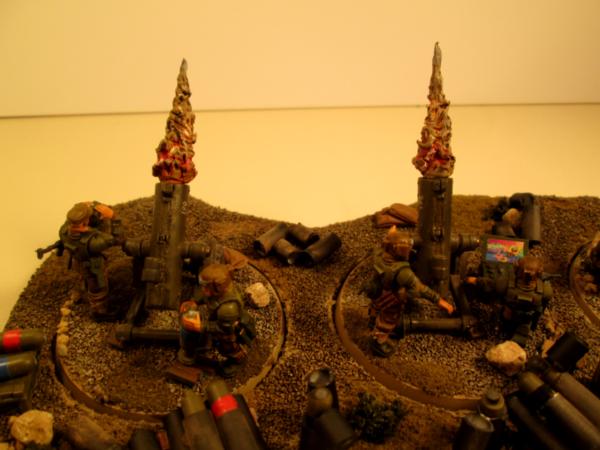
Here's Guns Two and Three firing for effect, and Hanging on Gun One:

Closer up of Guns Two and Three:
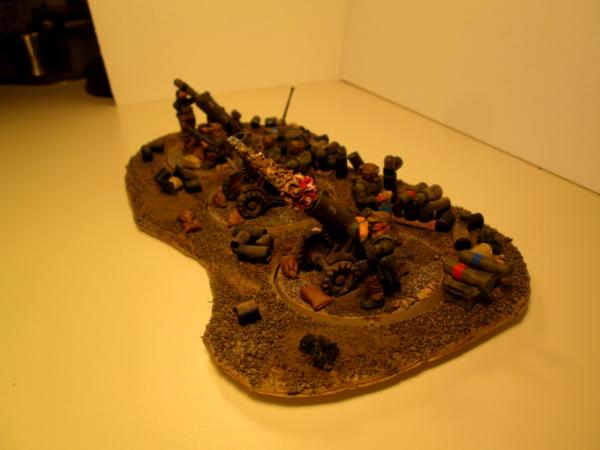
And a back shot of the whole battery again:
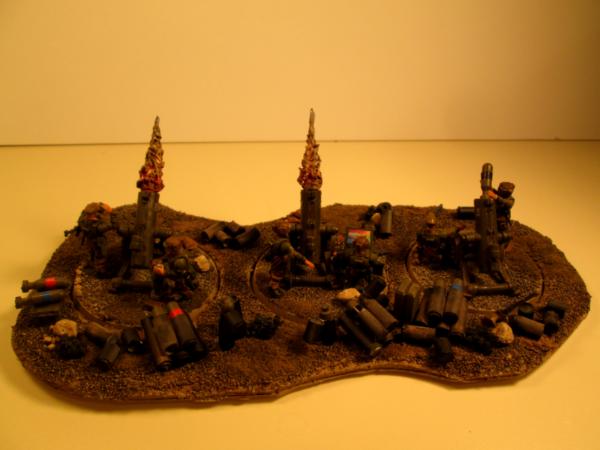
Like I said, I'm moving on for now, but believe this is a decent effort and certainly good enough to play on a proper table against an able foe. There was a little ditty they made us learn when I was on the mortar square qualifying with my buddies as gunners:
"Death and destruction and high angle hell,
For thirty-five meters the casualties fell.
With guts on the ground and limbs in the sky
When the 81's bark- everyone dies.
Boom boom, out go the lights!"
81's were the 81mm mortars we gunned on, then later we moved onto serving 120's. 35 meters is the kill radius of an 81mm mortar shell, the wound radius was supposed to be 60 meters. In proportion to the crewmembers, these Tehnolog toys scale out to 160, maybe 180mm heavy mortars.
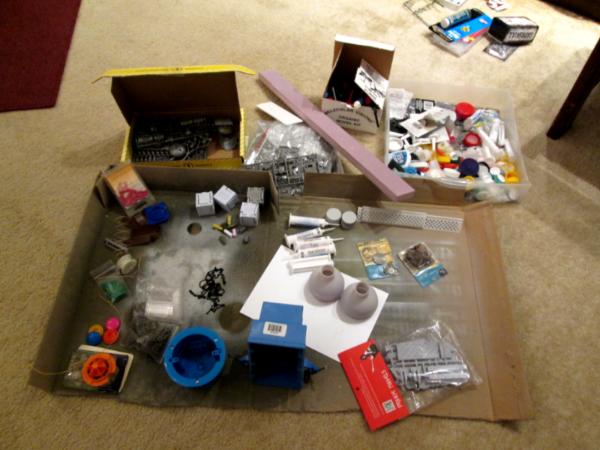
And now, for something completely different- the next project is going to be an entry into the Riveters' Terrain Competition. I've settled on a Necromunda/Industrial style strongpoint. Obviously, I will now have to purchase some gangers to man the fortifications and I'm partial to House Escher.
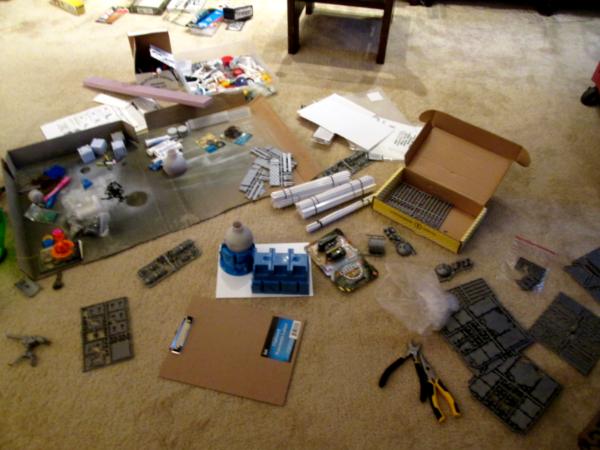
Here's the original pile of junk again:
And here's what I have after some frenzied effort- you can see it's almost finished:
You have us surrounded (poor fething b-tards) you may as well surrender now! Mwuhahahahahaha!
|
"He fears his fate too much, or his desserts are small, who will not put it to a single touch; to win- or lose- it all."
Montrose Toast
|
|
|
|
|
2018/07/19 01:15:08
Subject: Re:sCratchbuilding and Citbashing by Meer_Cat: 6/27: More fun with greenstuff
|
|
Is 'Eavy Metal Calling?
|
Out of the muzzle flashes I think I prefer your greenstuff ones. It may not be “realistic”, but it invokes what I feel it should look like, which is what our little toy soldiers represent.
Scale wise, 40k is all about oversized weapons, so a scale 160mm mortar is probably a light mortar in the 40k universe. They look perfectly appropriate for guard guns.
|
LOL, Theo your mind is an amazing place, never change.-camkierhi 9/19/13
I cant believe theo is right.. damn. -comradepanda 9/26/13
None of the strange ideas we had about you involved your sexual orientation..........-Monkeytroll 12/10/13
I'd put you on ignore for that comment, if I could...Alpharius 2/11/14 |
|
|
|
|
2018/07/21 14:23:28
Subject: sCratchbuilding and Citbashing by Meer_Cat: 6/27: More fun with greenstuff
|
|
Mastering Non-Metallic Metal
|
Good work.
Yeah, the first one looks a bit too cartoonish to match what you've built, but could have it's uses.
Agree with what you said about the cotton wool one.
Painting can tend to make it look less fluffy, I found that a "layer" of pure, fluffy, cotton wool over a painted core can look better; kind of what you have, but with a fluffy cloud at the muzzle.
The GS ones look nice 
Could even do a combined version; recreate the first one's shape in fluffy cotton about a core of GS, with the tip sticking out... that might be nice. [/thinking out loud]
|
Mastodon: @DrH@dice.camp
The army- ~2295 points (built).
* -=]_,=-eague Spruemeister General. * A (sprue) Hut tutorial *
Dsteingass - Dr. H..You are a role model for Internet Morality! // inmygravenimage - Dr H is a model to us all
Theophony - Sprue for the spruemeister, plastic for his plastic throne! // Shasolenzabi - Toilets, more complex than folks take time to think about! |
|
|
|
|
2018/07/31 01:33:50
Subject: Re:sCratchbuilding and Citbashing by Meer_Cat: 6/27: More fun with greenstuff
|
|
[DCM]
Boom! Leman Russ Commander
|
Sorry all for the long pause between postings, and especially for replying to you Theo, and you, Dr H- I greatly appreciate you coming by and offering your candid opinions and advice. I think as regards the muzzle flashes, I'm going to combine both y'alls words and try for a greenstuff core, with some cotton wisp around the bottom and see if that gets the look I'm going for- I'm optimistic, because I can see the finished effect, and that's usually a good sign, for me.
I'm coming off a real-life, work intensive period that has left me absolutely not wanting to paint or model by the time I drag myself in to home. So tonight is really the first night getting some time in, and as always, the minute I sit down and start touching the materials, I can't stop.
So here's the start of my defensive piece for the Riveters' contest. As originally envisioned, it'll be a piece of Industrial or Necromunda terrain: a Promethium Works or chemicals plant that's a strategic goal and tactical target, therefor reinforced and hardened as best as the defenders can with limited skills, resources and inclination (if they're gangers).
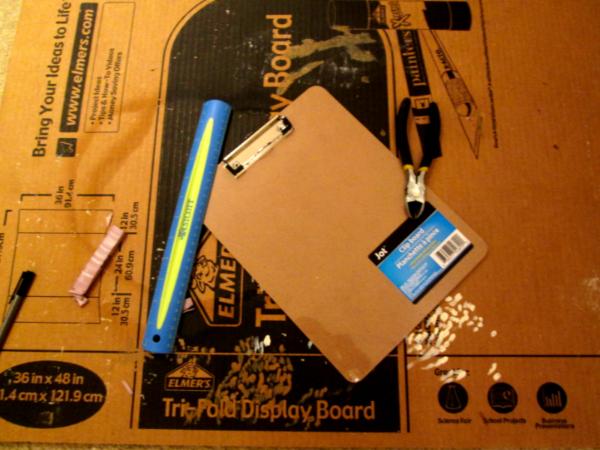
As always, the best basing material (for cheap) that I've come across so far are these clipboards from the Dollar Tree (everything's one dollar in them):
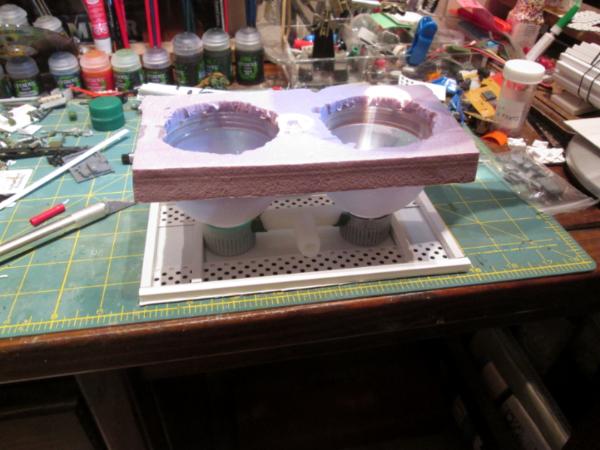
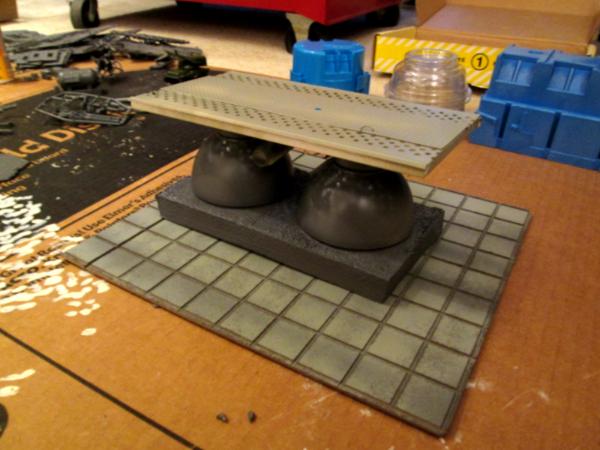
I trimmed it to length to get rid of the clip whilst I was at the farm this last weekend and then scored the grooves to simulate pavement edges with my radial arm saw. Basecoated it medium grey (spray can) and then hit it with a lighter grey to simulate weathering and make it a little different grey from the pipes and tanks and things- the fiber was thirsty and sucked some othe light grey in and made for some neat weathering already- I'll hit it with washes and some 'chemical staining' later. I also cut a piece of pink insulating foam to size for a base for the promethium tanks with my hot foam cutter:

Next carved out the seats for the promethium tanks (combination of my micrometer accurate circle cutter and centimeters accurate hacking with a hobby knife), the 'tanks' are the top parts of two plastic drinks bottles:
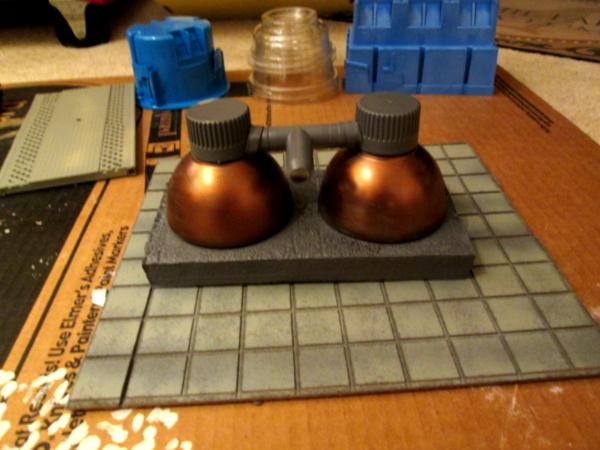
Next, added a cross-connecting fitting from the local hardware store, from their 'spare parts' table:
And then started in on some greenstuff work both to anchor the cross-connect in place and to look like pipe weld bands or something (heavy emphasis on the 'or something'). I'll add some rivets to everything and some more effects- I have a couple of new tricks I want to try, and at least one old one:
So, with this first real session of getting some actual work done, I'm fairly pleased: I've worked with insulating foam and greenstuff, am trying a piece of terrain different to anything I've done before and trying to meet a deadline- all good goals. And if I like how it comes out,, an excuse to get some ganger figures to 'occupy' the station!
More follows soonest.
|
"He fears his fate too much, or his desserts are small, who will not put it to a single touch; to win- or lose- it all."
Montrose Toast
|
|
|
|
|
2018/07/31 13:41:10
Subject: sCratchbuilding and Citbashing by Meer_Cat: 6/27: More fun with greenstuff
|
|
Grim Dark Angels Interrogator-Chaplain
|
Oh clipboards are a great idea! I often find base material in the reduced showroom section at IKEA. 50p for enough hardboard to base a city is a steal, but they often have nothing. I’ll be raiding my local £1 shops now just in case!
Excellent bottle cap use. Love me a good bottle cap! Some detail sticking out of each surface will help with painting as it creates shadows and interest. Excited to see how this progresses!
|
 Stormonu wrote: Stormonu wrote:For me, the joy is in putting some good-looking models on the board and playing out a fantasy battle - not arguing over the poorly-made rules of some 3rd party who neither has any power over my play nor will be visiting me (and my opponent) to ensure we are "playing by the rules"
|
|
|
|
|
2018/07/31 14:20:37
Subject: sCratchbuilding and Citbashing by Meer_Cat: 6/27: More fun with greenstuff
|
|
Combat Jumping Rasyat
|
Yaaas, join the gang side, we have 20+ distinct forces and don’t need to delay working on ideas as long!
As for terrain; [sarcasm] looks terrible, you should send it off to me so I can properly “dispose” of it. [/sarcasm] Seriously though, shaping up nicely! Can’t wait to see it finished.
|
|
|
|
|
2018/08/01 00:25:31
Subject: Re:sCratchbuilding and Citbashing by Meer_Cat: 6/27: More fun with greenstuff
|
|
[DCM]
Boom! Leman Russ Commander
|
Thanks Johnny-H- I love me some bottle caps too. I saw where one of us here on DakkaDakka glued two of the same sort together to make space-age shipping containers, or drums; I reckon to try that to help make up the improvised barricades the gangers have thrown up around the tanks.
Thanks CM- it's fun to be past the initial 'writer's block' and actually have an idea in mind of what this mess will look like when it's (more or less) finished. I think now it was a mistake to haul everything out and brainstorm- too many options, too many possibilities. Better to have thought of something to go for first, then scavenged through all the bits to find the right combination! At least to date, I'm still sticking to my rule to work only one project at a time- too easy for me to start more than one and then lack the oomph to get back to work on any of them a lesson learned many years ago).
I've a couple of pictures now, and hope to have some real progress to show tomorrow (maybe later tonight, if the bug holds)- almost to the point now where I can start painting (other than priming/basecoating)!
So far tonight, here's the 'fighting platform' that forms the upper deck of the promethium tank farm (it's gluing up here):

This will also have smaller tanks (a great kit from Tehnolog/Robogear) mounted up here, and railing and improvised fighting positions upon other gangers from which to snope with (ha! I love me some bad grammar!). You can see the 'two bottle cap' glued up method for making barrels in the foreground.
Here's a couple more cross struts glued in (the tanks are inverted here to get the right spacing). After everything is painted properly, I'll use greenstuff or JB Weld t permanently fasten the tanks to the struts:
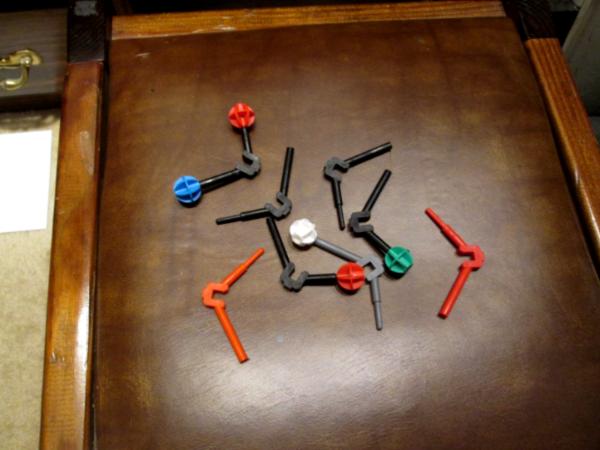
Finally, these widgets are part of a set I found at Goodwill for modeling atomic structures- the angles can all interlace and the different colored balls represent protons, nuetrons and electrons. I reckon to use the angle pieces to fashion more struts for supporting the upper deck. I have enough, I think I'll try using some others to make a different piece of terrain, like an elevated walkway (I have a metric crap-ton of these things):
Once the deck is dried and primered, I can start thinking about building the improvised barricades and hardened firing points- I was afraid at first I wouldn't have much call to put rivets in, but there's going to be lots of opportunity. More follows soonest!
|
"He fears his fate too much, or his desserts are small, who will not put it to a single touch; to win- or lose- it all."
Montrose Toast
|
|
|
|
|
2018/08/01 18:55:40
Subject: sCratchbuilding and Citbashing by Meer_Cat: 7/31 LOER Terrain Contest
|
|
Veteran Inquisitorial Tyranid Xenokiller
|
Coming along Great Meer_Cat, looking forward to seeing the progress
|
|
|
|
|
|
2018/08/01 22:07:58
Subject: Re:sCratchbuilding and Citbashing by Meer_Cat: 7/31 LOER Terrain Contest
|
|
Is 'Eavy Metal Calling?
|
The platform idea is coming along nicely .
I’ll need to keep an eye out in stores for those atom parts, I see many possibilities with those.
|
LOL, Theo your mind is an amazing place, never change.-camkierhi 9/19/13
I cant believe theo is right.. damn. -comradepanda 9/26/13
None of the strange ideas we had about you involved your sexual orientation..........-Monkeytroll 12/10/13
I'd put you on ignore for that comment, if I could...Alpharius 2/11/14 |
|
|
|
|
2018/08/02 00:18:39
Subject: Re:sCratchbuilding and Citbashing by Meer_Cat: 7/31 LOER Terrain Contest
|
|
[DCM]
Boom! Leman Russ Commander
|
Thanks Joe, Theo, for dropping by and for your encouragement! I really appreciate it. I mentioned earlier in this blog that the atmosphere I've found here on DakkaDakka reminds of the good ole days back in the late 80's when I first got started in Warhammer ( everything Warhammer- 40k, fantasy battle, Epic, later Space Hulk and Space Crusade when they came out- a surfeit of riches, indeed!). We would hustle to get cleaned up and changed following afternoon PT so we could go drool over the racks of Citadel paints and Marauder figures at the Shop and then paint until lights out in the Day Room. Lots of 'what are you working on now?' and mutual encouragement- just like here.
For three days in a row now I've kept myself on task, so here's tonight's forward progress (with more a bit later, I needed time to get the superglue scale off my fingers and for some of the more delicate connections to set up, so am blogging for a few minutes).
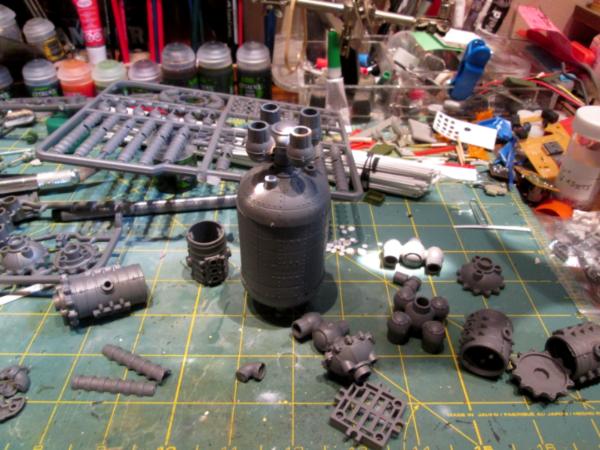
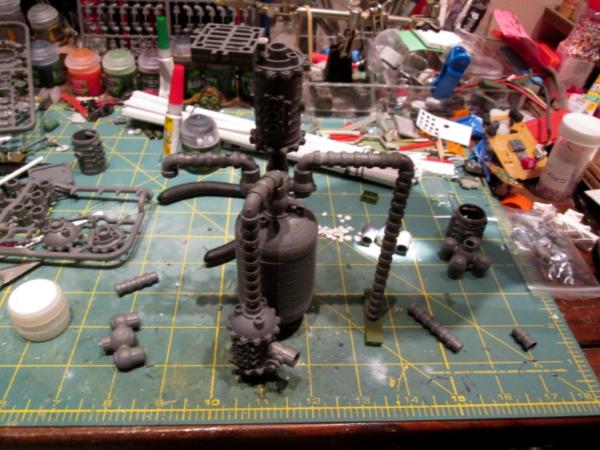
I started out working on the 'cracking tower' that will sit on the upper deck. This is a Russian kit, and I found it on eBay from the same guys that carry Tehnolog and Robogear. If I remember right, it cost me US$6- if you can still find these, I highly recommend you grab 'em while you can- there is so much you can do with the pieces. Not just buildings- I see potential for vehicles too. Here's at the start:
And here's where we are at the moment:
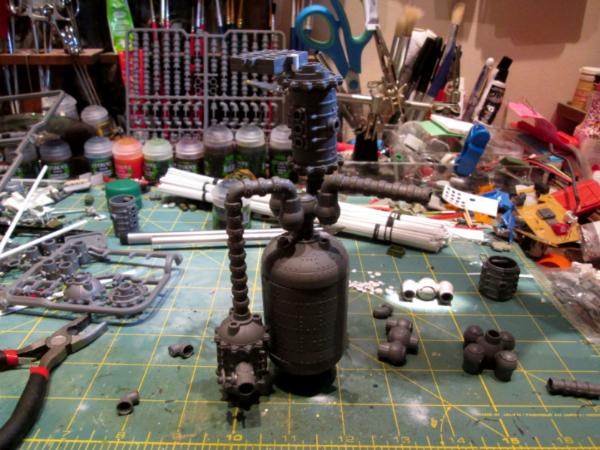
That little platform at the top, where normally the waste gas flare off vent would be located, is where a sniper can perch- good sight lines and will have some armor sheeting welded on around the edges.
Also got the main structure base coated (love me some spray can paint- gotta get an airbrush one day, I reckon):
Once all this is in place, the really fun part starts when I get to use all my junk to fashion 'hasty barricades' around the whole perimeter: crates, barrels, traffic guides, jersey walls, etc. Think Mad Max and the original (real) Road Warrior movies. Too easy.
More follows soonest! 
|
"He fears his fate too much, or his desserts are small, who will not put it to a single touch; to win- or lose- it all."
Montrose Toast
|
|
|
|
|
2018/08/03 00:20:34
Subject: Re:sCratchbuilding and Citbashing by Meer_Cat: 8/1 LOER Terrain Contest
|
|
[DCM]
Boom! Leman Russ Commander
|
Small increments forward tonight, not a lot of time to work:
Got the start of the base coat on the promethium tanks- these get another wash of lightened copper and then grunge applied on top, plus that greeny, grainy gunk that Cam's so good at doing to form a patina on the copper/bronze bits:
A little more work on the cracking tower:
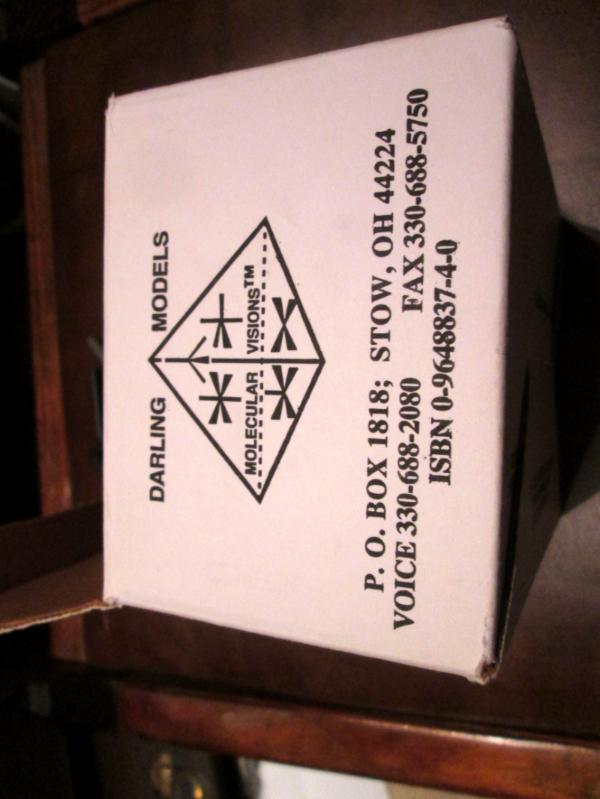
And this is the company that makes the atomic modeling kit (I think it must be for bio-chemistry), someone had indicated an interest:
That's it for tonight, not a lot, but wanted to show I'm still in the fight. I won't get a chance to work on it again until Monday, unfortunately, but will get myself back on task then.
More follows soonest!
|
"He fears his fate too much, or his desserts are small, who will not put it to a single touch; to win- or lose- it all."
Montrose Toast
|
|
|
|
|
|
|


