Forum adverts like this one are shown to any user who is not logged in. Join us by filling out a tiny 3 field form and you will get your own, free, dakka user account which gives a good range of benefits to you:
No adverts like this in the forums anymore.
Times and dates in your local timezone.
Full tracking of what you have read so you can skip to your first unread post, easily see what has changed since you last logged in, and easily see what is new at a glance.
Email notifications for threads you want to watch closely.
Being a part of the oldest wargaming community on the net.
If you are already a member then feel free to login now.
2020/06/09 13:15:28
Subject: Re:Mac's P&M Shenanigans-- 6/4: New LoER progress - medical station interior
Thanks, zahnib! You'll have to wait a bit for more paint because the monthly painting contest is about to leapfrog the medical suite, but I couldn't resist doing a little paint last night. I got all the components based during a break in the hot, windy weather and I had to sling a little paint just to see if my schemes were going to work out.
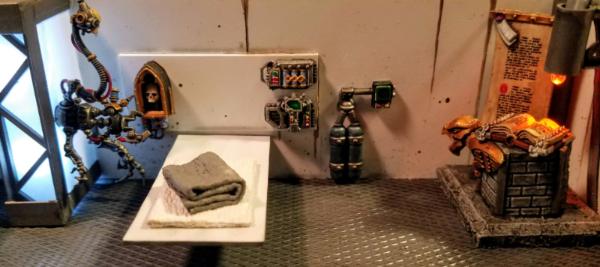
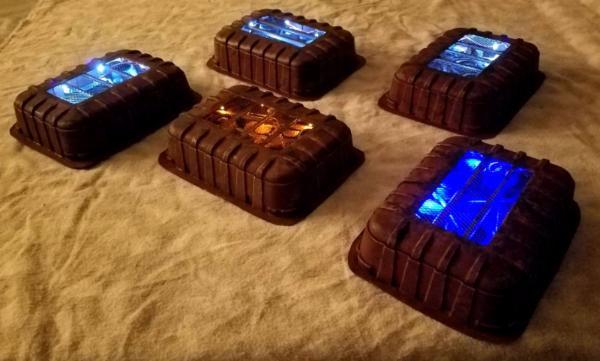
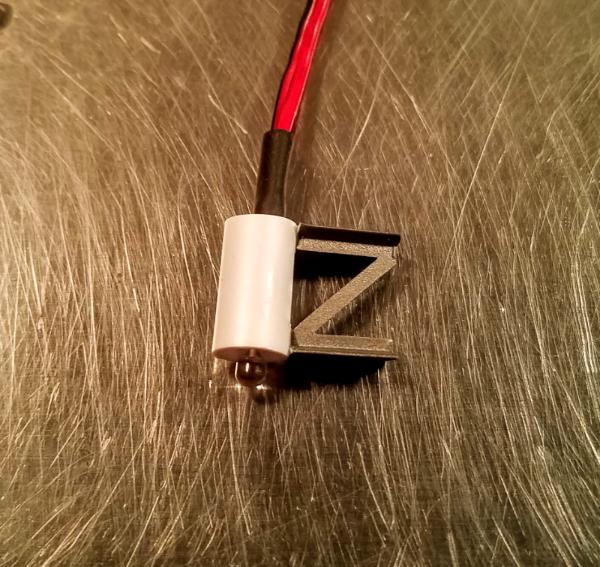
First I built the light fixtures to hold the last of my leftover LEDs from the "Double Entendre" round. I actually have plenty of lights and wiring, but this is it for the coin cell housings and switches. There's a single one with an amber LED for over the shrine to the God-Emperor:
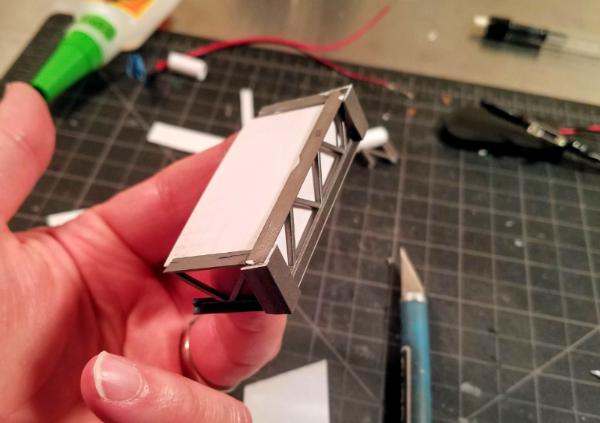
The other one is bigger and will go over the main operating table. This one holds two white LEDs, will have frosted panels set into the girders, and will also hold the suspended medical servitor... when I build one.
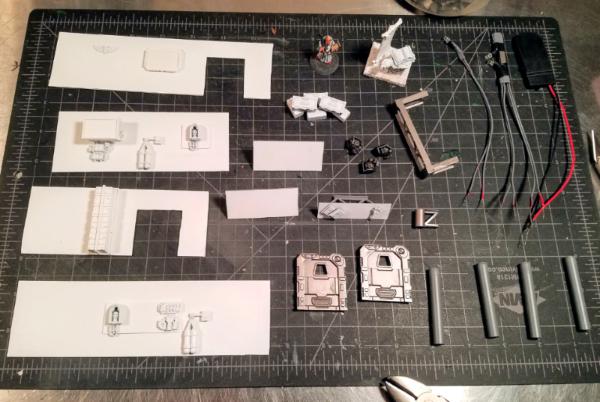
Then I had enough built to basecoat everything. Here's walls, doors, fixtures, floor features, and furniture, plus the LED rigs... I'll leave the wiring exposed for extra visual interest, but it needed a coat of paint first. Overseeing it all is Eugin Welt, Subordinate Chirurgeon Third-Rate of the Officio Medicae. He got painted last month for the Drunken Master challenge and has become a part of the project to the point that he's developing a name and character.
Dryfitting the painted components.
Once I got done cleaning up the bench from all the building, I made time for a little paint. The monitors were the big mystery, and I think they will work out well with a few more coats. I was more confident with the shrine, but I think it's going to deliver... I might do some waterslides on the banner. In general I think everything will paint up nicely.
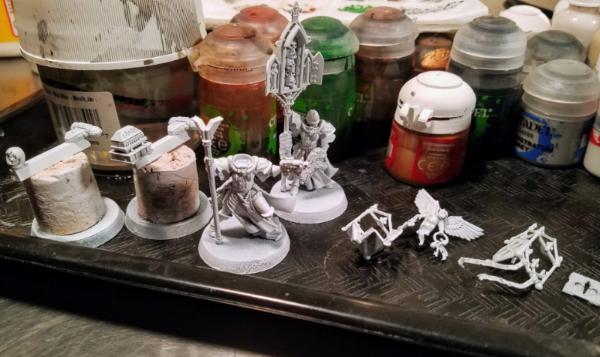
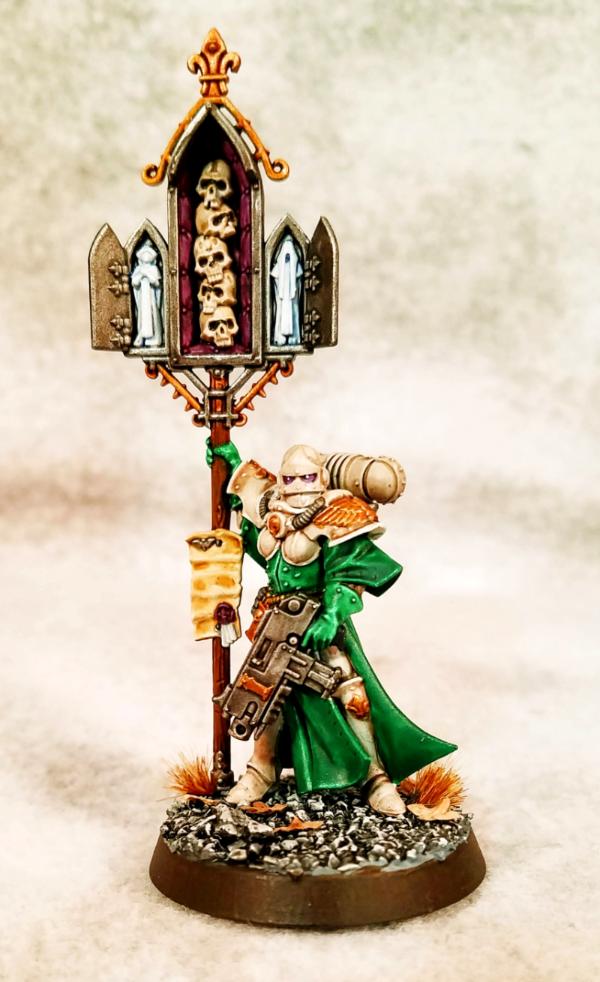
I'm going to mostly shift over to these badass ladies for a few weeks: a pair of Imagifiers / Simulacra Imperialis for the monthly painting compettiton. I'll do one in each of my main paint schemes: white robes over green armor, and green robes over white armor, both with gold trim. I was going to modify the little casket in the cage to be a book, as I'll probably mostly run one with the Book of St. Lucius (or a bunch of books... the Little Free Library of St. Lucius?)... but now that I've seen the model I'm going with the casket. There could be anything in there!
A minor progress update... I've gotten to the brush three nights running now, and all I have to show for it is most of the color blocking on two models. These Sisters are so detailed, they take forever, but they're really fun to paint. I especially enjoyed the skull-filled reliquary... that much iron-banded wood just looks neat. By this weekend, I think I'll be ready for washes, and I think they're really going to spring to life at that point... pretty excited to see how they work out.
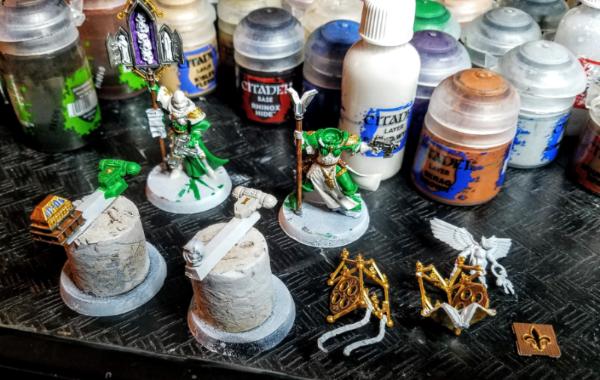
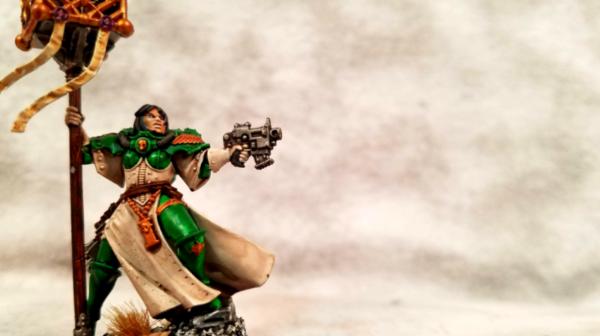
I haven't had as many nights painting as I'd like, but I made it to and through (mostly) the wash stage, allowing me to fully assemble one Simulacrum Imperialis bearer (in the background here) and partially assemble the other. There's still quite a bit of detail work to do, the attendant cherub, the hair, and some edge highlighting and cleanup, but they're really coming together. I accidentally snapped one of them off her painting base, so she got mounted on her permanent base early. As I learned with the Penitent Engine, painting pre-assembly allows some ease in the painting, but requires extra trimming and cleaning to get a good fit... that's just how precise these modern multipart kits are. I'll need to work on assembling the cage and do some gap filling before essentially repainting the outside of it, but I think I'm happy enough with how the little casket came out that it was worth it. I do wish I'd done either the cage or the casket in silver so it wasn't gold-on-gold.
Hopefully finishing both this weekend with room to spare on the contest, then back to the medical facility.
This message was edited 1 time. Last update was at 2020/06/24 12:08:58
I love how washes turn the model from “meh, it’s got colors blocked in” to “Wow, that looks great” in one simple step. But as it’s one of the last steps, there is a lot of steady plodding needed to get to that point.
I agree on the tons on fiddly detail. Lots of little passes needed to make sure you got everything. Nice sculpts though.
I've been taking a page from your playbook, Nevelon... painting small numbers in quick passes with multiple layers of basic color, or at least that's what I feel like your method is. This pair has two coats of thinned Warpstone Glow over a white base, plus a Biel-Tan wash, and it almost but doesn't quite look rich enough. The detail and lowlighting is there, but somehow I had a stronger green on the Zephyrim. It's tedious, even working 2-5 models at a time. Armor, robes, guns, and iconograpy are each 2 passes with paint plus a wash, and then there's lenses, belts and pouches, and purity seals. At least the Simulacra details are some of the most fun I've had painting recently... It will have taken me a month to paint these two models.
Heh, a playbook makes me sound more organized than I am.
I like painting small batches together. I figure with the overhead of sitting down, getting the paint out, grabbing the brush, and then the cleanup side of rinsing the brush, putting things back etc, it makes sense to paint more then one little pouch at a time. If you are young and have a good back, you can chain up to larger batches. Get them large enough and the first one is dry by the time you are finished with the last. Last time I did that regularly (which was ironically painting sisters) I found 4-5 was a good number. And I’d do them from start to finish in a week.
These days I’m more likely just to work pairs, and take long breaks between coats. The trick is slow and steady progress. How many layers does a model need? Get one or two a day, and you will burn right through them. Even with all the little fiddly details on the sisters. Just put down a coat, and get another step closer to the end.
And sometimes you just need to buckle down and push through the irritating stuff. There are a lot of models that sit at the “all I need to do is the edge highlights” stage for longer then they need to.
The green armour is looking really nice. And I'll second Viterbi, nice idea to invert the colours on the two sisters. They still look cohesive but gives a nice sense of individuality
Thanks for the support,everyone...I got the job done! I'll process the photos tomorrow, maybe take a few more if I can wear out my two and four year old boys enough to buy some time, and post the entry photos to the contest thread. In the meantime, here's one that I know I'll use.
Thanks, y'all! Here's the rest of the pics and the commentary from the contest thread:
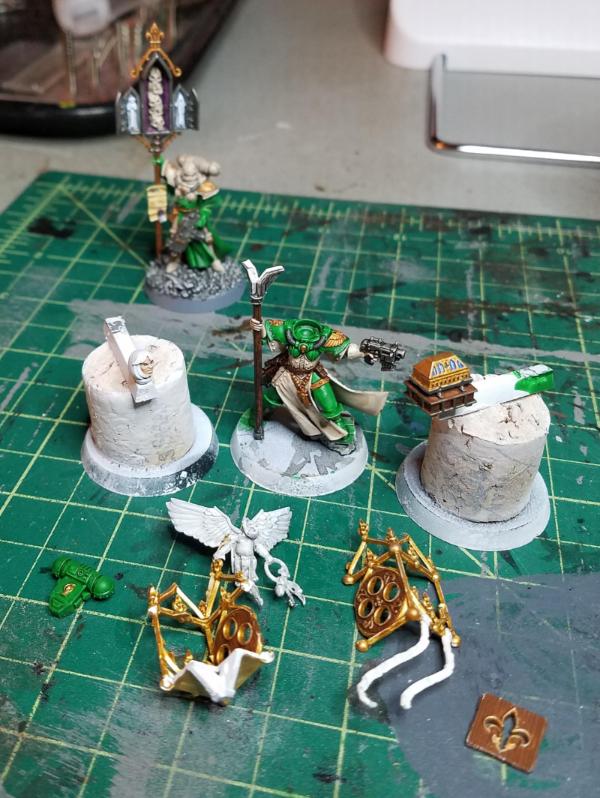
The one from the army box (below left) went quickly; I assembled her completely pre-paint and she didn't have too many fiddly bits to get bogged down with. I'm completely satisfied with her lenses (my third attempt at those overall), and her Simulacrum Imperialis was some of the most fun I've had painting in a while. The other one (below right), which is one of two Simulacra you can build from the Sisters/Dominions/Celestians box, was a real pain... sixteen pieces to start with, which I assembled down to seven and then painted. The cage-and-casket did not appreciate being painted before assembly, and I had to accept some weird gaps and join lines. That said, she's an amazing model... I love the slung bolter, the cherub was a fun challenge (the brushwork on the wings was finer than I usually attempt), and I was really happy with how her face, eyes, and hair came out (y'all might remember that my Canoness from "Final Boss" left something to be desired in those areas). I kept catching glances of her from a low angle when I held the painting handle just so, and I thought it looked so cool I made that one of my entry pics.
Yikes... you blink and two weeks blows by! Long overdue update:
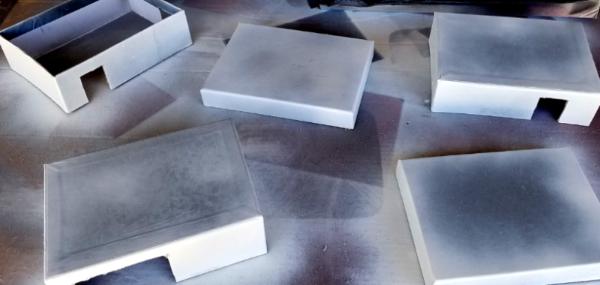
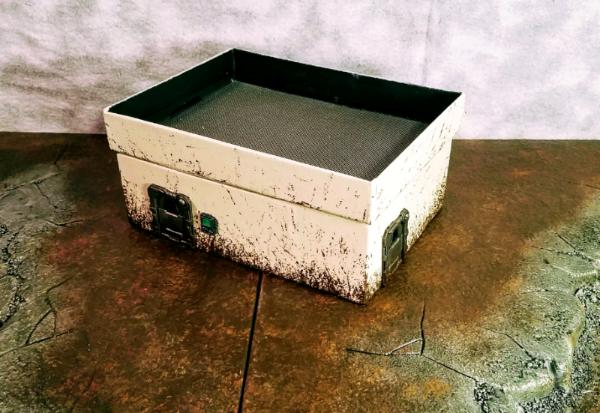
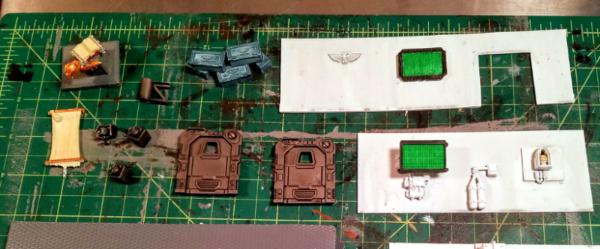
So my entry for the LoER contest is just one building with an interior, but I wanted to paint a few at once so they'd match. I quickly cut the doors out the other night, and then did the rest in one big blitz today. Here's the box buildings primed...
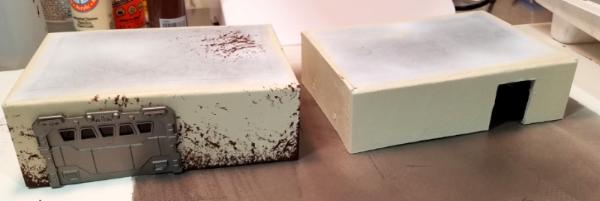
I then rolled on a quick coat of cheap acrylic (Unbleached Titanium) and sponged on another contrasting one (Burnt Umber).
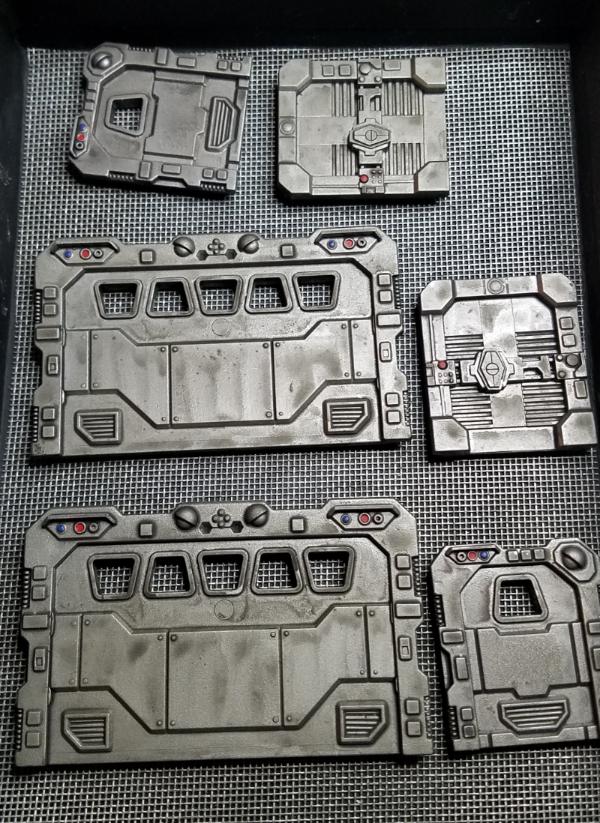
I started detailing the doors from the Maelstrom's Edge sprue.
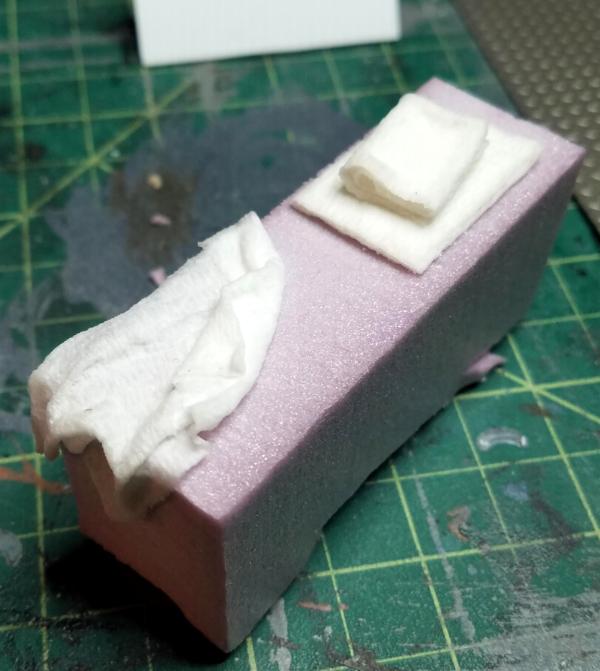
And this was really fun: I built some bed linens for the cots out of paper towel and PVA glue. For what went into them, I'm pretty pleased.
I'm glad the PVA and Paper Towel route worked out for you as well. Quite a brilliantly simple (if not messy) solution to getting a real linen texture and look.
I can now see it coming together. The paper towel worked out, but if you want something a little stronger and easier to use. Old dried out baby wipes (the ones that have been sitting in a container or pouch for years) work really well.
I think I'm on pace to finish this one... but with time to spare, maybe not.
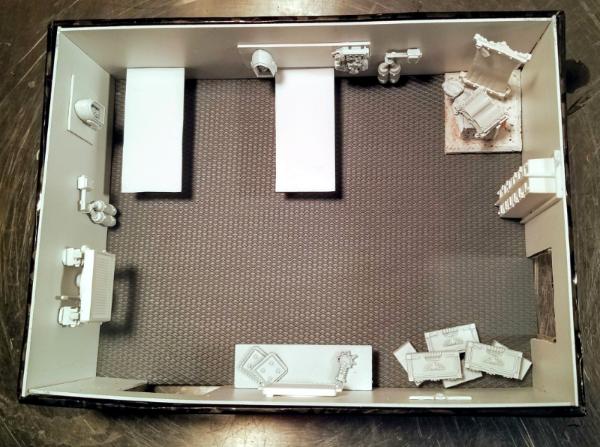
I wired up the medical facility for LED lighting and glued the floor into place. The walls got the last few details and then got glued into place. Next are gluing down the interior details, finishing the light fixtures, and mounting the roof on magnets.
Viterbi wrote: That's some nice interior, it's starting to really take shape, excellent work!
Thanks! It was a little hard to visualize at times, and I did a lot of dry fitting during paint just to see how the spaces would be used, but now that it's glued together, it looks pretty good.
Alright... I kind of let this blog wither on the vine. I was really stretching to get things done at the end of June (painting Sisters for the monthly contest) and July (finishing the med station for the terrain contest), and I had a pretty crazy August. I drove round-trip Colorado to California and back in a week with a visit to an ailing parent and a sibling with a share of the struggle. Then I started a new job teaching middle school to in-person and online students simultaneously. So life comes at you fast, I guess.
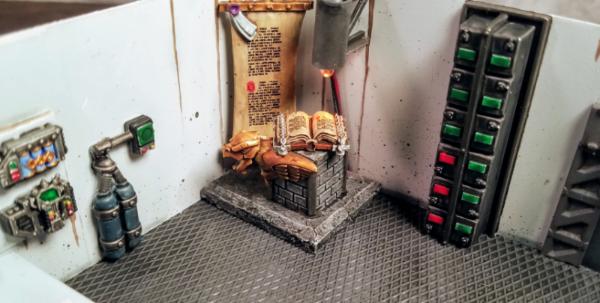
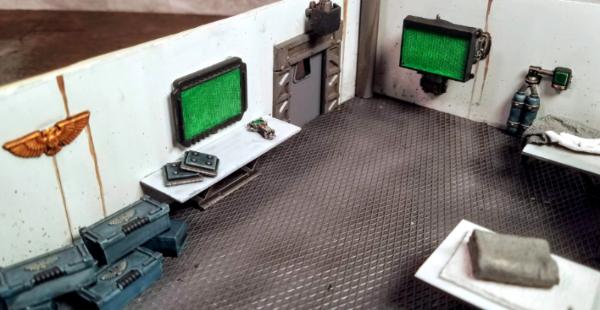
Surgical suite with servo-chirugeon, shrine to the Imperial Cult.
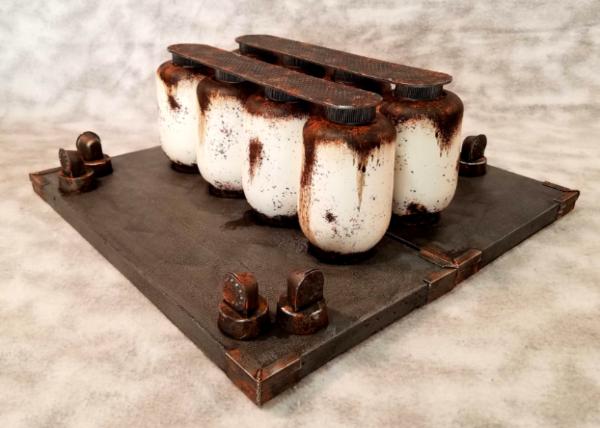
Imperial shrine, power cells.
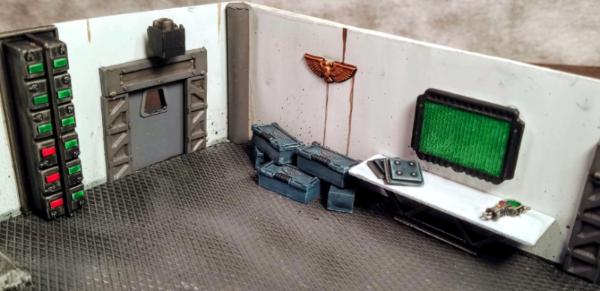
Power cells, workspace.
Workspace, communication array.
Top down, interior view, lights on.
Servo-chirugeon.
Imperial Medicae included for scale.
This contest has been awesome for my personal progress as a hobbyist. I put together a quick retrospective of contest entries since I started in spoilers as well:
Spoiler:
Modular Fueling & Service Depot
LED-lighted power generators:
Imperial-themed game aids:
I suspect some of my bolder hobby schemes have been in pursuit of one of these themed painting or hobbying contests. Highly recommeded.
This message was edited 1 time. Last update was at 2020/09/05 19:44:33
I echo that MacPhail. The LoER and the Unofficial Painting Challenge are both great in that you have another painting model(s) after each one. Although we might not have any love or want for the theme...that often spurred me to pull out something that had been sitting unloved for ages because it did fit the theme.


 Ultramarines, 3rd Co. and friends, 16k+
  4k
4k  4k Points
 Competition Index


 Finished Forge World Elysian Army
  Finished Tau Sept Cadre
  Finished Ork Waaagh |
  Alaitoc Eldar Warhost
  Finished Order of Our Martyred Lady - Sisters of Battle
  Finished Necromundian Imperial Guard Regiment