| Author |
Message |
 |
|
|
|
|
Advert
|
Forum adverts like this one are shown to any user who is not logged in. Join us by filling out a tiny 3 field form and you will get your own, free, dakka user account which gives a good range of benefits to you:
- No adverts like this in the forums anymore.
- Times and dates in your local timezone.
- Full tracking of what you have read so you can skip to your first unread post, easily see what has changed since you last logged in, and easily see what is new at a glance.
- Email notifications for threads you want to watch closely.
- Being a part of the oldest wargaming community on the net.
If you are already a member then feel free to login now. |
|
 |
2011/06/01 18:01:26
Subject: The Toolbox!
|
|

Winged Kroot Vulture
|
AvatarForm wrote:750 x .22 guage steel ball bearings.
Simly add one to each new pot of paint to act as an aggitator when you shake the paint.
When paint dries, simply retrive ball bearing and add to new pot of same pigment for continued use.
Viola! mixed paint!
This! It's why a rattlecan rattles!
Great advice!
|
|
|
|
 |
|
2011/06/01 19:16:46
Subject: Re:The Toolbox!
|
|

Fixture of Dakka
|
I agree! I'm glad the thread is having continued use and still helping people! Sadly it'll probably get lost eventually...
|
|
|
|
|
|
2011/06/01 19:22:55
Subject: Re:The Toolbox!
|
|
Three Color Minimum
|
Any way to have it pinned in this forum or made into an article so it does not fall into the pile of other posts over time?
|
|
This message was edited 2 times. Last update was at 2011/06/01 20:09:20
|
|
|
|
|
2011/06/01 23:33:10
Subject: Re:The Toolbox!
|
|
Fixture of Dakka
|
Good idea. I could make it an article!
Yeh i had legoburner sticky the thread to the top of the forum but one of the MODs took it down a day or two later and linked it from another thread... 
|
|
|
|
|
|
2011/06/01 23:46:42
Subject: The Toolbox!
|
|

Morphing Obliterator
|
Cottonjaw wrote:AvatarForm wrote:750 x .22 guage steel ball bearings.
Simly add one to each new pot of paint to act as an aggitator when you shake the paint.
When paint dries, simply retrive ball bearing and add to new pot of same pigment for continued use.
Viola! mixed paint!
This! It's why a rattlecan rattles!
Great advice!
Agitators are a great idea, but I simply use the cut off bits (sprues) of metal models. Cheap, and effective  Automatically Appended Next Post: Automatically Appended Next Post: Leigen_Zero wrote:Chowderhead wrote:Leigen_Zero wrote:Two other things that never leave my hobby kit:
A selection of various paperclips (for pinning)
An assortment of 'split-shot' fishing weights, split them in half (by bending back and forth until the little hinge of metal breaks) then superglue underneath bases to weight them down!
A nickel fits perfectly under a GW base, actually.
True, but fishing weights (in my case) are free, as my grandfather is a keen angler and when he buys new fishing weights, he gives me the old rusty/broken/etc ones
I use lead weights for the 'split' or slotta bases, but use cheap stainless steel washers to weigh down most of my models
Also, Im not sure if this actually fits in this section, so feel free to ignore it:
http://www.dakkadakka.com/gallery/34823-Model%20Case%20with%20Cork%20Board.html?m=2
Corkboard for pinning things too! (I suppose you could do that on the inside of your toolbox too).
|
|
This message was edited 1 time. Last update was at 2011/06/01 23:54:20
|
|
|
|
|
2011/06/02 01:32:11
Subject: The Toolbox!
|
|
Fixture of Dakka
|
Thanks for posting that idea up, very clever indeed!  As we stand currently this will not be added to the list. AvatarForm pointed out that if we add lots of misc items that aren't tools then the list will get bogged down quickly and become hard to use. Most of these things people will come up with by themselves(Blu- tac for example) .
ALTHOUGH! I love seeing these things posted up. Those who wish for more information will read the thread and find all these great ideas tucked away inside!!
NEWS:
I wrote the article!! 
I plan on adding all the gems of information to it soon so they will be even easier to find!
|
|
|
|
|
|
2011/06/02 17:53:11
Subject: Re:The Toolbox!
|
|
Kid_Kyoto
|
Only other thing I can think I have in my box is a couple of dust masks for when I'm doing sanding. The spare is for my roommate so I can work in the same room while he's painting/assembling.
|
|
|
|
|
|
2011/06/02 18:06:44
Subject: Re:The Toolbox!
|
|
Fixture of Dakka
|
Good shout! I have a stack of them for spraying and stuff as well. I'll add them to the list!
|
|
|
|
|
|
2011/06/06 05:45:11
Subject: Re:The Toolbox!
|
|

Elite Tyranid Warrior
|
Hey LostSoul,
As you requested here's a quick write-up on a material I use a lot as well as how I use it for my conversions.
Reading the list I did notice you have "cement" in the first section but I'd like to suggest one specific product be added in more than one category as it works for assembly, gap filling and conversion work. Tamiya's extra thin cement (the green cap bottle) is a product I discovered shortly a few years back and it's greatly facilitated many a project. It's uses include:
- gluing (of course). For those of you not familiar with cement it's actually a solvent that dissolves plastic rather than an adhesive, which is why the extra thin stuff works so well.
- smoothing surfaces. Say you've just filed down something off a model. If you pressed too hard while file or if your file is too coarse, just apply some cement on the section you want to clean up, let it sit for a few seconds, then draw a paintbrush applicator over the area. You'll effective "paint" the area smooth.
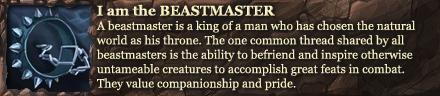
- smoothing transitions between two pieces. Similar to the above use except that it's done when you're at the assembly phase rather than the clean-up phase. What you have to do is put a large drop of cement on one of the pieces, let it set for a few seconds, then press the other piece tightly against it. What should happen is that the plastic on the first piece will be forced out of the joint area and create a bit of a "welding seam". At that point you come back with the cement laden paintbrush and "paint it smooth". When working with plastic kits there's been a lot of times where I never use GS because of this trick, such as on the model below.
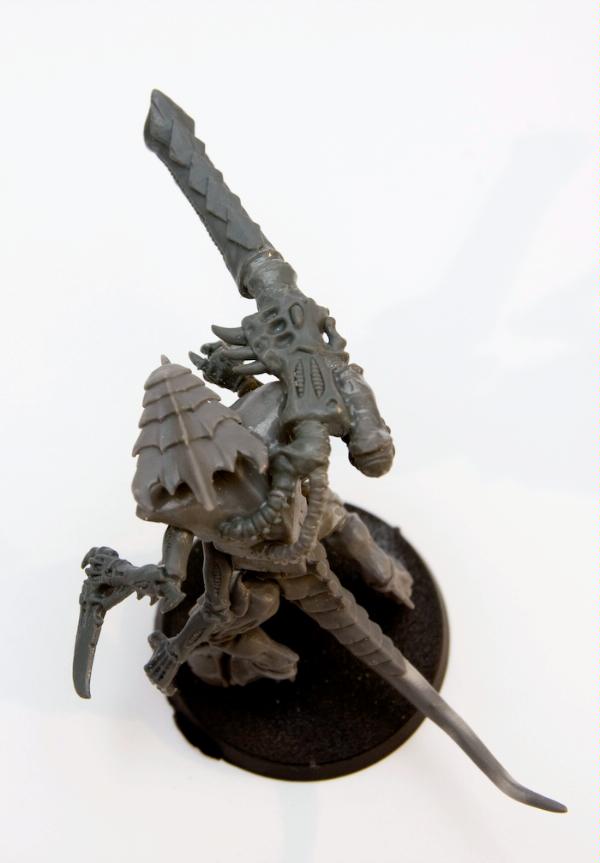
- Gap filling. This is a bit of an escalation of the previous technique. When two pieces can't possibly be joined smoothly because they are so deformed that all you can do is glue them and build up or file the transition down, this is where the extra cement really shines. First pick a model with horrible joints such as this carnifex:
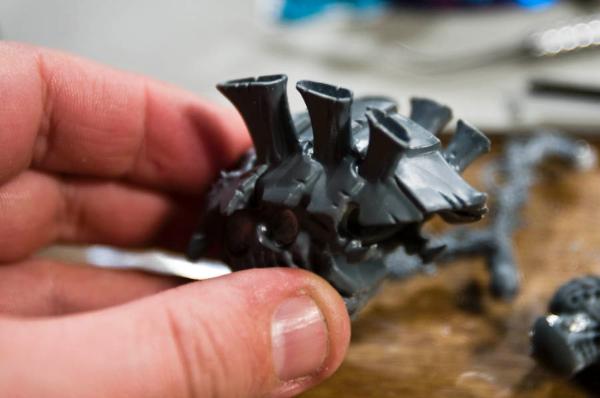
File things down until both pieces are flush with each other. Make sure to leave as much of the filings on the model as possible then apply a generous coat of cement either with a brush or an eye dropper. Yes, you want to literally, soak the filings with cement. If the gap is really bad I'll actually file down some sprue and collect the filings so I can drop a good quantity of extra material on the model. You now basically have liquid plastic putty with which to paint in the gaps. It may take more than one application. let it sit about 2 minutes between coats just so you don't dissolve underlying layers. Wait about 15-20 minutes before filing. When done the area will be smooth as glass. Here's a pic of the same Carnifex after much filing and 2 applications.
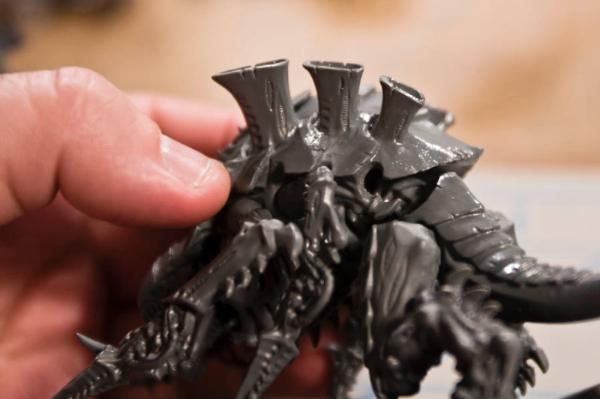
Total time, 30 minutes because I was working on other models at the same time.
It sells for 5.99 here in Canada so it's definitely cheaper than the GW crazy glue considering what you can accomplish with it.
Hope this helps. If you have any questions or comments, don't hesitate to ask
|
|
This message was edited 1 time. Last update was at 2011/06/06 05:46:06
|
|
|
|
|
2011/06/07 02:02:29
Subject: Re:The Toolbox!
|
|
Fixture of Dakka
|
Thanks very much mate! That's a fantastic write up that anyone can follow with ease. I'm sure thats going to help lots of people.
I have updated the list appropriately. Oh a little notice for UK hobbyists who want to buy the product: It is not available here due to regulations on how a product should be labeled. It's not dangerous or anything so just buy it online. This may effect other EU countries, not sure.
Thanks again Dark_Gear. Great work man!
Dark_Gear - Award for 'Most Original Stroke Of Genius' 
|
|
|
|
|
|
2011/06/07 05:39:31
Subject: Re:The Toolbox!
|
|
Elite Tyranid Warrior
|
<elvis voice>Thank you, thank you very much </elvis voice>
Always happy to share some tricks I've learned along the way. Great idea on starting this thread by the way. It's a great list for beginners and even vets. Now all we need to produce is a list of suppliers filtered by country or continent so we can figure out how to get the more obscure materials such as Mr. Surfacer in Canada.
|
|
|
|
|
|
2011/06/07 13:51:43
Subject: Re:The Toolbox!
|
|
Fixture of Dakka
|
Dark_Gear wrote:Always happy to share some tricks I've learned along the way. Great idea on starting this thread by the way. It's a great list for beginners and even vets. Now all we need to produce is a list of suppliers filtered by country or continent so we can figure out how to get the more obscure materials such as Mr. Surfacer in Canada.
 Mr. Surfacer?!
Thanks very much! Haha yeh, we had a slightly heated discussion about this near the start, i think it was Avatarform(i may be wrong there) that pointed out how difficult it was going to be to link a supplier for every country. The links that are attached to the list are for online deliveries and many of them are for amazon. This should allow most people to get there hands on whatever item they desire within a couple of weeks or less.
Seen something you like Dark_Gear?
|
|
|
|
|
|
2011/06/07 14:21:50
Subject: Re:The Toolbox!
|
|

Dakka Veteran
|
The Micro-Mark Seam Scraper.
Takes the hassle out of scraping/filing away mouldlines from plastic figures and even works on metal ones. Much better than an old exacto-blade.
|
|
|
|
|
|
2011/06/07 14:31:57
Subject: Re:The Toolbox!
|
|
Elite Tyranid Warrior
|
I've seen a lot that I like but can't find. When not posting here or working on my own models I lurk over at:
http://www.fichtenfoo.com/blog/
http://www.maschinenkrueger.com/forum/index.php/
http://www.scale120.com/
http://www.resinaddict.com/
The modelling and painting skills over on these forums are quite different than the typical 40k conversions and a great inspiration. Over the years I've taken notes on a lot of materials that I can't find anywhere such as Milliput, MiG pigments, and the full line of "Mr." products. It's just motivated to be creative with what materials I can find so I figure all this time I've spend practicing with the alternative solutions means I'll have a ball once I start working with the actual putties and surfacers that the "pros" use. I can't imagine my GS skills would have come too far if I'd just stuck to gluing plastic for the past 3 years.
|
|
|
|
|
|
2011/06/08 00:29:00
Subject: Re:The Toolbox!
|
|
Fixture of Dakka
|
pixelpusher wrote:The Micro-Mark Seam Scraper.
Takes the hassle out of scraping/filing away mouldlines from plastic figures and even works on metal ones. Much better than an old exacto-blade.
Thanks for that. Added to the list!
Dark_Gear wrote:I've seen a lot that I like but can't find. When not posting here or working on my own models I lurk over at:
http://www.fichtenfoo.com/blog/
http://www.maschinenkrueger.com/forum/index.php/
http://www.scale120.com/
http://www.resinaddict.com/
The modelling and painting skills over on these forums are quite different than the typical 40k conversions and a great inspiration. Over the years I've taken notes on a lot of materials that I can't find anywhere such as Milliput, MiG pigments, and the full line of "Mr." products. It's just motivated to be creative with what materials I can find so I figure all this time I've spend practicing with the alternative solutions means I'll have a ball once I start working with the actual putties and surfacers that the "pros" use. I can't imagine my GS skills would have come too far if I'd just stuck to gluing plastic for the past 3 years.
Nice links there. Your tenacity has really been worth it! Can i help you find something? I would suggest amazon for most products.
Now requesting paints for the list! Best paints everyone?
|
|
|
|
|
|
2011/06/15 13:53:03
Subject: Re:The Toolbox!
|
|
Fixture of Dakka
|
Paints? Anyone? Is Games Workshop the best, or have you found something better?!
|
|
|
|
|
|
2011/06/15 14:46:26
Subject: Re:The Toolbox!
|
|
Three Color Minimum
|
GW paint is great, but the delivery system, the pot, is considered by many to be inferior on multiple levels to the dropper bottles used by other companies. The other issue people have with GW paints is the limited amount of colors as compared to other vendors. So if you are looking for an alternative, most people look to Vallejo (Game, Model, Air) or Reaper Master Paints from what I have seen. The other pot based paint one is P3, but I do not see that one discussed nearly as much as Vallejo or Reaper.
|
|
|
|
|
2011/06/16 05:53:52
Subject: Re:The Toolbox!
|
|
Elite Tyranid Warrior
|
LostSoulCasey'sLaw wrote:Paints? Anyone? Is Games Workshop the best, or have you found something better?!
Here's my 3 cents (inflation... just gotta love quantitative easing  )
I'm a fan of Tamiya's paint selection. Not only are they not as thick right out of the pot but their metallics also thin out much more effectively than GW's. As an added bonus, Tamiya paints are great to work with when airbrushing. All of the above mean nothing compared to this last advantage. Tamiya's paint cleans up much more easily out of the brush. Since I started using them I've not once had problems with paint drying in the brush and causing bristles to splay out, thereby creating a drybrushing tool...
Lately I've started experimenting with oil paint due to my hatred of acrylic painting for minis. Although the curing time is a pain to deal with (days rather than minutes), everything else is better. Application, check. Resistance to chipping, check. Setup time, check. Clean up time, check. Ability to create mixes and washes on the fly, check and check.
To give you an idea, I often have 20 minutes to spare in the morning before leaving for work. Seeing as how you use the same solvent to dilute your paint and clean your brushes, all you need to do to get going with oil paints is put a few drops of Odourless Spirits on the paint you left out all night and you're good to go. This takes 20 seconds. When you're done, unscrew the lid on your "cleaning jar", swish the brush around for 3 seconds, wipe it down on a towel, repeat once or twice depending on colour and you're good to go. This takes 30 seconds. So if you only 20 minutes a day to paint, if you're working with oil paint, you could be painting for 19 minutes a day, as long as you have your colour selection picked out ahead of time (which I do). Oh, and because you actually mix the pigment with the spirits as you work to get just the right consistency of paint on your brush, it's really easy to go from a "paint" to a "wash" just by swishing more spirits into your mix right on the pallet. I'm not an elitist expert painter (since I spend too much time working on conversions) but I'm telling that once you discover how easy painting can be if you're using oil paint, it's really hard to go back.
The brand of oil paints doesn't necessarily matter as long as you don't use the cheapest one. Make sure you get odourless mineral spirits rather than turpentine to thin your paint. It's not as toxic and doesn't smell bad at all but you'll still want to work in a properly ventilated area. Your brushes and your models will thank you.
|
|
|
|
|
|
2011/06/16 08:40:36
Subject: The Toolbox!
|
|
Lieutenant Colonel
|
Okay I have copied in a load of stuff I need for a guy ages ago. I have more to add, we might need to re-organise the article slightly?
Whoops just read the top of the Article! Will re post the items in the correct area, are we Read/write protecting Articles now? 
I have the images read to go, so all you need to do is copy and paste the bits below and you will see the images...
MWNCIBOO's My Tool Box
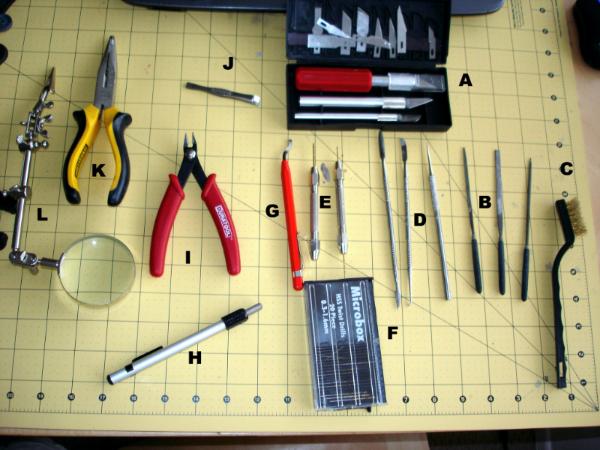
--Gallery:2010/8/9/127625_sm.jpg--
Okay so going around the board i'll give you what i paid over the years.
A. 3x Hobby knife set with Extra blades and metal insert (£10) (I have had to replace these because of the Plastic Insert, buy a metal insert!)
B. 3x Games workshop files (£5 off ebay)
C. Wire brush for cleaning files (50p) (Cheap flea Market DIY Store)
D. Sculpting tools off ebay (£3)
E. Pin Vices x 2 + Micro drill bits (£12)
F. Drill bits (came with pin vices) (Cheap flea Market DIY Store)
G.Deburring Tool (£6 you can get packs of 12 for £10 sell them onto friends for a £1 each)
H.Gerber Diamond Blade sharpener (Don't know how much was a present from my Wife)
I. Clippers (£5) (Cheap flea Market DIY Store)
J. Tweezers (nicked off my sister years ago!)
K. Pliers (for wire work/ pinning bits £5)
L. Multihand thingy ma-Jig (£5).
Advanced Tools
--Gallery:2010/12/5/161079_sm.JPG--
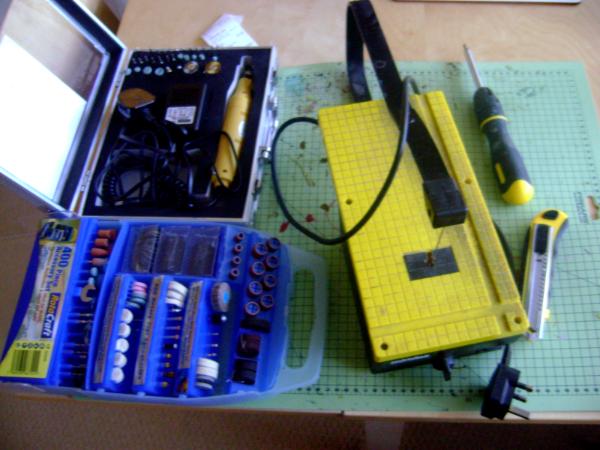
A. Cheap Dremel (£22) with lots of attachments.
B. Model Saw (£30) Awesome for Plastic and Plasti-card and big projects such as Terrain etc, makes everything super quick.
--Gallery:2011/4/20/212367_sm.jpg--

C. Daylight bulb, makes a huge difference to painting, in poor light, nightime, poorly lit area's.
Remember this is a general guide you don't need all the items right away, you build it up over years, just don't cheap out too much on tools or you end up paying twice or three times, do cheap out on the expendable pieces ! The internet is amazing for bargains. Good Hunting.
Oh and don't put Steel ball bearings in your Paints as they can and will oxidise (unless they are Stainless steel ek! Expense) I have an Article on the go all about Paint and it's make up and how it is manufactured etc. Use Glass Beads, there is a reason why we use Glass in Chemistry! I would recommend Glass Beads off ebay you can bags of them dirty cheap at hobby craft.
|
|
This message was edited 4 times. Last update was at 2011/06/17 21:42:45
Collecting Forge World 30k????? If you prefix any Thread Subject line on 30k or Pre-heresy or Horus Heresy with [30K] we can convince LEGO and the Admin team to create a 30K mini board if we can show there is enough interest! |
|
|
|
|
2011/06/17 13:10:14
Subject: Re:The Toolbox!
|
|
Fixture of Dakka
|
Thanks Synchro and Dark_Gear. Some great points there! I'll alter the list accordingly tonight or tomorrow.
mwnciboo wrote:Whoops just read the top of the Article! Will re post the items in the correct area, are we Read/write protecting Articles now?
Haha, due to all the code on the page it's very hard to keep track of and alter. Also it is supposed to be identical to the list on the first post of this thread. Thats the only reason i ask people not to edit it, sure it's a tad annoying but its better than the list falling apart at the seams.
Remember this is a general guide you don't need all the items right away, you build it up over years
Good point! New hobbyists that read this shouldn't worry about not having most of the kit and they shouldn't run out and buy it all right away. The list is most useful if you are finding a job difficult and need a new piece of kit to get it done!
Oh and don't put Steel ball bearings in your Paints as they can and will oxidise (unless they are Stainless steel ek! Expense) I have an Article on the go all about Paint and it's make up and how it is manufactured etc. Use Glass Beads, there is a reason why we use Glass in Chemistry! I would recommend Glass Beads off ebay you can bags of them dirty cheap at hobby craft.
I'm surprised myself or someone else didn't pick up on this earlier... Oh the shame. Yeh that could really ruin your paints.
As i say the list and article will be altered tonight or more likely tomorrow!
|
|
|
|
|
|
2011/06/17 13:48:39
Subject: Re:The Toolbox!
|
|
Three Color Minimum
|
Another option is pea gravel like you can find at your local pet supply store. You want the unpainted rocks of course. Someone pointed this out to me a few weeks ago and so far it has worked very well.
|
|
|
|
|
2011/06/17 15:17:46
Subject: Re:The Toolbox!
|
|
Elite Tyranid Warrior
|
Love the awesome new contributions guys.
@ Synchro: Good tip. Let's not forget that you could also use some of the gravel for basing material too.
@ mwnciboo: Nice toolbox and great point about the stepped purchases. Looking forward to the article on paint composition.
I guess that when you've been modeling for a few years it's easy to forget that the toolbox grows organically with your hobby experience. While you don't need all the tools all the time, there are still some tools no hobbyists should live without. When giving advice to the "baby seals" coming into the VFLGS for their first plastic kit, the list I suggest is composed of just 3 items:
-Extra thin cement.
-Sprue cutters.
-Needle files.
Anything else is just gravy until they start working on metal minis. This list also keeps the start-up cost lower than 15$ so it's less likely to scare the parents. I don't suggest a seam scraper (at first) because I've found it's easy to control just how much material you remove with files in most cases, but maybe that's just me.
|
|
|
|
|
|
2011/06/17 21:10:55
Subject: The Toolbox!
|
|
Lieutenant Colonel
|
Dark-Gear you are spot on with the 3 items. I have been doing this hobby for years but even today, yes today i learned something new.
If your needle applicator on REVELL contacta Professional Plastic Cement becomes blocked. Light a Candle and hold the needle in the flame for about 5- 10's flames will come out of either end as the glue clears out. Voilla, your needle is clear. I have 3 pots of this stuff that was gathering dust and now i can use them again!
My Painting Crusade moves forward the 1st article i did from scratch was this one
1. Colour and Light Theory http://www.dakkadakka.com/wiki/en/Colour%20Theory,%20light%20and%20Shade 100% complete
2. Paint what is it?
3. Undercoating vs Priming http://www.dakkadakka.com/wiki/en/Priming_vs_Undercoating 80% complete
|
|
This message was edited 1 time. Last update was at 2011/06/17 21:21:46
Collecting Forge World 30k????? If you prefix any Thread Subject line on 30k or Pre-heresy or Horus Heresy with [30K] we can convince LEGO and the Admin team to create a 30K mini board if we can show there is enough interest! |
|
|
|
|
2011/06/18 13:28:50
Subject: Re:The Toolbox!
|
|
Fixture of Dakka
|
Sorry all, i've been awful busy the last week but as it stands i have no plans tomorrow so i'll whip the list and article into shape then. I love the amount of input you are all putting in and it looks like the thread is going from strength to strength!
Looking forward to going through all these gems of information properly! I may even manage to get all the extra information onto the article as well!
Peace. Automatically Appended Next Post: P.S. The cutter you have in this image...
mwnciboo wrote:
I scratch built that using Autodesk Inventor in my second last year of school! They told me it was well above full marks and would have done very well at university level. Sorry to boast but i haven't seen the wee things in ages! Haha. It might not sound like much to most people but if you know about Autodesk Inventor and you own the knife mwnciboo you can see the amount of detail and time i had to put in!
Boasting over!
|
|
This message was edited 1 time. Last update was at 2011/06/18 13:36:02
|
|
|
|
|
2011/06/20 00:52:08
Subject: Re:The Toolbox!
|
|
Fixture of Dakka
|
So i'm halfway through the toolbox stuff and its getting rather late. Having a wee gathering because my friend is heading off for Ghana on Tuesday. I will finish the edit off on Tuesday and post it up as well as posting my write up for Oyumaru which appears to be an amazing tool so far. You can see a short write up on Dark_Gear's Nid's blog at the moment. Also just check out the blog its amazing!
Happy Modeling!!
|
|
|
|
|
|
2011/07/08 23:48:47
Subject: Re:The Toolbox!
|
|
Fixture of Dakka
|
Whoa it's been a long time since i posted. R/L been keeping me occupied recently but i'll get the update sorted out in the next couple of days.
If you are the betting type i wouldn't put any money on it being done tomorrow as i am going to audition for 'World War Z' the Brad Pitt film which is going to start filming soon. They are filming in Glasgow so fingers crossed that i get to be an extra.
|
|
|
|
|
|
|
|