| Author |
Message |
 |
|
|
|
|
Advert
|
Forum adverts like this one are shown to any user who is not logged in. Join us by filling out a tiny 3 field form and you will get your own, free, dakka user account which gives a good range of benefits to you:
- No adverts like this in the forums anymore.
- Times and dates in your local timezone.
- Full tracking of what you have read so you can skip to your first unread post, easily see what has changed since you last logged in, and easily see what is new at a glance.
- Email notifications for threads you want to watch closely.
- Being a part of the oldest wargaming community on the net.
If you are already a member then feel free to login now. |
|
 |
2016/08/15 17:49:27
Subject: Armies On Parade - *Finished*
|
|

Irked Necron Immortal
|
Evening Dakka 
I saw on Facebook that my FLGS is doing an AOP this year and so I thought I'd give it a go, having never tried anything like this before. The closing date is October 15th, so I should have sufficient time to get the base done and my army (or at least the units I'm using) finished, considering I do not work very quickly.
One slight issue is that I'm actually on holiday for two weeks end of Sep (going to see the mouse in Florida), so that eats into my timeframe somewhat. That aside, I'll see how far I get and hopefully produce something half decent!
The Base
So as this was a rather last minute decision and I wanted to get going straight away, I went into the garage to see if I could find a suitable board to use for my diorama. An old cat tree proved to be the perfect donor.
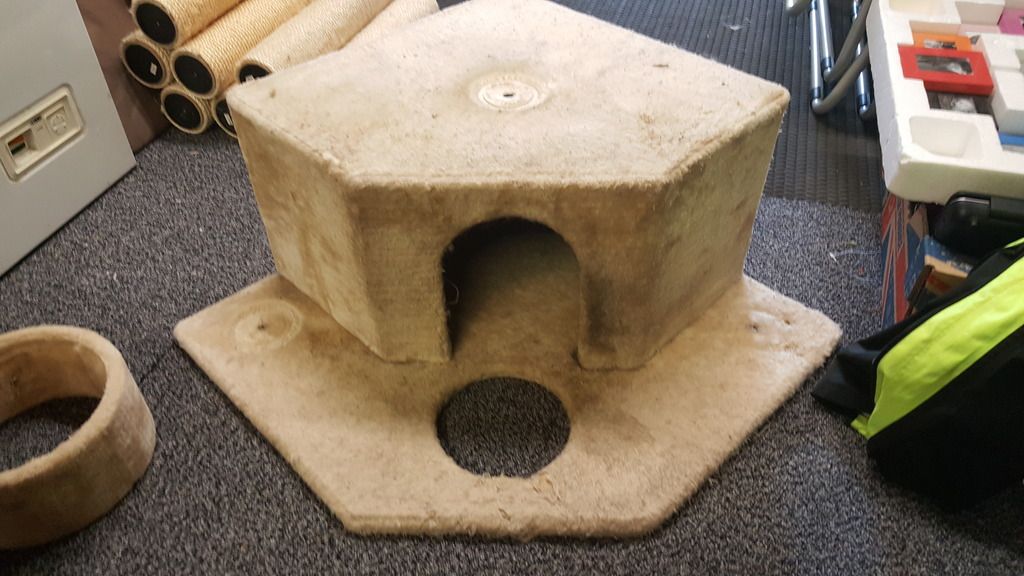
After much fiddling and removing about 50-60 staples, I got the old flock off and edges cleaned up.

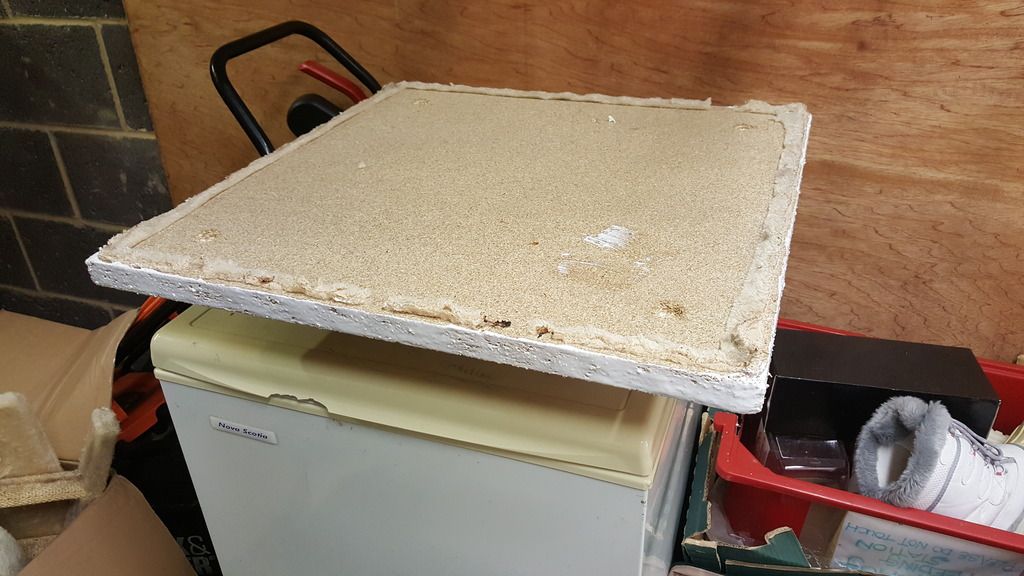
I then set about planning how I would utilise the missing corner or how I could fill it. ideas were failing me, so i went back to the cat tree pile to review my options. It was at this point I found the below item.

It literally took 2 minutes to get the flock off, which annoyed me greatly as I'd effectively wasted 40mins pissing about with the last piece. oh well, spilt milk and all that.
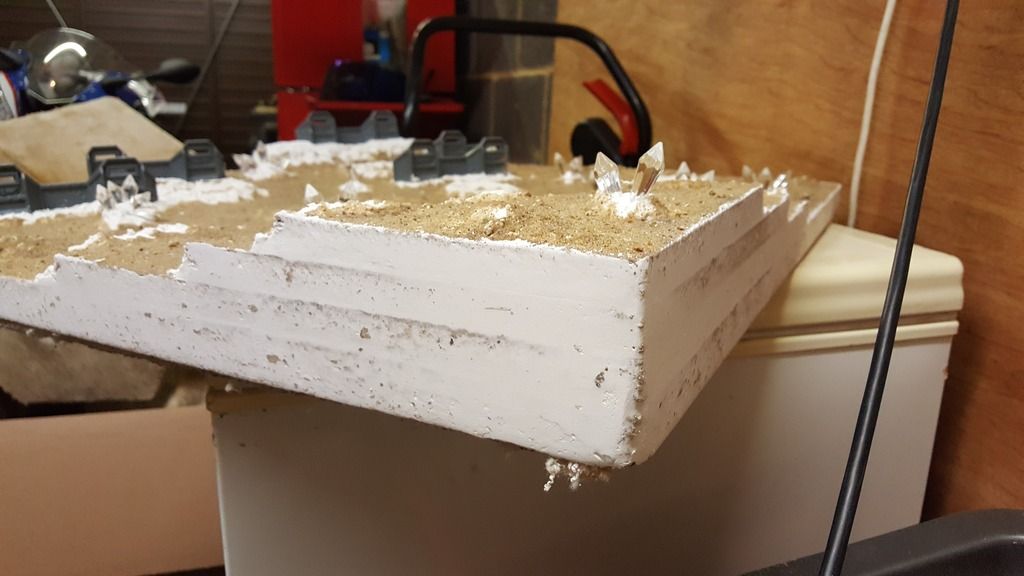
I then sealed the edges with PVA to stop the MDF from crubming away.
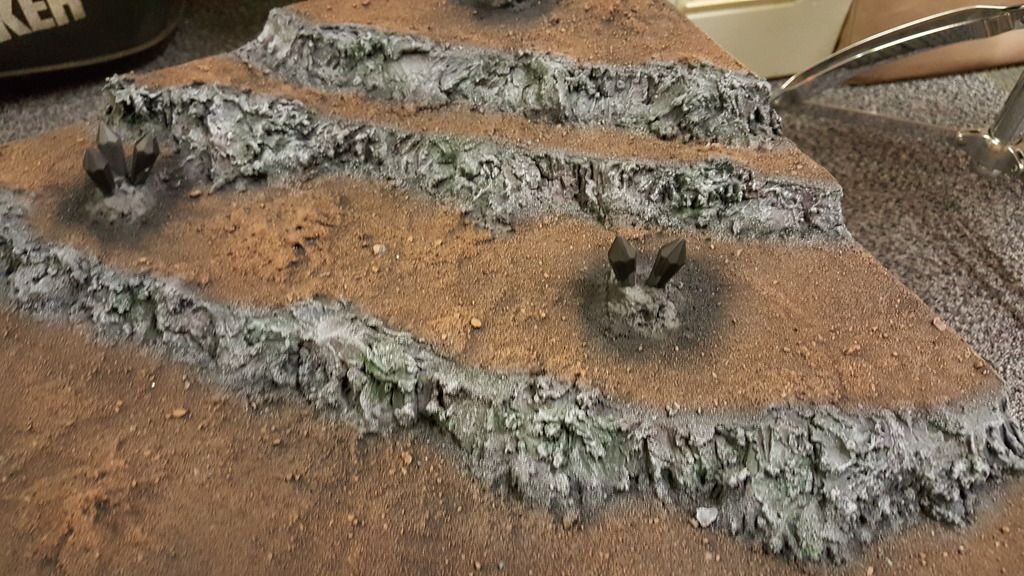
Then in a show of stubbornness about not wasting anything, I cut a few pieces from the first piece of wood to start a rock formation up (I am currently sans any foam, so am using what is to hand).

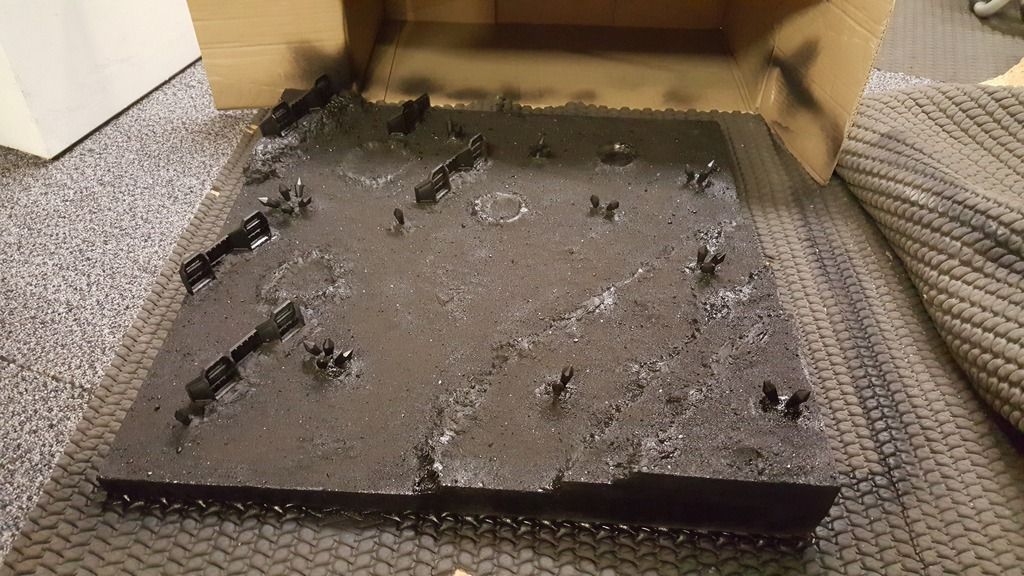
Edges sealed and pieces glued in place.

Rocks starting to take shape.

Closer image.

Added a few craters.

And that's it for now. I've got some plastic crystal on order to get this suitably Necronified, so I'll post more updates as and when they arrive. The vision isn't yet set in stone but I'm thinking starting with a relatively standard battlescape and then adding little bots and pieces as I got. I tend to just make stuff up on the fly, so hopefully it'll look okay when it's done.
Thanks for reading  Automatically Appended Next Post:
One last thing, I do plan to go back and tidy up the rocks and board edges further down the line, so the perfectionists among you need not fear 
|
|
This message was edited 3 times. Last update was at 2016/10/02 16:03:19
|
|
|
 |
|
2016/08/20 11:35:35
Subject: Re:Armies On Parade - WIP Thread *Small update*
|
|
Irked Necron Immortal
|
Afternoon all
I've done a tad more work on the board, but have been hindered by a lack of spare time and available materials. Did I mention that I'm a slow worker?
So I wanted to add some Necron touches to the board and as the crystals I normally make are far too small, I opted to buy some plastic jewellery beads.

Then made some clusters. These will be fun to paint! I think I'm up to 28 crystals so far.

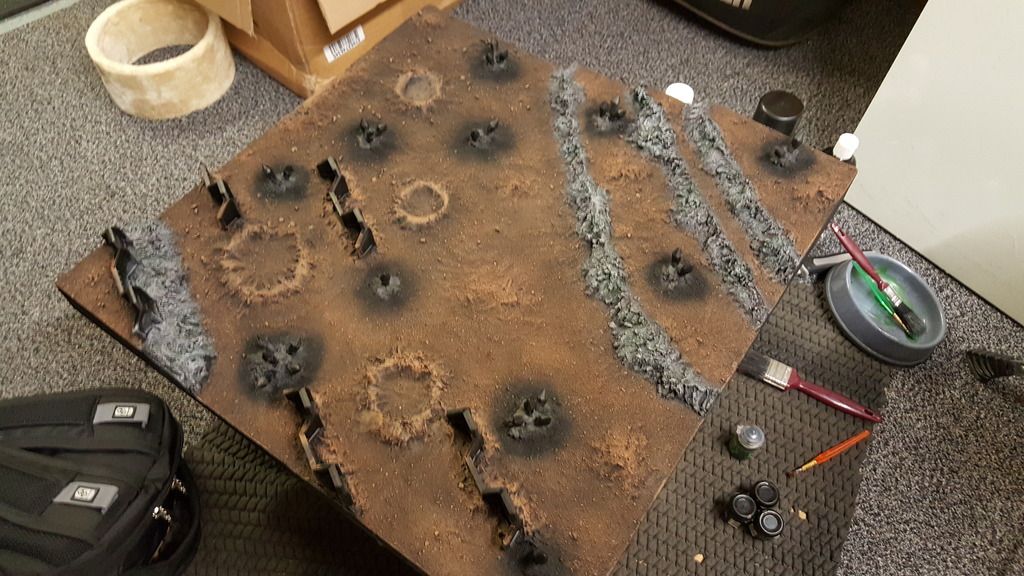
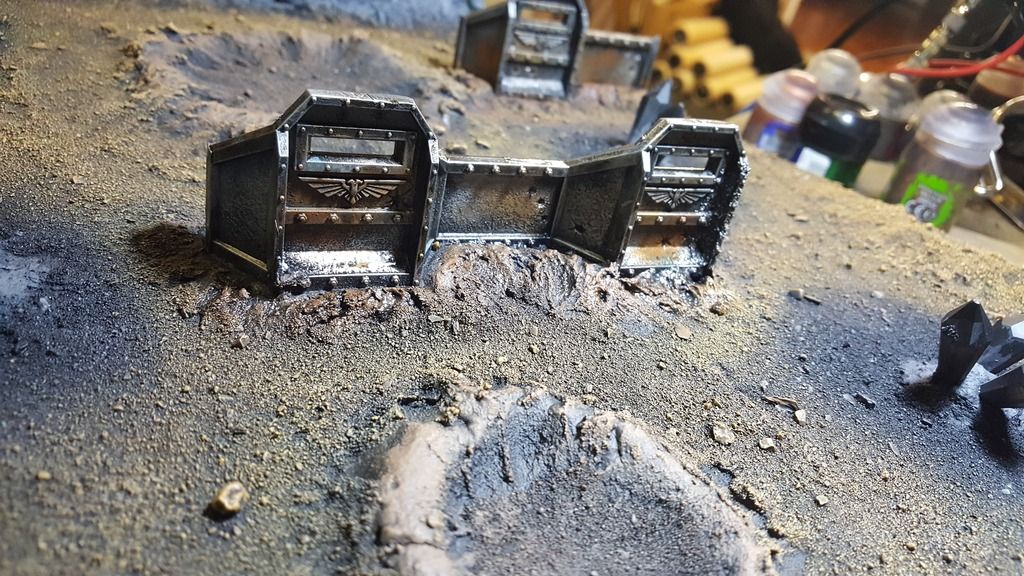
Then I added a few aegis lines to try and break it up a bit.

A few more added.

Added some more lines, a few additions to the hill and some more bits of crater/mound to try and break up the expanses of flat terrain.

Next step is to lay down some glue and get the sand on. I'm wondering if I should just coat the whole thing to begin with and then add as I go. There isn't too much forward planning with this, so hopefully I don't mess it up!
Thanks for reading!
|
|
|
|
|
|
2016/08/20 11:54:50
Subject: Armies On Parade - WIP Thread
|
|

Perfect Shot Dark Angels Predator Pilot
|
This is looking really good so far! Can't wait to see it painted.
Btw: not sure if you wrote this (was only looking at the pics) but, what army are you making this piece for?
|
hi |
|
|
|
|
2016/08/20 11:58:30
Subject: Armies On Parade - WIP Thread
|
|

Arch Magos w/ 4 Meg of RAM
|
Nice solid start. Looking forward to seeing this shape up
|
|
|
|
|
|
2016/08/20 12:04:00
Subject: Armies On Parade - WIP Thread
|
|
Dakka Veteran
|
The jewellery beads are an awesome idea.
Did you consider the implications of attaching them before undercoating everything? Dunno if you wanted them see through or not
|
|
|
|
|
|
2016/08/20 18:26:37
Subject: Armies On Parade - WIP Thread
|
|
Irked Necron Immortal
|
Thanks for the comments
This will be mostly for my Necrons (hence the cystals) but I'm planning to chuck a squad of blood angels in there just to break up the sea of grey.
It's all very fluid in planning, so the blood angels may go depending on time etc. Found out I return from holiday on deadline day, so will have to have it done and handed in before then!
As for the beads, they were a real bargain (think £4 posted for 50) but I plan to paint them blue anyway, so I'm happy for them to get blasted with the undercoat too.
|
|
|
|
|
|
2016/08/21 12:48:14
Subject: Armies On Parade - WIP Thread
|
|

Regular Dakkanaut
|
Great work so far!
I like the crystals a lot, where did you get them?
|
|
|
|
|
|
2016/08/21 15:11:40
Subject: Re:Armies On Parade - WIP Thread
|
|
Irked Necron Immortal
|
 Tim 121RVC wrote: Tim 121RVC wrote:Great work so far!
I like the crystals a lot, where did you get them?
Thank you I got them from eBay. The link is here: http://www.ebay.co.uk/itm/322128591867?euid=043b89533889441fa07c477414591004&bu=43543711268&cp=1&sojTags=bu=bu
Although after searching for that, I found out you can get mixed colours here: http://www.ebay.co.uk/itm/10-x-Acrylic-Pendants-Spike-Drop-Hanging-Beads-Crystal-Black-Mixed-Colour-/301974815946?var=600772942435&hash=item464f1a04ca:g:ef8AAOSw9eVXUrYU
Very small update on the board. I've coated the board in PVA (took waaaaay longer than planned) and added some sand. After this dried the excess was removed. I then got time to start trying to tidy up the edges.
The picture below is as the board sits now, I'll sand the edges down to a (hopefully) smooth finish once it's dried thoroughly.
 Top tip:
 If you buy a filler, get a good one. The cheap ones take roughly 1000000x longer to dry.
Next is edge sanding and then an undercoat of black. I'm hoping once that's done it should start to look more like a piece of 40k terrain and less like a building site.
Thanks for reading Automatically Appended Next Post: Another small update, which will likely be the last one for a few days as we now move back into the week and work (boo).
Sanded down the edges, the below shot is midway through. Currently it looks a lot smoother than this.
I then gave the whole thing a coat of black. It needs a bit of touching up, but it's starting to come together.

|
|
This message was edited 2 times. Last update was at 2016/08/21 21:18:34
|
|
|
|
|
2016/08/22 20:13:54
Subject: Re:Armies On Parade - WIP Thread
|
|
Irked Necron Immortal
|
Evening Dakka
Another small update on this. Got my first layer of paint down and it's actually starting to look okay now!

I still have lots more to do, but seeing it start to come together makes me want to get loads more done!
Thanks for reading.
|
|
|
|
|
|
2016/08/23 04:42:48
Subject: Armies On Parade - WIP Thread
|
|

Roaring Reaver Rider
|
That board looks great, I like it very much. Can't wait to see your further work and how you set it all up. I'm also entering into Armies on Parade this October and this is getting me stoked to start work on my display board.
|
 1500 1500  1000 1000
Please check out my project log on Dakka here |
|
|
|
|
2016/08/23 05:44:43
Subject: Armies On Parade - WIP Thread
|
|
Pious Palatine
|
Damn, you've progressed this fast. Nice work.
EDC
|
|
|
|
|
2016/08/27 08:41:06
Subject: Re:Armies On Parade - WIP Thread
|
|

Irked Necron Immortal
|
thanks for the comments everyone A small update for today (Haven't had much time recently to work on it).
I got the stone work sorted after a few different shades of grey drybrushing.


It looked a little flat to me, so I decided to bastardise a tutorial by Tiny Worlds. http://www.tinyworlds.co.uk/blog/painting-rocks-step-by-step/
Purple wash.

Red wash.

Blue wash.

Green wash.

Nuln oil.

Then some drybrushing with Codex Grey and a final light drybrush of white.

Next up is to get the Aegis lines painted and then to drybrush the mud with a layer or Ochre.
Once that's all sorted, I'll be adding some tufts/grass etc. to try and break up the sea of brown!
I'm still undecided on how I should paint the 'rocks' the crystals are coming out of, so any suggestions would be appreciated!
Thanks for reading Automatically Appended Next Post: ALSO: Sorry for the poor images, I was taking quick snaps with my off-hand, so they are a tad blurry! The colours in the rocks also didn't seem to come out in the images as they are definitely more visible in person!
|
|
This message was edited 1 time. Last update was at 2016/08/27 08:43:47
|
|
|
|
|
2016/08/27 11:45:25
Subject: Armies On Parade - WIP Thread
|
|
Arch Magos w/ 4 Meg of RAM
|
This is shaping up beautifully. Really great looking board.
|
|
|
|
|
|
2016/08/27 15:33:21
Subject: Armies On Parade - WIP Thread
|
|
Roaring Reaver Rider
|
Really love what you did with the rocks, I understand how colours don't show up properly in camera but I'm familiar with the technique your used and I really like it.
For the crystals I know it's a bit late but what I would have done is not paint them, but instead stain them green then wire the underside of the board with LED's sitting under pre-drilled holes. The crystals sit over the holes and can have a glowing effect with actual lights. An easier way is to buy those cheap electronic flickering tea candles then put the crystals over one then bury it in your terrain, super easy flickering crystals with no wiring required.
There's some pretty decent reference online about painting up crystals though and a lot of them look really good, the trick will be finding which one you like best.
Great looking table though I'm really loving seeing this come together.
|
1500 1000
Please check out my project log on Dakka here |
|
|
|
|
2016/08/28 21:21:31
Subject: Re:Armies On Parade - WIP Thread
|
|
Irked Necron Immortal
|
Evening Dakka
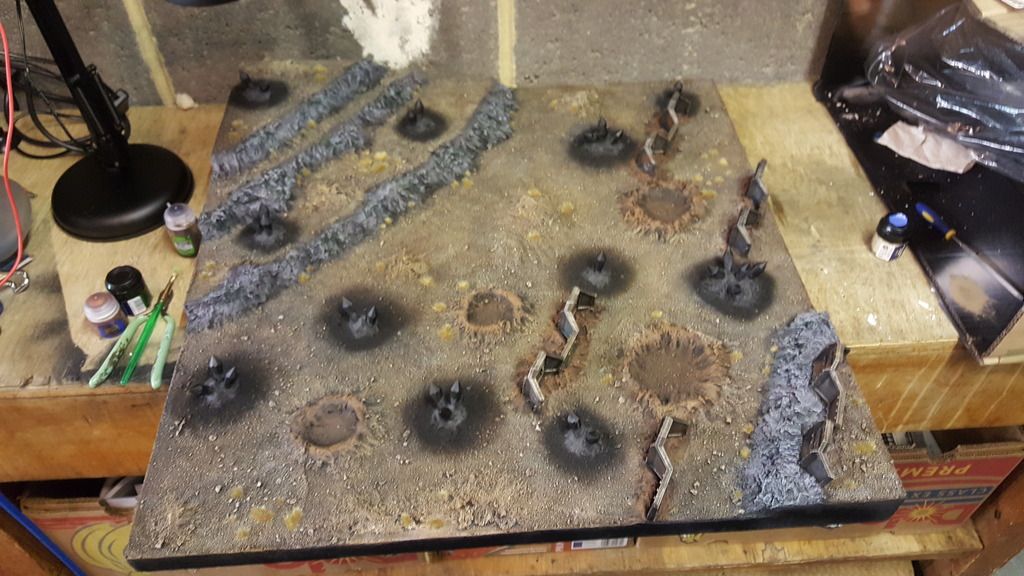
A little update for tonight. I managed to get the Aegis lines all painted up.
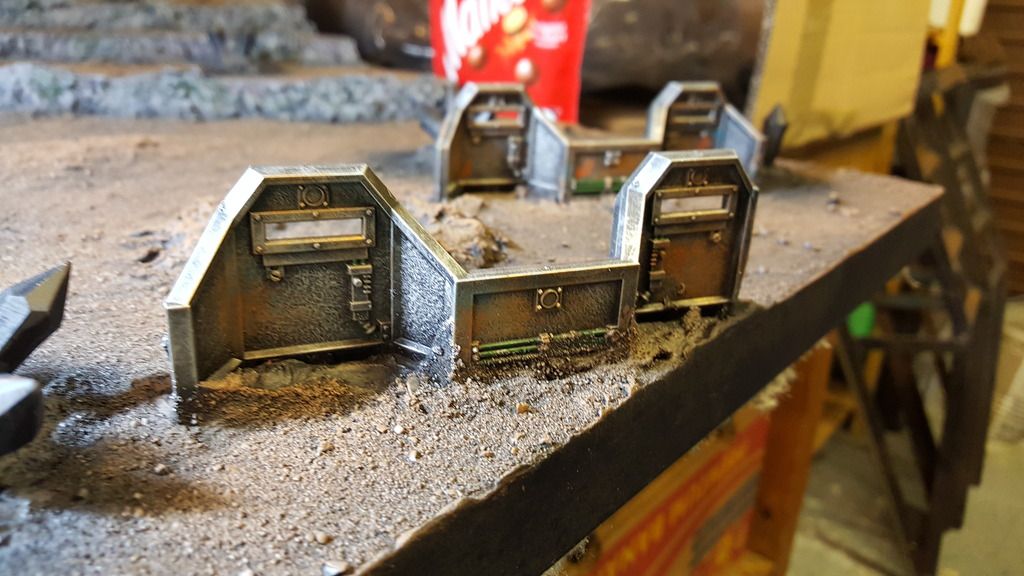

I then did a quick drybrush of Ochre on the rest of the board and added a wash of Agrax Earthshade.
Finally, I also gave the Aegis lines a quick wash too. They look better in person I think (my photography skills are questionable at best!).

Tomorrow's task is to give the mud a very light drybrush of bleached bone and then add some Middenland tufts to the rocks.
I'm putting off the crystals as I'm still in two minds about them. hopefully I'll settle on something soon as I need to get this board done and move onto my models!
Thanks for reading
|
|
|
|
|
|
2016/08/28 21:26:49
Subject: Armies On Parade - WIP Thread
|
|
Pious Palatine
|
Top work. Really like the way you've done the rock. It looks great.
EDC
|
|
|
|
|
2016/08/28 21:29:22
Subject: Armies On Parade - WIP Thread
|
|
Roaring Reaver Rider
|
Those defence lines look great, it's all coming together nicely.
|
1500 1000
Please check out my project log on Dakka here |
|
|
|
|
2016/08/31 17:53:57
Subject: Re:Armies On Parade - WIP Thread
|
|
Irked Necron Immortal
|
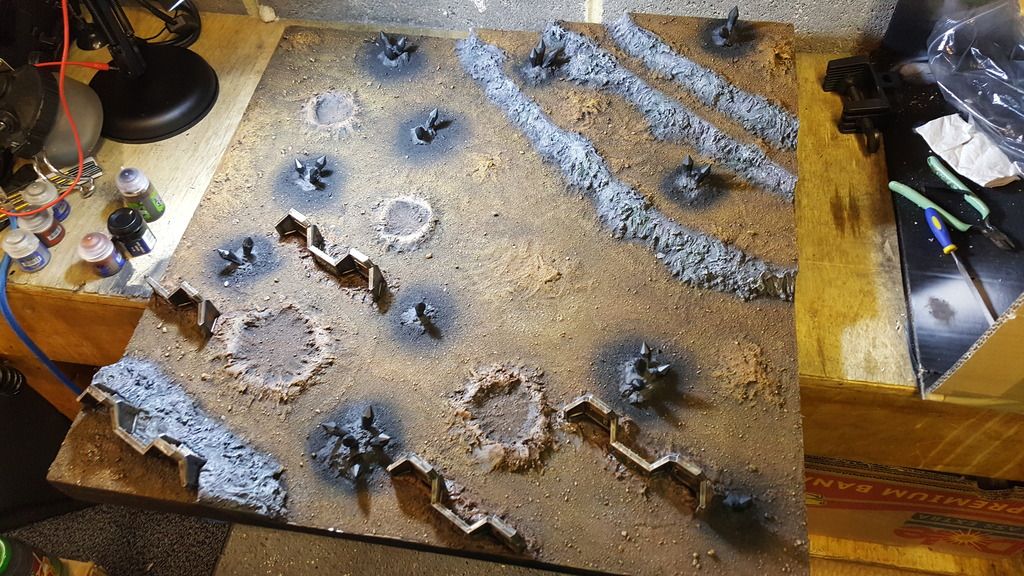
Very quick update on this. I've given the entire board a drybrush with bleached bone and thrown down some tufts to break it up a bit.
Would anyone recommend I add some lichen to the rocks at all?
And here's one of the models I'll be using for my army. Still not painted any more and I'm now slightly feeling the pressure!

I've also painted the rocks around the crystals (no pic yet) and given the crystals their basecoat of Vallejo metallic blue. I'm planning to blend in some lighter shades with the airbrush once I get a decent template made to prevent overspray.
Then once that's sorted, I can stick a fork in it!
Thanks for reading!
|
|
This message was edited 1 time. Last update was at 2016/08/31 17:55:48
|
|
|
|
|
2016/08/31 18:42:41
Subject: Armies On Parade - WIP Thread
|
|
Steady Space Marine Vet Sergeant
England
|
Ooo, that blue glow is really nice. For the brown on the board itself (the large section) is it just one big drybrush? Once again, lovely work.
|
 If you can't believe in yourself, believe in me! Believe in the Dakka who believes in you! If you can't believe in yourself, believe in me! Believe in the Dakka who believes in you! |
|
|
|
|
2016/08/31 19:30:18
Subject: Armies On Parade - WIP Thread
|
|
Irked Necron Immortal
|
Thank you The orb and wire on the scythe are wet blended and then the blade is airbrushed.
For the board I did a base coat in brown, then a drybrush with ochre using a big tank brush. The bleached bone was done rather painstakingly with a medium sized brush lol.
I think the colours work together quite well so you can get away with a few patchy areas here and there 
|
|
|
|
|
|
2016/09/01 01:34:41
Subject: Armies On Parade - WIP Thread
|
|
Roaring Reaver Rider
|
It's looking really great man! That overlord is top notch. I vote for putting some lichen on the rocks, I think it'd tie in nicely.
|
1500 1000
Please check out my project log on Dakka here |
|
|
|
|
2016/09/09 06:26:54
Subject: Re:Armies On Parade - WIP Thread
|
|
Irked Necron Immortal
|
Morning Dakka
I have the smallest of updates for you. I'be had a bit of a mad few weeks, so progress on the board has stopped for now. I'm in the final stages, so once I have some spare time to paint the crystals, I'll throw some pic up.
But for now, I've moved onto the models
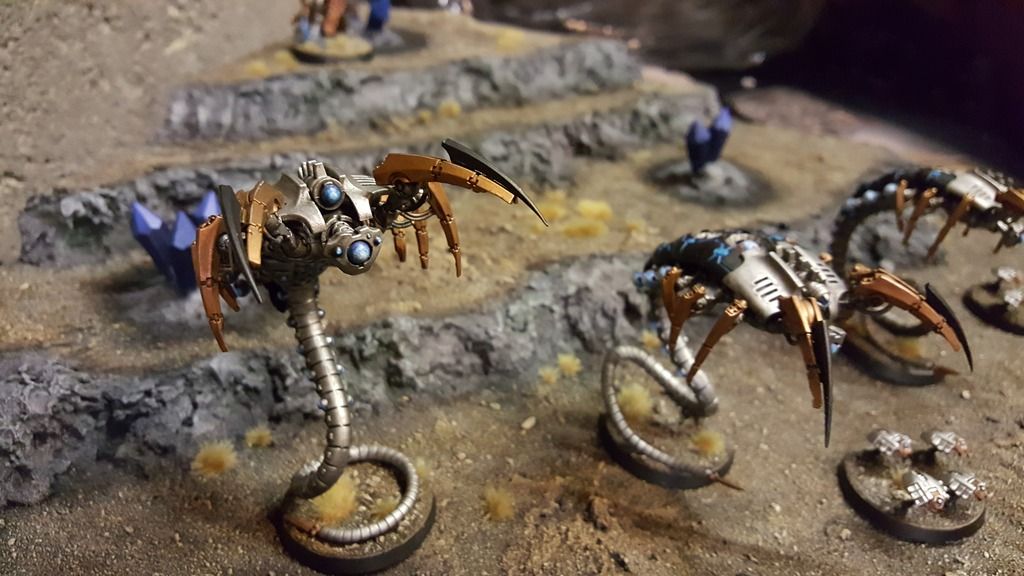
Progress hasn't been as quick as I'd have liked, but I have managed to get somewhere! The main focus of my efforts has been getting my Immortals finished (which I'm about 60% there with) and my wraiths (a rough 65%  ).

If you'll notice I forgot to add the 'caps' to 2 of the wraiths that sit just above their heads. Luckily the one on the right with the cap has a different head, so he's the 'leader'
I'll post more as/when I get them finished.
Thanks again for reading.
|
|
|
|
|
|
2016/09/09 07:02:45
Subject: Armies On Parade - WIP Thread
|
|
Pious Palatine
|
Nice work on the Overlord and Wraiths, you're really making good progress now.
EDC
|
|
|
|
|
2016/09/09 07:12:35
Subject: Armies On Parade - WIP Thread
|
|
Roaring Reaver Rider
|
Looks great. For the life of me I can't see the "caps" you're talking about, I just see three good-looking wraiths.
|
1500 1000
Please check out my project log on Dakka here |
|
|
|
|
2016/09/13 15:50:36
Subject: Armies On Parade - WIP Thread
|
|
Irked Necron Immortal
|
 Inevitable_Faith wrote: Inevitable_Faith wrote:Looks great. For the life of me I can't see the "caps" you're talking about, I just see three good-looking wraiths.
Basically, if you look at the blue glowy thingies above their heads, the one on the right has four prongs, whereas the rest don't. Nothing major, but something I noticed
Painting table as it stands:

Annoyingly, I had a really sweet image of my finished wraith and Overlord stood on the baord, but appear to have deleted it 
Hopefully I'll have another pic tomorrow eve with some more models
Thank you everyone for the comments and for reading
|
|
|
|
|
|
2016/09/13 23:58:48
Subject: Armies On Parade - WIP Thread
|
|
Roaring Reaver Rider
|
Forces are shaping up nicely. I really dig the use of blue, it's a nice contrast.
|
1500 1000
Please check out my project log on Dakka here |
|
|
|
|
2016/09/16 16:40:34
Subject: Re:Armies On Parade - WIP Thread - Some Models Finished!
|
|
Irked Necron Immortal
|
Cheers dude!
Got a few more images of some finished models
An overview on the board:
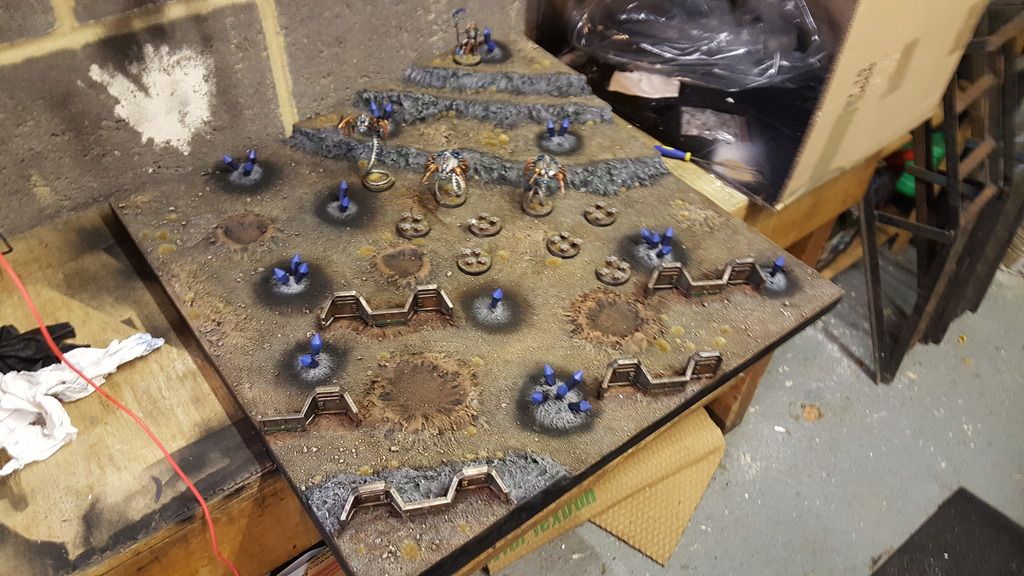
Some model shots:

Immortals should be finished off tomorrow (touch wood) and hoping to get my Lychguard buttoned up this weekend too! Then it's just the Spyder and finishing off those pesky crystals!
Thanks for reading
|
|
|
|
|
|
2016/09/16 22:00:19
Subject: Armies On Parade - WIP Thread - Some Models Finished!
|
|
Fixture of Dakka
|
Very nice indeed.
CB
|
|
|
|
|
|
2016/09/18 07:55:56
Subject: Armies On Parade - WIP Thread - Some Models Finished!
|
|
Roaring Reaver Rider
|
The models and board compliment each other very nicely. Fantastic work.
|
1500 1000
Please check out my project log on Dakka here |
|
|
|
|
2016/09/18 08:22:51
Subject: Armies On Parade - WIP Thread - Some Models Finished!
|
|
Steady Space Marine Vet Sergeant
England
|
Love the crystals. The bases are also really well blended in with the board. Great progress!
|
If you can't believe in yourself, believe in me! Believe in the Dakka who believes in you! |
|
|
|
|
|
|


 Finished Forge World Elysian Army
  Finished Tau Sept Cadre
  Finished Order of Our Martyred Lady - Sisters of Battle
  Finished Necromundian Imperial Guard Regiment
