| Author |
Message |
 |
|
|
|
|
Advert
|
Forum adverts like this one are shown to any user who is not logged in. Join us by filling out a tiny 3 field form and you will get your own, free, dakka user account which gives a good range of benefits to you:
- No adverts like this in the forums anymore.
- Times and dates in your local timezone.
- Full tracking of what you have read so you can skip to your first unread post, easily see what has changed since you last logged in, and easily see what is new at a glance.
- Email notifications for threads you want to watch closely.
- Being a part of the oldest wargaming community on the net.
If you are already a member then feel free to login now. |
|
 |
2024/12/01 12:41:25
Subject: Arcane’s Projects and Paintjobs…
|
|

Regular Dakkanaut
|
Hi all,
I’ve decided to start a Blog to record various projects and completed pieces.
First up my most recent entry into Dakka’s December ‘Open Round’
Automatically Appended Next Post:
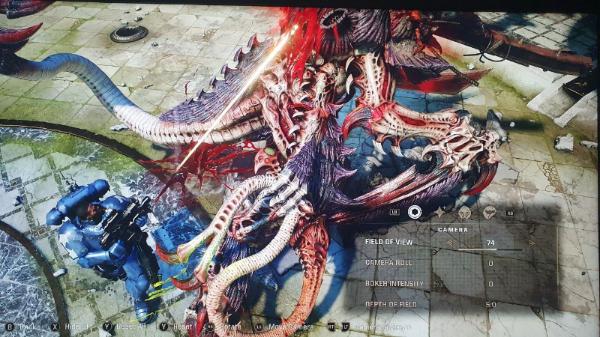
So in the following post I’ll explain the process I went through in order to customize a Hive Tyrant to look like the version seen in the Space Marine 2 video game. This is the version ‘post explosion’ which emerges from the trap laid by the Astartes.
Upon emerging from the wreckage of a huge explosion, this Hive Tyrant continues to limp on and remains an enormous threat to the determined Space Marines, who eventually corner the wounded beast and destroy it after an epic and desperate battle.
It is, without question, one of the most incredible ‘boss battles’ I’ve had the pleasure of engaging in and the art direction and animation for this lumbering monster truly leaves an impression. As soon as I witnessed this thing, I knew I had to try and recreate it in model form.
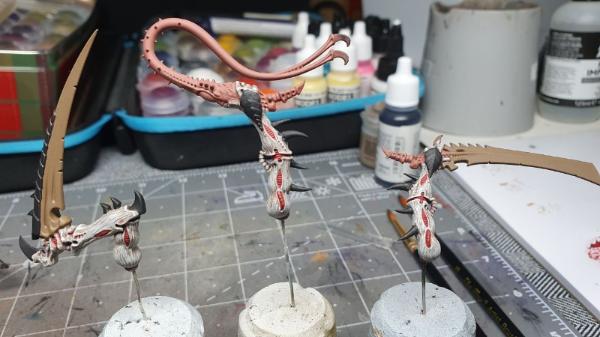
So, for reference, here are some pics frozen from the game to give those who are unfamiliar an idea of what needed to be recreated:
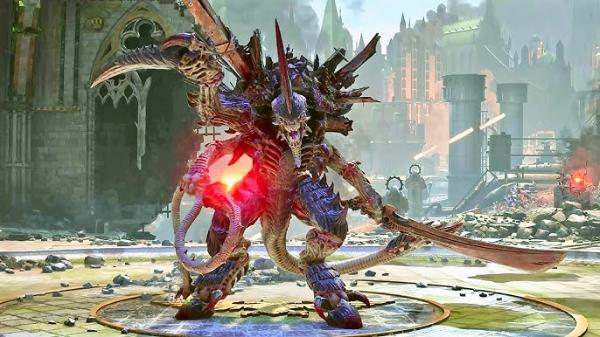
The Hive Tyrant has emerged with one of its limbs amputated. Several huge pieces of steel have crushed its carapace with one piece managing to impale the entire length of its upper body from right shoulder through to lower left back of the torso. This Hive Tyrant also has the whip held in its right hand and the sword in its left (the reverse of the arrangement provided in the kit)
The damage to the top of the carapace and the ‘vents’ is huge. Several of the larger vents have been split into sections and hang limp amidst the steel and rubble. The upper left vent has been almost entirely removed with only jagged pieces of steel now left in its place. The entire upper part of the carapace is covered in large pieces of broken concrete and smaller pieces of steel rebar.
Another difference between the Hive Tyrant in the game and the kit is the lack of ‘poison sacks’ on the forearms. In their place are instead several ‘spikes’ which decorate the forearm and the rear upper arm.
Now we have an idea of what is needed to recreate this ‘atrocity’ let’s move onto how I tackled it.
|
|
This message was edited 6 times. Last update was at 2024/12/01 13:38:37
|
|
|
 |
|
2024/12/01 13:46:50
Subject: Arcane’s Projects and Paintjobs…
|
|

The Marine Standing Behind Marneus Calgar
|
<grabs popcorn>
Looking forwards to seeing how this turns out!
|
|
|
|
|
|
2024/12/01 14:28:28
Subject: Arcane’s Projects and Paintjobs…
|
|
Regular Dakkanaut
|
 Nevelon wrote: Nevelon wrote:<grabs popcorn>
Looking forwards to seeing how this turns out!
Haha! Thankyou sir! I hope I do a good job of explaining myself and the process. I’ve just realised that I didn’t take pics of some of the parts pre-conversion (primarily the arms which had the poison sacks on etc)
Ah well, should be some online somewhere.
I’ve already had a couple of people ask me for this guide elsewhere on the internet so should be able to link them here once fully written. I’d better get on with it!
Automatically Appended Next Post:
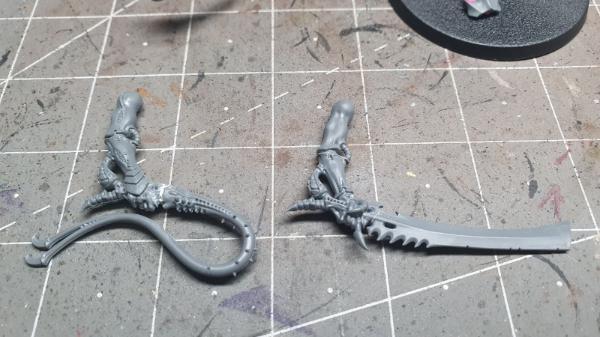
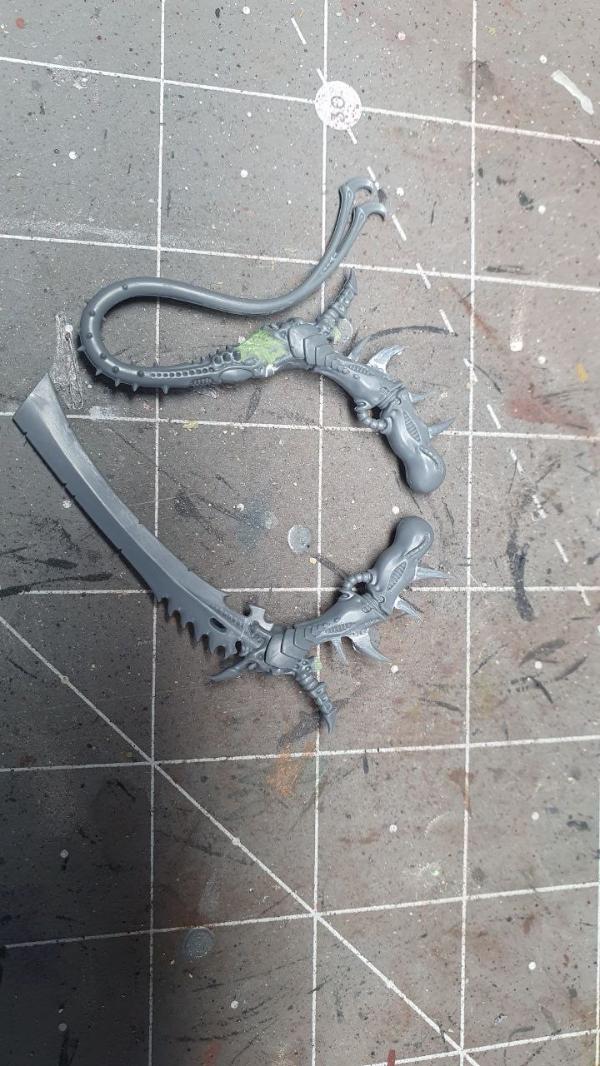
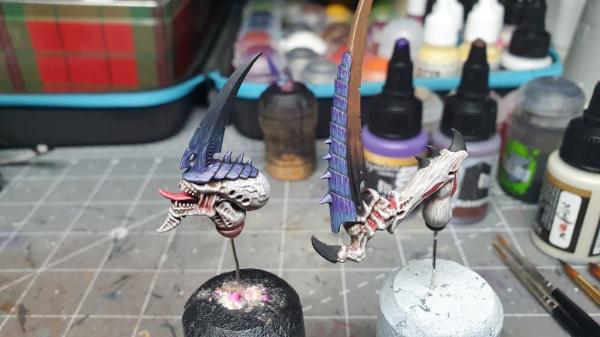
The first thing to tackle on the kit were the arms of the Hive Tyrant. The original arms came, as mentioned, with the whip only available on a left arm and vice versa for the large blade. Furthermore, the original blade arms all have an extra ‘poison sack’ attached that is absent from the version I’m trying to reproduce. I’ve posted an example below using an arm from the Swarmlord:

Out with the craft saw then! I removed the Boneswords’ blade just shy of the hand with the fine craft saw and transplanted that thicker blade onto the now modified Swarmlord’s left arm. Et voila! One left handed Bonesword complete. The join, due to the extra fine craft saw, was incredibly subtle and firm as the usual plastic glue (Tamiya extra thin) could be used.
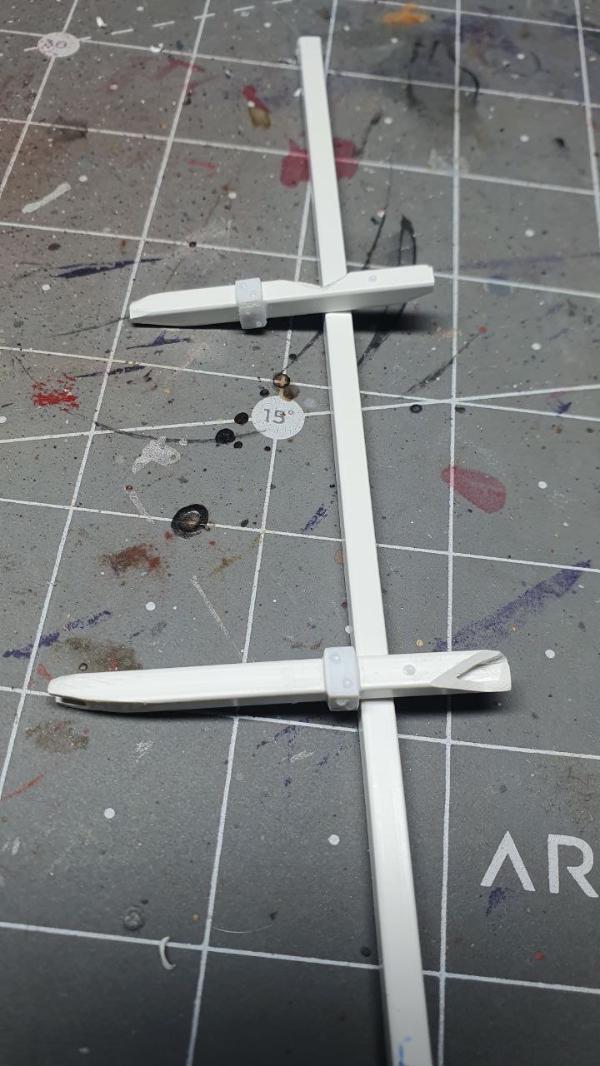
Onto the right arm. Once again I modified a Swarmlord right arm, then I removed the whip with the craft saw and, after some deliberation, decided on a suitable place to join that whip just prior to what would have been the handle of the sword originally. Again extra thin cement provided a good seal and the basics were in place. Picture below shows the weapon swaps just prior to clipping off the poison sacks with clippers during a later stage:
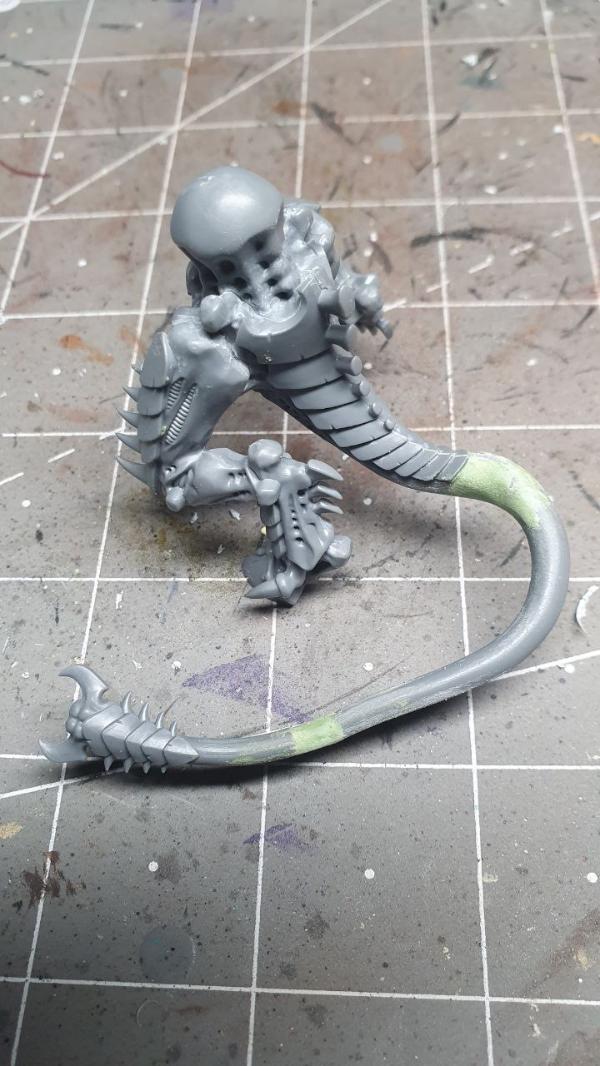
Leaving the arms aside for the time being, I moved onto tackling the lower body. The entire lower body was assembled as per the instructions as, after toying with the idea of reposing the legs, I decided the original position would work fine. What I did want to alter was the position of the tail. It seemed to me that reposing the tail would alter the feel of this build from the original and was more in line with the picture I used for inspiration (see 1st pic)
Time for more destruction with the hobby saw. I cut the tail in two places and altered the orientation in the exact opposite direction. After sanding the cuts, I used the pin vice and paper clips to seat and position the tail and then superglued everything in place.

With my Tyrant now the proud owner of a flash new tail pose I mixed up a 50/50 combo of Green Stuff and Milliput and filled the gaps left behind. After curing I sanded the filled in areas the best I could with a variety of sanding sticks up to 1500 grit.
To be continued….
Automatically Appended Next Post:
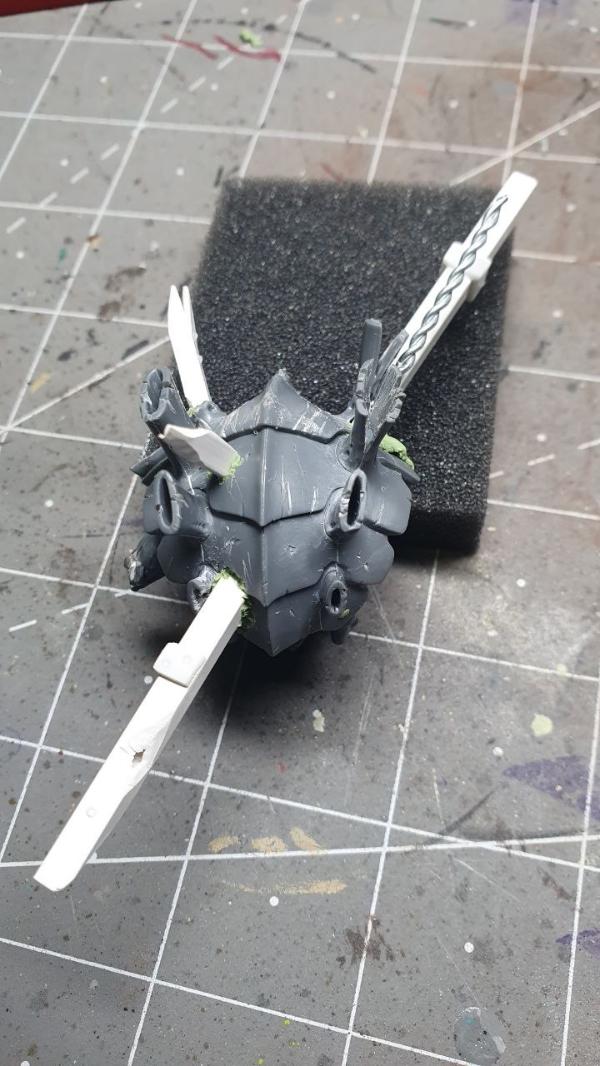
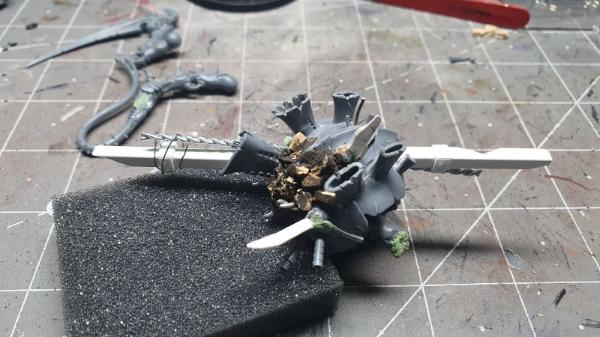
Setting aside the modified lower body it was time to get to work on the piece of the model that would require the most work. The upper body/carapace.
After referring to the pictures I managed to get using the in-game ‘photo mode’ it became clear the first port of call was to grab me my hobby knife and pin vice and just start hacking away. First port of call, amputate one of the arms in the kit above the ‘elbow’ and glue it in place. After that I began removing large areas from the vents on the carapace; trying as best I could to reproduce the damage I could see on the reference pictures. I also made sure to add scrapes, scars and damage to the entire upper part of the carapace. Let’s face it, you don’t get up from beneath a half mile deep pile of rubble and steel without some nasty scrapes to the old armour plating!
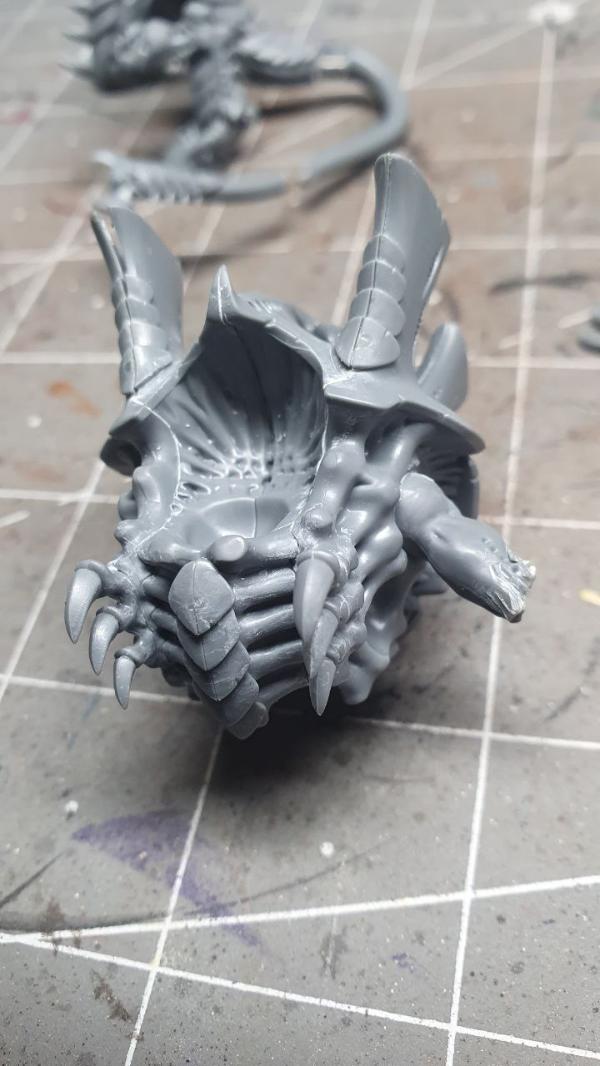
After I was satisfied with the general level of damage and outright vandalism I had committed upon my £40 model kit, I knew one thing for certain… I was going to HAVE to make this all work.
Also, I had no fear of going even further… so out came a large drill bit and into that torso I started a’drillin. I managed to excavate two huge deep chasms in the areas I planned to eventually insert the large steel scaffold that had impaled our battle damaged bug.
Satisfied I had the basic work done on the torso, it was time to turn to creating the large steels that will skewer our now horrifically mutilated GW model kit. For this I managed to source some thin square plastic tubes from an online hobby store. After cutting off sections roughly to size, I hacked off the ends to look akin to broken metal and cut some plasticard squares to stick in place as extra steel welded plates. Finally I used pva glue applied with a toothpick to create rivets that produced a convincing final look.
To be continued…
|
|
This message was edited 8 times. Last update was at 2024/12/01 19:18:12
|
|
|
|
|
2024/12/01 20:56:36
Subject: Arcane’s Projects and Paintjobs…
|
|
Walking Dead Wraithlord
|
Very impressive modeling. Can't wait to see the end result!
|
|
|
|
|
2024/12/01 22:13:25
Subject: Re:Arcane’s Projects and Paintjobs…
|
|
Regular Dakkanaut
|
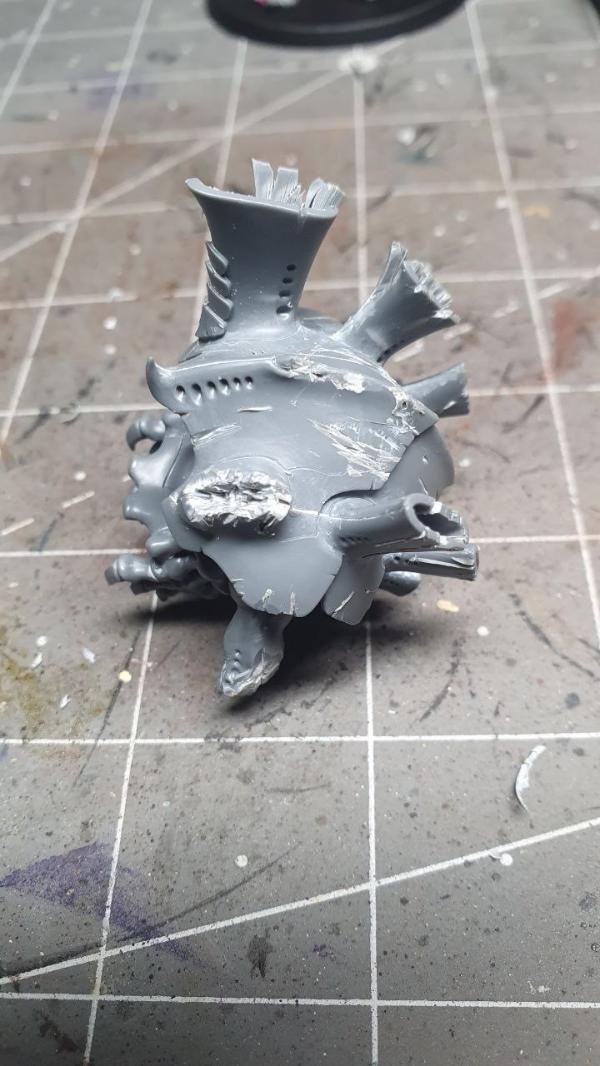
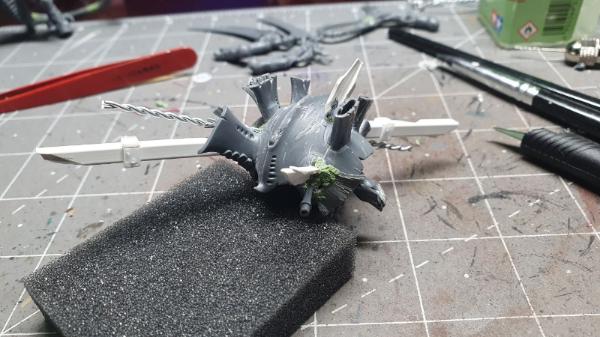
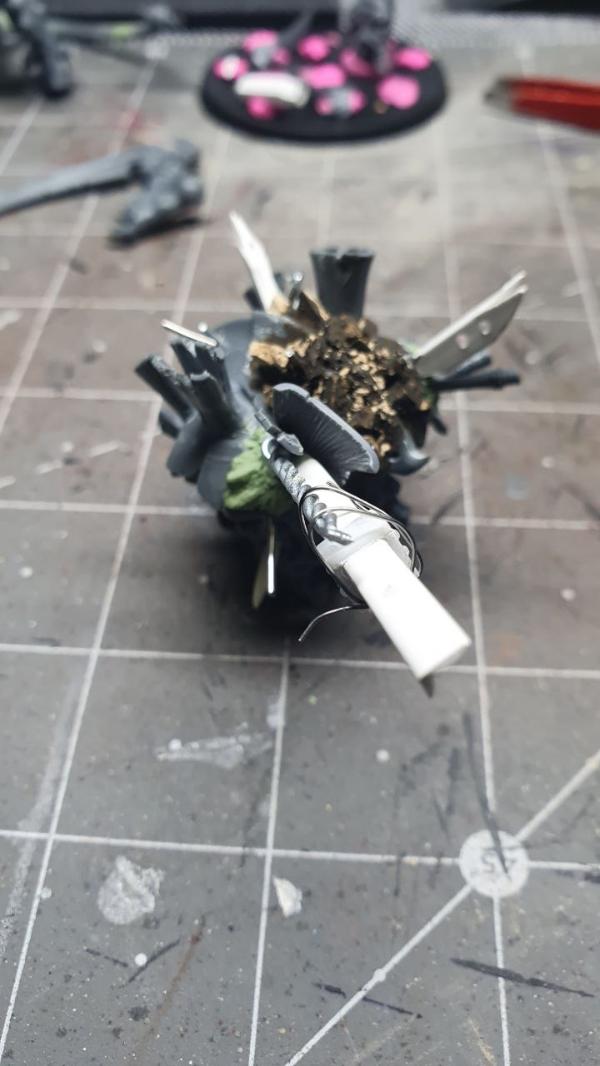
Now I’d completed the steel girders it was time to fix them in place. First port of call was to carefully begin carving the ‘steel girders’ at the point they would fit into the pre drilled holes until everything lined up. Getting the two main pieces to look as though they were actually one solid and continuous piece that had impaled the entire carapace was challenging but, with a little patience and the liberal and imaginative use of potty words, I managed to pull it off. Everything was then fixed into place using a liberal amount of Gorilla Glue.
From the same piece of square tube I cut off some smaller pieces and, after trimming those to look like shards of broken steel, I also glued those in place with the same adhesive. Following this I mixed some of my special magical putty (yes 50/50 Green Stuff and Milliput) and filled in the areas left around the drilled holes to look like mangled and exposed flesh. Finally, after that had firmed up, I took some coiled wire from a bottle of Prosecco that my beloved partner had polished off earlier and inserted some pieces of that into the still soft putty to simulate thick coiled rebar. My partner had actually left this for me on my hobby desk without any hints from me to do so, this is how I know she is ‘the one’
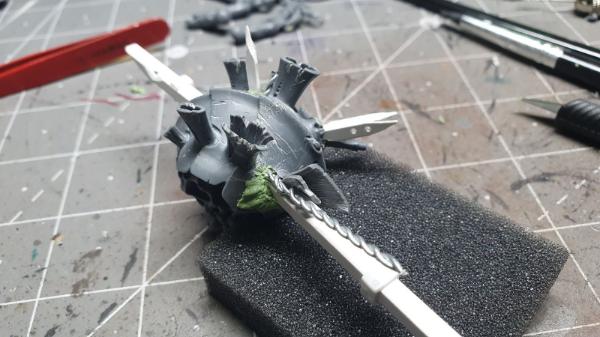
Now onto those damaged and torn vents either side of the upper carapace. For the vent that is all but destroyed on the left hand side I kept a small piece I had carved off earlier and glued it flat into place onto the carapace. I then drilled a hole through it and added a snipped piece of a Stormcast spear into the hole that would simulate a piece of metallic building rubble. This piece of metallic shard now gives off the appearance of having pinned what is left of the vent to the body. Nasty eh? I then added another small piece of spear and some putty into the hole which I again mangled around to look like ruined flesh.
Moving onto the right vent, and emboldened by my efforts with the putty mix, I decided to pretend I had some skill as a sculptor and opted to try and sculpt the damaged piece of vent myself. Taking a small piece of putty I rolled out a flat triangular shaped piece and placed it on the side of the badly mangled vent and girder and began to use a toothpick to pick away at the putty until I was satisfied with the result. In the end I felt this worked nicely as I could create small folds and tears that I should be able to bring out and emphasize if my paintwork is adequate enough (but who knows if that will be the case, guess we’ll find out as the month goes on)
With most of the steel girder and metallic shards in place, and the damaged vents sculpted, it was time to tackle the concrete rubble on the back. For this I used some scale clay bricks I’d sourced online. Initially I’d hoped these would be the exact size to place directly on the carapace, but it turns out they were a little large. A happy accident, because after I took a hammer to them the result was some very natural and convincing rubble indeed! Pleased with the result of my Neanderthal approach to problem solving I took some AK Interactive ‘Muddy Ground’ and spread this over the areas of the carapace the rubble was deepest and then carefully sprinkled the larger clay brick shards into place. My thinking here being that this would harden into a mix of large, medium and very small ‘rubble’ all without the need for glue. It worked a treat!
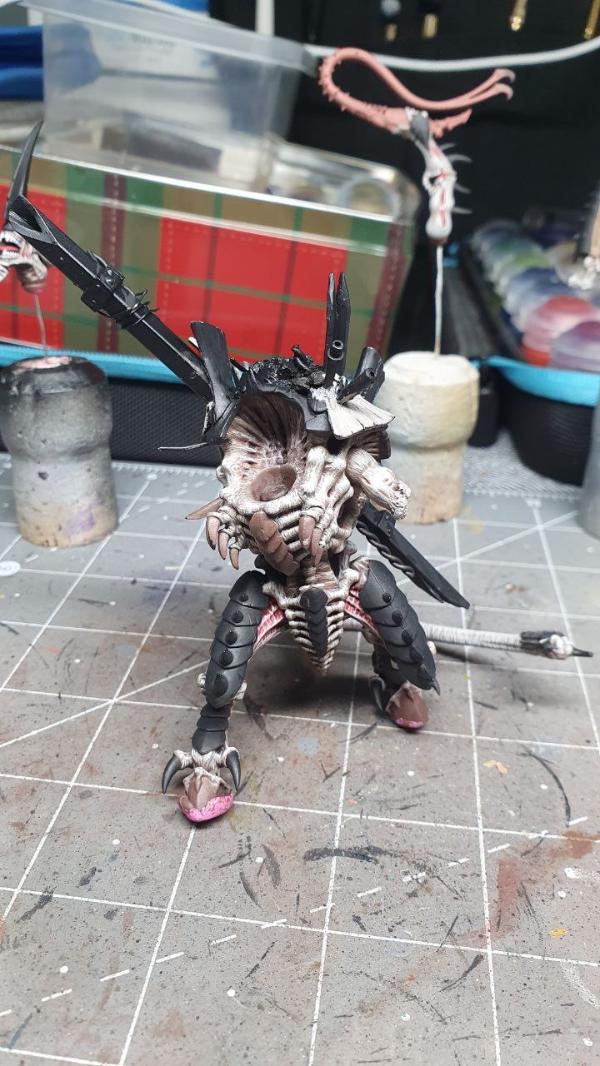
Finally I drilled some random holes and added a few bent paper clips here and there and, voila, one seriously battle damaged Hive Tyrant carapace emerged!
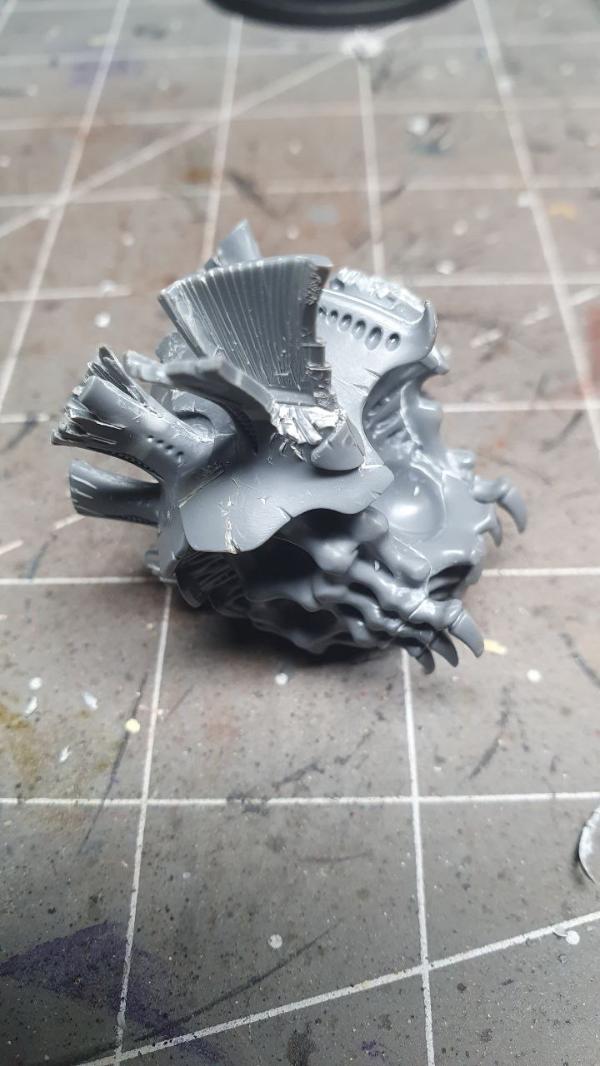
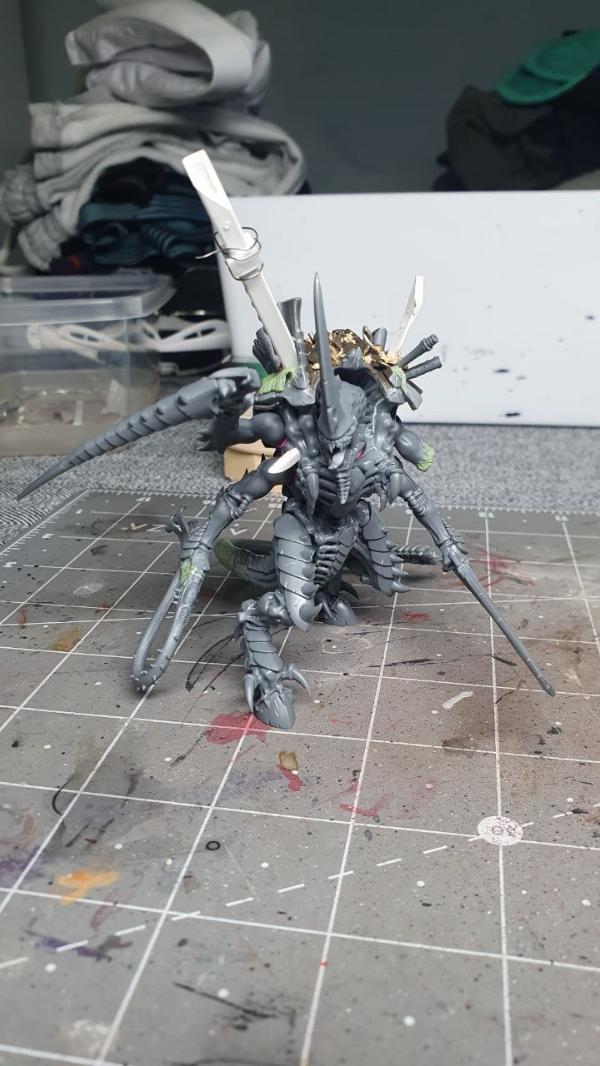
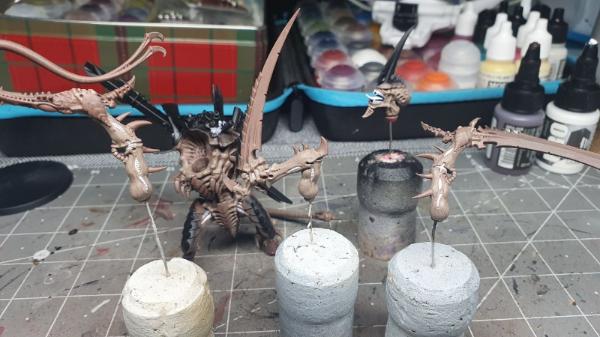
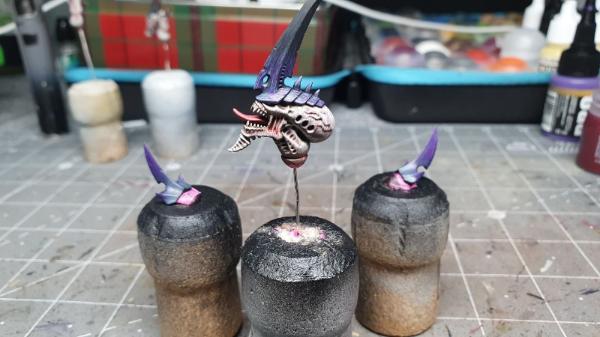
All that was left now was those arms. The whip hand was looking a bit ropes around the join so it was out with the putty again. After placing a small blob in place I dilly dallied around with a toothpick until I was reasonably happy something ‘weird and alien’ was in place. It would have to do. All that was left was the spikes on the forearms and upper arms. As mentioned earlier, the ‘poison sacks’ were clipped off. For the spikes I raided a bits box and found some spines left over from the Start Collecting Flesh Eater Courts box. Perfect.
I clipped off the spines, sanded them, donned my x4 magnifiers and glued them in place. Several times. Ahem. Much cursing later, and a few drips of Vallejo plastic putty around the joints, my custom Hive Tyrant arms were complete.
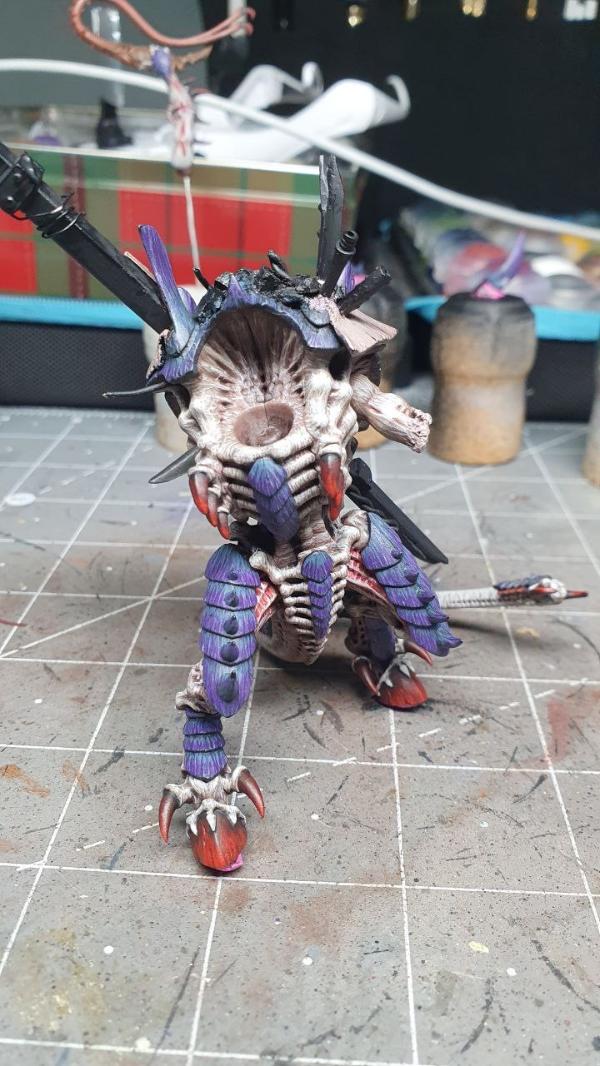
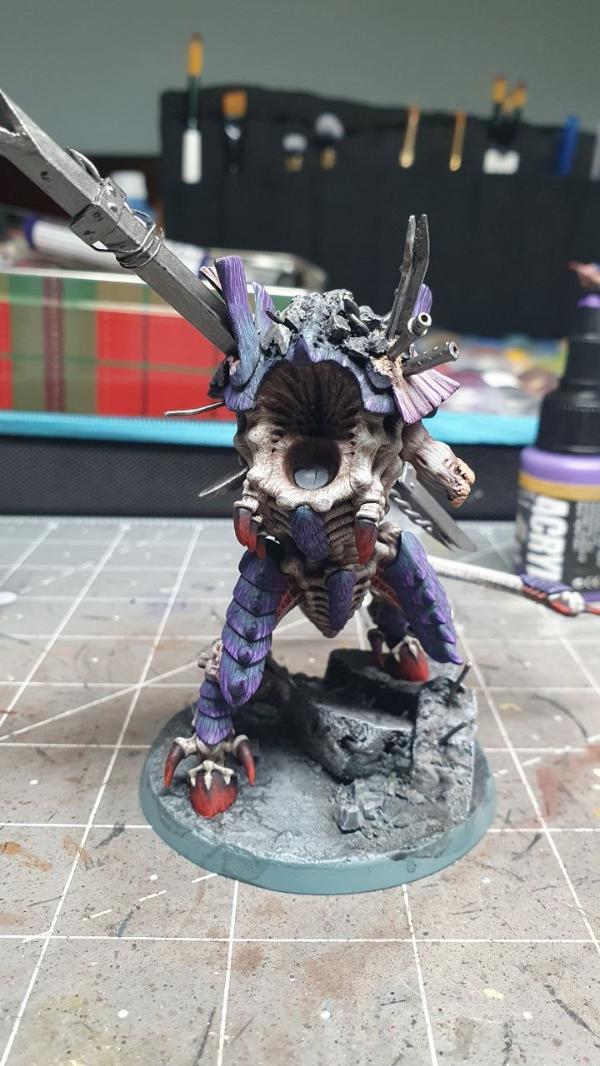
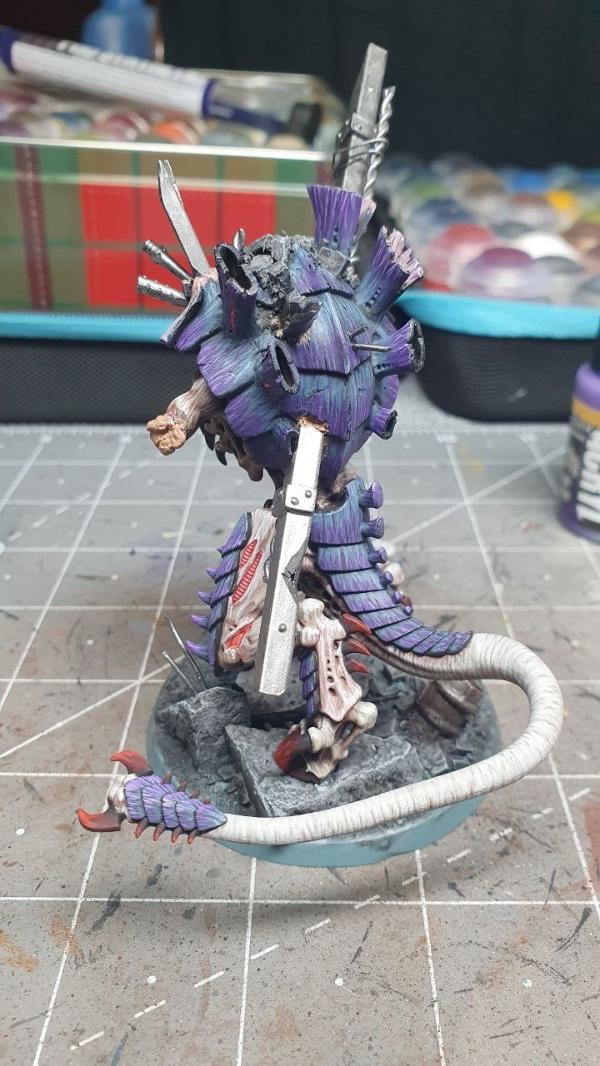
All that was left was to glue him together. I decided I wanted to keep the head and arms separate for painting. In the meantime though, here he is blu-tacked together so you get the idea.
Now, hopefully I don’t mess the paint job up!
I’ll post bits and pieces as I progress…
|
|
|
|
|
2024/12/02 00:41:05
Subject: Arcane’s Projects and Paintjobs…
|
|
The Marine Standing Behind Marneus Calgar
|
That is a crazy amount of modding. Looking forward to paint!
|
|
|
|
|
|
2024/12/02 06:24:47
Subject: Arcane’s Projects and Paintjobs…
|
|
Regular Dakkanaut
|
Thanks Nev and YouWasShock.
To be honest the whole project involved a little more work than I had anticipated, largely because after taking the pictures and looking at everything close up there were a lot of small details that are difficult to notice ‘in game’.
Obviously I couldn’t make everything exactly as it appeared on the pictures but I was determined to get as close as my ability would allow.
I’m happy with the results though.. and it was very fun to do… so in that sense it’s a success for me already.
Automatically Appended Next Post:
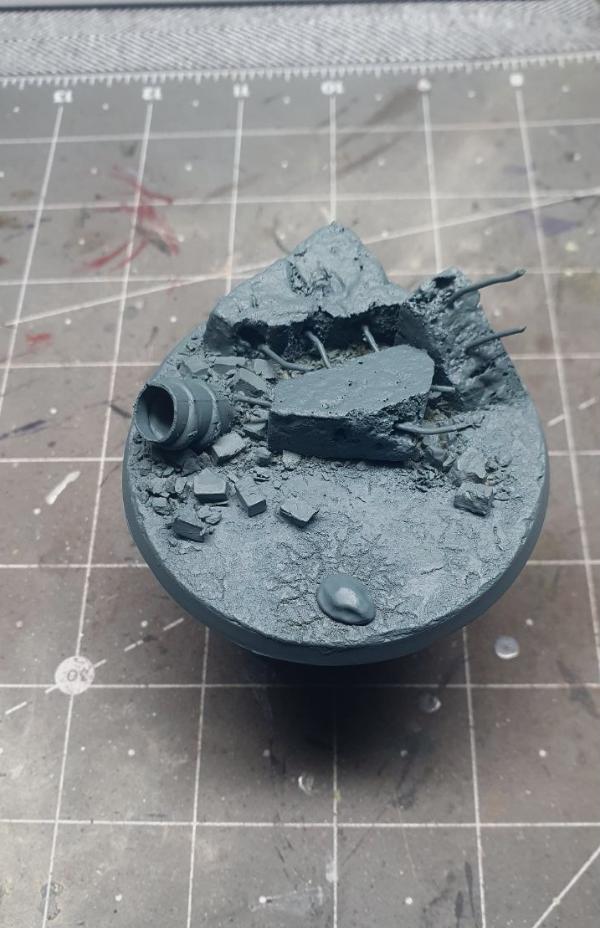
Moving onto the base.
Taking some 5mm craft foam I tore away some small pieces and arranged them on the base in such a way that my big bug would be stepping down and out of a pile of rubble.
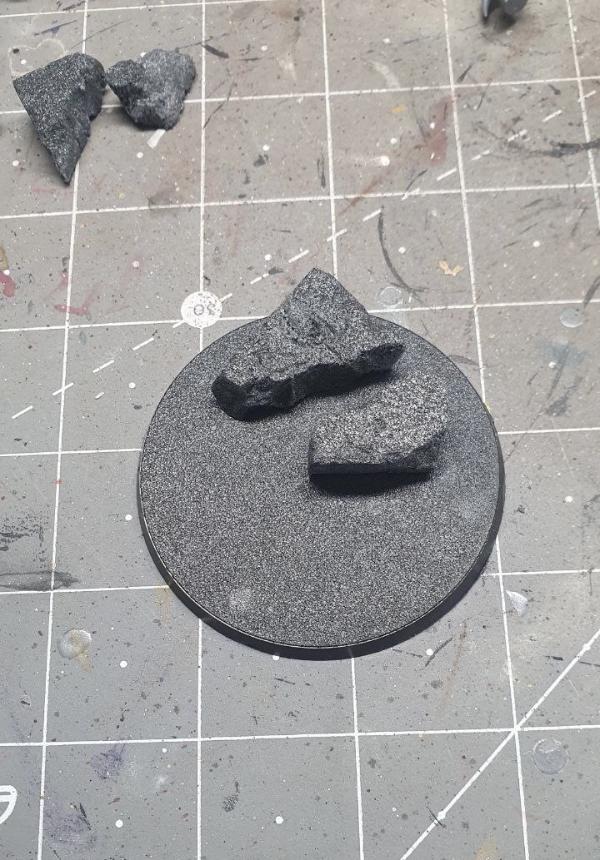
I then cut some paper clips and inserted them randomly into the foam to simulate protruding rebar. These are my large destroyed pieces of building. After covering everything with two thick coats of Matt Mod Podge I let everything dry:
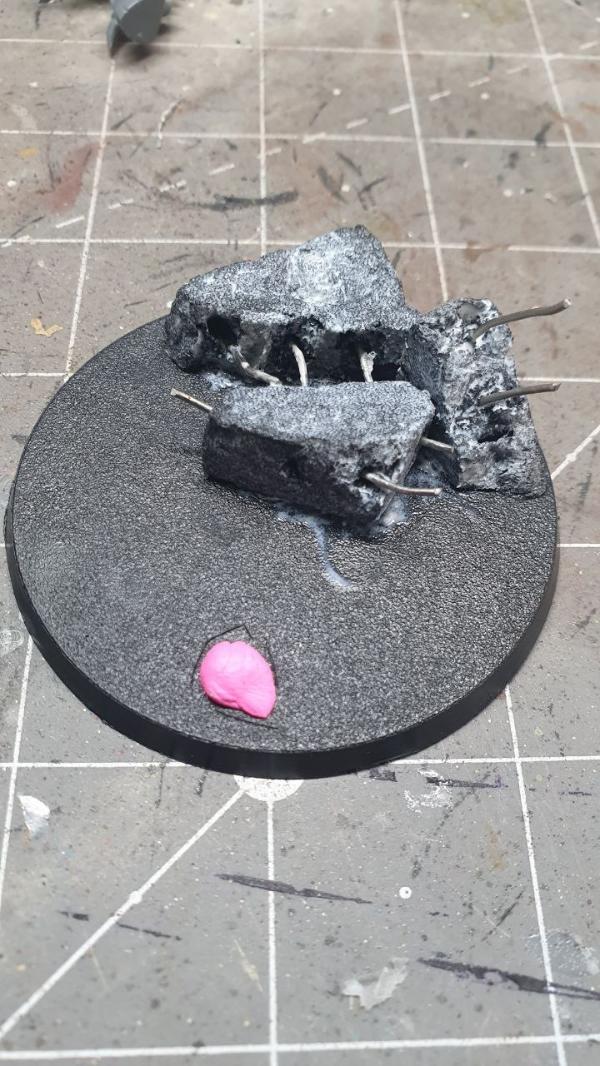
For the concrete ‘road’ I spread AK Concrete Terrain directly over the base. Again I waited for that to start to firm up a little before moving onto the next stage:
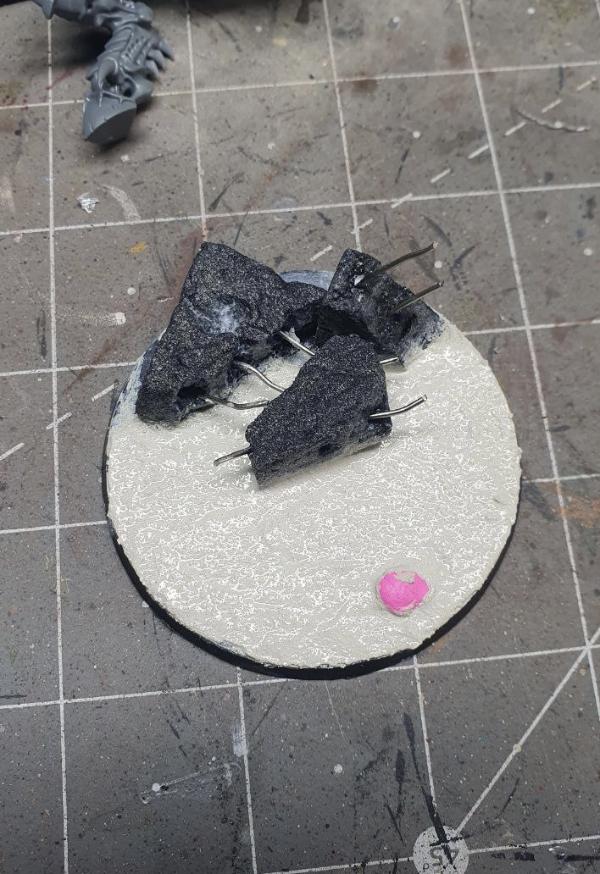
Now the basing material was starting to firm up I started to etch cracks and stress into the substrate; paying particular attention to the area where the Hive Tyrants front leg was impacting the road. I wanted to sell the impression this fella was one heavy unit.
After that, I retrieved some of the left over broken clay bricks and spread them around in the areas at the rear of the base and used an old straw to simulate some broken pipe:
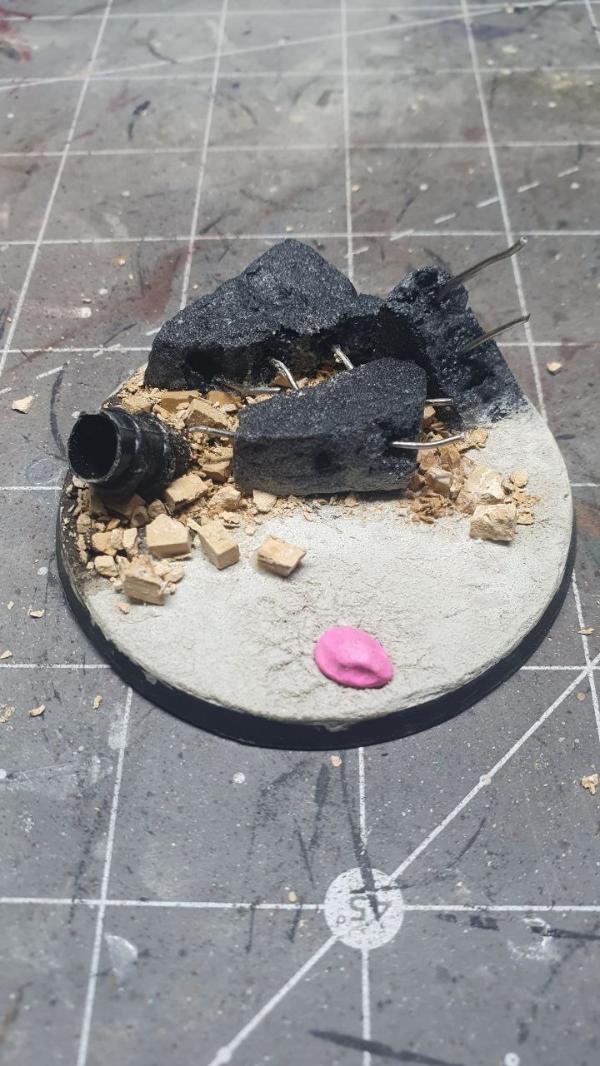
Finally, I sprayed the whole thing in Mechanicus Standard Grey primer from Citadel and here it is ready to paint:
|
|
This message was edited 3 times. Last update was at 2024/12/02 07:46:43
|
|
|
|
|
2024/12/02 10:27:49
Subject: Arcane’s Projects and Paintjobs…
|
|
Ragin' Ork Dreadnought
Deep in the Outer Boroughs of NYC
|
Incredible work so far!
|
|
|
|
|
|
2024/12/02 10:29:43
Subject: Arcane’s Projects and Paintjobs…
|
|

Regular Dakkanaut
|
Looking amazing so far!
|
|
|
|
|
|
2024/12/02 11:22:18
Subject: Arcane’s Projects and Paintjobs…
|
|
Regular Dakkanaut
|
Thanks for the support Muette and Warboss… I’ll post more as things progress
Automatically Appended Next Post:
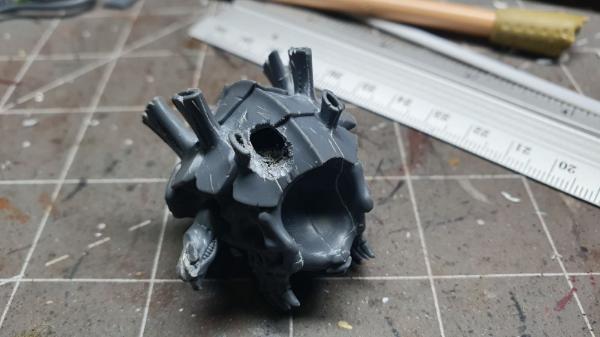
Having primed the miniature in Chaos Black I realized I’d made a boo boo.
It turns out the ridges present on the front vents in the Hive Tyrant kit are not present on the version in game. Ah well, time to ruin my lovely neat black primer and delay the painting by another few hours. It’s choppy choppy time with my hobby knife again!
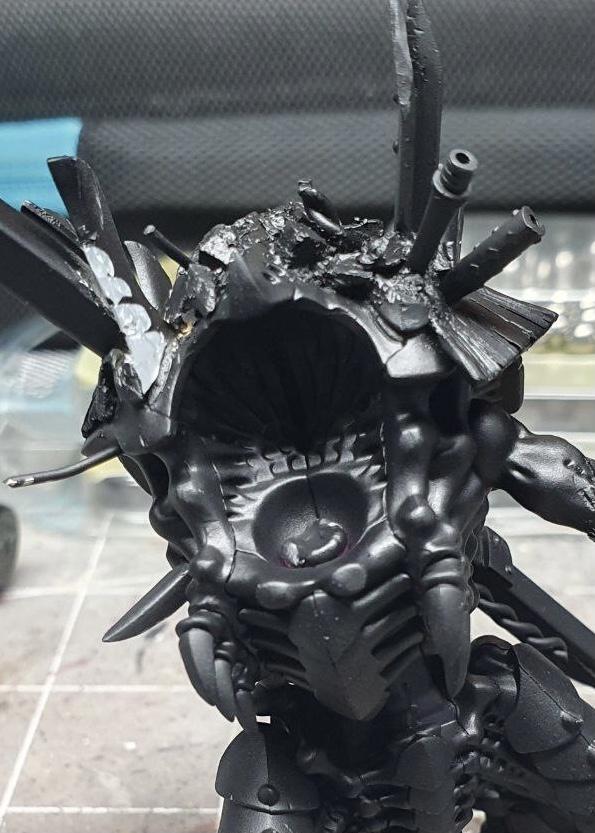
After sanding this down ready for re-priming I noticed that the small shoulder pad on the left arm could do with some battle damage too so, what the hell, I’ve already molested my lovely undercoat on the main body of the model, might as well take this opportunity to hack and slash at that piece too:
Two steps forward, one step back…
All in the name of accuracy…
|
|
This message was edited 2 times. Last update was at 2024/12/02 12:57:19
|
|
|
|
|
2024/12/02 19:18:49
Subject: Re:Arcane’s Projects and Paintjobs…
|
|
Regular Dakkanaut
|
Right that’s those damn scales removed.
So… let the painting begin.
Pro Acryl Mahogany… check
Large Cheapo Basing Brush… check
Ready… Chaaaaaaarge……
|
|
|
|
|
2024/12/02 20:34:54
Subject: Arcane’s Projects and Paintjobs…
|
|
The Marine Standing Behind Marneus Calgar
|
Paint for the paint god!
So after this you going to paint up some Ultras or the rest of the hivefleet?
|
|
|
|
|
|
2024/12/02 21:26:56
Subject: Arcane’s Projects and Paintjobs…
|
|
Regular Dakkanaut
|
Nevelon wrote:Paint for the paint god!
So after this you going to paint up some Ultras or the rest of the hivefleet?
Well, I had discussed this with my partner who would agree strongly with you that I should actually make some headway into the Leviathan box currently stuck on the shelf under the TV in the lounge. I don’t mind it being there, I like the box art, but she’s a little less keen. We’re currently in negotiations regarding that particular issue though as I have laid bare my plans to tackle Ushoran in January.
This was actually a cunning and highly strategic maneuver on my behalf as I was aware that, when I reminded her Ushoran was ‘that one you bought me in January’, she would agree I was a genius for selecting that particular project.
This gives Leviathan box a much needed respite from the prospect of life confined to the attic; a Godless and unspeakable fate reserved only for the most shameful of my impulse purchases.
So yeah, Ushoran in January.
Then I might revisit 40k
|
|
This message was edited 2 times. Last update was at 2024/12/02 21:30:47
|
|
|
|
|
2024/12/30 19:18:21
Subject: Re:Arcane’s Projects and Paintjobs…
|
|
Regular Dakkanaut
|
Thought I would offer up a little blog of my painting for the Hive Tyrant…
After priming with Chaos Black and then painting all the ‘skin’ areas Mahogany from Pro Acryl I began the lengthy process of covering the skin in fine lines of Baneblade Brown from Citadel. The first lines were actually a 50/50 mix of Mahogany and Baneblade followed by pure Baneblade Brown. To get the lines as fine as possible I used a size 1 brush and dampened with a little flow improver. The idea here is to keep building these lines up to a brighter colour and thus create texture on these otherwise very bland looking skin areas.
I also used this time to block in the areas of the skin that were to be either a red or pink tone later in the process. This would keep me from pooling up these places in too much paint and ruining the detail.
Following the same process, I started to lay down ever increasing paler lines using a 50/50 mix of Baneblade Brown and Pro Acryl Dark Ivory before moving directly to pure Dark Ivory. As I approached this lighter stage I started putting less Dark Ivory in the areas I thought would be in shadow. The final skintone color would be pure ivory and I wanted to use this only on the upper facing areas of the model.
I also used this stage to paint in the ‘fleshy’ areas in-between the legs, the joints and around the mouth etc. For this I used a 2/1 mix of Citadel Volupus Pink and Flesh Tearers Red. I then diluted that mix with some contrast medium and applied to the model. Finally, I painted the whip body in Citadel Bugman’s Glow and the bonesword and claw in Citadels Steel Legion Drab.
Now that the basic pattern of the skin was in place it was time to ‘block in’ the carapace to give me a cleaner template to work on. For this I selected Vallejo’s .950 which is, of course, the only ‘correct’ black in all the worlds paint ranges. This went on as smoothly as always and the miniature was suddenly looking much cleaner. I also gave the exposed parts of the damaged vents a coat of Citadel Rakarth Flesh to act as a base for later detailing.
Time now for the carapace. The first stage was, oh yes, more lines.
This time I was using Citadel Dark Reaper with the same method as used on the skin. The lines would begin with Dark Reaper, move through to Citadel Thunderhawk Blue, then finally on to Pro Acryl Royal Purple. The Hive Tyrant that inspired this project had a distinct color pattern that transitioned from a blue through to purple whilst keeping that transition very demarcated in the final scheme. I aimed to do my best on the surfaces provided by the miniature to replicate this!
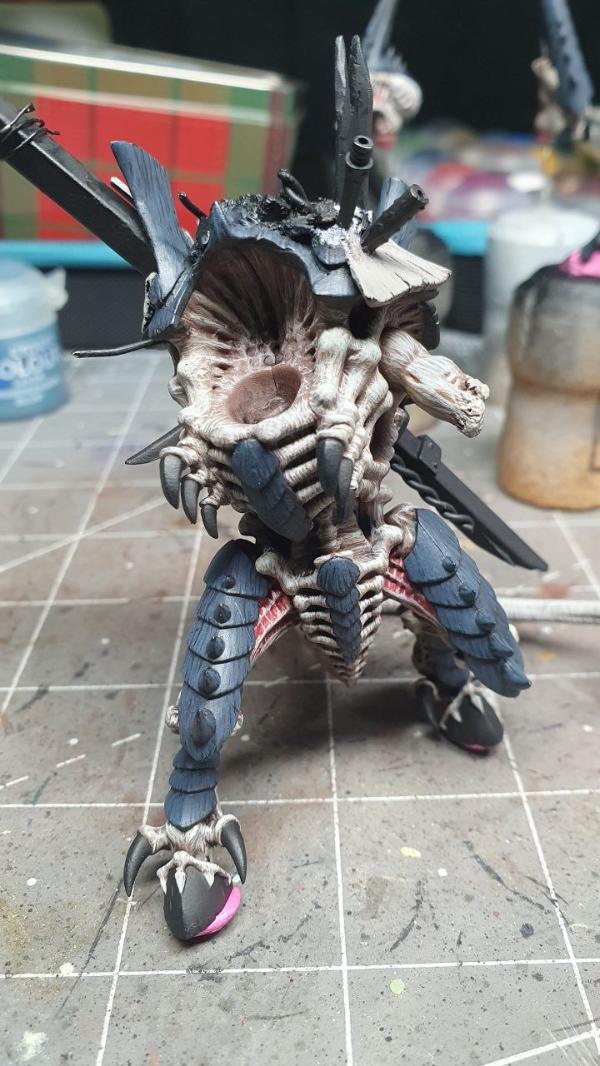
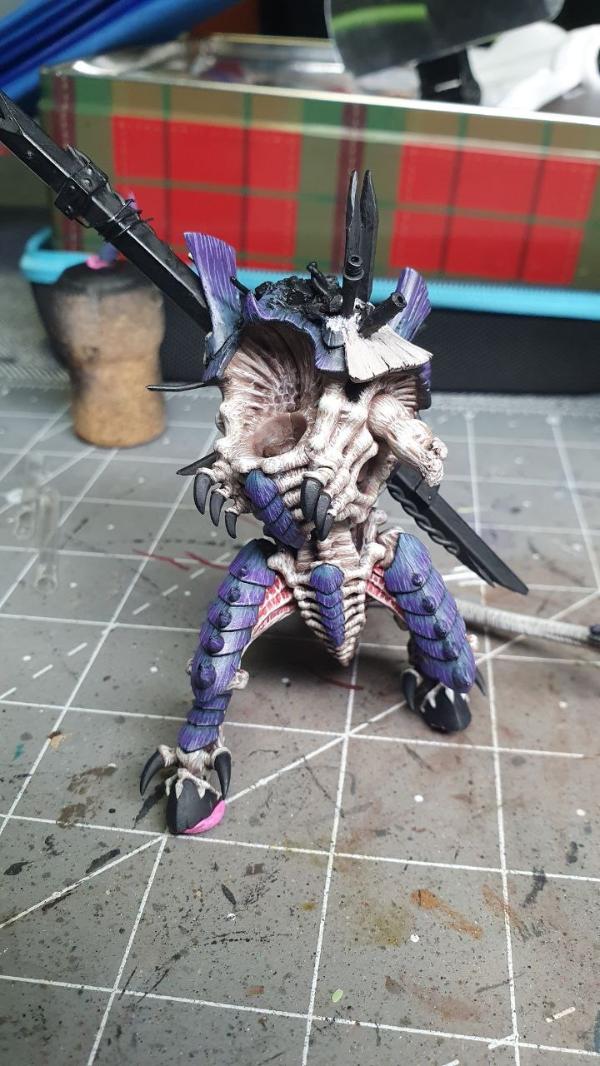
This was a long process but as I approached something I was getting content with I began working on the horn and the bone sword; generally blending blacks and dark browns as a base from which to work to the reds.
Moving from the carapace it was time to start giving the claws and talons some attention. For this I started with a watered-down Mahogany before glazing some Flesh Tearers Red into place. Finally I added a little touch of Bold Pyrrole Red from Pro Acryl to add that final glint of color!
At this stage I worked more reds into the bonesword and the horn on the head. I also began adding brighter lines of pure Ivory from Pro Acryl to the skin areas; this was applied only to the upward facing parts of the skin and around the edges of joints. I would then used Pro Acryl Bright Ivory on the very finest edges to accentuate detail; the eyes were also painted with Golden Yellow although they are not very prominent on this miniature.
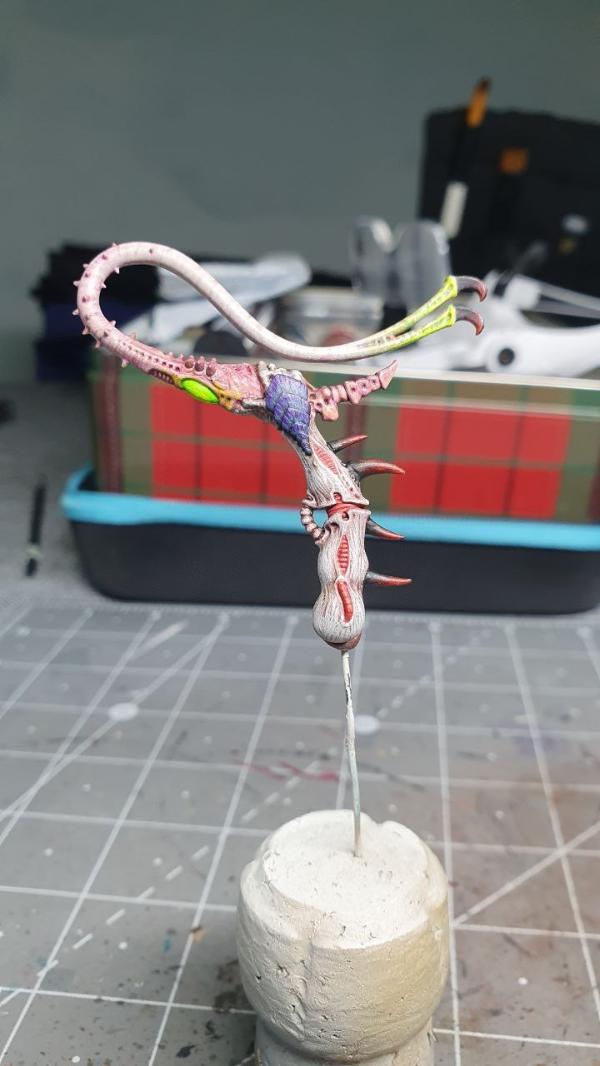
As the mini was coming to the final stages I tackled the whip with various washes of pink before painting fine lines of Dark Ivory over the thinner parts of the weapon. I then glazed over this with a very thinned down Volupus Pink before painting the ‘eye’ and some areas around the claw white. I then layed down a coat of Tesseract Glow to provide the venomous effect.
The Bonesword was a tricky undertaking, and I failed to take as many pics during these final stages as I’d have liked but the effect was achieved by blending various pinks, browns and reds over the blade and then edge highlighting with Bold Pyrrole Red and finally Wild Rider Red.
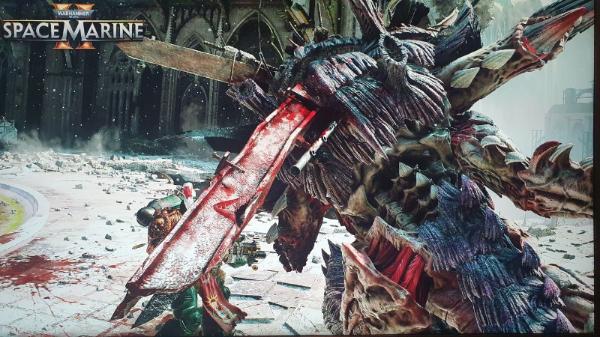
From this point I moved onto painting some of the finer areas including the teeth and around sharpest features of the face before moving onto the concrete rubble and steel on the carapace. The rubble was painted with Dawnstone and then washed with Nuln Oil and Agra’s Earthshade before being highlighted back up with various light greys. I dashed a little Carroburg Crimson here and there to simulate blood from the wounds seeping onto the carapace and then painted all the steel parts, well, Steel… from Vallejo Metal Color!
From here I used various black and brown washes on the steel before adding some thinned Mahogany and Doomball Brown for that slightly rusted effect. I then highlighted up with Dark Aluminum from Metal Color before touching the most prominent edges with Pure Aluminum from the same range. Certain areas of the steel also received a little dab of crimson, in particular the large section exiting the lower part of the carapace!
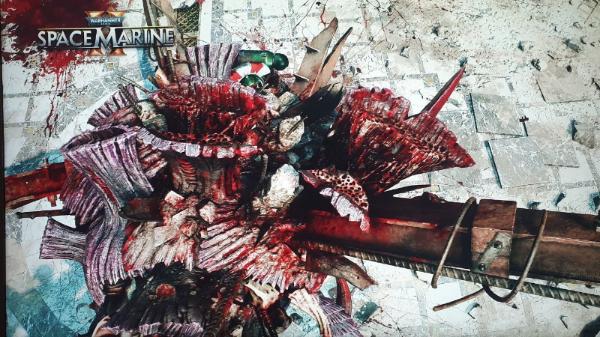
The gore in the torn and broken vents and severed arm was tackled by mixing Carroburg Crimson into different areas, some pure and some watered down. A touch of Blood for the Blood God was worked into the deepest tears and finally I used Dirty Down Gore effects to give the stringy and torn flesh a realistic appearance. This was a fun part indeed!
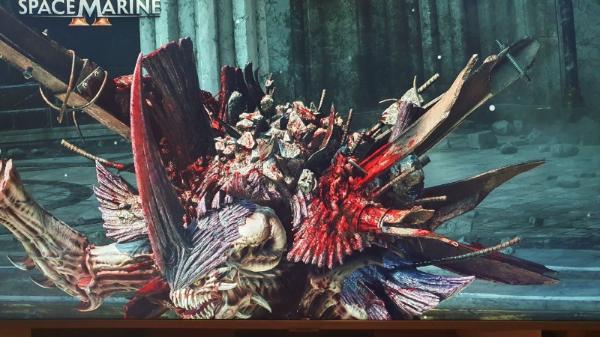
After this I basically ‘fussed’ over various areas of the miniature, adding some fine glazes here and these to lighten or darken areas to taste before assembling the model and taking photos. Here he is newly put together before his photo shoot:
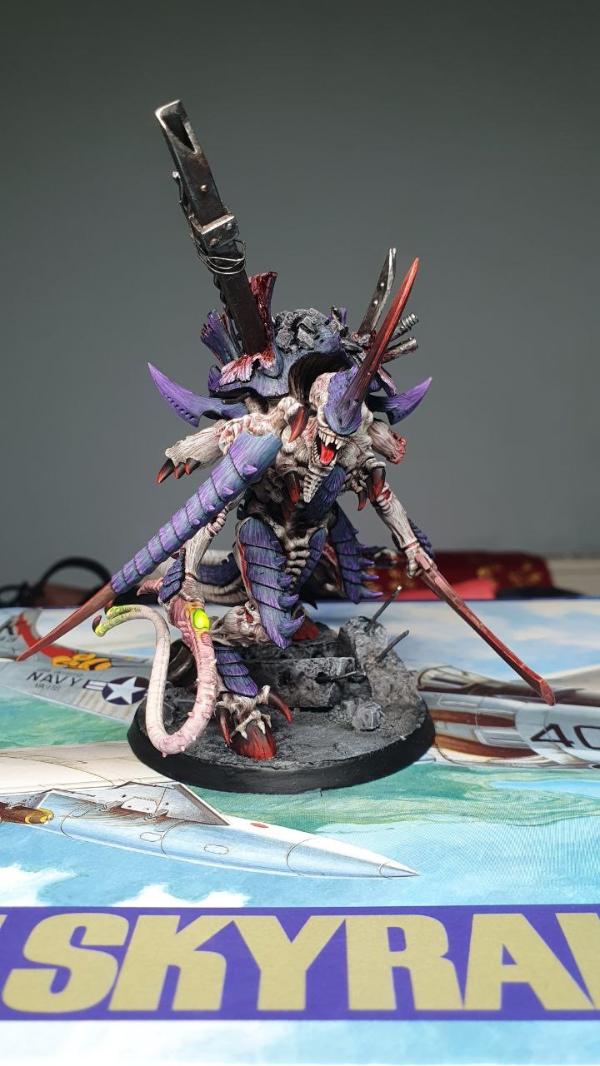
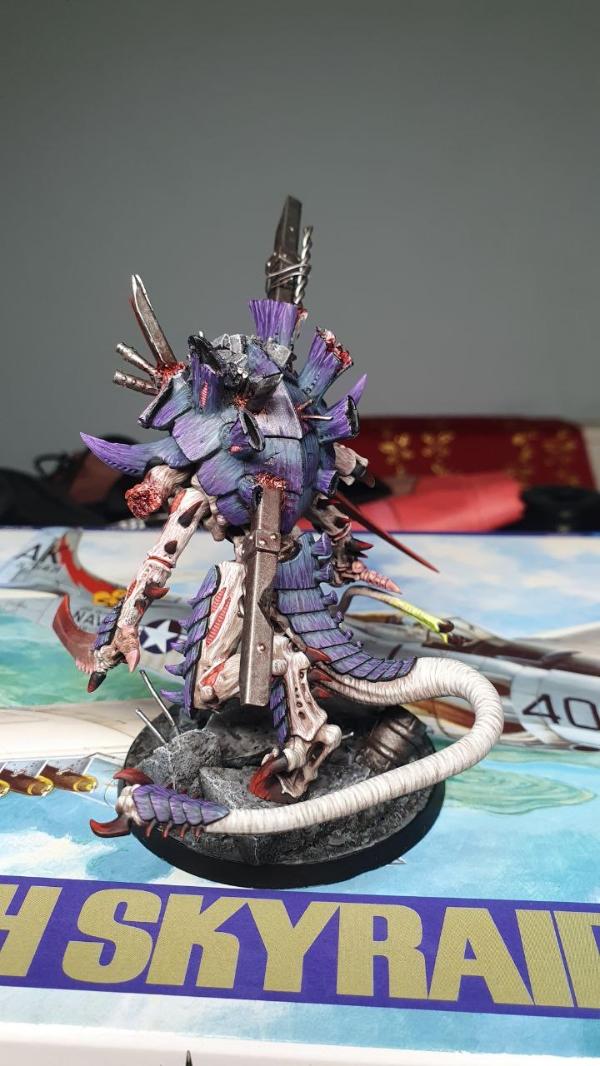
I enjoyed this project, and I’m very happy with the final result. Hope you all enjoyed reading!
|
|
|
|
|
2024/12/30 19:44:33
Subject: Arcane’s Projects and Paintjobs…
|
|
Walking Dead Wraithlord
|
Turned out great! Loving all the texture you've been able to get get. Fantastic brushwork.
|
|
|
|
|
2024/12/31 00:08:52
Subject: Arcane’s Projects and Paintjobs…
|
|
Regular Dakkanaut
|
Thanks! I think I missed a few details out of this blog but the main parts of the paint are all accounted for. I just realised I used some thinned down Carroburg Crimson on certain areas of the skin (around the elbows and thighs) to tint the ivory a pale pink. There was also ALOT of back and forth with various glazes of blue and purple and black on the carapace to try and give extra depth to the texture.
The texture on the model was a really important element of this paint for me as the miniature itself is rather old now and the skin surfaces, while detailed, have lots of very plain and smooth plastic on display. I wanted to try and give that skin a rough, wiry and layered appearance and simulate deep crevices in the carapace. Glad you think the texture looks good, it’s a relief to hear that from someone looking at the finished product!
|
|
This message was edited 1 time. Last update was at 2024/12/31 00:09:30
|
|
|
|
|
2025/02/08 13:45:28
Subject: Re:Arcane’s Projects and Paintjobs…
|
|
Regular Dakkanaut
|
So, following the crazy experiment in kitbashing and customization that was that Hive Tyrant I set myself up for something a little different following my recent acquisition of an airbrush for Christmas.
Obviously this is both an exciting and daunting thing but it occurred to me that a sensible way to tackle the learning curve with this new toy would be … building and painting a model plane!
Yes, I know, this is a wargaming miniature forum, but hear me out.
Whilst priming and basecoating miniatures is obviously something I wanted an airbrush for, it seemed to me that, as I rarely paint more than five minis at once, I would only be using the airbrush for a small amount of coverage and very infrequently during the first few weeks. As we know, when it comes to learning anything new, repetition and time spent with the new tool is what will increase one’s efficiency and understanding… and a few tiny minis at a time seemed to me to just too sparing a use of the tool to get competent with it in a reasonable timeframe.
Enter….a Tamiya F4U Corsair in 1/48 scale!
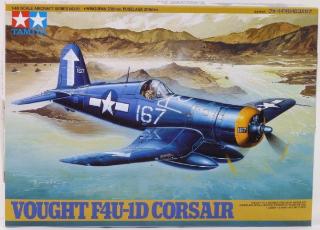
Plenty of large panels and open spaces with which to get to grips applying paint smoothly and, in that way, an immediate jump in the amount of time spent using my new tool to get used to the thing!
After settling on a primer, I have used a stencil to spray over that in various shades of grey, light grey and brown red to apply a mottling effect. All went smoothly and without much fuss. In fact, I had one incident with some splattering which I resolved quickly and another occasion where I had too high an air pressure with too thin a mix which resulted in a tiny bit of spider webbing. I stopped instantly and resolved that issue too. The airbrush is a H&S Ultra 2024… and honestly, it’s a joy. After the priming and mottling I started adding the white underbelly and lighter blues.
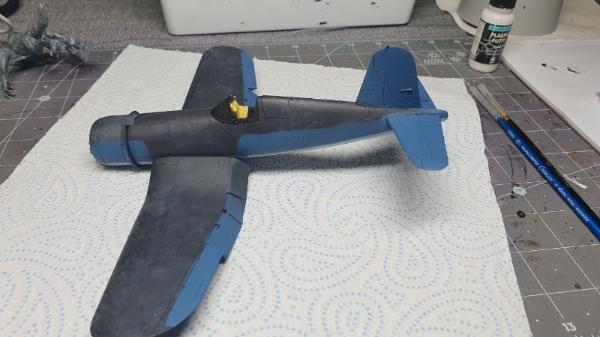
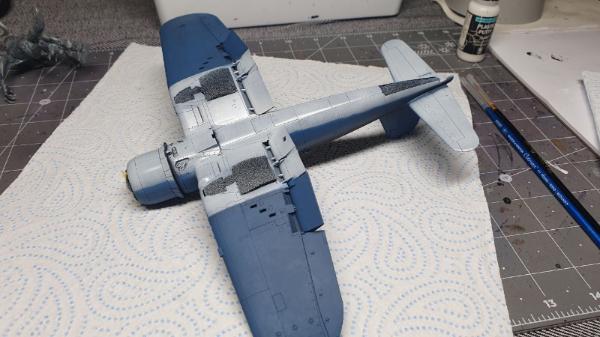
So far so good. All that was left was the final ‘dark blue’ topcoat. I mixed up some paints and again got a nice even coat with the airbrush… but I wanted to push things a little further. Sooo…
I got the settings on the airbrush turned to the produce the finest spray, watered down the paint to super super SUPER thin consistency and went over that topcoat of dark blue with lighter hues to begin a kind of faded and weathering post shade. I was really surprised and happy with the results considering this tool is so alien to me.
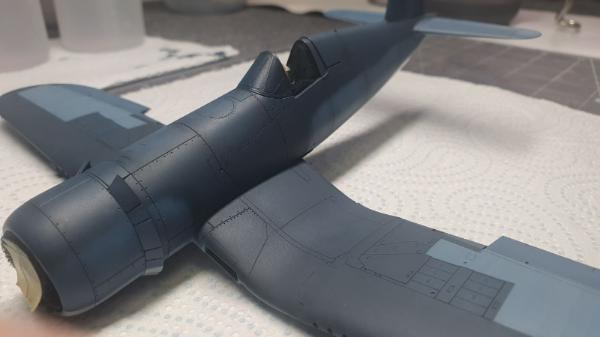
So there we have it. A quick post about my adventures getting used to the airbrush, and at this point, I have no idea why I didn’t get one sooner. What a fantastic bit of kit.
I have also primed and base coated a few minis and the results have been just as incredible.
If you are on the fence, just get one. Get a plane too, and start practicing! You won’t regret it…
|
|
|
|
|
2025/03/26 22:33:25
Subject: Arcane’s Projects and Paintjobs…
|
|

Fixture of Dakka
|
XvArcanevX,
Did you use any masking? Or just the stencil?
CB
|
|
|
|
|
|
2025/03/29 11:54:44
Subject: Arcane’s Projects and Paintjobs…
|
|
Regular Dakkanaut
|
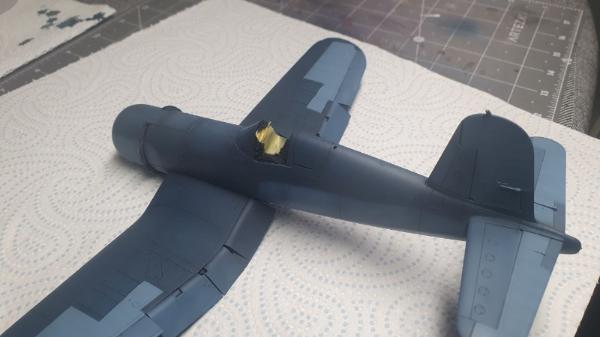
Hey, I used white tac to mask the area that was light blue from the area that is dark blue. Just loosely applied directly to the model and removed 10 minutes after spraying.
|
|
|
|
|
2025/03/29 12:06:45
Subject: Re:Arcane’s Projects and Paintjobs…
|
|
Regular Dakkanaut
|
So it’s been a while since I updated this thread and I thought I’d share the finished result of my adventure in scale modeling. After nearly three months I finally added the finishing touches to the wonderful F4U Corsair and, I have to say, the experience has been a really rewarding one.
There was much that was new in this journey, in particular working with the airbrush, using different types of paints, applying decals at this scale and tackling weathering with oils in a manner I’ve never tried with miniatures. I feel like I have genuinely absorbed a huge amount of knowledge and practical skill over this project and I look forward to building and painting many more scale models alongside my miniatures over the coming months and years.
In the meantime, here is my first completed model plane. Hope some like it and it inspires them to have a go too!
|
|
|
|
|
2025/03/29 12:18:08
Subject: Re:Arcane’s Projects and Paintjobs…
|
|
The Marine Standing Behind Marneus Calgar
|
Needs more dakka.  
I kid, looks amazing! Well done.
|
|
|
|
|
|
|
|
 Ultramarines, 3rd Co. and friends, 16k+
  4k
4k  4k Points
 Competition Index
 Finished Forge World Elysian Army
  Finished Tau Sept Cadre
  Finished Ork Waaagh |
  Alaitoc Eldar Warhost
  Finished Order of Our Martyred Lady - Sisters of Battle
  Finished Necromundian Imperial Guard Regiment

