| Author |
Message |
 |
|
|
|
|
Advert
|
Forum adverts like this one are shown to any user who is not logged in. Join us by filling out a tiny 3 field form and you will get your own, free, dakka user account which gives a good range of benefits to you:
- No adverts like this in the forums anymore.
- Times and dates in your local timezone.
- Full tracking of what you have read so you can skip to your first unread post, easily see what has changed since you last logged in, and easily see what is new at a glance.
- Email notifications for threads you want to watch closely.
- Being a part of the oldest wargaming community on the net.
If you are already a member then feel free to login now. |
|
 |
2011/06/08 23:28:07
Subject: Dark_Gear's spawning vats: A 'Nid building blog.
|
|

Fixture of Dakka
|
Dark_Gear wrote:I don't know but have you noticed that a ripper's jaws are just the right proportions compared to a Trigon's head...
You cannot contemplate the manic grin that played across my face as i read this... 
Dark_Gear wrote:I have sad news, the Tervigon might be taking a bit of a ride to the back burner as I received something in the mail today.
...
The magic words for this new project are (as if I needed any more projects..): magnetised modular terrain boards.
As epic as 'magnetised modular terrain boards' sound you better not leave to hanging on too long with the Tervigon man!!
Seriously though, do them both! NOW! Haha.
wyomingfox wrote:(my latest longfangs used several washes over a metalic coat instead).
Fantastic idea. Sounds like a cheap and effect way DarkStarSabre could get the effect he desires without ordering online. I may try it myself at some point. So Mithril Silver base and multiple blue washes. Maybe with a dab of purple in there. Man! That would look epic in green methinks!!
Is the blue beetle effect your colour of choice for this project Dark_Gear? Or have you yet to confirm?
|
|
|
|
 |
|
2011/06/09 00:49:03
Subject: Dark_Gear's spawning vats: A 'Nid building blog.
|
|

Focused Fire Warrior
australia
|
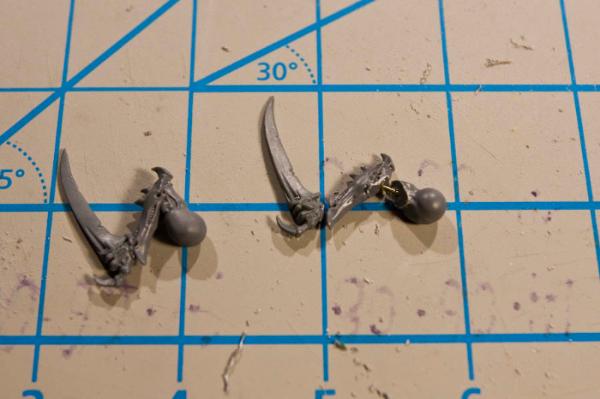
those bones swordsa are sweet
|
 Moonblade cadre 3400 pts Moonblade cadre 3400 pts
 24th Regiment of Tra 1800 pts 24th Regiment of Tra 1800 pts
Laylith the whites host - High elves 3500 pts
Men of the holy shrine - Bretonnian 3200 pts
Scarsnick;s hoddies -Night gobbos 2100 pts
The guard of the east gate of Mordhiem - 3200pts |
|
|
|
|
2011/06/09 02:11:32
Subject: Dark_Gear's spawning vats: A 'Nid building blog.
|
|

Blood Angel Terminator with Lightning Claws
|
This is great work, it would inspire me to do a nid army.
|
|
|
|
|
|
2011/06/09 07:12:32
Subject: Dark_Gear's spawning vats: A 'Nid building blog.
|
|

Elite Tyranid Warrior
|
Been a good long day off, much accomplished but also (thankfully) many beer with friends.
So first, questions and comments.
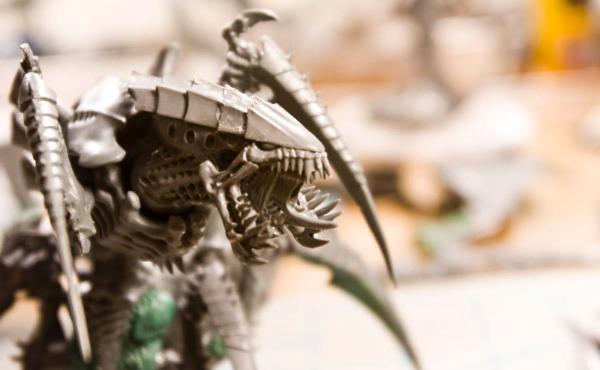
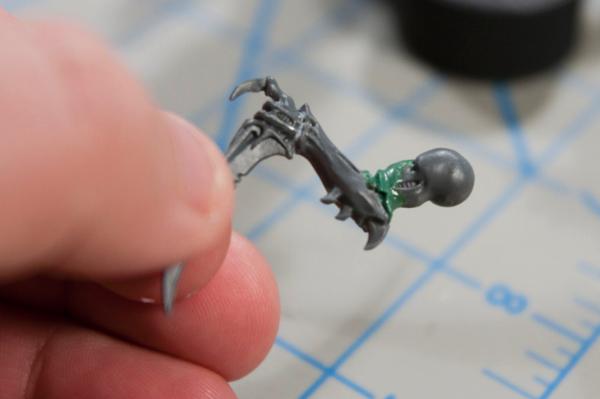
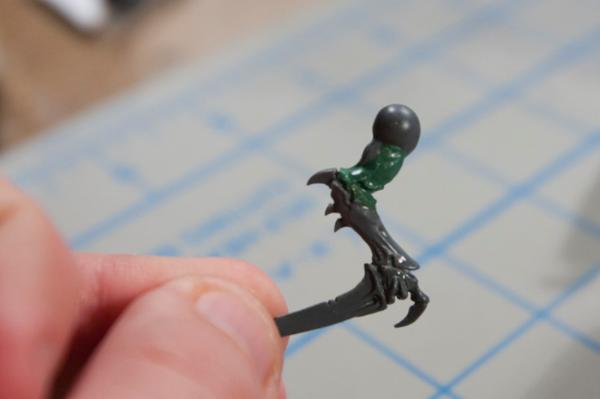
@ kevlar'o: Thank you. I would like also like to take this occasion to thank GW for producing rippers, without a doubt, the handiest bit they have added to a sprue. It's great when used as the handle of a bone sword and it's even better when used as the secondary jaws of a Tervigon...
@ jabbakahut: Jeez man, what more do you need to be inspired to start a Nid army! (other than 1000$) But seriously, thank you and glad you're enjoying the show. I just hope that my love of the conversion side of the hobby is contagious and pushes you, or anyone else, to experiment with your models rather than just use them as is.
LostSoulCasey'sLaw wrote:Is the blue beetle effect your colour of choice for this project Dark_Gear? Or have you yet to confirm?
The blue beetle effect was just a test scheme and it's been dropped. It's been replaced with a scheme inspired by a piece of Starcraft's concept art. The inspiration pic is on another computer but i'll post once I get to it.
LostSoulCasey'sLaw wrote: You cannot contemplate the manic grin that played across my face as i read this...
Sure I can! It's probably quite close to the manic grin I had when I discovered the foam cutting tools and came up with this mad idea. 
That being said, let's move on to a close-up on the new terrain tools shall we?
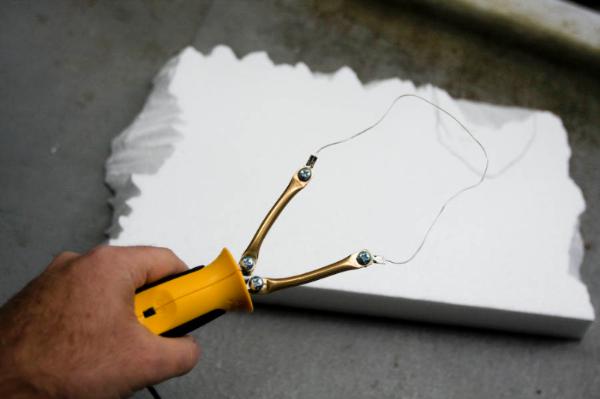
The above is the freeform cutter. Basically you twist the wire to whatever shape you want, turn the heat up and have fun carving foam. Great stuff.
Next up is the matched set of boards with facing hills. Sections are 23.5 inches per side. Only one of them has been covered with gel medium so far as I ran out. The idea is to seal the foam and make it smoother so that paint looks more even once I get to that phase.
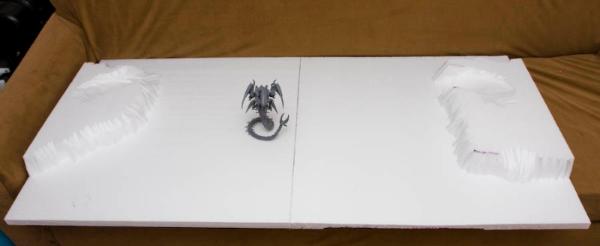
Regarding what I said earlier about these being modular, behold the magic of rotating each board section 180 degrees.

As a frame of reference for the height of the hilltops, which are glued to each section by the way, here's a "ground level" shot.
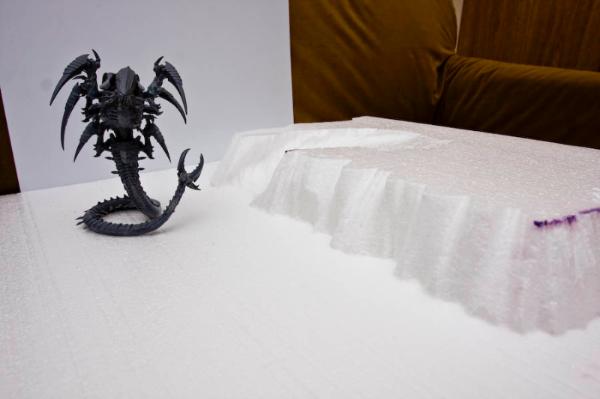
After working with the foam cutting tools for an hour I started getting comfortable with them and carved up some of the off cuts to be used as stylish LOS blocking terrain.
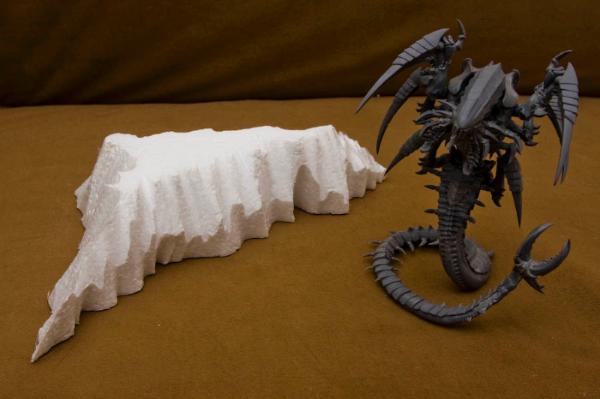
It's neither based nor painted but I'm sure you can appreciate at thiis point that complex are not a hard thing to achieve. My brain is racing 100 miles a minute coming out with new ideas, one of which is Tyranid spires. If I cut the general shape out of foam it shouldn't be too hard to coat the resultant piece with GS to add sturdiness and detail. All it would cost is time and GS, but I've got 18 feet of ribbon so it's all good. 
Hope you enjoyed the show. Tomorrow I should be resuming work on the Tervigon so you can reasonably expect the next pic update by Saturday. Stay tuned.
|
|
|
|
|
|
2011/06/09 07:49:16
Subject: Re:Dark_Gear's spawning vats: A 'Nid building blog.
|
|
Regular Dakkanaut
|
Love your work dark_Gear
With your permission, I think I'll definitely be using some of your ideas (boneswords in particular) in my own Nid modelling. Unfortunately, my conversion rate is seriously curtailed by my budget, so I think my progress is going to be significantly slower...
Look forward to seeing more!
|
|
|
|
|
|
2011/06/09 08:26:47
Subject: Re:Dark_Gear's spawning vats: A 'Nid building blog.
|
|
Fixture of Dakka
|
Great looking stuff! Keep it coming! Looking forward to seeing your colour scheme.
|
|
|
|
|
|
2011/06/09 09:27:54
Subject: Dark_Gear's spawning vats: A 'Nid building blog.
|
|
Ancient Chaos Terminator
Surfing the Tervigon Wave...on a baby.
|
Dark_Gear wrote:Have you thought of adding some acrylic ink medium, which you could be at an art supply store, into some mithril silver paint to tint it to your desired tone? I'd also suggest you look around for the Tamiya metallics. They have a wide assortment of colourful "candy coat" paints to choose and their metal flakes are much smaller than GW's. Another option might be to approach a car painting shop and ask where they buy their paint. I've found vehicle metal flake to be much finer than the some model metallic paints. Seeing as how these painting shops typically create their own mixes ont he spot you could benefit from getting a) better quality paint, b) larger volumes of paint for roughly the same price as GW paint and c) get your exact colour. Just a thought.
Very good suggestion. I'm also remembering something from Warseer a good several years ago where someone did a metallic Word Bearer army using the inks over drybrushed metal. I think I might try that as an idea tonight on one of my spare Chaos Marines.
Also, now we are waiting to see what you do with those boards.
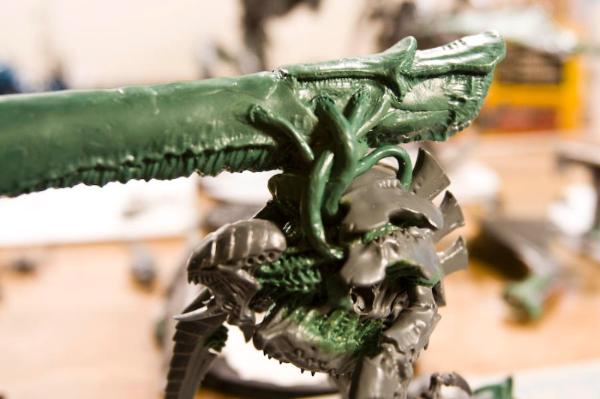
Love the Trygon that seems to be a mascot for them!
|
Now only a CSM player. |
|
|
|
|
2011/06/14 06:20:50
Subject: Re:Dark_Gear's spawning vats: A 'Nid building blog.
|
|
Elite Tyranid Warrior
|
Alrighty then!
Pardon the delay for updates but it's been a very ADHD weekend what with being busy all over the place. What little hobby time I had, I spent on the models rather than the forums. Here then is what's been going on. A quick heads-up for the photo geeks, pics won't be as clear as usual since my flash batteries died so I have to hand hold all my shots while I open up the aperture. Really wish I could afford a 5dMk2 so I could just shoot at ISO 1600 and not worry about anything as annoying as light or batteries...
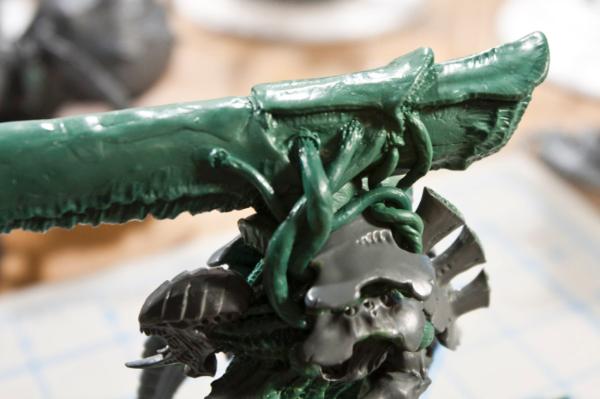
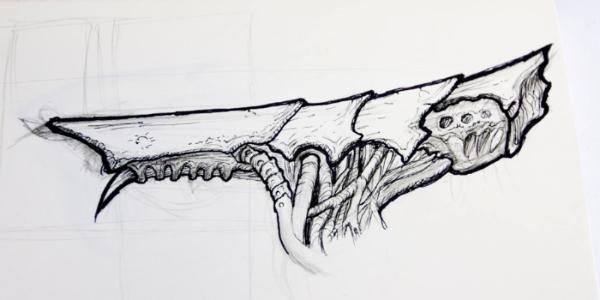
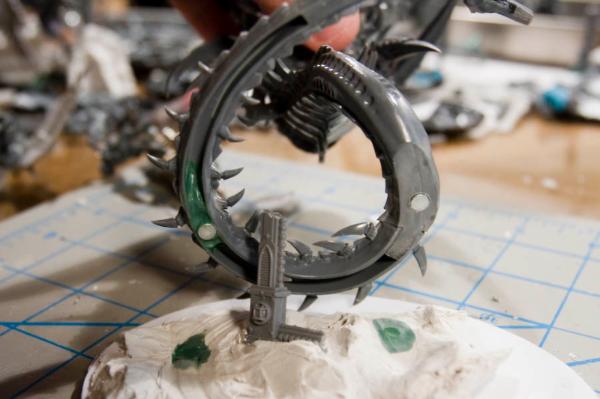
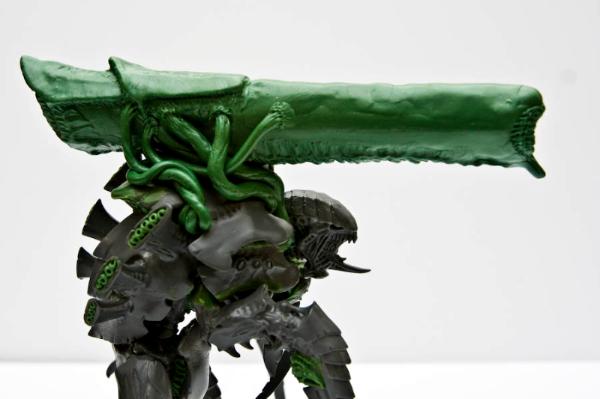
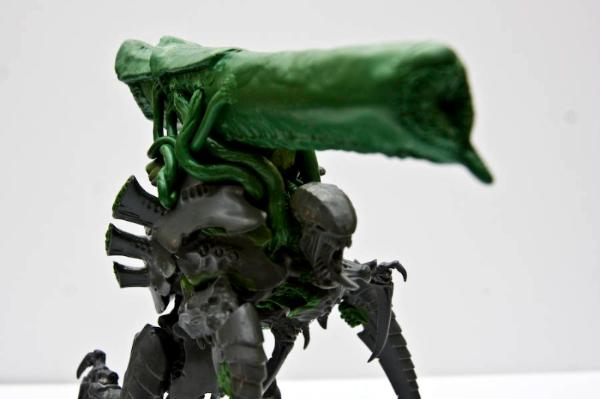
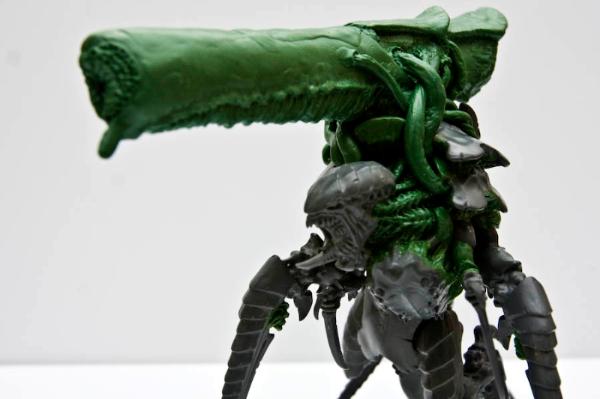
Tervigon | Worked quickly on the jaw.
Need some GS for filling and fleshing out the transitions.
Tyrannofex | Started working on the vestigial fore-limbs. The base for the arm is the 2nd smallest Trigon arm whereas the blade is a Warrior Scything Talon. Some GS required to create the inner crease and build up what was lost from the cutting, which should be easy once I get to it as it's just like the sections I rebuilt for the Harpy's two short arms.
s
Finally started on the blood and ammo tubes going to the Rupture Cannon. The vein seen at the right has been shaped in such a way because I'm planning on adding smaller blood vessels that will thread through the bottom opening. I'm only working on one side at a time to limit the chances that I'll squash the work by accident. Nothing is more infuriating than smudging a zone of fresh GS after you're done it and have moved on to a new area. For example, I had to redo some wing sections 4 times before I figured out this rule of thumb.
I've got the whole design sketched out so it makes the progress a lot easier to plan out. Next step on this model is to finish up the smaller blood vessels feeding the gun before I do the major veins on the other side. Then I can follow up with the short arms and the armour on the top of the gun before finally sculpting the extra chitin on the skull.
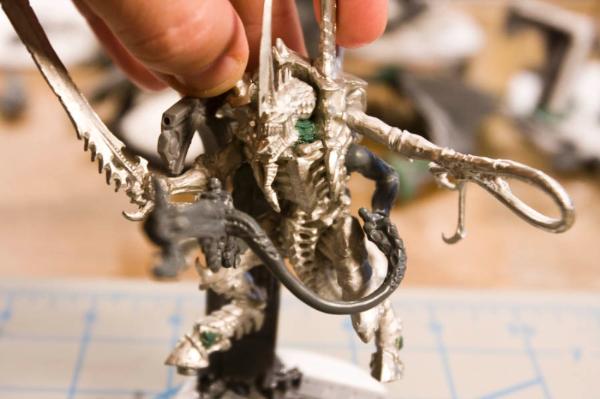
Walking Tyrant | GS'ed the tail, some gaps around the neck and filled the holes at the ankles since I didn't want to use the dinky little spikes which come with the kit. Also finally glued the Lash Whip arm and magnetised one of his feet so the model would stay snapped to the the base without having to deal with pins that either pop out or snap off.
 Flying Tyrant
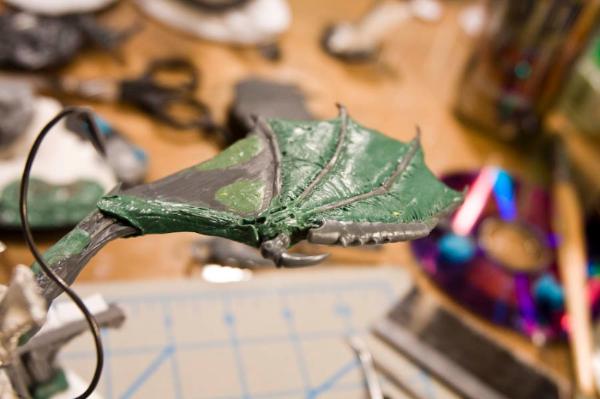
 | Got some more work done on the wings. First up, a better looking thumb courtesy of some chopped ScyTals.
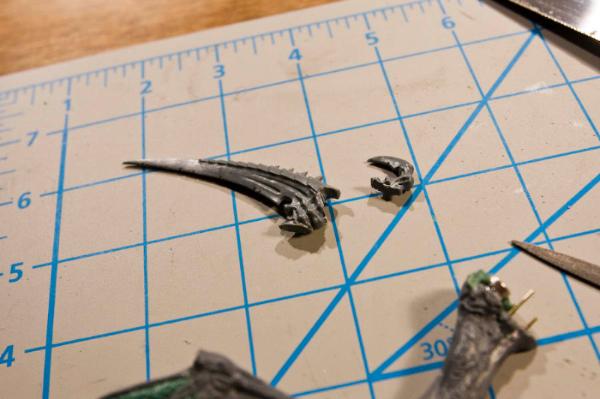
I'm so happy all the parts here are plastic as that means I can leverage the power of Tamiya's Extra Thin Cement again and not have to GS anything. All I needed to do was a) check for fit, b) file down the bitz a little and c) repeat a+b until until they meshed perfectly. Apply a big drop of cement, let sit, paint smooth as always.
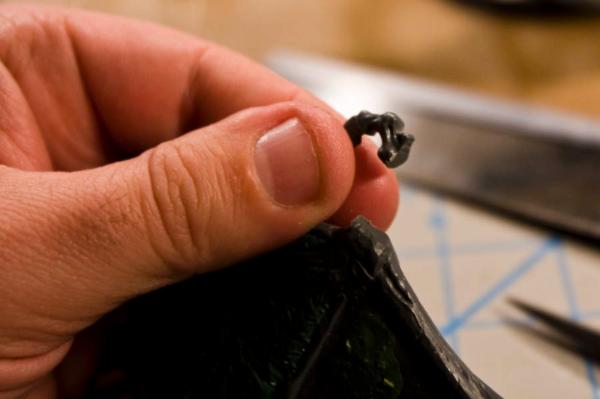
Following that I started reshaping the arms with a second coat of GS to cover the Balrog arms. Eventually, all of the plastic on both arms will be covered with GS. The idea is the give the wings a much more textured look that will also be smoother and look like it's more designed for flight than the "Burning Lava Monster's" ever did. Whether I get there or not is a different story but at least I'm getting some great practice scultping GS in the meantime.
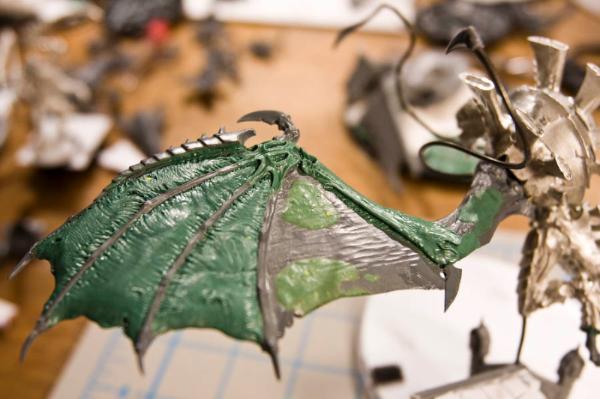
You'll notice I also put the armour plates from the earlier ScyTals on the front of the wings to bulk them up a bit. I'm not quite sure I'll keep it yet but sometimes you just have to build things up "just because". I'll post a little tut on how I did that later on. In the meantime, here's another view of the wings.
They're still far from over as I have yet to GS the upper arm, fill in the remaining wing sections and create a proper transition to the body from the wings. Once all that is done on both wings, I'll determine whether I'm getting rid of the armour on the leading edge of the wings. After seeing the E3 video of the dragons in Skyrim I'm really tempted to start on a 2nd Harpy that wouldn't be flying. Instead, it would be modeled more like the male dragon in Reign of Fire near the end of the movie when it's walking on the ground, using its knuckles as feet as it crawls its way through a ruined London, wings tucked safely away.
As for the terrain boards, they're on a bit of a hiatus until some large sheets of styrene show up. To magnetise the panels I'll be putting them into styrene trays which will serve double duty by reinforcing the outer edges. The styrene trays will also make it a lot easier to contain the magnets as I'm certain that the bond of any glue will be weaker than the strength of Rare Earth Magnets once they get close enough.
Anyways, that's it for now. CC&S welcome as always.
|
|
|
|
|
|
2011/06/14 07:39:02
Subject: Re:Dark_Gear's spawning vats: A 'Nid building blog.
|
|
Fresh-Faced New User
|
After seeing the E3 video of the dragons in Skyrim I'm really tempted to start on a 2nd Harpy that wouldn't be flying. Instead, it would be modeled more like the male dragon in Reign of Fire near the end of the movie when it's walking on the ground, using its knuckles as feet as it crawls its way through a ruined London, wings tucked safely away.
That is something I'd like to see.
I can't help but be reminded of the 80's version of Invaders from Mars after seeing the Warriors from your first post.
|
|
|
|
|
2011/06/14 08:31:17
Subject: Dark_Gear's spawning vats: A 'Nid building blog.
|
|
Ancient Chaos Terminator
Surfing the Tervigon Wave...on a baby.
|
Ok. That GSing is sickening. Those wings are incredible.
And the idea of a walking Harpy sounds good.
|
Now only a CSM player. |
|
|
|
|
2011/06/14 15:47:58
Subject: Dark_Gear's spawning vats: A 'Nid building blog.
|
|
[SWAP SHOP MOD]
Decrepit Dakkanaut
OH-I Wanna get out of here
|
Those wings are nuts! I wish there were some available like these.
|
|
|
|
|
2011/06/14 16:08:41
Subject: Dark_Gear's spawning vats: A 'Nid building blog.
|
|
Boosting Space Marine Biker
|
Great stuff looking forward to seeing them painted.
|
COVER IS FOR THE WEAK |
|
|
|
|
2011/06/14 16:23:52
Subject: Re:Dark_Gear's spawning vats: A 'Nid building blog.
|
|
Elite Tyranid Warrior
|
<quick edit>Thanks to all for my readers by the way. Just this morning I passed 7000 views which means you've all been come here upwards of 2500 times in the past 2 weeks.  <end quick edit>
Glad you guys like wings as there's plenty more work to do on them. If I'd known they were going to take this long to do I probably wouldn't started them. On the other hand, I'm really enjoying all the practice with GS. Total time spent thus far is reaching in the low 20's just on the Flyrant and I've barely even done any work on the right wing...
Speaking of wings, after I finished the post last night I figured I'd do an inventory of the army thus far, just to see how I could fit a 2nd Harpy in there somewhere.
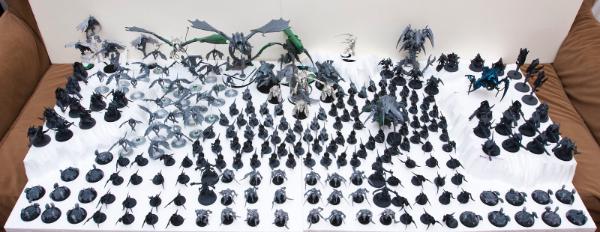 1st reaction
: Damn I won't have enough room!
I have to assemble 1 more Tyrannofex, 1 more Tervigon, 12 more gaunts, 20 Genestealers and 3 Zooanthropes. As cool as it will be, it seems like the 2nd harpy will have to wait.
2nd reaction: Better go buy some paint because I'm going to need A LOT!
But what a great way to save money if I can actually hold off on buying new models until everything gets painted.
3rd reaction: As you guys have pointed out, yes, not only do wings looks cool but ( IMHO) massive Monstrous Creature conversions look so much better than a bunch of tanks.
There are really good looking wings available from Forge World, but they're only for Shrikes. The wings for the Flying Tyrant just don't look as good. In other words, if you want a job done right, you have to do it yourself, possibly with a little inspiration from the Dakka P&M blogs. Seriously though, GS wings like these isn't that hard. It just takes a lot of patience. If you're nervous about ruining a batch of GS or a model here's a great trick. Buy some blue- tac or some animator's play-doh to practice on. Take your time, put in some hours sculpting on stress free material and then go to town on GS'ing. Another thing to keep in mind however is that working with GS on a model that you really care about and don't want to ruin even really tightens the screws on your skills, no matter their level. As I see it, when your work matters and you can't afford to make mistakes, it forces you to bring your "A" game but in a fun and rewarding way. Speaking of challenges, one of these days I should really consider learning how to do resin casting, just so I don't have to sculpt 21 boneswords by hand or ever have to sculpt a third pair of wings.
|
|
This message was edited 1 time. Last update was at 2011/06/14 16:27:10
|
|
|
|
|
2011/06/14 18:17:28
Subject: Dark_Gear's spawning vats: A 'Nid building blog.
|
|
[SWAP SHOP MOD]
Decrepit Dakkanaut
OH-I Wanna get out of here
|
Casting some smallish like the bonesword is easy as pie. The wings would be a bit more work, due to the size. If you had sculpted the whole thing, I woulda recommended getting in contact with Chapterhouse, see if they were interested.
|
|
|
|
|
2011/06/14 19:29:38
Subject: Re:Dark_Gear's spawning vats: A 'Nid building blog.
|
|
Elite Tyranid Warrior
|
That's a cool idea. Might just have to do that with the Boneswords since those are actually original sculpts. By chopping them off at the wrist not only could I get rid of the trademarked portion of the bitz (and thus keep GW off my work) but it would also cut down on the amount of resin used. As for the wings well, I think I'll just be better off scratch-building them next time. I reckon that after resculpting the flyrant's wings I'll have had enough practice with GS to feel comfortable attempting something like that.
|
|
|
|
|
|
2011/06/14 21:41:44
Subject: Dark_Gear's spawning vats: A 'Nid building blog.
|
|
Rampaging Reaver Titan Princeps
|
Nice army!! Need a few more little gribblies though!
The boneswords cant take that long surely?! If you do each separately they will be more organic Plus you can experiment with more crazy bonesword designs.
If you can resist buying more until you paint all that you have the willpower of a GOD!!
|
|
|
|
|
2011/06/14 23:32:08
Subject: Re:Dark_Gear's spawning vats: A 'Nid building blog.
|
|
Elite Tyranid Warrior
|
The Bone swords and lash whips, as modeled on my Tyranid Prime, will take about 4 hours each to make due to all the cutting, filing and GS work. Granted speed might increase once I get a production line going but I doubt it'll take anything less than 3 hours per Sword/Whip. Hence my interest in casting as I have no intention in cutting corners for the conversions. On the bright side, that means it'll be that much longer before I buy new models
The way things are going I'll still be working on this army by the time the 7th ed. Nid Dex comes out...
|
|
|
|
|
|
2011/06/15 13:55:23
Subject: Re:Dark_Gear's spawning vats: A 'Nid building blog.
|
|
Fixture of Dakka
|
Amazing stuff mate. You never fail to impress! I'm dying to see more gribblies!
Automatically Appended Next Post:
Oh yeh, check out Oyumaru if your looking to speed up the modeling process. Theres a link on my Toolbox thread and theres a thread about it in Dakka's vaults!
|
|
This message was edited 1 time. Last update was at 2011/06/15 13:57:05
|
|
|
|
|
2011/06/15 19:59:01
Subject: Re:Dark_Gear's spawning vats: A 'Nid building blog.
|
|
Elite Tyranid Warrior
|
Oyumaru seems like a pretty cool material. Is it just me or is it a different brand of "Instant Mold" (as advertised on CMON http://www.coolminiornot.com/shop/tools-and-misc/instant-mold.html) or InstaMorph ( http://www.instamorph.com/)? Have you worked with oyumaru before? How hard would it be to get a 2 part mold if I wanted to mass-produce some boneswords and lash whips?
Also, i noticed that you added the Tamiya Extra thin cement is the modding section of the toolbox, thanks.
As for the gribblies, just a short update today. Made a bit of progress on the Tyrannofex last night, tidying up some of the devilish details on the chopped fore-limb.
Also added the extra veins towards the tail end of the Cannon, like I was talking about yesterday, in order to fill out that void.
Slowly but surely I'll get the other side and finish the top armour plating as per this sketch I did a few months back.
Enjoy!
|
|
|
|
|
|
2052/08/16 00:53:37
Subject: Re:Dark_Gear's spawning vats: A 'Nid building blog.
|
|
Fixture of Dakka
|
Great wee update mate. Coming along nicely.
As for Oyumaru, i get my money through soon and will be ordering a batch. I have not used it but i looked into it in some detail. Its deffo the same stuff as the CMON link but not sure about the other stuff. It commonly comes in squares which are very easy to work with and can be reused. Not sure about the second link. Did you find the thread? Heres a link:
http://www.dakkadakka.com/dakkaforum/posts/list/342782.page
Shows you how it works and stuff on the first page. Should give you an idea if it will do the boneswords or not. Its hard for me to say without having the part in my hands obviously but its worth a try. There is also a load of links on where you can buy it too. If you plan on holding off i can tell you how it goes in the next week.In fact since it's you, and its a good cause i have some cash so i'll order some right now.
Peace out! Automatically Appended Next Post: £7.70 including delivery. Got it on Amazon.
Estimated delivery 18 Jun 2011 - 22 Jun 2011.
I'll tell you how it goes. I'll do a few different sized parts. Anything you want me to try out specifically?
|
|
This message was edited 1 time. Last update was at 2011/06/16 01:09:49
|
|
|
|
|
2011/06/16 01:32:34
Subject: Dark_Gear's spawning vats: A 'Nid building blog.
|
|
Nurgle Predator Driver with an Infestation
|
I'm loving all of these. That Trevigon is just amazing. Keep it up!
|
|
|
|
|
2011/06/16 04:56:04
Subject: Re:Dark_Gear's spawning vats: A 'Nid building blog.
|
|
Elite Tyranid Warrior
|
Thanks for that thread re: Oyumaru. Very interesting read. Once I finished it and did some research, I found out that I've been hoarding some of the unbranded plastic pellet versions of the mould material for the past 4 years without knowing what I actually had in my tool box. Go figure!
Let me know how your tests turn out as I'm really looking forward to reducing my bonesword creation time. Rippers would be a great model to test the mould material on as I'll need a whole bunch of them for the sword grips. Termagaunt heads would be my second choice bit to mass produce as I'm thinking of converting my hormogaunts since I rarely use them.
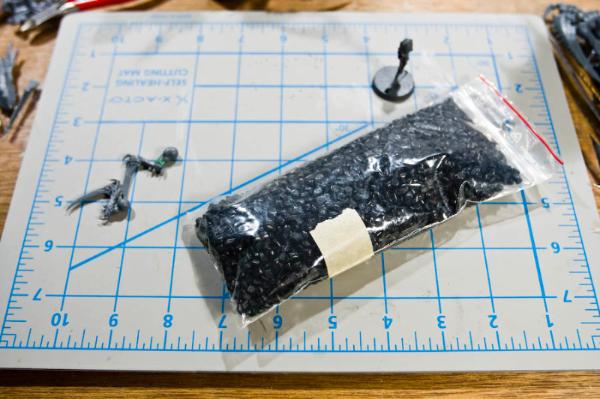
Speaking of new mats, my VeryFLGS (VFLGS from now on) received a shipment today and subsequently delivered it to me, free of charge.
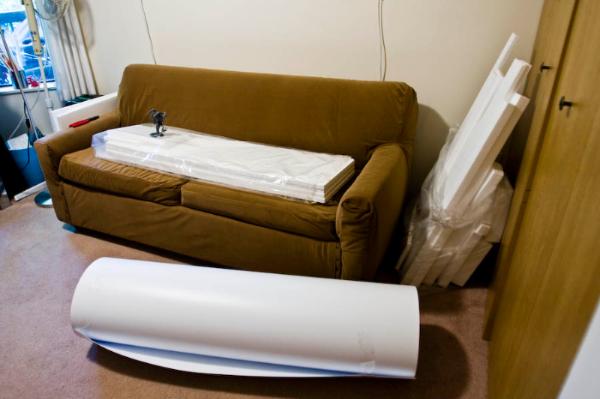
A bit of back story... When speaking to the owner about my plans for modular magnetised terrain boards a few weeks back, his eyes lit up. Upon hearing a better description of the project, he offered to pay for the styrene that I would need to complete 8 terrain sections for the VFLGS. Last Wednesday we made the arrangement for a bulk supply of styrene from a local supplier and today, I found out that buying bulk is a great way to go. Hence this:
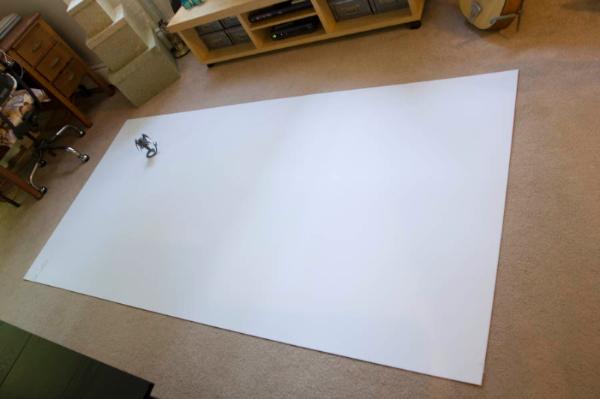
That right there is a 48x96 inch sheet of .06 thick styrene. Total cost: 55$. Cost to buy that quantity of styrene in 11x14 sheets: 209$. Now that the mats are here I can't wait to go back to the terrain boards. Ideas are racing through my head as I'm picturing board with modular rivers that are actually not on top of the terrain sections.
Stay tuned.
|
|
|
|
|
|
2011/06/16 11:43:29
Subject: Dark_Gear's spawning vats: A 'Nid building blog.
|
|
Rampaging Reaver Titan Princeps
|
Holy crap thats a lot of plasticard!! How thick is that? Thats a bargain, someone should think about doing Dakka bulk orders like that...
|
|
|
|
|
2011/06/16 14:37:31
Subject: Re:Dark_Gear's spawning vats: A 'Nid building blog.
|
|
Elite Tyranid Warrior
|
The sheet is .04 inches thick or 1 millimeter. I redid the math using the cost of 12x24 sheets, which work out to 6.20 per sheet, and it would have cost 99.20 plus shipping. So not only was it a 44 dollar saving but it's also a time saving as I now won't have to deal with patching up seams in the middle of the 24x24 board sections.
|
|
|
|
|
|
2011/06/17 12:57:34
Subject: Re:Dark_Gear's spawning vats: A 'Nid building blog.
|
|
Fixture of Dakka
|
Dark_Gear wrote:Thanks for that thread re: Oyumaru. Very interesting read. Once I finished it and did some research, I found out that I've been hoarding some of the unbranded plastic pellet versions of the mould material for the past 4 years without knowing what I actually had in my tool box. Go figure!
Haha great stuff! Loving that gargantuan sheet of plasticard my good man! Do people still say gargantuan? Or even 'good man?'
Anyway got the Oyumaru in today, first thoughts it's bloody tiny... There are 6, 67mm x 15mm x 7mm blocks. I'm not too worried because its supposed to be reusable and i don't plan on doing any huge parts. Anyway i will have a play about with it tonight cast a few parts using green stuff. I'll do the Nid parts you requested if you haven't used the pellets yet? I'll also try using the same stuff tomorrow and see if its responding the same. Oh and i'll put it on The Toolbox thread so as not to bog down your blog. Meanwhile get some cool, gribbly Nids up for the world to see!
Peace out!
|
|
|
|
|
|
2011/06/20 00:45:40
Subject: Re:Dark_Gear's spawning vats: A 'Nid building blog.
|
|
Fixture of Dakka
|
As requested :
So i've been testing out the Oyumaru tonight and i've learnt a lot already. I have by no means finished yet though so keep your eyes out for a more detailed evaluation/review when i get hold of my pals camera on Tuesday.
1. Boiling Water
Obviously be safety conscious, i don't see anyone burning themselves as your not in contact with the water for long and the Oyumaru cools quickly enough but don't be stupid about it. While we are on the topic, i'd suggest you come up with a different system to me. I filled a small plastic tray with water and brought it from the kitchen. Biggest problem here isn't, as you may have thought, spillages although expect them. The largest problem is in fact the surface area. My water would cool far to quickly and it really worked best while it was closest to boiling. Sadly this meant i was up and down every time i had to make a new mold. I would suggest a thermos of boiled water and a bucket to pour the cold stuff into, may as well use something that keeps the heat well too.
2. Moulding
Some small air bubbles and the mould isn't perfect every time but if you are careful and diligent then you should be able to stop this happening. Also, be very careful not to stretch the mould before it cools/solidifies. That brings me onto an interesting point... I noticed that if i stretched the moulds before they cooled or stretched the greenstuff casts before they hardened then i could very easily alter the component produced. Otherwise casts seem to be very, very good!
3. Time
I don't know why but i thought this was going to take like an hour to knock out some moulds. It took around 3 for 4 moulds and i'm not done yet. I'd say an hour per cast if your making the mould from scratch and then you'll have to let the green stuff harden(YAWN!). So find something else to do inbetween.
4. Casts
Gargoyle Head: Unbelievably good! Perfection? Not quite but i would say thats my fault.
Space Marine Gun Scope: Very good! Casts need some touch ups but it shouldn't be too hard. Cutting the greenstuff flash off is going to be hard!
A toy bi-pod that fits boltguns/lasguns and more: Almost perfect! Cutting the flash from such a flimsy component might be tough though...
Fire Warrior without front optics: Still in mould. First mould ripped due to the sharp edge and excessive pushing. Expect errors when you start.
5. Sizes
The tiny blocks of Oyumaru are way more than enough!! I suggest cutting small pieces from the blocks for things like heads(less than you think you will need). There is definitely enough in a block or two for components like your boneswords.
6. Re-usability
I can see the grain in the Oyumaru stretching already after very little use although it doesn't seem to be affecting the moulds or how it works. Watch this space!
Hope that helps. I'm a bit sleepy so it might not read very well. I'll post a more detailed version when i have the images to go with it. Conclusion so far: This is without a doubt one of thee most useful things you could have in your toolbox...
|
|
|
|
|
|
2011/06/20 02:36:47
Subject: Re:Dark_Gear's spawning vats: A 'Nid building blog.
|
|
Elite Tyranid Warrior
|
@ ZephyrRey: Thanks for the sub. Stay tuned for more as I'm soon to start work on Tervigon and Tyrannofex 2 (Mind you, knowing my work schedule, shortly means a month)
@ LostSoulCasey'sLaw: Wow, very throrough write-up. Once again, thanks for the research and the write-up. Learned a lot from your initial use of the material and I'll make sure to be as thorough as you when I try out my equivalent product over here.
1. Boiling Water
I would suggest a thermos of boiled water and a bucket to pour the cold stuff into, may as well use something that keeps the heat well too.
So do you think an electric kettle would be a good workaround here? With a kettle that's small enough to fit on the desk even, it should be easy enough to get just enough water right when needed. Having an insulated cup or bowl could compound the heat loss even more.
2. Moulding
That brings me onto an interesting point... I noticed that if i stretched the moulds before they cooled or stretched the greenstuff casts before they hardened then i could very easily alter the component produced.
The way you worded that it seemed like you're saying that the ability to alter a component is a good thing, which I can definitely see if say, you want to make a longer gun without having to convert one. Is that what you meant?
3. Time
I don't know why but i thought this was going to take like an hour to knock out some moulds. It took around 3 for 4 moulds and i'm not done yet. I'd say an hour per cast if your making the mould from scratch and then you'll have to let the green stuff harden(YAWN!). So find something else to do in between.
Good to know. Since I've got about 5 projects going on at the same time, I should be good.
4. Casts
Gargoyle Head: Unbelievably good! Perfection? Not quite but i would say thats my fault.
Sweet! This is awesome news as I've recently lost 2 Gaunt heads during my travels. It would be a shame to buy a new box of gaunts just to replace 2 heads. Then again I do need about 10 more to flesh out the 2nd devilgaunt squad and 14 more to make sure I have enough fleshborer gaunts for the upcoming 2nd tervigon. Current gaunt count: only 82.
If you let the green stuff sit for 2 hours is that long enough to remove it from the mold? If so that be perfect as that's typically the perfect "touch-up" window. By that I mean that the GS is usually firm enough to not get smudged by stray thumbs but workable with stiff tools.
6. Re-usability
I can see the grain in the Oyumaru stretching already after very little use although it doesn't seem to be affecting the moulds or how it works.
Something worth exploring. When working with metal, in order to make stretch it past a certain point, you typically anneal it to all it to relax between the various shaping stages. Do you think that heating up the oyumaru up to high enough temperature that it would flow into a shape of it's own and then allowing it to cool would get rid of the grain or do you think it would only make the grain worse?
Conclusion so far: This is without a doubt one of thee most useful things you could have in your toolbox...
Awesome news! That being the case I'll make sure to try out my plastic molding pellets sooner than later. I'll let you know how the test go.
Modeling wise, it was a slow but productive weekend.
For starters I magnetised the Trigon to it's base in order to facilitate transport. Thanks to the thickness of the scratch-built plasticard base, all it took was a bit of drilling, gluing and patching with GS to make a handy-dandy "snap-on" base.
Next came the task that would occupy me for the rest of Saturday. I finally completed the veins and pipes on the right hand side of the Tyrannofex, tweaking their arrangement a bit compared to the left hand side just to add some natural randomness to the monstrous cannon. Here then is where the Rupture Cannon stands thus far:
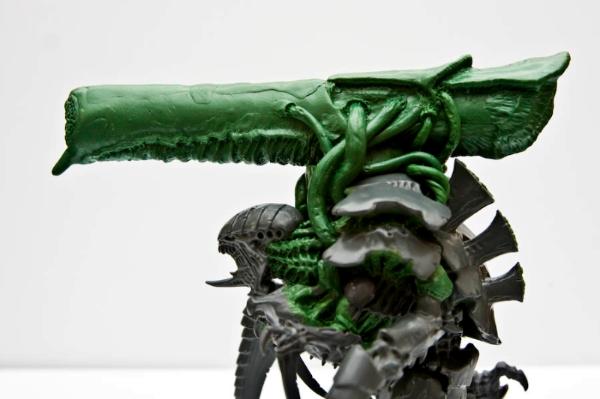
Next phase is the armour plating as illustrated in the sketch I published last week.
Did some more work on the Tervigon before heading out to FLGS. Nothing major so no pictures - for now.
To close this post, here was the list I used (successfully) for today's 2500pt fight:
Hive Tyrant | Brain Leech, Sword/Whip, Hive Commander, Old Advesary, Adrenal glands.
Hive Guard | x6
Venomthropes | x2
Warriors | Devourers x5, Sword/Whip, Adrenal Glands, Barbed Strangler x1 (outflanking)
Tervigon | Adrenal Glands, Toxin Sacs, Catalyst | x2
DevGaunts | x 34
Raveners | Deathspitter, Rending Claws | x5 (deepstriking)
Biovores | x6
Trigon | Prime | x1 (deepstriking)
Although my reserve rolls weren't what I expected, things worked out in the end. It was the first time I ever used the Trigon and although I wouldn't call it stellar compared to what the biovores and Devgaunts KP did on the opposite side of the board, it did pretty much wipe out a squad of Sniper Scouts that were camping on an objective, and thus cleared the only objective my opponent had captured. Let's just it say didn't end well for the marines (again).
Comments & Critiques welcome as always.
|
|
This message was edited 1 time. Last update was at 2011/06/20 05:12:58
|
|
|
|
|
2011/06/20 03:01:19
Subject: Dark_Gear's spawning vats: A 'Nid building blog.
|
|
Hellacious Havoc
|
This is some great stuff mate, keep up the good work, subscribing for epic 'nids.
|
Ave Dominus Nox.
Night Lords, Host of the Tumultuous Storm.

|
|
|
|
|
2011/06/20 13:13:18
Subject: Re:Dark_Gear's spawning vats: A 'Nid building blog.
|
|
Fixture of Dakka
|
1. Boiling Water
Dark_Gear wrote:So do you think an electric kettle would be a good workaround here? With a kettle that's small enough to fit on the desk even, it should be easy enough to get just enough water right when needed. Having an insulated cup or bowl could compound the heat loss even more.
Yep, an insulated cup or bowl would help a lot. If you can have a kettle at your desk thats perfect, and if you have somewhere to dispose of cold water thats even better. I was using an electric kettle but i had the distinct feeling i'd rub against it, burn my arm, knock the kettle down and have to go to hospital. I have a limited workspace though. :(
2. Moulding
The way you worded that it seemed like you're saying that the ability to alter a component is a good thing, which I can definitely see if say, you want to make a longer gun without having to convert one. Is that what you meant?
Stretching the moulds and casts is predominantly a bad thing but i can see positive uses in it if you did it on purpose. I will explain these at the end a bit.
4. Casts
only 82.
I got to 48 and started crying when i was doing mine.  Haha!
If you let the green stuff sit for 2 hours is that long enough to remove it from the mold? If so that be perfect as that's typically the perfect "touch-up" window. By that I mean that the GS is usually firm enough to not get smudged by stray thumbs but workable with stiff tools.
I'd say 2 hours is enough although any work you will need to do should be doable with normal hard kit(files, cutters, knives. oh an a touch of greenstuff)
6. Re-usability
Something worth exploring. When working with metal, in order to make stretch it past a certain point, you typically anneal it to all it to relax between the various shaping stages. Do you think that heating up the oyumaru up to high enough temperature that it would flow into a shape of it's own and then allowing it to cool would get rid of the grain or do you think it would only make the grain worse?
Sorry, the grain doesn't cause any problems at all, it's only visible due to the semi-transparency of the material. I worry that as it loses the grain it may become less responive. I just did a part where the Oyumary is botched together from cut offs, the colour is much darker and less transparent but the mould is perfect.
I got the casts, moulds and Oyumaru out again today to look on it with fresh eyes. Firstly i would say i've been a very silly billy!!
Some of the casts are mis aligned: This is partly to do with my impatience at the start where i wanted to see the quality of the print so i kept removing half the cast to see it. This is also just due to the fact that its hard to line up. No fear i have a solution! I would suggest putting a pin through the Oyumaru on either side of the component while it is being cast. This should make it easy to line up later, hell! use even more pins if you're doing something important.
Also i have noticed all of the casts are slightly larger than the originals. I was very annoyed when i noticed but i think i have figured out why! When you are happy that the mould has been made and you peel back the two sides of the mould and cut the closed edge the Oyumaru tends to curl outwards. This will be partly due to surface tension, the sides the moulds are on can't hold their selves together as strongly as the unblemished sides. This will also have to do with the removal of their counterpart, the two halves of the mould would have held each other in place until you peeled them away. The simplest solution would be Sellotape(i think thats sticky tape to you foreigners!  ). Wrap it up good so it doesn't stretch during the casting. Things like screws instead of pins are just going to shred the material, clamps won't give even pressure and might squash it too much. Elastic bands may work but not as well as tape. Trial and error might be required here...
Tyrranofex is looking great man. I wasn't quite sure about the gun the first time i saw it but every time you work your magic on it i find myself admiring it more and more.
That's a really cool list. I don't think i've got the balls to play with so few numbers but it looks like it can do the job to me. 2k of your 'Nids against my 2k of CSM from the last codex would be fun to watch never mind play! The CSM's would have no chance in hell of winning but it would be fun to see their insane stats and few numbers against all those hungry beasts!!
Peace out man keep up the good work!
|
|
|
|
|
|
2011/06/20 13:36:09
Subject: Dark_Gear's spawning vats: A 'Nid building blog.
|
|
Sneaky Sniper Drone
australia
|
Simply awsome, unbeleivable work on that tervigon, love the bone swords on the prime.
|
"if you're still alive your not fighting hard enough!" |
|
|
|
|
|
|


