| Author |
Message |
 |
|
|
|
|
Advert
|
Forum adverts like this one are shown to any user who is not logged in. Join us by filling out a tiny 3 field form and you will get your own, free, dakka user account which gives a good range of benefits to you:
- No adverts like this in the forums anymore.
- Times and dates in your local timezone.
- Full tracking of what you have read so you can skip to your first unread post, easily see what has changed since you last logged in, and easily see what is new at a glance.
- Email notifications for threads you want to watch closely.
- Being a part of the oldest wargaming community on the net.
If you are already a member then feel free to login now. |
|
 |
2014/12/24 15:55:48
Subject: Mr Bug Man blog
|
|

Decrepit Dakkanaut
|
Truly remarkable work NAVARRO. Merry Christmas to you as well!
|
|
|
|
 |
|
2015/05/09 13:50:42
Subject: Re:Mr Bug Man blog
|
|

Using Object Source Lighting
|
Time for a quick update.
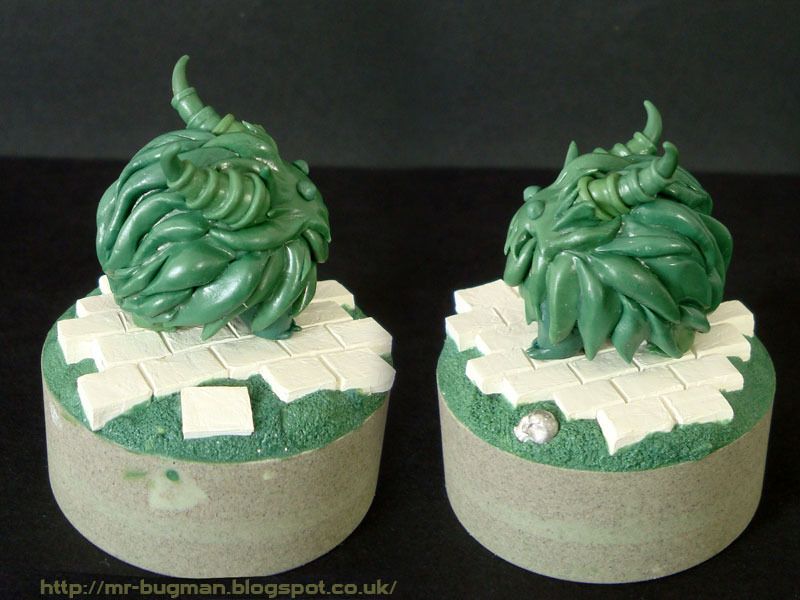
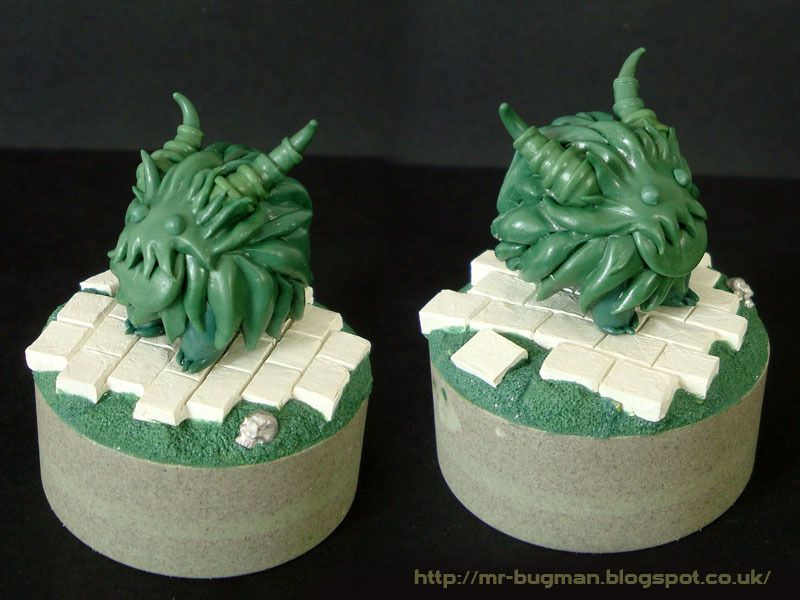
Last weekend I managed to sculpt and paint something a bit different as gift to a good friend.
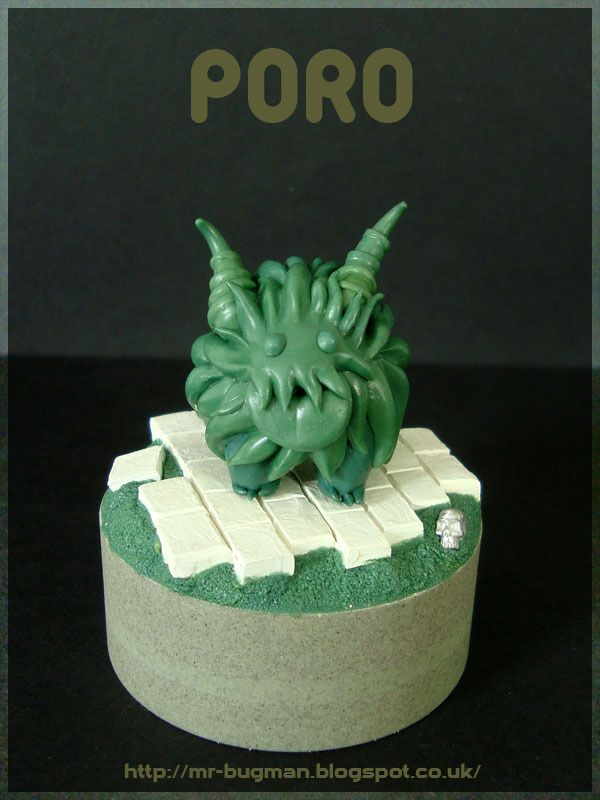
So, he is crazy about League of Legends videogame and specially one cute creature there called PORO ( its like a snow yak chibi thing), perfect! I had 3 days to pull this off and dont ask me he how but I did it!
Poro Sculpt
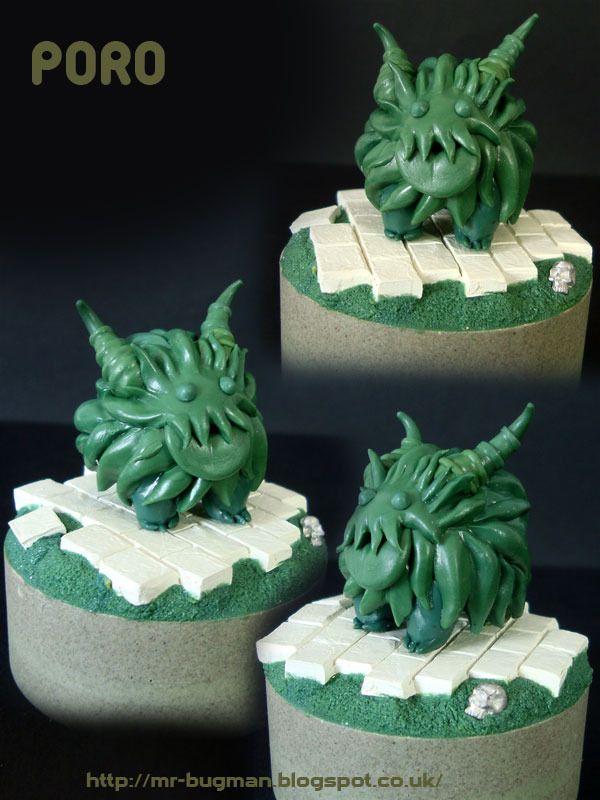
Paintjob
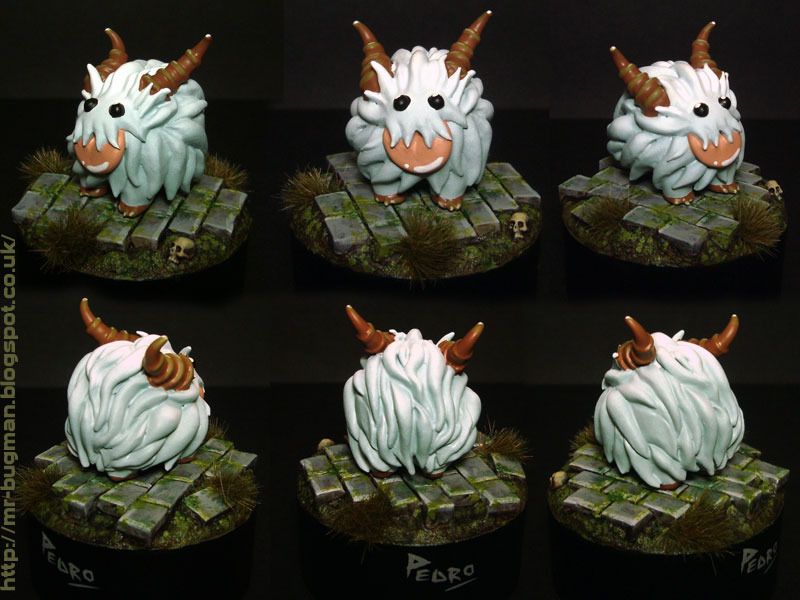
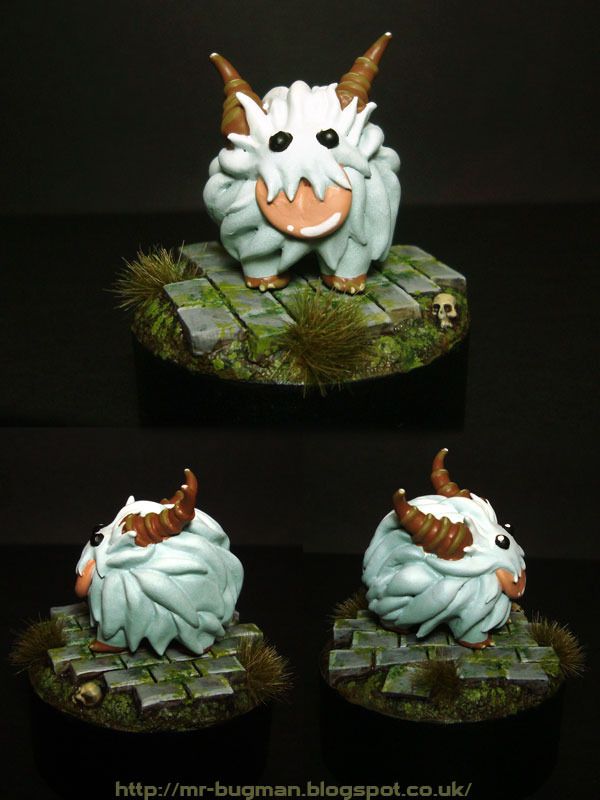
In the end he enjoyed this gift so I was happy with that.
|
|
|
|
|
|
2015/05/09 15:19:46
Subject: Mr Bug Man blog
|
|
Fixture of Dakka
|
Awesome! Glad to see some cute stuff, or any stuff really, from your blog man!
|
|
|
|
|
|
2015/05/30 17:56:02
Subject: Re:Mr Bug Man blog
|
|
Using Object Source Lighting
|
|
|
|
|
|
|
2015/06/13 13:02:55
Subject: Re:Mr Bug Man blog
|
|
Using Object Source Lighting
|
For the old vets here you probably remember my old site Buglands. This week I tried to recover it but unfortunately all files are missing so its really gone forever.
I had tutorials and all kind of bug things there, some of them useful for people curious about sculpting with Greenstuff.
With those bad news in mind I will slowly republish some of those tutorials on my Blog on Blogger. http://mr-bugman.blogspot.co.uk/2015/06/tutorial-sculpting-alien-skin.html
Here is the first one. Since its a small one I will also publish here on dakka.
Sculpting Alien Skin ( Greenstuff Tutorial)
Introduction
This small sculpting tutorial will be showcasing some tips on how to create a very simple alien skin texture that can be used in various projects, from chaos creatures, lizardmen to Tyranids.
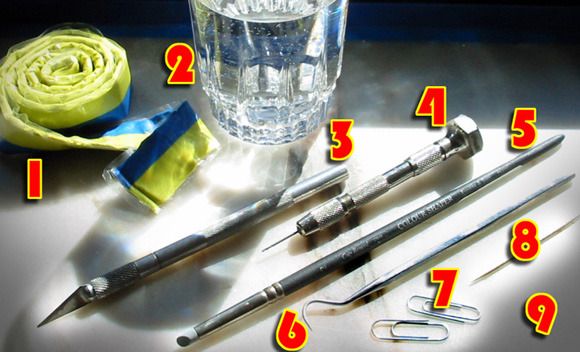
Step 1 ( things you will need) (pic1)
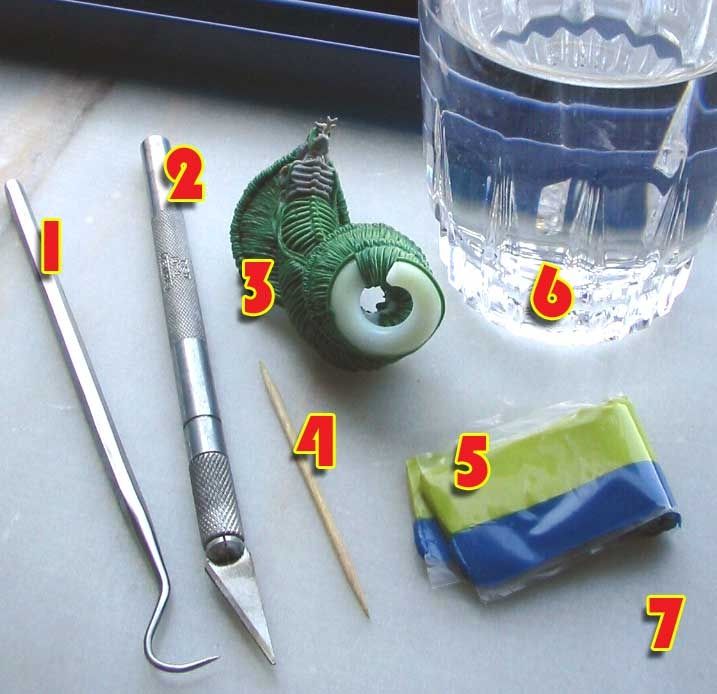
1- Sculpting tool
2- Hobby knife ( cutter)
3- Miniature or structure to apply textured skin
4- Toothpick
5- Modeling putty (green stuff)
6- Water
7- Flat surface
Patience
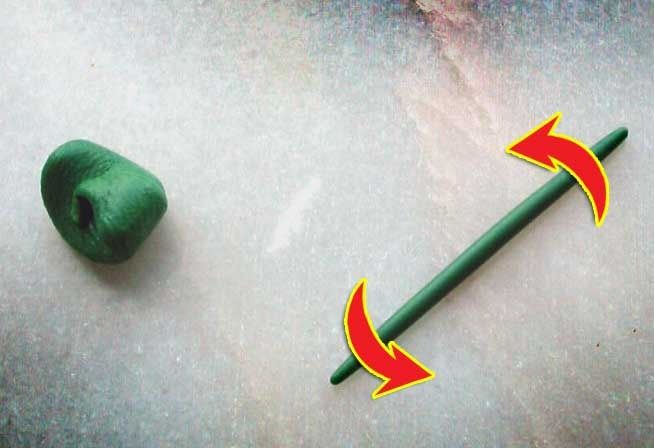
Step 2 (handling green stuff)
- Cut a bit of green stuff ( GS) and mix it, more yellow is better for detail work but it takes more time to cure and is also extremely sticky, more blue has the opposite effect.
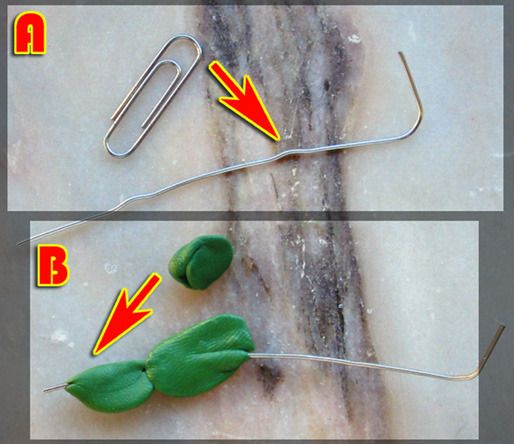
- In a flat area stretch, roll the GS until you reach the desired shape and size (pic2)
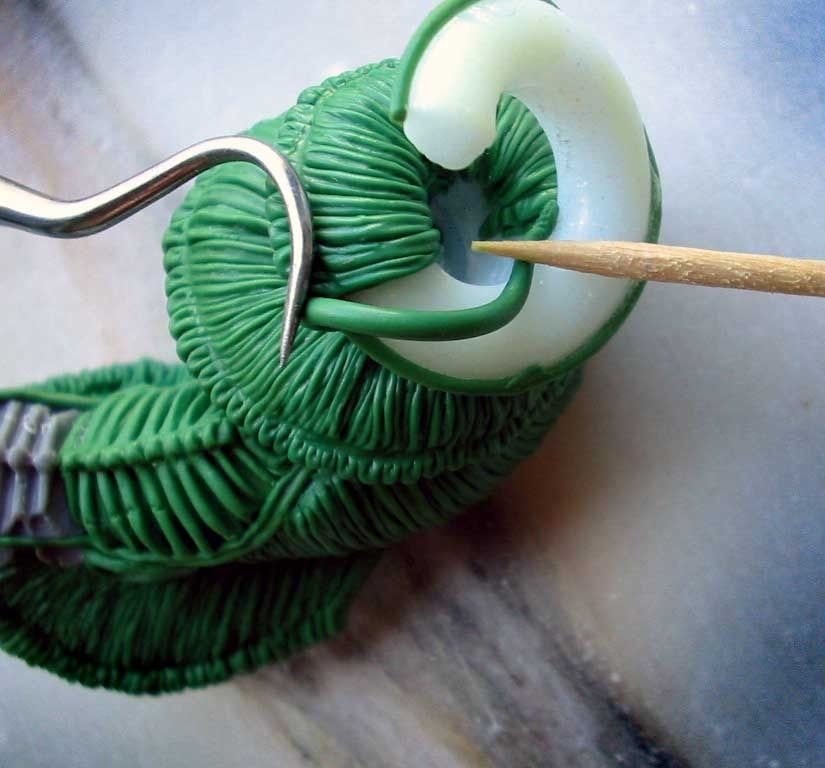
- Apply it directly on the miniature (I created a fimo swirly structure)
- Use the toothpick and sculpting tool to handle the GS, both should be dipped in water to avoid GS sticky properties (pic3)
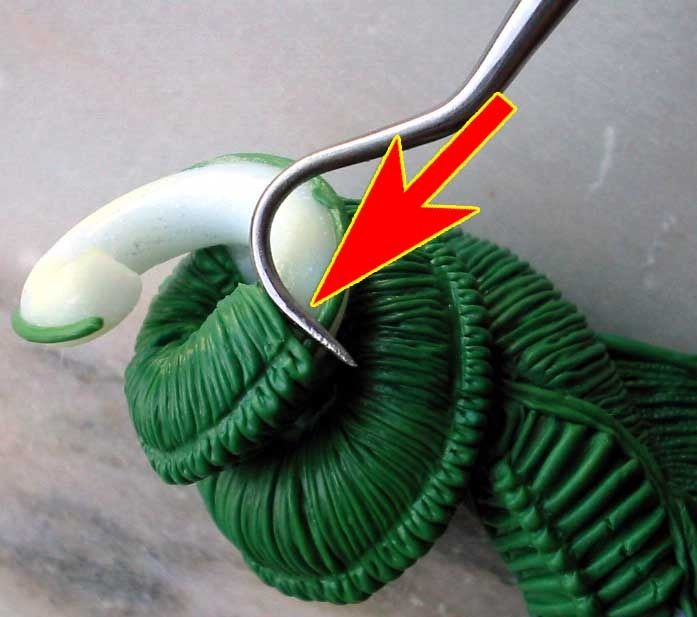
Step 3 ( Texturing)
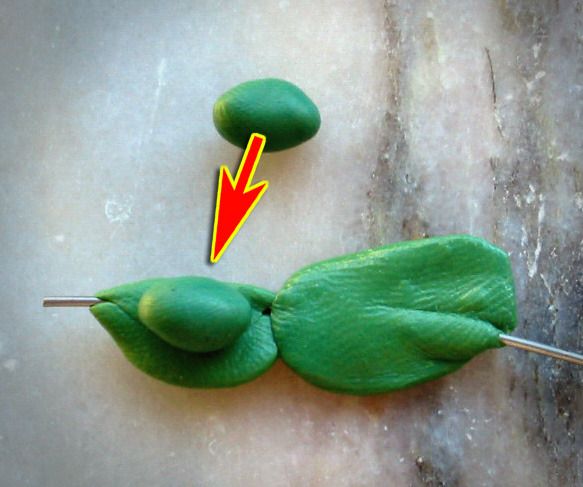
- Reshape the GS to fill the interior structure or miniature and cut the excess (pic4)
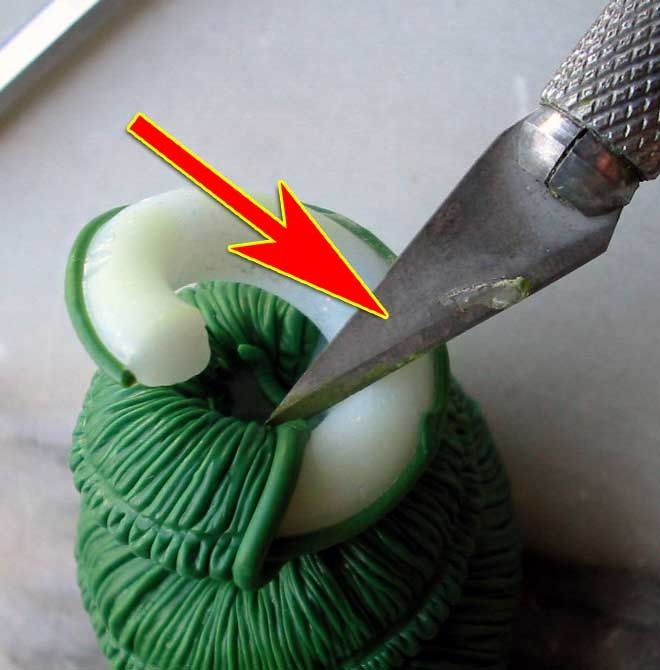
- With sculpting tool carve some parallel lines gently on GS (pic5)
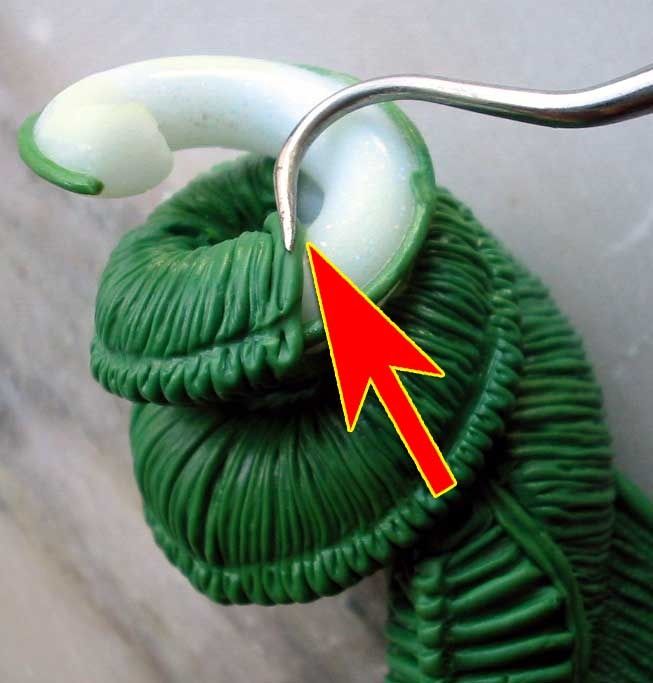
- Finally push it towards previous GS module in order to create space for next one (pic6)
Conclusion
Now that you have done the first module of the skin you just need to repeat the same steps several times in order to cover all the desired surface. The reason why I choose to make the skin in small modules and not all at once is due to the fact you will have more control over the skin sculpting and also makes the texture itself much more interesting. I hope these tips will help you all on your future sculpting projects.
Final result.
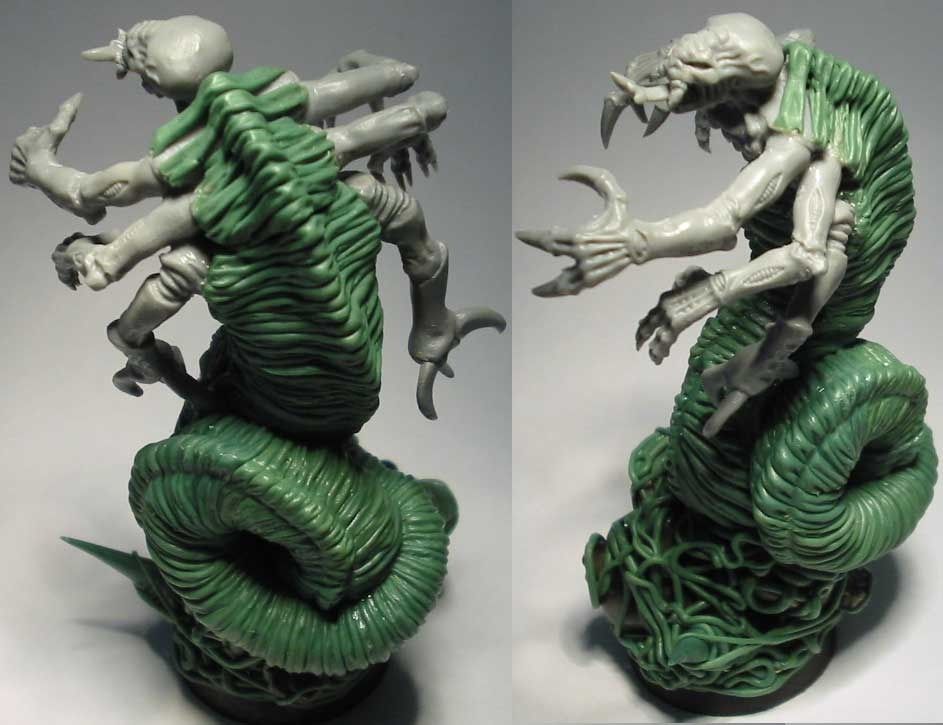
Have fun Greenstuffing.
|
|
|
|
|
|
2015/06/13 15:23:47
Subject: Mr Bug Man blog
|
|
Fixture of Dakka
|
Awesome! I remember the old Buglands, but hadn't realized it went down. Very sorry to hear it.
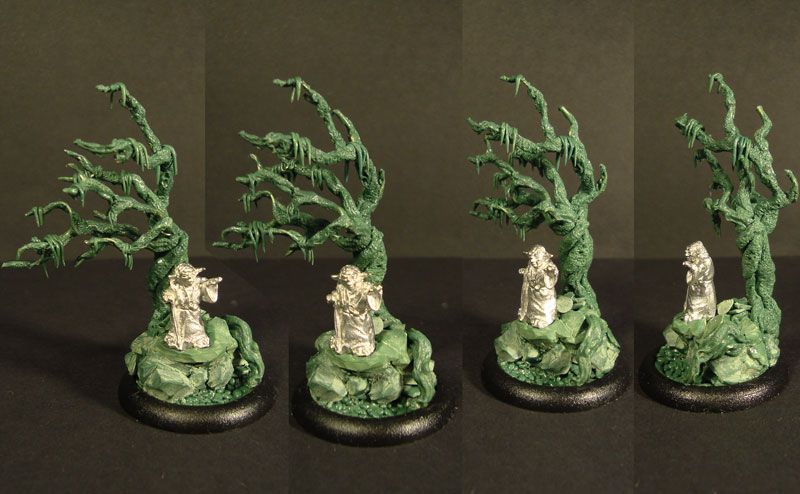
I like Yoda too, but honestly, I love the hell out of that tree  How did you do the texture on it? Any particular trick?
|
|
|
|
|
|
2015/06/13 16:12:36
Subject: Re:Mr Bug Man blog
|
|

Three Color Minimum
|
You control over green stuff is inspiring! 
|
|
|
|
|
|
2015/06/13 17:22:50
Subject: Mr Bug Man blog
|
|
Arch Magos w/ 4 Meg of RAM
|
Some amazing work on this blog.
Did you ever get the Orc and Goblin army painted up?
|
Bye bye Dakkadakka, happy hobbying! I really enjoyed my time on here. Opinions were always my own :-) |
|
|
|
|
2015/06/13 18:28:33
Subject: Mr Bug Man blog
|
|
Ragin' Ork Dreadnought
Deep in the Outer Boroughs of NYC
|
Great tutorial! Awesome sauce.
|
|
|
|
|
|
2015/06/13 18:46:55
Subject: Mr Bug Man blog
|
|
Using Object Source Lighting
|
Wehrkind wrote:Awesome! I remember the old Buglands, but hadn't realized it went down. Very sorry to hear it.
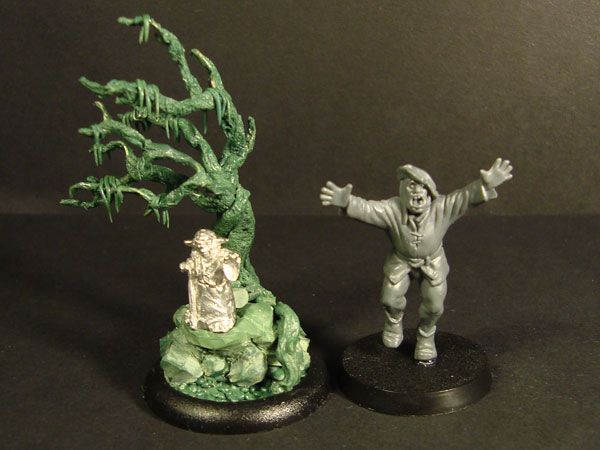
I like Yoda too, but honestly, I love the hell out of that tree How did you do the texture on it? Any particular trick?
The tree Texture Is a really simple process, you just gave me the theme for another sculpting tutorial right there.
Just in words if you want to try it now: the tree was made with the GS leftovers of my other sculpting projects and you only need a tree wire frame and a toothbrush. After you lay some GS on the tree wire you then poke it with an old tooth brush to create lots of little indentations. Simple and easy.
NobodyXY wrote:You control over green stuff is inspiring!
Thanks. glad I could inspire you, I hope that you try a bit of sculpting in the future. It can be a bit tricky in the beginning but with perseverance you will have lots of fun enhancing your minis.
Bottle wrote:Some amazing work on this blog.
Did you ever get the Orc and Goblin army painted up?
Yes good sir I have the 2 regiments of spiders ready just waiting to see what is going to be the outcome on the basing for Age of sigmar. Soon enough we will find out. I think my O&G as they stand will be the perfect number of models for a skirmish game.
Warboss_Waaazag wrote:Great tutorial! Awesome sauce.
More to come 
|
|
|
|
|
|
2015/06/13 21:03:50
Subject: Mr Bug Man blog
|
|
Fixture of Dakka
|
 NAVARRO wrote: NAVARRO wrote:Wehrkind wrote:Awesome! I remember the old Buglands, but hadn't realized it went down. Very sorry to hear it.
I like Yoda too, but honestly, I love the hell out of that tree How did you do the texture on it? Any particular trick?
The tree Texture Is a really simple process, you just gave me the theme for another sculpting tutorial right there.
Just in words if you want to try it now: the tree was made with the GS leftovers of my other sculpting projects and you only need a tree wire frame and a toothbrush. After you lay some GS on the tree wire you then poke it with an old tooth brush to create lots of little indentations. Simple and easy.
Cool, I will have to give that a try! I had been messing around with GS trees for gallows groves etc, and just never really felt comfortable with their look. Then again I kind of hate everything I do ever, so there's that 
|
|
|
|
|
|
2015/06/13 23:09:44
Subject: Mr Bug Man blog
|
|
Repentia Mistress
|
Thanks for posting this tutorial up. I've been looking for a way to sculpt alien skin like this for my alt 'Nids. I'm sorry to hear that your site went down. Is this the new hub for Bug Man stuff?
|
|
|
|
|
|
2015/06/14 02:04:32
Subject: Mr Bug Man blog
|
|
Decrepit Dakkanaut
|
Thank you so much for the tutorial! I'm a complete dunce when it comes to sculpting and even just this little tut contains all kinds of useful insights and techniques!
|
|
|
|
|
|
2015/06/14 09:05:10
Subject: Mr Bug Man blog
|
|
Using Object Source Lighting
|
Wehrkind wrote:
Cool, I will have to give that a try! I had been messing around with GS trees for gallows groves etc, and just never really felt comfortable with their look. Then again I kind of hate everything I do ever, so there's that
I will try to do the tut about that texture ASAP mate. Good thing about it is that you can use it for more than just trees.
youidiotkid wrote:Thanks for posting this tutorial up. I've been looking for a way to sculpt alien skin like this for my alt 'Nids. I'm sorry to hear that your site went down. Is this the new hub for Bug Man stuff?
Glad I could help a Nid fan in need I will use my blogger site for all updates and upload as much as I can over here too.
Gitsplitta wrote:Thank you so much for the tutorial! I'm a complete dunce when it comes to sculpting and even just this little tut contains all kinds of useful insights and techniques!
Thanks. I think the small simple tutorial approach is a good way to introduce everyone to sculpting and converting. I will do a few more time permitting.
|
|
|
|
|
|
2015/06/14 11:42:36
Subject: Mr Bug Man blog
|
|
Arch Magos w/ 4 Meg of RAM
|
NAVARRO wrote:
Bottle wrote:Some amazing work on this blog.
Did you ever get the Orc and Goblin army painted up?
Yes good sir I have the 2 regiments of spiders ready just waiting to see what is going to be the outcome on the basing for Age of sigmar. Soon enough we will find out. I think my O&G as they stand will be the perfect number of models for a skirmish game.
I understand, my empire army is on hold too till I know if it'll be circles or squares they need to stand.
Hopefully we can get some pics once they are all done :-)
|
Bye bye Dakkadakka, happy hobbying! I really enjoyed my time on here. Opinions were always my own :-) |
|
|
|
|
2015/06/20 21:41:57
Subject: Re:Mr Bug Man blog
|
|
Using Object Source Lighting
|
Wehrkind heres the tree tutorial as promised! On my blog http://mr-bugman.blogspot.co.uk/2015/06/tutorial-sculpting-texture.html
Or since its a small one here on dakka too...
- This tutorial will be about achieving some interesting textures that can be applied to many different subjects. Again it will be a really simple tutorial and easy to follow so that anyone can achieve the results fast with no hassle regardless of experience in sculpting.
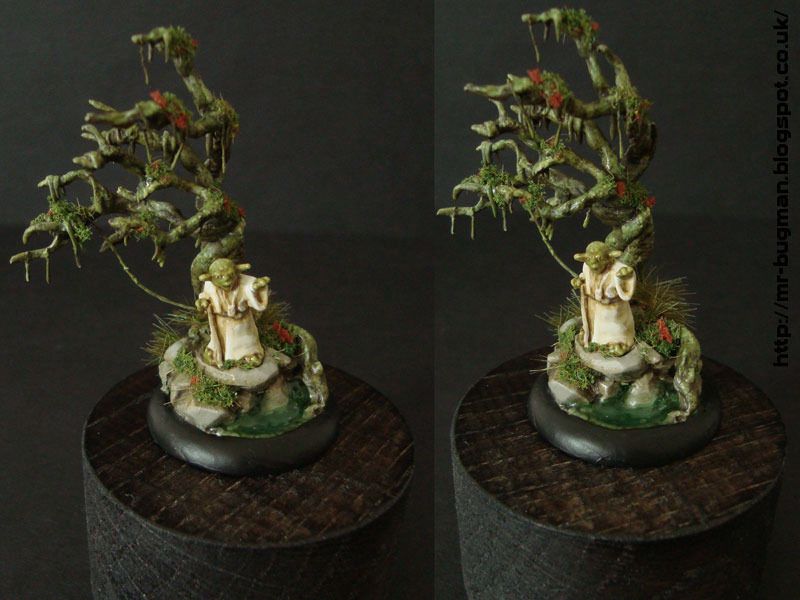
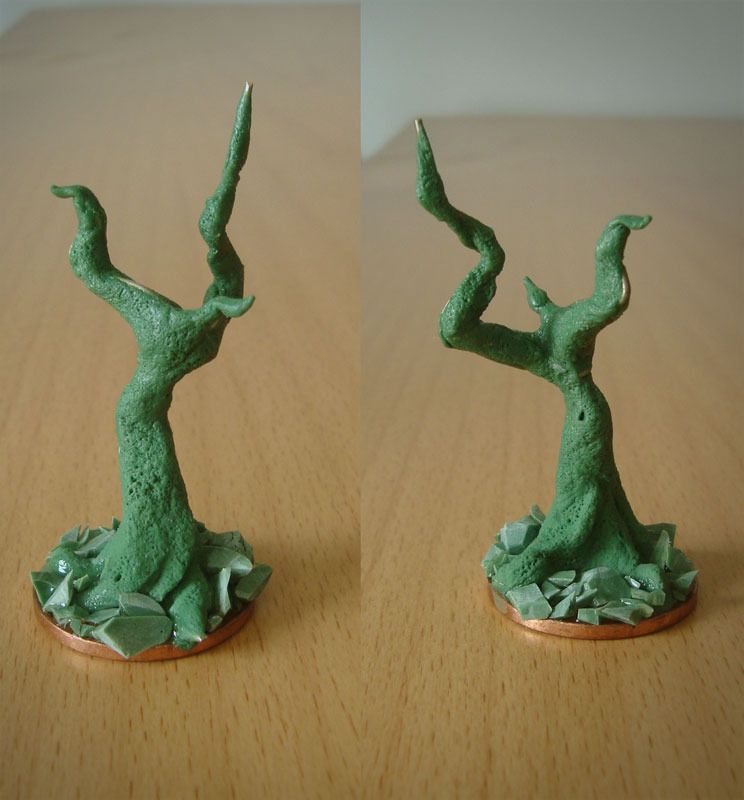
The subject will be some kind of swamp tree with a very mossy and rough texture on the bark, so bring in your greenstuff and lets get this project done.
Sculpting rough textures
You will need the following.
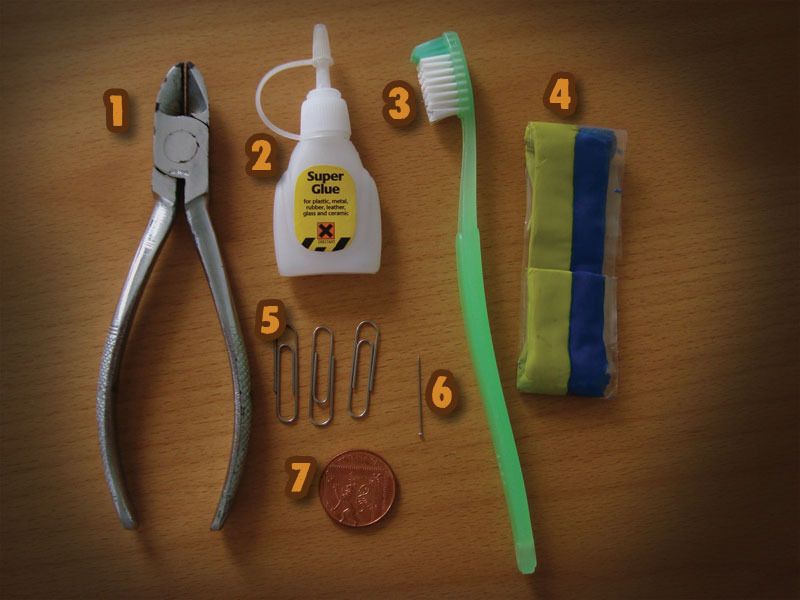
1- Wire cutter
2- Cheap super glue
3- Old toothbrush
4- Greenstuff
5- Paper clips
6- Needle
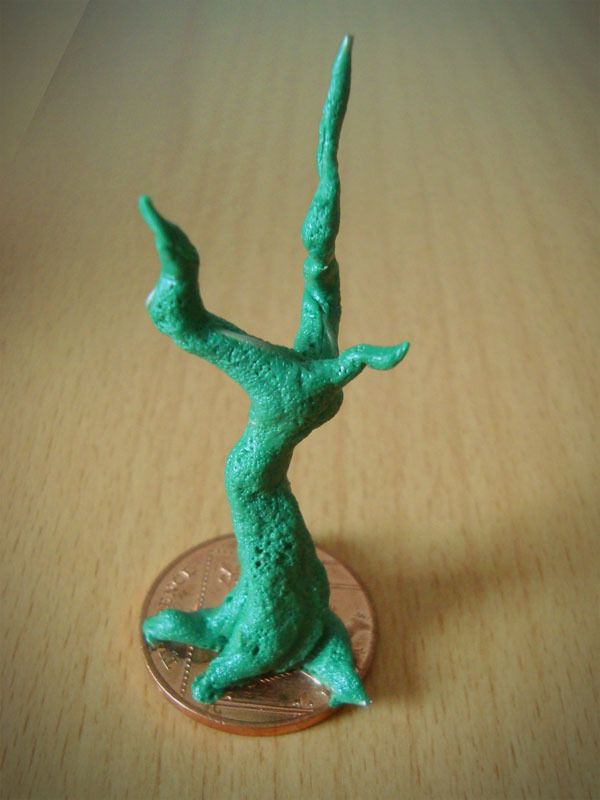
7- A base for your little tree branch, I used a coin
All sorted so lets play with some paperclips now.

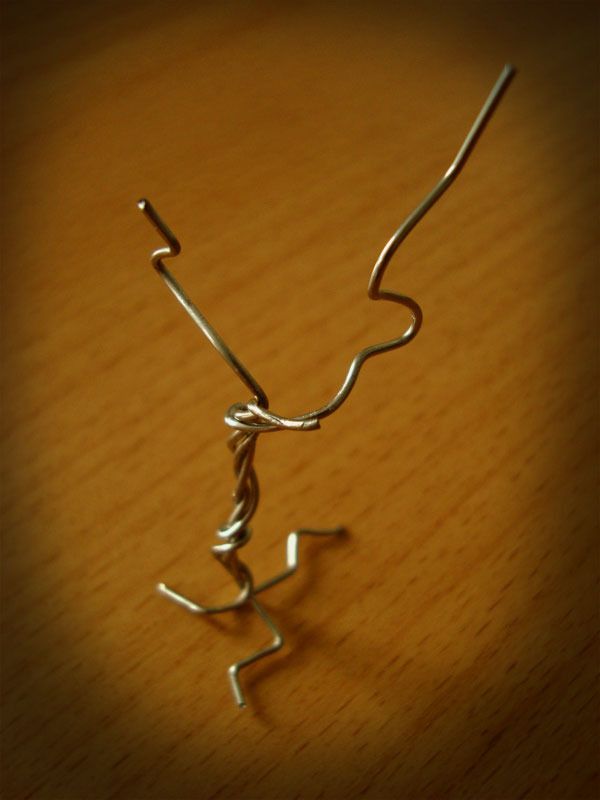
Bend and cut the clips to create the desired shape for our small tree, depending on how big and complex you want the tree you will need more or less paper clips\wires. Since my aim for this tutorial is to display the texture work I just made a really small young tree.
Lets base it now so we can have a good sturdy surface to work on.
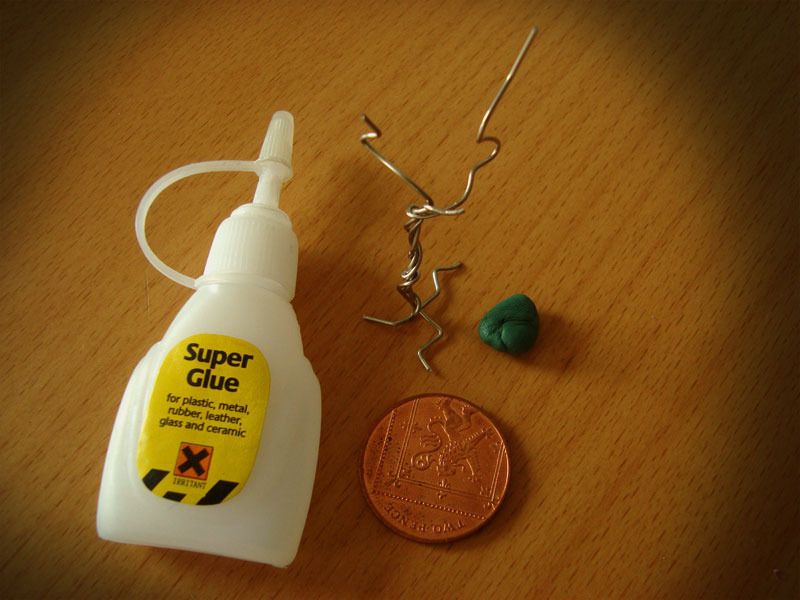
Mix just a little bit of Greenstuff...
Apply a little ball to the coin and use the rest to do some roots, this is really rough stuff so use your fingers and do not worry to much if your fingermarks are printed on the roots.
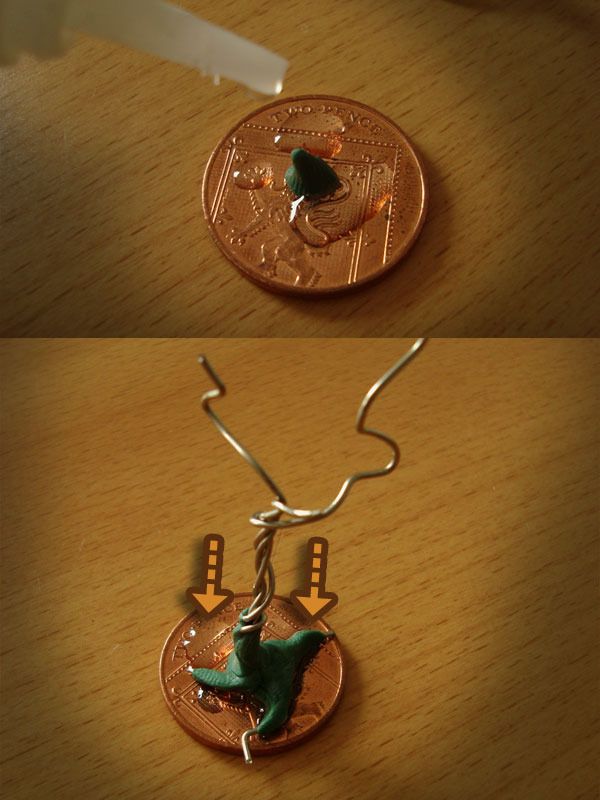
Once your happy with the roots and with the Greenstuff still fresh apply Superglue to join the tree to the base. The bound created by the mix of fresh Greenstuff and Superglue is VERY strong. Let the glue dry before going for the next step.

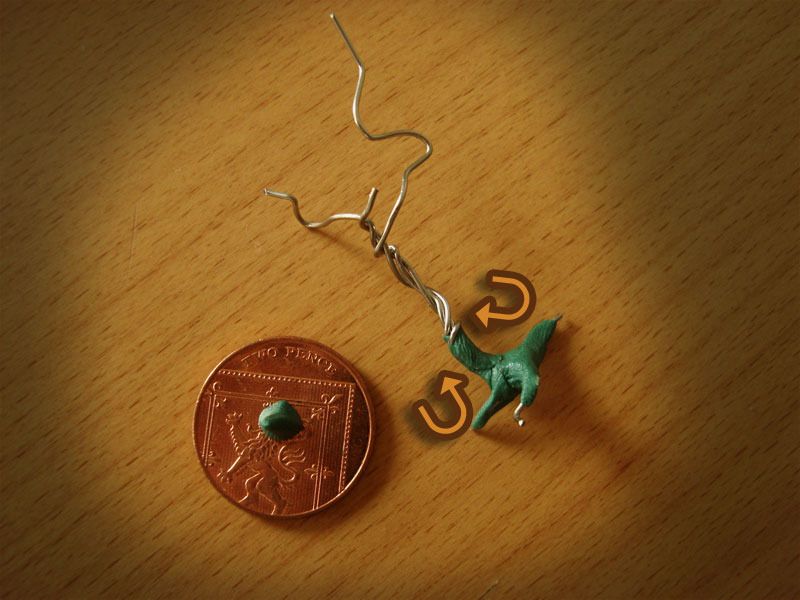
Mix more Greenstuff and break it in small manageable blobs, these will be your tree curves.

Bit by bit start bulking your tree, as you can notice if you just work one blob at the time you will have more control on the final shape. Note that all of this is just sculpted using your fingers so no need for other tools, we want a rough finish since its a tree after all.
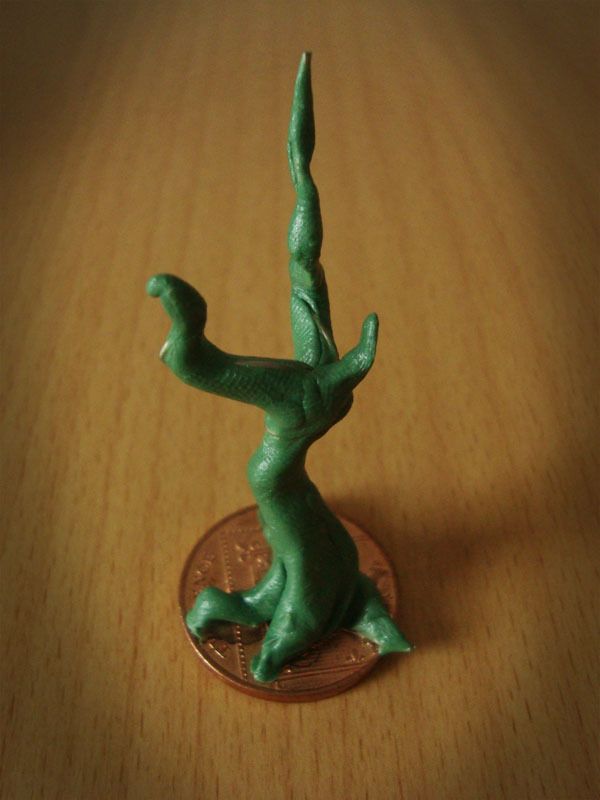
Horrible results so far, hey? Do not despair and lets have fun now.
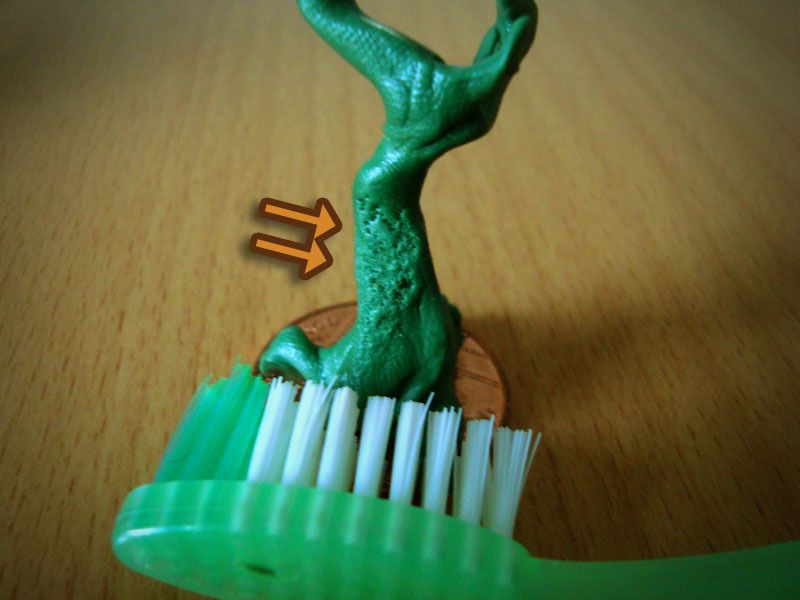
Bring in your secret weapon the mighty toothbrush and poke the Greenstuff! Experiment here, you will see that small jabs will create less deep indentations and vice versa. This picture displays just 2 pokes, one deep and a more subtle one.

Death by 100 pokes and your texture is almost done. Lets just add the final touch.
To make the final texture more eye catching use a fine needle and poke the putty again, this time some deep holes. Remember less is more so do not create to many holes.
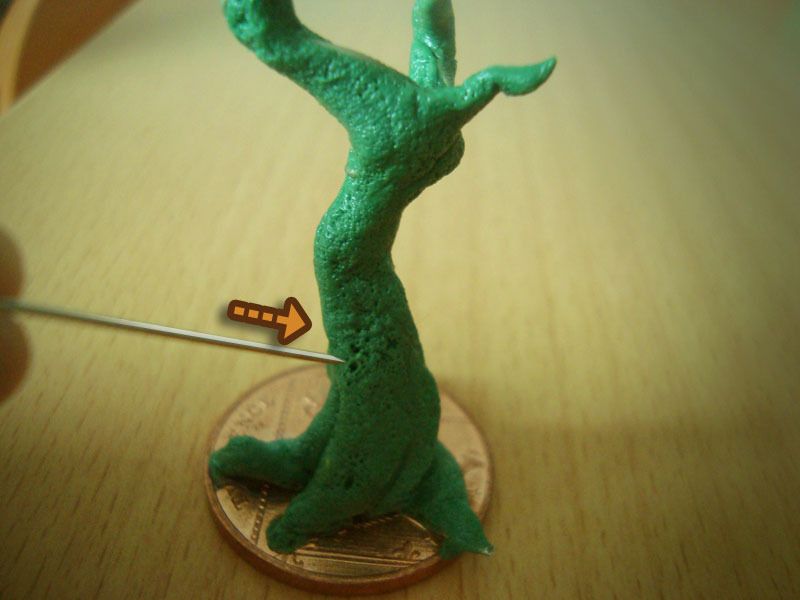
All done! Simple and easy! You can make a small tree like this in 1 hour. After that you can sculpt more stuff into it like mushrooms, lianas etc but thats for another day. Actually I did a small mushroom tut here Mushi tutorial http://mr-bugman.blogspot.co.uk/2012/01/tutorial-simple-bases-sculpting-mushi.html
So I hope you enjoyed this texture, it has many applications, you can use it to create soil, ugly tree bark or even a strange creature rough skin! Have fun and share your results and ideas.
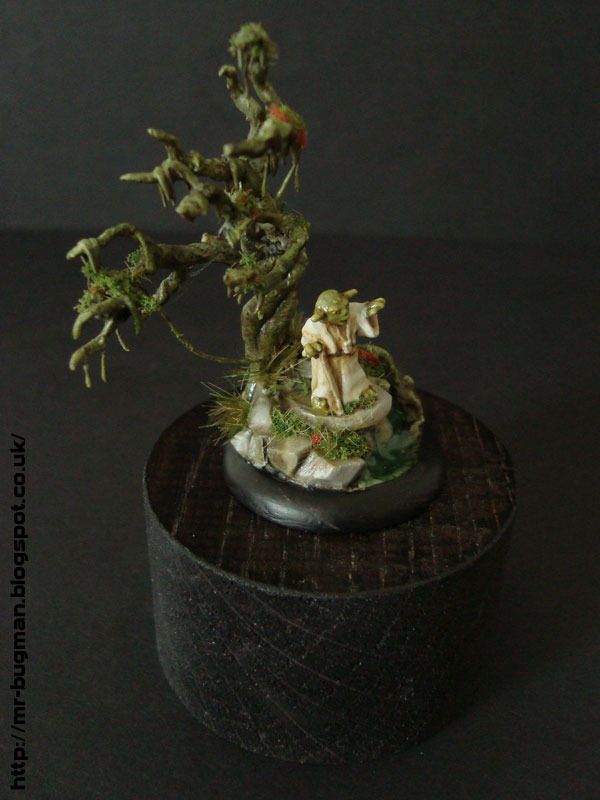
Some examples of how I use this texture.
Yoda tree
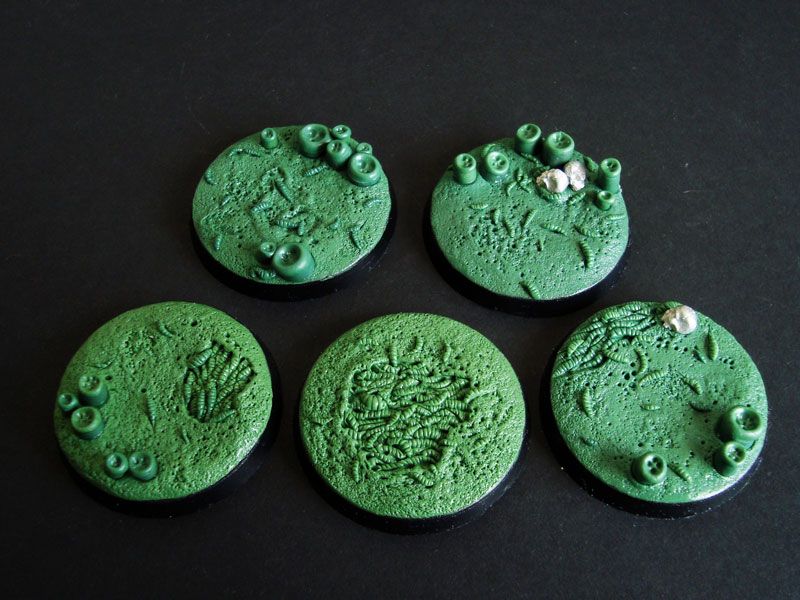
Soil for bases
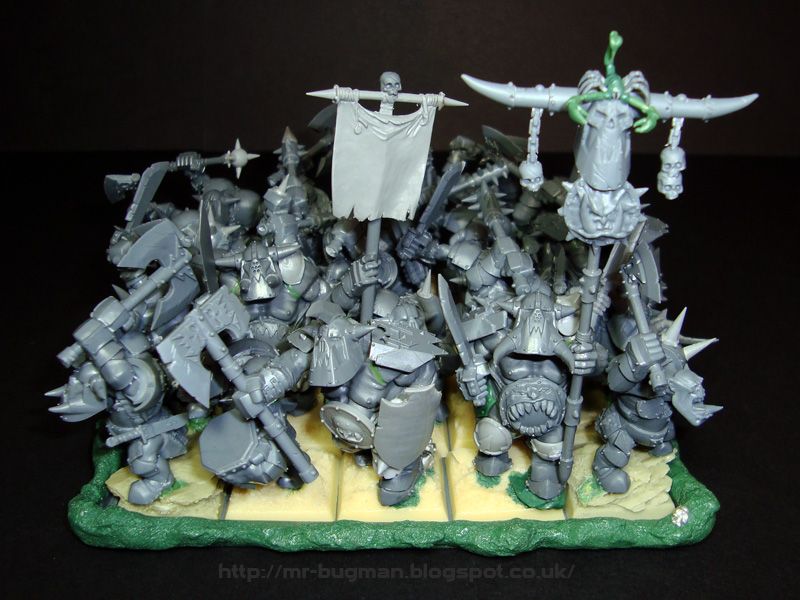
Movement trays
Cheers.
|
|
This message was edited 1 time. Last update was at 2015/06/20 21:53:50
|
|
|
|
|
2015/06/21 05:51:25
Subject: Mr Bug Man blog
|
|
Fixture of Dakka
|
Woo! Thanks! This will be handy; my trees haven't gotten much past the "horrible" stage, as putting on a thin layer of GS and futzing with it from there didn't get me far.
Question for you, do you use predominantly GS or do you sometimes use other types like ProCreate? I have used mostly PC as I like that it is less sticky, but now that I have run out again I figure it is time to think about switching if it makes sense. Any preferences, and why?
|
|
|
|
|
|
2015/06/21 06:39:41
Subject: Mr Bug Man blog
|
|
Been Around the Block
|
NAVARRO, I just wanted to drop in to say that while it is unfortunate to hear that the original Buglands is gone, it is great to see you are still putting that greenstuff magic good use. I can't remember specifically how many years it was since I saw Buglands on the web (close to a decade I think), but your hybrid Genestealers inspired a much younger me to start converting and working with greenstuff. Keep up the awesome work.
|
|
|
|
|
|
2015/06/21 11:29:19
Subject: Mr Bug Man blog
|
|
Using Object Source Lighting
|
Wehrkind wrote:Woo! Thanks! This will be handy; my trees haven't gotten much past the "horrible" stage, as putting on a thin layer of GS and futzing with it from there didn't get me far.
Question for you, do you use predominantly GS or do you sometimes use other types like ProCreate? I have used mostly PC as I like that it is less sticky, but now that I have run out again I figure it is time to think about switching if it makes sense. Any preferences, and why?
I got to the point that I find GS more reliable in therms of durability. I mean once dried its like flexible bendy plastic. I also find the stickiness one of the best features of the putty because you can get really cool effects if you explore the elasticity. Drawbacks of GS are the "memory" because unlike other putties you are always working against it, its like a little battle each sculpt and the other drawback is the blending between cured and non cured GS, its never really perfect.
I also used milliput and Fimo. Milli is perfect for blades and sharp pointy things and fimo is good for many things, like they say, but I literally hated the medium. I have seen amazing sculptors going procreate and even talked with some this salute... In general its very good for easy smooth work since it has little memory and blending is good too. ALthough not as sticky. I do not use though not because I have something against it ( by the contrary seems less problematic to work with) but more because Im at a point that I can explore the more complex nuances of GS and there is still lots to learn before shifting to other mediums.
So my goal at this point is learn more tricks with the GS and complement it with milliput.
Xysis wrote:NAVARRO, I just wanted to drop in to say that while it is unfortunate to hear that the original Buglands is gone, it is great to see you are still putting that greenstuff magic good use. I can't remember specifically how many years it was since I saw Buglands on the web (close to a decade I think), but your hybrid Genestealers inspired a much younger me to start converting and working with greenstuff. Keep up the awesome work.
Yes its about a decade if not more, it was such an old site. So glad that I could inspire you to sculpt a bit, specially our beloved Nids. Rest assured that I will do my best to keep on updating my blogs, I know its miles away from a fully fledged website but it will have to do for now. Thanks.
|
|
|
|
|
|
2015/06/21 11:52:58
Subject: Mr Bug Man blog
|
|
Decrepit Dakkanaut
|
Great tutorial NAVARRO. The toothbrush idea is a very neat one to be sure! Also very cool to see your explaining how to work with an armature.
|
|
|
|
|
|
2015/06/21 12:50:42
Subject: Mr Bug Man blog
|
|
Using Object Source Lighting
|
 Gitsplitta wrote: Gitsplitta wrote:Great tutorial NAVARRO. The toothbrush idea is a very neat one to be sure! Also very cool to see your explaining how to work with an armature.
Much appreciated.
Any ideas of things you all would like to see covered in a future tutorial just let me know.
|
|
This message was edited 1 time. Last update was at 2015/06/21 12:51:09
|
|
|
|
|
2015/06/28 15:44:29
Subject: Re:Mr Bug Man blog
|
|
Using Object Source Lighting
|
Small idea on what to do with dried blobs of Greenstuff.
When your sculpting a project most of the times there will be some Greenstuff leftovers. If its still fresh and you can sculpt something with it you can do plenty of things, little spikes, skulls, mushrooms, purity seals or scrolls etc.
But what to do when its not moldable anymore? Do you trash away the dried bits of Greenstuff?
I tend to use those for something else and again there are lots of things you can do with them, heres one.
Sharp rocks
Not much of a tutorial and more just an idea for you guys.
Greenstuff when dried is very easy to cut so bring in your sharp blades.
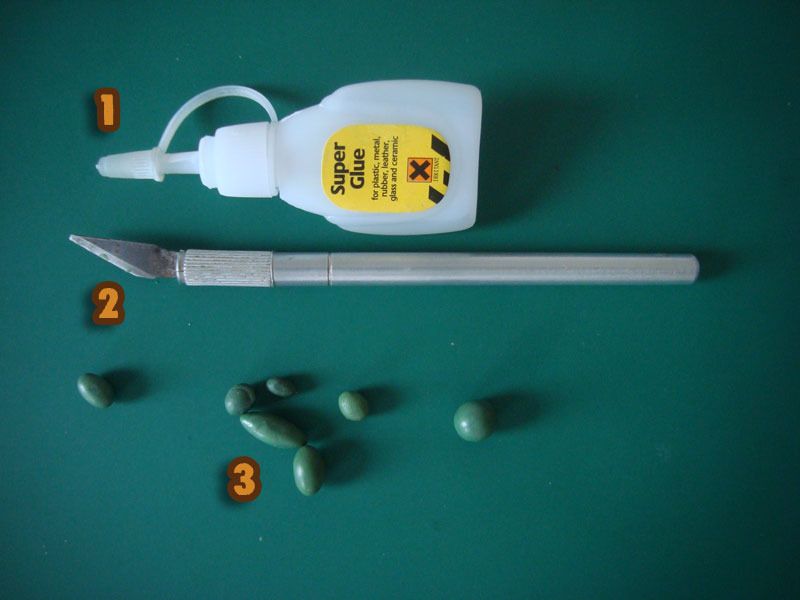
1- Super glue or PVA glue
2- Blade
3- Dried bits of Greenstuff
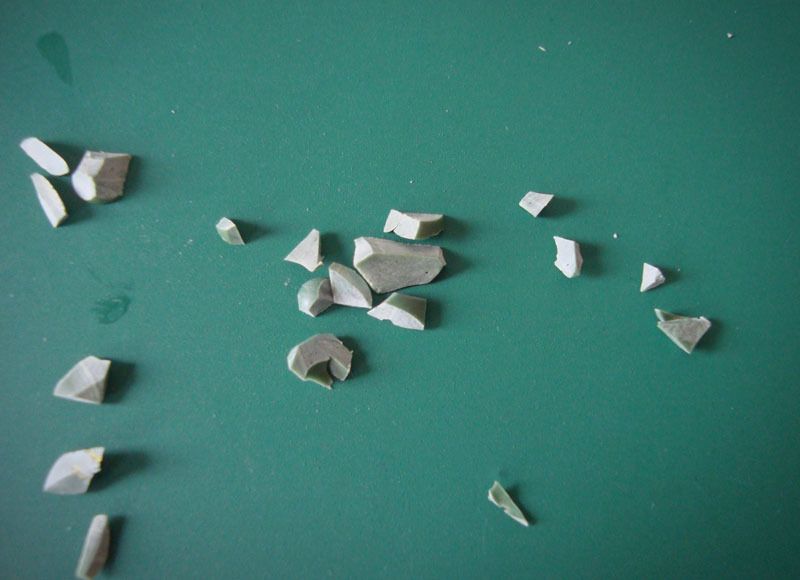
Cut random sizes and shapes, make sure they look very sharp.
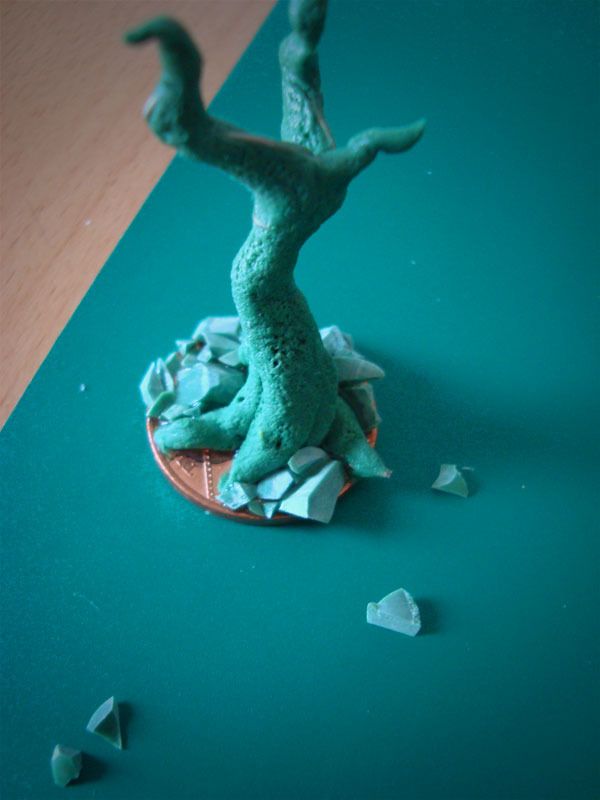
Glue the bigger stones first and then fill the gaps with the smaller ones.
Job done.
So why not just use cork? Apart from being expensive and your using free bits of Greenstuff that you normally throw away, the look is very different since cork looks like a less sharp type of rock. You will also struggle to get the fine sharp tips on cork.
Also take this opportunity to experiment, instead of rocks you can cut spear heads, spiked armour and all sorts of sharp things for your models. Again have fun.
|
|
|
|
|
|
2015/06/29 04:08:43
Subject: Mr Bug Man blog
|
|
Ragin' Ork Dreadnought
Deep in the Outer Boroughs of NYC
|
Excellent and informative. Great tutorial.
|
|
|
|
|
|
2015/06/29 18:50:26
Subject: Re:Mr Bug Man blog
|
|
Using Object Source Lighting
|
Thank you Sir
|
|
|
|
|
|
2015/07/05 18:50:55
Subject: Re:Mr Bug Man blog
|
|
Using Object Source Lighting
|
Introduction
Another little tutorial for my bugs, this time we will concentrate on sculpting Crab legs that can be very valuable for different projects, from crustaceans to insect segmented legs or just a nasty chaos mutations.
Step 1 (things you need) Picture 1
Modeling putty (green stuff)
Water
Hobby knife (cutter)
Pin vice
Clay shaper brush
Sculpting tool
Paper clips
Toothpick
Flat surface
Step 2 (structure) Picture 2
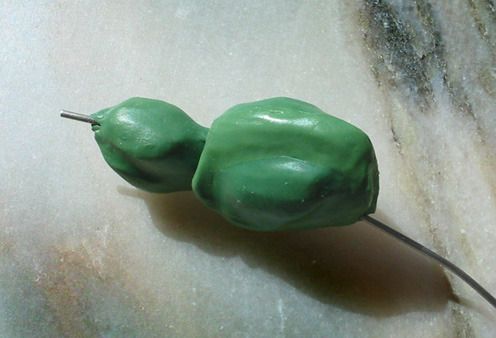
Start with a strong internal structure, I used a paper clip and bended it to the desired shape. Picture 2a
Mixed a bit of green stuff and applied it directly to the clip, at this point no precautions with smooth or clean green stuff areas are needed. This is just a WIP shape of the final crab leg. Picture 2b
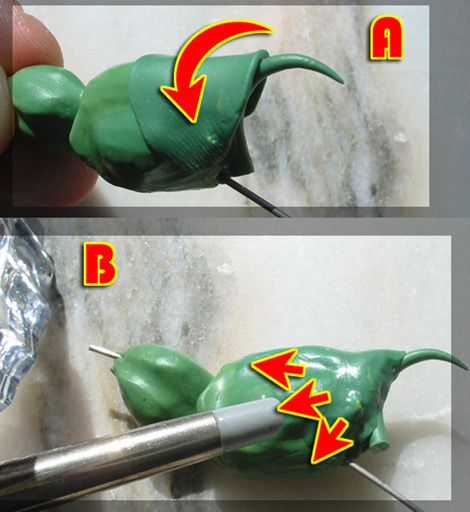
Step 3 (smooth shapes)
After the green stuff is cured its time to start building the final shape, so I mix a bit of the paste and apply it to the structure. It’s better to work on one side of the structure and let it dry before going for the other half, so I started with the left side of the crab leg. Picture 3
Used the clay shaper brush dipped in water and started smoothing the edges of the green stuff, take your time here and use always plenty of water. Picture 4
So, when left side is sculpted and smoothed just let it dry and only then, go for the right side. You can sculpt the shape you wish but avoid it looking too uniform, it’s a crustacean leg so irregular shapes work best. You should now have something like this. Picture 5
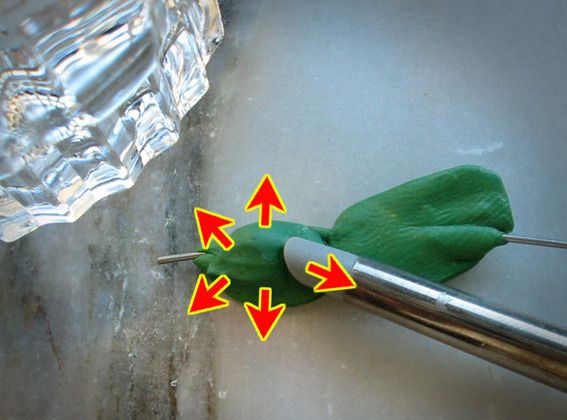
Step 4 (spikes and final contour) Picture 6
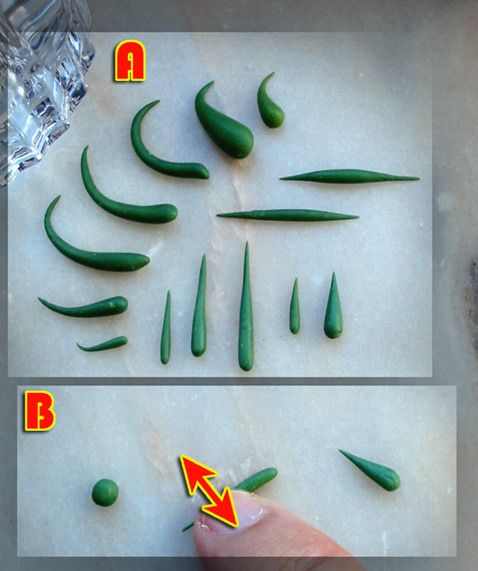
And the fun begins, while the stress of waiting for curing times is growing on you we can use one of those endless curing breaks to sculpt some little spikes, do some random sizes and shapes. And for those that say crabs don’t have spikes on legs I say… who cares it looks great.  Picture 6a
I hope everyone knows how to sculpt spikes but for the newt sculptors here is how I do them. Do one little ball of green stuff and put it on a flat surface, then dip fingers on water and start pressing green stuff against surface with vertical movements, just let it dry. Piece of cake. Picture 6b
Now, with all stuff cured, choose one cool spike and mix a ball of green stuff... lets use its sticky properties, for “gluing” the spike to the leg. Picture 7
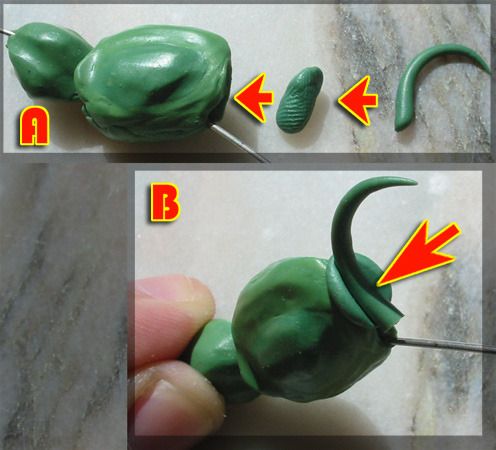
For better blending the spike to the crab leg lay a layer of green stuff over the junction Picture 8a
And for final smoothing use a clay shaper brush dipped in water. Picture 8b
Lets move to the final claw spike and this time we will use the paper clip extremity for a stronger structure. First with a cutter do a cut on another spike and then use a pin vice to do a small hole in it. Mix a bit of green stuff and squeeze the spike against it passing the hole on to the paper clip. This should make a stronger bond, but before you finish you need to smooth the greenstuff with a clay shaper dipped in water. Picture 9

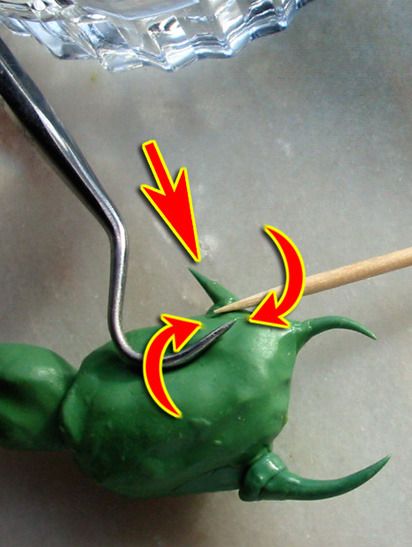
Step 5 (Texture)
With all shapes finished its time for texturing those legs. I started by putting some spikes on the legs, since you already sculpted several spikes just cut them to the desired size and use green stuff for gluing them to the leg. In this process I use mainly sculpting tools and a toothpick dipped in water to sculpt the junction of the spike to the leg. You could also use pins but since the spikes are small there’s no need for that. Picture 10
Almost there, now simply cut several random sized balls of green stuff and again with the help of a toothpick and sculpting tool stick and smooth them randomly on the crab leg, also try to make the balls on the leg interesting and natural. Picture 11
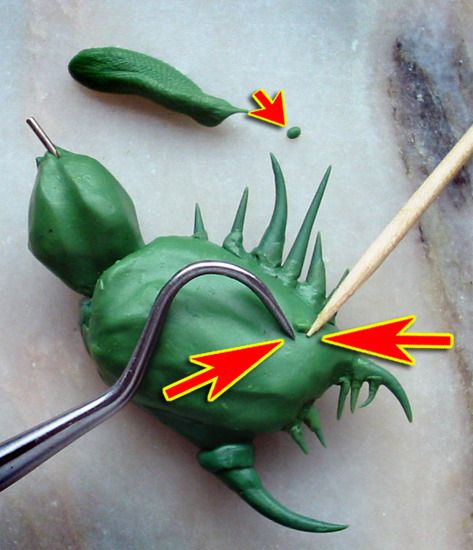
Conclusion Picture 12
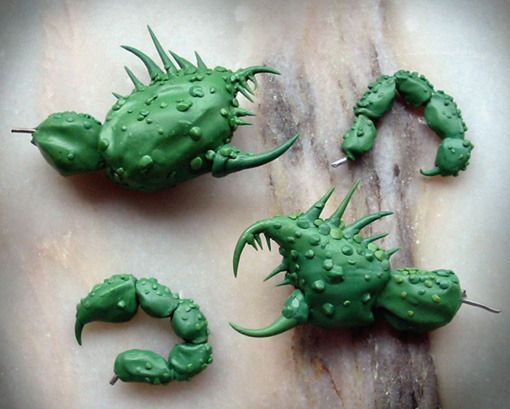
Well that’s it, you can now sculpt some crab legs for your projects, funny thing I noticed was that the smaller legs look like scorpions tails… hope you enjoyed it.
Result

|
|
|
|
|
|
2015/07/05 20:10:28
Subject: Re:Mr Bug Man blog
|
|
Mysterious Techpriest
|
Your stuff is really good. All the respects!
|
|
|
|
|
2015/07/06 01:15:09
Subject: Mr Bug Man blog
|
|
Decrepit Dakkanaut
|
Exalted that tutorial. Fantastic work on both the model and the tutorial. 
|
|
|
|
|
|
2015/07/06 01:37:45
Subject: Mr Bug Man blog
|
|

[MOD]
Making Stuff
|
I love these bases more than a man has ever loved icky-looking, maggot-ridden bases before...
|
|
|
|
|
|
2015/07/06 04:34:44
Subject: Mr Bug Man blog
|
|
Fresh-Faced New User
|
Loving these greenstuff tutorials here.
Also, I agree, those maggoty bases are amazing.
|
|
|
|
|
|
2015/07/06 17:42:00
Subject: Re:Mr Bug Man blog
|
|
Using Object Source Lighting
|
Thank you all
The worm bases are quite simple to do, yet I must confess that its a bit tedious to sculpt big ones
I will do a few more tutorials, its keeping me busy while I wait and see to what is going to happen to AOS.
Painting some Tau for a small kill team too.
|
|
|
|
|
|
|
|