| Author |
Message |
 |
|
|
|
|
Advert
|
Forum adverts like this one are shown to any user who is not logged in. Join us by filling out a tiny 3 field form and you will get your own, free, dakka user account which gives a good range of benefits to you:
- No adverts like this in the forums anymore.
- Times and dates in your local timezone.
- Full tracking of what you have read so you can skip to your first unread post, easily see what has changed since you last logged in, and easily see what is new at a glance.
- Email notifications for threads you want to watch closely.
- Being a part of the oldest wargaming community on the net.
If you are already a member then feel free to login now. |
|
 |
2013/02/26 22:36:28
Subject: Need help weathering & dirtying tanks
|
|

Freaky Flayed One
|
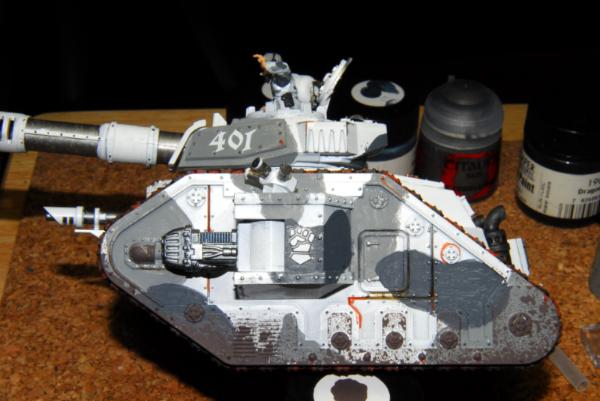
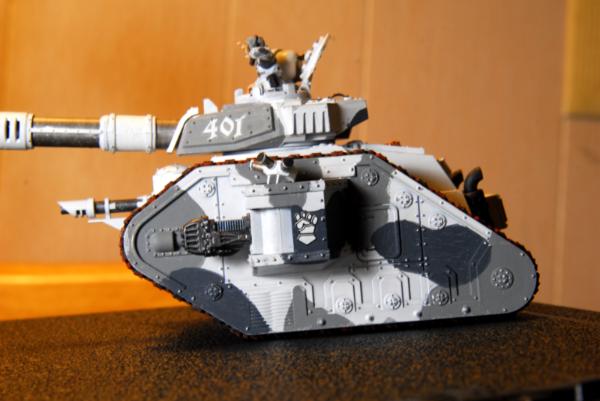
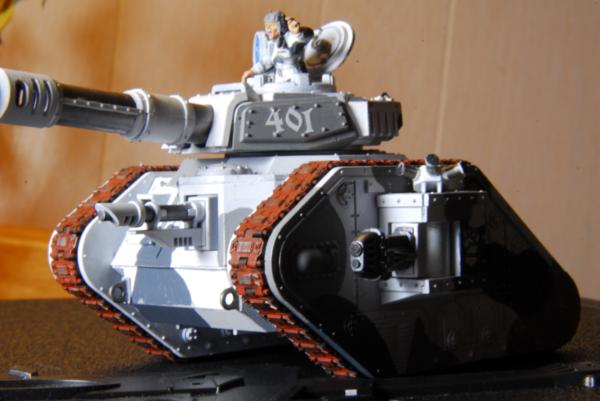
I've read all the great tutorials I can find on the subject(s), and while their end results all look great, they don't quite fit what I'm looking for or am able to do. I don't have an airbrush, nor do I have access to any sort of weathering powder/stick. With that said, here's what I'm working with:
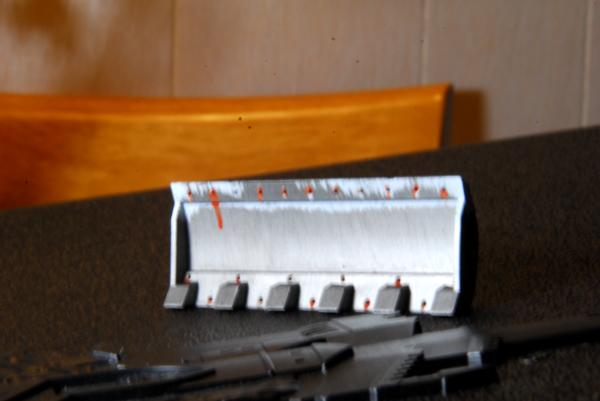
The first two photos are my Leman Russ Vanquisher. I've gone over all the rivets and some of the edges with Runefang Steel to give them a worn look. The third photo is the dozer blade from my Chimera, where I used a rust-colored wash to dot the rivets; something I was planning to do at random on the Vanquisher. The problem I'm having so far is that the Runefang Steel doesn't really seem to show at all. I want the tank to look like it's seen some battle without weathering it to the point where it looks as though it's been sitting on a Florida beach for 100 years.
Finally, what's the best method for making it look muddy and/or dirty without using any special type of paint or whatever?
|
|
|
|
 |
|
2013/02/26 23:10:04
Subject: Need help weathering & dirtying tanks
|
|
Focused Dark Angels Land Raider Pilot
|
Well, if you're going to weather a model, you're going to use SOMETHING. The quick and dirty way is to use a dirty iron color paint ( GW Leadbelcher or P3 Pig Iron for example) and lightly brush it on corners, edges, etc. Make scratches with it in flat surfaces. This will give you a beaten up paint job. A lot people first paint a colored section black before using the iron color to make it look rimmed and more like chipped paint.
For just dirt, you'll want a dark brown wash or very, very thin dark brown/umber. You can go with a lighter brown the sandier/drier the environment.
For the rust, I think you need to thin that rust down or let it pool in more areas (like the horizontal lines in the dozer blade).
If you're just wanting to go simple, that'll be about it. Other things you can try:
1) The hairspray method. Paint the tank bown, give it a red rust wash over the areas you want to show. Spray with cheap hair spray. Now paint all the camo over what you just painted, make it look showroom new. Get some isopropyl alcohol and apply it where you want the battle damage. Use a toothpick to chip the first layer of paint off to reveal the cruddy layer beneath. This has the benefit of a more layered, 3D effect.
2) Weathering powders. Get model store brand, not GW stuff. You can get colors of it for $7 each from http://www.bragdonent.com/weather.htm for example.
3) Mixing and applying washes.
|
|
|
|
|
|
2013/02/27 00:50:52
Subject: Need help weathering & dirtying tanks
|
|
Last Remaining Whole C'Tan
|
wfischer wrote:I'nor do I have access to any sort of weathering powder/stick.
<snip>
Finally, what's the best method for making it look muddy and/or dirty without using any special type of paint or whatever?
Do you have access to pastel chalks or colored pencils? If so, you could roll your own weathering powders.
Otherwise, I think you might be limited to things such as watered down muddy washes on the bottom third, as well as perhaps gluing some very fine sand onto the links/sides and then painting the grit exactly as you would a base made of it.
|
|
This message was edited 1 time. Last update was at 2013/02/27 00:51:08
 lord_blackfang wrote: lord_blackfang wrote:Respect to the guy who subscribed just to post a massive ASCII dong in the chat and immediately get banned.
 Flinty wrote: Flinty wrote:The benefit of slate is that its.actually a.rock with rock like properties. The downside is that it's a rock
|
|
|
|
|
2013/02/27 01:29:04
Subject: Re:Need help weathering & dirtying tanks
|
|

Stealthy Space Wolves Scout
|
heres a link to an awesome weathering tutorial
http://www.dakkadakka.com/dakkaforum/posts/list/495372.page
also google "gunpla weathering" for some awesome weathering effects
|
|
|
|
|
|
2013/02/27 07:43:58
Subject: Re:Need help weathering & dirtying tanks
|
|
Freaky Flayed One
|
Thanks for all the help, everyone! I ended up using Leadbelcher to wear some of the more well-used edges, then used a rust-colored wash in some random spots. I also applied some Nuln Oil in the panel gaps, and a few other cracks. Then I used a sponge to dab on some dark brown on the bottom third for mud. It turned out better than I expected!
|
|
|
|
|
|
2013/02/27 13:26:48
Subject: Need help weathering & dirtying tanks
|
|

Leader of the Sept
|
That looks really good!
|
Please excuse any spelling errors. I use a tablet frequently and software keyboards are a pain!
 Terranwing - w3;d1;l1 Terranwing - w3;d1;l1
 51st Dunedinw2;d0;l0 51st Dunedinw2;d0;l0
 Cadre Coronal Afterglow w1;d0;l0 Cadre Coronal Afterglow w1;d0;l0 |
|
|
|
|
2013/02/27 14:25:08
Subject: Need help weathering & dirtying tanks
|
|

Judgemental Grey Knight Justicar
|
That worked very nicely for an understated weathering effect, as if It's been on the feild, but not overly abused or sitting out for decades taking a massive beating.
Well done sir.
|
|
|
|
|
2013/02/27 16:30:05
Subject: Re:Need help weathering & dirtying tanks
|
|
Perfect Shot Black Templar Predator Pilot
|
If you have an airbrush then I would recommend some transparent paints (also known as candy coats or ghost tints) use these over a section that you have put down a heavy coat of rust paint, use them heavier on the outer parts of the rust and then not so much as you approach the edge, this will give a nice gradient effect that i have found looks great
|
|
|
|
|
|
|
 ~ Shai'ghool Dynasty, 3500 points
 ~ Zerathian 401st Mechanized, 7000 points
 ~ Raven Guard, 3000 points
 ~ Warriors of Chaos, 2500 points