Forum adverts like this one are shown to any user who is not logged in. Join us by filling out a tiny 3 field form and you will get your own, free, dakka user account which gives a good range of benefits to you:
No adverts like this in the forums anymore.
Times and dates in your local timezone.
Full tracking of what you have read so you can skip to your first unread post, easily see what has changed since you last logged in, and easily see what is new at a glance.
Email notifications for threads you want to watch closely.
Being a part of the oldest wargaming community on the net.
If you are already a member then feel free to login now.
Ok this is just making me trip out... But in a good way!
WAAAGH! Gutsnagga Mo-ork- 5000pts Kult of speed + goffs
red space marines, (almost angry enough!) 2000 points
Here's my P&M blog - http://www.dakkadakka.com/dakkaforum/posts/list/551978.page And here's a thread of my completed miniatures -
http://www.dakkadakka.com/dakkaforum/posts/list/551971.page 'You have that the wrong way around. Space Hulk teaches the inmates how large numbers of fast moving vicious hand to hand combatants can over come a small number of gun armed adversaries, in a sequence of narrow corridors.' -Orlanth
I'm a little curious about the durability of the styrene teef as well. I'm just wondering if they'll snap off at speed... you do plan on riding this bike, yes?
Anvildude: "Honestly, it's kinda refreshing to see an Ork vehicle that doesn't look like a rainbow threw up on it."
progreen10 wrote:Looking ace! Are you going to paint it once it's done?
yes, I got a guy who does it for a living helping me.
Dysartes wrote:Looking good, pox - how will the styrene teeth stand up to the elements?
if they rot or melt, I'll just replace them.
Work lied to me, I had another 70 hour week. :(
Ahh well, life goes on. I did get some work done though!
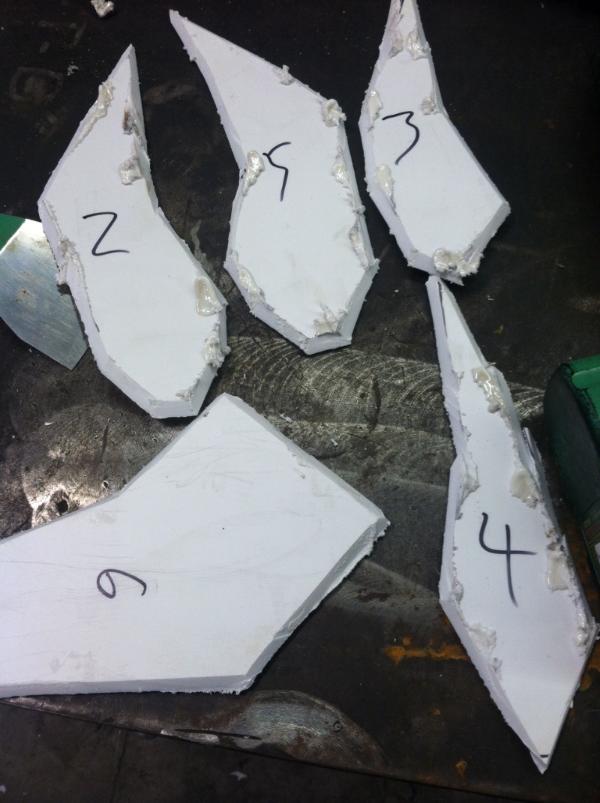
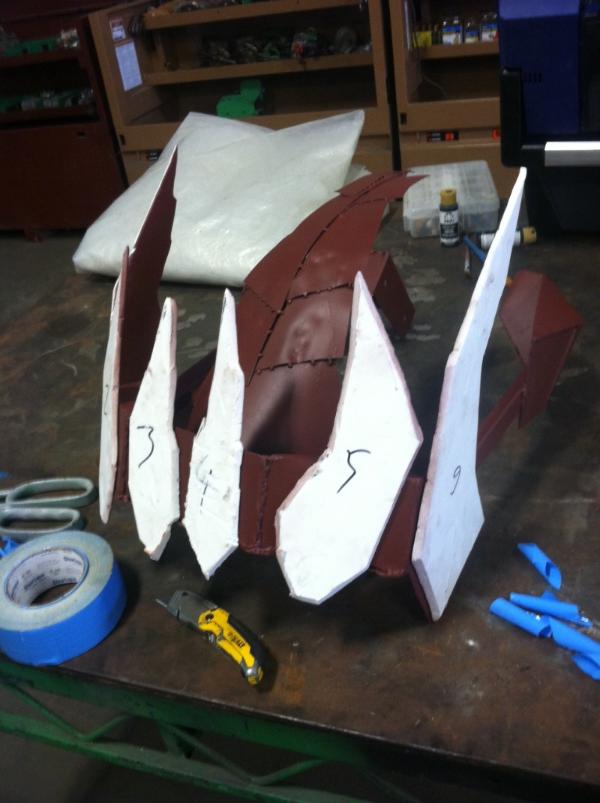
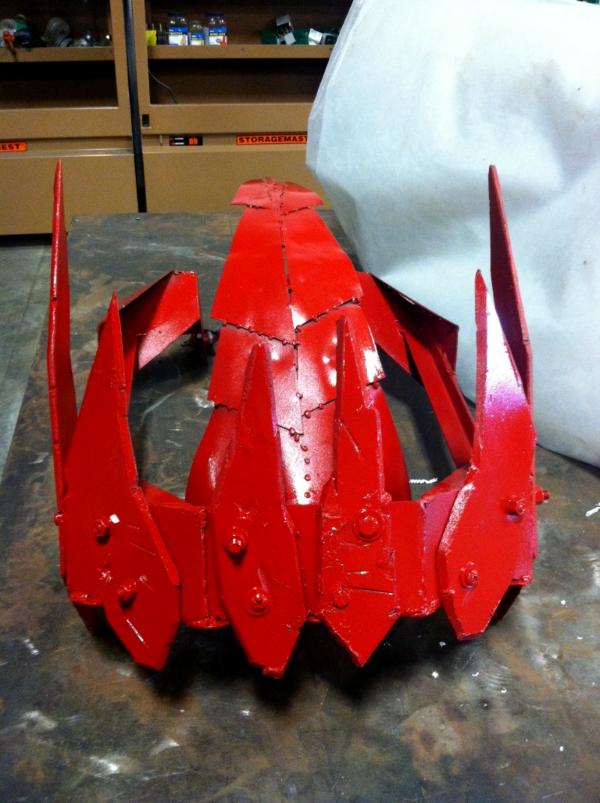
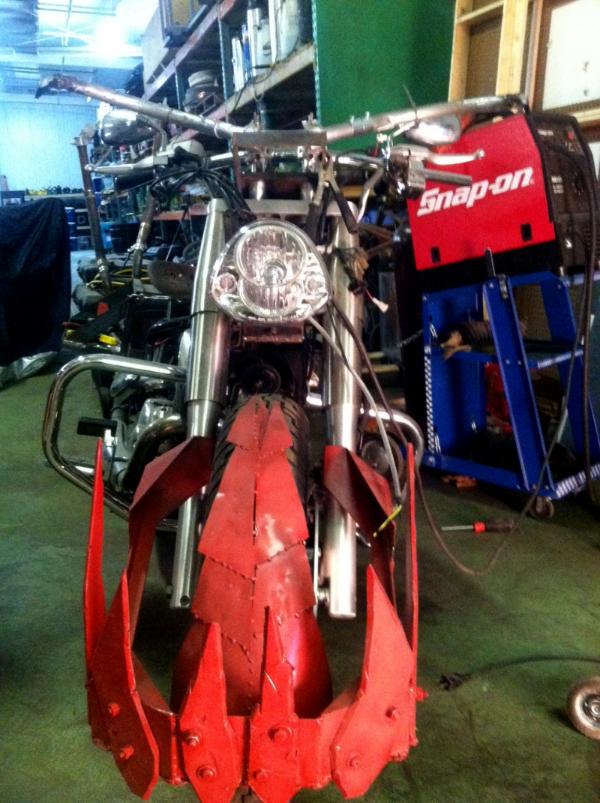
I cut out the teeth.
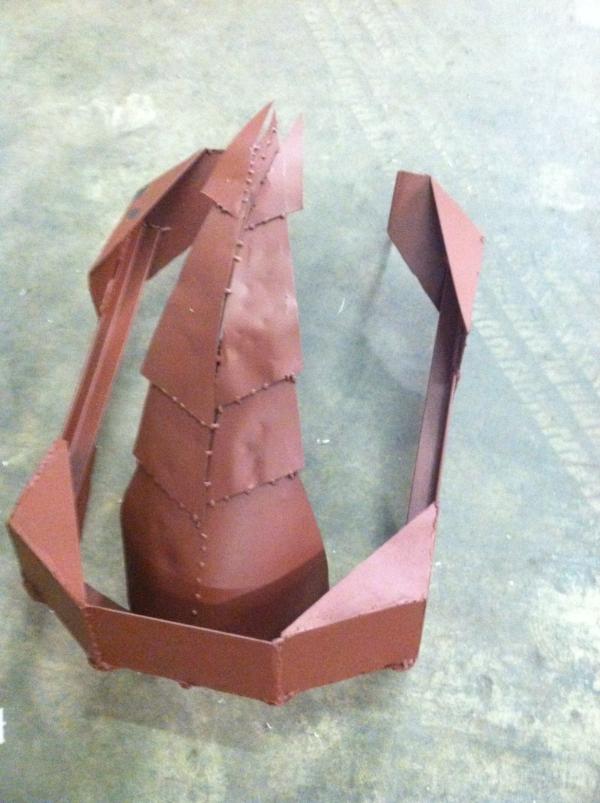
Next I primed up the fender.
I then cleaned up the teeth and stuck them on with some carpet tape.
I grab a handfull of nuts and bolts and mount these suckers!
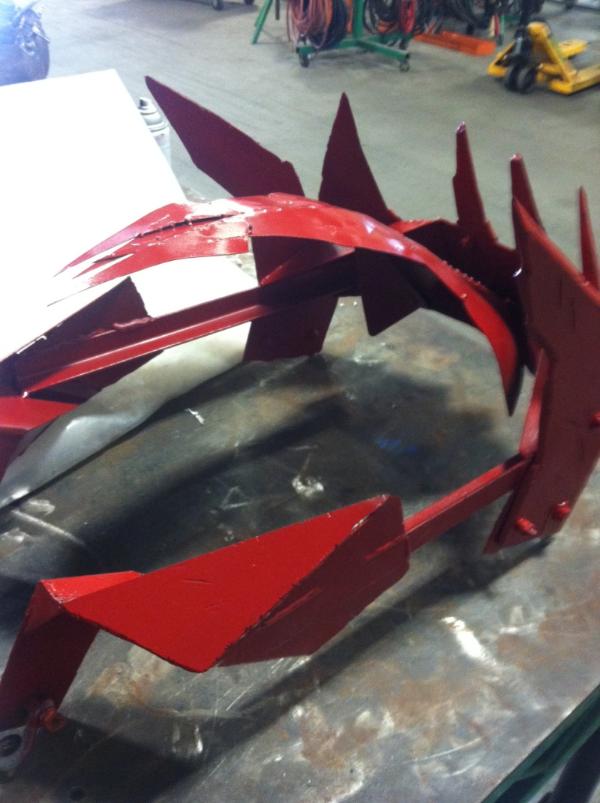
Lastly I hit the whole thing with some red coat.
I need to sand and re-coat a few times, then it will be ready for airbrushing!
The tank is having some pin-hole issues, so it will be hopefully finished next week. Thanks for looking!
We believe the inquisition may have something to do with it...
WAAAGH! Gutsnagga Mo-ork- 5000pts Kult of speed + goffs
red space marines, (almost angry enough!) 2000 points
Here's my P&M blog - http://www.dakkadakka.com/dakkaforum/posts/list/551978.page And here's a thread of my completed miniatures -
http://www.dakkadakka.com/dakkaforum/posts/list/551971.page 'You have that the wrong way around. Space Hulk teaches the inmates how large numbers of fast moving vicious hand to hand combatants can over come a small number of gun armed adversaries, in a sequence of narrow corridors.' -Orlanth
I'm a little curious about the durability of the styrene teef as well. I'm just wondering if they'll snap off at speed... you do plan on riding this bike, yes?
The teef are 1/4 inch thick, They should hold up. I plan on testing it to make sure though!
Insane Smile wrote:This is like that grenade thing on 4chan...
I don't know what the grenade thing is, but the reports of my death have been greatly exaggerated!
sadly, I have no pictures due to my phone exploding. My phone dying was just another link in a bad chain of horrible luck. if not for bad luck, I would have no luck at all!
First, It took three weeks to get the gas tank to seal. no matter what I did I had pinhole leaks. after I got that fixed, I had to seal the tank, which was hairy but eventually worked.
next, I accidentally fried most of the electrical system. A co-worker had reconnected the battery to test my new turn signals, and didn't let me know until AFTER i welded on the frame!
Work took a turn for the worse, so I'm working 70 hours a week right now. To top everything else, my main bike crapped out so I spent a bit of coin and a lot of time getting it back to working!
All is not lost though! The project is moving forward, I have grim determination to beat the inquisition and finish the project. I have the headlight mounted, the front bull horns and turn signals placed, I'm working on the sculpt job on the tank at home, I got my custom license plate in, and starting on the rear fender.
Thank y'all for your patience, I'll have pictures very soon. There's no way I'm quitting this project, I plan on having it finished by January first.
Yeah! Happy to see more. And the grenade thing was a guy found grenade in his basement and started messing with it and updated as he went. He said he was going to run it over with his car. Well then his account went inactive and no one heard from him.
Insane Smile wrote: Yeah! Happy to see more. And the grenade thing was a guy found grenade in his basement and started messing with it and updated as he went. He said he was going to run it over with his car. Well then his account went inactive and no one heard from him.
Insane Smile wrote: Yeah! Happy to see more. And the grenade thing was a guy found grenade in his basement and started messing with it and updated as he went. He said he was going to run it over with his car. Well then his account went inactive and no one heard from him.
That explains a lot!
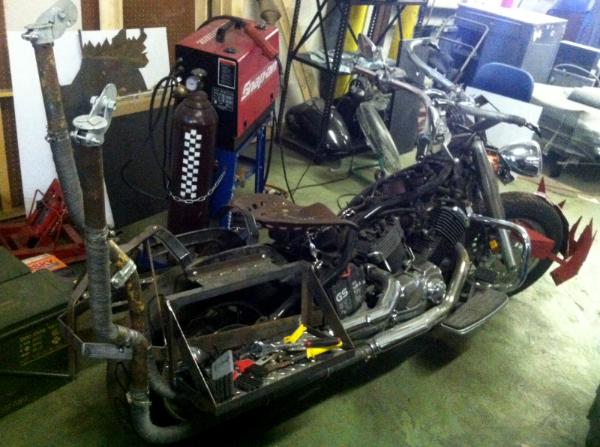
UPDATE TIME!
but first, my usual rambling. One of the things that really stopped me updating was a huge ton of setbacks on the project. Normally, I take these in stride and work on another part, but for about a month any part of the bike I worked on failed. Call me a coward if you like, but it's really hard to just post update after update of my failures. The two biggest areas were the gas tank and the drag bar mounts. I'll go into detail on those parts later, but suffice to say I stopped even taking pictures after the fourth failed drag bar mount, and the fifteenth leak on the tank. I had a huge push over the last few weeks, and I feel I'm back on track, with renewed energy. My work schedule should settle down December 3, so hopefully I will have a lot more time then I currently do.
On to the pretty pictures!
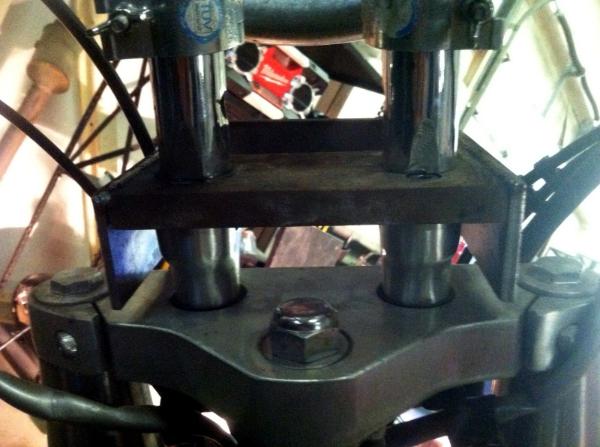
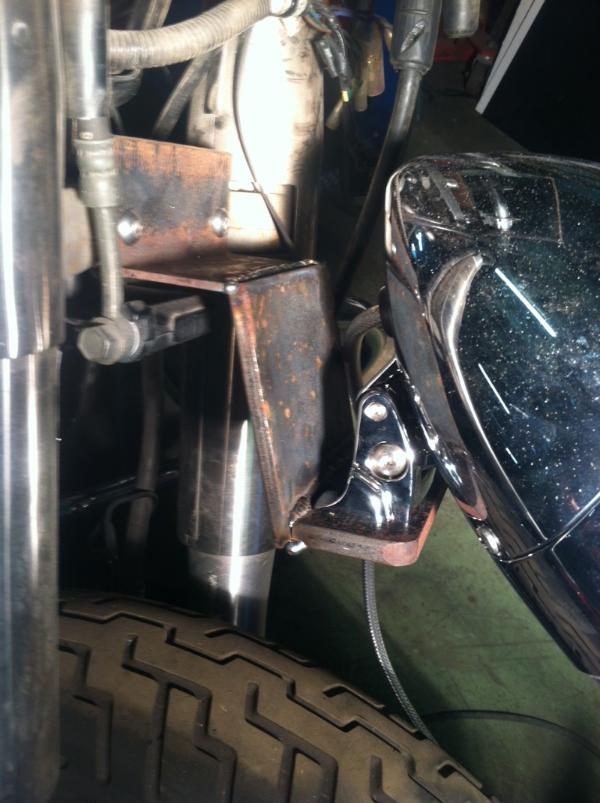
First up, the hated drag bar mounts. Here are the pictures of the final working mount.
The issue was the "scratch and dent" on sale drag bars I bought didn't rise up enough to clear my new gas tank. I didn't want to use the original bars, one of the few consistent details on Ork bikes is straight bars. I made several different mounts, but they either put the bar too high (and the electrical wires and cables didn't reach,) or they were deemed unsafe by the guy who goes over my work. (then I crash and die after they break free of their moorings at 50 miles per hour.)
The final solution was to make a mounting plate that used the original half of the raisers and through-bolted it to the new drag bars. The box in the front is for the steel skull mount.
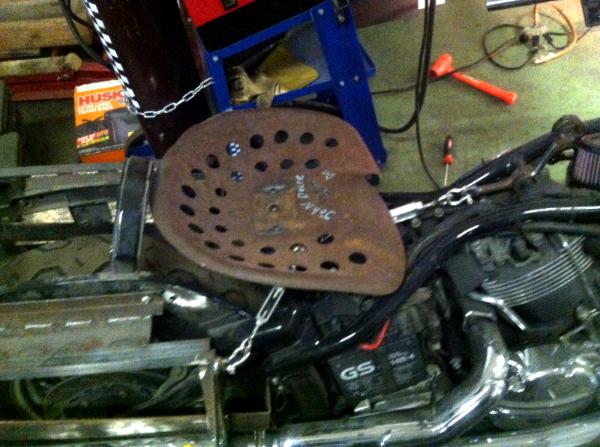
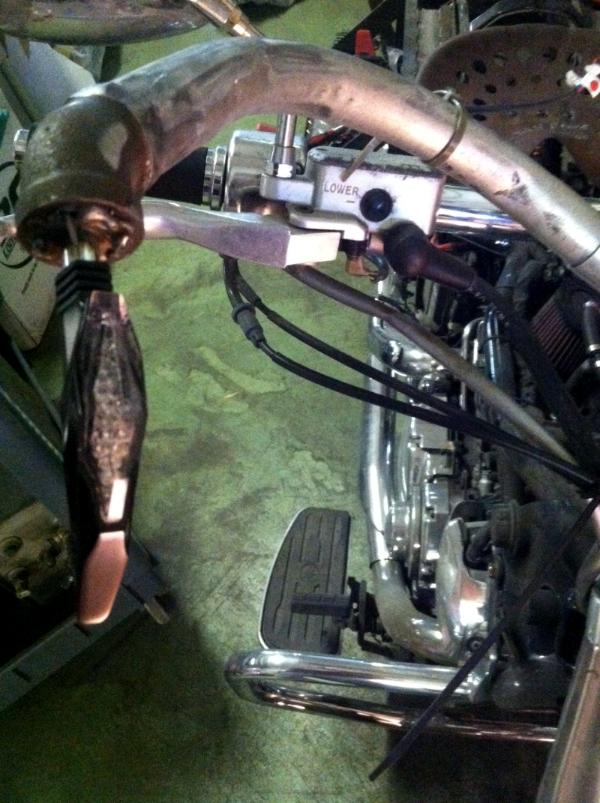
Next up is the seat. I spent a lot of time trying to mount the saddle, but it proved too difficult to mount without being safe. it straddled the empty space above the swing arm, and if I placed it high enough to mount I couldn't reach the floor!
I was originally gonna have it on springs for looks, but that proved to be to high also. It's hard mounted, and with three turnbuckles is fully adjustable.
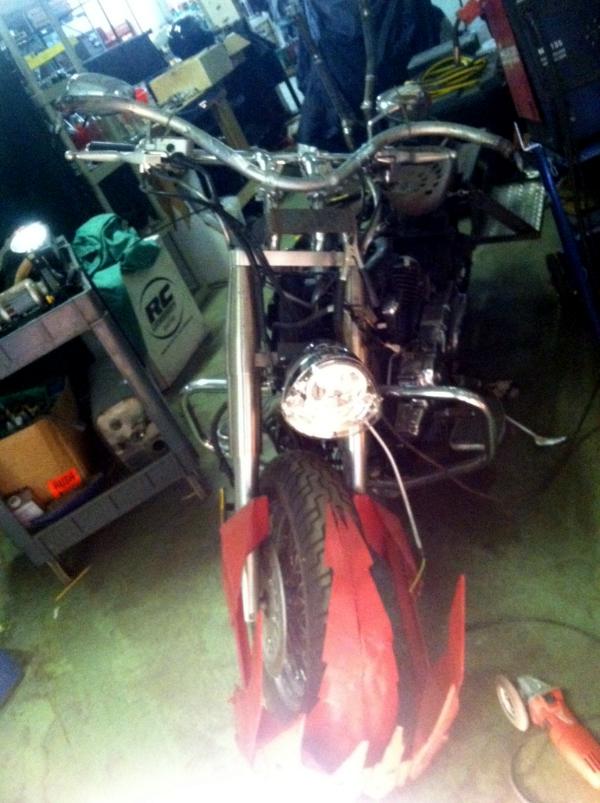
The next step was to mount the new headlight. I needed it on so I could see where to mount the skull.
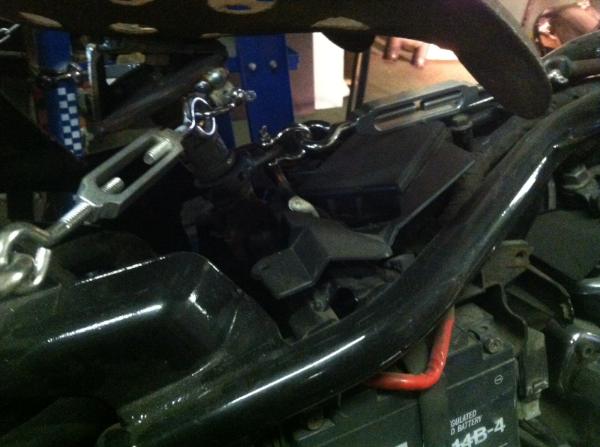
After that I got the horns for the skull in place. I'm trying to get the bare-bones stuff in place so I can move onto electrical.
Here are the front turn signals at the horn tips.
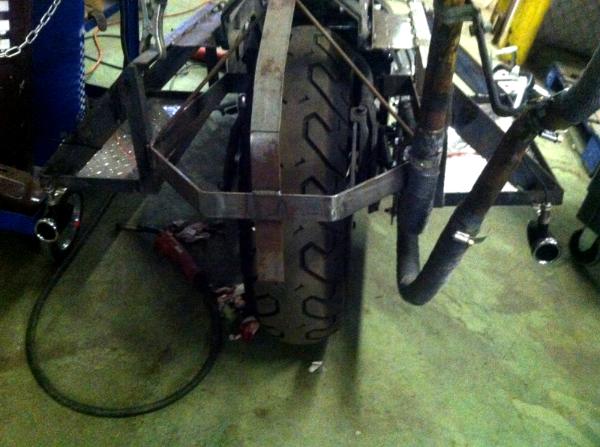
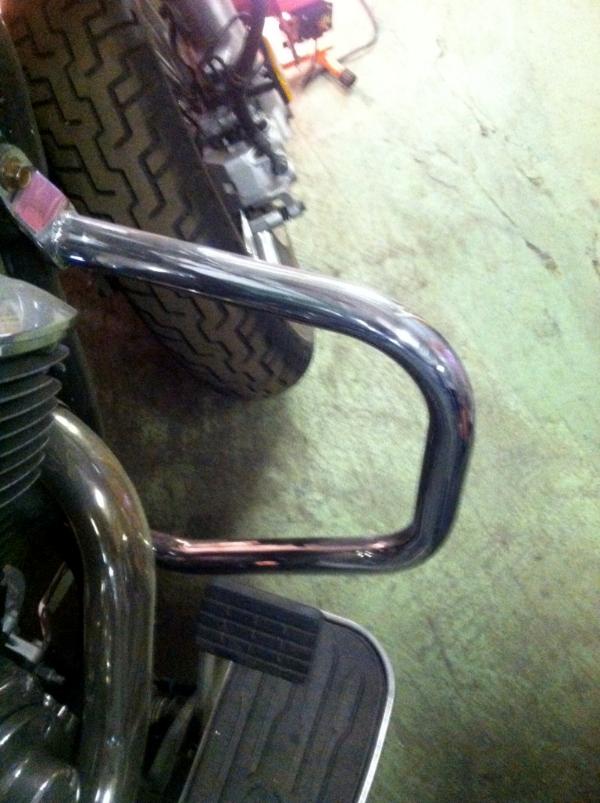
I then added much wider and thicker highway bars so I can add armored leg plates.
Well, thats the updates so far. Tomorrow I'll get pictures of my new license plate and the gas tank.
Yay! You're back!
The bike looks great, can't wait to see it finished!
WAAAGH! Gutsnagga Mo-ork- 5000pts Kult of speed + goffs
red space marines, (almost angry enough!) 2000 points
Here's my P&M blog - http://www.dakkadakka.com/dakkaforum/posts/list/551978.page And here's a thread of my completed miniatures -
http://www.dakkadakka.com/dakkaforum/posts/list/551971.page 'You have that the wrong way around. Space Hulk teaches the inmates how large numbers of fast moving vicious hand to hand combatants can over come a small number of gun armed adversaries, in a sequence of narrow corridors.' -Orlanth
If you're still having issues with pinhole leaks in the gas tank, try getting some UV dye (If you're at a car shop they use it for testing AC systems for freon leaks) and mix it in water, then fill the tank with water and slightly pressurize it.
necrovamp wrote:You gonna have one sore ass sitting on that tractor seat!
Looking good though
meh, It's still a swing-arm rear. Many better riders then I have ridden much worse for far longer. ever ridden a rigid frame with no rubber mounting on the engine? I know guys that do that for their iron butt badge of awesome.
AntomanElven wrote:Make the front headlamp more orky
Maybe put a big metal wireframe over it
The final detail of the bike is no-where near what it will become. My next step is to finish all the electrical, I have only made the framework for the cow-skull and headlight so I can make sure it all works. Once thats all done, I'll add the final layers of detail. and a wire frame may be in my future! (or a grot holding on for dear life, spanner in hand fixin' my front wheel.)
Nowlan wrote:If you're still having issues with pinhole leaks in the gas tank, try getting some UV dye (If you're at a car shop they use it for testing AC systems for freon leaks) and mix it in water, then fill the tank with water and slightly pressurize it.
Leak locations will glow under UV light.
good idea! I don't think its needed though. I filled it half with water and pressurized it to ten PSI, then sprayed down the tank with soapy water looking for bubbles. (its how we find propane leaks at work.) I then left it overnight with a gauge on it, still had ten PSI and was dry as a bone. If all that wasn't enough, I used Kreem tank liner, and did a double coat. I'm confident it will not leak.
UPDATE TIME!
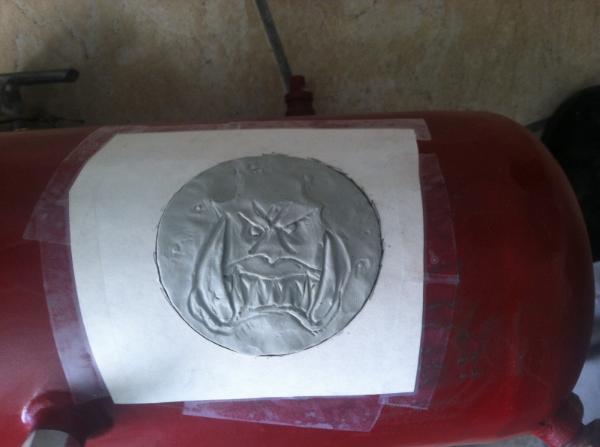
I rough-primed the tank, and started sculpting on it.
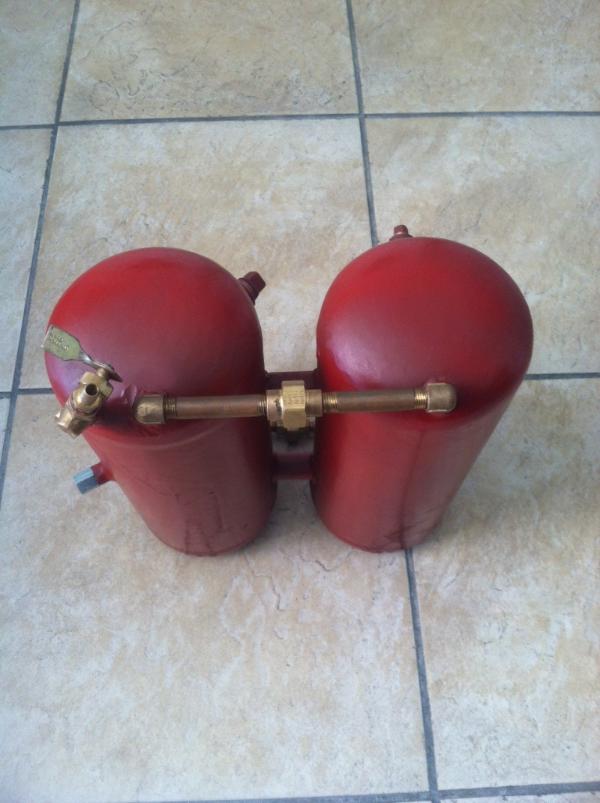
Here's the view from the bottom back of the tank, you can see the fuel crossovers and the petcock.
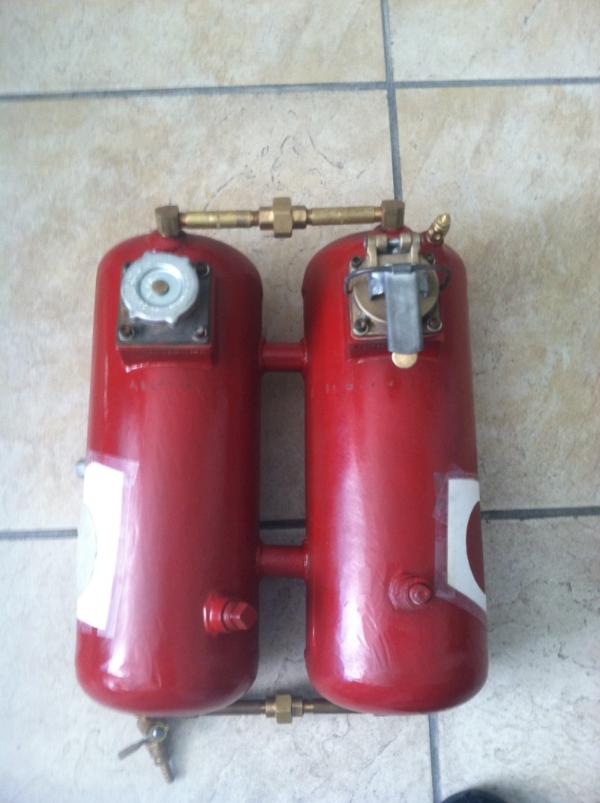
Here's a top view, you can see the air crossovers, vent valve, and of course the gas caps.
Lastly, I started the evil suns logo. this is only the first layer of course.
I'm sculpting the tank at home, so I'm still pushing forward with the main parts at work.
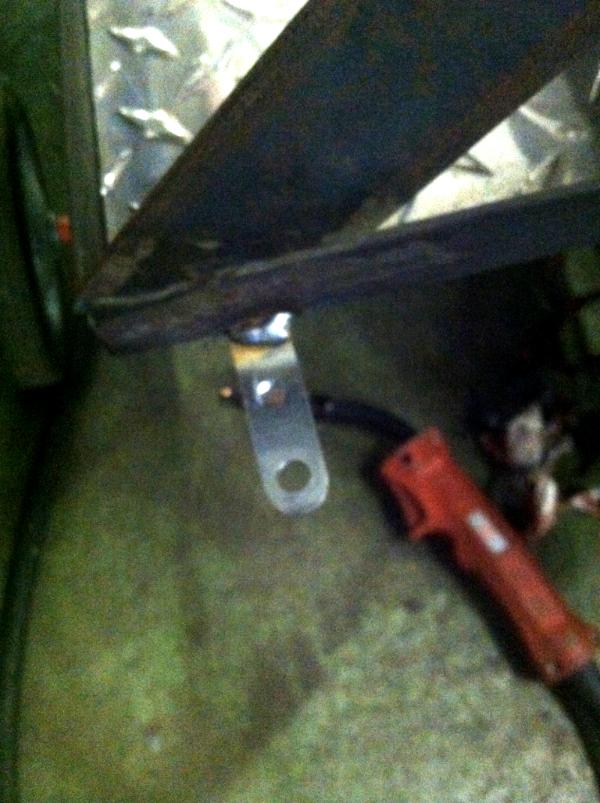
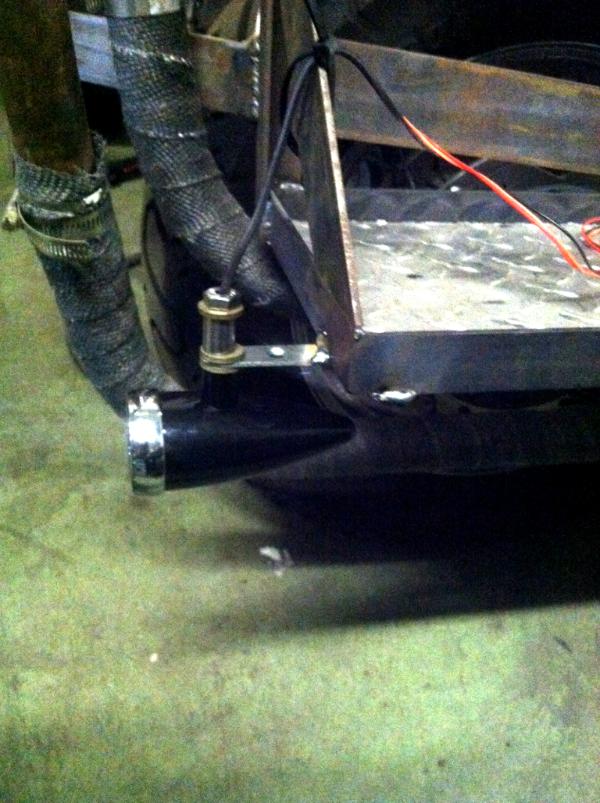
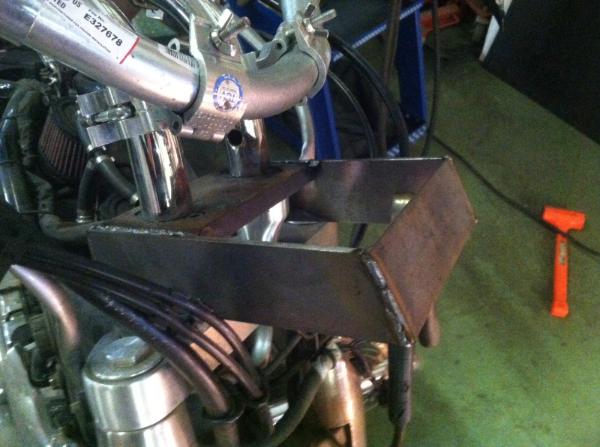
First up I welded some T brackets to hold my rear turn signals/rokkits.
I then mounted them so I can see how much wire I need to run to the relay.
They are sticking out back enough to clearly draw attention to them, while being tucked in enough from the sides that a spill wont snap them off.
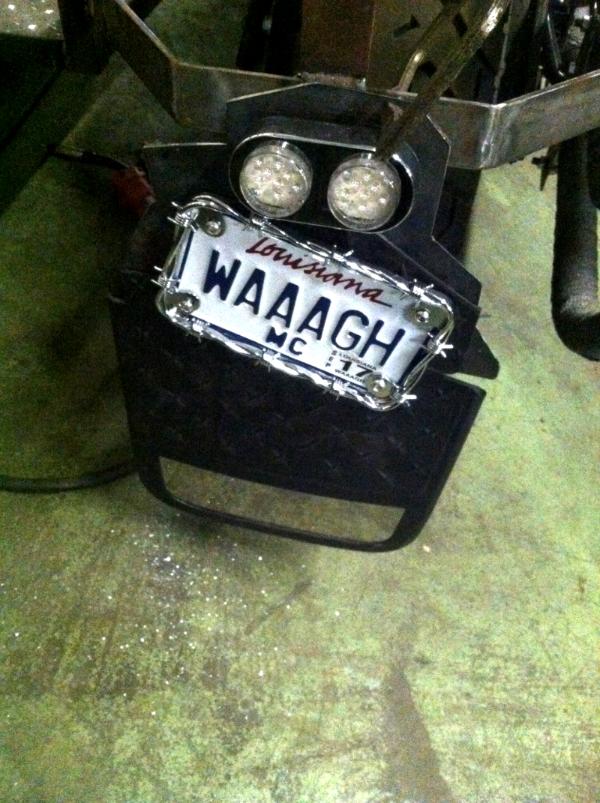
Next, I cut a sheet of metal to mount my mudflap, license plate, and brakelight to.
I drilled some holes, hacked up the mudflap, and got it ready to mount.
Hows THAT for a personalized plate?!?
next up is mounting the rest of the electrical gak. I still have to mount the new speedometer, and all the green running lights. I also have to build a switch box and then actually wire everything up.
I also hit upon a great idea to test the sheet plastic! I pulled out one of our hurricane fans at work, and hit the bike with 65 MPH winds. the plastic was flexing just a little, but it was enough for me to decide to add some gussets to reinforce them. I don't want to pull focus from making the bike 100% functional, so as it's a cosmetic fix I'll work on it later.
Thanks for looking! I feel like I'm gaining some momentum, here's hoping the wiring over the next week goes well.
Once thats all done, I'll add the final layers of detail. and a wire frame may be in my future! (or a grot holding on for dear life, spanner in hand fixin' my front wheel.)
Na.... you need to have the grot hanging for dear life from the back of the sissy bar.
My Project Blog: Necrons, Orks, Sisters, Blood Angels, and X-Wing "
"One morning I shot an elephant in my pajamas. How it got into my pajamas, I'll never know." Groucho Marx
~A grammatically correct sentence can have multiple, valid interpretations.
Arguing over the facts is the lowest form of debate.


 WAAAGH! Gutsnagga Mo-ork- 5000pts Kult of speed + goffs
 red space marines, (almost angry enough!) 2000 points


 blog!
blog! 1,500 Points II
  125
125


 - Assembling first army.

 Thin your paints, drill your gun barrels, remove all mold lines. The Emperor wills it.