Forum adverts like this one are shown to any user who is not logged in. Join us by filling out a tiny 3 field form and you will get your own, free, dakka user account which gives a good range of benefits to you:
No adverts like this in the forums anymore.
Times and dates in your local timezone.
Full tracking of what you have read so you can skip to your first unread post, easily see what has changed since you last logged in, and easily see what is new at a glance.
Email notifications for threads you want to watch closely.
Being a part of the oldest wargaming community on the net.
If you are already a member then feel free to login now.
2019/06/23 05:27:29
Subject: Re:Ah hell, here we go again - another 3D printed Godzlla model
Progress continues, albeit slowly. The tail is printed, as are the legs. The hip is printing currently. Here is a gif:
Spoiler:
I'm using 25% infill, so it's 75% air and 25% internal support structure. The hips are one of the longer parts to print - it's been about 40 hours and it's only halfway done. I think the the chest might be almost 5 days though.
Still to be printed - Chest, waist, arms, hands, and all the spines. The hands and maybe arms I will do on the DLP printer for better detail.
Speaking of DLP, I printed the head. Here is a timelapse video of the print - 8 hours in 50 seconds.
Spoiler:
And here is the head curing:
Spoiler:
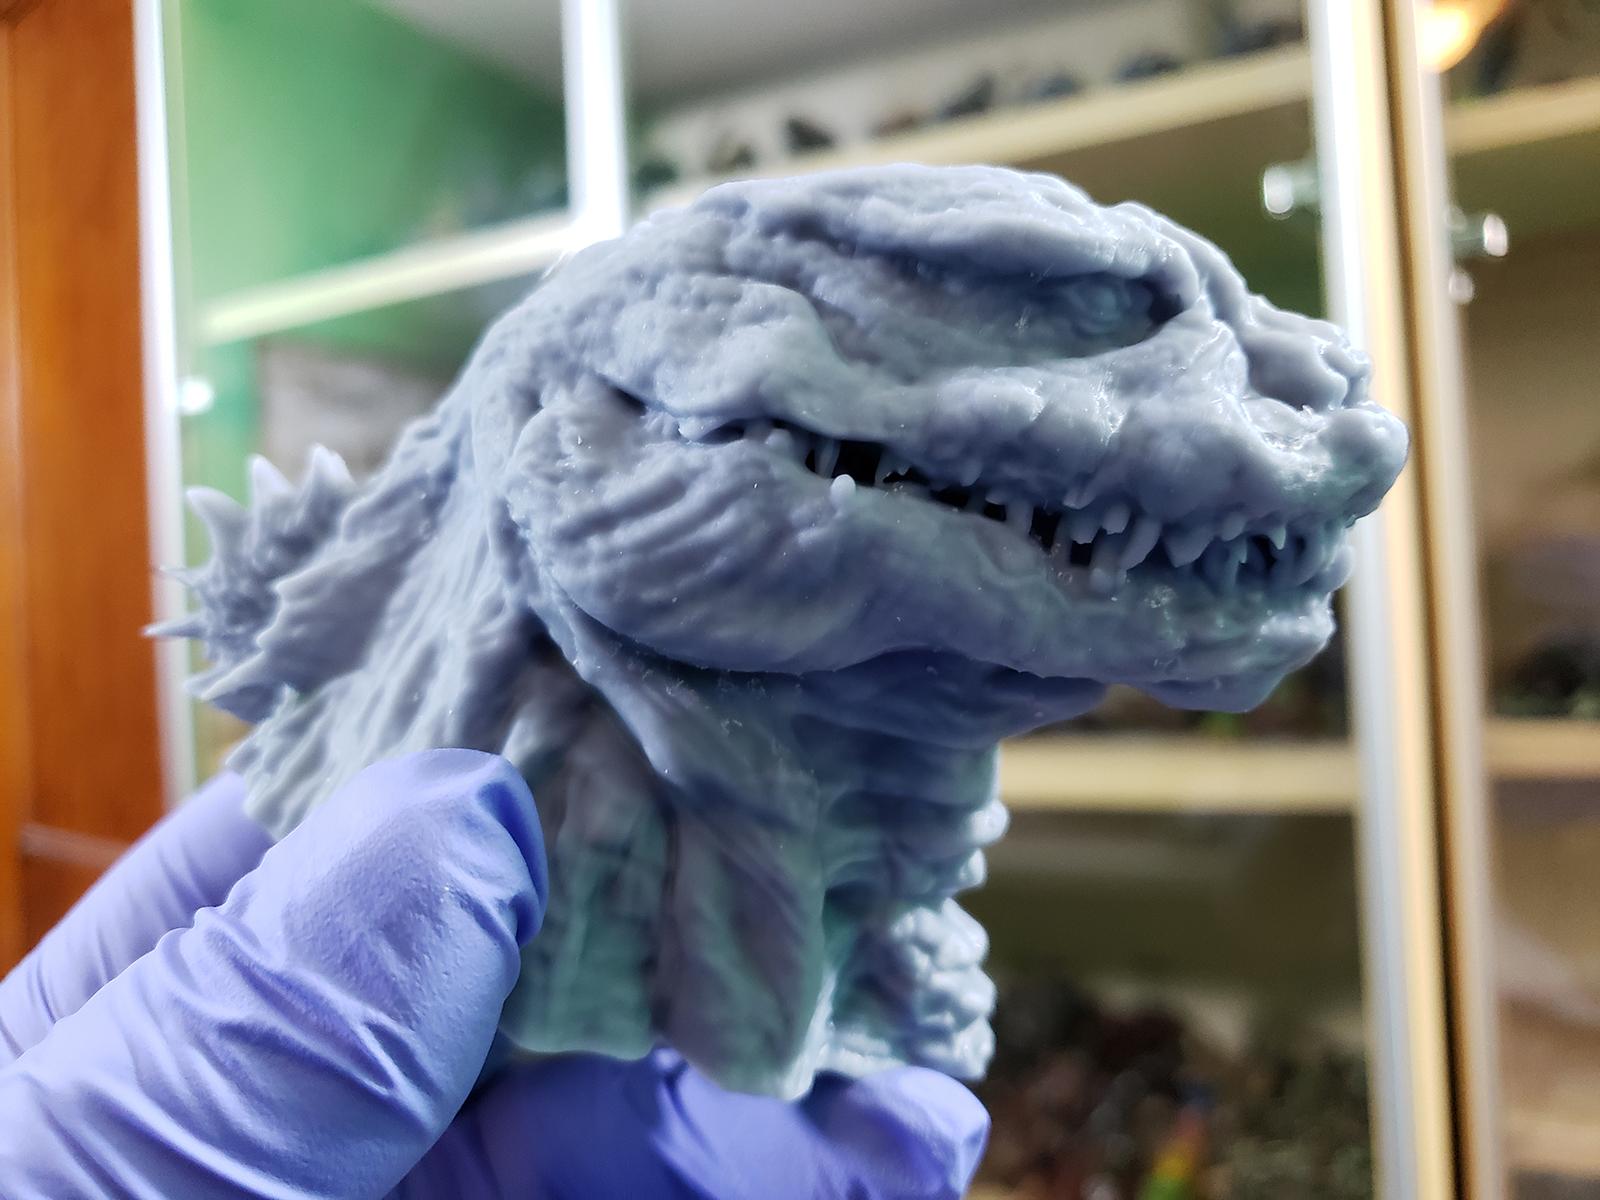
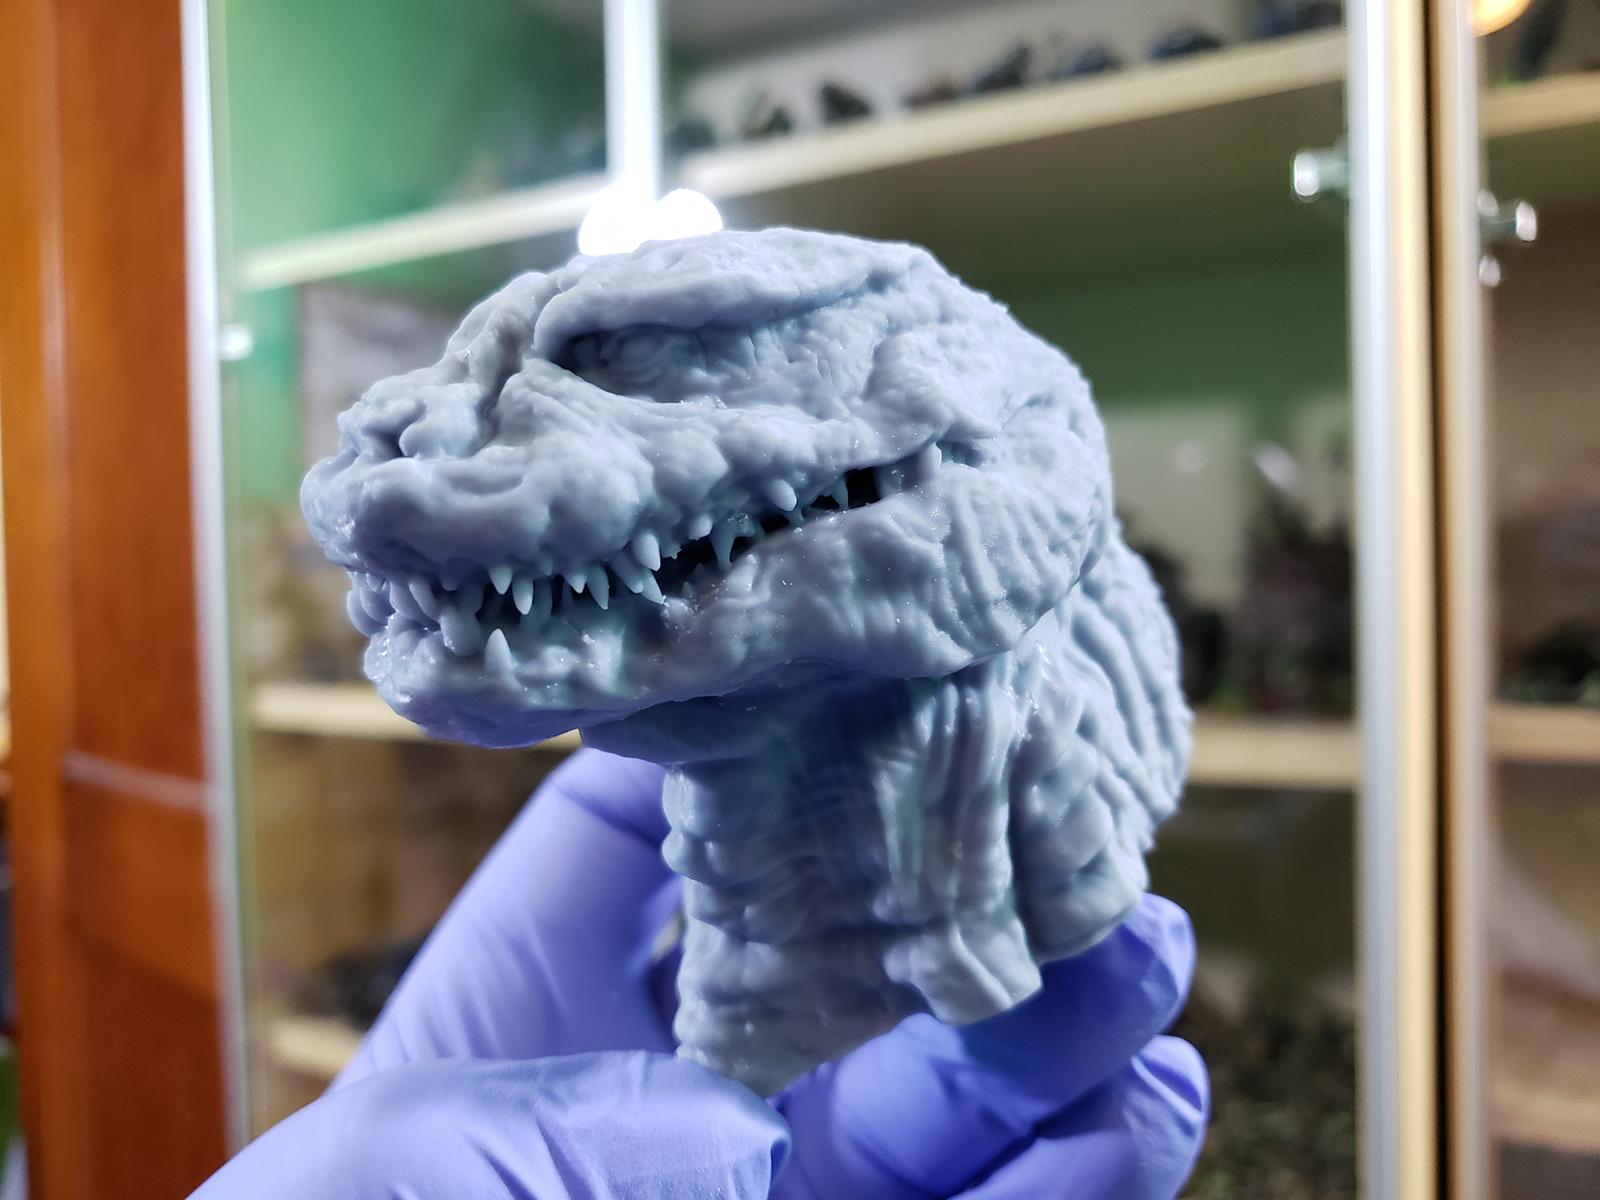
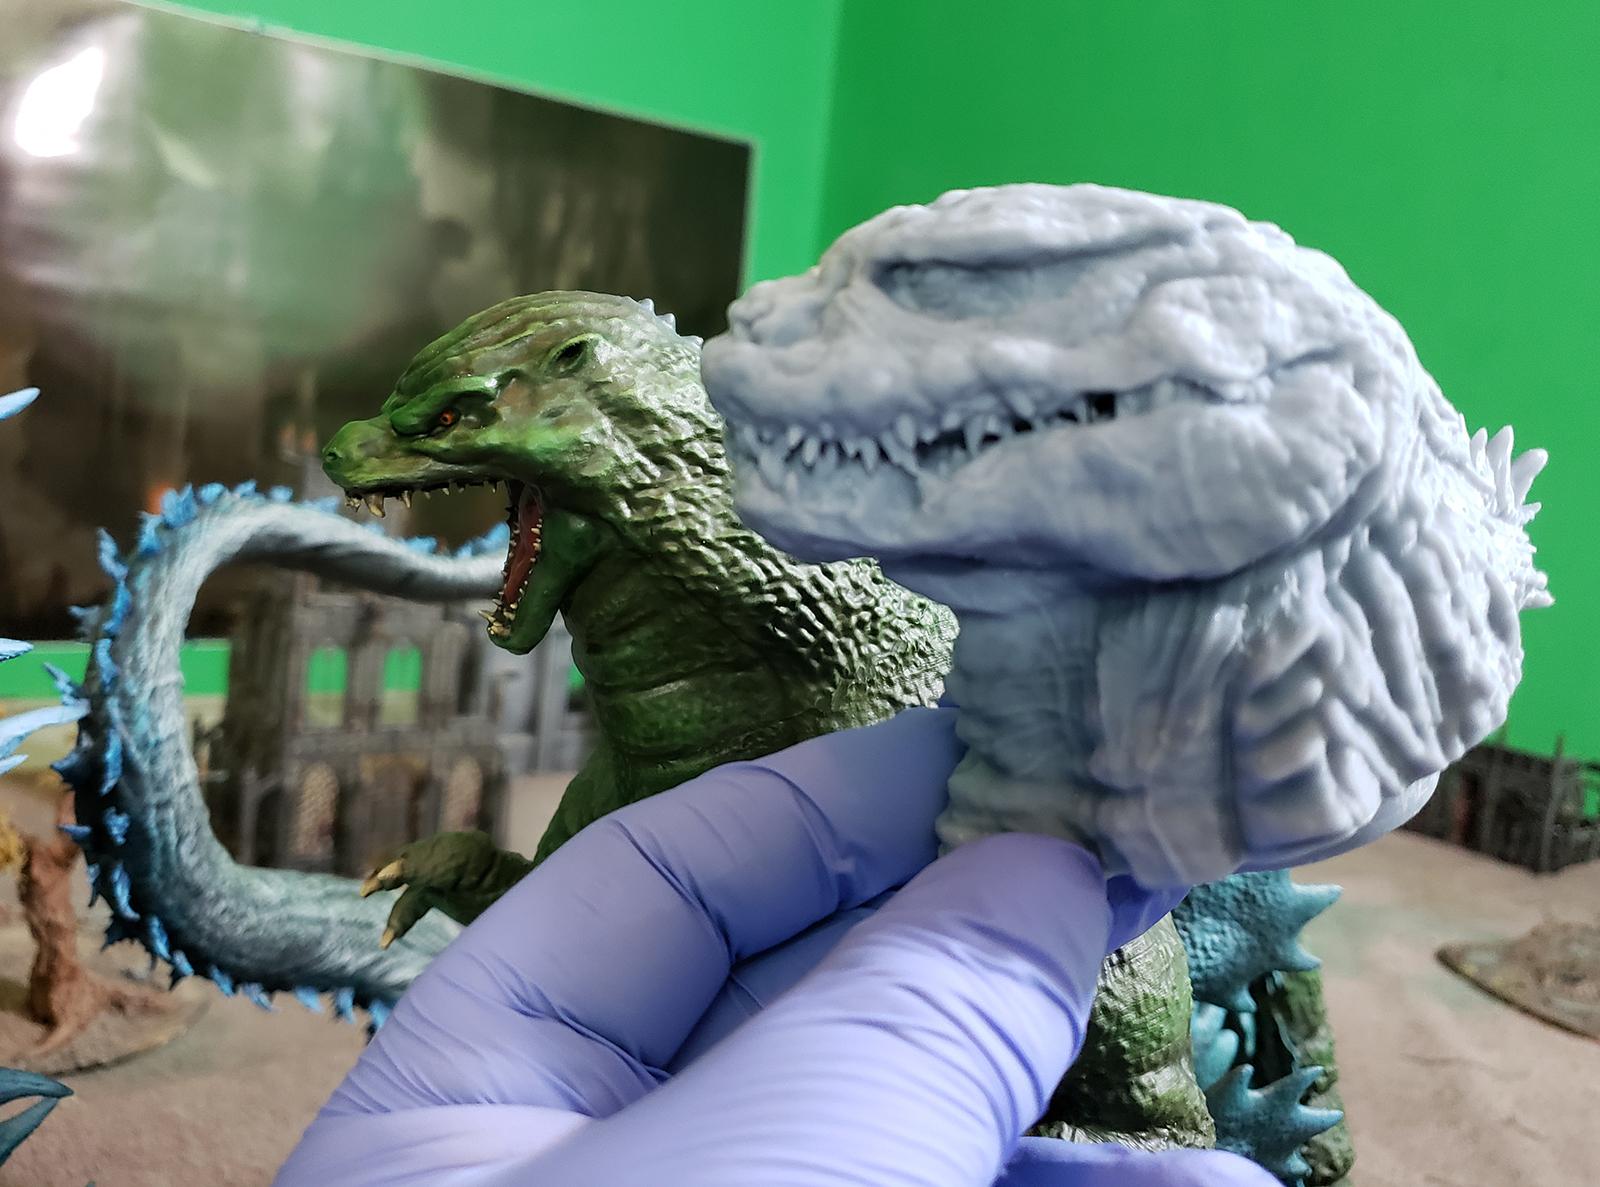
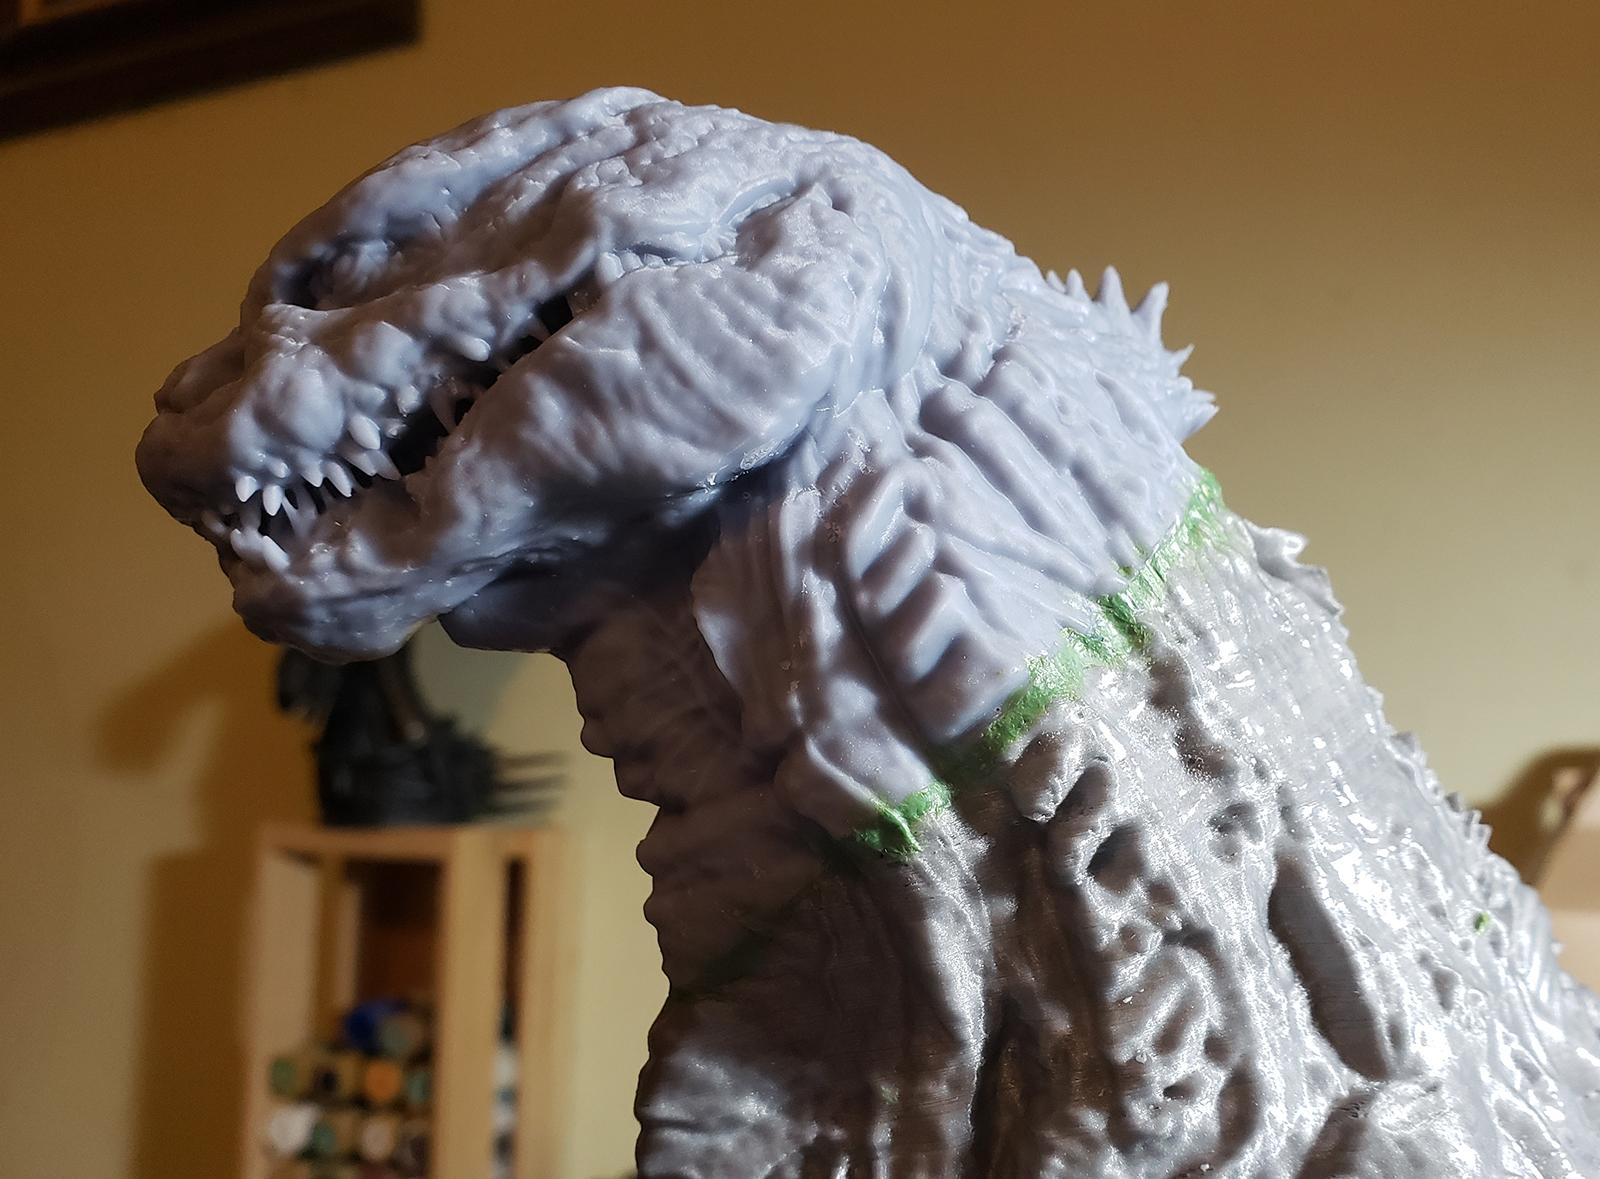
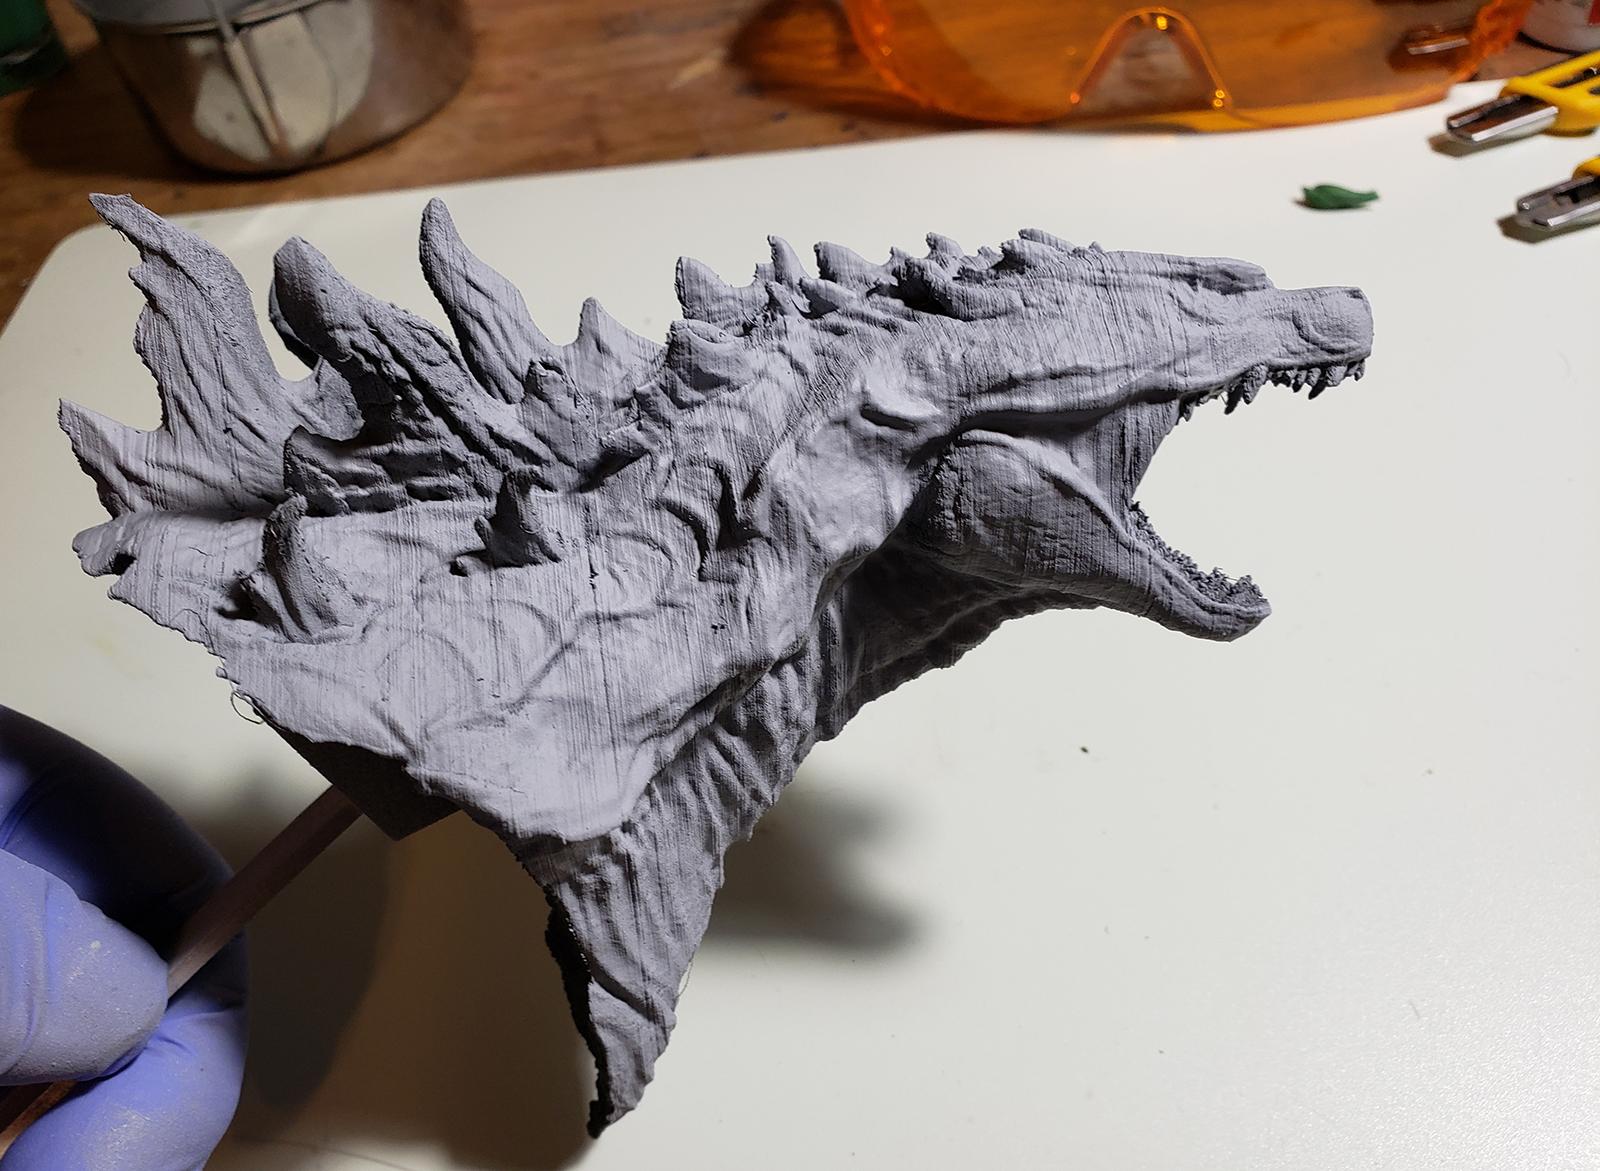
And here are some pictures of the head (note I have not 100% cleaned it up yet!)
Spoiler:
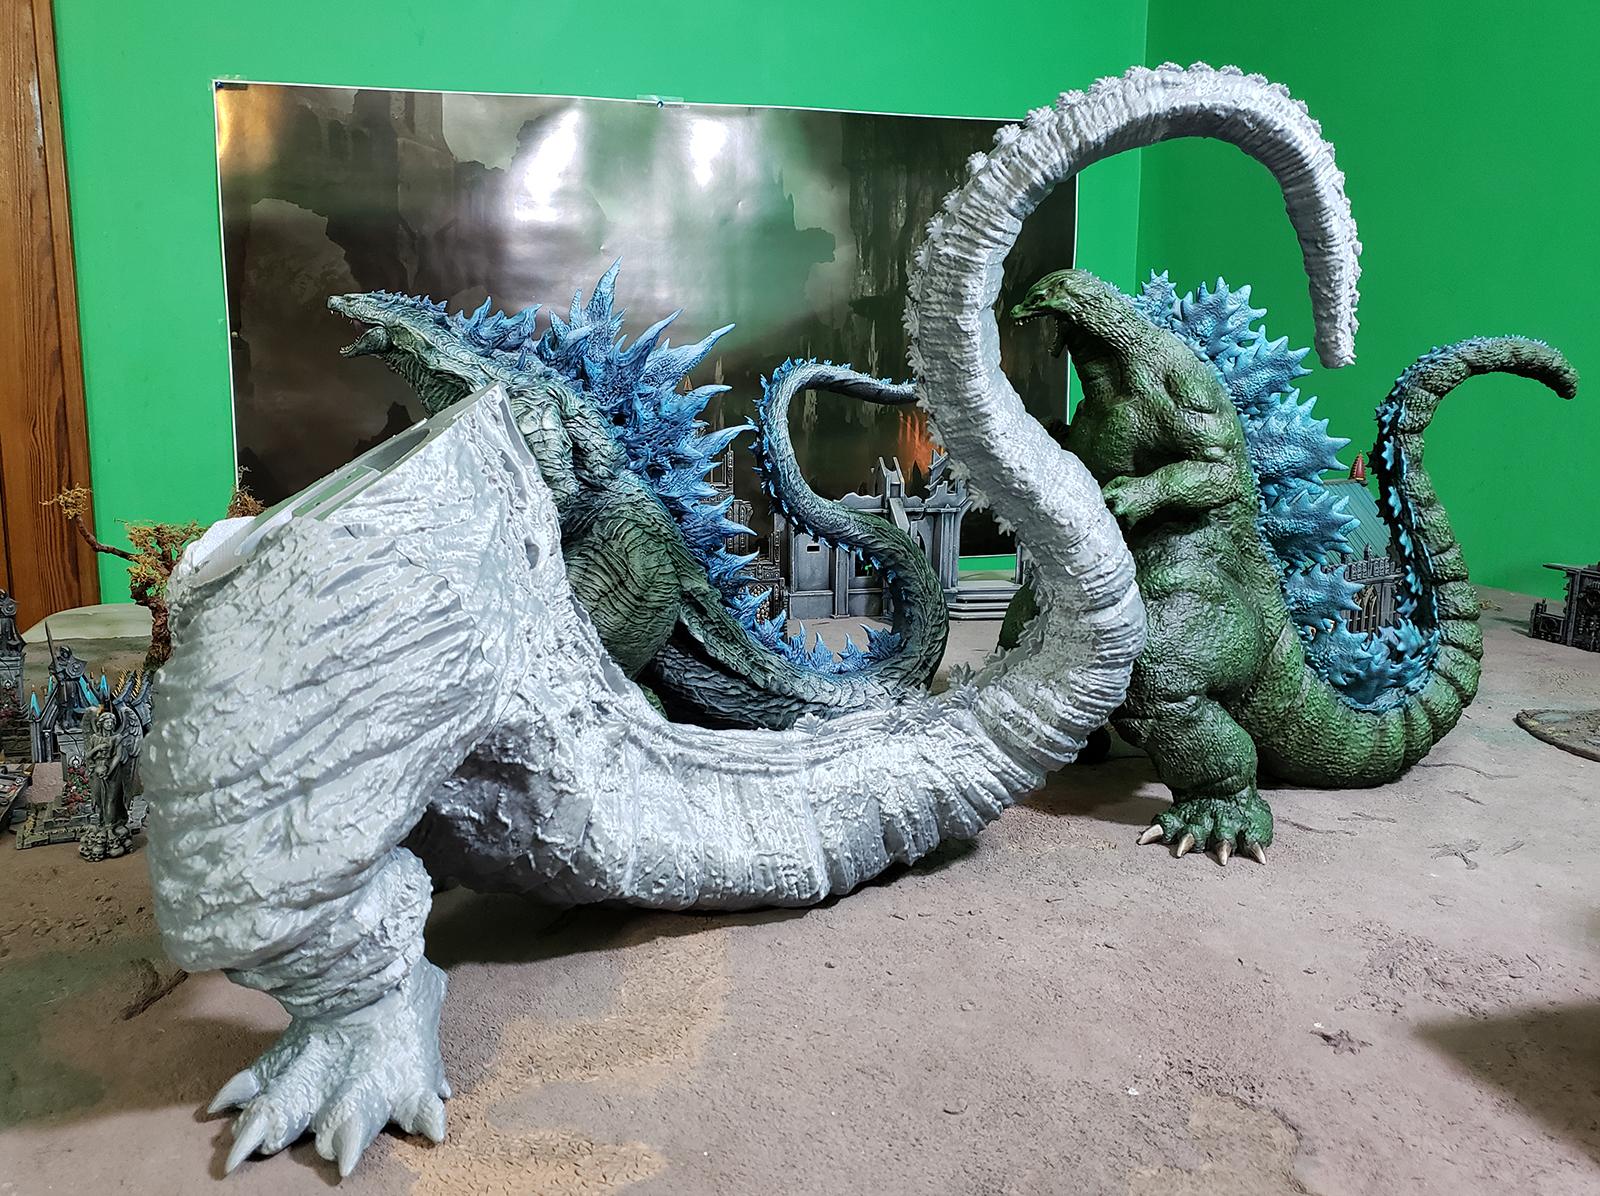
It's hard to get a good side by side with the other Godzillas... Godzilli? Godzillae? This one has a larger head, but it's not as enormously bigger as perspective is making it look here. I think the finished Shin Godzilla is only going to be a little bigger than the others, heightwise.
lord_blackfang wrote: Respect to the guy who subscribed just to post a massive ASCII dong in the chat and immediately get banned.
Flinty wrote: The benefit of slate is that its.actually a.rock with rock like properties. The downside is that it's a rock
2019/06/28 06:08:37
Subject: Re:Ah hell, here we go again - another 3D printed Godzlla model
Gorgeous! Out of curiosity, what's cleanup like? On that gif with the hips I'd say it looks (inadvertent pun) monstrous? You've done an impressive job thus far, can't wait to see how it ends up.
2019/06/29 20:53:49
Subject: Ah hell, here we go again - another 3D printed Godzlla model
Well, the hip is done, which means I'm about halfway done.
Spoiler:
posermcbogus wrote: Gorgeous! Out of curiosity, what's cleanup like? On that gif with the hips I'd say it looks (inadvertent pun) monstrous?
Well, I'll show you, and then I will tell you.
On the DLP (resin) printer, which I am doing the head and hands (and maybe arms) with: You let it hang out on the printer a little bit so the wet resin drips off. I then peel off the support material - it's very soft at this point and you can easily peel it off with your fingers. You then wash it in 99% isopropyl alcohol (I use a ultrasonic cleaner filled with 99% IPA, which is actually pretty dangerous and you shouldn't do that). I then let it dry, and peel off any support material I missed. Next is post-print curing - the surface of prints can be tacky, so i put it on a UV powered lazy susan in front of a UV lamp for about 5 minutes. You can also totally just leave it out in the sun on a sunny day. The last step is again, removing any supports - there are usually little bumps where you peeled them off. At this point the best way to remove them is to slice them off with a hobby knife, slowly and carefully. Good resins are a tiny bit soft on the surface and this is easy, cheap resins are brittle and this step can have them "shatter off" and leave pockmarks \ craters behind.
For the FDM (plastic) printer, the one that is doing the body of this model:
First you gotta get it off the bed. A lot of printers have problems with bed adhesion and use glue sticks or aqua net hairspray, and I bought those products when I bought the printer, but I don't use any of them, it sticks really well without any help. I use my fingers and needlenose pliers for most of the work, and sometimes a cheap pair of snips to get an edge off for a plastic scraper. This one took about 8 minutes to get all the supports off. You have to be careful with the pliers - sometimes the supports are stuck on there pretty good, and you use a lot of force to remove them - you gotta be cognizant where your hand is going to go when it comes off. I have this scar on the bottom of my left hand that came from that first Godzilla - I yanked a support off, and my hand went right across the edge a sharp spine, slicing it.
Spoiler:
Godzilla doesn't care from whom the blood flows, so long as it does.
Anyway;
After the support material is removed, I go over it carefully looking for tiny blobs of plastic, which appear here and there sometimes - I'm pretty sure it's when a line does a Z transition and it doesn't hide it in a seam like it should for whatever reason. They are usually a couple per part, and they are very small and just take a section to flick off with the edge of a hobby knife. This process takes a minute or two, mostly of careful looking.
Finally I scrape the print bed side edges of the model, since the print method I use lays down a thin brim around the part to improve adhesion, and this leaves a little strip I gotta peel off. This takes maybe a minute tops.
Then I have to glue it. One thing I haven't mentioned yet, I am going through a lot of superglue on this project. Just attaching the legs and tail to the hip took 2 tubes and some of a third.
Spoiler:
lord_blackfang wrote: Respect to the guy who subscribed just to post a massive ASCII dong in the chat and immediately get banned.
Flinty wrote: The benefit of slate is that its.actually a.rock with rock like properties. The downside is that it's a rock
2019/06/29 22:07:52
Subject: Ah hell, here we go again - another 3D printed Godzlla model
Mega Godzilla needs a LOT of glue! 3-D printer can do all that eh? awesome!
"Your mumblings are awakening the sleeping Dragon, be wary when meddling the affairs of Dragons, for thou art tasty and go good with either ketchup or chocolate. "
Dragons fear nothing, if it acts up, we breath magic fire that turns them into marshmallow peeps. We leaguers only cry rivets!
2019/06/30 09:01:23
Subject: Ah hell, here we go again - another 3D printed Godzlla model
This is an advert for 3D printing pure and simple! The quality and explanation of the process really make me want to look into this further, as I can see happening with others watching this thread
Relapse wrote:
Baron, don't forget to talk about the SEALs and Marines you habitually beat up on 2 and 3 at a time, as you PM'd me about.
nareik wrote: Perhaps it is a lube issue, seems obvious now.
2019/07/02 03:49:21
Subject: Ah hell, here we go again - another 3D printed Godzlla model
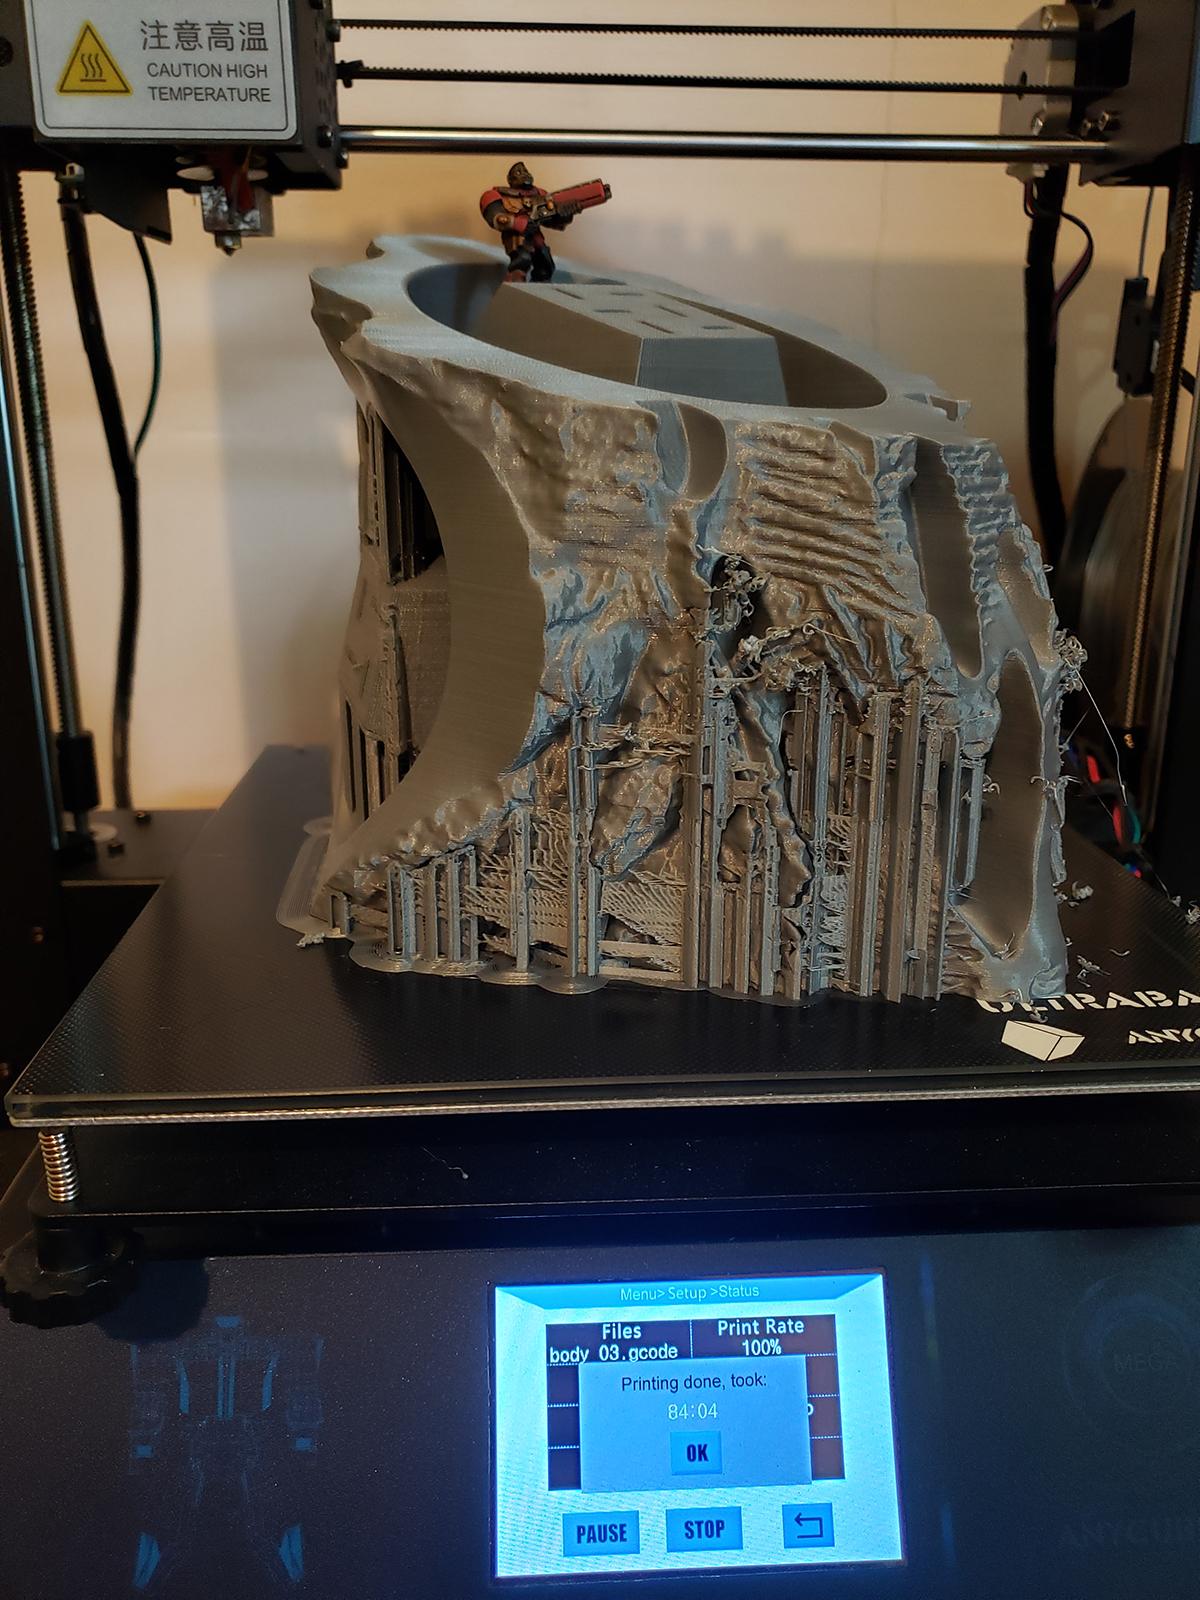
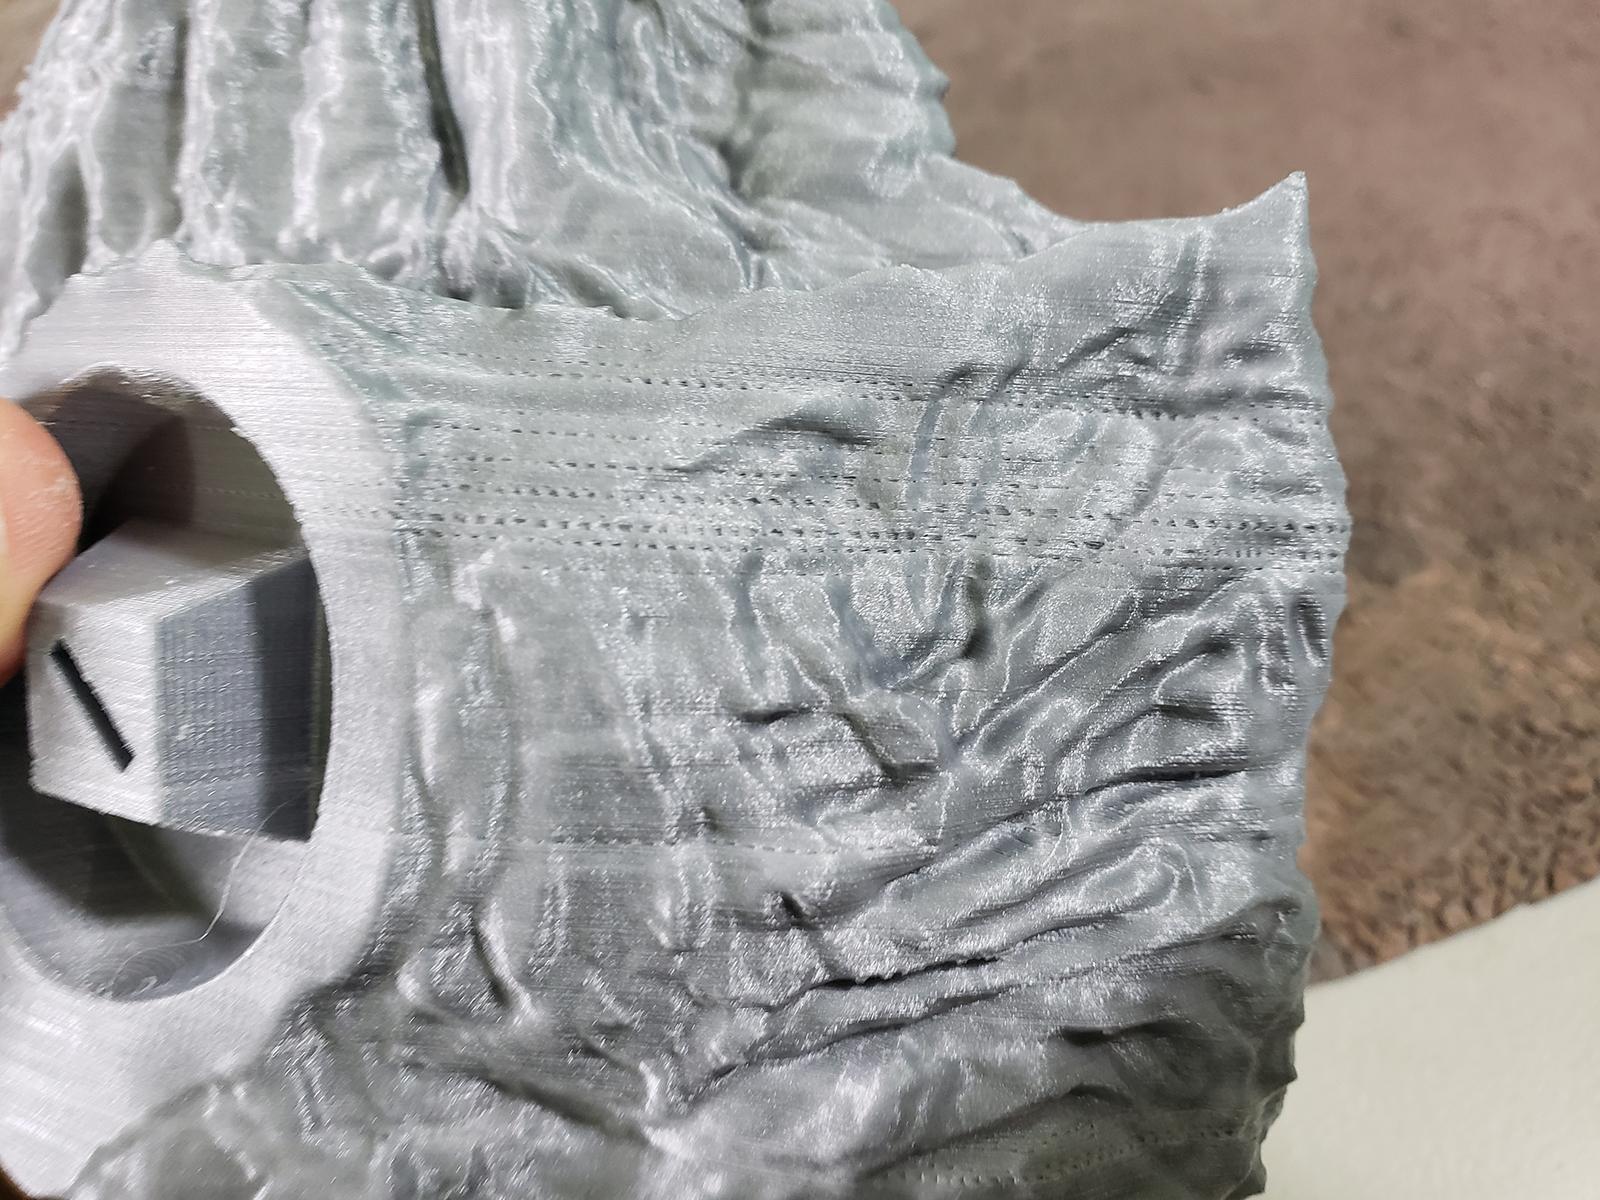
Ok, ran into a minor problem: a partial nozzle clog. I've had this happen twice before: once it happened at the start of a print and the resulting print was garbage - it only printed part of every line and the resultant part was spongy and loose, like it was made of foam. Luckily only a few hours of printing.
This one was intermittent - it manifested itself in a few strips and either unclogged or worked itself out, i assumed. It didn't - we'll get to that later.
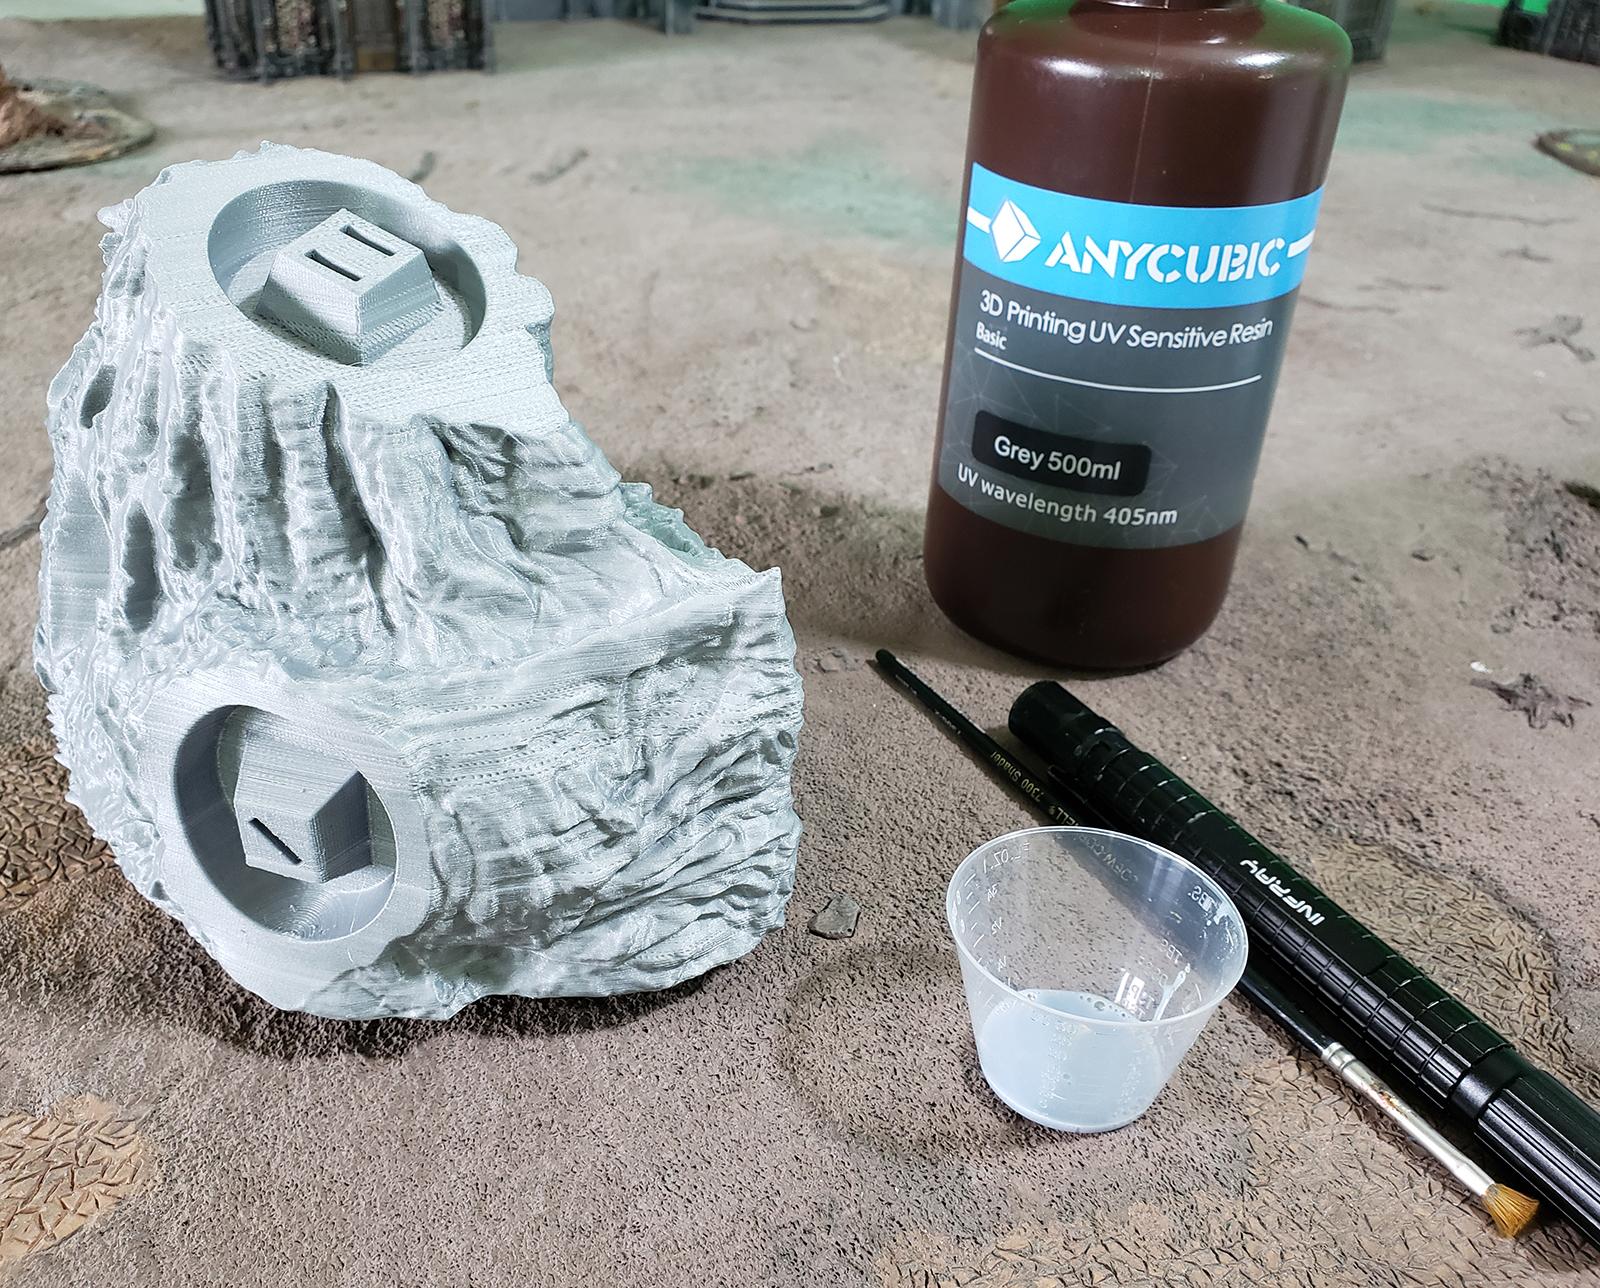
So, this is what an intermittent, partial clog looks like:
Spoiler:
If this was a smaller part, I would just clear the clog and reprint it. This was 85 hours though, and the visible damage minor - the parts where it's the worst are the torso-neck interface where you won't be able to see it anyway. So, rather than trash it, I'm going to try to repair it instead.
Spoiler:
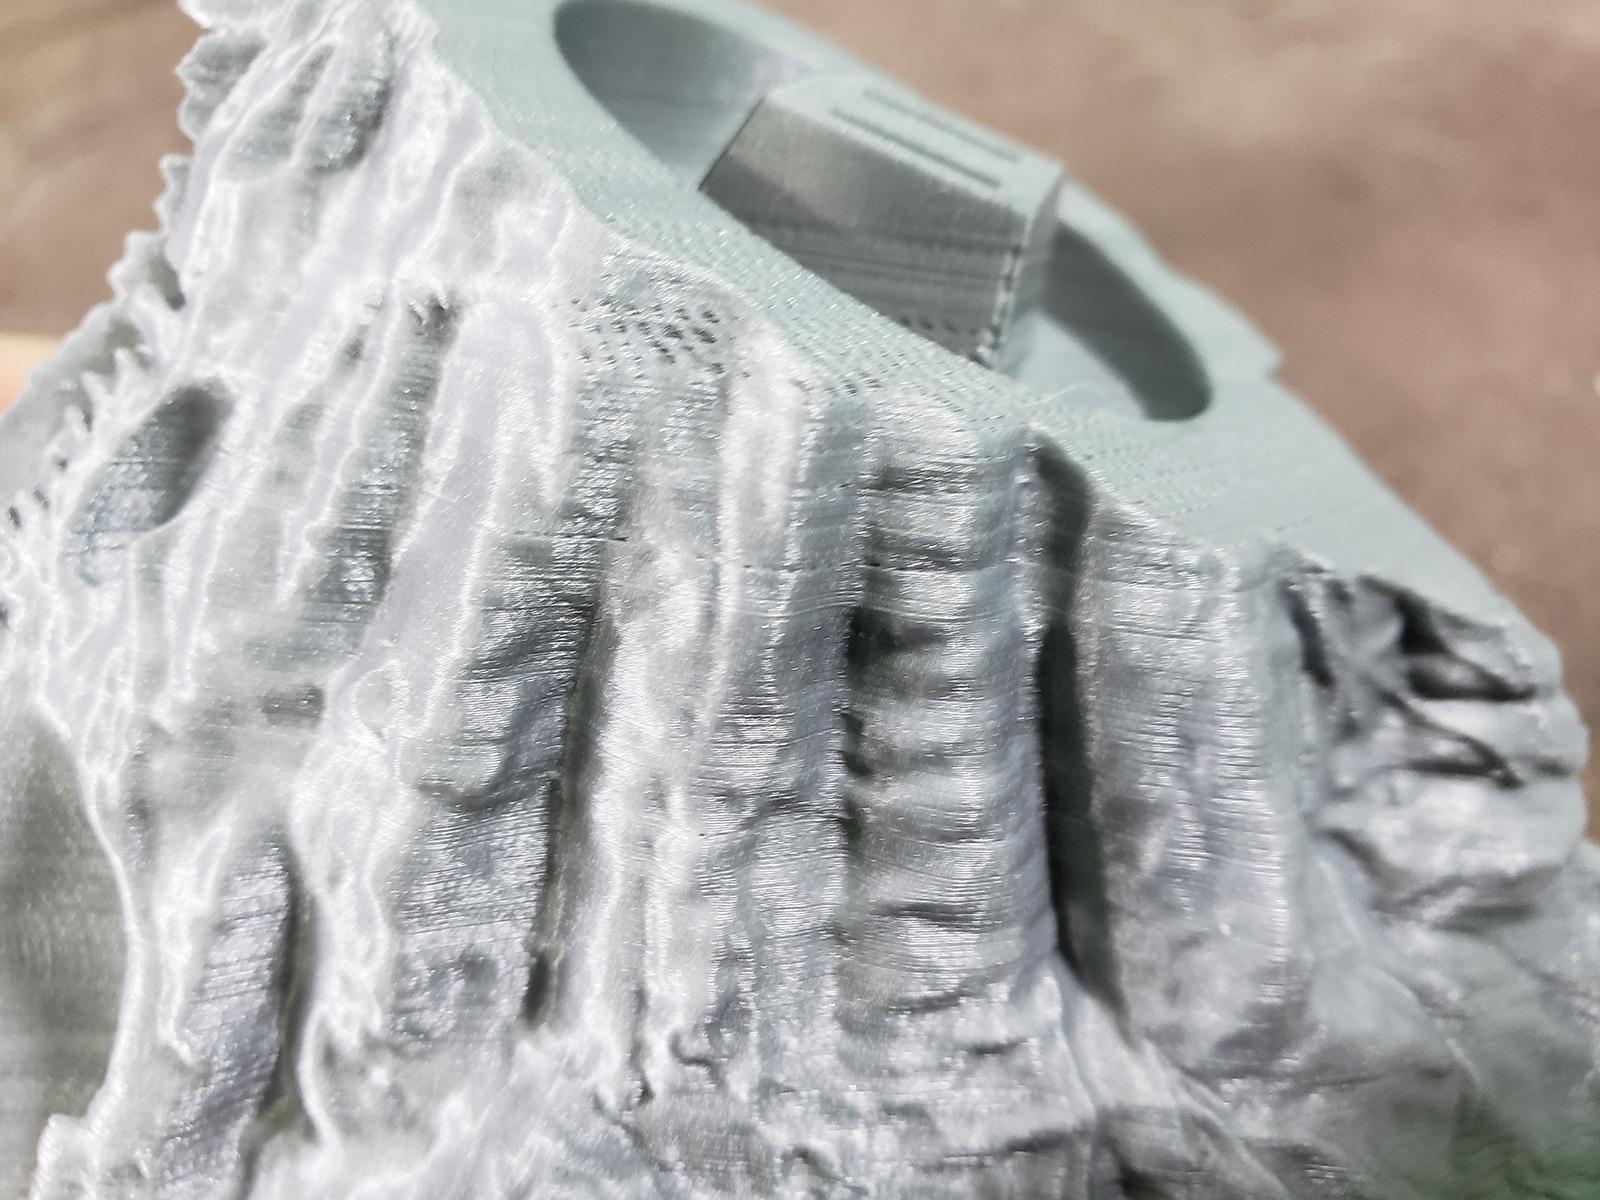
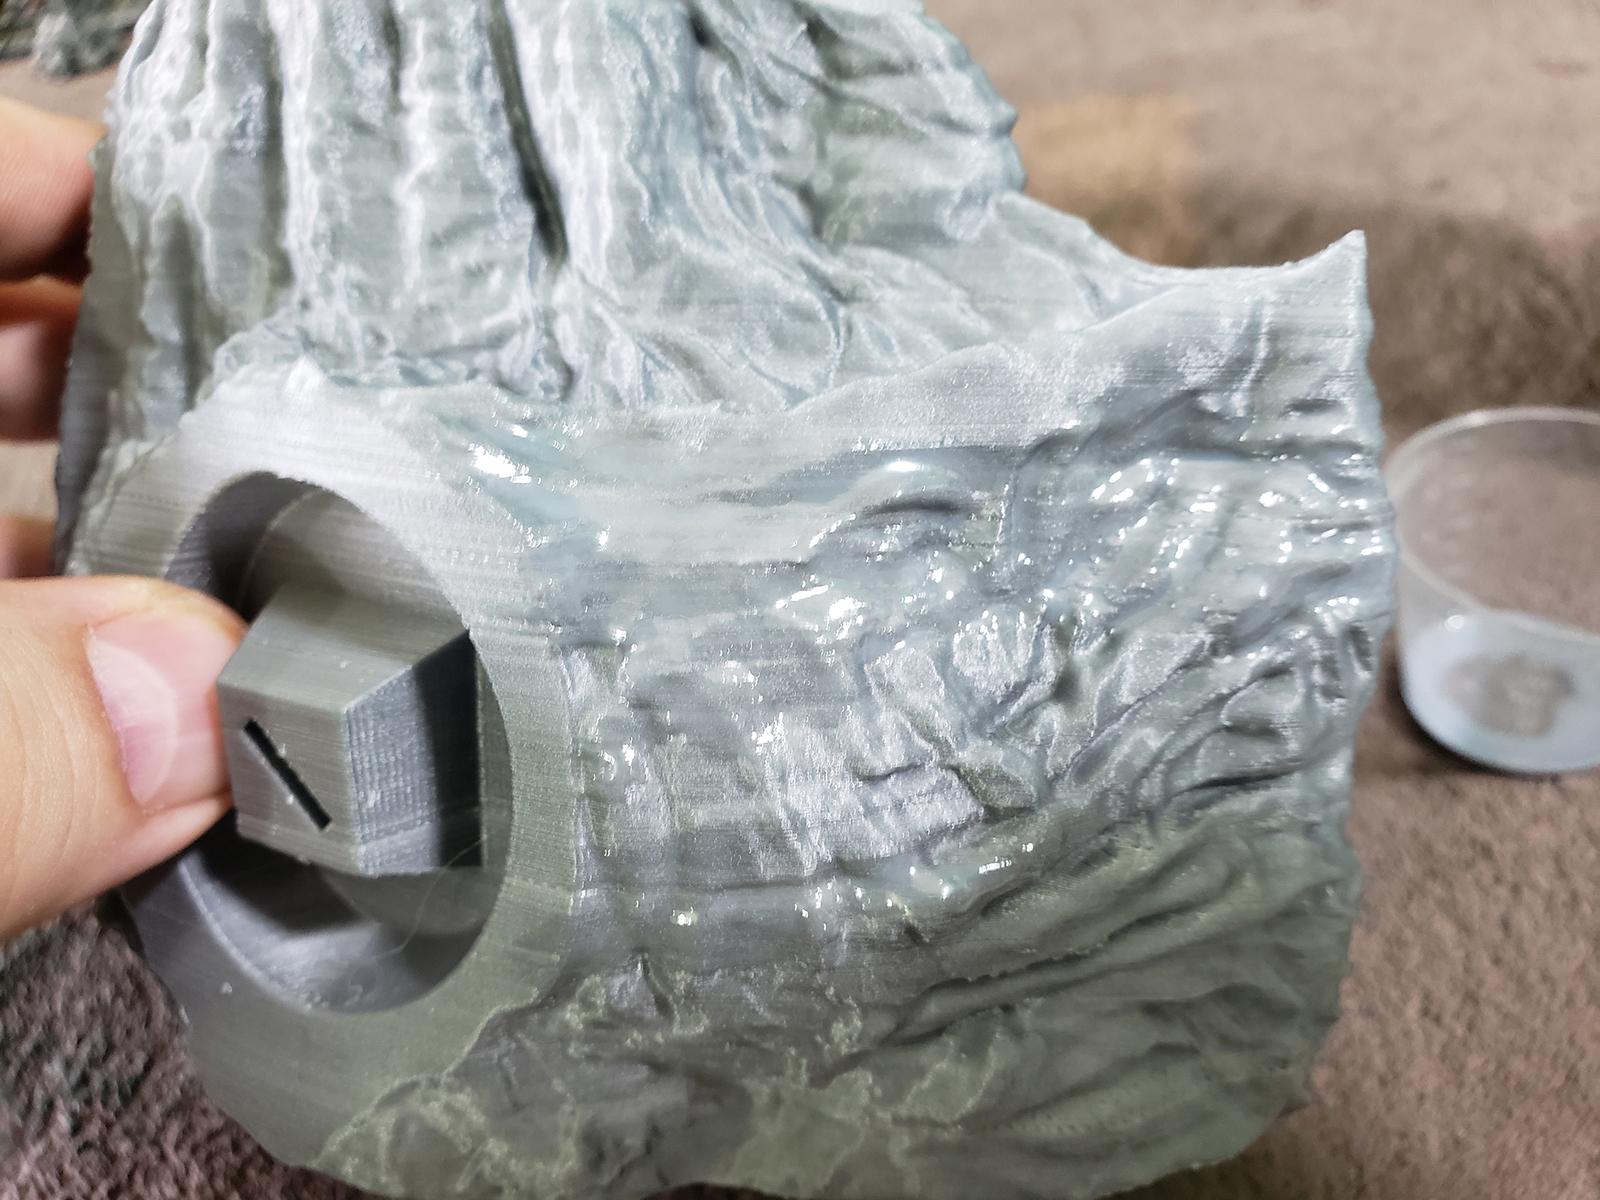
I decided to do that by "painting" it with 3D printing resin, then blasting it with a UV flashlight to insta-cure it. Doing this will fill the small gaps and should work OK, but it does lead to a smoother finish where it's applied. They actually sell a product that pretty much does this, albeit as an air-dry resin - it fills in all the stepping lines and makes a smooth finish, but it also eradicates detail - so I don't use it.
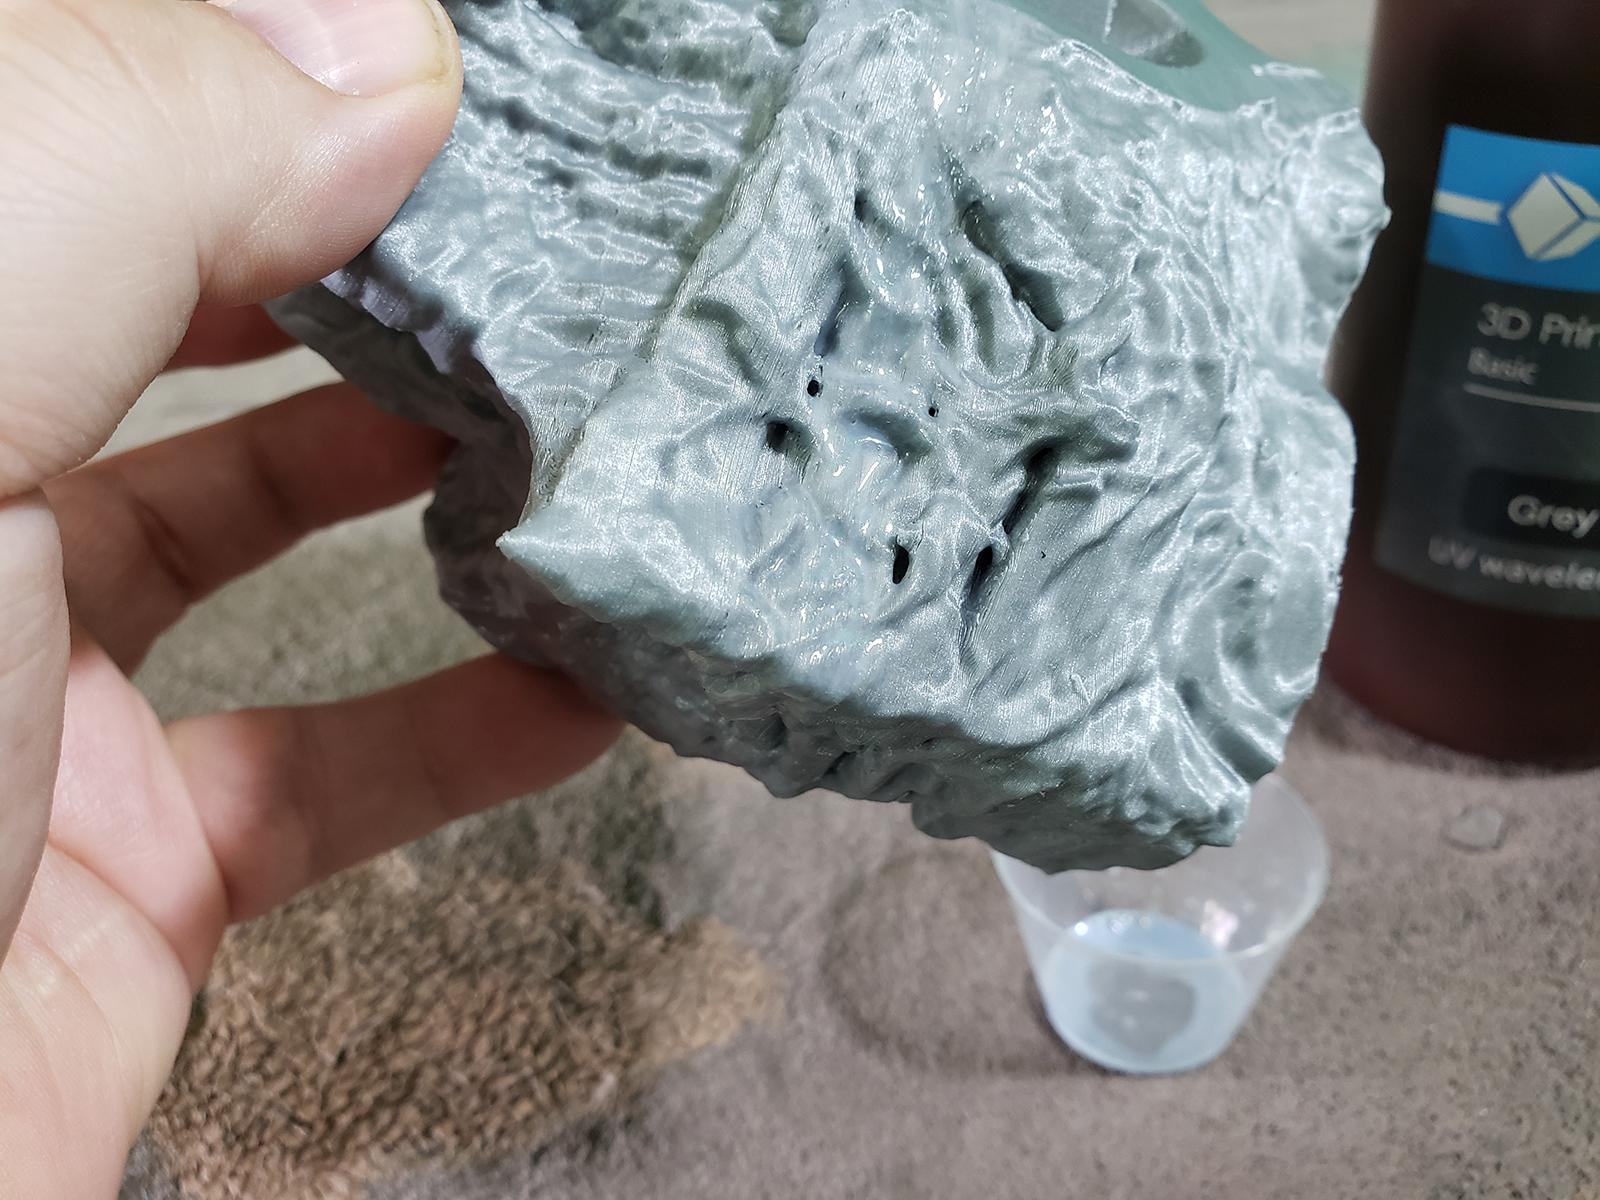
Here's how it looked after repairing:
Spoiler:
I think it worked OK - patched in those stitching lines without being so deep as to remove detail.I won't know for sure until I prime it, but if I prime it and it looks screwy, I'll just reprint it and reblend the head and torso /shrug. I think it will be fine though.
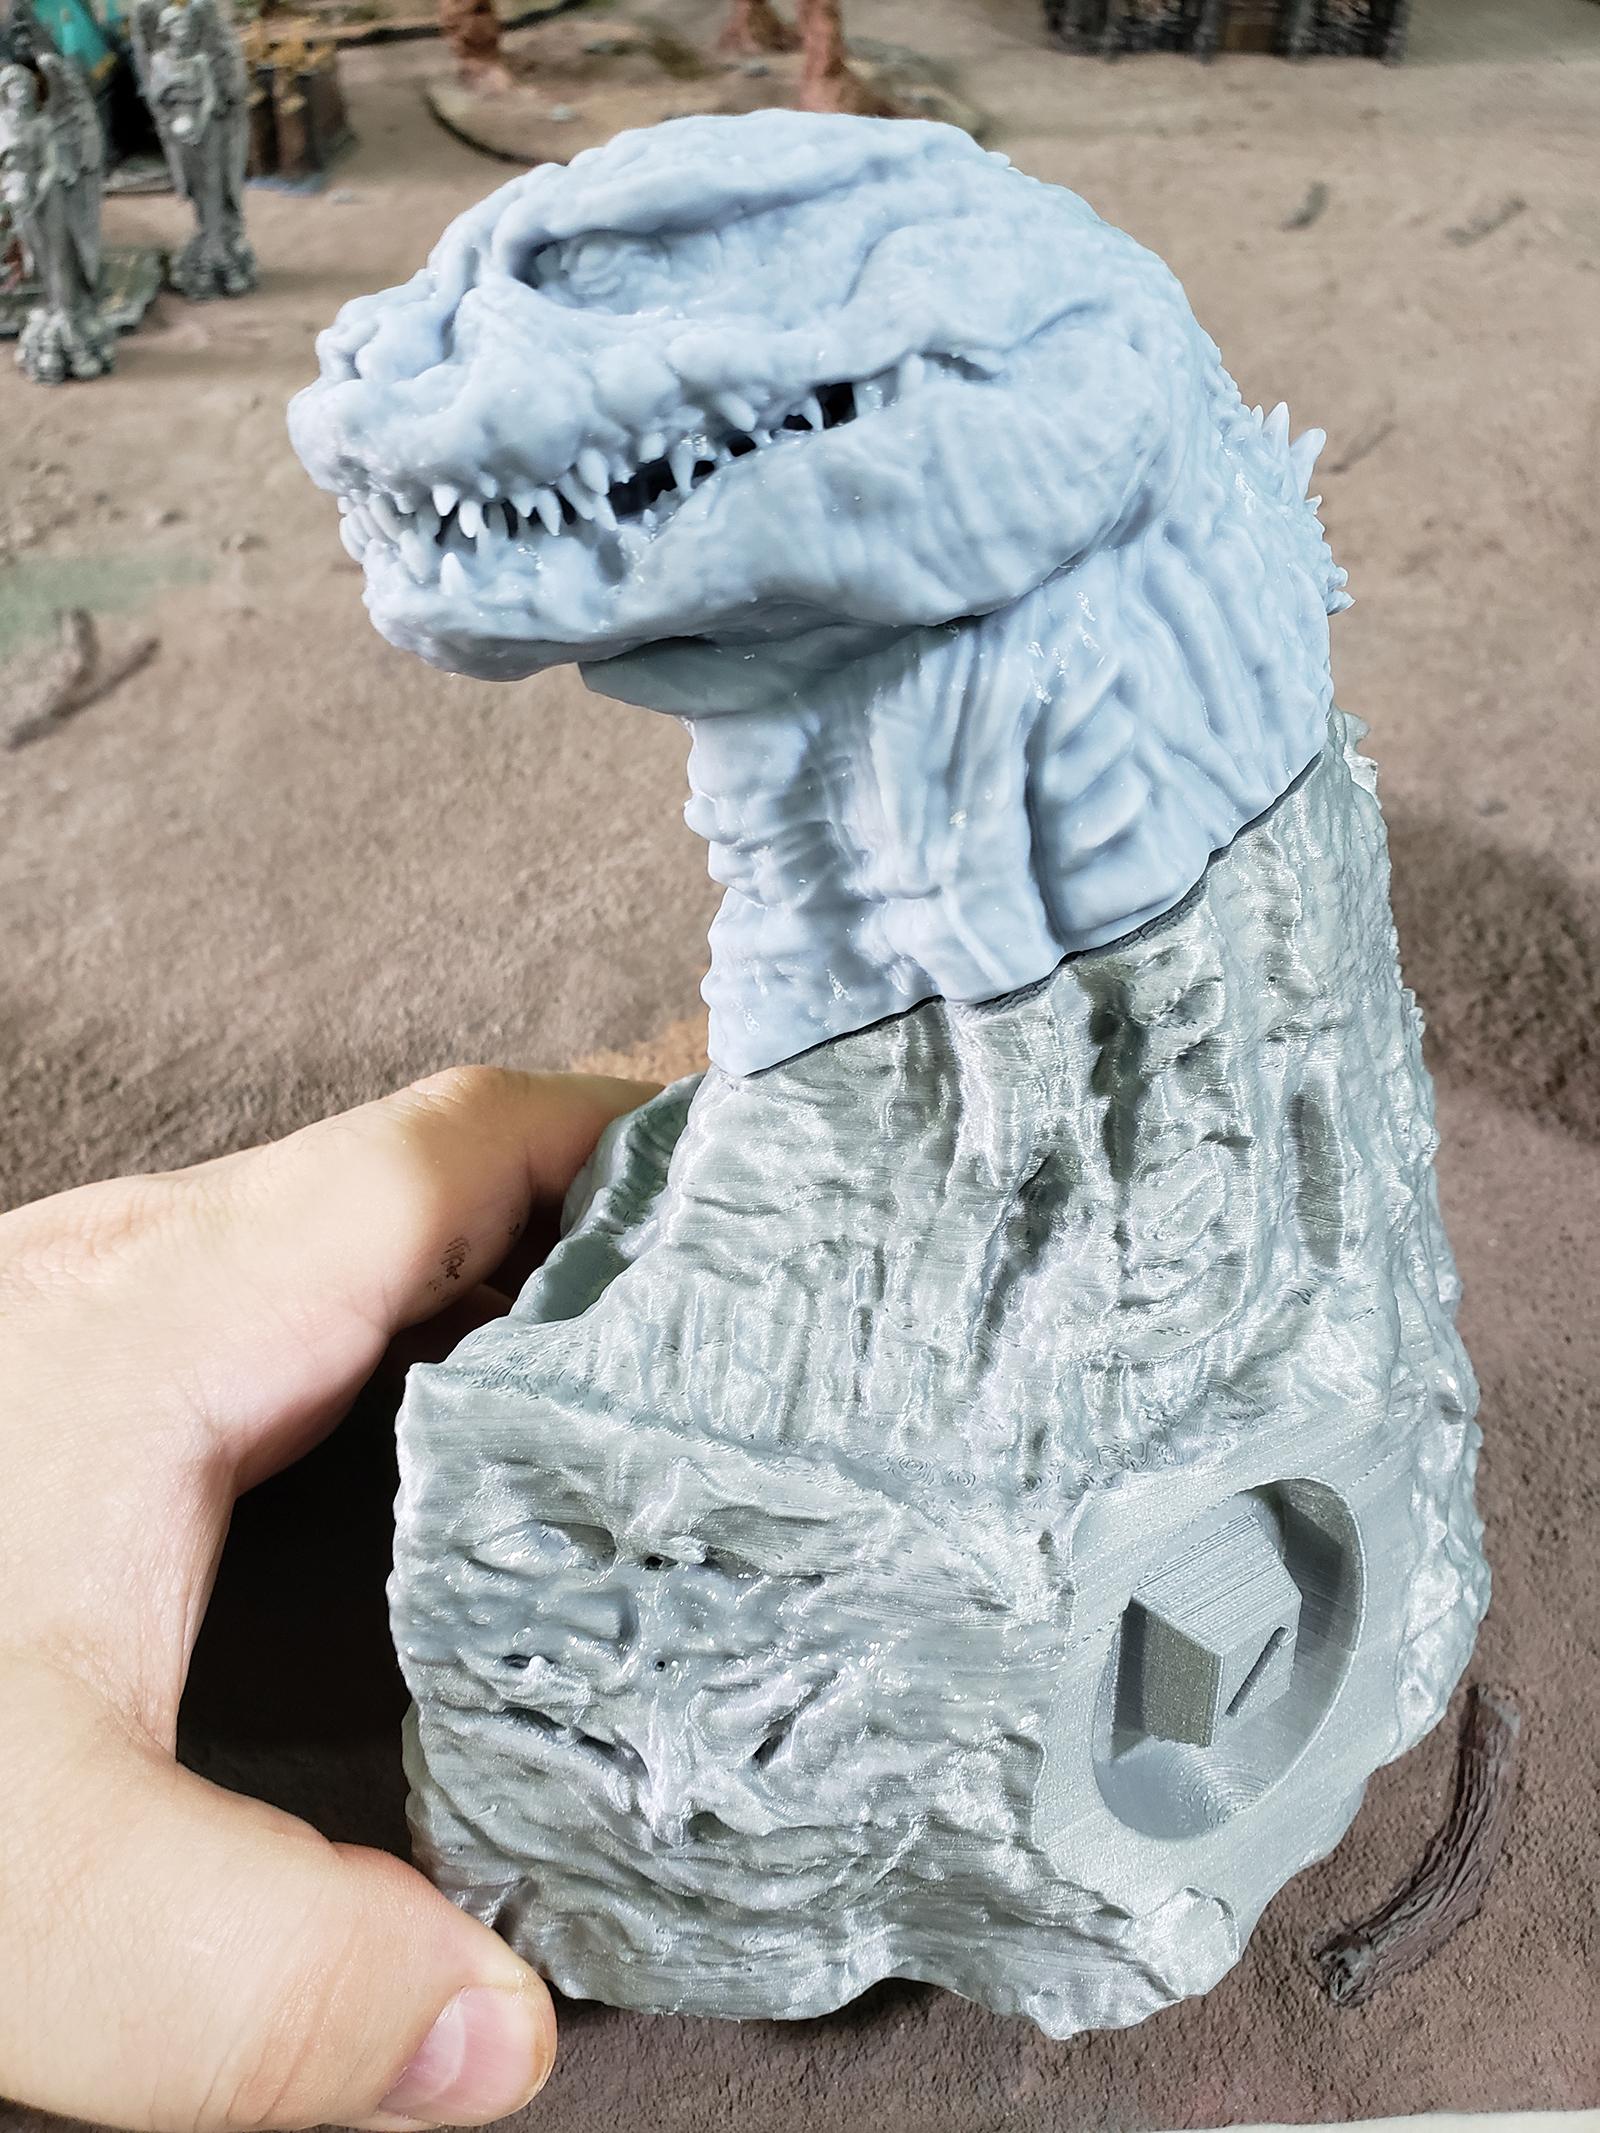
Here is the head fitting:
Spoiler:
Printing the head on the DLP printer gives much better detail but it does have some real drawbacks - the resin shrinks a little. In gakky resin it shrinks as much as 5% but in good resin it should be more like 1%, but it's impossible to know exactly how much until you print because I think ambient temp affects it too. I printed the head at 101% to adjust for shrink, but it's not going to be a perfect ft like the other FDM to FDM parts are. For the great teeth detail, totally worth it though.
Now we're up to the least fun part of these projects: blending in the gaps with greenstuff. For really thin, tight gaps, like 1-2mm, I just paint in some resin and blast it with the UV flashlight as above, but these gaps are much to wide - one side must be 6 or 7mm at least. Also, I need to sculpt some detail, anyway - so, tedious hours of greenstuffing.
Spoiler:
I got the neck seam done so far - it took about an hour while I was in the zone with my sculpting tools, jamming out to the soothing sounds of my dog losing her gak to fireworks.
Anyway, here is the picture you probably REALLY wanted to see:
Spoiler:
Just gotta print the hands (which is really fast, few hours tops) then the spines, which I am printing in blocks of 10, 10, 10, and then 20 out of a total 50 spine plates - roughly 15-20 hours per block. So, few more days. That gives me time to finish blending all those seams
Automatically Appended Next Post:
Ouze wrote: This one was intermittent - it manifested itself in a few strips and either unclogged or worked itself out, i assumed. It didn't - we'll get to that later.
I forgot about that. So, here is what happened later - I printed the first block of spines, number 1-10 of 50. They came out as foamy sponges - the clog came back with a vengeance. This was a 5 hour print so shrug, whatever.
There are a few ways to clear a nozzle clog. The leading way is to heat the nozzle to printing temp, and then ream it out with a acupuncture needle and then run some filament. Another option is to cut it before the extruder and yank the filament backwards, and that should pull the clog with it, or so some guy on facebook said. That sounds like a great way to break filament off in some super hard to read place to me but who knows, I never tried it.
What I do is - remove the nozzle and throw it out, and replace it with a new nozzle. If you get them from China they are like 40 cents and dude I do not have time in my life to be screwing around trying to get all this figured out. I've had this printer about 10 months and I'm on my 3rd nozzle and that is a rate of attrition I am very comfortable with.
The downside of swapping out the nozzle is that the bed needs to be releveled. This is a giant PITA for me. The DLP printer takes about 30 seconds to level and keeps its level forever, but this printer seems to slowly lose it's level as I remove parts over time - I had already been planning to relevel it anyway but now I had no choice. To relevel the printer, you out a piece of paper on the bed, bring the bed to temp, set the nozzle to home, and then unlock all the motors. I use calipers to make sure each side is the same height (feeding filament in sometimes screws up the right side one), and then you adjust 4 little wheels on each corner of the bed to raise or lower the spring tension on the bed. If you get it right, the paper should slide under the nozzle with just the right amount of resistance.
Once that is done, I print calibration cubes - a square in each corner and one in the center, one layer high - takes about 8 minutes. From the square quality you know how good your level is - if they are translucent the nozzle is too close, if the squares are stringy, the nozzle is too far.
In practice, it's super tedious - adjust the wheels, print the squares, probably burn your fingers a few times, over and over for at least an hour or so, all in a room that is at least 90 degrees because I keep the AC vent closed up there (ABS prints require a warm environment or they warp). It is the very worst.
There is this mod you can install, a bltouch probe, that allegedly can be used to auto-level the bed, but my printer doesn't easily support it - so it would take a lot of weird hackery I don't super understand. Besides, now that it's level, it should be good for at least 3 or 4 months now - just long enough for me to forget what the correct tension feels like on that paper
This message was edited 3 times. Last update was at 2019/07/05 06:34:07
lord_blackfang wrote: Respect to the guy who subscribed just to post a massive ASCII dong in the chat and immediately get banned.
Flinty wrote: The benefit of slate is that its.actually a.rock with rock like properties. The downside is that it's a rock
2019/07/05 15:56:46
Subject: Re:Ah hell, here we go again - another 3D printed Godzlla model
Godzilla has hips to birth a cargo ship , and not a small one either .
Really awesome. I started looking at the creality printer online last night because I saw a sale.....I must stay away from this thread so I don’t buy one.
LOL, Theo your mind is an amazing place, never change.-camkierhi 9/19/13
I cant believe theo is right.. damn. -comradepanda 9/26/13
None of the strange ideas we had about you involved your sexual orientation..........-Monkeytroll 12/10/13
I'd put you on ignore for that comment, if I could...Alpharius 2/11/14
2019/07/11 03:38:06
Subject: Re:Ah hell, here we go again - another 3D printed Godzlla model
So, the building part of this project is complete. Here are the last steps.
I now have built 3 Godzilla models. Each has taken a different approach to the dorsal plates: The Hybrid Godzilla simply had plates permanently attached to the back and tail. This made assembly simple, but it was very, very hard to separate the supports from the model without accidentally damaging the plates - and it was hard to paint the plates. The Heisei went a different way - the supports were all separated and the slots for the plates individually keyed. This made for simple, error free printing and assembly - and you had the option to paint the plates separately if you wanted. The downside here is that the actual editing of each plate was probably a nightmare for the model developer.
The Shin Godzilla went a different way. The plates are all separate and socketed, but not keyed. This gives you the print and paint advantages but not the individual keying hassles. The problem with this one is that neither the sockets not the plates are really labelled in a physical way - it's possible for the wrong socket to kind of sort of mate up to the wrong plate. What I wound up doing (after suggesting to the devs that they physically number the plates which should be pretty fast) was just opening the plates in cura, looking at them, and jotting down the plate number. Then I watched the YouTube assembly video they put out and labelled the sockets. It was exceedingly tedious.
So, I have two bad choices: I can either glue the plates in now, which allows me to blend the games between the body and the plate. I don't like visible seams. If I do that, access to some plates are restricted and it makes them hard to paint. Or I can not glue the plates in now, prime and paint them, and accept that there might be visible gaps\seams in the finished Godzilla around each plate - I won't be able to blend them in after painting.
I wound up splitting the difference. The plates are in 5 rows across - I glued and blended in rows 1, 3, and 4. I will separately paint and then socket plate rows 2 and 4 after it's all done. This gives decent access for painting them and also mostly hides sight lines to the plates I won't be able to blend.
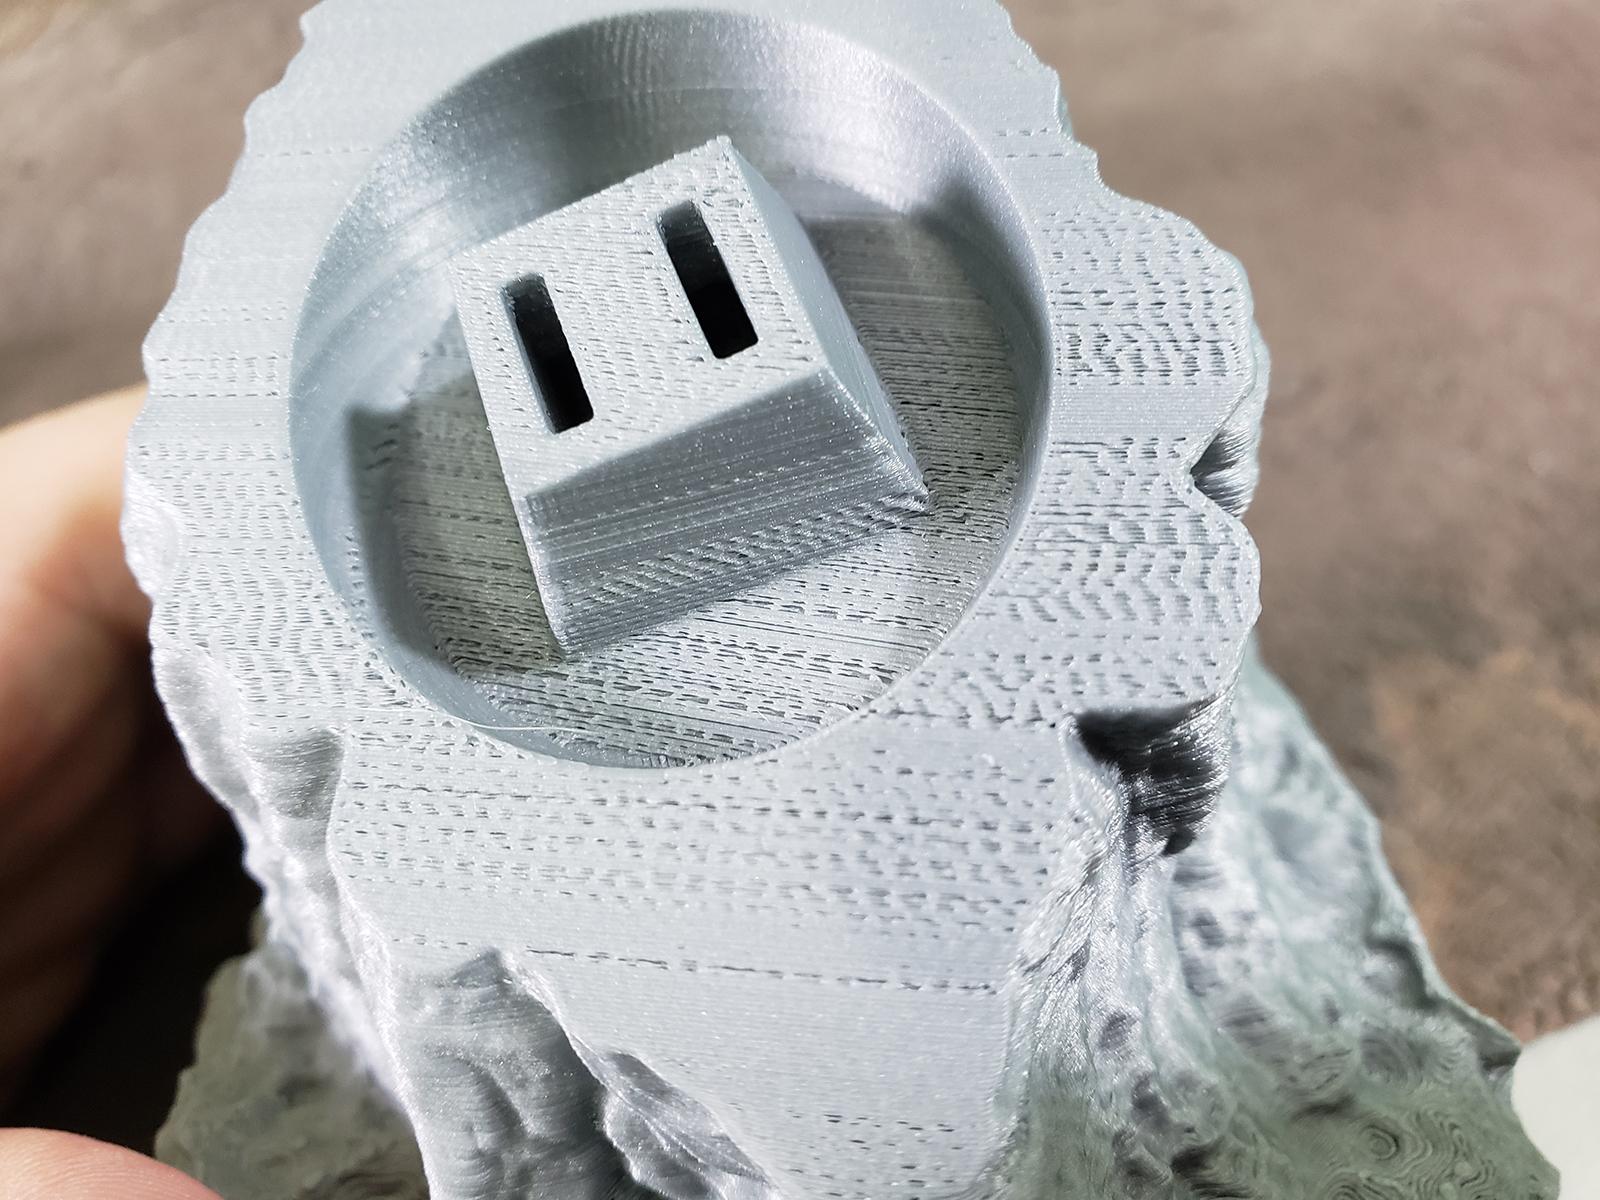
The sockets:
Spoiler:
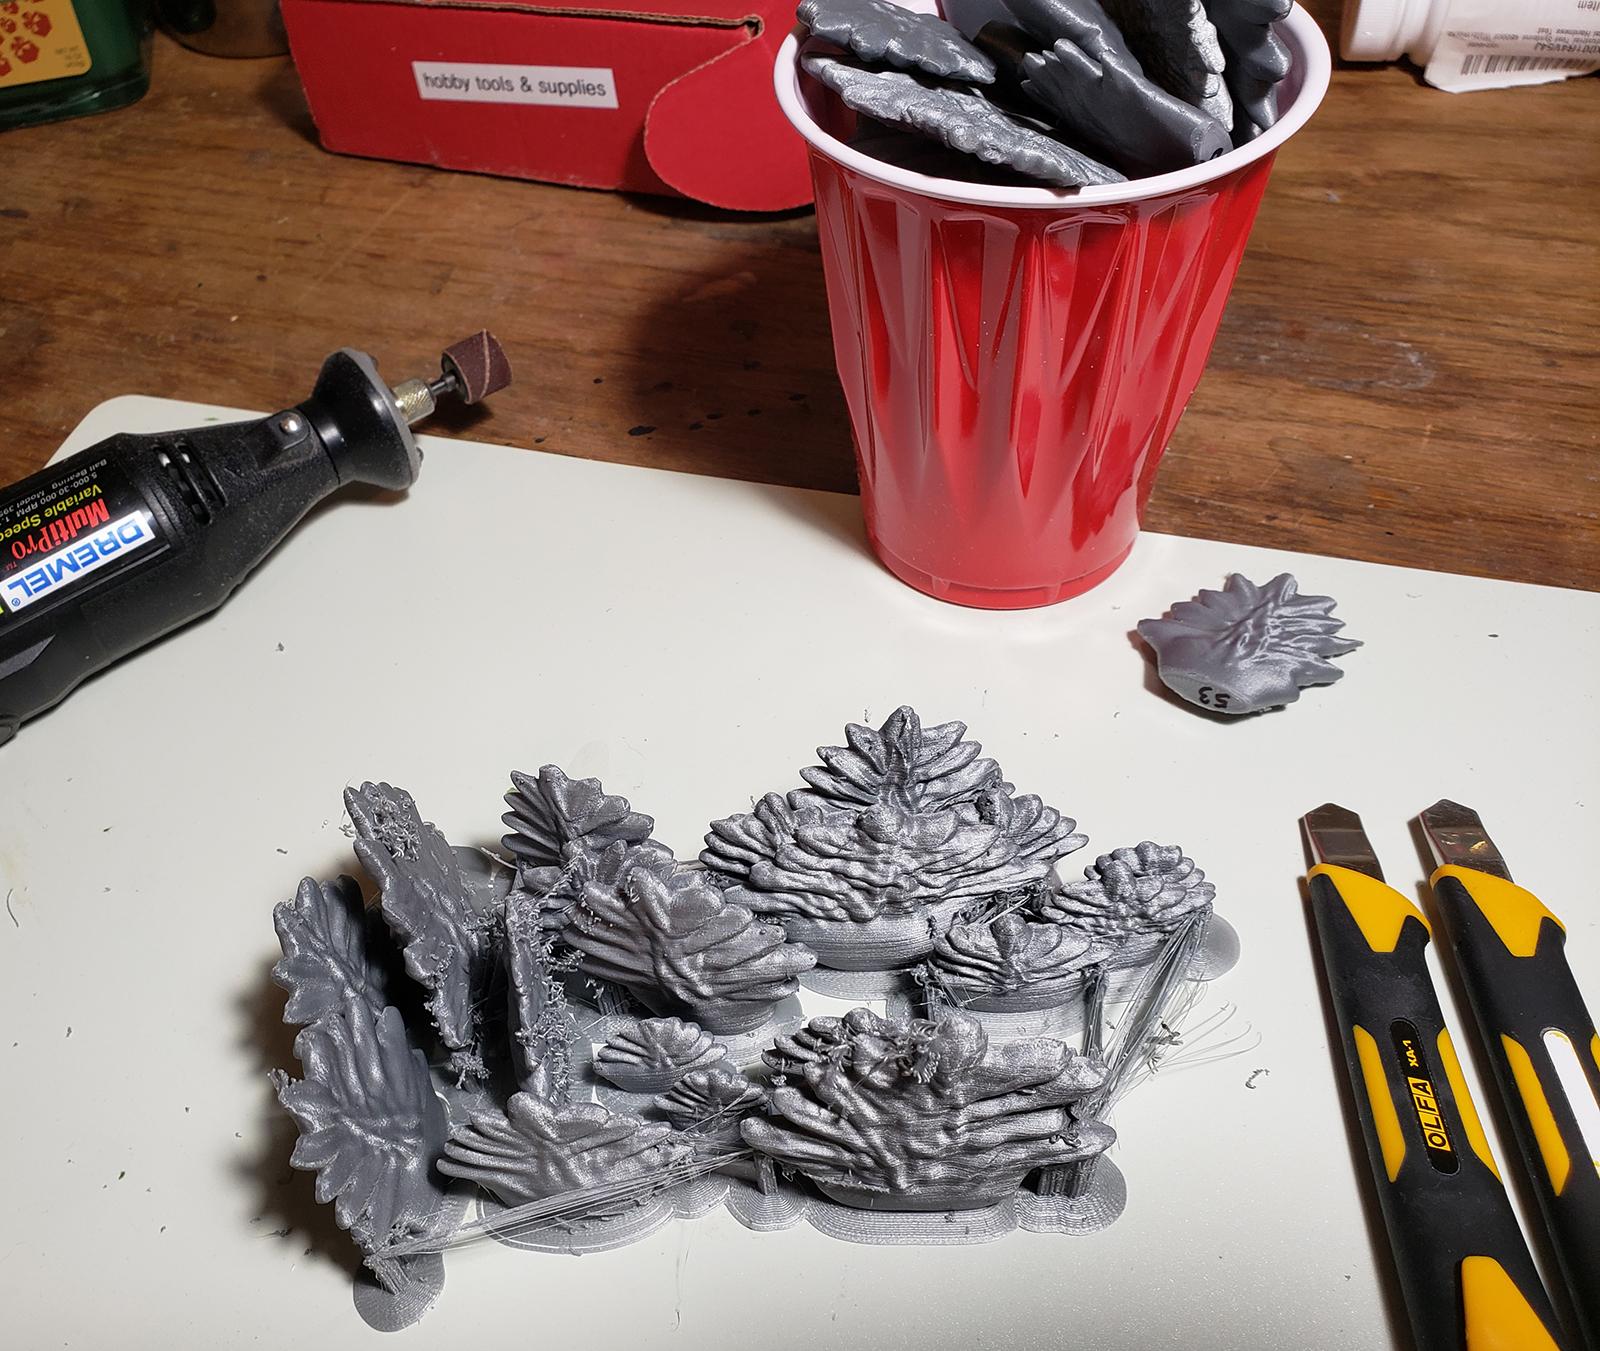
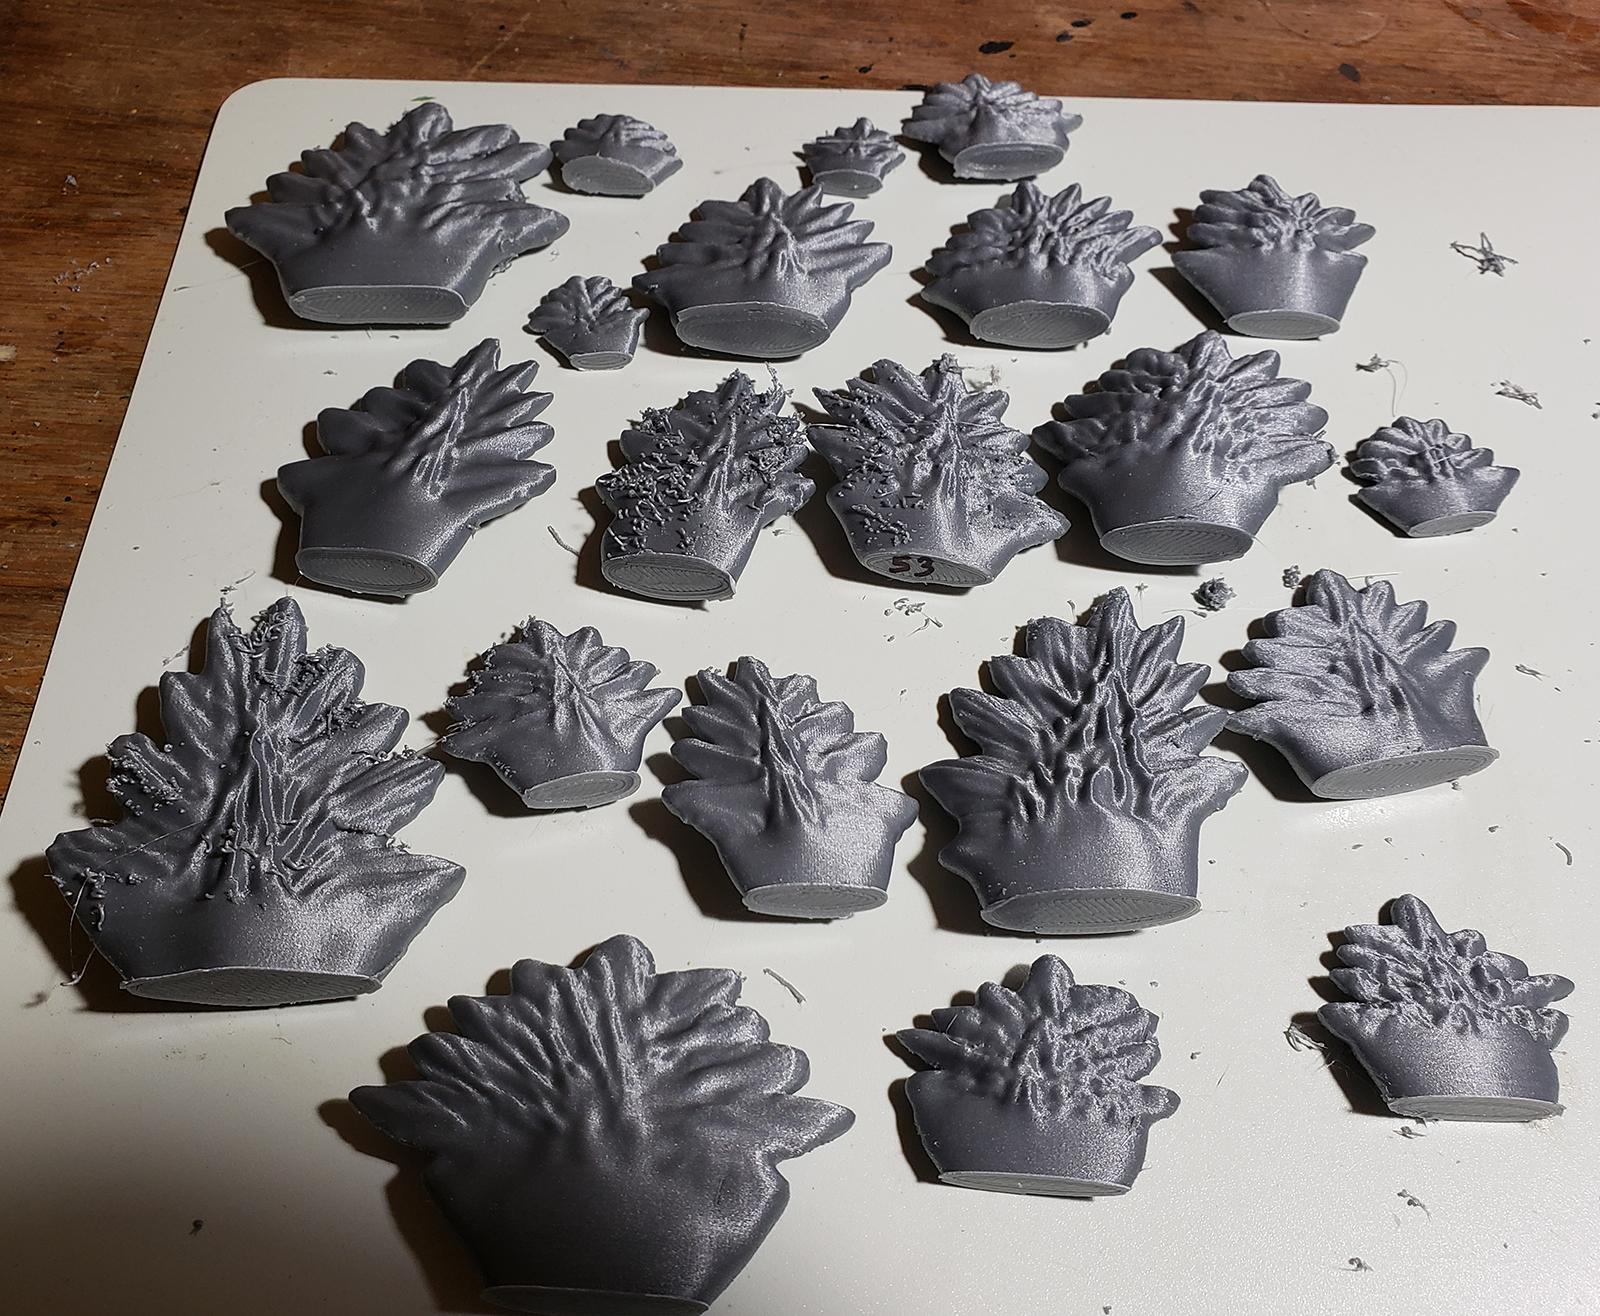
Here are the plates as they come off the printer:
Spoiler:
I could have saved myself a lot of hassle if I had organized them on the plate as they are numbered in the kit. Anyway, I used a dremel tool to grind of the little edge left on the bottom of each plate, it only took a second per plate and the tighter the fit, the better.
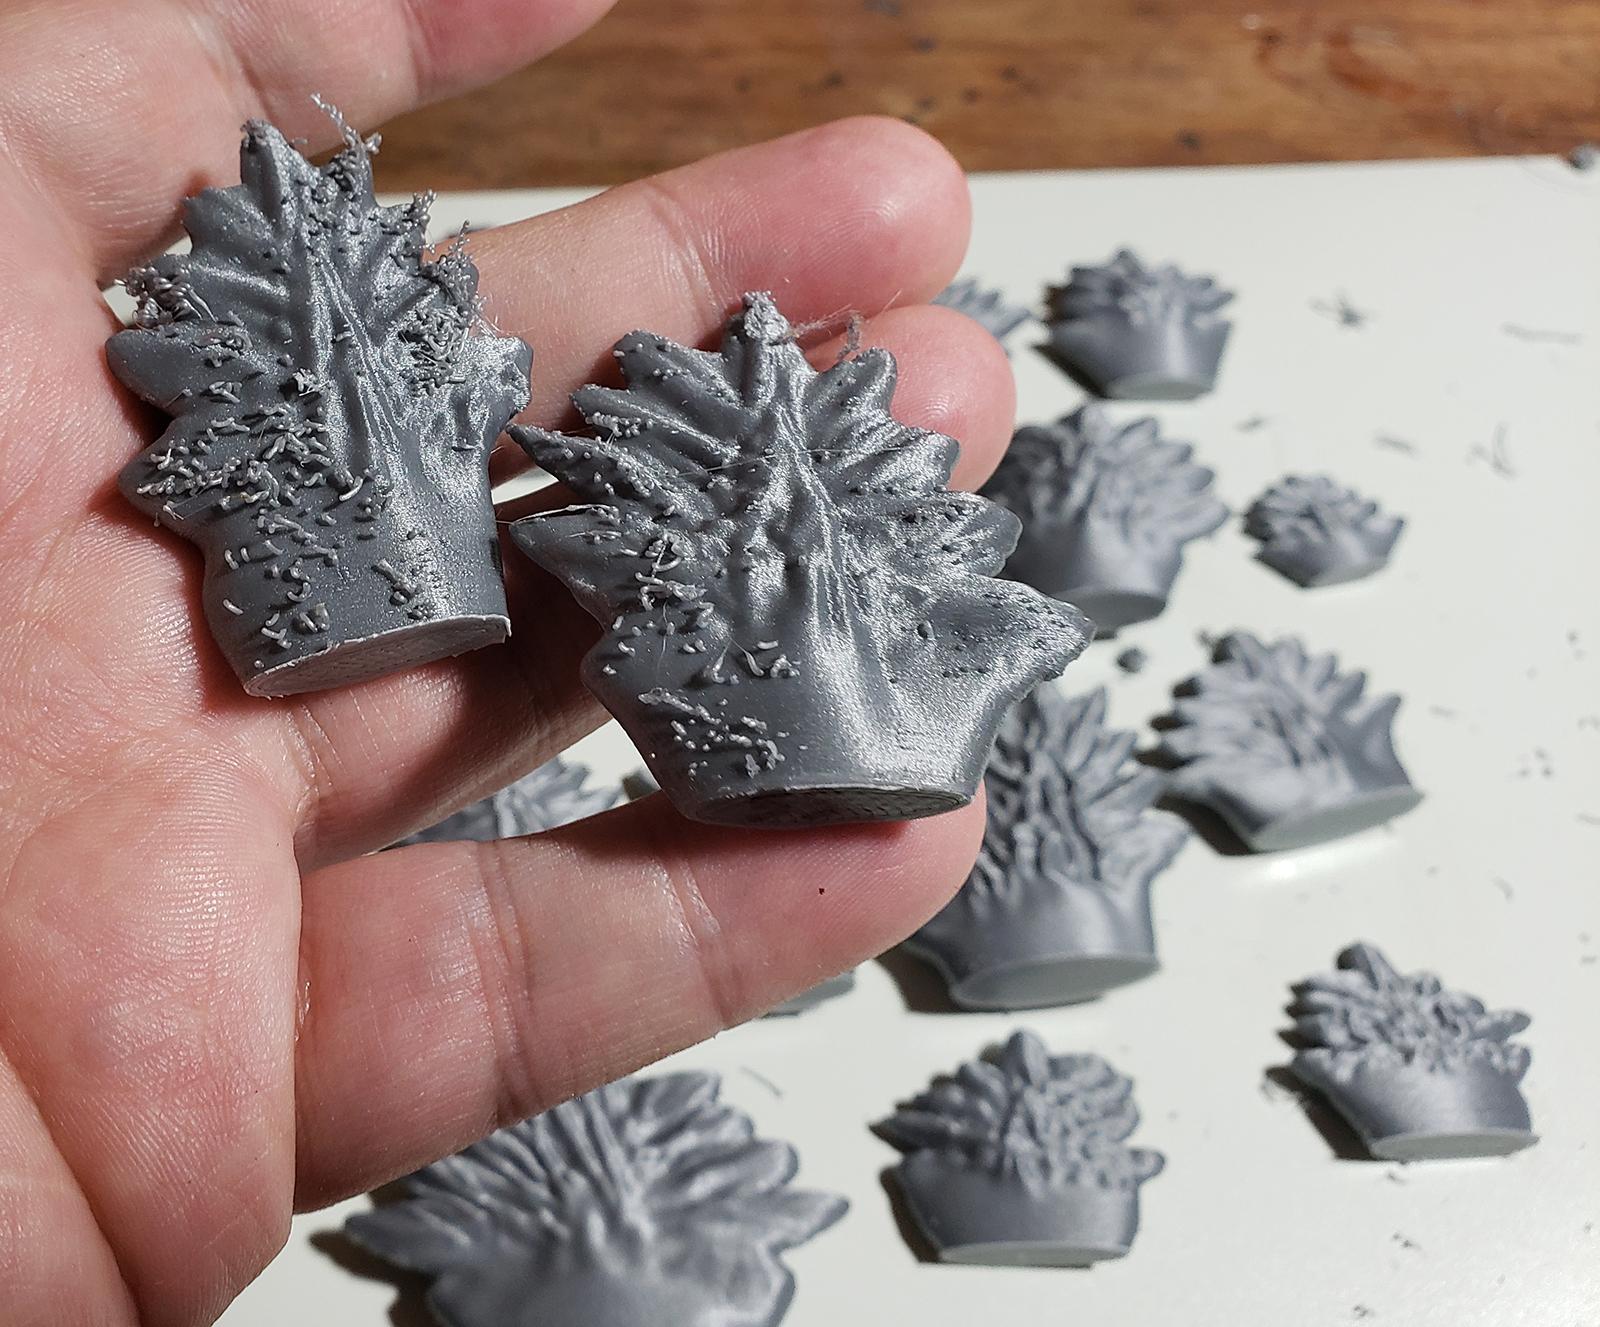
Two of the plates required an ungodly amount of cleanup:
Spoiler:
I am screwing something up with those. My guess is my retract settings are not perfect - essentially, hot plastic is will run from the tip of the nozzle when it's not printing, right? When the nozzle is moving, the more it moves, the longer it has for a blob of plastic to start dribbling out. The slicing software has a setting to retract the plastic when it moves x far to prevent that. I don't think I have the x distance correct. That's not a problem when you print a single large thing, since it's essentially all one continuous string anyway, start to stop. But when you're printing 20 plates at a time, it's moving from part to part a lot, and then moving up a single layer heightwise constantly - so if you don't have your retract settings right you get a lot of those little blobs. They're easy to remove, but tedious - they just flick off with the side of a hobby knife. I think I could have avoided this by putting the parts further apart from each other - when they are very close it's not traveling close enough to force a retract.
Maybe. I'm not 100% sure. Anyway, only 2 out of 20 required much cleanup.
Here they are cleaned up along with a test run of the hands:
Spoiler:
I am particularly worried about the hands since they seem like an easily broken part - they are thin and resin can be brittle. My typical go-to is Anycubic Grey resin, which is relatively strong, but it's not quite right for this job. I did a test with E-sun Bio-resin, which is some allegedly biodegradable resin. It's very, very tough, but it only comes in bright yellow and hazard orange - so it doesn't photograph well.
Right after I printed these yellow hands, some dude in my 3d printing facebook group mentioned you can roll your own tough resin. There is a company called Siraya which makes special purpose resins - for example, Siraya Blu is crazy tough, some guy 3D printed a functional one piece suppressor for a firearm with one (he has a SOT license). Turns out, if you mix whatever resin you like in a 2:3 ratio with this new resin, Siraya Tenacious, you get very tough resin but in the color you prefer. So, I made some tough grey resin! As you see on the finished product.
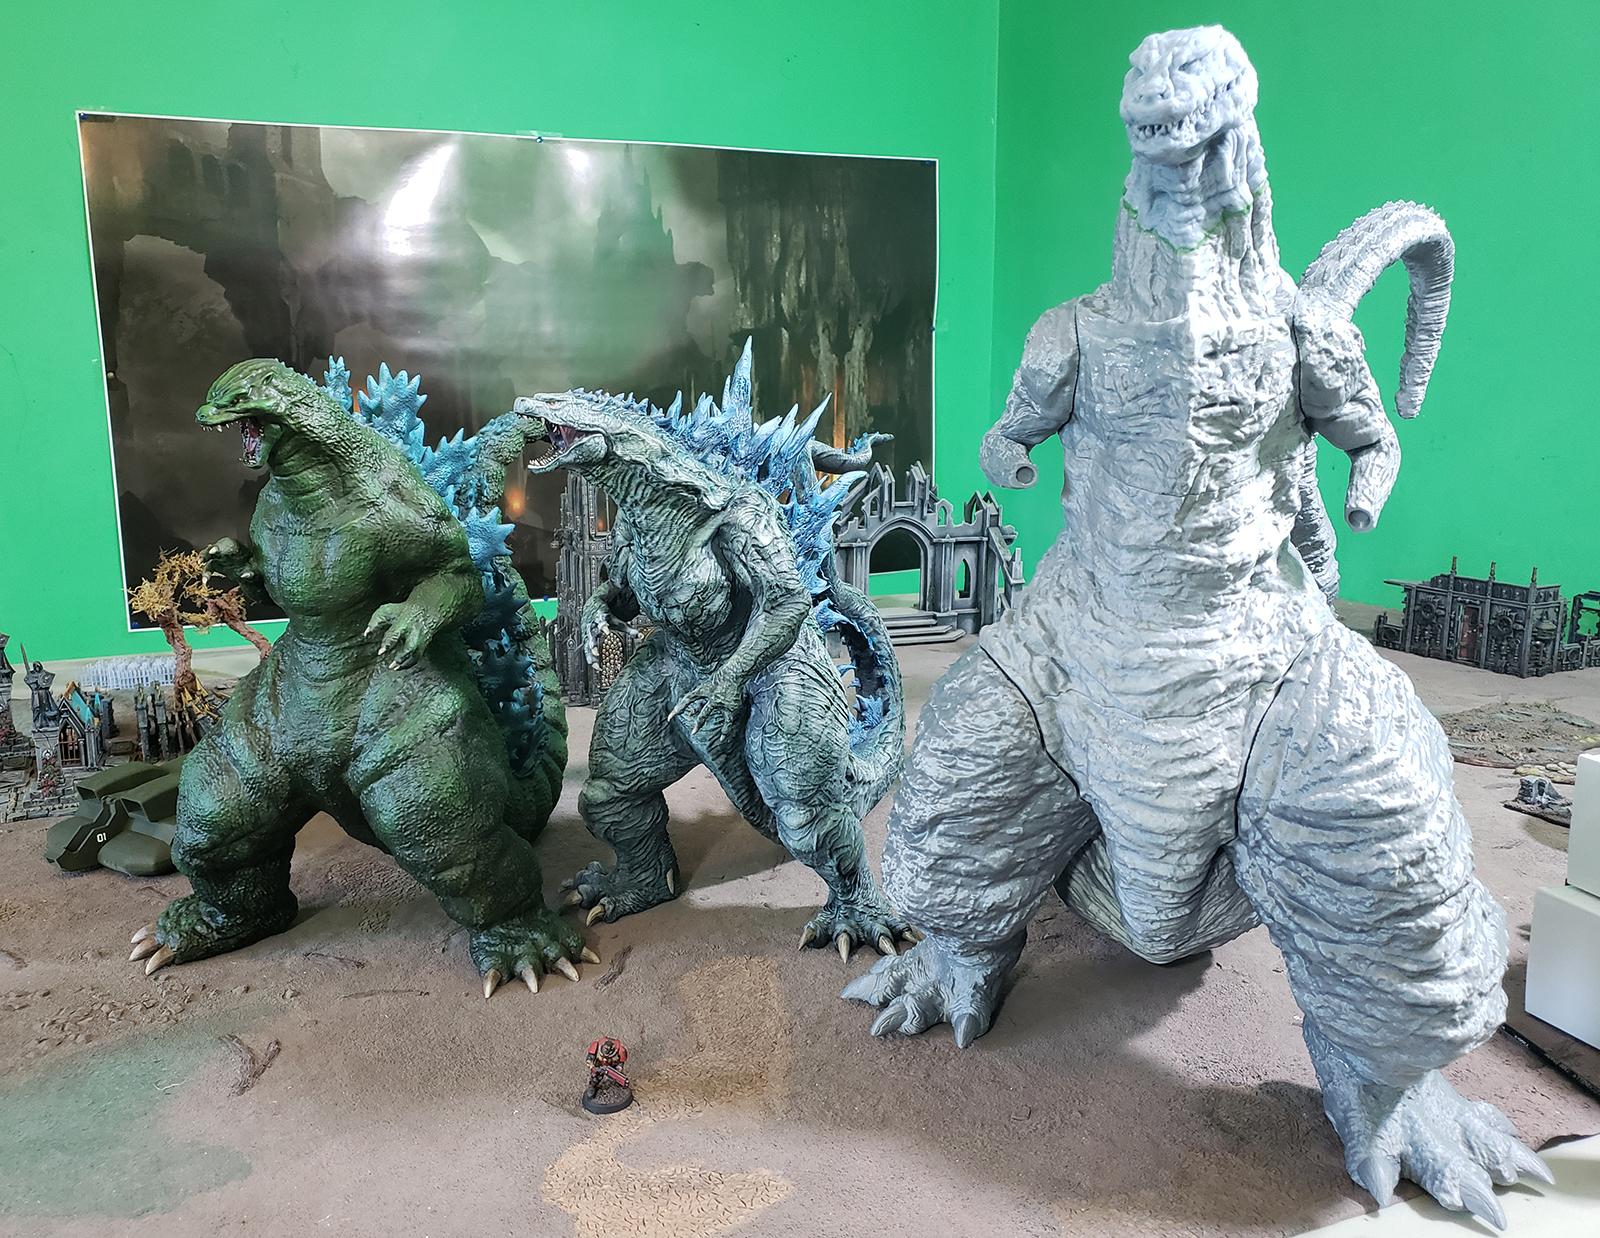
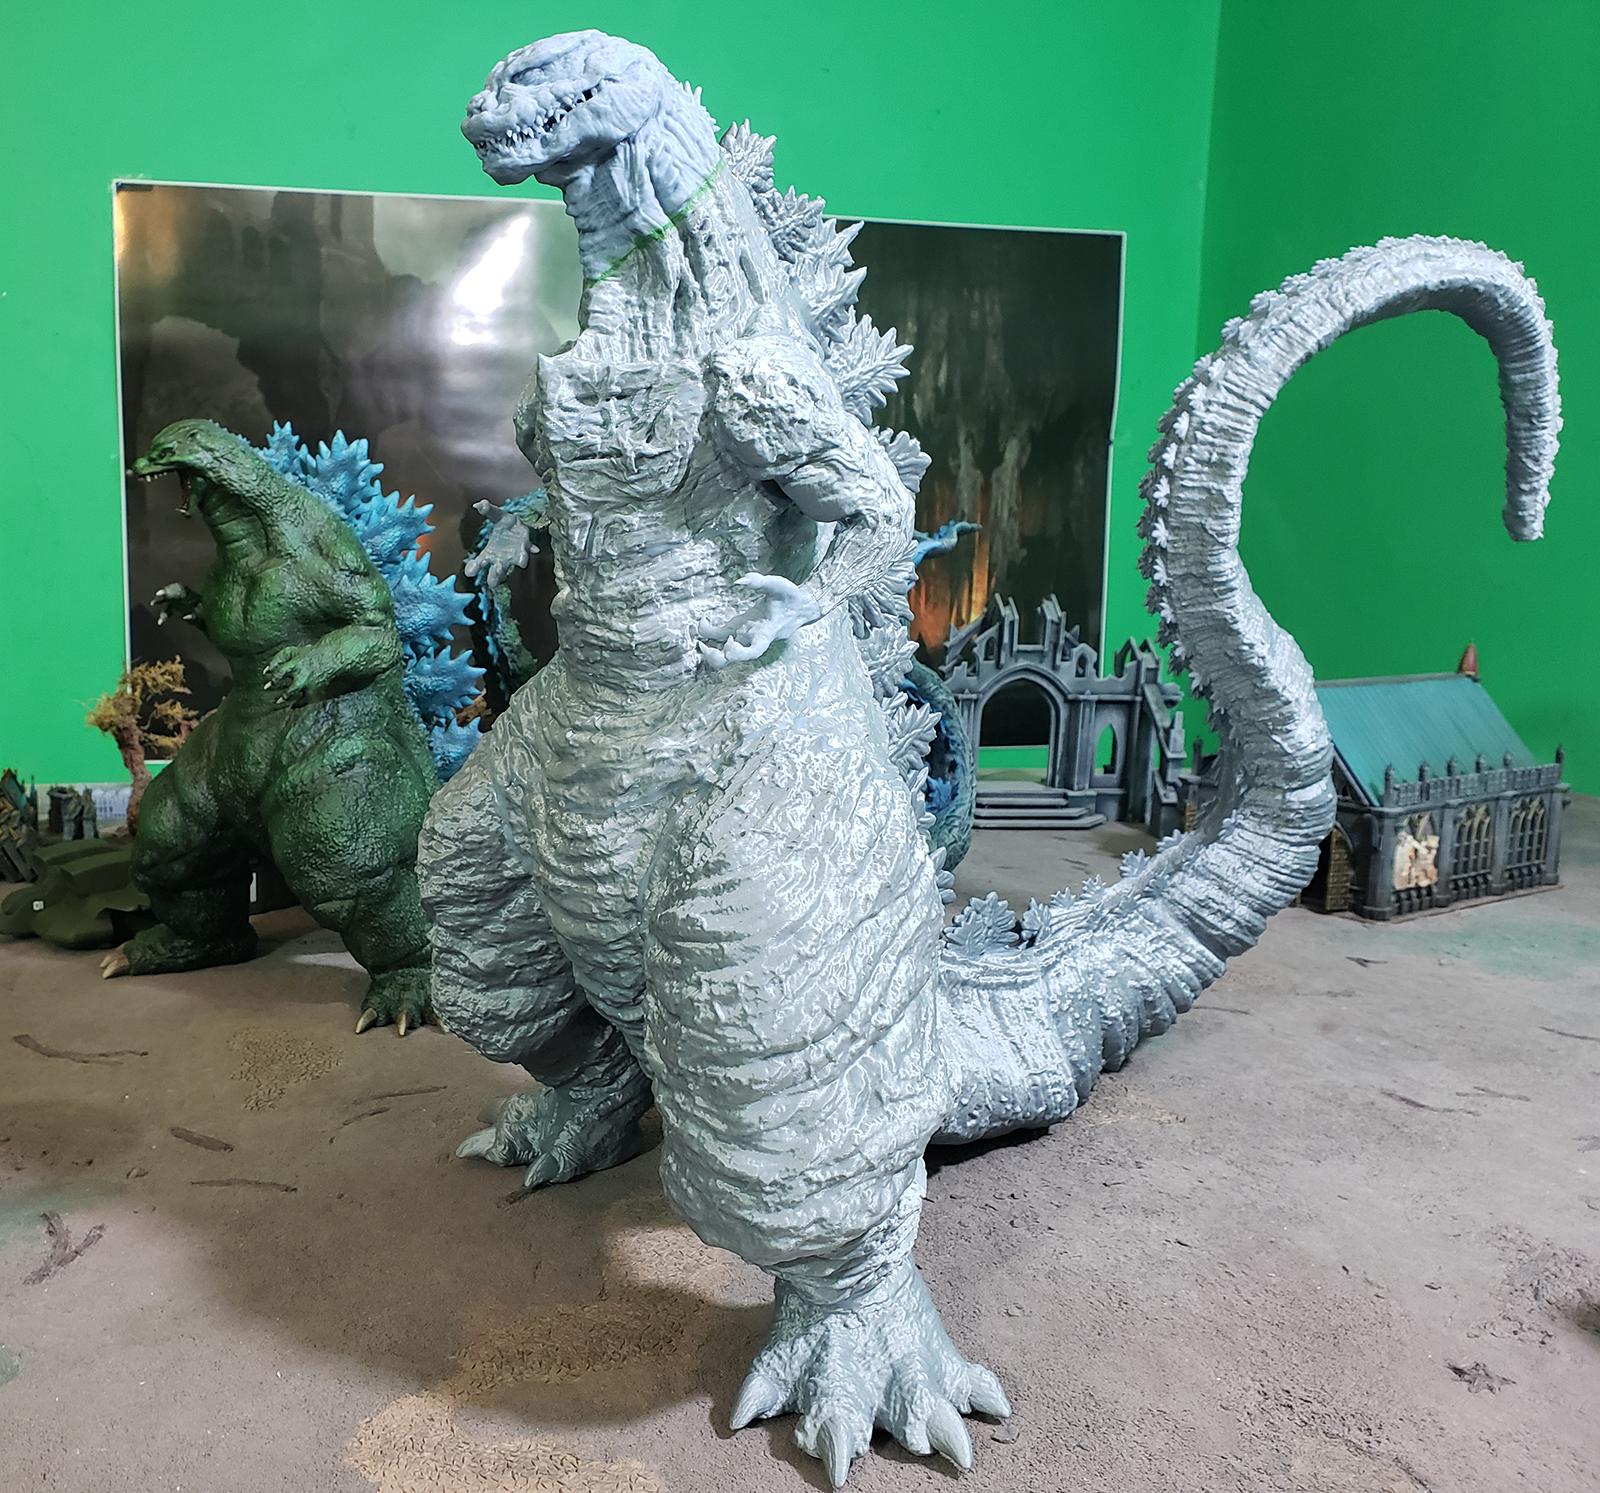
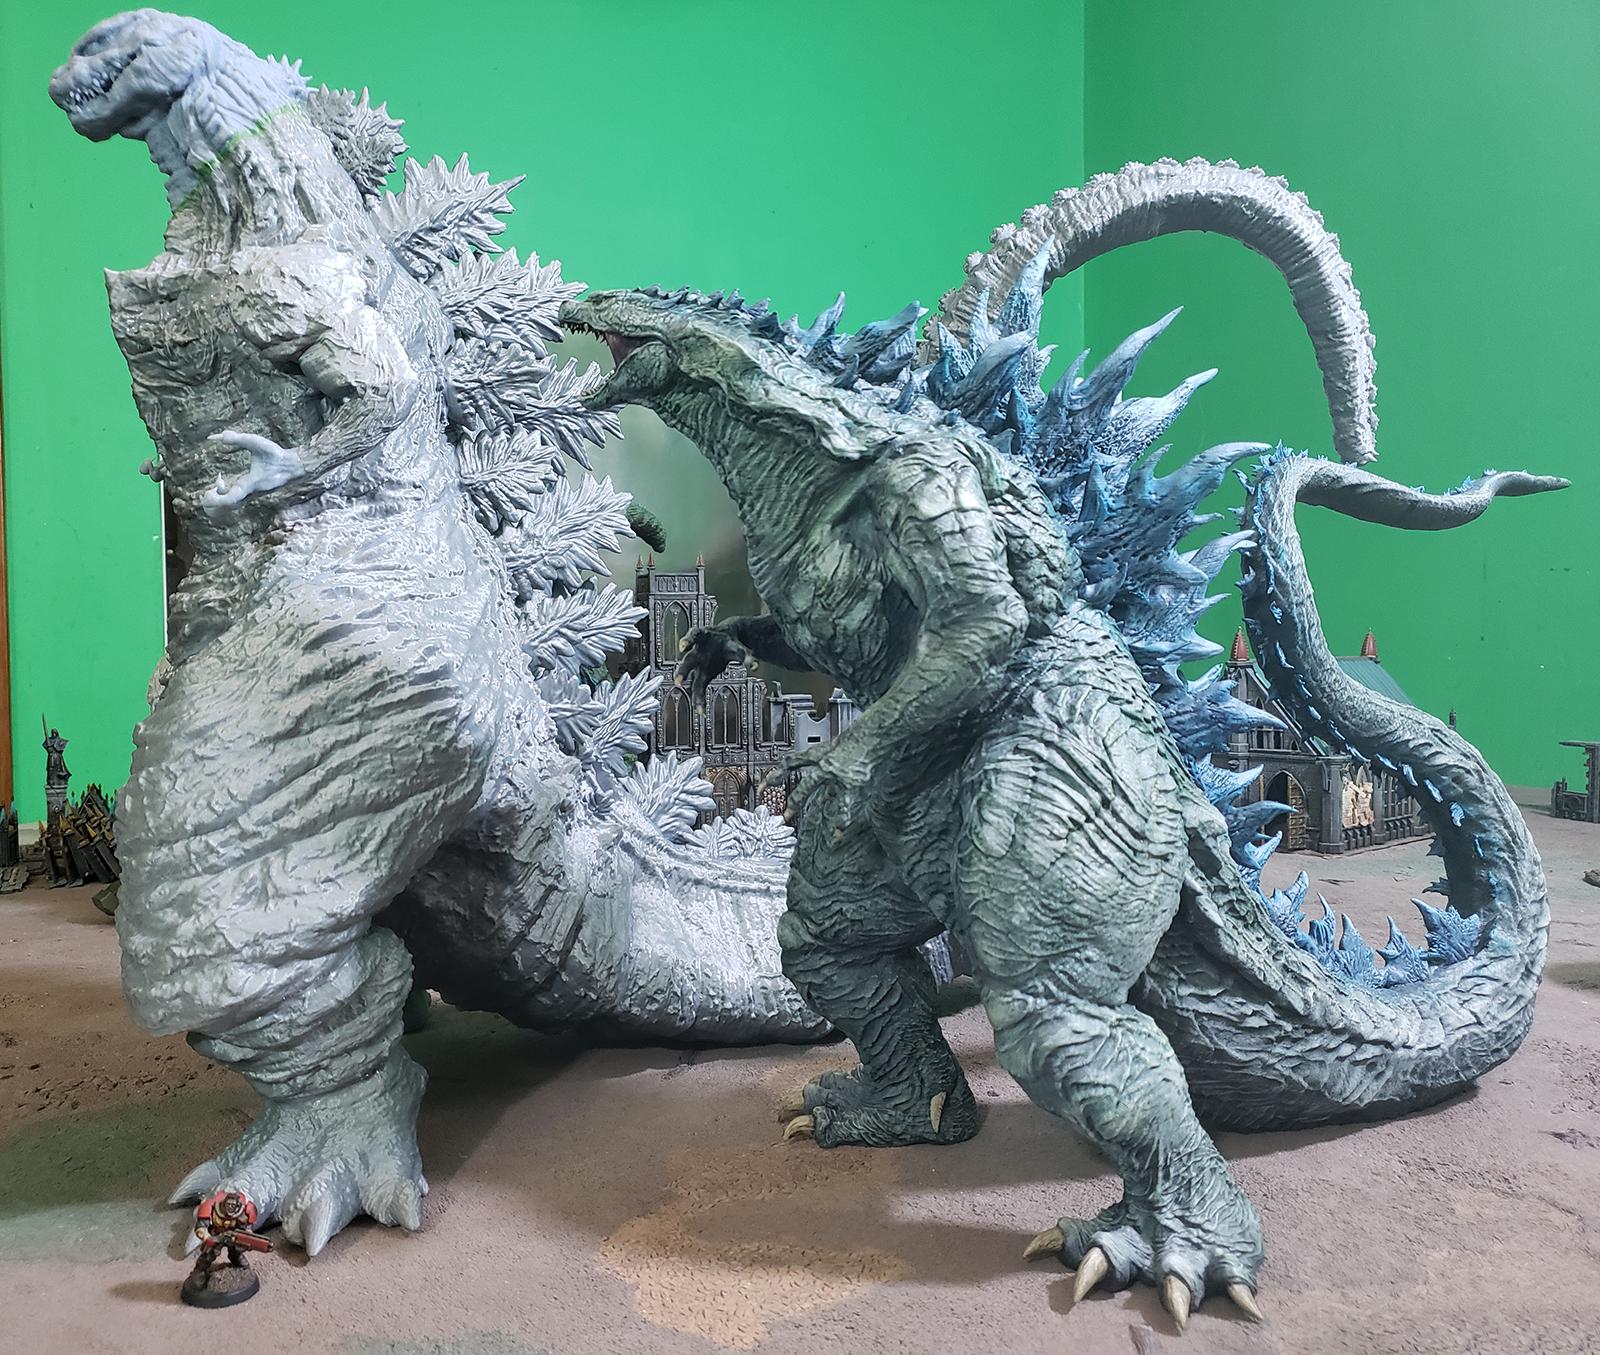
Speaking of finished product, here is this t a l l boi as he stands now:
Spoiler:
At this point, he is ready for painting.
As suggested in this thread, I am going to do a test paint job first. I happen to have this handy godzilla head I had earlier printed out as an FDM test a year ago:
Spoiler:
What a hideous print. This was one of the first things I printed in FDM, and I knew immediately that I could never print the heads on this printer - the teeth are never going to look good. I also clearly screwed up the layer height since it has some extreme striation... great for a test bed though!
I primed it with Rustoleum high-fill filler primer from Autozone. I'm gonna let this sit for a day, then lay down a dark red undercoat, then a drybrush of light brown, then a lighter drybrush of dark grey. I am probably only going to do this on the neck because that most accurately represents the skin on the Shin Godzilla - it is much more rugose.
I am probably going to try for some kind of glowing purple on the scales.
lord_blackfang wrote: Respect to the guy who subscribed just to post a massive ASCII dong in the chat and immediately get banned.
Flinty wrote: The benefit of slate is that its.actually a.rock with rock like properties. The downside is that it's a rock
2019/07/11 13:13:12
Subject: Re:Ah hell, here we go again - another 3D printed Godzlla model
Ouze wrote: So, the building part of this project is complete.
Sooner than I expected, frankly! Big boi looks really solid, and also helps me appreciate the Shin design more, seeing it static and against some other Zillas. But yea, those hips
There is a company called Siraya which makes special purpose resins - for example, Siraya Blu is crazy tough, some guy 3D printed a functional one piece suppressor for a firearm with one (he has a SOT license). Turns out, if you mix whatever resin you like in a 2:3 ratio with this new resin, Siraya Tenacious, you get very tough resin but in the color you prefer. So, I made some tough grey resin! As you see on the finished product.
That is some cyberpunk gak right there. Also reminded of a certain LDR episode ...
Good luck with the paint!
This message was edited 1 time. Last update was at 2019/07/11 13:13:21
Jun10th-july10th. I consider that a reasonable length of time for creating that . Now you get a week to paint it .
LOL, Theo your mind is an amazing place, never change.-camkierhi 9/19/13
I cant believe theo is right.. damn. -comradepanda 9/26/13
None of the strange ideas we had about you involved your sexual orientation..........-Monkeytroll 12/10/13
I'd put you on ignore for that comment, if I could...Alpharius 2/11/14
2019/07/12 02:02:52
Subject: Re:Ah hell, here we go again - another 3D printed Godzlla model
I'm not sure if I can even commit to having it primed in a week
I did start on that hybrid Godzilla head test paint job today though. Going to go with a deep red undercoat, drybrush of brown, drybrush of grey - see how it works. For the dorsal plates I went with a deep purple undercoat, then a drybrush of... dark grey, I think? then airbrushed bright spots of purple. I'm not 100% sure yet. We'll see how the test looks.
Deep red glowing in the skin cracks of otherwise brown\dark grey skin was the general look for the adult \ final morph of the Shin Godzilla though, so that part I think I am definitely going to aim for.
lord_blackfang wrote: Respect to the guy who subscribed just to post a massive ASCII dong in the chat and immediately get banned.
Flinty wrote: The benefit of slate is that its.actually a.rock with rock like properties. The downside is that it's a rock
2019/07/14 08:10:00
Subject: Re:Ah hell, here we go again - another 3D printed Godzlla model
Snrub wrote: I'd for sure be trying that colour scheme out on a tester mini first! Not the sort of thing you want to bugger up on something of that size. If only for the fact it took you a month to make.
I wasn't planning on doing a test paint job but after you suggested it, I did... and oh boy, am I glad I did. The test paint job came out horrible.
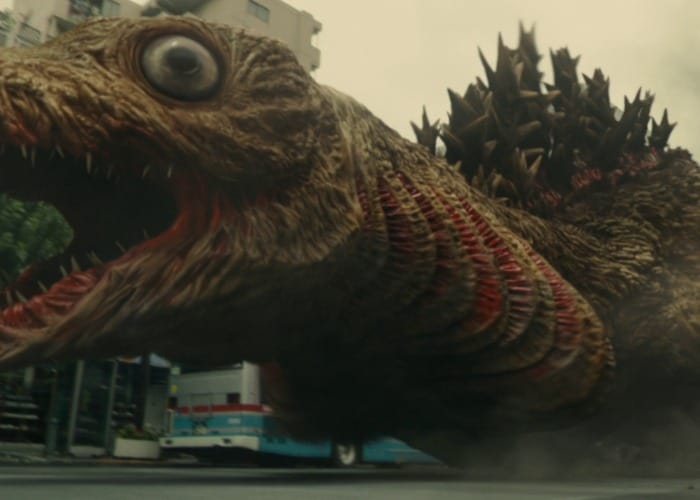
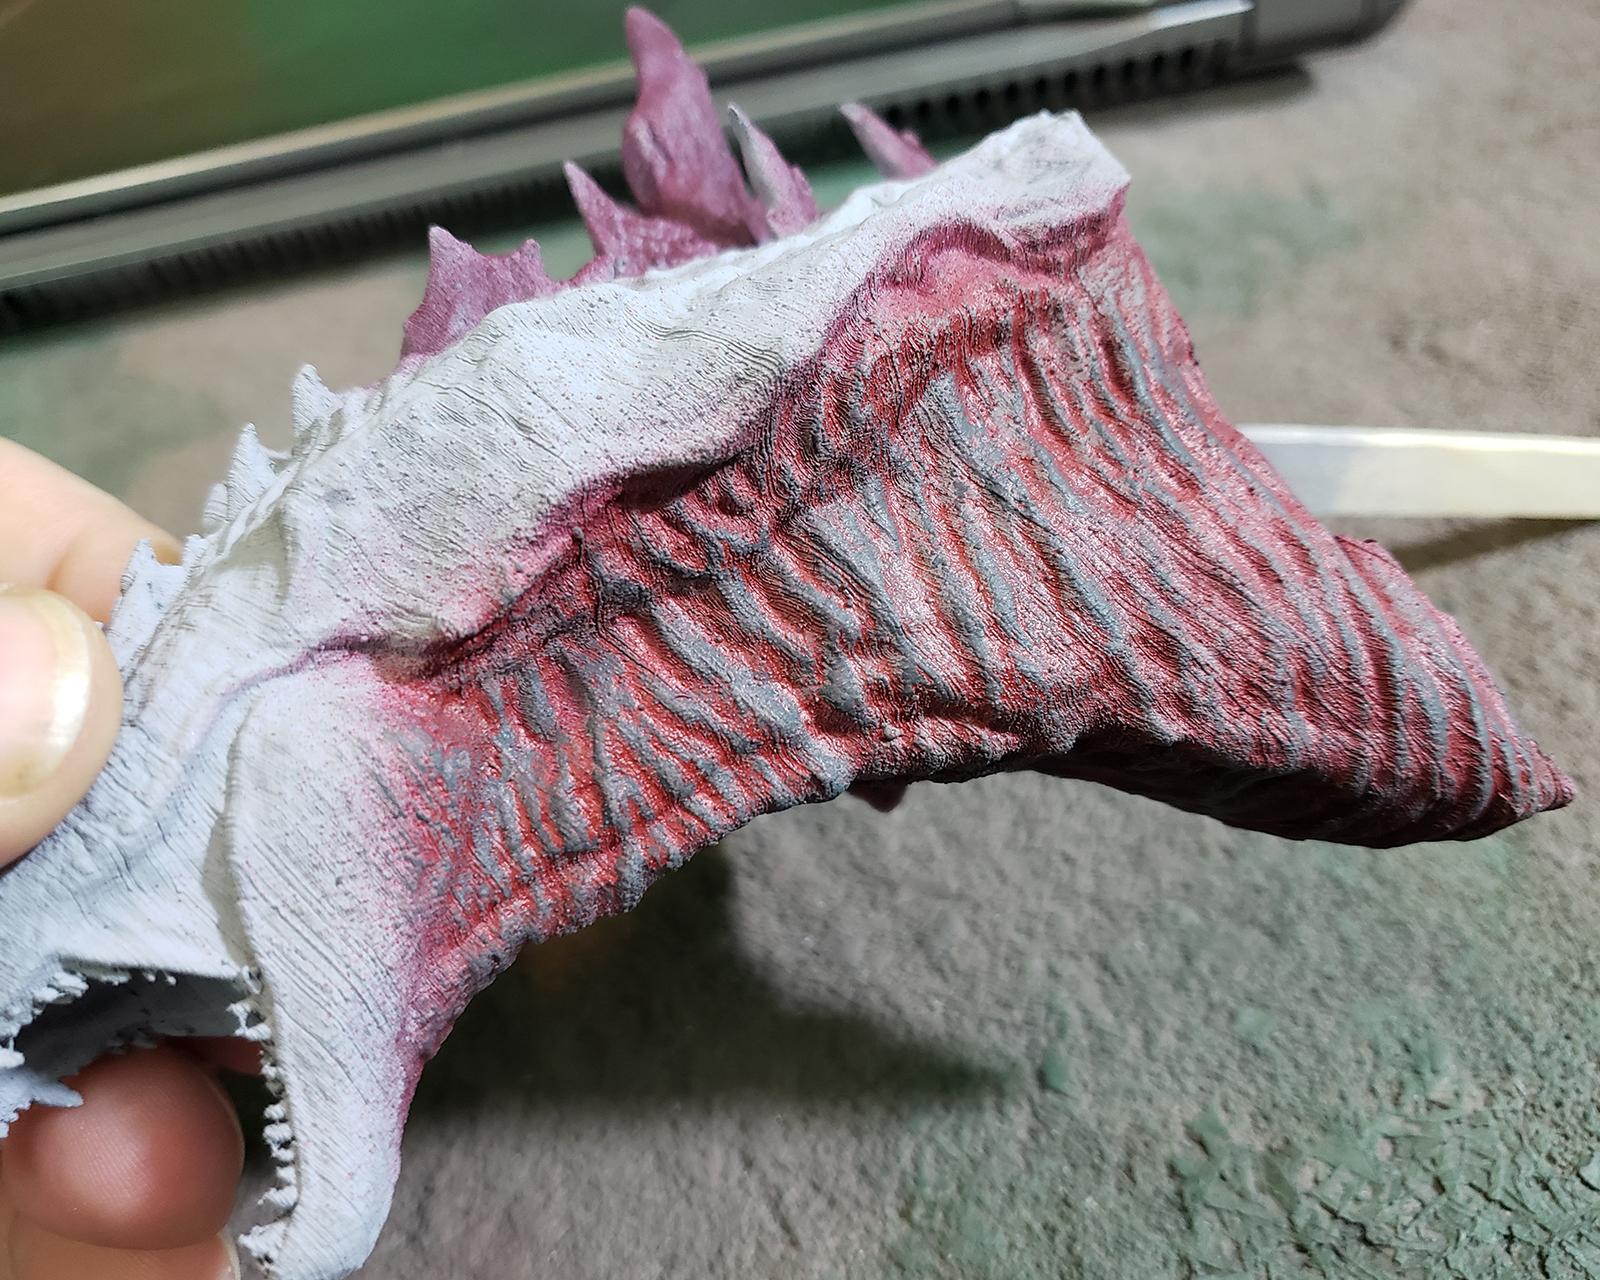
This is what I am going for:
Spoiler:
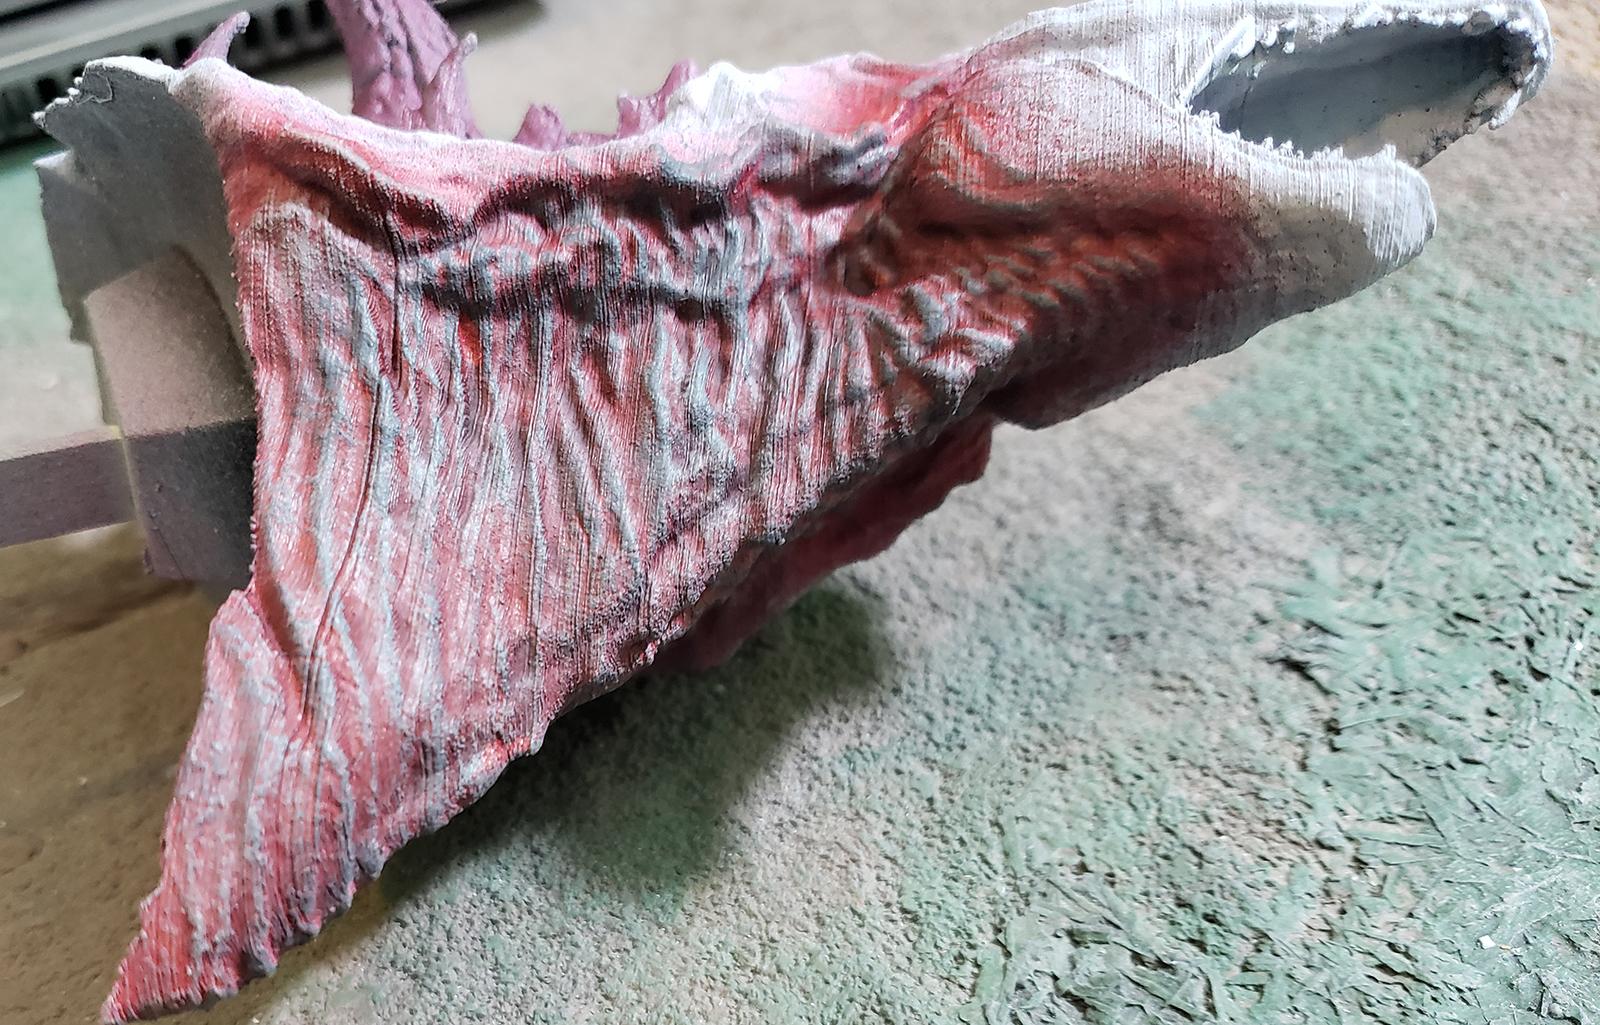
This is what I got:
Spoiler:
Forget the grey parts, I only concentrated on the underside of the neck because that is the closest to the actual model's skin.Way too much red came though - that's not at all what I was going for.
Also, the filler-primer went on much heavier than I would have liked. I am probably going to use Vallejo air primer like I did with the other two.
I am going to strip the test model and try again. This time I think I am going to try a dark basecoat, a light drybrush, and some kind of thin,opaque red wash. If that doesn't work I will start a thread in P&M and ask for help.
This message was edited 2 times. Last update was at 2019/07/14 12:56:04
lord_blackfang wrote: Respect to the guy who subscribed just to post a massive ASCII dong in the chat and immediately get banned.
Flinty wrote: The benefit of slate is that its.actually a.rock with rock like properties. The downside is that it's a rock
2019/07/14 10:47:25
Subject: Ah hell, here we go again - another 3D printed Godzlla model
The red in the cracks looks like it’s too distinct for just a wash. I’ve not tried the new contrast paints over black, I suspect they would not work either.
Just spitballing an idea here, but maybe base it black, then paint red on. While the red is still wet, wipe it off the high points with a sponge/paper towel? Kinda like a reverse drybrush.
Or paint the whole thing bright red, and give it a VERY heavy black drybrush.
No idea if these would work, but ideas to try if you can’t figure something out.
Nah, give up it’s pointless, just send the model to me so you don’t have to look at it ever again.
Also to keep you from putting yourself through this sort of trauma again you’ll need to send me all your 3D printers as well. We wouldn’t want a relapse .
LOL, Theo your mind is an amazing place, never change.-camkierhi 9/19/13
I cant believe theo is right.. damn. -comradepanda 9/26/13
None of the strange ideas we had about you involved your sexual orientation..........-Monkeytroll 12/10/13
I'd put you on ignore for that comment, if I could...Alpharius 2/11/14
2019/07/19 09:02:55
Subject: Re:Ah hell, here we go again - another 3D printed Godzlla model
I've been trying stuff off but no luck really. I took pictures but decided not to bother uploading them since they all were pretty terrible.
Base red, drybrush dark grey, drybrush darker grey - failed, looks terrible.
Base black, drybrush grey, wash with thin red wash - failed, looked like a mess of pink
Base vallejo russian green, wash with red contrast - real bad failure, it looked like a barn. Contrast is pretty potent turns out. However, once I watered it down a bit, I started to get the separation I wanted at least a little - although it tinted the raised areas more then I wanted.
Next\last attempt - based dark grey, drybrushed grey, and then sprayed real heavy with Future floor polish for a thick gloss coat. I am hoping that the gloss coat mixed with some really watery Contrast red will get the separation I want via surface tension.
If that doesn't work, then I think I am going to have to resign myself to painting in the red manually - either via hand or by airbrush. I'm not sure that I can count on my hand being steady enough or my airbrush running smoothly enough for that length of time.
I am for sure going to ask in P&M before I do though because that will take a bajillion years even if it works well. I'll know when I get off work in a few hours and try the last attempt.
lord_blackfang wrote: Respect to the guy who subscribed just to post a massive ASCII dong in the chat and immediately get banned.
Flinty wrote: The benefit of slate is that its.actually a.rock with rock like properties. The downside is that it's a rock
2019/07/19 09:42:41
Subject: Ah hell, here we go again - another 3D printed Godzlla model
I’m afraid that you are going to have to do it manually. The size may make it seem like drybrushing is the way to go, but to get the right effect with something this size it just means more tedious work.
LOL, Theo your mind is an amazing place, never change.-camkierhi 9/19/13
I cant believe theo is right.. damn. -comradepanda 9/26/13
None of the strange ideas we had about you involved your sexual orientation..........-Monkeytroll 12/10/13
I'd put you on ignore for that comment, if I could...Alpharius 2/11/14
2019/07/19 11:22:18
Subject: Ah hell, here we go again - another 3D printed Godzlla model
Holy crap. And I thought I was a Godzilla fan. Did you print all your big Zillas? This is incredible. Not particularly favoring the Shin Godzilla aesthetics but still an incredible undertaking.
JSF wrote:... this is really quite an audacious move by GW, throwing out any pretext that this is a game and that its customers exist to do anything other than buy their overpriced products for the sake of it. The naked arrogance, greed and contempt for their audience is shocking.
= Epic First Post.
2019/07/19 13:29:37
Subject: Re:Ah hell, here we go again - another 3D printed Godzlla model
Theophony wrote: I’m afraid that you are going to have to do it manually. The size may make it seem like drybrushing is the way to go, but to get the right effect with something this size it just means more tedious work.
Yeah I think that is what is going to happen. The gloss seemed to work initially, but then the actual liquid ran everywhere and dyed it pink again.
I might just abandon the red altogether, or manually paint it in, in a subtle fashion. He's not really glowing red for the whole movie anyway - just airbrushing a few bright spots would be pretty screen accurate too.
Oh, I'm not really worried at all. My fallback is to just paint him more or less like the Hybrid, which came out great I think. Maybe a tiny bit more of a brown tint. So worst case situation is still something I think I will be happy with.
This message was edited 3 times. Last update was at 2019/07/19 13:57:18
lord_blackfang wrote: Respect to the guy who subscribed just to post a massive ASCII dong in the chat and immediately get banned.
Flinty wrote: The benefit of slate is that its.actually a.rock with rock like properties. The downside is that it's a rock
2019/08/03 17:39:45
Subject: Re:Ah hell, here we go again - another 3D printed Godzlla model
A little progress, nothing exciting. Unfortunately work has been cutting into my hobby time pretty savagely lately. I hope to have this finished before the end of the month, because my mom is coming to visit and that will also keep me from finishing it... but it's almost done so I think should be able to finish it next weekend.
Painting him exactly like the hybrid initially.
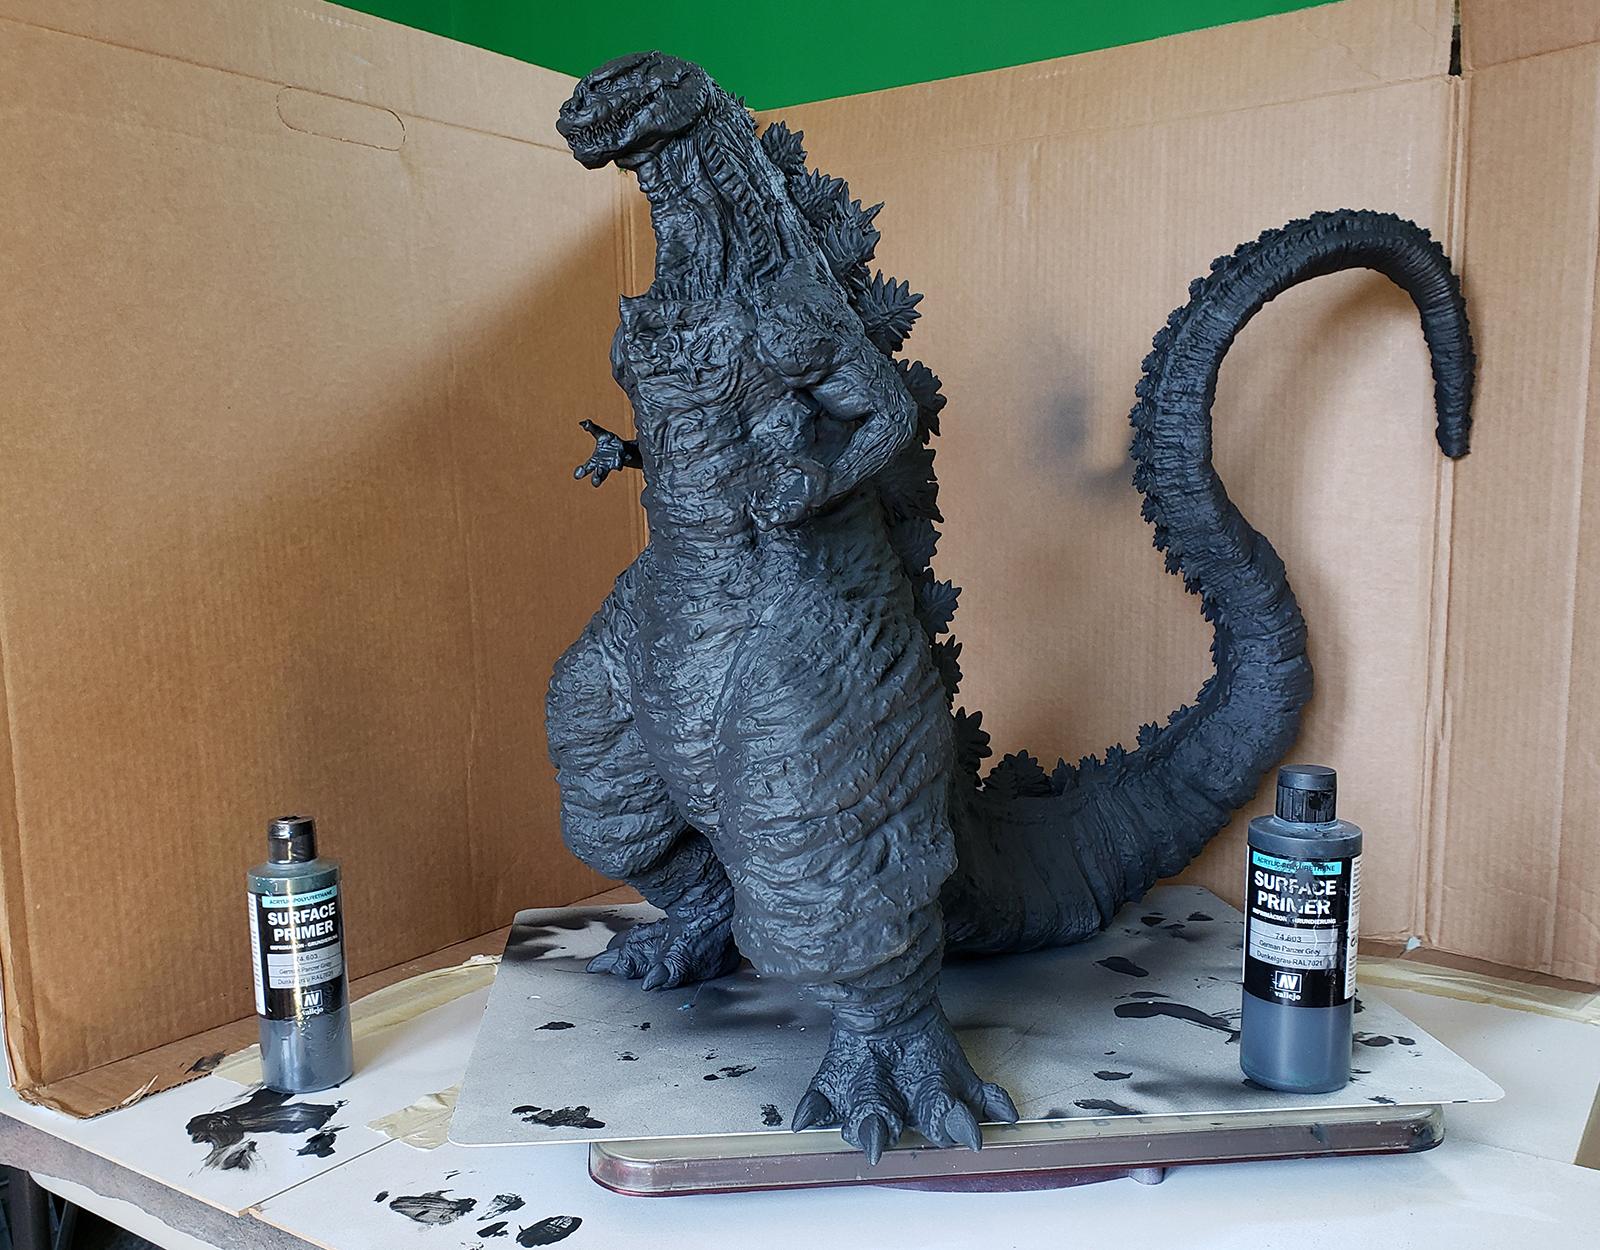
Primed in Vallejo German Grey:
Spoiler:
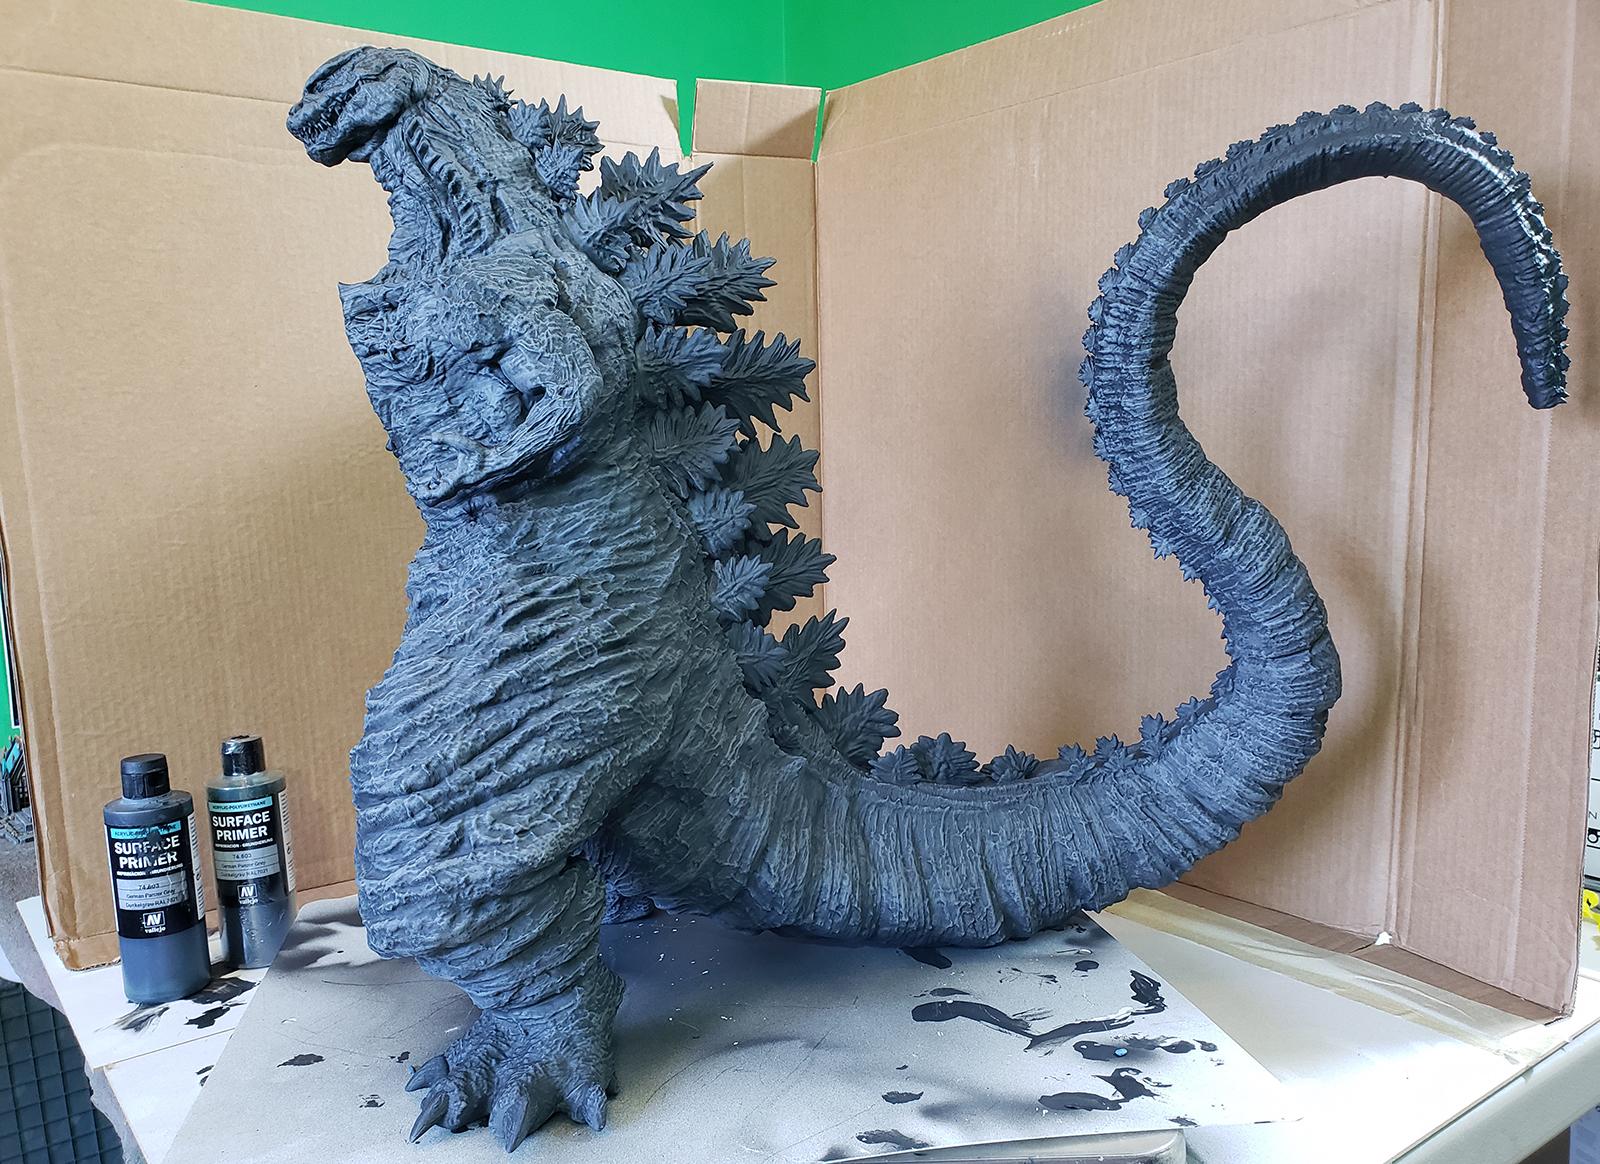
First level of drybrushing - 50/50 Neutral Grey / Graphite:
Spoiler:
Second level of drybrushing - 100% neutral grey:
Spoiler:
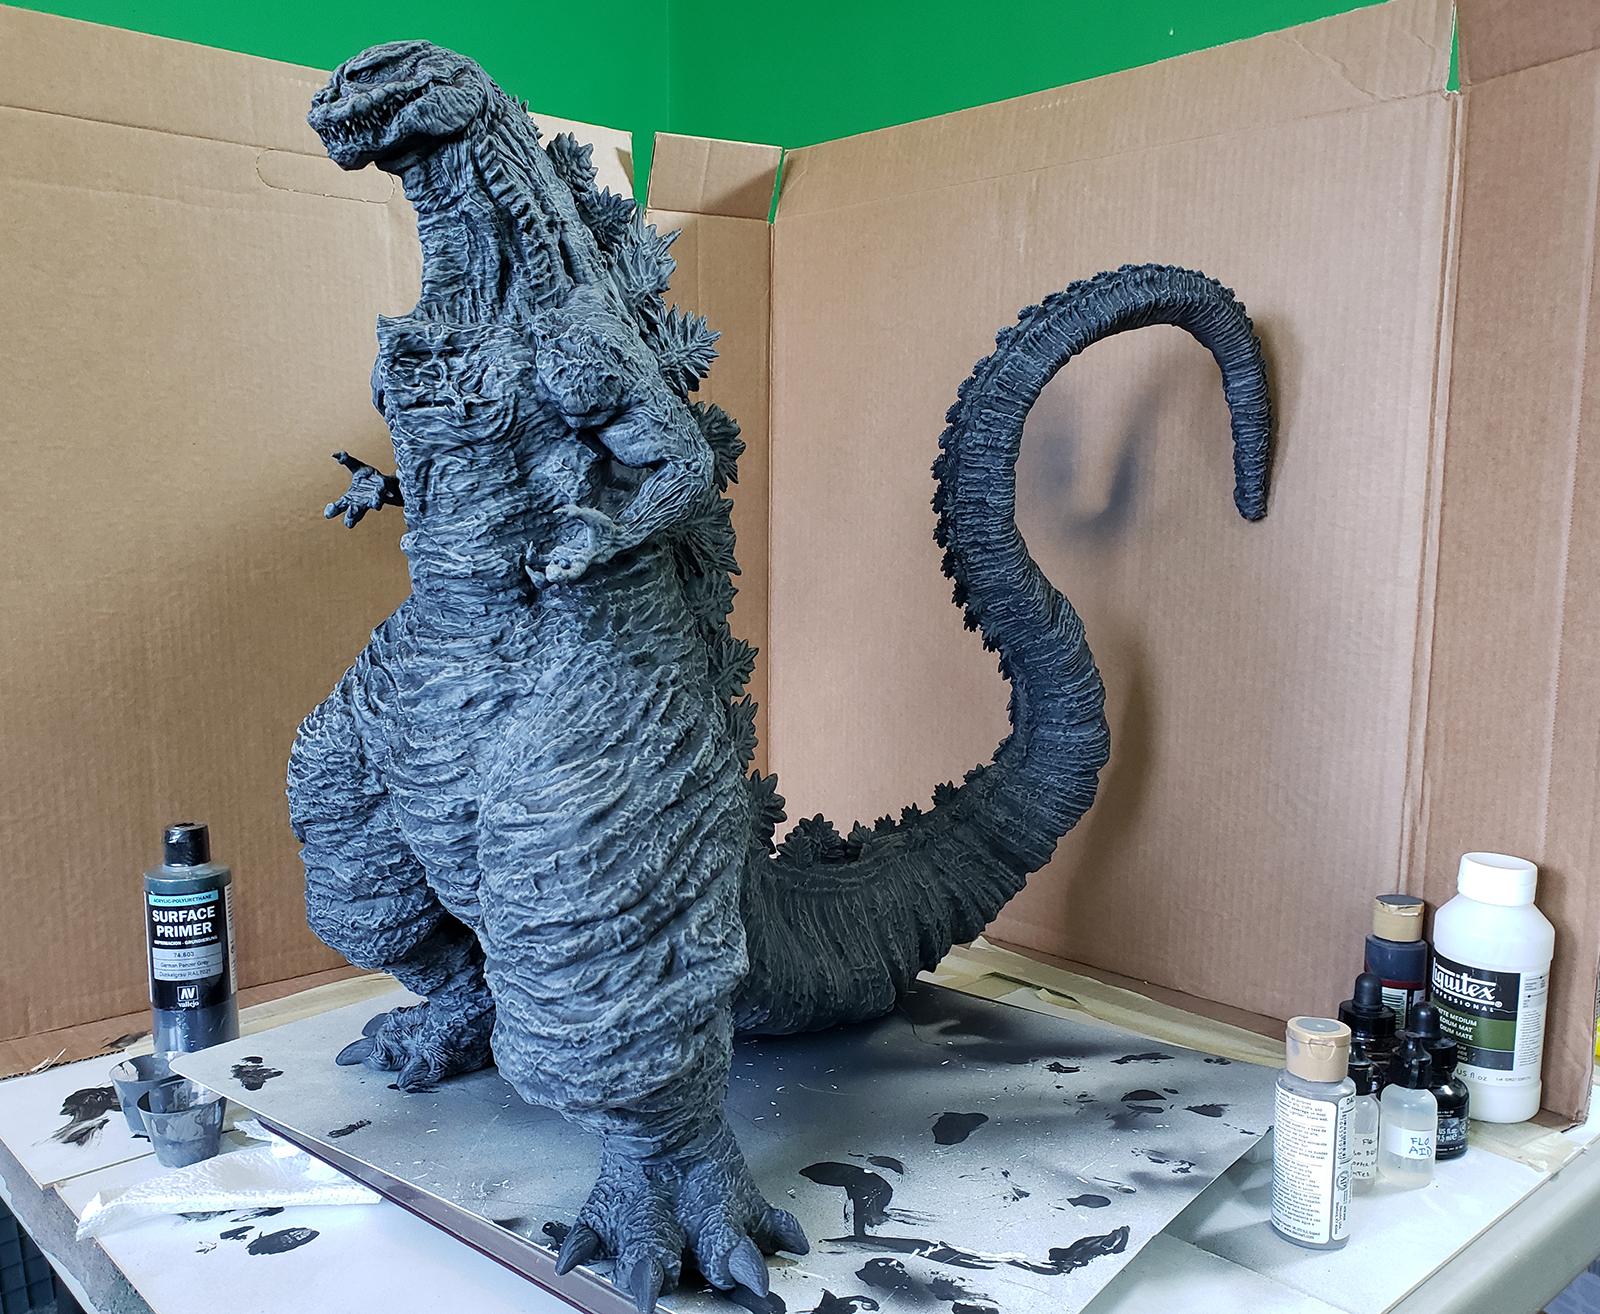
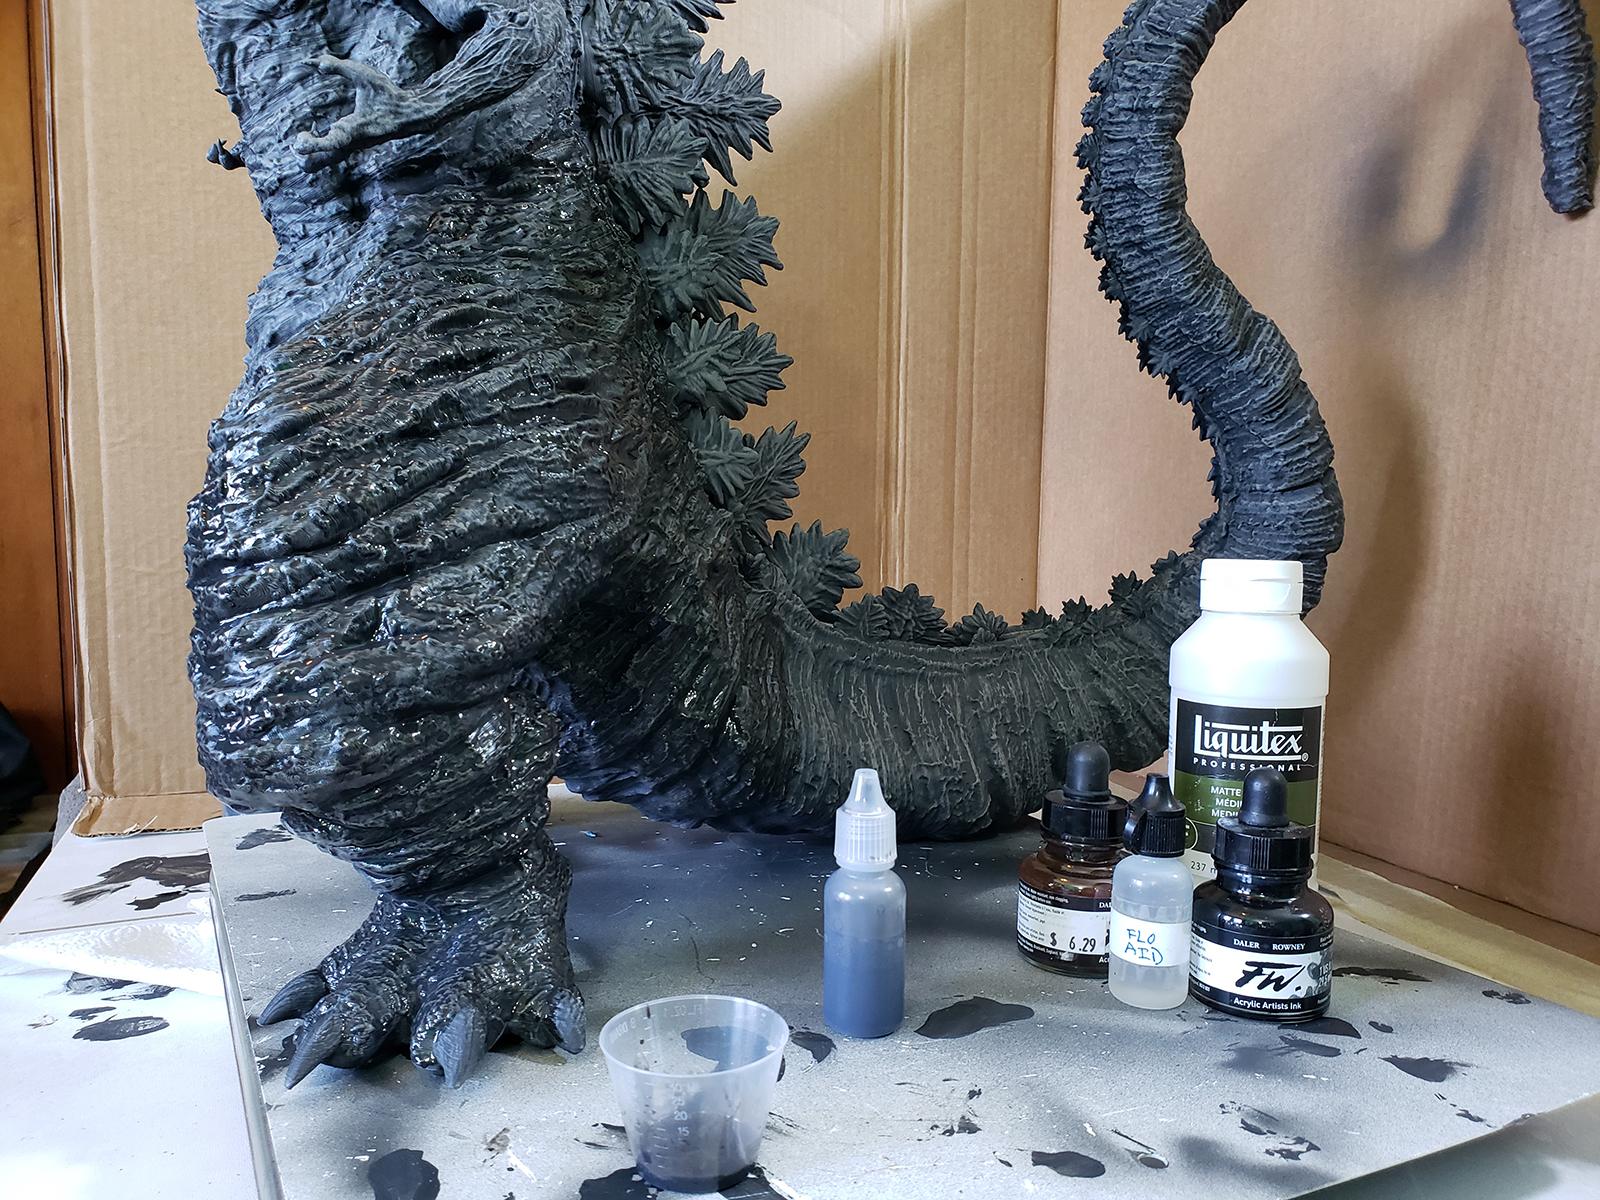
Applying the wash:
Spoiler:
The wash looks shiny and dark here because I took this picture mid-washing, it will lighten as it spreads and dries.
This is where the recipe digresses a little. Shin Godzilla has a little more brown in him than the other Godzillas - in the early phases, he is downright tan.
So for the wash I am going with 15 drops of carbon black, 5 drops of brown, and 60:40 matte medium to flow-aid. I don't think I included any brown in the other ones.
The wash is going to take a while - it needs to be carefully observed as it dries so I can clean up where it is starting to pool, so I am only doing a section at a time. I might be able to finish the wash today, we'll see.
The next steps will be cleaning up any errors, and then using ghost tints to shade in sections, then picking out details (eyes, teeth, nails etc). Then after that, we'll work on the red bits. I had good success manually painting in the red, carefully. It will be time consuming but I think that will give me the best results.
This message was edited 1 time. Last update was at 2019/08/03 17:41:33
lord_blackfang wrote: Respect to the guy who subscribed just to post a massive ASCII dong in the chat and immediately get banned.
Flinty wrote: The benefit of slate is that its.actually a.rock with rock like properties. The downside is that it's a rock
2019/08/10 12:29:34
Subject: Re:Ah hell, here we go again - another 3D printed Godzlla model
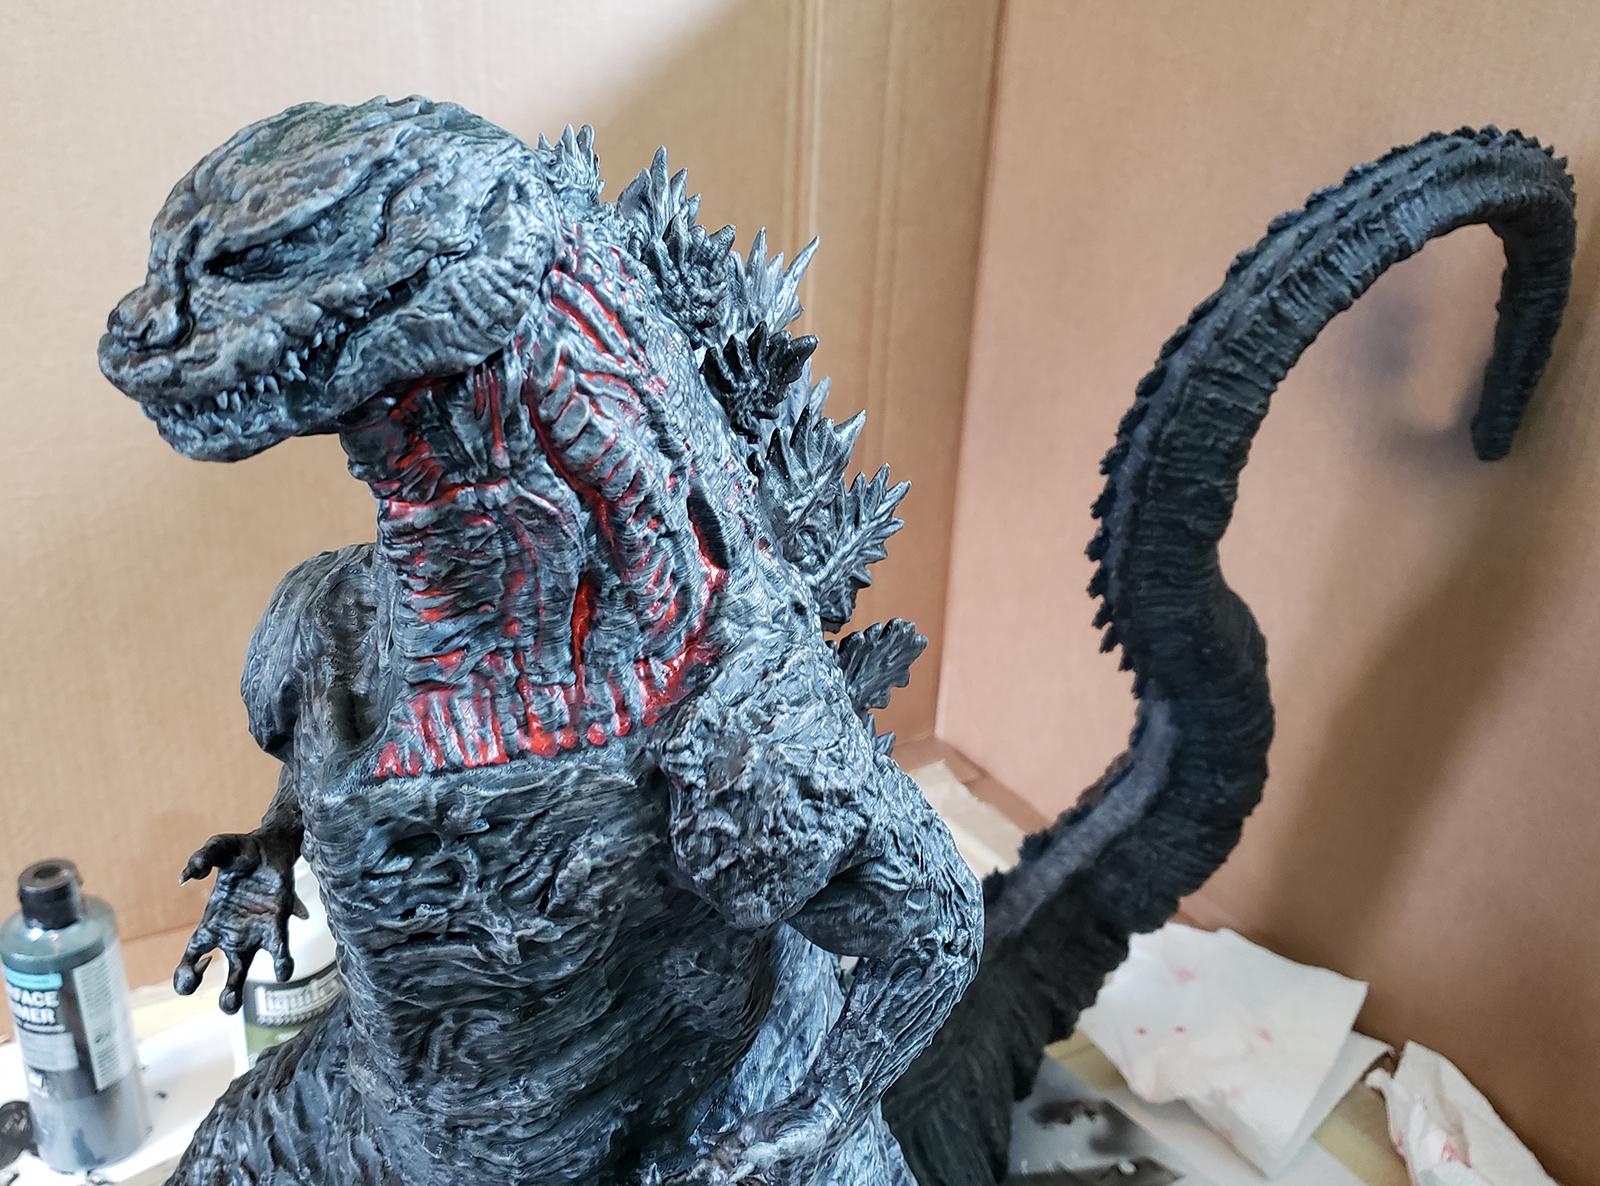
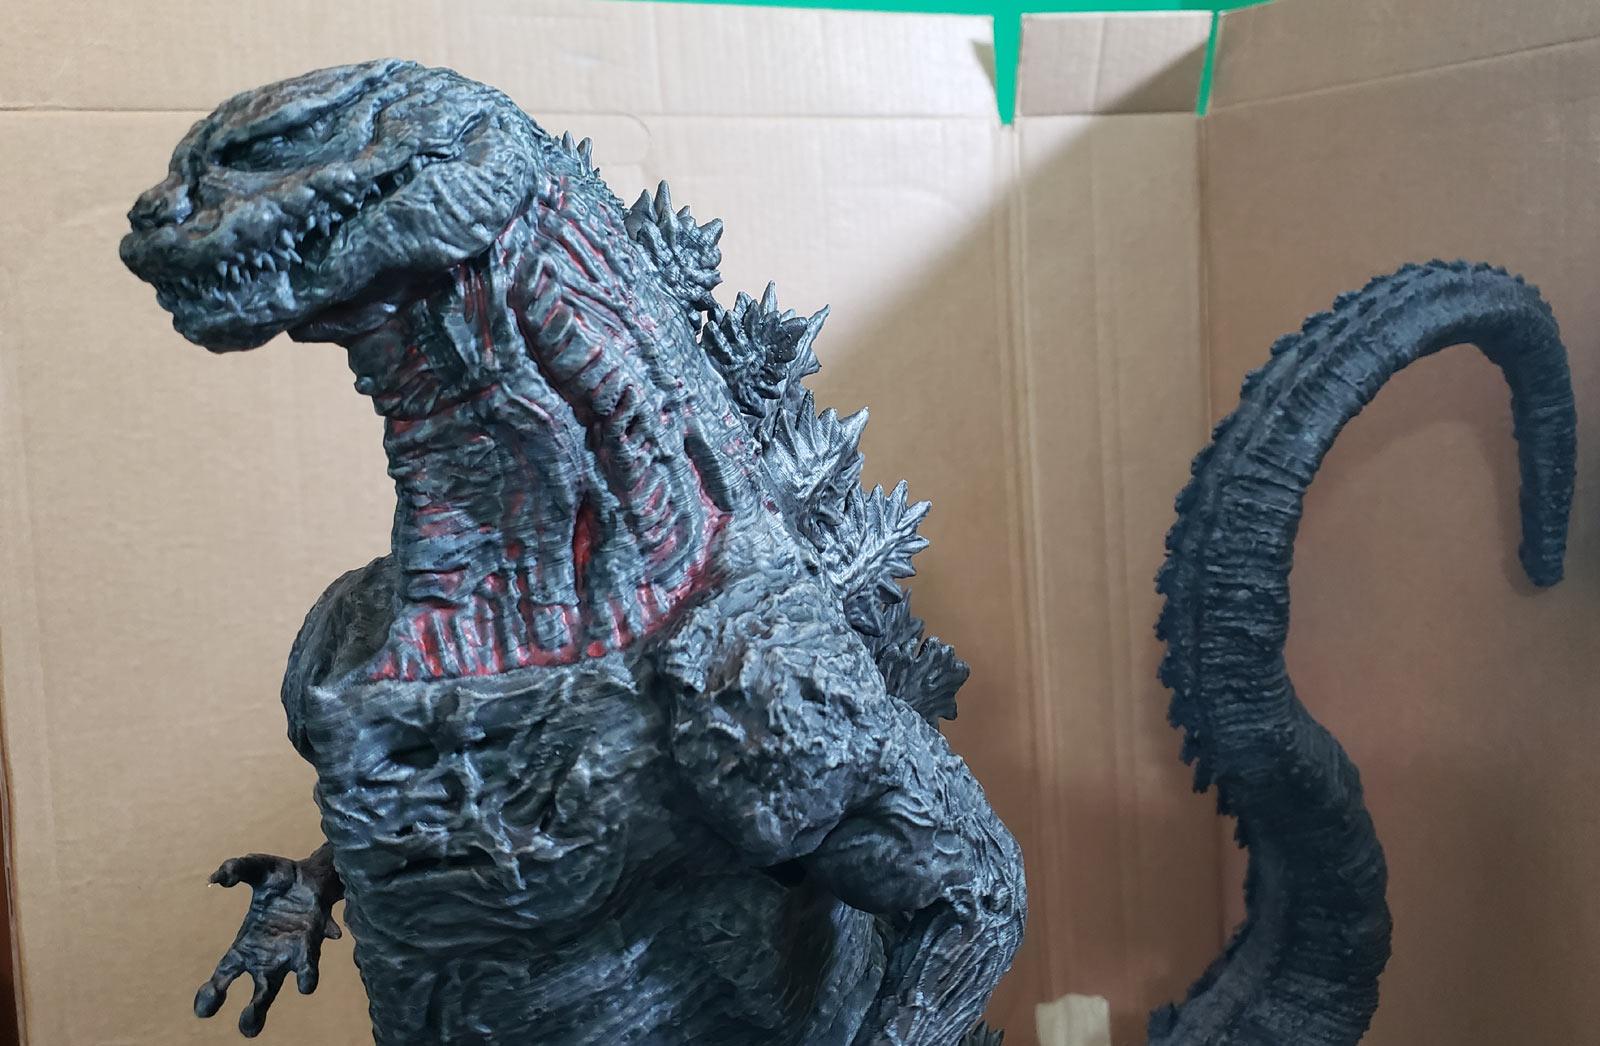
Started in on the glow. The good news is, I can get the effect I want.
The bad news is, I'm gonna have to work for it.
Spoiler:
No version of drybrushing, thinned wash, thin contrast, or thinned wash\paint\contrast is gonna work. This is what it's going to be - doing it by hand.
This will take some time.
The neck and part of the tail has the heaviest glow, it will be much more subtle for the rest of the model. I also have some cleanup to do here to knock it back a little, less is more. But this is definitely on the dartboard if not a bullseye.
edit: Added an AP red wash, getting a little closer:
Spoiler:
I still need to do a bunch of manual touchups.
Man this is going to take forever.
This message was edited 2 times. Last update was at 2019/08/11 03:13:07
lord_blackfang wrote: Respect to the guy who subscribed just to post a massive ASCII dong in the chat and immediately get banned.
Flinty wrote: The benefit of slate is that its.actually a.rock with rock like properties. The downside is that it's a rock


 , and not a small one either
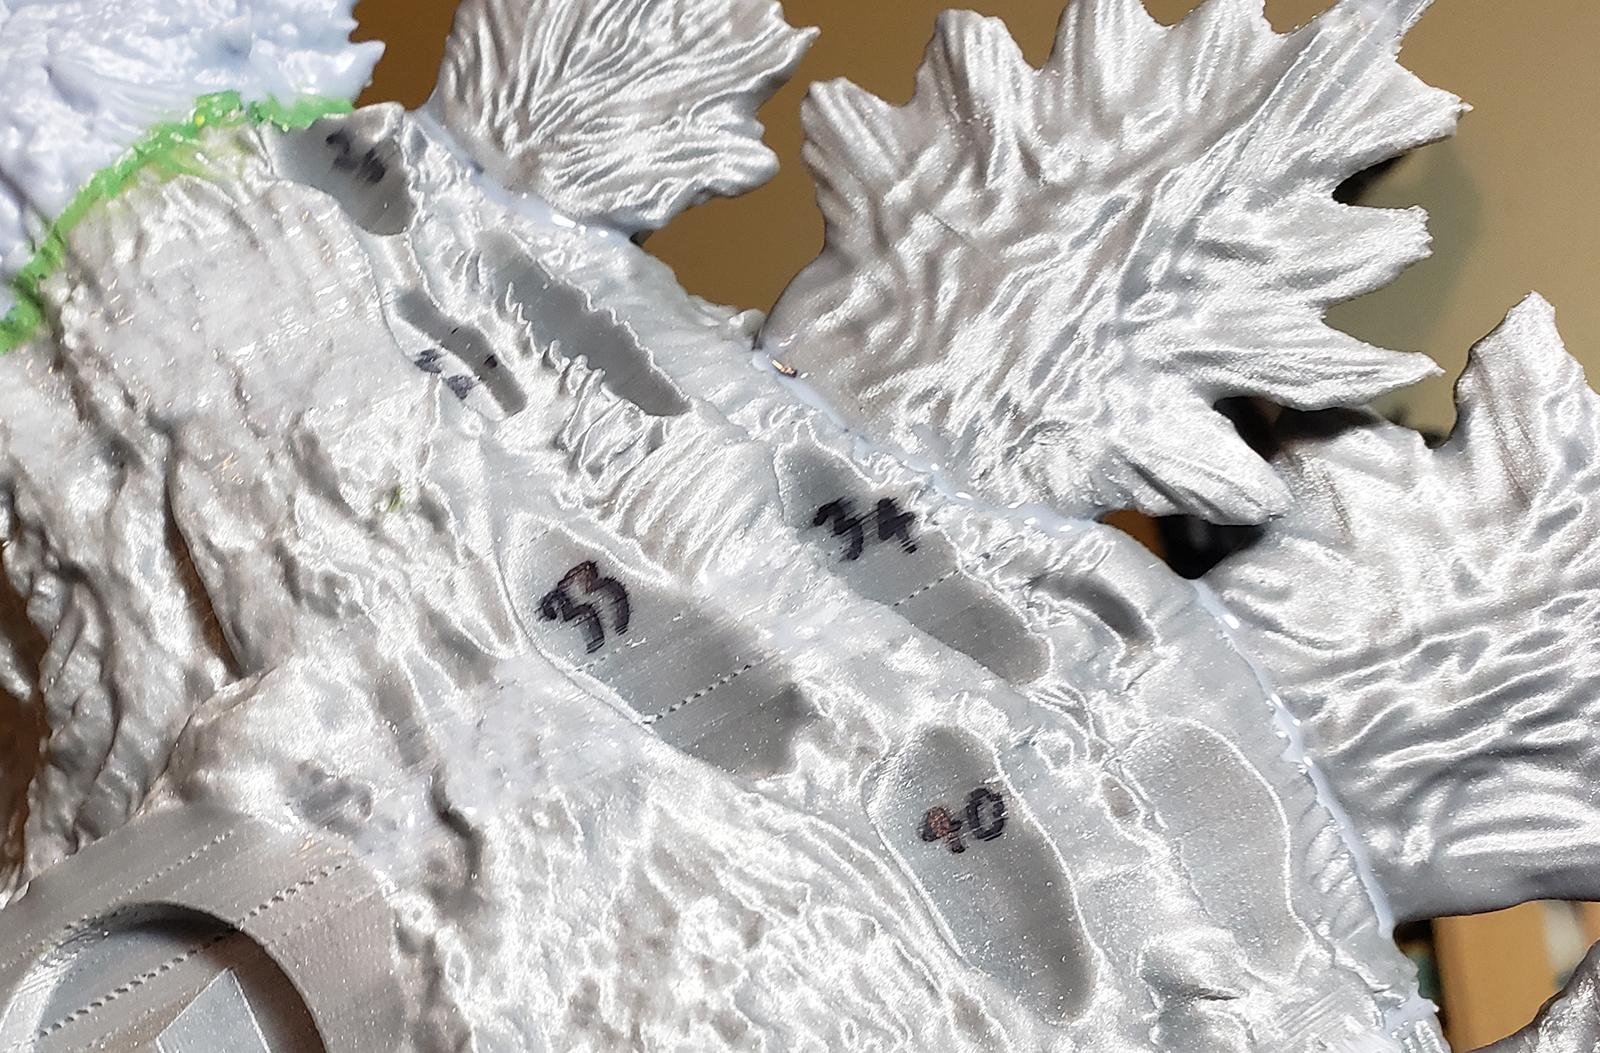


 . Now you get a week to paint it
  .
.


 Ultramarines, 3rd Co. and friends, 16k+
  4k
4k  4k Points
 Competition Index