Switch Theme:

Thumpingbear does Mordheim: 05/20/2024: Modular Magnetic Fence WIP  [RSS] Share on facebook Share on Twitter Submit to Reddit
»
Author Message
Advert


Forum adverts like this one are shown to any user who is not logged in. Join us by filling out a tiny 3 field form and you will get your own, free, dakka user account which gives a good range of benefits to you:
  • No adverts like this in the forums anymore.
  • Times and dates in your local timezone.
  • Full tracking of what you have read so you can skip to your first unread post, easily see what has changed since you last logged in, and easily see what is new at a glance.
  • Email notifications for threads you want to watch closely.
  • Being a part of the oldest wargaming community on the net.
If you are already a member then feel free to login now.


Made in us
Stone Bonkers Fabricator General


A garden grove on Citadel Station

The tower, board, bridge, tunnel are all amazing and look great even before paint. The characters are all very well, characterful, impressive work.

ph34r's Forgeworld Phobos blog, current WIP: Iron Warriors and Skaven Tau
+From Iron Cometh Strength+ +From Strength Cometh Will+ +From Will Cometh Faith+ +From Faith Cometh Honor+ +From Honor Cometh Iron+
The Polito form is dead, insect. Are you afraid? What is it you fear? The end of your trivial existence?
When the history of my glory is written, your species shall only be a footnote to my magnificence.
 
   
Made in us
Hollerin' Herda with Squighound Pack


Oh wow that looks lovely and full of character! I can't wait to see what it looks like painted
   
Made in ca
Fixture of Dakka


Surrey, BC - Canada

Very nice scratch-build Thumpingbear.

Cheers,

CB

   
Made in gb
Ancient Venerable Dreadnought


The tower just keeps getting better. Hopefully you manage to squeeze in some painting and get it done. Good luck!

Goberts Gubbins - P&M Blog, started with Oldhammer, often Blackstone Fortress and Void Panther Marines, with side projects along the way 
   
Made in gb
Mad Gyrocopter Pilot


Northumberland

Brilliant work, nice to see the tower fully built. It's very eye catching and lots of little details which make it very impressive. Good luck with painting it up!

One and a half feet in the hobby


My Painting Log of various minis:
# Olthannon's Oscillating Orchard of Opportunity #


Made in gb
Journeyman Inquisitor with Visions of the Warp


Beautiful work very inspiring .
   
Made in ca
Confident Halberdier


in the computer?

@ph34r: Thanks! The board is unfortunately on hiatus - there are some major issues with it, down to the construction. I need to revamp the entire project, which I'll probably get to in a few months.
@makeitorky: Thanks man, the painting took longer than expected but I'm happy with it.
@Captain Brown: Thanks! I think I'm approaching my end game for base Mordheim terrain, so the scratchbuilds will be slowing down soon (until I make the rural board for the Mordheim "Empire In Flames" expansion!)
@gobert: Thanks, I took longer than I thought but it's done, and that's the important bit!
@Olthannon: Thank you kindly, I think this is the one I've put the most effort into (so far!).
@niel101: Thanks man, that's high praise - your Yggdrassilium board is one of the aspiration metrics I hold my terrain against.

Some updates:

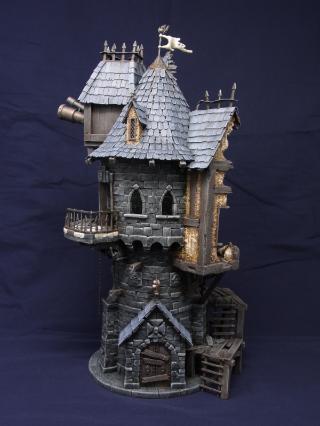
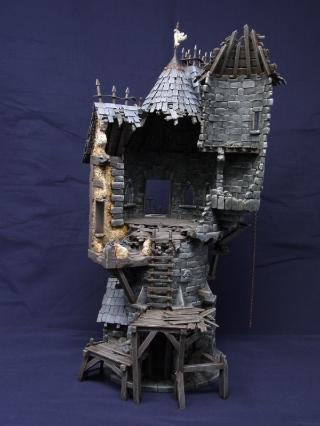
Life got in the way of finishing the Astrologer's Tower in a timely manner for the League of Extraordinary Riveters challenge, but I managed to get it done a few days late:


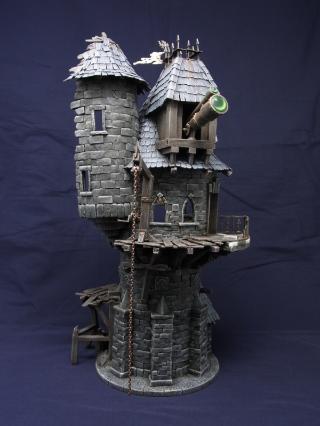
When the good news of the twin-tailed comet appearing in the skies above Mordheim spread across the Empire, pilgrims seeking enlightenment and redemption were drawn to the city like a moth to flame. It wasn't just pilgrims though - along with them came merchants, tradesmen, and anyone with a keen nose for making coin. Chief amongst these new peddlers were the astrologers, a new industry of soothsayers who would tell one's fortune by reading the comet's trails - for a nominal fee, of course. The seer, the charlatan, and all those in-between slithered into Mordheim and set up shop, making fortunes in the fevered anticipation of Sigmar's blessed return.

Unsurprisingly, not one of these astrologers made the most important prediction of all.


I've talked about this before, but there's an old article (that I can't find anymore) all about how to craft narrative of your wargame setting through terrain. It had an impact on how I approach making terrain, so I always try to have at least a little narrative (in my head at least) as to what the structure was before the comet fell and destroyed Mordheim. For this one, I imagine this tower was the home of one of the many astrologers that moved into Mordheim to peddle his predictions, made some major moolah, and was in the process of constructing more additions to his tower - hence the scaffolding, crane, and ramshackle additions to the balcony.

All in all, I'm happy with how it turned out. There were some issues in painting the stone - my usual method is basecoat in a variety of greys, successive drybrush highlights, hit it with a custom wash of brown, black, green, flow improver, and paint retarder, then top it off with a final drybrush highlight. My paint retarder was, for some reason, dried out and goopy, so I thought I could throw a little water in to thin it out and it'd be fine. It didn't work, it darkened the stone significantly and pooled on the surfaces. I had to drybrush basically from scratch again, and the result is the stone is darker and has quite a bit more contrast than usual. It still ties into the table just fine though, so no big deal.

I'll start from the bottom and work my way up:


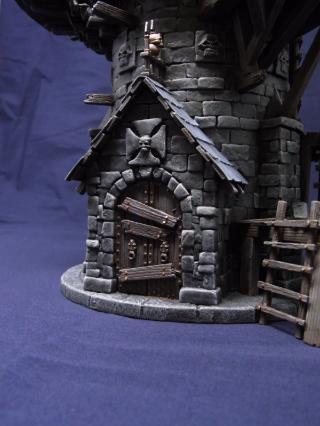
The doorway and the scaffolding. The riveted lining around each door is supposed to be metal, unfortunately there's not quite enough contrast between the metal and the wood. I may revisit it and throw a black wash over it to get a blackened metal look. Other than that, I really didn't need to put the handles on it, but it looks cool. To be honest, I'm not very keen on having doors there at all - I needed a visual to show the doors were unusable, and having a doorway with planks achieves that goal. I wanted to have the door blown out with rubble pouring out from the interior, but decided it would've been too much work. That being said, it's good enough.

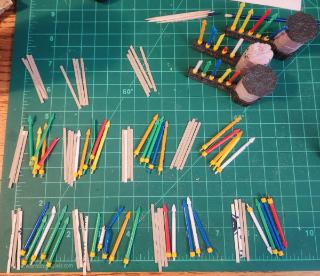
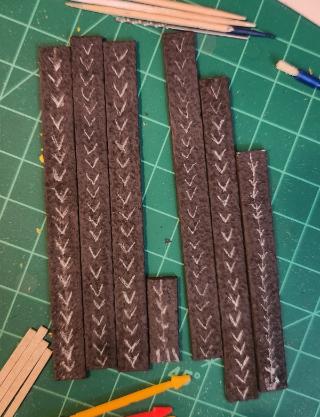
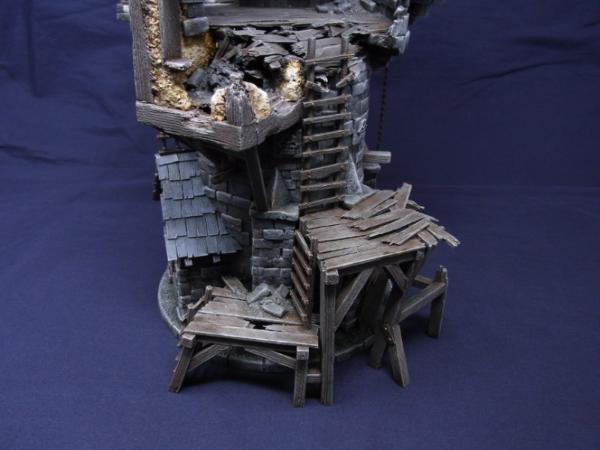
The scaffolding was difficult, but fun to make. I love making ramshackle wood stuff, it gives off such a chaotic vibe, especially when contrasted against orderly buildings. I forsee that this scaffolding will be an annoying sniper spot, as the stepped construction allows placement of bodyguards for ranged attackers. The small ladders are each 1 1/2", meaning it takes 3 inches of movement to climb both, and the large one to the tower interior is 6".


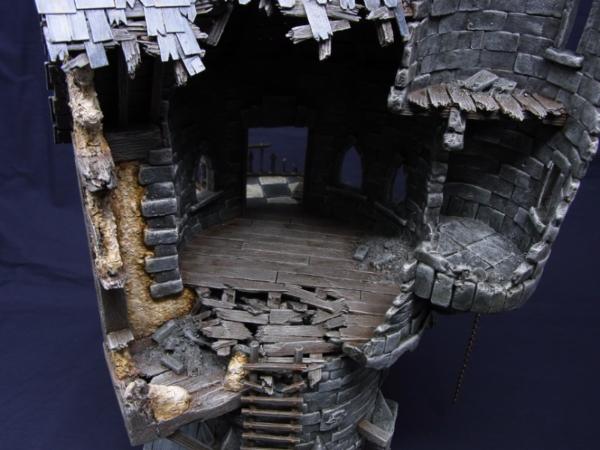
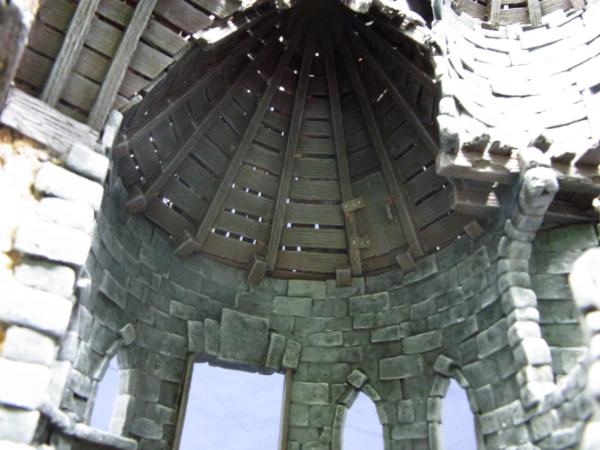
Moving up from the scaffolding ladders, we see the tower top interior and roof. The rubble beneath the collapsed portion of the floor was prepainted before placing all the planking, in retrospect I could've just painted it black, but it looks great when viewed up close. I forgot that I need to make a small stair leading up to the turret tower as it's over 1" to access it, so that'll be done later. The turret tower itself has a second story with enough room for 2 models and a sniper window - unfortunately I couldn't figure out a way to attach a rope or ladder that wouldn't interfere with the floor below, so it'll have to be accessible only through climbing.

The second shot is just to show off the painted rafters, decking, and roof door to the telescope room inside the tower. Is this a portion of the tower that will be totally unviewable to the player and was waaaaaayyyy to much work? Yes. Am I happy I did it? Also yes.


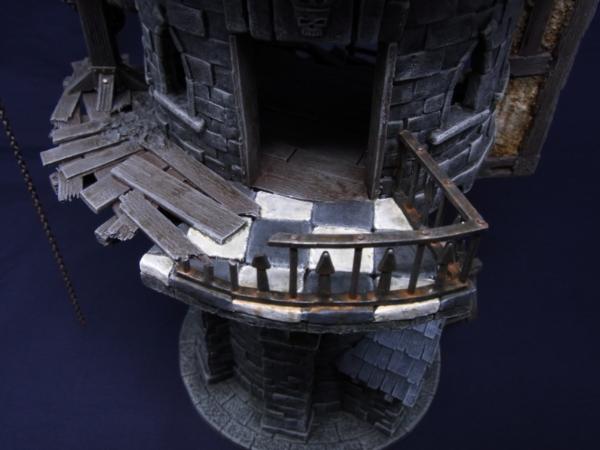
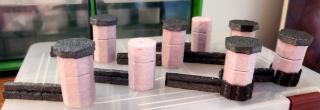
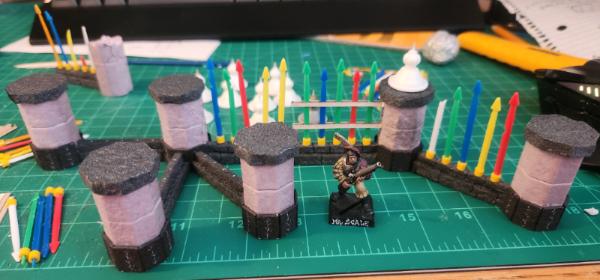
Moving out from the tower, we arrive at the balcony. I wanted the balcony to have a little more visual interest, so I painted the stones in a Warhammer checkerboard. The railing was some plastic ladder thing I had received from a fellow hobbyist (at the time, I had no idea how I'd use it - such is the life of a scratchbuilder), with some cocktail spears glued and resined in for extra detail. Part of the railing was destroyed for the additions to the balcony, which the previous inhabitant had hastily installed with wood planks.

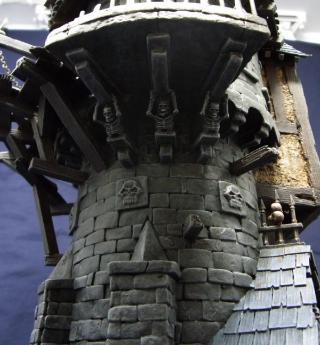
Below the balcony, the skeleton corbels hold it up. Also a bit of a view at the haphazard construction of the balcony extension.

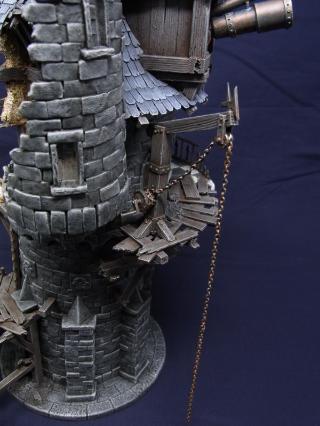
On the makeshift balcony, we have the crane. I wanted to have this as another access point to the balcony. It's a 6" movement to the top of the tower, so even Dwarfs will be able to get to the top in one movement (if they're up against it, of course). Again, the metal is mostly lost against the wood, but whatever.


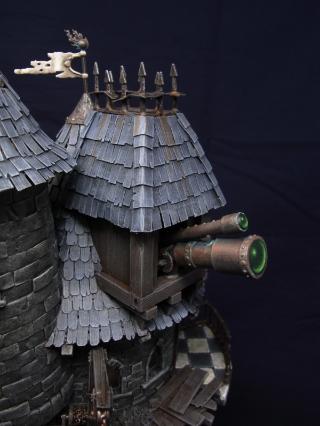
Finally we reach the telescope room and the roof. The telescope was made from shields (for the lenses), tubes of different dimensions (for the entire small telescope body and the thick portion of the large one), a bomb taken from a model aircraft (for the smaller tapered portion of the large telescope), and a small gear from a toy I deconstructed for Ork scratchbuild parts. Overall I like it and love the how it breaks up the silhouette of the tower, but I'm not terribly pleased with my paintwork on the lenses - it looks good at the angle I took the photo at, but from other angles it looks off. I'll be revisiting it in the future.

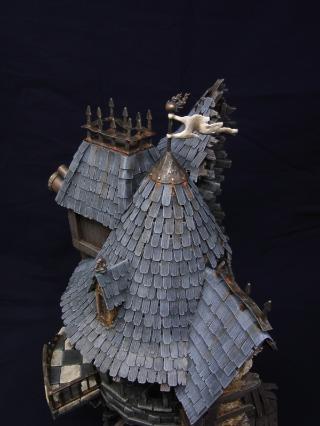
On the roof, we have a lil' comet adornment with a flag. I tried to do a hammered metal look on the tower cap by greenstuffing it and embossing it with a rounded thingy, I like the way it turned out. I also wanted this picture to show off the shingle paintwork and texture - the lightbox I'm using doesn't diffuse it's light very well so the detail wasn't captured well in the profile shots.


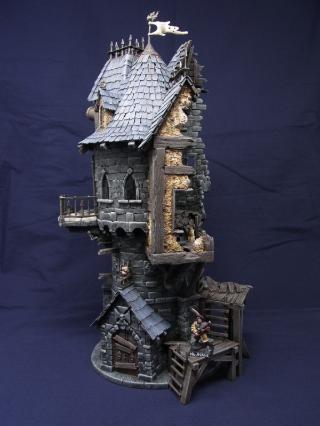
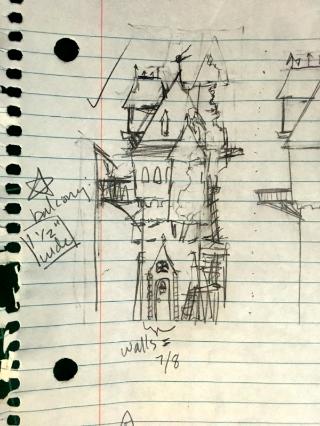
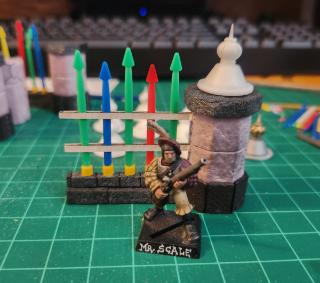
Finally, an obligatory shot with Mr. Scale. I also wanted to compare the build against my original concept. I think I did pretty well, but had to make some adjustments to the silhouette to allow for better gameplay. I'm happy with the final result, and I'm happier that it's finished.

Terrain projects are being shelved once again, as the field season for archaeology is starting up pretty soon here in Canada (that is, when the rampant wildfires currently ripping through my province are contained). I'm thinking I'll bring my Orc warband out to the field and work on it during my downtime, try to do an hour or so daily.

More updates soonish!

This message was edited 2 times. Last update was at 2023/05/12 23:01:35


Made in us
Speed Drybrushing


Colorado, USA

Thumpingbear,
So sorry to hear about life. It certainly has a way of piling up. But, I'm super glad you were able to finish the tower. Hopefully it didn't come at too much of a life-cost. It is such an incredible piece and I think the coolest in show at the League.
I haven't been by in a while, turns out, because I hadn't seen the dwarves. They are fantastic. I did some tartan recently-ish and I agree it was surprisingly easy compared to what I expected.
Keggy is a fantastic model. Really well done.
So much character in those models.

   
Made in us
Grisly Ghost Ark Driver


Fantastic tower!

See what's on my painting table Now painting: Radukar the Wolf 
   
Made in es
Regular Dakkanaut


Madrid, Spain

That tower is incredible, incredible attention to detail; doesn't look scratchbuild at all!! I would buy that if that was a kit!

Also known as KeiserS! muette is my old name.

I also have a 3d models shop, check it out here! https://cults3d.com/en/users/keiserspandp/creations 
   
Made in fi
Dipping With Wood Stain


Stunning! So many details to discover, no square-inch of the building seems half-assed! And not only is the build excellent, the paintwork complements it beautifully.

My P&M log here on Dakka [WIP and finished work]
My blog on Wordpress [Finished work] 
   
Made in au
Alluring Mounted Daemonette


Australia

That's a beautiful build mate, definitely something to be proud of - concept to execution. Things like all the internals and the rust from the metal cap on the roof bleeding down into the tiles, the details are just amazing.

A real labour of love. Thanks for sharing it with us!

t z you are k 
   
Made in gb
Ancient Venerable Dreadnought


Absolutely stunning work again Thumpingbear! The narrative certainly gives it a special feel and must’ve helped you identify what cool little details to add. Most Excellent!

Goberts Gubbins - P&M Blog, started with Oldhammer, often Blackstone Fortress and Void Panther Marines, with side projects along the way 
   
Made in gb
Mad Gyrocopter Pilot


Northumberland

Absolutely brilliant work, you must be chuffed to have completed it all. I particularly love the telescope lenses, they are terrific.

One and a half feet in the hobby


My Painting Log of various minis:
# Olthannon's Oscillating Orchard of Opportunity #


Made in au
Regular Dakkanaut


Australia

I know I’m a bit late but the finished tower looks absolutely beautiful Thumpingbear! And I’ll second muette, if that was a kit I’d buy it in a heatbeat. Looking forward to seeing your next update


Made in ca
Fixture of Dakka


Surrey, BC - Canada

This one slipped through my fingers.

Exalted Thumpingbear

Cheers,

CB

   
Made in ca
Confident Halberdier


in the computer?

@DJJazzyJeff: Thanks man, appreciated. Making characterful models is one of the most rewarding aspects of Mordheim, made possible by the small model count that lets you give some attention to each individual.
@Gwyn chan 'r Gwyll: Thanks bud!
@muette: Thanks a lot! I showed it to one of my coworkers who plays Fantasy and told him it was scratchbuilt, he told me to off. Your comment was nicer lol.
@mcmattila: Thank you! If no part of it looks half-assed, then I did my job correctly (there is a LOT of half-assed stuff that's hidden ).
@tzurk: Thanks! I don't know if "labour of love" was quite accurate, more like "get this thing done and out of my sight", but I was very satisfied to finish it.
@gobert: Thank you gobert. The narrative evolved with the tower, I really wasn't sure what the story was until I thought that the little building on the roof needed something extra, and a telescope sticking out seemed like a good idea.
@Olthannon: Thanks man, I definitely was relieved to get it done with. I was cutting it pretty close to the beginning of my work season, so I was happy to wrap it up before then.
@zahnib: Thank you! If I had any 3d modelling skill I'd give it a go, that may be something to try out in the future.
@Captain Brown: Cheers Captain, thank you kindly!

Recently I decided that I needed to do something about the fences I had built for the Mordheim table:


These are a previous attempt that I made quite a few years ago. The construction is XPS foam for the stone, toothpicks and cardboard for the wrought iron fence, and a bead with bamboo skewer for the fencepost cap. They work great in game as a way to block off areas, and to provide cover for any model standing behind it. Unfortunately I was dissatisfied with 3 things about them:

1. The design of the sections. Having a post on either side of the fence makes a complete section, but it looks weird when putting 2 pieces together, like in the photo. Additionally, the square shape of them doesn't allow for any smooth joints of the two pieces except for at 180 and 90 degrees - also visible in the photo, with the obvious gap between the 2 pieces.
2. The weight. The advantage of XPS foam (and scratchbuilds in general) is that they're relatively lightweight. However, these fence sections are so light that a careless whisper will send them flying across the board. I can't count the times one's been knocked over in game, often taking several models with it.
3. Their appearance. My hobby skills have advanced since I made these, and I think I can do better now.

So I whipped up a prototype for modular fence sections, which resulted in this:


I'll go through each element separately:
- Fencepost: These are XPS foam that have been cut into an octagonal pillar using a hot wire table. The black portion on top is more XPS foam to represent the top of the pillar, and there will be an ornate fencepost cap on the very top (not pictured - see later in post). The bottom of the pillar has been hollowed out with a washer placed in it for weight. The black segments on the bottom of the pillar are sheet magnets, which allow the fence sections to stick to each other more effectively and not get knocked around during games.
- Wrought iron fence: The fence is made of cocktail spears, cut to different lengths to give a staggered appearance. They are embedded in the 2 rectangles of XPS foam along the bottom. The very bottom XPS foam rectangle has a nail running through it to add more weight. The fencepost on the opposite side has been removed, and the 2 rectangles of XPS foam on the bottom are capped with more sheet magnet, which allows the fence sections to magnetically stick and create a seamless fence (pictures below).

I've planned to make 12 of these sections, which will make 31.5" of fence (each piece is 2 5/8" long). Here are the fence components and the fencepost components, ready for assembly:


I was having a bit of a hard time trying to figure out how to make the fence caps. I bought some nice beads that would work with it, but was having a hard time finding a plentiful and non-wasteful source for a cone component. When I found a suitable Lego piece that would work, I decided to build one and then just cast the rest. Here are the fencepost cap casts along with the master on the right, and what they'll look like on top of the fenceposts:


I also included a picture of the magnets. They're cheap magnetic sheets that I bought at Michaels, used for making custom fridge magnets and the like. The arrows indicate the orientation of the magnetic field, if I don't glue them on correctly the magnets repel each other, which kinda defeats the purpose of magnetizing terrain. They were roughed up with a dremel to give them a more stone-like appearance.


Here's a quick shot of some of the fence pieces combined. They fit together very nicely and are very sturdy. They can be fit together normally with a fencepost on both ends, or the 2 fence sections can be fit together to make one long unbroken fence section, which can be seen in the middle (and which I skilfully obscured with another fence section, whoops).


These are still very WIP, but I should be able to finish them up fairly quickly now that the all the prep work on the components is done. Overall I'm pretty happy with how the magnetization and modularity of the sections went, I'm gonna be very happy to get them on the table and not have to worry so much about breathing the wrong way and knocking over a fence (yes, this happened with the old pieces. More than once).

I had a thought a couple nights ago that I can easily make some gates to fit with this fence set - but I need to take one project on at a time, and right now I'm working on several. I'm also working on painting an Orc warband, as well as modelling a Freelancer Knight Hired Sword (which needs 2 versions of the model: on foot and mounted!). No pictures of these yet, I'll be posting when more progress is made.

More updates soonish!


Made in se
Boom! Leman Russ Commander


Oslo Norway

Cool fences, and really good modularity

   
Made in gb
Ancient Venerable Dreadnought


Cool fences, and some impressive modularity

Goberts Gubbins - P&M Blog, started with Oldhammer, often Blackstone Fortress and Void Panther Marines, with side projects along the way 
   
 
Forum Index » Dakka P&M Blogs
Go to: