| Author |
Message |
 |
|
|
|
|
Advert
|
Forum adverts like this one are shown to any user who is not logged in. Join us by filling out a tiny 3 field form and you will get your own, free, dakka user account which gives a good range of benefits to you:
- No adverts like this in the forums anymore.
- Times and dates in your local timezone.
- Full tracking of what you have read so you can skip to your first unread post, easily see what has changed since you last logged in, and easily see what is new at a glance.
- Email notifications for threads you want to watch closely.
- Being a part of the oldest wargaming community on the net.
If you are already a member then feel free to login now. |
|
 |
2010/08/30 20:28:50
Subject: Nurgle's Rope - How to make realistic barbed wire --+--+--+-- UPDATE: now with poles
|
|

Feldwebel
|

Hi there,
I just registered last week and posted my Death Korps of Krieg project today:
--+--+--+--+--+--+--+--+--+--+--+--+--+--
--+- Death Korps of Krieg - Muddy Times -+--
--+--+--+--+--+--+--+--+--+--+--+--+--+--
I was asked about the barbed wire you can see here:
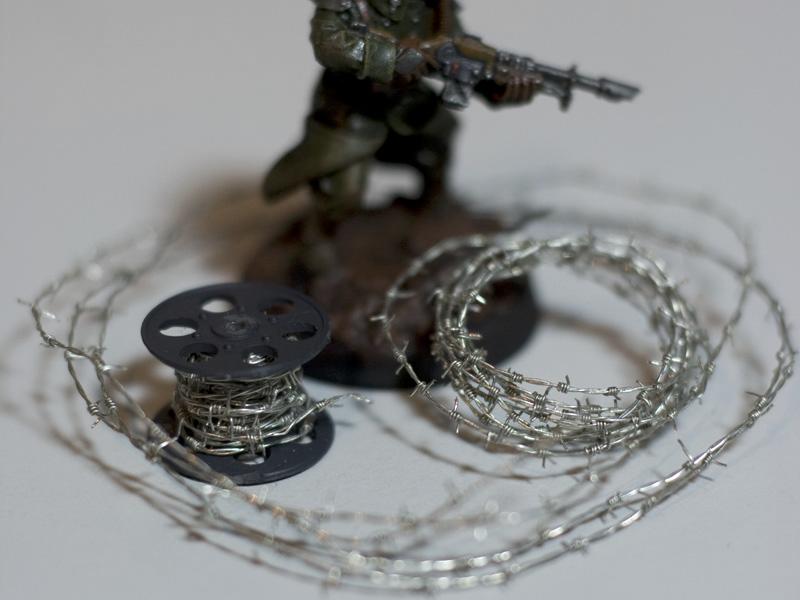
I don't like the look of GWs barbed wire and even FWs barbed wire didn't do it for me so I made my own*.
Since I was asked this quite often (on a German board, too), I decided to make a little tutorial.
(*: This method isn't new, I didn't invent it. I've seen it on some model-train websites before.

Nurgle's Rope - Tutorial
A little advice before we start!
Be careful!
I made barbed wire with 0,5 mm and it really has the potential to do some damage!! Even with 0,2 mm you should be carefull.
While the wire itself is very thin and breakable, short spikes won't bend and thus can cause some damage!
On the upside, people might avoid to touch your miniatures because of fear of tetanus.
--+--+--+--+--+--+--+--+--+--+--+--+--+--
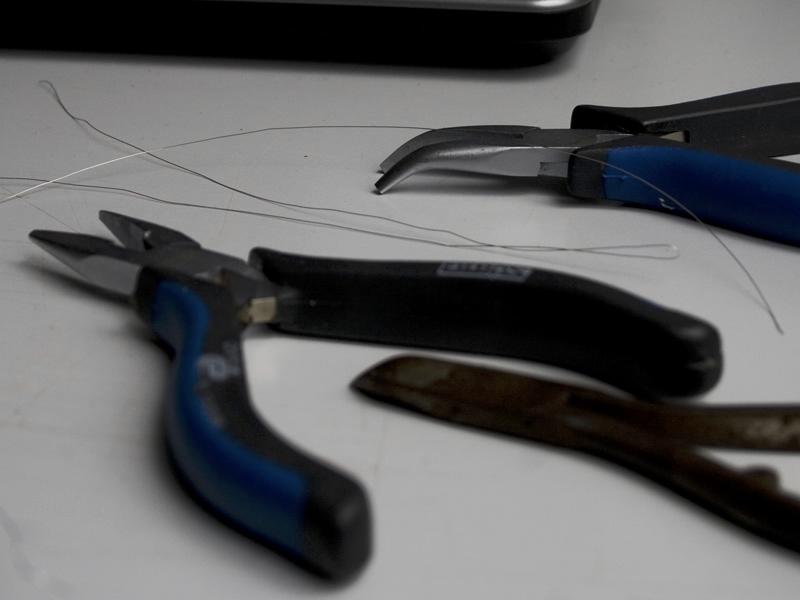
You will need:
- Fine Wire - I tried 0,5 mm and 0,2 mm. I think the later is better. You can get it from hobby stores. I recently bought ~ 1 km from ebay. You could strip small electric wires or network cables. There's usually some fine twisted wire inside.
- electric screwdriver / small drill
- pliers
- a piece of bigger wire, like a paperclip
 --+--+--+--+--+--+--+--+--+--+--+--+--+--
1st step:
--+--+--+--+--+--+--+--+--+--+--+--+--+--
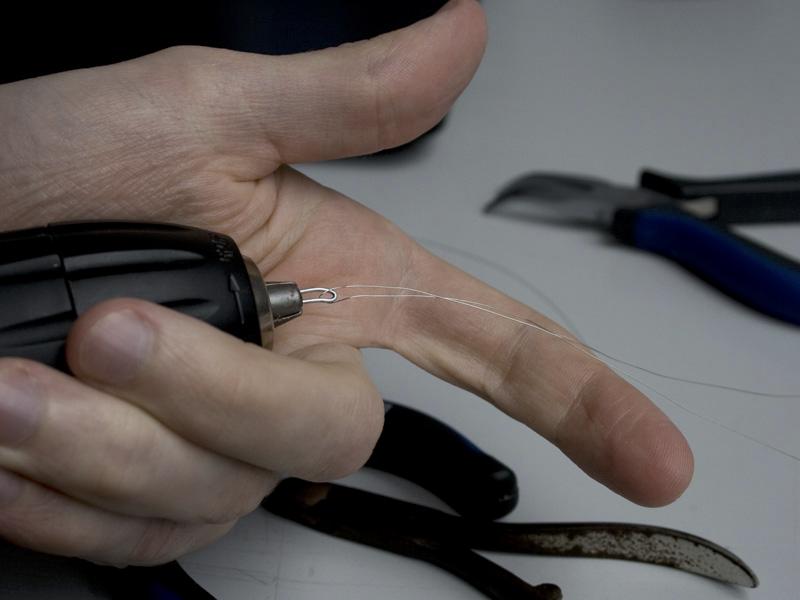
1st step:
- Take a piece of wire (I used a piece of about 30 to 40 cm) and fold it.
- Then take the paperclip or a piece of it and clamp it in the screwdriver / drill.
- thread the wire through the clip
 --+--+--+--+--+--+--+--+--+--+--+--+--+--
2nd step:
--+--+--+--+--+--+--+--+--+--+--+--+--+--
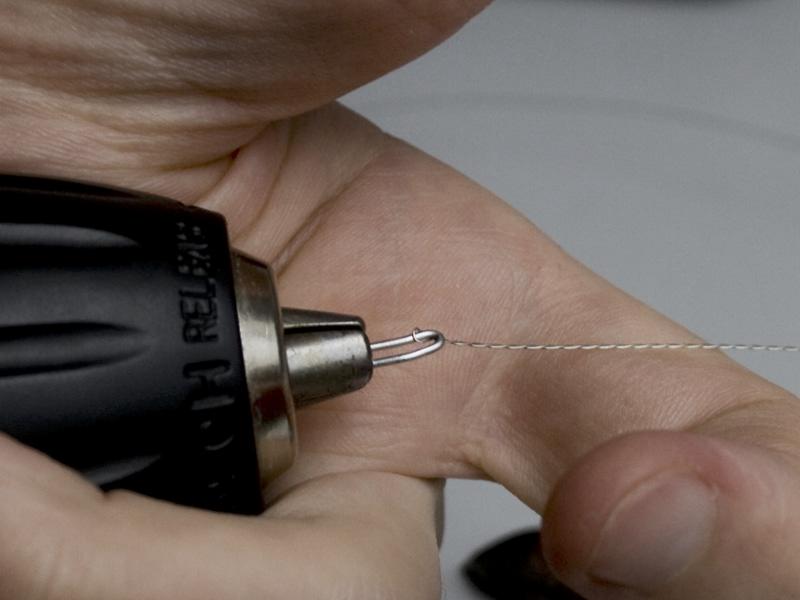
2nd step:
- hold the other end of the wires and twist them with the electric screwdriver / drill
 --+--+--+--+--+--+--+--+--+--+--+--+--+--
3rd step:
--+--+--+--+--+--+--+--+--+--+--+--+--+--
3rd step:
- clamp the clip to a vice or something else that will hold it

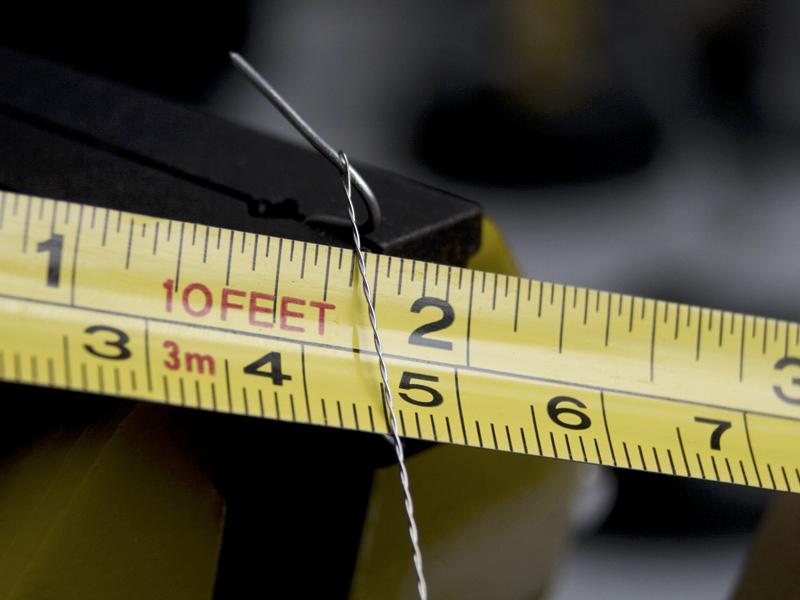
Here you can see how thin the wire is. It may break if you twist / bend it to much!
 --+--+--+--+--+--+--+--+--+--+--+--+--+--
4th step:
--+--+--+--+--+--+--+--+--+--+--+--+--+--
4th step:
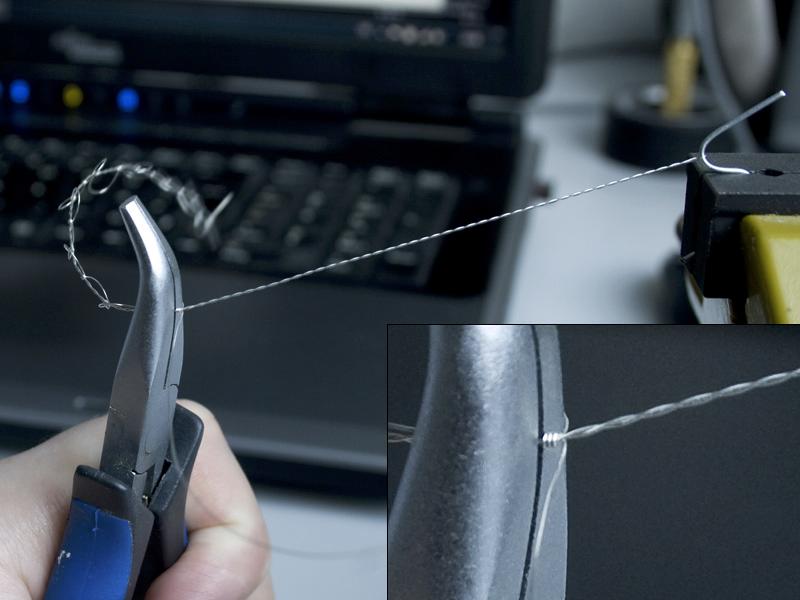
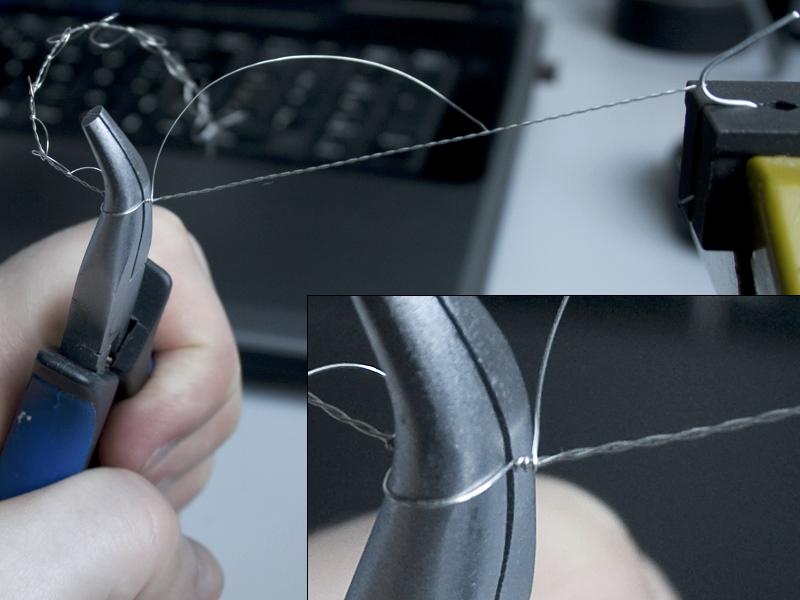
- The first spikes are the hardest to do. Normally I'll just twist the 2nd wire around the base wire and glue it in place.
- Take the pliers to hold the wire and twist the 2nd wire ( spike-wire) around the 1st wire.
- Try to twist it closely together.
- Do this every few mm or cm, just as you like. If you run out of spike-wire, just add another one.
a)
b)
 --+--+--+--+--+--+--+--+--+--+--+--+--+--
5th step:
--+--+--+--+--+--+--+--+--+--+--+--+--+--
5th step:
- When you are finished, you'll have something like this:
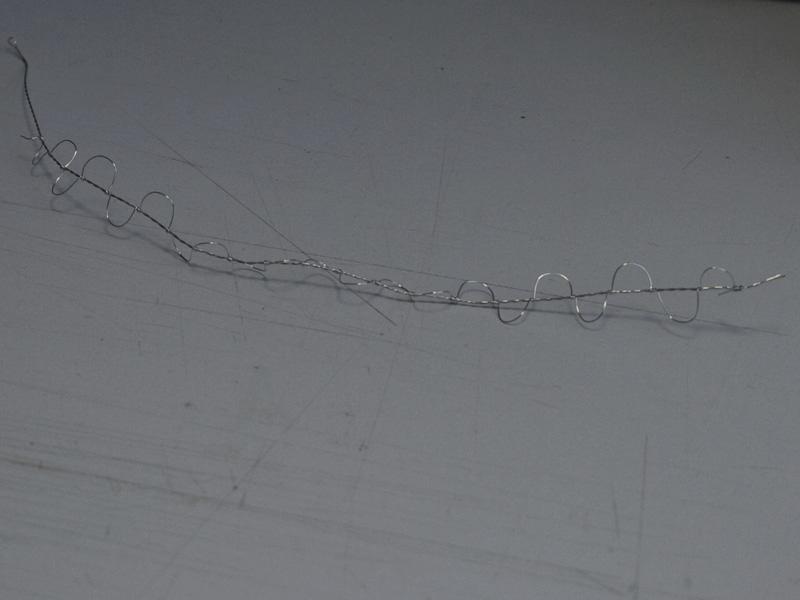 - Now, before you do anything: Glue the spikes in place with a small drop of superglue (mine has a little brush so I go over the spikes with it).
Otherwise the spikes might move on the wire!
- After the glue is dry you can clip of the spike wire at any length you want.
I know, there's some excess material. But if you do every spike alone you have excess material too - and you might go insane.
 --+--+--+--+--+--+--+--+--+--+--+--+--+--
Enjoy your barbed wire.
 A little advice!
Be careful!
I made barbed wire with 0,5 mm and it really has the potential to do some damage!! Even with 0,2 mm you should be carefull.
While the wire itself is very thin and breakable, short spikes won't bend and thus can cause some damage!
On the upside, people might avoid to touch your miniatures because of fear of tetanus.
That's it, hope you like it.
doubleT, at your service.
PS: "Nurgle's Rope" © doubleT 
edit: uploaded the pics to Dakka. Sorry, the quality of the pics doesn't reach that of the previous pics, the processing altered the images.
|
|
This message was edited 5 times. Last update was at 2010/09/04 19:13:44
|
|
|
 |
|
2010/08/30 20:51:36
Subject: Nurgle's Rope - How to make realistic barbed wire
|
|

Crazed Spirit of the Defiler
|
Very nice tutorial, with some great pics!
|
|
|
|
|
|
2010/08/30 21:00:19
Subject: Nurgle's Rope - How to make realistic barbed wire
|
|
Blood-Raging Khorne Berserker
|
Hehehe I used to do that in metal shop in high school and lay it on those plastic chairs in class w/ 1-3 inch peices, the cries of the victims hehehe. I was so mean back then
|
 Chaos rules you all drool! Blood for the Blood God! Chaos rules you all drool! Blood for the Blood God!
10,000 pts Black Legion
2,000 pts Traitor Catchian Guard (1067th).
8,000 point Sam Hain Eldar.
2,000 pts Squat Biker Force.
1,500 Orc Hoard (painting for a friend).
|
|
|
|
|
2010/08/31 04:24:53
Subject: Re:Nurgle's Rope - How to make realistic barbed wire
|
|

Moldy Mushroom
UK
|
awesome job, thanks for the good pics
|
|
|
|
|
|
2010/08/31 06:15:00
Subject: Re:Nurgle's Rope - How to make realistic barbed wire
|
|

Mekboy Hammerin' Somethin'
|
Great tutorial! I'll admit I would've tried to make every set of barbs individually if I tried something similar, but your way would definitely go a long way towards keeping me from losing my mind in the process. 

|
|
|
|
|
|
2010/08/31 12:05:56
Subject: Nurgle's Rope - How to make realistic barbed wire
|
|

Veteran Wolf Guard Squad Leader
Princedom of Buenos Aires
|
I'm like hungryp, I used to do each barb individually and that drove (more) mad.
Thanks a lot!
|
|
|
|
|
|
2010/08/31 13:12:18
Subject: Nurgle's Rope - How to make realistic barbed wire
|
|

Stormin' Stompa
|
Very good idea! I haven't come across this technique for creating the barbs - it doesn't seem half as fiddly as the result might imply.
|
|
|
|
|
2010/08/31 17:11:56
Subject: Re:Nurgle's Rope - How to make realistic barbed wire
|
|
Feldwebel
|
Thanks, guys. Got some questions regarding the posts where the barbed wire is attached to. Here's an update with a tutorial for the posts.   The inspiration: This scene in "The Pacific", click and click Relatively easy to do. If you need only a few, just bend a 0,5 mm wire around a piece of 1,00 mm wire. If you need more, though ... --+--+--+--+--+--+--+--+--+--+--+--+--+-- What you'll need: - a vise would be good - a small piece of wood - some 1,0 mm wire - more 0,5 mm wire - pliers - maybe a 0,5 mm drill - pencil --+--+--+--+--+--+--+--+--+--+--+--+--+-- 1st step: - on a line I made dots with a distance of 5 mm 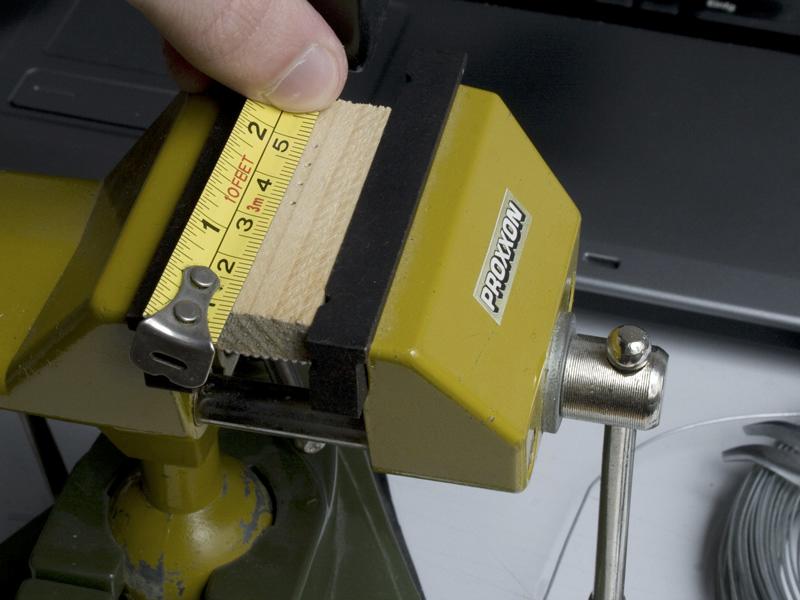 --+--+--+--+--+--+--+--+--+--+--+--+--+-- 2nd step: --+--+--+--+--+--+--+--+--+--+--+--+--+-- 2nd step: - I drilled holes with a 0,5 mm drill. That's not necessary but it'll help because it makes things easier. - I put short pieces of 1,0 mm wire into these holes. - Maybe it'd be wise to glue the pieces in place. They could move and come out later. 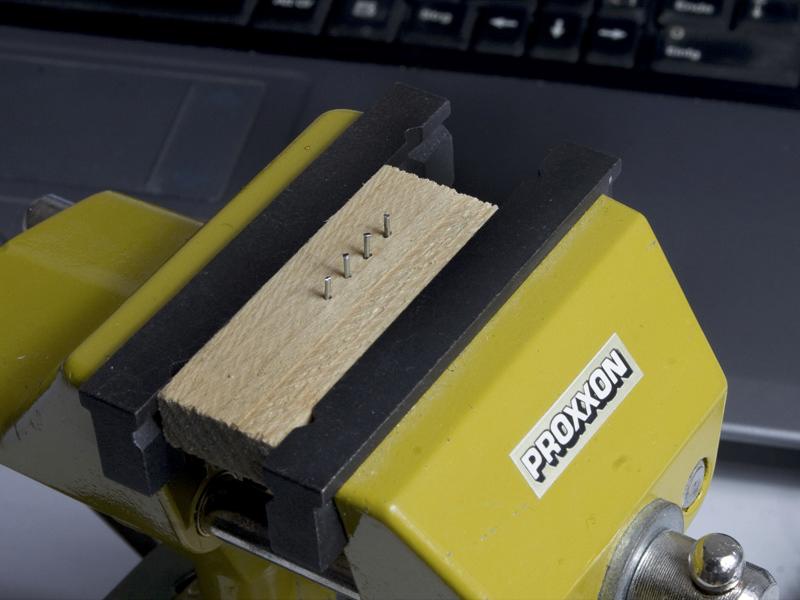 --+--+--+--+--+--+--+--+--+--+--+--+--+-- 3rd step: --+--+--+--+--+--+--+--+--+--+--+--+--+-- 3rd step: - At first I used 1,0 mm wire. It's harder to bend and looks a little big later on. I'd suggest using 0,5 mm wire as I did in the later pics. - Just bend the wire around the 4 pins. For the 1,0 mm wire you might need pliers; 0,5 mm wire is easier to bend. 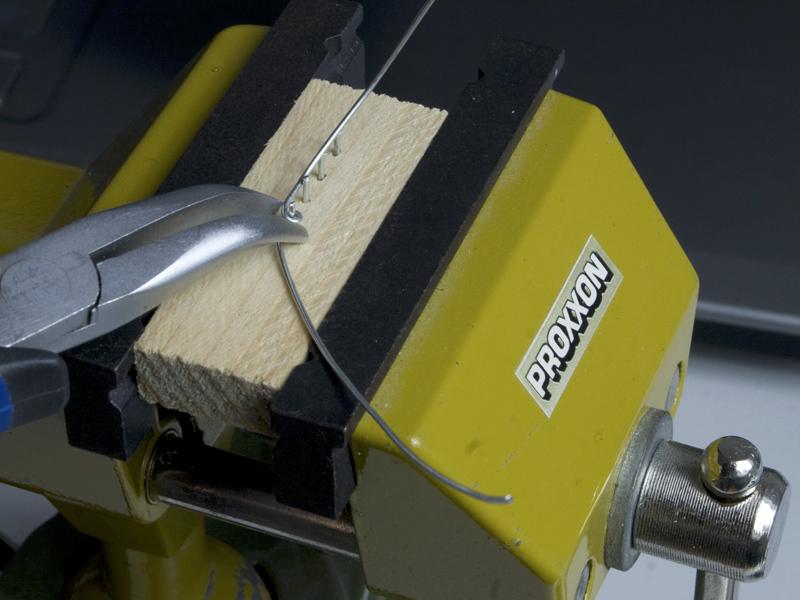 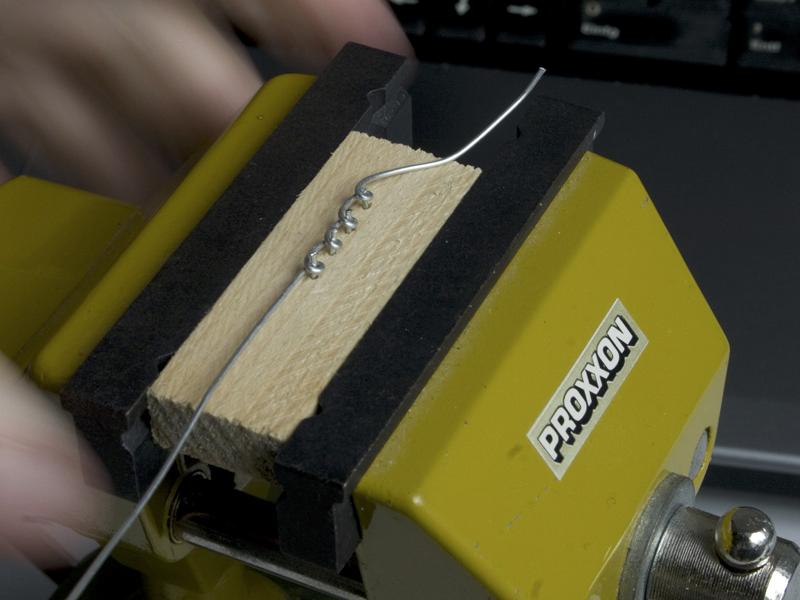 --+--+--+--+--+--+--+--+--+--+--+--+--+-- 4th step: --+--+--+--+--+--+--+--+--+--+--+--+--+-- 4th step: The pole now looks like this. 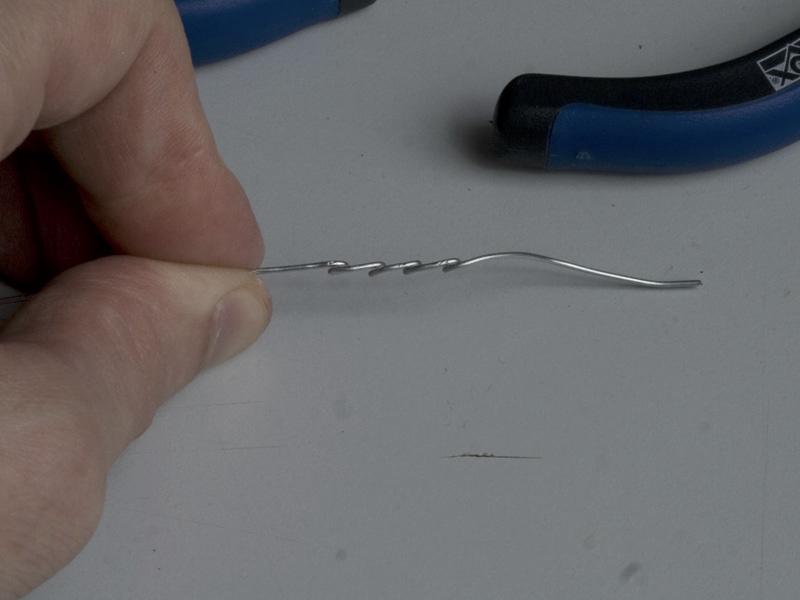 Now, how do we get the barbed wire in there? The openings are a little to small to just fit the spikes through there. - We open the bends a little with a sharp modelling knife. Open it to the upper side. Be careful with the knife! 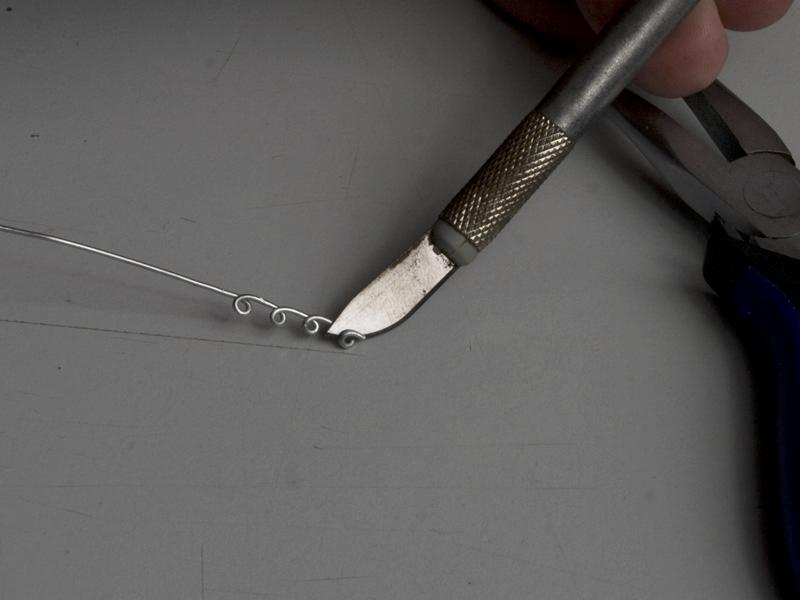 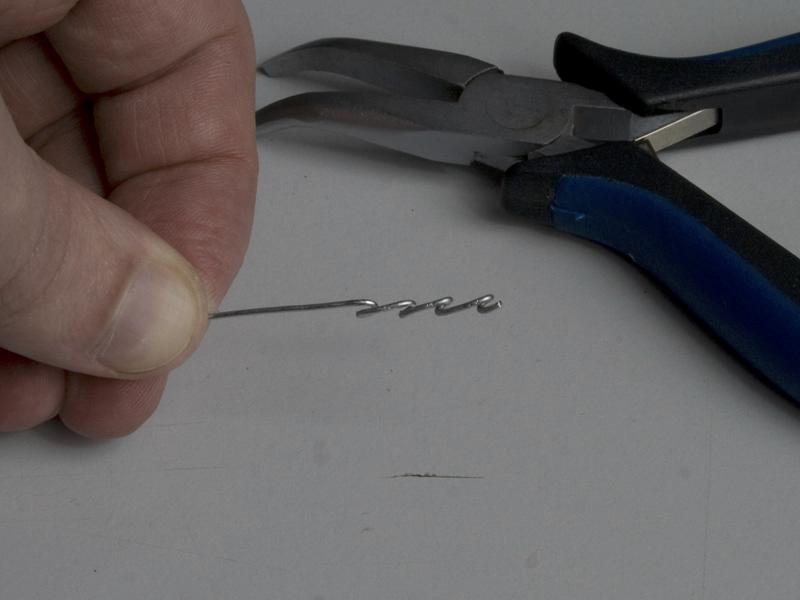 The pole is now ready to use on your base. Maybe leave some wire and bend it around to attach it to the base. 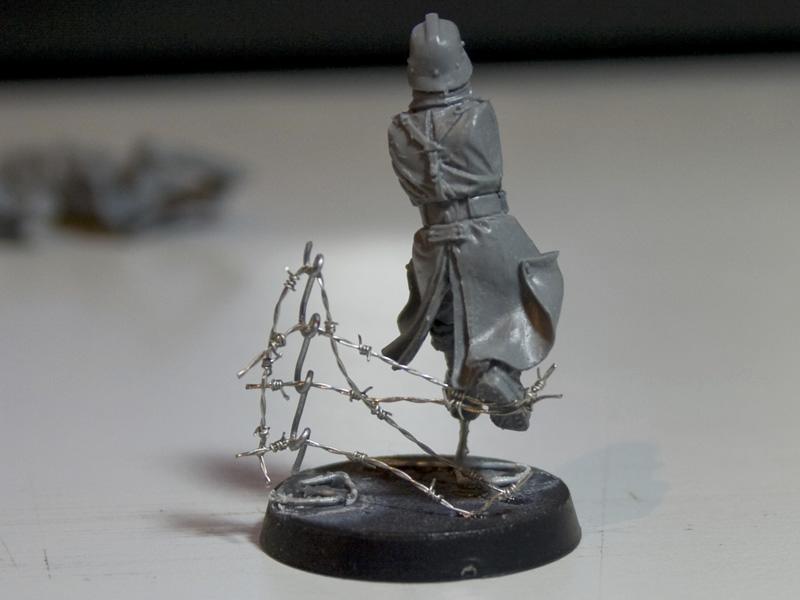 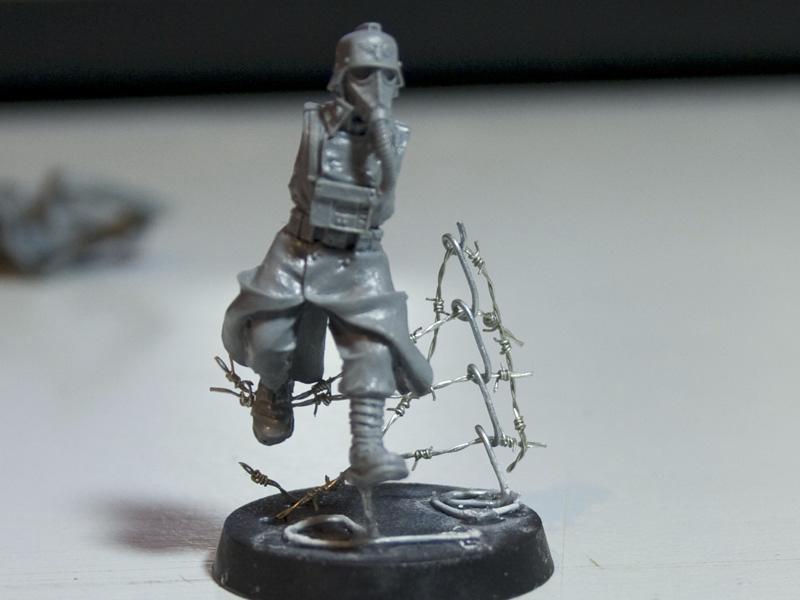 --+--+--+--+--+--+--+--+--+--+--+--+--+-- Bonus: --+--+--+--+--+--+--+--+--+--+--+--+--+-- Bonus: Maybe you are insane like me and you want these poles like you saw them in the pics from the series "The Pacific" that you've seen above. You could build some terrain or some Guardsmen drilling these into the ground ... Here's how I did the lower ends. - Clamp the pole and a piece of 1,0 mm wire into the pliers. At first (upper pic) I used the wrong pliers. It's easier to do it with those in the lower pic. - Just bend the pole around the 1,0 mm wire. You could also use a 2 mm nail or something else. Try what looks best for you. 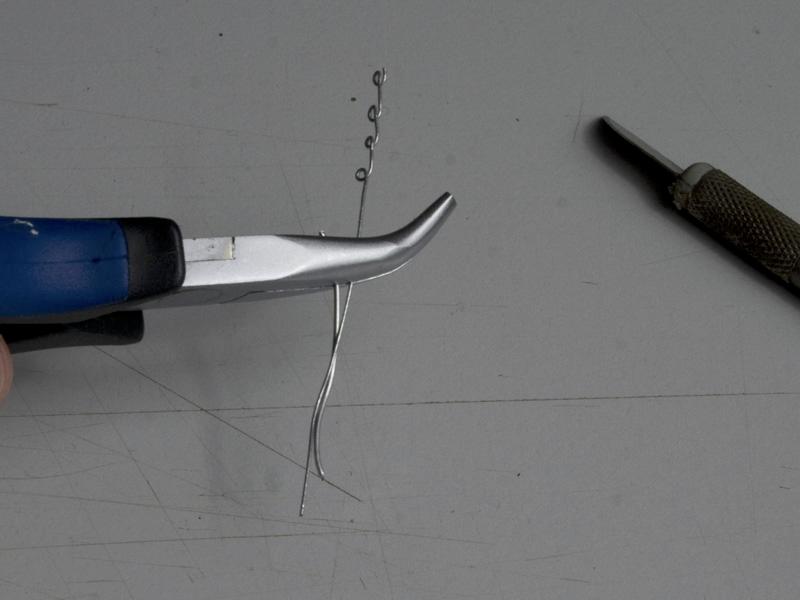 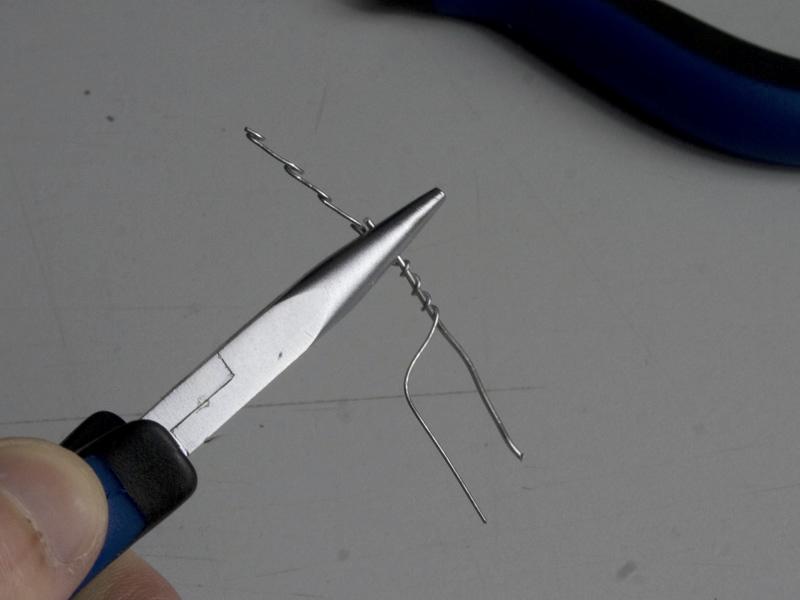 --+--+--+--+--+--+--+--+--+--+--+--+--+-- Getting the barbed wire into the pole: --+--+--+--+--+--+--+--+--+--+--+--+--+-- Getting the barbed wire into the pole: Now we have this beautiful pole: 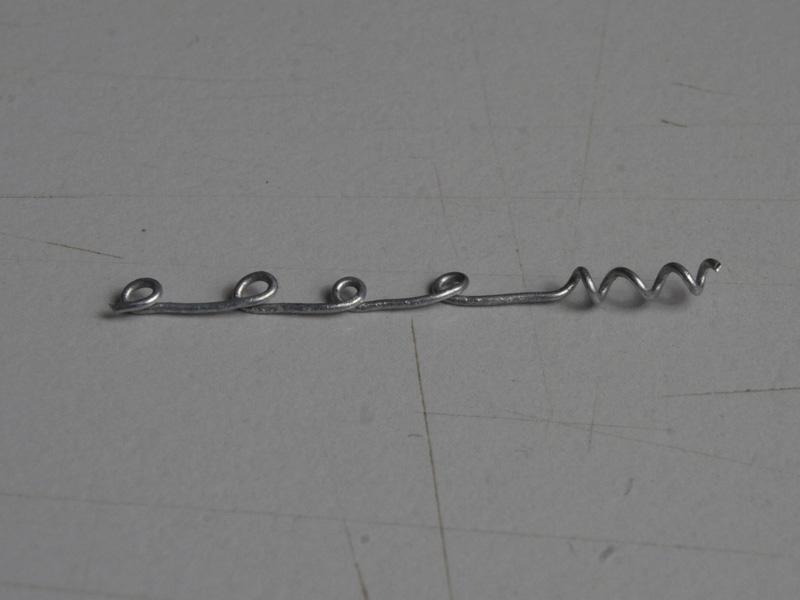 - Put the barbed wire into the little space between the bend. 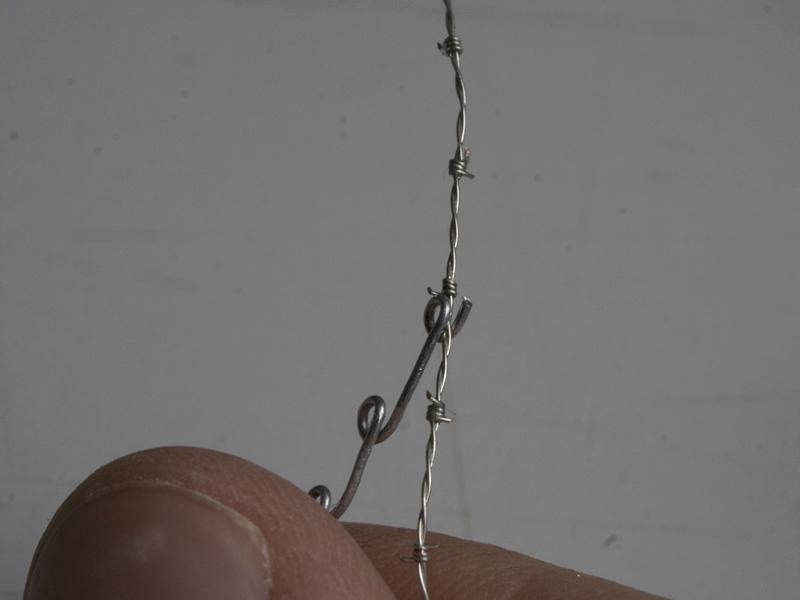 - Roll the barbed wire around the pole. 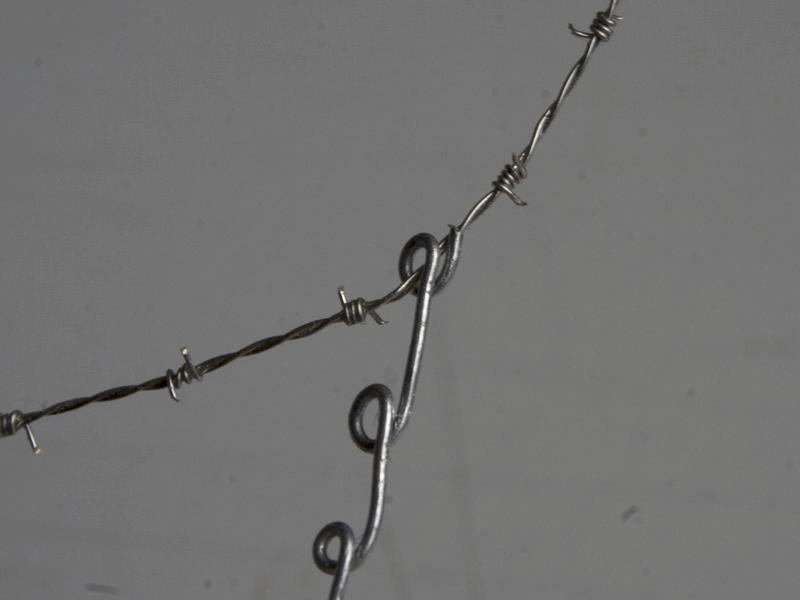 It's easier to begin with the lower openings and to work your way to the top. I usually glue the barbed wire in place. That's it. Hope you like this one, too. edit: uploaded the pics to Dakka. Sorry, the quality of the pics doesn't reach that of the previous pics, the processing altered the images.
|
|
This message was edited 2 times. Last update was at 2010/09/04 18:20:15
|
|
|
|
|
2010/08/31 17:21:03
Subject: Re:Nurgle's Rope - How to make realistic barbed wire --+--+--+-- UPDATE: now with poles
|
|

Yellin' Yoof on a Scooter
chichester
|
that looks super cool i`l have to give that a try soon thanks dude
|
 is it not better to die on your feet, then live on your knees? is it not better to die on your feet, then live on your knees?

 myname is Lrak not Irak!!!!!! myname is Lrak not Irak!!!!!! |
|
|
|
|
2010/08/31 17:45:49
Subject: Nurgle's Rope - How to make realistic barbed wire --+--+--+-- UPDATE: now with poles
|
|
Avatar of the Bloody-Handed God
Inside your mind, corrupting the pathways
|
Very nice tutorial and some great ideas. While the idea is not new, as you mentioned, the instructions and pictures are clear and easy to follow.
Great work 
|
|
|
|
|
|
2010/08/31 19:32:31
Subject: Nurgle's Rope - How to make realistic barbed wire --+--+--+-- UPDATE: now with poles
|
|
Regular Dakkanaut
|
Please host the pictures on Dakka.
|
|
|
|
|
2010/08/31 19:59:41
Subject: Nurgle's Rope - How to make realistic barbed wire --+--+--+-- UPDATE: now with poles
|
|
Feldwebel
|
Sorry, asmith. I don't want all the tutorial pics jamming my galery. I don't think that this is what the galery is for. That's what the thread is for.
At least I don't want to see some random tutorial pics while browsing the galery.
Also, if you have trouble seeing the pics, please say so. I never experienced any troubles with abload. de (had lots of trouble with imageshack, though).
So unless you can give me a sound reason or a mod tells me to host them on dakka, they stay where they are.
Thanks
|
|
|
|
|
|
2010/08/31 21:20:49
Subject: Nurgle's Rope - How to make realistic barbed wire --+--+--+-- UPDATE: now with poles
|
|
Phanobi
Canada,Prince Edward Island
|
Fantastic! I will certainly be using that on my bases from now on. Great instructions and pictures.
|
|
|
|
|
|
2010/09/01 12:46:45
Subject: Re:Nurgle's Rope - How to make realistic barbed wire --+--+--+-- UPDATE: now with poles
|
|
Regular Dakkanaut
|
I love your style of bases, please tell how!
|
|
|
|
|
2010/09/01 19:25:37
Subject: Nurgle's Rope - How to make realistic barbed wire --+--+--+-- UPDATE: now with poles
|
|
Regular Dakkanaut
|
doubleT wrote:Sorry, asmith. I don't want all the tutorial pics jamming my galery. I don't think that this is what the galery is for. That's what the thread is for.
At least I don't want to see some random tutorial pics while browsing the galery.
Also, if you have trouble seeing the pics, please say so. I never experienced any troubles with abload. de (had lots of trouble with imageshack, though).
So unless you can give me a sound reason or a mod tells me to host them on dakka, they stay where they are.
Thanks
Actually that is exactly what the gallery is for, the voting style system was tacked on later. The image hosting is meant to prevent exactly what is happening here: a post with pictures not everyone can see or with broken links.
|
|
|
|
|
2010/09/01 19:31:59
Subject: Nurgle's Rope - How to make realistic barbed wire --+--+--+-- UPDATE: now with poles
|
|
Decrepit Dakkanaut
|
AH!
I've been doing barbed wire that looks the same as yours (using thin gauge steel wire), except I was doing it where I cut little pieces off and wrapped them onto the wire. Using a single wire piece and then cutting off the loops is genius!
I've got to make some more now, knowing that it's going to take me less than like 3 hours a foot.
|
|
|
|
|
|
2010/09/02 19:06:36
Subject: Nurgle's Rope - How to make realistic barbed wire --+--+--+-- UPDATE: now with poles
|
|

Regular Dakkanaut
|
i love it!
|
 The flesh is weak! The flesh is weak! |
|
|
|
|
2010/09/02 19:48:39
Subject: Nurgle's Rope - How to make realistic barbed wire --+--+--+-- UPDATE: now with poles
|
|
Feldwebel
|
thx, guys, I'm happy you like it.
asmith wrote:The image hosting is meant to prevent exactly what is happening here: a post with pictures not everyone can see or with broken links.
"what is happening here"? Woah ... easy. Everyone can see every picture and no link is broken! I've used abload. de for years and have 500+ pictures there that are linked to in several German, UK and American boards (cars, photography, ...) without a problem ever since. But I'll make a new sub-galery on Dakka - just and only for you.
|
|
|
|
|
|
2010/09/02 20:49:17
Subject: Nurgle's Rope - How to make realistic barbed wire --+--+--+-- UPDATE: now with poles
|
|

Slippery Ultramarine Scout Biker
|
This is an awesome barbed wire! Would you mind if I used this method?
|
It has been varified by John Hurt that the Ultramarines are indeed the greatest space marine chapter. |
|
|
|
|
2010/09/02 21:44:24
Subject: Nurgle's Rope - How to make realistic barbed wire --+--+--+-- UPDATE: now with poles
|
|
Shroomin Brain Boy
|
well after all its a tutorial, its meant do give people an idea to work there models. i think it was his intention^^
|
|
|
|
|
|
2010/09/02 21:44:59
Subject: Nurgle's Rope - How to make realistic barbed wire --+--+--+-- UPDATE: now with poles
|
|
Regular Dakkanaut
|
Thanks TT for your effort. I guess I have to very specifically say, I can not see the pictures, and I am guessing anyone sitting behind web filters at work can not see them either. Suprisingly there are a large number of us who frequent Dakka (some for this reason alone).
|
|
|
|
|
2010/09/03 15:36:32
Subject: Nurgle's Rope - How to make realistic barbed wire --+--+--+-- UPDATE: now with poles
|
|
Feldwebel
|
Uploaded the pics to Dakka. The processing decreased image quality, thus the dull color of the pics. As a photographer, this annoyes me. To quote you: The image hosting is meant to prevent exactly what is happening here: a post with pictures in low quality. Hope you appreciate it, though. edit: UltraHawk wrote:This is an awesome barbed wire! Would you mind if I used this method?
As Viktor said, that's what the tutorial is for.
|
|
This message was edited 1 time. Last update was at 2010/09/03 17:38:54
|
|
|
|
|
2010/09/03 20:37:24
Subject: Nurgle's Rope - How to make realistic barbed wire --+--+--+-- UPDATE: now with poles
|
|
Shroomin Brain Boy
|
^^
|
|
|
|
|
|
2010/09/04 12:51:33
Subject: Nurgle's Rope - How to make realistic barbed wire --+--+--+-- UPDATE: now with poles
|
|

Krazy Grot Kutta Driva
|
That's inspired! Thanks for passing on the technique. I have to admit that I too tried to make barbed wire before by bending each individual spike and gave up.
Right need to go get me some wire now!
|
|
|
|
|
|
2010/09/08 18:02:08
Subject: Re:Nurgle's Rope - How to make realistic barbed wire --+--+--+-- UPDATE: now with poles
|
|
Ferocious Blood Claw
|
Thats the best DIY barbed wire I've seen. good job.
|
|
|
|
|
|
2010/09/12 22:54:15
Subject: Nurgle's Rope - How to make realistic barbed wire --+--+--+-- UPDATE: now with poles
|
|
Monstrous Master Moulder
Secret lab at the bottom of Lake Superior
|
This is the most realistic barbed wire I've ever seen. We have a winner, folks!
|
Commissar NIkev wrote:
This guy......is smart
|
|
|
|
|
2010/09/16 21:19:51
Subject: Nurgle's Rope - How to make realistic barbed wire --+--+--+-- UPDATE: now with poles
|
|
Giggling Nurgling
|
love this! i gotta use it with my nurgles
|
  Needs repainting, from my 16 year old skills. Needs repainting, from my 16 year old skills.
  Needs painting, from my 22 year old lazyness Needs painting, from my 22 year old lazyness |
|
|
|
|
2010/09/16 21:51:39
Subject: Nurgle's Rope - How to make realistic barbed wire --+--+--+-- UPDATE: now with poles
|
|
Feldwebel
|
I'd really love to build a complete Nurgle army around the barbed wire theme!
I may try it when the DKoK has seen a little progres.
|
|
|
|
|
|
2010/09/17 12:17:53
Subject: Nurgle's Rope - How to make realistic barbed wire --+--+--+-- UPDATE: now with poles
|
|

Hardened Veteran Guardsman
|
Great tut and nice pics. thanks
|
Never Give Up, Never Surrender!
 IG REDregiment 3000pts IG REDregiment 3000pts
I like to drink tea with Lady Luck |
|
|
|
|
2010/09/17 15:36:10
Subject: Nurgle's Rope - How to make realistic barbed wire --+--+--+-- UPDATE: now with poles
|
|
Drop Trooper with Demo Charge
|
I've been using army painters "barbed" wire, and this is going to be much, much better! Should buy some kids off the internet and start your own sweatshop making this stuff! I'd buy it!
|
Paperhammer40K FTW!
Khornholio wrote:I sometimes think Jesus manifests in gaming stores as a weirdo to test other people's patience.
John Lambshead said...
Never read 40K forums. They are populated by trolls. |
|
|
|
|
|
|