| Author |
Message |
 |
|
|
|
|
Advert
|
Forum adverts like this one are shown to any user who is not logged in. Join us by filling out a tiny 3 field form and you will get your own, free, dakka user account which gives a good range of benefits to you:
- No adverts like this in the forums anymore.
- Times and dates in your local timezone.
- Full tracking of what you have read so you can skip to your first unread post, easily see what has changed since you last logged in, and easily see what is new at a glance.
- Email notifications for threads you want to watch closely.
- Being a part of the oldest wargaming community on the net.
If you are already a member then feel free to login now. |
|
 |
2010/02/22 22:42:17
Subject: Demi-Legion: Chaos Titan Mega Build-Two Warhounds, One Reaver
|
|

Furious Raptor
|
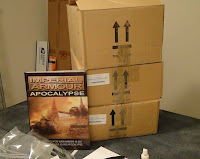
Well I couldn't help myself. Being a long time follower of all things Chaotic, when the Forgeworld Chaos Reaver Titan hit I just had to have it. But I was afraid that he would be a little lonely by himself in my display case so I bought two Warhounds to keep him company as well. It seemed like a good idea at the time....
Thus my Chaotic Demi-Legion was born, to ravage apocalypse and gladiator games to no end. However in order to make this plan come to fruition, I had to get my arse in gear and assemble these puppies. Fortunately I have cohorts that are eager and willing to help for their share of plastic toys!
So with a watchful eye and a devoted helper the Legion began to emerge.

Most people by now have heard that assembling these things are a pain the arse. However its mostly just the legs that suck. You really, really have to plan that out carefully. First trim up all your leg pieces from the toes up to the hip joints. Have it all ready to go and your leg build will go smoothly.
It's preferable to have two people for this operation. My helper Andy "Submariner" Holley trimmed down and de-flasher these pieces in no time flat. We used the instructions for inspiration for the leg poses (basically that means we copied it). So while I dry fitted and glued each piece Andy held the hip and legs to make sure everything lined up and the hip joint that attached to the torso would be level.
It all turned out pretty good, and you can even do this without attaching the pistons -except the hamstring one you have to attach that when you build up to the hip.

One last piece of advice. Magnetizing or pinning the leg assembly to the torso will not only give you the ability to move you titan left to right ( and make cool machine gun noises when you shoot), but lets you transport your bad boy easier as well.
I used two 1/2" rare earth magnets here. You have to try and make sure that even with the magnets attached that the two pieces they are connecting remain flush to transfer the force of the Torso assembly to the legs. These magnets will not do all the work by themselves!
So that's it for now, hopefully if the freakish snow lets up we can get more of this done, and move on to the big boy himself, Mr Reaver. The journey of three titans has begun....
|
|
This message was edited 2 times. Last update was at 2010/02/22 22:45:40
Check out my conversion blog-

"Iron Warriors turn: he shoots my falcon with his lascannon, and destroys it" -Blackmoor
|
|
|
 |
|
2010/02/23 07:07:13
Subject: Demi-Legion: Chaos Titan Mega Build-Two Warhounds, One Reaver
|
|

Avatar of the Bloody-Handed God
Inside your mind, corrupting the pathways
|
/envy 
|
|
|
|
|
|
2010/02/23 11:40:24
Subject: Re:Demi-Legion: Chaos Titan Mega Build-Two Warhounds, One Reaver
|
|
Long-Range Land Speeder Pilot
|
I do not envy you having to build or paint these Epic monstrosities, but truly I envy you the finished product, which I have no doubt will be awesome.
I'll be keeping an eye on this thread, keep up the good work 
|
|
|
|
|
|
2010/02/23 15:22:44
Subject: Demi-Legion: Chaos Titan Mega Build-Two Warhounds, One Reaver
|
|
[DCM]
.
|
Wow!
Good luck - from what I hear, you'll need it!
Looking forward to seeing this progress...
|
|
|
|
|
2010/02/24 01:07:57
Subject: Demi-Legion: Chaos Titan Mega Build-Two Warhounds, One Reaver
|
|
Frightening Flamer of Tzeentch
|
You sir have way too much disposable income...(contemplates the hobby itself)...(discovers the Emperor's real reason for the crusades across the galaxy)...(tells findings to a bunch of Black Templars carrying chain swords)......
|
|
This message was edited 1 time. Last update was at 2010/02/24 01:08:29
|
|
|
|
|
2010/02/24 01:12:16
Subject: Demi-Legion: Chaos Titan Mega Build-Two Warhounds, One Reaver
|
|
Junior Officer with Laspistol
|
I will be watching this one with interest.
|
|
|
|
|
|
2010/02/26 01:18:41
Subject: Re:Demi-Legion: Chaos Titan Mega Build-Two Warhounds, One Reaver
|
|
Furious Raptor
|
Well we were able to get more done on Warhound #1. We're working on the torso now, and while its not quite as hard as doing the legs, it's still important to make sure everything lines up correctly. I also plan on going back and painting the interior. I just want to get the outside painted first because we have an Apocalypse game coming up in a few weeks that I need this guy for.

We started with the powe-plant piece that connects to the hips. If you remember from the last article I magnetized it so we could separate and rotate the torso in game. I got a lot of comments saying to protect the magnets themselves from shattering under their own attractive force, and I have to concur with that recommendation. I plan on either putting thin card or a small layer of resin on top of the hip magnet to give it some protection. So good heads up to all that commented on that!

Back to the torso- It's best to lay everything out first, and then dry fit it all together before glueing. First I attached the powe-plant to the forward hatch area. Then I glued the servitor arm sockets on. It's very important to make sure these are level, otherwise your titan arms will be slouching.

After that is all assembled I added on the back shoulders and filled the gaps in the pieces as best I could with some gap filler CA glue. Dry-fitting the top carapace here is a must. I realized after doing this that the right arm was a little off, but manageable. The top servitor hatches glue to the carapace and have to line up with the recesses on the torso assembly. Be sure to double check that and the overall fit of the carapace carefully, you don't want your centerpiece to look like the hunchback.

Next up is the cockpit, and unlike its Imperial cousin, there is almost no assembly involved. All you have to do it insert two control sticks onto the forward control panel, and a support collar to the back. Then you just glue the whole thing to the torso. So I slapped it together and attached it to the torso.
It was kinda hard to figure out the correct positioning of the head without the arms, so I used the feet as reference. Hopefully everything will flow together when I get to the arms.
You'll notice the center compartment bulkhead isn't glued in yet. I kept that out so that I can paint the interior later. It really would have jammed me up if that was in there when I went back to paint there.
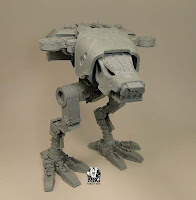
So here's a good progress shot of Warhound I along with a shot of the flexibility of the torso when its magnetized. The center of gravity of the torso seems to be working out well with the positioning of the feet. It worked out pretty good I think.
Next up, pistons and weapons!
-MBG
|
Check out my conversion blog-
"Iron Warriors turn: he shoots my falcon with his lascannon, and destroys it" -Blackmoor
|
|
|
|
|
2010/02/26 01:45:56
Subject: Demi-Legion: Chaos Titan Mega Build-Two Warhounds, One Reaver
|
|
Wolf Guard Bodyguard in Terminator Armor
|
Good luck sir
|
DR:90+S++G++M+B++I+Pw40kPwmhd+ID+++A++/wWD359R+++++T(M)DM+
 Deff Gearz 2,000+pts. (50% painted), Deff Gearz 2,000+pts. (50% painted),  Retribution 57pt.(70% painted), Retribution 57pt.(70% painted),  FOW British Armoured Squadron 1660pts. (15% painted) FOW British Armoured Squadron 1660pts. (15% painted)
|
|
|
|
|
2010/02/26 23:00:10
Subject: Demi-Legion: Chaos Titan Mega Build-Two Warhounds, One Reaver
|
|
Lustful Cultist of Slaanesh
|
Good luck with the epic modelling and painting job.
Unpainted, they remind me of AT-ATs.
|
|
This message was edited 1 time. Last update was at 2010/02/26 23:00:24
|
|
|
|
|
2010/02/27 05:16:12
Subject: Demi-Legion: Chaos Titan Mega Build-Two Warhounds, One Reaver
|
|

Liberated Grot Land Raida
|
3 titans... Some poeple have too much disposable income I guess  . Nice step-by-step, I'll be following this one with interest since it promises to be a very detailed account of what it takes to build one!
|
A Squeaky Waaagh!!
Camkhieri: "And another very cool thing, my phones predictive text actually gave me chicken as an option after typing robot, how cool is that."'
Meercat: "All eyes turned to the horizon and beheld, in lonely and menacing grandeur, the silhouette of a single Grot robot chicken; a portent of evil days to come."
From 'The Plucking of Gindoo Phlem' |
|
|
|
|
2010/02/27 07:08:05
Subject: Demi-Legion: Chaos Titan Mega Build-Two Warhounds, One Reaver
|
|
Longtime Dakkanaut
|
wait wait wait........ You spent HOW much money on these?!?!
|
|
|
|
|
2010/02/27 07:37:09
Subject: Re:Demi-Legion: Chaos Titan Mega Build-Two Warhounds, One Reaver
|
|

Virus Filled Maggot
The Plague Planet
|
Sweeet!
I'm in the process of building a Chaos Warhound myself, and I can safely say its the most challenging and fun model I have ever laid my hands on
I see that you have glued it together before you painted the interior. It might be hard to reach some places afterwards when your going to paint it. I painted the pieces seperatly and then glued them.
Also, what titan legion are you going to paint them in?
|
|
|
|
|
|
2010/02/27 19:16:43
Subject: Re:Demi-Legion: Chaos Titan Mega Build-Two Warhounds, One Reaver
|
|
Furious Raptor
|
Luftwaffel wrote:Sweeet!
I'm in the process of building a Chaos Warhound myself, and I can safely say its the most challenging and fun model I have ever laid my hands on
I see that you have glued it together before you painted the interior. It might be hard to reach some places afterwards when your going to paint it. I painted the pieces seperatly and then glued them.
Also, what titan legion are you going to paint them in?
Cool, yep they are no joke.
I didn't glue the middle bulkhead in, or glue on the carapaces so I should be okay for going back to do the interior. I'm thinking for the legion, something black and gold or nurglily. I would like to maybe do the legion of the des ires? from the storm of iron, and one of the heresy novels. I need to check that asap cause I want to start painting this week.
Automatically Appended Next Post:
Legio Mortis?
http://www.box.net/services/ipaper_by_scribd/102/92806047/675460/legio_mortis_logo_sheet/shared/xubic4jtj4
Click Preview
Automatically Appended Next Post:
Sigh,the titan I wanted to duplicate was an Imperator...
http://wh40k.lexicanum.com/wiki/Dies_Irae
|
|
This message was edited 3 times. Last update was at 2010/02/27 19:38:02
Check out my conversion blog-
"Iron Warriors turn: he shoots my falcon with his lascannon, and destroys it" -Blackmoor
|
|
|
|
|
2010/02/27 23:17:34
Subject: Re:Demi-Legion: Chaos Titan Mega Build-Two Warhounds, One Reaver
|
|
Virus Filled Maggot
The Plague Planet
|
Dies Irae was from Legio Mortis, same legion I'm painting mine in. Dies Irae is perhaps the most (in)famous titan in history! Both firering on the loyialists on Istvann and also breaching the wall of the Imperial Palace on Terra
You can find their colours in this pdf document along with icons and other stuff.
Edit: I see you already found their colours
|
|
This message was edited 1 time. Last update was at 2010/02/27 23:18:28
|
|
|
|
|
2010/03/15 22:46:27
Subject: Re:Demi-Legion: Chaos Titan Mega Build-Two Warhounds, One Reaver
|
|
Furious Raptor
|
So far we're up to working on the pistons and weapons for Warhound #1. We knocked the rest of that assembly out in one night, and managed to clean and trim the weapons.
We went ahead and cleaned up all the weapons I bought for both Warhounds just so we could have options to use for the upcoming Apocalypse game. I wasn't sure what lists we would be running for that so I wanted to make sure I at least planned the Titan out for maximum killing.
I left the leg greaves off so I could paint them, and the leg detail itself easier. The pistons go on pretty fast, but some we had to drill out because the casts had been a bit smooshed and the sides had jutted into the mounting hole. No big deal really, but you have to be prepared for anything I think when you are assembling these things.
I ended up magnetizing the weapon arms, so we could use whatever weapon load-out I had. The most popular weapon combo so far, seemed to be the twin Turbo Laser Destroyers. I pinned the top of the weapons mount and magnetized the bottom, again with a 1/2" diameter rare earth magnet. I also glued a small strip of plastic card onto the magnet on the weapon mount, to help prevent them from chipping or cracking- a fact learned from a previous blog comment!
Now that the assembly was complete for the most part, I needed to wash the resin down so I wouldn't have any problems with the paint adhering to it. It's a good idea to do this because when resin is cast, a small coat of mold release is left on the model. Sometimes some of the mold comes off and gets wedged into bits of detail as well. It all can make paint run off, or not even stick at all. So it's best to scrub this thing down with soap, and let it dry overnight.
I used some Dawn to clean the titan cause it good at cutting grease as well as dirt. I dunno if there is any of either on there, but hey least I got my bases covered. I got an old tooth brush and a normal soft sponge and just scrubbed every exposed surface I could see. Then I left it to dry overnight with a small fan running on it.
By morning it was completely dry, and I started priming it up in the base color I wanted. I used Army Painter's Necrotic Flesh. It's a lighter green color, like Dead Flesh, which is fine because I'm going to wash it with darker colors anyways.
Next update- a little bit of customizing...
-MBG
|
Check out my conversion blog-
"Iron Warriors turn: he shoots my falcon with his lascannon, and destroys it" -Blackmoor
|
|
|
|
|
2010/03/15 23:41:56
Subject: Re:Demi-Legion: Chaos Titan Mega Build-Two Warhounds, One Reaver
|
|

Been Around the Block
|
Wow, ambitious project. Watching with interest.
|
|
|
|
|
|
|


 Defenders of Obscurus


