Switch Theme:

Armor Plating Sculpting Tutorial...How To...  [RSS] Share on facebook Share on Twitter Submit to Reddit
»
Author Message
Advert


Forum adverts like this one are shown to any user who is not logged in. Join us by filling out a tiny 3 field form and you will get your own, free, dakka user account which gives a good range of benefits to you:
  • No adverts like this in the forums anymore.
  • Times and dates in your local timezone.
  • Full tracking of what you have read so you can skip to your first unread post, easily see what has changed since you last logged in, and easily see what is new at a glance.
  • Email notifications for threads you want to watch closely.
  • Being a part of the oldest wargaming community on the net.
If you are already a member then feel free to login now.


Made in us
Regular Dakkanaut


The Crosse, Wisc.

Armor Plating

Tools Used: Xacto knife, various metal sculpting tools, tooth picks, needles, colour shapers (primarily Royal Sovereign Size 0, for beginners I recommend the Firm), Ball Burnisher/Stylus, Mechanical Pencil, Thin Wall Metal Tubing

The picture below shows the various tools I use:


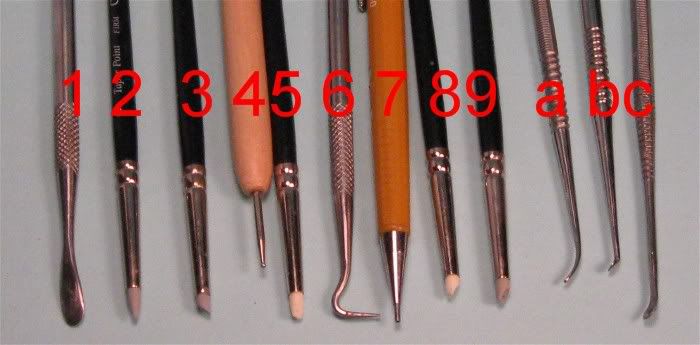
1 – Large Spoon Spatula: I use this for smoothing larger plate areas. Turned on
its edge works great for smoothing out the edges of your plates.

2 – Firm Round taper point. I use this for getting into all of those really tight areas and for smooth curved concave surfaces.

3 – Cup Round. I use this one for general smoothing. Flat for smoothing plates and convex surfaces. Round for concave surfaces and for round raised edges.

4 – Ball Burnisher / Stylus. I use this primarily for chainmail, but also for make holes in putty plates. Has too ball sizes. I also use this for denting and making the ball-peened hammer type look on the plates.

5 – Flat Chisel. General Smoothing. Square raised edges. Smoothing out plate edges.

6 – Metal Tooth Pick Hook. The point is like the Stylus. The bend kind of works like the Round Taper and Cup Round, but much finer than both and moves the putty much better.

7 – Mechanical Pencil. Used for recessed rivets and normal rivets when coupled with an xacto.

8 – Cup Chisel, Soft. When you really need a soft touch. These are the work horses for the way I make the raised edges on the armor.

9 – Cup Chisel, Firm. When you can use a slightly firmer touch. These are the work horses for the way I make the raised edges on the armor.

a – Knife on one end and long narrow spoon of uniform width.

b - Normal style knife, spoon spatula Sculpting tool. When you need to really move the putty. These are the work horses for the way I make the raised edges on the armor. The knife end used for smoothing the edges of the plates.

c - Normal style knife, spoon spatula Sculpting tool, but larger than b.


Materials Used: Brownstuff (BS), or Greenstuff (GS), Water.

General Notes, The More Common Putties
Greenstuff (also known as Kneadatite Blue-Yellow)
It is the most common putty you see used. It will cure solid, but will retain some flexibility. Very similar to a hard rubber. It strength is that it is excellent for making organic shapes. Its weakness is that it does not hold well for sharp edges. If you want really sharp edges, use your Xacto Knife and cut those edges after the GS has cured. GS can easily be cut once cured. GS does not take well to sanding or filing, but that does not mean you cannot smooth it out after it has cured. To smooth it after it is cured, use a sharp razor blade and gently shave the GS with the edge of the blade. Holds detail very well. Semi-sticky like gum in the early stages of curing, after being mixed.

Brownstuff (also known as Kneadatite Brown-Aluminum)
BS is a hard putty that combines a bit of flexibility with the ability to be sanded and filed into sharp edges. It cures harder than GS, and is more brittle. BS is often used for making mechanical looking parts or other metal parts like sword blades. I have also found that BS is much easier to get smooth before its cured than GS. Does not work as well as GS when sculpting more organic looking stuff, better suited for mechanical things.

Apoxie-Sculp
Apoxie-sculp is a self-hardening synthetic clay that combines the features and benefits of clay with those of epoxy. Apoxie sculp will be very soft when mixed, and has a much longer working time than BS or GS and takes a couple hours to really start stiffening. Once cured it becomes rock like. It can take sanding and filing. Its very strong and rigid. However, it does not take detail very well in my opinion.

Milliput
Milliput is an epoxy putty that cures hard. Once fully cured Milliput can be machined, drilled, tapped, turned, filed, sawn, sanded, but can be brittle.

Putty Mixing / Curing
After mixing the GS or BS putty, it will be soft and pliable. You will have about 20-30 minutes where it is very soft. This is a good time for basic shapes. After the first 20 minutes the putty will start showing more rubbery characteristics and begin to harden. Most epoxy putties, also depends on the amount of the hardener you use, will have about 1-1.5 hours of working time before it is too hard to work anymore. Epoxy putty will typically cure fully in about 24 hours.


General Tips for Armor Plates
- Recommend using BS, but GS works fine. BS is more forgiving in getting smooth plates, especially if you are new to using putty.
- Sharp edges are very critical to make it look right.
- To make raised edges very gently use your spatula/spoon tool, ball burnisher, or my personal favorites the chisel pointed colour shapers.
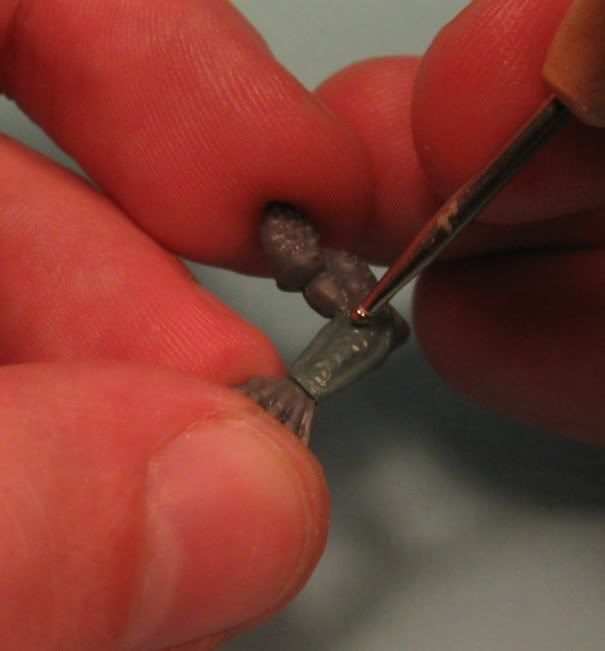
- For recessed rivets use a mechanical pencil without the lead in them and simply jab the putty as it's curing with the metal tubing.
- Plastic Rod Rivet method. Use your Xacto to shave off a thin layer of plastic rod. Place a tiny drop of glue on the model where you want the rivet and put the thin layer of the plastic rod over the glue.
- For raised rivets, allow the putty armor to cure (it helps if you put a little tiny divot in the putty where the rivet is going), flatten a small ball of putty over the armor, then use the tubing and press it into the flattened piece of putt. Remove the excess putty and allow it to cure. This is a very delicate rivet, not durable at all unless it is sealed in place somehow. I recommend the recessed rivet for use with your armies and things that get played with, its much more durable and gets the idea across easily.


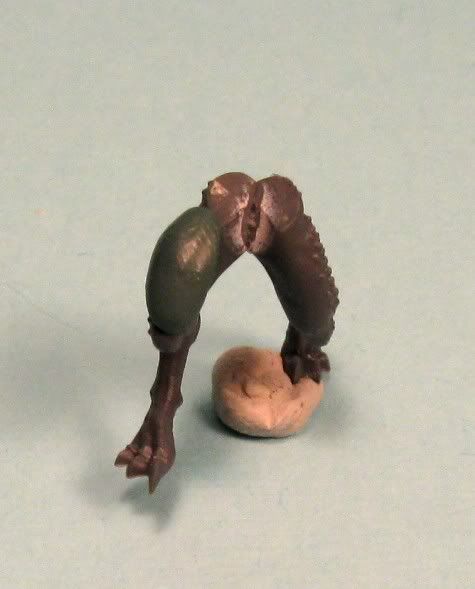
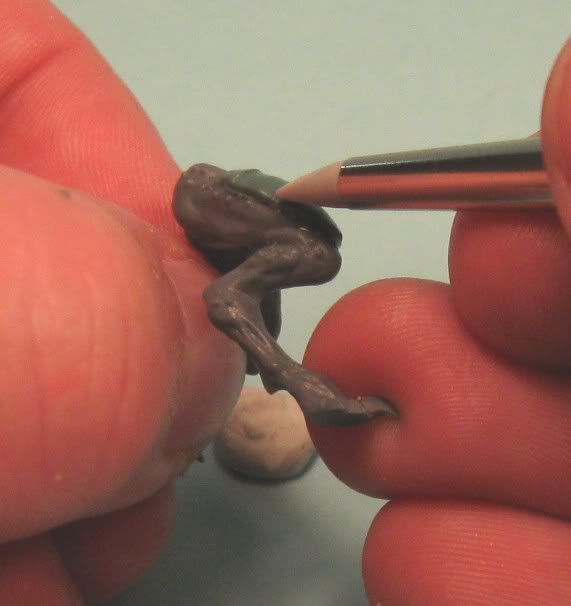
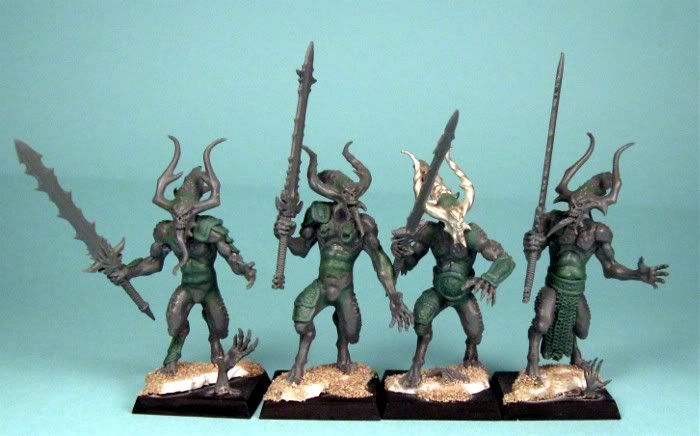
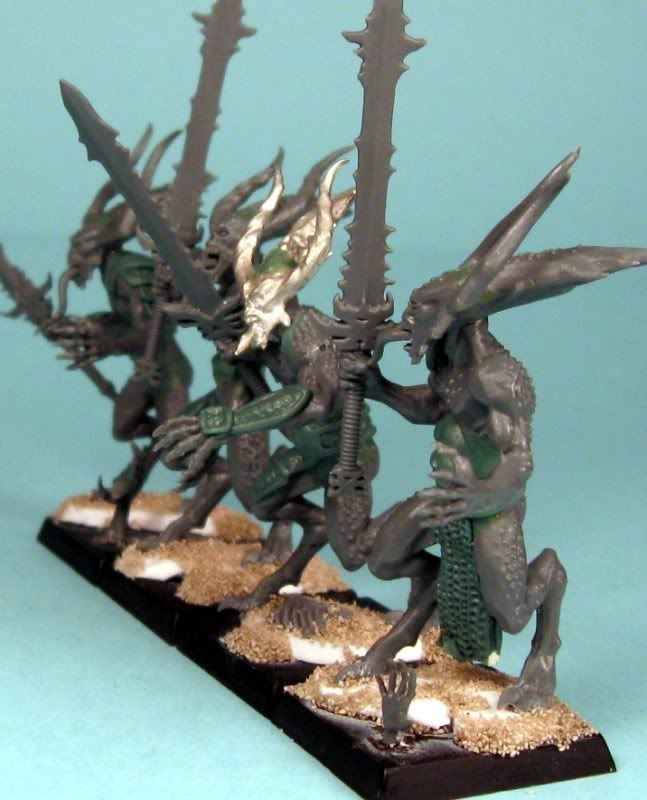
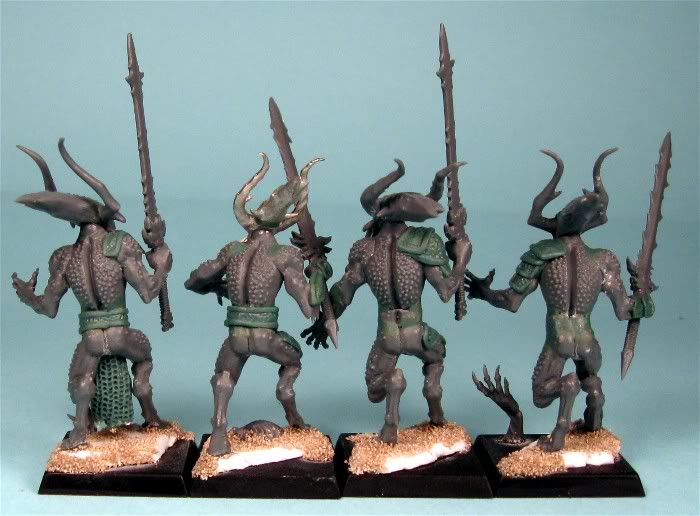
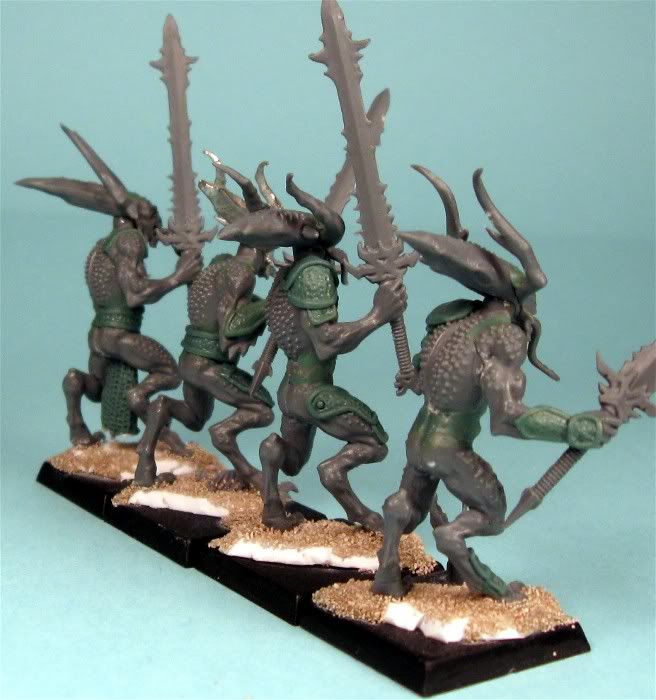
Automatically Appended Next Post:
Alright, let’s do some armor plates. Here we have a set of bloodletter legs, I’ve added a sheet of GS to the legs in the general shape that I want on the leg, and smoothed it out with my fingers. Again use water and/or lotion on your fingers to smooth out the GS.


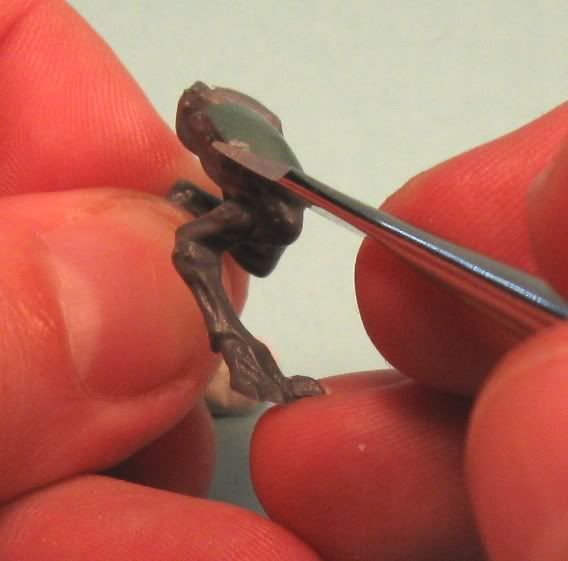
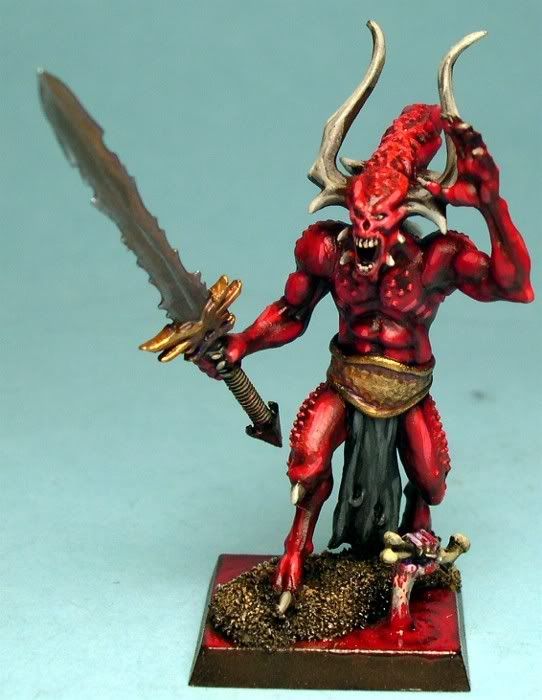
Next shape up the armor plate edges with the knife end of your sculpting tool. Done right this will give you a fairly sharp edge.

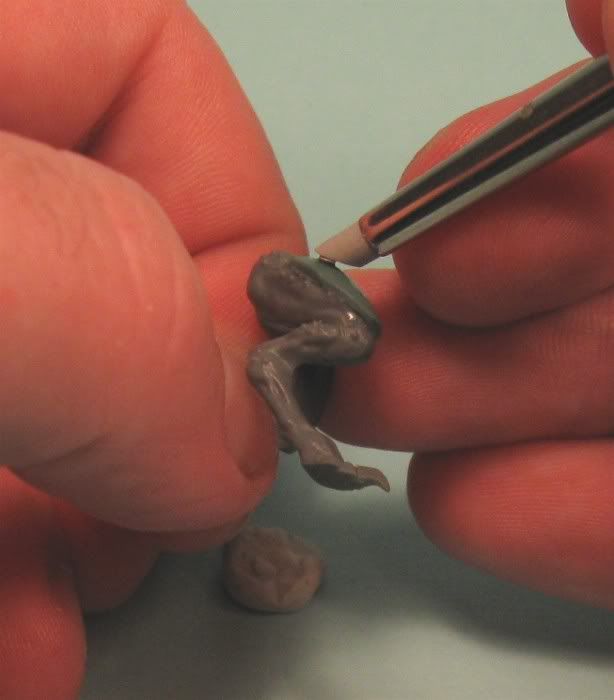
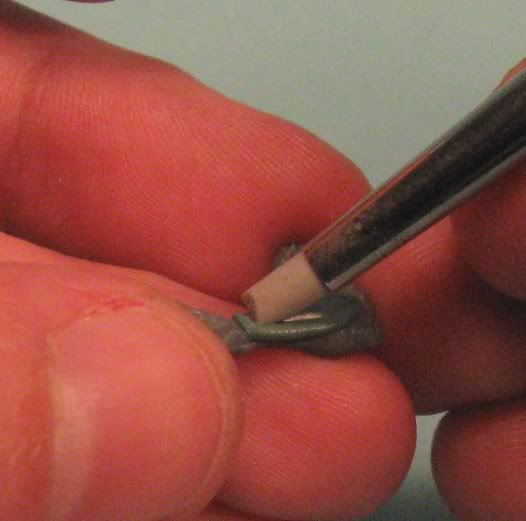
Smooth out the plate. In this picture you see me using the round cup smoothing out the GS. This is a cool picture, as you can actually see the water between the cup and the GS, as I was lifting the tool to back up and smooth an area out.

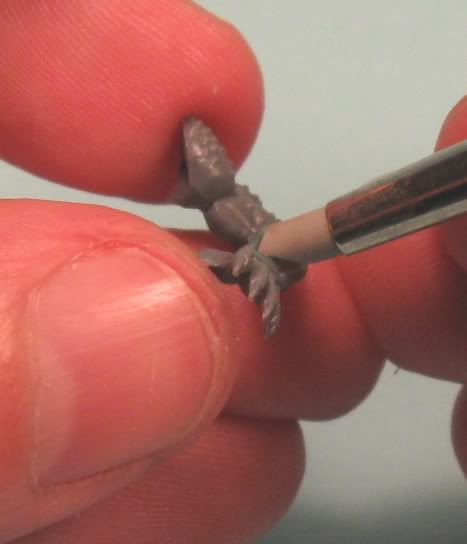
You could also use the spoon/spatula shaped end of your sculpting tool to do this, like what I am doing on this arm.

At this point I want to make the plate on the leg into several plates, so I’m using the firm flat chisel point to make raised edges for what will be overlapping plates.

Now back to the arm. I’m not making a number of plates, but I am using the same technique to make raised edges around the perimeter of the plate. In this picture I am gently denting the plate with the cup chisel. I do this by pushing edge in and then gently drag it back to smooth the central area. Again we are doing this after we got the plate completely smooth and the edge defined.


Some more coming up very soon.

---PPC


Automatically Appended Next Post:
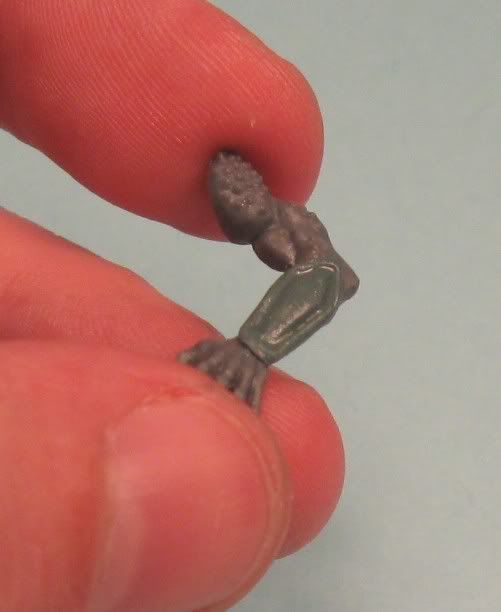
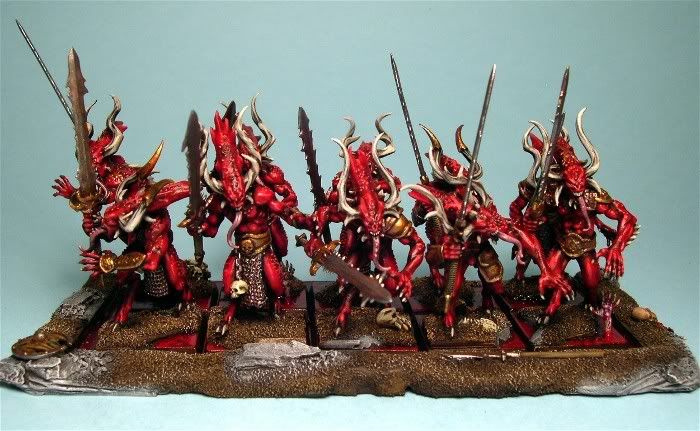
Some additional pics of the arm:

This message was edited 1 time. Last update was at 2010/05/22 00:29:00


Made in gb
Fresh-Faced New User


Very good tutorial, the pictures really help illustrate the techniques used. All those tools are now next of the list of purchases .
   
Made in gb
Avatar of the Bloody-Handed God


Inside your mind, corrupting the pathways

Some different sorts of plates and armours would be cool, but certainly a good covering of the basics

   
Made in us
Regular Dakkanaut


The Crosse, Wisc.

Yea that is the real basics, once you figure that stuff out you can do all sorts of variants. It is a pretty straight forward technique. I've shown this technique to numerous people in about 10 minutes, and have them sculpting the basics in no time. You can make it as difficult as you want, or as simple as you want.

My advice is that if you are having trouble with metal tools, it probably means you need a softer touch, and try the colour shapers, they are more forgiving while you are learning to get that right touch. If you have trouble getting green stuff smooth, get more patience and if that doesn't work try brownstuff for awhile, again its more forgiving, and sandable.

Now if you want Khorne, I kind of like to do that beaten brass plate look so another step, would be to make it look like it was beaten out with a hammer, a sort of ball-peened hammer look. For this effect, I’m using the ball stylus, tool number 4.


And here is the final work minus the spine pieces, on the bloodletters:


Made in au
Lady of the Lake


Nice tutorial

I haven't done any sculpting yet, but I intend to as I got the stuff for it; so this is very helpful.

Looks like some members of my next army are going to have fancy armour

This message was edited 1 time. Last update was at 2010/05/22 15:12:18


Made in us
Furious Raptor


Colorado

This is great, but I'm wondering if it's possible to do without a color shaper, since even the smallest ones are ridiculously expensive.

   
Made in gb
Towering Hierophant Bio-Titan


Fareham

Any chance of a quick post as to the best place to buy these tools from?
Ive done a fair bit of sculpting work, but all of my tools are simple objects ive made or adapted myself.

   
Made in au
Snord


Australia : SA

I really like its helpfulness


Kreig - 2850 pts
Skaven - 3450 pts
Orks - 1950 (pro painted)


Made in gb
Faithful Squig Companion


Could you please post an image of a painted one? The look brilliant and it's a shame not to see them painted.

This account is a relic of the past and must be placed in a museum 
   
Made in us
Regular Dakkanaut


The Crosse, Wisc.

Da 'nid crusher wrote:Could you please post an image of a painted one? The look brilliant and it's a shame not to see them painted.


And some of the pics GW took of my Khorne
http://www.games-workshop.com/gws/content/article.jsp?community=&catId=&categoryId=300005&pIndex=3&aId=11100004&start=4

۞ Jack ۞ wrote:Any chance of a quick post as to the best place to buy these tools from?
Ive done a fair bit of sculpting work, but all of my tools are simple objects ive made or adapted myself.

2,3,5,8,&9 are made by Royal Sovereign. In the U.S. the best place to find them is Dick Blick Art Supply.

1, 6, and C were from an 11 piece purchased of Ebay for about $12, made in India, a little rough and poorly finished, but with being stainless you can fix that with a bit of wet sand paper.

4 - in the U.S., the ball stylus can be found at Michaels

a, b - I got from the Sculpture Depot, they have a ton of tools. Widget Tools is another.

7-just a plain old mechanical pencil.

   
Made in gb
Faithful Squig Companion


Thanks for listning! They look orgasmic!!

This account is a relic of the past and must be placed in a museum 
   
Made in gb
Avatar of the Bloody-Handed God


Inside your mind, corrupting the pathways

Knew I'd seen this tutorial and models before

   
Made in se
Fresh-Faced New User


I call awesome! Give us more if you discover anything, this is really cool and helpful Every thought of making your own sculpting tools?
   
Made in us
Regular Dakkanaut


The Crosse, Wisc.

Yea, this tutorial was buried in my "Messing with Chaos", Dakka P&M Blog, so I thought I would move it over here. I think people have found it useful, and I have taught alot of people how to do this stuff.

Izirath wrote:Every thought of making your own sculpting tools?

I have made a number of tools over the years and still use them, but for doing this stuff I thought it would be good to show tools people can actually buy, and quite frankly most of them are better than mine anyways. Mine are typically for very small details. I have modified the afforementioned India stainless tools as some of them did not work for what I needed them for, so I took to grinding them into something useful.

   
Made in gb
Stubborn Dark Angels Veteran Sergeant


Teesside

۞ Jack ۞ wrote:Any chance of a quick post as to the best place to buy these tools from?
Ive done a fair bit of sculpting work, but all of my tools are simple objects ive made or adapted myself.


In the UK, Heresy sell the Colour Shapers (aka Clay Shapers), among other things:

http://www.heresyminiatures.com/tools.htm

My painting & modelling blog: https://www.dakkadakka.com/dakkaforum/posts/list/699224.page

Serpent King Games: Dragon Warriors Reborn!
http://serpentking.com/


Made in gb
Annoyed Blood Angel Devastator


Dundee

Hate how easy people make sculpting look - I need to get some serious practicing in.

Very very nice pics taken by GW there too, well done!

-Jaxn

2000+ pts
2000+ pts 
   
Made in gb
Avatar of the Bloody-Handed God


Inside your mind, corrupting the pathways

I thought I should admit to stealing the mechanical pencil tip from this tutorial - a great way to make recessed rivets/bolts.

   
Made in us
Wondering Why the Emperor Left


Toledo, Ohio

Awesome tutorial! and some great looking models!
   
Made in us
Possessed Khorne Marine Covered in Spikes


Ohio

What if you can make some expendable tools from sprues?

The Black Hand


Made in nl
Esteemed Veteran Space Marine


the Netherlands

its actually better then i expected! good job

   
Made in gb
Aspirant Tech-Adept


I like the technique you used, very effective.
   
Made in be
Mechanized Halqa


It looks so easy :p The result is badass though. Like the plate on the bloodcrusher in the pics of GW, it's sick ^^
I'd like to try and make shoulderpads for a sister of battle conversion. However, the pads are standing out a bit you know. They don't follow the curve of the shoulder completely.
What would you do to make them? I can use your technique for the part that actually overlaps the shoulder, but should I make them out of another material and wrap the greenstuff around for the edges?


Forum Index » Painting & Modeling Tutorials
Go to: