Forum adverts like this one are shown to any user who is not logged in. Join us by filling out a tiny 3 field form and you will get your own, free, dakka user account which gives a good range of benefits to you:
No adverts like this in the forums anymore.
Times and dates in your local timezone.
Full tracking of what you have read so you can skip to your first unread post, easily see what has changed since you last logged in, and easily see what is new at a glance.
Email notifications for threads you want to watch closely.
Being a part of the oldest wargaming community on the net.
If you are already a member then feel free to login now.
2015/05/03 19:46:54
Subject: Painting Starry Sky / Nebula Eldar ***Update in OP***
I am trying to figure out the best way to paint a starry night effect on my Eldar army. I have gotten some great inspiration here and elsewhere but need some help actually getting it done! I have an airbrush as well as most of the GW paint line, and can order just about any paints I need. I just want to know some techniques and thoughts you all have!
I also saw an older Dakka post that had some thoughts. It wasn't bad but I was hoping for some more directly applicable techniques. This is the post I'm referring to, it's pretty old: http://www.dakkadakka.com/dakkaforum/posts/list/389432.page
Thanks guys!
***Update***
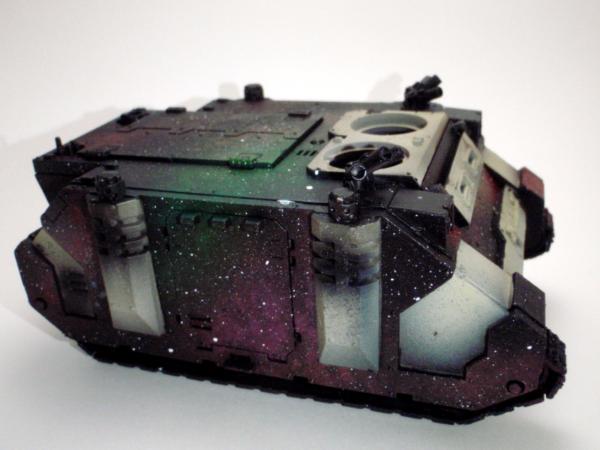
Hey guys, just wanted to get your thoughts on a test version of the nebula. Check out some images below and let me know your honest feedback. Clearly these aren't finished, just testing the nebula and star field effect!
This message was edited 3 times. Last update was at 2015/06/12 06:59:08
This message was edited 1 time. Last update was at 2015/05/03 21:55:41
d-usa wrote: "When the Internet sends its people, they're not sending their best. They're not sending you. They're not sending you. They're sending posters that have lots of problems, and they're bringing those problems with us. They're bringing strawmen. They're bringing spam. They're trolls. And some, I assume, are good people."
Start with a layer of kantor blue, then airbrush patches of colour? For stars you could airbrush small patches of white then put dots of pure white in the middle
I pretty much copied wholesale from the video I posted in that second link, but here's the steps:
1: Black base
2: Spatter a few stars by kinking the air hose, let a bit of white paint flow, then unkink the hose so the burst of air splatters paint randomly. Keep a light touch.
3: Add nebulae by picking different colors and lightly spraying around a random stencil. I picked up a few like this for cheap at a craft stor Move the stencil around as you spray to build up variation.
4: Add more stars as described above, and more nebulae as you see fit. Stop when you like how it looks.
Planets would be easy to add with a circular stencil and similar techniques. I think they look a little "van-mural" for my tastes but that could be appropriate on some minis. Maybe when I start a space sharks army.
For the brighter swirly nebulae in your pinterest, I'd lay down the basic pattern with a dark color of your choice, purple in that case, and give it a wide, faint spray. Go to a lighter color, like the pink in those pics, and spray that in a tighter line and slightly deeper coat over the same pattern. Add some white to the pink, tighten it up some more, and go over it again. A stencil on the second and third steps might not be a bad idea either to give some variation.
Zefig wrote: Hey, that's my rhino in your second link!
I pretty much copied wholesale from the video I posted in that second link, but here's the steps:
1: Black base
2: Spatter a few stars by kinking the air hose, let a bit of white paint flow, then unkink the hose so the burst of air splatters paint randomly. Keep a light touch.
3: Add nebulae by picking different colors and lightly spraying around a random stencil. I picked up a few like this for cheap at a craft stor Move the stencil around as you spray to build up variation.
4: Add more stars as described above, and more nebulae as you see fit. Stop when you like how it looks.
Planets would be easy to add with a circular stencil and similar techniques. I think they look a little "van-mural" for my tastes but that could be appropriate on some minis. Maybe when I start a space sharks army.
For the brighter swirly nebulae in your pinterest, I'd lay down the basic pattern with a dark color of your choice, purple in that case, and give it a wide, faint spray. Go to a lighter color, like the pink in those pics, and spray that in a tighter line and slightly deeper coat over the same pattern. Add some white to the pink, tighten it up some more, and go over it again. A stencil on the second and third steps might not be a bad idea either to give some variation.
That's great!
Thanks so much, I was hoping to draw out some of my inspiration
I've seen the "how to paint a nebula" video but need to check these out.
My only issue with the "how to paint a nebula" video is that I am trying to make sure that my nebulas and star fields don't just look like patches of airbrush. The flyer in that video looks good, but it toes that line juuuuust a little bit.
In any case, I'm excited to check out those other tutorials!
Zefig wrote: I think the stencil really helps to break up the "patches of airbrush."
I agree! I really want to track down one of those random stencils. If any of you have an idea where I can order one, I'd love to give it a try!
Also, I'm hoping to do a similar scheme on some smaller minis in addition to vehicles. Any thoughts on how to translate the nebula effect to things like Wraithguard? Or just do the same things on a small scale?
I picked mine up at hobby lobby, I think. I found them online through Chicago Airbrush Supply here, but you can find cheaper splatter stencils on Amazon.
Zefig wrote: I picked mine up at hobby lobby, I think. I found them online through Chicago Airbrush Supply here, but you can find cheaper splatter stencils on Amazon.
Thanks! I think I found one on Amazon that I'll try.
Automatically Appended Next Post:
Stormwall wrote: Hey guys, lurking in this thread. I can't wait to see what comes of this, I want to try this out so bad.
I'll be posting results as they come along! Hoping to get things built and primed this week.
Automatically Appended Next Post: I'll need to spin this into a different post, but just a heads up that I'm picking up a new Grex TG3 airbrush kit just to do this project justice. You guys have done a great job of inspiring me and I hope you'll continue the great advice and eventually feedback!
This message was edited 2 times. Last update was at 2015/05/07 03:59:09
Toothbrush works well for stars. Do a thin later of paint on the bristles for a light dust and then thicken it up for some bigger ones (don't get too close!!!!)
Here is a few of mine.
I put a tutorial on YouTube, there is a big thread in the eldar group on Facebook if you want more information...
YouTube vids: search Google for gaz jones basic painting tutorial.
This message was edited 2 times. Last update was at 2015/05/15 15:10:10
Shingen wrote: Toothbrush works well for stars. Do a thin later of paint on the bristles for a light dust and then thicken it up for some bigger ones (don't get too close!!!!)
Here is a few of mine.
I put a tutorial on YouTube, there is a big thread in the eldar group on Facebook if you want more information...
YouTube vids: search Google for gaz jones basic painting tutorial.
Wow! These are great.
I checked out your video, really awesome. I do wish I could've seen the part where you wash the violet right before your part 2 video.
I'd also really love to see how exactly you translate this technique to your infantry models!
If you ever get the time those would be fantastic. In any case, thanks so much for posting!
Those are so cool. Space scenes are one of those things I feel I like the artistic ability to produce rather than lacking the mechanical ability to apply the techniques.
That's looking great! I think the large areas blocked by the stencil are a little off, bit another pass of color over the already colored areas would help blend them a little better. Fantastic start though!
Zefig wrote: That's looking great! I think the large areas blocked by the stencil are a little off, bit another pass of color over the already colored areas would help blend them a little better. Fantastic start though!
Thanks Zefig!
I agree, some of the areas are a little too sharp. I think I'll airbrush some hazy areas in light grey around the edge then ghost on the matching color.


 Heresy World Eaters/Emperors Children


 Order of the Sable Heart
 Grave Knights
 House Rouen

 Dark Eldar 35,000pts
 Craftworld Eldar 27,500pts
