| Author |
Message |
 |
|
|
|
|
Advert
|
Forum adverts like this one are shown to any user who is not logged in. Join us by filling out a tiny 3 field form and you will get your own, free, dakka user account which gives a good range of benefits to you:
- No adverts like this in the forums anymore.
- Times and dates in your local timezone.
- Full tracking of what you have read so you can skip to your first unread post, easily see what has changed since you last logged in, and easily see what is new at a glance.
- Email notifications for threads you want to watch closely.
- Being a part of the oldest wargaming community on the net.
If you are already a member then feel free to login now. |
|
 |
2016/10/31 21:57:02
Subject: Jadenim's Predator Mk VI - A first adventure in plasticard!
|
|

Fireknife Shas'el
|
Hi everybody,
I've never done a blog before, so forgive me if this isn't perfect, but I wanted to share something I've been working on over the past year or so; my Predator tank conversion.
This project came from two different sources; firstly I've never been entirely satisfied with the standard GW Predator. It's supposed to be a dedicated Main Battle Tank, with substantially better armour and armament than a Rhino or Razorback, yet it just looks like, surprise, surprise, a Rhino with a turret plonked on top. The Baal Predator is a bit better, with the different front glacis, but still fundamentally doesn't do it for me.
The second source of inspiration was reading through one of the legendary Blackadder's scratch-build blogs and being stupid/naive/mad enough to think "how hard can it be?!"
So stupid. So naive...
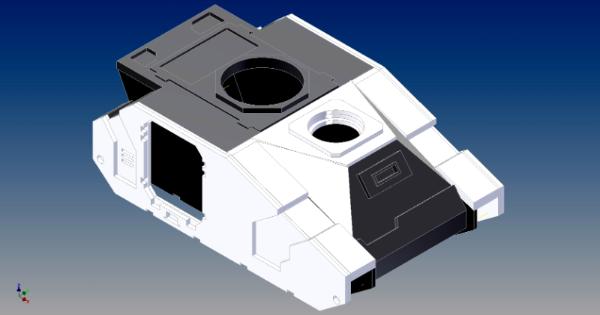
Anyway, I give you the Predator Mk VI:
 Note: I'll update this post with the final picture's once I've got the model painted, so this is the current state of play.
In universe, I imagine this to be an updated version of the Predator STC that was in final development at the start of the Horus Heresy, so it never made it into full production before turmoil engulfed the galaxy. A few out-of-the way forgeworlds have continued to produce them in limited numbers, but as it lacks commonality with the Rhino/Razorback, it is only produced in small numbers. Although it doesn't offer radical improvements over the standard Predator Mk III, the design has been optimised* for use as a Main Battle Tank, compared to the standard Rhino chassis. The driver's compartment has been repositioned for better visibility and to allow increased sloping of the front armour to better deflect enemy fire. The engines have been repositioned to the rear of the vehicle, in place of the troop ramp, making them less vulnerable to frontal fire and allowing the side sponsons to be moved rearwards, again increasing the slope of the front armour.
* - I'm aware that no Space Marine vehicle is optimised by any modern standards, but they're my toy soldiers and you can keep your pedantic comments to yourselves!
In reality I was trying to take design cues from the Sicaran and Land Raider; keeping the Space Marine aesthetic, but with a sleeker, more purposeful profile. It was only later on, when I'd finally built it, that I realised that the driver's compartment also harks back to the original predator design. A totally unforeseen, but happy, coincidence!
Although I've nearly finshed the model, I took photos of (most of) the steps in the design and build process, so I'll try and take you through it step-by-step.
|
|
|
|
 |
|
2016/10/31 22:03:21
Subject: Jadenim's Predator Mk VI - A first adventure in plasticard!
|
|
Growlin' Guntrukk Driver with Killacannon
|
Shes a thing of beauty mate, well done!
|
|
|
|
|
|
2016/11/01 00:50:15
Subject: Re:Jadenim's Predator Mk VI - A first adventure in plasticard!
|
|

Excited About the Great Crusade
Texas
|
 I love this!
Yes, please do the walk through...I would love to make some of the Mk4 for my marines. They don't like the Mk3 either.
|
|
This message was edited 1 time. Last update was at 2016/11/01 00:56:04
I don't post, I lurk. Have been for a decade.
|
|
|
|
|
2016/11/01 01:08:55
Subject: Jadenim's Predator Mk VI - A first adventure in plasticard!
|
|
Crushing Black Templar Crusader Pilot
|
Yes please do a walk through, I want to try a scratch build!
|
|
|
|
|
|
2016/11/01 01:25:17
Subject: Jadenim's Predator Mk VI - A first adventure in plasticard!
|
|

Nasty Nob
|
Please, please, please do a walk-through, would love to build one of these myself!
|
Current Project: Random quaratine models!
Most Recently Completed: Stormcast Nightvault Warband
On the Desk: Looking into 3D Printing!
Instagram Updates: @joyous_oblivion |
|
|
|
|
2016/11/01 01:32:10
Subject: Jadenim's Predator Mk VI - A first adventure in plasticard!
|
|
Jinking Ravenwing Land Speeder Pilot
|
Excellent work, looks professionally done to me.
|
 6000 pts 6000 pts
 2000 pts 2000 pts
 2500 pts 2500 pts
 3000 pts 3000 pts
"We're on an express elevator to hell - goin' down!"
"Depends on the service being refused. It should be fine to refuse to make a porn star a dildo shaped cake that they wanted to use in a wedding themed porn..." |
|
|
|
|
2016/11/01 02:12:41
Subject: Jadenim's Predator Mk VI - A first adventure in plasticard!
|
|

Veteran Knight Baron in a Crusader
|
It's like the good bits of a Predator and a Sicarian put into one tank. Looks great.
And excuse me for parroting everyone else in this thread but oh my emperor do we need a walkthrough. Or at least the pattern you used for your plasticard.
|
3000pts Blood Angels (4th Company) - 2000pts Skitarii (Voss Prime) - 2500pts Imperial Knights (Unnamed House) - 1000pts Imperial Guard (Household Retainers)
2000pts Free Peoples (Edlynd Fusiliers) - 2000pts Kharadron Overlords (Barak Zilfin) - 500pts Ironweld Arsenal (Edlynd Ironwork Federation) - 1000pts Duardin (Grongrok Powderheads)
Wargaming's no fun when you have a plan! |
|
|
|
|
2016/11/01 03:09:54
Subject: Jadenim's Predator Mk VI - A first adventure in plasticard!
|
|
Ancient Venerable Dreadnought
|
Very well done. I like the little details and thought you've put into the conversion's design.
|
|
|
|
|
|
2016/11/01 06:50:06
Subject: Jadenim's Predator Mk VI - A first adventure in plasticard!
|
|
Pious Palatine
|
That's awesome. Did you take any work in progress pics.
Your design hits all the right notes.
EDC
|
|
|
|
|
2016/11/01 07:10:15
Subject: Jadenim's Predator Mk VI - A first adventure in plasticard!
|
|
Fireknife Shas'el
|
Wow, thanks guys, I'll try and get the first of the updates done later today. If not it'll be tomorrow.
And yes, I have fully dimensioned plans 
|
|
This message was edited 1 time. Last update was at 2016/11/01 07:10:47
|
|
|
|
|
2016/11/01 09:11:02
Subject: Jadenim's Predator Mk VI - A first adventure in plasticard!
|
|

Shroomin Brain Boy
|
i have two rhino´s in my collection and spend quite some time on them...but it took me some moments to even realize what you changed...meaning: you did a wonderful job! it looks fitting and from the 40k universe...
would lobe to see the in between stages as to better understand what work you´ve put inside of that tank!
cheers, vik
|
|
|
|
|
|
2016/11/01 13:05:51
Subject: Jadenim's Predator Mk VI - A first adventure in plasticard!
|
|
Fireknife Shas'el
|
So, despite my naive stupidity in starting this project, I had enough common sense to realise that I wanted to keep as much of the actual Predator kit as I could; in my experience it's very hard to replicate all those little details on the official kits, so it's much better to just modify and reposition them than start from scratch.
Fortunately I am an engineer, which means I have access to fairly sophisticated 3D modelling software  . So after several evenings going over the entire Rhino hull with a ruler and protractor, I was able to build a model in the computer, which I could then start hacking around.
I'd already had the idea to move the doors back, to increase the front slope, but I decided to keep the front glacis (although cut down) as the basis for the cockpit. I also decided I wanted to keep the lower hull and the standard top plate/hatch/turret ring. So after a little experimentation I settled on chopping off the top front of the Rhino, from the edge of the main hatch aperture down to the top of the track covers:
This meant that I could also keep the inner sides of the track sections and the internal bulkhead from the Rhino, giving a core box section to support the rest.
The new sections would consist of new outer panels, track covers and cockpit sides and roof.
From the 3D model I was able to produce dimensioned drawings and 1:1 templates for cutting out (I didn't know which would be easiest). As I started building I found it was very difficult to keep things straight and true using the templates, so I just ended up using the dimensions to draw out the patterns on the plasticard.
Note: I have the drawings and templates as a PDF, but I don't know how to embed it in a post, if anyone can help?!
|
|
|
|
|
|
2016/11/01 13:10:41
Subject: Jadenim's Predator Mk VI - A first adventure in plasticard!
|
|
Longtime Dakkanaut
|
Looks really good. I thought it was a siciran chassis at a first glance.
|
|
|
|
|
|
2016/11/02 00:21:28
Subject: Jadenim's Predator Mk VI - A first adventure in plasticard!
|
|
Crushing Black Templar Crusader Pilot
|
That is awesome! When we get the templates and dimensional drawings haha.
You engineers and your skills at modeling things in 3D. There was a guy who was making a whole new leman russ (in CAD), it was awesome! wish he could have made it in plastic.
|
|
|
|
|
|
2016/11/02 07:30:00
Subject: Jadenim's Predator Mk VI - A first adventure in plasticard!
|
|
Ragin' Ork Dreadnought
Deep in the Outer Boroughs of NYC
|
That's a really cool design. PLasticard is a pain in the neck to work with. I hate trying to cut straight lines with it. I don't know how other modelers can do it, honestly.
|
|
|
|
|
|
2016/11/02 08:33:02
Subject: Jadenim's Predator Mk VI - A first adventure in plasticard!
|
|
Shroomin Brain Boy
|
at warboss: with plasticcard you mainly score the plastic with a sharp edged too...doesn´t have to be a knife even...can be a needle...and then break...as you would do with tiles...then sand the "cut"...done...cutting something out is a bit harder tho...also...the kind of ruler you use is important... some anti slide underside for the ruler is important...
very cool CAD image jadenim! and all that effort one day will lead to you using a 3D printer and skipping entirely the process of working with plasticcard ^^
|
|
|
|
|
|
2016/11/05 18:28:11
Subject: Re:Jadenim's Predator Mk VI - A first adventure in plasticard!
|
|
Fireknife Shas'el
|
So, having developed the CAD model, it was time to start building in the real world. The key to Space Marine vehicle design is all the panelling and recesses, so I designed the entire conversion to be build up from layers of plasticard. For my own sanity (and wallet) I tried to limit myself to as few different thicknesses as possible.
I ended up with the following parts list:
1x A4 1.0mm thick plasticard sheet
1x A4 1.5mm thick plasticard sheet
1x 0.5mm diameter plastic rod
1x 2.0mm diameter plastic rod
1x GW Predator kit (obviously)
Rare earth magnets for the doors (size to your personal preference, see later)
Plus the usual tools:
Craft knife
Safety rule
Razor saw
Cutting board
Pin vise drill (with 0.5mm and 2.0mm bits)
Thick and thin ploystyrene glue
Superglue (for magnets)
Greenstuff (other modelling puttys are available!)
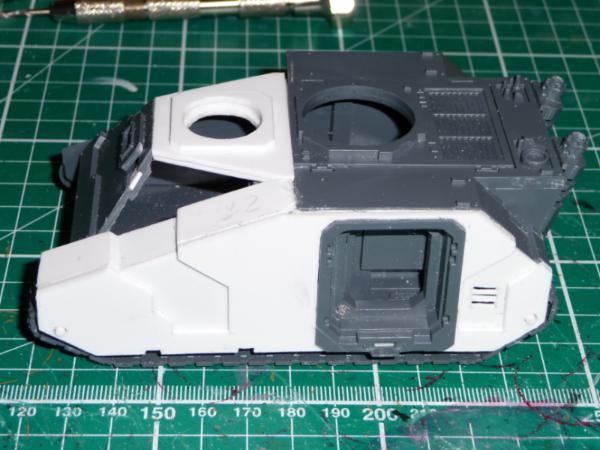
The first step was to use the razor saw to cut down the two inner side panels, the front glacis plate and the top plate. I measured everything from the back of the hull, as this would remain intact, using the dimensions I'd created for the new outer side panels. There are also two pegs used to join the inner and outer side panels, towards the rear of the hull, that needed to be chopped back to avoid interfering with the new door position.
The top plate was cut along the edge of the hole for the top hatch and the front glacis plate was cut to match the new top hatch plate. [Sorry I didn't take photo's of all the individual pieces; like I said, it's my first time!]
This then allowed me to assemble the basic hull, like so:
 Slightly out-of -sequence, but this view also shows the cuts quite nicely.
I also cut the wheels off the bottom of the outer side panel, so that I could glue them to the inside of the new panels. Not only does this make the model look better, but they also help to support and align the new panels.

I cut down the front blast shield piece to a single slit and fitted it to the middle of the cut-down glacis panel, to make the central driver's position. Note that the pillar between the two original windows shows through the slit and almost looks like a chunk of armoured glass. Also, with all of the panels, make sure you bevel the corners slightly, to make it look more Space Marine-y (they don't do square corners apparently!). I put a couple of pieces of plasticard in the orginal window recesses to pack them out a bit, they will be filled and smoothed with greenstuff later, which is easier with a smaller/shallower hole.
|
|
This message was edited 3 times. Last update was at 2016/11/05 18:44:37
|
|
|
|
|
2016/11/05 19:42:04
Subject: Jadenim's Predator Mk VI - A first adventure in plasticard!
|
|
Longtime Dakkanaut
|
Much better than GW's version!
|
|
|
|
|
|
2016/11/05 20:19:14
Subject: Jadenim's Predator Mk VI - A first adventure in plasticard!
|
|
Fixture of Dakka
|
Jadenim,
That is more than just plastic card work on the chassis.
How did you keep your saw cuts even?
Cheers,
CB
|
|
|
|
|
|
2016/11/05 20:51:02
Subject: Jadenim's Predator Mk VI - A first adventure in plasticard!
|
|
Fireknife Shas'el
|
@CB the first thing is to draw it on and then score it using a ruler and knife. This gives the saw a line to follow. I tend to notch the full thickness at each end too, so you don't lose the mark.
The real key is to use the full length of the saw along the length of the cut, slow and smooth (I.e. So you're cutting the entire line at the same time). If you try to cut from one end to the other it's likely to wander.
|
|
|
|
|
|
2016/11/05 21:32:41
Subject: Jadenim's Predator Mk VI - A first adventure in plasticard!
|
|
Crushing Black Templar Crusader Pilot
|
Amazing work. Wish you would have done this 3 years ago, when before I built my 2 predators, so that they would be different from the Rhinos.
|
|
|
|
|
|
2016/11/20 15:01:32
Subject: Re:Jadenim's Predator Mk VI - A first adventure in plasticard!
|
|
Fireknife Shas'el
|
Ok, apologies for the slight gap in updates, I've been off travelling. Last time I showed you how I cut down and assembled the original parts of the Predator kit, now it's time to move on to something new, the new design outer panels.
The panels are built up from two layers, an inner 1mm thick sheet and an outer 1.5mm thick sheet. This gives the panelling effect on the front and rear and was originally intended to provide the recesses for the doors too (more on that later). Once cut, the sheets look like this:
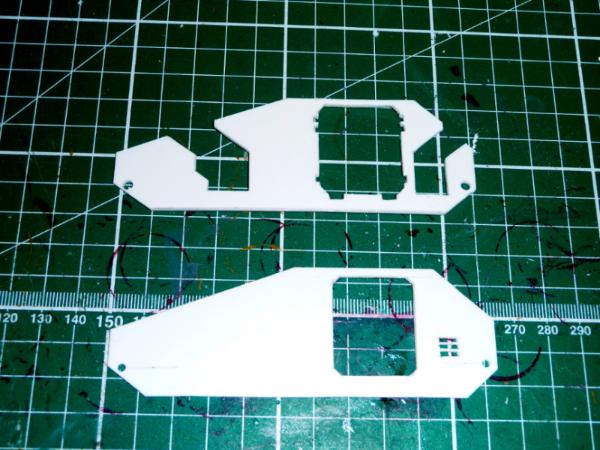
IMPORTANT EDIT: I forgot to mention, rather than trying to cut the whole thing out of the plasticard sheet, I cut out rectangles of the right length and height for the overall panel size, as they're easier to handle. If you do this DO NOT throw away the triangles cut from the top front, you'll need them later.
Some key points to notice; the grilles on the rear of the inner layer, as per the original Rhino and the fact that the inner layer doesn't have the notch for the recesses yet. I assembled the panels together and then cut the recesses on the inner layer to match the outer layer. Trying to do it by measurement just wouldn't be accurate enough. Finally there are the holes for the main track sprocket axles, the inner layer has 2mm holes for the plastic rod, the outer layer has 3mm holes, so that the axle sits in a recess as per the original. If you cut the plastic rod to be about 2mm long it will sit proud of the panel surface, again as per the original. These holes are also useful to help align the two layers to each other and the original parts (as the axles are in the same place).
The beauty of this construction method is that the individual layers are identical for both sides, it just depends which way round you glue them together. Just make sure you don't glue them both the same, or you'll end up with two left sides! One thing to watch is that some plasticard has a matte side and a shiny side. They both glue OK, but obviously the shiny side won't take paint as well, so plan ahead as to which side you want to be outside.
Also, it's worth leaving tidying up the edges of the cuts until you've glued the two halves together, that way you can sand both together and get a smoother finish and hopefully disguise the two layers.
I then glued the road wheels from the original outer side to the inside of each panel, using the notches on the bottom of the panel to align them, and then glue the sides onto the main body. I tend to use thin glue for most modelling, but for these large structural joints I use the thick glue, as I find it fills any gaps and provides a better, stronger joint.
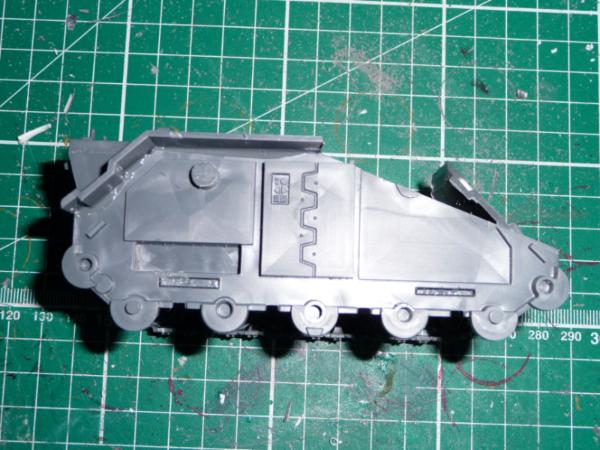
Once assembled, the side looks like this:
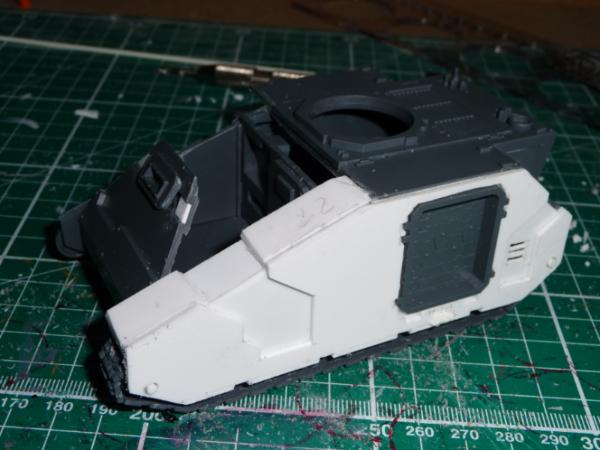
The front track guards are just made from rectangles of 1mm plasticard, cut to the right width and then layered up. A long one for the base, covering the entire length, and then shorter ones to build up either side of the recess. The shorter ones are cut slightly overlong and then cut and sanded down once glued in position, so that you get a smooth edge that aligns with the sides.
You'll see from this photo that I originally intended to fit the doors/sponsons directly into my new side panels, but I changed my mind at this stage. Firstly, despite my best efforts (and boy was there a lot of effort) I couldn't get the little fiddly bits all around the edge of the door looking as neat as I wanted. With the factory made parts sitting right next to my cut edges any slight deviation was really obvious. Secondly, because I'd removed the engines from the sides, I found it made the whole thing rather flat. Tune in next time to see what I did to fix this!
Or, you know, read the first post where I give the answer away.
|
|
This message was edited 2 times. Last update was at 2016/11/20 15:27:11
|
|
|
|
|
2016/11/20 17:32:32
Subject: Jadenim's Predator Mk VI - A first adventure in plasticard!
|
|
Growlin' Guntrukk Driver with Killacannon
|
I hadn't even noticed the lack of engines in the 1st photo, nice update.
|
|
|
|
|
|
2016/11/20 22:11:56
Subject: Jadenim's Predator Mk VI - A first adventure in plasticard!
|
|
Storm Trooper with Maglight
|
I'm more of a leman russ kinda guy, but this made me seriously consider picking up a predator and some plasticard. This is Seriously awesome!
|
|
|
|
|
|
2016/11/22 15:17:24
Subject: Re:Jadenim's Predator Mk VI - A first adventure in plasticard!
|
|
Fireknife Shas'el
|
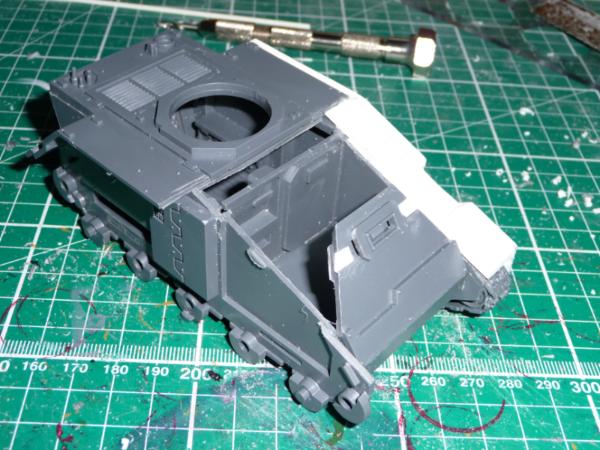
Having got the really tricky bit done, time to move on to the main hull. I wanted to put a rear mounted engine module on, similar to the Land Raider and Sicaran. I was originally going to build up an entire enclosure, using the original Rhino engines as a base, but once I'd cut them out and trial fitted them I found that they worked quite nicely by themselves. There's even a little ridge at the top that you can use to position them! This was by far the easiest part of the project, two razor saw cuts per engine and five minutes with a knife removing the lugs from the Rhino rear hatch and you get this:
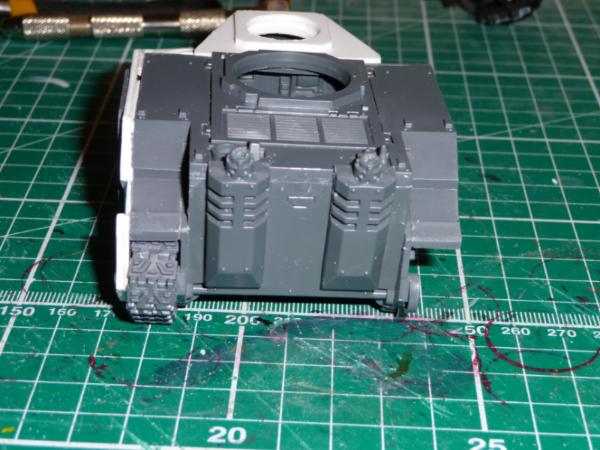
Now, as I mentioned last time, I wasn't happy with the door apertures I'd cut myself and after cutting the engines off of one side I suddenly realised that the original door was now a neat, independent module, which I could just slot in the hull. Cue a few minutes enlarging/obliterating my original door aperture, and a quick tidy up of the saw cuts (plus chamfering the corners) and it looks like this:
Now you'll need to be careful doing this from the start, because you only end up with 1-2mm thickness in the panels at the top and bottom of the aperture, so it's really easy to snap. Also at this stage I fitted magnets into the corner of the door frame, so that I can swap out the doors and sponsons. I only had little 2mm magnets, but you might get better results using a single larger magnet in the centre of the aperture. There's so many tutorials on magnetising on the web, so I won't go into the details here.
Finally you'll notice that I installed the cockpit top panel. This was built up from three layers; the middle one is the "hero"panel, that actually forms the hull, and the top one is a little chamfered rectangle to form the hatch. The bottom one is the same size as the middle, but with a smaller hole, so that the hatch can't drop through, but allows the bits on the bottom of the hatch to project through (remember that the Space Marine hatches are reversible, with detail on both sides).
|
|
This message was edited 1 time. Last update was at 2016/11/22 15:20:37
|
|
|
|
|
2017/02/03 06:34:35
Subject: Jadenim's Predator Mk VI - A first adventure in plasticard!
|
|
Fixture of Dakka
|
Awesome. Now I want to try building this myself, maybe even 2-3 for a heresy force. Any chance you are willing/able to release a stencil or exact measurements for the plasticard parts to make them easier to replicate?
|
|
|
|
|
2017/02/03 06:47:32
Subject: Jadenim's Predator Mk VI - A first adventure in plasticard!
|
|
Pious Palatine
|
This is looking really cool. Nice work.
EDC
|
|
|
|
|
2017/02/03 06:51:42
Subject: Jadenim's Predator Mk VI - A first adventure in plasticard!
|
|
Member of a Lodge? I Can't Say
|
It's a baby sicaran.
Beautiful work, it looks great.
|
I prefer to buy from miniature manufacturers that *don't* support the overthrow of democracy. |
|
|
|
|
|
|


 and
and  WIP
WIP


 Finished Forge World Elysian Army
  Finished Tau Sept Cadre
  Finished Ork Waaagh |
  Alaitoc Eldar Warhost
  Finished Order of Our Martyred Lady - Sisters of Battle
  Finished Necromundian Imperial Guard Regiment


 Click below for plenty guardsmen