| Author |
Message |
 |
|
|
|
|
Advert
|
Forum adverts like this one are shown to any user who is not logged in. Join us by filling out a tiny 3 field form and you will get your own, free, dakka user account which gives a good range of benefits to you:
- No adverts like this in the forums anymore.
- Times and dates in your local timezone.
- Full tracking of what you have read so you can skip to your first unread post, easily see what has changed since you last logged in, and easily see what is new at a glance.
- Email notifications for threads you want to watch closely.
- Being a part of the oldest wargaming community on the net.
If you are already a member then feel free to login now. |
|
 |
2019/07/31 13:50:20
Subject: Cadian Tank Camo advice
|
|

Bounding Dark Angels Assault Marine
Berkeley Springs, West Virginia
|
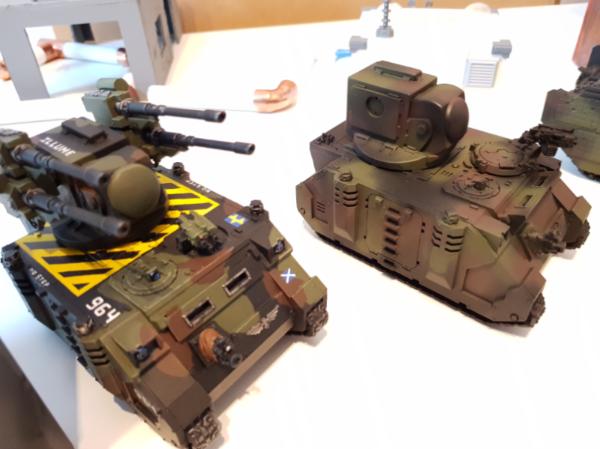
Hey everyone! Currently working on my tanks for my Cadia AM army. Im using an airbrush for the first time through all this so my highlights might not be perfect but just know it’s a learning experience. I would like to get some advice on my camo pattern as I’m also new to that as well. I feel like this isn’t working, any advice on what to charge would be appreciated.
Side note: I wasn’t aiming for any particular pattern just messing around and trying to make my own style. I suppose it’s somewhat influenced on tiger stripes?
|
|
|
 |
|
2019/07/31 15:11:30
Subject: Cadian Tank Camo advice
|
|

Leader of the Sept
|
Camo works by disrupting shapes and disguising obviously man made silhouettes. I think you have a great start here but maybe try to get the patterns to cover more of the corners and edges. There Ilis a lot of pattern in the middle of plates and not quite enough over edges.
Also i have found adding a 3rd colour, even in very small amounts helps make it more pleasing to the eye. Kind of light shading and highlights do for flat colours, having a range of 3 colours in the pattern looks nice to me 
|
Please excuse any spelling errors. I use a tablet frequently and software keyboards are a pain!
 Terranwing - w3;d1;l1 Terranwing - w3;d1;l1
 51st Dunedinw2;d0;l0 51st Dunedinw2;d0;l0
 Cadre Coronal Afterglow w1;d0;l0 Cadre Coronal Afterglow w1;d0;l0 |
|
|
|
|
2019/07/31 15:44:01
Subject: Cadian Tank Camo advice
|
|
Regular Dakkanaut
|
Reminds me of Tiger Stripe Camo.
A 3rd colour... perhaps a dark one would be good... Dark Reaper, Black, a very dark green or a dark brown.
Good work!
|
|
|
|
|
|
2019/07/31 15:49:21
Subject: Cadian Tank Camo advice
|
|
Bounding Dark Angels Assault Marine
Berkeley Springs, West Virginia
|
Thanks for the advice form both of you. I can definitely work some black into it, as it’s another color present on my Troops.
I didn’t realize it but I did avoid the edges unintentionally. I will toy around with adding some tonight and see how it goes!
|
|
|
|
|
2019/07/31 16:16:38
Subject: Cadian Tank Camo advice
|
|

Fixture of Dakka
|
coganaut,
Tiger stripes on an animal to help it blend in are fuzzy as they transition between colours, so that might be an option with your airbrush to make a more organic look. The sharp edge contrast works better with camo patterns for dazzle schemes with weird shapes to break up the silhouette.
My two cents,
CB
|
|
|
|
|
|
2019/08/01 00:42:11
Subject: Cadian Tank Camo advice
|
|
Leader of the Sept
|
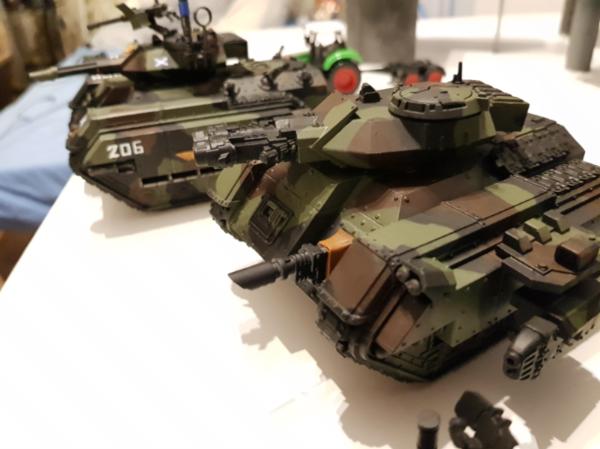
Here is a comparison between my Guard scheme done by brush with hard edging and with rather poorly controlled airbrush, if that helps.get the idea across.
And then a cleaned upnversion where I went back and hardened up the edging 9f the disruptive pattern and back filled with a bit more black.
I'm definately not saying its.perfect camo.scheme but I think it gets the idea across and I find the colours pleasing
|
Please excuse any spelling errors. I use a tablet frequently and software keyboards are a pain!
Terranwing - w3;d1;l1
51st Dunedinw2;d0;l0
Cadre Coronal Afterglow w1;d0;l0 |
|
|
|
|
2019/08/01 00:47:43
Subject: Re:Cadian Tank Camo advice
|
|
Guardsman with Flashlight
Louisville
|
You could also keep it super simple:
Base coat olive green
Airbrush centers of panels with a slightly lighter green
Airbrush panel lines, seams, and shadow areas with a slightly darker green
Mr. Color Super Clear
Wash with Tamiya Panel Liner Dark Brown; ensure you get good coverage in panel lines and use q-tips to adjust weathering level on panels
Matte Clear
It's not as sexy as a full on camo paint job, but it's really quick, will look great, and will show off the detail of the model.
***Also, future tip: it's easiest to paint the tracks separately whether by airbrush or spray can, then add them after the model has been painted.
|
|
This message was edited 1 time. Last update was at 2019/08/01 00:49:12
|
|
|
|
|
2019/08/01 01:58:52
Subject: Cadian Tank Camo advice
|
|
Utilizing Careful Highlighting
|
Small note, but keep in mind working camo will also break up the shape of your models, which will make them look less nice and work against your shades and highlights. I'd consider a few extensions of the tigerstripe across corners, but I think it looks plenty good as is.
|
|
|
|
|
2019/08/01 07:42:56
Subject: Cadian Tank Camo advice
|
|
Member of a Lodge? I Can't Say
|
Vejut wrote:Small note, but keep in mind working camo will also break up the shape of your models, which will make them look less nice and work against your shades and highlights. I'd consider a few extensions of the tigerstripe across corners, but I think it looks plenty good as is.
When I do camo I tend to use colors with high contrast for precisely this reason - real life camo is supposed to make the camougflaged object harder to see and you want your minis to stand out.
IMO the stripes look well executed but spread out a bit. I'd add a third color - probably a reddish brown color or maybe a dark rust red.
|
I prefer to buy from miniature manufacturers that *don't* support the overthrow of democracy. |
|
|
|
|
2019/08/01 07:49:22
Subject: Cadian Tank Camo advice
|
|
Dakka Veteran
Lincoln, UK
|
Spread out stripes, as others have said.
The tiger scheme works a bit better with more, smaller stripes.
A thn ink wash or filter wash can bring discordant colours together and soften them.
Mud does something similar - Typhus Corrosion then drybrush XV-88 for a simple mud effect
|
|
|
|
|
2019/08/01 15:01:48
Subject: Cadian Tank Camo advice
|
|
Lone Wolf Sentinel Pilot
|
Echo above. The biggest issue I see is you just have your camo on the flat parts.
It helps to look at actual camo patterns, pick one you like and mimic it.
http://forum.worldoftanks.com/index.php?/topic/200193-italian-tanks-and-military-vehicles/page__st__6400
You can do anything from 2-4 color camo as I have seen.
2 color is fine, I actually did something similar to yours, Dunkelgelb (yellow) and Olivgran (green) modulation.
A few things:
Get a filter paint for green tanks. Airbrushing a filter will help blend/tie the scheme together. Take a look at AK INteractive or MiG paints.
Look at some of Hersey brush guides. He specializes in painting armor.
https://www.heresybrush.com/en/guides/
Nice higlights/modulation for first attempt. Definitely recommend doing this as it helps create contrast on an otherwise flat model.
Here is my Leman Russ. Yes I know the sponson is crooked because of the magnet But this should give you an idea of a 2 tone paint scheme (with filter) and weathering.
https://www.reddit.com/r/Warhammer40k/comments/athkjv/pask_in_a_punisher_fully_magnatized/
As others have mentioned you can do 3 colors or even 4 (look at some WW1/2 tanks of various armies.
|
 10000+ 10000+
 10000+ 10000+
 8500+ 8500+
 3000+ 3000+
 8000+ 8000+
 3500+ IK Plus 1x Warhound, Reaver, Warlord Titans 3500+ IK Plus 1x Warhound, Reaver, Warlord Titans
DakkaSwap Successful Transactions: cormadepanda, pretre x3, LibertineIX, Lbcwanabe, privateer4hire, Cruentus (swap), Scatwick2 (swap), boneheadracer (swap), quickfuze (swap), Captain Brown (swap) x2, luftsb, Forgottonson, WillvonDoom, bocatt (swap)
*I'm on Bartertown as Dynas |
|
|
|
|
2019/08/04 13:08:21
Subject: Cadian Tank Camo advice
|
|
Splattered With Acrylic Paint
Nottingham
|
I really like the Camo pattern! You could do what other have said by putting another colour in so the stripes arnt too distanced but if you like it as is keep it that way they look cool.
|
|
|
|
|
|
|

 Alaitoc Eldar Warhost
  Finished Order of Our Martyred Lady - Sisters of Battle
  Finished Necromundian Imperial Guard Regiment

