| Author |
Message |
 |
|
|
|
|
Advert
|
Forum adverts like this one are shown to any user who is not logged in. Join us by filling out a tiny 3 field form and you will get your own, free, dakka user account which gives a good range of benefits to you:
- No adverts like this in the forums anymore.
- Times and dates in your local timezone.
- Full tracking of what you have read so you can skip to your first unread post, easily see what has changed since you last logged in, and easily see what is new at a glance.
- Email notifications for threads you want to watch closely.
- Being a part of the oldest wargaming community on the net.
If you are already a member then feel free to login now. |
|
 |
2010/09/02 09:02:48
Subject: Sculpting an Ambull in Green Stuff
|
|

The Hammer of Witches
|
looking forward to it!
My first ever batch of GS should arrive this week. I might make an ogre/ogryn
|
|
|
|
 |
|
2010/09/03 04:03:15
Subject: Re:Sculpting an Ambull in Green Stuff
|
|

Regular Dakkanaut
New York, Technocratic People's Republic of Vinnland
|
New Stuff, little tiny bits, scale-like elements on the upper back on the sides, and starting to fill in the space between the two ribbed-tubes:

Time willing this sucker will be completed by the end of the weekend. I'll probably be able to box him in a mold and start the process with the RTV Silicone. I can't believe I'm actually going to finish this thing, I will be a happy person the day I post a pic of the painted Ambull on this thread.
|
|
|
|
|
|
2010/09/03 09:01:40
Subject: Sculpting an Ambull in Green Stuff
|
|
The Hammer of Witches
|
And we will be happy too. Are you going to paint it, sell it, make molds for it? I'm sure there are a lot of peeps who would pay for that...
|
|
|
|
|
|
2010/09/03 10:15:13
Subject: Re:Sculpting an Ambull in Green Stuff
|
|

Fighter Ace
|
Ambulls... always thought of them as hairy b's ever since the Ciaphas Cain series...
Great work btw!
|
I won't bother. |
|
|
|
|
2010/09/06 04:54:17
Subject: Re:Sculpting an Ambull in Green Stuff
|
|
Regular Dakkanaut
New York, Technocratic People's Republic of Vinnland
|
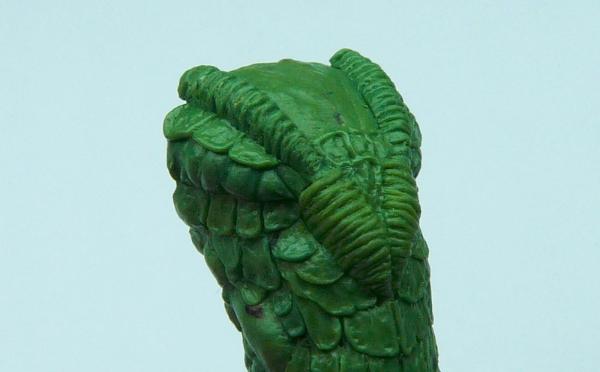
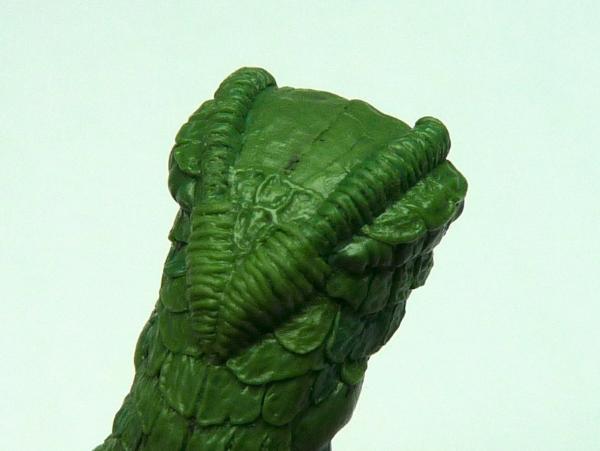
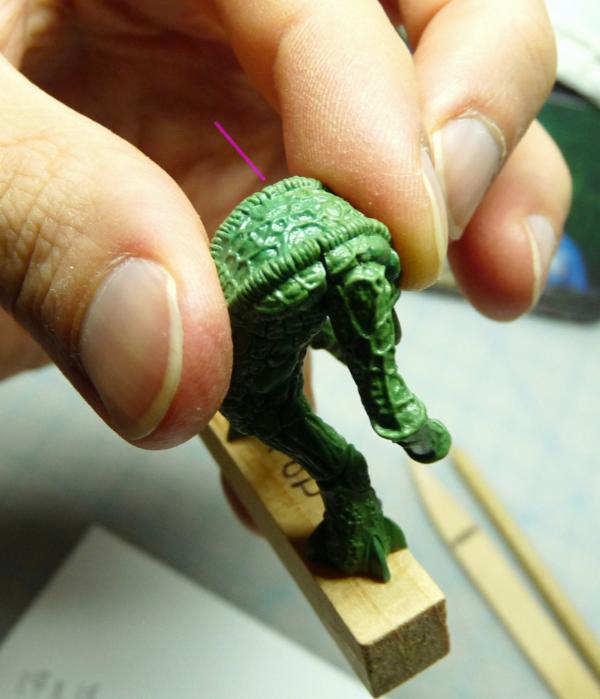
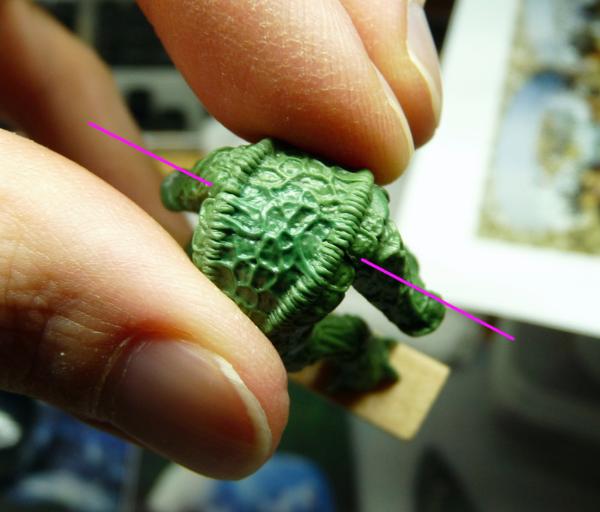
Worked on the 'forehead' area, added some craggy-detail, and added a bit of organic styling to it by extending portions up onto the ribbed-tubes.
These two pics are essentially the same view but give a slightly different angle, I couldn't decide on which to include so I included both:
|
|
|
|
|
|
2010/09/06 05:04:48
Subject: Sculpting an Ambull in Green Stuff
|
|

Mekboy Hammerin' Somethin'
|
Wow! Just keeps getting better and better! Can't wait to see this guy finished and painted up.
|
|
|
|
|
|
2010/09/06 05:19:47
Subject: Sculpting an Ambull in Green Stuff
|
|
Renegade Kan Killin Orks
|
Amazing work! The detail, and all those different textures!! Astounding!
Between you and Jackanory, I am really inspired to start my own greens.
Great work. I'll sure be checking in with this blog more often.
|
|
|
|
|
|
2010/09/08 03:59:32
Subject: Re:Sculpting an Ambull in Green Stuff
|
|
Regular Dakkanaut
New York, Technocratic People's Republic of Vinnland
|
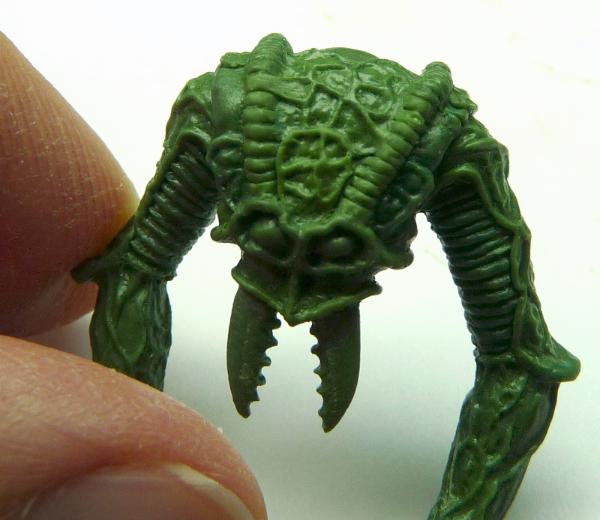
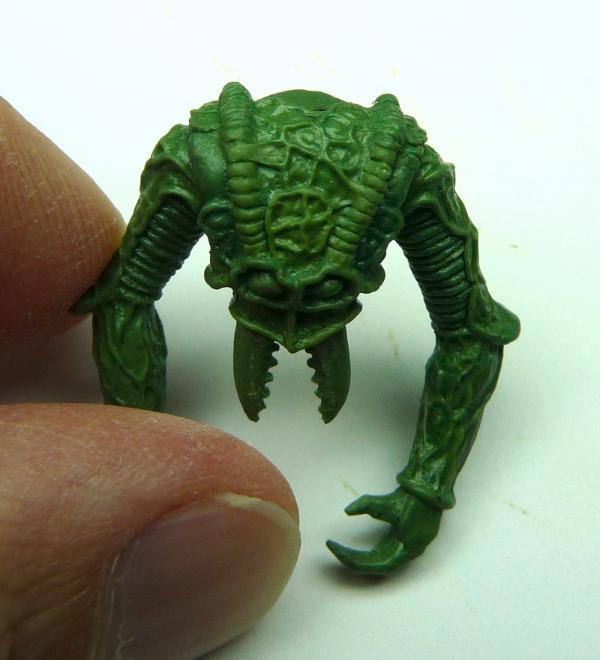
I've completed, more or less, the texture for the top of this guy, the carapace area. I didn't know what I was going to do at the seam where the two pieces meet, but in the end I decided to hold the two together and sculpt right over the seam, and slice it later. So here's a pic of the top, with a mark showing where the slice would occur:
And more of the top:
And this is how I situated the Ambull to let the GS cure in place last night:
I'm going to increase the height a bit by adding to the feet-bottoms, then I'll clean up a few bits and this will be ready to get into a mold. Although - I have reservations because of how thin the legs are, I may try some radical surgery to increase the bulk of the legs... we shall see... agh... maybe not, as I write this I realize how stupid that might be. I want to see this get done.
|
|
|
|
|
|
2010/09/08 11:09:32
Subject: Sculpting an Ambull in Green Stuff
|
|
The Hammer of Witches
|
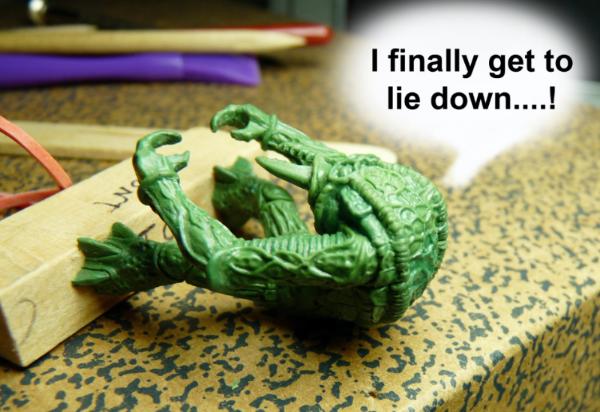
Ambull need lie down, Ambull tired (Yawn)
|
|
|
|
|
|
2010/09/08 20:47:26
Subject: Sculpting an Ambull in Green Stuff
|
|
Dakka Veteran
|
That's looking really good. Looks like it might be ready to be cast in just a few updates.
|
|
|
|
|
2010/09/15 18:40:53
Subject: Sculpting an Ambull in Green Stuff
|
|
Phanobi
|
coolness, me want.
|
http://www.dakkadakka.com/dakkaforum/posts/list/463976.page (Space Sharks and Tau)
DJ @ http://www.rockindocradio.net
Mon, Thursday+Fri 06am - 09am EST
We refuse to take sides in this anymore. And we refuse to let you turn us against one another. We know who we are now, we can find our own way between order and chaos...
It's over because we've decided it's over. Now get the hell out of our galaxy! Both of you.
"Whoever takes purple sash is purple, and follows purple leader." I follow purple tau. Theophony
|
|
|
|
|
2010/09/15 18:47:19
Subject: Sculpting an Ambull in Green Stuff
|
|
Swift Swooping Hawk
|
Very nice work!
|
 
"Now I am become Death, the destroyer of worlds." - J. Robert Oppenheimer - Exterminatus had it's roots way back in history. |
|
|
|
|
2010/09/16 14:49:03
Subject: Sculpting an Ambull in Green Stuff
|
|
Been Around the Block
|
First sculpt?! That's outstanding... I'm guessing your experience with 2d art gave you an excellent base to understand good textures/patterns?
Your model looks like very good work from an experienced sculptor. I hope you keep going after the ambull's done - you could turn out some wonderful stuff.
|
|
|
|
|
|
2010/09/16 15:11:22
Subject: Sculpting an Ambull in Green Stuff
|
|
Pestilent Plague Marine with Blight Grenade
|
Dude this rocks. My vote's on a Piscean next 
|
|
|
|
|
|
2010/09/16 15:17:38
Subject: Sculpting an Ambull in Green Stuff
|
|
Decrepit Dakkanaut
|
That's a tremendous figure Ambull... excellent job!
|
|
|
|
|
|
2010/09/16 17:55:56
Subject: Sculpting an Ambull in Green Stuff
|
|
The Hammer of Witches
|
hey ambull - had a go at sculpting green stuff today! pop over my blog and give me your opinion wouldya?
|
|
|
|
|
|
2010/09/16 21:29:16
Subject: Sculpting an Ambull in Green Stuff
|
|
Regular Dakkanaut
|
Your chappy looks unerringly close to the actual Ambull - congratulations. Great work.
|
|
|
|
|
|
2010/09/16 21:55:41
Subject: Re:Sculpting an Ambull in Green Stuff
|
|
Regular Dakkanaut
New York, Technocratic People's Republic of Vinnland
|
Thank you all, I appreciate the comments and the viewings. It is now complete and ready to be set up for mold-making, I'll be doing that over the next few days I believe and will get some pics of progress on as I go.
Green Stuff is good for your health.
|
|
|
|
|
|
2010/09/17 14:43:10
Subject: Sculpting an Ambull in Green Stuff
|
|
Phanobi
|
I think it looks better than GW's
|
http://www.dakkadakka.com/dakkaforum/posts/list/463976.page (Space Sharks and Tau)
DJ @ http://www.rockindocradio.net
Mon, Thursday+Fri 06am - 09am EST
We refuse to take sides in this anymore. And we refuse to let you turn us against one another. We know who we are now, we can find our own way between order and chaos...
It's over because we've decided it's over. Now get the hell out of our galaxy! Both of you.
"Whoever takes purple sash is purple, and follows purple leader." I follow purple tau. Theophony
|
|
|
|
|
2010/10/04 05:05:19
Subject: Re:Sculpting an Ambull in Green Stuff
|
|
Regular Dakkanaut
New York, Technocratic People's Republic of Vinnland
|
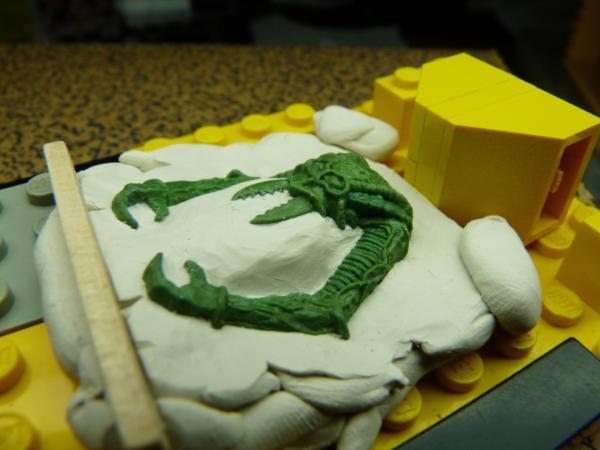
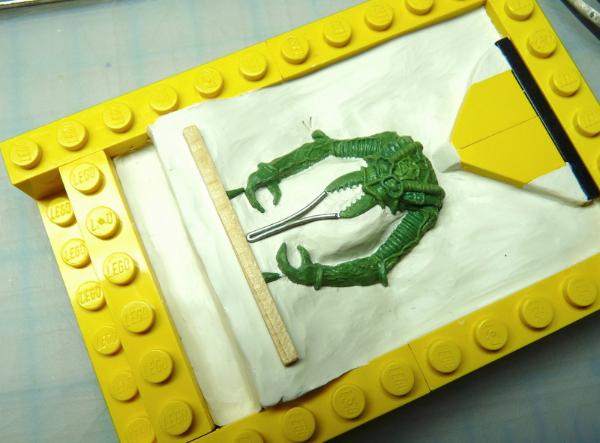
*yawn* *stretch* ...well that was a lovely nap... now back to work:
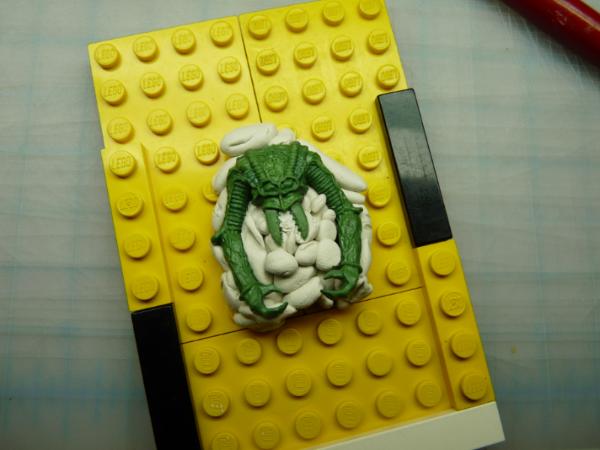
Claying in the first half of the face/arms portion. What I do with small pieces like this is surround it with clay, a non-hardening non-greasy clay (I use some stuff from Germany, I have no idea what it's called, OMYA, something like that) and 'sculpt' this wall of clay right up to the mold-line where I want the split to be. This will be where any flash will occur so I take my time determining what will be best, silicone allows for some undercuts but there are limits.
Once I get all of this clay formed (I'll show pics of that soon, next few days or so) I build up the mold box (trusty modular easy-to-clean LEGO), double check all sensitive points, press in a few dents to serve as a 'key' to register the two halves of the mold and pour the rubber. Once that's cured I flip it over, remove the clay barrier, apply a release agent to the rubber (I've used different stuff, Murphy's Oil Soap, Vaseline, but I'm thinking about getting some professional release as silicone can react adversely to certain substances) and pour the second half.
I hope to have pics of all of this soon, but for now here's the basic fitting of the Ambull's head/arms section to a basic mold box floor. The size of the box and the position of the piece in the box comes from a lot of sketching out of plans. It is very important to sketch out what I want the mold section to look-like - plan plan plan before a mold-make - this one will include some ducts that will run around the Ambull to help the flow of resin once it's poured.
This shows the clay riding right up to the sculpt, at the line at which I want the mold to split. There's a trick to this, avoiding undercuts and following the 'natural' shapes so as not to create flash lines that obliterate detail.
More pics and progress soon. Thanks for your patience to those who have been following!
"... we're The Sweeney son and we haven't had any dinner..."
|
|
|
|
|
|
2010/10/04 08:07:16
Subject: Sculpting an Ambull in Green Stuff
|
|
Powerful Spawning Champion
|
Well, I just found this thread and I'm thrilled that I did. I didn't know what an Ambull was, but now I do and I love it. It looks just fantastic.
|
|
|
|
|
|
2010/10/04 08:55:42
Subject: Sculpting an Ambull in Green Stuff
|
|
The Hammer of Witches
|
This is just like what I used to do in uni to make press moulds and slip molds for ceramics - Its amazing how many of these skills are transferable
|
|
|
|
|
|
2010/10/04 09:32:06
Subject: Re:Sculpting an Ambull in Green Stuff
|
|

Adolescent Youth with Potential
Blue Mountains, Australia
|
Awesome blog; only just stumbled upon it.
Your information on sculpting, and your project, is very useful; thank you for taking the time to post it.
I especially liked your homemade tools; quite ingenious.
My lady friend is just starting to do some scratch sculpts, so you have done us both a great service here. She is going to make some of your tools this evening and hopefully try them out soon.
Again, thanks for the really informative blog.
I look forward to seeing how it all turns out! Keep up the great work, mate.
|
The only truth is paradox |
|
|
|
|
2010/10/04 17:48:59
Subject: Sculpting an Ambull in Green Stuff
|
|
Stabbin' Skarboy
|
*ambull is stuck, ambull tired zZzZz* Looking great mate!
|
monkeytroll wrote:
In the grim darkness of the future there is only boar.
 Waagh Nazdreg! Waagh Nazdreg!
|
|
|
|
|
2010/10/05 05:39:52
Subject: Re:Sculpting an Ambull in Green Stuff
|
|
Regular Dakkanaut
New York, Technocratic People's Republic of Vinnland
|
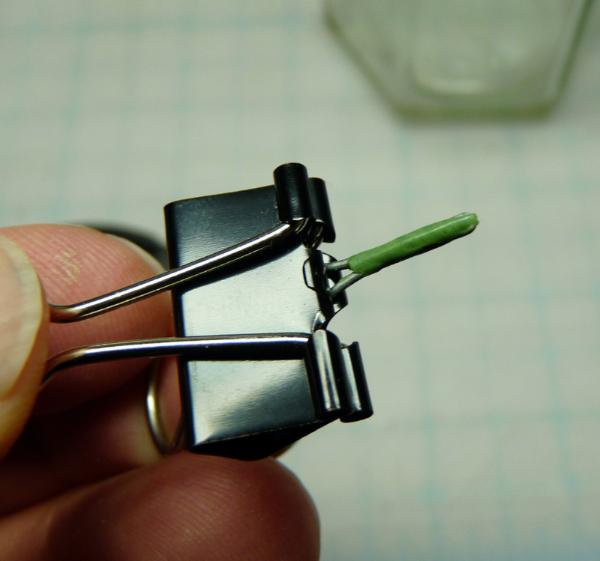
Clay barrier fitted to the Ambull and completed. This of course does not include the various channels and venting ducts that will allow more fluid travel of the resin through the mold, I'll get those in a post soon.
Side view, showing a curious triangular bit at what will be the top of the mold. This is a funnel, built into the mold to provide a place to pour the resin into. Imagine it as a negative space, it will direct resin towards the main entry point into the mold (which will be around back of this part of the Ambull. This will create a stalk of resin after it has cured, but it will be easy to trim away as it will be one of the mating faces of the completed model and will be hidden once the two parts are glued together). This channel will need to be included when I pour the second half of the mold, it will be shown in subsequent posts.
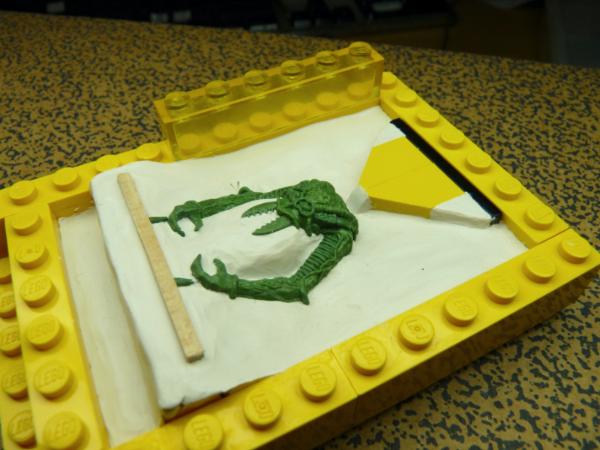
And front-on. No Han Solo jokes please. One thing I've learned from casting is to never economize on the size of the mold relative to the piece, what I mean to say is that it is worth it to use more silicone to provide strength and stability, rather than have a too-small weaker mold by using a smaller mold box and less silicone. this little guy has plenty of space around him not only for the strength of the mold but for the venting sprues. Thin silicone molds result in deformed final casts. I'll explain why I've left a suspicious gap at the bottom when I pour the second half of the mold. Oh, and that bit of wood is the lower-most venting channel, the claws are channelled out into that. The fangs will be as well, delicate work at that point, I may have to have a drink before getting to work on that (chamomile or peppermint?)
|
|
|
|
|
|
2010/10/05 05:57:08
Subject: Sculpting an Ambull in Green Stuff
|
|
Mekboy Hammerin' Somethin'
|
Still great stuff! Can't wait to see how the molding and casting turns out!
|
|
|
|
|
|
2010/10/11 21:41:44
Subject: Re:Sculpting an Ambull in Green Stuff
|
|
Regular Dakkanaut
New York, Technocratic People's Republic of Vinnland
|
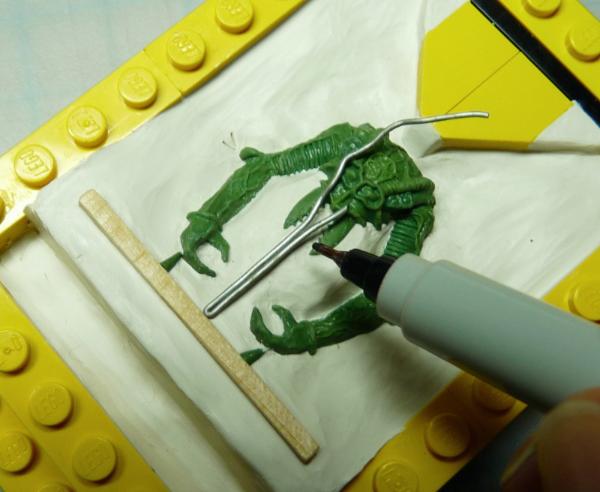
More activity: creating some sprues for the mold. These will allow greater passage of resin throughout the cavity.
A particular point of sensitivity is the Ambull's fangs, without a channel stemming off of the tips they will never fill properly with resin. I need to create a "Y" shape to connect the tips with the main horizontal channel at the bottom (the strip of wood).
I start with a piece of 22 gauge wire (craft stores sell this in rolls or spools):
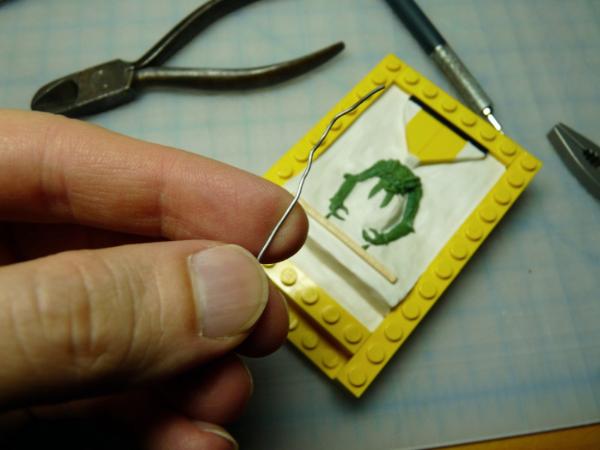
then I bend it in half, roughly, and crimp it together:
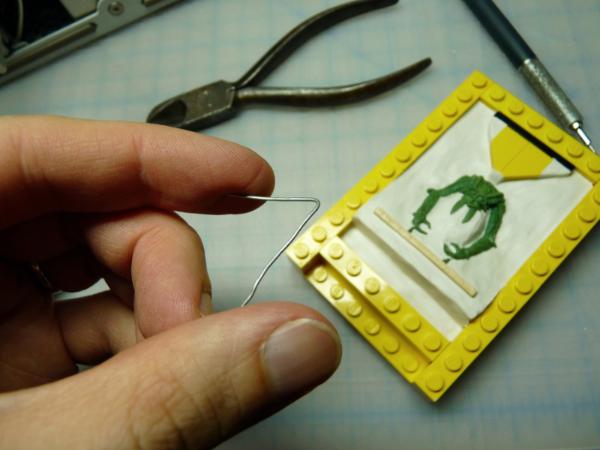
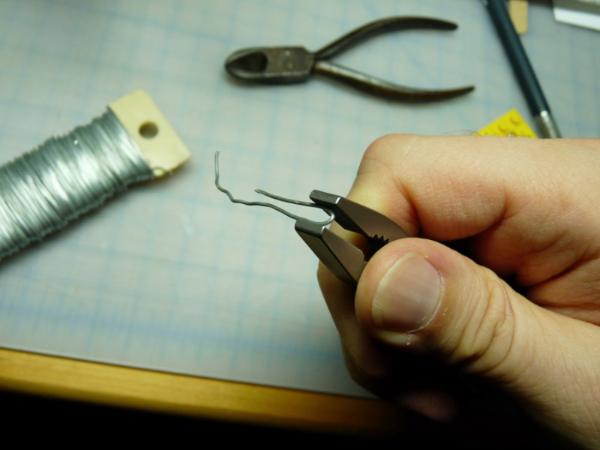
... position it to see if it's going to fit well, spread the fork apart a bit more to get it as close to the tips of the fangs as possible ...
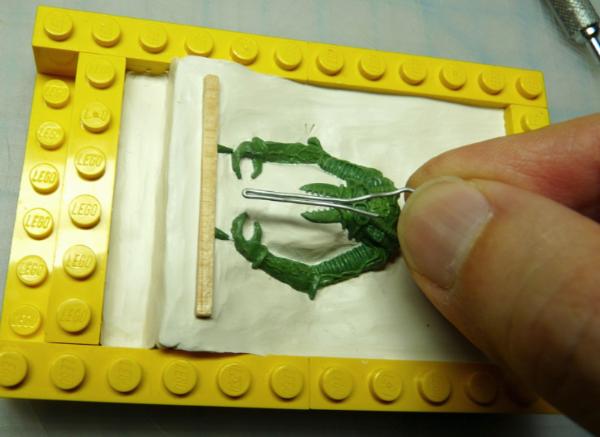
... looking pretty good, I mark the points where I'll trim the end to make a better fit ...
... and snip them ...
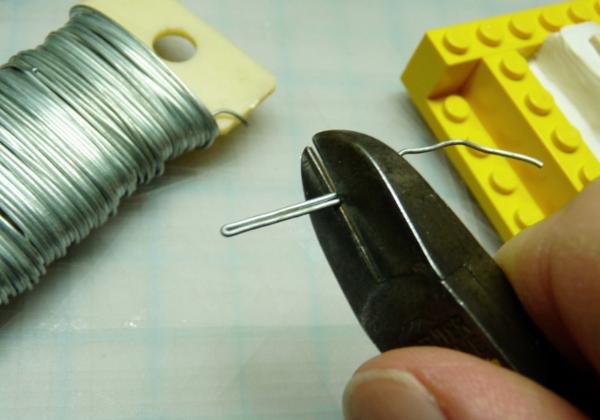
Now the fit is very nice, minor adjustments and the actual connecting to the fangs can be done with tiny bits of clay.
However, I will bulk the wire up a bit to make a bigger and smoother channel, I add Green Stuff and let it cure, a few more blobs and the sprue will be finished and incorporated into the mold before the first silicone pour.
It may seem like a lot of effort but the careful planning and preparation of a mold makes for better casts.
|
|
This message was edited 1 time. Last update was at 2010/10/12 01:04:36
|
|
|
|
|
2010/10/11 22:16:46
Subject: Sculpting an Ambull in Green Stuff
|
|
The Hammer of Witches
|
Thats exactly what the crafts tutor used to say. Cant say I was really any good at it - but at least If your doing it small you wouldn't have the problem we used to have making large molds from plaster of paris - that if your mold walls collapse you end up with a gallon of quickly solidifying plaster on your shoes! this looks safer. Thankyou very much for the step by step pics and structions - they could come in handy on day for if I dare try this...
|
|
|
|
|
|
2010/10/12 01:07:53
Subject: Re:Sculpting an Ambull in Green Stuff
|
|
Regular Dakkanaut
New York, Technocratic People's Republic of Vinnland
|
I've learned through experience: many molds made, casts poured, only to find out that the resin only made it about a quarter of the way through the cavity.
But when it works, wow - the results are just so darned cool, to pull a decent copy out of a mold, clean it off and then paint it up. I love doing it.
Hopefully I'll be able to provide some nice results to show all of you fine folks!
|
|
|
|
|
|
2010/10/12 01:09:45
Subject: Re:Sculpting an Ambull in Green Stuff
|
|
Fixture of Dakka
|
Heh, you just take your time Ambull. My impatience to see finished products is easily tempered by my wish to see an excellent cast of the fantastic sculpt 
|
|
|
|
|
|
|
|


