And I have not really decided what they are going to be yet. They will eventually get their own datasheets, but for now they are probably count as Defilers, as that is what they are (mostly) made of.
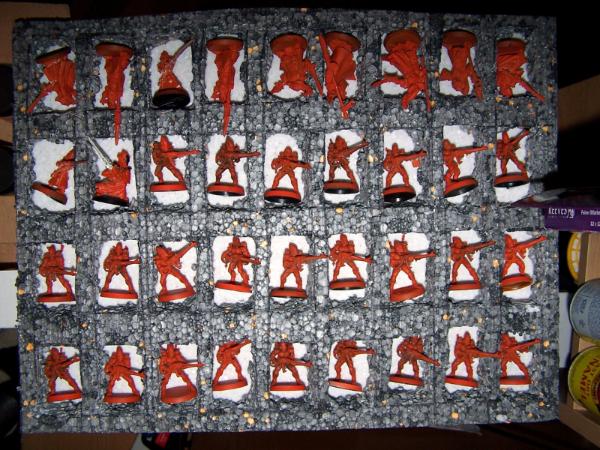
Really like the gritty, rusted shades on everything. Definately plays to the rotting Nugle look. The paint on some of the Marines' heads looks a bit thick, but everything else looks really great
The walkers look like defilers for sure. The main criticism I have for them is only game-wise. They will be VERY easily to see and VERY hard to hide. Otherwise the models are looking very nurgly lol ;D.
Yeah, they are not exactly subtle. At least it means that they will not lack for targets to shoot at (assuming that they last long enough to shoot at something anyway)
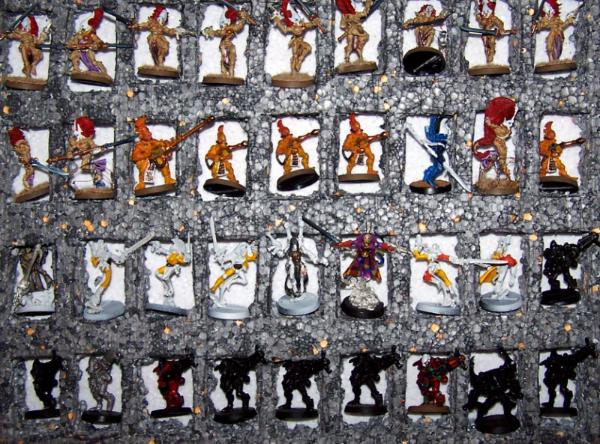
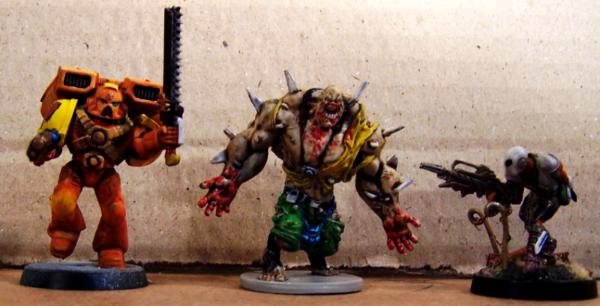
Nice job! That wep on Famine looks like one of the Grey Knight staves - Nemesis weapons I believe they are called? Anyway those are the best looking weapons in the game IMO and I love how you've adapted that to fit Chaos. I don't particularly like the look of Nurgle models (tends to make me throw up; I prefer Tzeentch) but I can't help but admire this. I also like the Dread - especially the Ultramarines symbol on the ground. Makes it look like some sort of "recently possessed" Chaos Dread (as in, the daemon just burst out and the Dread went berserk, tearing the symbol off etc.) As for the army as a whole . . . Looking forward to more!
Yes, Famine uses a Grey Knight arm with the blade replaced.
I like your interpretation of the dread. Although it was not what I intended, I like that you are able to make your own story from the model. That is something that I love people to be able to do , so I am glad that you posted
@ Everyone:
Thanks for the positive comments. If anyone has any suggestions/tips, just let me know, thanks
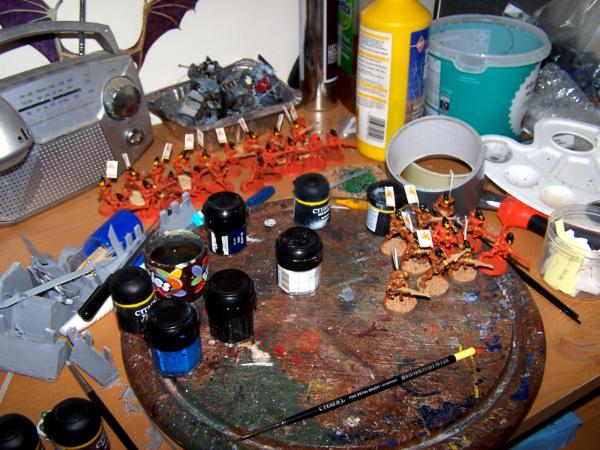
I've had a few people asking me via PM how I painted these, and I did promise (quite a while ago now - oops!) to post a step by step.
The great thing about my method of painting is that it requires very little skill, as most of it is done with washes, it is also quite fast. The slowest part is painting the armour trim, which I hate doing.
I will edit this post at a later date with some pictures, but for now, here is a text only version of my "Silver's lazy painting of Nurgle Maries guide":
--------------------------------------
1) Basecoat chaos balck (or a mid-dark grey if you want a lighter colour final model).
2) Wash skull white (approx 2-3 parts water, 1 part skull white. Adjust the mixture depending on how white you want to make the armour).
2) a) OPTIONAL - wash with other bone colours, such as bleached bone, in areas that you want to be slightly richer. Works well for anything you want to look particularly bony, such as the feet on plague marine models, horns etc.
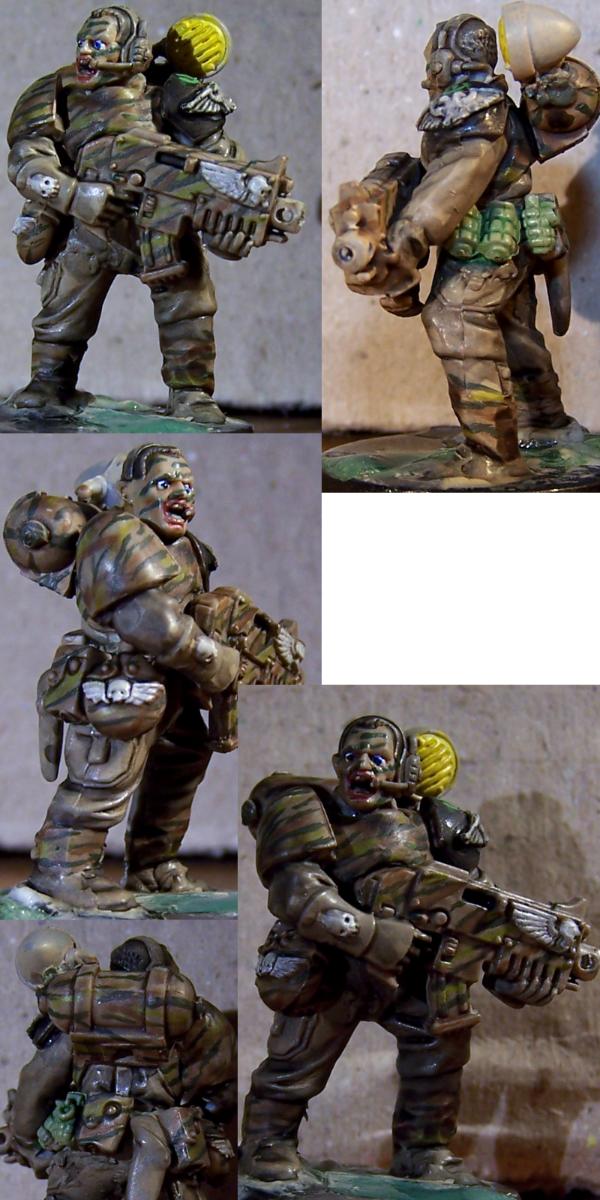
3) Paint on the armour trim - most of my models use a dark olive green colour I mixed a while ago. I can't remember the paints I mixed or the ratios, but it is about half way between black and goblin green, but any colour trim you want to use is good here... blue, green, red; whatever you want your war band to look like. Just do a couple of test models. The models in squad 5, the dread and the rhino all use plain ol' camo green.
4) Paint the bits and bobs - I use a slightly watered down (same thickness as milk) dwarf bronze for the armour joints, pipes etc, as well as painting any decals or badges you want on the armour.
5) Wash with flesh wash. Dilute the wash depending on how grubby you want the final armour to look. I think mine varies from about 2:1 (water:wash) to about 5:1.
6) Touch up details if you want.
I use a relatively large brush to apply the main washes, and it only takes about 30 seconds per model, per wash, so it is great for getting lots of models painted up fairly quickly.
I will also post some WIP pictures of my LR later (I was going to enter it into the weathering contest, but I am way too slow at painting and it is nowhere near done... plus I have not really got any weathering products, so hey ).
Some WIP shots of my Land Raider. It was going to be my entry into the nitty gritty armour contest, but I did not have enough time (ie I was too lazy) to finish it. Still a WIP at the moment, but enjoy.
Pretty cool stuff, I prefer a greener and "corroded white" scheme but your doing a great job on all the conversion work. Also, love the freehanding on the LR.
ZacktheChaosChild wrote:Pretty cool stuff, I prefer a greener and "corroded white" scheme but your doing a great job on all the conversion work. Also, love the freehanding on the LR.
Thanks for the comment
I have to say that there is more to Nurgle than green slime. I am going for more of a rusted, fungal, unwashed look for my guys. Plus I don't really like green all that much, so the brownish hue offsets it somewhat
PanzerLeader wrote:Too bad you're in England Silver. I'd gladly make a trade---you paint the models and I'll write the fluff. Looks very good.
I think you mean too bad you are in the USA
Have you taken a look at the fluff on my site? I have not uploaded a whole load of it for my IG yet, as it keeps on crashing the browser every time I try and edit my wiki (stupid thing). Would love for your feedback, even with the fluff in it's current basic state.
ZacktheChaosChild wrote:Pretty cool stuff, I prefer a greener and "corroded white" scheme but your doing a great job on all the conversion work. Also, love the freehanding on the LR.
Thanks for the comment
I have to say that there is more to Nurgle than green slime. I am going for more of a rusted, fungal, unwashed look for my guys. Plus I don't really like green all that much, so the brownish hue offsets it somewhat
Yeah that's cool, it's all personal preference. I'm just saying I really like the Post-Heresy Death Guard scheme, but it's good to see something different for a change.
Empchild wrote:They are the people who assassinated the arch duke francis ferdinad and his wife sophie from austria hungary. Use wikipedia and you will see it all.
I have to admit that I did google the group after I posted. I had not based my army on the faction, but I may see if I can find any interesting bits to include in the fluff.
ZacktheChaosChild wrote:You know, for anyone who played Oblivion, the Black Hand was the symbol of the Dark Brotherhood (a badass band of cutthroats and assassins).
Not sure how I missed this, but they are looking very cool. I agree that the usual green nurgle theme is a bit... mneh. The white is an interesting alternative.
endtransmission wrote:Not sure how I missed this, but they are looking very cool. I agree that the usual green nurgle theme is a bit... mneh. The white is an interesting alternative.
Ok, I have been shamed into doing some work on this army again.
Thought I would start work on one of the units that I will need (assuming that my army list remains more or less the same) for the UK Dakka meet.
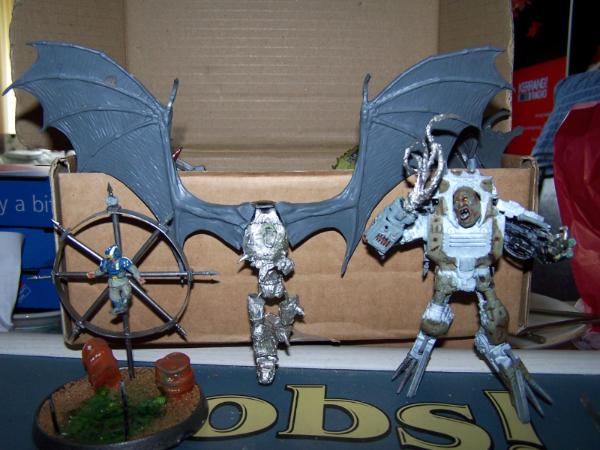
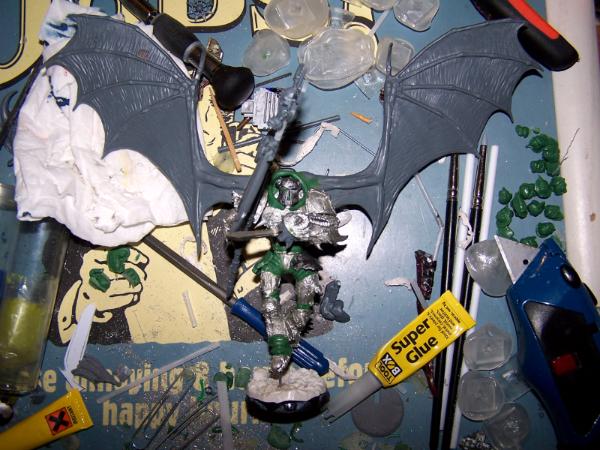
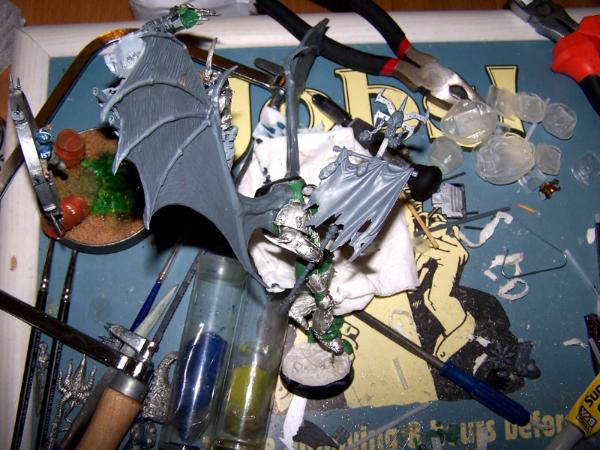
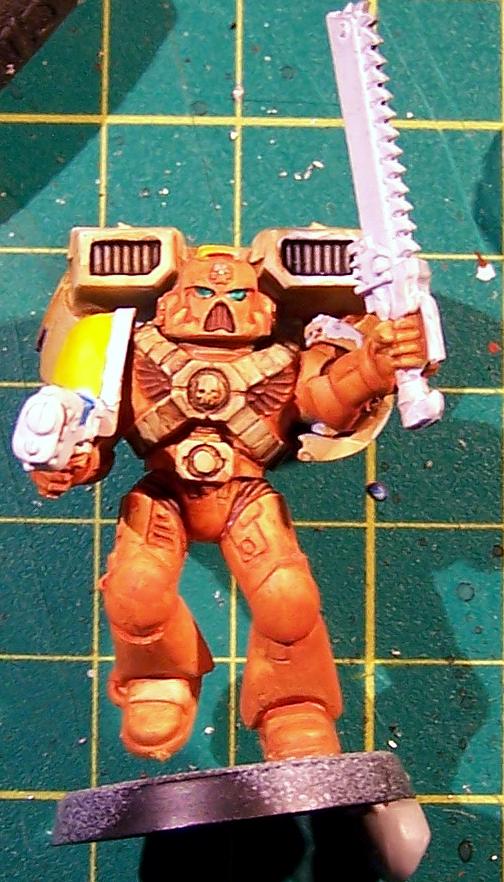
Meet a very WIP "War":
Needs green-stuffing up, and extra gubbins sticking on. I would really like comments on anything that will make it better, as at this stage I just have really weak glue bonds on everything so it will be quite easy to take apart and rebuild.
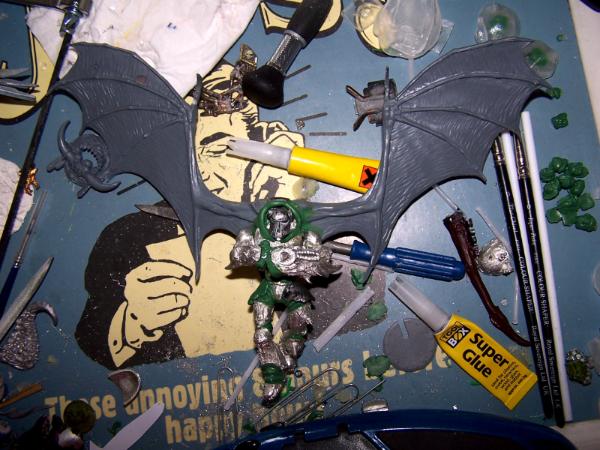
I was planning on adding a set of hand/claws to the wing tips. the GS skin will be a kind of techno/nurgle, but with khornate touches (to fit in with my nurgle army, but also give me scope to call this chap "war" ).
hands on his wings? never seen that before, so it might be pretty cool
love the hammer. Maybe, as an idea, to link him into nurgle, is give hims antlers? or a hood. Like the warhammer nurgle champion, as im sure it would make him look very impressive(er)
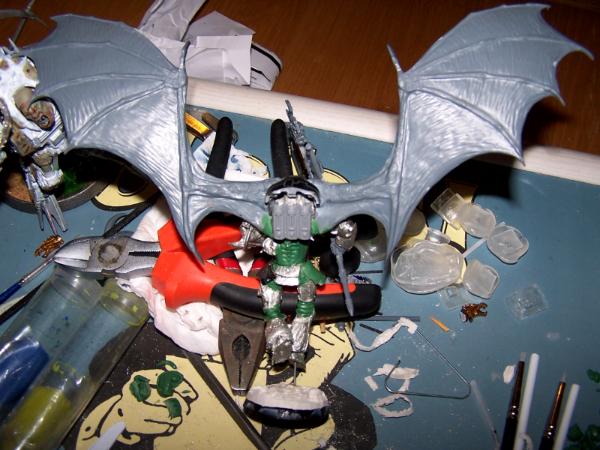
The hands are rending claws from one of the larger tyranid creatures, and they look OK, though I may change them later if it continues not to grab me totally
I spent a happy hour drilling the hell out of his wings to make them look torn and tattered, and then spent not such a happy hour trying to get very thin bits of GS to stick to the paint that covered the wings so that I could get some nurgley-ness started.
I've filled in most of the gaps with GS now, and have done a little detailing (though it is nowhere near done). Need to find some plasticard to progress with some armour though, as when I tried with GS, it kinda failed
I will add some pictures when I get back home tonight.
Ok, so I forgot that I was going to the in-laws so I was not able to take any pictures, but I am now the proud owner of a set of colour shapers, so my GS'ing should be much easier and precise from now on, which is good.
This looks awesome. I was half expecting him to be leaning on the raised leg. Also, I'm not as much a fan of his right hand. It's the same as the wing hands, right? but the hammer hand is something else. Just my opinion, the model on whole looks incredible.
@ Zhetsuken - I've only played the first metal gear, and that was a long time ago. I'm glad you think my stuff looks kind of like some of the designs from such a well executed game
@ The Good Green - Yeah, I am not sure about the hand either. It is a Tyranid warrior hand, as are the ones on the wings (so you are correct ), the one on the left is an ogre hand. I may eventually swap the right hand for another ogre hand, as you are correct that it looks a bit off.
And thanks for the positive comments.
@ LEEQAEX - the name was a combination of things, Oblivion was one of them, though I was also thinking of doing a card/gambling themed chaos army at one point, so the name also comes from there.
Although the fluff is also that there are 4 deamon princes and a chaos lord in charge of the chapter, the fingers and thumb of the black, necrotic hand of PAPA NURGLE!
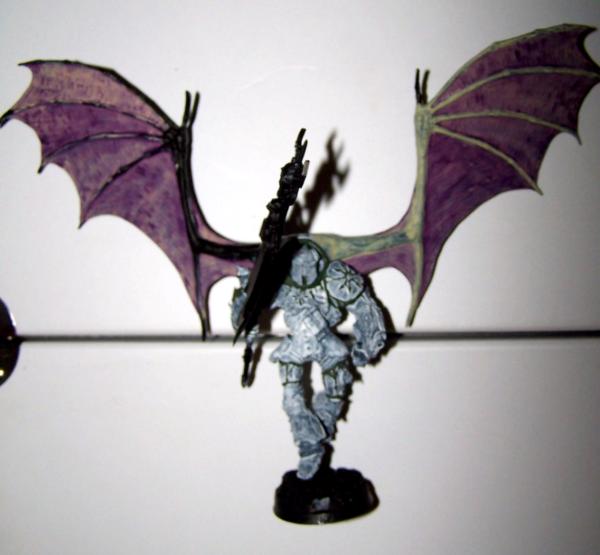
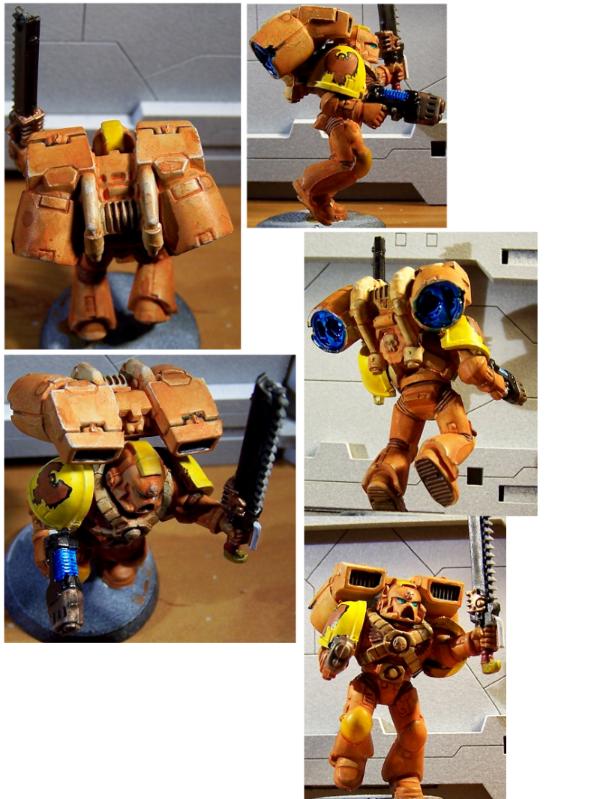
Ok, had a rather massive painting session (for me anyway ) this evening and have almost completely "finished" painting my new daemon prince. I hope you enjoy, any C&C is much appreciated, but I think it looks rather good - though obviously there are a few more bits and bobs which need doing.
I love the hands on the wings, it really works, and makes him look really menacing. Additionally, i love how he seems to be leaning on his leg. Truly an inspiring miniature. Feel proud!
I thought I'd show off some WIP shots of something big I've just started working on. It can count for a couple of things, Daemon Prince (although a very huge one, it is about 1 inch bigger than War, who is pretty huge), A defiler (bit of a stretch), or what I intend to use it for; a summon greater daemon!
There is currently no green stuffing (which there will be plenty of, much of the machinery will be covered by a layer of decaying flesh). It is designed to look kind of like a giant Terminator Armoured daemon
Pics:
The Sacrifice from which the SGD will be coming from and chained to:
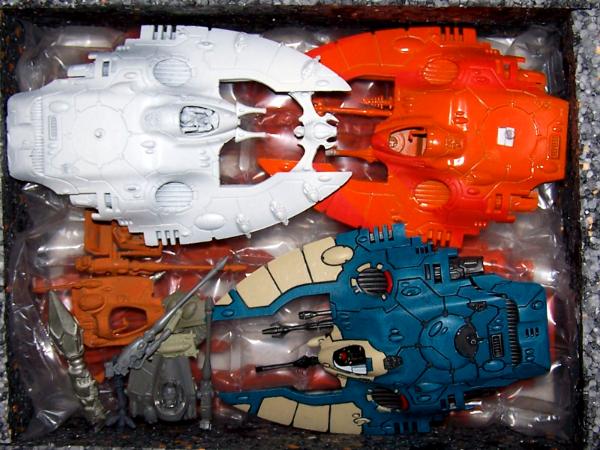
Taking a break from my CSM for a while and have thus done a bit of work on my IG. Been pimping out my valkyrie - I don't really like the wings too much so have stolen some from a Tau Piranha. Everything is either magnetized or pinned so it all moves (or stays still ). Paint job is still very rough.
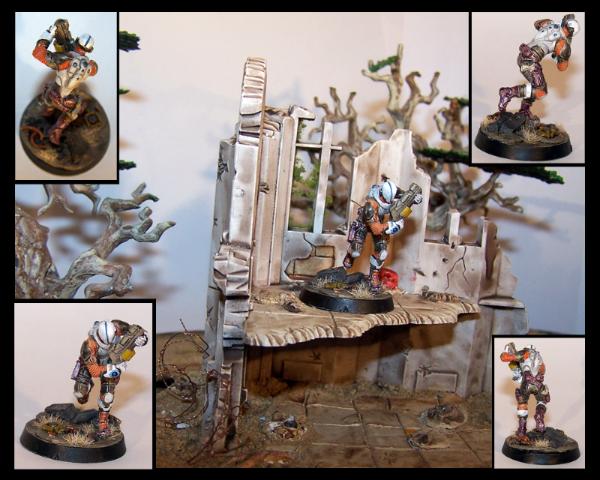
I have a few action shots of the army from the Dakka Tournament last weekend. Photos taken by endtransmission. If you were there and took pictures of my army, please let me know and I will add the pictures here
My army was ranked 2nd best painted, which I was really pleased with. Apparently if I had tidied up the bases (painted the rims etc) and finished basing all the models (I had a raptor squad and a havoc squad which just had grit on the bases as I had only just finished painting them in time ) I may have been able to come 1st
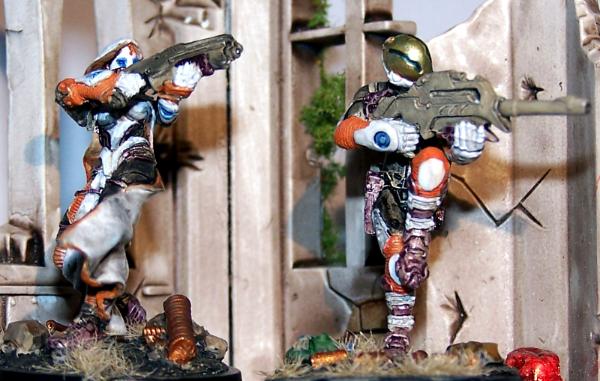
My Daemon Princes rocking out with a couple of squads of Chaos Marines relaxing in the background.
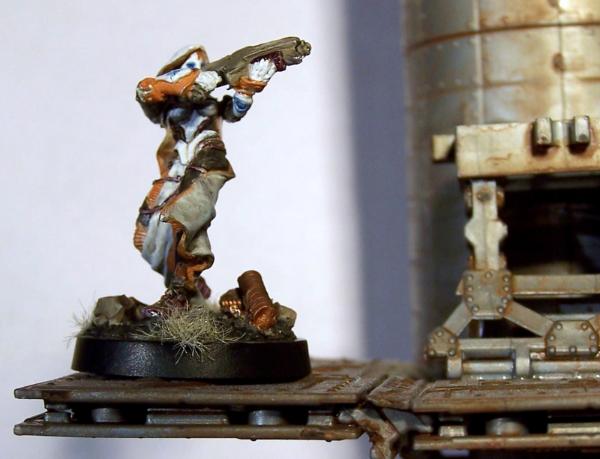
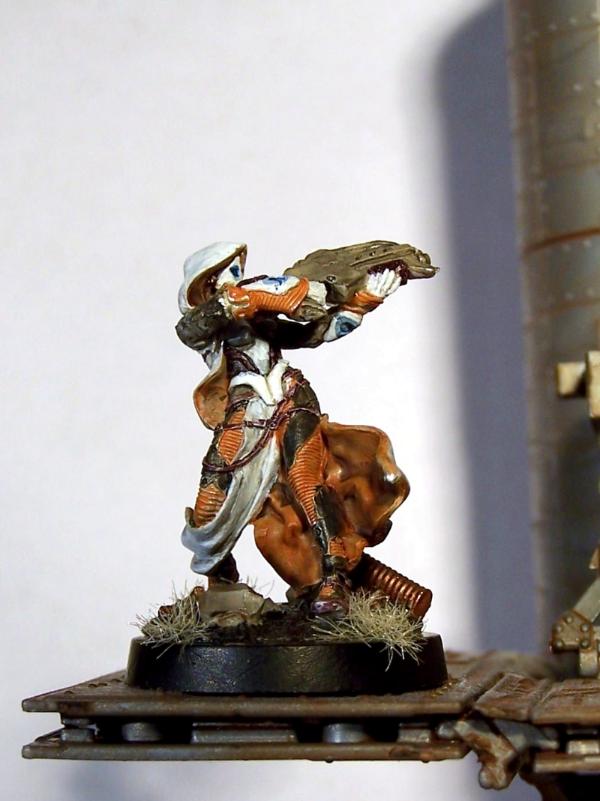
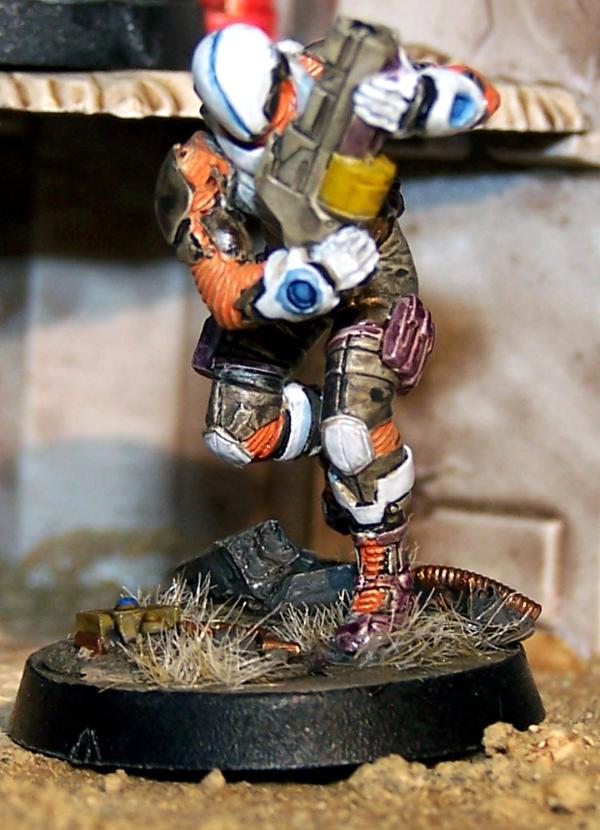
Famine about to show some Imperial Guard the meaning of the words "ARGH OH GOD THAT HURTS!"
Chaos Marines want in on the action too.
Along with all the other stuff I am working on (or not as the case may be), I am working on a "count as" Plague Tower. I will add pictures soonish, along with pictures of 2 new rhinos, 1 raptor squad and 1 havoc squad which are now painted
Your summoned greater demon looks brilliant. Im actually really enjoying the mechanised look of your army. I had an idea a while back for a khorne iron warrior type army, but sadly it never came to fruitation. Bleh. Are you planning on having another two daemon princes named after the other two riders of the apocolypse? Heres hoping you will
Ok, first up is my super heavy counts as "Plague Tower", still very WIP and the idea is very stolen from this thread:
There will eventually be a couple of Earthshaker cannons on the top, along with lots of hull mounted defensive weapons. The Earthshaker section will be removable so I can also make a big anti-titan turret and also an anti-squishy people turret.
And a quick disclaimer on the following images; the light is really bad at the moment so I had to take these with the flash on, so they look pretty terrible
Raptors:
Autocannon Havocs:
Rhino 1:
Rhino 2:
Rhino 3:
Automatically Appended Next Post: @ endtransmission - Thanks - I really enjoyed playing against your army, some great conversions/sculpts and very nice to look at - I look forward to meeting them on the tabletop again at some point in the future.
@ Commander Cain - Thank you
@ ghosty - Thanks, I wanted something a bit different and although I have seen a couple mech/daemon style armies, they are pretty rare and usually very different from one another. I am indeed planning on having 2 more daemon princes for the other riders, as well as my chaos lord (probably counts as Typhus of some sort).
A few more images of The Chapter of the Black Hand from Silver Sorcerer taken by Panic:
My battle against ceorron's Orks from the Sunday: My Daemon Princes dish out punishment to the Ork hordes while my Rhino driver apparently re-enacts something he did while playing GTA
Not sure what battle this is from, but I think it was either against Battlecannon it Phil, or TalonCAB from the Saturday: My Chaos Marines pile out of their rhino to take the objective.
From my game against Panic's grots: My Havocs set up to get a commanding view of the battlefield
"What do you mean we've only got 3 meltas and a power fist between us and he's got a KFF and 9 Kans?!?" - my Raptors and a squad of Chaos Marines get ready to take on the full force of Panic's Kan wall. They would go on to do surprisingly well (far better than my Daemon Prince who died horribly without doing much), and take out qute a number of Kans in CC.
"Come and have a go if you think you're hard enough!" - My 2 remaining marines amid the carnage they and their comrades had inflicted on the Kan wall.
Well, depends what I want to take - I have about 1,500 points painted up now, but the units I actually like are still unpainted to that level
To get up to 1,500 I need to paint up another havoc squad, finish painting my predator (and also build some HB sponsons ), and a few other odds and sods. Which will probably take me another year...
Not sure what battle this is from, but I think it was either against Battlecannon it Phil, or TalonCAB from the Saturday:
My Chaos Marines pile out of their rhino to take the objective.
I love how mysterious that no numbered orange dice is. What will it land on? Another blank? Only the gods can forsee!
Anyway, I still stamp you in the name of the Alpha Legi-Inquisition. *ahem* -shifty eyes-
"What? Don't look at me like that! Sure, I might be a bit on the big side and almost double the hight of all of you, but that's nothing to base accusations that I'm an Alpha Legion infiltrator that you might be considering stating on. Now if you excuse me, I have to use the little-Daemonhunters room.." *pulls out boltgun slowly*
Just a quick update on the super heavy - I've used parts from the biotoxin plant to pimp out the back deck (they are not stuck on yet as I am going to finish up the back end a bit more before putting the details on. The platform is not glued, but the pipework and tanks are.
Any comments or suggestions on improving the design? There will probably be more pipes etc in the final design.
I'm now officially adding my IG into this thread (means that I don't have 800 million P&M blogs and also means that I should hopefully keep this thread updated fairly regularly
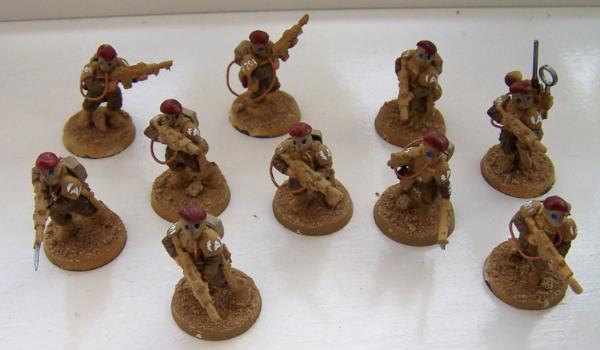
My IG are a (loosely) WWI British themed army, mostly a gunline army with plenty of templates, but since I love tanks (and own quite a few) I am also having another "allied" force of tanks to support the main gunline army.
12th Tank Company ("Tennyson's Twelfth"), Britannon 24th Armoured Regiment.
The armylist (approximately 3,400 points without most of the upgrades - I just counted out all the models that I have and not particularly the weapons/characters that I have):
HQ HQ Squad 1 - 1
Vox 1
Standard 1
Master of Ordnance 1
HQ Squad 2 - 1
Vox 1
Standard 1
Master of Ordnance 1
HQ Squad 3 - 1
Vox 1
Standard 1
Master of Ordnance 1
Elites Storm Troopers 1 - 1
Chimera 1
Storm Troopers 2 - 1
Storm Troopers 3 - 1
Extra Soldiers x 1 1
Chimera 1
Troops Infantry Platoon 1 Command 1 - 1
Vox 1
P1 - S1 - 1
Vox 1
Grenade/flamer 1
P1 - S2 - 1
Vox 1
Grenade/flamer 1
P1 - S3 - 1
Vox 1
Grenade/flamer 1
P1 - S4 - 1
Vox 1
Grenade/flamer 1
P1 - HWS1 - 1
Autocannons 3
Infantry Platoon 2 Command 2 1
Vox 1
P2 - S1 - 1
Vox 1
Grenade/flamer 1
P2 - S2 - 1
Vox 1
Grenade/flamer 1
P2 - S3 - 1
Vox 1
Grenade/flamer 1
P2 - S4 - 1
Vox 1
Grenade/flamer 1
P2 - HWS1 - 1
Autocannons 2
Lascannon 1
Fast Attack Armour Stentinels 1 - 3
Lascannon 3
Armoured Sentinels 2 - 3
Autocannons 3
Armoured Sentinels 3 - 3
Lascannon 2
Multilaser 1
Heavy Support Basilisk Battery 1 - 2
Basilisk Battery 2 - 2
Leman Russ - 2
Vanquisher - 2
Demolisher - 1
And, so that this post is not just me typing stuff, have some WIP pictures!
My planned Russ engine upgrades (will be rolled out to all my tanks once I get it how I want it).
My planned Russ engine upgrades (will be rolled out to all my tanks once I get it how I want it).
Earthshaker platform - think the base may be too "high-tech" looking for my army, but I will see what I think when the rest of the army comes together. Need to rebuild the rear rail of the platform.
Earthshaker platform - think the base may be too "high-tech" looking for my army, but I will see what I think when the rest of the army comes together. Need to rebuild the rear rail of the platform.
Earthshaker platform - think the base may be too "high-tech" looking for my army, but I will see what I think when the rest of the army comes together. Need to rebuild the rear rail of the platform.
Trench rails that will be added to every vehicle - will be casting this piece once it is finished.
Looks great so far, but why does everyone destroy defilers to make chaos walkers? Use a sentinel. it's much cheaper and you get cool bitz. Oh, and it's almost 1/3 of the price
Wow! i really like the IG and terrain! great stuff!
for the Earthshaker platform, you could add some GW Bits from the Manufactorum, Basilica etc... to give it some more Goth/less high tech look. Personally, i like what you did with it.
Well, I have 10 sentinels for my IG, which I am keeping as sentinels. I got my 3 defilers really cheap so didn't mind cutting them up for bits (since I don't like the defiler model very much anyway).
Plus, they are way bigger
Automatically Appended Next Post:
alarmingrick wrote:Wow! i really like the IG and terrain! great stuff!
for the Earthshaker platform, you could add some GW Bits from the Manufactorum, Basilica etc... to give it some more Goth/less high tech look. Personally, i like what you did with it.
Thanks
I don't actually have any of those kits, and I have another 3 Earthshaker platforms to build (at the moment, I will probably get some more guns at some point in the future - I love things that go BOOM! ), so I may just do what I was originally going to do and scratch build and cast some supports similar to the FW platform.
SilverMK2 wrote:Well, I have 10 sentinels for my IG, which I am keeping as sentinels. I got my 3 defilers really cheap so didn't mind cutting them up for bits (since I don't like the defiler model very much anyway).
Plus, they are way bigger
Automatically Appended Next Post:
alarmingrick wrote:Wow! i really like the IG and terrain! great stuff!
for the Earthshaker platform, you could add some GW Bits from the Manufactorum, Basilica etc... to give it some more Goth/less high tech look. Personally, i like what you did with it.
Thanks
I don't actually have any of those kits, and I have another 3 Earthshaker platforms to build (at the moment, I will probably get some more guns at some point in the future - I love things that go BOOM! ), so I may just do what I was originally going to do and scratch build and cast some supports similar to the FW platform.
Ah, I see. Come to think of it, sentinels are on the small side
Samus_aran115 wrote:Ah, I see. Come to think of it, sentinels are on the small side
Btw, is that Prince on page one a wraithlord?
Nope - not sure what it is, but it is definitely not a wraithlord
Got it in a bag of bits I think. I was actually really annoyed as some kid managed to grab a slightly bigger and bulkier version of the figure that I had been eying for a while from across the store, so I had to settle with his little brother (the model's, not the kid's ).
Well, whatever it is, it looks awesome! Love those chosen squads too. They look really chaos-y. I want to buy a chaos dreadnought now. That's the first time I've really looked at the back of it
Just so you know, that is not the usual back on my dread - I took off the original power plant and made my own. Also added a section to the waist to make it taller and transition the otherwise quite stupid disparity between the waist and torso and also allow some movement.
Just got myself a nice and cheap airbrush - finding it a real pain to repaint my IG using a regular brush (plus there are millions of them). I will wait for it to arrive before I get some propellant for it, as I am not sure what kind of connection it has. Also going to see if it comes with an adapter for a compressor. If I find it is good and easy to use I may well see if I can get a cheap one
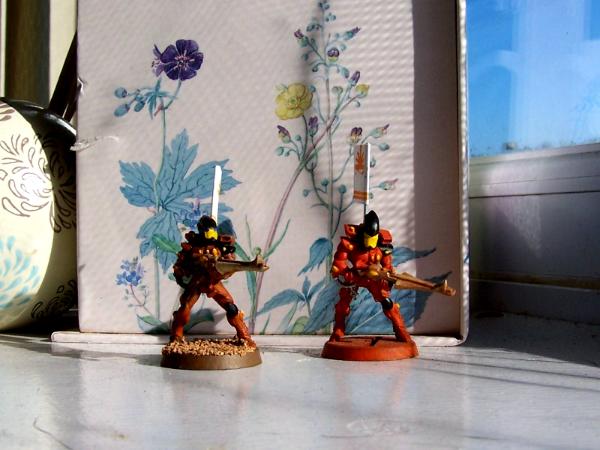
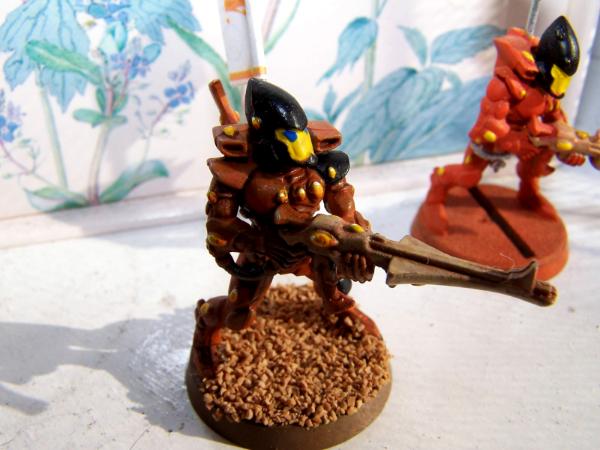
Thought I would fold in my Eldar into this thread so that I keep all my armies together.
So, here is my second Avatar:
Need to finish off the base and do a little touching up here and there. As with the previous Avatar, I went for a kind of hot metal rather than magma look. C&C welcome.
And here is my first WIP trial squad of Guardians. They are a bit darker than I was intending, but I think they look pretty good still.
Like all of my pictures the colours are totally messed up - which is a bit annoying
@ TGG - Thanks, I have a more standard pose Avatar and wanted something a bit more dynaic - a pair of pliers wrapped in cloth and some bending later and there you go (also some cutting with a saw and pinning :()
Re the flags: I didn't feel like painting loads of the craftworld symbols on the millions of Eldar I have to paint up (after having already done the same with the rather fiddly black hand icon on my CSM), so thought I'd do something relatively colourful and decoratively instead. Thought the samurai flags would look good on the table.
Only problem is that I've had to paint over some of the print work where the glue has smudged the printer ink (I found that superglue made the paper go all horrible and translucent). Just using PVA at the moment. Looks good when I touch it back up. Luckily the print out was pretty close to some of the paint I had on hand
Different squads will have more or less stripes on the base of the flag. This is the first squad, as they have 1 stripe.
Automatically Appended Next Post:
Truffle wrote:I really like how the colour on that russ has come out.
Haha, unfortunately that is painted by someone else. I got it in a trade. Though surprisingly enough, it is more or less the same colour scheme as my original IG
They will be repainted in a kind of tan/mud colour once I have finished modifying them all (and once I have all my new airbrush bottles - have the paint all waiting!).
Been off ill today so spent most of my more able time painting up some Eldar. Was not going to take any pictures but the sun just came out of a few minutes, so thought I would try and get some better pictures of the stuff I have painted recently.
First up, Avatar^2
My Guardians, hopefully looking much better colour-wise and with basic basing started:
And finally, what I have been doing today:
I would have done some more spraying on my troops and vehicles, but the adapter supplied with my airbrush which is supposed to be 1/4" to 1/8", is actually more like 5/8" to 1/8" and therefore does not fit on my brand new compressor that arrived today :(
I would have done some more spraying on my troops and vehicles, but the adapter supplied with my airbrush which is supposed to be 1/4" to 1/8", is actually more like 5/8" to 1/8" and therefore does not fit on my brand new compressor that arrived today :(
Let me know how you like your airbrush. I have one and I just have a terrible time with the paint mix. I always get either to much paint and clog the gun or too much water thus runny paint If you have any luck I would love to hear about it. OFF TOPIC sorry!
ON TOPIC: Your Eldar are lookin good What a hard road I would have to go up against two avatars I wonder how long you will resist the call of the new Dark Eldar? Seems like a given for you me thinks
Haha, it is a really cheap one (was about £8-9 with postage), so it is not great. I hope the compressor will help with this though, providing a more steady flow of air to give a smoother spray.
I'm also experimenting a bit with paint mixtures as well - my orange is a bit too watery I think, but that will improve with time.
I actually ordered 2 new adaptors and got one of them through the post yesterday. Too bad they sent the WRONG SIZE! *unimpressed*
Ah well.
As to the Eldar: Thank you Just wish the light was a bit better so I could get some good pictures of them.
And I have vowed not to get any more armies until I have finished the ones I already have (as you may know I am trying to sell/trade my Orks as well). I have about 50-70% of a CSM army left to finish, and most of my Eldar army left to finish, and the whole of my IG army will be getting pimped out with lots of custom sculpted work and re-painted (when I eventually get round to it ).
So yeah, although some of the units look fantastic, (the wytches, Incubi and warriors), it will be a while before I get round to getting any, if I decide I can get past the looks of the jetbikes and the transports (which I hate ).
Possibly about the same time they next get updated again
AH that's right. Well good luck getting some good trades. It seems that people don't like to read. I saw that the MOD stepped in and put a UK only tag on your thread and people still asked to trade! Funny , anyway do you want to trade? J/K
Yeah, I know. I'm pretty sure that I've made it clear several times that I only want to trade or sell, not buy, but there are still lots of people who PM/post asking me if I want to buy their stuff.
I would not mind, but I have said several times quite explicitly that I only want to trade, not buy
Anyway, this morning I have almost finished painting my Banshees - just need to touch up the helmets and paint the eyes and finish the bases (static grass, some stones and a bit of barbed wire on 3 of them).
Finished my Striking Scorpions other than painting the eyes and finishing the bases (grass and stones, and the whole base on the head chap).
My Fire Dragons (all 5 of them ) are looking pretty cool - did a kind of fade from yellow feet or orange heads which looks pretty cool (if I do say so myself).
My Swooping Hawks now have white wings but have a fair way to go until finished.
Also organised my Guardians for painting/spraying (when I eventually get the right adaptor for my compressor!) into squads of 10, or squads of 8 and a HW platform + gunners, so I can fully paint up a squad at a time.
No pictures as the light is really terrible so I don't want to offend with my usual (poor) quality pictures. May add some in later if the sun ever comes out though...
Pennywise wrote:That avatar is really cool, the way you painted the pink is sick.
Thanks Pennywise. I can't remember if I said how I did it but this is the method:
1) Undercoat white
2) Wash very weak black
3) While the black wash is still wet (ie straight away) wash with water to clear the raised areas better
4) May or may not need to drybrush some raised areas white again
5) Repeat steps 2-4 using slightly less watered down dark red wash, and slightly less water
6) See step 5 but with almost straight light red wash and a bit less water
7) See step 6 but with sepia wash and a bit less water
8) Specifically target certain areas (for example the crests on the helmets) with more sepia wash and white drybrushing.
Just been painting/retouching/building some elements of my army that I will be taking to Platinum Devil in a few weeks. I have to appologise in advance for these photos - the light is really crappy and I only have a couple of really yellow lamps and the camera flash - it all looks much better in person
First up, an overall shot of my whole force (minus Famine, who is in for some mutation therapy to grow some wings):
My main armoured element (2 rhinos + squads and predator) and some Raptors and Havocs:
... and the other half, some more havocs, another squad of raptors (might have to go out and buy some more as I don't really have anything that looks like jump packs to give them) and War:
And a few close ups of the almost finished predator. I have tried out some crackle glaze on this tank, but apparently it didn't work at all, which I am quite annoyed about. Currently testing it on some other stuff to see if I can get it to work properly.
So, you can kind of see a little bit of cracking, but it is not very much :(
Hello there, a few pictures of my army at Platinum Devil Dakka meet from the weekend. Unfrotunately due to super heavy snow I had to leave at lunch on the first day (took me 3 and a half hours to drive back where it took me about 40-50 minutes to get there) and could not attend the second day :(
However, I did have fun winning my first game against Panic (by tabling his grots ), and loosing to Ketera's IG (I had way more kill points than him as I had 2 HQ's at 3 points each, and 2 heavy supports at 2 points each). Could have forced a draw (perhaps) if the game had carried on for another couple of turns as I had just reached his lines and was hoping to cut through his remaining squads in hand to hand
Anyway, on with the pictures:
Panic's pictures: My Army parked up ready for deployment.
My DP chops up Panic's kans having just turned his dread to scrap.
My Raptors move around to take on the grots and my CSM take out the buggies.
Greetings once again. I have been inspired by the current contest that has been announced by GW - Armies on Parade.
Since I can only ever (apparently) work to a deadline, I thought this would be a great opportunity to make a (re)start on my WWI trench themed gaming board and also, possibly, get a crack on with my IG who have been languishing a bit.
Anyway, I started by cutting up a 2ft by 2ft bit of board to which I had stuck an inch of insulation foam and then drawing on my design:
Then I chopped out the marked trench areas and I then took some of the wooden boards that I had created before Christmas and spent a long while (and vast quantities of PVA) sticking, chopping and swearing them into position:
I thought about the army on parade thing, realised almost instantly that i didn't have time and wouldn't get it done and returned to slowly painting the multitude of figures that I have lying around It looks good. Be nice to have someone from dakka win that!
I had to build up the walls a lot higher than I originally intended as when I put the duckboards in the bottom of the trench, it meant that models were only hidden up to their waist rather than their shoulders.
Just means I have to ramp dirt/earth up higher to reinforce the boards
The rear edge of the board (where the PVA bottle is) will have a shelled wood where (if I get them done in time) a column of IG will be marching to reinforce the trenches from the crater in the corner.
The front edge of the board will have a couple of tank traps and plenty of barbed wire, as well as a few shelled trees.
Imperial Monkey wrote:Yeh, have that destroyed Rhino (plastic scenery kit thing) in and amongst the trees...that would look good!
I have the kit, but it is a bit too large to fit into the space (plus I am trying to make a point of not using any GW products on the board, other than a bit of paint ).
About £3 a pack. You can get them direct from the Woodland Scenics site as well in Americaland.
@madmartykmf - thanks and thanks for the link - though I was just going to use ramped earth abutting the wooden walls with fire channels dug out where the view slits are located.
@ endtransmission - cheers
I'm sure yours will be full of goodness
Automatically Appended Next Post: And just a small update as I am waiting for loads of glue to dry:
I sealed the edges of the board with masking tape, then used PVA to ensure it stuck down and also reinforced the tape (the tape will eventually get painted over as well):
I also dug out the large corner crater (you can also more clearly see lots more masking tape ):
Another small update - returned home from work and found my pine trees had arrived and so decided to give them a go to create the shelled woods at the rear of the board:
The trees come with their own bases, but I thought I would just stick them into the ground for now. I will probably incorporate their bases into the terrain and then "plug and play" the trees for ease of transport/storage
My wife is going out for a bit tonight, so I will probably make a start at some of the terrain sculpting and finish off digging out the craters.
Looks great Silver! Only suggestion I would make is buy some more trees. It looks a little sparse right now, but a few more would make it look less like random trees and more like a dense forest. Just a thought
Awesome project though, can't wait to see it all finished.
The wife and I have managed to catch some kind of plague and are both off work today. In between tending to her, being ill and generally feeling "mler" I have been working a bit more on my board.
The sand is not dry yet and is not completely covering the board, but I thought I would get a few pictures to show you how it is getting on.
The front rampart:
The rear bombed out entrance:
The board as a whole:
A "simulation" of what it looks like with some trees added:
I looks good Silver! I am liking it a lot more now that the trees are in place. I think you probably are already planning this but are you going to add debris and carnage to the board? I am excited to see you get some paint on it.
I will be raiding my bits box for a few choice pieces to add to the landscape. I also spent some time creating some poles to add barbed wire strings to yesterday, though I will have to create some more barbed wire, as I only have enough to do a small section of fence.
The shelled wood will also have plenty of blown apart trees from the deadfall pack.
@ neil - just what you need? You are going to steal by board?!?!
@ Stretch - thanks; I hope to get the rest of the sand and such like on the board either tonight or tomorrow.
And I went in to speak to the head beard at my local GW today (which is now on my way home from work - yay!) and he said they had still not got a date on when they will be running the event, but they were hoping they would know by the end of the week and they were probably looking at the end of March still (though he also said it may also vary from store to store).
A small amount of progress on the board today: Finished adding sand (I hope ) to the main board area. Really heaped it on and it is still drying, so it is not quite as bumpy as it looks here. Also started adding really small amounts of glue along the tops of some of the cross pieces inside the trench to look like sand has settled there over time. I will eventually do this to the whole trench, but there was way too much loose sand around to be able to do much of this at the moment. I will also be giving the trench floor a similar treatment at a later date.
Anyway, some pictures!
Also, as an aside, I have been doing a bit of work to my counts as plague tower. The yellow/tan gun is the plague mortar and the green turret will have 2 demolisher cannons mounted on it. The pus cannon will be mounted where the broken assault ramp is located at the front. Lots more tubes and green stuffing will take place to make it a bit more nurgle.
Also, ignore the stupid face at the front - I was just messing around
Shook off the majority of the sand today and patched up a couple of bits where there was not enough coverage.
Put the trees on and some models to simulate what I was thinking of doing. There are 2 squads of 10 guardsmen, and 1 HQ squad. I might add in some sentinels or a tank or something, but I will wait until I have painted up the board a bit more until I decide. Also need to make up a whole load of heads and other equipment to add onto the guardsmen.
If I can't do that, the CSM will be coming out to play
Anyway, on to the pictures!
Advancing through the shelled forest to reinforce the line.
The Eldar watch the silly humans and their pitiful defenses.
The commander watches the new cannon fodder arrive.
A sentry keeps watch over the shelled entrance.
Automatically Appended Next Post: Two updates in such a short space of time? Impossible!
I have been busy with the old airbrush, colouring in the craters and adding a bit of variation to the sand colour as well (desert yellow to be exact ). Also sprayed the guardsmen I would be using and, for poops and giggles, did a first coat on some of my (many) sentinels.
Note to self: undercoat everything white, not black
wow good gracious what a great update, the board looks amazing fella , as does the plague tower,the rubble is great and the trenches are perfect. And good muted colour choice for the "HQ Chappy" very suited to your board. I also re looked through all your ealier stuff. man you are creative.
Keep it up i wanna see how the board looks painted . so i can steal it ...muh hahahaha!
His sword is a bit bent and he has a strand(?) of flashing on his foot, but I like scheme. The red really pops in what will be an otherwise muted (as trench warfare should be) scene.
And I only noticed the flashy foot in the pictures (damn you flashing!)
And I was going to sort out the sword when I got round to painting it.
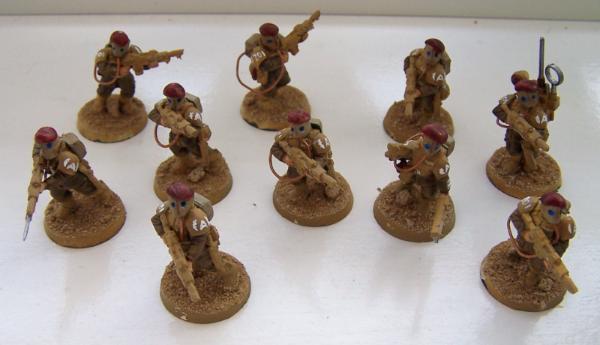
The only real colour on the guys are the reds of their grenades (the standard troops all have red grenades, just to put this comment into context ), and I will possibly be painting orange identification marks on the backs of their armour (where that sticking out block for attaching back packs is). The lenses of their gas masks may also be fairly brightly coloured, but I am not sure yet. The gas hoods will be a lighter coloured khaki than the armour and the uniform just to give a bit of variation.
I'm torn as to what colour to paint the unit number. I was thinking about either white or orange. The benefit with white would be I could use transfers (though I have never done so before, so it could be interesting )
I'm a transfer convert since my Tank Masterclass - just seems you need to know the right technique and tools - and a bit of practice - preferably not on your masterpiece! You will be hard pressed to paint to the same crispness - which I can get away with for Orks, but I wouldn't want to for Guard...
@ Whalemusic - I was thinking about green, but I was also thinking of keeping the colours within the red/yellow grouping, hence the orange lenses.
@ Arakasi - any tips on using transfers? I think I've only ever used them once about 10 years ago when I first got into the game (2nd edition boxed set ) when I was quite a bit smaller than I am now
Also, I was trying to think up an emblem for the army... although they are Britannon Guard, I did not want a union jack or St Georges cross... I was thinking of a "B" in the middle of a laurel. Both in white. Not too hard to paint, not too complicated and not too simple either.
Arakas's blog has some cool tips on transfers , using a little gloss varnish underneath so the transfer has a nice flat surface to ahere to was one i think , i try to blend them in to the rest of the armour using powders or wash, i also chip away the edges with a knife so they are no so clean , but i too could really do with using a proper sound technique...lokking at you arakasi for a tutorial...( whistles)
Dirty and Dusty! Great job silver, the board looks sweet. I did laugh a bit at the bent sword I have to admit. As far as a symbol I am liking the "B" with a laurel , and the lenses imo should be blue with a white dot in the corner then gloss varnish. I have never been a big fan of any other color lenses. Keep it up buddy!
madmartykmf wrote:Dirty and Dusty! Great job silver, the board looks sweet. I did laugh a bit at the bent sword I have to admit. As far as a symbol I am liking the "B" with a laurel , and the lenses imo should be blue with a white dot in the corner then gloss varnish. I have never been a big fan of any other color lenses. Keep it up buddy!
Cheers - and it is only bent so much because he has been chopping so many enemies of the Imperium
RE the lenses - not sure about blue, though thinking about it it could look quite good. I will be using some gloss varnish on them - I got some specially for this actually
Though I need to finish scuplting the heads and then cast them before I can think about painting them
SilverMK2 wrote:@ Arakasi - any tips on using transfers? I think I've only ever used them once about 10 years ago when I first got into the game (2nd edition boxed set ) when I was quite a bit smaller than I am now
I'll see what I can cobble together for you tonight from my less than perfect memory I do remember having the same experience/concerns though...
So, presumably you have read endtransmission's writeup of the Warhammer World Tank Masterclass (above), but you want more - so here goes:
WARNING: I have yet to apply these to my own miniatures, only the blank canvas (Hellhound) provided on the day...
1. Decals/tranfers go on just before chipping/weathering begins (that way your chipping/weathering can help to integrate the transfer into your masterpiece)
2. First - coat the surface with a coat of gloss varnish and allow to dry (or help with a blow dryer!). Basically coat the entire area (panel) - as the gloss varnish will otherwise cause its own "edge" (we don't want that). This provides a smooth surface for the decal/transfer, which removes the frosting effect (which is just trapped air under the decal/transfer).
3. Cut your decal/transfer as close to the design as possible - less edge means less to "hide".
4. Place decal/transfer in clean water. Only needs 5-10 seconds really.
5. Wet the area where the decal/transfer will be applied. You can also use Micro Set or even mix in some gloss varnish for better adhesion.
6. Apply the transfer with a brush. If using tweezers, plastic is best to avoid tearing. Move around to the desired location. You can add more water to lift it and reposition if necessary.
7. Use some paper towel or cotton bud to dab the decal/transfer to remove excess water - being careful not to shift it.
8. Let dry. You can use Micro Sol at this point if desired. This will soften the decal/transfer - allowing it to mould itself better to irregular shapes - ie shoulder pads or arms. I have to give this a try for tattoos! Suggest trying on a test mini first - apparently putting the Micro Sol on will initially look like you have ruined the decal/transfer - just have to be patient and wait! The Micro Sol will shrink the decal/transfer to the surface.
9. Once dry, coat the decal/transfer with gloss varnish. Again, coat the entire area (panel) so the gloss varnish doesn't leave its own lip. You can repeat this step several times (dry, gloss) as necessary. Your decal/transfer is not going anywhere!
10. You can touch up the edges with the base colour if necessary.
11. Weather/chip if/as required!
Hopefully I didn't miss anything out - endtransmission can probably confirm/epand upon the above
Will let you know how my own progress goes (I have some Stormboyz Nobz banners that need decals, and I'm looking to get some Micro Set/Sol and try applying tattoos too...)
I will be hand painting the guardsmen, but I will be using transfers on the vehicles, so I will look at finishing spraying one of my sentinels and then applying some transfers.
Automatically Appended Next Post: Phew! Painted all the unit numbers on my chaps.
Been thinking of changing my IG to be from Arbour Three (see the journal link in my sig) as I am really getting into the fluff and it is a lot less cheesy than "Britannon"
Also - I seem to have utterly lost my IG codex (it has been lost to the warp - aka it is in the spare room somewhere under a billion tonnes of junk ) - can someone tell me how many guardsmen there are supposed to be in a HQ squad as well as the officer? Thanks
Just a small one - Started painting the trees and added some dead fall around the shelled wood.
Trees are white as I am going for an ash/burnt out look on them. They will be washed with red ink, drybrushed white, then drybrushed black to simulate trees that are almost completely burnt.
Also, if you haven't seen my Eldar titan blog, check it out here. Decided to start work on it again after... a bit of a break
Not an update, however, with the sale of my Ork army (well, most of it at least), I was looking at getting some artilery pieces sorted out for my IG.
I have been tempted for a long while by the DKoK artillary carriage, but can't quite decide whether I like it £66.50 worth
The other alternative would be the Earthshaker cannon platform which is less than half the cost of the artillary carrage, but not as interesting looking.
I was just hoping for people's thoughts on the matter.
the only think I can add to Arakasi's decal instructions is that you can add a few layers of gloss varnish until the edged don't have a stepped look to them as it's the stepped edge to the transfer that catches the eye and makes it all look odd.
Once you're finished, an all over coat of satin ('Ard coat) will return the paints to a non gloss state. It was suggested that a matt varnish at the end would make the paints look a bit odd.
I can't really comment on whether £66 is too much for an earthshaker, given that I've got rather a lot of forgeworld upgrade kits. I do like the DKoK one though as It's proper artillery
Also, where do you get your matt varnish from, as I can never seem to find any (in spray form if possible)
It is not so much the cost (well, it is a bit expensive for my tastes, especially as it would probably be run as a counts as basilisk anyway - if it ever gets run at all as I have a horrible tendency to never use my Warhammer stuff :( ), but more the look of the gun itself.
Although I like most of it there is just some small detail to me that is just "off" about it.
It's looking good Silver. I only have one somewhat negative comment, and that is: I don't like the red grenades. Are those only temporary, are you going to change them? I hope so. It looks kinda off with the rest of the colors. Hope this wasn't too harsh, but for the rest, it looks smashing good, sir!
Thanks shingouki (sorry, I have so many subscribed threads I lost my own for a while ).
I hope to eventually have a 4'x6' table, though I was thinking of creating the rest in 30cm x 30cm sections, rather than 60x60cm as that one is just so I have a few more options for configuration.
Though I might do 4 large sections and 8 small sections (which is 2 large sections broken into quarters), as the large sections can have more stuff done to them.
A couple of pictures here to update everyone on how the IG are doing:
Started producing the backpack/gas mask filter packs (you can also see the toned down grenades - decided I preferred this to having green ones):
Also decided to finally try and finish off the heads. Also discovered that I really cannot sculpt helmets, so gave them all berets instead:
The cloth of the gas hoods and back packs will be a light grey/tan colour, the berets will probably be the same colour as the grenades. I will be adding a small eagle badge to the crest of each beret.
Lookin good Silver! I am just not sold on the red grenades. Oh well I know you have an idea in your head and I am sure it will be great when you are all done
I've painted up most of the backpacks (still got a few more to make though - one of the cats got up onto the table and seems to have either eaten or stolen some of the moulds - I've found one of them but I think one is still missing). The new colour doesn't look too different in poor light but it is different enough that it breaks up the model a little yet still fits in.
Also tried a couple of times to cast some helmets but they have come out absolutely horribly. Will try again at the weekend.
Greetings once again - managed to create some casts which actually give you something that looks like a head at the end
Really loving my reusable mould making material
Anyway, to the update!
Just need to finish painting these guys (another coat of light grey on the heads, a wash of sepia on the cloth, a wash of red ink on the hat and then a darkening wash and some blue eyes. Then paint the pipes dwarf brass with a wash). These chaps have the original sculpted heads I made:
These guys have the cast heads. There are a couple which are a bit naff, as I tried 2 different casting types and one worked much better than the other:
You can also see a pile of backpacks forming in the top right of the picture ready to be added to the rest of my IG
Scrazza wrote:It looks great. I may have missed it, but is there a tutorial for those heads?
No there is not unfortunately.
Any particular part you want to know about?
Also - I have added a page of contents to the first post
Yes, I want to know how you made those. Maybe I could ask for a close-up of one? That would give me some hindsight. I might try gas masked heads with berrets once.
Scrazza wrote:Yes, I want to know how you made those. Maybe I could ask for a close-up of one? That would give me some hindsight. I might try gas masked heads with berrets once.
There are some relatively close up shots of the gasmasks above:
I used standard non-helmeted IG heads, filed off the faces, then added a small blob of GS to the face area to create the mask; smoothing down into a drooping snout style gas hood. I added a seam down the front using a colour shaper, then added eyes using a rounded colour shaper.
I left this to set before adding very thin strips of plasticard to the rear and sides of the head in an inverted "T" shape to simulate straps holding the mask in place.
Then once dry I added another ball of GS to the top of the head and smoothed down into a beret.
No worries. If I ever make heads again, I will take pictures
I've also made use of the last rays of the sun to get some better pictures of my CSM army (though unfortunately I did not get time to take pictures of everything as the sun went away :( ).
What is the proper length for a table of contents in a blog? No way I'm making one for the GMS (to many things going on independent of each other), but might be nice in my personal blog.
You board provided a really nice back drop for the CSM. I really dig Famine.
I have no idea if there is a definite length whereby a table of contents is required
And thank you - I was going to use a more interesting bit of the board with a backdrop but it was a race against the sun, so I just threw them down in the crater and took some pictures
I have learned that if I want to play on this board I will need to spray on a protective layer as I have already chipped off some of the sand/paint :(
SilverMK2 wrote:It is actually kind of depressing how few updates and how little progress I have actually made
Wait till you get to fifty pages... I'm currently working through mine. I have a suspicion that I didn't finish (including painting) *anything* in 2010
endtransmission and I look like we'll be headed back up to Warhammer World the weekend of July 2nd/3rd if you are interested/able...
Arakasi wrote:Wait till you get to fifty pages... I'm currently working through mine. I have a suspicion that I didn't finish (including painting) *anything* in 2010
At least you have a load of people interested in what you are doing (not that I do not appreciate my loyal followers in the madness that is my PLog ).
endtransmission and I look like we'll be headed back up to Warhammer World the weekend of July 2nd/3rd if you are interested/able...
It could be done... Let me know closer the time and I will see what I can arrange.
neil101 wrote:loving your custom backpacks , and great chaos army pics also Silver , that prince looks really good in natural light.
Cheers
Though I need to go back and sort the wings out a bit as they were thrown together really quickly and have some gaps in them where there should be no gaps
About the table of contents, someone suggested that I make one. Is it really that big a deal? If it would make life easier for Dakkites then I may have to consider it.
On topic- Silver are your backpacks custom or press modeled? Either way they look great. I am excited to see these guys all painted up. Have you thought about a shorter lead from their gas masks? Maybe a coiled line like a telephone headset running over their shoulders? I think they look a bit cumbersome for a foot solider. Just a thought
madmartykmf wrote:About the table of contents, someone suggested that I make one. Is it really that big a deal? If it would make life easier for Dakkites then I may have to consider it.
It took me about 10-15 minutes with 2 tabs open (1 for the post edit, 1 to go through the thread and copy the various post urls).
On topic- Silver are your backpacks custom or press modeled?
Bit of both
I used my extra fun re-usable mould making stuff to make some press moulds. The helmets were replicated using the same material to make 2 part moulds.
Either way they look great. I am excited to see these guys all painted up.
Thank you - me too
Have you thought about a shorter lead from their gas masks? Maybe a coiled line like a telephone headset [image] running over their shoulders? I think they look a bit cumbersome for a foot solider. Just a thought
Mike
I'm using guitar wire for the tubes (it is "coiled", though you may not be able to tell from the pictures). The problem is that although it looks the part, it is really quite stiff and hard to bend into the right shape especially when it is cut short (you can bend it "on the wire" to the approximate shape but you need to cut and bend it on the model to get it to fit which is really hard on the model as the wire is so stiff). I was going to use a thicker wire for it as well but it was almost impossible to bend at this scale (though it would be OK for vehicles or large models).
Part of the look I was going for is a relatively low-tech solution to gas attacks harking back to the old WWI gas hoods which all have long "trunks" leading to a large filter in a bag.
Made up of parts from the older metal DP (yes, it was an absolute bitch to cut up - not helped that the prior owner had stuck it together with a glue gun ) and some super huge wings.
The legs are set in the crucification position, the arms will be held across the chest and the head will be bowed (I am thinking of using the skull mask from the defiler for the face - it fits nicely in terms of size and look). The back and neck are going to be built up to simulate terminator armour and the existing collar will be extended to match this (to make it almost look as if the face is covered with a hood).
filled out the joints in the legs, added some hip armour, and bulked out the torso section.
Kind of messed up the hands, so will need to re-sculpt them (whoops! ). Also need to finish off the collar and back pack.
Automatically Appended Next Post: Redid the arms on Death as I couldn't get it to look good. Added a punching sword to the left arm, and the right is carrying The Banner of Death. Also added him to his base. Just need to add some extra gubbins to him and finish the backpack and a bit of GS on the wing joins.
Thanks Arakasi - just got to finish Death, then I have 3 more HQ choices to make - Pestilence, Mortarion, and Typhus. Then I will have the full set of evil excellence
I have an LOTR Balrog which will become Mortarion, a new plastic DP which will be Pestilence, and I need to source a Typhus stand in
Lots of eldar , so little time! You are going to have your hands full but a fully painted army is so worth it. Good luck Silver, I will be watching in awe.
Remembering at all times that I suck at painting and have about as much brush control as a chimp (and also only have quite large brushes for doing work this small ):
So, not the best in the world, but with a black wash around it to give it some definition it looks better.
Color is done as followed: Sunshine yellow all over, then solar orange on the bottom half, then golden yellow wash across the middle, then a "dot" of white in the bright yellow. I think it looks OK, but if people have better suggestions for breaking up the colourscheme a bit (I was thinking perhaps of purple gems?). They do look slightly different and better at tabletop range compared to just the plain yellow gems.
The model on the right is the orange that I am using for the body of the rest of the eldar as it is brighter, so the gems look a bit different against that setting. Also thinking of going back and repainting the black as dark grey.
Was also thinking of using a yellow and dark orange/brown/red pencil to do some edge highlighting on the armour plates.
Really would like suggestions on how to break up the colours and paint the gems.
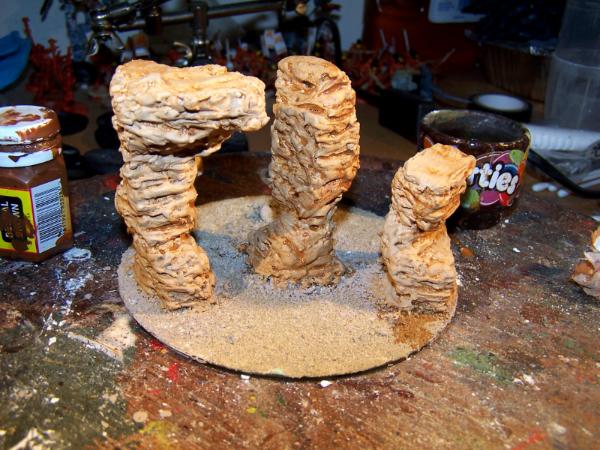
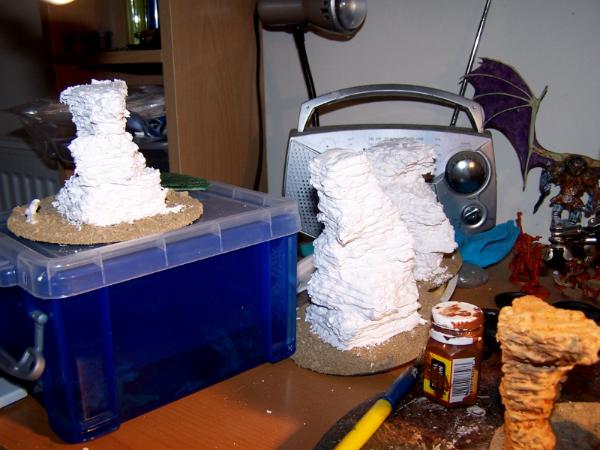
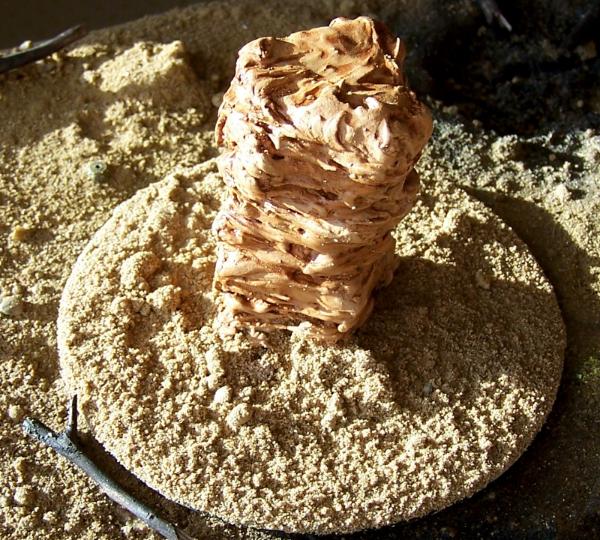
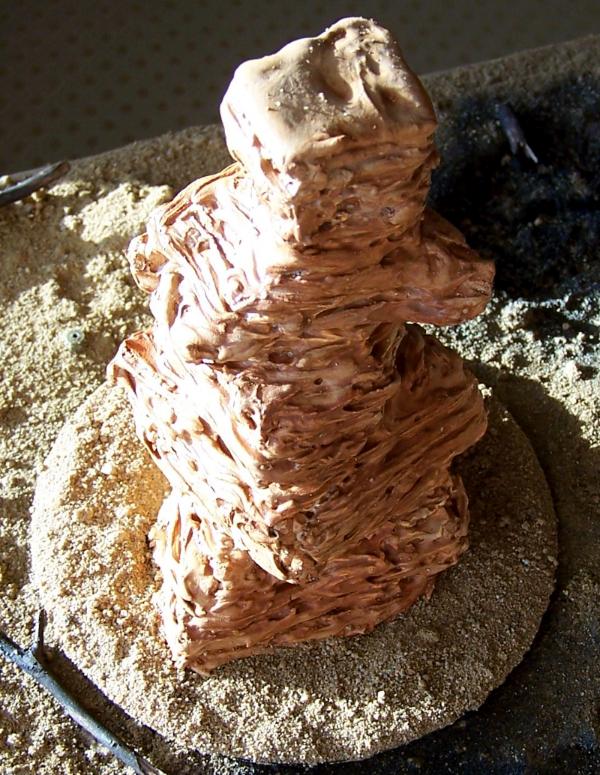
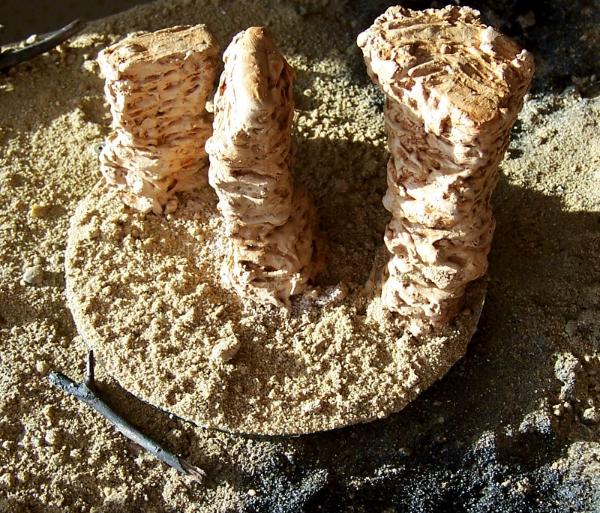
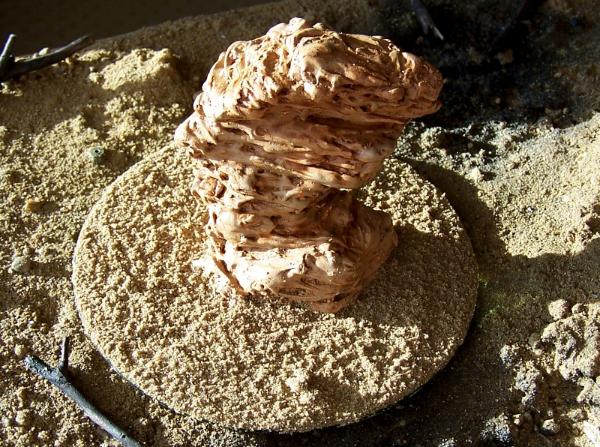
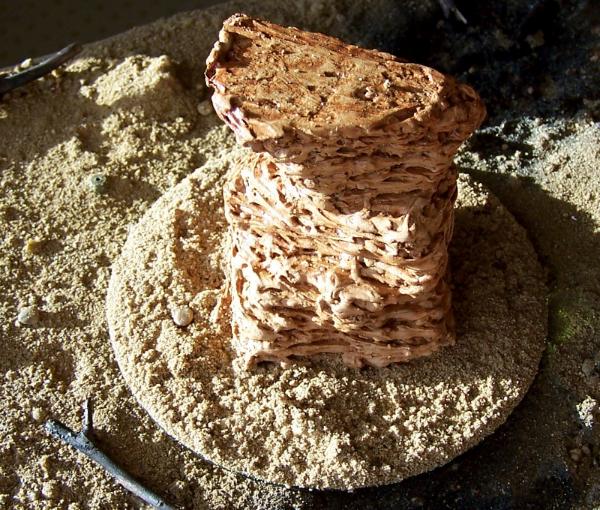
Ok, thought I would just post up some of the stuff I had been working on:
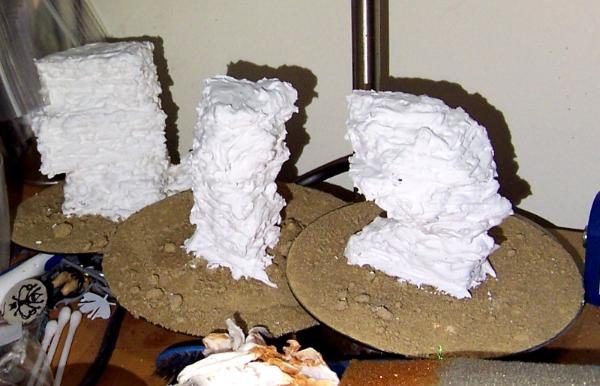
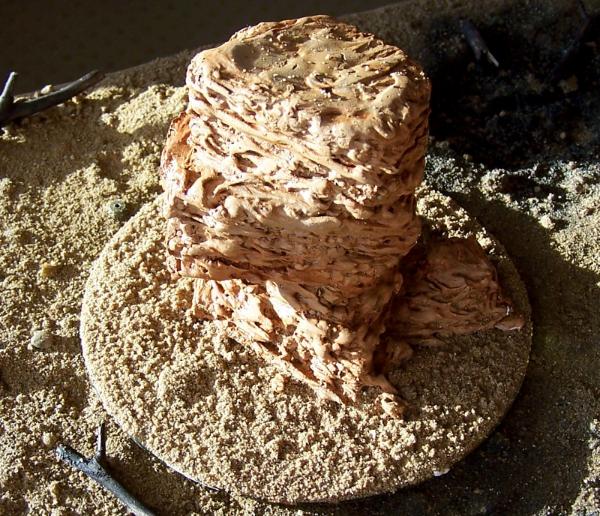
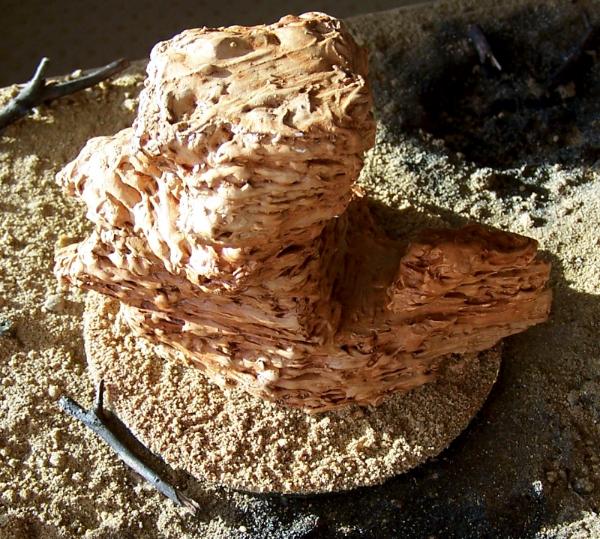
ROCK SPIRES!
Paint is still wet that is how up to the minute my PLog is (I wish )
And some more spires that still need sanding and painting:
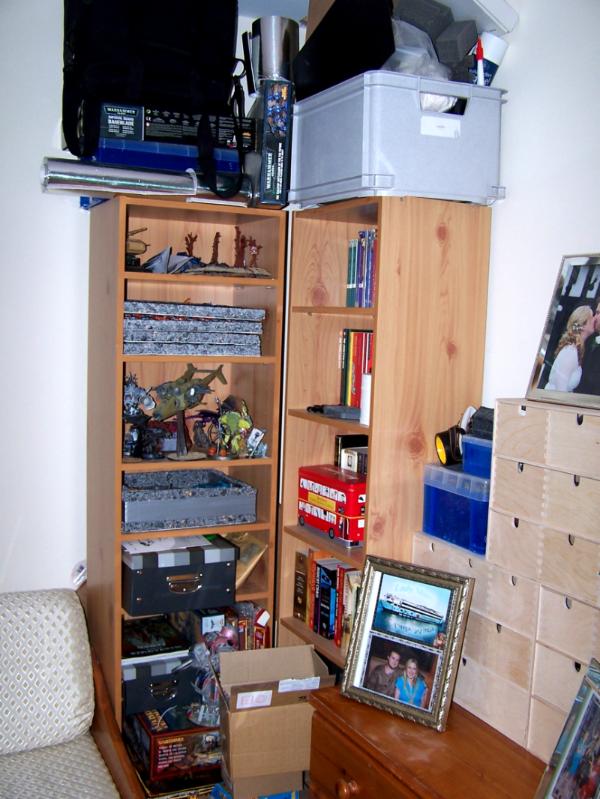
And as an added bonus, some pictures of my newly cleared up room:
The tower o' power - including a large number of boxes for warhammer quest, (old) space hulk, Necromunda and various 40 starter sets filled with terrain bits off the picture at the bottom, and some HomeMade (TM) army trays.
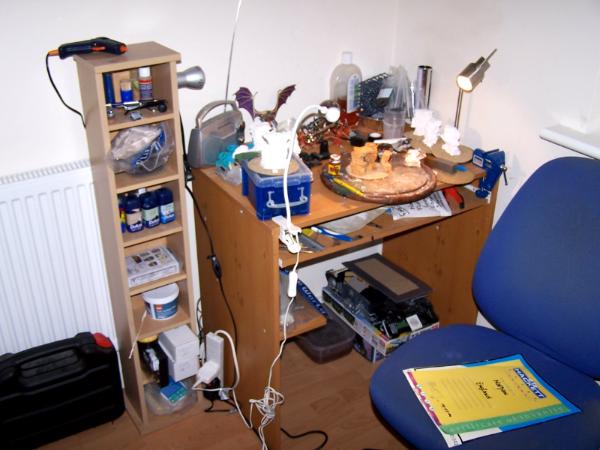
Work desk
Draws o' doom - containing paints, my bits collection(s), dice, templates, terrain making stuff (static grass, flock, etc), some smaller terrain pieces, and other associated painting and modeling supples.
Long time no update (yeah, I know, no change there! ). This year I will be selling most of my warhammer stuff, including my Eldar (except for a few units that I like the look of ), in order to focus on my TS marines and finishing off the last few bits of my CSM army.
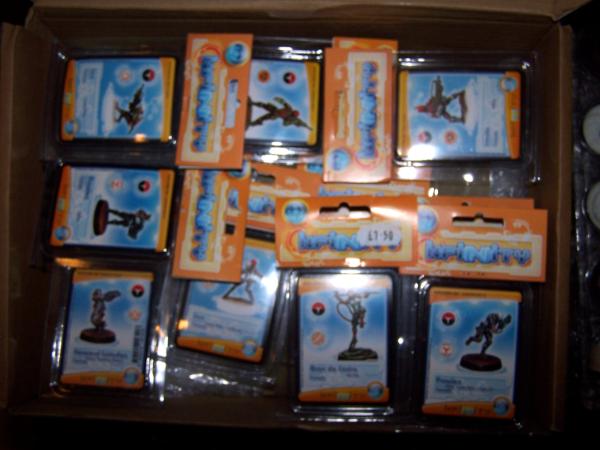
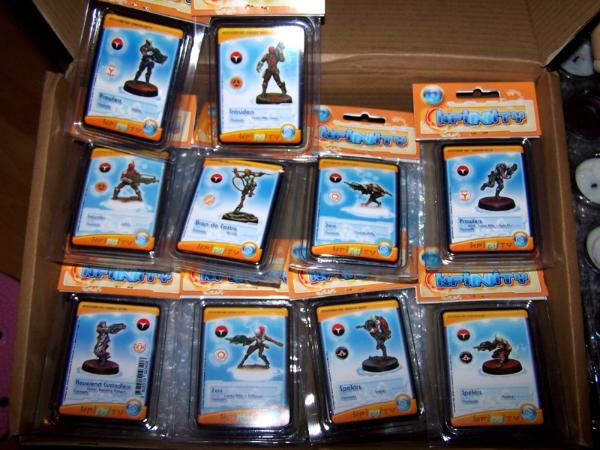
Once my CSM are done I will be starting on some Infinity (my current planned 300pt army has 9 models, so I might actually get them all painted ).
Also have a few 54mm and general "misc" models that I purchased over last year because they looked cool that I plan to paint up
That is not the kind of progress I was hoping for Silver, but needs must I suppose . I'll look forward to your progress on other projects then I suppose. When you place the stuff for sale could you drop me a PM, I'd be interested in the Wave serpents and warp spiders.
Cheers and all the best for the future projects too.
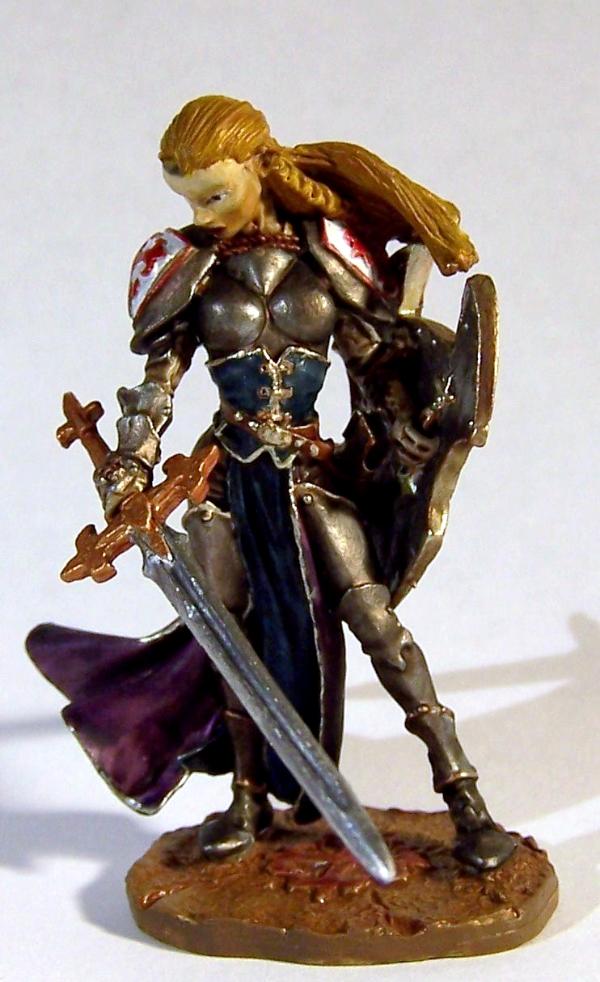
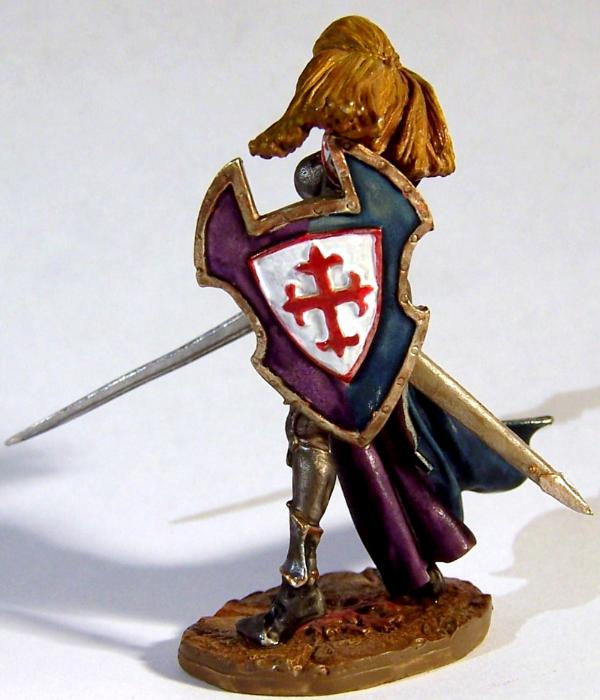
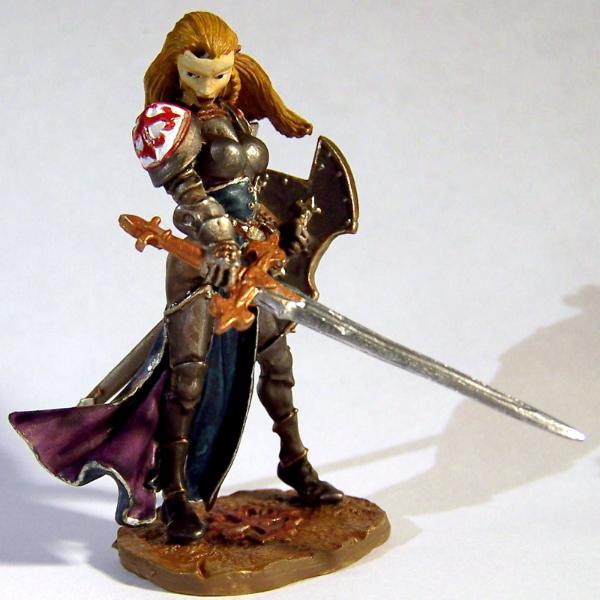
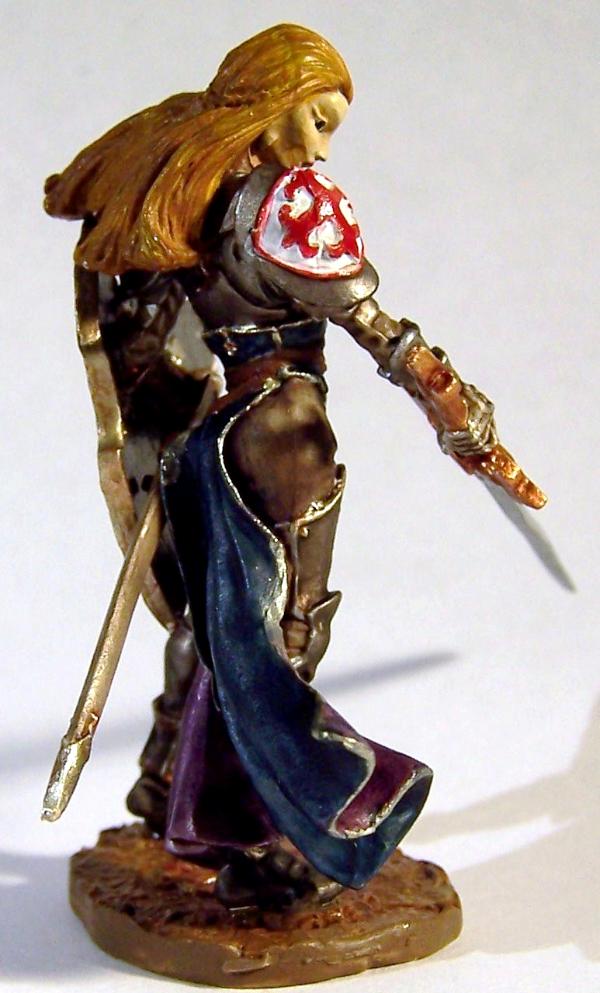
I was going to enter her as half of a diorama for the Dakka painting contest but forgot to take a WIP and she is not actually that well painted (especially since she is 54mm... yeah, I suck at painting ) and I LOST PART OF HER DAMN HAIR - was picking it up as the rest of the model was done and managed to fire it off behind the shelves somewhere. Though having said that she does look a LOT better in person...
The angle and the lighting have conspired against her face - as you can see from the other angles, the contrast between shadows and highlights is actually much more graduated
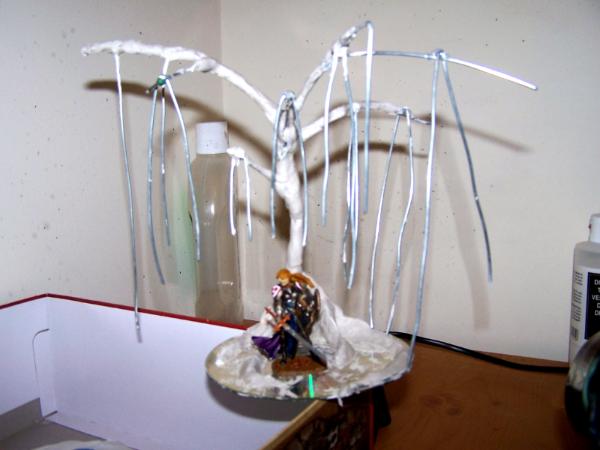
Decided that my knight needed a suitably awesome base (to take away attention from her poor paint job perhaps? ). Early phase WIP at the moment; will eventually be a kind of weeping willow with pink cherry tree style blossoms and a light white/cream bark set in a rocky meadow:
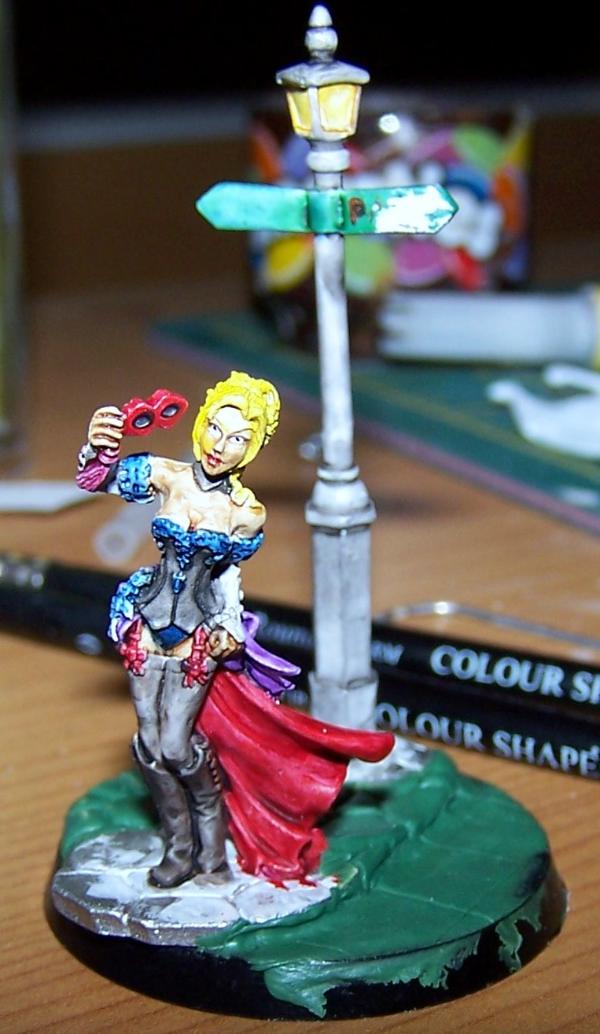
And my Reaper Christmas order free mini, Bourbon Street Sophie. Painted entirely (other than the brass buttons) with washes over a white base coat - still WIP. I tried painting street names on the sign but gaked it up, hence the damage to the sign where I wiped it off and took it back to the primer
There will still be plenty of random models and terrain going on in here (hopefully ). Got a couple more reaper minis (including another 54mm) and some Hasslefree models on my to do list - they will be started after I have finished the tree base and Sophie.
Decided that I am going to work on 1 or 2 single model projects at once while doing my Warp Dragon marines to stop the model spread that seems to occur
great... now i have to yet again follow another good thread... man i need some paid readers to keep me on the updates it seems...^^
never was that much interested in nurgle stuff...but yours is drawing my attention pretty strong here... and that trench table...simply awsome looking...
also i am here because of the variety of all the portryed models you have worked with... seems you have your fingers in all major armies...^^
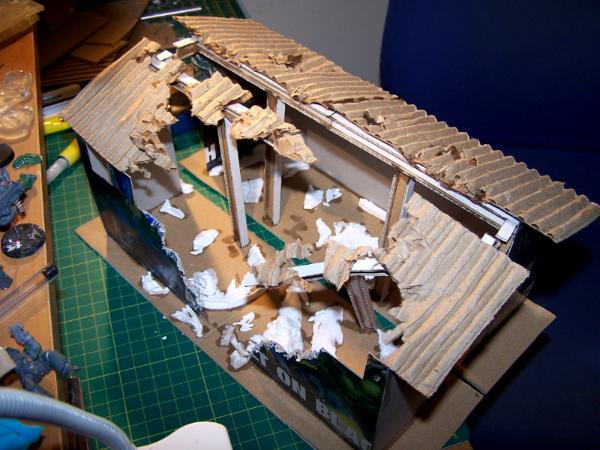
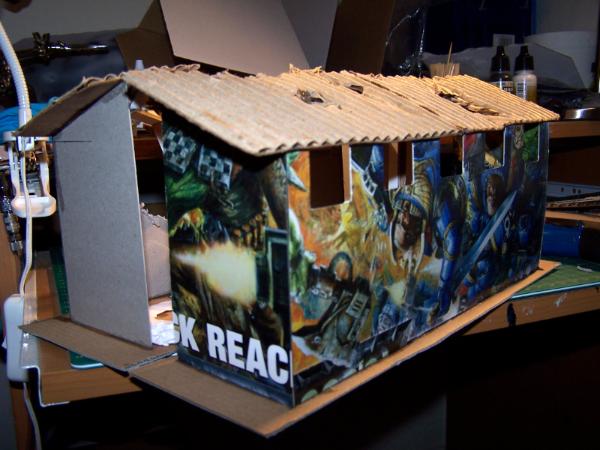
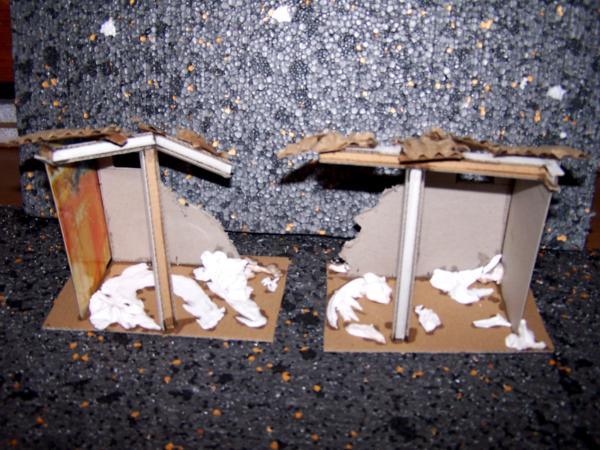
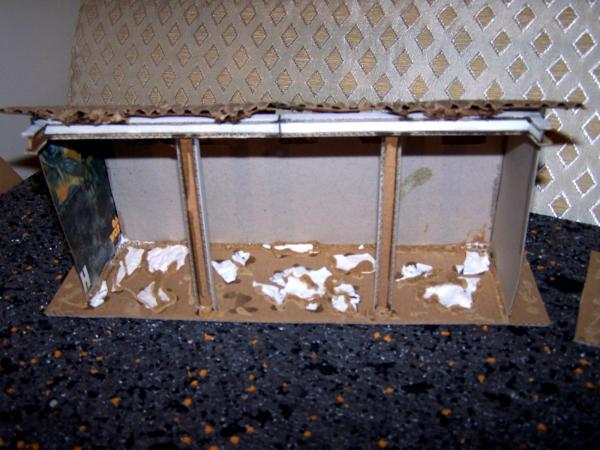
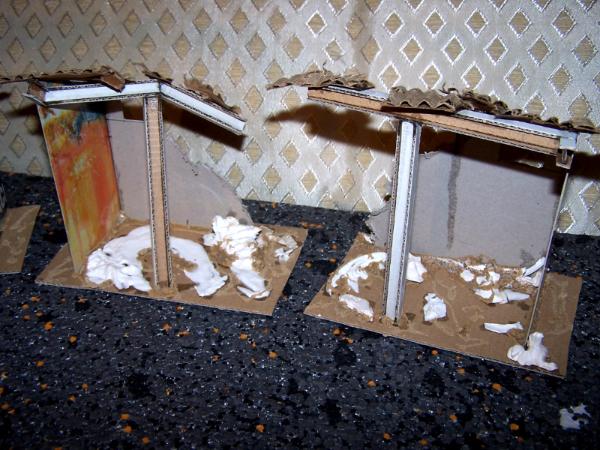
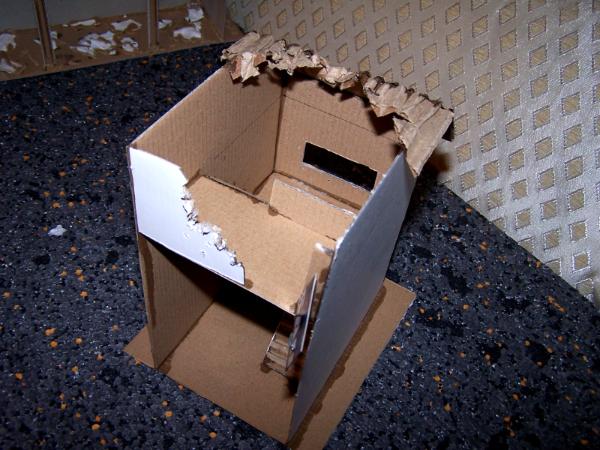
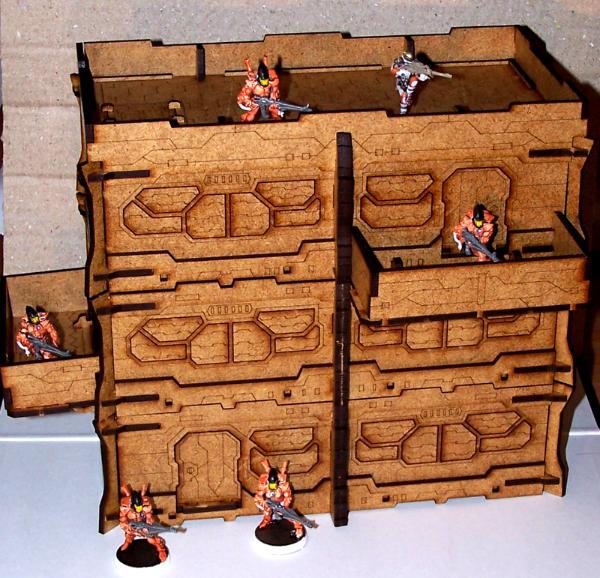
I was immediately inspired to go and make some urban ruins that would fit my GW models and the mechanics of Infinity (where each model gets a reactive action, so if it can see a model of the enemy at any point along its movement path, it can shoot at it), and came up with this; an industrial factory/warehouse:
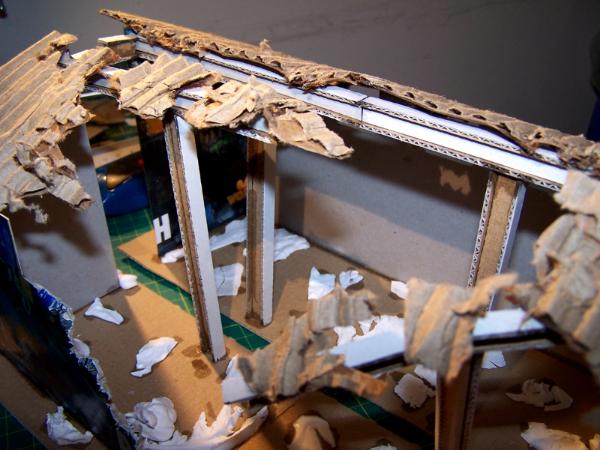
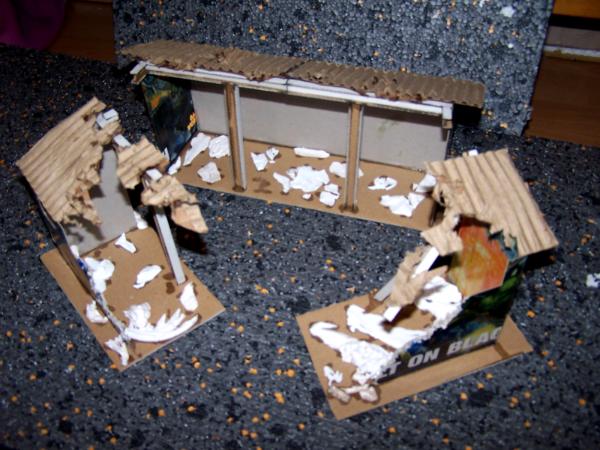
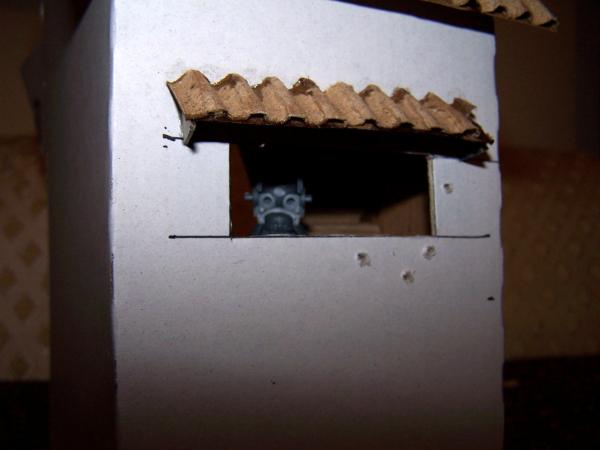
A three piece building, with high up windows (good for infinity - some models can climb which means they can shoot out of them), a closed and open roof, a complete and ruined wall, and can be set up to either provide a smallish (it is about 11" by 7" in the picture above) building, or expanded out, or used as free floating terrain.
More pictures:
Bonus points to anyone who can tell what I made the walls out of
Yep, that's right - I made my own I beams
I've used up about 5 tubes of superglue on this bad boy so far (50p's worth of glue from Poundland - bargain!).
very good and interesting looking terrain...and yep, your stuff is worth the extra read
what a cool idea to make the factory ruin in thre different pieces...reminds me of a playmobil castle my kids have to play with...
and yep... i instantly recognized the cardboards origin... but i wont tell...only hint here... reading can help you^^... is that you getting even with GW and now switching over to infinity? LOL
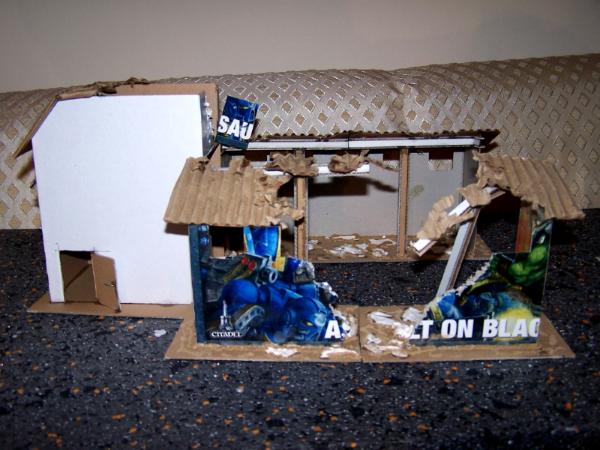
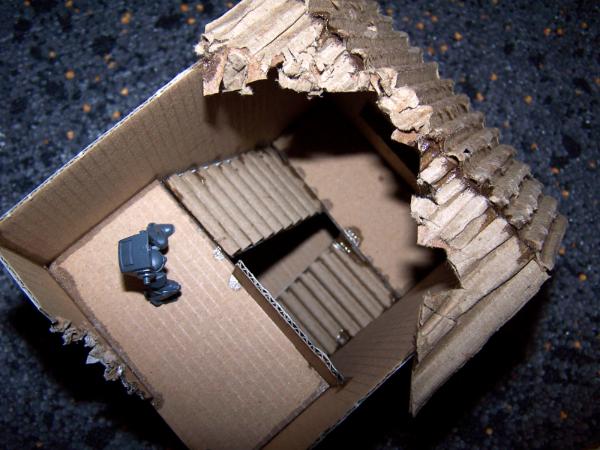
I cleared up some of my bits boxes and sold a whole bunch of GW stuff so had some of my GW boxes free - some of them were turned into shipping boxes, but I still had the AOBR lid sitting around taking up room... now it is actually a room!
And a super special bonus - a second update in a single day!!!1111onepisquared
Anyway, added some sand to the bases to simulate smaller grit and debris (not sure if you can really see it in these pictures as it is the same colour as the cardboard floor ):
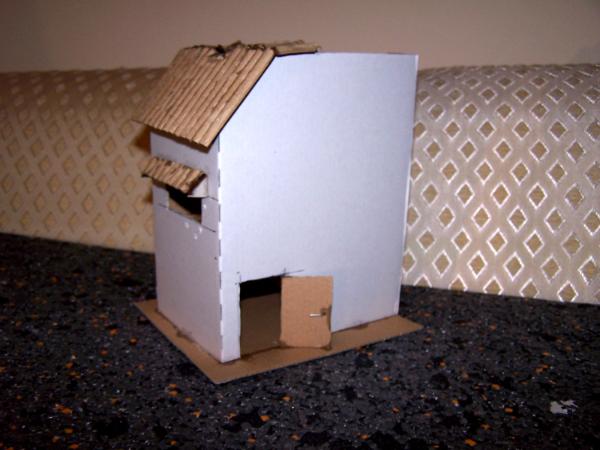
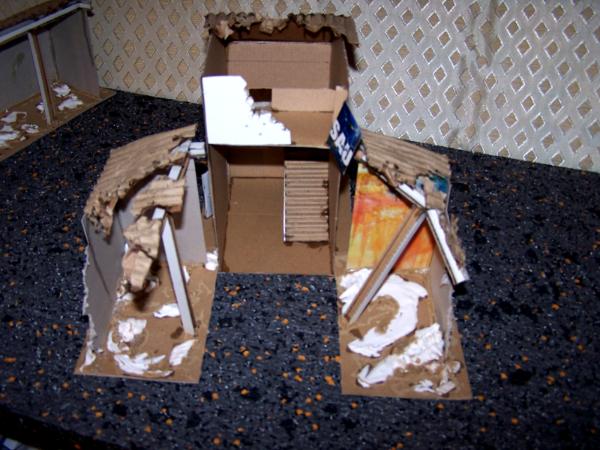
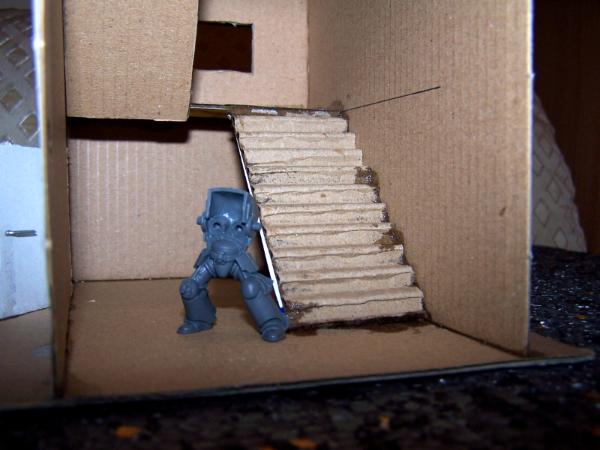
And a new building - The Stairway (tm + patent pending):
Going to make up a nice big sign for the side to make it less boring. Also note door handle!
Dual landings with connecting stairs, and first floor window. Ruined roof to allow access for hands and/or models and also because I think it looks cool
The two half sections in place with the stairway to give some scale. The top landing is about 5 inches from the surface, with the first landing being at 2.5. Thinking of trimming the bases on the "shed" sections so it can all fit flush together without the big gaps in the walls. Still got some work to do on the interior of the stairwell to pretty it up, but I am running out of glue (used about 9 tubes so far - enough to glue together several armies. Good job it is only £1 for 10 tubes )
stairway looks great... tho a better pic...particularly of the stairs would be nice...
ruleswise, can these only be taken one flight in whole? they are not wide enough for a model to stand on?
and yep... i would probably cut the bases so that each piece fits flush together!
how do you intend to paint all this? airbrush or classic brush by hand?...that could take ages... and will you seal the cardboard with something? a coat of PVA? and why do you use superglue for that kind of material? i know quickness is probably the cause here... but for sturdiness i would recommend PVA...or for that matter something called liquid nail...as this toughens up the structures a treat!...
oh and i saw the debris/sand structures and also the door handle... details make the piece pop as usual^^
by the way... speaking of handles? what about some stairrails? even broken ones would look cool and give that finished look...even for a ruin...
Viktor von Domm wrote:stairway looks great... tho a better pic...particularly of the stairs would be nice...
I will get one in a bit - got a cat sitting on me at the moment and they don't like being moved
ruleswise, can these only be taken one flight in whole? they are not wide enough for a model to stand on?
I'm not sure what the Infinity rules are on stairs; as you say they are not wide enough to actually stand a model on and the slope is too steep for one to stay balanced. I'd imagine that they would be treated as normal floor to floor movement for 40K.
how do you intend to paint all this? airbrush or classic brush by hand?...that could take ages... and will you seal the cardboard with something? a coat of PVA?
I was going to go pick up some more spray paint tomorrow which should seal and paint it all in one. Was going to go for either a white or light grey, then weather with oil washes after painting on some details and other weathering.
and why do you use superglue for that kind of material? i know quickness is probably the cause here... but for sturdiness i would recommend PVA...or for that matter something called liquid nail...as this toughens up the structures a treat!...
Because I want to build things quickly
The main joints all get a line of PVA after the superglue has set though.
oh and i saw the debris/sand structures and also the door handle... details make the piece pop as usual^^
I would have to agree I'm planning on adding some more bits and pieces around - was thinking of making some lighting (non functional) but then realised after looking for about 30 minutes that I had thrown out my scrap wires :(
by the way... speaking of handles? what about some stairrails? even broken ones would look cool and give that finished look...even for a ruin...
That was actually going to be my next step
Will need some more superglue before I start that though - matchsticks are an absolute begger to glue.
just some thoughts on the top of my head...
Thanks for your comments
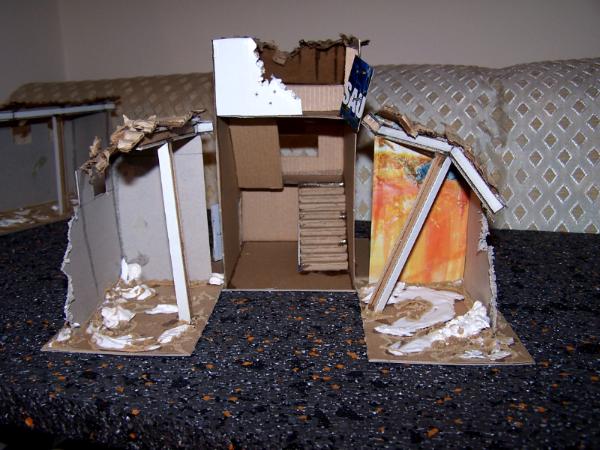
Automatically Appended Next Post: As requested - additional shots of the stairs:
I saw the price of the textured spray paints and decided against it
I will be adding some weathering powders to add a little bit of grit/soot in places though.
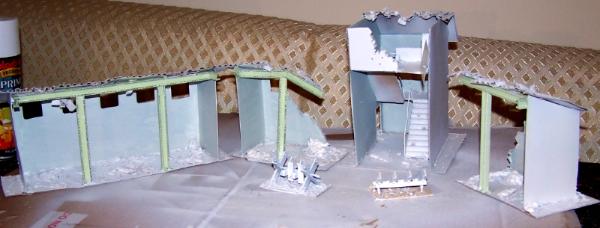
Automatically Appended Next Post: Ok, so I have sprayed the buildings white, and started painting the interiors. I have done all the internal walls a very pale green and the iron girders a darker green. Going for a kind of institutional look - the kind of horrible cheap paint that you always get in public buildings. Just going out to the shop to get some different colours as I seem to have used most of mine without realising it.
lol...that termy looks like he is doing a jig...lol...
thanks for the extra pics of the stairs...
by chance you should look for those bigger matches you get for fireplaces...extra long and such things...
two days ago i used a thick mix of PVA and sand and water... and this made a perfect mess and mass of some structure that solidifies as hard as rock... with that you can form some pretty nice weathered structures on the walls...but i bet you know that already...
by the way... nathe...that is a cool sounding name... one of my favorites in english... only topped by logan^^ (you probably can guess whre that love for those names comes from...)
I actually made the railings out of florists wire - you can just see it in the picture above.
I am keeping the buildings reasonably smooth for now, though the paint I am using for the outside has a bit of a texture to it, so it should look OK once I add some whethering to it. Also planning on airbrushing some smoke damage.
Viktor von Domm wrote: now pointed out i see them too... thin railings in a technological structure actually look very convincing....
Yeah, I thought since it was a pre-fab type building it would have cheap and easy to make fittings. Plus it took me about a minute to make it, rather than 6 hours of swearing that would have been involved with making it out of matchsticks
the oil wahses sound interesting... have you used them on other projects already?
Not that I have pictures of, but I have used them before.
Check out my painting with oils article (made with the kind contributions of others).
i´ve read that article beforer... didn´t connect it with you back then...but i guess being the quick painter and having to stop all of a sudden due to family issues it is a not-now ^^ for me atm... tho it sounds very good and that you could achieve quite better effects with oilpaints and washes...
and yep... sometimes wire you can´t beat with other materials^^
So, opened and painted up my first Infinity model and I have to say that the amount of detail on there blows GW's efforts out the water.
No pictures as I am considering entering it for the Infinity painting contest - will paint up some more though and add the ones I will not be entering to this thread
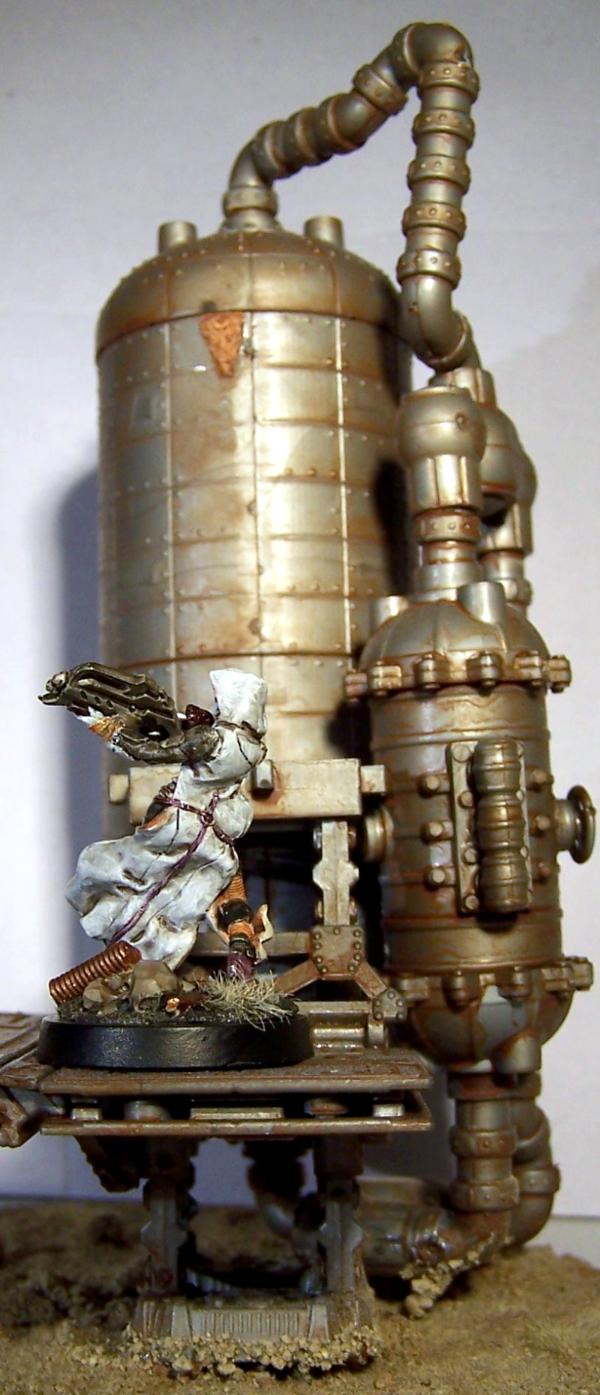
Automatically Appended Next Post: Ok, my first model, a Reverend Custodier! Decided to keep the standard Nomad colours for the most part - just changed the strapping to purple. Oh, and purple shoes as well
Super fragile... that's a shame. Oh well it couldn't be perfect I guess. . Model looks good, I see what you mean about the level of detail. I might have to invest.
Oh and your Pegasus hobbies( I assume) terrain looks sweet!
Keep up the great work!
madmartykmf wrote:Super fragile... that's a shame. Oh well it couldn't be perfect I guess. .
I think it was more to do with me grabbing it by the arms to fit the foot pin through the base - the arms just popped out slightly and had to be re-glued. I've picked it up and moved it around by the arms/shoulders and it seems solid - just not up to being dropped or rough-handled too much as it is metal. All the joints have small pins/holes already but if you wanted a rock solid model you would have to put some larger pins in place.
Model looks good, I see what you mean about the level of detail. I might have to invest.
Well, for £60 I got a 300 point (plus a couple of extra models) force, so it is pretty damn cheap compared to GW. Even if you never play they are fun to paint and look great if you have somewhere to display them
Oh and your Pegasus hobbies( I assume) terrain looks sweet!
Keep up the great work!
The set I have here are from Urban Mammoth (part of the biotoxin plant kit), but I understand they are repackaged by a number of different companies.
Wooh good to see you getting in to Infinity! I haven't bought a GW model since I discovered it As you say, for less than a couple of tanks you can get a complete army, give them a bash and even if you don't want to play them after you can go and buy another army to try without breaking the bank! Unfortunately this is why I currently have Haqqislam, Ariadna, PanO and Yu Jing armies...
As I mentioned in the brief rundown in the main thread, he's looking good, but could have been closer to the camera. Any chance of a bigger photo now the competition is done? I'd love to see him up closer; the orange looks fantastic
Your entry was one of my favourites, i think it would have done better if it had been framed better but you know that already. Looking forward to some more pics!
No pictures today as I have been out pretty much all day
Will get some tomorrow (going out to get some spray paint to paint my birthday purchases when the shops open, so will hopefully get some pictures in the morning before I head out).
However, I have purchased some buildings to build up an infinity board including:
1x extra set of roof plates for the apartment buildings
and 2x grey vinyl mats which I plan on spraying in urban/wasteland/desert colours and using as a playing surface for both infinity (where I can probably use just one mat, and 40K where I can use both together).
Also got some d20's so I can actually play Infinity if I ever find anyone to play against
Automatically Appended Next Post: I've had to put the close up pictures in spoilers as they may offend anyone who has ever painted before (even finger painting in pre-school ):
Spoiler:
The gang so far:
Prowler:
The other two:
All I can say is that they look better in real life
Just had an email from micro art studios saying my order has been sent - looking forward to getting my order - very glad that I went to them direct rather than through maelstrom
Hey - they don't look *that* bad Probably the worst culprit is the untidiness of the blue OSL, and general untidiness on the bottom left - but the other two look good! They are so tiny in real life...
Don't be so down on yourself! I'd be proud to put them on the table, sure there are a few bits and bobs you could change but you can still do that at a later stage if you decide to. Good job, dude.
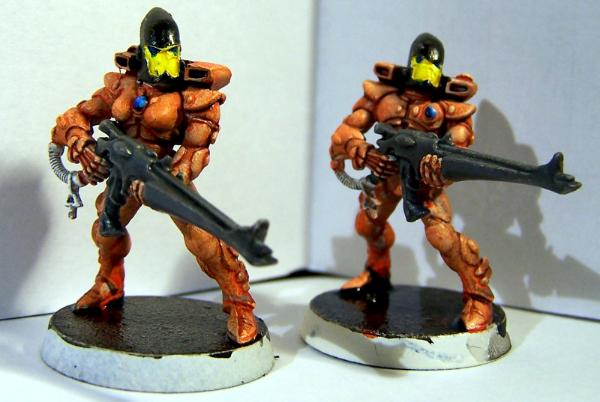
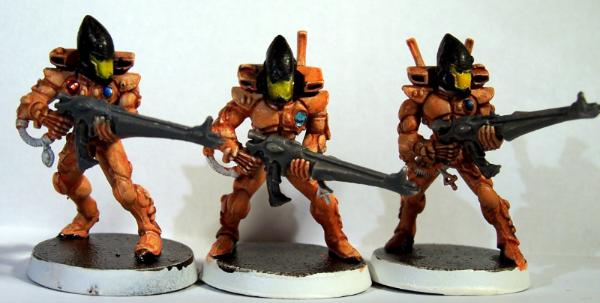
I decided to paint up a squad of Elder Guardians (I stripped and underpainted my entire Eldar Army ) and I think the orange I have now is a lot closer to what I want to have.
Ignore the roughness of the paint as I was using an old spray can on these ones before switching to a new one for the rest of the army (plus you can't really see it at tabletop level )
Really just looking for some suggestions as to colour choices for the little bits and pieces (runes, cloth bits, weapon doodads etc).
I think if you painted the black helmets blue it would up the cool level dramatically. If not i'd definitely pick out more runes and stuff in blue, the one or two stones isn't enough right now.
The eyes are supposed to be blue but they have only had the dark blue base layer added.
The helmets have to stay black as I am painting these up as a specific craftworld. I will be repainting them though as I used a black ink to colour them and it is quite shiny
I suck at painting gems (as you can see ) so I have ordered some 2 and 3mm self adhesive gems in different colours that I am going to try out
However, blue for runes etc is certainly something that I can do.
There is another cat too. Though it keeps on running off if I take a picture
The gemstones I ordered have arrived and I tried them out - the 2mm stones are the perfect size but are too thick (especially with glue layer). So I got out the old pin drill and drilled a 2mm hole with a 2.5mm countersink and scraped off the glue layer and they look pretty awesome.
The red gems are REALLY good with this colour scheme but I think I will probably stick with the pale blue gems to stick with the 'official' colours.
Might use the red for optics and other devices.
The 3mm size gems look like they would be a good size for MCs or larger gems but are too big for standard infantry.
I wasn't sure about them looking at the thread picture but i zoomed in and imagined them without the flash glare and i think they look pretty cool now. Good find man.
Might be worth doing a tutorial and telling people where/how to get them. I'm sure there will be a lot of interest!
Well, my birthday present to myself arrived today - a stupidly heavy package from Polandland
A few hours of popping wood out and (occasionally) putting bits on the wrong way round and I have my first apartment building!
Reasonably easy to put together - the instructions could have been slightly easier to follow but I think there were only a couple of bits that I put on the wrong way round/on the wrong parts (one of which I put on upside down as I did not look at it properly before I put it on). The whole thing fitted together without glue (and there was only one type of component which needed trimming down - the vertical supports fit into holes and the peg sections just needed shaving down with a knife in order to fit). I think there are a few bits that I will end up gluing in place just to make them more secure (the pegs on the floor hatches and the pins on the removable roof pieces).
The only thing that I am slightly disapointed by is the extra roof pack (which I got one of) - while it gives you enough pieces to make up 2 extra roof sections it does not contain any walls/railings, nor does it contain the little pegs to hold the floor hatches in place. I think it also provides you with two balcony floors as well but again there are no fittings or fixtures which will allow you to actually use them. I think the best bet with the extra roof sections is to glue the interior floor hatches in place and use the pegs from those on the extra roof kits.
The finish of the wood is not as terrible as it looks in the picture (the flash was really quite powerful) - it looks pretty good just on its own and with a bit of staining in various colours could look quite cool.
You've gotta give to MAS, that's a nice piece of kit they came up with! I'd be tempted to paint it dingy, Blade Runner style, are the details engraved or just printed on?
The details are etched, and the shutters, doors etc all pop out. I plan to have a reasonably grimy white/grey with faded blue red and yellow detailing. Will also download and print out some posters
Casey's Law wrote:Sounds like a good plan and my estimates of the kits quality just sky-rocketed! It'd be immensely fun to convert.
It is pretty good - I am planning on popping out the shutters and sticking them on card so I can just slot them into the back of the window in one piece, rather than having to add them all in individually
Quick run down of how I painted it:
+Prime white
+Wash with bestial brown wash (you can see how thick it is by looking at the jump pack as that has not been given anything else yet).
+Wash with a thin wash of blazing orange all the marine armour parts, avoiding straps, flexible joints etc
+Retouch in white any parts that will be painted yellow/other colours
+Paint yellow stuff yellow (I can't remember off the top of my head which colour it was but I start with quite a light one and then will shade down)
+paint eyes white, then use green ink (since it dries with a shine - you can use green washes/paints and then gloss varnish)
+Use a thicker bestial brown wash on the armour joints, mouth grill and chest eagle, then hit with Devlan Mud
+Use a thin black wash on the jump pack straps
And that is pretty much as far as I got other than using a blue ink on the plasma coils and in the jump pack jets.
+Prime white
+Wash with bestial brown wash (you can see how thick it is by looking at the jump pack pipes as that has not been given anything else yet).
+Wash with a thin wash of blazing orange all the marine armour parts, avoiding straps, flexible joints, shoulder pads etc
+Retouch in white any parts that will be painted yellow/other colours
+Paint yellow stuff yellow with a couple of thin layers of golden yellow
+Paint eyes white, then use green ink (since it dries with a shine - you can use green washes/paints and then gloss varnish)
+Use a thicker bestial brown wash on the armour joints, mouth grill and chest eagle, then hit with Devlan Mud
+Use a thin black wash on the jump pack straps across the torso
+Paint the plasma pistol front section and chainsword motor with dwarf brass then give a thick badab black wash
+Paint the pistol body and the blade case with black ink (can use multiple black washes)
+Paint the plasma pistol coil and jump pack vents with blue ink
+Paint the sword teeth with a heavy badab black wash
+Outline shoulder design in chaos black, fill in with bestial brown then go over with blazing orange wash and add golden yellow eye
+Paint skulls with bleached bone/kaki and then go over with sepia wash
I think that is everything, and I hope you like the scheme
Because it uses washes so much, it gives you a built in weathering which I think looks pretty cool (can be seen most on the edges of the angular bits of the jump pack).
One of the reasons I don't like painting camo is that everything blends together
Still got a little bit more work to do, but the general scheme is done. I may change the colour of the cloth areas just to give some more variation.
C&C welcome.
And a bonus early WIP shot (sorry for it being sideways, took it on my phone and don't know why it made it sideways)
Here is the painting guide for what I have done so far:
+ Undercoat kaki
+ Use a dark green/olive (I used a really old mix I did of, if I recall, 50:50 Chaos Black:Goblin Green) to do the first layer of tiger stripes using a 000 brush - use light strokes to go at a slight diagonal - the best effect is to mix stripes with sharp pointed ends and blunter ended stripes - Mostly do a lazy "S" or slightly wavy line, with the occasional "Y" shape, or small branching "Y" shape - You want a reasonable coverage of these dark lines - maybe leave a gap between them of 1-2 times the thickness of the line, with each line slightly staggered, almost like bricks in a wall
+ Next do the same with Camo Green, though you want about 50% less stripes in this colour - Get most of them between the darker lines, but the odd one touching or crossing/painted over the dark lines
+ Next do the same with Graveyard Earth, again about 50-75% less of these lines than the dark green - You can afford to have larger, thicker brown lines than you can with the green
+ Wash the armour with a heavy layer of Devlan Mud (you may need two washes) to blend everything together
+ Wash the cloth with Badab Black
+ Paint the white bits with Rotting Flesh
+ Paint the white bits with Skull White
+ Wash the white bits with a light wash of Badab Black
+ Paint the face with Elf Flesh (for a lighter skin tone which I think would work on such a dull scheme - not shown here as I could not find my Elf Flesh bottle)
+ Wash with Sepia wash
+ Paint on streaks of your dark green as with the armour camo - You can have the streaks further apart - You can add in other colours here as well
+ Paint the eyes (Skull White with Enchanted Blue and Choas Black pupils in this case)
+ Use several Badab Black washes on the black shoulder pad (which should still be Kaki as it has not been painted) to get a nice black colour, or use a dark grey with a black wash
+ Paint the army mark in Camo Green, then go over in Goblin Green
Well, I have finally been able to open up my copy of Zombicide that has been sitting on the table for the last week or so (I promised the wife I would not open it until I had finished my research dissertation ) and have gone right ahead a painted.... THE ABOMINATION!
Very nice to paint once it had been primed (you might need to wash the models if you plan to paint them as they are a little greasy, or just use a good primer) - plenty of details to pick out if you paint with washes like I do
I wanted to really play up on the design of the model (a giant freaking monster in the tattered remains of what looks like a tourist's clothes) so I used pretty bright, clashing colours for the clothes. I wanted to keep his skin relatively normal as I picture him being in better condition than regular zombies

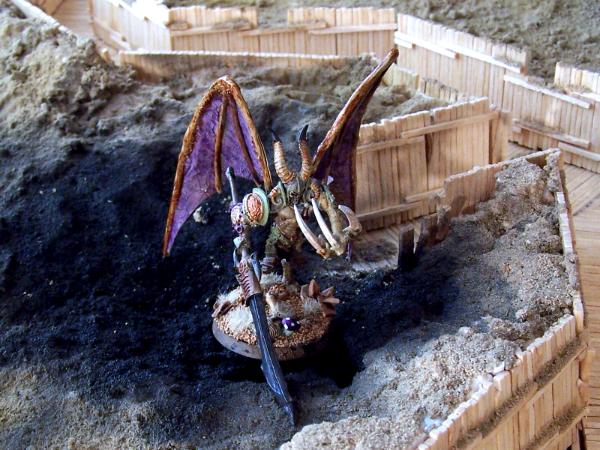
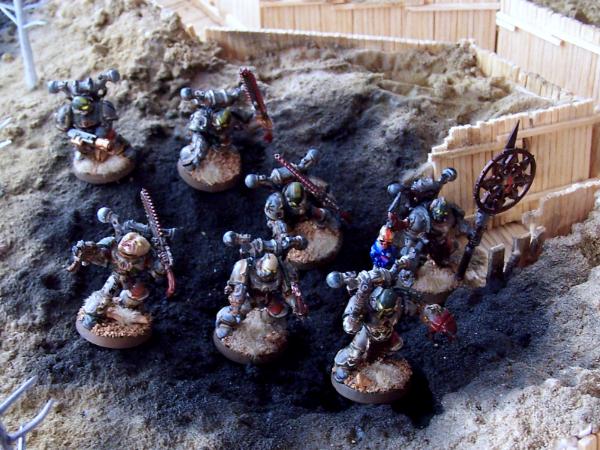
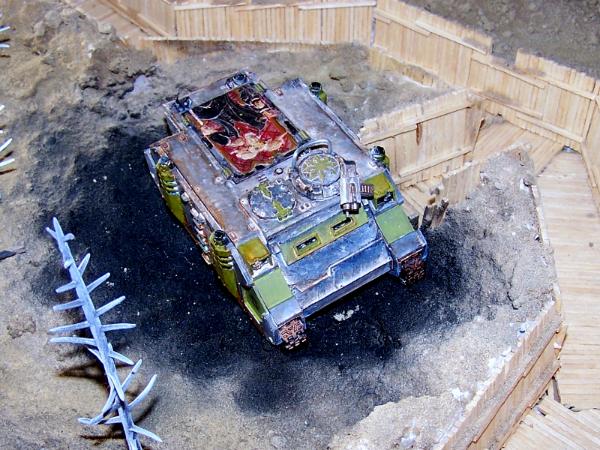
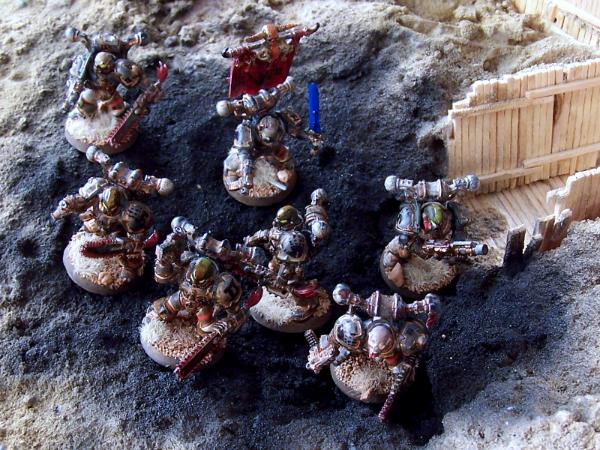
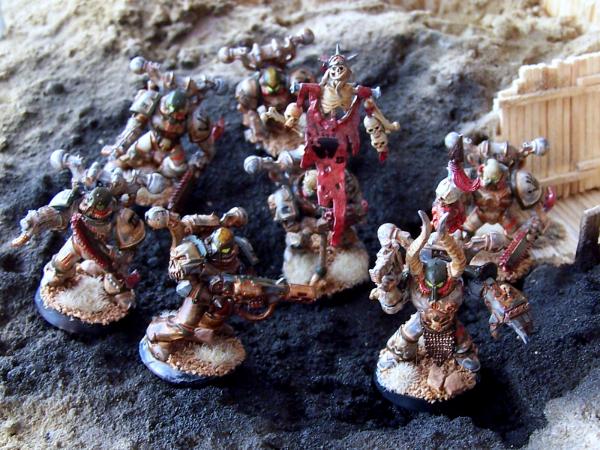
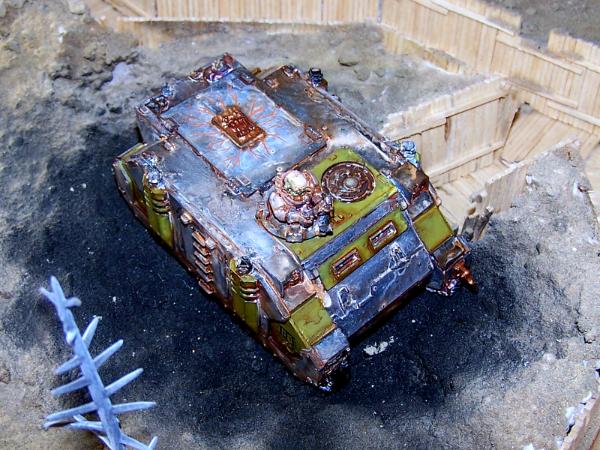


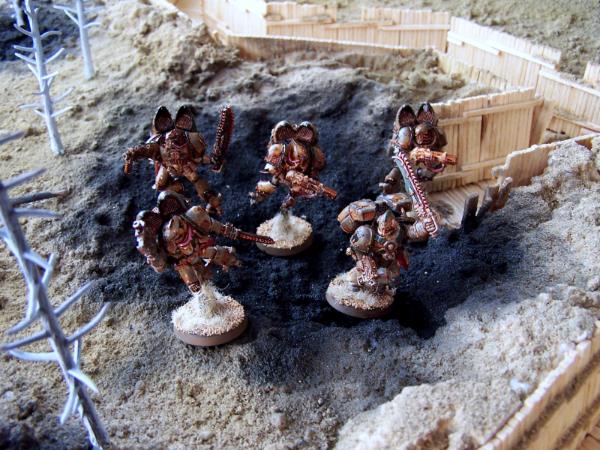
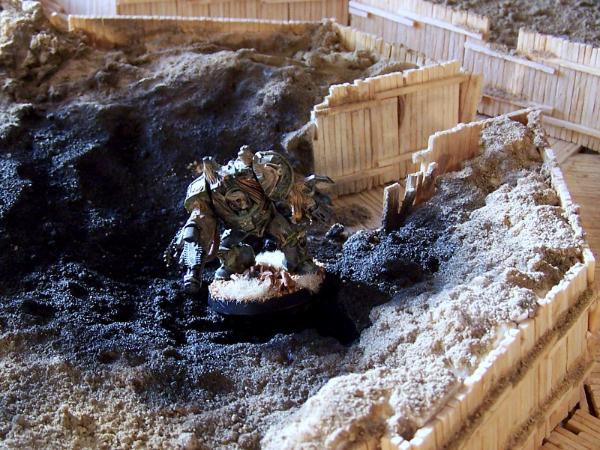
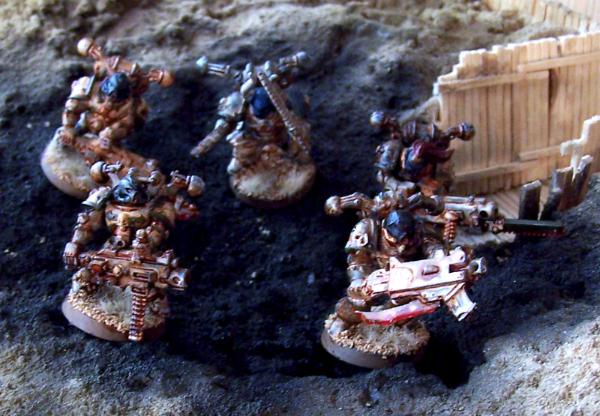
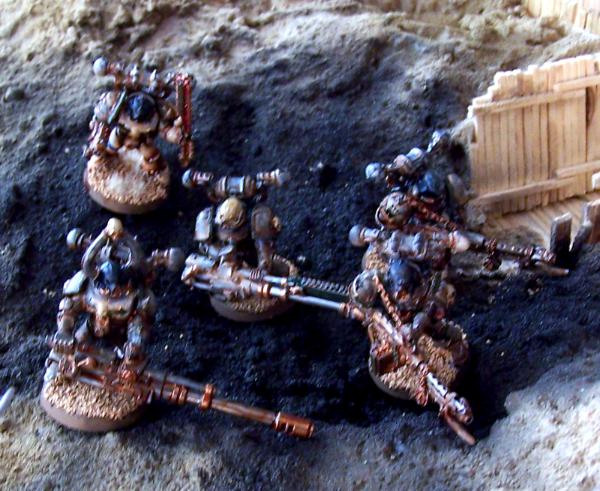
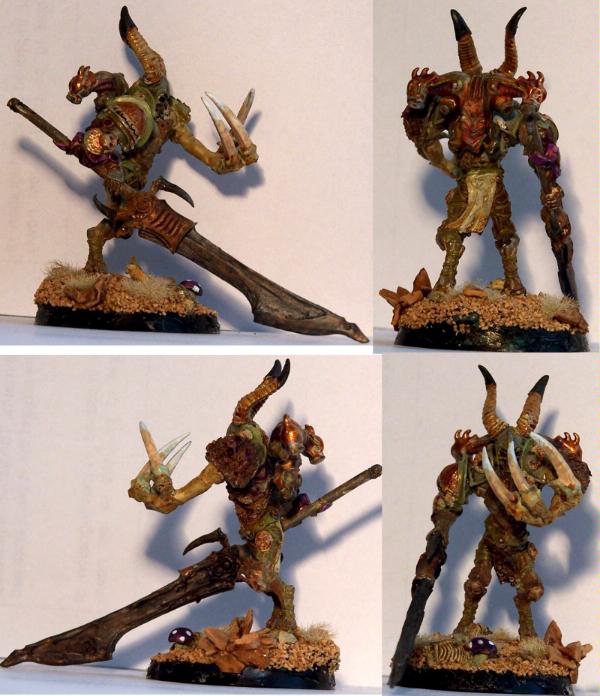
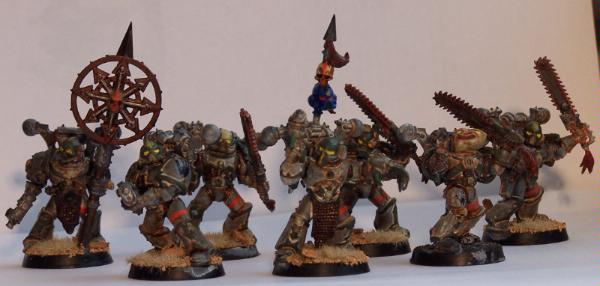
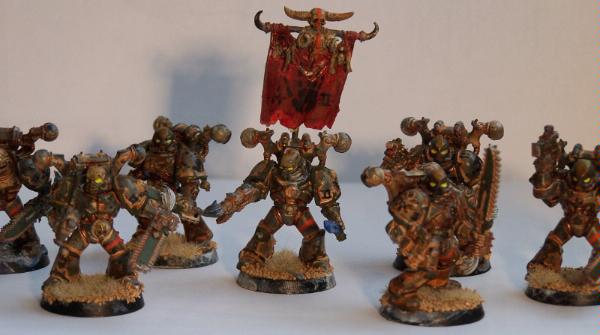
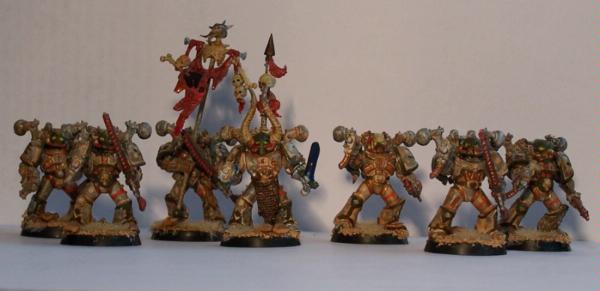
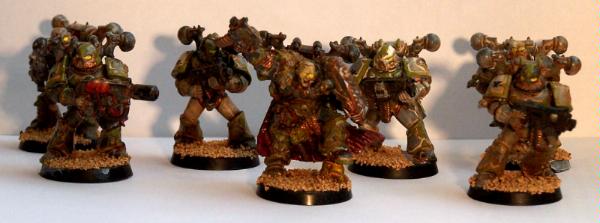
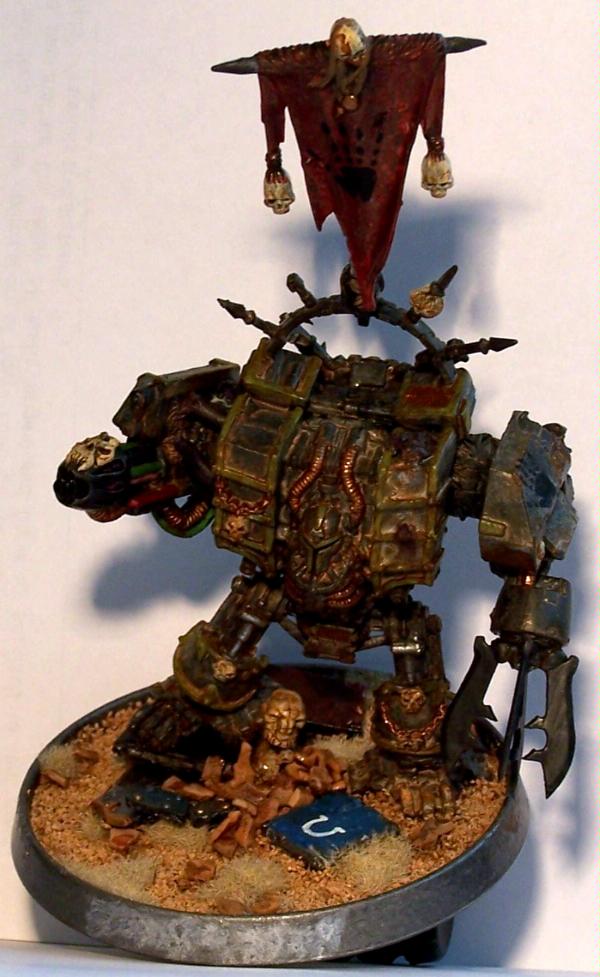
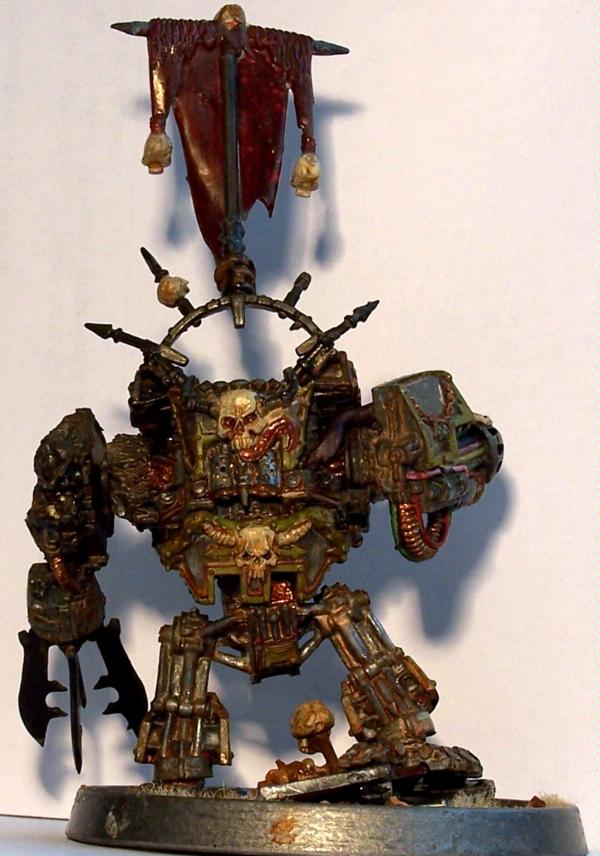
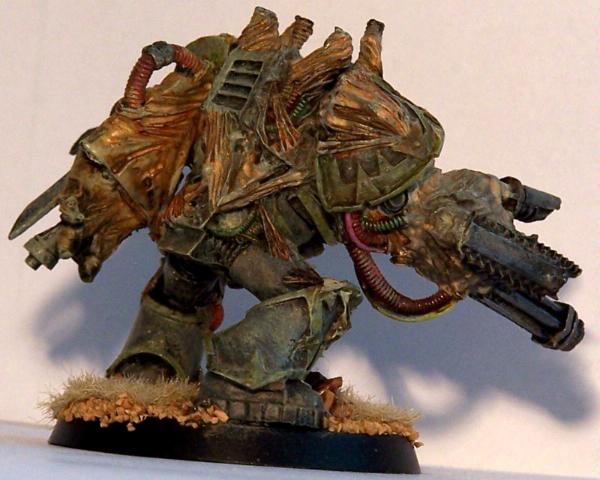
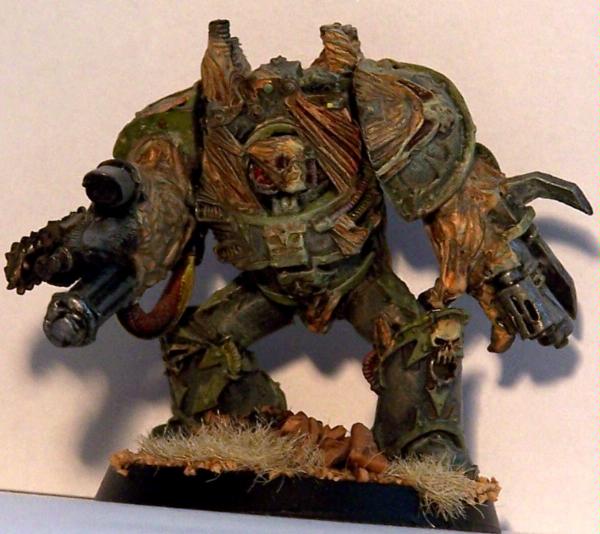
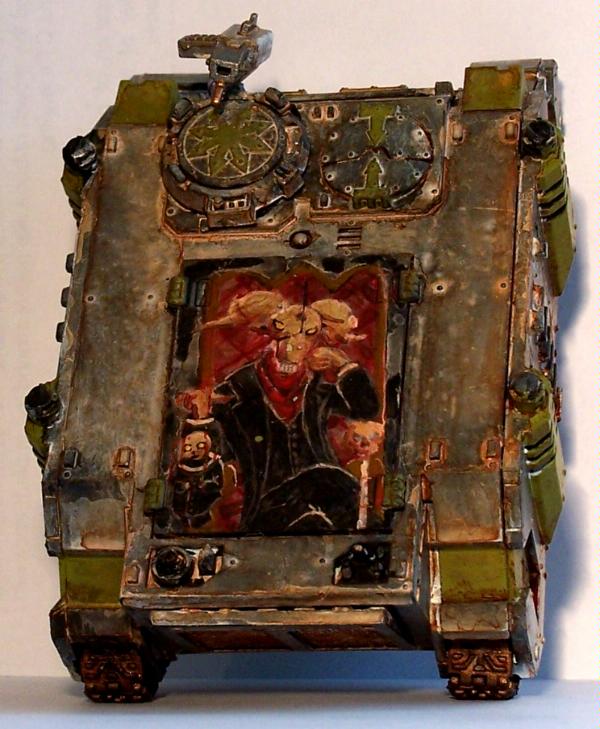

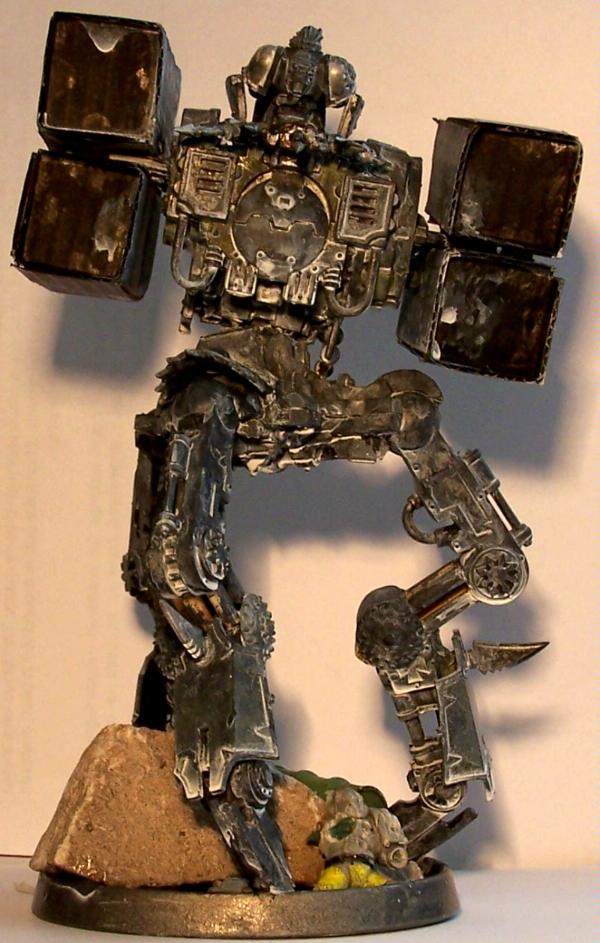
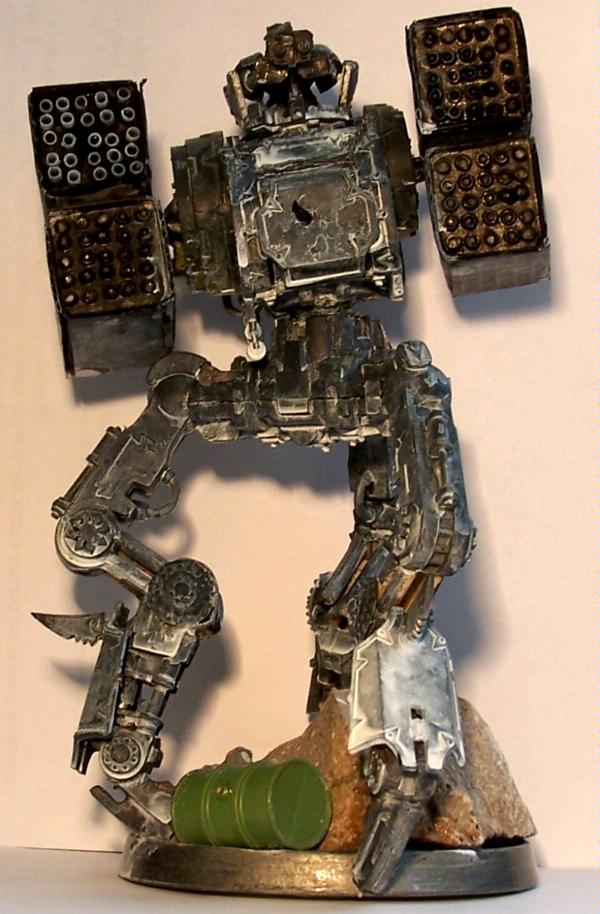
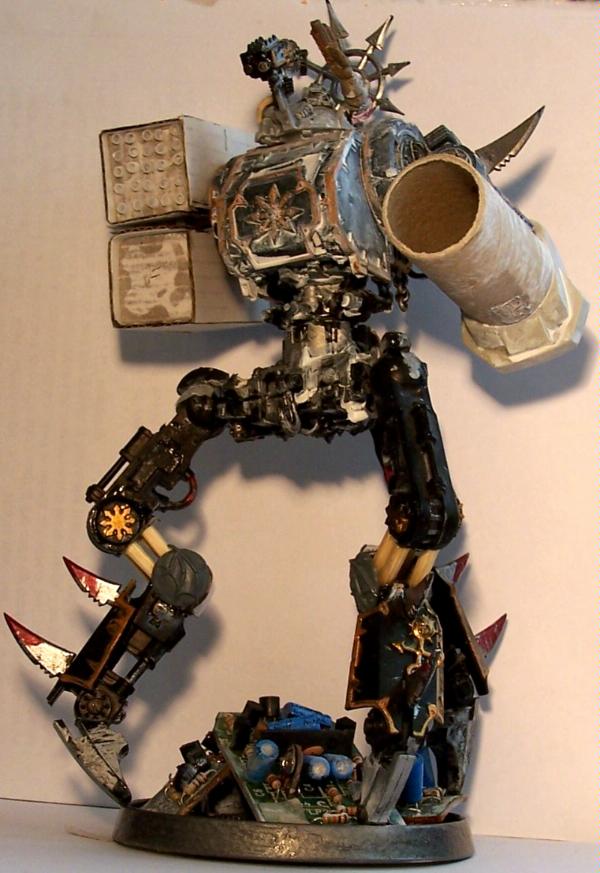
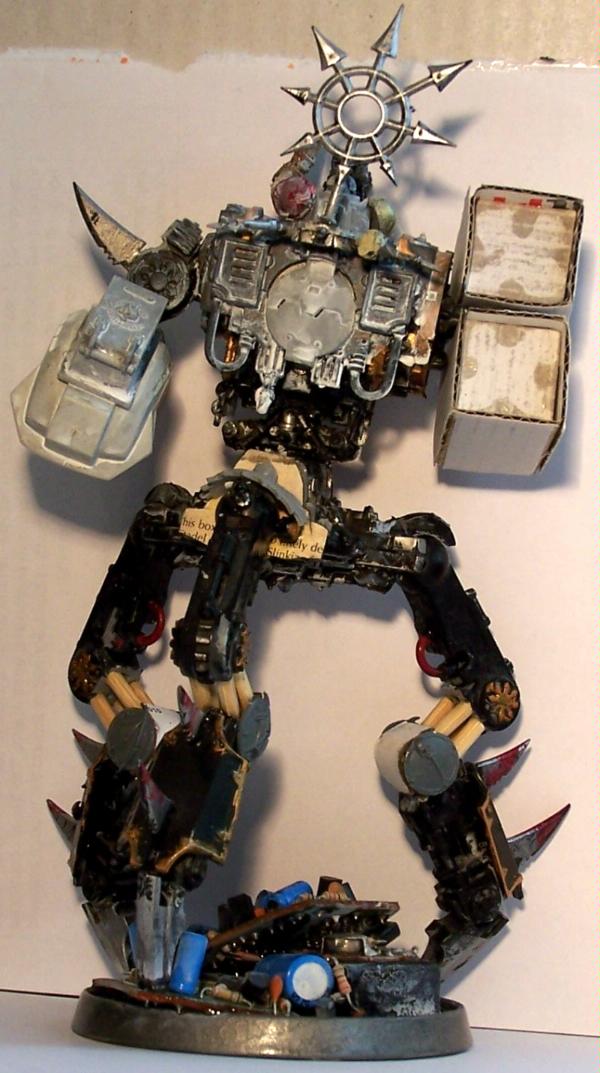


 Looking forward to more!
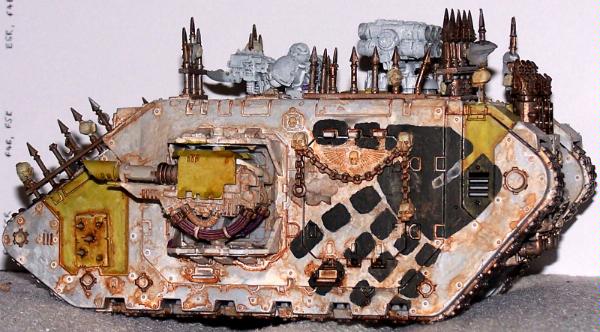
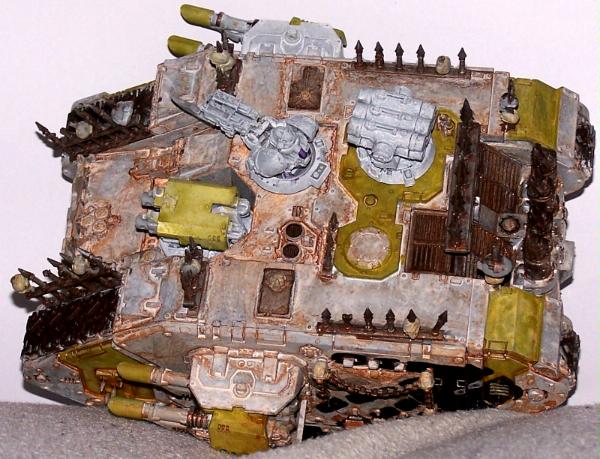
 Looks very good.

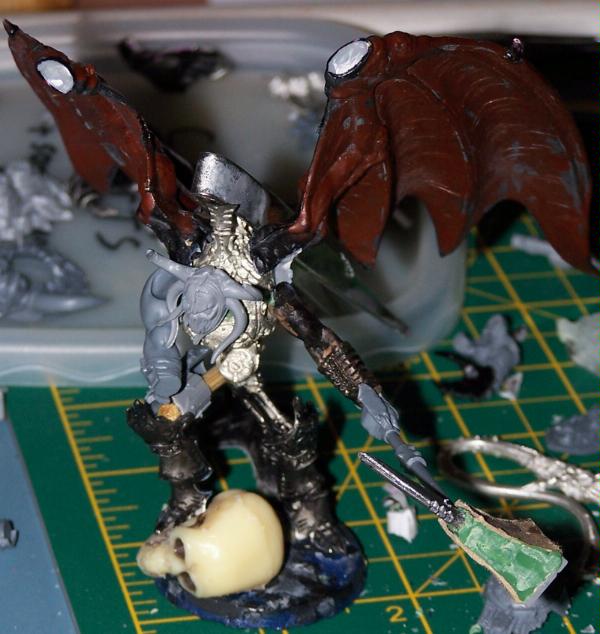

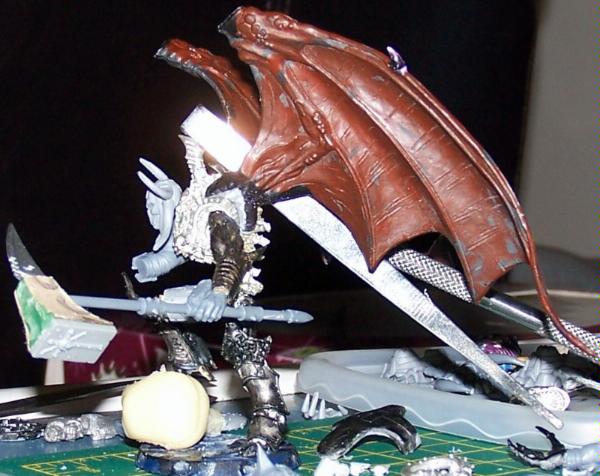
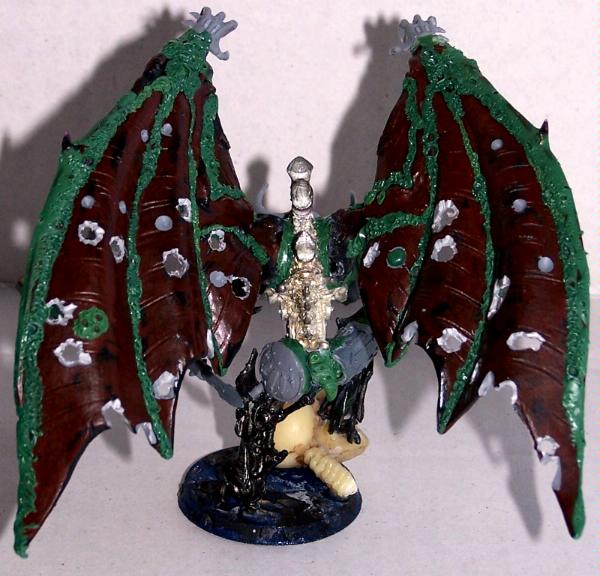
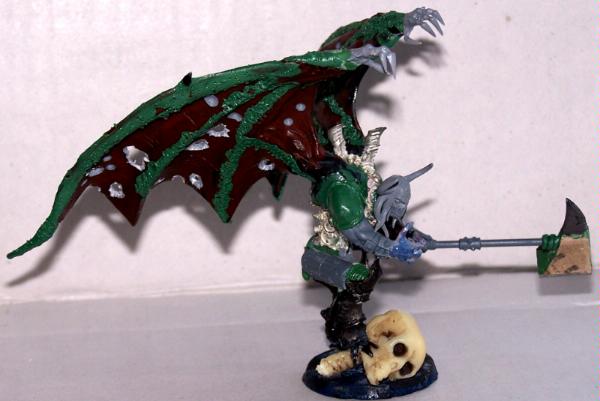
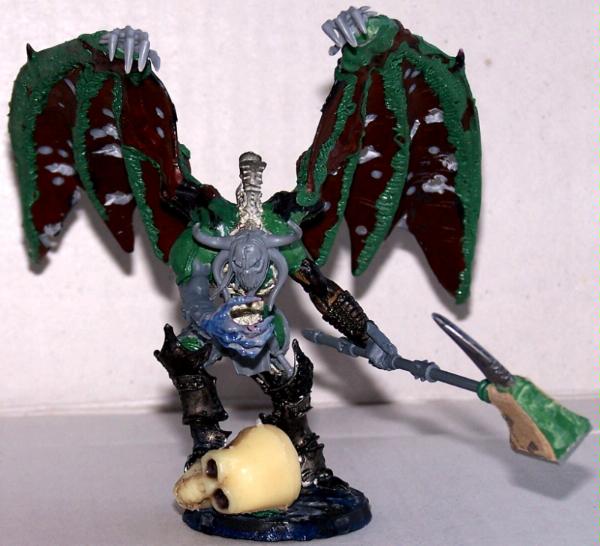
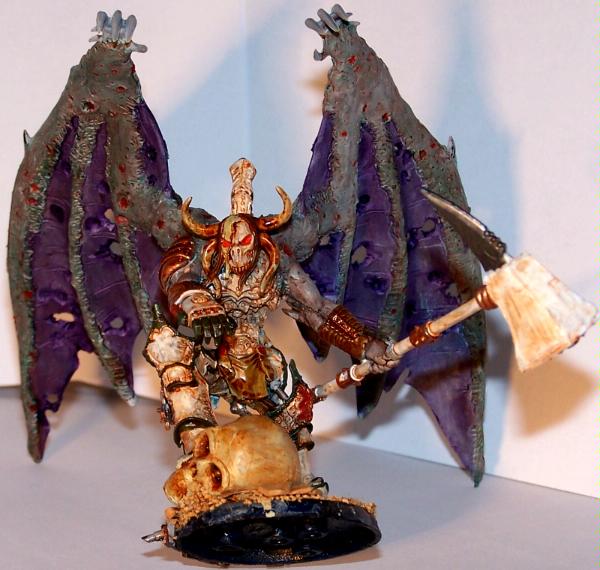
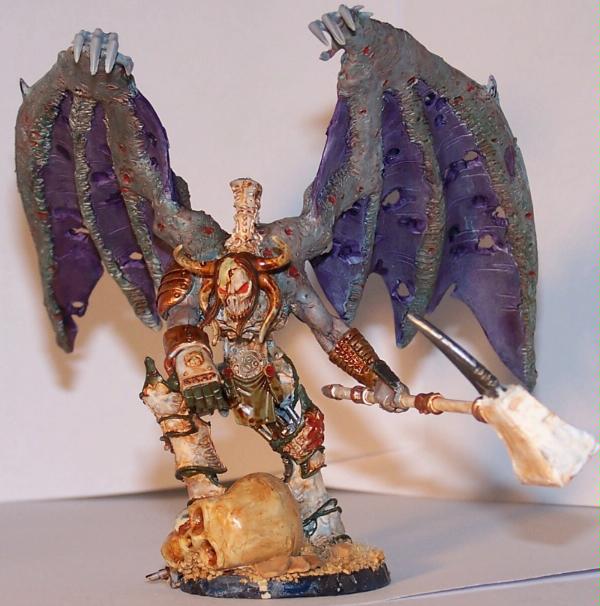
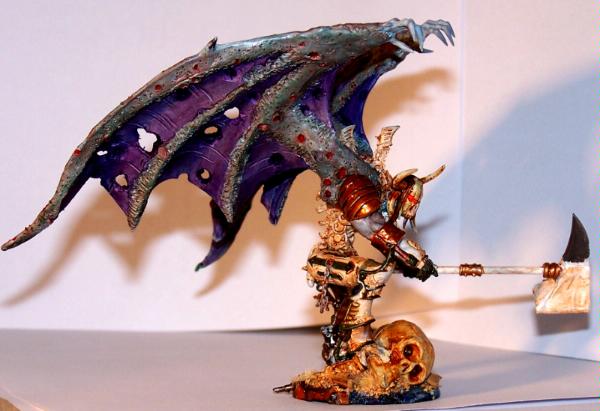
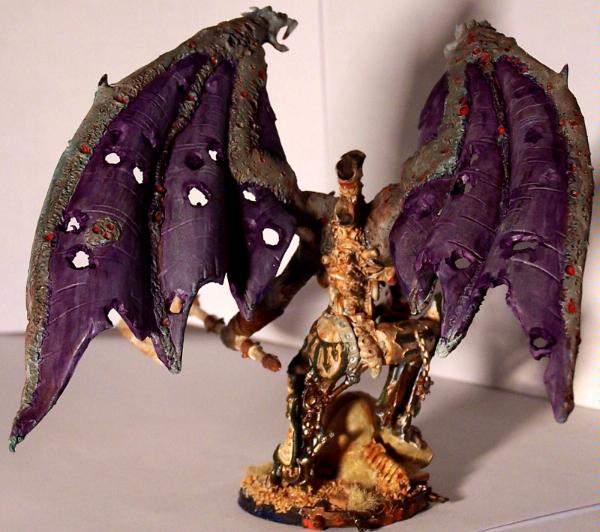

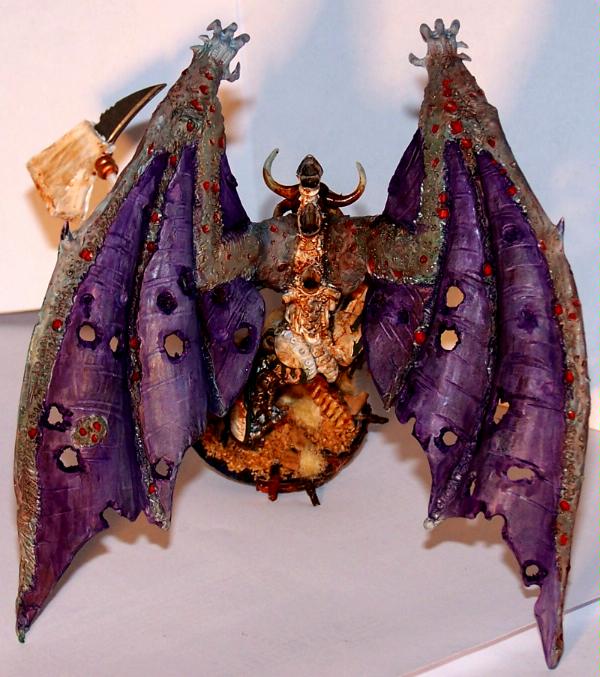
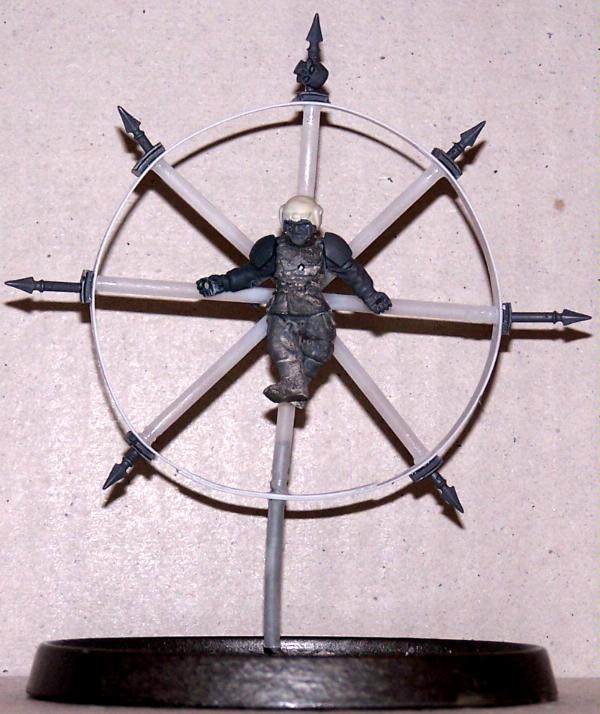
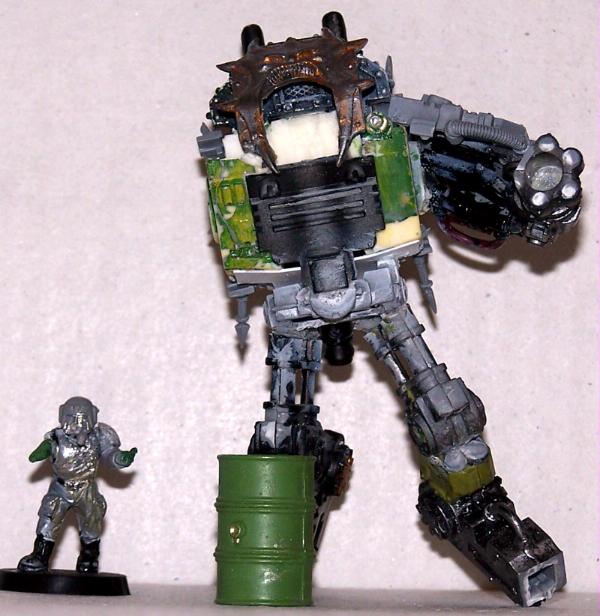
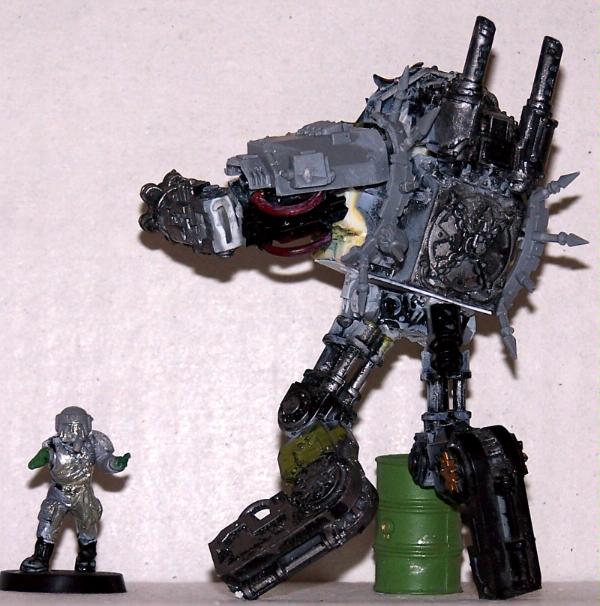
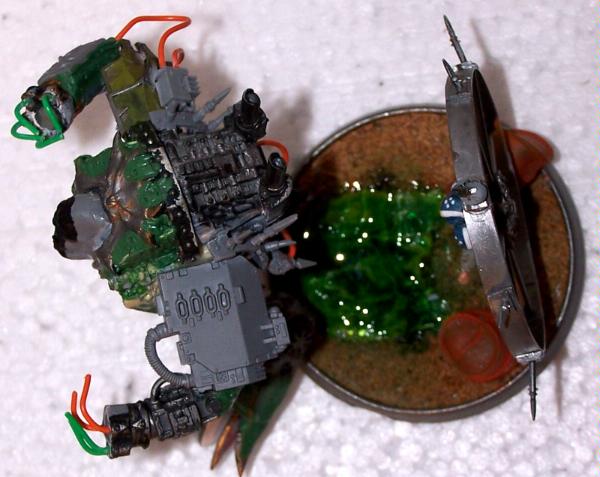
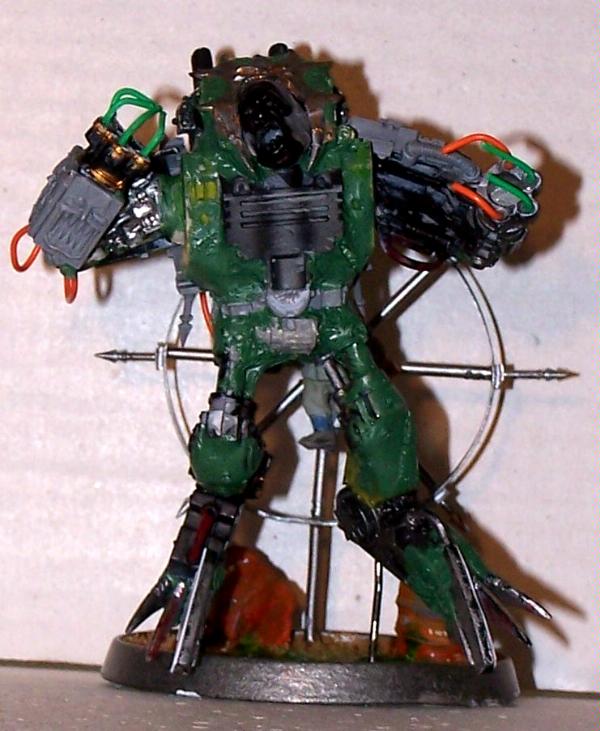
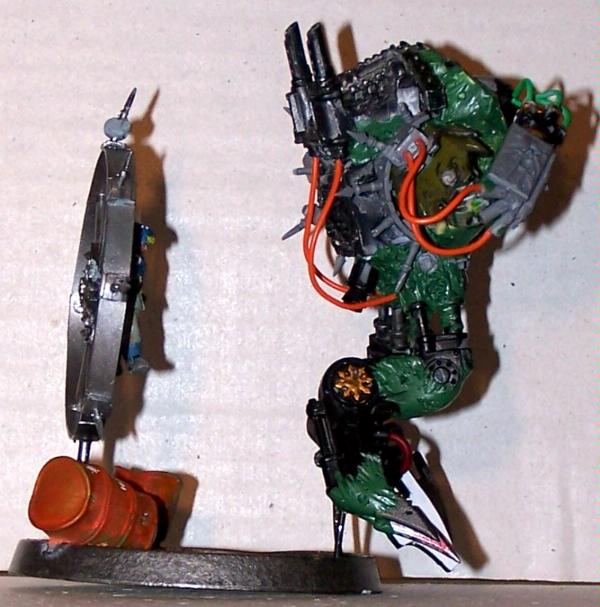
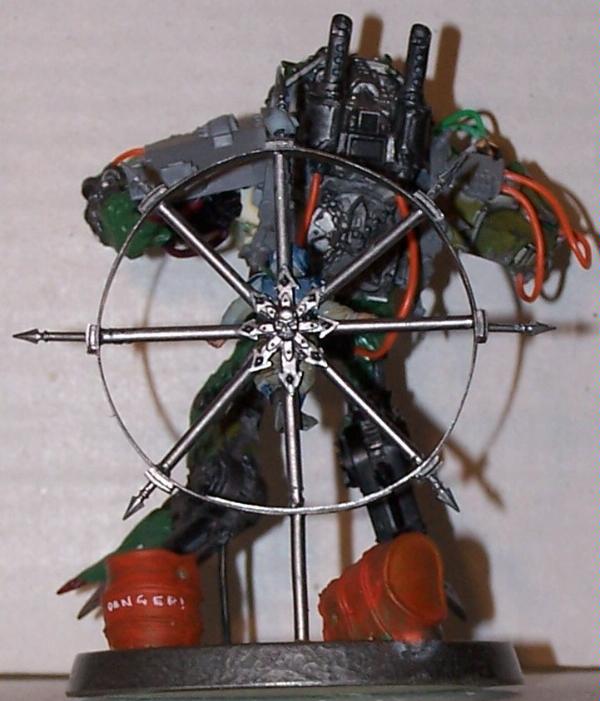
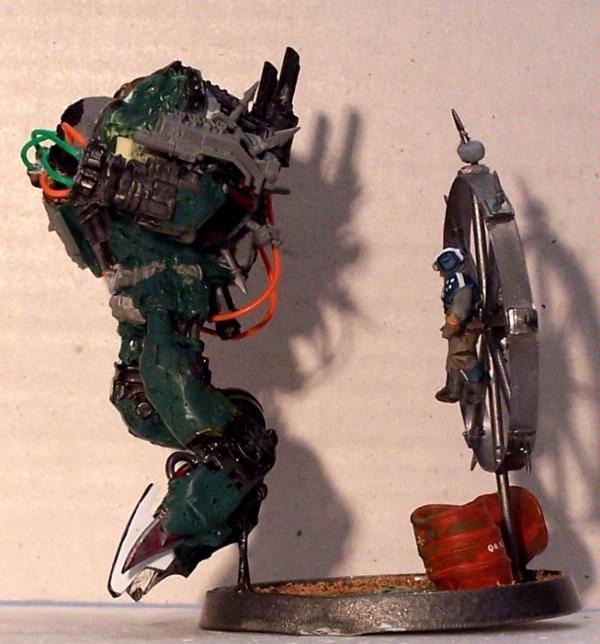
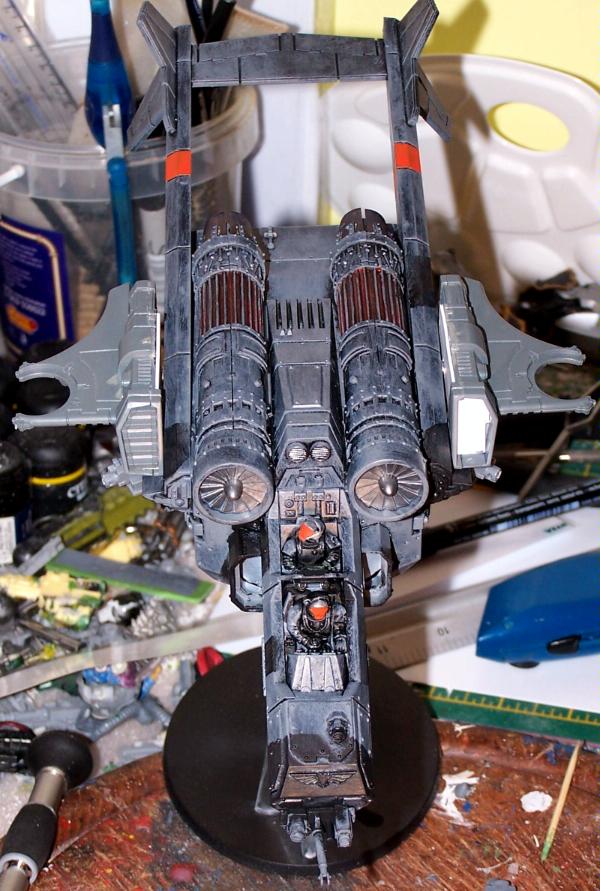
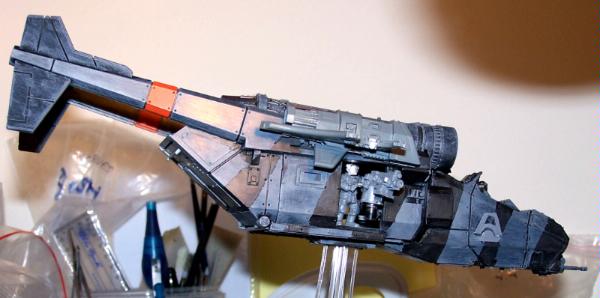
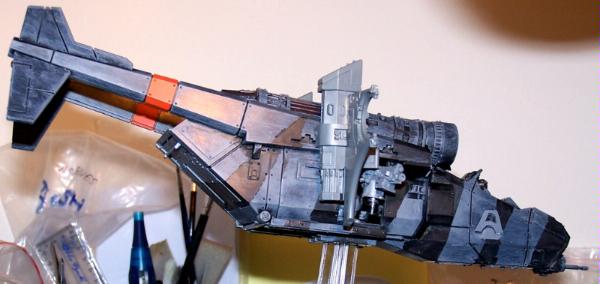

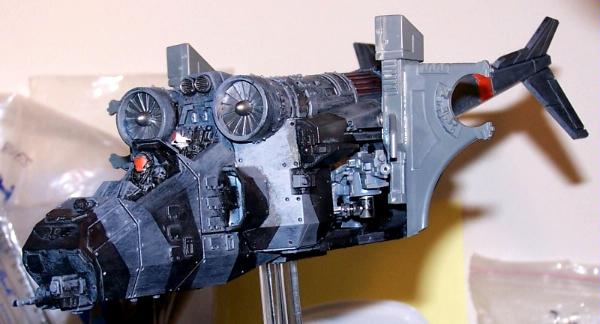

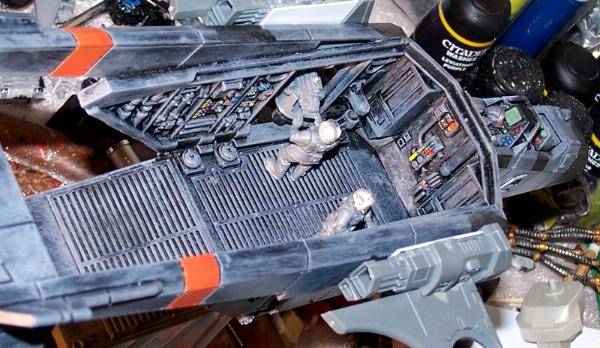
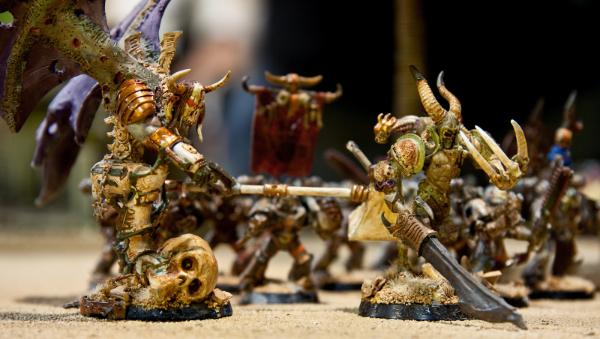
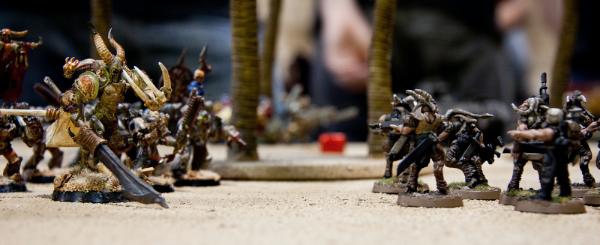
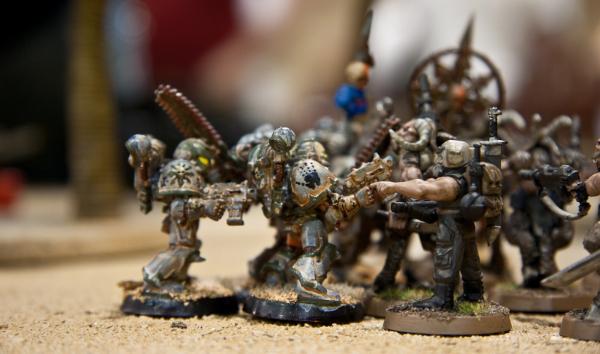
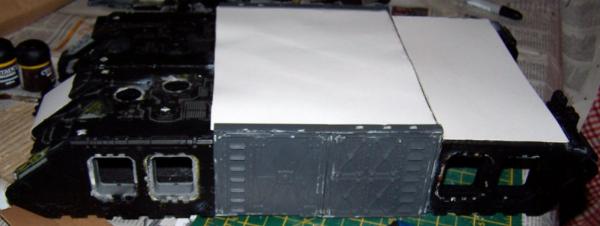
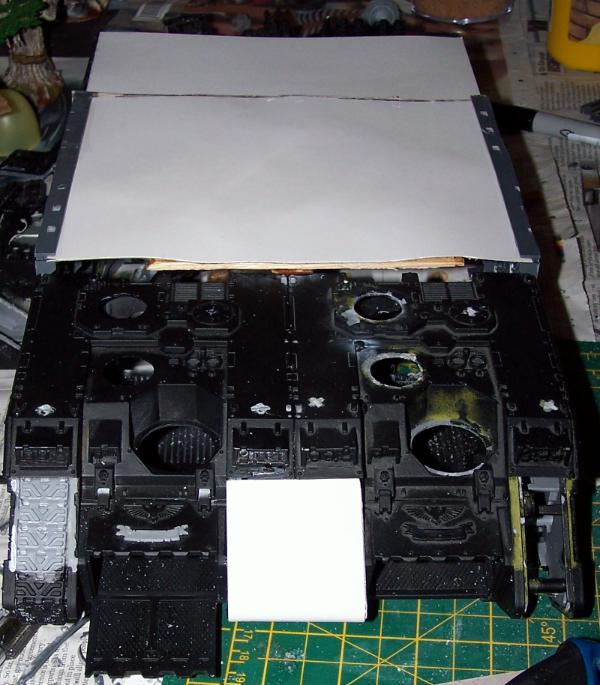
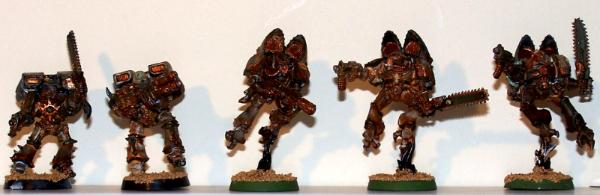
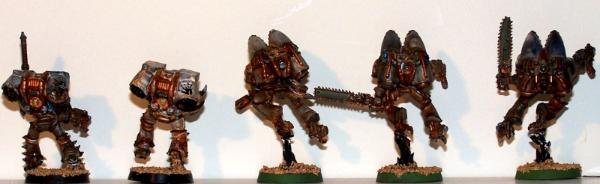
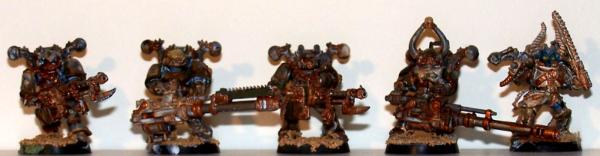
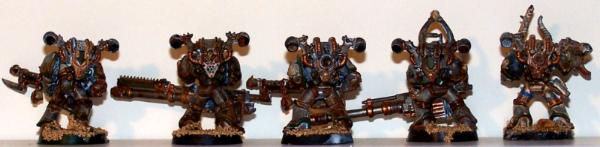
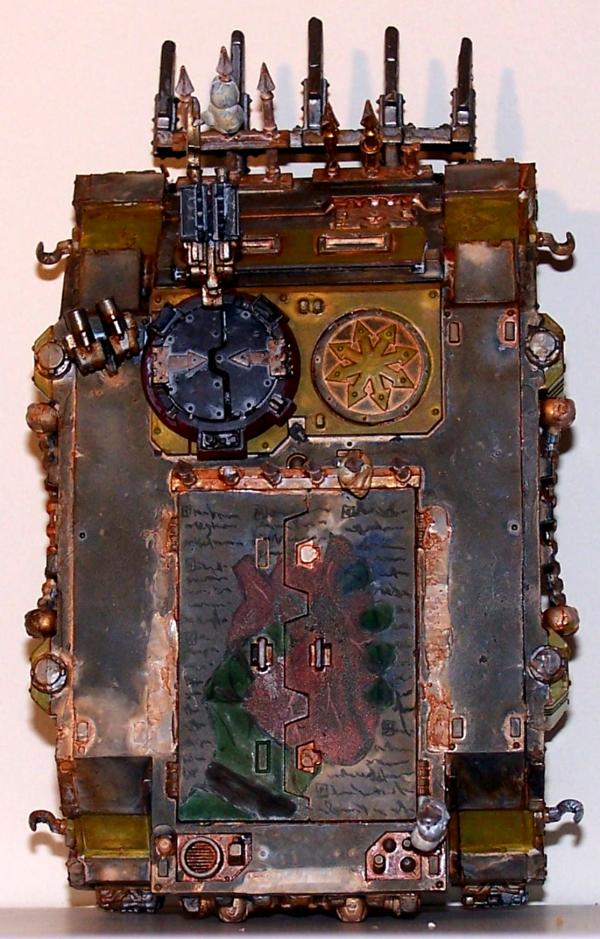
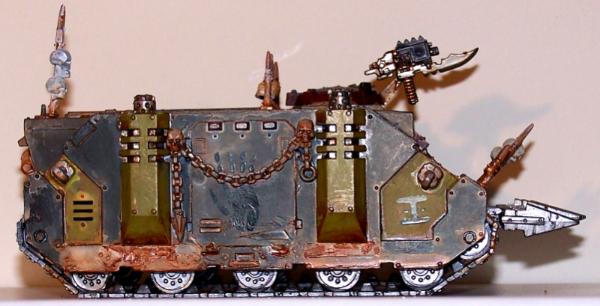
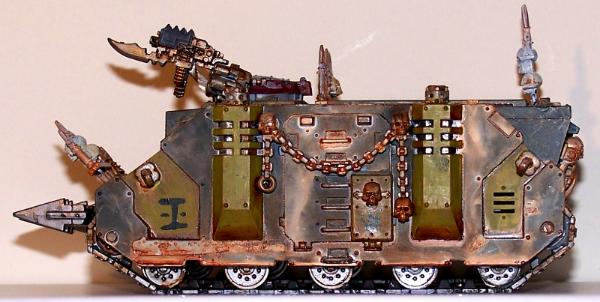
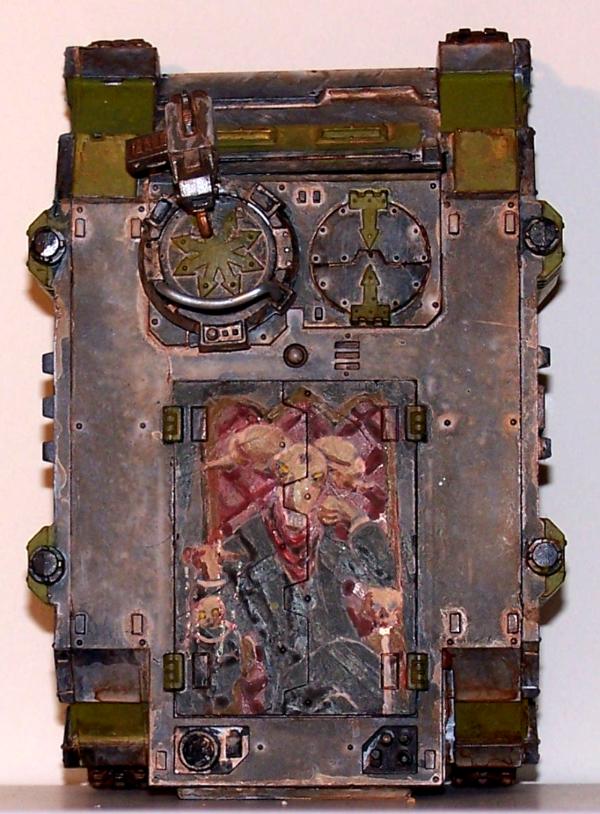
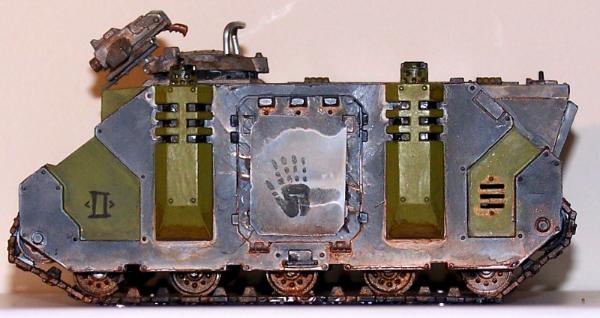
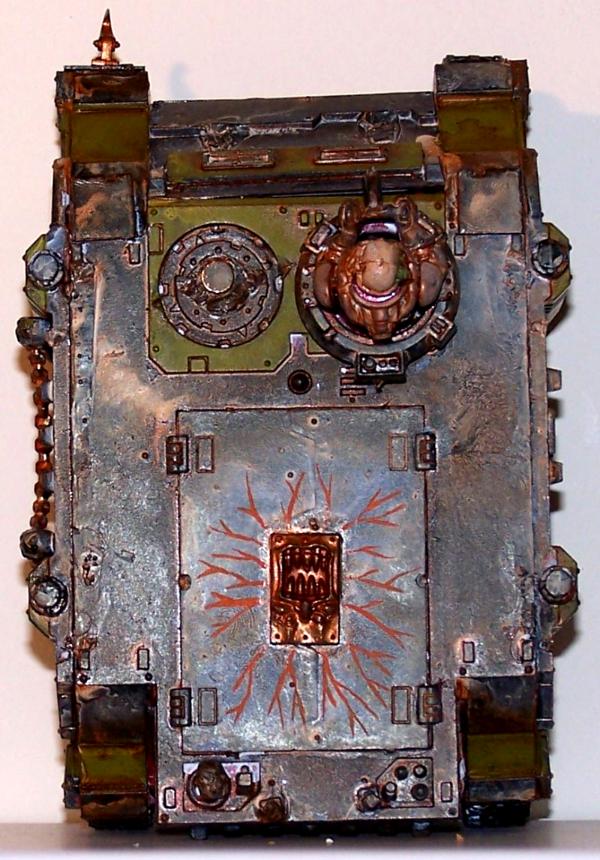
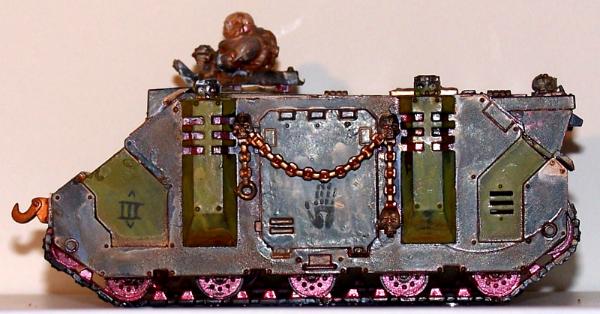
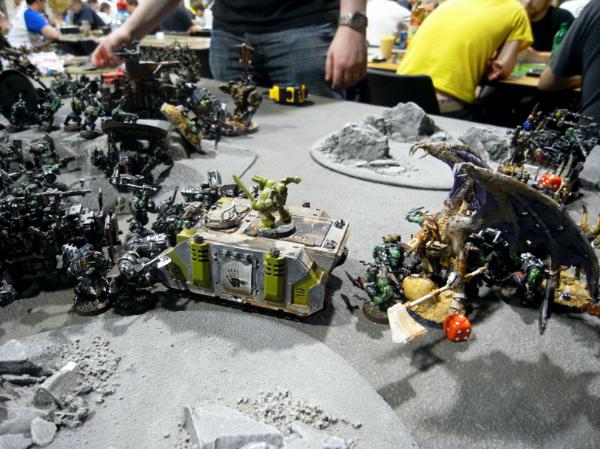
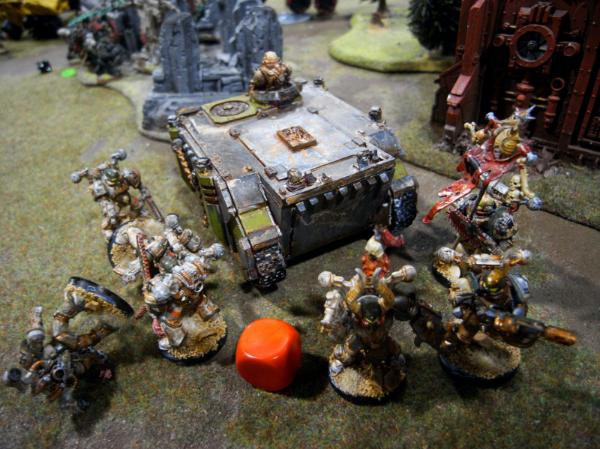
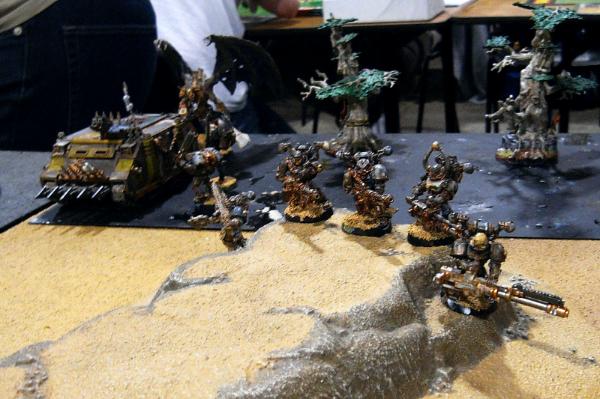
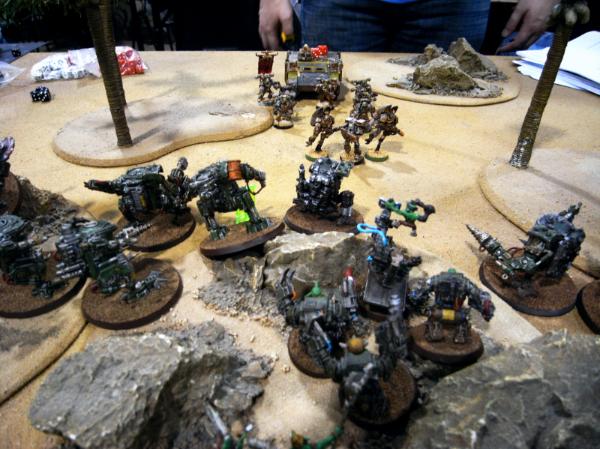
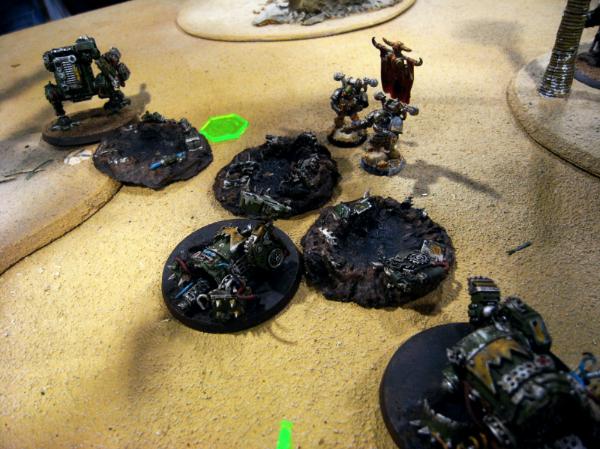
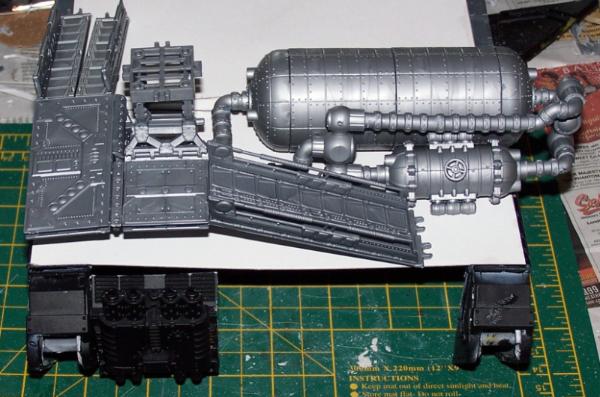
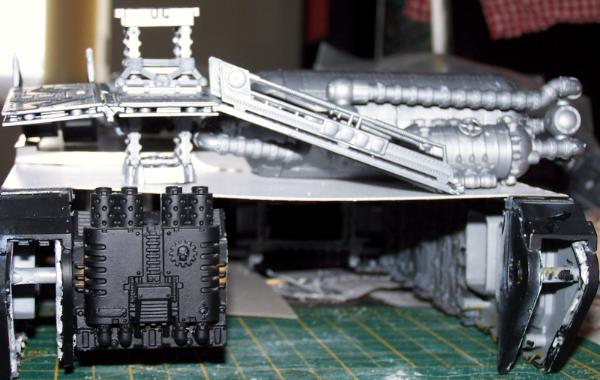
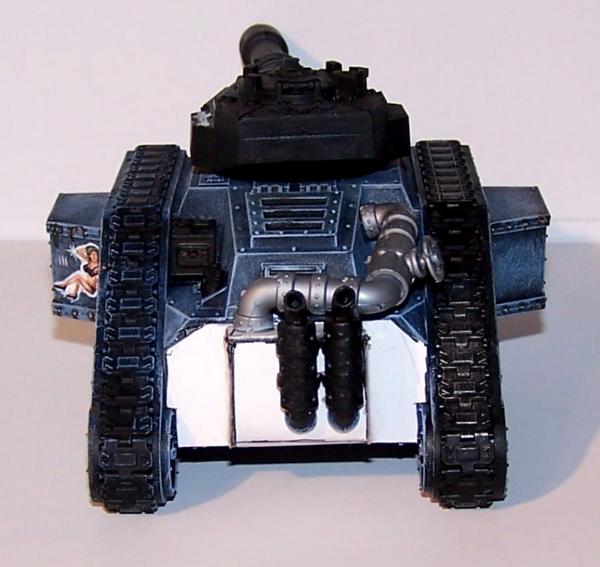
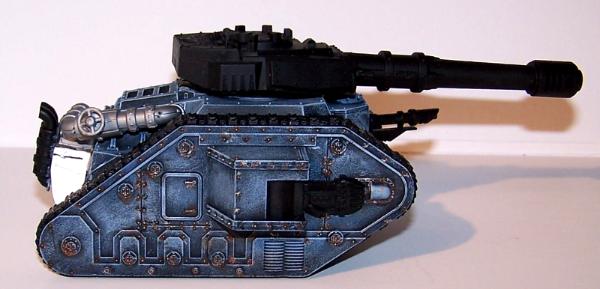
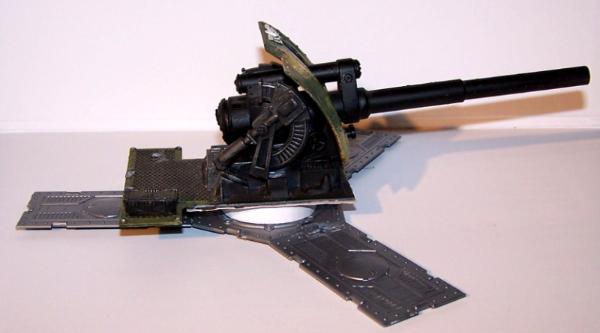
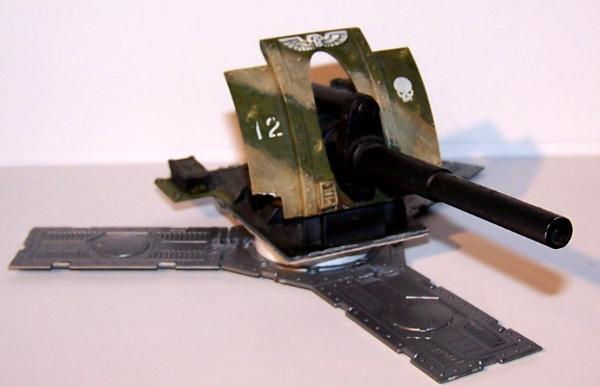
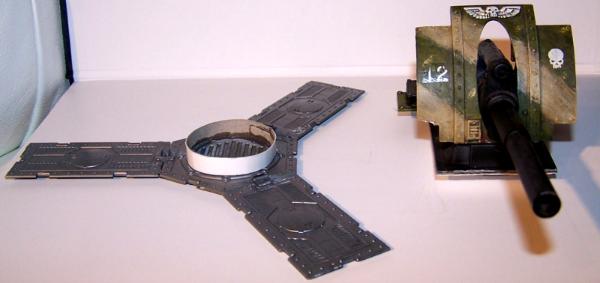
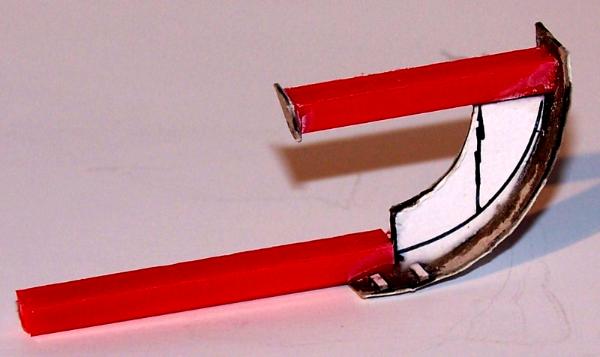
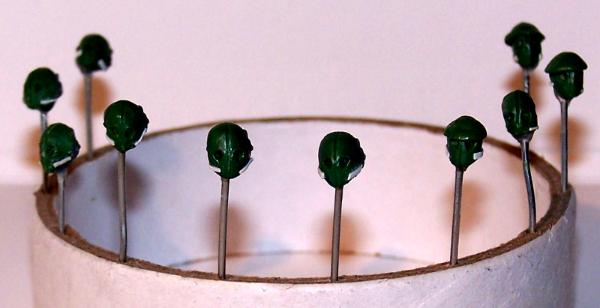
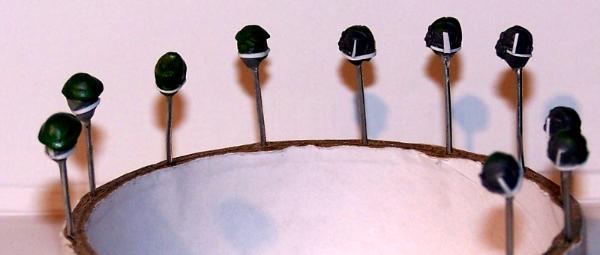
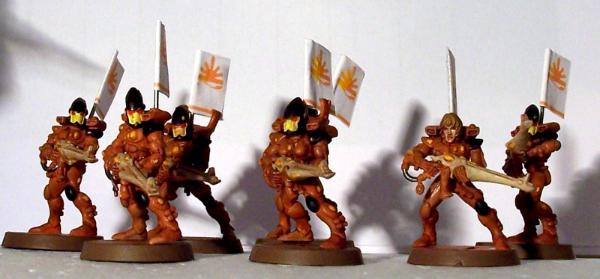
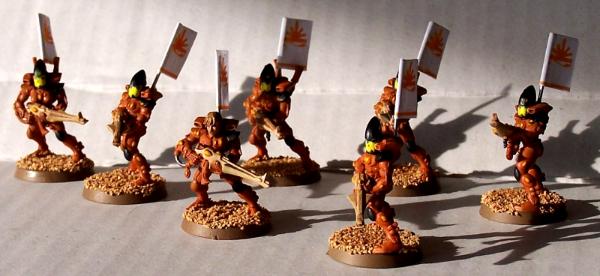
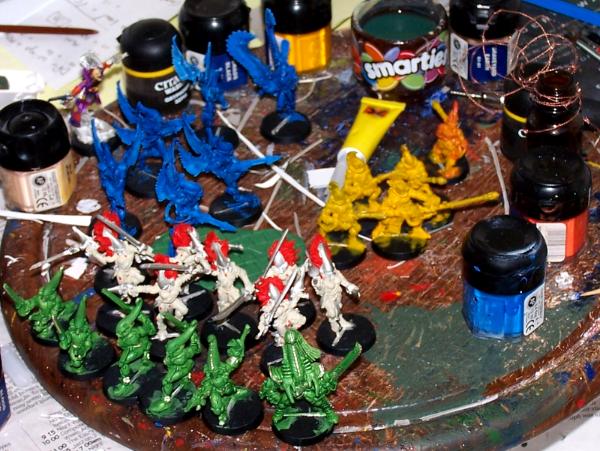

 sorry!

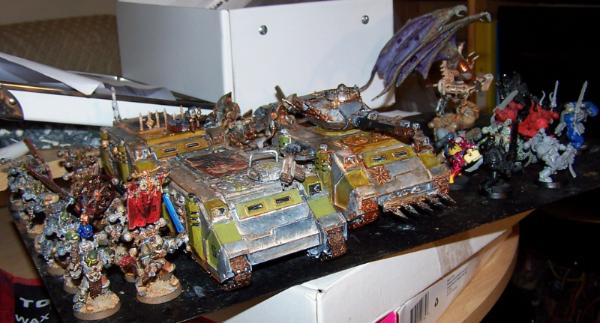
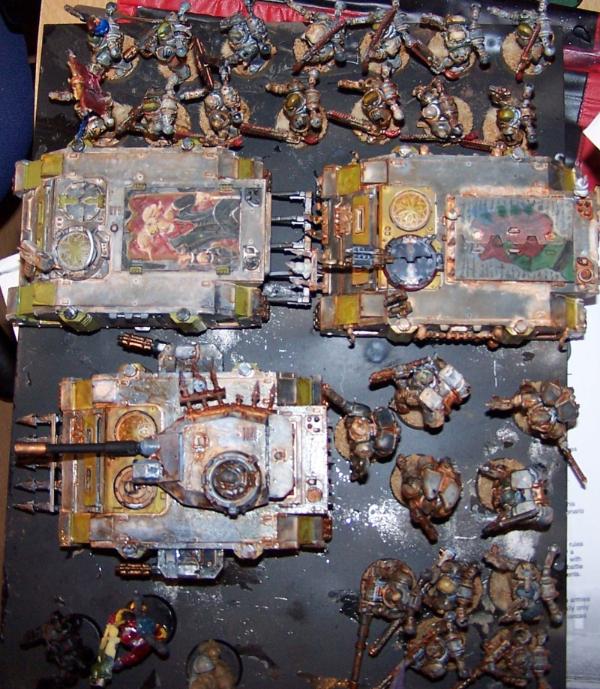
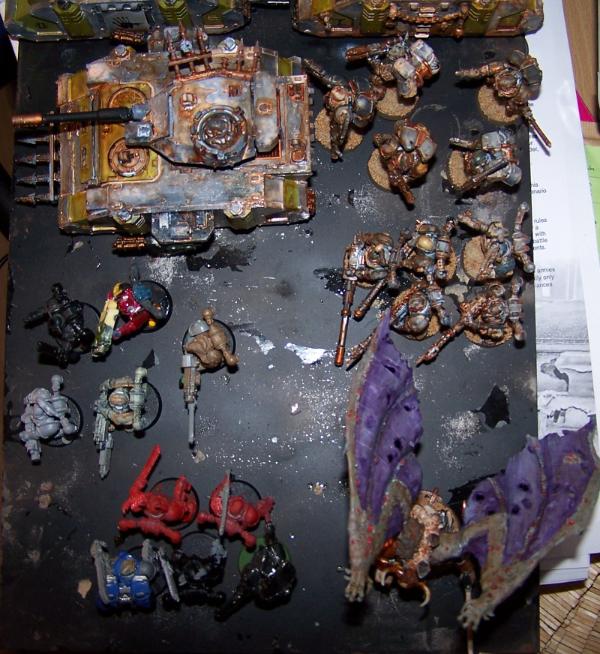
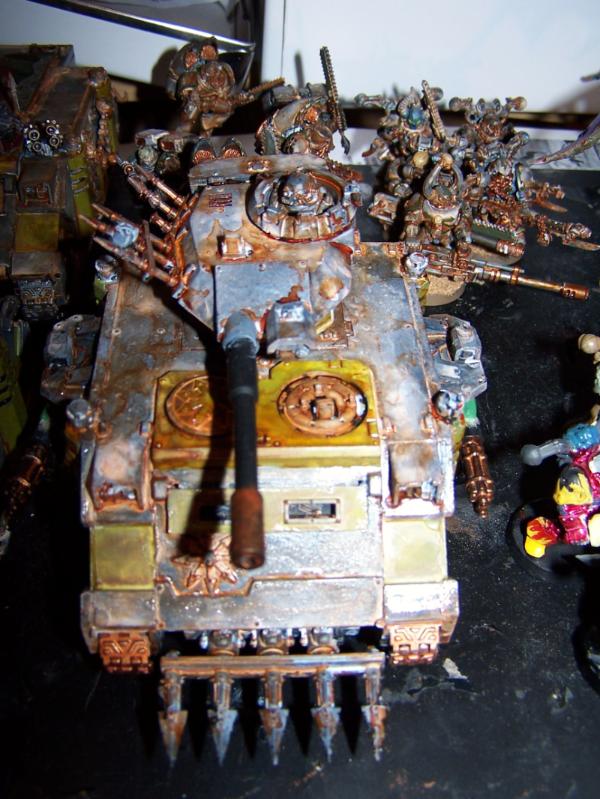
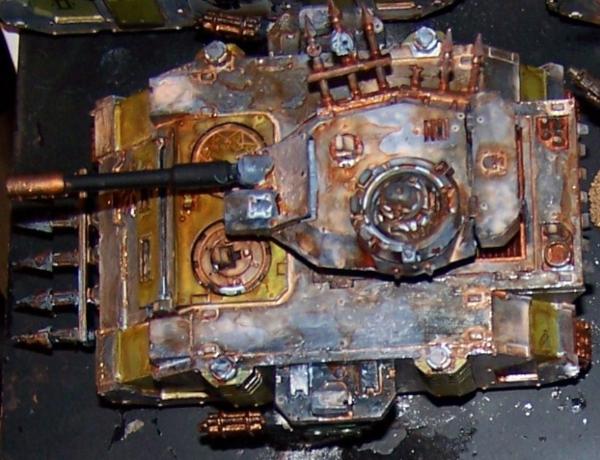
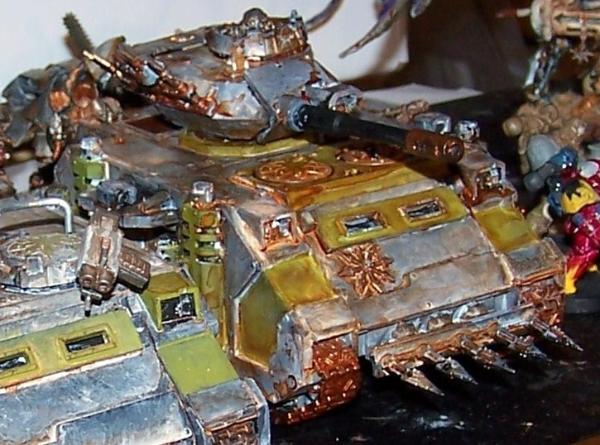
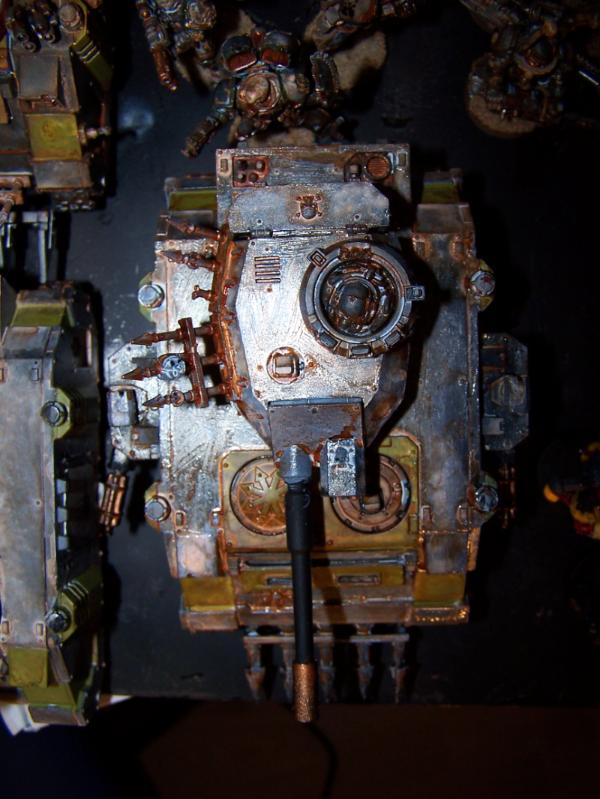
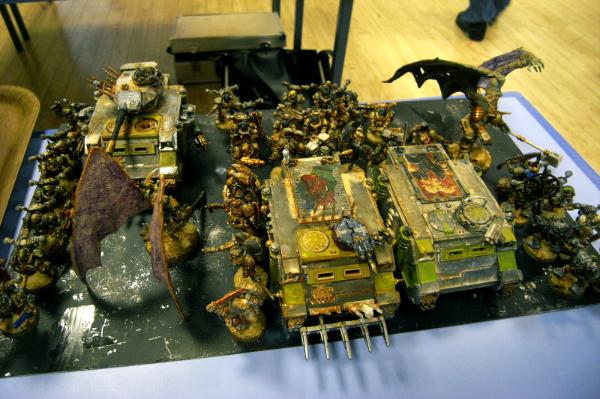

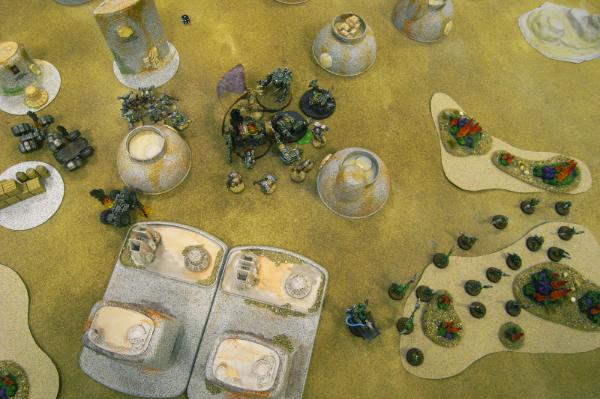

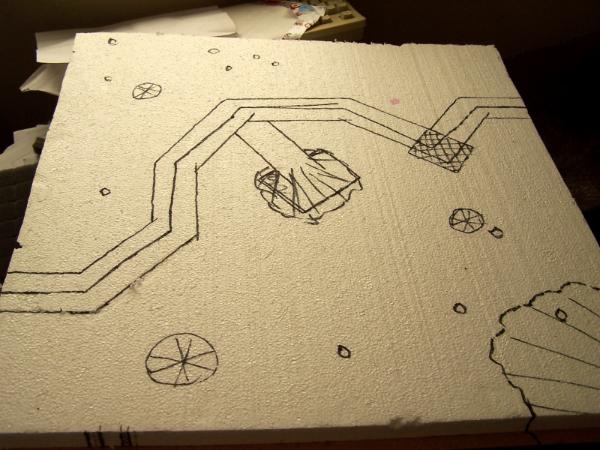
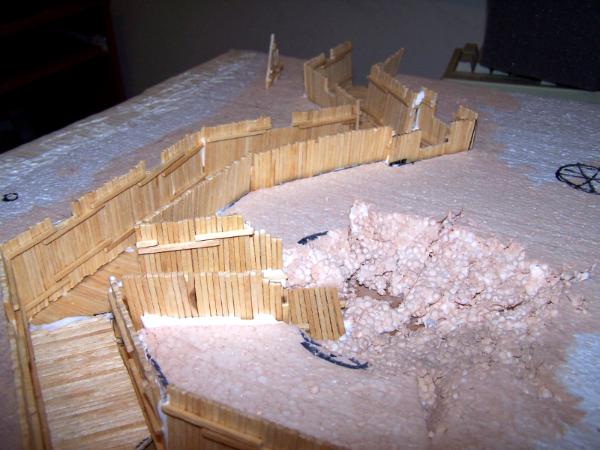
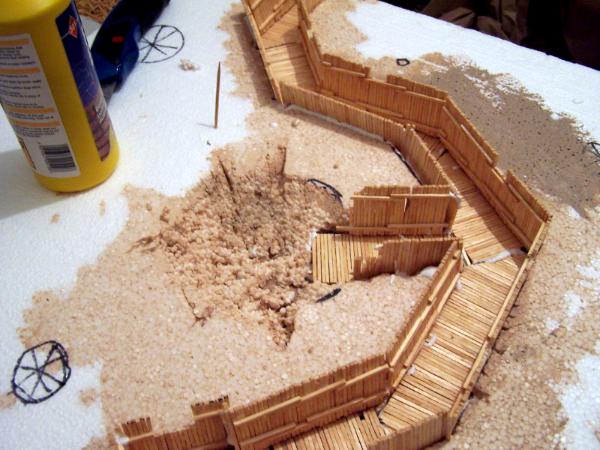
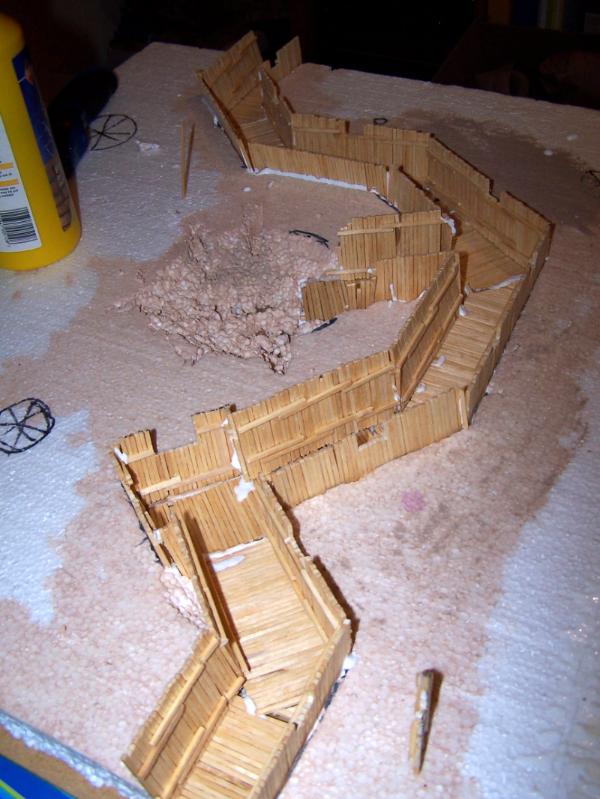
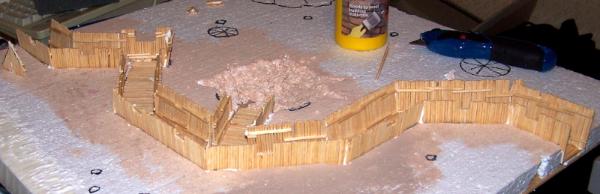

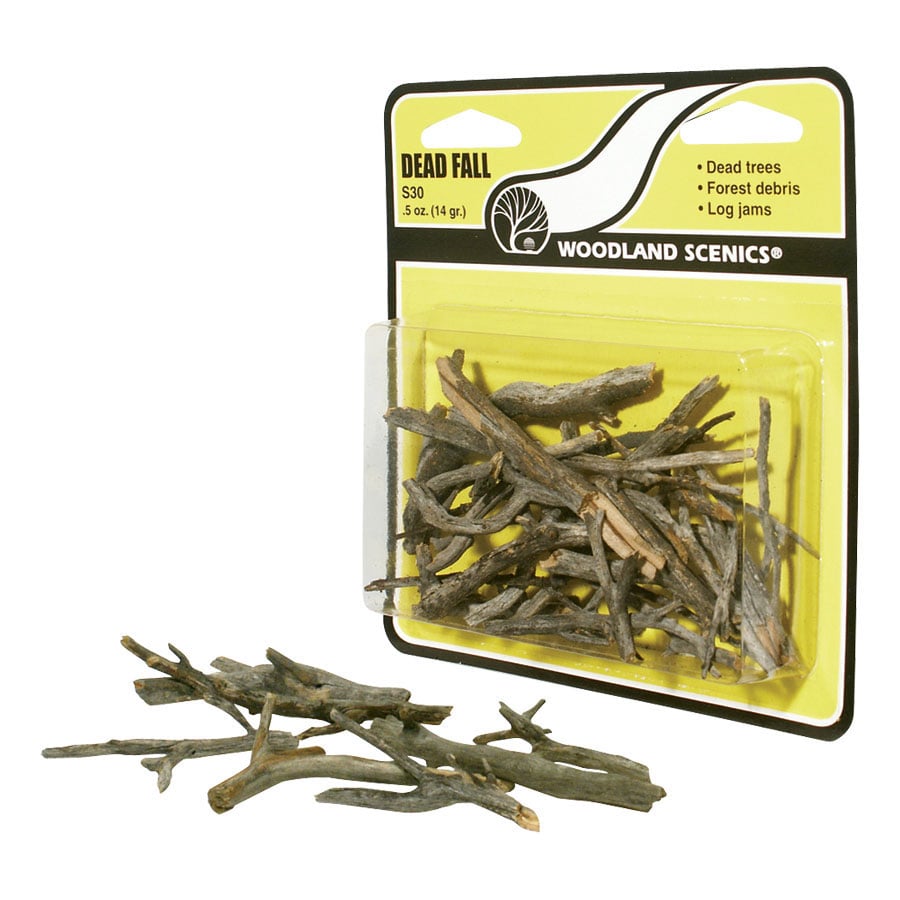
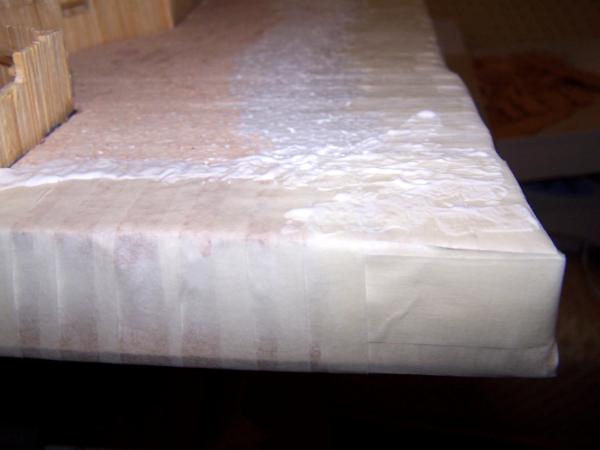
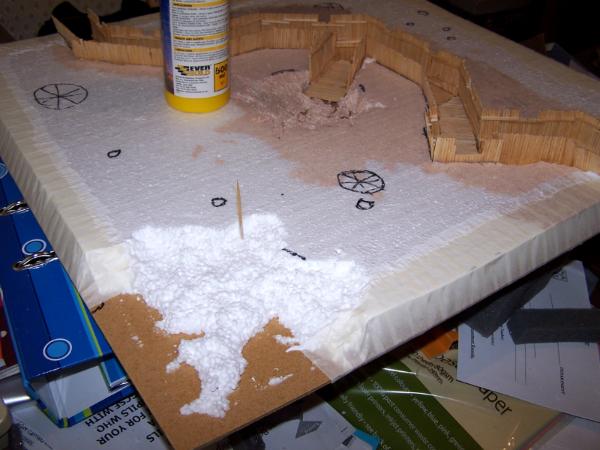
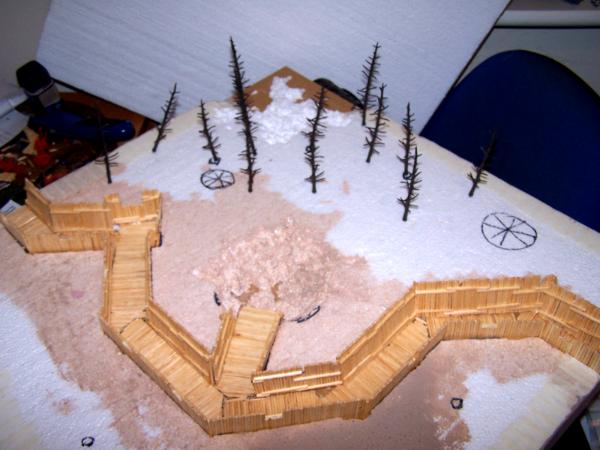
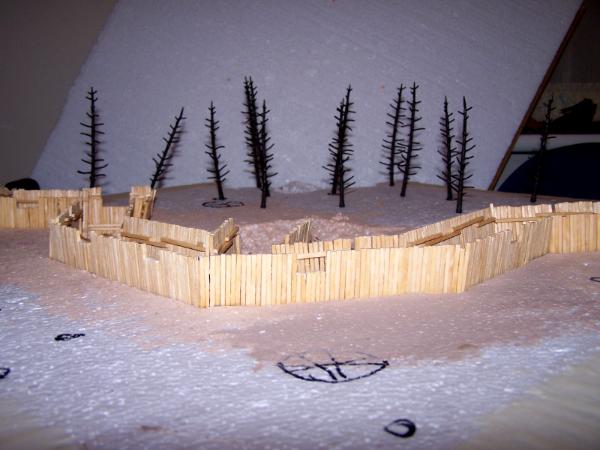
 fficial%26biw%3D1280%26bih%3D621%26tbs%3Disch:10%2C1632&um=1&itbs=1&iact=
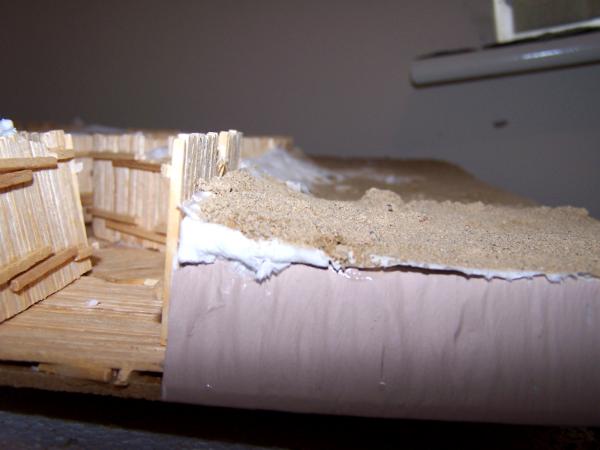
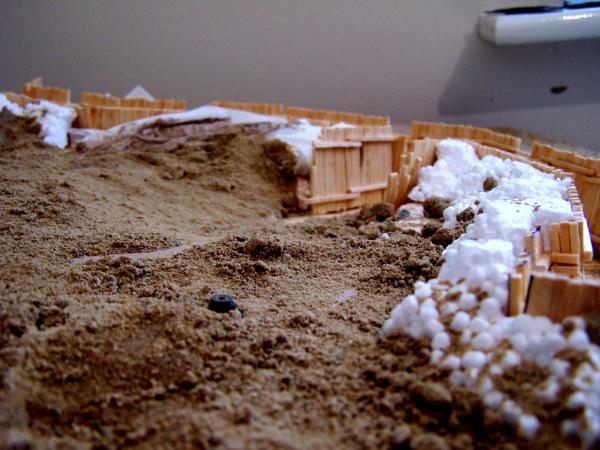
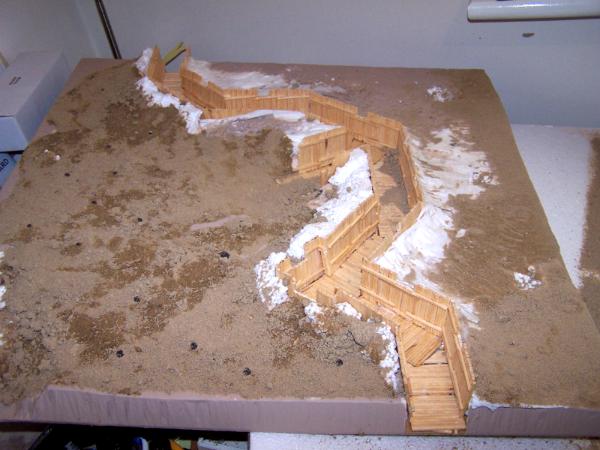
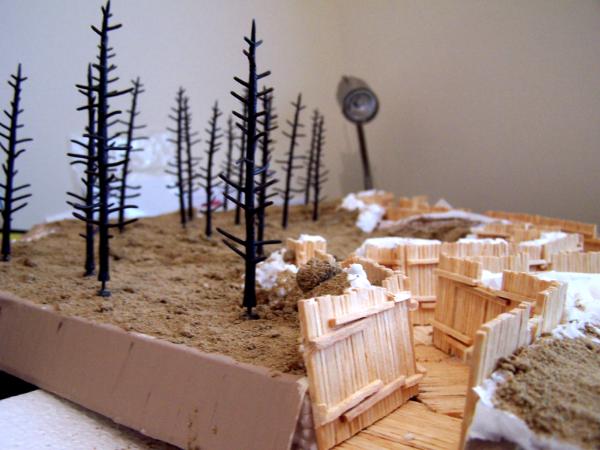
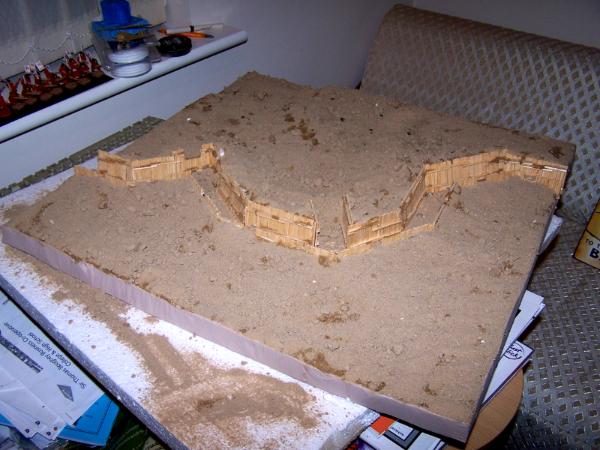
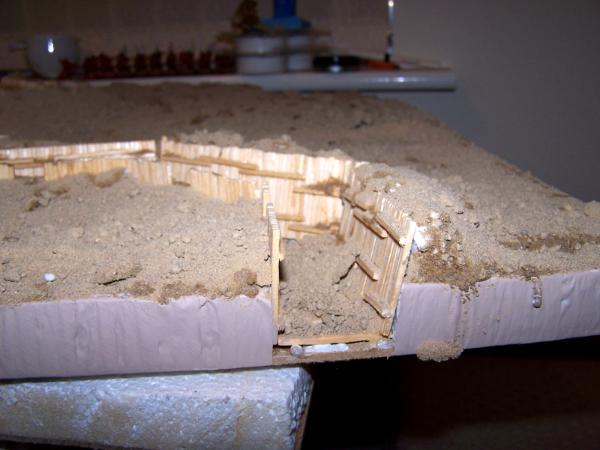
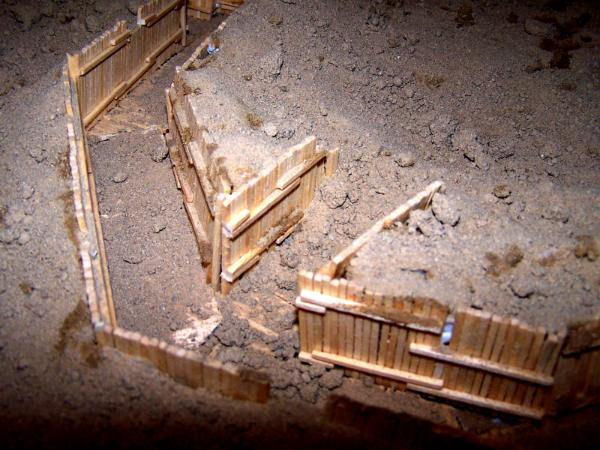
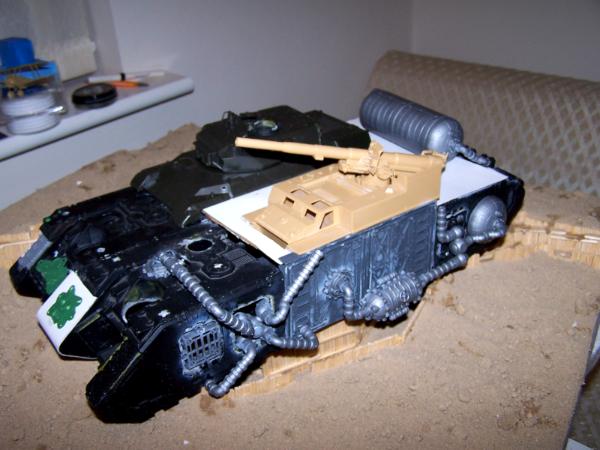
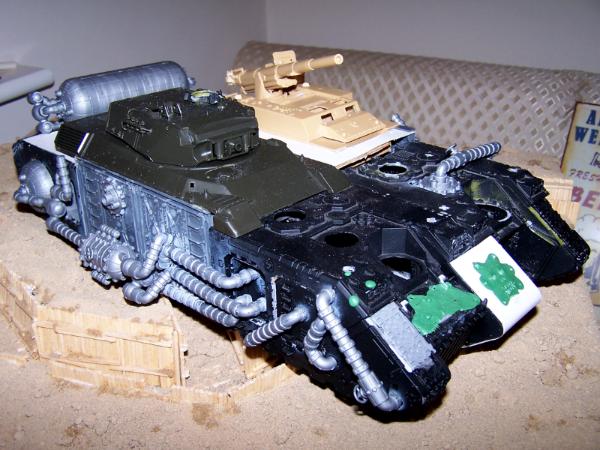
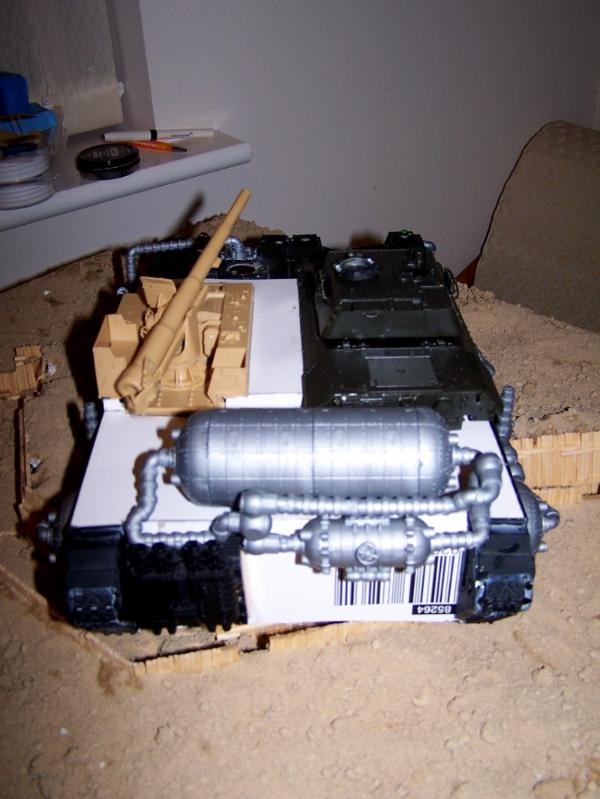
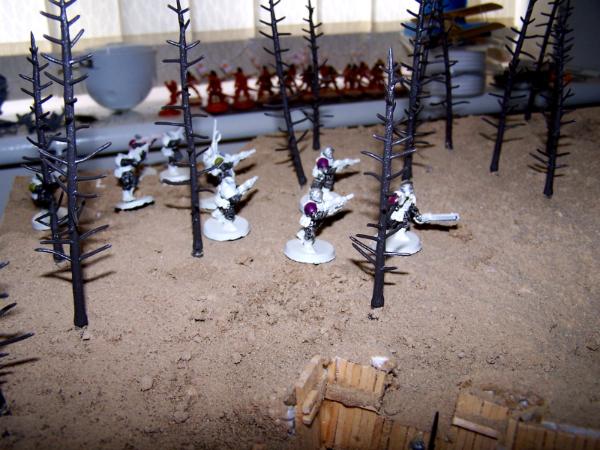
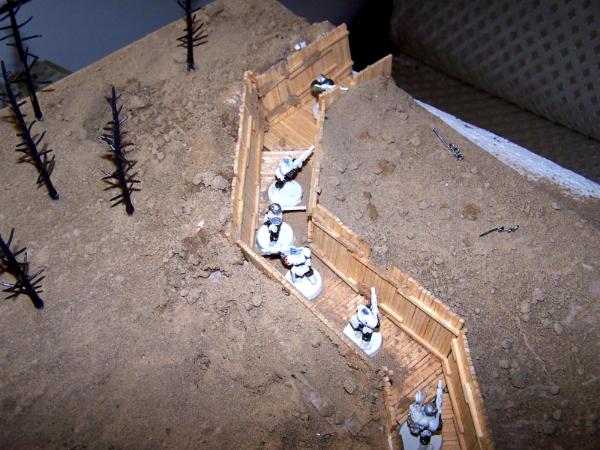
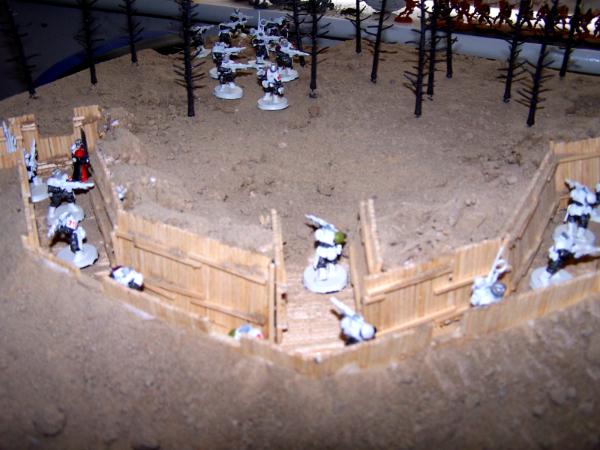
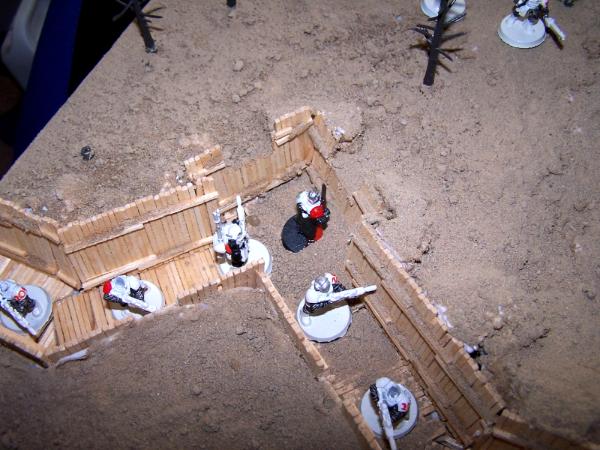
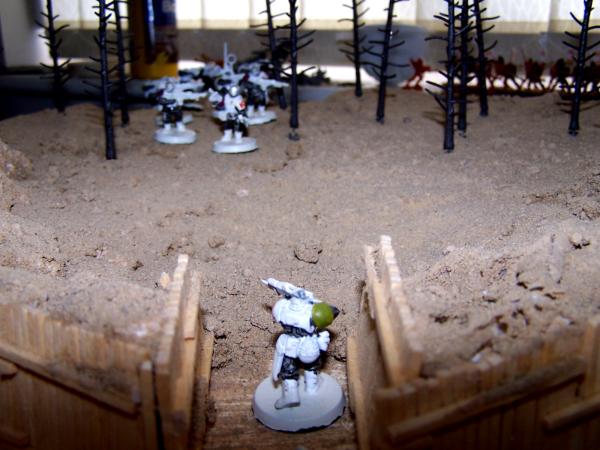
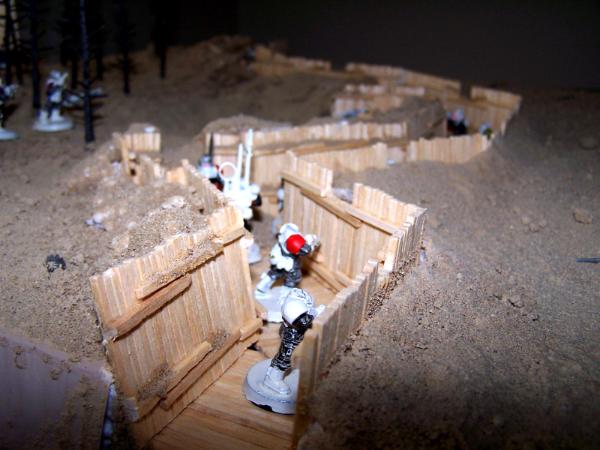
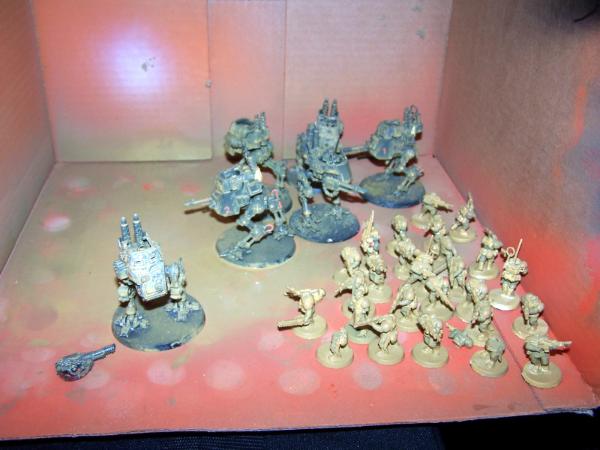
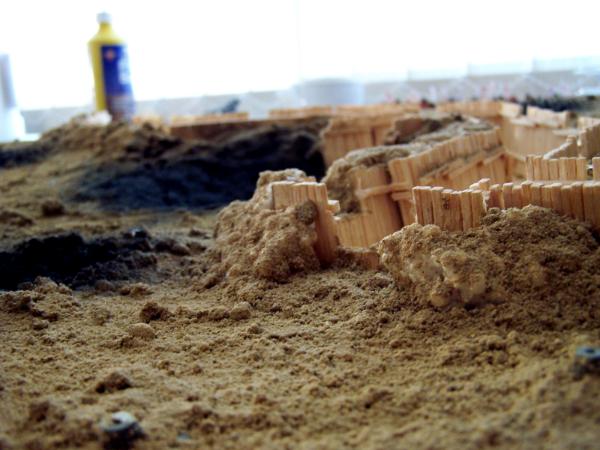

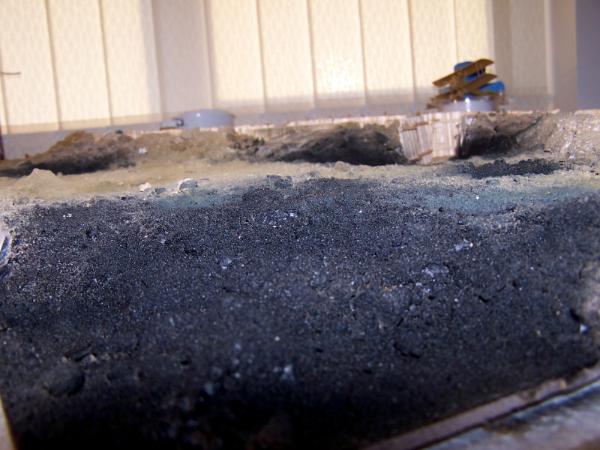
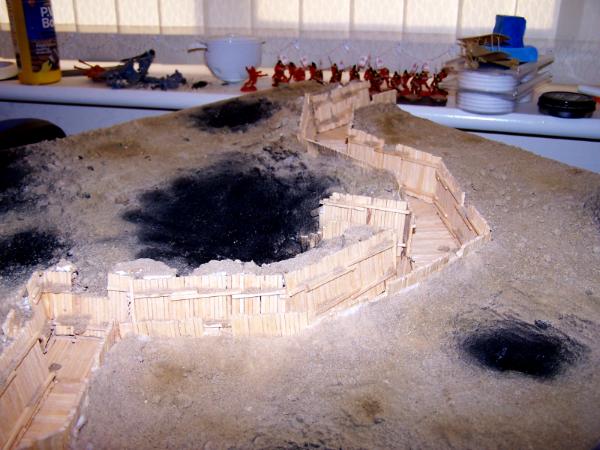
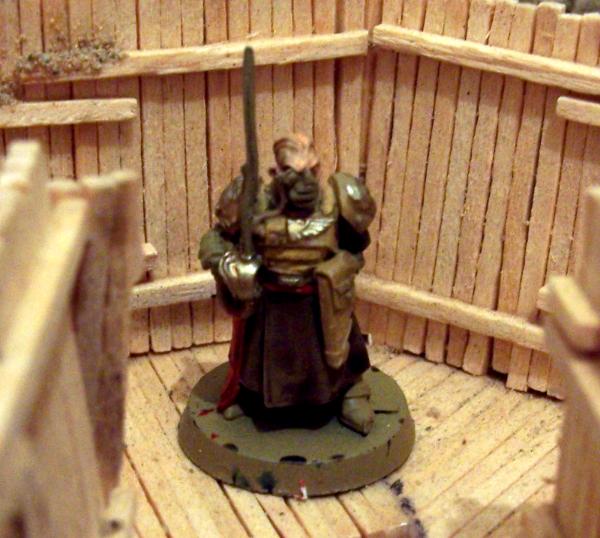
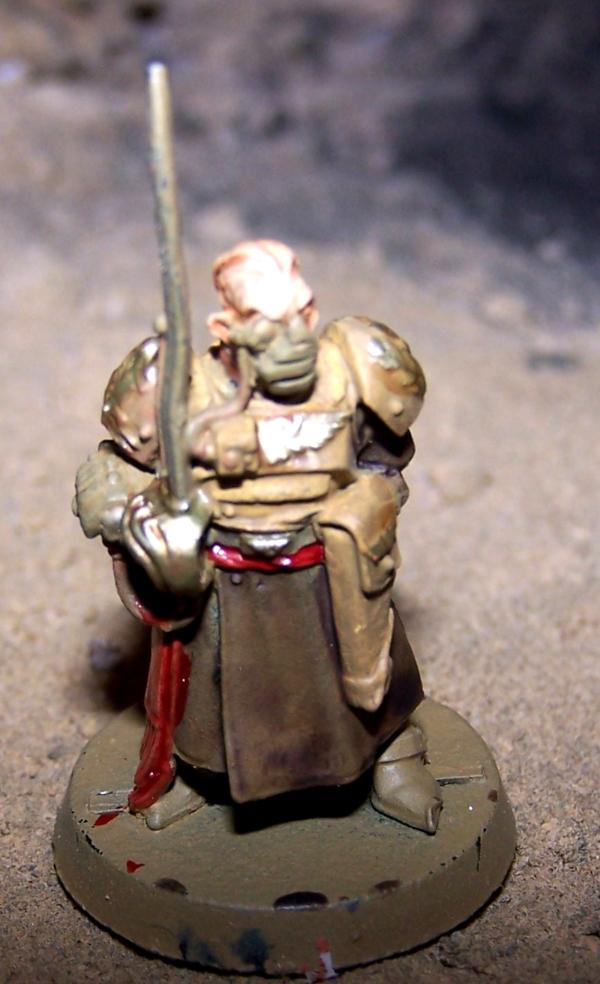
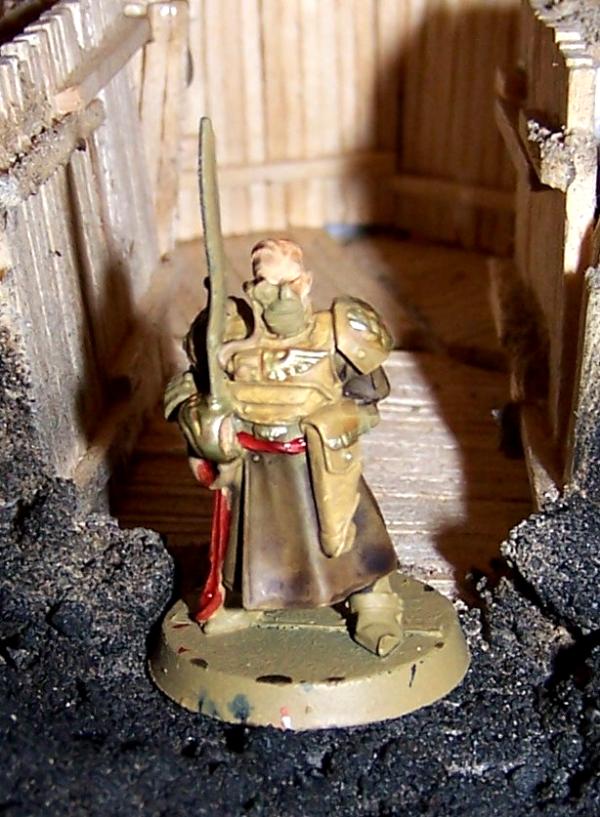
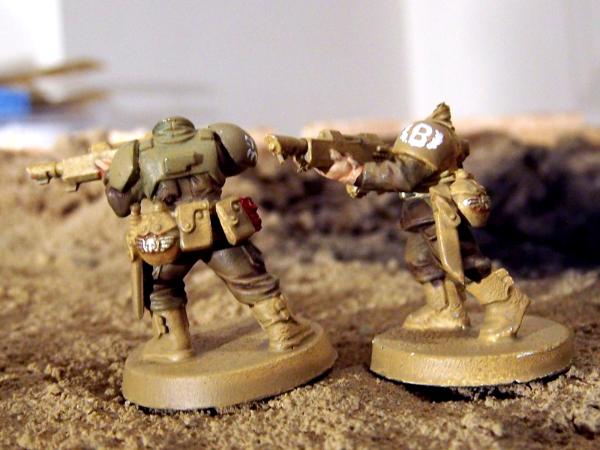
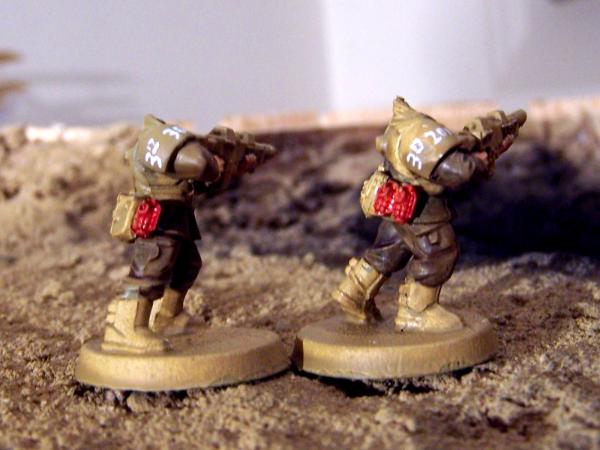
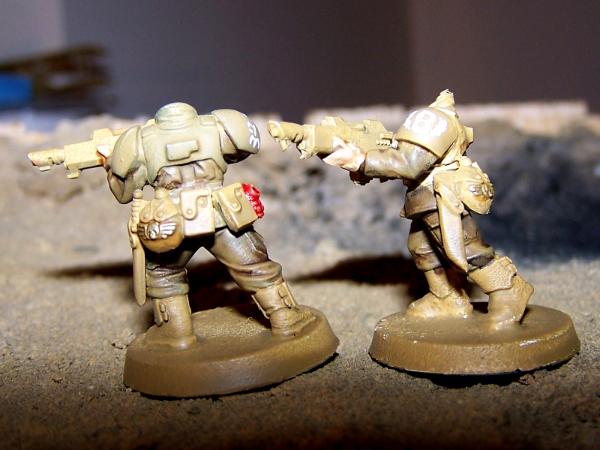
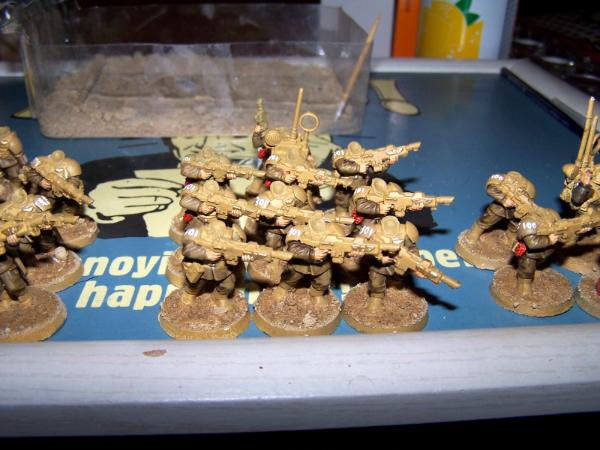
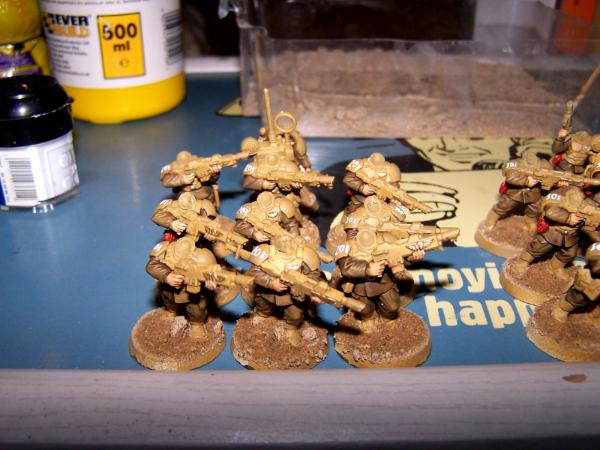
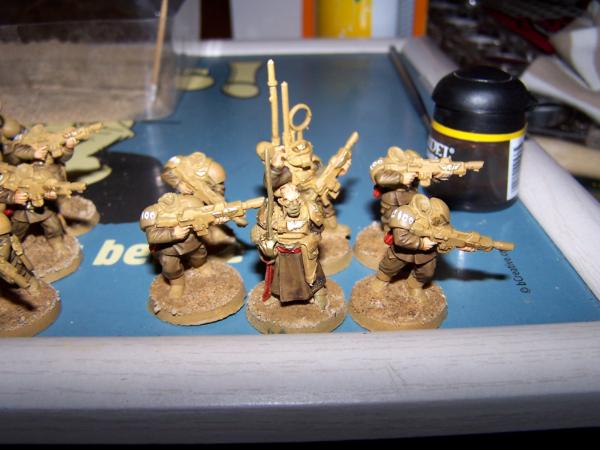
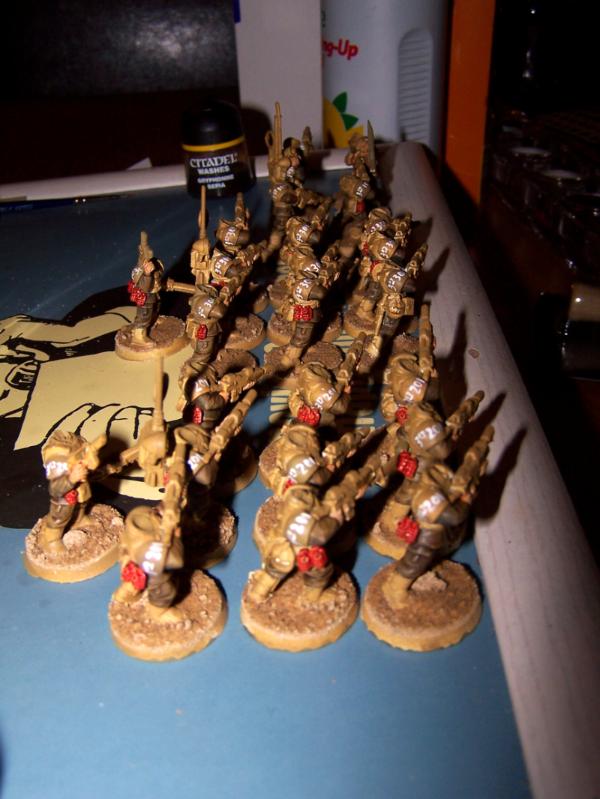
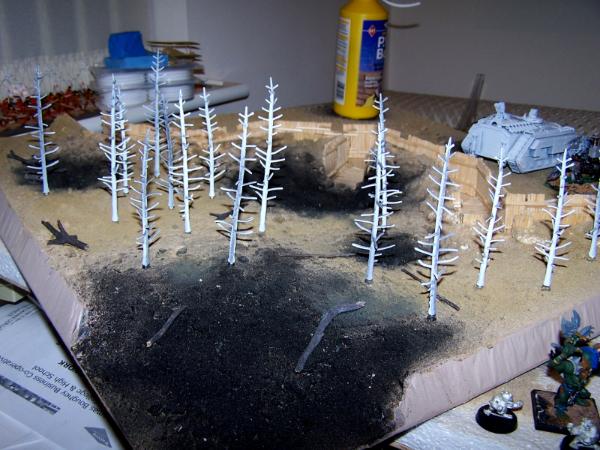
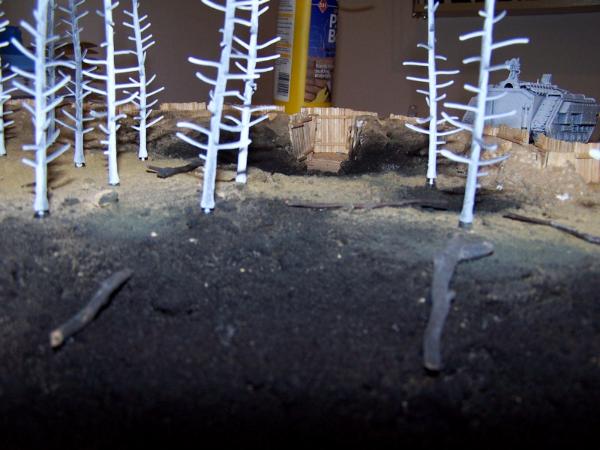
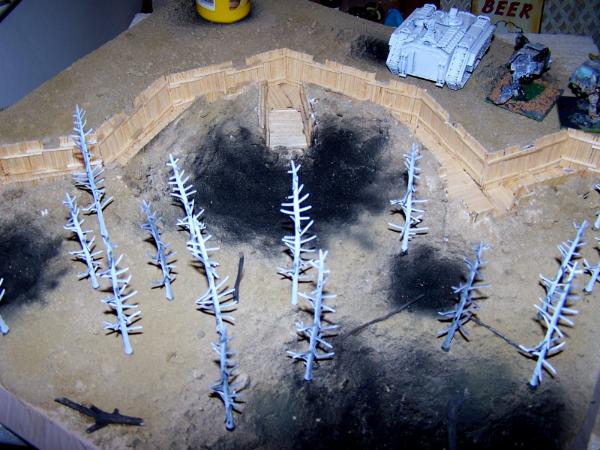
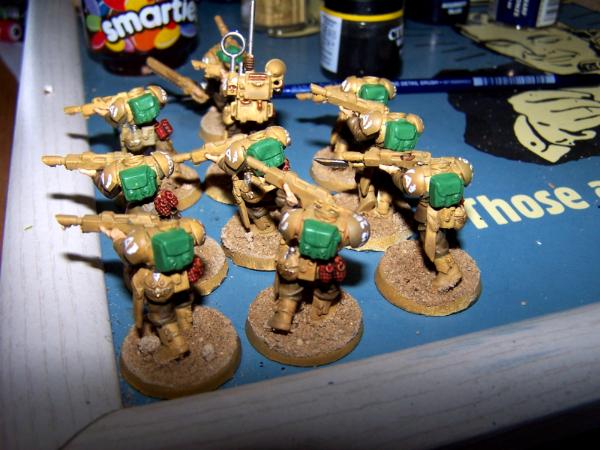

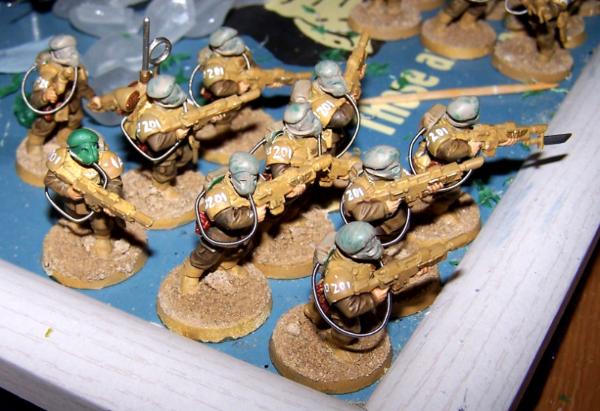
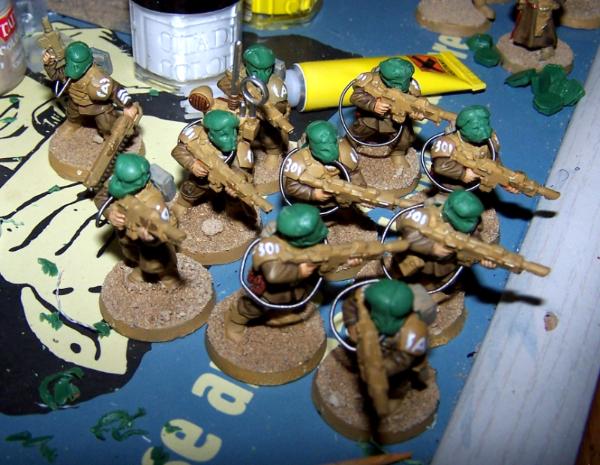
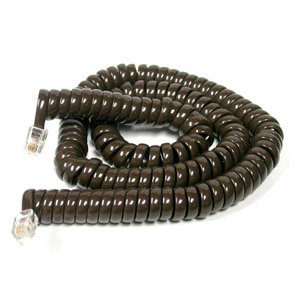 running over their shoulders? I think they look a bit cumbersome for a foot solider. Just a thought