Forum adverts like this one are shown to any user who is not logged in. Join us by filling out a tiny 3 field form and you will get your own, free, dakka user account which gives a good range of benefits to you:
No adverts like this in the forums anymore.
Times and dates in your local timezone.
Full tracking of what you have read so you can skip to your first unread post, easily see what has changed since you last logged in, and easily see what is new at a glance.
Email notifications for threads you want to watch closely.
Being a part of the oldest wargaming community on the net.
If you are already a member then feel free to login now.
2012/05/12 22:03:18
Subject: Re:SilverMK2's thread o'stuff - Now with Infinity! [Updated 03/May/12]
As I mentioned in the brief rundown in the main thread, he's looking good, but could have been closer to the camera. Any chance of a bigger photo now the competition is done? I'd love to see him up closer; the orange looks fantastic
Your entry was one of my favourites, i think it would have done better if it had been framed better but you know that already. Looking forward to some more pics!
No pictures today as I have been out pretty much all day
Will get some tomorrow (going out to get some spray paint to paint my birthday purchases when the shops open, so will hopefully get some pictures in the morning before I head out).
However, I have purchased some buildings to build up an infinity board including:
1x extra set of roof plates for the apartment buildings
and 2x grey vinyl mats which I plan on spraying in urban/wasteland/desert colours and using as a playing surface for both infinity (where I can probably use just one mat, and 40K where I can use both together).
Also got some d20's so I can actually play Infinity if I ever find anyone to play against
Automatically Appended Next Post: I've had to put the close up pictures in spoilers as they may offend anyone who has ever painted before (even finger painting in pre-school ):
Spoiler:
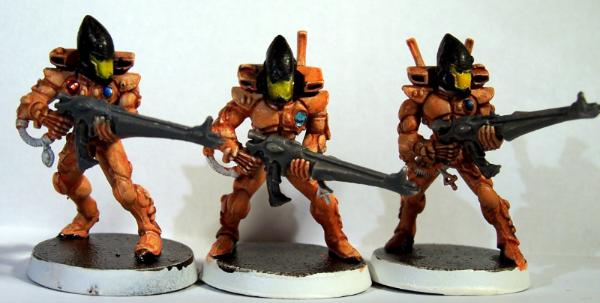
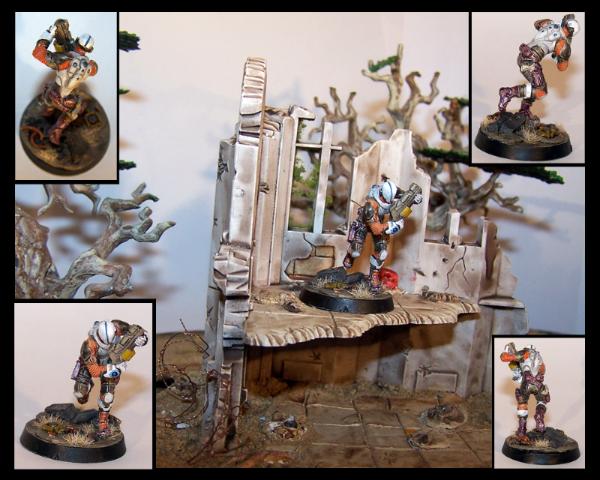
The gang so far:
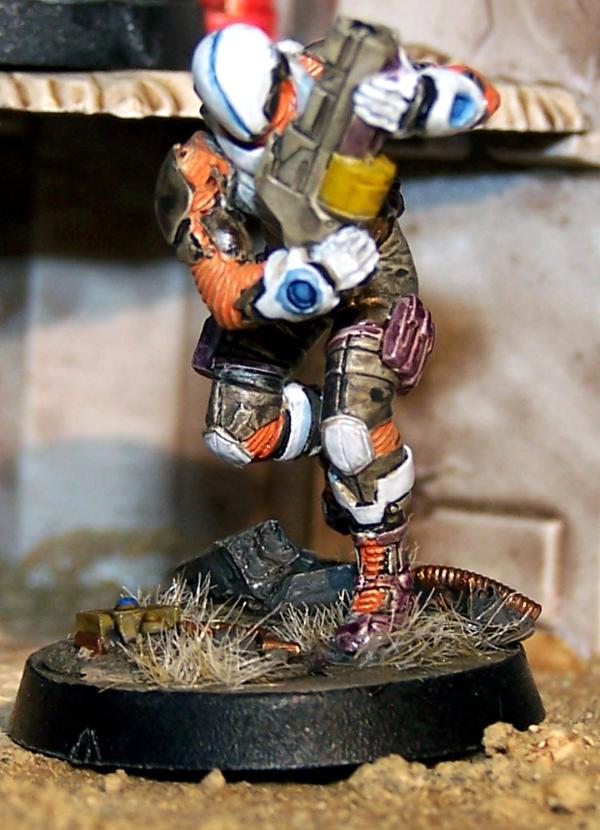
Prowler:
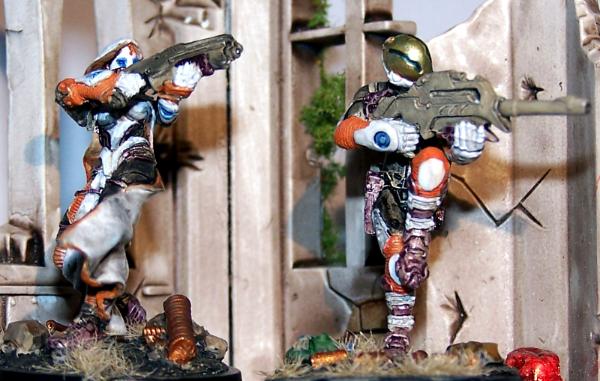
The other two:
All I can say is that they look better in real life
This message was edited 2 times. Last update was at 2012/05/27 06:42:52
Just had an email from micro art studios saying my order has been sent - looking forward to getting my order - very glad that I went to them direct rather than through maelstrom
Hey - they don't look *that* bad Probably the worst culprit is the untidiness of the blue OSL, and general untidiness on the bottom left - but the other two look good! They are so tiny in real life...
Don't be so down on yourself! I'd be proud to put them on the table, sure there are a few bits and bobs you could change but you can still do that at a later stage if you decide to. Good job, dude.
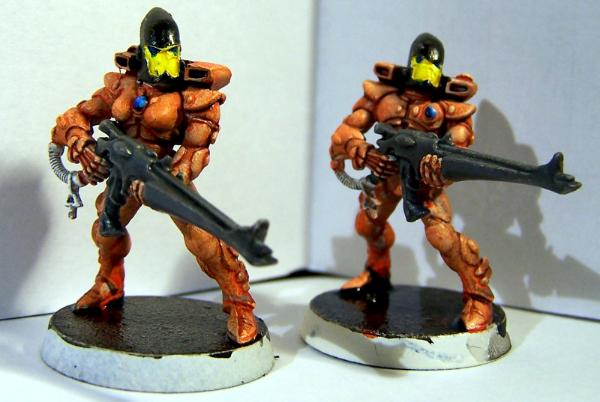
I decided to paint up a squad of Elder Guardians (I stripped and underpainted my entire Eldar Army ) and I think the orange I have now is a lot closer to what I want to have.
Ignore the roughness of the paint as I was using an old spray can on these ones before switching to a new one for the rest of the army (plus you can't really see it at tabletop level )
Really just looking for some suggestions as to colour choices for the little bits and pieces (runes, cloth bits, weapon doodads etc).
I think if you painted the black helmets blue it would up the cool level dramatically. If not i'd definitely pick out more runes and stuff in blue, the one or two stones isn't enough right now.
The eyes are supposed to be blue but they have only had the dark blue base layer added.
The helmets have to stay black as I am painting these up as a specific craftworld. I will be repainting them though as I used a black ink to colour them and it is quite shiny
I suck at painting gems (as you can see ) so I have ordered some 2 and 3mm self adhesive gems in different colours that I am going to try out
However, blue for runes etc is certainly something that I can do.
There is another cat too. Though it keeps on running off if I take a picture
The gemstones I ordered have arrived and I tried them out - the 2mm stones are the perfect size but are too thick (especially with glue layer). So I got out the old pin drill and drilled a 2mm hole with a 2.5mm countersink and scraped off the glue layer and they look pretty awesome.
The red gems are REALLY good with this colour scheme but I think I will probably stick with the pale blue gems to stick with the 'official' colours.
Might use the red for optics and other devices.
The 3mm size gems look like they would be a good size for MCs or larger gems but are too big for standard infantry.
This message was edited 1 time. Last update was at 2012/06/01 16:51:16
I wasn't sure about them looking at the thread picture but i zoomed in and imagined them without the flash glare and i think they look pretty cool now. Good find man.
Might be worth doing a tutorial and telling people where/how to get them. I'm sure there will be a lot of interest!
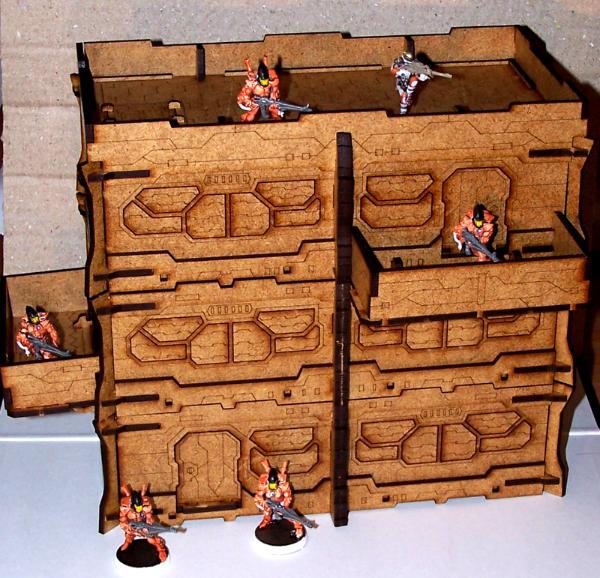
Well, my birthday present to myself arrived today - a stupidly heavy package from Polandland
A few hours of popping wood out and (occasionally) putting bits on the wrong way round and I have my first apartment building!
Reasonably easy to put together - the instructions could have been slightly easier to follow but I think there were only a couple of bits that I put on the wrong way round/on the wrong parts (one of which I put on upside down as I did not look at it properly before I put it on). The whole thing fitted together without glue (and there was only one type of component which needed trimming down - the vertical supports fit into holes and the peg sections just needed shaving down with a knife in order to fit). I think there are a few bits that I will end up gluing in place just to make them more secure (the pegs on the floor hatches and the pins on the removable roof pieces).
The only thing that I am slightly disapointed by is the extra roof pack (which I got one of) - while it gives you enough pieces to make up 2 extra roof sections it does not contain any walls/railings, nor does it contain the little pegs to hold the floor hatches in place. I think it also provides you with two balcony floors as well but again there are no fittings or fixtures which will allow you to actually use them. I think the best bet with the extra roof sections is to glue the interior floor hatches in place and use the pegs from those on the extra roof kits.
The finish of the wood is not as terrible as it looks in the picture (the flash was really quite powerful) - it looks pretty good just on its own and with a bit of staining in various colours could look quite cool.
You've gotta give to MAS, that's a nice piece of kit they came up with! I'd be tempted to paint it dingy, Blade Runner style, are the details engraved or just printed on?
The details are etched, and the shutters, doors etc all pop out. I plan to have a reasonably grimy white/grey with faded blue red and yellow detailing. Will also download and print out some posters
Casey's Law wrote:Sounds like a good plan and my estimates of the kits quality just sky-rocketed! It'd be immensely fun to convert.
It is pretty good - I am planning on popping out the shutters and sticking them on card so I can just slot them into the back of the window in one piece, rather than having to add them all in individually
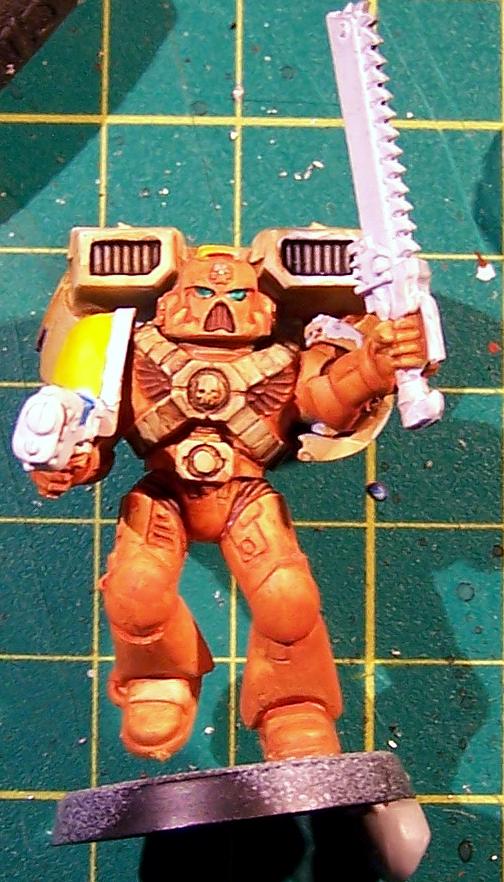
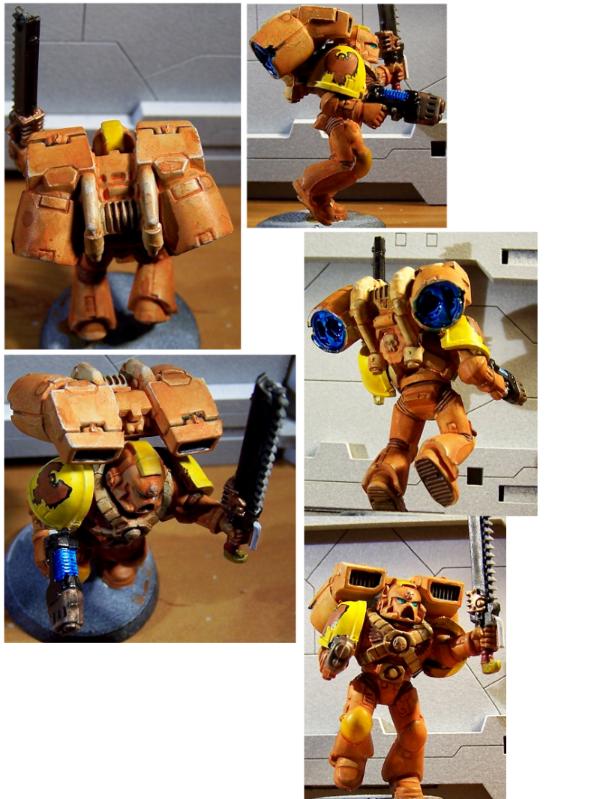
Quick run down of how I painted it:
+Prime white
+Wash with bestial brown wash (you can see how thick it is by looking at the jump pack as that has not been given anything else yet).
+Wash with a thin wash of blazing orange all the marine armour parts, avoiding straps, flexible joints etc
+Retouch in white any parts that will be painted yellow/other colours
+Paint yellow stuff yellow (I can't remember off the top of my head which colour it was but I start with quite a light one and then will shade down)
+paint eyes white, then use green ink (since it dries with a shine - you can use green washes/paints and then gloss varnish)
+Use a thicker bestial brown wash on the armour joints, mouth grill and chest eagle, then hit with Devlan Mud
+Use a thin black wash on the jump pack straps
And that is pretty much as far as I got other than using a blue ink on the plasma coils and in the jump pack jets.
+Prime white
+Wash with bestial brown wash (you can see how thick it is by looking at the jump pack pipes as that has not been given anything else yet).
+Wash with a thin wash of blazing orange all the marine armour parts, avoiding straps, flexible joints, shoulder pads etc
+Retouch in white any parts that will be painted yellow/other colours
+Paint yellow stuff yellow with a couple of thin layers of golden yellow
+Paint eyes white, then use green ink (since it dries with a shine - you can use green washes/paints and then gloss varnish)
+Use a thicker bestial brown wash on the armour joints, mouth grill and chest eagle, then hit with Devlan Mud
+Use a thin black wash on the jump pack straps across the torso
+Paint the plasma pistol front section and chainsword motor with dwarf brass then give a thick badab black wash
+Paint the pistol body and the blade case with black ink (can use multiple black washes)
+Paint the plasma pistol coil and jump pack vents with blue ink
+Paint the sword teeth with a heavy badab black wash
+Outline shoulder design in chaos black, fill in with bestial brown then go over with blazing orange wash and add golden yellow eye
+Paint skulls with bleached bone/kaki and then go over with sepia wash
I think that is everything, and I hope you like the scheme
Because it uses washes so much, it gives you a built in weathering which I think looks pretty cool (can be seen most on the edges of the angular bits of the jump pack).
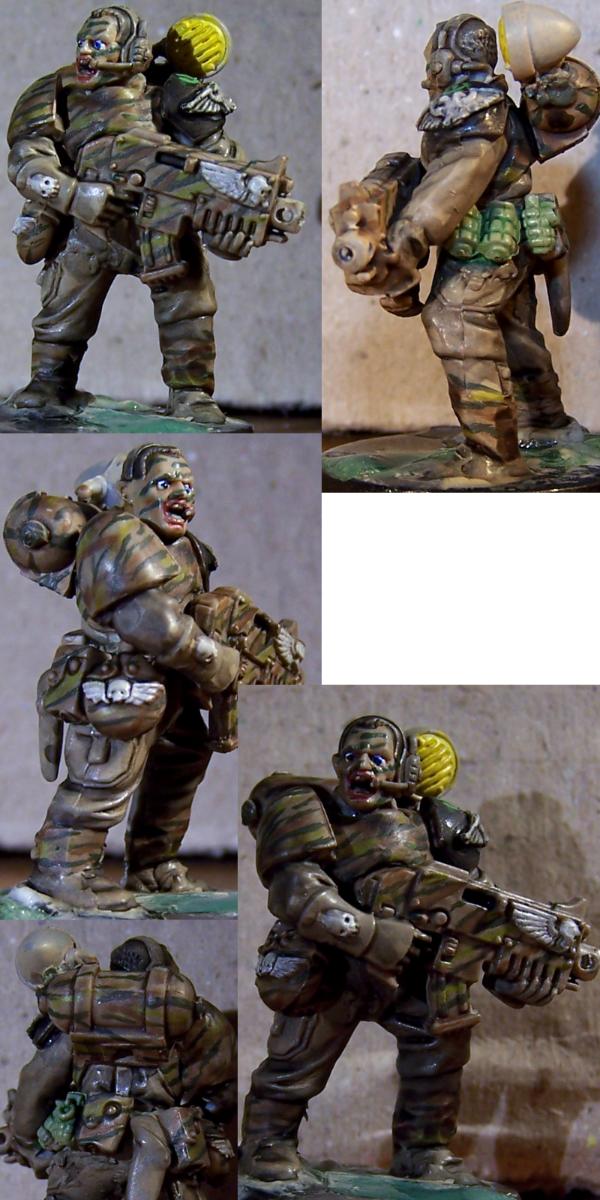
One of the reasons I don't like painting camo is that everything blends together
Still got a little bit more work to do, but the general scheme is done. I may change the colour of the cloth areas just to give some more variation.
C&C welcome.
And a bonus early WIP shot (sorry for it being sideways, took it on my phone and don't know why it made it sideways)
Here is the painting guide for what I have done so far:
+ Undercoat kaki
+ Use a dark green/olive (I used a really old mix I did of, if I recall, 50:50 Chaos Black:Goblin Green) to do the first layer of tiger stripes using a 000 brush - use light strokes to go at a slight diagonal - the best effect is to mix stripes with sharp pointed ends and blunter ended stripes - Mostly do a lazy "S" or slightly wavy line, with the occasional "Y" shape, or small branching "Y" shape - You want a reasonable coverage of these dark lines - maybe leave a gap between them of 1-2 times the thickness of the line, with each line slightly staggered, almost like bricks in a wall
+ Next do the same with Camo Green, though you want about 50% less stripes in this colour - Get most of them between the darker lines, but the odd one touching or crossing/painted over the dark lines
+ Next do the same with Graveyard Earth, again about 50-75% less of these lines than the dark green - You can afford to have larger, thicker brown lines than you can with the green
+ Wash the armour with a heavy layer of Devlan Mud (you may need two washes) to blend everything together
+ Wash the cloth with Badab Black
+ Paint the white bits with Rotting Flesh
+ Paint the white bits with Skull White
+ Wash the white bits with a light wash of Badab Black
+ Paint the face with Elf Flesh (for a lighter skin tone which I think would work on such a dull scheme - not shown here as I could not find my Elf Flesh bottle)
+ Wash with Sepia wash
+ Paint on streaks of your dark green as with the armour camo - You can have the streaks further apart - You can add in other colours here as well
+ Paint the eyes (Skull White with Enchanted Blue and Choas Black pupils in this case)
+ Use several Badab Black washes on the black shoulder pad (which should still be Kaki as it has not been painted) to get a nice black colour, or use a dark grey with a black wash
+ Paint the army mark in Camo Green, then go over in Goblin Green
This message was edited 2 times. Last update was at 2012/07/15 21:19:44
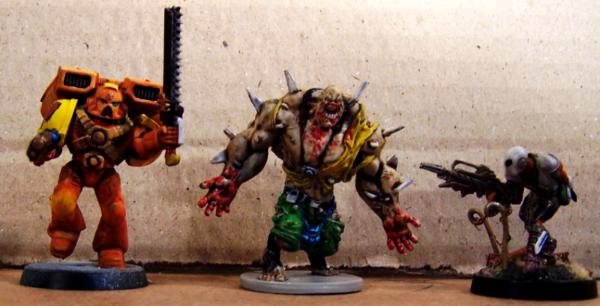
Well, I have finally been able to open up my copy of Zombicide that has been sitting on the table for the last week or so (I promised the wife I would not open it until I had finished my research dissertation ) and have gone right ahead a painted.... THE ABOMINATION!
Very nice to paint once it had been primed (you might need to wash the models if you plan to paint them as they are a little greasy, or just use a good primer) - plenty of details to pick out if you paint with washes like I do
I wanted to really play up on the design of the model (a giant freaking monster in the tattered remains of what looks like a tourist's clothes) so I used pretty bright, clashing colours for the clothes. I wanted to keep his skin relatively normal as I picture him being in better condition than regular zombies
C&C welcome
This message was edited 1 time. Last update was at 2012/09/17 13:23:48


 ).
).

 Looking forward to some more pics!

 Da Dark Angelz
 Arakasi vs Infinity
 ) and I think the orange I have now is a lot closer to what I want to have.