15523
Post by: silveroxide
This is a sailing ship that can be used for warhammer pirate gaming or the LOTR pirates or Buccaneers game play. You can locate the plans for free here http://www.imprime-recorta-pega.com/descargas/dload.php?action=category&cat_id=99
Continuing with another build, I hope to have it finished by the Holidays. My initial finish date was for Thanksgiving but I do not believe I can accomplish that. This model will be a mixture of cardstock and wood. The decking is almost finished and the rib sections are heavily laminated to almost the same thickness as a wooden model. The hull will be a mixture of wood planking over a cardstock hull. There is some slight fit problems with the ribs but they are easy to overcome. I will treat this build like a wood model from Artesania Latina. Here are the first photos
24297
Post by: Viktor von Domm
very good looking start silver...the planking is very good... and i like how you started with that supportive substructure...
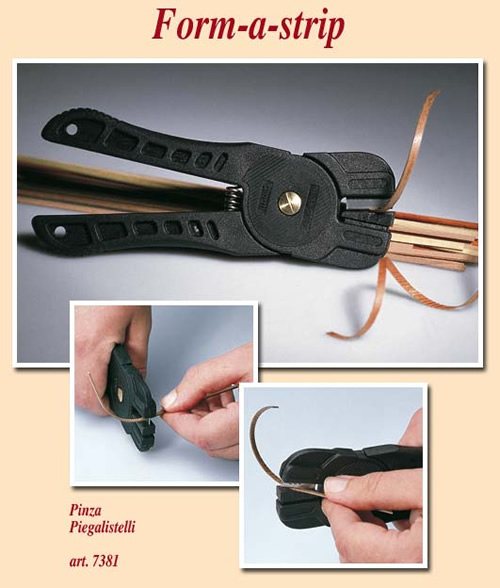
also... i think i am now getting my that slicing tool... i have eyed that particular tool for a long time... now the last straw was drawn^^ seeing you using that prooves the usefulness to me in the fulness!
15523
Post by: silveroxide
 Viktor von Domm wrote: Viktor von Domm wrote:very good looking start silver...the planking is very good... and i like how you started with that supportive substructure...
also... i think i am now getting my that slicing tool... i have eyed that particular tool for a long time... now the last straw was drawn^^ seeing you using that prooves the usefulness to me in the fulness!
Thanks Viktor. As mentioned earlier, This will be a paper and wood hybrid. That tool also comes in handy for making doll house flooring and wall planking. It is also a money saver, in that you cam make more slats than paying for each one individually.
Here is the next installment of photos on the build. The model is at a standstill for the moment. Ran into a blank wall in getting more details information. I want to add a few more details but info on the San Salvador seems limited. This model has only four gunports and Galeons of that era had more armaments, to include swivel cannons. The wall attachments for the cannons and gear storage above deck is missing on the plans. I want to add supplies into the upper cabin areas and because of that, I cannot close the upper areas. It will be hard to place those items there after the sides are up. Also missing is the life boat/dinghy storage rack. Enjoy and see you all next posting.
6
44232
Post by: DijnsK
looking good so far  consider me subscribed and interested
15523
Post by: silveroxide
DijnsK wrote:looking good so far consider me subscribed and interested
Check out the link in the beginning of the thread for the free download and follow my lead or start your own thread. It should be an interestng build. The hardest part will be digging up details for the deck.
15523
Post by: silveroxide
More updates on the ship building. This model is a full hull display model but if you leave the bottom off, you can make it into a waterline model and it can be used on the table top for wargaming.
6
15523
Post by: silveroxide
Some of the details in this project can also be used in other sceneries and dioramas. As for the San Salvador, I am gathering as much deck information that I can, before I start to close it up and have a hard time later to add in the details. I have a gathered a lot of references from other galleons that may be of use for this model. I am also gathering some tips and trick for the making of small details for ship building, which I will post along with the build process. Here are some photo updates of the build. At the moment I am at a standstill while visiting family for Turkey day (Thanksgiving) but I have a few more pics to show.
5
10972
Post by: Ruglud
Excellent project - nice to see a wooden ship build on Dakka. I have a Constructo Mayflower gathering dust that stil needs to be finished (read as started..) and is a similar construction method.
Presuming that you're making this for a display piece as you have a full hull rather than waterline model. Interesting to see that you're covering the bulkheads prior to planking, that's a great idea. Looking forward to your next updates.
No doubt you've been on model boat building forums, but just in case, I find this one invaluable for advice and motivation... http://modelshipworld.com/phpBB2/index.php
49179
Post by: Valhalla130
Looking good so far.
24297
Post by: Viktor von Domm
very good looking developments here! did you show how you made those barrels by the way in another thread? would be nice if you explained this a bit more...
15523
Post by: silveroxide
 Ruglud wrote: Ruglud wrote:Excellent project - nice to see a wooden ship build on Dakka. I have a Constructo Mayflower gathering dust that stil needs to be finished (read as started..) and is a similar construction method.
Presuming that you're making this for a display piece as you have a full hull rather than waterline model. Interesting to see that you're covering the bulkheads prior to planking, that's a great idea. Looking forward to your next updates.
No doubt you've been on model boat building forums, but just in case, I find this one invaluable for advice and motivation... http://modelshipworld.com/phpBB2/index.php
There will be some other tricks in the building of the hull later on. This will be an extensive project in that it will be full hulled. The plans do give the opportunity to make it into a waterline but there are other methods in placing the model on a recessed base and dropping the ship to the waterline and giving it that sailing on the water effect. I may try that option time considering. If I do not do it with this model, I may try it with another version later on. Thanks for the link, I have various ship model links in my repository. By the way, this model is also featured there as well as a free download too.
Thank you for your words of encouragement, there are more ideas to come from this build.
quote=Viktor von Domm 488652 5000361 4419c2166b061bb2ed65ee359293aa3a.jpg]very good looking developments here! did you show how you made those barrels by the way in another thread? would be nice if you explained this a bit more...
Right now, I am accumulating a bunch of tricks and jigs and one of them will cover the making of the barrels, the cannons and dead-eyes. I plan on constructing a mini lathe with the dremel which will come in handy for turning the dowels, both paper and wood. Stick around and there will be more to com, God willing and the creek don't rise.
24297
Post by: Viktor von Domm
I plan on constructing a mini lathe with the dremel which will come in handy for turning the dowels, both paper and wood. Stick around and there will be more to come
mini lathe? that i want to see... be as descriptive as you can get!
320
Post by: Platuan4th
Looking good! I need to get one of those planking tools. My trench bases for Warmachine look so un-uniform dong it by hand, plus I'd love to get some ships like this built.
15523
Post by: silveroxide
 Platuan4th wrote: Platuan4th wrote:Looking good! I need to get one of those planking tools. My trench bases for Warmachine look so un-uniform dong it by hand, plus I'd love to get some ships like this built.
That plank tool does come in handy, especially for doll houses wooden floors and siding. For trenches, it comes in handy for wall retentions. I bought mine from micromark.com
I will start the jig building soon but I am behind due to the holidays. Family are visiting and got to take care of them first.
Back with some update photos. It will be slow for a while, until the holidays are done. I was trying to finish by Christmas, but because of the details, it is going to be done next year. Before I start the planking, I have to fix some of the rib problems, which thankfully are minimal. I am getting my parts ready to make some jigs and things at the same time. Here are the photos and enjoy. See you all next posting
6
24297
Post by: Viktor von Domm
I will start the jig building soon but I am behind due to the holidays. Family are visiting and got to take care of them first.
that is of course understood  happy belated thanksgiving
and the hull is looking very good i have to say by the way... the upper decks details look very promising!
15523
Post by: silveroxide
Thanks for the holiday greetings Viktor. (By the way, my grandson's name is Victor) I wish the best for the upcoming holiday and new years festivities as well.
Here is an update on the build. The individual cutting and the staining of the plankings is tedious and slowing the process. enjoy and see you all next posting.
5
10972
Post by: Ruglud
How are you going to keep the hull planking in shape while the glue dries? Will you use a bending tool, soak the strips in water or just clamp?
15523
Post by: silveroxide
Ruglud wrote:How are you going to keep the hull planking in shape while the glue dries? Will you use a bending tool, soak the strips in water or just clamp?
The reason for the second skin, is to have the surface for the glue to adhere to it. This saves on the planking clamps, which I may use in some instances. I like to steam the planking, which makes it easier to bend. I also have a bending tool, which looks like a plier and only marks the inside. At the moment, it is somewhere in my tools mixed in with a bunch of jewelry pliers. I will be back with more updates soon. Thanks for looking in.
10972
Post by: Ruglud
Ahh, right. I have one of those, still in thepacking even though I bought it about 5-6 years ago...
In case anyone is wondering what we're talking about, it's this
49179
Post by: Valhalla130
It's fascinating watching this come together.
15523
Post by: silveroxide
Thanks for the comments. As for that crimper, it looks real nice. The one I have, is an early version which I will post later on in the build thread.
Here is the next installment on the build. The wood and paper medium seems to complement each other and makes for a good mix. As of the moment, it is still slow going but I am pleased with the results. Enjoy and see you all next posting.
5
15523
Post by: silveroxide
This build is turning out very interesting in the mixed media. Since I am making this a hybrid, I am not restricted to just paper in the construction. here are some more updates on the making of the pumps. There is one pick of how I bend some of the wood railings, while I am waiting for the glue to set on the pumps. Enjoy and see you all next posting.
6
10972
Post by: Ruglud
Your methods are ingenious - the pump handles for example, so much detail on such a tiny scale...
The overall build is really coming together...
15523
Post by: silveroxide
 Ruglud wrote: Ruglud wrote:Your methods are ingenious - the pump handles for example, so much detail on such a tiny scale...
The overall build is really coming together...
Thanks for the vote of confidence Ruglud, There will be more details to come and I still need to make the mini lathes and jigs for them. I will post those process later on.
I am back with more updates on the build. The references did not show how many bilge pumps on the decks, so I went to four as noted from other Galeons. As seen on the photos, you can see the outlines of the ribs if I were to use paper planking strips. With the use of wood planking, the ribs will not show through. The windows are made by drilling the upper round arch and cutting straight down to get that window with the arch effect. Later on, there will be a trim and slats added, but I I am still working out the details for that effect. The planking is coming out great for now. I have not done the bottom hard part. That is where the fit starts to get hard, but since I made the planks thin and in scale, it will work out. I done earlier wood models and the planking was thicker. It made it hard to bend into shape, especially when the curves and bends fought against each other. The thin planking helps to overcome this fit problem. So here are the photos, enjoy and see you all next posting.
6
15523
Post by: silveroxide
More updates on the build. It is going slow, due to the planking process. I have to wait for the glue to set before I move on to the next plankings. I am doing about 5 planking rows at a time. Here you can see the special pliers that I use to bend the planks without having to soak or steam them.
6
24297
Post by: Viktor von Domm
very good looking progress silver...!
by the way... gotta ask... what scale is this ship? looks more like 15mm to me than standard tabletop scale, am i right?
15523
Post by: silveroxide
 Viktor von Domm wrote: Viktor von Domm wrote:very good looking progress silver...!
by the way... gotta ask... what scale is this ship? looks more like 15mm to me than standard tabletop scale, am i right?
The original plans are for about a 1/90 scale. I upscale it to about 1/48 scale (maybe slightly smaller). The human buccaneer figs from epic warhammer should be about the right size.
24297
Post by: Viktor von Domm
oh... i think this will then look very good together... some crew members will sell this model so very much... it is already looking very lifelike
15523
Post by: silveroxide
Viktor von Domm wrote:oh... i think this will then look very good together... some crew members will sell this model so very much... it is already looking very lifelike
I will probably use a mixed crew and the Catachans will probably be the main crew members. Their physiques have that nautical sailor look.
The planking is almost done and soon I can get to my favorite part, the detailing. I may have to do the keel a bit different than the usual method but that will be nxt as soon as I finish the other side of the hull. This has to be done first, so that I can clamp the keel on a base and start on the deck details. Enjoy and see you all next posting.
6
24297
Post by: Viktor von Domm
that planked look is really good looking... i like this model more and more each time i see it... how did you get to that seperate plank look? you started with full length planks? now it looks really hand crafted... trule awesome!
15523
Post by: silveroxide
Viktor von Domm wrote:that planked look is really good looking... i like this model more and more each time i see it... how did you get to that seperate plank look? you started with full length planks? now it looks really hand crafted... trule awesome!
Yes, I used full length planking but cut them to add that joined planking effect.
Here are some more updates on the trimmings. For the trimmings I used laminated thin strips of card stock. The paper strips are easier to bend around the hull than the wood strips. There are a few more details that I have to scratch build since they are not depicted in the plans. This will be a slow build thread and I may do a couple of other build threads while waiting for the glue or paint to fully dry. The bottom hull color of white, will probably need at least 4 or 5 coats to avoid the wood bleed through. I will probably mask it off and use a grey or white primer and finish it off with white paint. enjoy and see you all next posting.
6
24297
Post by: Viktor von Domm
the diagonal planks of the aft... superb... fotorealistic modeling!!!
10972
Post by: Ruglud
Looking amazing, really impressed with this model 
15523
Post by: silveroxide
Viktor von Domm wrote:the diagonal planks of the aft... superb... fotorealistic modeling!!!
Thank you Viktor, more details are a coming.
Ruglud wrote:Looking amazing, really impressed with this model
Give this ship a try, go back to the beginning of this thread to get the link, that way you can build as I continue the build process.
Here is the most recent update on the ship build. The keel when made this way, will form the rabbet groove for the planking. The outside of the keel is made from basswood. On the beak, the extension has a tendency to bend or break. With the outside made of wood and the center of laminated card stock, it will withstand the usage and hopefully avoid breaking the beak or the head area. Enjoy and see you all soon with more on the hull detailing.
6
15523
Post by: silveroxide
And now, for more updates in the build process. The printed plans are still viable and I use them to make parts out of wood or mixed wood and paper or just paper alone. While the Galeon seems to be all wood, there is a good part of it that is made from card stock. That is the reason I named it a hybrid. When finished, it will probably be hard to tell the card stock from the wood. Enjoy and more to come.
6
15523
Post by: silveroxide
On with the details. Finished the planking on the beak. I used the printed portion on the inside of the side walls and used wood for the outside. The trimming is laminated card stock. Here you can see the hull planking, which was the hardest part. There is some putty fill in the bow where the planks meet the front of the keel. This area will not show the stain of the wood filler when the bottom is painted later on in the build. Stick around and see you all next posting.
5
15523
Post by: silveroxide
So here are some more details of the build. I made a jig for holding the sides in place and keeping the steps steady while the glue set. I made the ladders with four steps and it is just a basic set-up. There is a ladder also inside the cargo hold. Enjoy and see you all next posting.
4
15523
Post by: silveroxide
The next batch of photos show the placements of the rat line spreaders and the support braces. You can almost make out the flow of the planking. While reading up on references, there is a technique to making the planks flow without kinking. There is a lot of pressure on the bottom part of the hull that works against each other. I lucked out and it came out pretty good. Enjoy and see you all next posting.
6
24297
Post by: Viktor von Domm
don´t fear you´ve lost your audience... holidays and family as well as a manflu that won´t go away... but i simply love your inventiveness when it comes to solving such things as getting straight stairs and so on... the pin jig... awesome idea! also seeing your work... you have amazing controll over your blades and the dremel...
about that dremel control... i still haven´t forgotten about that lathe^^
15523
Post by: silveroxide
Viktor von Domm wrote:don´t fear you´ve lost your audience... holidays and family as well as a manflu that won´t go away... but i simply love your inventiveness when it comes to solving such things as getting straight stairs and so on... the pin jig... awesome idea! also seeing your work... you have amazing controll over your blades and the dremel...
about that dremel control... i still haven´t forgotten about that lathe^^
I have not forgotten about the mini lathe. see the comments below. and thanks for looking in.
Continuing with the build. My tools are in the shed and the weather is a bit too chilly and wet to work there. With that reason stated, I have not made the mini-lathe with my dremel. I will construct one later to show how it is made. I started on it and made the rail system for the motor. In the meantime, I made the pins holding the dremel free in my hand. This method does make the piece a bit on the rough side but the piece is presentable.
5
24297
Post by: Viktor von Domm
inside of the railings looks lovley!
and yeah... weather... such a spoiler for good things... i know there is no such thing as bad weather... no...there IS bad weather^^
518
Post by: Kid_Kyoto
Such a great project! Thanks for documenting it so well.
15523
Post by: silveroxide
Viktor von Domm wrote:inside of the railings looks lovley!
and yeah... weather... such a spoiler for good things... i know there is no such thing as bad weather... no...there IS bad weather^^
The weather continue dismal, very bleak, almost like London winter weather, wet and cold. There is much more to come, sit back and enjoy.
Kid_Kyoto wrote:Such a great project! Thanks for documenting it so well.
Thank you. I usually do a tutorial with all of my models, to instill more enthusiasm to the members and to show what can be done with imagination and everyday tools. If just one person has learned something from my threads, then it is worth continuing to do so.
Well here is the next posting and the build goes on. In this sequence, the rail posts are made using a dull x-acto knife, but a jewelers file will do a much better job. As of the moment, I am re-doing all of the belaying pins with a thin file and all the pieces will be the same size. The file makes them smoother and they look much nicer. The railing post are already set and I would damage the deck if I were to pull them out and replace them. I will know better with the next build. I enjoy how this ship is coming out and I have two in the back burner to build. It is a toss up between the horse drawn carriages, more Warhammer40k, a streetcar, and possibly an attempt into a rail car. So I am starting a new year with too many choices already. Enjoy and see you all next posting.
6
15523
Post by: silveroxide
more on the deck details. The belaying pins I believe are not too good. I have decide to remake them a bit more even and I will replace them later on in the build. Enjoy and see you all next posting
6
10972
Post by: Ruglud
Awesome detailing, this beauty is really coming on. Especially love the dremel lathe idea you use on your various projects, really great idea.
15523
Post by: silveroxide
 Ruglud wrote: Ruglud wrote:Awesome detailing, this beauty is really coming on. Especially love the dremel lathe idea you use on your various projects, really great idea.
The dremel idea for the mini lathe is slightly on hold, I am thinking of using a regular electric drill. The reason, is that it would have a higher rpm and the chuck can accommodate a larger dowel than the dremel. As mentioned earlier, the rail is done, it is just that I am procrastinating.
Did the lattice cover for the cargo hold. I measured the opening and sketched the outline of the inside cover. I have two options, one is closed, so that I can place the life boat on a rack on the cover. The other option, is to keep it open, but I would have to place the boat to the starboard side. The plans do not have the parts for the side booms that hold the anchor in place while under sail, so I drilled the holds on both sides and installed it. The anchor points are also not noted in the plans, so I placed the support bracket on the bow for both sides and drilled the holes for the anchor rope. Enjoy and see you all next posting.
5
24297
Post by: Viktor von Domm
a thought crossed my mind... will this ship be armed by the way?
and as usual... splendid looking details...
oh one minir nitpick... i think the individual planks of the hatch to the cargo opeing seem a bit thick... but i guess you have reached by now the possible smallest thickness of materials?
15523
Post by: silveroxide
Viktor von Domm wrote:a thought crossed my mind... will this ship be armed by the way?
and as usual... splendid looking details...
oh one minir nitpick... i think the individual planks of the hatch to the cargo opeing seem a bit thick... but i guess you have reached by now the possible smallest thickness of materials?
Yes, the ship will have four cannons, two per side. As for the gratings might be a bit large, but when I place the Boat on top of it, it will not show off too much of the grating. Here is the possible cannon for it. I have done one and will do a build process for it. The barrels are done and the chasis parts are cut and ready to build. Here some photos of the cannons in question. They are the old style and not the ones with the four wheels and step up chassis.
2
275
Post by: Taarnak
Amazing build! Truly.
I love the fact that you are doing the entire underneath of the ship. Most builds that I have seen of ships used flat bottoms placed at the lowest deck level.
I will be subscribing and watching this thread for sure.
Great work.
~Eric
24297
Post by: Viktor von Domm
oh my... those canons look mighty promising...
15523
Post by: silveroxide
Taarnak wrote:Amazing build! Truly.
I love the fact that you are doing the entire underneath of the ship. Most builds that I have seen of ships used flat bottoms placed at the lowest deck level.
I will be subscribing and watching this thread for sure.
Great work.
~Eric
If you start at the beginning of this thread, you will see that there is an option for building this model a a tabletop waterline model, which would make it handy for table top freebooters wargaming
Viktor von Domm wrote:oh my... those canons look mighty promising...
I have already finished one cannon and it came out real nice. There are a few mre photos before I get to that stage but it is coning.
So here is the next posting on the life boat build. The space on the deck is taken into consideration as to the size of the little boat and its stowage. Thee are a few more photos of the build and the mounting of it on the deck. Enjoy and see you all next posting.
6
15523
Post by: silveroxide
I had a slight slow down. One of my grandsons had a school project on a bridge project. I helped him out on a covered bridge. Made the plans and had him glue it together. I made the base and a gully diorama scene, with the bridge over it. I had an extra model of an early America horse and wagon from Airfix, 1/72. It came out real nice, unfortunately, he took it to school and I did not get a chance to take a photo of it. (He complained that it was too small, my other grandson is in the same class and his father help him make a two foot bridge!!!!!!) But his is more detailed, with painted scenery.
Anyways, here are more photo updates on the build. I am at a conundrum at the moment. The cannons are made and I am trying to figure out the rope details that hold it against the sides. y fingers are too fat and the working space is very tight. This is were Doris excels, in those tight confines.
5
49179
Post by: Valhalla130
I am amazed at your level of skill. Just the idea that someone can take multiple small pieces of wood and plastic and make them actually look like something amazes me. I think that's part of why those Ancient Alien shows are so popular. People can't beleive normal folks can make amazing things. I should point them to things like this as proof otherwise.
15523
Post by: silveroxide
 Valhalla130 wrote: Valhalla130 wrote:I am amazed at your level of skill. Just the idea that someone can take multiple small pieces of wood and plastic and make them actually look like something amazes me. I think that's part of why those Ancient Alien shows are so popular. People can't beleive normal folks can make amazing things. I should point them to things like this as proof otherwise.
Thanks for your encouragement. When I do a thread, I usually show how it is accomplished, so that others can learn and build better models. Now, as for painting, I wish that I could paint my figures like some of the master here in the forum.
So here is another batch of updates on the build. The boat cradle is something that I came up with, I would assume that the life boat had to be steady when tied down or it would have the danger of coming loose and hurting the crew. This is probably the reason that in many ships depicted, the life boat is usually upside down. With the boat upside down, it would be more steady and easier to tie down. This boat had a tiller/rudder which probably impeded it from being placed upside down. If the cargo hold had to be opened, It would have been place to he side for access to the hold. I found a solution to the cannon rope system and that will be forthcoming later on in the build. Enjoy and see you all next posting.
5
22687
Post by: MajorTom11
What a great project, thank you for sharing it with Dakka!
15523
Post by: silveroxide
My pleasure and I hope to help others in making better models while I learn to paint better figures.
Continuing with ships work. The cannons are a build of their own and will have a few more postings. I had three choices, all wrapped paper dowels, paper wrapped around a paper stick, wood barrels. The wood barrels are best in that I can carve the rings on the barrels. With the other versions, I would have to wrap the bands around the barrels, and the spacing would be uneven in some.
6
15523
Post by: silveroxide
Again, more on the cannons. Attached the axles and made the cannons with my dremmel and fine teeth files. I have not done my mini-lathe yet but it would have been the same procedures.
6
15523
Post by: silveroxide
Finishing off the cannons. More to come, like mentioned before, the best part are the small details.
6
10972
Post by: Ruglud
ooh, yes.... Those cannons are pure awesome... Really looking shipshape and Bristol fashion Silver
What's up next - masts & rigging?
15523
Post by: silveroxide
Ruglud wrote:ooh, yes.... Those cannons are pure awesome... Really looking shipshape and Bristol fashion Silver
What's up next - masts & rigging?
There are a few more details before I get to the masting and rigging. I have to make all of those deadeyes and turnbuckles and that will take some time. There is a new technique that I want to try out that should save me some time..
The cannons are finished and the details continue. Tried a new way for making the recoil ropes, Made the ramrods and the water buckets, still more details to come.
6
15523
Post by: silveroxide
More photos on the details. Once the buckets were trimmed off the base, Re-painted them. With a permanent drafting ink pen, drew lines to simulate the slats. Drilled a hole through the buckets and made some handles for them. While waiting for the glue and paint to set, made some supply trunks and placed them on the deck. To simulate the water in the buckets, later on filled the cavity with the white glue. The glue will dry clear and give the illusion of the buckets holding water. So much for now, see you all next posting.
5
15523
Post by: silveroxide
The build continues and I will have to stop doing details or I will take over a year to make it.
In some ships, there are cannon ball tacks on the side walls and on this model, I also did a cannon ball rack around the cargo hatch opening. I also noticed that on some ships, they had what appeared to be a wooden crate with cannonballs in it next to the cannons. This version appealed to me and I used this method. Those cannonballs have to be held somehow and we cannot ave them rolling around the deck now can we.
The use of the rope rig, is to facilitate the placement in the pin racks. If you try to do a figure eight on the rack, it is very hard to do. The reasoning behind the jig, is to form the figure eight, tie it off in the center while still of the ship, and then pull the pins and stick the pin through one of the loops and hang it on the rack. (Whew, that is a long sentence!). With the ropes pre-folded/pre-formed, it makes it easier to place them where you want them.
6
49179
Post by: Valhalla130
It's all these little details like this that really make a model come alive. Honestly, I see my problem is that I would never even consider to do all this.
10972
Post by: Ruglud
This just keeps getting better with each update. The ingenuity here is just outstanding, those cannonballs are great, but the rope and the jig to create it... Hats off to you...
I love pics 172 and 176 - sooo much detail in such a small area...
15523
Post by: silveroxide
Valhalla130 wrote:It's all these little details like this that really make a model come alive. Honestly, I see my problem is that I would never even consider to do all this.
Details do make a model come alive. It is like a tank commander in the cupola and instead of holding a Las-pistol, cut off the gun and replace it with a coffee cup or a beer can. Imagination comes into play in the details.
Ruglud wrote:This just keeps getting better with each update. The ingenuity here is just outstanding, those cannonballs are great, but the rope and the jig to create it... Hats off to you...
I love pics 172 and 176 - sooo much detail in such a small area...
There is a lot going on in that deck. There is so much details but I have to stop somewhere. For example, one of the most important items on a ship, are the lanterns. I am considering on how to make them that minuative.
I finally got around to the window frames. I cut very thin strips of laminated card stock. The bend is tricky and you have to do the curvature quickly while the glue is still wet. If the glue sets, it will separate or kink up when bended. I am still deliberating whether to keep the trim white or paint it later a darker brown or red.
Somewhere between the painting of the hull and the mast mounting ring, I lost the build photos. I have to blame my oldest grandson who borrowed my camera and he accidentally erased them. The mounting ring was easy, it is just a thin strip of card stock wrapped around the mast and placing the mast into the mounting hole. As soon as the mast is placed, it is taking out while holding the ring in position. There is much to do with the mast, before It is ready to be mounted. Enjoy and see you all next posting.
6
15523
Post by: silveroxide
Continuing with the thread, here is the half finished mini lathe rack. The channel is made so as to act as a base to place the ship while working on it. The channel also allows for the drill to slide in or out to the desired depth. Missing are the resting blocks for the knife edges. I will eventually finish it.
6
24297
Post by: Viktor von Domm
you do realize we all feel very humble when we see this great looking ship develop even further...
i was amazed by the making of the cannons...but then i saw those buckets...i am in awe...again...
the lathe looks good... cable binders for fixing it to the rig... aha... did you fix the whole lathe later on to the table? i bet there is much movement, unwanted at that into such a construction...do you use the slowest drilling speed by the way? or rather high speed?
Automatically Appended Next Post:
oh and i didn´t see it...but does the drill have a fixing button for constant drilling action or do you have to press the button constantly?
15523
Post by: silveroxide
Viktor von Domm wrote:you do realize we all feel very humble when we see this great looking ship develop even further...
i was amazed by the making of the cannons...but then i saw those buckets...i am in awe...again...
the lathe looks good... cable binders for fixing it to the rig... aha... did you fix the whole lathe later on to the table? i bet there is much movement, unwanted at that into such a construction...do you use the slowest drilling speed by the way? or rather high speed?
Automatically Appended Next Post:
oh and i didn´t see it...but does the drill have a fixing button for constant drilling action or do you have to press the button constantly?
The way I made the buckets, is the same way that I make drinking mugs for my 1/35 scale Tamiya soldiers. For that, I use smaller size cylinders like the micro screwdrivers or small scale nails to wrap thin regular paper strips.
On the lathe, I am not finished with it and I freehanded the milling down of the dowel. A tool rest bar would have made it much better but it worked out in the end. The dremel has adjustable speeds but not the torque required for the larger pieces, or the size of the chuck for the larger dowel. This drill does have a hands free button to keep it spinning while shaving down the part. This is one of my old drills and it runs at 1200 rpms but it has the torque I need. The dremel does not have the torque and I can actually slow down dremel with the friction exerted on the dowel. On the smaller diameter dowels the dremel works just fine.
15523
Post by: silveroxide
An now, for some more updates on the build and a few more techniques to boot. Checked the fitting of the mast. Lost the photos of the bell build up but the bell was done in the dremel and shaped. The archway of the bell housing is a mixed laminated paper and a carved wood arch. The basket build will continue with the next posting.
6
15523
Post by: silveroxide
More updates on the observation basket (crows nest). This photos have two versions of the crows nest. One has less slats to the top section than the other one. I may place the missing slats later on. The finished basket is made from card stock and the later, is a mixture of wood and cardstock. I am still working on the masts and developing the connectors to the yard arms and booms.
6
49179
Post by: Valhalla130
I just am amazed at the level of detail you're putting into this. It hits all my OCD tics just right.
15523
Post by: silveroxide
Valhalla130 wrote:I just am amazed at the level of detail you're putting into this. It hits all my OCD tics just right.
Thanks for looking in and I am glad that the techniques and detail have some appeal.
Big slow down making the deadeyes. First they are small and drilling is a bit harder than I thought. Made two kinds of jigs which I will show later when I get to that stage. Both of them are adequate but getting the eyes even is a slight problem. Here is an update on the build. For the basket support, i used a straight pin to hold the part steady while the glue sets. The pin will stay in place. The bowsprit had a tendency to slide to the center of the keel. I used a sharpie pen as a wedge to keep the bowsprit in place while the glue sets.
5
15523
Post by: silveroxide
Here is another update on the build. I designed a jig for a more suitable deadeye but that will come later. For the chain plates, I do have scaled size chains but decided for the plate version. I am lucky in that I have a hand anvil I found at a flea market years ago. With the small ballpean hammer, I can flatten wire to imitate parts. Later on, I will be using it to flatten some more wires and construct the hinges for the rudder. For the plates, I kept the upper portion rounded and did not flatten it so as to not cut the ropes with it later due to the sharp edges.
4
15523
Post by: silveroxide
And now for another field expedient tool. I made this one first and it is adequate but way to slow for the making of the deadeyes, If you make the deadeyes out of solid dowels, it will work much better. With the laminated parts, You have to be extra careful. The slowest speed of the dremel will tear the part up if you are not careful. I had to resort to a very slow speed drill for this. A push drill will work much better. This is only one version but I designed a multiple holding block which I will post next.
5
15523
Post by: silveroxide
Here is the jig that I settled for in the deadeye construction. With this jig, I can make 6 deadeyes at a time but you can accommodate a larger piece for more pieces if you wish. You will have to make two stop wedges at both ends or one in the middle, it all depends how big a jig you want to make.
This build will probably take three postings to get all of the information in. What is good about this version, is that the pieces fit snug and do not spin around if you make a mistake. Some pieces will no doubt be damage but the mass production will even it out.
Another good thing about this jig, is that with the dowels, you can push the parts out when finished. When the dowels have too much damage from the drilling, you can replace them easily with another dowel piece. So here is the first batch of photos on this jig.
6
10972
Post by: Ruglud
Right what I have I missed... Masts and crows nests, and a bell and, and.... Loads of work going on here and all superb...
Can't tell you enough how much I'm enjoying this build come together and your uber detailed WIP is the icing on the cake.
Shiver me timbers...
15316
Post by: Lord_J
Amazing work! I have seen some scratch built ships before, but never appreciated how much work that the super detailing take! As stated, amazing!
65900
Post by: Hruotland
Yay, a ship model! And she's turning a real beauty...
15523
Post by: silveroxide
Ruglud wrote:Right what I have I missed... Masts and crows nests, and a bell and, and.... Loads of work going on here and all superb...
Can't tell you enough how much I'm enjoying this build come together and your uber detailed WIP is the icing on the cake.
Shiver me timbers...
Thank you for dropping in and your vote of confidence.
Lord_J wrote:Amazing work! I have seen some scratch built ships before, but never appreciated how much work that the super detailing take! As stated, amazing!
This is one of the few models that I have made that is taking so long to finish. It is full of stuff that it takes a while to build it. I can see why some take up to a year or more to make one. This is an intermediate model, if it was the Sovereign of the Seas or the HMS Victory, it would take a year or more to finish it.
Hruotland wrote:Yay, a ship model! And she's turning a real beauty...
Thanks for your kind words, There is still a lot more to do. The first hard part, was the hull, The second hard part is coming up soon, which will be the rigging.
Continuing with the deadeye jig. This jig came out good. Later I will make another that looks less rustic, but this rough one did the job. The dowels must coincide with the deadeyes. The dowels must also be cut or trimmed off with the deadeye in place. If this is not done, the the dowel will too long. The reason for the dowels to be trimmed, is that the jig must lay flat and if the dowels are too long, the deadeyes will no be able to be placed into the drilling holes. There are a couple more photos for the next posting. Stick around and see you all there.
6
15523
Post by: silveroxide
Here are the final photos of the deadeye jig. The last photo is at what stage the ship is. I will post a few more photos later on but the ship will be in drydock for a couple of weeks while I take a sabbatical, but I will be back later with more especially in the rigging department.
4
15523
Post by: silveroxide
And here are the final photos in my inventory for the moment. You can make out the finished deadeyes in this posting. I will not get around to working on the ship until the 20th of Feb this year. I am still on my sabbatical.
5
48594
Post by: dsteingass
Oh yeah! I use Hemostats too, very handy tools.
That's one amazing ship! Your scratch-building is off the hook!
10972
Post by: Ruglud
Great updates, the full shot you have in the previous post is awesome and is that a rigging jig I see in front?
15523
Post by: silveroxide
dsteingass wrote:Oh yeah! I use Hemostats too, very handy tools.
That's one amazing ship! Your scratch-building is off the hook!
Thanks for your vote of confidence. I am pleased as to how this ship is turning out. In actuallity, this is a trial run for some other ships that I have in mind to build later on in the future.
Ruglud wrote:Great updates, the full shot you have in the previous post is awesome and is that a rigging jig I see in front?
Thanks Ruglud for your comment. At the bottom of that picture is a version of a ratline rig. It will look different when I am done but it is there to measure the spacing and the location of the standing rigging for the ratline. Unfortunately, it will be a while until I get back to the ship, I may have to build something in between to take care of my model building itch, maybe a warhammer tank or something along those lines. I will not be home until the 20th of Feb but who knows if I get too bore and start something over here at my moms place. (She is not into cleaning up too many small itty bitty paper strips and bits, I will have to clean as I go"
15523
Post by: silveroxide
Well I am back a bit earlier than planned.
In the continuing saga of the San Salvador build, I have ran into various rigging descriptions so I will use the ones that seem logical in this build. Here is the start of the standing and running rigging starting from the prow, or beak. One of the first glitches, was in the Crows nest. The ratlines are supposed to go through the support brackets and the tied inside the observation bucket. I compromised and placed a heavy thread through the support brackets. this will serve as the connection point for the ratlines and the bottom standing rigging going to the bowsprit.
5
10972
Post by: Ruglud
Nice to see you back. I find the rigging stage seriously exciting - I really don't know why though, maybe it's the Boy Scout in me and the thought of all those knots...
49179
Post by: Valhalla130
Is this finished?
15523
Post by: silveroxide
No, not yet, I have the sails to construct and I lack a sewing machine, but I found some material that will not unravel and I may try a different method in doing them. Thanks for looking in and I will be back with this build again.
15523
Post by: silveroxide
Time to resurrect this thread again. This portion will be on the standing line and some running line rigging. The reference on the rigging seems to differ from ship to ship but the Standing rigging is a standard. the running lines, seem to differ from ship to ship. i made the running lines as reasonable as possible. The next posting will cover the making of the sails. Until then, enjoy and see you all next posting.
8
15523
Post by: silveroxide
On with the Build. The rigging is impressive but that will be for another thread. I was considering using cloth for the sails but from past experiences, the cloth seems to be too thick for the scale. I opted for white gift tissue paper, which is very light and about the thickness scale for the sails. The paper is very fragile and one way that I used to strengthen the sails, is to use a heavy thread around the edges. The purpose of the line is two fold. One, it gives it stability and cuts down on the ripping effect of the running lines when attached. The other, it gives a gripping or anchor points for the block and tackles and a point to attach the lines and the tackles. The tissue also has the added capability of adding symbols and lines more readily than cloth. Enjoy this portion and the next installment will show how the sails are attached, using the tissue paper and thick thread. Enjoy and see you all soon with more.
8
10972
Post by: Ruglud
Yesss, he's back... Sooo excited to see the continuation of the Galeon San Salvador Tissue paper sails? - sounds absolutely crazy and a painful process, but the end result is looking great
15523
Post by: silveroxide
 Ruglud wrote: Ruglud wrote:Yesss, he's back...
Sooo excited to see the continuation of the Galeon San Salvador
Tissue paper sails? - sounds absolutely crazy and a painful process, but the end result is looking great
Thanks for looking in, It was about time I resurrected this thread. I have worked on other projects since the last posting and I believe that this one has been in limbo for too long.
In the making of the running lines, I used the upholstery thread showed here. It is a very strong thread with a tremendous tensile strength, almost like a fishing line. The booms for the sails were adapted to the sails. Through references, there were various ways of running the lines and I tried to make them look feasible. Enjoy and see you all soon with more updates.
8
29449
Post by: weetyskemian44
That's great I'd really love seeing it finished. I made a ship out of lollipop sticks once. Not as pretty as the san salvador!
15523
Post by: silveroxide
 weetyskemian44 wrote: weetyskemian44 wrote:That's great I'd really love seeing it finished. I made a ship out of lollipop sticks once. Not as pretty as the san salvador!
Thanks for looking in. As a matter of fact, Someone did this model out matchsticks. While it was way smaller than mine, it was also highly detailed for it mini size.
More stuff on the rigging. So far, the rigging is coming along nicely. Enjoy and see you all soon with more updates.
5
15523
Post by: silveroxide
Re worked the Dead-eyes, by using wood instead of card stock. With the card stock, I was getting one good dead-eye out of three. The drilling had a tendency to rip the lamination apart. By suing the wood ice cream sticks. the procedure was more rewarding. The work is going slow, due to the handmade details and the rigging is a monster. I do not believe, that I will try the HMS Victory. Doris has done a fantastic job in that department. Enjoy and see you all soon with more stuff.
7
15523
Post by: silveroxide
Continuing with more rigging details. The center ratlines are coming along nicely. The original concept, was to make the ratlines on a jig. I had trouble aligning the ratlines to the keepers and the length was either too short and loose or too tight and throwing off the other rigging lines and making them limp. Later on in the build I will show how the ladder system is constructed. Enjoy and see you all soon with more.
5
15523
Post by: silveroxide
The new deadeyes are better than the earlier ones made from card stock. While drilling, I hold a piece of a mini spatula to hold the piece inside the jig. If you do not hold the piece down, it will have a tendency to spin or fly out of the jig. The drill, is actually a piece of rod cut from a paper clip. It does not have the drill ridges but when cut diagonally, it leave a sharp cutting edge which will drill out the hole.
The last photo, is of a rigging jig for the deadeyes and threading of them.
6
15523
Post by: silveroxide
It is looking better with each little detail. the rigging is murder and there is much more to do. I added some extra details that are not in the plans but I found them in the references. The rigging as mentioned earlier for the ratlines, will be done while the long lines are in place. I tried the jig method, but I ran into conflict with the notches later on. This method works for me. Once the lines are in placed, they are locked in with a strip of laminated or heavy cardstock. By doing this, the lines seem to come through the spreaders. Enjoy and more is to come this way.
5
10972
Post by: Ruglud
You're not wrong, this is looking totally amazing with all the detail you're putting in. The rigging is mind boggling
15523
Post by: silveroxide
Ruglud wrote:You're not wrong, this is looking totally amazing with all the detail you're putting in. The rigging is mind boggling
thanks for looking in. This rigging is driving me nuts. I want to continue with something else but I will finish this thread before I move on.
Still working on the rigging. There are more lines being attached that I lost count.
4
15523
Post by: silveroxide
The main mast standing rigging/ratlines are almost done and the sails will be next. The ratlines have to be done first, because if the sails and booms were attached, it would be a hassle trying to attach the ratlines. here are shown a couple of techniques for aiding in the ratlines while attached.
5
63129
Post by: Littletower
Awesome build, amazing attention to detail.
And the care put in documenting the step-by-step, mind blowing as well as enlightening.
15523
Post by: silveroxide
 Littletower wrote: Littletower wrote:Awesome build, amazing attention to detail.
And the care put in documenting the step-by-step, mind blowing as well as enlightening.
Thanks for looking in. I also enjoy your build thread on scratchbuilding scenery.
The ratline riggings are finished. very tedious construction. Even thought they were done the easiest way, gluing them in place, it still consumed a lot of time. The upper ratlines for the main mast, were made using the swivel joints from a fishing accessory. For this scale, the #14 is about right. The sails will come next.
5
15523
Post by: silveroxide
So on with more rigging. I looked for references on the rigging of Spanish Galleons and they seem to be rigged different from each other. The mechanics are still the same but they are not as orderly as the English ship of the line which follow a strict order for rigging. I assume, that is were the term ship shape came into use, since the used a uniform flow for the rigging. Enjoy and see you all soon with more details, the anchors and the base.
13
15523
Post by: silveroxide
Now for the making of the anchors. I was going to make four anchors, two for in service and the others in the stowed position. The deck seemed a bit too cluttered with the anchor on it, that I decided to make just two anchors.
12
10972
Post by: Ruglud
That rigging -  . Simply astounding, looks so good. Great job on the anchor, has areal solid weight look about it (as it should)
15523
Post by: silveroxide
Ruglud wrote:That rigging - . Simply astounding, looks so good. Great job on the anchor, has areal solid weight look about it (as it should)
Thanks for looking in and for your kind words. That rigging is why The next ships, will have simpler rigging and less clutter. 
The ship is finished and there is just left some minor details and a different way to make that display stand. Like I mentioned earlier, My version has that used look to it, compared to one making its maiden voyage. More updates and soon on to something else.
8
15523
Post by: silveroxide
The galleon is almost coming to an end. It should have been finished over a year ago but it was so detail intensive that I lost the urge for a while. Here are a few updates on the ship, the gun ports. The stand came out great and she looks mighty proud in her display stand but those photos will come later. Enjoy and see you soon with more updates.
3
15523
Post by: silveroxide
With this update, I will show the build of the rudder. It has a laminated center and the outside templates are cut into strips and glued to the inner center, sort of like a sandwich. The hinges are made from cardstock thin strips and using cut straight pins as the hinge pins. The rudder template is from the plans sheet and it seemed a bit to narrow to steer the ship. This maybe one of the reasons that the galleys were a bit cumbersome and slow in their steering capabilities. Added to the small rudder, the galleys were too fat in their bellies and had too much water contact to allow for a smooth flow and get speed to get away from privateers. Enjoy the show and the end is coming soon. See you all soon with more updates and small details.
8
10972
Post by: Ruglud
I have nothing to add that I haven't already said - but this thread is a joy to read
15523
Post by: silveroxide
Ruglud wrote:I have nothing to add that I haven't already said - but this thread is a joy to read
thanks for looking in and for your comment. By the view counts, There are many out there who also enjoy this thread as silent members. It is here for all and hopefully some of the techniques can transfer over to other models as well.
More updates on the build. this session, is on the display base. I was planning on a full ship length base but opted for the smaller cradle. I used the template from the printed plans as a base and used coffee stirrers to plank the stand.
9
61618
Post by: Desubot
Man that is an astonishing amount of detail and work.
15523
Post by: silveroxide
Thanks for looking in and your words of encouragement. This ship has an over abundance of details which drove me crazy on some occasions.
I am glad that it is coming to an end so that I can continue with something else.
The small cradle base can also be attached to a longer wood base. It fits good and I did not add a felt strip to the contact edges or to the bottom of the base. I will probably do that sometime in the future but for now it will stand as is. This session is divided in two portions. This split is due to one of my sites will only allow ten photos per upload and this will keep me straight as to what I post on each site. See you soon with part two.
6
15523
Post by: silveroxide
Here is the second portion of the base. I believe it stands out a bit better than the original. As mentioned earlier, my first option, was to make a long base, but this small cradle can also be attached centered on a larger wood base. The next installments, will be on the finished ship. Until then, see you all soon.
6
15523
Post by: silveroxide
And so, another thread comes to an end. I will not say that it was fun all of the time but the effort of building it was worth all the while. Hopefully, all of you who have looked in now and then enjoyed the show. here are some final photos of the Galleon, it could use some more small details but I believe that I will stop here and move on to the next subject. It will be the small Steampunk tracked vehicle. Enjoy and see you all in the next forum.
13
29449
Post by: weetyskemian44
A fine ship.
Automatically Appended Next Post:
And its amusing to see guardsmen in the rigging
77159
Post by: Paradigm
Absolutely stunning work. The attention to detail, skill and dedication are amazing.
15523
Post by: silveroxide
weetyskemian44 wrote:A fine ship.
Automatically Appended Next Post:
And its amusing to see guardsmen in the rigging
thanks for looking in. The 40K minis are there for size comparison. The Minis are almost to scale, and now I have to check EPIC minis to see if there are some that I can use.
Paradigm wrote:Absolutely stunning work. The attention to detail, skill and dedication are amazing.
thank you for looking in and for your kind comment. I am pleased that you have enjoyed the tread. More to come but next will be a Steampunk tank.
10972
Post by: Ruglud
Congratulations on a stunning and inspirational build Silver. She certainly is a beautiful scale model and as you say, well worth the time spent on her.
Out of interest (and you may have said this already) but what are the measurements bow to stern?
15523
Post by: silveroxide
Ruglud wrote:Congratulations on a stunning and inspirational build Silver. She certainly is a beautiful scale model and as you say, well worth the time spent on her.
Out of interest (and you may have said this already) but what are the measurements bow to stern?
Somewhere in the build thread, there is a ruler alongside the model while in progress, But it is about 20 inches (US) or 50 cm.
121748
Post by: arturas.jas
Hi!
Firstly, a GREAT work. I have to confess - I'm working on the same one right now - and your thread is actual help for me.
Just one small question - could you post some close up of these joints? I'm interested in how they are done..
Thanks in advance!
Artūras
1
|
|
