24297
Post by: Viktor von Domm
how to recapture so much in so little time....  ... yep... that sums it up pretty inadequately enough 
the ladder... you really went the full length with this... and the flowers and the bottles are probably the icing of the already delicious cake...amazing... truly amazing...
as for the colors of wood... it is a bit difficult to answer that one ... seeing them all next to each other... i favor nr5... but i agree grey would look probably best...
what i would do... i would prime it all white or grey... and then i would open the bottle of your brown wash and start painting it all in one go... then... i would start with odd boards here and there again with the same wash... and then some of those again... thus you have a matching hue but in different intesities... figuring it is always the same wood but some boards are more ancient than others...?
great work doc!...
43045
Post by: Casey's Law
What are your plans for this extra time we've got, bud? I'm not sure if I'm going to keep to my schedule then put it aside and work on C&R's competition or mix my time up.
62749
Post by: Dr H
 Viktor von Domm wrote: Viktor von Domm wrote:how to recapture so much in so little time.... ... yep... that sums it up pretty inadequately enough
the ladder... you really went the full length with this... and the flowers and the bottles are probably the icing of the already delicious cake...amazing... truly amazing...
Thanks Vik. I'm glad that it all comes across so well. 
as for the colors of wood... it is a bit difficult to answer that one ... seeing them all next to each other... i favor nr5... but i agree grey would look probably best...
what i would do... i would prime it all white or grey... and then i would open the bottle of your brown wash and start painting it all in one go... then... i would start with odd boards here and there again with the same wash... and then some of those again... thus you have a matching hue but in different intesities... figuring it is always the same wood but some boards are more ancient than others...?
great work doc!...
Yeah, it's not going to have as much variation to neighbouring boards as that piece. It might serve better if I did the whole side one colour and then test the weathering... in fact I might do that for just that reason...  I was just too impatient to try all the variations...
I keep looking at pictures of wood and trying to think of how to get the right colours... Really look closely at a piece of grey wood, the amount of not grey in it boggles the mind...
That sounds like a good plan. The water damage and rust streaks etc... will definitely be done with washes. But varying the boards like that is a good idea.
After all this wood, I've then got to go through the whole process with the rusty metal...So many variations there as well... 
At least I'm happy with how to do the muddy and rocky base  I'll leave that 'til last.
24297
Post by: Viktor von Domm
well.... whatever you do... it will be a feast for our eyes 
62749
Post by: Dr H
 Casey's Law wrote: Casey's Law wrote:What are your plans for this extra time we've got, bud? I'm not sure if I'm going to keep to my schedule then put it aside and work on C&R's competition or mix my time up.
I'm currently thinking that I may still get it done for the original deadline, as I've started painting earlier than I planned. However, the extra time does take the pressure off, so I may use it to tinker with anything I may not be happy with...or add some other furniture-like things...
I very much like to do one job at a time, get that finished and then move on...that's just how I work. Automatically Appended Next Post:
I hope so.
45857
Post by: SelvaggioSaky
Been absent for a while and just seen what You can do with Sprue and patience and skills of course.
I'm amazed, truly 
If I'm not late I think that 4 and 5 are perfect as colors choices, they are similar to the sprue color and is a nice thing to not change the original color after all the effort You put on It.
Keep up this amazing build and (when everything is finished) fill the tutorials section with all this awesome stuff please
62749
Post by: Dr H
 SelvaggioSaky wrote: SelvaggioSaky wrote:Been absent for a while and just seen what You can do with Sprue and patience and skills of course.
I'm amazed, truly
If I'm not late I think that 4 and 5 are perfect as colors choices, they are similar to the sprue color and is a nice thing to not change the original color after all the effort You put on It.
Keep up this amazing build and (when everything is finished) fill the tutorials section with all this awesome stuff please
Thanks SS.
Not too late at all. I'm still throwing colour concepts about at the mo.
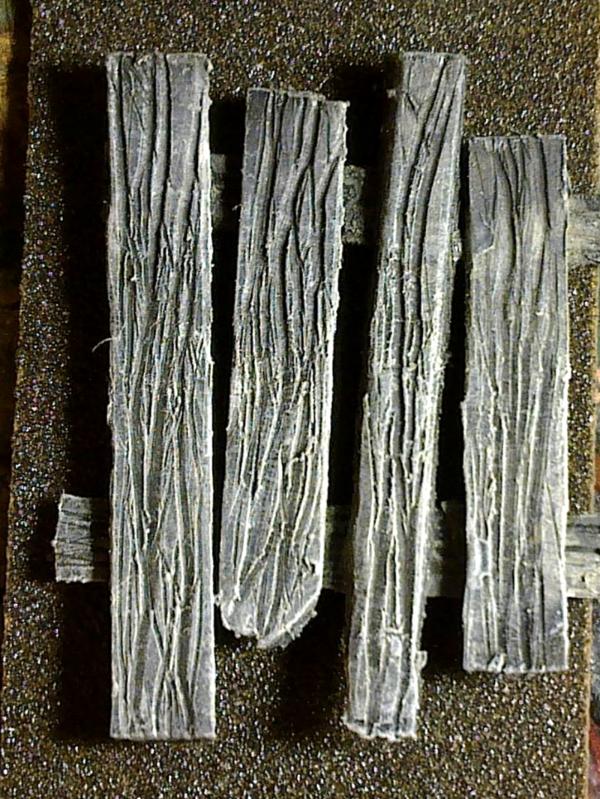
and on that note...more colour concepts
As before, from left to right:
1. Darker yellow/brown wood;
Over the base colour the following were dry-brushed;
63(Sand ~ Iyanden Darksun)
72(Khaki Drill ~ Desert Yellow)
Wash with 33(Black = Chaos Black)
2. A green-ish wood...
Over the base colour the following were dry-brushed;
155(Olive Drab ~ Snakebite Leather)
72(Khaki Drill ~ Desert Yellow)
71(Satin Oak ~ Bleached Bone)
Wash with 33(Black = Chaos Black)
3. Grey, bleached wood, the slightly lighter version.
Over the base colour the following were dry-brushed;
64(Light Grey ~ fortress Grey)
34(White = Skull White)
Wash with 33(Black = Chaos Black)
4. "trying to tone down the yellow", yellow wood.
Over the base colour the following were dry-brushed;
63(Sand ~ Iyanden Darksun)
71(Satin Oak ~ Bleached Bone)
72(Khaki Drill ~ Desert Yellow)
Wash with 33(Black = Chaos Black)
5. "making use of an off colour paint I found in my box" wood colour.
Over the base colour the following were dry-brushed;
72(Khaki Drill ~ Desert Yellow)
40(Pale Grey? Very old and brown-ish rather than the grey it's supposed to be ~ Commando Khaki)
34(White = Skull White)
Wash with 33(Black = Chaos Black)
I'll give some weathering a go tomorrow and see if I can't produce some kind of realistic looking wood...
Even used some spare planks to make a test piece that represents the wood of the hut
24297
Post by: Viktor von Domm
with the exception of nr4 i cant really see that many differencies here... so... i think if you stick to these other four types and mix them all around the hut i think you have a good formula
48594
Post by: dsteingass
Don't be afraid of venturing into Model Railroad sites/magazines/books either
62749
Post by: Dr H
Viktor von Domm wrote:with the exception of nr4 i cant really see that many differencies here... so... i think if you stick to these other four types and mix them all around the hut i think you have a good formula
Cool. Yeah I was going for more subtle colours that the previous test and thinking (at least subconsciously) about neighbouring planks.
Will see how some of these look on larger areas and with some weathering tomorrow. Automatically Appended Next Post:  dsteingass wrote: dsteingass wrote:Don't be afraid of venturing into Model Railroad sites/magazines/books either
Actually hadn't thought about that  There's bound to be some good tips in those for wood...
43045
Post by: Casey's Law
 Dr H wrote: Dr H wrote: Casey's Law wrote:What are your plans for this extra time we've got, bud? I'm not sure if I'm going to keep to my schedule then put it aside and work on C&R's competition or mix my time up.
I'm currently thinking that I may still get it done for the original deadline, as I've started painting earlier than I planned. However, the extra time does take the pressure off, so I may use it to tinker with anything I may not be happy with...or add some other furniture-like things...
I very much like to do one job at a time, get that finished and then move on...that's just how I work.
Good shout, I'm leaning towards doing that myself but I think I might take a day off to rough out my other entry to get the juices flowing so to speak.
62774
Post by: da waaagh orkz
Love the woods. Going to try these out for myself.
62749
Post by: Dr H
Go for it Casey.
Good good. There's more to come...
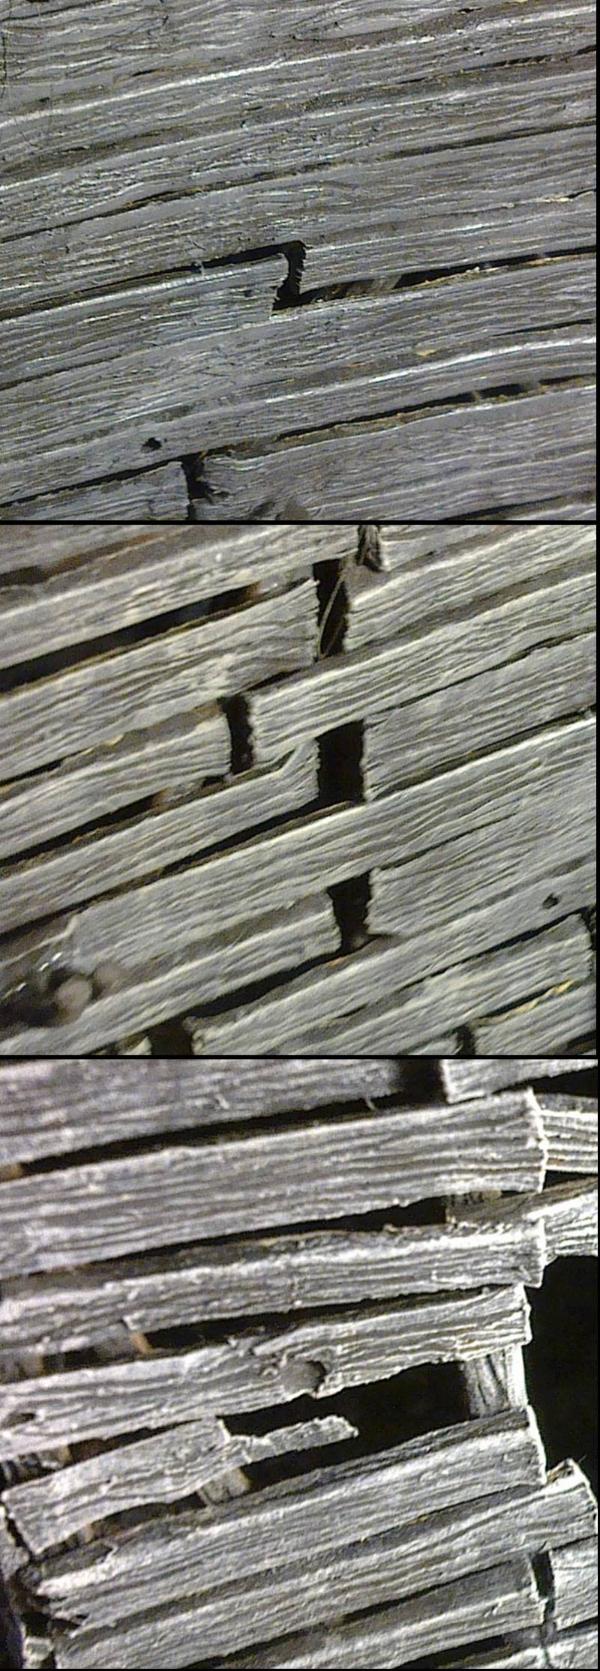
Tried a larger piece with just the one colour this time. Much easier to work on , Much slower to do  .
This is the bleached wood that will largely be the outside of the hut...
These were done by following (sort of) a tutorial I found online.
This was based with white on the left side and the right two planks were based with the "bleached bone"-alike. This was to see what sort of difference these would make.
However the next step completely knocked that on the head... a wash with black. The wash was too black and the planks ended up black, rather than grey. However this was partially saved by the next step of scrubbing the planks with a wet brush (white spirit in my case, you'll want to use water) in some places more than others to give a variation to the tone.
The planks were then dry-brushed with grey and then white, again concentrating on certain areas over others.
The final step was adding a few drops of the black wash to the upper end of the planks and then a little more white spirit was used to blend this into the plank's underlying colour.
And in more exciting news: I decided to paint the bench as I found the colours I wanted for it in the first test.
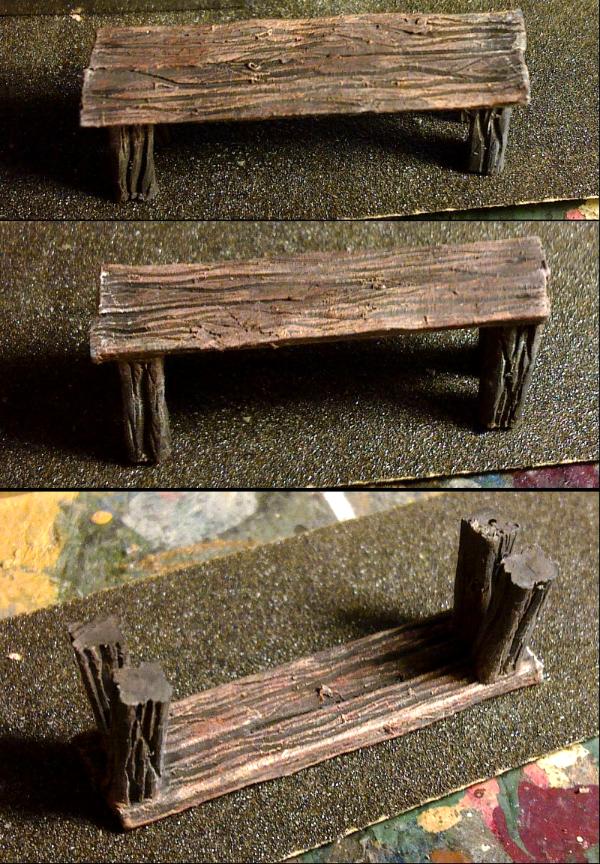
The seat was done as per the red-ish wood previously described (minus the light "pink" dry-brush) but with the added spots of black wash.
The legs were done as with the chocolate brown wood and added black wash to the lower ends.
The whole bench was given a few patches of gently white dry-brushing which were mostly rubbed off with my finger.
Also, I added some small black dots/lines to indicate the positions of the nails attaching the planks to the legs.
It's supposed to look like damp has got to it as it is sitting on the muddy floor for most of the time.
I'm quite happy with it really.
Still got to do the weathering tests. Will update when I do...
24297
Post by: Viktor von Domm
truly lovly looking boards... the bleached looks
and the bench looks like it is straight of some garden attire catalogue^^
now i even saw some knotholes!!!
62749
Post by: Dr H
Viktor von Domm wrote:truly lovly looking boards... the bleached looks
and the bench looks like it is straight of some garden attire catalogue^^
now i even saw some knotholes!!!
Cool. Glad you like.
Is that "Cheap, Water damaged, Wonky, Wooden Furniture World's" catalogue
I know what you mean really. Thanks. I hope that I can make the rest of the wood look as realistic...
24297
Post by: Viktor von Domm
hope that I can make the rest of the wood look as realistic...
i think now is a good time to raise your self esteem... you are doing a great show here!!!
and wonky wooden furniture world
62749
Post by: Dr H
Thanks Dude.
45857
Post by: SelvaggioSaky
That looks real, well done Doc!
24297
Post by: Viktor von Domm
...no need for that!! now back to painting... or feel the flat side of me sword!!!
62749
Post by: Dr H
SelvaggioSaky wrote:That looks real, well done Doc!
Thanks SS. That's the aim.
Viktor von Domm wrote:...no need for that!! now back to painting... or feel the flat side of me sword!!!
Ooo, kinky...
45565
Post by: cormadepanda
62749
Post by: Dr H
Thanks Panda.
I've done a bit of weathering to the bleached piece.
The top is meant to look like it doesn't get as much sun from being under the eaves of the roof.
How does that grab you?
and for those interested, these are the paints used for this wood.
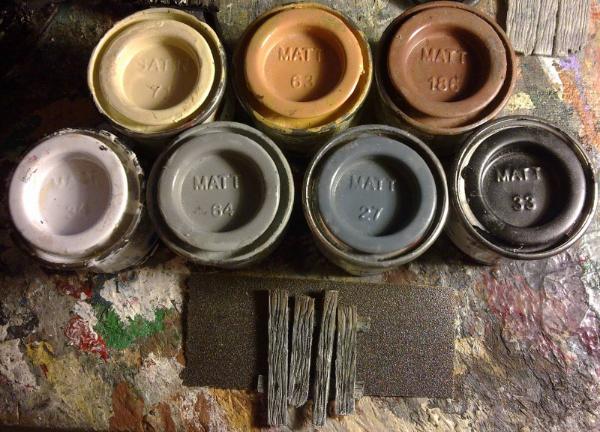
I still need to make some lighter shade of wood, this is still too dark for my liking... More tests tomorrow.
24297
Post by: Viktor von Domm
holy sh...t
next to these paints your wood looks considerably small
and... you use revell colors i see?
and i like that non sunbleached kinda non weathering-weathering!!!
62749
Post by: Dr H
Yeah, that piece is just over 2cm wide. Each plank is between 3 and 5mm wide.
and... you use revell colors i see?
They're Humbrol actually 
Although I do have a few Revell's, I prefer Humbrol Enamels.
and i like that non sunbleached kinda non weathering-weathering!!!
Thanks. That is exactly what it is.
24297
Post by: Viktor von Domm
They're Humbrol actually
Although I do have a few Revell's, I prefer Humbrol Enamels.
are they the same amount as the revell ones?
also... Enamels... do these require thinner to clean the brushes?
62749
Post by: Dr H
Viktor von Domm wrote:They're Humbrol actually
Although I do have a few Revell's, I prefer Humbrol Enamels.
are they the same amount as the revell ones?
also... Enamels... do these require thinner to clean the brushes?
Yeah, 14ml. and they cost about the same, and come in pretty much the same colours (although with different names and numbers), but I've just had better luck and results with the Humbrol's.
Ja, it's all white spirit here... 
30672
Post by: Theophony
This project just keeps getting better and better. Can't wait to see the completion of your work. In time I will be using this technique on my bloodbowl pitch for sidelines and player benches, possibly the grandstands.
24297
Post by: Viktor von Domm
Ja, it's all white spirit here...
well then...cheers *burp*
62749
Post by: Dr H
Theophony wrote:This project just keeps getting better and better. Can't wait to see the completion of your work. In time I will be using this technique on my bloodbowl pitch for sidelines and player benches, possibly the grandstands.
Thanks Theo.
That sounds cool. I would suggest lots and lots of research pictures and really look closely at the wood, there's so many colours in just plain wood.
Viktor von Domm wrote:Ja, it's all white spirit here...
well then...cheers *burp*
Wheeeeeeeeeeeeeeeeeeeeeeeeeeeeeeeeeeee!
30672
Post by: Theophony
Dr H wrote:Theophony wrote:This project just keeps getting better and better. Can't wait to see the completion of your work. In time I will be using this technique on my bloodbowl pitch for sidelines and player benches, possibly the grandstands.
Thanks Theo.
That sounds cool. I would suggest lots and lots of research pictures and really look closely at the wood, there's so many colours in just plain wood.
Mine would be more bloodstained, after all the pitch might be where the game is at, but the stands is where the brawling occurs.
62749
Post by: Dr H
 Theophony wrote: Theophony wrote:Mine would be more bloodstained, after all the pitch might be where the game is at, but the stands is where the brawling occurs.
Of course. They're professional players, wouldn't catch them brawling...
A bloodstain though...that's a thought... 
62749
Post by: Dr H
So I had a box arrive for me today from a certain Comrade of mine.
It contained a whole load of Sprue
...and a few other model pieces...
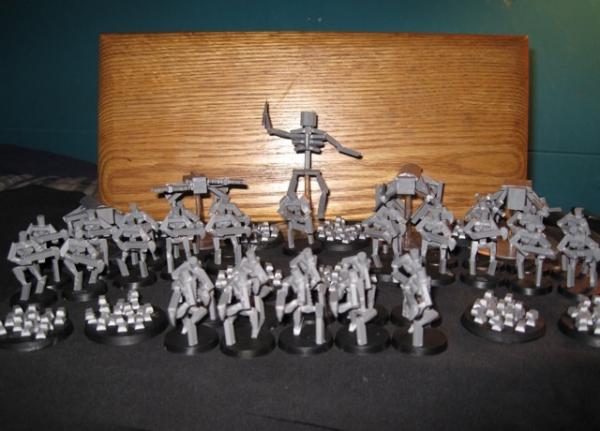
Namely 3 sets of Wraithguard/blade spares, including; 12 guns (in two flavours), 16 swords, 14 axes (all with associated arms), a bunch of bits and pieces and some suspiciously large hands (that I suspect are from the Wraithlord?).

I know you said you didn't need them and it's all cool, but Comrade Panda...
I now need to think about what I shall create with all these sharp implements...
14392
Post by: nerdfest09
..... That's what she said!
30672
Post by: Theophony
Dr H wrote:
I now need to think about what I shall create with all these sharp implements...
So he sent you sharp implements and sprue........I wonder if he's wanting you to hold an entire village, or just sabotaging your fingers for future competitions so he doesn't have to face you in them , I know that "wood" be my cunning plan.
@nerd, is that when she told you that's the only time she saw something smaller than yours 
14392
Post by: nerdfest09
^ OH-OH, we're going there are we?......... right now i need to put my depravity cap on! :-)
45565
Post by: cormadepanda
Oh excellent that stuff made it! I was worried it be lost in the post. Nmm you can spike out the shack? Or a weapons rack? Large hands? Hmm... it depends they could be from the wraith knight. If you need other bit hook ups I will happily fill the request.
The picture cleared them up. Yeah those are wraith lord hands.
62749
Post by: Dr H
Nerd & Theo: Settle down you two. This is my hut and my awesome wood. You can compare your woods elsewhere... Comrade: I did think about adding things like weapons racks and shelving (my thoughts often drifted to the houses and huts in Skyrim), but the walls of the hut aren't really built for having things bolted (correction, riveted) on and anything not nailed (riveted) down has been long pilfered from this hut, so a weapon rack would no doubt be empty. Equally, if there's something you want in return, let me know. Do not worry, I have an idea of something to do with a large quantity of close combat weapons and it's quite (Mad) Scientist in it's construction... There's even a pair of feet for the wraithlord and a pair of arms. I haven't had a good look at all the little pieces yet so there's many more little excited moments to come... And now for something completely different... ...well actually no, it's more wood and not even Larch at that... 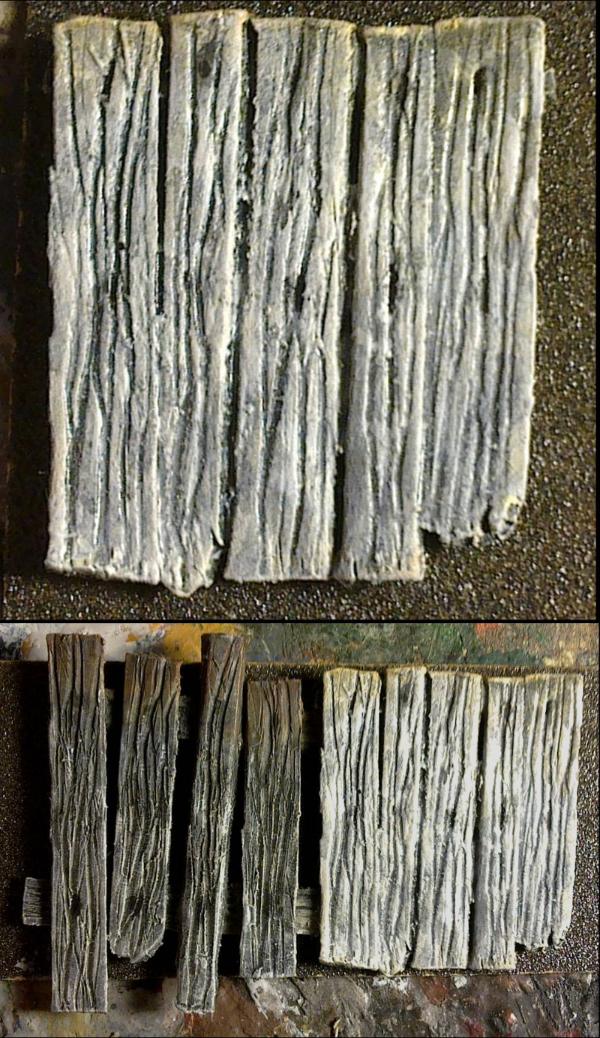 I think I have the pale grey wood look down and getting a variation between the two extremes shouldn't be too hard... This was a combination of dilute black washes and dry-brushing with 64(grey), 63(sand), 71(bone-alike) and white. Then a few little dabs of black and white to give greater variation and tidy up a few bits. However, I'm going to start on the inside of the hut with the less bleached wood as I don't want that colour to spill out onto the bleached wood, but the bleached wood colour can spill "in" onto the normal wood. May do the table first though.
45565
Post by: cormadepanda
make that table old and sad! do it. Then make a fine perfect house party. That is the next piece.
24297
Post by: Viktor von Domm
However, I'm going to start on the inside of the hut with the less bleached wood as I don't want that colour to spill out onto the bleached wood, but the bleached wood colour can spill "in" onto the normal wood. May do the table first though.
clever plan!!!
62749
Post by: Dr H
cormadepanda wrote:make that table old and sad! do it. Then make a fine perfect house party. That is the next piece.
It will certainly be a "distressed" look. Table is currently underway, the legs and frame are done but I had to wait for that to dry before masking them off to do the top...so will update that tomorrow when finished.
Viktor von Domm wrote:However, I'm going to start on the inside of the hut with the less bleached wood as I don't want that colour to spill out onto the bleached wood, but the bleached wood colour can spill "in" onto the normal wood. May do the table first though.
clever plan!!!
Or perhaps...
48594
Post by: dsteingass
As cunning as a fox who's just been appointed Professor of Cunning at Oxford University?
62774
Post by: da waaagh orkz
Are you going to make the wood look like it has a bit of lichen or something on it?
65595
Post by: Camkierhi
I have to say, sorry I have been lurking. I think the wood looks awesome. Exactly what I envisaged. Perfect.
45565
Post by: cormadepanda
well i want to see the table Dr.
62749
Post by: Dr H
dsteingass wrote:As cunning as a fox who's just been appointed Professor of Cunning at Oxford University?
Or even as cunning as a fox that used to be Professor of Cunning at Oxford University but has moved on, and is now working for the UN at the High Commission of International Cunning Planning...
da waaagh orkz wrote:Are you going to make the wood look like it has a bit of lichen or something on it?
Indeed there will be, in places.
That can be done near the end though.
But first...
...a table.
Thank you Theo for the bloodstain idea.
You will notice that the bottles don't look very exciting here. That's because they aren't finished, and you won't see the finished labels until the hut is complete... have to keep something under wraps for the end... Automatically Appended Next Post: Camkierhi wrote:I have to say, sorry I have been lurking. I think the wood looks awesome. Exactly what I envisaged. Perfect.
No worries. Thanks dude.
cormadepanda wrote:well i want to see the table Dr.
Almost perfect timing...
39973
Post by: Galorn
THe bottles are carved from sprue?
62749
Post by: Dr H
Yes indeedee
48594
Post by: dsteingass
nice stain!
a lot of something was cut up there over the years
65595
Post by: Camkierhi
Now that is a work of art.
62749
Post by: Dr H
dsteingass wrote:nice stain!
a lot of something was cut up there over the years
Ha ha Thanks.
Yeah, and reasonably recently as well.
Camkierhi wrote:Now that is a work of art.
Thanks. That's quite the compliment.
69562
Post by: Largeblastmarker
somebody rolled a 6 for rending while playing a knife based drinking game. I love it!
PS; i have a question for the mad scientist. what do i do if one of my eyes is red rimmed and half closed from puffy-ness?
24297
Post by: Viktor von Domm
oh my... who will clean up this mess now???...it´s always the drunk that spill their drink all over...tstststs...
62749
Post by: Dr H
Largeblastmarker wrote:somebody rolled a 6 for rending while playing a knife based drinking game. I love it!
Thanks LBM.
PS; i have a question for the mad scientist. what do i do if one of my eyes is red rimmed and half closed from puffy-ness?
er...
If you're asking the (Mad) Scientist, He'd say to poke the other one until it matches...
If you're asking me in an official capacity, I'm afraid I have a PhD in chemistry and not an MD... so can't really help.
If you're asking just in general, I'd say if it doesn't go down soon you should probably see a Doctor with an MD.
Or is there going to be a punchline?
Viktor von Domm wrote:oh my... who will clean up this mess now???...it´s always the drunk that spill their drink all over...tstststs...
Yeah, of course. It's just a spill of claret and noone was hurt in the process... Keep telling yourself that...
24297
Post by: Viktor von Domm
well... of course one of the bottles could still be involved with that stainmaking... just not the true inteded useage of bottles could have happened...i am on that case....*where was my cool looking pipe again?*
Or is there going to be a punchline?
LOL... i think that was before the question even^^
62749
Post by: Dr H
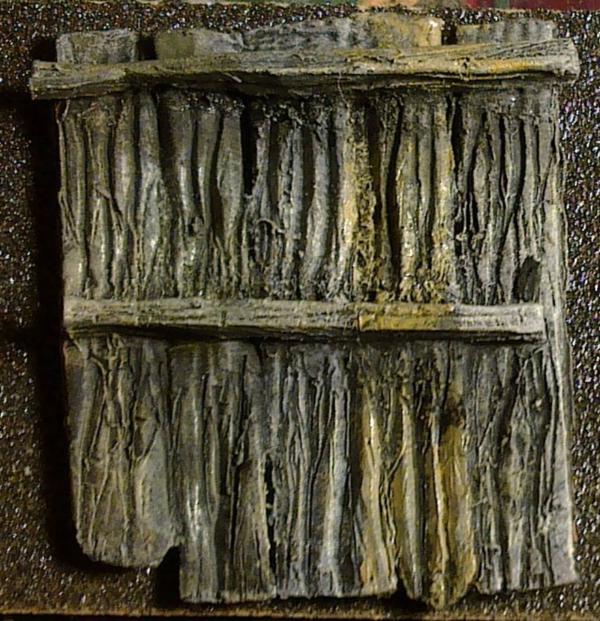
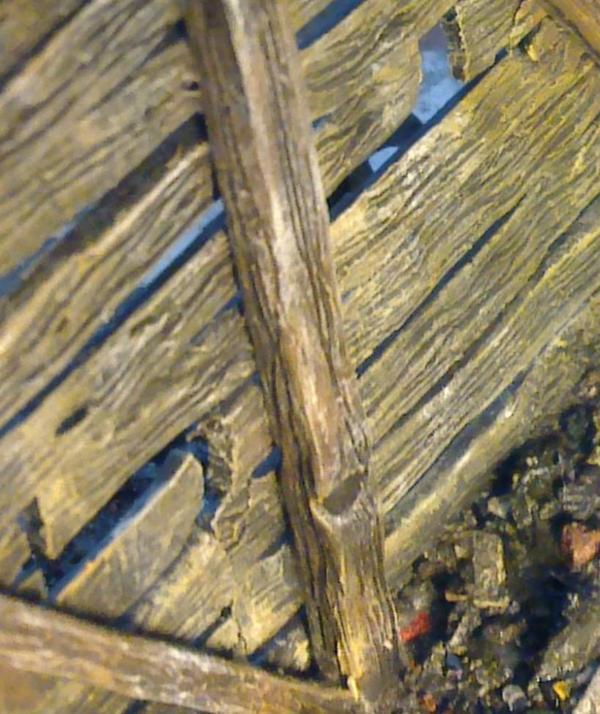
Pretty good deduction there... But what if the bottles present on the table are all clean except for a layer of dust...? To keep the air of suspense (and to show that the wood doesn't look awesome right from the off) while still showing wip shots, here's a slightly blurry, cropped, close-up of some wood;  This is after the base coat of very dark brown, The beams were dry-brushed with 186(brown), The planks and beams (partially) were dry-brushed with 83(Ochre), Everything was then dry-brushed with 71(oak)... More slightly blurry wip shots later, once some work has progressed. Thanks for the voting on the table btw. The bench from earlier is also vote-able, should anyone feel the need...
24297
Post by: Viktor von Domm
funny thing... i had humbrol paints today in my hand when visiting the hardware store... i was searching for a saw bit for my drill... then in the color section i saw them...
do they smell? and about cleaning your brushes... what kind of brushes do you use? the same as for the acrylic paints? i think not?.. and does cleaning take (that much) longer?
Automatically Appended Next Post:
oh...and i voted^^
62749
Post by: Dr H
Viktor von Domm wrote:funny thing... i had humbrol paints today in my hand when visiting the hardware store... i was searching for a saw bit for my drill... then in the color section i saw them...
do they smell? and about cleaning your brushes... what kind of brushes do you use? the same as for the acrylic paints? i think not?.. and does cleaning take (that much) longer?
Yeah, they smell and so does the white spirit required to clean them (although I believe you can get non-smelly thinner as an alternative, but that doesn't help you with the paints).
Other than the many brushes that I've used for years and were handed down to me, the recent brushes I've actually bought have been Sable hairs.
I usually use some Humbrol "Palpo" brushes which say on the pack Sable hair and Enamel paint. These
And because of those, I bought some Winsor & Newton water colour brushes (pure red sable) for really fine work These. I've used one of them and it works fine.
To clean them: All I do, once I've finished painting with that colour, is just rinse is off in white spirit. I swirl it around and massage it against the side of the jar (just enough to part the bristles and not enough to really damage the brush). I then wipe off the excess white spirit on a towel for the purpose of wiping paint-y and white spirit-y things on, making sure with a twist that the brush comes to a point. That's all, nothing special. With occasional use most of these brushes have lasted years (although the most used ones have worn out quicker).
oh...and i voted^^
Danke
43045
Post by: Casey's Law
The table looks brilliant just by itself! Awesome work.
30672
Post by: Theophony
He table is great if he rest of the project gets painted like this you should take it to a golden demon like the blood on the table
24297
Post by: Viktor von Domm
speaking of signature...why no carving (lol...typing it now...I see the double entendre)
and I agree... a knife in the tables surface would look cool!
62749
Post by: Dr H
Casey's Law wrote:The table looks brilliant just by itself! Awesome work.
Thanks Casey. Wait until you see it with the bottles done...
Theophony wrote:He table is great if he rest of the project gets painted like this you should take it to a golden demon like the blood on the table
I don't think I'm that good, but thanks for the compliment.
Thanks Cam. You best have a lie down after that then.
Viktor von Domm wrote:speaking of signature...why no carving (lol...typing it now...I see the double entendre)
and I agree... a knife in the tables surface would look cool!
We'll see about the knife, I can add it any time.
Although I quite like the mystery of "where did the stain come from?"... goes with the whole hut "what is the back story?"...
And here's another slightly blurry extreme close-up of some wood to show what has been happening.
Following the previous picture, this has had a dilute, uneven, black wash all over,
Then the beams were washed with 186(brown),
And then everything was dry-brushed with 63(Sand)...
Still more to do and then I can start on the outside...
24297
Post by: Viktor von Domm
you´re doing a wonderful job here... even if you are a bloody tease
62774
Post by: da waaagh orkz
Great job doc!
2326
Post by: shasolenzabi
Sweet scenery! cobbled together shelter/station/field HQ etc.
62749
Post by: Dr H
Viktor von Domm wrote:you´re doing a wonderful job here... even if you are a bloody tease
Thanks Vik. More teasing below...
da waaagh orkz wrote:Great job doc!
Thanks da waaagh.
shasolenzabi wrote:Sweet scenery! cobbled together shelter/station/field HQ etc.
Thanks shas. It can be pretty much anything you want it to be.
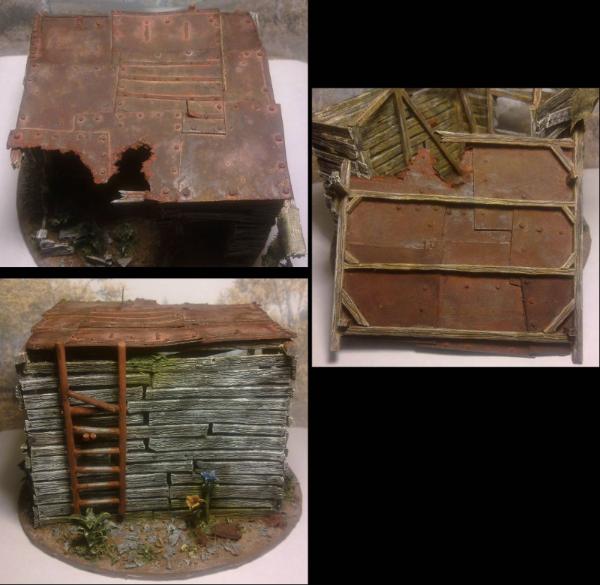
The basic wood painting is complete inside. There will be weathering/dirt/rust/mould added later (I'll do the inside and outside at the same time so they match).
This is after a patchy/irregular dry-brush of white over everything.
The outside has also been started.
From the top; A dry-brush of 27(Sea Grey), 64(light grey) and then 34(white). This is about 1/3rd done so far...
More later...
62749
Post by: Dr H
I'm calling the outside done. Except for the weathering/dirt etc...
The pictures below are;
Top picture; Irregular black wash,
The rest is the step by stepfor the "anti-weathering" where the wood is usually out of the sunlight and so not bleached...
Note the positions where there is likely to be shade (this is mostly only where the roof overhangs and so is quite rare on this model),
Start with a "paint heavy" wash of 186(brown) in the most shaded areas,
Then another "paint heavy" wash of 83(Ochre) that overlaps the brown and extends at little further out,
Then an irregular dry-brush of 71(oak) to further merge the brown into the grey.
Then a black wash to aid the merge.
Finally an irregular dry-brush of white.
And as a special treat, I've named The Hut...
Is it too obvious?
Is it not readable enough?
Too corny?
Suitably amusing?
1
65595
Post by: Camkierhi
Absolutely amazing. Perfect name. I have said it before, by the time you are finished this belongs in an art gallery.
62749
Post by: Dr H
Thanks Cam. It will take pride of place on the shelf at least.
24297
Post by: Viktor von Domm
LOL... that name...what a mind...what a mind...reminds me of a corckscrew^^
62749
Post by: Dr H
I twists and I turns like a twisty turn-y thing...
Thanks, glad you like the name.
I was just going to have the name plank completely fallen off and trampled into the mud with just HOME written on it. But after I started referring to it as The Hut, the name just fell into place...
Also, it's not too easily read, is it? I want you to be looking at it a little while trying to read it before it hits you. Although I have touched up the lower half of the first B as I made more of a mess of it than intended.
And so, with the wood done, I've started on the roof...
This is just a dark red-ish brown that I just mixed by eye, so I can't really help you find a matching paint unfortunately.
Interesting top-tip for you: The texture was created by adding a pinch of the finest dried paint dust (that usually gives texture in greater quantities to the mud on my bases) to the paint mixture before slapping it on. I assume this is what all these weathering powders do in addition to the pigment... 
24297
Post by: Viktor von Domm
Also, it's not too easily read, is it? I want you to be looking at it a little while trying to read it before it hits you. Although I have touched up the lower half of the first B as I made more of a mess of it than intended.
HA! exactly... it took me quite some time... if you hadn´t pointed out there was a name to be read at all i might have overlooked it completley! ... and i tried to explain my wife your work and your naming of that ..shed (she is almost half a nerd too... with us three boys at home...no other option available )
and that rusty roof... yes... looks the part... and i see your point with those weathering powders....seems fitting to me... we often pay for stuff a bright mind could make and come up on his own...
62749
Post by: Dr H
Viktor von Domm wrote:HA! exactly... it took me quite some time... if you hadn´t pointed out there was a name to be read at all i might have overlooked it completley! ... and i tried to explain my wife your work and your naming of that ..shed (she is almost half a nerd too... with us three boys at home...no other option available )
Cool. That seems the right sort of level. I hope your wife got it in the end. I don't suppose that "the hut" and "a hut/shed" translates too well in German to get the pun. and that rusty roof... yes... looks the part... and i see your point with those weathering powders....seems fitting to me... we often pay for stuff a bright mind could make and come up on his own...
That's only the first of many layers. Like the wood, rust has many subtle colours when you look closely enough... It's just had a very wet wash of purple for instance... And the use of dried paint as a weathering powder works with the competition as well.
24297
Post by: Viktor von Domm
And the use of dried paint as a weathering powder works with the competition as well.
werrrrlll.... how come noob would have dried up paint already? of forgott... he bought the new pots of GW
and actually in german shed stands for "Hütte" wich is not that far away from hut... so... and welll she quite quickly got the joke... as i said... star wars is very top item atm at home... she can try to resist... but if your oldest humms continuisly the imperial march your resistances fade into nothingness rather quick^^
62749
Post by: Dr H
Well yeah, that is a good point. But maybe, being a noob he or she wasn't as fastidious about putting the lids on their new paints and therefore has plenty of dried paint...
and actually in german shed stands for "Hütte" wich is not that far away from hut... so... and welll she quite quickly got the joke... as i said... star wars is very top item atm at home... she can try to resist... but if your oldest humms continuisly the imperial march your resistances fade into nothingness rather quick^^
Good good. We can change the non-geeks one at a time...bring them over to the dark side, you might say...
I also wasn't sure what Mr. The Hut's name may have been translated into, assuming that you do watch a dubbed version. But he probably is just das Hütte (or is it der Hütte? been a long time since I learnt any German).
30672
Post by: Theophony
Nice work on the roof, really like the finish with the crumbly paint. I've got an idea for weathering powder that's been sitting in the garage since the move.
62749
Post by: Dr H
Theophony wrote:Nice work on the roof, really like the finish with the crumbly paint.
Thanks. I felt it needed some texture to the large flat areas. We'll see if I can make it work for me in the end.
Much more to come on the rust... I've got quite into the adding many subtle colours to create an overall effect.
I've got an idea for weathering powder that's been sitting in the garage since the move.
Would that be something that's sat still long enough to become a pile of rust?
30672
Post by: Theophony
No but after going in there a few hours ago and finding that the squirrel had gotten in there and chewed through the bag of bird food I might have some grey tree squirrel powder.
43045
Post by: Casey's Law
Nice progress teases. Looking forward to seeing this all finished up!
62749
Post by: Dr H
Theophony wrote:No but after going in there a few hours ago and finding that the squirrel had gotten in there and chewed through the bag of bird food I might have some grey tree squirrel powder.
lol. pesky squirrels.
Casey's Law wrote:Nice progress teases. Looking forward to seeing this all finished up!
Thanks. More teases to come...
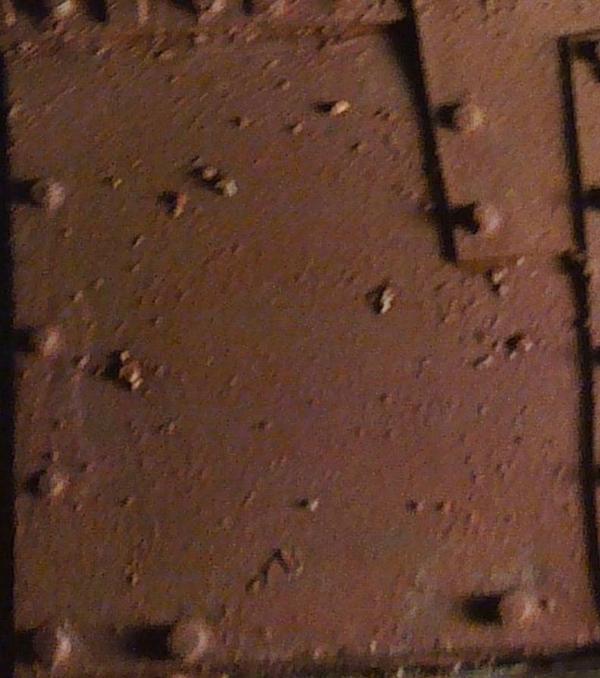
These are the next few steps of the roof to date.
Top is after the purple wash, then the middle shows a plate that got a quite red-ish wash and the bottom shows some that got a yellow/orange wash (this dried a bit too light and will be darkened by a black wash in the future).
45565
Post by: cormadepanda
This shack is gunna be shacky! I will forever loot it and call it my own.
48594
Post by: dsteingass
Rust shack.... baby rust shack...That's where it's at
14392
Post by: nerdfest09
Why thank you Dave! stuck in my head much now...... baby rust shack! ..... got me a shack it's covered in rust!
62749
Post by: Dr H
Thanks guys. lol Rust Shack...
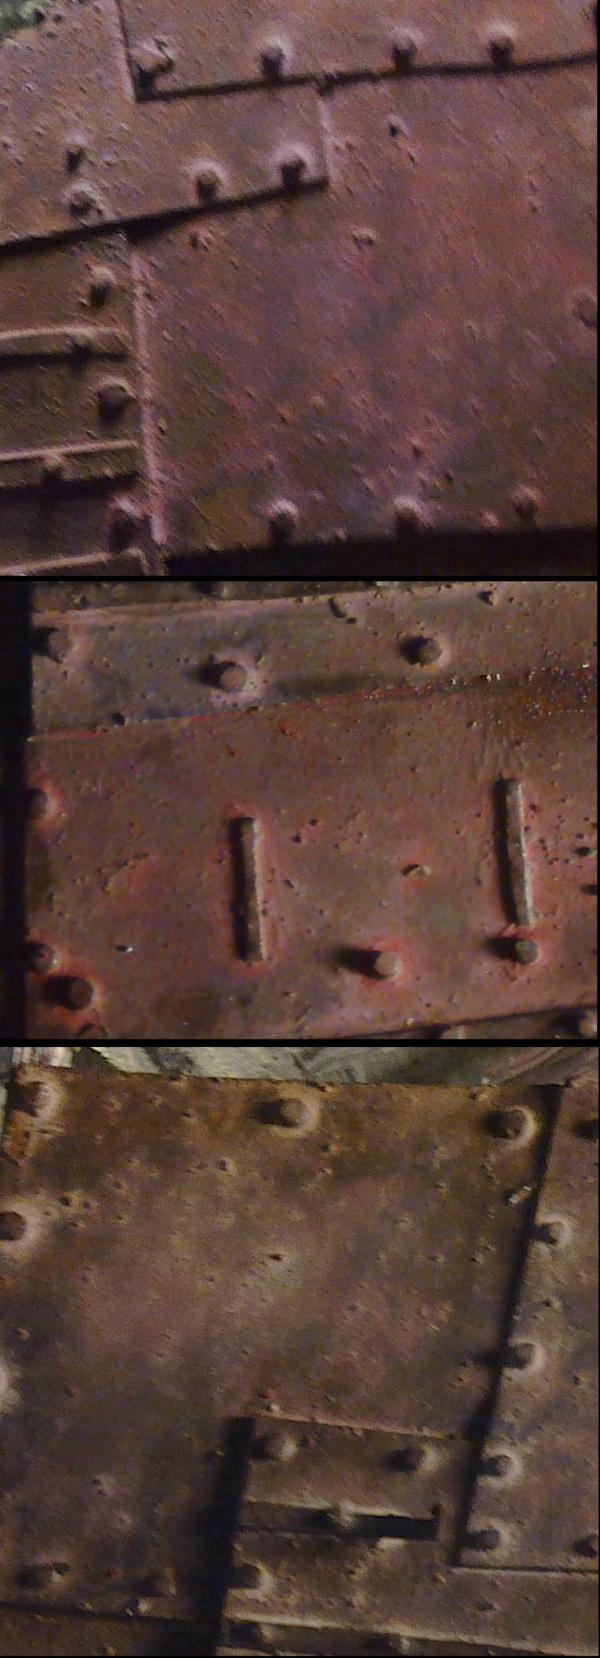
And here's a teaser picture that is (shock horror) in focus for a change...
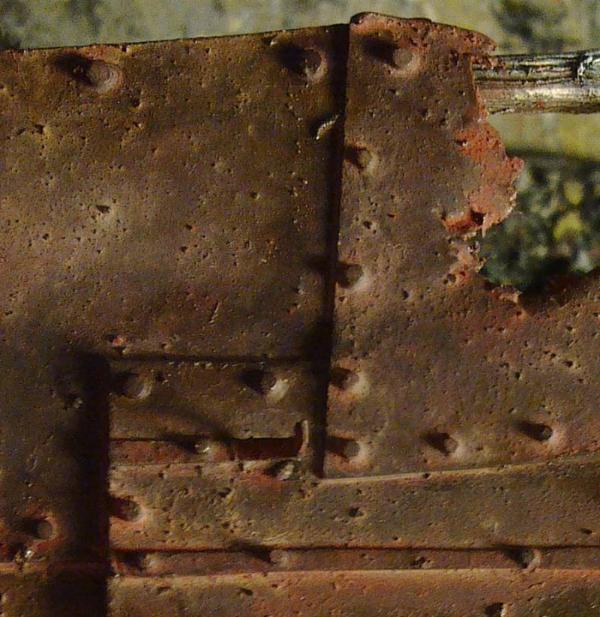
This is after some more red-ish washing (as I quite liked it in the previous picture) and some dilute black wash to bring down the lighter patches. I've also tried to minimise the "high water marks" from some of the washes, but kept some as they seem to work on this roof.
There's a few little touch ups I want to do (a little orange here, maybe even a little metal there) and sort out the ladder that hasn't turned out as well and then I can move on to the base...
65595
Post by: Camkierhi
My ladder is giving me gip too.
That roof looks crazy good. That edge with the rusty-ness is truly epic. Looks perfectly real. If you do add any "metal" make it titanium coloured. Just seems to work nicer than silver on these things. But the "goto man" for paint effects of this calibre has to be Dave.
I think we have a winner here. Everyone's work in the competition is amazing, but this just takes it to another level.
62749
Post by: Dr H
Yeah, I've found that slapping paint on doesn't work as well on a ladder then it does on a flat surface.
The real shame is that it looked good half way through the procedure and now it just looks mostly brown... so I'll just start again on it.
That roof looks crazy good. That edge with the rusty-ness is truly epic. Looks perfectly real. If you do add any "metal" make it titanium coloured. Just seems to work nicer than silver on these things. But the "goto man" for paint effects of this calibre has to be Dave.
Thanks. I'm quite liking it, although the plates didn't end up as different as I planned. There are variations, but they're subtle and all the plates have sort of proceeded towards the same end through different routes... *shrugs* You can't fight the paint sometimes, go with the flow.
I was thinking of a gun-metal colour as it's darker than silver. But it's only going to be on very few raised edges, just to make some things look newer than others...may not even be noticeable...
I think we have a winner here. Everyone's work in the competition is amazing, but this just takes it to another level.
I don't know about that  . But it's down to the judges in the end and what tickles their modelling bits the most.
And there is some very good modellers out there that have shown very little of their pieces so far and could easily snatch a victory with wow factor 45. I'm happy just for the challenge of the modelling and to show off just what I can do (to myself as much as the rest of you).
Before I started the models you see in this blog, I always followed the instructions for the model to the letter and painted cleanly and neatly with no weathering at all. Any techniques beyond neat shapes and a bit of dry-brushing (that I did without knowing it was a thing) I have learned during the course of this blog.
Enough of that though, time to look at this ladder again...
24297
Post by: Viktor von Domm
it is really a bit creepy how good all of your stuff turns out atm...???
the rust is way too RL looking for my taste...wow...
by the way... the first non blurred pic doc
62749
Post by: Dr H
 Viktor von Domm wrote: Viktor von Domm wrote:it is really a bit creepy how good all of your stuff turns out atm...???
the rust is way too RL looking for my taste...wow...
Thanks Vik. I just been tinkering with it, throwing some paint about and they seem to work out in the end. I've posted everything I've done, every step, you can see that it just comes together at the last step. Or more accurately, I keep going until it looks good enough for me... and I want it as real as possible.
by the way... the first non blurred pic doc
Yeah, entirely by accident I assure you. Call it a treat for putting up with my teasing.
24297
Post by: Viktor von Domm
Yeah, entirely by accident I assure you. Call it a treat for putting up with my teasing.
ROFL...
Thanks Vik. I just been tinkering with it, throwing some paint about and they seem to work out in the end.
see? this is what makes it soo creepy!... in a trail and error session the fail is more common than the win... ...but you either keep from us all the fail parts or you have a rather uncommon lucky streak... what a bugger...
no seriously... whatever you currently do... amazing really... i even thought the orange yellow wash at the back of the earlier update was quite convincing looking... really... rust can come in so many varieties
62749
Post by: Dr H
True. I think that's the thing with the wood and the rust. There's so many possible varieties/colours, that so long as your not aiming for a particular colour and just see what results, it's going to work.
30672
Post by: Theophony
The roof is coming along great, especially in newer pics .
Stupid fact of the day in the b-52 song "love shack" when they say "tin roof rusted", it is slang for "the girl is pregnant". I know there's no point in saying this here, but thought I'd share some of my vast useless Information.
10972
Post by: Ruglud
Rusty roof looking great Dr H
62749
Post by: Dr H
Thanks dudes. Nowt wrong with interesting facts here Theo. Having decided that I should stop fiddling with the roof for fear of making a mess of it (like the ladder) and having fixed said ladder, I have started the (potentially quite long and laborious process of) painting the base. This is brown as a base colour, dry-brushed with a lighter brown (having run out of my usual lighter brown I have had to mix some "bone" with brown) and now I've picked out the things that look enough like rocks to be rocks and found out what else is going to be needing paint, such as scrap wood, rusty metal and some either young plants or dried leaves... And what bright spark decided to put a large rock next to a large plant (because that's where a plant would likely grow) and therefore make both of them difficult to paint... 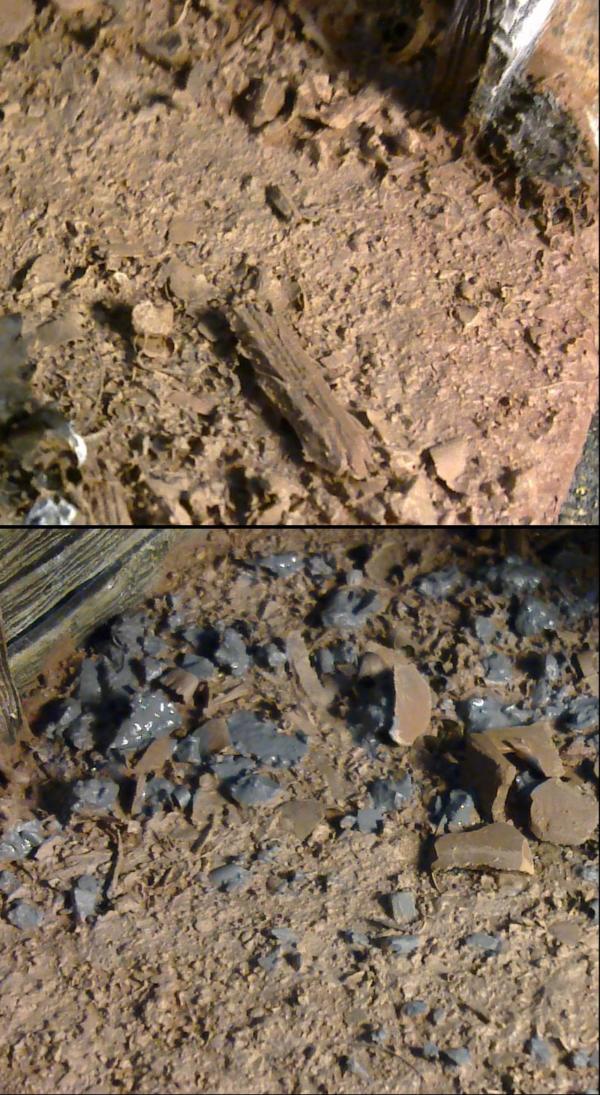 The paint is still a little wet in places here, so ignore the shinyness.
30672
Post by: Theophony
The dirt is looking good...  your dirt looks better than mine, I guess the it is always browner on the other side.
62749
Post by: Dr H
Theophony wrote:The dirt is looking good... your dirt looks better than mine, I guess the it is always browner on the other side.
...and it's all just dried paint and the rubbish off the modelling board... Thanks Theo. The things that look like rocks are mostly rock-like. The things that look like rusty metal are mostly rusty. The things that look like bits of wood are becoming woody... Edit: Oh, and the things that look like broken pottery are ceramic coloured and waiting for a simple design... Once that's done, I can start on the plant life and it's affect on the surroundings (read; mould). Getting very close to done...
14392
Post by: nerdfest09
Getting very close to wanting to see it finished!
62749
Post by: Dr H
You'll just have to hold back a little bit longer NF...
45565
Post by: cormadepanda
Can the Dr finish?
62749
Post by: Dr H
I always finish...
I am now starting the plants...
24297
Post by: Viktor von Domm
Tiere is only dust, grime, rust and rotting carcasses... No room left for plants in the grimm darkness...
62749
Post by: Dr H
Viktor von Domm wrote:Tiere is only dust, grime, rust and rotting carcasses... No room left for plants in the grimm darkness...
But if there was no plants then those Catachen jungle fighters would have nothing to complain about...
And for the 1000th post here in my blog, here's the first layer of green on the plants.
The piles of plastic shavings painted up ok in the end.
You can also see some rocks and a lump of rusty metal.
24297
Post by: Viktor von Domm
those spure plants are bloody ridiculous! and amazing!...
the smaller one looks like someone tossed his spinach away
48594
Post by: dsteingass
Amazing work!-But try some lighter brighter green too
62749
Post by: Dr H
Viktor von Domm wrote:those spure plants are bloody ridiculous! and amazing!...
the smaller one looks like someone tossed his spinach away
Thanks , they were just following the tutorial and there were about 3 or 4 other plants that I made but didn't make the grade.
Maybe that's why the hut got broken...
dsteingass wrote:Amazing work!-But try some lighter brighter green too
Thanks.
Yeah, see below. That was just the base green, there were washes and highlights to be added.
Well guys and gals, the time has come... it is done.
May I present... The (Sprue) Hut!
Outside:
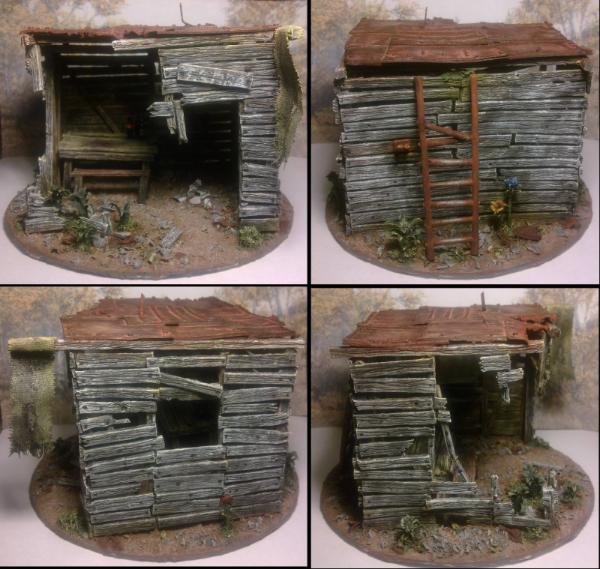
Roof, top and bottom, and the ladder on it's hook:
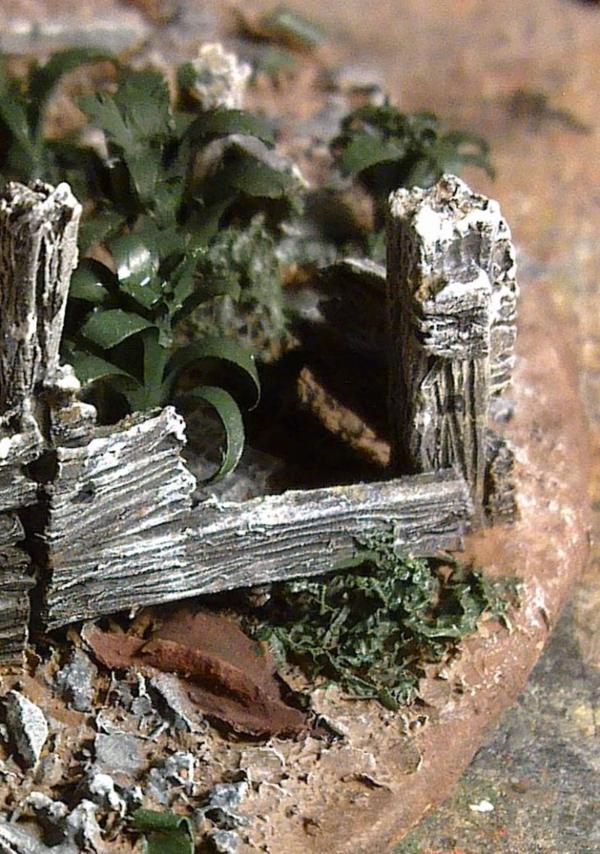
and moving inside, the table and bench in position with the completed bottles (I wanted something recognisable and also a nod to one of the prizes on offer...) and you can see some broken pottery:
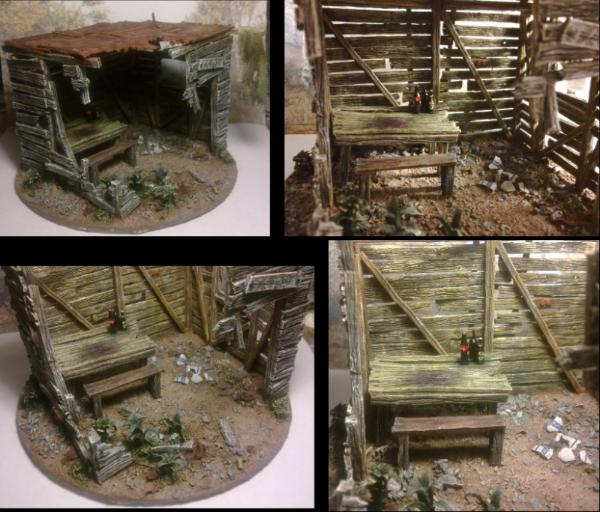
and finally, the smaller details:

All the above pictures are quite zoom-able (and vote-able ) so you can see all the little details.
I hope it's been worth the wait.
Any comments, questions and criticism welcome.
There is a lot of detail crammed in so feel free to ask about things if they're not clear...
43045
Post by: Casey's Law
Jaw droppingly, gob smackingly brilliant! A round of applause for that, truly outstanding, H!
30672
Post by: Theophony
Absolutely amazing, very blackadder in detail level, the modeler not the actor. And voted
29449
Post by: weetyskemian44
What a great hut. A bit open plan and drafty to live in but if I went to Butlins holiday camp and this was my hut I would be pleasantly surprised
Automatically Appended Next Post:
What a great hut. A bit open plan and drafty to live in but if I went to Butlins holiday camp and this was my hut I would be pleasantly surprised
Is this for the re-purposing comp? Where do I vote?
10972
Post by: Ruglud
Dr H, I take my hat off to you... That is simply stunning and worthy of shed of the year
http://www.readersheds.co.uk/
The small details such as the bottles, broken pottery and flowers really add to the unique story on this hut
24297
Post by: Viktor von Domm
voted earlier.... first i may add
then wanted to comment but my phone ate up my comment and i went all grumpy...
now with better mood again...
looks lovley! really... all those details...the flowers and the bottles or the hanging cloth... it is a true gem... i hpope you are proud about it... every ounce of sweat you lost was totally worth it!
also... on a related note... you defniatly made some great looking pics of that piece... somehow the light is very pleasant to see... it loosk most athmospheric!
seeing this i think you know should get yourself a new hobby...maybe ping pong... as i can´t see you best that thing anymore
62749
Post by: Dr H
Casey: Thank you *bows*
Theo: Thanks. Details is where it's at.
Weety: lol. Thanks. Yeah, it's for Brian's recycling competition. You can vote in the Dakka gallery, but it won't affect the competition as it's up to the judges who wins in the end. So it's only for my own warm, fuzzy feeling...
Ruglud: Ha ha, it's almost in a better condition than Mr "I've got a boat for a roof" 's shed. Thanks. Yeah I wanted it to look like it's had a long history.
Viktor von Domm wrote:voted earlier.... first i may add
then wanted to comment but my phone ate up my comment and i went all grumpy...
now with better mood again...
looks lovley! really... all those details...the flowers and the bottles or the hanging cloth... it is a true gem... i hpope you are proud about it... every ounce of sweat you lost was totally worth it!
also... on a related note... you defniatly made some great looking pics of that piece... somehow the light is very pleasant to see... it loosk most athmospheric!
seeing this i think you know should get yourself a new hobby...maybe ping pong... as i can´t see you best that thing anymore
I can see a comment you made on one of the pictures, so maybe it wasn't entirely eaten. Thanks.
Yeah, I am very happy with it.
Thanks about the pictures, you probably won't believe me when I say they were taken with a camera phone and a clip on desk lamp that I had to hold at the same time. I did have to take about 3 times the number of pictures to get the ones I used. I quite like the shot with the light coming in the window though.
Ha, I do have many, many hobbies and tend to rotate the focus every now and then depending on time/money/effort.
Although I'm more of a rock climber than ping pong player... (but I haven't done much for ages and so am very out of shape).
24297
Post by: Viktor von Domm
I quite like the shot with the light coming in the window though.
that´s the one i was referring to...
and it was only a joke.... don´t even think about stopping your awesome work
62749
Post by: Dr H
Yeah-I-know.
Had you worried there for a minute. I won't be stopping the modelling, there is so many models left to build...
48594
Post by: dsteingass
As an objective judge, I can't comment too much yet, but I think it's great!
30672
Post by: Theophony
As a fellow competitor I realized the only way of beating this was a tragic accident.....I'm glad my operative failed.....mostly.
62749
Post by: Dr H
dsteingass wrote:As an objective judge, I can't comment too much yet, but I think it's great!
Of course. Thanks. I await your final judgement when the day comes.
Theophony wrote:As a fellow competitor I realized the only way of beating this was a tragic accident.....I'm glad my operative failed.....mostly.
Thanks. I'll have him (brain)washed and sent back to you soon...
45565
Post by: cormadepanda
Well done dr h. I like that hut a lot you have impressed me with both your skills of sprue foo and a good paint job.
54500
Post by: hk1x1
I've been following your build on this, it's a brilliant piece of work, and beautifully painted.
Plus I love your attention to detail, It's those little things which really Bring it to life .
62749
Post by: Dr H
cormadepanda wrote:Well done dr h. I like that hut a lot you have impressed me with both your skills of sprue foo and a good paint job.
Thanks Comrade.
hk1x1 wrote:I've been following your build on this, it's a brilliant piece of work, and beautifully painted.
Plus I love your attention to detail, It's those little things which really Bring it to life .
Thanks hk. You know I already worship at your altar, so I'm glad you like it.
Little details (with reason behind them) are what makes a model.
65595
Post by: Camkierhi
Away to vote now.
It is brilliant and beautiful. As someone trying to compete, and failing, this is simply art. Absolutely perfect. We are definitely trying for 2nd place now.
Now lets see you pump one out for the other competitions.!!
62749
Post by: Dr H
 Camkierhi wrote: Camkierhi wrote:Away to vote now.
It is brilliant and beautiful. As someone trying to compete, and failing, this is simply art. Absolutely perfect. We are definitely trying for 2nd place now.
Now lets see you pump one out for the other competitions.!!
Thanks Cam.
Hey wow, thanks everyone; near perfect 10s. I was hoping for 8s or maybe 9s... I is a happy chappy.
You just have to push yourself Cam and pay close attention to the smallest of details, you can do it.
Ha ha. One's enough for me. You can tell how much I dislike deadlines by how much effort I put in to getting this done (and I still only just got it done before the original deadline I was aiming for...).
I think I'm going to go back to my more casual modelling pace for now... and maybe one day in the future I may enter another competition that captures my imagination like this one did.
48594
Post by: dsteingass
I feel ya..I don't even want to finish my speeder anymore. Comps aren't really my thing.
65595
Post by: Camkierhi
I have to admit, these competitions are changing my modelling habit's. I usually always start a project and finish that project. Now got a bench full of half finished projects, and not sure which to get on to next, so my mind is wondering.
What ever you do next Dr H, I for one will be following closely.
For now, still admiring that Hut.
62749
Post by: Dr H
 dsteingass wrote: dsteingass wrote:I feel ya..I don't even want to finish my speeder anymore. Comps aren't really my thing.
Yeah, a competition can do one of two things; either motivate you to get something done quickly and to the best of your ability, Or make a fun hobby a bit of a chore. I had this happen to me at school (many years ago) where I used to spend lunchtime drawing pictures with a couple of friends and so when it came time to pick GCSEs to do, I chose art as one of them because I enjoyed drawing. But when it came to it that I HAD to draw, I couldn't get motivated and ended up just scraping a GCSE (an E) due to a lack of quantity of work even though the few things I did were getting top grades (As and Bs). I approached this competition like I did any project or experiment I would do in the lab. Set out the time-scale (decided that I was to be painting with at least a week to go to the deadline) and set goals regularly (albeit not all that strict), and worked as efficiently as possible (the next couple of steps were planned out while doing to previous step, if something wasn't working I either changed or dropped it and any added extras were pushed to the end to make sure the important things were done first. Also leaving easier things 'til last to make time to do the harder things first). Try to look at it as a challenge and not a chore, you can get there Dave, you don't HAVE to do it but lets see IF you can. Automatically Appended Next Post: Camkierhi wrote:I have to admit, these competitions are changing my modelling habit's. I usually always start a project and finish that project. Now got a bench full of half finished projects, and not sure which to get on to next, so my mind is wondering.
Yeah, I like to finish one thing before moving on. Although I have an added incentive for this in that I don't currently have the space for many unfinished things (don't really have much space for finished things...).
What ever you do next Dr H, I for one will be following closely.
For now, still admiring that Hut.
Thanks, so am I.
62774
Post by: da waaagh orkz
Really nice finished project. Looks amazing!
62749
Post by: Dr H
Thanks da waaagh.
I'm currently working on a full tutorial for the hut from sprue to paint-job. But it's taking a little time to do.
43045
Post by: Casey's Law
Dr H wrote:Try to look at it as a challenge and not a chore, you can get there Dave, you don't HAVE to do it but lets see IF you can.
Yeh I think this is the best way to approach it. If it's a chore there is no point in doing it in my opinion. Then again I'm not out to win so maybe that requires a different mind set. I just think it's best to see what you can do in the time frame to please yourself and then see if you can do better in the next competition.
62749
Post by: Dr H
Casey's Law wrote:Yeh I think this is the best way to approach it. If it's a chore there is no point in doing it in my opinion. Then again I'm not out to win so maybe that requires a different mind set. I just think it's best to see what you can do in the time frame to please yourself and then see if you can do better in the next competition.
Yarp. I was quite impressed with myself for not getting all competitive with this like I do with computer games. I was able to just look at it as a set of restrictions for the model and just work to the best of my ability within those guidelines and had fun doing it. Anything I get on top of that is just a bonus.
69562
Post by: Largeblastmarker
That hut must have av 14 on all sides. Amazing work.
30672
Post by: Theophony
Dr. H, you make me cry , that you have so much talent and weren't even trying to be competitive. Some people have talent, you sir have taken more than your share.
62749
Post by: Dr H
Largeblastmarker wrote:That hut must have av 14 on all sides. Amazing work.
I think it's more likely to have AV 1.4 as it's all rotten wood with great big holes everywhere.
Thanks.
Theophony wrote:Dr. H, you make me cry , that you have so much talent and weren't even trying to be competitive. Some people have talent, you sir have taken more than your share.
I didn't say I wasn't trying. I really pushed myself to the limits to get it to look right and I set my standards very high (even by comparison to my usualy high standards). But I still maintain that the actual techniques required for this are simple enough for anyone to do.
I'm just happy to have had the challenge and if I win anything it'll be a bonus. Automatically Appended Next Post: I have the first part of the tutorial up. How to build you very own Sprue Hut.
http://www.dakkadakka.com/dakkaforum/posts/list/545398.page#5935106
It will be updated over the coming days, not least of all with the painting instructions.
45565
Post by: cormadepanda
Nice tutorial Dr. I will be using it in the future at my local club I will be creating.
62749
Post by: Dr H
Cool. Thanks Comrade.
Normal ( ) service will be resumed here once I've finished that and got back to modelling these weapons...
65595
Post by: Camkierhi
Great tut. Thank you for this masterpiece.
43045
Post by: Casey's Law
Good job on the tutorial, mate!
2326
Post by: shasolenzabi
I do like the rust of the roof.
62749
Post by: Dr H
Thanks Cam and Casey.
Thanks Shas. I'm pleased how it turned out and it is the next part of the tutorial that I am working on and will be updated soon-ish.
30672
Post by: Theophony
Still waiting on the rest of the village.....but i'll keep looking at the tutorial until then.
24297
Post by: Viktor von Domm
so... with the rotting rusty shed all done and wrapped up for the win...
will this mean the army of the second law gets a new member?
after all... the show must go on...!
62749
Post by: Dr H
Theophony wrote:Still waiting on the rest of the village.....but i'll keep looking at the tutorial until then.
Ha ha. I will add more terrain in time. I didn't really intend to build any terrain until I had enough of an army and the space to start playing games.
But more terrain will happen one day and I already have plans/ideas for them. I even have fluff collecting (pun intended) to explain various table layouts and a huge folder for terrain inspiration on my computer.
I do however also have just as many (if not more) ideas for army units. So many ideas, not enough time/hands/money to do them...
The tutorial has been updated recently up to the painting of the rusty roof.
Viktor von Domm wrote:so... with the rotting rusty shed all done and wrapped up for the win...
will this mean the army of the second law gets a new member?
after all... the show must go on...!
The competition's not over until the man in charge says so (whether he chooses to employ a fat lady to sing is up to him).
The show will go on. I will finish this tutorial off first and then a little tidy of the board (which currently has several piles of future basing material laying on it) and then I'll be back to where I left off with the army.
24297
Post by: Viktor von Domm
i vote for the fat lady ... you gotta go down with style^^
62749
Post by: Dr H
Well you can talk to Brian about that...
and anyway, I'm still waiting for it to snow on your entry... 
24297
Post by: Viktor von Domm
*hides in the deepest shadows* um....er....looks at the weather forecast.... winter is not due till...winter?^^
24297
Post by: Viktor von Domm
yeah really... i´ve worked my bum off to make a crisp looking eldar piece and the win gets stolen by totaly ruined and stinking boards nailed inexterly to a shady shed....tststs... some peeps have nerve...
62749
Post by: Dr H
Viktor von Domm wrote:*hides in the deepest shadows* um....er....looks at the weather forecast.... winter is not due till...winter?^^
I get the feeling that you'll all be more disappointed than me if I don't win.
Remember that there is more than one prize up for grabs and you have to be in it to win it Automatically Appended Next Post: Viktor von Domm wrote:yeah really... i´ve worked my bum off to make a crisp looking eldar piece and the win gets stolen by totaly ruined and stinking boards nailed inexterly to a shady shed....tststs... some peeps have nerve...
and who says it stinks... those flowers may add a pleasant smell to their surrounding...
62749
Post by: Dr H
I'd have thought a greenskin such as yourself would appreciate that sort of thing... especially the added hint of iron from the blood
and is what I say to that
30672
Post by: Theophony
I don't think the hut is done until you grow a fungus sprout in a corner, the new occupant almost ready to grow up into his future home.
62749
Post by: Dr H
I was tempted to try to sculpt tiny 'shrooms but they would be so much easier to make out of putty and that was outside the scope of the competition (or at least the limitation that I set upon myself).
There will be 'shrooms in the future.
30672
Post by: Theophony
Come on man, take th little round circles off a sprue and carve a mushroom top. Then carve a stalk from the sprue. You can do it you know you want to
62749
Post by: Dr H
I know it could be done. But The Hut is done, it is on the shelf and it's time to do new things...
On that note, I have completed the tutorial for said Hut. I noticed it got onto the front page, so thank you all for liking it and thanks for the help, ideas and kind words throughout the build.
Stick around and I'll continue to build more things with minute attention to detail.
45565
Post by: cormadepanda
Dr H wrote:I know it could be done. But The Hut is done, it is on the shelf and it's time to do new things...
On that note, I have completed the tutorial for said Hut. I noticed it got onto the front page, so thank you all for liking it and thanks for the help, ideas and kind words throughout the build.
Stick around and I'll continue to build more things with minute attention to detail.
Yes!
62749
Post by: Dr H
Thanks Comrade. and on that note, where was I before I got distracted by this hut thing...? ...Ah yes, Hands. Tricky little putty hands...  However, after the success of the wood and bottles and plants and flowers... I had a thought ... What's easy to work with? Fairly forgiving? Easily repaired? and compatible with the Sprue Swords? Why, Sprue of course... and considering my new title (I never asked, do I get designatory letters with that title? It would be nice to add to my collection) of Spruemeister General... SPRUE HANDS! 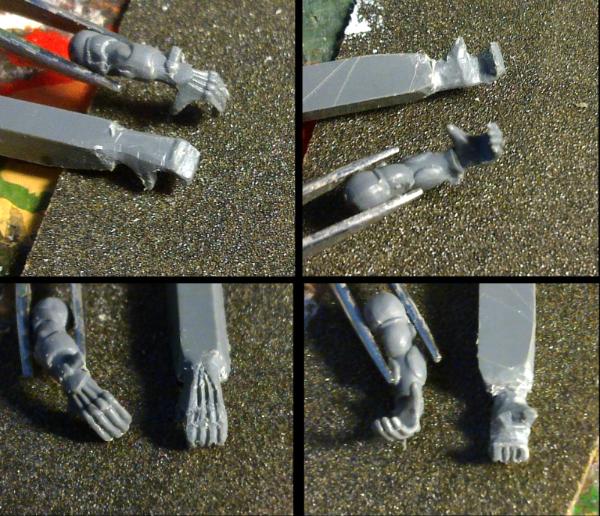 Still a wip at the mo, and requires some cleaning up and sharpening some features (like the tips of the fingers) but not bad for 15 minutes... What do we think? Am I on to a winner?
30672
Post by: Theophony
(Mad) scientist (spruemeister) using raw materials at hand to emulate foreign technology in order to take over the world (Internet).....seen this somewhere.....can't seem to put a sprue finger on it......
Well yes, I think you are on to a WINNER
Here I thought the spruecrons were awesome.
I'll give you an hour each and see what you come up with .
62749
Post by: Dr H
Thanks Theo.
When the day comes, and I have some Necrons to look closely at, I will knock out a spruecron to rule all spruecrons...and in the darkness...bind...them...?!
30672
Post by: Theophony
I suggest that you do a self sculpture of sprue. One where you have ourself made of sprue hunched over a desk of sprue cutting a sculpture of yourself carving sprue. Of course you'll need. Sprue knife, and sprue doctors with a sprue jacket to haul you away in a Sprue van to a room of sprue padded walls, but I know your up to the task.
62749
Post by: Dr H
I'll have to work up to that in time. Not enough hours in the day and so much modelling to do...
24297
Post by: Viktor von Domm
would you mind showing exactly what type of knife you use for that work???... my own scalpels and razor blades or carpet knifes sure never let me do this amount of detail when trying something (far far far away) along these lines...
the sprue hand is a good start... tho i actually wonder why you didn´t start with a bended sprue piece... thus you could have gotten the fingers longer and already bended to a more fitting posing?
and also... you do remember me challenging you to make a sprue horse?
62749
Post by: Dr H
Viktor von Domm wrote:would you mind showing exactly what type of knife you use for that work???... my own scalpels and razor blades or carpet knifes sure never let me do this amount of detail when trying something (far far far away) along these lines...
No prob's 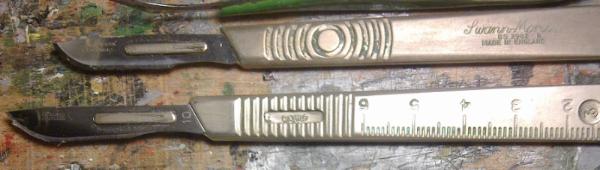 These are what I use for all my sharp sharp-implement needs (as opposed to my not-so-sharp sharp implement that I used for putty work). The upper one says "Swann-Morton" and the lower one says "Dahle" (I assume that's the company name, says nothing else). They are both number "3" handles and I use number "10" blades. I prefer curved blades for all my modelling. The top scalpel has a slightly stronger blade than the other one, but I have a box of (what's left of) 100 of the thinner/weaker blades, so I use the top scalpel for heavy duty cutting (like removing things from sprue or cutting sprue to length) and the lower scalpel for all the carving and scraping. the sprue hand is a good start... tho i actually wonder why you didn´t start with a bended sprue piece... thus you could have gotten the fingers longer and already bended to a more fitting posing?
It's a good point, although I've had an idea about the hand sculpting that should solve most problems. That is to sculpt fists... because an open hand I'd only have to try and bend around a handle so why not sculpt a closed hand and glue the sword to the hand. Although the axes will require an open hand. 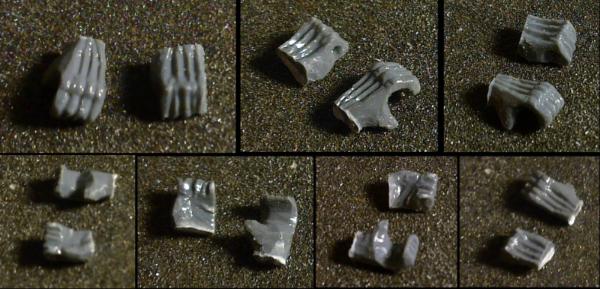 This is only a practice fist, so doesn't look too good at the mo. and also... you do remember me challenging you to make a sprue horse?
I do. Have you had an idea?
24297
Post by: Viktor von Domm
no, currently no idea...but seeing you do all those wonders with sprue... i thought this might be the man to charge for that mission
and well... do you use a magnifying glass at all? i think this might help you get the sinews of the outer hand more in line... but the current work is almost perfect anyway...also... as you have worked by the DE hand... you could have gotten a more easy start by using SM hands... i bet these are more easier... but no sir... you had to go the full mile ... and it keeps getting better...
curved blades... i had the slight suspicion already that you don´t use straight blades... somehow i can´t imagine this would work that well with a straight blade... tho i´d be damned to put my finger on the why...
and starting woith clenched fists... there is a nice idea...
62749
Post by: Dr H
Viktor von Domm wrote:no, currently no idea...but seeing you do all those wonders with sprue... i thought this might be the man to charge for that mission
I have made sure that it is on my (ever growing) list of things to do, so one day, when the right inspiration hits and the time is right, it may become a thing. I would also like to see your take on a robo-horse as well. I know you have a nice starting piece too. and well... do you use a magnifying glass at all? i think this might help you get the sinews of the outer hand more in line... but the current work is almost perfect anyway...also... as you have worked by the DE hand... you could have gotten a more easy start by using SM hands... i bet these are more easier... but no sir... you had to go the full mile ... and it keeps getting better... curved blades... i had the slight suspicion already that you don´t use straight blades... somehow i can´t imagine this would work that well with a straight blade... tho i´d be damned to put my finger on the why... and starting woith clenched fists... there is a nice idea...
I do have a magnifying glass yes, but it requires a hand to hold it so I only use it to check what I've done and not what I'm doing. I have to use Dave Lister's special human "zoom mode" and move my head closer to the object... Yeah, I was saying earlier that it would have been so much easier to do SM hands. But if I was doing a SM, I'm pretty sure I still have plenty of hands spare (although not left hands I don't think, they're all open "cradling the gun" hands). I think the point of a straight blade would be too pointy and so the "scraping with the tip sideways" (which is how I did the wood and the grooves on the hands) probably doesn't work so well. Edit: the main way I use the scalpel for carving is like a chisel and slowly taking away small slivers and adding notches. and I've done another, better, fist. 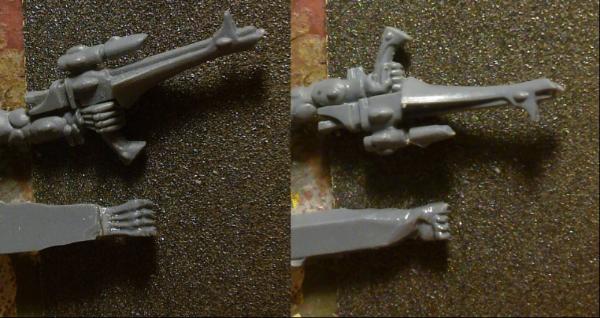 I even remembered to leave a piece in the fist for the handle (which I didn't in the previous one) and got the thumb looking right. Needs a little more attention to the back of the hand to round off the ridges. These are all looking shiny because I'm using brush-on poly' cement to smooth the rough edges.
29449
Post by: weetyskemian44
Insane post from theophany there. Sprue taken to the next level.
Good luck with hands Dr H they are the test of the artist.
And going back a bit I should like to say that taking part in a competition has raised me to new levels of insane competitiveness. I hope.
24297
Post by: Viktor von Domm
good idea to use the poly cement to smooth the edges... i have done so in the past too... it is a really good way around a problem!
i think i will soon invest in a new scalpel... these do look interesting for certain jobs i yet tried to avoid...!
the new fist is looking genius!... a very good solution to have the handle already carved !!!
by the way... do you aim for "just" the fist or the whole arm too?... in my view that would be a bit OOT as arms galore are just a chop-job away^^
62749
Post by: Dr H
weetyskemian44 wrote:Insane post from theophany there. Sprue taken to the next level.
Good luck with hands Dr H they are the test of the artist.
And going back a bit I should like to say that taking part in a competition has raised me to new levels of insane competitiveness. I hope.
Thanks. So far I still think heads are more of a challenge than hands, the head I did on Venus was ok in the end and took so many attempts to get it that far (and it's not even small enough to use on a not-statue). I have a great respect for people that sculpt heads. Your work since that competition has been really awesome so I'm looking forward to you pushing the boat out for another one. Viktor von Domm wrote:good idea to use the poly cement to smooth the edges... i have done so in the past too... it is a really good way around a problem!
i think i will soon invest in a new scalpel... these do look interesting for certain jobs i yet tried to avoid...!
the new fist is looking genius!... a very good solution to have the handle already carved !!!
by the way... do you aim for "just" the fist or the whole arm too?... in my view that would be a bit OOT as arms galore are just a chop-job away^^
I do have a selection of different shaped blades for these scalpels but I could never get on with the straight ones, they require different hand movements to work right and I'm used to the curved ones. Thanks. Yeah, added handle for the win. I'm just doing the hands and I'll stick them on the arm that I have set aside for this chap. and I can do a hand for each potential weapon quicker and easier... Edit: and good news. Mum has just given me a clip-on-the-desk magnifier that she wasn't using so this may help future work.
22192
Post by: whalemusic360
This sprue work is crazy! Can't believe I haven't checked out you blog before, will give it a good once through as time permits.
29449
Post by: weetyskemian44
You are right of course - when it comes to this scale heads are the hard bit. I'm tempted to give my sculpt an enclosed helm to get round that!
62749
Post by: Dr H
whalemusic360 wrote:This sprue work is crazy! Can't believe I haven't checked out you blog before, will give it a good once through as time permits.
Lo WM, welcome. Cool, take your time and enjoy it.
weetyskemian44 wrote:You are right of course - when it comes to this scale heads are the hard bit. I'm tempted to give my sculpt an enclosed helm to get round that!
That's not a bad idea. I did find a nice tutorial about sculpting people, including nice tips about the head, a while ago. But not had the chance to try it out since.
30672
Post by: Theophony
You should try to sculpt a sprue version of the new space marine centurions. It can't come out worse than the pics we've seen. It could be part of one of the lost chapters......the "sprue hands". The emperor had run out of raw material after 18/19 primarchs so he had to use the leftover material and created this chapter. Their primarch Daned Evihto was mocked so much that he quit the crusade and became an actor.
62749
Post by: Dr H
Ha ha, where do you get your ideas from Theo?!
I did think when I saw the pictures of the Centurions that I would rather make my own and they would look different to what the official models do. Will have to wait for them to be released and see what they involve (construction and rules wise) before I can plan my own version.
In other news; I have done 4 fists now and may have rescued one of the putty hands, so I will look at attaching hands to swords tomorrow (after all I only need one to work really) and I'll need to think about the guards for the swords as well.
I have taken enough pictures for a mini hand-carving tutorial, If people are interested I can show tomorrow as well?
24297
Post by: Viktor von Domm
Yes, most definitely!!! Sculpting is not really me, but carving I could see...
10972
Post by: Ruglud
So many fisting jokes, but I will not go down that back alley
Suffice to say, they look great and your love affair with sprue knows no bounds, interested to see what else you come up...
43045
Post by: Casey's Law
Lovely work mate. I definitely don't have the patience for carving sprue, very impressive.
62749
Post by: Dr H
Viktor von Domm wrote:Yes, most definitely!!! Sculpting is not really me, but carving I could see...
K. See below.
Ruglud wrote:So many fisting jokes, but I will not go down that back alley
Suffice to say, they look great and your love affair with sprue knows no bounds, interested to see what else you come up...
Thanks Ruglud.
As they say, when God gives you lemons, make lemonade. So when GW gives you sprue, make things from sprue... It's free building material...
Casey's Law wrote:Lovely work mate. I definitely don't have the patience for carving sprue, very impressive.
Thanks Casey. Well see it as an example of what is possible. Start small and simple (like bottles) and the more complicated pieces can come later.
So by popular demand ( ) here is my quick tutorial of how to start along the path to sprue fist joy...
This is for an Eldar Guardian's left hand, that is holding something like a weapon. My point of reference was a right hand that was holding a gun so I had to reverse most of the details.
First, square off the piece of sprue. Those cut sides will become the top and bottom of the hand. So turn the piece to one side and start the fist shape by cutting one corner off (Green line) then cut only a small amount off the other corner (Blue line), just enough to "round off" that corner. Make sure to leave a short section of the original flat end of the sprue between the two cuts so you get 3 angled sections that get progressively smaller from green to blue.
Then you need to carve away at (what will become) the back of the hand. You want this to be as flat as possible. The final shape you want to achieve, when looking down at the fist should be similar to the line drawing shown (where yellow is the original, untouched sprue shape).
The next step is tricky to do and tricky to explain. I plan out the shape of the thumb with a few scratches (as indicated by the light blue lines in the inset). These scratches are to show where you start your carving down into the sprue.
The shape that is to represent the handle in the hand is carved to a rounded shape. A groove is scratched (with the side of the scalpel tip) to indicate the extent of the fingers and the thumb is carved with reference to the original model thumb. Try not to remove too much material and only slightly round the edges of the thumb just so it doesn't look square.
With that done (don't worry about it looking rough at this point), you can move onto the back of the hand. The first job is to create the raised knuckles of the Guardian's gloved hand. I create a ridge with some careful carving (the inset shows a top down view) and the individual knuckles are created at the next step.
Starting in the middle of the hand, scratch a line up to (but not over) the ridge that you just created, again using the side of the tip of your scalpel (I also switch the blade over to give an even shape to the groove). I'm actually holding the blade of my scalpel between finger and thumb for maximum control at this stage, so be careful of cutting yourself. Once that line is straight you can do two more lines at equal distances either side of the middle line. These lines should taper towards each other at the wrist end, but that's very hard to achieve.
The knuckles are then shaped by cutting little "V"s in line with the lines that you just created and then you can carry on scratching the grooves, through these "V"s and down the next section of hand.
You then need to extend these lines round the corner and all the way to the tips of the fingers.
Once you are happy with the shape of your hand then take some brush-on liquid polystyrene cement and make sure most of the glue is removed from the brush (just wipe off on the side of the bottle neck) and lightly brush over the hand in the direction of the grooves. This will dissolve the rough edges and gently round off any square sides. don't get too carried away with the glue or you will destroy your hard work.
And you're done, cut it off at the wrist and use as you see fit.
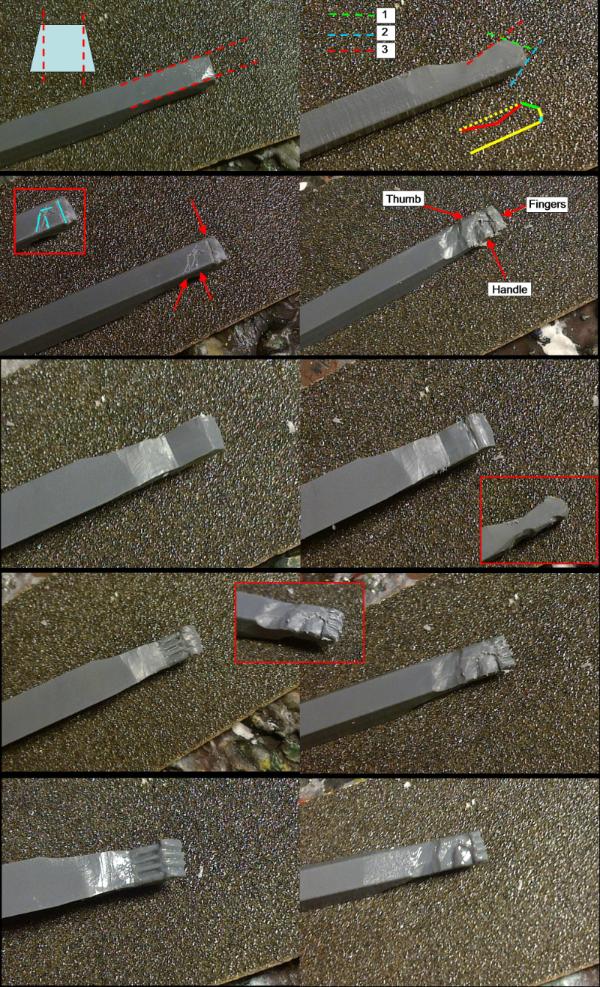
Hope that is helpful.
I'll update later once I've done something...
43045
Post by: Casey's Law
Dr H wrote:Casey's Law wrote:Lovely work mate. I definitely don't have the patience for carving sprue, very impressive.
Thanks Casey. Well see it as an example of what is possible. Start small and simple (like bottles) and the more complicated pieces can come later.
I've done a few bits for my project but I'd much rather sculpt if I have the opportunity. Give me a colour shaper any day!
23173
Post by: finnan
Dr - that's insane! Loving it!
62749
Post by: Dr H
Casey: I've found that a lot of my putty sculpting ends with me doing a little dried putty carving anyway...
...That's probably why my carving skills seems to be improving quickly...
Thanks Finnan. Welcome.
62774
Post by: da waaagh orkz
I go away for a few days and you do models made entirely out of SPRUE?!?you are a true sprue mainiac.
Keep it up mate.
62749
Post by: Dr H
Thanks da waaagh.
I'm only using sprue to fill the gaps when I don't have a model piece that I want to use... I don't have any left hands holding things, so I make my own.
Most of the rest of these Guardians will be actual model and not sprue.
62749
Post by: Dr H
Right, so this is a test of the sword concept.
It's a little rough...
It's not quite square in some places...
and it might not work / look right when attached to an arm...
But, you don't know if you don't try.
This is what I've been aiming at throughout this whole Sprue Sword / scratch built weapon thing; a complete sword/weapon attached to a hand with a guard and pommel ready to be attached to an arm of Guardian #10.
I started with this sword as it's the simplest in it's "look". Others will get more intricate/complex looking guards etc...
Maybe I'll need to carve a hand that's holding a "thing" at an angle rather than straight like the current ones...
Thoughts, ideas, suggestions?
30672
Post by: Theophony
I think the bead is a little large for the hand, but otherwise it looks like an excellent midevil sword
62749
Post by: Dr H
 Theophony wrote: Theophony wrote:I think the bead is a little large for the hand, but otherwise it looks like an excellent midevil sword
Yeah, I couldn't find one in the pot that was between that and one that was too small (no thicker than the actual handle). Thanks.
Also didn't mention that this is all pinned together with thin wire from the blade through the guard into the hand and the pommel is also pinned to the hand.
30672
Post by: Theophony
Excellent, then they are reinforced weapons to withstand battle damage.
62749
Post by: Dr H
Ja. I thought it would be worthwhile making them tough enough to survive gaming/falling off a shelf (maybe). The added benefit of using sprue is that it's also mostly held together with plastic cement which also makes it tougher.
10972
Post by: Ruglud
It looks great - some small alignment issues with the blade and the tang, but as a prototype it's good...
24297
Post by: Viktor von Domm
wow... the new fist looks even better... specially the finger section... you really raise the learning curve here!!!
62749
Post by: Dr H
Ruglud wrote:It looks great - some small alignment issues with the blade and the tang, but as a prototype it's good...
Thanks. Yeah, with the prototype down I can work on getting it right for the final piece.
Also, just because this is the prototype sword it does not mean that this blade is out of the running for the final use.
Viktor von Domm wrote:wow... the new fist looks even better... specially the finger section... you really raise the learning curve here!!!
Thanks, there is more to learn and the hands are far from perfect as yet... See below.
So now as things are progressing, it's time for a test fit before the final push towards a finished model and an objective assessment of the success of the carving...

As you can see, even with the large blob of blu-tack holding the hand on, it's too large at the wrist (I expected this).
On the plus side, the straight grip pose of the hand doesn't look as bad as I thought it would.
So, next batch of hands will:
Be thinner and more tapered towards the wrist. With the original hand now removed from the arm it'll be easier to judge the size.
Be angled only slightly to allow a more raised pose of the weapon.
Be shorter between the knuckle and wrist, as was apparent when I put the amputated hand down next to the others...
And I still need to decide on what I'm going to have this chap doing with his legs...
24297
Post by: Viktor von Domm
And I still need to decide on what I'm going to have this chap doing with his legs...
er....why? he looks a bit odd but not necessarily something that needs fixing...
and bugger... never thought it would be a too big of a fist...
2326
Post by: shasolenzabi
Back to arming the troops I see.
24297
Post by: Viktor von Domm
I see what you did there
62749
Post by: Dr H
Viktor von Domm wrote:And I still need to decide on what I'm going to have this chap doing with his legs...
er....why? he looks a bit odd but not necessarily something that needs fixing...
Just because I don't like the "look at my cod-piece" pose that most of these models come with. And it adds to the individualism of the models/units/army. I want him charging, it's just a matter of whether it's the front or back leg that gets the chop... But I'll get the top half sorted first and see what will look better. and bugger... never thought it would be a too big of a fist...
(That's what she said... ) I did expect it, as I could see they were getting slightly bigger as I went. It's only really obvious once you put them together with a "real" hand or arm. The first couple of fists are ok size-wise and I've just done a fist 2.0 that I think will be good. I will show in a bit if it works out. shasolenzabi wrote:Back to arming the troops I see.
Viktor von Domm wrote:I see what you did there
So do I.
24297
Post by: Viktor von Domm
ah... ok... the cod piece issue is easy peasy fixed... tabard.... nuff said...
and with a tabard you can add a sense of motion too as it can billow in the gale^^...
62749
Post by: Dr H
Well it's more the static stance that bothers me, especially for the Eldar. They are meant to be elegant and fluid and fast and active, Not standing still saying "I dare you to kick me in the goolies"... leave that to the Marines.
Number 9 will be getting a cloak for the whole "blowing in the wind" thing. That will also be a relatively new thing for me (I try to do at least one new thing per model).
This shows the difference between the fists so far along with the arm and the new Fist 2.0
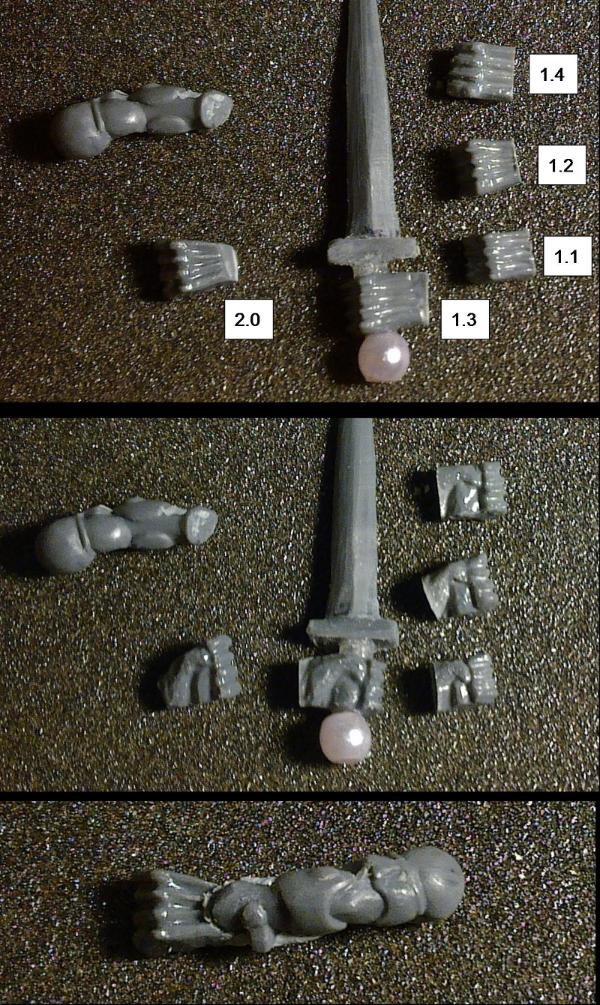
You can see how the first fists are all a bit square but I managed the get the new one to taper enough to match the arm (I'll have to rotate the wrist of that arm to make it look right with the pose I have in mind).
However, I have tried to replicate that fist 3 times since and completely messed them up. So I may save that one for best and maybe try some more later if I need to. After all, I only need one hand...
65595
Post by: Camkierhi
Looking great to me, boy you have some skill and patience.
62749
Post by: Dr H
Thanks Cam.
Patience, Persistence, Practice and Perfectionism... and probably some more words beginning with "p"... You get the idea...
24297
Post by: Viktor von Domm
would that be poo?... I doubt it but one can never make too sure, eh?
62749
Post by: Dr H
Not on my models, no.
But there will always be poo in all our lives, those with children (as you well know) however have a little more.
I have been progressing.
I'm adding the guards/tangs to the swords (not worth showing yet).
I may have saved a second putty hand along with half the guard (and replaced the other half with plastic), but time will tell.
I've rotated the wrist on the arm. Also not worth showing yet as it was only a cut between the armour of the forearm and the tag thing and then re-glued somewhere between 60 and 90 degrees round.
So it's all little jobs which are all slow going.
24297
Post by: Viktor von Domm
well even if you think progress might be slow... we are here for your motivation...
and on a side note... isn´t it funny that the use of toilet paper is measured per head?...:p of course does are we parents more gifted in the poo business^^
62749
Post by: Dr H
Thanks Vik.
It's not that I'm lacking motivation, it's just that the current jobs are slow as I need to wait for the glue to properly set before I can have at it with the scalpel.
Ha, yeah they have the wrong end of the body there. But at least the numbers of each end of the digestive system are proportional (ignoring the very occasional conjoined twins that share a rear end).
48594
Post by: dsteingass
Sprue hands are off the hook doc!
62749
Post by: Dr H
Thanks Dave.
and an update for the swords...
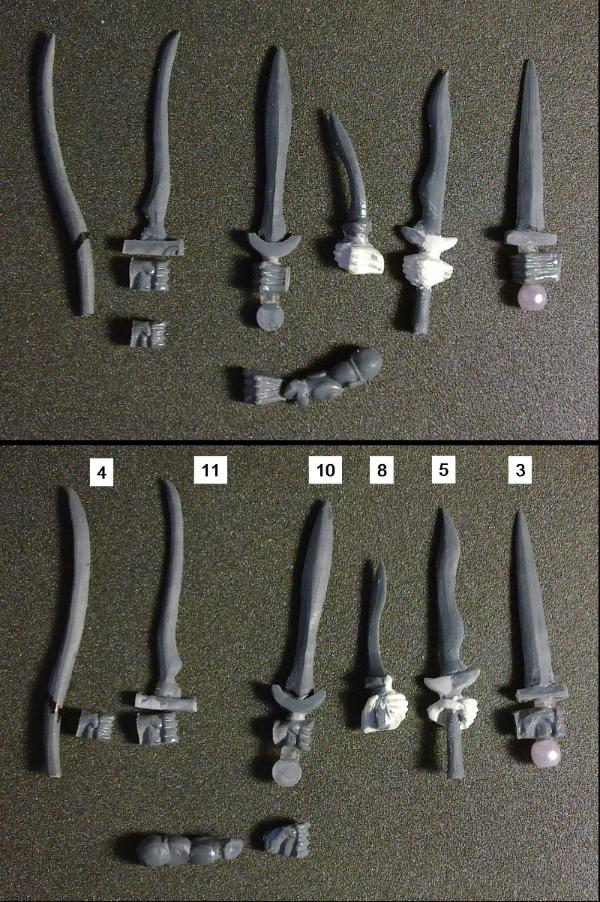
Starting on the right (because I still seems to lay things out from right to left ) you can see #3 that I previously showed, no change there for now.
#5 has one of the saved putty hands and the reconstructed guard. The front fell of while carving it to shape and so I stuck on two small pieces of plastic, let the glue set and then carved/sanded them to shape. I haven't yet decided what I'll do with the end of the handle, may leave it long and make it a bastard sword.
#8 (the minimised version, 8.2 whatever, it's #8) also has a saved putty hand. The guard, intentionally small, was made from a couple of thin strips of plastic glued on and bent to shape (helpfully softened by the glue) and then a little carving to tidy them up. Also need to add a pommel of some kind.
#10. I've only just finished gluing this together here and needs a little more work. The guard was made by using my file (that has a rounded side) to create the curve at the top of the guard. The sword blade was then cut to fit this shape and was glued in. Once that was set, I carved/sanded away the lump of plastic until I was left with the shape here. The handle is a disk of plastic, a hand, another disk and then a large disk on it's side (that I may drill a hole through). The handle area is where it still needs tidying once the glue is set.
#11 has only had the piece of plastic glued on that will become the guard (going to go straight and pointy). The hand is just there for scale.
#4 has had nothing done to it yet. It won't be getting much of a guard (if at all) and really only needs a hand glued in the correct place.
Under the swords you can see the arm with the rotated wrist and hand 2.0 for scale.
It's a lot of work for one weapon for a simple troop. But it's quite enjoyable.
45565
Post by: cormadepanda
Give him the entire lot of swords I say. Your handy work is good Dr H. Your sprue powers are off the charts. Keep up the great work.
62749
Post by: Dr H
 cormadepanda wrote: cormadepanda wrote:Give him the entire lot of swords I say. Your handy work is good Dr H. Your sprue powers are off the charts. Keep up the great work.
Thanks Comrade.
Well any weapons that he doesn't use will be available for future models that they may "fit" better. As well as all the swords and axes that you sent me I have plenty to share around. I should check the scale of them actually, after we talked about it.
62749
Post by: Dr H
Right-y ho. Here's what a Guardian looks like holding a Wraithblade's Sword.
It's actually not bad for a two handed sword, however the hand would need to be changed as it's a little large...
I had an idea while drilling the pommel of Sword #10, Don't drill all the way though. I think it looks nice and ornate.
And I've done the handle for sword #11. The end is actually the handle off a bolter (I think) that I cut off ages ago and it's sat in my "random little plastic pieces" tub since.
These have had a little tidying up but would probably need more if they were to actually be used.
What do we think?
What's good, what's not so good?
Time is approaching for choosing a weapon for Guardian #10... be it sword or axe... Thank you all for your input so far.
30672
Post by: Theophony
I think they look great , I would suggest some of the microbeads I've been using for the gems and jewels on the sword as they are smaller. I think right now the only thing too out of sorts are the really big pommels.
45565
Post by: cormadepanda
The sword actually looks like a good fit. The wraith hand is too bulky, but a simple swap and some reposing you can easily have some samurai guardians.
62749
Post by: Dr H
Theophony wrote:I think they look great , I would suggest some of the microbeads I've been using for the gems and jewels on the sword as they are smaller. I think right now the only thing too out of sorts are the really big pommels.
I do have smaller beads. However, they are all mixed up together with all the other round beads and picking out a single one is tricky, I could spend longer than I did last time looking and find the perfect size eventually.
The other problem with these is, at this scale, it's a fine line between too small and too big. The smaller bead I found last time was barely larger than the handle and so didn't look right, but you can't tell until you stick it on really.
The disk, I went intentionally large as that's quite a large heavy-looking blade and so I wanted a large pommel to balance it. It may be the small hand that makes it all look too big, so it's probably a sword for a larger being.
cormadepanda wrote:The sword actually looks like a good fit. The wraith hand is too bulky, but a simple swap and some reposing you can easily have some samurai guardians.
Yeah, definitely more of a two-handed sword for a Guardian-sized person. Hand would indeed be an easy swap. One of the remaining Dire Avengers may get one...
As to swords, how does this grab you?
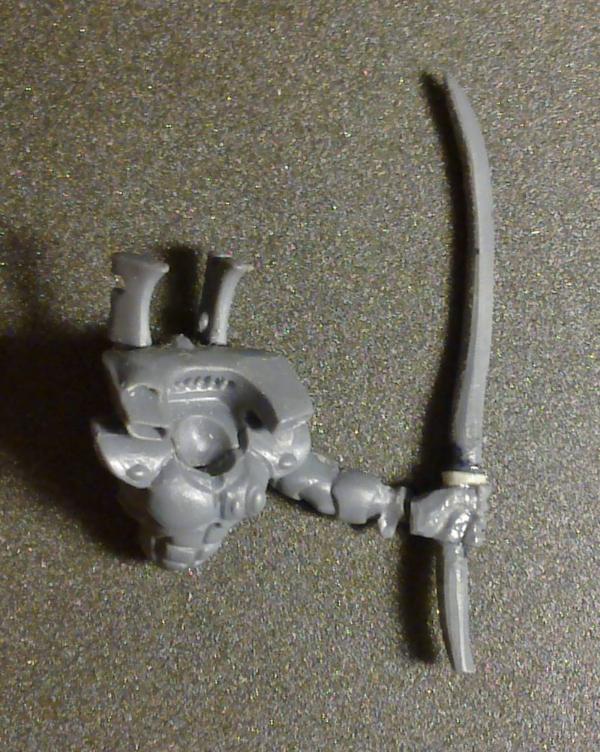
I went very simple with the tang and may not do much beyond tidying the end of the handle once the glue is fully set.
Although I might wrap some wire around the handle to look like a grip...
65595
Post by: Camkierhi
Looking good to me, I like the pommels myself.
The wraithblade, looks awesome, my only quibble, and it's me being a numpty, but he has a shuriken rifle in a single hand and a huge two handed sword in the other, and he's only a puny elf! Got to say it looks brilliant and awesome. I would do this.
Automatically Appended Next Post:
just ninja'd me. That last sword there is awesome, really cool.
24297
Post by: Viktor von Domm
oh..... that kris weapon looks very good.... you carved such a thin blade.... unbelievable
as for your update from yesterday (ok...i am lagging behind a bit )... i think the handguards are a bit too far away from the hands.... i dunno why you´ve put so much space inbetween...
as for the current update... now that is good looking.... it has the flair of a katana and an elven sword.... the hand guard is a very fitting one!
62749
Post by: Dr H
Thanks Cam.
Yeah, he is a (Shuriken pistol + ccw = ) Storm Guardian, because I want (at least) one of everything available from every army in my army.
As you say, he's a little space elf, so needs a smaller single-handed weapon. Hence the whole shrinking of some of the swords thing that happened before the hut.
Automatically Appended Next Post: Viktor von Domm wrote:oh..... that kris weapon looks very good.... you carved such a thin blade.... unbelievable
Most of the swords are not much thinner than your typical GW sword and much thinner and they start to become weak. Number 11 in particular is probably too thin to be useful, it's so bendy and wouldn't take much to snap it.
as for your update from yesterday (ok...i am lagging behind a bit )... i think the handguards are a bit too far away from the hands.... i dunno why you´ve put so much space inbetween...
Ah yes. That was to give the impression that the hand was actually holding the handle of the sword, that the handle extended all the way through the hand.
But yeah, probably not necessary. When these are used for a model, they will probably be tweaked and things like that will be ironed out (and those extra spacers actually only add an extra weak point to the model...).
as for the current update... now that is good looking.... it has the flair of a katana and an elven sword.... the hand guard is a very fitting one!
Thanks. I'm definitely getting good vibes from this sword...
Also, when I do finally make the final final decision as to which weapon gets finally used here. I have decided to finish up all the others (e.g. remove the hands and rebuild the handles) and paint them and build a weapon rack to store them. Just because I've always wanted a sword collection and as I can't afford real swords at the moment I'm going to have a mini sword collection. This doesn't mean that these won't be used for future models, but it does mean that you will get to see all of them finished and the promise that I'll just have to make more weapons in the future to add to the collection.
24297
Post by: Viktor von Domm
the kirs weapon would be ideal to have a dual wileding character... head facing downwards, both arm outstreched backwards and in full charge... that would be awesome!
70564
Post by: epicwalrus
Those sprue weapons are awesome! You must go mad when carving them though. It would drive me nuts! Any ways nice works and keep at it. I would love to see an eldar model made by you sculpted ONLY from sprue, and green stuff! I know you could do it.
62749
Post by: Dr H
Viktor von Domm wrote:the kirs weapon would be ideal to have a dual wileding character... head facing downwards, both arm outstreched backwards and in full charge... that would be awesome!
That's a good pose idea Vik. I'll save that for future use.
epicwalrus wrote:Those sprue weapons are awesome! You must go mad when carving them though. It would drive me nuts! Any ways nice works and keep at it. I would love to see an eldar model made by you sculpted ONLY from sprue, and green stuff! I know you could do it.
Thanks epicwalrus and welcome.
The carving is a double-edged blade ( ), a lot of the time it's quite nice and peaceful and calming and lovely. Then there are the times (and there are plenty of times) when it goes wrong or it won't work and you just have to chuck it in the scrap plastic pot and start again. Those times it can get maddening and motivation-sapping, but it's not as bad as when things go wrong with my putty work (as the sprue is free).
A whole model may be a long way off (alright I did just build a hut from sprue, but...). Eldar tech' is really tricky to replicate with all the complex curves.
My secret so far is to keep the things carved as simple as possible and add small details later (like the guards and pommels). But when you look at my swords next to the sword from the Wraithblades, for example, you can see how much more detail there is in the GW bits over what I can achieve.
But I'm not down on that I will continue to push myself further and in time I may be able to do models from scratch with all the lovely little details.
Oh, in other news, I bought some drill bits while buying some more paint. I wanted a bit to fit between the ~1.5mm and the 0.4mm bits I already had and was aiming for about 0.7mm. However, I've only seen packs of many bits in the shops I've been in, so I bought a set of 20 bits that go in 0.05mm increments from 0.3 to 1.6mm. So I can now drill anything I may need to drill for quite some time anyway. *shrugs*
48594
Post by: dsteingass
My mind's eye can see the pose Vik suggested..it's a good idea!
62749
Post by: Dr H
Indeed. I've made a note of it.
24297
Post by: Viktor von Domm
the smallest drill i own is 1.5mm... but it changed my hobby life very intense... 1.5mm is the thickness of paperclips... and now i pin my models with paperclips and thus i can paint them way better... afterwards i just clip the paperclips off and i am done...
62749
Post by: Dr H
Viktor von Domm wrote:the smallest drill i own is 1.5mm... but it changed my hobby life very intense... 1.5mm is the thickness of paperclips... and now i pin my models with paperclips and thus i can paint them way better... afterwards i just clip the paperclips off and i am done...
Yeah, I have some paperclips for pinning joints and things.
I've also been pinning these swords with some really thin wire which fits nicely in 0.4mm holes.
How much stronger it actually makes them, if at all, I don't know...
I just found that sometimes the ~1.5mm bit was a little too large (like bolter barrels), maybe it's a 1.6mm... it was something else I was given along with most of the other modelling supplies I have.
24297
Post by: Viktor von Domm
I would suggest getting yourself this kind of tool...:

62749
Post by: Dr H
Ah yes, that would indeed tell me how thick the bit is but the new ones are in slots that say what they are, so I'll believe them for now and try to put them back where they came from.
24297
Post by: Viktor von Domm
ah... yeah I tried that kind of order and organization once... and now I have a small casket where I throw every bit inside after use^^
62749
Post by: Dr H
Ha ha yeah, I'll be a good boy to start with at least and I probably won't be swapping and changing bits too often anyway. So I'll let the ocd part of me look after them (everything must have a home and I get irate if something is not in it's home and I can't find it.)
24297
Post by: Viktor von Domm
ha... good deal I have a very good memory where I put what and where I would found these then... my bitzcollection or my junk collection... vast would be an understatement...
62749
Post by: Dr H
I envy you and your good memory. Mine is appalling (related to the dyslexia), so I need to put things in a place where it makes sense to me and then I just have to think "where would I put "x" if I wanted to store it?" and that's where it'll be.
24297
Post by: Viktor von Domm
the thing is... I start with order but than a cancer growth happens and due to projects small pots full of bitz get collected... I kinda have a scenic/ historical /image related memory...mannnnny connections...
62749
Post by: Dr H
That is the very nature of everything, Vik. Entropy (disorder) of any system will always increase without an outside influence (someone tidying).
and the decision has been made...
Guardian #10's upper body has been glued together and will look like the following.
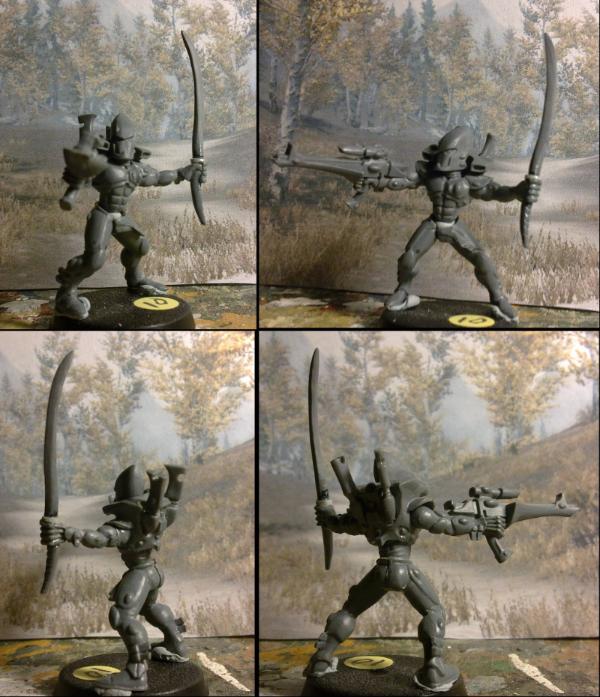
I need to carve the inside of his wrist to match the arm, but the outside fits well
After that it'll be time to chop the leg(s) to give him a running/charging pose. The back leg (being the straighter of the two) will be the contact point with the ground/base, but may need a little chopping to aid the pose if the front leg can't sell it by itself.
Thank you all for your help with the weapons. It was all very helpful, even if your ideas were not used they were all considered and potentially stored for the future.
Do not be disappointed if your favourite was not chosen, it will be used in the future.
and more weapons will be made in time...
Now it is time to move forward, where's the saw...
48594
Post by: dsteingass
Chop Chop! -lookin good with dat pose!
62749
Post by: Dr H
Thanks Dave.
His right leg is currently in 4 pieces and I'm working on straightening the shin.
65595
Post by: Camkierhi
Looks great, and I said it before that sword is cool.
Good luck with the hacking. Always fun.
62749
Post by: Dr H
Thanks.
Good luck with the hacking. Always fun.
I always find it stressful to start with.
It's one thing carving something from a piece of sprue, if it doesn't work, no matter it didn't cost anything.
Chopping actual model pieces; if you make a mess of it, it's gone...
But once I've actually bitten that bullet and done the chopping, all is well again and I can carry on as normal.
14392
Post by: nerdfest09
Carry on as normal?......'normal!?'......... doubt that dude :-)
24297
Post by: Viktor von Domm
Do not be disappointed if your favourite was not chosen, it will be used in the future.
after all...you need to recycle...it´s the law!!!
looking forward to that reposing work then...
30672
Post by: Theophony
Hey pot, this is the kettle, I heard you called me "black" 
48594
Post by: dsteingass
My kettle is white enamel
62749
Post by: Dr H
NF: Well a consistent level of madness can be considered "normal"...
Vik: Yeah, very little is thrown away as even small slivers of plastic are useful (as you can see below).
Theo/Dave:
This is where the leg is at the moment.
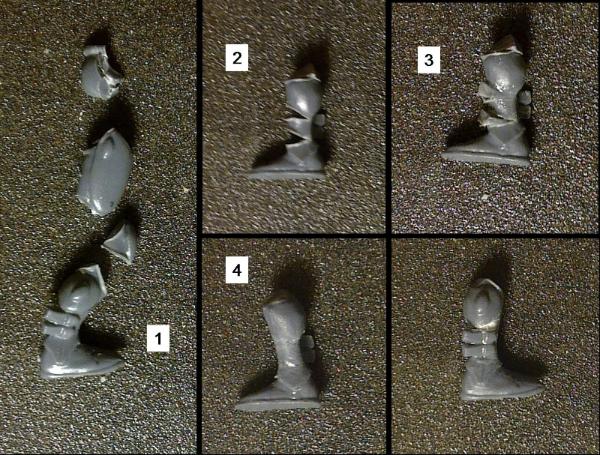
I used small wedges of plastic to fill the gaps in the shin and then shaved/carved/sanded them down after the glue had set.
Next job is to point the foot and I'll hopefully do a better job than I did on the DA Exarch. I have an idea of how to make my life easier.
24297
Post by: Viktor von Domm
now that is a method even GS hypo allergic folks like dave could use to rearrange legs and arms and so on ... that is a very nice tut!
atm I am collecting plastic cutoffs and shavings for a future use... the orky way to build leaves a mess of these... a plethora of shaving I tell you!!!
62749
Post by: Dr H
Viktor von Domm wrote:now that is a method even GS hypo allergic folks like dave could use to rearrange legs and arms and so on ... that is a very nice tut!
atm I am collecting plastic cutoffs and shavings for a future use... the orky way to build leaves a mess of these... a plethora of shaving I tell you!!!
Yeah, it's an extension to what I already did to legs/arms when I re-posed them; I would use small wedges of plastic to glue the two parts together at the right angle. The wedges were always smaller than the parts and I would then fill in the knee/elbow around the wedge with putty.
Then I saw a post that Blackadder put up about filling small gaps with a piece of scrap plastic and cutting it off flush.
And after all the sprue carving I've been doing recently, it all just clicked into place. Fill the majority of the gap with plastic, carve it to shape, and then fill any small gaps left with putty (saves on putty and therefore money ).
So that is Sprue use number 1354. (note: that is just a random number and I won't be keeping track of it).
And on to the foot.
The last time a repositioned a foot to be pointing the toes, it was for the Dire Avenger Exarch that is perched on Venus' shoulder.
For that I cut off the toe-end of the foot at the point it met the leg armour and then cut off the heel where it met the leg armour.
This left the foot in two pieces and I wanted to remove some material from the smaller of the two (to reduce the heel). This was a bad idea, as trying to carve off a sliver of plastic from a tiny piece of plastic was very difficult and the foot needed quite a bit of work to reconstruct it.
So this time, I did it differently.
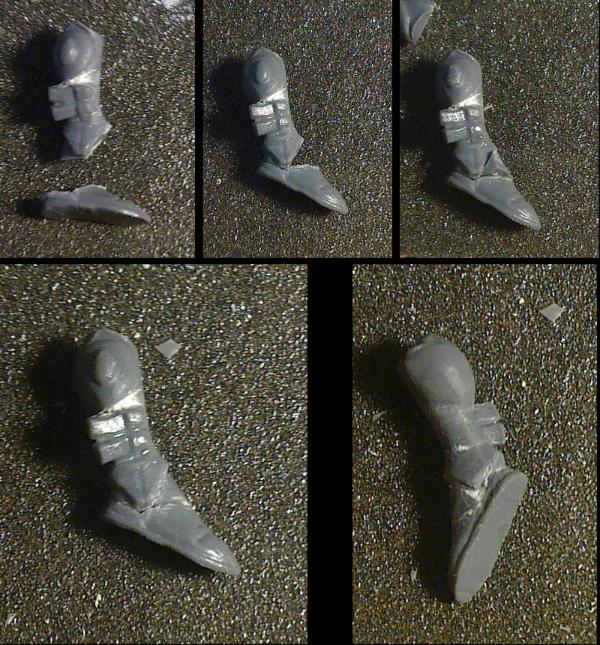
I cut into the heel, parallel with the sole and then cut into the toe end along the join with the armour. This kept the foot in one piece.
The also allowed me to remove the heel material from the leg (which is easier to hold).
I then reattached the foot at the heel and glued in a wedge of plastic to fill in the foot.
Carve that down once the glue is set and fill any little gaps with some putty.
Foot and lower leg, done.
Now to work on the knee joint.
59541
Post by: creativehivemind
Excellent surgical procedure doctor!
48594
Post by: dsteingass
the wedge is brilliant!
62749
Post by: Dr H
creativehivemind wrote:Excellent surgical procedure doctor!
Thank you. I even used a scalpel for most of the work...
dsteingass wrote:the wedge is brilliant!
Ta very much Dave.
45565
Post by: cormadepanda
Its operation time. Nice reposing so far, good sword. Its interesting! keep up the lovely work dr.
24297
Post by: Viktor von Domm
creativehivemind wrote:Excellent surgical procedure doctor!
I was about to make a joke of medical origins too... bloody ninja 
love that leg surgery!... I will try that out eventually too!
62749
Post by: Dr H
cormadepanda wrote:Its operation time. Nice reposing so far, good sword. Its interesting! keep up the lovely work dr.
Thanks Comrade. I will try.
Viktor von Domm wrote:love that leg surgery!... I will try that out eventually too!
Thanks Vik. It's not too difficult and I find it easier than rebuilding with putty.
And being all polystyrene it gives you a strong join.
24297
Post by: Viktor von Domm
And being all polystyrene it gives you a strong join
that is the selling detail
62749
Post by: Dr H
Yeah. That's why I was using the small wedges before. This way is even better.
I'm just working on the knee now. The back of the thigh piece has been carved away (to allow the calf to fit) and has been glued to the lower leg.
62749
Post by: Dr H
The knee is done (pretty much).
The knee pad was glued onto the rest of the leg and the gaps were filled with mostly putty.
Next job is to sort out his buttock as I want the thigh to be roughly horizontal. You can imagine the amount of work this will take.
However, I'm off out tomorrow and will be back Saturday at some point, so this picture will have to do you until then.
1
48594
Post by: dsteingass
I hate sorting buttockses
65595
Post by: Camkierhi
Love the legs, great work.
and shouldn't that be buttock-eye.
24297
Post by: Viktor von Domm
so you´re not a butt man then?... what a crying shame
and that leg looks very good posed.... I bet you will sort out all buttocks related issues without any probs...
14392
Post by: nerdfest09
I do love me a good buttocks!...... Gym pants.......mmmmmmm.......tight jeans........Mmmmmmm
and that's why I couldn't play or paint Eldar, too many opportunities to get male and female confused!
24297
Post by: Viktor von Domm
*sniggers*
62749
Post by: Dr H
dsteingass wrote:I hate sorting buttockses
I've usually got away with minimal bum work on previous models. Hopefully it's only the one cheek.
Thanks Cam.
Thanks Vik. It will get done it's just a matter of how many times I shake my fist at it during the work...
nerdfest09 wrote:I do love me a good buttocks!...... Gym pants.......mmmmmmm.......tight jeans........Mmmmmmm
I'm with you there NF.
too many opportunities to get male and female confused!
If you can't tell, then it's not a problem...
But yeah, it is a little weird when you realise that you are staring intently at a male bottom.
Luckily the torso is not attached, so I can pretend that it's a female bottom.
No progress to show yet, but I have news.
I'm going to be venturing into commission painting.
A friend has an ebay store and has been recently selling used GW models.
He asked me if I would paint up models for him, which should (hopefully) bring in more money.
It's only an informal thing really and we will see how it goes.
I will start up another blog to keep it separate from my own models here and to get feedback on my work there.
Wish me luck.
24297
Post by: Viktor von Domm
luck
but do announce the thread when it starts, eh?
62749
Post by: Dr H
Thanks. Will do.
30672
Post by: Theophony
Good luck Dr. H, I Wil look forward to your enterprise. Then I'll be able to hob knob with other hobby royalty and say "I knew Dr. H before carving sprue into works of art was cool."
If your after nice model buttocks nerdfest, then you hour check out dream forge eisenkern troopers, especially the Ada model. Though Hans is rocking the badonkadonk as well .
48594
Post by: dsteingass
Oh I like them..I just couldn't pick a favorite GL Doc!
43045
Post by: Casey's Law
Lovely, delicate work, H! It's great how you subtly make use of everything you have. I've just kept a tonne of sprue I would normally throw out because you've shown us what can be done when we are less wasteful. Good man! It reminds me of how I first started converting miniatures, making little alterations of the bits I had and keeping everything. Once I got on good terms with greenstuff I became immensely wasteful.
62749
Post by: Dr H
Thanks Theo. It's only painting really, there won't be much modification on those things or scratch-builds for now. But maybe one day...
Thanks Dave.
Casey's Law wrote:Lovely, delicate work, H! It's great how you subtly make use of everything you have. I've just kept a tonne of sprue I would normally throw out because you've shown us what can be done when we are less wasteful. Good man! It reminds me of how I first started converting miniatures, making little alterations of the bits I had and keeping everything. Once I got on good terms with greenstuff I became immensely wasteful.
Thanks Casey. It's good to know that I'm inspiring people to do more with the supplies at hand.
I also have tonnes of household recycling bits that "may be useful one day"... This really is modelling on a budget.
I have been gluing and painting the first squad for commission but they're not very exciting to look at, at the moment. But when they are, I'll fire up a blog and will share the link here.
I may do a little more on my guardian(s) later, once my back has had a rest...
43045
Post by: Casey's Law
I think there is a lot of discussion to be had about that, hooby on a budget and such. I have much to say about it so I'll add it to my list of things to write about in future.
I shant derail you any longer though. Looking forward to more.
62749
Post by: Dr H
Casey's Law wrote:I think there is a lot of discussion to be had about that, hooby on a budget and such. I have much to say about it so I'll add it to my list of things to write about in future.
I shant derail you any longer though. Looking forward to more.
After a couple of pages of Llama puns, for example, I don't think you should worry about derailing my thread.
So, I haven't finished the re-modelling of Guardian #10's backside, but I have attached all his pieces together...
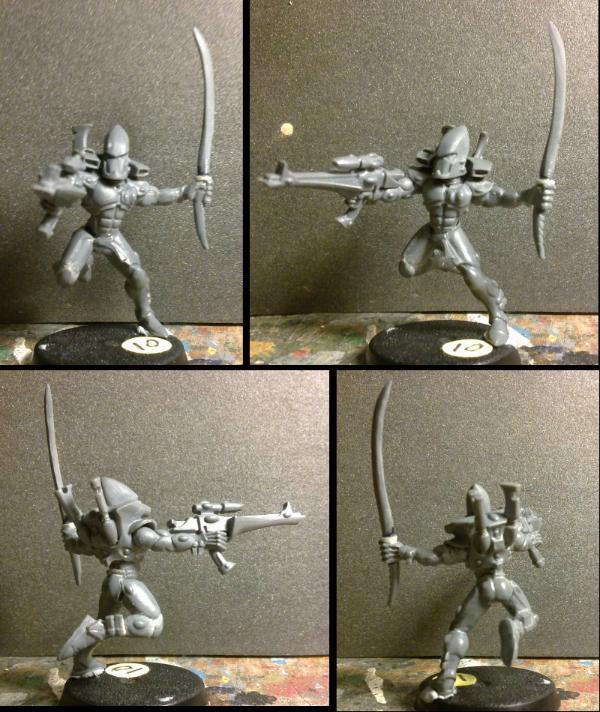
I'm quite happy with the pose like this. But does anyone see any issues or anything you think should change? Does it look natural enough to you?
43045
Post by: Casey's Law
Haha, fair enough.
Lovely. It's a floaty, almost ethereal, pose but that's not a bad thing. It looks both natural and alien to me.
45565
Post by: cormadepanda
Dr H wrote: Casey's Law wrote:I think there is a lot of discussion to be had about that, hooby on a budget and such. I have much to say about it so I'll add it to my list of things to write about in future.
I shant derail you any longer though. Looking forward to more.
After a couple of pages of Llama puns, for example, I don't think you should worry about derailing my thread.
So, I haven't finished the re-modelling of Guardian #10's backside, but I have attached all his pieces together...
I'm quite happy with the pose like this. But does anyone see any issues or anything you think should change? Does it look natural enough to you?
His pose screams he just slipped on a banana peel to me. I think it is because the arms are so far out.
65595
Post by: Camkierhi
He looks absolutely brilliant.
Except.......LOL. Just kidding. Looking really great. I think I would have his sword maybe slightly less vertical. The position its in looks like he is about to swing, but he is shooting! Not sure. Like I say he looks brilliant. Way better than normal pose. and the legs look dynamic, and you have everything just right on the shoulders and head. It's just something with the arms. Maybe just a twist at the wrist!
24297
Post by: Viktor von Domm
I think there is something fishy about the swordwielding arm... I think you should tilt the swordhand a bit so that the tip is a bit lower and more laid back...
also... I am not sure if the buttocks would still be symmetrically like they are now? wouldn´t the one with the raised leg be looking either more bulged or ...well smaller? just a thought...
also the pose is highly dependant later on how you position the model to the base... atm I am thinking it loks as if the fella is jumping from a stone or something else...?
62749
Post by: Dr H
Lots of thoughts, thanks dudes.
Casey's Law wrote:Lovely. It's a floaty, almost ethereal, pose but that's not a bad thing. It looks both natural and alien to me.
Thanks. That all pretty much equates to an Eldar, so that's good.
cormadepanda wrote:His pose screams he just slipped on a banana peel to me. I think it is because the arms are so far out.
lol. See below.
Camkierhi wrote:He looks absolutely brilliant.
Except.......LOL. Just kidding. Looking really great. I think I would have his sword maybe slightly less vertical. The position its in looks like he is about to swing, but he is shooting! Not sure. Like I say he looks brilliant. Way better than normal pose. and the legs look dynamic, and you have everything just right on the shoulders and head. It's just something with the arms. Maybe just a twist at the wrist!
Thanks. That bit (in red) is exactly what I was going for. I wanted him to be charging into battle, shooting as he goes and ready to hit the first person who comes into range with the sword. Also see below.
Viktor von Domm wrote:I think there is something fishy about the swordwielding arm... I think you should tilt the swordhand a bit so that the tip is a bit lower and more laid back...
also... I am not sure if the buttocks would still be symmetrically like they are now? wouldn´t the one with the raised leg be looking either more bulged or ...well smaller? just a thought...
also the pose is highly dependant later on how you position the model to the base... atm I am thinking it loks as if the fella is jumping from a stone or something else...?
The buttocks can (and will) change once I've filled the gap. Good point, thanks.
So, the main issue is with the arm. I'm happy though that the legs are ok.
What I was going for, with the whole pose and that arm in particular, was a highly proficient martial artist type look. The kind of look you get in films like House of Flying Daggers or Crouching Tiger, Hidden Dragon (although I can't actually find any pictures to illustrate my point so maybe I'm imagining it).
I wanted him to look like he has perfect control of his posture and would hold the sword perfectly still even while charging over rough terrain and would then swing into battle with perfect grace when he gets there.
Does that make sense? or should I just change the arm anyway?
14392
Post by: nerdfest09
Dr H wrote: The buttocks can (and will) change once I've filled the gap.
No, no no no refrain....... refrainnnnnnnn I can't believe you wrote that and knew I read your blog!
45565
Post by: cormadepanda
 nerdfest09 wrote: nerdfest09 wrote: Dr H wrote: The buttocks can (and will) change once I've filled the gap.
No, no no no refrain....... refrainnnnnnnn I can't believe you wrote that and knew I read your blog!
I got this no worries.
Fill that gap smoothly Dr. He requires some repairs between the cheeks. That gap is what needs some putty in place. if you know putty between the legs.
I will see what you do to fix the pose.
62749
Post by: Dr H
Ha ha NF.
Thanks Comrade, that's probably just what NF needed...
I've done a little bit more on his bottom. The crevices have mostly been plugged and the excess carved away, just some more smoothing and shaping and I should have something to show tomorrow.
2326
Post by: shasolenzabi
Running action poses! Dr.H is definitely getting a leg up on the competition!
24297
Post by: Viktor von Domm
Does that make sense? or should I just change the arm anyway?
perfect sense to me... while I didn't watch all these movies completely...(not my kind of movie...) I still know what you are about... and I think you are on the right track there!
in the end the paintjob will clarify everything...
39973
Post by: Galorn
Even though they are not carved entirely from sprue they are really shaping up to be awesome.
62749
Post by: Dr H
shasolenzabi wrote:Running action poses! Dr.H is definitely getting a leg up on the competition!
Thanks Shas.
Viktor von Domm wrote:Does that make sense? or should I just change the arm anyway?
perfect sense to me... while I didn't watch all these movies completely...(not my kind of movie...) I still know what you are about... and I think you are on the right track there!
in the end the paintjob will clarify everything...
Cool.
Indeed, paint will hide any minor issues and highlight the important bits.
Galorn wrote:Even though they are not carved entirely from sprue they are really shaping up to be awesome.
Thanks Galorn. There is sprue involved though.
And on that note...
Here's Guardian #10's backside for you to goggle at.
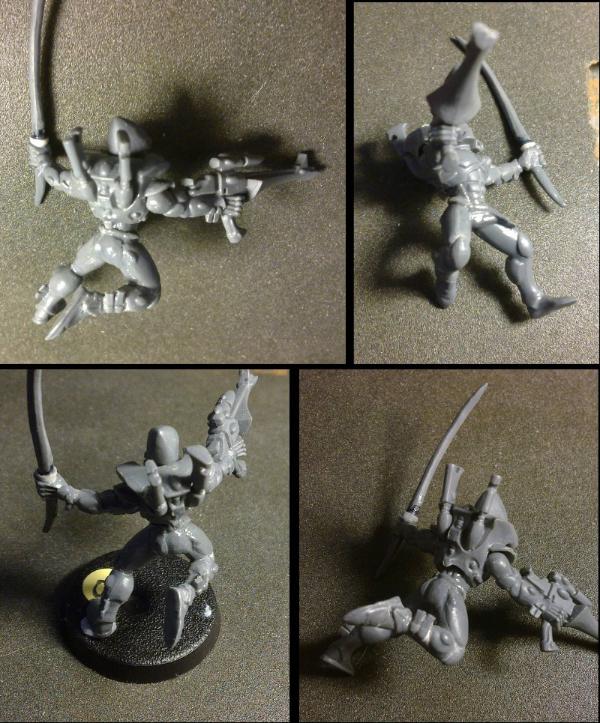
I did carve away a little from his right cheek and tried to merge it into the thigh (as it would in that pose).
Also notice the "belt" that I had to re-sculpt above the leg.
Any small imperfections will become apparent once I come to paint him. There's probably a few more trinkets to add to him, I'll have to consult my plan. So I may move onto looking at #9 and bring him up to the same point, before painting.
Also nearing the final detailing of the first "commission" squad (just so you know that I have been busy), so there will be something to look at soon.
24297
Post by: Viktor von Domm
that update sure looks quite good to me
54500
Post by: hk1x1
I love seeing conversions like this, well any conversion really, but I like the attention to detail you've lavished on this.
Great work .
62749
Post by: Dr H
Viktor von Domm wrote:that update sure looks quite good to me
Thanks Vik.
hk1x1 wrote:I love seeing conversions like this, well any conversion really, but I like the attention to detail you've lavished on this.
Great work .
Thanks HK. It's the little details that do it for me and make it look "right". The models you can buy have all these details, so you have to match them at the very least.
Speaking of little details, that's all that is left on the commission squad. So I'm hoping to finish them today, expect pictures later today... Automatically Appended Next Post: and Woo Hoo, page 40!
30672
Post by: Theophony
Congrats on 40 pages, never thought i would get there either. The eldar are looking fantastic. You've done more than justice to them with our conversions. Most people want their conversions to look like they were part of the model, yours looks like he models the original sculptor presented to GW, but were ha led up because they couldn't produce them with he current technology.
I had to check where I was (69) and then snickered and wondered where Damo was when I needed him.
62749
Post by: Dr H
Theophony wrote:Congrats on 40 pages, never thought i would get there either. The eldar are looking fantastic. You've done more than justice to them with our conversions. Most people want their conversions to look like they were part of the model, yours looks like he models the original sculptor presented to GW, but were ha led up because they couldn't produce them with he current technology.
I had to check where I was (69) and then snickered and wondered where Damo was when I needed him.
Thanks Theo. It means a lot that my models are looking good/realistic/"real" to others, as a lot of thought and effort goes into them just to reach my own standards. So it's nice to know others are enjoying them.
On that note, nothing new here, but I have finished the first commission models and have started up my commission blog.
Check it out and let me know what you think.
24297
Post by: Viktor von Domm
checking it out
48594
Post by: dsteingass
I went to bed, bath and beyond the other day...they didn't even sell black kettles, they were all colored
That expression is curious
69562
Post by: Largeblastmarker
I vote for paint.
29449
Post by: weetyskemian44
Excellent carving - you really finished that one off professionally. Henceforth you shall be known as the Sprue-Master...
48594
Post by: dsteingass
He's The League Spruemeister General (It sounds like Brewmeister) for a reason!
62749
Post by: Dr H
Ta Viktor.
lol Dave. I think it has to do with the inside, I dunno, I don't drink tea or coffee...
Paint will appear soon LBM. If you're desperate to see paint, have a look at my new commission blog...
weetyskemian44 wrote:Excellent carving - you really finished that one off professionally. Henceforth you shall be known as the Sprue-Master...
Thanks weety. If only I was professional standard... I do try.
dsteingass wrote:He's The League Spruemeister General (It sounds like Brewmeister) for a reason!
Merci *bows*
===============================================
The Scientist looked at the Auspex. It didn't look back, obviously, but he liked to think that it did.
He knew that the piece of equipment didn't have a heart or any biological functions and he felt pity for the little thing.
"Tell you what" he said "I'll give you a life, allow you to think and taste that beautiful nectar that is living"
The scientist looked about his workshop and spied a tank filled with fluid in one corner "ah ha" he said.
Having already probed the "minds" of the many symbiotic lifeforms present in the tank, he selected the perfect specimen for the required job.
It had a simple mind, but with a little reprogramming could easily perform the computations required for the device and the complex proteins that it produced could easily (for The Scientist) be used to fuel a small power generator.
After performing the required tasks and connecting wires to the required nodes The Scientist, sat in a dark corner of the laboratory, bathed in the glow produced by the screen of the first (and perhaps only) Toxin sac-Auspex.
The Scientist looked at the Auspex and knew that it looked back.
===============================================
May I present to you the one and only Toxin sac powered and controlled Auspex.
The answer to what Guardian #9 is looking at in his hand.
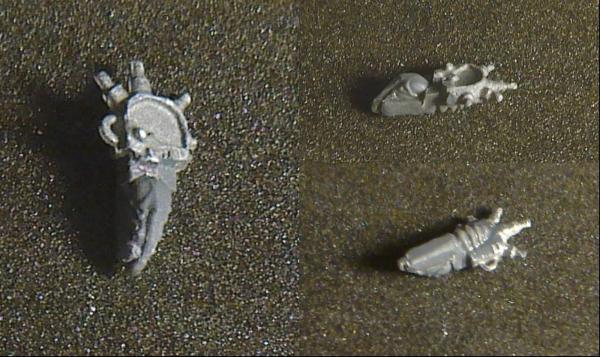
How does that grab you?
(badly, it's got no arms/hands/tentacles/appendages )
65595
Post by: Camkierhi
Brilliantly scary. I love it, got a Gieger vib about it.
62749
Post by: Dr H
Thanks Cam. That is exactly the look I was going for, I'd even been looking at some Giger work as inspiration. The ribbing of the back is supposed to be like that seen on his Aliens.
2326
Post by: shasolenzabi
The nice thing about this one professor, he seems very good at recycling!
62749
Post by: Dr H
Well you have to work with what you've got, now and in the grim-darkness of the future...
Time to start planning the hood and cape for number 9...
24297
Post by: Viktor von Domm
Yeah, definitely a hood and cloak, for someone that comes up with such ideas, the right look is a must. I think this idea is genius, because it makes totally sense for me . Such little devices often feel already as if they have a mind of their own...
62749
Post by: Dr H
Viktor von Domm wrote:Yeah, definitely a hood and cloak, for someone that comes up with such ideas, the right look is a must. I think this idea is genius, because it makes totally sense for me . Such little devices often feel already as if they have a mind of their own...
Thanks Vik. Glad you like the idea. I hope I can deliver on the cloak. My last attempt at a cloak/tabard didn't work brilliantly.
Going to read many tutorials on cloak making and see what I can achieve, so prepare yourselves for another long (but hopefully not boring) journey into experimentation into something new...
24297
Post by: Viktor von Domm
*preparing*
62749
Post by: Dr H
Well the first attempt at a hood didn't work.
Trying just pure milliput isn't going to make a hood, at least not over a guardians pointy head.
Green-stuff would probably work as it's more elastic (I'm going to have to get some one day).
I only succeeded in making a mess.
So next attempt will be a similar approach to how I'm planning to do the cloak; use card/paper fixed in the basic shape with super-glue and then covered with putty.
24297
Post by: Viktor von Domm
That could work too...maybe toilet paper and pva? And I would trim the head slightly a bit...for better shaping...
62749
Post by: Dr H
Yeah, that's also a possibility.
And I would trim the head slightly a bit...for better shaping...
Well he wouldn't be much of an Eldar if he didn't have a pointy head...
62749
Post by: Dr H
OK, so card didn't really work either. It's not flexible enough to bend in two directions at the same time and attaching multiple pieces together was very difficult and still didn't give the right shape.
Therefore, Hood Mark III. Tissue paper and PVA.
I'm using some of that tissue paper that you can get in craft shops or out of new shoes... Not bog roll.
This stuff is stronger when wet than your toilet stuff and so doesn't tear/fall apart.
I first made a cone and glued that together. Then placed that on his head and started gluing strips of tissue (soaked in PVA) to it and built up the shape.
See for yourselves.
65595
Post by: Camkierhi
Sorry little late to the party on this one.
Hood looking good. I have had quite good success in the past with kitchen roll, and it's slightly textured. Nice and strong, one sheet is plenty!!!!!
On other products, I have had great success with a mix of greenstuff and milliput, and also a similar product used for sealing leaky pipes by plumbers. Can't remember the name now. It's expensive but sets in 10 minutes solid like metal. I know you like to recycle, but sometimes you just have to bite the bullet.
Also, a bit extreme, but have you tried plastic. I have had some successes with heating PC and bending. The trick is gentle heat, bend a bit and reheat as necessary.
Having spouted all that, a bit late really, because you have done an excellent job by the looks of it.
2326
Post by: shasolenzabi
Gray stuff may work as it hardens slower, allowing more details to be added as opposed to the fast curing greenstuff
24297
Post by: Viktor von Domm
Hood shape looks promising, but additional milliput is still needed methinks... Also I just had an idea... There is these wet tissue paper, maybe this would be strong and soft enough to create the cloak with...
62749
Post by: Dr H
Camkierhi wrote:Sorry little late to the party on this one.
Hood looking good. I have had quite good success in the past with kitchen roll, and it's slightly textured. Nice and strong, one sheet is plenty!!!!!
Ha Thanks.
On other products, I have had great success with a mix of greenstuff and milliput, and also a similar product used for sealing leaky pipes by plumbers. Can't remember the name now. It's expensive but sets in 10 minutes solid like metal. I know you like to recycle, but sometimes you just have to bite the bullet.
Again, I would need to get some green-stuff or equivalent. Will keep it in mind.
Also, a bit extreme, but have you tried plastic. I have had some successes with heating PC and bending. The trick is gentle heat, bend a bit and reheat as necessary.
Having spouted all that, a bit late really, because you have done an excellent job by the looks of it.
Yeah, that was towards the end of the list of things to try. Thanks again.
shasolenzabi wrote:Gray stuff may work as it hardens slower, allowing more details to be added as opposed to the fast curing greenstuff
Does grey- behave in a similar way to green-stuff (apart from curing slower)?
Viktor von Domm wrote:Hood shape looks promising, but additional milliput is still needed methinks... Also I just had an idea... There is these wet tissue paper, maybe this would be strong and soft enough to create the cloak with...
Thanks. Yeah, I'm planning on building up the tissue until it's strong enough to take a layer of milliput to give it the final details.
Will have to see once I get to the cloak. Card should work fine as a base for that as it doesn't require such an extreme curvature as the hood.
62749
Post by: Dr H
I've added a second layer of tissue to the hood and I've played about with a possible shape for the cape.
What do we think? Bare in mind that it will get putty over it to give all the creases etc... So just the basic shape here.
In other news The Hut won the "Newbie prize" in Briancj's competition for recycled-material terrain.
Meaning that it's the ideal method for a new modeller to attempt a piece of terrain from the materials that they will likely have laying about.
My tutorial explains every step required and a little imagination on your part will allow you to build practically anything and will cost you practically nothing.
Get out there and make some terrain.
43045
Post by: Casey's Law
Love the biospex mate but I'm not feeling the hood yet. Maybe I'm just not seeing it right but I would suggest you'll get a better effect persevering with the putty.
As always, get a load of references together, there are some good examples in the Eldar range:
Eldar Harlequin Shadowseer 360
Eldar Rangers
65595
Post by: Camkierhi
Congratulations on the win in the comp. Well deserved, a truly inspirational piece.
Liking the basic shape for the cloak, watching with bated breath to see how this pans out.
62749
Post by: Dr H
Casey's Law wrote:Love the biospex mate but I'm not feeling the hood yet. Maybe I'm just not seeing it right but I would suggest you'll get a better effect persevering with the putty.
As always, get a load of references together, there are some good examples in the Eldar range:
Eldar Harlequin Shadowseer 360
Eldar Rangers
Thanks Casey.
Worry ye not, there will be putty on the hood. This is just building up a solid base to stick the putty to.
Ta for the reference pics.
Camkierhi wrote:Congratulations on the win in the comp. Well deserved, a truly inspirational piece.
Liking the basic shape for the cloak, watching with bated breath to see how this pans out.
Thanks Cam (O' great and mighty competition winner).
We shall see, when I start throwing putty at it...
|
|