| Author |
Message |
 |
|
|
|
|
Advert
|
Forum adverts like this one are shown to any user who is not logged in. Join us by filling out a tiny 3 field form and you will get your own, free, dakka user account which gives a good range of benefits to you:
- No adverts like this in the forums anymore.
- Times and dates in your local timezone.
- Full tracking of what you have read so you can skip to your first unread post, easily see what has changed since you last logged in, and easily see what is new at a glance.
- Email notifications for threads you want to watch closely.
- Being a part of the oldest wargaming community on the net.
If you are already a member then feel free to login now. |
|
 |
2012/04/18 04:16:54
Subject: Dark_Gear's Webway Portal: a new Kabal rises...
|
|

Regular Dakkanaut
|
Awesome stuff, looking forward to seeing more.
|
|
|
 |
|
2012/04/19 17:56:46
Subject: Dark_Gear's Webway Portal: a new Kabal rises...
|
|

Angelic Adepta Sororitas
|
Hey! Loving your stuff. I'm really interested in your weathering drawings. Any idea on what techniques you plan to use?
I also really like the display board! (i know it was a long time ago you showed it, but still....)
|
|
|
|
|
|
2012/04/24 04:57:18
Subject: Re:Dark_Gear's Webway Portal: a new Kabal rises...
|
|

Elite Tyranid Warrior
|
Work has been crazy but I finally got a chance to get some work in.
@ S'Jet: If you look in the early pages of my Nid thread I posted some other weathering pics over there, way back in the day. As for the weathering the vehicles, once all the base colours are blocked in, I'll be giving them a gloss coat and using oils and powders, which I finally found a local supplier for last weekend.
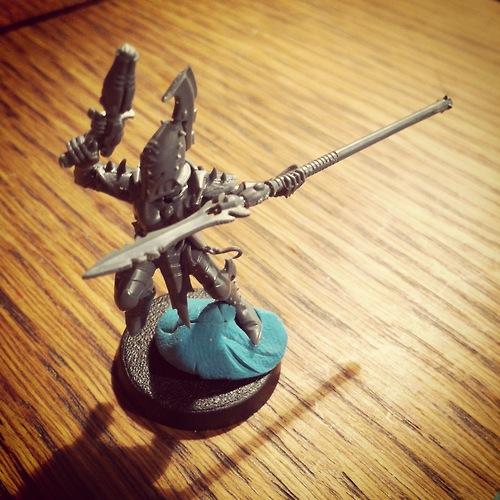
If you liked the previous terrain board, here's a new treat for you...
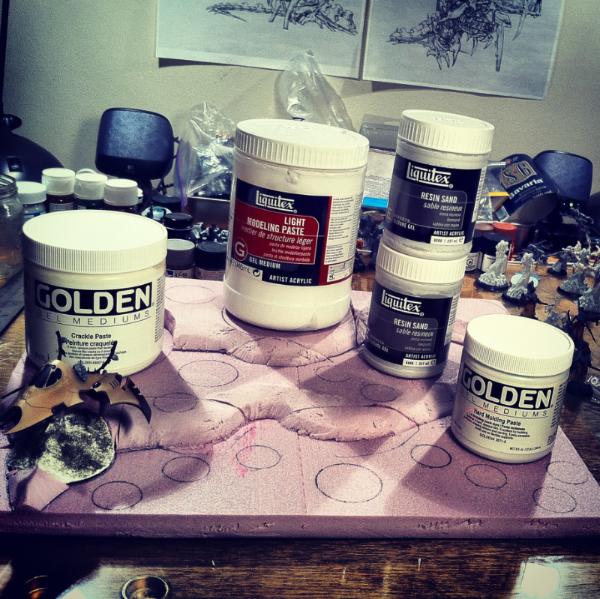
A new display board for a 1000 point team tournament! 
In the background are the various acrylics that will be used to built up the terrain. Due to the army's theme, the goal is to create a desert landscape. Expect lots of sand, some scrub brush and a few gnarly trees.
For now I'm at the "Hurry up and wait" phase of the project while the first layer of molding paste settles.
Stay tuned.
|
|
|
|
|
|
2012/04/25 05:34:18
Subject: Re:Dark_Gear's Webway Portal: more progress on the desert display board
|
|
Elite Tyranid Warrior
|
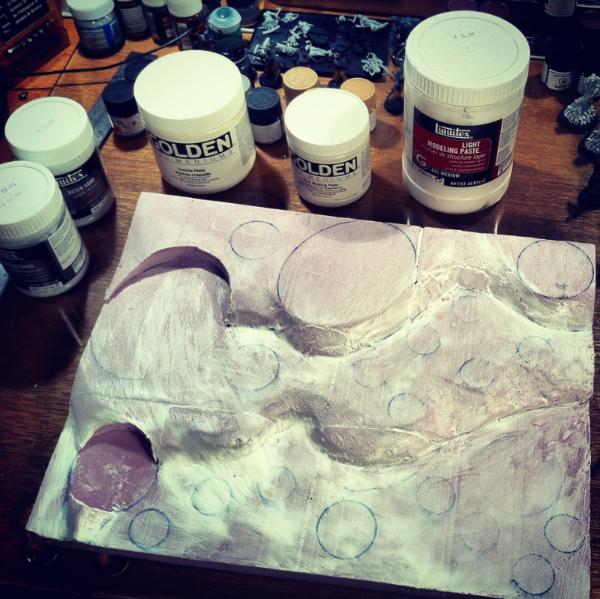
Worked late again today but it worked in my favour. Once I got home ideas were swimming through my mind at breakneck speeds so I dove right into the project as though I never stopped working yesterday.
After finding some inspiring images of crackled river beds online, it was decided that the crackle paste would be put to use on this display board. I've never the stuff before so here's hoping it turns out alright as I really have no interest in sculpting a whole riverbed for a project that's due in 3 weekends.
At least the top two levels of the display are being treated with a material I'm used to working with by now so that took care of a lot of worries. Resin sand is the neatest thing since sliced bread in that it's easy to apply, easy to shape once applied, easy to rinse off if you apply too much and it has great adhesive properties so you can also use it to glue sand, rocks and twigs to a base without having to reach for anything else.
To make things even better, because of it's viscosity, you can apply it onto a display board while the models are on the board. You basically paint it on thick, going over the base of the models to make you get perfect coverage. Once done, just pull the model straight off the board and you have a perfect hole for the base. All you have to do is wipe the excess off the base's rim after pulling it up. The board itself needs no touch-ups.
Stay tuned.
|
|
|
|
|
|
2012/05/01 05:19:55
Subject: Dark_Gear's Webway Portal: a new Kabal rises...
|
|

Using Inks and Washes
|
Your duchess is looking beuitifull  I hope you dont mind if I nick the idea? Im thinking of turning her into malys.
|
|
|
|
|
|
2012/05/02 18:39:38
Subject: Re:Dark_Gear's Webway Portal: a new Kabal rises...
|
|
Elite Tyranid Warrior
|
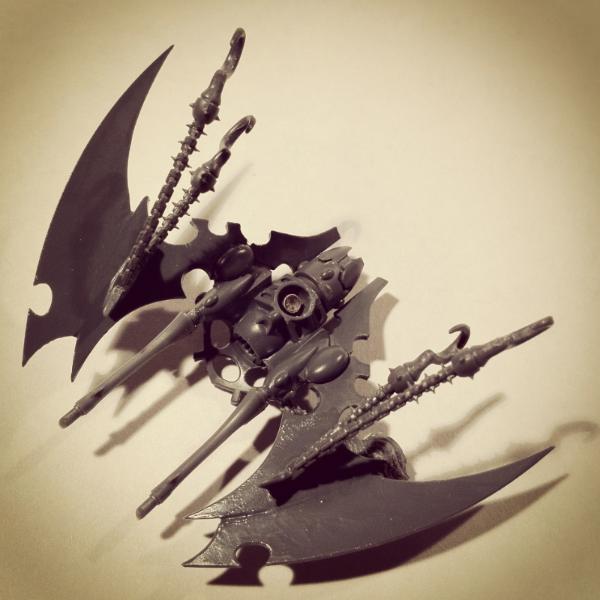
Feel free to steal the idea. God knows I've done the same countless times on Dakka. Wait until you see what I've got planned for the Baronness...
It's been forever and a day since my last update but there's a good reason— I hit a creative groove and didn't to slow down the progress by working on a post.
What sparked this was rediscovering a website that should be in everyone's bookmarks: Les Burley's Awesome Paintjob Wash Recipes.
Seeing as how I had a large bottle of matte medium in my supplies I figured it was high time I put it to use and devised my own mixtures in order to step up my painting. Turns out it was the single best hobby related decision I've taken next to buying an airbrush. Those of you who are familiar with my threads will know how much I hated painted with bristle brushes because I could just never get the paint to go on as easily as I could with an airbrush. Notice I said hated.
Upon getting the ink wash ingredients home and brewed up the first batch, there was still a half bottle of pre-mixed flo-aid and water left.
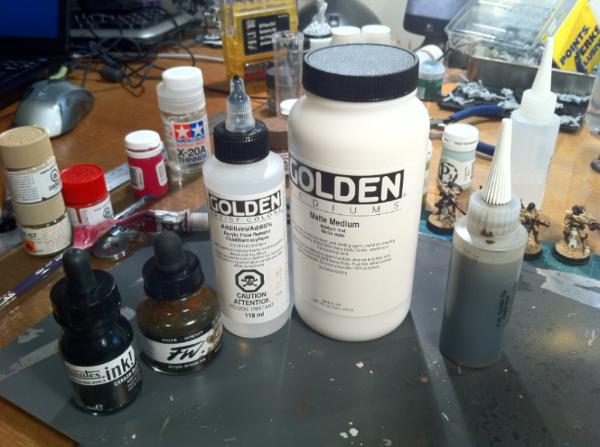
As I needed to do a few touch ups on the models I made the fateful decision to just dilute the paint in the bottle by about 1/3 with the flo-aid mixture. How something so simple can completely change the way one looks at painting is just astounding and I can't believe I didn't do this until last week. Go figure! So basically, it's like the door to better painting has finally unlocked and I'm actually more excited about painting than converting for the first time ever.
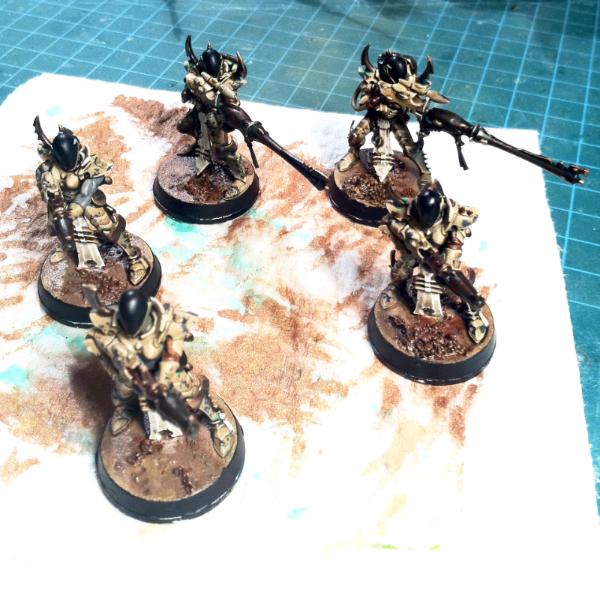
Thanks to this insight, all of the infantry models for the team tournament are now ready for washes, hightlighting and basing.
First up is the Haemonculus. Her Liquifier has finally been connected to her body with guitar wire.
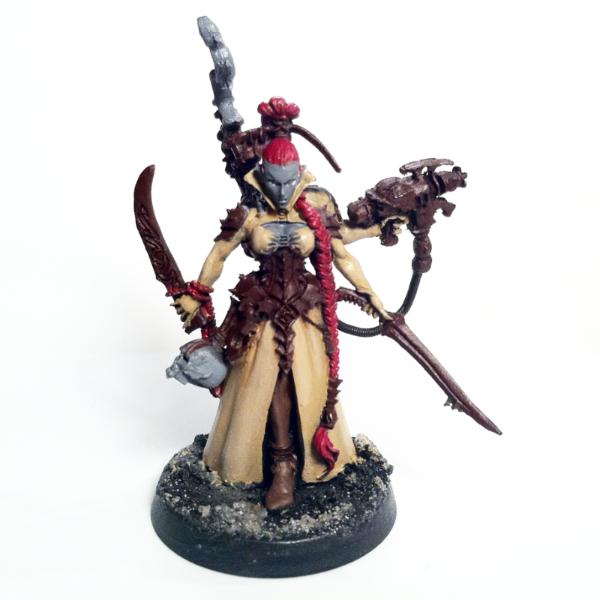
Next up, one of her charges.
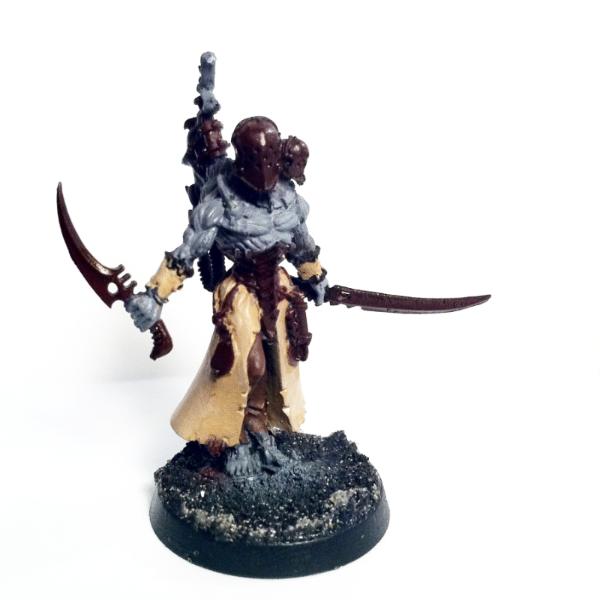
Both squads of Trueborne have also been finished up to the wash stage, which I'm hoping to get to this evening.
 \
Colour-wise, it took a while to figure out the colour scheme for the army as I was still unsure what colour the tunic areas of the models would be. After trying many different hues, I decided on Nato Brown and Red Brown for accents to stick fairly close to a German desert camo scheme rather than a more colourful GW style scheme.
Another part of the army that got some attention was the Razorwings. Having recently played a game where not keeping track of which plane had fired its missiles caused some problems, I figure it was time to finally magnetise them. These particular magnets are 1/32 of an inch wide and required just the slightest amoount of drilling in order to fit.
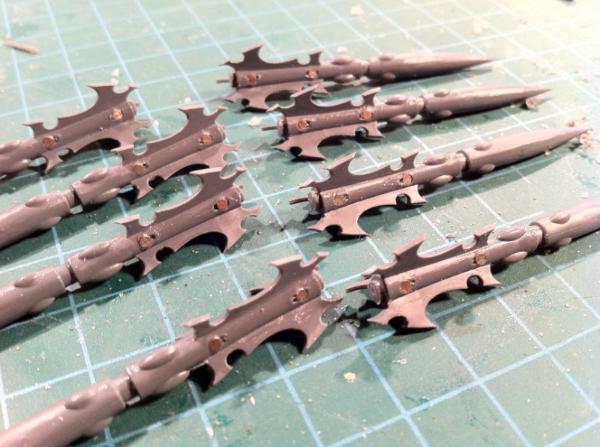
While under the plane, another problem that needed fixing was the way the plane fit on the top of the. On a crowded table it's sometimes bothersome to reach for the bottom of the base in order to move the planes but at the same time, gluing the planes to their base just isn't a valiable option. It's time for more magnets.
And some creative use of sprues to affix said magnets into the plane. Notice the flush-mounted magnets on the missile pylons.
All of this magnetisation leads us to a model that not only seems more complete but is also a lot safer to move around on the table.
All finally, thanks to a new-found enjoyment of painting, I changed my mind about not painting all of the gems on the Razorwings. They're now going to be all brassed up and oxidized, so there will be some subtle turquoise and green streaks going down the wings, just like on the Venoms and Raiders.
That's it for now, hope you enjoyed the latest progress.
Stay tuned.
|
|
|
|
|
|
2012/05/03 23:43:30
Subject: Re:Dark_Gear's Webway Portal: a new Kabal rises...
|
|
Elite Tyranid Warrior
|
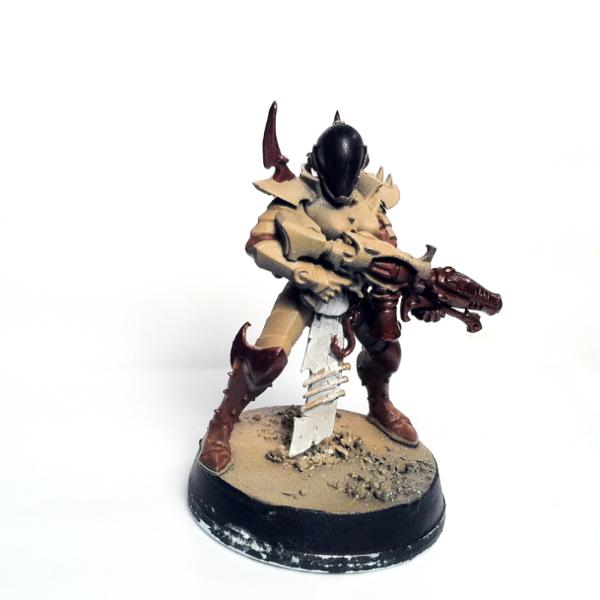
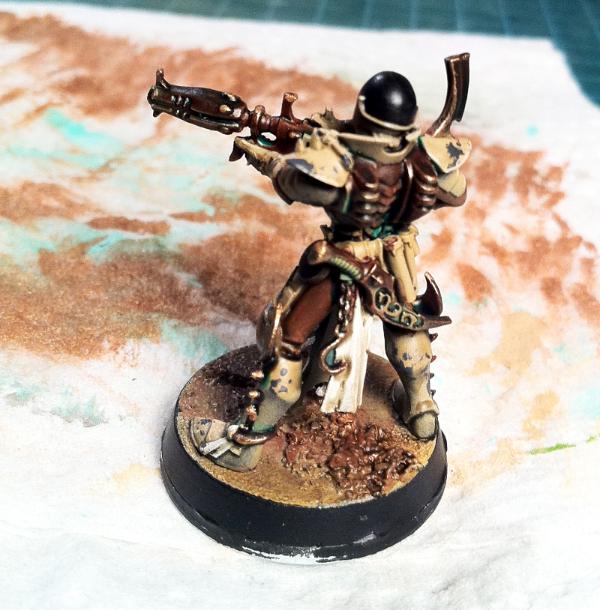
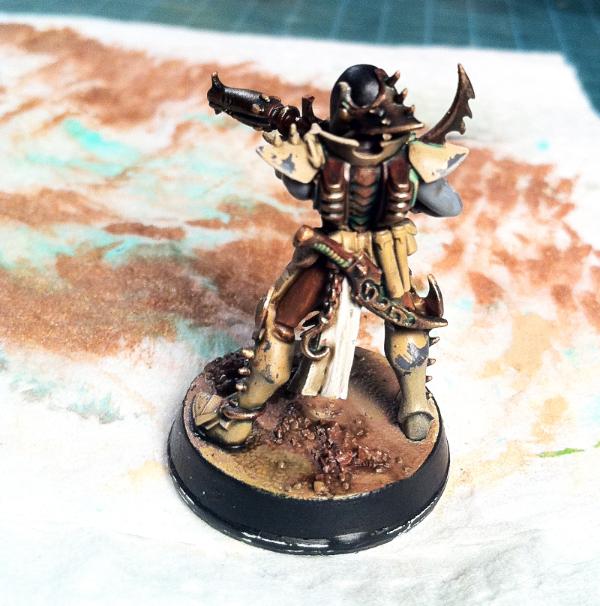
A quick update following some more painting. I'm beginning to understand how Mechanicum John can crank out the squads as quickly as he does now. Once you an established paint scheme and you have the workflow down pat from basecoat, to details, washes and then highlights, it all well, flows quite well. The process isn't quite there for me yet but I can see how it could be. First up, a Kabalite Warrior. This one doesn't have any bronze yet as it was the first test model. Didn't really want to test the washes and sponge chipping on one of the final models. 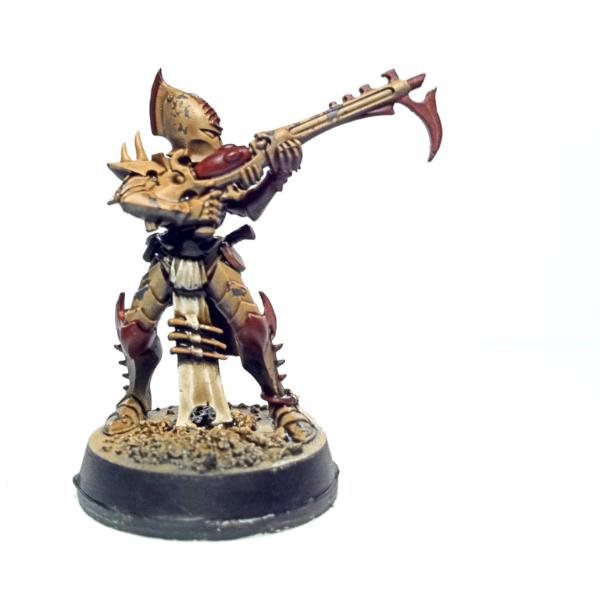 He turned out well so one of the squads of Trueborn was given a wash. 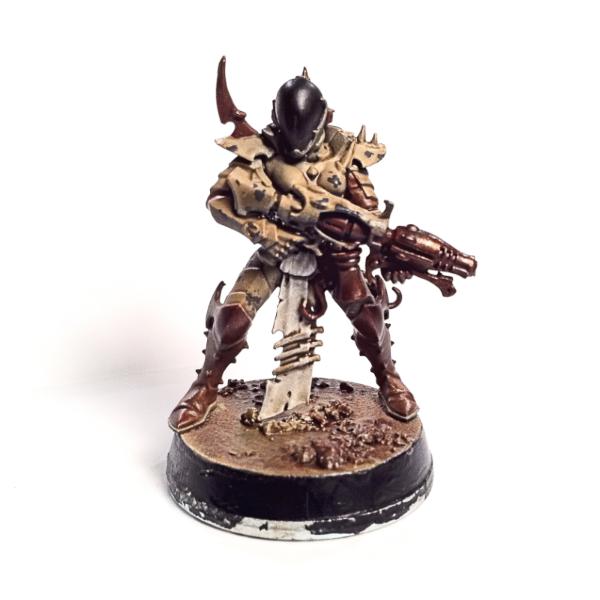 Thus far, Les Burley's wash recipe has just been amazing. The viscosity and coverage is spot on. If any of you have been wondering whether or not to work with washes but never took the plunge yet, I strongly suggest you do as it makes shading a breeze. Even by being picky with the application, a squad of 5 took only 40 minutes. This time is bound to go down as I get more used to working with the washes. It's working so well that I'll be buying some turquoise ink soon so I can make an oxidising wash for all the bronze in the army. Stay tuned.
|
|
This message was edited 1 time. Last update was at 2012/05/08 15:45:54
|
|
|
|
|
2012/05/08 15:55:31
Subject: Re:Dark_Gear's Webway Portal: a new Kabal rises...
|
|
Elite Tyranid Warrior
|
Woke up at 4:30 am this morning and couldn't stop thinking about painting and this coming Saturday's looming deadline to get the army completed. The best cure for such worries was to just get up and paint.
Within an hour of edge highlighting, one squad down and 2 more to go before I get to pigments and basing.
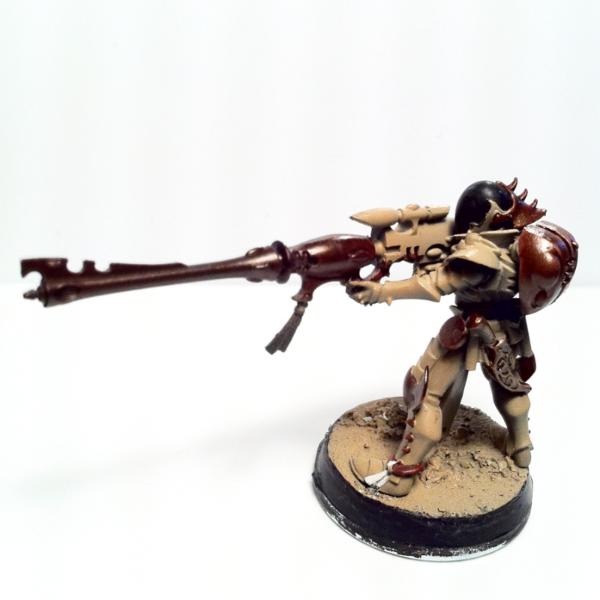
Blasterborn with beefy Scourge arms.

Blasterborn #2
Stay tuned
|
|
|
|
|
|
2012/05/08 16:13:11
Subject: Dark_Gear's Webway Portal: a new Kabal rises...
|
|
Fully-charged Electropriest
|
Early morning painting is the best! Especially if it's nerves that woke you up That said, it looks like you've had your coffee.The trueborn look really good. One thing though, I think that the stocks of the blasters should also be that lovely metal color, not the bone of the armor. Of course, what do I know? 
Good luck on the deadline!
|
|
|
|
|
2012/05/08 20:02:26
Subject: Re:Dark_Gear's Webway Portal: a new Kabal rises...
|
|
Elite Tyranid Warrior
|
It was one of the first ever that I got up this early to paint and I agree, it was great. Totally was a shame I had to go to work as after an hour I was really getting into the painting groove.
I hear what you're saying about the stocks, but I'm going for a mostly polymer bodied G36 or SCAR. Who knew that beige could actually be sexy. Mostly, it was faster to paint but I might just revise the painting after the tournament has passed.
I have no idea how I'll finish everything on time other than keep telling myself: "tabletop quality, tabletop quality, etc...".
Really happy they're coming along so well considering what you're looking at is the first ever fully painted squad of models ever produced by yours truly. What with all the Nid conversions I've worked on, you could count the amount of models I've fully painted on a 6-fingered hand.
|
|
|
|
|
|
2012/05/09 02:24:48
Subject: Dark_Gear's Webway Portal: a new Kabal rises...
|
|
Fully-charged Electropriest
|
I know how it is to paint an army. I figure I've got about a month to get my DE done (we have so much in common!), and it's quite a deadline. You're on the right track, and you can do it! If that's your first squad, then the army should look great on the tabletop.
As for skipping work to paint, I would never do that. Ever 
|
|
|
|
|
2012/05/09 21:53:24
Subject: Dark_Gear's Webway Portal: a new Kabal rises...
|
|
Fixture of Dakka
|
Lovely stuff, man! Glad to see you are getting some fun out of painting and the results are wonderful!
|
|
|
|
|
|
2012/05/10 20:25:35
Subject: Dark_Gear's Webway Portal: a new Kabal rises...
|
|
Angelic Adepta Sororitas
|
Your infantry looks really nice. Any idea what colour you're gunna do eyes? =)
|
|
|
|
|
|
2012/05/11 03:20:24
Subject: Re:Dark_Gear's Webway Portal: a new Kabal rises...
|
|
Elite Tyranid Warrior
|
As for skipping work to paint, I would never do that. Ever
Me neither. It just so happens that I tend to get sick right around the time of a painting deadline. No coincidence to see here folks. @ Casey: Thanks, and believe me, I'm just surprised as you that I'm actually enjoying painting. It's only taken, oh, 24 years... @ S'Jet: Thanks, coming from you that means a lot. As for the eye colour, that's a really good question and also a great reminder because I actually hadn't realised I'd skipped them, mostly because Trueborn don't have eyes in my army. Seeing as how I'm going for an analogic colour scheme, eyes and weapon scopes will be a orangy-reddish hue since my main colour is yellow and the other accent is turquoise. You can get a goo idea of the colours I'm aiming for by looking at this online colour scheme designer. The Female haemonculus strayed from the scheme a little bit more towards the pink side because I wanted to differentiate her from the rank and file. Her colours are only shifted however so she's still close enough to the established scheme that she won't clash next to other models, unlike say, a Pink Noise Champion leading a squad of Berzerkers. Minus the basing, which is going to be once all the models are finished, here's both finished squads, ready to snipe a vehicle. 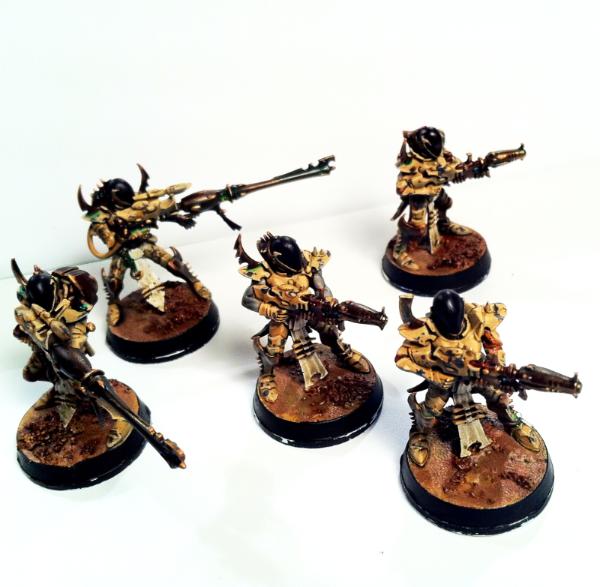 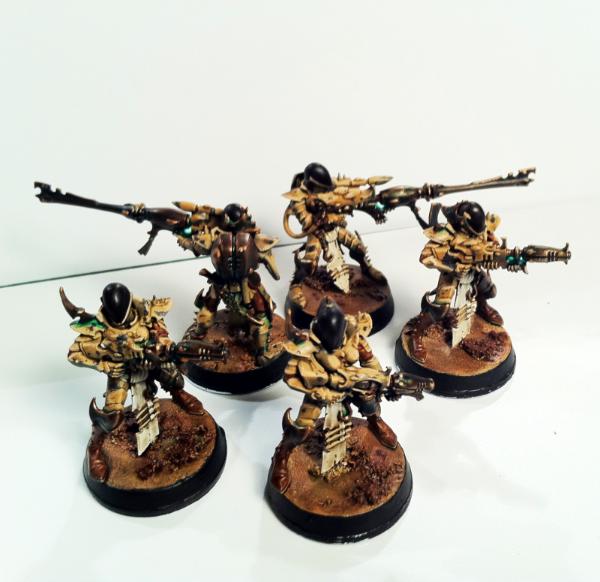 Once these 2 were done, it wasn't time to rest however, instead, it was time to get to work on highlighting the flesh on the Wracks and burnish the brass. 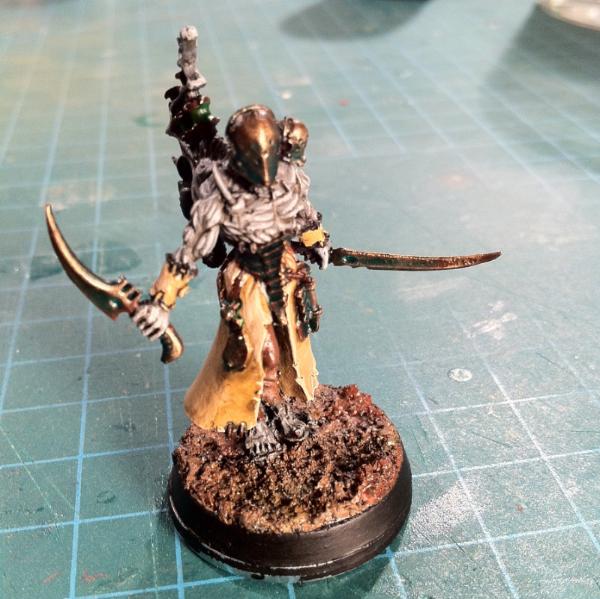  Stay tuned.
|
|
This message was edited 1 time. Last update was at 2012/05/11 04:49:48
|
|
|
|
|
2012/08/15 20:00:33
Subject: Re:Dark_Gear's Webway Portal: a new Kabal rises...
|
|
Elite Tyranid Warrior
|
Summer took a bite out of the hobby time budget but that's not to say there hasn't been any progress, just slow progress.
After sitting on an extra 15 Hellions since mid-spring, I finally tools to plastic in order to get them finished. While ferreting through the bitz I happily realised that I had a half-dozen Wyche torsos to sub into the squad.

Progress was good once everything was prepped.
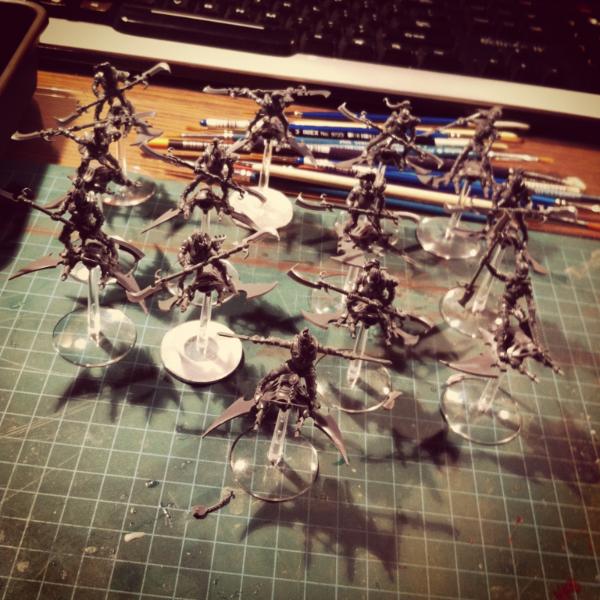
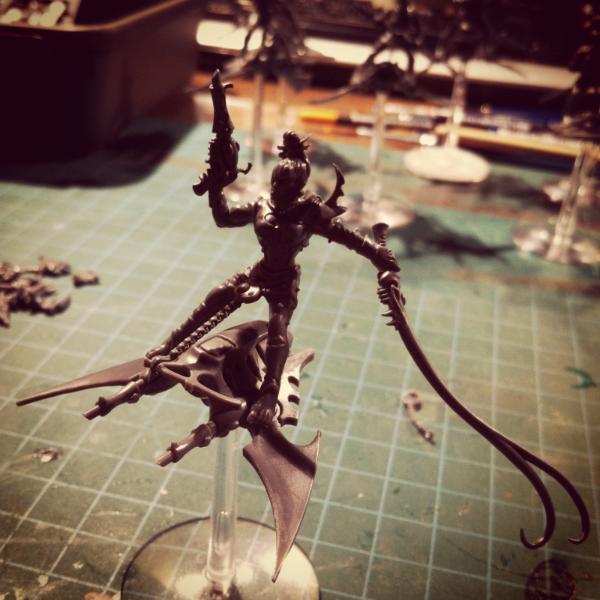
One thing that's just awesome with Hellions (and Dark Eldar in general) in their silhouette. The spikes and sharp edges looks just sleek, fast and deadly. Case in point, this Helliarch.
Stay tuned for more.
|
|
|
|
|
|
2012/08/16 20:00:41
Subject: Re:Dark_Gear's Webway Portal: a new Kabal rises...
|
|
Elite Tyranid Warrior
|
Made some more progress on the Baroness Sathonix conversion.
After extending the blades, the skyboard was given 2 Venom splinter cannons as well as some Raider chains to balance out the proportions and also enhance the appearance of speed.
To simplify packing around these spiky little models, magnets were added to the base, the board and the Baroness so they could all be taken apart.
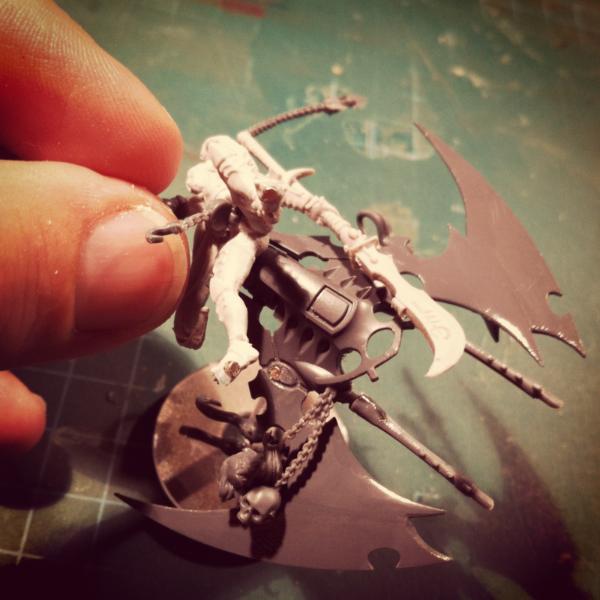
So there you have it, a quick and dirty conversion for the Baroness using bitz from 7 different kits.
Lilith Hesperax body
Succubus head and left arm
Hellion chain and board
Wyche pistol arm
Raider chains and keels
Venom splinter rifles
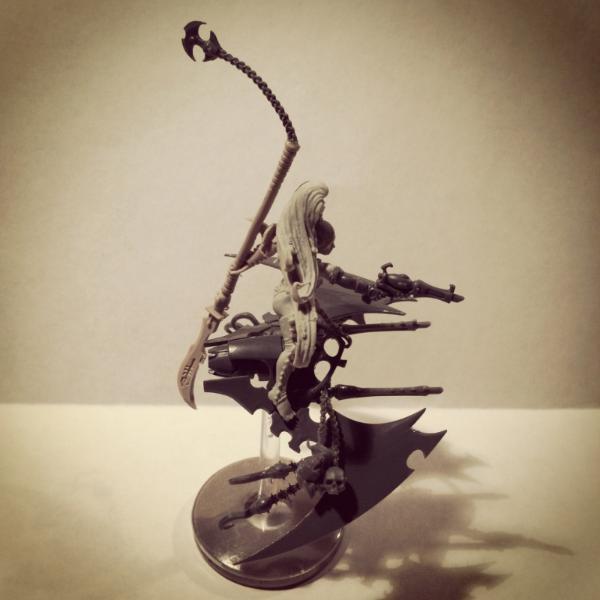
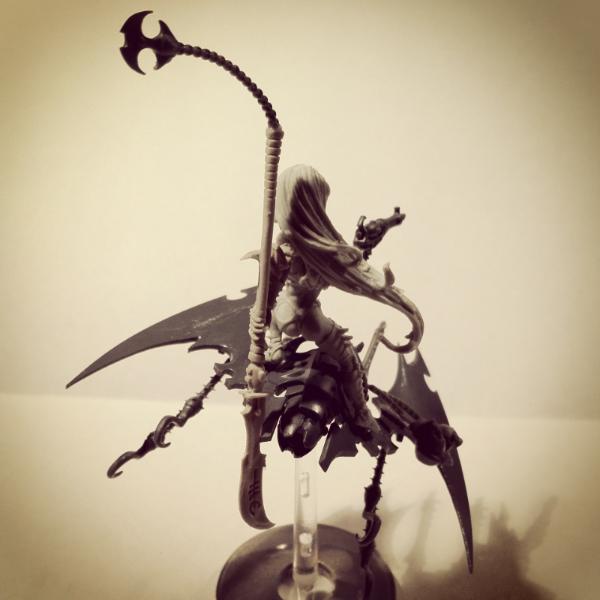
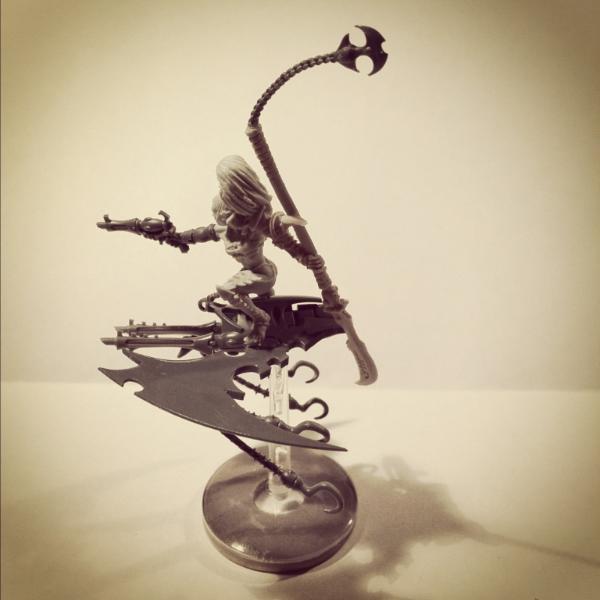
Enjoy!
|
|
|
|
|
|
2012/08/19 12:22:09
Subject: Dark_Gear's Webway Portal: a new Kabal rises...
|
|
Angelic Adepta Sororitas
|
Cool you're using Lelith. She looks great mounted on anything *cough*.... Try make sure the hair is aligned as backward facing as possible for the Illusion of speed!!
Nice Wrack. Shows off your Bronze. Turquoise wash looks ace.
|
|
|
|
|
|
2012/08/19 15:44:06
Subject: Re:Dark_Gear's Webway Portal: a new Kabal rises...
|
|
Elite Tyranid Warrior
|
Thanks S'Jet.
Soon I'll be playing with some pus green and red washes for a vehicle conversion. A FLGS is closing and they're liquidating all their Warhammer kits at 70%.
What do you get when you cross a: Haemonculus Ancient, a Raider and a Vampire Corpse Cart? I don't know yet either but I"ll let you know as soon as I have some pictures Automatically Appended Next Post: And the answer to the previous riddle is:
A Dark Eldar Corpse Raider.
More pics as this project unfolds.
|
|
This message was edited 1 time. Last update was at 2012/08/20 03:27:17
|
|
|
|
|
2012/08/21 16:58:48
Subject: Re:Dark_Gear's Webway Portal: a new Kabal rises...
|
|
Elite Tyranid Warrior
|
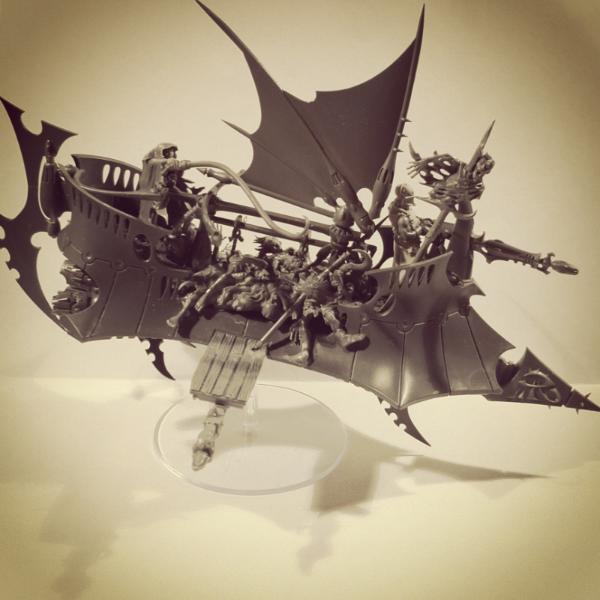
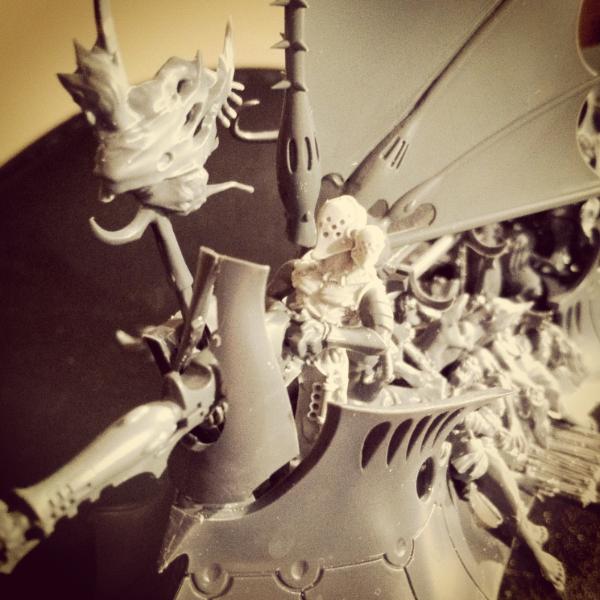
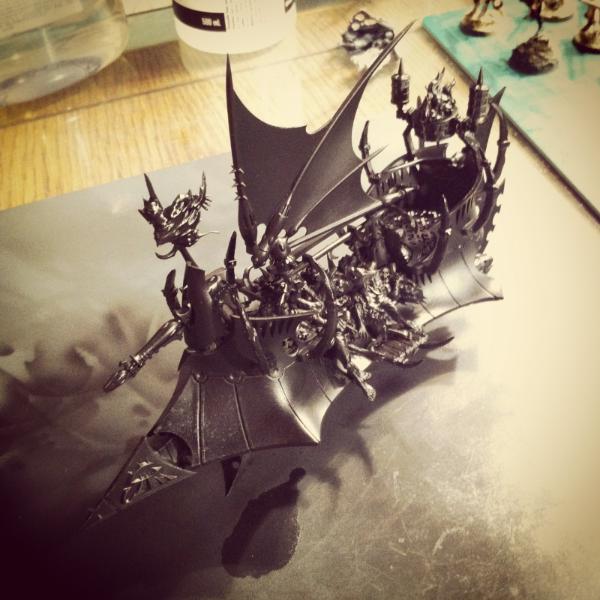
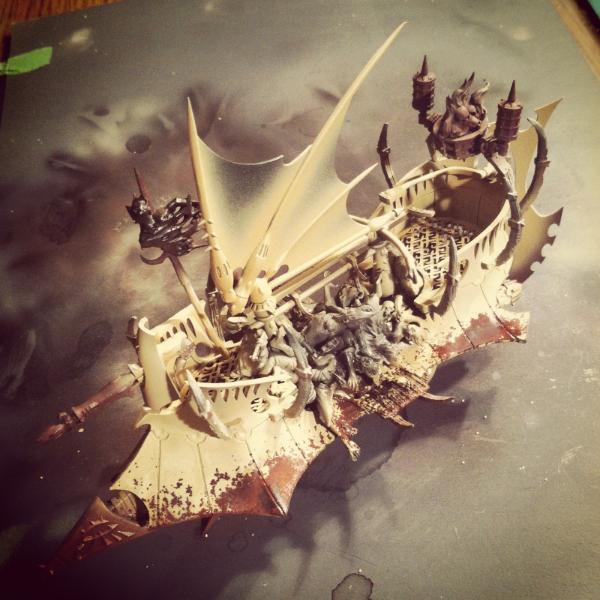
Made some progress on the Corpse Raider.
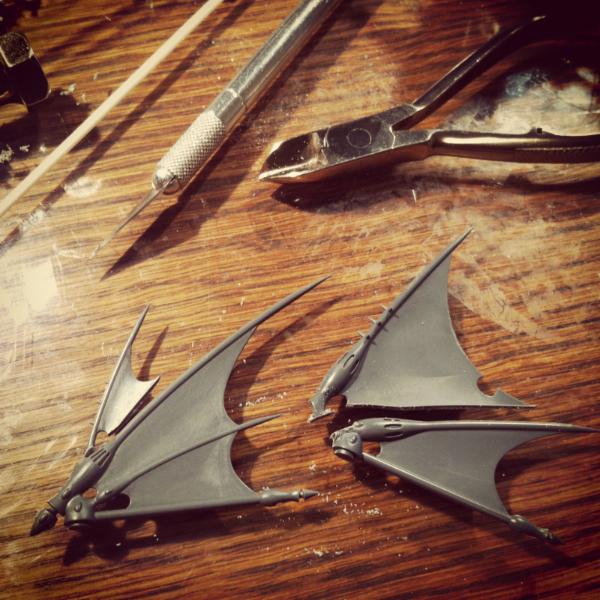
First, seeing as how this Raider has so more to carry, bigger sails were in order. The trick here was to cut the various parts using multiple passes with a sharp hobby knife rather than try to get the cut done in one pass and applying a lot of pressure. After some finishy filing to better match the edges, both sections were glued together.
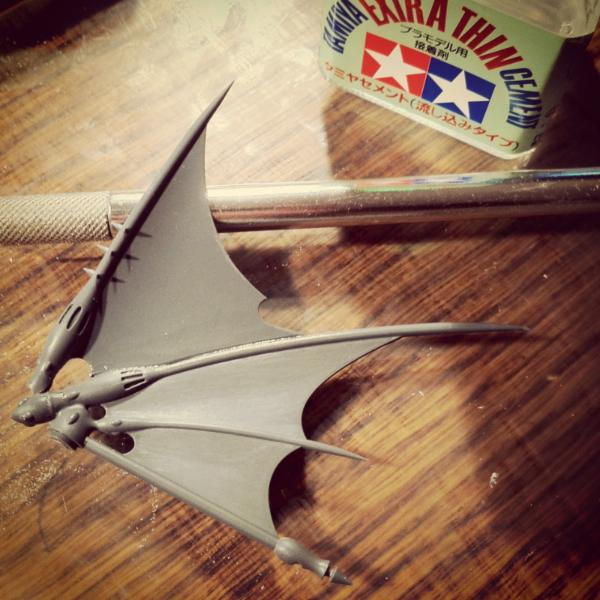
Next step will be to fill in the gaps with Milliput and smooth out the transitions.
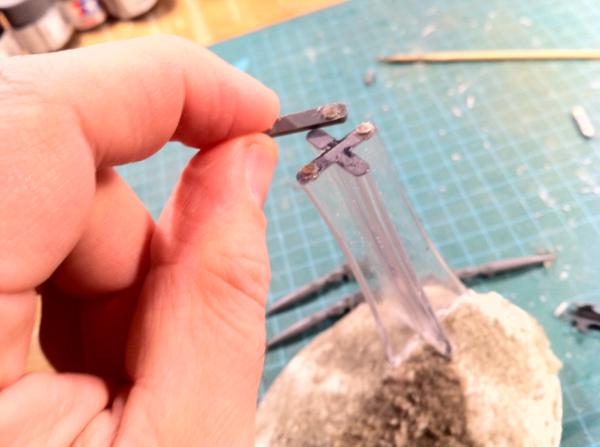
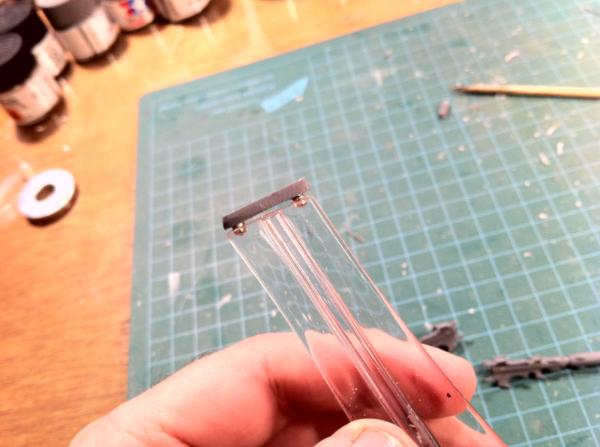
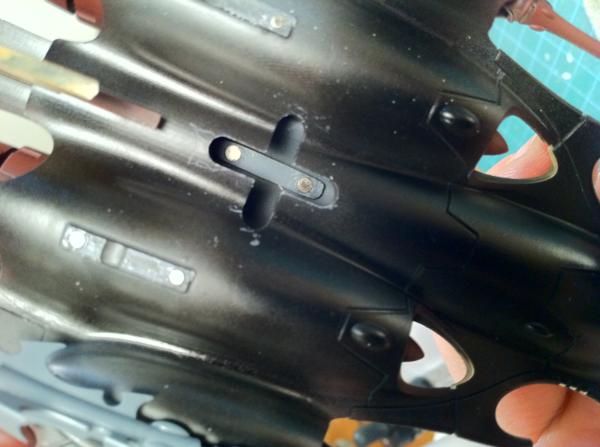
The nose turret was fully magnetised, both to the hull and for the weapon options. In order to make the gun pivot more stable I drilled out the Disentegrator in order to slide a small section of styrene tubing which was then drilled out to accept the tiny 1/16th magnets. Doing this also made it a lot easier to match the spacing just right. The tube was filed to the currect width and the magnets then just had to be flush mounted. Now I can swap out the Dark Lance for a Disentegrator and not worry about being stuck with only configuration.
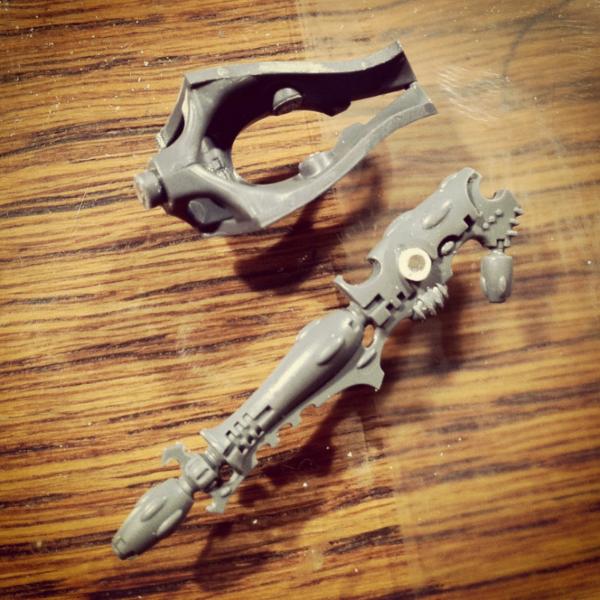
The Raider pilot is based on the Corpse Cart rider because the robes really fit the twisted monster theme already. Modifications were minor though time consuming. For example, to make him stand a bit taller, the left foot was replaced by a Warrior leg section. Also, rather than use the Rider's selection of heads, I wanted to use something more Elvish looking so I filed down a male Wyche's head to fit inside the cowl. I'm still debating whether I'll turn this guy into a flegling Haemonculus by adding some limbs and a hump on his back.
For scale, that is a 1/16th drill bit holding that head steady in the shot.
That's it for now,
Stay tuned for more.
|
|
|
|
|
|
2012/08/21 18:41:45
Subject: Dark_Gear's Webway Portal: a new Kabal rises...
|
|
Fully-charged Electropriest
|
Corpse raider is looking cool The pilot looks really cool, and I would totally go for more of a haemonculus look. Some limbs and a hump would help reinforce the fact that it's a coven raider to begin with.
Should be awesome when finished
|
|
|
|
|
2012/08/21 20:23:34
Subject: Re:Dark_Gear's Webway Portal: a new Kabal rises...
|
|
Elite Tyranid Warrior
|
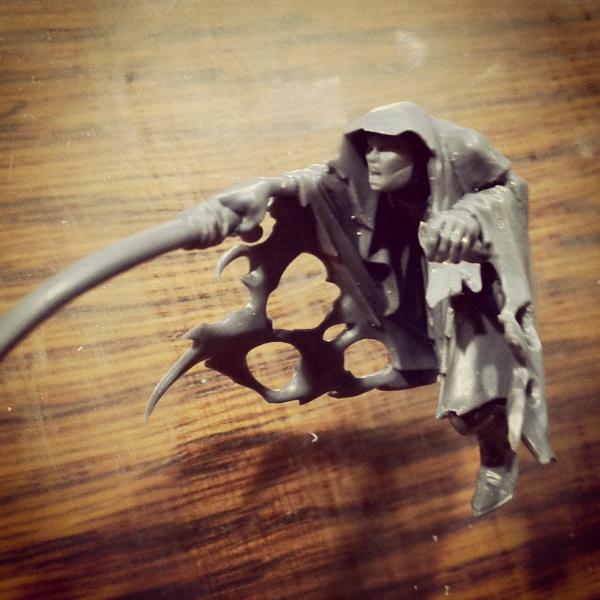
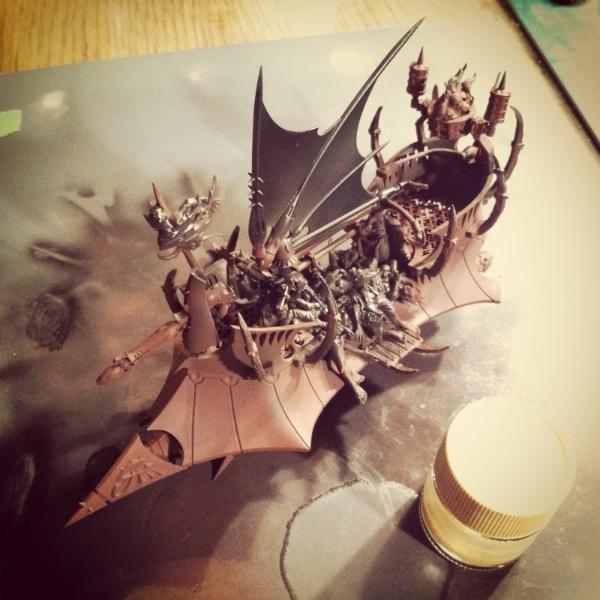
You're right, the pilot needs to have a heightened "flesh shaper" look to him in order to fit in properly. I'll get to those changes later today while also working on the Gunner's back.
In the meantime, here's what the build is looking like so far, with all the magnetised bitz installed.
A bit of closer look at the gunner. Ever since he took up this new job, he hasn't been called "four eyes" by anyone.
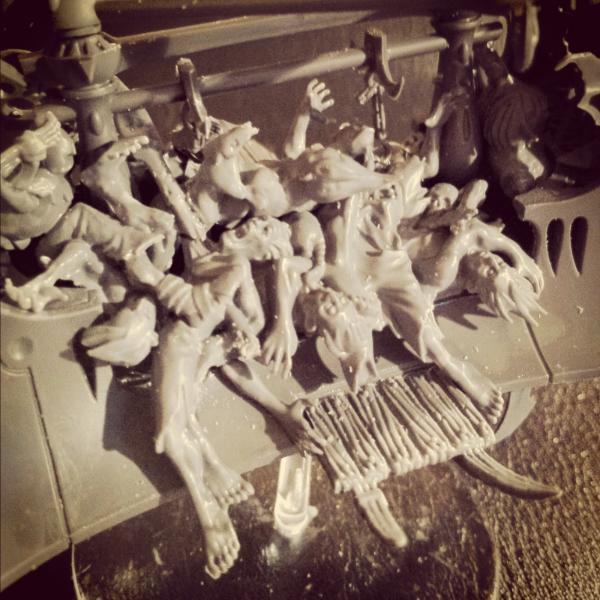
A closer view of the right loading ramp and some of the new "recruits".
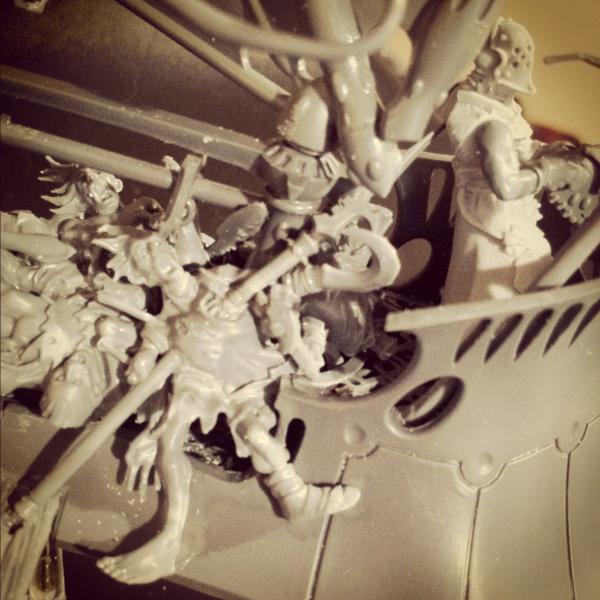
And then a closer view of the left side. The bottom edge of the corpse pile was finished off by adding a few extra dangling limbs.
Other than some GS on the Gunner, the pilot and the sails, the other I have to figure out is how to hang the torches and pot of flaming skulls which are included with the corpse cart.
This will definitely a fun yet challenging project to paint. There will be no questioning which HQ belongs to which Raider that's for sure.
C&C welcome as always.
Stay tuned.
|
|
|
|
|
|
2012/08/21 22:04:49
Subject: Dark_Gear's Webway Portal: a new Kabal rises...
|
|
Grey Knight Purgator firing around corners
|
Your project is amazing! I love it, keep it up man!
|
 5000pts 5000pts
 5000pts 5000pts
 5000pts 5000pts
 3000pts 3000pts
 |
|
|
|
|
2012/08/31 20:50:26
Subject: Re:Dark_Gear's Webway Portal: a new Kabal rises...
|
|
Fireknife Shas'el
|
 Dark_Gear wrote: Dark_Gear wrote:The plan for the weekend was to finally magnetise the whole fleet of flyers to their bases, along with their sails and weapons in order to facilitate storage.
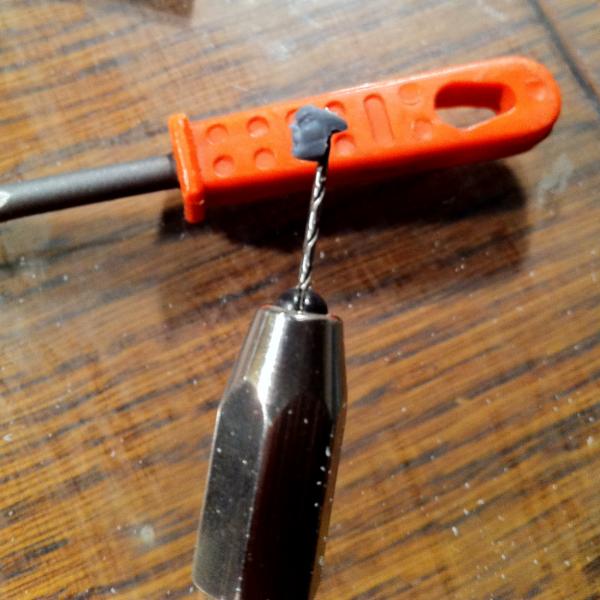
In regards to the pilot of the Raiders, I was wondering how to magnetise them to the floor of the Raider until I reliased that one of my favourite beers actually comes in steel cans, not aluminium. Why is this cool? Because now that I've found a good and cheap source of steel that is as thin as human hair, magnetising small objects to bases just got a lot simpler. Case in point, the following picture ...
Once the thin strips of steel foil are cut and glued to the model's foot, all that left to do is drill a hole for the small magnet. Installation can be a bit tricky but there's a neat you can use to make the task of holding a tiny magnet in place while CA Glue dries. By filing down the head of an oval head pin till it's flat, you have a perfect a stable and thin applicator that can squeeze into tight places.
Once the magnet has been put in place just use a piece of spree or plasticard to wipe the excess glue and voila, nice flush mounted magnet in your Raider's floorboards just waiting for a model.
So this is what you have been doing with your life lately
That is a nice trick for applying magnets I have to say. In regards to glueing steel to a models feet...why not just glue magnets to thier feet? Does a steel on magnet bond hold stronger than a magnet on magnet bond? Or is it due to cost? Beer can steel would be much cheaper than rare earth magnets.
|
|
|
|
|
|
2012/09/01 00:42:34
Subject: Re:Dark_Gear's Webway Portal: a new Kabal rises...
|
|
Elite Tyranid Warrior
|
So this is what you have been doing with your life lately
Beer, work and conversions... yeah that about sums it up. How've you been doing?
That is a nice trick for applying magnets I have to say. In regards to glueing steel to a models feet...why not just glue magnets to thier feet? Does a steel on magnet bond hold stronger than a magnet on magnet bond? Or is it due to cost? Beer can steel would be much cheaper than rare earth magnets.
Magnet on magnet bonds are definitely stronger than steel on magnet bonds. The main reason I was using the super thin steel at the time was that the magnets I had at the time were wider than the Raider crew's feet. The thin strips of steel were therefore just a workaround until I found some smaller magnets, such as the ones that were just recently used to magnetise Lilith to a Skyboard for my Sathonix conversion. These new magnets are small enough that they can flush mounted into the feet of most models, which opens a whole new level of possibilities.
|
|
|
|
|
|
2012/09/14 22:10:03
Subject: Re:Dark_Gear's Webway Portal: a new Kabal rises...
|
|
Elite Tyranid Warrior
|
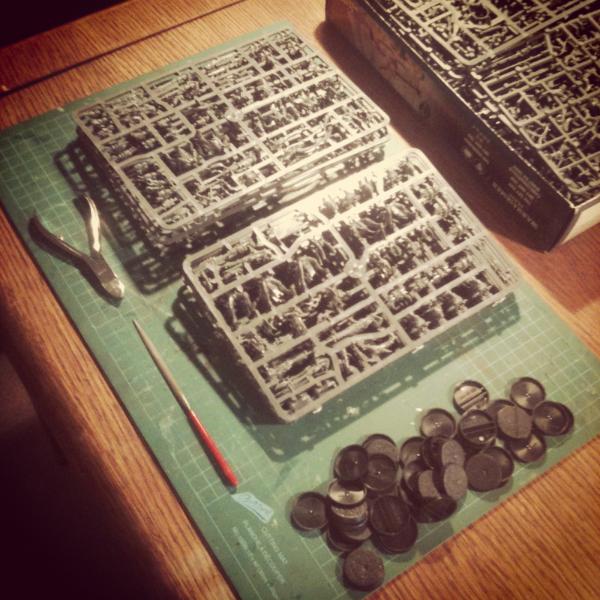
It's a productive week.
Since last Friday, I snipped, cleaned up, assembled, gave 3 coats of paint and sponge-weathered a measly 40 kabalite warriors. While the paint was mixed and the airbrush was humming, another 15 kabalites, 10 Wyches, 1 Venom, 1 Raider and 2 Razorwing Fighters were brought up to the same painting level.
So basically, I went from this:
To this:
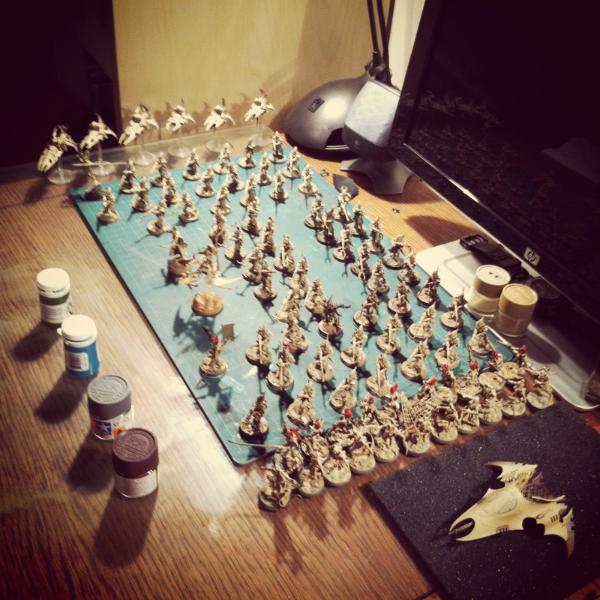
In just under 2 weeks.
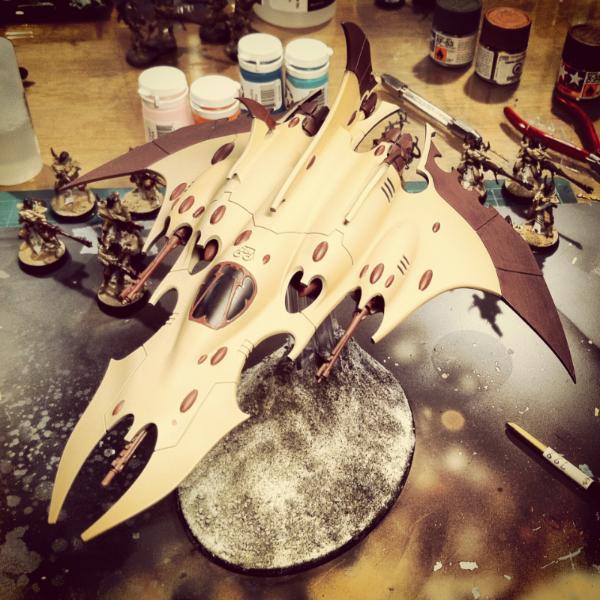
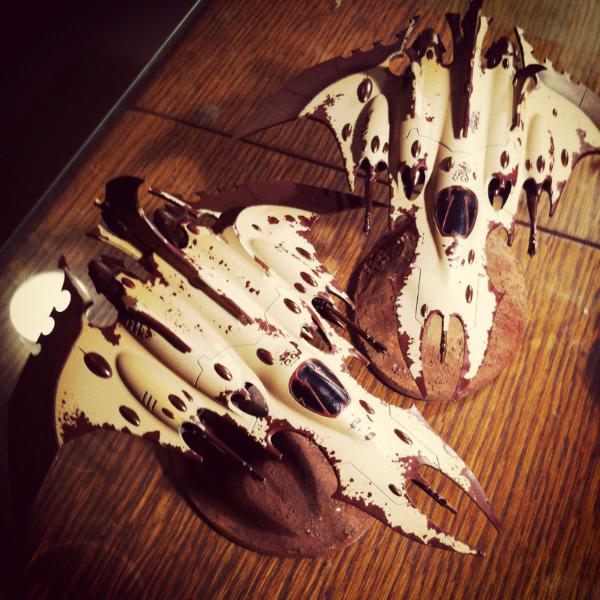
Vehicles still need work but they're coming along as you can see from the Venoms:
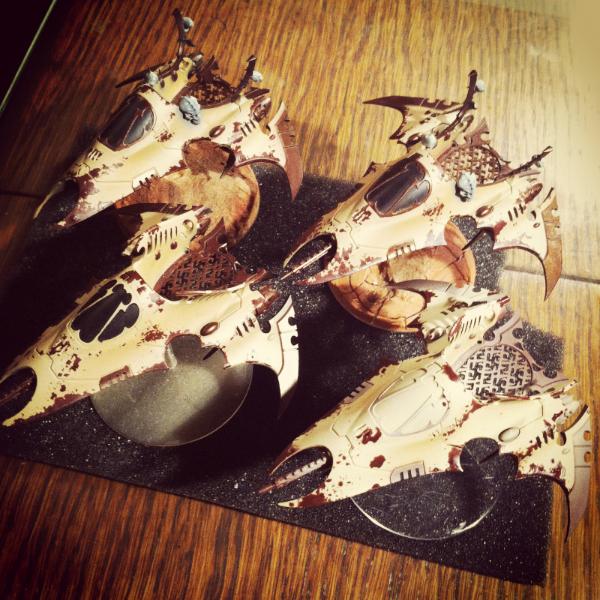
The Raiders and the Ravager:
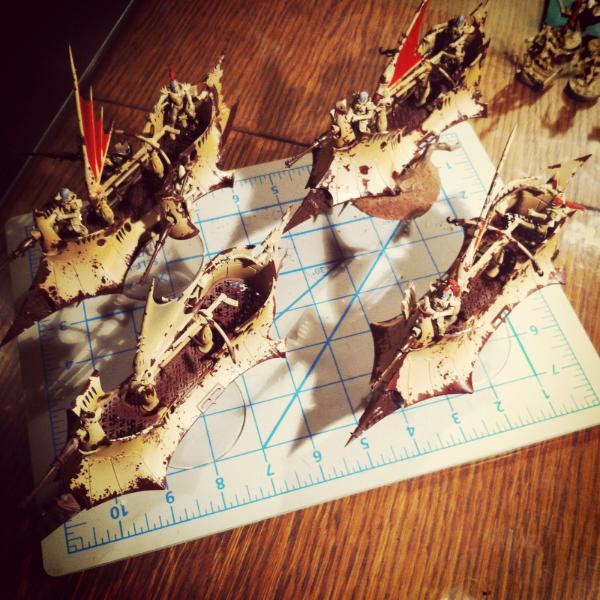
As well as the Razorwings:
As a little side project, I even built up this little Sybarite conversion using the Raider Crew bitz for a more dynamic and active model:
Stay tuned.
|
|
|
|
|
|
2012/09/14 22:43:22
Subject: Re:Dark_Gear's Webway Portal: a new Kabal rises...
|
|
Death-Dealing Devastator
|
The more I see of your models the more I fall in love with that color scheme. It is nice to see some bright colors on Dark Eldar.
How easy is it to paint all of those models using an airbrush? I have been thinking of getting one for some time now, but I just don't know if it is worth the investment.
|
|
|
|
|
|
2012/09/15 00:23:56
Subject: Re:Dark_Gear's Webway Portal: a new Kabal rises...
|
|
Elite Tyranid Warrior
|
Thanks Dorn. Painting an army up with an airbrush is just a dream compared to using bristles. All the infantry models you see in the 2nd picture were given 3 different colours (pre-shade, base coat and highlight ) in about 6 or 7 hours. In that time I also touched up 6 jetbikes, 1 Raider, 1 Venom, 10 Wyches and 10 kabalites, so yes, an airbrush makes a world of difference.
I won't lie and see a good airbrush isn't an investment, but there are deals out there. The word investment is quite appropriate because an airbrush isn't just an expense. Your painting will defintely go to another level once you pick up an airbrush. It will never replace your bristle brushes but it's a very versatile tool nonetheless. Don't hesitate to PM me if you have any questions.
|
|
|
|
|
|
2012/09/21 19:34:56
Subject: Re:Dark_Gear's Webway Portal: a new Kabal rises...
|
|
Elite Tyranid Warrior
|
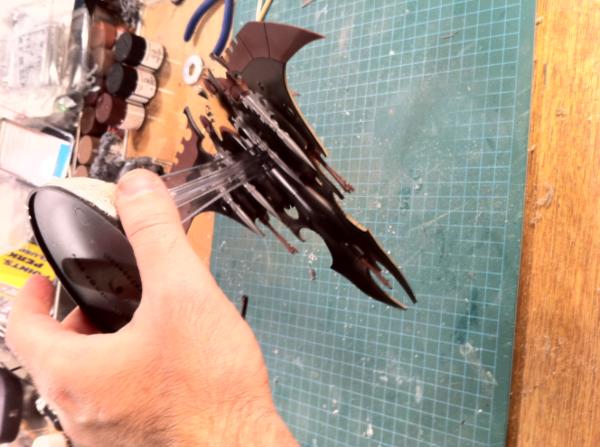
Last night I took a break from painting the kabalites and started painting the Corpse Raider. Along the way, it was also decided that I'd try my hand at salt weathering the Raider.
First step was to treat the whole model to a generous black coat.
Followed by a coat of Hull Red, mostly around the hull and areas that will be brassed up.
On top of this coat of paint I sprayed some Future to seal the areas that would be salted. Once that was dry, the model was sprayed with tap water with the airbrush so the salt would stick.
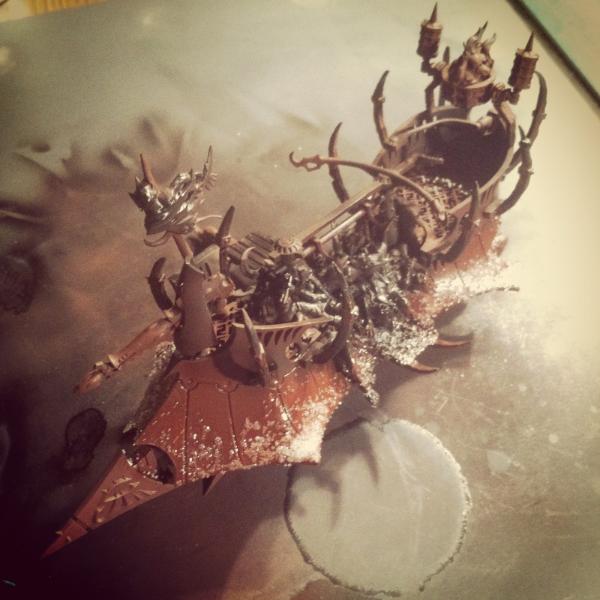
Don't worry about pouring it on thick.
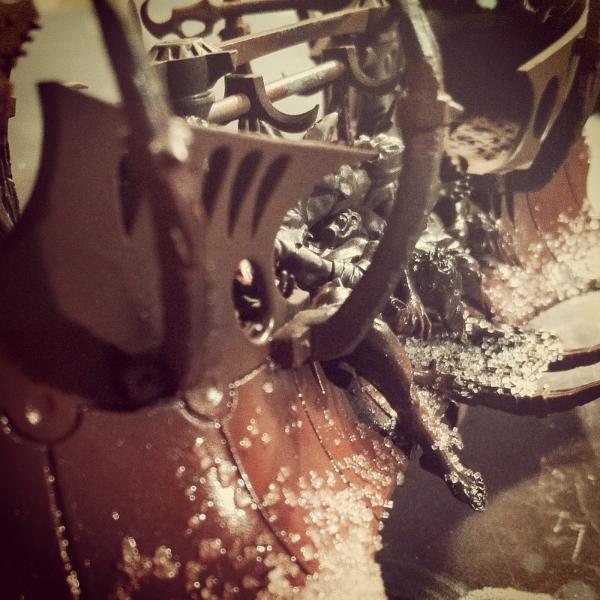
Once the coat of Desert Yellow and Buff were done, the salt was removed with all old tooth brush. At this stage I realised that I should have probably used colder water or a thicker coat of Future as, in some areas, scrubbing removed more than just the salt and Desert Yellow, revealing the black basecoat. Thankfully, it was a happy accident as the scratches in the Red enhanced the look of the weathering.
After this first attempt I'd have to say that salting definitely gives a great appearance but on a model that has so many angled surfaces, such as a Raider, sponge weathering makes it easier to distribute the chips and flakes across the surface. With time and practice this might not be the case but for now, I think I'll be sticking to sponge weathering.
Stay tuned.
|
|
|
|
|
|
2012/09/21 19:45:48
Subject: Dark_Gear's Webway Portal: a new Kabal rises...
|
|
Hacking Shang Jí
Calgary, Great White North
|
Love the weathering! I'd expect to need a tetanus shot after handling those raiders...
|
|
|
|
|
|
2012/09/22 11:08:51
Subject: Dark_Gear's Webway Portal: a new Kabal rises...
|
|
Angelic Adepta Sororitas
|
Nice weathering mate. I found it really fun painting batches like this with the AB. You can really smell the progress!
|
|
|
|
|
|
|
|

 :
: 


