| Author |
Message |
 |
|
|
|
|
Advert
|
Forum adverts like this one are shown to any user who is not logged in. Join us by filling out a tiny 3 field form and you will get your own, free, dakka user account which gives a good range of benefits to you:
- No adverts like this in the forums anymore.
- Times and dates in your local timezone.
- Full tracking of what you have read so you can skip to your first unread post, easily see what has changed since you last logged in, and easily see what is new at a glance.
- Email notifications for threads you want to watch closely.
- Being a part of the oldest wargaming community on the net.
If you are already a member then feel free to login now. |
|
 |
2019/03/16 18:17:52
Subject: Industrial Insanity - A Terrain Blog by H.B.M.C. (A question for everyone...)
|
|

Veteran Inquisitor with Xenos Alliances
|
Does it really need to be that big? What if you went 1x1 and don't build it quite as tall as one large wall panel per building floor? Being 1x1x2, still with 3 floors, I think it captures the feel and ends up close to the original's size.
|
|
|
 |
|
2019/03/16 23:15:35
Subject: Industrial Insanity - A Terrain Blog by H.B.M.C. (A question for everyone...)
|
|

Owns Whole Set of Skullz Techpriests
Versteckt in den Schatten deines Geistes.
|
1x1 is very thin though, and won't quite do justice of the tower.
Plus I've got like 6 spare stacks, might as well use 'em.
|
|
|
|
|
|
2019/03/20 12:45:33
Subject: Re:Industrial Insanity - A Terrain Blog by H.B.M.C. (The Monster)
|
|
Owns Whole Set of Skullz Techpriests
Versteckt in den Schatten deines Geistes.
|
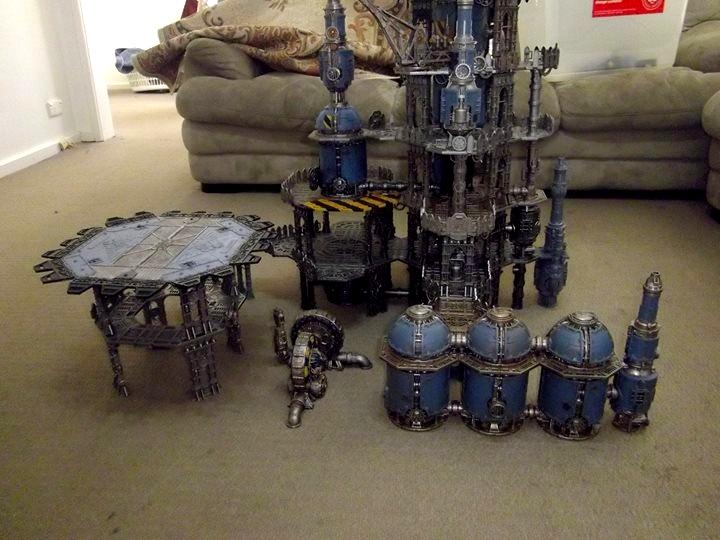
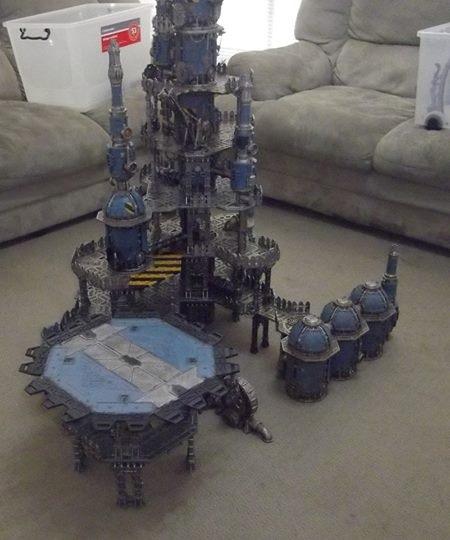
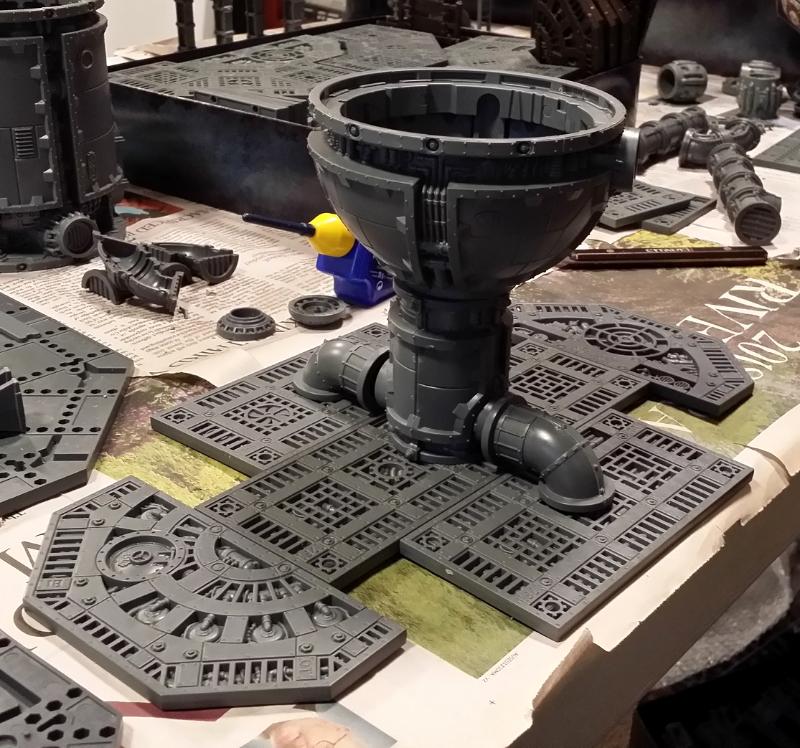
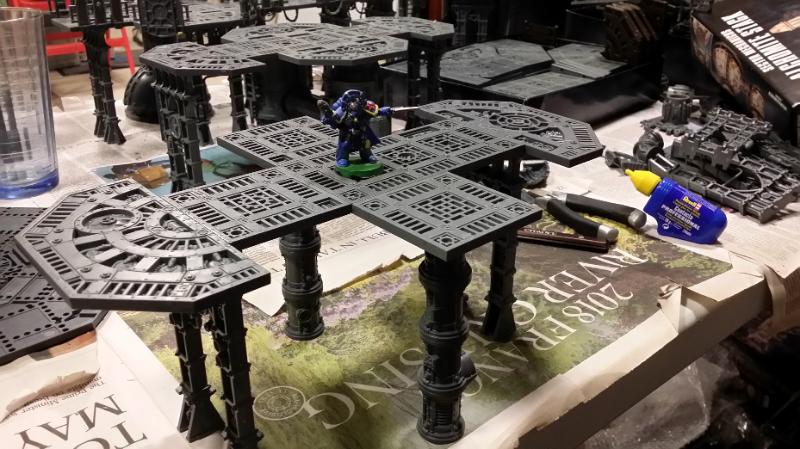
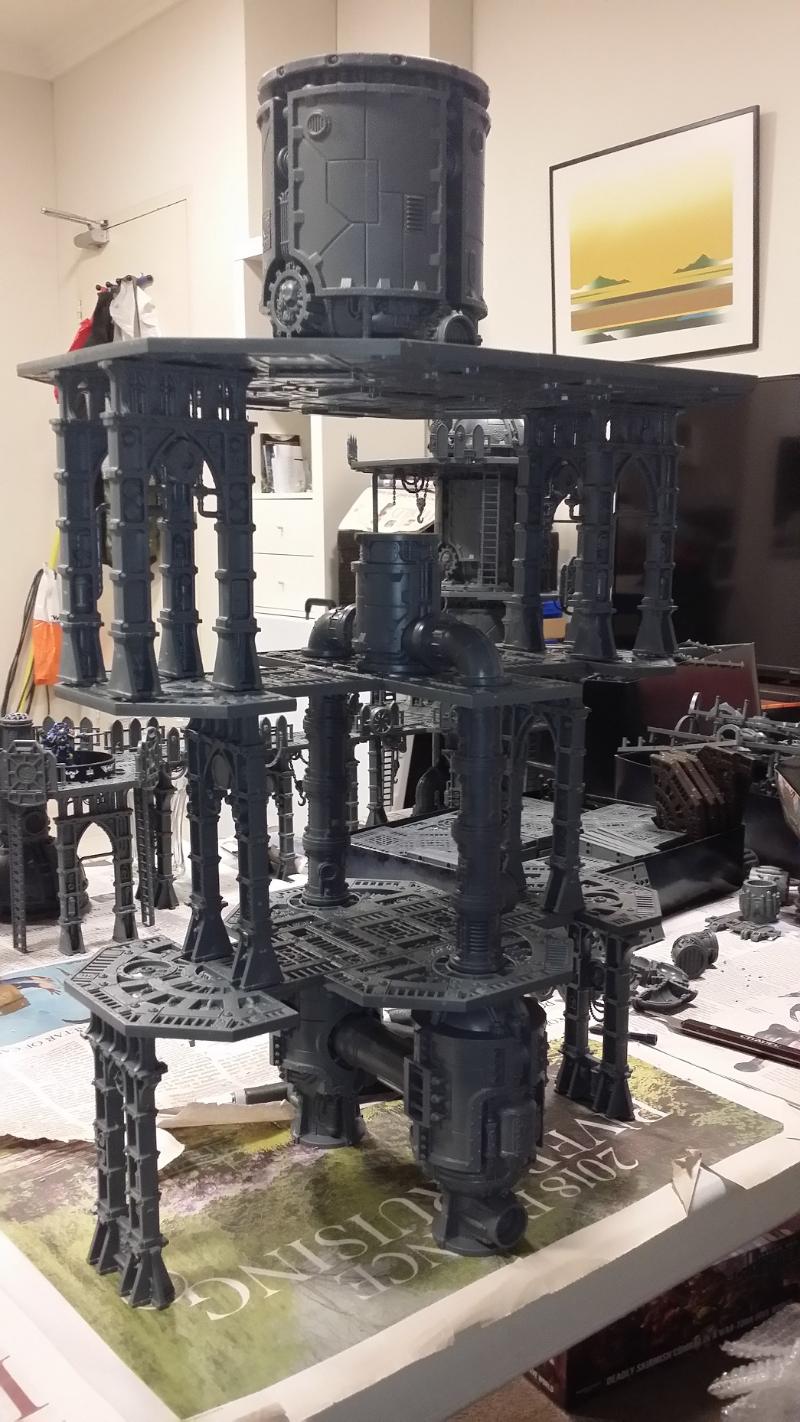
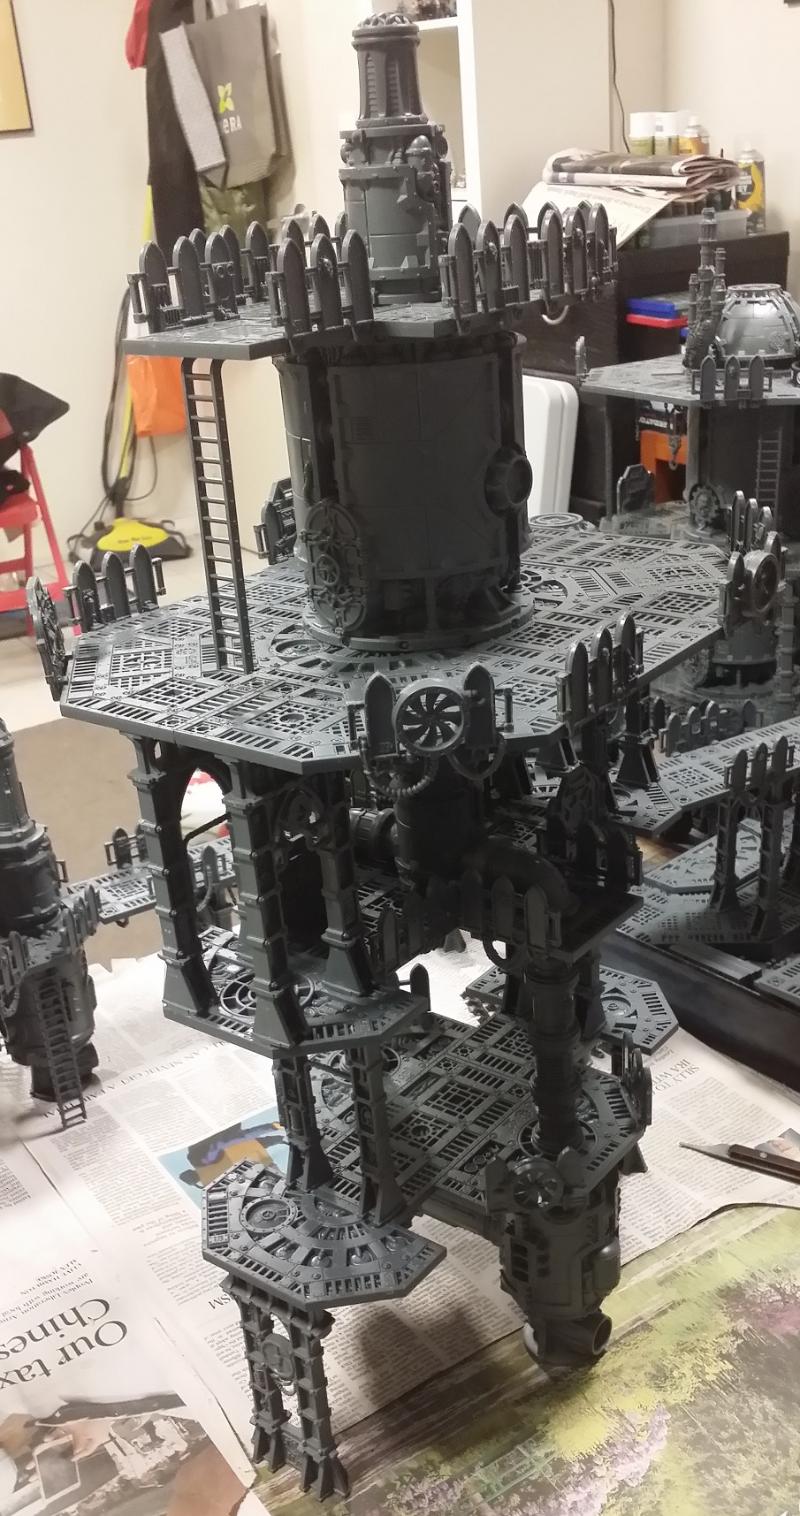
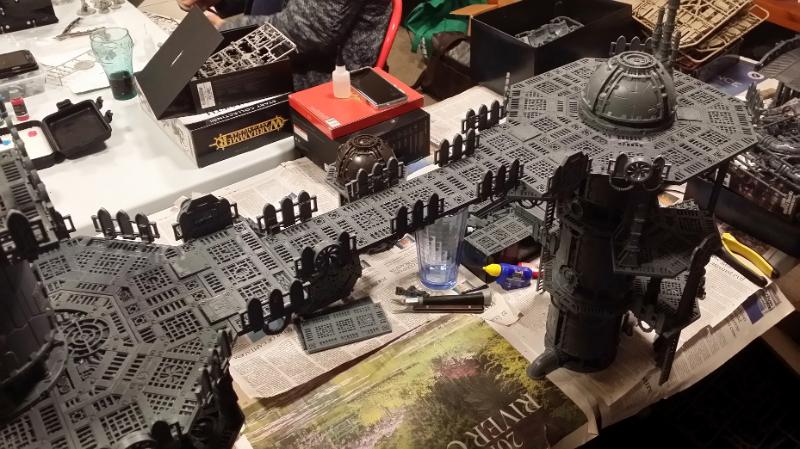
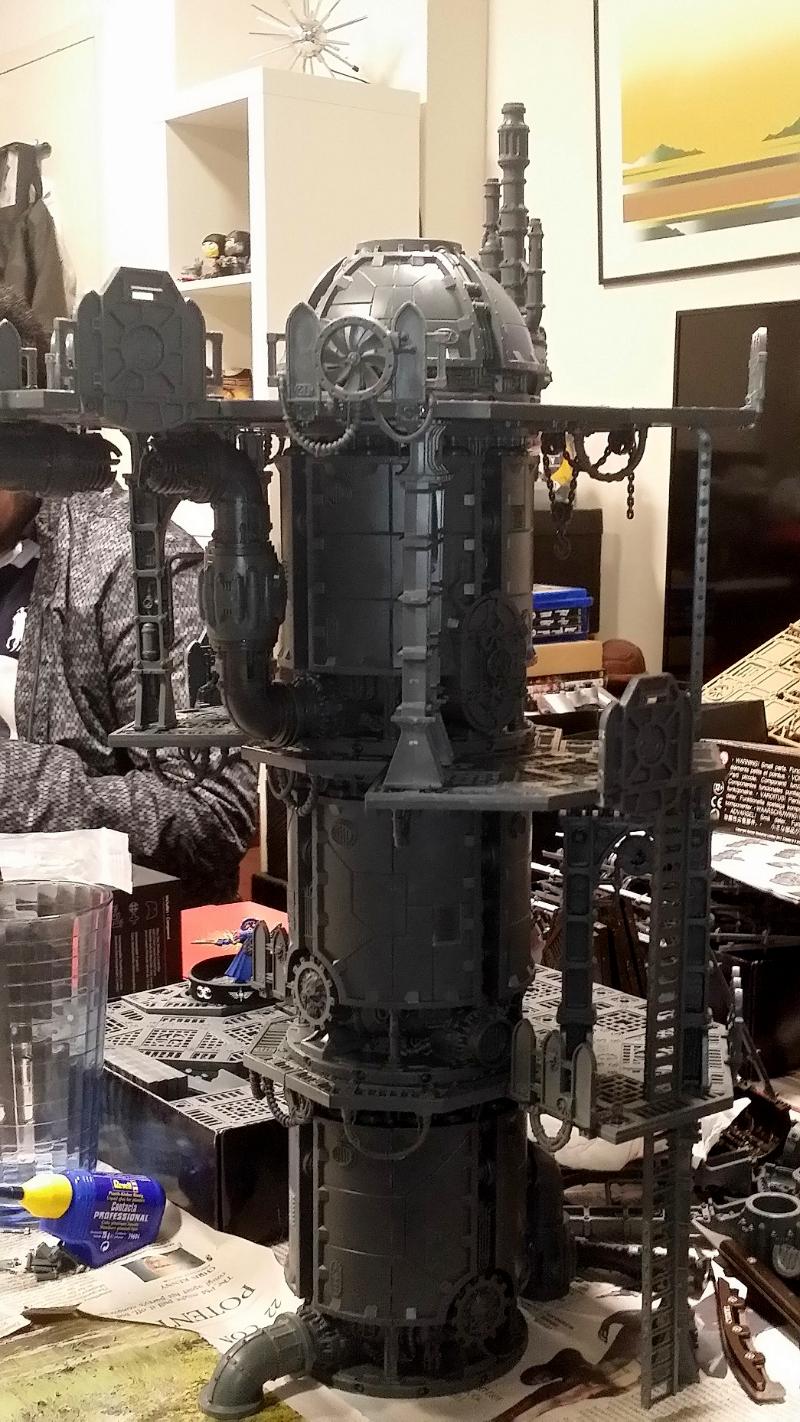
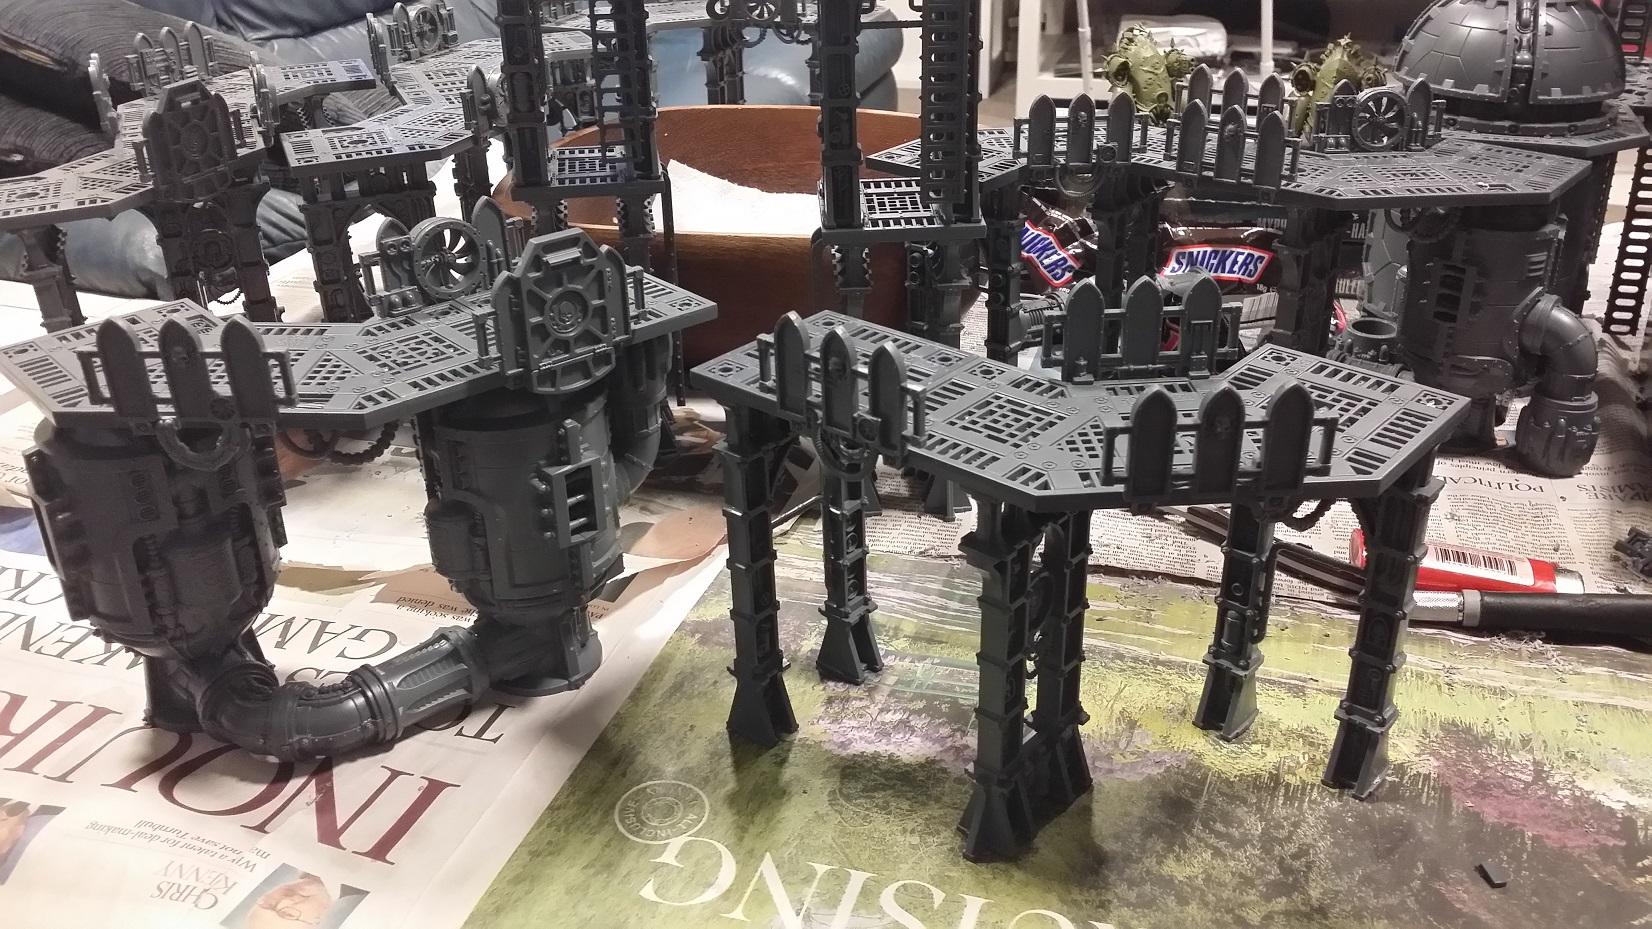
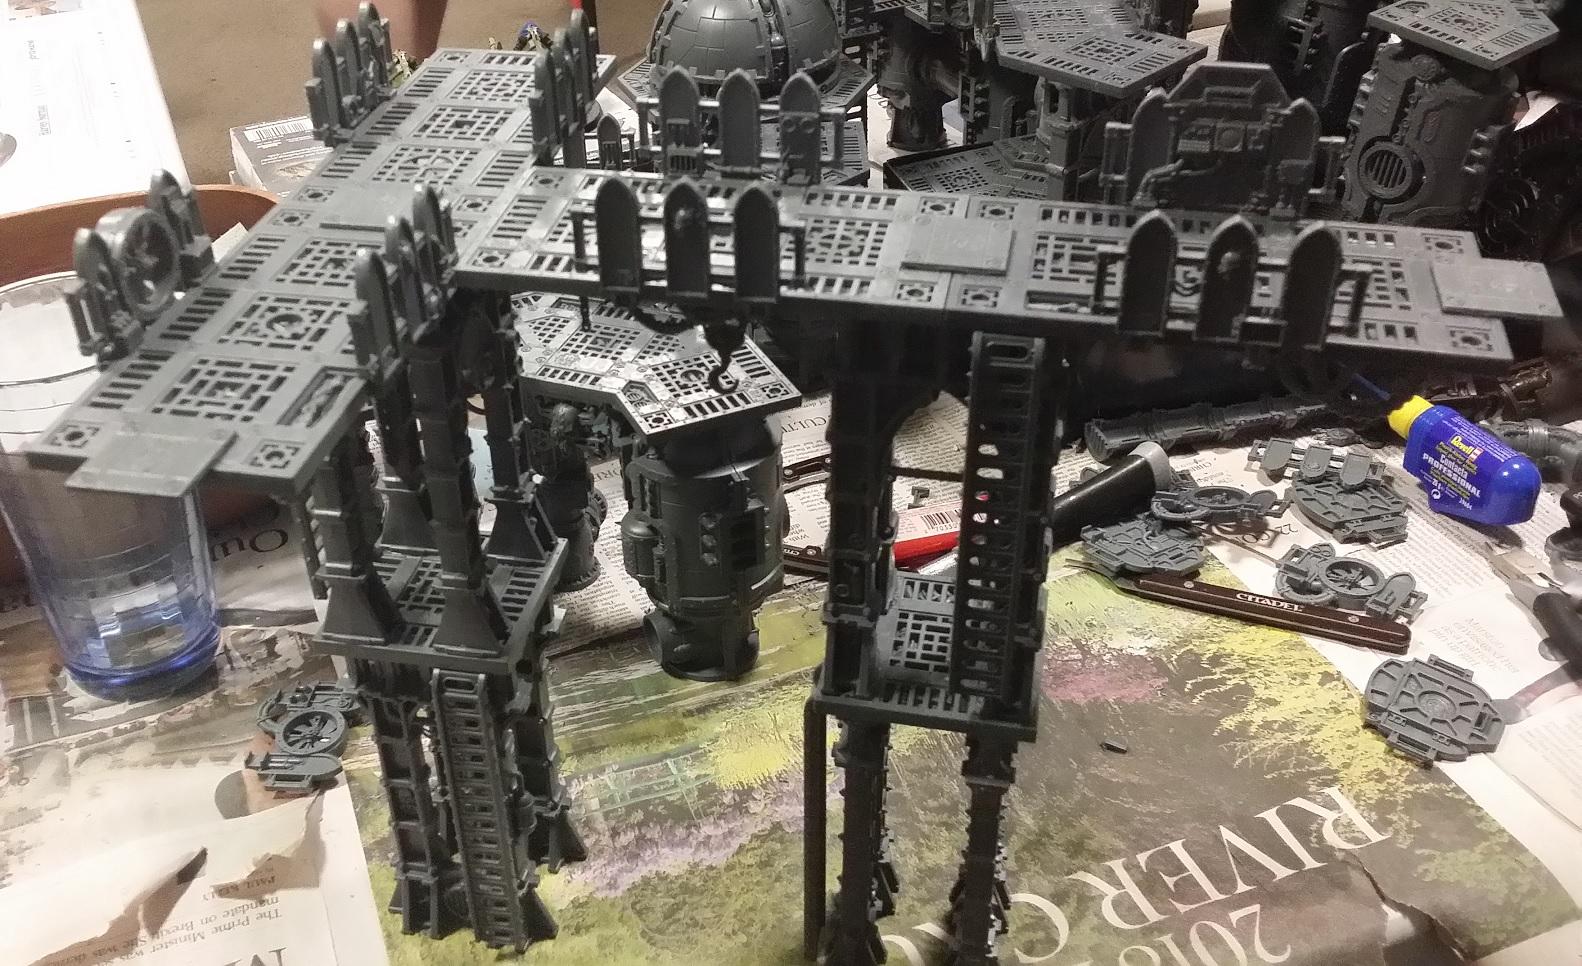
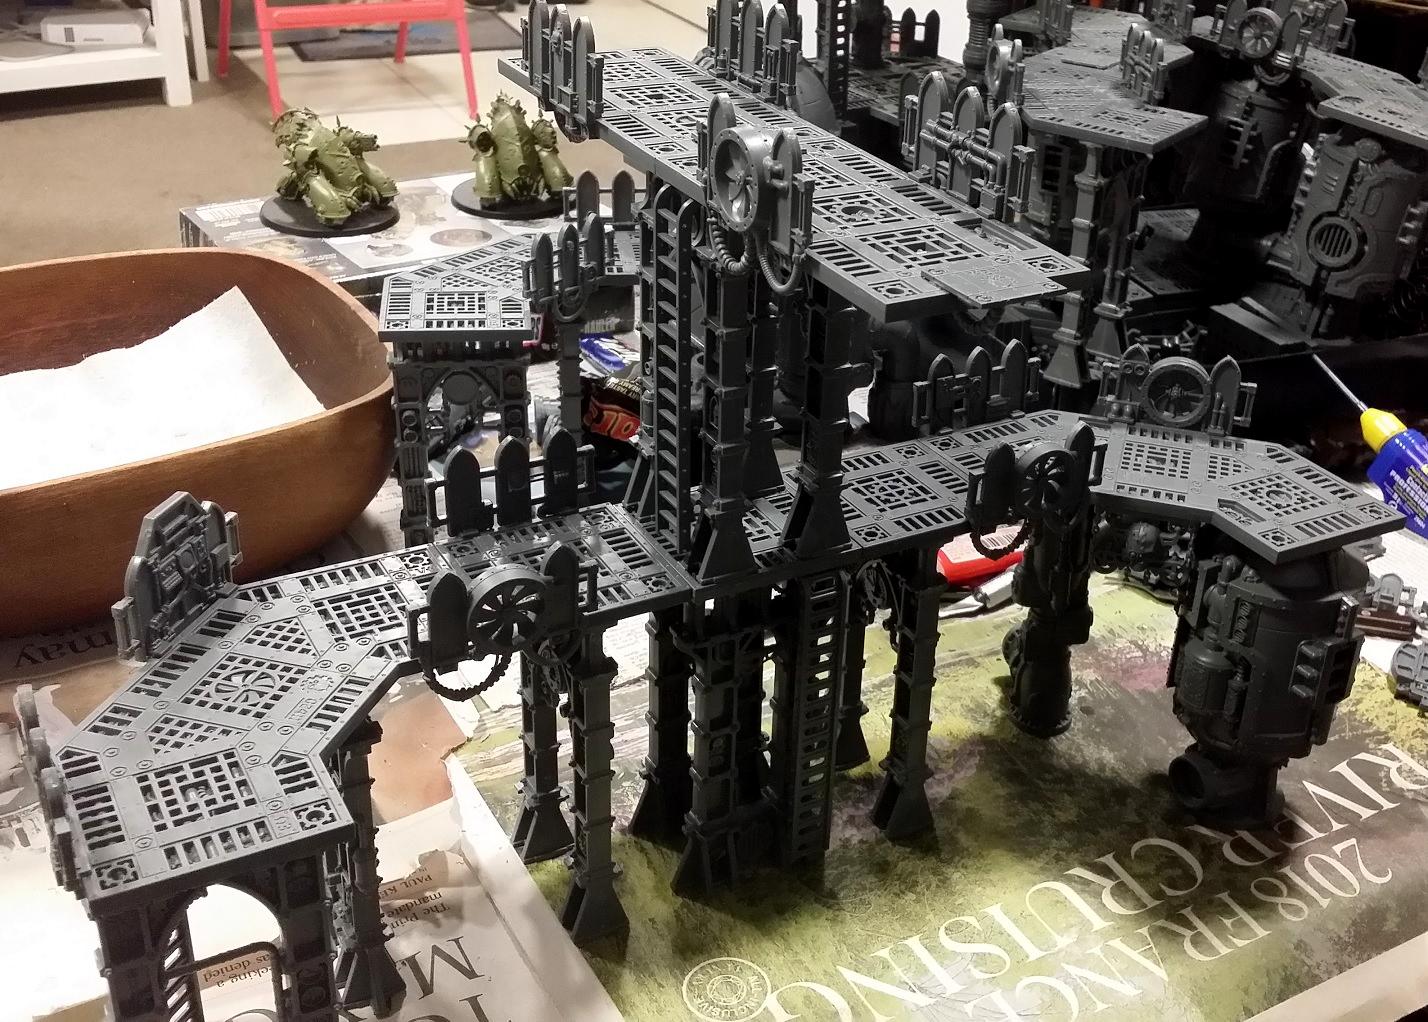
Last weekend I finally put together something I've been teasing for many posts. There have been shots of its test layout, but the size and scope of The Monster, or Rita Tower to use it's proper name was not quite apparent. Suffice to say it is the tallest structure I've built yet, with a few complex new building ideas that I was testing out for the first time. I still have to add cables/pipes and ladders, but from this you will see how it looks when joined with the Lift Tower and the Underpipe bridge.
So let's get started and test out what the Dakka picture limit per post is at the same time!  The Monster/Rita Tower
When I created the Underpipe Bridge (and when I make the Mk.II Underpipe Bridge this weekend) I ended up with a double straight piece with two of those flat connectors on each end on it to give it extra strength and to allow it to "hang" between two tall buildings without the need for supports. It means it can hang at any level. Up until now though I've only had one tall building to connect it to, the Lift Tower, but I always intended to have it connect to an even larger building. In a lot of ways it's like the Armoured Walkway from the Outlanders Necromunda expansion, in that it is unique compared to all the other standard bridge types.
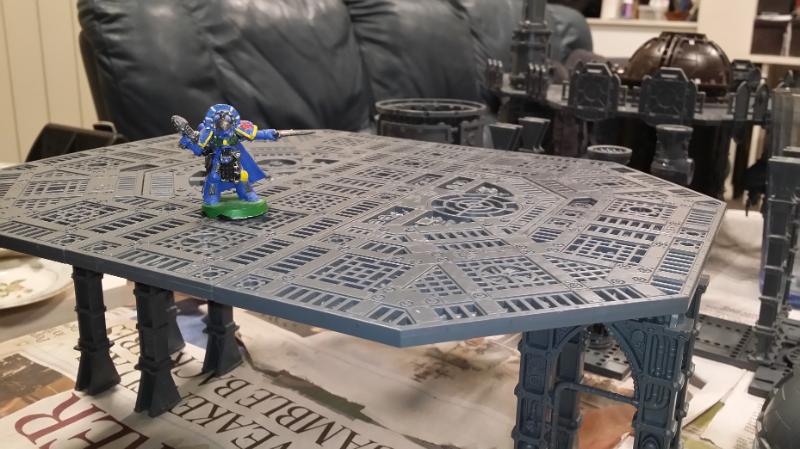
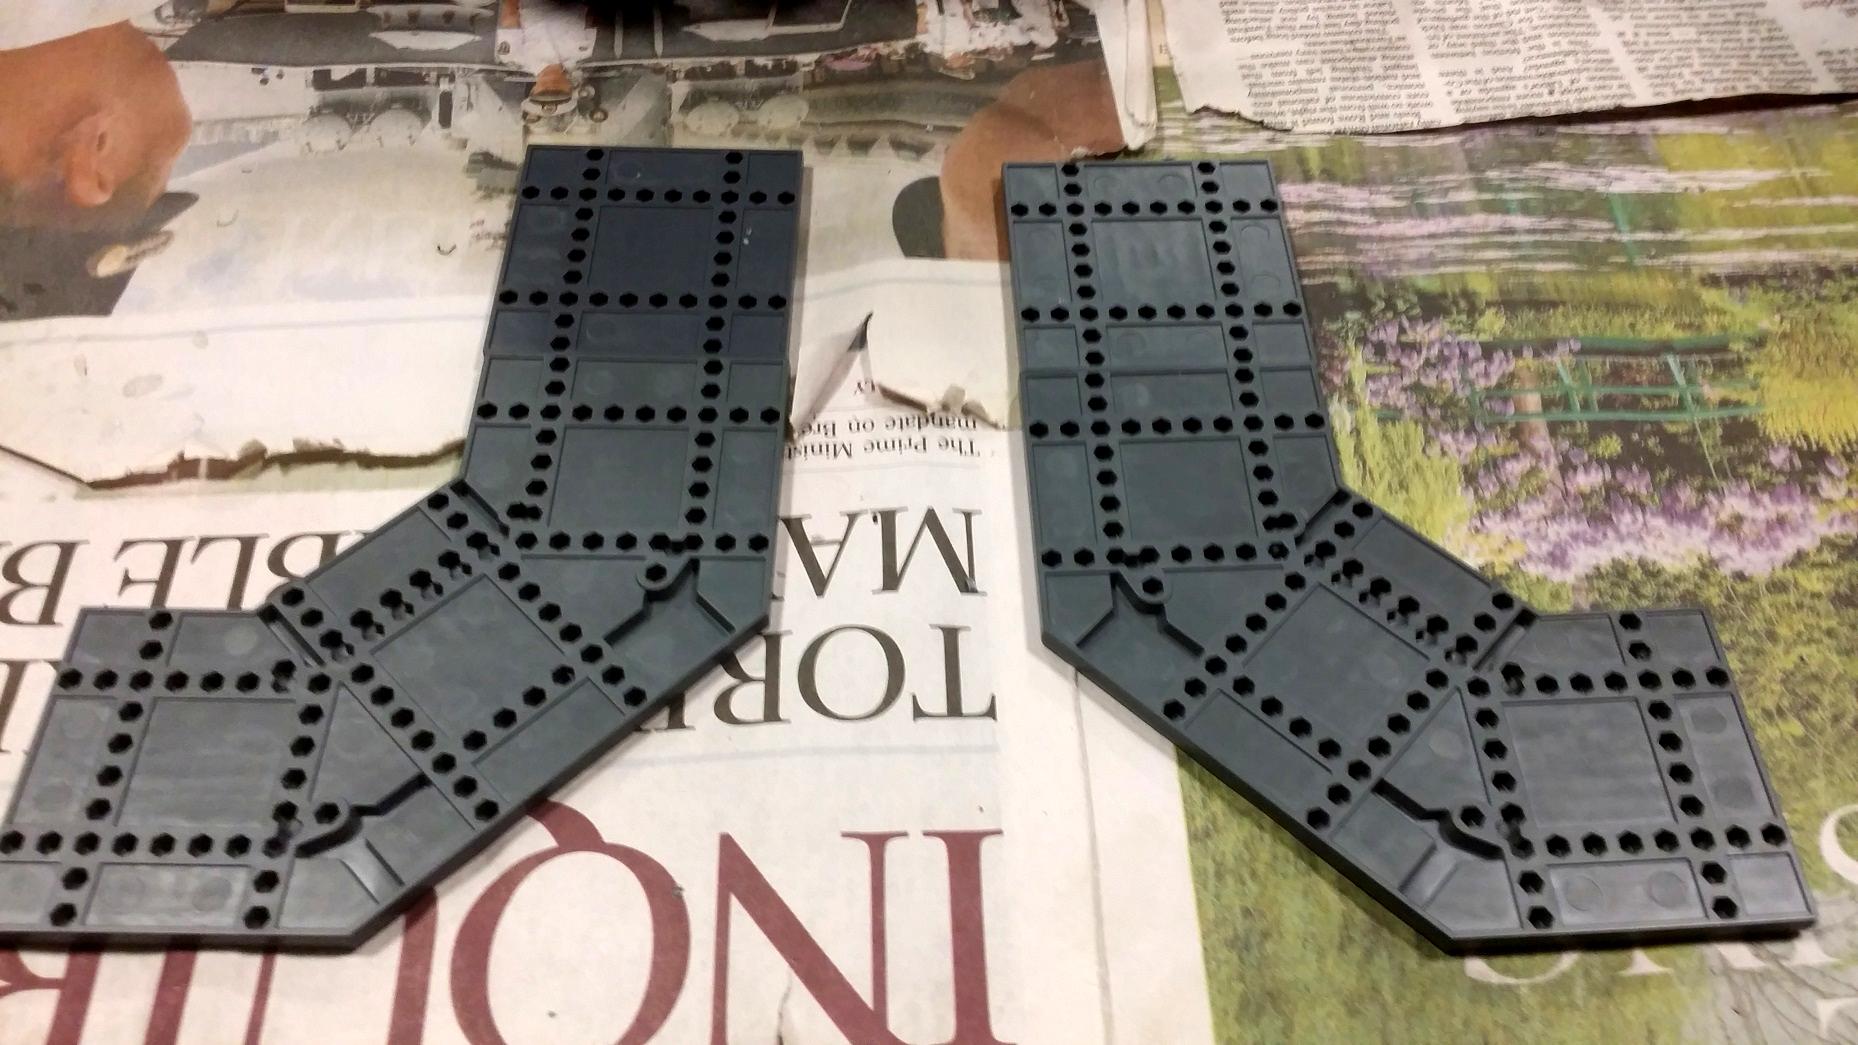
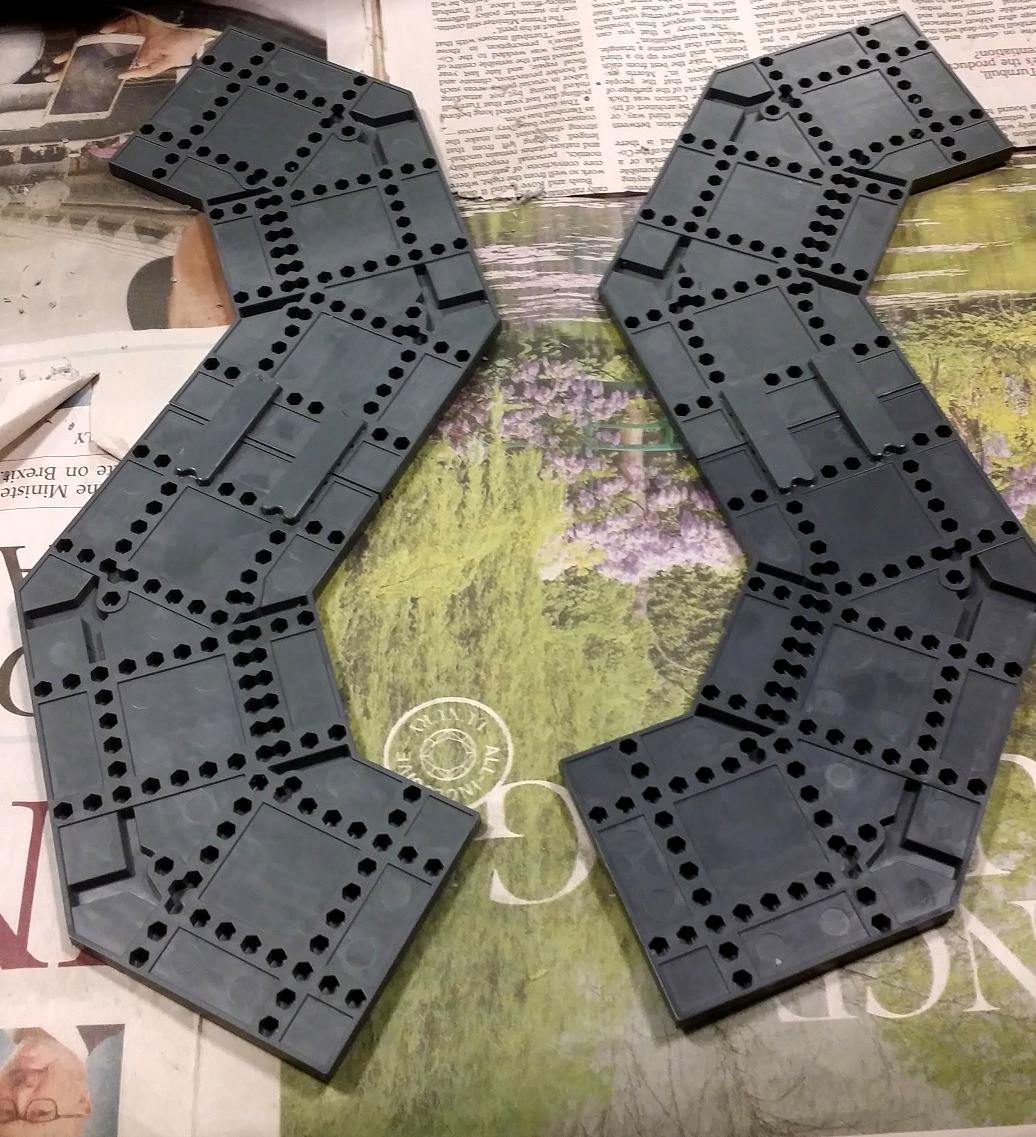
So this building needed to be big, so have a look at each floor, starting with the ground floor:

I was trying to be resource conscious here, after the Three Towers and second U-Shaped Platform used a good chunk of my circular floors, but in the end I had to stretch the floor out by one square (that's why there's that extra single-space square on the left). Why this is important will become apparent at the end.
Now the second floor, which has a lot of negative space. Originally the two single-square "wings" were not there, but a combination of stability concerns and the fact that it would require lots of end caps to position correctly with the pipes holding this level up convinced me to add them:
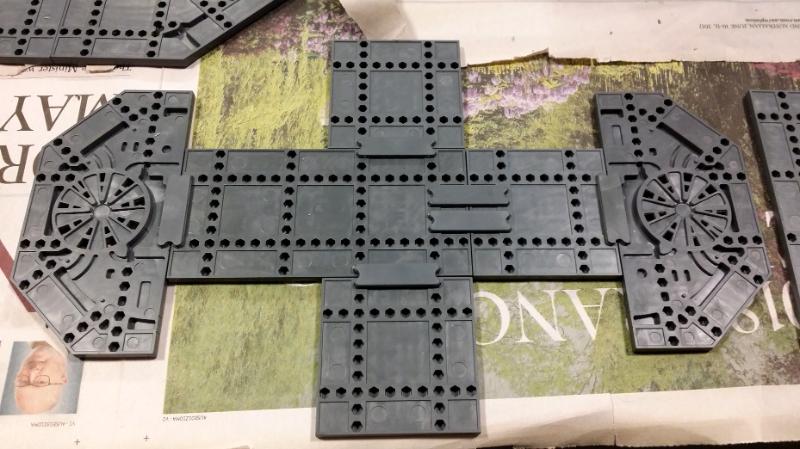
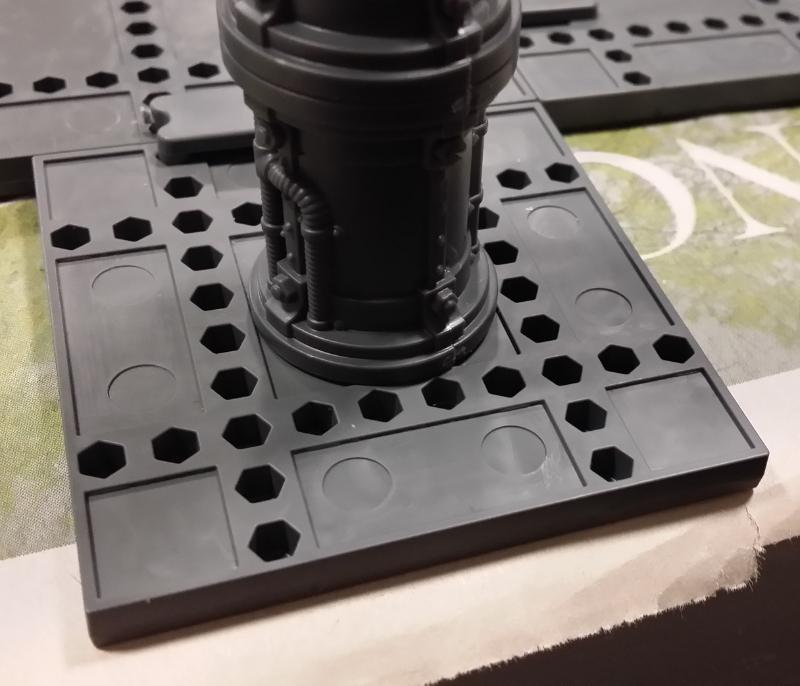
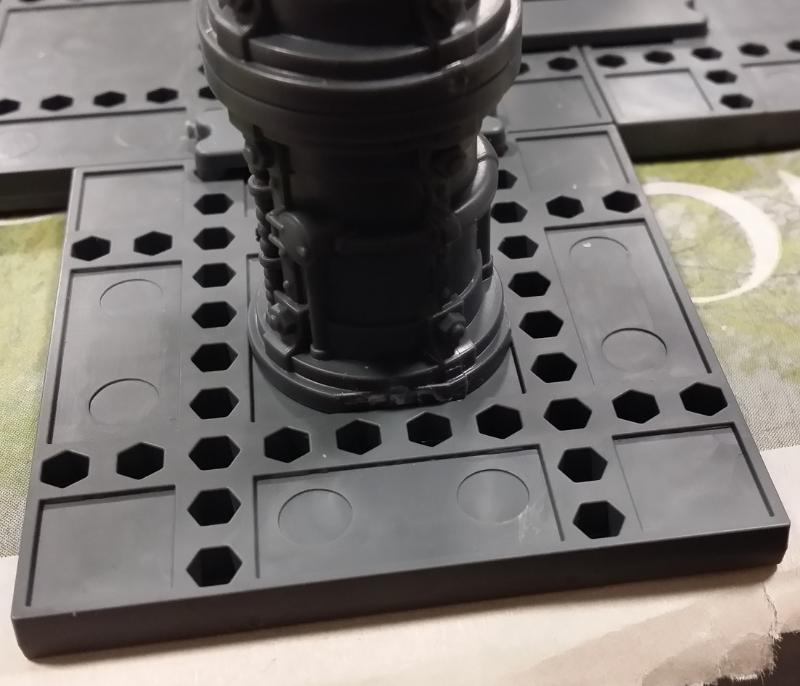
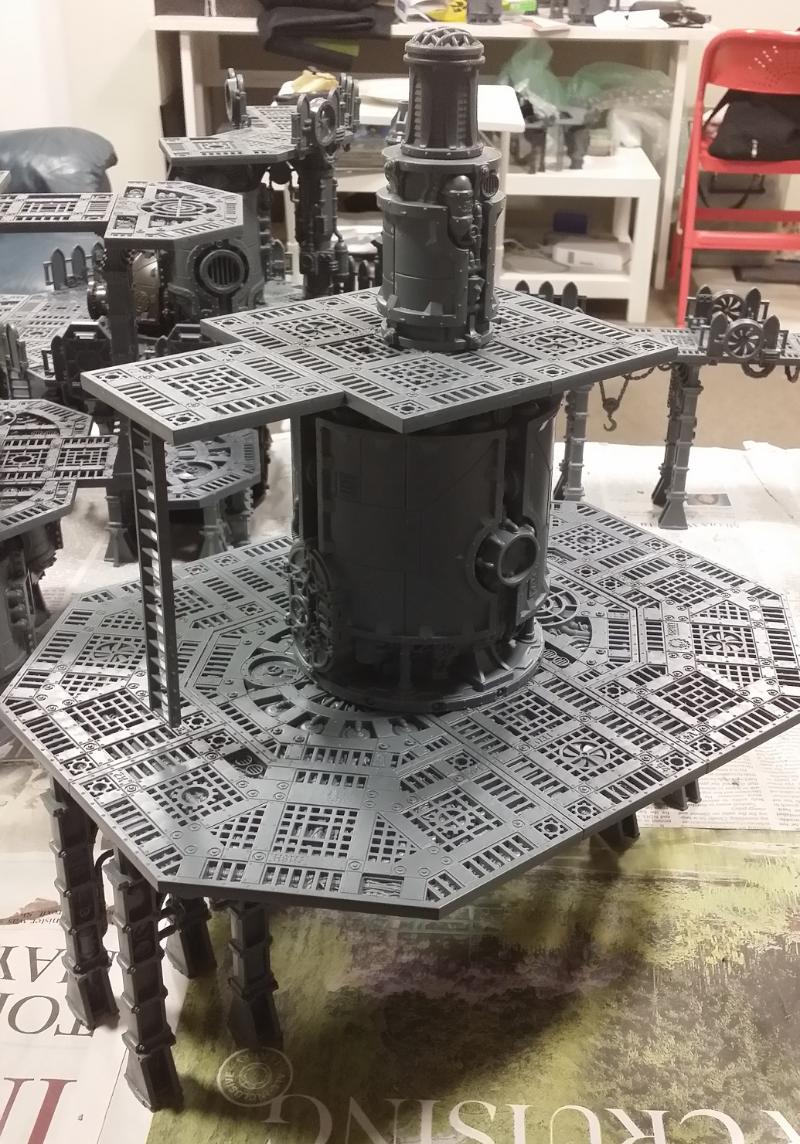
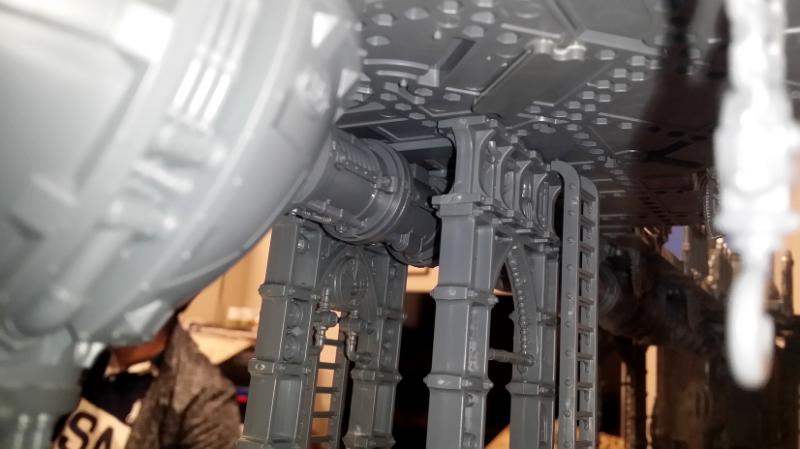
Third floor is a LOT bigger than the two underneath. This is an interesting challenge as it means the tower gets wider at the second to highest level. This is also the floor where the Underpipe Bridge is designed to connect:
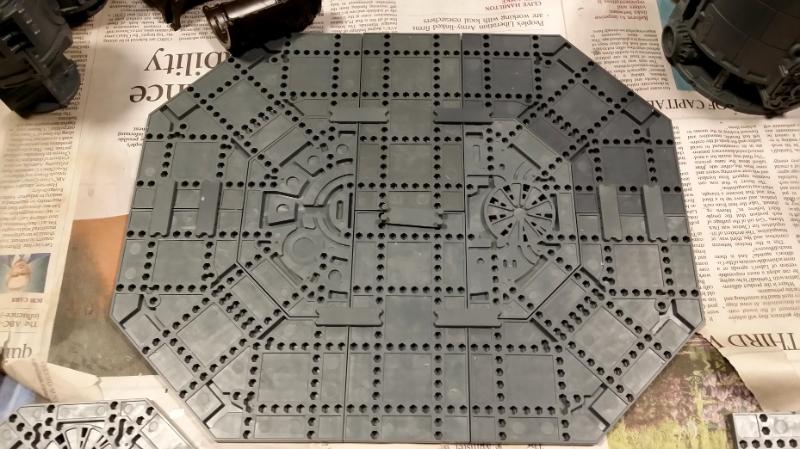
Fourth floor is considerably smaller, and will sit atop a regular stack. This isn't so much a sniper's nest as the third floor is so wide in all directions.

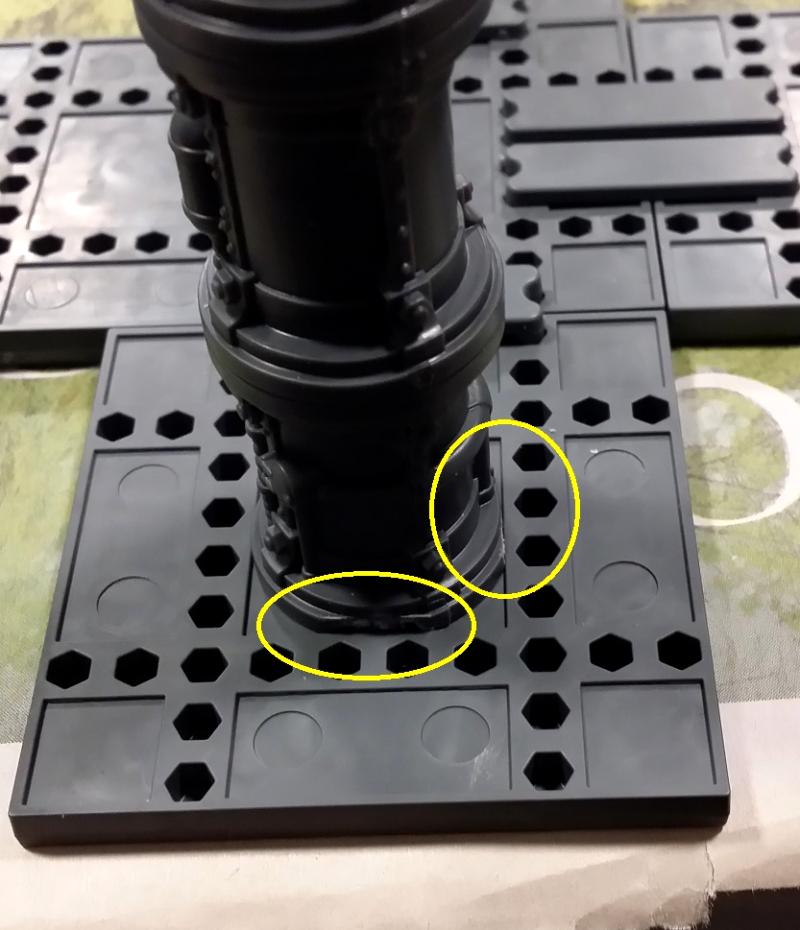
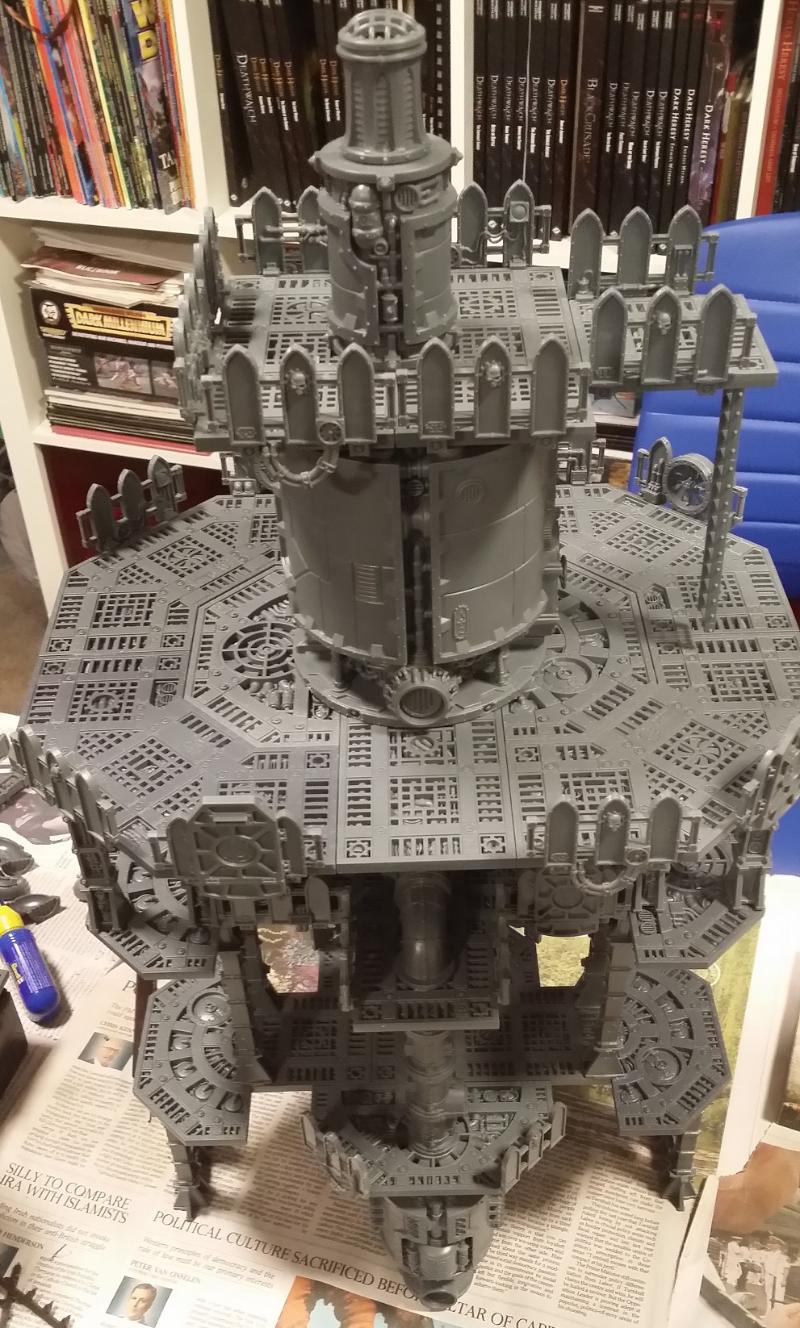
The problem with the circular platforms is that they do not have as many clip connector points as the other platform types. To add extra stability I needed to have three clips here, but there's no room for the pegs on each clip, so some creative cutting had to be attempted:
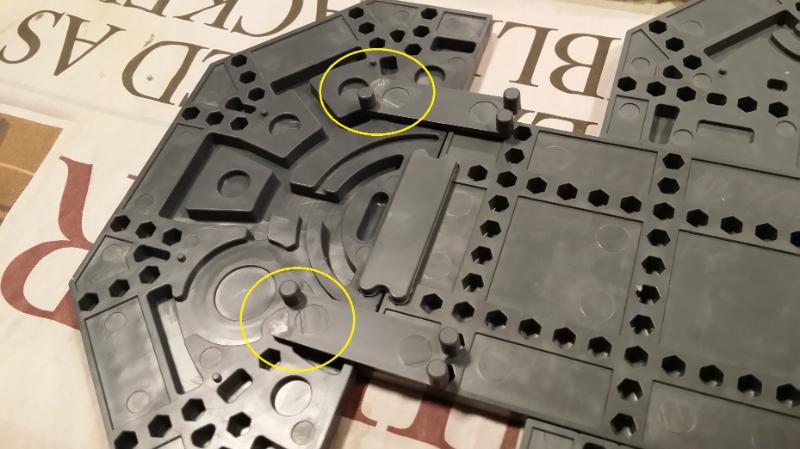
Now they fit and are safely hidden underneath:
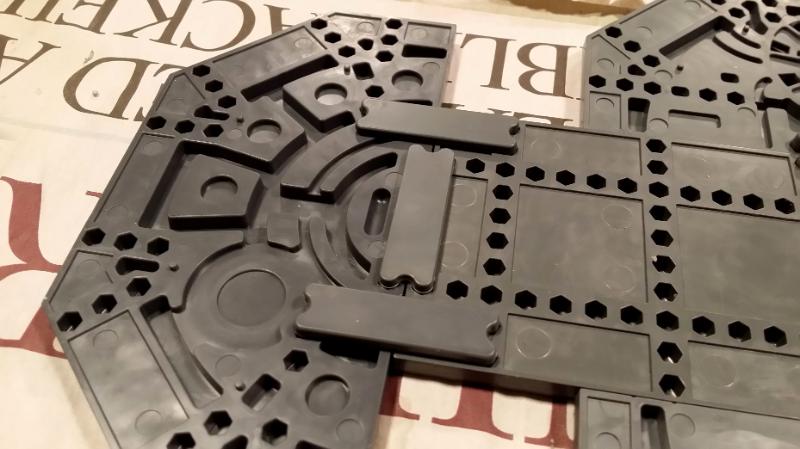
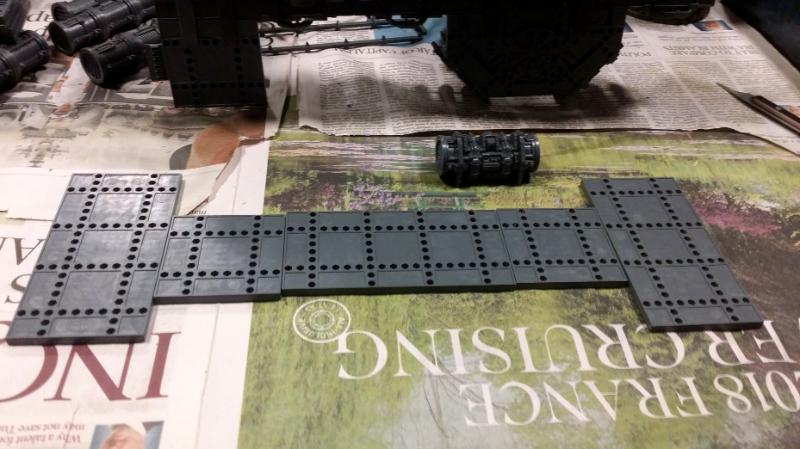
The Plasma Conduits are the perfect height to go between levels but they're too wide at either end to fit inside the square on the underside of the platforms, as you can see here:
So after trimming away two sides on both the pipes I'd be using...:
... they fit flush. The Plasma Conduits are a good looking kit, and seem very practical at first, but the actual pipe lengths are tough things to use, with certain sides only fitting with other sides. Not as modular as you might think:
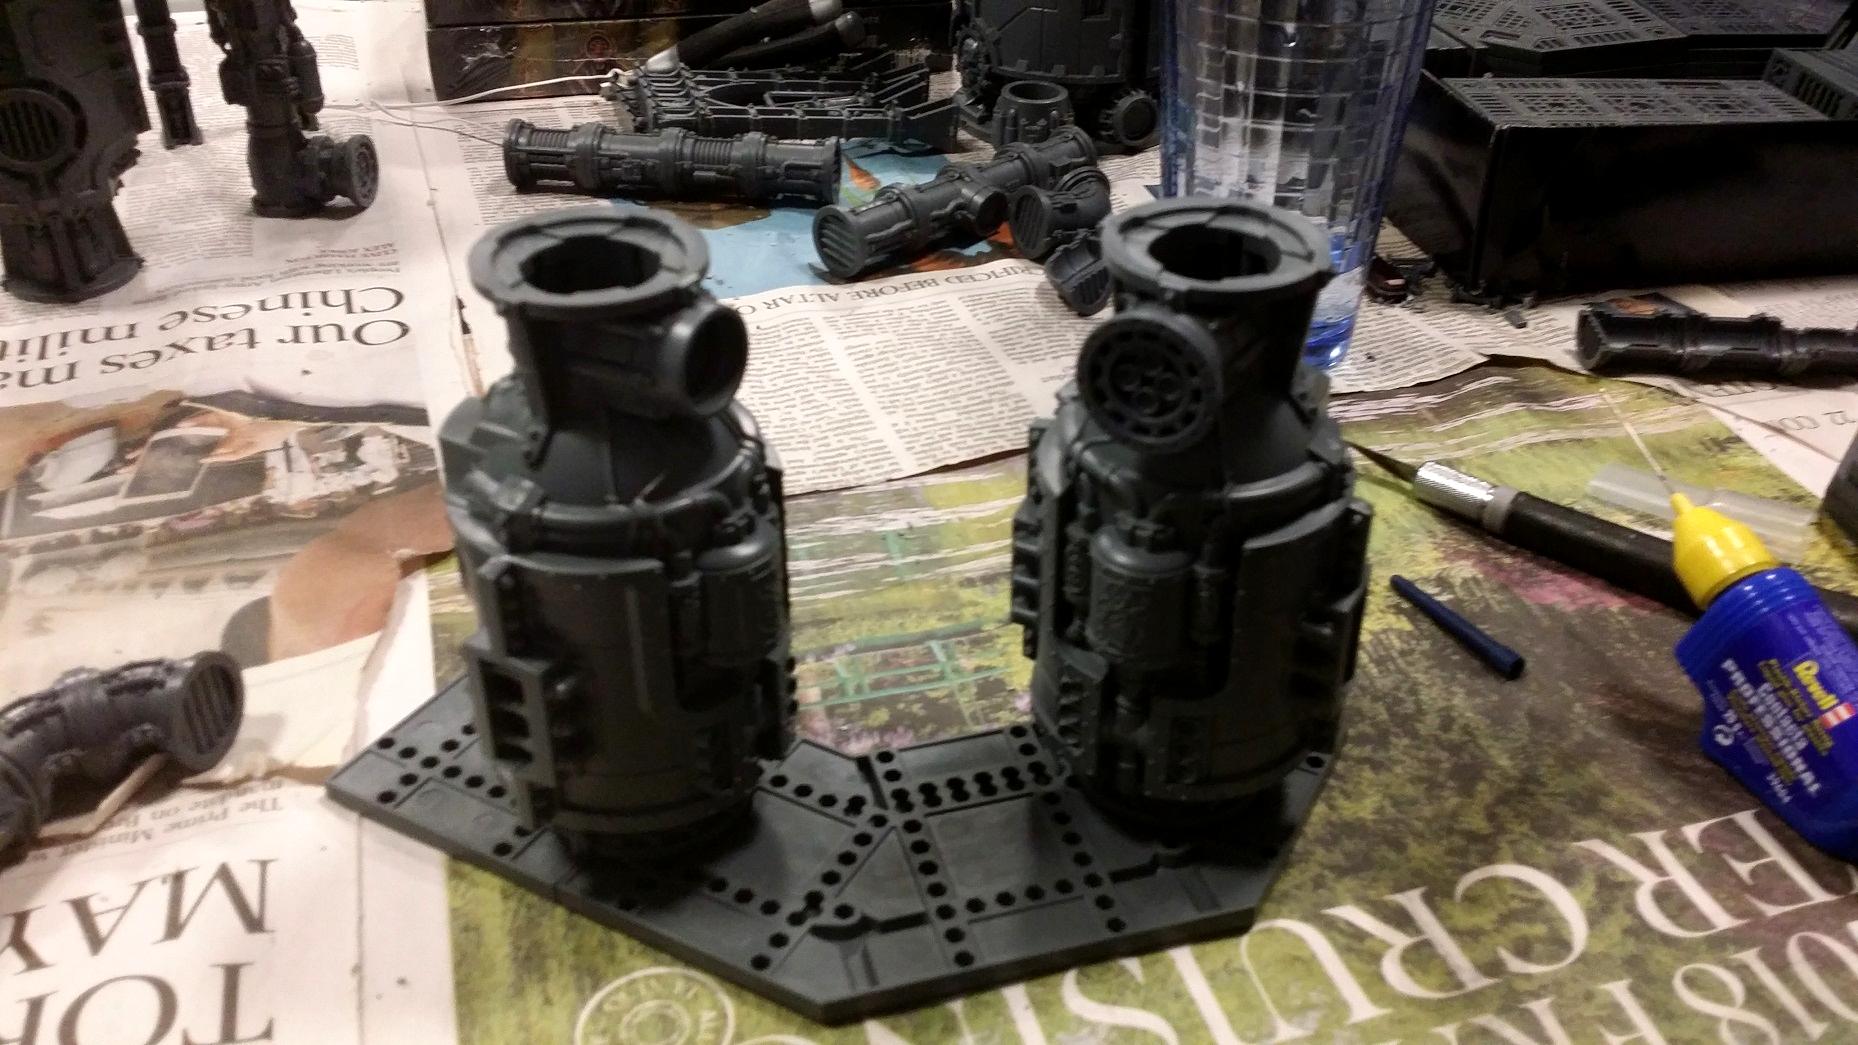
Holding up the third floor was going to be an upside-down dome, which in turn would be connected to the level below via a kiln that was using two sides from two different sprues. They were designed to fit together in either configuration so if you have spare ones you can have no pipe ends, or a pipe end on either side as you see here:
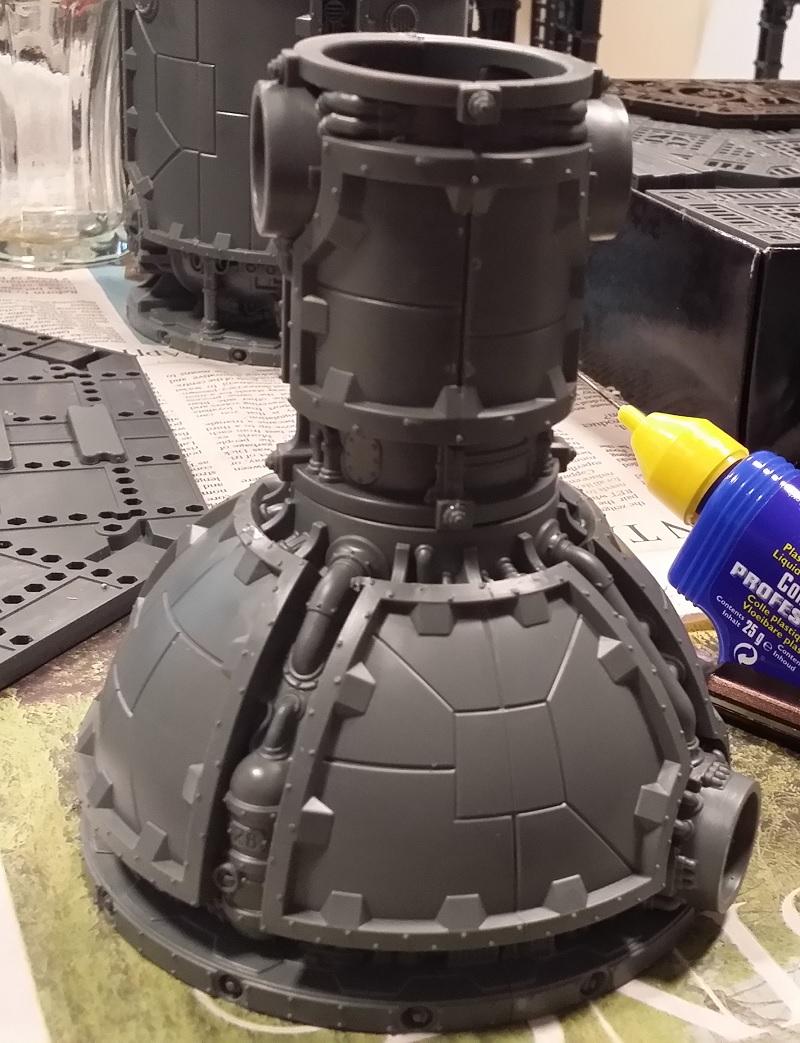
This is a slightly older shot when I was considering using more flooring on this level, but it shows you how I intend to connect the kiln/dome to the pipes that will be coming up from the level beneath:
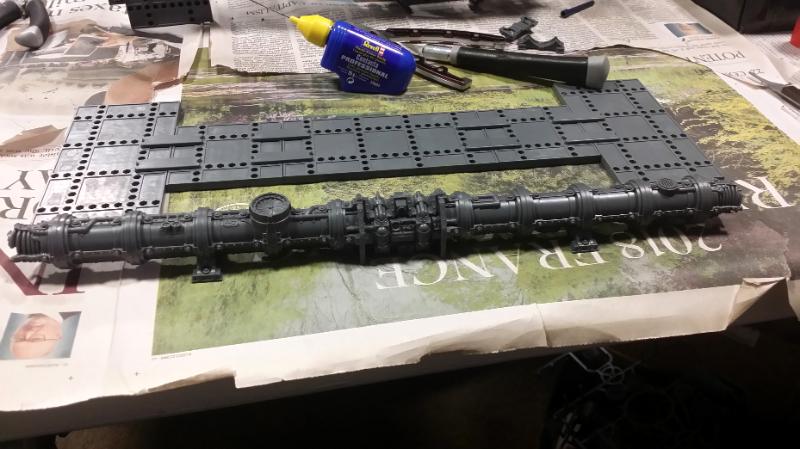
After working out the spacing I started putting on the curved pipes:
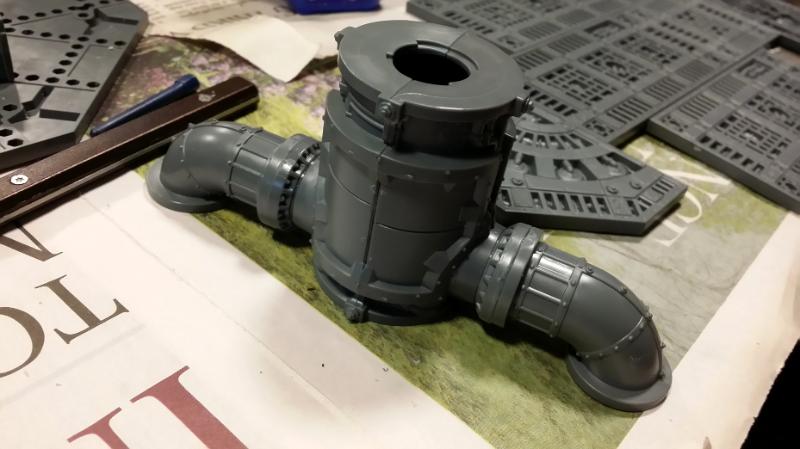
I also discovered that you can use the straight pipe between two furnaces and the spacing works perfectly. These two would be holding up the entire structure:
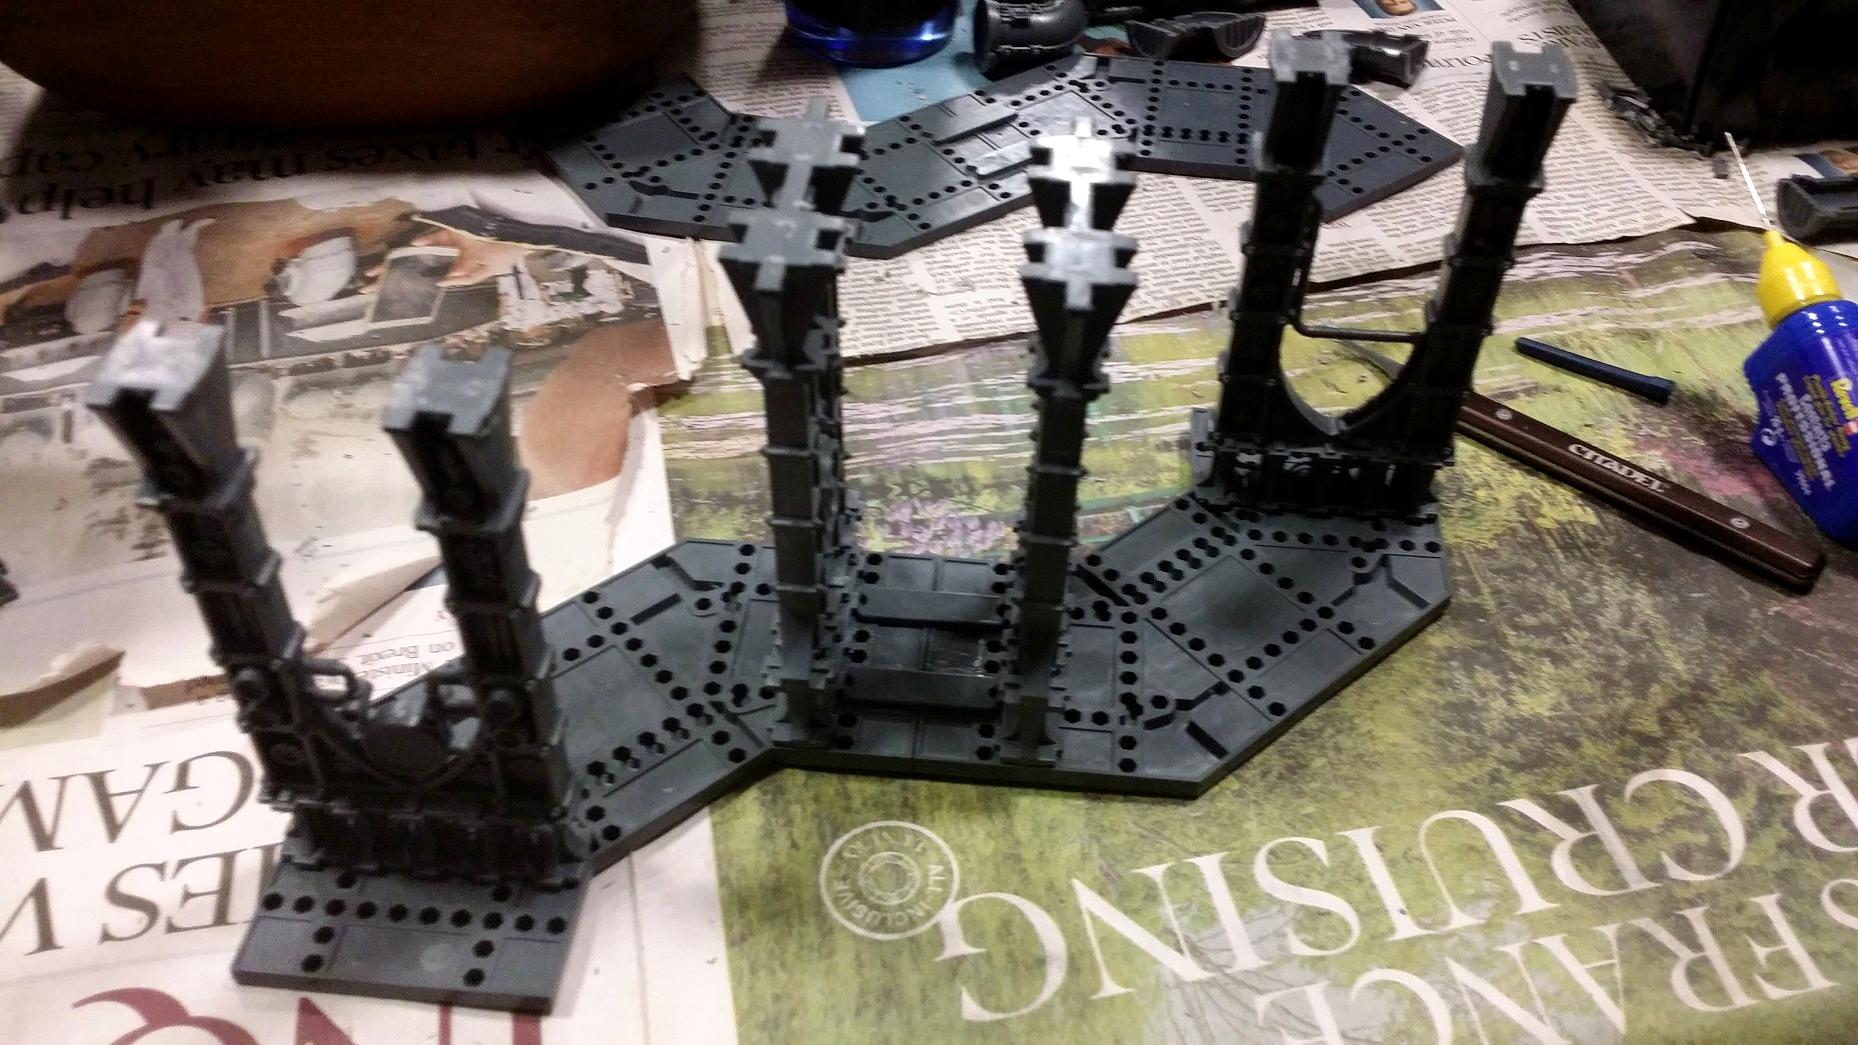
Captain Short-Sword is here to demonstrate how the first floor looks:
And here he is again to show off how the second floor works, and now you can see how the pipes will come up from below to hold this level up:
The third floor has 4 struts holding it up, just two very close to one another on either side. These proved to be quite a problem. The upside-down dome will hold up the middle of this platform.
I have now added the upside-down dome, and you can now see how the curves pipes fit with the pipes from below:
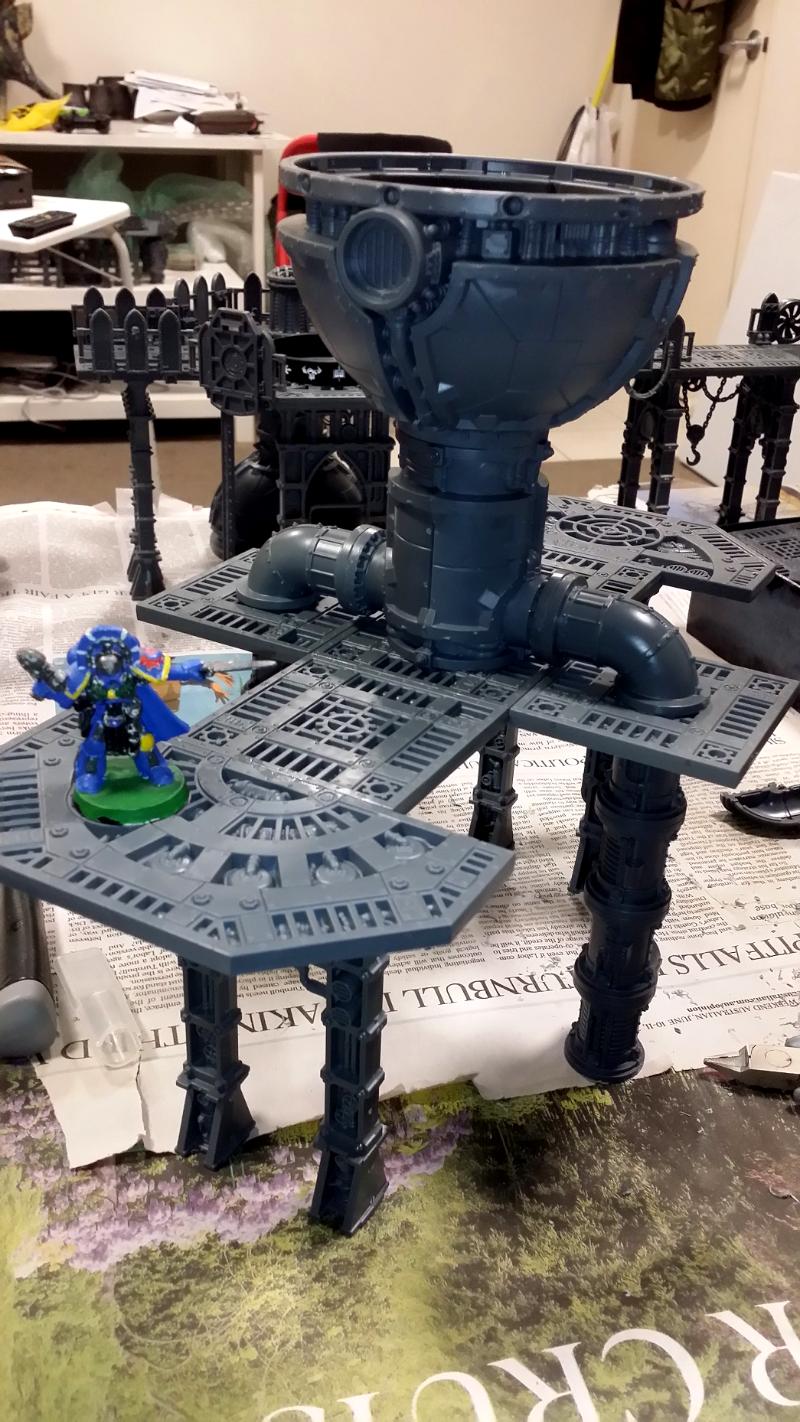
An upside-down balance test to see how it works before I glue the struts into the third floor's underside:
A right-side up test that includes the fourth floor (no dome in this pic yet):
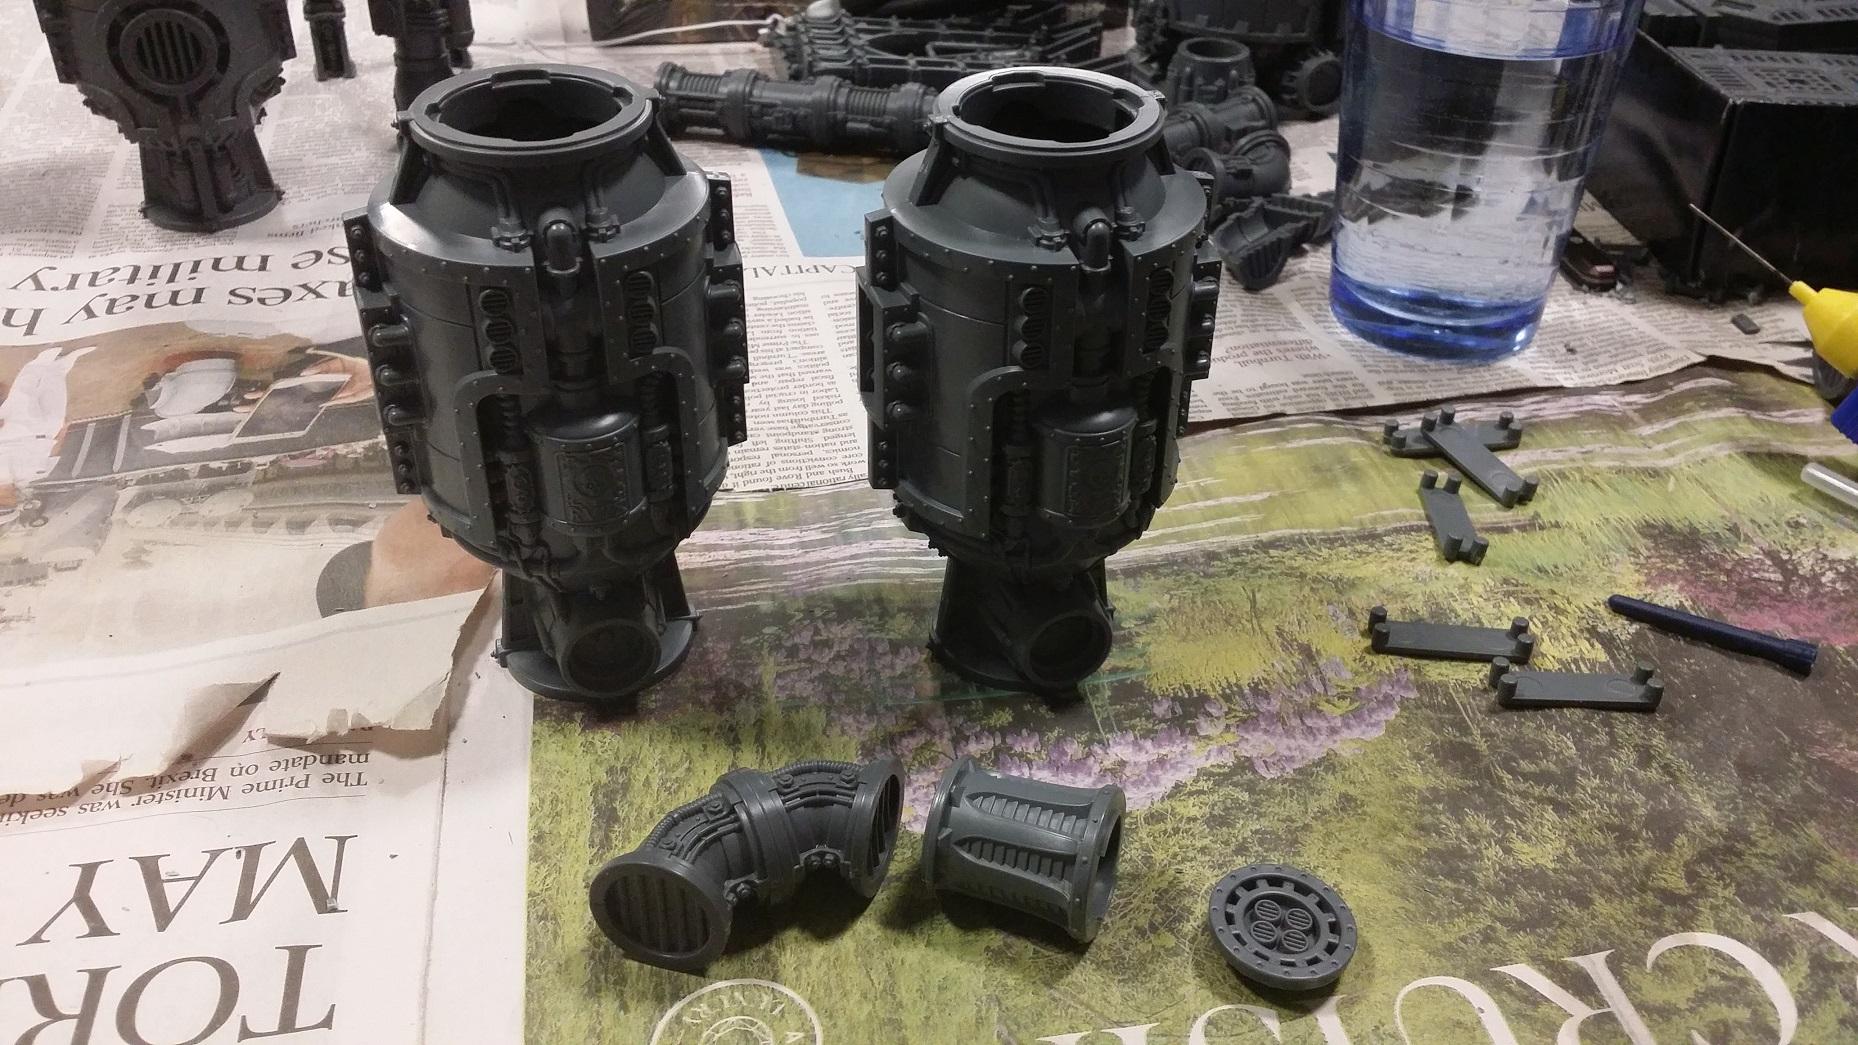
Here we have the other two non-pipe ends of the kiln put together along with a short pipe/covering to give the whole thing a chimney so it isn't completely flat on the fourth floor:
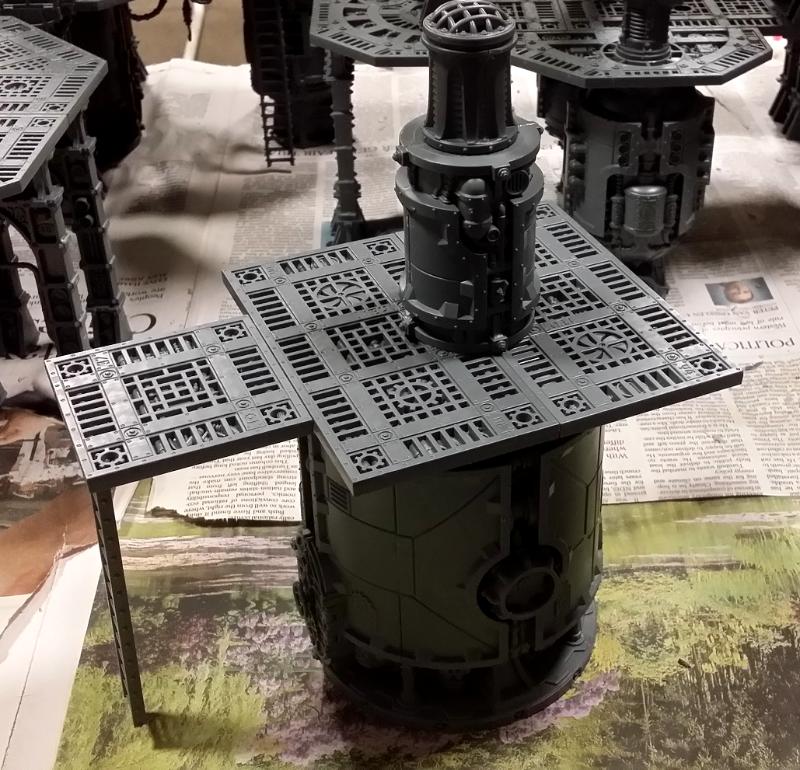
I added the fourth floor to the third floor first. I was going to need a lot more effort to join the 2nd to the 3rd, so wanted the 4th already in place before that:
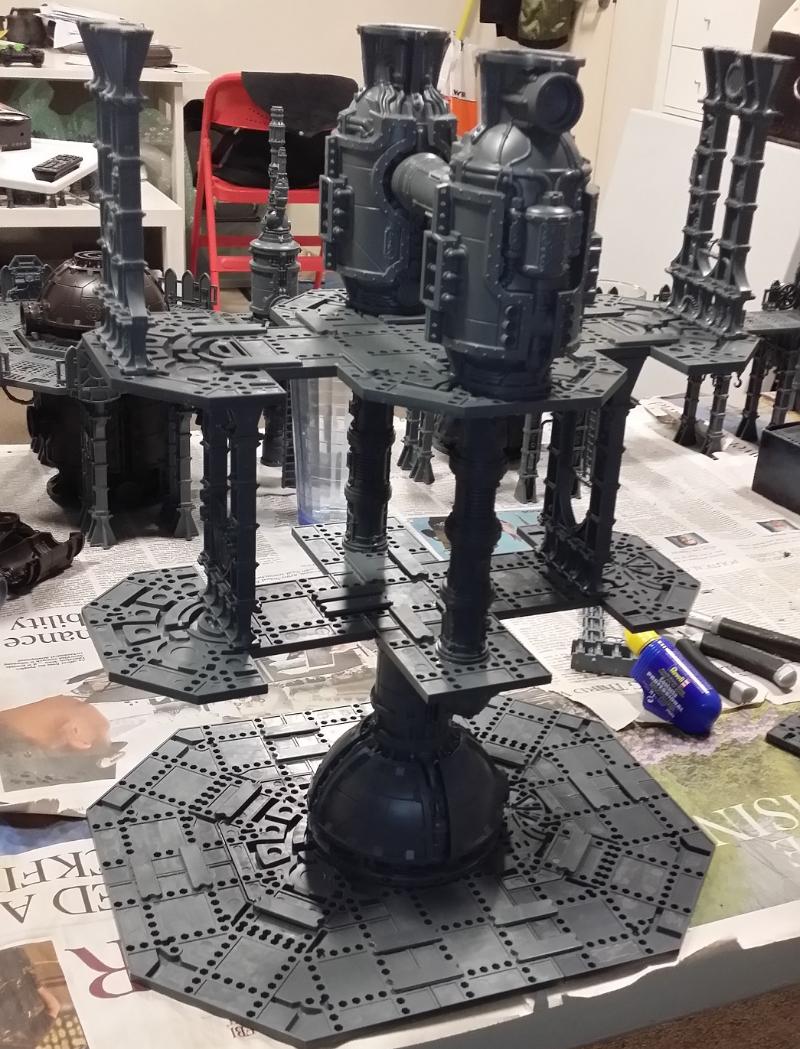
Also, due to the size of the tower, I knew adding the shields around the platform ridges would be a nightmare when the whole thing was in one piece, so I started to do them first... but I had to clean them first:
Now the shields on the 3rd and 4th floors are complete:

First and second floors complete, with shields:
 "Make my monster grow!!!"
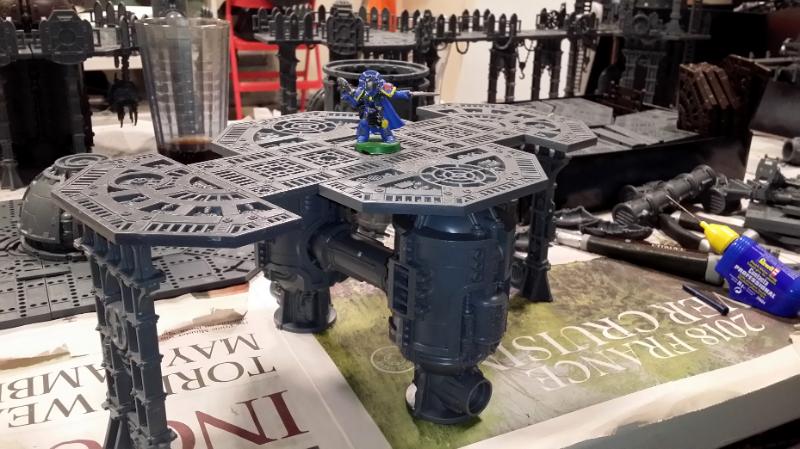
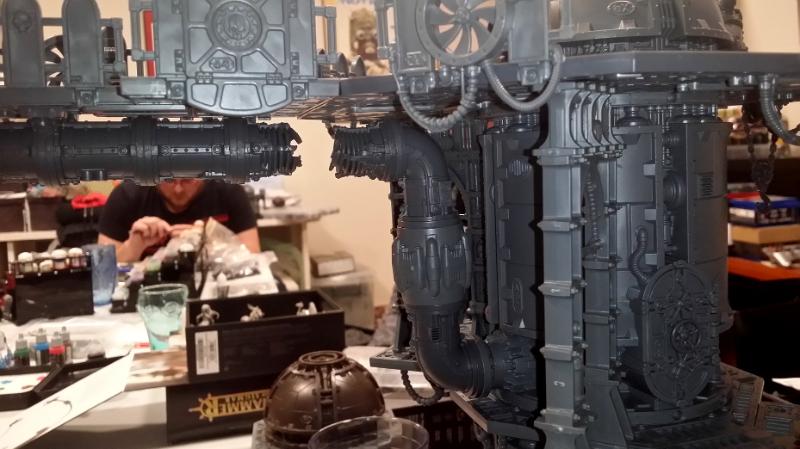
, the completed Rita Tower:
Connecting the third floor to the second floor was awful. After holding in place for a good 5m I realised that it wasn't really gluing down because of the rivets on the platforms on the second floor. So I ripped it in half, clipped away the rivets, and glued it back down. Must've sat there pinching the two levels between my hands for a good 20-25 minutes until they no longer came apart when I put them down. My arms hurt the next day.
And from another angle:
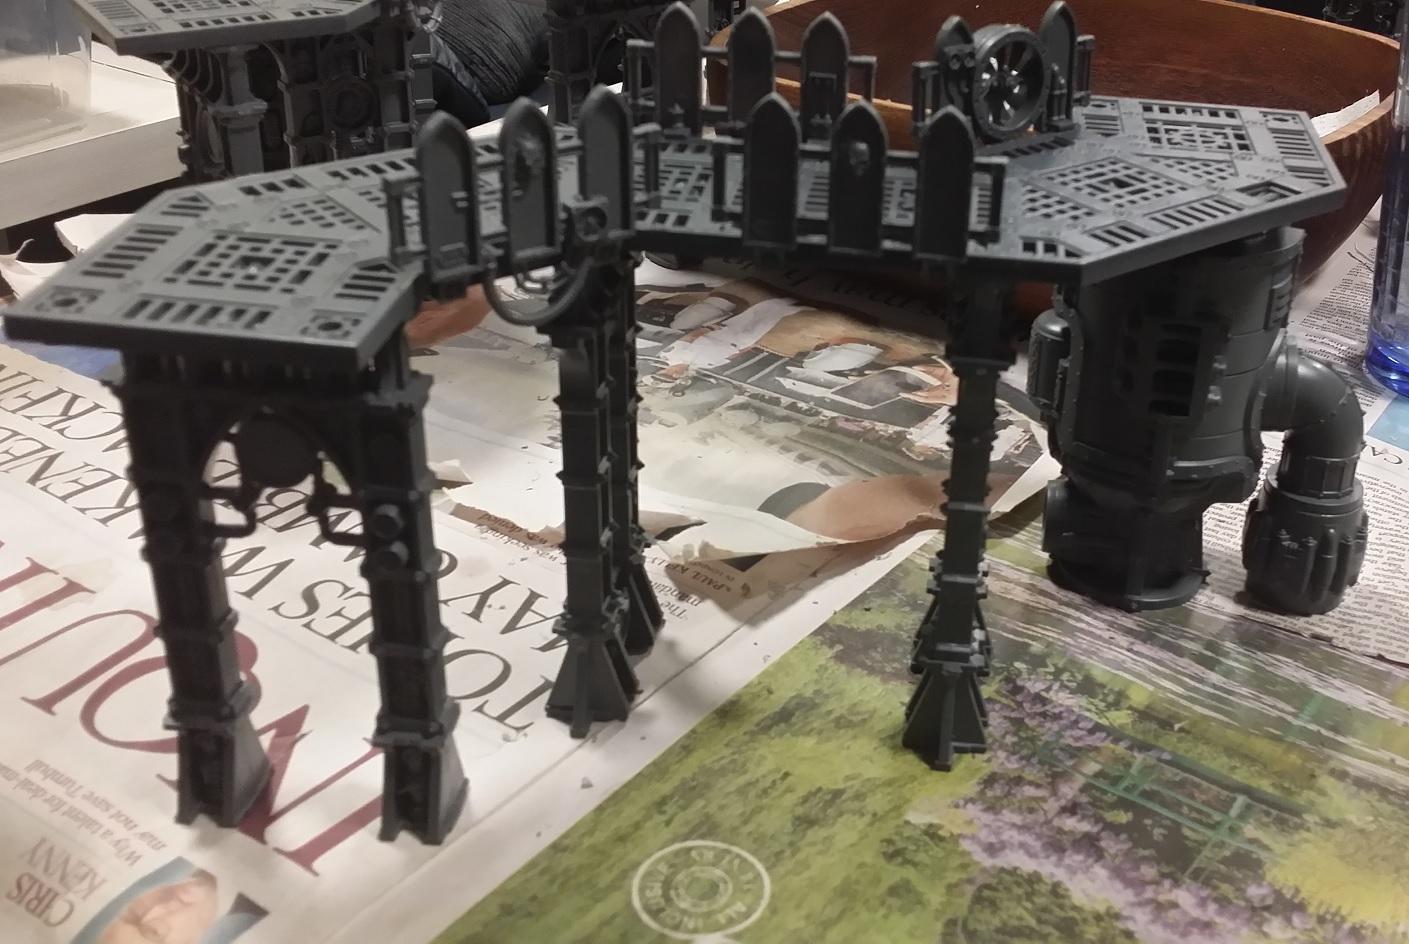
With the Underpipe Bridge connecting Rita Tower to the Lift Tower:
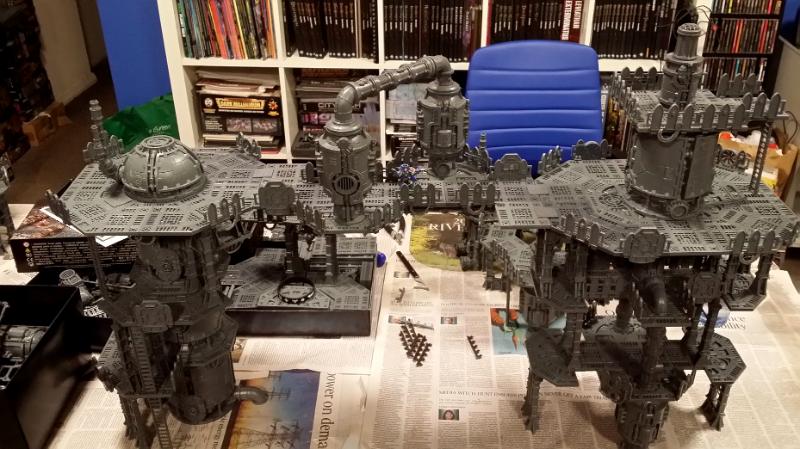
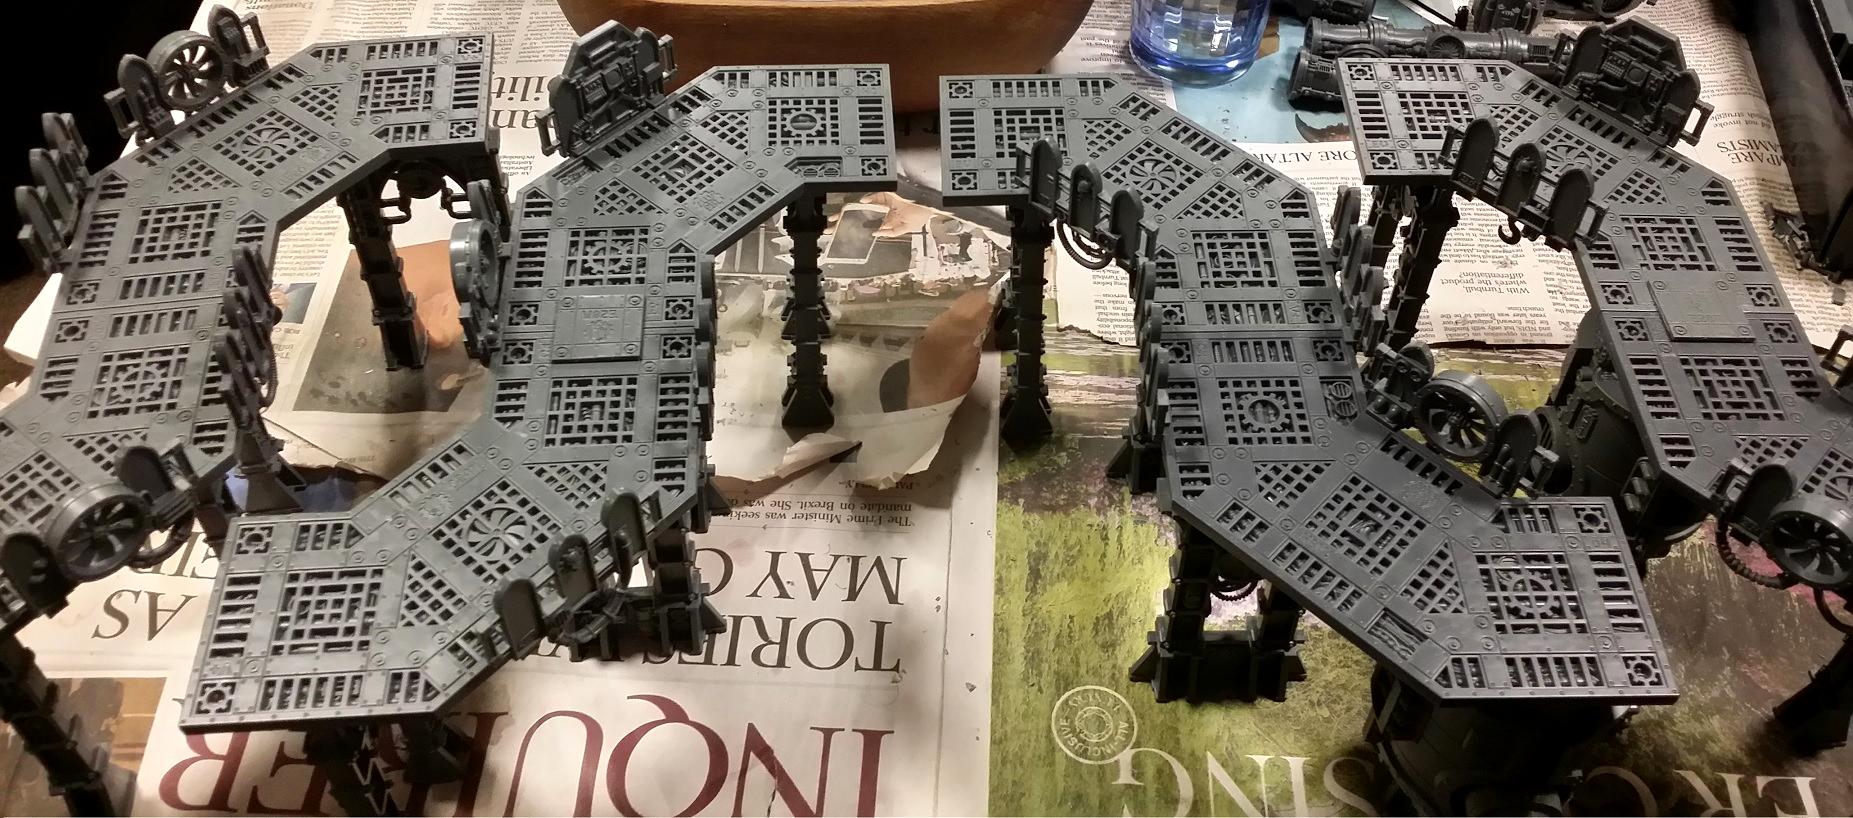
And finally, how it slots into the Outer Ring, because of course I did!:
As I said, there are still some final touches to go - ladders are tough on this one, I want to find some good places for wires/cables, and might add something underneath the second level to to be under the dome/kiln. But that's my biggest (and probably it will remain the biggest) tower I've made.
Hope you like it! 
BYE
|
|
|
|
|
|
2019/03/20 17:19:38
Subject: Industrial Insanity - A Terrain Blog by H.B.M.C. (The Monster!)
|
|

Fixture of Dakka
|
That is one crazy building, HBMC - it's going to be interesting to see where you add the ladders, as I'm not sure how you get between floors on this one...
|
2021-4 Plog - Here we go again... - my fifth attempt at a Dakka PLOG
My Pile of Potential - updates ongoing...
Gamgee on Tau Players wrote:we all kill cats and sell our own families to the devil and eat live puppies.
 Kanluwen wrote: Kanluwen wrote:This is, emphatically, why I will continue suggesting nuking Guard and starting over again. It's a legacy army that needs to be rebooted with a new focal point.
Confirmation of why no-one should listen to Kanluwen when it comes to the IG - he doesn't want the IG, he want's Kan's New Model Army...
tneva82 wrote:You aren't even trying ty pretend for honest arqument. Open bad faith trolling.
- No reason to keep this here, unless people want to use it for something... |
|
|
|
|
2019/03/20 22:31:18
Subject: Industrial Insanity - A Terrain Blog by H.B.M.C. (The Monster!)
|
|
Freaky Flayed One
Sydney, Australia
|
Wow, very impressive!
How heavy is the "Underpipe Bridge", and how stable is it sitting there? (I would have fears of accidentally knocking it loose when reaching for a mini).
|
|
|
|
|
2019/03/21 16:48:27
Subject: Re:Industrial Insanity - A Terrain Blog by H.B.M.C. (The Monster!)
|
|
Regular Dakkanaut
|
thats a cool latest build, might use some of those ideas on the rig 
|
|
|
|
|
2019/03/24 05:46:02
Subject: Re:Industrial Insanity - A Terrain Blog by H.B.M.C. (The Underpipe Bridge - Take 2!)
|
|
Owns Whole Set of Skullz Techpriests
Versteckt in den Schatten deines Geistes.
|
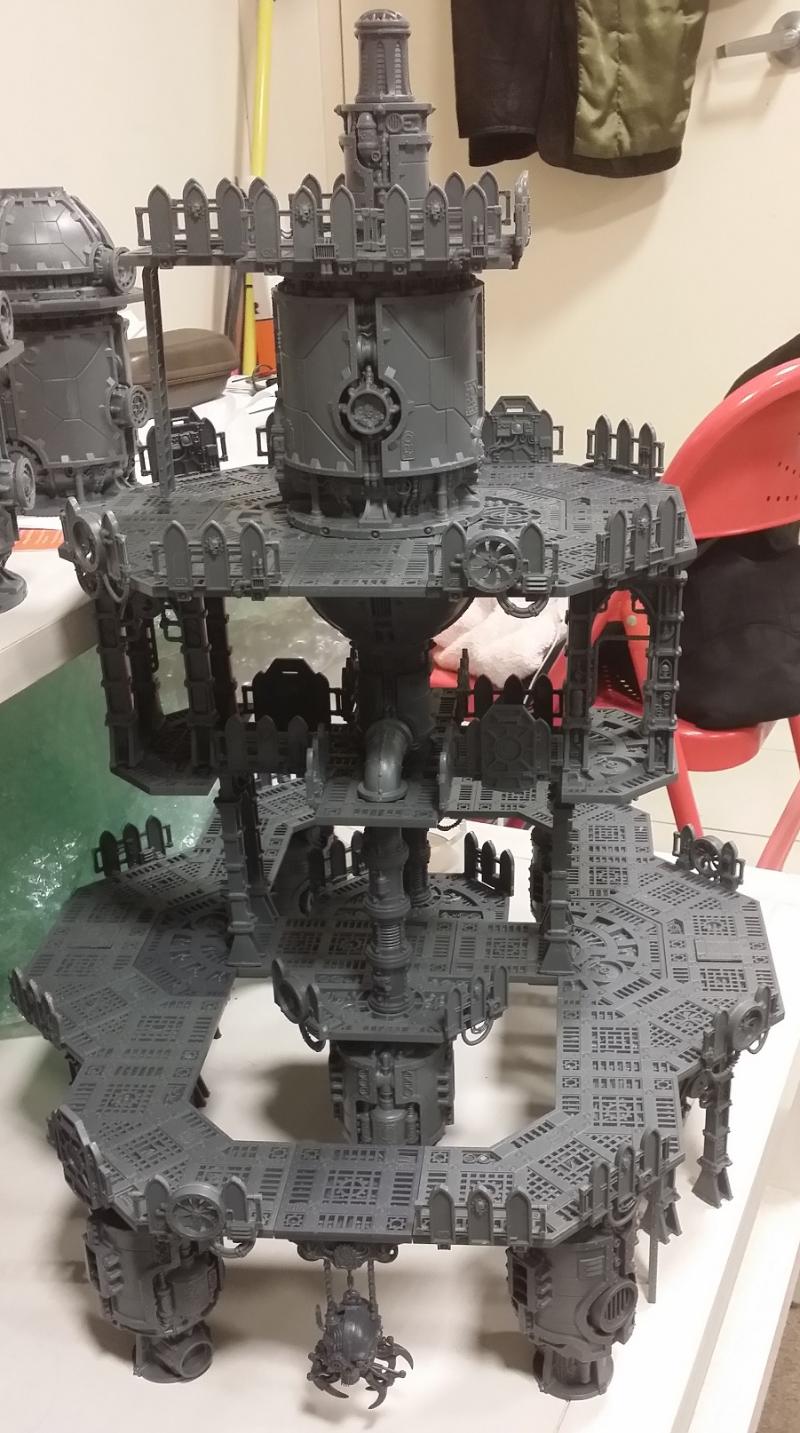
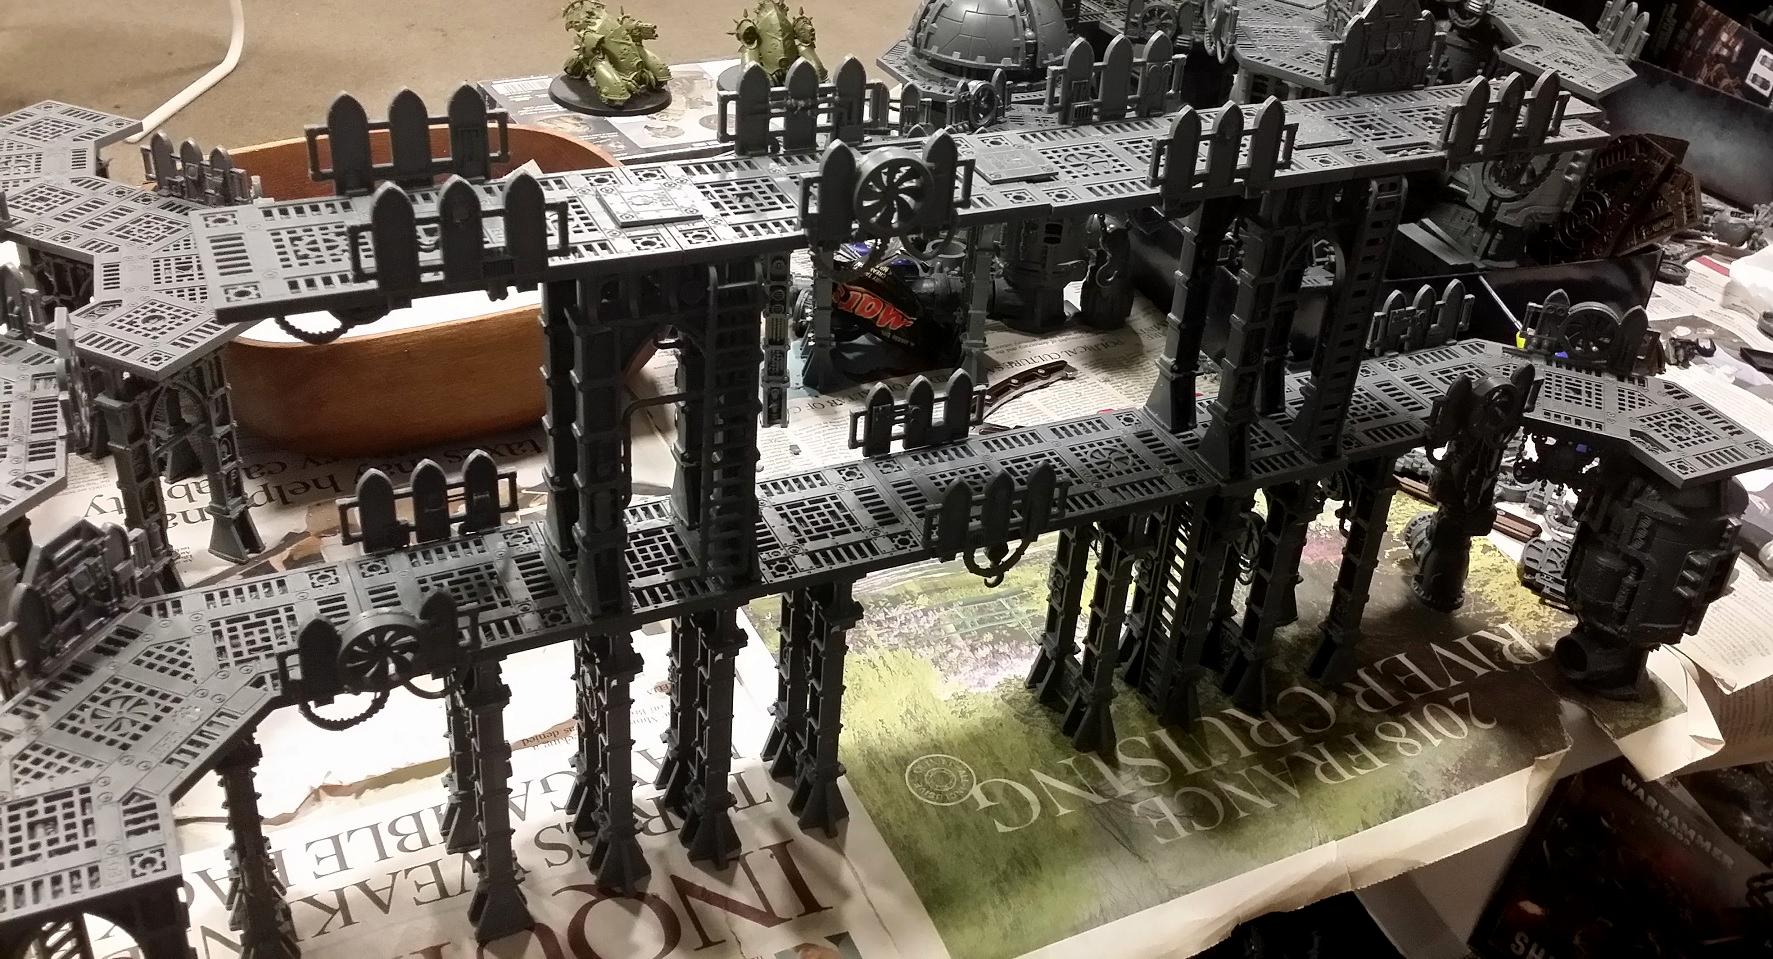
Ever since the overly-elaborate Underpipe Bridge that ended up being off-centre and far too big for it's own good I've been wanting to create a new version that, apart from having the pipe centred would be far more stripped down and simple - just a bridge, nothing fancy.
The other feature of the Underpipe bridge is in the name - the pipe running underneath it. The entire point was to create a pipe that ran between the Lift Tower and Rita Tower, but using the ruined/broken pipe parts from the Plasma Conduit kit. Not possible with the Mk.I Underpipe bridge due to it being off-centre, but now knowing what I'm doing this time it would be easier.
The Underpipe Bridge Mk.II
As always we start at the beginning with the base layout. I wanted to limit the usage of the double length straight pieces as they are still the hardest to come by and the most useful pieces overall. After this construction I have exactly 10 left, so I have to ration them:
With the layout set I built the the pipes with the part in the middle that gives it a bit more flavour (rather than just pipes!) and also helps to space them out a bit more. The other thing to consider is where the feet that attach to the underside of the walkway would go. This is important as I have to be able to connect the various platforms together in a way that gives them strength (ie. two clips rather than one) and doesn't get in the way. In the end I went for two feet, which meant quite a bit of it was 'hanging' and not attached to the bridge. It worked out though:
10 shields and 4 plates later (and a bout 5 mins holding the plates so they dried flat, rather than tilted slightly, so as to give a better hold when it put in place) and the far-less-ostentatious Underbridge Mk.II is complete:
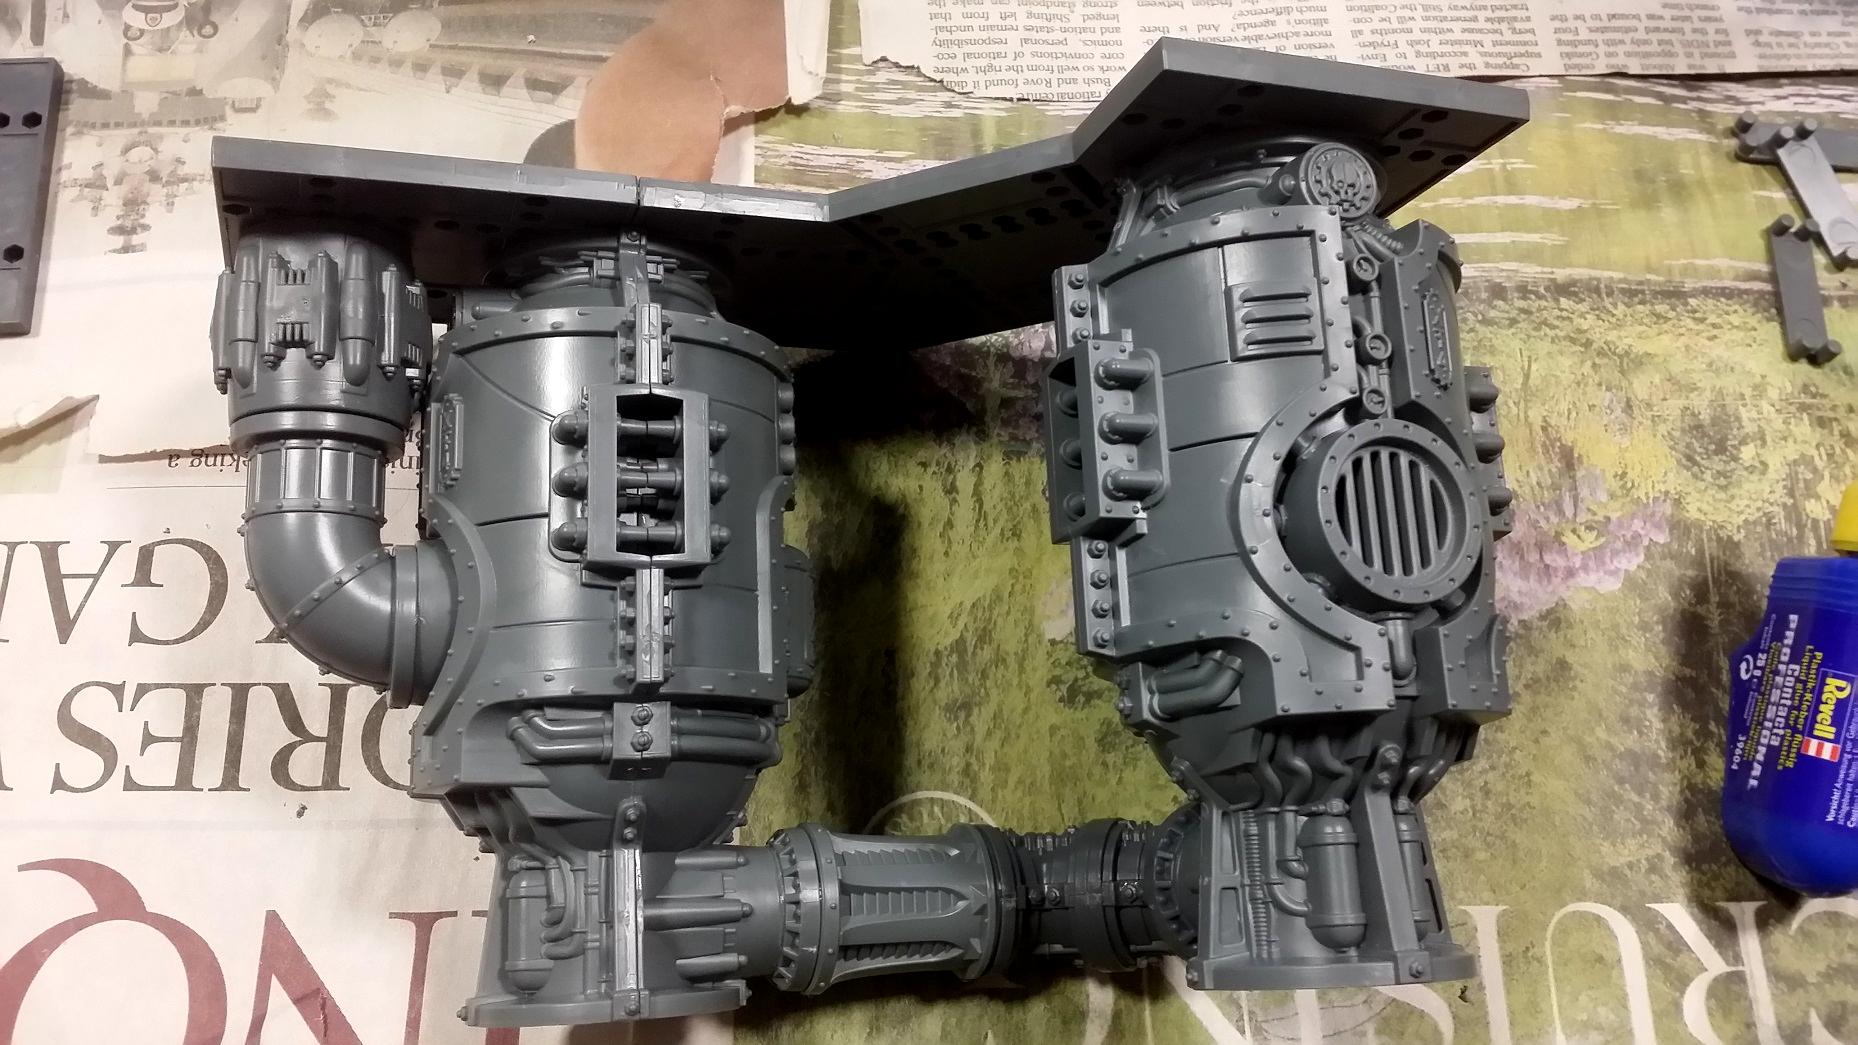
But we're not done, as we have to make the other bits of the pipe network that leads, to the Underpipe Bridge from either side, starting with Rita Tower. In one of Ray Dranfield's tips he talks about how the plasma conduits are built with a grove on the inside at several places that lets you cut them into shorter lengths. Turns out that this is a bit of a bitch to do, even with an oiled blade, but after a lot of back and forth (literally) I got the section off that I needed. The best part though is that when you cut something like that, the two halves then fit together perfectly so you don't need to cut the other half to match. Instead you're just left with... half a pipe... hmm...
Anyway, the upside-down dome that sits under the third floor of Rita tower has a pipe end facing outwards. I did that so I could eventually add this pipe sticking out, and then add the damaged bit of pipe from the plasma conduit kit. Ends up looking like this:
And here's a slightly different angle:
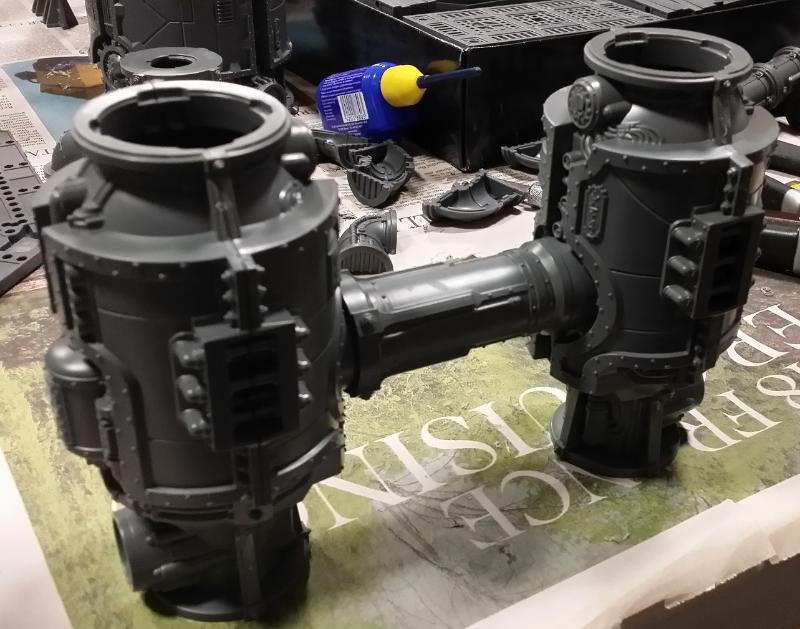
Then over to the Lift Tower, where the middle elevator area has another outward facing pipe end that I wanted to snake upwards to join the piped on the Underpipe Bridge, and it ends up looking like this (bonus points for finding another use for that chunky turbine bit I have thousands of):
And a more fuller shot of the entire building now that it's actually complete:
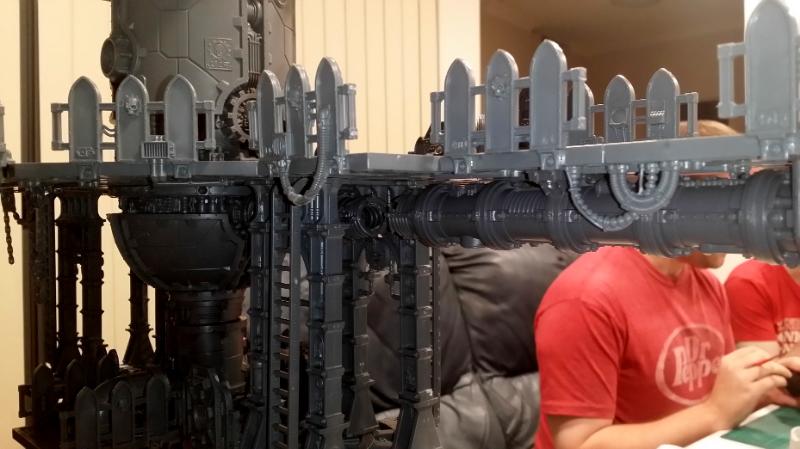
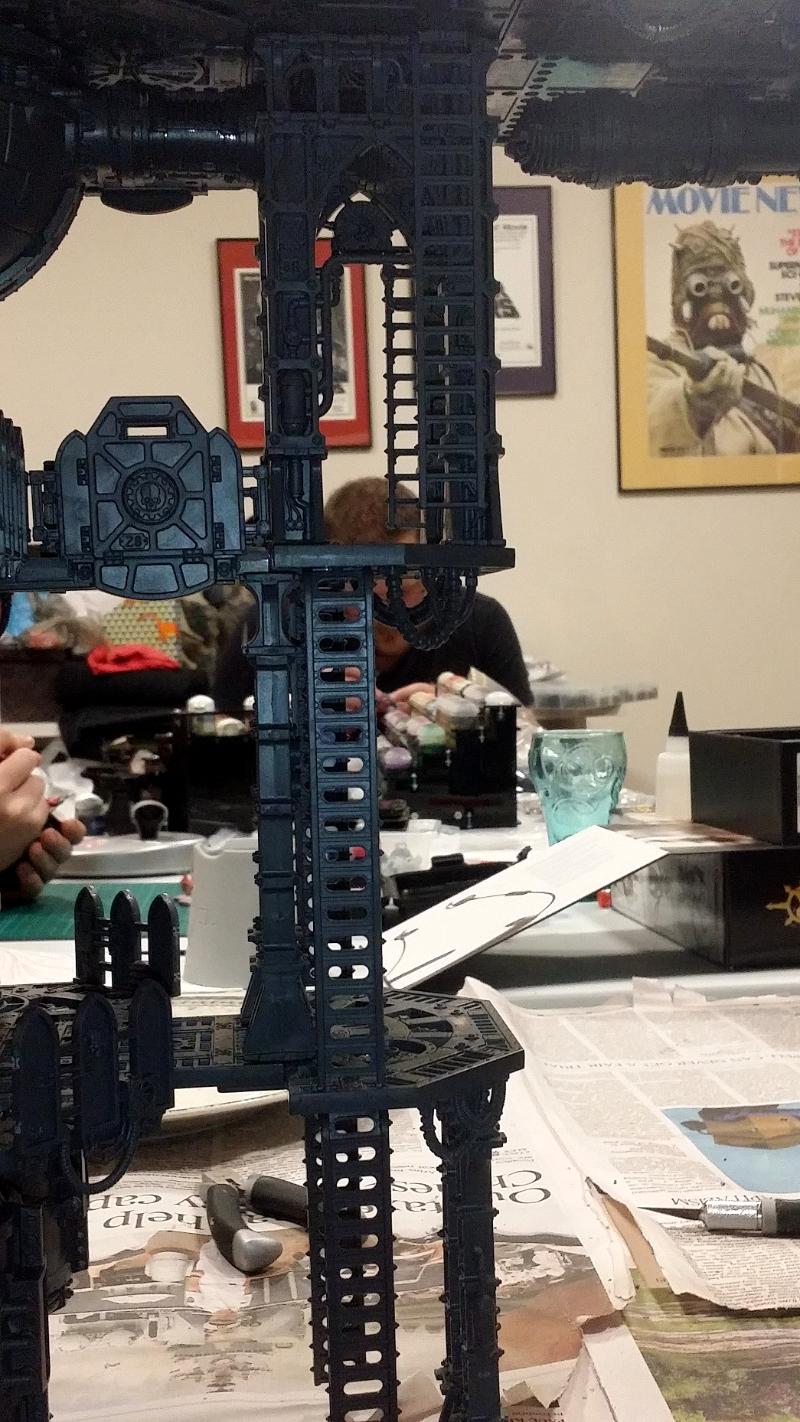
And lastly I put hanging wires, pulleys and hooks as well as lots of ladders onto Rita Tower to finish that off completely:
Coming up next: Bridgeapalooza 2 - Electric Bridgaloo!
BYE
|
|
|
|
|
|
2019/04/16 18:14:51
Subject: Industrial Insanity - A Terrain Blog by H.B.M.C. (The Underpipe Bridge - Take 2!)
|
|

Fixture of Dakka
|
H.B.M.C.
That is most ambitious and quite the custom build.
Cheers,
CB
|
|
|
|
|
|
2019/04/16 18:40:55
Subject: Re:Industrial Insanity - A Terrain Blog by H.B.M.C. (The Underpipe Bridge - Take 2!)
|
|
Boosting Space Marine Biker
|
I love how high that bridge is. What's the distance?
|
|
|
|
|
2019/04/16 19:40:57
Subject: Re:Industrial Insanity - A Terrain Blog by H.B.M.C. (The Underpipe Bridge - Take 2!)
|
|
Calculating Commissar
|
Agreed. What class of Titan could comfortably walk under it? I reckon Warhound for sure, with a Reaver being just a smidge too tall.
|
 ChargerIIC wrote: ChargerIIC wrote:If algae farm paste with a little bit of your grandfather in it isn't Grimdark I don't know what is.
|
|
|
|
|
2019/04/17 14:39:37
Subject: Industrial Insanity - A Terrain Blog by H.B.M.C. (The Underpipe Bridge - Take 2!)
|
|
Owns Whole Set of Skullz Techpriests
Versteckt in den Schatten deines Geistes.
|
Each level of the Sector Mechanicus terrain is 5", so what you see there is 15" off the surface of the table. Of course it doesn't have to be set at that level, it can span any height as long as there are slots for the square plates on either side.
The bridge itself is about 14.5" long.
|
|
|
|
|
|
2019/04/17 18:06:30
Subject: Industrial Insanity - A Terrain Blog by H.B.M.C. (The Underpipe Bridge - Take 2!)
|
|
Fixture of Dakka
|
 H.B.M.C. wrote: H.B.M.C. wrote:Each level of the Sector Mechanicus terrain is 5", so what you see there is 15" off the surface of the table. Of course it doesn't have to be set at that level, it can span any height as long as there are slots for the square plates on either side.
The bridge itself is about 14.5" long.
So you're saying it's more than a footbridge?
|
2021-4 Plog - Here we go again... - my fifth attempt at a Dakka PLOG
My Pile of Potential - updates ongoing...
Gamgee on Tau Players wrote:we all kill cats and sell our own families to the devil and eat live puppies.
Kanluwen wrote:This is, emphatically, why I will continue suggesting nuking Guard and starting over again. It's a legacy army that needs to be rebooted with a new focal point.
Confirmation of why no-one should listen to Kanluwen when it comes to the IG - he doesn't want the IG, he want's Kan's New Model Army...
tneva82 wrote:You aren't even trying ty pretend for honest arqument. Open bad faith trolling.
- No reason to keep this here, unless people want to use it for something... |
|
|
|
|
2019/04/20 05:33:03
Subject: Re:Industrial Insanity - A Terrain Blog by H.B.M.C. (Bridgeapalooza 2 - Electric Bridgaloo!)
|
|
Owns Whole Set of Skullz Techpriests
Versteckt in den Schatten deines Geistes.
|
Just before the first time we used all this terrain in a big day of Necromunda, I was up late (and then early) putting together a selection of walkways to connect all the various buildings. I made two straight, two curved, two wiggly S-shaped ones, the original U-Shaped walkway, and this fun thing. This was good enough for one table, but somewhat limited. Also, the walkways were all at ground level. The straight ones balance pretty well on higher levels, but for the most part they're restricted to the floor. As the second phase of this Industrial Insanity project is "the only way is up", I figured some higher walkways would be good, plus I wanted to double up on some of the other walkways I had already made.
That brings us to yesterday, and...
Bridgeapalooza 2 - Electric Bridgaloo!
The first step was another set of curved walkways. The two I have already are nice, but if two are good, then surely four would be more useful? They start with a very simple layout, each one bending the opposite direction:
I wanted to make one of them a bit more industrial than normal, so rather than going for the usual struts to support it, I went with a pair of furnaces (remember, I have like 15 of the damned things spare, so might as well use 'em!):
I also wanted them to be linked in some way, rather than both being freestanding, so after a bit of fiddling I found the right parts to have a pipe connecting them:
Then I added even more industrial nonsense to one side once everything was done:
The other curved walkway is fairly normal one, and with that they were both complete:
Next up was another pair of wiggly walkways, each one curving away in a different way. My two originals are useful, but having each one curve in one direction did limit how I could use them somewhat. You can see them both towards the right-hand side of this picture, and it took a while to figure out how to use both and there were times I wished they were identical. With an extra pair, now I'll have two of each.
Again, a simple layout:
I learnt from the last set that you need a bit more than 3 sets of supports, so went with an extra strut in the middle:
And another bit of industrial nonsense just to add some variety (and to find more uses for this weird part):
And here's the whole collection of wiggly walkways:
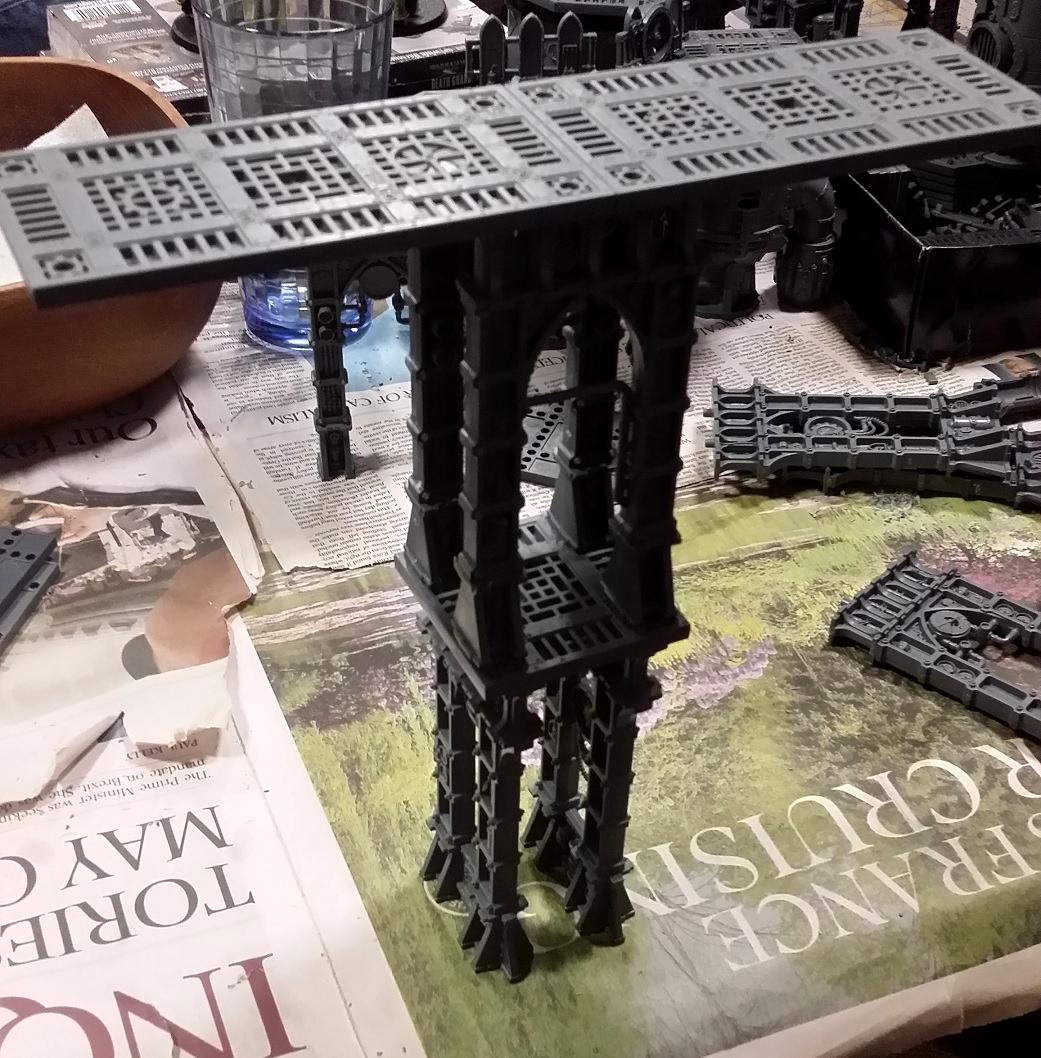
Now we come to what I'm calling the "Double High" bridges. Originally I was just going to stick one strut right in the middle, and then stick that to another one, and that'd be that. The piece would never be free-standing, but it didn't need to be as the square plates at each end would hold the piece in place. Apart from not being tall enough in practice, I went against this idea in the end because I came up with something better and far, far more modular.
To start with, a not-so-simple layout. I know, it's two straight pieces and one clip to connect them, but that's significant because normally I'd use two for added strength. One is kinda risky, but as you'll see how the struts work it will be quite secure in the end:
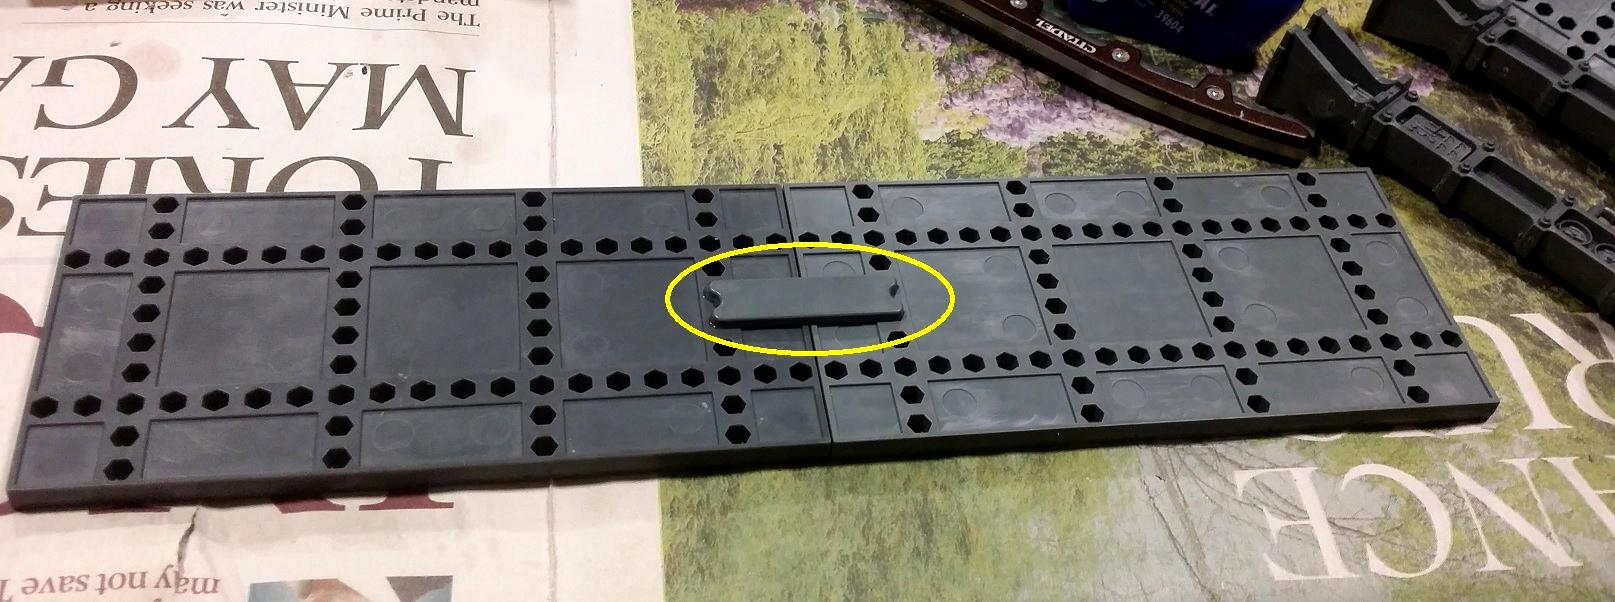
The trick with this building is actually the single square platform on the first level. Not only does this provide greater stability and the height needed to make this all work, it also adds the modular part of this (which you'll see in a bit). And, as you might be able to tell from that single square piece, I've shaved down the four rivets. The lessons I learnt from having to pull Rita Tower apart to get rid of those things so the feet of all the struts would glue properly are being applied here:
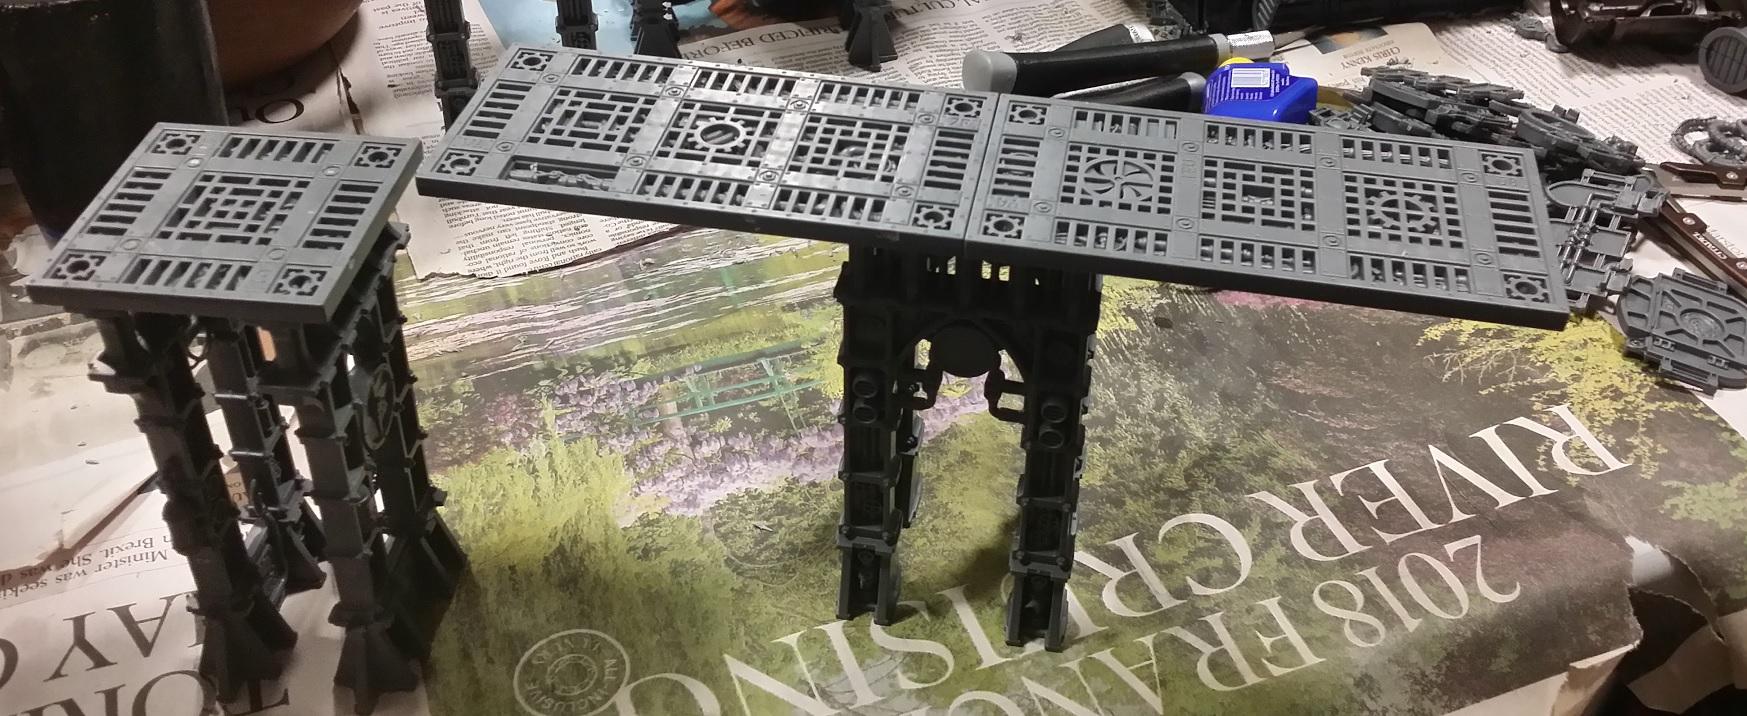
This is the test fit pre-glue, and now you can see where this is going:
Some shields, ladders and square plates later, and the pair of double high walkways are complete:

I was being more careful with shield placement this time, intentionally leaving walk-way sized gaps so that you can do things like this:
Now I said the key to this walkways was the small lower square, well this is why:
I intentionally chose the struts with the separate legs so that there would be gaps to walk through on that first level square, and it means that when you start to combine them with other walkways you get results like this:
I'm not sure if I'll build any more walkways, of this height or otherwise, as I am running seriously low on the double-length straight platforms. Need to find a new source of those. And if you're wondering why I didn't make a second set of standard straight walkways to go with the pair I already had, it's because I already did as part of the Three Towers/Modular Walkways build. They're slightly longer than the original straight walkways, but that's fine.
Next up? We get a little more industrial with some non-platform buildings.
BYE
|
|
|
|
|
|
2019/04/20 12:17:32
Subject: Re:Industrial Insanity - A Terrain Blog by H.B.M.C. (Bridgeapalooza 2 - Electric Bridgaloo!)
|
|
Posts with Authority
Boston-area [Watertown] Massachusetts
|
But I love that part. It is glorious for making jet engines out of.
|
Falling down is the same as being hit by a planet — "I paint to the 20 foot rule, it saves a lot of time." -- Me
ddogwood wrote:People who feel the need to cheat at Warhammer deserve pity, not anger. I mean, how pathetic does your life have to be to make you feel like you need to cheat at your toy army soldiers game?
 |
|
|
|
|
2019/05/13 10:50:11
Subject: Industrial Insanity - A Terrain Blog by H.B.M.C. (Bridgeapalooza 2 - Electric Bridgaloo!)
|
|
Owns Whole Set of Skullz Techpriests
Versteckt in den Schatten deines Geistes.
|
Very small update - I haven't built anything new - but I finally, after a long time looking, managed to find a place selling both of the Killzone: Deathworld Forest boxes that I've been after for a while. Not cheap, but it's two of them, and when combined with a couple of of Derelict Factorums, some old CoD stuff, and GW's vines and bracken, and I can make a proper death world table. If this is Industrial Insanity, then it'd be... Deathworld Delirium.
|
|
This message was edited 1 time. Last update was at 2019/05/13 10:50:21
|
|
|
|
|
2019/05/13 15:14:00
Subject: Industrial Insanity - A Terrain Blog by H.B.M.C. (Bridgeapalooza 2 - Electric Bridgaloo!)
|
|

Calculating Commissar
|
H.B.M.C. wrote:Very small update - I haven't built anything new - but I finally, after a long time looking, managed to find a place selling both of the Killzone: Deathworld Forest boxes that I've been after for a while.
Not cheap, but it's two of them, and when combined with a couple of of Derelict Factorums, some old CoD stuff, and GW's vines and bracken, and I can make a proper death world table.
If this is Industrial Insanity, then it'd be... Deathworld Delirium.
Excellent! Will that be in its own thread? Please post a link here if you do start one
|
ChargerIIC wrote:If algae farm paste with a little bit of your grandfather in it isn't Grimdark I don't know what is.
|
|
|
|
|
2019/05/18 03:25:26
Subject: Re:Industrial Insanity - A Terrain Blog by H.B.M.C. (Bridgeapalooza 2 - Electric Bridgaloo!)
|
|
Fixture of Dakka
|
Well that is a magnificent table there, H. Really can't wait to see it finished.
Massive amount of work you've put into it so far. Any chance you could write up a Dakka article or something of all tips and tricks for working with these kits?
|
|
|
|
|
|
2019/05/18 12:02:21
Subject: Re:Industrial Insanity - A Terrain Blog by H.B.M.C. (3d Printed Gubbinz)
|
|
Owns Whole Set of Skullz Techpriests
Versteckt in den Schatten deines Geistes.
|
So... a random link on the Necromunda Terrain facebook group led me to discover an interesting selection of very useful pieces, specifically:
Freestanding industrial walkways ( Type A, Type B).
Half-Size Struts ( Type A, Type B).
Stairs ( OMG!).
The freestanding walkways are a good way of connecting higher levels of buildings with something a little more secure plus they save me from having to use up my dwindling amounts of double-length straight walkways. The half-size struts solve the immediate problem of trying to integrate the Thermic Plasma Regulators with everything else, as now I can support the walkways between them without having to use the regulators as the supports.
And the stairs... wow. I've wanted stairs for the Sector Mechanicus stuff since they came about. These are 5" high one-level stairs. They're basically perfect. And they are designed to clip snugly around Sector Mechanicus walkways. Great!
Thank you.
Neither can I.
 Snrub wrote: Snrub wrote:Any chance you could write up a Dakka article or something of all tips and tricks for working with these kits?
That's actually not a bad idea. One of the aims of this blog was to mention all the various tricks and techniques that go with these kits, so I could collate them into a single article.
|
|
|
|
|
|
2019/05/18 13:36:47
Subject: Re:Industrial Insanity - A Terrain Blog by H.B.M.C. (3d Printed Gubbinz)
|
|
Posts with Authority
Boston-area [Watertown] Massachusetts
|
Digital Fabrication, filling the gaps.
|
Falling down is the same as being hit by a planet — "I paint to the 20 foot rule, it saves a lot of time." -- Me
ddogwood wrote:People who feel the need to cheat at Warhammer deserve pity, not anger. I mean, how pathetic does your life have to be to make you feel like you need to cheat at your toy army soldiers game?
|
|
|
|
|
2019/05/28 09:39:48
Subject: Re:Industrial Insanity - A Terrain Blog by H.B.M.C. (3d Printed Gubbinz)
|
|
Furious Raptor
|
Cheers for the terrain plug!
looking forward to seeing what you can conjour up with the bits!
If you need any other parts or shapes let me know
|
Chaos Battleship - 3D print your own evil starship!
https://www.kickstarter.com/projects/watcorpdesigns/chaos-battleship
www.WatcorpDesigns.com
https://www.ebay.co.uk/str/watcorpdesigns
https://www.etsy.com/uk/shop/WatcorpDesigns
|
|
|
|
|
2019/05/28 12:10:08
Subject: Industrial Insanity - A Terrain Blog by H.B.M.C. (3d Printed Gubbinz)
|
|
Bonkers Buggy Driver with Rockets
|
So many cool and creative ideas here. Thanks for the inspiration. Now when are you going to start painting this insane collection?
|
|
|
|
|
|
2019/05/28 13:43:51
Subject: Re:Industrial Insanity - A Terrain Blog by H.B.M.C. (3d Printed Gubbinz)
|
|

[MOD]
Otiose in a Niche
|
|
|
This message was edited 1 time. Last update was at 2019/05/28 13:44:04
|
|
|
|
|
2019/05/29 15:16:08
Subject: Industrial Insanity - A Terrain Blog by H.B.M.C. (3d Printed Gubbinz)
|
|
Veteran Inquisitor with Xenos Alliances
|
Have you considered using any of the Sector Fronteris/Moonbase terrain, since those visually blend with the Sector Mechanicus kits?
|
|
|
|
|
2019/05/31 11:07:48
Subject: Industrial Insanity - A Terrain Blog by H.B.M.C. (Landing Pad?)
|
|
Owns Whole Set of Skullz Techpriests
Versteckt in den Schatten deines Geistes.
|
So I picked up one of these on the cheap (and another Fragdrill - the Blast Pit will soon be realised!) and I'm not sure what to do with it.
"Just build it, dummy!"
Well, yes, but I already have two freestanding Skyshields and another that I have build into a large complex made up of 4-ish Bastion kits (I'll post pics of my fortification collection eventually). So I'd rather incorporate it into the Sector Mechanicus stuff, but I'm wondering how.
I've seen a few examples:
... and if I'm being honest that third pic makes me want to get another so I can build that, but I'm wondering if there are perhaps better ways to do this.
Any thoughts/ideas from anyone??
 aka_mythos wrote: aka_mythos wrote:Have you considered using any of the Sector Fronteris/Moonbase terrain, since those visually blend with the Sector Mechanicus kits?
Got two full sets of that. Haven't put it together yet.
|
|
|
|
|
|
2019/05/31 21:55:02
Subject: Re:Industrial Insanity - A Terrain Blog by H.B.M.C. (Landing Pad?)
|
|
Posts with Authority
Boston-area [Watertown] Massachusetts
|
Mail the stuff to me, and I'll take care of it.
|
Falling down is the same as being hit by a planet — "I paint to the 20 foot rule, it saves a lot of time." -- Me
ddogwood wrote:People who feel the need to cheat at Warhammer deserve pity, not anger. I mean, how pathetic does your life have to be to make you feel like you need to cheat at your toy army soldiers game?
|
|
|
|
|
2019/06/01 12:59:32
Subject: Industrial Insanity - A Terrain Blog by H.B.M.C. (Landing Pad?)
|
|
Bonkers Buggy Driver with Rockets
|
I agree, the third picture looks excellent: it looks good, fits naturally and is very practical by giving a large usable space. This could be for bigger units in 40k-scale games or for some epic face-offs in the skirmish games.
-Rids
|
|
This message was edited 1 time. Last update was at 2019/06/01 12:59:42
|
|
|
|
|
2019/06/04 06:49:05
Subject: Re:Industrial Insanity - A Terrain Blog by H.B.M.C. (Reinforcements!)
|
|
Owns Whole Set of Skullz Techpriests
Versteckt in den Schatten deines Geistes.
|
Just a quick note to say that the Deathworld Kill Zones showed up today! Very happy with my reinforcements:

|
|
|
|
|
|
2019/09/30 16:54:42
Subject: Industrial Insanity - A Terrain Blog by H.B.M.C. (Reinforcements!)
|
|
Impassive Inquisitorial Interrogator
U.K.
|
Awesome thread, have you done any more to it recently?
|
3 SPRUUUUUEESSSS!!!!
JWBS wrote:
I'm not going to re-read the lunacy that is the last few pages of this thread, but I'd be very surprised if anyone actually said that. Even that one guy banging on about how relatively difficult it might be for an Inquisitor to acquire power armour, I don't think even that guy said that.
|
|
|
|
|
2019/11/01 11:54:58
Subject: Re:Industrial Insanity - A Terrain Blog by H.B.M.C. (Reinforcements!)
|
|
Speed Drybrushing
|
Do you have any spare ladders? I'm in need of some to make into railings
|
Not a GW apologist |
|
|
|
|
2019/11/06 05:36:18
Subject: Industrial Insanity - A Terrain Blog by H.B.M.C. (Reinforcements!)
|
|
Owns Whole Set of Skullz Techpriests
Versteckt in den Schatten deines Geistes.
|
I have a couple of small things I've done (a generator using two of the Haemotrope Reactors, and the Chaos Gate thing), but I'm awaiting one last surge of kits so that I can make some truly tall Necro pieces but still have enough odds and ends to do some more general 40K things.
I've also found that there are some people doing some wonderful stuff on thingiverse, such as this and this. I may invest in some of that as well.
|
|
|
|
|
|
|
|

 Finished Forge World Elysian Army
  Finished Tau Sept Cadre
  Alaitoc Eldar Warhost
  Finished Order of Our Martyred Lady - Sisters of Battle
  Finished Necromundian Imperial Guard Regiment